Embed Size (px)
Citation preview

INSTRUCTION MANUAL
MODEL: F434CABLE CROSSOVER ATTACHMENT
Bodycraft is a division of Recreation Supply Inc.P.O. BOX 181Sunbury, OH 43074
QUESTION?
As a quality home gym supplier we are committed to your complete satisfaction. If you have questions, or find missing or damaged parts, we will guarantee your complete satisfaction through our authorized dealer service centers or our home office customer service department. Please call your local dealer for assistance or BodyCraft at 800-990-5556 (9:00 AM - 5:00 PM). Our trained technicians will provide immediate assistance to you, free of charge.

101
104
108
113
115
116
121
125
130
126
131 132
127 128 129
122 123 124
117 118 119 120
114
109 110 111 112
105 106 107
102 103
PARTS LISTNO. DESCRIPTION QTY.101102103104105106107108109110111112113114115116117118119120121122123124125126127128129130131132
1122111242124282444448�
444
1224
42016
82
RIGHT BASE FRAMELEFT BASE FRAMECHROMED UPRIGHTWEIGHT HOLDERLEFT TOP PULLEY ASSEMBLYRIGHT TOP PULLEY ASSEMBLYTOP FRAMETOP FRAME CONNECTORSWIVEL PULLEY BRACKETHAND GRIPANKLE STRAP13 LINK CHAINHOOKUPHI / LOW CABLEPULLEY50 SQ. END CAP50 SQ. END PLUG50 SQ. BUSHINGRUBBER DOUGHNUTSPRING CLIP1/2" X 4-1/4" HEX BOLT1/2" X 3" HEX BOLT3/8" X 3" HEX BOLT3/8" X 1-3/4" HEX BOLT3/8" X 1-1/2" HEX BOLT3/8" X 1/2" HEX BOLT1/2" WASHER (LARGER)1/2" WASHER (SMALL)3/8" WASHER1/2" NYLON NUT3/8" NYLON NUTSPRING COIL
0 1/4 1/2 3/4 1/4 1/2 3/4 1/4 1/2 3/4 1/4 1/2 3/41" 2" 3" 4" 1/4 1/2 3/4 1/4 1/2 3/45" 6"(inch)
102
101
103
103
104
104
105
106
107
108
108
109
109
109
109110
110
111
112
112
113
113
113
113
115
115
115
115
115
115
115
115
116
116
117
117
117
117
118
118
118
118
119
119
119
119
122
122
122
122
130130
130 130125
125
124
124
131
131
130128
130128
126
126
126
126
126126
126
126
126
126
126
126
129
129
129
129
129129
129
129129
129
129
129114
114
127
127
127
127
127
127127
127
127
127
127
127
127
127
120
120
120
120
128
128
130
130
124
131
131
113
113114
114
125
132
132
121
123
121
123
130
130
127
127
127
129
127
129
131
131
129
129
129 129
127
124
125
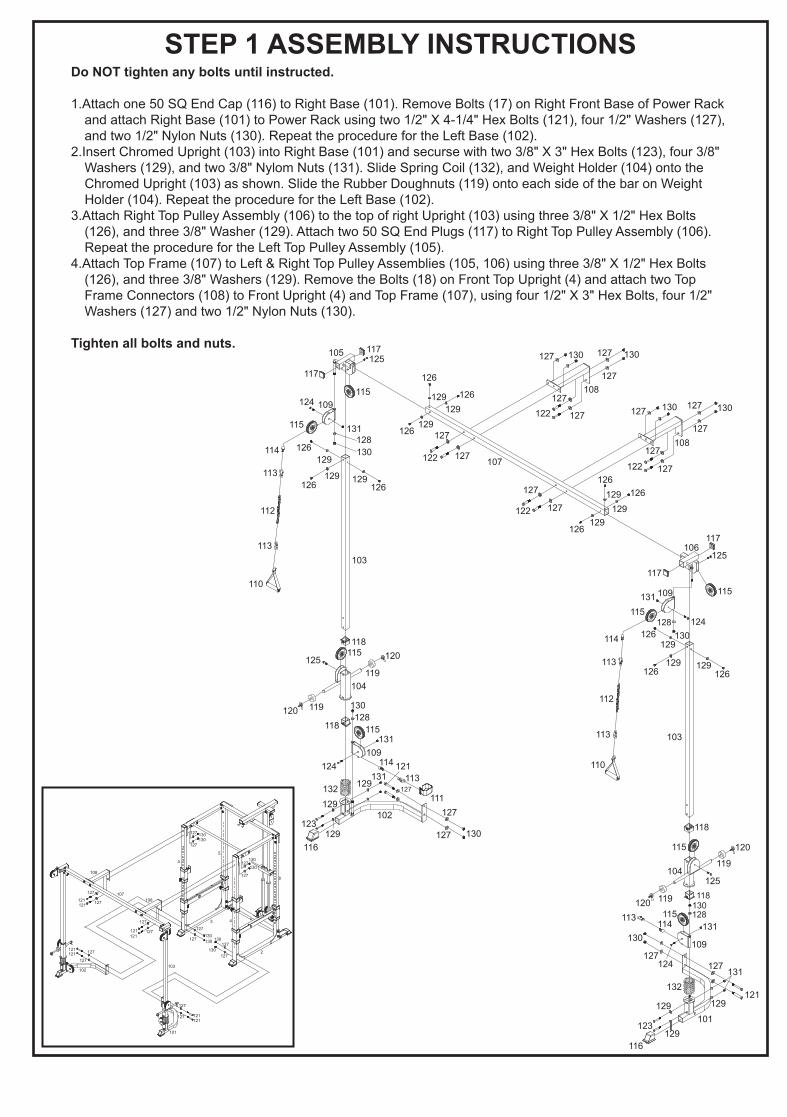
STEP 1 ASSEMBLY INSTRUCTIONSDo NOT tighten any bolts until instructed.
1.Attach one 50 SQ End Cap (116) to Right Base (101). Remove Bolts (17) on Right Front Base of Power Rack and attach Right Base (101) to Power Rack using two 1/2" X 4-1/4" Hex Bolts (121), four 1/2" Washers (127), and two 1/2" Nylon Nuts (130). Repeat the procedure for the Left Base (102).
2.Insert Chromed Upright (103) into Right Base (101) and securse with two 3/8" X 3" Hex Bolts (123), four 3/8" Washers (129), and two 3/8" Nylom Nuts (131). Slide Spring Coil (132), and Weight Holder (104) onto the Chromed Upright (103) as shown. Slide the Rubber Doughnuts (119) onto each side of the bar on Weight Holder (104). Repeat the procedure for the Left Base (102).
3.Attach Right Top Pulley Assembly (106) to the top of right Upright (103) using three 3/8" X 1/2" Hex Bolts (126), and three 3/8" Washer (129). Attach two 50 SQ End Plugs (117) to Right Top Pulley Assembly (106). Repeat the procedure for the Left Top Pulley Assembly (105).
4.Attach Top Frame (107) to Left & Right Top Pulley Assemblies (105, 106) using three 3/8" X 1/2" Hex Bolts (126), and three 3/8" Washers (129). Remove the Bolts (18) on Front Top Upright (4) and attach two Top Frame Connectors (108) to Front Upright (4) and Top Frame (107), using four 1/2" X 3" Hex Bolts, four 1/2" Washers (127) and two 1/2" Nylon Nuts (130).
Tighten all bolts and nuts.
121
121
121
121
121
121121
121
107
127
127
127
127
127
127
127
127
130
130
130
130
130
130 130
130
127
127127
127
127
127
127
127
108
108
102
101
103
4
4
5
2
3

H1
H3
H2
H4
HI / LOW CABLE ASSEMBLYAssemble cable and pulleys simultaneously.
1.Attach Swivel Pulley Bracket (109) to pivot on Base Frames (101, 102) and Top Pulley Assemblies (105, 106), using 1/2" Washer (128) and Nylon Nut (130).
2.Run Ball end of Hi / Low Cable (114) through Swivel Pulley Bracket (109) on Right Base (101). Route cable up and over pulley welded on Right Top Pulley Assembly (106), then down and around pulley on Weight Holder (104), and then up to the Swivel Pulley Bracket on Top Pulley Assembly as shown.
Repeat the procedure for the left side.


![Grundfos SQ 3-105 pump : SQ 3-105 1.85kW 200-240V 50/60Hz … · Printed from Grundfos Product Centre [2018.02.043] Position Qty. Description 1 SQ 3-105 Note! Product picture may](https://img.pdfslide.us/doc/110x75/5ff7b14dbb7ca6343d22b9c2/grundfos-sq-3-105-pump-sq-3-105-185kw-200-240v-5060hz-printed-from-grundfos.jpg)