Embed Size (px)
Citation preview
l i v e s t o c k wat e r e r

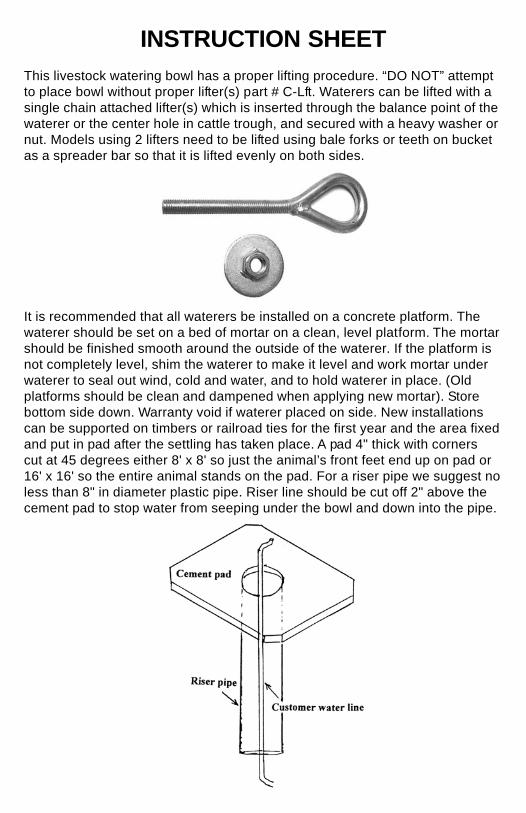
INSTRUCTION SHEETThis livestock watering bowl has a proper lifting procedure. “DO NOT” attemptto place bowl without proper lifter(s) part # C-Lft. Waterers can be lifted with asingle chain attached lifter(s) which is inserted through the balance point of thewaterer or the center hole in cattle trough, and secured with a heavy washer ornut. Models using 2 lifters need to be lifted using bale forks or teeth on bucketas a spreader bar so that it is lifted evenly on both sides.
It is recommended that all waterers be installed on a concrete platform. Thewaterer should be set on a bed of mortar on a clean, level platform. The mortarshould be finished smooth around the outside of the waterer. If the platform isnot completely level, shim the waterer to make it level and work mortar underwaterer to seal out wind, cold and water, and to hold waterer in place. (Oldplatforms should be clean and dampened when applying new mortar). Storebottom side down. Warranty void if waterer placed on side. New installationscan be supported on timbers or railroad ties for the first year and the area fixedand put in pad after the settling has taken place. A pad 4" thick with cornerscut at 45 degrees either 8' x 8' so just the animal’s front feet end up on pad or16' x 16' so the entire animal stands on the pad. For a riser pipe we suggest noless than 8" in diameter plastic pipe. Riser line should be cut off 2" above thecement pad to stop water from seeping under the bowl and down into the pipe.
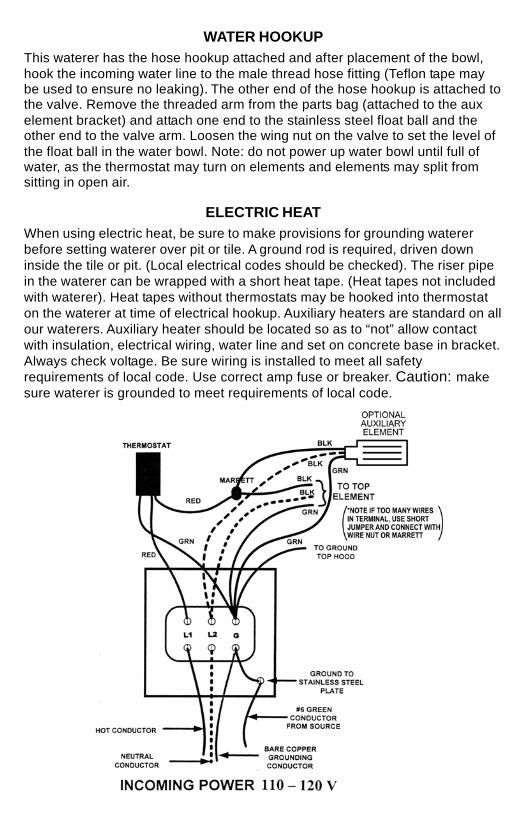
WATER HOOKUPThis waterer has the hose hookup attached and after placement of the bowl,hook the incoming water line to the male thread hose fitting (Teflon tape maybe used to ensure no leaking). The other end of the hose hookup is attached tothe valve. Remove the threaded arm from the parts bag (attached to the auxelement bracket) and attach one end to the stainless steel float ball and theother end to the valve arm. Loosen the wing nut on the valve to set the level ofthe float ball in the water bowl. Note: do not power up water bowl until full ofwater, as the thermostat may turn on elements and elements may split fromsitting in open air.
ELECTRIC HEATWhen using electric heat, be sure to make provisions for grounding watererbefore setting waterer over pit or tile. A ground rod is required, driven downinside the tile or pit. (Local electrical codes should be checked). The riser pipein the waterer can be wrapped with a short heat tape. (Heat tapes not includedwith waterer). Heat tapes without thermostats may be hooked into thermostaton the waterer at time of electrical hookup. Auxiliary heaters are standard on allour waterers. Auxiliary heater should be located so as to “not” allow contactwith insulation, electrical wiring, water line and set on concrete base in bracket.Always check voltage. Be sure wiring is installed to meet all safetyrequirements of local code. Use correct amp fuse or breaker. Caution: makesure waterer is grounded to meet requirements of local code.
AUTO CONTINUOUS FLOW
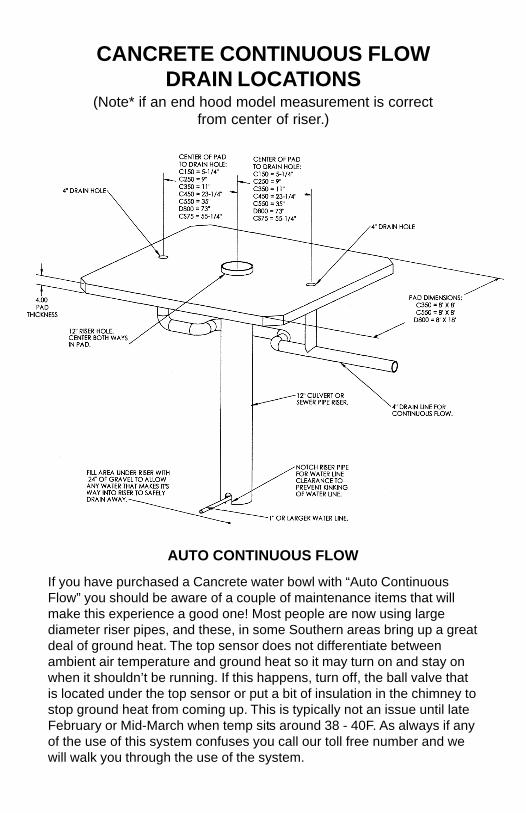
If you have purchased a Cancrete water bowl with “Auto ContinuousFlow” you should be aware of a couple of maintenance items that willmake this experience a good one! Most people are now using largediameter riser pipes, and these, in some Southern areas bring up a greatdeal of ground heat. The top sensor does not differentiate betweenambient air temperature and ground heat so it may turn on and stay onwhen it shouldn’t be running. If this happens, turn off, the ball valve thatis located under the top sensor or put a bit of insulation in the chimney tostop ground heat from coming up. This is typically not an issue until lateFebruary or Mid-March when temp sits around 38 - 40F. As always if anyof the use of this system confuses you call our toll free number and wewill walk you through the use of the system.
CANCRETE CONTINUOUS FLOWDRAIN LOCATIONS
(Note* if an end hood model measurement is correctfrom center of riser.)
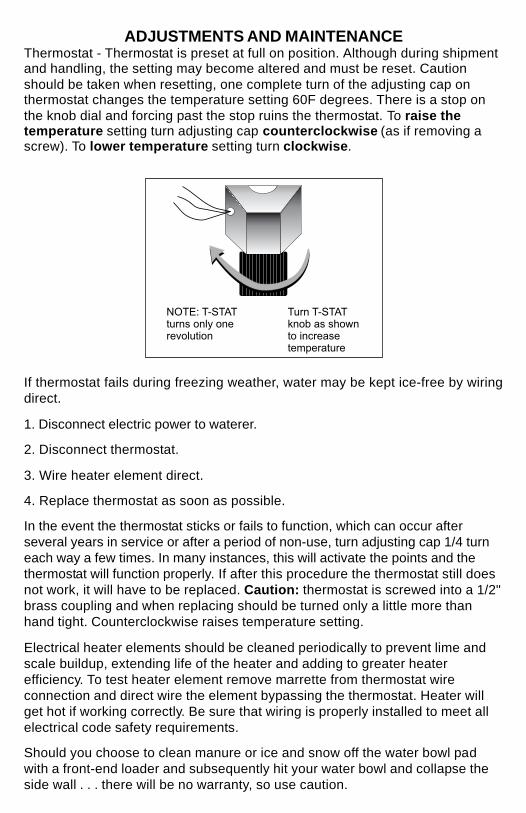
ADJUSTMENTS AND MAINTENANCEThermostat - Thermostat is preset at full on position. Although during shipmentand handling, the setting may become altered and must be reset. Cautionshould be taken when resetting, one complete turn of the adjusting cap onthermostat changes the temperature setting 60F degrees. There is a stop onthe knob dial and forcing past the stop ruins the thermostat. To raise thetemperature setting turn adjusting cap counterclockwise (as if removing ascrew). To lower temperature setting turn clockwise.
If thermostat fails during freezing weather, water may be kept ice-free by wiringdirect.
1. Disconnect electric power to waterer.
2. Disconnect thermostat.
3. Wire heater element direct.
4. Replace thermostat as soon as possible.
In the event the thermostat sticks or fails to function, which can occur afterseveral years in service or after a period of non-use, turn adjusting cap 1/4 turneach way a few times. In many instances, this will activate the points and thethermostat will function properly. If after this procedure the thermostat still doesnot work, it will have to be replaced. Caution: thermostat is screwed into a 1/2"brass coupling and when replacing should be turned only a little more thanhand tight. Counterclockwise raises temperature setting.
Electrical heater elements should be cleaned periodically to prevent lime andscale buildup, extending life of the heater and adding to greater heaterefficiency. To test heater element remove marrette from thermostat wireconnection and direct wire the element bypassing the thermostat. Heater willget hot if working correctly. Be sure that wiring is properly installed to meet allelectrical code safety requirements.
Should you choose to clean manure or ice and snow off the water bowl padwith a front-end loader and subsequently hit your water bowl and collapse theside wall . . . there will be no warranty, so use caution.
PRECAST CONCRETE CATTLE WATERER WARRANTYAdvanced Agri-Direct Inc. (hereafter referred to as the “supplier”) cattle watererhulls are warranted against defects in the materials and workmanship, and willperform according to our specification provided that installation is proved to besatisfactory to the supplier.In the event that the concrete hull proves defective, during the first 3 years, itwill be replaced free of charge (F.O.B. our yard) to the original owner or repairedupon the supplier option. The remainder of the warranty period will provide tothe original owner a rebate against the replacement of the waterer hull equal to20% of the original cost of the hull. This rebate will only be applied to the cost ofthe replacement hull.Permission to replace, alter, or repair must first be obtained from the supplier.Labor costs, transportation or any other extraneous costs will not be allowed.This warranty does not include replacement of any materials lost throughleakage, or damages arising therefrom.The supplier does not assume liability for a hull damaged or made defectivebecause of improper installation, improper usage, negligence, or for a hulldamaged by any other cause. Furthermore, the supplier also assumes no liabilityfor any consequential damage to persons, property or the environment due todischarge from a hull. we do not assume, nor do we authorize any other personto assume for us, any other responsibility to this purchase. The term “originalowner” as used in this warranty is understood to mean the person who originallyrequested the installation of the tank on his property and the term “originalinstallation” shall mean the first installation of such tank on such property.Warranty void if waterer is placed on side. Only store bottom down.Warning: install on non-combustible surface.
ELECTRONICS AND COMPONENTS WARRANTYAdvanced Agri-Direct Inc. (hereafter referred to as the “supplier”) warrants allCOMPONENTS and electrical parts and workmanship to be free frommanufacturing defects, for a period of 1 year from date of original installation.At the option of the supplier, replacement parts may be sent to the original owner,and the installation of those replacement parts will be the responsibility of theoriginal owner. Parts sent to the supplier for repair or replacement must be sentto the supplier shipping prepaid. parts will be returned shipping collect.The supplier’s total obligation under this warranty shall be limited to the repair ofdefects or replacement of defective parts as outlined above. The supplierassumes no other responsibility whatsoever. If the failure of the parts is due tomisuse, abuse, in transit or in process of installation, replacement becomes theresponsibility of the original owner. There is no other warranty, written or verbal,pertaining to waterer COMPONENTS and parts.Note: Top elements are immersion elements. If it splits, it has been out of waterfor a substantial amount of time. This is not a warrantable situation. Animmersion element can also split if it develops a substantial amount of buildup onthe element from exceptionally dirty water (dugout). This can be scraped off tostop this condition.

PROBLEMWhere does auxiliaryelement go?
Waterer freezing
Element doesn’t heat upafter being off for aperiod of timeCattle lapping water outmaking mess or icearound bowl
Water has excessive icebuildup in bowl infreezing temperatures
Valve freezing at elbow
Elements not heating
Valve seeps causingbowl to overflow
How to move or liftwaterer
Clean-out plug leaks
Thread on hood boltsstripped or ruined
Plastic float ball heatdamaged
Sealing bowl to pad
Power failure or burnedout element, bowl isfrozen
SOLUTIONOn your pad under bowl (DO NOT put down riserpipe). If bowl is on timbers, set on block of wood.Check the thermostat setting, turning itcounterclockwise (left) increases temperature. Ifunder bowl and 4" riser, heat with heat tape.
Turn thermostat back and forth (Note: only goes onefull turn), this will loosen a stuck contact.
Turn temperature down. Cattle don’t like hot waterand will lap it out and wait for cold water to come in.(See excessive ice buildup also)Lower water level to just above holes on hood inwinter. It will stop this and save energy (less water toheat). Adjust thermostat in small increments. (Seecattle lapping water also)Check if auxiliary element is hooked up and workingunder the bowl. This sends heat up through thechimney to the valve.Check power at bowl, (See item #2) bypassthermostat. If all else fails, put power to each side ofelement, if the element doesn’t heat it needs to bereplaced. Replace split or faulty elements.Check float ball setting. If waterer has been in place forsome time, take valve apart and clean. ALL watercauses buildup on rubber seals. Replace if necessary.Use a proper lifter. Lifter is a simple eyebolt 3/4" orlarger with a flat plate 3" x 3" under bowl with a nut.Lift with chain and front end loader.Pound in with rubber mallet, dry hole first, to ensureproper seal.Replace with new studs. These are stainless,replaceable and almost impossible to re-thread. Visegrip will remove old one. If turned too far will breakout the bowl concrete.Bowl has been drained of water, either power was offor supply problem. Using Kerick valve with min. 20 lb.pressure, you can’t get enough cattle to drink it down.Replace plastic float ball with stainless steel.In most cases within one day the cattle bring mud andmanure onto the pad and it seals. You can seal withcold application tar BEFORE setting bowl in place.Do not use heavy object to break out ice to removeelement (such as axe, sledge hammer, etc.), hulls arehollow and the bottom will break out or crack. Insteaduse an alternative heat source to melt the ice andthen remove and replace element.
CONCRETE WATERERTROUBLESHOOTING GUIDE
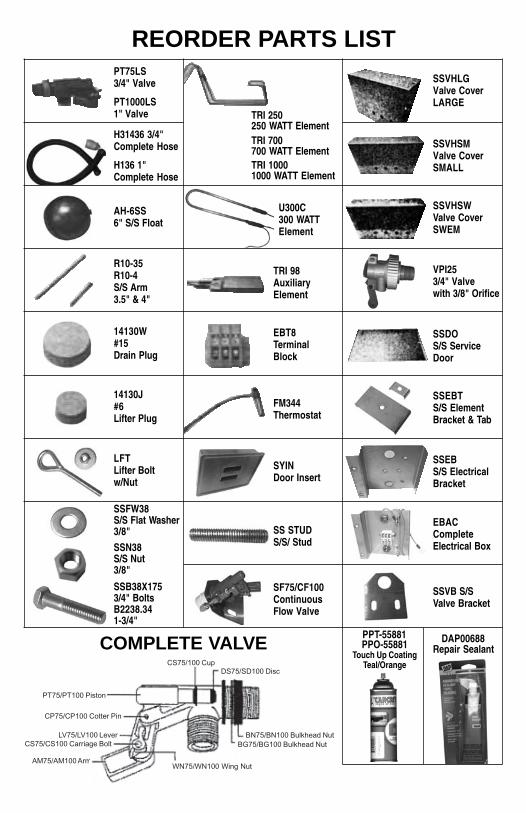
REORDER PARTS LISTPT75LS3/4" Valve
PT1000LS1" Valve
H31436 3/4"Complete Hose
H136 1"Complete Hose
AH-6SS6" S/S Float
R10-35R10-4S/S Arm3.5" & 4"
14130W#15Drain Plug
14130J#6Lifter Plug
LFTLifter Boltw/Nut
SSFW38S/S Flat Washer3/8"
SSN38S/S Nut3/8"
SSB38X1753/4" BoltsB2238.341-3/4"
TRI 250250 WATT ElementTRI 700700 WATT ElementTRI 10001000 WATT Element
SSVHLGValve CoverLARGE
SSVHSMValve CoverSMALL
U300C300 WATTElement
TRI 98AuxiliaryElement
EBT8TerminalBlock
FM344Thermostat
SSVHSWValve CoverSWEM
SSDOS/S ServiceDoor
SSEBTS/S ElementBracket & Tab
SSEBS/S ElectricalBracket
EBACCompleteElectrical Box
SSVB S/SValve Bracket
SYINDoor Insert
SS STUDS/S/ Stud
SF75/CF100ContinuousFlow Valve
VPI253/4" Valvewith 3/8" Orifice
COMPLETE VALVE
AM75/AM100 Arm
BG75/BG100 Bulkhead NutBN75/BN100 Bulkhead Nut
DS75/SD100 DiscCS75/100 Cup
CP75/CP100 Cotter Pin
LV75/LV100 LeverCS75/CS100 Carriage Bolt
WN75/WN100 Wing Nut
PT75/PT100 Piston
DAP00688Repair Sealant
PPT-55881PPO-55881
Touch Up CoatingTeal/Orange

AVAILABLE MODELS
Model No. of Head No. of Head Dimensions Weight Feeder Cattle Cows
CGSA50 N/A 50 Goats 21 ¼”L x 24 ¼”W x 14" H 260 lbsor Small Animals
CESA50 N/A 50 Horses 22"L x 24 7/8"W x 18" H 320 lbsor Small Animals
CDESA50 N/A 60 Horses 36"L x 27"W x 18" H 460 lbsor Small Animals
C150 1 - 200 0 - 50 33"L x 36"W x 25"H 800 lbsC250 200 - 300 50 - 120 37"L x 36"W x 25"H 1000 lbsC350 300 - 400 120 - 220 43"L x 36"W x 25"H 1100 lbsCS75 400 - 500 220 - 350 78"L x 36"W x 25"H 1400 lbs
C75SWEM 400 - 500 220 - 350 78"L x 36"W x 25"H 1400 lbsC450 400 - 500 220 - 350 69"L x 36"W x 25"H 1300 lbsC550 500 - 600 350 - 500 93"L x 36"W x 25"H 1850 lbsD800 600 - 800 500 - 650 168"L x 36"W x 25"H 3300 lbs
C150
C250 C450
CS75
C550 “The Bad Boy”
D800 Dairy and Big Feeder Bowl
EASY PAD SPECS
CGSA50 CESA50
C350
C75SWEM
CDESA50


ADVANCED AGRI-DIRECT INC.
710 WEST 26TH STREET
YORK, NEBRASKA 68467-96
TEL: (402) 362-0122
FAX: (402) 362-6148