Embed Size (px)
Citation preview

Installing LLEAP on instructor PCs and patient monitor PCs
with Laerdal legacy softwareImplementation of LLEAP Instructions
www.laerdal.com
EN

Implementation of LLEAP Instructions
Tick off each step as you complete it.
Equipment
• Ethernet cable• License Number
Computer Compatibility Matrix
Check if your PC is compatible. Refer to the compatibility matrix on www.laerdal.com/LLEAP-PC-Specs
To find your PC’s CPU mark, follow the instructions here: www.laerdal.com/Find-Computer-Specifications
Installation of LLEAP on Instructor PCs and Patient Monitor PCs
NoteAfter installing LLEAP the legacy SW is no longer valid and may be deleted.
1. Windows Update
Ensure the PCs have the latest Windows Update installed.
2. Scenarios
Make a backup copy of any custom scenarios which have been developed locally. As these scenarios are not on SimStore it is important to have a backup in case they are affected by installing LLEAP.
3. Videos
Make a backup copy of any Debrief Viewer video recordings you want to keep.
4. Install LLEAP on instructor PCs
Download the full Laerdal Learning Application (LLEAP) software installation file from www.laerdal.com/LLEAP#/Downloads.
Copy the installation file to the PCs where you will install LLEAP.
Double click the installation file (requires administrator privileges) and follow the instructions in the Installation Wizard.
NoteFor some systems the installation process will automatically restart the computer. If this happens, just double click the installation file again, and the process will continue where it left off.
When the installation is complete, a window called LLEAP release notes about different versions of LLEAP will show. Close this window and click Next and then Finish in the Installation Wizard.
Restart the computer.
2
Implementation of LLEAP Instructions
5. Activate licenses
Open Laerdal Simulation Home
Start button > All programs > Laerdal Medical > Laerdal Simulation Home
NoteIf running Windows 8, the shortcut to Laerdal Simulation Home is automatically added to the desktop.
Start License Manager
NoteFor the Patient Monitor PC there is no need for a license. The Patient Monitor looks for a license in the Instrutor PC.
In License Manager, click the 'Add new license' button, and add the LLEAP license number. If the computer is on the internet, the activation is automatic, otherwise follow the instructions for manual activation.
NoteIf you have any problems with license activation, call your local help desk
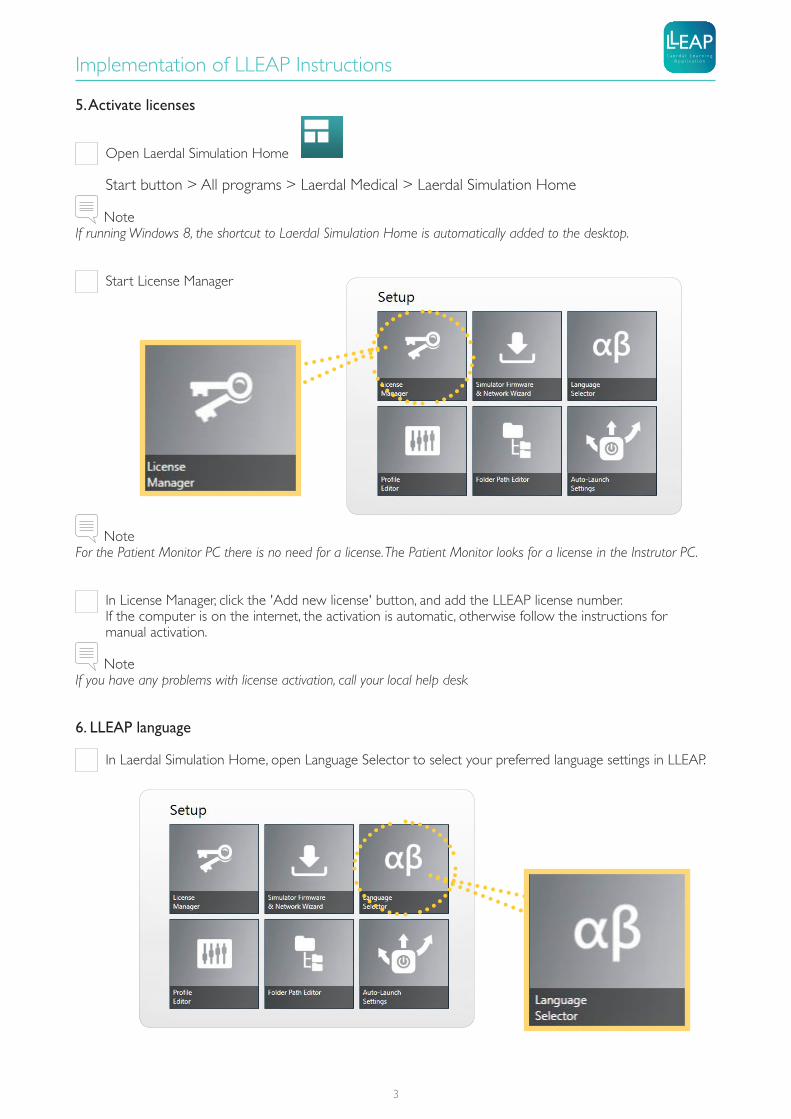
6. LLEAP language
In Laerdal Simulation Home, open Language Selector to select your preferred language settings in LLEAP.
3

Implementation of LLEAP Instructions
7. Start LLEAP
From Laerdal Simulation Home, open LLEAP.
If LLEAP detects old scenario files on your computer, it will prompt you to convert your scenarios to the new LLEAP scenario format (with *.scx as file extension). If you have a considerable amount of scenarios to convert, we recommend that you skip this step for now, as this process may take several minutes. You will be promted again about scenario conversion whenever you start LLEAP, as long as old scenario files are discovered on your hard drive. It is also possible to convert old scenarios one by one by opening them in SimDesigner.
NoteBefore you have installed the LLEAP firmware on your simulator, you cannot connect to it. However, it is possible to start a virtual simulator on your PC and connect to this instead.
To check that you have successfully installed LLEAP, start and connect to a virtual simulator (any model), select the debriefing system (use the Session Viewer on your computer, or alternatively select Advanced Options and click Continue without debriefing system), select a user profile and then select Manual Mode.
Start the session and check that it works as expected.
Close down LLEAP.
8 a. Start Laerdal Patient Monitor (applicable only to PCs with extended Elo Touch monitor)
From Laerdal Simulation Home, open Laerdal Patient Monitor.
To check that you have successfully installed Laerdal Patient Monitor, connect to the virtual simulator you started in step 6.
Check that it works as expected.
Close down Patient Monitor as well as Laerdal Simulation Engine and Session Viewer.
8 b. Install Laerdal Patient Monitor on the patient monitor PCs
Download the Laerdal Patient Monitor installation file from www.laerdal.com/LLEAP#/Downloads
Copy the installation file to the PCs where you will install Laerdal Patient Monitor
Run the installation file (requires administrator privileges)
Restart the computer
To check that you have successfully installed Laerdal Patient Monitor, open Laerdal Simulation Home on the patient monitor PC and start Patient Monitor. It will ask for a simulator to connect to, but depending on your network setup there is a fair chance that the list is empty until you have updated your simulator firmware to LLEAP.
Close down Patient Monitor as well as Laerdal Simulation Engine and Session Viewer.
4

Implementation of LLEAP Instructions
9. Calibrate ELO Touch Monitor in Windows 8.x (applicable only to PCs with extended ELO Touch Monitor) After installing LLEAP we recommend that you recalibrate your ELO Touch Monitor.
Locate the ELO icon in the lower right corner of the system tray by the clock.
Left click once on the ELO icon and select Align from the menu.
5

The targets will appear on the built-in display. Press ESC on your keyboard to push the targets over to the ELO display. Press the center of each target as it appears on your screen.
Once the calibration is complete, you do NOT need to see if the mouse will follow your finger, as this feature will not work correctly. Simply click on the green check box, and the calibration will be complete. Your monitor is now calibrated.
Implementation of LLEAP Instructions

10. Automatic Launch
If you would like to automatically launch Laerdal Simulation Home, LLEAP or Laerdal Patient Monitor when starting up the computer, you can choose the desired settings from Auto-Launch Settings in Laerdal Simulation Home.
11. Install LLEAP on your simulators
LLEAP should now be successfully installed on your PCs. You can proceed to install LLEAP on your simulators. Please download and follow the instructions applicable to your simulator.
12. System startup:
Ensure to start the system in the following order:
1. Manikin2. Instructor PC3. Patient Monitor
Booting up in this order makes the connection between the devices more intuitive.
Implementation of LLEAP Instructions

© 2015 Laerdal Medical AS. All rights reserved.
www.laerdal.com
0002
9079
Rev
C