Embed Size (px)
Citation preview
12D SOLUTIONS PTY LTD
ACN 101 351 991
PO Box 351 Narrabeen NSW Australia 2101
Australia Telephone (02) 9970 7117 Fax (02) 9970 7118
International Telephone 61 2 9970 7117 Fax 61 2 9970 7118
email [email protected] web page www.12d.com
Installing 12d Network CodeMeters
September 2015
12d Model Installing Wibu Network Dongles
2
Disclaimer12d Model is supplied without any express or implied warranties whatsoever.
No warranty of fitness for a particular purpose is offered.
No liabilities in respect of engineering details and quantities produced by 12d Model are accepted.
Every effort has been taken to ensure that the advice given in this manual and the program 12d MODEL is correct, however, no warranty is expressed or implied by 12D SOLUTIONS PTY LTD.
CopyrightThis manual is copyrighted and all rights reserved.
This manual may not, in whole or part, be copied or reproduced without the prior consent in writing from 12d Solutions Pty Ltd.
Copies of 12d Model software must not be released to any party, or used for bureau applications without the written permission of 12d Solutions Pty Ltd.
Copyright (c) 1989-2015 by 12d Solutions Pty Ltd
Sydney, New South Wales, Australia.
ACN 101 351 991
All rights reserved.
Table of Contents
1 Setting Up CodeMeter Servers and Clients ..................................................................................... 51.1 A Guide to the Notes.............................................................................................................. 51.2 Definitions.............................................................................................................................. 7
2 Installing the CodeMeter Drivers ..................................................................................................... 9
3 Setting up a Network CodeMeter ................................................................................................... 18
4 dongles.4d and nodes.4d................................................................................................................... 234.1 Updating dongles.4d ............................................................................................................ 24
4.1.1 Search for any Network CodeMeter ...................................................................... 264.1.2 Using a 12d Dongle Number in a Network CodeMeter ........................................ 28
4.2 Updating nodes.4d................................................................................................................ 32
5 Certifying the CodeMeter ................................................................................................................ 355.1 Displaying the Certified Time.............................................................................................. 355.2 Updating the Certified Time ................................................................................................ 37
5.2.1 Manually Updating the Certified Time.................................................................. 375.2.2 Automatically Updating the Certified Time .......................................................... 39
5.3 Time Servers for Certified Time .......................................................................................... 40
6 The CodeMeter Control Centre Software...................................................................................... 416.1 Stopping & Starting the CodeMeter Runtime Server .......................................................... 426.2 Updating Licenses in a Network CodeMeter ....................................................................... 456.3 Generating the Context File (.WibuCmRac)........................................................................ 46
6.3.1 Updating Using the .WibuCmRaU File ................................................................. 496.3.2 Manually Updating the Network CodeMeter ........................................................ 50
6.4 Errors Updating the Network CodeMeter ............................................................................ 52
7 Monitoring and Cancelling Licenses .............................................................................................. 53
8 Replacing an Existing Network CodeMeter................................................................................... 58
9 Port Address for Communication ................................................................................................... 59
3

12d Model Installing Wibu Network Dongles
4
1 Setting Up CodeMeter Servers and ClientsIMPORTANT WARNING
Do not attach any CodeMeters, Network or Standalone, to your computer until after you have installed the CodeMeter Drivers.
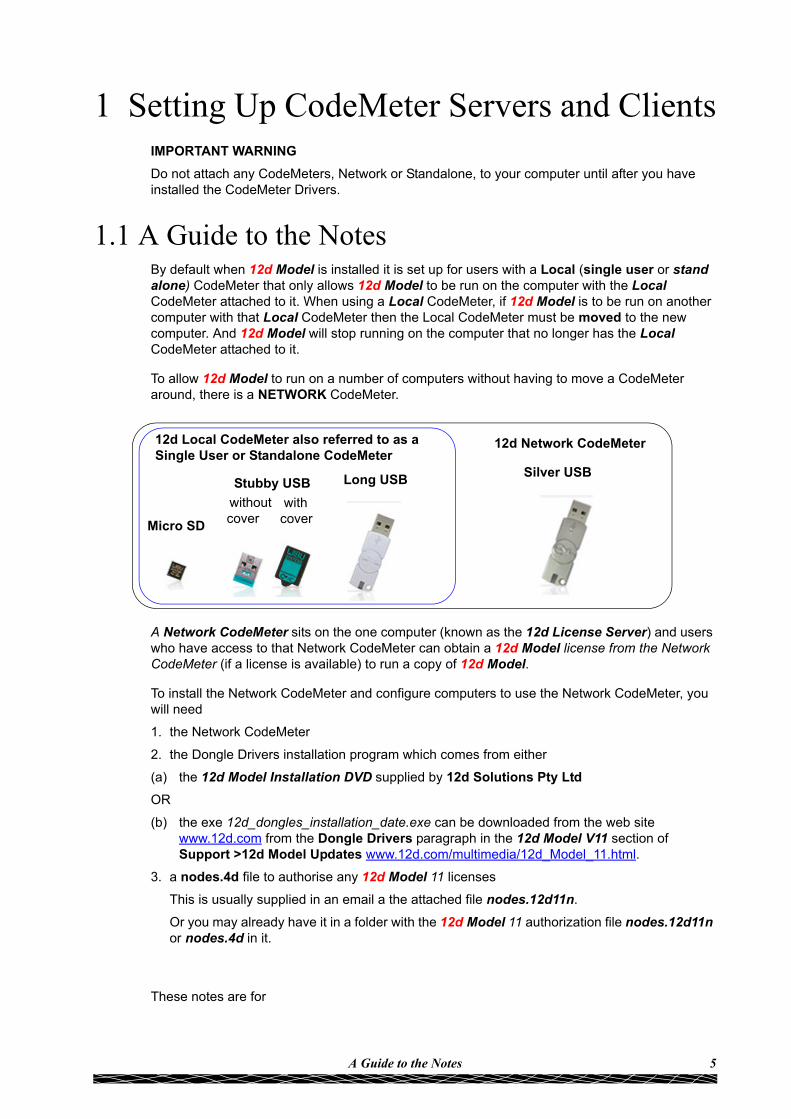
1.1 A Guide to the NotesBy default when 12d Model is installed it is set up for users with a Local (single user or stand alone) CodeMeter that only allows 12d Model to be run on the computer with the Local CodeMeter attached to it. When using a Local CodeMeter, if 12d Model is to be run on another computer with that Local CodeMeter then the Local CodeMeter must be moved to the new computer. And 12d Model will stop running on the computer that no longer has the Local CodeMeter attached to it.
To allow 12d Model to run on a number of computers without having to move a CodeMeter around, there is a NETWORK CodeMeter.
Micro SD
Stubby USB Long USB
12d Local CodeMeter also referred to as a Single User or Standalone CodeMeter
12d Network CodeMeter
Silver USB
without cover
with cover
A Network CodeMeter sits on the one computer (known as the 12d License Server) and users who have access to that Network CodeMeter can obtain a 12d Model license from the Network CodeMeter (if a license is available) to run a copy of 12d Model.
To install the Network CodeMeter and configure computers to use the Network CodeMeter, you will need
1. the Network CodeMeter
2. the Dongle Drivers installation program which comes from either
(a) the 12d Model Installation DVD supplied by 12d Solutions Pty Ltd
OR
(b) the exe 12d_dongles_installation_date.exe can be downloaded from the web site www.12d.com from the Dongle Drivers paragraph in the 12d Model V11 section of Support >12d Model Updates www.12d.com/multimedia/12d_Model_11.html.
3. a nodes.4d file to authorise any 12d Model 11 licenses
This is usually supplied in an email a the attached file nodes.12d11n.
Or you may already have it in a folder with the 12d Model 11 authorization file nodes.12d11n or nodes.4d in it.
These notes are for
5A Guide to the Notes

12d Model Installing Wibu Network Dongles
(a) Installing and setting up a new Network CodeMeter to act as a 12d License server
(b) Setting up other computers (Clients) so they can access the Network CodeMeter and 12d Model licenses in the Network CodeMeter.
(c) Setting up/Updating the dongles4d to instruct the other computers (Clients) which Network CodeMeters to use. This can be down to the level of using a particular virtual 12d dongle inside a particular Network CodeMeters.
(d) Setting up/Updating the nodes.4d file with the authorisation to match the 12d dongle being accessed in a Network CodeMeter.
(e) Updating the 12d Model licenses in a Network CodeMeter
and
(f) Monitoring Network CodeMeters.
An Adobe Acrobat (PDF) copy of these notes is on the 12d Model Installation DVD in the folder
Documentation\Installing 12d Network CodeMeters
WARNINGIf the computers accessing a Network CodeMeter are in a different subnet (behind a router) to the Network CodeMeter then 12d Model needs to be given the IP address or the computer names of the servers with the Network CodeMeter. This will be explained later in the notes. This will also apply to computers connected by Wireless or DHCP.
If you already have a Network CodeMeter and are simply updating a 12d dongle inside the Network Codemeter, go to the section 6.2 Updating Licenses in a Network CodeMeter on page 45.
if your are installing a Network CodeMeter on the computer for the first time, please continue to the next section 1.2 Definitions on page 7.
6 A Guide to the Notes
Chapter 1 Setting Up CodeMeter Servers and Clients
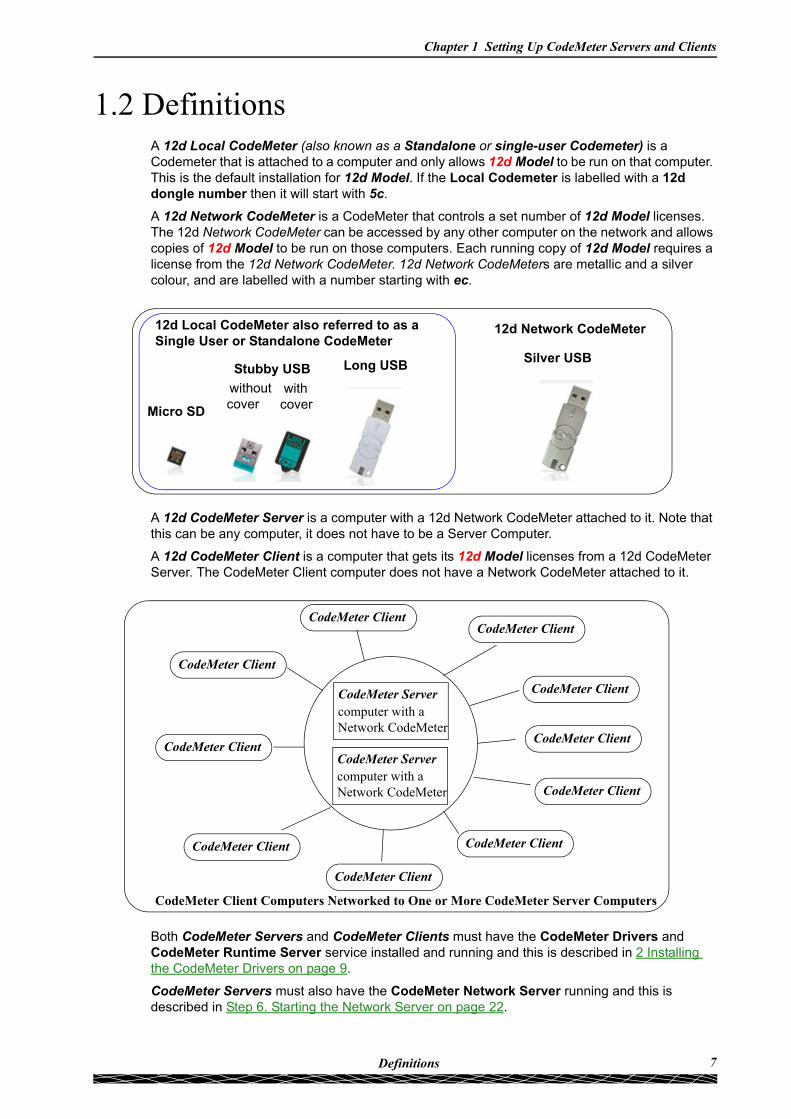
1.2 DefinitionsA 12d Local CodeMeter (also known as a Standalone or single-user Codemeter) is a Codemeter that is attached to a computer and only allows 12d Model to be run on that computer. This is the default installation for 12d Model. If the Local Codemeter is labelled with a 12d dongle number then it will start with 5c.
Micro SD
Stubby USB Long USB
12d Local CodeMeter also referred to as a Single User or Standalone CodeMeter
12d Network CodeMeter
Silver USB
without cover
with cover
A 12d Network CodeMeter is a CodeMeter that controls a set number of 12d Model licenses. The 12d Network CodeMeter can be accessed by any other computer on the network and allows copies of 12d Model to be run on those computers. Each running copy of 12d Model requires a license from the 12d Network CodeMeter. 12d Network CodeMeters are metallic and a silver colour, and are labelled with a number starting with ec.
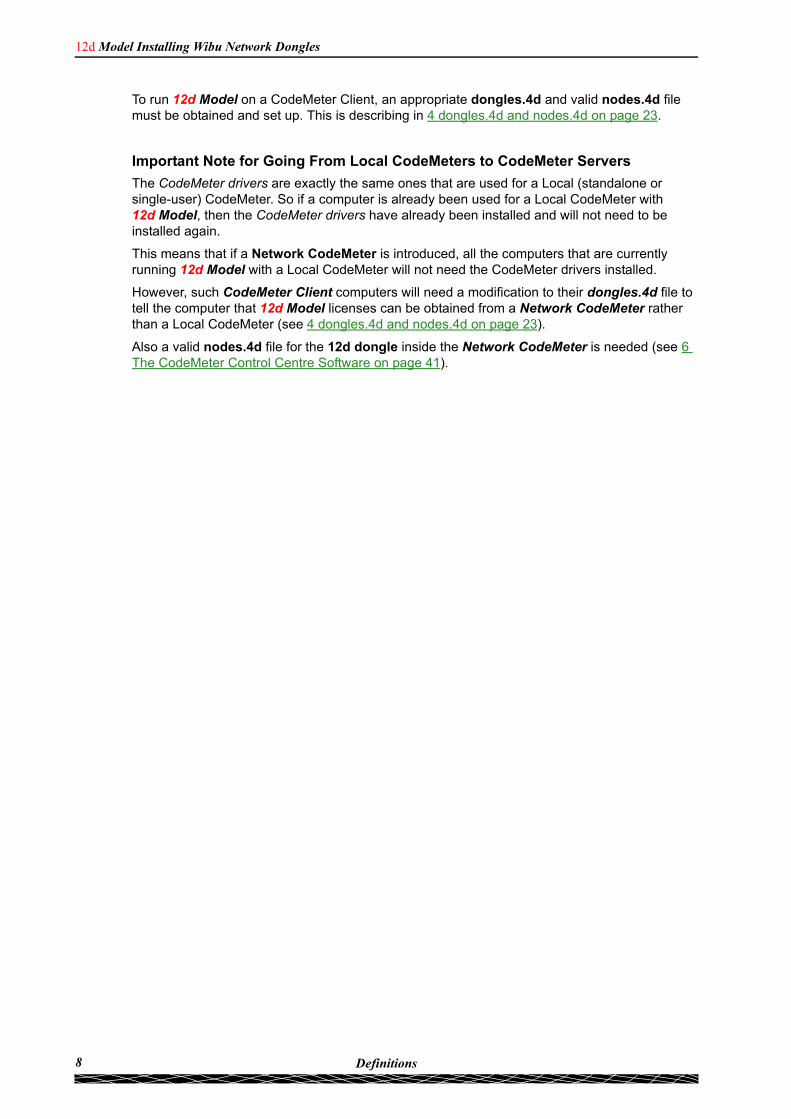
A 12d CodeMeter Server is a computer with a 12d Network CodeMeter attached to it. Note that this can be any computer, it does not have to be a Server Computer.
CodeMeter Client Computers Networked to One or More CodeMeter Server Computers
CodeMeter ClientCodeMeter Client
CodeMeter Client
CodeMeter Client
CodeMeter Client
CodeMeter Client
CodeMeter Client
CodeMeter Client
CodeMeter Client
CodeMeter Client
CodeMeter Servercomputer with a Network CodeMeter
CodeMeter Servercomputer with a Network CodeMeter
A 12d CodeMeter Client is a computer that gets its 12d Model licenses from a 12d CodeMeter Server. The CodeMeter Client computer does not have a Network CodeMeter attached to it.
Both CodeMeter Servers and CodeMeter Clients must have the CodeMeter Drivers and CodeMeter Runtime Server service installed and running and this is described in 2 Installing the CodeMeter Drivers on page 9.
CodeMeter Servers must also have the CodeMeter Network Server running and this is described in Step 6. Starting the Network Server on page 22.
7Definitions
12d Model Installing Wibu Network Dongles
To run 12d Model on a CodeMeter Client, an appropriate dongles.4d and valid nodes.4d file must be obtained and set up. This is describing in 4 dongles.4d and nodes.4d on page 23.
Important Note for Going From Local CodeMeters to CodeMeter Servers
The CodeMeter drivers are exactly the same ones that are used for a Local (standalone or single-user) CodeMeter. So if a computer is already been used for a Local CodeMeter with 12d Model, then the CodeMeter drivers have already been installed and will not need to be installed again.
This means that if a Network CodeMeter is introduced, all the computers that are currently running 12d Model with a Local CodeMeter will not need the CodeMeter drivers installed.
However, such CodeMeter Client computers will need a modification to their dongles.4d file to tell the computer that 12d Model licenses can be obtained from a Network CodeMeter rather than a Local CodeMeter (see 4 dongles.4d and nodes.4d on page 23).
Also a valid nodes.4d file for the 12d dongle inside the Network CodeMeter is needed (see 6 The CodeMeter Control Centre Software on page 41).
8 Definitions
Chapter 2 Installing the CodeMeter Drivers
2 Installing the CodeMeter Drivers
WARNING - Do not attach a CodeMeter to your computer until after you have installed the CodeMeter drivers.
This section is for installing of the CodeMeter drivers.
This is required for the computer which will have the Network CodeMeter attached to it (the CodeMeter Server) and also for the computers that are CodeMeter Clients that will use the CodeMeter Server.
If the computer is to be a CodeMeter Sever but already has the CodeMeter Drivers installed on it, then go straight to 3 Setting up a Network CodeMeter on page 18.
If the computer is already set up as a CodeMeter Server and you are adding a new 12d dongle to the Network CodeMeter, or upgrading the number of 12d licenses on a 12d dongle in the Network CodeMeter, go to 6.3.1 Updating Using the .WibuCmRaU File on page 49.
If you are replacing the existing Network CodeMeter by a new Network CodeMeter, go to 8 Replacing an Existing Network CodeMeter on page 58.
9Definitions
12d Model Installing Wibu Network Dongles
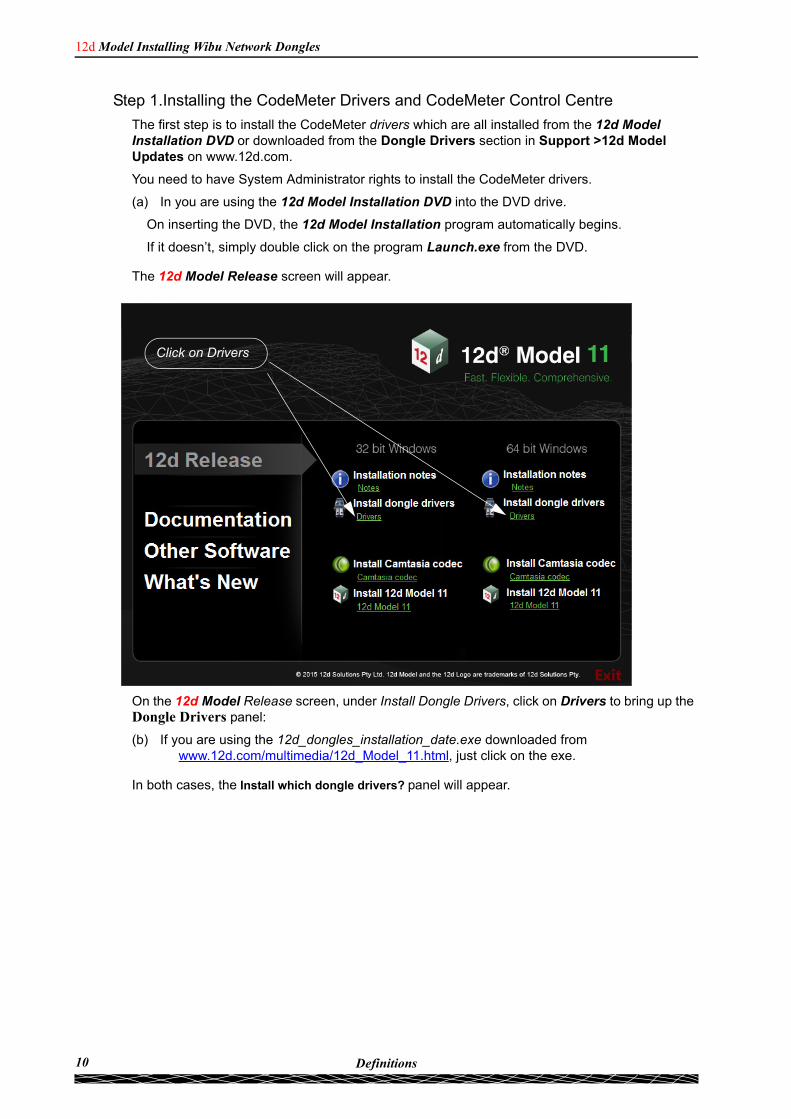
Step 1.Installing the CodeMeter Drivers and CodeMeter Control Centre
The first step is to install the CodeMeter drivers which are all installed from the 12d Model Installation DVD or downloaded from the Dongle Drivers section in Support >12d Model Updates on www.12d.com.
You need to have System Administrator rights to install the CodeMeter drivers.
(a) In you are using the 12d Model Installation DVD into the DVD drive.
On inserting the DVD, the 12d Model Installation program automatically begins.
If it doesn’t, simply double click on the program Launch.exe from the DVD.
The 12d Model Release screen will appear.
Click on Drivers
On the 12d Model Release screen, under Install Dongle Drivers, click on Drivers to bring up the Dongle Drivers panel:
(b) If you are using the 12d_dongles_installation_date.exe downloaded from www.12d.com/multimedia/12d_Model_11.html, just click on the exe.
In both cases, the Install which dongle drivers? panel will appear.
10 Definitions
Chapter 2 Installing the CodeMeter Drivers
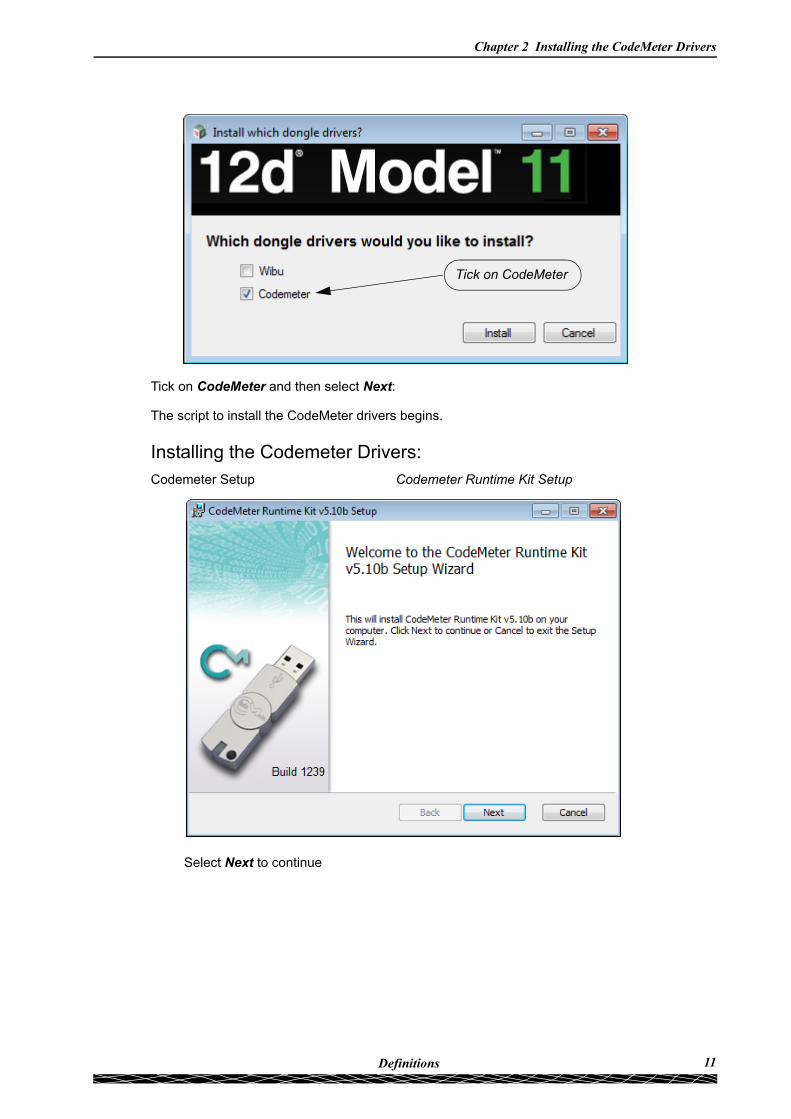
Tick on CodeMeter
Tick on CodeMeter and then select Next:
The script to install the CodeMeter drivers begins.
Installing the Codemeter Drivers:Codemeter Setup Codemeter Runtime Kit Setup
Select Next to continue
11Definitions
12d Model Installing Wibu Network Dongles
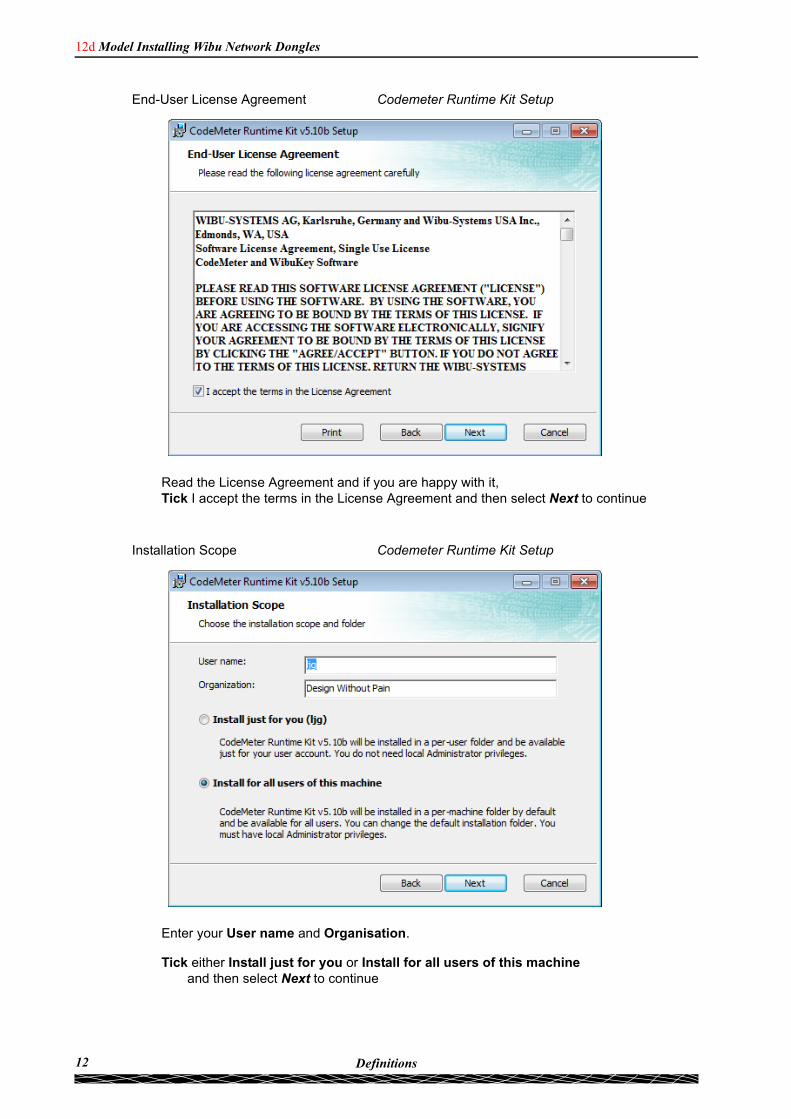
End-User License Agreement Codemeter Runtime Kit Setup
Read the License Agreement and if you are happy with it, Tick I accept the terms in the License Agreement and then select Next to continue
Installation Scope Codemeter Runtime Kit Setup
Enter your User name and Organisation.
Tick either Install just for you or Install for all users of this machine and then select Next to continue
12 Definitions
Chapter 2 Installing the CodeMeter Drivers
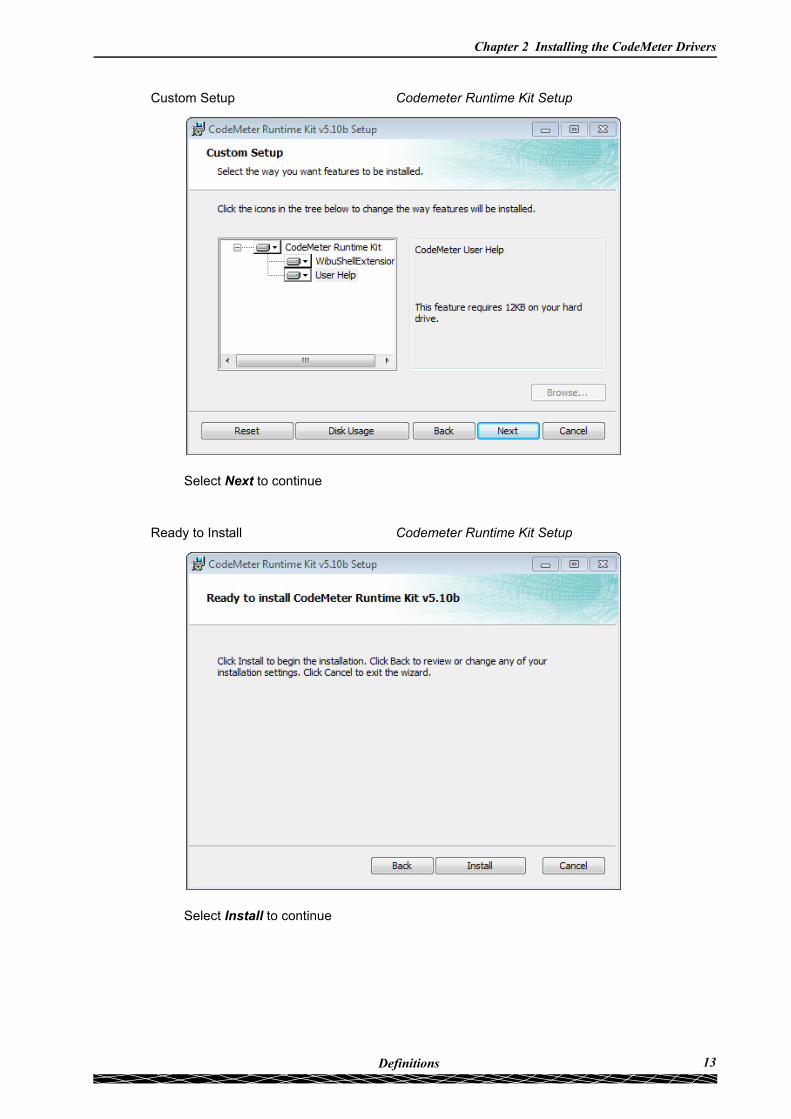
Custom Setup Codemeter Runtime Kit Setup
Select Next to continue
Ready to Install Codemeter Runtime Kit Setup
Select Install to continue
13Definitions
12d Model Installing Wibu Network Dongles
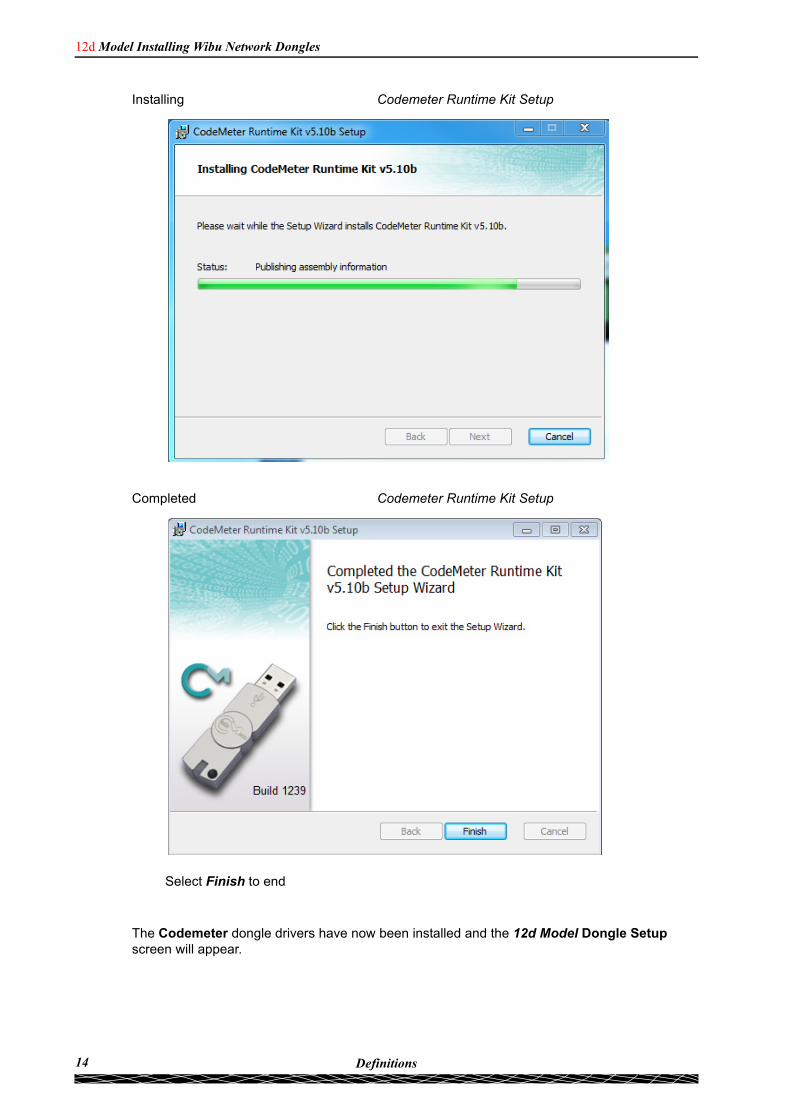
Installing Codemeter Runtime Kit Setup
Completed Codemeter Runtime Kit Setup
Select Finish to end
The Codemeter dongle drivers have now been installed and the 12d Model Dongle Setup screen will appear.
14 Definitions
Chapter 2 Installing the CodeMeter Drivers
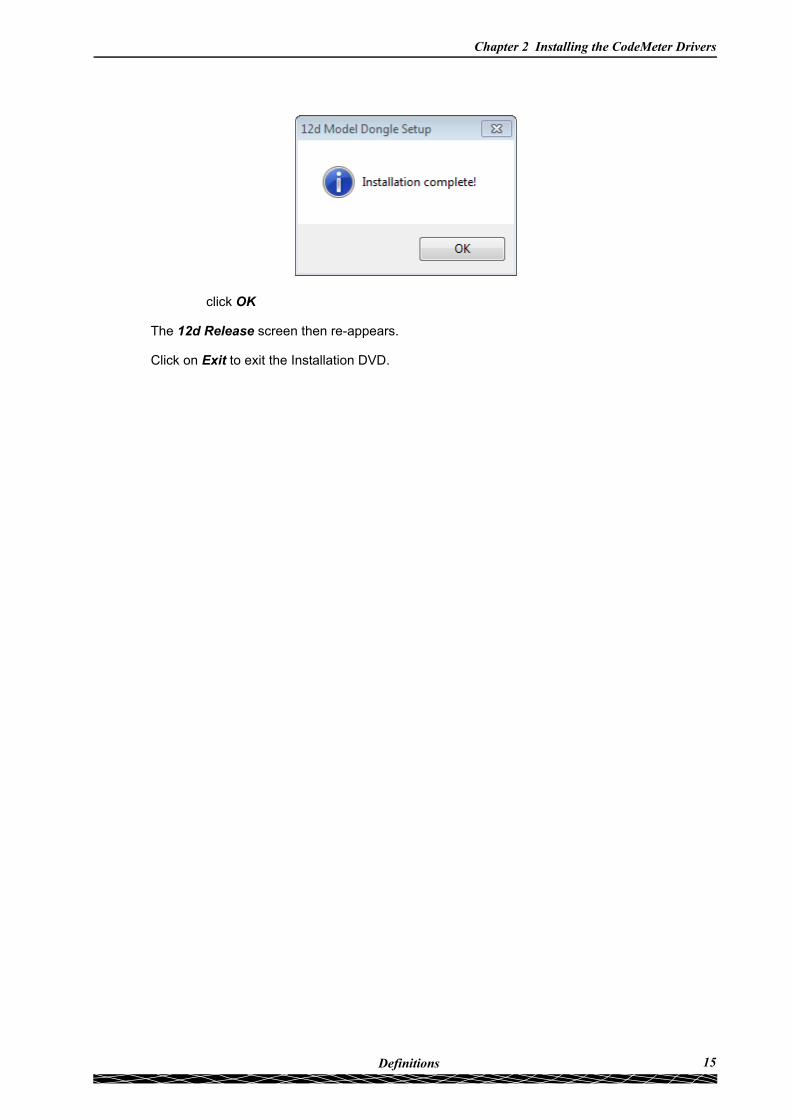
click OK
The 12d Release screen then re-appears.
Click on Exit to exit the Installation DVD.
15Definitions
12d Model Installing Wibu Network Dongles
What is Done to the Computer By Step 11. CodeMeter Drivers
The CodeMeter drivers that allows software to access CodeMeters anywhere on the network is installed.
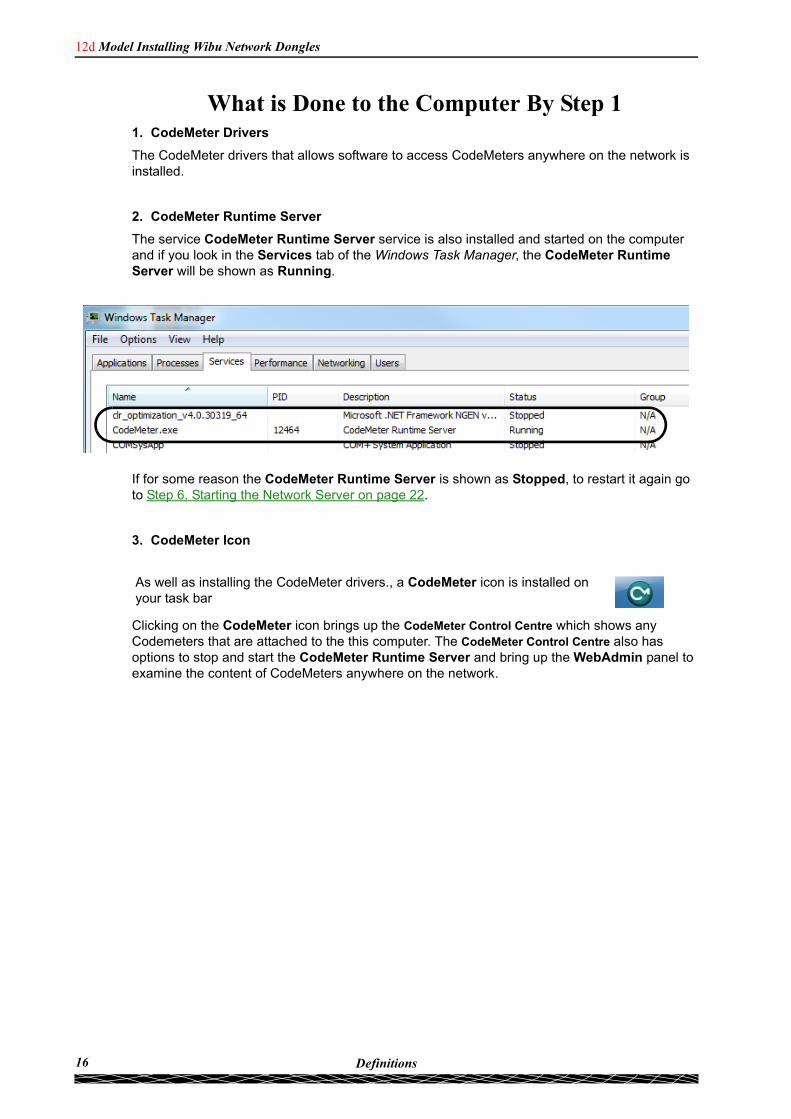
2. CodeMeter Runtime Server
The service CodeMeter Runtime Server service is also installed and started on the computer and if you look in the Services tab of the Windows Task Manager, the CodeMeter Runtime Server will be shown as Running.
If for some reason the CodeMeter Runtime Server is shown as Stopped, to restart it again go to Step 6. Starting the Network Server on page 22.
3. CodeMeter Icon
As well as installing the CodeMeter drivers., a CodeMeter icon is installed on your task bar
Clicking on the CodeMeter icon brings up the CodeMeter Control Centre which shows any Codemeters that are attached to the this computer. The CodeMeter Control Centre also has options to stop and start the CodeMeter Runtime Server and bring up the WebAdmin panel to examine the content of CodeMeters anywhere on the network.
16 Definitions
Chapter 2 Installing the CodeMeter Drivers
.
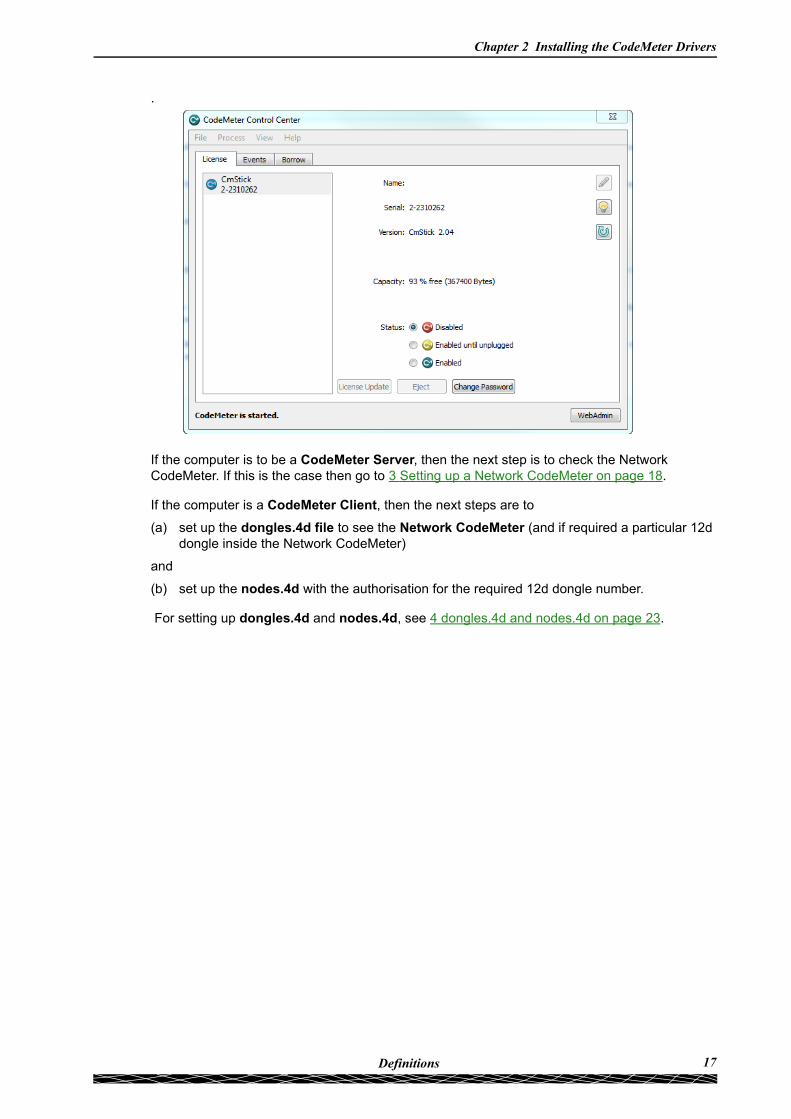
If the computer is to be a CodeMeter Server, then the next step is to check the Network CodeMeter. If this is the case then go to 3 Setting up a Network CodeMeter on page 18.
If the computer is a CodeMeter Client, then the next steps are to
(a) set up the dongles.4d file to see the Network CodeMeter (and if required a particular 12d dongle inside the Network CodeMeter)
and
(b) set up the nodes.4d with the authorisation for the required 12d dongle number.
For setting up dongles.4d and nodes.4d, see 4 dongles.4d and nodes.4d on page 23.
17Definitions
12d Model Installing Wibu Network Dongles
3 Setting up a Network CodeMeterThe CodeMeter drivers are now installed and the CodeMeter Runtime Server is running.
The next steps are to actually attach the Network CodeMeter, examine its contents to make sure everything that are correct, and then start up the Network Server so that other computers in the network will be able to see and use the Network CodeMeter.
These steps will complete the setting up of the Network CodeMeter as a CodeMeter Server.
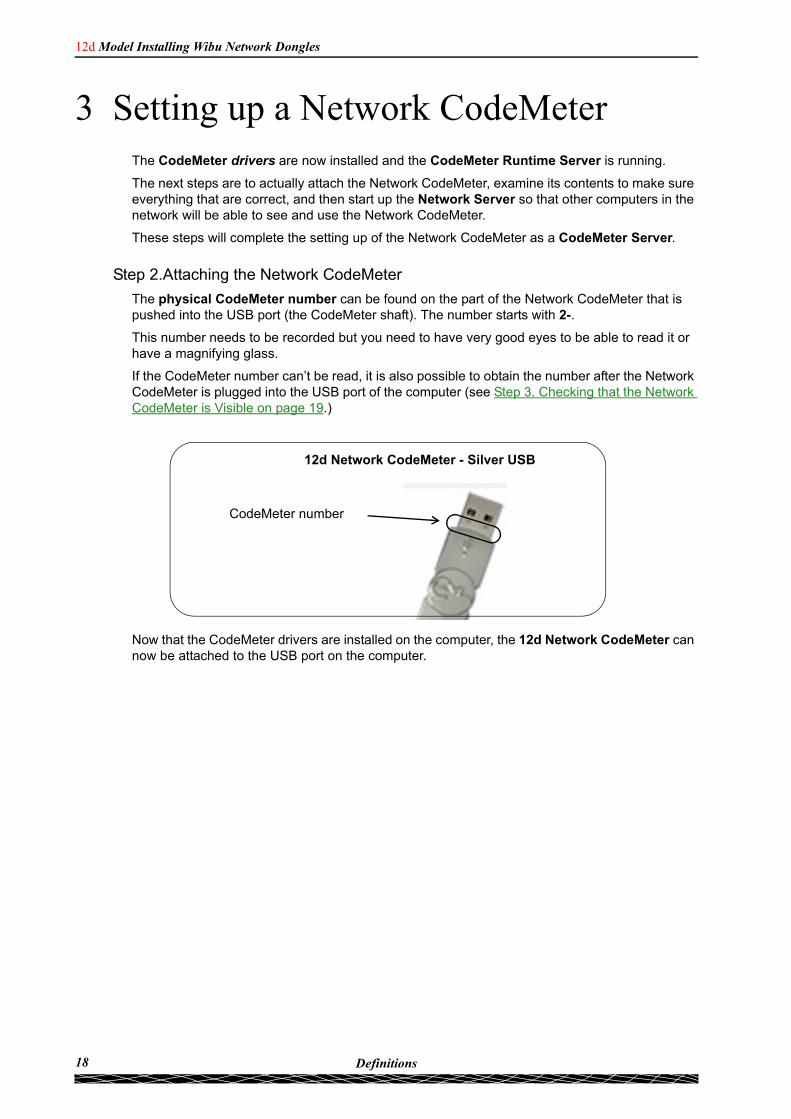
Step 2.Attaching the Network CodeMeter
The physical CodeMeter number can be found on the part of the Network CodeMeter that is pushed into the USB port (the CodeMeter shaft). The number starts with 2-.
This number needs to be recorded but you need to have very good eyes to be able to read it or have a magnifying glass.
If the CodeMeter number can’t be read, it is also possible to obtain the number after the Network CodeMeter is plugged into the USB port of the computer (see Step 3. Checking that the Network CodeMeter is Visible on page 19.)
12d Network CodeMeter - Silver USB
CodeMeter number
Now that the CodeMeter drivers are installed on the computer, the 12d Network CodeMeter can now be attached to the USB port on the computer.
18 Definitions
Chapter 3 Setting up a Network CodeMeter
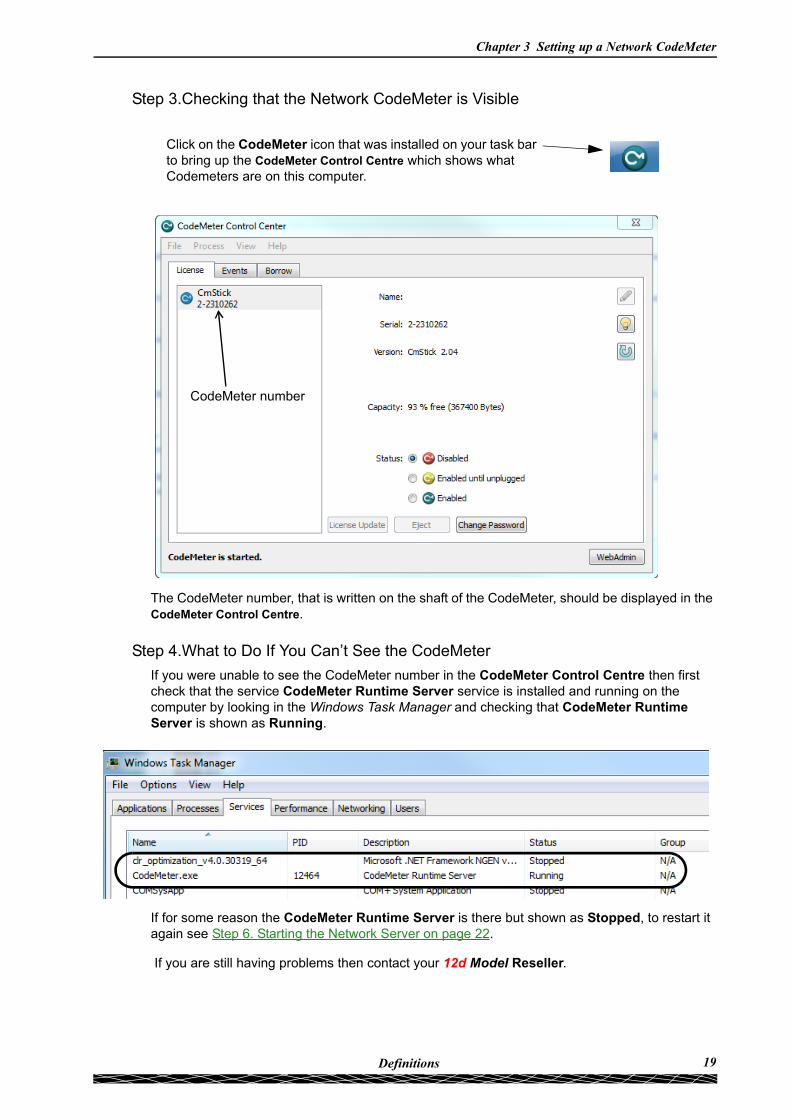
Step 3.Checking that the Network CodeMeter is Visible
Click on the CodeMeter icon that was installed on your task bar to bring up the CodeMeter Control Centre which shows what Codemeters are on this computer.
CodeMeter number
The CodeMeter number, that is written on the shaft of the CodeMeter, should be displayed in the CodeMeter Control Centre.
Step 4.What to Do If You Can’t See the CodeMeter
If you were unable to see the CodeMeter number in the CodeMeter Control Centre then first check that the service CodeMeter Runtime Server service is installed and running on the computer by looking in the Windows Task Manager and checking that CodeMeter Runtime Server is shown as Running.
If for some reason the CodeMeter Runtime Server is there but shown as Stopped, to restart it again see Step 6. Starting the Network Server on page 22.
If you are still having problems then contact your 12d Model Reseller.
19Definitions
12d Model Installing Wibu Network Dongles
Step 5.Checking the Virtual 12d Network Dongles Inside the Network CodeMeter
The Network CodeMeter alone is not enough to provide a license to run 12d Model.
There must also be a 12d network dongle inside the Network CodeMeter.
It is the 12d network dongle that controls how many network licenses of 12d Model are.available.
Aside: The 12d network dongle issues the 12d Model licenses but the actual 12d Model modules that go with a license from a 12d network dongle is controlled by a matching entry in the nodes.4d file. This means that what 12d Model modules you have can be updated by just emailing a new entry for the nodes.4d file.
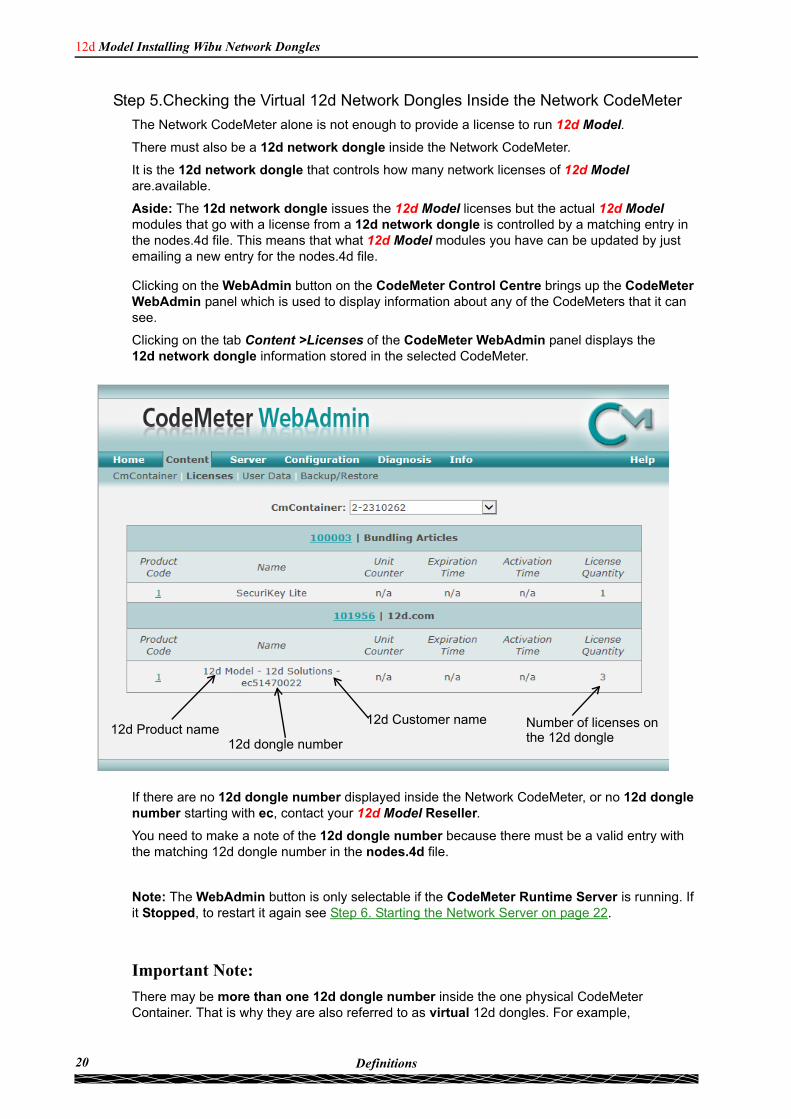
Clicking on the WebAdmin button on the CodeMeter Control Centre brings up the CodeMeter WebAdmin panel which is used to display information about any of the CodeMeters that it can see.
12d Product name12d Customer name
12d dongle number
Number of licenses on the 12d dongle
Clicking on the tab Content >Licenses of the CodeMeter WebAdmin panel displays the 12d network dongle information stored in the selected CodeMeter.
If there are no 12d dongle number displayed inside the Network CodeMeter, or no 12d dongle number starting with ec, contact your 12d Model Reseller.
You need to make a note of the 12d dongle number because there must be a valid entry with the matching 12d dongle number in the nodes.4d file.
Note: The WebAdmin button is only selectable if the CodeMeter Runtime Server is running. If it Stopped, to restart it again see Step 6. Starting the Network Server on page 22.
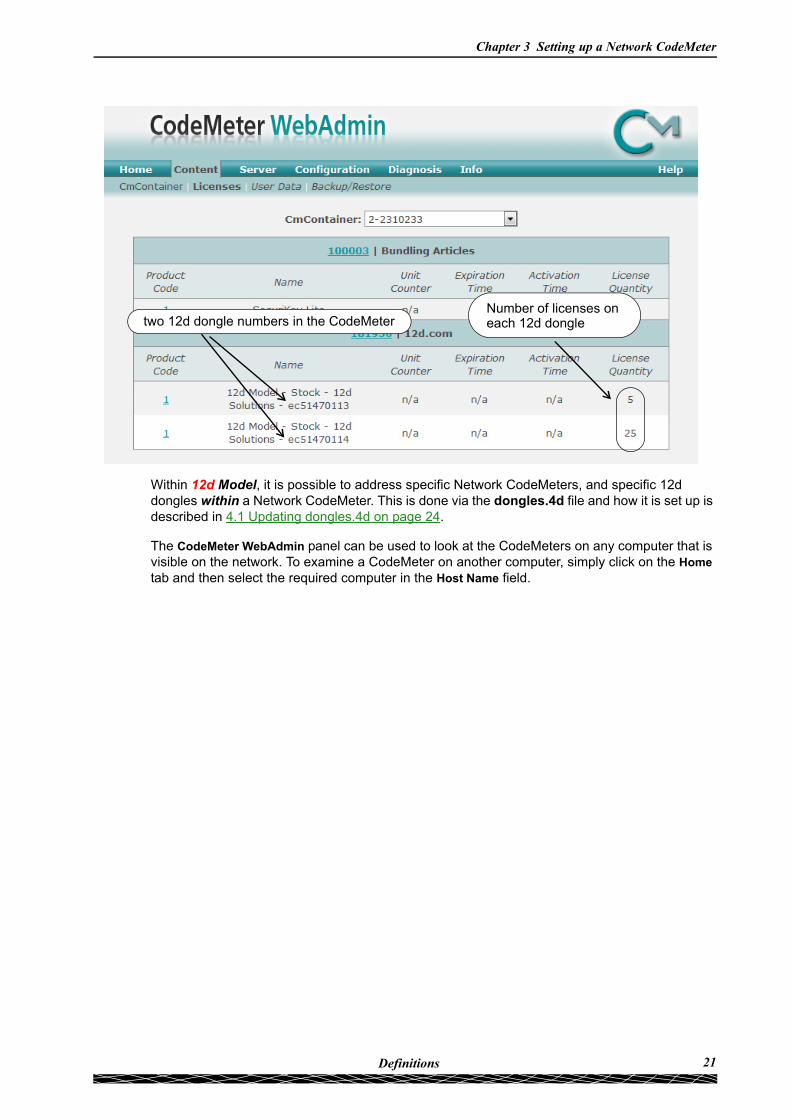
Important Note:
There may be more than one 12d dongle number inside the one physical CodeMeter Container. That is why they are also referred to as virtual 12d dongles. For example,
20 Definitions
Chapter 3 Setting up a Network CodeMeter
two 12d dongle numbers in the CodeMeterNumber of licenses on each 12d dongle
Within 12d Model, it is possible to address specific Network CodeMeters, and specific 12d dongles within a Network CodeMeter. This is done via the dongles.4d file and how it is set up is described in 4.1 Updating dongles.4d on page 24.
The CodeMeter WebAdmin panel can be used to look at the CodeMeters on any computer that is visible on the network. To examine a CodeMeter on another computer, simply click on the Home tab and then select the required computer in the Host Name field.
21Definitions
12d Model Installing Wibu Network Dongles
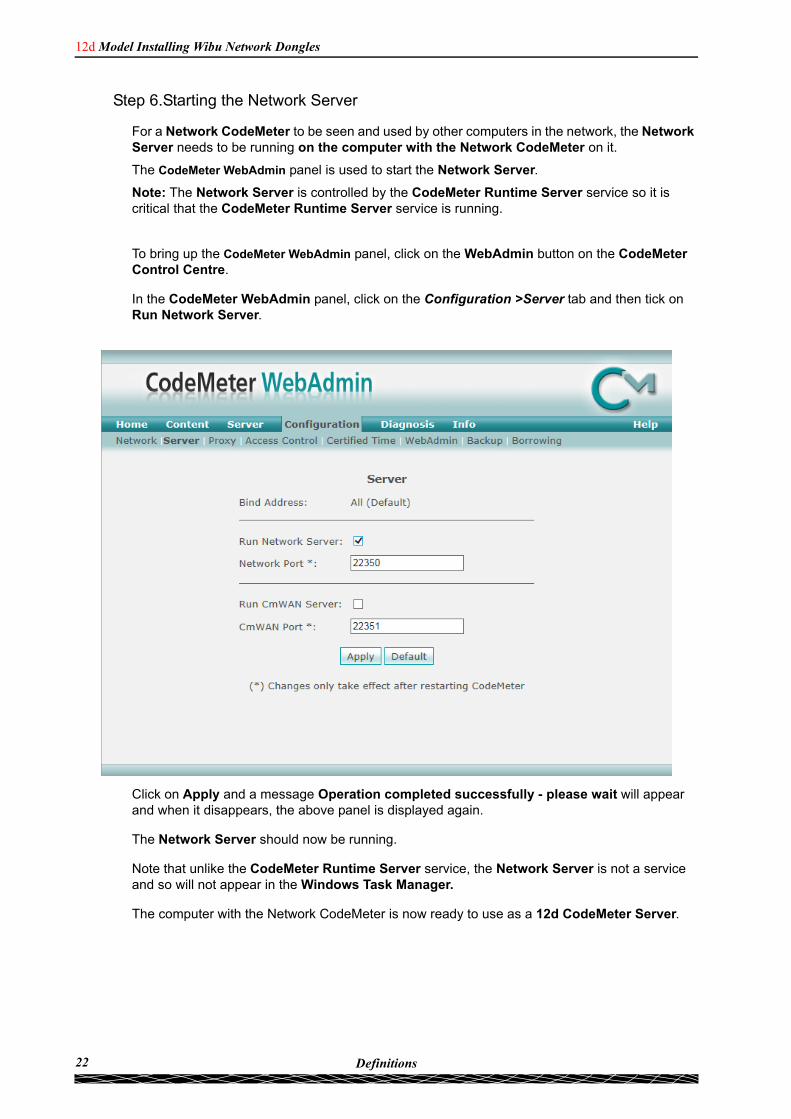
Step 6.Starting the Network Server
For a Network CodeMeter to be seen and used by other computers in the network, the Network Server needs to be running on the computer with the Network CodeMeter on it.
The CodeMeter WebAdmin panel is used to start the Network Server.
Note: The Network Server is controlled by the CodeMeter Runtime Server service so it is critical that the CodeMeter Runtime Server service is running.
To bring up the CodeMeter WebAdmin panel, click on the WebAdmin button on the CodeMeter Control Centre.
In the CodeMeter WebAdmin panel, click on the Configuration >Server tab and then tick on Run Network Server.
Click on Apply and a message Operation completed successfully - please wait will appear and when it disappears, the above panel is displayed again.
The Network Server should now be running.
Note that unlike the CodeMeter Runtime Server service, the Network Server is not a service and so will not appear in the Windows Task Manager.
The computer with the Network CodeMeter is now ready to use as a 12d CodeMeter Server.
22 Definitions
Chapter 4 dongles.4d and nodes.4d
4 dongles.4d and nodes.4dFor 12d Model to be able to create and/or open existing projects, it requires
(a) a license from a 12d dongle inside a Network Codemeter
and
(b) a valid entry with the matching 12d dongle number in the nodes.4d file
Once dongles.4d and nodes.4d have been updated, they must be the nodes.4d and dongles.4d files that are used for any computer wanting to use a 12d Model license from a Network CodeMeter.
For the updating of dongles.4d, see 4.1 Updating dongles.4d on page 24.
For the updating of nodes.4d, see 4.2 Updating nodes.4d on page 32.
23Definitions
12d Model Installing Wibu Network Dongles
4.1 Updating dongles.4dThe dongles.4d file lists the computers to search for Network CodeMeters, Local CodeMeters and Wibu dongles to find 12d dongle numbers.
It also defines the order to search for CodeMeters and Wibus.
When 12d Model is installed on a computer from the 12d Model Installation DVD, it installs a dongles.4d file that is configured to only look for Local (standalone) CodeMeters and Local Wibus.
For each computer that needs to access to a Network CodeMeter, a modification has to be made to the dongles.4d file used by that computer to tell 12d Model to search for a Network CodeMeter and not just use a Local CodeMeter.
The updated dongles.4d is then placed in the standard search path for a set up file for that computer. For example, dongles.4d could be in c:\12d\11.00\User, or a file pointed to by the environment variable DONGLES_4D in env.4d. This means that the dongles.4d file could be on the one central computer and accessed by all the other computers.
Important Note
In the initial 12d Model installation, the dongles.4d file is a set up file and is installed in the folder
Program files\12d\12dmodel\11.00\Set_ups
All the files in Set_ups are supplied by 12d Solutions and must not be modified. Hence in updating the default dongles.4d file, the procedures outlined will modify a copy of the dongles.4d file.
The editing of dongles.4d does not have to be the computer that the Network CodeMeter is on. It can be done from any computer.
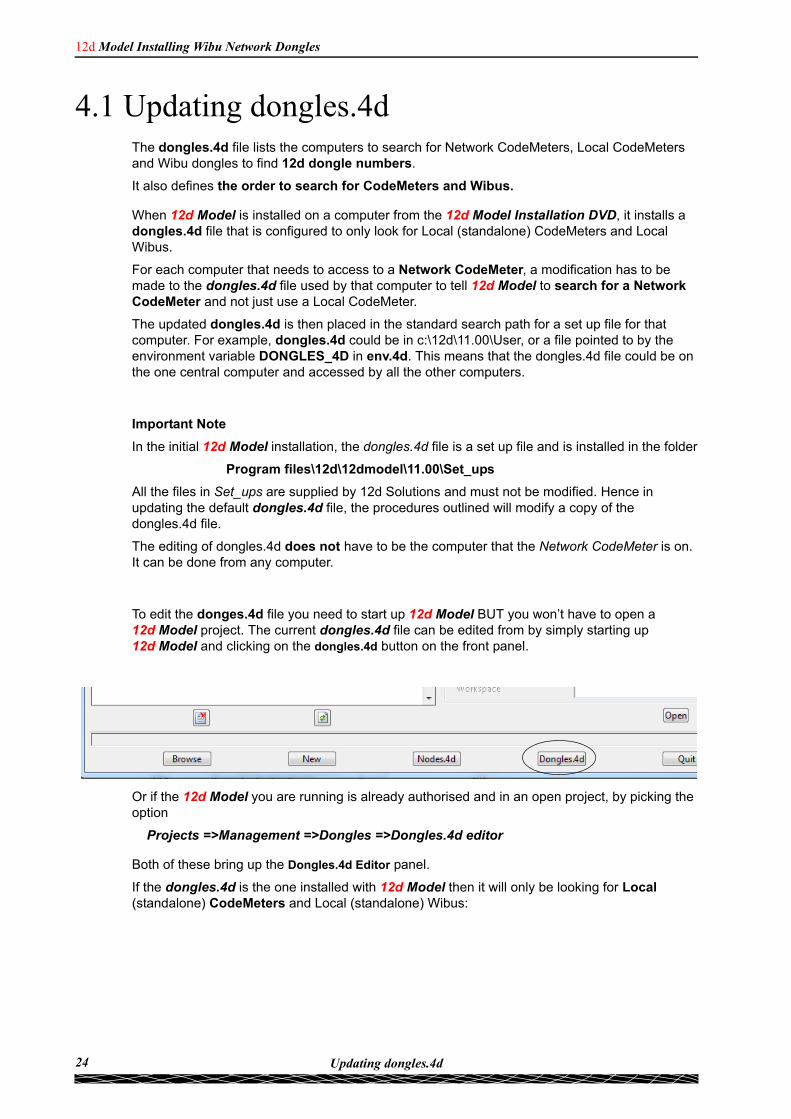
To edit the donges.4d file you need to start up 12d Model BUT you won’t have to open a 12d Model project. The current dongles.4d file can be edited from by simply starting up 12d Model and clicking on the dongles.4d button on the front panel.
Or if the 12d Model you are running is already authorised and in an open project, by picking the option
Projects =>Management =>Dongles =>Dongles.4d editor
Both of these bring up the Dongles.4d Editor panel.
If the dongles.4d is the one installed with 12d Model then it will only be looking for Local (standalone) CodeMeters and Local (standalone) Wibus:
24 Updating dongles.4d

Chapter 4 dongles.4d and nodes.4d
Add a new entry
List of CodeMeter and Wibu dongles to search for.
They are searched for in the order in this list.
What it needs in the list is an entry to tell 12d Model to look for your Network CodeMeter.
To Add a new entry to dongles.4d, click on the Add button which then bring up the Add a New Dongle panel.
.
To add an entry to search for all Network CodeMeter on the network, see 4.1.1 Search for any Network CodeMeter on page 26.
To add an entry to use a particular 12d dongle number in a particular Network CodeMeter, see 4.1.2 Using a 12d Dongle Number in a Network CodeMeter on page 28.
25Updating dongles.4d
12d Model Installing Wibu Network Dongles
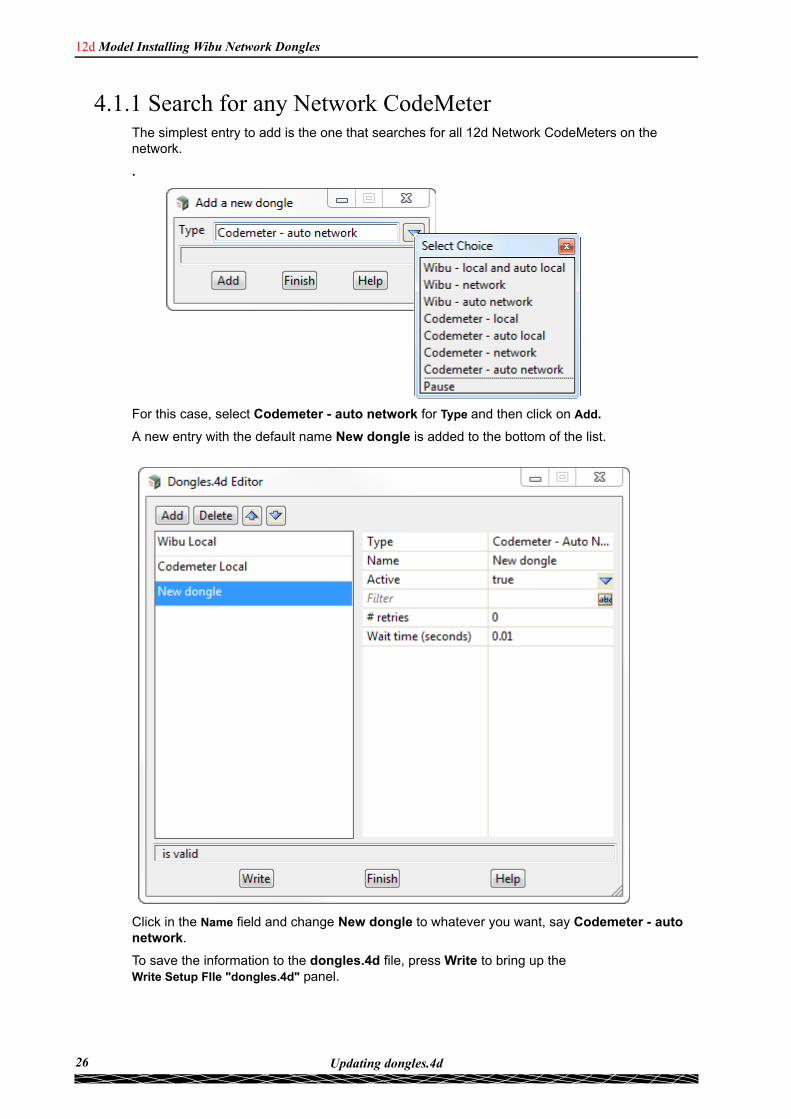
4.1.1 Search for any Network CodeMeterThe simplest entry to add is the one that searches for all 12d Network CodeMeters on the network.
.
For this case, select Codemeter - auto network for Type and then click on Add.
A new entry with the default name New dongle is added to the bottom of the list.
Click in the Name field and change New dongle to whatever you want, say Codemeter - auto network.
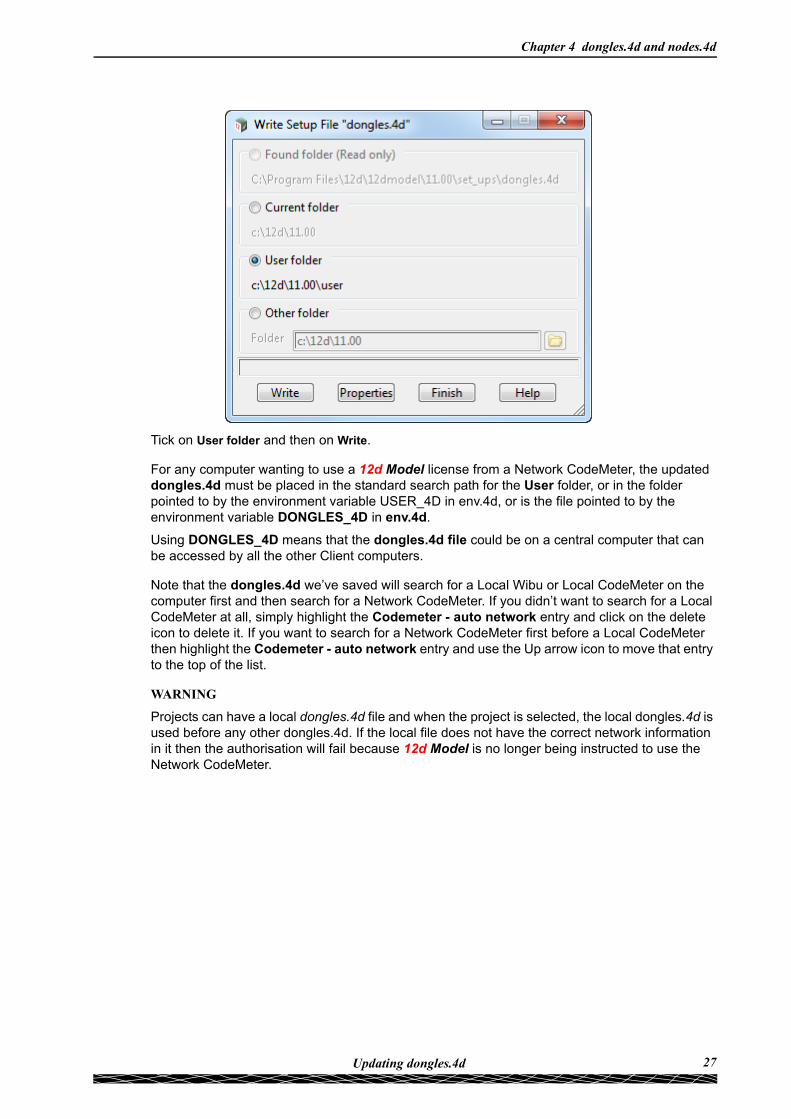
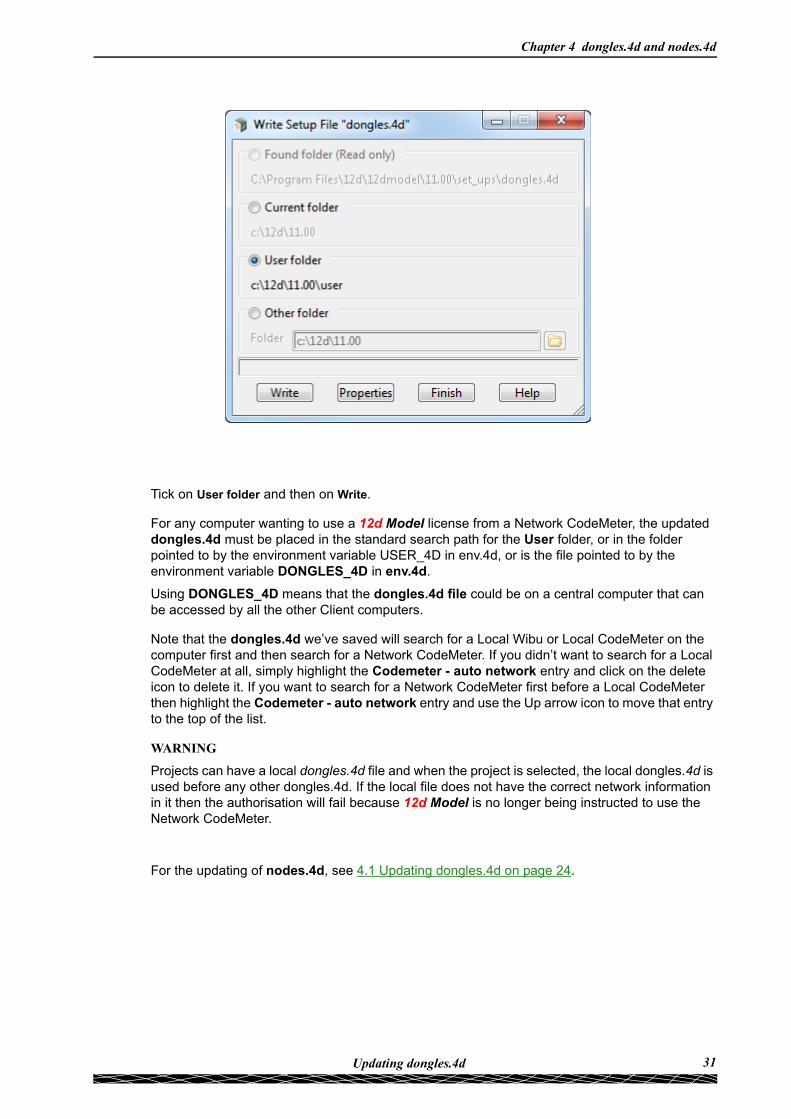
To save the information to the dongles.4d file, press Write to bring up the Write Setup FIle "dongles.4d" panel.
26 Updating dongles.4d
Chapter 4 dongles.4d and nodes.4d
Tick on User folder and then on Write.
For any computer wanting to use a 12d Model license from a Network CodeMeter, the updated dongles.4d must be placed in the standard search path for the User folder, or in the folder pointed to by the environment variable USER_4D in env.4d, or is the file pointed to by the environment variable DONGLES_4D in env.4d.
Using DONGLES_4D means that the dongles.4d file could be on a central computer that can be accessed by all the other Client computers.
Note that the dongles.4d we’ve saved will search for a Local Wibu or Local CodeMeter on the computer first and then search for a Network CodeMeter. If you didn’t want to search for a Local CodeMeter at all, simply highlight the Codemeter - auto network entry and click on the delete icon to delete it. If you want to search for a Network CodeMeter first before a Local CodeMeter then highlight the Codemeter - auto network entry and use the Up arrow icon to move that entry to the top of the list.
WARNING
Projects can have a local dongles.4d file and when the project is selected, the local dongles.4d is used before any other dongles.4d. If the local file does not have the correct network information in it then the authorisation will fail because 12d Model is no longer being instructed to use the Network CodeMeter.
27Updating dongles.4d
12d Model Installing Wibu Network Dongles
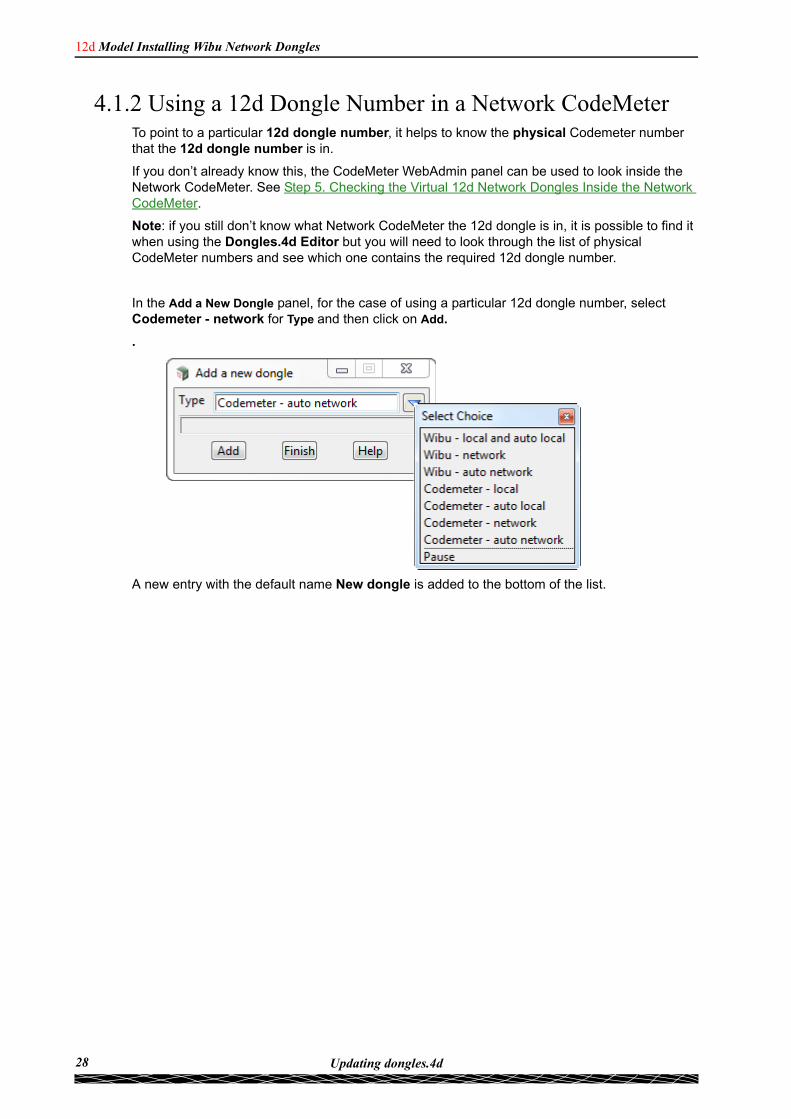
4.1.2 Using a 12d Dongle Number in a Network CodeMeterTo point to a particular 12d dongle number, it helps to know the physical Codemeter number that the 12d dongle number is in.
If you don’t already know this, the CodeMeter WebAdmin panel can be used to look inside the Network CodeMeter. See Step 5. Checking the Virtual 12d Network Dongles Inside the Network CodeMeter.
Note: if you still don’t know what Network CodeMeter the 12d dongle is in, it is possible to find it when using the Dongles.4d Editor but you will need to look through the list of physical CodeMeter numbers and see which one contains the required 12d dongle number.
In the Add a New Dongle panel, for the case of using a particular 12d dongle number, select Codemeter - network for Type and then click on Add.
.
A new entry with the default name New dongle is added to the bottom of the list.
28 Updating dongles.4d
Chapter 4 dongles.4d and nodes.4d
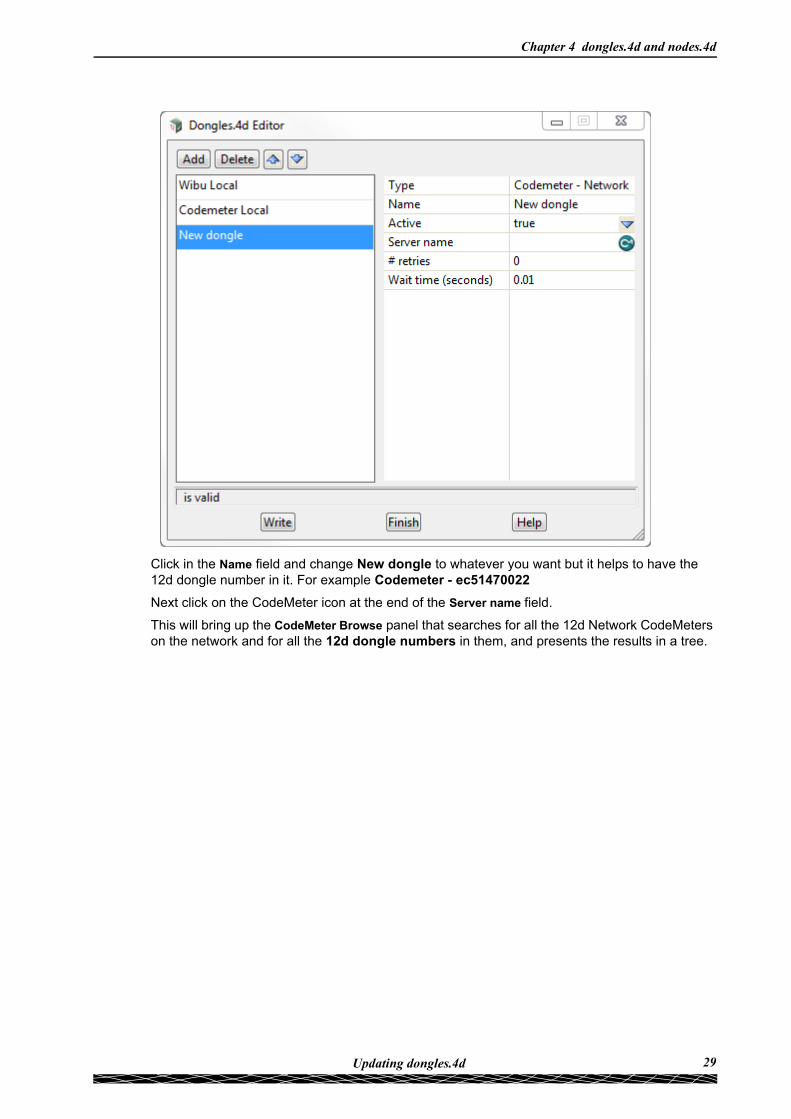
Click in the Name field and change New dongle to whatever you want but it helps to have the 12d dongle number in it. For example Codemeter - ec51470022
Next click on the CodeMeter icon at the end of the Server name field.
This will bring up the CodeMeter Browse panel that searches for all the 12d Network CodeMeters on the network and for all the 12d dongle numbers in them, and presents the results in a tree.
29Updating dongles.4d
12d Model Installing Wibu Network Dongles
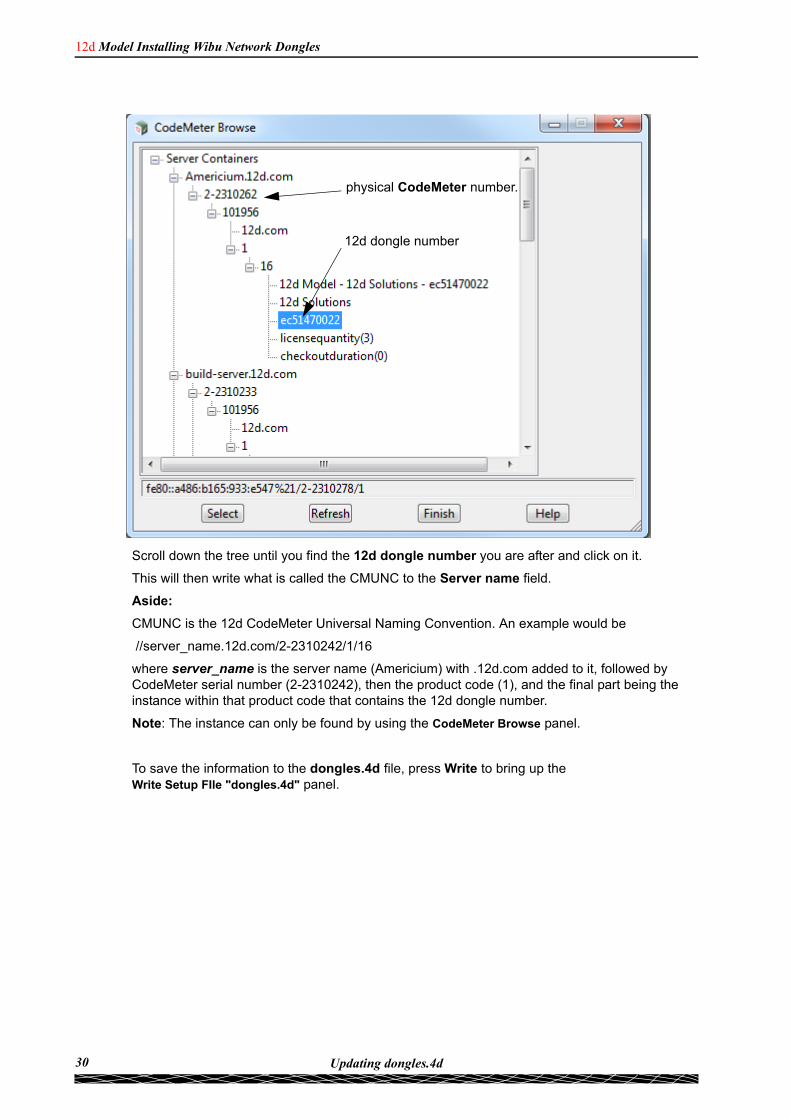
physical CodeMeter number.
12d dongle number
Scroll down the tree until you find the 12d dongle number you are after and click on it.
This will then write what is called the CMUNC to the Server name field.
Aside:
CMUNC is the 12d CodeMeter Universal Naming Convention. An example would be
//server_name.12d.com/2-2310242/1/16
where server_name is the server name (Americium) with .12d.com added to it, followed by CodeMeter serial number (2-2310242), then the product code (1), and the final part being the instance within that product code that contains the 12d dongle number.
Note: The instance can only be found by using the CodeMeter Browse panel.
To save the information to the dongles.4d file, press Write to bring up the Write Setup FIle "dongles.4d" panel.
30 Updating dongles.4d
Chapter 4 dongles.4d and nodes.4d
Tick on User folder and then on Write.
For any computer wanting to use a 12d Model license from a Network CodeMeter, the updated dongles.4d must be placed in the standard search path for the User folder, or in the folder pointed to by the environment variable USER_4D in env.4d, or is the file pointed to by the environment variable DONGLES_4D in env.4d.
Using DONGLES_4D means that the dongles.4d file could be on a central computer that can be accessed by all the other Client computers.
Note that the dongles.4d we’ve saved will search for a Local Wibu or Local CodeMeter on the computer first and then search for a Network CodeMeter. If you didn’t want to search for a Local CodeMeter at all, simply highlight the Codemeter - auto network entry and click on the delete icon to delete it. If you want to search for a Network CodeMeter first before a Local CodeMeter then highlight the Codemeter - auto network entry and use the Up arrow icon to move that entry to the top of the list.
WARNING
Projects can have a local dongles.4d file and when the project is selected, the local dongles.4d is used before any other dongles.4d. If the local file does not have the correct network information in it then the authorisation will fail because 12d Model is no longer being instructed to use the Network CodeMeter.
For the updating of nodes.4d, see 4.1 Updating dongles.4d on page 24.
31Updating dongles.4d
12d Model Installing Wibu Network Dongles
4.2 Updating nodes.4d12d Model will not create new projects or open an existing project without an authorisation file called nodes.4d with valid information in it.
The information inside nodes.4d controls
(a) which 12d dongles are authorised to run 12d Model
(b) what version of 12d Model will run for a 12d dongle
(c) what modules are authorised for a 12d dongle
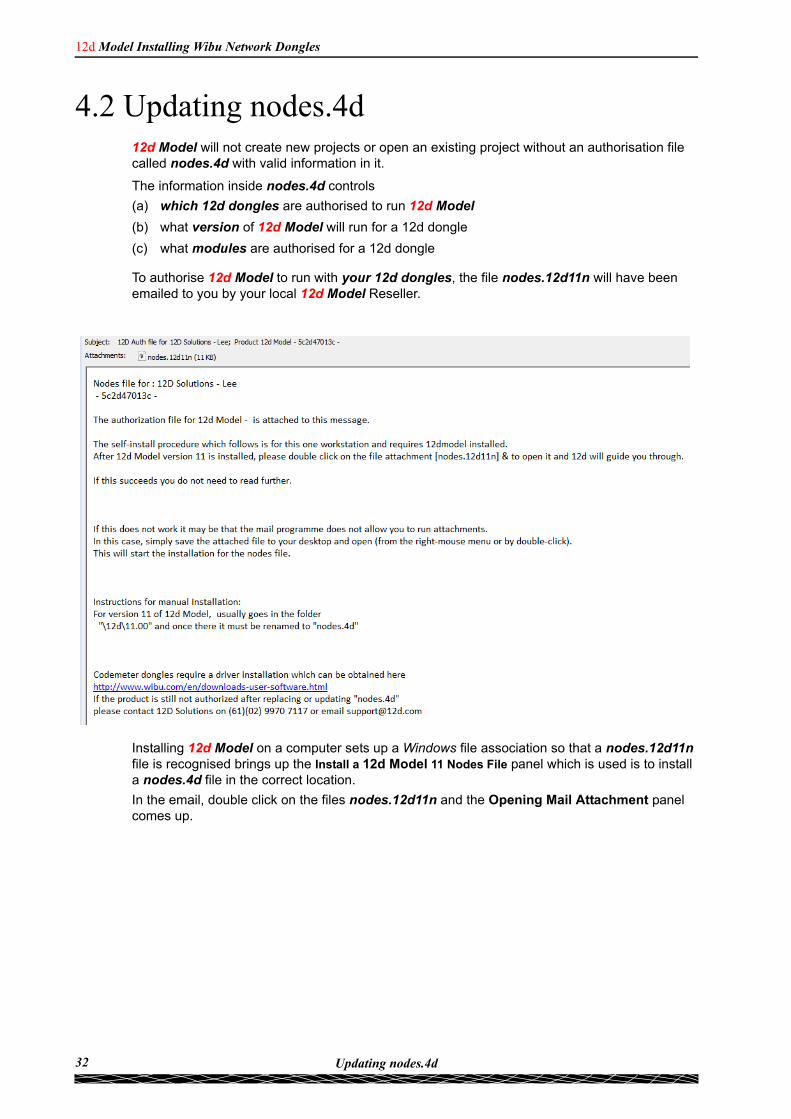
To authorise 12d Model to run with your 12d dongles, the file nodes.12d11n will have been emailed to you by your local 12d Model Reseller.
Installing 12d Model on a computer sets up a Windows file association so that a nodes.12d11n file is recognised brings up the Install a 12d Model 11 Nodes File panel which is used is to install a nodes.4d file in the correct location.
In the email, double click on the files nodes.12d11n and the Opening Mail Attachment panel comes up.
32 Updating nodes.4d
Chapter 4 dongles.4d and nodes.4d
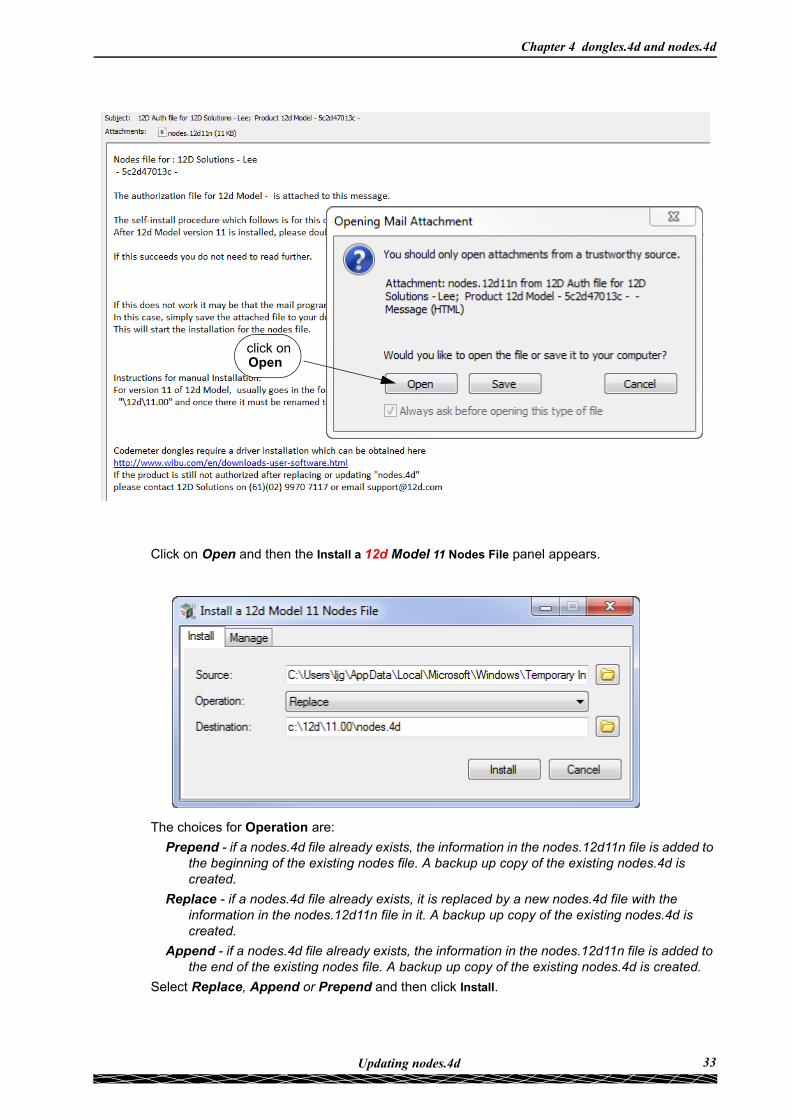
Openclick on
Click on Open and then the Install a 12d Model 11 Nodes File panel appears.
The choices for Operation are:
Prepend - if a nodes.4d file already exists, the information in the nodes.12d11n file is added to the beginning of the existing nodes file. A backup up copy of the existing nodes.4d is created.
Replace - if a nodes.4d file already exists, it is replaced by a new nodes.4d file with the information in the nodes.12d11n file in it. A backup up copy of the existing nodes.4d is created.
Append - if a nodes.4d file already exists, the information in the nodes.12d11n file is added to the end of the existing nodes file. A backup up copy of the existing nodes.4d is created.
Select Replace, Append or Prepend and then click Install.
33Updating nodes.4d
12d Model Installing Wibu Network Dongles
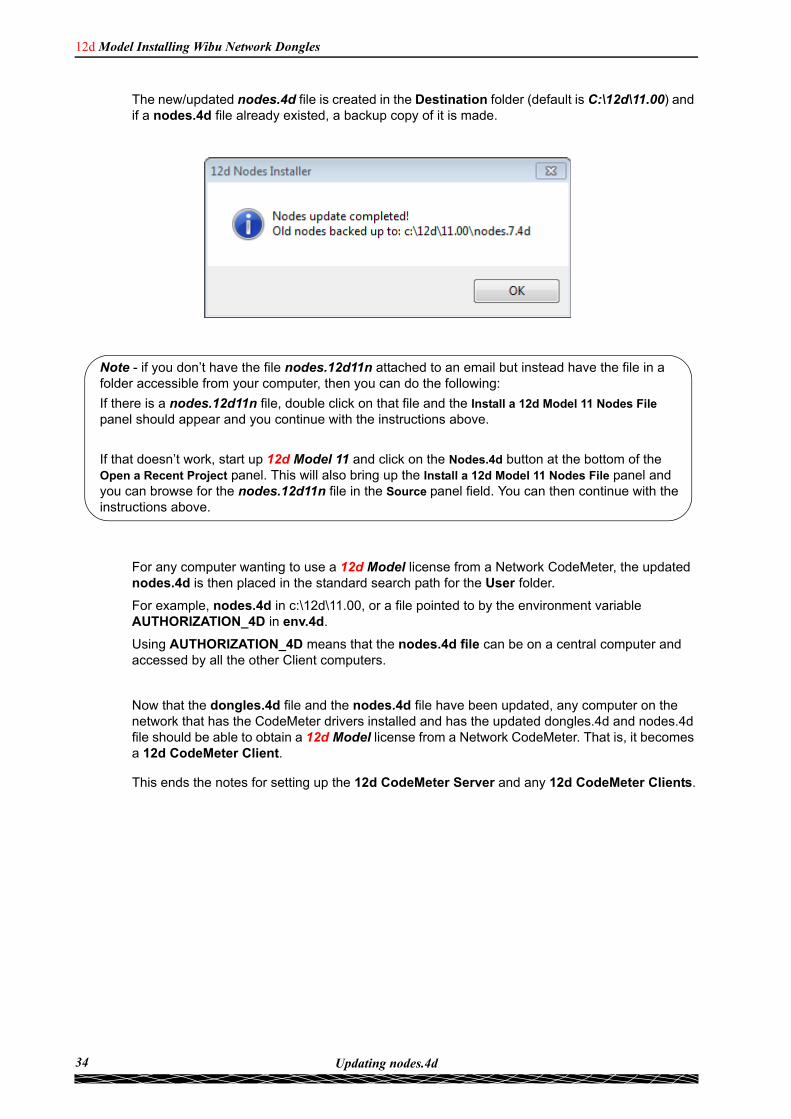
The new/updated nodes.4d file is created in the Destination folder (default is C:\12d\11.00) and if a nodes.4d file already existed, a backup copy of it is made.
Note - if you don’t have the file nodes.12d11n attached to an email but instead have the file in a folder accessible from your computer, then you can do the following:
If there is a nodes.12d11n file, double click on that file and the Install a 12d Model 11 Nodes File panel should appear and you continue with the instructions above.
If that doesn’t work, start up 12d Model 11 and click on the Nodes.4d button at the bottom of the Open a Recent Project panel. This will also bring up the Install a 12d Model 11 Nodes File panel and you can browse for the nodes.12d11n file in the Source panel field. You can then continue with the instructions above.
For any computer wanting to use a 12d Model license from a Network CodeMeter, the updated nodes.4d is then placed in the standard search path for the User folder.
For example, nodes.4d in c:\12d\11.00, or a file pointed to by the environment variable AUTHORIZATION_4D in env.4d.
Using AUTHORIZATION_4D means that the nodes.4d file can be on a central computer and accessed by all the other Client computers.
Now that the dongles.4d file and the nodes.4d file have been updated, any computer on the network that has the CodeMeter drivers installed and has the updated dongles.4d and nodes.4d file should be able to obtain a 12d Model license from a Network CodeMeter. That is, it becomes a 12d CodeMeter Client.
This ends the notes for setting up the 12d CodeMeter Server and any 12d CodeMeter Clients.
34 Updating nodes.4d
Chapter 5 Certifying the CodeMeter
5 Certifying the CodeMeter
The Network CodeMeters use the Certified Time capability of the CodeMeter.
This means that before two months after the Certified Time in the CodeMEter, the Network CodeMeter that your 12d Model licenses are coming from must communicate over the Internet with a Certified Wibu Time Server and check that there is no problem with the Network CodeMeter.
If there are no problems, then the Certified Time on the CodeMEter will be updated to the current time.
See
5.1 Displaying the Certified Time on page 35
5.2.1 Manually Updating the Certified Time on page 37
5.2.2 Automatically Updating the Certified Time on page 39
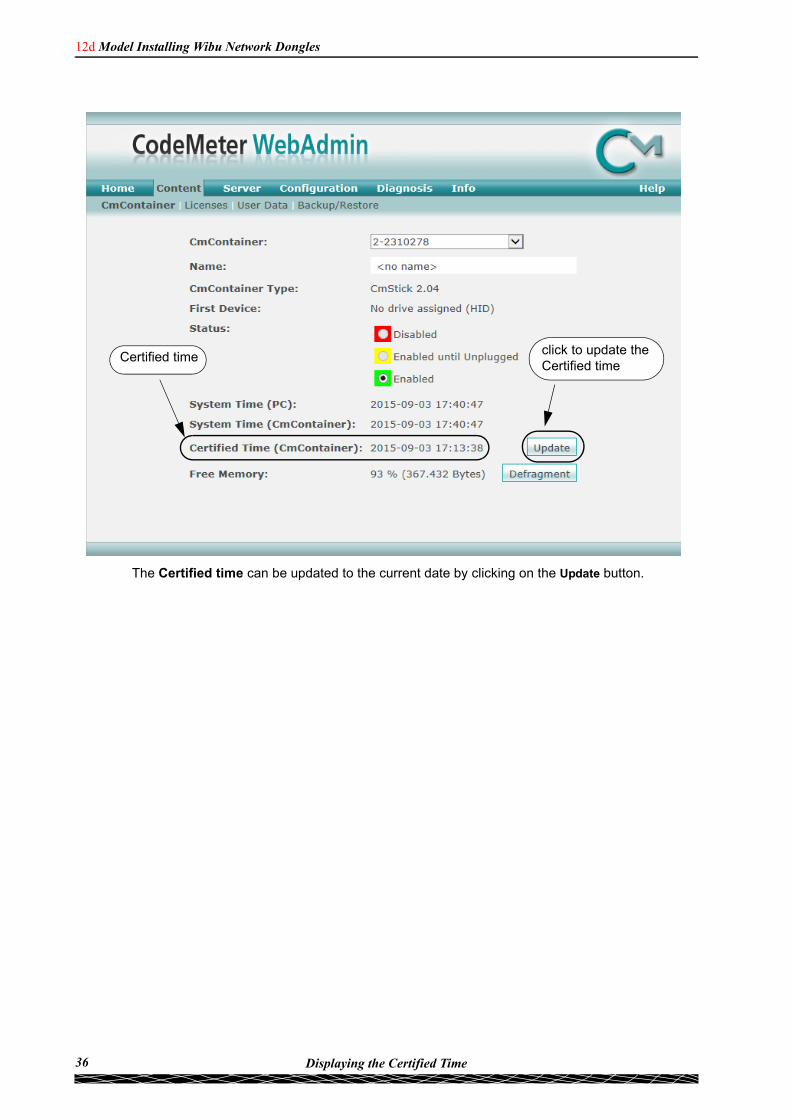
5.1 Displaying the Certified TimeThe time that the CodeMeter was last certified (the Certified Time) can be displayed in the CodeMeter WebAdmin panel.
After getting up CodeMeter WebAdmin panel up, on the Home tab set the Host Name: field to the name of the server that the Network CodeMeter and then go to the Content >CmContainer tab.
If there is more than one CodeMeter on that server, select the one that you want to examine in the CmContainer: field.
35Displaying the Certified Time
12d Model Installing Wibu Network Dongles
Certified time click to update the Certified time
The Certified time can be updated to the current date by clicking on the Update button.
36 Displaying the Certified Time
Chapter 5 Certifying the CodeMeter
5.2 Updating the Certified TimeTo update the Certified Time in the Network CodeMeter, you need to access over the Internet to a CodeMeter Time Server (see 5.3 Time Servers for Certified Time).
This Internet communication is done through a set IP port (see 9 Port Address for Communication).
The Certified Time can be updated either
(a) manually - see 5.2.1 Manually Updating the Certified Time)
or
(b) automatically - see 5.2.2 Automatically Updating the Certified Time).
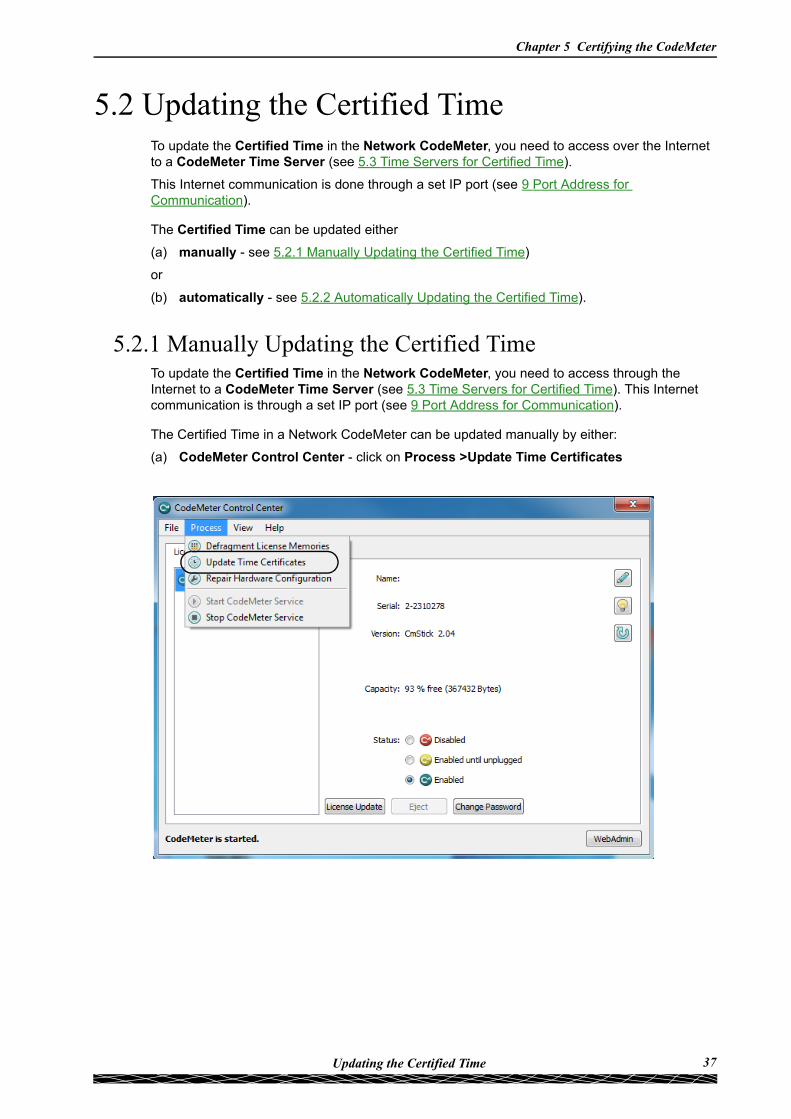
5.2.1 Manually Updating the Certified TimeTo update the Certified Time in the Network CodeMeter, you need to access through the Internet to a CodeMeter Time Server (see 5.3 Time Servers for Certified Time). This Internet communication is through a set IP port (see 9 Port Address for Communication).
The Certified Time in a Network CodeMeter can be updated manually by either:
(a) CodeMeter Control Center - click on Process >Update Time Certificates
37Updating the Certified Time
12d Model Installing Wibu Network Dongles
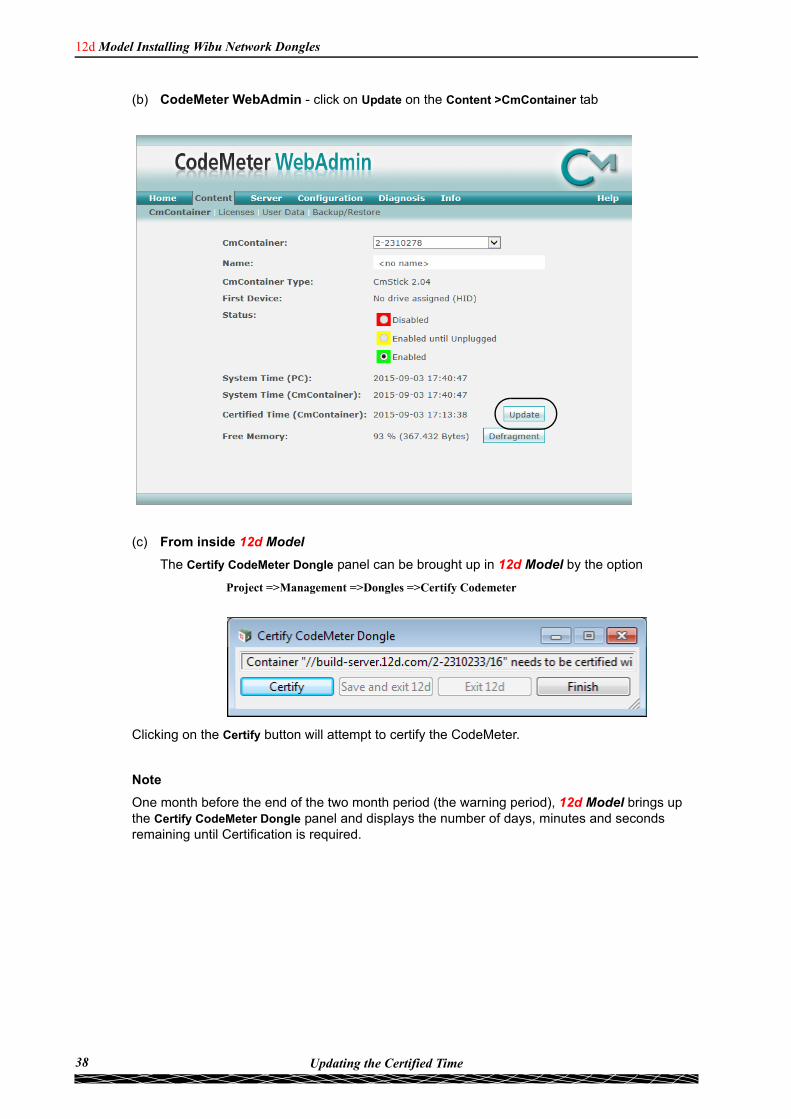
(b) CodeMeter WebAdmin - click on Update on the Content >CmContainer tab
(c) From inside 12d Model
The Certify CodeMeter Dongle panel can be brought up in 12d Model by the option
Project =>Management =>Dongles =>Certify Codemeter
Clicking on the Certify button will attempt to certify the CodeMeter.
Note
One month before the end of the two month period (the warning period), 12d Model brings up the Certify CodeMeter Dongle panel and displays the number of days, minutes and seconds remaining until Certification is required.
38 Updating the Certified Time
Chapter 5 Certifying the CodeMeter
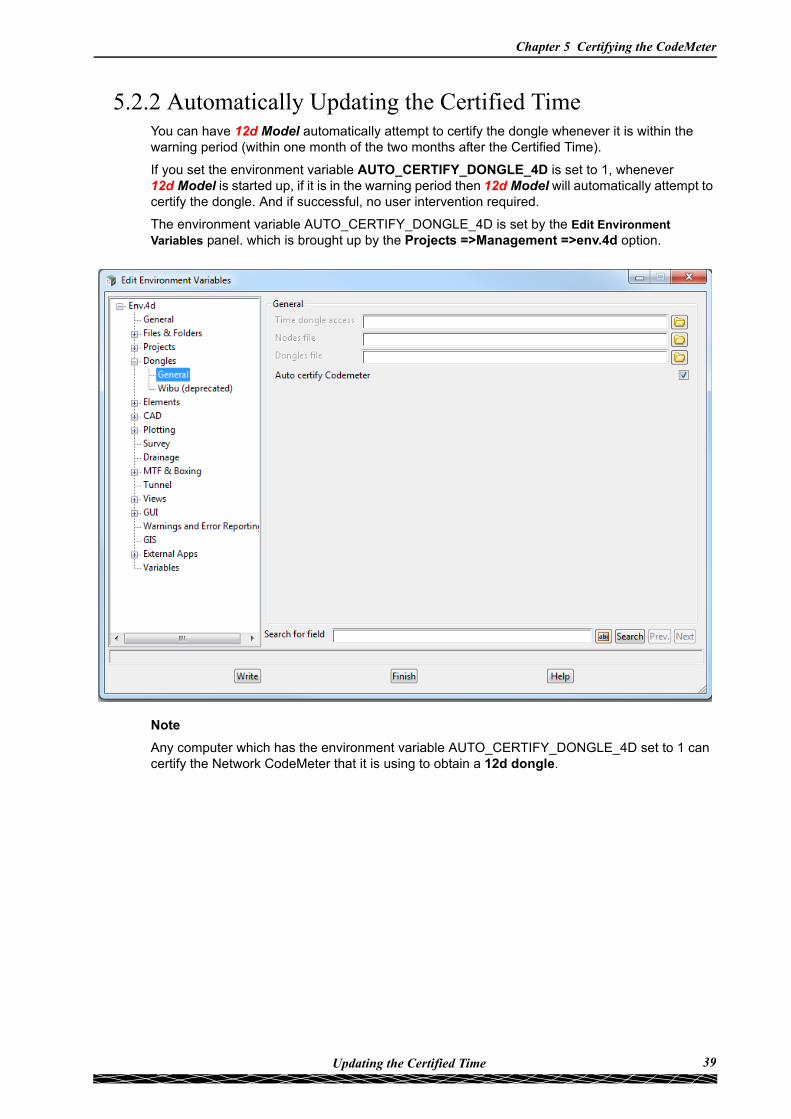
5.2.2 Automatically Updating the Certified TimeYou can have 12d Model automatically attempt to certify the dongle whenever it is within the warning period (within one month of the two months after the Certified Time).
If you set the environment variable AUTO_CERTIFY_DONGLE_4D is set to 1, whenever 12d Model is started up, if it is in the warning period then 12d Model will automatically attempt to certify the dongle. And if successful, no user intervention required.
The environment variable AUTO_CERTIFY_DONGLE_4D is set by the Edit Environment Variables panel. which is brought up by the Projects =>Management =>env.4d option.
Note
Any computer which has the environment variable AUTO_CERTIFY_DONGLE_4D set to 1 can certify the Network CodeMeter that it is using to obtain a 12d dongle.
39Updating the Certified Time
12d Model Installing Wibu Network Dongles
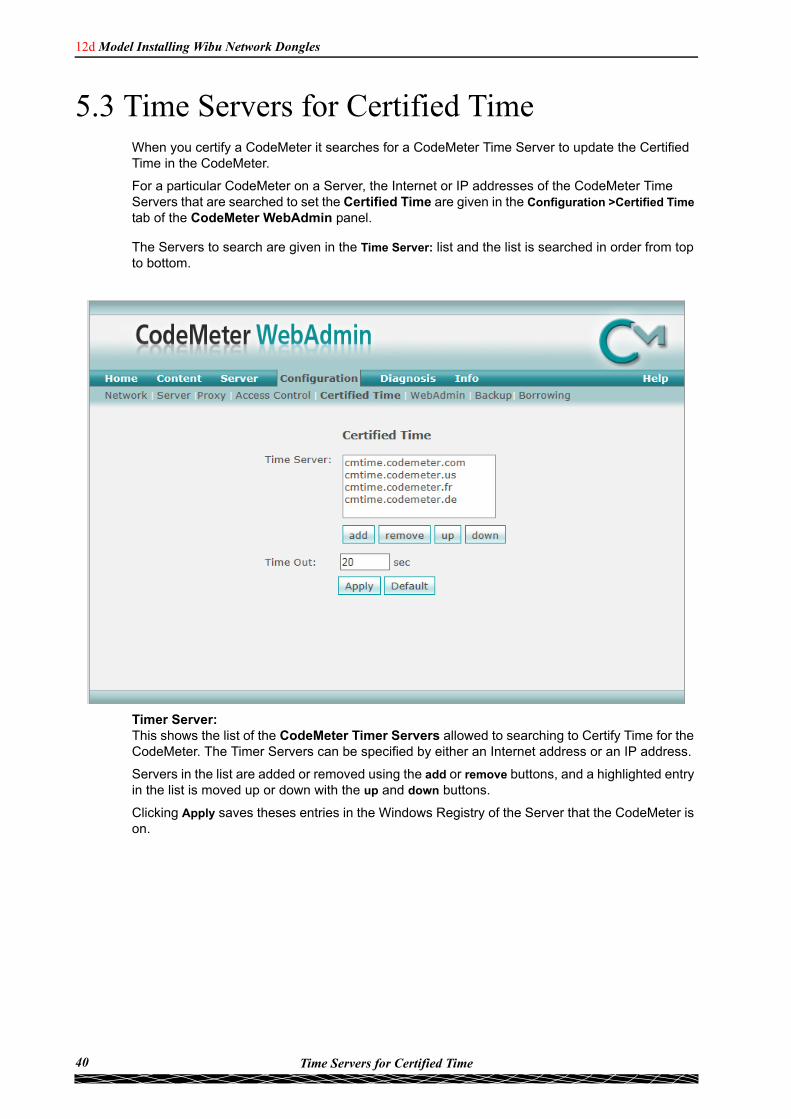
5.3 Time Servers for Certified TimeWhen you certify a CodeMeter it searches for a CodeMeter Time Server to update the Certified Time in the CodeMeter.
For a particular CodeMeter on a Server, the Internet or IP addresses of the CodeMeter Time Servers that are searched to set the Certified Time are given in the Configuration >Certified Time tab of the CodeMeter WebAdmin panel.
The Servers to search are given in the Time Server: list and the list is searched in order from top to bottom.
Timer Server:This shows the list of the CodeMeter Timer Servers allowed to searching to Certify Time for the CodeMeter. The Timer Servers can be specified by either an Internet address or an IP address.
Servers in the list are added or removed using the add or remove buttons, and a highlighted entry in the list is moved up or down with the up and down buttons.
Clicking Apply saves theses entries in the Windows Registry of the Server that the CodeMeter is on.
40 Time Servers for Certified Time

Chapter 6 The CodeMeter Control Centre Software
6 The CodeMeter Control Centre Software
The CodeMeter Control Centre is used on a particular computer to display which Codemeters are on the computer, to stop and start the CodeMeter Runtime Server service on the computer, and to update the contents of any CodeMeters on the computer.
It can also bring up the CodeMeter WebAdmin panel which gives information on CodeMeters on any computer that are visible on the network. It can monitor the number of licenses being used by any of the 12d dongles within any of the CodeMeters visible on the network.
2-2310242
Options under the Process menu can start and stop the CodeMeter Runtime Server service on the computer. See 6.1 Stopping & Starting the CodeMeter Runtime Server on page 42)
The License Update button is for reporting on, and updating the information about 12d Model licenses for any CodeMeter (Network or Standalone) attached to this computer. See 6.2 Updating Licenses in a Network CodeMeter on page 45).
The WebAdmin button brings up the CodeMeter WebAdmin panel which can display information about 12d Model licenses for any CodeMeter (Network or Standalone) that is visible on the computer network. See 6.2 Updating Licenses in a Network CodeMeter on page 45.
To bring up the CodeMeter Control Center, click on the CodeMeter icon that was installed on your task bar.
41Time Servers for Certified Time
12d Model Installing Wibu Network Dongles
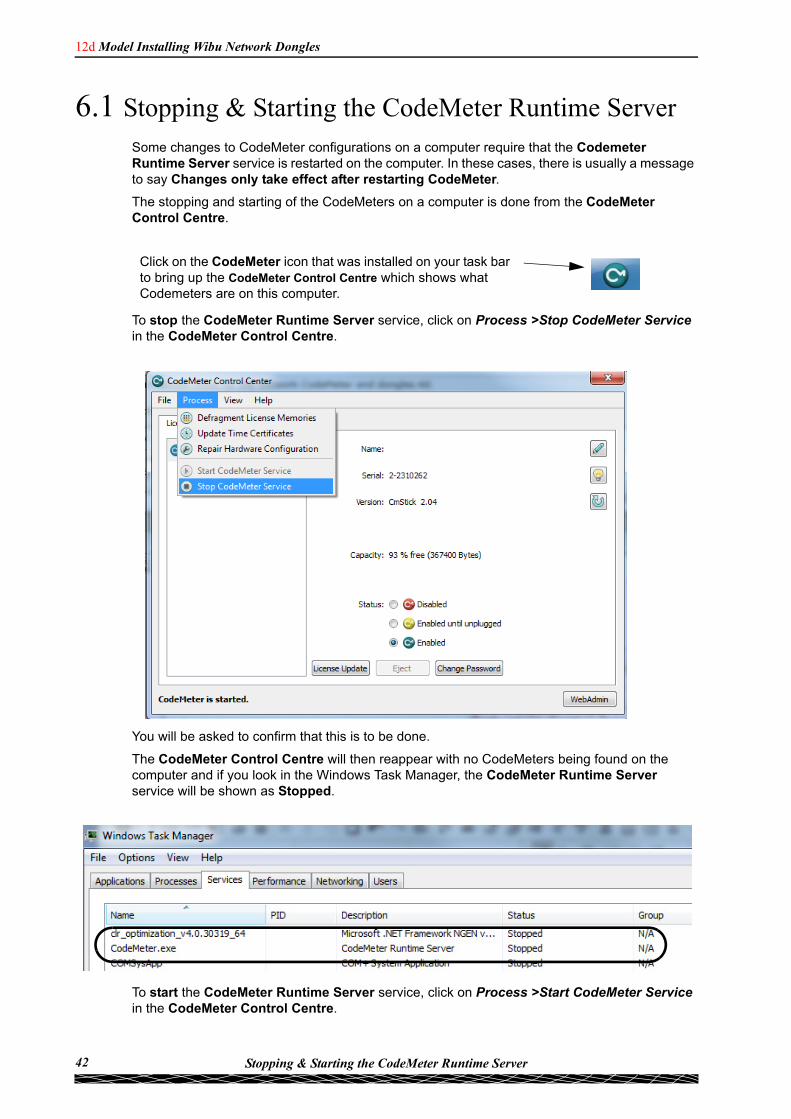
6.1 Stopping & Starting the CodeMeter Runtime ServerSome changes to CodeMeter configurations on a computer require that the Codemeter Runtime Server service is restarted on the computer. In these cases, there is usually a message to say Changes only take effect after restarting CodeMeter.
The stopping and starting of the CodeMeters on a computer is done from the CodeMeter Control Centre.
Click on the CodeMeter icon that was installed on your task bar to bring up the CodeMeter Control Centre which shows what Codemeters are on this computer.
To stop the CodeMeter Runtime Server service, click on Process >Stop CodeMeter Service in the CodeMeter Control Centre.
You will be asked to confirm that this is to be done.
The CodeMeter Control Centre will then reappear with no CodeMeters being found on the computer and if you look in the Windows Task Manager, the CodeMeter Runtime Server service will be shown as Stopped.
To start the CodeMeter Runtime Server service, click on Process >Start CodeMeter Service in the CodeMeter Control Centre.
42 Stopping & Starting the CodeMeter Runtime Server
Chapter 6 The CodeMeter Control Centre Software
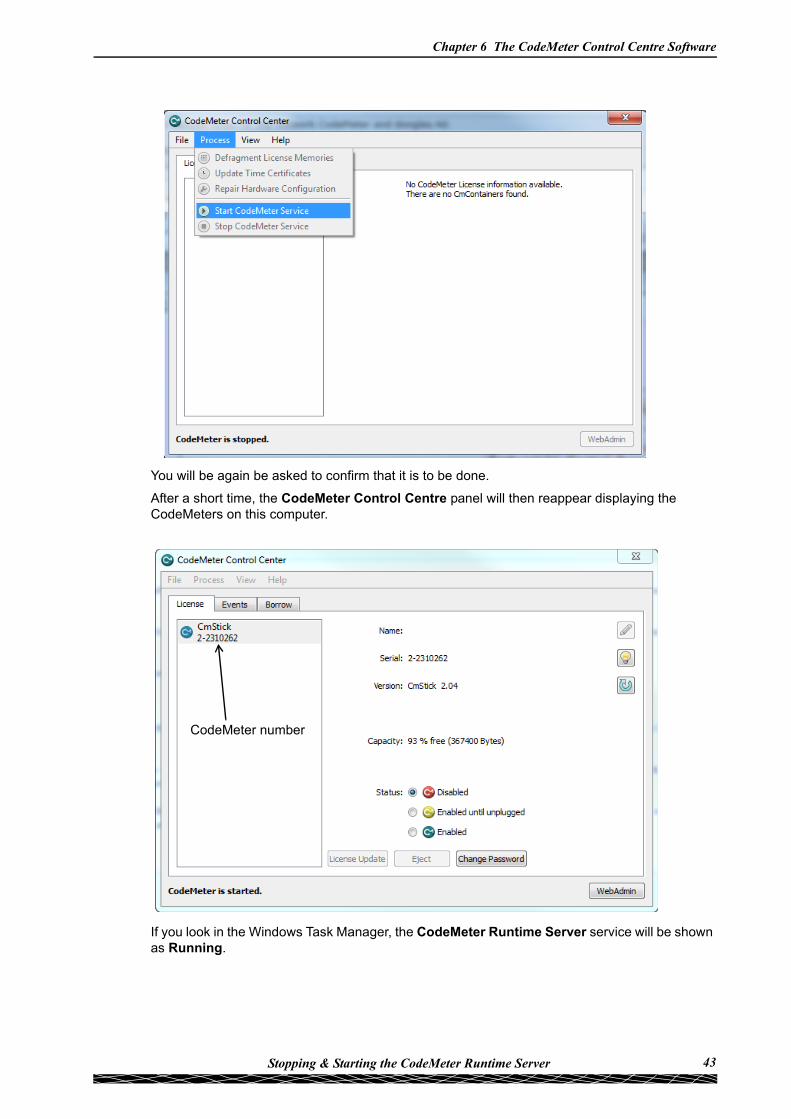
You will be again be asked to confirm that it is to be done.
After a short time, the CodeMeter Control Centre panel will then reappear displaying the CodeMeters on this computer.
CodeMeter number
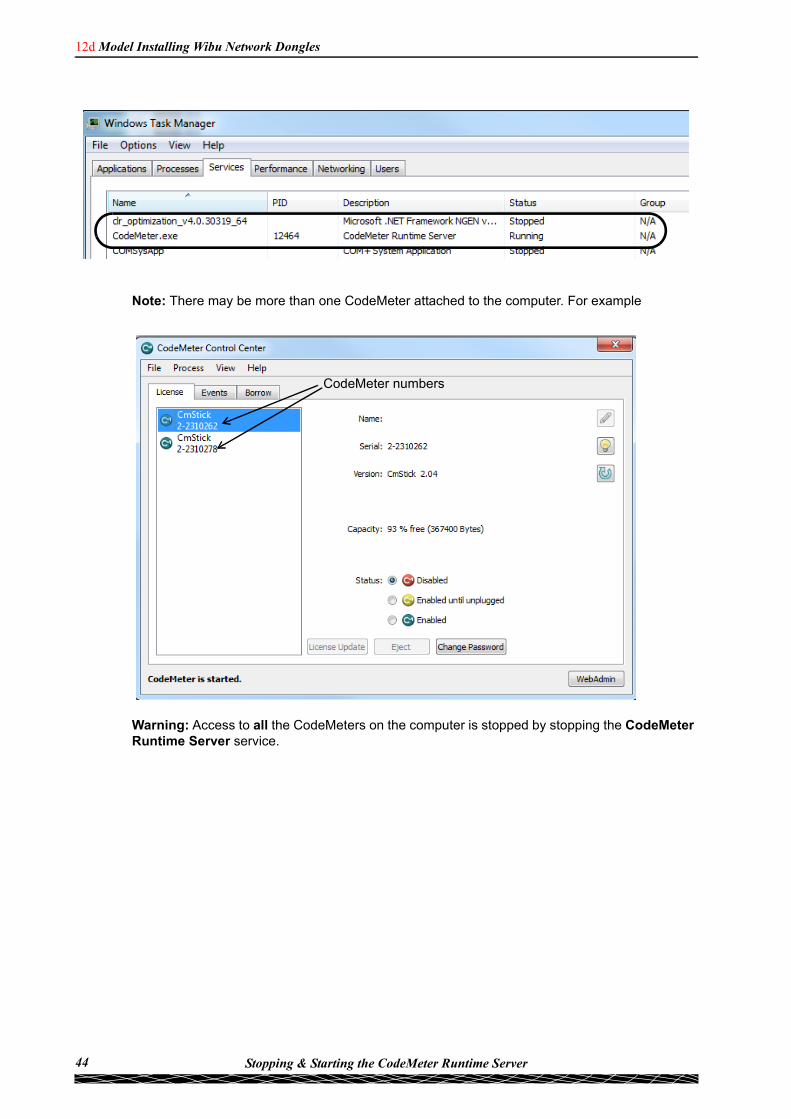
If you look in the Windows Task Manager, the CodeMeter Runtime Server service will be shown as Running.
43Stopping & Starting the CodeMeter Runtime Server
12d Model Installing Wibu Network Dongles
Note: There may be more than one CodeMeter attached to the computer. For example
CodeMeter numbers
Warning: Access to all the CodeMeters on the computer is stopped by stopping the CodeMeter Runtime Server service.
44 Stopping & Starting the CodeMeter Runtime Server
Chapter 6 The CodeMeter Control Centre Software
6.2 Updating Licenses in a Network CodeMeterA Network CodeMeter can contain one or more virtual 12d dongles and each of these virtual dongles can have a different number of 12d Model licenses.
Adding extra 12d dongles, or modifying the number of licenses on each of the 12d dongles can be done electronically without having to remove the Network CodeMeter from the computer.
Updating virtual 12d dongles is usually one simple step but it may involve two steps.
Step 1.Generating the CodeMeter Context File (.WibuCmRaC) - only if asked for
The context (.WibuCmRaC) file holds information about the current settings in the Network CodeMeter. 12d Solutions usually knows these setting for your Network CodeMeter and this step is normally not required.
However sometimes you may be asked to generate the .WibuCmRaC file and email it to your local 12d Model Distributor.
If you need to generate the .WibuCmRaC file, go to 6.3 Generating the Context File (.WibuCmRac) on page 46.
Step 2.Updating the Network CodeMeter with the .WibuCmRaU file
You will be emailed one or more special files (ending in .WibuCmRaU) which are used to update the information about the virtual 12d dongles in the Network CodeMeter.
If you have a WibuCmRaU file, go to 6.3.1 Updating Using the .WibuCmRaU File on page 49.
45Updating Licenses in a Network CodeMeter

12d Model Installing Wibu Network Dongles
6.3 Generating the Context File (.WibuCmRac)
2-2310242
Click on License
The follow steps will generate a new context file for a Network CodeMeter using the CodeMeter Control Center panel.
Click on License Update to bring up the CmFAS Assistant panel.
Select Next.
The CodeMeter Control Center panel is accessed by clicking on the CodeMeter icon that was installed on your task bar.
46 Generating the Context File (.WibuCmRac)
Chapter 6 The CodeMeter Control Centre Software
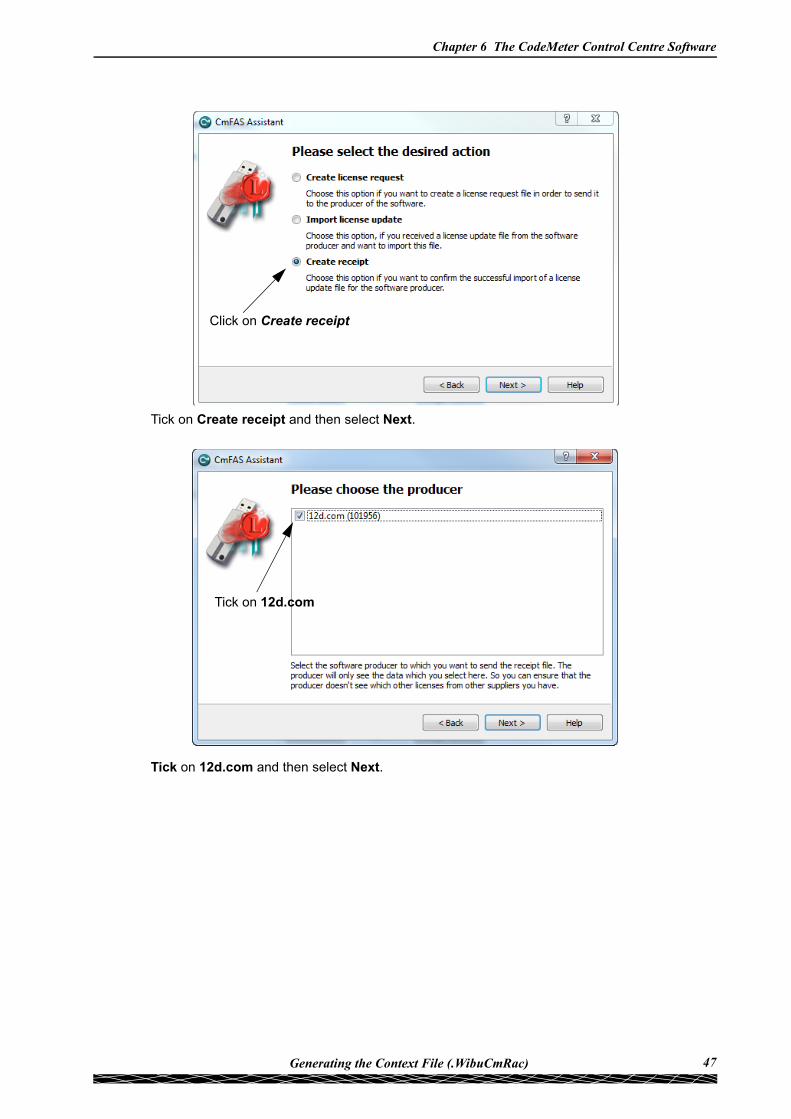
Click on Create receipt
Tick on Create receipt and then select Next.
Tick on 12d.com and then select Next.
Tick on 12d.com
47Generating the Context File (.WibuCmRac)
12d Model Installing Wibu Network Dongles
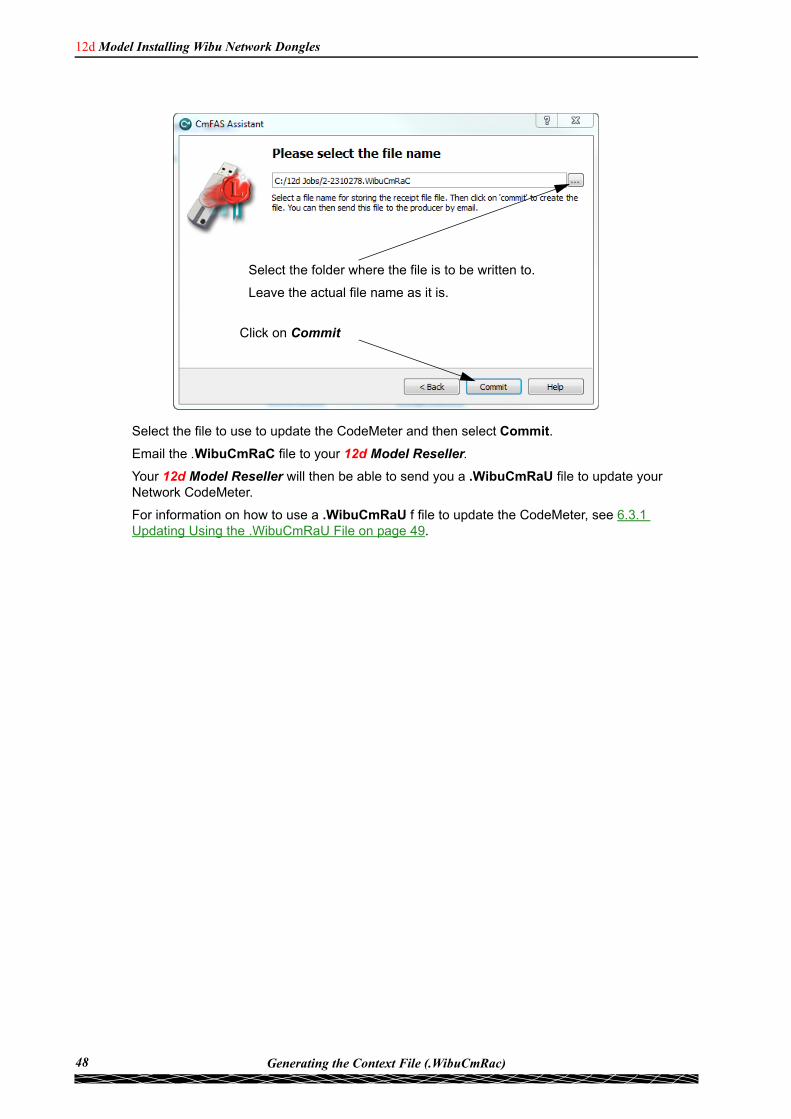
Select the file to use to update the CodeMeter and then select Commit.
Email the .WibuCmRaC file to your 12d Model Reseller.
Your 12d Model Reseller will then be able to send you a .WibuCmRaU file to update your Network CodeMeter.
For information on how to use a .WibuCmRaU f file to update the CodeMeter, see 6.3.1 Updating Using the .WibuCmRaU File on page 49.
Select the folder where the file is to be written to.
Leave the actual file name as it is.
Click on Commit
48 Generating the Context File (.WibuCmRac)
Chapter 6 The CodeMeter Control Centre Software
6.3.1 Updating Using the .WibuCmRaU FileThe number of virtual 12d dongles and the number of 12d Model licenses on them can be changed electronically without having to remove the CodeMeter from the computer.
To update the CodeMeter, you will be sent a file starting with the CodeMeter number, then the date and finally ending in .WibuCmRau.
The steps below will show how to use the .WibuCmRau file to update the Network CodeMeter
You need to have System Administrator rights to update the Network CodeMeter.
Before updating a Network CodeMeter dongle, run the CodeMeter WebAdmin software to check that no one is using the Network CodeMeter (7 Monitoring and Cancelling Licenses on page 53). The CodeMeter WebAdmin displays network dongle activity and it can also remove users from the network dongle.
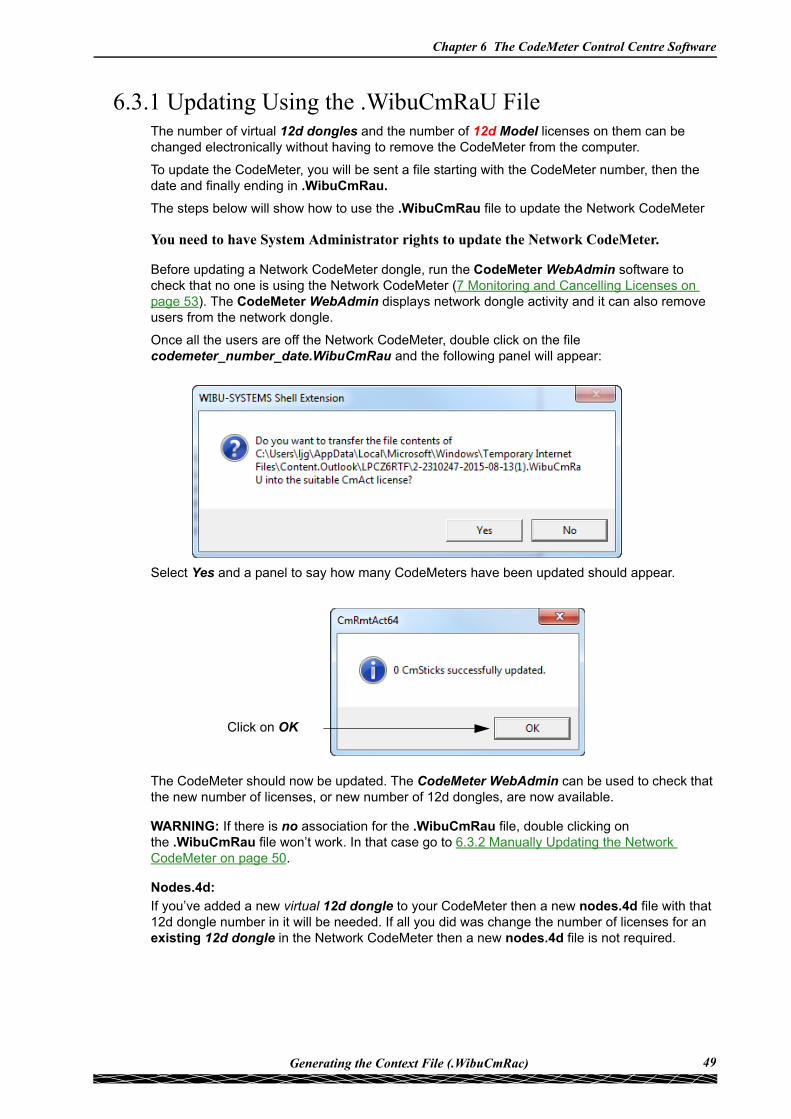
Once all the users are off the Network CodeMeter, double click on the file codemeter_number_date.WibuCmRau and the following panel will appear:
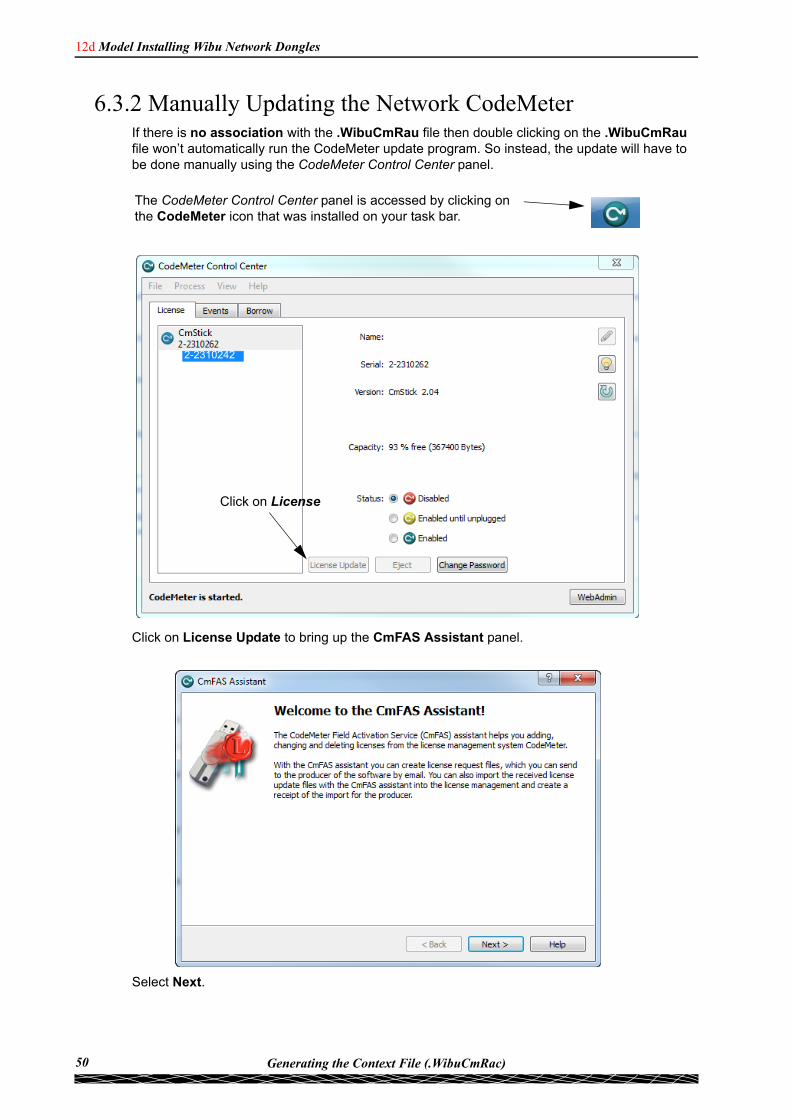
Select Yes and a panel to say how many CodeMeters have been updated should appear.
Click on OK
The CodeMeter should now be updated. The CodeMeter WebAdmin can be used to check that the new number of licenses, or new number of 12d dongles, are now available.
WARNING: If there is no association for the .WibuCmRau file, double clicking on the .WibuCmRau file won’t work. In that case go to 6.3.2 Manually Updating the Network CodeMeter on page 50.
Nodes.4d:
If you’ve added a new virtual 12d dongle to your CodeMeter then a new nodes.4d file with that 12d dongle number in it will be needed. If all you did was change the number of licenses for an existing 12d dongle in the Network CodeMeter then a new nodes.4d file is not required.
49Generating the Context File (.WibuCmRac)
12d Model Installing Wibu Network Dongles
6.3.2 Manually Updating the Network CodeMeter
2-2310242
Click on License
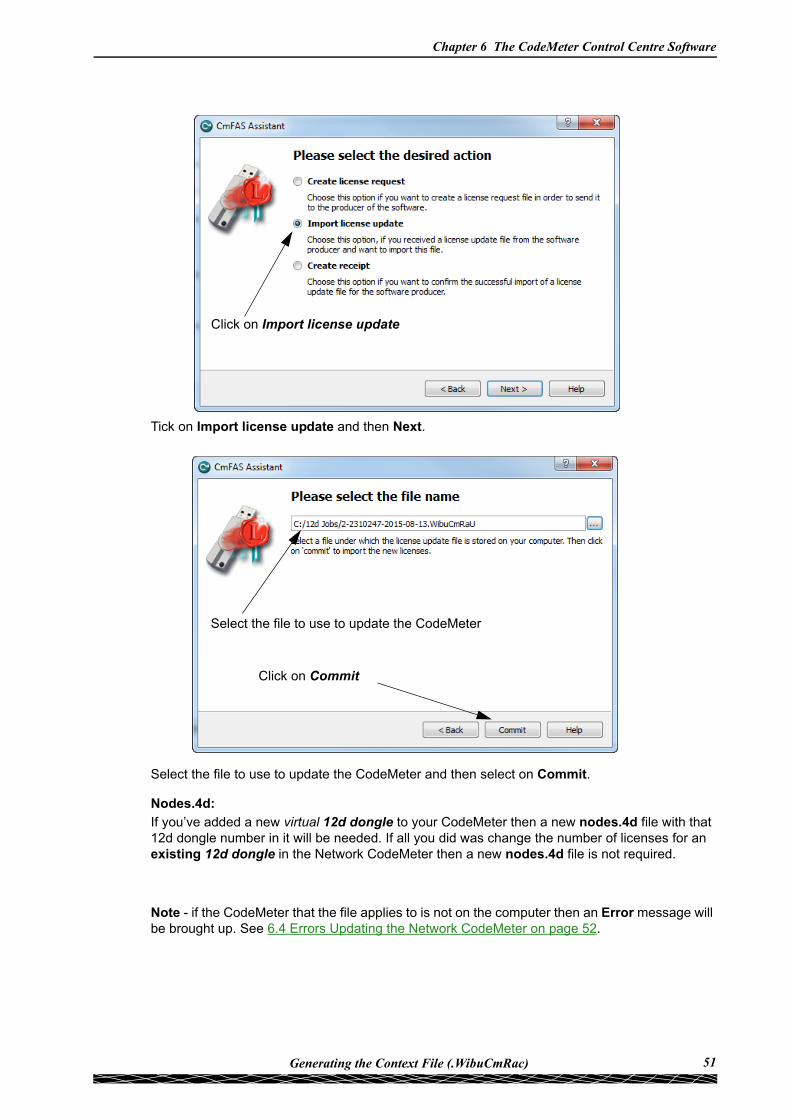
If there is no association with the .WibuCmRau file then double clicking on the .WibuCmRau file won’t automatically run the CodeMeter update program. So instead, the update will have to be done manually using the CodeMeter Control Center panel.
Click on License Update to bring up the CmFAS Assistant panel.
Select Next.
The CodeMeter Control Center panel is accessed by clicking on the CodeMeter icon that was installed on your task bar.
50 Generating the Context File (.WibuCmRac)
Chapter 6 The CodeMeter Control Centre Software
Click on Import license update
Tick on Import license update and then Next.
Select the file to use to update the CodeMeter and then select on Commit.
Nodes.4d:
If you’ve added a new virtual 12d dongle to your CodeMeter then a new nodes.4d file with that 12d dongle number in it will be needed. If all you did was change the number of licenses for an existing 12d dongle in the Network CodeMeter then a new nodes.4d file is not required.
Note - if the CodeMeter that the file applies to is not on the computer then an Error message will be brought up. See 6.4 Errors Updating the Network CodeMeter on page 52.
Select the file to use to update the CodeMeter
Click on Commit
51Generating the Context File (.WibuCmRac)
12d Model Installing Wibu Network Dongles
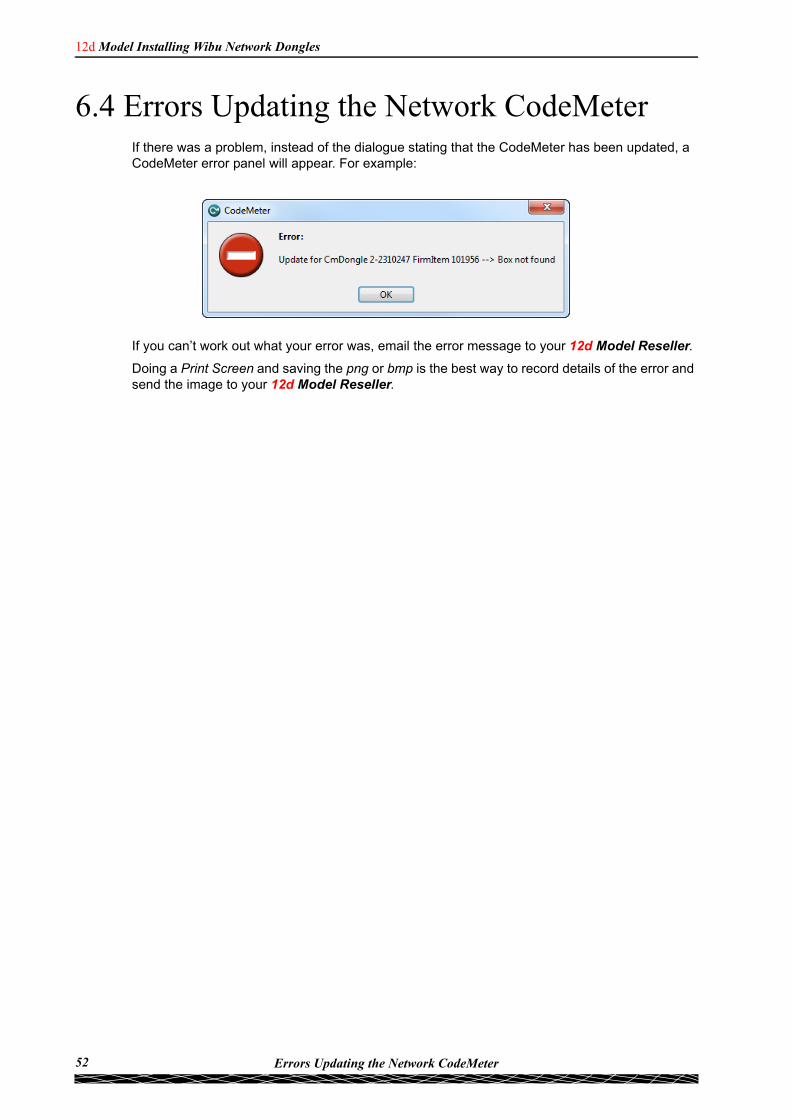
6.4 Errors Updating the Network CodeMeterIf there was a problem, instead of the dialogue stating that the CodeMeter has been updated, a CodeMeter error panel will appear. For example:
If you can’t work out what your error was, email the error message to your 12d Model Reseller.
Doing a Print Screen and saving the png or bmp is the best way to record details of the error and send the image to your 12d Model Reseller.
52 Errors Updating the Network CodeMeter
Chapter 7 Monitoring and Cancelling Licenses
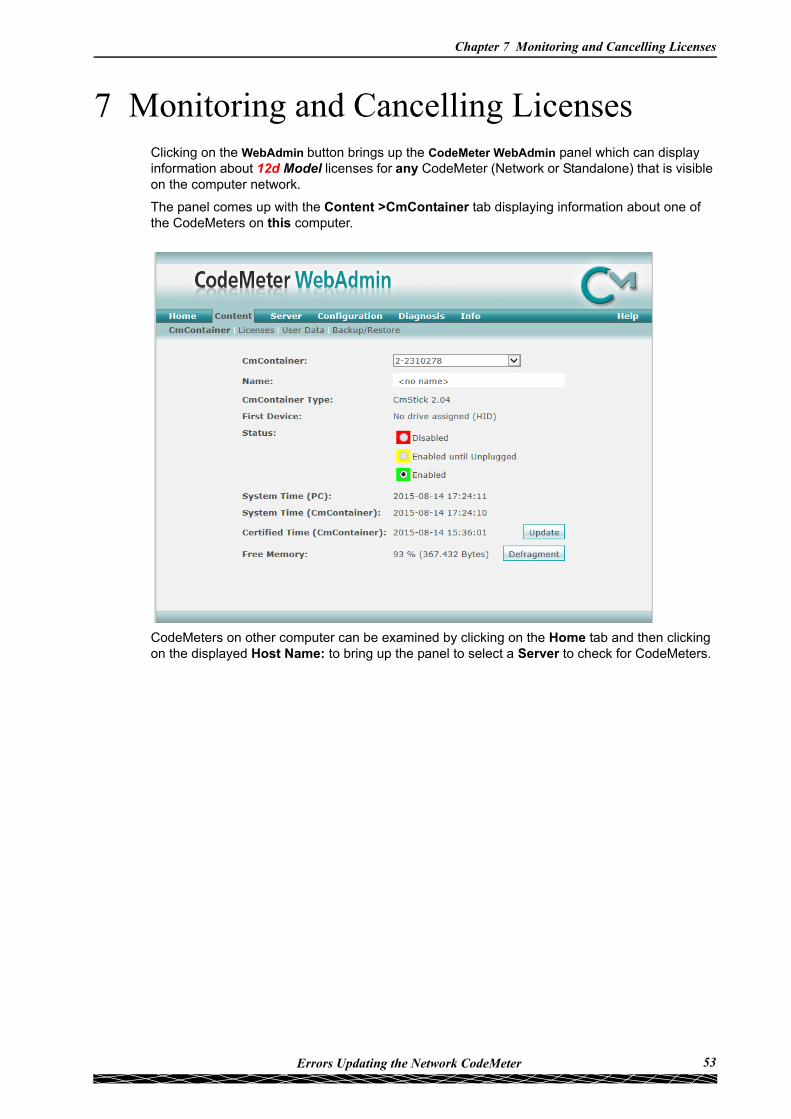
7 Monitoring and Cancelling LicensesClicking on the WebAdmin button brings up the CodeMeter WebAdmin panel which can display information about 12d Model licenses for any CodeMeter (Network or Standalone) that is visible on the computer network.
The panel comes up with the Content >CmContainer tab displaying information about one of the CodeMeters on this computer.
CodeMeters on other computer can be examined by clicking on the Home tab and then clicking on the displayed Host Name: to bring up the panel to select a Server to check for CodeMeters.
53Errors Updating the Network CodeMeter
12d Model Installing Wibu Network Dongles
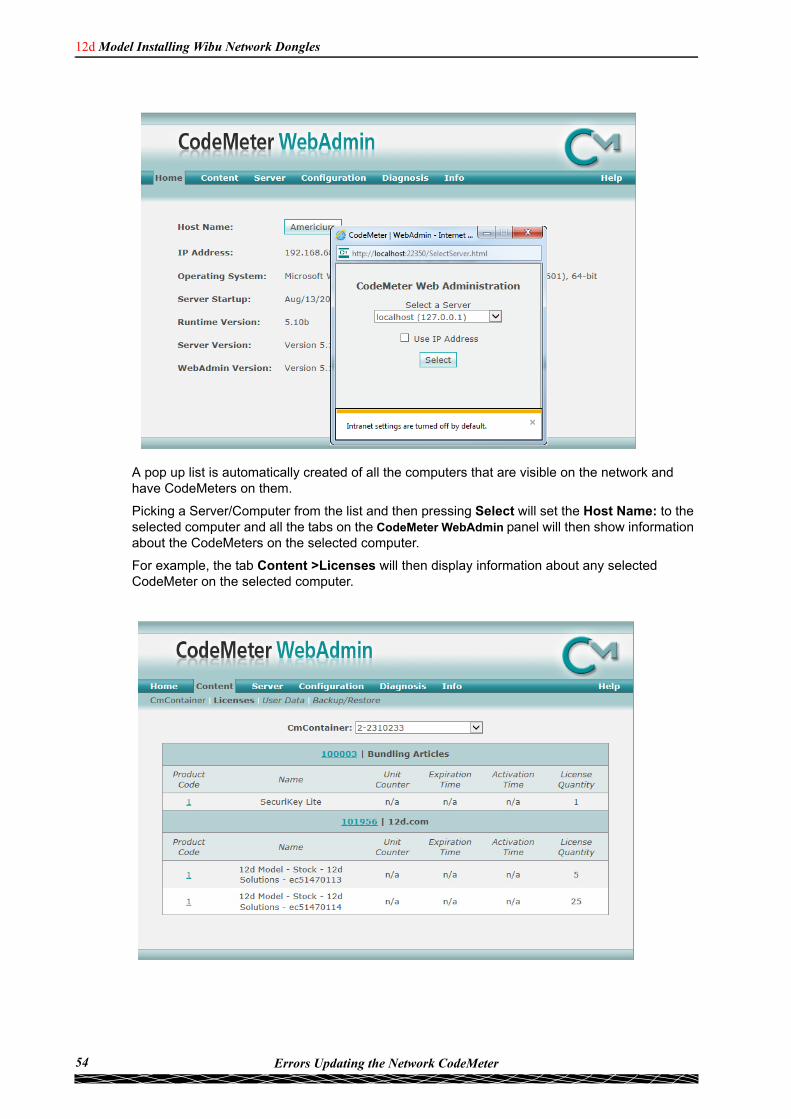
A pop up list is automatically created of all the computers that are visible on the network and have CodeMeters on them.
Picking a Server/Computer from the list and then pressing Select will set the Host Name: to the selected computer and all the tabs on the CodeMeter WebAdmin panel will then show information about the CodeMeters on the selected computer.
For example, the tab Content >Licenses will then display information about any selected CodeMeter on the selected computer.
54 Errors Updating the Network CodeMeter
Chapter 7 Monitoring and Cancelling Licenses
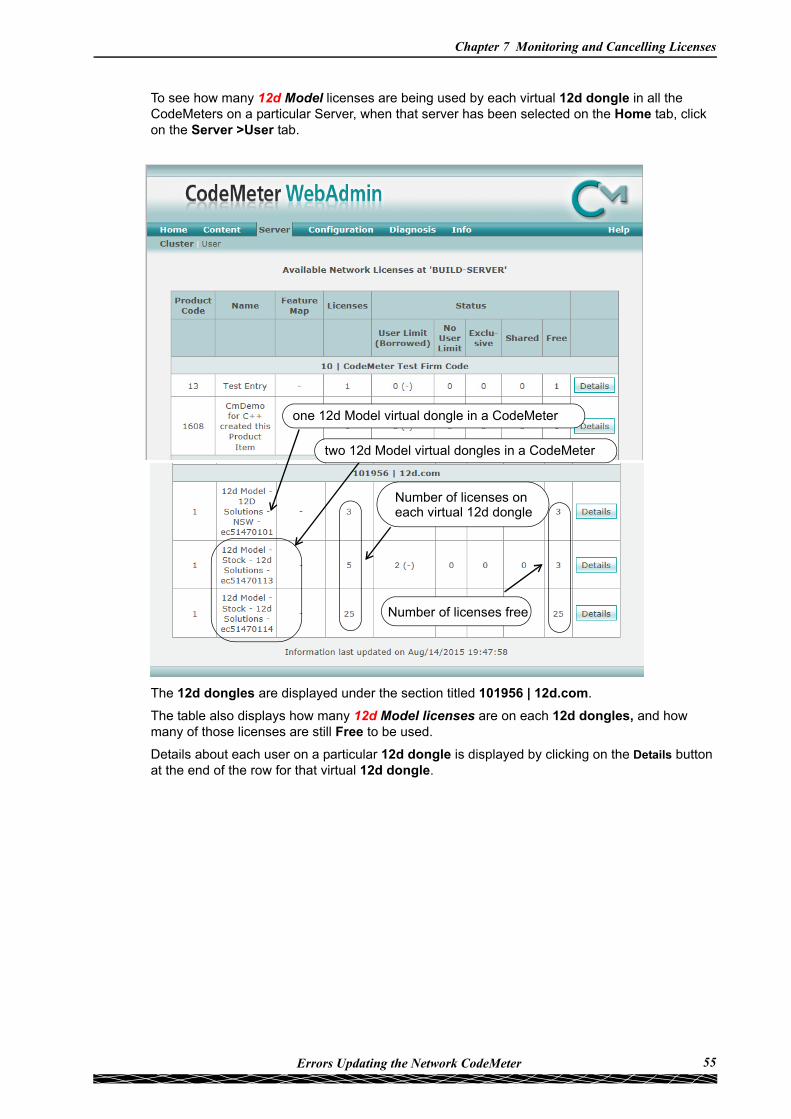
To see how many 12d Model licenses are being used by each virtual 12d dongle in all the CodeMeters on a particular Server, when that server has been selected on the Home tab, click on the Server >User tab.
one 12d Model virtual dongle in a CodeMeter
Number of licenses on each virtual 12d dongle
two 12d Model virtual dongles in a CodeMeter
Number of licenses free
The 12d dongles are displayed under the section titled 101956 | 12d.com.
The table also displays how many 12d Model licenses are on each 12d dongles, and how many of those licenses are still Free to be used.
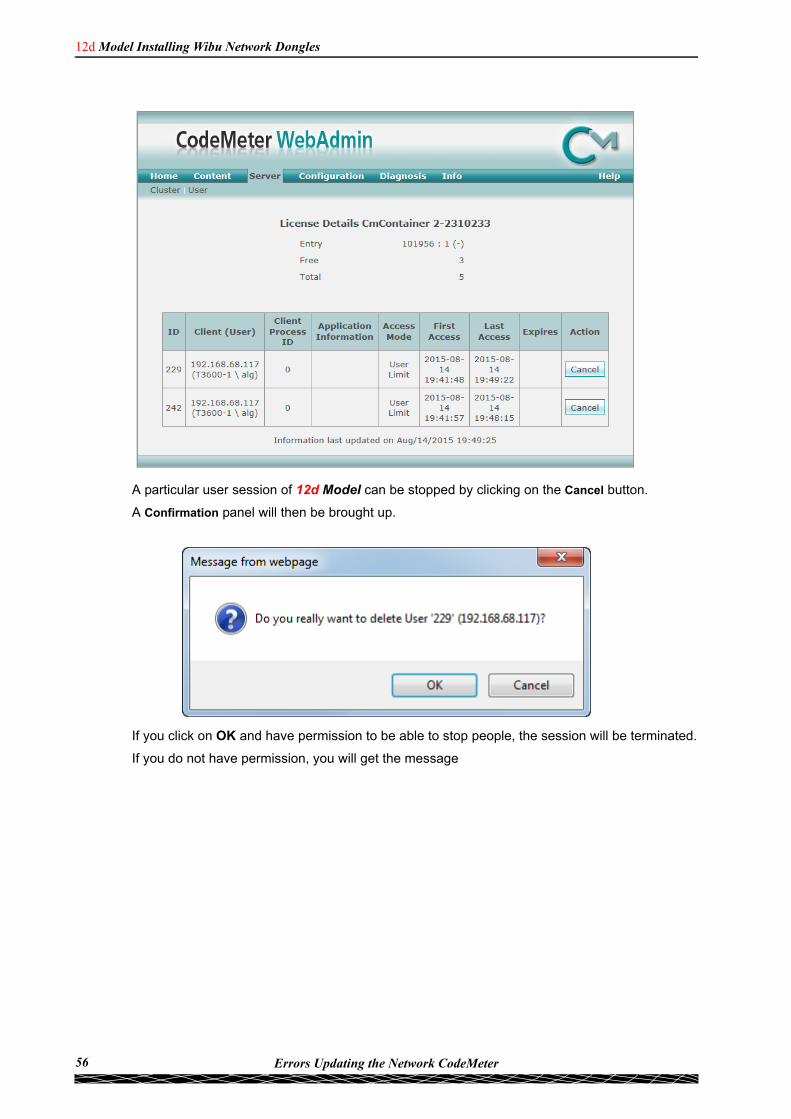
Details about each user on a particular 12d dongle is displayed by clicking on the Details button at the end of the row for that virtual 12d dongle.
55Errors Updating the Network CodeMeter
12d Model Installing Wibu Network Dongles
A particular user session of 12d Model can be stopped by clicking on the Cancel button.
A Confirmation panel will then be brought up.
If you click on OK and have permission to be able to stop people, the session will be terminated.
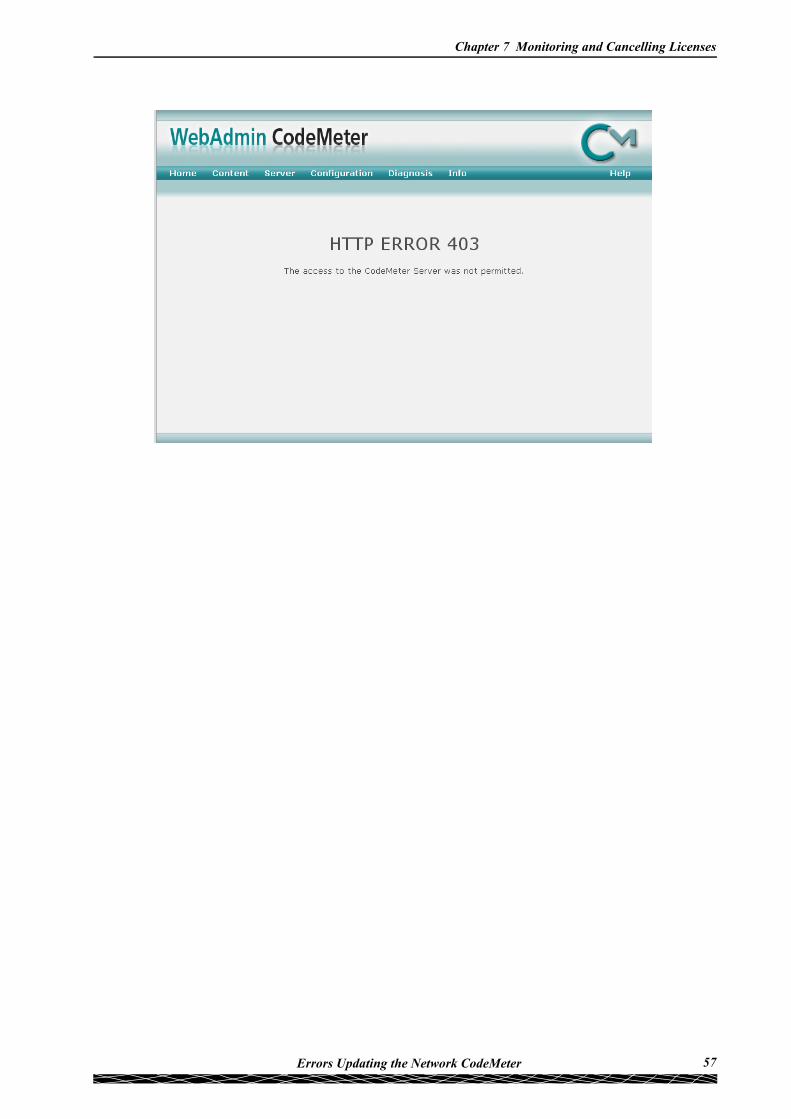
If you do not have permission, you will get the message
56 Errors Updating the Network CodeMeter
Chapter 7 Monitoring and Cancelling Licenses
57Errors Updating the Network CodeMeter
12d Model Installing Wibu Network Dongles
8 Replacing an Existing Network CodeMeter
Before removing a Network CodeMeter, run the CodeMeter WebAdmin software to check that no one is using the Network Codemeter dongle (7 Monitoring and Cancelling Licenses on page 53).
If there are no user on the Network CodeMeter, the existing Network CodeMeter can be removed from the computer and the new Network CodeMeter attached.
The new Network CodeMeter should now be ready to use.
NOTE - a new nodes file will be required for the new virtual 12d dongles that are in the new Network CodeMeter.
58 Errors Updating the Network CodeMeter
Chapter 9 Port Address for Communication
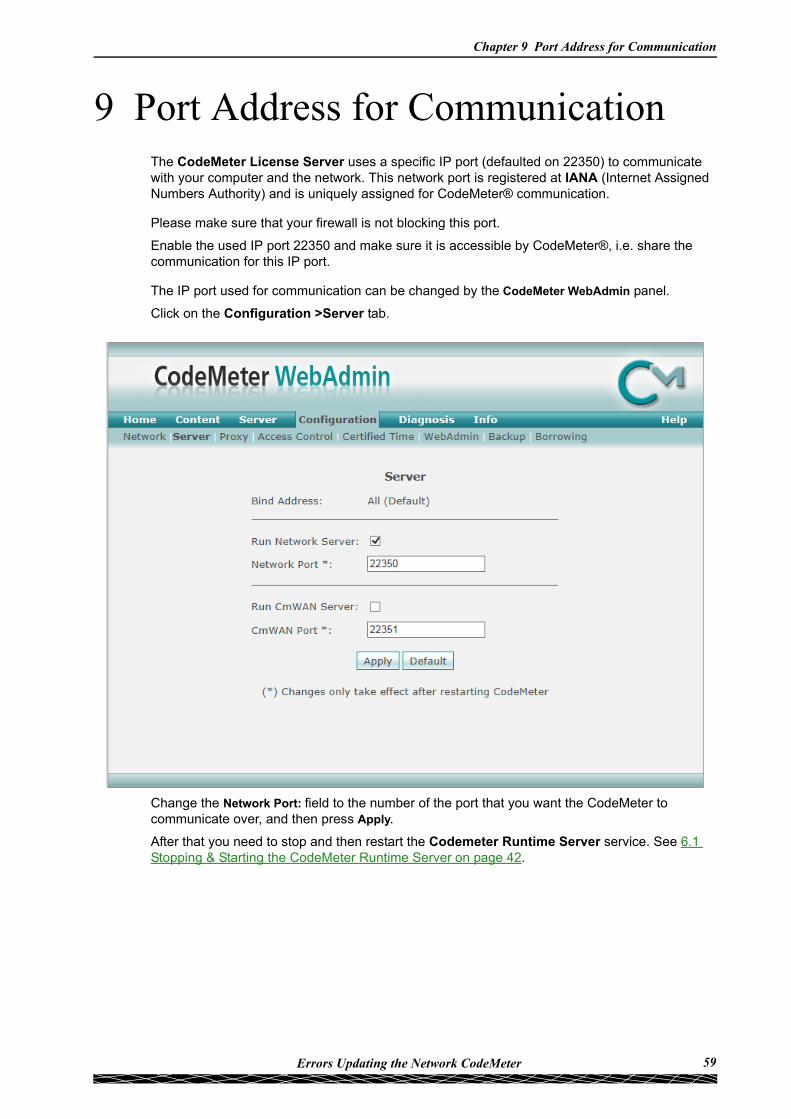
9 Port Address for CommunicationThe CodeMeter License Server uses a specific IP port (defaulted on 22350) to communicate with your computer and the network. This network port is registered at IANA (Internet Assigned Numbers Authority) and is uniquely assigned for CodeMeter® communication.
Please make sure that your firewall is not blocking this port.
Enable the used IP port 22350 and make sure it is accessible by CodeMeter®, i.e. share the communication for this IP port.
The IP port used for communication can be changed by the CodeMeter WebAdmin panel.
Click on the Configuration >Server tab.
Change the Network Port: field to the number of the port that you want the CodeMeter to communicate over, and then press Apply.
After that you need to stop and then restart the Codemeter Runtime Server service. See 6.1 Stopping & Starting the CodeMeter Runtime Server on page 42.
59Errors Updating the Network CodeMeter
12d Model Installing Wibu Network Dongles
60 Errors Updating the Network CodeMeter