Embed Size (px)
Citation preview

Installation & Operating Instructions
Under Cabinet Plumbed-In Beverage System
With Programmable Clock/Timer and Lighted Display Model: AP-UCBS-KIT
Unit Shown with Optional Tall Carafe, Medium Size Carafe is Included)
961 N. Main Street, Mansfield, OH 44903
419.529.3949 • 800.522.3949 • Fax 419-529-8484 USA E-mail: [email protected]
Website: www.alwaysfreshh2o.com
1/1/2008 Instruction Number: WL-9600284

Page 2
Thank you for purchasing the Alwaysfreshh2o Beverage System. Over 75 years of experience in designing and manufacturing commercial brewing equipment goes into every brewer. Matching commercial quality components with consumer friendly features have created the best brewer available for the residential market.
This solid state programmable brewer will brew fresh filtered water when you connect the Alwaysfreshh2o high flow drinking water system included with this model.
This truly is a green product designed to replace traditional instant hot systems on the market today. It does not use energy to continually heat water nor store heated water until needed. Therefore every brewing session is freshly filtered and then freshly brewed to provide you with great tasting coffee or steaming beverages and/or hot water for cooking.
Program it for automatic brewing or manual operation by pushing one of three volume brew buttons. It will freshly brew coffee with the addition of the filter paper and coffee or simply brew water, for tea, soups, and other hot water beverages when no coffee is added.
Save energy and protect the environment while enjoying freshly brewed coffee or freshly brewed hot water at the temperature recommended for coffee, tea, and other hot beverages and cooking needs.
The Alwaysfreshh2o High Flow Drinking Water System AP-DWS-HFC1000 is packaged in a separate carton with the normal installation materials required.
A true commercial unit designed for the home:
• Programmable digital clock/timer with auto on function – set at night and wake up to the invigorating smell of freshly brewed coffee or freshly brewed hot water for tea, hot cereal and/or other hot beverages.
• Three fully adjustable brew volume options including Full Brew, Half Brew and Quarter Brew.
• Ideal for commuters and single cup drinkers,brew directly into a travel mug for on-the-go convenience.
• This unique brewing system assures water is brewed at optimum temperatures to release the coffee or tea’s full flavor, delivering the perfect cup.
• A fast and convenient source of hot water for tea, cereal, soup and hot chocolate.
• Innovative under the cabinet installation frees up counter space.
• Commercial grade internal components assures years of trouble free service.
• Sleek stainless steel finish accents any décor.
• Designed for use in home, office, boat or RV. If there is anything we can do to be of assistance, please do not hesitate to call. We hope that you enjoy using your Under Cabinet Plumbed-In Beverage System.
We strongly recommend that you read and follow the Installation and Operating Instructions to prevent injury to you or damage to your system.
Professional Installation Recommended If you have questions regarding installation, please contact Waterline at 800-522-3949

Page 3
IMPORTANT INFORMATION & SAFEGUARDS Read all instructions and safeguards carefully and completely before installing or operating this equipment. Save all instructions for future reference. To reduce the risk of fire or electric shock, do not remove covers. There are no end user serviceable parts inside. Repairs should be done by authorized service personnel only. If this appliance should fail to operate properly, contact Waterline direct at 800-522-3949.
Only Authorized Replacement Parts Should Be Used. Part substitutions could create a fire hazard and the risk of personal injury. The use of replacement parts or accessory attachments not recommended by the manufacturer may be hazardous.
The carafes are designed for use with this appliance. IT MUST NEVER BE USED ON A RANGE TOP. (Unless specific instructions for use on a range top are provided and included, the precautions are to be observed.) Do not set a hot container on a cold surface. Do not use a cracked container or containers having a loose or weakened handle. Do not clean container with cleansers, steel wool pads, or other abrasive material. Be sure the carafe is empty and properly positioned beneath the brew cone. Spilling hot water can scald. Do not touch hot surfaces. Use handles or knobs whenever possible. Do not let power cord hang over the edge of table, counter or touch hot surfaces. To reduce the risk of fire or electric shock, do not mount unit over or near any portion of a heating or cooking appliance. Do not place any electric or gas heating appliance beneath this unit. Do not immerse in water or other liquids. Do not mount over a sink. Close supervision is necessary when any appliance is used by or near children. Unplug from outlet and allow for cooling before servicing or cleaning. Do not use outdoors. Do not use appliance for other than intended use.
Do Not By-Pass Any Safety Mechanisms Or Operate This Appliance Without Covers In Place. Manufacturer requires that all safety devices and covers be in place and functioning at all times to guard against a fire hazard and/or risk of personal injury.
Waterline Does Not Recommend, And Will Not Furnish Anyone With Information For Changing The Electrical Rating Of Any Appliance Distributed By Waterline. Waterline will not approve of any unauthorized changes to the basic design of this appliance. Any modifications or alterations to the appliance may create a fire hazard, or create a risk of personal injury and may void the safety listings and the warranty.
Special Instructions for Thermal Carafes • Rinse thoroughly before using. • Do not place thermal carafe on a hot surface, open flame, range top stove element or in a microwave oven. • Do not clean thermal carafe with steel wool pads, abrasive cleansers and/or abrasive materials.
All procedures, diagrams and specifications contained in this manual are based on the latest information available at the time of publication. Information, parts and specifications are subject to change without notice. Due to periodic reviews and changes in listing standards, listings and approvals may change at any time. For current listing and approval information contact Waterline.
Plumbing Connections - All plumbing connections to water supply lines and drains should be performed by a licensed plumber complying with all applicable plumbing codes having jurisdiction.
Electrical Connections - With the exception of cords with plugs already attached, all electrical connections or alterations to the power supply should be performed by a licensed electrician complying with all applicable electrical codes having jurisdiction. When calling for information, parts or service, have the following information available:
Model Number: ___________________ Serial Number: __________________________
Voltage: ___________ Amps: _________Phase:_________ Date Of Purchase: _________________
Electrical information may be obtained from the electrical information nameplate located on the appliance
SAVE THESE INSTRUCTIONS

Page 4
APPLIANCE INFORMATION
APPLIANCE SPECIFICATIONS:
Model Numbers: AP-UCBS Descriptions: AP-UCBS-KIT With Programmable Clock/Timer and LIGHTED
Display Dimensions: 13” W x 3-9/16” H x 7-3/16” D
Volts: 120 Watts: 1600 Amps: 13.6 Hertz: 60
Phase: 1 Power Supply Cord: 4 Ft., 3 Wire w/Ground
Plug: NEMA 5-15P. Furnished and attached
Power Supply Required: 120Volts, 15 Amp, dedicated circuit.
Wall Receptacle Required: 15Amp. NEMA 5-15R. Not furnished
Listing: ETL Electrical & NSF Sanitation
SETTINGS AND ADJUSTMENTS:
Brewing Capacity: 16, 32 and 64 ounce standard setting (quarter, half or full setting)
Brewing Temperature Brew Cone: User Adjustable. Default Temp Setting (t2): 192ºF (89ºC) to 196ºF (91ºC)
Thermostat Adjustment: Adjustable via Program Mode
Flow Control: .065 GPM Flow Rate
Hi-Limit Thermostat: Manual reset. Not adjustable.

CONTROL LOCATIONS AND DESCRIPTIONS
Fig. 1
1. “+” Button Press to adjust the clock (hr) and or adjust the time (hr) for “Brew Start Time”.
14. Toggle Switch (On-Off-Fill) Turns ON the power to the coffee appliance and fills the tank prior to use.
2. “-” Button Press to adjust the time (min.) and or adjust the time (min.) for “Brew Start Time”.
15. Circuit Breaker Breaks the power to the machine.
3. Program Button. Press this button to change the time and selection settings.
16. Power Supply Cord Connect this cord to appropriate wall receptacle.
4. Power Light. When lit, indicates unit is in ON.
17. Rear Mounting Bracket Holds the rear of the machine
5. Quarter Brew Selection Light Will light when Quarter Brew selection is pressed or flash when selection is in program mode.
18. Plastic Nut Fitting Insert the plastic water supply tubing here. (See item #26)
6. Quarter Brew Selection Button Press this button to select Quarter Brew selection to brew coffee.
19. Plastic Water Inlet Elbow Fitting The incoming tube polyethylene (water supply) connects here.
7. Half Brew Selection Light. Will light when Half Brew selection is pressed or flash when Half Brew selection is in Program Mode.
20. LIGHT Dot Display (“PM” Indicator) When lit, indicates time is past 12 O’clock in afternoon.
8. Half Brew Selection Button Press this button to select Half Brew selection to brew coffee.
21. LIGHT Dot Display “Brew time SET” Indicator Will light when a “Brew time” is Set.
9. Full Brew Selection Button Press this button to brew a full carafe or decanter
22. Wing Nut Secures the machine to the “L” bracket
10. Full Brew Selection Light Will light when Full Brew selection is pressed or flash when Full Brew selection is in Program Mode.
23. Top Mounting Plate Secure this to the underneath the cabinet.
11. “Service” Light Indicates problem with the machine and service is required.
24. Safety Bracket Prevents the user from dry firing when the screw is in place during installation.
12. Display Window Displays the time in hours, minutes and program information
25. Safety Screw Prevent the toggle switch from being pushed up before filling the tank with water.
13. Brew Cone Guide Rails Slide the brew cone in here.
26. Plastic Tubing (Polyethylene) NOT SHOWN – 1/4” OD Tubing supplied is 25’, cut to appropriate length before connecting to water inlet.
Page 5

INSTALLATION INSTRUCTIONS WARNING: Read these installation instructions completely before connecting this brewer to a power supply or water supply. The water tank must be filled with water for this brewer to function properly. WARNING: Incorrect installation or operating procedures will void the warranty and may damage this brewer. Note: Any changes to the internal plumbing or wiring of the building should be performed by a licensed plumber or a licensed electrician. Check applicable building codes and requirements for procedures and restrictions that may apply during this installation. This appliance is designed to be mounted to the underside of a kitchen wall cabinet near a convenient source of water and power with a minimum of 15” & a maximum of 19.5” height of space between counter and cabinet. (see optional pot sizes under accessories on page 17. Medium pot included requires a minimum of 18” and a maximum of 19.5”. MOUNTING: (See Mounting Diagram below for Details) 1. Check the contents of the package carefully. In addition to the brewer and these instructions, the following items should be
present. If any item is missing, contact Waterline to arrange for a replacement.
Built-In Brewer Appliance – Part No.1033520WL Stainless Steel Carafe – Part No. AP-POT-MED Mounting Brackets and Screws Coffee Filters – Part No. 6000415WL Plastic Polyethylene Tubing - 25 feet Silicone Trivet – Part No. 9920564 Quick Reference Guide – ParNo.9600276WL Instructions & Warranty Information
SET UP: (See Fig. 2) TO INSTALL THE APPLIANCE PROPERLY, FOLLOW DIRECTIONS BELOW AND FIGURE 2. NOTE: TO AVOID POSSIBLE DAMAGE TO THE CABINET, MAKE SURE TO USE THE MOUNTING PLATE AS A TEMPLATE TO DRILL THE TWO (2) 3/32” DIA. PILOT HOLES.
Fig. 2
MOUNTING DIAGRAM a) Determine the desired location of the appliance. b) Remove the brew cone from the appliance and remove the wing nut (See Fig. 2, Illus. #3) from the lower mounting screw
and slide the mounting plate out from the rear of the appliance. c) Loosen, but do not remove, the nut holding the “L” bracket to the rear of the mounting plate while holding the mounting
plate in place flush along the bottom edge of the cabinet facing (See Fig. 2 Illus. #1), drill two (2) 3/32” Dia. pilot holes on the cabinet using the 2 holes provided on the mounting plate flange. This assures that the mounting screws will go in easily and not damage the cabinet.
d) After drilling the two (2) pilot holes, hold the mounting plate in place (Fig. 2, Illus. #2), install two (2) screws through the holes provided at the front edge of the mounting plate and tighten. This will mount the front of the mounting plate.
e) While holding the mounting plate level, hold mounting “L” bracket up against the bottom of the cabinet and mark the location of the rear mounting screw through the slot in the “L” bracket. Drill a 3/32” pilot hole at the marking to assure that the mounting screw will go in easily and not damage the cabinet. Install the mounting screw through “L” bracket, at the location marked.
f) Hold the mounting plate level; tighten the nut to hold the rear of the mounting plate in place. g) Slide the appliance onto the mounting plate making sure the attachment screw on the rear of the appliance fits into the slot
on the “L” bracket. Attach the wing nut to hold the appliance in place. Level the appliance and tighten the wing nut. Note: Make sure the appliance is level. If the appliance is not level, loosen the top mounting nut and level the appliance. Tighten nut.
Page 6

PLUMBING CONNECTION: (See Fig. 3 below for a typical water line connection.)
Note: This brewer is designed to operate with water pressure of 30 to 80 psi. If the water pressure exceeds 80 psi, it is recommended that a water pressure regulator (not included) to be installed and reduce the water pressure to 50 psi.
2. The Alwaysfreshh2o AP-DWS-HFC1000 water filtering system (included) is required to ensure optimal performance of your Built-In Appliance. Failure to install this water filtration system will void warranty. It is also recommended that a shut off valve (included) be installed on the incoming water line to allow the water supply to be turned off for cleaning and servicing.
3. After installing the desired components onto the incoming water line, flush the water line to remove any impurities that may be present in the line, flush the water filter also. (Follow the water filters recommendations for the correct procedures).
4. Installation of the AP-DWS-HFC1000 high flow water filter included with this machine is required.
See AP-DWS-HFC-1000 INSTRUCTIONS
Fig. 3. Fitting and water line connection
Page 7
Fig. 3A. Plastic Tube and Fitting connection. Fig. 3B.
5. Connect the supplied polyethylene tube, from filter (cut to length required). Fig. 3A insert into the plastic water inlet elbow fitting (Fig. 1, item 19) located on the rear of the appliance following the instructions below:
a. Hand tighten the plastic nut onto the plastic water inlet fitting. (Fig. 3A and Fig. 1, Item #19) b. Insert polyethylene tube (Fig. 3A and Fig. 1, Item #26) firmly into the plastic water inlet elbow fitting (Fig. 1, Item #19),
until the tube is no longer able to move further into the fitting. c. Loosen the plastic nut. Check to make sure the polyethylene tube, and washers are attached correctly. Inspect
assembled items on the polyethylene tube (Fig. 3A). End of tube should extend out 3/8 inches from the plastic nut. d. Reconnect the plastic nut with assembled items and tighten firmly. Use the appropriate connector for other end of 1/4"
plastic tube (To be supplied by installer) to incoming water supply. Turn on water supply and inspect for leaks.
Note: To prevent leakage at the water inlet elbow fitting, use the supplied polyethylene tubing (1/4” OD Polyethylene). Additional tubing is available from your local dealer.

ELECTRICAL CONNECTIONS:
Make sure the power switch toggle (Fig.1 Item #14) is in the off (middle) position before connecting the power supply cord to prevent damage to the machine. Refer to Fig. 4.
a. Connect the power supply cord into the proper power supply outlet as indicated on the electrical nameplate.
WARNING: Be certain the power supply outlet is of the correct rating and polarity before connecting the power supply cord. Failure to heed this warning will void the warranty and may cause damage or injury.
FILLING THE WATER TANK: Fig. 4
5. Place the brew cone in the cone rails and push cone all the way in. 6. Place an empty (64 ounce/1.9 Liter capacity) stainless steel carafe under the brew cone. 7. To fill the water tank, press down and hold the power–fill switch located on the rear of the appliance until water flows from the brew cone into the empty stainless steel carafe. Release the power–fill switch when water starts flowing into the vessel. (See Fig. 4) 8. After the water has stopped flowing into the vessel, remove the wing nut securing the safety screw across the power –fill switch and push the power-fill switch to the ON (up) position. (See Fig. 5)
Fig. 59. Empty the vessel and replace under the cone. 10. Press the full brew button setting. 11. See the Trouble Shooting guide for adjustment instructions if required. The brewer appliance is now ready for use. Refer to Operating Instructions for more details if needed. If this coffee appliance should fail to function properly, refer to the Trouble Shooting Guide for further instructions. These Installation Instructions are for installers only. Operators should refer to Operating Instructions only. For a complete check list please refer
to the label (Fig. 6) applied over the operating switches on the front of the machine and remove after the check list is complete
Fig. 6
Page 8

OPERATING INSTRUCTIONS
CAUTION: Read these instructions completely before operating this brewer. CAUTION: Make sure the installation instructions have been followed before attempting to operate this brewer. Incorrect installation or operating procedures will void the warranty and may cause damage to this appliance. Note: Make sure the tank has been filled with water before the power switch is turned ON. The temperature probe may be damaged and warranty will be voided if the power switch is turned ON before tank is filled with water (See “Filling the Water Tank”).
PREPARING TO MAKE COFFEE:
1. Place a paper coffee filter into the brew cone. Add the desired amount of fresh ground coffee into the paper filter.
Note: We recommend that Coffee Filter, Part No. 6000415WL, be used with this coffee brewer. This commercial quality filter has been especially designed for use with this appliance to ensure proper extraction of your coffee grounds and to prevent overflow from brew cone. Your unit ships from the factory with a starter supply of Coffee Filters, Part No. 6000415WL, please call Waterline at 1-800-522-3949 to reorder.
Note: Individual coffee tastes vary greatly. If you are not sure how much ground coffee to use, add one (1) tablespoon of ground coffee for every two (2) cups of coffee to be brewed (6 tablespoons for a full brew of 64 oz). Increase or decrease this amount to suit your own coffee tastes. The use of too much coffee or use of finely grind coffee may cause an overflow of grounds from the brew cone.
Note: To provide better extraction, gently tap the side of the brew cone to level the bed of coffee in the brew cone.
2. Place the brew cone with coffee and filter into the cone rails and gently push the brew cone all the way in until it stops. 3. Place the empty (64 ounces/1.9L capacity) stainless steel carafe under the brew cone. Make sure the carafe is aligned
with the opening of the brew cone. Note: Included with your brewer is a silicone trivet. It is recommended that you place your carafe on this
trivet to help protect your countertop. In addition, the trivet can be used to mark the proper location for placement of the decanter/carafe under the brew cone.
Page 9
Brewing Coffee or Hot Water (no coffee placed in brew cone):
4. Press the volume selection button that corresponds to the amount desired. (Full Pot, Half Pot or Quarter Pot)
Note: These buttons can be reprogrammed for your requirements. See “Programming”, page 10.
5. Fresh hot water will begin to flow from the brew cone into the carafe. The display will indicate the time remaining in the actual brewing cycle. Once the brewing cycle is completed, the unit will begin the drip cycle. The display will read “d1:00” and begin to count down from 60 seconds. The drip cycle allows the brew cone to drain completely into the carafe. The brewer will emit a beep to confirm the end of both the brewing and drip cycles.
WARNING: Hot coffee and water can cause serious burns. Make sure that the coffee or water has stopped coming out of the brew cone before you remove it from the coffee appliance. HANDLE CAREFULLY. 192-195 degree F.
6. After both the brewing and drip cycles are completed, remove the brew cone and discard the used coffee grounds and paper filter. Inspect cone to be sure that the stainless steel spring in bottom has not become dislodged and thrown away with the grounds. Rinse the brew cone with water and place it back into the appliance.
7. To brew another carafe full repeat instruction steps 1 thru 6.
CAUTION: Make sure the carafe is empty before brewing again.

ADJUSTMENTS and PROGRAMMING YOUR Brewer : (See Fig. 7) (ALL MACHINES STARTING FROM SERIAL NO. 3432583 AND HIGHER)
SETTING THE CLOCK: Fig. 7 1. Press and Hold the “PROGRAM” button for approximately 3 seconds to enter Program Mode. The colon (:) on the display will
begin to flash and a beep is emitted by the brewer to confirm that it is has entered Program Mode. 2. To set hours, press and hold the plus (+) button; hours on display will advance from 00 to 12pm. PM time is set when the green
dot is lit next to the “PM” in the upper left corner of the display box. 3. To set minutes press and hold the minus (-) button; minutes will advance from 00 to 59. 4. After setting the clock, press the “PROGRAM” button four (4) times to exit the Program Mode. RESETTING THE VOLUME: (Amount of Coffee or water to be brewed) NOTE: This machine is preset at the factory for the following settings:
FACTORY PRESET SETTINGS: Volume Settings: Full Brew: (64 oz) 7:00 Minutes Half Brew (32 oz): 3:30 Minutes Qtr. Brew (16 oz): 1:45 Minutes NOTE: When making volume adjustments, always insure an empty container with 64 ounces capacity is under the brew cone and the power is ON. The volume of water dispensed, may vary slightly depending on water pressure or other factors. 1. Press and Hold the “PROGRAM” button for approximately 3 seconds to enter Program Mode. The colon (:) on the display will
begin to flash and a beep is emitted by the brewer to confirm that it is has entered Program Mode. 2. Press the “PROGRAM” button two (2) times. The display window will now show “----“. 3. Press the “FULL BREW SELECTION” button. Note the display will start counting minutes and seconds and water will start to
flow into the container. When desired volume has been reached, press the “FULL SELECTION” button to stop the water flow. If more water is needed, press the “FULL SELECTION” BUTTON repeatedly until desired level is reached. After the “SELECTION” button is programmed, press the “PROGRAM” button once to exit the Program mode.
4. To program the “HALF BREW SELECTION”, follow steps 1 & 2 (above) using the “HALF BREW SELECTION” button. After the “SELECTION” button is programmed, press the “PROGRAM” button once to exit the Program mode.
5. To program the “QTR. BREW SELECTION”, follow steps 1 & 2 (above) using the “QTR. BREW SELECTION” button. After the “SELECTION” button is programmed, press the “PROGRAM” button once to exit the Program mode.
Page 10

Page 11
SETTING AUTOMATIC BREW TIME: (Note: The clock must be set in order to have “Brew Start Time” functioning.)
Note: Once set, “Brew Start Time” is stored in the brewer’s internal memory and will be the default “Brew Start Time” unless changed or the unit is reset.
1. Press and Hold the “PROGRAM” button for approximately 3 seconds to enter Program Mode. The colon (:) on the display will begin to flash and a beep is emitted by the brewer to confirm that it is has entered Program Mode.
2. Press the “PROGRAM” button one (1) time. The display window will show “0:00” or the default brew time and the set light will flash in the upper right corner of the display window. (Note: you have 30 seconds to begin entering the brew time.)
3. To set hours, press and hold the (+) button; hours on the display will advance from 00 to 12pm. PM time is set when the green dot is lit next to the “PM” in the upper left corner of the display box.
4. To set minutes, press and hold the minus (-) button; minutes will advance from 00 to 59. 5. To set the volume option, (amount of coffee to be brewed at a selected time), press the button that corresponds to the amount
desired (full pot, half pot, quarter pot options). The light will light when the button is selected. 6. After setting the brew time, press the program button three (3) times to exit from the menu. The display will show the current
time, the set light will be illuminated in the upper right corner of the display window and the light corresponding to the volume selection button will be flashing.
TO CANCEL THE PROGRAMMED BREW TIME 1. Press and Hold the “PROGRAM” button for approximately 3 seconds to enter Program Mode. The colon (:) on the display will
begin to flash and a beep is emitted by the brewer to confirm that it is has entered Program Mode. 2. Press the “PROGRAM” button one (1) time. Display will show the actual programmed brewing time 3. To cancel the Programmed Brew Time, press the flashing “VOLUME SELECTION BUTTON”, the light will turn off. Press the
“PROGRAM” button three (3) times to exit the Program Mode. The display will show the current time and both the set light and “VOLUME SELECTION BUTTON” will no longer be illuminated.
TO RE-PROGRAM A DIFFERENT “VOLUME SELECTION” BREW BUTTON OPTION 1. Press and hold the “PROGRAM” button for approximately 3 seconds until the display changes and the colon (:) flashes. A
beep is emitted by the brewer to confirm that it is in Program Mode. Press the “PROGRAM” button one (1) time. Display will show the actual programmed brewing time.
2. Press a different “VOLUME SELECTION BUTTON” to change the current volume option. The previous assigned “VOLUME SELECTION BUTTON” light will turn off. Press the “PROGRAM” button three (3) times to exit the Program Mode. The display will show the current time and the new “VOLUME SELECTION BUTTON” light will be illuminated.
Note: Brewing while the “Brew Start Time” is set will cancel the current “Brew Start Time”, repeat steps 1 - 6 above, in “SETTING AUTOMATIC BREW TIME: WARNING: Always make sure an empty container such as a glass decanter, stainless steel carafe or thermos is placed directly beneath the coffee appliance brew cone when a “Brew Start Time” is set. If this appliance should fail to function properly, unplug it and contact Waterline at 1-800-522-3949

Page 12
RE-SETTING AUTOMATIC BREW TIME: (FOR THE NEXT DAY) Note: The clock must be set in order to have “Brew Start Time” functioning. 1. Press and Hold the “PROGRAM” button for approximately 3 seconds to enter Program Mode. The colon (:) on the display will
begin to flash and a beep is emitted by the brewer to confirm that it is has entered Program Mode. 2. Press the “PROGRAM” button one (1) time. Display will show the default brew time (previous brew start time). 3. USING DEFAULT (PREVIOUS BREW START TIME): Press the desired “VOLUME SELECTION BUTTON” and press
“PROGRAM” button three (3) times to exit the Program Mode. Your brewer is now set. 4. NEW BREW TIME: Follow the above instructions (“SETTING AUTOMATIC BREW TIME”) steps 1 thru 6.
CHANGING BREW TEMPERATURE SETTINGS Note: The Brewer brews coffee or water at a preset factory temperature setting of Level #2 (t2). The brewing temperature can be adjusted lower or higher depending upon your personal preference. Level #1 (t1) is the lowest temperature setting while Level #5 (t5) is highest. The temperature increment between each setting (t1 to t5) is about 2 to 3 degrees. This coffee maker is designed to maintain an accurate brewing temperature and compensate at a certain degree for outside influential factors. Note: for high altitude areas we recommend a lower temperature setting.
1. Press and Hold the “PROGRAM” button for approximately 3 seconds to enter Program Mode. The colon (:) on the display will begin to flash and a beep is emitted by the brewer to confirm that it is has entered Program Mode.
2. Press the “PROGRAM” button three (3) times. The display window will show the letter “t°” followed by a number. The number (1 to 5) represents the current temperature setting of the unit.
3. To set temperature range, press and hold the plus (+) button or (-) button to scroll between t1 – t5. 4. After selecting the desired range, press the program button once to exit from the menu. WARNING: Hot coffee or Hot water can cause serious burns. Make sure that the coffee or water has stopped coming out of the brew cone before you remove it from the coffee appliance. HANDLE HOT COFFEE/WATER CAREFULLY AND PRACTICE CARE WHEN DRINKING.
RESETTING YOUR BREWER TO FACTORY DEFAULTS Note: Resetting the brewer to factory defaults will clear all settings previously programmed and restore default settings programmed at the factory for brew volume and temperature range. Clock Time, Automatic Brew Time, Volume Selections and Temperature Range Setting will be cleared. TO RESET BREWER BACK TO FACTORY DEFAULTS
1. Turn the power OFF from the main power switch in the back of unit. 2. Press and hold “PROGRAM” button. 3. Keeping “PROGRAM” button depressed, turn the power ON from the main power switch in the back of the unit. 4. Release the PROGRAM button. Clock will flash and now read “00:00”.

MAINTENANCE & CLEANING
Fig. 8
CAUTION: Only those persons trained and qualified in equipment repair should attempt to open and clean the inside of this appliance.
CAUTION: Turn the power switch off, unplug the power supply cord and allow the brewing appliance to cool before cleaning.
Note: Do not use abrasive or harsh cleaners as they may damage the finish of this coffee appliance.
Note: Failure to follow these cleaning instructions may damage this appliance and may void the warranty.
As needed, clean stainless steel surfaces with a mild, non-abrasive stainless steel cleaner. Other surfaces can be cleaned with a soft damp cloth or mild liquid detergent.
Fig. 9
The brew cone should be rinsed with water after each brew cycle. At least once a week the brew cone should be washed by hand with a mild detergent. Rinse well after washing.
As necessary, the area between the brew cone rails and above the brew cone should be wiped clean with a damp cloth as coffee oils will gradually collect on these surfaces. (Fig. 8)
Once a week, more often in hard water areas, the spray head, located above the brew cone, should be removed and cleaned.
Page 13
Page 14
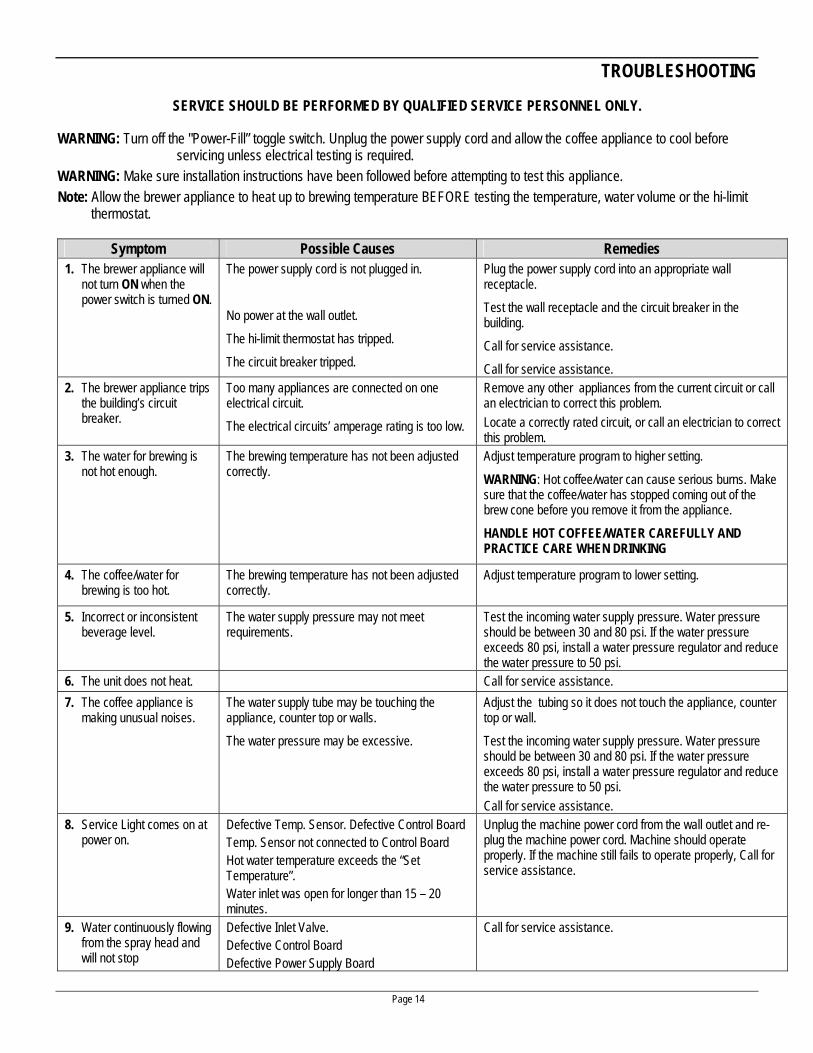
TROUBLESHOOTING
SERVICE SHOULD BE PERFORMED BY QUALIFIED SERVICE PERSONNEL ONLY.
WARNING: Turn off the "Power-Fill” toggle switch. Unplug the power supply cord and allow the coffee appliance to cool before servicing unless electrical testing is required. WARNING: Make sure installation instructions have been followed before attempting to test this appliance. Note: Allow the brewer appliance to heat up to brewing temperature BEFORE testing the temperature, water volume or the hi-limit thermostat.
Symptom Possible Causes Remedies 1. The brewer appliance will
not turn ON when the power switch is turned ON.
The power supply cord is not plugged in.
No power at the wall outlet.
The hi-limit thermostat has tripped.
The circuit breaker tripped.
Plug the power supply cord into an appropriate wall receptacle.
Test the wall receptacle and the circuit breaker in the building.
Call for service assistance.
Call for service assistance. 2. The brewer appliance trips
the building’s circuit breaker.
Too many appliances are connected on one electrical circuit.
The electrical circuits’ amperage rating is too low.
Remove any other appliances from the current circuit or call an electrician to correct this problem. Locate a correctly rated circuit, or call an electrician to correct this problem.
3. The water for brewing is not hot enough.
The brewing temperature has not been adjusted correctly.
Adjust temperature program to higher setting.
WARNING: Hot coffee/water can cause serious burns. Make sure that the coffee/water has stopped coming out of the brew cone before you remove it from the appliance.
HANDLE HOT COFFEE/WATER CAREFULLY AND PRACTICE CARE WHEN DRINKING
4. The coffee/water for brewing is too hot.
The brewing temperature has not been adjusted correctly.
Adjust temperature program to lower setting.
5. Incorrect or inconsistent beverage level.
The water supply pressure may not meet requirements.
Test the incoming water supply pressure. Water pressure should be between 30 and 80 psi. If the water pressure exceeds 80 psi, install a water pressure regulator and reduce the water pressure to 50 psi.
6. The unit does not heat. Call for service assistance. 7. The coffee appliance is
making unusual noises.
The water supply tube may be touching the appliance, counter top or walls.
The water pressure may be excessive.
Adjust the tubing so it does not touch the appliance, counter top or wall.
Test the incoming water supply pressure. Water pressure should be between 30 and 80 psi. If the water pressure exceeds 80 psi, install a water pressure regulator and reduce the water pressure to 50 psi. Call for service assistance.
8. Service Light comes on at power on.
Defective Temp. Sensor. Defective Control Board Temp. Sensor not connected to Control Board Hot water temperature exceeds the “Set Temperature”. Water inlet was open for longer than 15 – 20 minutes.
Unplug the machine power cord from the wall outlet and re-plug the machine power cord. Machine should operate properly. If the machine still fails to operate properly, Call for service assistance.
9. Water continuously flowing from the spray head and will not stop
Defective Inlet Valve. Defective Control Board Defective Power Supply Board
Call for service assistance.

Page 15
Symptom Possible Causes Remedies
10. Poor tasting coffee.
Water deposits are plugging the spray head or siphon tube. The brewing temperature has not been adjusted correctly. The amount of coffee being used may not be correct. More than one paper filter was used when brewing. The brewer appliance should be cleaned regularly.
Clean the spray head. See the Maintenance And Cleaning section. Adjust temperature .
Change the amount of coffee being used.
Use only one paper filter for each brew cycle. See the Maintenance And Cleaning section.
11. There are coffee grounds in the brewed coffee.
Using too much coffee or coffee that has been ground too fine.
Incorrect type of paper filters being used.
Two paper filters may have been used accidentally.
Adjust the amount of ground coffee being used or adjust the grind of the coffee. Too much coffee or coffee that is ground too fine may slow the flow of the water through the coffee.
Make sure that the paper filter being used is correct for this type of coffee appliance. Contact Waterline to order coffee filters.
Use only one paper filter per brew cycle. 12. Coffee/water overflows
from top of brew cone. Using too much coffee or coffee that has been ground too fine. Removal or absence of stainless steel spring at bottom of cone.
Incorrect type of paper filters being used.
Adjust the amount of ground coffee being used or adjust the grind of the coffee. Too much coffee or coffee that is ground too fine may slow the flow of the water through the coffee. A coiled stainless spring is affixed in the cone. Be careful when cleaning or dumping coffee grounds not to discard this device.
Make sure that the paper filter being used is correct for this type of coffee appliance. Contact Waterline to order coffee filters.
If the steps in this trouble shooting guide should fail to solve your problem, unplug the brewing appliance and contact Waterline at 1-800-522-3949 This trouble-shooting guide is for the installers use only. Operator should refer to the operating instruction only.

Page 16
LIMITED WARRANTY
Manufacturer warrants this product to be free of defects in material and workmanship for a period of three (3) years from the original date of purchase. Within this warranty period, it will repair or replace, at its option, any part providing it's defective in material or workmanship. Labor is included for the first year of the warranty period.
The warranty is void under the following circumstances:
The Improper installation or operation of equipment, including without limitation: use of improper voltage or wiring, improper cleaning and the failure to use our water filtration system with the Alwaysfreshh2o Built-In Beverage System.
Abuse, misuse, alteration, accident or neglect, including but not limited to the failure to follow the installation, care and operating instructions.
Service/work performed on the unit by unauthorized persons or return of equipment to Waterline without authorization from Waterline’s Customer Service.
Equipment damaged in transit from customer to Waterline due to improper packaging. Please use original shipping carton.
Equipment damaged in transit from Waterline to customer. Please submit claims to the transportation company immediately.
This warranty applies only to new products and extends only to the original purchaser. This warranty is valid only in the United States of America and its possessions.
All warranty service must have prior authorization from Waterline. Please contact Waterline Customer Service at 1-800-522-3949.
No Waterline representative or other person is authorized to add to or alter the foregoing in any respect.
THE FOREGOING WARRANTY IS IN LIEU OF ALL OTHER WARRANTIES EXPRESSED OR IMPLIED, INCLUDING ANY IMPLIED WARRANTIES FOR MERCHANTABILITY AND FITNESS FOR A PARTICULAR PURPOSE. THIS WARRANTY EXCLUDES CONSEQUENTIAL DAMAGES.
Some states do not allow limitation or exclusion of implied warranties or consequential damages. In such cases the limitations stated above may not apply to you, and your rights will be determined by applicable law.
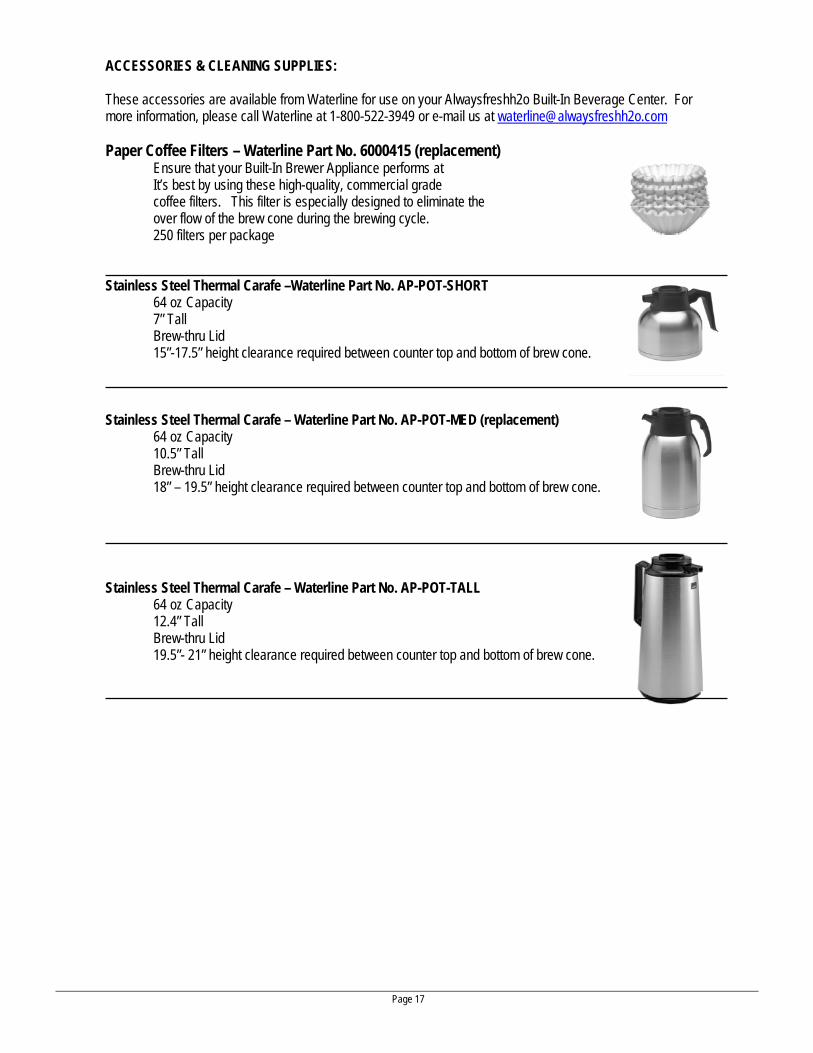
ACCESSORIES & CLEANING SUPPLIES: These accessories are available from Waterline for use on your Alwaysfreshh2o Built-In Beverage Center. For more information, please call Waterline at 1-800-522-3949 or e-mail us at [email protected] Paper Coffee Filters – Waterline Part No. 6000415 (replacement)
Ensure that your Built-In Brewer Appliance performs at It’s best by using these high-quality, commercial grade
coffee filters. This filter is especially designed to eliminate the over flow of the brew cone during the brewing cycle. 250 filters per package
Stainless Steel Thermal Carafe –Waterline Part No. AP-POT-SHORT
64 oz Capacity 7” Tall Brew-thru Lid 15”-17.5” height clearance required between counter top and bottom of brew cone.
Stainless Steel Thermal Carafe – Waterline Part No. AP-POT-MED (replacement) 64 oz Capacity 10.5” Tall Brew-thru Lid 18” – 19.5” height clearance required between counter top and bottom of brew cone.
Stainless Steel Thermal Carafe – Waterline Part No. AP-POT-TALL 64 oz Capacity 12.4” Tall Brew-thru Lid 19.5”- 21” height clearance required between counter top and bottom of brew cone.
Page 17

ACCESSORIES & CLEANING SUPPLIES:
Brew Cone for System – Waterline Part No. AP-CONE (replacement)
Stainless Steel Construction For use with Digital UCBS only (Model AP-UCBS-KIT) Quick Reference Guide for UCBS. – Waterline Part No. AP-GUIDE (replacement) Contains programming and settings information Store next to UCBS for quick reference Laminated, Double Sided Measures 8-1/2” x 5-1/2” Silicone Trivet –Black, 8” Round - Waterline Part No. AP-TRIVET(replacement) Use with Thermal Carafe to protect countertop Use to indicate proper location of carafe under the brew cone. Made from the highest quality medical-grade, FDA approved silicone Skid and slip resistant Dishwasher safe Nonstick
Page 18

Page 19
NOTES:

1-800-522-3949 www.alwaysfreshh2o.com