Embed Size (px)
Citation preview

Thank you for purchasing ROXTERTM Hitch Mounted Mud Flaps. Agri-Cover, Inc. proudly manufactured these mud flaps using superior quality materials and workmanship. With proper care, your mud flaps will provide years of service and enjoyment.
NOTICE TO INSTALLER: Even if familiar with product, read instructions prior to installation as improvements may be made without notice. Always handle components with care. If you have questions or problems, call customer service. When done, these instructions must be given to the consumer.
NOTICE TO CONSUMER: Before using mud flaps, read maintenance and safety sections. Save these instructions for future reference.
INSTALLATION INSTRUCTIONS
Questions? (888) 568-3709agricover.com
FOR YOUR RECORDSDATE PURCHASED:
WHERE PURCHASED:

2
PREPARATIONCOMPONENTS
• (4) Mud flaps with hardware• (2) Rails• (2) Rail plugs• Support rail• Upper clamp with hardware• Lower clamp
TOOLS NEEDED
• 9/16” Wrench• Ft-lb. torque wrench with 9/16” socket• Utility knife• Straight edge• Drill with 13/32” drill bit• Marking pen• Protective gloves• Protective eyewear
NOTE: Some modification may be needed for your truck model. For compact trucks, the large rail may be shortened to appropriate lengths.
! CAUTION: Over torquing hardware may damage components.
1: ASSEMBLE FRAME
A. Measure and mark center point on small support rail.
Mark center of small support rail
B. Insert small support rail into large rail to center mark.
C. Repeat for remaining large rail on opposite side.
Marked center of small support rail
Large rails

2 3
1: ASSEMBLE FRAME (Continued)D. Insert (2) 3/8” x 1” hex bolts with lock washers through upper clamp half into weld nuts. Leave loose for now.
E. Slide weld nuts into nut channel on rail and center, then torque bolts to 32 ft-lbs.
Nut channel
3/8” x 1” Hex bolt
Lock washer
Weld nut
Upper clamp half
2: ASSEMBLING CLAMPA. Insert (2) 3/8” x 6” carriage bolts through upper and lower clamp halves and finger tighten nylock nuts.NOTE: Frame not shown for illustration purposes.
3/8” x 6” Carriage bolt
Nylock nut
Upper clamp half
Lower clamp half
4
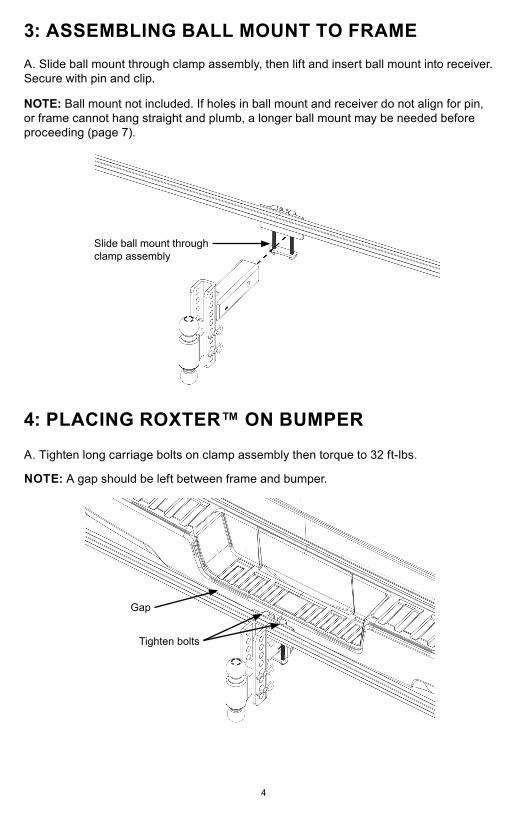
3: ASSEMBLING BALL MOUNT TO FRAMEA. Slide ball mount through clamp assembly, then lift and insert ball mount into receiver. Secure with pin and clip.
NOTE: Ball mount not included. If holes in ball mount and receiver do not align for pin, or frame cannot hang straight and plumb, a longer ball mount may be needed before proceeding (page 7).
Slide ball mount through clamp assembly
4: PLACING ROXTER™ ON BUMPERA. Tighten long carriage bolts on clamp assembly then torque to 32 ft-lbs.
NOTE: A gap should be left between frame and bumper.
Tighten bolts
Gap

4 5
5: ATTACHING FLAPS TO FRAME! WARNING: Ensure exhaust fumes are NOT directed or redirected toward any
plastic or flaps, including on the vehicle.
Precautionary Measures: • Adjust exhaust tips per manufacturer’s specifications • Add an exhaust diverter• Optional heat shield available to protect flap from hot exhaust (page 7)• For rear exhaust, cut hole in flap 1” larger than exhaust tip, keep holes away from
edges to prevent loss of strength
A. Position flaps to provide proper tire coverage.
NOTE: Always check ground clearance of flaps. Suggested clearance without a load is 5”-7” and with a load is 3” minimum to prevent dragging. Install on vehicles with suspension modifications or oversized tires may exceed suggested clearance. Mud flaps still function, though performance may be affected.
Tip: If trimming is necessary, lay flaps on flat surface. Use straight edge and utility knife to repeatedly score through flap.
B. Drill mounting holes 3” or more from edge at selected height.
C. Insert (4) 3/8” x 1-1/4” hex bolts, lock washers and fender washers into flap, secure with weld nuts. Keep loose for now.
D. Repeat on opposite side.
Tip: If installing trim plates, refer to trim plate instructions.
Mounting hole
3/8” x 1-1/4” Hex bolt
Lock washer
Fender washer
Flap
3”
Weld nut
6
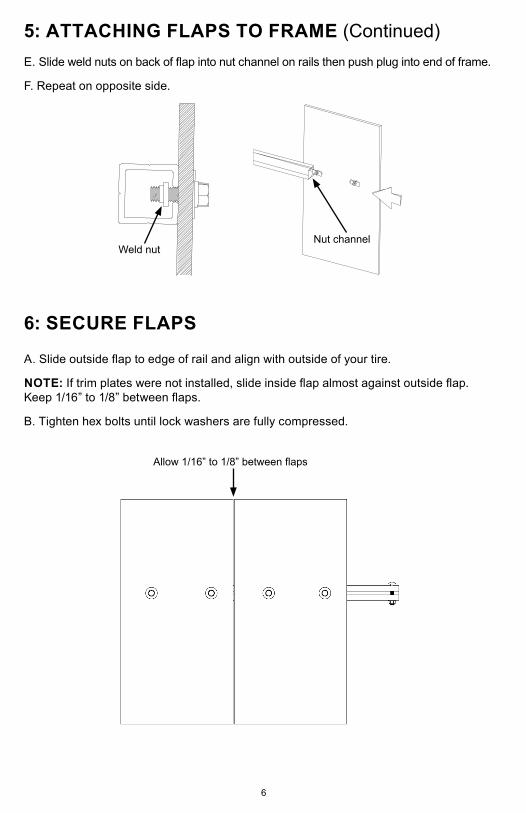
5: ATTACHING FLAPS TO FRAME (Continued)E. Slide weld nuts on back of flap into nut channel on rails then push plug into end of frame.
F. Repeat on opposite side.
Nut channelWeld nut
6: SECURE FLAPS
A. Slide outside flap to edge of rail and align with outside of your tire.
NOTE: If trim plates were not installed, slide inside flap almost against outside flap. Keep 1/16” to 1/8” between flaps.
B. Tighten hex bolts until lock washers are fully compressed.
Allow 1/16” to 1/8” between flaps

6 7
SAFETY AND MAINTENANCEThe operator can perform most of inspection and maintenance. It may be necessary to review the installation instructions.
• Always route safety chains under mud flap frame.• Always remove mud flaps before entering automatic car wash systems.• DO NOT use mud flap frame as a step.• DO NOT hook up anything to mud flap frame.• Periodically check all bolts and nuts, retighten if needed.
NOTE: Inspection and/or maintenance should be performed anytime a malfunction is observed or suspected. If you need assistance inspecting and/or servicing your mud flaps, call customer service at 888-568-3709. Always use original equipment replacement parts for your mud flaps.
ACCESSORIES2-1/2” RECEIVER CLAMP
Corrosion resistant clamp and mounting hardware designed to attach ROXTER™ Mud Flaps to 2-1/2” ball mount.
PN 4001592
HEAT SHIELD
Protects the flap from hot exhaust. Stainless steel plate and hardware included.
PN 80807
EXTENDED SHAFT 2” BALL MOUNTS
Black powder coated finish with up to 7,500 lbs. capacity. Extended shaft made to work with hitch mounted mud flaps.
Two Options:2” Drop PN 808124” Drop PN 80826

050521 2000037_G
MANUFACTURER’S LIMITED WARRANTY
Hours: 8:00 am - 5:00 pm CST Monday through Friday, except Holidays
Agri-Cover, Inc.Customer Service Dept
3000 Hwy 281 SEJamestown, ND 58401Phone: 888-568-3709
© 2021 AGRI-COVER, INC. ALL RIGHTS RESERVED.Product subject to change without notice. Patents: agricover.com/patents.
Agri-Cover, Inc. extends the following (1) year Limited Warranty for the ROXTERTM Hitch Mounted Mud Flaps:
Agri-Cover, Inc. warrants a period of one (1) year from the date of manufacture that its ROXTERTM Hitch Mounted Mud Flaps are free from defects in workmanship, under normal use for the truck model it was intended for. This Limited Warranty does not cover any damage due to accident, abuse, misuse, alteration, neglect, improper installation, or ordinary wear and tear.
Agri-Cover, Inc.’s sole obligation under this Limited Warranty is limited to the repair or replacement at its option, of defective parts only. No labor or service allowance is given or implied. IN NO EVENT SHALL AGRI-COVER, INC. BE LIABLE FOR INCIDENTAL, CONSEQUENTIAL, OR SPECIAL DAMAGES. AGRI-COVER, INC. EXPRESSLY DISCLAIMS ANY AND ALL IMPLIED WARRANTIES OF MERCHANTABILITY, AND THERE ARE NO WARRANTIES WHICH EXTEND BEYOND THE LIMITED WARRANTY DESCRIPTION CONTAINED HEREIN.
For warranty, have serial number ready and fill out the warranty claim form at agricover.com/warrantyclaim or call Customer Service Department at 888-568-3709 to determine if only a replacement part is needed or if the mud flaps needs to be returned for inspection and repair. Goods to be returned must have a pre-authorized RA # (Return Authorization Number) - obtained by calling the number above. Mark the number on the package and ship it freight prepaid to address below. Agri-Cover, Inc. will pay freight to return goods to sender.
This Limited Warranty gives you specific legal rights and you may have other rights, which vary, from state to state.
For replacement parts shop at mudflapparts.com or call Customer Service at 888-568-3709.