Embed Size (px)
Citation preview

P/N i01750-EN
Installation &
Instruction
Manual
June 2018 P/N i01750-EN

2
This page is blank Image on front page shows a Token Paymax with its pedestal, fully equipped with a credit card reader, a bill acceptor, a coin changer, 6-selection, 1 OK, 1 language, and 1 cancel but-tons, the LED cap kit, and finally one receipt printer. The machine is in a stand-by state, ready to make a transaction.

3
Content Content ................................................................................................................................. 3 Introduction .......................................................................................................................... 5 Outdoor/Indoor operating range ......................................................................................... 6 Operating voltage ................................................................................................................. 6 Installation ............................................................................................................................ 7 Examples of fixation on a wall ............................................................................................ 12 Electrical connection .......................................................................................................... 14 Identifying your machine and its components ................................................................... 16 More details on each components ..................................................................................... 22 The coin changer .............................................................................................................. 22 The coin acceptor alone .................................................................................................. 24 The bill acceptor .............................................................................................................. 24 The credit-debit card reader ............................................................................................ 25 The token dispensers ....................................................................................................... 26 The MAX Controller ......................................................................................................... 28 The heating device ........................................................................................................... 29 The coin box ..................................................................................................................... 29 The receipt printer ........................................................................................................... 30 Wiring diagrams ................................................................................................................. 31 Navigating through the menus of the machine .................................................................. 32 Operator section ................................................................................................................ 32 Audit ........................................................................................................................ 32 + 47 Inventory setting .............................................................................................................. 32 Last bill accepted ..................................................................................................... 33 + 48 Currency setting ............................................................................................................... 33 Currency setting in exact change ..................................................................................... 34 Vend price setting ............................................................................................................ 34 Dispense setting ............................................................................................................... 34 The event report .............................................................................................................. 35 Technician menus –System settings ................................................................................... 36 Language .......................................................................................................................... 36 Dispenser type ................................................................................................................. 36 Clock setting..................................................................................................................... 37 Hour format ..................................................................................................................... 38 Day of the week ............................................................................................................... 38 CLK—Summer time .......................................................................................................... 38 Cashless type ................................................................................................................... 38 Receipt time-out .............................................................................................................. 39 Machine ID ....................................................................................................................... 39 Card dispenser time out .................................................................................................. 39 SEM Built-In Editing Tool ................................................................................................. 40 Receipt printed on low paper .......................................................................................... 41 Refund coupon allowed ................................................................................................... 41 Coupon lines refund......................................................................................................... 41 Message *Out-of-Order* ................................................................................................. 42 Receipt lines ..................................................................................................................... 43 Print parameters .............................................................................................................. 43

4
Technician menus –Test Mode ........................................................................................... 44 Port tests .......................................................................................................................... 44 Button(s) & light(s) test .................................................................................................... 44 Acceptor test .................................................................................................................... 45 Dump hopper (port) function ............................................................................................. 46 Audit Annex ........................................................................................................................ 47 Last bill accepted Annex ..................................................................................................... 48 Quick Troubleshooting ........................................................................................................ 49 Replacing a MAX controller ................................................................................................ 51 Parts listing ......................................................................................................................... 52 Personal notes .................................................................................................................... 53
5
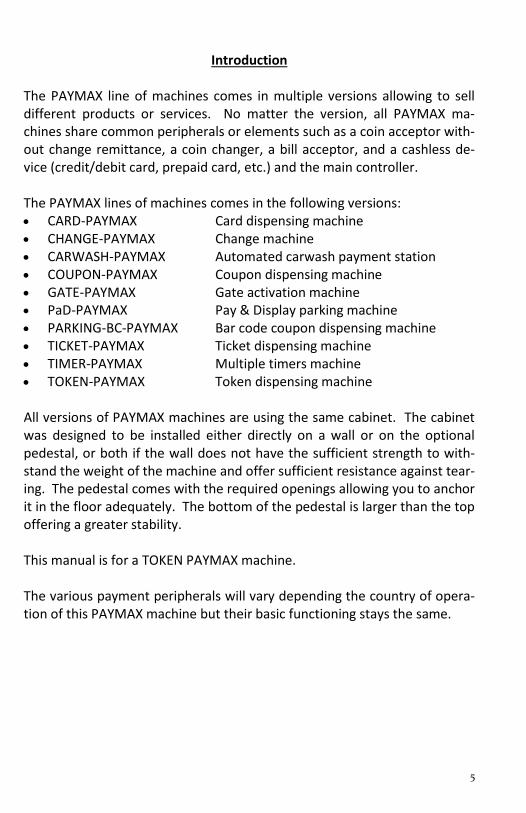
Introduction The PAYMAX line of machines comes in multiple versions allowing to sell different products or services. No matter the version, all PAYMAX ma-chines share common peripherals or elements such as a coin acceptor with-out change remittance, a coin changer, a bill acceptor, and a cashless de-vice (credit/debit card, prepaid card, etc.) and the main controller. The PAYMAX lines of machines comes in the following versions: CARD-PAYMAX Card dispensing machine CHANGE-PAYMAX Change machine CARWASH-PAYMAX Automated carwash payment station COUPON-PAYMAX Coupon dispensing machine GATE-PAYMAX Gate activation machine PaD-PAYMAX Pay & Display parking machine PARKING-BC-PAYMAX Bar code coupon dispensing machine TICKET-PAYMAX Ticket dispensing machine TIMER-PAYMAX Multiple timers machine TOKEN-PAYMAX Token dispensing machine All versions of PAYMAX machines are using the same cabinet. The cabinet was designed to be installed either directly on a wall or on the optional pedestal, or both if the wall does not have the sufficient strength to with-stand the weight of the machine and offer sufficient resistance against tear-ing. The pedestal comes with the required openings allowing you to anchor it in the floor adequately. The bottom of the pedestal is larger than the top offering a greater stability. This manual is for a TOKEN PAYMAX machine. The various payment peripherals will vary depending the country of opera-tion of this PAYMAX machine but their basic functioning stays the same.

6
Outdoor/Indoor Operating Range The PAYMAX machine works outdoor if there is sufficient protection against bad weather. Do not operate without an adequate protection against rain and snow. If the machine goes outdoor, check with your elec-trician contractor as the circuit powering up the machine will have to be on a GFI (Ground Fault Interrupter) protected circuit. The minimum/maximum operating temperatures varies depending the pe-ripherals and dispensers in the machine. It was determined that this ma-chine will operate between +5°C (41°F) and +40°C (104°F). If you are plan-ning to operate your machine in an environment below +5°C (41°F), you need to get the optional heating device with built-in thermostat available from SEM.
Operating voltage The PAYMAX line of machines comes with a switching power supply deliver-ing 24-volt DC to the different peripherals and dispensers (optional heating device excluded). The power supply specifications are:
Input: 100-240 Volts; 50/60 Hz 1.5A Output: 24 volts DC; 2,5 A
This type of power supply enables you to operate this machine anywhere in the world.
7
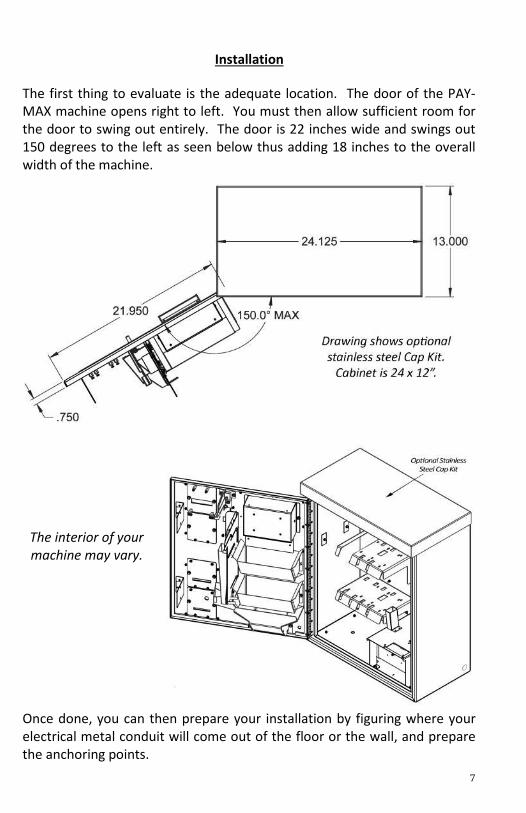
Installation
The first thing to evaluate is the adequate location. The door of the PAY-MAX machine opens right to left. You must then allow sufficient room for the door to swing out entirely. The door is 22 inches wide and swings out 150 degrees to the left as seen below thus adding 18 inches to the overall width of the machine.
Once done, you can then prepare your installation by figuring where your electrical metal conduit will come out of the floor or the wall, and prepare the anchoring points.
The interior of your machine may vary.

8
The pedestal comes with the necessary openings allowing installation. Below are three sketches showing you the dimensions of the pedestal along with the different positions and sizes of the various openings.

9
The dimensions of the pedestal at the base are 24" wide by 18" deep. The top of the pedestal sees its depth reduced to 12" to match the cabinet. That gives a 17 degrees angle forward towards the base. The height of the pedestal is 22.5". Com-bined with the height of the cabinet, it gives an overall height of 50.5 ". There is an empty space between the base of the pedestal and the floor. This space is 2" high as seen in grey above. Therefore, the anchoring devices you will use need to extend at least 2.75" above the surface of the floor. In a concrete floor, an an-chor sleeve 1/2 X 6 HEX will offer sufficient protection against pullout and shear. In a 2000-PSI concrete floor, the ultimate pullout tension is 1676 lbs and the ultimate shear is 3645 lbs providing the sleeve is embedded to a minimum of 2 inches in the concrete floor.

10
The PAYMAX cabinet can also be mounted back to back if you have two ma-chines free standing as seen below that cannot be fixed to a wall for what-ever reason. The holes behind the cabinet are symmetrical. This type of installation does NOT prevent you from anchoring the pedestal to the floor as de-scribed on the previous page. The PAYMAX cabinet can be mounted embedded in a wall, or surface-mount on a wall, or surface-mount on a wall, mounted on the pedestal as well. The back of the machine offers four anchoring points you can use to fix the machine to the wall. The weight of this machine, especially when fully loaded, can reach more than 103 kg (225 lbs). Therefore, you must make sure the wall intended to receive this machine can withstand such a weight, and more importantly, offers great resistance against tearing off. If you are not sure about the type of anchoring devices and fixations you need to se-cure your installation, please refer to a building contractor.

11
The machine can also be embedded in a wall if the backspace is sufficient. You will then need to make your own angle metal brackets and make addi-tional holes on all four sides of the cabinet. You may need also to support the weight of the machine in the back with some sort of support as seen in the images next page. Before starting the installation of your machine, you have also to take into consideration that the machine will be used by personal in wheelchair. You then have to install it so that anyone can insert either a bill or a coin with ease. The ADA standards stipulate a maximum height of accessibility of 48 inches. In the case of the PAYMAX cabinet, the maximum accessibility is the vertical coin insertion slot. If you install your machine directly on the wall, make sure it is perfectly flat otherwise, you may warp the cabinet resulting in difficulties to close the door. The outline of the cabinet on the wall must not offer any grip that could eventually be used as a point of support to tear it off the wall. You will appreciate the hanging hook-style double holes in the back of the cabinet. Just mark your spots on the wall using the holes as a guide, re-move the machine, make your holes using the proper tool, install the proper anchoring devices, hang the machine in place and tighten the an-choring devices.
A PAYMAX machine can hold a very large quantity of money and can then stir up the covetousness of many. Therefore, IT IS YOUR ABSOLUTE RESPONSABILITY to make sure your instal-lation is solid enough and resistant to tearing off attempts. In case of doubt, refer to a building contractor.

12
Machine embedded into a cement block wall with angle metal
brackets (not included).
Machine embedded into drywall with double studs and additional
support (not included)
Machine attached to a cement block wall and
mounted on a pedestal anchored in the floor for
added security.
Machine mounted on a pedestal anchored in the
floor and attached to studs of a drywall for added
security.
Examples of fixation on a wall

13
This page is blank

14
Electrical connection
You need to refer to a certified electrician to bring power to the PAYMAX machine,
as there is no power cord coming out of the machine. If needed, you can buy the optional power cord allowing you to connect your machine to a standard wall out-let. You will find at the bottom right corner of the cabinet three knockout holes that will allow you passing the wires. The holes will fit 1/2" EMT connector. If your ma-chine is sitting on a pedestal, you will find a hole, back right corner that will allow you passing either the wires or the electrical conduit (see page 8). In North America, the machine requires a standard 120-volt, 60Hz, 15 amps power source properly grounded. It does not necessarily have to be on a dedicated circuit although it is better if it is. The machine draws a maximum of 1.5 amps, 4 if there is an internal optional heating device sold by SEM. If the machine is to be operated outdoor, the circuit feeding the machine MUST be protected by a GFI (Ground Fault Interrupter). The wiring enters the junction box where you will make the proper connection. Refer to a certified electrician for a secured connection. If the machine came with the optional power cord, the connection is already done and you do not need to access the box. A 4 amps slo-blo fuse located in the junction box, under the main switch protects the machine. The main switch cuts power (hot only) to the entire machine. From there, it goes to a switching power supply with a 24 VDC, 2.5 amps output. The auxiliary output for the heater is also switched and fused.

15
WARNING !!!
Shut power OFF before unplugging or plugging any element (dispenser, hopper, coin changer, bill acceptor, credit card reader). Failure to comply may result in
damages to the controller and/or the elements.

16
A. Optional Red Cancel button (the position may vary depending the configuration of your machine)
B. Green OK button (used in multi-vend operation if available)
C. Optional Cap-Kit with white LED's D. Vertical coin insertion slot and es-
crow plunger E. Horizontal banknote insertion bezel F. T-handle (pair) G. Credit/Debit card reader
H. Optional receipt button I. Optional receipt delivery slot J. Optional pedestal K. External error indicator L. Large delivery bin M. Blue selection buttons (from 2 up to
6 depending configuration) N. Large trilingual LCD display (English,
French, Spanish) O. Orange Language selection button
(optional)
Identifying your machine and its components
Once the PAYMAX machine properly installed and connected, it is now time to
identify the machine and its components. Your machine may differ from illustra-tion below depending the product you sell and the options you have chosen.
The external door

17
P. Bill acceptor & cassette (yours may be different) Q. Coin acceptor and change giver (yours may be different) R. Display & selection buttons module S. Dual product delivery chutes T. Delivery bin U. Optional receipt & audit printer See next page for another internal door configuration...
The internal door The internal door of your machine varies depending the option you have bought and the type of machine. The image below shows the internal door applicable to a CARD-PAYMAX or TOKEN-PAYMAX. It has delivery chutes, coin changer, bill acceptor, and receipt printer.

18
P. Bill acceptor & cassette (yours may be different) Q. Coin acceptor only (yours may be different) R. Display & selection buttons module S. Coin chute to cashbox. T. Delivery bin
The internal door of your machine varies depending the option you have bought and the type of machine. The image below shows the internal door applicable to a CHANGE-PAYMAX or TO-KEN-PAYMAX. It has a coin acceptor (no change given out) and a bill acceptor.

19
The interior of the machine—Ports location The PAYMAX line of machines has a maximum capacity of four dispensing ports. These ports consist of different elements. You can have a card dispenser of various capacity, a universal coin/token hopper, a mini coin/token hopper. The position of the ports is always the same no matter what is connected to the port. Below are some configurations possible. Some card dispensers or coin hoppers may be very high depending their capacity. In such a case, it may extend sufficiently high to prevent the presence of the upper tray thus reducing the quantity of ports possible as seen below.

20
a. Standard-capacity token hopper on port A (some hoppers may have an extension thus adding token capac-ity).
b. Standard-capacity token hopper on port B.
c. MAX Controller with self-diagnosis LCD display.
d. 24-VDC 2,5 amps. switching power
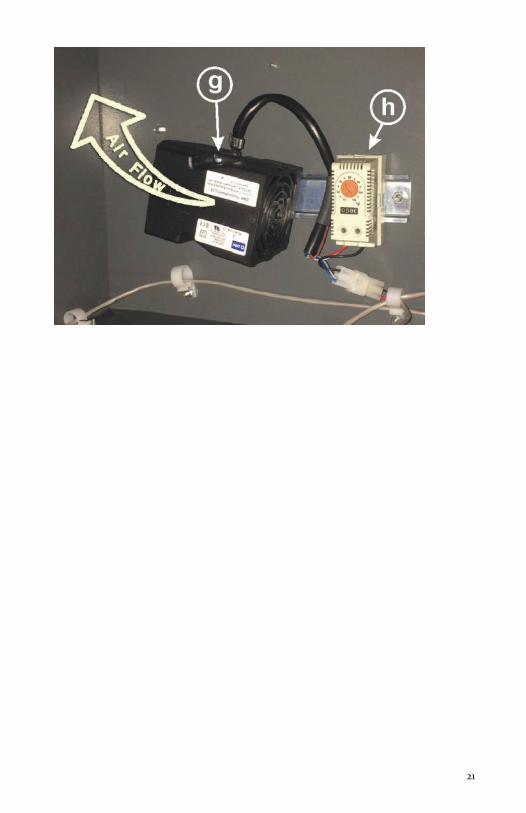
supply. e. Main switch and fuse housing. f. Large capacity coin box. g. 200-watts heater and blower. h. Adjustable Thermostat (default
value 15°C).
The interior of the machine—Component identification
21

22
More details on each component In the next pages we will talk about the different payment and distribution periph-erals you can find in the different PAYMAX versions. The coin changer: The coin changer has 5 tubes of change. Each of the tube will hold a certain quan-tity of coins. Coins lay flat in the tube, ready to be dispensed out when it reaches the bottom of the tube. All tubes self-replenish when a customer inserts a coin matching the tube. The top priority is always to keep the tubes full. When a tube is full, the coin is then directed to the coin box sitting on the floor of the cabinet. The coin changer always gives out change in the less coins possible (i.e., it will not give 4 x 25¢, it will give 1 x 1$). The value of all the coins in the tubes is sent on a regular basis to the MAX controller thus adjusting the values in the Audit section of the controller. You need to fill up the tubes when installing your machine to make sure it will behave adequately. To fill up the tubes, unscrew the small wing nut (do not remove it) holding the coin changer bracket in place and slide it out. Remove the bill cassette as it blocks the way for removing the coin cassette (see images next page). Remove the coin cas-sette. Fill up all the tubes with the proper coin in the proper tube. If you have two coin tubes sharing the same value of coin, those are seen as a single tube in the audit of the machine (i.e. Three 25¢-tubes having each $18 in quarters will be seen as ONE tube having $54 in the audit of the MAX controller. Push back the coin changer in place and tighten the wing nut once done. Changer will auto-evaluate how many coins there is in each tube with a 1-coin per tube margin of error, and sends the result to the Audit. In self-replenish, the capacity per tube of a 5-tube coin changer is: 5¢ = 82 ($4.10) 10¢ = 123 ($12.30) 25¢ = 90 ($22.50) $1 = 72 ($72.00) $2 = 79 ($158.00)

23
Lift handle
Tilt forward and remove ( Caution! Heavy! )
Fill coins in the proper tube

24
The coin acceptor alone The PAYMAX series can be equipped with a coin acceptor only, thus not offering change pay back. The coins it will accept are programmed in the Currency Settings that we will talk about further in the manual. The bill acceptor: As the PAYMAX Series is using the international MDB protocol, we can then install a bill acceptor capable of accepting the banknotes of the country (the same principle applies to the coin changer as well). In Canada, the bill acceptor will accept current polymer notes ($5, $10, and $20). In the USA, it will accept $1, $5, $10, and $20. Whenever a new banknote is issued by the monetary authorities, a flash update is then required into the bill acceptor in order to accept those new notes. All the notes are stacked into a removable cassette. The capacity of the cassette is roughly 400 bills. Some bill acceptors can have bigger capacity bill cassette. A customer can insert a bill 4-way.

25
The credit card reader: The PAYMAX Series can have a credit card reader as well. Depending the make of the credit card reader, it can be combined with the bill acceptor offering a common bezel as seen below where the bills are inserted in the bottom green section. In all cases, the card reader comes with an additional communication module inside the machine. Depending the make of the credit card system, it can communicate wire-less or through the IP network.
Coinco card reader combined with bill acceptor Coinco Iris communication module wireless only
NAYAX AMIT Communication Module IP/Wireless NAYAX Card Reader with LCD display

26
The token dispensers: The Token PAYMAX can have one or two universal coin/token hoppers. The univer-sal hopper can have an extension at the top thus adding capacity. This type of uni-versal hopper can hold different types of tokens in thickness and diameter. The capacity of a hopper equipped with the top extension is roughly 3500 tokens having a 0.984 diameter. The universal hopper slides in and out of it bracket. There is no cable attached to the hopper. The hopper connects to a 12-pin socket.
WARNING !!!
Shut power OFF before removing the token hopper(s). Failure to comply will result in damages to the controller
and/or the hopper.

27
Filling up the hoppers with tokens may be easier if you slide it out of its position. Caution. A full hopper is very heavy. Again, shut power off before sliding in and out the token hopper(s).

28
The MAX Controller: The MAX Controller is the brain of the system. It receives the information from the payment peripherals and manages all dispensing ports. It has four programming buttons and one bright blue LCD display. If everything is normal, it will display SEM MAX + the current day, date & time. If the machine is into an error situation, the error(s) will be visible on the display (i.e. Port A empty) . The MAX Controller is the same for all Paymax machine. However, its internal soft-ware will vary according which version of Paymax you are operating.

29
The heating device: The PAYMAX can be equipped with an optional small heating device when used outdoor. An adjustable thermostat controls this heating device. Default value is set to 15°C. This heating device is mounted on a rail under the lower tray and con-nects to the auxiliary output below the main switch (see page 15). This heating device is capable of producing 200 watts and has a built-in fan blowing left side up as seen in the image below. This position allows for a constant hot air flow circulat-ing in the cabinet.
The coin box: The coin box is sitting in an adapted bracket at the bottom of the machine. It col-lects all coins not directed to the coin tubes of the changer. This receptacle can hold coins in excess of $1000 and can therefore become quite heavy. Use both hands to handle it. The box measures 7,5" x 8,5" x 4,25" (W x L x H).

30
The printer: The printer is located at the base of the door. It is equipped with an auto-cutter and prints a transaction receipt, an I-O-U coupon, the audit of the machine, and all the parameters. It is a thermal paper printer using 58-60mm wide paper. It can handle a paper roll having an overall diameter of 65-90mm with a 14-20mm core. The printer auto-detects the paper when installing a new roll. Just present the pa-per-end into the entry bezel as shown below and it will be pulled into the proper ready position. When out of paper, the printer sends a message to the MAX con-troller and an error message will be visible on the small display. An out-of-paper condition will not prevent the machine from working. We have two models of printer: Kalypso and custom.
This concludes the components identification section. In the next pages, we will talk about programming the different functions of the machine.
Kalypso Printer
Custom Printer

31
Wiring Diagrams
Below is the wiring diagrams of the PAYMAX machine for control and communica-tion. The power portion wiring diagram is detailed on page 15.

32
SEM-MAX day
date & time
Audit CLEARED !
Pressing the blue button sends the
audit report to the printer.
Reset meters?
Hold RED button
Pressing the green button
scrolls through the audit on the display
Navigating through the menus of the machine Navigating through the menus of the PAYMAX is easy using the bright LCD display on the controller itself. Each element must be installed and connected before you start. The MAX Controller has a peripheral self-detection system. Therefore, if a peripheral is absent, there will be no mention of it when programming. The buttons are: BLACK: The MENU button scrolls through the different menus. GREEN: The ENTER button enables you to enter the menu visible on the display. RED: The CLEAR button increases a value on the display (+). BLUE: The DUMP button decreases a value on the display (-). Operator section The first 3 menus are more informative than programming. Audit The audit of the PAYMAX is complete. If the machine is equipped with a printer, press on the blue button to print the entire audit. If the printer is out of paper, you can scroll through the audit on the display. You can erase some meters, while oth-ers will keep on accumulating information. When you see an abbreviation of the word Cumulative on the display, it means you cannot erase this meter. When you see Reset Meters? Hold RED button on the display, you can then erase all non-cumulative meters by pressing and holding the Red button + for 3 seconds. Cleared is visible briefly before exiting the audit. (For more details, consult the Audit Annex at the end of the manual) Inventory setting This informs the controller about the current inventory in each port. If you adjust the inventory on each visit, you'll be informed of what's left upon your next visit. Press the Green button to enter. The display will show you the first port and its current value. Press on the Red button + to increase or the Blue button - to de-crease. Press the Green button to confirm the new setting. Using the inventory setting allows you to dispense until the very last coin of the hopper (see page 22). Add two extra coins in the hopper outside the inventory for safety.

33
Currency setting
$0.05 no
Currency setting
Last bills
accepted
This shows you the last 20 bills that were
accepted, starting with the most recent.
To scroll...
To exit !
Pressing the blue button at anytime sends the report to the printer.
Port A 450
Saving
Port A 24
Grn= save 426
Port A 24
Red = +, blue = -
Inventory setting
Port B 100
Saving
Port B 11
Grn= save 89
Port B 11
Red = +, blue = -
Port C 300
Saving
Port C 69
Grn= save 231
Port C 69
Red = +, blue = -
Last bill accepted The PAYMAX keeps a log of the last 20 bills that were accepted by the machine starting with the most recent along with the date and time it was accepted. The most recent bill erases the oldest. It will NOT give you the details of a bill that was inserted by a customer but rejected for whatever reason. Consult the Last bill An-nex at the end of the manual for more details.
Currency setting Upon powering up, the peripherals send their internal configuration to the Max Controller. When you go into the currency setting, you can instruct the PAYMAX what you wish to accept as payment. For example, if you have a coin acceptor ac-cepting all coins, you may wish to accept only $1 and $2 while rejecting nickels, dimes, and quarters. The same applies for the bills. You may not want to accept a $20 bill. When a currency is visible on the display, press on the Red button + to change it to Yes or No and confirm with the Green button.

34
Curr. setting Exact
change $5 Yes
Currency setting
In exact change
Selection 1:
B = Token: 0
Selection 1:
A = Token: 1
Selection 2:
B = Token: 3
Selection 2:
A = Token: 2
Free vend disp:
B = Token: 0
Free vend disp:
A = Token: 0
Dispense setting
Selection 1:
Card: $5.00
Selection 1:
Cash: $5.00
Vend price
setting
Selection 2:
Card: $25.00
Selection 2:
Cash: $25.00
Currency setting in exact change You can force the acceptation of banknotes if the machine is short in change. For example, you may want to accept $5, $10, and $20 if you have a selection selling at $20. If the highest vend price is $10, then you can decide to accept only the $5 and $10, and reject the $20 because you can't provide change. If you set all of them to NO, no bills will be accepted when short of change. Use the red button + to mod-ify. Confirm with Green (May not be available at the time of printing). Vend price setting This is where you set the prices for each selection button. Furthermore, a different price can be charged if paid Cash vs. Card. It means that if you have two selection buttons, you have four prices to program. Without a card reader, you only have two prices to program and so if you only accept cards as a mean of payment. Press the Green button to enter and your will see Selection 1: cash $5.00. Press on the Red button + to increase, Blue button - to decrease. Pressing and holding the but-ton accelerates the process. This setting wraps around. If you are at $5.00 and wish to go to $75.00, it is faster to decrease. Confirm the new price by pressing on the Green button. Again, make sure you program the proper price according the mean of payment (cash vs. card). You can have up to 6 selections to program. Dispense setting

35
Event report
To scroll...
To exit !
Pressing the blue button at anytime sends the report to the printer.
SEM-MAX day
date & time
This shows you the last 50 events that
occured, starting with the most recent.
This section is where you instruct the MAX controller what to dispense in a transac-tion. The quantity of settings depends on the quantity of selections, the quantity of hoppers and the free vend dispense. The free vend portion may not be visible if the payment peripherals cannot accept either a token or a coupon. It is possible to dispense from two hoppers if needed. When a selection and a dispenser are visible on the display (i.e. Selection 1, A = Token), press on the Red button + to increase, Blue button - to decrease. Confirm the setting by pressing on the Green button. Repeat for all selections and all dispensers. You can have up to 6 selections to pro-gram. The event report This report is a useful diagnosis tool informing you of any events happening in your machine that is not a transaction or related to a transaction. An event can be a bill cassette removed, an out-of-paper situation, a card jam, a token jam, a dispenser empty, etc. It will not mention that the bill acceptor rejected a note or that the gateway processor rejected a card transaction. The report holds up to 50 events starting with the most recent. If the log is full, the earliest will push the oldest out. Along with the description are the date and the time it happened. This report can be printed at any time by pressing on the Blue button while you are consulting it. Here is an example of event:
2017-11-22 13:07 Printer out of paper 2017-11-11 09:29 Coin not remit. $0.05
If the error description is too long, the display toggles to show the entire descrip-tion. Press on the Green button to scroll throughout the report. When you reach the last event, the MAX controller comes back to the stand-by message. This concludes the operator section of the programming.

36
Dispenser type Port A:
Token
System setting
SEM-MAX day
date & time
Hold both buttons for 3
seconds to access
technician menu.
Language Language
english
Technician section—System settings Only by a skilled person must access the technician section as it contains parame-ters that affect the entire behavior of the PAYMAX. You cannot access this section accidentally. If you're in it, it is because you really want it. Language The PAYMAX can display in English, or French, or Spanish. To set the default lan-guage, press the Red button when the current language is shown to toggle be-tween the choices and confirm with Green. Note that the language description is in the respective language. Français stands for French while español is for Spanish. The optional language push button allows users to select their own language for the entire duration of a transaction before switching back to the default language. Depending on the default language set, the user may have to press twice on the language button to reach the language of his choice. If no activity is going on for thirty seconds, it comes back to the default language. Dispenser type The MAX controller is capable of dispensing from up to four dispensers. Your ma-chine model may have between 1 to 4 dispensers. The DISPENSER TYPE setting al-lows identifying your dispenser type (coins or tokens). You can configure your MAX

37
Clock setting year-mo-da hr:mn
2017-12-26 13:48
controller to dispense tokens from each hopper. Press on the Green button to see the current setting for dispenser A, press the Red button to modify and the green again to confirm. Assigning a value to a missing dispenser will result in constant error message on the display of the controller (i.e. setting a Token value to dis-penser C when there are only dispensers A and B in the machine). The next screen will ask for the AUTO-RESET value. Enter a number here if you are planning to swap dispensers instead of adding coins or cards to this dispenser on site. EX, "100" means that you will always swap this dispenser with a filled dis-penser having 500 coins or cards in it. Most operators will leave that number to 0. If your machine does have more than one same-value and capacity hopper, the SEM Max Controller will ask for your choice of dispensing method. You can select between AUTONOMOUS, CONTINUOUS, or ALTERNATIVE.
Autonomous dispense mode The autonomous mode makes each dispenser totally independent even if it shares the same values. Use it if dispensers have different capacity. Continuous dispense mode The continuous mode is sequential. It means it totally empties dispenser A before moving to dispenser B. If in the meantime dispenser A is filled, dispenser B will keep on dispensing until it runs empty. It then comes back to A until it runs out of cards and so on. Alternative dispense mode The alternative mode will dispense equally from both dispensers (i.e. A-B-A-B-A- etc.).
Clock Setting Set the current date and time here. Start with the year and go down to the last minute. Press the Green to move from one digit to the other, and the red or blue to modify the blinking digit. Once the last digit done, press on the Green to confirm your setting. Although the MAX controller uses extremely accurate components, it is a good practice to check the time occasionally to make sure it is keeping up with the correct date and time. The time on your cell phone is usually 100% accurate so you can rely on that time to adjust this setting if needed.

38
CLK -summer time CLK -summer time
Canada/USA
Hour format Hour format
24
Day of the week Day of the week
Friday
Hour format Display the time in the 24-hour (military style) or AM-PM format. Press Green to enter, Red to modify and Green again to confirm. Day of the week Set the current day of the week. Press Green to enter, Red or Blue to modify and Green again to confirm. CLK - summer time The MAX controller is capable of adapting to Daylight Saving Time (summer time) when such a time change takes place. Set it to Canada/USA to activate the time change or leave it to None to inhibit the time change. At the time of writing this manual, in North America, almost every parts of the continent move to DST on the second Sunday of March, at 2AM, except Arizona (USA) and Saskatchewan (Canada) and get back to Normal time on the first Sunday of November at 2AM. If this ma-chine goes to Mexico, the time change to DST takes effect according a different schedule not taken into account by the MAX Controller. Cashless type
Cashless type Cashless type
swipe

39
Card dispenser
time-out
Card disp. time-out
55 sec.
Machine ID Machine ID
Machine 0001
Receipt time-out Receipt time-out
15 sec.
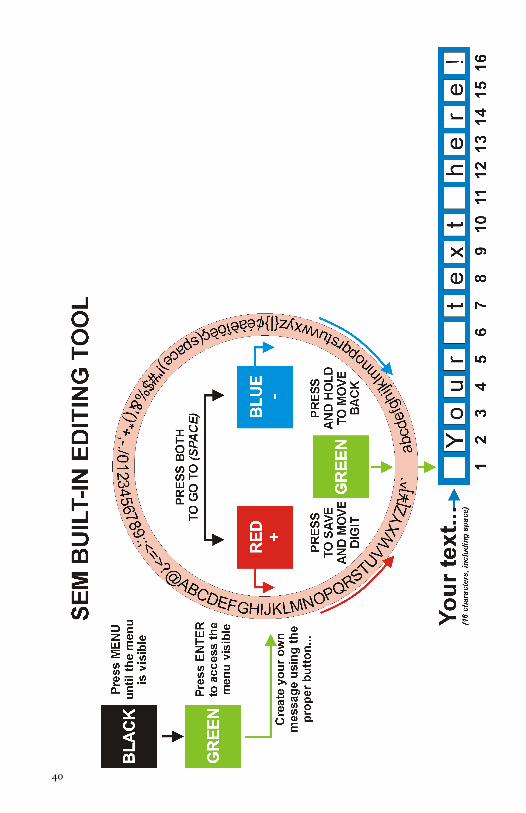
If a card reader is present, you can customize the message to the customer accord-ing the type of reader you have. You have the choice between Swipe, Insertion, and Proximity (Contactless). Press the green button to access and the red button change the setting. Confirm with the green button. This parameter will not be visi-ble if your machine does not have a cashless system. Receipt time-out After a transaction, your customer can ask for a receipt. The blue LED push button will flash for the time set (default 15 seconds). Once the blue LED stops flashing, the receipt is no more available. To modify the delay, press the Green button, press Red to increase, Blue to decrease. Confirm the new setting with Green. A "0" setting will set the printer for an automatic receipt printing after each transaction. Machine ID If you are operating more than one machine, you can assign a specific ID to your machine. This ID will be visible on the transaction receipt, the audit, and the pa-rameters printout. The ID is alphanumeric with a maximum of 16 characters includ-ing the space between each set of characters. Next page is a diagram showing you how to enter the multiple characters available using the blue, green and red push buttons. Card dispenser timer out The MAX controller monitors the dispensing of a card and if for some reason, it does not have a response from the dispenser within a preset time, it will activate
40

41
Coupon lines
Refund
Top line 1
Receipt for refund
Refund coupon
allowed
Refund coupon
allowed Yes
Receipt printed
on low paper
Receipt printed
on low paper 10
a countdown visible on the display to inform the customer some action is going on inside the machine and that the delivery of its card is on the way. If the SEM MAX controller does not receive confirmation of a card delivery, it will issue a refund (in cash or back to the card) and will consider that dispenser as not available anymore. Adjust the time using the Red button; confirm new setting with the Green button. Receipt printed on low paper This setting allows you to print up to x receipts after the MAX controller has re-ceived the low paper signal from the printer as we all know there is still paper avail-able in the roll. Adjust the quantity using the Red button; confirm new setting with the Green button. Refund coupon allowed The MAX controller can issue a refund coupon (I-O-U) if it senses the product has not been delivered or if the machine has-short changed a customer. Select Yes or No using the Red button; confirm new setting with the Green button. Coupon lines refund In case of product jam or undelivered change, the MAX controller will print a refund coupon to your customer if the previous setting was set to Yes. You can edit the coupon as well by using the SEM Built-In Editing Tool seen on the previous page. There is a maximum of 6 lines available. Empty lines will not be printed thus saving on paper. In addition to the 6 lines, the coupon indicates the machine ID, the date and time, the error that caused the printout and the equivalent amount. An exam-

42
Message
* Out of order *
Message, line 1
Sorry, this machine
Message *Out of Order* The MAX Controller allows you to creating your own Out of order message to the customer. This message will be visible on the front display. You have four lines available and each line has a maximum of 20 characters. If the display has only two lines, the message will toggle. This is an example of an out-of-order message:
Sorry, this machine is currently out of service. Call us at
** 1-888-888-8888 ** To edit or create your own message, use the SEM Built-In Editing Tool described on page 34. Press the green button to access the first line. Edit your text. If the text does not need editing, press on the black button to move to the second line. Please note that the display on the MAX controller is 16-character wide while the one visible by the customer is 20-character. A space is a character.
Machine 0001
2017-11-22 13:55
Receipt for refund
Reçu remboursement
Coins not remitted
$4.00
Machine ID line Date and time of transaction
Top Line 1 Top Line 2 (subsequent lines have smaller font)
Description of what happened
Equivalent amount lost because of the error

43
Print parameters Printing in
progress...
0001 Transaction Receipt Mr. Bubble Laundry 2017-12-26-15:19 $20.00 Thank You / Merci
Receipt lines Top line 1
Transaction receipt
Machine ID line Top Line 1 Top Line 2 (subsequent lines have smaller font) Date and time of transaction Amount paid Bottom Line 1
Receipt lines The MAX Controller can issue a transaction receipt. You can customize this receipt to fit your needs. You have 15 lines available: 6 top lines, 3 middle lines, and 6 bottom lines. In addition to those 15 customizable lines, the receipt will have the machine ID at the very top plus the date, time, and amount of the transaction. The printer ignores an empty line thus saving on paper. Program all your lines using the SEM Built-In Editing Engine described previously. Example of receipt below. Print parameters This is a very useful feature. As you have noticed, there are many parameters to program thus increasing the odds of entering a wrong setting by mistake. Once all your parameters programmed, print them for comparison with other machines you may have. This concludes the System Settings section.
44
Button(s) and
light(s) test
Ports test
System setting
SEM-MAX day
date & time
Test mode
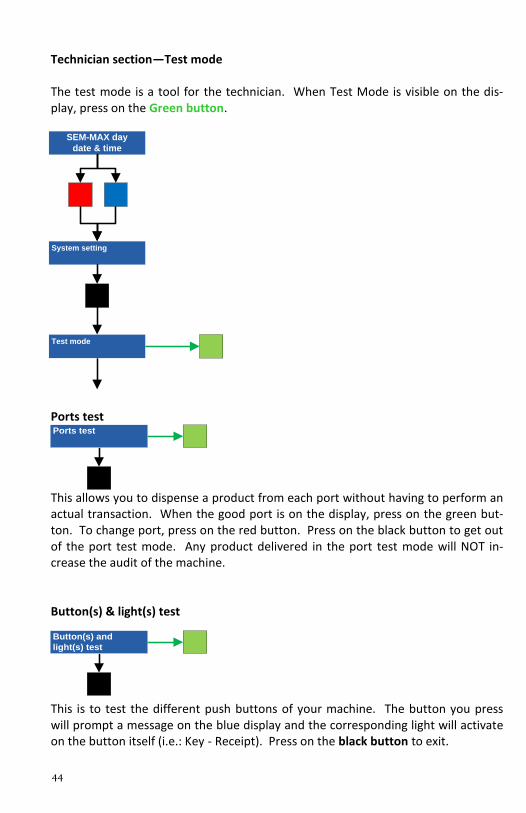
Technician section—Test mode The test mode is a tool for the technician. When Test Mode is visible on the dis-play, press on the Green button. Ports test This allows you to dispense a product from each port without having to perform an actual transaction. When the good port is on the display, press on the green but-ton. To change port, press on the red button. Press on the black button to get out of the port test mode. Any product delivered in the port test mode will NOT in-crease the audit of the machine. Button(s) & light(s) test This is to test the different push buttons of your machine. The button you press will prompt a message on the blue display and the corresponding light will activate on the button itself (i.e.: Key - Receipt). Press on the black button to exit.

45
Acceptor(s) test
Acceptor test This is to test the good acceptance of the bill and/or coin acceptor. In this test mode, the audit ignores any money inserted and no sales will take place. There-fore, if you go on site following a complaint from a customer saying the machine has difficulties accepting money, use this test menu instead of making real sales. All acceptance tests done outside this test mode will affect the audit thus creating a discrepancy in your accounting. Press on the black button to exit. This test mode disables the credit/debit card reader and therefore you cannot test it, as it would result in a real transaction visible on your monthly credit card statement.
This concludes the Technician menu.

46
DUMPBlue button
-
PROCESS to DUMP the
HOPPERS
Press and hold the blue
button for at least three
seconds. Release and follow
the instruction on the screen.
Dump hopper B?
GN=Dump, BK=Next
Dump hopper A?
GN=Dump, BK=Next
Emptying…
0033 á
Emptying…
0066 á
Dump hopper A?
GN=Dump, BK=Next
Dump hopper B?
GN=Dump, BK=Next
Port A B
Empty / disabled
Dump Hopper (port) function The MAX controller allows you to dump the contents of each port to zero for physi-cal inventory purposes. A port is a coin hopper. To access the DUMP function press and hold the Blue button for about 3 seconds and release. The first port available will be A. Follow instruction on the display as seen below. It stops dispensing when the port is empty or if you press the red button. If a port is empty, it automatically transfers to the following port available. Careful when using the dump function. Hopper will dispense non-stop so make sure you can catch what is being dispensed. If you are using the Inventory setting, it will take into consideration what is being dump and adjust the inventory accordingly.

47
Audit Annex As seen on page 32, the MAX controller offers a full audit. Below is a full descrip-tion of each line. Remember that two or more coin tubes sharing the same value are seen as a single tube with the total of all tubes.
SEM MAX Control. V2,0b2377 Type of controller and its firmware version
Machine 0001 ID of the machine
Audit 2018-11-22 12:30:00 Type of report + the date and time of the printout
Tube of ¢5 $3.25 Value of all the nickels in the ¢5 tube(s)
Tube of ¢10 $10.50 Value of all the dimes in the ¢10 tube(s)
Tube of ¢25 $18.00 Value of all the quarters in the ¢25 tube(s)
Tube of $1 79.00 Value of all the loonies in the $1 tube(s)
Tube of $2 $148.00 Value of all the twonies in the $2 tube(s) Inventory port A 30 Quantity of items left in dispenser A Inventory port B 38 Quantity of items left in dispenser B
Resettable meters Meters you can erase upon each visit on site
Port A out: 430 Quantity of products dispensed from A since last reset
Port B out: 72 Quantity of products dispensed from B since last reset
Coin box: $842.00 Value of the coins present in the coin box since last reset
Bill of : $5 36 Quantity of $5 bills in bill cassette since last reset
Bill of : $10 15 Quantity of $10 bills in bill cassette since last reset
Bill of : $20 20 Quantity of $20 bills in bill cassette since last reset
Bill box: $730.00 Value of all the bills in the cassette since last reset
Cash sales: $1560.00 Value of the sales done using cash (coins & bills) since last reset
Cashless sales: $8420.00 Sales done using a card (credit/debit/prepaid) since last reset
Total sales: $10040.00 All the sales done since last reset
Selection 1: 430 Products sold using selection button #1 since last reset
Selection 2: 72 Products sold using selection button #2 since last reset
Non-resettable meters Meters you cannot erase
Port A out: 602 Quantity of products dispensed from A since DAY ONE
Port B out: 244 Quantity of products dispensed from B since DAY ONE
Cash sales: $3880.00 Value of the sales done using cash (coins & bills) since DAY ONE
Cashless sales: $13040.00 Sales done using a card (credit/debit/prepaid) since DAY ONE
Total sales: $16920.00 All the sales done since DAY ONE
Selection 1: 602 Products sold using selection button #1 since DAY ONE
Selection 2: 244 Products sold using selection button #2 since DAY ONE

48
SEM MAX Control. V2,0b2377
Machine 0001
Last bills accepted
2017-11-22 13:47
2017-11-22 13:39 $20
2017-11-22 13:26 $20
2017-11-22 13:18 $20
2017-11-22 13:15 $10
2017-11-22 13:15 $5
2017-11-22 13:14 $5
2017-11-22 13:01 $10
2017-11-21 13:00 $10
2017-11-21 11:19 $20
2017-11-21 10:36 $20
2017-11-21 08:04 $20
2017-11-21 06:45 $10
2017-11-21 06:21 $5
2017-11-21 06:21 $10
2017-11-21 06:12 $10
2017-11-21 06:06 $20
2017-11-21 06:01 $5
2017-11-20 23:49 $20
2017-11-20 22:22 $10
2017-11-20 22:11 $10
Last bill accepted Annex Once last point to discuss that is somehow related to the audit is the Last Bills Ac-cepted feature. As mentioned on page 33, the MAX controller keeps tracks of the last twenty banknotes inserted and accepted by the machine. This list is printable if needed by pressing on the Blue button when you see a bill description on the display. Below is an example of such a printout. The most recent entry erases the oldest. In this example, the most recent was a $20 inserted on November 22nd at 13:39. When it made its entry in the log, it pushed out the oldest bill that could have been a $5 inserted on the 20th at 21:00. The value of the bill shown in an entry is equal to the credit the display showed when the bill was inserted. In other words, the display cannot show $10 if the entry in the log shows $20.

49
Quick troubleshooting In the next pages, we will go though a quick troubleshooting of the most common problem you may experience with this MAX machine.
Machine in not lit, looks dead Machine is lit, but does not ac-cept payment Accepts coins and cards but no bills Not accepting coins at all.
No power to the machine. Make sure main switch in ON in the machine, if it is, check the fuse and replace if needed (see page 15) Make sure power goes the power supply and from there to the MAX Controller module, (black rounded jack entering bottom left corner) Check power entry, circuit breaker. Machine is empty of products to sell. A sold-out machine will not accept payment. Display of the MAX controller will prompt the sold-out message. Machine is in error mode in all of its dispensers (card jam, dispenser not connected, etc.) Dis-play will inform you. When cause of error solved, press the Red button on the MAX Con-troller to reset the machine. Check the level of coin in the tubes of the coin changer. Fill to the top if needed. Check Currency settings (see pages 35+36). Coins can be jammed in upper part of the coin changer. Check Currency settings (see pages 35+36).

50
Machine does not give out proper change Credit card reader not accepting cards Coins inserted but not going through. Machine accepts payment but no token comes out
Make sure your vend prices are set according your signage. If prices are OK, check the payout manually by pressing on the payout buttons on the coin changer itself (A-B-C-D-E). One coin should fall into the delivery bin for each button you press. Make sure coin changer sliding bracket is pushed in the proper position and the wing nut tighten. If not, you will most likely find coins at the bottom of the cabinet. Make sure the proper coin sits in the proper tube. Remove coin cassette and look very care-fully at each tube to see a potential intruder. Network may be absent (consult displays on the card reader and the AMIT module) Check coin changer for a jam. Remove coins if jammed. Make tests using the Test Mode (see page 38). Check token hoppers for damaged, bent, or sticky tokens.
Clearing an error message To clear an error message, shut power OFF and turn it back ON. The display will prompt Wait while initializing. This will reset not only the MAX controller but also any dispenser or hopper connected to any port.

51
Replacing a MAX Controller The MAX Controller of your machine is a very reliable circuit assembly. However, it may require, one day, to be replaced for some reasons. If it ever comes, you will greatly appreciate the memory transfer feature unique to all SEM products. There is a small 8-pin memory chip on the circuit board containing the entire mem-ory of the machine. It includes the audit, all the parameters, plus the internal hid-den configuration. In the unlikely event that you need to replace the MAX control-ler, shut power OFF, remove the MAX controller from its position, locate the mi-crochip, carefully remove it and install it onto the new circuit. This microchip MUST be inserted into its socket the proper way. There is a half-moon shape groove on the chip itself that indicates the way to insert the chip. As seen below, when looking at the back of the MAX Controller, with all port con-nectors pointing down, the half-moon groove is on the right of the microchip. Fail-ure to comply with the above may result in losing all the data on this microchip, including the audit and all the multiple settings. Pressing and holding on any button while booting, will prompt the internal configu-ration code on the display, something like 000-03-10-02-004.
WARNING !!!
Shut power OFF before unplugging or plugging any element (dispenser, hopper, coin changer, bill acceptor, credit card reader, circuit). Failure to comply may
result in damages to the controller and/or the element.

52
Description P/N Qty
36-inch MDB Harness Extension from Controller to Peripherals A03610 1
Blue Selection Button A09540 2
Cable Tie-Clip 0,500 G00815 12
Cage Nut 1/2-13 for T-Handle B00290 2
EVO Hopper Extension Funnel S06715 2
EVO Regular Hopper S06710 2
MEI 5-tube Coin Changer (5-25-100-100-200¢) 7512i-DAE 1
Harness to external Light Indicator A05530 1
Kept Nut 1/4-20 B00610 27
Kept Nut 6-32 B00490 13
Kept Nut 8-32 B00520 30
MAX Controller w/Housing A08760 1
MDB Down Stack Canadian Banknote Acceptor VX73D34CA00 1
Nayax Card Reader VPOS Black w/AMIT GSM 500015 1
Orange 24-V Tab Light Indicator E01200 1
Orange Language Selection Button A09570 1
Paymax BV Stopper UP S06504 1
Paymax Coin Box S06020 1
Paymax Coin Box Bracket S06030 1
Paymax Coin Box Chrome Button S04110 1
Paymax Coin Changer Bracket S06000 1
Paymax Coin Insert Assembly w/Plunger S06100 1
Paymax Custom Printer Assembly w/Harness A09725 1
Paymax Delivery Bin S05070 1
Paymax Display/SV6 Module Assembly A09700 1
Paymax Dispenser shelf S05080 1
Paymax Door Assembly w/NAMA Internal Plates S05060 1
Paymax EVO Hopper Harness A09750 2
Paymax Heater Kit DIN w/Thermostat A09730 1
Paymax Lower Dispenser Shelf S05080 1
Paymax MDB Display Harness & Printer Power A09740 1
Paymax Power Supply 115/230-24VDC 2,5A desktop E04350 1
Paymax Power Supply Assembly K01630 1
Paymax Power Supply Holding Bracket S06045 1
Paymax Stainless Steel Door Chute S05090 2
Paymax Standard Housing S05050 1
Paymax T-Handle Secure Internal Plate S06090 2
Paymax Upper Dispenser Shelf S05085 1
Red Cancel Button A09560 1
T-Handle 5500/N9900 5,5 without Lock S04640 2
VAN Lock Key (specify key encoding) K5 2
VAN Lock Plug-Lock Standard for T-handle (specify key encoding) 4275S 2
Parts Listing

53
Personal notes: Use this page to write notes and memos. ____________________________________________________________________ ____________________________________________________________________ ____________________________________________________________________ ____________________________________________________________________ ____________________________________________________________________ ____________________________________________________________________ ____________________________________________________________________ ____________________________________________________________________ ____________________________________________________________________ ____________________________________________________________________ ____________________________________________________________________ ____________________________________________________________________ ____________________________________________________________________ ____________________________________________________________________ ____________________________________________________________________ ____________________________________________________________________ ____________________________________________________________________ ____________________________________________________________________ ____________________________________________________________________ ____________________________________________________________________ ____________________________________________________________________ ____________________________________________________________________ ____________________________________________________________________ ____________________________________________________________________ ____________________________________________________________________ ____________________________________________________________________ ____________________________________________________________________ ____________________________________________________________________ ____________________________________________________________________ ____________________________________________________________________ ____________________________________________________________________ ____________________________________________________________________ ____________________________________________________________________ ____________________________________________________________________ ____________________________________________________________________ ____________________________________________________________________ ____________________________________________________________________ ____________________________________________________________________

54
____________________________________________________________________ ____________________________________________________________________ ____________________________________________________________________ ____________________________________________________________________ ____________________________________________________________________ ____________________________________________________________________ ____________________________________________________________________ ____________________________________________________________________ ____________________________________________________________________ ____________________________________________________________________ ____________________________________________________________________ ____________________________________________________________________ ____________________________________________________________________ ____________________________________________________________________ ____________________________________________________________________ ____________________________________________________________________ ____________________________________________________________________ ____________________________________________________________________ ____________________________________________________________________ ____________________________________________________________________ ____________________________________________________________________ ____________________________________________________________________ ____________________________________________________________________ ____________________________________________________________________ ____________________________________________________________________ ____________________________________________________________________ ____________________________________________________________________ ____________________________________________________________________ ____________________________________________________________________ ____________________________________________________________________ ____________________________________________________________________ ____________________________________________________________________ ____________________________________________________________________ ____________________________________________________________________ ____________________________________________________________________ ____________________________________________________________________ ____________________________________________________________________ ____________________________________________________________________ ________________________________________________________________________________________________________________________________________ ____________________________________________________________________

55
This page is blank

56
Our technical department wrote this manual. Even though the utmost attention was given to writing this manual, errors may have slipped by unnoticed. Any com-ments, suggestions, or errors should be sent directly to: [email protected]
Telephone: 514-334-7569 Toll free: 1-888-334-7569 Fax: 1-514-334-5922 [email protected] www.sem.ca