Embed Size (px)
Citation preview
INSTALLATION GUIDE
Tools & Accessories Required ..................................................................................
VacuBond™ Installation Preparations ...................................................................
VacuBond™ Installation Procedure .......................................................................
Completing the Job ....................................................................................................
Sub Floor Types & Walk-Through Sites Recommendations ................................................................
Proper Site Conditions & Handling ........................................................................
General Recommendations for Tongue & Groove Hardwood Flooring Installation ...............................................................
Radiant Heat ................................................................................................................
Asbestos Warning .......................................................................................................
Wood Dust Warning ...................................................................................................
Cleaning & Maintenance ...........................................................................................
Residential Limited Lifetime Warranty ................................................................
Warranty Exclusions .................................................................................................
1
1
2
4
4
5
6
7
8
8
9
10
11
Table of Contents
VACUBOND™ FLOORING INSTALLATION INSTRUCTIONS
Please read the instructions completely before starting the installation in order to avoid failure and warranty exclusions.
VACUBOND™ INSTALLATION PREPARATIONS
1. Flooring must be on site and acclimated to between 60°F and 80°F for a minimum of 48 hours before installation can start. If the flooring boards have been stored off site and they are below 60°F, you MUST wait until the boards are at the minimum installation temperature before starting. Important: See Proper Site Conditions & Handling
2. Sub-floor preparation is the most important thing to accomplish as you prepare to install your new VacuBond™ hardwood floor. Important: See Sub-Floor Types & Walk Through Site Recommendations
It is vital and required that the sub-floor is primed with VacuBond™ Primer or Membrane, which dries in 4 hours for concrete (membrane) installations and about 20- 30 min for most other sub-floors (standard primer installations), make sure to shake or stir up the bucket prior to priming.
VacuBond™ Membrane is required instead of primer for below grade applications due to moisture risk. Dries in 4 hours.
TOOLS & ACCESSORIES REQUIRED:BroomVacuumSawsJamb SawRubber HammerEar PlugsGlasses
PencilTape MeasureDust MaskHardwood CleanerChalk LinePull-BarTapping Block
Moisture Meter (Wood & Con-crete) Touch-Up FillerVacuBond™ Prim-er or VacuBond™ Membrane
1
VACUBOND™ INSTALLATION PROCEDURE
1. Determine starting wall and direction to lay boards. An outside wall is normally best as it is most likely straight and square with the room.
2. Start by opening 4 to 6 cartons of flooring and inspect color range, quality and lengths. Select the boards you wish to install and determine the sequence and structure in which to install them. Always be working out of several cartons at the same time to keep a good visual mix of your installation.
3. Measure accordingly for expansion space to determine starting line. Snap a straight chalk line on the sub-floor next to the beginning wall, making sure the chalk line is 1/2” wider than the width of two boards (rows) to be installed. The reason we do this is to have the ability to measure a rip cut accordingly if need be for walls that are not level/ straight. The additional 1/2” is required for expansion space.
4. The groove side of the flooring should be facing the starting wall with the tongue side of the board placed on the chalk line. Clean up any access chalk debris.
5. Applying Primer or Membrane:
Primer: Apply a thin coat of primer to the floor about the same distance as 3 boards from the wall and allow time to dry. Continue to apply 2-3 rows worth of primer in increments throughout the installation for best results. (if applying with a paint roller, make sure you are rolling the opposite direction of the wall to avoid any spatter). Membrane: Apply Membrane to the entire floor prior to installing your VacuBond flooring and allow 4 hours to dry.
6. Important: For successful installation, use diagram #1 and install the boards in the order as indicated for the first two rows for proper starting sequence. A. Pull the release paper from the back of Board 1 (pro tip: when removing the paper, peel it off quickly at a 45-degree angle) and place the board as indicated, making sure to line up the tongue of the board with the chalk line. Walk “heel to toe” across the length of the board to expel the air from under the board and create the VacuBond suction. Make sure the adhesive has made full connection to the sub-floor. B. Remove the release paper and place Board 2 on the chalk line, but do not step on it.
C. Remove the release paper and place Boards 3 and 4 and tap them slightly in the direction of Board 1 with your tapping block.
D. Make sure that the joints between Boards 3 & 4 and 1 & 2 are square and that the long side fit is tight.
2
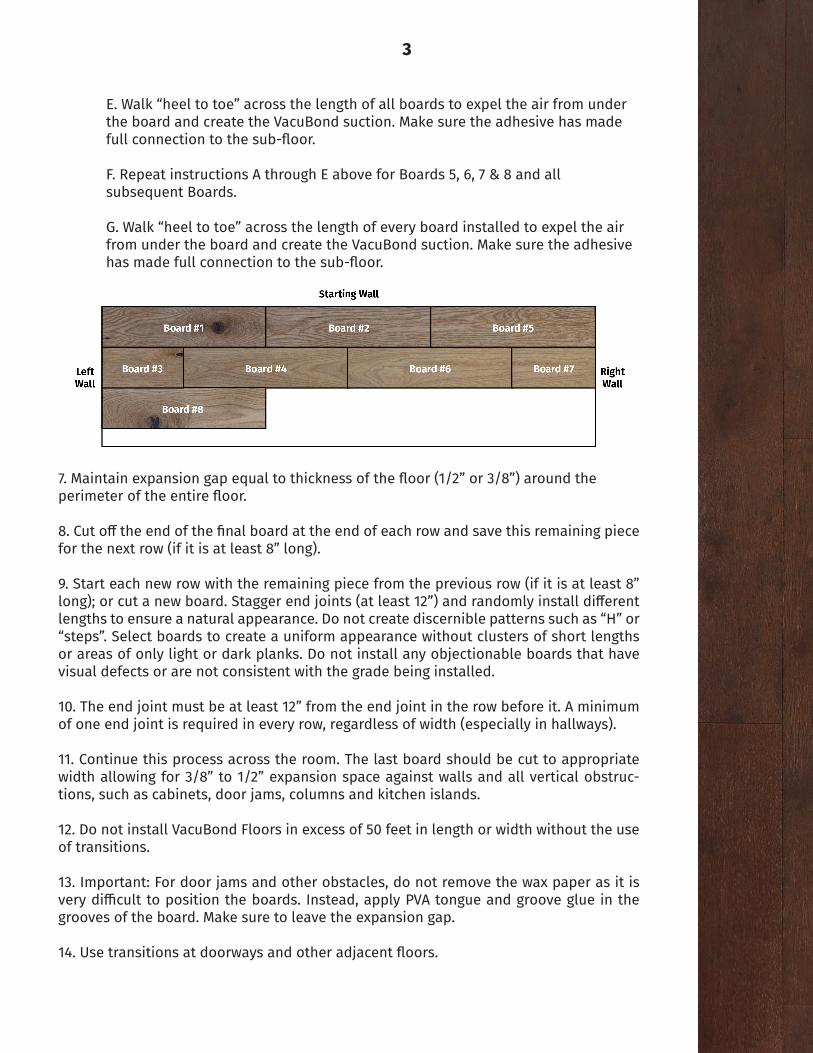
E. Walk “heel to toe” across the length of all boards to expel the air from under the board and create the VacuBond suction. Make sure the adhesive has made full connection to the sub-floor. F. Repeat instructions A through E above for Boards 5, 6, 7 & 8 and all subsequent Boards. G. Walk “heel to toe” across the length of every board installed to expel the air from under the board and create the VacuBond suction. Make sure the adhesive has made full connection to the sub-floor.
7. Maintain expansion gap equal to thickness of the floor (1/2” or 3/8”) around the perimeter of the entire floor.
8. Cut off the end of the final board at the end of each row and save this remaining piece for the next row (if it is at least 8” long).
9. Start each new row with the remaining piece from the previous row (if it is at least 8” long); or cut a new board. Stagger end joints (at least 12”) and randomly install different lengths to ensure a natural appearance. Do not create discernible patterns such as “H” or “steps”. Select boards to create a uniform appearance without clusters of short lengths or areas of only light or dark planks. Do not install any objectionable boards that have visual defects or are not consistent with the grade being installed.
10. The end joint must be at least 12” from the end joint in the row before it. A minimum of one end joint is required in every row, regardless of width (especially in hallways).
11. Continue this process across the room. The last board should be cut to appropriate width allowing for 3/8” to 1/2” expansion space against walls and all vertical obstruc-tions, such as cabinets, door jams, columns and kitchen islands.
12. Do not install VacuBond Floors in excess of 50 feet in length or width without the use of transitions. 13. Important: For door jams and other obstacles, do not remove the wax paper as it is very difficult to position the boards. Instead, apply PVA tongue and groove glue in the grooves of the board. Make sure to leave the expansion gap. 14. Use transitions at doorways and other adjacent floors.
3
1. Fill visible joints and gaps with a non-silicon-based filler that blends with the floor color (test filler on a cut off piece of a plank). Note: The use of fillers/putty and stain is a recommended and acceptable industry practice. Full plank replacements are also ac-ceptable forms of repair and do not affect the integrity of the floor when done correctly.
2. Install molding and trim making sure not to nail into the hardwood flooring.
3. Sweep or vacuum the floor. Clean the floor with a hardwood flooring cleaner.
4. If necessary, to protect the finish during construction, cover the floor with rosin paper or another type of breathable covering.
COMPLETING THE JOB
1. Particle board and plywood are approved sub-floors for VacuBond applications. OSB must be a high grade with a heavy concentration of adhesive.
2. Make sure concrete is flat, dry, structurally sound and clean.
3. Important: Sub-floor should be flat to 1/8” within an 8’ radius.
4. Site conditions must be between 60°F and 80°F.
5. Allow for an expansion space (i.e. 3/8” or 1/2”) around all vertical obstructions.
6. No area of connected floor can span greater than 50’ in width or 50’ in length without allowing for additional expansion space beyond the standard 3/8” to ½”. Installations larger than 48’ require T-Molds or other transition pieces in addition to the extra spacing.
7. Note: Minor occasional noise (such as squeaking) within the flooring is inherent to all installation hardwood flooring applications and can occur as environmental conditions change.
SUB FLOOR TYPES & WALK-THROUGH SITES RECOMMENDATIONS
4
1. The building must be fully constructed and enclosed. It is essential that masonry, dry wall, paint and all other ‘wet’ work to be completed is given time to thoroughly dry as this will affect the moisture content of the job site.
2. The exterior landscape should be complete with all gutters, downspouts and drainage directed away from the building. The crawl spaces must have adequate cross ventilation. There must also be a minimum of 24” from the ground to the underside of the joists.
3. Permanent HVAC systems must be working and in operation 14 days prior to installa-tion to stabilize the interior environment at normal living conditions and to acclimate the flooring. The HVAC must also be in operation during and after the installation to ensure a stable environment to protect the hardwood floor. Ideal conditions are always a tem-perature between 60°F and 80°F (15-26 degrees Celsius) and relative humidity between 30-60% during and after installation. The use of a humidifier or dehumidifier may be required to maintain these conditions.
4. Engineered wood flooring can be installed on, below or above grade level, but should not be installed in full bathrooms or other wet environments.
5. Take special care when transporting and unloading hardwood flooring at the job site. Store the hardwood flooring in a safe dry place making sure to provide a 4” air space un-der cartons that are stored upon “on-grade” concrete floors. Flooring should be stored in small lots in the rooms where the installation will take place and allowed to properly acclimate/ condition to the job environment.
6. Flooring should be allowed to acclimate for a minimum of 48 hours or until condi-tions are at normal living conditions and meet minimum installation requirements for moisture content. Store the wood flooring in the unopened boxes at installation area. Do not store the boxes of flooring directly on concrete or close to a wall. DO NOT OPEN more than a few boxes in advance of installation and only the number of boxes that will be installed within the next few hours. Only open enough boxes to ensure a good mix of lengths and color.
7. Moisture content should be checked with the appropriate device to ensure proper in-stallation conditions. Moisture content of wood sub floor should not exceed 9% and the moisture content of the wood should be within 2% of the sub floor.
8. Concrete sub floors must be fully cured for a minimum of 60 days and dry (3lbs or less/24 hours /1,000 sq. ft., with a calcium chloride test) or less than 75% with relative humidity probes (in-situ testing)
9. Ensure exterior landscaping is complete and graded away from the foundation. Gutters and downspouts must be in place directing rainwater away. Always store wood flooringin a controlled environment of 60°- 80° Fahrenheit (15° - 26° Celsius) and 30% - 60% relative humidity.
PROPER SITE CONDITIONS & HANDLING
5
3/8”, 1/2”, 9/16”, 5/8”, 3/4”. We recommend the installer follow all guidelines set forth by the National Wood Flooring Association (www.nwfa.org) for job site, sub-floor and gener-al installation recommendations. Engineered hardwood flooring can be installed on all grade levels; on grade, above grade and below grade. This includes installation directly to concrete, terrazzo and wood sub floors, or over existing ceramic tile, wood and vinyl floors, with proper preparation. Installer/Owner Responsibility: It is the responsibility of the owner/installer to inspect the flooring. It is also the owner/installer’s responsibility to ensure the jobsite conditions, plus the jobsite sub-floors are environmentally and structurally acceptable prior to the beginning of installation. Prior to installation, the owner and or installer are responsible for the final inspection of materials and is encour-aged to report any deficiencies in grade, manufacturing and finish directly to the seller. Should an individual piece be questionable or not meet standards, it should not be used. Materials installed with visible defects will not be covered by the warranty. The owner and/or installer are responsible for ensuring that the proper installation conditions and appropriate sub-floors meet or exceed all NWFA industry standards. Proper installation can be affected by adverse moisture content in the product, humidity at the job site, ac-climation of flooring to local site conditions, preparation of job site, preparation of sub-floor, and flooring layout. The sub-floor must be clean, flat, dry and structurally sound. We recommend ordering 5% above the actual square footage requirements to allow for cutting and grading of material. Due to inherent variations with wood flooring product, the installer must work out of 4-5 cartons simultaneously to ensure proper blending across the floor.
GENERAL RECOMMENDATIONS FOR TONGUE & GROOVE HARDWOOD FLOORING INSTALLATION
6
Radiant Heat is warranted for installation over hydronic radiant heat if installed per these instructions. However, flooring is not warranted over electric radiant heat systems. Only hydronic systems are approved. Please carefully read the “Radiant Heat” section below before finalizing product selections.
When installing engineered wood flooring over radiant heat, follow the installation pro-cedure in addition to the directions below:
1. Flooring is not warranted for use over radiant heat systems heated by electric ele-ments. Only hydronic systems are approved. Hydronic systems must include in-floor temperature sensors and a wall thermostat that allows the system to adjust the water temperature according to anticipated heat loss. Flooring installed in multi-unit projects where the water temperature is not regulated separately in each unit is not warranted.
2. Prior to installation over radiant heat moisture testing must be conducted and doc-umented per ASTM 1869-89 (Calcium Chloride Test) or, for wood sub-floors, using a pin type meter. The moisture content for concrete sub-floors must not exceed 3.0 lbs. per 1000 square feet per ASTM 1869-89 (Calcium Chloride Test), and the moisture content for wood sub-floors must not exceed 12%. If moisture levels exceed these limits, do not install the flooring.
3. The surface temperature of the subfloor must never exceed 82°F in any location. The temperature setting must always remain within 15°F of normal operating level and should never be turned completely off. Excessive heat, rapid heating, and/or failure to maintain humidity levels between 30% and 60% are likely to cause cracking, cupping and other forms of floor failure. Slight surface checking (cracking), particularly at the ends of planks, should be expected in installations over radiant heat and do not constitute a product failure. 4. All concrete must be allowed to properly cure and dry for a minimum of 4 weeks prior to the operation of the radiant heat system. The system should then be operated at least 2/3 maximum output for a minimum of 2 weeks prior to installation of flooring to further allow moisture from the sub-floor to dissipate and reach equilibrium. This procedure must be followed regardless of the time of year. Four (4) days prior to flooring installa-tion, reduce thermostat to 65°F.
5. As always, relative humidity of the jobsite must be maintained between 30% and 60%. Use of a humidification/ dehumidification system may be required to maintain the prop-er humidity levels, particularly over radiant heat. Failure to maintain proper humidity levels will void all warranties.
6. Beginning 48 hours after installation, slowly raise the temperature of the heating sys-tem to its preferred operating level over a period of 5 days.
RADIANT HEAT
7
Do not sand existing resilient tile, sheet flooring, backing, or felt linings as these prod-ucts may contain asbestos fibers that are not easily identified. The inhalation of asbestos dust can cause asbestosis or other serious bodily harm. Check with local, state, and fed-eral laws for handling hazardous material prior to attempting the removal of these floors.
Wood Dust contains a chemical known to the state of California to cause cancer. Ap-proved respirators may be needed depending upon dust conditions. Sawing, sanding and/or machining wood products can produce wood dust, which can cause a flammable or explosive hazard. Wood dust may also lead to lung, upper respiratory tract, eye, and or skin irritation, and some species of wood may cause dermatitis and or allergic respira-tory effects. The International Agency for Research on Cancer (IARC) has classified wood dust as a nasal carcinogen in humans. The National Toxicology Program (NTP) has also classified wood dust as a known human carcinogen. • Avoid dust contact with ignition source. • Sweep or vacuum dust for recovery or disposal. • Avoid prolonged or repeated breathing of wood dust in air.
• Approved respirators may be needed depending upon dust conditions.
• Avoid dust contact with eyes and skin. Wear gloves and safety glasses when handling and machining the product.
First Aid: If inhaled, remove to fresh air. If irritation persists, contact a physician.
ASBESTOS WARNING
WOOD DUST WARNING
8
Prevent Scratches - There is no such thing as a “scratchproof” wood floor, but following these basic procedures will reduce the likelihood and frequency of scratches:
• Do not drag or roll furniture or other heavy objects across the floor. Rollers from refrig-erators, TV’s, stereos, etc. will dent the floor. To prevent the denting first lay 1/2” plywood on the floor and roll the appliance or heavy furniture on the plywood.
• Place protective mats under chairs with wheels.
• Felt padding should be permanently affixed to the legs of all furniture before it is moved into the space.
• Do not allow people to wear spiked heels on the floor, which will damage even the hard-est wood floors and finishes.
• Pet claws should always be properly trimmed.
• Work boots and shoes that may have pebbles lodged in the soles should be removed prior to entering.
• Remove Grit - Care should be taken to prevent dirt, sand and grit from accumulating on the surface of your floor. They will act like sandpaper and abrade the finish. Walk off mats should be placed inside and out at all exterior exits, and the floor should be swept or vacuumed frequently.
• Mats and Area Rugs - All mats or rugs should be cleaned and/or replaced on a regular basis. They should also be moved occasionally to allow natural color changes caused by light to occur evenly in all areas. Never use latex or rubber backed mats or rugs; they will permanently stain the floor.
• Avoid Standing Moisture - Water and hardwood floors don’t mix. Never wet mop your floor, and always clean up spills and standing water as soon as possible. With water or any other cleaning agent, be sure to thoroughly ring out the applicator or mop prior to applying it to the floor. A damp mop is fine if the moisture is limited to an amount that will evaporate quickly. Moisture that can seep into the seams between the planks may cause damage to your flooring. Do not allow soiled mats or rugs to stay on the floor as they can trap moisture on the surface.
CLEANING & MAINTENANCE
9
Finish will not wear through in normal residential conditions with proper maintenance.
Flooring will be free from manufacturing defects for as long as you own your home (orig-inal purchaser only). Manufacturing defects are improper milling, laminating, or assem-bly. THIS LIMITED WARRANTY IS MADE SUBJECT TO THE FOLLOWING CONDITIONS:
The flooring must be used only indoors in residential areas and installed and used in accordance with our installation procedures.
The installation was done in compliance with the written instructions, and humidity levels do not drop below 30%.
No warranty coverage is provided for flooring that contains obvious defects of any kind that were installed, nonetheless.
The surface wear must not have occurred as a result of incorrect maintenance or acci-dents such as damage caused by scratching, impact, or cutting. It must be readily visible and be 10% or more of the floor. Gloss reduction is not considered wear through.
Wood is a natural product; variations in its grain pattern, color, and or texture are normal and are not considered defects. No warranty shall apply to those. The warranty will not apply to the natural color changes which occur in wood over time due to light exposure.
RESIDENTIAL LIMITED LIFETIME WARRANTY
10
Squeaking, popping or crackling due to low spots, un-even sub-floor, insufficient expan-sion space.
Color match to other wood products such as moldings, stairs, cabinets.
Indentations, scratches, or damages caused by negligence, exposure to extreme heat, dryness, or water saturation (including but not limited to a leaky faucet, broken pipe and wet mopping), accidents, abuse, misuse, indentation from high heels or pet nails, pet stains, furniture rollers, stains as a result of chemical or industrial products, failure to follow all the manufacturers specific written installation and maintenance instructions, insufficient protection or improper alterations of the original product.
This writing is the complete and exclusive statement of the warranty and is in lieu of all other express and/or statutory warranties. The manufacturer assumes no liability for in-cidental or consequential damages, so this exclusion may not apply to you. This warranty gives you specific legal rights and you may also have other rights that vary from state to state or province to province. The sole remedy provided herein is the repair or replace-ment of the defective products. Labor for installation is not covered by this warranty.
No installer, retailer, distributor, or agent has the authority to increase or alter the obli-gations or limitations of this warranty.
Any and all disputes arising out of the purchase of this product or this warranty shall be subject to mandatory and binding arbitration in Wausau, Wisconsin, pursuant to the rules of the American Arbitration Association. Any jury trials are expressly waived.
WARRANTY EXCLUSIONS
11