Embed Size (px)
Citation preview

INSTALLATION GUIDE
Timberlane, Inc. • 150 Domorah Drive, Montgomeryville, PA 18936 • 800-250-2221 • Timberlane.com
Timberlane, Inc. • 150 Domorah Drive, Montgomeryville, PA 18936 • 800-250-2221 • Timberlane.com 2
Find more resources at Timberlane.com
Timberlane Shutters: Installation Guide
WELCOME Thank you for choosing Timberlane. This guide provides clear, step-by-step instructions for installing your new Timberlane shutters and shutter hardware.
Receiving Your Products: • Count the number of boxes you received against the count detailed in the packing slip.
(Note: Shutters and Hardware MAY ship separately so please refer to the packing slip.) • Inspect the outside of the boxes for visible damage. Open each package and check
the contents. • Should you be missing any packages or items, or notice any damage, call a Timberlane
Professional at 1-800-250-2221 before proceeding.
Finishing Your Shutters: • If you ordered your shutters primed, they are now ready for a topcoat of your choice. • Either latex or oil-based high gloss paints can be applied over our primer. The primer
will have slightly raised the wood’s grain, so a light sanding is recommended. • If you ordered your shutters in unprimed, be sure to use a superior quality tannin-blocking
millwork primer prior to painting. Staining is an alternative, but inappropriate in almost all historical projects, as stain is considered a contemporary finish.
Installing Your Shutters:Once your shutters are finished, use the Table of Contents below to find the appropriate installation instructions based on the type of shutter hardware that will be used. Should you have any questions at any time during this process, please call us at 800.250.2221. A Timberlane Shutter Specialist will be happy to assist you.
Once again, thank you for choosing Timberlane.
TABLE OF CONTENTS
Before you Start ........................................... 3Glossary ..................................................................... 3Hardware Installation1/2” Diameter Notched Pintel ...........................4T-Notched Pintel ....................................................4“H” Style Lift Off Hinges ...................................... 5Lull & Porter Mortise Hinges .............................. 5Jamb Pintels ............................................................ 5Clark Tip Blind Hinge ............................................6New York Style “L” Hinge .................................... 7Strap Hinges with Plate Pintels ........................ 8
Strap Hinges with Jamb Pintels .......................9Strap Hinges with Lag Pintels ......................... 10Tiebacks with Lag Mount ....................................11Tiebacks with Plate Mount ................................12Tiebacks with Sill Mount .....................................13Bullet Catch .............................................................14Hook & Staple .........................................................15New England Spring Latch................................16Shutter Locks with Pull Rings .......................... 17Shutter Capping ....................................................18Bermuda Shutters ................................................19Board & Batten Shutters .................................. 20

Timberlane, Inc. • 150 Domorah Drive, Montgomeryville, PA 18936 • 800-250-2221 • Timberlane.com 3
Find more resources at Timberlane.com
Timberlane Shutters: Installation Guide
BEFORE YOU BEGINSafety First! Always be certain to heed all safety instructions provided with any hand and power tools you may use to install our shutters and shutter hardware! Be sure to wear all appropriate safety equipment, including eye protection. Be aware that any material, particularly glass and masonry, can easily chip or break even when all safety precautions are followed.
Wood: We advise drilling pilot holes into wood before screwing additional parts into the surface. The pilot hole must be slightly smaller than the diameter of the screw to be used.
Masonry: We recommend using Tapcon® screws and expansion shields when working in masonry (brick, stone, stucco, etc.). When drilling into masonry, always drill the hole for the expansion shield using a masonry bit in a hammer drill. Note that the size of the required masonry bit is cast into the expansion shield. After an expansion shield is installed, screw the lag into it until the exposed portion of the lag yields the desired position of the shutter.
Mortises: Always try to use existing mortises before deciding to cut new ones. Should you need to cut a new mortise, be aware that unless you are a skilled carpenter, you may want to consider asking an expert for help. All of the instructions included here assume there are no existing mortises. Castings: Do not forget that all of our cast hardware is shipped unpainted and should be painted before installation. Castings are inherently weaker than stamped or machined metal parts so be sure to use hand tools rather than power tools when installing them to avoid over torquing and possible breakage.
Shutter Positioning: Nearly all of the installations described here require a 1/4” gap between the shutter and the casement. To accommodate this while maintaining a balanced, centered appearance, your shutters must be sized properly when originally ordered. Be sure you have ordered shutters that fit properly into (or in some cases, over) your window casement’s. Large shutters (generally 6’ tall or more) may require more than two hinges.
Remember: With only a few exceptions, male hinges always go on the house and female hinges always go on the shutter! (Our #2075 Notched Pintel, #2077 T-Notched Pintel and #105-Series Philadelphia Strap Hinge assemblies are the exceptions.)
GLOSSARY
Casement: The frame around a window, usually made of wood or metal.Expansion Shield: A metal insert used in masonry to receive a lag screw.Head: The swiveling portion of a Tieback that contacts the shutter.Mortise: A recessed area cut into a shutter or casement to receive a hinge or pintel.Pintel: The pin on which another part pivots.Plumb: Exactly vertical.Rabbet: A step shaped channel cut along the edge of a shutter.
Rail: The horizontal pieces of a shutter’s frame.Shim: A thin strip of material used to fill in a space between parts.Shutter Dog: A British term for the head of a Tieback.Stile: The vertical pieces of a shutter’s frame.Tieback: A hardware assembly designed to retain a shutter in its open position. (SHUTTER DOG)Window Sill: The horizontal shelf at the base of a window casement.
Timberlane, Inc. • 150 Domorah Drive, Montgomeryville, PA 18936 • 800-250-2221 • Timberlane.com 4
Find more resources at Timberlane.com
Timberlane Shutters: Installation Guide
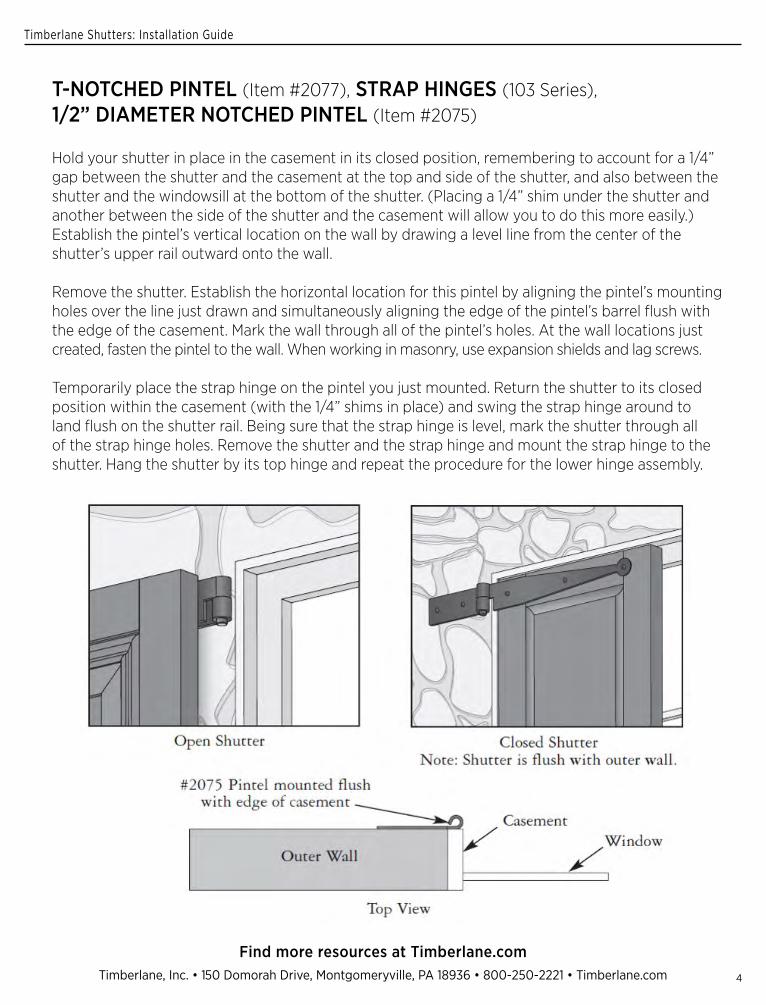
T-NOTCHED PINTEL (Item #2077), STRAP HINGES (103 Series), 1/2” DIAMETER NOTCHED PINTEL (Item #2075)
Hold your shutter in place in the casement in its closed position, remembering to account for a 1/4” gap between the shutter and the casement at the top and side of the shutter, and also between the shutter and the windowsill at the bottom of the shutter. (Placing a 1/4” shim under the shutter and another between the side of the shutter and the casement will allow you to do this more easily.) Establish the pintel’s vertical location on the wall by drawing a level line from the center of the shutter’s upper rail outward onto the wall.
Remove the shutter. Establish the horizontal location for this pintel by aligning the pintel’s mounting holes over the line just drawn and simultaneously aligning the edge of the pintel’s barrel flush with the edge of the casement. Mark the wall through all of the pintel’s holes. At the wall locations just created, fasten the pintel to the wall. When working in masonry, use expansion shields and lag screws.
Temporarily place the strap hinge on the pintel you just mounted. Return the shutter to its closed position within the casement (with the 1/4” shims in place) and swing the strap hinge around to land flush on the shutter rail. Being sure that the strap hinge is level, mark the shutter through all of the strap hinge holes. Remove the shutter and the strap hinge and mount the strap hinge to the shutter. Hang the shutter by its top hinge and repeat the procedure for the lower hinge assembly.

Timberlane, Inc. • 150 Domorah Drive, Montgomeryville, PA 18936 • 800-250-2221 • Timberlane.com 5
Find more resources at Timberlane.com
Timberlane Shutters: Installation Guide
“H” STYLE LIFT OFF HINGES, LULL & PORTER MORTISE HINGE JAMB PINTELS (107 Series • 109 Series • 203 Series)
These assemblies require cutting mortises in both the shutter and the casement. Note that the 107-Series has left- and right-specific hinges. Establish the casement mortise location by measuring from the underside surface of the top of the casement down 4“ and marking the spot with a level line. This line represents the top of the casement hinge. Place your shutter in the casement in its closed position, remembering to account for a 1/4” gap between the shutter and the casement at the top and side of the shutter, and also between the shutter and the windowsill at the bottom of the shutter. (Placing a 1/4” shim under the shutter and another between the side of the shutter and the casement will allow you to do this more easily.) Transfer the casement hinge mark you previously made onto the shutter to locate the shutter mortise. Be sure your second, transferred mark is level with the first, casement mark. Remove the shutter.
Trace the male hinge outline onto the casement at the mark you just made. Cut the casement mortise and screw the male hinge to the casement. Trace the female hinge outline onto the shutter and cut its mortise the same way. Now screw the female hinge to the shutter.
Hang the shutter on the top hinge assembly, being sure to maintain the 1/4” gap around the shutter perimeter as previously described, and measure 4” up from the top of the windowsill to establish the lower shutter mortise location (not the casement mortise location). Remove the shutter, trace and cut the shutter mortise and mount the female hinge on the shutter. Hang the shutter again and transfer marks from the lower shutter hinge to the casement to locate the casement mortise. Remove the shutter, trace and cut the casement mortise, mount the male hinge to the casement and hang the shutter.
Timberlane, Inc. • 150 Domorah Drive, Montgomeryville, PA 18936 • 800-250-2221 • Timberlane.com 6
Find more resources at Timberlane.com
Timberlane Shutters: Installation Guide
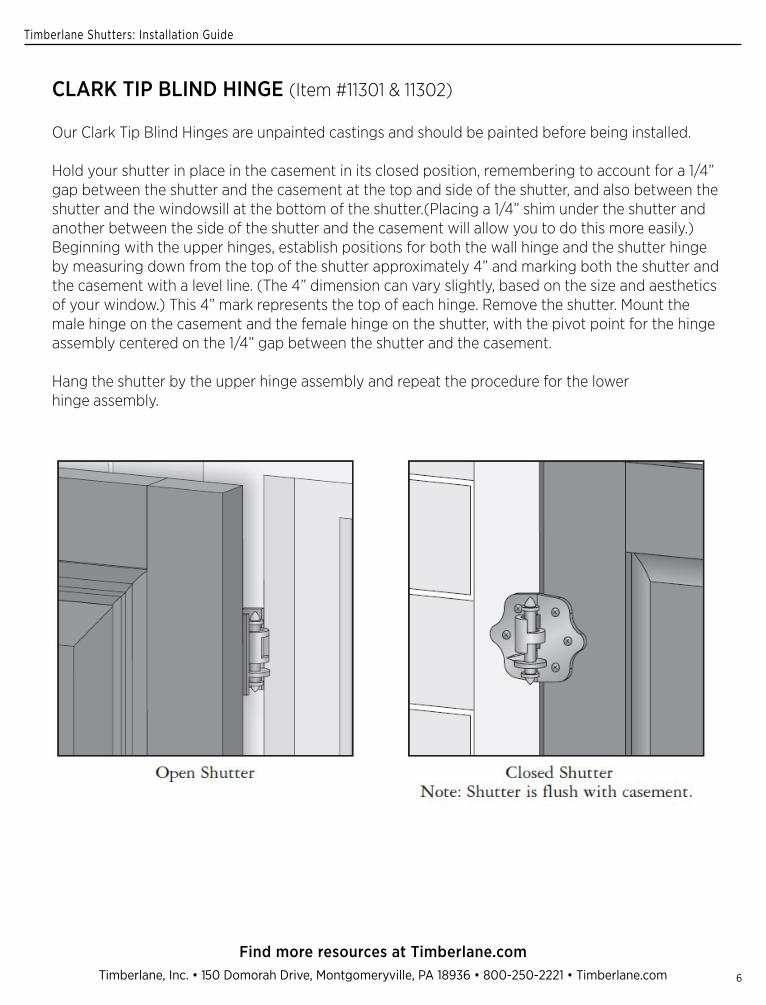
CLARK TIP BLIND HINGE (Item #11301 & 11302)
Our Clark Tip Blind Hinges are unpainted castings and should be painted before being installed.
Hold your shutter in place in the casement in its closed position, remembering to account for a 1/4” gap between the shutter and the casement at the top and side of the shutter, and also between the shutter and the windowsill at the bottom of the shutter.(Placing a 1/4” shim under the shutter and another between the side of the shutter and the casement will allow you to do this more easily.) Beginning with the upper hinges, establish positions for both the wall hinge and the shutter hinge by measuring down from the top of the shutter approximately 4” and marking both the shutter and the casement with a level line. (The 4” dimension can vary slightly, based on the size and aesthetics of your window.) This 4” mark represents the top of each hinge. Remove the shutter. Mount the male hinge on the casement and the female hinge on the shutter, with the pivot point for the hinge assembly centered on the 1/4” gap between the shutter and the casement.
Hang the shutter by the upper hinge assembly and repeat the procedure for the lowerhinge assembly.

Timberlane, Inc. • 150 Domorah Drive, Montgomeryville, PA 18936 • 800-250-2221 • Timberlane.com 7
Find more resources at Timberlane.com
Timberlane Shutters: Installation Guide
NEW YORK STYLE “L” HINGE(#11101s • #11102s • #11103s • #11001 • #11002)
One upper and one lower New York Style “L” Hinge are required to hang an individual shutter. These parts are specifically designed to be either upper or lower hinges and are not interchangeable.
With your left-hand shutter laying on a flat, stable surface, place an upper hinge 1/2“ down from the top of the shutter and 1/4” in from the left edge of the shutter. Make sure the hinge is square to the edges of the shutter and fasten it to the shutter with the screws provided. Repeat this procedure for the lower hinge at the bottom of the shutter.
Temporarily insert your two plate pintels into the hinges you just fastened to the shutter. Use tape to hold the pintels in position and place your shutter in the casement in its closed position, remembering to account for a 1/4” gap between the shutter and the casement at the top and side of the shutter, and also between the shutter and the windowsill at the bottom of the shutter. (Placing a 1/4” shim under the shutter and another between the side of the shutter and the casement will allow you to do this more easily.) Be sure the shutter is vertically plumb and swing the pintels around to the casement and mark their holes on the casement. Remove the shutter. Install the pintels to the casement with the screws provided and hang the shutter on the pintels.

Timberlane, Inc. • 150 Domorah Drive, Montgomeryville, PA 18936 • 800-250-2221 • Timberlane.com 8
Find more resources at Timberlane.com
Timberlane Shutters: Installation Guide
STRAP HINGES (101 Series • 102 Series • 103 Series • 104 Series • 105 Series • 117 Series)
PLATE PINTELS (#2042 • #2042 • #2044 • #2062 • #2063 • #2064 • #20681S •#2082S • #2085 • #2086 • #2087)
Hold your shutter in place in the casement in its closed position, remembering to account for a 1/4” gap between the shutter and the casement at the top and side of the shutter, and also between the shutter and the windowsill at the bottom of the shutter. (Placing a 1/4” shim under the shutter and another between the side of the shutter and the casement will allow you to do this more easily.) Temporarily assemble the pintel to the strap hinge. Establish the pintel’s location on the casement by centering the strap hinge on the shutter’s upper rail, and sliding the assembly horizontally so the bend in the strap hinge is directly over the inner edge of the casement. Ensure the assembly is level and mark the pintel’s holes onto the casement. Remove the shutter and mount the pintel where marked.
With a level, draw a plumb line from the pintel you just installed down to the area where the shutter’s lower rail will be. This horizontally locates the lower pintel. Vertically locate this pintel by using the same method described above...centering it with the lower rail of the shutter. Once located, mount the pintel. Place the shutter back into the casement, accounting for the 1/4” gap earlier described. Place the strap hinges on their respective pintels and swing them around to lay flush and level on the shutter. Mark the holes, remove the shutter and mount the strap hinges to the shutter. Hang the shutter on the pintels to finish.

Timberlane, Inc. • 150 Domorah Drive, Montgomeryville, PA 18936 • 800-250-2221 • Timberlane.com 9
Find more resources at Timberlane.com
Timberlane Shutters: Installation Guide
STRAP HINGES (101 Series • 102 Series • 104 Series • 105 Series)JAMB PINTELS (#2032 • #2033 • #2034)
Installing the jamb pintel will require either cutting a mortise in the wood window casement or using a suitable existing mortise.
Temporarily assemble the strap hinge to the jamb pintel and lay the hinge on the upper rail of the shutter, centered vertically. Swing the pintel around to be flush against the edge of the shutter and mark a line on the edge of the shutter at the bottom of the pintel. Remove the hinge assembly. Hold your shutter in place in the casement in its closed position, remembering to account for a 1/4” gap between the shutter and the casement at the top and side of the shutter, and also between the shutter and the windowsill at the bottom of the shutter. (Placing a 1/4” shim under the shutter and another between the side of the shutter and the casement will allow you to do this more easily.) Transfer the mark you just made onto the jamb surface of the casement. Remove the shutter. Align the pintel with the mark on the jamb surface and trace its outline. Use this outline to cut a 3/16” deep mortise. Mount the pintel into the mortise.
Place the shutter into the casement in its closed position, again being sure to account for the 1/4” gap around its perimeter. Temporarily install the strap hinge into the mounted pintel and swing it around to be flush against the outer surface of the shutter and mark the holes. Remove the shutter and mount the strap hinge to it. Repeat the procedure for the lower hinge assembly.
Timberlane, Inc. • 150 Domorah Drive, Montgomeryville, PA 18936 • 800-250-2221 • Timberlane.com 10
Find more resources at Timberlane.com
Timberlane Shutters: Installation Guide
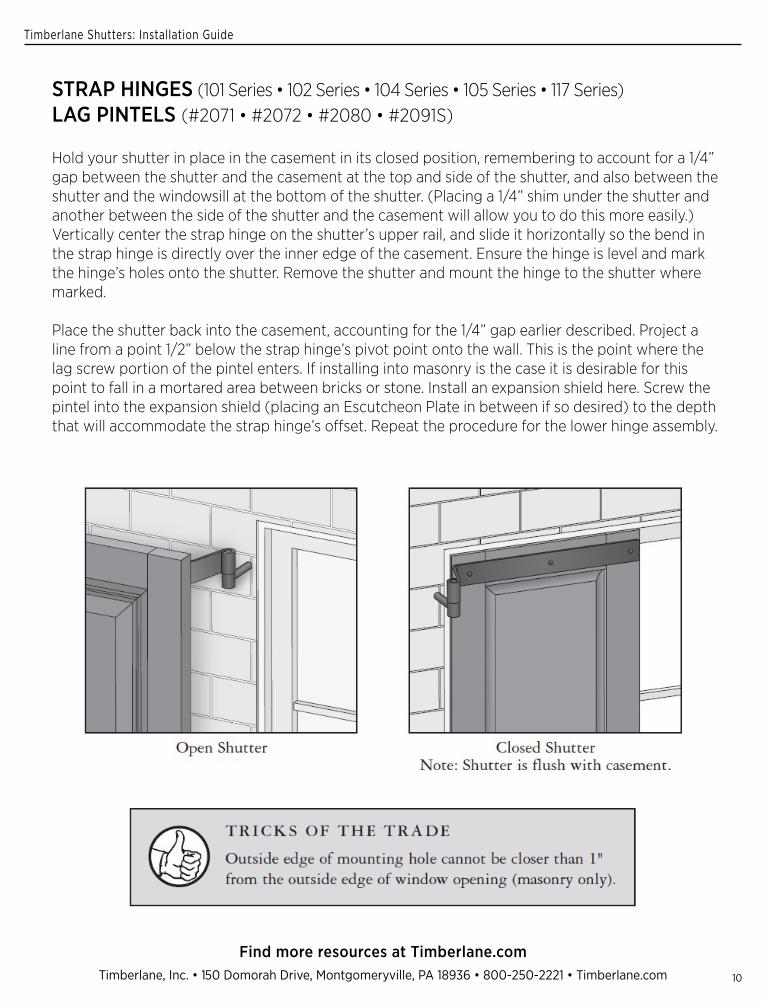
STRAP HINGES (101 Series • 102 Series • 104 Series • 105 Series • 117 Series)LAG PINTELS (#2071 • #2072 • #2080 • #2091S)
Hold your shutter in place in the casement in its closed position, remembering to account for a 1/4” gap between the shutter and the casement at the top and side of the shutter, and also between the shutter and the windowsill at the bottom of the shutter. (Placing a 1/4” shim under the shutter and another between the side of the shutter and the casement will allow you to do this more easily.) Vertically center the strap hinge on the shutter’s upper rail, and slide it horizontally so the bend in the strap hinge is directly over the inner edge of the casement. Ensure the hinge is level and mark the hinge’s holes onto the shutter. Remove the shutter and mount the hinge to the shutter where marked.
Place the shutter back into the casement, accounting for the 1/4” gap earlier described. Project a line from a point 1/2” below the strap hinge’s pivot point onto the wall. This is the point where the lag screw portion of the pintel enters. If installing into masonry is the case it is desirable for this point to fall in a mortared area between bricks or stone. Install an expansion shield here. Screw the pintel into the expansion shield (placing an Escutcheon Plate in between if so desired) to the depth that will accommodate the strap hinge’s offset. Repeat the procedure for the lower hinge assembly.
Timberlane, Inc. • 150 Domorah Drive, Montgomeryville, PA 18936 • 800-250-2221 • Timberlane.com 11
Find more resources at Timberlane.com
Timberlane Shutters: Installation Guide
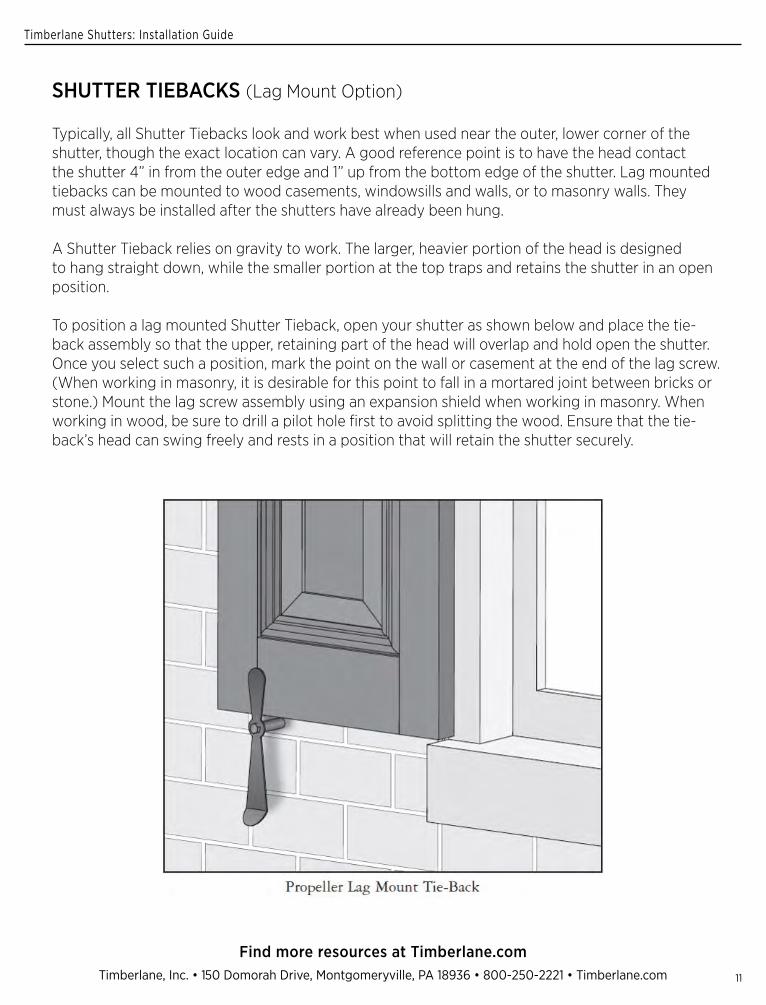
SHUTTER TIEBACKS (Lag Mount Option)
Typically, all Shutter Tiebacks look and work best when used near the outer, lower corner of the shutter, though the exact location can vary. A good reference point is to have the head contact the shutter 4” in from the outer edge and 1” up from the bottom edge of the shutter. Lag mounted tiebacks can be mounted to wood casements, windowsills and walls, or to masonry walls. They must always be installed after the shutters have already been hung.
A Shutter Tieback relies on gravity to work. The larger, heavier portion of the head is designed to hang straight down, while the smaller portion at the top traps and retains the shutter in an open position.
To position a lag mounted Shutter Tieback, open your shutter as shown below and place the tie-back assembly so that the upper, retaining part of the head will overlap and hold open the shutter. Once you select such a position, mark the point on the wall or casement at the end of the lag screw. (When working in masonry, it is desirable for this point to fall in a mortared joint between bricks or stone.) Mount the lag screw assembly using an expansion shield when working in masonry. When working in wood, be sure to drill a pilot hole first to avoid splitting the wood. Ensure that the tie-back’s head can swing freely and rests in a position that will retain the shutter securely.

Timberlane, Inc. • 150 Domorah Drive, Montgomeryville, PA 18936 • 800-250-2221 • Timberlane.com 12
Find more resources at Timberlane.com
Timberlane Shutters: Installation Guide
SHUTTER TIEBACKS (Plate Mount Option)
Typically, all Shutter Tiebacks look and work best when used near the outer, lower corner of the shutter, though the exact location can vary. A good reference point is to have the head contact the shutter 4” in from the outer edge and 1” up from the bottom edge of the shutter. Lag mounted tiebacks can be mounted to wood casements, windowsills and walls, or to masonry walls. They must always be installed after the shutters have already been hung.
A Shutter Tieback relies on gravity to work. The larger, heavier portion of the head is designed to hang straight down, while the smaller portion at the top traps and retains the shutter in an open position.
To position a lag mounted Shutter Tieback, open your shutter as shown below and place the tie-back assembly so that the upper, retaining part of the head will overlap and hold open the shutter. Once you select such a position, mark the point on the wall or casement at the end of the lag screw. (When working in masonry, it is desirable for this point to fall in a mortared joint between bricks or stone.) Mount the lag screw assembly using an expansion shield when working in masonry. When working in wood, be sure to drill a pilot hole first to avoid splitting the wood. Ensure that the tie-back’s head can swing freely and rests in a position that will retain the shutter securely.

Timberlane, Inc. • 150 Domorah Drive, Montgomeryville, PA 18936 • 800-250-2221 • Timberlane.com 13
Find more resources at Timberlane.com
Timberlane Shutters: Installation Guide
SHUTTER TIEBACKS (Still Mount Option)
Typically, all Shutter Tiebacks look and work best when used near the outer, lower corner of the shutter, though the exact location can vary. A good reference point is to have the head contact the shutter 4” in from the outer edge and 1” up from the bottom edge of the shutter. Sill Mounted Tiebacks are to be mounted to windowsills only. They must always be installed after the shutters have already been hung.
A Shutter Tieback relies on gravity to work. The larger, heavier portion of the head is designed to hang straight down, while the smaller portion at the top traps and retains the shutter in an open position.
To position a sill mounted Shutter Tieback, open your shutter as shown below and place the tie-back assembly so that the upper, retaining part of the head will overlap and hold open the shutter. Once you select such a position, be sure the sill mount bar is level and mark the holes of the sill mount bar onto the windowsill. Attach the sill mount assembly using the appropriate wood screws. Ensure that the tie-back’s head can swing freely and rests in a position that will retain the shutter securely.
Timberlane, Inc. • 150 Domorah Drive, Montgomeryville, PA 18936 • 800-250-2221 • Timberlane.com 14
Find more resources at Timberlane.com
Timberlane Shutters: Installation Guide
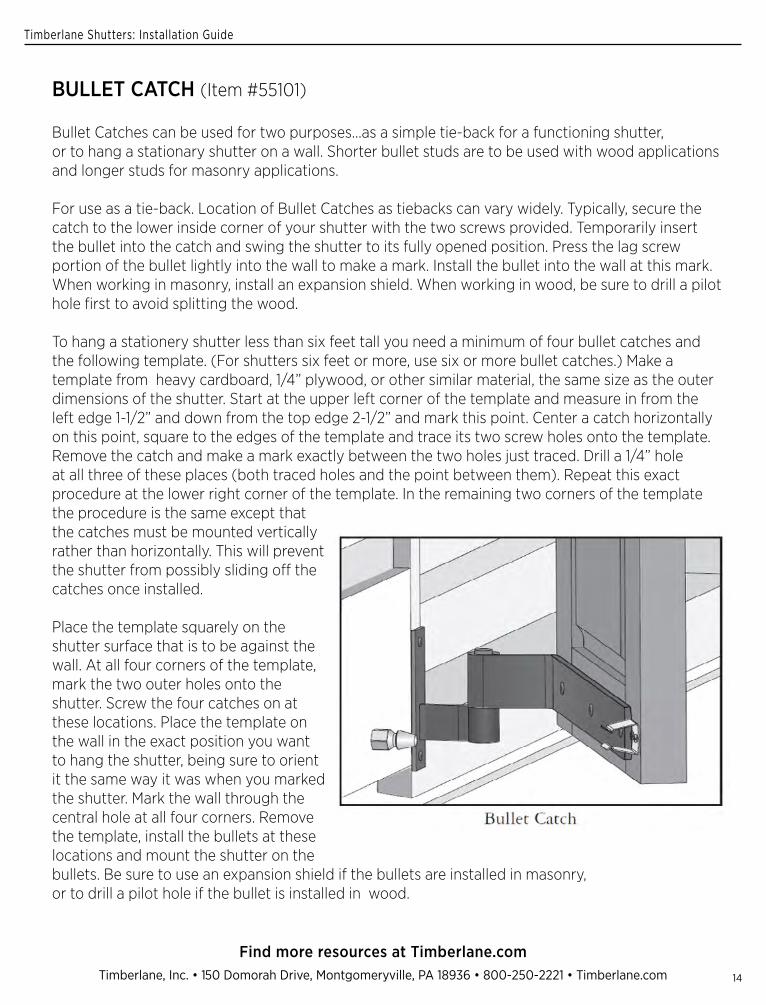
BULLET CATCH (Item #55101)
Bullet Catches can be used for two purposes...as a simple tie-back for a functioning shutter, or to hang a stationary shutter on a wall. Shorter bullet studs are to be used with wood applications and longer studs for masonry applications.
For use as a tie-back. Location of Bullet Catches as tiebacks can vary widely. Typically, secure the catch to the lower inside corner of your shutter with the two screws provided. Temporarily insert the bullet into the catch and swing the shutter to its fully opened position. Press the lag screw portion of the bullet lightly into the wall to make a mark. Install the bullet into the wall at this mark. When working in masonry, install an expansion shield. When working in wood, be sure to drill a pilot hole first to avoid splitting the wood.
To hang a stationery shutter less than six feet tall you need a minimum of four bullet catches and the following template. (For shutters six feet or more, use six or more bullet catches.) Make a template from heavy cardboard, 1/4” plywood, or other similar material, the same size as the outer dimensions of the shutter. Start at the upper left corner of the template and measure in from the left edge 1-1/2” and down from the top edge 2-1/2” and mark this point. Center a catch horizontally on this point, square to the edges of the template and trace its two screw holes onto the template. Remove the catch and make a mark exactly between the two holes just traced. Drill a 1/4” hole at all three of these places (both traced holes and the point between them). Repeat this exact procedure at the lower right corner of the template. In the remaining two corners of the template the procedure is the same except that the catches must be mounted verticallyrather than horizontally. This will prevent the shutter from possibly sliding off the catches once installed.
Place the template squarely on the shutter surface that is to be against the wall. At all four corners of the template, mark the two outer holes onto the shutter. Screw the four catches on at these locations. Place the template on the wall in the exact position you want to hang the shutter, being sure to orient it the same way it was when you marked the shutter. Mark the wall through the central hole at all four corners. Remove the template, install the bullets at these locations and mount the shutter on the bullets. Be sure to use an expansion shield if the bullets are installed in masonry, or to drill a pilot hole if the bullet is installed in wood.

Timberlane, Inc. • 150 Domorah Drive, Montgomeryville, PA 18936 • 800-250-2221 • Timberlane.com 15
Find more resources at Timberlane.com
Timberlane Shutters: Installation Guide
HOOK & STAPLE (#52121 • #52161 • #52181)
Our Hook & Staple sets are to be used with wooden casements and windowsills. As their exact location can vary, please understand these instructions are for general reference only. The shutters must already be installed. Hook & Staple sets are available in various lengths to accommodate most windowsill applications. Often, a longer hook will work where a shorter one will not.
Hammer one staple into the shutter approximately 1” up from the bottom of the shutter and beyond the center point of the shutter, as shown below. This staple should be parallel with the bottom of the shutter.
To position the second staple, swing the shutter to approximately 10º short of its fully opened position and slip the hooked end of the rod into the staple just installed. Swing the free end of the rod around to the windowsill while maintaining the shutter’s nearly fully open position. Insert the staple through the rod’s eye and hammer it into the windowsill. Be sure that the position of this staple is far enough inward on the windowsill to not prevent the shutter from fully closing. Some adjustment of either staple’s position and/or the 10º opening position of the window may be needed.
Timberlane, Inc. • 150 Domorah Drive, Montgomeryville, PA 18936 • 800-250-2221 • Timberlane.com 16
Find more resources at Timberlane.com
Timberlane Shutters: Installation Guide
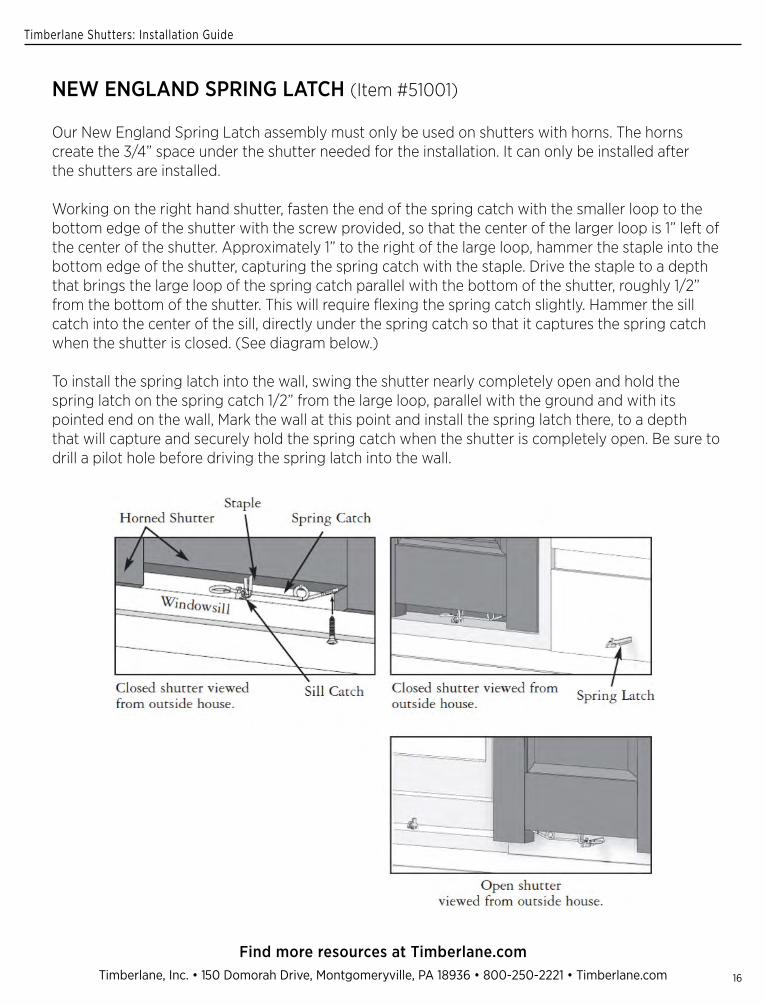
NEW ENGLAND SPRING LATCH (Item #51001)
Our New England Spring Latch assembly must only be used on shutters with horns. The horns create the 3/4” space under the shutter needed for the installation. It can only be installed after the shutters are installed.
Working on the right hand shutter, fasten the end of the spring catch with the smaller loop to the bottom edge of the shutter with the screw provided, so that the center of the larger loop is 1” left of the center of the shutter. Approximately 1” to the right of the large loop, hammer the staple into the bottom edge of the shutter, capturing the spring catch with the staple. Drive the staple to a depth that brings the large loop of the spring catch parallel with the bottom of the shutter, roughly 1/2” from the bottom of the shutter. This will require flexing the spring catch slightly. Hammer the sill catch into the center of the sill, directly under the spring catch so that it captures the spring catch when the shutter is closed. (See diagram below.)
To install the spring latch into the wall, swing the shutter nearly completely open and hold the spring latch on the spring catch 1/2” from the large loop, parallel with the ground and with its pointed end on the wall, Mark the wall at this point and install the spring latch there, to a depth that will capture and securely hold the spring catch when the shutter is completely open. Be sure to drill a pilot hole before driving the spring latch into the wall.

Timberlane, Inc. • 150 Domorah Drive, Montgomeryville, PA 18936 • 800-250-2221 • Timberlane.com 17
Find more resources at Timberlane.com
Timberlane Shutters: Installation Guide
SHUTTER LOCKS (301 Series)PULL RINGS (#53101 • #53102 • #53103)
SHUTTER LOCKS are to be installed on the shutter surface that is seen from the outside of the house when the shutters are open. They function best when installed on the center rail of the shutter. Typically the slide portion (the larger piece) of the shutter lock assembly is installed on the left shutter when viewed from outside the house. Installation of Shutter Locks must be done after the shutters are hung.
Hold the slide portion (the larger piece) of the shutter lock assembly on the center rail of the shutter, centered vertically on the rail and flush with the inner edge of the shutter. (If your shutter has a rabbeted edge, position the slide to be flush with the edge of the rabbet.) Ensure that it is level, and fasten it to the shutter with the screws provided.
With both shutters closed, place a level against the bottom of the slide portion just installed and draw a level line onto the opposite shutter. Place the bottom of the catch portion (the smaller piece) of the shutter lock assembly on this line and flush with the inner edge of the shutter (or flush with the rabbeted edge), and fasten it to the shutter with the screws provided. The slide bar of the lock should slide smoothly into the catch.
Pull Rings are to be installed on the shutter surface seen from outside the house when the shutters are open, and on the outer stile as seen from outside the house, again, when the shutters are open. Screw #53101 and #53102 to the shutter with the screws provided. #53103 includes a threaded eye bolt, which is to be screwed to the shutter.
Timberlane, Inc. • 150 Domorah Drive, Montgomeryville, PA 18936 • 800-250-2221 • Timberlane.com 18
Find more resources at Timberlane.com
Timberlane Shutters: Installation Guide
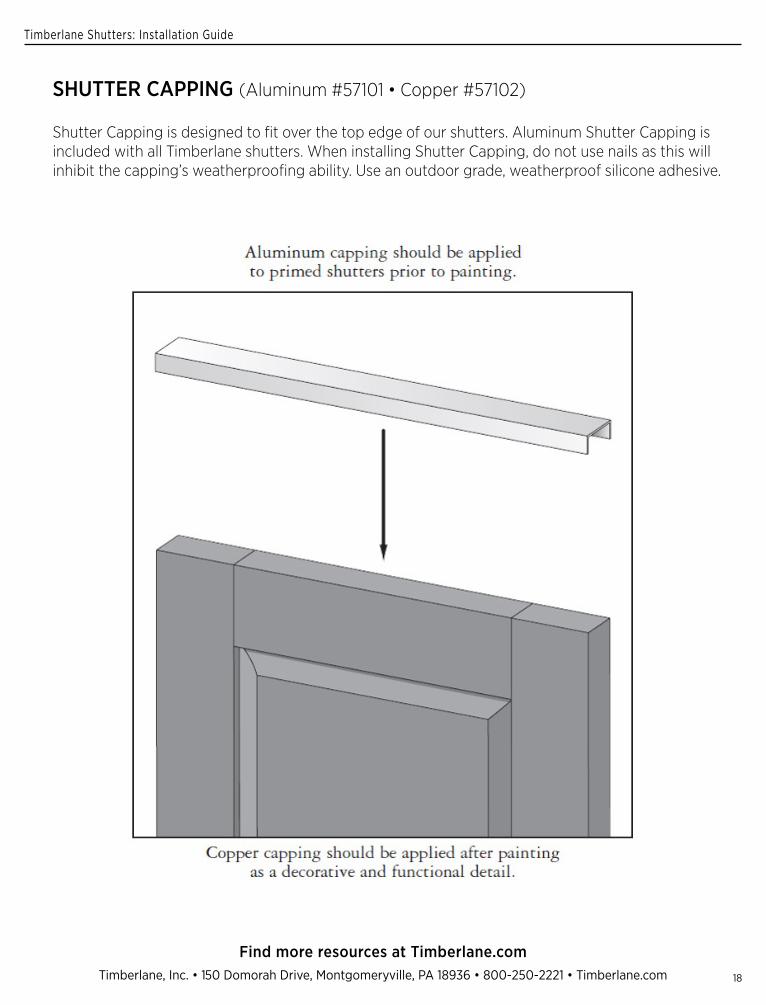
SHUTTER CAPPING (Aluminum #57101 • Copper #57102)
Shutter Capping is designed to fit over the top edge of our shutters. Aluminum Shutter Capping is included with all Timberlane shutters. When installing Shutter Capping, do not use nails as this will inhibit the capping’s weatherproofing ability. Use an outdoor grade, weatherproof silicone adhesive.
Timberlane, Inc. • 150 Domorah Drive, Montgomeryville, PA 18936 • 800-250-2221 • Timberlane.com 19
Find more resources at Timberlane.com
Timberlane Shutters: Installation Guide
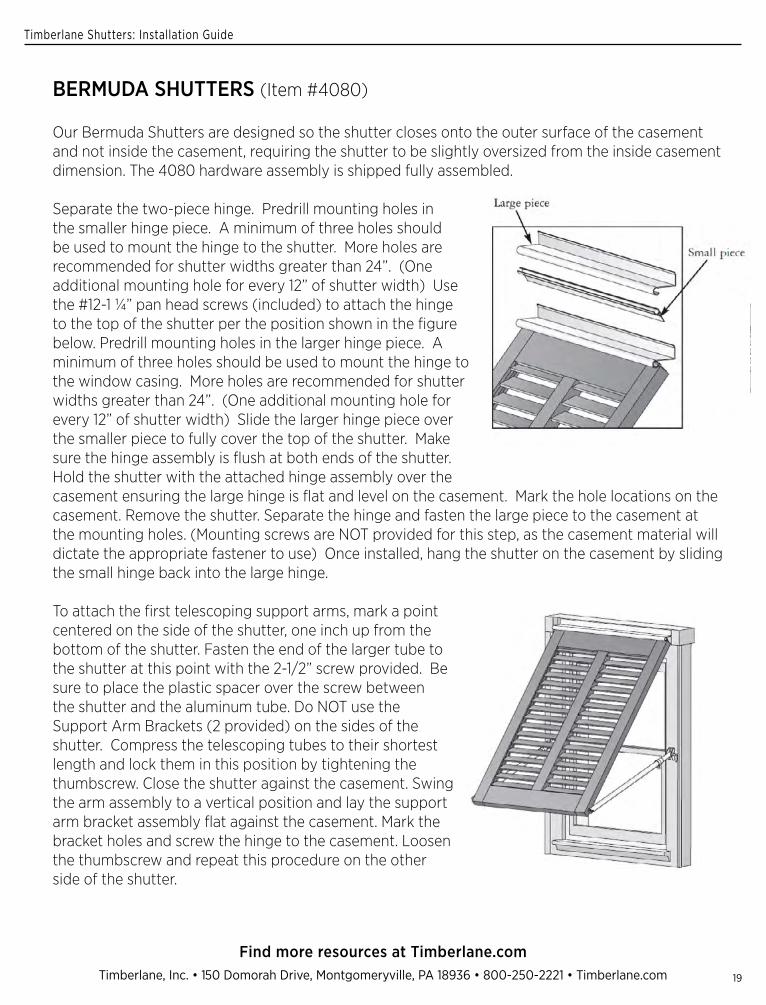
BERMUDA SHUTTERS (Item #4080)
Our Bermuda Shutters are designed so the shutter closes onto the outer surface of the casement and not inside the casement, requiring the shutter to be slightly oversized from the inside casement dimension. The 4080 hardware assembly is shipped fully assembled.
Separate the two-piece hinge. Predrill mounting holes in the smaller hinge piece. A minimum of three holes should be used to mount the hinge to the shutter. More holes are recommended for shutter widths greater than 24”. (One additional mounting hole for every 12” of shutter width) Use the #12-1 ¼” pan head screws (included) to attach the hinge to the top of the shutter per the position shown in the figure below. Predrill mounting holes in the larger hinge piece. A minimum of three holes should be used to mount the hinge to the window casing. More holes are recommended for shutter widths greater than 24”. (One additional mounting hole for every 12” of shutter width) Slide the larger hinge piece over the smaller piece to fully cover the top of the shutter. Make sure the hinge assembly is flush at both ends of the shutter. Hold the shutter with the attached hinge assembly over the casement ensuring the large hinge is flat and level on the casement. Mark the hole locations on the casement. Remove the shutter. Separate the hinge and fasten the large piece to the casement at the mounting holes. (Mounting screws are NOT provided for this step, as the casement material will dictate the appropriate fastener to use) Once installed, hang the shutter on the casement by sliding the small hinge back into the large hinge.
To attach the first telescoping support arms, mark a point centered on the side of the shutter, one inch up from the bottom of the shutter. Fasten the end of the larger tube to the shutter at this point with the 2-1/2” screw provided. Be sure to place the plastic spacer over the screw between the shutter and the aluminum tube. Do NOT use the Support Arm Brackets (2 provided) on the sides of the shutter. Compress the telescoping tubes to their shortest length and lock them in this position by tightening the thumbscrew. Close the shutter against the casement. Swing the arm assembly to a vertical position and lay the support arm bracket assembly flat against the casement. Mark the bracket holes and screw the hinge to the casement. Loosen the thumbscrew and repeat this procedure on the other side of the shutter.
Timberlane, Inc. • 150 Domorah Drive, Montgomeryville, PA 18936 • 800-250-2221 • Timberlane.com 20
Find more resources at Timberlane.com
Timberlane Shutters: Installation Guide
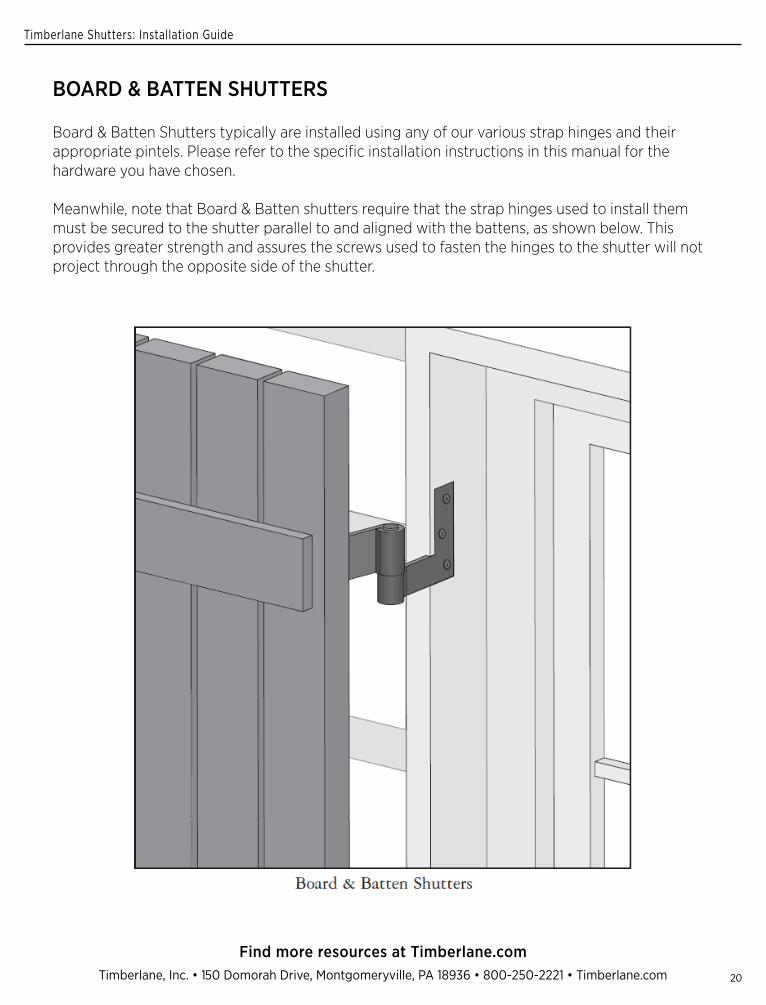
BOARD & BATTEN SHUTTERS
Board & Batten Shutters typically are installed using any of our various strap hinges and their appropriate pintels. Please refer to the specific installation instructions in this manual for the hardware you have chosen.
Meanwhile, note that Board & Batten shutters require that the strap hinges used to install them must be secured to the shutter parallel to and aligned with the battens, as shown below. This provides greater strength and assures the screws used to fasten the hinges to the shutter will not project through the opposite side of the shutter.
Timberlane, Inc. • 150 Domorah Drive, Montgomeryville, PA 18936 • 800-250-2221 • Timberlane.com 21
Find more resources at Timberlane.com
Timberlane Shutters: Installation Guide
GENERAL INFORMATION
Hardware ReturnsIn some cases, Timberlane, Inc. will accept returned hardware. All returned shutter hardware must be received in its original condition. All returns must be pre-approved and must be requested within 30 days of delivery.
Certain pieces are not covered by Timberlane’s return policy and therefore we can not allow these items to be returned. Custom hardware and/or discontinued hardware is not returnable for any reason.
It is your responsibility to check all packages upon delivery and to notify Timberlane within seven (7) days of delivery of damaged or missing parts. To notify a Timberlane representative, please call our Customer Service Department at 1 800-250-2221.
DisclaimerThe instructions found in this Timberlane Shutter Installation Guide are meant to assist you as you mount your Timberlane shutters using hardware supplied by Timberlane, and approximations are used throughout. These instructions assume your window casement depth is equal to or greater than the thickness of your shutter and that your shutters are sized appropriately for your window opening. Therefore, please understand that these instructions illustrate only basic guidelines and that specific measurements and mounting options vary from application to application.
Timberlane, Inc. and all parties represented are not liable for any injury, defect or damage sustained in the process of installing shutters and/or the accompanying hardware. For your safety, Timberlane recommends the use of protective apparatus, including safety goggles and ear plugs, when necessary.
If you have any questions throughout the installation process, please call our Customer Service Department immediately at 1-800-250-2221.
All rights reserved. Reproduction or transmission of this guide by any means, including but not limited to electronic or mechanical reprinting, photocopying or recording of any kind is strictly prohibited unless otherwise authorized in advance, in writing, by an officer of Timberlane, Inc.