Embed Size (px)
Citation preview
EMAIL: [email protected]: facebook.com/corsair
BLOG: blog.corsair.com
FORUM: forum.corsair.comTWITTER: twitter.com/corsair
USA and CANADA: (510) 657-8747 | INTERNATIONAL: (888) 222-4346 | FAX: (510) 657-8748
corsair.com
47100 BAYSIDE PARKWAY • FREMONT • CALIFORNIA • 94538 • USA
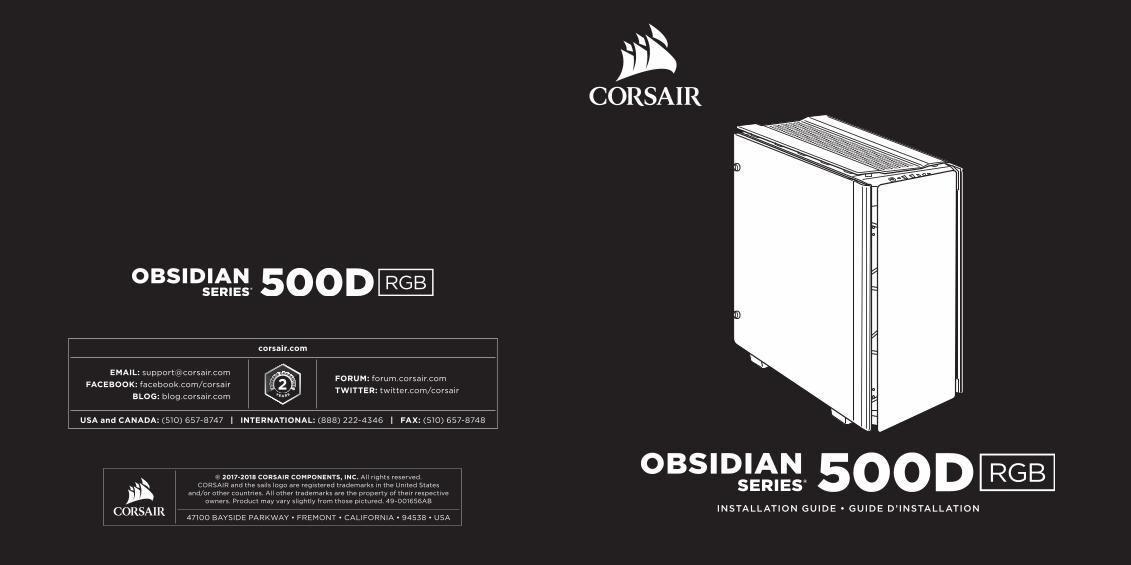
© 2017-2018 CORSAIR COMPONENTS, INC. All rights reserved. CORSAIR and the sails logo are registered trademarks in the United States
and/or other countries. All other trademarks are the property of their respective owners. Product may vary slightly from those pictured. 49-001656AB
INSTALLATION GUIDE • GUIDE D’INSTALLATION
OBSIDIAN SERIES® 500D RGB
Table des matières n Inhaltsverzeichnis n Contenido n Содержание n Índice
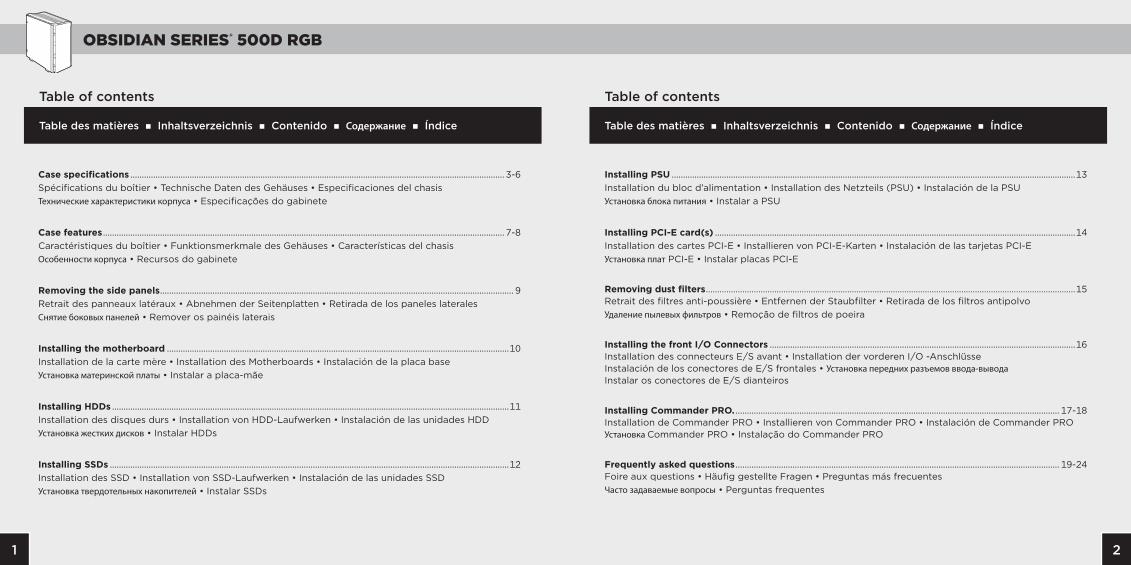
Table of contents
Table des matières n Inhaltsverzeichnis n Contenido n Содержание n Índice
Table of contents
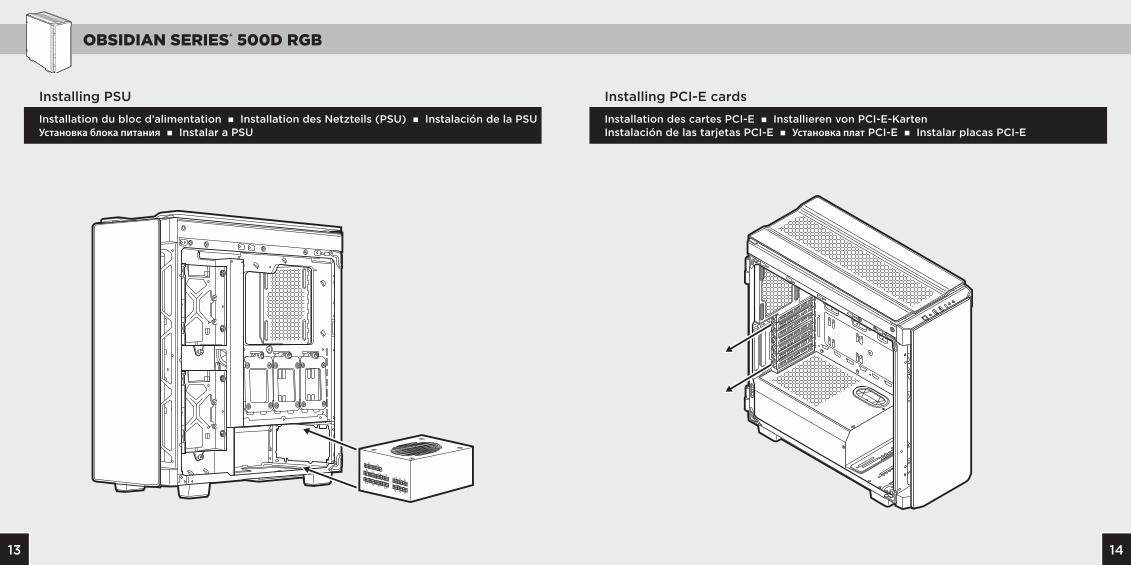
Installing PSU .................................................................................................................................................................................13 Installation du bloc d’alimentation • Installation des Netzteils (PSU) • Instalación de la PSU Установка блока питания • Instalar a PSU
Installing PCI-E card(s) ..............................................................................................................................................................14 Installation des cartes PCI-E • Installieren von PCI-E-Karten • Instalación de las tarjetas PCI-E Установка плат PCI-E • Instalar placas PCI-E
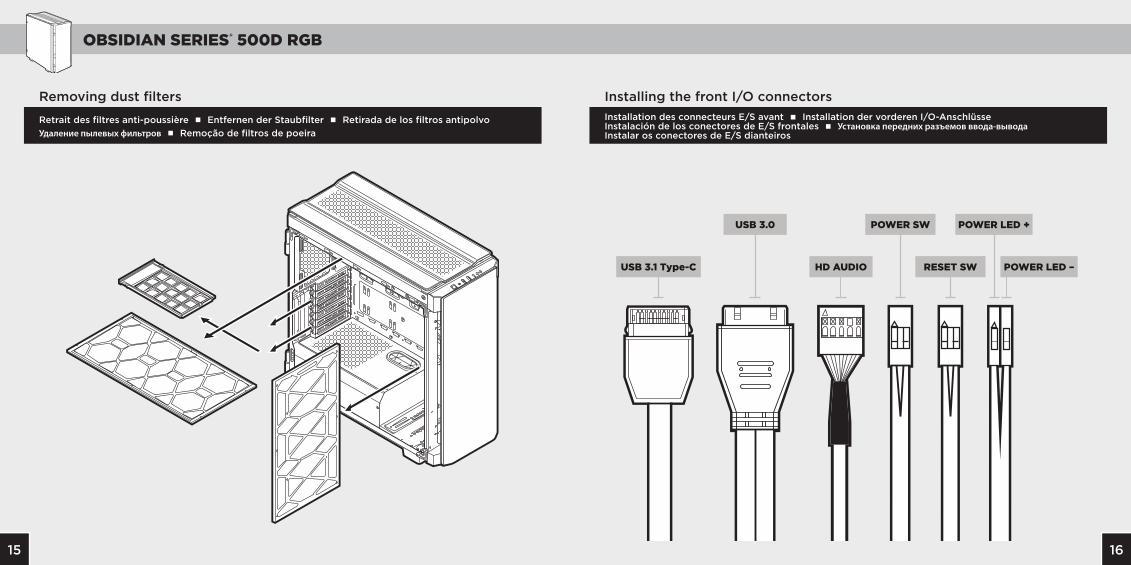
Removing dust filters ..................................................................................................................................................................15 Retrait des filtres anti-poussière • Entfernen der Staubfilter • Retirada de los filtros antipolvo Удаление пылевых фильтров • Remoção de filtros de poeira
Installing the front I/O Connectors ......................................................................................................................................16 Installation des connecteurs E/S avant • Installation der vorderen I/O -Anschlüsse Instalación de los conectores de E/S frontales • Установка передних разъемов ввода-вывода Instalar os conectores de E/S dianteiros
Installing Commander PRO. .............................................................................................................................................. 17-18 Installation de Commander PRO • Installieren von Commander PRO • Instalación de Commander PRO Установка Commander PRO • Instalação do Commander PRO
Frequently asked questions .............................................................................................................................................. 19-24 Foire aux questions • Häufig gestellte Fragen • Preguntas más frecuentes Часто задаваемые вопросы • Perguntas frequentes
Case specifications .................................................................................................................................................................... 3-6 Spécifications du boîtier • Technische Daten des Gehäuses • Especificaciones del chasis Технические характеристики корпуса • Especificações do gabinete
Case features ................................................................................................................................................................................ 7-8 Caractéristiques du boîtier • Funktionsmerkmale des Gehäuses • Características del chasis Особенности корпуса • Recursos do gabinete
Removing the side panels ........................................................................................................................................................... 9 Retrait des panneaux latéraux • Abnehmen der Seitenplatten • Retirada de los paneles laterales Снятие боковых панелей • Remover os painéis laterais
Installing the motherboard ......................................................................................................................................................10 Installation de la carte mère • Installation des Motherboards • Instalación de la placa base Установка материнской платы • Instalar a placa-mãe
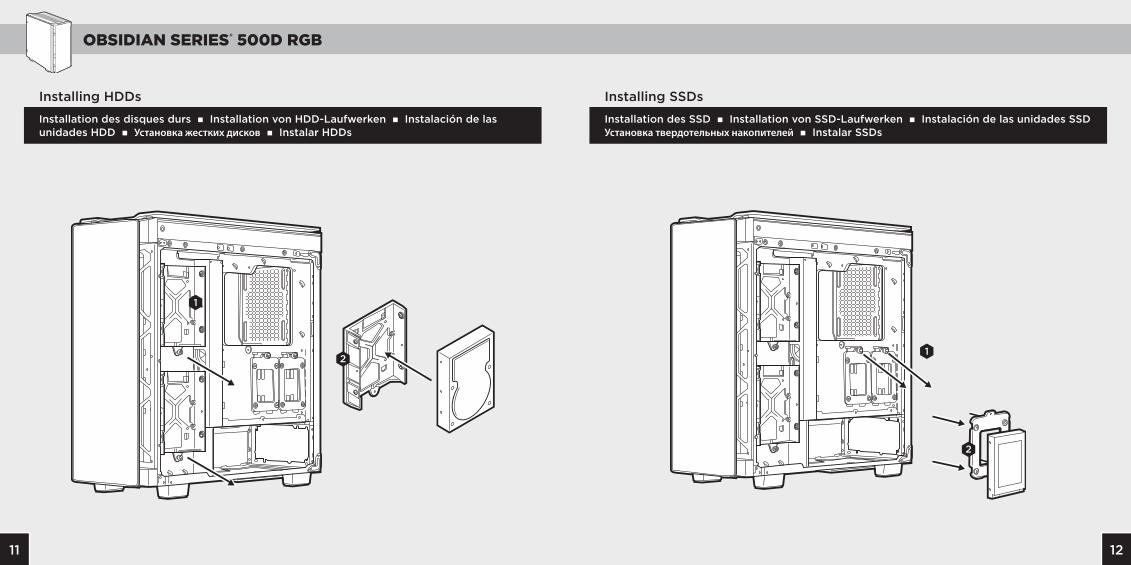
Installing HDDs ..............................................................................................................................................................................11 Installation des disques durs • Installation von HDD-Laufwerken • Instalación de las unidades HDD Установка жестких дисков • Instalar HDDs
Installing SSDs ...............................................................................................................................................................................12 Installation des SSD • Installation von SSD-Laufwerken • Instalación de las unidades SSD Установка твердотельных накопителей • Instalar SSDs
21
OBSIDIAN SERIES® 500D RGB
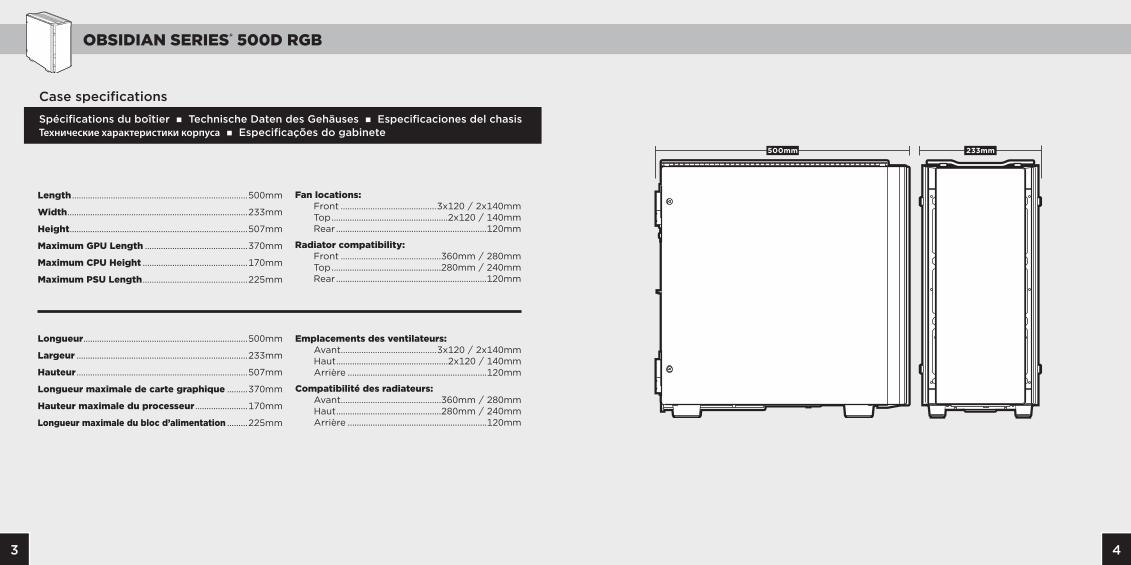
Spécifications du boîtier n Technische Daten des Gehäuses n Especificaciones del chasis Технические характеристики корпуса n Especificações do gabinete
Case specifications
Fan locations: Front ..........................................3x120 / 2x140mm Top ...................................................2x120 / 140mm Rear ..................................................................120mm
Length .............................................................................500mm
Width ...............................................................................233mm
Height ..............................................................................507mm
Maximum GPU Length .............................................370mm
Maximum CPU Height ..............................................170mm
Maximum PSU Length ..............................................225mm
Radiator compatibility: Front ............................................360mm / 280mm Top ................................................280mm / 240mm Rear ..................................................................120mm
500mm 233mm
Emplacements des ventilateurs: Avant ..........................................3x120 / 2x140mm Haut .................................................2x120 / 140mm Arrière .............................................................120mm
Longueur ........................................................................500mm
Largeur ...........................................................................233mm
Hauteur ...........................................................................507mm
Longueur maximale de carte graphique .........370mm
Hauteur maximale du processeur .......................170mm
Longueur maximale du bloc d’alimentation .........225mm
Compatibilité des radiateurs: Avant ............................................360mm / 280mm Haut ..............................................280mm / 240mm Arrière .............................................................120mm
43
OBSIDIAN SERIES® 500D RGB
Spécifications du boîtier n Technische Daten des Gehäuses n Especificaciones del chasis Технические характеристики корпуса n Especificações do gabinete
Case specifications
Расположение вентиляторов: Спереди ......................................3x120 / 2x140mm Сверху: .............................................2x120 / 140mm Сзади: ................................................................120mm
Длина ...............................................................................500mm
Ширина ............................................................................233mm
Высота ..............................................................................507mm
Максимальная длина графического процессора .....370mm
Максимальная высота ЦП ..........................................170mm
Максимальная длина блока питания ......................225mm
Совместимость радиаторов: Спереди: .......................................360mm / 280mm Сверху: ..........................................280mm / 240mm Сзади: ................................................................120mm
Locais das ventoinhas: Frente ........................................3x120 / 2x140mm Topo ................................................2x120 / 140mm Traseira ............................................................120mm
Comprimento ...............................................................500mm
Largura ...........................................................................233mm
Altura ...............................................................................460mm
Comprimento máximo da GPU ............................370mm
Altura máxima da CPU ............................................170mm
Comprimento máximo da PSU .............................225mm
Compatibilidade do radiador: Frente ..........................................360mm / 280mm Topo .............................................280mm / 240mm Traseira ............................................................120mm
Lüfterpositionen: Vorderseite ..............................3x120 / 2x140mm Oben ...............................................2x120 / 140mm Rückseite ........................................................120mm
Länge ...............................................................................500mm
Breite ...............................................................................233mm
Höhe .................................................................................507mm
Maximale GPU-Länge ...............................................370mm
Maximale CPU-Höhe .................................................170mm
Maximale Netzteil-Länge ........................................225mm
Radiatorkompatibilität: Vorderseite ................................360mm / 280mm Oben ............................................280mm / 240mm Rückseite ........................................................120mm
Ubicación del ventilador: Delantero ..................................3x120 / 2x140mm Superior .........................................2x120 / 140mm Posterior .........................................................120mm
Longitud .........................................................................500mm
Anchura ..........................................................................233mm
Altura ...............................................................................507mm
Longitud máxima de GPU ......................................370mm
Longitud máxima de CPU.......................................170mm
Longitud máxima de la PSU ..................................225mm
Compatibilidad del radiador: Delantero ....................................360mm / 280mm Superior ......................................280mm / 240mm Posterior .........................................................120mm
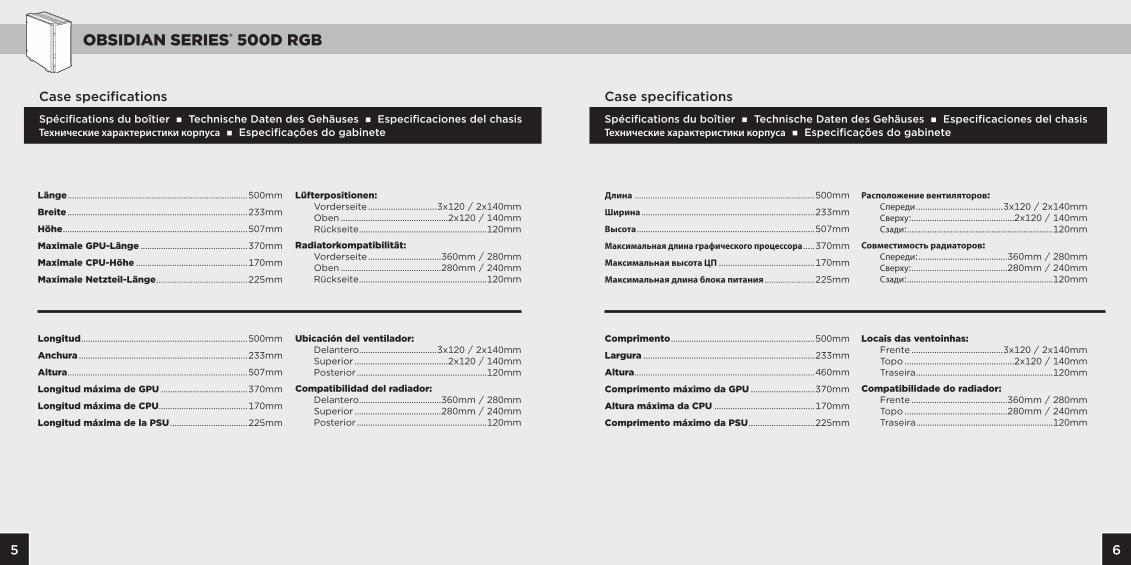
Spécifications du boîtier n Technische Daten des Gehäuses n Especificaciones del chasis Технические характеристики корпуса n Especificações do gabinete
Case specifications
65
OBSIDIAN SERIES® 500D RGB
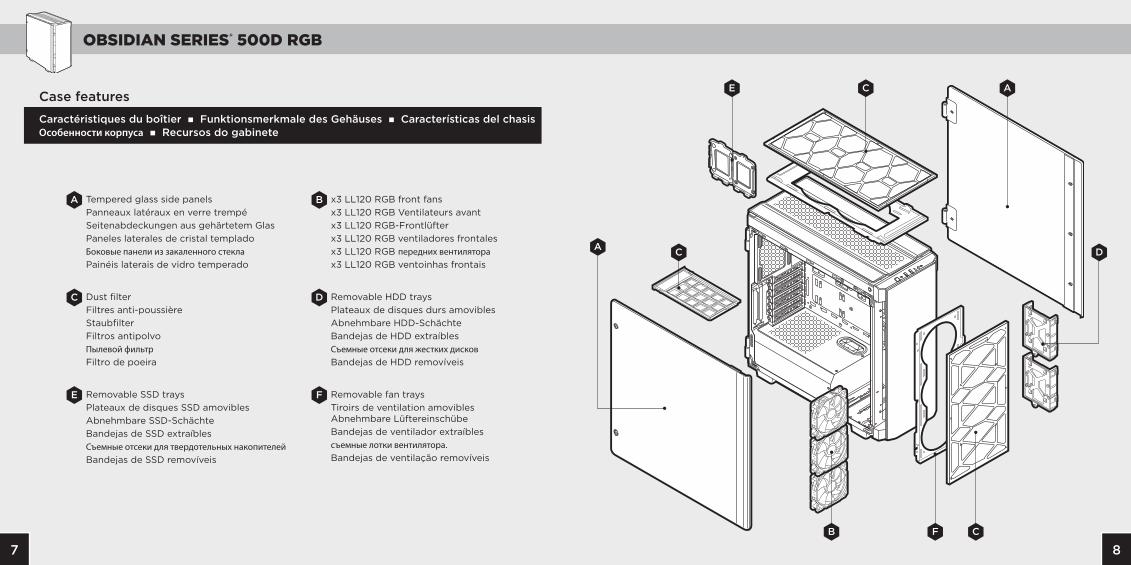
Caractéristiques du boîtier n Funktionsmerkmale des Gehäuses n Características del chasis Особенности корпуса n Recursos do gabinete
Case features
Tempered glass side panelsPanneaux latéraux en verre trempéSeitenabdeckungen aus gehärtetem GlasPaneles laterales de cristal templadoБоковые панели из закаленного стеклаPainéis laterais de vidro temperado
A x3 LL120 RGB front fansx3 LL120 RGB Ventilateurs avant x3 LL120 RGB-Frontlüfter x3 LL120 RGB ventiladores frontales x3 LL120 RGB передних вентилятораx3 LL120 RGB ventoinhas frontais
B
Dust filterFiltres anti-poussièreStaubfilterFiltros antipolvo Пылевой фильтрFiltro de poeira
C Removable HDD traysPlateaux de disques durs amoviblesAbnehmbare HDD-SchächteBandejas de HDD extraíblesСъемные отсеки для жестких дисковBandejas de HDD removíveis
D
Removable fan traysTiroirs de ventilation amovibles Abnehmbare LüftereinschübeBandejas de ventilador extraíblesсъемные лотки вентилятора.Bandejas de ventilação removíveis
FRemovable SSD traysPlateaux de disques SSD amoviblesAbnehmbare SSD-SchächteBandejas de SSD extraíblesСъемные отсеки для твердотельных накопителейBandejas de SSD removíveis
E
A
B CF
ACE
C D
87
OBSIDIAN SERIES® 500D RGB
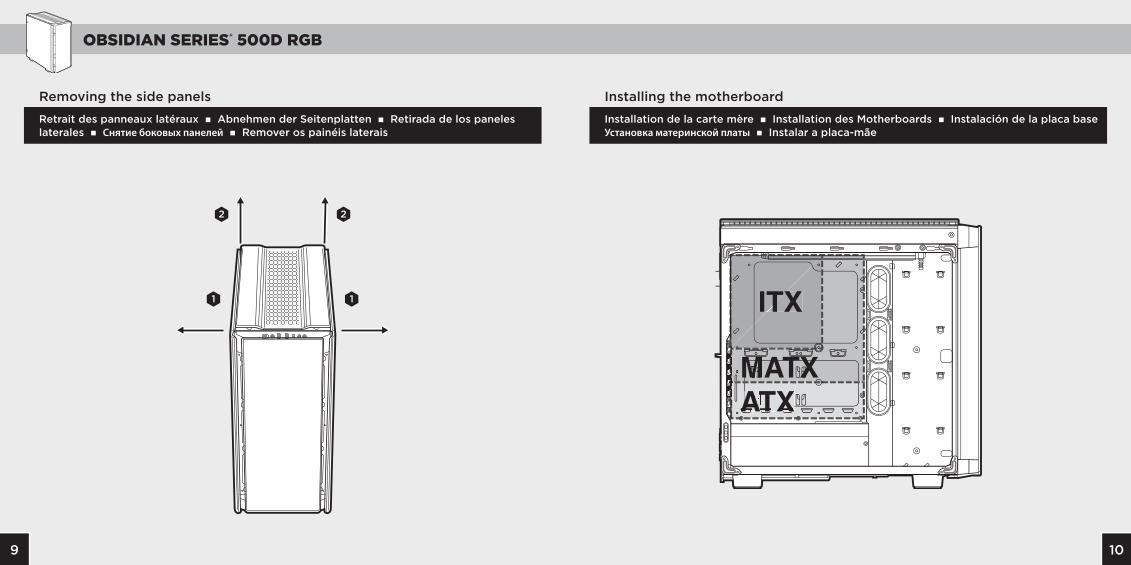
Installation de la carte mère n Installation des Motherboards n Instalación de la placa baseУстановка материнской платы n Instalar a placa-mãe
Retrait des panneaux latéraux n Abnehmen der Seitenplatten n Retirada de los paneles laterales n Снятие боковых панелей n Remover os painéis laterais
Installing the motherboardRemoving the side panels
1
22
1
ATXATXAAATATXAATAATTXXATXMATX
ITXTX
109
OBSIDIAN SERIES® 500D RGB
Installation des SSD n Installation von SSD-Laufwerken n Instalación de las unidades SSDУстановка твердотельных накопителей n Instalar SSDs
Installation des disques durs n Installation von HDD-Laufwerken n Instalación de las unidades HDD n Установка жестких дисков n Instalar HDDs
Installing SSDsInstalling HDDs
2
1
1
2
1211
OBSIDIAN SERIES® 500D RGB
Installing PCI-E cardsInstalling PSU
Installation du bloc d’alimentation n Installation des Netzteils (PSU) n Instalación de la PSUУстановка блока питания n Instalar a PSU
Installation des cartes PCI-E n Installieren von PCI-E-Karten Instalación de las tarjetas PCI-E n Установка плат PCI-E n Instalar placas PCI-E
1413
OBSIDIAN SERIES® 500D RGB
Retrait des filtres anti-poussière n Entfernen der Staubfilter n Retirada de los filtros antipolvo Удаление пылевых фильтров n Remoção de filtros de poeira
Installing the front I/O connectorsRemoving dust filtersInstallation des connecteurs E/S avant n Installation der vorderen I/O-Anschlüsse Instalación de los conectores de E/S frontales n Установка передних разъемов ввода-вывода Instalar os conectores de E/S dianteiros
USB 3.1 Type-C
USB 3.0
HD AUDIO
POWER SW
RESET SW
POWER LED +
POWER LED –
1615
OBSIDIAN SERIES® 500D RGB
Installation de Commander PRO n Installieren von Commander PRO n Instalación de Commander PRO Установка Commander PRO n Instalação do Commander PRO
Installing Commander PRO
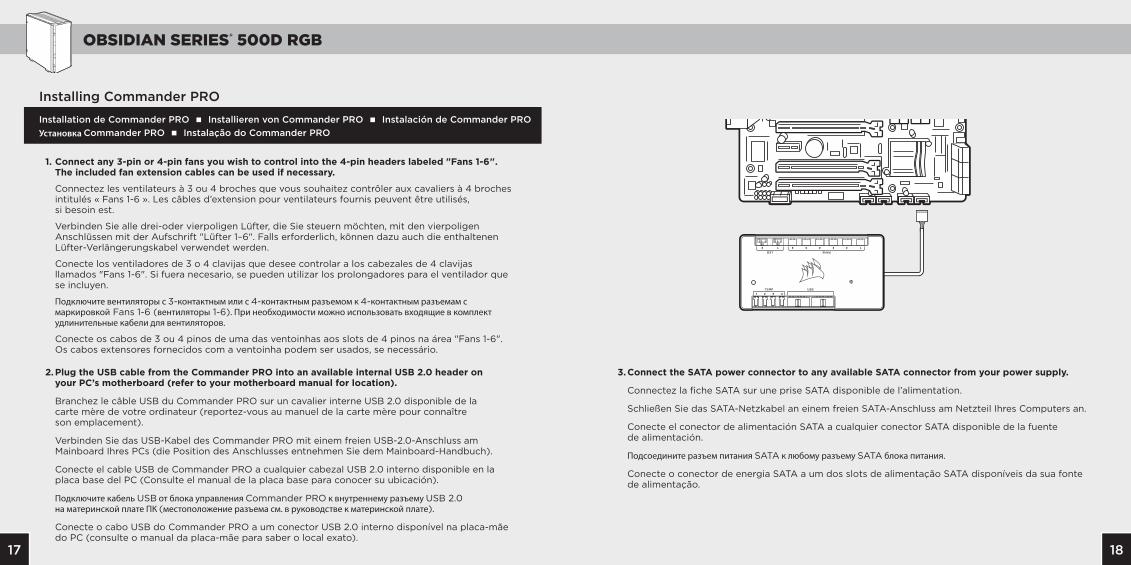
1. Connect any 3-pin or 4-pin fans you wish to control into the 4-pin headers labeled "Fans 1-6". The included fan extension cables can be used if necessary.
Connectez les ventilateurs à 3 ou 4 broches que vous souhaitez contrôler aux cavaliers à 4 broches intitulés « Fans 1-6 ». Les câbles d’extension pour ventilateurs fournis peuvent être utilisés, si besoin est.
Verbinden Sie alle drei-oder vierpoligen Lüfter, die Sie steuern möchten, mit den vierpoligen Anschlüssen mit der Aufschrift "Lüfter 1–6". Falls erforderlich, können dazu auch die enthaltenen Lüfter-Verlängerungskabel verwendet werden.
Conecte los ventiladores de 3 o 4 clavijas que desee controlar a los cabezales de 4 clavijas llamados "Fans 1-6". Si fuera necesario, se pueden utilizar los prolongadores para el ventilador que se incluyen.
Подключите вентиляторы с 3-контактным или с 4-контактным разъемом к 4-контактным разъемам с маркировкой Fans 1-6 (вентиляторы 1-6). При необходимости можно использовать входящие в комплект удлинительные кабели для вентиляторов.
Conecte os cabos de 3 ou 4 pinos de uma das ventoinhas aos slots de 4 pinos na área "Fans 1-6". Os cabos extensores fornecidos com a ventoinha podem ser usados, se necessário.
3. Connect the SATA power connector to any available SATA connector from your power supply.
Connectez la fiche SATA sur une prise SATA disponible de l’alimentation.
Schließen Sie das SATA-Netzkabel an einem freien SATA-Anschluss am Netzteil Ihres Computers an.
Conecte el conector de alimentación SATA a cualquier conector SATA disponible de la fuente de alimentación.
Подсоедините разъем питания SATA к любому разъему SATA блока питания.
Conecte o conector de energia SATA a um dos slots de alimentação SATA disponíveis da sua fonte de alimentação.
2. Plug the USB cable from the Commander PRO into an available internal USB 2.0 header on your PC’s motherboard (refer to your motherboard manual for location).
Branchez le câble USB du Commander PRO sur un cavalier interne USB 2.0 disponible de la carte mère de votre ordinateur (reportez-vous au manuel de la carte mère pour connaître son emplacement).
Verbinden Sie das USB-Kabel des Commander PRO mit einem freien USB-2.0-Anschluss am Mainboard Ihres PCs (die Position des Anschlusses entnehmen Sie dem Mainboard-Handbuch).
Conecte el cable USB de Commander PRO a cualquier cabezal USB 2.0 interno disponible en la placa base del PC (Consulte el manual de la placa base para conocer su ubicación).
Подключите кабель USB от блока управления Commander PRO к внутреннему разъему USB 2.0 на материнской плате ПК (местоположение разъема см. в руководстве к материнской плате).
Conecte o cabo USB do Commander PRO a um conector USB 2.0 interno disponível na placa-mãe do PC (consulte o manual da placa-mãe para saber o local exato).
1817
OBSIDIAN SERIES® 500D RGB
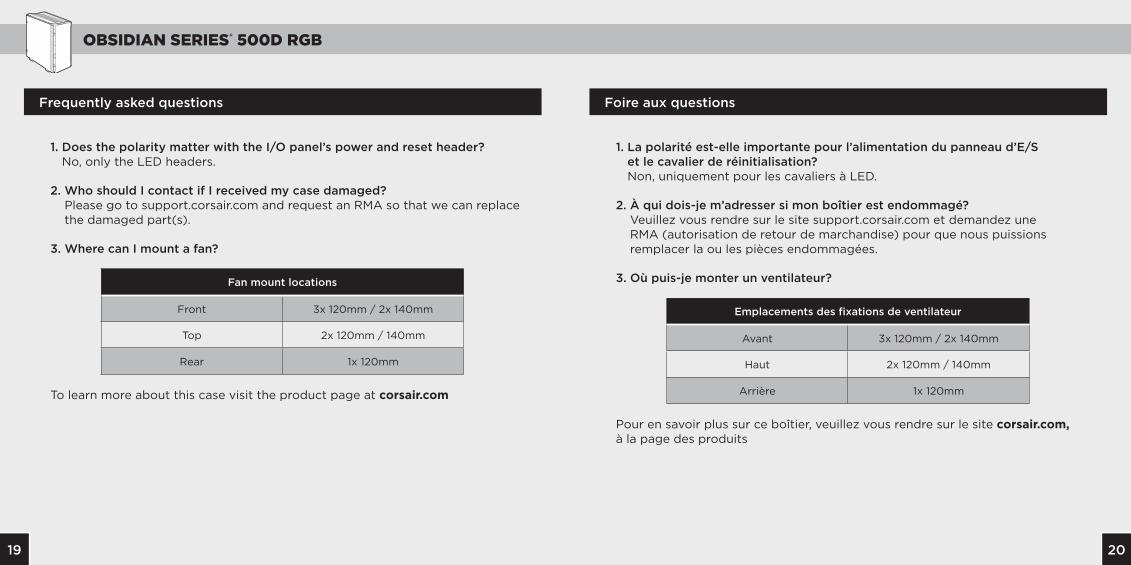
Frequently asked questions
1. Does the polarity matter with the I/O panel’s power and reset header? No, only the LED headers.
2. Who should I contact if I received my case damaged? Please go to support.corsair.com and request an RMA so that we can replace the damaged part(s).
3. Where can I mount a fan? To learn more about this case visit the product page at corsair.com
Fan mount locations
Front 3x 120mm / 2x 140mm
Top 2x 120mm / 140mm
Rear 1x 120mm
Foire aux questions
1. La polarité est-elle importante pour l’alimentation du panneau d’E/S et le cavalier de réinitialisation? Non, uniquement pour les cavaliers à LED.
2. À qui dois-je m’adresser si mon boîtier est endommagé? Veuillez vous rendre sur le site support.corsair.com et demandez une RMA (autorisation de retour de marchandise) pour que nous puissions remplacer la ou les pièces endommagées.
3. Où puis-je monter un ventilateur? Pour en savoir plus sur ce boîtier, veuillez vous rendre sur le site corsair.com, à la page des produits
Emplacements des fixations de ventilateur
Avant 3x 120mm / 2x 140mm
Haut 2x 120mm / 140mm
Arrière 1x 120mm
2019
OBSIDIAN SERIES® 500D RGB
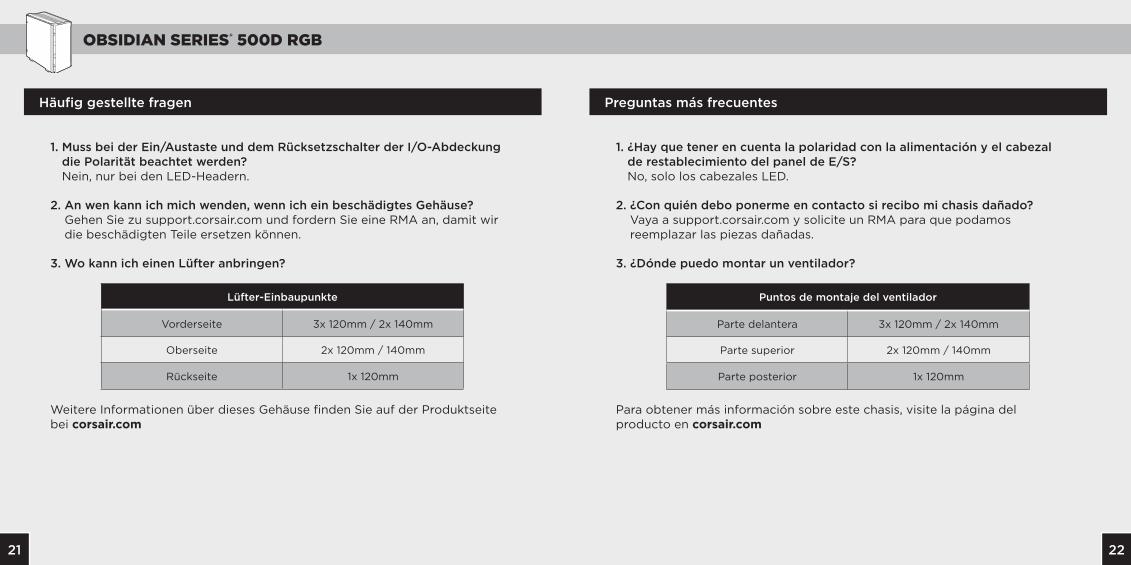
Häufig gestellte fragen
1. Muss bei der Ein/Austaste und dem Rücksetzschalter der I/O-Abdeckung die Polarität beachtet werden? Nein, nur bei den LED-Headern.
2. An wen kann ich mich wenden, wenn ich ein beschädigtes Gehäuse? Gehen Sie zu support.corsair.com und fordern Sie eine RMA an, damit wir die beschädigten Teile ersetzen können.
3. Wo kann ich einen Lüfter anbringen? Weitere Informationen über dieses Gehäuse finden Sie auf der Produktseite bei corsair.com
Preguntas más frecuentes
1. ¿Hay que tener en cuenta la polaridad con la alimentación y el cabezal de restablecimiento del panel de E/S? No, solo los cabezales LED.
2. ¿Con quién debo ponerme en contacto si recibo mi chasis dañado? Vaya a support.corsair.com y solicite un RMA para que podamos reemplazar las piezas dañadas.
3. ¿Dónde puedo montar un ventilador? Para obtener más información sobre este chasis, visite la página del producto en corsair.com
Lüfter-Einbaupunkte
Vorderseite 3x 120mm / 2x 140mm
Oberseite 2x 120mm / 140mm
Rückseite 1x 120mm
Puntos de montaje del ventilador
Parte delantera 3x 120mm / 2x 140mm
Parte superior 2x 120mm / 140mm
Parte posterior 1x 120mm
2221
OBSIDIAN SERIES® 500D RGB
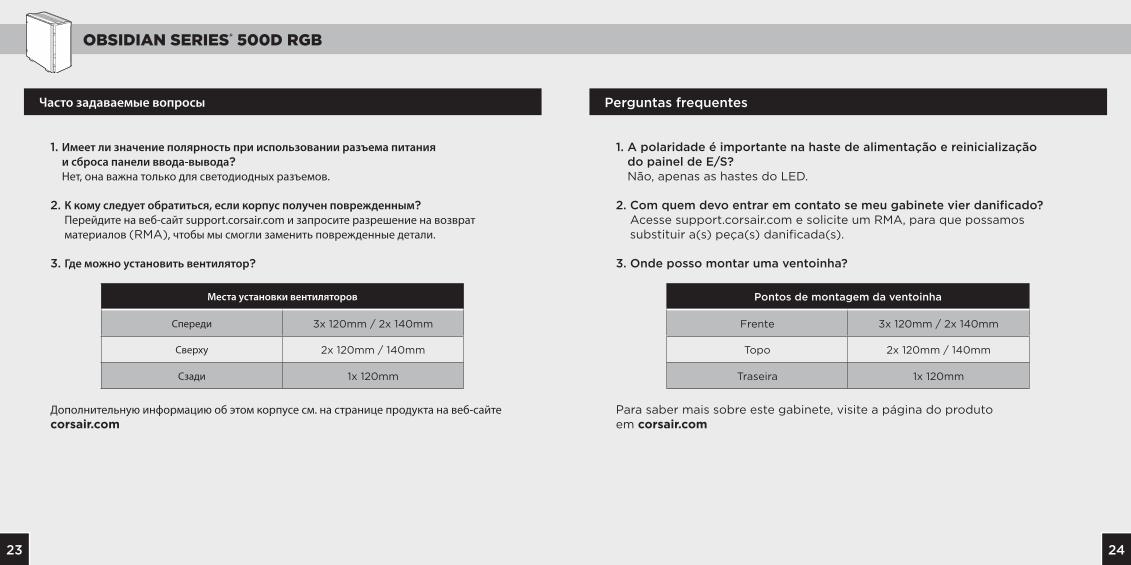
Часто задаваемые вопросы
1. Имеет ли значение полярность при использовании разъема питания и сброса панели ввода-вывода? Нет, она важна только для светодиодных разъемов.
2. К кому следует обратиться, если корпус получен поврежденным? Перейдите на веб-сайт support.corsair.com и запросите разрешение на возврат материалов (RMA), чтобы мы смогли заменить поврежденные детали.
3. Где можно установить вентилятор? Дополнительную информацию об этом корпусе см. на странице продукта на веб-сайте corsair.com
Perguntas frequentes
1. A polaridade é importante na haste de alimentação e reinicialização do painel de E/S? Não, apenas as hastes do LED.
2. Com quem devo entrar em contato se meu gabinete vier danificado? Acesse support.corsair.com e solicite um RMA, para que possamos substituir a(s) peça(s) danificada(s).
3. Onde posso montar uma ventoinha? Para saber mais sobre este gabinete, visite a página do produto em corsair.com
Места установки вентиляторов
Спереди 3x 120mm / 2x 140mm
Сверху 2x 120mm / 140mm
Сзади 1x 120mm
Pontos de montagem da ventoinha
Frente 3x 120mm / 2x 140mm
Topo 2x 120mm / 140mm
Traseira 1x 120mm
2423
OBSIDIAN SERIES® 500D RGB
NOTES NOTES
2625