Embed Size (px)
Citation preview
Installation and Technical Manual
Dura Deck
Dura Deck Strong and durable, Dura Deck looks and feels just like natural wood. Our unique formula provides long lasting composite timber decking that is environmentally friendly, easy to install and requires minimal maintenance compared with traditional timber. To ensure you get the best results from your Dura Deck, we recommend working with a professional contractor with previous decking installation experience. As well as the detailed installation instructions provided in this Technical Manual, a helpful video is available on the Dura Composites website to offer additional visual guidance. If you require any further information or support, please visit www.duracomposites.com or call us on +44 (0)1255 423601 where one of our knowledgeable staff will be happy to help.
Installation and Technical Manual – Landscaping January 2016
1
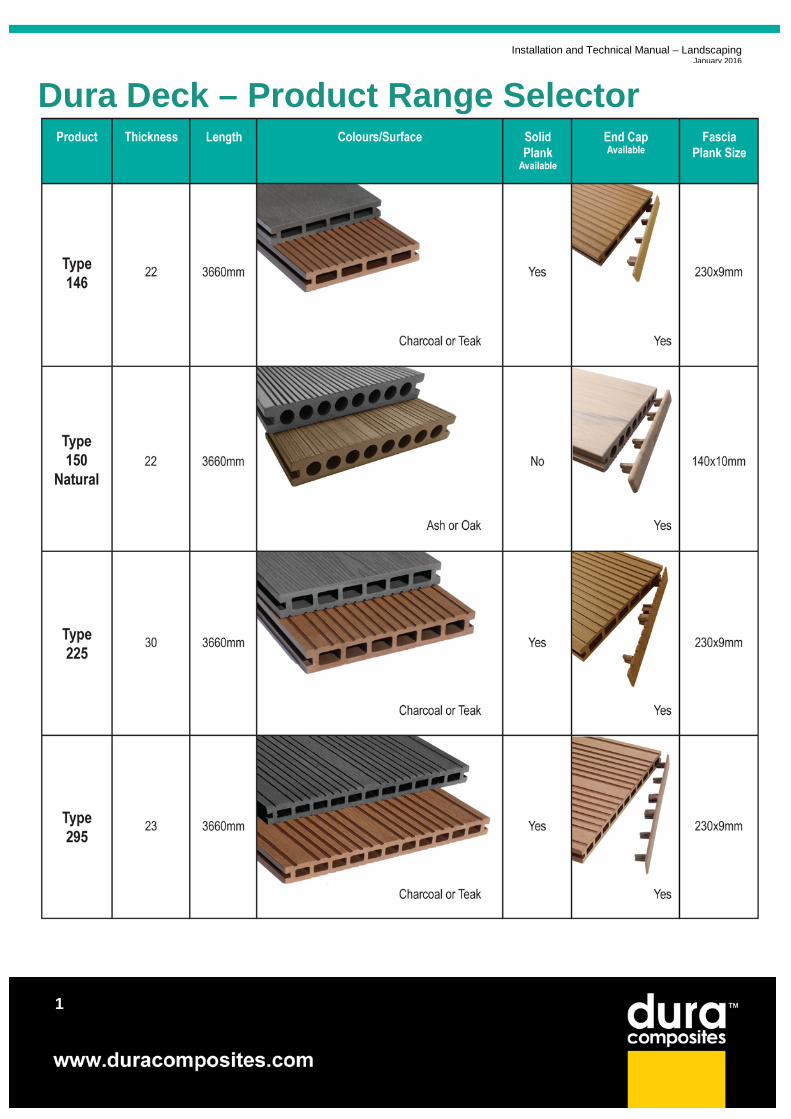
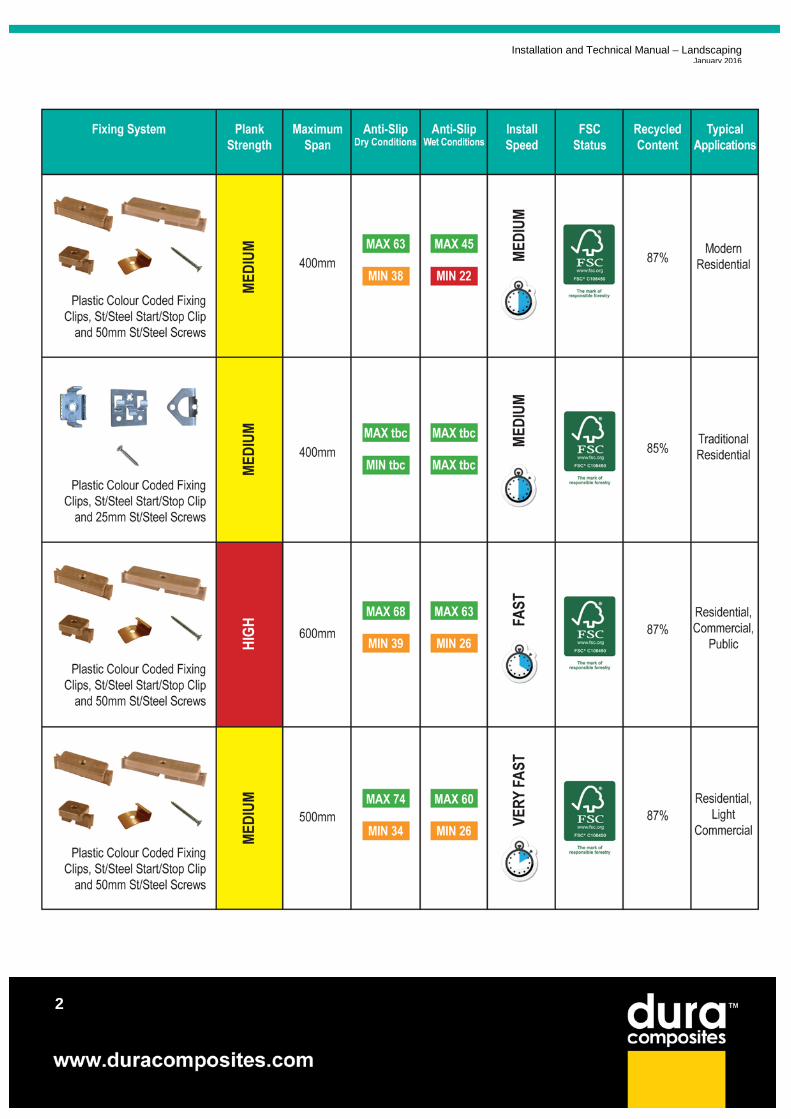
Dura Deck – Product Range Selector
Installation and Technical Manual – Landscaping January 2016
2
Installation and Technical Manual – Landscaping January 2016
3
Contents 1. Quick Reference Guide 2. Preparation And Materials 3. Sub-Frame Installation 4. Deck Installation 5. Maintenance and Cleaning Guide 6. Technical Specifications
Installation and Technical Manual – Landscaping January 2016
4
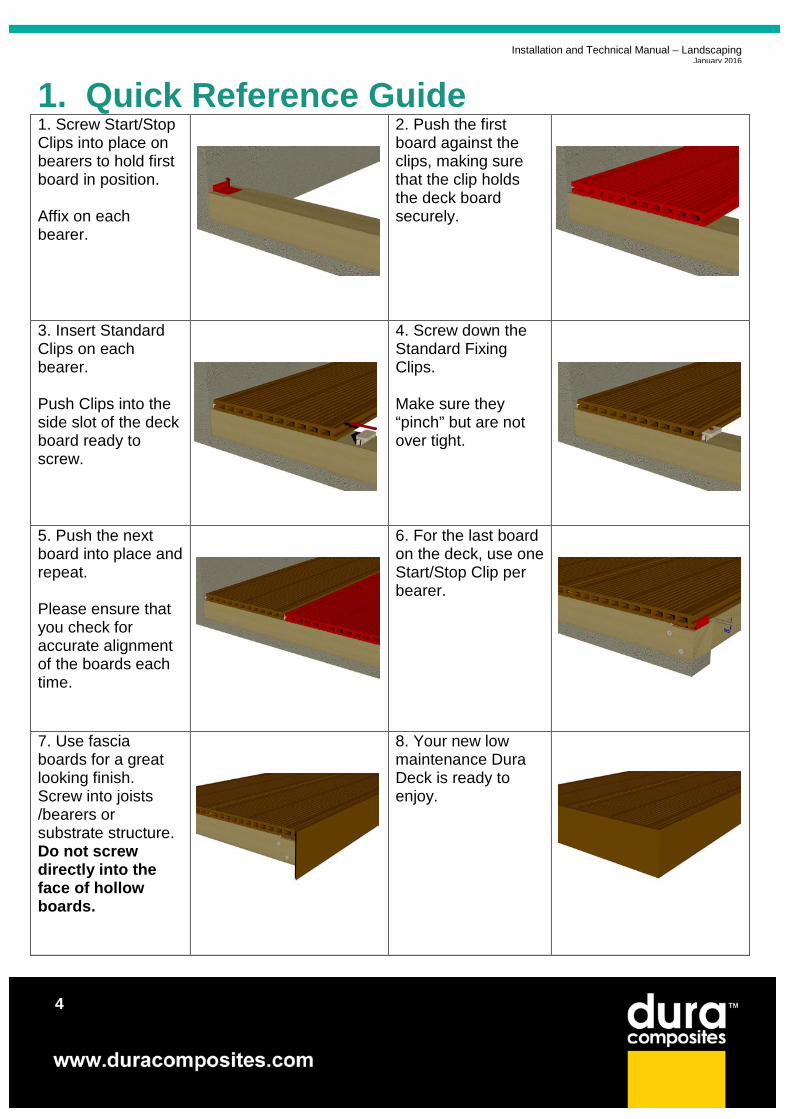
1. Quick Reference Guide 1. Screw Start/Stop Clips into place on bearers to hold first board in position. Affix on each bearer.
2. Push the first board against the clips, making sure that the clip holds the deck board securely.
3. Insert Standard Clips on each bearer. Push Clips into the side slot of the deck board ready to screw.
4. Screw down the Standard Fixing Clips. Make sure they “pinch” but are not over tight.
5. Push the next board into place and repeat. Please ensure that you check for accurate alignment of the boards each time.
6. For the last board on the deck, use one Start/Stop Clip per bearer.
7. Use fascia boards for a great looking finish. Screw into joists /bearers or substrate structure. Do not screw directly into the face of hollow boards.
8. Your new low maintenance Dura Deck is ready to enjoy.
Installation and Technical Manual – Landscaping January 2016
5
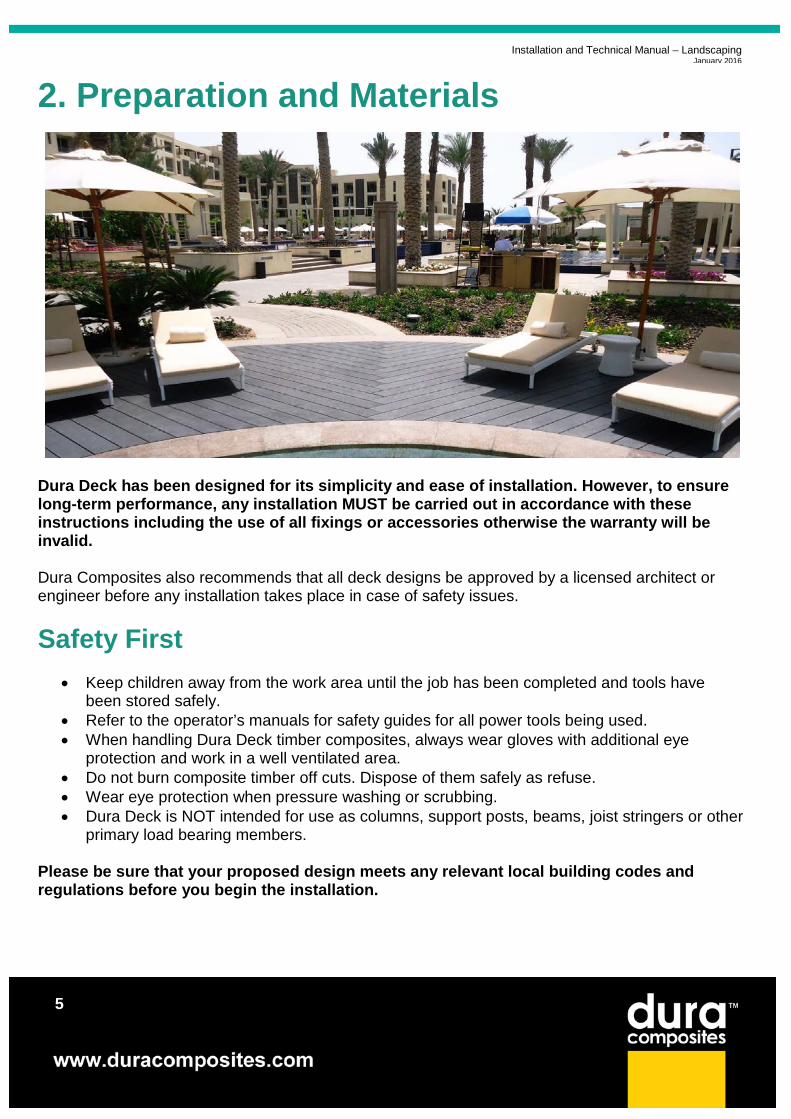
2. Preparation and Materials
Dura Deck has been designed for its simplicity and ease of installation. However, to ensure long-term performance, any installation MUST be carried out in accordance with these instructions including the use of all fixings or accessories otherwise the warranty will be invalid. Dura Composites also recommends that all deck designs be approved by a licensed architect or engineer before any installation takes place in case of safety issues. Safety First
• Keep children away from the work area until the job has been completed and tools have been stored safely.
• Refer to the operator’s manuals for safety guides for all power tools being used. • When handling Dura Deck timber composites, always wear gloves with additional eye
protection and work in a well ventilated area. • Do not burn composite timber off cuts. Dispose of them safely as refuse. • Wear eye protection when pressure washing or scrubbing. • Dura Deck is NOT intended for use as columns, support posts, beams, joist stringers or other
primary load bearing members. Please be sure that your proposed design meets any relevant local building codes and regulations before you begin the installation.

Installation and Technical Manual – Landscaping January 2016
6
Power Tools Required Chop Saw
• Any wood cutting blade can be used but fine teeth are recommended for a professional finish. • Used for simple straight cuts. • Ideal for cutting obtuse and acute angles. • Perfect for cutting mitres.
Jigsaw
• Any Bosch blades can be used. • Used for simple straight cuts, radius edges and for intricate shapes. • Useful for notching out sections. • A proficient Jigsaw operator is capable of absolute precision.
Circular Saw
• Any wood cutting blade can be used but fine teeth are recommended for a professional finish. • Suitable for cuts exceeding 1m. • Provides a perfect straight line cut. • Usually quicker than a jigsaw but limited to cuts in one direction at a time.
Drills
• Used for creating clearance holes using appropriate sized wood drill bits depending on the size of the fixing.
• Used for screwing fixings through clearance holes to firmly secure objects. • Can also be used with attachments such as Hex (Allen) key tools or sockets to the correct diameter of
the fixing to enable rapid tightening of the fixings.
Other Equipment Required
Tape Measure Spirit Level Square
Sawhorse or Bench
Installation and Technical Manual – Landscaping January 2016
7
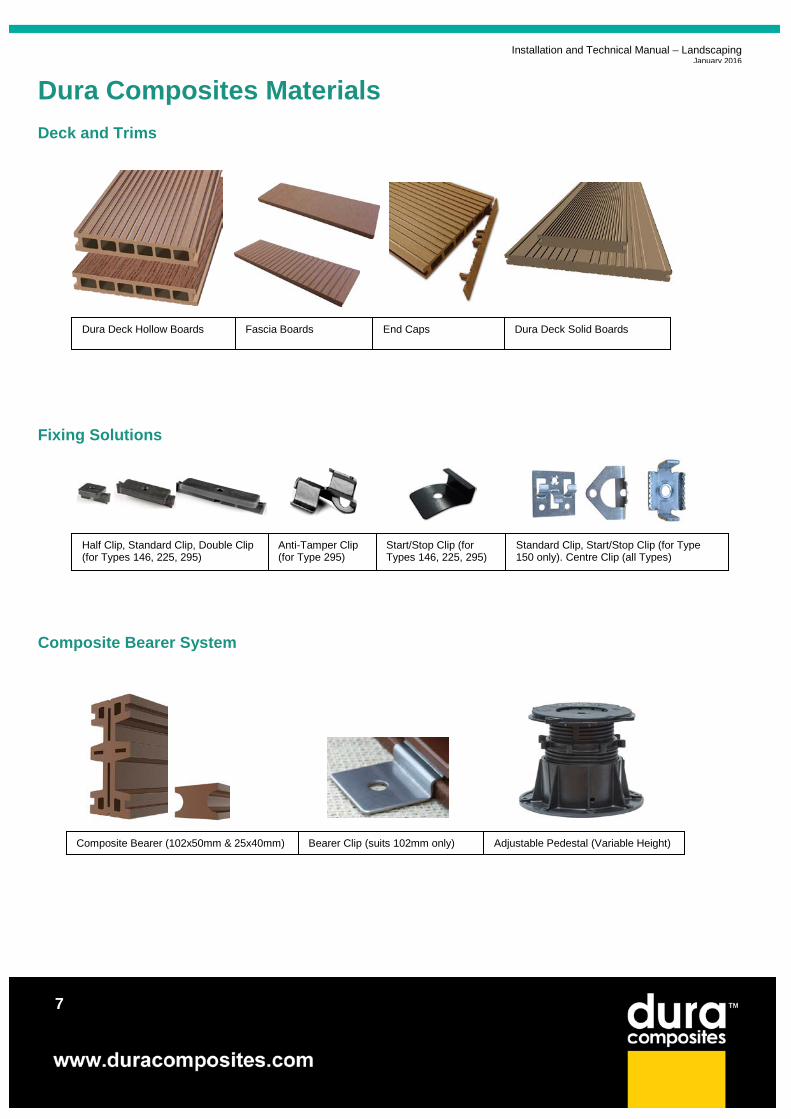
Dura Composites Materials Deck and Trims
Fixing Solutions
Composite Bearer System
Half Clip, Standard Clip, Double Clip (for Types 146, 225, 295)
Anti-Tamper Clip (for Type 295)
Start/Stop Clip (for Types 146, 225, 295)
Standard Clip, Start/Stop Clip (for Type 150 only). Centre Clip (all Types)
Dura Deck Hollow Boards Fascia Boards End Caps Dura Deck Solid Boards
Bearer Clip (suits 102mm only) Composite Bearer (102x50mm & 25x40mm) Adjustable Pedestal (Variable Height)
Installation and Technical Manual – Landscaping January 2016
8
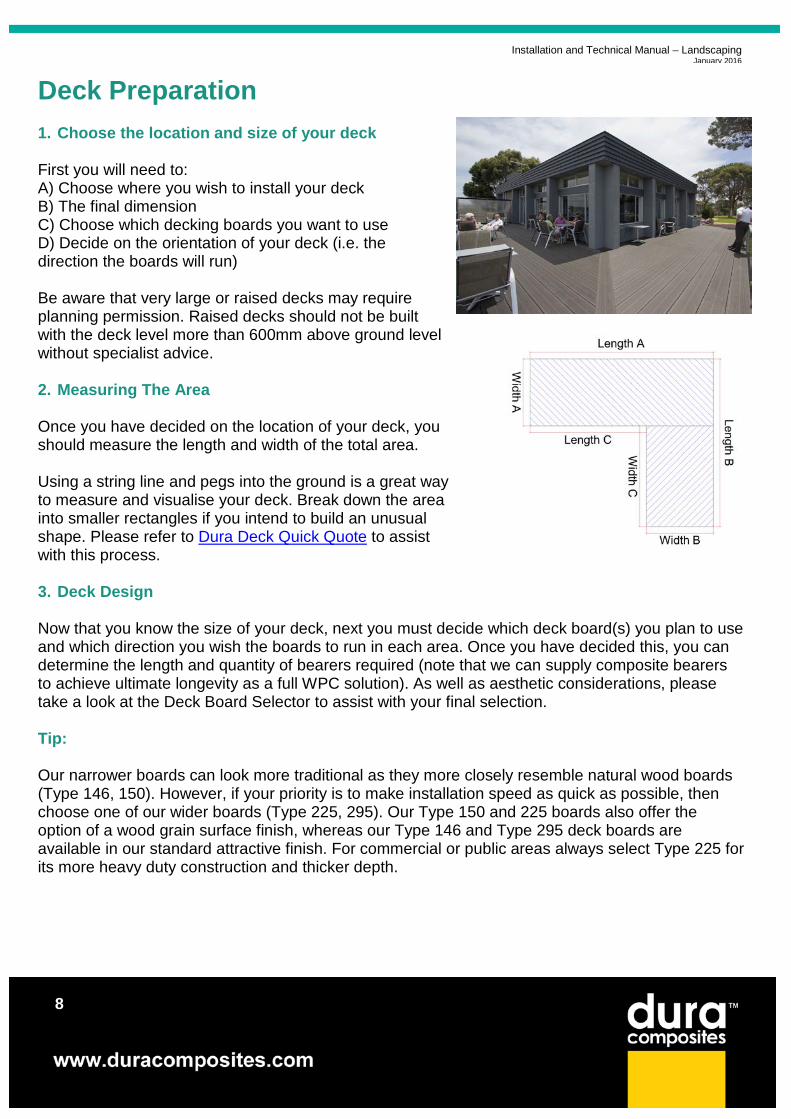
Deck Preparation 1. Choose the location and size of your deck
First you will need to: A) Choose where you wish to install your deck B) The final dimension C) Choose which decking boards you want to use D) Decide on the orientation of your deck (i.e. the direction the boards will run)
Be aware that very large or raised decks may require planning permission. Raised decks should not be built with the deck level more than 600mm above ground level without specialist advice. 2. Measuring The Area
Once you have decided on the location of your deck, you should measure the length and width of the total area. Using a string line and pegs into the ground is a great way to measure and visualise your deck. Break down the area into smaller rectangles if you intend to build an unusual shape. Please refer to Dura Deck Quick Quote to assist with this process. 3. Deck Design
Now that you know the size of your deck, next you must decide which deck board(s) you plan to use and which direction you wish the boards to run in each area. Once you have decided this, you can determine the length and quantity of bearers required (note that we can supply composite bearers to achieve ultimate longevity as a full WPC solution). As well as aesthetic considerations, please take a look at the Deck Board Selector to assist with your final selection. Tip: Our narrower boards can look more traditional as they more closely resemble natural wood boards (Type 146, 150). However, if your priority is to make installation speed as quick as possible, then choose one of our wider boards (Type 225, 295). Our Type 150 and 225 boards also offer the option of a wood grain surface finish, whereas our Type 146 and Type 295 deck boards are available in our standard attractive finish. For commercial or public areas always select Type 225 for its more heavy duty construction and thicker depth.
Installation and Technical Manual – Landscaping January 2016
9
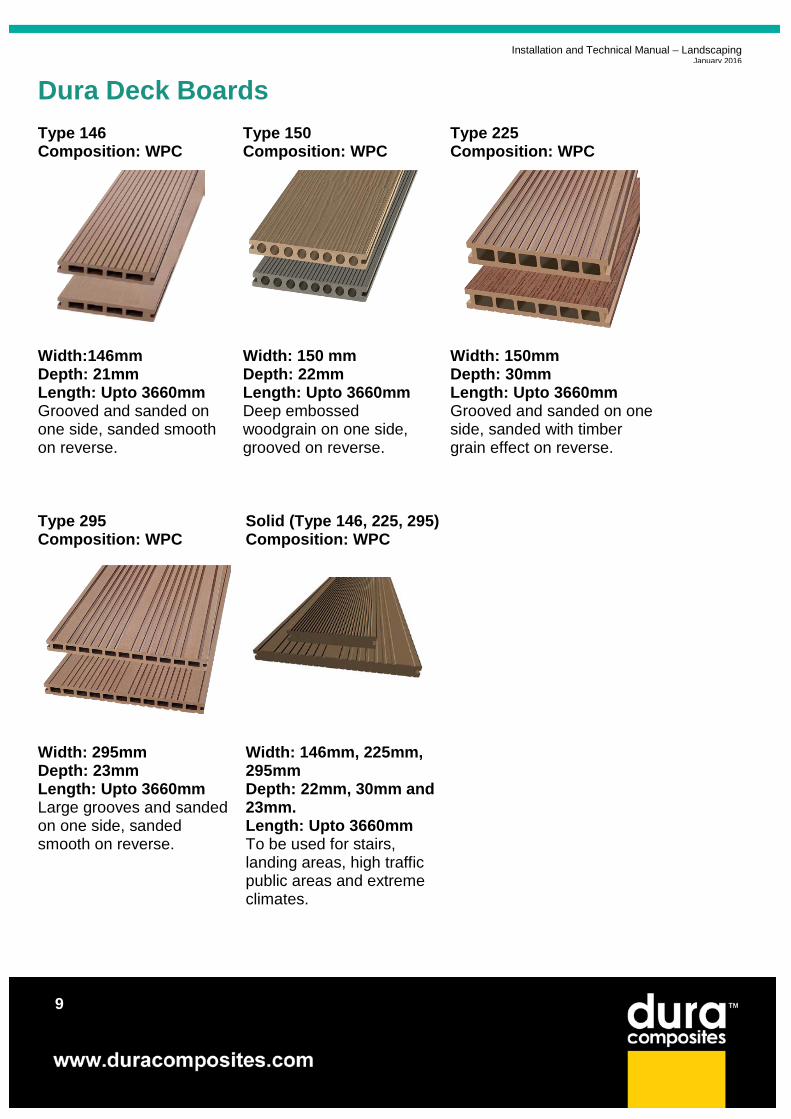
Dura Deck Boards Type 146 Type 150 Type 225 Composition: WPC Composition: WPC Composition: WPC
Width:146mm Depth: 21mm Length: Upto 3660mm Grooved and sanded on one side, sanded smooth on reverse.
Width: 150 mm Depth: 22mm Length: Upto 3660mm Deep embossed woodgrain on one side, grooved on reverse.
Width: 150mm Depth: 30mm Length: Upto 3660mm Grooved and sanded on one side, sanded with timber grain effect on reverse.
Type 295 Solid (Type 146, 225, 295) Composition: WPC Composition: WPC
Width: 295mm Depth: 23mm Length: Upto 3660mm Large grooves and sanded on one side, sanded smooth on reverse.
Width: 146mm, 225mm, 295mm Depth: 22mm, 30mm and 23mm. Length: Upto 3660mm To be used for stairs, landing areas, high traffic public areas and extreme climates.
Installation and Technical Manual – Landscaping January 2016
10
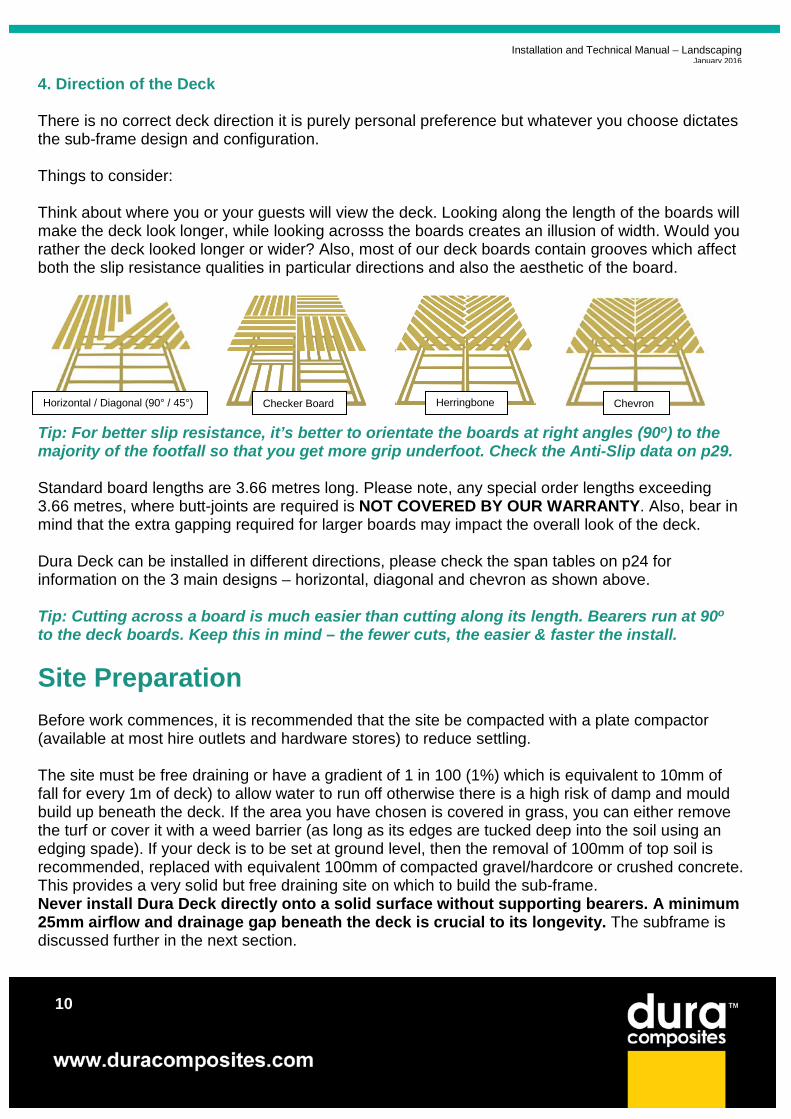
4. Direction of the Deck There is no correct deck direction it is purely personal preference but whatever you choose dictates the sub-frame design and configuration. Things to consider: Think about where you or your guests will view the deck. Looking along the length of the boards will make the deck look longer, while looking acrosss the boards creates an illusion of width. Would you rather the deck looked longer or wider? Also, most of our deck boards contain grooves which affect both the slip resistance qualities in particular directions and also the aesthetic of the board. Tip: For better slip resistance, it’s better to orientate the boards at right angles (90o) to the majority of the footfall so that you get more grip underfoot. Check the Anti-Slip data on p29. Standard board lengths are 3.66 metres long. Please note, any special order lengths exceeding 3.66 metres, where butt-joints are required is NOT COVERED BY OUR WARRANTY. Also, bear in mind that the extra gapping required for larger boards may impact the overall look of the deck. Dura Deck can be installed in different directions, please check the span tables on p24 for information on the 3 main designs – horizontal, diagonal and chevron as shown above. Tip: Cutting across a board is much easier than cutting along its length. Bearers run at 90o to the deck boards. Keep this in mind – the fewer cuts, the easier & faster the install.
Site Preparation Before work commences, it is recommended that the site be compacted with a plate compactor (available at most hire outlets and hardware stores) to reduce settling. The site must be free draining or have a gradient of 1 in 100 (1%) which is equivalent to 10mm of fall for every 1m of deck) to allow water to run off otherwise there is a high risk of damp and mould build up beneath the deck. If the area you have chosen is covered in grass, you can either remove the turf or cover it with a weed barrier (as long as its edges are tucked deep into the soil using an edging spade). If your deck is to be set at ground level, then the removal of 100mm of top soil is recommended, replaced with equivalent 100mm of compacted gravel/hardcore or crushed concrete. This provides a very solid but free draining site on which to build the sub-frame. Never install Dura Deck directly onto a solid surface without supporting bearers. A minimum 25mm airflow and drainage gap beneath the deck is crucial to its longevity. The subframe is discussed further in the next section.
Checker Board
Horizontal / Diagonal (90° / 45°) Herringbone
Chevron
Installation and Technical Manual – Landscaping January 2016
11
3. Sub-Frame Installation
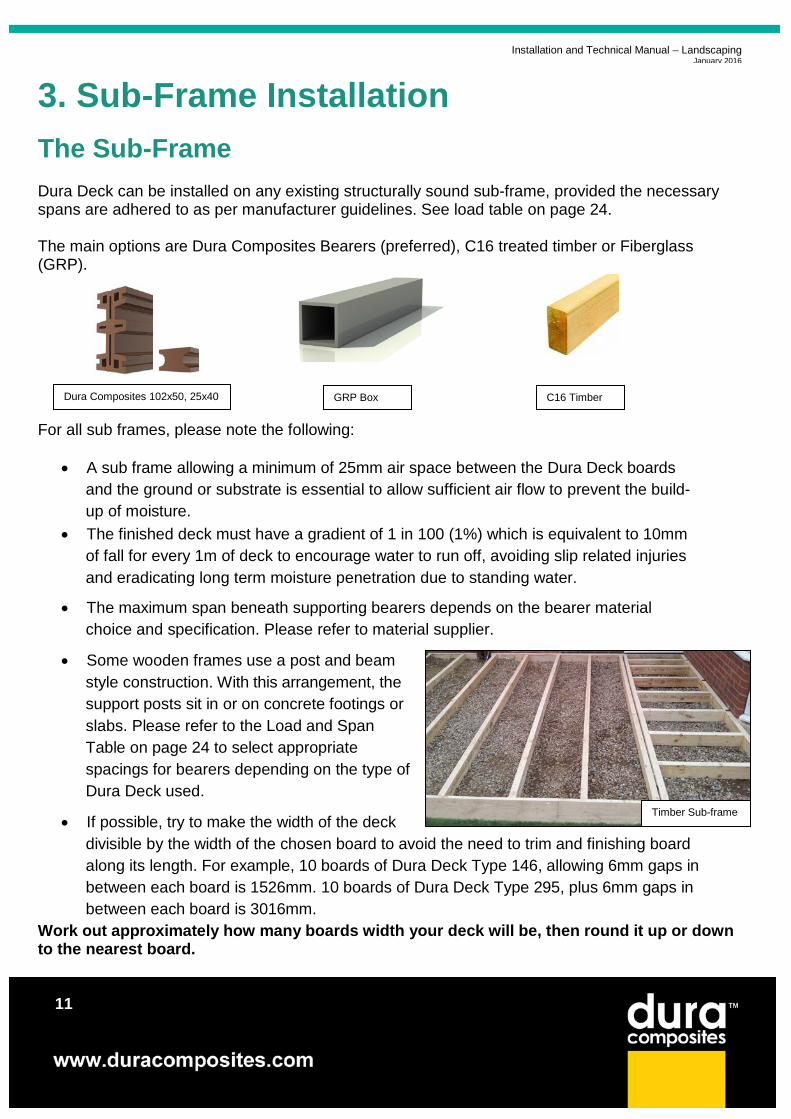
The Sub-Frame Dura Deck can be installed on any existing structurally sound sub-frame, provided the necessary spans are adhered to as per manufacturer guidelines. See load table on page 24. The main options are Dura Composites Bearers (preferred), C16 treated timber or Fiberglass (GRP). For all sub frames, please note the following:
• A sub frame allowing a minimum of 25mm air space between the Dura Deck boards and the ground or substrate is essential to allow sufficient air flow to prevent the build-up of moisture.
• The finished deck must have a gradient of 1 in 100 (1%) which is equivalent to 10mm of fall for every 1m of deck to encourage water to run off, avoiding slip related injuries and eradicating long term moisture penetration due to standing water.
• The maximum span beneath supporting bearers depends on the bearer material
choice and specification. Please refer to material supplier.
• Some wooden frames use a post and beam style construction. With this arrangement, the support posts sit in or on concrete footings or slabs. Please refer to the Load and Span Table on page 24 to select appropriate spacings for bearers depending on the type of Dura Deck used.
• If possible, try to make the width of the deck
divisible by the width of the chosen board to avoid the need to trim and finishing board along its length. For example, 10 boards of Dura Deck Type 146, allowing 6mm gaps in between each board is 1526mm. 10 boards of Dura Deck Type 295, plus 6mm gaps in between each board is 3016mm.
Work out approximately how many boards width your deck will be, then round it up or down to the nearest board.
Dura Composites 102x50, 25x40 C16 Timber GRP Box
Timber Sub-frame
Installation and Technical Manual – Landscaping January 2016
12
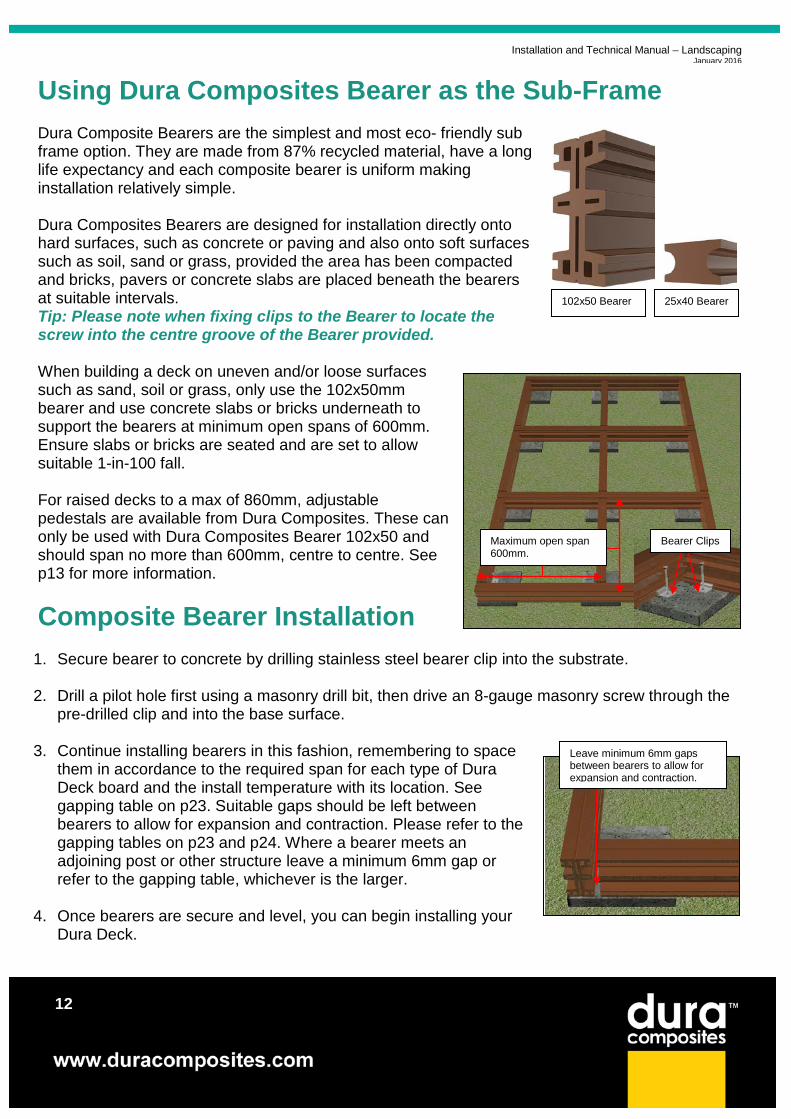
Using Dura Composites Bearer as the Sub-Frame Dura Composite Bearers are the simplest and most eco- friendly sub frame option. They are made from 87% recycled material, have a long life expectancy and each composite bearer is uniform making installation relatively simple. Dura Composites Bearers are designed for installation directly onto hard surfaces, such as concrete or paving and also onto soft surfaces such as soil, sand or grass, provided the area has been compacted and bricks, pavers or concrete slabs are placed beneath the bearers at suitable intervals. Tip: Please note when fixing clips to the Bearer to locate the screw into the centre groove of the Bearer provided. When building a deck on uneven and/or loose surfaces such as sand, soil or grass, only use the 102x50mm bearer and use concrete slabs or bricks underneath to support the bearers at minimum open spans of 600mm. Ensure slabs or bricks are seated and are set to allow suitable 1-in-100 fall. For raised decks to a max of 860mm, adjustable pedestals are available from Dura Composites. These can only be used with Dura Composites Bearer 102x50 and should span no more than 600mm, centre to centre. See p13 for more information.
Composite Bearer Installation
1. Secure bearer to concrete by drilling stainless steel bearer clip into the substrate.
2. Drill a pilot hole first using a masonry drill bit, then drive an 8-gauge masonry screw through the pre-drilled clip and into the base surface.
3. Continue installing bearers in this fashion, remembering to space
them in accordance to the required span for each type of Dura Deck board and the install temperature with its location. See gapping table on p23. Suitable gaps should be left between bearers to allow for expansion and contraction. Please refer to the gapping tables on p23 and p24. Where a bearer meets an adjoining post or other structure leave a minimum 6mm gap or refer to the gapping table, whichever is the larger.
4. Once bearers are secure and level, you can begin installing your Dura Deck.
102x50 Bearer 25x40 Bearer
Bearer Clips Maximum open span 600mm.
Leave minimum 6mm gaps between bearers to allow for expansion and contraction.
Installation and Technical Manual – Landscaping January 2016
13
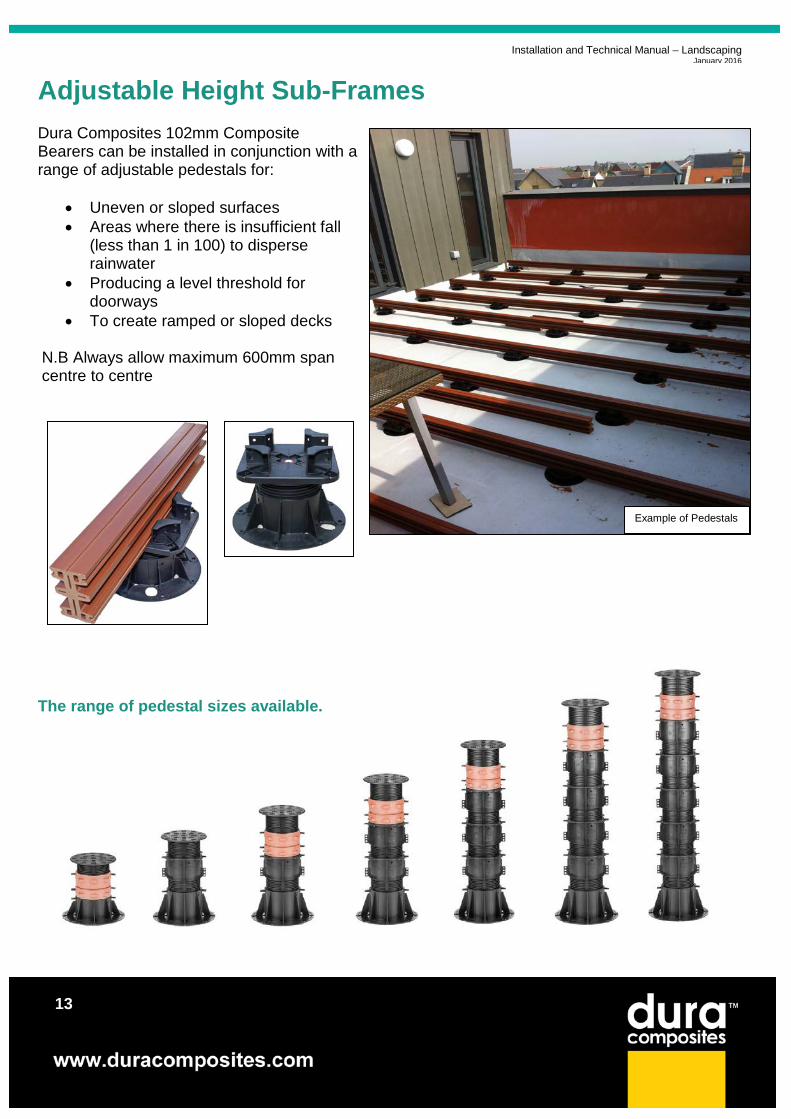
Example of Pedestals
Adjustable Height Sub-Frames Dura Composites 102mm Composite Bearers can be installed in conjunction with a range of adjustable pedestals for:
• Uneven or sloped surfaces • Areas where there is insufficient fall
(less than 1 in 100) to disperse rainwater
• Producing a level threshold for doorways
• To create ramped or sloped decks N.B Always allow maximum 600mm span centre to centre
The range of pedestal sizes available.
Installation and Technical Manual – Landscaping January 2016
14
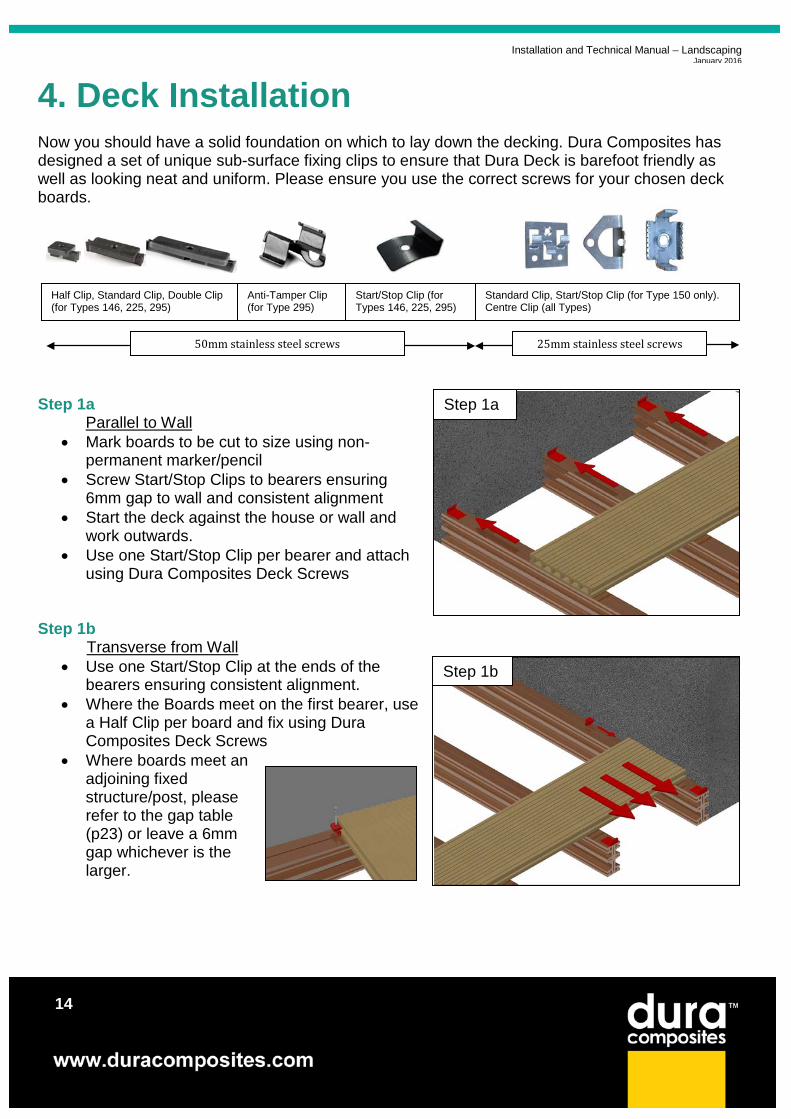
4. Deck Installation Now you should have a solid foundation on which to lay down the decking. Dura Composites has designed a set of unique sub-surface fixing clips to ensure that Dura Deck is barefoot friendly as well as looking neat and uniform. Please ensure you use the correct screws for your chosen deck boards.
Step 1a
Parallel to Wall • Mark boards to be cut to size using non-
permanent marker/pencil • Screw Start/Stop Clips to bearers ensuring
6mm gap to wall and consistent alignment • Start the deck against the house or wall and
work outwards. • Use one Start/Stop Clip per bearer and attach
using Dura Composites Deck Screws
Step 1b Transverse from Wall
• Use one Start/Stop Clip at the ends of the bearers ensuring consistent alignment.
• Where the Boards meet on the first bearer, use a Half Clip per board and fix using Dura Composites Deck Screws
• Where boards meet an adjoining fixed structure/post, please refer to the gap table (p23) or leave a 6mm gap whichever is the larger.
Half Clip, Standard Clip, Double Clip (for Types 146, 225, 295)
Anti-Tamper Clip (for Type 295)
Start/Stop Clip (for Types 146, 225, 295)
Standard Clip, Start/Stop Clip (for Type 150 only). Centre Clip (all Types)
Step 1a
Step 1b
50mm stainless steel screws 25mm stainless steel screws
Installation and Technical Manual – Landscaping January 2016
15
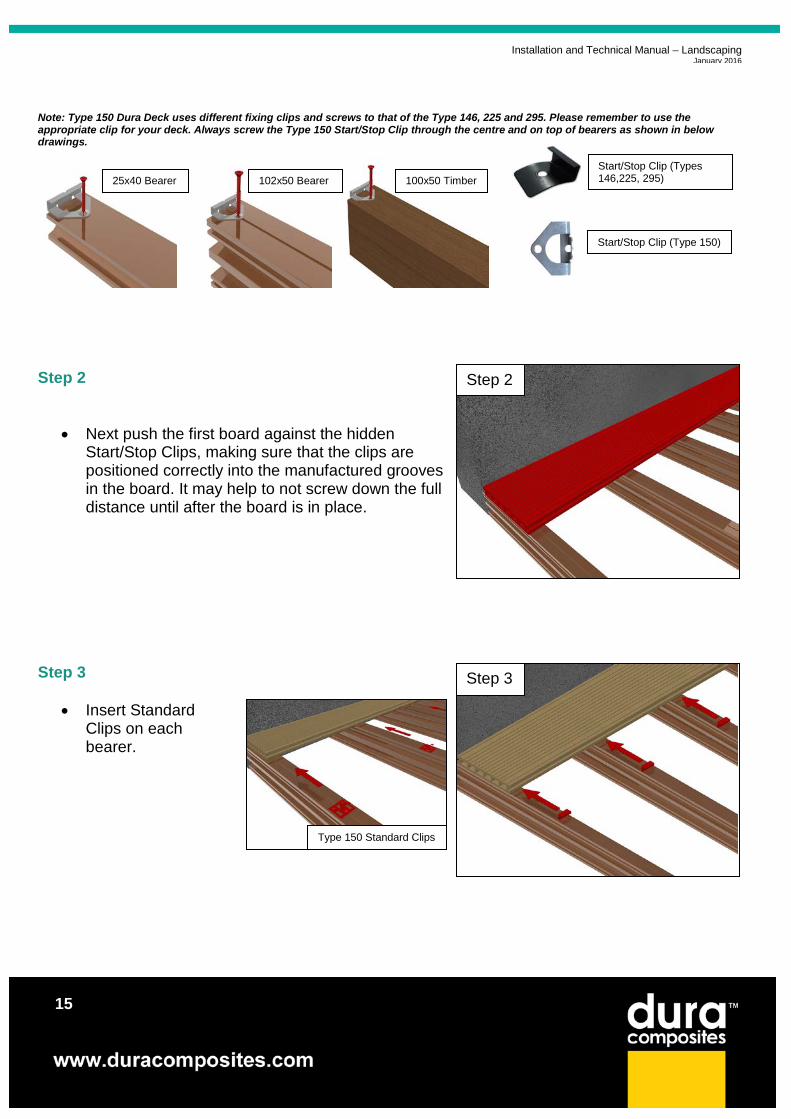
Note: Type 150 Dura Deck uses different fixing clips and screws to that of the Type 146, 225 and 295. Please remember to use the appropriate clip for your deck. Always screw the Type 150 Start/Stop Clip through the centre and on top of bearers as shown in below drawings. Step 2
• Next push the first board against the hidden Start/Stop Clips, making sure that the clips are positioned correctly into the manufactured grooves in the board. It may help to not screw down the full distance until after the board is in place.
Step 3
• Insert Standard Clips on each bearer.
Step 2
Step 3
100x50 Timber 25x40 Bearer 102x50 Bearer Start/Stop Clip (Types 146,225, 295)
Start/Stop Clip (Type 150)
Type 150 Standard Clips
Installation and Technical Manual – Landscaping January 2016
16
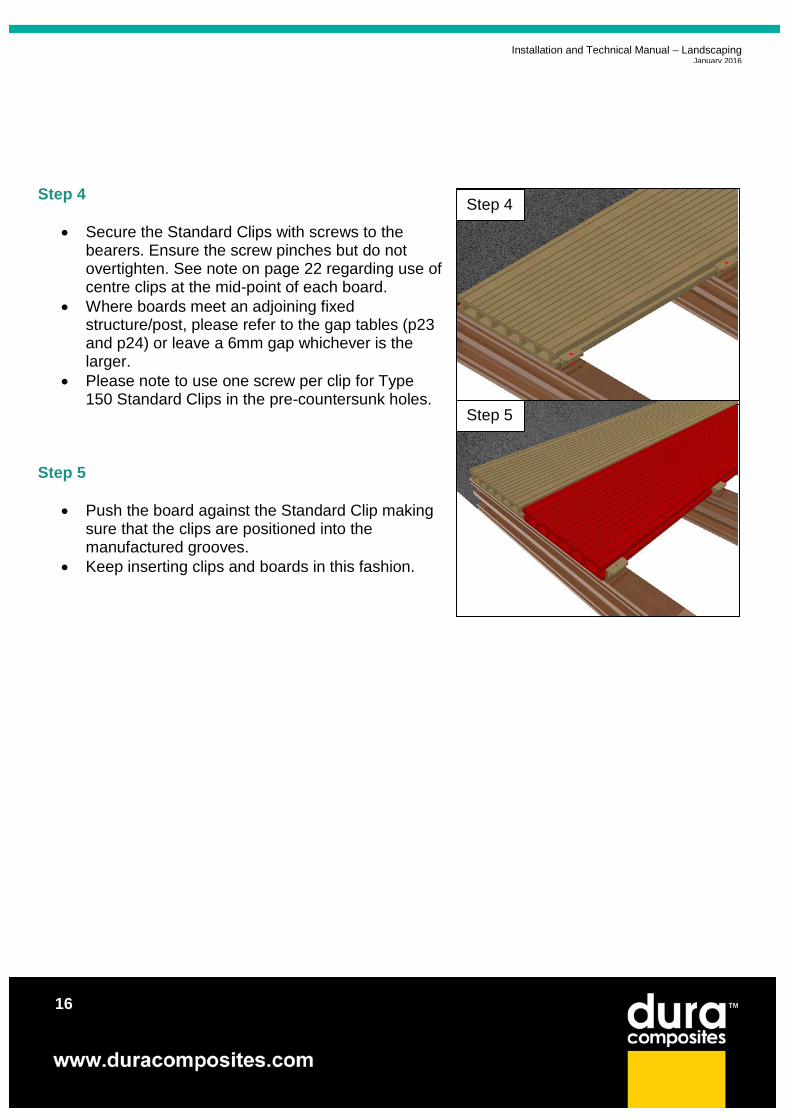
Step 4
• Secure the Standard Clips with screws to the bearers. Ensure the screw pinches but do not overtighten. See note on page 22 regarding use of centre clips at the mid-point of each board.
• Where boards meet an adjoining fixed structure/post, please refer to the gap tables (p23 and p24) or leave a 6mm gap whichever is the larger.
• Please note to use one screw per clip for Type 150 Standard Clips in the pre-countersunk holes.
Step 5
• Push the board against the Standard Clip making sure that the clips are positioned into the manufactured grooves.
• Keep inserting clips and boards in this fashion.
Step 5
Step 4
Installation and Technical Manual – Landscaping January 2016
17
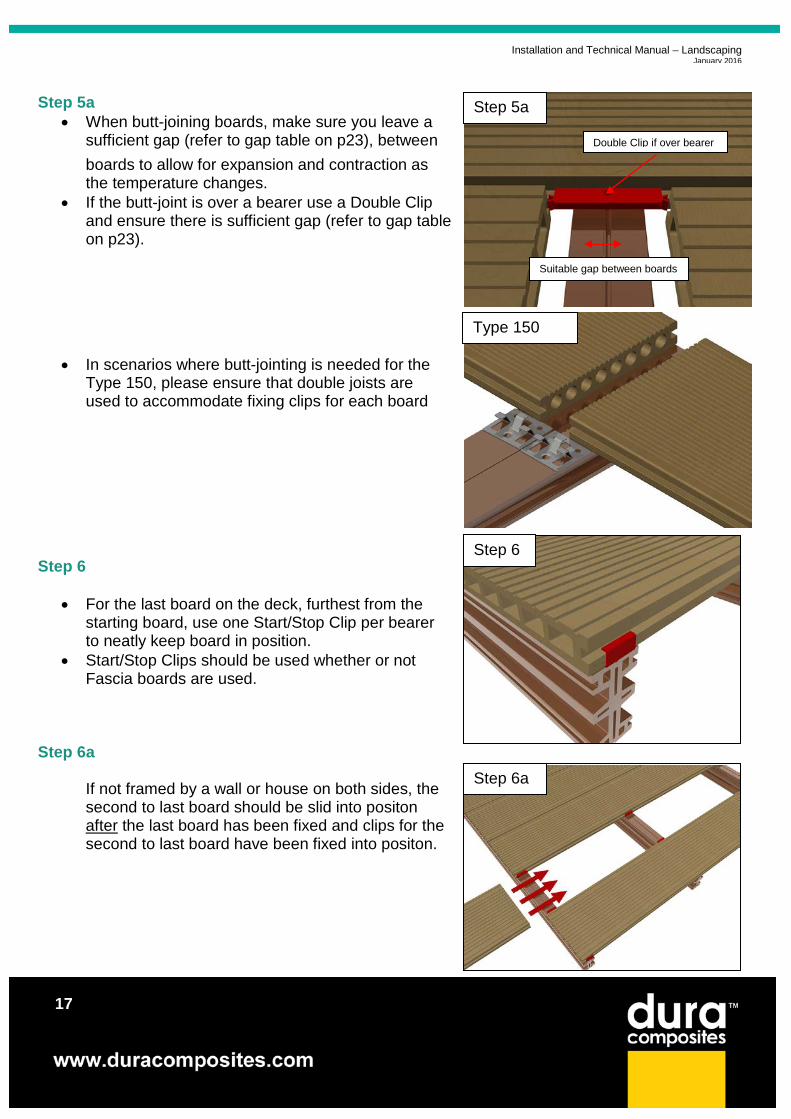
Step 5a
• When butt-joining boards, make sure you leave a sufficient gap (refer to gap table on p23), between boards to allow for expansion and contraction as the temperature changes.
• If the butt-joint is over a bearer use a Double Clip and ensure there is sufficient gap (refer to gap table on p23).
• In scenarios where butt-jointing is needed for the Type 150, please ensure that double joists are used to accommodate fixing clips for each board
Step 6
• For the last board on the deck, furthest from the starting board, use one Start/Stop Clip per bearer to neatly keep board in position.
• Start/Stop Clips should be used whether or not Fascia boards are used.
Step 6a
If not framed by a wall or house on both sides, the second to last board should be slid into positon after the last board has been fixed and clips for the second to last board have been fixed into positon.
Suitable gap between boards
Double Clip if over bearer
Step 5a
Step 6
Step 6a
Type 150
Installation and Technical Manual – Landscaping January 2016
18
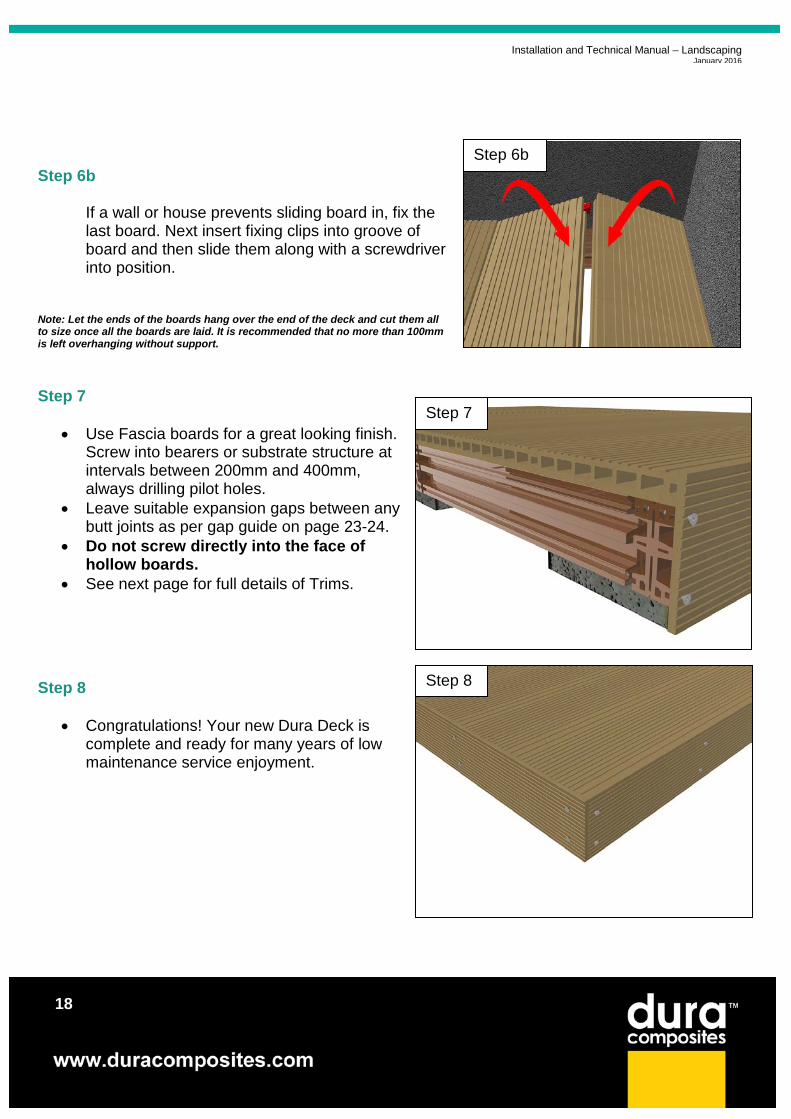
Step 6b
If a wall or house prevents sliding board in, fix the last board. Next insert fixing clips into groove of board and then slide them along with a screwdriver into position.
Note: Let the ends of the boards hang over the end of the deck and cut them all to size once all the boards are laid. It is recommended that no more than 100mm is left overhanging without support.
Step 7
• Use Fascia boards for a great looking finish. Screw into bearers or substrate structure at intervals between 200mm and 400mm, always drilling pilot holes.
• Leave suitable expansion gaps between any butt joints as per gap guide on page 23-24.
• Do not screw directly into the face of hollow boards.
• See next page for full details of Trims.
Step 8
• Congratulations! Your new Dura Deck is complete and ready for many years of low maintenance service enjoyment.
Step 6b
Step 7
Step 8
Installation and Technical Manual – Landscaping January 2016
19
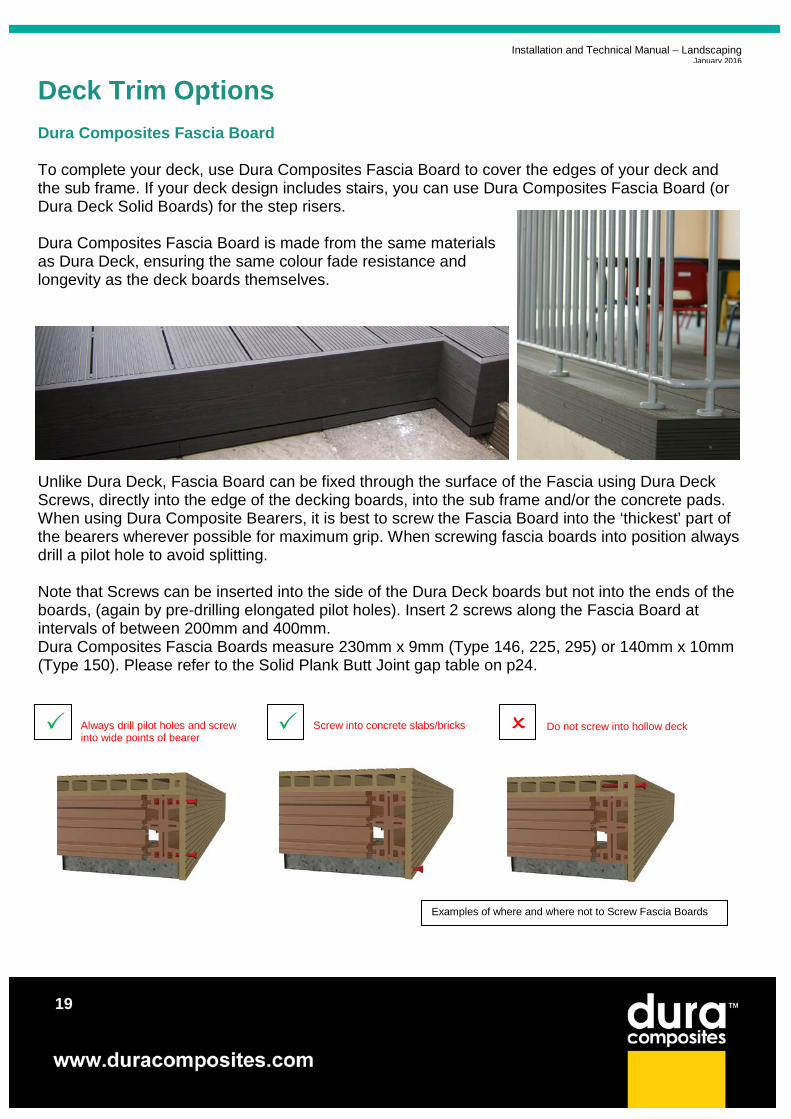
Deck Trim Options Dura Composites Fascia Board To complete your deck, use Dura Composites Fascia Board to cover the edges of your deck and the sub frame. If your deck design includes stairs, you can use Dura Composites Fascia Board (or Dura Deck Solid Boards) for the step risers. Dura Composites Fascia Board is made from the same materials as Dura Deck, ensuring the same colour fade resistance and longevity as the deck boards themselves. Unlike Dura Deck, Fascia Board can be fixed through the surface of the Fascia using Dura Deck Screws, directly into the edge of the decking boards, into the sub frame and/or the concrete pads. When using Dura Composite Bearers, it is best to screw the Fascia Board into the ‘thickest’ part of the bearers wherever possible for maximum grip. When screwing fascia boards into position always drill a pilot hole to avoid splitting. Note that Screws can be inserted into the side of the Dura Deck boards but not into the ends of the boards, (again by pre-drilling elongated pilot holes). Insert 2 screws along the Fascia Board at intervals of between 200mm and 400mm. Dura Composites Fascia Boards measure 230mm x 9mm (Type 146, 225, 295) or 140mm x 10mm (Type 150). Please refer to the Solid Plank Butt Joint gap table on p24.
Examples of where and where not to Screw Fascia Boards
Do not screw into hollow deck
Always drill pilot holes and screw into wide points of bearer
Screw into concrete slabs/bricks
Installation and Technical Manual – Landscaping January 2016
20
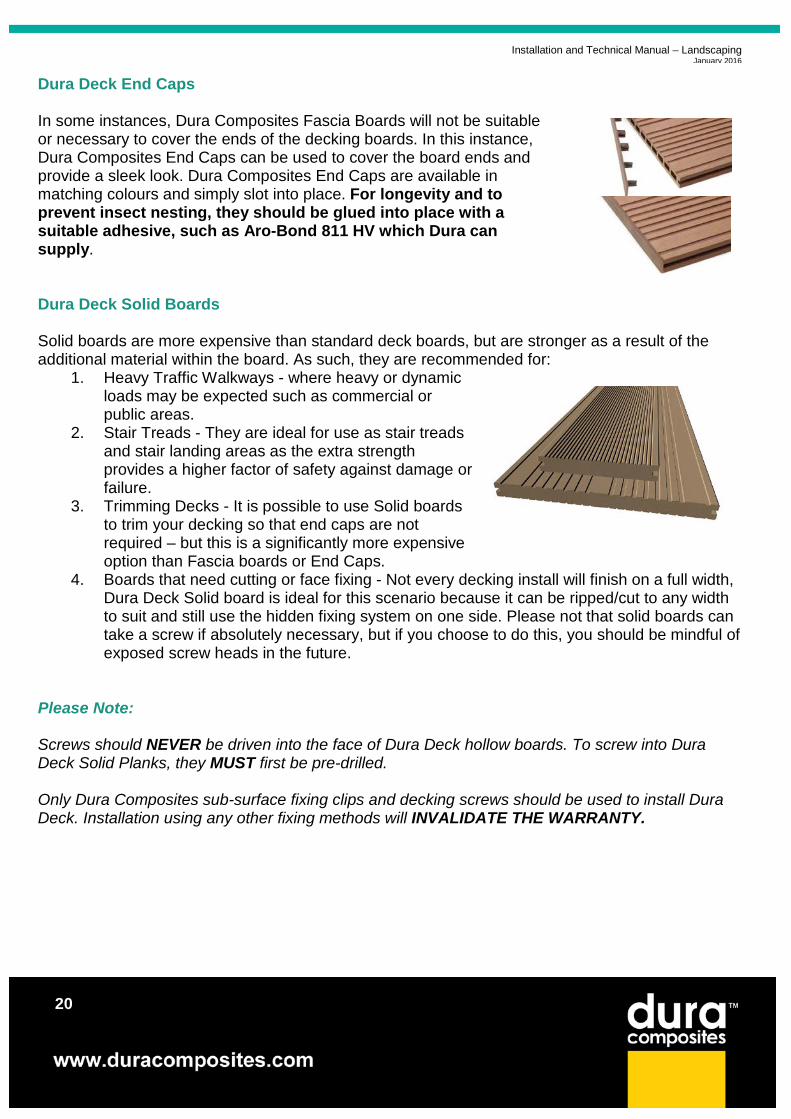
Dura Deck End Caps In some instances, Dura Composites Fascia Boards will not be suitable or necessary to cover the ends of the decking boards. In this instance, Dura Composites End Caps can be used to cover the board ends and provide a sleek look. Dura Composites End Caps are available in matching colours and simply slot into place. For longevity and to prevent insect nesting, they should be glued into place with a suitable adhesive, such as Aro-Bond 811 HV which Dura can supply.
Dura Deck Solid Boards Solid boards are more expensive than standard deck boards, but are stronger as a result of the additional material within the board. As such, they are recommended for:
1. Heavy Traffic Walkways - where heavy or dynamic loads may be expected such as commercial or public areas.
2. Stair Treads - They are ideal for use as stair treads and stair landing areas as the extra strength provides a higher factor of safety against damage or failure.
3. Trimming Decks - It is possible to use Solid boards to trim your decking so that end caps are not required – but this is a significantly more expensive option than Fascia boards or End Caps.
4. Boards that need cutting or face fixing - Not every decking install will finish on a full width, Dura Deck Solid board is ideal for this scenario because it can be ripped/cut to any width to suit and still use the hidden fixing system on one side. Please not that solid boards can take a screw if absolutely necessary, but if you choose to do this, you should be mindful of exposed screw heads in the future.
Please Note: Screws should NEVER be driven into the face of Dura Deck hollow boards. To screw into Dura Deck Solid Planks, they MUST first be pre-drilled. Only Dura Composites sub-surface fixing clips and decking screws should be used to install Dura Deck. Installation using any other fixing methods will INVALIDATE THE WARRANTY.
Installation and Technical Manual – Landscaping January 2016
21
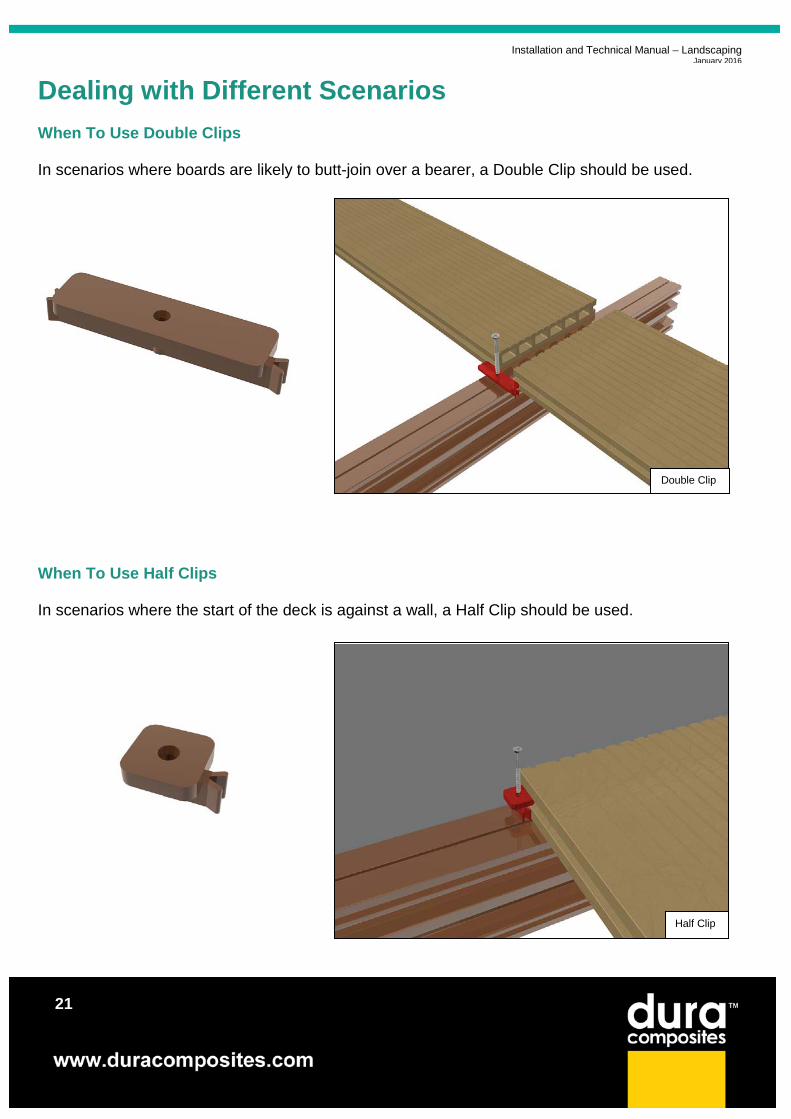
Dealing with Different Scenarios When To Use Double Clips In scenarios where boards are likely to butt-join over a bearer, a Double Clip should be used.
When To Use Half Clips In scenarios where the start of the deck is against a wall, a Half Clip should be used.
Double Clip
Half Clip
Installation and Technical Manual – Landscaping January 2016
22
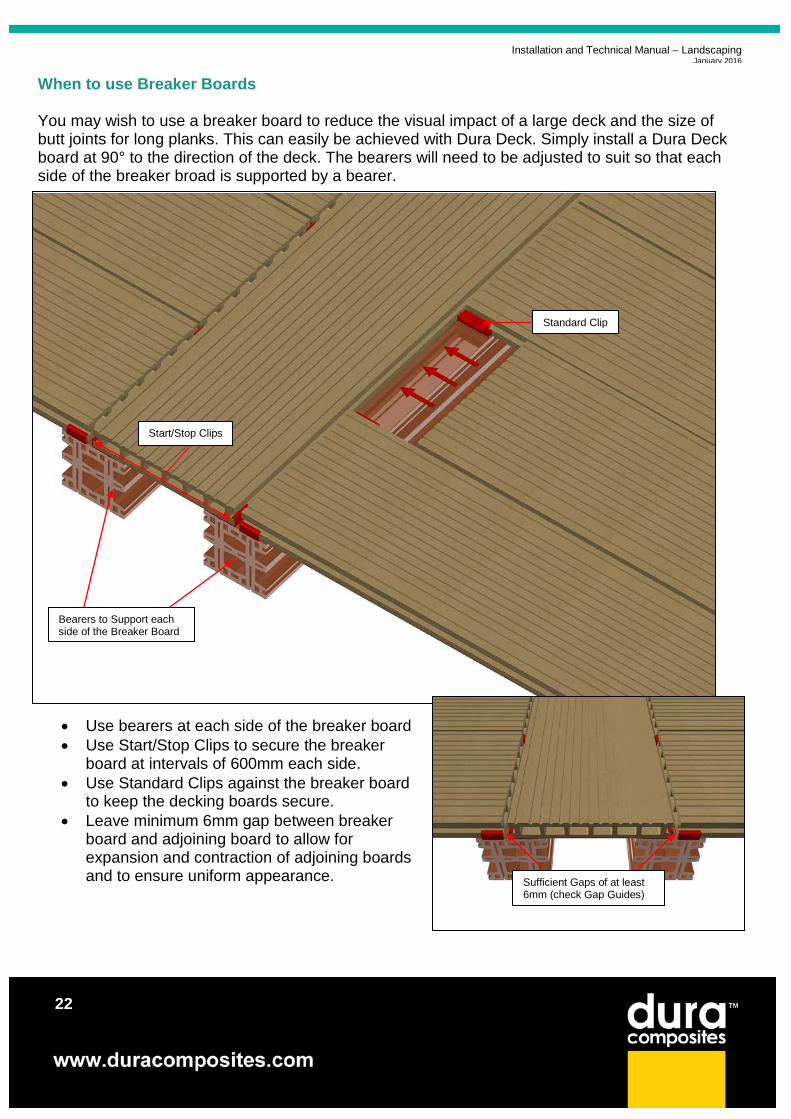
When to use Breaker Boards You may wish to use a breaker board to reduce the visual impact of a large deck and the size of butt joints for long planks. This can easily be achieved with Dura Deck. Simply install a Dura Deck board at 90° to the direction of the deck. The bearers will need to be adjusted to suit so that each side of the breaker broad is supported by a bearer.
• Use bearers at each side of the breaker board • Use Start/Stop Clips to secure the breaker
board at intervals of 600mm each side. • Use Standard Clips against the breaker board
to keep the decking boards secure. • Leave minimum 6mm gap between breaker
board and adjoining board to allow for expansion and contraction of adjoining boards and to ensure uniform appearance.
Start/Stop Clips
Bearers to Support each side of the Breaker Board
Standard Clip
Sufficient Gaps of at least 6mm (check Gap Guides)
Installation and Technical Manual – Landscaping January 2016
23
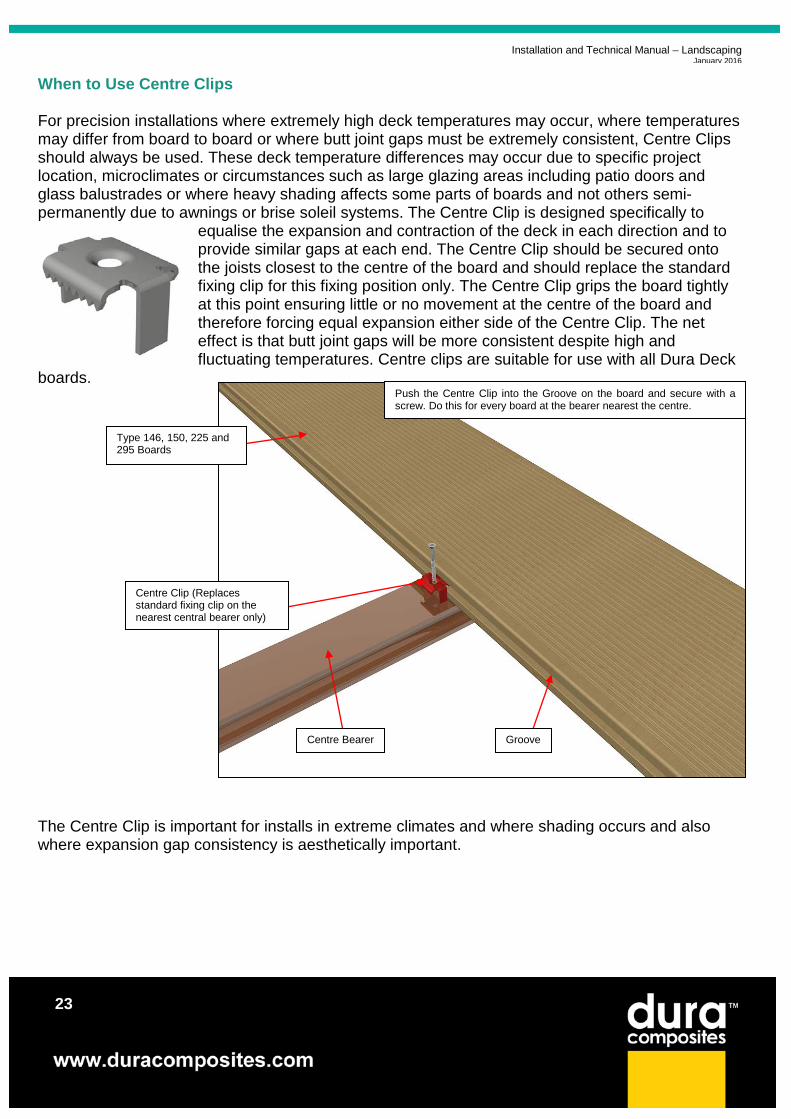
When to Use Centre Clips For precision installations where extremely high deck temperatures may occur, where temperatures may differ from board to board or where butt joint gaps must be extremely consistent, Centre Clips should always be used. These deck temperature differences may occur due to specific project location, microclimates or circumstances such as large glazing areas including patio doors and glass balustrades or where heavy shading affects some parts of boards and not others semi-permanently due to awnings or brise soleil systems. The Centre Clip is designed specifically to
equalise the expansion and contraction of the deck in each direction and to provide similar gaps at each end. The Centre Clip should be secured onto the joists closest to the centre of the board and should replace the standard fixing clip for this fixing position only. The Centre Clip grips the board tightly at this point ensuring little or no movement at the centre of the board and therefore forcing equal expansion either side of the Centre Clip. The net effect is that butt joint gaps will be more consistent despite high and fluctuating temperatures. Centre clips are suitable for use with all Dura Deck
boards.
The Centre Clip is important for installs in extreme climates and where shading occurs and also where expansion gap consistency is aesthetically important.
Push the Centre Clip into the Groove on the board and secure with a screw. Do this for every board at the bearer nearest the centre.
Centre Clip (Replaces standard fixing clip on the nearest central bearer only)
Centre Bearer
Type 146, 150, 225 and 295 Boards
Groove
Installation and Technical Manual – Landscaping January 2016
24
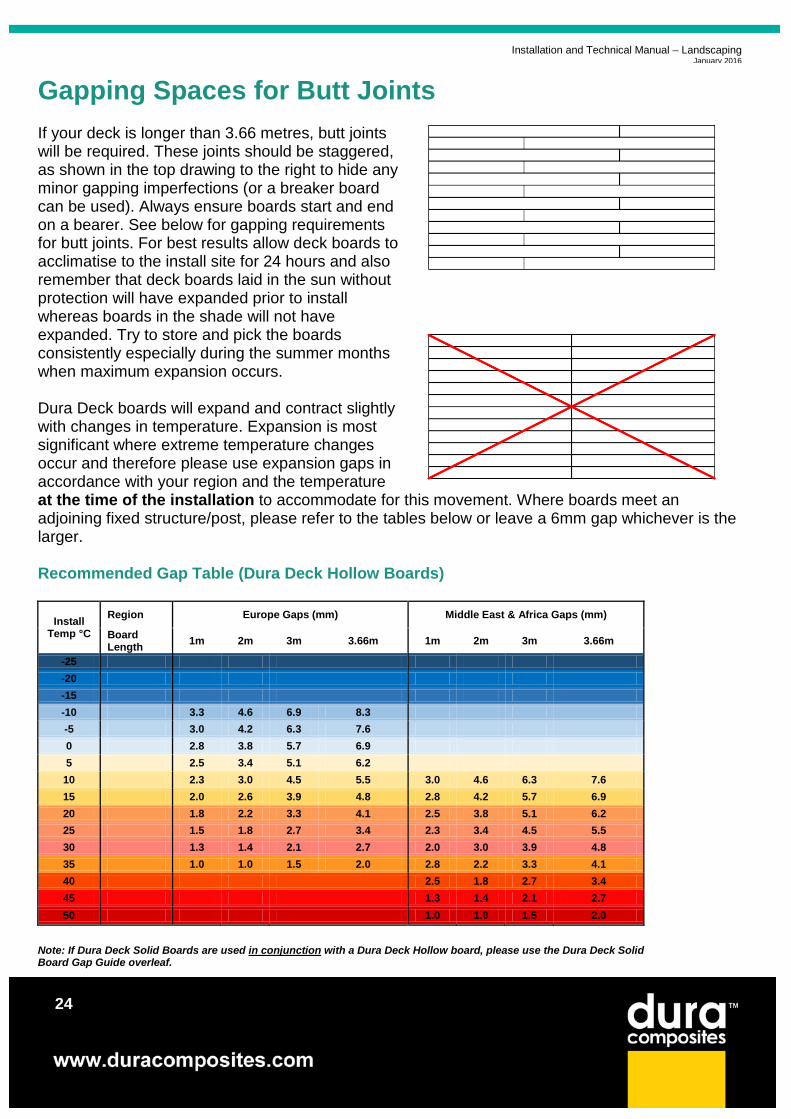
Gapping Spaces for Butt Joints If your deck is longer than 3.66 metres, butt joints will be required. These joints should be staggered, as shown in the top drawing to the right to hide any minor gapping imperfections (or a breaker board can be used). Always ensure boards start and end on a bearer. See below for gapping requirements for butt joints. For best results allow deck boards to acclimatise to the install site for 24 hours and also remember that deck boards laid in the sun without protection will have expanded prior to install whereas boards in the shade will not have expanded. Try to store and pick the boards consistently especially during the summer months when maximum expansion occurs.
Dura Deck boards will expand and contract slightly with changes in temperature. Expansion is most significant where extreme temperature changes occur and therefore please use expansion gaps in accordance with your region and the temperature at the time of the installation to accommodate for this movement. Where boards meet an adjoining fixed structure/post, please refer to the tables below or leave a 6mm gap whichever is the larger. Recommended Gap Table (Dura Deck Hollow Boards)
Install Temp °C
Region Europe Gaps (mm) Middle East & Africa Gaps (mm)
Board Length 1m 2m 3m 3.66m 1m 2m 3m 3.66m
-25 -20 -15 -10 3.3 4.6 6.9 8.3 -5 3.0 4.2 6.3 7.6 0 2.8 3.8 5.7 6.9 5 2.5 3.4 5.1 6.2
10 2.3 3.0 4.5 5.5 3.0 4.6 6.3 7.6 15 2.0 2.6 3.9 4.8 2.8 4.2 5.7 6.9 20 1.8 2.2 3.3 4.1 2.5 3.8 5.1 6.2 25 1.5 1.8 2.7 3.4 2.3 3.4 4.5 5.5 30 1.3 1.4 2.1 2.7 2.0 3.0 3.9 4.8 35 1.0 1.0 1.5 2.0 2.8 2.2 3.3 4.1 40 2.5 1.8 2.7 3.4 45 1.3 1.4 2.1 2.7 50 1.0 1.0 1.5 2.0
Note: If Dura Deck Solid Boards are used in conjunction with a Dura Deck Hollow board, please use the Dura Deck Solid Board Gap Guide overleaf.
Installation and Technical Manual – Landscaping January 2016
25
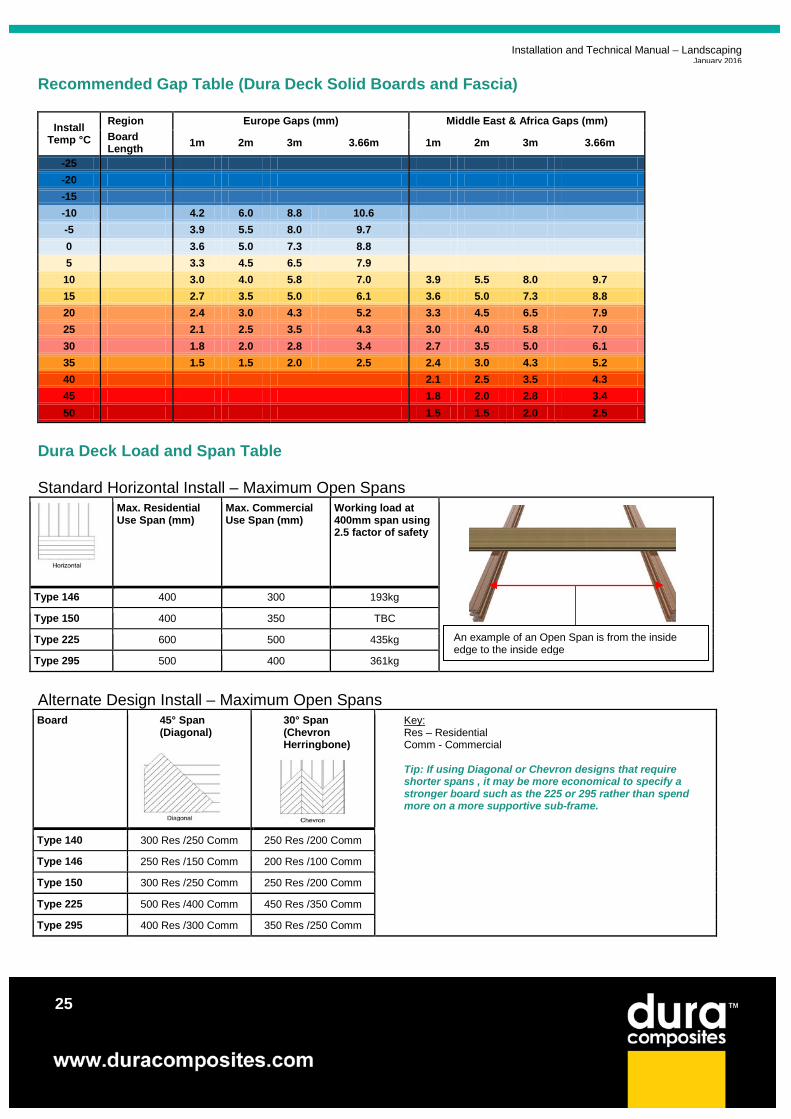
Recommended Gap Table (Dura Deck Solid Boards and Fascia)
Install Temp °C
Region Europe Gaps (mm) Middle East & Africa Gaps (mm) Board Length 1m 2m 3m 3.66m 1m 2m 3m 3.66m
-25 -20 -15 -10 4.2 6.0 8.8 10.6 -5 3.9 5.5 8.0 9.7 0 3.6 5.0 7.3 8.8 5 3.3 4.5 6.5 7.9 10 3.0 4.0 5.8 7.0 3.9 5.5 8.0 9.7 15 2.7 3.5 5.0 6.1 3.6 5.0 7.3 8.8 20 2.4 3.0 4.3 5.2 3.3 4.5 6.5 7.9 25 2.1 2.5 3.5 4.3 3.0 4.0 5.8 7.0 30 1.8 2.0 2.8 3.4 2.7 3.5 5.0 6.1 35 1.5 1.5 2.0 2.5 2.4 3.0 4.3 5.2 40 2.1 2.5 3.5 4.3 45 1.8 2.0 2.8 3.4 50 1.5 1.5 2.0 2.5
Dura Deck Load and Span Table Standard Horizontal Install – Maximum Open Spans
Max. Residential Use Span (mm)
Max. Commercial Use Span (mm)
Working load at 400mm span using 2.5 factor of safety
Type 146 400 300 193kg
Type 150 400 350 TBC
Type 225 600 500 435kg
Type 295 500 400 361kg
Alternate Design Install – Maximum Open Spans Board 45° Span
(Diagonal)
30° Span (Chevron Herringbone)
Key: Res – Residential Comm - Commercial
Tip: If using Diagonal or Chevron designs that require shorter spans , it may be more economical to specify a stronger board such as the 225 or 295 rather than spend more on a more supportive sub-frame.
Type 140 300 Res /250 Comm 250 Res /200 Comm
Type 146 250 Res /150 Comm 200 Res /100 Comm
Type 150 300 Res /250 Comm 250 Res /200 Comm
Type 225 500 Res /400 Comm 450 Res /350 Comm
Type 295 400 Res /300 Comm 350 Res /250 Comm
An example of an Open Span is from the inside edge to the inside edge
Installation and Technical Manual – Landscaping January 2016
26
5. Maintenance and Cleaning Information
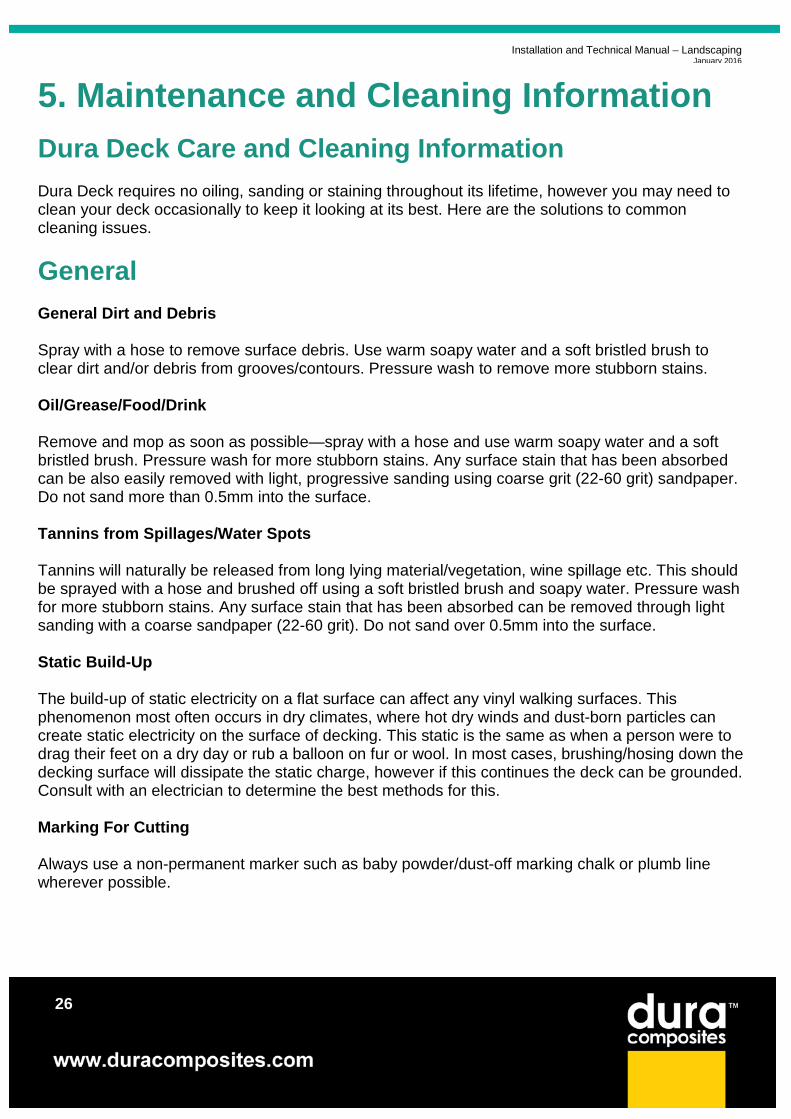
Dura Deck Care and Cleaning Information Dura Deck requires no oiling, sanding or staining throughout its lifetime, however you may need to clean your deck occasionally to keep it looking at its best. Here are the solutions to common cleaning issues.
General General Dirt and Debris Spray with a hose to remove surface debris. Use warm soapy water and a soft bristled brush to clear dirt and/or debris from grooves/contours. Pressure wash to remove more stubborn stains. Oil/Grease/Food/Drink Remove and mop as soon as possible—spray with a hose and use warm soapy water and a soft bristled brush. Pressure wash for more stubborn stains. Any surface stain that has been absorbed can be also easily removed with light, progressive sanding using coarse grit (22-60 grit) sandpaper. Do not sand more than 0.5mm into the surface. Tannins from Spillages/Water Spots Tannins will naturally be released from long lying material/vegetation, wine spillage etc. This should be sprayed with a hose and brushed off using a soft bristled brush and soapy water. Pressure wash for more stubborn stains. Any surface stain that has been absorbed can be removed through light sanding with a coarse sandpaper (22-60 grit). Do not sand over 0.5mm into the surface. Static Build-Up The build-up of static electricity on a flat surface can affect any vinyl walking surfaces. This phenomenon most often occurs in dry climates, where hot dry winds and dust-born particles can create static electricity on the surface of decking. This static is the same as when a person were to drag their feet on a dry day or rub a balloon on fur or wool. In most cases, brushing/hosing down the decking surface will dissipate the static charge, however if this continues the deck can be grounded. Consult with an electrician to determine the best methods for this. Marking For Cutting Always use a non-permanent marker such as baby powder/dust-off marking chalk or plumb line wherever possible.
Installation and Technical Manual – Landscaping January 2016
27
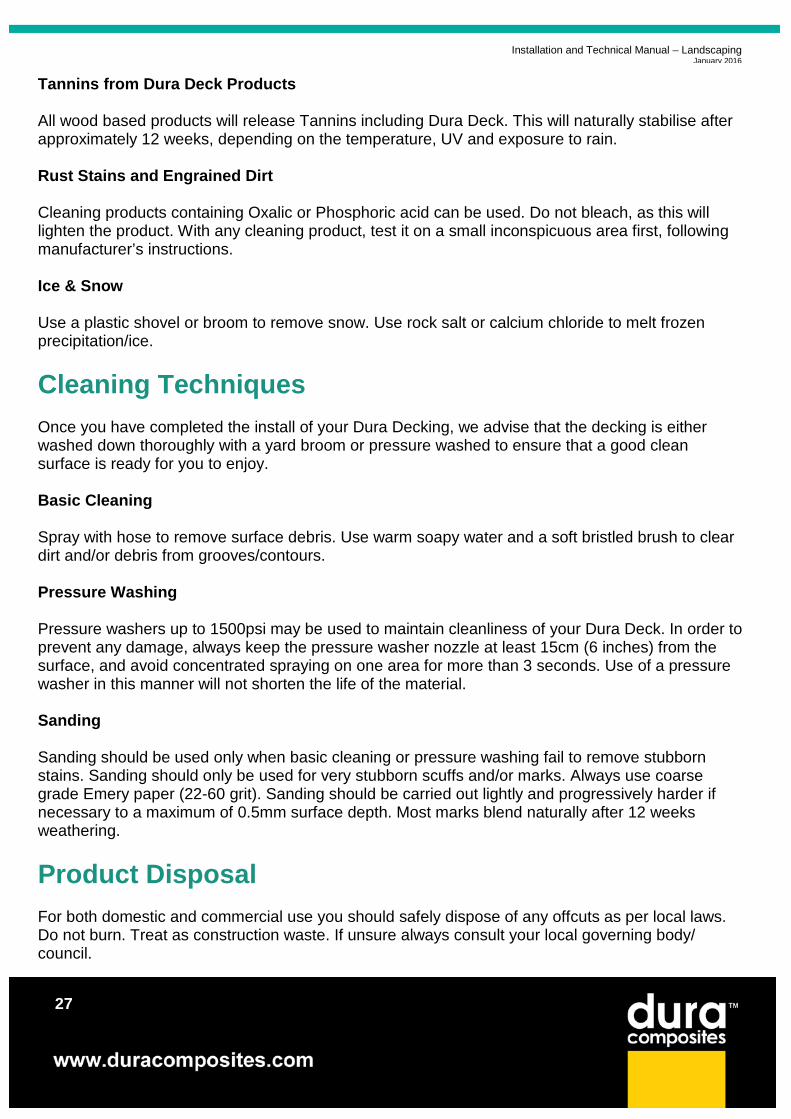
Tannins from Dura Deck Products All wood based products will release Tannins including Dura Deck. This will naturally stabilise after approximately 12 weeks, depending on the temperature, UV and exposure to rain. Rust Stains and Engrained Dirt Cleaning products containing Oxalic or Phosphoric acid can be used. Do not bleach, as this will lighten the product. With any cleaning product, test it on a small inconspicuous area first, following manufacturer’s instructions. Ice & Snow Use a plastic shovel or broom to remove snow. Use rock salt or calcium chloride to melt frozen precipitation/ice.
Cleaning Techniques Once you have completed the install of your Dura Decking, we advise that the decking is either washed down thoroughly with a yard broom or pressure washed to ensure that a good clean surface is ready for you to enjoy. Basic Cleaning Spray with hose to remove surface debris. Use warm soapy water and a soft bristled brush to clear dirt and/or debris from grooves/contours. Pressure Washing Pressure washers up to 1500psi may be used to maintain cleanliness of your Dura Deck. In order to prevent any damage, always keep the pressure washer nozzle at least 15cm (6 inches) from the surface, and avoid concentrated spraying on one area for more than 3 seconds. Use of a pressure washer in this manner will not shorten the life of the material. Sanding Sanding should be used only when basic cleaning or pressure washing fail to remove stubborn stains. Sanding should only be used for very stubborn scuffs and/or marks. Always use coarse grade Emery paper (22-60 grit). Sanding should be carried out lightly and progressively harder if necessary to a maximum of 0.5mm surface depth. Most marks blend naturally after 12 weeks weathering.
Product Disposal For both domestic and commercial use you should safely dispose of any offcuts as per local laws. Do not burn. Treat as construction waste. If unsure always consult your local governing body/ council.
Installation and Technical Manual – Landscaping January 2016
28
6. Technical Specifications
1. Definition
Range of decking products produced from Wood Polymer Composite (WPC) which is manufactured by an extrusion process using a mix of recycled plastics and hardwood wastes with various bespoke additives. 1.1 Applications
WPC is an immensely versatile material which combines the traditional appearance of natural timber with the durability and resilience of an engineered composite. Given it can be produced in a virtually unlimited range of colours and huge range of profile sections, the engineer can create a product or component suitable for many applications. 1.2 Benefits
Natural appearance, long life, light weight, low maintenance, no warping, no rotting, no trip hazards, corrosion/electrical resistance, low tooling/installation cost, long service life, no splintering, UV stable. WPC products compete very favourably on a life cycle cost basis versus traditional materials due to their limited maintenance needs and long life span. 2. Raw Materials
WPC is manufactured using a composition comprising high density polyethylene, hardwood waste plus a number of specialist additives such as coupling agents, inhibitors and stabilisers. The exact composition used for Dura Composites products is confidential. It is this highly developed, precise composition that enables the composite to deliver such strength and durability. 3. Product
Dura Deck comprises a range of low maintenance composite timber decking products that provide a comfortable walking surface for leisure, domestic or marine walkways. The boards are designed for a minimum 25 year service life and most products feature a sub-surface fixing system that means no trip hazards. The materials will not warp, rot or splinter like natural wood and due to the fact that it is available in widths up to 295mm it makes for very rapid installation. The range of bespoke fixing systems ensure consistent gapping to suit permanent or removable requirements. The range can be supplemented with balustrading and pergolas, produced from the same eco-friendly materials to suit specific project needs.
Installation and Technical Manual – Landscaping January 2016
29
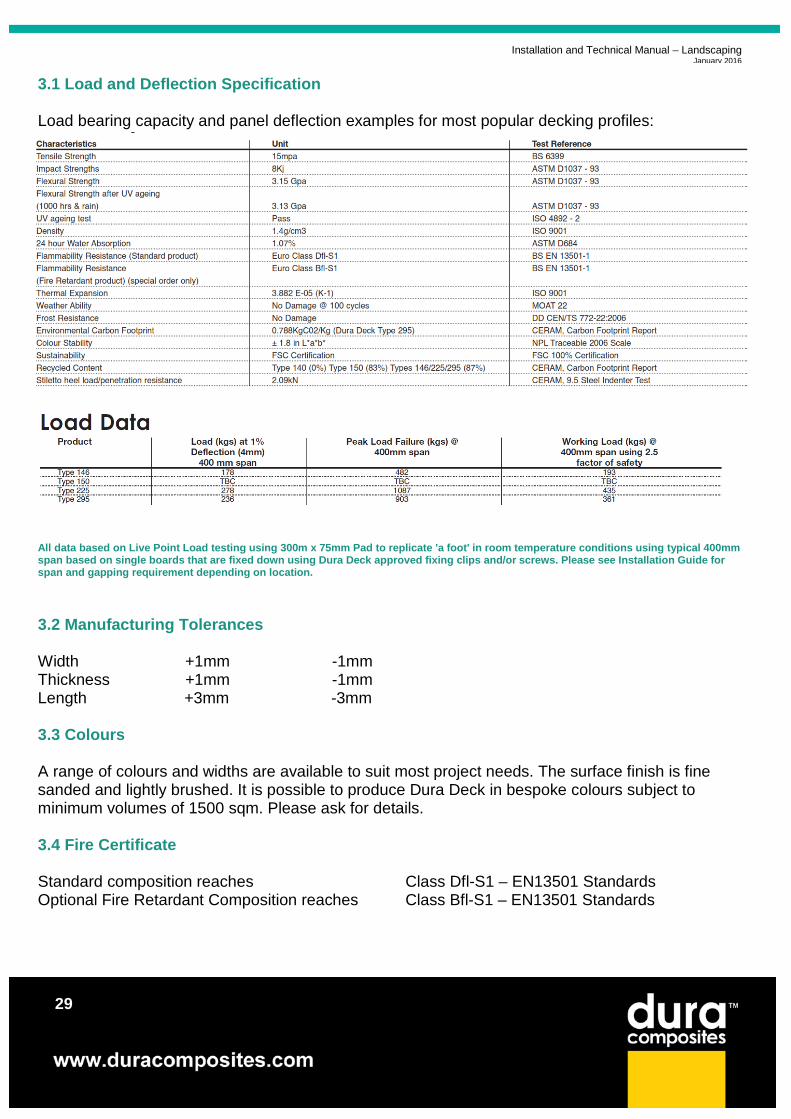
3.1 Load and Deflection Specification
Load bearing capacity and panel deflection examples for most popular decking profiles:
All data based on Live Point Load testing using 300m x 75mm Pad to replicate 'a foot' in room temperature conditions using typical 400mm span based on single boards that are fixed down using Dura Deck approved fixing clips and/or screws. Please see Installation Guide for span and gapping requirement depending on location.
3.2 Manufacturing Tolerances
Width +1mm -1mm Thickness +1mm -1mm Length +3mm -3mm 3.3 Colours A range of colours and widths are available to suit most project needs. The surface finish is fine sanded and lightly brushed. It is possible to produce Dura Deck in bespoke colours subject to minimum volumes of 1500 sqm. Please ask for details. 3.4 Fire Certificate Standard composition reaches Class Dfl-S1 – EN13501 Standards Optional Fire Retardant Composition reaches Class Bfl-S1 – EN13501 Standards
Installation and Technical Manual – Landscaping January 2016
30
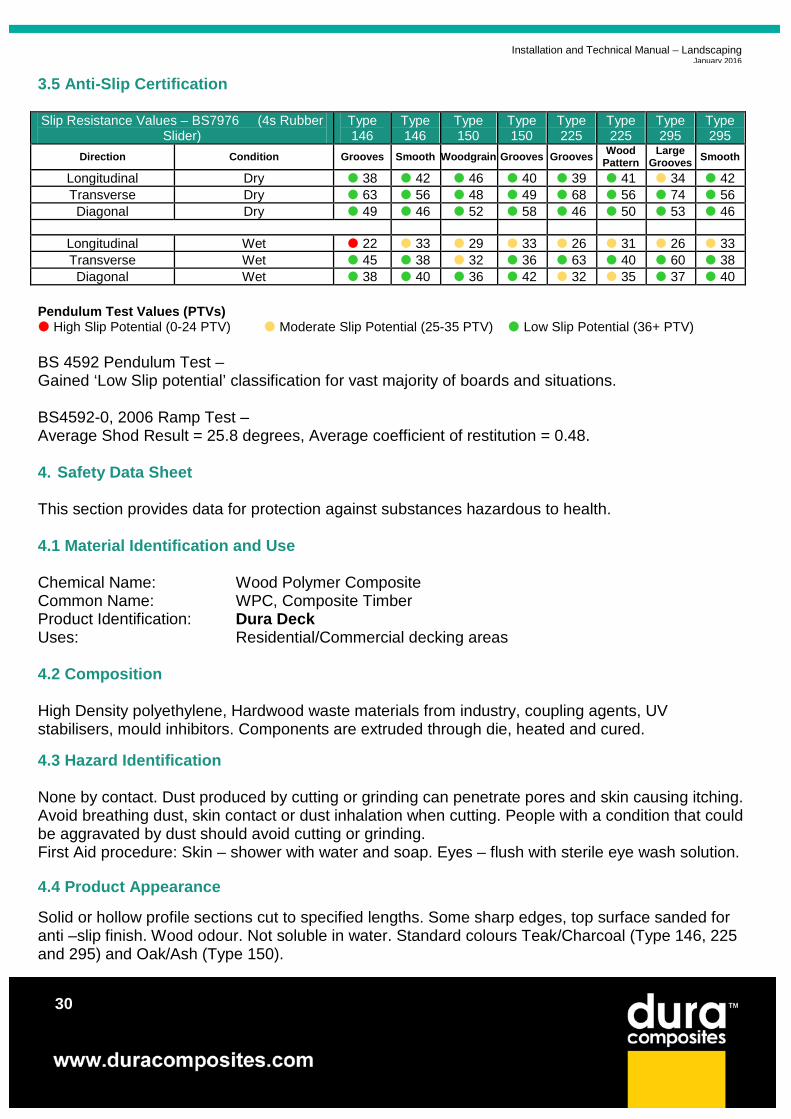
3.5 Anti-Slip Certification Slip Resistance Values – BS7976 (4s Rubber
Slider) Type 146
Type 146
Type 150
Type 150
Type 225
Type 225
Type 295
Type 295
Direction Condition Grooves Smooth Woodgrain Grooves Grooves Wood Pattern
Large Grooves Smooth
Longitudinal Dry 38 42 46 40 39 41 34 42 Transverse Dry 63 56 48 49 68 56 74 56 Diagonal Dry 49 46 52 58 46 50 53 46
Longitudinal Wet 22 33 29 33 26 31 26 33 Transverse Wet 45 38 32 36 63 40 60 38 Diagonal Wet 38 40 36 42 32 35 37 40
Pendulum Test Values (PTVs) High Slip Potential (0-24 PTV) Moderate Slip Potential (25-35 PTV) Low Slip Potential (36+ PTV) BS 4592 Pendulum Test – Gained ‘Low Slip potential’ classification for vast majority of boards and situations. BS4592-0, 2006 Ramp Test – Average Shod Result = 25.8 degrees, Average coefficient of restitution = 0.48. 4. Safety Data Sheet
This section provides data for protection against substances hazardous to health.
4.1 Material Identification and Use Chemical Name: Wood Polymer Composite Common Name: WPC, Composite Timber Product Identification: Dura Deck Uses: Residential/Commercial decking areas
4.2 Composition High Density polyethylene, Hardwood waste materials from industry, coupling agents, UV stabilisers, mould inhibitors. Components are extruded through die, heated and cured.
4.3 Hazard Identification None by contact. Dust produced by cutting or grinding can penetrate pores and skin causing itching. Avoid breathing dust, skin contact or dust inhalation when cutting. People with a condition that could be aggravated by dust should avoid cutting or grinding. First Aid procedure: Skin – shower with water and soap. Eyes – flush with sterile eye wash solution.
4.4 Product Appearance Solid or hollow profile sections cut to specified lengths. Some sharp edges, top surface sanded for anti –slip finish. Wood odour. Not soluble in water. Standard colours Teak/Charcoal (Type 146, 225 and 295) and Oak/Ash (Type 150).
Installation and Technical Manual – Landscaping January 2016
31
4.5 Fire Fighting Measures Standard extinguishing equipment, water, foam, A, B or C fire extinguishers. Produces black smoke while burning, carbon particles. Use air respirator. 4.6 Waste Disposal Product is not considered a hazardous waste. Abide by local laws and procedures.
4.7 Handling/Cutting Wear masks and goggles when cutting or grinding. Cover exposed parts of the body. Wear gloves when moving or lifting. Use standard wood working equipment & tolls for cutting. Avoid direct fire source.
5. Product Warranty 10 year limited warranty, further details available on request.
November 2015
Installation and Technical Manual – Landscaping January 2016
32
Head Office Dura Composites Ltd Dura House, Telford Road, Clacton-on-Sea Essex CO15 4LP United Kingdom Tel: +44 (0)1255 423601 Fax: +44 (0)1255 435426 www.duracomposites.com [email protected] For further information, please do not hesitate to call us. Please note that every effort has been made to ensure that the information in this publication is correct at the time of publishing. Dura Composites Ltd. assumes no responsibility or liability for typographical errors or omissions or for any misinterpretation of the information within this publication and reserves the right to change without notice.