Embed Size (px)
Citation preview
CisOL-31474-01
C H A P T E R 1
Installation and Configuration GuideOverviewThe Installation and Configuration Guide is divided into the following sections:
• Prerequisites and Installation Overview: A quick reference on software and hardware requirements.
• Configuring Database: Instructions for configuring your databases for use with Service Catalog.
• Preinstallation Configuration for JBoss: Instructions for preparing your computer for installing Service Catalog with JBoss Application Server.
• Preinstallation Configuration for WebLogic: Instructions for configuring WebLogic Application Server prior to installing Service Catalog.
• Preinstallation Configuration for WebSphere: Instructions for configuring WebSphere Application Server prior to installing Service Catalog.
• Running the Service Catalog Installer: Instructions for executing the Service Catalog installer.
• Postinstallation Configuration for JBoss: Instructions for starting the Service Catalog applications on JBoss Application Server.
• Postinstallation Configuration for WebLogic: Instructions for deploying the Service Catalog WAR files on WebLogic Application Server.
• Postinstallation Configuration for WebSphere: Instructions for deploying the Service Catalog WAR files on WebSphere Application Server.
Related DocumentationFor information about performing an upgrade installation, see Chapter 3, “Upgrade Guide”.
For information about installing the Reporting and IBM Cognos software, see Reporting Guide, page 2-1.
For information about configuring Directory Integration and Service Link, including LDAP, see the Cisco Prime Service Catalog Integration Guide.
For information about customizing Service Catalog stylesheets, see the Cisco Prime Service Catalog Configuration Guide.
For information about Platform Support Matrix, see the Cisco Prime Service Catalog Compatibility Matrix document
These guides are available on the http://www.cisco.com product download site.
1-1co Prime Service Catalog 10.0 R2 Installation Guide
Chapter 1 Installation and Configuration Guide Prerequisites and Installation Overview
Prerequisites and Installation Overview
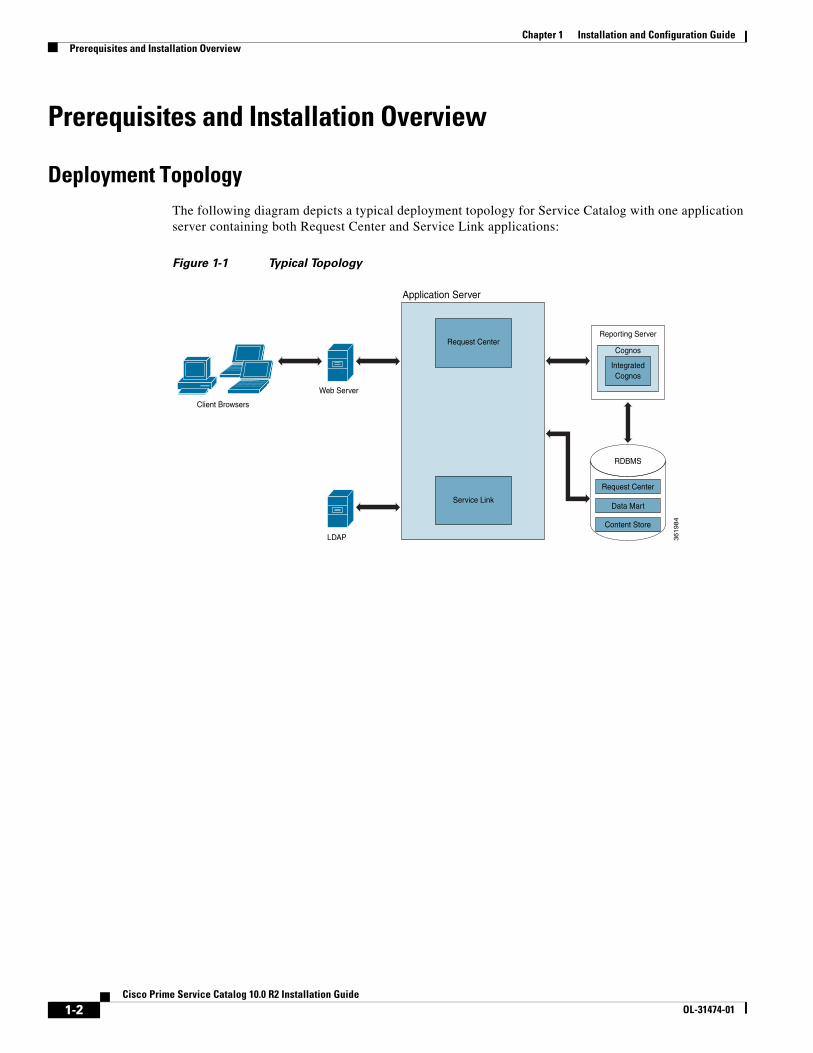
Deployment TopologyThe following diagram depicts a typical deployment topology for Service Catalog with one application server containing both Request Center and Service Link applications:
Figure 1-1 Typical Topology
Application Server
Service Link
Request Center
36
19
84
Request Center
Data Mart
Content Store
RDBMS
IntegratedCognos
Cognos
Reporting Server
Web Server
LDAP
Client Browsers
1-2Cisco Prime Service Catalog 10.0 R2 Installation Guide
OL-31474-01
Chapter 1 Installation and Configuration GuidePrerequisites and Installation Overview
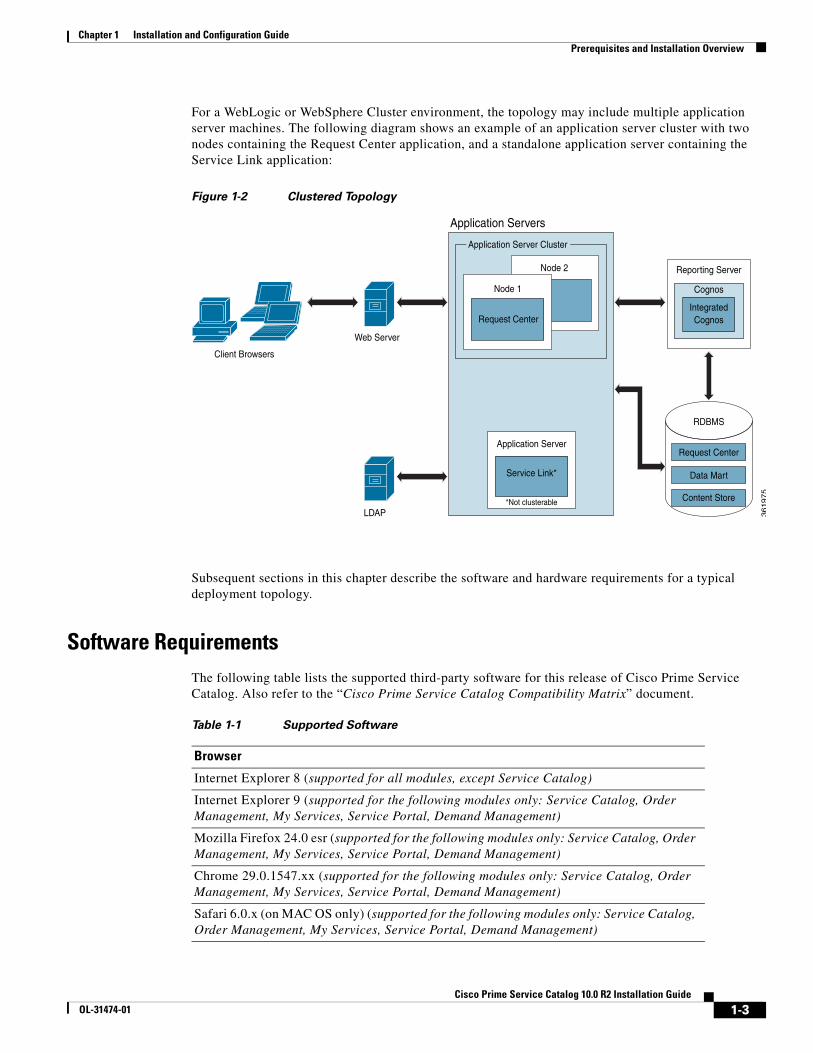
For a WebLogic or WebSphere Cluster environment, the topology may include multiple application server machines. The following diagram shows an example of an application server cluster with two nodes containing the Request Center application, and a standalone application server containing the Service Link application:
Figure 1-2 Clustered Topology
Subsequent sections in this chapter describe the software and hardware requirements for a typical deployment topology.
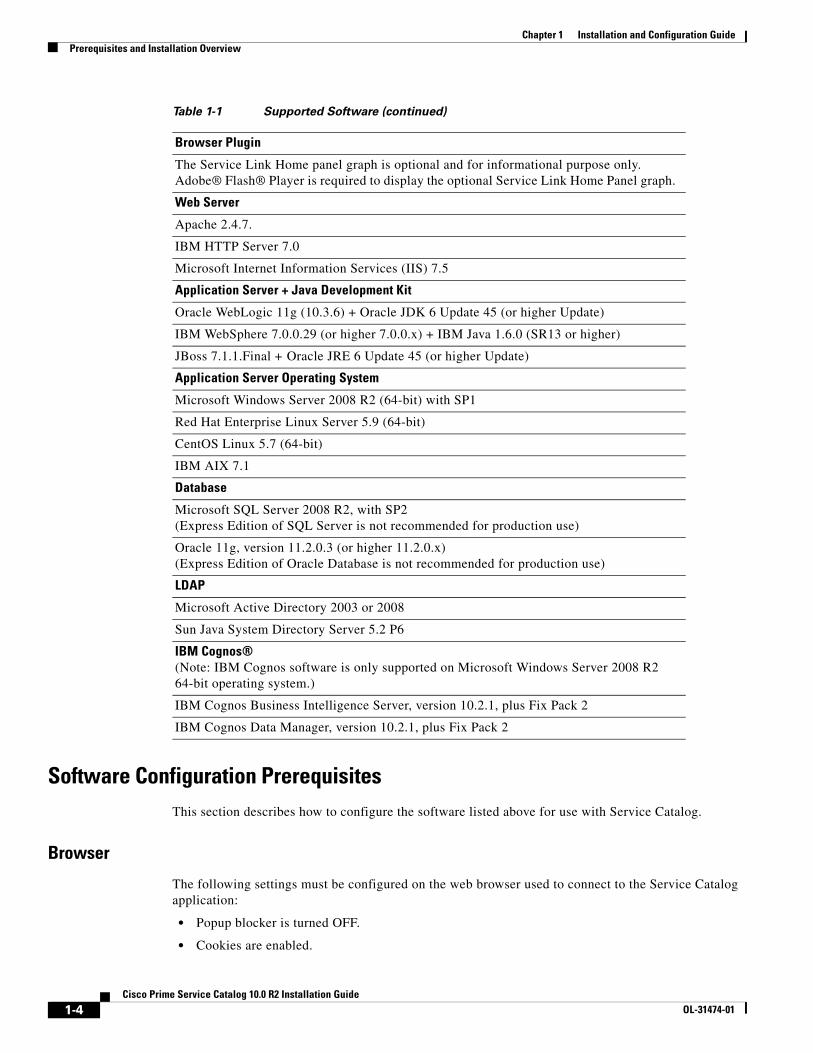
Software RequirementsThe following table lists the supported third-party software for this release of Cisco Prime Service Catalog. Also refer to the “Cisco Prime Service Catalog Compatibility Matrix” document.
Request Center
Application Servers
Node 2
Node 1
Request Center
Application Server Cluster
Service Link*
Application Server
*Not clusterable
36
19
75
Request Center
Data Mart
Content Store
RDBMS
IntegratedCognos
Cognos
Reporting Server
Web Server
LDAP
Client Browsers
Table 1-1 Supported Software
Browser
Internet Explorer 8 (supported for all modules, except Service Catalog)
Internet Explorer 9 (supported for the following modules only: Service Catalog, Order Management, My Services, Service Portal, Demand Management)
Mozilla Firefox 24.0 esr (supported for the following modules only: Service Catalog, Order Management, My Services, Service Portal, Demand Management)
Chrome 29.0.1547.xx (supported for the following modules only: Service Catalog, Order Management, My Services, Service Portal, Demand Management)
Safari 6.0.x (on MAC OS only) (supported for the following modules only: Service Catalog, Order Management, My Services, Service Portal, Demand Management)
1-3Cisco Prime Service Catalog 10.0 R2 Installation Guide
OL-31474-01
Chapter 1 Installation and Configuration Guide Prerequisites and Installation Overview
Software Configuration PrerequisitesThis section describes how to configure the software listed above for use with Service Catalog.
Browser
The following settings must be configured on the web browser used to connect to the Service Catalog application:
• Popup blocker is turned OFF.
• Cookies are enabled.
Browser Plugin
The Service Link Home panel graph is optional and for informational purpose only. Adobe® Flash® Player is required to display the optional Service Link Home Panel graph.
Web Server
Apache 2.4.7.
IBM HTTP Server 7.0
Microsoft Internet Information Services (IIS) 7.5
Application Server + Java Development Kit
Oracle WebLogic 11g (10.3.6) + Oracle JDK 6 Update 45 (or higher Update)
IBM WebSphere 7.0.0.29 (or higher 7.0.0.x) + IBM Java 1.6.0 (SR13 or higher)
JBoss 7.1.1.Final + Oracle JRE 6 Update 45 (or higher Update)
Application Server Operating System
Microsoft Windows Server 2008 R2 (64-bit) with SP1
Red Hat Enterprise Linux Server 5.9 (64-bit)
CentOS Linux 5.7 (64-bit)
IBM AIX 7.1
Database
Microsoft SQL Server 2008 R2, with SP2 (Express Edition of SQL Server is not recommended for production use)
Oracle 11g, version 11.2.0.3 (or higher 11.2.0.x) (Express Edition of Oracle Database is not recommended for production use)
LDAP
Microsoft Active Directory 2003 or 2008
Sun Java System Directory Server 5.2 P6
IBM Cognos®(Note: IBM Cognos software is only supported on Microsoft Windows Server 2008 R2 64-bit operating system.)
IBM Cognos Business Intelligence Server, version 10.2.1, plus Fix Pack 2
IBM Cognos Data Manager, version 10.2.1, plus Fix Pack 2
Table 1-1 Supported Software (continued)
1-4Cisco Prime Service Catalog 10.0 R2 Installation Guide
OL-31474-01
Chapter 1 Installation and Configuration GuidePrerequisites and Installation Overview
• To run an Asian language version of the system, you must install East Asian Language Support from the vendor of your web browser.
• Adobe Reader® is required on your web browser machine, in order to view and print reports.
Note If you are a user who needs to access the Administration module or the designer related modules (such as Service Designer, Organization Designer, Portal Designer, etc.), then you must use Internet Explorer 8 browser.
Application Server
If you choose JBoss as your application server, you do not need to install JBoss software as a prerequisite. The Cisco Prime Service Catalog installer will automatically install the Jboss Application Server and deploy the Service Catalog applications. Follow the instructions in the “Preinstallation Configuration for JBoss” section on page 1-14 to prepare your machine for installing Service Catalog with the JBoss Application Server.
If you choose WebLogic as your application server, you need to install the Oracle WebLogic Application Server software as a prerequisite on your machine. This guide does not contain instructions for installing the WebLogic software. However you will need to follow the instructions in the “Preinstallation Configuration for WebLogic” section on page 1-16 to prepare your WebLogic Server for use with Service Catalog.
If you choose WebSphere as your application server, you need to install the IBM WebSphere Application Server software as a prerequisite on your machine. This guide does not contain instructions for installing the WebSphere software. However you will need to follow the instructions in the “Preinstallation Configuration for WebSphere” section on page 1-33 to prepare your WebSphere Server for use with Service Catalog.
Clustering Considerations
To deploy Service Catalog in a clustered WebLogic or WebSphere environment, WebLogic or WebSphere Application Server must be set up in a clustered configuration before you install Service Catalog. Additionally, if you want to provide full fail-over capability, then you must configure cluster-able sessions on one or more of the clustered nodes. See your application server documentation for information on clustered configuration.
Note A clustered configuration is not supported for the JBoss Application Server.
Web Server
As a prerequisite, your web server must already be installed and running. Your web server does not have to be installed on the same machine as your application server, or on the machine where you plan to execute the Service Catalog installer.
The web server must have the plugin configuration necessary to communicate with your application server. For example, if you choose to use Apache web server with WebLogic Application Server for your deployment topology, then as a prerequisite, you need to manually configure the plugin for your Apache server to connect to your WebLogic server. The plugin between the web server and the application server will not be configured by the Service Catalog installer.
1-5Cisco Prime Service Catalog 10.0 R2 Installation Guide
OL-31474-01
Chapter 1 Installation and Configuration Guide Prerequisites and Installation Overview
Internet Information Service (IIS) with JBoss
If you select JBoss as your application server on a Windows operating system, the Service Catalog installer can configure the Tomcat plugin for the IIS web server automatically for you, if it detects that the IIS web server is already installed on the same Windows machine where you execute the installer.
You will see the "Configure IIS" option on the installation wizard during the installation, and can select or deselect that option as you desire. To enable this feature, the IIS web server must meet the following required settings:
• IIS Web Server is installed on the same Windows machine where you execute the Service Catalog installer
• IIS Web Server has the following Role Services: ISAPI Filters, ISAPI Extensions
Java Development Kit
Java Development Kit is a prerequisite software on your application server machine. As listed in Table 1-1, only specific versions (and vendors) of JDK or JRE are supported for each type of application server. More information about how to configure Java for your application server is described in the “Preinstallation Configuration for JBoss” section on page 1-14, the “Preinstallation Configuration for WebLogic” section on page 1-16, and the “Preinstallation Configuration for WebSphere” section on page 1-33.
Java 1.6 is also a prerequisite for the Cisco Prime Service Catalog installer. Therefore if you plan to execute the Service Catalog installer on a machine different from your application server, then you need to install either Java Runtime Environment or Java Development Kit, version 1.6.0_x, on that machine. If you plan to execute the Service Catalog installer on the same machine where your application server is installed, then just set JAVA_HOME environment variable to the same Java that is used by your application server.
Database
If you choose SQL Server 2008 R2 as your RDBMS, then you need to install the Microsoft SQL Server 2008 R2 software as a prerequisite (see Table 1-1 for specific version).
If you choose Oracle 11g as your RDBMS, you need to install the Oracle 11g Database Server software as a prerequisite (see Table 1-1 for specific version).
Do not install any SQL Server Client or Oracle Client connectivity software on your application server. You must use the JDBC driver that is bundled with the Cisco Prime Service Catalog product. For the JBoss application server, the Cisco Prime Service Catalog installer automatically installs the appropriate JDBC driver and configures the JDBC datasource to use this driver. For WebLogic or WebSphere, you will need to manually copy the appropriate JDBC driver jar file (included in the Cisco Prime Service Catalog product image) to your WebLogic or WebSphere directory, and manually configure the JDBC datasource to use that driver. The instructions for configuring JDBC datasource for WebLogic or WebSphere are described in later sections of this chapter.
Your database must be configured to enable TCP/IP for client connectivity. The “Configuring Database” section on page 1-10 contains instructions on how to create a database or schema for use with Service Catalog.
1-6Cisco Prime Service Catalog 10.0 R2 Installation Guide
OL-31474-01
Chapter 1 Installation and Configuration GuidePrerequisites and Installation Overview
LDAP
Service Catalog can be integrated with your corporate LDAP server to access your company’s employee directory. This integration feature is optional, so an LDAP server is not a prerequisite software for installing Service Catalog.
If you plan to use the LDAP integration feature, see the Cisco Prime Service Catalog Integration Guide. Ensure that you use only one of the supported LDAP software listed in Table 1-1.
IBM Cognos
Service Catalog is bundled with an OEM version of the IBM Cognos software, which is used for the (optional) Reporting module. To enable all Reporting and Advanced Reporting features in the Service Catalog application, the Cognos software must be installed in your deployment topology. This software can be installed after the Service Catalog software is installed. The instructions for installing and configuring Cognos software can be found in Reporting Guide, page 2-1
Other Miscellaneous Settings
X-Window or Xvfb
The Service Catalog installer is a GUI program. Therefore if you are on a UNIX or Linux operating system, you must have either an X-Window Server or an X11 emulator to display the installation wizard. The Service Catalog installer does not support console mode or CLI mode.
You must also have either X-Window Server or Xvfb (virtual framebuffer X server) installed and running on your application server machine, in order for the KPI Charts in the Reporting module to be displayed properly on the browser. If you are not using the KPI Charts feature in the Reporting module, then X-Window Server is not required for the application server machine.
Unzip Utility
You need to have an Unzip program (on Windows) or a GNU-compatible tar utility (on UNIX or Linux) available on your machine to extract the Cisco Prime Service Catalog software installer package.
Network – TCP/IP
TCP/IP must be configured on all host computers.
SMTP
You need to set up an SMTP server that listens to port 25, for email notification and a valid email address that the Service Catalog system will use to send out system alerts to the system administrator. You must provide the SMTP address and a valid email address during the installation of the Service Catalog software.The SMTP Server must not require user authentication.
1-7Cisco Prime Service Catalog 10.0 R2 Installation Guide
OL-31474-01
Chapter 1 Installation and Configuration Guide Prerequisites and Installation Overview
Hardware Requirements
Sizing
We recommend a minimum of three computers for a typical (nonclustered) deployment topology:
• Web Server + Application Server together
• Database Server
• Reporting Server
Your hardware configuration depends on site-specific factors. Contact the Cisco Technical Assistance Center (TAC) if you need more sizing recommendations.
The variables that can affect your hardware configuration include the following:
• the number of people who will use the system
• the number and frequency of service requests that the installed product will handle
• the nature of the service requests (complexity, type, and so on)
• reporting frequency
• systems integration and system availability requirements
Minimum Hardware Requirements for Application Server Host
Your application server machine must meet the following minimum hardware requirements:
• 4 Core, 2 GHz (or faster) processor
• 4 GB RAM
• 50 GB free hard disk space
Note If you have a clustered application server environment, the hardware requirements specified above are applicable for each node (that is, each machine) in your clustered environment.
Minimum Hardware Requirements for Web Server Host
If your web server resides on a different machine from your application server, then your web server machine must meet the following minimum hardware requirements:
• 4 Core, 2 GHz (or faster) processor
• 2 GB RAM
• 2 GB free hard disk space
Minimum Hardware Requirements for Database Host
Your database server machine must meet the following minimum hardware requirements:
• 4 Core, 2 GHz (or faster) processor
• 4 GB RAM
1-8Cisco Prime Service Catalog 10.0 R2 Installation Guide
OL-31474-01
Chapter 1 Installation and Configuration GuidePrerequisites and Installation Overview
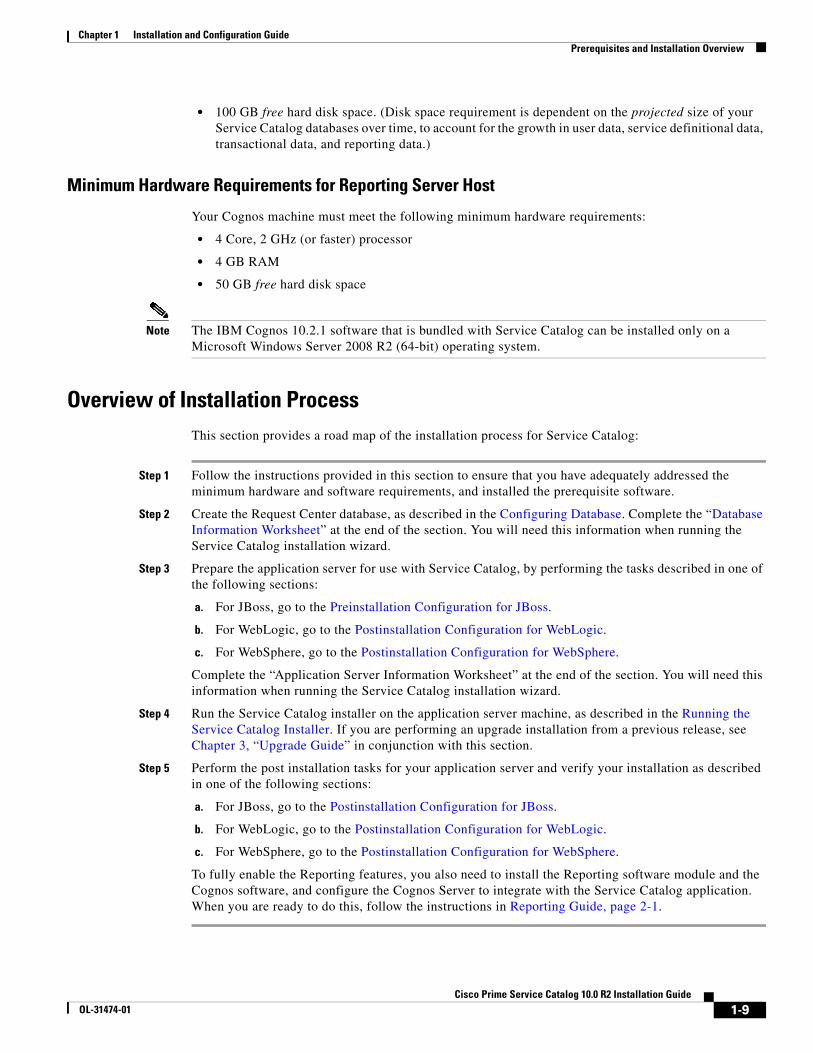
• 100 GB free hard disk space. (Disk space requirement is dependent on the projected size of your Service Catalog databases over time, to account for the growth in user data, service definitional data, transactional data, and reporting data.)
Minimum Hardware Requirements for Reporting Server Host
Your Cognos machine must meet the following minimum hardware requirements:
• 4 Core, 2 GHz (or faster) processor
• 4 GB RAM
• 50 GB free hard disk space
Note The IBM Cognos 10.2.1 software that is bundled with Service Catalog can be installed only on a Microsoft Windows Server 2008 R2 (64-bit) operating system.
Overview of Installation ProcessThis section provides a road map of the installation process for Service Catalog:
Step 1 Follow the instructions provided in this section to ensure that you have adequately addressed the minimum hardware and software requirements, and installed the prerequisite software.
Step 2 Create the Request Center database, as described in the Configuring Database. Complete the “Database Information Worksheet” at the end of the section. You will need this information when running the Service Catalog installation wizard.
Step 3 Prepare the application server for use with Service Catalog, by performing the tasks described in one of the following sections:
a. For JBoss, go to the Preinstallation Configuration for JBoss.
b. For WebLogic, go to the Postinstallation Configuration for WebLogic.
c. For WebSphere, go to the Postinstallation Configuration for WebSphere.
Complete the “Application Server Information Worksheet” at the end of the section. You will need this information when running the Service Catalog installation wizard.
Step 4 Run the Service Catalog installer on the application server machine, as described in the Running the Service Catalog Installer. If you are performing an upgrade installation from a previous release, see Chapter 3, “Upgrade Guide” in conjunction with this section.
Step 5 Perform the post installation tasks for your application server and verify your installation as described in one of the following sections:
a. For JBoss, go to the Postinstallation Configuration for JBoss.
b. For WebLogic, go to the Postinstallation Configuration for WebLogic.
c. For WebSphere, go to the Postinstallation Configuration for WebSphere.
To fully enable the Reporting features, you also need to install the Reporting software module and the Cognos software, and configure the Cognos Server to integrate with the Service Catalog application. When you are ready to do this, follow the instructions in Reporting Guide, page 2-1.
1-9Cisco Prime Service Catalog 10.0 R2 Installation Guide
OL-31474-01
Chapter 1 Installation and Configuration Guide Configuring Database
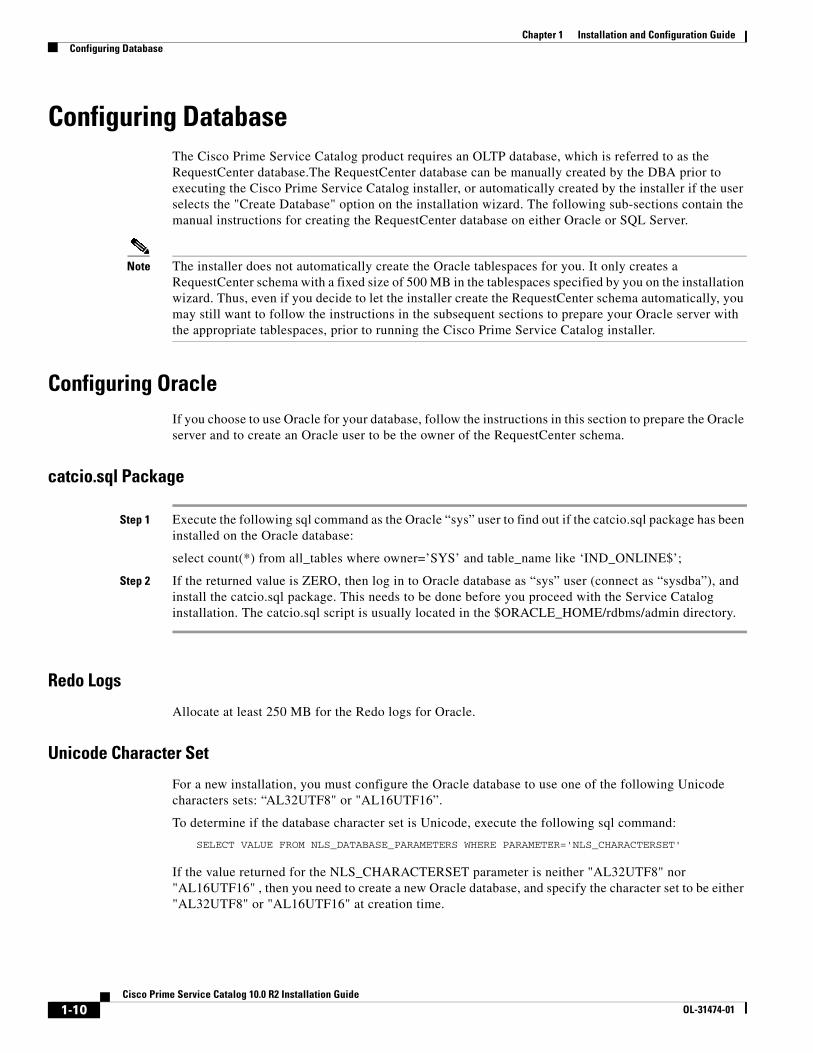
Configuring DatabaseThe Cisco Prime Service Catalog product requires an OLTP database, which is referred to as the RequestCenter database.The RequestCenter database can be manually created by the DBA prior to executing the Cisco Prime Service Catalog installer, or automatically created by the installer if the user selects the "Create Database" option on the installation wizard. The following sub-sections contain the manual instructions for creating the RequestCenter database on either Oracle or SQL Server.
Note The installer does not automatically create the Oracle tablespaces for you. It only creates a RequestCenter schema with a fixed size of 500 MB in the tablespaces specified by you on the installation wizard. Thus, even if you decide to let the installer create the RequestCenter schema automatically, you may still want to follow the instructions in the subsequent sections to prepare your Oracle server with the appropriate tablespaces, prior to running the Cisco Prime Service Catalog installer.
Configuring OracleIf you choose to use Oracle for your database, follow the instructions in this section to prepare the Oracle server and to create an Oracle user to be the owner of the RequestCenter schema.
catcio.sql Package
Step 1 Execute the following sql command as the Oracle “sys” user to find out if the catcio.sql package has been installed on the Oracle database:
select count(*) from all_tables where owner=’SYS’ and table_name like ‘IND_ONLINE$’;
Step 2 If the returned value is ZERO, then log in to Oracle database as “sys” user (connect as “sysdba”), and install the catcio.sql package. This needs to be done before you proceed with the Service Catalog installation. The catcio.sql script is usually located in the $ORACLE_HOME/rdbms/admin directory.
Redo Logs
Allocate at least 250 MB for the Redo logs for Oracle.
Unicode Character Set
For a new installation, you must configure the Oracle database to use one of the following Unicode characters sets: “AL32UTF8" or "AL16UTF16”.
To determine if the database character set is Unicode, execute the following sql command:
SELECT VALUE FROM NLS_DATABASE_PARAMETERS WHERE PARAMETER='NLS_CHARACTERSET'
If the value returned for the NLS_CHARACTERSET parameter is neither "AL32UTF8" nor "AL16UTF16" , then you need to create a new Oracle database, and specify the character set to be either "AL32UTF8" or "AL16UTF16" at creation time.
1-10Cisco Prime Service Catalog 10.0 R2 Installation Guide
OL-31474-01
Chapter 1 Installation and Configuration GuideConfiguring Database
Note For an upgrade installation from an older release, the database character set does not have to be Unicode.
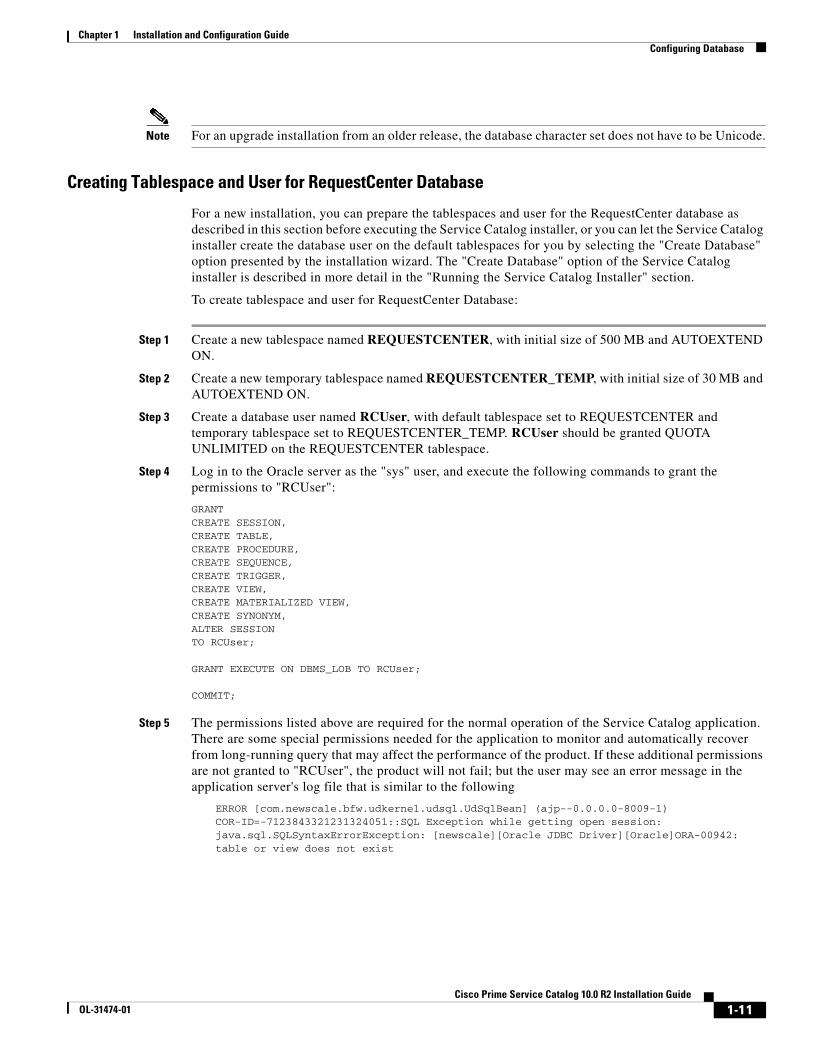
Creating Tablespace and User for RequestCenter Database
For a new installation, you can prepare the tablespaces and user for the RequestCenter database as described in this section before executing the Service Catalog installer, or you can let the Service Catalog installer create the database user on the default tablespaces for you by selecting the "Create Database" option presented by the installation wizard. The "Create Database" option of the Service Catalog installer is described in more detail in the "Running the Service Catalog Installer" section.
To create tablespace and user for RequestCenter Database:
Step 1 Create a new tablespace named REQUESTCENTER, with initial size of 500 MB and AUTOEXTEND ON.
Step 2 Create a new temporary tablespace named REQUESTCENTER_TEMP, with initial size of 30 MB and AUTOEXTEND ON.
Step 3 Create a database user named RCUser, with default tablespace set to REQUESTCENTER and temporary tablespace set to REQUESTCENTER_TEMP. RCUser should be granted QUOTA UNLIMITED on the REQUESTCENTER tablespace.
Step 4 Log in to the Oracle server as the "sys" user, and execute the following commands to grant the permissions to "RCUser":
GRANTCREATE SESSION,CREATE TABLE,CREATE PROCEDURE,CREATE SEQUENCE,CREATE TRIGGER,CREATE VIEW,CREATE MATERIALIZED VIEW,CREATE SYNONYM,ALTER SESSIONTO RCUser;
GRANT EXECUTE ON DBMS_LOB TO RCUser;
COMMIT;
Step 5 The permissions listed above are required for the normal operation of the Service Catalog application. There are some special permissions needed for the application to monitor and automatically recover from long-running query that may affect the performance of the product. If these additional permissions are not granted to "RCUser", the product will not fail; but the user may see an error message in the application server's log file that is similar to the following
ERROR [com.newscale.bfw.udkernel.udsql.UdSqlBean] (ajp--0.0.0.0-8009-1) COR-ID=-7123843321231324051::SQL Exception while getting open session: java.sql.SQLSyntaxErrorException: [newscale][Oracle JDBC Driver][Oracle]ORA-00942: table or view does not exist
1-11Cisco Prime Service Catalog 10.0 R2 Installation Guide
OL-31474-01

Chapter 1 Installation and Configuration Guide Configuring Database
To grant these special permissions, log in to the Oracle server as the "sys" user, and execute the following commands:
GRANT ALTER SYSTEM TO RCUser;GRANT SELECT ON v_$session TO RCUser;GRANT SELECT ON v_$mystat to RCUser;COMMIT;
Configuring Microsoft SQL ServerIf you choose to use Microsoft SQL Server for your databases, follow the instructions in this section to prepare the SQL Server, and to create the RequestCenter database.
Default Instance or Named Instance
The SQL Server can be set up as a Default Instance or a Named Instance. Port number for each instance must be unique per database host.
Mixed-Mode Authentication
The SQL Server must be configured to use mixed-mode authentication.
Creating RequestCenter Database and Login User
For a new installation, you can prepare the RequestCenter database and login user as described in this section before executing the Service Catalog installer, or you can let the Service Catalog installer create the database and login user for you by selecting the "Create Database" option presented by the installation wizard. The "Create Database" option of the Service Catalog installer is described in more detail in the "Running the Service Catalog Installer" section.
To create the RequestCenter database and login user:
Step 1 Create a database named RequestCenter in the SQL Server, with the following settings for the data file
• Initial size = 500 MB.
• Autogrowth = By 10 percent
Step 2 Set the collating sequence for the RequestCenter database to case-insensitive.
Step 3 Put the RequestCenter database in SINGLE-USER mode, and execute the following command:
ALTER DATABASE RequestCenter SET READ_COMMITTED_SNAPSHOT ON.
Step 4 Put the RequestCenter database back in MULTI-USER mode.
Step 5 Create a SQL Server Login named RCUser, with the Default Database property set to “RequestCenter”.
Note RCUser must be a SQL Server login account that authenticates to the SQL Server using SQL Server authentication method, and not Windows authentication method.
1-12Cisco Prime Service Catalog 10.0 R2 Installation Guide
OL-31474-01
Chapter 1 Installation and Configuration GuideConfiguring Database
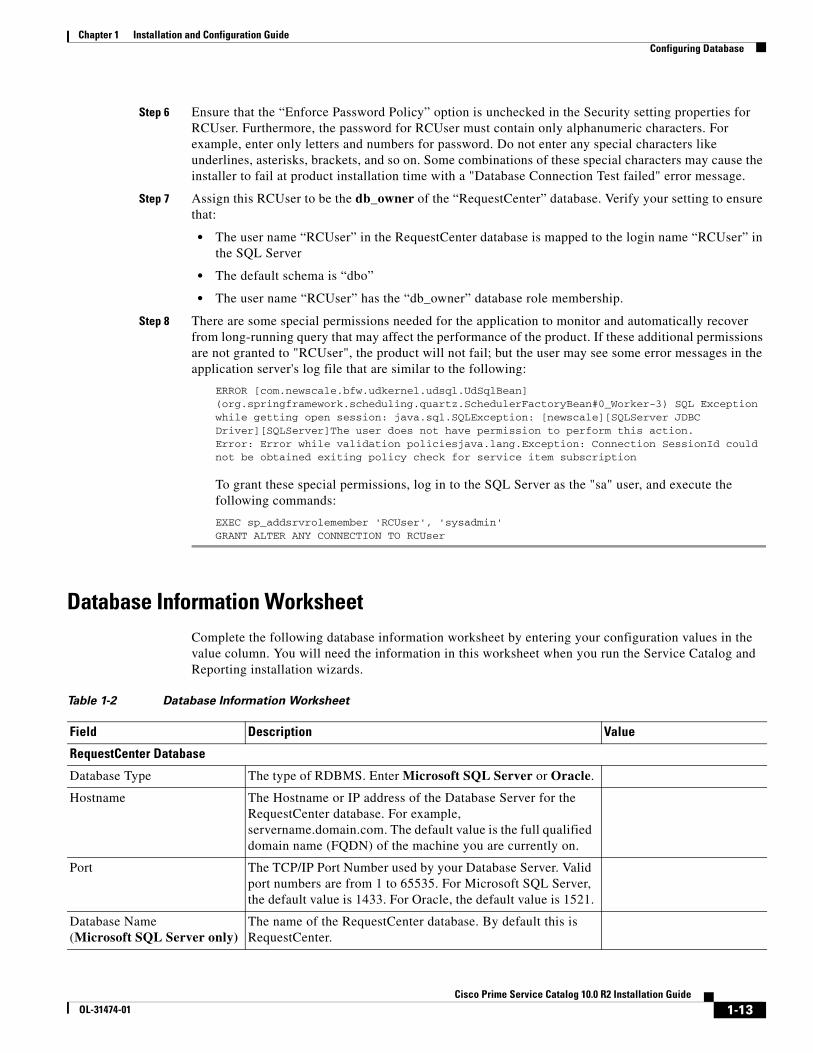
Step 6 Ensure that the “Enforce Password Policy” option is unchecked in the Security setting properties for RCUser. Furthermore, the password for RCUser must contain only alphanumeric characters. For example, enter only letters and numbers for password. Do not enter any special characters like underlines, asterisks, brackets, and so on. Some combinations of these special characters may cause the installer to fail at product installation time with a "Database Connection Test failed" error message.
Step 7 Assign this RCUser to be the db_owner of the “RequestCenter” database. Verify your setting to ensure that:
• The user name “RCUser” in the RequestCenter database is mapped to the login name “RCUser” in the SQL Server
• The default schema is “dbo”
• The user name “RCUser” has the “db_owner” database role membership.
Step 8 There are some special permissions needed for the application to monitor and automatically recover from long-running query that may affect the performance of the product. If these additional permissions are not granted to "RCUser", the product will not fail; but the user may see some error messages in the application server's log file that are similar to the following:
ERROR [com.newscale.bfw.udkernel.udsql.UdSqlBean] (org.springframework.scheduling.quartz.SchedulerFactoryBean#0_Worker-3) SQL Exception while getting open session: java.sql.SQLException: [newscale][SQLServer JDBC Driver][SQLServer]The user does not have permission to perform this action.Error: Error while validation policiesjava.lang.Exception: Connection SessionId could not be obtained exiting policy check for service item subscription
To grant these special permissions, log in to the SQL Server as the "sa" user, and execute the following commands:
EXEC sp_addsrvrolemember 'RCUser', 'sysadmin'GRANT ALTER ANY CONNECTION TO RCUser
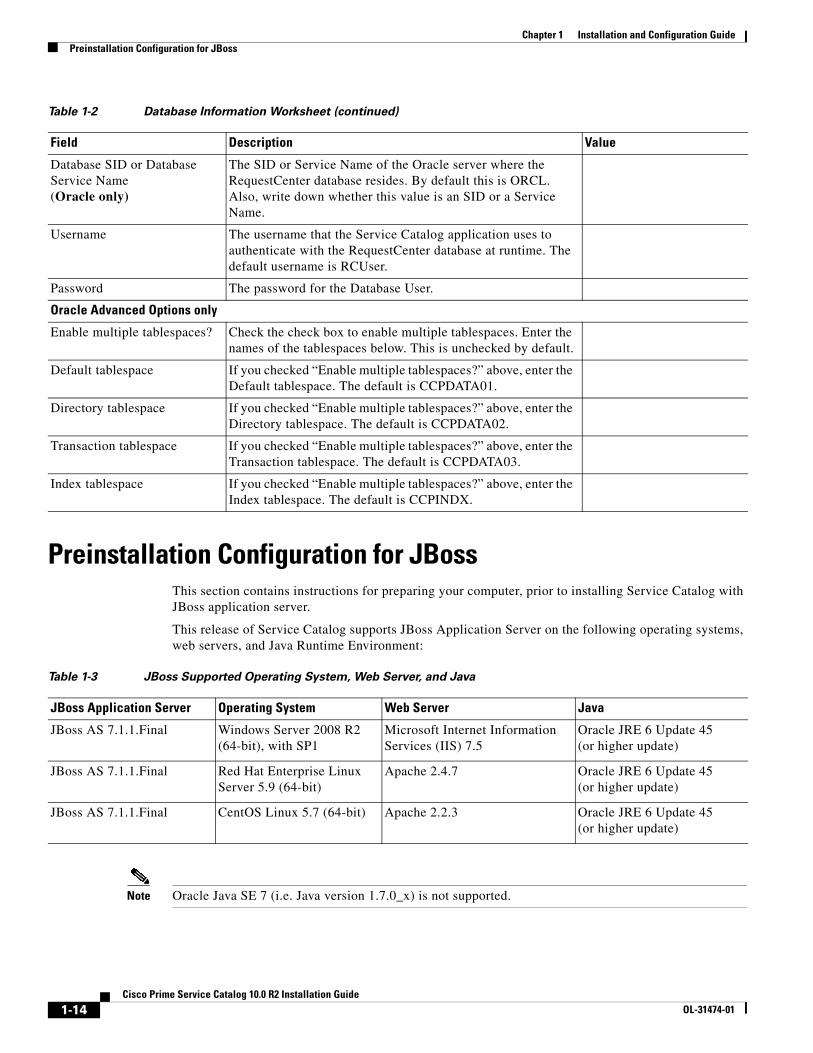
Database Information WorksheetComplete the following database information worksheet by entering your configuration values in the value column. You will need the information in this worksheet when you run the Service Catalog and Reporting installation wizards.
Table 1-2 Database Information Worksheet
Field Description Value
RequestCenter Database
Database Type The type of RDBMS. Enter Microsoft SQL Server or Oracle.
Hostname The Hostname or IP address of the Database Server for the RequestCenter database. For example, servername.domain.com. The default value is the full qualified domain name (FQDN) of the machine you are currently on.
Port The TCP/IP Port Number used by your Database Server. Valid port numbers are from 1 to 65535. For Microsoft SQL Server, the default value is 1433. For Oracle, the default value is 1521.
Database Name (Microsoft SQL Server only)
The name of the RequestCenter database. By default this is RequestCenter.
1-13Cisco Prime Service Catalog 10.0 R2 Installation Guide
OL-31474-01
Chapter 1 Installation and Configuration Guide Preinstallation Configuration for JBoss
Preinstallation Configuration for JBossThis section contains instructions for preparing your computer, prior to installing Service Catalog with JBoss application server.
This release of Service Catalog supports JBoss Application Server on the following operating systems, web servers, and Java Runtime Environment:
Note Oracle Java SE 7 (i.e. Java version 1.7.0_x) is not supported.
Database SID or Database Service Name (Oracle only)
The SID or Service Name of the Oracle server where the RequestCenter database resides. By default this is ORCL. Also, write down whether this value is an SID or a Service Name.
Username The username that the Service Catalog application uses to authenticate with the RequestCenter database at runtime. The default username is RCUser.
Password The password for the Database User.
Oracle Advanced Options only
Enable multiple tablespaces? Check the check box to enable multiple tablespaces. Enter the names of the tablespaces below. This is unchecked by default.
Default tablespace If you checked “Enable multiple tablespaces?” above, enter the Default tablespace. The default is CCPDATA01.
Directory tablespace If you checked “Enable multiple tablespaces?” above, enter the Directory tablespace. The default is CCPDATA02.
Transaction tablespace If you checked “Enable multiple tablespaces?” above, enter the Transaction tablespace. The default is CCPDATA03.
Index tablespace If you checked “Enable multiple tablespaces?” above, enter the Index tablespace. The default is CCPINDX.
Table 1-2 Database Information Worksheet (continued)
Field Description Value
Table 1-3 JBoss Supported Operating System, Web Server, and Java
JBoss Application Server Operating System Web Server Java
JBoss AS 7.1.1.Final Windows Server 2008 R2 (64-bit), with SP1
Microsoft Internet Information Services (IIS) 7.5
Oracle JRE 6 Update 45 (or higher update)
JBoss AS 7.1.1.Final Red Hat Enterprise Linux Server 5.9 (64-bit)
Apache 2.4.7 Oracle JRE 6 Update 45 (or higher update)
JBoss AS 7.1.1.Final CentOS Linux 5.7 (64-bit) Apache 2.2.3 Oracle JRE 6 Update 45 (or higher update)
1-14Cisco Prime Service Catalog 10.0 R2 Installation Guide
OL-31474-01
Chapter 1 Installation and Configuration GuidePreinstallation Configuration for JBoss
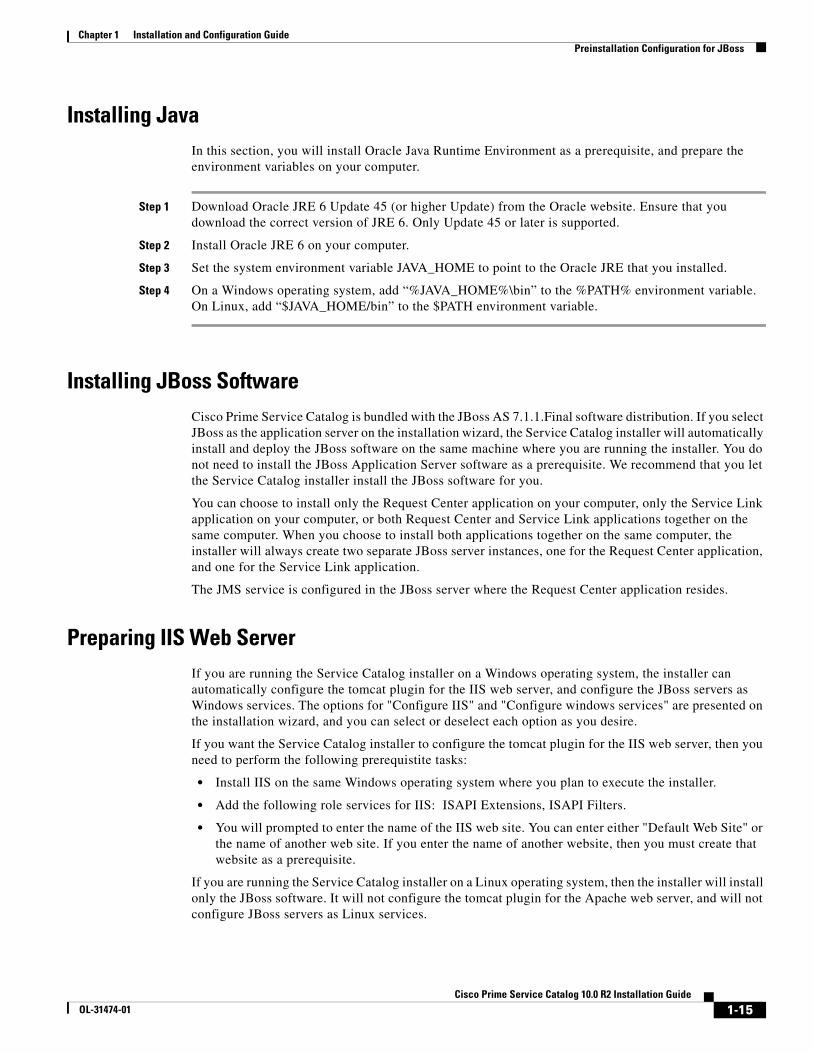
Installing JavaIn this section, you will install Oracle Java Runtime Environment as a prerequisite, and prepare the environment variables on your computer.
Step 1 Download Oracle JRE 6 Update 45 (or higher Update) from the Oracle website. Ensure that you download the correct version of JRE 6. Only Update 45 or later is supported.
Step 2 Install Oracle JRE 6 on your computer.
Step 3 Set the system environment variable JAVA_HOME to point to the Oracle JRE that you installed.
Step 4 On a Windows operating system, add “%JAVA_HOME%\bin” to the %PATH% environment variable. On Linux, add “$JAVA_HOME/bin” to the $PATH environment variable.
Installing JBoss SoftwareCisco Prime Service Catalog is bundled with the JBoss AS 7.1.1.Final software distribution. If you select JBoss as the application server on the installation wizard, the Service Catalog installer will automatically install and deploy the JBoss software on the same machine where you are running the installer. You do not need to install the JBoss Application Server software as a prerequisite. We recommend that you let the Service Catalog installer install the JBoss software for you.
You can choose to install only the Request Center application on your computer, only the Service Link application on your computer, or both Request Center and Service Link applications together on the same computer. When you choose to install both applications together on the same computer, the installer will always create two separate JBoss server instances, one for the Request Center application, and one for the Service Link application.
The JMS service is configured in the JBoss server where the Request Center application resides.
Preparing IIS Web ServerIf you are running the Service Catalog installer on a Windows operating system, the installer can automatically configure the tomcat plugin for the IIS web server, and configure the JBoss servers as Windows services. The options for "Configure IIS" and "Configure windows services" are presented on the installation wizard, and you can select or deselect each option as you desire.
If you want the Service Catalog installer to configure the tomcat plugin for the IIS web server, then you need to perform the following prerequistite tasks:
• Install IIS on the same Windows operating system where you plan to execute the installer.
• Add the following role services for IIS: ISAPI Extensions, ISAPI Filters.
• You will prompted to enter the name of the IIS web site. You can enter either "Default Web Site" or the name of another web site. If you enter the name of another website, then you must create that website as a prerequisite.
If you are running the Service Catalog installer on a Linux operating system, then the installer will install only the JBoss software. It will not configure the tomcat plugin for the Apache web server, and will not configure JBoss servers as Linux services.
1-15Cisco Prime Service Catalog 10.0 R2 Installation Guide
OL-31474-01
Chapter 1 Installation and Configuration Guide Preinstallation Configuration for WebLogic
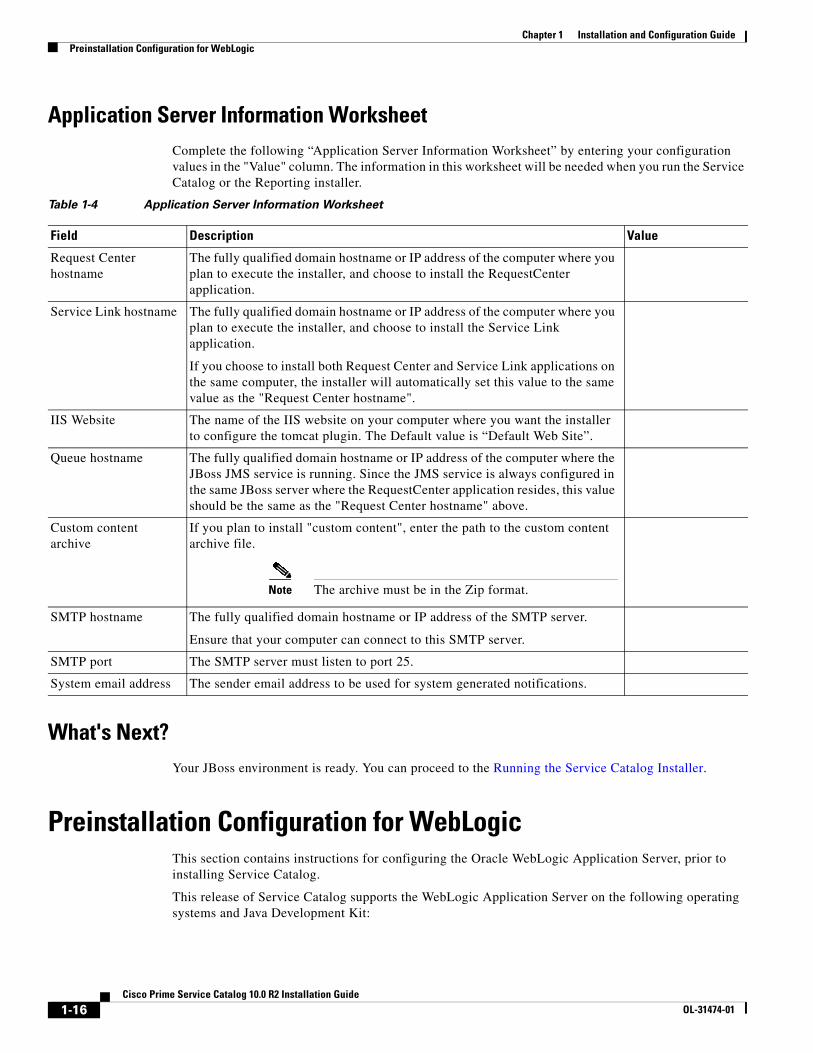
Application Server Information WorksheetComplete the following “Application Server Information Worksheet” by entering your configuration values in the "Value" column. The information in this worksheet will be needed when you run the Service Catalog or the Reporting installer.
What's Next?Your JBoss environment is ready. You can proceed to the Running the Service Catalog Installer.
Preinstallation Configuration for WebLogicThis section contains instructions for configuring the Oracle WebLogic Application Server, prior to installing Service Catalog.
This release of Service Catalog supports the WebLogic Application Server on the following operating systems and Java Development Kit:
Table 1-4 Application Server Information Worksheet
Field Description Value
Request Center hostname
The fully qualified domain hostname or IP address of the computer where you plan to execute the installer, and choose to install the RequestCenter application.
Service Link hostname The fully qualified domain hostname or IP address of the computer where you plan to execute the installer, and choose to install the Service Link application.
If you choose to install both Request Center and Service Link applications on the same computer, the installer will automatically set this value to the same value as the "Request Center hostname".
IIS Website The name of the IIS website on your computer where you want the installer to configure the tomcat plugin. The Default value is “Default Web Site”.
Queue hostname The fully qualified domain hostname or IP address of the computer where the JBoss JMS service is running. Since the JMS service is always configured in the same JBoss server where the RequestCenter application resides, this value should be the same as the "Request Center hostname" above.
Custom content archive
If you plan to install "custom content", enter the path to the custom content archive file.
Note The archive must be in the Zip format.
SMTP hostname The fully qualified domain hostname or IP address of the SMTP server.
Ensure that your computer can connect to this SMTP server.
SMTP port The SMTP server must listen to port 25.
System email address The sender email address to be used for system generated notifications.
1-16Cisco Prime Service Catalog 10.0 R2 Installation Guide
OL-31474-01
Chapter 1 Installation and Configuration GuidePreinstallation Configuration for WebLogic
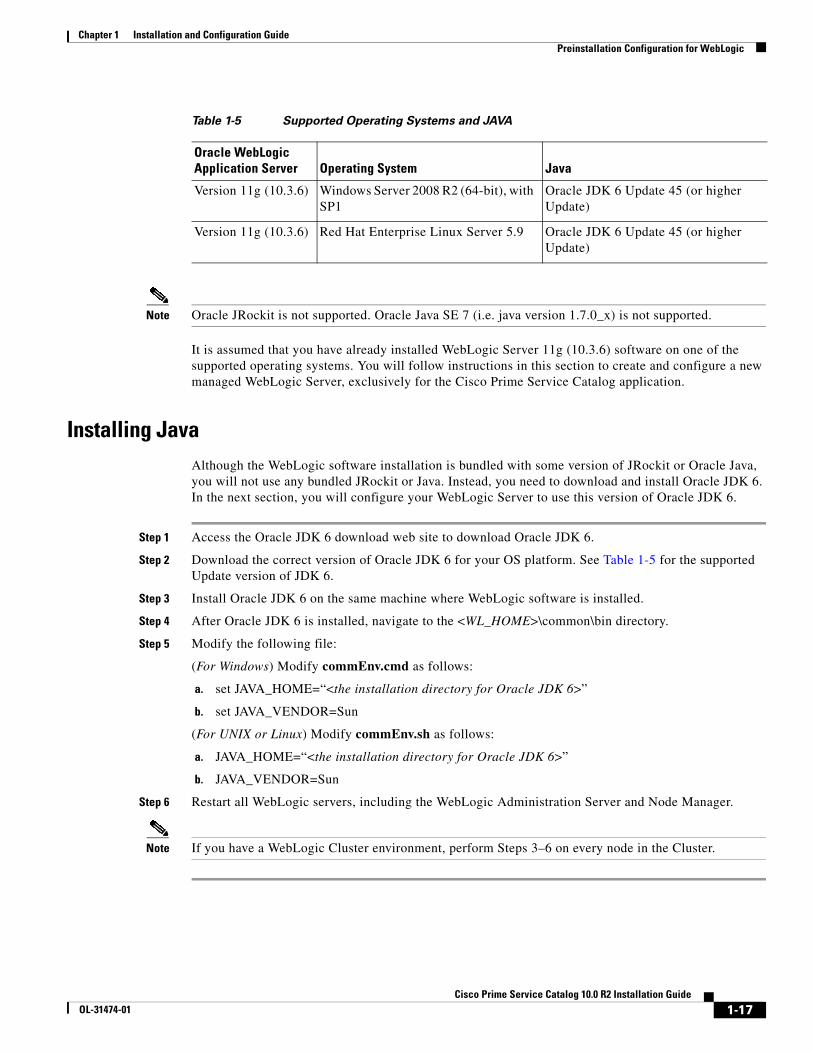
Note Oracle JRockit is not supported. Oracle Java SE 7 (i.e. java version 1.7.0_x) is not supported.
It is assumed that you have already installed WebLogic Server 11g (10.3.6) software on one of the supported operating systems. You will follow instructions in this section to create and configure a new managed WebLogic Server, exclusively for the Cisco Prime Service Catalog application.
Installing JavaAlthough the WebLogic software installation is bundled with some version of JRockit or Oracle Java, you will not use any bundled JRockit or Java. Instead, you need to download and install Oracle JDK 6. In the next section, you will configure your WebLogic Server to use this version of Oracle JDK 6.
Step 1 Access the Oracle JDK 6 download web site to download Oracle JDK 6.
Step 2 Download the correct version of Oracle JDK 6 for your OS platform. See Table 1-5 for the supported Update version of JDK 6.
Step 3 Install Oracle JDK 6 on the same machine where WebLogic software is installed.
Step 4 After Oracle JDK 6 is installed, navigate to the <WL_HOME>\common\bin directory.
Step 5 Modify the following file:
(For Windows) Modify commEnv.cmd as follows:
a. set JAVA_HOME=“<the installation directory for Oracle JDK 6>”
b. set JAVA_VENDOR=Sun
(For UNIX or Linux) Modify commEnv.sh as follows:
a. JAVA_HOME=“<the installation directory for Oracle JDK 6>”
b. JAVA_VENDOR=Sun
Step 6 Restart all WebLogic servers, including the WebLogic Administration Server and Node Manager.
Note If you have a WebLogic Cluster environment, perform Steps 3–6 on every node in the Cluster.
Table 1-5 Supported Operating Systems and JAVA
Oracle WebLogic Application Server Operating System Java
Version 11g (10.3.6) Windows Server 2008 R2 (64-bit), with SP1
Oracle JDK 6 Update 45 (or higher Update)
Version 11g (10.3.6) Red Hat Enterprise Linux Server 5.9 Oracle JDK 6 Update 45 (or higher Update)
1-17Cisco Prime Service Catalog 10.0 R2 Installation Guide
OL-31474-01
Chapter 1 Installation and Configuration Guide Preinstallation Configuration for WebLogic
Downloading Service Catalog Software ImageIn this section, you will download the electronic software distribution for Service Catalog.
Step 1 Access the Cisco product download web site and authenticate with the user name and password provided to you.
Step 2 Search by product name, or navigate within the product selector to locate the product you want to download. (Navigation: Downloads Home > Products > Cloud and Systems Management > Service Catalog > Cisco Prime Service Catalog).
Step 3 A list of different releases is displayed. Locate Release 10.0 R2 and click it.
Step 4 Download file CPSC_10.0.0R2_win.zip for the Windows operating system, or file CPSC_10.0.0R2_unix.tar.gz for the UNIX/Linux operating system.
Step 5 Extract the software image to a directory on your application server machine. If you have WebLogic Cluster environment, then extract the Cisco Prime Service Catalog software on the machine where the WebLogic Administration Server is running. For example, extract the software to C:\Cisco_Download (for Windows) or /opt/Cisco_Download (for UNIX/Linux). For the rest of this section, this directory is referred to as the <ServiceCatalog_Software_Dir>.
Note The CPSC_10.0.0R2_unix.tar.gz file must be untarred using a GNU-compatible tar utility. Older tar utilities may have problems unzipping tar files that contain filenames longer than 100 characters.
Installing Custom Java LibrariesIn this section, you will copy several java library files from the <ServiceCatalog_Software_Dir> to the <WL_HOME> directory, and add these jar files to the class paths. Afterward, you need to restart the WebLogic servers in order to pick up the new java libraries.
Step 1 Under the “<WL_HOME>” directory, create a subdirectory called “cisco”. And under "cisco", create two sub-directories called "endorsed" and "lib".
Step 2 Copy the following jar files from the “<ServiceCatalog_Software_Dir>\preinstall\weblogic\jre_lib_endorsed” directory to the “<WL_HOME>\cisco\endorsed” directory:
• serializer.jar
• xalan.jar
• xercesImpl.jar
• xml-apis.jar
Step 3 Copy the following jar files from the "<ServiceCatalog_Software_Dir>\preinstall\weblogic\cisco_lib" directory to the "<WL_HOME>\cisco\lib" directory:
1-18Cisco Prime Service Catalog 10.0 R2 Installation Guide
OL-31474-01
Chapter 1 Installation and Configuration GuidePreinstallation Configuration for WebLogic
• commons-lang-2.4.jar
• geronimo-ccpp_1.0_spec-1.0-beta.jar
• sqljdbc4.jar
• pluto-container-api-2.0.2.jar
• pluto-container-driver-api-2.0.2.jar
• pluto-taglib-2.0.2.jar
• portlet-api_2.0_spec-1.0.jar
Step 4 Navigate to the “<WL_HOME>\common\bin” directory and modify the following file:
(For Windows) Modify commEnv.cmd as follows:
a. Search for the line that contains the parameter “WEBLOGIC_CLASSPATH=”.
b. Add the value %WL_HOME%\cisco\lib\commons-lang-2.4.jar; to the beginning of the existing value. Do not forget to include the semicolon character.
c. Perform this step only if your database is SQL Server: Append the value ;%WL_HOME%\cisco\lib\sqljdbc4.jar to the end of the existing value. Do not forget to include the semicolon character before the %WL_HOME%.
For example, after you modify the WEBLOGIC_CLASSPATH, it may look like:
WEBLOGIC_CLASSPATH="%WL_HOME%\cisco\lib\commons-lang-2.4.jar; %PATCH_CLASSPATH%;%JAVA_HOME%\lib\tools.jar;%WL_HOME%\server\lib\weblogic_sp.jar;%WL_HOME%\server\lib\weblogic.jar;%FEATURES_DIR%\weblogic.server.modules_10.3.0.0.jar;%WL_HOME%\server\lib\webservices.jar;%ANT_HOME%/lib/ant-all.jar;%ANT_CONTRIB%/lib/antcontrib.jar;%WL_HOME%\cisco\lib\sqljdbc4.jar"
(For UNIX or Linux) Modify commEnv.sh as follows:
a. Search for the line that contains the parameter “WEBLOGIC_CLASSPATH=”.
b. Add the value ${WL_HOME}/cisco/lib/commons-lang-2.4.jar${CLASSPATHSEP} to the beginning of the existing value.
c. Perform this step only if your database is SQL Server: Append the value ${CLASSPATHSEP}${WL_HOME}/cisco/lib/sqljdbc4.jar to the end of the existing value.
For example, after you modify the WEBLOGIC_CLASSPATH, it may look like:
WEBLOGIC_CLASSPATH="${WL_HOME}/cisco/lib/commons-lang-2.4.jar${CLASSPATHSEP}${PATCH_CLASSPATH}${CLASSPATHSEP}${JAVA_HOME}/lib/tools.jar${CLASSPATHSEP}${WL_HOME}/server/lib/weblogic_sp.jar${CLASSPATHSEP}${WL_HOME}/server/lib/weblogic.jar${CLASSPATHSEP}${FEATURES_DIR}/weblogic.server.modules_10.3.0.0.jar${CLASSPATHSEP}${WL_HOME}/server/lib/webservices.jar${CLASSPATHSEP}${ANT_HOME}/lib/ant-all.jar${CLASSPATHSEP}${ANT_CONTRIB}/lib/ant-contrib.jar${CLASSPATHSEP}${WL_HOME}/cisco/lib/sqljdbc4.jar"
1-19Cisco Prime Service Catalog 10.0 R2 Installation Guide
OL-31474-01
Chapter 1 Installation and Configuration Guide Preinstallation Configuration for WebLogic
Step 5 Restart the WebLogic Administration Server and WebLogic Node Manager. You must restart all WebLogic servers for them to pick up the custom Java libraries that you just installed.
Note If you have a WebLogic Cluster environment, perform Steps 1–5 on every node in the Cluster.
Note If you are upgrading from a previous release of Prime Service Catalog to this release, you must still repeat steps 1 to 5 in this section on your WebLogic environment. This is because: a) You have to overwrite the older version of the Cisco jar files with the newer version shipped with this release of Prime Service Catalog. b) There is a new JDBC driver for SQL Server (sqljdbc4.jar) that is bundled with this release of Prime Service Catalog.
Creating a Managed WebLogic ServerIn this section you will create a new managed WebLogic Server, to be used exclusively for Service Catalog.
Step 1 Log on to the WebLogic Administration Console.
Step 2 If your WebLogic was installed in PRODUCTION mode, click Lock & Edit so that you can proceed to make changes. Otherwise, you can skip this step.
Step 3 Choose Environment > Servers.
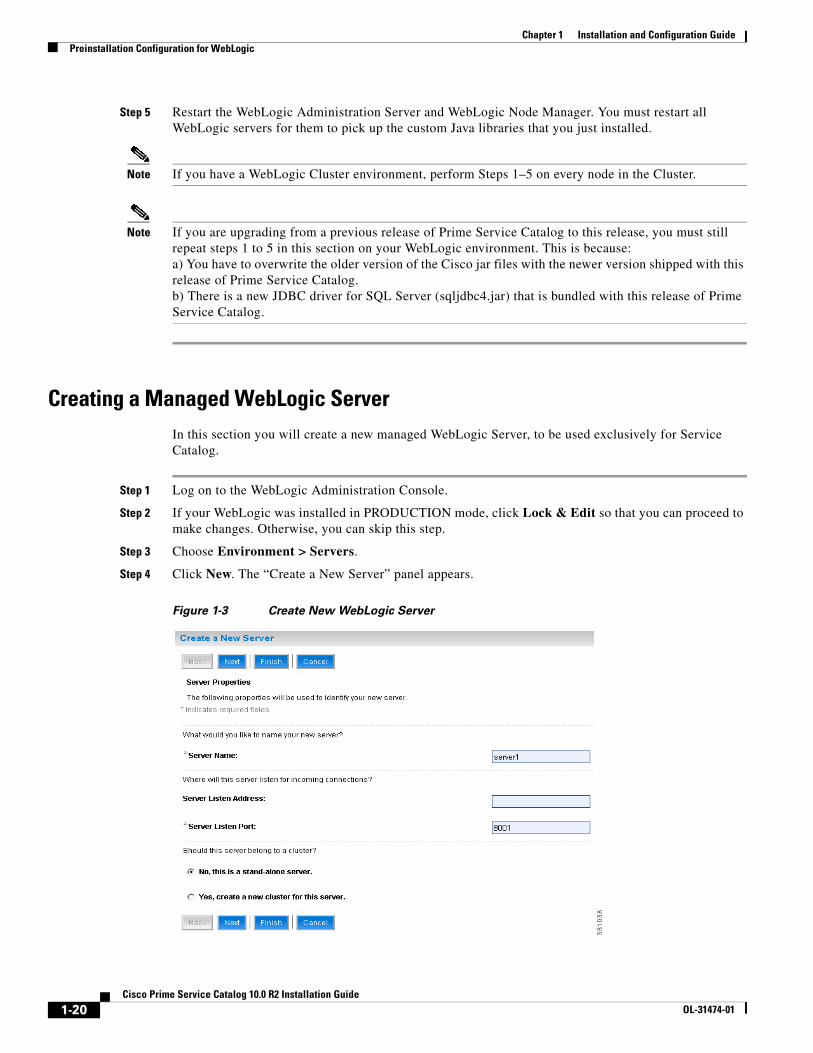
Step 4 Click New. The “Create a New Server” panel appears.
Figure 1-3 Create New WebLogic Server
1-20Cisco Prime Service Catalog 10.0 R2 Installation Guide
OL-31474-01
Chapter 1 Installation and Configuration GuidePreinstallation Configuration for WebLogic
Step 5 Enter a Server Name (for example, “server1”). Enter a port number different from 7001 (for example, 8001), because port 7001 is most likely already used by the WebLogic Administration Server. Choose the No, this is a stand-alone server option.
Step 6 Click Finish. Your newly created WebLogic Server appears on the list.
Step 7 Click the newly created Server “server1” to open its properties.
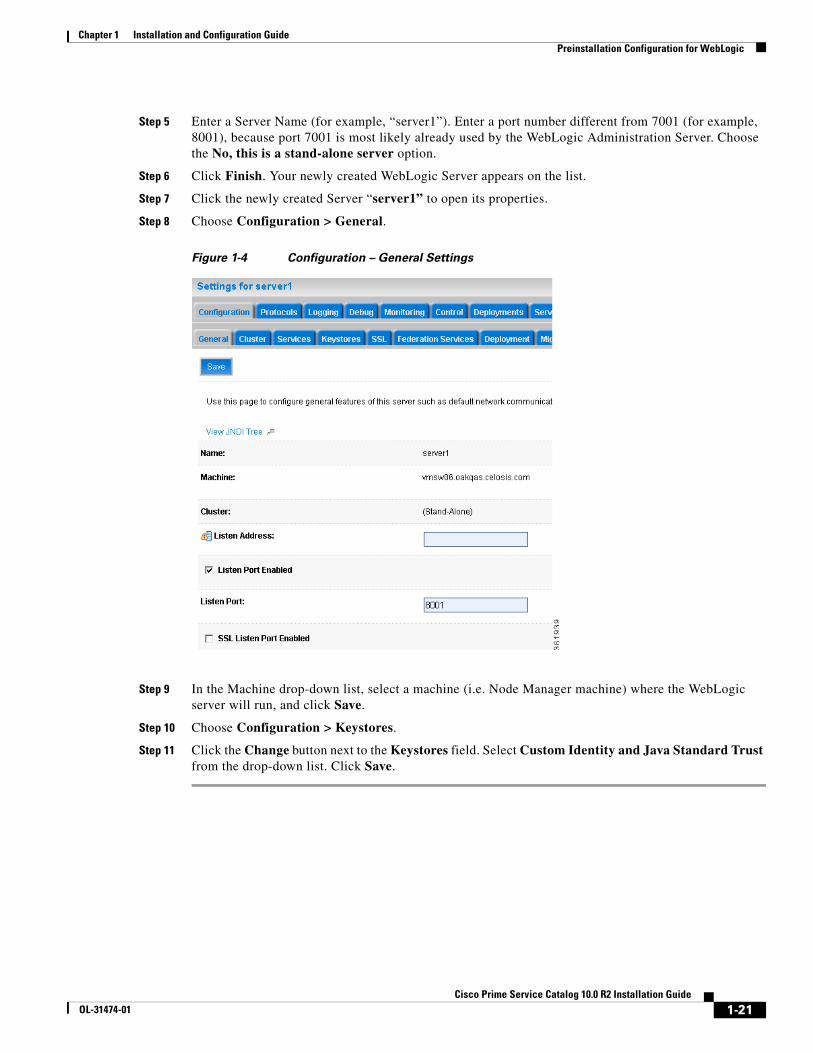
Step 8 Choose Configuration > General.
Figure 1-4 Configuration – General Settings
Step 9 In the Machine drop-down list, select a machine (i.e. Node Manager machine) where the WebLogic server will run, and click Save.
Step 10 Choose Configuration > Keystores.
Step 11 Click the Change button next to the Keystores field. Select Custom Identity and Java Standard Trust from the drop-down list. Click Save.
1-21Cisco Prime Service Catalog 10.0 R2 Installation Guide
OL-31474-01
Chapter 1 Installation and Configuration Guide Preinstallation Configuration for WebLogic
Setting the Arguments for Java Virtual Machine
Step 1 Choose Configuration > Server Start.
Step 2 Enter values for the following parameters:
• Arguments = ‐server ‐Xms1024m ‐Xmx1024m ‐XX:PermSize=256m
-XX:MaxPermSize=256m -XX:NewRatio=3
-Dweblogic.ext.dirs=<WL_HOME>/cisco/lib -Djava.endorsed.dirs=<WL_HOME>/cisco/endorsed
-XX:CompileCommand=exclude,com/newscale/bfw/signon/filters/AuthenticationFilter,doFilter
-XX:CompileCommand=exclude,org/apache/xml/dtm/ref/sax2dtm/SAX2DTM,startElement
-XX:CompileCommand=exclude,org/exolab/castor/xml/Marshaller,marshal
-XX:CompileCommand=exclude,org/apache/xpath/compiler/XPathParser,UnionExpr
-XX:CompileCommand=exclude,org/apache/oro/text/regex/Perl5Compiler,__parseAtom
(where <WL_HOME>/cisco/lib and <WL_HOME>/cisco/endorsed are the directories described in the Installing Custom Java Libraries).
• User Name = weblogic
• Password = <the password for the “weblogic” username>
• Confirm Password = <re-enter the password for the “weblogic” username>
Step 3 Click Save.
Step 4 If your WebLogic was installed in PRODUCTION mode, click Activate Changes. Otherwise, you can skip this step.
Step 5 Open the Control tab.
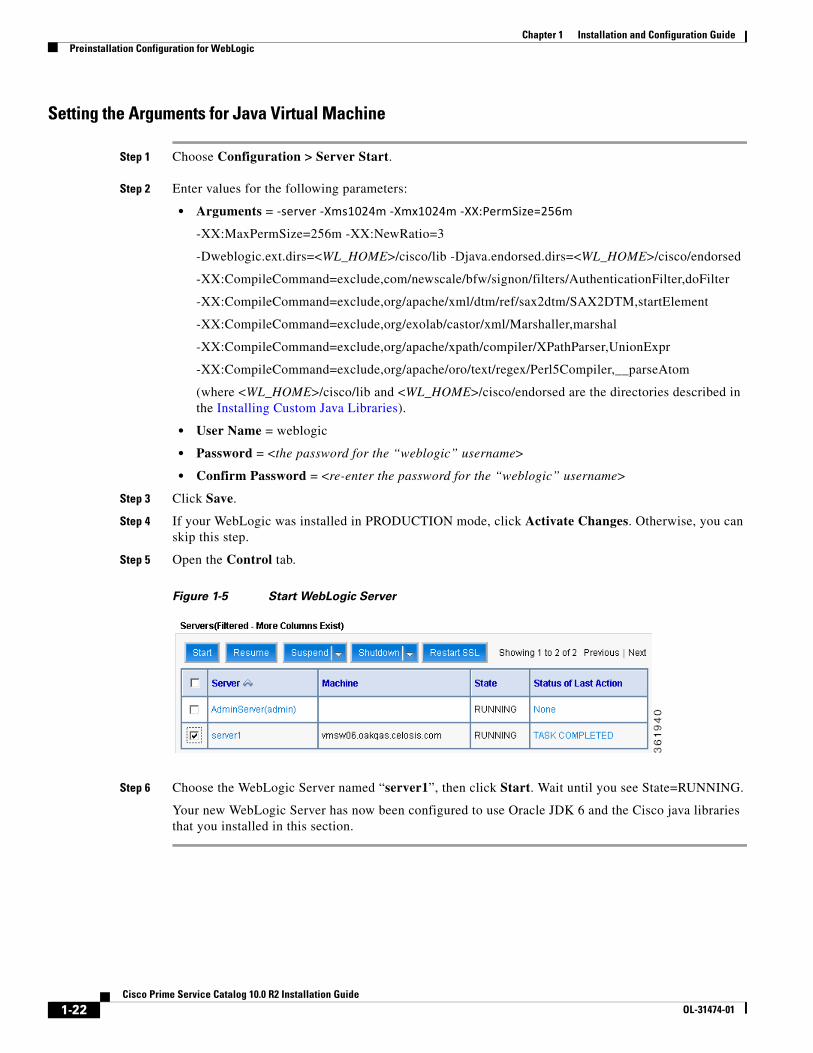
Figure 1-5 Start WebLogic Server
Step 6 Choose the WebLogic Server named “server1”, then click Start. Wait until you see State=RUNNING.
Your new WebLogic Server has now been configured to use Oracle JDK 6 and the Cisco java libraries that you installed in this section.
1-22Cisco Prime Service Catalog 10.0 R2 Installation Guide
OL-31474-01
Chapter 1 Installation and Configuration GuidePreinstallation Configuration for WebLogic
Configurations for WebLogic Cluster
The Service Catalog product is comprised of two enterprise applications named “RequestCenter” and “ServiceLink”. However, the Service Catalog installer does not automatically deploy the RequestCenter and ServiceLink applications on your WebLogic Server for you. The installer will generate two WAR files (RequestCenter.war for the RequestCenter application, and ISEE.war for the ServiceLink application) which are customized for your WebLogic environment. After you execute the Service Catalog installer, you will need to follow the instructions in a later section of this chapter to manually deploy RequestCenter.war and ISEE.war on your WebLogic Server.
The RequestCenter.war file and ISEE.war file can be deployed together in the same WebLogic Server even though they are two separate enterprise applications. However, if you are setting up a WebLogic Cluster environment with multiple nodes (where each node is a separate computer), you need to perform the additional configurations as follows:
Step 1 Perform the tasks described in the Installing Java and Installing Custom Java Libraries on each node (that is, each computer) in the Cluster.
Step 2 Follow the instructions in the Creating a Managed WebLogic Server to create the WebLogic Server for each node and to set the JVM arguments for each server, before you add these servers to the Cluster.
Step 3 Each WebLogic Server in your Cluster must be configured to use the same port number. For example, your Cluster contains two nodes. If the WebLogic Server on Node 1 is running on port 8001, then the WebLogic Server on Node 2 must also be configured to run on port 8001.
Step 4 RequestCenter.war file is deployed on the WebLogic Cluster. But, the ISEE.war file cannot be deployed in the same Cluster; it must be deployed on a stand-alone WebLogic Server that is not a member of any Cluster. Therefore, if you have a clustered WebLogic environment, then you must create an additional stand-alone WebLogic Server (that is, not a member of the Cluster), to be used for ISEE.war. For the rest of the chapter, this stand-alone WebLogic Server is referred to as the “Service Link WebLogic Server”. For this stand-alone “Service Link WebLogic Server”, the JVM arguments can be set as follows:
Arguments = -server –Xms1024m –Xmx1024m –XX:PermSize=256m –XX:MaxPermSize=256m –XX:NewRatio=3 -Dweblogic.ext.dirs=<WL_HOME>/cisco/lib -Djava.endorsed.dirs=<WL_HOME>/cisco/endorsed
(where <WL_HOME>/cisco/lib and <WL_HOME>/cisco/endorsed
are the directories described in the Installing Custom Java Libraries).
Step 5 If the stand-alone “Service Link WebLogic Server” resides on another machine, then make sure that you also performed the tasks described in the Installing Java and Installing Custom Java Libraries on that WebLogic machine. The port number for the “Service Link WebLogic Server” does not have to match the port numbers of the WebLogic Servers in the Cluster.
Configuring JMS ServerIn this section, you will configure a JMS Server and JMS Queues that will be used by Service Catalog.
Note If RequestCenter.war and ISEE.war are deployed together on the same nonclustered WebLogic Server, then the JMS configurations described in this section are performed for that WebLogic Server. However, if you have a WebLogic Cluster environment, then the JMS configurations are performed for the “Service Link WebLogic Server”.
1-23Cisco Prime Service Catalog 10.0 R2 Installation Guide
OL-31474-01
Chapter 1 Installation and Configuration Guide Preinstallation Configuration for WebLogic
Creating a Persistent Store
Step 1 On your computer, cd to <WL_HOME>.
Step 2 Create a subdirectory called CiscoFileStore.
Step 3 Log on to the WebLogic Administration Console.
Step 4 If your WebLogic was installed in PRODUCTION mode, click Lock & Edit. Otherwise, you can skip this step.
Step 5 Choose Services > Persistent Stores.
Step 6 Choose New > Create FileStore. The “Create a New File Store” panel appears.
Step 7 In the Name field, enter CiscoFileStore.
Step 8 In the Target drop-down list, choose your WebLogic Server.
Step 9 In the Directory text box, enter the full path of the CiscoFileStore directory you created in Step 2 above (for example, /opt/bea/wlserver_10.3/CiscoFileStore).
Step 10 Click OK.
Creating a JMS Server
Step 1 On the WebLogic Administration Console, choose Services > Messaging > JMS Modules.
Step 2 Click New. The “Create a New JMS Server” panel appears.
Step 3 In the Name field, enter CiscoJMSServer.
Step 4 In the Persistent Store drop-down list, choose the Persistent Store named CiscoFileStore.
Step 5 Click Next.
Step 6 In the Target drop-down list, choose your WebLogic Server. (If you have a WebLogic Cluster environment, click Service Link WebLogic Server.)
Step 7 Click Finish.
Creating a JMS Module
Step 1 On the WebLogic Administration Console, choose Services > Messaging > JMS Modules.
Step 2 Click New. The Create JMS System Module panel appears.
Step 3 In the Name field, enter CiscoJMSModule. and click Next.
Step 4 Choose your WebLogic Server as the target. (If you have a WebLogic Cluster environment, choose Service Link WebLogic Server.) and click Next.
Step 5 Click Finish.
Step 6 Click the newly created JMS Module named CiscoJMSModule to open its properties.
Step 7 Open the Subdeployments tab and click New.
Step 8 In the Subdeployment Name field, enter CiscoSubdeployment and click Next.
1-24Cisco Prime Service Catalog 10.0 R2 Installation Guide
OL-31474-01
Chapter 1 Installation and Configuration GuidePreinstallation Configuration for WebLogic
Step 9 Choose the JMS Server named CiscoJMSServer. and click Finish.
Creating Connection Factory
Step 1 On the WebLogic Administration Console, choose Services > Messaging > JMS Modules.
Step 2 Click the JMS Module named CiscoJMSModule to open its properties.
Step 3 Open the Configuration tab and click New.
Step 4 Choose the Connection Factory option and click Next.
Step 5 In the Name and JNDI Name fields, enter NSConnectionFactory and click Next.
Step 6 Click Advanced Targeting.
Step 7 In the Subdeployments drop-down list, choose CiscoSubdeployment. The screen is refreshed to show that the JMS Server named “CiscoJMSServer” is already selected.
Step 8 Click Finish.
Creating JMS Templates
Step 1 On the WebLogic Administration Console, choose Services > Messaging > JMS Modules.
Step 2 Click the JMS Module named CiscoJMSModule to open its properties.
Step 3 Open the Configuration tab and click New.
Step 4 Choose the JMS Template option and click Next.
Step 5 In the Name field, enter CiscoQueueTemplate and click OK.
Creating Queues
Step 1 On the WebLogic Administration Console, choose Services > Messaging > JMS Modules.
Step 2 Click the JMS Module named CiscoJMSModule to open its properties.
Step 3 Open the Configuration tab and click New.
Step 4 Choose the Queue option.
Step 5 Click Next.
Step 6 In the Name and JNDI Name fields, enter ISEEInboundQueue.
Step 7 In the Template drop-down list, choose the CiscoQueueTemplate that you created and click Next.
Step 8 In the Subdeployments drop-down list, choose CiscoSubdeployment. The screen is refreshed to show that the JMS Server named “CiscoJMSServer” is already selected.
Step 9 Click Finish.
Step 10 Repeat the above steps four more times to create four more JMS Queues with the following names:
1-25Cisco Prime Service Catalog 10.0 R2 Installation Guide
OL-31474-01
Chapter 1 Installation and Configuration Guide Preinstallation Configuration for WebLogic
Step 11 If your WebLogic was installed in PRODUCTION mode, click Activate Changes. Otherwise, you can skip this step.
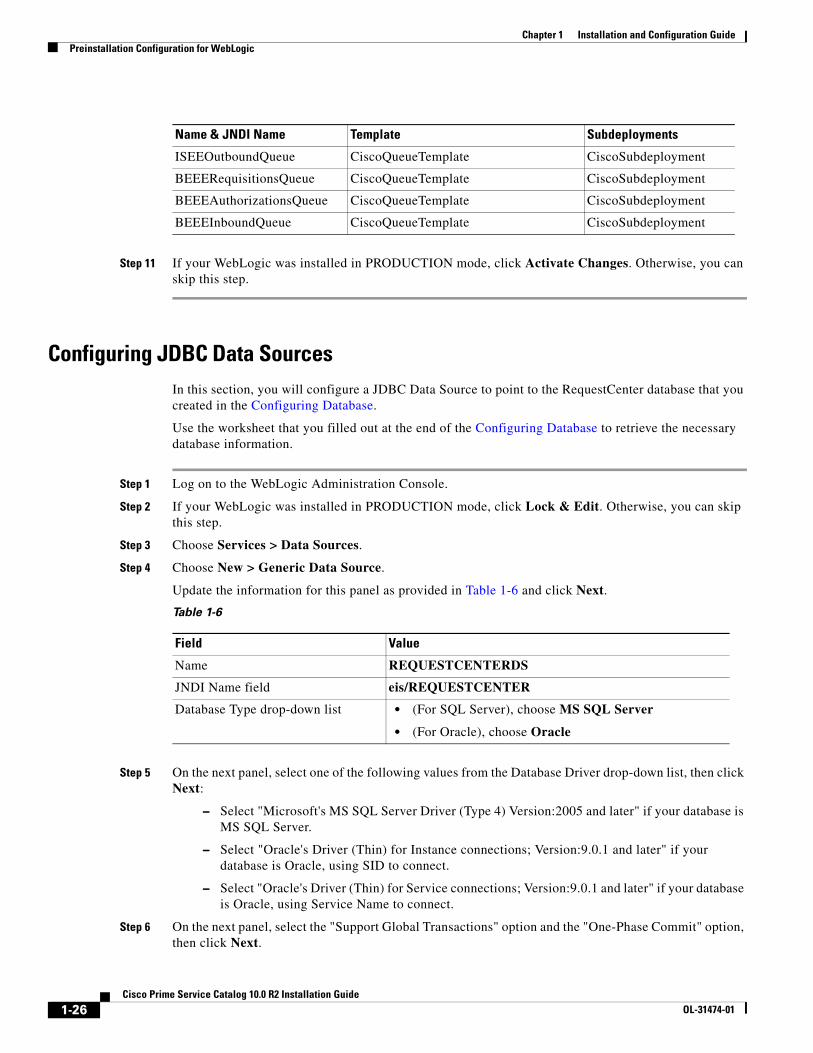
Configuring JDBC Data SourcesIn this section, you will configure a JDBC Data Source to point to the RequestCenter database that you created in the Configuring Database.
Use the worksheet that you filled out at the end of the Configuring Database to retrieve the necessary database information.
Step 1 Log on to the WebLogic Administration Console.
Step 2 If your WebLogic was installed in PRODUCTION mode, click Lock & Edit. Otherwise, you can skip this step.
Step 3 Choose Services > Data Sources.
Step 4 Choose New > Generic Data Source.
Update the information for this panel as provided in Table 1-6 and click Next.
Step 5 On the next panel, select one of the following values from the Database Driver drop-down list, then click Next:
– Select "Microsoft's MS SQL Server Driver (Type 4) Version:2005 and later" if your database is MS SQL Server.
– Select "Oracle's Driver (Thin) for Instance connections; Version:9.0.1 and later" if your database is Oracle, using SID to connect.
– Select "Oracle's Driver (Thin) for Service connections; Version:9.0.1 and later" if your database is Oracle, using Service Name to connect.
Step 6 On the next panel, select the "Support Global Transactions" option and the "One-Phase Commit" option, then click Next.
Name & JNDI Name Template Subdeployments
ISEEOutboundQueue CiscoQueueTemplate CiscoSubdeployment
BEEERequisitionsQueue CiscoQueueTemplate CiscoSubdeployment
BEEEAuthorizationsQueue CiscoQueueTemplate CiscoSubdeployment
BEEEInboundQueue CiscoQueueTemplate CiscoSubdeployment
Table 1-6
Field Value
Name REQUESTCENTERDS
JNDI Name field eis/REQUESTCENTER
Database Type drop-down list • (For SQL Server), choose MS SQL Server
• (For Oracle), choose Oracle
1-26Cisco Prime Service Catalog 10.0 R2 Installation Guide
OL-31474-01
Chapter 1 Installation and Configuration GuidePreinstallation Configuration for WebLogic
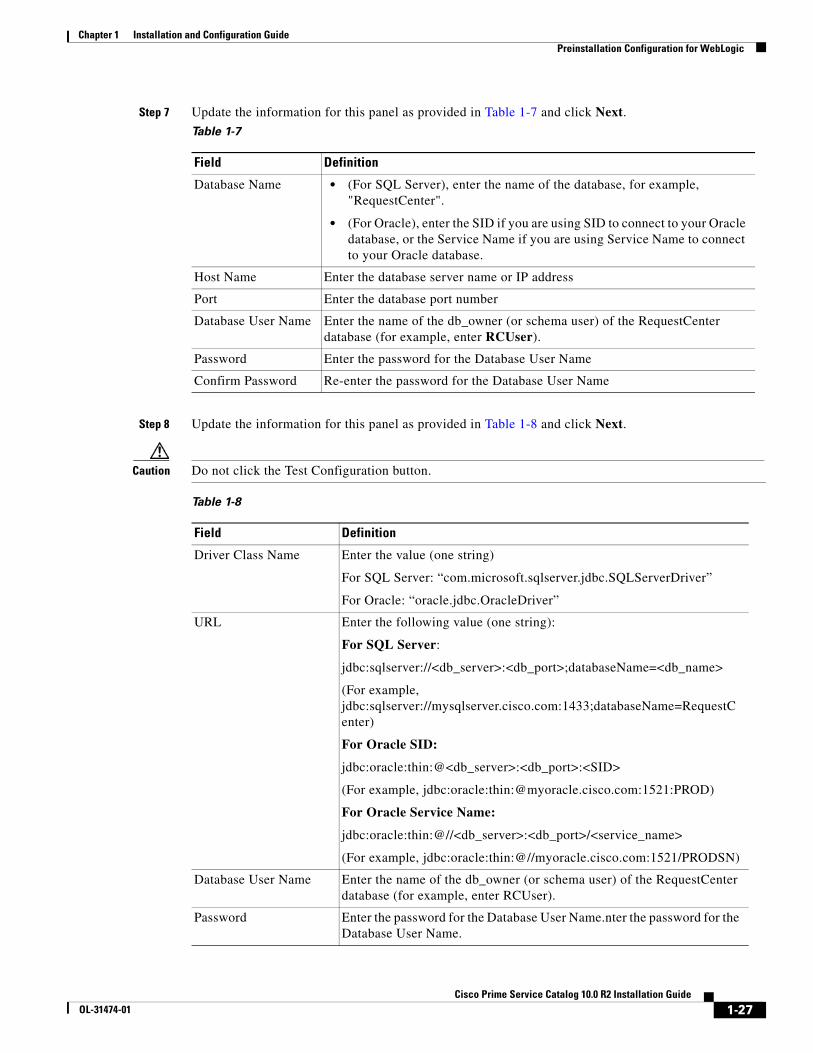
Step 7 Update the information for this panel as provided in Table 1-7 and click Next.
Step 8 Update the information for this panel as provided in Table 1-8 and click Next.
Caution Do not click the Test Configuration button.
Table 1-7
Field Definition
Database Name • (For SQL Server), enter the name of the database, for example, "RequestCenter".
• (For Oracle), enter the SID if you are using SID to connect to your Oracle database, or the Service Name if you are using Service Name to connect to your Oracle database.
Host Name Enter the database server name or IP address
Port Enter the database port number
Database User Name Enter the name of the db_owner (or schema user) of the RequestCenter database (for example, enter RCUser).
Password Enter the password for the Database User Name
Confirm Password Re-enter the password for the Database User Name
Table 1-8
Field Definition
Driver Class Name Enter the value (one string)
For SQL Server: “com.microsoft.sqlserver.jdbc.SQLServerDriver”
For Oracle: “oracle.jdbc.OracleDriver”
URL Enter the following value (one string):
For SQL Server:
jdbc:sqlserver://<db_server>:<db_port>;databaseName=<db_name>
(For example, jdbc:sqlserver://mysqlserver.cisco.com:1433;databaseName=RequestCenter)
For Oracle SID:
jdbc:oracle:thin:@<db_server>:<db_port>:<SID>
(For example, jdbc:oracle:thin:@myoracle.cisco.com:1521:PROD)
For Oracle Service Name:
jdbc:oracle:thin:@//<db_server>:<db_port>/<service_name>
(For example, jdbc:oracle:thin:@//myoracle.cisco.com:1521/PRODSN)
Database User Name Enter the name of the db_owner (or schema user) of the RequestCenter database (for example, enter RCUser).
Password Enter the password for the Database User Name.nter the password for the Database User Name.
1-27Cisco Prime Service Catalog 10.0 R2 Installation Guide
OL-31474-01
Chapter 1 Installation and Configuration Guide Preinstallation Configuration for WebLogic
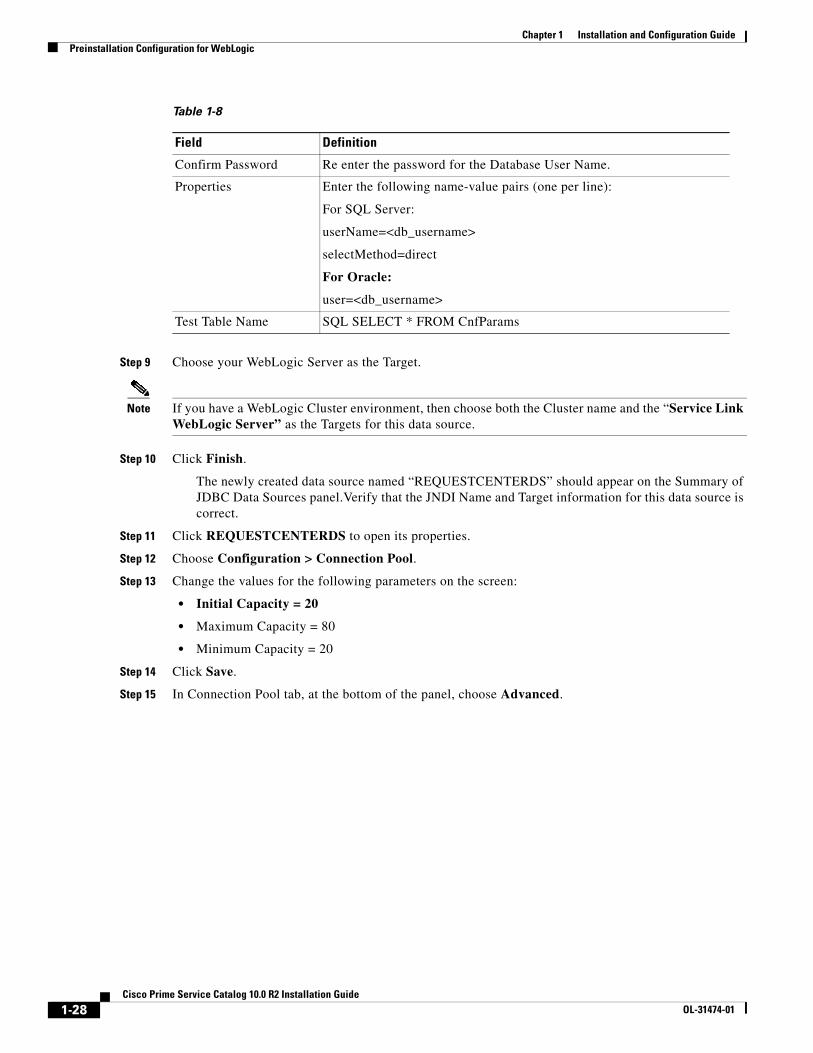
Step 9 Choose your WebLogic Server as the Target.
Note If you have a WebLogic Cluster environment, then choose both the Cluster name and the “Service Link WebLogic Server” as the Targets for this data source.
Step 10 Click Finish.
The newly created data source named “REQUESTCENTERDS” should appear on the Summary of JDBC Data Sources panel.Verify that the JNDI Name and Target information for this data source is correct.
Step 11 Click REQUESTCENTERDS to open its properties.
Step 12 Choose Configuration > Connection Pool.
Step 13 Change the values for the following parameters on the screen:
• Initial Capacity = 20
• Maximum Capacity = 80
• Minimum Capacity = 20
Step 14 Click Save.
Step 15 In Connection Pool tab, at the bottom of the panel, choose Advanced.
Confirm Password Re enter the password for the Database User Name.
Properties Enter the following name-value pairs (one per line):
For SQL Server:
userName=<db_username>
selectMethod=direct
For Oracle:
user=<db_username>
Test Table Name SQL SELECT * FROM CnfParams
Table 1-8
Field Definition
1-28Cisco Prime Service Catalog 10.0 R2 Installation Guide
OL-31474-01
Chapter 1 Installation and Configuration GuidePreinstallation Configuration for WebLogic
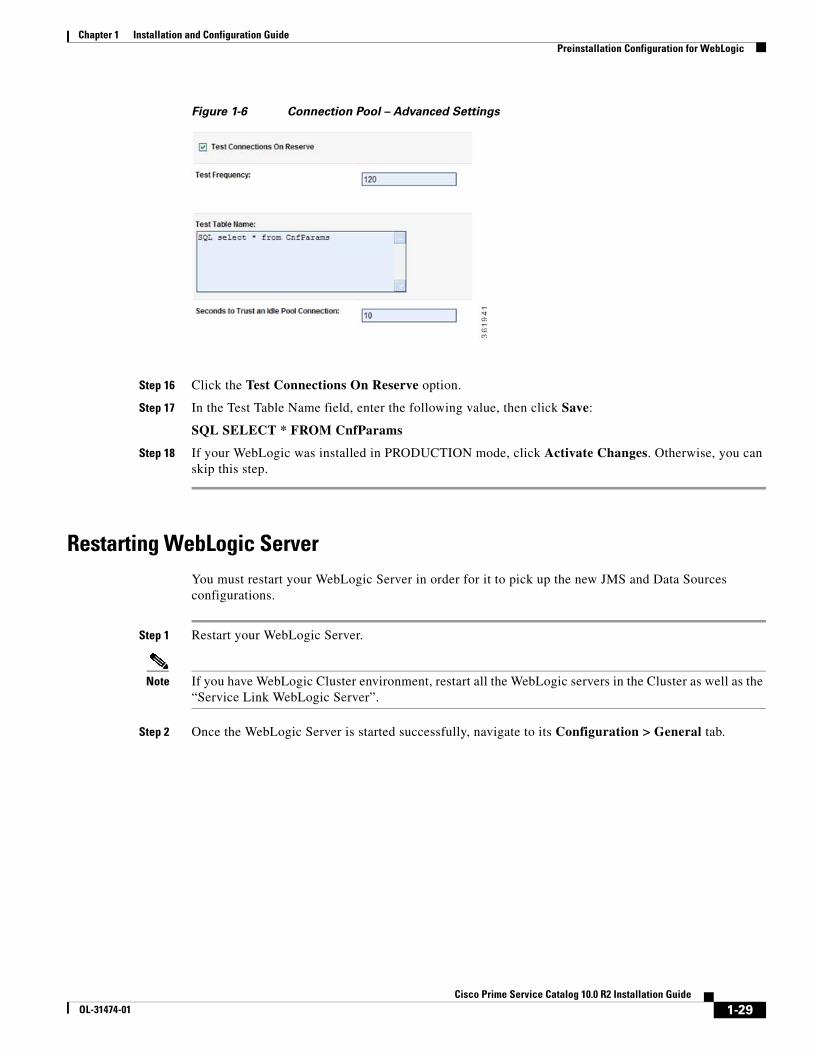
Figure 1-6 Connection Pool – Advanced Settings
Step 16 Click the Test Connections On Reserve option.
Step 17 In the Test Table Name field, enter the following value, then click Save:
SQL SELECT * FROM CnfParams
Step 18 If your WebLogic was installed in PRODUCTION mode, click Activate Changes. Otherwise, you can skip this step.
Restarting WebLogic ServerYou must restart your WebLogic Server in order for it to pick up the new JMS and Data Sources configurations.
Step 1 Restart your WebLogic Server.
Note If you have WebLogic Cluster environment, restart all the WebLogic servers in the Cluster as well as the “Service Link WebLogic Server”.
Step 2 Once the WebLogic Server is started successfully, navigate to its Configuration > General tab.
1-29Cisco Prime Service Catalog 10.0 R2 Installation Guide
OL-31474-01
Chapter 1 Installation and Configuration Guide Preinstallation Configuration for WebLogic
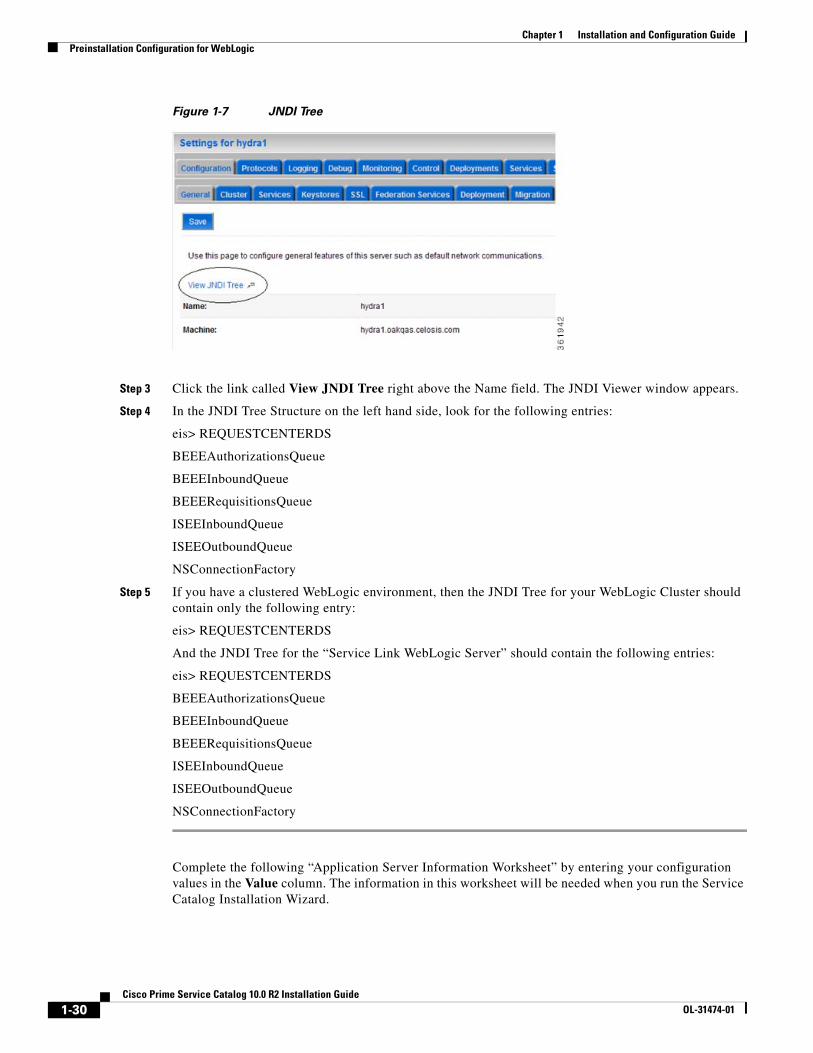
Figure 1-7 JNDI Tree
Step 3 Click the link called View JNDI Tree right above the Name field. The JNDI Viewer window appears.
Step 4 In the JNDI Tree Structure on the left hand side, look for the following entries:
eis> REQUESTCENTERDS
BEEEAuthorizationsQueue
BEEEInboundQueue
BEEERequisitionsQueue
ISEEInboundQueue
ISEEOutboundQueue
NSConnectionFactory
Step 5 If you have a clustered WebLogic environment, then the JNDI Tree for your WebLogic Cluster should contain only the following entry:
eis> REQUESTCENTERDS
And the JNDI Tree for the “Service Link WebLogic Server” should contain the following entries:
eis> REQUESTCENTERDS
BEEEAuthorizationsQueue
BEEEInboundQueue
BEEERequisitionsQueue
ISEEInboundQueue
ISEEOutboundQueue
NSConnectionFactory
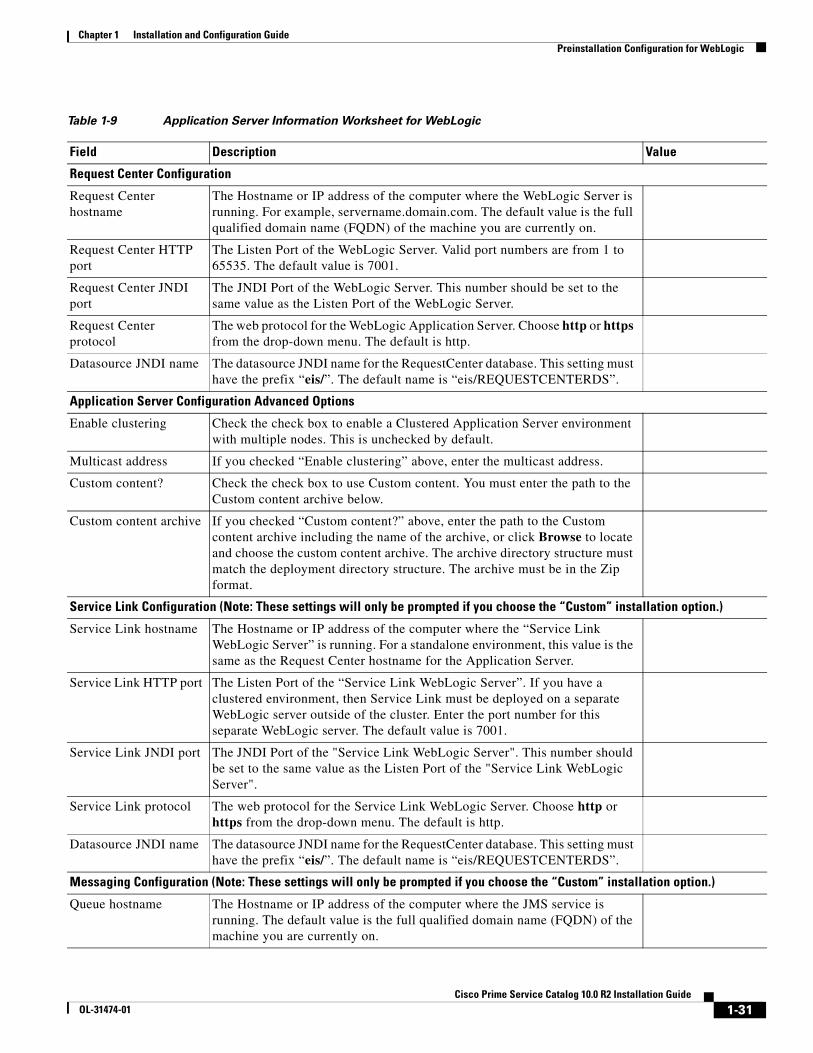
Complete the following “Application Server Information Worksheet” by entering your configuration values in the Value column. The information in this worksheet will be needed when you run the Service Catalog Installation Wizard.
1-30Cisco Prime Service Catalog 10.0 R2 Installation Guide
OL-31474-01
Chapter 1 Installation and Configuration GuidePreinstallation Configuration for WebLogic
Table 1-9 Application Server Information Worksheet for WebLogic
Field Description Value
Request Center Configuration
Request Center hostname
The Hostname or IP address of the computer where the WebLogic Server is running. For example, servername.domain.com. The default value is the full qualified domain name (FQDN) of the machine you are currently on.
Request Center HTTP port
The Listen Port of the WebLogic Server. Valid port numbers are from 1 to 65535. The default value is 7001.
Request Center JNDI port
The JNDI Port of the WebLogic Server. This number should be set to the same value as the Listen Port of the WebLogic Server.
Request Center protocol
The web protocol for the WebLogic Application Server. Choose http or https from the drop-down menu. The default is http.
Datasource JNDI name The datasource JNDI name for the RequestCenter database. This setting must have the prefix “eis/”. The default name is “eis/REQUESTCENTERDS”.
Application Server Configuration Advanced Options
Enable clustering Check the check box to enable a Clustered Application Server environment with multiple nodes. This is unchecked by default.
Multicast address If you checked “Enable clustering” above, enter the multicast address.
Custom content? Check the check box to use Custom content. You must enter the path to the Custom content archive below.
Custom content archive If you checked “Custom content?” above, enter the path to the Custom content archive including the name of the archive, or click Browse to locate and choose the custom content archive. The archive directory structure must match the deployment directory structure. The archive must be in the Zip format.
Service Link Configuration (Note: These settings will only be prompted if you choose the “Custom” installation option.)
Service Link hostname The Hostname or IP address of the computer where the “Service Link WebLogic Server” is running. For a standalone environment, this value is the same as the Request Center hostname for the Application Server.
Service Link HTTP port The Listen Port of the “Service Link WebLogic Server”. If you have a clustered environment, then Service Link must be deployed on a separate WebLogic server outside of the cluster. Enter the port number for this separate WebLogic server. The default value is 7001.
Service Link JNDI port The JNDI Port of the "Service Link WebLogic Server". This number should be set to the same value as the Listen Port of the "Service Link WebLogic Server".
Service Link protocol The web protocol for the Service Link WebLogic Server. Choose http or https from the drop-down menu. The default is http.
Datasource JNDI name The datasource JNDI name for the RequestCenter database. This setting must have the prefix “eis/”. The default name is “eis/REQUESTCENTERDS”.
Messaging Configuration (Note: These settings will only be prompted if you choose the “Custom” installation option.)
Queue hostname The Hostname or IP address of the computer where the JMS service is running. The default value is the full qualified domain name (FQDN) of the machine you are currently on.
1-31Cisco Prime Service Catalog 10.0 R2 Installation Guide
OL-31474-01
Chapter 1 Installation and Configuration Guide Preinstallation Configuration for WebLogic
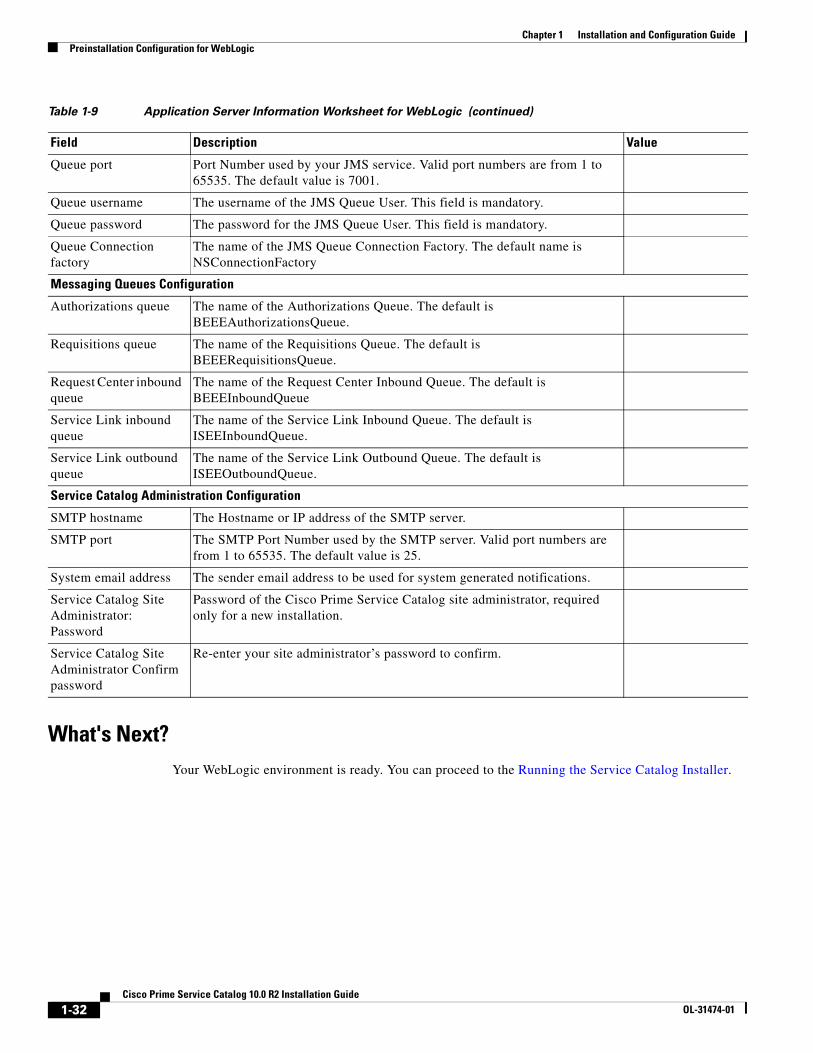
What's Next?Your WebLogic environment is ready. You can proceed to the Running the Service Catalog Installer.
Queue port Port Number used by your JMS service. Valid port numbers are from 1 to 65535. The default value is 7001.
Queue username The username of the JMS Queue User. This field is mandatory.
Queue password The password for the JMS Queue User. This field is mandatory.
Queue Connection factory
The name of the JMS Queue Connection Factory. The default name is NSConnectionFactory
Messaging Queues Configuration
Authorizations queue The name of the Authorizations Queue. The default is BEEEAuthorizationsQueue.
Requisitions queue The name of the Requisitions Queue. The default is BEEERequisitionsQueue.
Request Center inbound queue
The name of the Request Center Inbound Queue. The default is BEEEInboundQueue
Service Link inbound queue
The name of the Service Link Inbound Queue. The default is ISEEInboundQueue.
Service Link outbound queue
The name of the Service Link Outbound Queue. The default is ISEEOutboundQueue.
Service Catalog Administration Configuration
SMTP hostname The Hostname or IP address of the SMTP server.
SMTP port The SMTP Port Number used by the SMTP server. Valid port numbers are from 1 to 65535. The default value is 25.
System email address The sender email address to be used for system generated notifications.
Service Catalog Site Administrator: Password
Password of the Cisco Prime Service Catalog site administrator, required only for a new installation.
Service Catalog Site Administrator Confirm password
Re-enter your site administrator’s password to confirm.
Table 1-9 Application Server Information Worksheet for WebLogic (continued)
Field Description Value
1-32Cisco Prime Service Catalog 10.0 R2 Installation Guide
OL-31474-01
Chapter 1 Installation and Configuration GuidePreinstallation Configuration for WebSphere
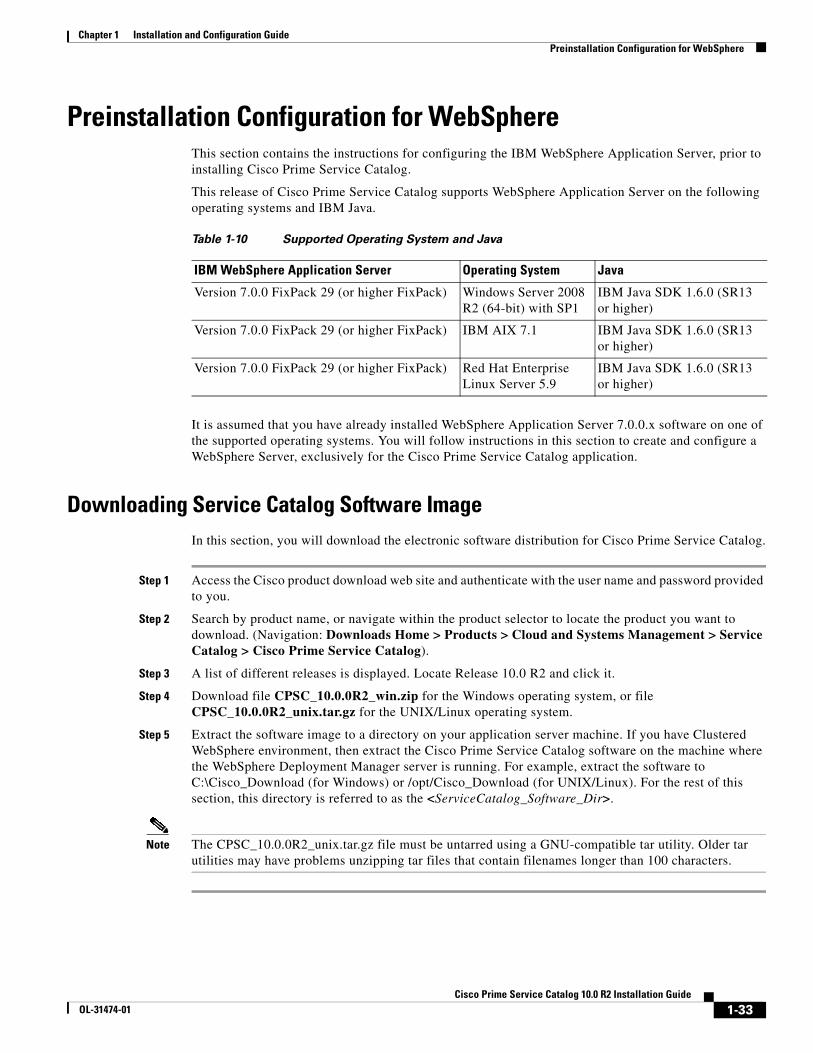
Preinstallation Configuration for WebSphereThis section contains the instructions for configuring the IBM WebSphere Application Server, prior to installing Cisco Prime Service Catalog.
This release of Cisco Prime Service Catalog supports WebSphere Application Server on the following operating systems and IBM Java.
It is assumed that you have already installed WebSphere Application Server 7.0.0.x software on one of the supported operating systems. You will follow instructions in this section to create and configure a WebSphere Server, exclusively for the Cisco Prime Service Catalog application.
Downloading Service Catalog Software ImageIn this section, you will download the electronic software distribution for Cisco Prime Service Catalog.
Step 1 Access the Cisco product download web site and authenticate with the user name and password provided to you.
Step 2 Search by product name, or navigate within the product selector to locate the product you want to download. (Navigation: Downloads Home > Products > Cloud and Systems Management > Service Catalog > Cisco Prime Service Catalog).
Step 3 A list of different releases is displayed. Locate Release 10.0 R2 and click it.
Step 4 Download file CPSC_10.0.0R2_win.zip for the Windows operating system, or file CPSC_10.0.0R2_unix.tar.gz for the UNIX/Linux operating system.
Step 5 Extract the software image to a directory on your application server machine. If you have Clustered WebSphere environment, then extract the Cisco Prime Service Catalog software on the machine where the WebSphere Deployment Manager server is running. For example, extract the software to C:\Cisco_Download (for Windows) or /opt/Cisco_Download (for UNIX/Linux). For the rest of this section, this directory is referred to as the <ServiceCatalog_Software_Dir>.
Note The CPSC_10.0.0R2_unix.tar.gz file must be untarred using a GNU-compatible tar utility. Older tar utilities may have problems unzipping tar files that contain filenames longer than 100 characters.
Table 1-10 Supported Operating System and Java
IBM WebSphere Application Server Operating System Java
Version 7.0.0 FixPack 29 (or higher FixPack) Windows Server 2008 R2 (64-bit) with SP1
IBM Java SDK 1.6.0 (SR13 or higher)
Version 7.0.0 FixPack 29 (or higher FixPack) IBM AIX 7.1 IBM Java SDK 1.6.0 (SR13 or higher)
Version 7.0.0 FixPack 29 (or higher FixPack) Red Hat Enterprise Linux Server 5.9
IBM Java SDK 1.6.0 (SR13 or higher)
1-33Cisco Prime Service Catalog 10.0 R2 Installation Guide
OL-31474-01
Chapter 1 Installation and Configuration Guide Preinstallation Configuration for WebSphere
Installing Custom Java LibraryIn this section, you will copy several custom java library files from <ServiceCatalog_Software_Dir> to the <WAS_INSTALL_ROOT> directory, where <ServiceCatalog_Software_Dir> is where you extracted the electronic software distribution for Cisco Prime Service Catalog (for example, C:\Cisco_Download or /opt/Cisco_Download), and <WAS_INSTALL_ROOT> is the installation directory of your WebSphere application server (for example, C:\IBM\WebSphere\AppServer, or /opt/IBM/WebSphere/AppServer).
Step 1 Within <WAS_INSTALL_ROOT>, create a directory called "cisco_lib". And within "cisco_lib", create two sub-directories called "java_ext" and "was_ext".
Step 2 Copy the following files from the “<ServiceCatalog_Software_Dir>\preinstall\websphere\lib_ext” directory to the “<WAS_INSTALL_ROOT>\cisco_lib\was_ext” directory:
• geronimo-ccpp_1.0_spec-1.0-beta.jar
• sqljdbc4.jar
• ojdbc6.jar
• pluto-container-api-2.0.2.jar
• pluto-container-driver-api-2.0.2.jar
• pluto-taglib-2.0.2.jar
Step 3 Copy the following files from the “<ServiceCatalog_Software_Dir>\preinstall\websphere\java_jre_lib_ext” directory to the “<WAS_INSTALL_ROOT>\cisco_lib\java_ext” directory:
• portlet-api_2.0_spec-1.0.jar
• wsdl4j-1.6.1.jar
Note If you have WebSphere Cluster environment, then you have to perform Steps 1–3 on every node in the Cluster, including the machine that hosts the WebSphere Deployment Manager server.
Note If you are upgrading from a previous release of Prime Service Catalog to this release, you must still repeat steps 1 to 3 in this section on your WebSphere environment. This is because: a) You have to overwrite the older version of the Cisco jar files with the newer version shipped with this release of Prime Service Catalog. b) There are new JDBC drivers for Oracle (ojdbc6.jar) and SQL Server (sqljdbc4.jar) that are bundled with this release of Prime Service Catalog.
1-34Cisco Prime Service Catalog 10.0 R2 Installation Guide
OL-31474-01
Chapter 1 Installation and Configuration GuidePreinstallation Configuration for WebSphere
Creating a WebSphere ServerIn this section you will create a WebSphere Server, to be used exclusively for Cisco Prime Service Catalog.
Step 1 Log on to the WebSphere Administration Console.
Step 2 Choose Servers > Server Types, and click WebSphere application servers.
Step 3 In the right pane, click New. The “Create a new application server” panel appears.
Step 4 Choose the node name from the drop-down list, enter a server name (for example, enter server1), then click Next.
Step 5 Choose the “default” template, then click Next.
Step 6 Choose the Generate Unique Ports option, then click Next.
Step 7 Click Finish.
Step 8 Click Save directly to the master configuration.
Setting the Arguments for Java Virtual Machine
Step 1 Click the newly created WebSphere Server (for example, click on "server1"), and open the Configuration tab.
Step 2 Under the Server Infrastructure section in the right pane, expand Java and Process Management, and click Process Definition.
Step 3 Under the Additional Properties section in the right pane, click Java Virtual Machine.
Step 4 Modify only the following settings on the screen:
• Initial heap size = 1024
• Maximum heap size = 1024
• Deselect the "Debug Mode" option (if it is selected)
• Generic JVM arguments = -Djava.net.preferIPv4Stack=true -Dclient.encoding.override=UTF-8
Step 5 Click OK.
Step 6 Back on the Process Definition page, click Java Virtual Machine again.
Step 7 Under the Additional Properties section in the right pane, click Custom properties.
Step 8 Click the New button.
Step 9 Enter values for the following properties, then click OK:
• Name = ws.ext.dirs
• Value = <WAS_INSTALL_ROOT>/cisco_lib/was_ext
(For example, Value = C:/IBM/WebSphere/AppServer/cisco_lib/was_ext. Make sure you use the forward slash as directory separator, even on Windows operating system.)
Step 10 Click the New button again to enter another Custom property.
Step 11 Enter the values for the following properties, then click OK:
1-35Cisco Prime Service Catalog 10.0 R2 Installation Guide
OL-31474-01
Chapter 1 Installation and Configuration Guide Preinstallation Configuration for WebSphere
• Name = java.ext.dirs
• Value = <WAS_INSTALL_ROOT>/java/jre/lib/ext;<WAS_INSTALL_ROOT>/cisco_lib/java_ext
(For example, Value = C:/IBM/WebSphere/AppServer/java/jre/lib/ext;C:/IBM/WebSphere/AppServer/cisco_lib/was_ext. Make sure you use forward slash as directory separator, even on Windows operating system. On UNIX/Linux operating system, replace the semicolon with a colon in between the two paths. For example, on Unix/Linux, Value = /opt/IBM/WebSphere/AppServer/java/jre/lib/ext:/opt/IBM/WebSphere/AppServer/cisco_lib/java_ext.
Step 12 Click Save directly to the master configuration.
Configuring the DISPLAY Property (for UNIX or Linux Only)
Perform the following steps to enable the display of KPI charts on the Service Catalog UI. As stated in the prerequisites section, if your Application Server machine is running a UNIX or Linux operating system, you must have either X-Window Server or Xvfp (virtual framebuffer X server) installed and running on your machine, so that WebSphere can communicate with X-Windows Server or Xvfb to display the KPI charts.
To configure the DISPLAY property:
Step 1 Click the newly created WebSphere Server (that is, server1), and open the Configuration tab.
Step 2 Under the Server Infrastructure section in the right pane, choose Java and Process Management, and click Process Definition.
Step 3 Under the Additional Properties section in the right pane, click Environment Entries.
Step 4 Click New.
Step 5 Enter the following values:
• Name = DISPLAY
• Value = localhost:0.0Step 6 Click OK.
Step 7 Click Save directly to the master configuration.
Getting Port Numbers
Step 1 Click the newly created WebSphere Server (that is, server1), and open the Configuration tab.
Step 2 Under the Communication section in the right pane, choose Ports. A table that shows the Port Name and Number appears.
Step 3 Write down the port number for the following Port Names. You will need this information when completing the worksheet at the end of this section.
• BOOTSTRAP_ADDRESS =?
• WC_defaulthost =?
1-36Cisco Prime Service Catalog 10.0 R2 Installation Guide
OL-31474-01
Chapter 1 Installation and Configuration GuidePreinstallation Configuration for WebSphere
If you need to modify these port numbers:
a. To the right of the Ports table, click Details.
b. Click the link for either BOOTSTRAP_ADDRESS or WC_defaulthost to open its General Properties panel.
c. Modify the value in the Port field.
d. Click OK.
e. Click Save directly to the master configuration.
Configurations for WebSphere ClusterThe Service Catalog product is comprised of two enterprise applications named “Request Center” and “Service Link.” However, the Service Catalog installer does not automatically deploy the Request Center and Service Link applications on your WebSphere Server for you. The installer will generate two WAR files (RequestCenter.war for the Request Center application, and ISEE.war for the Service Link application) which are customized for your WebSphere environment. After you execute the Service Catalog installer, you will need to follow the instructions in a later section of this guide to manually deploy RequestCenter.war and ISEE.war on your WebSphere Server.
The RequestCenter.war file and ISEE.war file can be deployed together in the same WebSphere Server even though they are two separate enterprise applications. However, if you are setting up a WebSphere Cluster environment with multiple nodes (where each node is a separate computer), then you need to perform the additional configurations as follows:
Step 1 Perform the tasks described in the Installing Custom Java Libraries on each node (that is, each computer) in the Cluster.
Step 2 Follow the instructions in the Creating a WebSphere Server to create the WebSphere Server for each node and to set the JVM arguments for each server, before you add these servers to the Cluster.
Step 3 Each WebSphere Server in your Cluster must be configured to use the same BOOTSTRAP_ADDRESS port number, and WC_defaulthost port number. For example, your Cluster contains two nodes. If the WebSphere Server on Node 1 is using BOOTSTRAP_ADDRESS=2810 and WC_defaulthost=9080, then the WebSphere Server on Node 2 must also be configured to use BOOTSTRAP_ADDRESS=2810 and WC_defaulthost=9080. If necessary, follow the instructions in the Getting Port Numbers to set the BOOTSTRAP_ADDRESS and WC_defaulthost port numbers for all WebSphere Servers in the Cluster to be the same.
Step 4 RequestCenter.war file is deployed on the WebSphere Cluster. But, the ISEE.war file cannot be deployed in the same Cluster; it must be deployed on a stand-alone WebSphere Server that is not a member of any Cluster. Therefore, if you have a clustered WebSphere environment, then you must create an additional stand-alone WebSphere Server (that is, not a member of the Cluster), to be used for ISEE.war. For the rest of the chapter, this stand-alone WebSphere Server is referred to as the “Service Link WebSphere Server”. For this stand-alone “Service Link WebSphere Server”, the JVM arguments can be set as follows:
• Initial heap size = 1024
• Maximum heap size = 1024
• Deselect the “Debug Mode” option (if it is selected)
• Generic JVM arguments = -Djava.net.preferIPv4Stack=true
1-37Cisco Prime Service Catalog 10.0 R2 Installation Guide
OL-31474-01
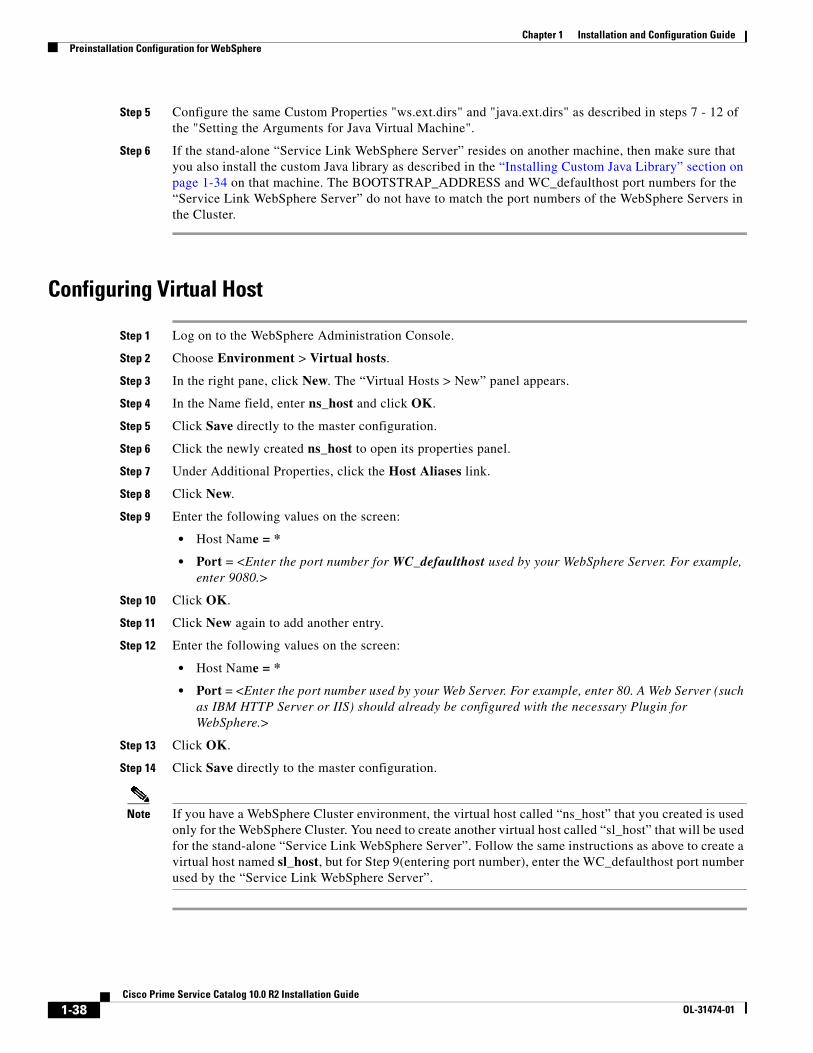
Chapter 1 Installation and Configuration Guide Preinstallation Configuration for WebSphere
Step 5 Configure the same Custom Properties "ws.ext.dirs" and "java.ext.dirs" as described in steps 7 - 12 of the "Setting the Arguments for Java Virtual Machine".
Step 6 If the stand-alone “Service Link WebSphere Server” resides on another machine, then make sure that you also install the custom Java library as described in the “Installing Custom Java Library” section on page 1-34 on that machine. The BOOTSTRAP_ADDRESS and WC_defaulthost port numbers for the “Service Link WebSphere Server” do not have to match the port numbers of the WebSphere Servers in the Cluster.
Configuring Virtual Host
Step 1 Log on to the WebSphere Administration Console.
Step 2 Choose Environment > Virtual hosts.
Step 3 In the right pane, click New. The “Virtual Hosts > New” panel appears.
Step 4 In the Name field, enter ns_host and click OK.
Step 5 Click Save directly to the master configuration.
Step 6 Click the newly created ns_host to open its properties panel.
Step 7 Under Additional Properties, click the Host Aliases link.
Step 8 Click New.
Step 9 Enter the following values on the screen:
• Host Name = *
• Port = <Enter the port number for WC_defaulthost used by your WebSphere Server. For example, enter 9080.>
Step 10 Click OK.
Step 11 Click New again to add another entry.
Step 12 Enter the following values on the screen:
• Host Name = *
• Port = <Enter the port number used by your Web Server. For example, enter 80. A Web Server (such as IBM HTTP Server or IIS) should already be configured with the necessary Plugin for WebSphere.>
Step 13 Click OK.
Step 14 Click Save directly to the master configuration.
Note If you have a WebSphere Cluster environment, the virtual host called “ns_host” that you created is used only for the WebSphere Cluster. You need to create another virtual host called “sl_host” that will be used for the stand-alone “Service Link WebSphere Server”. Follow the same instructions as above to create a virtual host named sl_host, but for Step 9(entering port number), enter the WC_defaulthost port number used by the “Service Link WebSphere Server”.
1-38Cisco Prime Service Catalog 10.0 R2 Installation Guide
OL-31474-01
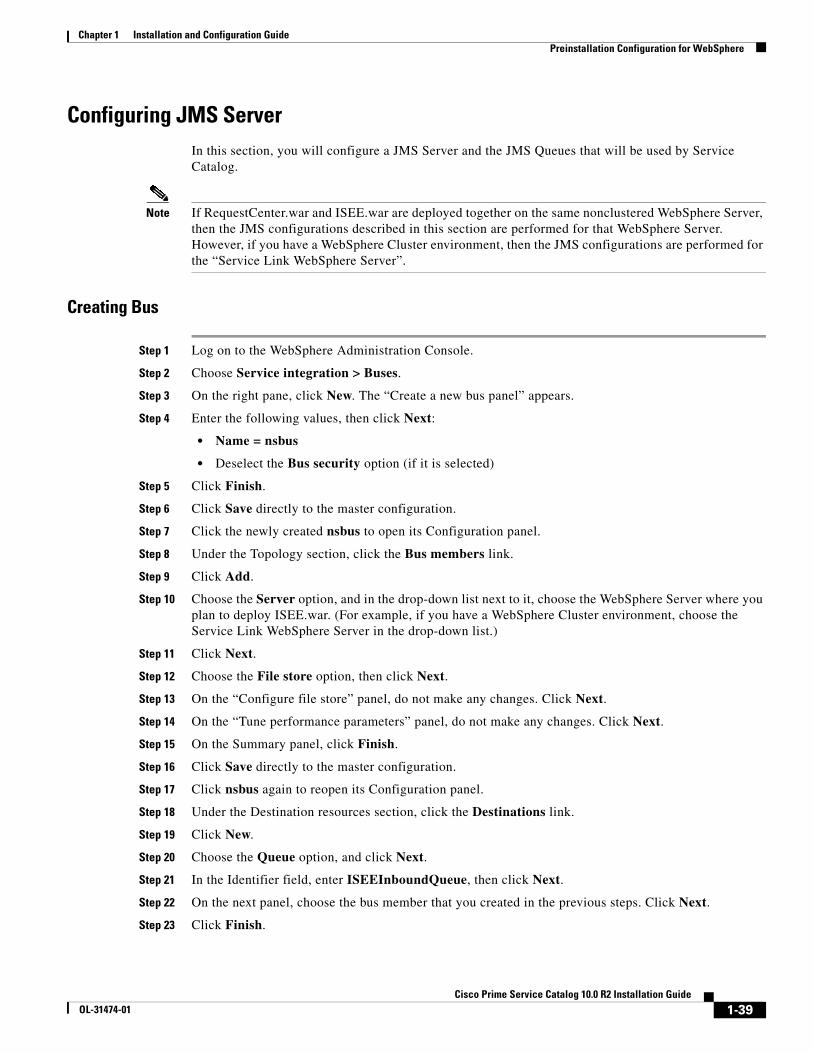
Chapter 1 Installation and Configuration GuidePreinstallation Configuration for WebSphere
Configuring JMS ServerIn this section, you will configure a JMS Server and the JMS Queues that will be used by Service Catalog.
Note If RequestCenter.war and ISEE.war are deployed together on the same nonclustered WebSphere Server, then the JMS configurations described in this section are performed for that WebSphere Server. However, if you have a WebSphere Cluster environment, then the JMS configurations are performed for the “Service Link WebSphere Server”.
Creating Bus
Step 1 Log on to the WebSphere Administration Console.
Step 2 Choose Service integration > Buses.
Step 3 On the right pane, click New. The “Create a new bus panel” appears.
Step 4 Enter the following values, then click Next:
• Name = nsbus
• Deselect the Bus security option (if it is selected)
Step 5 Click Finish.
Step 6 Click Save directly to the master configuration.
Step 7 Click the newly created nsbus to open its Configuration panel.
Step 8 Under the Topology section, click the Bus members link.
Step 9 Click Add.
Step 10 Choose the Server option, and in the drop-down list next to it, choose the WebSphere Server where you plan to deploy ISEE.war. (For example, if you have a WebSphere Cluster environment, choose the Service Link WebSphere Server in the drop-down list.)
Step 11 Click Next.
Step 12 Choose the File store option, then click Next.
Step 13 On the “Configure file store” panel, do not make any changes. Click Next.
Step 14 On the “Tune performance parameters” panel, do not make any changes. Click Next.
Step 15 On the Summary panel, click Finish.
Step 16 Click Save directly to the master configuration.
Step 17 Click nsbus again to reopen its Configuration panel.
Step 18 Under the Destination resources section, click the Destinations link.
Step 19 Click New.
Step 20 Choose the Queue option, and click Next.
Step 21 In the Identifier field, enter ISEEInboundQueue, then click Next.
Step 22 On the next panel, choose the bus member that you created in the previous steps. Click Next.
Step 23 Click Finish.
1-39Cisco Prime Service Catalog 10.0 R2 Installation Guide
OL-31474-01
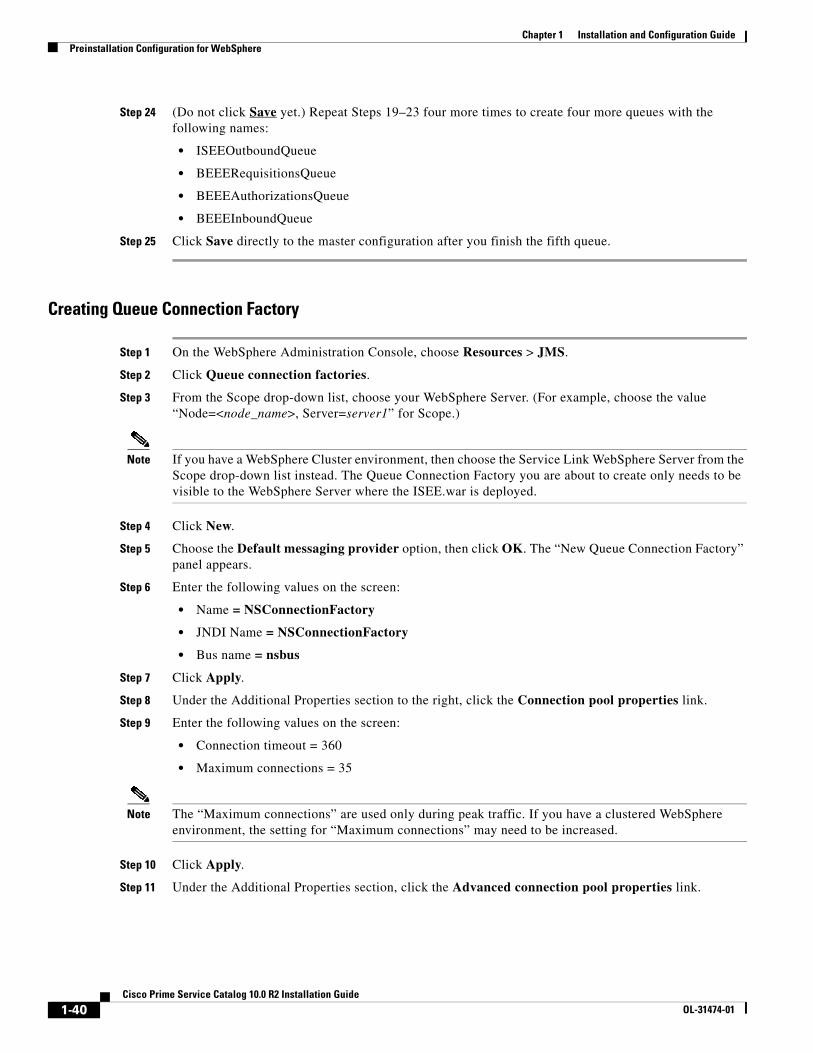
Chapter 1 Installation and Configuration Guide Preinstallation Configuration for WebSphere
Step 24 (Do not click Save yet.) Repeat Steps 19–23 four more times to create four more queues with the following names:
• ISEEOutboundQueue
• BEEERequisitionsQueue
• BEEEAuthorizationsQueue
• BEEEInboundQueue
Step 25 Click Save directly to the master configuration after you finish the fifth queue.
Creating Queue Connection Factory
Step 1 On the WebSphere Administration Console, choose Resources > JMS.
Step 2 Click Queue connection factories.
Step 3 From the Scope drop-down list, choose your WebSphere Server. (For example, choose the value “Node=<node_name>, Server=server1” for Scope.)
Note If you have a WebSphere Cluster environment, then choose the Service Link WebSphere Server from the Scope drop-down list instead. The Queue Connection Factory you are about to create only needs to be visible to the WebSphere Server where the ISEE.war is deployed.
Step 4 Click New.
Step 5 Choose the Default messaging provider option, then click OK. The “New Queue Connection Factory” panel appears.
Step 6 Enter the following values on the screen:
• Name = NSConnectionFactory
• JNDI Name = NSConnectionFactory
• Bus name = nsbus
Step 7 Click Apply.
Step 8 Under the Additional Properties section to the right, click the Connection pool properties link.
Step 9 Enter the following values on the screen:
• Connection timeout = 360
• Maximum connections = 35
Note The “Maximum connections” are used only during peak traffic. If you have a clustered WebSphere environment, the setting for “Maximum connections” may need to be increased.
Step 10 Click Apply.
Step 11 Under the Additional Properties section, click the Advanced connection pool properties link.
1-40Cisco Prime Service Catalog 10.0 R2 Installation Guide
OL-31474-01
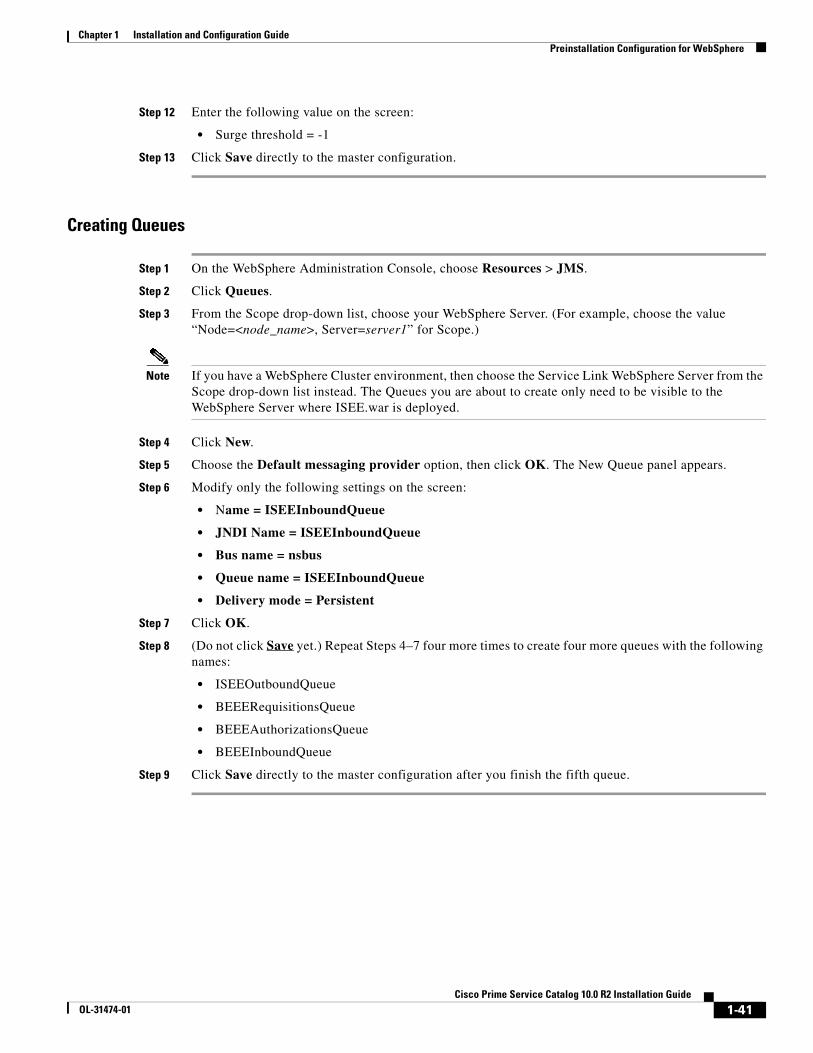
Chapter 1 Installation and Configuration GuidePreinstallation Configuration for WebSphere
Step 12 Enter the following value on the screen:
• Surge threshold = -1
Step 13 Click Save directly to the master configuration.
Creating Queues
Step 1 On the WebSphere Administration Console, choose Resources > JMS.
Step 2 Click Queues.
Step 3 From the Scope drop-down list, choose your WebSphere Server. (For example, choose the value “Node=<node_name>, Server=server1” for Scope.)
Note If you have a WebSphere Cluster environment, then choose the Service Link WebSphere Server from the Scope drop-down list instead. The Queues you are about to create only need to be visible to the WebSphere Server where ISEE.war is deployed.
Step 4 Click New.
Step 5 Choose the Default messaging provider option, then click OK. The New Queue panel appears.
Step 6 Modify only the following settings on the screen:
• Name = ISEEInboundQueue
• JNDI Name = ISEEInboundQueue
• Bus name = nsbus
• Queue name = ISEEInboundQueue
• Delivery mode = Persistent
Step 7 Click OK.
Step 8 (Do not click Save yet.) Repeat Steps 4–7 four more times to create four more queues with the following names:
• ISEEOutboundQueue
• BEEERequisitionsQueue
• BEEEAuthorizationsQueue
• BEEEInboundQueue
Step 9 Click Save directly to the master configuration after you finish the fifth queue.
1-41Cisco Prime Service Catalog 10.0 R2 Installation Guide
OL-31474-01
Chapter 1 Installation and Configuration Guide Preinstallation Configuration for WebSphere
Configuring J2C Authentication DataIn the Configuring Database, you created the RequestCenter database. In this section, you will add the database user that owns the RequestCenter schema to the J2C Authentication Data.
Step 1 On the WebSphere Administration Console, choose Security > Global security.
Step 2 Under the Authentication section in the right pane, click Java Authentication and Authorization Service.
Step 3 Click J2C authentication data.
Step 4 Click New.
Step 5 Enter the following values on the screen (replace “RCUser” with the actual ID that you created as the schema owner for the RequestCenter database):
• Alias = RCUser
• User ID = RCUser
• Password = <Enter the password for the database user RCUser.>
Step 6 Click OK.
Step 7 Click Save directly to the master configuration.
Configuring JDBC Data SourcesIn this section, you will configure a JDBC Data Source for the RequestCenter database.
Use the worksheet that you filled out at the end of the Configuring Database to retrieve the necessary database information.
Creating JDBC Provider
Step 1 On the WebSphere Administration Console, choose Resources > JDBC, and click JDBC Providers.
Step 2 From the Scope drop-down list, choose your WebSphere Server. (For example, choose the value “Node=<node_name>, Server=server1” for Scope.)
Note If you have a WebSphere Cluster environment, then choose the WebSphere Cluster name from the Scope drop-down list instead. The JDBC Provider you are about to create need to be visible to all WebSphere Servers that belong in the Cluster.
Step 3 Click New. The “Create new JDBC provider” panel appears.
Step 4 Enter the following values on the screen:
• Database Type = User-defined
• Implementation class name = <enter one of the following values:>
– (For SQL Server:) com.microsoft.sqlserver.jdbc.SQLServerConnectionPoolDataSource
– (For Oracle:) oracle.jdbc.pool.OracleConnectionPoolDataSource
1-42Cisco Prime Service Catalog 10.0 R2 Installation Guide
OL-31474-01
Chapter 1 Installation and Configuration GuidePreinstallation Configuration for WebSphere
• Name = Cisco JDBC Driver for <database_type>
• Description = Cisco JDBC Driver for <database_type>
Step 5 Click Next. The “Enter database class path information” panel appears.
Step 6 Replace the “Class path” with the following line:
– (For SQL Server:) com.ibm.websphere.rsadapter.MicrosoftSQLServerDataStoreHelper
– (For Oracle:) com.ibm.websphere.rsadapter.Oracle11gDataStoreHelper
Step 7 Click Next. The Summary panel appears.
Step 8 Review the information on the Summary panel. If everything looks correct, then click Finish.
Step 9 Click Save directly to the master configuration.
Note If you have a WebSphere Cluster environment, then the JDBC Provider that you just created will not be visible to the stand-alone “Service Link WebSphere Server”, which does not belong to the Cluster. Therefore, you need to create the same JDBC Provider by repeating Steps 1–9, but this time, at Step 2, set the Scope to the Service Link WebSphere Server.
Creating REQUESTCENTERDS Data Source
Step 1 Click the newly created JDBC Provider to open its Configuration panel.
Step 2 Under the Additional Properties section, click the Data sources link.
Step 3 Click New. The “Enter basic data source information” panel appears.
Step 4 Enter the following values on the screen:
• Data source name = REQUESTCENTERDS
• JNDI name = eis/REQUESTCENTERDS
Step 5 Click Next.
Step 6 Enter the following value in the “Data store helper class name” field:
For SQL Server: com.ibm.websphere.rsadapter.MicrosoftSQLServerDataStoreHelper
For Oracle: com.ibm.websphere.rsadapter.Oracle11gDataStoreHelper
Step 7 Click Next.
Step 8 In the drop-down list for the “Component-managed authentication alias” field, choose the “RCUser” alias that you created for J2C authentication data in the previous section (for example, choose the value “<host>CellManager01/RCUser”).
Step 9 Click Next.
Step 10 Review the information on the Summary panel. If everything looks correct, then click Finish.
Step 11 Click Save directly to the master configuration.
Step 12 Click the newly created data source named REQUESTCENTERDS to open its General Properties panel.
Step 13 Under Additional Properties section, click the Connection pool properties link.
1-43Cisco Prime Service Catalog 10.0 R2 Installation Guide
OL-31474-01
Chapter 1 Installation and Configuration Guide Preinstallation Configuration for WebSphere
Step 14 Enter the following values on the screen:
• Maximum connections = 80
• Minimum connections = 20
Step 15 Click OK.
Step 16 (Do not click Save yet.) Under the Additional Properties section, click the Custom properties link. A long list of property names is displayed. The list of property names may span multiple pages.
Step 17 For SQL Server, delete all of the existing property names that you see on the screen. For Oracle, delete all of the existing property names, except for the property called "URL". You may have to navigate to the next page of property names in order to delete more entries.
Step 18 If your database is Oracle:
a. Click the existing URL property.
b. Modify the Value for URL as follows:
– (For Oracle SID) URL = jdbc:oracle:thin:@<db_host>:<db_port>:<SID>
– (For Oracle Service Name) URL = jdbc:oracle:thin:@//<db_host>:<db_port>/<Service_Name>
where <db_host> is the hostname of the database server, <db_port> is the port number used by the database server, <SID> is the Oracle SID, and <Service_Name> is the Oracle Service Name.
c. Click OK.
d. Click Save directly to the master configuration.
Step 19 If your database is SQL Server:
a. Click New to add a new property.
b. Enter the following values on the screen.
– Name = serverName
– Value = <db_host>
– Type = java.lang.String
c. Click OK.
d. Click New to add a 2nd property.
e. Enter the following values on the screen:
– Name = portNumber
– Value = <db_port>
– Type = java.lang.String
f. Click OK.
g. Click New to add a 3rd property.
h. Enter the following values on the screen.
– Name = databaseName
– Value = <db_name>
– Type = java.lang.String
i. Click OK.
j. Click New to add a 4th property.
1-44Cisco Prime Service Catalog 10.0 R2 Installation Guide
OL-31474-01
Chapter 1 Installation and Configuration GuidePreinstallation Configuration for WebSphere
k. Enter the following values on the screen.
– Name = selectMethod
– Value = direct
– Type = java.lang.String
l. Click OK.
m. Click New to add a 5th property.
n. Enter the following values on the screen.
– Name = webSphereDefaultIsolationLevel
– Value = 2
– Type = java.lang.String
o. Click OK.
p. Click Save directly to the master configuration.
Starting WebSphere ServerYou need to restart the WebSphere Server for it to pick up all of the configurations that you have done in the previous sections.
Note If you have a WebSphere Cluster environment, then you need to restart the Cluster as well as the “Service Link WebSphere Server.”
After the WebSphere Server is restarted, verify that the Bus is running:
Step 1 Log on to the WebSphere Administration Console.
Step 2 Choose Service integration > Buses.
Step 3 Click nsbus to open its Configuration panel.
Step 4 Under the Topology section, click the Messaging engines link.
Step 5 Verify that the messaging engine has the status of “Started” (that is, a green arrow as shown in the screen shot below).
1-45Cisco Prime Service Catalog 10.0 R2 Installation Guide
OL-31474-01
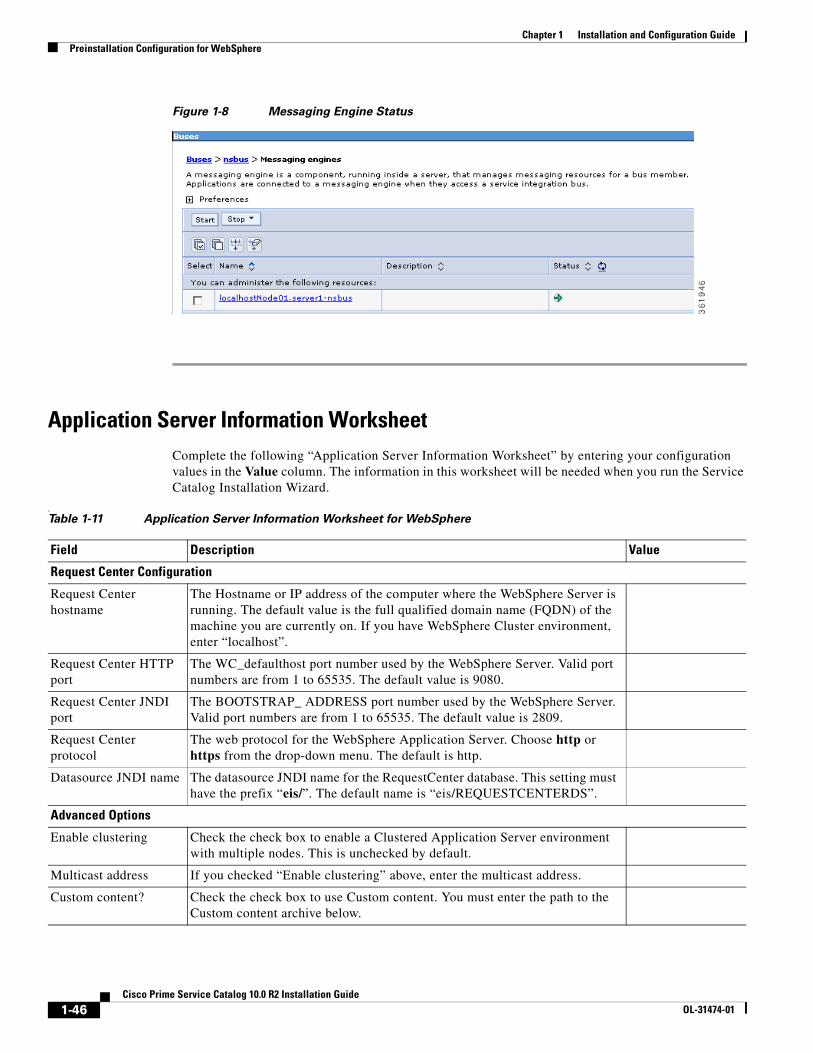
Chapter 1 Installation and Configuration Guide Preinstallation Configuration for WebSphere
Figure 1-8 Messaging Engine Status
Application Server Information WorksheetComplete the following “Application Server Information Worksheet” by entering your configuration values in the Value column. The information in this worksheet will be needed when you run the Service Catalog Installation Wizard.
.Table 1-11 Application Server Information Worksheet for WebSphere
Field Description Value
Request Center Configuration
Request Center hostname
The Hostname or IP address of the computer where the WebSphere Server is running. The default value is the full qualified domain name (FQDN) of the machine you are currently on. If you have WebSphere Cluster environment, enter “localhost”.
Request Center HTTP port
The WC_defaulthost port number used by the WebSphere Server. Valid port numbers are from 1 to 65535. The default value is 9080.
Request Center JNDI port
The BOOTSTRAP_ ADDRESS port number used by the WebSphere Server. Valid port numbers are from 1 to 65535. The default value is 2809.
Request Center protocol
The web protocol for the WebSphere Application Server. Choose http or https from the drop-down menu. The default is http.
Datasource JNDI name The datasource JNDI name for the RequestCenter database. This setting must have the prefix “eis/”. The default name is “eis/REQUESTCENTERDS”.
Advanced Options
Enable clustering Check the check box to enable a Clustered Application Server environment with multiple nodes. This is unchecked by default.
Multicast address If you checked “Enable clustering” above, enter the multicast address.
Custom content? Check the check box to use Custom content. You must enter the path to the Custom content archive below.
1-46Cisco Prime Service Catalog 10.0 R2 Installation Guide
OL-31474-01
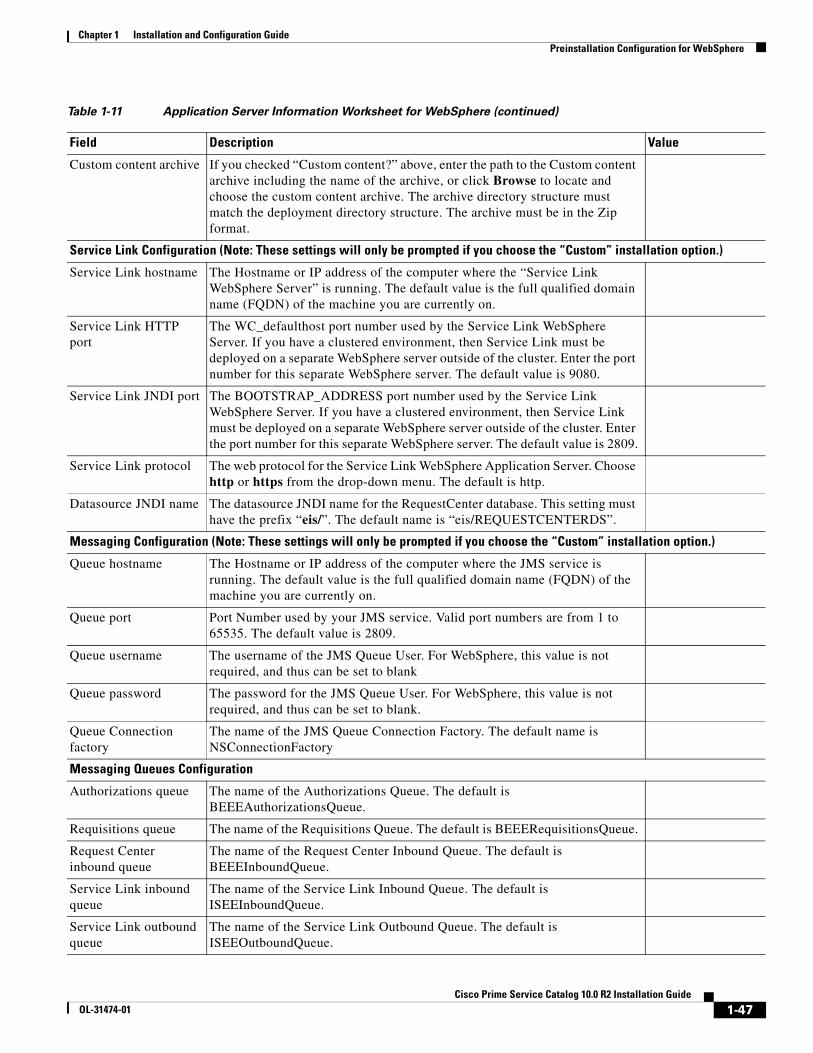
Chapter 1 Installation and Configuration GuidePreinstallation Configuration for WebSphere
Custom content archive If you checked “Custom content?” above, enter the path to the Custom content archive including the name of the archive, or click Browse to locate and choose the custom content archive. The archive directory structure must match the deployment directory structure. The archive must be in the Zip format.
Service Link Configuration (Note: These settings will only be prompted if you choose the “Custom” installation option.)
Service Link hostname The Hostname or IP address of the computer where the “Service Link WebSphere Server” is running. The default value is the full qualified domain name (FQDN) of the machine you are currently on.
Service Link HTTP port
The WC_defaulthost port number used by the Service Link WebSphere Server. If you have a clustered environment, then Service Link must be deployed on a separate WebSphere server outside of the cluster. Enter the port number for this separate WebSphere server. The default value is 9080.
Service Link JNDI port The BOOTSTRAP_ADDRESS port number used by the Service Link WebSphere Server. If you have a clustered environment, then Service Link must be deployed on a separate WebSphere server outside of the cluster. Enter the port number for this separate WebSphere server. The default value is 2809.
Service Link protocol The web protocol for the Service Link WebSphere Application Server. Choose http or https from the drop-down menu. The default is http.
Datasource JNDI name The datasource JNDI name for the RequestCenter database. This setting must have the prefix “eis/”. The default name is “eis/REQUESTCENTERDS”.
Messaging Configuration (Note: These settings will only be prompted if you choose the “Custom” installation option.)
Queue hostname The Hostname or IP address of the computer where the JMS service is running. The default value is the full qualified domain name (FQDN) of the machine you are currently on.
Queue port Port Number used by your JMS service. Valid port numbers are from 1 to 65535. The default value is 2809.
Queue username The username of the JMS Queue User. For WebSphere, this value is not required, and thus can be set to blank
Queue password The password for the JMS Queue User. For WebSphere, this value is not required, and thus can be set to blank.
Queue Connection factory
The name of the JMS Queue Connection Factory. The default name is NSConnectionFactory
Messaging Queues Configuration
Authorizations queue The name of the Authorizations Queue. The default is BEEEAuthorizationsQueue.
Requisitions queue The name of the Requisitions Queue. The default is BEEERequisitionsQueue.
Request Center inbound queue
The name of the Request Center Inbound Queue. The default is BEEEInboundQueue.
Service Link inbound queue
The name of the Service Link Inbound Queue. The default is ISEEInboundQueue.
Service Link outbound queue
The name of the Service Link Outbound Queue. The default is ISEEOutboundQueue.
Table 1-11 Application Server Information Worksheet for WebSphere (continued)
Field Description Value
1-47Cisco Prime Service Catalog 10.0 R2 Installation Guide
OL-31474-01
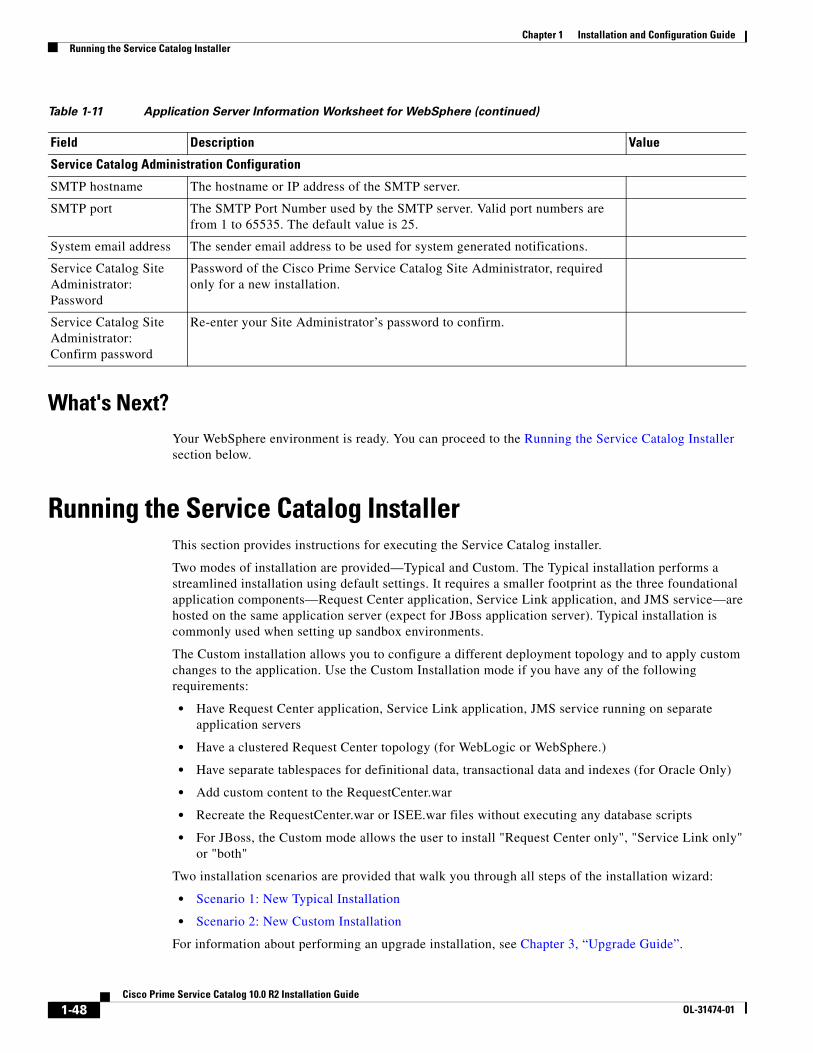
Chapter 1 Installation and Configuration Guide Running the Service Catalog Installer
What's Next?Your WebSphere environment is ready. You can proceed to the Running the Service Catalog Installer section below.
Running the Service Catalog InstallerThis section provides instructions for executing the Service Catalog installer.
Two modes of installation are provided—Typical and Custom. The Typical installation performs a streamlined installation using default settings. It requires a smaller footprint as the three foundational application components—Request Center application, Service Link application, and JMS service—are hosted on the same application server (expect for JBoss application server). Typical installation is commonly used when setting up sandbox environments.
The Custom installation allows you to configure a different deployment topology and to apply custom changes to the application. Use the Custom Installation mode if you have any of the following requirements:
• Have Request Center application, Service Link application, JMS service running on separate application servers
• Have a clustered Request Center topology (for WebLogic or WebSphere.)
• Have separate tablespaces for definitional data, transactional data and indexes (for Oracle Only)
• Add custom content to the RequestCenter.war
• Recreate the RequestCenter.war or ISEE.war files without executing any database scripts
• For JBoss, the Custom mode allows the user to install "Request Center only", "Service Link only" or "both"
Two installation scenarios are provided that walk you through all steps of the installation wizard:
• Scenario 1: New Typical Installation
• Scenario 2: New Custom Installation
For information about performing an upgrade installation, see Chapter 3, “Upgrade Guide”.
Service Catalog Administration Configuration
SMTP hostname The hostname or IP address of the SMTP server.
SMTP port The SMTP Port Number used by the SMTP server. Valid port numbers are from 1 to 65535. The default value is 25.
System email address The sender email address to be used for system generated notifications.
Service Catalog Site Administrator: Password
Password of the Cisco Prime Service Catalog Site Administrator, required only for a new installation.
Service Catalog Site Administrator: Confirm password
Re-enter your Site Administrator’s password to confirm.
Table 1-11 Application Server Information Worksheet for WebSphere (continued)
Field Description Value
1-48Cisco Prime Service Catalog 10.0 R2 Installation Guide
OL-31474-01
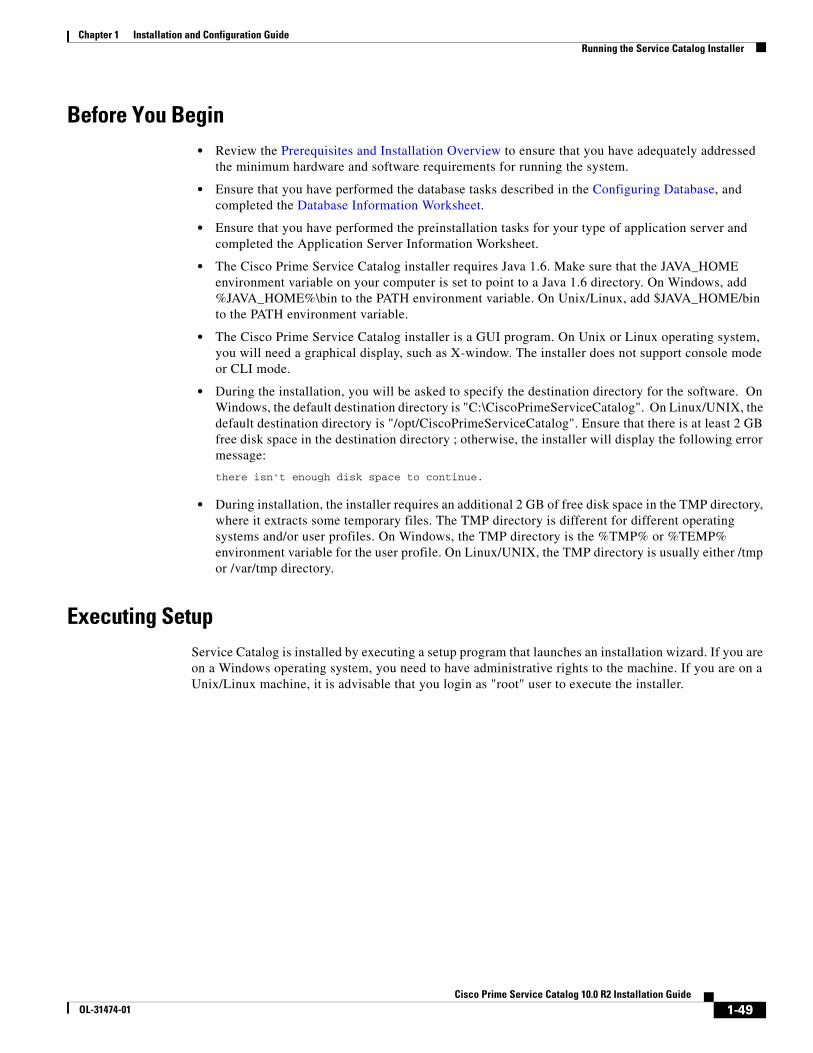
Chapter 1 Installation and Configuration GuideRunning the Service Catalog Installer
Before You Begin • Review the Prerequisites and Installation Overview to ensure that you have adequately addressed
the minimum hardware and software requirements for running the system.
• Ensure that you have performed the database tasks described in the Configuring Database, and completed the Database Information Worksheet.
• Ensure that you have performed the preinstallation tasks for your type of application server and completed the Application Server Information Worksheet.
• The Cisco Prime Service Catalog installer requires Java 1.6. Make sure that the JAVA_HOME environment variable on your computer is set to point to a Java 1.6 directory. On Windows, add %JAVA_HOME%\bin to the PATH environment variable. On Unix/Linux, add $JAVA_HOME/bin to the PATH environment variable.
• The Cisco Prime Service Catalog installer is a GUI program. On Unix or Linux operating system, you will need a graphical display, such as X-window. The installer does not support console mode or CLI mode.
• During the installation, you will be asked to specify the destination directory for the software. On Windows, the default destination directory is "C:\CiscoPrimeServiceCatalog". On Linux/UNIX, the default destination directory is "/opt/CiscoPrimeServiceCatalog". Ensure that there is at least 2 GB free disk space in the destination directory ; otherwise, the installer will display the following error message:
there isn't enough disk space to continue.
• During installation, the installer requires an additional 2 GB of free disk space in the TMP directory, where it extracts some temporary files. The TMP directory is different for different operating systems and/or user profiles. On Windows, the TMP directory is the %TMP% or %TEMP% environment variable for the user profile. On Linux/UNIX, the TMP directory is usually either /tmp or /var/tmp directory.
Executing SetupService Catalog is installed by executing a setup program that launches an installation wizard. If you are on a Windows operating system, you need to have administrative rights to the machine. If you are on a Unix/Linux machine, it is advisable that you login as "root" user to execute the installer.
1-49Cisco Prime Service Catalog 10.0 R2 Installation Guide
OL-31474-01
Chapter 1 Installation and Configuration Guide Running the Service Catalog Installer
To execute the setup program:
Step 1 Extract the electronic software distribution file that you downloaded from the Cisco web site to your computer, if you have not already done so.
Step 2 On a Windows operating system, double-click setup.cmd to launch the GUI installation wizard. For a UNIX or Linux operating system, run ./setup.sh from a graphical interface, such as X-window.
A progress bar appears, as shown in Figure 1-9 below.
Figure 1-9 Setup Progress Bar
When complete, the introduction panel appears.
How to Use the Installation WizardThe installation wizard guides you through the installation of Cisco Prime Service Catalog by presenting panels of fields to be configured. As each panel is completed, click Next to advance to the next panel, or Previous to return to a previous panel. At the end of the wizard, click Install to begin the installation. At any time, you may click Cancel to exit the installation wizard without installing Service Catalog.
Some panels may have the Restore Default button. If this button is clicked, the input values on the current panel will be restored back to the factory-default values. If the Custom installation mode is selected, some panels might have the Advanced Options button. Click this button to see more advanced settings for the database or the application server.
The installation configuration options are case-sensitive, so ensure that you enter a value, such as a database name or a JMS queue name, with case sensitivity; otherwise, your installation may fail.
Scenario 1: New Typical InstallationIn this scenario, a new database schema is created for a new Service Catalog installation. A “Typical” installation type is chosen in the installation wizard when you want to perform a streamlined installation using default settings.
Step 1 If you are on a Windows operating system, stop the IIS web server.
Step 2 Launch the installation wizard (see the Executing Setup).
Step 3 On the Introduction panel, click Next to begin.
1-50Cisco Prime Service Catalog 10.0 R2 Installation Guide
OL-31474-01
Chapter 1 Installation and Configuration GuideRunning the Service Catalog Installer
Step 4 In the Choose Install Folder panel, enter a destination folder for the installation and click Next.
• For a Windows environment, C:\CiscoPrimeServiceCatalog is entered as the default destination folder.
• For Linux/Unix, the default destination folder is “/opt/CiscoPrimeServiceCatalog". Enter a different destination folder, or click Choose to locate and select a folder (or create a new one). The destination folder field cannot be blank, and must not contain any space character.
Note Do not enter the installation folder of your WebLogic or WebSphere root directory. We recommend that you create the destination folder outside of your application server directory.
Throughout this document, this destination folder is referred to as <ServiceCatalog_Install_Dir>.
For WebLogic or WebSphere, this directory is where the Service Catalog installer creates the generated WAR files for the Service Catalog application. For JBoss, this directory is also where the Service Catalog installer installs and configures the JBoss Application Server software.
Step 5 On the Installation Type panel, select Typical radio button and click Next.
Step 6 On the Application Server Selection panel, select the application server and click Next. The subsequent panels may look different depending on which application server you select at this point. Refer to the Application Server Information Worksheet that you filled out earlier.
Step 7 On the Database Selection panel, select a database platform (Microsoft SQL Server or Oracle) and click Next. The subsequent panels may look different depending on which database platform you select at this point. Refer to the Database Information Worksheet that you filled out earlier to determine your database platform.
Step 8 On the Request Center Database Creation panel:
• If you have not created the database in advance, select Yes. By selecting Yes, you are telling the installer to create the database automatically for you. In the next panel, you will be prompted for the information that the installer will use to create the database user and database schema for RequestCenter. Refer to the Database Information Worksheet for the description of each field on this panel.
• If you have already created your database, then select No. In the next panel, you will be prompted for the information of the existing database user and database schema. Refer to the Database Information Worksheet for the description of each field on this panel. (If you are performing an upgrade installation, you must select No. Refer to Chapter 3: Upgrade Guide for more detailed information).
Step 9 On the Request Center Database panel, enter the information for the RequestCenter database.
• If you selected Yes in the last panel, you will see a "Create Database" button on this panel, and the Next button is grayed out. Notice that you need to enter the password for either the "sys" user (for Oracle) or the "sa" user (for SQL Server) which the installer will use to connect to your database server. Once you fill out the information on this panel, click the "Create Database" button. If you get the message "Request Center database created successfully", click OK to close the message. The Next button is now enabled.
• If you selected No in the last panel, you just need to fill out the information for the existing RequestCenter database, and select the "Execute database scripts" check box.
1-51Cisco Prime Service Catalog 10.0 R2 Installation Guide
OL-31474-01
Chapter 1 Installation and Configuration Guide Running the Service Catalog Installer
Note The "Create Database" feature creates a very basic RequestCenter database that meets the minimum requirements for the Service Catalog application to operate. This feature is recommended for a Demo or Test system. For a Production system, contact your DBA in advance, to create the RequestCenter database which meets all of the product requirements as described in the Configuring Databases section, as well as any performance, reliability, and security requirements that adhere to your corporate policy.
Step 10 Click Next to continue. The installer connects to the database to validate the required settings for the database. If the installer created the database for you, then it would meet all of the required settings, and the validation test would pass. If you provided the information for an existing database, then the installer may report a validation error if any database setting is missing. (Refer to the Supported Software section in this chapter for the database requirements.) If a database validation error occurs, you can do the following:
• Close the error dialog and click Cancel to exit the installation wizard, or
• Fix the missing database setting on a separate database connection session. Then come back to this screen, close the error dialog, and click Next again. At this point, the installer will repeat the validation test, and if the test passes, it will let you move to the next panel.
Step 11 If you selected JBoss as the application server, the installation procedure is as follows:
a. The Choose Java Virtual Machine panel is displayed. This panel displays all the available java executable programs on the computer. Select a Java version 1.6.0_x from the list or click the Search Another Location button to navigate to the correct location of Java 1.6.0_x on your computer and click Next.
Note You must specify the location of Java for JBoss because the installer will install the JBoss Application Server software on your computer, and it will set the JAVA_HOME variable in the JBoss configuration to use this particular Java.
b. On the Request Center Configuration panel, enter the information for the JBoss server where the Request Center application (i.e. RequestCenter.war) will be deployed. Refer to the Request Center Configuration Table for JBoss for the description of each field on this panel. Click Next.
c. On the Service Link Configuration panel, enter the information for the JBoss server where Service Link application (i.e. ISEE.war) will be deployed. Refer to the Service Link Configuration Table for JBoss for the description of each field on this panel. Click Next.
Note For WebSphere or WebLogic, you will not see this panel. This is because for a Typical installation mode for WebSphere or WebLogic, the Request Center application (i.e. RequestCenter.war) and Service Link application (i.e. ISEE.war) will be deployed together in the same WebSphere or WebLogic server. Thus, there is no need for the installer to prompt for the information of the Service Link server. However, for a Typical installation mode for JBoss, the installer will always create two separate JBoss servers, one for Request Center application and one for Service Link application, even though both JBoss servers are running on the same machine.
d. On the Messaging Configuration panel, enter the information for the JMS Queue connection Factory, user name and password. Refer to the Messaging Configuration Table for the description of each field on this panel. Click Next
1-52Cisco Prime Service Catalog 10.0 R2 Installation Guide
OL-31474-01
Chapter 1 Installation and Configuration GuideRunning the Service Catalog Installer
e. On the Service Catalog Administration Configuration panel, enter the information for the SMTP server, and the password for the Site Administrator. Refer to the Service Catalog Administration Configuration Table for the description of each field on this panel. Click Next.
Step 12 If you selected Weblogic or Websphere as the application server, the installation procedure is as follows:
a. In the Request Center Configuration panel, enter the information for the WebSphere or WebLogic server where Request Center application (i.e. RequestCenter.war) will be deployed. Refer to the Application Server Information Worksheet that you have filled out earlier. For more information, see Request Center Configuration for WebLogic and WebSphere.
b. Click Next to display the Messaging Configuration panel. Enter the information for the JMS Queue Connection Factory. Refer to the Application Server Information Worksheet that you filled out earlier. For more information, see Messaging Configuration Table.
c. Click Next to display the Messaging Queues Configuration panel. Enter the queue names as how you prepared them for your WebSphere or WebLogic server. Refer to the Application Server Information Worksheet that you filled out earlier.
Note For JBoss, you will not see this panel. This is because for JBoss, all the queue names are preset when the installer installs the JBoss AS software on your computer. You do not have the option to overwrite these queue names.
d. Click Next to display the Service Catalog Administration panel. Enter details as provided in Service Catalog Administration Configuration Table.
e. Click Next.
Step 13 Click Install in the Pre-Installation Summary panel to begin installation.
The installer will display the progress bar. It may take up to 30 minutes for the installer to complete. Do not interrupt or abort the installer during this process.
Step 14 If the installation process completes successfully, the Install Complete panel appears. Click Done to exit the installation wizard.
What’s NextYou have completed the execution of the Service Catalog installer. You can now skip to the Postinstallation Configuration section for the appropriate application server below.
Scenario 2: New Custom InstallationIn this scenario, a "Custom" installation type is chosen in the installation wizard to customize aspects of the installation rather than accepting the defaults.
Step 1 If you are on a Windows operating system, stop the IIS web server.
Step 2 Launch the installation wizard (see the Executing Setup).
Step 3 On the first panel of the installation wizard , click Next to begin. The Choose Install Folder panel of the installation wizard appears.
1-53Cisco Prime Service Catalog 10.0 R2 Installation Guide
OL-31474-01
Chapter 1 Installation and Configuration Guide Running the Service Catalog Installer
Step 4 Choose a destination folder for the installation and click Next.
• For a Windows environment, C:\CiscoPrimeServiceCatalog is entered as the default destination folder.
• For Linux/Unix, the default destination folder is “/opt/CiscoPrimeServiceCatalog". Enter a different destination folder, or click Choose to select a folder (or create a new one). The destination folder field cannot be blank.
Note Do not enter the installation folder of your application server. We recommend that you create the destination folder outside the application server directory. The path name for the destination folder must not contain any spaces.
Throughout this document, this destination folder is referred to as <ServiceCatalog_Install_Dir>. For WebLogic or WebSphere, this directory is where the Service Catalog installer creates the generated WAR files for the Service Catalog application. For JBoss, this directory is also where the Service Catalog installer installs and configures the JBoss Application Server software.
Step 5 Select the Custom radio button on the Installation Type panel and click Next.
The Application Server Selection panel appears.
Step 6 On the Application Server Selection panel, select one of the Application server radio buttons and click Next.
• If you select JBoss, continue with Component Selection panel in Step 7
• If you select WebSphere or WebLogic, skip Step 7
Step 7 Select a component in the Component Selection panel and click Next.
The Custom installation mode for JBoss allows you to install
• only the Request Center server,
• only the Service Link server, or
• both Request Center and Service Link servers on the same computer.
Step 8 Choose the database platform (Microsoft SQL Server or Oracle) you want, on the Database Selection panel and click Next.
The subsequent panels may look different depending on the database platform you select. Refer to the Database Information Worksheet to determine your database platform.
Step 9 On the Request Center Database Creation panel:
• If you have not created the database in advance, select Yes. By selecting Yes, you are telling the installer to create the database automatically for you. In the next panel, you will be prompted for the information that the installer will use to create the database user and database schema for RequestCenter. Refer to the Database Information Worksheet for the description of each field on this pane.
• If you have already created your database, then select No. In the next panel, you will be prompted for the information of the existing database user and database schema. Refer to the Database Information Worksheet for the description of each field on this panel. (If you are performing an upgrade installation, you must select No. Refer to Chapter 3: Upgrade Guide for more detailed information.)
1-54Cisco Prime Service Catalog 10.0 R2 Installation Guide
OL-31474-01
Chapter 1 Installation and Configuration GuideRunning the Service Catalog Installer
Step 10 On the Request Center Database panel, enter the information for the RequestCenter database.
• If you selected Yes in the last panel, you will see a "Create Database" button on this panel, and the Next button is grayed out. Notice that you need to enter the password for either the "sys" user (for Oracle) or the "sa" user (for SQL Server) which the installer will use to connect to your database server. Once you fill out the information on this panel, click the "Create Database" button. If you get the message "Request Center database created successfully", click OK to close the message. The Next button is now enabled.
• If you selected No in the last panel, you just need to fill out the information for the existing RequestCenter database, and select the "Execute database scripts" check box.
Note The "Create Database" feature will create a very basic RequestCenter database that meets the minimum requirements for the Service Catalog application to operate. This feature is recommended for a Demo or Test system, but for a Production system, it is advisable that you work with your DBA to create the RequestCenter database in advance which meets all of the product requirements as described in the Configuring Databases section, as well as any performance, reliability, and security requirements that adhere to your corporate policy.
Step 11 Click Next.
The installer will connect to the database to validate the required settings for the database. If the installer created the database for you, then it would meet all of the required settings, and the validation test would pass. If you provided the information for an existing database, then the installer may report a validation error if it detects that certain required database setting is missing. (Refer to the Configuring Databases page section in this Chapter for the database requirements.) If a database validation error occurs, you can do the following:
• Close the error dialog and click Cancel to exit the installation wizard, or
• Fix the missing database setting on a separate database connection session. Then come back to this screen, close the error dialog, and click Next again. At this point, the installer will repeat the validation test, and if the test passes, it will let you move to the next panel.
Step 12 If you selected JBoss as the application server the, installation procedure is as follows:
a. The Choose Java Virtual Machine window is displayed. This window contains all of the java executable program that it detects on the computer. Select a Java version 1.6.0_x from the list or click Search Another Location button to navigate to the correct location of Java 1.6.0_x on your computer and Click Next.
Note You must specify the location of Java for JBoss because the installer will install the JBoss Application Server software on your computer, and it will set the JAVA_HOME variable in the JBoss configuration to use this particular Java.
b. On the Request Center Configuration panel:
– Enter the information for the JBoss server where the Request Center application (i.e. RequestCenter.war) will be deployed. Refer to the Request Center Configuration Table for JBoss for the description of each field on this panel.
– Click the Advanced Options button. Enter the information on the Advanced Options window, see Advanced Options Table for Request Center Configuration panel for reference and click Close.
– Click the Change Ports button if you want to change any of the default port numbers assigned to the JBoss server for Request Center and click Close.
1-55Cisco Prime Service Catalog 10.0 R2 Installation Guide
OL-31474-01
Chapter 1 Installation and Configuration Guide Running the Service Catalog Installer
c. Click Next to display the Service Link Configuration panel.
– Enter the information for the JBoss server where Service Link application (i.e. ISEE.war) will be deployed. Refer to the Service Link Configuration Table for JBoss for the description of each field on this panel
– Click the Change Ports button if you want to change any of the default port numbers assigned to the JBoss server for Service Link and click Close.
– Click Next. The Messaging Configuration window is displayed.
d. Enter the information for the JMS Queue server and click Next. Refer to the Application Server Information Worksheet that you filled out earlier. For more information, see Messaging Configuration Table for Custom Installation.
e. On the Service Catalog Administration Configuration panel, enter the information for the SMTP server, and the password for the Site Administrator. Refer to the Service Catalog Administration Configuration Table for the description of each field on this panel. Click Next
Step 13 If you selected WebLogic or WebSphere as the application server, the installation procedure is as follows:
a. On Request Center Configuration panel:
– Enter the information for the WebSphere or WebLogic server where Request Center application (i.e. RequestCenter.war) will be deployed. Refer to the Application Server Information Worksheet that you have filled out earlier. For more information, see Request Center Configuration for WebLogic and WebSphere.
– Click the Advanced Options. To enter the advanced options details see, Advanced Options Table for Request Center Configuration panel.
– Click Close in the Advanced Options window and Click Next.
The Service Link Configuration window is displayed.
b. Enter the information for the WebSphere or WebLogic server where Service Link application (i.e. ISEE.war) will be deployed and Click Next. Refer to the Application Server Information Worksheet that you have filled out earlier. See Service Link Configuration Table for Custom Installation using WebLogic or WebSphere.
Note If Request Center is deployed in a Clustered WebSphere or Clustered WebLogic, then Service Link must be deployed in a separate WebSphere or WebLogic server that does not belong to the Cluster
c. In the Messaging Configuration window enter information for the JMS Queue Server and Click Next. Refer to the Application Server Information Worksheet that you filled out earlier. For more information, see Messaging Configuration Table for Custom Installation.
d. Click Next to display the Messaging Queues Configuration panel. Enter the queue names as how you prepared them for your WebSphere or WebLogic server. Refer to the Application Server Information Worksheet that you filled out earlier.
e. On the Service Catalog Administration Configuration panel, enter the information for the SMTP server, and the password for the Site Administrator. Refer to the Service Catalog Administration Configuration Table for the description of each field on this panel. Click Next
Step 14 Click Install in the Pre-Installation Summary panel to begin installation.
The installer will display the progress bar. It may take up to 30 minutes for the installer to complete. Do not interrupt or abort the installer during this process.
1-56Cisco Prime Service Catalog 10.0 R2 Installation Guide
OL-31474-01
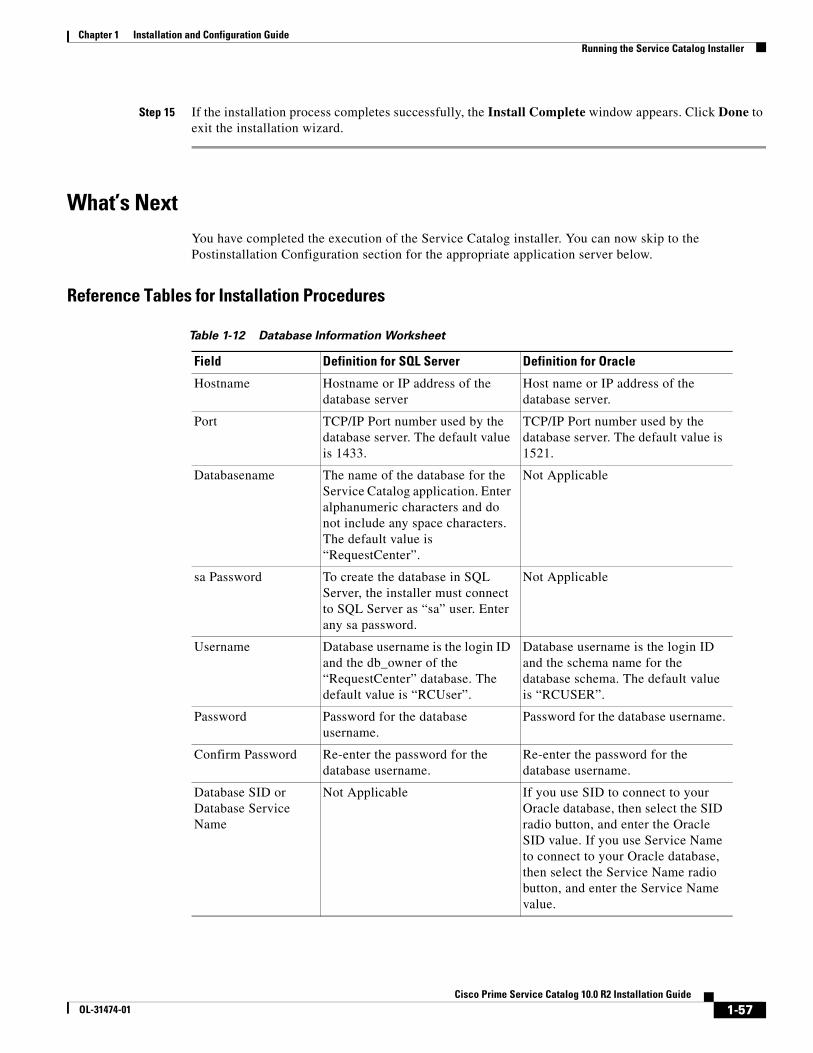
Chapter 1 Installation and Configuration GuideRunning the Service Catalog Installer
Step 15 If the installation process completes successfully, the Install Complete window appears. Click Done to exit the installation wizard.
What’s NextYou have completed the execution of the Service Catalog installer. You can now skip to the Postinstallation Configuration section for the appropriate application server below.
Reference Tables for Installation Procedures
Table 1-12 Database Information Worksheet
Field Definition for SQL Server Definition for Oracle
Hostname Hostname or IP address of the database server
Host name or IP address of the database server.
Port TCP/IP Port number used by the database server. The default value is 1433.
TCP/IP Port number used by the database server. The default value is 1521.
Databasename The name of the database for the Service Catalog application. Enter alphanumeric characters and do not include any space characters. The default value is “RequestCenter”.
Not Applicable
sa Password To create the database in SQL Server, the installer must connect to SQL Server as “sa” user. Enter any sa password.
Not Applicable
Username Database username is the login ID and the db_owner of the “RequestCenter” database. The default value is “RCUser”.
Database username is the login ID and the schema name for the database schema. The default value is “RCUSER”.
Password Password for the database username.
Password for the database username.
Confirm Password Re-enter the password for the database username.
Re-enter the password for the database username.
Database SID or Database Service Name
Not Applicable If you use SID to connect to your Oracle database, then select the SID radio button, and enter the Oracle SID value. If you use Service Name to connect to your Oracle database, then select the Service Name radio button, and enter the Service Name value.
1-57Cisco Prime Service Catalog 10.0 R2 Installation Guide
OL-31474-01
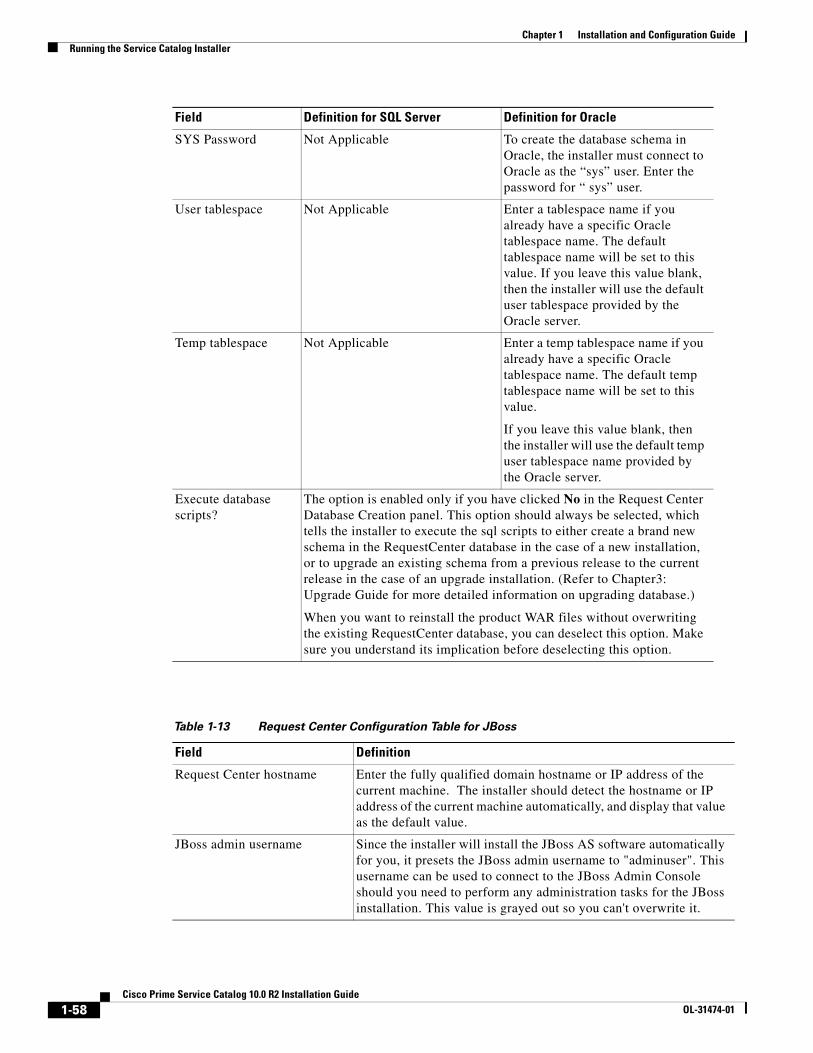
Chapter 1 Installation and Configuration Guide Running the Service Catalog Installer
Table 1-13 Request Center Configuration Table for JBoss
SYS Password Not Applicable To create the database schema in Oracle, the installer must connect to Oracle as the “sys” user. Enter the password for “ sys” user.
User tablespace Not Applicable Enter a tablespace name if you already have a specific Oracle tablespace name. The default tablespace name will be set to this value. If you leave this value blank, then the installer will use the default user tablespace provided by the Oracle server.
Temp tablespace Not Applicable Enter a temp tablespace name if you already have a specific Oracle tablespace name. The default temp tablespace name will be set to this value.
If you leave this value blank, then the installer will use the default temp user tablespace name provided by the Oracle server.
Execute database scripts?
The option is enabled only if you have clicked No in the Request Center Database Creation panel. This option should always be selected, which tells the installer to execute the sql scripts to either create a brand new schema in the RequestCenter database in the case of a new installation, or to upgrade an existing schema from a previous release to the current release in the case of an upgrade installation. (Refer to Chapter3: Upgrade Guide for more detailed information on upgrading database.)
When you want to reinstall the product WAR files without overwriting the existing RequestCenter database, you can deselect this option. Make sure you understand its implication before deselecting this option.
Field Definition for SQL Server Definition for Oracle
Field Definition
Request Center hostname Enter the fully qualified domain hostname or IP address of the current machine. The installer should detect the hostname or IP address of the current machine automatically, and display that value as the default value.
JBoss admin username Since the installer will install the JBoss AS software automatically for you, it presets the JBoss admin username to "adminuser". This username can be used to connect to the JBoss Admin Console should you need to perform any administration tasks for the JBoss installation. This value is grayed out so you can't overwrite it.
1-58Cisco Prime Service Catalog 10.0 R2 Installation Guide
OL-31474-01
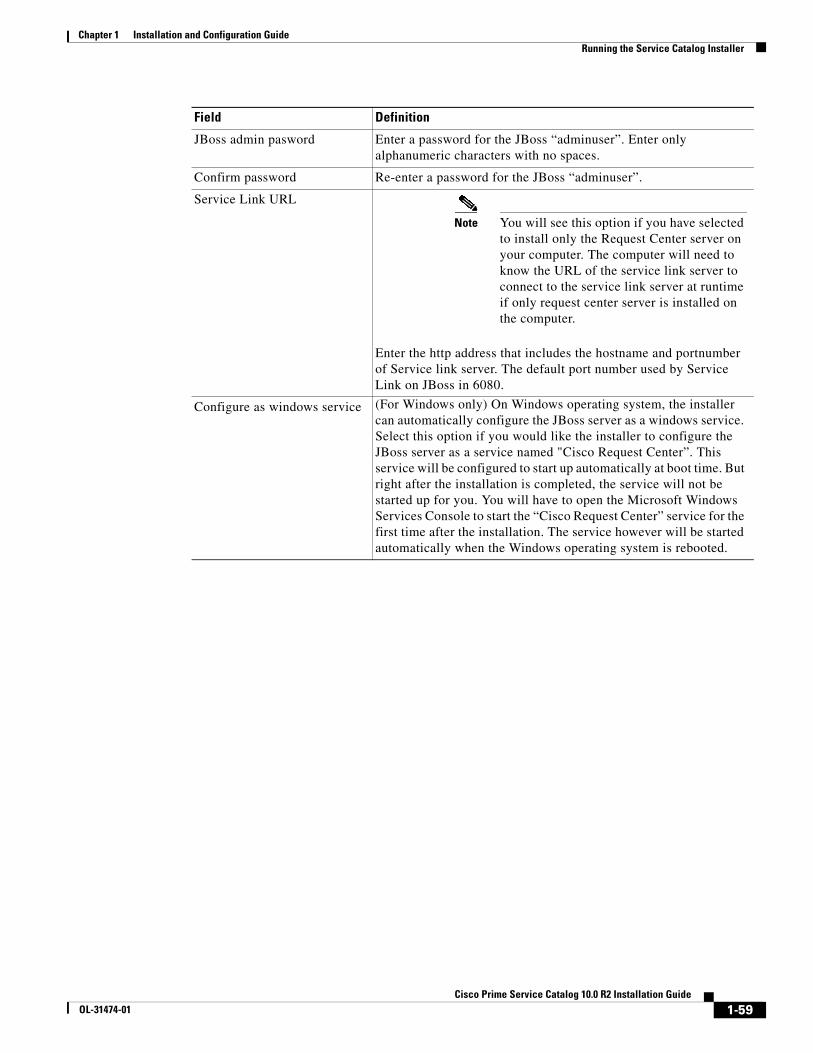
Chapter 1 Installation and Configuration GuideRunning the Service Catalog Installer
JBoss admin pasword Enter a password for the JBoss “adminuser”. Enter only alphanumeric characters with no spaces.
Confirm password Re-enter a password for the JBoss “adminuser”.
Service Link URL
Note You will see this option if you have selected to install only the Request Center server on your computer. The computer will need to know the URL of the service link server to connect to the service link server at runtime if only request center server is installed on the computer.
Enter the http address that includes the hostname and portnumber of Service link server. The default port number used by Service Link on JBoss in 6080.
Configure as windows service (For Windows only) On Windows operating system, the installer can automatically configure the JBoss server as a windows service. Select this option if you would like the installer to configure the JBoss server as a service named "Cisco Request Center”. This service will be configured to start up automatically at boot time. But right after the installation is completed, the service will not be started up for you. You will have to open the Microsoft Windows Services Console to start the “Cisco Request Center” service for the first time after the installation. The service however will be started automatically when the Windows operating system is rebooted.
Field Definition
1-59Cisco Prime Service Catalog 10.0 R2 Installation Guide
OL-31474-01
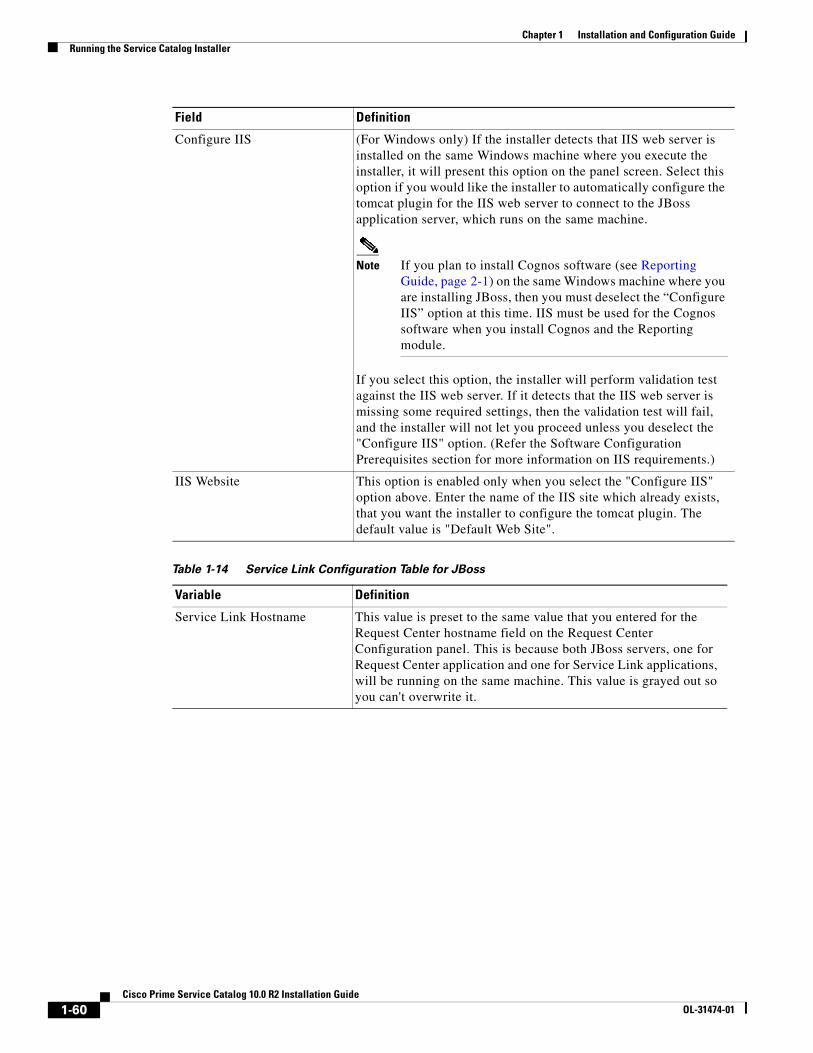
Chapter 1 Installation and Configuration Guide Running the Service Catalog Installer
Table 1-14 Service Link Configuration Table for JBoss
Configure IIS (For Windows only) If the installer detects that IIS web server is installed on the same Windows machine where you execute the installer, it will present this option on the panel screen. Select this option if you would like the installer to automatically configure the tomcat plugin for the IIS web server to connect to the JBoss application server, which runs on the same machine.
Note If you plan to install Cognos software (see Reporting Guide, page 2-1) on the same Windows machine where you are installing JBoss, then you must deselect the “Configure IIS” option at this time. IIS must be used for the Cognos software when you install Cognos and the Reporting module.
If you select this option, the installer will perform validation test against the IIS web server. If it detects that the IIS web server is missing some required settings, then the validation test will fail, and the installer will not let you proceed unless you deselect the "Configure IIS" option. (Refer the Software Configuration Prerequisites section for more information on IIS requirements.)
IIS Website This option is enabled only when you select the "Configure IIS" option above. Enter the name of the IIS site which already exists, that you want the installer to configure the tomcat plugin. The default value is "Default Web Site".
Variable Definition
Service Link Hostname This value is preset to the same value that you entered for the Request Center hostname field on the Request Center Configuration panel. This is because both JBoss servers, one for Request Center application and one for Service Link applications, will be running on the same machine. This value is grayed out so you can't overwrite it.
Field Definition
1-60Cisco Prime Service Catalog 10.0 R2 Installation Guide
OL-31474-01
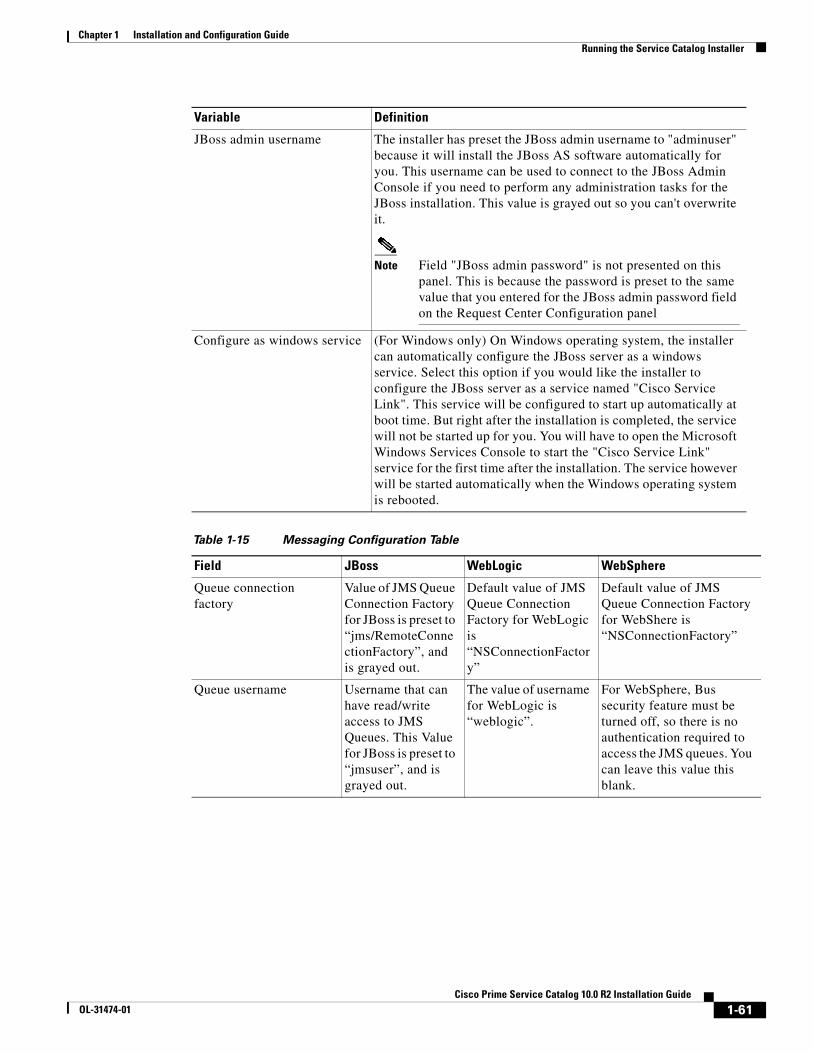
Chapter 1 Installation and Configuration GuideRunning the Service Catalog Installer
Table 1-15 Messaging Configuration Table
JBoss admin username The installer has preset the JBoss admin username to "adminuser" because it will install the JBoss AS software automatically for you. This username can be used to connect to the JBoss Admin Console if you need to perform any administration tasks for the JBoss installation. This value is grayed out so you can't overwrite it.
Note Field "JBoss admin password" is not presented on this panel. This is because the password is preset to the same value that you entered for the JBoss admin password field on the Request Center Configuration panel
Configure as windows service (For Windows only) On Windows operating system, the installer can automatically configure the JBoss server as a windows service. Select this option if you would like the installer to configure the JBoss server as a service named "Cisco Service Link". This service will be configured to start up automatically at boot time. But right after the installation is completed, the service will not be started up for you. You will have to open the Microsoft Windows Services Console to start the "Cisco Service Link" service for the first time after the installation. The service however will be started automatically when the Windows operating system is rebooted.
Field JBoss WebLogic WebSphere
Queue connection factory
Value of JMS Queue Connection Factory for JBoss is preset to “jms/RemoteConnectionFactory”, and is grayed out.
Default value of JMS Queue Connection Factory for WebLogic is “NSConnectionFactory”
Default value of JMS Queue Connection Factory for WebShere is “NSConnectionFactory”
Queue username Username that can have read/write access to JMS Queues. This Value for JBoss is preset to “jmsuser”, and is grayed out.
The value of username for WebLogic is “weblogic”.
For WebSphere, Bus security feature must be turned off, so there is no authentication required to access the JMS queues. You can leave this value this blank.
Variable Definition
1-61Cisco Prime Service Catalog 10.0 R2 Installation Guide
OL-31474-01
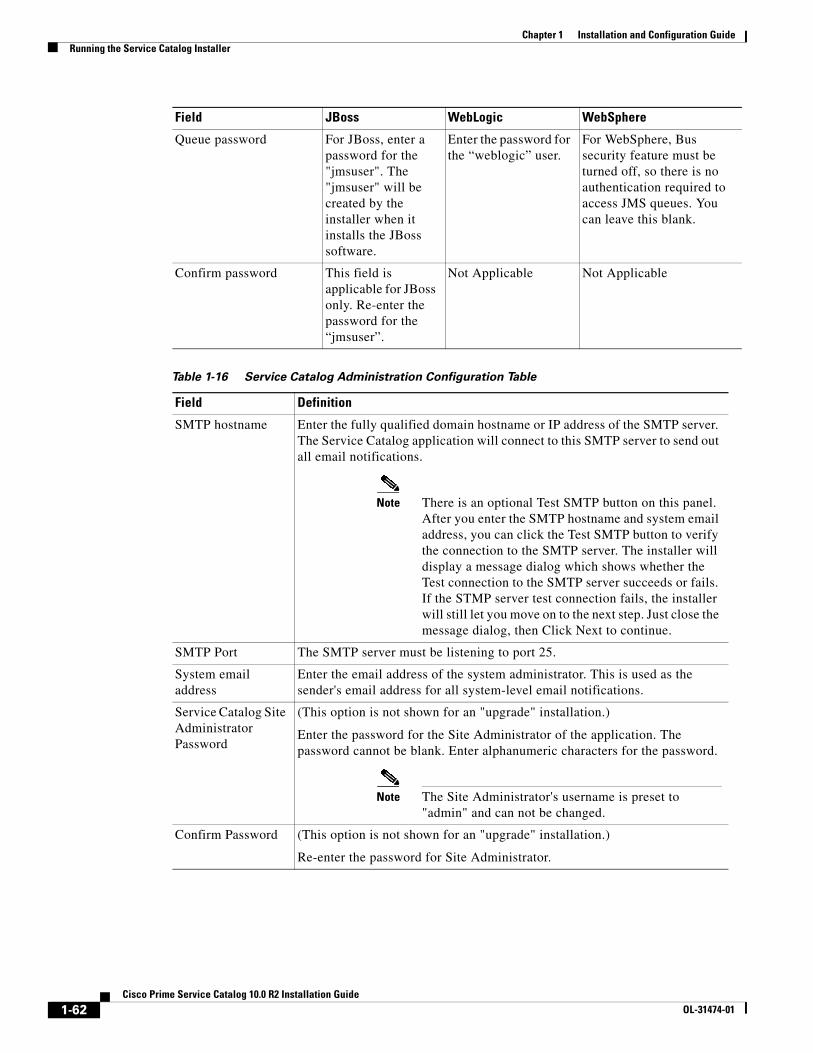
Chapter 1 Installation and Configuration Guide Running the Service Catalog Installer
Table 1-16 Service Catalog Administration Configuration Table
Queue password For JBoss, enter a password for the "jmsuser". The "jmsuser" will be created by the installer when it installs the JBoss software.
Enter the password for the “weblogic” user.
For WebSphere, Bus security feature must be turned off, so there is no authentication required to access JMS queues. You can leave this blank.
Confirm password This field is applicable for JBoss only. Re-enter the password for the “jmsuser”.
Not Applicable Not Applicable
Field Definition
SMTP hostname Enter the fully qualified domain hostname or IP address of the SMTP server. The Service Catalog application will connect to this SMTP server to send out all email notifications.
Note There is an optional Test SMTP button on this panel. After you enter the SMTP hostname and system email address, you can click the Test SMTP button to verify the connection to the SMTP server. The installer will display a message dialog which shows whether the Test connection to the SMTP server succeeds or fails. If the STMP server test connection fails, the installer will still let you move on to the next step. Just close the message dialog, then Click Next to continue.
SMTP Port The SMTP server must be listening to port 25.
System email address
Enter the email address of the system administrator. This is used as the sender's email address for all system-level email notifications.
Service Catalog Site Administrator Password
(This option is not shown for an "upgrade" installation.)
Enter the password for the Site Administrator of the application. The password cannot be blank. Enter alphanumeric characters for the password.
Note The Site Administrator's username is preset to "admin" and can not be changed.
Confirm Password (This option is not shown for an "upgrade" installation.)
Re-enter the password for Site Administrator.
Field JBoss WebLogic WebSphere
1-62Cisco Prime Service Catalog 10.0 R2 Installation Guide
OL-31474-01
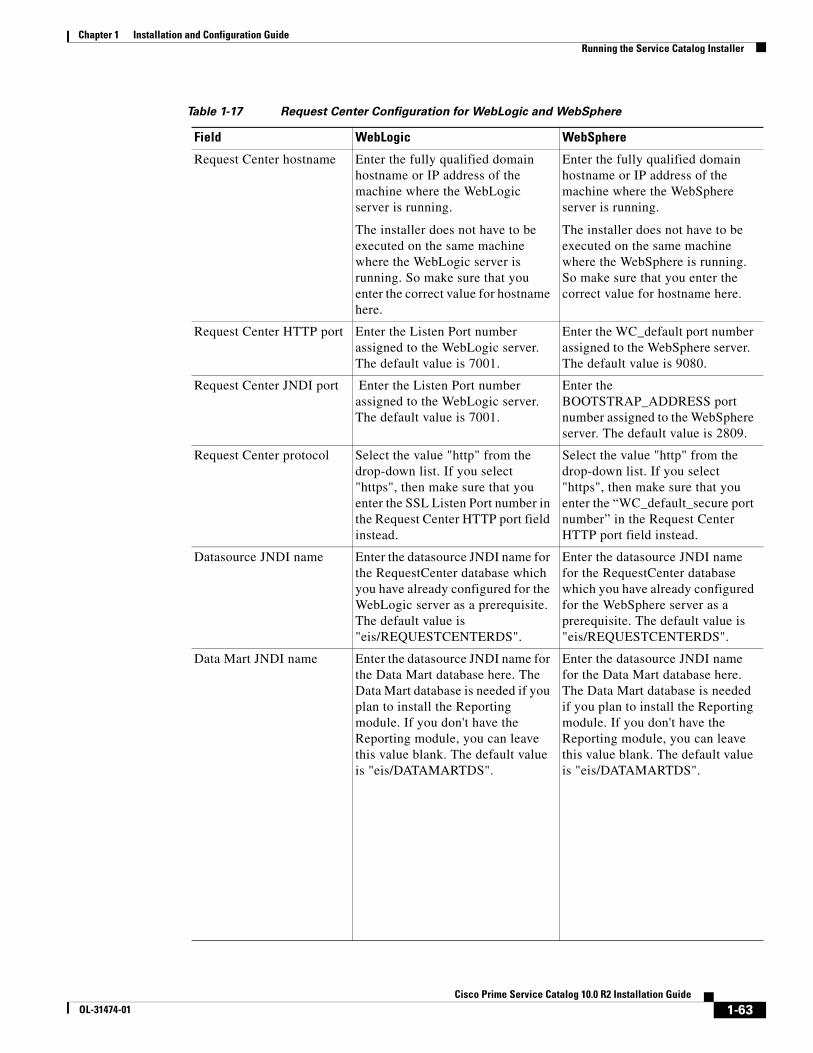
Chapter 1 Installation and Configuration GuideRunning the Service Catalog Installer
Table 1-17 Request Center Configuration for WebLogic and WebSphere
Field WebLogic WebSphere
Request Center hostname Enter the fully qualified domain hostname or IP address of the machine where the WebLogic server is running.
The installer does not have to be executed on the same machine where the WebLogic server is running. So make sure that you enter the correct value for hostname here.
Enter the fully qualified domain hostname or IP address of the machine where the WebSphere server is running.
The installer does not have to be executed on the same machine where the WebSphere is running. So make sure that you enter the correct value for hostname here.
Request Center HTTP port Enter the Listen Port number assigned to the WebLogic server. The default value is 7001.
Enter the WC_default port number assigned to the WebSphere server. The default value is 9080.
Request Center JNDI port Enter the Listen Port number assigned to the WebLogic server. The default value is 7001.
Enter the BOOTSTRAP_ADDRESS port number assigned to the WebSphere server. The default value is 2809.
Request Center protocol Select the value "http" from the drop-down list. If you select "https", then make sure that you enter the SSL Listen Port number in the Request Center HTTP port field instead.
Select the value "http" from the drop-down list. If you select "https", then make sure that you enter the “WC_default_secure port number” in the Request Center HTTP port field instead.
Datasource JNDI name Enter the datasource JNDI name for the RequestCenter database which you have already configured for the WebLogic server as a prerequisite. The default value is "eis/REQUESTCENTERDS".
Enter the datasource JNDI name for the RequestCenter database which you have already configured for the WebSphere server as a prerequisite. The default value is "eis/REQUESTCENTERDS".
Data Mart JNDI name Enter the datasource JNDI name for the Data Mart database here. The Data Mart database is needed if you plan to install the Reporting module. If you don't have the Reporting module, you can leave this value blank. The default value is "eis/DATAMARTDS".
Enter the datasource JNDI name for the Data Mart database here. The Data Mart database is needed if you plan to install the Reporting module. If you don't have the Reporting module, you can leave this value blank. The default value is "eis/DATAMARTDS".
1-63Cisco Prime Service Catalog 10.0 R2 Installation Guide
OL-31474-01
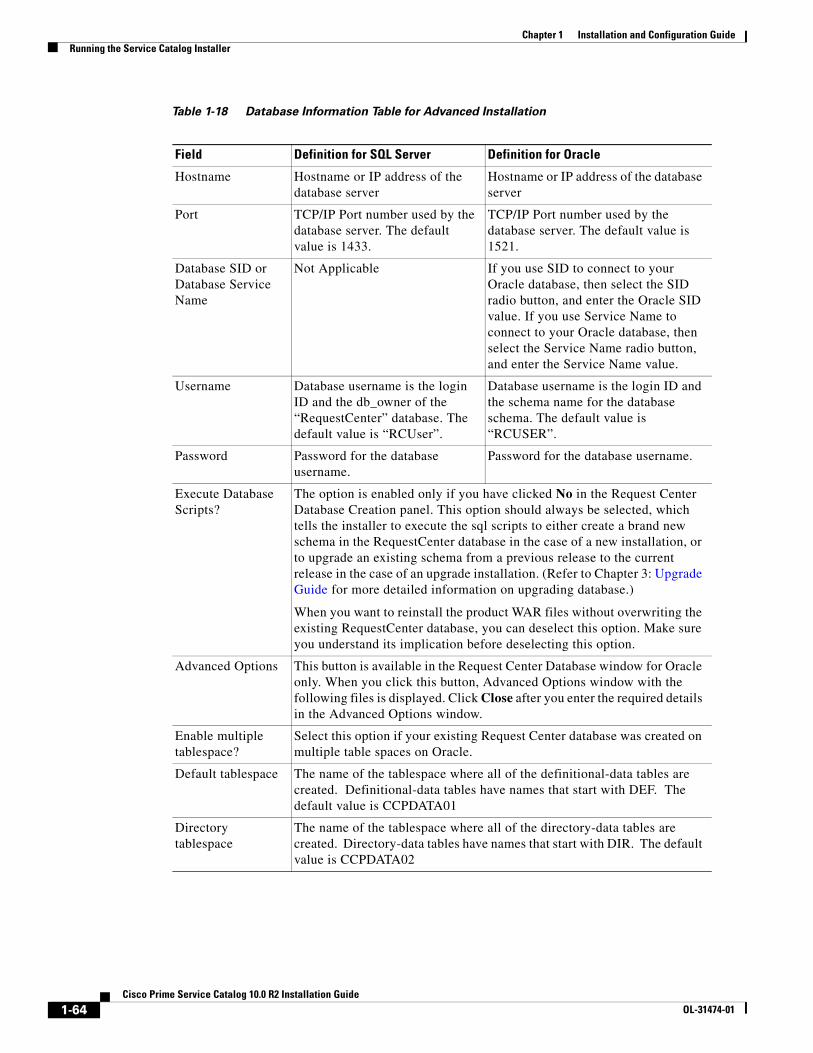
Chapter 1 Installation and Configuration Guide Running the Service Catalog Installer
Table 1-18 Database Information Table for Advanced Installation
Field Definition for SQL Server Definition for Oracle
Hostname Hostname or IP address of the database server
Hostname or IP address of the database server
Port TCP/IP Port number used by the database server. The default value is 1433.
TCP/IP Port number used by the database server. The default value is 1521.
Database SID or Database Service Name
Not Applicable If you use SID to connect to your Oracle database, then select the SID radio button, and enter the Oracle SID value. If you use Service Name to connect to your Oracle database, then select the Service Name radio button, and enter the Service Name value.
Username Database username is the login ID and the db_owner of the “RequestCenter” database. The default value is “RCUser”.
Database username is the login ID and the schema name for the database schema. The default value is “RCUSER”.
Password Password for the database username.
Password for the database username.
Execute Database Scripts?
The option is enabled only if you have clicked No in the Request Center Database Creation panel. This option should always be selected, which tells the installer to execute the sql scripts to either create a brand new schema in the RequestCenter database in the case of a new installation, or to upgrade an existing schema from a previous release to the current release in the case of an upgrade installation. (Refer to Chapter 3: Upgrade Guide for more detailed information on upgrading database.)
When you want to reinstall the product WAR files without overwriting the existing RequestCenter database, you can deselect this option. Make sure you understand its implication before deselecting this option.
Advanced Options This button is available in the Request Center Database window for Oracle only. When you click this button, Advanced Options window with the following files is displayed. Click Close after you enter the required details in the Advanced Options window.
Enable multiple tablespace?
Select this option if your existing Request Center database was created on multiple table spaces on Oracle.
Default tablespace The name of the tablespace where all of the definitional-data tables are created. Definitional-data tables have names that start with DEF. The default value is CCPDATA01
Directory tablespace
The name of the tablespace where all of the directory-data tables are created. Directory-data tables have names that start with DIR. The default value is CCPDATA02
1-64Cisco Prime Service Catalog 10.0 R2 Installation Guide
OL-31474-01
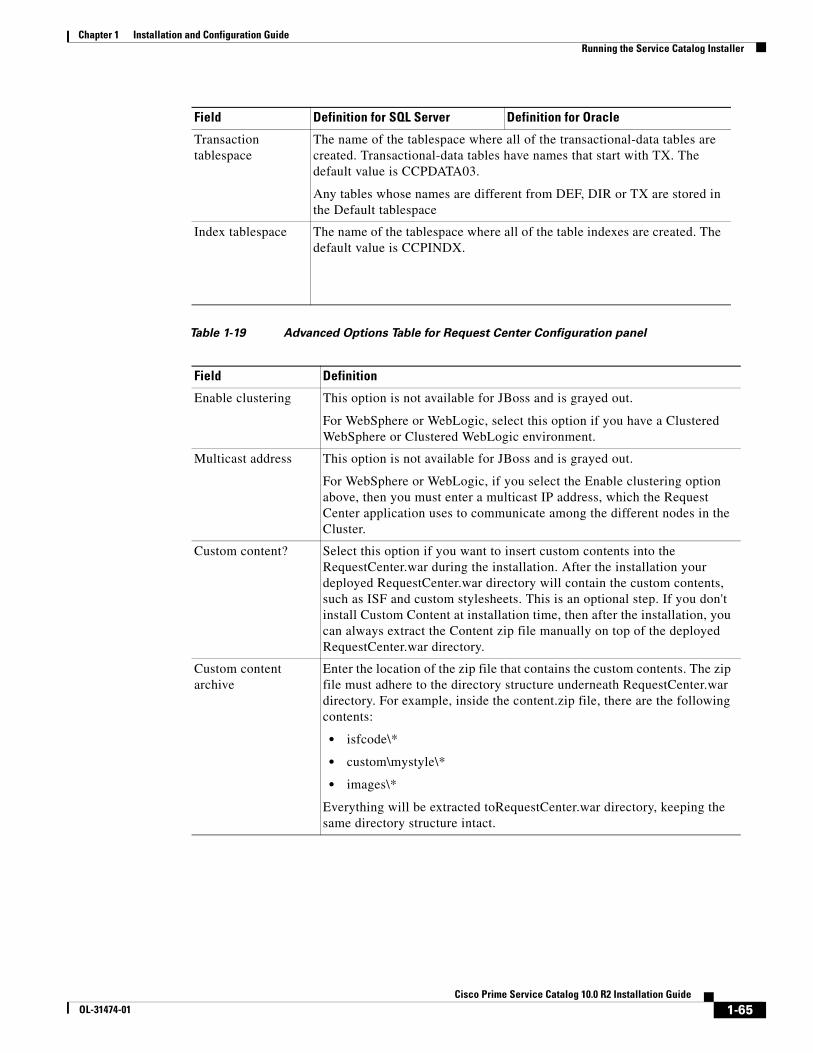
Chapter 1 Installation and Configuration GuideRunning the Service Catalog Installer
Table 1-19 Advanced Options Table for Request Center Configuration panel
Transaction tablespace
The name of the tablespace where all of the transactional-data tables are created. Transactional-data tables have names that start with TX. The default value is CCPDATA03.
Any tables whose names are different from DEF, DIR or TX are stored in the Default tablespace
Index tablespace The name of the tablespace where all of the table indexes are created. The default value is CCPINDX.
Field Definition for SQL Server Definition for Oracle
Field Definition
Enable clustering This option is not available for JBoss and is grayed out.
For WebSphere or WebLogic, select this option if you have a Clustered WebSphere or Clustered WebLogic environment.
Multicast address This option is not available for JBoss and is grayed out.
For WebSphere or WebLogic, if you select the Enable clustering option above, then you must enter a multicast IP address, which the Request Center application uses to communicate among the different nodes in the Cluster.
Custom content? Select this option if you want to insert custom contents into the RequestCenter.war during the installation. After the installation your deployed RequestCenter.war directory will contain the custom contents, such as ISF and custom stylesheets. This is an optional step. If you don't install Custom Content at installation time, then after the installation, you can always extract the Content zip file manually on top of the deployed RequestCenter.war directory.
Custom content archive
Enter the location of the zip file that contains the custom contents. The zip file must adhere to the directory structure underneath RequestCenter.war directory. For example, inside the content.zip file, there are the following contents:
• isfcode\*
• custom\mystyle\*
• images\*
Everything will be extracted toRequestCenter.war directory, keeping the same directory structure intact.
1-65Cisco Prime Service Catalog 10.0 R2 Installation Guide
OL-31474-01

Chapter 1 Installation and Configuration Guide Running the Service Catalog Installer
Table 1-20 Service Link Configuration Table for Custom Installation using JBoss Server
Variable Definition
Service Link Hostname This value is preset to the same value that you entered for the Request Center hostname field on the Request Center Configuration panel. This is because both JBoss servers, one for Request Center application and one for Service Link application, will be running on the same machine. This value is grayed out so you cannot overwrite it.
JBoss admin username The installer has preset the JBoss admin username to "adminuser" because it will install the JBoss AS software automatically for you. This username can be used to connect to the JBoss Admin Console if you need to perform any administration tasks for the JBoss installation. This value is grayed out so you can't overwrite it.
JBoss admin password If you chose to install only Service Link server on this computer, then the installer will prompt you to enter the password for the JBoss administrator user.
This field will not be shown if you chose the "Both" option instead. This is because the password is preset to the same value that you entered for the JBoss admin password field on the Request Center Configuration panel.
Confirm password Re-enter the password for the JBoss administrative user.
This field will not be shown if you chose the "Both" option.
Configure as windows service (For Windows only) On Windows operating system, the installer can automatically configure the JBoss server as a windows service. Select this option if you would like the installer to configure the JBoss server as a service named "Cisco Service Link".
This service will be configured to start up automatically at boot time. But right after the installation is completed, the service will not be started up for you. You will have to open the Microsoft Windows Services Console to start the "Cisco Service Link" service for the first time after the installation. The service however will be started automatically when the Windows operating system is rebooted.
1-66Cisco Prime Service Catalog 10.0 R2 Installation Guide
OL-31474-01
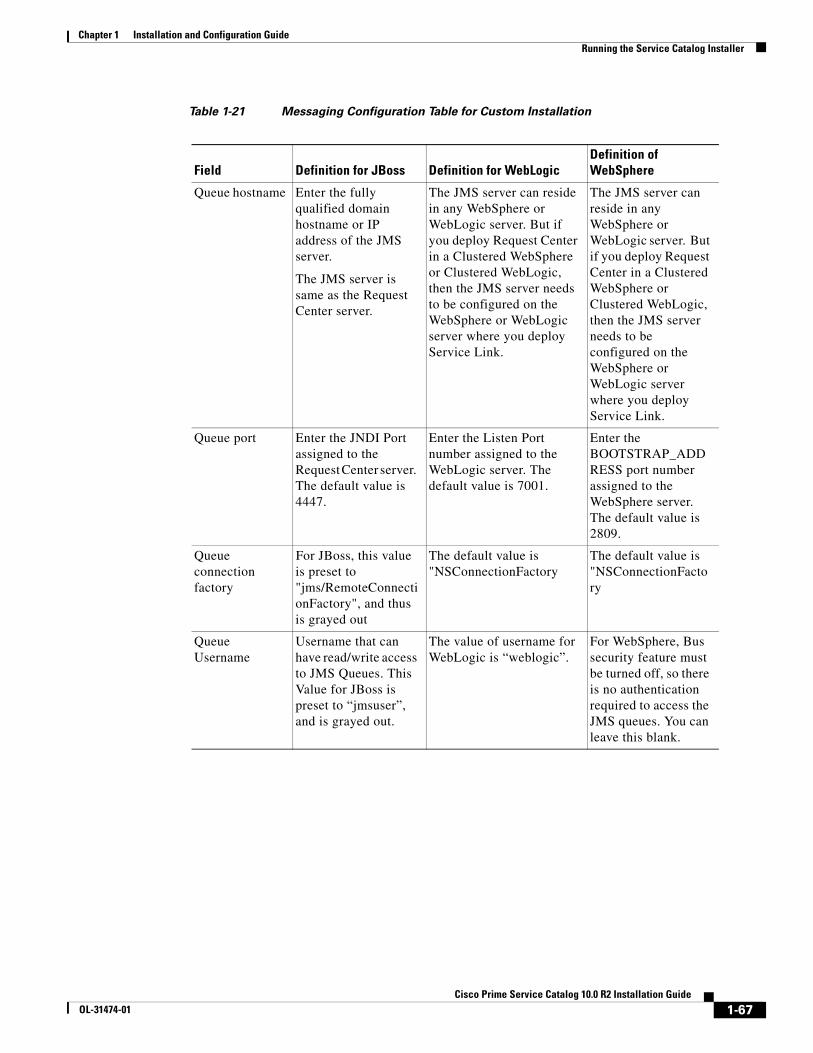
Chapter 1 Installation and Configuration GuideRunning the Service Catalog Installer
Table 1-21 Messaging Configuration Table for Custom Installation
Field Definition for JBoss Definition for WebLogicDefinition of WebSphere
Queue hostname Enter the fully qualified domain hostname or IP address of the JMS server.
The JMS server is same as the Request Center server.
The JMS server can reside in any WebSphere or WebLogic server. But if you deploy Request Center in a Clustered WebSphere or Clustered WebLogic, then the JMS server needs to be configured on the WebSphere or WebLogic server where you deploy Service Link.
The JMS server can reside in any WebSphere or WebLogic server. But if you deploy Request Center in a Clustered WebSphere or Clustered WebLogic, then the JMS server needs to be configured on the WebSphere or WebLogic server where you deploy Service Link.
Queue port Enter the JNDI Port assigned to the Request Center server. The default value is 4447.
Enter the Listen Port number assigned to the WebLogic server. The default value is 7001.
Enter the BOOTSTRAP_ADDRESS port number assigned to the WebSphere server. The default value is 2809.
Queue connection factory
For JBoss, this value is preset to "jms/RemoteConnectionFactory", and thus is grayed out
The default value is "NSConnectionFactory
The default value is "NSConnectionFactory
Queue Username
Username that can have read/write access to JMS Queues. This Value for JBoss is preset to “jmsuser”, and is grayed out.
The value of username for WebLogic is “weblogic”.
For WebSphere, Bus security feature must be turned off, so there is no authentication required to access the JMS queues. You can leave this blank.
1-67Cisco Prime Service Catalog 10.0 R2 Installation Guide
OL-31474-01
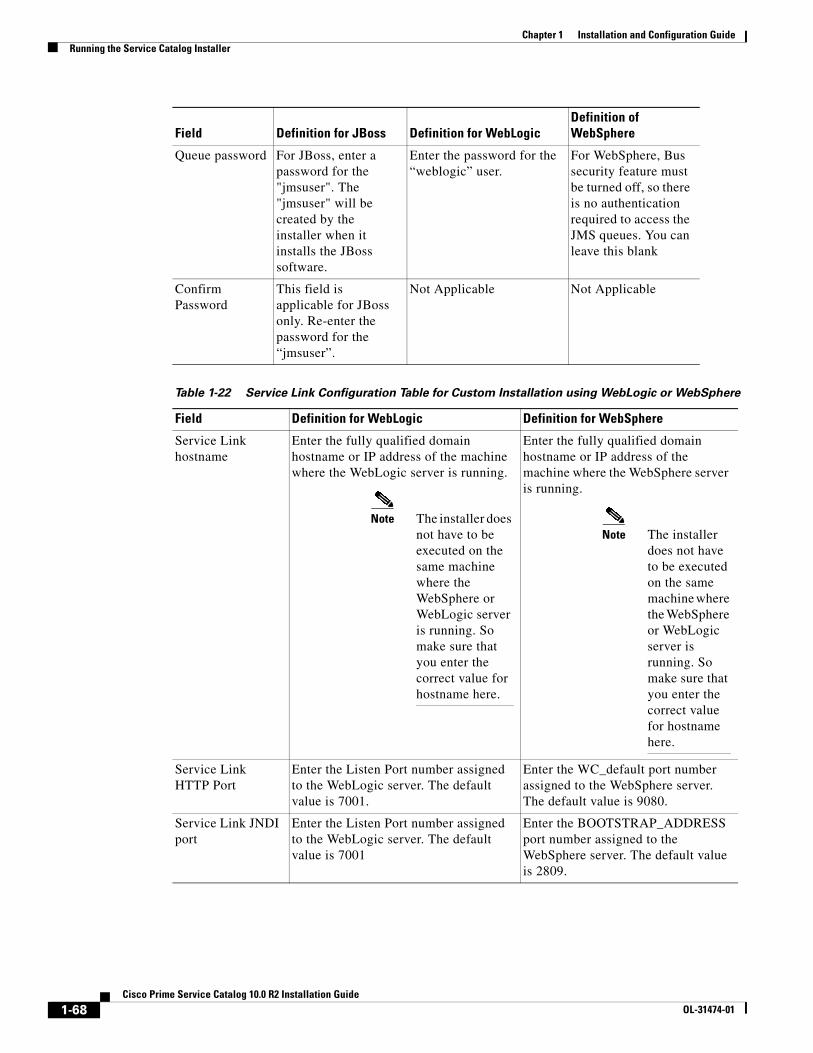
Chapter 1 Installation and Configuration Guide Running the Service Catalog Installer
Table 1-22 Service Link Configuration Table for Custom Installation using WebLogic or WebSphere
Queue password For JBoss, enter a password for the "jmsuser". The "jmsuser" will be created by the installer when it installs the JBoss software.
Enter the password for the “weblogic” user.
For WebSphere, Bus security feature must be turned off, so there is no authentication required to access the JMS queues. You can leave this blank
Confirm Password
This field is applicable for JBoss only. Re-enter the password for the “jmsuser”.
Not Applicable Not Applicable
Field Definition for WebLogic Definition for WebSphere
Service Link hostname
Enter the fully qualified domain hostname or IP address of the machine where the WebLogic server is running.
Note The installer does not have to be executed on the same machine where the WebSphere or WebLogic server is running. So make sure that you enter the correct value for hostname here.
Enter the fully qualified domain hostname or IP address of the machine where the WebSphere server is running.
Note The installer does not have to be executed on the same machine where the WebSphere or WebLogic server is running. So make sure that you enter the correct value for hostname here.
Service Link HTTP Port
Enter the Listen Port number assigned to the WebLogic server. The default value is 7001.
Enter the WC_default port number assigned to the WebSphere server. The default value is 9080.
Service Link JNDI port
Enter the Listen Port number assigned to the WebLogic server. The default value is 7001
Enter the BOOTSTRAP_ADDRESS port number assigned to the WebSphere server. The default value is 2809.
Field Definition for JBoss Definition for WebLogicDefinition of WebSphere
1-68Cisco Prime Service Catalog 10.0 R2 Installation Guide
OL-31474-01
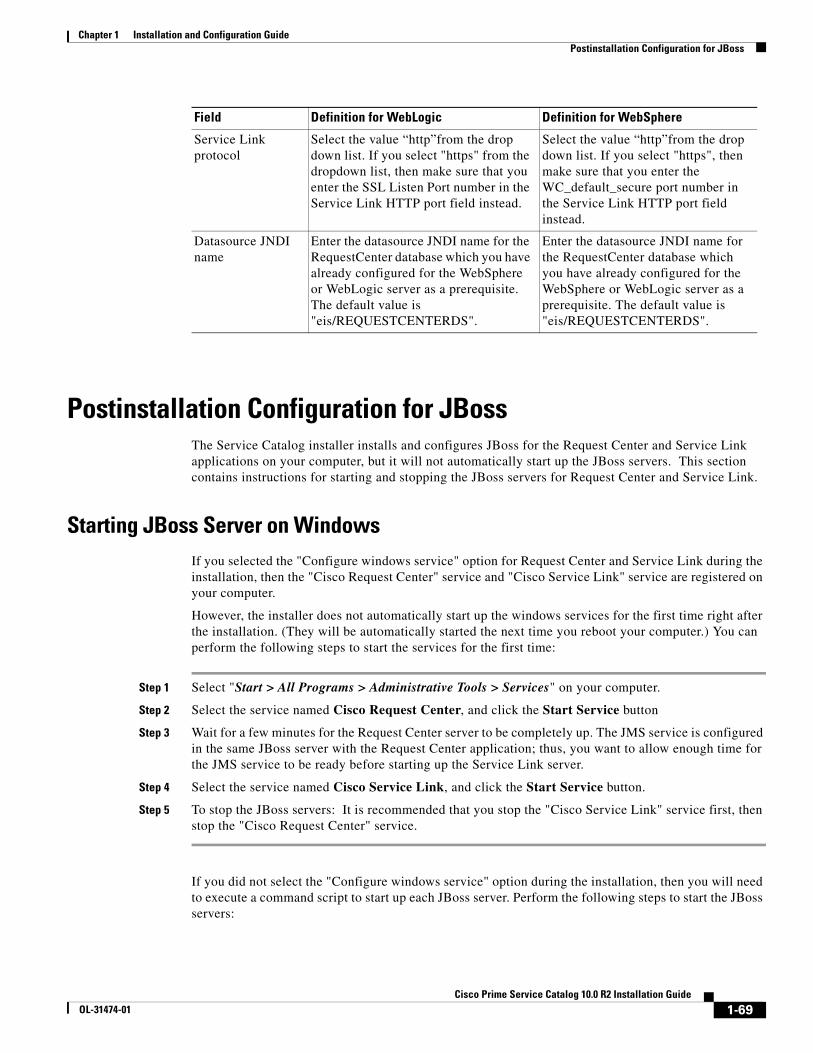
Chapter 1 Installation and Configuration GuidePostinstallation Configuration for JBoss
Postinstallation Configuration for JBossThe Service Catalog installer installs and configures JBoss for the Request Center and Service Link applications on your computer, but it will not automatically start up the JBoss servers. This section contains instructions for starting and stopping the JBoss servers for Request Center and Service Link.
Starting JBoss Server on WindowsIf you selected the "Configure windows service" option for Request Center and Service Link during the installation, then the "Cisco Request Center" service and "Cisco Service Link" service are registered on your computer.
However, the installer does not automatically start up the windows services for the first time right after the installation. (They will be automatically started the next time you reboot your computer.) You can perform the following steps to start the services for the first time:
Step 1 Select "Start > All Programs > Administrative Tools > Services" on your computer.
Step 2 Select the service named Cisco Request Center, and click the Start Service button
Step 3 Wait for a few minutes for the Request Center server to be completely up. The JMS service is configured in the same JBoss server with the Request Center application; thus, you want to allow enough time for the JMS service to be ready before starting up the Service Link server.
Step 4 Select the service named Cisco Service Link, and click the Start Service button.
Step 5 To stop the JBoss servers: It is recommended that you stop the "Cisco Service Link" service first, then stop the "Cisco Request Center" service.
If you did not select the "Configure windows service" option during the installation, then you will need to execute a command script to start up each JBoss server. Perform the following steps to start the JBoss servers:
Service Link protocol
Select the value “http”from the drop down list. If you select "https" from the dropdown list, then make sure that you enter the SSL Listen Port number in the Service Link HTTP port field instead.
Select the value “http”from the drop down list. If you select "https", then make sure that you enter the WC_default_secure port number in the Service Link HTTP port field instead.
Datasource JNDI name
Enter the datasource JNDI name for the RequestCenter database which you have already configured for the WebSphere or WebLogic server as a prerequisite. The default value is "eis/REQUESTCENTERDS".
Enter the datasource JNDI name for the RequestCenter database which you have already configured for the WebSphere or WebLogic server as a prerequisite. The default value is "eis/REQUESTCENTERDS".
Field Definition for WebLogic Definition for WebSphere
1-69Cisco Prime Service Catalog 10.0 R2 Installation Guide
OL-31474-01
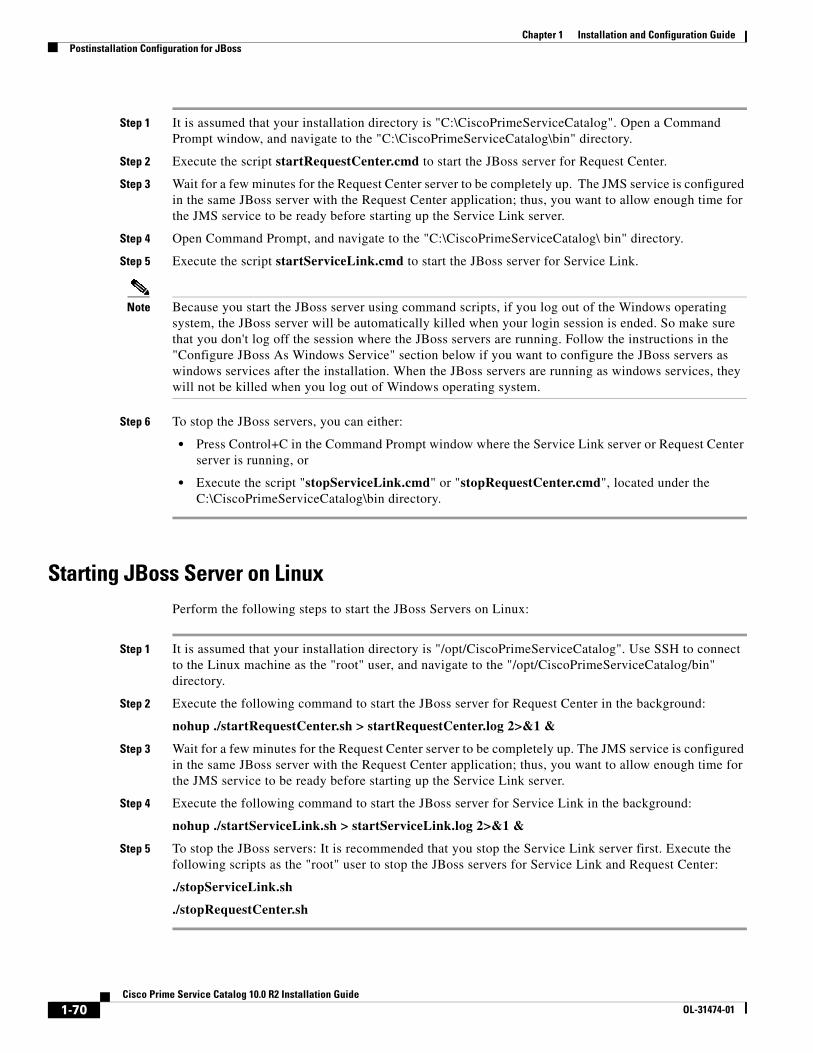
Chapter 1 Installation and Configuration Guide Postinstallation Configuration for JBoss
Step 1 It is assumed that your installation directory is "C:\CiscoPrimeServiceCatalog". Open a Command Prompt window, and navigate to the "C:\CiscoPrimeServiceCatalog\bin" directory.
Step 2 Execute the script startRequestCenter.cmd to start the JBoss server for Request Center.
Step 3 Wait for a few minutes for the Request Center server to be completely up. The JMS service is configured in the same JBoss server with the Request Center application; thus, you want to allow enough time for the JMS service to be ready before starting up the Service Link server.
Step 4 Open Command Prompt, and navigate to the "C:\CiscoPrimeServiceCatalog\ bin" directory.
Step 5 Execute the script startServiceLink.cmd to start the JBoss server for Service Link.
Note Because you start the JBoss server using command scripts, if you log out of the Windows operating system, the JBoss server will be automatically killed when your login session is ended. So make sure that you don't log off the session where the JBoss servers are running. Follow the instructions in the "Configure JBoss As Windows Service" section below if you want to configure the JBoss servers as windows services after the installation. When the JBoss servers are running as windows services, they will not be killed when you log out of Windows operating system.
Step 6 To stop the JBoss servers, you can either:
• Press Control+C in the Command Prompt window where the Service Link server or Request Center server is running, or
• Execute the script "stopServiceLink.cmd" or "stopRequestCenter.cmd", located under the C:\CiscoPrimeServiceCatalog\bin directory.
Starting JBoss Server on LinuxPerform the following steps to start the JBoss Servers on Linux:
Step 1 It is assumed that your installation directory is "/opt/CiscoPrimeServiceCatalog". Use SSH to connect to the Linux machine as the "root" user, and navigate to the "/opt/CiscoPrimeServiceCatalog/bin" directory.
Step 2 Execute the following command to start the JBoss server for Request Center in the background:
nohup ./startRequestCenter.sh > startRequestCenter.log 2>&1 &
Step 3 Wait for a few minutes for the Request Center server to be completely up. The JMS service is configured in the same JBoss server with the Request Center application; thus, you want to allow enough time for the JMS service to be ready before starting up the Service Link server.
Step 4 Execute the following command to start the JBoss server for Service Link in the background:
nohup ./startServiceLink.sh > startServiceLink.log 2>&1 &
Step 5 To stop the JBoss servers: It is recommended that you stop the Service Link server first. Execute the following scripts as the "root" user to stop the JBoss servers for Service Link and Request Center:
./stopServiceLink.sh
./stopRequestCenter.sh
1-70Cisco Prime Service Catalog 10.0 R2 Installation Guide
OL-31474-01
Chapter 1 Installation and Configuration GuidePostinstallation Configuration for JBoss
Configure JBoss As Windows Service
Step 1 It is assumed that your installation directory is "C:\CiscoPrimeServiceCatalog". Open a Command Prompt window, and navigate to the "C:\CiscoPrimeServiceCatalog\bin" directory. Execute the script "installRequestCenterService.cmd" to configure the JBoss server for Request Center as a window service. The service will be named "Cisco Request Center".
Step 2 Execute the script "installServiceLinkService.cmd" to configure the JBoss server for Service Link as a window service. The service will be named "Cisco Service Link".
Step 3 To remove the windows services: First you need to manually stop the "Cisco Request Center" and "Cisco Service Link" services. Then, execute the scripts "uninstallRequestCenterService.cmd" and "uninstallServiceLinkService.cmd"
Verifying Your InstallationVerify your installation by performing the following tasks:
Step 1 Open a browser, and connect to the following URL: http://<hostname>:<port>/RequestCenter where
<hostname> = The fully qualified domain hostname of the computer where you installed the JBoss server for Request Center.
<port> =The HTTP Port number assigned to the JBoss server for Request Center. The default value for HTTP Port number is 8080.
Note If you are on a Windows operating system, and during the installation you selected the "Configure IIS" option, then the Service Catalog installer automatically configured the tomcat plugin for the IIS web server on your machine to redirect to the JBoss server. Thus, in this case, the URL for Request Center should point to the port number used by the IIS web server instead. For example, if your IIS web server is using port 80, then the URL should be http://<hostname>:80/RequestCenter, or http://<hostname>/RequestCenter since port 80 can be omitted from the URL.
Step 2 Log in as the Site Administrator. For a new installation of Service Catalog, the username for the Site Administrator is "admin" and the password is the value you entered on the Service Catalog Administration Configuration panel of the installation wizard.
Step 3 Navigate to the Service Link module.
Step 4 On the left hand side of the panel, under Service Link Status, verify that the connection has a green status.
You have completed the installation for Cisco Prime Service Catalog on JBoss.
1-71Cisco Prime Service Catalog 10.0 R2 Installation Guide
OL-31474-01
Chapter 1 Installation and Configuration Guide Postinstallation Configuration for WebLogic
Postinstallation Configuration for WebLogicWhen the Service Catalog installation wizard completes, it creates the following WAR files underneath the “<ServicePortal_Install_Dir>\dist” directory:
• RequestCenter.war
• ISEE.war
The Service Catalog installation wizard did not automatically deploy these WAR files on your WebLogic Server. You need to follow the instructions in this section to manually deploy these WAR files. See the Application Server Information Worksheet that you completed earlier to get the parameter values needed during the deployment.
Extracting WAR FilesYou must deploy RequestCenter.war and ISEE.war in extracted format. To extract the WAR files:
Step 1 Create a subdirectory called applications underneath the “<BEA_HOME>\ user_projects\domain\<your_domain>” directory, if it does not already exist. Note that you perform this task on the computer where the WebLogic Administration Server is running.
Step 2 Create two subdirectories underneath “applications” as follows:
• RequestCenter
• ServiceLink
Step 3 Extract the WAR files (generated by the Service Catalog installation wizard) into the new directories that you just created:
a. Unzip file “<ServicePortal_Install_Dir>\dist\RequestCenter.war” into the “<BEA_HOME>\user_projects\domain\<your_domain>\applications\RequestCenter” directory.
b. Unzip file “<ServicePortal_Install_Dir>\dist\ISEE.war” into the “<BEA_HOME>\user_projects\domain\<your_domain>\applications\ServiceLink” directory.
Note If the RequestCenter or ServiceLink subdirectory under the “<BEA_HOME>\user_projects\domain\<your_domain>\applications” directory is not empty, you must first empty the entire directory before extracting the contents of the new RequestCenter.war or ISEE.war file into it. This is because the unzip utility may only overwrite files with the same names. There may be some “remnants” of old files in your destination directory that may be inadvertently deployed.
Deploying RequestCenter.war
Step 1 Log on to the WebLogic Administration Console.
Step 2 Start your WebLogic Server (or WebLogic Cluster) if it is not already running.
Step 3 If WebLogic was installed in PRODUCTION mode, click Lock & Edit so that you can proceed to make changes. Otherwise, you can skip this step.
1-72Cisco Prime Service Catalog 10.0 R2 Installation Guide
OL-31474-01
Chapter 1 Installation and Configuration GuidePostinstallation Configuration for WebLogic
Step 4 In the left pane, click Deployments.
Step 5 Click Install.
Step 6 Browse to (or enter the full pathname of) the directory “<BEA_HOME>\user_projects\domain\<your_domain>\applications.”You should see the two subdirectories called “RequestCenter” and “ServiceLink”.
Step 7 Click the radio button for RequestCenter, then click Next.
Step 8 Choose the Install this deployment as an application option, then click Next.
Step 9 Choose your WebLogic Server (or WebLogic Cluster) as the Target, then click Next.
Step 10 Enter RequestCenter in the Name field. Select the Copy this application onto every target for me option. Click Next.
Step 11 Choose the No, I will review the configuration later option, then click Finish. The progress indicator begins. This may take several minutes to complete.
Step 12 Wait until the screen is refreshed to show that the “RequestCenter” application has State=Active and Health=OK. If your WebLogic Application Server was installed in PRODUCTION mode, then the State may be set to “Prepared” until you click Activate Changes.
Deploying ISEE.war
Step 1 Log on to the WebLogic Administration Console.
Step 2 Start your WebLogic Server if it is not already running (if you have a WebLogic Cluster environment, then start the “Service Link WebLogic Server”. The Service Link application cannot be deployed on a Cluster).
Step 3 If your WebLogic was installed in PRODUCTION mode, click Lock & Edit so that you can proceed to make changes. Otherwise, you can skip this step.
Step 4 In the left pane, click Deployments.
Step 5 Click Install.
Step 6 Browse to (or enter the full pathname of) the directory “<BEA_HOME>\user_projects\domain\<your_domain>\applications.” You should see the two subdirectories called “RequestCenter” and “ServiceLink”.
Step 7 Click the radio button for ServiceLink, then click Next.
Step 8 Choose the Install this deployment as an application option, then click Next.
Step 9 Choose your WebLogic Server as the Target. (If you have a WebLogic Cluster, choose the stand-alone “Service Link WebLogic Server” as the Target.) Then click Next.
Step 10 Enter ServiceLink in the Name field. Select the Copy this application onto every target for me option. Click Next.
Step 11 Choose the No, I will review the configuration later option, then click Finish. The progress indicator begins. This may take several minutes to complete.
Step 12 Wait until the screen is refreshed to show that the “ServiceLink” application has State=Active and Health=OK. If your WebLogic Application Server was installed in PRODUCTION mode, then the State may be set to “Prepared” until you click Activate Changes.
1-73Cisco Prime Service Catalog 10.0 R2 Installation Guide
OL-31474-01
Chapter 1 Installation and Configuration Guide Postinstallation Configuration for WebLogic
Verifying Your Installation
Step 1 Test your installation by opening a new browser and connect to the following URL:
http://<AppServer_Host>:<Port>/RequestCenter
where <AppServer_Host> = the host name of your WebLogic Server, and <Port> = the port number used by your WebLogic Server.
For example,
http://m1.cisco.com:8001/RequestCenter
Step 2 Log in as the Site Administrator. For a new installation of Service Catalog, the username for the Site Administrator is "admin" and the password is the value you entered on the Service Catalog Administration Configuration panel of the installation wizard.
Step 3 Navigate to the Service Link Module.
Step 4 On the left hand side of the panel, under Service Link Status, verify that the connection has a green status.
You have completed the installation for Cisco Prime Service Catalog on WebLogic.
Configuring Web ServerAt this time, you should configure the plugin for your Web Server to point to your WebLogic Server (or your WebLogic Cluster). The following Web Servers are supported with WebLogic Server:
• Apache 2.4.7
• IIS 7.5
This chapter does not contain instructions on how to configure your Web Server Plugin. Any plugin configurations between your Web Server and WebLogic are not handled by the Service Catalog installer program. There is no Cisco library or binary that needs to be installed or configured on your Web Server installation. You should follow instructions provided by either Oracle (for WebLogic Plugin) or by the vendor of your web server.
This section contains only examples of the settings that you may want to add to your web server configuration file.
The following are examples for the settings for Apache 2.4.7 Web Server. Add the following entries to the end of file httpd.conf:
LoadModule weblogic_module modules/mod_wl_24.so
<IfModule mod_weblogic.c>WebLogicHost m1.mydomain.comWebLogicPort 8001</IfModule>
<Location /RequestCenter>SetHandler weblogic-handlerPathTrim /</Location>
1-74Cisco Prime Service Catalog 10.0 R2 Installation Guide
OL-31474-01
Chapter 1 Installation and Configuration GuidePostinstallation Configuration for WebSphere
The following are examples for the settings for IIS 7.5 Web Server. Add the following entries to file iisproxy.ini:
WebLogicHost=m1.mydomain.comWebLogicPort=8001ConnectTimeoutSecs=20ConnectRetrySecs=5KeepAliveEnabled=trueKeepAliveSecs=20WlForwardPath=/RequestCenter
After you complete the Plugin configuration, you need to restart both the Web Server and the WebLogic Application Server.
Repeat the steps described in the Verifying Your Installation to verify that your Web Server plugin is configured correctly to point to your WebLogic Server. However, this time connect to the following URL =
http://<WebServer_Host>:<WebServer_Port>/RequestCenter
where <WebServer_Host> = the host name of your Web Server, and <WebServer_Port> = the port number used by your Web Server (omit the port number if it is set to 80).
For example,
http://webserver.cisco.com/RequestCenter
Postinstallation Configuration for WebSphereWhen the Service Catalog installation wizard completes, it creates the following WAR files underneath the <ServicePortal_Install_Dir>/dist directory:
• RequestCenter.war
• ISEE.war
The Service Catalog installation wizard did not automatically deploy the WAR files on your WebSphere Server. You will need to follow the instructions in this section to manually deploy WAR files. See the Application Server Information Worksheet that you completed earlier to get the parameter values needed during the deployment.
Deploying RequestCenter.war
Step 1 Log on to the WebSphere Administration Console.
Step 2 Start your WebSphere Server (or WebSphere Cluster) if it is not already running.
Step 3 Choose Applications > Application Types, and click WebSphere enterprise applications.
Step 4 In the right pane, click Install. The “Path to the new application” panel appears.
Step 5 If your browser is running on the same machine where <ServicePortal_Install_Dir> resides, then choose the Local file system option. Otherwise, choose the Remote file system option.
Step 6 Click Browse, and navigate to the “<ServicePortal_Install_Dir>/dist” directory.
Step 7 Choose RequestCenter.war and click OK.
Step 8 Click Next. The “How do you want to install the application?” panel appears.
1-75Cisco Prime Service Catalog 10.0 R2 Installation Guide
OL-31474-01
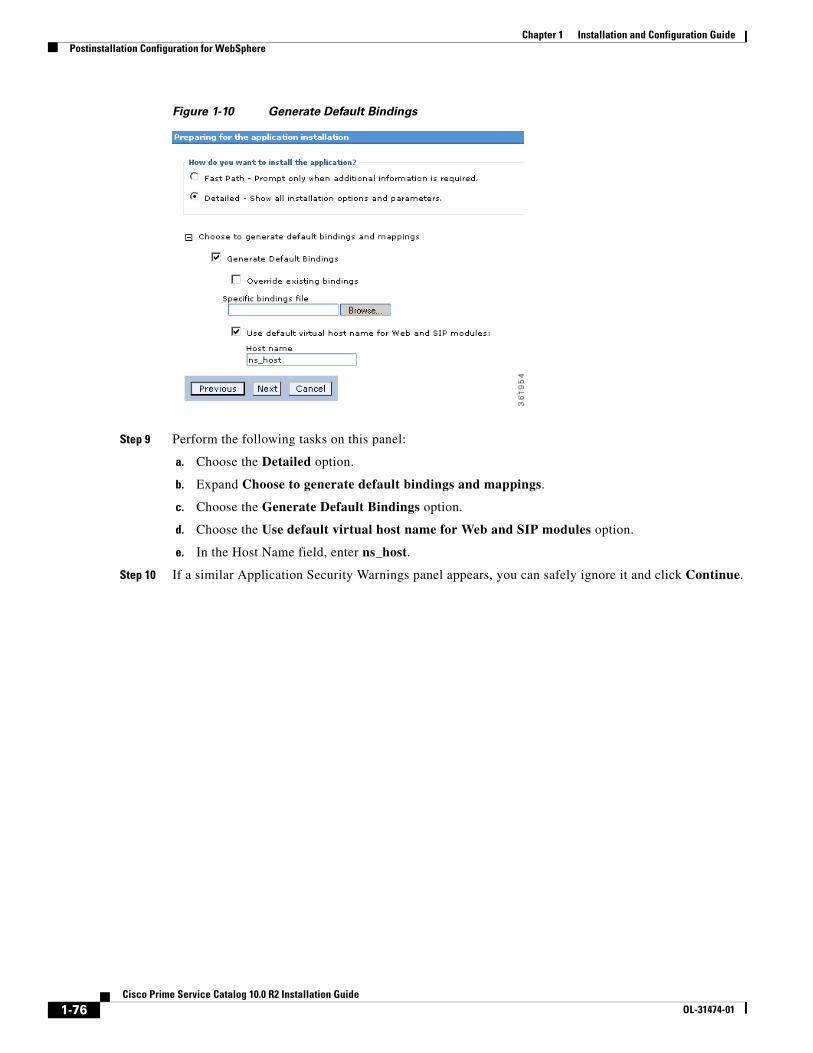
Chapter 1 Installation and Configuration Guide Postinstallation Configuration for WebSphere
Figure 1-10 Generate Default Bindings
Step 9 Perform the following tasks on this panel:
a. Choose the Detailed option.
b. Expand Choose to generate default bindings and mappings.
c. Choose the Generate Default Bindings option.
d. Choose the Use default virtual host name for Web and SIP modules option.
e. In the Host Name field, enter ns_host.
Step 10 If a similar Application Security Warnings panel appears, you can safely ignore it and click Continue.
1-76Cisco Prime Service Catalog 10.0 R2 Installation Guide
OL-31474-01
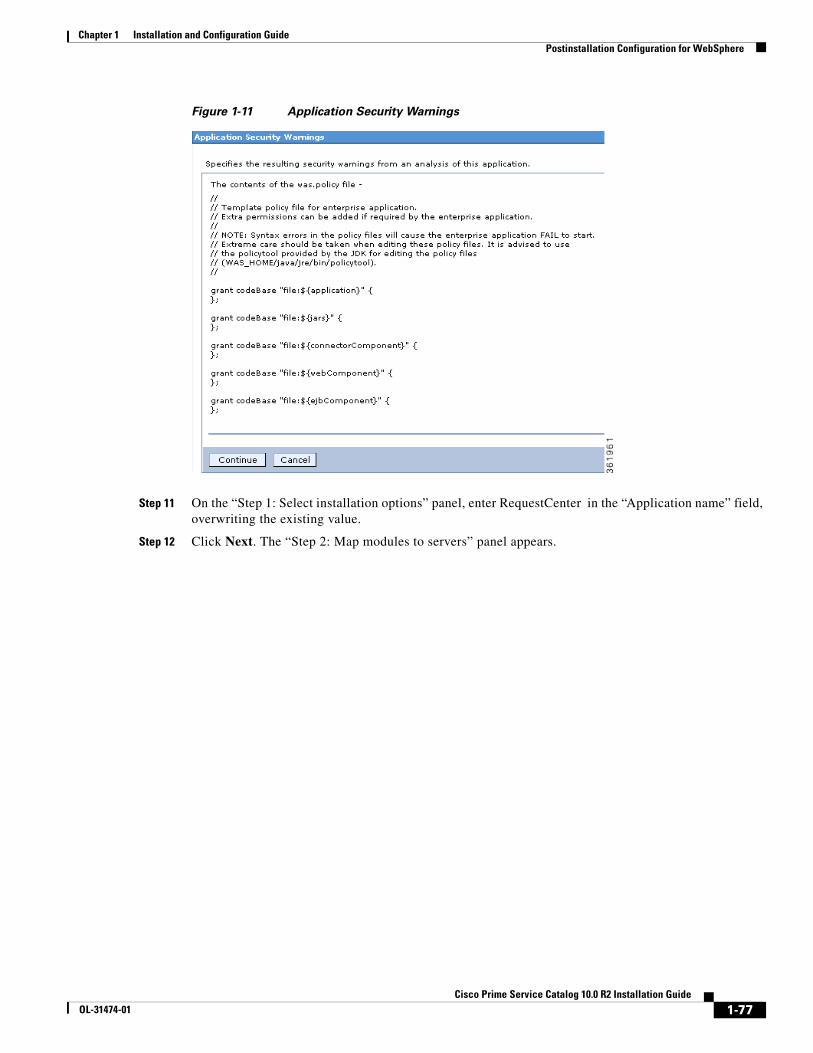
Chapter 1 Installation and Configuration GuidePostinstallation Configuration for WebSphere
Figure 1-11 Application Security Warnings
Step 11 On the “Step 1: Select installation options” panel, enter RequestCenter in the “Application name” field, overwriting the existing value.
Step 12 Click Next. The “Step 2: Map modules to servers” panel appears.
1-77Cisco Prime Service Catalog 10.0 R2 Installation Guide
OL-31474-01
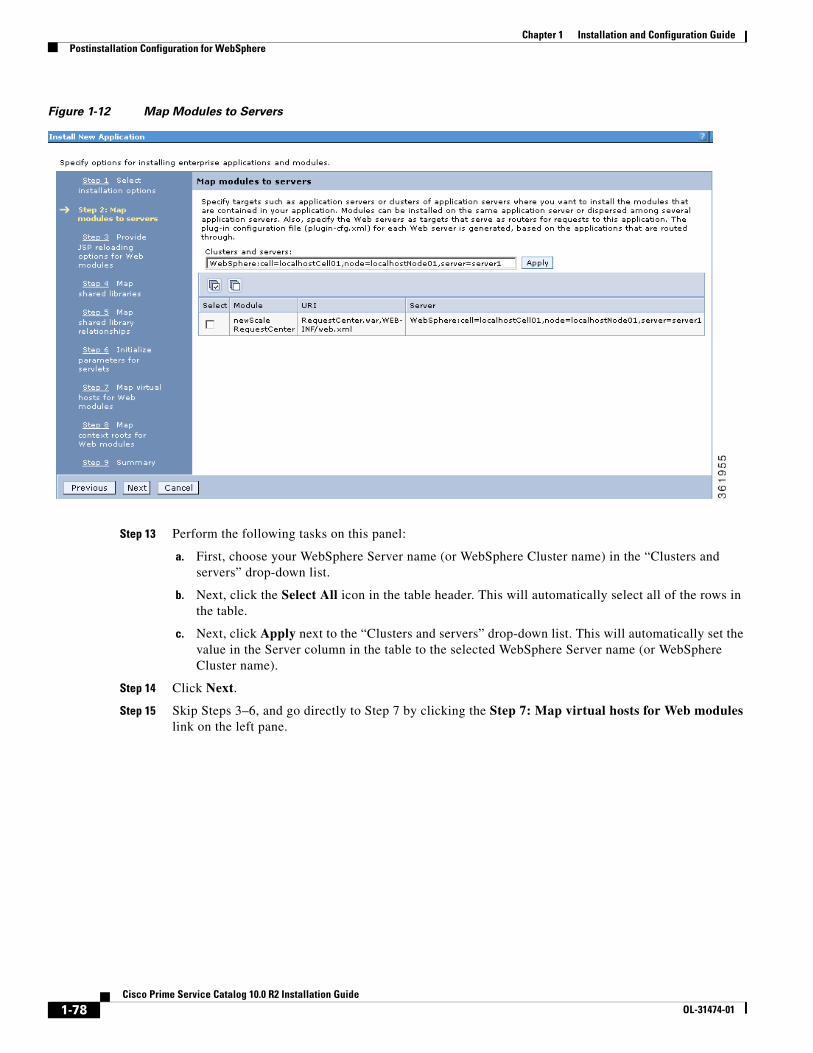
Chapter 1 Installation and Configuration Guide Postinstallation Configuration for WebSphere
Figure 1-12 Map Modules to Servers
Step 13 Perform the following tasks on this panel:
a. First, choose your WebSphere Server name (or WebSphere Cluster name) in the “Clusters and servers” drop-down list.
b. Next, click the Select All icon in the table header. This will automatically select all of the rows in the table.
c. Next, click Apply next to the “Clusters and servers” drop-down list. This will automatically set the value in the Server column in the table to the selected WebSphere Server name (or WebSphere Cluster name).
Step 14 Click Next.
Step 15 Skip Steps 3–6, and go directly to Step 7 by clicking the Step 7: Map virtual hosts for Web modules link on the left pane.
1-78Cisco Prime Service Catalog 10.0 R2 Installation Guide
OL-31474-01
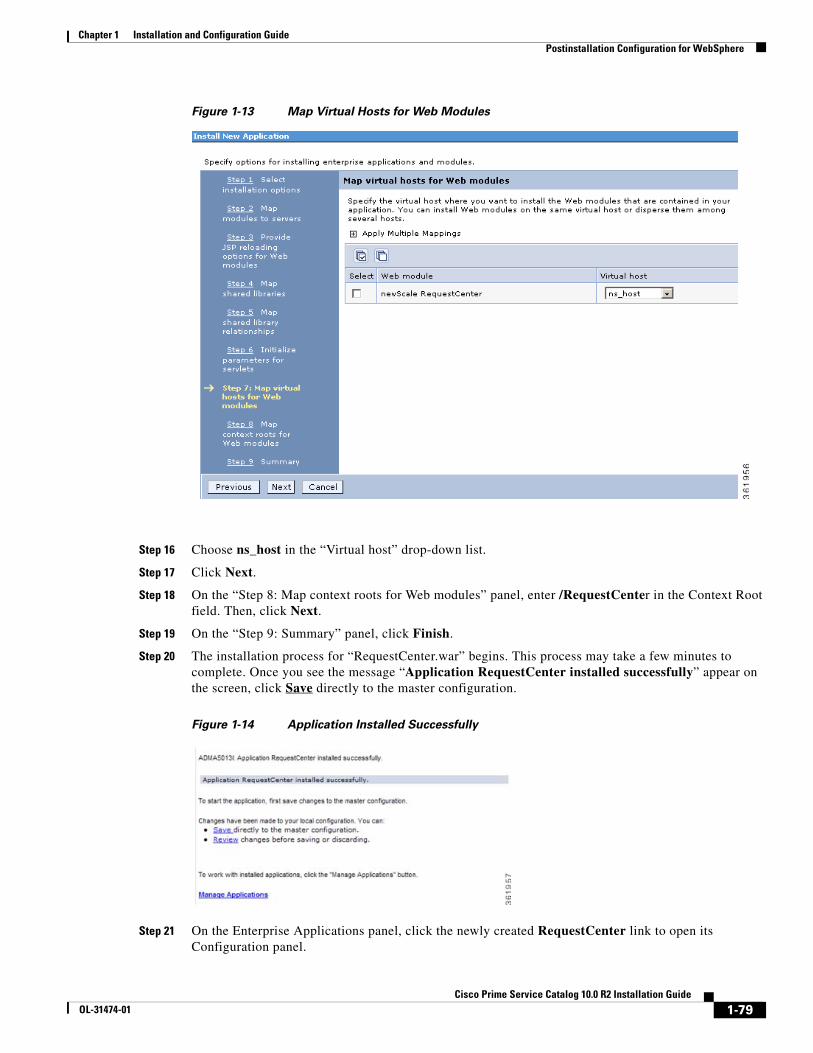
Chapter 1 Installation and Configuration GuidePostinstallation Configuration for WebSphere
Figure 1-13 Map Virtual Hosts for Web Modules
Step 16 Choose ns_host in the “Virtual host” drop-down list.
Step 17 Click Next.
Step 18 On the “Step 8: Map context roots for Web modules” panel, enter /RequestCenter in the Context Root field. Then, click Next.
Step 19 On the “Step 9: Summary” panel, click Finish.
Step 20 The installation process for “RequestCenter.war” begins. This process may take a few minutes to complete. Once you see the message “Application RequestCenter installed successfully” appear on the screen, click Save directly to the master configuration.
Figure 1-14 Application Installed Successfully
Step 21 On the Enterprise Applications panel, click the newly created RequestCenter link to open its Configuration panel.
1-79Cisco Prime Service Catalog 10.0 R2 Installation Guide
OL-31474-01
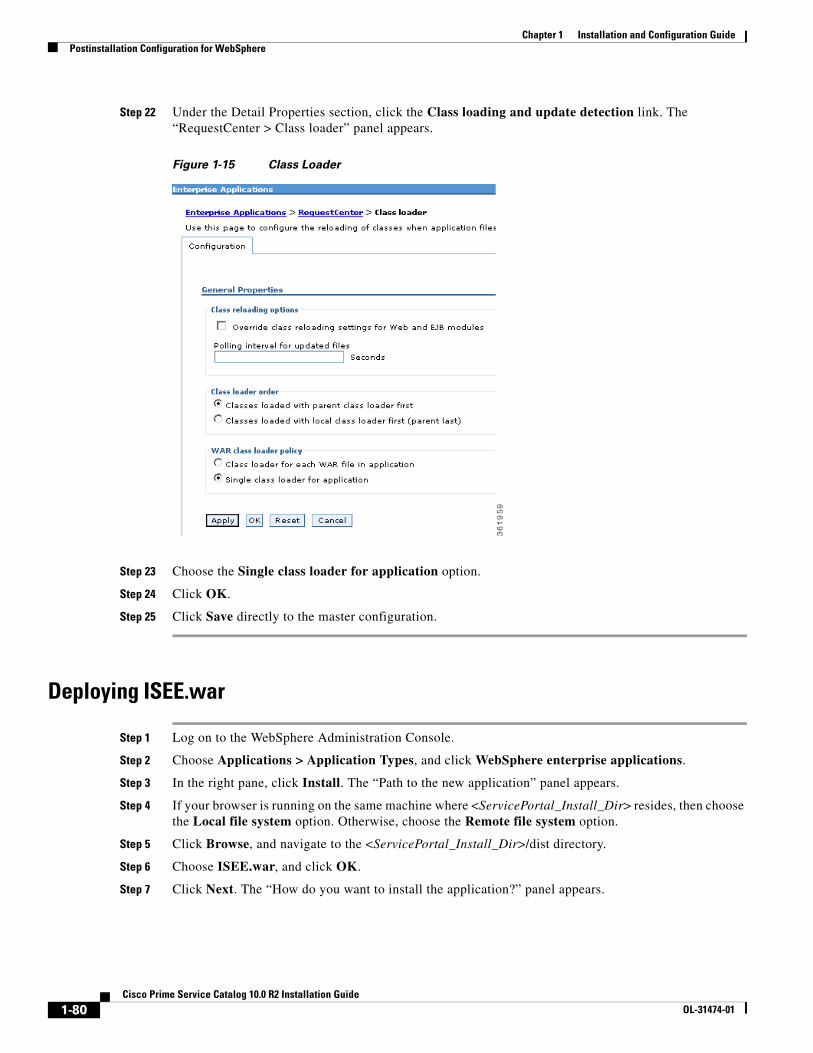
Chapter 1 Installation and Configuration Guide Postinstallation Configuration for WebSphere
Step 22 Under the Detail Properties section, click the Class loading and update detection link. The “RequestCenter > Class loader” panel appears.
Figure 1-15 Class Loader
Step 23 Choose the Single class loader for application option.
Step 24 Click OK.
Step 25 Click Save directly to the master configuration.
Deploying ISEE.war
Step 1 Log on to the WebSphere Administration Console.
Step 2 Choose Applications > Application Types, and click WebSphere enterprise applications.
Step 3 In the right pane, click Install. The “Path to the new application” panel appears.
Step 4 If your browser is running on the same machine where <ServicePortal_Install_Dir> resides, then choose the Local file system option. Otherwise, choose the Remote file system option.
Step 5 Click Browse, and navigate to the <ServicePortal_Install_Dir>/dist directory.
Step 6 Choose ISEE.war, and click OK.
Step 7 Click Next. The “How do you want to install the application?” panel appears.
1-80Cisco Prime Service Catalog 10.0 R2 Installation Guide
OL-31474-01
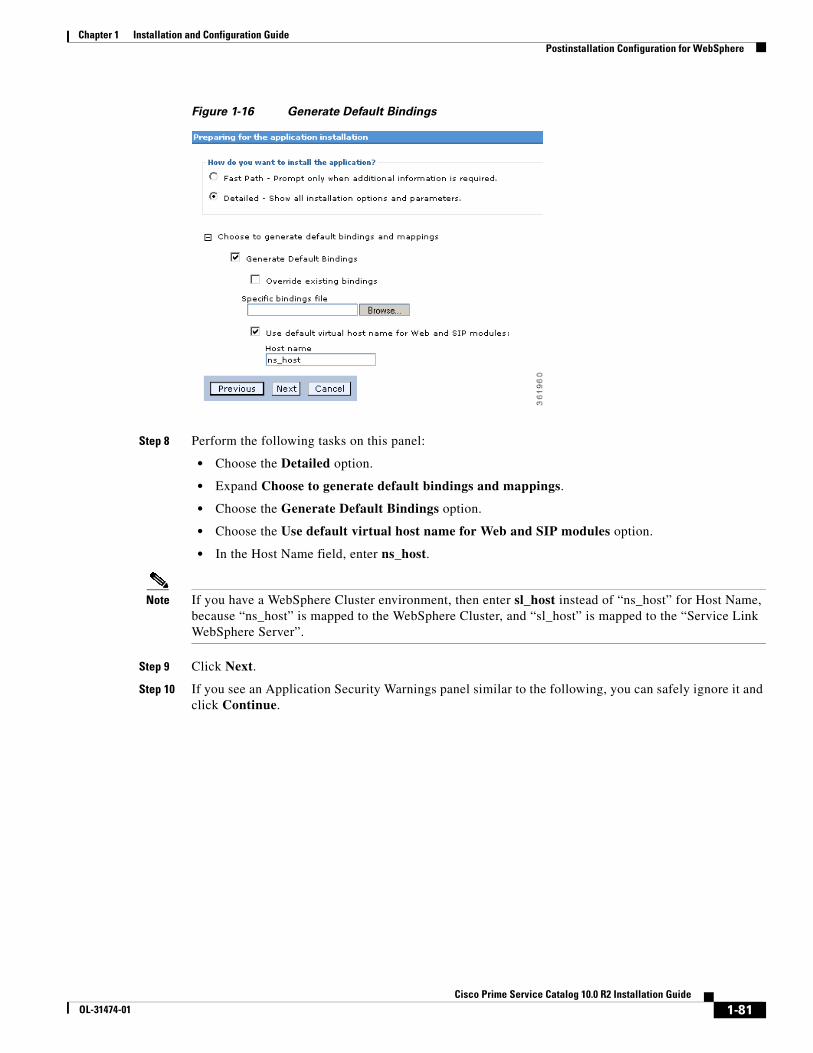
Chapter 1 Installation and Configuration GuidePostinstallation Configuration for WebSphere
Figure 1-16 Generate Default Bindings
Step 8 Perform the following tasks on this panel:
• Choose the Detailed option.
• Expand Choose to generate default bindings and mappings.
• Choose the Generate Default Bindings option.
• Choose the Use default virtual host name for Web and SIP modules option.
• In the Host Name field, enter ns_host.
Note If you have a WebSphere Cluster environment, then enter sl_host instead of “ns_host” for Host Name, because “ns_host” is mapped to the WebSphere Cluster, and “sl_host” is mapped to the “Service Link WebSphere Server”.
Step 9 Click Next.
Step 10 If you see an Application Security Warnings panel similar to the following, you can safely ignore it and click Continue.
1-81Cisco Prime Service Catalog 10.0 R2 Installation Guide
OL-31474-01
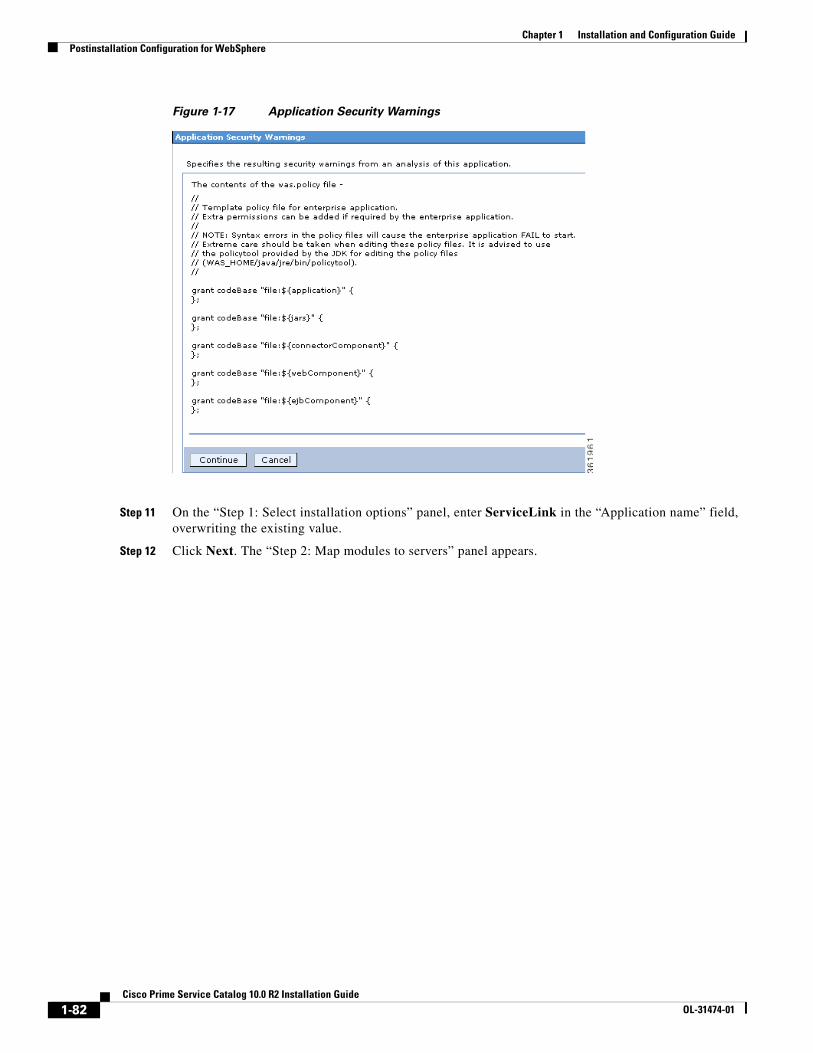
Chapter 1 Installation and Configuration Guide Postinstallation Configuration for WebSphere
Figure 1-17 Application Security Warnings
Step 11 On the “Step 1: Select installation options” panel, enter ServiceLink in the “Application name” field, overwriting the existing value.
Step 12 Click Next. The “Step 2: Map modules to servers” panel appears.
1-82Cisco Prime Service Catalog 10.0 R2 Installation Guide
OL-31474-01
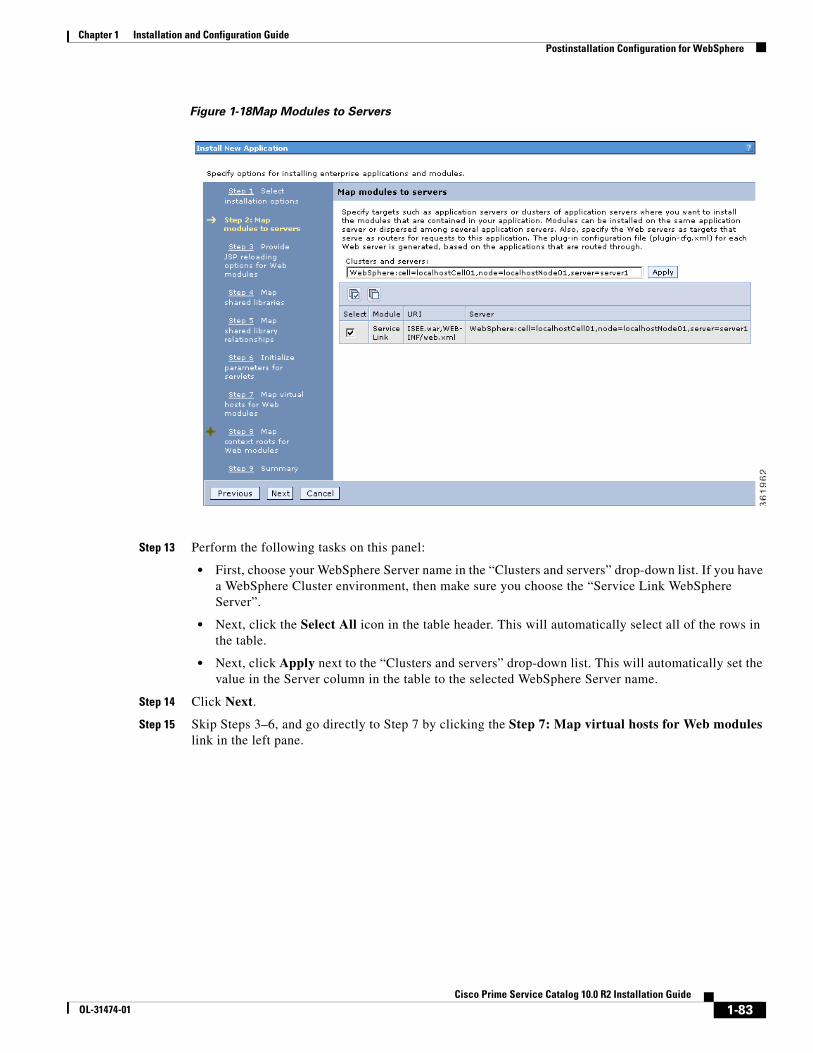
Chapter 1 Installation and Configuration GuidePostinstallation Configuration for WebSphere
Figure 1-18Map Modules to Servers
Step 13 Perform the following tasks on this panel:
• First, choose your WebSphere Server name in the “Clusters and servers” drop-down list. If you have a WebSphere Cluster environment, then make sure you choose the “Service Link WebSphere Server”.
• Next, click the Select All icon in the table header. This will automatically select all of the rows in the table.
• Next, click Apply next to the “Clusters and servers” drop-down list. This will automatically set the value in the Server column in the table to the selected WebSphere Server name.
Step 14 Click Next.
Step 15 Skip Steps 3–6, and go directly to Step 7 by clicking the Step 7: Map virtual hosts for Web modules link in the left pane.
1-83Cisco Prime Service Catalog 10.0 R2 Installation Guide
OL-31474-01
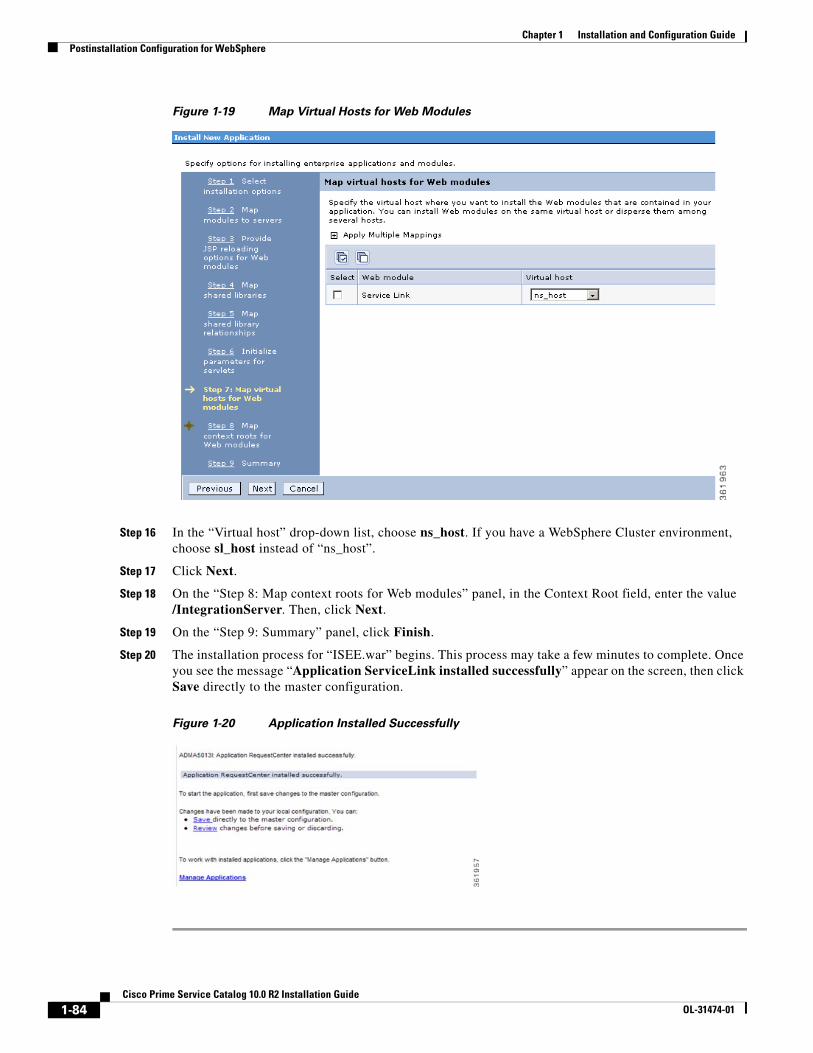
Chapter 1 Installation and Configuration Guide Postinstallation Configuration for WebSphere
Figure 1-19 Map Virtual Hosts for Web Modules
Step 16 In the “Virtual host” drop-down list, choose ns_host. If you have a WebSphere Cluster environment, choose sl_host instead of “ns_host”.
Step 17 Click Next.
Step 18 On the “Step 8: Map context roots for Web modules” panel, in the Context Root field, enter the value /IntegrationServer. Then, click Next.
Step 19 On the “Step 9: Summary” panel, click Finish.
Step 20 The installation process for “ISEE.war” begins. This process may take a few minutes to complete. Once you see the message “Application ServiceLink installed successfully” appear on the screen, then click Save directly to the master configuration.
Figure 1-20 Application Installed Successfully
1-84Cisco Prime Service Catalog 10.0 R2 Installation Guide
OL-31474-01
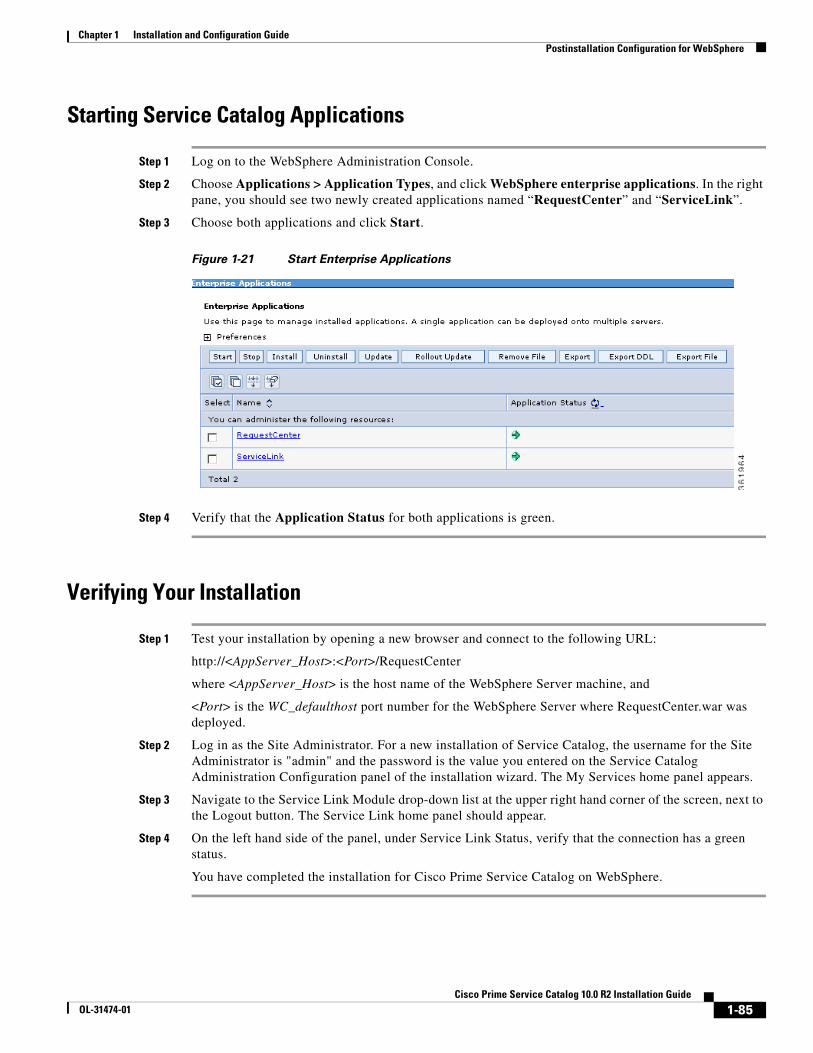
Chapter 1 Installation and Configuration GuidePostinstallation Configuration for WebSphere
Starting Service Catalog Applications
Step 1 Log on to the WebSphere Administration Console.
Step 2 Choose Applications > Application Types, and click WebSphere enterprise applications. In the right pane, you should see two newly created applications named “RequestCenter” and “ServiceLink”.
Step 3 Choose both applications and click Start.
Figure 1-21 Start Enterprise Applications
Step 4 Verify that the Application Status for both applications is green.
Verifying Your Installation
Step 1 Test your installation by opening a new browser and connect to the following URL:
http://<AppServer_Host>:<Port>/RequestCenter
where <AppServer_Host> is the host name of the WebSphere Server machine, and
<Port> is the WC_defaulthost port number for the WebSphere Server where RequestCenter.war was deployed.
Step 2 Log in as the Site Administrator. For a new installation of Service Catalog, the username for the Site Administrator is "admin" and the password is the value you entered on the Service Catalog Administration Configuration panel of the installation wizard. The My Services home panel appears.
Step 3 Navigate to the Service Link Module drop-down list at the upper right hand corner of the screen, next to the Logout button. The Service Link home panel should appear.
Step 4 On the left hand side of the panel, under Service Link Status, verify that the connection has a green status.
You have completed the installation for Cisco Prime Service Catalog on WebSphere.
1-85Cisco Prime Service Catalog 10.0 R2 Installation Guide
OL-31474-01
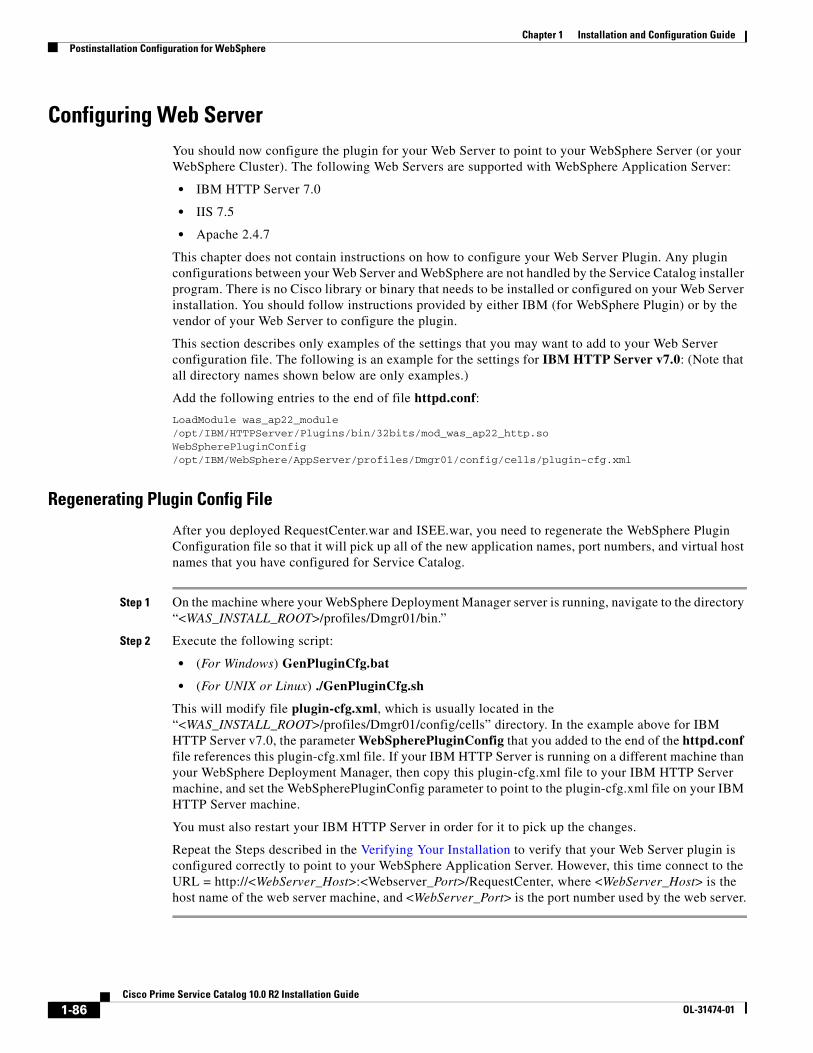
Chapter 1 Installation and Configuration Guide Postinstallation Configuration for WebSphere
Configuring Web ServerYou should now configure the plugin for your Web Server to point to your WebSphere Server (or your WebSphere Cluster). The following Web Servers are supported with WebSphere Application Server:
• IBM HTTP Server 7.0
• IIS 7.5
• Apache 2.4.7
This chapter does not contain instructions on how to configure your Web Server Plugin. Any plugin configurations between your Web Server and WebSphere are not handled by the Service Catalog installer program. There is no Cisco library or binary that needs to be installed or configured on your Web Server installation. You should follow instructions provided by either IBM (for WebSphere Plugin) or by the vendor of your Web Server to configure the plugin.
This section describes only examples of the settings that you may want to add to your Web Server configuration file. The following is an example for the settings for IBM HTTP Server v7.0: (Note that all directory names shown below are only examples.)
Add the following entries to the end of file httpd.conf:
LoadModule was_ap22_module /opt/IBM/HTTPServer/Plugins/bin/32bits/mod_was_ap22_http.soWebSpherePluginConfig /opt/IBM/WebSphere/AppServer/profiles/Dmgr01/config/cells/plugin-cfg.xml
Regenerating Plugin Config File
After you deployed RequestCenter.war and ISEE.war, you need to regenerate the WebSphere Plugin Configuration file so that it will pick up all of the new application names, port numbers, and virtual host names that you have configured for Service Catalog.
Step 1 On the machine where your WebSphere Deployment Manager server is running, navigate to the directory “<WAS_INSTALL_ROOT>/profiles/Dmgr01/bin.”
Step 2 Execute the following script:
• (For Windows) GenPluginCfg.bat
• (For UNIX or Linux) ./GenPluginCfg.sh
This will modify file plugin-cfg.xml, which is usually located in the “<WAS_INSTALL_ROOT>/profiles/Dmgr01/config/cells” directory. In the example above for IBM HTTP Server v7.0, the parameter WebSpherePluginConfig that you added to the end of the httpd.conf file references this plugin-cfg.xml file. If your IBM HTTP Server is running on a different machine than your WebSphere Deployment Manager, then copy this plugin-cfg.xml file to your IBM HTTP Server machine, and set the WebSpherePluginConfig parameter to point to the plugin-cfg.xml file on your IBM HTTP Server machine.
You must also restart your IBM HTTP Server in order for it to pick up the changes.
Repeat the Steps described in the Verifying Your Installation to verify that your Web Server plugin is configured correctly to point to your WebSphere Application Server. However, this time connect to the URL = http://<WebServer_Host>:<Webserver_Port>/RequestCenter, where <WebServer_Host> is the host name of the web server machine, and <WebServer_Port> is the port number used by the web server.
1-86Cisco Prime Service Catalog 10.0 R2 Installation Guide
OL-31474-01