Embed Size (px)
Citation preview
INSCou
PurpThe for o Targ
ObjeAfter
1234
ReqUsin
12
34
5
6
SpoNeithcoma pu This provthat not ipres The
TRUCTIOurse 8: Posi
pose/goal purpose of t
operative and
get Audien
ectives r reading this1. Identify fa2. Specify n3. Distingui4. Recogniz
quirementsng this self-d1. Review t2. Read and
http://ww3. Access t4. Provide y
have trou5. Complete
70% is re6. Receive
CNOR a
onsorship her the progmercial or inrpose other
activity wasvider of contiare approvemply that CCentation.
contact hou
ONS & DISCition the P
Statementthis chapter d invasive pr
nce: Periop
s chapter, thactors that innursing activsh appropriaze special co
s for Succeirected learnhe above lead review the
ww.cc-instituthe online quyour purchasuble locatinge the evaluaequired to pacertificate ofnd or CRNF
ram plannern-kind suppothan for whi
s approved fonuing educa
ed by CCI arCI or the Ca
rs for this ac
CLOSUREatient
t is to providerocedures.
erative RNs
he participanncrease the vities commoate patient consideration
essful Comning modulearning objec
e course white.org/docs/puiz which is ase order numg this, pleaseation questioass, and youf completion
FA credential
rs, authors, oort has been ich it is appr
or 1.6 contaation by the Cre recognizelifornia State
ctivity will ex
E STATEM
e information
nt should be patient’s ris
on to all posicare activitiesns in patient
mpletion :
ctives. ch is availabphippenchapavailable at mber as foune contact CCns and succ
u have two an and 1.6 conl, the contac
or reviewersobtained fo
roved by the
ct hours by California Std as continue Board of N
xpire on June
ENT
n to the regis
able to: sk for adversitions. s for specificpositioning.
ble at: pters/2012/0http://start.cnd on the CCCI at 888-257cessfully pasattempts. ntact hours i
ct hours will b
s have any cr this offerin FDA.
the Competetate Board o
uing educatioNursing appr
e 17, 2014.
stered nurse
se outcomes
c positions.
08/30/coursec-institute.orCI bookstore7-2667. ss the ten ite
in approximabe added to
conflict of intg. There is n
ency and Crof Nursing, Pon for registeroves or end
e about safe
s related to p
e-8.pdf rg/s3/Phippee order confi
em multiple-c
ately 2-3 weo your online
erest relatedno discussio
redentialing Provider numered nurses
dorses any p
ly positionin
positioning.
en-Course-8irmation ema
choice quiz.
eeks. If you CCI accoun
d to this progon of a produ
Institute, anmber 15613.
. This recogproduct in the
g patients
8 ail. If you
A score of
hold the nt.
gram. No uct used for
n approved Activities nition does e
CHAPTER 8
Chapter Contents177 Introduction
178 Measurable Criteria
178 Identifying the Patient’s Risk for
Adverse Outcomes Related to
Positioning
188 Nursing Activities Common to All
Positions
191 Patient Care Activities for Specifi c
Positions
192 Supine Position
193 Trendelenburg Position
195 Reverse Trendelenburg Position
196 Lithotomy Position
200 Lateral Decubitus Position
203 Prone Position
206 Sitting Position
208 Semi-Sitting/Fowler/Beach
Chair Position
209 Special Considerations
211 Conclusion
213 References
Position the PatientPaula Bishop
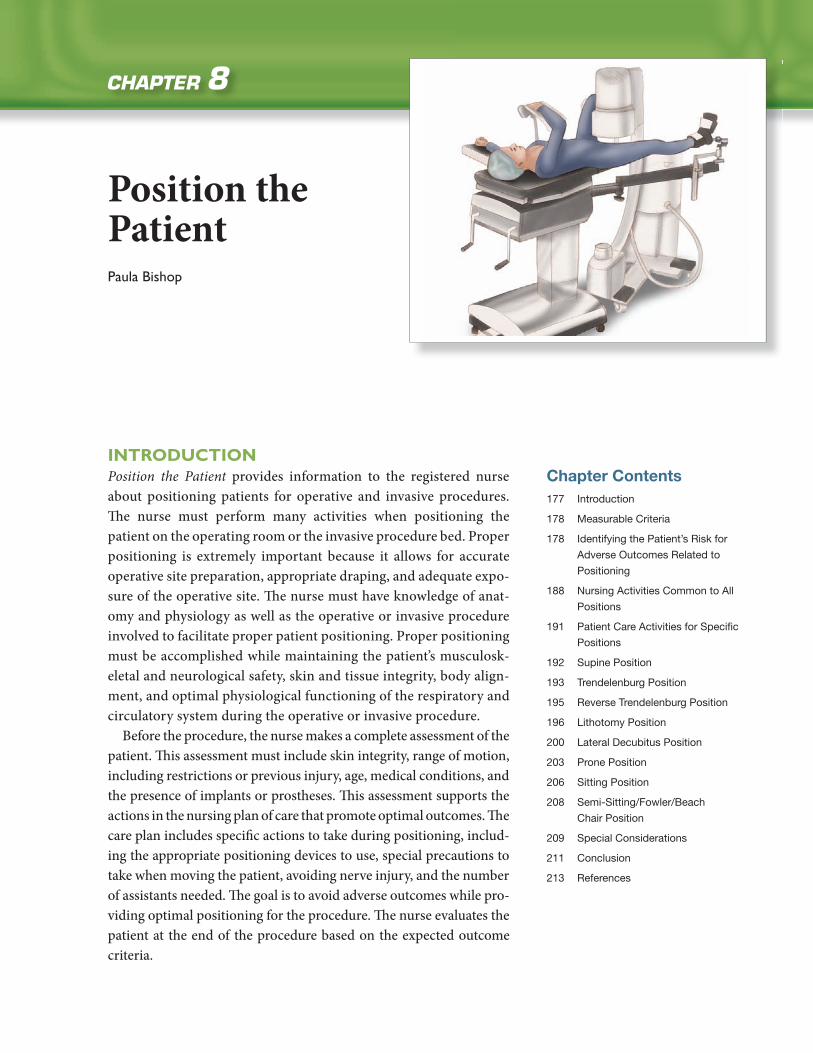
INTRODUCTIONPosition the Patient provides information to the registered nurse about positioning patients for operative and invasive procedures. Th e nurse must perform many activities when positioning the patient on the operating room or the invasive procedure bed. Proper positioning is extremely important because it allows for accurate operative site preparation, appropriate draping, and adequate expo-sure of the operative site. Th e nurse must have knowledge of anat-omy and physiology as well as the operative or invasive procedure involved to facilitate proper patient positioning. Proper positioning must be accomplished while maintaining the patient’s musculosk-eletal and neurological safety, skin and tissue integrity, body align-ment, and optimal physiological functioning of the respiratory and circulatory system during the operative or invasive procedure.
Before the procedure, the nurse makes a complete assessment of the patient. Th is assessment must include skin integrity, range of motion, including restrictions or previous injury, age, medical conditions, and the presence of implants or prostheses. Th is assessment supports the actions in the nursing plan of care that promote optimal outcomes. Th e care plan includes specifi c actions to take during positioning, includ-ing the appropriate positioning devices to use, special precautions to take when moving the patient, avoiding nerve injury, and the number of assistants needed. Th e goal is to avoid adverse outcomes while pro-viding optimal positioning for the procedure. Th e nurse evaluates the patient at the end of the procedure based on the expected outcome criteria.
178 Section 2: Competencies for Safe Patient Care
Only a registered nurse with proven competency should position the patient for a procedure. Delegation of positioning activities to surgical technologists or assis-tive personnel occurs only if the nurse determines that the patient’s risk for adverse outcomes related to positioning is low. When delegating any part of the positioning to another party, the nurse must reassess the patient before the procedure begins. Reassessment of the patient during the procedure occurs when patient or environ-mental variables change. Th ese changes may include change in position, extended procedure time, pooling of body fl uids, or team members leaning against a body structure. Th e nurse must remain vigilant in observing changes and reassessing the patient as needed. Th e nurse maintains accountability for the patient throughout the procedure.
MEASURABLE CRITERIATh e nurse demonstrates competency for positioning a patient by
• Identifying the patient’s risk for adverse outcomes related to positioning • Selecting the appropriate supplies and equipment based on the patient’s identi-
fi ed needs • Preparing the bed • Centering the patient on the bed • Placing the arms on arm boards • Using positioning devices according to the established practice recommenda-
tions and the manufacturer’s recommendations • Padding bony prominences • Moving the anesthetized patient • Communicating and documenting risk factors, nursing diagnoses, expected
outcomes, the plan of care, interventions, and evaluation • Placing the patient in various positions for operative and invasive procedures • Supine • Trendelenburg • Reverse Trendelenburg • Lithotomy (high and low) • Prone • Jackknife • Lateral • Fowler (sitting) • Semi-Fowler (beach chair) • Fracture table • Spine table
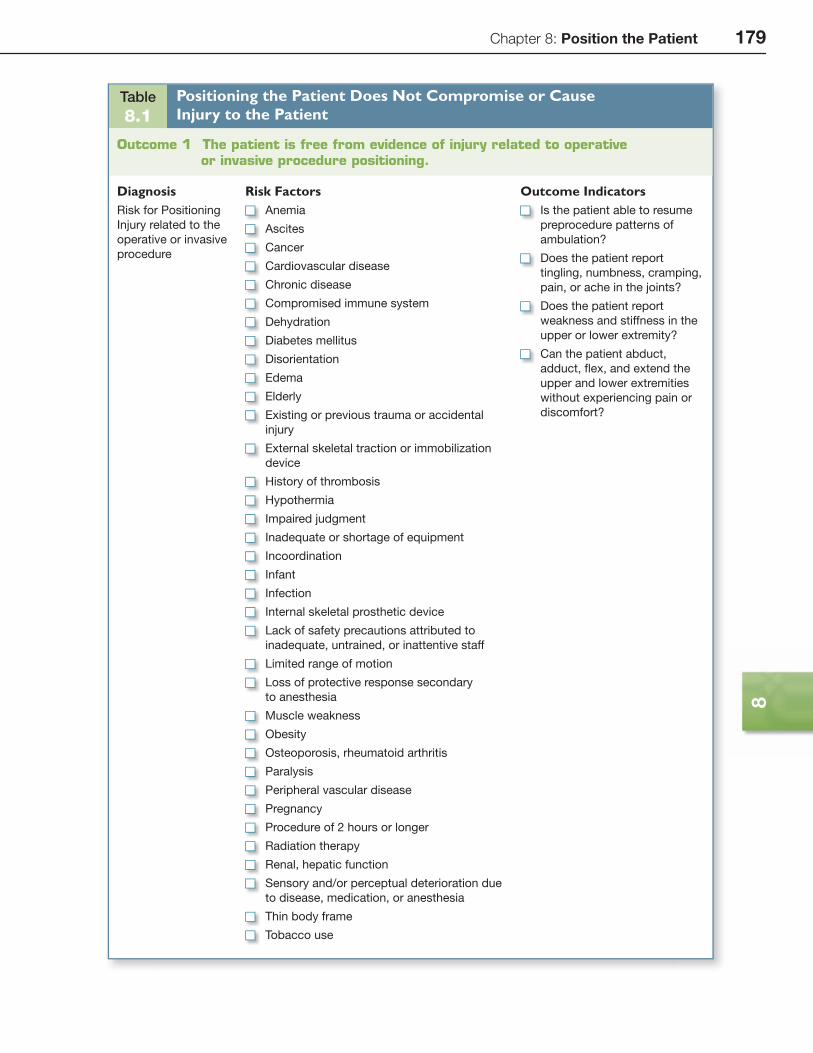
IDENTIFYING THE PATIENT’S RISK FOR ADVERSE OUTCOMES RELATED TO POSITIONINGPositioning for the procedure has the potential for compromising or causing injury to the patient. Table 8.1 identifi es outcome statements, diagnoses, risk factors, and outcome indicators related to this patient care event.
Chapter 8: Position the Patient 179
8
Table 8.1
Positioning the Patient Does Not Compromise or Cause Injury to the Patient
Outcome 1 The patient is free from evidence of injury related to operative or invasive procedure positioning.
Diagnosis Risk Factors Outcome IndicatorsRisk for Positioning
Injury related to the
operative or invasive
procedure
Anemia
Ascites
Cancer
Cardiovascular disease
Chronic disease
Compromised immune system
Dehydration
Diabetes mellitus
Disorientation
Edema
Elderly
Existing or previous trauma or accidental
injury
External skeletal traction or immobilization
device
History of thrombosis
Hypothermia
Impaired judgment
Inadequate or shortage of equipment
Incoordination
Infant
Infection
Internal skeletal prosthetic device
Lack of safety precautions attributed to
inadequate, untrained, or inattentive staff
Limited range of motion
Loss of protective response secondary
to anesthesia
Muscle weakness
Obesity
Osteoporosis, rheumatoid arthritis
Paralysis
Peripheral vascular disease
Pregnancy
Procedure of 2 hours or longer
Radiation therapy
Renal, hepatic function
Sensory and/or perceptual deterioration due
to disease, medication, or anesthesia
Thin body frame
Tobacco use
Is the patient able to resume
preprocedure patterns of
ambulation?
Does the patient report
tingling, numbness, cramping,
pain, or ache in the joints?
Does the patient report
weakness and stiffness in the
upper or lower extremity?
Can the patient abduct,
adduct, fl ex, and extend the
upper and lower extremities
without experiencing pain or
discomfort?
180 Section 2: Competencies for Safe Patient Care
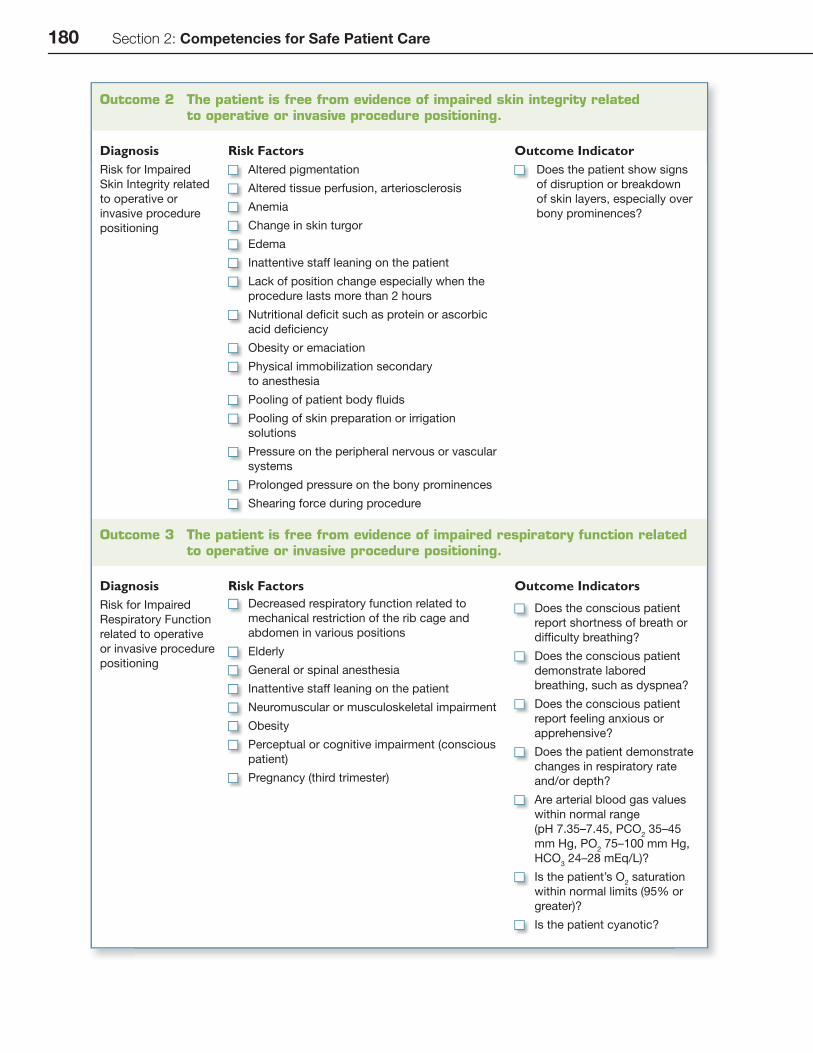
Outcome 2 The patient is free from evidence of impaired skin integrity related to operative or invasive procedure positioning.
Diagnosis Risk Factors Outcome IndicatorRisk for Impaired
Skin Integrity related
to operative or
invasive procedure
positioning
Altered pigmentation
Altered tissue perfusion, arteriosclerosis
Anemia
Change in skin turgor
Edema
Inattentive staff leaning on the patient
Lack of position change especially when the
procedure lasts more than 2 hours
Nutritional defi cit such as protein or ascorbic
acid defi ciency
Obesity or emaciation
Physical immobilization secondary
to anesthesia
Pooling of patient body fl uids
Pooling of skin preparation or irrigation
solutions
Pressure on the peripheral nervous or vascular
systems
Prolonged pressure on the bony prominences
Shearing force during procedure
Does the patient show signs
of disruption or breakdown
of skin layers, especially over
bony prominences?
Outcome 3 The patient is free from evidence of impaired respiratory function related to operative or invasive procedure positioning.
Diagnosis Risk Factors Outcome IndicatorsRisk for Impaired
Respiratory Function
related to operative
or invasive procedure
positioning
Decreased respiratory function related to
mechanical restriction of the rib cage and
abdomen in various positions
Elderly
General or spinal anesthesia
Inattentive staff leaning on the patient
Neuromuscular or musculoskeletal impairment
Obesity
Perceptual or cognitive impairment (conscious
patient)
Pregnancy (third trimester)
Does the conscious patient
report shortness of breath or
diffi culty breathing?
Does the conscious patient
demonstrate labored
breathing, such as dyspnea?
Does the conscious patient
report feeling anxious or
apprehensive?
Does the patient demonstrate
changes in respiratory rate
and/or depth?
Are arterial blood gas values
within normal range
(pH 7.35–7.45, PCO2 35–45
mm Hg, PO2 75–100 mm Hg,
HCO3 24–28 mEq/L)?
Is the patient’s O2 saturation
within normal limits (95% or
greater)?
Is the patient cyanotic?
Chapter 8: Position the Patient 181
8
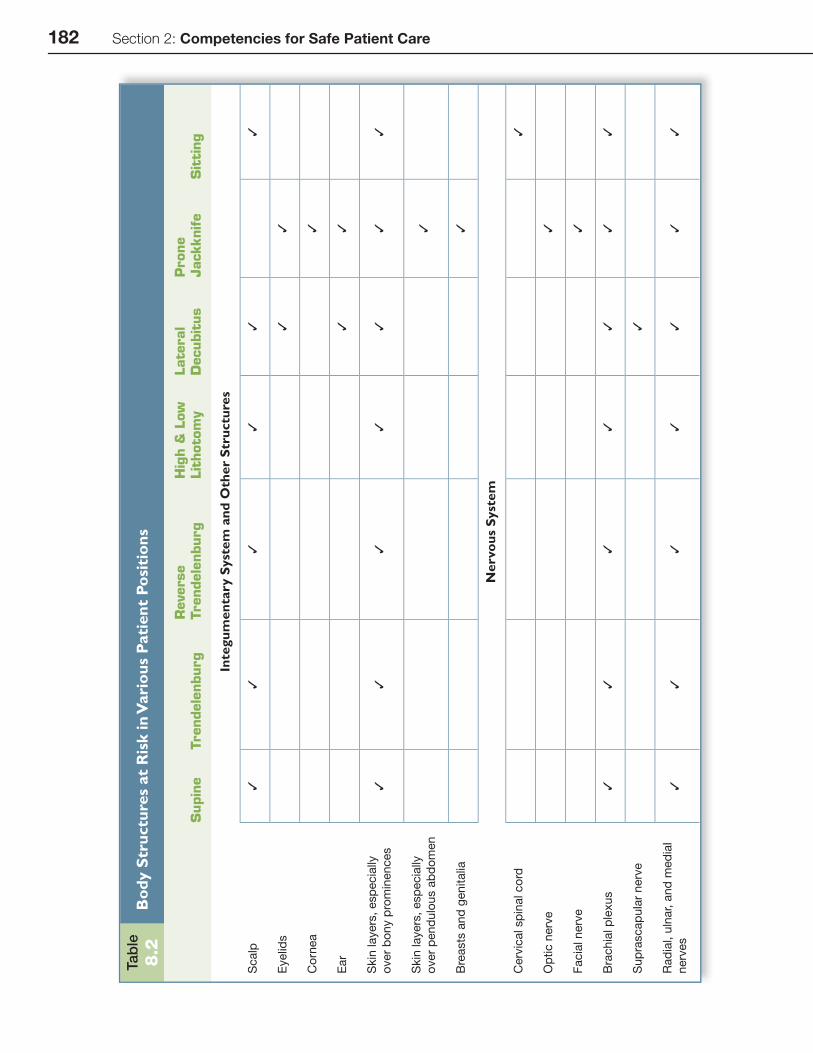
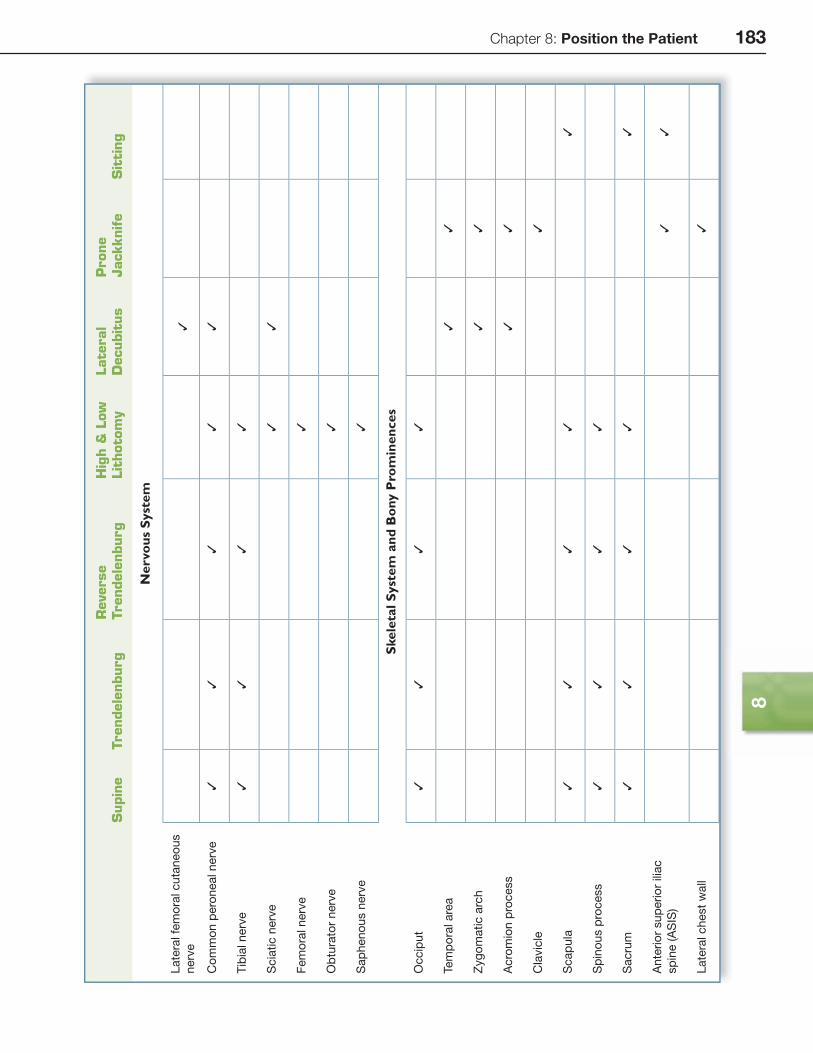
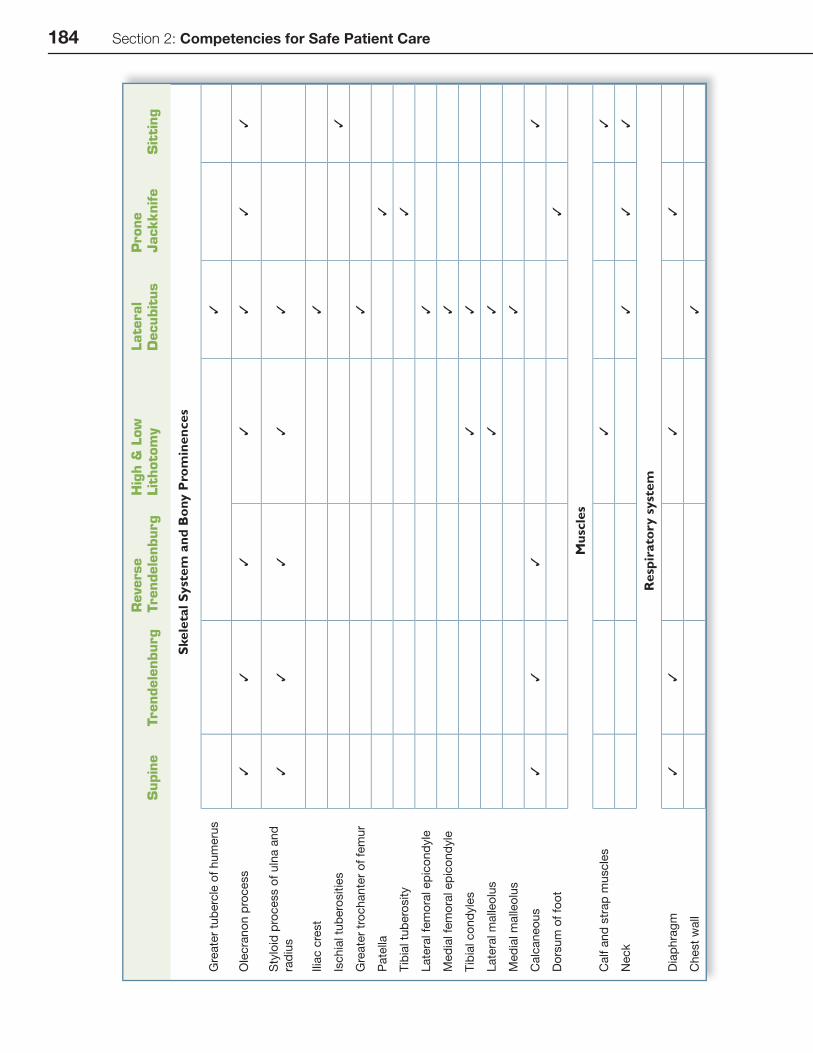
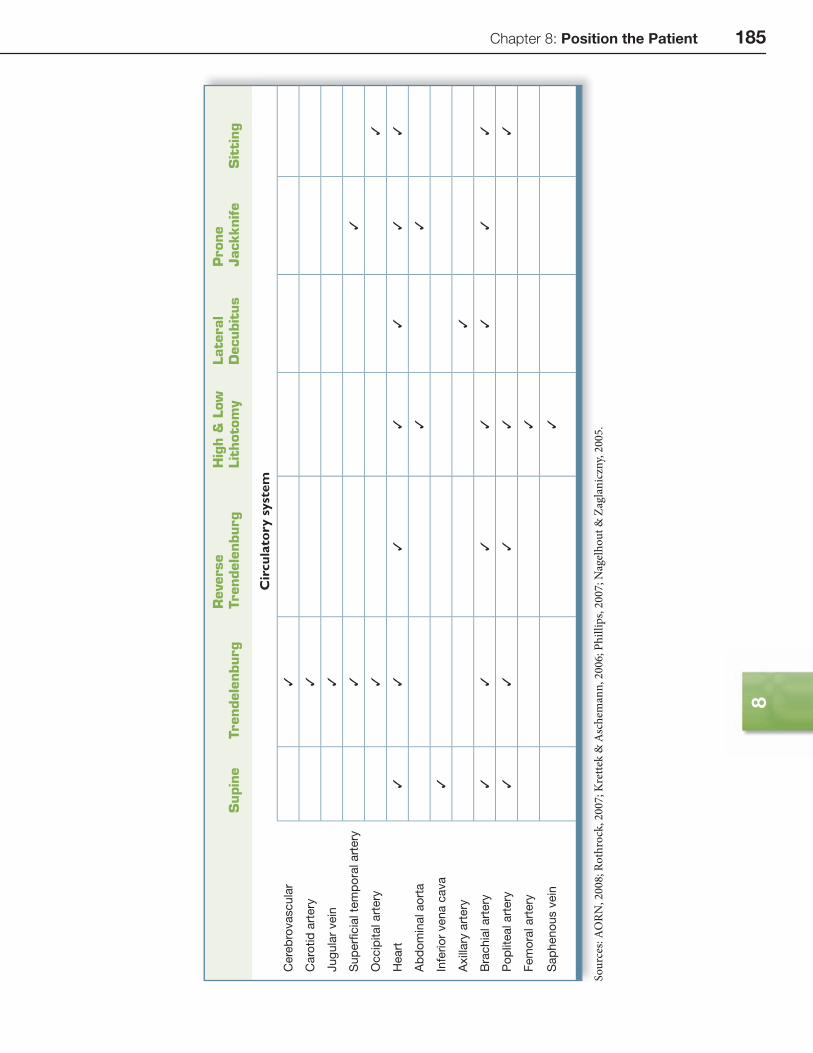
Body Structures at RiskPositioning places many of the patient’s body structures at risk for injury. During
the assessment, the nurse identifi es at-risk body structures through evaluation of the following systems: respiratory, circulatory, neurological, musculoskeletal, and integumentary. Th orough assessment will determine if the patient has an existing impairment. Awareness of vulnerable body structures will help the nurse plan for the positioning episode. As an example, the hip joint is an at-risk structure for the patient being placed in the lithotomy position. Th e nurse would determine the extent of range of motion in the hip and the presence of existing disease processes such as rheumatoid arthritis, of edema, and of prosthetic devices. Other factors that the nurse would consider in the assessment include age, height, weight, skin condition, and nutritional status. Procedure type and length must also be factored into plan-ning appropriate positioning interventions for an operative or invasive procedure (AORN, 2008). Specifi c body structures at risk are shown in Table 8.2.
PressureSome of the areas at risk during patient positioning are created by changes in the
skin and underlying tissue, the musculoskeletal system, the nervous system, the car-diovascular system, and the respiratory system. Other areas of vulnerability include the eyes, breasts, perineum, and fi ngers (Rothrock, 2007).
Th e skin and underlying tissue may be injured during positioning as a result of external pressure and time. When sitting or lying, the body weight is borne by the tissue overlying the bony prominences. Pressure over the bony prominence and the support structure is called external pressure. Th is pressure can also occur from a retractor or positioning device exerting force against the patient’s tissue. When external pressure exceeds capillary pressure, capillary fl ow is obstructed.
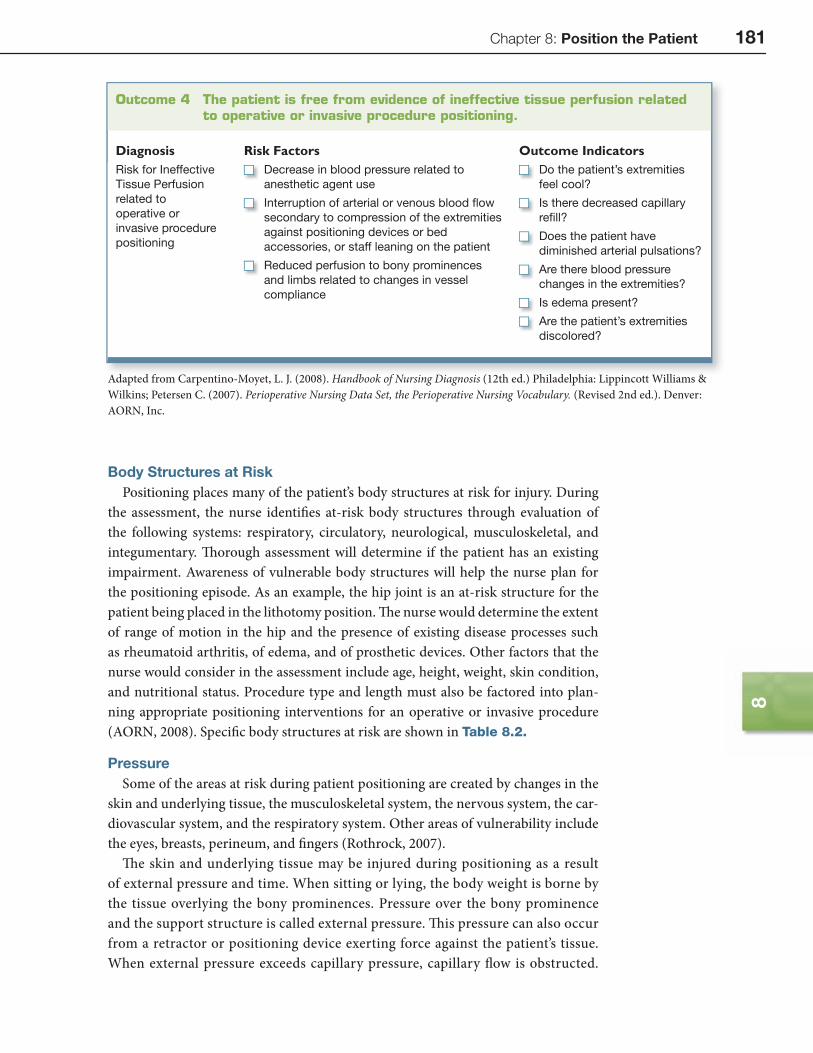
Outcome 4 The patient is free from evidence of ineffective tissue perfusion related to operative or invasive procedure positioning.
Diagnosis Risk Factors Outcome IndicatorsRisk for Ineffective
Tissue Perfusion
related to
operative or
invasive procedure
positioning
Decrease in blood pressure related to
anesthetic agent use
Interruption of arterial or venous blood fl ow
secondary to compression of the extremities
against positioning devices or bed
accessories, or staff leaning on the patient
Reduced perfusion to bony prominences
and limbs related to changes in vessel
compliance
Do the patient’s extremities
feel cool?
Is there decreased capillary
refi ll?
Does the patient have
diminished arterial pulsations?
Are there blood pressure
changes in the extremities?
Is edema present?
Are the patient’s extremities
discolored?
Adapted from Carpentino-Moyet, L. J. (2008). Handbook of Nursing Diagnosis (12th ed.) Philadelphia: Lippincott Williams & Wilkins; Petersen C. (2007). Perioperative Nursing Data Set, the Perioperative Nursing Vocabulary. (Revised 2nd ed.). Denver: AORN, Inc.
182 Section 2: Competencies for Safe Patient Care
Tab
le8
.2B
ody
Str
uctu
res
at R
isk
in V
ario
us P
atie
nt P
osi
tio
ns
Supin
eTrendele
nburg
Reverse
Trendele
nburg
Hig
h &
Low
Lit
hoto
my
Late
ral
Decubit
us
Prone
Jackknife
Sit
ting
Inte
gum
enta
ry S
yste
m a
nd O
ther
Str
uctu
res
Scalp
✓✓
✓✓
✓✓
Eyelid
s✓
✓
Co
rnea
✓
Ear
✓✓
Skin
layers
, esp
ecia
lly
over
bo
ny p
rom
inences
✓✓
✓✓
✓✓
✓
Skin
layers
, esp
ecia
lly
over
pend
ulo
us a
bd
om
en
✓
Bre
asts
and
genitalia
✓
Ner
vous
Sys
tem
Cerv
ical sp
inal co
rd✓
Op
tic n
erv
e✓
Facia
l nerv
e✓
Bra
chia
l p
lexus
✓✓
✓✓
✓✓
✓
Sup
rascap
ula
r nerv
e✓
Rad
ial, u
lnar, a
nd
med
ial
nerv
es
✓✓
✓✓
✓✓
✓
Chapter 8: Position the Patient 183
8
Supin
eTrendele
nburg
Reverse
Trendele
nburg
Hig
h &
Low
Lit
hoto
my
Late
ral
Decubit
us
Prone
Jackknife
Sit
ting
Ner
vous
Sys
tem
Late
ral fe
mo
ral cu
taneo
us
nerv
e✓
Co
mm
on p
ero
neal nerv
e✓
✓✓
✓✓
Tib
ial nerv
e✓
✓✓
✓
Scia
tic n
erv
e✓
✓
Fem
ora
l nerv
e✓
Ob
tura
tor
nerv
e✓
Sap
heno
us n
erv
e✓
Ske
leta
l Sys
tem
and
Bo
ny P
rom
inen
ces
Occip
ut
✓✓
✓✓
Tem
po
ral are
a✓
✓
Zyg
om
atic a
rch
✓✓
Acro
mio
n p
rocess
✓✓
Cla
vic
le✓
Scap
ula
✓✓
✓✓
✓
Sp
ino
us p
rocess
✓✓
✓✓
Sacru
m✓
✓✓
✓✓
Ante
rio
r sup
erio
r ili
ac
sp
ine (A
SIS
)✓
✓
Late
ral chest
wall
✓
184 Section 2: Competencies for Safe Patient Care
Supin
eTrendele
nburg
Reverse
Trendele
nburg
Hig
h &
Low
Lit
hoto
my
Late
ral
Decubit
us
Prone
Jackknife
Sit
ting
Ske
leta
l Sys
tem
and
Bo
ny P
rom
inen
ces
Gre
ate
r tu
berc
le o
f hum
eru
s✓
Ole
cra
no
n p
rocess
✓✓
✓✓
✓✓
✓
Sty
loid
pro
cess o
f uln
a a
nd
rad
ius
✓✓
✓✓
✓
Ilia
c c
rest
✓
Ischia
l tu
bero
sitie
s✓
Gre
ate
r tr
ochante
r o
f fe
mur
✓
Pate
lla✓
Tib
ial tu
bero
sity
✓
Late
ral fe
mo
ral ep
ico
nd
yle
✓
Med
ial fe
mo
ral ep
ico
nd
yle
✓
Tib
ial co
nd
yle
s✓
✓
Late
ral m
alle
olu
s✓
✓
Med
ial m
alle
olu
s✓
Calc
aneo
us
✓✓
✓✓
Do
rsum
of
foo
t✓
Mus
cles
Calf a
nd
str
ap
mu
scle
s✓
✓
Neck
✓✓
✓
Res
pira
tory
sys
tem
Dia
phra
gm
✓✓
✓✓
Chest
wall
✓
Chapter 8: Position the Patient 185
8
Sour
ces:
AORN
, 200
8; R
othr
ock,
200
7; K
rette
k &
Asc
hem
ann,
200
6; P
hilli
ps, 2
007;
Nag
elho
ut &
Zag
lani
czny
, 200
5.S
AORN
2008
Rh
k20
07K
k&
Ah
2006
Phill
i20
07N
lh&
Zl
i20
05
Supin
eTrendele
nburg
Reverse
Trendele
nburg
Hig
h &
Low
Lit
hoto
my
Late
ral
Decubit
us
Prone
Jackknife
Sit
ting
Cir
cula
tory
sys
tem
Cere
bro
vascula
r✓
Caro
tid
art
ery
✓
Jug
ula
r vein
✓
Sup
erfi
cia
l te
mp
ora
l art
ery
✓✓
Occip
ital art
ery
✓✓
Heart
✓✓
✓✓
✓✓
✓
Ab
do
min
al ao
rta
✓✓
Infe
rio
r vena c
ava
✓
Axill
ary
art
ery
✓
Bra
chia
l art
ery
✓✓
✓✓
✓✓
✓
Po
plit
eal art
ery
✓✓
✓✓
✓
Fem
ora
l art
ery
✓
Sap
heno
us v
ein
✓

186 Section 2: Competencies for Safe Patient Care
Th is obstructed fl ow results in diminished circulation to the area. Capillary blood fl ow disruption for more than two hours results in cellular destruction and irre-versible tissue damage (Mills, 2006). High pressure over a shorter duration is as signifi cant in development of tissue injury as long periods with less extrinsic pressure.
Based on research, the most signifi cant factors in predicting the risk of pressure ulcer development during operative procedures are increasing age, a medical diag-nosis of diabetes or vascular disease, and vascular procedures. Th ese fi ndings sup-port the belief that patients who have poor peripheral circulation, based on their decreased tissue tolerance, would be more at risk of developing pressure ulcers. Other risk factors for tissue injury include poor nutrition and smaller body size as well as obesity (Shultz, 2005).
Nerve InjuryStretching and compressing nerves can result in serious neuropathies occurring
in the upper and lower extremities, head and neck, and pelvis and spine. Peripheral nerve injury can cause sensory or motor injury or both. Th ere are some patients who have an increased risk for nerve injury based on metabolic conditions including diabetes mellitus, cancer, alcoholism, smoking, vitamin defi ciencies, previous nerve injuries, limitations in range of motion, obesity, and malnutrition (Nagelhout & Zaglaniczny, 2005; Rothrock, 2007, p. 136).
StretchStretching a peripheral nerve causes ischemia or nerve disruption, resulting in
nerve injury. Peripheral nerves have a high degree of fl exibility and laxity, but pro-longed stretching beyond the normal range can result in intraneural pressure increase great enough to cause ischemia and tissue death (Nagelhout & Zaglaniczny, 2005).
CompressionInjury induced by pressure is dependent on both on the amount and dura-
tion of pressure. Typically, duration of pressure is of more signifi cance than the quantity of pressure, but extremely high pressure can cause injury (Nagelhout & Zaglaniczny, 2005).
Ulnar NerveTh e ulnar nerve is at high risk for injury due to the anatomic position of the
nerve in the medial epicondyle. Th e nerve lacks adequate cover from connective tissue or muscles, thus exposing it to higher risk from pressure. Extreme fl ex-ion or pronation increases pressure risk (Krettek & Aschemann, 2006). Padding should be placed around the elbow to prevent direct pressure on the olecranon process.
Brachial PlexusTh e brachial plexus exits the intervertebral foramina of the cervical spine and runs
through the anterior and middle scalene muscles. Th e plexus divides into trunks that run through the narrow space between the clavicle and the fi rst rib to the axilla
Chapter 8: Position the Patient 187
8
(Krettek & Aschemann, 2006). Th e plexus travels in close proximity to bony struc-tures and immobile soft tissue structures and is fi xed in two locations. Th e anatomi-cal structure of the brachial plexus increases the risk for injury related to stretch and direct nerve compression (Rothrock, 2007).
Causes of injury to the brachial plexus include hyperabduction of the arm and the use of shoulder braces. Th e position of the cervical spine and the head are fac-tors that greatly infl uence the development of injury. Guidelines for positioning the upper extremity include:
• Limit abduction to a maximum of 90 degrees • Avoid simultaneous abduction, supination, and extension • Maintain the head and cervical spine in neutral position • Avoid dorsal extension and lateral fl exion of the head to the side opposite of the
arm being positioned • Avoid extension and abduction of the arms above the head (Rothrock,
2007)
Use caution when positioning the arms in the prone position, preferably tucking the arms at the side.
Shoulder braces are used to support the patient positioned in head-down tilt or Trendelenburg. Th e shoulder braces can compress the brachial plexus against the bony structures within the shoulder complex. While there are newer techniques to minimize the use of shoulder braces, such as non-slip mattresses and modifying operative techniques, the need to use shoulder braces still exists. When braces are used, the following guidelines are recommended:
• Use only when absolutely necessary • Pad shoulder braces well and position over the acromion and not the clavicle or
the root of the neck • Use a non-slip mattress for the head-down tilt position • Avoid the use of wrist straps • Avoid abduction of arms greater than 90 degrees • Tuck arms at the sides whenever possible • Adjust the shoulder braces before tilting the table • Recheck the position of the braces and torso aft er tilting the table (Nagelhout &
Zaglaniczny, 2005)
Lower ExtremityInjury to the nerves of the lower extremities can occur because of compression
or stretching most commonly experienced when placed in the lithotomy position. Th e nerves at risk include the peroneal, posterior tibial, femoral obturator, and sci-atic nerves. Pressure exerted on the lateral aspect of the knee from a stirrup bar or other foot holder against the peroneal nerve can result in foot drop. Care should be taken when placing popliteal knee supports, as pressure on the posterior tibial nerve in this area can result in numbness of the foot. Pressure placed against the medial tibial condyle produces compression of the femoral obturator nerve and can result
188 Section 2: Competencies for Safe Patient Care
in paralysis and numbness of the calf muscle. Th is can occur when the medial side of the knee is pressed against a metal knee-supporting device. Excess fl exion of the hips with high extension, such as in high lithotomy position, can create both compression and stretching injury to the sciatic nerve (Spry, 2005).
Physical LimitationsPhysical limitations for patient positioning are a risk factor for injury and
should be considered when preparing the patient for surgery. Such limitations include:
• Decreased range of motion • Previous operative procedures • Preexisting medical conditions (arthritis or diabetes) • Presence of joint prosthesis • Patient’s height and weight (O’Connel, 2006)
An awake and alert patient can restrict range of motion to prevent injury. Th e anesthetized patient does not have this safety mechanism, therefore the nurse and the operative or invasive procedure team must be alert to situations in which injury could occur. Moving the patient from the stretcher to the bed should be performed while maintaining the patient in proper body alignment. Avoid jerking motions and support the extremities as much as possible during the transfer and positioning process.
RespirationsTh e respiratory system can be compromised during positioning due to an upward
shift in the viscera placing pressure against the diaphragm, typically in the lithotomy and Trendelenburg positions. Th e lateral position results in decreased lung capac-ity due to the weight of the body putting pressure on the lower chest. Th is creates mechanical interference with the chest wall, diaphragm, and abdominal wall. Th e prone position creates a decreased cardiac index and stroke volume with increased systemic and pulmonary vascular resistance (Nagelhout & Zaglaniczny, 2005). Th e operative or invasive procedure team must be aware of the eff ect of the patient’s position and compensate appropriately.
Th roughout the positioning process, attention must be paid to the areas at risk for injury. Th e appropriate measures to reduce risk for injury are detailed as each posi-tion is discussed later in this chapter.
NURSING ACTIVITIES COMMON TO ALL POSITIONSSelecting Supplies and Equipment
Supplies and equipment needed for positioning the patient depend on patient variables such as height, weight, physiological condition, and the required posi-tion for the procedure. Th e nurse plans for the positioning equipment prior to the procedure. Th is is accomplished by looking at the planned procedure, the physician’s preferences, and the patient condition. Further evaluation of the specifi c case such as
Chapter 8: Position the Patient 189
8
the length of procedure, the operative approach, and the use of radiological equip-ment provides more information for appropriate planning (AORN, 2008). Universal Protocol dictates that the operative or invasive procedure team verifi es the correct patient position and equipment during the “time out” (Joint Commission, 2008).
Basic positioning supplies and equipment include arm boards, arm restraints, pillow or headrest, padding for bony prominences, safety strap, and overlays for bed mattresses. Padding may include gel pads, foam, and blankets. Th e nurse should be aware that foam pads might not provide eff ective padding when used in areas of heavy weight, as this compresses the foam quickly and negates the pressure reducing eff ect. Convoluted foam mattress overlays (egg crate mattress) may be more eff ec-tive in reducing pressure, but not for obese patients. Pillows, blankets, and molded foam devices are less eff ective during long procedures and provide only minimal pressure reduction. Towel rolls and sheets do not decrease pressure and linen may actually cause tissue damage (AORN, 2008). Both foam or gel mattresses and vis-coelastic overlays prevent skin changes more eff ectively than standard mattresses (Schultz, 2005).
Some supplies are procedure specifi c and include items such as protective leg cov-erings (foam boots, stockings, and towels), stirrups, and stirrup holders for lithotomy positioning. Other specialized supplies such as a padded footboard, pelvic wedge, table extension, beanbag, padded knee rests, supporting frames, backrest or face rest, and toboggans are identifi ed on an as needed basis in the nursing care plan.
Preparing the BedBefore transferring the patient, check the bed for proper functioning. Ensure that
the bed can he elevated and lowered, fl exed up and down, placed in the Trendelen-burg and reverse Trendelenburg positions, horizontally rotated to the left and the right, and modifi ed for the lithotomy and sitting positions.
On electrically operated beds, look for frayed cords. Make sure that the control box is clearly marked and operational.
Inspect the bed for cleanliness. Check the underside of the foot of the bed, the base of the bed, and the bed railings. During bed cleaning these areas may be over-looked and harbor dried blood, body fl uids, or prepping solutions and tissue debris. Look for cracks or tears in bed pad covers. Crack or tears may present an infection control hazard.
Look for hazards on the bed such as sharp edges and loose screws, nuts, and bolts. Confi rm that devices used to secure bed pads to the bed are intact. Loose securing devices may result in pad movement while the patient is being transferred to the bed or while being positioned. Bed pads should be of equal height. Modify the bed for the procedure and lock it in place. Transfer the patient to the bed, as described in Chapter 5, Transfer the Patient.
Centering the Patient on the BedAlign the patient’s head, spine, and legs. Th e patient’s legs should not be crossed.
Apply the safety strap at least 2 inches (5 cm) above the knees. Insert a hand between the strap and the thighs to check for excessive pressure.
190 Section 2: Competencies for Safe Patient Care
Placing the Patient’s Arms on the Arm Boards or Tucking at SidePosition arm boards at less than a 90-degree angle to the patient’s body (Phillips,
2007). Caution must be exercised for patients with restricted range of motion. Ensure that the arm boards and bed pad are of the same height to prevent the arms from fall-ing below the body or being elevated. Th is helps to prevent the potential for stretch and possibly compression injuries. Secure each arm onto a padded arm board with a safety strap.
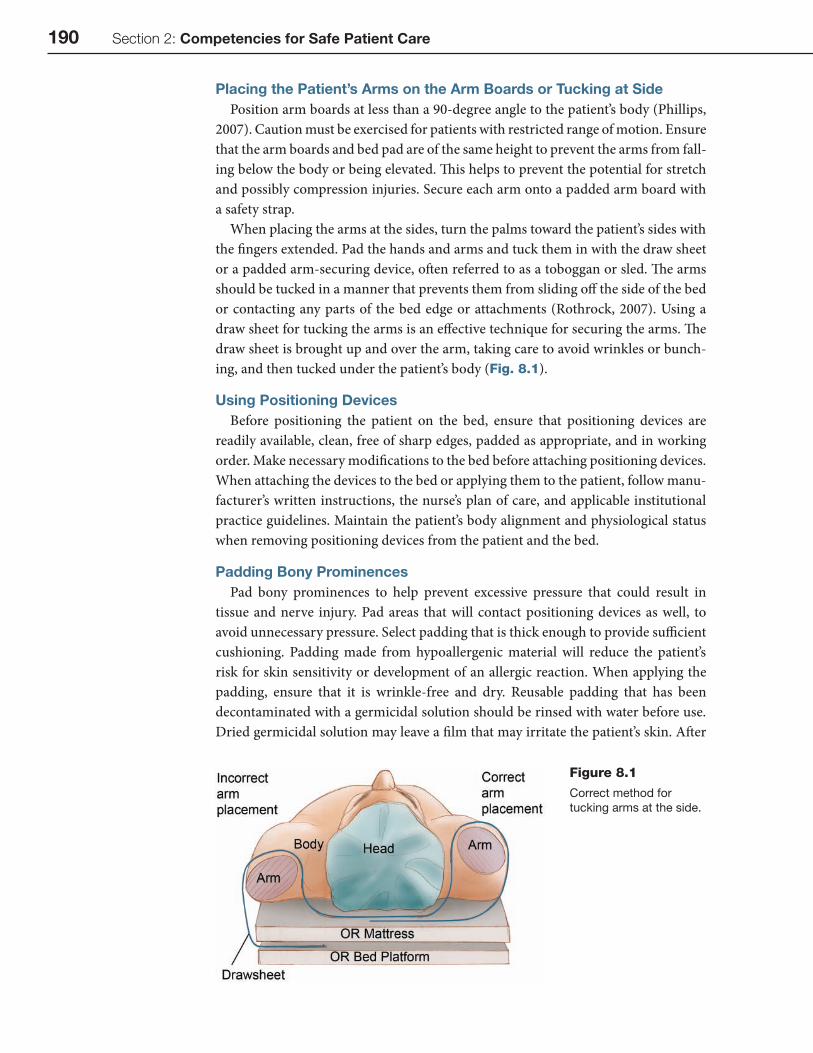
When placing the arms at the sides, turn the palms toward the patient’s sides with the fi ngers extended. Pad the hands and arms and tuck them in with the draw sheet or a padded arm-securing device, oft en referred to as a toboggan or sled. Th e arms should be tucked in a manner that prevents them from sliding off the side of the bed or contacting any parts of the bed edge or attachments (Rothrock, 2007). Using a draw sheet for tucking the arms is an eff ective technique for securing the arms. Th e draw sheet is brought up and over the arm, taking care to avoid wrinkles or bunch-ing, and then tucked under the patient’s body (Fig. 8.1).
Using Positioning DevicesBefore positioning the patient on the bed, ensure that positioning devices are
readily available, clean, free of sharp edges, padded as appropriate, and in working order. Make necessary modifi cations to the bed before attaching positioning devices. When attaching the devices to the bed or applying them to the patient, follow manu-facturer’s written instructions, the nurse’s plan of care, and applicable institutional practice guidelines. Maintain the patient’s body alignment and physiological status when removing positioning devices from the patient and the bed.
Padding Bony ProminencesPad bony prominences to help prevent excessive pressure that could result in
tissue and nerve injury. Pad areas that will contact positioning devices as well, to avoid unnecessary pressure. Select padding that is thick enough to provide suffi cient cushioning. Padding made from hypoallergenic material will reduce the patient’s risk for skin sensitivity or development of an allergic reaction. When applying the padding, ensure that it is wrinkle-free and dry. Reusable padding that has been decontaminated with a germicidal solution should be rinsed with water before use. Dried germicidal solution may leave a fi lm that may irritate the patient’s skin. Aft er
Figure 8.1
Correct method for
tucking arms at the side.

Chapter 8: Position the Patient 191
8
padding is applied, the nurse assesses the patient to determine if the padding is pro-viding the intended integumentary protection and pressure relief.
Moving the Anesthetized PatientTh e patient may require repositioning on the bed aft er the induction of anesthesia.
Safe patient positioning requires coordination of the entire operative or invasive procedure team. Th e team must use clear communication to assure that each member knows his or her responsibility during the positioning process. Check with the anes-thesia provider before positioning or repositioning the anesthetized patient. Move the patient only with adequate assistance. Before the move, remove or loosen the leg safety strap. Leaving the strap attached during a move may result in skin trauma from pinching or shearing force. When moving the patient, do so slowly and as a coordinated team, maintaining proper body alignment and supporting the patient’s extremities and joints to minimize potential injury. Prevent excessive abduction of the patient’s arms during the move. If necessary, cross the patient’s arms across his or her chest during the move. Aft er the move is complete, reapply or tighten the safety strap as applicable. Check that it is secure and not constrictive. Reassess the patient for body alignment and tissue integrity before draping (AORN, 2008).
Communication and DocumentationCommunication with the patient and members of the operative or invasive pro-
cedure team is essential. Th e nurse should inform the patient of the positioning pro-cedure during the patient teaching session. Specifi c patient requirements should be communicated with other members of the team.
Documentation of positioning is a professional responsibility. At a minimum, the documentation should include a preprocedure assessment that notes the patient’s overall skin condition upon arrival to the operative or invasive procedure suite, identifi ed risk factors, nursing diagnoses with expected outcomes, patient posi-tion/reposition, positioning devices, personnel positioning the patient, incidents of reassessment, and postprocedure assessment for signs and symptoms of injury due to positioning (AORN, 2008).
PATIENT CARE ACTIVITIES FOR SPECIFIC POSITIONSStaffi ng Requirements
Patient positioning is a team eff ort and should be coordinated through eff ective communication of each team member’s responsibilities. Th e number of people required to assist in positioning is dependent upon the type of position, the parts of the body that must be moved and supported, and the need to move in tandem (such as in raising legs for the lithotomy position). Th e nurse should take an active role as a participant in the safe positioning of the patient (AORN, 2008). Th e nurse maintains the patient’s dignity by providing privacy during the transfer and positioning. Th is may include such actions as keeping doors closed, keeping the patient exposed only to the extent necessary for the procedure, restricting access to the procedure room to authorized personnel, and providing care without prejudicial behavior (AORN, 2008). Th e anes-thesia provider should always have responsibility for the patient’s airway and coordi-nating the movement of an anesthetized patient. Th e nurse verifi es that appropriate
192 Section 2: Competencies for Safe Patient Care
actions are taken to promote skin integrity and body alignment while using the correct positioning devices to promote operative exposure. Final inspection and approval of the patient’s position is the responsibility of the physician or the licensed independent practitioner involved in the operative or invasive procedure.
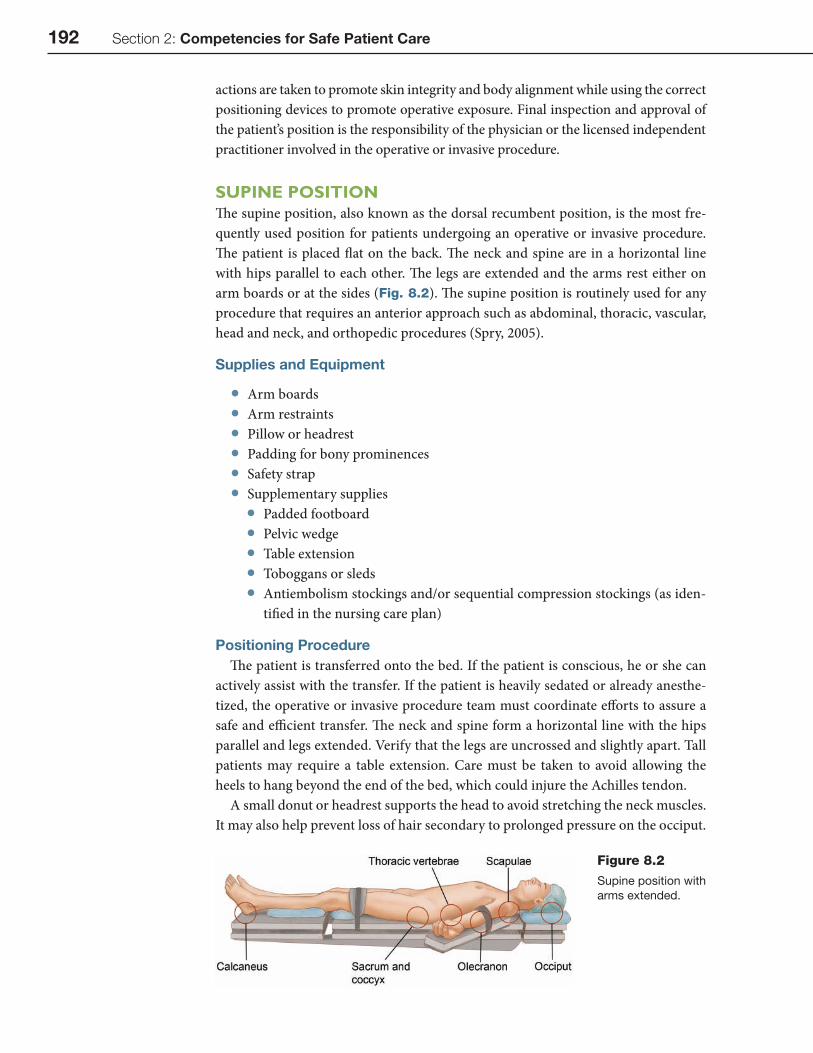
SUPINE POSITIONTh e supine position, also known as the dorsal recumbent position, is the most fre-quently used position for patients undergoing an operative or invasive procedure. Th e patient is placed fl at on the back. Th e neck and spine are in a horizontal line with hips parallel to each other. Th e legs are extended and the arms rest either on arm boards or at the sides (Fig. 8.2). Th e supine position is routinely used for any procedure that requires an anterior approach such as abdominal, thoracic, vascular, head and neck, and orthopedic procedures (Spry, 2005).
Supplies and Equipment
• Arm boards • Arm restraints • Pillow or headrest • Padding for bony prominences • Safety strap • Supplementary supplies • Padded footboard • Pelvic wedge • Table extension • Toboggans or sleds • Antiembolism stockings and/or sequential compression stockings (as iden-
tifi ed in the nursing care plan)
Positioning ProcedureTh e patient is transferred onto the bed. If the patient is conscious, he or she can
actively assist with the transfer. If the patient is heavily sedated or already anesthe-tized, the operative or invasive procedure team must coordinate eff orts to assure a safe and effi cient transfer. Th e neck and spine form a horizontal line with the hips parallel and legs extended. Verify that the legs are uncrossed and slightly apart. Tall patients may require a table extension. Care must be taken to avoid allowing the heels to hang beyond the end of the bed, which could injure the Achilles tendon.
A small donut or headrest supports the head to avoid stretching the neck muscles. It may also help prevent loss of hair secondary to prolonged pressure on the occiput.
Figure 8.2
Supine position with
arms extended.
Chapter 8: Position the Patient 193
8
Arms are placed on padded arm boards or tucked at the side. Be sure that the fi ngers of tucked arms are free from the bed breaks and attachments. Follow the guidelines described earlier for placement of the arms.
For long procedures, place a small pillow behind the back in the lumbar curvature to help prevent back strain that can occur when the muscles become relaxed during anesthesia. A pillow may also be placed under the knees to lessen strain on the back. Th e pillow should be placed above the popliteal space to avoid pressure on the popliteal artery, common peroneal nerve, and the tibial nerve, which run superfi cially through the popliteal space. A padded footboard may be required to avoid plantar fl exion and result-ing foot drop and should be used for any debilitated patient. Th e footboard must extend beyond the toes to prevent crushing injuries. Procedures expected to take longer than 2 hours increase the risk for skin injury, particularly from pressure duration. It is impor-tant to pad the bony prominences and other areas at risk for pressure (Spry, 2005).
Apply the table strap loosely over the upper thighs, at least 2 inches (5 cm) above the knee to prevent hyperextension of the knees. Make sure the strap is secure, but not constricting and that a sheet or blanket is placed between the patient’s skin and the safety strap.
Increased pressure on the vena cava occurs from compression by abdominal vis-cera in obese patients, abdominal masses, or a fetus in a pregnant woman resulting in decreased blood return to the heart and lowered blood pressure. To relieve some of this pressure, a wedge is placed under the right fl ank area causing the patient to tilt slightly to the left (Rothrock, 2007).
Potential Adverse Effects of the Supine PositionEvery patient position has the potential for adverse eff ects. Each position dis-
cussed in this chapter will have a table listing these adverse eff ects. Table 8.3 lists the potential adverse eff ects of the supine position.
TRENDELENBURG POSITIONTh e Trendelenburg position is a modifi cation of the supine (dorsal recumbent) position. Also referred to as the head-down tilt position, the patient is placed in the supine position and the bed is modifi ed to varying degrees of the head-down tilt. Th e lower section of the bed may be altered to lower the knees (Fig. 8.3). Th is position causes the abdominal organs to move out of the pelvis, improving the view of the pel-vic organs. However, because of the risk for physiological stresses or abnormalities, this position should be used with caution (Nagelhout & Zaglaniczny, 2005).
Supplies and Equipment
• Arm boards • Arm restraints • Pillow or headrest • Padding for boney prominences • Safety strap • Supplementary supplies and equipment • Padded foot board • Pelvic wedge

194 Section 2: Competencies for Safe Patient Care
• Table extension • Toboggans or sleds • Antiembolism stockings and/or sequential compression stockings (as iden-
tifi ed in the nursing care plan) • Shoulder braces (not recommended)
Positioning ProcedurePosition the patient as described for the supine position. If lowering the knee
section of the bed to minimize pressure on the calves and knee joints, position the knees over the break in the bed so that safe anatomical positioning is maintained (Rothrock, 2007). Tilt the bed, feet up and head down, to the desired angle. When
Figure 8.3
Trendelenburg
position with knees
fl exed.
Table8.3
Potential Adverse Effects of the Supine Position
Cause Effect
Prolonged (greater than 2 hours) pressure
on tissue
→ Skin breakdown at heels, elbows, and sacrum
Crossed ankles throughout the procedure → Peroneal nerve damage
Positioning pressure on the popliteal space
from positioning aids such as pillows and
straps that are not appropriately placed
→ Common peroneal nerve injury
Arms abducted greater than 90 degrees → Brachial plexus injury—sensory and motor loss
ranging from a portion of to the entire arm
Prolonged arm pronation or fl exion of the
elbow greater than 90 degrees
→ Ulnar nerve compression injury
Organs resting against the upper abdominal
wall
→ Decreased diaphragmatic excursion
Position-induced → Hypotension
Reduction of venous pressure, poor venous
return
→ Venous pooling in legs
Induction of anesthesia → Decreased mean arterial pressure, heart rate, and
peripheral resistance
Vena cava and aortic compression/obstruction → Pregnant patients—risk of hypotension and
diminished placental and uterine perfusion
Sources: AORN, 2008; Rothrock, 2007; Krettek & Aschemann, 2006; Phillips, 2007; Nagelhout & Zaglaniczny, 2005.
Chapter 8: Position the Patient 195
8
Table8.4
Potential Adverse Effects of the Trendelenburg Position
Cause Effect
Prolonged (greater than 2 hours)
pressure on tissue
→ Skin breakdown at vulnerable weight-bearing bony
prominences
Increased venous pressure → Retinal detachment or cerebral edema
Improper positioning of shoulder braces → Brachial plexus injury
Displaced abdominal contents exerting
pressure against the diaphragm;
Increased in obese individuals
→ Increased work of spontaneous ventilation
Unrecognized blood loss due to
gravitational fl ow of blood away from the
operative fi eld, reduced cardiac output
→ Hypotension
Congestion of cerebral arteries → Venous thrombosis
Positioning and restraining devices
or fl exed knees diminish blood fl ow
→ Occlusion of superfi cial veins and thrombophlebitis
Dependent position of head and thorax → Increased intracranial pressure
Dependent position of head, abnormal
cranial circulation
→ Increased intraocular pressure
Sources: AORN, 2008; Rothrock, 2007; Krettek & Aschemann, 2006; Phillips, 2007; Nagelhout & Zaglaniczny, 2005.
tilting the bed, be sure equipment is clear of the bed to avoid catching or tipping the equipment. Th e Mayo stand should be raised to prevent pressure to the feet. Shoul-der braces may be used, with caution, to secure the patient. Th e braces should be applied carefully in the appropriate position, as described earlier, to minimize the risk of brachial plexus injury.
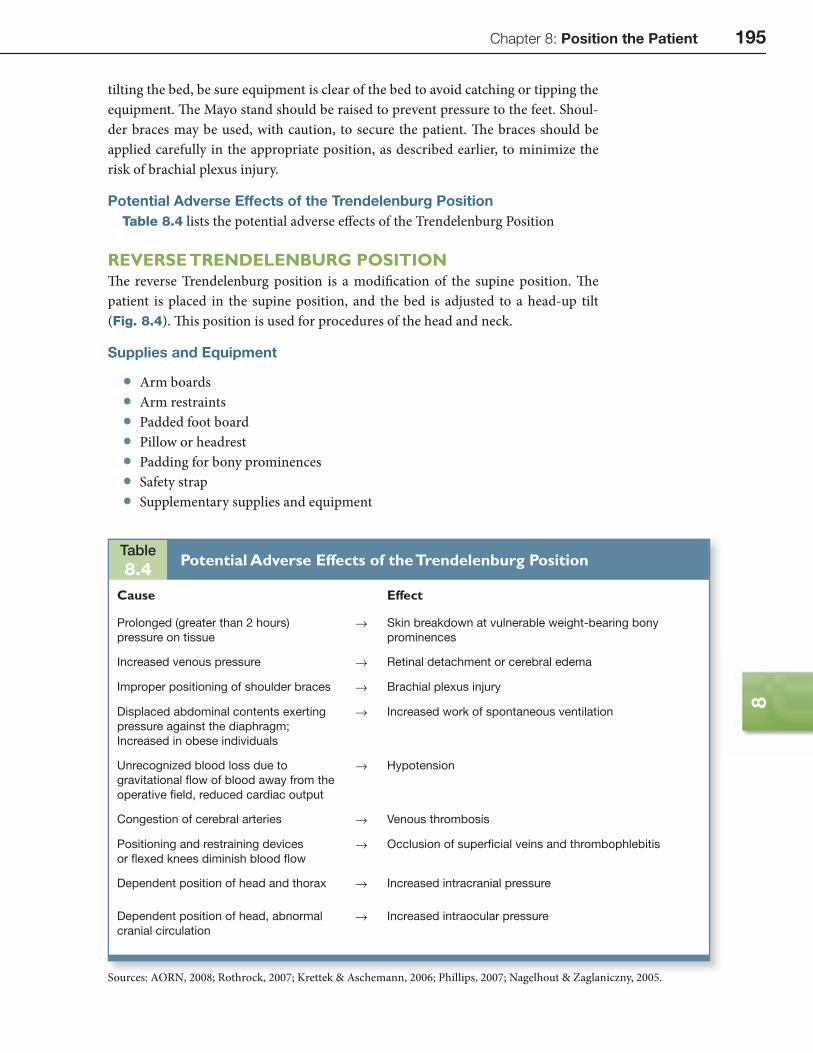
Potential Adverse Effects of the Trendelenburg PositionTable 8.4 lists the potential adverse eff ects of the Trendelenburg Position
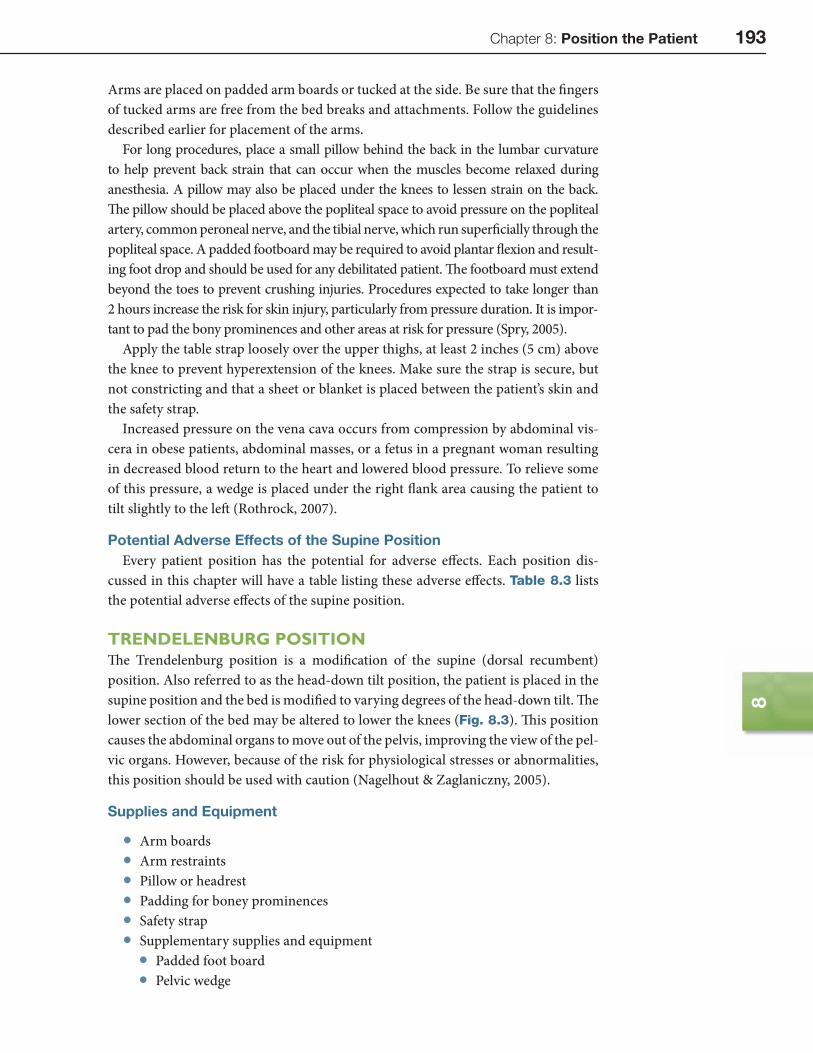
REVERSE TRENDELENBURG POSITIONTh e reverse Trendelenburg position is a modifi cation of the supine position. Th e patient is placed in the supine position, and the bed is adjusted to a head-up tilt (Fig. 8.4). Th is position is used for procedures of the head and neck.
Supplies and Equipment
• Arm boards • Arm restraints • Padded foot board • Pillow or headrest • Padding for bony prominences • Safety strap • Supplementary supplies and equipment
196 Section 2: Competencies for Safe Patient Care
• Pelvic wedge • Table extension • Toboggans or sleds • Antiembolism stockings and/or sequential compression stockings (as
identifi ed in the nursing care plan)
Positioning ProcedurePosition the patient as described for the supine position. Attach a padded foot-
board to the foot of the bed to keep the patient from sliding toward the foot of the bed. Th is intervention will help prevent shearing force as the bed is tilted. Tilt the bed, feet down and head up, to the desired angle.
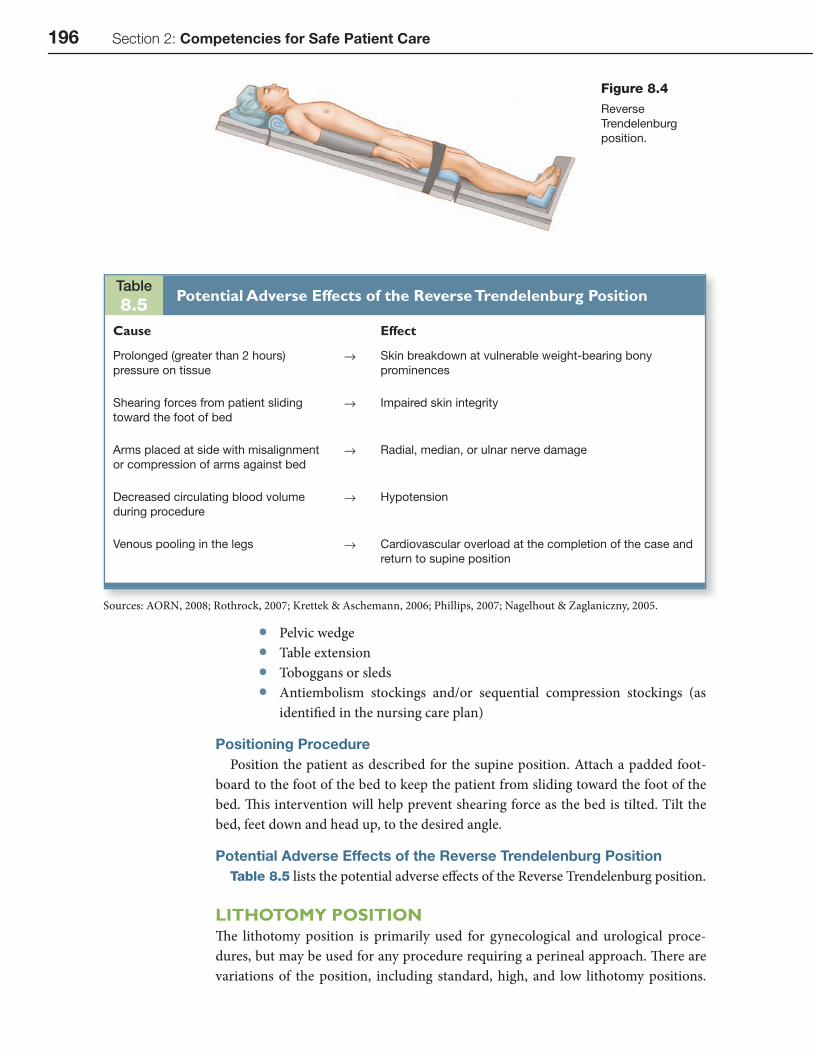
Potential Adverse Effects of the Reverse Trendelenburg PositionTable 8.5 lists the potential adverse eff ects of the Reverse Trendelenburg position.
LITHOTOMY POSITIONTh e lithotomy position is primarily used for gynecological and urological proce-dures, but may be used for any procedure requiring a perineal approach. Th ere are variations of the position, including standard, high, and low lithotomy positions.
Table8.5
Potential Adverse Effects of the Reverse Trendelenburg Position
Cause Effect
Prolonged (greater than 2 hours)
pressure on tissue
→ Skin breakdown at vulnerable weight-bearing bony
prominences
Shearing forces from patient sliding
toward the foot of bed
→ Impaired skin integrity
Arms placed at side with misalignment
or compression of arms against bed
→ Radial, median, or ulnar nerve damage
Decreased circulating blood volume
during procedure
→ Hypotension
Venous pooling in the legs → Cardiovascular overload at the completion of the case and
return to supine position
Sources: AORN, 2008; Rothrock, 2007; Krettek & Aschemann, 2006; Phillips, 2007; Nagelhout & Zaglaniczny, 2005.
Figure 8.4
Reverse
Trendelenburg
position.
Chapter 8: Position the Patient 197
8
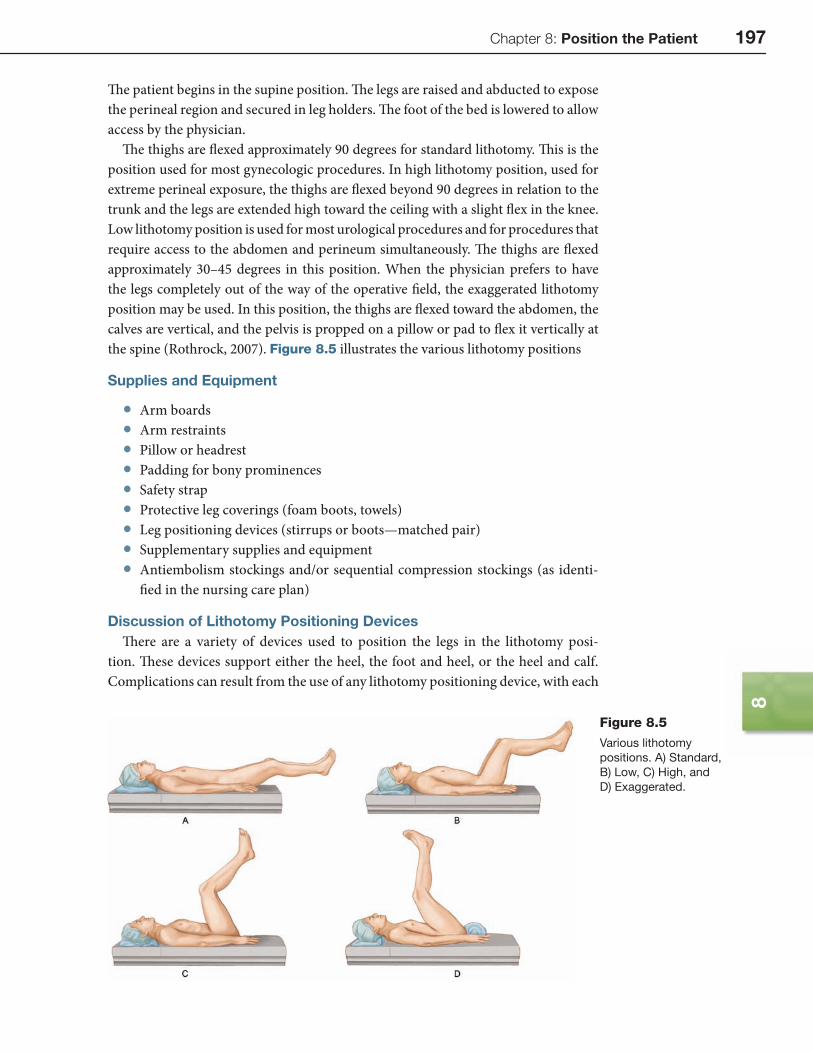
Th e patient begins in the supine position. Th e legs are raised and abducted to expose the perineal region and secured in leg holders. Th e foot of the bed is lowered to allow access by the physician.
Th e thighs are fl exed approximately 90 degrees for standard lithotomy. Th is is the position used for most gynecologic procedures. In high lithotomy position, used for extreme perineal exposure, the thighs are fl exed beyond 90 degrees in relation to the trunk and the legs are extended high toward the ceiling with a slight fl ex in the knee. Low lithotomy position is used for most urological procedures and for procedures that require access to the abdomen and perineum simultaneously. Th e thighs are fl exed approximately 30–45 degrees in this position. When the physician prefers to have the legs completely out of the way of the operative fi eld, the exaggerated lithotomy position may be used. In this position, the thighs are fl exed toward the abdomen, the calves are vertical, and the pelvis is propped on a pillow or pad to fl ex it vertically at the spine (Rothrock, 2007). Figure 8.5 illustrates the various lithotomy positions
Supplies and Equipment
• Arm boards • Arm restraints • Pillow or headrest • Padding for bony prominences • Safety strap • Protective leg coverings (foam boots, towels) • Leg positioning devices (stirrups or boots—matched pair) • Supplementary supplies and equipment • Antiembolism stockings and/or sequential compression stockings (as identi-
fi ed in the nursing care plan)
Discussion of Lithotomy Positioning DevicesTh ere are a variety of devices used to position the legs in the lithotomy posi-
tion. Th ese devices support either the heel, the foot and heel, or the heel and calf. Complications can result from the use of any lithotomy positioning device, with each
Figure 8.5
Various lithotomy
positions. A) Standard,
B) Low, C) High, and
D) Exaggerated.
198 Section 2: Competencies for Safe Patient Care
one possessing its own unique risks. In lithotomy position, regardless of the posi-tioning device used, nerve injury can occur. Excessive abduction of the thigh results in femoral nerve entrapment and hyperfl exion of the thigh can cause damage to the sciatic and obturator nerves due to stretch injury (Rothrock, 2007).
Th e heel-supporting device is commonly referred to as the candy cane stirrup, consisting of a strap that wraps around the ankle and the plantar surface of the foot. Th e stirrup is secured to a pole that is attached to the side of the bed. When using the candy cane stirrups, uncontrolled abduction of the leg can occur, allowing the knee or calf to rest on the pole. Th is can result in pressure over the common peroneal nerve that curves over the fi bula (Rothrock, 2007).
Providing support at the knee area reduces the uncontrolled abduction, but care must be used to avoid pressure on the peroneal, tibial, and saphenous nerves in the popliteal space or the medial or lateral aspects of the knee.
Th e calf-supporting device supports the entire weight of the leg on the calf and places it at great risk for developing compartment syndrome. Compartment syn-drome is a complication that can be attributed to prolonged direct pressure on the muscles of the calf. Th e prolonged pressure increases the pressure within the muscle compartment. Th is is a critical complication and frequently requires operative inter-vention (Nagelhout & Zaglaniczny, 2005). While the calf-supporting device may provide more stability than the ankle strap stirrup, it is still not optimal.
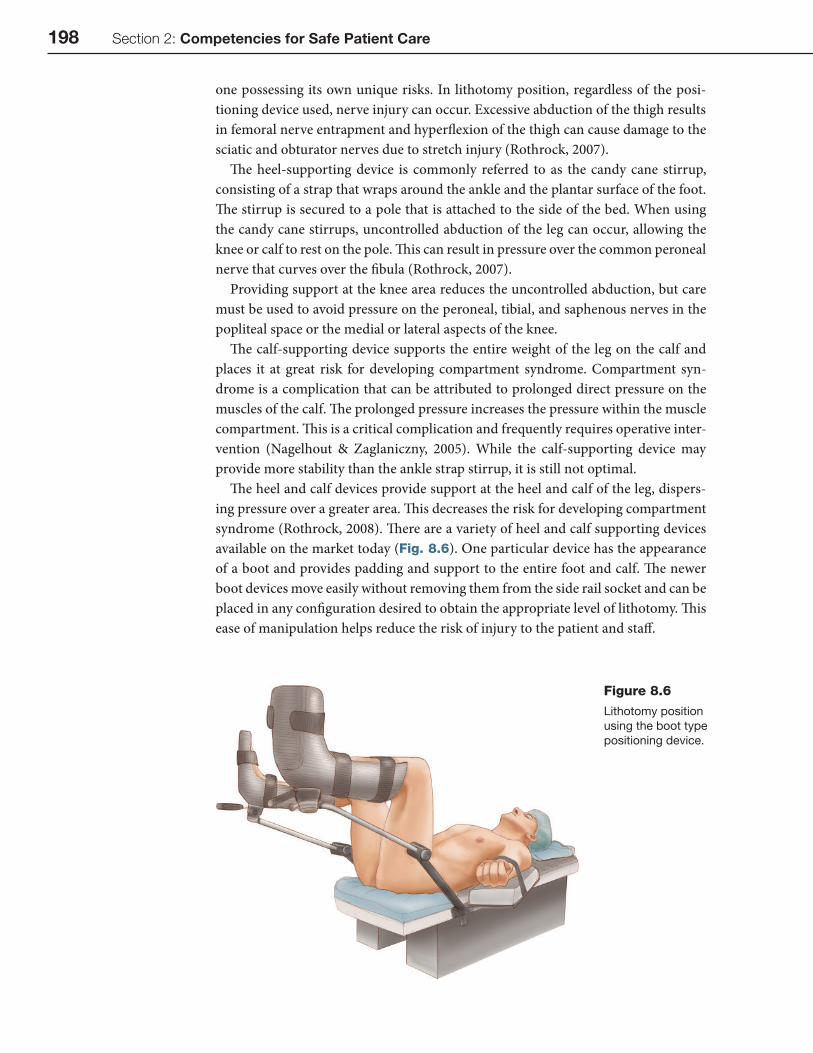
Th e heel and calf devices provide support at the heel and calf of the leg, dispers-ing pressure over a greater area. Th is decreases the risk for developing compartment syndrome (Rothrock, 2008). Th ere are a variety of heel and calf supporting devices available on the market today (Fig. 8.6). One particular device has the appearance of a boot and provides padding and support to the entire foot and calf. Th e newer boot devices move easily without removing them from the side rail socket and can be placed in any confi guration desired to obtain the appropriate level of lithotomy. Th is ease of manipulation helps reduce the risk of injury to the patient and staff .
Figure 8.6
Lithotomy position
using the boot type
positioning device.
Chapter 8: Position the Patient 199
8
Regardless of the device selected to maintain the lithotomy position, care must be exercised to avoid injury. Placing padding over all areas in contact with any part of the positioning device is very important. Following the proper procedure for placing the patient in lithotomy position will also help minimize the risks for injury.
Positioning ProcedureAdjust the Bed and Transfer the Patient
Before transferring the patient, adjust the bed. Begin by releasing the head section of the mattress pad. Pull the headpiece and mattress pad out. Attach the headpiece and mattress to the foot of the bed. Refi t the bed sheet to the bed. Transfer and prepare the patient for anesthesia administration in the supine position. Apply pro-tective padding to the patient’s feet and lower legs. Other protective padding is used as described for interventions common for all positions.
Attach the Stirrup/Boot
Th e common verbiage used to describe any positioning device for placing the patient in the lithotomy position is stirrup. Th e term stirrup typically connotes the ankle strap device. Th e use of this term can be confusing, as this may not be the appropriate device to use. Th is chapter uses the terms stirrup and boot to describe positioning devices as appropriate to the discussion.
Attach the positioning device holders, also called side rail sockets, to the bed above the knee break hinge. Th ese holders are designed to fi t on the bed and allow insertion of the device at the desired location on the bed. Insert the positioning device into the holders and tighten. Adjust the stirrups or boots to the appropriate height for the level of lithotomy desired; ensure that they are level and secure and are a matched pair.
Place the Patient in Lithotomy Position
Aft er the patient is anesthetized, remove the safety strap from the legs. Grasp the sole of one foot in one hand, supporting the leg at the knee with the other hand. Instruct the assistant to perform the same maneuver for the other leg. Together with the assistant, slowly fl ex the legs toward the abdomen, then slightly externally rotate the hips and secure the feet in the stirrup strap or boot (Rothrock, 2007). Do not allow the knees to drop outward, externally rotating, to minimize the potential for joint dislocations or nerve or muscle injury. When using ankle strap stirrups, ensure that the legs and thighs do not touch the stirrup poles and that the feet and ankles are well padded at the strap points. When boots are used, be sure they are at the same angle and level before placing the legs. Th e knees should always remain fl exed in the lithotomy position and never be allowed to straighten to minimize pressure on the knee joints (Rothrock, 2007). Cover the patient’s genitalia and perineum with a towel or sheet.
Complete the Bed Modifi cation
Remove the headrest and the leg section of the bed. Place the headrest and the leg section on a clean surface outside the sterile fi eld. Touch the patient’s hands to ensure that the patient’s fi ngers are not in the hinges of the bed. Lower the leg section of the bed.
200 Section 2: Competencies for Safe Patient Care
Reposition if Necessary
Remove the arm board straps and fold the patient’s arms across the abdomen. Coor-dinate with the anesthesia provider before any patient movement. Stand between the patient’s legs. Place the hands and arms under the patient’s buttocks. Gently lift using proper body mechanics and move the patient to the edge of the bed break. Take care to lift instead of dragging the patient to minimize the risk of shearing forces on the skin of the patient’s back and buttocks. Be sure that the anesthesia provider protects the arms during movement. An alternative method includes the use of an assistant to lift the patient. Both team members may stand on opposite sides of the bed and move the patient using the draw sheet underneath the patient to lift and move the patient. Move the arm boards and re-secure the patient’s arms. Reassess leg and stirrup posi-tion. Palpate the patient’s inner thighs to check for tension or stretching of ligaments and tendons. Check again for any pressure points before draping the patient.
Reposition After the Procedure
Check that the patient’s hands and fi ngers are not extending beyond the bedbreak. Elevate the leg section to the horizontal position. Replace the mattress pad on the leg section. Reattach the head section and mattress pad to the foot of the bed. Have the assistant stand on the opposite side of the bed and prepare to reposition the patient. When given clearance by the anesthesia provider, both team members simultane-ously grasp the patient’s legs and remove the stirrup straps or remove the leg from the boot. With one hand under the patient’s heel and the other under the knee, slowly bring the knees back to alignment with the body; extend the legs and then lower them together. Lowering the legs too rapidly can cause the patient’s blood pressure to drop signifi cantly, so ensure that the anesthesia provider is ready for the legs to be repositioned. Reapply the safety strap securely across the thighs. Cover the patient with a warm sheet or blanket. Remove the positioning equipment from the bed.
Potential Adverse Effects of the Lithotomy PositionTable 8.6 lists potential adverse eff ects of the lithotomy position.
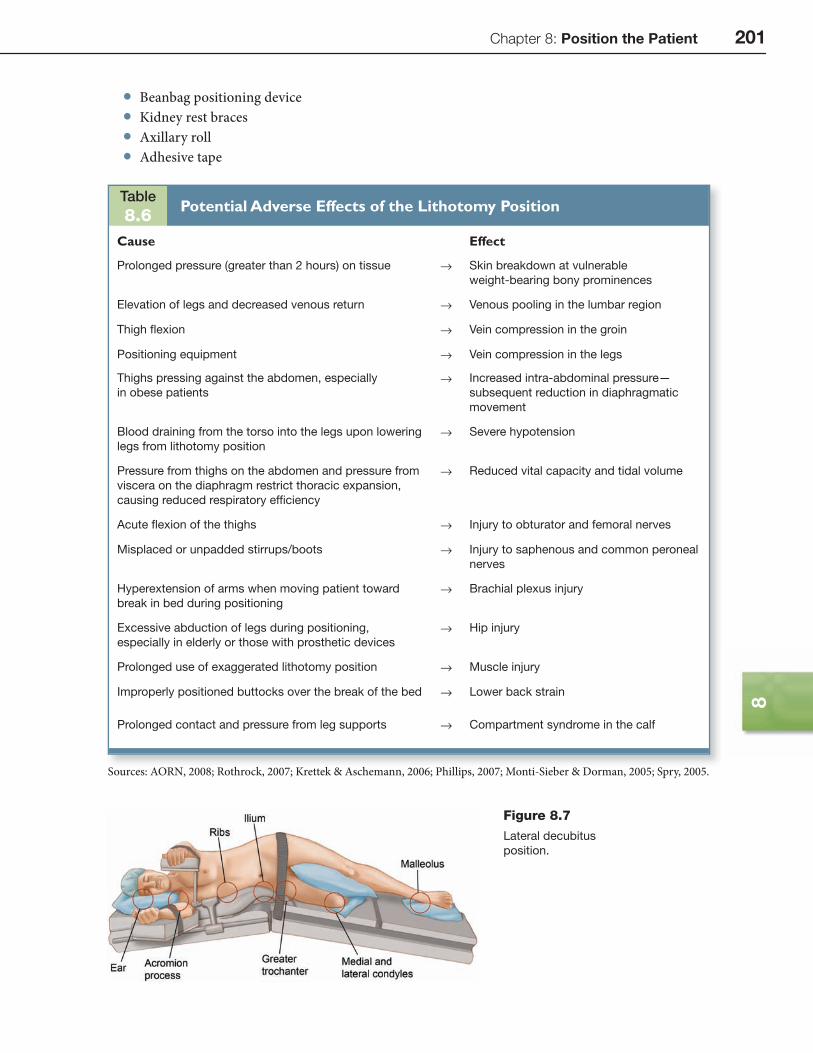
LATERAL DECUBITUS POSITIONTh e lateral decubitus position, also known as lateral recumbent or Sims position, is used for access to the upper chest, the kidney, the upper section of the ureter, and the hip. Th e patient lies on one side to expose the area required for the procedure (Fig. 8.7). Th e reference to left or right lateral indicates which side on which the patient is lying. In right lateral, the patient is lying on the right side to expose struc-tures on the left side. In left lateral, the patient is lying left side down.
Supplies and Equipment
• Headrest • Pillows for between the legs and supporting structures • Bath blankets • Padding for bony prominences • Arm boards: regular and over-arm • Safety strap (several)
Chapter 8: Position the Patient 201
8
Table8.6
Potential Adverse Effects of the Lithotomy Position
Cause Effect
Prolonged pressure (greater than 2 hours) on tissue → Skin breakdown at vulnerable
weight-bearing bony prominences
Elevation of legs and decreased venous return → Venous pooling in the lumbar region
Thigh fl exion → Vein compression in the groin
Positioning equipment → Vein compression in the legs
Thighs pressing against the abdomen, especially
in obese patients
→ Increased intra-abdominal pressure—
subsequent reduction in diaphragmatic
movement
Blood draining from the torso into the legs upon lowering
legs from lithotomy position
→ Severe hypotension
Pressure from thighs on the abdomen and pressure from
viscera on the diaphragm restrict thoracic expansion,
causing reduced respiratory effi ciency
→ Reduced vital capacity and tidal volume
Acute fl exion of the thighs → Injury to obturator and femoral nerves
Misplaced or unpadded stirrups/boots → Injury to saphenous and common peroneal
nerves
Hyperextension of arms when moving patient toward
break in bed during positioning
→ Brachial plexus injury
Excessive abduction of legs during positioning,
especially in elderly or those with prosthetic devices
→ Hip injury
Prolonged use of exaggerated lithotomy position → Muscle injury
Improperly positioned buttocks over the break of the bed → Lower back strain
Prolonged contact and pressure from leg supports → Compartment syndrome in the calf
Sources: AORN, 2008; Rothrock, 2007; Krettek & Aschemann, 2006; Phillips, 2007; Monti-Sieber & Dorman, 2005; Spry, 2005.
Figure 8.7
Lateral decubitus
position.
• Beanbag positioning device • Kidney rest braces • Axillary roll • Adhesive tape
202 Section 2: Competencies for Safe Patient Care
Positioning ProcedureTransfer the Patient to the Bed
Transfer and prepare the patient for anesthesia administration in the supine position.
Prepare the Assistants
Ensure that the assistants understand their individual roles. Th e anesthesia pro-vider has control of the patient’s head and airway. Th e nurse and one assistant stand on one side of the bed. Two other assistants stand on the opposite side of the bed. One assistant stands at the foot of the bed to control the feet and legs. Th e patient is turned so that the operative side is up.
Turn and Position the Patient
Th e anesthesia provider controls the head and neck and initiates the movement. Aft er the patient’s arms are placed at his or her sides, the circulating nurse and an assistant reach under the patient’s shoulders and hips, lift slightly, and draw the patient’s far shoulder and hip toward the middle of the bed. Th ey concurrently rotate the patient to the lateral position. Two assistants help rotate the patient. Th e assistant at the foot of the bed controls the patient’s legs. Support the patient until aft er the anesthetist has reestablished ventilation. Place a rolled towel or other type of pad-ding (axillary roll) under the patient below the axilla, not in the axilla (Nagelhout & Zaglaniczny, 2005). Secure the patient with tape, beanbags, rolls, or other type of support. Flex the downside leg at the hip and knee to add stability. Ensure the depen-dent leg is well padded, especially at the knee and ankle. Place pillows or padding between the patient’s legs.
Th e lateral decubitus position may be modifi ed to provide better exposure for a particular procedure. Modifi cations include more lateral tilt creating the semi prone position or fl exion at the kidney break to create the fl exed kidney position. Th e prin-ciples for turning and positioning the patient remain the same.
Aft er positioning the patient, verify the following: • the patient’s head, neck, and spine are in proper alignment • the axillary roll is in the proper position below the axilla • the genitals and dependent breast are free from pressure • the legs and knees are padded • no part of the patient’s anatomy is resting on an unpadded surface • the extremities are secured away from the bed joints (breaks) and attachments • the nondependent arm is well supported on an over bed sling or with pillows
Stabilize and secure the patient’s body to the bed. Th e use of a bean bag posi-tioner is eff ective in holding the patient stable and disperses pressure over a wide area (Rothrock, 2007). Non-elastic adhesive tape and Velcro type safety straps may be used for stability in addition to the bean bag or alone. For positioning in a fl exed or kidney position, the kidney rest is elevated. Make sure the iliac crest is positioned over the kidney break to prevent respiratory complications (Rothrock, 2007). Th e use of kidney rest braces may be necessary. If these are used, they must be padded very thoroughly. Th e use of viscoelastic or gel pads may be the most eff ective in this area.
Chapter 8: Position the Patient 203
8
Potential Adverse Effects of the Lateral Decubitus PositionTable 8.7 lists the potential adverse eff ects of the Lateral Decubitus Position
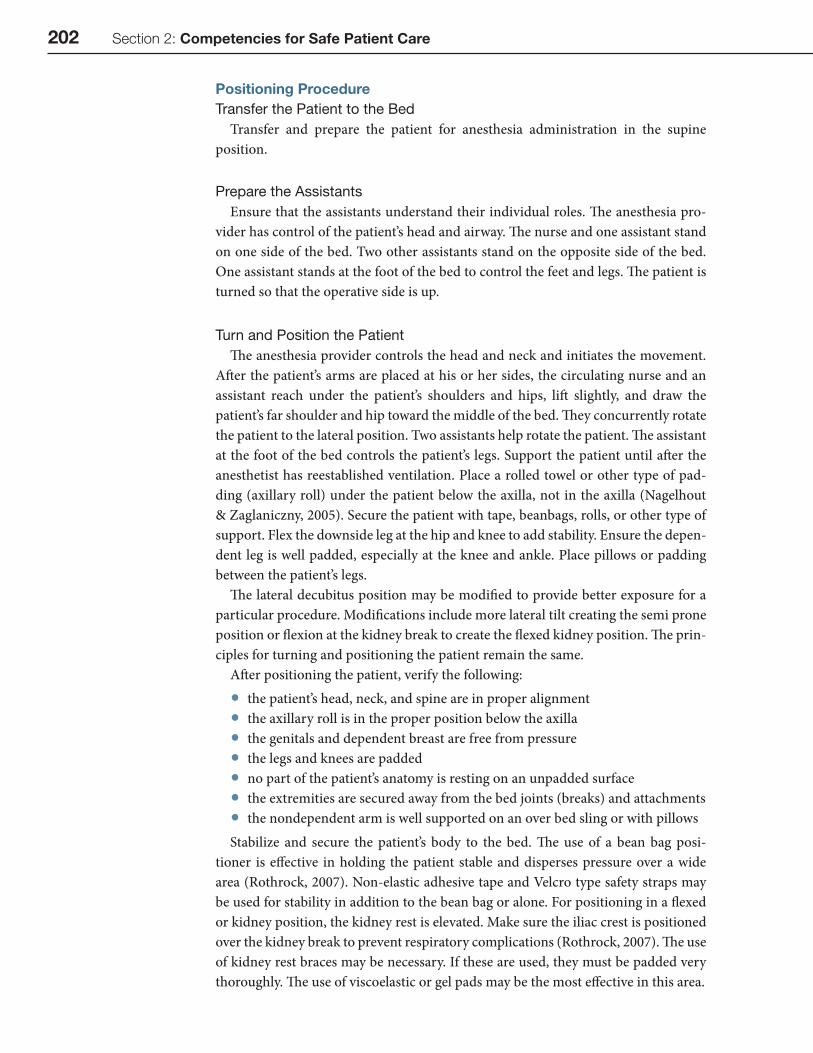
PRONE POSITIONFor the prone position (also known as the ventral recumbent or ventral decubi-tus position), the patient is placed face down, resting on his or her abdomen and chest (Fig. 8.8). Th is position and modifi cations of this position, such as the Kraske (Jackknife) position, are used for procedures of the spine, back, rectal area, and pos-terior aspects of the lower extremities. Typically, the patient is placed under general anesthesia on the transport stretcher before being transferred to the bed. However, the patient may be anesthetized on the bed and then rotated into the prone position.
Supplies and Equipment
• Pillows • Head rest • Chest rolls or supporting frame • Padding for bony prominences • Padding or pillows for feet
Table8.7
Potential Adverse Effects of the Lateral Decubitus Position
Cause Effect
Pressure and stretching forces → Injury to dependent brachial plexus
Pressure points and insuffi cient padding → Injury to median, radial, ulnar, and peroneal
nerves
Prolonged pressure, decreased circulation to tissue
in dependent position
→ Pressure sore development on tissues overlying
the dependent greater trochanter of the femur
Possible shift in heart position → Potential interference with cardiac action
Kidney rests compressing the fl ank → Vena cava occlusion
Lateral fl exion of the head and stretching
of cervical nerve structures
→ Injury to cervical sympathetic nerves—ptosis
of eyelid, fl ushing of the face
Excessive pressure on dependent eye—improperly
placed positioning device
→ Retinal artery thrombosis
Sources: AORN, 2008; Rothrock, 2007; Krettek & Aschemann, 2006; Phillips, 2007; Nagelhout & Zaglaniczny, 2005.
Figure 8.8
Prone position.
204 Section 2: Competencies for Safe Patient Care
• Arm boards • Arm board restraints • Safety strap • Face rest (horseshoe, Mayfi eld, other) • Padded knee rest (donut or other gel type pad) • Supplementary supplies and equipment • Antiembolism stockings and/or sequential compression stockings (as identi-
fi ed in the nursing care plan)
Positioning ProcedureTransfer the Patient to the Bed
Transfer and prepare the patient for anesthesia administration in the supine position.
Turn the Patient on the Bed
Prepare the assistants by communicating their individual roles and confi rming that they understand them. Th e circulating nurse and one assistant stand on one side of the bed, and the other two assistants stand on the opposite side of the bed. One assistant stands at the foot of the bed to control the legs and feet. Th e anesthesia provider controls the head and neck and initiates the movement. Aft er the patient’s arms are placed at his or her sides, the circulating nurse and assistant reach under the patient’s shoulders and hips, lift slightly, and draw the patient’s far shoulder and hip toward the middle of the bed. Th e nurse and assistant concurrently rotate the patient to the lateral position. Th e assistants across from the circulating nurse help rotate the patient. Th e assistant at the foot of the bed maintains control of the legs, keeping them in alignment with the hips and spine. Continue rotating the patient while cen-tering the trunk on the positioning device (eg, Wilson frame, chest rolls). Support the patient until aft er the anesthesia provider has reestablished ventilation. Place supplemental positioning devices under the patient’s extremities (Phillips, 2007). Care should be taken to avoid pulling any tubes such as catheters, IV access, or breathing circuit hoses so that patency is maintained.
Place the Patient in Position
Aft er turning the patient, make certain that the chest rolls extend from the acro-mioclavicular joint to the iliac crest and that they do not impinge on the chest expan-sion and decrease abdominal pressure (AORN, 2008). Position the breasts so that they are displaced medially on the chest rolls. Check that the head, neck, spine, and legs are in proper alignment. Ensure that the legs are uncrossed and slightly apart. Check and free genitals from pressure and torsion. Pad iliac crests to decrease abdom-inal pressure on the vena cava, which is especially important with obese patients (Rothrock, 2007). To prevent pressure on the toes, either support the dorsum of the foot with a pillow high enough to allow the toes to hang free or allow the feet to hang over the end of the bed. Be sure the dorsum of the foot is protected from pressure. Make sure that no part of the patient’s anatomy is resting on an unpadded surface and that the extremities are secured away from the bed joints (breaks) and attachments.
Th e Jackknife or Kraske position is a modifi cation of the prone position in which the table is reverse fl exed, placing the patient in an inverted V position. Th is position is typically used for proctologic procedures. Th e same principles for positioning apply
Chapter 8: Position the Patient 205
8
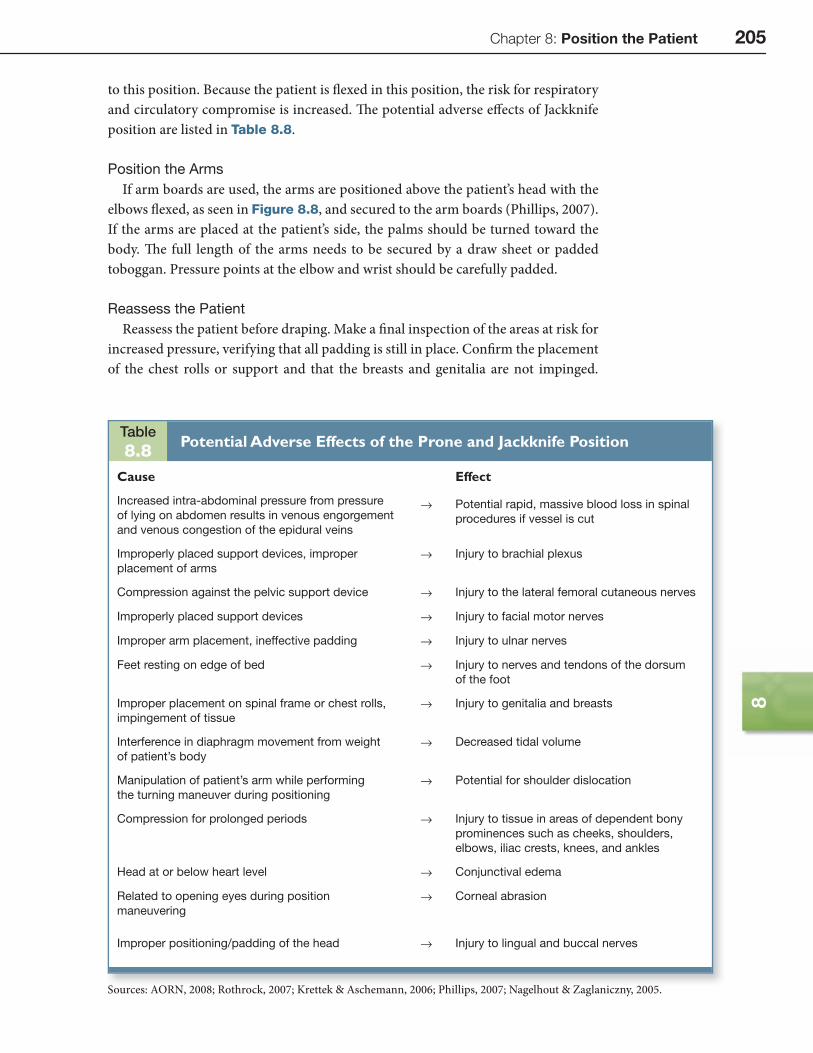
to this position. Because the patient is fl exed in this position, the risk for respiratory and circulatory compromise is increased. Th e potential adverse eff ects of Jackknife position are listed in Table 8.8.
Position the Arms
If arm boards are used, the arms are positioned above the patient’s head with the elbows fl exed, as seen in Figure 8.8, and secured to the arm boards (Phillips, 2007). If the arms are placed at the patient’s side, the palms should be turned toward the body. Th e full length of the arms needs to be secured by a draw sheet or padded toboggan. Pressure points at the elbow and wrist should be carefully padded.
Reassess the Patient
Reassess the patient before draping. Make a fi nal inspection of the areas at risk for increased pressure, verifying that all padding is still in place. Confi rm the placement of the chest rolls or support and that the breasts and genitalia are not impinged.
Table8.8
Potential Adverse Effects of the Prone and Jackknife Position
Cause Effect
Increased intra-abdominal pressure from pressure
of lying on abdomen results in venous engorgement
and venous congestion of the epidural veins
→ Potential rapid, massive blood loss in spinal
procedures if vessel is cut
Improperly placed support devices, improper
placement of arms
→ Injury to brachial plexus
Compression against the pelvic support device → Injury to the lateral femoral cutaneous nerves
Improperly placed support devices → Injury to facial motor nerves
Improper arm placement, ineffective padding → Injury to ulnar nerves
Feet resting on edge of bed → Injury to nerves and tendons of the dorsum
of the foot
Improper placement on spinal frame or chest rolls,
impingement of tissue
→ Injury to genitalia and breasts
Interference in diaphragm movement from weight
of patient’s body
→ Decreased tidal volume
Manipulation of patient’s arm while performing
the turning maneuver during positioning
→ Potential for shoulder dislocation
Compression for prolonged periods → Injury to tissue in areas of dependent bony
prominences such as cheeks, shoulders,
elbows, iliac crests, knees, and ankles
Head at or below heart level → Conjunctival edema
Related to opening eyes during position
maneuvering
→ Corneal abrasion
Improper positioning/padding of the head → Injury to lingual and buccal nerves
Sources: AORN, 2008; Rothrock, 2007; Krettek & Aschemann, 2006; Phillips, 2007; Nagelhout & Zaglaniczny, 2005.

206 Section 2: Competencies for Safe Patient Care
Check the body for proper alignment and make sure the safety strap is in place. Reas-sess the arms for proper placement and security and verify that the dorsum of the foot is supported to prevent pressure on the toes. If any aspect of the patient’s posi-tion appears unsatisfactory, the nurse has an obligation to the patient to question this with the physician and anesthesia provider and to follow through until the situation has been addressed to everyone’s satisfaction.
Spinal Frame or Spinal Surgery Table
Th ere are devices that are designed to place the patient in a kneeling position to improve exposure to the spine while taking pressure off the abdomen, decreasing the risks associated with increased intra-abdominal pressure. Th e Andrews frame is a well-known spinal positioning device. It consists of a body lift , where the patient’s head and chest rest; a tibial support with leg restraints to allow the patient’s weight to be evenly distributed over the pretibial area; iliac crest supports and bolsters to level the lumbar spine; and a support strap that goes across the patient’s thighs and the support frame to provide security (Phillips, 2007; O’Connell, 2006). Th e arms are placed on arm boards and fl exed at the elbows so that they are positioned next to the head. Th e face rests in a cut-out foam pad or face rest designed to avoid pressure on the face, eyes, and ears.
Th e spinal table is designed to allow surgery with imaging access and is oft en used for lumbar and cervical surgery, providing cervical traction. Th e patient is posi-tioned using a variety of supporting pads and attachments (Rothrock, 2007). Th e spinal table can be rotated with precise control, allowing the patient to be turned from supine to prone and back by rotating the table.
Th e same safety precautions exist when using the spinal frame or spinal surgery table. Extra care should be taken when positioning the legs on the tibial support in the kneeling position to avoid excess pressure on the knees and pretibial areas. Th e patient must be secured with care before rotating position when using the spinal table. While the spinal frame and table do help reduce the intra-abdominal pressure and the associated complications from this, there are still associated risks when posi-tioning the patient. Th ese are listed in Table 8.8.
Potential Adverse Effects of the Prone and Jackknife PositionsTable 8.8 lists the potential adverse eff ects of the prone and jackknife positions.
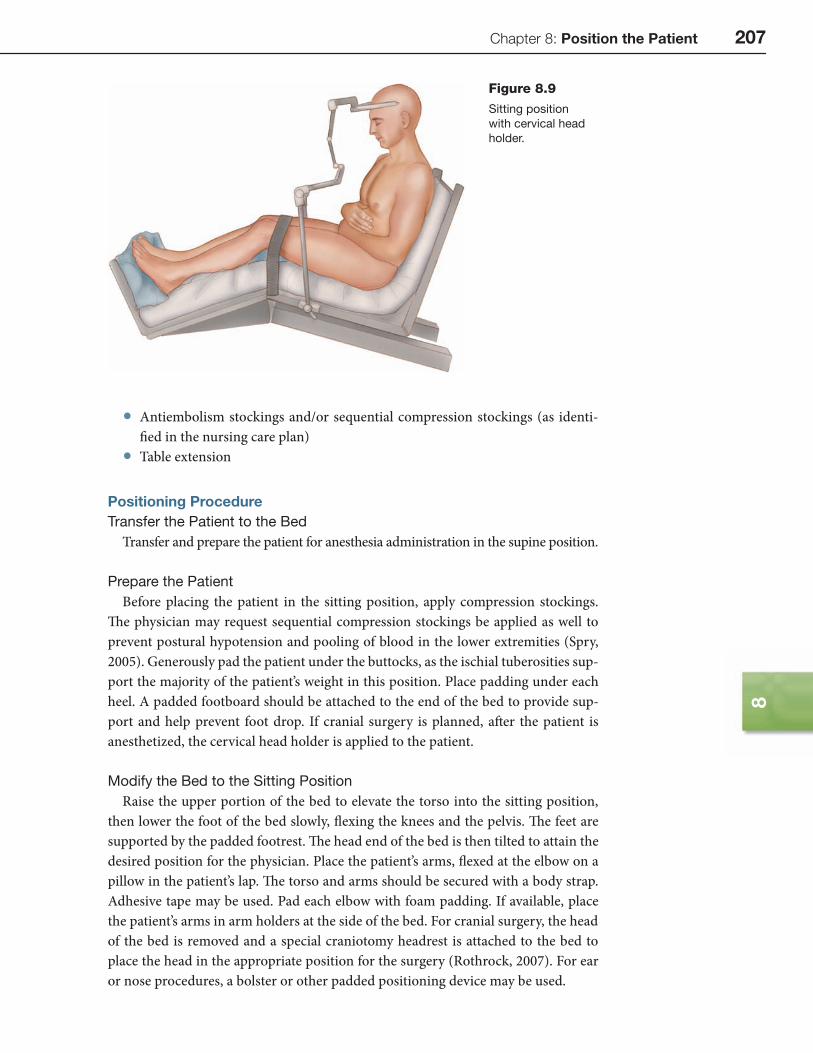
SITTING POSITIONTh e sitting position is used for cranial surgery requiring a posterior or occipital approach and for some ear and nose procedures. In this position, the patient’s back is raised approximately 90 degrees, the knees are slightly fl exed, and the legs lowered (Rothrock, 2007, p. 153). Figure 8.9 depicts the patient in sitting position.
Supplies and Equipment
• Head holder (skull clamp, Mayfi eld, Gardner) • Padding for bony prominences • Padded footboard • Safety strap • Supplementary supplies and equipment
Chapter 8: Position the Patient 207
8
• Antiembolism stockings and/or sequential compression stockings (as identi-fi ed in the nursing care plan)
• Table extension
Positioning ProcedureTransfer the Patient to the Bed
Transfer and prepare the patient for anesthesia administration in the supine position.
Prepare the Patient
Before placing the patient in the sitting position, apply compression stockings. Th e physician may request sequential compression stockings be applied as well to prevent postural hypotension and pooling of blood in the lower extremities (Spry, 2005). Generously pad the patient under the buttocks, as the ischial tuberosities sup-port the majority of the patient’s weight in this position. Place padding under each heel. A padded footboard should be attached to the end of the bed to provide sup-port and help prevent foot drop. If cranial surgery is planned, aft er the patient is anesthetized, the cervical head holder is applied to the patient.
Modify the Bed to the Sitting Position
Raise the upper portion of the bed to elevate the torso into the sitting position, then lower the foot of the bed slowly, fl exing the knees and the pelvis. Th e feet are supported by the padded footrest. Th e head end of the bed is then tilted to attain the desired position for the physician. Place the patient’s arms, fl exed at the elbow on a pillow in the patient’s lap. Th e torso and arms should be secured with a body strap. Adhesive tape may be used. Pad each elbow with foam padding. If available, place the patient’s arms in arm holders at the side of the bed. For cranial surgery, the head of the bed is removed and a special craniotomy headrest is attached to the bed to place the head in the appropriate position for the surgery (Rothrock, 2007). For ear or nose procedures, a bolster or other padded positioning device may be used.
Figure 8.9
Sitting position
with cervical head
holder.
208 Section 2: Competencies for Safe Patient Care
Reassessing the Patient
Th e cervical, thoracic, and lumbar spine should be in alignment. Verify correct placement and security of the head holder. Check the popliteal space to ensure that there is no pressure from the edge of the bed on that area (Rothrock, 2007). Male patients should be checked to make sure that the scrotum and penis are not twisted or compressed between the legs.
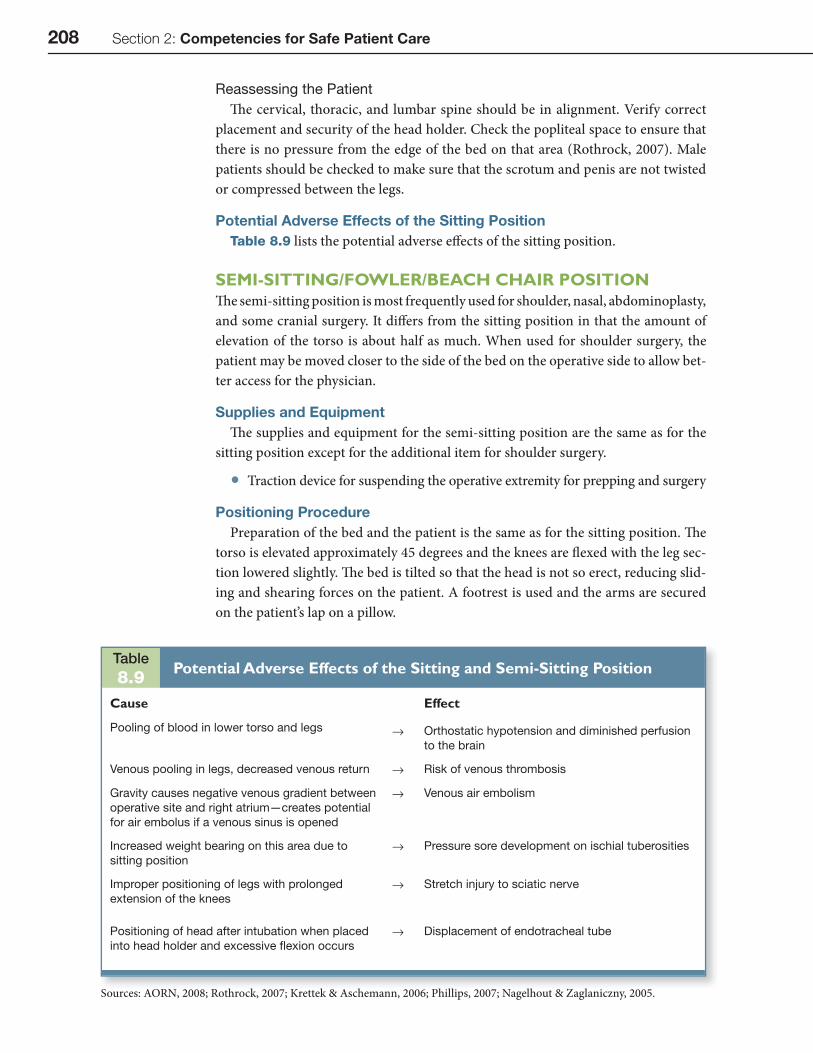
Potential Adverse Effects of the Sitting PositionTable 8.9 lists the potential adverse eff ects of the sitting position.
SEMI-SITTING/FOWLER/BEACH CHAIR POSITIONTh e semi-sitting position is most frequently used for shoulder, nasal, abdominoplasty, and some cranial surgery. It diff ers from the sitting position in that the amount of elevation of the torso is about half as much. When used for shoulder surgery, the patient may be moved closer to the side of the bed on the operative side to allow bet-ter access for the physician.
Supplies and EquipmentTh e supplies and equipment for the semi-sitting position are the same as for the
sitting position except for the additional item for shoulder surgery.
• Traction device for suspending the operative extremity for prepping and surgery
Positioning ProcedurePreparation of the bed and the patient is the same as for the sitting position. Th e
torso is elevated approximately 45 degrees and the knees are fl exed with the leg sec-tion lowered slightly. Th e bed is tilted so that the head is not so erect, reducing slid-ing and shearing forces on the patient. A footrest is used and the arms are secured on the patient’s lap on a pillow.
Table8.9
Potential Adverse Effects of the Sitting and Semi-Sitting Position
Cause Effect
Pooling of blood in lower torso and legs → Orthostatic hypotension and diminished perfusion
to the brain
Venous pooling in legs, decreased venous return → Risk of venous thrombosis
Gravity causes negative venous gradient between
operative site and right atrium—creates potential
for air embolus if a venous sinus is opened
→ Venous air embolism
Increased weight bearing on this area due to
sitting position
→ Pressure sore development on ischial tuberosities
Improper positioning of legs with prolonged
extension of the knees
→ Stretch injury to sciatic nerve
Positioning of head after intubation when placed
into head holder and excessive fl exion occurs
→ Displacement of endotracheal tube
Sources: AORN, 2008; Rothrock, 2007; Krettek & Aschemann, 2006; Phillips, 2007; Nagelhout & Zaglaniczny, 2005.
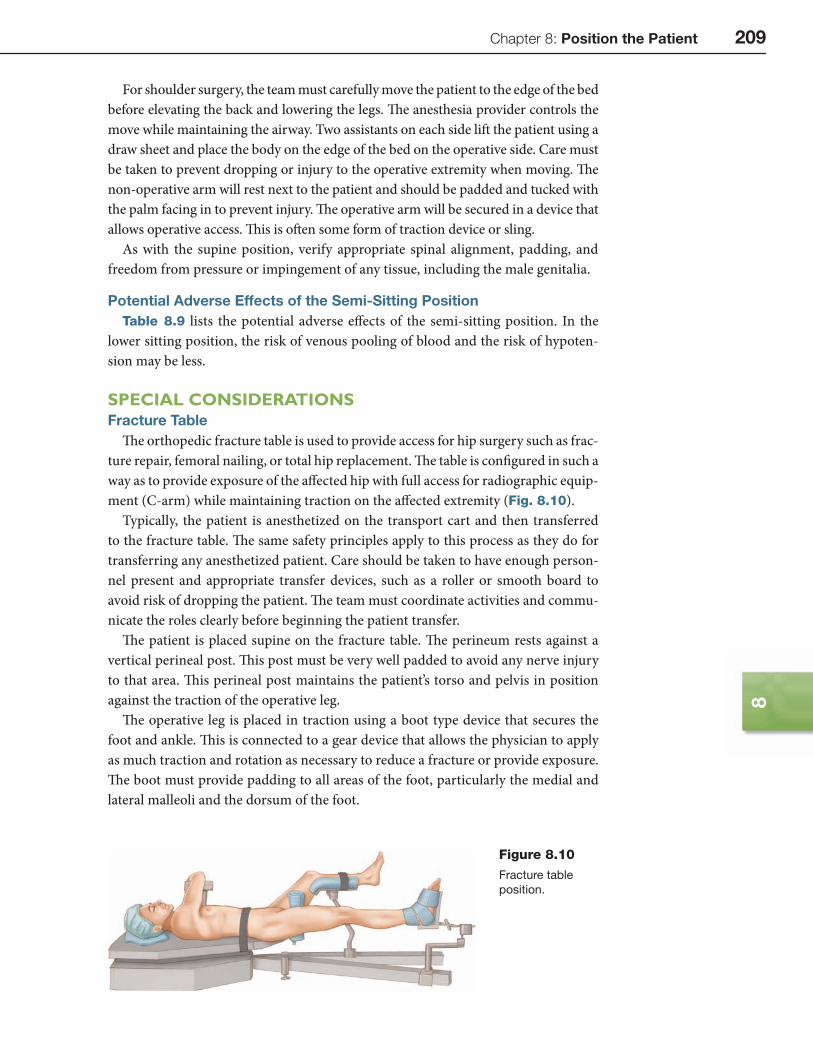
Chapter 8: Position the Patient 209
8
For shoulder surgery, the team must carefully move the patient to the edge of the bed before elevating the back and lowering the legs. Th e anesthesia provider controls the move while maintaining the airway. Two assistants on each side lift the patient using a draw sheet and place the body on the edge of the bed on the operative side. Care must be taken to prevent dropping or injury to the operative extremity when moving. Th e non-operative arm will rest next to the patient and should be padded and tucked with the palm facing in to prevent injury. Th e operative arm will be secured in a device that allows operative access. Th is is oft en some form of traction device or sling.
As with the supine position, verify appropriate spinal alignment, padding, and freedom from pressure or impingement of any tissue, including the male genitalia.
Potential Adverse Effects of the Semi-Sitting PositionTable 8.9 lists the potential adverse eff ects of the semi-sitting position. In the
lower sitting position, the risk of venous pooling of blood and the risk of hypoten-sion may be less.
SPECIAL CONSIDERATIONSFracture Table
Th e orthopedic fracture table is used to provide access for hip surgery such as frac-ture repair, femoral nailing, or total hip replacement. Th e table is confi gured in such a way as to provide exposure of the aff ected hip with full access for radiographic equip-ment (C-arm) while maintaining traction on the aff ected extremity (Fig. 8.10).
Typically, the patient is anesthetized on the transport cart and then transferred to the fracture table. Th e same safety principles apply to this process as they do for transferring any anesthetized patient. Care should be taken to have enough person-nel present and appropriate transfer devices, such as a roller or smooth board to avoid risk of dropping the patient. Th e team must coordinate activities and commu-nicate the roles clearly before beginning the patient transfer.
Th e patient is placed supine on the fracture table. Th e perineum rests against a vertical perineal post. Th is post must be very well padded to avoid any nerve injury to that area. Th is perineal post maintains the patient’s torso and pelvis in position against the traction of the operative leg.
Th e operative leg is placed in traction using a boot type device that secures the foot and ankle. Th is is connected to a gear device that allows the physician to apply as much traction and rotation as necessary to reduce a fracture or provide exposure. Th e boot must provide padding to all areas of the foot, particularly the medial and lateral malleoli and the dorsum of the foot.
Figure 8.10
Fracture table
position.
210 Section 2: Competencies for Safe Patient Care
Th e unaff ected leg is fl exed at the hip and knee and is placed in a holder such as a well or sling. Th e holder must also be well padded to avoid injury to the extremity. Th e leg should be secured in the holder with a safety strap (Rothrock, 2007).
Th e arm on the operative side is secured either against the patient’s torso or over the body in a padded sling or on an arm holder. Th e purpose is to avoid obstruction of the operative site. Pressure must be avoided over the ulnar nerve regardless of the method used. When securing the arm to the torso, avoid extreme fl exion of the elbow to prevent ulnar nerve injury and keep circumduction of the shoulder unforced, to avoid a stretch injury to the suprascapular nerve. When securing the arm to the torso, place padding between the arm and the body. Use caution when securing the arm in an arm holder above the patient to also avoid stretching the suprascapular nerve (Rothrock, 2007). Th e arm on the non-operative side can be secured on a pad-ded arm board at the side, following the practices previously discussed.
Upon fi nal positioning, be sure that all areas are padded, pulses are present in all extremities, and positioning devices are secure.
The Morbidly Obese PatientTh e morbidly obese patient, one with a BMI over 40 or weight of 100 pounds
(45.36 kg) over the recommended weight, presents some special considerations when being positioned for a procedure. Some of these have been previously dis-cussed. Th e physiological issues associated with morbid obesity include respiratory and circulatory.
Respiratory issues:
• Short, thick neck causes airway compromise • Risk of diffi cult intubation • Increased risk for hypoxia • Increased risk of aspiration • Increased risk for intra-abdominal pressure on the diaphragm
Circulatory issues:
• Increased cardiac output • Increased pulmonary artery pressure • Risk for inferior vena cava compression (AORN, 2008)
Th e AORN Recommended Practices for Positioning the Patient in the Perioperative Practice Setting (2008) provide several guidelines for protecting the morbidly obese patient. Th ese practices include using a procedure bed that will support patients weighing 800–1000 pounds and that has hydraulics that can lift a patient in that weight range. Mattresses on the bed should provide enough support and padding to avoid compression. If the patient’s legs will not fi t completely on the bed, stirrups or side extensions should be used.
Supplies and equipment used with the obese patient must be extra large or extra long, provide greater padding capability, and be able to withstand greater weight. Use only items that are designed for use with the morbidly obese patient.
As described earlier, a wedge or pillow should be placed under the right fl ank area to decrease pressure on the vena cava when in the supine position. When in
Chapter 8: Position the Patient 211
8
the prone position, verify that the upper chest and pelvis are supported to free the abdominal viscera so that pressure is reduced on the diaphragm and the vena cava. Th e lateral position may be preferable over the prone position when possible because the weight of the panniculus can be displaced off the abdomen. Caution must be exercised to prevent the risk of falling in this position. Lithotomy position should be avoided if possible because the pressure of the thighs on the abdomen creates increased intra-abdominal pressure. If it is used, be sure the leg holders can support the extra weight. Trendelenburg position should be avoided since increased pressure on the diaphragm produces respiratory compromise and increased blood fl ow from the lower extremities into the pulmonary and central circulation causes vascular congestion (AORN, 2008).
While this discussion focuses on the morbidly obese patient, care should be taken with any overweight patient to assure proper equipment is used and to prevent complications.
Robotic SurgeryIn robotic surgery, the physician sits at an operative console consisting of hand-
held controls and three-dimensional imaging, while robotic arms at the operative site hold instruments and respond to the physician,s commands from the console.
Th e use of robots in surgery presents a unique situation in patient positioning. Th e robot must be located either on the sides or at the foot of the bed. Th e base of the patient side cart containing the robotic arms has a large footprint and once it is placed, the bed cannot be moved (Intuitive Surgical, 2007). Access to the patient becomes restricted once the side cart is in place, so fi nal assessment of the patient’s position should take place prior to this. A study performed to review an institution’s experience with robot-assisted laparoscopy determined that one disadvantage is the bulkiness of the robot arms. Th ese arms can interfere with the assistant’s movements (Miller, Schlinkert, & Schlinkert, 2004).
Th e conventional positions are still used for robotic operative procedures and the same precautions to prevent injury must be taken. Additionally, the perioperative nurse should be especially vigilant in observing the procedure to assure that the robotic arms do not disrupt the patient’s position in any way. Careful preparation is essential when positioning the patient for any procedure, especially robotic surgery.
CONCLUSIONPositioning a patient for operative and invasive procedures requires assessment skills, knowledge of anatomy and physiology, an understanding of the planned pro-cedure, and familiarity with the positioning devices and various positions used in surgery. Th e nurse uses the information obtained during the assessment to plan the care during the positioning event. Injury to the patient’s integumentary, circulatory, respiratory, musculoskeletal, and neurological structures can be prevented by iden-tifying patients at risk for injury before initiating positioning activities.
Careful planning and cooperation with clear communication of assigned roles and responsibilities supports safety for the patient and the team positioning the patient. Teamwork is essential to help avoid adverse outcomes related to positioning.
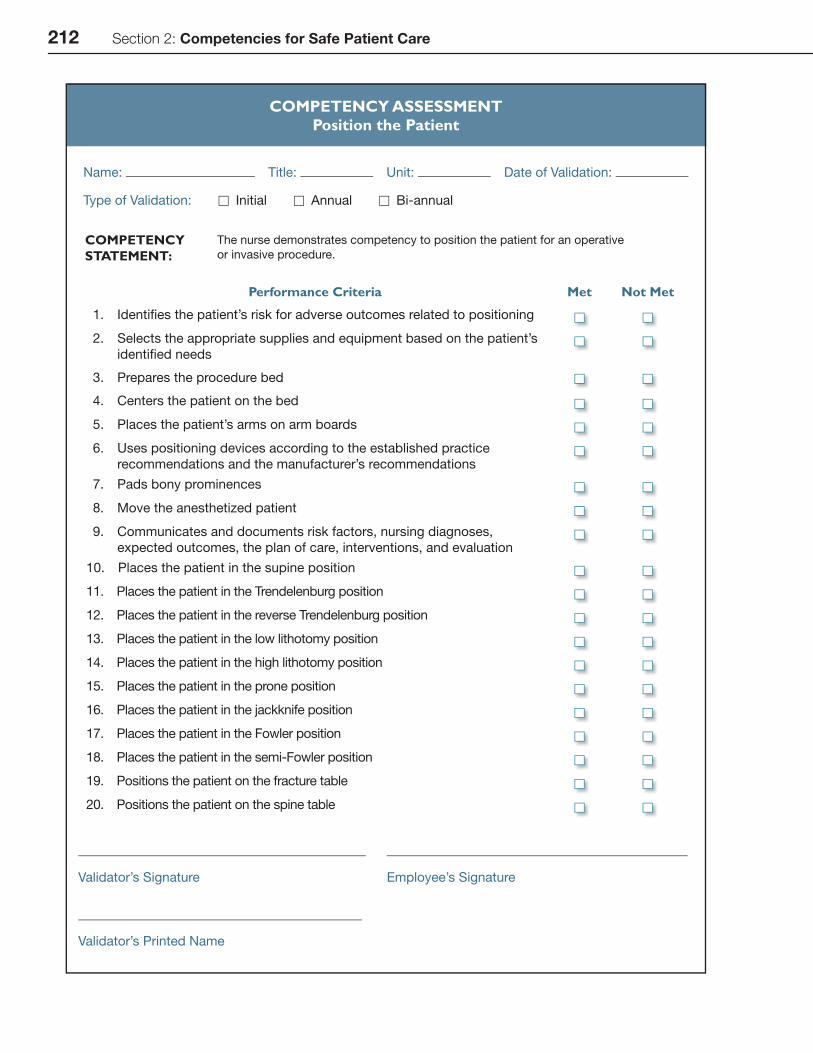
212 Section 2: Competencies for Safe Patient Care
COMPETENCY ASSESSMENTPosition the Patient
Name: Title: Unit: Date of Validation:
Type of Validation: □ Initial □ Annual □ Bi-annual
COMPETENCY STATEMENT:
The nurse demonstrates competency to position the patient for an operative
or invasive procedure.
Performance Criteria Met Not Met
1. Identifi es the patient’s risk for adverse outcomes related to positioning
2. Selects the appropriate supplies and equipment based on the patient’s
identifi ed needs
3. Prepares the procedure bed
4. Centers the patient on the bed
5. Places the patient’s arms on arm boards
6. Uses positioning devices according to the established practice
recommendations and the manufacturer’s recommendations
7. Pads bony prominences
8. Move the anesthetized patient
9. Communicates and documents risk factors, nursing diagnoses,
expected outcomes, the plan of care, interventions, and evaluation
10. Places the patient in the supine position
11. Places the patient in the Trendelenburg position
12. Places the patient in the reverse Trendelenburg position
13. Places the patient in the low lithotomy position
14. Places the patient in the high lithotomy position
15. Places the patient in the prone position
16. Places the patient in the jackknife position
17. Places the patient in the Fowler position
18. Places the patient in the semi-Fowler position
19. Positions the patient on the fracture table
20. Positions the patient on the spine table
Validator’s Signature Employee’s Signature
Validator’s Printed Name
Chapter 8: Position the Patient 213
8
1. AORN (2008). Recommended practices for position-ing the patient in the perioperative practice setting. In Perioperative standards and recommended practices, 2008 edition. Denver: AORN, Inc. pp. 497–520.
2. Beyea, S. C. (2002). Perioperative Nursing Data Set: Th e perioperative nursing vocabulary, 2nd ed. Denver: Association of Perioperative Registered Nurses.
3. Intuitive Surgical (2007). DaVinci sacropopexy procedure card. Intuitive Surgical, Sunnyvale, CA.
4. Krettek, C., & Aschemann, D. (2006). Position-ing techniques in surgical applications. Heidelberg, Germany: Springer Medizin Verlag.
5. Miller, D. W., Schlinkert, R. T., & Schlinkert, D. K. (2004, Sep). Robot-assisted laparoscopic cholecystec-tomy: Initial mayo clinic Scottsdale experience. Mayo Clinic Proceedings, 79(9), pp. 1132–1136.
6. Mills, E.J. (ed.) (2006). Handbook of medical-surgical nursing, 4th ed. Philadelphia: Lippincott, Williams, & Wilkins. pp. 739–742.
7. Monti-Siebert, E.J., Dorman, L., & Hill, D. (2005). Positioning for anesthesia and surgery. In J.J. Nagelhout
and K.L. Zaglaniczny, Nurse anesthesia, 3rd ed. St. Louis: Elsevier Saunders. pp. 390–408.
8. O’Connel, M. P. (2006). Positioning impact on the surgical patient. Nursing clinics of North America, 41, pp. 173–192.
9. Phillips, N. (2007). Berry & Kohn’s operating room techniques, 11th ed. St. Louis: Mosby. pp. 492–530.
10. Rockrock, J. (2007). Positioning the patient for sur-gery. In Alexander’s care of the patient in surgery, 13th ed. St. Louis: Mosby, pp. 130–158.
11. Schultz, A. (2005). Predicting and preventing pres-sure ulcers in surgical patients. AORN Journal, 81(5), pp. 986–1006.
12. Spry, C. (2005). Essentials of perioperative nursing (3rd ed.). Sudbury: Jones and Bartlett Publishers.
13. Th e Joint Commission. (2008). Universal protocol for preventing wrong site, wrong procedure, wrong person surgery. Available at http://www.jointcom-mission.org/NR/rdonlyres/E3C600EB-043B-4E86-B04E-CA4A89AD5433/0/universal_protocol.pdf Accessed February 25, 2008.
REFERENCES