Embed Size (px)
Citation preview

Document 411 Version 1
Information Systems EISD
Information Systems
Part of the Education & Information Support Division
Title: Dreamweaver 4 Part 1
Author: Dan Stowell, Information Systems
Based on: Dreamweaver 3.0 (Doc 387) by Geoff Gwillym
Reference: Doc 411 v1
Date: September 2002
Revisions: None
Abstract Macromedia Dreamweaver 4 is a powerful tool for building websites. It offers an intuitive working environment for building cross-platform websites. Unlike many other web design tools it doesn’t add irrelevant HTML code. This workbook is aimed at users who are new to Dreamweaver. It has been designed to accompany the Information Systems Dreamweaver courses. Prerequisites It is assumed in this workbook that you have good basic IT skills including file management and word processing. If you are unfamiliar with any of these topics, please consult the other workbooks in the series. Some familiarity with HTML would be beneficial, but is not essential. However, you should be familiar with navigating the World Wide Web using an internet browser such as Internet Explorer or Netscape Navigator. Please Note Dreamweaver 4 can be accessed from UCL Information Systems PC workstations running WTS1. It is assumed in this Workbook that you are a registered user (i.e. you have an IS userid and password), using a PC on the Information Systems WTS Service. Dreamweaver is a registered trademark of the Macromedia corporation. Microsoft is a registered trademark, and Windows is a trademark of Microsoft Corporation. Screen shots reprinted with permission from Microsoft Corporation.
1 WTS is the Windows Terminal Service, which provides a Windows environment on, for example, the IS Managed Service.

Creating Webpages Dreamweaver 4 Part 1
UCL Information Systems i
Contents 1. What is Dreamweaver? ...................................................................................................1
1.1 Getting Started ...............................................................................................................1 1.2 The Dreamweaver Environment ....................................................................................2 1.3 Menus.............................................................................................................................2 1.4 Objects Palette ...............................................................................................................3 1.5 Launcher ........................................................................................................................4 1.6 Properties Inspector .......................................................................................................4
2. Websites and the Site Window........................................................................................5
2.1 What is a Website?.........................................................................................................5 2.2 Local and Remote Sites .................................................................................................5 2.3 Setting up your sites in Dreamweaver - the Site Definition ..........................................6
3. Planning your website....................................................................................................11
3.1 Site Structure................................................................................................................11 3.2 Maintenance Needs......................................................................................................12 3.3 Common Webpage Features ........................................................................................12
4. Creating Webpages – The Document Window ...........................................................13
4.1 Creating a New Webpage ............................................................................................13 4.2 Opening an Existing Webpage.....................................................................................13 4.3 Saving a Webpage........................................................................................................13 4.4 The Document Window Toolbar .................................................................................13 4.5 Page Properties.............................................................................................................15
5. Text..................................................................................................................................17
5.1 Paragraph Formatting...................................................................................................17 5.2 Text Formatting ...........................................................................................................18 5.3 Alignment ....................................................................................................................19 5.4 Font Groups .................................................................................................................20 5.5 Bulleted and Numbered Lists.......................................................................................21 5.6 Horizontal Rules ..........................................................................................................21
6. Images .............................................................................................................................23
6.1 Inserting an Image........................................................................................................23 6.2 Modifying Image Properties ........................................................................................24
7. Tables ..............................................................................................................................28
7.1 Inserting a Table ..........................................................................................................28 7.2 Adding Table Data.......................................................................................................29 7.3 Inserting Images into a Table.......................................................................................29 7.4 Selecting a Table..........................................................................................................29 7.5 Selecting a Column or Row .........................................................................................30 7.6 Deleting a Column or Row ..........................................................................................30 7.7 Table Properties ...........................................................................................................30 7.8 Merging and Splitting Cells .........................................................................................31
8. Hyperlinks ......................................................................................................................33

Dreamweaver 4 Part 1 Creating Webpages
ii UCL Information Systems
8.1 Linking to Another Page..............................................................................................33 8.2 Linking to a Page on the Internet .................................................................................35 8.3 Email Links..................................................................................................................35 8.4 Linking to Anchors on the Same Page.........................................................................36 8.5 Creating Links From Thumbnail Images.....................................................................37 8.6 Removing a Link..........................................................................................................37
9. Managing your Website ................................................................................................38
9.1 Uploading and Downloading .......................................................................................39 9.2 The Site Map................................................................................................................40
10. Using Templates .............................................................................................................42
10.1 Using a Template to Create a Web Page......................................................................42 10.2 Applying a Template to an Existing Page....................................................................42 10.3 Updating Pages which Use a Template........................................................................43 10.4 The UCL Web Templates ............................................................................................44
11. Style Sheets .....................................................................................................................45
11.1 Attaching a Style Sheet to a Webpage .........................................................................45 11.2 Detaching a Style Sheet from a Webpage....................................................................46
12. Accessibility ....................................................................................................................47
12.1 Text and Colour Schemes ............................................................................................47 12.2 Links.............................................................................................................................47 12.3 Images ..........................................................................................................................48 12.4 Tables ...........................................................................................................................48
13. Getting Help ...................................................................................................................50
13.1 Getting Help within Dreamweaver ..............................................................................50 13.2 Learning More..............................................................................................................50
Tasks Task One - Setting Up Your Site .............................................................................................10 Task Two - Planning Your Site ...............................................................................................12 Task Three - Beginning a webpage .........................................................................................16 Task Four - Creating a webpage ..............................................................................................22 Task Five - Adding Images......................................................................................................27 Task Seven - Insert a Table......................................................................................................29 Task Eight - Editing Your Table..............................................................................................32 Task Nine - A Table of Links ..................................................................................................36 Task Ten - Anchor Links .........................................................................................................37 Task Eleven - Uploading Files.................................................................................................41 Task Twelve – Applying Templates ........................................................................................44 Task Thirteen - Style Sheets ...................................................................................................46

Creating Webpages Dreamweaver 4 Part 1
UCL Information Systems iii
Toolbar Tip
Open
Conventions used in this Workbook The following table outlines the formatting conventions used in this workbook.
Commands Represented as Commands Courier regular Menu commands Buttons to press
Arial Narrow bold
Keys to press enclosed in square brackets e.g. [Ctrl] or [Shift]
Key combinations
square brackets with combined keys linked with plus sign e.g. [Ctrl + C] hold down the Ctrl key and press C
Enter/Return key [Return] Key sequences Press each key enclosed in brackets.
e.g. [→] [→] press right arrow key twice in succession
Toolbar Tips Where possible, a toolbar shortcut has been provided, shown in a bubble alongside the relevant text. This button can be used instead of the menu method described in the text. How to Use this Workbook This guide can be used as a reference or tutorial document. To facilitate the learning process, a series of practical tasks are contained within the text. It is recommended that you try each of these tasks as you progress through the workbook. For further practice and as a means of self-assessment, a number of staged exercises have been included at the end of this workbook. Training Files If you wish to attempt the exercises contained in this document and you are not using a training account, you will need to download the training files from the IS Training website at: http://www.ucl.ac.uk/is/training/exercises.htm Full instructions on how to do this are provided there.

Creating Webpages Dreamweaver 4 Part 1
Information Systems 1
1. What is Dreamweaver?
Macromedia Dreamweaver 4.0 is a powerful WYSIWYG2 tool for constructing websites. It offers an intuitive working environment for building cross-platform websites. Although Dreamweaver generates the necessary HTML code for you, it doesn’t alter existing HTML code by inserting irrelevant tags that do nothing but increase the file size. It is part of the Macromedia suite of web design products which includes Director, Flash, Fireworks and Authorware. In addition to basic webpage design, Dreamweaver provides a number of other features including the ability to: • Manage your website(s) and links effectively. • Incorporate text and graphics easily. • Set up and use templates. • Take advantage of cascading style sheets. • Add rollover images and tables. • Integrate Flash and other Macromedia products smoothly. • Add and modify behaviours. • Insert and manipulate layers. • Create timelines which allows you to have moving objects on your page. • Create framesets and navigation bars. In this course you will learn how to: • Set up and manage a local and remote website. • Change and control webpage settings. • Use the Properties Inspector and Objects Palette. • Insert images and text. • Create basic tables. • Create links. • Use Dreamweaver Templates and Cascading Style Sheets (CSS). Also covered are the basic principles of good webpage design.
1.1 Getting Started
1. From the Start menu, point to Programs. Select Software A-Z. 2. From the submenu choose Dreamweaver, then Dreamweaver 4.
2 What You See Is What You Get

Dreamweaver 4 Part 1 Creating Webpages
2 Information Systems
1.2 The Dreamweaver Environment
When entering Dreamweaver the screen should be similar to Figure 1:1. The Objects Palette and the Properties Inspector should be displayed. If they are not shown, do the following: 1. From the Window menu, choose Objects or Properties. 2. The Palette or Inspector should then be displayed.
Figure 1:1 - Dreamweaver document window
1.3 Menus
One of the ways of accessing a Dreamweaver command is through the Menu Bar. Accessing the Menus using the Mouse 1. Click on the menu item on the Menu Bar and click on
the option you require in the drop-down menu. Or 2. Right-click for context-sensitive options. Accessing the Menus using the Keyboard There are two keyboard methods for accessing menu commands; using the [Alt] key, or using the [Ctrl] key: 1. Hold down the [Alt] key and press the letter underlined in the menu
item. For example, to access the Edit menu press [Alt + E].
Objects Palette
Launcher
Properties Inspector
Press [Alt + E] to select the Edit menu.
Press [Ctrl + Z] to Undo

Creating Webpages Dreamweaver 4 Part 1
Information Systems 3
2. Use the [Ctrl] combinations where indicated in the menu. For example, use [Ctrl + C] to copy and [Ctrl + V] to paste etc. (Note only certain menu commands can be accessed using the [Ctrl] key combinations).
1.4 Objects Palette
The Objects Palette displays the most common objects you are likely to place on your Dreamweaver webpage such as images and tables. The buttons available are:
Figure 1:2 - Objects Palette
By clicking on the down arrow at the top of the Objects Palette, you can change the contents of the palette. See Table 1-1 for the list of palettes available. Palette Buttons
Common Tables, layers, images, horizontal lines, email links, rollovers etc.
Characters Characters not found on the keyboard such as em-dash, euro sign, copyright etc.
Forms Form controls such as radio buttons, check boxes, lists, etc.
Frames Shortcuts for inserting frames and multiple frames.
Head Shortcuts for entering data in the head section of the page, such as keywords and a description (“meta tags”).
Invisibles Items not displayed on a webpage such as comments and scripts.
Special Other objects (applets, plugins, and ActiveX objects).
Table 1-1 - Other Palettes
Switch Palettes
Image
Tables
Horizontal Rule
Layers
Email Link
Flash
Generator
Options for Table Layout View
Standard/Layout View for Tables
Rollover Image
Flash Text
Navigation Bar
Flash Button
Insert Date
Shockwave
Fireworks
Tabular Data
Include

Dreamweaver 4 Part 1 Creating Webpages
4 Information Systems
1.5 Launcher
The Launcher at the base of the Dreamweaver window offers a quick and simple way to access some of Dreamweaver’s supporting functions, such as the Site Map and History. Moving the mouse over the icon will display its function.
Figure 1:3 - Launcher
1.6 Properties Inspector
The Properties Inspector changes appearance according to what is selected within the Dreamweaver window. The Inspectors can also be expanded using the Expander Button. Examples of the Properties Inspector are shown in Figure 1:4 and Figure 1:5:
Figure 1:4 - Tables Properties Inspector
Figure 1:5 - Tables Properties Inspector - Expanded
The Properties Inspectors for the various objects are dealt with in the relevant sections.
Expander Button
Show Site Map
Show Assets
Show CSS Styles Show HTML Styles
Show Behaviours Show History
Contract Button
Show HTML Code

Creating Webpages Dreamweaver 4 Part 1
Information Systems 5
2. Websites and the Site Window
“Sites” are fundamental to Web design, and Dreamweaver makes things easy for you by allowing you to manage your sites via an interface similar to Windows Explorer (the file-management program for Microsoft Windows).
2.1 What is a Website?
You may know how to access various websites – the UCL website or the BBC website, for example – but for the purposes of Web design we need to know what a site physically is. In fact, it's fundamentally just a folder of files, stored on a computer connected to the internet. When you browse the web, your web browser sends messages across the internet, requesting files from a computer. For example, if you type the URL http://www.ucl.ac.uk/prospectus/undergraduate/index.htm your browser knows which computer to ask because of the domain name (“www.ucl.ac.uk”), which is associated with a specific computer at UCL – the Web server. It knows which file to request from that computer, because the rest of the URL specifies the file's path and name (“index.htm”, in the “undergraduate” folder, which itself is in the “prospectus” folder). See Figure 2:1.
Figure 2:1 - Viewing a Webpage via the Internet
Normally a website contains webpages and files with some common theme – for example UCL’s website contains files relating to UCL. Within the UCL site there are other, smaller sites, for individual departments etc. Files for the smaller sites are organised in subfolders of the main UCL site folder.
2.2 Local and Remote Sites
When designing and editing webpages, we need to be able to create/edit files on our local computer, and then send them across to the Web server where they will be accessible by all. Figure 2:2 shows this process. The local computer contains a copy of the files and folders which make up the website, and we can transfer files in either direction between the local computer and the Web server. The local copy of the website is simply called the local site, and the copy on the web server is called the remote site. You can see that the local site is effectively a “mirror image” of the remote site.
Browser 1. HTTP request for www.ucl.ac.uk/prospectus/undergraduate/index.htm
2. index.htm file is sent to browser

Dreamweaver 4 Part 1 Creating Webpages
6 Information Systems
Figure 2:2 - Exchanging Files between the Local and Remote Sites
The standard method for sending files from one computer to another like this is called File Transfer Protocol, or FTP. Dreamweaver takes care of the FTP procedure, as well as allowing you to edit your local files. This means that the entire process of creating and maintaining your website can be managed within one application. The folder which contains the entire site is called the root folder. In Figure 2:2 the local root folder is called “copy of www.ucl.ac.uk”. It can be stored anywhere on your computer, and called anything you like. When you create webpages for this site, you will save them into the local root folder you have created.
2.2.1 So Where Is My Remote Site?
If you are working on departmental webpages, then you’ll need to speak to your departmental web co-ordinator (or the UCL web team) to find out where the departmental webpages are stored. They will either be stored on the UCL Web server (as a site within the main UCL site), or on a Web server run within your department. If you are intending to work on personal webpages, you can use space provided by UCL. Every member of staff, and every student, may use a special folder within their UCL account named html.pub as their remote site. If you are using an alternative (such as a commercial webspace provider) your pages will be stored on a Web server run by whoever provides the webspace. They will be able to provide you with details of how to connect to their Web server.
2.3 Setting up your sites in Dreamweaver - the Site Definition
2.3.1 Create the Local Root Folder
Since the “local site” is simply the contents of a specific folder on your computer, you can use Windows Explorer to create your local root folder. (Open Windows Explorer and select the drive on which you want to create your local root folder, e.g. C:, R: or N:. Select New from the File menu, then select Folder, and give the folder an appropriate name.) Alternatively you can create the local folder through Dreamweaver, as will be described shortly.
2.3.2 Create the Remote Root Folder
To create a root folder on the remote site we need to be able to access the file system on the web server, which can be tricky. Happily, at UCL there is a program available via WTS called “Publish Web Pages” which establishes the remote site for you. To use Publish Web Pages in WTS:
“Put”/”Upload” a file to the web server
“Get”/”Download” a file from the web server
Make changes to the files on your computer
Remote Site Local Site

Creating Webpages Dreamweaver 4 Part 1
Information Systems 7
1. From the Start menu choose Programs and Software O-Z. 2. Run the Publish Web Pages program. This program will ask for your user ID and password, and then establish your local site for you. If you do not have access to the Publish Web Pages feature, you can follow the instructions given in Appendix 1.
2.3.3 Site Definition
Once this is done, we need to set up a site definition in Dreamweaver. Each site definition specifies a local site and a remote site. (You can have as many separate site definitions as you wish, which is useful if you are responsible for more than one website.)
1. From the Site menu, select New Site. The Site Definition dialogue box (Figure 2:3) should appear.
Figure 2:3 - The Site Definition dialogue box - Local Info
2. In the category list make sure that Local Info is selected. In the Site Name text
box type in an appropriate name for your site, for example, Training Site. 3. Your Local Root Folder can be located by clicking on the Browse icon. Locate
the folder that is to be the root of your site (the one which you created in Windows Explorer).
If you have not already created your local root folder, you can do this by clicking on the “Create New Folder” icon in Dreamweaver's file chooser (Figure 2:4).
Browse Button

Dreamweaver 4 Part 1 Creating Webpages
8 Information Systems
Figure 2:4 - Choose Local Folder
4. Once you have found and selected the folder, click on the Select button to
return to the Site Definition dialogue box. (Figure 2:3). 5. From the list of categories on the left choose Remote Info. The dialogue box
will now look similar to Figure 2:5 (not all options will display at first – they will appear when you choose “FTP” in the Access box).
Figure 2:5 - The Site Definition dialogue box - Remote Info
6. Enter the following details, which will allow you to access your remote site at
UCL:
Server Access: Choose FTP from the list FTP Host: ftp.ucl.ac.uk Host Directory: html.pub Login: [Your System Login] Password: [Your System Password]
Table 2:1
Create New Folder

Creating Webpages Dreamweaver 4 Part 1
Information Systems 9
If you are working through your WTS account, or on a secure computer, you can check the Save Password box so that you don’t have to enter the password anew each time you use Dreamweaver. If you are using a public or shared computer, do not check the Save Password box. 7. Click on OK to finish setting up your site definition.
You should now see the Dreamweaver Site Window (Figure 2:6). In the right-hand panel is a representation of your local site, showing any files and folders which you have within the root folder. The panel on the left-hand side will display the remote site - however, at first it is completely blank, because we need to connect to the remote site. You can do this by pressing the Connect button on the toolbar, or alternatively by selecting “Connect” from the Site menu.
Figure 2:6 - The Site Window
Dreamweaver will attempt to connect to the remote site. If it is successful, the remote site will appear in the left-hand panel of the Site Window (Figure 2:7). (If it is unsuccessful, a message will appear to tell you why it could not connect. Mistyping the settings for the remote site can often cause Dreamweaver to fail to connect.)
Connect button
Dreamweaver 4 Part 1 Creating Webpages
10 Information Systems
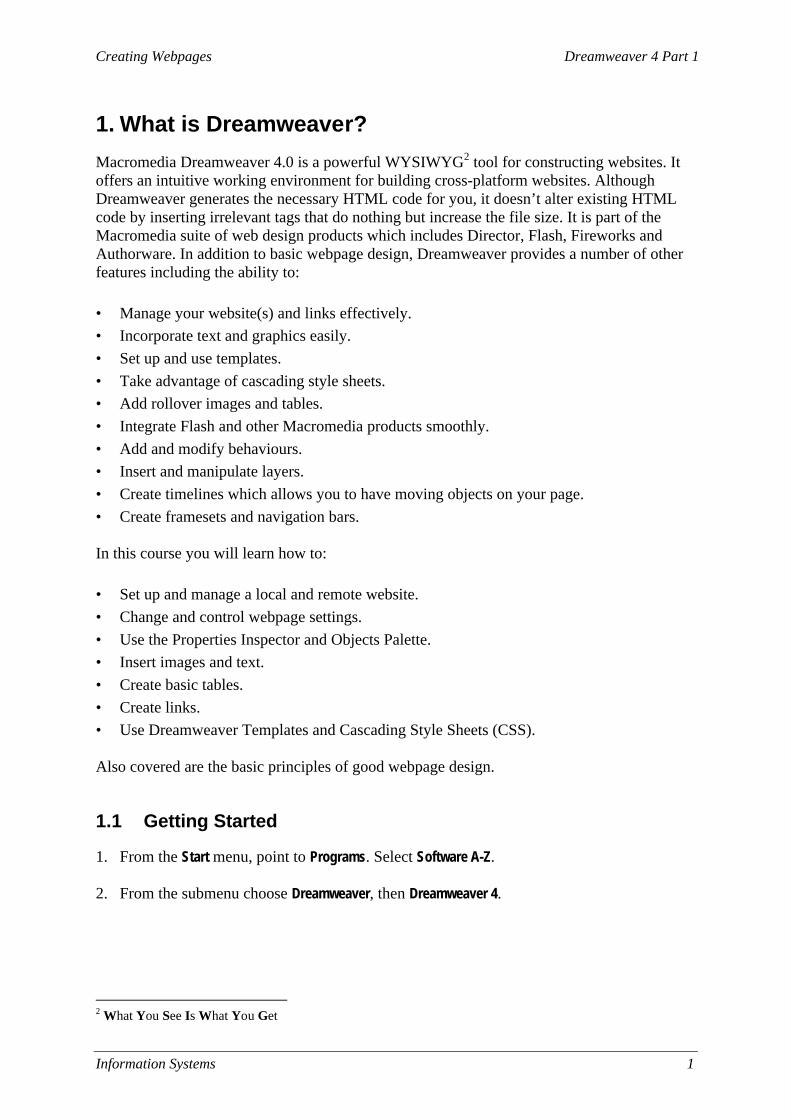
Figure 2:7 - The Site Window (Connected to Remote Site)
You are now ready to start work on creating your webpages. We will return to the Site Window in Section 9, when we are ready to upload the webpages we have created to the remote site. To return to the Site Definition window at any time, choose Define Sites from the Site menu, and then click on Edit in the dialogue box which appears.
Tip: Take a note of the local and remote settings which you have entered into the Site Definition in case you ever need to input them again. (Do not leave your site password lying around.)
Task One - Setting Up Your Site In this task we are going to establish a local root folder and a remote root folder for the website which you are going to work on during this session. 1. Using Windows Explorer, create a local root folder for a website which you can work on
during this session. 2. Run the Publish Web Pages program to ensure you have a remote root folder prepared. 3. Within Dreamweaver, create a new Site Definition. Make sure that you set the local root
folder in the Site Definition to be the folder you have just created. The remote settings should be as shown in Table 2:1.
4. Press Connect on the toolbar to connect to the remote site. You should now see that you are connected to the “html.pub” remote folder, which is empty and ready to store your website.

Creating Webpages Dreamweaver 4 Part 1
Information Systems 11
3. Planning your website
3.1 Site Structure
The structure of your site, in terms of the different folders and filenames you use, is important. As we saw earlier, the folder structure is reflected in the URL people will need to type in order to access your pages. Also bear in mind the following: • Ordinary webpages have filenames ending in “.htm” or “.html” (it doesn't matter which;
“.htm” is recommended in UCL). File and folder names must not contain spaces. It is also a good idea to use short, meaningful names with no capital letters, so that the URLs will be easy for people to type and to pass on to others (e.g. over the phone). http://www.ucl.ac.uk/admissions/postgrad.htm is much better than http://www.ucl.ac.uk/SECTION_TWO/Page-Three.htm
• A webpage called “index.htm” or “index.html” has a special role as the “index page” in a folder. If someone types the URL to access a folder on your website, without specifying the filename, for example http://www.ucl.ac.uk/admissions/ the page their browser will display is the index page: http://www.ucl.ac.uk/admissions/index.htm
• A useful way to arrange a website is in a hierarchy according to themes. For example, a departmental website could have an “admissions” folder, containing two folders called “undergraduate” and “postgraduate”, as well as a “research” folder, which might contain a folder for each research group in the department.
• It is a good idea to have a folder called “images” in your root directory. In this folder you will store the images which are to be displayed on your webpages.
• In any significant website project, there will come a point in the future when new sections need to be added, or old sections enlarged.
It is important that you plan a site's structure before you create it. If you create a site, and then later decide to change the names of the folders and the locations of the files, any links which have been created to your pages (from other websites) will need to be changed. Similarly, “bookmarks” to your pages stored in people's browsers will no longer work. Therefore it's advisable to create a good folder structure for your website at the outset, and then to stick with it.

Dreamweaver 4 Part 1 Creating Webpages
12 Information Systems
3.2 Maintenance Needs
The bigger a website is, the more maintenance it will need. If you're not expecting to have much time available for keeping your website up-to-date, it is safest to create a relatively small site, and not to put information on it which will rapidly go out of date (e.g. “My next public lecture will be on the 13th...”). Similarly, it is probably unwise to create a “News” section on your site unless the section is going to be updated at least weekly with new items.
3.3 Common Webpage Features
You will probably have noticed, while browsing the Internet, that there are some features which are common to a set of webpages. An institution or company often has a common format for all of their pages, and certain pieces of information may be present on each page. Consider what your website should have on every page – remembering that people might not see your page in the context you expect. They may follow a link from someone else's website, or a bookmark in their internet browser, and so might not go via your website's “homepage”. Some things you may want to include are:
• A link to your homepage • Contact information (your email address – possibly also your telephone/postal
address) • The date the page was last updated • A copyright notice • A link to your institution (i.e. UCL)'s homepage
Task Two - Planning Your Site 1. Plan the structure of a small website to set up during this training session. It could be a
research group website, or a personal website (about your hobbies and interests), for example. Include an “images” folder, and not more than three or four other folders.
2. Using Windows Explorer, create an appropriate set of folders within your local root
folder. 3. Note down the common elements which need to be on each of the webpages you will
create, considering the purpose of the website.

Creating Webpages Dreamweaver 4 Part 1
Information Systems 13
4. Creating Webpages – The Document Window
Once you have defined the site (Section 2.3) and planned its structure (Section 3), you can start to create the webpages.
4.1 Creating a New Webpage
To create a new webpage: 1. From the File menu choose New. 2. A new, empty window appears ready for you to create the content. This is a document window, and it functions much like a word processor window. You are presented with a blank webpage into which you can type text, add images, etc.
4.2 Opening an Existing Webpage
To edit an existing webpage: 1. From the File menu choose Open. 2. Select the file that you wish to edit. 3. Click on Open. The file then opens in the document window.
4.3 Saving a Webpage
1. From the File menu choose Save. 2. Type in a filename in the File Name box. 3. Click on Save.
4.4 The Document Window Toolbar
The document window should display a toolbar at the top, underneath the menus. If it is not visible, select Toolbar from the View menu.
Figure 4:1 - Document Window Toolbar
Document View Options Page Title File Management Browser Preview/Debug

Dreamweaver 4 Part 1 Creating Webpages
14 Information Systems
4.4.1 Page Title
The page title is displayed in a text box which you can edit simply by clicking on the box and typing. The title is an important aspect of a webpage; it is distinct from the filename, and from any title or heading text you might write on the page. The page title appears in the following situations: • At the top of your browser window while browsing the page, and also on the Taskbar. • In the results lists of most search engines – therefore it is often the first encounter people
will have with your webpage. • In browser Bookmarks or Favourites lists. The page title should preferably be short and descriptive, and include the name of the institution to which it belongs – for example “Graduate Prospectus at UCL”. The default page title in Dreamweaver is “Untitled Document”, which is not very useful! Be sure to give each of your pages an appropriate title.
4.4.2 Design View and Code View
The document window ordinarily shows your webpage graphically (the Design View) – but we can switch between this and the underlying HTML code (Code View). HTML stands for HyperText Markup Language and is a page layout code that browsers such as Internet Explorer or Netscape Navigator can interpret. Dreamweaver automatically generates the HTML code while you are creating the webpage. If you are familiar with HTML, you can edit existing code or or add to it in the Code View. There are three display options for any webpage you are working on – Design View, Code View, and both Design and Code Views at once. At the top-left of the Dreamweaver screen (just underneath the menu bar) are the three buttons used to change between these displays. Alternatively, pressing [Ctrl + Tab] will switch between Design View and Code View.
Figure 4:2 - Page Viewing Options
HTML is outside the scope of this course, and from now on we will be using only the Design View. If you are interested in a HTML course, please contact the IS Training department. Document number 223 covers some of the basics of HTML.
4.4.3 Browser View
To see your page as it is going to be viewed by others on the Internet, you need to view the page through a Web browser. There are several different types of Web browser available; the two most popular are Internet Explorer and Netscape Navigator. A Web browser interprets the HTML code and displays the page. To view your page in a browser:
Design and Code Views
Code View Design View

Creating Webpages Dreamweaver 4 Part 1
Information Systems 15
1. From the File menu select Preview in Browser. 2. From the submenu choose the required browser. 3. The page should load up in the browser of your choice. To return to your Dreamweaver page select File from the browser menu then Exit or select Dreamweaver on the taskbar. [F12] is a useful shortcut key which displays your page in the default browser.
4.5 Page Properties
The background colour of your webpage, and the default colour of text and links displayed, are normally specified using a stylesheet. Stylesheets are introduced in Section 11. It is also possible to set page colours etc. in Page Properties: 1. From the Modify menu choose Page Properties...
The following dialogue box is displayed:
Figure 4:3 - Page Properties
4.5.1 Title
The page title (see Section 4.4.1) appears again in the Page Properties box.
4.5.2 Background Image
If you wish to have an image as a background to your page you can enter the filename. Alternatively you can use the Browse button to locate it. Graphics are tiled across the webpage. Please note: having an image as a background may mean slower loading speeds for your webpage. It can also make your page more difficult to read, if the background image contains too much detail.
Text that will appear on the Title Bar of your browser
Graphic displayed as page background
Page background colour
Text and Link colours

Dreamweaver 4 Part 1 Creating Webpages
16 Information Systems
4.5.3 Colours
You can set the default colours for text and links by either clicking on the colour button and choosing a colour from the colour palette that is displayed, or by typing in the hexadecimal code for the colour3. If you leave any of the colour boxes blank, browsers will use their default colours – for example, black text, white backgrounds, blue links, and purple visited links. Text and link colours should be chosen carefully to avoid clashing with the background.
Task Three - Beginning a webpage 1. Open a new document window in Dreamweaver. This page is eventually going to be the
homepage for your site. 2. Make sure the page has an appropriate title (and not “Untitled Document”). 3. Although the page appears blank, Dreamweaver has already written some HTML code
for it. Switch to Code View to see the code, and then switch back to Design View. 4. Preview the document in the default browser. It will be blank, of course – but note where
the page title appears in the browser window. 5. Save the document as index.htm in your local root folder.
3 All colours on a PC can be represented by a hexadecimal (Hex) code. The code is a six-digit alphanumeric code preceded by a hash (#). For example, the Hex code for yellow is #FFFF99 and the Hex code for red is #FF6666. You do not need to know Hex codes to use Dreamweaver, as choosing the colour from the colour palette inserts the correct Hex code into your text box.

Creating Webpages Dreamweaver 4 Part 1
Information Systems 17
5. Text
Entering text is as straightforward as typing it on the screen. Text attributes can be changed with the menus or through the Properties Inspector as shown below. Most of the properties you would expect from a word processing application are available. You can use the Properties Inspector to change the font, size, colour, style (bold, italic) and alignment. You can also create numbered and bulleted lists.
Figure 5:1 - Text Property Inspector
5.1 Paragraph Formatting
Each individual paragraph can be set to one of the following formats:
• Paragraph • Heading 1 • Heading 2 • Heading 3 • Heading 4 • Heading 5 • Heading 6 • Preformatted • None
“Paragraph” is the default format. Use this style for ordinary paragraphs of text. The heading formats, “Heading 1”-”Heading 6” (often abbreviated to “h1”-“h6”), are used to create headings of different size and precedence. “Heading 1” is normally the largest type of paragraph and used for the main headings in a web page, while “Heading 6” is very small (often smaller than ordinary paragraph text!). “Preformatted” text is displayed slightly differently to other text on a webpage. It is ordinarily displayed in a “fixed-width” font such as Courier, and allows you to include as much “whitespace” in your text as you wish. (You may have noticed that, ordinarily, Dreamweaver only allows one space between words – pressing the space bar multiple times has no effect.)
Bulleted/Numbered List
Bold Text alignment Italic
Indent
Font List Size Colour Paragraph Format

Dreamweaver 4 Part 1 Creating Webpages
18 Information Systems
To select a format for a paragraph: 1. Ensure that the cursor is positioned within the paragraph. 2. In the Properties Inspector select one of the options in the Paragraph Format box (the
first box next to the Format label). Paragraph formats become important later on (Section 11) when we use stylesheets to specify appearances for “h1” headings, “h2” headings, paragraphs, etc.
5.2 Text Formatting
Bold/Italic To embolden or italicise text: 1. Select the text. 2. In the Properties Inspector click on the Bold or Italics icon. Note that although it is possible to underline text, there is a convention on webpages that links are shown underlined. Therefore, it is not usual to underline text for formatting purposes. Size Every user will have a default font size set for their browser known as the base font. Any increase or decrease in font size of your text is relative to that. You cannot change the user's base font size. The base font would normally be 12 or 14 point. The scale that Dreamweaver uses is between 1 to 7 (absolute) and -7 to +7 (relative). The default scale setting that Dreamweaver uses is 3. To change the absolute text size: 1. Select the text. 2. From the menu choose Text then Size. 3. Choose a size. To change the relative text size: 1. Select the text. 2. From the menu choose Text then either Size Increase or Size Decrease. 3. Choose a relative size. Alternatively, use the Properties Inspector.

Creating Webpages Dreamweaver 4 Part 1
Information Systems 19
Colour To change the text colour from the menu: 1. Select the text. 2. From the menu choose Text then Color..... 3. A window is displayed as shown in
Figure 5:2. 4. Select the desired colour and click on
OK.
Figure 5:2 - Colour Window
To change text colour from the Properties Inspector: 1. Select the text. 2. In the Properties Inspector, click on the button to
display the colour palette – Figure 5:3 – and select a colour.
This second method is preferable, since all the colours in the colour palette are “web-safe” – they will appear the same in all browsers.
Figure 5:3 - Colour Palette
5.3 Alignment
Text can be aligned left, right or centre. To align text: 1. Select the text. 2. In the Properties Inspector click on the required Align button:
Figure 5:4 - Alignment Buttons
Left Centre Right

Dreamweaver 4 Part 1 Creating Webpages
20 Information Systems
5.4 Font Groups
The font describes the physical shapes of the characters. If no font is specified, the text will be displayed in the user's default font. A problem arises when you specify a font the user does not have installed. With Dreamweaver you not only specify a font, but also a second one in case the first one is not available in the user's browser, and if that is not available you can specify a third, and so on. Dreamweaver brings fonts together in font groups. There are a number of combinations already set up. For example: Verdana, Arial, Helvetica, sans-serif If this font combination was applied to text, Verdana would be the first choice of display. If Verdana was not available in the user's browser, the text would be displayed in Arial. If Arial was not available, it would be displayed in Helvetica, and so on.4 Changing the font: 1. Select the text. 2. From the Text menu select Font. The following menu is displayed:
Figure 5:5 - Font List Menu
3. Choose the required font group. The font can also be changed in the Properties Inspector. It is possible to create your own customised font lists via the Edit Font List... menu option. However, this will not be covered in the present course.
4 “Sans-serif” in the example is not the name of a specific font, but of a generic type of font – a font whose characters don't have serifs. Putting a generic font type at the end of the list is equivalent to saying to the user's browser, “If you don't have Verdana, Arial, or Helvetica, any sans-serif font will do”. Generic font types include serif, sans-serif, cursive, fantasy, and monotype.

Creating Webpages Dreamweaver 4 Part 1
Information Systems 21
Toolbar Tip
Unordered List
Toolbar Tip
Ordered List
5.5 Bulleted and Numbered Lists
Numbered and bulleted lists (known as “ordered” and “unordered” lists) can be created from existing or new text.
5.5.1 Creating a Bulleted (Unordered) List
1. Select the set of paragraphs that is to be a bulleted list. 2. From the Text menu select List. 3. From the submenu choose Unordered List.
5.5.2 Creating a Numbered (Ordered) List
1. Select the set of paragraphs that is to be a numbered
list. 2. From the Text menu select List. 3. From the submenu choose Ordered List.
5.6 Horizontal Rules
A horizontal rule is a line that runs across the screen providing a division on the page. To insert a horizontal rule from the menu: 1. Position the cursor where the line is to be drawn. 2. From the menu choose Insert and then Horizontal Rule. To insert a horizontal rule from the Objects Palette: 1. Position the cursor where the line is to be drawn. 2. Click on the Insert Horizontal Rule button. The line is then inserted, occupying the width of the screen.
5.6.1 Horizontal Rule Properties
When a horizontal rule is selected the Properties Inspector changes to:
Dreamweaver 4 Part 1 Creating Webpages
22 Information Systems
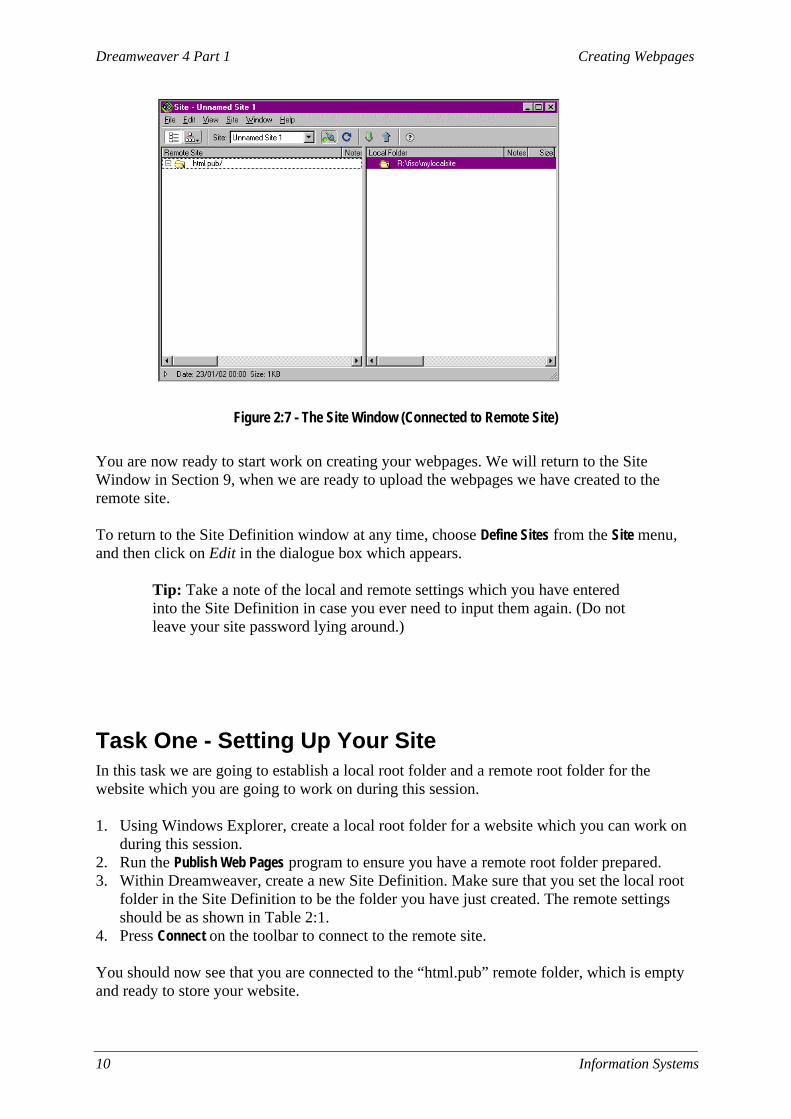
Figure 5:6 - Horizontal Rule Properties Inspector
Using the Properties Inspector you can change the width, height and alignment, and choose whether to have shading.
Task Four - Creating a webpage 1. Open the page index.htm which you created in the previous task (if it is not already
open). Start to create a homepage for your website in this window, by typing text into the page. Make sure that you use paragraphs of different styles: include at least some “Paragraph”, “Heading 1”, and “Heading 2” styles. (This will be important later.) Also make use of horizontal rules, and list/bullet formats, if you wish.
2. Preview the document in the browser by pressing F12, and note the appearance of the
page. Try resizing the browser window to see how the page looks in different-sized windows.
3. Look at the underlying HTML code for the document you have created. Can you identify
the text you have typed in? Can you see the codes which signify the different formatting commands?
4. Save the document. 5. Create a second page, again using paragraph/text/list formatting as appropriate, and again
ensuring it has an appropriate title. Also save this in your local root folder, but with a different file name.

Creating Webpages Dreamweaver 4 Part 1
Information Systems 23
6. Images
Images that can be incorporated into a webpage include JPG files (normally photos) and GIF files (normally art, such as drawings and clipart). There are a number of ways that images can be inserted into your webpages.
6.1 Inserting an Image
6.1.1 To Insert an Image
1. Position the cursor at the point where you wish the image to be placed. 2. From the Insert menu choose Image. The Select Image Source dialogue box is displayed:
Figure 6:1 - Inserting an image
3. Locate the image that you wish to insert and click on Select. The image file should be located within your local root folder so that it can be referenced properly. If not, then Dreamweaver will helpfully prompt you, asking whether the file should be copied into your local site (Figure 6:2). Choose Yes when faced with this, and a file chooser window will appear. It is recommended that you save the image within the “images” folder in your local root folder.
Figure 6:2 - Warning for images inserted from outside local site

Dreamweaver 4 Part 1 Creating Webpages
24 Information Systems
6.1.2 Inserting an Image From the Objects Palette
1. Position the cursor at the point where you wish the image to be placed. 2. Click on the Insert Image icon on the Objects Palette. The Select Image Source
dialogue box is displayed. 3. Locate the image that you wish to insert and click on Select.
6.2 Modifying Image Properties
6.2.1 Selecting an Image
Before you can change an image's properties, you first need to select the image. 1. Click on the image with the left mouse button. The image should be surrounded by a
border as in Figure 5:3 and handles can be seen on its corners and edges.
Figure 6:3 - Image Figure 6:4 - Selected Image
6.2.2 Changing Dimensions
It is possible to change an image's size by clicking-and-dragging. Note that it is usually better to set your images to the correct size using graphics software, before importing it into your webpage. To change an image's size in Dreamweaver: 1. Select the image. 2. Move the mouse over one of the handles. The mouse pointer will change to a double-
headed arrow.
Handles

Creating Webpages Dreamweaver 4 Part 1
Information Systems 25
Figure 6:5 - Image Size
3. Hold down the left mouse button and drag until the image is the required size. Then
release the mouse button. Holding down the [Shift] key while clicking-and-dragging the corner handle will preserve the aspect ratio of the image (the ratio of the width and the height), so that the picture doesn’t become stretched or squashed. It is often preferable to alter the size in the Properties Inspector. An exact width and height can be entered. Alternatively, it is very useful to be able to specify the width as a percentage: entering the width as 30% will ensure that the image fills 30% of the width of the screen. 1. Select the image. 2. In the Properties Inspector type in the required width (W) and height (H) in pixels5 .
Figure 6:6 - Image Size
3. Click on the Refresh button. Note that resizing an image in Dreamweaver does not affect the file size of the image. This means that resizing within Dreamweaver is not a good way to shrink images down to “thumbnail” images – because even though the image will appear small onscreen, it may be a large file and take a while for a user to download it to their computer.
6.2.3 Applying Borders
To apply a border around an image: 1. Select the image.
5 A pixel is the smallest unit of visual information that can be used to build an image. Pixels are the little squares that can be seen when a graphics image is enlarged. The more pixels in an image, the better its resolution.
Refresh Width & Height
Arrow

Dreamweaver 4 Part 1 Creating Webpages
26 Information Systems
2. In the Properties Inspector, type a number from 1 to 400 in the Border box. The higher the number, the thicker the border.
3. Press [Return].
Figure 6:7 - Image Border
6.2.4 Supplying Alternative Text
Some browsers are not capable of displaying images, while others have the facility turned off in order to speed up the downloading of webpages. To overcome this you should always supply text as an alternative to an image. Alternative text can also be used to provide the user with further information. To supply alternative text: 1. Select the image. 2. Click in the Alt box within the Properties Inspector and type in the text that you wish to
have displayed. Alternative text is displayed in a browser in one of two ways: 1. If the picture is not downloaded, the text is displayed instead. (Speaking browsers,
e.g. for the visually impaired, will read out the alternative text.) 2. If the picture is downloaded, the text will be displayed when the user moves the
mouse over the image.
Reset image size
Border
Alternative-text box

Creating Webpages Dreamweaver 4 Part 1
Information Systems 27
Task Five - Adding Images In this task you are going to add images to your page, and check their appearance in the browser. The image files can be ones of your own, or alternatively some example image files are provided in the folder R:\training.dir\dweaver4\Part1\Images\ 1. Open your webpage index.htm (if it isn't already open). 2. Add one or two images to your page. As described in Section 6.1.1, if Dreamweaver
prompts you to ask whether an image file should be copied into your local site, select Yes and place it in your “images” folder.
3. Preview the webpage in your browser. 4. Now return to the Dreamweaver document window and select one of the images. In the
Properties Inspector, delete the value for the image's height, and enter 50% for the image's width.
5. Again, preview the page in your browser. Resize the browser window to see how the size
of the image changes.
Dreamweaver 4 Part 1 Creating Webpages
28 Information Systems
7. Tables
Tables allow you to line up text and graphics easily and quickly. Tables are simply grids divided into rows and columns. A simple table is shown below:
Name Location Extension P Smith IT 4553
L Whittle Sales 7669
Table 7:1
In the above example, the table is made up of three columns and three rows. Each piece of data is contained within a cell. By default the table lines are displayed, but they can be removed.
7.1 Inserting a Table
1. Position the cursor where you want the table to be inserted. 2. From the Objects Palette click on the Insert Table icon.
Alternatively, select Table from the Insert menu.
The following dialogue box is displayed:
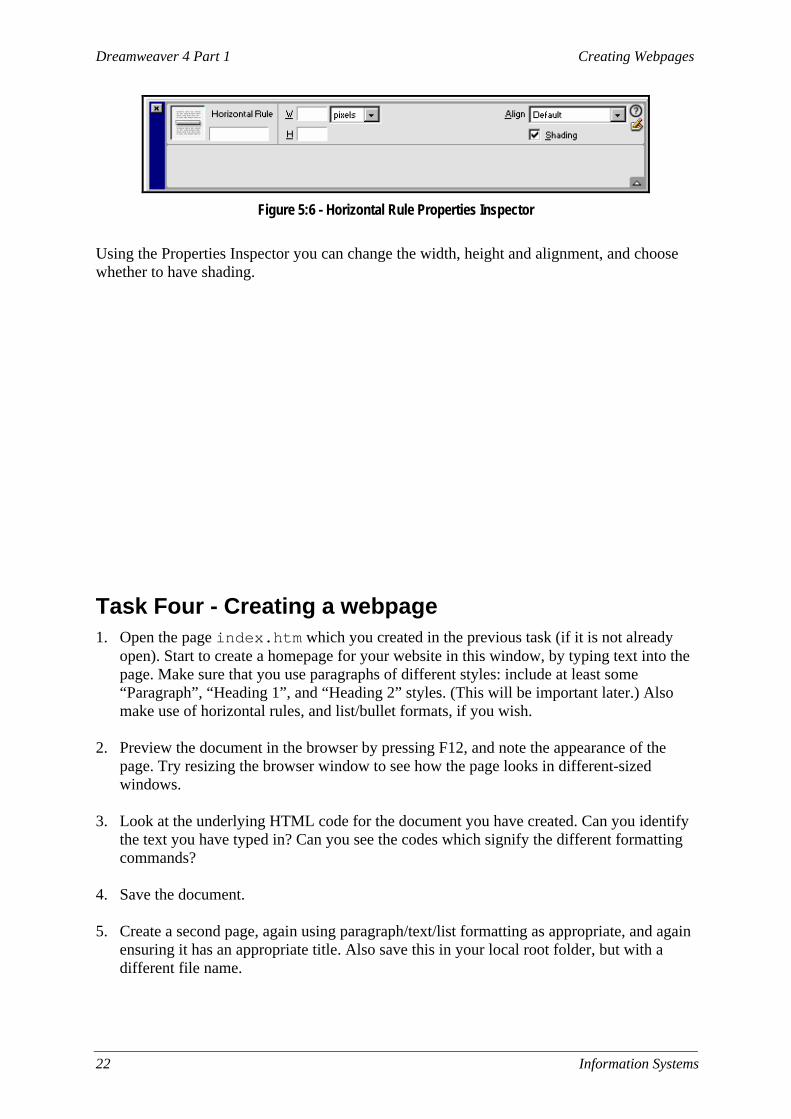
Figure 7:1 - Insert Table
3. Specify the number of rows and columns in your table. 4. Choose a width for your table, either by typing in the percentage of the page width or
by typing in the number of pixels the table width should be. 6. Specify whether the table is to have a border; 0 (zero) means no border. The higher
the number, the thicker the border. 7. Click on OK.

Creating Webpages Dreamweaver 4 Part 1
Information Systems 29
7.2 Adding Table Data
To add text to the table, simply position the cursor in the cell where you wish to start and then type the text. Note: • To move from one cell to another press the [Tab] key. • To move back a cell press [Shift+Tab]. • To move up or down a line use the cursor keys.
7.3 Inserting Images into a Table
Inserting images into tables is similar to inserting images in a webpage. Position the cursor at the point in the table where the image is to go, and click on the Insert Image icon on the Objects Palette.
Task Seven - Insert a Table 1. Add a table with three rows and two columns into your second webpage. 2. Enter the text “Image” into the the first cell of the table, and “Description” into the
second cell. 3. Insert an image of your choice in the cell beneath the “Image” label. 4. Type a description into the adjacent cell. 5. Save the webpage.
7.4 Selecting a Table
To select a table, click once on the table border. The table should have a thick black line around it and handles on the bottom, right and bottom right hand corner:
Figure 7:2 - Selected Table
The Properties Inspector should look similar to Figure 7:3.
Figure 7:3 - Tables Properties Inspector

Dreamweaver 4 Part 1 Creating Webpages
30 Information Systems
7.5 Selecting a Column or Row
Move the mouse to the left of the row or to the top of the column you wish to select, until the mouse pointer becomes an arrow pointing along the row/column. Then click once to select the entire row/column.
Figure 7:4 - Column Selection
The Properties Inspector will look something similar to Figure 7:5.
Figure 7:5 - Table Column Properties Inspector
7.6 Deleting a Column or Row
1. Select the column or row to be deleted. 2. Press the [Delete] key on the keyboard.
7.7 Table Properties
7.7.1 Changing Widths
1. Move the mouse over the column border to be widened. 2. Hold down the left mouse button and drag to the required width.
7.7.2 Colours
You can change the border and background colours within the Properties Inspector: 1. Select the table, row, column or cell that you wish to change. 2. In the Properties Inspector choose the relevant colour button.

Creating Webpages Dreamweaver 4 Part 1
Information Systems 31
Figure 7:6 - Changing Table Colours
3. From the colour palette choose a colour from the ones displayed.
7.7.3 Changing Border Width
1. Select the table. 2. Type a number in the Border box in the Properties Inspector. The higher the number,
the thicker the width. Zero, or blank, means no border.
Figure 7:7 - Border Widths
3. Click on the Refresh button for the change to take effect.
7.8 Merging and Splitting Cells
Merging is the process of combining two or more cells together. It can be used, for example, where you want titles to span columns. Splitting cells is the opposite of merging; it is to create two or more cells out of one.
7.8.1 Merging cells
1. Select the cells to merge. 2. In the Properties Inspector click on the Merge Cells button.
Figure 7:8 - Merge/Split Cells
The selected cells are then merged.
Border Colour Background Colour
Merge Cells Split Cells
Refresh
Border Width
Dreamweaver 4 Part 1 Creating Webpages
32 Information Systems
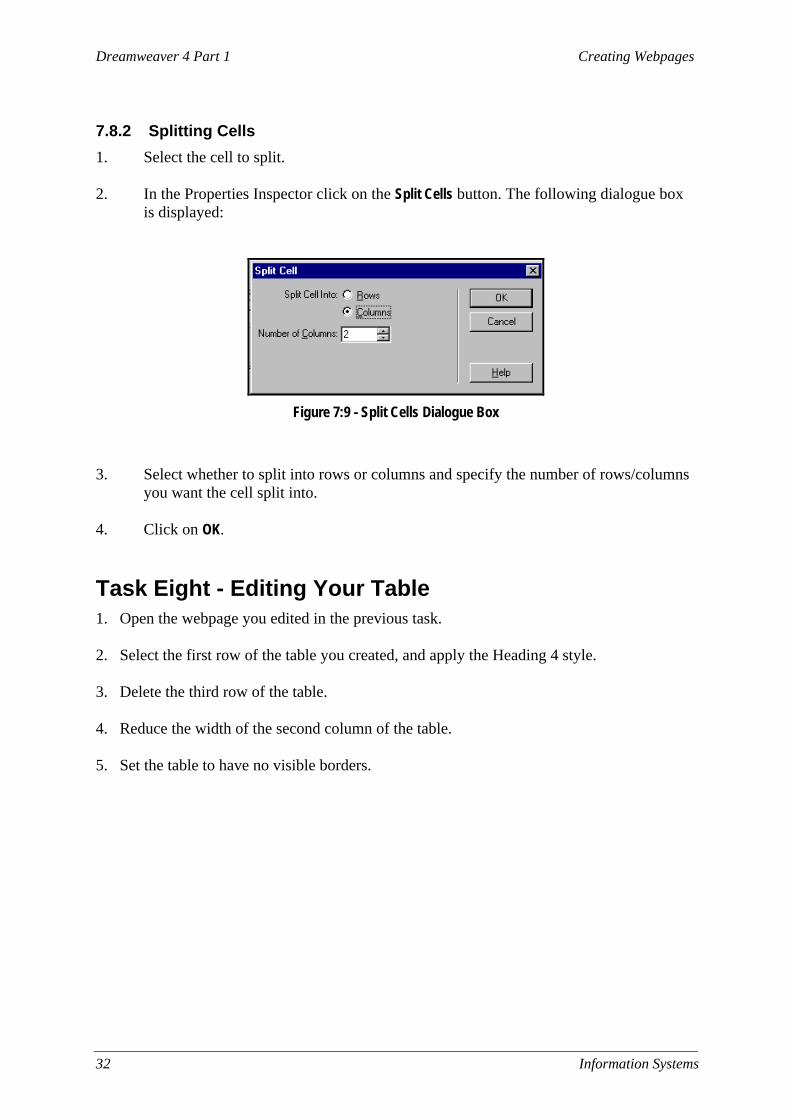
7.8.2 Splitting Cells
1. Select the cell to split. 2. In the Properties Inspector click on the Split Cells button. The following dialogue box
is displayed:
Figure 7:9 - Split Cells Dialogue Box
3. Select whether to split into rows or columns and specify the number of rows/columns
you want the cell split into. 4. Click on OK.
Task Eight - Editing Your Table 1. Open the webpage you edited in the previous task. 2. Select the first row of the table you created, and apply the Heading 4 style. 3. Delete the third row of the table. 4. Reduce the width of the second column of the table. 5. Set the table to have no visible borders.

Creating Webpages Dreamweaver 4 Part 1
Information Systems 33
8. Hyperlinks
A hyperlink is a graphic or piece of text within a webpage that leads to another place within the same document or to another webpage. Hyperlinked text is usually shown as underlined or in a different colour. Essentially, there are four types of link: • A link to your own files on your website • A link to a page on another site • A link to other areas on the same webpage • An email link, which initiates an email to a specified address Both text and images can be used as links. Note that the page you are working on should be saved before you create hyperlinks.
8.1 Linking to Another Page
1. Select the text or image that you want to become the link. The Properties Inspector for text will look similar to Figure 8:1. For an image it will look similar to Figure 8:2.
Figure 8:1 - Links from Text
Figure 8:2 - Links from Images
3. If you know the path of the page to link to, type in the full path in the Link box.
Alternatively, click on the Browse button to search for the file. By default linked text appears underlined, and linked images appear outlined.
Link box Browse
Dreamweaver 4 Part 1 Creating Webpages
34 Information Systems
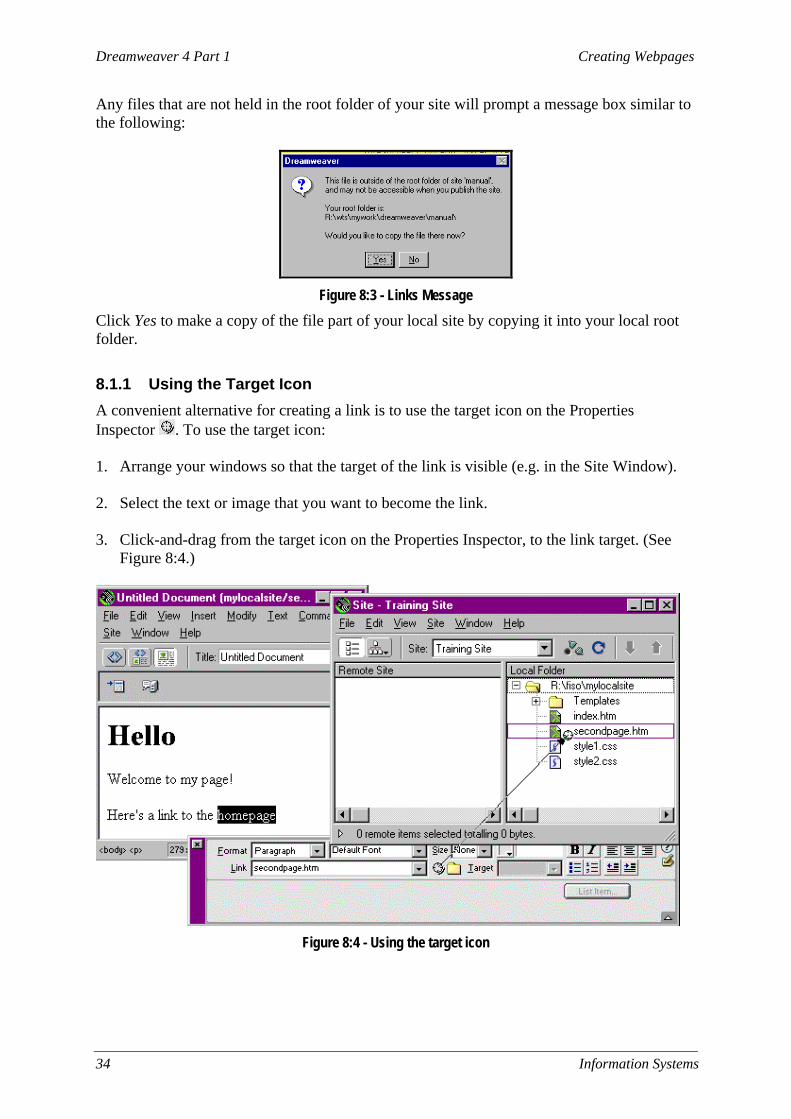
Any files that are not held in the root folder of your site will prompt a message box similar to the following:
Figure 8:3 - Links Message
Click Yes to make a copy of the file part of your local site by copying it into your local root folder.
8.1.1 Using the Target Icon
A convenient alternative for creating a link is to use the target icon on the Properties Inspector . To use the target icon: 1. Arrange your windows so that the target of the link is visible (e.g. in the Site Window). 2. Select the text or image that you want to become the link. 3. Click-and-drag from the target icon on the Properties Inspector, to the link target. (See
Figure 8:4.)
Figure 8:4 - Using the target icon
Creating Webpages Dreamweaver 4 Part 1
Information Systems 35
Toolbar Tip
Insert Email Link
8.2 Linking to a Page on the Internet
1. Select the text or image that you want to become the link. 2. Click in the Link text box within the Properties Inspector. 3. Enter the full address of the website that you want to link to. Make sure you include
the http:// in front and the www. as well, if necessary. For example: http://www.ucl.ac.uk/ UCL http://www.bbc.co.uk/ BBC http://sunsite.doc.ic.ac.uk/wm/ WebMuseum at Imperial College http://www.yahoo.com/ Search Engine
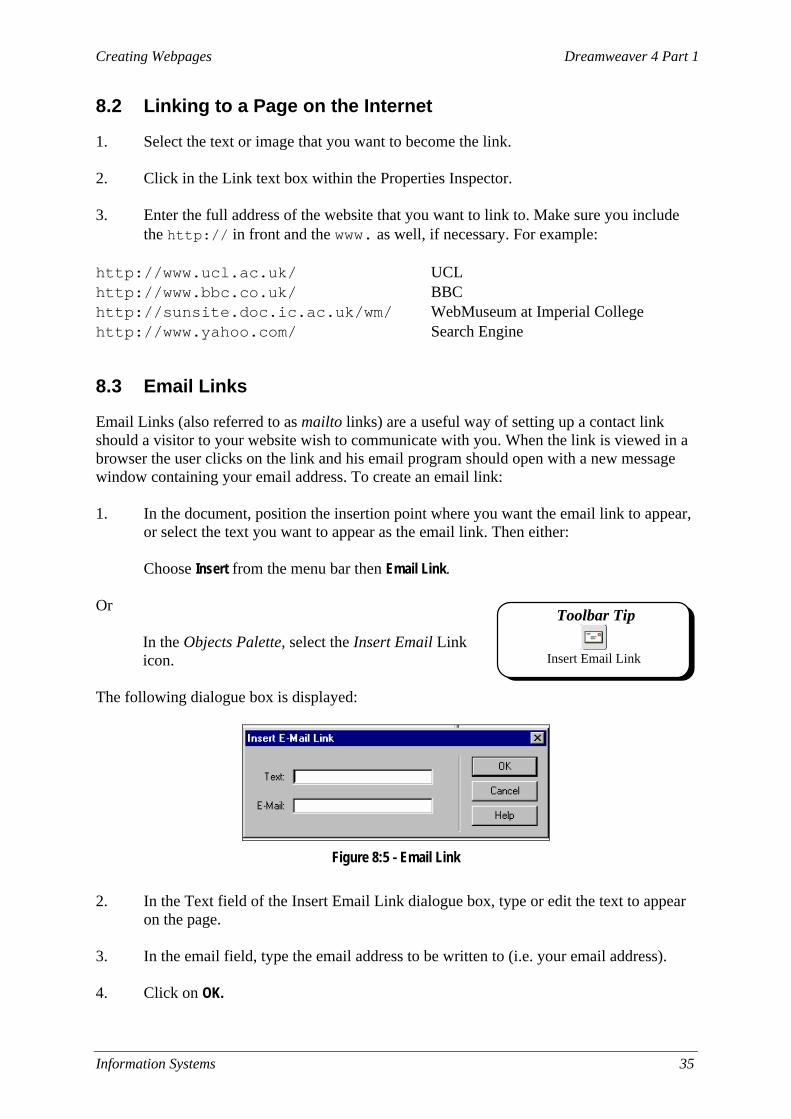
8.3 Email Links
Email Links (also referred to as mailto links) are a useful way of setting up a contact link should a visitor to your website wish to communicate with you. When the link is viewed in a browser the user clicks on the link and his email program should open with a new message window containing your email address. To create an email link: 1. In the document, position the insertion point where you want the email link to appear,
or select the text you want to appear as the email link. Then either: Choose Insert from the menu bar then Email Link. Or
In the Objects Palette, select the Insert Email Link icon.
The following dialogue box is displayed:
Figure 8:5 - Email Link
2. In the Text field of the Insert Email Link dialogue box, type or edit the text to appear
on the page. 3. In the email field, type the email address to be written to (i.e. your email address). 4. Click on OK.

Dreamweaver 4 Part 1 Creating Webpages
36 Information Systems
Task Nine - A Table of Links 1. Open one of your webpage documents (the second one you created, i.e. not index.htm)
and add a table at the bottom – for example:
Links
Home UCL Email Me
2. Make the text in each of the three lower cells into links, as follows:
• “Home”: A link to your homepage • “UCL”: A link to the UCL homepage, http://www.ucl.ac.uk/ • “Email me”: An email link to send email to yourself
3. Preview the page in your browser. Test each of the links. Do they work? 4. Save the page. 5. Open your homepage, index.htm. Add a link from the homepage to the second page. 6. Test this link by previewing the page in your browser. 7. Save the page.
8.4 Linking to Anchors on the Same Page
Creating links to areas on the same page is a two step process. You first need to name the area on the page to be linked to, by creating a ‘named anchor’. You then need to create a link to that anchor.
8.4.1 Creating a Named Anchor
1. Select the point on the page to be linked to. 2. From the Insert menu select Named Anchor. The
following dialogue box is displayed:
Figure 8:6 - Named Anchor
3. Type in a name for the anchor, e.g. coffee. Click on OK. The text on the Dreamweaver
screen will be marked by an icon, as shown in Figure 8:7.
Figure 8:7 - Named Anchor

Creating Webpages Dreamweaver 4 Part 1
Information Systems 37
8.4.2 Creating a Link to a Named Anchor
1. Select the text or image that is to be the link. 2. Within the Properties Inspector, click in the Link box. 3. Type in the name of the anchor, preceded by a hash (#). For instance, to link to the
text in the previous example you would type #coffee. Note: Anchors are case sensitive. Alternatively, you can use the target icon to click-and-drag to create an anchor link (Section 8.1.1). Instead of dragging the target to a file, drag it to the yellow anchor symbol (Figure 8:7).
8.5 Creating Links From Thumbnail Images
1. Select the thumbnail image to be linked from. 2. In the Link box in the Properties Inspector type the path and filename for the image that it
is to be linked to.
8.6 Removing a Link
1. Highlight the text or the image with the link. 2. Within the Properties Inspector, select the link address displayed in the Link box. 3. Press the [Delete] key on the keyboard. The link formatting (the underline and colour)
should disappear from your text.
Task Ten - Anchor Links 1. Using Dreamweaver, open the file
R:\training.dir\dweaver4\part1\sonnets.htm This file contains three sonnets, and is fairly long. Because of its length it is a good candidate for including a table of contents or menu.
2. Within the sonnets.htm page create named anchors at each of the sonnet headings. 3. Using these named anchors, insert a menu or table of contents at the top of the file, with
links to each of the three sonnets. Test the links in Netscape. 4. Use the File > Save As command to save your modified version of sonnets.htm within
the local root folder for your website. If you have time, close sonnets.htm and open a different file from your local site (such as index.htm). Create a set of three links from that page, directly to each of the sonnets.
Dreamweaver 4 Part 1 Creating Webpages
38 Information Systems
9. Managing your Website
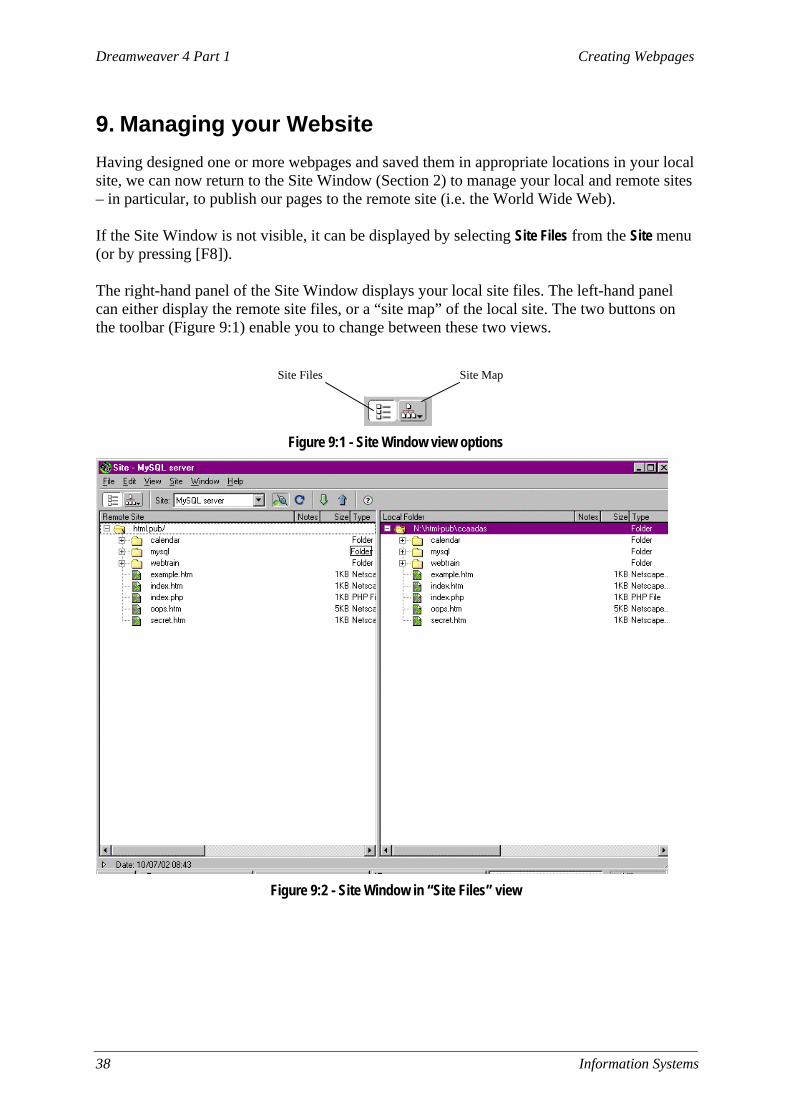
Having designed one or more webpages and saved them in appropriate locations in your local site, we can now return to the Site Window (Section 2) to manage your local and remote sites – in particular, to publish our pages to the remote site (i.e. the World Wide Web). If the Site Window is not visible, it can be displayed by selecting Site Files from the Site menu (or by pressing [F8]). The right-hand panel of the Site Window displays your local site files. The left-hand panel can either display the remote site files, or a “site map” of the local site. The two buttons on the toolbar (Figure 9:1) enable you to change between these two views.
Figure 9:1 - Site Window view options
Figure 9:2 - Site Window in “Site Files” view
Site Files Site Map

Creating Webpages Dreamweaver 4 Part 1
Information Systems 39
Figure 9:3 - Site Window in “Site Map” view
9.1 Uploading and Downloading
Make sure that the “Site Files” view rather than the “Site Map” view is enabled (Figure 9:2). If Dreamweaver is not already connected to the remote site then the left-hand pane will be blank, and you will need to click on the Connect button on the toolbar (Figure 9:4).
Figure 9:4 - The Connect button
9.1.1 Uploading a File
1. Select the file/folder in your local site which you want to upload to the remote site. You can select multiple files/folders by holding down the [Ctrl] or [Shift] keys while clicking. As in other Windows applications, clicking with [Ctrl] held down selects multiple files, and with [Shift] held down selects a range of files.
2. Click the “Put” button on the Dreamweaver toolbar, which looks like an arrow pointing
upwards. Alternatively, choose Put from the Site menu. 3. If Dreamweaver is not already connected to the remote site, then it will attempt to
connect. It will then attempt to upload the file(s) to the remote site. Using this method, files and folders will be transferred from their position in the local site, to the exactly equivalent position in the remote site.
Connected (click to disconnect)
Not connected (click to connect)
Get Put

Dreamweaver 4 Part 1 Creating Webpages
40 Information Systems
9.1.2 Downloading a File
1. Select the file/folder in your remote site which you want to download to the local site. You can select multiple files/folders by holding down the [Ctrl] or [Shift] keys while clicking.
2. Click the “Get” button on the Dreamweaver toolbar, which looks like an arrow pointing
downwards. Alternatively, choose Get from the Site menu. 3. If Dreamweaver is not already connected to the remote site then it will attempt to connect.
It will then attempt to download the file(s) from the remote site. Using this method, files and folders will be transferred from their position in the remote site, to the exactly equivalent position in the local site. As an alternative to the “Get” and “Put” buttons, you can click-and-drag to move files between the local and the remote site; but this is not advisable because you run the risk of dragging them to the wrong location in the remote site.
9.2 The Site Map
Dreamweaver can display a site map which shows graphically the links and relationships between files on your sites.
9.2.1 Setting the Home Page
In order that the site map can be constructed, one of your pages must be designated as the home page. The home page is the first page that a user sees when they log into your website and is normally called index.htm or index.html. The following steps are carried out once the site has been defined and you have created and saved the page that is to be set as your home page. To define a page as the home page: 1. Make sure that the active window is the Site Window. 2. In the right pane click on the file you wish to define as the home page. 3. From the Site menu select Set as Home Page. This page is then defined as your home page, for the purpose of building the site map.
9.2.2 Viewing the Site Map
To view the site map, use the Site Map button on the toolbar (Figure 9:1) to switch to Site Map view (Figure 9:3). Note that you must have chosen one file to be your site's home page, otherwise Dreamweaver will display an error message to tell you that it cannot build the site map.
Creating Webpages Dreamweaver 4 Part 1
Information Systems 41
9.2.3 Exporting the Site Map
You cannot print out the site map from Dreamweaver but you can export the map as a bitmap file. You can then import that file into a wordprocessor or graphics package to print. 1. From the Site Map window choose File. 2. Select Save Site Map. 3. Give the file a name and save it as a Bitmap (BMP) file. 4. Click on Save.
Task Eleven - Uploading Files 1. Activate the Site Window, and upload both of your webpages to the remote site. 2. Define index.htm in your local site as your home page. 3. View the Site Map for your site. 4. Find out the URL for the remote site, and visit it using your browser. For example, if we
were using the account trainXY, then the URL could be http://www.homepages.ucl.ac.uk/~trainXY/
5. Follow the links to ensure that they work.
Dreamweaver 4 Part 1 Creating Webpages
42 Information Systems
10. Using Templates
Templates allow the web designer to reuse elements of a webpage over and over again. They allow you to set up a consistent look and feel for your pages by editing a single template file. Any changes made to the template file can be applied automatically to all webpages based on that template. With templates you can set up or define “editable areas”. Only the areas defined as editable can be changed or edited within the document. Documents based on the template can then be created by users. Using Templates makes it easier to maintain a consistent design across your website and makes it easier to make minor changes to every page on the site very quickly. When creating a template you include on it the elements that are never going to change such as a masthead or a copyright notice at the bottom. This workbook does not cover the creation or editing of Dreamweaver Templates – see document 412, “Dreamweaver 4 Part 2” to learn how to create and manipulate templates. Here we will assume that a Template already exists, and we will apply it to our webpage.
10.1 Using a Template to Create a Web Page
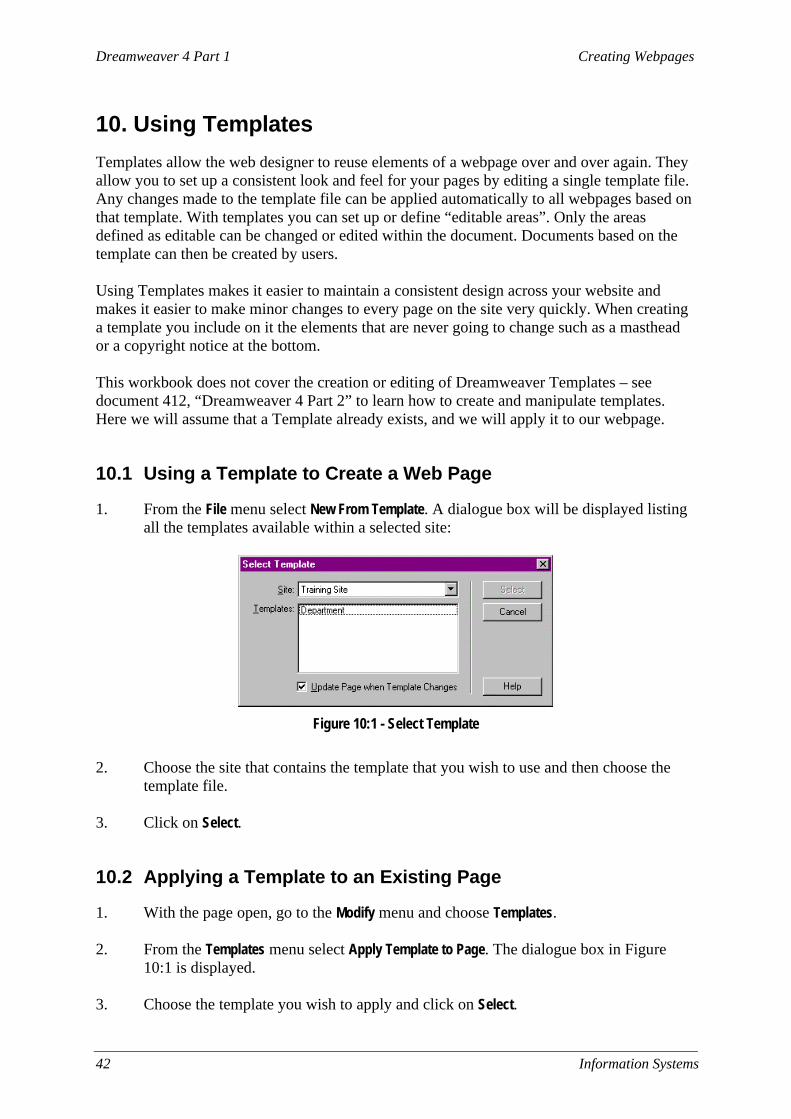
1. From the File menu select New From Template. A dialogue box will be displayed listing all the templates available within a selected site:
Figure 10:1 - Select Template
2. Choose the site that contains the template that you wish to use and then choose the
template file. 3. Click on Select.
10.2 Applying a Template to an Existing Page
1. With the page open, go to the Modify menu and choose Templates. 2. From the Templates menu select Apply Template to Page. The dialogue box in Figure
10:1 is displayed. 3. Choose the template you wish to apply and click on Select.

Creating Webpages Dreamweaver 4 Part 1
Information Systems 43
Dreamweaver may present you with the following dialogue box:
Figure 10:2 - Choose editable region
This means that Dreamweaver cannot guess exactly where in the Template the content of your webpage should go. The main content of the webpage will ordinarily go in the section labelled “main” or “body” (see Figure 10:2), so normally you should choose that option. If you select “(none)” then the so-called “orphaned content” will be discarded.
10.3 Updating Pages which Use a Template
If a Template is changed then it will be necessary to update the pages which use this template. The process is simple: 1. When you change a Dreamweaver Template yourself, Dreamweaver will prompt you
to ask whether to update the pages which use the Template. Otherwise, you can start the process by selecting Templates from the Modify menu. Then select either Update Current Page (to update only the page in the document window) or Update Pages... (to update all the files in your site which use the Template).
2. If you selected Update Current Page the process is finished. If you selected Update
Pages..., a dialogue box appears similar to Figure 10:3:
Figure 10:3 - Update pages
Dreamweaver 4 Part 1 Creating Webpages
44 Information Systems
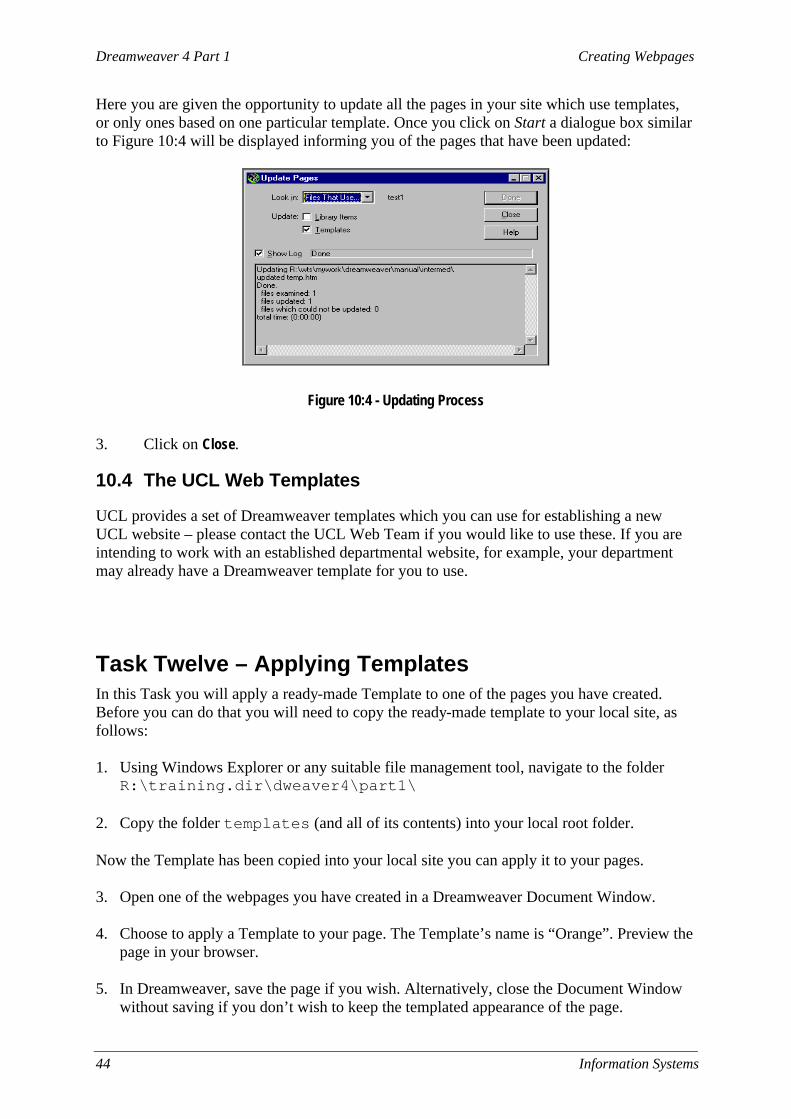
Here you are given the opportunity to update all the pages in your site which use templates, or only ones based on one particular template. Once you click on Start a dialogue box similar to Figure 10:4 will be displayed informing you of the pages that have been updated:
Figure 10:4 - Updating Process
3. Click on Close.
10.4 The UCL Web Templates
UCL provides a set of Dreamweaver templates which you can use for establishing a new UCL website – please contact the UCL Web Team if you would like to use these. If you are intending to work with an established departmental website, for example, your department may already have a Dreamweaver template for you to use.
Task Twelve – Applying Templates In this Task you will apply a ready-made Template to one of the pages you have created. Before you can do that you will need to copy the ready-made template to your local site, as follows: 1. Using Windows Explorer or any suitable file management tool, navigate to the folder
R:\training.dir\dweaver4\part1\ 2. Copy the folder templates (and all of its contents) into your local root folder. Now the Template has been copied into your local site you can apply it to your pages. 3. Open one of the webpages you have created in a Dreamweaver Document Window. 4. Choose to apply a Template to your page. The Template’s name is “Orange”. Preview the
page in your browser. 5. In Dreamweaver, save the page if you wish. Alternatively, close the Document Window
without saving if you don’t wish to keep the templated appearance of the page.

Creating Webpages Dreamweaver 4 Part 1
Information Systems 45
11. Style Sheets
Style sheets, properly called Cascading Style Sheets or CSS, are a useful way to specify the formatting of every component of your webpages. CSS formatting commands are stored in a separate file6, and then “attached” to a webpage. The attributes then control aspects of your webpage, including: • The font, colour, size, etc. of the different levels of heading (h1, h2, etc.). • The page margins, background colour etc. • The alignment (left, right, centre, justified) of text and images. • The amount of space surrounding each kind of page element. This workbook does not cover the details of creating or editing style sheets. Document 412 provides more advanced information about using CSS in Dreamweaver.
11.1 Attaching a Style Sheet to a Webpage
To attach a style sheet to a webpage you are currently editing: 1. Choose CSS Styles from the Text menu (in the document window), and then choose Attach
Style Sheet.... A dialogue box appears for you to choose the style sheet to attach (Figure 11:1).
Figure 11:1 - Select Style Sheet File
2. Navigate to the folder containing the style sheet file. 3. Select the file from the list of files (style sheet files end in the extension .css), and click
Select.
6 CSS commands can also be embedded directly into a webpage.

Dreamweaver 4 Part 1 Creating Webpages
46 Information Systems
11.2 Detaching a Style Sheet from a Webpage
To detach a style sheet from a webpage, choose CSS Styles from the Text menu, and then choose Edit Style Sheet.... A dialogue box will appear (Figure 11:2), with a list of CSS commands/files. Choose the filename for the style sheet you wish to detach from the webpage, and then click the Remove button.
Figure 11:2 - Edit Style Sheet window
Task Thirteen - Style Sheets In this task you are going to attach different style sheets to one of the webpages you have created, to see the formatting effects which can be achieved with CSS. 1. Open one of your previously-saved webpages in a Dreamweaver document window – not
one which uses a Template. 2. Attach the stylesheet file R:\training.dir\dweaver4\part1\style1.css to
your document. 3. Preview the document in Netscape. 4. Detach the style sheet, and then instead attach
R:\training.dir\dweaver4\part1\style2.css to your document. 5. Preview the document in Netscape. 6. Close the document window without saving the file.

Creating Webpages Dreamweaver 4 Part 1
Information Systems 47
12. Accessibility
Webpages are available for all to view over the Internet. However, not everyone accesses the Internet in the same way. There are many varieties of Internet browser (you may be familiar with Internet Explorer and Netscape Navigator, but there are others including Lynx, Mozilla and Opera) – which can run on many kinds of computer (for example PC, Mac and UNIX). These platforms all have vastly different possibilities for the amount of screen space available (some monitors only display 640 x 400 pixels, while some are much larger). Always remember that not all computers will necessarily display a webpage exactly as yours does. • Visually impaired people may navigate the Web via Internet browsers which read out the
content of a webpage, or alternatively may have problems if text is very small or low-contrast.
• People with motor difficulties may find it difficult to click on a small link. • Those reading a webpage which is not written in their first language, or those with
learning difficulties, may have problems understanding over-complicated text. Often, making your website useable by all will lead to general improvements, such as in the clarity of your online writing. Here are some specific suggestions for improving the accessibility of your pages:
12.1 Text and Colour Schemes
One of the most general recommendations about page design is to make text easy to read. Dark (e.g. black) text on a very light (e.g. white) background is proven to be the easiest colour scheme to read on a computer screen, especially if there are large amounts of text to read. Text should never be made so small that it could be difficult to read, especially for those with eyesight problems. Text sizes on the web range between 1 and 7, where 3 represents the ordinary text size (12pt or 14pt on most people's browsers). Size 1 should only be used very rarely. Background images can often make text more difficult to read. If you are sure you want to use a background image, ensure that its colours contrast well with text laid over it. It is often best to use a graphics package to convert a background image into a “watermark” by reducing the contrast, and increasing the brightness, of the image.
12.2 Links
Links should normally be made to stand out. Underlining links often distinguishes them from surrounding text, but it also helps if they are a different colour – ordinarily links are coloured blue in contrast to black for ordinary text. It is also important that the text of a link describes what users will find if they follow the link. The following is a common mistake:
Click here if you'd like to view my CV.

Dreamweaver 4 Part 1 Creating Webpages
48 Information Systems
This looks fine to many users. However, certain text-based browsers and speech-browsers list the links on a page, without reference to the text which surrounds them – the above link “Click here” is meaningless out of context. Much better would be:
You can view my CV. or:
You can view my CV. If a link is based on an image rather than text, it is a good idea to ensure that the image's “alternative text” indicates the link destination.
12.3 Images
As described in Section 6.2.4, it is important that every image you include in your webpages has “alternative text” (also called “alt text”). Otherwise those browsing without images may be unable to use your site as effectively as those able to view the images. As a guide, there are various uses of images, and various corresponding needs for the alt text: • Illustration. If an image is used to illustrate a webpage, a short textual description is a
good idea for the alt text: e.g. “Photograph of students in a laboratory class”, “Dr E. Penney”.
• Links. If an image is used as a link, make sure the alt text provides a useful description of the link's function: e.g. “View RAE results”, “Email Dr E. Penney”.
• Icons and logos. Icons and logos are ordinarily given a descriptive alt text, as with illustrations, eg. “UCL logo”, “Haematology at UCL”. If no description is needed, follow the advice for structural images, below.
• Structural. “Structural” images, such as ones which are used to give the impression of a border around a page element, do not carry information and don't need to be presented to the text-only browser. The alt text should be a simple space: “ ”.
Considering that many users are not able to make use of images which might be associated with a webpage, no “vital” information should be encoded in an image. For example, if it is impossible to tell where one should click to access the various sections of your site unless certain images are loaded, this can cause problems. Also remember that images take a long time to download compared with text. If your webpages are full of high-quality, large images, then the slow speed of downloading may be intolerable for many users. At UCL a very fast Internet connection is available, but your webpages should also be useable by those in far-off countries, or those accessing your pages via a modem, for whom UCL webpages will take much longer to download.
12.4 Tables
Tables are commonly used in two situations in webpages: to display an actual table, i.e. tabular data; and to control the layout of page elements. In both cases it pays to remember that not all browsers are able to render tables properly. Text-only browsers, speaking browsers, and very old browsers all render the contents of a table linearly: imagine reading out the contents of a table row-by-row, left-to-right – would your table's contents make sense?

Creating Webpages Dreamweaver 4 Part 1
Information Systems 49
12.4.1 Tables for Data
For informational tables, the advice is to make sure that clear table headings are given. It is good practice to give a textual summary of the information shown in the table – for example, “The following table shows that heart disease in women has been increasing at a greater rate, over the past twenty years, than in men...”.
12.4.2 Tables for Layout
The use of tables to lay out a webpage is widespread, but increasingly frowned upon. Advanced techniques using stylesheets are gradually replacing the use of tables, and if you are designing a large and important website it may be wise to read up on these techniques. If you do use tables for layout purposes, pay attention to the order in which your elements would appear if presented linearly. Figure 12:1 illustrates one possible layout achieved with a table.
Title
Menu Option 1
Menu Option 2
Menu Option 3
Main Content of Webpage
Figure 12:1 - A problematic layout
The webpage in Figure 12:1 would be rendered linearly as Title, Menu Option 1, Main Content of Webpage, Menu Option 2, Menu Option 3. The menu is split up in an odd fashion. There are a number of ways of getting round this problem. Figure 12:2 shows one – the menu is now contained within a second inner table. The page would thus be rendered linearly as Title, Menu Option 1, Menu Option 2, Menu Option 3, Main Content of Webpage; this is perhaps the best linear order for the elements.
Title
Menu Option 1 Menu Option 2 Menu Option 3
Main Content of Webpage
Figure 12:2 - One possible improvement to the layout

Dreamweaver 4 Part 1 Creating Webpages
50 Information Systems
13. Getting Help
13.1 Getting Help within Dreamweaver
Dreamweaver has a help system which you can call upon at any time while you are working on a website. Select Using Dreamweaver from the Help menu to open Dreamweaver help (it will launch in your browser).
13.2 Learning More
• Information Systems publish a document to accompany this one, entitled “Dreamweaver 4 Part 2” (document 412). It covers some of the more advanced features of Dreamweaver you may wish to use, such as forms and libraries, and also goes into more depth about some features covered here, such as style sheets and templates.
• There is an option on Dreamweaver's Help menu called Lessons, which takes you through
some of the more advanced Dreamweaver features in an interactive fashion. • A Web search using a search engine such as Google
(http://www.google.co.uk/) can also retrieve helpful webpages. For example, a search for CSS “style sheet” tutorial would return a useful selection of tutorials.

Creating Webpages Dreamweaver 4 Part 1
Information Systems 51
Exercises In the following exercises, you have taken responsibility for the website of the Institute of Things. All the files for the Institute of Things website are contained in the local folder R:\training.dir\dweaver4\exercise\things Exercise 1 We are going to create the site in a subfolder of your existing site. If you have not already created and edited a remote site in your UCL personal webspace, instead of following step 2, follow the instructions in Section 2.3 – but make sure your local root folder is R:\training.dir\dweaver4\exercise\things 1. In the Site Window, connect to your remote site (with root folder html.pub). Create a
new folder in the remote site called things 2. Create a new Site Definition in Dreamweaver for the Institute of Things website, using
the following details:
Local Root Folder: R:\training.dir\dweaver4\exercise\things Remote Access: Choose FTP from the list FTP Host: ftp.ucl.ac.uk Host Directory: html.pub/things Login: Your UCL user ID Password: Your UCL password
3. Now make sure you are viewing the Site Window. You'll notice that the local files are
displayed in the local site panel, including the homepage index.htm. 4. Open index.htm The pages on this website are based on a Template. Text has been entered into the main body of index.htm, but it hasn't been formatted properly. 5. Modify the text so that the paragraphs containing the text “Things” and “Information” are
of style Heading 1. 6. Insert a horizontal rule just before the “Information” heading, to split the two sections of
the webpage. 7. Convert the paragraphs below the “Information” heading into a bulleted list. 8. Save the file.

Dreamweaver 4 Part 1 Creating Webpages
52 Information Systems
Exercise 2 1. Make sure you have the file index.htm open in a document window. 2. Under the heading “Information”, turn the items “Staff at the Institute” and “Research at
the Institute” into a link to the appropriate webpage. 3. Preview the document and check that the links work by following them. 4. Close index.htm and return to the Site Window. 5. In the local root folder, set index.htm to be the homepage, and view the Site Map. It
should display the links that you have just created. Exercise 3 1. Make sure index.htm is open in a document window. There is an image inserted into the main body of the page, but unfortunately it has been inserted wrongly - it is supposed to reference the image called jars.jpg in the “images” folder. Dreamweaver displays a “broken reference” icon instead of the image. 2. Update the page so that it correctly references jars.jpg. You should now see the
actual image in the webpage. Save index.htm. Exercise 4 1. Open a word processor or simple text editor program. (If you are using a training account,
open Notepad by choosing Programs > Accessories > Notepad from the Start menu.) Open the document in the website’s root folder called joining.txt. This is a simple text document containing some text which is to be turned into a webpage.
2. Select all of the text in the document, and copy-and-paste it from the word processor into
a new Dreamweaver document window. 3. Give the webpage an appropriate title. 4. Modify the email address given in the text so that people can click on it to send email to
that address. 5. Add a link at the bottom of this page, to the Institute homepage. 6. Save the newly-created webpage with an appropriate filename. 7. Apply the Template “Things1” to your new webpage, and then save it again. 8. Open index.htm and make the text “Joining the Institute” into a link to your new page.
Creating Webpages Dreamweaver 4 Part 1
Information Systems 53
Exercise 5 1. Open staff.htm. This page needs to have the photographs of the staff members added
into the appropriate slots in the table. 2. For each of the cells in the “Photograph” column of the table, add one of the images
found in the images folder - use photograph1.jpg, photograph2.jpg and photograph3.jpg. Give the images appropriate “alt text”. Resize them if you wish. Also, make each staff member's name appear in bold type.
3. Add a link at the bottom of this page, to the Institute homepage. Exercise 6 1. Open research.htm, and create a named anchor at each of the four headings. 2. At the top of the page, just underneath the introductory paragraph, create a bulleted list of
links so that the user can jump directly to each of the four sections of the page. 3. Preview the page in your browser and try out the anchor links. 4. Save the page. Exercise 7 1. In this exercise you will add some links from the Institute homepage, directly to the four
subsections of the research page. 2. Open research.htm and index.htm. In index.htm, directly underneath the link
“Research at the Institute”, insert four more links which link directly to the four anchor points in research.htm (created in the previous exercise). Indent these four links so that it is clear they are subsections of the research page.

Dreamweaver 4 Part 1 Creating Webpages
54 Information Systems
Appendix 1. Establishing your Remote Folder at UCL: Instructions for non-WTS users If you don't have access to the “Publish Web Pages” program available through WTS, then follow one of these sets of instructions to set up your remote folder at UCL. In each case the process will create a folder called html.pub in your home directory, and then ensure that it is “world-readable” (i.e. that it can be accessed by anyone using a web browser). Using DOS on a managed PC
Note: these instructions are only for machines running native DOS using PC-NFS. These are the machines where you have to type “login userid” in order to log in. 1. To create your html.pub directory in the root of drive R:, use the DOS md command:
md html.pub
2. Use the DOS chmod command to make your html.pub and home directories world-
readable (you need do this only once). Take care: the following chmod commands end with ‘dot’ and ‘dot-dot’: cd \html.pub chmod og+x . chmod og+x ..
Using Unix on Socrates or a cluster Sun workstation
1. To create your html.pub directory in the root of drive R:, use the Unix mkdir command: mkdir html.pub
2. To publish your pages, use the Unix reveal command. This will automatically make
your html.pub and home directories world-readable. You can do this for a single file or a number of files:
reveal index.html reveal * Non-Managed Computers
To create and make world-readable your html.pub directory from a non-UCL-managed computer, you will need to use Telnet. (Users of Windows 95 and later will find Telnet in Start > Programs > Accessories.) Using Telnet, connect to socrates.ucl.ac.uk, log in with your normal id and password, and enter the following Unix commands: mkdir html.pub chmod og+x $home html.pub Don’t forget to logout to end your Unix session.