Embed Size (px)
Citation preview
Quick Reference Guide Chalkable_0714171611 InformationNOW – Scheduling •••• 1
InformationNOW – Scheduling
About This Guide This guide provides an overview of the scheduling options available in InformationNOW.
Contents
InformationNOW – Scheduling 1
About This Guide ...................................................................................................................... 1 Contents..................................................................................................................................... 1 Checklist .................................................................................................................................... 2
Prepare To Schedule in the Next Academic Session................................................... 2 To Schedule in Next Academic Session...................................................................... 3
Data Preparation ........................................................................................................................ 3 Served Grade Levels ................................................................................................... 3 Set Complete Schedule Option.................................................................................... 4 Create New Academic Session.................................................................................... 4 Switch Academic Sessions .......................................................................................... 4 Lookups....................................................................................................................... 4 Update Rooms ............................................................................................................. 5 Update Teacher Information ....................................................................................... 6 Valid Courses .............................................................................................................. 6 Master Schedule ........................................................................................................ 12 Teaching Teams ........................................................................................................ 15
Enter Student Requests ............................................................................................................ 18 Mass Assign Course Requests................................................................................... 18 Mass Apply Models .................................................................................................. 21 Apply Models to an Individual Student..................................................................... 22 Posting Requests from Career Plans.......................................................................... 22 Enter Requests Individually ...................................................................................... 26 Processing Home Portal Requests ............................................................................. 26
Request Reports....................................................................................................................... 27 Build Master Schedule............................................................................................................. 31 Schedule Requests ................................................................................................................... 31
For a Group of Students ............................................................................................ 31 For a Single Student .................................................................................................. 35
Mass-Assign Sections.............................................................................................................. 36
Quick Reference Guide Chalkable_0302171241 InformationNOW – Scheduling •••• 2
Manually Resolving Student Conflicts .................................................................................... 39 Schedule Reports ..................................................................................................................... 39 Individual Student Schedule View .......................................................................................... 40
Override..................................................................................................................... 40 Term .......................................................................................................................... 41 Include Withdrawn Classes ....................................................................................... 41 Reassign .................................................................................................................... 41 Withdraw................................................................................................................... 43 Add............................................................................................................................ 43 View .......................................................................................................................... 44 Delete ........................................................................................................................ 44 Other Sections ........................................................................................................... 44 Requests .................................................................................................................... 45 Tasks Menu ............................................................................................................... 45 Manage ...................................................................................................................... 45 Reports ...................................................................................................................... 45
Student Schedule Matrix View................................................................................................ 46 Layout ....................................................................................................................... 48 Overrides ................................................................................................................... 49 Tasks ......................................................................................................................... 49 Reports ...................................................................................................................... 49 Saving Changes ......................................................................................................... 49 Dates.......................................................................................................................... 50
Block Scheduling..................................................................................................................... 50 Create Academic Session .......................................................................................... 50 Setup.......................................................................................................................... 51 Master Schedule ........................................................................................................ 52 Master Schedule Builder ........................................................................................... 53 Student Schedule ....................................................................................................... 53
Checklist This checklist is provided to facilitate the process of scheduling students into classes. Detailed information
about the listed steps is included in the document.
Prepare To Schedule in the Next Academic Session
� School Next Year: Students | Student Maintenance | Main tab or Students | Quick Entry Edit.
� Confirm School Grade Levels: School/District | School | Grade Levels under Manage
menu at left.
� Set Complete Schedule Options: School/District | School | Setup tab on the individual
school record.
� Verify Custom Fields: System Preferences | Setup | Custom Fields. Confirm fields that
are to be retained during Rollover are checked as Retain Data During Rollover.
� Valid Courses: Scheduling | Valid Courses
� Master Schedule: Scheduling | Master Schedule

Quick Reference Guide Chalkable_0302171241 InformationNOW – Scheduling •••• 3
To Schedule in Next Academic Session
� Create New Year Academic Session: Management Console | Create New Academic Session or School/District | School | Acad. Sessions tab.
� Switch to New Academic Session: Preferences | Change Context
� Verify Periods: Scheduling | Setup | Periods
� Verify Day Types:
� Verify Rooms
� Verify Staff: Staff | Staff Maintenance.
� Create Request Models: Scheduling | Setup | Models.
� Enroll individual students who were not enrolled during the creation of the new academic session.
� Enter Student Requests: By model or individually.
� Set Staff Criteria: Scheduling | Master Schedule Staff.
� Set Course Criteria: Scheduling | Build Master Schedule.
• Select Course Number.
� Terms
� Periods or Blocks, depending on the Scheduling Type/Model selected
� Day Type
� Teacher
o Course Schedule Settings Screen
� Recommended Sections
� Sections Actual
� # Created Sections
� Search Sections
� Copy Settings
� Clear Sections
� Create Sections
� Build Schedule
� Schedule Students against Master Schedule: Scheduling | Schedule Requests.
� Modify Individual Student Schedules: Students | Student Maintenance.
Data Preparation
Served Grade Levels
• Go to Schools/District | School. Search for and select to View the school.
• Under the Manage menu list, select Grading Levels.
• Confirm that all grades serviced by the school are selected. Also, check the grade specified as the
incoming grade level. For example, if Hometown High School is to receive 8th graders from

Quick Reference Guide Chalkable_0302171241 InformationNOW – Scheduling •••• 4
Hometown Jr. High, on the Hometown High School Grading Levels screen, 8th Grade must be
selected as a valid grade level for this school.
Set Complete Schedule Option
• Go to Schools/District | School. Search for and select to View the school.
• Click the Setup tab.
• Select the Scheduling option to indicate a student has a complete schedule when…
o All periods have been scheduled for every day in every term.
o All requests have been scheduled.
Based on the option selected, a student with a complete schedule will not display on the schedule requests
error report with an incomplete schedule.
Create New Academic Session For details regarding creating a new academic session, please refer to the InformationNOW – Creating an
Academic Session Quick Reference Guide.
Switch Academic Sessions To schedule in the new academic session, switch to that session by going to Preferences | Change Context. Select the appropriate academic session.
Note: It is critical that users be aware of the Academic Session in which they are
working. Use the task bar at the very top of the screen to confirm.
Lookups
Scheduling To access scheduling lookups, go to either Scheduling | Setup or System Preferences | Setup.
Confirm the following are established for the selected academic session.
• Bell Schedules
• Blocks
• Classification of Instructional Programs
• Course Type
• Custom Fields – Course
• Custom Fields – Student Schedule
• Difficulty Level
• Funding Method
• Instructional Setting
• Models
� Click +Add to add a new Request Model.
� *Type: Choose Request.
� *Model: Name Request Model.
Quick Reference Guide Chalkable_0302171241 InformationNOW – Scheduling •••• 5
� Click Create.
� Click +Add to add Valid Courses to Model.
� Click Search to access Valid Course File.
� Place a check beside each class from page 1 and click OK.
� Click +Add and navigate to each additional page in Valid Course File.
� Place a check beside each class from each additional page(s) until all classes are listed for the
Request Model.
� Click OK to finish creating Model.
� Repeat for each Request Model desired; click Cancel to exit when finished.
• Periods
• Teaching Methods
• Terms
Grading To access scheduling-related lookups that also pertain to grading, go to either Grades | Setup or to
System Preferences | Setup. Confirm the following are established for the selected academic session.
• GPA Methods
• Grading Periods
• Grading Scale
• Standards Subjects
• Standards
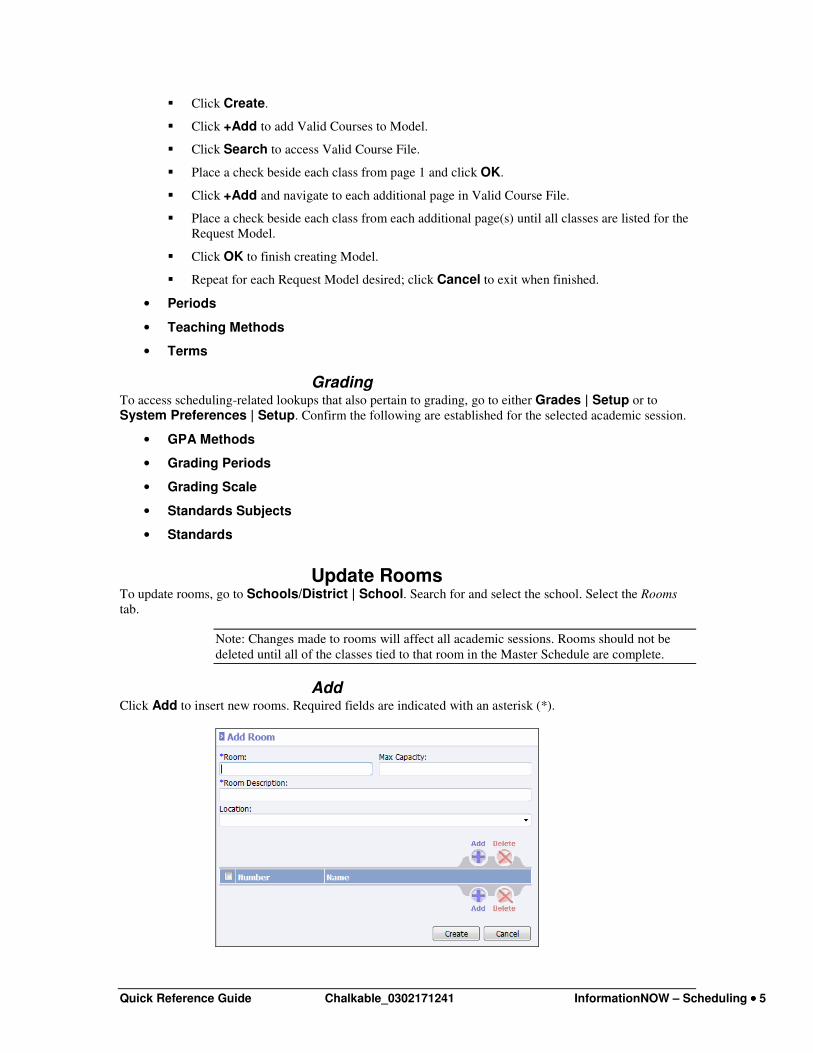
Update Rooms To update rooms, go to Schools/District | School. Search for and select the school. Select the Rooms
tab.
Note: Changes made to rooms will affect all academic sessions. Rooms should not be
deleted until all of the classes tied to that room in the Master Schedule are complete.
Add Click Add to insert new rooms. Required fields are indicated with an asterisk (*).
Quick Reference Guide Chalkable_0302171241 InformationNOW – Scheduling •••• 6
• *Room: Enter a unique alpha/numeric room identifier.
• Max Capacity: Enter the maximum number of seats available in the room.
• *Room Description: Enter a unique brief description of the room.
• Location: Select a location for the room. Locations are created under System Preferences | Setup. Select School Locations and click Refresh to add, view or delete locations.
• Click to Create the record.
• Add: Click to add the primary teacher to the room. If the teacher is assigned to the room, when
the teacher is assigned to a section in the Master Schedule, the room will automatically be
populated (but may be changed if necessary).
View To view or edit a room, either click the room blue link or place a check next to the room and click View.
Delete To delete a room, place a check next to the room and click Delete. Warning! Rooms are not unique to the
academic session. When a room is created, it may be viewed in any academic session. Therefore, rooms
must not be deleted until all classes tied to the room in the Master Schedule have been completed and the
academic session has been closed.
Update Teacher Information To update staff information, go to Staff | Staff Maintenance.
• Add any new teachers
• Select and view existing teachers to make any necessary changes.
Note: Changes made will affect staff records regardless of the academic session. It is not
recommended to delete outgoing teachers until after the current academic session has
been closed.
Valid Courses To update valid courses go to Scheduling | Valid Courses.
Add Click Add to insert new courses for the selected academic session. Required fields are indicated with an
asterisk (*).
Note: Depending on the user’s state, some fields may be hidden.

Quick Reference Guide Chalkable_0302171241 InformationNOW – Scheduling •••• 7
• *Course Number: Enter a unique course identifier. May be alpha and/or numeric.
• Alt Course Number: Enter an alternative course number. May be alpha and/or numeric.
• State Course Number: Enter the state-specific number for this course to be used in state
reporting. Check the State Guidelines to determine if this is required. State Course Number may
be alpha and/or numeric.
• *Short Name: Enter a short name for this course. The short name will print on the standards
bank report, course request verification report, course request roster report, course request matrix
report, course listing report and will display on the student’s request screen.
• *Long Name: Enter a long description for the course.
• *Course Type: Used in relation to transcript graduation requirements and prerequisites.
Required for VOC (Vocational Courses) in Mississippi.
• CIP Code: Enter the unique CIP code for this course. Consult State Guidelines to determine if
this is required. The CIP code is used in vocational reporting.
• GPA Credit: Enter the total number of GPA credit to be issued to students enrolled in this course.
• Difficulty Level: Assign the difficulty level for this course. Difficulty level may be used in
tracking graduation requirements. Consult State Guidelines to determine if this is required.
• Graduation Credit: Enter the total number of Graduation credit to be issued to students who
successfully complete the entire course.
• Max Capacity: Enter the maximum number of students allowed per section of this course. When
sections are created under the Build Master Schedule option, capacity will automatically be set to
25 for sections in which a capacity is not specified.
Quick Reference Guide Chalkable_0302171241 InformationNOW – Scheduling •••• 8
• *Starting Grade/Ending Grade: Select the starting and ending grade levels for students who
may request or take this course. Earliest allowable grade level to request or take this course.
Remember that the students will be in their current grade level until promotion has taken place.
So, for example at the High School, the earliest grade level for freshman classes may need to be 8
rather than 9.
Note: If starting and ending grade levels are set here, then only courses with the grade
levels identified for the school will be pulled into the Master Builder screen. See “Build
Master Schedule” on page 31 for more details.
• *Allowable Gender: Check the applicable genders for this course.
• Honor Roll: Check if the grades received in this course should be considered when calculating
the honor roll.
• *School Category: Select the school(s) in which this course is taught.
o GPA Method: Options in this section of the screen control the GPA Method criteria for all
sections of this course. As a new section is added, these data elements will be copied to the
section. Users with appropriate permissions will be able to modify the settings for the
individual section. However, if a user checks the Apply Changes To Section option and edits
a course and makes changes to the GPA Method section. All changes will be copied to each
existing section of the course. Users should take care when selecting the Apply Changes To
Section option and editing a course.
� Weight Add: Enter the weight-added value for the various GPA methods. GPA
Methods are created under either Grades | Setup or System Preferences | Setup.
� Weight Mult.: Enter the weight multiplier for the various GPA methods. GPA Methods
are created under either Grades | Setup or System Preferences | Setup.
� Inc. Weighted GPA: Check if scores received for this course are to be included in a
student’s weighted GPA.
� Inc. Unweighted GPA: Check if scores received for this course are to be included in a
student’s non-weighted GPA.
• Course is Instructional: Check if this course is considered instructional. Consult State
Guidelines to determine if this is required.
• Is State Reported: Check if this course is to be included in state reports. Consult State
Guidelines to determine if this is required.
• Display on Report Card: Check if the grades for this class are to be printed on report cards.
• Is Required: Check to indicate that this course is required. If checked, when requests are entered
for students, the course will be marked as required automatically. Any course may be unchecked
as desired.
• Active: Uncheck to make this course inactive. Inactive courses will not display on Course
Request Entry, Master Schedule Builder, or Course Listing Report (unless selected to include).
When searching for a course, if Active Only is selected, inactive courses will not display on the
search results screen.
• Display on Course Request Matrix For…: Check if this course is to be included on the
course request matrix report which is used to determine where to best place sections of this course
for maximum scheduling results.
• Instructional Setting: Select the instructional setting for this course. Consult State Guidelines
to determine if this is required.
• Teaching Method: Select the teaching method for this course. Consult State Guidelines to
determine if this is required.

Quick Reference Guide Chalkable_0302171241 InformationNOW – Scheduling •••• 9
• Funding Method: Choose the funding method for this course. Consult State Guidelines to
determine if this is required.
Click Create to save the course. After saving the record, the following tabs may be accessed.
Summary Tab The Summary tab displays the course number and short description. Also lists the school, academic session
and sections available by term.
Standards Tab Allows user to view, add or delete standards from the selected course. To insert a standard, perform the
following steps:
• Click Add.
• Enter or select at least one search criteria (Name, Standard Subject, Low Grade or High Grade)
and click Search.
• The list of matching criteria will display.
• Place a check next to the standard to be applied to this course.
• Click OK.
Custom Tab Custom fields may be assigned to the Valid Course File. Refer to State Guidelines to determine if this is
required. Custom fields are created under System Preferences | Setup. Select Custom Fields and
Course and then click Refresh to add, view, delete or re-prioritize custom fields.
Textbook Tab Textbooks may be assigned to the Valid Course File. Refer to the InformationNOW – Textbook Quick
Reference guide for details regarding textbooks.
Scheduling Rules Tab The ability to assign Scheduling Rules to the courses in the Valid Course file has been added.
Scheduling rules allow users to assign specific scenarios to be followed when using the Master Schedule Builder or the Schedule Request options.
To create a new rule, click Add. Required fields are indicated with an asterisk (*).
In the following example, a rule is being assigned to a course called Biology I.
• *Course Name: Click Find to locate the course for which the rule is to be created that will be
tied to the selected course. In this example, Algebra I is selected.
• Is Required: Check if this rule Is Required. Selecting this option will override any Priority
selected. When the Master Schedule Builder or schedule request options are selected, this rule will
be followed absolutely. If selected, the Priority field will be inactive.
Quick Reference Guide Chalkable_0302171241 InformationNOW – Scheduling •••• 10
• *Priority: Select the Priority in which this rule is to be followed as it relates to other rules that
have been assigned to this course. Assigning a priority of 1 indicates that this rule is to be
followed before any other rules with a high priority (i.e., 2, 3, 4, etc.).
• Term: Select if this course is to take place during a Different term than the selected course, during
the Same term, during a term that takes place Before the selected course or during a term that takes
place After the selected course. In the above example, Algebra I and Biology I are to be placed in
Different terms when either the Master Schedule Builder or the schedule requests options are
selected.
• Period/Block/Day Type: Select if this course is to take place in a Different Period/Block/Day
Type than the selected course, the Same Period/Block/Day Type, a Period/Block/Day Type that
occurs Before the selected class or a Period/Block/Day Type that occurs After the selected course.
In the above example, Algebra I and Biology I are to be placed in the Same Period/Block/Day
Type as Biology I when either the Master Schedule Builder or the schedule requests options are
selected.
• Teacher: Select if this course is to be assigned to a Different Teacher than the selected course or
the Same Teacher. In the above example, Algebra I and Biology I, no preference has been
assigned.
Averaging Setup Tab
Click to modify the averaging setup for this course for all teachers of the course. Once criteria is set here, if
a teacher does not have permission to modify his or her averaging setup, that teacher will not be able to
modify the average setup for individual classes.
Tasks Menu Click to perform one of the following tasks:
• Print Screen
• Help
Manage Menu Click to access one of the following menu options:
• Create Sections from Course: Allows the user to create and/or add to section(s) of an
existing Valid Course.
• Prerequisites: Prerequisites allow for the creation of requirements that students must meet in
order to enroll in the selected course.
Example 1 – “AND” Requirement: To enroll in a Creative Writing course, a student must have
earned at least two credits within the course type of English AND at least one of the credits must
have been in English 9. For this example, on the pre-requisites screen for the Creative Writing
course, perform the following steps:
• First create a rule for the requirement that states a student must have received 1.0 credit
in English 9.
� Under the Rules (And) section, click Add.
� Enter a name for the rule (ex.: English 9)
� Under the Course Requirements (OR) section, click Add.
� Click Find to locate the English 9 course.
� Enter a credit of 1.0 indicating the student must have received a full credit in the
English 9 course.
� Click Create.

Quick Reference Guide Chalkable_0302171241 InformationNOW – Scheduling •••• 11
• Next, create a rule for the requirement that states a student must have completed two
credits within the English course type. Since this is an “AND” requirement, meaning in
addition to the English 9 requirement, a new rule on the left side of the screen must be
added.
� Under the Rules (AND) section, click Add.
� Enter a name for the rule (ex.: 2 English Credits).
� Under the Course Type Requirements (OR) section, click Add.
� Select the course type of English.
� Enter the credit of 2.0.
� Click Create.
Example 2 – “OR” Requirement: To enroll in a Creative Writing course, a student must have
earned at least two credits within the course type of English OR at least one credit of English 9.
For this example, on the pre-requisites screen for the Creating Writing course, perform the
following steps:
• Create a rule for the pre-requisite. Since this is an OR requirement, only one rule needs to
be created on the left-hand side of the screen.
� Under the Rules (AND) section, click Add.
� Enter a name for the rule (ex.: Creative Writing).
� Under the Course Requirements (OR) section, click Add. Find the English 9 course.
Enter a credit of 1.0 and click Create.
� Under the Course Type Requirements (OR) section, click Add. Select the English
course type. Enter a credit of 2.0 and click Create.
� Click Close to save the pre-requisite.
• Course Fees: Click Add to insert a fee for this course. Required fields are indicated with an
asterisk (*).
� *Name: Enter a name for the fee (ex.: Workbook).
� *Category: Select the category for the fee. Categories are created under either Fees | Setup
or System Preferences | Setup.
� *Amount: Enter the entire fee amount in decimal format (ex.: 20.00)
� Description: Enter a brief description for the course fee.
• Course Request Roster: Click to view student requests for this course.
� Add: Click to add requests for additional students.
� View: Place a check next to existing request(s) and click to edit.
� Delete: Place a check next to existing request(s) and click to delete.
� Prerequisites: Click to view prerequisites for this course.
� Copy Students: Click to copy students who are currently requesting this course to another
course.
� Move Students: Click to move students who are currently requesting this course to a
different course.
� Course Request Roster: Click to print a report of the student requests.
Quick Reference Guide Chalkable_0302171241 InformationNOW – Scheduling •••• 12
Reports Menu Click to access the following report:
• Standards Bank: Allows Standards for the Selected Course or all Standards to be printed.
Master Schedule To update valid courses, go to Scheduling | Master Schedule.
Note: The Master Schedule may be copied from a different school or Academic Session.
To copy the Master Schedule, including customer fields, from one school to another, go
to Mgmt Console | Console. Click Share School Setup. Select the
School/Academic Session FROM WHICH to copy and check the Master Schedule
box. Click OK.
The Master Schedule contains information detailing when a course will be taught; where it will be taught;
and who will teach the course. Some information will pull from the Valid Courses File. In some instances,
this information may be edited on each section. Some fields must be edited on the valid course and may not
be edited on the Master Schedule.
Note: If the Master Schedule was copied into the new Academic Session, it can be edited
to change information for the new academic session. If user is only editing the Master
Schedule for the new academic session, the Build Master Schedule function option would
not be used.
Add To insert a new section, click Add.
Note: Sections may also be added from the Valid Course file. Go to Scheduling | Valid Courses. Search for and view the desired course. Click to Create Section From Course under the Manage menu at left.
Enter the course search criteria (ex.: English) and click Search.
Bullet the course from the resulting list and click OK or click the course number that appears as a blue link.
Required fields are indicated with an asterisk (*).

Quick Reference Guide Chalkable_0302171241 InformationNOW – Scheduling •••• 13
• Course Information: Course Number, Alt Course Number, State Course Number, CIP Code
and Active flag pull from the Valid Course File and cannot be edited.
• Section Details:
o *Section Number: Enter a unique section number. This field may be alpha and/or numeric.
o *Short Name: Enter a short name for this section. The short name will print on most grading
reports (including report cards), transcript reports, student schedule reports, Master Schedule
reports, discipline reports as well as the student’s schedule screen.
o *Long Name: Enter a long name for this section. The long name will print on the Room-
Teacher utilization report and will display on most of the teacher’s classroom screens.
o *Allowable Gender: Check Male and/or Female as needed.
o *Course Type: Select the appropriate course type from the drop-list. Used in relation to
transcript graduation requirements and prerequisites. Consult State Guidelines to determine if
this is required.
o Difficulty Level: Assign the difficulty level for this section. Difficulty level may be used in
tracking graduation requirements. Consult State Guidelines to determine if this is required.
o Display on Report Card: Check this box if this section of the course should display on
report cards.
Quick Reference Guide Chalkable_0302171241 InformationNOW – Scheduling •••• 14
o Merge Rosters For Attendance: Check if the teacher teaches multiple sections of classes
during the same period of the day. If this is checked, any classes that meet for the same period
and teacher will be combined into one screen from which the teacher can take attendance.
o Honor Roll: Check if the grades received for this section of the course should be considered
when calculating honor roll.
o Teacher: Click the Teacher link to add the main teacher or add additional teacher(s).
o Room: Select from the drop-list. Rooms are created under School/District | School. Search for and view the school. Click the Rooms tab.
o *Starting/Ending Grade: Enter the lowest and highest grade level to be scheduled into the
class. Remember that the students will be in their current grade level until promotion has
taken place so, for example, at the High School the earliest grade level for freshman classes
may need to be 8 rather than 9.
o Grading Scale: Select a grading scale if this course uses a scale different from the scale
attached to grade levels.
o GPA Credit: Enter the amount of credit a student will earn toward GPA for the entire course.
Amount must be entered in the format of x.xxx (i.e. 1.000).
o Graduation Credit: Enter the amount of credit a student will earn toward graduation for the
successful completion of the entire course. Amount must be entered in the format of x.xxx (i.e.
1.000).
o Serving Section: When editing sections in the master schedule at a Reporting School, the
user may link this section to a section in a Serving School which allows the user to import
report card grades, comments and notes from the Serving School to the Reporting School.
For more details regarding dual enrolled students refer to the InformationNOW – Grading
quick reference guide.
o *Periods: Check the period(s) during which this section will meet.
o Period Variation: Only available if period variations have been attached to bell schedules.
For example, if the student lunch wave is determined by the class the students attend during
3rd
period, each Period 3 course would be assigned a period variation indicating the time that
students go to lunch vs. class. Please refer to the InformationNOW – Attendance Quick
Reference Guide for more details regarding period variations.
o *Meets On: Available only for specific scheduling types which are selected when the
academic session is created. If available, select the appropriate day type(s) on which the class
will meet.
o Terms: Check the terms during which the class will meet.
� Capacity: Enter the maximum number of students that may be scheduled into this class.
When sections are created under the Build Master Schedule option, capacity will
automatically be set to 25 for sections where a capacity is not specified.
� Enrolled: The number of currently enrolled students for the term will display.
� A. Credit: Check if attempted (GPA) credit is awarded at the end of the term. The
number of check marks here will be divided into the GPA credit and Graduation credit
values entered for the section.
o GPA Method: Enter the GPA settings to be considered for the grade a student receives in
this class.
� Weight Add: Enter the weight-added value for the various GPA methods. GPA
Methods are created under either Grades | Setup or System Preferences | Setup.
� Weight Mult: Enter the weight multiplier for the various GPA methods. GPA Methods
are created under either Grades | Setup or System Preferences | Setup.
Quick Reference Guide Chalkable_0302171241 InformationNOW – Scheduling •••• 15
� Inc Weighted GPA: Check if the score that the student receives for this section of this
course is to be included when calculating a weighted GPA.
� Inc Unweighted GPA: Check if the score that the student receives for this section of
this course is to be included when calculating an unweighted GPA.
• Additional Info:
o Course is Instructional: Check if this section is considered instructional. Consult State
Guidelines to determine if this is required.
o Is State Reported: Check if section is to be included in state-mandated extracts. Consult
State Guidelines to determine if this is required.
o Instructional Setting: Select the instructional setting for this section. Consult State
Guidelines to determine if this is required.
o Teaching Method: Select the teaching method for this section. Consult State Guidelines to
determine if this is required.
o Funding Method: Select the funding method for this section. Consult State Guidelines to
determine if this is required.
o Teaching Team: Select the team of students who are to be assigned to this section (ex.
Green, Gold, Lions, or Tigers). Only applicable for schools that use a team-oriented
scheduling method. See more under “Teaching Teams” beginning on page 15.
Edit To modify an existing section, go to Scheduling | Master Schedule. Search for and view the section to
be modified. After making the changes, click OK to save.
Note: On the search result list, users may click the number of students currently enrolled
in the class that appears as a blue link.
A list of currently enrolled students will display. Users with appropriate rights may then
click a student number that appears as a blue link to access that student’s demographic
information.
Delete To delete an existing section, go to Scheduling | Master Schedule. Search for the section to be deleted.
Place a check next to the section number and click Delete.
Teaching Teams For schools that utilize team scheduling, teaching teams should be created. The overall process for team
teaching is as following.
• Teaching Teams are defined with staff members associated to them.
• Sections are assigned Teaching Teams.
• The Schedule Requests routine will place each student into sections for a single team. Teams
must be defined prior to running the schedule requests routine.

Quick Reference Guide Chalkable_0302171241 InformationNOW – Scheduling •••• 16
Set Up Teaching Teams Go to Scheduling | Setup. Select Teaching Teams from the list and click Refresh. Click to Add a
new team.
• *Team Name: Enter the name of the team – up to 50 characters. Ex. Green, Gold, Lions, Tigers.
• Description: Enter a brief description for the team if desired.
• Click Create.
• Once the team record has been saved, click Add to insert teachers to the team.
• Continue adding all staff who belong to that particular team. Do not assign teachers to a team that
teaches multiple teams such as a shared music teacher that teaches students in multiple teams.
Note: A team can have as many staff associated as needed. However, a staff member can
only be associated with one team per academic session. A message will display if the user
tries to add a teacher to a team who is already assigned to a different team.
Users must have Maintain Academic Session permission to add teams. Users must have
View Academic Session to view teaching teams.
Assigning Team To Master Schedule Sections Once teams have been created and teachers assigned to the teams, the teams will be assigned to sections in
the master schedule. Go to Scheduling | Master Schedule. Search for and select to View the section
that is part of a teaching team.

Quick Reference Guide Chalkable_0302171241 InformationNOW – Scheduling •••• 17
• Teaching Team: Select the team of students who are to be assigned to this section (ex. Green,
Gold, Lions, or Tigers).
o Select Do not use a team if this section can be assigned to students of any team (ex. A
music class that can be assigned to students of many teams).
o If the primary teacher assigned to the section is a member of a team, that team will
automatically display in the drop list. However, it will automatically use the primary teacher’s
team even if the Teaching Team field is blank.
o The Teaching Team assigned to the section does not need to match the team to which the
primary teacher of this section has been assigned. For example, the Teaching Team Lion may
be assigned to the section even though the teacher Husting is not part of the Lion teaching
team.
o The teaching team assigned to the section will be copied when Creating A New Academic Session and selecting Copy Master Schedule. The teaching team that is assigned to the
section can also be copied as part of Share School Setup when the user selects Master Schedule.
Schedule Requests Routine The Schedule Requests routine will place a student into sections for a single teaching team.
• When a user schedules a student via the Schedule Requests routine or from the individual
student’s requests screen the schedule requests routine will attempt to assign sections to the
student based on a team.
For example, the student has requested Algebra 1, Spanish 1 and English 1. If the student is
assigned to section 1 of Algebra 1 that has been assigned to teaching team “Blue” then the student
will also be assigned to the sections of Spanish 1 and English 1 that have been assigned to
teaching team “Blue”.
Quick Reference Guide Chalkable_0302171241 InformationNOW – Scheduling •••• 18
• Sections that have Do Not Use A Team (i.e. Chorus that students do not attend as a team) will
be scheduled as before based on student availability.
• When a request is entered on the student the user has the option to prescribe a section. If the user
prescribes a section to a student that is part of a team, then that student will automatically be
placed into that team’s sections. For example, if the user prescribes section 3 of Algebra which has
been assigned a Teaching Team of Blue, then that student will be assigned to all sections of their
requests that have been assigned Teaching Team Blue. Prescribing sections is a way for schools to
force certain students into a specific team. However, if a user prescribes sections from varying
teams, when the user runs the schedule requests routine the program will not allow the students to
be scheduled into sections from different teams.
• If a user has manually forced a student into sections that have been assigned different teaching
teams, when the Schedule Requests routine is run, the program will not be able to schedule any
additional requests. An error will display on the Scheduling Error Report.
Enter Student Requests
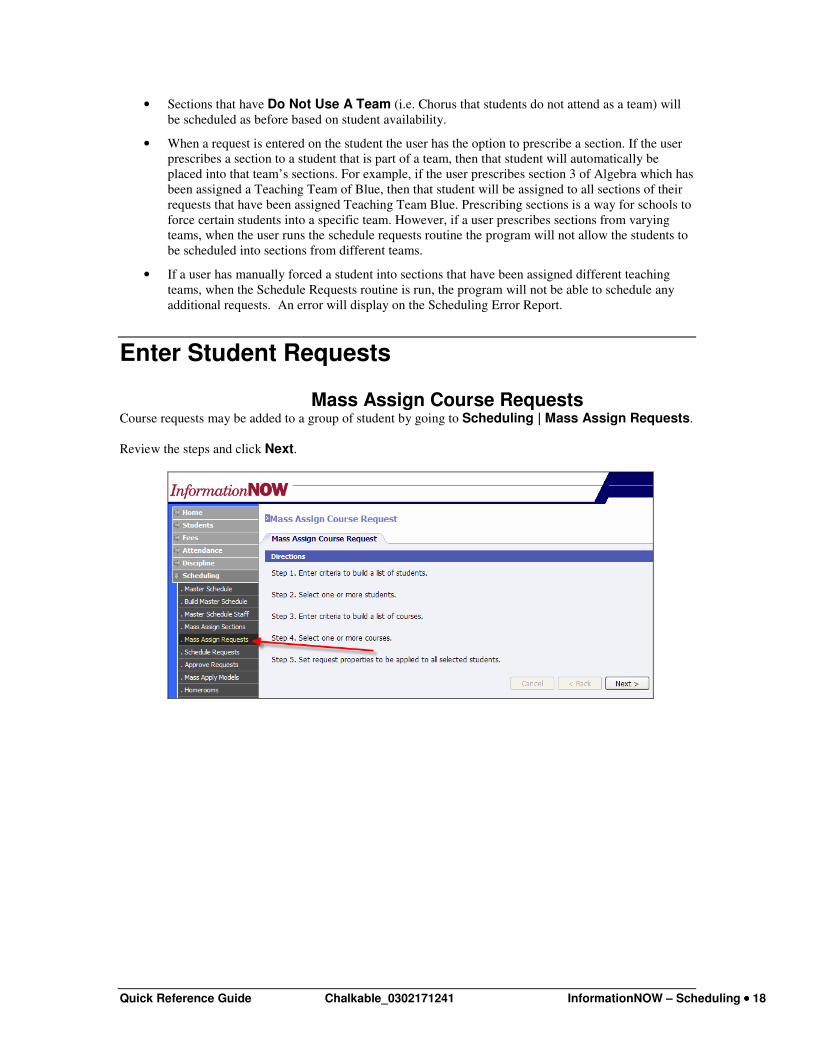
Mass Assign Course Requests Course requests may be added to a group of student by going to Scheduling | Mass Assign Requests.
Review the steps and click Next.
Quick Reference Guide Chalkable_0302171241 InformationNOW – Scheduling •••• 19
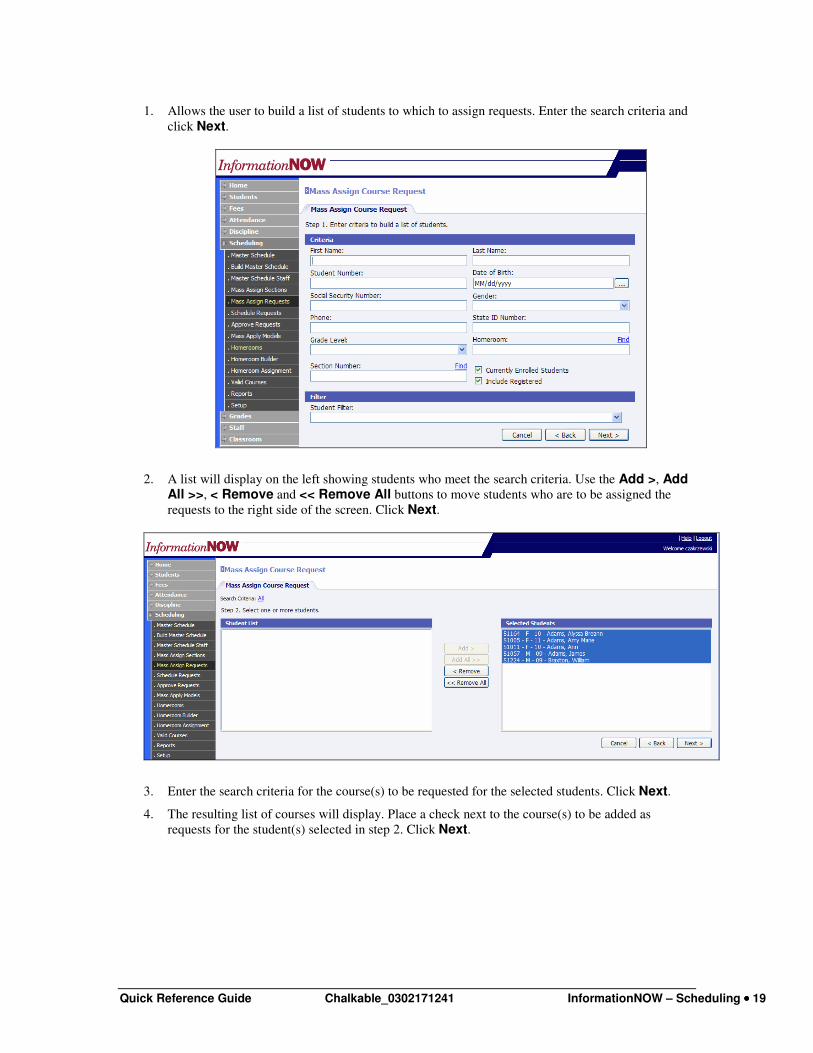
1. Allows the user to build a list of students to which to assign requests. Enter the search criteria and
click Next.
2. A list will display on the left showing students who meet the search criteria. Use the Add >, Add All >>, < Remove and << Remove All buttons to move students who are to be assigned the
requests to the right side of the screen. Click Next.
3. Enter the search criteria for the course(s) to be requested for the selected students. Click Next.
4. The resulting list of courses will display. Place a check next to the course(s) to be added as
requests for the student(s) selected in step 2. Click Next.
Quick Reference Guide Chalkable_0302171241 InformationNOW – Scheduling •••• 20
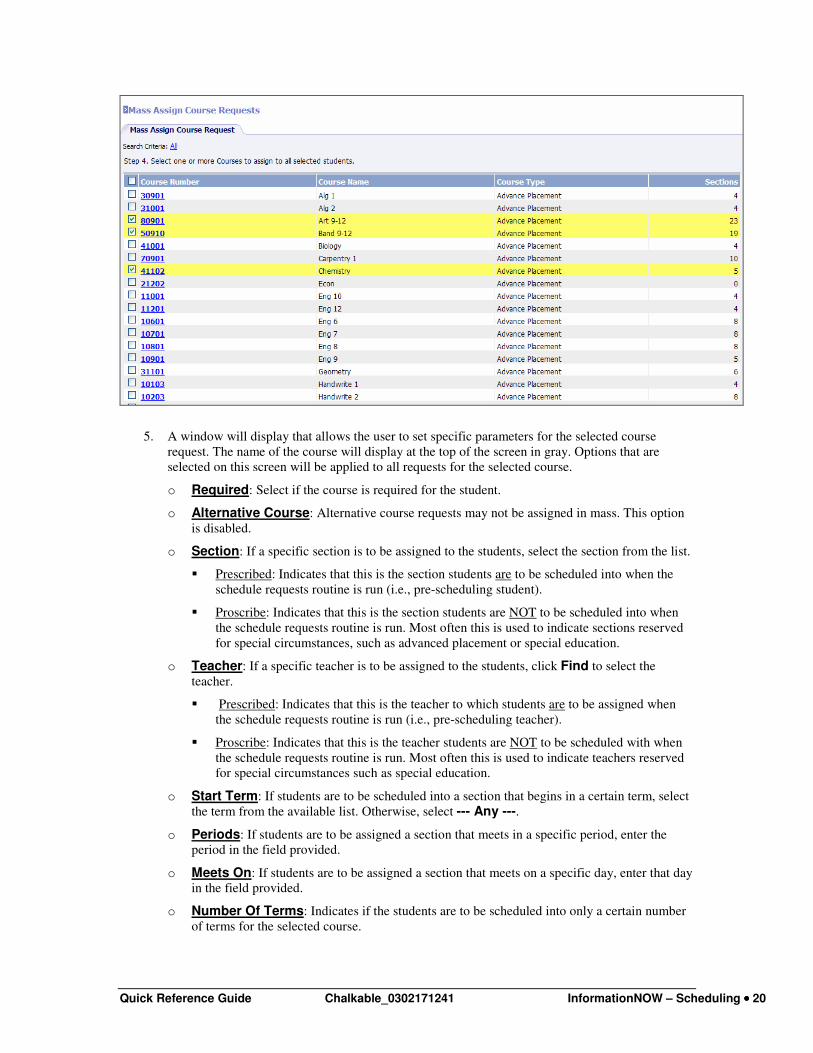
5. A window will display that allows the user to set specific parameters for the selected course
request. The name of the course will display at the top of the screen in gray. Options that are
selected on this screen will be applied to all requests for the selected course.
o Required: Select if the course is required for the student.
o Alternative Course: Alternative course requests may not be assigned in mass. This option
is disabled.
o Section: If a specific section is to be assigned to the students, select the section from the list.
� Prescribed: Indicates that this is the section students are to be scheduled into when the
schedule requests routine is run (i.e., pre-scheduling student).
� Proscribe: Indicates that this is the section students are NOT to be scheduled into when
the schedule requests routine is run. Most often this is used to indicate sections reserved
for special circumstances, such as advanced placement or special education.
o Teacher: If a specific teacher is to be assigned to the students, click Find to select the
teacher.
� Prescribed: Indicates that this is the teacher to which students are to be assigned when
the schedule requests routine is run (i.e., pre-scheduling teacher).
� Proscribe: Indicates that this is the teacher students are NOT to be scheduled with when
the schedule requests routine is run. Most often this is used to indicate teachers reserved
for special circumstances such as special education.
o Start Term: If students are to be scheduled into a section that begins in a certain term, select
the term from the available list. Otherwise, select --- Any ---.
o Periods: If students are to be assigned a section that meets in a specific period, enter the
period in the field provided.
o Meets On: If students are to be assigned a section that meets on a specific day, enter that day
in the field provided.
o Number Of Terms: Indicates if the students are to be scheduled into only a certain number
of terms for the selected course.

Quick Reference Guide Chalkable_0302171241 InformationNOW – Scheduling •••• 21
6. Once parameters have been selected, click Assign.
7. The course request will be assigned to the selected students and a resulting list will display.
8. If multiple courses were selected in Step 4, use the navigation arrows to
move to the next course. Set the appropriate parameters and click Assign.
9. Continue until all selected courses have been assigned to the selected students.
Mass Apply Models Go to Scheduling | Mass Apply Models and follow the Wizard. Models should first be created under
Scheduling | Setup or under System Preferences | Setup.
Note: At any time, click Cancel to exit the process. Click Back to return to the previous
screen. Click Next to continue.

Quick Reference Guide Chalkable_0302171241 InformationNOW – Scheduling •••• 22
Step 1: Select a model from the list of models displayed for a selected model type
• For Type, choose Requests and click Refresh.
• Bullet a model and click Next.
Step 2: Enter criteria to build a list of students
• Select criteria using any field (usually a grade level).
• Click Next.
Step 3: Select student or subset of students from the resulting set of students to be applied to a model
• Select students and move from left list to right list.
• Click Next.
Step 4: List of students that would be applied to a model
• Check any Override options that apply. See “Override” on page 40 for more details.
• Confirm list of students is correct.
• Click Apply.
Apply Models to an Individual Student Go to Students | Maintenance.
• Find a student.
• Under the Manage menu, click Requests.
• Under the Manage menu, click Apply Model.
Posting Requests from Career Plans
Note: When creating requests from a career plan, any existing requests for the student
will not be overwritten.
Quick Reference Guide Chalkable_0302171241 InformationNOW – Scheduling •••• 23
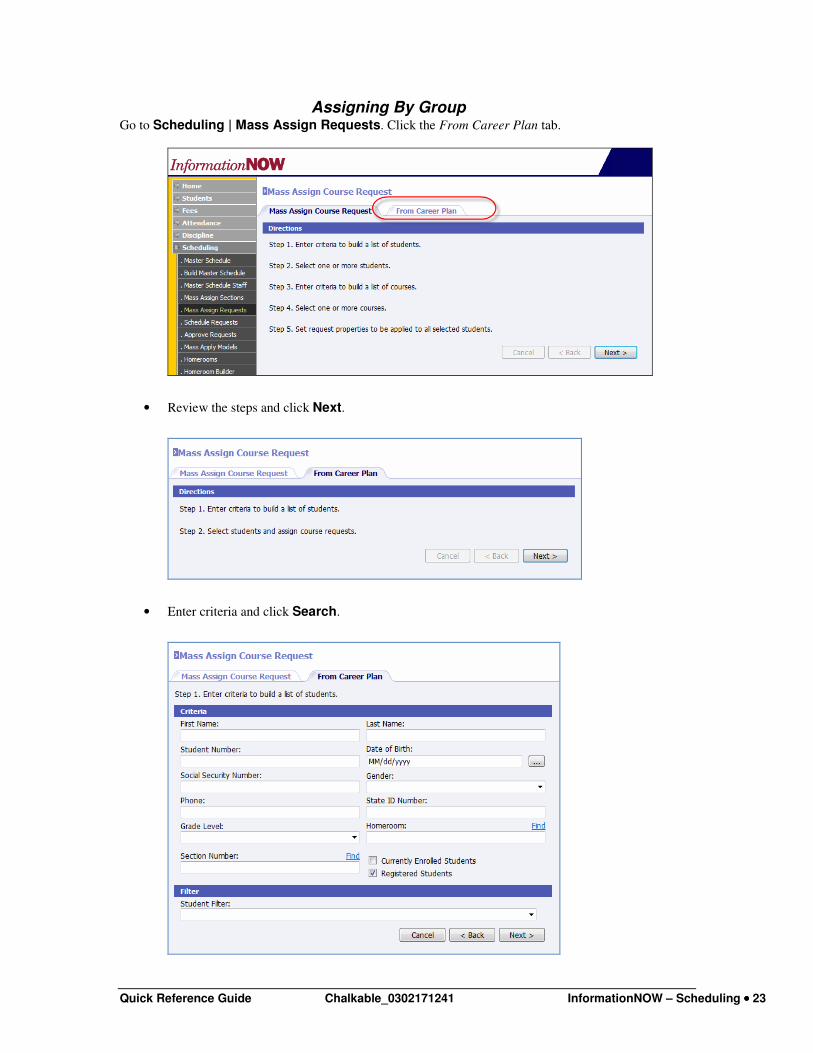
Assigning By Group Go to Scheduling | Mass Assign Requests. Click the From Career Plan tab.
• Review the steps and click Next.
• Enter criteria and click Search.
Quick Reference Guide Chalkable_0302171241 InformationNOW – Scheduling •••• 24
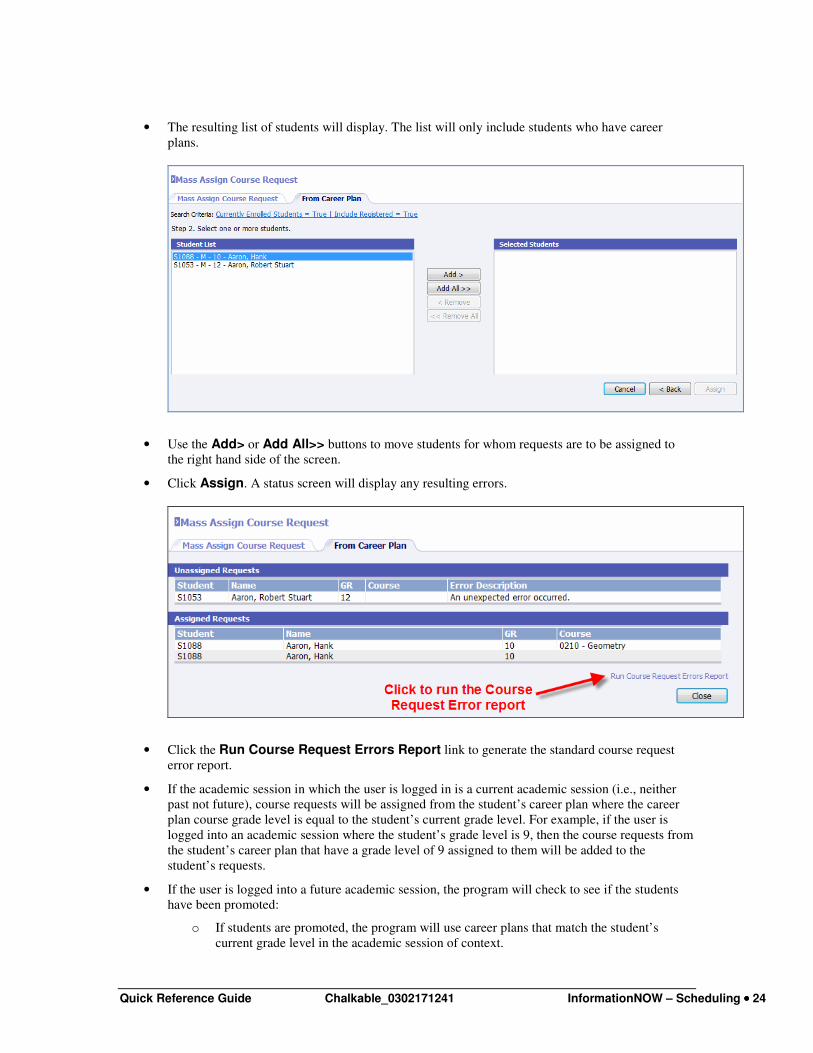
• The resulting list of students will display. The list will only include students who have career
plans.
• Use the Add> or Add All>> buttons to move students for whom requests are to be assigned to
the right hand side of the screen.
• Click Assign. A status screen will display any resulting errors.
• Click the Run Course Request Errors Report link to generate the standard course request
error report.
• If the academic session in which the user is logged in is a current academic session (i.e., neither
past not future), course requests will be assigned from the student’s career plan where the career
plan course grade level is equal to the student’s current grade level. For example, if the user is
logged into an academic session where the student’s grade level is 9, then the course requests from
the student’s career plan that have a grade level of 9 assigned to them will be added to the
student’s requests.
• If the user is logged into a future academic session, the program will check to see if the students
have been promoted:
o If students are promoted, the program will use career plans that match the student’s
current grade level in the academic session of context.
Quick Reference Guide Chalkable_0302171241 InformationNOW – Scheduling •••• 25
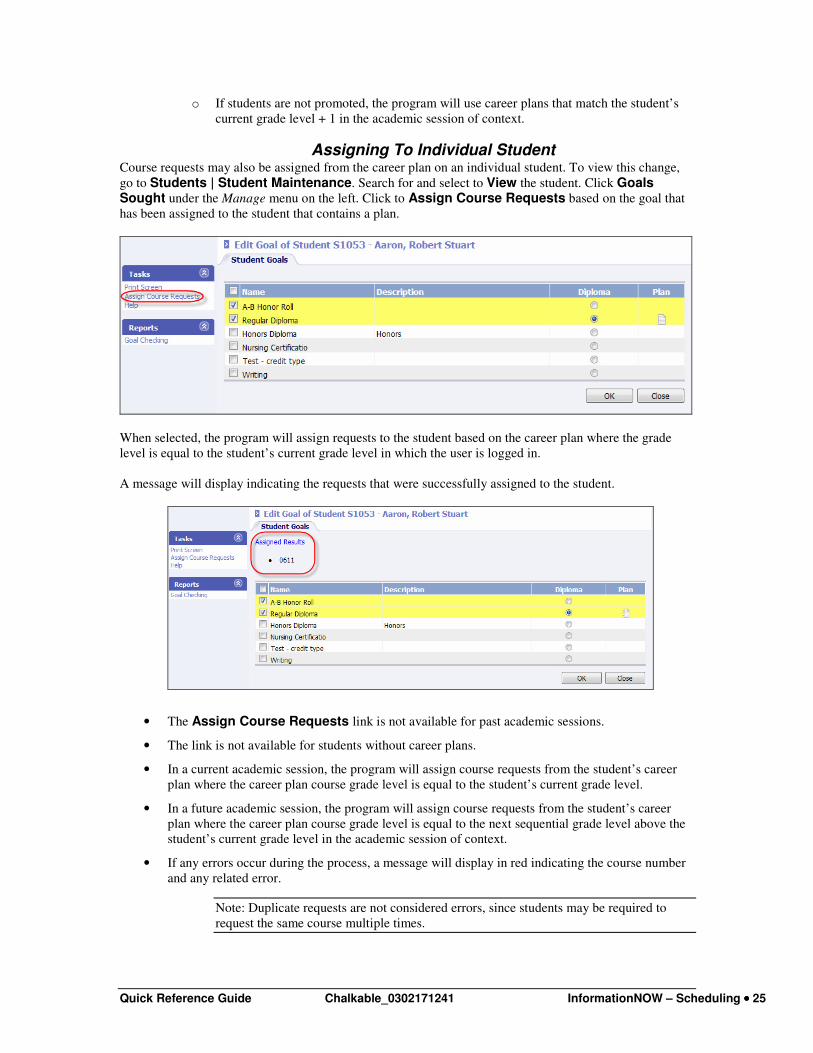
o If students are not promoted, the program will use career plans that match the student’s
current grade level + 1 in the academic session of context.
Assigning To Individual Student Course requests may also be assigned from the career plan on an individual student. To view this change,
go to Students | Student Maintenance. Search for and select to View the student. Click Goals Sought under the Manage menu on the left. Click to Assign Course Requests based on the goal that
has been assigned to the student that contains a plan.
When selected, the program will assign requests to the student based on the career plan where the grade
level is equal to the student’s current grade level in which the user is logged in.
A message will display indicating the requests that were successfully assigned to the student.
• The Assign Course Requests link is not available for past academic sessions.
• The link is not available for students without career plans.
• In a current academic session, the program will assign course requests from the student’s career
plan where the career plan course grade level is equal to the student’s current grade level.
• In a future academic session, the program will assign course requests from the student’s career
plan where the career plan course grade level is equal to the next sequential grade level above the
student’s current grade level in the academic session of context.
• If any errors occur during the process, a message will display in red indicating the course number
and any related error.
Note: Duplicate requests are not considered errors, since students may be required to
request the same course multiple times.
Quick Reference Guide Chalkable_0302171241 InformationNOW – Scheduling •••• 26
Enter Requests Individually Go to Students | Student Maintenance.
• Find a student.
• Under the Manage menu, click Requests.
• Under the Manage menu, click Add to multiple-select courses to add as requests.
• Click the +Add button to add one request at a time.
� Prescribe: User is marking a course/section/teacher to which the student will be scheduled
when the schedule requests routine is run. (Pre-scheduling student)
� Proscribe: User is marking a course/section/teacher into which a student is NOT to be
scheduled.
Processing Home Portal Requests Requests may be entered by students or parents via the home portal of InformationNOW. These requests
must then be approved or rejected.
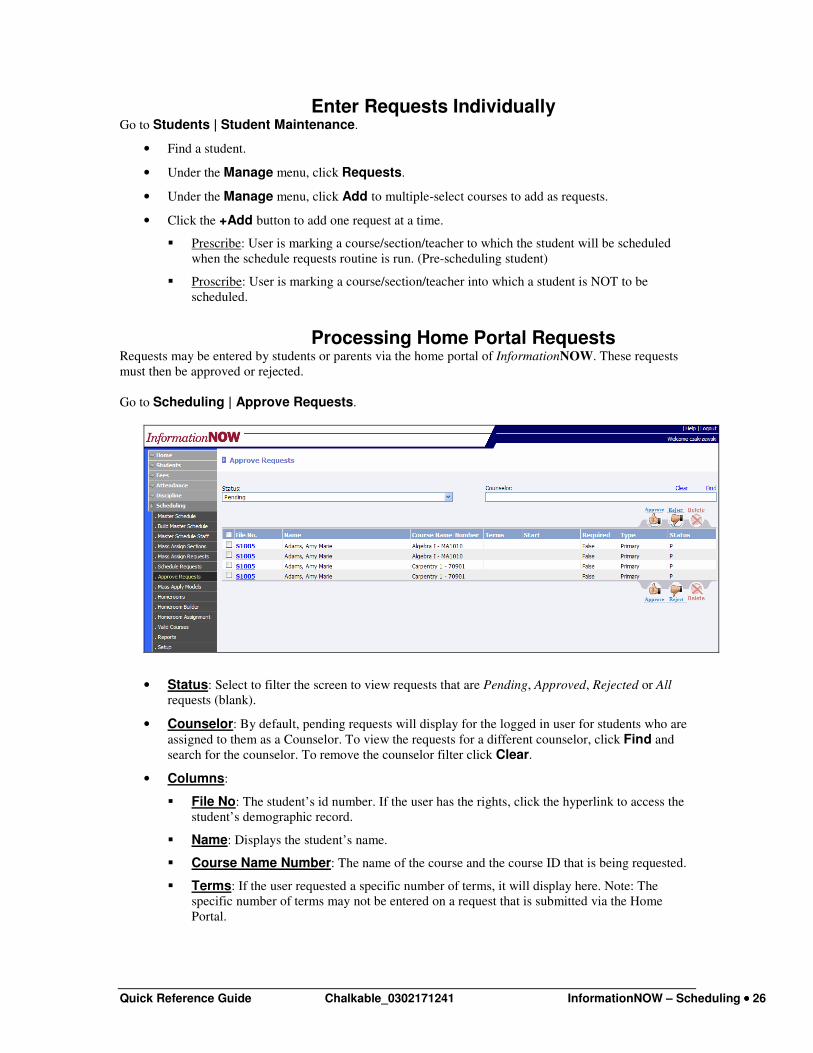
Go to Scheduling | Approve Requests.
• Status: Select to filter the screen to view requests that are Pending, Approved, Rejected or All
requests (blank).
• Counselor: By default, pending requests will display for the logged in user for students who are
assigned to them as a Counselor. To view the requests for a different counselor, click Find and
search for the counselor. To remove the counselor filter click Clear.
• Columns:
� File No: The student’s id number. If the user has the rights, click the hyperlink to access the
student’s demographic record.
� Name: Displays the student’s name.
� Course Name Number: The name of the course and the course ID that is being requested.
� Terms: If the user requested a specific number of terms, it will display here. Note: The
specific number of terms may not be entered on a request that is submitted via the Home
Portal.
Quick Reference Guide Chalkable_0302171241 InformationNOW – Scheduling •••• 27
� Start: If the user requested a specific starting term, it will display here. Note: The specific
starting term may not be entered on a request that is submitted via the Home Portal.
� Required: If this request has been marked as a required course for the student, a Yes will
display in the Required column. Note: Required may not be checked on a request that is
submitted via the Home Portal.
� Type: Indicates if this request is a primary request or if the request is an alternative request.
Primary requests will be scheduled first if possible. If the primary course is unable to be
scheduled due to conflicts, the alternative course will be scheduled instead. Note: Alternates
may not be assigned for requests that are submitted via the Home Portal.
� Status: Once a request is added through the parent portal, school staff must review the
request. Until the request is approved by the school, the request will display in a P (Pending)
status. Once the school has accepted the request, the status will display as A (Accepted).
• Approve: To approve the request, place a check next to the request(s) and click Approve. The
request will display in the Home Portal as accepted and will be processed when the student is
scheduled. Once approved, the request will display on the student’s screen under Students | Student Maintenance.
• Reject: To reject the request, place a check next to the request(s) and click Reject. The request
will display in the Home Portal as rejected.
• Delete: To remove the request from the student, place a check next to the request(s) and click
Delete. The request will no longer display on the student request screen in Home Portal or from
the student’s record under Student Maintenance.
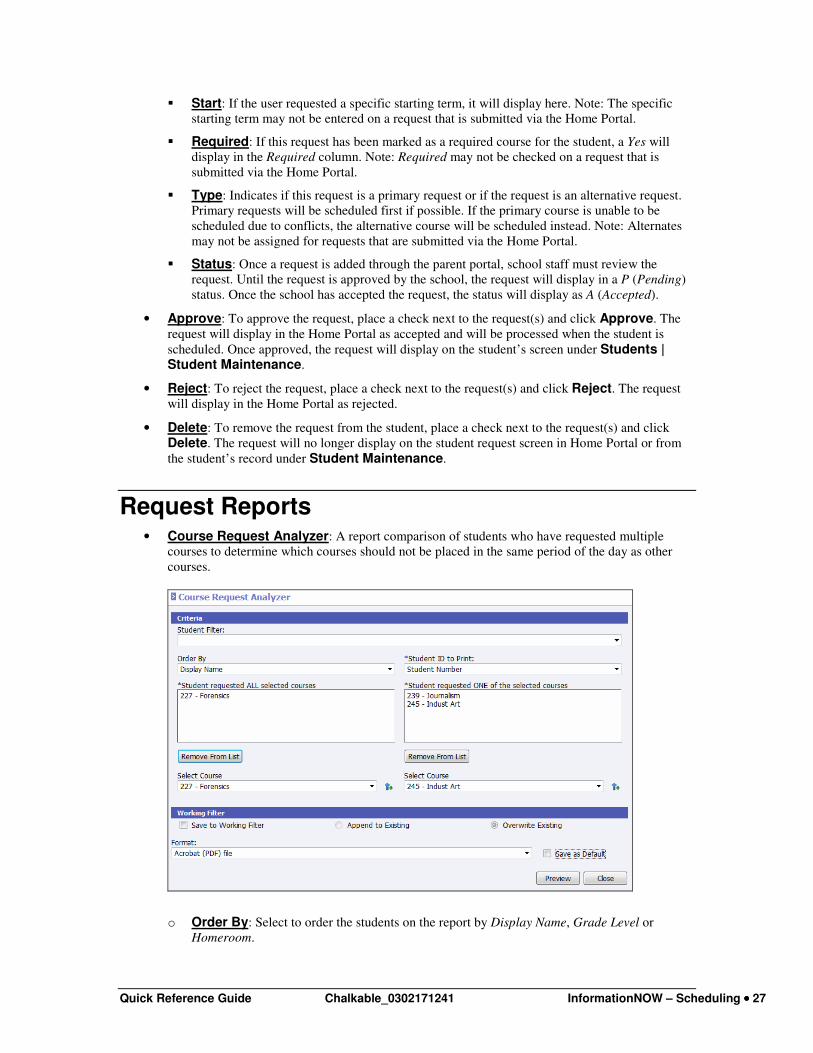
Request Reports • Course Request Analyzer: A report comparison of students who have requested multiple
courses to determine which courses should not be placed in the same period of the day as other
courses.
o Order By: Select to order the students on the report by Display Name, Grade Level or
Homeroom.
Quick Reference Guide Chalkable_0302171241 InformationNOW – Scheduling •••• 28
o Student ID to Print: Select to include Student Number, State ID Number, Alternate Student
Number, Social Security Number or None.
o Student requested All selected courses: Click the drop-list below to select the courses
to include in the report. Any student who has requested ALL of the selected courses will be
included on the report.
o Student requested ONE of the selected courses: Click the drop-list below to select
the courses to include in the report. Any student who has at least ONE of the selected courses
will be included on the report.
Note: Use the Remove From List button to remove any courses from the ALL or ONE
sections that do not belong on the report.
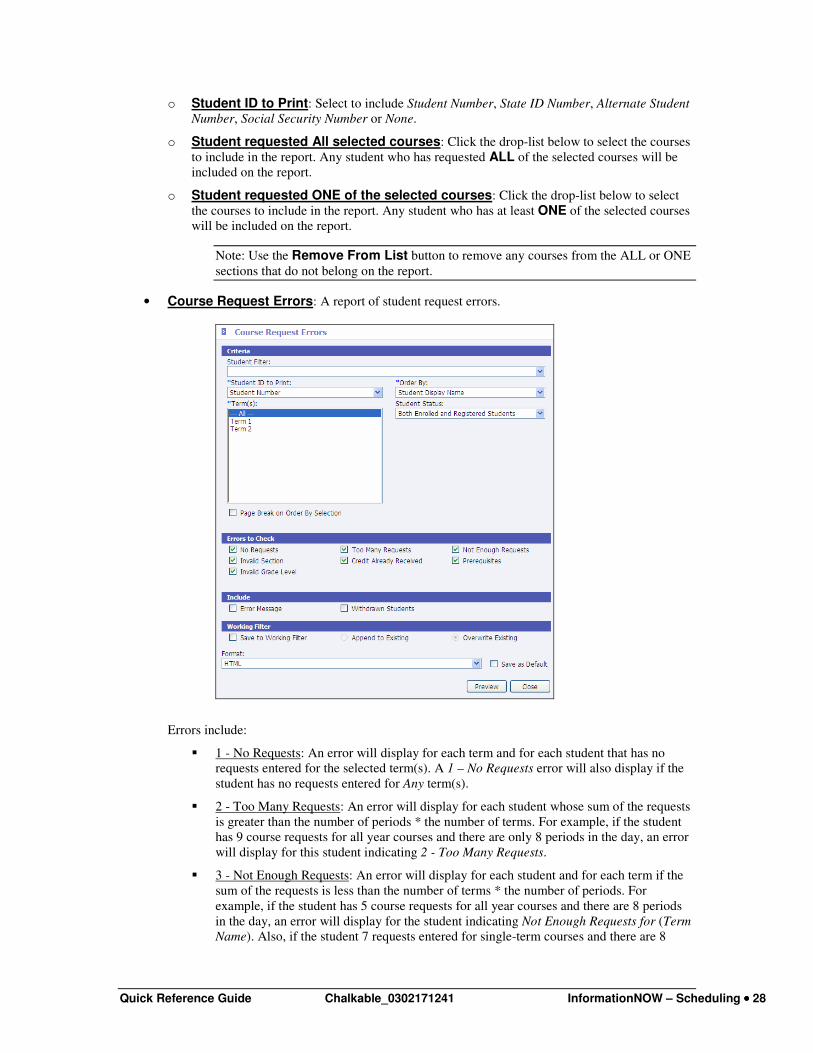
• Course Request Errors: A report of student request errors.
Errors include:
� 1 - No Requests: An error will display for each term and for each student that has no
requests entered for the selected term(s). A 1 – No Requests error will also display if the
student has no requests entered for Any term(s).
� 2 - Too Many Requests: An error will display for each student whose sum of the requests
is greater than the number of periods * the number of terms. For example, if the student
has 9 course requests for all year courses and there are only 8 periods in the day, an error
will display for this student indicating 2 - Too Many Requests.
� 3 - Not Enough Requests: An error will display for each student and for each term if the
sum of the requests is less than the number of terms * the number of periods. For
example, if the student has 5 course requests for all year courses and there are 8 periods
in the day, an error will display for the student indicating Not Enough Requests for (Term
Name). Also, if the student 7 requests entered for single-term courses and there are 8
Quick Reference Guide Chalkable_0302171241 InformationNOW – Scheduling •••• 29
terms in the year, a message will display indicating 3 - Not Enough Requests for (Term
Name).
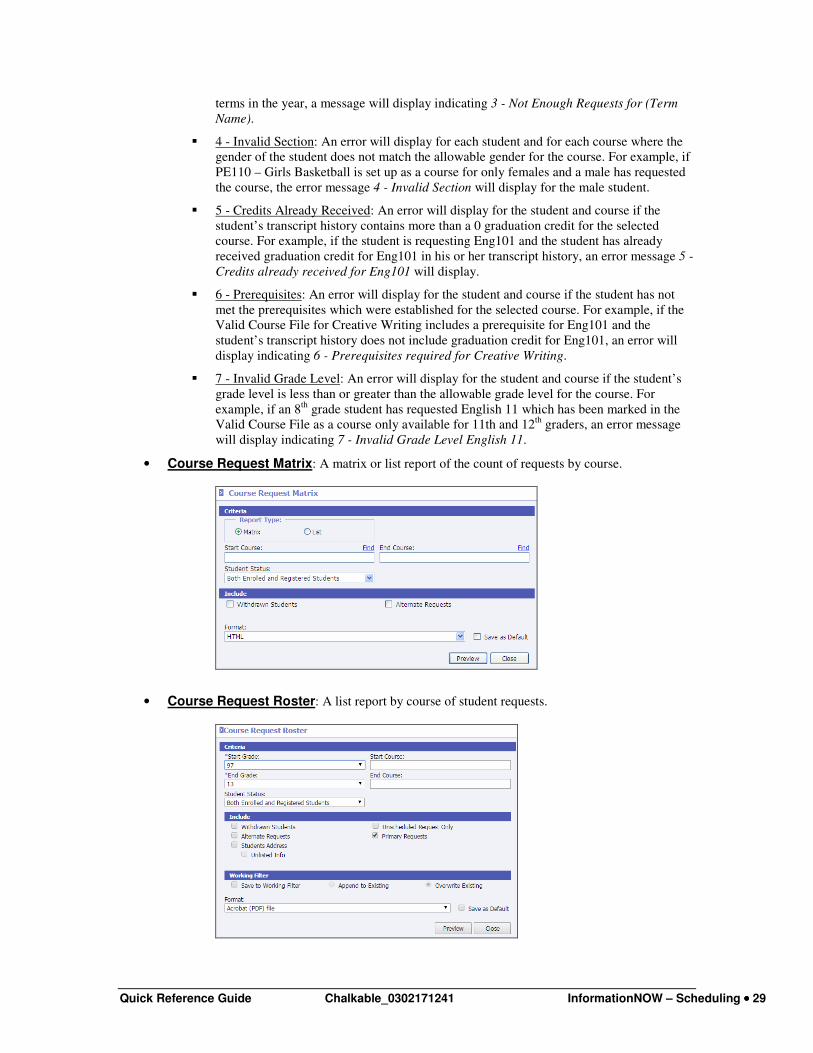
� 4 - Invalid Section: An error will display for each student and for each course where the
gender of the student does not match the allowable gender for the course. For example, if
PE110 – Girls Basketball is set up as a course for only females and a male has requested
the course, the error message 4 - Invalid Section will display for the male student.
� 5 - Credits Already Received: An error will display for the student and course if the
student’s transcript history contains more than a 0 graduation credit for the selected
course. For example, if the student is requesting Eng101 and the student has already
received graduation credit for Eng101 in his or her transcript history, an error message 5 -
Credits already received for Eng101 will display.
� 6 - Prerequisites: An error will display for the student and course if the student has not
met the prerequisites which were established for the selected course. For example, if the
Valid Course File for Creative Writing includes a prerequisite for Eng101 and the
student’s transcript history does not include graduation credit for Eng101, an error will
display indicating 6 - Prerequisites required for Creative Writing.
� 7 - Invalid Grade Level: An error will display for the student and course if the student’s
grade level is less than or greater than the allowable grade level for the course. For
example, if an 8th
grade student has requested English 11 which has been marked in the
Valid Course File as a course only available for 11th and 12th
graders, an error message
will display indicating 7 - Invalid Grade Level English 11.
• Course Request Matrix: A matrix or list report of the count of requests by course.
• Course Request Roster: A list report by course of student requests.
Quick Reference Guide Chalkable_0302171241 InformationNOW – Scheduling •••• 30
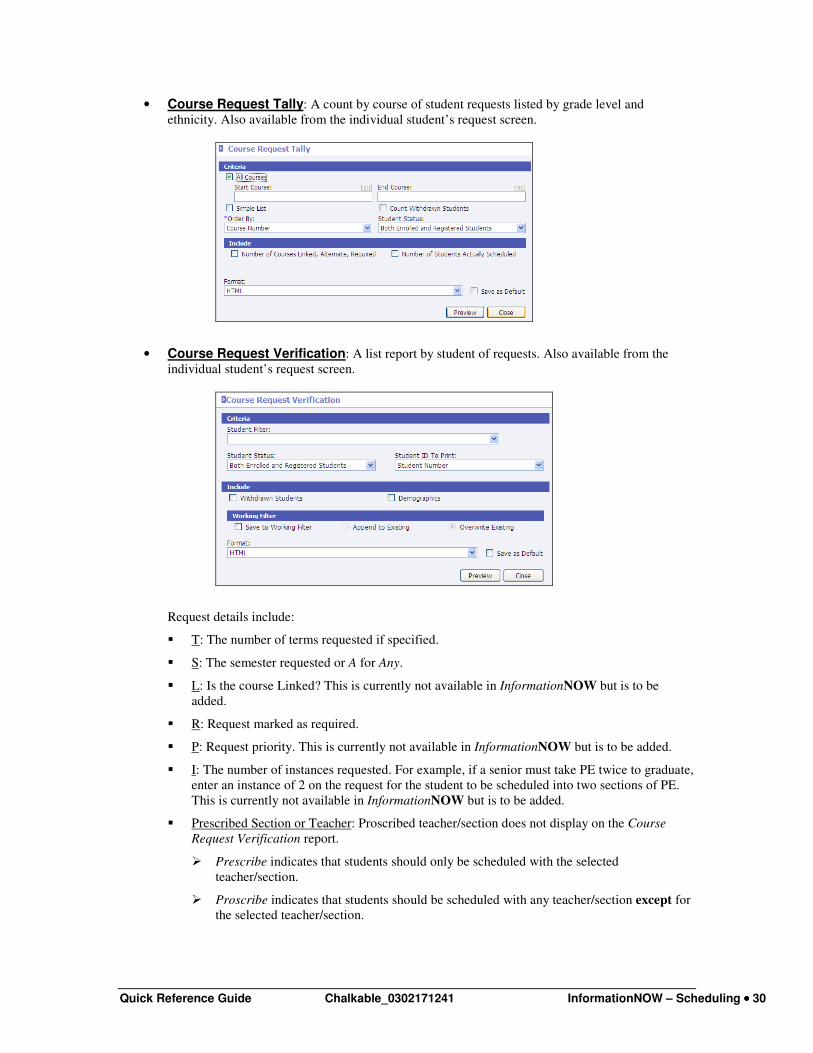
• Course Request Tally: A count by course of student requests listed by grade level and
ethnicity. Also available from the individual student’s request screen.
• Course Request Verification: A list report by student of requests. Also available from the
individual student’s request screen.
Request details include:
� T: The number of terms requested if specified.
� S: The semester requested or A for Any.
� L: Is the course Linked? This is currently not available in InformationNOW but is to be
added.
� R: Request marked as required.
� P: Request priority. This is currently not available in InformationNOW but is to be added.
� I: The number of instances requested. For example, if a senior must take PE twice to graduate,
enter an instance of 2 on the request for the student to be scheduled into two sections of PE.
This is currently not available in InformationNOW but is to be added.
� Prescribed Section or Teacher: Proscribed teacher/section does not display on the Course
Request Verification report.
� Prescribe indicates that students should only be scheduled with the selected
teacher/section.
� Proscribe indicates that students should be scheduled with any teacher/section except for
the selected teacher/section.
Quick Reference Guide Chalkable_0302171241 InformationNOW – Scheduling •••• 31
� Grad Credit: The graduation credit to be earned by the student upon the successful completion
of the course.
Build Master Schedule Through the Build Master Schedule option, InformationNOW will construct a Master Schedule based
on the constraints entered for Staff and Course information as well as student Course Requests. Refer to the
InformationNOW – Master Schedule Builder quick reference guide for details.
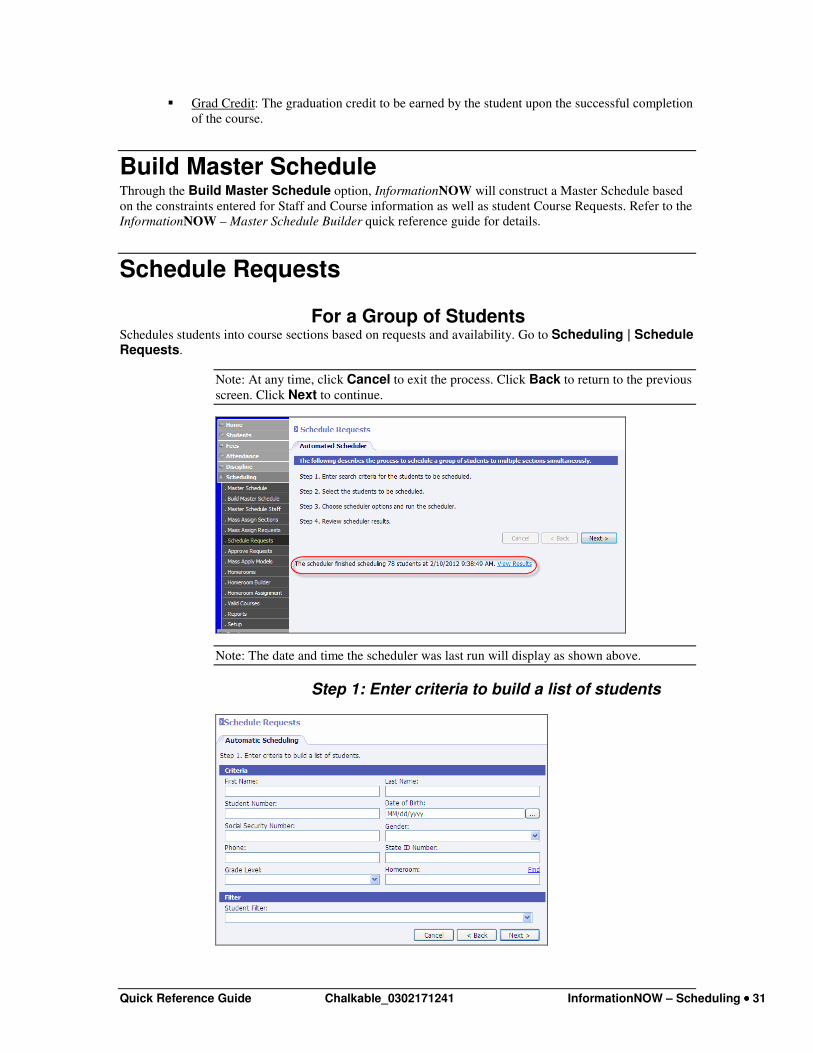
Schedule Requests
For a Group of Students Schedules students into course sections based on requests and availability. Go to Scheduling | Schedule Requests.
Note: At any time, click Cancel to exit the process. Click Back to return to the previous
screen. Click Next to continue.
Note: The date and time the scheduler was last run will display as shown above.
Step 1: Enter criteria to build a list of students

Quick Reference Guide Chalkable_0302171241 InformationNOW – Scheduling •••• 32
Step 2: Select from the resulting list all or a subset of students to schedule
• Based upon the criteria entered on the initial search screen, the lists of students who meet the
criteria will be displayed at left. Move students to be scheduled to the right side using one of the
following methods:
Note: If the desired students do not display at left, click the Search Criteria blue link to
return to the search screen and modify the search criteria.
• Select a student and click Add to move the student to the right.
• Use Ctrl+click or Shift+click options to select multiple students. Click Add to move the students
to the right.
• Click Add All>> to move all students to the right.
Note: Highlight students and use the <Remove and <<Remove All buttons to move
students back to the left who are not to be scheduled.
o Click Next to continue.
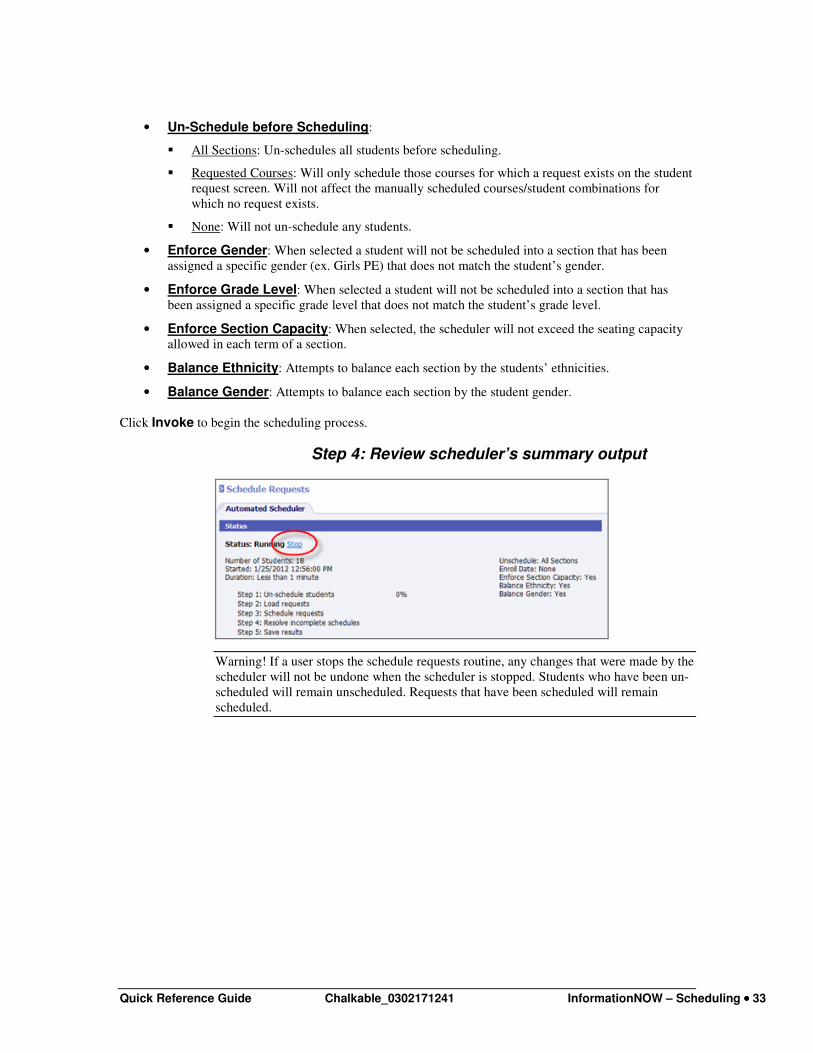
Step 3: Set scheduler execution settings
Quick Reference Guide Chalkable_0302171241 InformationNOW – Scheduling •••• 33
• Un-Schedule before Scheduling:
� All Sections: Un-schedules all students before scheduling.
� Requested Courses: Will only schedule those courses for which a request exists on the student
request screen. Will not affect the manually scheduled courses/student combinations for
which no request exists.
� None: Will not un-schedule any students.
• Enforce Gender: When selected a student will not be scheduled into a section that has been
assigned a specific gender (ex. Girls PE) that does not match the student’s gender.
• Enforce Grade Level: When selected a student will not be scheduled into a section that has
been assigned a specific grade level that does not match the student’s grade level.
• Enforce Section Capacity: When selected, the scheduler will not exceed the seating capacity
allowed in each term of a section.
• Balance Ethnicity: Attempts to balance each section by the students’ ethnicities.
• Balance Gender: Attempts to balance each section by the student gender.
Click Invoke to begin the scheduling process.
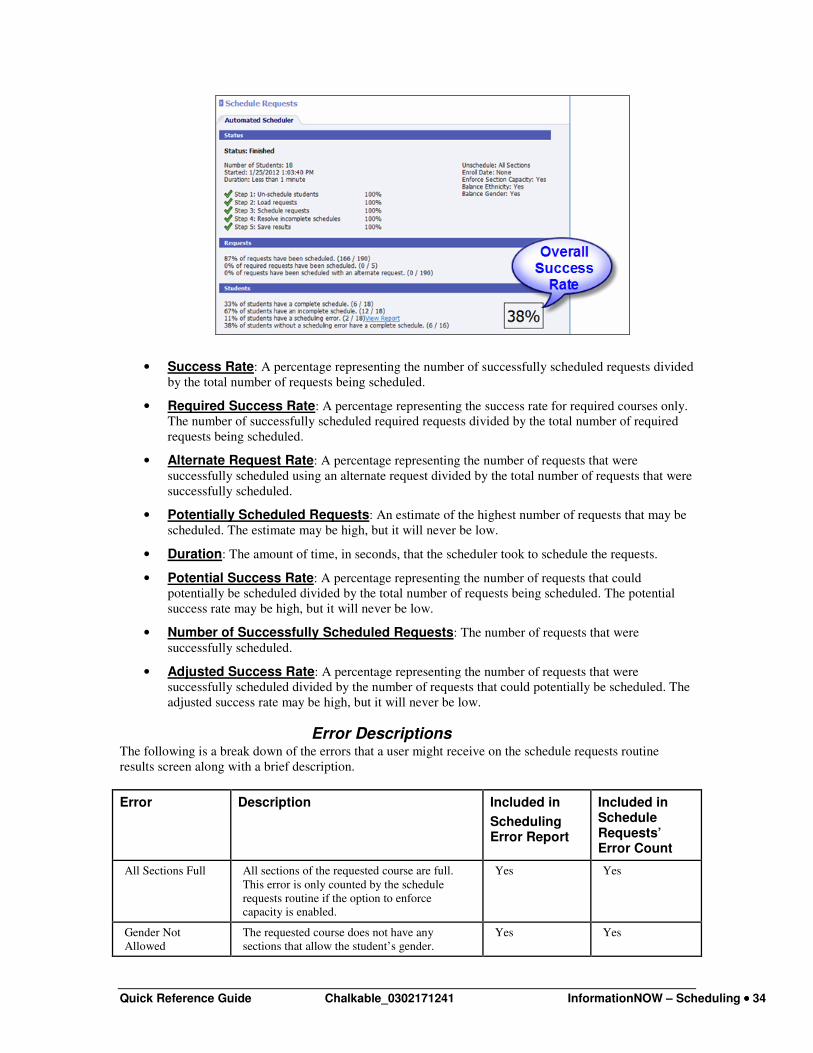
Step 4: Review scheduler’s summary output
Warning! If a user stops the schedule requests routine, any changes that were made by the
scheduler will not be undone when the scheduler is stopped. Students who have been un-
scheduled will remain unscheduled. Requests that have been scheduled will remain
scheduled.
Quick Reference Guide Chalkable_0302171241 InformationNOW – Scheduling •••• 34
• Success Rate: A percentage representing the number of successfully scheduled requests divided
by the total number of requests being scheduled.
• Required Success Rate: A percentage representing the success rate for required courses only.
The number of successfully scheduled required requests divided by the total number of required
requests being scheduled.
• Alternate Request Rate: A percentage representing the number of requests that were
successfully scheduled using an alternate request divided by the total number of requests that were
successfully scheduled.
• Potentially Scheduled Requests: An estimate of the highest number of requests that may be
scheduled. The estimate may be high, but it will never be low.
• Duration: The amount of time, in seconds, that the scheduler took to schedule the requests.
• Potential Success Rate: A percentage representing the number of requests that could
potentially be scheduled divided by the total number of requests being scheduled. The potential
success rate may be high, but it will never be low.
• Number of Successfully Scheduled Requests: The number of requests that were
successfully scheduled.
• Adjusted Success Rate: A percentage representing the number of requests that were
successfully scheduled divided by the number of requests that could potentially be scheduled. The
adjusted success rate may be high, but it will never be low.
Error Descriptions The following is a break down of the errors that a user might receive on the schedule requests routine
results screen along with a brief description.
Error Description Included in
Scheduling Error Report
Included in Schedule Requests’ Error Count
All Sections Full All sections of the requested course are full.
This error is only counted by the schedule
requests routine if the option to enforce
capacity is enabled.
Yes Yes
Gender Not
Allowed
The requested course does not have any
sections that allow the student’s gender.
Yes Yes
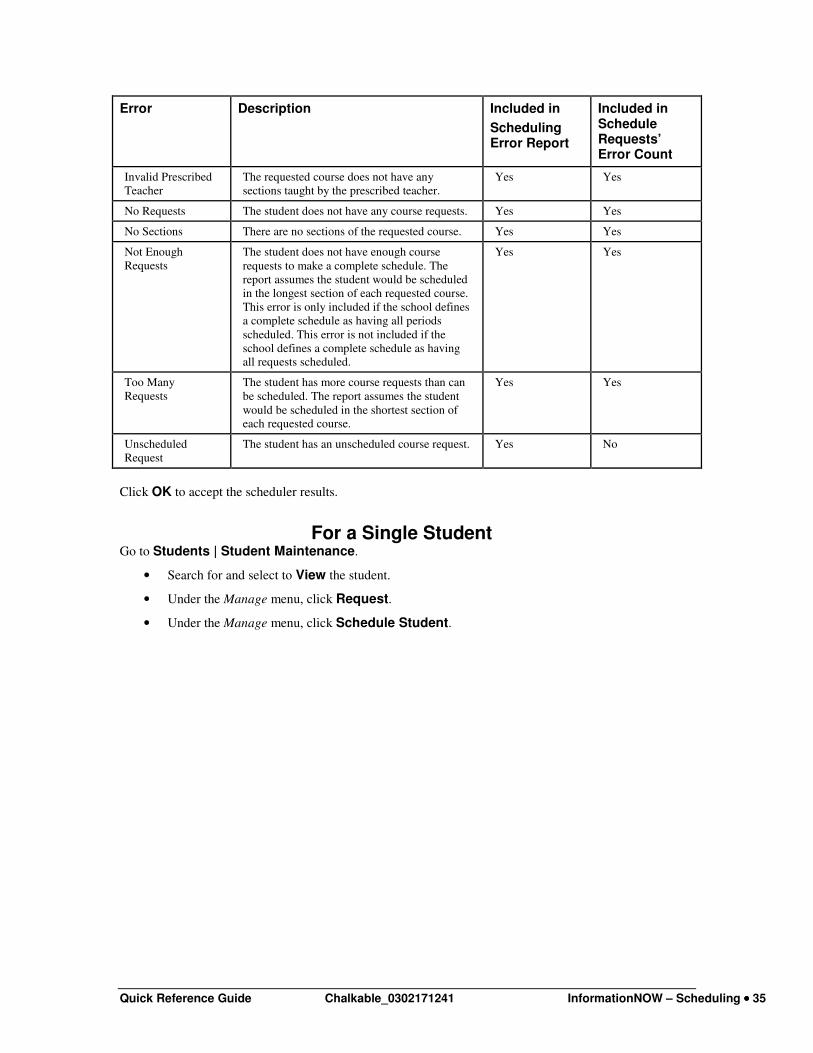
Quick Reference Guide Chalkable_0302171241 InformationNOW – Scheduling •••• 35
Error Description Included in
Scheduling Error Report
Included in Schedule Requests’ Error Count
Invalid Prescribed
Teacher
The requested course does not have any
sections taught by the prescribed teacher.
Yes Yes
No Requests The student does not have any course requests. Yes Yes
No Sections There are no sections of the requested course. Yes Yes
Not Enough
Requests
The student does not have enough course
requests to make a complete schedule. The
report assumes the student would be scheduled
in the longest section of each requested course.
This error is only included if the school defines
a complete schedule as having all periods
scheduled. This error is not included if the
school defines a complete schedule as having
all requests scheduled.
Yes Yes
Too Many
Requests
The student has more course requests than can
be scheduled. The report assumes the student
would be scheduled in the shortest section of
each requested course.
Yes Yes
Unscheduled
Request
The student has an unscheduled course request. Yes No
Click OK to accept the scheduler results.
For a Single Student Go to Students | Student Maintenance.
• Search for and select to View the student.
• Under the Manage menu, click Request.
• Under the Manage menu, click Schedule Student.
Quick Reference Guide Chalkable_0302171241 InformationNOW – Scheduling •••• 36
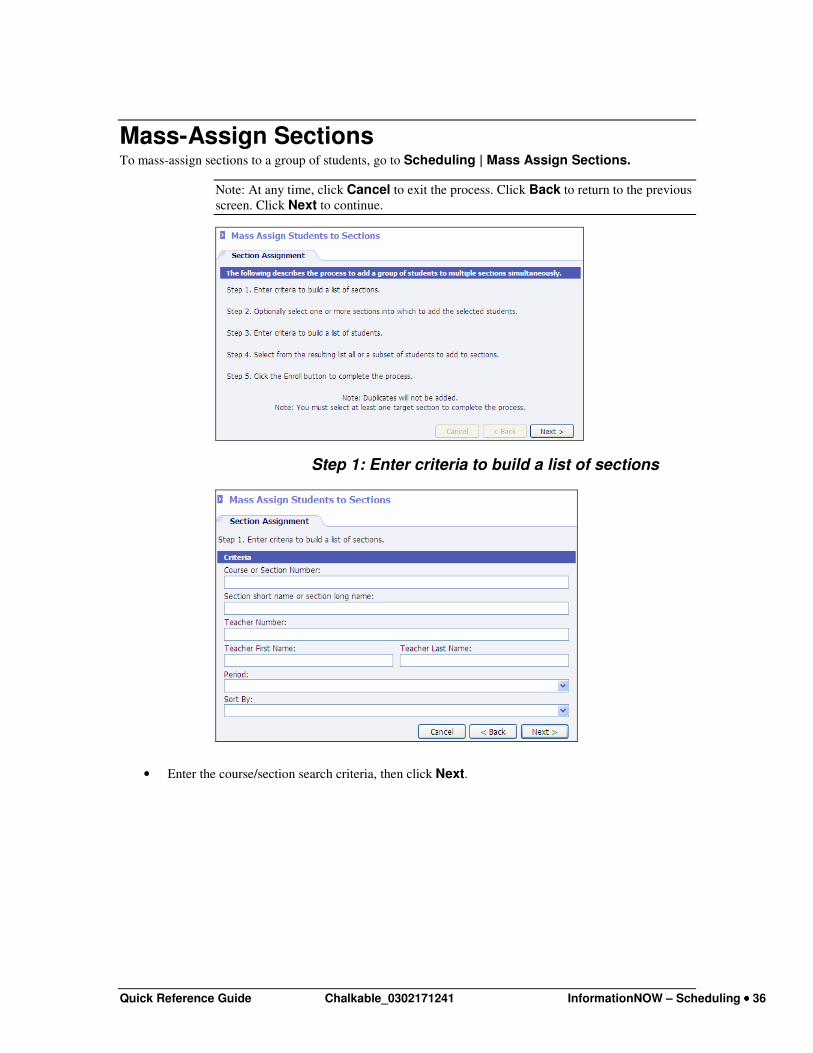
Mass-Assign Sections To mass-assign sections to a group of students, go to Scheduling | Mass Assign Sections.
Note: At any time, click Cancel to exit the process. Click Back to return to the previous
screen. Click Next to continue.
Step 1: Enter criteria to build a list of sections
• Enter the course/section search criteria, then click Next.
Quick Reference Guide Chalkable_0302171241 InformationNOW – Scheduling •••• 37
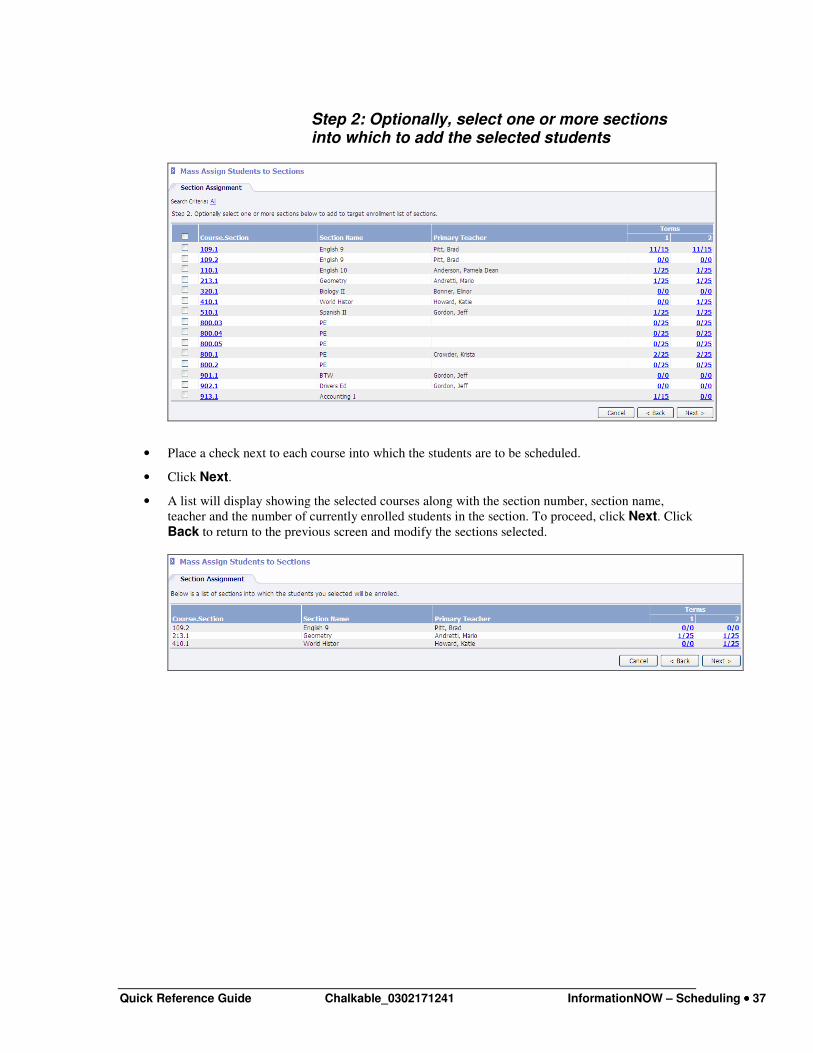
Step 2: Optionally, select one or more sections into which to add the selected students
• Place a check next to each course into which the students are to be scheduled.
• Click Next.
• A list will display showing the selected courses along with the section number, section name,
teacher and the number of currently enrolled students in the section. To proceed, click Next. Click
Back to return to the previous screen and modify the sections selected.
Quick Reference Guide Chalkable_0302171241 InformationNOW – Scheduling •••• 38
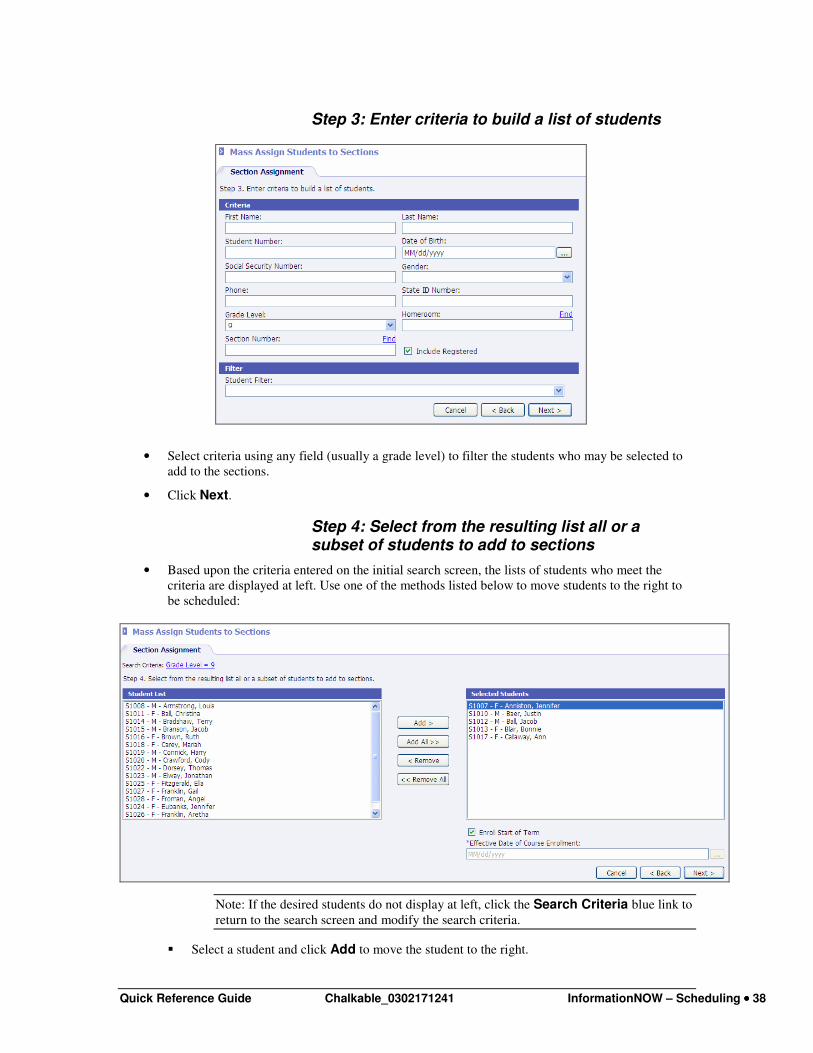
Step 3: Enter criteria to build a list of students
• Select criteria using any field (usually a grade level) to filter the students who may be selected to
add to the sections.
• Click Next.
Step 4: Select from the resulting list all or a subset of students to add to sections
• Based upon the criteria entered on the initial search screen, the lists of students who meet the
criteria are displayed at left. Use one of the methods listed below to move students to the right to
be scheduled:
Note: If the desired students do not display at left, click the Search Criteria blue link to
return to the search screen and modify the search criteria.
� Select a student and click Add to move the student to the right.
Quick Reference Guide Chalkable_0302171241 InformationNOW – Scheduling •••• 39
� Use Ctrl+click or Shift+click options to select multiple students. Click Add to move the
students to the right.
� Click Add All>> to move all students to the right.
Note: Highlight students and use the <Remove and <<Remove All buttons to move
students back to the left who are not to be scheduled.
� Click Next to proceed.
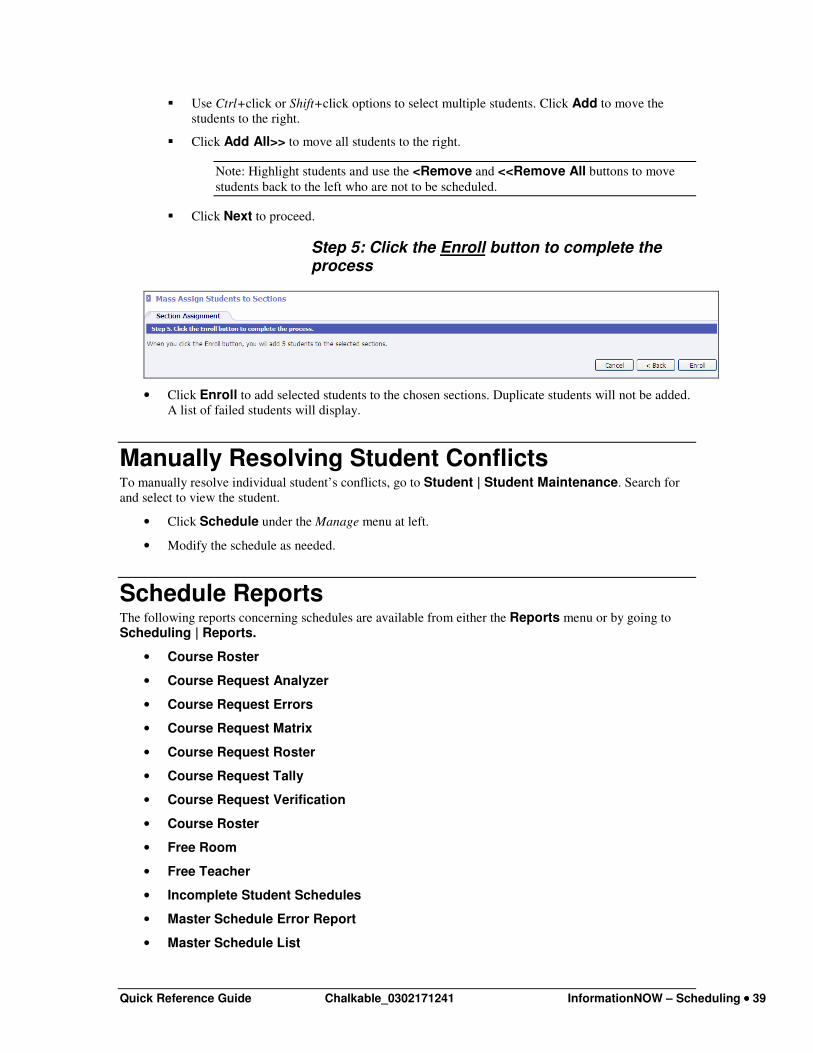
Step 5: Click the Enroll button to complete the process
• Click Enroll to add selected students to the chosen sections. Duplicate students will not be added.
A list of failed students will display.
Manually Resolving Student Conflicts To manually resolve individual student’s conflicts, go to Student | Student Maintenance. Search for
and select to view the student.
• Click Schedule under the Manage menu at left.
• Modify the schedule as needed.
Schedule Reports The following reports concerning schedules are available from either the Reports menu or by going to
Scheduling | Reports.
• Course Roster
• Course Request Analyzer
• Course Request Errors
• Course Request Matrix
• Course Request Roster
• Course Request Tally
• Course Request Verification
• Course Roster
• Free Room
• Free Teacher
• Incomplete Student Schedules
• Master Schedule Error Report
• Master Schedule List

Quick Reference Guide Chalkable_0302171241 InformationNOW – Scheduling •••• 40
• Master Schedule Matrix
• Master Schedule Summary
• Room-Teacher Utilization
• Student Schedule List
• Student Schedule Matrix
Individual Student Schedule View To access an individual student’s schedule:
• Go to Students | Student Maintenance.
• Search for and select to View a student.
• Click the Schedule link under the Manage menu at left.
Override When copying a schedule, applying a model or adding a section to the student schedule, courses will not be
available to add to the student schedule if parameters of capacity, gender and grade level have been
assigned to the course section. For example: If a Boy’s PE class has been created with a gender restriction
of Male only, when adding a PE class to a girl’s schedule, the course may not be added because of the
gender restriction.
Using an override allows sections to be added to the student’s schedule regardless of capacity, gender or
grade level restrictions that have been assigned to the course section.
• Seating Capacity: Checking this option will allow the section to be assigned to the student
even when the student will exceed the section’s seating capacity. The user will not receive the
Cannot enroll student. Exceeding seating capacity is not allowed. error when adding students
to sections.
• Gender Restriction: Checking this option will allow the section to be assigned to the
student even when the student is not the gender type required by the section. The user will not
receive the Cannot enroll student. Gender is not allowed. error when adding students to
sections.

Quick Reference Guide Chalkable_0302171241 InformationNOW – Scheduling •••• 41
• Grade Level Restriction: Checking this option will allow the section to be assigned to the
student even when the student is not in the grade level required by the section. The user will
not receive the Cannot enroll student. Grade Level is not allowed. error when adding students
to sections.
Note: The same override options are also available under Scheduling | Mass Assign Sections and Scheduling | Mass Apply Models.
The user may select one or more options. Once selected, these settings are saved for this user and will
remain selected as long as the user is logged in to InformationNOW. The next time the user logs in, the
options will be unchecked.
Term When accessing the student schedule screen, the entire schedule for the selected student and academic
session will display. To filter the displayed schedule to just one term, select that term from the available list
and click Refresh.
Include Withdrawn Classes When accessing the student schedule screen, only the classes in which the student is currently enrolled will
display. To view classes from which the student has withdrawn, check the Include Withdrawn Classes box
and click Refresh.
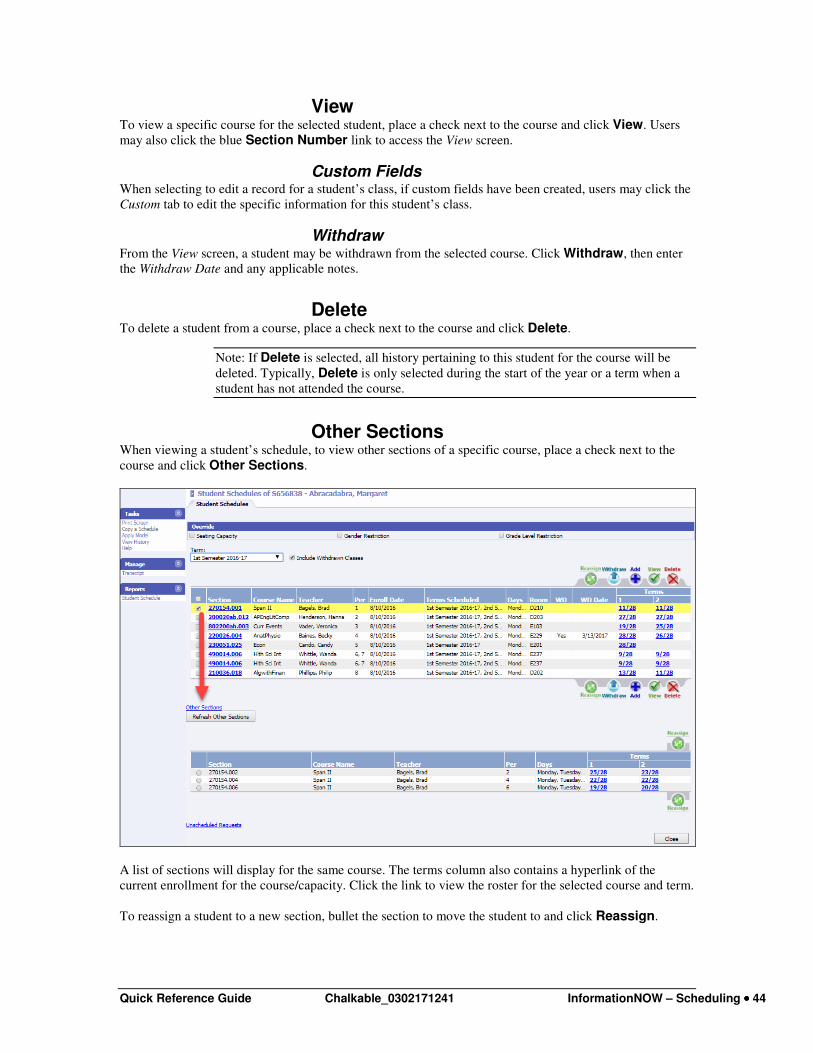
Reassign Users may reassign students from one section of a course to another section of the same course or to a
section of a new course.
• To activate the option, place a check next to the existing course/section to be changed.
• Once a course is selected, the Reassign option becomes active.
• Select to Reassign. Select to Delete the course from the student schedule or Withdraw the
student. If deleting, all history pertaining to this student for the course will be deleted. Typically
delete is only selected during the start of the year or a term when a student has not attended the
course. If withdrawing, enter the Withdraw Date and any applicable notes. Click OK.

Quick Reference Guide Chalkable_0302171241 InformationNOW – Scheduling •••• 42
• The Search Sections screen will display.
Note: If an override is selected on the student schedule screen (Seating Capacity, Gender
Restriction, Grade Level Restriction), when using the Reassign option, the override(s)
will be considered when displaying courses in the Search Sections option.
• Enter the search criteria.
Fit Only
• When the Fit Only option is selected and the user clicks Next, the Section Result list will display
sections considering:
� Sections of courses that are not already scheduled;
� Periods that are not already scheduled;
� Grade level allowances (unless Override/Grade Level is selected);
� Gender allowances (unless Override/Gender is selected);
� Section seat capacity (unless Override/Capacity is selected);
� and Course pre-requisites (unless Override/‘Pre-requisites’ is selected).
• Click Next. The sections list will appear.
• Place a check next to the courses to be added/reassigned to the student.
Note: In the Terms column, the current number of students enroll will display with the
capacity for the course separated by a /. Click the link to access a roster for the selected
course and term.
Quick Reference Guide Chalkable_0302171241 InformationNOW – Scheduling •••• 43
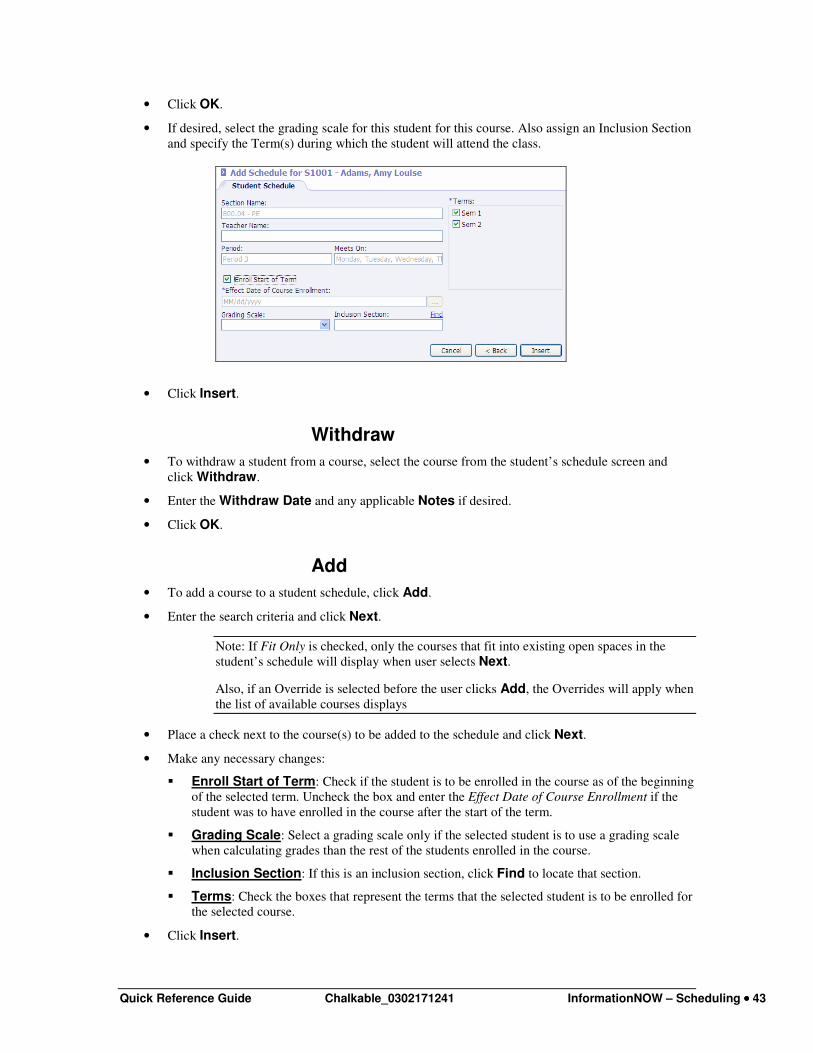
• Click OK.
• If desired, select the grading scale for this student for this course. Also assign an Inclusion Section
and specify the Term(s) during which the student will attend the class.
• Click Insert.
Withdraw
• To withdraw a student from a course, select the course from the student’s schedule screen and
click Withdraw.
• Enter the Withdraw Date and any applicable Notes if desired.
• Click OK.
Add
• To add a course to a student schedule, click Add.
• Enter the search criteria and click Next.
Note: If Fit Only is checked, only the courses that fit into existing open spaces in the
student’s schedule will display when user selects Next.
Also, if an Override is selected before the user clicks Add, the Overrides will apply when
the list of available courses displays
• Place a check next to the course(s) to be added to the schedule and click Next.
• Make any necessary changes:
� Enroll Start of Term: Check if the student is to be enrolled in the course as of the beginning
of the selected term. Uncheck the box and enter the Effect Date of Course Enrollment if the
student was to have enrolled in the course after the start of the term.
� Grading Scale: Select a grading scale only if the selected student is to use a grading scale
when calculating grades than the rest of the students enrolled in the course.
� Inclusion Section: If this is an inclusion section, click Find to locate that section.
� Terms: Check the boxes that represent the terms that the selected student is to be enrolled for
the selected course.
• Click Insert.
Quick Reference Guide Chalkable_0302171241 InformationNOW – Scheduling •••• 44
View To view a specific course for the selected student, place a check next to the course and click View. Users
may also click the blue Section Number link to access the View screen.
Custom Fields When selecting to edit a record for a student’s class, if custom fields have been created, users may click the
Custom tab to edit the specific information for this student’s class.
Withdraw From the View screen, a student may be withdrawn from the selected course. Click Withdraw, then enter
the Withdraw Date and any applicable notes.
Delete To delete a student from a course, place a check next to the course and click Delete.
Note: If Delete is selected, all history pertaining to this student for the course will be
deleted. Typically, Delete is only selected during the start of the year or a term when a
student has not attended the course.
Other Sections When viewing a student’s schedule, to view other sections of a specific course, place a check next to the
course and click Other Sections.
A list of sections will display for the same course. The terms column also contains a hyperlink of the
current enrollment for the course/capacity. Click the link to view the roster for the selected course and term.
To reassign a student to a new section, bullet the section to move the student to and click Reassign.
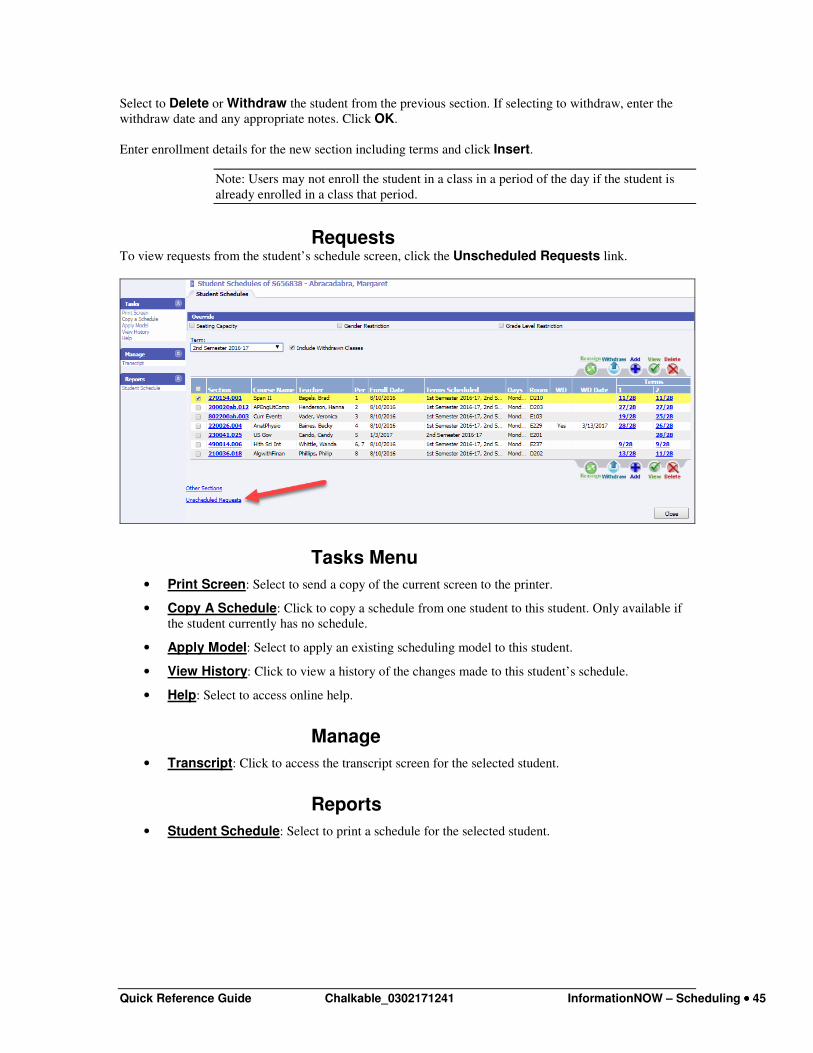
Quick Reference Guide Chalkable_0302171241 InformationNOW – Scheduling •••• 45
Select to Delete or Withdraw the student from the previous section. If selecting to withdraw, enter the
withdraw date and any appropriate notes. Click OK.
Enter enrollment details for the new section including terms and click Insert.
Note: Users may not enroll the student in a class in a period of the day if the student is
already enrolled in a class that period.
Requests To view requests from the student’s schedule screen, click the Unscheduled Requests link.
Tasks Menu
• Print Screen: Select to send a copy of the current screen to the printer.
• Copy A Schedule: Click to copy a schedule from one student to this student. Only available if
the student currently has no schedule.
• Apply Model: Select to apply an existing scheduling model to this student.
• View History: Click to view a history of the changes made to this student’s schedule.
• Help: Select to access online help.
Manage
• Transcript: Click to access the transcript screen for the selected student.
Reports
• Student Schedule: Select to print a schedule for the selected student.
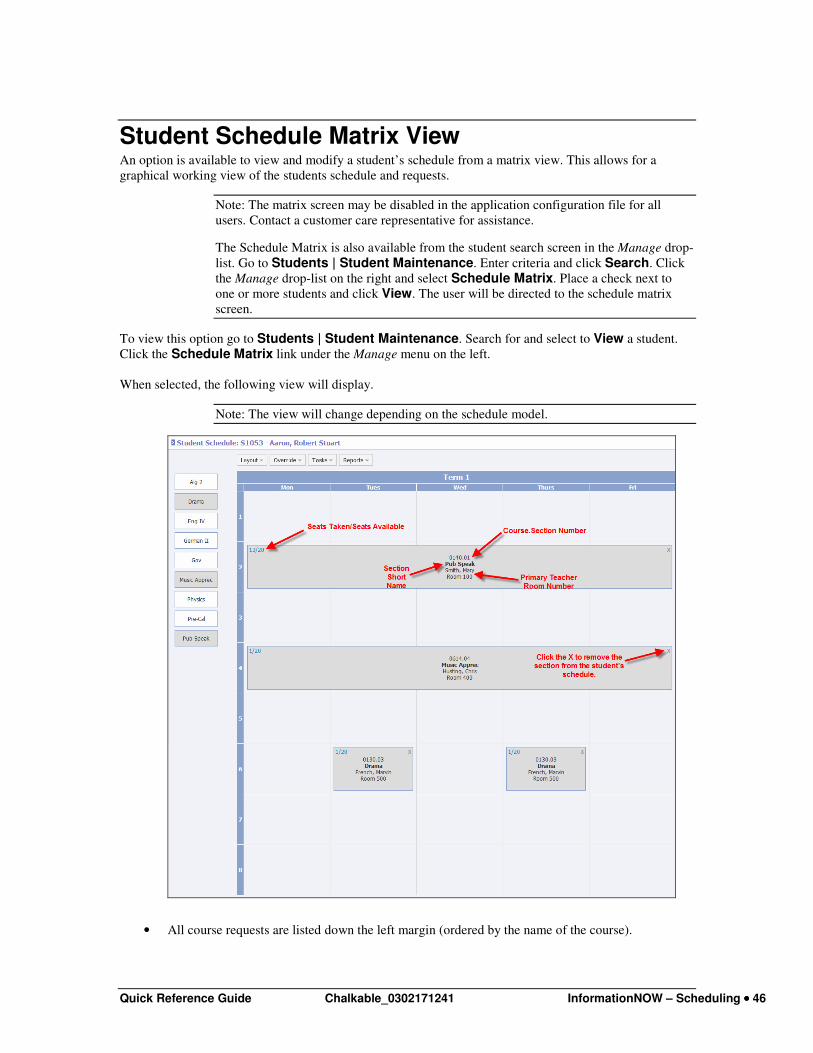
Quick Reference Guide Chalkable_0302171241 InformationNOW – Scheduling •••• 46
Student Schedule Matrix View An option is available to view and modify a student’s schedule from a matrix view. This allows for a
graphical working view of the students schedule and requests.
Note: The matrix screen may be disabled in the application configuration file for all
users. Contact a customer care representative for assistance.
The Schedule Matrix is also available from the student search screen in the Manage drop-
list. Go to Students | Student Maintenance. Enter criteria and click Search. Click
the Manage drop-list on the right and select Schedule Matrix. Place a check next to
one or more students and click View. The user will be directed to the schedule matrix
screen.
To view this option go to Students | Student Maintenance. Search for and select to View a student.
Click the Schedule Matrix link under the Manage menu on the left.
When selected, the following view will display.
Note: The view will change depending on the schedule model.
• All course requests are listed down the left margin (ordered by the name of the course).
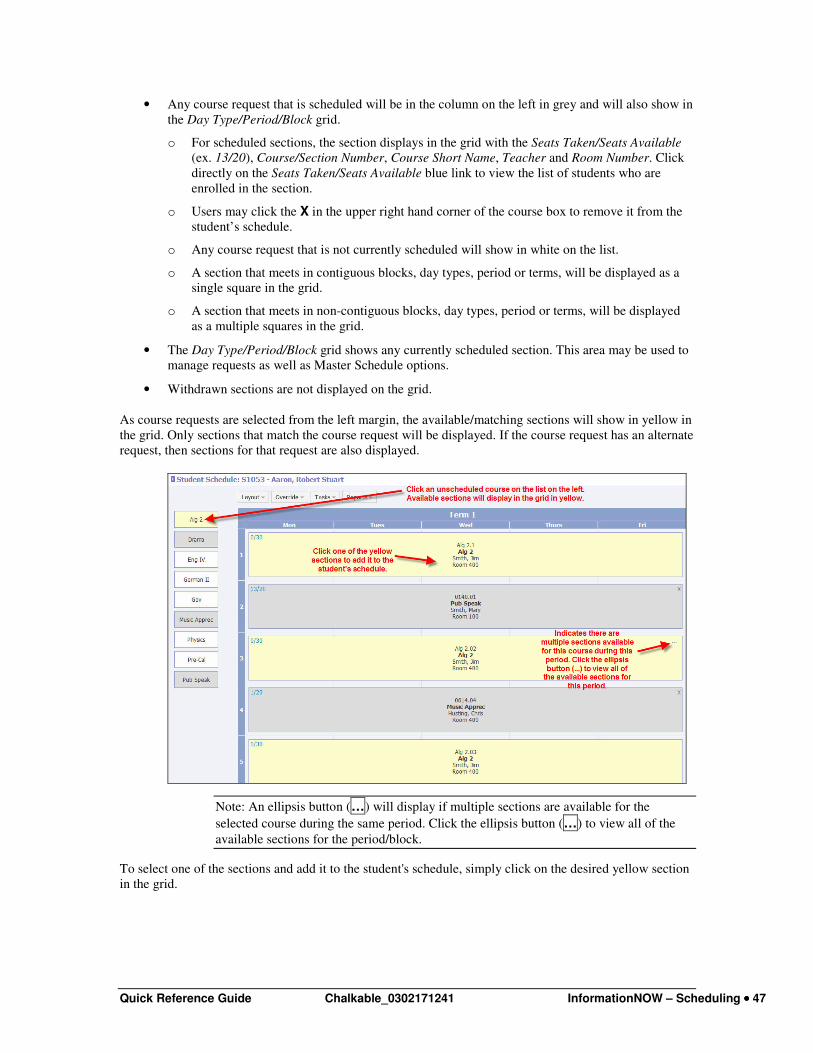
Quick Reference Guide Chalkable_0302171241 InformationNOW – Scheduling •••• 47
• Any course request that is scheduled will be in the column on the left in grey and will also show in
the Day Type/Period/Block grid.
o For scheduled sections, the section displays in the grid with the Seats Taken/Seats Available
(ex. 13/20), Course/Section Number, Course Short Name, Teacher and Room Number. Click
directly on the Seats Taken/Seats Available blue link to view the list of students who are
enrolled in the section.
o Users may click the X in the upper right hand corner of the course box to remove it from the
student’s schedule.
o Any course request that is not currently scheduled will show in white on the list.
o A section that meets in contiguous blocks, day types, period or terms, will be displayed as a
single square in the grid.
o A section that meets in non-contiguous blocks, day types, period or terms, will be displayed
as a multiple squares in the grid.
• The Day Type/Period/Block grid shows any currently scheduled section. This area may be used to
manage requests as well as Master Schedule options.
• Withdrawn sections are not displayed on the grid.
As course requests are selected from the left margin, the available/matching sections will show in yellow in
the grid. Only sections that match the course request will be displayed. If the course request has an alternate
request, then sections for that request are also displayed.
Note: An ellipsis button (…) will display if multiple sections are available for the
selected course during the same period. Click the ellipsis button (…) to view all of the
available sections for the period/block.
To select one of the sections and add it to the student's schedule, simply click on the desired yellow section
in the grid.
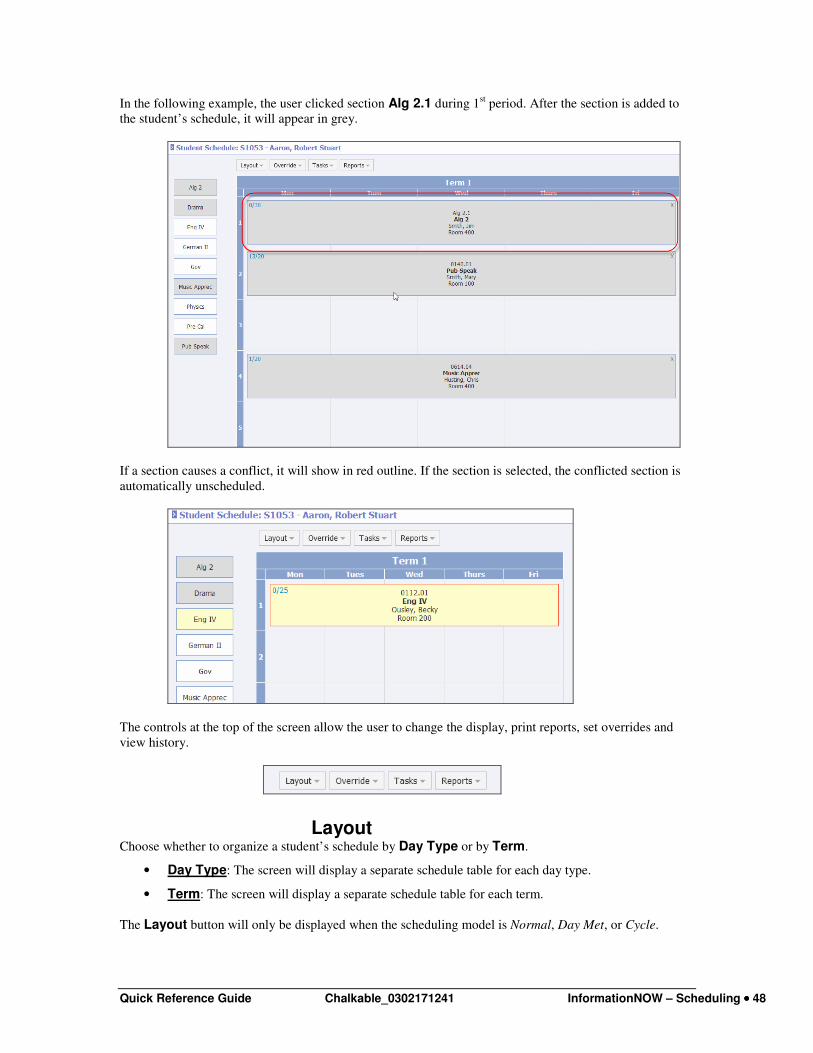
Quick Reference Guide Chalkable_0302171241 InformationNOW – Scheduling •••• 48
In the following example, the user clicked section Alg 2.1 during 1st period. After the section is added to
the student’s schedule, it will appear in grey.
If a section causes a conflict, it will show in red outline. If the section is selected, the conflicted section is
automatically unscheduled.
The controls at the top of the screen allow the user to change the display, print reports, set overrides and
view history.
Layout Choose whether to organize a student’s schedule by Day Type or by Term.
• Day Type: The screen will display a separate schedule table for each day type.
• Term: The screen will display a separate schedule table for each term.
The Layout button will only be displayed when the scheduling model is Normal, Day Met, or Cycle.
Quick Reference Guide Chalkable_0302171241 InformationNOW – Scheduling •••• 49
When the scheduling model is Normal, the page will use the Day Type layout by default.
When the scheduling model is Day Met or Cycle, the page will use the Term layout by default.
When the scheduling model is Period, the page will display a single schedule table. The name of the day
type will not be displayed.
When the scheduling model is Block, the page will display a single schedule table. Blocks will be displayed
down the vertical axis in place of periods. Terms will be displayed across the horizontal axis. Day types
and periods will not be displayed.
Overrides Select the validation rules that will be enforced or overridden.
• Validation rules with a checkbox next to them will not be enforced.
• Zero, one, or more of the validation rules may be checked.
• When the user clicks an option, the checkbox next to that option will be toggled.
• The options that were previously selected by the user will be restored when the user re-opens the
page.
• The Override button will only be displayed when the user has permission to Allow Override of
Section Checks.
Tasks The Tasks button provides a list of links to other pages for this student. When the View History link is
clicked, a popup will display showing the student’s full schedule history.
Note: The history screen will only display schedule changes that were made AFTER the
summer release was applied. Changes to schedules that were performed prior to the
installation of the summer update will not be included.
Reports The Reports button provides a list links to reports for this student. When the Student Schedule link is
clicked, a popup will display showing the options page for the Student Schedule Report.
Saving Changes Click OK to save all changes. Changes are not saved until the OK button is clicked. If the user clicks
Close, the screen will close without saving changes. Click Reset to re-load the screen without saving
changes.
Note: When the user attempts to save changes, an error will be displayed if any changes
have been made to the student’s schedule outside of this page since the page was
accessed (i.e., if another user access the same student’s screen). When a validation error
occurs, the system will attempt to save changes to other sections. When a more serious
error occurs, the system will roll back all changes. In either case, all errors are displayed
to the user.

Quick Reference Guide Chalkable_0302171241 InformationNOW – Scheduling •••• 50
Dates
• Course Enrollment Dates: When a student is enrolled in a section under Students | Student Maintenance | Schedule link, InformationNOW typically allows the user to select the
scheduled terms and enroll date for the section. The Schedule Matrix page does not allow the user
to select the scheduled terms or an enroll date. Instead, these options are determined for the user.
o When a student is enrolled in a section before the section has started, the student will be
scheduled in all terms that the section meets. The enroll date will be null.
o When a student is enrolled in a section after the term has started, the student will be scheduled
in the current term and all future terms that the section meets. The enroll date will be today’s
date.
o When a student is enrolled in a section on a date that occurs between two terms, the student
will be scheduled in all future terms that the section meets. The enroll date will be the first
day of the next term.
o The page will not allow a student to be enrolled in a section that has ended.
o An un-scheduled section that has ended will not be displayed when the user selects a request,
a section, or the More Sections dialog.
• Deletes or Withdrawals: When a student is withdrawn from a section via the Students | Student Maintenance | Schedule link, InformationNOW typically allows the user to choose
whether to delete or withdraw a student from a section. If withdrawn is selected, the user enters a
withdrawn date. The Schedule Matrix page does not allow the user to choose whether to delete or
withdraw a student and does not allow the user to enter a withdrawn date. Instead, these options
are determined for the user.
o When a student is removed from a section before the section has started, the student will be
deleted from the section.
o When a student is removed from a section during a term, the student will be withdrawn from
the section. The withdraw date will be yesterday’s date.
o When a student is removed from a section on a date that occurs between two terms, the
student will be withdrawn from the section. The withdraw date will be the last day of the
previous term.
o The page will not allow a student to be removed from a section after the section has ended.
� The X icon will not be displayed for a scheduled section that has ended.
� The ellipsis icon will not be displayed for a scheduled section that has ended.
� An un-scheduled section will not be displayed if it has a scheduling conflict with a
section that has ended.
Block Scheduling Block scheduling is the most complex and capable scheduling model. Each section is assigned to a block,
which is then assigned to a day type and time slot. The calendar specifies the day type and bell schedule for
each school day. Block scheduling is ideal for schools that use mosaic or block scheduling.
Create Academic Session
Note: The following assumes user is creating a new academic session under the
School/District menu from the school’s Acad Session tab and not through the Create New Academic Session option under Mgmt Console.
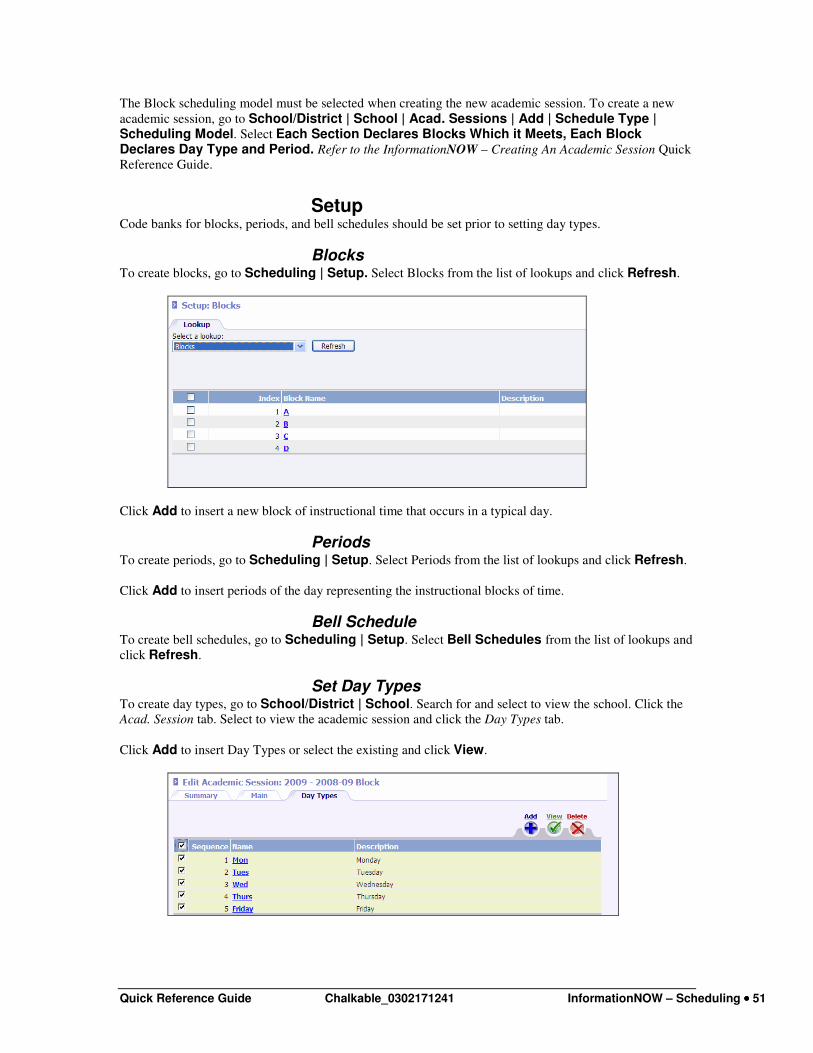
Quick Reference Guide Chalkable_0302171241 InformationNOW – Scheduling •••• 51
The Block scheduling model must be selected when creating the new academic session. To create a new
academic session, go to School/District | School | Acad. Sessions | Add | Schedule Type | Scheduling Model. Select Each Section Declares Blocks Which it Meets, Each Block Declares Day Type and Period. Refer to the InformationNOW – Creating An Academic Session Quick
Reference Guide.
Setup Code banks for blocks, periods, and bell schedules should be set prior to setting day types.
Blocks To create blocks, go to Scheduling | Setup. Select Blocks from the list of lookups and click Refresh.
Click Add to insert a new block of instructional time that occurs in a typical day.
Periods To create periods, go to Scheduling | Setup. Select Periods from the list of lookups and click Refresh.
Click Add to insert periods of the day representing the instructional blocks of time.
Bell Schedule To create bell schedules, go to Scheduling | Setup. Select Bell Schedules from the list of lookups and
click Refresh.
Set Day Types To create day types, go to School/District | School. Search for and select to view the school. Click the
Acad. Session tab. Select to view the academic session and click the Day Types tab.
Click Add to insert Day Types or select the existing and click View.
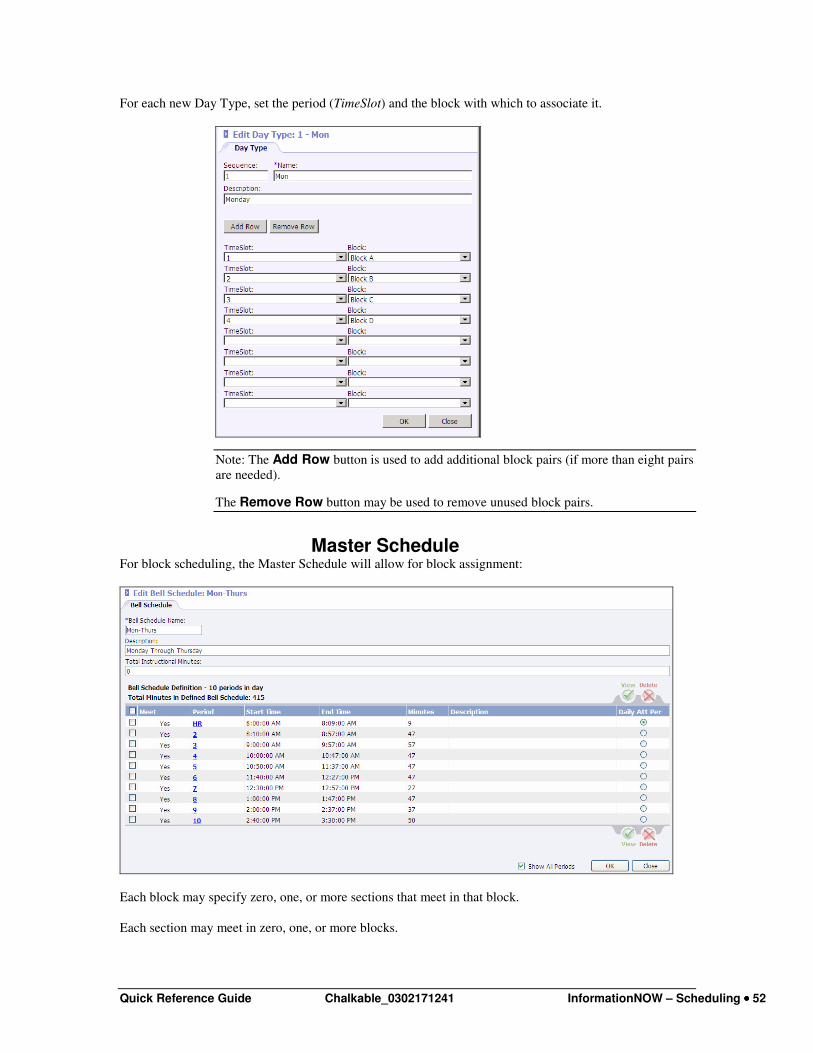
Quick Reference Guide Chalkable_0302171241 InformationNOW – Scheduling •••• 52
For each new Day Type, set the period (TimeSlot) and the block with which to associate it.
Note: The Add Row button is used to add additional block pairs (if more than eight pairs
are needed).
The Remove Row button may be used to remove unused block pairs.
Master Schedule For block scheduling, the Master Schedule will allow for block assignment:
Each block may specify zero, one, or more sections that meet in that block.
Each section may meet in zero, one, or more blocks.

Quick Reference Guide Chalkable_0302171241 InformationNOW – Scheduling •••• 53
Master Schedule Builder Where Period was formerly displayed, it will be replaced by the term Block.
For example, go to Scheduling | Build Master Schedule. Select a course. Instead of defining the
periods available, select the blocks available.
Student Schedule The student schedule will display blocks instead of periods of the day.