Embed Size (px)
Citation preview

Infor ERP VISUAL .NET 7.2
Installation Guide

Copyright © 2007 Infor Global Solutions Technology GmbH and/or its affiliates and subsidiaries
All rights reserved. The word and design marks set forth herein are trademarks and/or registered trademarks of Infor Global Solutions Technology GmbH and/or its affiliates and subsidiaries. All rights reserved. All other trademarks listed herein are the property of their respective owners.
Important Notices
The material contained in this publication (including any supplementary information) constitutes and contains confidential and proprietary information of Infor Global Solutions Technology GmbH.
By gaining access to the attached, you acknowledge and agree that the material (including any modification, translation or adaptation of the material) and all copyright, trade secrets and all other right, title and interest therein, are the sole property of Infor Global Solutions Technology GmbH and that you shall not gain right, title or interest in the material (including any modification, translation or adaptation of the material) by virtue of your review thereof other than the non-exclusive right to use the material solely in connection with and the furtherance of your license and use of software made available to your company from Infor Global Solutions Technology GmbH pursuant to a separate agreement (“Purpose”).
In addition, by accessing the enclosed material, you acknowledge and agree that you are required to maintain such material in strict confidence and that your use of such material is limited to the Purpose described above.
Although Infor Global Solutions Technology GmbH has taken due care to ensure that the material included in this publication is accurate and complete, Infor Global Solutions Technology GmbH cannot warrant that the information contained in this publication is complete, does not contain typographical or other errors, or will meet your specific requirements. As such, Infor Global Solutions Technology GmbH does not assume and hereby disclaims all liability, consequential or otherwise, for any loss or damage to any person or entity which is caused by or relates to errors or omissions in this publication (including any supplementary information), whether such errors or omissions result from negligence, accident or any other cause.
Publication Information
Release: Infor ERP VISUAL .NET 7.2 Installation Guide
Publication Date: July 2008

3
Table of contents Installing Infor ERP VISUAL .NET: an overview ............................................................................... 4
Notes on installing databases on SQL Server 2005....................................................................... 5 Changing SQL Server 2005 compatibility to SQL Server 2000..................................................... 5 Strong passwords ......................................................................................................................... 6
Upgrading Infor ERP VISUAL .NET from 7.1 to 7.2 .......................................................................... 7 Updating revaluation entries in Global Financials databases in multi-language and/or multi-entity environments ................................................................................................................................ 7
Installing the application(s)............................................................................................................ 10
Creating the LSA database on the server ..................................................................................... 20
Creating or registering default application databases on the server ......................................... 26
Adding license keys for databases ............................................................................................... 32
Updating existing Infor ERP VISUAL databases ............................................................................ 33
Setting up the Exchange Service with the Exchange wizard ...................................................... 40
Setting up the Infor ERP VISUAL Manufacturing triggers............................................................. 47
Setting up the Exchange log file.................................................................................................... 49
Defining a central folder for reports (optional)............................................................................. 54
Setting up the registry to allow users to access Infor ERP VISUAL Manufacturing from the .NET applications (optional)........................................................................................................... 55
Applying the Infor ERP VISUAL licenses in Manufacturing.......................................................... 57
Installing the application(s) on the client...................................................................................... 59
Registering the databases on the client........................................................................................ 60
Checklists ........................................................................................................................................ 61

4
Installing Infor ERP VISUAL .NET: an overview
Follow these steps to successfully install Infor ERP VISUAL .NET:
Verify that your database engine is properly installed on your server. Make sure that you can access the engine using the appropriate database administration tool (i.e., SQLServer’s Enterprise Manager, Oracle Enterprise Manager Console). Consult your database engine documentation for more information.
1. Install the application(s) on your system.
2. Create and Register or update databases on your server using the Database Utility.
3. Set up Exchange.
4. Create the VMFG triggers.
5. Set up the Exchange Log
6. Define the optional report location and menu access from .NET applications to Infor ERP VISUAL Manufacturing.
7. Apply Infor ERP VISUAL Manufacturing Licenses
8. Install the applications on your client machine Infor ERP VISUAL .NET applications are compatible with the following database engines:
• Oracle™ 9i
• Oracle™ 10g
• Microsoft™ SQL Server 2000 • Microsoft™ SQL Server 2005

5
Notes on installing databases on SQL Server 2005
Please note: the following applies to SQL Server 2005 users only.
Changing SQL Server 2005 compatibility to SQL Server 2000
If you are using SQL Server 2005, all Infor ERP VISUAL databases (VFIN, VTA, VMFG) must be set up using SQL Server 8.0 compatibility mode. SQL Server 8.0 mode forces the database to use the ANSI-92 standards (Infor ERP VISUAL databases are not compatible with the ANSI-99 join standard that SQL Server 2005 9.0 uses).
1. To adjust the database compatibility, open the SQL Server Management Studio. The SQL Server Management Studio window appears.
6
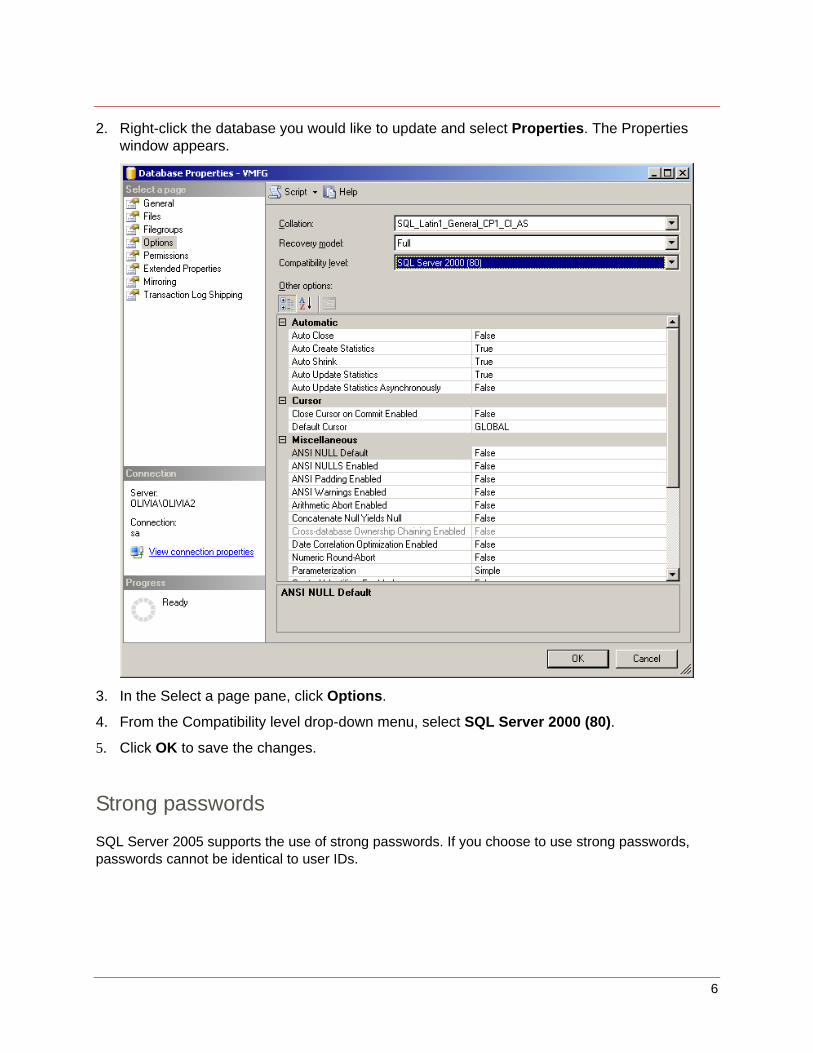
2. Right-click the database you would like to update and select Properties. The Properties window appears.
3. In the Select a page pane, click Options.
4. From the Compatibility level drop-down menu, select SQL Server 2000 (80).
5. Click OK to save the changes.
Strong passwords
SQL Server 2005 supports the use of strong passwords. If you choose to use strong passwords, passwords cannot be identical to user IDs.

7
Upgrading Infor ERP VISUAL .NET from 7.1 to 7.2
If you are upgrading to Infor ERP VISUAL .NET 7.2 from a previous version, please be aware of the following:
• The default installation path is now C:\Infor\VISUAL Enterprise\Visual .NET instead of C:\Program Files\Lilly Software. If you plan to use the default path, Infor recommends uninstalling Infor VISUAL Enterprise 7.1 using the 7.1 installation file. Then, install Infor ERP VISUAL .NET 7.2 using the 7.2 installation file.
• When you uninstall 7.1, user-specific files such as logs, database configuration files, and renamed .rpx files are retained. If you plan to use these files with your 7.2. installation, copy them into your 7.2 directory after you install the 7.2 applications.
• Registry keys are now located under HKEY_CURRENT_USER\Infor Global Solutions. If you altered your registry in your 7.1 installation to allow users direct access to Infor ERP VISUAL Manufacturing, you must update the registry keys in their new location. For more information, please see Setting Up the Registry to Allow Users to Access Infor ERP VISUAL Manufacturing from the .NET Applications.
• If you set up a central report location, you may need to update the report location. For more information, please see Defining a Central Folder for Reports.
Updating revaluation entries in Global Financials databases in multi-language and/or multi-entity environments
To prevent issues with revaluation in a non-English or multi-language environment (i.e., some clients use the English language pack and some use the Spanish language pack), Infor has added a column to all Distribution tables/views named DISTRIBUTION_CONTEXT. This column currently contains two possible values, NULL and 'REVAL'. Any distribution written by the revaluation process will contain 'REVAL' in the DISTRIBUTION_CONTEXT column as well as the REFERENCE value of 'Revaluation Distribution'. Unlike the 'Revaluation Distribution' REFERENCE value, DISTRIBUTION_CONTEXT is a system-controlled value that is not localized, so it can be used to process revaluation distributions. This will eliminate the problems with trying to detect revaluation distributions on Global Financials databases that contain multiple translations of 'Revaluation Distribution' in the REFERENCE column.
To create this new column you must modify a config file PRIOR to upgrading your Global Financials database(s).
If you use multiple entities and would like to specify different posting dates for the updated revaluation entries for some or all of your entities, you can edit the config file PRIOR to upgrading your Global Financials database(s) to set the posting date(s).
8
NOTE: If you run Global Financials in English only and do not wish to set a specific posting date for the updated revaluation transactions for any of your entities, you DO NOT need to modify the config file.
To access and modify the config file:
1. Locate the sample config file named FixCashMgmt721To722.config in your VFIN folder. The default file path is:
C:\InforVFIN\FixCashMgmt721To722.config.
2. Copy the config file to the startup folder of the LSADBUtility.exe program, usually the Bin folder. The default file path is C:\Infor Global Solutions\Bin.
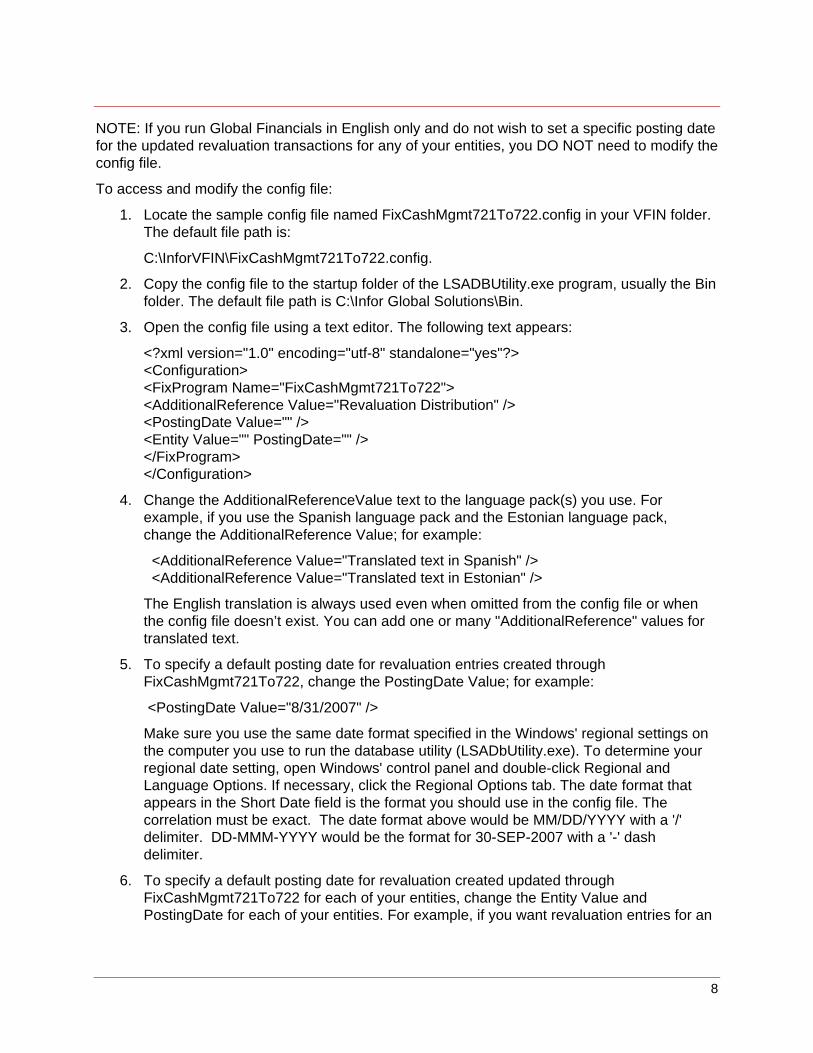
3. Open the config file using a text editor. The following text appears:
<?xml version="1.0" encoding="utf-8" standalone="yes"?> <Configuration> <FixProgram Name="FixCashMgmt721To722"> <AdditionalReference Value="Revaluation Distribution" /> <PostingDate Value="" /> <Entity Value="" PostingDate="" /> </FixProgram> </Configuration>
4. Change the AdditionalReferenceValue text to the language pack(s) you use. For example, if you use the Spanish language pack and the Estonian language pack, change the AdditionalReference Value; for example:
<AdditionalReference Value="Translated text in Spanish" /> <AdditionalReference Value="Translated text in Estonian" />
The English translation is always used even when omitted from the config file or when the config file doesn’t exist. You can add one or many "AdditionalReference" values for translated text.
5. To specify a default posting date for revaluation entries created through FixCashMgmt721To722, change the PostingDate Value; for example:
<PostingDate Value="8/31/2007" />
Make sure you use the same date format specified in the Windows' regional settings on the computer you use to run the database utility (LSADbUtility.exe). To determine your regional date setting, open Windows' control panel and double-click Regional and Language Options. If necessary, click the Regional Options tab. The date format that appears in the Short Date field is the format you should use in the config file. The correlation must be exact. The date format above would be MM/DD/YYYY with a '/' delimiter. DD-MMM-YYYY would be the format for 30-SEP-2007 with a '-' dash delimiter.
6. To specify a default posting date for revaluation created updated through FixCashMgmt721To722 for each of your entities, change the Entity Value and PostingDate for each of your entities. For example, if you want revaluation entries for an

9
entity named MMC to post on August 31, 2007 and the entries for an entity called MMCE to post on July 31, 2007, enter the following:
<Entity Value="MMC" PostingDate="8/31/2007" /> <Entity Value="MMCE" PostingDate="7/31/2007" />
Make sure you use the same date format specified in the Windows' regional settings on the computer you use to run the database utility (LSADbUtility.exe). To determine your regional date setting, open Windows' control panel and double-click Regional and Language Options. If necessary, click the Regional Options tab. The date format that appears in the Short Date field is the format you should use in the config file. The correlation must be exact. The date format above would be MM/DD/YYYY with a '/' delimiter. DD-MMM-YYYY would be the format for 30-SEP-2007 with a '-' dash delimiter.
7. Save the config file and exit.
8. Proceed with your database upgrade.
NOTE: Be sure the translations are for 'Revaluation Distribution' or the system WILL NOT perform correctly after the upgrade
Please contact Infor Support if you have any questions about changing the config file.
After you upgrade the database, the FixCashMgmt721To722.log will indicate whether the config file was found and used. The log also indicates how many rows in each table were updated.

10
Installing the application(s)
The Infor ERP VISUAL .NET applications are normally loaded in one location as the “primary install” and then installed on individual client machines. The primary install is usually where the services are run and may reside on the database server or on a separate machine.
If you are upgrading a previous installation, make sure that you back up all existing databases, customized reports, .rpx files, forms, and logic, and the function of all customized items is documented. Ideally, you should back up existing data in a location separate from the computer on which you plan to install the applications.
1. Insert the Infor ERP VISUAL .NET CD into your CD-ROM drive. The Autorun feature should launch the installer automatically. If the Autorun feature does not operate properly, open My Computer, then double click the icon that represents the CD-ROM drive that contains the Infor ERP VISUAL .NET CD. Double click Setup.exe.
The Welcome window appears.

11
2. Click Next. The Installer Notes window appears.
The Installer Notes window contains important information you need to successfully complete the installation. Please review these notes carefully.
12
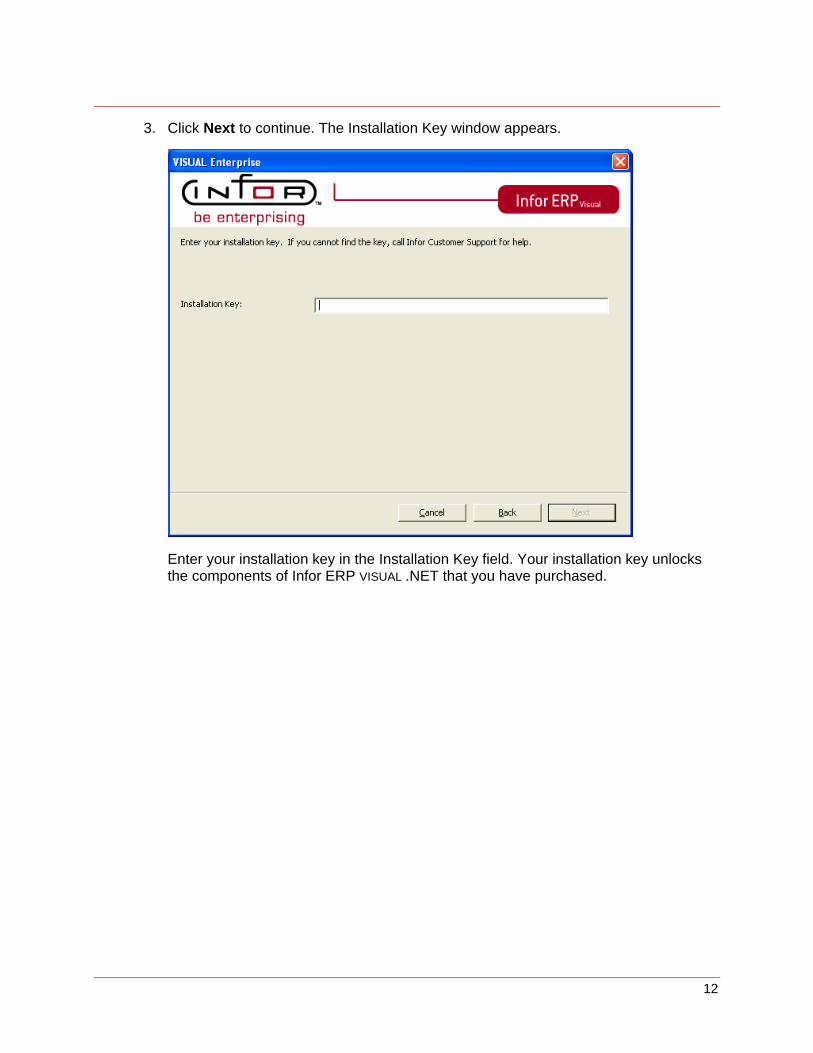
3. Click Next to continue. The Installation Key window appears.
Enter your installation key in the Installation Key field. Your installation key unlocks the components of Infor ERP VISUAL .NET that you have purchased.

13
4. Click Next. The Installation Mode window appears.
Select the type of installation you would like to perform. If you do not have a version of Infor ERP VISUAL .NET installed on your computer, only the Standard Installation options is available to you.
Standard Installation – Standard Installation is the only option available to you if you have never installed Infor ERP VISUAL .NET.
Replace Previous Installation – If you have a previous version of Infor ERP VISUAL .NET installed on the computer, select Replace Previous Installation. The existing installation will be overwritten with the new version of Infor ERP VISUAL .NET.
Keep previous version and do a new Standard Installation – Select this option if you would like to install the new version of Infor ERP VISUAL .NET in parallel with an existing version. If you select this installation type, your previous installation will not be overwritten. Infor does not support multiple versions of the software installed on the same machine. This option is only provided for specialized installation environments and should not be used under normal circumstances.
Uninstall All – Select this option to completely remove Infor ERP VISUAL .NET from the computer.

14
5. Click Next. The Select Features window appears.
The Select Features window lists the applications and other tools that you can install. The items that appear depend upon your installation key. If a feature you expected does not appear, please contact Infor customer support.
If you choose to install any Infor ERP VISUAL application, the installer selects the Common files for installation. You cannot de-select the Common files if you are installing any Infor ERP VISUAL application.
The Manufacturing .Net Objects are required for all installations on both server and clients as this component directs the communication between Global Financials and Manufacturing. Even users who do not have access to Manufacturing require this component to be installed on their machine.
Infor no longer distributes the Adobe Reader. If you would like to view Infor ERP VISUAL reports in a .pdf format, download the reader at http://www.adobe.com/products/acrobat/readstep2.html.
15
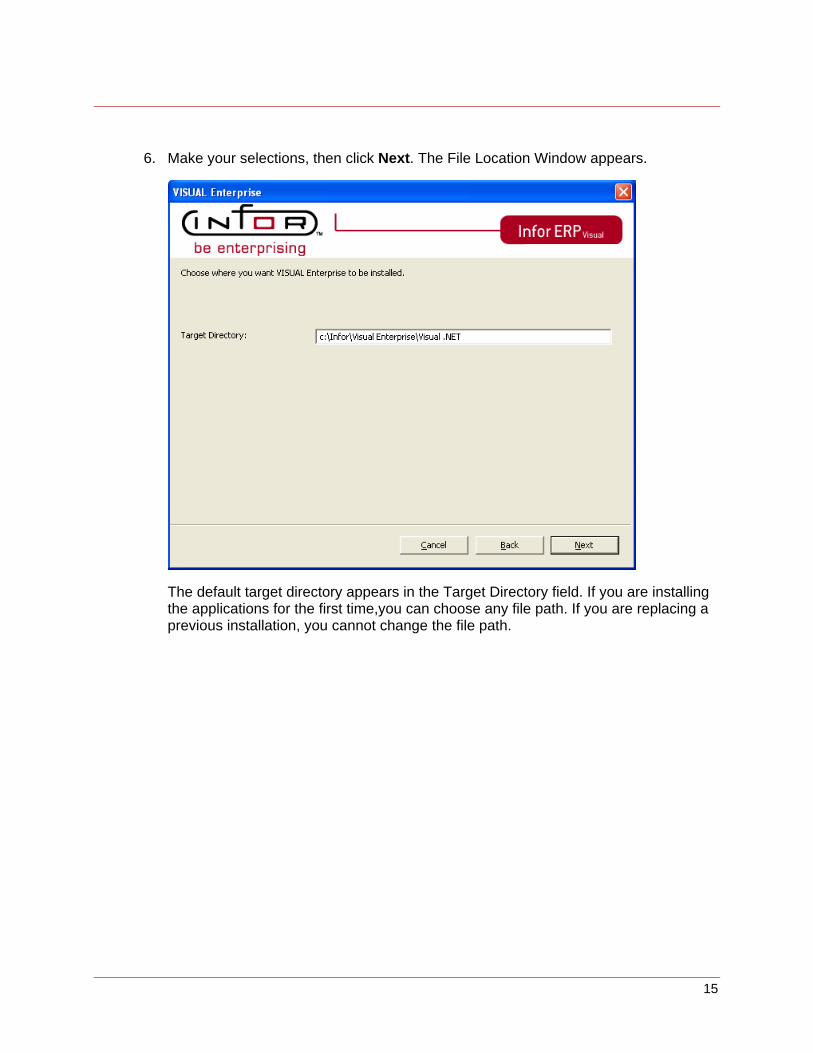
6. Make your selections, then click Next. The File Location Window appears.
The default target directory appears in the Target Directory field. If you are installing the applications for the first time,you can choose any file path. If you are replacing a previous installation, you cannot change the file path.

16
7. Click Next. The Auto Update URL window appears.
If you would like to use the auto update feature, enter the URL where updated components and files will reside in the Auto Update URL field. Client computers will be able to automatically access this URL to receive instant software updates.
If you do not want to use this feature, leave the Auto Update URL field empty.

17
8. Click Next. If you are installing Infor ERP VISUAL Time & Attendance, the Infor ERP VISUAL Time & Attendance Type window appears. If you are not installing Infor ERP VISUAL Time & Attendance, proceed to step 9.
Select which Infor ERP VISUAL Time & Attendance applications you would like to install. You can select any or all of the following:
Install client applications – Select this check box to install the necessary components for clients. If you plan to install kiosk components, you must select Install client applications in addition to Install kiosk application, below.
Install server applications – Select this check box to install the necessary server components. This option should only be installed on the machine where the Infor ERP VISUAL Time & Attendance service is going to be run.
Install kiosk application – Select this check box to install kiosk components. If you select this option, you must also select Install client applications.

18
9. Click Next. The Ready to Install window appears.
If you would like to change any of the installation settings, click Back to navigate to the appropriate window. If you are satisfied with the installation settings, click Next to begin the installation.
A Status window appears, updating you on the progress of the installation.

19
10. When the installation is complete, the following window appears.
After the installation is complete, update existing databases or create new databases to work with the applications.

20
Creating the LSA database on the server
If you are installing Infor ERP VISUAL for the first time, you must create the LSA Database.
1. Open the Database Management Utility by clicking the Start button and selecting Programs, Infor Global Solutions, Manage Databases. The Database Utility Login window appears.

21
2. Click Perform administrative database creation, update or registration. The Database Wizard appears.
3. Select Create (or Replace) Database.
Caution: Before you continue, make sure that you do not already have an LSA database set up. Creating or Replacing a Database will destroy any existing LSA databases.

22
4. Click Next. The Database Instance Information window appears.
Infor ERP VISUAL populates the Instance Type and Instance Name fields. Leave the License Number field blank; the LSA database does not require a License Number.
Select Default in the Instance Group field or the named Instance group created for this install..
5. Click Next. The Database Information window appears.
Enter basic information about your LSA database.
Provider – Click the Provider drop-down button to select the type of database. The valid choices are Sql Server and Oracle.
Owner User ID – The default Owner User ID is LSA. You cannot change this field.

23
Owner Password – The default Owner Password is LSA. You can change the password to one of your choosing.
If you are installing the database on SQLServer2005 with Strong Passwords, the database owner’s password cannot be the same as the database owner’s ID.
Repeat Password – Re-enter the password you entered in the Owner Password field in the Repeat Password field.
Admin User ID – Enter the Admin User ID. For SQL Server users, the user ID is usually sa. For Oracle users, the user ID is usually sys.
Admin Password – Enter the password for your Admin User.
6. Click Next. The Server Name window appears.
For a SQL Server installation , enter the name of the Server where the database resides. For an Oracle installation, enter the SID created for this installation.

24
7. Click Next. The Ready to Create Database window appears.
8. The Ready To Create Database window describes the action that Infor ERP VISUAL is about to perform. Review the window carefully; if you would like to make any changes, click the Back button to navigate to the appropriate window, and make your changes. Otherwise, click Finish. The Progress window appears.
9. When Infor ERP VISUAL has finished creating the database, click Close to exit the Wizard.

25
Note: If you are using strong passwords, the following message appears if you entered a password identical to the user name:
Repeat the database creation/registration process, making sure that your system administrator and database owner passwords are different from the owner and administrator user IDs.
26
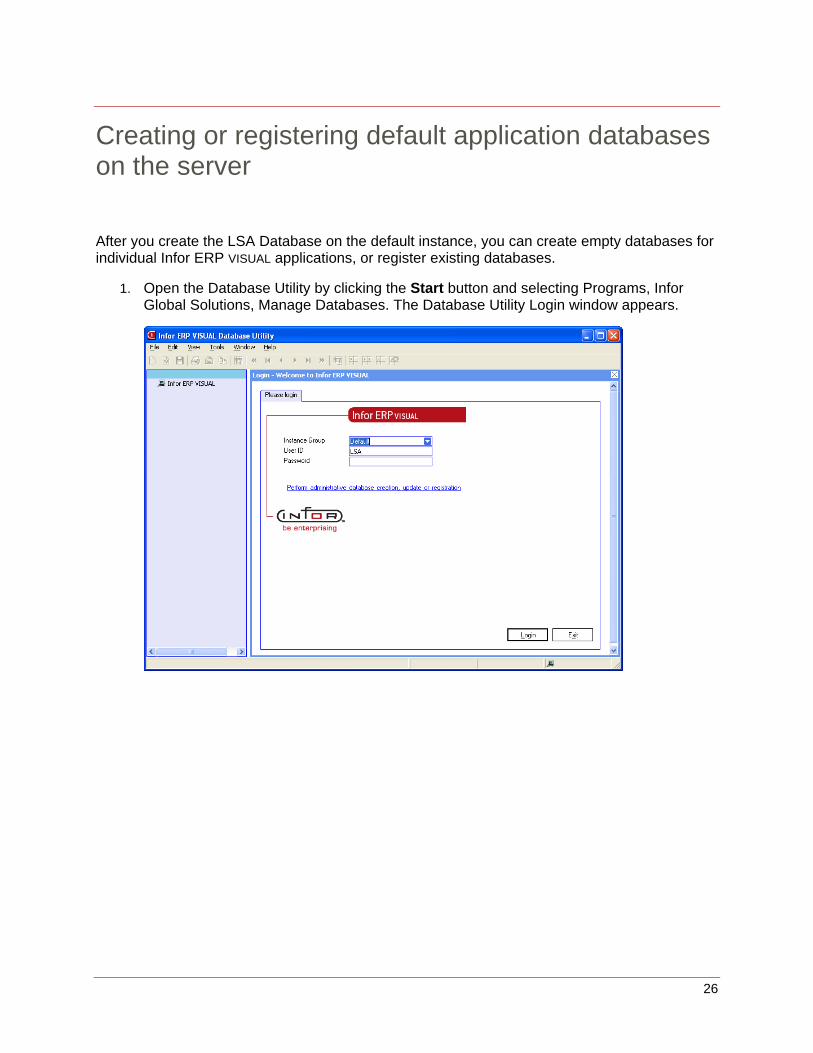
Creating or registering default application databases on the server
After you create the LSA Database on the default instance, you can create empty databases for individual Infor ERP VISUAL applications, or register existing databases.
1. Open the Database Utility by clicking the Start button and selecting Programs, Infor Global Solutions, Manage Databases. The Database Utility Login window appears.
27
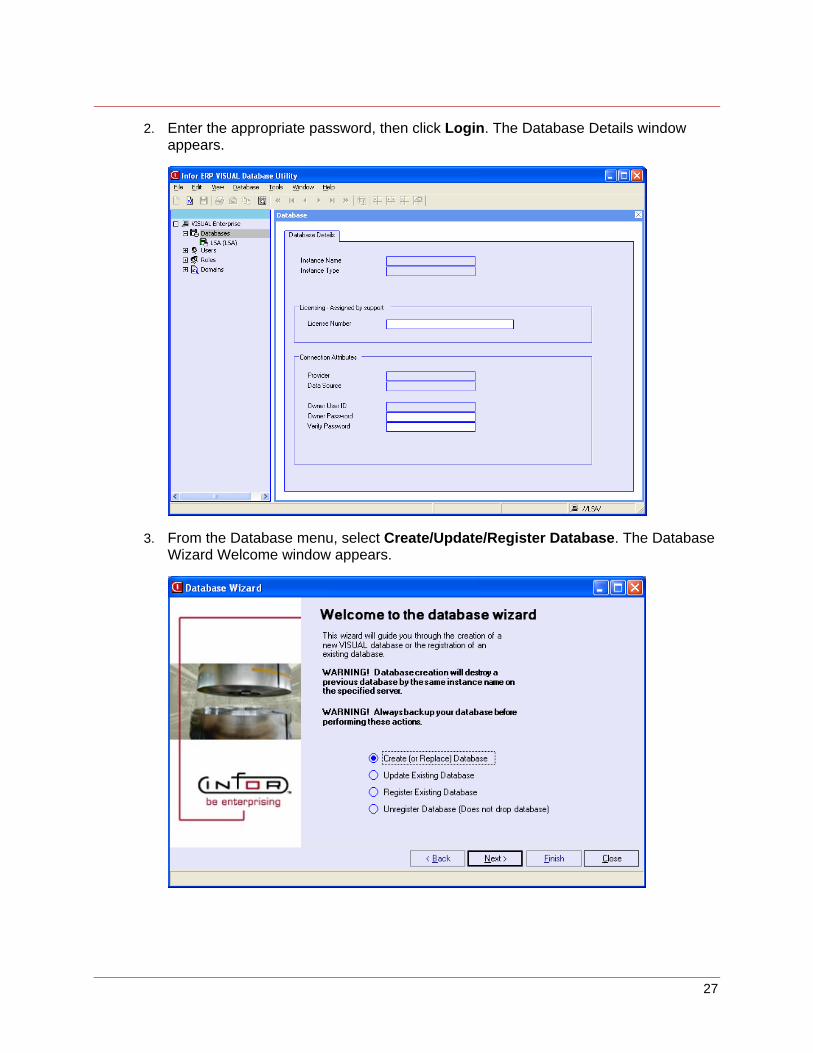
2. Enter the appropriate password, then click Login. The Database Details window appears.
3. From the Database menu, select Create/Update/Register Database. The Database Wizard Welcome window appears.

28
4. To create a blank database, select Create (or Replace) Database. To register an existing database, select Register Existing Database. Click Next. The Instance window appears.
5. Click the Instance Type drop-down button to select an instance type. Enter the specific name of the instance (database) in the Instance Name field. If you have a license number, enter it in the License Number field. The License Number field is optional at this step of the installation..

29
6. Click Next. The Database Information window appears.
Provider – Click the Provider drop-down button to select the type of database. The valid choices are Sql Server and Oracle.
Owner User ID – The database utility populates the Owner User ID field. The owner user ID is identical to the name of the instance you provided in the instance field in step 5.
Owner Password – Enter the password associated with the user ID in the Owner Password field. The system defaults to a password identical to the Owner User ID, but you can change the password.
If you are installing the database on SQLServer2005 with Strong Passwords, the database owner’s password cannot be the same as the database owner’s ID.
Repeat Password – Re-enter the password you entered in the Owner Password field in the Repeat Password field.
Admin User ID –Enter the SQL Server (usually sa) or Oracle (usually sys) administrator id for your system.
Admin Password – Enter a password for your Admin User.

30
7. Click Next. The Server Name window appears.
For a SQL Server installation , enter the name of the Server where the database resides. For an Oracle installation, enter the SID created for this installation.
If you are registering an Infor ERP VISUAL Manufacturing database, the Database Name field appears. Enter the name of your manufacturing database.
8. Click Next. The Ready to Create Database window appears.

31
The Ready To Create Database window describes the action that Infor ERP VISUAL is about to perform. Review the window carefully; if you would like to make any changes, click the Back button to navigate to the appropriate window, and make your changes. Otherwise, click Finish. The Progress window appears.
9. When Infor ERP VISUAL has finished creating the database, click Close to exit the Wizard.
10. Repeat steps 3 through 9 to create databases for additional instances.
Note: If you are using strong passwords, the following message appears if you entered a password identical to the user name:
Repeat the database creation/registration process, making sure that your system administrator and database owner passwords are different from the owner and administrator user IDs.

32
Adding license keys for databases
After you create your databases, make sure you enter the correct license number for each database. Do not allow a demo license to remain in your installation.
1. Log into the Database Utility. The Database Details window appears.
2. If necessary, click the Plus button next to Databases in the navigation pane to view all your registered databases. Click the database for which you would like to add the license number. You can only enter license numbers for Time & Attendance and Global Financials databases.
3. In the License Number field, enter the license number provided to you.
4. Click Save.

33
Updating existing Infor ERP VISUAL databases
If you already have databases that you have used with Infor ERP VISUAL .NET applications, you must update them before using the applications.
Infor strongly recommends that you install the upgrade of your Infor .Net application in a test environment for evaluation prior to updating the production environment.
When you upgrade your Infor .Net environment, you must run the Database Utility to update your databases and ensure their compatibility with the current version. Data fix routines are often included in this process and can take a significant amount of time to process. You must run the database updates within a test environment prior to updating on the production database(s). In certain circumstances these updates can take hours to run depending on the size of the database, the database platform, the number of modifications and/or custom triggers in use, and other variables.
Once complete, all logs should be reviewed to ensure no errors were encountered. Log files are located in the user’s temp directory; the default path is C:\Documents and Settings\<UserID>\Local Settings\Temp. When you are comfortable that the test environment has updated properly, you can update your production environment database(s). Being familiar with the test environment update results will help the production database upgrade proceed smoothly.
If you run Global Financials in a non-English or multi-language environment, please see Upgrading the Global Financials database in a multi-language environment before proceeding with the database update.

34
Update the LSA database first, then update your application databases.
1. From the Start Menu, select Infor Global Solutions, Manage Databases. Or, go to the folder where you installed Infor ERP VISUAL, and double-click LsaDbUtility.exe.
The Database Utility Log-in Window appears.

35
2. Click Perform administrative database creation, upgrade or registration. The Database Wizard appears.
3. Select Update Existing Database, then click Next. The Instance window appears.

36
4. Click Next. The database information window appears.
Enter the Admin User ID and the Admin Password. For SQL Server users, the admin user ID is usually sa. For Oracle users, the admin user ID is usually sys.
If you are installing the database on SQLServer2005 with Strong Passwords, the database owner’s password cannot be the same as the database owner’s ID.
5. Click Next. The Server window appears.
37
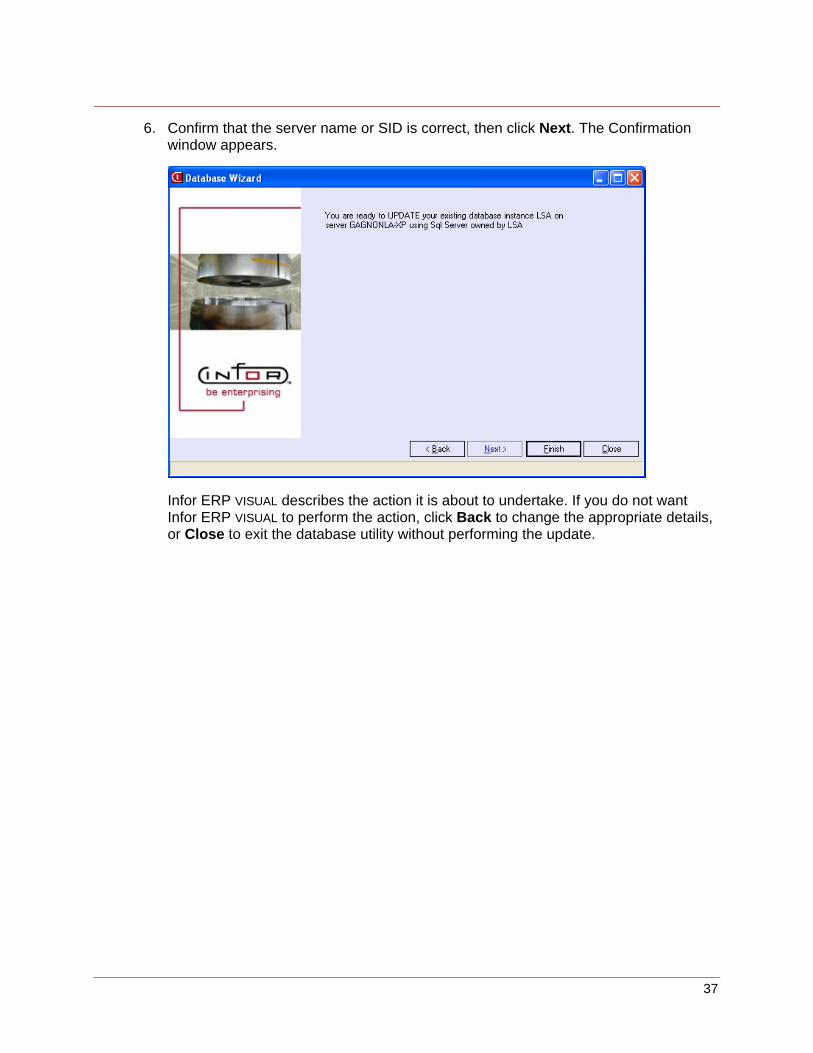
6. Confirm that the server name or SID is correct, then click Next. The Confirmation window appears.
Infor ERP VISUAL describes the action it is about to undertake. If you do not want Infor ERP VISUAL to perform the action, click Back to change the appropriate details, or Close to exit the database utility without performing the update.

38
7. If the action is correct, click Finish. The Progress window appears. The progress window describes each action Infor ERP VISUAL is performing and announces the success of the update.
Note: Sometimes, the database does not require updates. In those cases, the Progress window only displays Opening database, Parsing schema…, and Database process has completed successfully.
8. Click Close to exit the database utility.

39
9. To update your application databases, launch the Database Utility again and log in. The Database Details window appears.
10. If necessary, click the Plus button next to Databases to expand the list. Select the database you would like to update. The database details appear in the window.
11. Click Perform database update. The Instance window appears with the information about the selected database populated in the window. Repeat steps 4 through 7 to complete the upgrade for any Time & Attendance or Global Financials database. Manufacturing databases cannot be updated through the Database Utility.

40
Setting up the Exchange Service with the Exchange wizard
After you install your databases, set up the Exchange service so that the databases can communicate with each other.
1. Launch Infor ERP VISUAL by double-clicking the desktop shortcut or clicking Start, Programs, Infor Global Solutions, VISUAL Enterprise. The Login window appears.
41
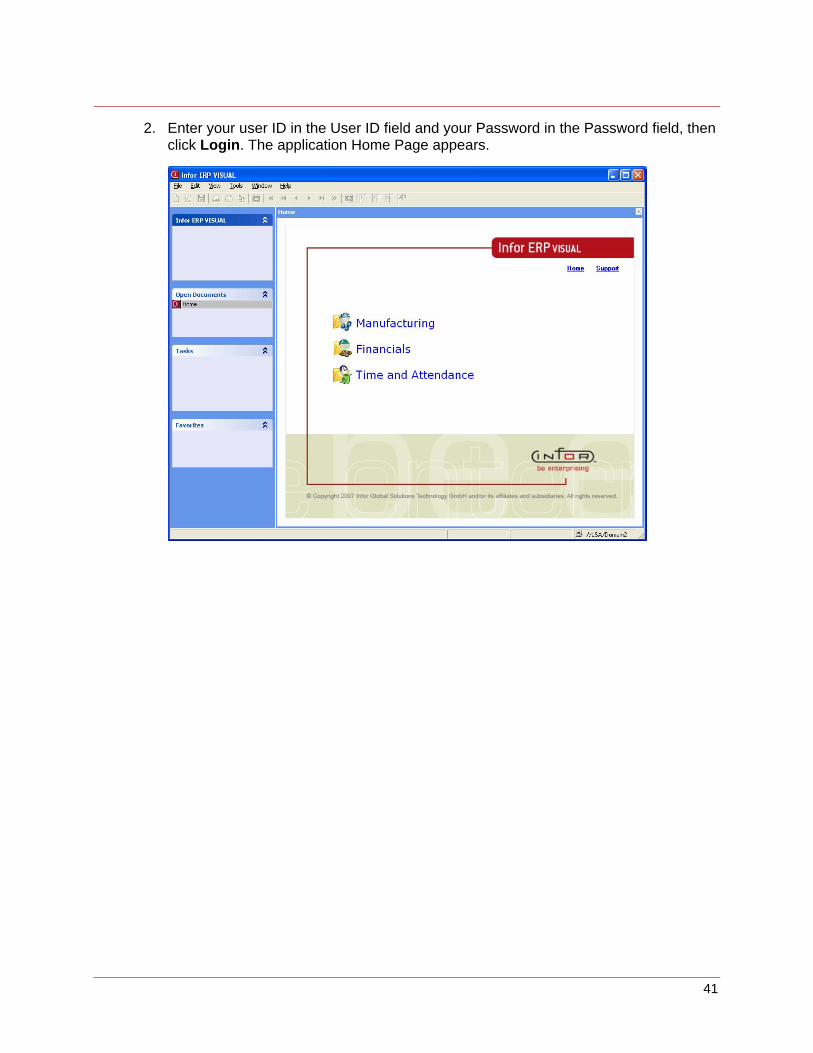
2. Enter your user ID in the User ID field and your Password in the Password field, then click Login. The application Home Page appears.
42
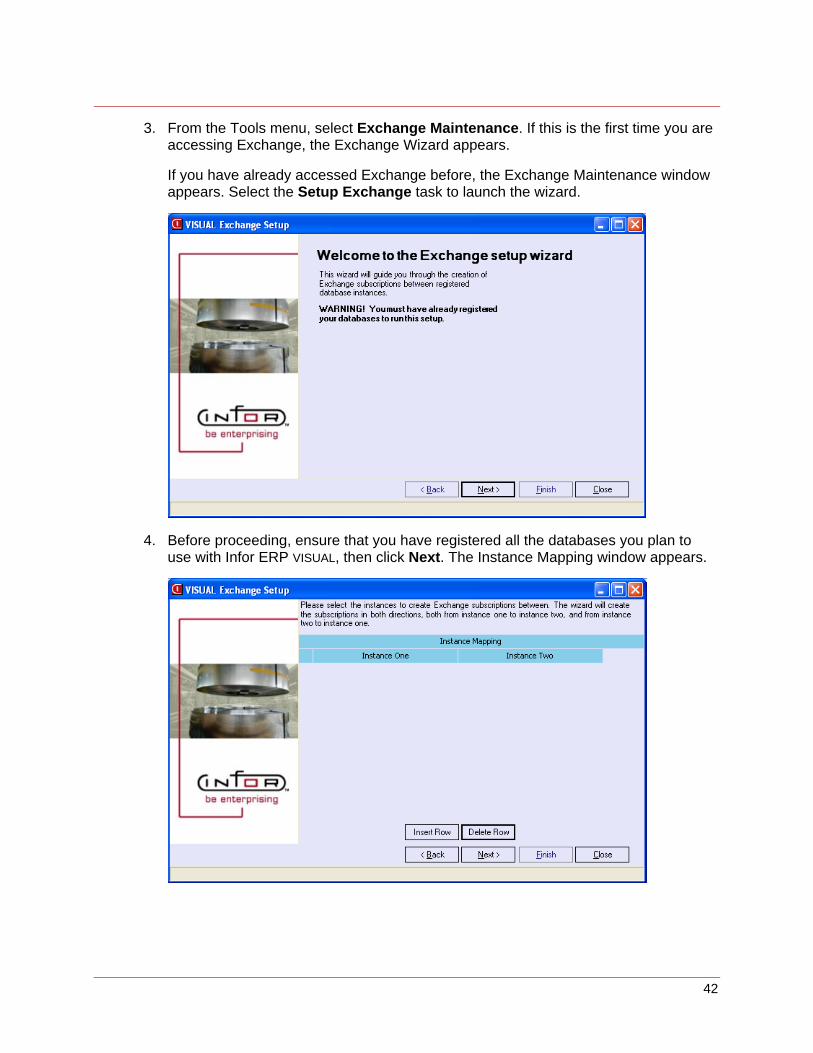
3. From the Tools menu, select Exchange Maintenance. If this is the first time you are accessing Exchange, the Exchange Wizard appears.
If you have already accessed Exchange before, the Exchange Maintenance window appears. Select the Setup Exchange task to launch the wizard.
4. Before proceeding, ensure that you have registered all the databases you plan to use with Infor ERP VISUAL, then click Next. The Instance Mapping window appears.
43
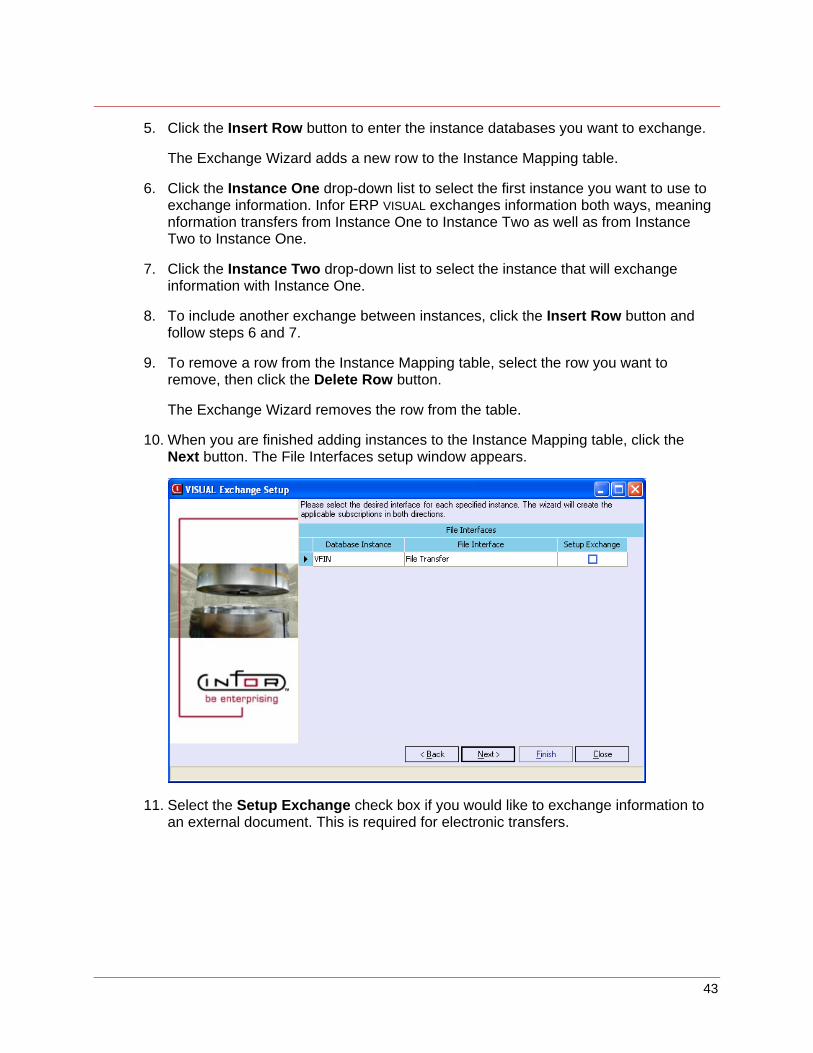
5. Click the Insert Row button to enter the instance databases you want to exchange.
The Exchange Wizard adds a new row to the Instance Mapping table.
6. Click the Instance One drop-down list to select the first instance you want to use to exchange information. Infor ERP VISUAL exchanges information both ways, meaning nformation transfers from Instance One to Instance Two as well as from Instance Two to Instance One.
7. Click the Instance Two drop-down list to select the instance that will exchange information with Instance One.
8. To include another exchange between instances, click the Insert Row button and follow steps 6 and 7.
9. To remove a row from the Instance Mapping table, select the row you want to remove, then click the Delete Row button.
The Exchange Wizard removes the row from the table.
10. When you are finished adding instances to the Instance Mapping table, click the Next button. The File Interfaces setup window appears.
11. Select the Setup Exchange check box if you would like to exchange information to an external document. This is required for electronic transfers.

44
12. Click Next. The Setup Actions window appears.
13. If this is the first time you are setting up the Exchange service, select Create New in the Desired Action column for each instance mapping. If you have previously set up Exchange, select the Desired Action drop-down button and select from the following:
Create New – Select Create New if you would like to remove all previous subscriptions and create new ones.
Update – Select Update if you would like to update existing subscriptions or add new subscriptions distributed through an Infor maintenance release.
Drop – Select Drop to remove all subscriptions, breaking all links between databases.
45
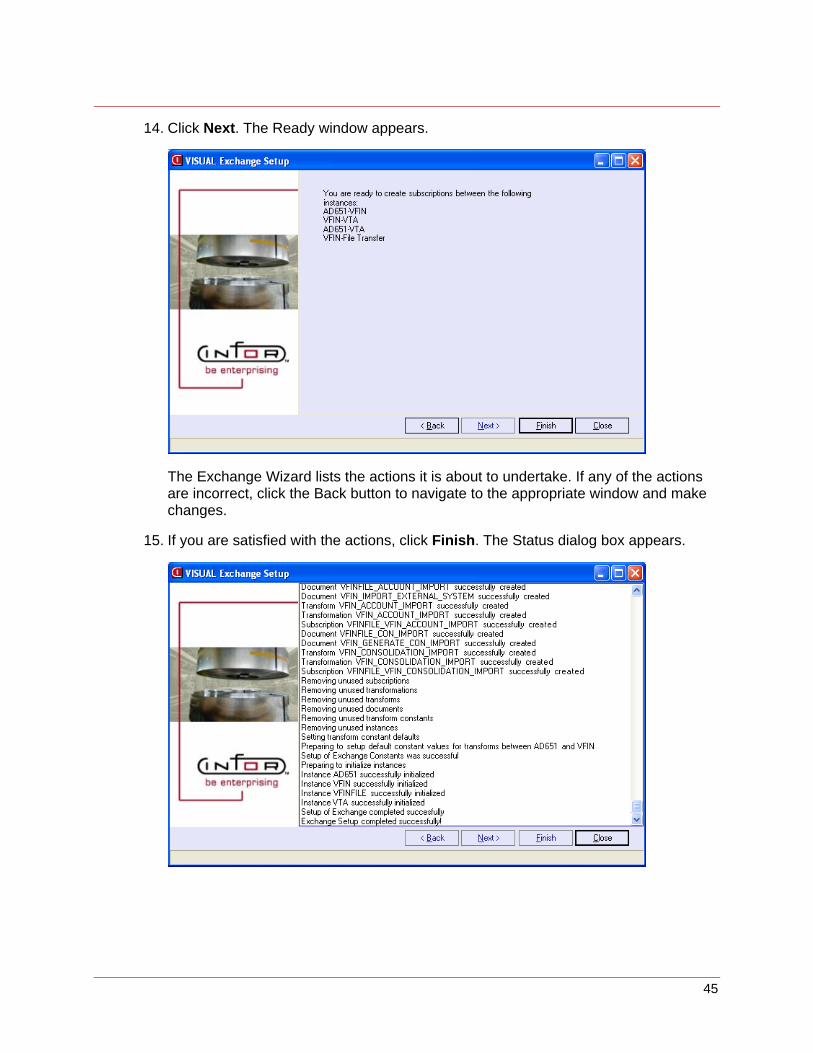
14. Click Next. The Ready window appears.
The Exchange Wizard lists the actions it is about to undertake. If any of the actions are incorrect, click the Back button to navigate to the appropriate window and make changes.
15. If you are satisfied with the actions, click Finish. The Status dialog box appears.

46
The Exchange Wizard lists all the exchange subscriptions that it created. When the Exchange Wizard is finished processing all subscriptions, the Exchange Wizard informs you of the successful completion.
16. Click the Close button to return to the Exchange Maintenance window.

47
Setting up the Infor ERP VISUAL Manufacturing triggers
In order for your Infor ERP VISUAL Manufacturing database to properly communicate with your Time & Attendance and/or Global Financials databases, you must set up the triggers by running the utility, vmvxctgr.exe. The utility resides in your Infor ERP VISUAL Manufacturing executables folder. You must run the utility from your Infor ERP VISUAL Manufacturing executables folder. The triggers will not be set up properly if you do not.
1. Start the utility by double-clicking vmvxctgr.exe. If you are not logged into your Manufacturing database, the log in window appears.
2. Enter the name of your Manufacturing database, then click Ok. The VISUAL Manufacturing Exchange Trigger Setup Utility appears.

48
3. Select the triggers you would like to install by clicking on the trigger’s name. If you would like to install all the triggers, click the Select All button.
4. Click the Add Triggers button to set up the triggers.
5. If you would like to remove a trigger (for example, if you no longer want to exchange Commodity Codes between Infor ERP VISUAL Manufacturing and other databases), select the trigger then click Remove Triggers.
6. When the utility has set up the triggers, a dialog box appears confirming that the triggers were successfully created.
7. Click the Ok button, then close the utility.

49
Setting up the Exchange log file
To ensure that the Exchange log file functions properly, perform the following steps:
1. Launch Infor ERP VISUAL and log in. The Home Page appears.
50
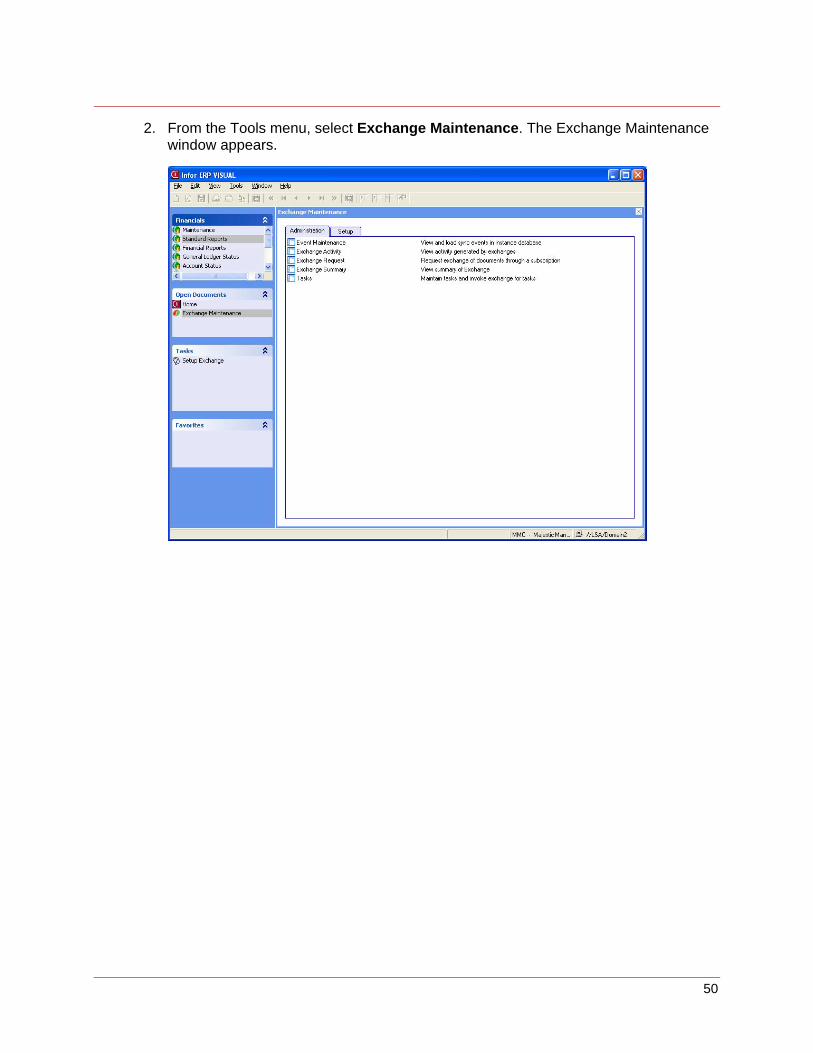
2. From the Tools menu, select Exchange Maintenance. The Exchange Maintenance window appears.

51
3. Click the Setup tab, then click Configure Service The Configure Service window appears.
4. In the Server Name field, enter the name of your server. If you would like to enter a description of the server, enter one in the Description field.
5. If you would like the service to run automatically, select Run on Boot in the Properties box. You must also go into the Services section of Windows’ Administrative Tools (click Start, Settings, Control Panel, Administrative Tools, Services) and set the properties of the Exchange Service to start automatically.
6. In the Service Control box, click Start. Clicking Start launches the Exchange Service. Information between your databases is exchanged, and a log file is created.
7. Click Stop to stop the service, and exit Configure Services.
52
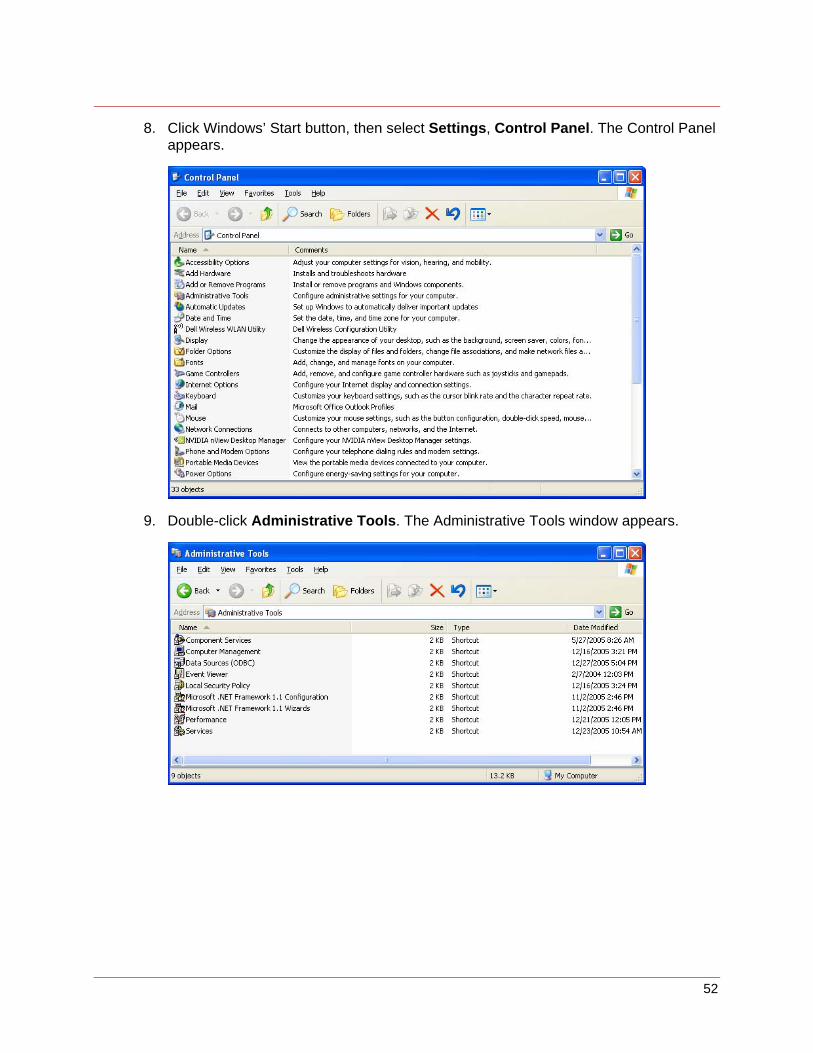
8. Click Windows’ Start button, then select Settings, Control Panel. The Control Panel appears.
9. Double-click Administrative Tools. The Administrative Tools window appears.

53
10. Double-click Event Viewer. The Event Viewer window appears.
11. Right-click VISUAL Exchange Log and select Properties. The VISUAL Exchange Log Properties window appears.
12. In the Log Size box, increase the size of the log to at least 1000 KB. Select Overwrite events as needed.
13. Click Ok to save the changes.

54
Defining a central folder for reports (optional)
If you would like to save all reports in a single location, define a location for the reports then set up Time & Attendance and Global Financials to refer to this location.
1. Create a folder for your reports using Microsoft Windows.
2. Launch Infor ERP VISUAL and log in. The Home Page appears.
3. From the Tools menu, select Options. The Options dialog box appears.
4. Click the Instance Info tab.
5. In the Instance field, click the drop-down button and select the instance for which you would like to set up the report location.
6. In the Path Information field, enter the file path location of the folder, or select the Browse button and navigate to the location.
7. Click Ok to save the information.
8. When you install the applications on the clients, repeat this process so that client computers also access the central report location.

55
Setting up the registry to allow users to access Infor ERP VISUAL Manufacturing from the .NET applications (optional)
If you would like users to access Infor ERP VISUAL Manufacturing directly from the .NET applications, you must edit your registry. Please proceed with caution; if you are unsure how to update your registry, please contact an Infor support representative.
1. Click Windows’ Start button and select Run. The Run window appears.
2. In the Open field, type regedit. Click Ok. The Registry Editor window appears.
3. Navigate to HKEY_CURRENT_USER/Software/Infor Global Solutions/VISUAL Manufacturing/Configuration.
4. Right-click in the window and select New String Value. Name the new string value exactly as shows (case sensitive):
InstallDirectory
56
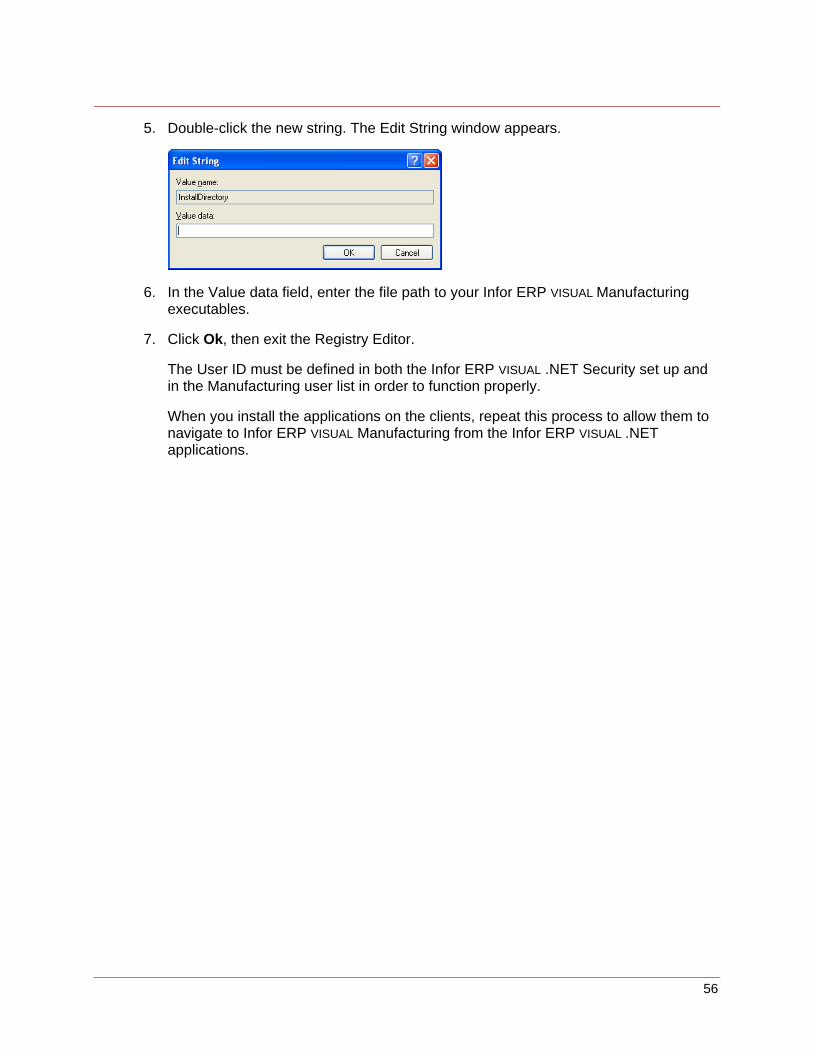
5. Double-click the new string. The Edit String window appears.
6. In the Value data field, enter the file path to your Infor ERP VISUAL Manufacturing executables.
7. Click Ok, then exit the Registry Editor.
The User ID must be defined in both the Infor ERP VISUAL .NET Security set up and in the Manufacturing user list in order to function properly.
When you install the applications on the clients, repeat this process to allow them to navigate to Infor ERP VISUAL Manufacturing from the Infor ERP VISUAL .NET applications.

57
Applying the Infor ERP VISUAL licenses in Manufacturing
After you install the Infor ERP VISUAL .NET applications, you must enter the .NET licenses in your main Infor ERP VISUAL Manufacturing application.
1. Log in to Infor ERP VISUAL Manufacturing. The Infor ERP VISUAL Enterprise application window appears.

58
2. From the Admin menu, select Enter New License Key. The Enter License Key window appears.
3. Select the VISUAL Financials Global Edition radio button, then enter your Infor ERP VISUAL Financial Global license key. If you have a Time & Attendance key, select the VISUAL Time and Attendance radio button and enter the license key.
4. Click Ok.
5. To turn off the standard Infor ERP VISUAL Financials menus, navigate to your Visual.ini file located in your main Infor ERP VISUAL Manufacturing directory. In the [Visual Mfg] section, find the Financial Menus entry. Set the entry to read, Financial Menus=N .

59
Installing the application(s) on the client
Installing the Application(s) on client computers is identical to the process for installing the applications on the server. Please see Installing the Application(s) for more information.

60
Registering the databases on the client
You can register the databases on the client by following the procedures for registering databases on the server. Or, you can copy the database.config file from the server’s Bin directory and copy it to the Bin directory of the client.

61
Checklists
Use the following checklists to guide your installation of Infor ERP VISUAL .NET on your server and clients and to guide the update of your installation on your server and clients.
Server installation checklist Build required instances/SIDS Infor recommends creating the following instances/SIDS for Infor ERP VISUAL .NET applications. You should create instances/SIDS for the LSA database, Financials Global database and/or Time & Attendance Database.
Default Production Test
Download .NET build for installation
Run Setup. EXE You must have an installation key for clients. Exchange must be loaded where service will run and for users needing access to Exchange. You must install the Infor ERP VISUAL Manufacturing .NET objects. If you are installing Time & Attendance on the server, you must select both the Server and the Client components. On Clients, you can install just the client components, or client and kiosk. Please see Installing the application(s) on page 10 of the Installation Guide for more information.
Create the LSA database Create the LSA Database on each of your instance groups (default, production, and test if you chose to use them). Please see Creating the LSA database on the server on page 20 of the Installation Guide for more information.
Create and register .NET databases Create the .NET databases on each of your instance groups (default, production, and test) if necessary. Please see Creating or registering default application databases on page 25 of the Installation Guide for more information.
Register the existing Infor ERP VISUAL Manufacturing database Please see Creating or registering default application databases on page 25 of the Installation Guide for more information.
Run the Exchange wizard to set up the logic between databases Please see Setting up the Exchange Service with the Exchange wizard on page 40 of the Installation Guide for more information.

62
Set up the Exchange triggers for Infor ERP VISUAL Manufacturing Run VmVxcTgr.exe from Infor ERP VISUAL Manufacturing executables folder. Please see
Setting up the Infor ERP VISUAL Manufacturing triggers on page 47 of the Installation Guide for more information.
Create the Exchange log file by starting and stopping the Exchange Service Alter the log file settings to a maximum size of at least 1000 KB and select the Overwrite
Events as Needed option. Please see Setting up the Exchange log file on page 49 of the Installation Guide for more information.
Create interface link between Infor ERP VISUAL .NET and Infor ERP VISUAL Manufacturing (optional) If you would like users to access Manufacturing from within the Infor ERP VISUAL .NET applications, edit the registry by adding a new string value (InstallDirectory) with the path to the Manufacturing executable directory. Please see Setting up the registry to allow users to access Infor ERP VISUAL Manufacturing from the .NET applications on page 55 for more information.
Define a centralized report area (Optional) Use the Options window within the Tools menu of the .NET applications to specify a centralized report area. Please see Defining a central folder for reports on page 54 for more information.
Apply .NET license keys in Infor ERP VISUAL Manufacturing and disable standard financials menus To complete the link to Infor ERP VISUAL Manufacturing, enter your .NET license key in Manufacturing and alter the VISUAL.INI file to disable the standard Financials menus. Please see Applying the Infor ERP VISUAL licenses in Manufacturing on page 57 for more information.

63
Client installation checklist
Run Setup. EXE You must have an installation key for clients. Only install Exchange if a user needs access to it. You must install the Infor ERP VISUAL Manufacturing .NET objects. If you are installing Time & Attendance on the server, select the client components only or the client and the kiosk components. Please see Installing the application(s) on page 10 of the Installation Guide for more information.
Register the databases by copying the Database.config file Copy the database.config file from the Bin directory of your server (typically, Infor\Bin) to the Bin directory or your client computer. You can also use the Database Utility to register the databases. See Creating or registering default application databases on page 25 of the Installation Guide for more information.
Create interface link between Infor ERP VISUAL .NET and Infor ERP VISUAL Manufacturing (optional) If you would like users to access Manufacturing from within the Infor ERP VISUAL .NET applications, edit the registry by adding a new string value (InstallDirectory) with the path to the Infor ERP VISUAL Manufacturing executable directory. Please see Setting up the registry to allow users to access Infor ERP VISUAL Manufacturing from the .NET applications on page 55 for more information.
Define a centralized report area (optional) Use the Options window within the Tools menu of the .NET applications to specify a centralized report area. Please see Defining a central folder for reports on page 54 for more information.

64
Updating the installation and databases on the server
Back up the databases Back up all existing databases, preferably in a location separate from the server. Please
note that any VfinTestData.mdb file will be written over, so copy this file to another location if you would like to preserve it.
Save customized reports and files Ensure that a backup copy of any modified .rpx files are stored, and be sure to document
any configuration issues.
Download .NET build for installation You can download the latest version of Infor ERP VISUAL .NET from Infor’s support site,
http://discrete.support.infor.com/asp/index.asp.
Stop the Exchange Service Before installing the update, stop the Exchange Service through the Configure Services window in Exchange.
Run Setup.exe You must have an installation key. Select Replace Standard Installation to update your applications. Or, you can remove your previous installation, then run setup.exe again to install the applications. If you choose to remove your previous installation before installing the update, make sure that all Infor ERP VISUAL services were removed properly. You can delete them manually by clicking Windows’ Start button and selecting Run…. Enter Regedit, then click Ok. You must then reboot the machine for the deletion to take full effect. Navigate to Local Machine System\Current Control Set\Services\Visual and delete the entries. Please see Installing the application(s) on page 10 for more information.
Update the LSA database Open the Database Utility and click the Perform Administrative Database Creation,
Update or Registration link on the log in window. Please see Updating existing Infor ERP VISUAL databases on page 33 for more information.
Update application databases Open the Database Utility and log in. Select the database you would like to update, then
click the Perform Database Update link. Please see Updating existing Infor ERP VISUAL databases on page 33 for more information.
Update the Exchange subscriptions Run the Exchange Wizard to update the Exchange Subscriptions. In the Set Up Actions
window, choose Create New to remove all existing subscriptions and replace them with new subscriptions, or Update to replace only those subscriptions that have been changed.
Update the Exchange triggers for Infor ERP VISUAL Manufacturing Run VmVxcTgr.exe from Infor ERP VISUAL Manufacturing executables folder. Please see
Setting up the Infor ERP VISUAL Manufacturing triggers on page 47 of the Installation Guide for more information. If the file has not changed, you do not need to perform this step.

65
Copy any customized reports or other modified components back to their appropriate locations.
Restart the Exchange Service through Exchange’s Configure Service window.
Updating the installation and the databases on the client
Run Setup.exe
You must have an installation key. Select Replace Standard Installation to update your applications. Or, you can remove your previous installation, then run setup.exe again to install the applications. If you choose to remove your previous installation before installing the update, make sure that all Infor ERP VISUAL services were removed properly. You can delete them manually by clicking Windows’ Start button and selecting Run…. Enter Regedit, then click Ok. You must then reboot the machine for the deletion to take full effect. Navigate to Local Machine System\Current Control Set\Services\Visual and delete the entries. Please see Installing the application(s) on page 10 for more information.