Industrial Computers for Hazardous Locations · Industrial Computers for Hazardous Locations The...
32
Installation Instructions Original Instructions Industrial Computers for Hazardous Locations Series H Catalog Numbers 6181X-12A2SW71DC, 6181X-00N2SW71DC, 6181X-12A2SWX1DC, 6181X-00N2SWX1DC, 6181X-12P2SWX1DC Topic Page Summary of Changes 2 Installation Precautions 3 Hazardous Locations 5 Hot Surfaces 7 Restricted Access Location 7 Computer Options 7 Operating Systems 8 Before You Begin 8 Parts List 9 Installation Guidelines 9 Mounting Clearance Requirements 11 Computer Dimensions 12 Tools for Computer Installation 14 Install the Computer 14 Hardware Features 17 Connect Power 18 Connect to a Network 19 Accessories and Replacement Parts 20 Voltage Precautions 20 Electrostatic Discharge Precautions 20 Preconfiguration 21 Post-configuration 21 Tools for Component Replacement 21 Remove the Cover 22 Reinstall the Cover 22 Load a CompactFlash Card 22 Install an Add-in Card 24 Replace or Add Memory Modules 26 Real-time Clock (RTC) Battery 27 Ship or Transport the Computer 27 Technical Specifications 28 Additional Resources 31
Industrial Computers for Hazardous Locations · Industrial Computers for Hazardous Locations The Following Conditions for Safe Use Apply in ATEX, IECEx, and INMETRO For all non-display
Topic PageSummary of Changes 2Installation Precautions 3Hazardous Locations 5Hot Surfaces 7Restricted Access Location 7Computer Options 7Operating Systems 8Before You Begin 8Parts List 9Installation Guidelines 9Mounting Clearance Requirements 11Computer Dimensions 12Tools for Computer Installation 14Install the Computer 14Hardware Features 17Connect Power 18Connect to a Network 19Accessories and Replacement Parts 20Voltage Precautions 20Electrostatic Discharge Precautions 20Preconfiguration 21Post-configuration 21Tools for Component Replacement 21Remove the Cover 22Reinstall the Cover 22Load a CompactFlash Card 22Install an Add-in Card 24Replace or Add Memory Modules 26Real-time Clock (RTC) Battery 27Ship or Transport the Computer 27Technical Specifications 28Additional Resources 31
Industrial Computers for Hazardous Locations
Summary of ChangesThis publication contains new and updated information as indicated in this table
Topic PageAdded ABNT NR ratings to Important table in Environment and Enclosure Information subsection 3
Added ratings information sentence that references Hazardous Location section 3
Updated Product Certifications URL to rokautocertifications 3 31
Reduced maximum distance for IO cables from 30 ft to 3 ft and added Ethernet cable exception 3
Added paragraph about available Rockwell Automationreg sun shield in the Outdoor Installation section 4
Added Important table about Rockwell Automation sun shield in the Outdoor Installation section 4
Added Cat No 6181X-12P2SWX1DC to Hazardous Locations table 5
Revised rating numbers and added INMETRO information in the Hazardous Locations table 5
Added Important table above the Hazardous Locations table 5
Converted table footnotes to the new The Following Conditions for Safe Use Apply in ATEX IECEx and INMETRO section
6
Added lsquoConditions for Safe Use in North American Hazardous Locationsrsquo subsection title 7
Revised content to address sun shield usage in Important table in Hot Surfaces section 7
Added Cat No 6181X-12P2SWX1DC and footnote to the first table in the Computer Options section 7
Revised description to 6189X-PCIRISER to the second table in the Computer Options section 8
Added Cat No 6189X-SUNSHIELD to the second table in the Computer Options section 8
Added footnote to the second table in the Computer Options section 8
Added DC wiring table to Installation Guidelines section 9
Added Cat No 6181X-12P2SWX1DC to the table in the Panel Cutout Dimensions section 14
Added Cat No 6181X-12P2SWX1DC to the table in the Mount the Integrated Display Computer in a Panel section 15
Added second sentence to introductory paragraph in Hardware Features section 17
Added cross-references to new DC wiring table in steps 3 and 4 and Important table in step 4 18
Revised Important table to specify add-in card evaluation and use 24
Added picture of factory-installed riser card and available riser card accessory 24
Expanded step 3 to include slot cover screw information for further use 24
Expanded step 6 to include separate install instructions for PCIe and PCI add-in cards 24
Added sentence about memory modules with heatsinks to Important table in Replace or Add Memory Modules section
26
Added second sentence to Important table in the Replace or Add Memory Modules subsection 26
Added picture of memory modules with heatsinks to step 3 in the Replace or Add Memory Modules section 26
Added step 5 to the Replace or Add Memory Modules section 27
Updated website and URL to return a computer for clock battery replacement 27
Added 6181X-12P2SWX1DC column to all specification tables and any corresponding specifications 28hellip31
Added UAE RoHS row to table in Certifications section 31
Added EAC row to table in Certifications section 31
2 Rockwell Automation Publication 6181X-IN002C-EN-P - October 2019
Industrial Computers for Hazardous Locations
Installation PrecautionsRead and follow these precautions before you install the computer
Environment and Enclosure Information
European Union DirectiveThis computer meets the European Union Directive requirements when installed within the European Union or EEA regions and have the CE marking A copy of the declaration of the conformity is available at rokautocertifications
To comply with EN 55024 and EN 55032 use the following for cable types
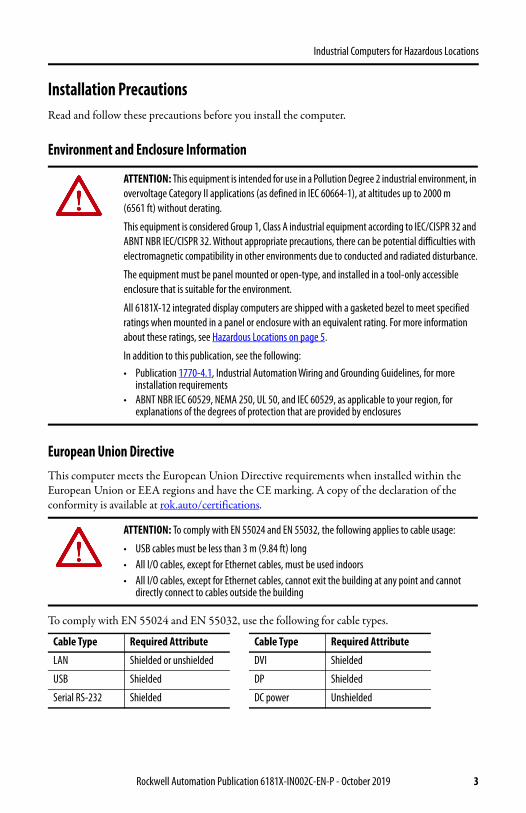
ATTENTION This equipment is intended for use in a Pollution Degree 2 industrial environment in overvoltage Category II applications (as defined in IEC 60664-1) at altitudes up to 2000 m (6561 ft) without derating
This equipment is considered Group 1 Class A industrial equipment according to IECCISPR 32 and ABNT NBR IECCISPR 32 Without appropriate precautions there can be potential difficulties with electromagnetic compatibility in other environments due to conducted and radiated disturbance
The equipment must be panel mounted or open-type and installed in a tool-only accessible enclosure that is suitable for the environment
All 6181X-12 integrated display computers are shipped with a gasketed bezel to meet specified ratings when mounted in a panel or enclosure with an equivalent rating For more information about these ratings see Hazardous Locations on page 5
In addition to this publication see the followingbull Publication 1770-41 Industrial Automation Wiring and Grounding Guidelines for more
installation requirementsbull ABNT NBR IEC 60529 NEMA 250 UL 50 and IEC 60529 as applicable to your region for
explanations of the degrees of protection that are provided by enclosures
ATTENTION To comply with EN 55024 and EN 55032 the following applies to cable usage
bull USB cables must be less than 3 m (984 ft) longbull All IO cables except for Ethernet cables must be used indoorsbull All IO cables except for Ethernet cables cannot exit the building at any point and cannot
directly connect to cables outside the building
Cable Type Required Attribute Cable Type Required Attribute
LAN Shielded or unshielded DVI Shielded
USB Shielded DP Shielded
Serial RS-232 Shielded DC power Unshielded
Rockwell Automation Publication 6181X-IN002C-EN-P - October 2019 3
Industrial Computers for Hazardous Locations
Outdoor InstallationWhen you use a 6181X integrated display computer outdoors consider the following to maximize the field life of the front bezel and display
bull Select the proper enclosurebull Computer orientation
Ultraviolet (UV) and infrared radiation can reduce the field life of any electronic device While the materials used in the computer bezels provide long field life that life can be improved by proper installation
UV radiation from the sun causes all plastics to fade or yellow and become brittle over time Avoiding long-term exposure to direct sunlight helps protect the front of the computer from direct exposure to UV radiation and greatly increase its field life
Rockwell Automation sells a sun shield (Cat No 6189X-SUNSHIELD) for the 6181X integrated display computers If you install a sun shield that closes over the display the temperature between the sun shield and the display cannot exceed the maximum temperature of the display which is 55 degC (131 degF) Adequately ventilate all sun shields to help prevent excess heat rise on the computer display
Use stirring fans or active cooling in high altitude and high ambient temperature locations to keep the internal enclosure temperature below 70 degC (158 degF) Use a heater in installations where the ambient temperature is below -20 degC (-4 degF)
If possible avoid placing the computer on the south (north in the southern hemisphere) or west side of the cabinet This reduces the heat rise due to solar loading during the hottest part of the day
Mount the computer vertically to minimize solar loading on the display Do not mount the computer in a sloped enclosure if it exposes the computer to direct sunlight
IMPORTANT The Rockwell Automation approved sun shield (Cat No 6189X-SUNSHIELD) must be used if the computer is exposed to direct sunlight
4 Rockwell Automation Publication 6181X-IN002C-EN-P - October 2019
Industrial Computers for Hazardous Locations
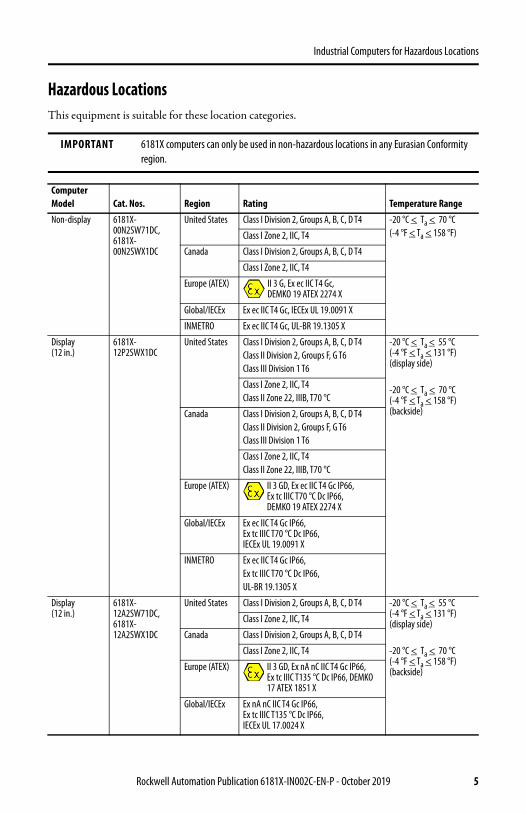
Hazardous LocationsThis equipment is suitable for these location categories
IMPORTANT 6181X computers can only be used in non-hazardous locations in any Eurasian Conformity region
Computer Model Cat Nos Region Rating Temperature RangeNon-display 6181X-
00N2SW71DC 6181X-00N2SWX1DC
United States Class I Division 2 Groups A B C D T4 -20 degC lt Ta lt 70 degC(-4 degF lt Ta lt 158 degF)Class I Zone 2 IIC T4
Canada Class I Division 2 Groups A B C D T4
Class I Zone 2 IIC T4
Europe (ATEX) II 3 G Ex ec IIC T4 GcDEMKO 19 ATEX 2274 X
GlobalIECEx Ex ec IIC T4 Gc IECEx UL 190091 X
INMETRO Ex ec IIC T4 Gc UL-BR 191305 X
Display (12 in)
6181X-12P2SWX1DC
United States Class I Division 2 Groups A B C D T4Class II Division 2 Groups F G T6Class III Division 1 T6
-20 degC lt Ta lt 55 degC(-4 degF lt Ta lt 131 degF) (display side)
-20 degC lt Ta lt 70 degC (-4 degF lt Ta lt 158 degF) (backside)
Class I Zone 2 IIC T4Class II Zone 22 IIIB T70 degC
Canada Class I Division 2 Groups A B C D T4Class II Division 2 Groups F G T6Class III Division 1 T6
Class I Zone 2 IIC T4Class II Zone 22 IIIB T70 degC
Europe (ATEX) II 3 GD Ex ec IIC T4 Gc IP66Ex tc IIIC T70 degC Dc IP66 DEMKO 19 ATEX 2274 X
GlobalIECEx Ex ec IIC T4 Gc IP66 Ex tc IIIC T70 degC Dc IP66IECEx UL 190091 X
INMETRO Ex ec IIC T4 Gc IP66Ex tc IIIC T70 degC Dc IP66UL-BR 191305 X
Display (12 in)
6181X-12A2SW71DC 6181X-12A2SWX1DC
United States Class I Division 2 Groups A B C D T4 -20 degC lt Ta lt 55 degC(-4 degF lt Ta lt 131 degF) (display side)
-20 degC lt Ta lt 70 degC (-4 degF lt Ta lt 158 degF) (backside)
Class I Zone 2 IIC T4
Canada Class I Division 2 Groups A B C D T4
Class I Zone 2 IIC T4
Europe (ATEX) II 3 GD Ex nA nC IIC T4 Gc IP66Ex tc IIIC T135 degC Dc IP66 DEMKO 17 ATEX 1851 X
GlobalIECEx Ex nA nC IIC T4 Gc IP66 Ex tc IIIC T135 degC Dc IP66IECEx UL 170024 X
Rockwell Automation Publication 6181X-IN002C-EN-P - October 2019 5
Industrial Computers for Hazardous Locations
The Following Conditions for Safe Use Apply in ATEX IECEx and INMETROFor all non-display models (Cat Nos 6181X-00N2SW71DC and 6181X-00N2SWX1DC)
bull The equipment shall only be used in an area of not more than Pollution Degree 2 as defined in ENIEC 60664-1 as applicable to your region
bull The equipment shall be installed in an INMETROATEXIEC certified enclosure that provides a degree of protection not less than IP54 and is only accessible by use of a tool
bull Transient protection shall be provided that is set at a level not exceeding 140 of the peak rated voltage value at the supply terminals to the equipment
bull The non-display computers were evaluated for use with a PCI Express (PCIe) or PCI add-in card
bull PCIe and PCI add-in cards must be rated Zone 2 ATEXIECExINMETRO T4 (maximum) 4 W (maximum) 90 degC (194 degF) (minimum) surrounding ambient temperature
bull The internal enclosure ambient temperature range is -20hellip+70 degC (-4hellip+158 degF)
For all integrated display models (Cat Nos 6181X-12A2SW71DC 6181X-12A2SWX1DC and 6181X-12P2SWX1DC)
bull The equipment shall only be used in an area of not more than Pollution Degree 2 as defined in ENIEC 60664-1 as applicable to your region
bull For EPL Gc the equipment shall be installed in an INMETROATEXIEC certified enclosure that provides a degree of protection not less than IP54 and is only accessible by use of a tool
bull For EPL Dc the equipment shall be installed in an INMETROATEXIEC Zone 22 (minimum) certified enclosure that provides a degree of protection not less than IP64 and is only accessible by use of a tool
bull Transient protection shall be provided that is set at a level not exceeding 140 of the peak rated voltage value at the supply terminals to the equipment
bull The ambient temperature (external to enclosure) range is -20hellip+55 degC (-4hellip+131 degF) and that of the internal enclosure ambient temperature is -20hellip+70 degC (-4hellip+158 degF)
bull The integrated display computers with a resistive touch screen (Cat Nos 6181X-12A2SW71DC and 6181X-12A2SWX1DC) were evaluated for use with a PCI Express (PCIe) add-in card
bull The integrated display computer with a PCAP touch screen (Cat No 6181X-12P2SWX1DC) was evaluated for use with a PCIe or PCI add-in card
bull PCIe and PCI add-in cards must be rated Zone 2 ATEXIECExINMETRO T4 (max) 4 W (max) 90 degC (194 degF) (min) surrounding ambient temperature
bull To maintain the IP66 rating of the equipment it shall be mounted in an enclosure with an equivalent IP rating
bull To minimize risk from electrostatic discharge only clean the display with a damp cloth
6 Rockwell Automation Publication 6181X-IN002C-EN-P - October 2019
Industrial Computers for Hazardous Locations
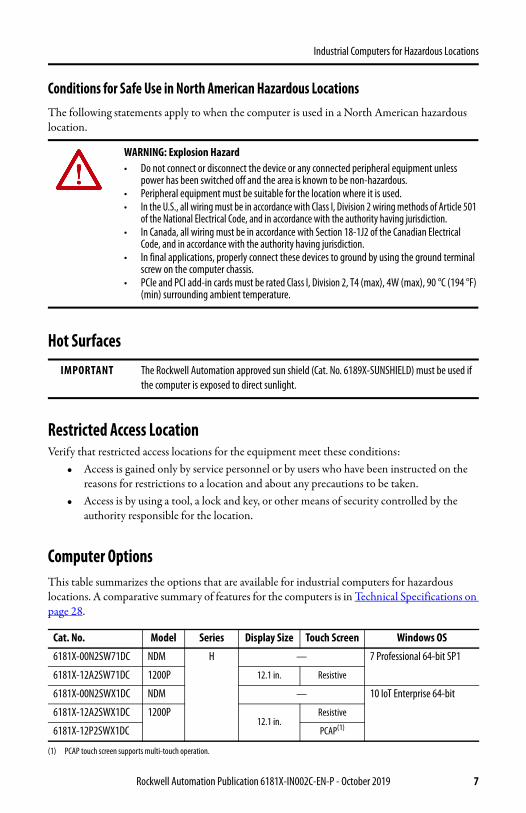
Conditions for Safe Use in North American Hazardous LocationsThe following statements apply to when the computer is used in a North American hazardous location
Hot Surfaces
Restricted Access LocationVerify that restricted access locations for the equipment meet these conditions
bull Access is gained only by service personnel or by users who have been instructed on the reasons for restrictions to a location and about any precautions to be taken
bull Access is by using a tool a lock and key or other means of security controlled by the authority responsible for the location
Computer OptionsThis table summarizes the options that are available for industrial computers for hazardous locations A comparative summary of features for the computers is in Technical Specifications on page 28
WARNING Explosion Hazardbull Do not connect or disconnect the device or any connected peripheral equipment unless
power has been switched off and the area is known to be non-hazardousbull Peripheral equipment must be suitable for the location where it is usedbull In the US all wiring must be in accordance with Class I Division 2 wiring methods of Article 501
of the National Electrical Code and in accordance with the authority having jurisdiction bull In Canada all wiring must be in accordance with Section 18-1J2 of the Canadian Electrical
Code and in accordance with the authority having jurisdictionbull In final applications properly connect these devices to ground by using the ground terminal
screw on the computer chassisbull PCIe and PCI add-in cards must be rated Class I Division 2 T4 (max) 4W (max) 90 degC (194 degF)
(min) surrounding ambient temperature
IMPORTANT The Rockwell Automation approved sun shield (Cat No 6189X-SUNSHIELD) must be used if the computer is exposed to direct sunlight
Cat No Model Series Display Size Touch Screen Windows OS
6181X-00N2SW71DC NDM H mdash 7 Professional 64-bit SP1
Rockwell Automation Publication 6181X-IN002C-EN-P - October 2019 7
Industrial Computers for Hazardous Locations
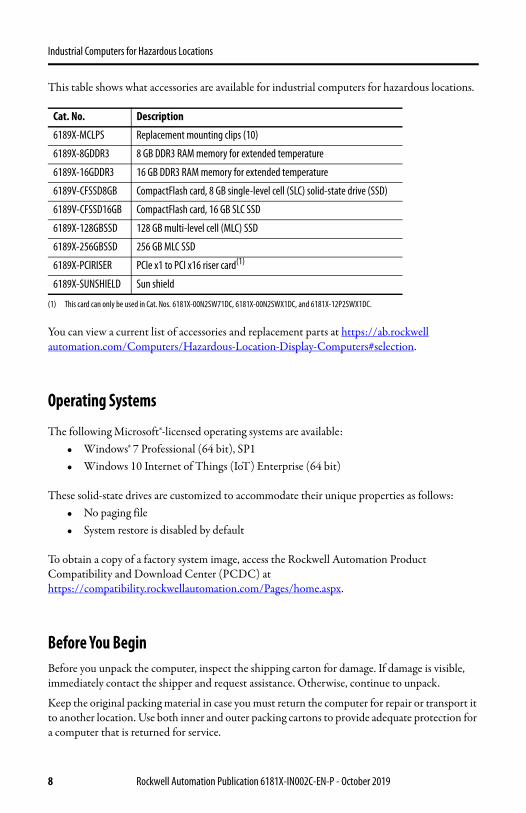
This table shows what accessories are available for industrial computers for hazardous locations
You can view a current list of accessories and replacement parts at httpsabrockwellautomationcomComputersHazardous-Location-Display-Computersselection
Operating Systems
The following Microsoftreg-licensed operating systems are availablebull Windowsreg 7 Professional (64 bit) SP1bull Windows 10 Internet of Things (IoT) Enterprise (64 bit)
These solid-state drives are customized to accommodate their unique properties as followsbull No paging filebull System restore is disabled by default
To obtain a copy of a factory system image access the Rockwell Automation Product Compatibility and Download Center (PCDC) at httpscompatibilityrockwellautomationcomPageshomeaspx
Before You BeginBefore you unpack the computer inspect the shipping carton for damage If damage is visible immediately contact the shipper and request assistance Otherwise continue to unpack
Keep the original packing material in case you must return the computer for repair or transport it to another location Use both inner and outer packing cartons to provide adequate protection for a computer that is returned for service
Cat No Description
6189X-MCLPS Replacement mounting clips (10)
6189X-8GDDR3 8 GB DDR3 RAM memory for extended temperature
6189X-16GDDR3 16 GB DDR3 RAM memory for extended temperature
(1) This card can only be used in Cat Nos 6181X-00N2SW71DC 6181X-00N2SWX1DC and 6181X-12P2SWX1DC
6189X-SUNSHIELD Sun shield
8 Rockwell Automation Publication 6181X-IN002C-EN-P - October 2019
Industrial Computers for Hazardous Locations
Rockwell Automation Publication 6181X-IN002C-EN-P - October 2019 9
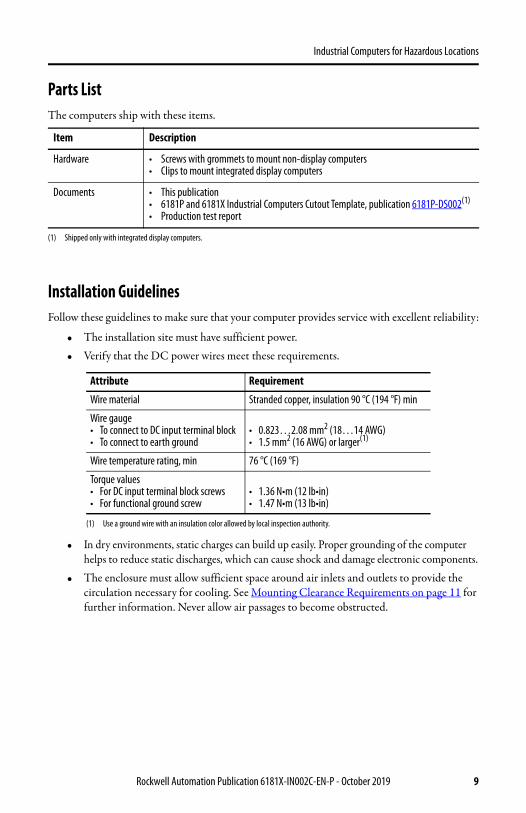
Parts ListThe computers ship with these items
Installation GuidelinesFollow these guidelines to make sure that your computer provides service with excellent reliability
bull The installation site must have sufficient powerbull Verify that the DC power wires meet these requirements
bull In dry environments static charges can build up easily Proper grounding of the computer helps to reduce static discharges which can cause shock and damage electronic components
bull The enclosure must allow sufficient space around air inlets and outlets to provide the circulation necessary for cooling See Mounting Clearance Requirements on page 11 for further information Never allow air passages to become obstructed
Item Description
Hardware bull Screws with grommets to mount non-display computersbull Clips to mount integrated display computers
Documents bull This publicationbull 6181P and 6181X Industrial Computers Cutout Template publication 6181P-DS002(1)
bull Production test report
(1) Shipped only with integrated display computers
Attribute Requirement
Wire material Stranded copper insulation 90 degC (194 degF) min
Wire gaugebull To connect to DC input terminal blockbull To connect to earth ground
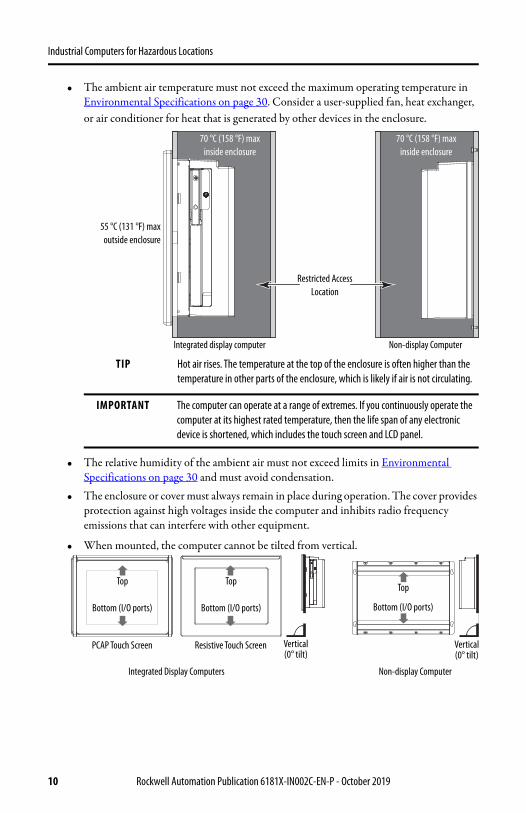
bull The ambient air temperature must not exceed the maximum operating temperature in Environmental Specifications on page 30 Consider a user-supplied fan heat exchanger or air conditioner for heat that is generated by other devices in the enclosure
bull The relative humidity of the ambient air must not exceed limits in Environmental Specifications on page 30 and must avoid condensation
bull The enclosure or cover must always remain in place during operation The cover provides protection against high voltages inside the computer and inhibits radio frequency emissions that can interfere with other equipment
bull When mounted the computer cannot be tilted from vertical
TIP Hot air rises The temperature at the top of the enclosure is often higher than the temperature in other parts of the enclosure which is likely if air is not circulating
IMPORTANT The computer can operate at a range of extremes If you continuously operate the computer at its highest rated temperature then the life span of any electronic device is shortened which includes the touch screen and LCD panel
55 degC (131 degF) maxoutside enclosure
70 degC (158 degF) max inside enclosure
Restricted Access Location
Non-display ComputerIntegrated display computer
70 degC (158 degF) max inside enclosure
Integrated Display Computers Non-display Computer
Top
Bottom (IO ports)
Top
Bottom (IO ports)
Vertical(0deg tilt)
Top
Bottom (IO ports)
Vertical(0deg tilt)
PCAP Touch Screen Resistive Touch Screen
10 Rockwell Automation Publication 6181X-IN002C-EN-P - October 2019
Industrial Computers for Hazardous Locations
Mounting Clearance Requirements
Minimum Clearances (display model shown)
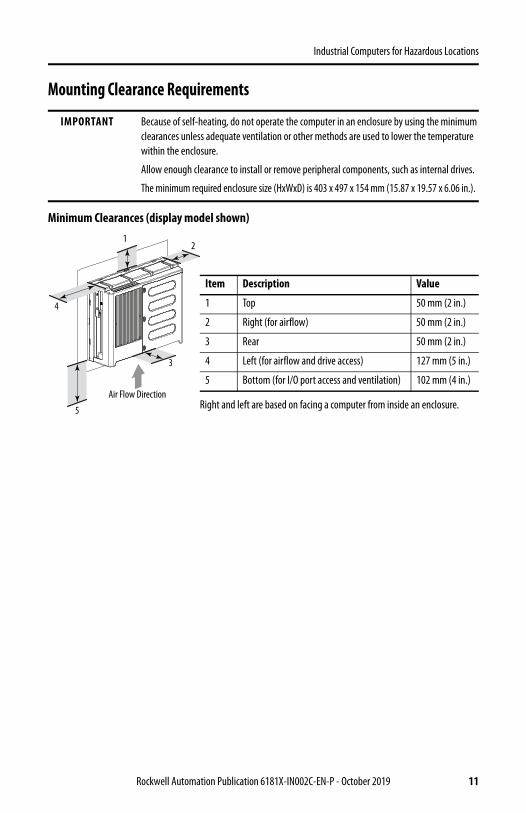
IMPORTANT Because of self-heating do not operate the computer in an enclosure by using the minimum clearances unless adequate ventilation or other methods are used to lower the temperature within the enclosure
Allow enough clearance to install or remove peripheral components such as internal drives
The minimum required enclosure size (HxWxD) is 403 x 497 x 154 mm (1587 x 1957 x 606 in)
Right and left are based on facing a computer from inside an enclosure
Item Description Value
1 Top 50 mm (2 in)
2 Right (for airflow) 50 mm (2 in)
3 Rear 50 mm (2 in)
4 Left (for airflow and drive access) 127 mm (5 in)
5 Bottom (for IO port access and ventilation) 102 mm (4 in)
4
5
3
12
Air Flow Direction
Rockwell Automation Publication 6181X-IN002C-EN-P - October 2019 11
Industrial Computers for Hazardous Locations
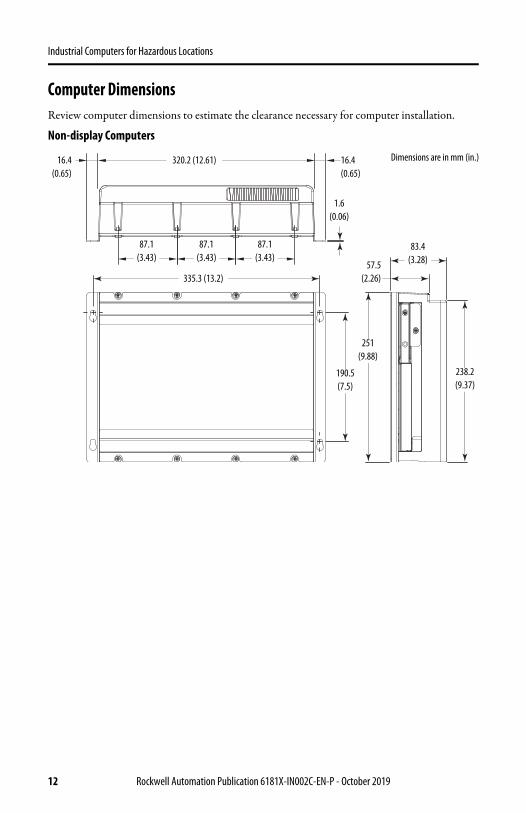
Computer DimensionsReview computer dimensions to estimate the clearance necessary for computer installation
Non-display Computers
16 (006)
1905 (75)
834 (328)575
(226)3353 (132)
3202 (1261)
2382 (937)
164 (065)
164(065)
871 (343)
871 (343)
871 (343)
251 (988)
Dimensions are in mm (in)
12 Rockwell Automation Publication 6181X-IN002C-EN-P - October 2019
Industrial Computers for Hazardous Locations
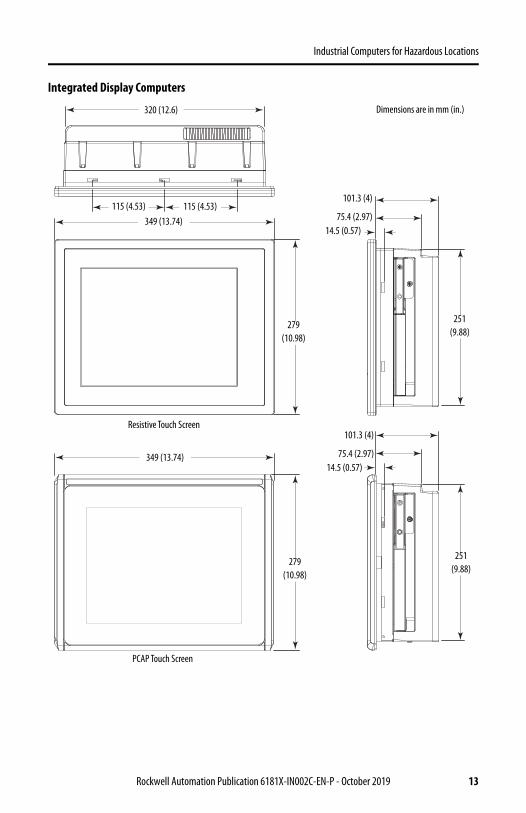
Integrated Display Computers
115 (453)349 (1374)
1013 (4)
754 (297)145 (057)
320 (126)
251 (988)
279 (1098)
115 (453)
Dimensions are in mm (in)
349 (1374)
1013 (4)
754 (297)145 (057)
251 (988)
279 (1098)
Resistive Touch Screen
PCAP Touch Screen
Rockwell Automation Publication 6181X-IN002C-EN-P - October 2019 13
Industrial Computers for Hazardous Locations
Tools for Computer InstallationThese tools are required for computer installation
bull 2 cross-head screwdriver bull Panel cut out tools (for panel mounting)bull Drill motor drill bit and M4 screw tap (for wall mounting)bull Anti-static wriststrap
Install the ComputerThe computers support these mounting options
bull Panel mount (integrated display computer models)bull Wall mount (non-display computer models)
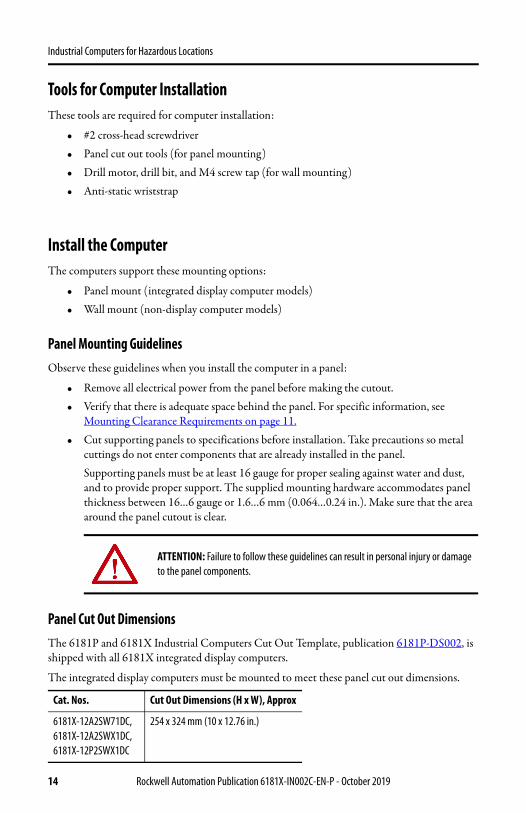
Panel Mounting Guidelines Observe these guidelines when you install the computer in a panel
bull Remove all electrical power from the panel before making the cutoutbull Verify that there is adequate space behind the panel For specific information see
Mounting Clearance Requirements on page 11bull Cut supporting panels to specifications before installation Take precautions so metal
cuttings do not enter components that are already installed in the panelSupporting panels must be at least 16 gauge for proper sealing against water and dust and to provide proper support The supplied mounting hardware accommodates panel thickness between 16hellip6 gauge or 16hellip6 mm (0064hellip024 in) Make sure that the area around the panel cutout is clear
Panel Cut Out DimensionsThe 6181P and 6181X Industrial Computers Cut Out Template publication 6181P-DS002 is shipped with all 6181X integrated display computers
The integrated display computers must be mounted to meet these panel cut out dimensions
ATTENTION Failure to follow these guidelines can result in personal injury or damage to the panel components
Cat Nos Cut Out Dimensions (H x W) Approx
6181X-12A2SW71DC6181X-12A2SWX1DC6181X-12P2SWX1DC
254 x 324 mm (10 x 1276 in)
14 Rockwell Automation Publication 6181X-IN002C-EN-P - October 2019
Industrial Computers for Hazardous Locations
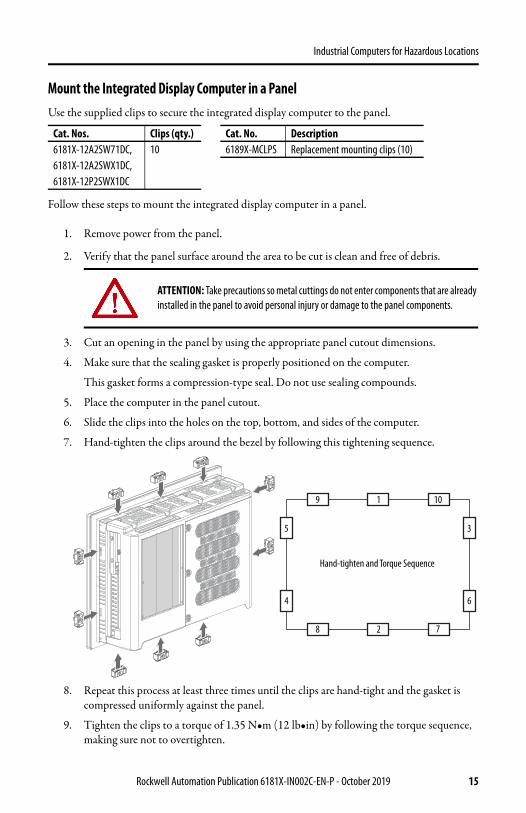
Mount the Integrated Display Computer in a PanelUse the supplied clips to secure the integrated display computer to the panel
Follow these steps to mount the integrated display computer in a panel
1 Remove power from the panel
2 Verify that the panel surface around the area to be cut is clean and free of debris
3 Cut an opening in the panel by using the appropriate panel cutout dimensions
4 Make sure that the sealing gasket is properly positioned on the computer
This gasket forms a compression-type seal Do not use sealing compounds
5 Place the computer in the panel cutout
6 Slide the clips into the holes on the top bottom and sides of the computer
7 Hand-tighten the clips around the bezel by following this tightening sequence
8 Repeat this process at least three times until the clips are hand-tight and the gasket is compressed uniformly against the panel
9 Tighten the clips to a torque of 135 Nbullm (12 lbbullin) by following the torque sequence making sure not to overtighten
Cat Nos Clips (qty) Cat No Description6181X-12A2SW71DC 10 6189X-MCLPS Replacement mounting clips (10)6181X-12A2SWX1DC6181X-12P2SWX1DC
ATTENTION Take precautions so metal cuttings do not enter components that are already installed in the panel to avoid personal injury or damage to the panel components
5
4
3
6
9 1 10
8 2 7
Hand-tighten and Torque Sequence
Rockwell Automation Publication 6181X-IN002C-EN-P - October 2019 15
Industrial Computers for Hazardous Locations
10 Repeat this process at least three times until the clips are properly torqued making sure that the gasket is compressed uniformly against the panel
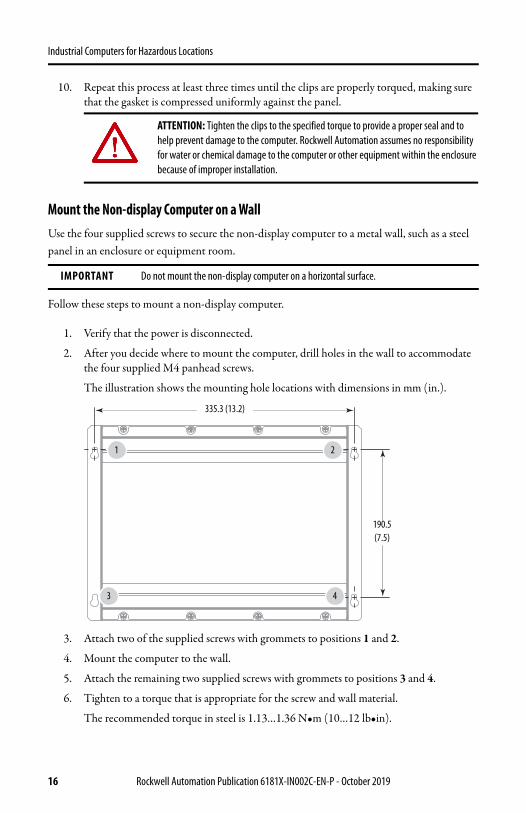
Mount the Non-display Computer on a WallUse the four supplied screws to secure the non-display computer to a metal wall such as a steel panel in an enclosure or equipment room
Follow these steps to mount a non-display computer
1 Verify that the power is disconnected
2 After you decide where to mount the computer drill holes in the wall to accommodate the four supplied M4 panhead screws
The illustration shows the mounting hole locations with dimensions in mm (in)
3 Attach two of the supplied screws with grommets to positions 1 and 2
4 Mount the computer to the wall
5 Attach the remaining two supplied screws with grommets to positions 3 and 4
6 Tighten to a torque that is appropriate for the screw and wall material
The recommended torque in steel is 113hellip136 Nbullm (10hellip12 lbbullin)
ATTENTION Tighten the clips to the specified torque to provide a proper seal and to help prevent damage to the computer Rockwell Automation assumes no responsibility for water or chemical damage to the computer or other equipment within the enclosure because of improper installation
IMPORTANT Do not mount the non-display computer on a horizontal surface
3353 (132)
1905 (75)
43
21
16 Rockwell Automation Publication 6181X-IN002C-EN-P - October 2019
Industrial Computers for Hazardous Locations
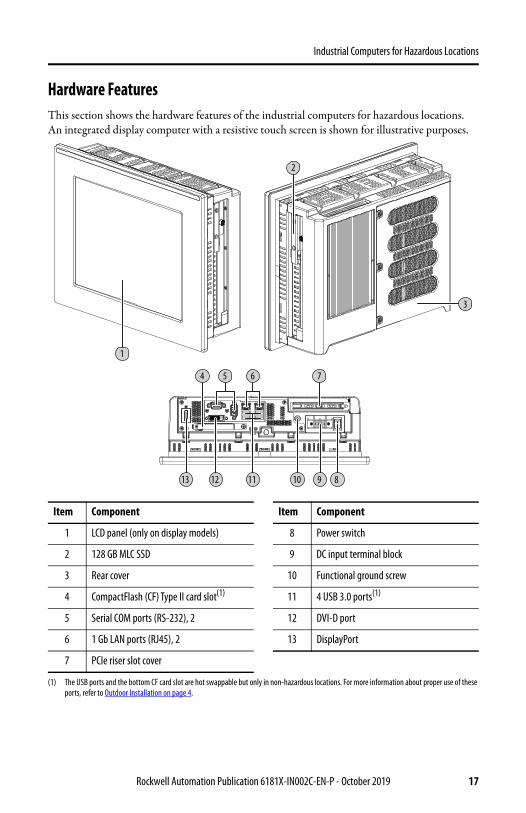
Hardware FeaturesThis section shows the hardware features of the industrial computers for hazardous locations An integrated display computer with a resistive touch screen is shown for illustrative purposes
Item Component Item Component
1 LCD panel (only on display models) 8 Power switch
2 128 GB MLC SSD 9 DC input terminal block
3 Rear cover 10 Functional ground screw
4 CompactFlash (CF) Type II card slot(1)
(1) The USB ports and the bottom CF card slot are hot swappable but only in non-hazardous locations For more information about proper use of these ports refer to Outdoor Installation on page 4
11 4 USB 30 ports(1)
5 Serial COM ports (RS-232) 2 12 DVI-D port
6 1 Gb LAN ports (RJ45) 2 13 DisplayPort
7 PCIe riser slot cover
1
3
2
4 5 6 7
13 11 10 9 812
Rockwell Automation Publication 6181X-IN002C-EN-P - October 2019 17
Industrial Computers for Hazardous Locations
Connect Power Display and non-display computers have a DC input terminal block for connection to an 18hellip32V DC power source
Operate the computer in an industrial or control room environment which uses some form of power isolation from the public low-voltage mains
The DC power option supports operation from safety extra low voltage (SELV) power source
The power supply is internally protected against reverse polarity
Follow these steps to connect the computer to a DC power source
1 Turn off the main power switch or breaker
2 Verify that the DC power wires meet the requirements in the table in Installation Guidelines on page 9
3 Secure the DC power wires to the terminal block by tightening the terminal block screws to the torque value listed in the table in Installation Guidelines on page 9
ATTENTION When you connect power to the computer for the first time these actions occur
bull The default BIOS setting automatically starts the computer after it is plugged into a power source
bull You must read and accept an End-User Setup procedure for computers with a Windows operating system
Do not disconnect power from the system until after the Windows Setup procedure is completed Disconnecting power during this procedure can result in a corrupted system image
ATTENTION Supply the computer circuit with its own disconnect Use an uninterruptible power source (UPS) to help protect against unexpected power failure or power surges
Always shut down the Windows operating system before disconnecting power to the computer to minimize performance degradation and operating system failures
ATTENTION Use a SELV isolated and ungrounded power supply as input power to the computer This power source provides protection so that under normal and single fault conditions the voltage between the conductors and Functional EarthProtective Earth does not exceed a safe value
IMPORTANT A functional ground connection is required for EMC compliance
-V +V
18 Rockwell Automation Publication 6181X-IN002C-EN-P - October 2019
Industrial Computers for Hazardous Locations
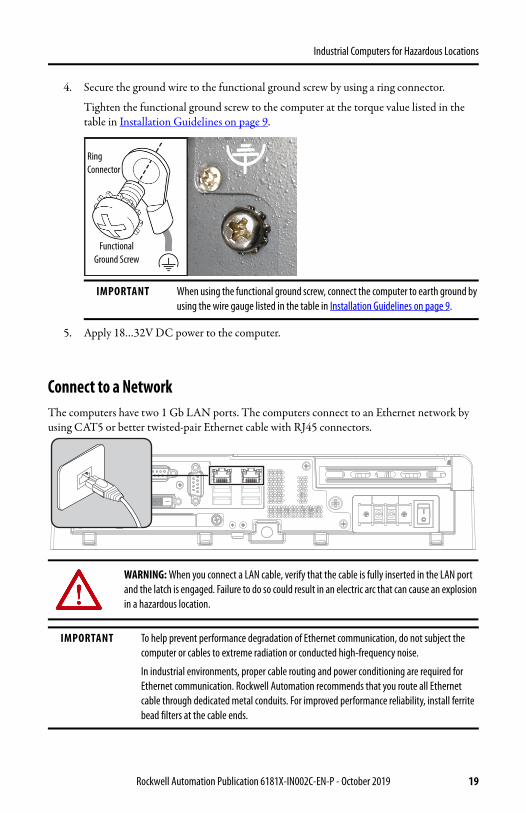
4 Secure the ground wire to the functional ground screw by using a ring connector
Tighten the functional ground screw to the computer at the torque value listed in the table in Installation Guidelines on page 9
5 Apply 18hellip32V DC power to the computer
Connect to a NetworkThe computers have two 1 Gb LAN ports The computers connect to an Ethernet network by using CAT5 or better twisted-pair Ethernet cable with RJ45 connectors
IMPORTANT When using the functional ground screw connect the computer to earth ground by using the wire gauge listed in the table in Installation Guidelines on page 9
WARNING When you connect a LAN cable verify that the cable is fully inserted in the LAN port and the latch is engaged Failure to do so could result in an electric arc that can cause an explosion in a hazardous location
IMPORTANT To help prevent performance degradation of Ethernet communication do not subject the computer or cables to extreme radiation or conducted high-frequency noise
In industrial environments proper cable routing and power conditioning are required for Ethernet communication Rockwell Automation recommends that you route all Ethernet cable through dedicated metal conduits For improved performance reliability install ferrite bead filters at the cable ends
Ring Connector
Functional Ground Screw
Rockwell Automation Publication 6181X-IN002C-EN-P - October 2019 19
Industrial Computers for Hazardous Locations
Accessories and Replacement PartsYou can view a current list of accessories and replacement parts at httpsabrockwellautomationcomComputersHazardous-Location-Display-Computersselection
Review the specifications of a new component before you install it to verify that it is compatible with the computer Record the model and serial number and any other pertinent information of new components for future reference
Voltage PrecautionsThe computers contain line voltages Disconnect all power to the computer before you install or remove components
Electrostatic Discharge Precautions
Follow these precautions
bull Keep electrostatic-sensitive parts in their containers until they arrive at the designated static-free work area
bull Cover the designated work area with approved static-dissipating material ndash Use an anti-static wriststrap that is connected to the work surfacendash Use properly grounded tools and equipment
bull Keep the designated work area free of nonconductive materials such as ordinary plastic assembly-aids and foam packing
bull Avoid contact with pins leads or circuitrybull Always hold components with a printed circuit board (PCB) by its edges and place it
with the assembly side downbull To minimize risk from electrostatic discharge only clean displays with a damp cloth
IMPORTANT We recommend that you use only Allen-Bradleyreg approved accessories and replacement parts
SHOCK HAZARD Disconnect all power to the computer before you remove components
Failure to disconnect power can result in severe electric shock to an individual or electrostatic discharge (ESD) damage to the computer and components
ATTENTION Electrostatic discharge (ESD) can damage static-sensitive devices or microcircuitry
bull Disconnect all power before you work on the computer as detailed in Voltage Precautions on page 20
bull Observe proper packaging and grounding techniques to help prevent damage
20 Rockwell Automation Publication 6181X-IN002C-EN-P - October 2019
Industrial Computers for Hazardous Locations
Preconfiguration
Follow these steps before you remove the cover or replace a hardware component
1 Shut down the computer and all peripherals that are connected to it
2 To avoid exposure to high energy levels disconnect all cables from power outlets
If necessary label each cable to expedite reassembly
3 To avoid exposure to a shock hazard from ring voltages disconnect telecommunication cables
Post-configurationFollow these steps after you install or remove a hardware component
1 Make sure that all components are installed according to instructions
2 Make sure that no tools or loose parts are left inside the computer
3 Reinstall any expansion boards peripherals and system cables that were previously removed
4 Reinstall the cover according to the instructions on page 22
5 Reconnect all external cables and power to the computer
6 Press the power switch to start the computer
Tools for Component ReplacementThe following tools are required for component replacement
IMPORTANT When you install hardware or you perform maintenance procedures that require access to internal components we recommend that you first back up all computer data to avoid loss
ATTENTION Make sure to read and understand all installation and removal procedures before you begin to configure the computer hardware
Rockwell Automation Publication 6181X-IN002C-EN-P - October 2019 21
Industrial Computers for Hazardous Locations
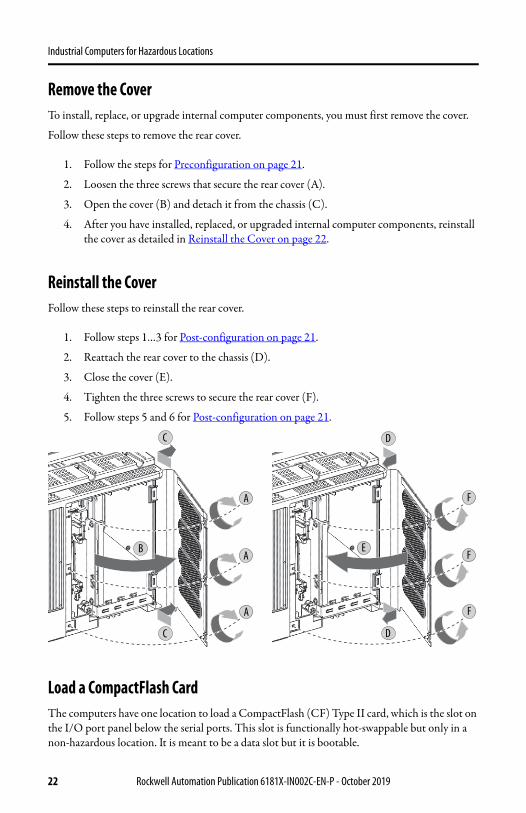
Remove the CoverTo install replace or upgrade internal computer components you must first remove the cover
Follow these steps to remove the rear cover
1 Follow the steps for Preconfiguration on page 21
2 Loosen the three screws that secure the rear cover (A)
3 Open the cover (B) and detach it from the chassis (C)
4 After you have installed replaced or upgraded internal computer components reinstall the cover as detailed in Reinstall the Cover on page 22
Reinstall the CoverFollow these steps to reinstall the rear cover
1 Follow steps 1hellip3 for Post-configuration on page 21
2 Reattach the rear cover to the chassis (D)
3 Close the cover (E)
4 Tighten the three screws to secure the rear cover (F)
5 Follow steps 5 and 6 for Post-configuration on page 21
Load a CompactFlash CardThe computers have one location to load a CompactFlash (CF) Type II card which is the slot on the IO port panel below the serial ports This slot is functionally hot-swappable but only in a non-hazardous location It is meant to be a data slot but it is bootable
A
BA
A
C
C
F
EF
F
D
D
22 Rockwell Automation Publication 6181X-IN002C-EN-P - October 2019
Industrial Computers for Hazardous Locations
See Hardware Features on page 17 for the CF card slot location
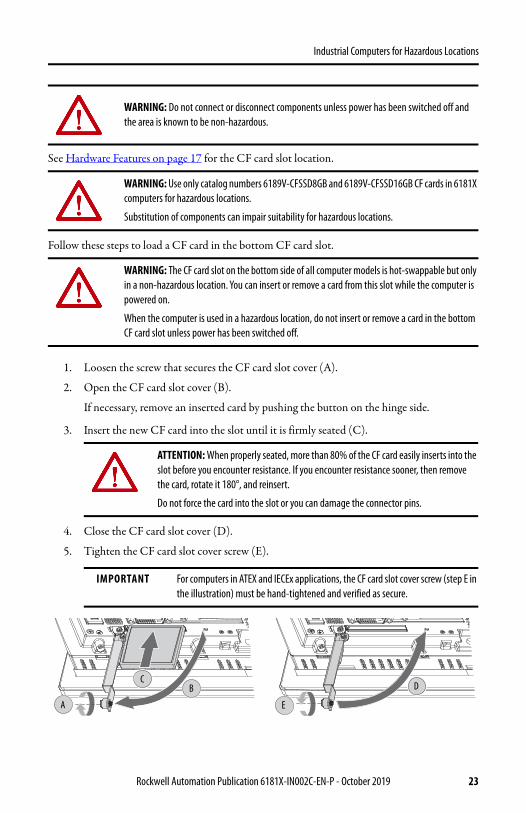
Follow these steps to load a CF card in the bottom CF card slot
1 Loosen the screw that secures the CF card slot cover (A)
2 Open the CF card slot cover (B)
If necessary remove an inserted card by pushing the button on the hinge side
3 Insert the new CF card into the slot until it is firmly seated (C)
4 Close the CF card slot cover (D)
5 Tighten the CF card slot cover screw (E)
WARNING Do not connect or disconnect components unless power has been switched off and the area is known to be non-hazardous
WARNING Use only catalog numbers 6189V-CFSSD8GB and 6189V-CFSSD16GB CF cards in 6181X computers for hazardous locations
Substitution of components can impair suitability for hazardous locations
WARNING The CF card slot on the bottom side of all computer models is hot-swappable but only in a non-hazardous location You can insert or remove a card from this slot while the computer is powered on
When the computer is used in a hazardous location do not insert or remove a card in the bottom CF card slot unless power has been switched off
ATTENTION When properly seated more than 80 of the CF card easily inserts into the slot before you encounter resistance If you encounter resistance sooner then remove the card rotate it 180deg and reinsert
Do not force the card into the slot or you can damage the connector pins
IMPORTANT For computers in ATEX and IECEx applications the CF card slot cover screw (step E in the illustration) must be hand-tightened and verified as secure
C
EA
B D
Rockwell Automation Publication 6181X-IN002C-EN-P - October 2019 23
Industrial Computers for Hazardous Locations
Install an Add-in Card
Follow these steps to install an add-in card
1 Disconnect power from the computer
2 Remove the back cover from the computer as detailed on page 22
3 Remove the one screw that secures the slot cover
Save the screw for the add-in card install
4 Remove and store the slot cover
5 Hold the add-in card by its edges and remove it from its protective packaging
6 Install a PCIe or PCI add-in card
For a PCIe add-in carda Connect the PCIe add-in board to the corresponding slot on the factory-supplied
PCIe riser cardb Verify that the add-in card is properly seated in the riser cardc Use the slot cover screw to secure the add-in card to the slot
IMPORTANT For hazardous locations please note the following
bull The integrated display computers with a resistive touch screen were evaluated for use with a PCIe add-in card
bull The integrated display computer with a PCAP touch screen and non-display computers were evaluated for use with PCIe and PCI add-in cards
IMPORTANT Use an anti-static wriststrap that is connected to the work surface and properly grounded tools and equipment
Hold any card by its edges to avoid touching the contacts on the bottom or circuitry on the board
ATTENTION Do not discard the slot cover If the add-in card is removed in the future the slot cover and its screw must be reinstalled to maintain agency access requirements
Cat No 6189X-PCIRISERPCI Riser Card
Factory-installedPCIe Riser Card
24 Rockwell Automation Publication 6181X-IN002C-EN-P - October 2019
Industrial Computers for Hazardous Locations
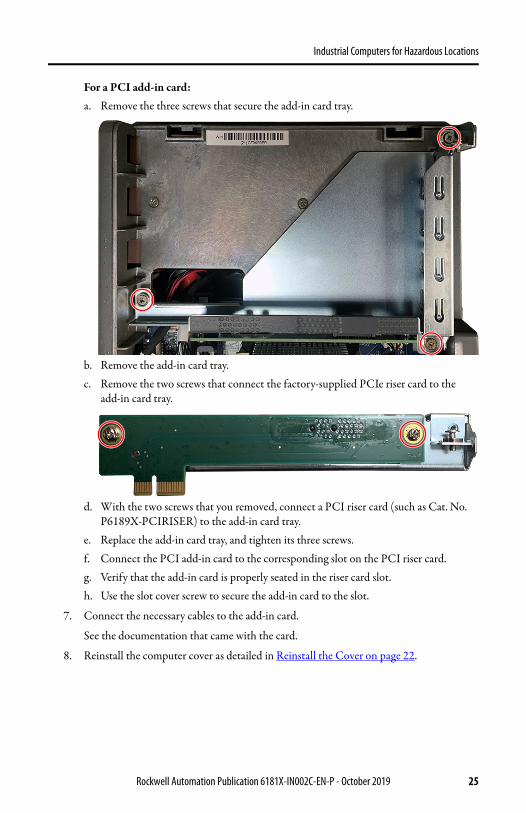
For a PCI add-in carda Remove the three screws that secure the add-in card tray
b Remove the add-in card trayc Remove the two screws that connect the factory-supplied PCIe riser card to the
add-in card tray
d With the two screws that you removed connect a PCI riser card (such as Cat No P6189X-PCIRISER) to the add-in card tray
e Replace the add-in card tray and tighten its three screwsf Connect the PCI add-in card to the corresponding slot on the PCI riser cardg Verify that the add-in card is properly seated in the riser card sloth Use the slot cover screw to secure the add-in card to the slot
7 Connect the necessary cables to the add-in card
See the documentation that came with the card
8 Reinstall the computer cover as detailed in Reinstall the Cover on page 22
Rockwell Automation Publication 6181X-IN002C-EN-P - October 2019 25
Industrial Computers for Hazardous Locations
Replace or Add Memory ModulesThe computers have two dual-channel DDR3 SO-DIMM slots that support up to 16 GB maximum system memory
Memory Configuration GuidelinesFollow these guidelines when you replace or add memory to the computers
Replace or Add Memory ModulesFollow these steps to replace or add memory modules
1 Follow the steps for Preconfiguration on page 21
2 Remove the computer cover as detailed in Remove the Cover on page 22
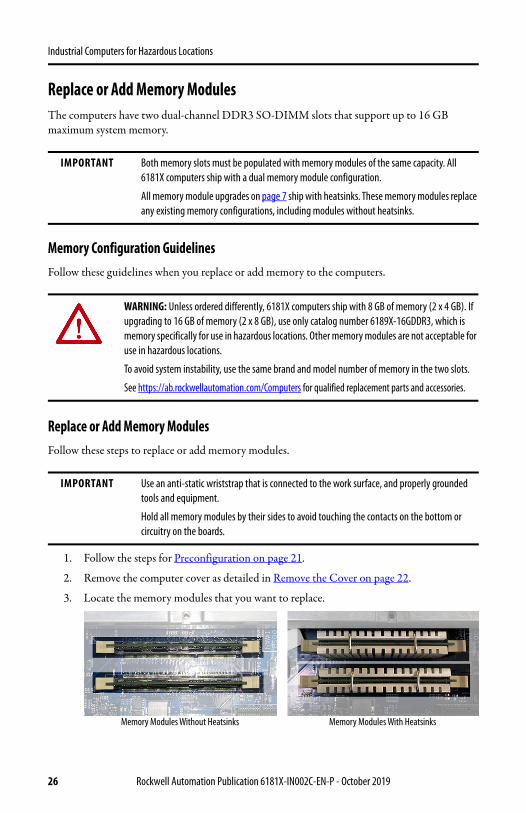
3 Locate the memory modules that you want to replace
IMPORTANT Both memory slots must be populated with memory modules of the same capacity All 6181X computers ship with a dual memory module configuration
All memory module upgrades on page 7 ship with heatsinks These memory modules replace any existing memory configurations including modules without heatsinks
WARNING Unless ordered differently 6181X computers ship with 8 GB of memory (2 x 4 GB) If upgrading to 16 GB of memory (2 x 8 GB) use only catalog number 6189X-16GDDR3 which is memory specifically for use in hazardous locations Other memory modules are not acceptable for use in hazardous locations
To avoid system instability use the same brand and model number of memory in the two slots
See httpsabrockwellautomationcomComputers for qualified replacement parts and accessories
IMPORTANT Use an anti-static wriststrap that is connected to the work surface and properly grounded tools and equipment
Hold all memory modules by their sides to avoid touching the contacts on the bottom or circuitry on the boards
Memory Modules With HeatsinksMemory Modules Without Heatsinks
26 Rockwell Automation Publication 6181X-IN002C-EN-P - October 2019
Industrial Computers for Hazardous Locations
4 Remove the existing memory modulesa Use your thumbs or two fingers to push open the lock levers which release each
memory module from its slot for easy removal See step 5 on page 27b Gently pull out each memory module to remove it from its slotc Place each memory module on a static-dissipating work surface or inside an
anti-static bag
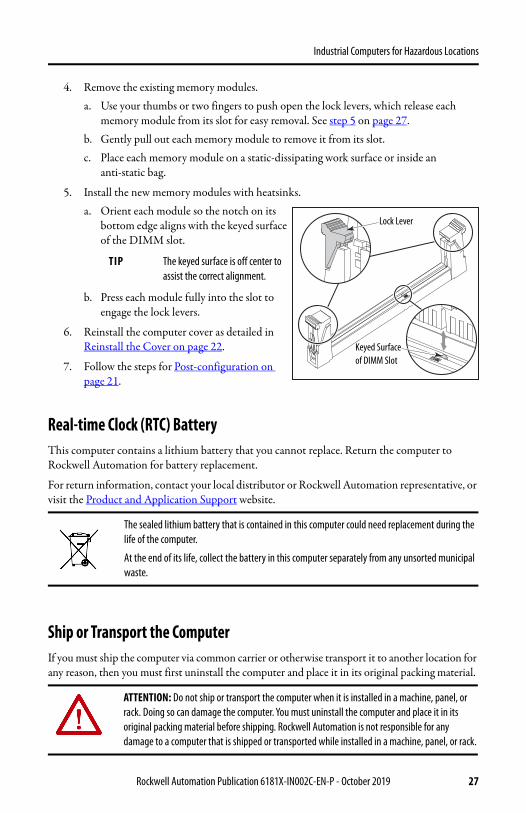
5 Install the new memory modules with heatsinksa Orient each module so the notch on its
bottom edge aligns with the keyed surface of the DIMM slot
b Press each module fully into the slot to engage the lock levers
6 Reinstall the computer cover as detailed in Reinstall the Cover on page 22
7 Follow the steps for Post-configuration on page 21
Real-time Clock (RTC) BatteryThis computer contains a lithium battery that you cannot replace Return the computer to Rockwell Automation for battery replacement
For return information contact your local distributor or Rockwell Automation representative or visit the Product and Application Support website
Ship or Transport the ComputerIf you must ship the computer via common carrier or otherwise transport it to another location for any reason then you must first uninstall the computer and place it in its original packing material
TIP The keyed surface is off center to assist the correct alignment
The sealed lithium battery that is contained in this computer could need replacement during the life of the computer
At the end of its life collect the battery in this computer separately from any unsorted municipal waste
ATTENTION Do not ship or transport the computer when it is installed in a machine panel or rack Doing so can damage the computer You must uninstall the computer and place it in its original packing material before shipping Rockwell Automation is not responsible for any damage to a computer that is shipped or transported while installed in a machine panel or rack
Lock Lever
Keyed Surface of DIMM Slot
Rockwell Automation Publication 6181X-IN002C-EN-P - October 2019 27
Industrial Computers for Hazardous Locations
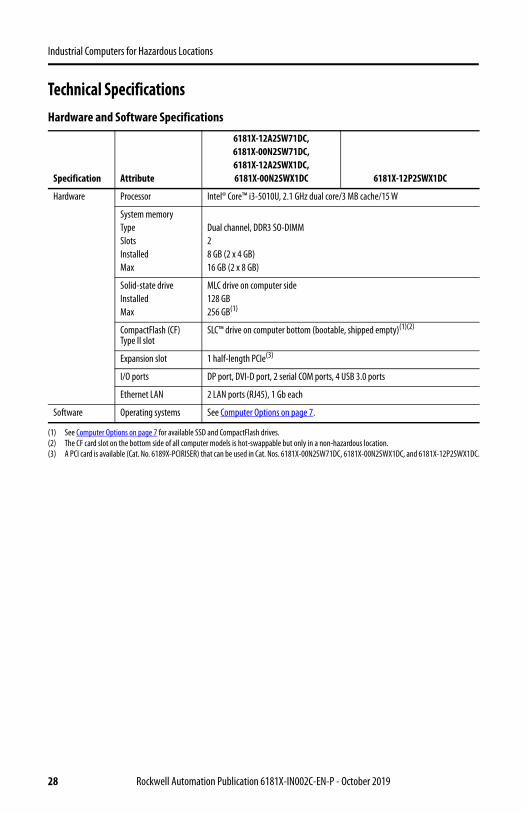
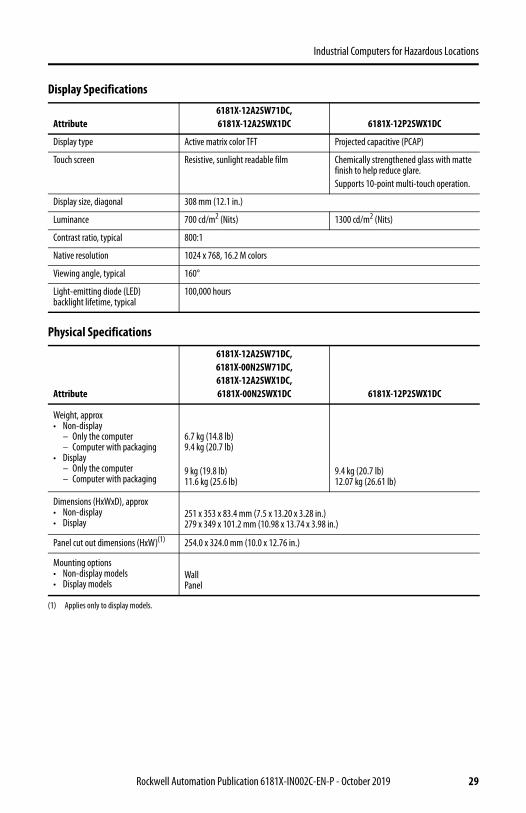
Technical SpecificationsHardware and Software Specifications
Display type Active matrix color TFT Projected capacitive (PCAP)
Touch screen Resistive sunlight readable film Chemically strengthened glass with matte finish to help reduce glareSupports 10-point multi-touch operation
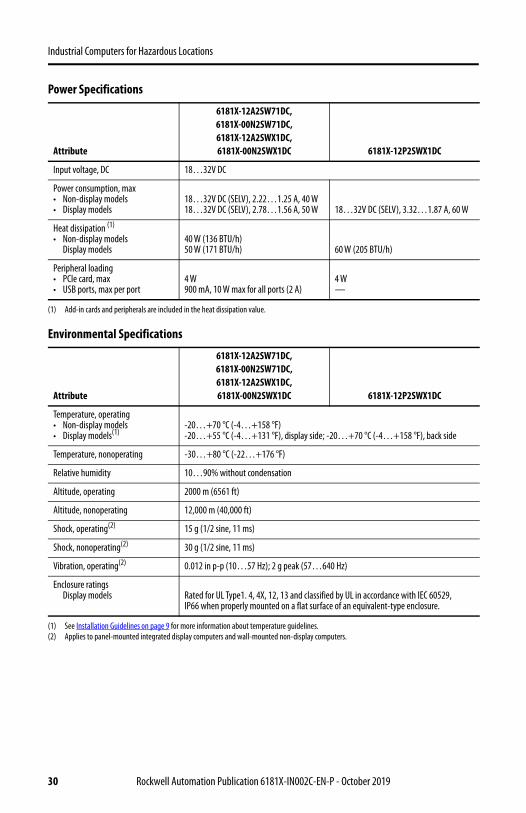
Temperature operatingbull Non-display modelsbull Display models(1)
(1) See Installation Guidelines on page 9 for more information about temperature guidelines
-20hellip+70 degC (-4hellip+158 degF)-20hellip+55 degC (-4hellip+131 degF) display side -20hellip+70 degC (-4hellip+158 degF) back side
Temperature nonoperating -30hellip+80 degC (-22hellip+176 degF)
Relative humidity 10hellip90 without condensation
Altitude operating 2000 m (6561 ft)
Altitude nonoperating 12000 m (40000 ft)
Shock operating(2)
(2) Applies to panel-mounted integrated display computers and wall-mounted non-display computers
15 g (12 sine 11 ms)
Shock nonoperating(2) 30 g (12 sine 11 ms)
Vibration operating(2) 0012 in p-p (10hellip57 Hz) 2 g peak (57hellip640 Hz)
Enclosure ratingsDisplay models Rated for UL Type1 4 4X 12 13 and classified by UL in accordance with IEC 60529
IP66 when properly mounted on a flat surface of an equivalent-type enclosure
30 Rockwell Automation Publication 6181X-IN002C-EN-P - October 2019
Industrial Computers for Hazardous Locations
CertificationsFor the most current information on all certifications for 6181X computers visit the Rockwell Automation Product Certifications website at rokautocertifications
Additional ResourcesThese documents contain additional information to related products from Rockwell Automation
You can view or download publications at httpswwwrockwellautomationcomgloballiterature-libraryoverviewpage To order paper copies of technical documentation contact your local Allen-Bradley distributor or Rockwell Automation sales representative
RoHS Turkey RoHS (EEE Youmlnetmeliğine Uygundur In Conformity with the EEE Regulation)
UAE RoHS
EAC
Resource Description
Industrial Computer for Hazardous Locations User Manual publication 6181X-UM001
Gives an overview of the system and provides procedures to install the computer set up computer connections operate the computer and troubleshoot the computer
Industrial Automation Wiring and Grounding Guidelines publication 1770-41
Provides general guidelines for installing a Rockwell Automationreg industrial system
Rockwell Automation Publication 6181X-IN002C-EN-P - October 2019 31
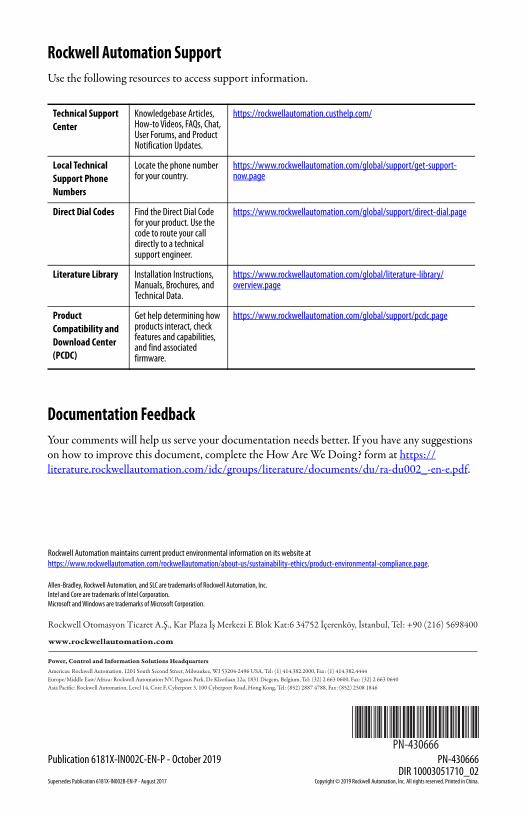
NotesRockwell Automation SupportUse the following resources to access support information
Documentation FeedbackYour comments will help us serve your documentation needs better If you have any suggestions on how to improve this document complete the How Are We Doing form at httpsliteraturerockwellautomationcomidcgroupsliteraturedocumentsdura-du002_-en-epdf
Technical Support Center
Knowledgebase Articles How-to Videos FAQs Chat User Forums and Product Notification Updates
Allen-Bradley Rockwell Automation and SLC are trademarks of Rockwell Automation IncIntel and Core are trademarks of Intel CorporationMicrosoft and Windows are trademarks of Microsoft Corporation
Rockwell Otomasyon Ticaret AŞ Kar Plaza İş Merkezi E Blok Kat6 34752 İccedilerenkoumly İstanbul Tel +90 (216) 5698400
Rockwell Automation maintains current product environmental information on its website athttpswwwrockwellautomationcomrockwellautomationabout-ussustainability-ethicsproduct-environmental-compliancepage
Publication 6181X-IN002C-EN-P - October 2019 PN-430666DIR 10003051710_02
Supersedes Publication 6181X-IN002B-EN-P - August 2017 Copyright copy 2019 Rockwell Automation Inc All rights reserved Printed in China
PN-430666PN-430666
Industrial Computers for Hazardous Locations Installation Instructions Series H
Summary of Changes
Installation Precautions
Environment and Enclosure Information
European Union Directive
Outdoor Installation
Hazardous Locations
The Following Conditions for Safe Use Apply in ATEX IECEx and INMETRO
Conditions for Safe Use in North American Hazardous Locations
This tab summarizes Rockwell Automation Global Sales and Marketing preferred printing standards It also provides guidance on whether a publication should be released print on demand or if it requires an RFQ for offset printingFind your publication type in the first section below Use the assigned Printing Category information to determine the standard print specifications for that document type The Printing Categories are defined below the Publication Type section Note there may be slightly different print specifications for the categories depending on the region (EMEA or Americas)For more information on Global Sales and Marketing Printing Standards see publication RA-CO004 in DocMan
Publication Type and Print Category
Publication Type
Off Set Print Category Spec (See tables below)
Print on Demand Spec (See tables below)
Description
Order Min
Order Max
Life Cycle Usage Release Option
AD
NA - Puttman
NA
Advertisement Reprint Colour
NA
NA
Presale Internal
AP
A3
D2
Application Solution or Customer Success Story
5
100
Presale External
AR
NA
NA
ArticleEditorialByline
NA
NA
Presale Internal
(press releases should not be checked into DocMan or printed)
AT
B3 B4
D5
Application techniques
5
100
Presale External
BR
A2 Primary A1
NA
Brochures
5
100
Presale External
CA
C2 Primary C1
NA
Catalogue
1
50
Presale External
CG
NA
NA
Catalogue Guide
1
50
Presale External
CL
NA
NA
Collection
5
50
Presale External
CO
A5 A6 A9
D5
Company Confidential Information
NA
NA
NA Confidential
CP
E-only
E-only D5
Competitive Information
5
50
NA Confidential
DC
E-only
E-only
Discount Schedules
NA
NA
Presale Internal
DI
A1 A3
NA
Direct Mail
5
100
Presale Internal
DM
NA
NA
Product Demo
5
50
Presale Internal
DS
B3
D5
Dimensions Sheet
1
5
Post External
DU
B3
D5
Document Update
1
5
Post External
GR
B2
D6
Getting Results
1
5
Post External
IN
B3 Primary B2
D5 D6
Installation instructions
1
5
Post External
LM
NA
NA
Launch Materials
5
50
Presale Internal
PC
B3
D5
Packaging Contents
PL
E-only primary B3
E-only
Price List
5
50
Presale Internal
PM
B2
D6
Programming Manual
1
5
Post External
PP
A3
D1
Profile (Single Product or Service) NOTE Application Solutions are to be assigned the AP pub type
5
100
Presale External
QR
B2 primary B3 B5
D5 D6
Quick Reference
1
5
Post External
QS
B2 primary B3 B5
D5 D6
Quick Start
1
5
Post External
RM
B2
D5 D6
Reference Manual
1
5
Post External
RN
B3
D5
Release Notes
1
5
Post External
SG
B1 Primary B4
D5 D6
Selection Guide Colour
5
50
Presale External
SG
B2
D5 D6
Selection Guide BW
5
50
Presale External
SP
A1 A2 A3 A4
NA
Sales Promotion NOTE Service profiles are to be assigned the PP pub type
5
100
Presale Internal
SR
B2 B3
D5 D6
Specification Rating Sheet
5
100
Presale External
TD
B2 Primary B3 B4 B5
D5 D6
Technical Data
5
50
Presale External
TG
B2 B3
D6
Troubleshooting Guide
1
5
Post External
UM
B2 Primary B4
D6
User Manual BW
1
5
Post External
WD
B3
D5
Wiring Diagrams Dwgs
1
5
Post Internal
WP
B3 Primary B5
D5
White Paper
5
50
Presale External
Minimum order quantities on all POD items are based on the publication length
Publication length
Minimum Order Quantity
77 or more pages
1 (no shrink wrap required)
33 to 76 pages
25
3 to 32 pages
50
1 or 2 pages
100
Pre-sale Marketing
All paper in this category is White Brightness 90 or better Opacity 90 or better
Category
Color Options
AP EMEA Paper Requirements
Canada LA US Paper Requirements
A1
4 color
170 gsm 2pp
100 gloss cover 100 gloss text
A2
4 color
170 gsm folded 4pp
100 gloss cover 80 gloss text
A3
4 color
Cover 170 gsm with Body 120 gsm gt 4pp
80 gloss cover 80 gloss text
A4
2 color
170gsm Silk ndash 120gsm Silk
80 gloss cover 80 gloss text
A5
2 color
170gsm Silk ndash 120gsm Silk
80 gloss cover 80 matt sheet text
A6
1 color
170gsm Silk ndash 120gsm Silk
80 gloss cover 80 matt sheet text
A7
4 color cover2 color textSelection Guide
Category being deleted
10 Point Cover C2S50 matte sheet text
A8
4 color cover
Category being deleted
50 matte sheet text self cover
2 color text
Selection Guide
A9
2 color
100gsm bond
50 matte sheet text self cover
Selection Guide
Gray shading indicates Obsolete Print Catagories
Post Sale Technical Communication
Category
Color Options
AP EMEA Paper Requirements
Canada LA US Paper Requirements
B1
4 color cover
270gsm Gloss 100gsm bond
10 Point Cover C2S
2 color text
50 matte sheet text
B2
1 color
160gsm Colortech amp 100gsm Bond
90 Cover50 matte sheet text
B3
1 color
100gsm bond
50 matte sheet text self cover
B4
2 color
160gsm Colortech amp 100gsm Bond
90 Cover50 matte sheet text
B5
2 color
100gsm bond
50 matte sheet text self cover
Catalogs
Category
Color Options
AP EMEA Paper Requirements
Canada LA US Paper Requirements
C1
4 color cover
270gsm Gloss 90gsm silk
10 Point Cover C2S
4 color text
45 Coated Sheet
C2
4 color cover
270gsm Gloss 80gsm silk
10 Point Cover C2S
2 color text
32-33 Coated Sheet
Print on Demand by Print Vendor (POD)
All paper in this category is White Brightness 82 or better Opacity 88 or better
Category
Color Options
AP EMEA Paper Requirements
Canada LA US Paper Requirements
D1
4 color
170gsm white silk
80 gloss cover coated 2 sides
D2
4 color
120gsm white silk
80 gloss text coated 2 sides self cover
D3
4 color
Cover 170gsm with Body 120gsm
80 gloss cover 80 gloss text coated 2 sides
D4
1 color
160gsm tab
90 index
D5
1 color
80gsm bond
20 bond self cover
D6
1 color
Cover 160gsm tab with Body 80gsm bond
90 index 20 bond
D7
2 color
160gsm tab
90 index
D8
2 color
80gsm bond
20 bond self cover
D9
2 color
Cover 160gsm tab with Body 80gsm bond
90 index 20 bond
D10
Combination 4 color cover with 2 color body
Cover 160gsm with Body 80gsm
90 index 20 bond
Gray shading indicates Obsolete Print Catagories
Print on Demand By Print Vendor (POD) or Off Set (OS)
Use these guidelines to determine if your publication should be print on demand by print vendor (POD) or if it would be more economical to print ffseton a press (OS) OS print jobs require an RFQ (Request For Quote) in US If your job fits into the ldquoEitherrdquo category an RFQ is recommended but not required In the US RA Strategic Sourcing will discourage or reject RFQs for jobs that fall within the POD category Guidelines differ for black amp white and color printing so be sure to check the correct tables
RA-QR005K-EN-P
Jan-19
Printing Specification
YOUR DATA HERE
Instructions
NO
(required) Publication Number
6181X-IN002C-EN-P
Sample 2030-SP001B-EN-P
11rdquo x 17rdquo
LOOSE -Loose Leaf
YES
Pre-sale Marketing
TOP
Use Legacy Number
YES or NO
85rdquo x 11rdquo
PERFECT - Perfect Bound
A1
LEFT
Legacy Number if applicable
Sample Legacy Number 0160-533
8375rdquo x 10875
SADDLE - Saddle Stitch
A2
RIGHT
CORNER
Publication Title
Industrial Computers for Hazardous Locations Installation Instructions
Sample ElectroGuard Selling Brief80 character limit - must match DocMan Title
825rdquo x 11rdquo (RA product profile std)
PLASTCOIL - Plastic Coil (Coil Bound)
A4
BOTTOM
SIDE
Used in Manufacturing
NO
YES or NO - If Yes must have Part No listed below
825rdquo x 10875rdquo
STAPLED1 -1 position
A3
Part Number
PN-430666
If SAP Part Number be sure to enter PN- before the number
7385rdquo x 9rdquo (RSI Std)
STAPLED1B - bottom 1 position
A5
(required) Category
D5
Select Print Category ABC or D from category list on Introduction_Category Types tab
6rdquo x 4rdquo
STAPLED2 - 2 positions
A6
Paper Stock Color
White
White is assumed For color options contact your vendor
55rdquo x 85rdquo (half-size)
THERMAL - Thermal bound (Tape bound)
A7
Ink Color
Black
One color assumes BLACK 4 color assume CMYK Indicate PMS number here
475rdquo x 775rdquo
THERMALO - Thermal Bound (Tape bound - offline)
A8
(required) Page Count ofPublication
32
Total page count including cover Enter PAGE count not SHEET count
475rdquo x 7rdquo (slightly smaller half-size)
A9
(required) Finished Trim Size Width
85rdquo x 11rdquo
This is sheet size before folding
425 x 550
Post Sale Technical Communication
Fold
Half or V or Single Fold
Review key below Leave blank if folded for saddle stitching
4rdquo x 6rdquo
B1
Finished Fold Size
55 x 85
This is size after folding is completed
3rdquo x 5rdquo
B2
BindingStitching
STAPLED2 - 2 positions
Review key below
9rdquo x 12rdquo (Folder)
B3
None
Stitching Location
Blank Corner or Side
A4 (8 frac14rdquo x 11 frac34rdquo) (210 x 297 mm)
B4
Half or V or Single Fold
Drill Hole (YesNo)
All drilled publications use the 5-hole standard 516 inch-size hole and a minimum of frac14 inch from the inner page border
A5 (583rdquo x 826rdquo) (148 x 210 mm)
B5
C or Tri-Fold
Number of Tabs Needed
5 tab in stock at RR Donnelley
36rdquo x 24rdquo Poster
Catalogs
DbleParll
Number of Pages per Pad
Average sheets of paper 25 50 75100 Max
24rdquo x 36rdquo Poster
C1
Sample
Glue Location on Pad
Glue location on pads
18rdquo x 24rdquo Poster
C2
Short (must specify dimensions between folds in Comments)
Comments
DIR 10003051710_02
Print on Demand (POD)
Double Gate
Saddle-Stitch Items All page quantities must be divisible by 4Note Stitching is implied for Saddle-Stitch -no need to specify in Stitching Location80 pgs max on 20 (text and cover)76 pgs max on 20 (text) and 24 (cover)72 pgs max on 24 (text and cover)Perfect Bound Items940 pgs max wcover (90 index unless indicated otherwise)70 pgs min for spine without words200 pgs min for spine with words Plastic Coil Bound Items530 pgs max of 20 (if adding cover deduct equivalent number of pages to equal cover thickness) (90 index unless indicated otherwise)Tape Bound Items250 pgs max on 20 no cover240 pgs max wcover (90 index unless indicated otherwise)
D1
D2
D5
D6
Industrial Computers for Hazardous Locations
Summary of ChangesThis publication contains new and updated information as indicated in this table
Topic PageAdded ABNT NR ratings to Important table in Environment and Enclosure Information subsection 3
Added ratings information sentence that references Hazardous Location section 3
Updated Product Certifications URL to rokautocertifications 3 31
Reduced maximum distance for IO cables from 30 ft to 3 ft and added Ethernet cable exception 3
Added paragraph about available Rockwell Automationreg sun shield in the Outdoor Installation section 4
Added Important table about Rockwell Automation sun shield in the Outdoor Installation section 4
Added Cat No 6181X-12P2SWX1DC to Hazardous Locations table 5
Revised rating numbers and added INMETRO information in the Hazardous Locations table 5
Added Important table above the Hazardous Locations table 5
Converted table footnotes to the new The Following Conditions for Safe Use Apply in ATEX IECEx and INMETRO section
6
Added lsquoConditions for Safe Use in North American Hazardous Locationsrsquo subsection title 7
Revised content to address sun shield usage in Important table in Hot Surfaces section 7
Added Cat No 6181X-12P2SWX1DC and footnote to the first table in the Computer Options section 7
Revised description to 6189X-PCIRISER to the second table in the Computer Options section 8
Added Cat No 6189X-SUNSHIELD to the second table in the Computer Options section 8
Added footnote to the second table in the Computer Options section 8
Added DC wiring table to Installation Guidelines section 9
Added Cat No 6181X-12P2SWX1DC to the table in the Panel Cutout Dimensions section 14
Added Cat No 6181X-12P2SWX1DC to the table in the Mount the Integrated Display Computer in a Panel section 15
Added second sentence to introductory paragraph in Hardware Features section 17
Added cross-references to new DC wiring table in steps 3 and 4 and Important table in step 4 18
Revised Important table to specify add-in card evaluation and use 24
Added picture of factory-installed riser card and available riser card accessory 24
Expanded step 3 to include slot cover screw information for further use 24
Expanded step 6 to include separate install instructions for PCIe and PCI add-in cards 24
Added sentence about memory modules with heatsinks to Important table in Replace or Add Memory Modules section
26
Added second sentence to Important table in the Replace or Add Memory Modules subsection 26
Added picture of memory modules with heatsinks to step 3 in the Replace or Add Memory Modules section 26
Added step 5 to the Replace or Add Memory Modules section 27
Updated website and URL to return a computer for clock battery replacement 27
Added 6181X-12P2SWX1DC column to all specification tables and any corresponding specifications 28hellip31
Added UAE RoHS row to table in Certifications section 31
Added EAC row to table in Certifications section 31
2 Rockwell Automation Publication 6181X-IN002C-EN-P - October 2019
Industrial Computers for Hazardous Locations
Installation PrecautionsRead and follow these precautions before you install the computer
Environment and Enclosure Information
European Union DirectiveThis computer meets the European Union Directive requirements when installed within the European Union or EEA regions and have the CE marking A copy of the declaration of the conformity is available at rokautocertifications
To comply with EN 55024 and EN 55032 use the following for cable types
ATTENTION This equipment is intended for use in a Pollution Degree 2 industrial environment in overvoltage Category II applications (as defined in IEC 60664-1) at altitudes up to 2000 m (6561 ft) without derating
This equipment is considered Group 1 Class A industrial equipment according to IECCISPR 32 and ABNT NBR IECCISPR 32 Without appropriate precautions there can be potential difficulties with electromagnetic compatibility in other environments due to conducted and radiated disturbance
The equipment must be panel mounted or open-type and installed in a tool-only accessible enclosure that is suitable for the environment
All 6181X-12 integrated display computers are shipped with a gasketed bezel to meet specified ratings when mounted in a panel or enclosure with an equivalent rating For more information about these ratings see Hazardous Locations on page 5
In addition to this publication see the followingbull Publication 1770-41 Industrial Automation Wiring and Grounding Guidelines for more
installation requirementsbull ABNT NBR IEC 60529 NEMA 250 UL 50 and IEC 60529 as applicable to your region for
explanations of the degrees of protection that are provided by enclosures
ATTENTION To comply with EN 55024 and EN 55032 the following applies to cable usage
bull USB cables must be less than 3 m (984 ft) longbull All IO cables except for Ethernet cables must be used indoorsbull All IO cables except for Ethernet cables cannot exit the building at any point and cannot
directly connect to cables outside the building
Cable Type Required Attribute Cable Type Required Attribute
LAN Shielded or unshielded DVI Shielded
USB Shielded DP Shielded
Serial RS-232 Shielded DC power Unshielded
Rockwell Automation Publication 6181X-IN002C-EN-P - October 2019 3
Industrial Computers for Hazardous Locations
Outdoor InstallationWhen you use a 6181X integrated display computer outdoors consider the following to maximize the field life of the front bezel and display
bull Select the proper enclosurebull Computer orientation
Ultraviolet (UV) and infrared radiation can reduce the field life of any electronic device While the materials used in the computer bezels provide long field life that life can be improved by proper installation
UV radiation from the sun causes all plastics to fade or yellow and become brittle over time Avoiding long-term exposure to direct sunlight helps protect the front of the computer from direct exposure to UV radiation and greatly increase its field life
Rockwell Automation sells a sun shield (Cat No 6189X-SUNSHIELD) for the 6181X integrated display computers If you install a sun shield that closes over the display the temperature between the sun shield and the display cannot exceed the maximum temperature of the display which is 55 degC (131 degF) Adequately ventilate all sun shields to help prevent excess heat rise on the computer display
Use stirring fans or active cooling in high altitude and high ambient temperature locations to keep the internal enclosure temperature below 70 degC (158 degF) Use a heater in installations where the ambient temperature is below -20 degC (-4 degF)
If possible avoid placing the computer on the south (north in the southern hemisphere) or west side of the cabinet This reduces the heat rise due to solar loading during the hottest part of the day
Mount the computer vertically to minimize solar loading on the display Do not mount the computer in a sloped enclosure if it exposes the computer to direct sunlight
IMPORTANT The Rockwell Automation approved sun shield (Cat No 6189X-SUNSHIELD) must be used if the computer is exposed to direct sunlight
4 Rockwell Automation Publication 6181X-IN002C-EN-P - October 2019
Industrial Computers for Hazardous Locations
Hazardous LocationsThis equipment is suitable for these location categories
IMPORTANT 6181X computers can only be used in non-hazardous locations in any Eurasian Conformity region
Computer Model Cat Nos Region Rating Temperature RangeNon-display 6181X-
00N2SW71DC 6181X-00N2SWX1DC
United States Class I Division 2 Groups A B C D T4 -20 degC lt Ta lt 70 degC(-4 degF lt Ta lt 158 degF)Class I Zone 2 IIC T4
Canada Class I Division 2 Groups A B C D T4
Class I Zone 2 IIC T4
Europe (ATEX) II 3 G Ex ec IIC T4 GcDEMKO 19 ATEX 2274 X
GlobalIECEx Ex ec IIC T4 Gc IECEx UL 190091 X
INMETRO Ex ec IIC T4 Gc UL-BR 191305 X
Display (12 in)
6181X-12P2SWX1DC
United States Class I Division 2 Groups A B C D T4Class II Division 2 Groups F G T6Class III Division 1 T6
-20 degC lt Ta lt 55 degC(-4 degF lt Ta lt 131 degF) (display side)
-20 degC lt Ta lt 70 degC (-4 degF lt Ta lt 158 degF) (backside)
Class I Zone 2 IIC T4Class II Zone 22 IIIB T70 degC
Canada Class I Division 2 Groups A B C D T4Class II Division 2 Groups F G T6Class III Division 1 T6
Class I Zone 2 IIC T4Class II Zone 22 IIIB T70 degC
Europe (ATEX) II 3 GD Ex ec IIC T4 Gc IP66Ex tc IIIC T70 degC Dc IP66 DEMKO 19 ATEX 2274 X
GlobalIECEx Ex ec IIC T4 Gc IP66 Ex tc IIIC T70 degC Dc IP66IECEx UL 190091 X
INMETRO Ex ec IIC T4 Gc IP66Ex tc IIIC T70 degC Dc IP66UL-BR 191305 X
Display (12 in)
6181X-12A2SW71DC 6181X-12A2SWX1DC
United States Class I Division 2 Groups A B C D T4 -20 degC lt Ta lt 55 degC(-4 degF lt Ta lt 131 degF) (display side)
-20 degC lt Ta lt 70 degC (-4 degF lt Ta lt 158 degF) (backside)
Class I Zone 2 IIC T4
Canada Class I Division 2 Groups A B C D T4
Class I Zone 2 IIC T4
Europe (ATEX) II 3 GD Ex nA nC IIC T4 Gc IP66Ex tc IIIC T135 degC Dc IP66 DEMKO 17 ATEX 1851 X
GlobalIECEx Ex nA nC IIC T4 Gc IP66 Ex tc IIIC T135 degC Dc IP66IECEx UL 170024 X
Rockwell Automation Publication 6181X-IN002C-EN-P - October 2019 5
Industrial Computers for Hazardous Locations
The Following Conditions for Safe Use Apply in ATEX IECEx and INMETROFor all non-display models (Cat Nos 6181X-00N2SW71DC and 6181X-00N2SWX1DC)
bull The equipment shall only be used in an area of not more than Pollution Degree 2 as defined in ENIEC 60664-1 as applicable to your region
bull The equipment shall be installed in an INMETROATEXIEC certified enclosure that provides a degree of protection not less than IP54 and is only accessible by use of a tool
bull Transient protection shall be provided that is set at a level not exceeding 140 of the peak rated voltage value at the supply terminals to the equipment
bull The non-display computers were evaluated for use with a PCI Express (PCIe) or PCI add-in card
bull PCIe and PCI add-in cards must be rated Zone 2 ATEXIECExINMETRO T4 (maximum) 4 W (maximum) 90 degC (194 degF) (minimum) surrounding ambient temperature
bull The internal enclosure ambient temperature range is -20hellip+70 degC (-4hellip+158 degF)
For all integrated display models (Cat Nos 6181X-12A2SW71DC 6181X-12A2SWX1DC and 6181X-12P2SWX1DC)
bull The equipment shall only be used in an area of not more than Pollution Degree 2 as defined in ENIEC 60664-1 as applicable to your region
bull For EPL Gc the equipment shall be installed in an INMETROATEXIEC certified enclosure that provides a degree of protection not less than IP54 and is only accessible by use of a tool
bull For EPL Dc the equipment shall be installed in an INMETROATEXIEC Zone 22 (minimum) certified enclosure that provides a degree of protection not less than IP64 and is only accessible by use of a tool
bull Transient protection shall be provided that is set at a level not exceeding 140 of the peak rated voltage value at the supply terminals to the equipment
bull The ambient temperature (external to enclosure) range is -20hellip+55 degC (-4hellip+131 degF) and that of the internal enclosure ambient temperature is -20hellip+70 degC (-4hellip+158 degF)
bull The integrated display computers with a resistive touch screen (Cat Nos 6181X-12A2SW71DC and 6181X-12A2SWX1DC) were evaluated for use with a PCI Express (PCIe) add-in card
bull The integrated display computer with a PCAP touch screen (Cat No 6181X-12P2SWX1DC) was evaluated for use with a PCIe or PCI add-in card
bull PCIe and PCI add-in cards must be rated Zone 2 ATEXIECExINMETRO T4 (max) 4 W (max) 90 degC (194 degF) (min) surrounding ambient temperature
bull To maintain the IP66 rating of the equipment it shall be mounted in an enclosure with an equivalent IP rating
bull To minimize risk from electrostatic discharge only clean the display with a damp cloth
6 Rockwell Automation Publication 6181X-IN002C-EN-P - October 2019
Industrial Computers for Hazardous Locations
Conditions for Safe Use in North American Hazardous LocationsThe following statements apply to when the computer is used in a North American hazardous location
Hot Surfaces
Restricted Access LocationVerify that restricted access locations for the equipment meet these conditions
bull Access is gained only by service personnel or by users who have been instructed on the reasons for restrictions to a location and about any precautions to be taken
bull Access is by using a tool a lock and key or other means of security controlled by the authority responsible for the location
Computer OptionsThis table summarizes the options that are available for industrial computers for hazardous locations A comparative summary of features for the computers is in Technical Specifications on page 28
WARNING Explosion Hazardbull Do not connect or disconnect the device or any connected peripheral equipment unless
power has been switched off and the area is known to be non-hazardousbull Peripheral equipment must be suitable for the location where it is usedbull In the US all wiring must be in accordance with Class I Division 2 wiring methods of Article 501
of the National Electrical Code and in accordance with the authority having jurisdiction bull In Canada all wiring must be in accordance with Section 18-1J2 of the Canadian Electrical
Code and in accordance with the authority having jurisdictionbull In final applications properly connect these devices to ground by using the ground terminal
screw on the computer chassisbull PCIe and PCI add-in cards must be rated Class I Division 2 T4 (max) 4W (max) 90 degC (194 degF)
(min) surrounding ambient temperature
IMPORTANT The Rockwell Automation approved sun shield (Cat No 6189X-SUNSHIELD) must be used if the computer is exposed to direct sunlight
Cat No Model Series Display Size Touch Screen Windows OS
6181X-00N2SW71DC NDM H mdash 7 Professional 64-bit SP1
Rockwell Automation Publication 6181X-IN002C-EN-P - October 2019 7
Industrial Computers for Hazardous Locations
This table shows what accessories are available for industrial computers for hazardous locations
You can view a current list of accessories and replacement parts at httpsabrockwellautomationcomComputersHazardous-Location-Display-Computersselection
Operating Systems
The following Microsoftreg-licensed operating systems are availablebull Windowsreg 7 Professional (64 bit) SP1bull Windows 10 Internet of Things (IoT) Enterprise (64 bit)
These solid-state drives are customized to accommodate their unique properties as followsbull No paging filebull System restore is disabled by default
To obtain a copy of a factory system image access the Rockwell Automation Product Compatibility and Download Center (PCDC) at httpscompatibilityrockwellautomationcomPageshomeaspx
Before You BeginBefore you unpack the computer inspect the shipping carton for damage If damage is visible immediately contact the shipper and request assistance Otherwise continue to unpack
Keep the original packing material in case you must return the computer for repair or transport it to another location Use both inner and outer packing cartons to provide adequate protection for a computer that is returned for service
Cat No Description
6189X-MCLPS Replacement mounting clips (10)
6189X-8GDDR3 8 GB DDR3 RAM memory for extended temperature
6189X-16GDDR3 16 GB DDR3 RAM memory for extended temperature
(1) This card can only be used in Cat Nos 6181X-00N2SW71DC 6181X-00N2SWX1DC and 6181X-12P2SWX1DC
6189X-SUNSHIELD Sun shield
8 Rockwell Automation Publication 6181X-IN002C-EN-P - October 2019
Industrial Computers for Hazardous Locations
Rockwell Automation Publication 6181X-IN002C-EN-P - October 2019 9
Parts ListThe computers ship with these items
Installation GuidelinesFollow these guidelines to make sure that your computer provides service with excellent reliability
bull The installation site must have sufficient powerbull Verify that the DC power wires meet these requirements
bull In dry environments static charges can build up easily Proper grounding of the computer helps to reduce static discharges which can cause shock and damage electronic components
bull The enclosure must allow sufficient space around air inlets and outlets to provide the circulation necessary for cooling See Mounting Clearance Requirements on page 11 for further information Never allow air passages to become obstructed
Item Description
Hardware bull Screws with grommets to mount non-display computersbull Clips to mount integrated display computers
Documents bull This publicationbull 6181P and 6181X Industrial Computers Cutout Template publication 6181P-DS002(1)
bull Production test report
(1) Shipped only with integrated display computers
Attribute Requirement
Wire material Stranded copper insulation 90 degC (194 degF) min
Wire gaugebull To connect to DC input terminal blockbull To connect to earth ground
bull The ambient air temperature must not exceed the maximum operating temperature in Environmental Specifications on page 30 Consider a user-supplied fan heat exchanger or air conditioner for heat that is generated by other devices in the enclosure
bull The relative humidity of the ambient air must not exceed limits in Environmental Specifications on page 30 and must avoid condensation
bull The enclosure or cover must always remain in place during operation The cover provides protection against high voltages inside the computer and inhibits radio frequency emissions that can interfere with other equipment
bull When mounted the computer cannot be tilted from vertical
TIP Hot air rises The temperature at the top of the enclosure is often higher than the temperature in other parts of the enclosure which is likely if air is not circulating
IMPORTANT The computer can operate at a range of extremes If you continuously operate the computer at its highest rated temperature then the life span of any electronic device is shortened which includes the touch screen and LCD panel
55 degC (131 degF) maxoutside enclosure
70 degC (158 degF) max inside enclosure
Restricted Access Location
Non-display ComputerIntegrated display computer
70 degC (158 degF) max inside enclosure
Integrated Display Computers Non-display Computer
Top
Bottom (IO ports)
Top
Bottom (IO ports)
Vertical(0deg tilt)
Top
Bottom (IO ports)
Vertical(0deg tilt)
PCAP Touch Screen Resistive Touch Screen
10 Rockwell Automation Publication 6181X-IN002C-EN-P - October 2019
Industrial Computers for Hazardous Locations
Mounting Clearance Requirements
Minimum Clearances (display model shown)
IMPORTANT Because of self-heating do not operate the computer in an enclosure by using the minimum clearances unless adequate ventilation or other methods are used to lower the temperature within the enclosure
Allow enough clearance to install or remove peripheral components such as internal drives
The minimum required enclosure size (HxWxD) is 403 x 497 x 154 mm (1587 x 1957 x 606 in)
Right and left are based on facing a computer from inside an enclosure
Item Description Value
1 Top 50 mm (2 in)
2 Right (for airflow) 50 mm (2 in)
3 Rear 50 mm (2 in)
4 Left (for airflow and drive access) 127 mm (5 in)
5 Bottom (for IO port access and ventilation) 102 mm (4 in)
4
5
3
12
Air Flow Direction
Rockwell Automation Publication 6181X-IN002C-EN-P - October 2019 11
Industrial Computers for Hazardous Locations
Computer DimensionsReview computer dimensions to estimate the clearance necessary for computer installation
Non-display Computers
16 (006)
1905 (75)
834 (328)575
(226)3353 (132)
3202 (1261)
2382 (937)
164 (065)
164(065)
871 (343)
871 (343)
871 (343)
251 (988)
Dimensions are in mm (in)
12 Rockwell Automation Publication 6181X-IN002C-EN-P - October 2019
Industrial Computers for Hazardous Locations
Integrated Display Computers
115 (453)349 (1374)
1013 (4)
754 (297)145 (057)
320 (126)
251 (988)
279 (1098)
115 (453)
Dimensions are in mm (in)
349 (1374)
1013 (4)
754 (297)145 (057)
251 (988)
279 (1098)
Resistive Touch Screen
PCAP Touch Screen
Rockwell Automation Publication 6181X-IN002C-EN-P - October 2019 13
Industrial Computers for Hazardous Locations
Tools for Computer InstallationThese tools are required for computer installation
bull 2 cross-head screwdriver bull Panel cut out tools (for panel mounting)bull Drill motor drill bit and M4 screw tap (for wall mounting)bull Anti-static wriststrap
Install the ComputerThe computers support these mounting options
bull Panel mount (integrated display computer models)bull Wall mount (non-display computer models)
Panel Mounting Guidelines Observe these guidelines when you install the computer in a panel
bull Remove all electrical power from the panel before making the cutoutbull Verify that there is adequate space behind the panel For specific information see
Mounting Clearance Requirements on page 11bull Cut supporting panels to specifications before installation Take precautions so metal
cuttings do not enter components that are already installed in the panelSupporting panels must be at least 16 gauge for proper sealing against water and dust and to provide proper support The supplied mounting hardware accommodates panel thickness between 16hellip6 gauge or 16hellip6 mm (0064hellip024 in) Make sure that the area around the panel cutout is clear
Panel Cut Out DimensionsThe 6181P and 6181X Industrial Computers Cut Out Template publication 6181P-DS002 is shipped with all 6181X integrated display computers
The integrated display computers must be mounted to meet these panel cut out dimensions
ATTENTION Failure to follow these guidelines can result in personal injury or damage to the panel components
Cat Nos Cut Out Dimensions (H x W) Approx
6181X-12A2SW71DC6181X-12A2SWX1DC6181X-12P2SWX1DC
254 x 324 mm (10 x 1276 in)
14 Rockwell Automation Publication 6181X-IN002C-EN-P - October 2019
Industrial Computers for Hazardous Locations
Mount the Integrated Display Computer in a PanelUse the supplied clips to secure the integrated display computer to the panel
Follow these steps to mount the integrated display computer in a panel
1 Remove power from the panel
2 Verify that the panel surface around the area to be cut is clean and free of debris
3 Cut an opening in the panel by using the appropriate panel cutout dimensions
4 Make sure that the sealing gasket is properly positioned on the computer
This gasket forms a compression-type seal Do not use sealing compounds
5 Place the computer in the panel cutout
6 Slide the clips into the holes on the top bottom and sides of the computer
7 Hand-tighten the clips around the bezel by following this tightening sequence
8 Repeat this process at least three times until the clips are hand-tight and the gasket is compressed uniformly against the panel
9 Tighten the clips to a torque of 135 Nbullm (12 lbbullin) by following the torque sequence making sure not to overtighten
Cat Nos Clips (qty) Cat No Description6181X-12A2SW71DC 10 6189X-MCLPS Replacement mounting clips (10)6181X-12A2SWX1DC6181X-12P2SWX1DC
ATTENTION Take precautions so metal cuttings do not enter components that are already installed in the panel to avoid personal injury or damage to the panel components
5
4
3
6
9 1 10
8 2 7
Hand-tighten and Torque Sequence
Rockwell Automation Publication 6181X-IN002C-EN-P - October 2019 15
Industrial Computers for Hazardous Locations
10 Repeat this process at least three times until the clips are properly torqued making sure that the gasket is compressed uniformly against the panel
Mount the Non-display Computer on a WallUse the four supplied screws to secure the non-display computer to a metal wall such as a steel panel in an enclosure or equipment room
Follow these steps to mount a non-display computer
1 Verify that the power is disconnected
2 After you decide where to mount the computer drill holes in the wall to accommodate the four supplied M4 panhead screws
The illustration shows the mounting hole locations with dimensions in mm (in)
3 Attach two of the supplied screws with grommets to positions 1 and 2
4 Mount the computer to the wall
5 Attach the remaining two supplied screws with grommets to positions 3 and 4
6 Tighten to a torque that is appropriate for the screw and wall material
The recommended torque in steel is 113hellip136 Nbullm (10hellip12 lbbullin)
ATTENTION Tighten the clips to the specified torque to provide a proper seal and to help prevent damage to the computer Rockwell Automation assumes no responsibility for water or chemical damage to the computer or other equipment within the enclosure because of improper installation
IMPORTANT Do not mount the non-display computer on a horizontal surface
3353 (132)
1905 (75)
43
21
16 Rockwell Automation Publication 6181X-IN002C-EN-P - October 2019
Industrial Computers for Hazardous Locations
Hardware FeaturesThis section shows the hardware features of the industrial computers for hazardous locations An integrated display computer with a resistive touch screen is shown for illustrative purposes
Item Component Item Component
1 LCD panel (only on display models) 8 Power switch
2 128 GB MLC SSD 9 DC input terminal block
3 Rear cover 10 Functional ground screw
4 CompactFlash (CF) Type II card slot(1)
(1) The USB ports and the bottom CF card slot are hot swappable but only in non-hazardous locations For more information about proper use of these ports refer to Outdoor Installation on page 4
11 4 USB 30 ports(1)
5 Serial COM ports (RS-232) 2 12 DVI-D port
6 1 Gb LAN ports (RJ45) 2 13 DisplayPort
7 PCIe riser slot cover
1
3
2
4 5 6 7
13 11 10 9 812
Rockwell Automation Publication 6181X-IN002C-EN-P - October 2019 17
Industrial Computers for Hazardous Locations
Connect Power Display and non-display computers have a DC input terminal block for connection to an 18hellip32V DC power source
Operate the computer in an industrial or control room environment which uses some form of power isolation from the public low-voltage mains
The DC power option supports operation from safety extra low voltage (SELV) power source
The power supply is internally protected against reverse polarity
Follow these steps to connect the computer to a DC power source
1 Turn off the main power switch or breaker
2 Verify that the DC power wires meet the requirements in the table in Installation Guidelines on page 9
3 Secure the DC power wires to the terminal block by tightening the terminal block screws to the torque value listed in the table in Installation Guidelines on page 9
ATTENTION When you connect power to the computer for the first time these actions occur
bull The default BIOS setting automatically starts the computer after it is plugged into a power source
bull You must read and accept an End-User Setup procedure for computers with a Windows operating system
Do not disconnect power from the system until after the Windows Setup procedure is completed Disconnecting power during this procedure can result in a corrupted system image
ATTENTION Supply the computer circuit with its own disconnect Use an uninterruptible power source (UPS) to help protect against unexpected power failure or power surges
Always shut down the Windows operating system before disconnecting power to the computer to minimize performance degradation and operating system failures
ATTENTION Use a SELV isolated and ungrounded power supply as input power to the computer This power source provides protection so that under normal and single fault conditions the voltage between the conductors and Functional EarthProtective Earth does not exceed a safe value
IMPORTANT A functional ground connection is required for EMC compliance
-V +V
18 Rockwell Automation Publication 6181X-IN002C-EN-P - October 2019
Industrial Computers for Hazardous Locations
4 Secure the ground wire to the functional ground screw by using a ring connector
Tighten the functional ground screw to the computer at the torque value listed in the table in Installation Guidelines on page 9
5 Apply 18hellip32V DC power to the computer
Connect to a NetworkThe computers have two 1 Gb LAN ports The computers connect to an Ethernet network by using CAT5 or better twisted-pair Ethernet cable with RJ45 connectors
IMPORTANT When using the functional ground screw connect the computer to earth ground by using the wire gauge listed in the table in Installation Guidelines on page 9
WARNING When you connect a LAN cable verify that the cable is fully inserted in the LAN port and the latch is engaged Failure to do so could result in an electric arc that can cause an explosion in a hazardous location
IMPORTANT To help prevent performance degradation of Ethernet communication do not subject the computer or cables to extreme radiation or conducted high-frequency noise
In industrial environments proper cable routing and power conditioning are required for Ethernet communication Rockwell Automation recommends that you route all Ethernet cable through dedicated metal conduits For improved performance reliability install ferrite bead filters at the cable ends
Ring Connector
Functional Ground Screw
Rockwell Automation Publication 6181X-IN002C-EN-P - October 2019 19
Industrial Computers for Hazardous Locations
Accessories and Replacement PartsYou can view a current list of accessories and replacement parts at httpsabrockwellautomationcomComputersHazardous-Location-Display-Computersselection
Review the specifications of a new component before you install it to verify that it is compatible with the computer Record the model and serial number and any other pertinent information of new components for future reference
Voltage PrecautionsThe computers contain line voltages Disconnect all power to the computer before you install or remove components
Electrostatic Discharge Precautions
Follow these precautions
bull Keep electrostatic-sensitive parts in their containers until they arrive at the designated static-free work area
bull Cover the designated work area with approved static-dissipating material ndash Use an anti-static wriststrap that is connected to the work surfacendash Use properly grounded tools and equipment
bull Keep the designated work area free of nonconductive materials such as ordinary plastic assembly-aids and foam packing
bull Avoid contact with pins leads or circuitrybull Always hold components with a printed circuit board (PCB) by its edges and place it
with the assembly side downbull To minimize risk from electrostatic discharge only clean displays with a damp cloth
IMPORTANT We recommend that you use only Allen-Bradleyreg approved accessories and replacement parts
SHOCK HAZARD Disconnect all power to the computer before you remove components
Failure to disconnect power can result in severe electric shock to an individual or electrostatic discharge (ESD) damage to the computer and components
ATTENTION Electrostatic discharge (ESD) can damage static-sensitive devices or microcircuitry
bull Disconnect all power before you work on the computer as detailed in Voltage Precautions on page 20
bull Observe proper packaging and grounding techniques to help prevent damage
20 Rockwell Automation Publication 6181X-IN002C-EN-P - October 2019
Industrial Computers for Hazardous Locations
Preconfiguration
Follow these steps before you remove the cover or replace a hardware component
1 Shut down the computer and all peripherals that are connected to it
2 To avoid exposure to high energy levels disconnect all cables from power outlets
If necessary label each cable to expedite reassembly
3 To avoid exposure to a shock hazard from ring voltages disconnect telecommunication cables
Post-configurationFollow these steps after you install or remove a hardware component
1 Make sure that all components are installed according to instructions
2 Make sure that no tools or loose parts are left inside the computer
3 Reinstall any expansion boards peripherals and system cables that were previously removed
4 Reinstall the cover according to the instructions on page 22
5 Reconnect all external cables and power to the computer
6 Press the power switch to start the computer
Tools for Component ReplacementThe following tools are required for component replacement
IMPORTANT When you install hardware or you perform maintenance procedures that require access to internal components we recommend that you first back up all computer data to avoid loss
ATTENTION Make sure to read and understand all installation and removal procedures before you begin to configure the computer hardware
Rockwell Automation Publication 6181X-IN002C-EN-P - October 2019 21
Industrial Computers for Hazardous Locations
Remove the CoverTo install replace or upgrade internal computer components you must first remove the cover
Follow these steps to remove the rear cover
1 Follow the steps for Preconfiguration on page 21
2 Loosen the three screws that secure the rear cover (A)
3 Open the cover (B) and detach it from the chassis (C)
4 After you have installed replaced or upgraded internal computer components reinstall the cover as detailed in Reinstall the Cover on page 22
Reinstall the CoverFollow these steps to reinstall the rear cover
1 Follow steps 1hellip3 for Post-configuration on page 21
2 Reattach the rear cover to the chassis (D)
3 Close the cover (E)
4 Tighten the three screws to secure the rear cover (F)
5 Follow steps 5 and 6 for Post-configuration on page 21
Load a CompactFlash CardThe computers have one location to load a CompactFlash (CF) Type II card which is the slot on the IO port panel below the serial ports This slot is functionally hot-swappable but only in a non-hazardous location It is meant to be a data slot but it is bootable
A
BA
A
C
C
F
EF
F
D
D
22 Rockwell Automation Publication 6181X-IN002C-EN-P - October 2019
Industrial Computers for Hazardous Locations
See Hardware Features on page 17 for the CF card slot location
Follow these steps to load a CF card in the bottom CF card slot
1 Loosen the screw that secures the CF card slot cover (A)
2 Open the CF card slot cover (B)
If necessary remove an inserted card by pushing the button on the hinge side
3 Insert the new CF card into the slot until it is firmly seated (C)
4 Close the CF card slot cover (D)
5 Tighten the CF card slot cover screw (E)
WARNING Do not connect or disconnect components unless power has been switched off and the area is known to be non-hazardous
WARNING Use only catalog numbers 6189V-CFSSD8GB and 6189V-CFSSD16GB CF cards in 6181X computers for hazardous locations
Substitution of components can impair suitability for hazardous locations
WARNING The CF card slot on the bottom side of all computer models is hot-swappable but only in a non-hazardous location You can insert or remove a card from this slot while the computer is powered on
When the computer is used in a hazardous location do not insert or remove a card in the bottom CF card slot unless power has been switched off
ATTENTION When properly seated more than 80 of the CF card easily inserts into the slot before you encounter resistance If you encounter resistance sooner then remove the card rotate it 180deg and reinsert
Do not force the card into the slot or you can damage the connector pins
IMPORTANT For computers in ATEX and IECEx applications the CF card slot cover screw (step E in the illustration) must be hand-tightened and verified as secure
C
EA
B D
Rockwell Automation Publication 6181X-IN002C-EN-P - October 2019 23
Industrial Computers for Hazardous Locations
Install an Add-in Card
Follow these steps to install an add-in card
1 Disconnect power from the computer
2 Remove the back cover from the computer as detailed on page 22
3 Remove the one screw that secures the slot cover
Save the screw for the add-in card install
4 Remove and store the slot cover
5 Hold the add-in card by its edges and remove it from its protective packaging
6 Install a PCIe or PCI add-in card
For a PCIe add-in carda Connect the PCIe add-in board to the corresponding slot on the factory-supplied
PCIe riser cardb Verify that the add-in card is properly seated in the riser cardc Use the slot cover screw to secure the add-in card to the slot
IMPORTANT For hazardous locations please note the following
bull The integrated display computers with a resistive touch screen were evaluated for use with a PCIe add-in card
bull The integrated display computer with a PCAP touch screen and non-display computers were evaluated for use with PCIe and PCI add-in cards
IMPORTANT Use an anti-static wriststrap that is connected to the work surface and properly grounded tools and equipment
Hold any card by its edges to avoid touching the contacts on the bottom or circuitry on the board
ATTENTION Do not discard the slot cover If the add-in card is removed in the future the slot cover and its screw must be reinstalled to maintain agency access requirements
Cat No 6189X-PCIRISERPCI Riser Card
Factory-installedPCIe Riser Card
24 Rockwell Automation Publication 6181X-IN002C-EN-P - October 2019
Industrial Computers for Hazardous Locations
For a PCI add-in carda Remove the three screws that secure the add-in card tray
b Remove the add-in card trayc Remove the two screws that connect the factory-supplied PCIe riser card to the
add-in card tray
d With the two screws that you removed connect a PCI riser card (such as Cat No P6189X-PCIRISER) to the add-in card tray
e Replace the add-in card tray and tighten its three screwsf Connect the PCI add-in card to the corresponding slot on the PCI riser cardg Verify that the add-in card is properly seated in the riser card sloth Use the slot cover screw to secure the add-in card to the slot
7 Connect the necessary cables to the add-in card
See the documentation that came with the card
8 Reinstall the computer cover as detailed in Reinstall the Cover on page 22
Rockwell Automation Publication 6181X-IN002C-EN-P - October 2019 25
Industrial Computers for Hazardous Locations
Replace or Add Memory ModulesThe computers have two dual-channel DDR3 SO-DIMM slots that support up to 16 GB maximum system memory
Memory Configuration GuidelinesFollow these guidelines when you replace or add memory to the computers
Replace or Add Memory ModulesFollow these steps to replace or add memory modules
1 Follow the steps for Preconfiguration on page 21
2 Remove the computer cover as detailed in Remove the Cover on page 22
3 Locate the memory modules that you want to replace
IMPORTANT Both memory slots must be populated with memory modules of the same capacity All 6181X computers ship with a dual memory module configuration
All memory module upgrades on page 7 ship with heatsinks These memory modules replace any existing memory configurations including modules without heatsinks
WARNING Unless ordered differently 6181X computers ship with 8 GB of memory (2 x 4 GB) If upgrading to 16 GB of memory (2 x 8 GB) use only catalog number 6189X-16GDDR3 which is memory specifically for use in hazardous locations Other memory modules are not acceptable for use in hazardous locations
To avoid system instability use the same brand and model number of memory in the two slots
See httpsabrockwellautomationcomComputers for qualified replacement parts and accessories
IMPORTANT Use an anti-static wriststrap that is connected to the work surface and properly grounded tools and equipment
Hold all memory modules by their sides to avoid touching the contacts on the bottom or circuitry on the boards
Memory Modules With HeatsinksMemory Modules Without Heatsinks
26 Rockwell Automation Publication 6181X-IN002C-EN-P - October 2019
Industrial Computers for Hazardous Locations
4 Remove the existing memory modulesa Use your thumbs or two fingers to push open the lock levers which release each
memory module from its slot for easy removal See step 5 on page 27b Gently pull out each memory module to remove it from its slotc Place each memory module on a static-dissipating work surface or inside an
anti-static bag
5 Install the new memory modules with heatsinksa Orient each module so the notch on its
bottom edge aligns with the keyed surface of the DIMM slot
b Press each module fully into the slot to engage the lock levers
6 Reinstall the computer cover as detailed in Reinstall the Cover on page 22
7 Follow the steps for Post-configuration on page 21
Real-time Clock (RTC) BatteryThis computer contains a lithium battery that you cannot replace Return the computer to Rockwell Automation for battery replacement
For return information contact your local distributor or Rockwell Automation representative or visit the Product and Application Support website
Ship or Transport the ComputerIf you must ship the computer via common carrier or otherwise transport it to another location for any reason then you must first uninstall the computer and place it in its original packing material
TIP The keyed surface is off center to assist the correct alignment
The sealed lithium battery that is contained in this computer could need replacement during the life of the computer
At the end of its life collect the battery in this computer separately from any unsorted municipal waste
ATTENTION Do not ship or transport the computer when it is installed in a machine panel or rack Doing so can damage the computer You must uninstall the computer and place it in its original packing material before shipping Rockwell Automation is not responsible for any damage to a computer that is shipped or transported while installed in a machine panel or rack
Lock Lever
Keyed Surface of DIMM Slot
Rockwell Automation Publication 6181X-IN002C-EN-P - October 2019 27
Industrial Computers for Hazardous Locations
Technical SpecificationsHardware and Software Specifications
Display type Active matrix color TFT Projected capacitive (PCAP)
Touch screen Resistive sunlight readable film Chemically strengthened glass with matte finish to help reduce glareSupports 10-point multi-touch operation
Temperature operatingbull Non-display modelsbull Display models(1)
(1) See Installation Guidelines on page 9 for more information about temperature guidelines
-20hellip+70 degC (-4hellip+158 degF)-20hellip+55 degC (-4hellip+131 degF) display side -20hellip+70 degC (-4hellip+158 degF) back side
Temperature nonoperating -30hellip+80 degC (-22hellip+176 degF)
Relative humidity 10hellip90 without condensation
Altitude operating 2000 m (6561 ft)
Altitude nonoperating 12000 m (40000 ft)
Shock operating(2)
(2) Applies to panel-mounted integrated display computers and wall-mounted non-display computers
15 g (12 sine 11 ms)
Shock nonoperating(2) 30 g (12 sine 11 ms)
Vibration operating(2) 0012 in p-p (10hellip57 Hz) 2 g peak (57hellip640 Hz)
Enclosure ratingsDisplay models Rated for UL Type1 4 4X 12 13 and classified by UL in accordance with IEC 60529
IP66 when properly mounted on a flat surface of an equivalent-type enclosure
30 Rockwell Automation Publication 6181X-IN002C-EN-P - October 2019
Industrial Computers for Hazardous Locations
CertificationsFor the most current information on all certifications for 6181X computers visit the Rockwell Automation Product Certifications website at rokautocertifications
Additional ResourcesThese documents contain additional information to related products from Rockwell Automation
You can view or download publications at httpswwwrockwellautomationcomgloballiterature-libraryoverviewpage To order paper copies of technical documentation contact your local Allen-Bradley distributor or Rockwell Automation sales representative
RoHS Turkey RoHS (EEE Youmlnetmeliğine Uygundur In Conformity with the EEE Regulation)
UAE RoHS
EAC
Resource Description
Industrial Computer for Hazardous Locations User Manual publication 6181X-UM001
Gives an overview of the system and provides procedures to install the computer set up computer connections operate the computer and troubleshoot the computer
Industrial Automation Wiring and Grounding Guidelines publication 1770-41
Provides general guidelines for installing a Rockwell Automationreg industrial system
Rockwell Automation Publication 6181X-IN002C-EN-P - October 2019 31
NotesRockwell Automation SupportUse the following resources to access support information
Documentation FeedbackYour comments will help us serve your documentation needs better If you have any suggestions on how to improve this document complete the How Are We Doing form at httpsliteraturerockwellautomationcomidcgroupsliteraturedocumentsdura-du002_-en-epdf
Technical Support Center
Knowledgebase Articles How-to Videos FAQs Chat User Forums and Product Notification Updates
Allen-Bradley Rockwell Automation and SLC are trademarks of Rockwell Automation IncIntel and Core are trademarks of Intel CorporationMicrosoft and Windows are trademarks of Microsoft Corporation
Rockwell Otomasyon Ticaret AŞ Kar Plaza İş Merkezi E Blok Kat6 34752 İccedilerenkoumly İstanbul Tel +90 (216) 5698400
Rockwell Automation maintains current product environmental information on its website athttpswwwrockwellautomationcomrockwellautomationabout-ussustainability-ethicsproduct-environmental-compliancepage
Publication 6181X-IN002C-EN-P - October 2019 PN-430666DIR 10003051710_02
Supersedes Publication 6181X-IN002B-EN-P - August 2017 Copyright copy 2019 Rockwell Automation Inc All rights reserved Printed in China
PN-430666PN-430666
Industrial Computers for Hazardous Locations Installation Instructions Series H
Summary of Changes
Installation Precautions
Environment and Enclosure Information
European Union Directive
Outdoor Installation
Hazardous Locations
The Following Conditions for Safe Use Apply in ATEX IECEx and INMETRO
Conditions for Safe Use in North American Hazardous Locations
This tab summarizes Rockwell Automation Global Sales and Marketing preferred printing standards It also provides guidance on whether a publication should be released print on demand or if it requires an RFQ for offset printingFind your publication type in the first section below Use the assigned Printing Category information to determine the standard print specifications for that document type The Printing Categories are defined below the Publication Type section Note there may be slightly different print specifications for the categories depending on the region (EMEA or Americas)For more information on Global Sales and Marketing Printing Standards see publication RA-CO004 in DocMan
Publication Type and Print Category
Publication Type
Off Set Print Category Spec (See tables below)
Print on Demand Spec (See tables below)
Description
Order Min
Order Max
Life Cycle Usage Release Option
AD
NA - Puttman
NA
Advertisement Reprint Colour
NA
NA
Presale Internal
AP
A3
D2
Application Solution or Customer Success Story
5
100
Presale External
AR
NA
NA
ArticleEditorialByline
NA
NA
Presale Internal
(press releases should not be checked into DocMan or printed)
AT
B3 B4
D5
Application techniques
5
100
Presale External
BR
A2 Primary A1
NA
Brochures
5
100
Presale External
CA
C2 Primary C1
NA
Catalogue
1
50
Presale External
CG
NA
NA
Catalogue Guide
1
50
Presale External
CL
NA
NA
Collection
5
50
Presale External
CO
A5 A6 A9
D5
Company Confidential Information
NA
NA
NA Confidential
CP
E-only
E-only D5
Competitive Information
5
50
NA Confidential
DC
E-only
E-only
Discount Schedules
NA
NA
Presale Internal
DI
A1 A3
NA
Direct Mail
5
100
Presale Internal
DM
NA
NA
Product Demo
5
50
Presale Internal
DS
B3
D5
Dimensions Sheet
1
5
Post External
DU
B3
D5
Document Update
1
5
Post External
GR
B2
D6
Getting Results
1
5
Post External
IN
B3 Primary B2
D5 D6
Installation instructions
1
5
Post External
LM
NA
NA
Launch Materials
5
50
Presale Internal
PC
B3
D5
Packaging Contents
PL
E-only primary B3
E-only
Price List
5
50
Presale Internal
PM
B2
D6
Programming Manual
1
5
Post External
PP
A3
D1
Profile (Single Product or Service) NOTE Application Solutions are to be assigned the AP pub type
5
100
Presale External
QR
B2 primary B3 B5
D5 D6
Quick Reference
1
5
Post External
QS
B2 primary B3 B5
D5 D6
Quick Start
1
5
Post External
RM
B2
D5 D6
Reference Manual
1
5
Post External
RN
B3
D5
Release Notes
1
5
Post External
SG
B1 Primary B4
D5 D6
Selection Guide Colour
5
50
Presale External
SG
B2
D5 D6
Selection Guide BW
5
50
Presale External
SP
A1 A2 A3 A4
NA
Sales Promotion NOTE Service profiles are to be assigned the PP pub type
5
100
Presale Internal
SR
B2 B3
D5 D6
Specification Rating Sheet
5
100
Presale External
TD
B2 Primary B3 B4 B5
D5 D6
Technical Data
5
50
Presale External
TG
B2 B3
D6
Troubleshooting Guide
1
5
Post External
UM
B2 Primary B4
D6
User Manual BW
1
5
Post External
WD
B3
D5
Wiring Diagrams Dwgs
1
5
Post Internal
WP
B3 Primary B5
D5
White Paper
5
50
Presale External
Minimum order quantities on all POD items are based on the publication length
Publication length
Minimum Order Quantity
77 or more pages
1 (no shrink wrap required)
33 to 76 pages
25
3 to 32 pages
50
1 or 2 pages
100
Pre-sale Marketing
All paper in this category is White Brightness 90 or better Opacity 90 or better
Category
Color Options
AP EMEA Paper Requirements
Canada LA US Paper Requirements
A1
4 color
170 gsm 2pp
100 gloss cover 100 gloss text
A2
4 color
170 gsm folded 4pp
100 gloss cover 80 gloss text
A3
4 color
Cover 170 gsm with Body 120 gsm gt 4pp
80 gloss cover 80 gloss text
A4
2 color
170gsm Silk ndash 120gsm Silk
80 gloss cover 80 gloss text
A5
2 color
170gsm Silk ndash 120gsm Silk
80 gloss cover 80 matt sheet text
A6
1 color
170gsm Silk ndash 120gsm Silk
80 gloss cover 80 matt sheet text
A7
4 color cover2 color textSelection Guide
Category being deleted
10 Point Cover C2S50 matte sheet text
A8
4 color cover
Category being deleted
50 matte sheet text self cover
2 color text
Selection Guide
A9
2 color
100gsm bond
50 matte sheet text self cover
Selection Guide
Gray shading indicates Obsolete Print Catagories
Post Sale Technical Communication
Category
Color Options
AP EMEA Paper Requirements
Canada LA US Paper Requirements
B1
4 color cover
270gsm Gloss 100gsm bond
10 Point Cover C2S
2 color text
50 matte sheet text
B2
1 color
160gsm Colortech amp 100gsm Bond
90 Cover50 matte sheet text
B3
1 color
100gsm bond
50 matte sheet text self cover
B4
2 color
160gsm Colortech amp 100gsm Bond
90 Cover50 matte sheet text
B5
2 color
100gsm bond
50 matte sheet text self cover
Catalogs
Category
Color Options
AP EMEA Paper Requirements
Canada LA US Paper Requirements
C1
4 color cover
270gsm Gloss 90gsm silk
10 Point Cover C2S
4 color text
45 Coated Sheet
C2
4 color cover
270gsm Gloss 80gsm silk
10 Point Cover C2S
2 color text
32-33 Coated Sheet
Print on Demand by Print Vendor (POD)
All paper in this category is White Brightness 82 or better Opacity 88 or better
Category
Color Options
AP EMEA Paper Requirements
Canada LA US Paper Requirements
D1
4 color
170gsm white silk
80 gloss cover coated 2 sides
D2
4 color
120gsm white silk
80 gloss text coated 2 sides self cover
D3
4 color
Cover 170gsm with Body 120gsm
80 gloss cover 80 gloss text coated 2 sides
D4
1 color
160gsm tab
90 index
D5
1 color
80gsm bond
20 bond self cover
D6
1 color
Cover 160gsm tab with Body 80gsm bond
90 index 20 bond
D7
2 color
160gsm tab
90 index
D8
2 color
80gsm bond
20 bond self cover
D9
2 color
Cover 160gsm tab with Body 80gsm bond
90 index 20 bond
D10
Combination 4 color cover with 2 color body
Cover 160gsm with Body 80gsm
90 index 20 bond
Gray shading indicates Obsolete Print Catagories
Print on Demand By Print Vendor (POD) or Off Set (OS)
Use these guidelines to determine if your publication should be print on demand by print vendor (POD) or if it would be more economical to print ffseton a press (OS) OS print jobs require an RFQ (Request For Quote) in US If your job fits into the ldquoEitherrdquo category an RFQ is recommended but not required In the US RA Strategic Sourcing will discourage or reject RFQs for jobs that fall within the POD category Guidelines differ for black amp white and color printing so be sure to check the correct tables
RA-QR005K-EN-P
Jan-19
Printing Specification
YOUR DATA HERE
Instructions
NO
(required) Publication Number
6181X-IN002C-EN-P
Sample 2030-SP001B-EN-P
11rdquo x 17rdquo
LOOSE -Loose Leaf
YES
Pre-sale Marketing
TOP
Use Legacy Number
YES or NO
85rdquo x 11rdquo
PERFECT - Perfect Bound
A1
LEFT
Legacy Number if applicable
Sample Legacy Number 0160-533
8375rdquo x 10875
SADDLE - Saddle Stitch
A2
RIGHT
CORNER
Publication Title
Industrial Computers for Hazardous Locations Installation Instructions
Sample ElectroGuard Selling Brief80 character limit - must match DocMan Title
825rdquo x 11rdquo (RA product profile std)
PLASTCOIL - Plastic Coil (Coil Bound)
A4
BOTTOM
SIDE
Used in Manufacturing
NO
YES or NO - If Yes must have Part No listed below
825rdquo x 10875rdquo
STAPLED1 -1 position
A3
Part Number
PN-430666
If SAP Part Number be sure to enter PN- before the number
7385rdquo x 9rdquo (RSI Std)
STAPLED1B - bottom 1 position
A5
(required) Category
D5
Select Print Category ABC or D from category list on Introduction_Category Types tab
6rdquo x 4rdquo
STAPLED2 - 2 positions
A6
Paper Stock Color
White
White is assumed For color options contact your vendor
55rdquo x 85rdquo (half-size)
THERMAL - Thermal bound (Tape bound)
A7
Ink Color
Black
One color assumes BLACK 4 color assume CMYK Indicate PMS number here
475rdquo x 775rdquo
THERMALO - Thermal Bound (Tape bound - offline)
A8
(required) Page Count ofPublication
32
Total page count including cover Enter PAGE count not SHEET count
475rdquo x 7rdquo (slightly smaller half-size)
A9
(required) Finished Trim Size Width
85rdquo x 11rdquo
This is sheet size before folding
425 x 550
Post Sale Technical Communication
Fold
Half or V or Single Fold
Review key below Leave blank if folded for saddle stitching
4rdquo x 6rdquo
B1
Finished Fold Size
55 x 85
This is size after folding is completed
3rdquo x 5rdquo
B2
BindingStitching
STAPLED2 - 2 positions
Review key below
9rdquo x 12rdquo (Folder)
B3
None
Stitching Location
Blank Corner or Side
A4 (8 frac14rdquo x 11 frac34rdquo) (210 x 297 mm)
B4
Half or V or Single Fold
Drill Hole (YesNo)
All drilled publications use the 5-hole standard 516 inch-size hole and a minimum of frac14 inch from the inner page border
A5 (583rdquo x 826rdquo) (148 x 210 mm)
B5
C or Tri-Fold
Number of Tabs Needed
5 tab in stock at RR Donnelley
36rdquo x 24rdquo Poster
Catalogs
DbleParll
Number of Pages per Pad
Average sheets of paper 25 50 75100 Max
24rdquo x 36rdquo Poster
C1
Sample
Glue Location on Pad
Glue location on pads
18rdquo x 24rdquo Poster
C2
Short (must specify dimensions between folds in Comments)
Comments
DIR 10003051710_02
Print on Demand (POD)
Double Gate
Saddle-Stitch Items All page quantities must be divisible by 4Note Stitching is implied for Saddle-Stitch -no need to specify in Stitching Location80 pgs max on 20 (text and cover)76 pgs max on 20 (text) and 24 (cover)72 pgs max on 24 (text and cover)Perfect Bound Items940 pgs max wcover (90 index unless indicated otherwise)70 pgs min for spine without words200 pgs min for spine with words Plastic Coil Bound Items530 pgs max of 20 (if adding cover deduct equivalent number of pages to equal cover thickness) (90 index unless indicated otherwise)Tape Bound Items250 pgs max on 20 no cover240 pgs max wcover (90 index unless indicated otherwise)
D1
D2
D5
D6
Industrial Computers for Hazardous Locations
Technical SpecificationsHardware and Software Specifications
Display type Active matrix color TFT Projected capacitive (PCAP)
Touch screen Resistive sunlight readable film Chemically strengthened glass with matte finish to help reduce glareSupports 10-point multi-touch operation
Temperature operatingbull Non-display modelsbull Display models(1)
(1) See Installation Guidelines on page 9 for more information about temperature guidelines
-20hellip+70 degC (-4hellip+158 degF)-20hellip+55 degC (-4hellip+131 degF) display side -20hellip+70 degC (-4hellip+158 degF) back side
Temperature nonoperating -30hellip+80 degC (-22hellip+176 degF)
Relative humidity 10hellip90 without condensation
Altitude operating 2000 m (6561 ft)
Altitude nonoperating 12000 m (40000 ft)
Shock operating(2)
(2) Applies to panel-mounted integrated display computers and wall-mounted non-display computers
15 g (12 sine 11 ms)
Shock nonoperating(2) 30 g (12 sine 11 ms)
Vibration operating(2) 0012 in p-p (10hellip57 Hz) 2 g peak (57hellip640 Hz)
Enclosure ratingsDisplay models Rated for UL Type1 4 4X 12 13 and classified by UL in accordance with IEC 60529
IP66 when properly mounted on a flat surface of an equivalent-type enclosure
30 Rockwell Automation Publication 6181X-IN002C-EN-P - October 2019
Industrial Computers for Hazardous Locations
CertificationsFor the most current information on all certifications for 6181X computers visit the Rockwell Automation Product Certifications website at rokautocertifications
Additional ResourcesThese documents contain additional information to related products from Rockwell Automation
You can view or download publications at httpswwwrockwellautomationcomgloballiterature-libraryoverviewpage To order paper copies of technical documentation contact your local Allen-Bradley distributor or Rockwell Automation sales representative
RoHS Turkey RoHS (EEE Youmlnetmeliğine Uygundur In Conformity with the EEE Regulation)
UAE RoHS
EAC
Resource Description
Industrial Computer for Hazardous Locations User Manual publication 6181X-UM001
Gives an overview of the system and provides procedures to install the computer set up computer connections operate the computer and troubleshoot the computer
Industrial Automation Wiring and Grounding Guidelines publication 1770-41
Provides general guidelines for installing a Rockwell Automationreg industrial system
Rockwell Automation Publication 6181X-IN002C-EN-P - October 2019 31
NotesRockwell Automation SupportUse the following resources to access support information
Documentation FeedbackYour comments will help us serve your documentation needs better If you have any suggestions on how to improve this document complete the How Are We Doing form at httpsliteraturerockwellautomationcomidcgroupsliteraturedocumentsdura-du002_-en-epdf
Technical Support Center
Knowledgebase Articles How-to Videos FAQs Chat User Forums and Product Notification Updates
Allen-Bradley Rockwell Automation and SLC are trademarks of Rockwell Automation IncIntel and Core are trademarks of Intel CorporationMicrosoft and Windows are trademarks of Microsoft Corporation
Rockwell Otomasyon Ticaret AŞ Kar Plaza İş Merkezi E Blok Kat6 34752 İccedilerenkoumly İstanbul Tel +90 (216) 5698400
Rockwell Automation maintains current product environmental information on its website athttpswwwrockwellautomationcomrockwellautomationabout-ussustainability-ethicsproduct-environmental-compliancepage
Publication 6181X-IN002C-EN-P - October 2019 PN-430666DIR 10003051710_02
Supersedes Publication 6181X-IN002B-EN-P - August 2017 Copyright copy 2019 Rockwell Automation Inc All rights reserved Printed in China
PN-430666PN-430666
Industrial Computers for Hazardous Locations Installation Instructions Series H
Summary of Changes
Installation Precautions
Environment and Enclosure Information
European Union Directive
Outdoor Installation
Hazardous Locations
The Following Conditions for Safe Use Apply in ATEX IECEx and INMETRO
Conditions for Safe Use in North American Hazardous Locations
This tab summarizes Rockwell Automation Global Sales and Marketing preferred printing standards It also provides guidance on whether a publication should be released print on demand or if it requires an RFQ for offset printingFind your publication type in the first section below Use the assigned Printing Category information to determine the standard print specifications for that document type The Printing Categories are defined below the Publication Type section Note there may be slightly different print specifications for the categories depending on the region (EMEA or Americas)For more information on Global Sales and Marketing Printing Standards see publication RA-CO004 in DocMan
Publication Type and Print Category
Publication Type
Off Set Print Category Spec (See tables below)
Print on Demand Spec (See tables below)
Description
Order Min
Order Max
Life Cycle Usage Release Option
AD
NA - Puttman
NA
Advertisement Reprint Colour
NA
NA
Presale Internal
AP
A3
D2
Application Solution or Customer Success Story
5
100
Presale External
AR
NA
NA
ArticleEditorialByline
NA
NA
Presale Internal
(press releases should not be checked into DocMan or printed)
AT
B3 B4
D5
Application techniques
5
100
Presale External
BR
A2 Primary A1
NA
Brochures
5
100
Presale External
CA
C2 Primary C1
NA
Catalogue
1
50
Presale External
CG
NA
NA
Catalogue Guide
1
50
Presale External
CL
NA
NA
Collection
5
50
Presale External
CO
A5 A6 A9
D5
Company Confidential Information
NA
NA
NA Confidential
CP
E-only
E-only D5
Competitive Information
5
50
NA Confidential
DC
E-only
E-only
Discount Schedules
NA
NA
Presale Internal
DI
A1 A3
NA
Direct Mail
5
100
Presale Internal
DM
NA
NA
Product Demo
5
50
Presale Internal
DS
B3
D5
Dimensions Sheet
1
5
Post External
DU
B3
D5
Document Update
1
5
Post External
GR
B2
D6
Getting Results
1
5
Post External
IN
B3 Primary B2
D5 D6
Installation instructions
1
5
Post External
LM
NA
NA
Launch Materials
5
50
Presale Internal
PC
B3
D5
Packaging Contents
PL
E-only primary B3
E-only
Price List
5
50
Presale Internal
PM
B2
D6
Programming Manual
1
5
Post External
PP
A3
D1
Profile (Single Product or Service) NOTE Application Solutions are to be assigned the AP pub type
5
100
Presale External
QR
B2 primary B3 B5
D5 D6
Quick Reference
1
5
Post External
QS
B2 primary B3 B5
D5 D6
Quick Start
1
5
Post External
RM
B2
D5 D6
Reference Manual
1
5
Post External
RN
B3
D5
Release Notes
1
5
Post External
SG
B1 Primary B4
D5 D6
Selection Guide Colour
5
50
Presale External
SG
B2
D5 D6
Selection Guide BW
5
50
Presale External
SP
A1 A2 A3 A4
NA
Sales Promotion NOTE Service profiles are to be assigned the PP pub type
5
100
Presale Internal
SR
B2 B3
D5 D6
Specification Rating Sheet
5
100
Presale External
TD
B2 Primary B3 B4 B5
D5 D6
Technical Data
5
50
Presale External
TG
B2 B3
D6
Troubleshooting Guide
1
5
Post External
UM
B2 Primary B4
D6
User Manual BW
1
5
Post External
WD
B3
D5
Wiring Diagrams Dwgs
1
5
Post Internal
WP
B3 Primary B5
D5
White Paper
5
50
Presale External
Minimum order quantities on all POD items are based on the publication length
Publication length
Minimum Order Quantity
77 or more pages
1 (no shrink wrap required)
33 to 76 pages
25
3 to 32 pages
50
1 or 2 pages
100
Pre-sale Marketing
All paper in this category is White Brightness 90 or better Opacity 90 or better
Category
Color Options
AP EMEA Paper Requirements
Canada LA US Paper Requirements
A1
4 color
170 gsm 2pp
100 gloss cover 100 gloss text
A2
4 color
170 gsm folded 4pp
100 gloss cover 80 gloss text
A3
4 color
Cover 170 gsm with Body 120 gsm gt 4pp
80 gloss cover 80 gloss text
A4
2 color
170gsm Silk ndash 120gsm Silk
80 gloss cover 80 gloss text
A5
2 color
170gsm Silk ndash 120gsm Silk
80 gloss cover 80 matt sheet text
A6
1 color
170gsm Silk ndash 120gsm Silk
80 gloss cover 80 matt sheet text
A7
4 color cover2 color textSelection Guide
Category being deleted
10 Point Cover C2S50 matte sheet text
A8
4 color cover
Category being deleted
50 matte sheet text self cover
2 color text
Selection Guide
A9
2 color
100gsm bond
50 matte sheet text self cover
Selection Guide
Gray shading indicates Obsolete Print Catagories
Post Sale Technical Communication
Category
Color Options
AP EMEA Paper Requirements
Canada LA US Paper Requirements
B1
4 color cover
270gsm Gloss 100gsm bond
10 Point Cover C2S
2 color text
50 matte sheet text
B2
1 color
160gsm Colortech amp 100gsm Bond
90 Cover50 matte sheet text
B3
1 color
100gsm bond
50 matte sheet text self cover
B4
2 color
160gsm Colortech amp 100gsm Bond
90 Cover50 matte sheet text
B5
2 color
100gsm bond
50 matte sheet text self cover
Catalogs
Category
Color Options
AP EMEA Paper Requirements
Canada LA US Paper Requirements
C1
4 color cover
270gsm Gloss 90gsm silk
10 Point Cover C2S
4 color text
45 Coated Sheet
C2
4 color cover
270gsm Gloss 80gsm silk
10 Point Cover C2S
2 color text
32-33 Coated Sheet
Print on Demand by Print Vendor (POD)
All paper in this category is White Brightness 82 or better Opacity 88 or better
Category
Color Options
AP EMEA Paper Requirements
Canada LA US Paper Requirements
D1
4 color
170gsm white silk
80 gloss cover coated 2 sides
D2
4 color
120gsm white silk
80 gloss text coated 2 sides self cover
D3
4 color
Cover 170gsm with Body 120gsm
80 gloss cover 80 gloss text coated 2 sides
D4
1 color
160gsm tab
90 index
D5
1 color
80gsm bond
20 bond self cover
D6
1 color
Cover 160gsm tab with Body 80gsm bond
90 index 20 bond
D7
2 color
160gsm tab
90 index
D8
2 color
80gsm bond
20 bond self cover
D9
2 color
Cover 160gsm tab with Body 80gsm bond
90 index 20 bond
D10
Combination 4 color cover with 2 color body
Cover 160gsm with Body 80gsm
90 index 20 bond
Gray shading indicates Obsolete Print Catagories
Print on Demand By Print Vendor (POD) or Off Set (OS)
Use these guidelines to determine if your publication should be print on demand by print vendor (POD) or if it would be more economical to print ffseton a press (OS) OS print jobs require an RFQ (Request For Quote) in US If your job fits into the ldquoEitherrdquo category an RFQ is recommended but not required In the US RA Strategic Sourcing will discourage or reject RFQs for jobs that fall within the POD category Guidelines differ for black amp white and color printing so be sure to check the correct tables
RA-QR005K-EN-P
Jan-19
Printing Specification
YOUR DATA HERE
Instructions
NO
(required) Publication Number
6181X-IN002C-EN-P
Sample 2030-SP001B-EN-P
11rdquo x 17rdquo
LOOSE -Loose Leaf
YES
Pre-sale Marketing
TOP
Use Legacy Number
YES or NO
85rdquo x 11rdquo
PERFECT - Perfect Bound
A1
LEFT
Legacy Number if applicable
Sample Legacy Number 0160-533
8375rdquo x 10875
SADDLE - Saddle Stitch
A2
RIGHT
CORNER
Publication Title
Industrial Computers for Hazardous Locations Installation Instructions
Sample ElectroGuard Selling Brief80 character limit - must match DocMan Title
825rdquo x 11rdquo (RA product profile std)
PLASTCOIL - Plastic Coil (Coil Bound)
A4
BOTTOM
SIDE
Used in Manufacturing
NO
YES or NO - If Yes must have Part No listed below
825rdquo x 10875rdquo
STAPLED1 -1 position
A3
Part Number
PN-430666
If SAP Part Number be sure to enter PN- before the number
7385rdquo x 9rdquo (RSI Std)
STAPLED1B - bottom 1 position
A5
(required) Category
D5
Select Print Category ABC or D from category list on Introduction_Category Types tab
6rdquo x 4rdquo
STAPLED2 - 2 positions
A6
Paper Stock Color
White
White is assumed For color options contact your vendor
55rdquo x 85rdquo (half-size)
THERMAL - Thermal bound (Tape bound)
A7
Ink Color
Black
One color assumes BLACK 4 color assume CMYK Indicate PMS number here
475rdquo x 775rdquo
THERMALO - Thermal Bound (Tape bound - offline)
A8
(required) Page Count ofPublication
32
Total page count including cover Enter PAGE count not SHEET count
475rdquo x 7rdquo (slightly smaller half-size)
A9
(required) Finished Trim Size Width
85rdquo x 11rdquo
This is sheet size before folding
425 x 550
Post Sale Technical Communication
Fold
Half or V or Single Fold
Review key below Leave blank if folded for saddle stitching
4rdquo x 6rdquo
B1
Finished Fold Size
55 x 85
This is size after folding is completed
3rdquo x 5rdquo
B2
BindingStitching
STAPLED2 - 2 positions
Review key below
9rdquo x 12rdquo (Folder)
B3
None
Stitching Location
Blank Corner or Side
A4 (8 frac14rdquo x 11 frac34rdquo) (210 x 297 mm)
B4
Half or V or Single Fold
Drill Hole (YesNo)
All drilled publications use the 5-hole standard 516 inch-size hole and a minimum of frac14 inch from the inner page border
A5 (583rdquo x 826rdquo) (148 x 210 mm)
B5
C or Tri-Fold
Number of Tabs Needed
5 tab in stock at RR Donnelley
36rdquo x 24rdquo Poster
Catalogs
DbleParll
Number of Pages per Pad
Average sheets of paper 25 50 75100 Max
24rdquo x 36rdquo Poster
C1
Sample
Glue Location on Pad
Glue location on pads
18rdquo x 24rdquo Poster
C2
Short (must specify dimensions between folds in Comments)
Comments
DIR 10003051710_02
Print on Demand (POD)
Double Gate
Saddle-Stitch Items All page quantities must be divisible by 4Note Stitching is implied for Saddle-Stitch -no need to specify in Stitching Location80 pgs max on 20 (text and cover)76 pgs max on 20 (text) and 24 (cover)72 pgs max on 24 (text and cover)Perfect Bound Items940 pgs max wcover (90 index unless indicated otherwise)70 pgs min for spine without words200 pgs min for spine with words Plastic Coil Bound Items530 pgs max of 20 (if adding cover deduct equivalent number of pages to equal cover thickness) (90 index unless indicated otherwise)Tape Bound Items250 pgs max on 20 no cover240 pgs max wcover (90 index unless indicated otherwise)
D1
D2
D5
D6
NotesRockwell Automation SupportUse the following resources to access support information
Documentation FeedbackYour comments will help us serve your documentation needs better If you have any suggestions on how to improve this document complete the How Are We Doing form at httpsliteraturerockwellautomationcomidcgroupsliteraturedocumentsdura-du002_-en-epdf
Technical Support Center
Knowledgebase Articles How-to Videos FAQs Chat User Forums and Product Notification Updates
Allen-Bradley Rockwell Automation and SLC are trademarks of Rockwell Automation IncIntel and Core are trademarks of Intel CorporationMicrosoft and Windows are trademarks of Microsoft Corporation
Rockwell Otomasyon Ticaret AŞ Kar Plaza İş Merkezi E Blok Kat6 34752 İccedilerenkoumly İstanbul Tel +90 (216) 5698400
Rockwell Automation maintains current product environmental information on its website athttpswwwrockwellautomationcomrockwellautomationabout-ussustainability-ethicsproduct-environmental-compliancepage
Publication 6181X-IN002C-EN-P - October 2019 PN-430666DIR 10003051710_02
Supersedes Publication 6181X-IN002B-EN-P - August 2017 Copyright copy 2019 Rockwell Automation Inc All rights reserved Printed in China
PN-430666PN-430666
Industrial Computers for Hazardous Locations Installation Instructions Series H
Summary of Changes
Installation Precautions
Environment and Enclosure Information
European Union Directive
Outdoor Installation
Hazardous Locations
The Following Conditions for Safe Use Apply in ATEX IECEx and INMETRO
Conditions for Safe Use in North American Hazardous Locations
This tab summarizes Rockwell Automation Global Sales and Marketing preferred printing standards It also provides guidance on whether a publication should be released print on demand or if it requires an RFQ for offset printingFind your publication type in the first section below Use the assigned Printing Category information to determine the standard print specifications for that document type The Printing Categories are defined below the Publication Type section Note there may be slightly different print specifications for the categories depending on the region (EMEA or Americas)For more information on Global Sales and Marketing Printing Standards see publication RA-CO004 in DocMan
Publication Type and Print Category
Publication Type
Off Set Print Category Spec (See tables below)
Print on Demand Spec (See tables below)
Description
Order Min
Order Max
Life Cycle Usage Release Option
AD
NA - Puttman
NA
Advertisement Reprint Colour
NA
NA
Presale Internal
AP
A3
D2
Application Solution or Customer Success Story
5
100
Presale External
AR
NA
NA
ArticleEditorialByline
NA
NA
Presale Internal
(press releases should not be checked into DocMan or printed)
AT
B3 B4
D5
Application techniques
5
100
Presale External
BR
A2 Primary A1
NA
Brochures
5
100
Presale External
CA
C2 Primary C1
NA
Catalogue
1
50
Presale External
CG
NA
NA
Catalogue Guide
1
50
Presale External
CL
NA
NA
Collection
5
50
Presale External
CO
A5 A6 A9
D5
Company Confidential Information
NA
NA
NA Confidential
CP
E-only
E-only D5
Competitive Information
5
50
NA Confidential
DC
E-only
E-only
Discount Schedules
NA
NA
Presale Internal
DI
A1 A3
NA
Direct Mail
5
100
Presale Internal
DM
NA
NA
Product Demo
5
50
Presale Internal
DS
B3
D5
Dimensions Sheet
1
5
Post External
DU
B3
D5
Document Update
1
5
Post External
GR
B2
D6
Getting Results
1
5
Post External
IN
B3 Primary B2
D5 D6
Installation instructions
1
5
Post External
LM
NA
NA
Launch Materials
5
50
Presale Internal
PC
B3
D5
Packaging Contents
PL
E-only primary B3
E-only
Price List
5
50
Presale Internal
PM
B2
D6
Programming Manual
1
5
Post External
PP
A3
D1
Profile (Single Product or Service) NOTE Application Solutions are to be assigned the AP pub type
5
100
Presale External
QR
B2 primary B3 B5
D5 D6
Quick Reference
1
5
Post External
QS
B2 primary B3 B5
D5 D6
Quick Start
1
5
Post External
RM
B2
D5 D6
Reference Manual
1
5
Post External
RN
B3
D5
Release Notes
1
5
Post External
SG
B1 Primary B4
D5 D6
Selection Guide Colour
5
50
Presale External
SG
B2
D5 D6
Selection Guide BW
5
50
Presale External
SP
A1 A2 A3 A4
NA
Sales Promotion NOTE Service profiles are to be assigned the PP pub type
5
100
Presale Internal
SR
B2 B3
D5 D6
Specification Rating Sheet
5
100
Presale External
TD
B2 Primary B3 B4 B5
D5 D6
Technical Data
5
50
Presale External
TG
B2 B3
D6
Troubleshooting Guide
1
5
Post External
UM
B2 Primary B4
D6
User Manual BW
1
5
Post External
WD
B3
D5
Wiring Diagrams Dwgs
1
5
Post Internal
WP
B3 Primary B5
D5
White Paper
5
50
Presale External
Minimum order quantities on all POD items are based on the publication length
Publication length
Minimum Order Quantity
77 or more pages
1 (no shrink wrap required)
33 to 76 pages
25
3 to 32 pages
50
1 or 2 pages
100
Pre-sale Marketing
All paper in this category is White Brightness 90 or better Opacity 90 or better
Category
Color Options
AP EMEA Paper Requirements
Canada LA US Paper Requirements
A1
4 color
170 gsm 2pp
100 gloss cover 100 gloss text
A2
4 color
170 gsm folded 4pp
100 gloss cover 80 gloss text
A3
4 color
Cover 170 gsm with Body 120 gsm gt 4pp
80 gloss cover 80 gloss text
A4
2 color
170gsm Silk ndash 120gsm Silk
80 gloss cover 80 gloss text
A5
2 color
170gsm Silk ndash 120gsm Silk
80 gloss cover 80 matt sheet text
A6
1 color
170gsm Silk ndash 120gsm Silk
80 gloss cover 80 matt sheet text
A7
4 color cover2 color textSelection Guide
Category being deleted
10 Point Cover C2S50 matte sheet text
A8
4 color cover
Category being deleted
50 matte sheet text self cover
2 color text
Selection Guide
A9
2 color
100gsm bond
50 matte sheet text self cover
Selection Guide
Gray shading indicates Obsolete Print Catagories
Post Sale Technical Communication
Category
Color Options
AP EMEA Paper Requirements
Canada LA US Paper Requirements
B1
4 color cover
270gsm Gloss 100gsm bond
10 Point Cover C2S
2 color text
50 matte sheet text
B2
1 color
160gsm Colortech amp 100gsm Bond
90 Cover50 matte sheet text
B3
1 color
100gsm bond
50 matte sheet text self cover
B4
2 color
160gsm Colortech amp 100gsm Bond
90 Cover50 matte sheet text
B5
2 color
100gsm bond
50 matte sheet text self cover
Catalogs
Category
Color Options
AP EMEA Paper Requirements
Canada LA US Paper Requirements
C1
4 color cover
270gsm Gloss 90gsm silk
10 Point Cover C2S
4 color text
45 Coated Sheet
C2
4 color cover
270gsm Gloss 80gsm silk
10 Point Cover C2S
2 color text
32-33 Coated Sheet
Print on Demand by Print Vendor (POD)
All paper in this category is White Brightness 82 or better Opacity 88 or better
Category
Color Options
AP EMEA Paper Requirements
Canada LA US Paper Requirements
D1
4 color
170gsm white silk
80 gloss cover coated 2 sides
D2
4 color
120gsm white silk
80 gloss text coated 2 sides self cover
D3
4 color
Cover 170gsm with Body 120gsm
80 gloss cover 80 gloss text coated 2 sides
D4
1 color
160gsm tab
90 index
D5
1 color
80gsm bond
20 bond self cover
D6
1 color
Cover 160gsm tab with Body 80gsm bond
90 index 20 bond
D7
2 color
160gsm tab
90 index
D8
2 color
80gsm bond
20 bond self cover
D9
2 color
Cover 160gsm tab with Body 80gsm bond
90 index 20 bond
D10
Combination 4 color cover with 2 color body
Cover 160gsm with Body 80gsm
90 index 20 bond
Gray shading indicates Obsolete Print Catagories
Print on Demand By Print Vendor (POD) or Off Set (OS)
Use these guidelines to determine if your publication should be print on demand by print vendor (POD) or if it would be more economical to print ffseton a press (OS) OS print jobs require an RFQ (Request For Quote) in US If your job fits into the ldquoEitherrdquo category an RFQ is recommended but not required In the US RA Strategic Sourcing will discourage or reject RFQs for jobs that fall within the POD category Guidelines differ for black amp white and color printing so be sure to check the correct tables
RA-QR005K-EN-P
Jan-19
Printing Specification
YOUR DATA HERE
Instructions
NO
(required) Publication Number
6181X-IN002C-EN-P
Sample 2030-SP001B-EN-P
11rdquo x 17rdquo
LOOSE -Loose Leaf
YES
Pre-sale Marketing
TOP
Use Legacy Number
YES or NO
85rdquo x 11rdquo
PERFECT - Perfect Bound
A1
LEFT
Legacy Number if applicable
Sample Legacy Number 0160-533
8375rdquo x 10875
SADDLE - Saddle Stitch
A2
RIGHT
CORNER
Publication Title
Industrial Computers for Hazardous Locations Installation Instructions
Sample ElectroGuard Selling Brief80 character limit - must match DocMan Title
825rdquo x 11rdquo (RA product profile std)
PLASTCOIL - Plastic Coil (Coil Bound)
A4
BOTTOM
SIDE
Used in Manufacturing
NO
YES or NO - If Yes must have Part No listed below
825rdquo x 10875rdquo
STAPLED1 -1 position
A3
Part Number
PN-430666
If SAP Part Number be sure to enter PN- before the number
7385rdquo x 9rdquo (RSI Std)
STAPLED1B - bottom 1 position
A5
(required) Category
D5
Select Print Category ABC or D from category list on Introduction_Category Types tab
6rdquo x 4rdquo
STAPLED2 - 2 positions
A6
Paper Stock Color
White
White is assumed For color options contact your vendor
55rdquo x 85rdquo (half-size)
THERMAL - Thermal bound (Tape bound)
A7
Ink Color
Black
One color assumes BLACK 4 color assume CMYK Indicate PMS number here
475rdquo x 775rdquo
THERMALO - Thermal Bound (Tape bound - offline)
A8
(required) Page Count ofPublication
32
Total page count including cover Enter PAGE count not SHEET count
475rdquo x 7rdquo (slightly smaller half-size)
A9
(required) Finished Trim Size Width
85rdquo x 11rdquo
This is sheet size before folding
425 x 550
Post Sale Technical Communication
Fold
Half or V or Single Fold
Review key below Leave blank if folded for saddle stitching
4rdquo x 6rdquo
B1
Finished Fold Size
55 x 85
This is size after folding is completed
3rdquo x 5rdquo
B2
BindingStitching
STAPLED2 - 2 positions
Review key below
9rdquo x 12rdquo (Folder)
B3
None
Stitching Location
Blank Corner or Side
A4 (8 frac14rdquo x 11 frac34rdquo) (210 x 297 mm)
B4
Half or V or Single Fold
Drill Hole (YesNo)
All drilled publications use the 5-hole standard 516 inch-size hole and a minimum of frac14 inch from the inner page border
A5 (583rdquo x 826rdquo) (148 x 210 mm)
B5
C or Tri-Fold
Number of Tabs Needed
5 tab in stock at RR Donnelley
36rdquo x 24rdquo Poster
Catalogs
DbleParll
Number of Pages per Pad
Average sheets of paper 25 50 75100 Max
24rdquo x 36rdquo Poster
C1
Sample
Glue Location on Pad
Glue location on pads
18rdquo x 24rdquo Poster
C2
Short (must specify dimensions between folds in Comments)
Comments
DIR 10003051710_02
Print on Demand (POD)
Double Gate
Saddle-Stitch Items All page quantities must be divisible by 4Note Stitching is implied for Saddle-Stitch -no need to specify in Stitching Location80 pgs max on 20 (text and cover)76 pgs max on 20 (text) and 24 (cover)72 pgs max on 24 (text and cover)Perfect Bound Items940 pgs max wcover (90 index unless indicated otherwise)70 pgs min for spine without words200 pgs min for spine with words Plastic Coil Bound Items530 pgs max of 20 (if adding cover deduct equivalent number of pages to equal cover thickness) (90 index unless indicated otherwise)Tape Bound Items250 pgs max on 20 no cover240 pgs max wcover (90 index unless indicated otherwise)
This tab summarizes Rockwell Automation Global Sales and Marketing preferred printing standards It also provides guidance on whether a publication should be released print on demand or if it requires an RFQ for offset printingFind your publication type in the first section below Use the assigned Printing Category information to determine the standard print specifications for that document type The Printing Categories are defined below the Publication Type section Note there may be slightly different print specifications for the categories depending on the region (EMEA or Americas)For more information on Global Sales and Marketing Printing Standards see publication RA-CO004 in DocMan
Publication Type and Print Category
Publication Type
Off Set Print Category Spec (See tables below)
Print on Demand Spec (See tables below)
Description
Order Min
Order Max
Life Cycle Usage Release Option
AD
NA - Puttman
NA
Advertisement Reprint Colour
NA
NA
Presale Internal
AP
A3
D2
Application Solution or Customer Success Story
5
100
Presale External
AR
NA
NA
ArticleEditorialByline
NA
NA
Presale Internal
(press releases should not be checked into DocMan or printed)
AT
B3 B4
D5
Application techniques
5
100
Presale External
BR
A2 Primary A1
NA
Brochures
5
100
Presale External
CA
C2 Primary C1
NA
Catalogue
1
50
Presale External
CG
NA
NA
Catalogue Guide
1
50
Presale External
CL
NA
NA
Collection
5
50
Presale External
CO
A5 A6 A9
D5
Company Confidential Information
NA
NA
NA Confidential
CP
E-only
E-only D5
Competitive Information
5
50
NA Confidential
DC
E-only
E-only
Discount Schedules
NA
NA
Presale Internal
DI
A1 A3
NA
Direct Mail
5
100
Presale Internal
DM
NA
NA
Product Demo
5
50
Presale Internal
DS
B3
D5
Dimensions Sheet
1
5
Post External
DU
B3
D5
Document Update
1
5
Post External
GR
B2
D6
Getting Results
1
5
Post External
IN
B3 Primary B2
D5 D6
Installation instructions
1
5
Post External
LM
NA
NA
Launch Materials
5
50
Presale Internal
PC
B3
D5
Packaging Contents
PL
E-only primary B3
E-only
Price List
5
50
Presale Internal
PM
B2
D6
Programming Manual
1
5
Post External
PP
A3
D1
Profile (Single Product or Service) NOTE Application Solutions are to be assigned the AP pub type
5
100
Presale External
QR
B2 primary B3 B5
D5 D6
Quick Reference
1
5
Post External
QS
B2 primary B3 B5
D5 D6
Quick Start
1
5
Post External
RM
B2
D5 D6
Reference Manual
1
5
Post External
RN
B3
D5
Release Notes
1
5
Post External
SG
B1 Primary B4
D5 D6
Selection Guide Colour
5
50
Presale External
SG
B2
D5 D6
Selection Guide BW
5
50
Presale External
SP
A1 A2 A3 A4
NA
Sales Promotion NOTE Service profiles are to be assigned the PP pub type
5
100
Presale Internal
SR
B2 B3
D5 D6
Specification Rating Sheet
5
100
Presale External
TD
B2 Primary B3 B4 B5
D5 D6
Technical Data
5
50
Presale External
TG
B2 B3
D6
Troubleshooting Guide
1
5
Post External
UM
B2 Primary B4
D6
User Manual BW
1
5
Post External
WD
B3
D5
Wiring Diagrams Dwgs
1
5
Post Internal
WP
B3 Primary B5
D5
White Paper
5
50
Presale External
Minimum order quantities on all POD items are based on the publication length
Publication length
Minimum Order Quantity
77 or more pages
1 (no shrink wrap required)
33 to 76 pages
25
3 to 32 pages
50
1 or 2 pages
100
Pre-sale Marketing
All paper in this category is White Brightness 90 or better Opacity 90 or better
Category
Color Options
AP EMEA Paper Requirements
Canada LA US Paper Requirements
A1
4 color
170 gsm 2pp
100 gloss cover 100 gloss text
A2
4 color
170 gsm folded 4pp
100 gloss cover 80 gloss text
A3
4 color
Cover 170 gsm with Body 120 gsm gt 4pp
80 gloss cover 80 gloss text
A4
2 color
170gsm Silk ndash 120gsm Silk
80 gloss cover 80 gloss text
A5
2 color
170gsm Silk ndash 120gsm Silk
80 gloss cover 80 matt sheet text
A6
1 color
170gsm Silk ndash 120gsm Silk
80 gloss cover 80 matt sheet text
A7
4 color cover2 color textSelection Guide
Category being deleted
10 Point Cover C2S50 matte sheet text
A8
4 color cover
Category being deleted
50 matte sheet text self cover
2 color text
Selection Guide
A9
2 color
100gsm bond
50 matte sheet text self cover
Selection Guide
Gray shading indicates Obsolete Print Catagories
Post Sale Technical Communication
Category
Color Options
AP EMEA Paper Requirements
Canada LA US Paper Requirements
B1
4 color cover
270gsm Gloss 100gsm bond
10 Point Cover C2S
2 color text
50 matte sheet text
B2
1 color
160gsm Colortech amp 100gsm Bond
90 Cover50 matte sheet text
B3
1 color
100gsm bond
50 matte sheet text self cover
B4
2 color
160gsm Colortech amp 100gsm Bond
90 Cover50 matte sheet text
B5
2 color
100gsm bond
50 matte sheet text self cover
Catalogs
Category
Color Options
AP EMEA Paper Requirements
Canada LA US Paper Requirements
C1
4 color cover
270gsm Gloss 90gsm silk
10 Point Cover C2S
4 color text
45 Coated Sheet
C2
4 color cover
270gsm Gloss 80gsm silk
10 Point Cover C2S
2 color text
32-33 Coated Sheet
Print on Demand by Print Vendor (POD)
All paper in this category is White Brightness 82 or better Opacity 88 or better
Category
Color Options
AP EMEA Paper Requirements
Canada LA US Paper Requirements
D1
4 color
170gsm white silk
80 gloss cover coated 2 sides
D2
4 color
120gsm white silk
80 gloss text coated 2 sides self cover
D3
4 color
Cover 170gsm with Body 120gsm
80 gloss cover 80 gloss text coated 2 sides
D4
1 color
160gsm tab
90 index
D5
1 color
80gsm bond
20 bond self cover
D6
1 color
Cover 160gsm tab with Body 80gsm bond
90 index 20 bond
D7
2 color
160gsm tab
90 index
D8
2 color
80gsm bond
20 bond self cover
D9
2 color
Cover 160gsm tab with Body 80gsm bond
90 index 20 bond
D10
Combination 4 color cover with 2 color body
Cover 160gsm with Body 80gsm
90 index 20 bond
Gray shading indicates Obsolete Print Catagories
Print on Demand By Print Vendor (POD) or Off Set (OS)
Use these guidelines to determine if your publication should be print on demand by print vendor (POD) or if it would be more economical to print ffseton a press (OS) OS print jobs require an RFQ (Request For Quote) in US If your job fits into the ldquoEitherrdquo category an RFQ is recommended but not required In the US RA Strategic Sourcing will discourage or reject RFQs for jobs that fall within the POD category Guidelines differ for black amp white and color printing so be sure to check the correct tables