Embed Size (px)
Citation preview
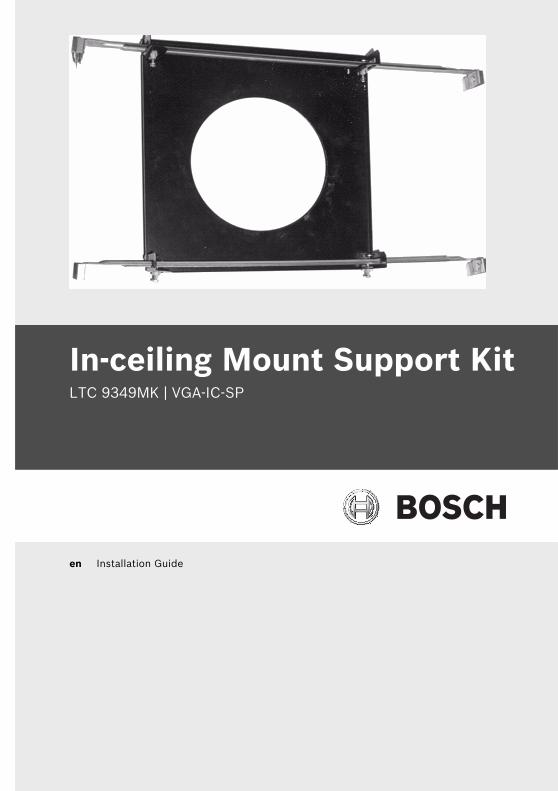
In-ceiling Mount Support KitLTC 9349MK | VGA-IC-SP
en Installation Guide

In-ceiling Mount Support Kit Table of Contents | en 3
Bosch Security Systems, Inc. Installation Guide F.01U.245.284 | 2.0 | 2011.06
Table of Contents
1 Important Safety Instructions 4
2 Unpacking 52.1 Parts List 5
3 Installation 6

4 en | Important Safety Instructions In-ceiling Mount Support Kit
F.01U.245.284 | 2.0 | 2011.06 Installation Guide Bosch Security Systems, Inc.
1 Important Safety InstructionsRead, follow, and retain all of the following safety instructions. Heed all warnings on the unit and in the operating instructions before operation.1. Clean only with a dry cloth. Do not use liquid cleaners or
aerosol cleaners.2. Use only replacement parts specified by the manufacturer.3. Install in accordance with the manufacturer's instructions
in accordance with applicable local codes. Use only attachments/accessories specified by the manufacturer. Equipment change or modification could void the user's guarantee or authorization agreement.
This Installation Manual is the intellectual property of Bosch Security Systems; protected by copyright. Contact: www.boschsecurity.com
In-ceiling Mount Support Kit Unpacking | en 5
Bosch Security Systems, Inc. Installation Guide F.01U.245.284 | 2.0 | 2011.06
2 UnpackingThis equipment should be unpacked and handled with care. If an item appears to have been damaged in shipment, notify the shipper immediately.Verify that all the parts listed in the Parts List below are included. If any items are missing, notify your Bosch Security Systems Sales or Customer Service Representative. The original packing carton is the safest container in which to transport the unit and must be used if returning the unit for service. Save it for possible future use.
This installation should be made by qualified service personnel and conform to the National Electrical Code and applicable local codes.
2.1 Parts List– One (1) Base Bracket Assembly– One (1) Mounting Plate– Two (2) Rails– Installation Guide
6 en | Installation In-ceiling Mount Support Kit
F.01U.245.284 | 2.0 | 2011.06 Installation Guide Bosch Security Systems, Inc.
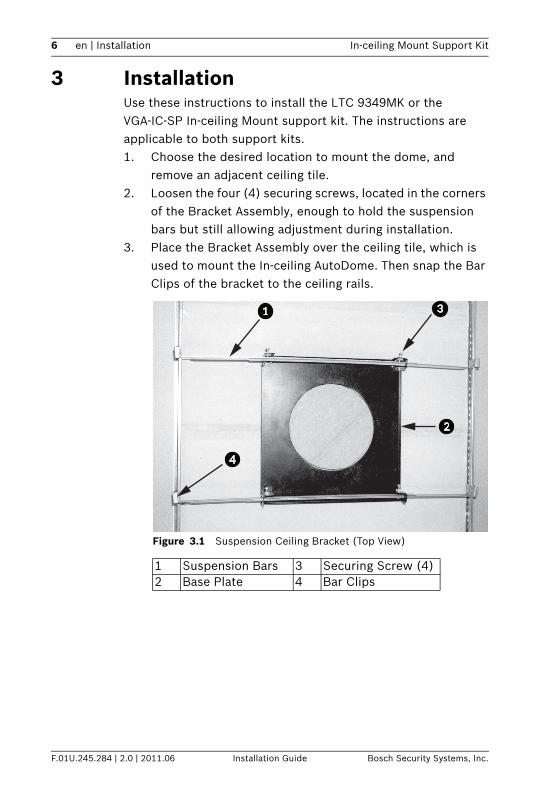
3 InstallationUse these instructions to install the LTC 9349MK or the VGA-IC-SP In-ceiling Mount support kit. The instructions are applicable to both support kits.1. Choose the desired location to mount the dome, and
remove an adjacent ceiling tile.2. Loosen the four (4) securing screws, located in the corners
of the Bracket Assembly, enough to hold the suspension bars but still allowing adjustment during installation.
3. Place the Bracket Assembly over the ceiling tile, which is used to mount the In-ceiling AutoDome. Then snap the Bar Clips of the bracket to the ceiling rails.
Figure 3.1 Suspension Ceiling Bracket (Top View)
1 Suspension Bars 3 Securing Screw (4)2 Base Plate 4 Bar Clips
A

In-ceiling Mount Support Kit Installation | en 7
Bosch Security Systems, Inc. Installation Guide F.01U.245.284 | 2.0 | 2011.06
4. Use the bracket Base Plate as a template or cut a 7 in. hole with a tolerance of ±1/8 in. (177.8 mm ±2.2 mm) hole in the center of the ceiling tile with a drywall utility saw or Jig Saw.
Figure 3.2 Cut Hole in Ceiling Tile
5. Tighten the four (4) securing screws to the Bracket Assembly.
Figure 3.3 Tighten Bracket Securing Screw
8 en | Installation In-ceiling Mount Support Kit
F.01U.245.284 | 2.0 | 2011.06 Installation Guide Bosch Security Systems, Inc.
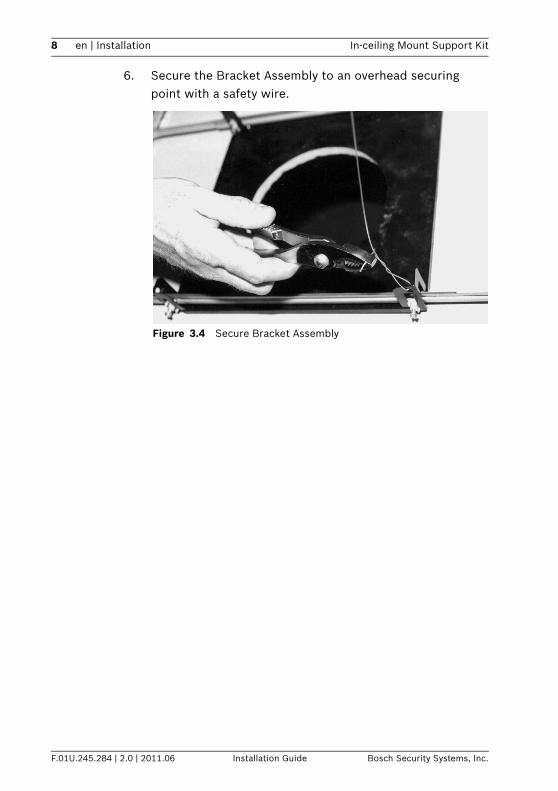
6. Secure the Bracket Assembly to an overhead securing point with a safety wire.
Figure 3.4 Secure Bracket Assembly


Bosch Security Systems, Inc.850 Greenfield RoadLancaster, PA 17601U.S.A.www.boschsecurity.com © Bosch Security Systems, Inc., 2011