Embed Size (px)
Citation preview

IMPORT
Back in the May 1988 issue of Import Service, we
gave you an assortment of overhaul and repair tips for
Toyota Corolla front wheel drive transaxles. Wepromised you then that we would return for a closelook at the other units in Toyota's front wheel drive
transaxle family. So we're back this month with anoverhaul overview of the four-speed automatic trans
axles used in Toyota's Camry models.Toyota was one of the first companies to offer a
four-speed front wheel drive transaxle. Instead of add
ing a fourth gear to an existing three-speed transaxle,
Toyota started out by designing a new four-speedautomatic for the introduction of the Camry. Then they
worked backward to build a three-speed version forthe Corolla based on the four-speed model.
Before we go any further, we should do our bestto explain Toyota's transaxle identification system.
That way you'll know which transaxles we're talking
about and what cars you're likely to find them in. Our
earlier article covered the A130L and A131L three-
speed lockup units that were used in the Toyota Corolla
and Chevy Nova.
This article will pick up with the A140E
(electronically controlled shifting) and A140L
(hydraulically controlled shifting) four-speed
automatic transaxles. Both transaxles also have lock
ing torque converters. These transaxles have beeninstalled in Camrys since their introduction and are
also used in later front wheel drive Celica models.
Originally, the A140L transaxle was only installedin diesel-engined Camrys. Since the 1987 model year,
standard model Camrys have also used this transaxle.
Deluxe model Camrys still use the electronically
shifted A140E.
A very similar transaxle, called the A141E, is
installed in the mid-engine, rear wheel drive MR-2.
And a beefed up version of the A140E, called the
A540E, has been installed in all Camry models withV6 engines built since February 1988.
Don't be confused by all of these numbers. All ofthese transaxles belong to the same basic family. Whileinternal parts for each will differ slightly, the repair
information included in this article should apply to
all of them.

We aren't going to take you through every step in
the overhaul procedure. You'll need a service manualor lots of previous experience for that. Our purposehere is to point out the tricks and traps that can makethe difference between a successful overhaul and avery long afternoon.
Keep Your Eyes Open
Probably the most important thing to find outwhen you're overhauling a transaxle is why it failedin the first place. The sooner you find out the causeof the problem, the less time you'll have to spendworrying about whether your overhaul is going to last.
To help you out in this area, we spoke with severaltransmission specialists. They told us the areas they
give special attention to during an A140 overhaul. To
call these problem areas wouldn't be fair to Toyota'sdesign engineers, since many of the specialists' tipsapply only to early versions of this transaxle. Severalimprovements have been made and all of our sources
agree that they see far fewer problems with later versions of the A140.
We've included the following tips in the introduction
because they wouldn't fit our photo caption format.Keep your eyes and ears open for these symptoms bothbefore and during an A140 overhaul.
Locking Torque Converter Operation
The locking torque converter engagement on early(1983-84) transaxles seemed harsh to some customers.
The converter begins locking up as early as secondgear under certain conditions. It must unlock before
each following upshift or during changes in engineload.
This makes for a very busy transmission that mayseem like it's shifting all the time. Later electronictransmission controls are more finely tuned. The con
verter doesn't lock up quite so soon, and engages moresmoothly when it does.
1-2 Shift Quality
The 1-2 shift seemed too harsh to some 1987 Camryowners, especially when the engine was cold. The
harshness should diminish as the transmission warmsup. Some techs tried to adjust (loosen) the transmis
sion's throttle cable to compensate. This caused the
transmission to shift a little softer and reduced the 1-2
harshness, but ran the risk of burning the clutch platesdue to slippage.
Consult a manual for the proper throttle cableadjustment procedure. The cable should be checkedand adjusted at the wide open throttle position. If youdo try to loosen the cable adjustment slightly to reduceshift harshness, make sure you move the cable adjusting lock nuts 1 mm or less. Any more than that andyou're risking other problems.
Bushing Wear
As we'll describe in our photo captions, wornbushings are responsible for many early A140 problems. If you're lucky, your customer will bring you his
car before bushing wear has completely disabled his
transaxle. If he does, the transaxle may have any of thefollowing symptoms:
• Chatter on takeoff.
• Sluggish takeoff in forward or reverse gears.
• Slow engagement of reverse gear, especially whenthe transaxle is cold.
• Slipping shift into third.
• Slipping in high gear.
You will save your customer's money if you can
convince him that now is the time to repair a transaxle with these symptoms.
Shift Solenoid Operation
On A140E (electronic shift) transaxles, it may be
hard to determine whether some shifting problems are
caused by electronic or internal transaxle problems.
For a quick check, disconnect the transmission con
trol unit connector. The transmission should now take
off in high gear. The ECT control unit is located in thedash, below the right hand speaker.
Two shift solenoids mounted on the valve body are
actuated by the ECT control unit to control the Al40E's
forward shifting. In Drive range (overdrive switch on),
the ECT control unit actuates the shift solenoids in thefollowing order to select the forward gears:
• In first gear, the number 1 solenoid is on and thenumber 2 solenoid is off.
• In second gear, the number 1 solenoid is on andthe number 2 solenoid is on.
• In third gear, the number 1 solenoid is off and thenumber 2 solenoid is on.
• In fourth gear, the number 1 solenoid is off and the
number 2 solenoid is off.
Using a wiring diagram, it's possible to actuateeach of the shift solenoids in the proper sequence to
shift the transaxle through the gears without using the
ECT control unit. If you can't get all of the gears using
this method, you know that the problem is inside thetransaxle, not the ECT control unit.
Shift solenoids can fail intermittently, causing
unusual shifting characteristics. The transmission may
shift normally under a light load, but slip underheavier acceleration. This may be caused by a solenoidthat's not opening and closing cleanly. Solenoids open
to vent pressure when actuated, allowing the valvebody's shift valves to function.
Properly operating shift solenoids should make asolid clunking noise when they are actuated. You canhear it right through the pan. A solenoid that makesa dull clunking noise is probably on its last legs.
Thanks to John Wozniak at Freudenberg-NOK forhis technical assistance on this article.
—By Karl Seyfert

ToyotA140
i
Early Al40s used babbit-style bushings in the clutchdrums and oil pump bushings. Worn babbit bushings
are one of the main reasons early A140 transaxles fail.Later Al40s have longer wearing bronze bushings.
Aftermarket bronze replacement bushings are available
to repair early Al40s.
3
The inner pump bushings support the forward clutch
shaft. A wobbling forward clutch will wipe out this seal
(arrow) at the tip of the overdrive unit's intermediate
shaft. The leaking seal keeps lube oil from passing
through the forward clutch to the overdrive unit. Lack
of lubrication will cause overdrive melt down.
5
A backed out intermediate brake (B2) cup seal cancause second gear slippage on early Al40s. The B2 cup
seal is driven into the case to prevent pressure lossbetween the valve body and the intermediate brake.
Don't forget to install this second seal (arrow) between
the passage and the valve body.
2
Worn internal oil pump bushings will let the internaltransmission parts wobble as they rotate. This causes
wear and fluid leakage in other parts of the transaxlefurther down the line. Worn pump bushings can cause
the overdrive unit at the other end of the transaxle to
fail, as we'll describe next.
4
If the overdrive unit fails, there probably won't be anyuseable parts left when you get the transaxle apart. Theheat often welds everything into a solid mass. Allinternal parts are available separately, or can be purchased in kit form from aftermarket suppliers.
u
6
Later B2 seals (right) have an extension which reachesalmost to the bottom of the valve body and prevents
the seal from backing out. Some techs had problems
with the early seal (left) because they installed it eithertoo deep or too shallow. Both mistakes will cause
pressure loss to the B2 circuit.

ToyotAl40
7
Check each clutch drum for wear in the area wherethe sealing rings ride (arrow). Dirty fluid combinedwith the Teflon sealing rings can wear grooves in the
drum's sealing surface. High mileage transaxles mayalso show this wear, even with clean fluid. Clutch
drum replacement is the only fix.
Measure the new sealing ring end gap beforeinstallation. Stretch the new seals by hand first, then
place them inside the clutch drum in their installedposition. Measure the seal's end gap the same way you
measure piston ring end gap. Maximum allowable seal
end gap is 1 mm (0.040 in).
The steel plates used for the intermediate brake (B2)
and low/reverse brake (B3) look very similar. Side byside measurement of the teeth will prevent confusion.
Low/reverse plates have wider teeth, and intermediate
plates have thinner teeth. Some plates are notched,
some aren't. Don't use these markings as a guide.
8
VAlso check all sealing ring lands for wear. Worn
bushings or fluid contamination can round off or
damage the ring lands' sharp edges. Sloppy ring lands
can make for loose fitting Teflon sealing rings. Dam
aged ring lands can also keep the sealing rings from
turning or sealing properly.
Keep a close eye on the number and location of theclutch drum release springs (we've already removed
two here). Different length springs are used in eachof the clutch drums. Either disassemble your clutchdrums one at a time, or make sure you keep each set
of release springs in a separate place.
Different versions of this transaxle may have back-to-
back steel clutch plates (sometimes as many as threeback-to-back) in different brake and clutch packs. The
steel plates are used to help dissipate heat. Both over
drive clutch packs use extra steels to handle the extra
heat in this area.
ToyotAl40
If the fiber faced plates in clutch packs or brakes areburnt and you also find clutch material in the pan,
suspect the torque converter clutch. Friction materialfrom the clutch may flake off and clog the transaxle'spressure regulator. The stuck regulator lowers line
pressure, causing the clutches to burn.
It's a good idea to remove and replace the differential
spider gear shaft roll pin (arrow) during an overhaul.These pins have been known to break, which lets the
spider gear shaft slide out of the spinning differen
tial housing. A loose spider gear shaft will really do
a number on the inside of the transaxle case.
This nylon thrust bushing sits on top of the governor
to keep the governor located in the case on A140L
transaxles. If the bushing wears out or is lost duringan overhaul, the governor will walk out of the case,
gouging the governor cover and causing a loss of gover
nor circuit pressure.
While you have the roll pin out, carefully inspect thespider gear shaft. Early, gray colored shafts may
become worn in the area where the spider gears ride.Later models have a gold colored shaft which seems
to hold up better. Gold shafts may be installed on early
transaxles.
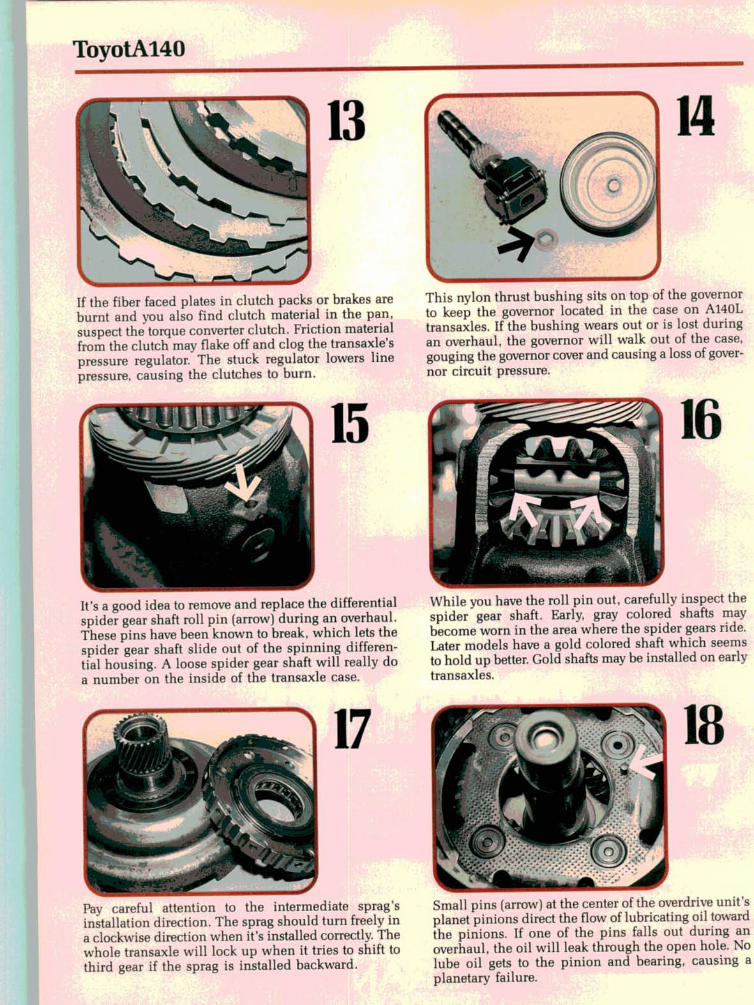
Pay careful attention to the intermediate sprag's
installation direction. The sprag should turn freely in
a clockwise direction when it's installed correctly. The
whole transaxle will lock up when it tries to shift to
third gear if the sprag is installed backward.
Small pins (arrow) at the center of the overdrive unit'splanet pinions direct the flow of lubricating oil towardthe pinions. If one of the pins falls out during an
overhaul, the oil will leak through the open hole. Nolube oil gets to the pinion and bearing, causing a
planetary failure.

ToyotAl40
Many of the parts in the A140 are similar to parts used
in other Toyota transmissions. Look for an extension
at the tip of the forward clutch shaft (arrow) to iden
tify locking torque converter versions. There's no
o-ring seal, so any wear can cause fluid pressure loss
and locking torque converter problems.
21
The transaxle case has separate fluid reservoirs for the
transmission and differential. A leak at the speed
ometer gear seal (arrow) can drain the fluid out of the
differential section and into the transmission. The
transaxle will shift normally right up until the dif
ferential fails from lack of lubrication.
Intermittent operation of the electronic shift solenoids
on A140E transaxles can cause strange shifting com
plaints. The solenoid electromagnets can also attract
stray metal or may simply die of old age. When acti
vated, the solenoids dump pressure, allowing the valve
body shift valves to move.
This plastic thrust washer at the back of the oil pump
(arrow) controls overall transaxle end play. Only two
shim sizes are available. So if you get the transaxle
back together and the end play is wrong, you've prob
ably got something assembled wrong. Check for prop
er installation of the thrust bearings and races.
Fluid can also pass between the two halves of the
transaxle at the drive pinion seals. Two large seals, an
aluminum collar, and an o-ring surround the pinion
to keep the fluid where it belongs (left photo). Don't
forget to fill the differential reservoir with ATF after
your overhaul (right photo).
24
Two shift solenoids control all four gears on the
A140E. The ECT computer selects each gear by a dif
ferent combination of' 'on'' or ' 'off'' signals to the shift
solenoids. For a memory aid, remember the number
1 solenoid (right) has one mounting bracket, the
number 2 solenoid (left) has two brackets.