Embed Size (px)
Citation preview
Implementing Two-Factor Authentication for Remote Access using PhoneFactor
A Proof-of-Concept Experiment for an Accountancy Firm
By
Michael Kaishar, MSIA | CISSP | Security+Sr. Information Security Architect & Consultant
A Master of Science Research PracticumSubmitted to the Faculty of
The Graduate School of Management, at the University of Dallas
in Partial Fulfillment of the Requirementsfor the Master of Science Degree
in Information Assurance
Sunday, March 19, 2010
DEDICATION
This research paper is a dedication to my dad Gabriel Elias Kaishar, who
unexpectedly passed away May 12th, 2009. My dad was a devoted Husband,
Father, Grand-Father and Pharmacist. The pursuit and achievement of the
Master of Science degree would not have been possible if it were not for my
dad’s love and devotion and his belief in higher-education and mentorship as
ways of enriching one’s life. May he rest in peace and eternally be remembered.
I love my dad very much and I miss him dearly. I want to express my gratitude
for everything that my dad has done for all of us, especially his unrelenting
generosity, support, sacrifices and never ending love.
ii
TABLE OF CONTENTS
Page
DEDICATION..........................................................................................................ii
ABSTRACT............................................................................................................iv
CHAPTER 1: INTRODUCTION.............................................................................1
Problem Statement..........................................................................................3Research Objective..........................................................................................3Research Design and Methodology.................................................................4
CHAPTER 2: LITERATURE REVIEW...................................................................5
Single-Factor Authentication............................................................................5Two-Factor Authentication...............................................................................7
CHAPTER 3: ANALYSIS.....................................................................................11
Methodology...................................................................................................11Hardware Components..................................................................................12Software Components....................................................................................12Setting the stage for initial part of experiment...............................................12Single-Factor Authentication steps to connect to AF Server.........................15Final stage of experiment and introduction of PhoneFactor..........................18Two-Factor Authentication steps to connect to AF Server............................18Experiment Analysis.......................................................................................20Experiment Results........................................................................................21
CHAPTER 4: CONCLUSIONS............................................................................22
Recommendations.........................................................................................22Limitations......................................................................................................23Areas of Future Work.....................................................................................25
REFERENCES......................................................................................................26
APPENDICES.......................................................................................................29
A. Downloading, Installing, and Configuring VMware Server 2.0.2..............30B. Creating, Installing, Configuring MS Windows Server 2003....................39C. Creating, Installing, Configuring MS Windows XP Professional..............58D. Installing and Configuring 2X Application Server.....................................74E. Installing and Configuring 2X Application Client.......................................84
iii
F. Installing and Configuring PhoneFactor...................................................92
iii
ABSTRACT
Small and medium sized businesses cannot afford the luxury of
purchasing expensive token-based two-factor authentication products, so they
rely mostly on user names and passwords as methods for remote access
security. The reliance on user names and passwords as methods of security is a
weak strategy; therefore small and medium-sized businesses need to add an
extra layer of security in order to strengthen their security stance.
This research study is based on an experiment performed for an
accounting firm to introduce two-factor authentication based on the PhoneFactor
technology solution. PhoneFactor is a cost-effective and viable product that
provides the added layer of security by using the telephone system as a second-
factor of authentication.
iv
CHAPTER 1: INTRODUCTION
Today, the ability to remotely access computer systems over the Internet
is ubiquitous. Companies, both large and small, provide the infrastructure for
employees and business partners to be able to access internal resources over a
remote access session. The most common practice used for verification and
authentication into remote systems has largely been based on user names and
passwords (Turban, 2006). Turban stated that “…passwords are notoriously
insecure because people have a habit of writing them down in easy-to-find
places, choosing values that are guessed easily, and willingly telling people their
passwords when asked” (p. 472).
A 2006 CSI/FBI Computer Crime and Security Survey of 313 respondents
claimed a total of $20 million in losses due to unauthorized access to information,
theft of proprietary information, and financial fraud (Gordon, Loeb, Lucyshyn, &
Richardson, 2006). Furthermore, on June 19, 2006 Countrywide Home Loans
(CHL) discovered a security breach involving one of their business partners
(DataLossDB Open Security Foundation, 2006). CHL typically works with
various mortgage brokers as their business partners, providing them with user
names and passwords for remote access capabilities into CHL's resources.
Apparently, a user name and password allocated to one of CHL’s
business partners was used by an unknown source to gain unauthorized access
into three individuals’ credit reports. Large companies, such as CHL, typically
have the money and resources to curtail these types of security incidents and are
6
able to provide an advanced security infrastructure for remote access. However,
small businesses do not have the same luxuries as their larger counterparts,
making them easier targets, even for the most inexperienced attacker (Gaskin,
2007). Gaskin further affirms that hackers have turned to stealing intellectual
property and customer data from smaller companies, because smaller
companies sometimes have weaker systems and defenses.
Pullman & Streff (2007) define Authentication as “…the process of
verifying the identity of a user who is trying to gain access to a system” (p. 229).
There are four basic methods or factors for authentication: (1) Something you
know, such as a password, (2) Something you have, such as a smart-card, a
token, or a mobile-phone, (3) Something you are, such as physical
characteristics like fingerprints, iris or retina, and (4) Something you do, such as
voice recognition or typing patterns (Yeo, 2007).
The addition of two-factor authentication reduces the risk of unauthorized
access (Schneier, 2005). It is more difficult to attack a system when you do not
have all the information. An attacker may know the user name and password of
an individual, but if the attacker does not have the missing piece to complete the
puzzle, they will not be able to gain access. They need that second part or factor
in order to complete the authentication process.
PhoneFactor authenticates users based on something they know, such as
a password, and something they have, such as a mobile or traditional phone
(Dispensa, 2009). As far as mobile phones are concerned, a large percentage of
working professionals in the United States own cellular phones.
7
Problem Statement
A small Accountancy Firm (AF) comprised of 10 employees in California
offers the ability to remotely access company resources, and most of the time,
employees telecommute from home. The current remote access solution is
simple and easy; however, it is also easily exploitable, because it relies on
single-factor authentication (Pullman & Streff, 2007).
Once remote users are identified and authenticated they are presented
with AF’s published applications. AF relies only on user names and passwords
for identifying and authenticating remote users, which is not enough to protect
the entity from various malicious attacks and unauthorized access. In addition, a
security breach would affect AF in the sense of negative consequences such as
loss of customer trust and business, as well as possible penalties from The
American Institute of Certified Public Accountants (AICPA).
Research Objective
The purpose of this paper is to research two-factor authentication for
remote access using the PhoneFactor application. A Proof-Of-Concept (POC)
experiment will be conducted. The goal of the POC experiment is to illustrate
PhoneFactor’s two-factor authentication solution and to find out if it is feasible for
AF, as well as whether this solution can help address and reduce the risks of
malicious attacks and unauthorized access.
8
Research Design and Methodology
Since it was not possible to work on AF’s production systems, a test
environment was built, set up and configured simulating the current production
infrastructure at AF. Additionally, the PhoneFactor solution was introduced into
this test environment. VMware Server was the virtualization technology used to
reproduce a replica of AF’s production systems. A virtual environment allowed
the researcher more flexibility in designing, architecting, and deploying a
simulated replica of a production computing environment.
The POC addressed several components: The ease of implementing the
PhoneFactor solution into a computing environment, the ease of managing the
new application, the attractive cost of the new solution, and how the new solution
can help reduce the risks of malicious attacks and unauthorized access.
9
CHAPTER 2: LITERATURE REVIEW
Authentication is usually based on a two-way trust relationship between an
entity and an individual (Kelley, 2001). Yeo (2007) stated that, “…authentication
thus refers to any process, either online or offline, by which one party determines
whether the other party is who the other party claims to be” (p. 154). There are
four basic methods of authentication: Something a person knows, such as a
password; something a person has, such as a token or mobile-phone; something
a person is, such as finger prints; and something a person does, such as typing
patterns (Volonino & Volonino, 2006).
Single-Factor Authentication
Single-factor authentication has its advantages in that it is an acceptable,
relatively cheap, and easy to implement and maintain solution that has been in
use for many decades (Schneier, 2005). A major disadvantage of single-factor
authentication is that it is a weak method of allowing access to an entity’s internal
resources.
Typically, an organization would create a user account for an employee
based on the employee’s first name initial and last name. For example, an
employee named ‘John Smith’ would have ‘jsmith’ as their user name. Knowing
the process of how a company allocates user names makes it easy for an
attacker to guess a person’s user name. Thus, the attacker has acquired 50% of
the information. All the attacker would need now is the other 50% of the
information, which would be the user’s password, to complete a successful
attack.
10
There are several ways to acquire passwords, guessing the password is
one way, another way is to use password crackers (Milletary, 2005). Yet another
effective type of attack is called Social Engineering. Originally, Social
Engineering was not based on technical attacks, but now Social Engineering has
evolved; it is an attack that is based on a combination of clever and creative
social and technical ways of getting information by fooling the user. “Phishing”
and “Pharming” are examples of these types of methods of Social Engineering
attacks (McAfee, 2006). Social Engineering is one of the most prevalent and
continuously successful types of attacks where fake websites and well-crafted
emails lure unsuspecting users into giving information that can be used by
attackers.
Furthermore, the Man-in-the-Middle (MITM) is yet another attack against
authentication (Ornaghi & Valleri, 2003). MITM attacks consist of various ways
of getting information from a user that can include Address Resolution Protocol
(ARP) cache, Domain Name System (DNS), and Dynamic Host Configuration
Protocol (DHCP) spoofing. The concept of MITM involves the attacker sitting in-
between the two parties, essentially listening in on the ‘conversation’ between the
entity and the authenticated user.
Encryption, which is beyond the scope of this research, is an answer to
mitigating MITM attacks (Schneier, 2005). Attacks on systems can never be
eliminated; however, the impact can be minimized via the introduction of two-
factor authentication.
11
Two-Factor Authentication
Two-factor and multi-factor authentication are the answers to mitigating
these weaknesses in the authentication process (Federal Financial Institutions
Examination Council, 2005). The addition of more than one factor adds a level of
complexity to the overall process of identifying and authenticating a user, thereby
countering an attack. Two-factor authentication is based on two or more factors,
and they can be a combination of something a person knows, something a
person has, something a person is, and something a person does.
Biometrics references something a person is or something a person does
(National Science and Technology Council, 2006). The National Science and
Technology Council’s Subcommittee on Biometrics defines Biometrics as a
method of recognizing an individual based on biological and behavioral
characteristics.
Vogel (2003) wrote that, “...biometrics are highly effective and reliable.”
The advantage of biometrics is that it is very difficult to copy or clone physical
characteristics like finger prints. Every human being has different finger prints
from one another, making it extremely difficult to authenticate someone without a
particular set of finger prints that are already configured in the system.
Biometric systems are not without their disadvantages though (Jain, Hong,
& Pankanti, 2000). The matching and identification of physical and behavioral
characteristics are challenging, since the biometric system is measured in terms
of accuracy, speed, and storage. So there are several deficiencies where a
biometric system fails and provides false matches and false non-matches.
12
The probabilities of these two types of failures are called False-Match-
Rate (FMR) and False-Non-Match-Rate (FNR). A false match occurs when an
unauthorized user is granted access, and conversely a false non-match is when
a valid user is denied access. The use of biometric systems within the small
business sector would not be feasible based on complexity and cost alone.
Two-factor authentication based on something a person knows and
something a person has, such as an access token, is the most popular and most
well accepted and feasible method of authentication in large corporations, as well
as medium-sized and small businesses (Stockton, 2009). There are several two-
factor authentication technologies based on tokens that generate One-Time
Passwords (OTP) (Yeo, 2007). The advantages of OTP access tokens like the
ones from RSA Security are that they are rugged and reliable, easy to use, small
in size, and have a life expectancy of up to six years.
The disadvantage associated with the RSA SecurID product is that it is
relatively expensive to purchase and maintain (eSecurity To Go, 2009). The
RSA SecurID solution is approximately $4,000 for an appliance and a 10-token
perpetual user license. Another disadvantage with the RSA SecurID solution is
that it is complex to set up and configure, and would require an experienced IT
person to manage it on a full-time basis. RSA tokens cost approximately $82 per
user, and the majority of the time users either lose their tokens or damage them,
requiring replacements and adding to the overall costs.
Furthermore, the RSA SecurID solution is not an out-of-band two-factor
authentication solution, which puts it at a disadvantage as well (Dispensa, 2009).
13
For example, a company employee wishing to access the corporate office would
use their Virtual Private Network (VPN) client to access the remote office. The
process would be to enter the user name and password, along with the OTP
provided by the RSA token. All of these entries travel over the same
communications channel, therefore making the RSA solution an in-band solution.
This type of solution is not as secure as having an out-of-band authentication
method, such as the one provided by PhoneFactor.
PhoneFactor’s two-factor authentication is based on an out-of-band
solution which requires the user to enter a user name and password on one
communications channel, and then also authenticate via a mobile or regular
telephone over a secondary channel. This type of process has its advantages
because the authentication process is going over two different communications
channels, making it more difficult for an attacker to be able to circumvent the
system (Schneier, 2005). According to Schneier, “…eavesdropping is much
more difficult” (p. 27).
There are disadvantages to using a mobile phone as an authentication
device as well (Perrin, 2008). The user can lose their mobile phone, they can
also be in a location where there aren’t any signals, their mobile phone battery
can lose its charge, and mobile phones can be cloned by attackers. The use of
PhoneFactor two-factor authentication will not completely alleviate the issues
associated with authentication.
Yeo (2007) wrote, “…No single security technology offers a silver bullet”
(p. 165). Yeo further stated that, “…if an authentication process is time
14
consuming and complex that it deters users, it is counterproductive” (p. 165).
There isn’t one solution to solve all of the problems associated with
authentication in general. The choice of an authentication solution is going to be
different for different companies.
All four authentication methods have their advantages and disadvantages
(Schneier, 2005). Furthermore, authentication, whether it is single-factor or two-
factor, like everything else, is not immune from different attack vectors.
However, the more factors involved in the authentication process, the more
complex and time consuming it is for an attacker to succeed in gaining access.
Businesses have to accept the fact that there are risks involved, and it is the
balancing of these risks that make a solution successful.
15

CHAPTER 3: ANALYSIS
In order to complete the experiment it was necessary to simulate AF’s
production environment using virtualization technology from VMware. The use of
VMware allowed the researcher to have a platform in order to experiment freely
and without any worries of affecting AF’s production systems. The experiment
was split into two parts. The first part of the experiment was to illustrate how the
current AF employees were accessing the company resources remotely, and the
second part of the experiment was the addition of the PhoneFactor solution and
illustration of the added layer of two-factor authentication.
Methodology
The methodology chosen for this research was an experiment. The
experiment required several hardware and software components in order to
achieve meaningful results. Figure 1 was created to illustrate the very basic high
level overview of the components that are required for this experiment. The first
layer depicts the laptop, then the operating system, then the VMware Server
Application and then the Virtual Machines.
Figure 1. VMWare Inc. Illustration of the basic components required
16
The experiment required the following components in order to achieve
meaningful test results:
Hardware Components
• A Dell Laptop, system model Latitude D630, with BIOS Version A16 dated 7/14/2009, an Intel 2.2 GHz CPU, 4,096 Megabytes of Physical RAM, a CD/DVD Drive, and an internal Seagate Model ST980411ASG 75.00 GB Hard Drive.
• A Broadcom NetXtreme 57xx Gigabit Network Card.• An LG VX5400 Cellular Phone with wireless service from Verizon.• A Motorola SB5100 Cable Modem with Internet service from Charter Cable.
Software Components
• Microsoft Windows XP Professional 5.1.2600 Service Pack 3 Build 2600.• Microsoft Windows Server 2003 Standard Edition 5.2.3790 Service Pack 2
Build 3790.• VMware Server Application Version 2.0.2 Build 203138.• 2X Application Server Console from 2X Software Limited, SMB Edition,
Version 7.3, Build 768.• 2X Application Client Console from 2X Software Limited, SMB Edition,
Version 7.3, Build 768.• PhoneFactor Agent Version 3.0.0.7844 from PhoneFactor Incorporated, a
subsidiary of Positive Networks Incorporated.
Setting the stage for initial part of experiment
The first part of the experiment was to show how the current employees at
AF are accessing AF’s resources remotely using only single-factor authentication
via user names and passwords. Figure 2 below is a simple illustration of the
current process in place at AF for accessing resources remotely by using only
user names and passwords for authentication.
17
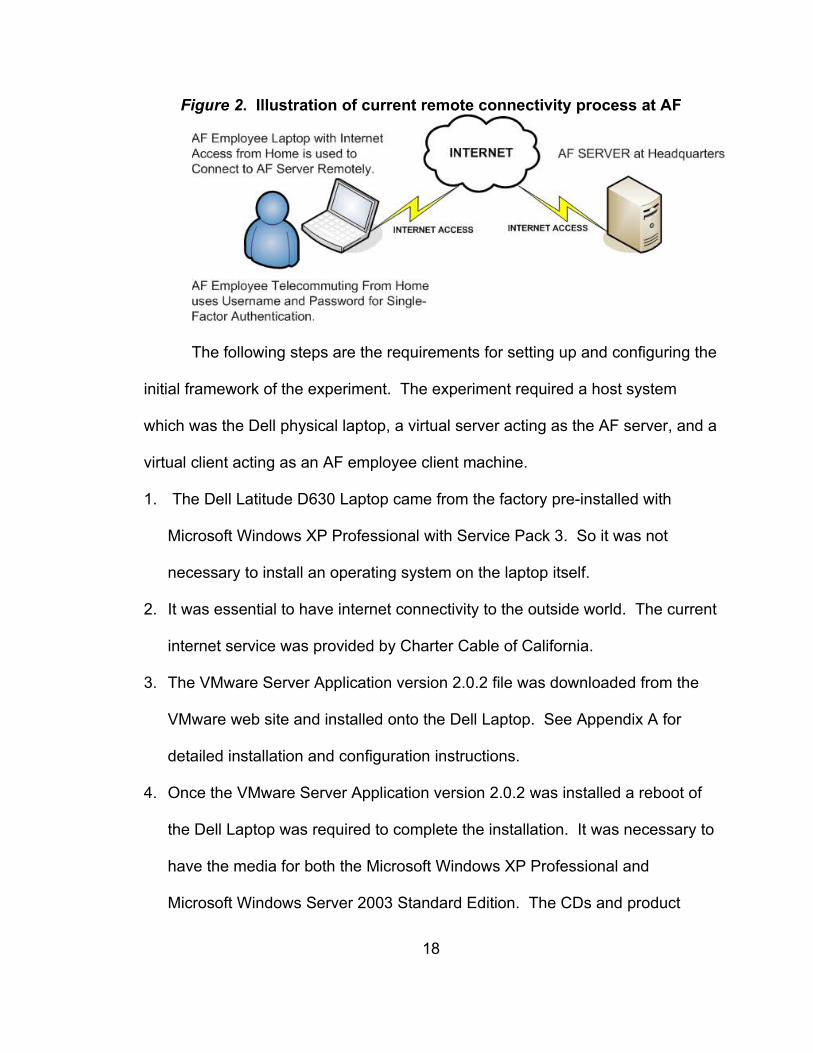
Figure 2. Illustration of current remote connectivity process at AF
The following steps are the requirements for setting up and configuring the
initial framework of the experiment. The experiment required a host system
which was the Dell physical laptop, a virtual server acting as the AF server, and a
virtual client acting as an AF employee client machine.
1. The Dell Latitude D630 Laptop came from the factory pre-installed with
Microsoft Windows XP Professional with Service Pack 3. So it was not
necessary to install an operating system on the laptop itself.
2. It was essential to have internet connectivity to the outside world. The current
internet service was provided by Charter Cable of California.
3. The VMware Server Application version 2.0.2 file was downloaded from the
VMware web site and installed onto the Dell Laptop. See Appendix A for
detailed installation and configuration instructions.
4. Once the VMware Server Application version 2.0.2 was installed a reboot of
the Dell Laptop was required to complete the installation. It was necessary to
have the media for both the Microsoft Windows XP Professional and
Microsoft Windows Server 2003 Standard Edition. The CDs and product
18
licensing keys for these operating systems are provided by AF. To simulate
AF’s production environment, the creation of the server and client
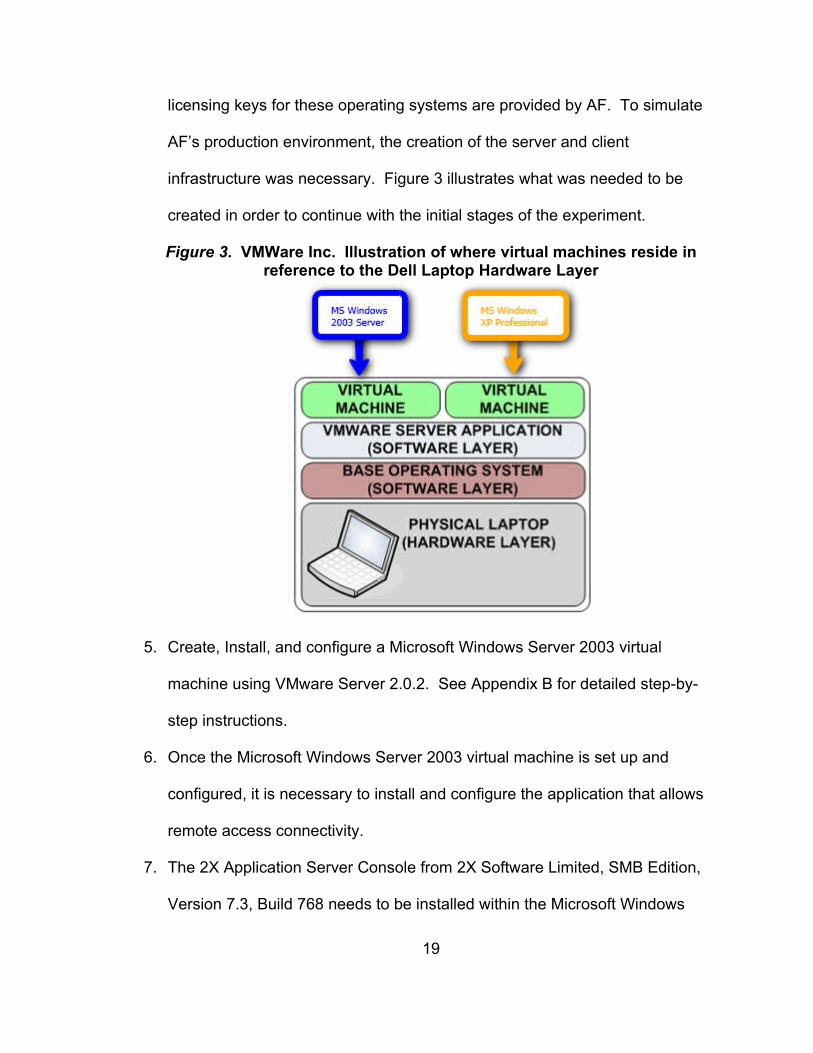
infrastructure was necessary. Figure 3 illustrates what was needed to be
created in order to continue with the initial stages of the experiment.
Figure 3. VMWare Inc. Illustration of where virtual machines reside in reference to the Dell Laptop Hardware Layer
5. Create, Install, and configure a Microsoft Windows Server 2003 virtual
machine using VMware Server 2.0.2. See Appendix B for detailed step-by-
step instructions.
6. Once the Microsoft Windows Server 2003 virtual machine is set up and
configured, it is necessary to install and configure the application that allows
remote access connectivity.
7. The 2X Application Server Console from 2X Software Limited, SMB Edition,
Version 7.3, Build 768 needs to be installed within the Microsoft Windows
19
Server 2003 virtual machine. See Appendix D for detailed step-by-step
instructions.
8. The server side of the platform is now installed, configured and ready to
accept client connection requests. This server will simulate the production AF
server. It is necessary to create, install, and configure the client side now.
9. Create, Install, and configure a Microsoft Windows XP Professional virtual
machine client using VMware Server 2.0.2. See Appendix C for detailed
step-by-step instructions on how to complete this process.
10. Install and configure the 2X Application client from 2X Software Limited, SMB
Edition Version 7.3, build 768 on the AF Remote Client virtual system. See
Appendix E for detailed step-by-step instructions.
11.The stage is now set for initial experimentation and will illustrate the process
of an AF employee using their client machine to connect to AF’s remote
resources. This gives the reader an idea of how the process works in order to
gain a better understanding.
Single-Factor Authentication steps to connect to AF Server
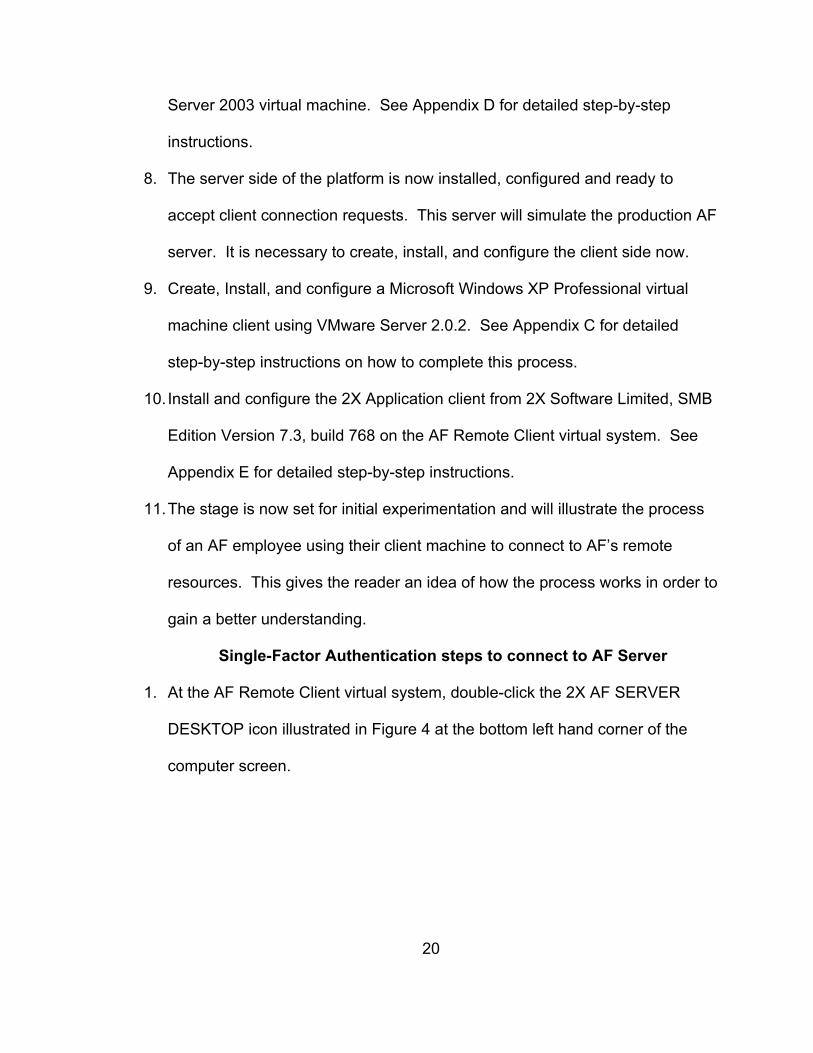
1. At the AF Remote Client virtual system, double-click the 2X AF SERVER
DESKTOP icon illustrated in Figure 4 at the bottom left hand corner of the
computer screen.
20
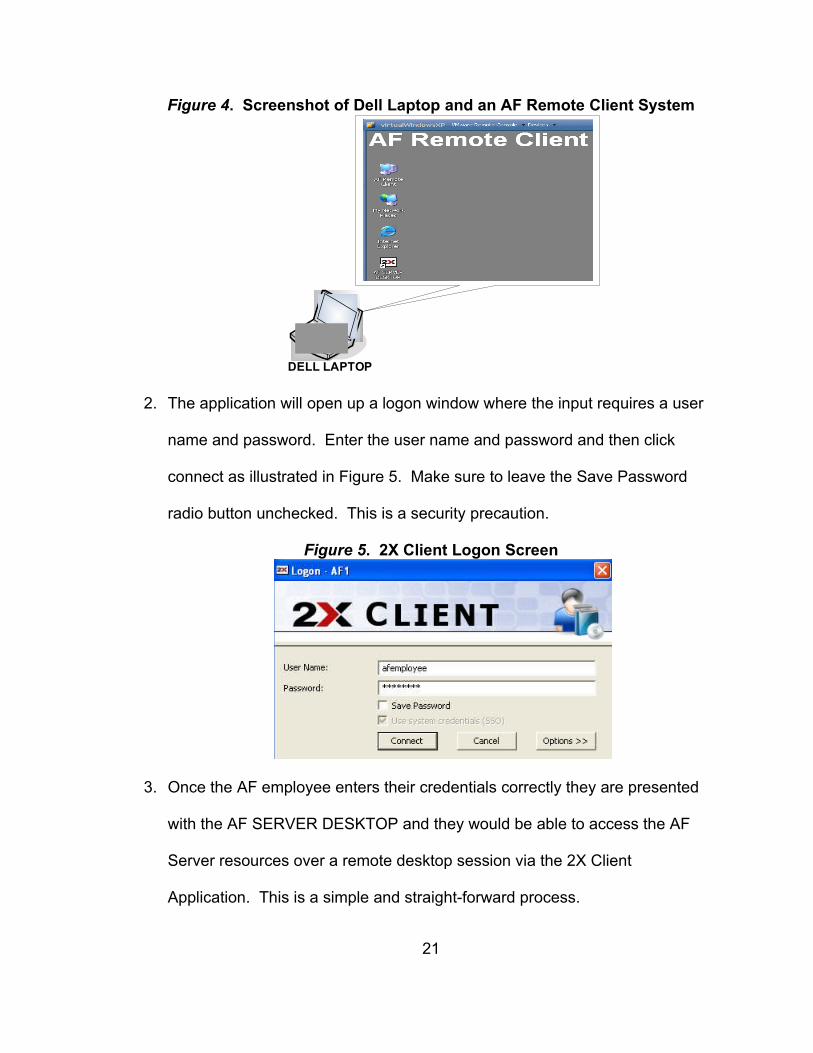
Figure 4. Screenshot of Dell Laptop and an AF Remote Client System
DELL LAPTOP
2. The application will open up a logon window where the input requires a user
name and password. Enter the user name and password and then click
connect as illustrated in Figure 5. Make sure to leave the Save Password
radio button unchecked. This is a security precaution.
Figure 5. 2X Client Logon Screen
3. Once the AF employee enters their credentials correctly they are presented
with the AF SERVER DESKTOP and they would be able to access the AF
Server resources over a remote desktop session via the 2X Client
Application. This is a simple and straight-forward process.
21
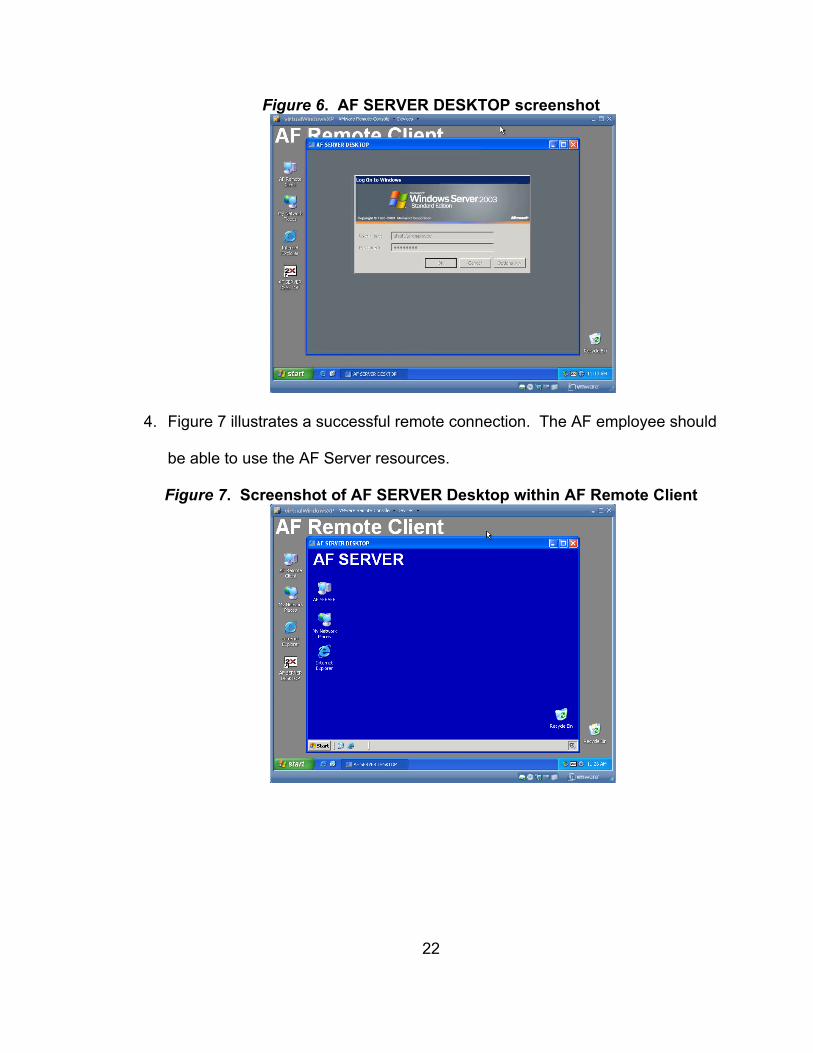
Figure 6. AF SERVER DESKTOP screenshot
4. Figure 7 illustrates a successful remote connection. The AF employee should
be able to use the AF Server resources.
Figure 7. Screenshot of AF SERVER Desktop within AF Remote Client
22
Final stage of experiment and introduction of PhoneFactor
1. The necessary stage of this experiment is to introduce the PhoneFactor
solution and integrate it into AF’s infrastructure. Insert the PhoneFactor
Agent Version 3.0.0.7844 media from PhoneFactor Incorporated into the Dell
Laptop’s CD/DVD drive.
2. Install and configure the PhoneFactor application accordingly. See Appendix
F for detailed step-by-step instructions.
Two-Factor Authentication steps to connect to AF Server
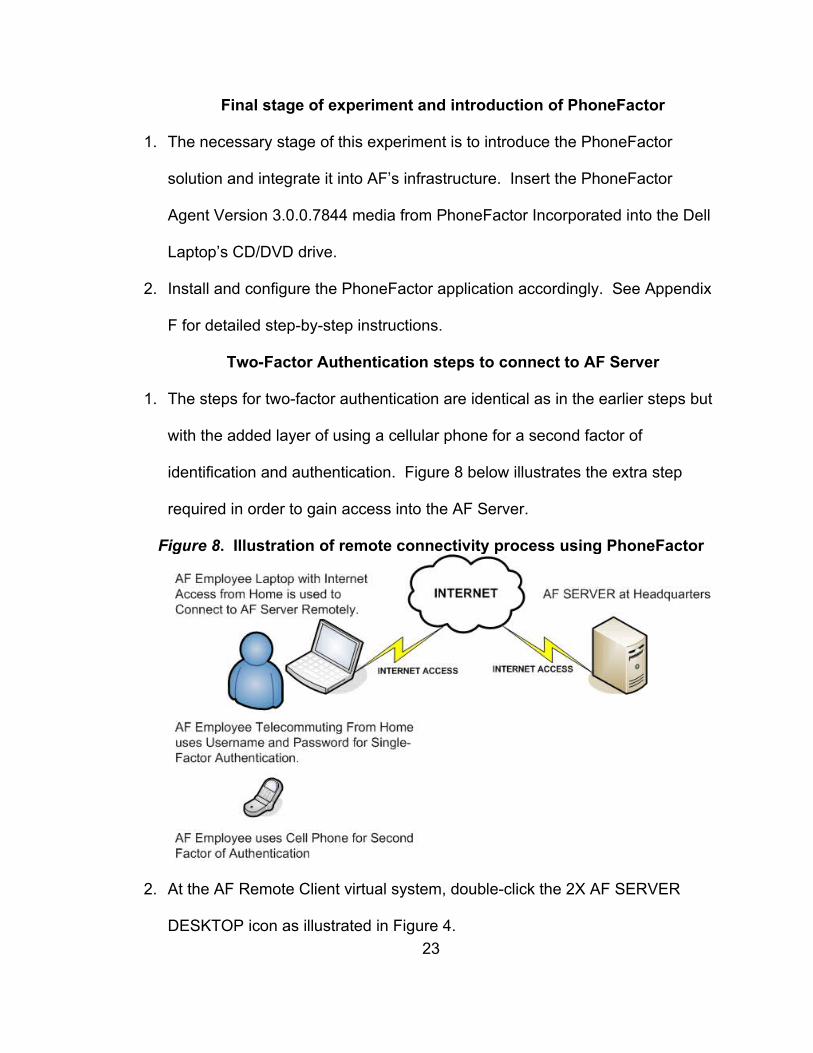
1. The steps for two-factor authentication are identical as in the earlier steps but
with the added layer of using a cellular phone for a second factor of
identification and authentication. Figure 8 below illustrates the extra step
required in order to gain access into the AF Server.
Figure 8. Illustration of remote connectivity process using PhoneFactor
2. At the AF Remote Client virtual system, double-click the 2X AF SERVER
DESKTOP icon as illustrated in Figure 4.
23
3. The application will open up a logon window where the input requires a user
name and password. Enter the user name and password and then click
connect as illustrated in Figure 5 above.
4. At this point there is a difference. The system will not allow you to access the
AF Server until your credentials are verified and have been authenticated by
PhoneFactor.
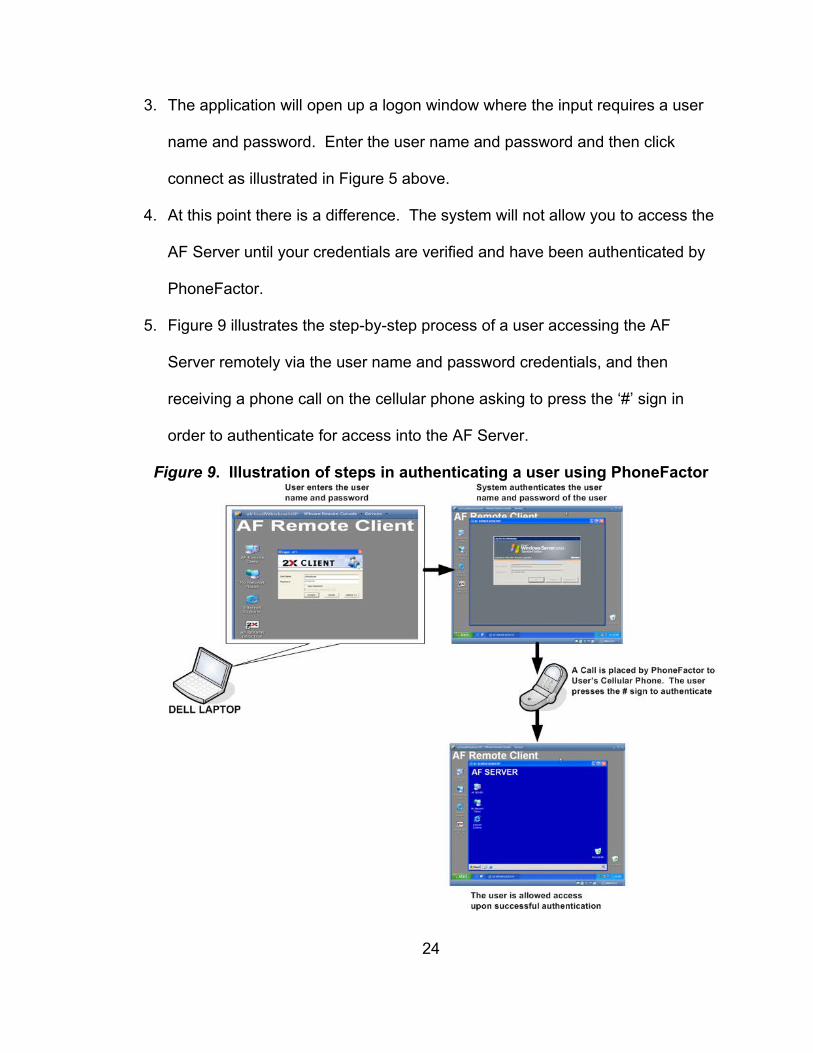
5. Figure 9 illustrates the step-by-step process of a user accessing the AF
Server remotely via the user name and password credentials, and then
receiving a phone call on the cellular phone asking to press the ‘#’ sign in
order to authenticate for access into the AF Server.
Figure 9. Illustration of steps in authenticating a user using PhoneFactor
24
Experiment Analysis
The initial part of the experiment was to show how the current
environment at AF is configured. It was necessary to illustrate to the reader how
the process currently works at AF. An employee clicks on the remote access
icon, and then the employee is presented with a logon screen where they input
their user names and passwords. This is sufficient to authenticate and allow the
user access to the AF resources.
The last part of the experiment is the addition of the PhoneFactor Agent
application into the mix. This part of the experiment is at the heart of this
research. Now it is not sufficient to only have a user name and password to be
able to gain access into AF’s resources, but an employee is required to have a
cellular phone where PhoneFactor places a telephone call in order to complete
the authentication process.
In assessing the implementation of PhoneFactor into the solution it was
relevant to keep in mind how easy it was to integrate the application. The
addition of PhoneFactor added an extra layer of security into the process. The
added step in requiring a cellular phone to authenticate a user adds complexity,
because it is necessary to have that device in order to be able to access the AF
server.
In performing analysis of the entire experiment, it is necessary to mention
the fact that it is possible to create a platform where AF has introduced a solution
whereby employees have a heightened awareness of the added benefit of two-
factor authentication using the PhoneFactor solution.
25
Experiment Results
The end result of the experiment was a successful deployment and
implementation of PhoneFactor’s two-factor authentication solution within the test
environment. The product installed without any issues and it performed as
indicated in the product literature. The addition of PhoneFactor into the
computing environment was very easy and did not require advanced knowledge.
It was more difficult to create the virtualized environment in order to perform the
experiment. The creation of the virtualized environment did provide the
researcher with the added benefit of not having to purchase expensive hardware
in order to mimic AF’s actual production systems.
The PhoneFactor solution did not fail at all during the experiment. On
every occasion the authentication process worked flawlessly. The user would
double-click the remote access icon, then they would be presented with the login
screen where they would enter their user names and passwords, and then at that
point-in-time the PhoneFactor application would dial the cellular phone for that
particular user in order to complete the authentication process. Once the user
presses the ‘#’ sign they are authenticated by the PhoneFactor application and
are authorized to access the AF Server.
The experiment was performed in front of AF’s President and some of the
AF employees. AF’s President was very pleased with the experiment and the
successful results. AF would like to move forward with implementing the
PhoneFactor solution into their production environment.
26
CHAPTER 4: CONCLUSIONS
PhoneFactor is a viable product for companies looking to introduce a two-
factor authentication solution into their current computing infrastructure. The
integration of PhoneFactor adds an extra layer of security into the process of
connecting to an internal server via the internet. If AF were to adopt a defense-
in-depth strategy, PhoneFactor would be a value-add.
Recommendations
After researching and testing the PhoneFactor product it seems to be a
product that can provide the added level of security that might make a company
more secure in regards to their remote connectivity solution. In further testing the
product, I found it to be easy to use and easy to integrate into a computing
environment without many changes to the state of production systems. As far as
downtime is concerned, I do not see much downtime in moving forward with this
solution.
The addition of PhoneFactor should by no means discard a company’s
policies, procedures and employees’ habits. PhoneFactor is an added measure
of control for AF in order to curb some attack vectors that stem from single-factor
authentication. After all, PhoneFactor is a technology solution and a technology
solution by itself will not solve all information security issues. Figure 10 is an
illustration of strengths, weaknesses, opportunities and threats of the
PhoneFactor Two-Factor authentication solution.
27
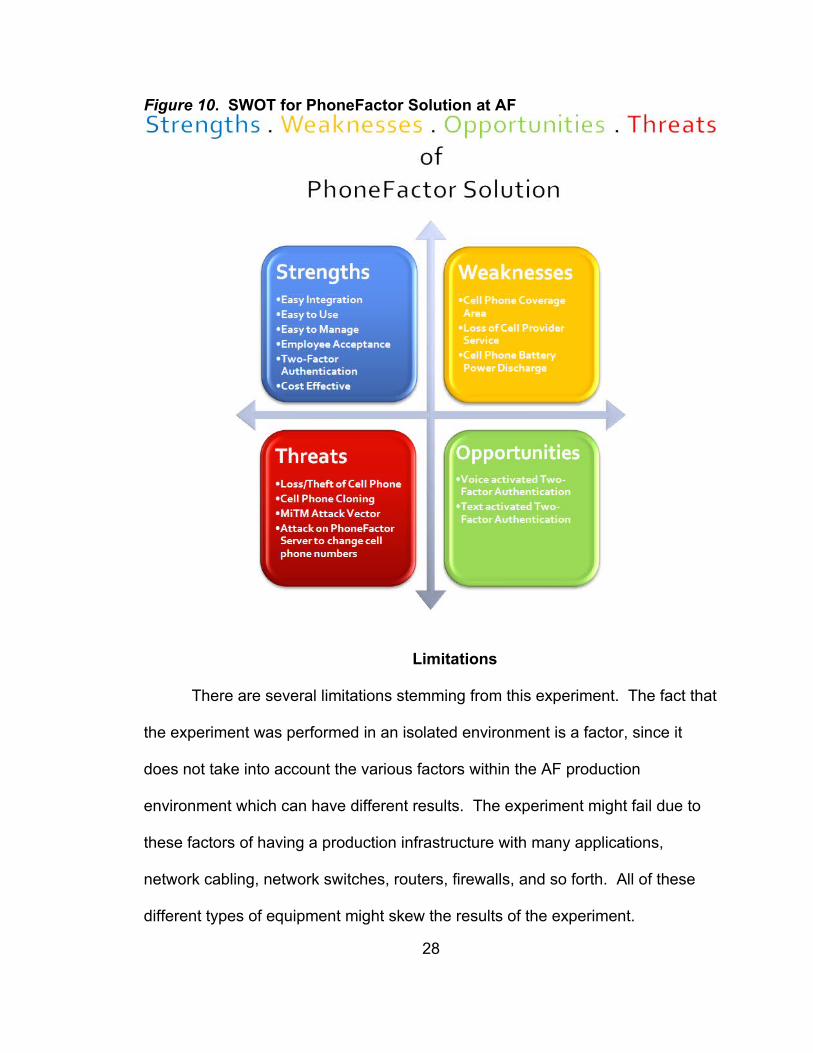
Figure 10. SWOT for PhoneFactor Solution at AF
Limitations
There are several limitations stemming from this experiment. The fact that
the experiment was performed in an isolated environment is a factor, since it
does not take into account the various factors within the AF production
environment which can have different results. The experiment might fail due to
these factors of having a production infrastructure with many applications,
network cabling, network switches, routers, firewalls, and so forth. All of these
different types of equipment might skew the results of the experiment.
28
The lack of usage load on the experimental test environment is also
another limiting factor. The experiment was conducted using only one user
connecting to the AF Server. If there were many users connecting to the AF
Server simultaneously might have adverse effects on the system itself and the
end result will be an unsuccessful result.
The experiment was also limited to a local network connection on a laptop
using VMWare to create virtual machines. The behavior of PhoneFactor might
be different on a hardware system versus a virtual system. The result might also
come out differently in this regard.
Since the experiment was done in a test environment and basically
isolated, it is unknown whether an attack on the system can be carried out
successfully or not. This is a limiting factor and was not part of the scope of the
experiment. The research did not include any type of attack procedures on the
PhoneFactor experiment itself and therefore it is a limitation in itself.
The experiment was also limited to authenticating remote access over a
2X application solution and did not take into consideration any other type of
connectivity technologies such as ones from Citrix, RSA, or any provider of
remote access capability. So it is unknown how PhoneFactor would function in
such a scenario.
Areas of Future Work
In the future if I were to redo this experiment from scratch I would love to
be able to perform it on a live production system. By performing this experiment
on live systems would give the researcher as well as the stake holders more
29
meaningful results such as failures and successes. Maybe by performing this
experiment in a sand-box if you will, could have skewed some of the failures that
would be useful in looking further into the product.
PhoneFactor works on the premise that a user has in their possession a
mobile phone. The PhoneFactor Company can look at other avenues for
providing two-factor authentication because of some of the weaknesses in using
the mobile phone as an authentication device. The user can be in an area where
there isn’t any cellular service. This is one of the weaknesses in using this type
of technology.
It would be nice to have a solution that is very transparent to the user and
works in the background without any adverse impact. A couple of opportunities
for PhoneFactor would be to provide voice-activated two-factor authentication as
well as text based two-factor authentication. These can be a value-add to the
end-user and can provide more choices for authentication.
Integration of two-factor authentication into everyday life can help lessen
the impact of unauthorized access. By leveraging the use of two-factor
authentication using PhoneFactor and a well though-out defense-in-depth
strategy using policies, procedures and step-by-step guidelines might benefit an
organization and give it a peace of mind that their security initiative is reasonable.
30
REFERENCES
DataLossDB Open Security Foundation. (2006, June 19). Data Breach Notification: Countrywide Home Loans. Retrieved September 16, 2009, from DataLossDB Open Security Foundation: http://datalossdb.org/primary_sources/416
Dispensa, S. (2009, January 28). PhoneFactor Incorporated. Retrieved September 17, 2009, from PhoneFactor Incorporated Web Site: http://www.phonefactor.com/wp-content/pdfs/PhoneFactor-WhitePaper.pdf
Federal Financial Institutions Examination Council. (2005, October 7). Authentication in an Internet Banking Environment. Retrieved October 4, 2009, from Federal Financial Institutions Examination Council Web Site: http://www.ffiec.gov/pdf/authentication_guidance.pdf
Gaskin, J. E. (2007, August 2). Network World. Retrieved September 17, 2009, from Network World Web Site: http://www.networkworld.com/newsletters/sbt/2007/0730smbtech1.html?page=1
Gordon, A. L., Loeb, P. M., Lucyshyn, W., & Richardson, R. (2006, January). UBM Technology. Retrieved September 17, 2009, from UBM Technology Web Site: http://i.cmpnet.com/gocsi/db_area/pdfs/fbi/FBI2006.pdf
Kelley, D. (2001, November 15). Authentication as the Foundation for eBusiness. Retrieved October 4, 2009, from SecurityFocus Web Site: http://www.securityfocus.com/infocus/1513
Jain, A., Hong, L., & Pankanti, S. (2000). Biometric Identification. Communications of the ACM , 91-98.
McAfee. (2006, February 8). McAfee Incorporated. Retrieved September 18, 2009, from McAfee Incorporated Web Site: http://www.mcafee.com/us/local_content/white_papers/wp_phishing_pharming.pdf
Milletary, J. (2005, October 31). CERT. Retrieved September 18, 2009, from CERT Web Site: http://www.cert.org/archive/pdf/Phishing_trends.pdf
National Science and Technology Council. (2006, September 15). Biometrics. Retrieved October 2, 2009, from National Science & Technology Council: http://www.biometrics.gov/docs/privacy.pdf
31
Ornaghi, A., & Valleri, M. (2003, July 16). Man in the Middle Attacks Demos. Retrieved September 18, 2009, from Black Hat Web Site: http://www.blackhat.com/presentations/bh-usa-03/bh-us-03-ornaghi-valleri.pdf
Perrin, C. (2008, May 28). Is PhoneFactor really better security? Retrieved October 14, 2009, from TechRepublic Web Site: http://search.techrepublic.com.com/search/chad+perrin.html
Pullman, N., & Streff, K. (2007). Identity and Access Management. In H. R. Rao, M. Gupta, & J. U. Shambhu, Managing Information Assurance in Financial Services (pp. 208-239). Hershey: IGI Publishing.
Schneier, B. (2005, April 18). Two-Factor Authentication: Too Little, Too Late. Communications of the ACM , p. 27.
Shinder, T. W. (2009, April 17). Review of Collective Software’s Two-Factor Authentication Solution. Retrieved September 17, 2009, from Collective Software LLC Web Site: http://www.collectivesoftware.com/Files/AuthLiteReview.pdf
Stockton, R. (2009, July 8). RSA SecurID Authenticators. Retrieved October 14, 2009, from Token Guard Web Site: http://www.tokenguard.com/datasheets/RSA_SecurID_Authenticators_datasheet.pdf
Turban, E., King, D., Viehland, D., & Lee, J. (2006). E-COMMERCE SECURITY. In E. Turban, D. King, D. Viehland, & J. Lee, Electronic Commerce, A Managerial Perspective (pp. 457-492). Upper Saddle River: Pearson Prentice Hall.
VMWare Inc. (n.d.). VMWare Inc. Retrieved October 19, 2009, from VMWare Inc.: http://www.vmware.com
Vogel, T. L. (2003, April 25). International Foundation for Protection Officers. Retrieved October 2, 2009, from International Foundation for Protection Officers Web Site: http://www.ifpo.org/articlebank/biometrics.html
Volonino, L., & Volonino, R. P. (2006). Security Middleware. In L. Volonino, & R. P. Volonino, Handbook of Information Security (pp. 512-521). Hoboken: John Wiley and Sons Incorporated.
Yeo, A. Y. (2007). Stronger Authentication: Responding to the Crisis of Confidence. In H. R. Rao, M. Gupta, & J. U. Shambhu, Managing
32

Information Assurance in Financial Services (pp. 152-165). Hershey: IGI Publishing.
33

APPENDICES
34
APPENDIX A
DOWNLOADING, INSTALLING, AND CONFIGURING VMWARE SERVER 2.0.2
35
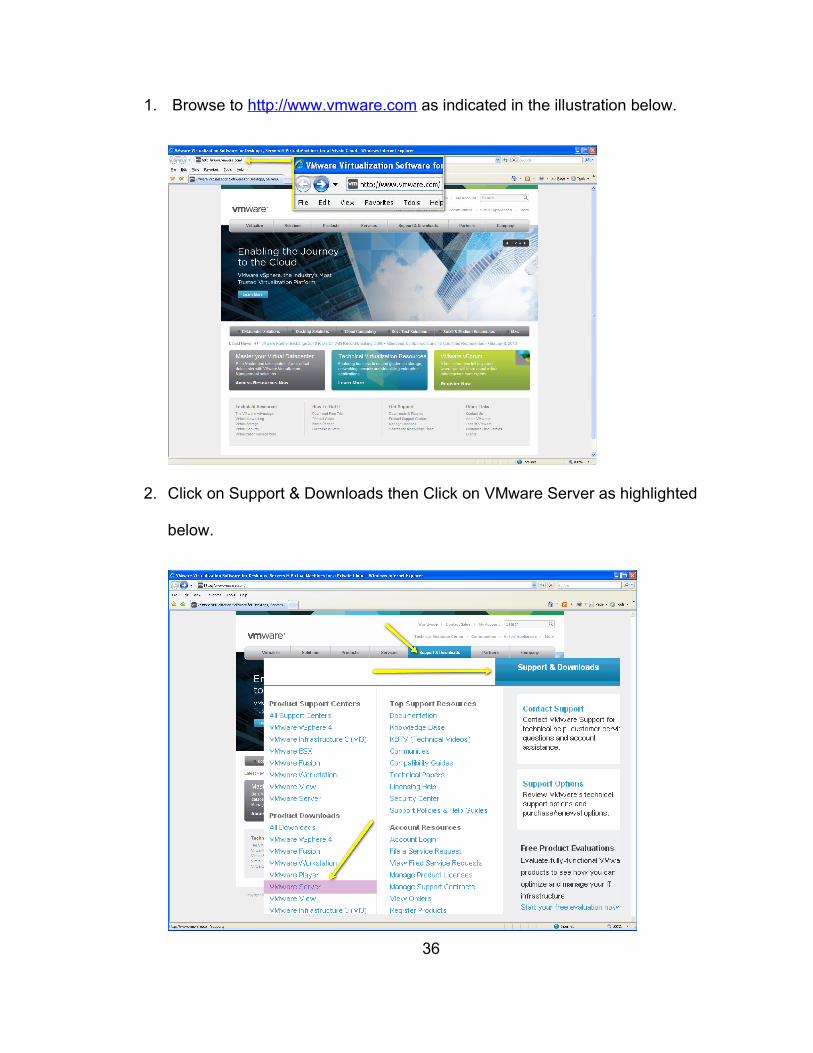
1. Browse to http://www.vmware.com as indicated in the illustration below.
2. Click on Support & Downloads then Click on VMware Server as highlighted
below.
36
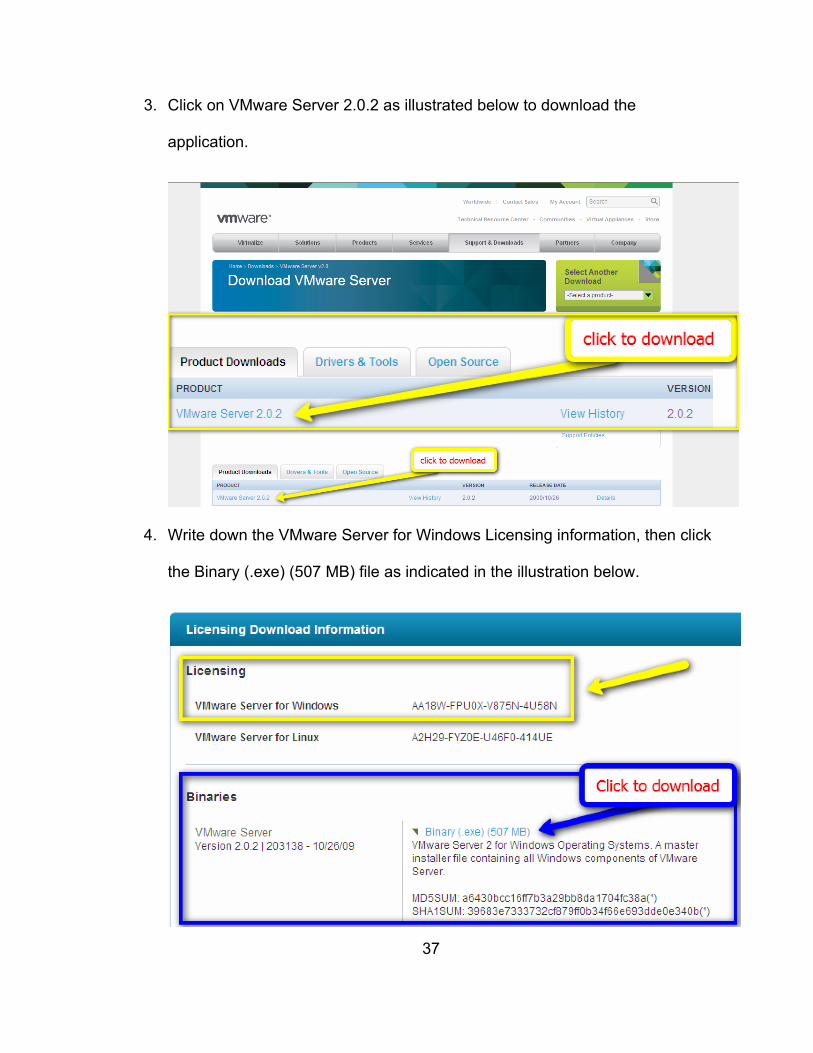
3. Click on VMware Server 2.0.2 as illustrated below to download the
application.
4. Write down the VMware Server for Windows Licensing information, then click
the Binary (.exe) (507 MB) file as indicated in the illustration below.
37
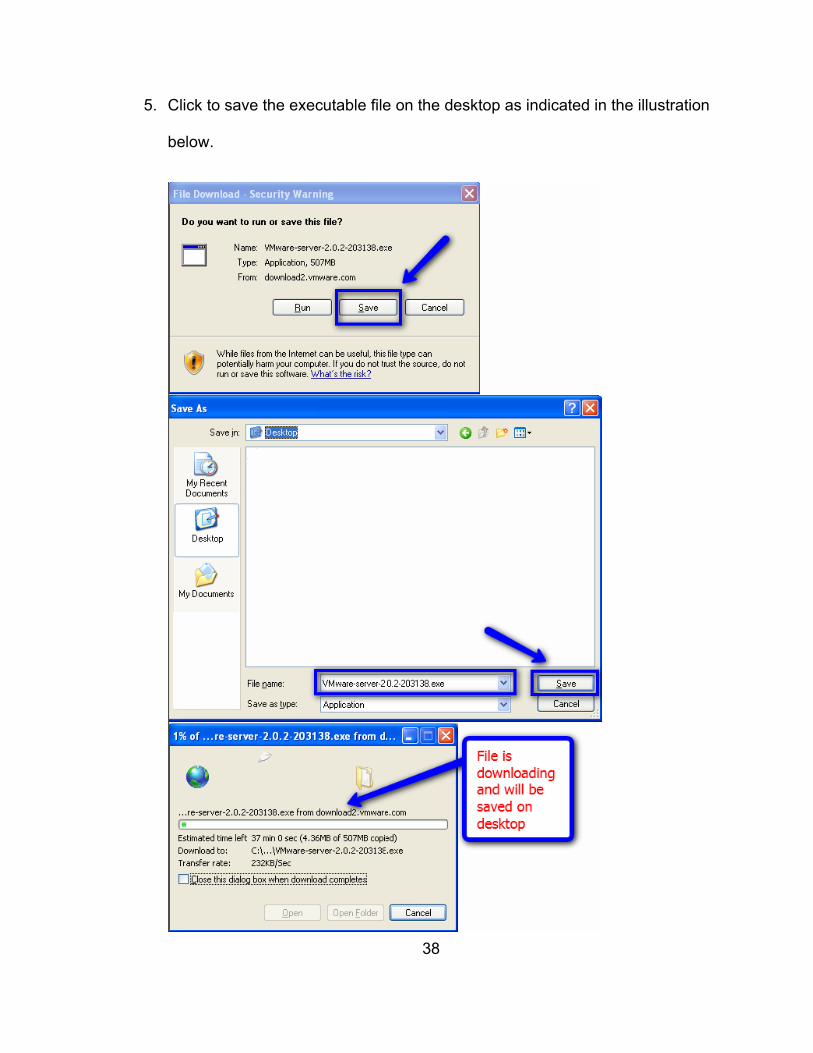
5. Click to save the executable file on the desktop as indicated in the illustration
below.
38
6. The file will be saved on the desktop as VMware-server-2.0.2-203138.exe.
The time for the download will depend on the network connection available.
The higher the bandwidth of the connection the faster the download.
7. Once the file download is complete, double-click the VMware-
server-2.0.2-203138.exe located on the desktop. The installation of VMware
server will begin as illustrated below.
39
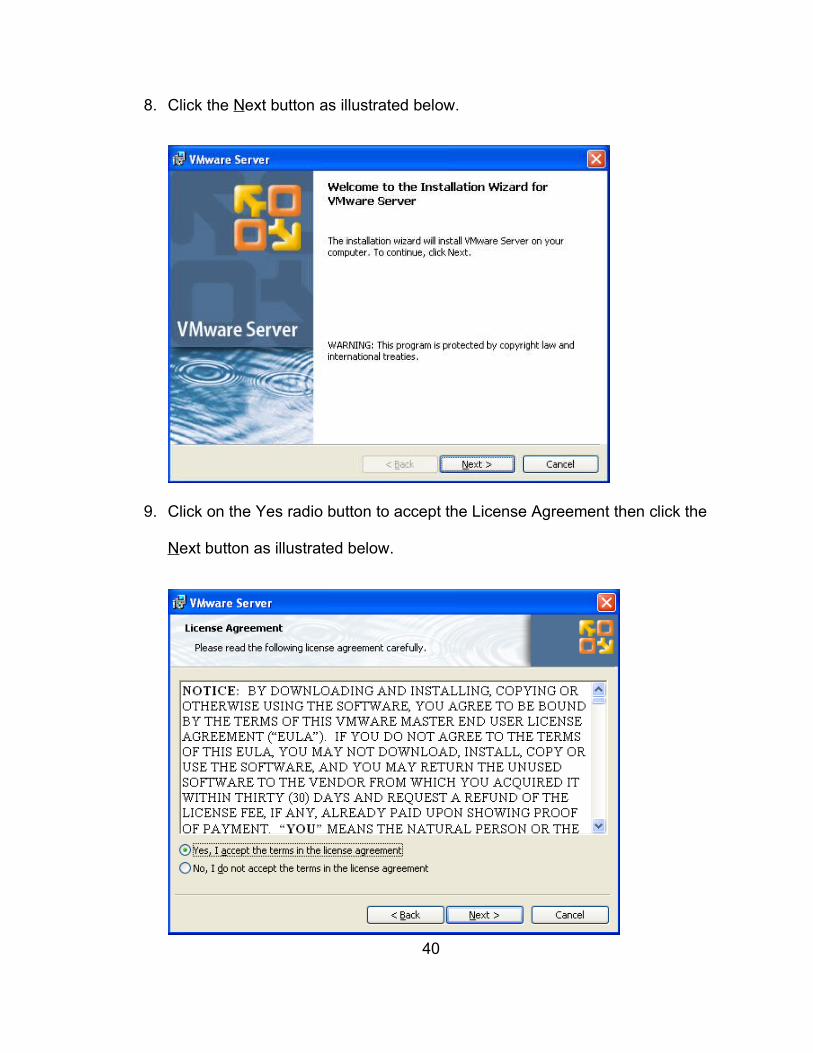
8. Click the Next button as illustrated below.
9. Click on the Yes radio button to accept the License Agreement then click the
Next button as illustrated below.
40
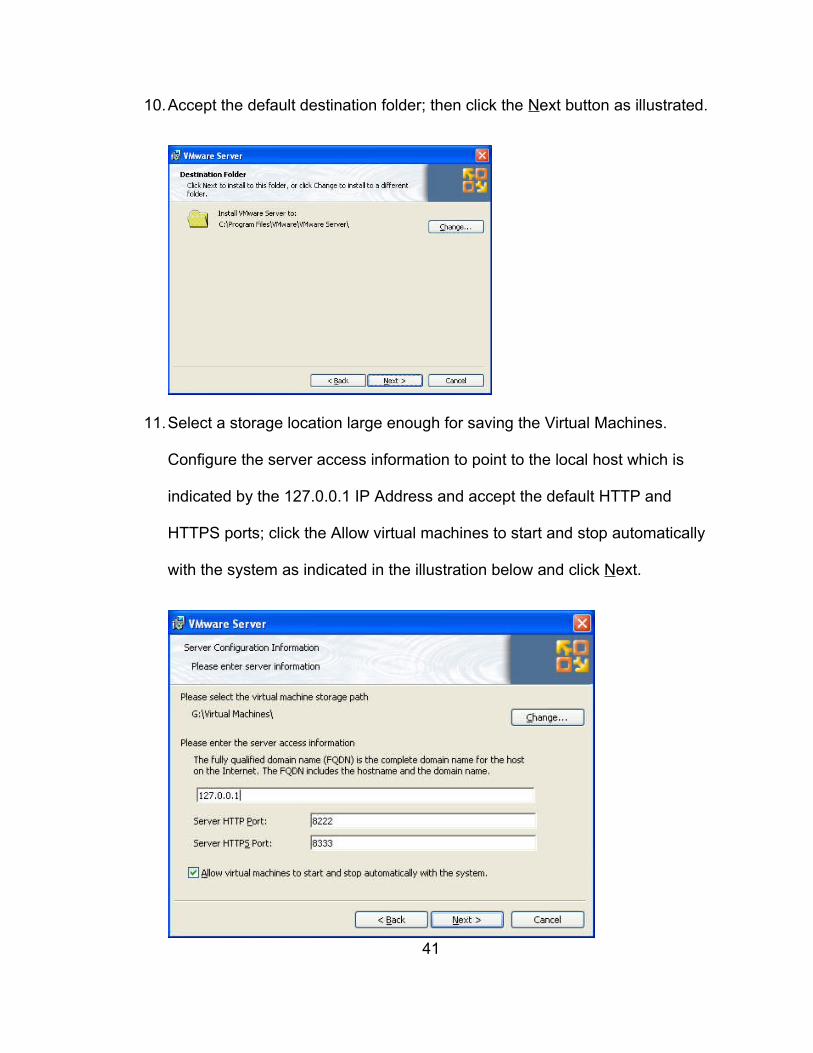
10.Accept the default destination folder; then click the Next button as illustrated.
11.Select a storage location large enough for saving the Virtual Machines.
Configure the server access information to point to the local host which is
indicated by the 127.0.0.1 IP Address and accept the default HTTP and
HTTPS ports; click the Allow virtual machines to start and stop automatically
with the system as indicated in the illustration below and click Next.
41
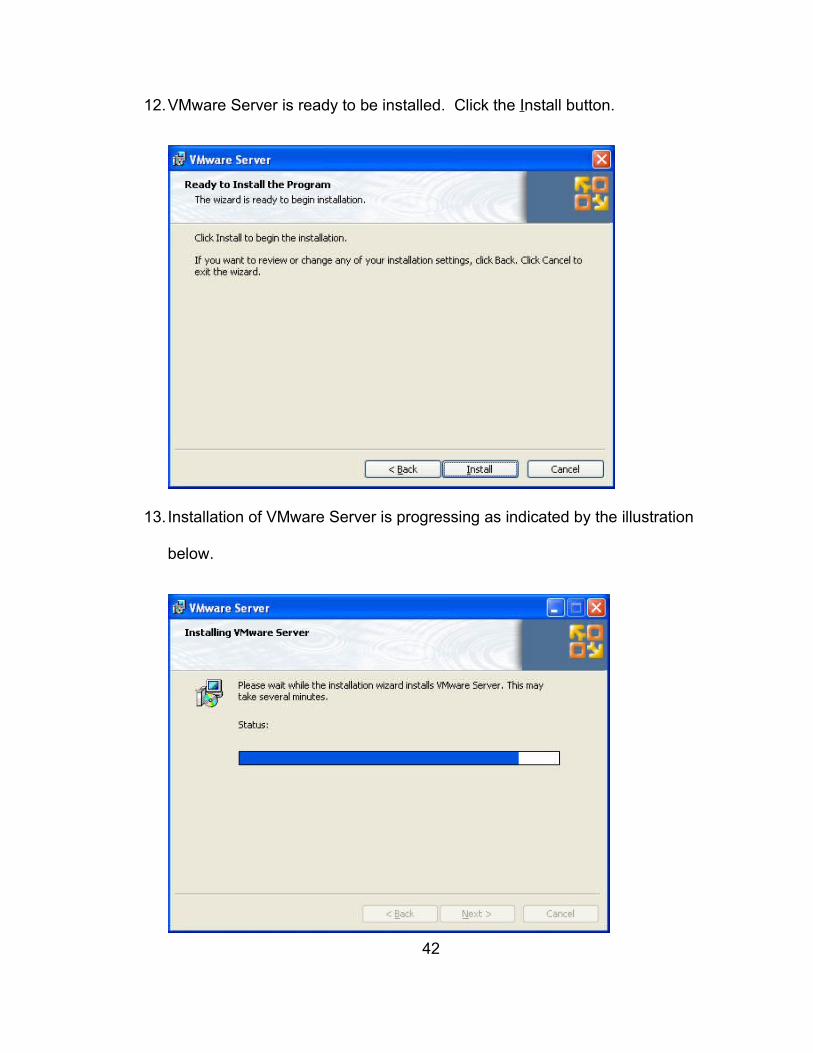
12.VMware Server is ready to be installed. Click the Install button.
13. Installation of VMware Server is progressing as indicated by the illustration
below.
42
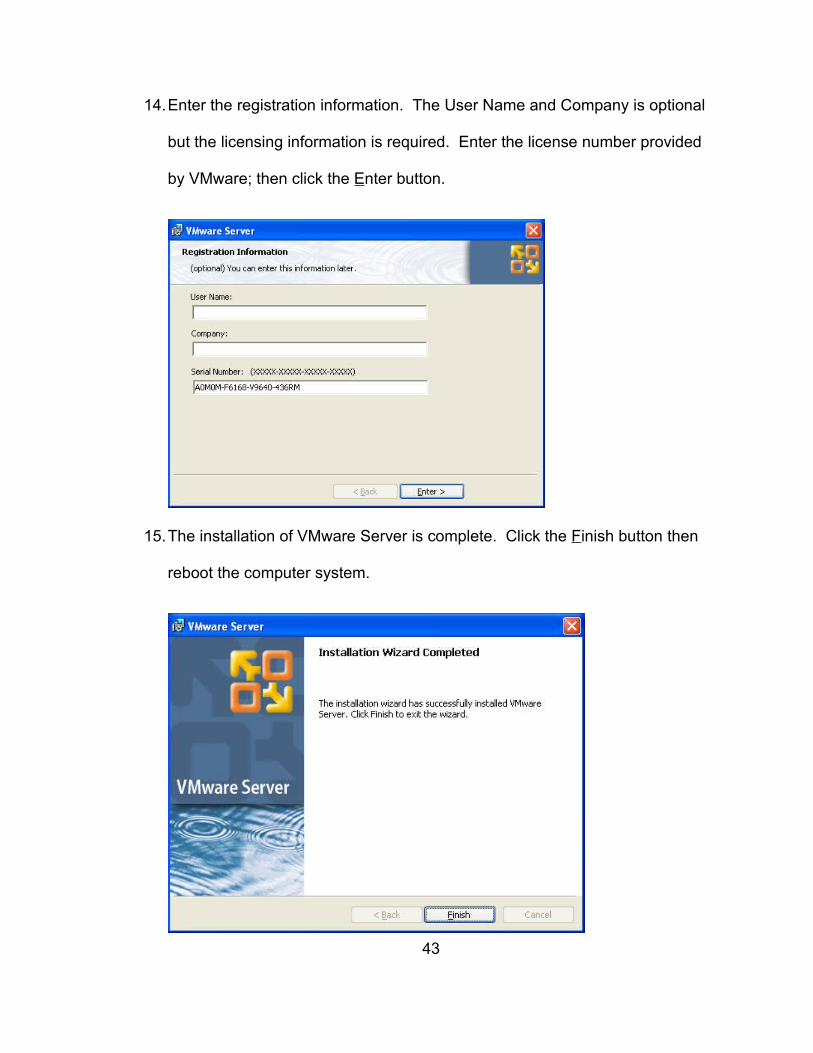
14.Enter the registration information. The User Name and Company is optional
but the licensing information is required. Enter the license number provided
by VMware; then click the Enter button.
15.The installation of VMware Server is complete. Click the Finish button then
reboot the computer system.
43
APPENDIX B
CREATING, INSTALLING, AND CONFIGURING A MICROSOFT WINDOWS
SERVER 2003 VIRTUAL MACHINE USING VMWARE SERVER 2.0.2
44
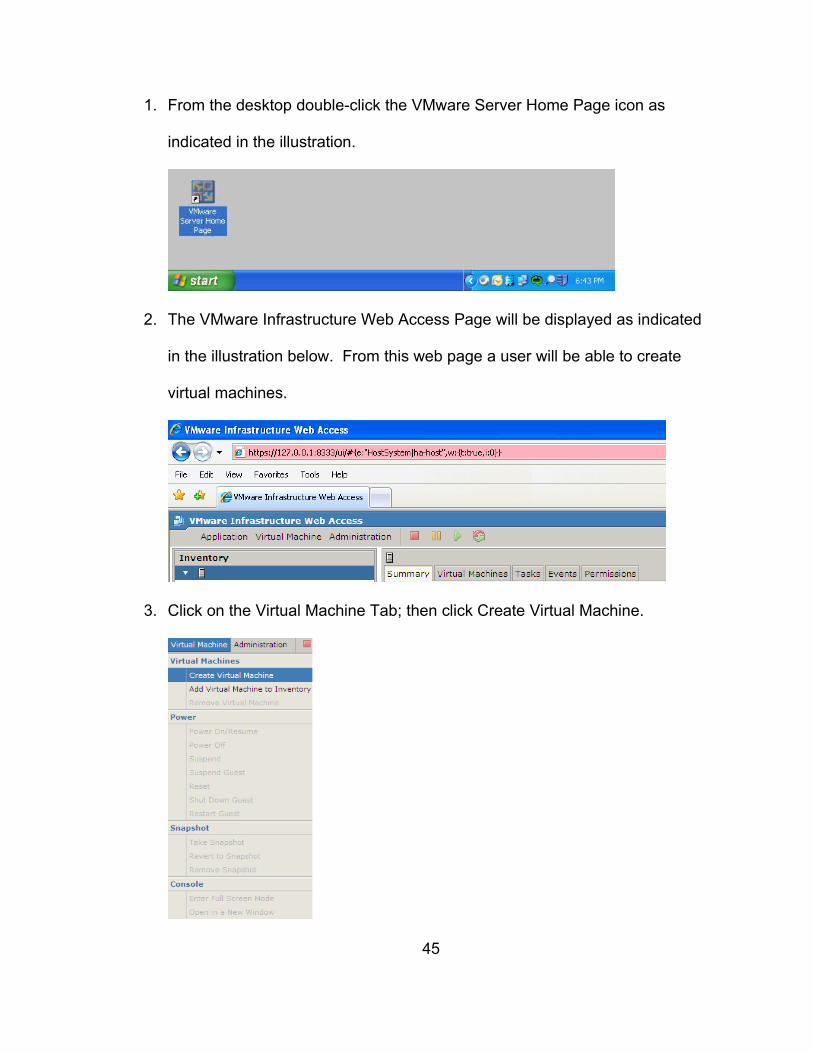
1. From the desktop double-click the VMware Server Home Page icon as
indicated in the illustration.
2. The VMware Infrastructure Web Access Page will be displayed as indicated
in the illustration below. From this web page a user will be able to create
virtual machines.
3. Click on the Virtual Machine Tab; then click Create Virtual Machine.
45

4. Enter a name for the virtual windows server. In this case the name of the
server is virtualWindowsServer1 as indicated in the illustration below. Click
Next.
5. For Operating System choose the Windows operating system radio button
and in the drop-down menu choose MS Windows Server 2003, Standard
Edition (32-bit) as indicated by the illustration.
46
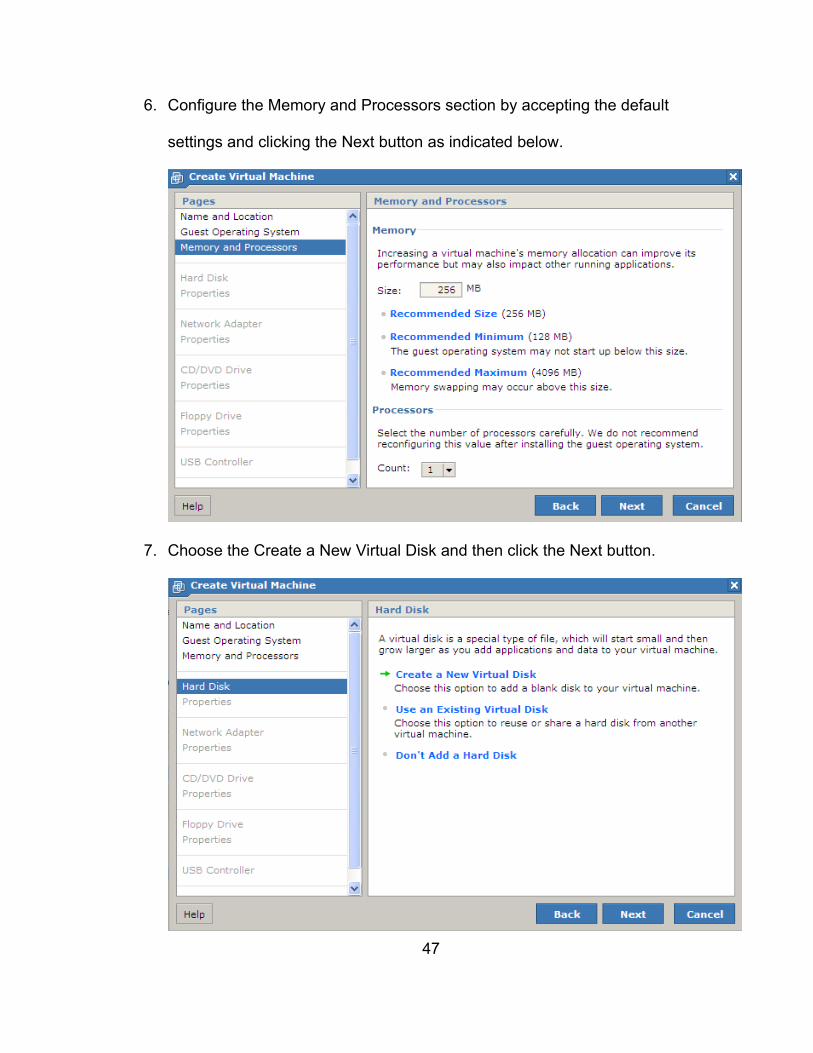
6. Configure the Memory and Processors section by accepting the default
settings and clicking the Next button as indicated below.
7. Choose the Create a New Virtual Disk and then click the Next button.
47
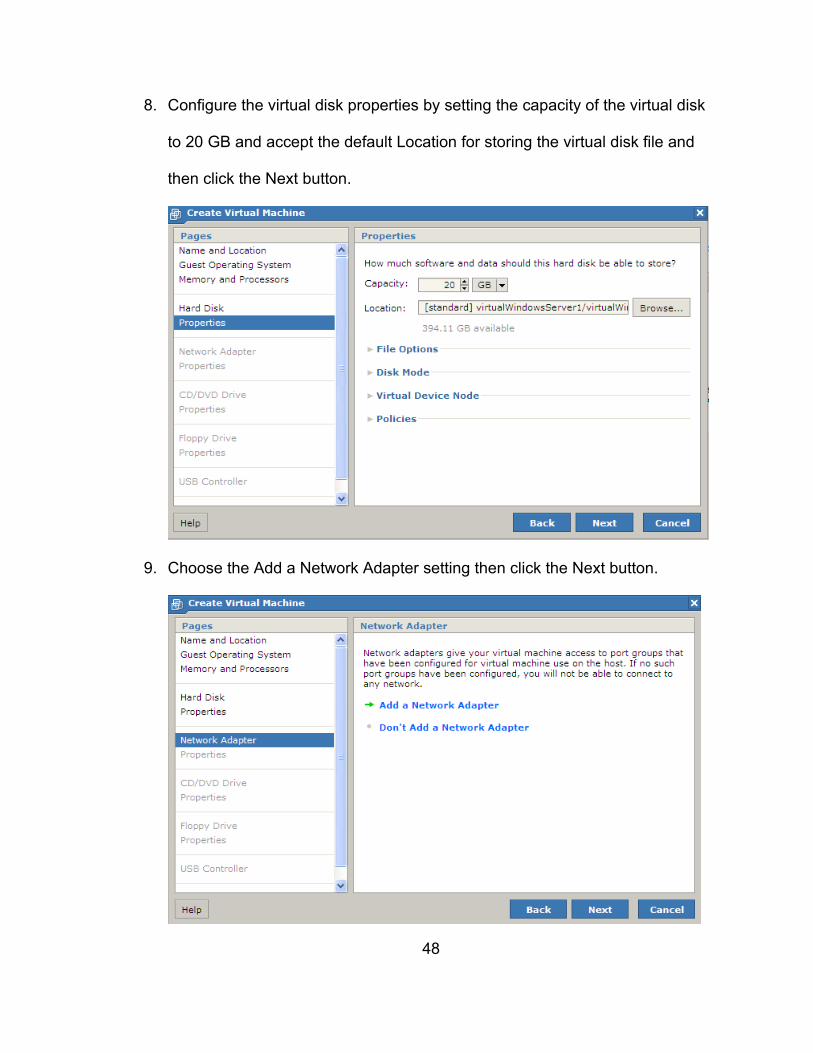
8. Configure the virtual disk properties by setting the capacity of the virtual disk
to 20 GB and accept the default Location for storing the virtual disk file and
then click the Next button.
9. Choose the Add a Network Adapter setting then click the Next button.
48
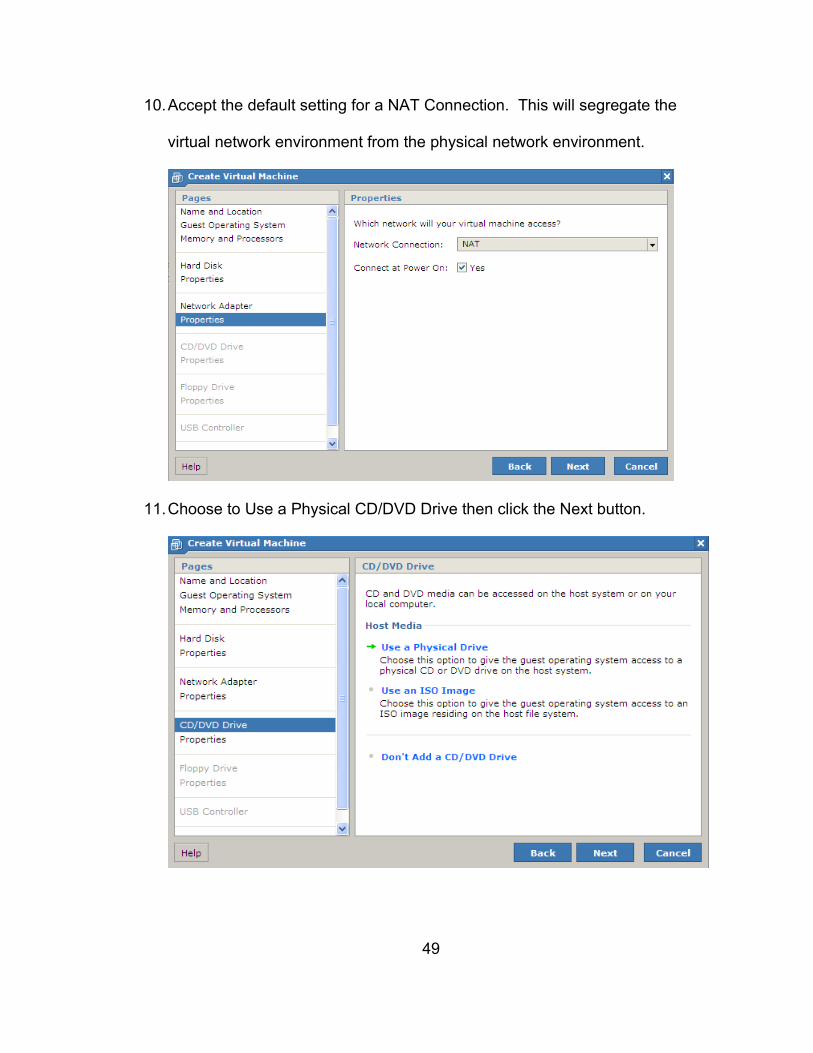
10.Accept the default setting for a NAT Connection. This will segregate the
virtual network environment from the physical network environment.
11.Choose to Use a Physical CD/DVD Drive then click the Next button.
49

12.Choose the location of the CD/DVD drive then click the Next button.
13.Choose the Don’t Add a Floppy Drive setting then click the Next button.
50
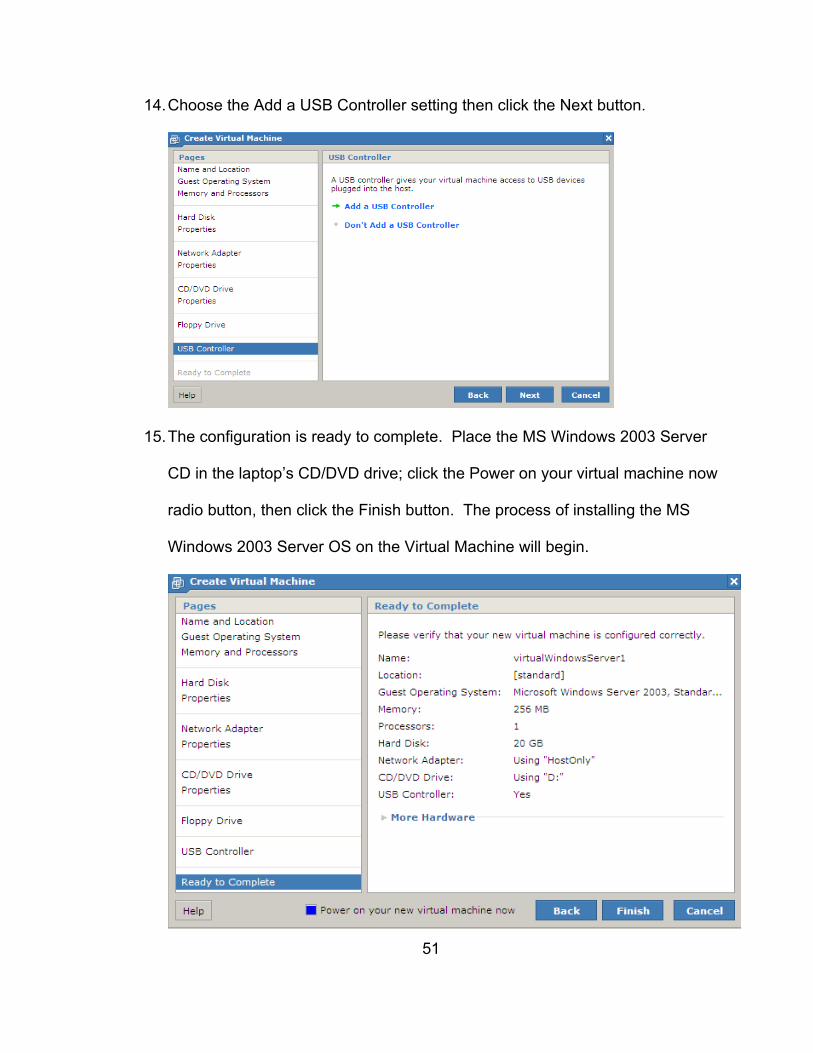
14.Choose the Add a USB Controller setting then click the Next button.
15.The configuration is ready to complete. Place the MS Windows 2003 Server
CD in the laptop’s CD/DVD drive; click the Power on your virtual machine now
radio button, then click the Finish button. The process of installing the MS
Windows 2003 Server OS on the Virtual Machine will begin.
51
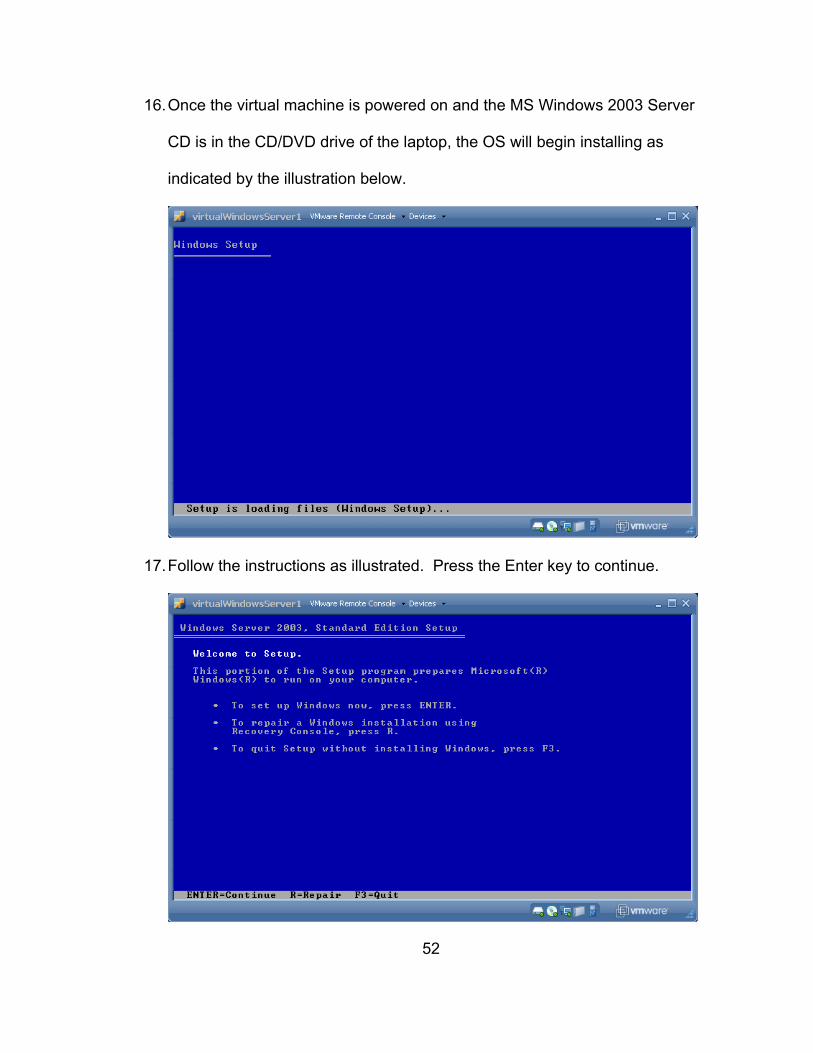
16.Once the virtual machine is powered on and the MS Windows 2003 Server
CD is in the CD/DVD drive of the laptop, the OS will begin installing as
indicated by the illustration below.
17.Follow the instructions as illustrated. Press the Enter key to continue.
52
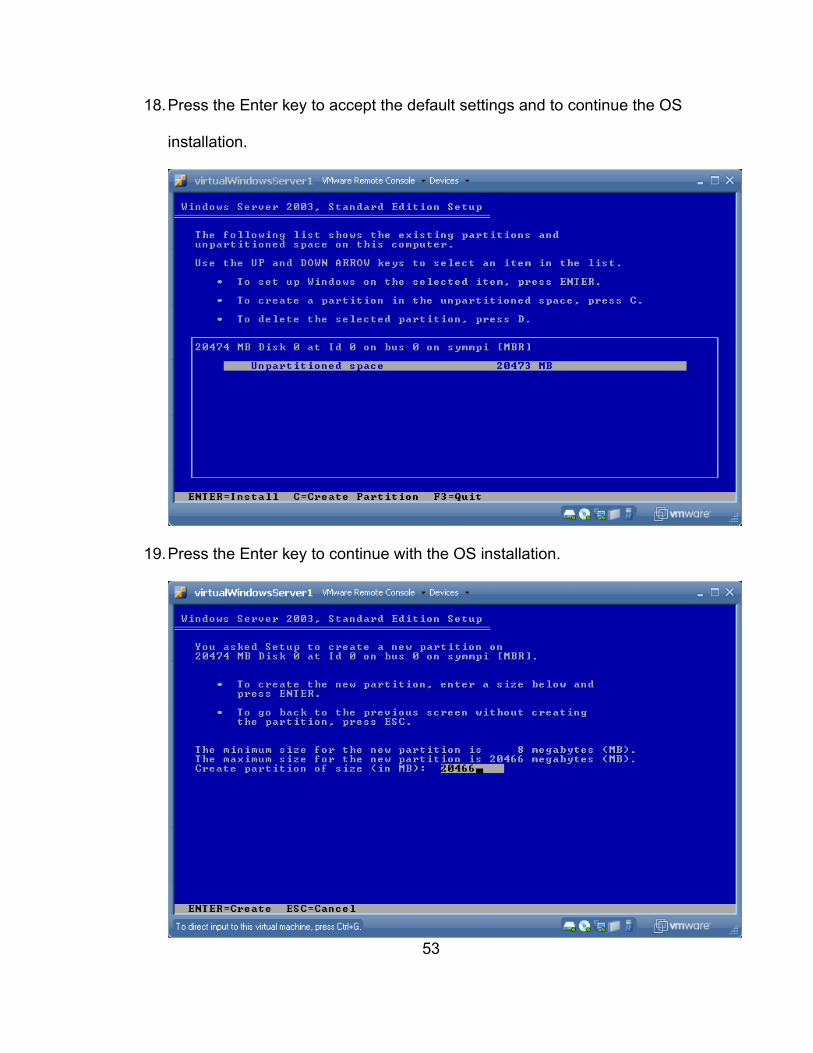
18.Press the Enter key to accept the default settings and to continue the OS
installation.
19.Press the Enter key to continue with the OS installation.
53
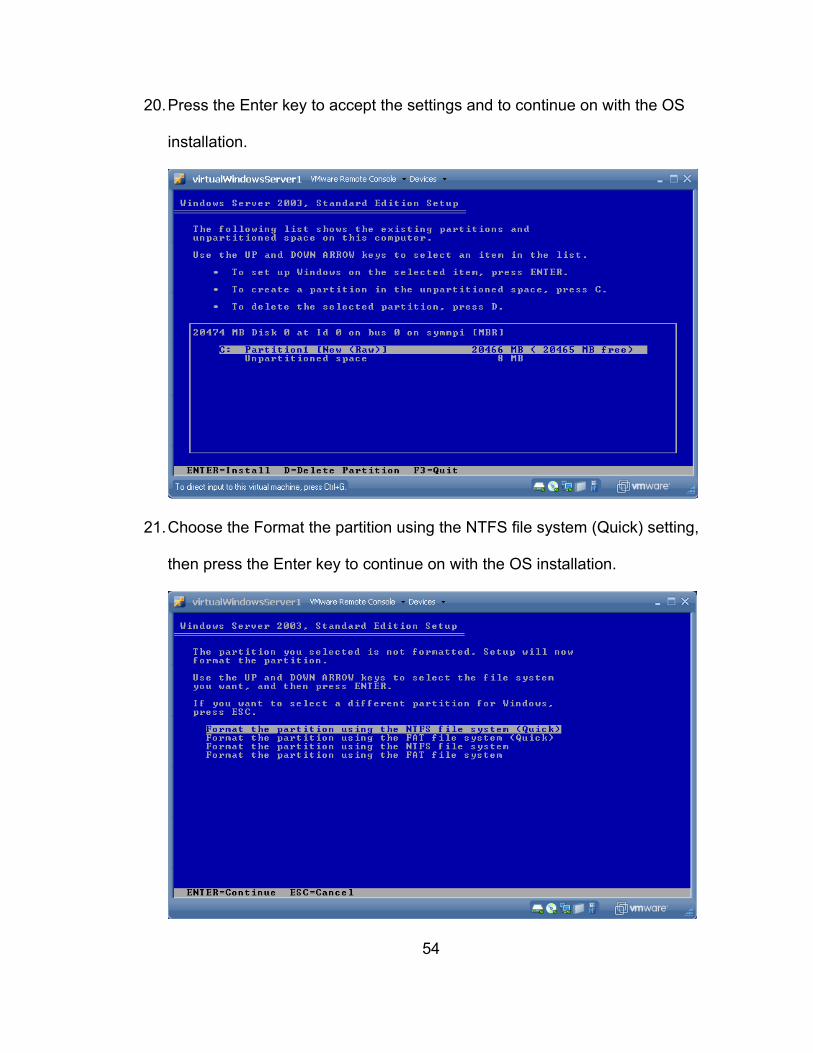
20.Press the Enter key to accept the settings and to continue on with the OS
installation.
21.Choose the Format the partition using the NTFS file system (Quick) setting,
then press the Enter key to continue on with the OS installation.
54
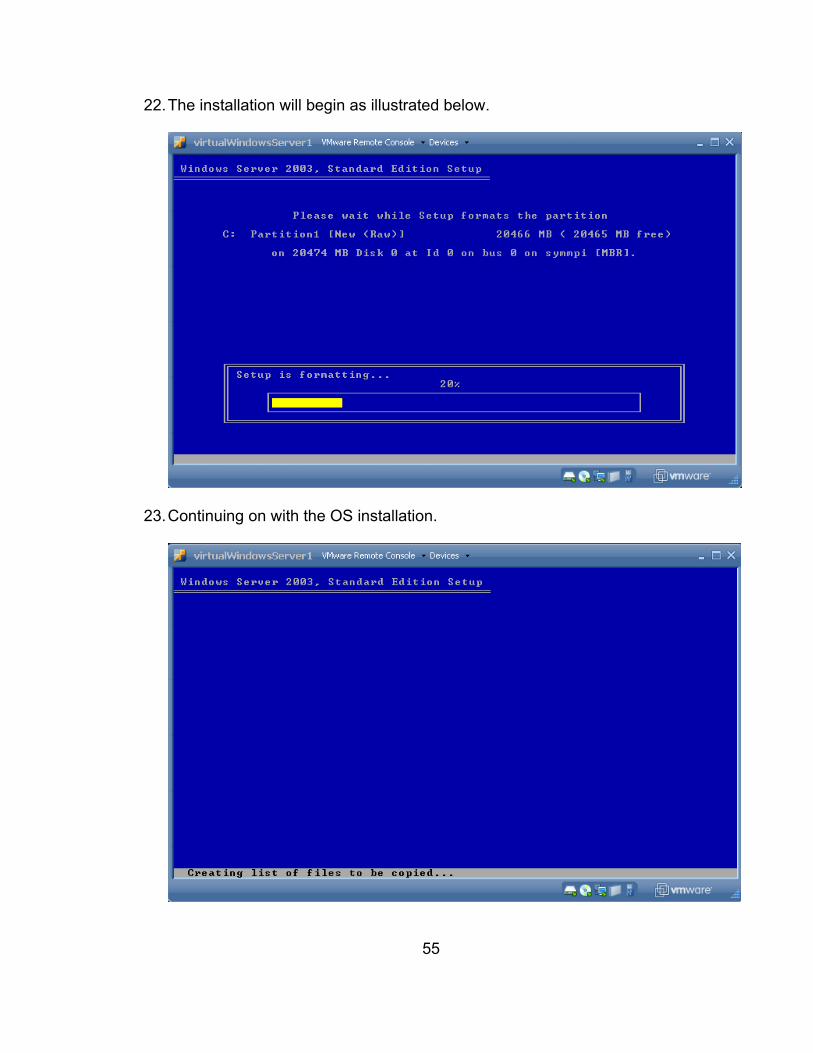
22.The installation will begin as illustrated below.
23.Continuing on with the OS installation.
55
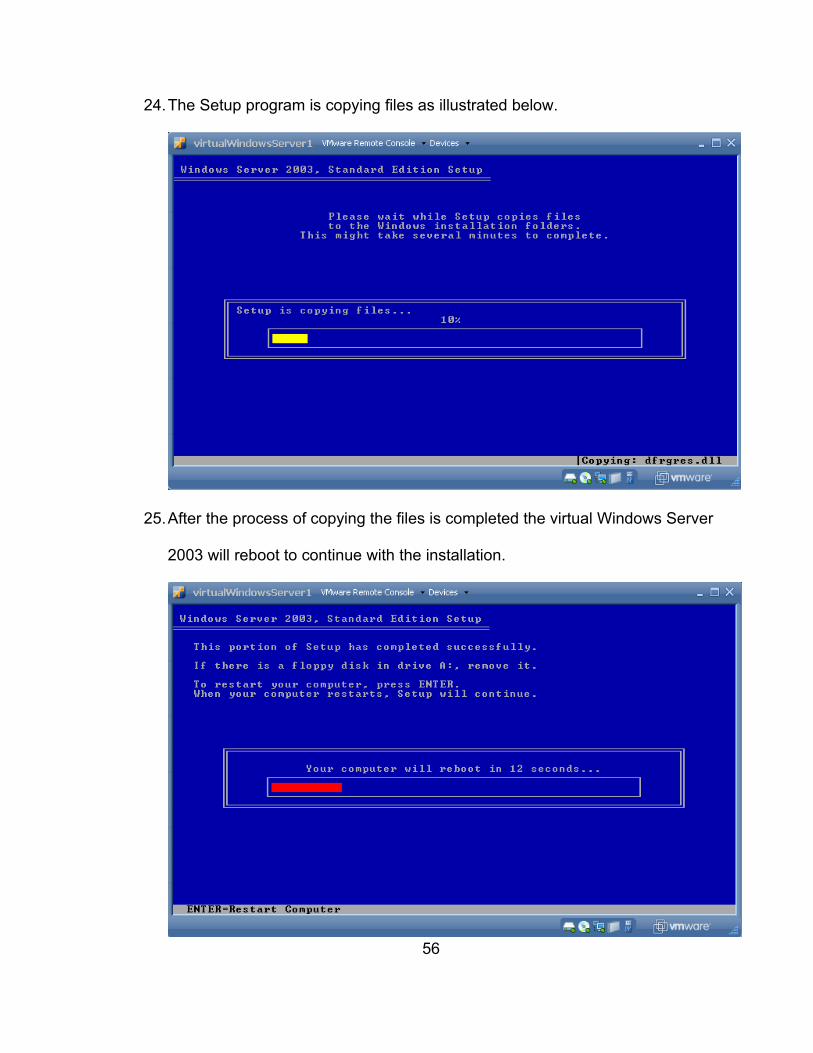
24.The Setup program is copying files as illustrated below.
25.After the process of copying the files is completed the virtual Windows Server
2003 will reboot to continue with the installation.
56
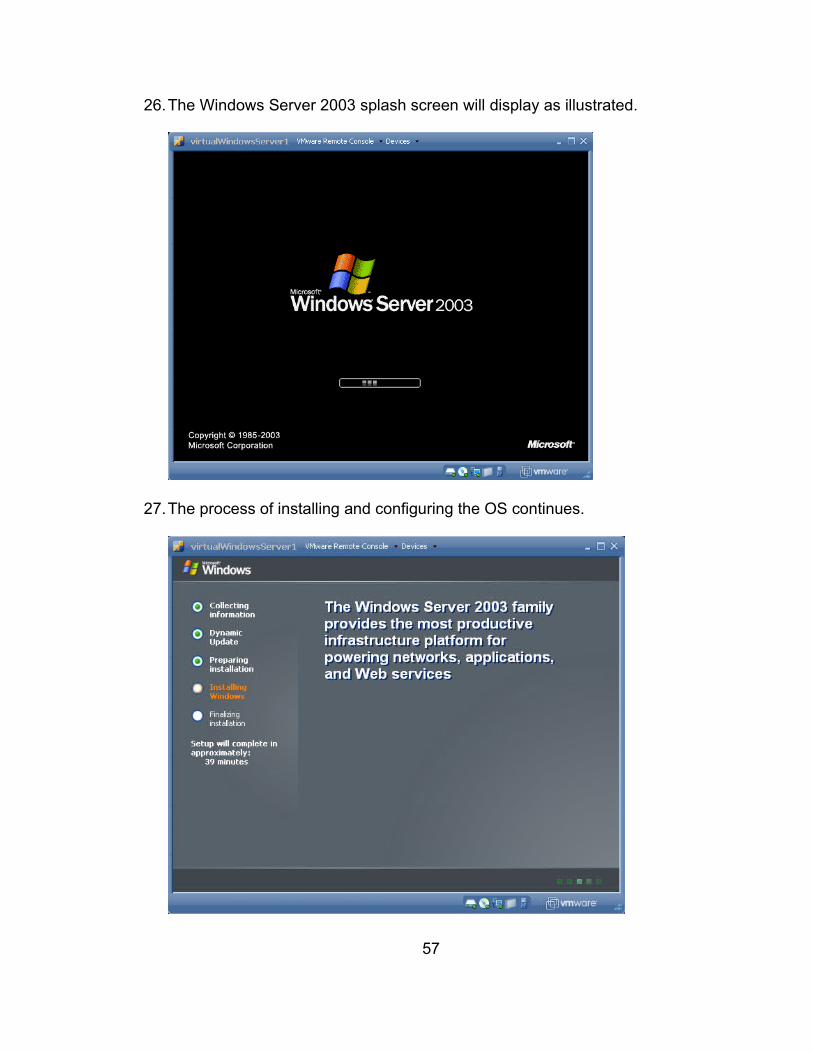
26.The Windows Server 2003 splash screen will display as illustrated.
27.The process of installing and configuring the OS continues.
57
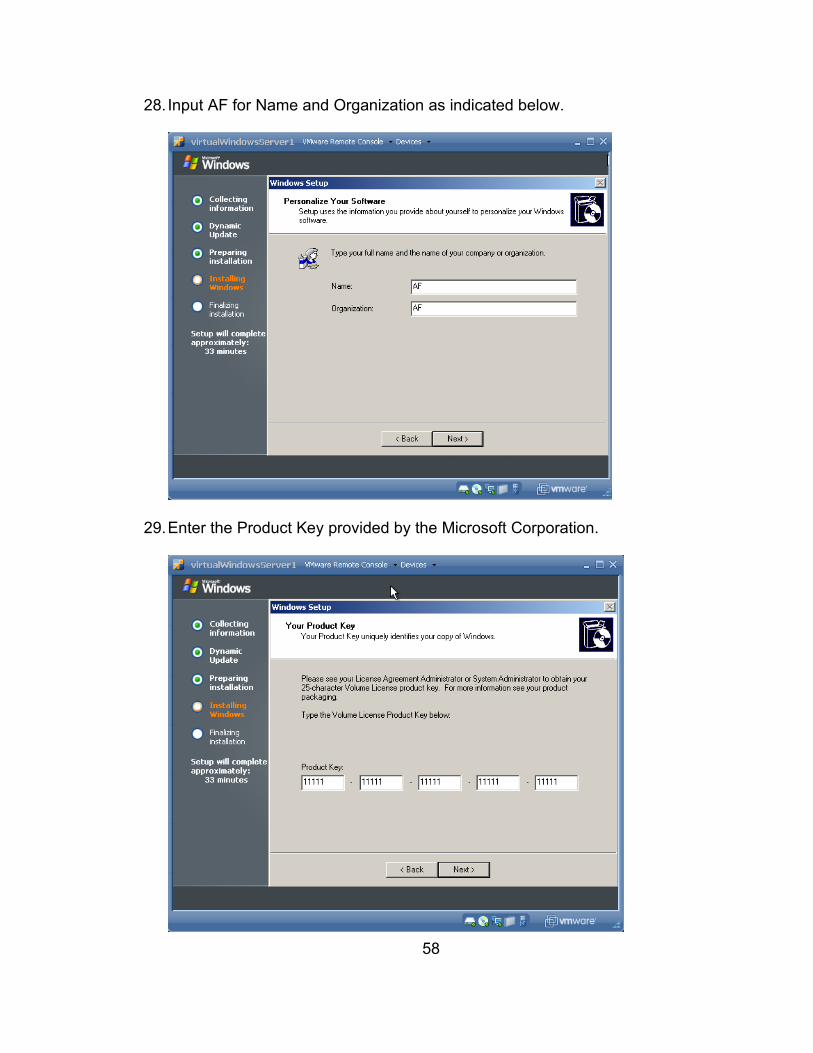
28. Input AF for Name and Organization as indicated below.
29.Enter the Product Key provided by the Microsoft Corporation.
58
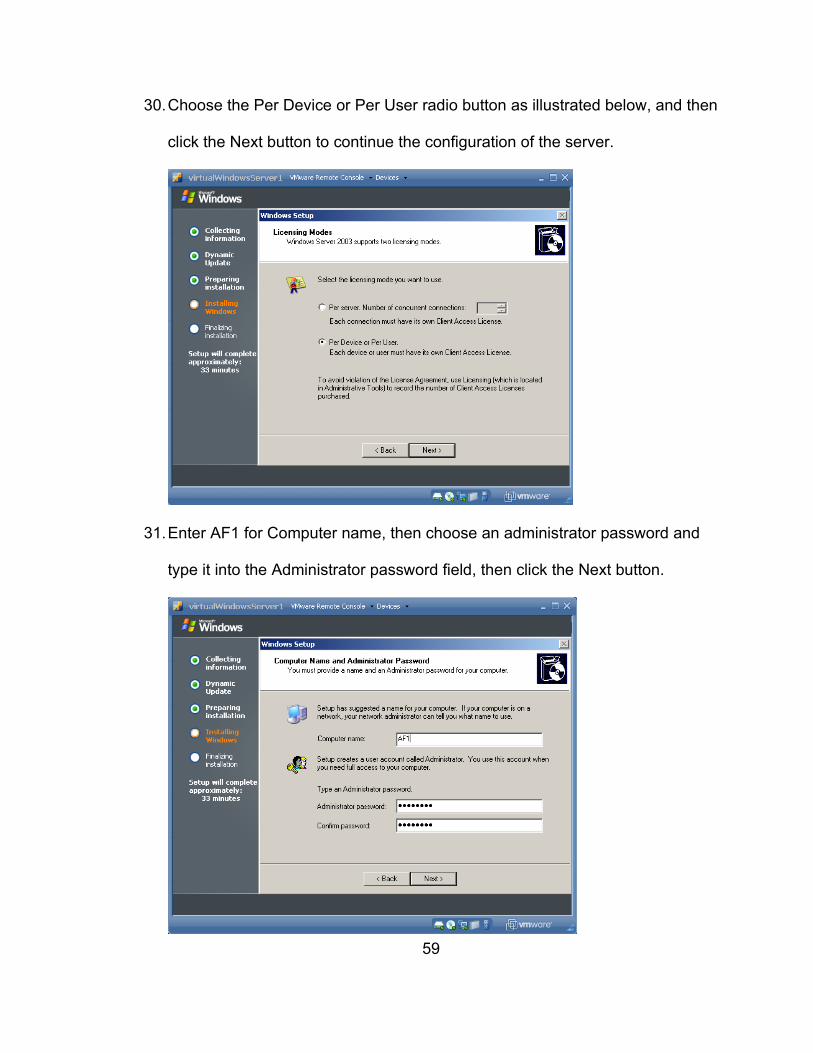
30.Choose the Per Device or Per User radio button as illustrated below, and then
click the Next button to continue the configuration of the server.
31.Enter AF1 for Computer name, then choose an administrator password and
type it into the Administrator password field, then click the Next button.
59
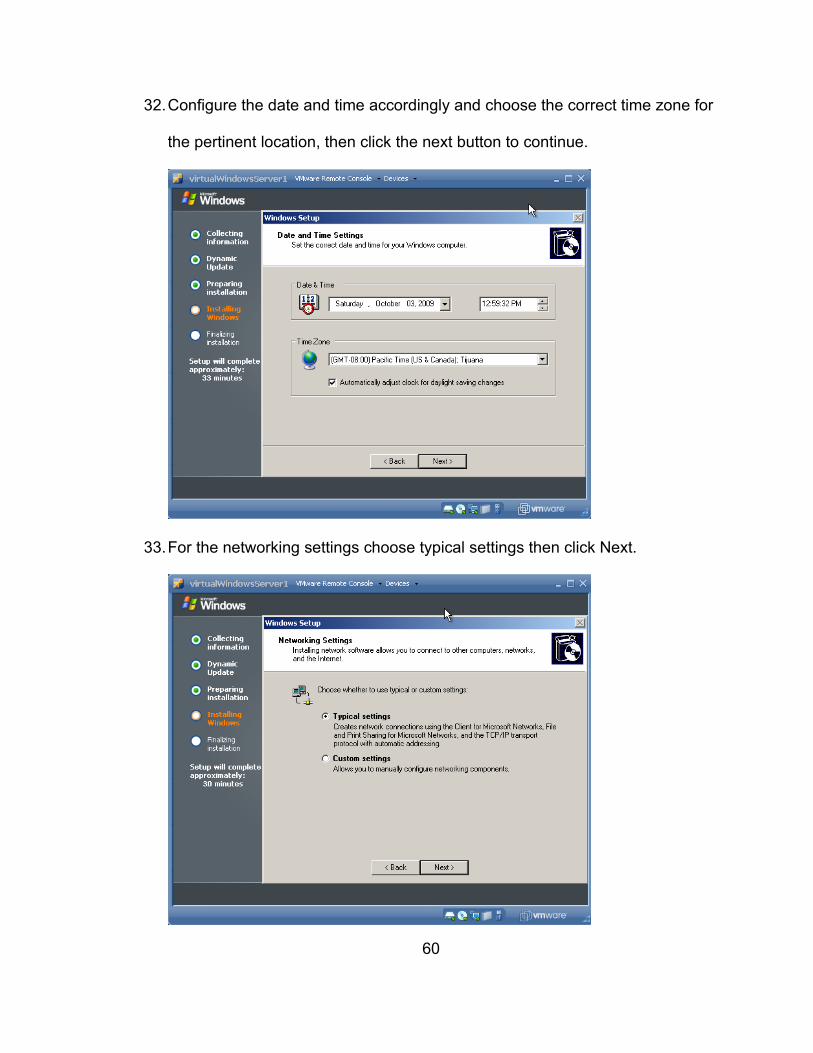
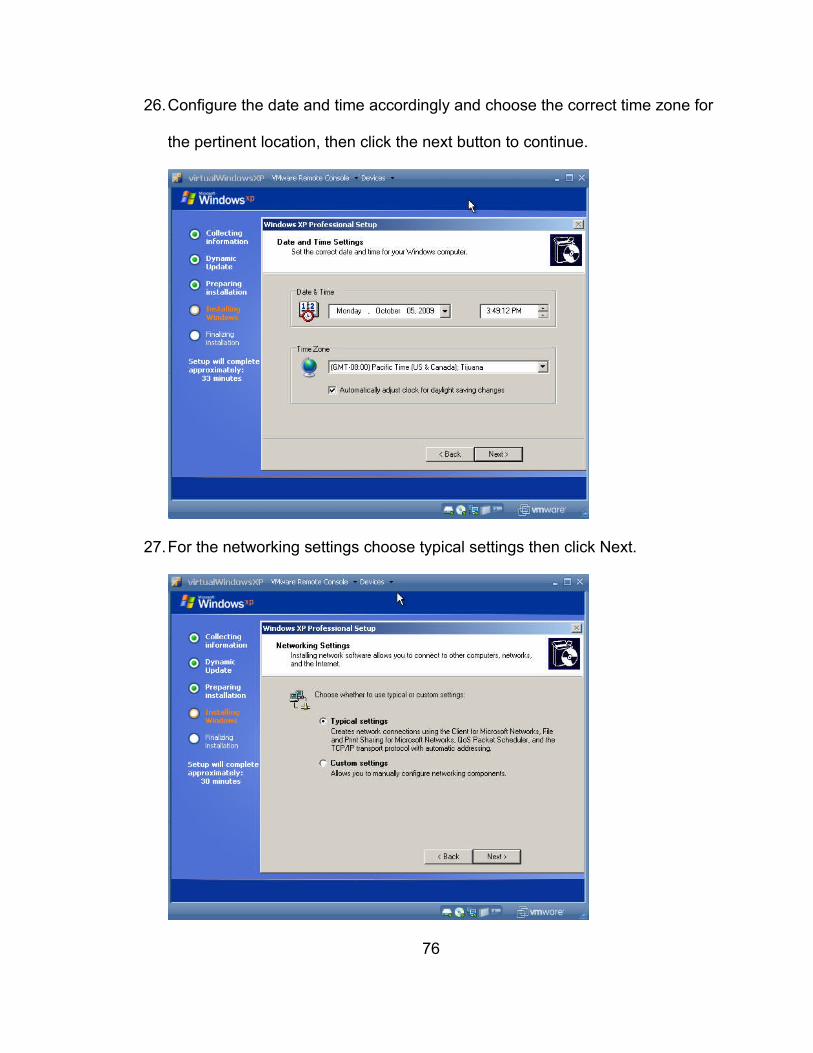
32.Configure the date and time accordingly and choose the correct time zone for
the pertinent location, then click the next button to continue.
33.For the networking settings choose typical settings then click Next.
60
34.Choose the No radio button to indicate that the system is going to be
configured in a workgroup and enter AF for the workgroup name, then click
the Next button to continue.
35.The system will finalize all of the inputs and will reboot and the MS Windows
2003 Server splash screen will be displayed as illustrated.
61
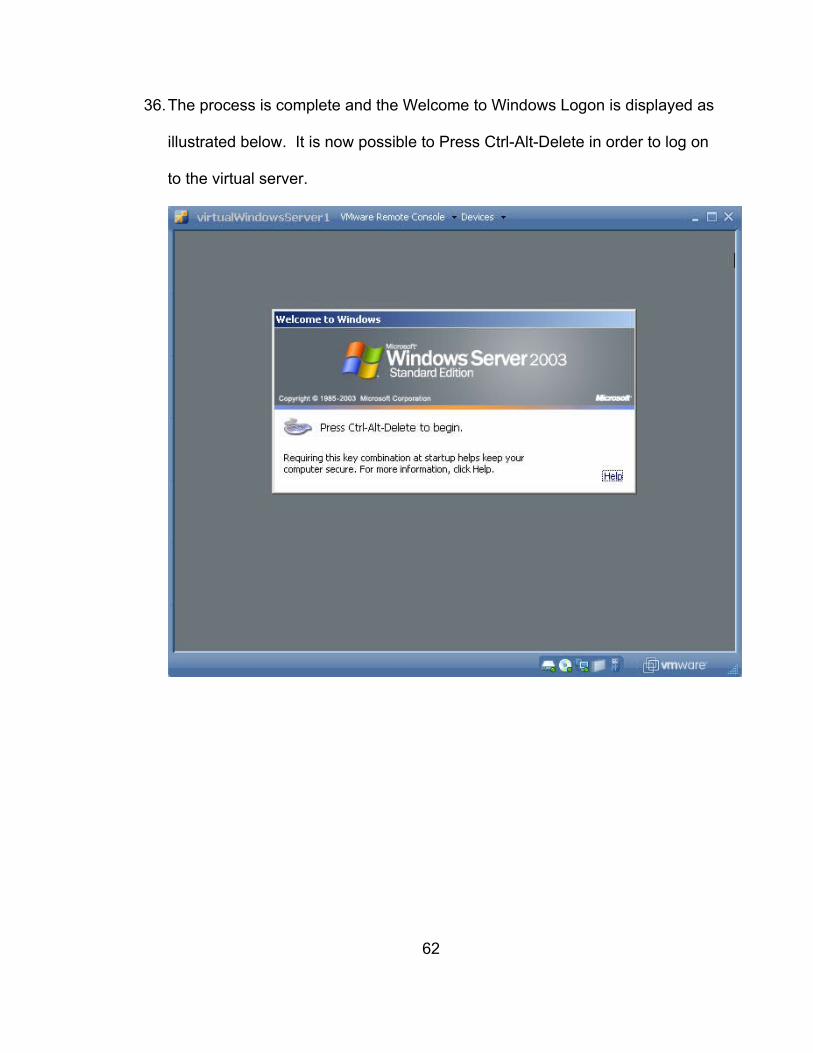
36.The process is complete and the Welcome to Windows Logon is displayed as
illustrated below. It is now possible to Press Ctrl-Alt-Delete in order to log on
to the virtual server.
62
APPENDIX C
CREATING, INSTALLING, AND CONFIGURING A MICROSOFT WINDOWS
XP CLIENT MACHINE USING VMWARE SERVER 2.0.2
63

1. From the desktop double-click the VMware Server Home Page icon as
indicated in the illustration.
2. The VMware Infrastructure Web Access Page will be displayed as indicated
in the illustration below. From this web page a user will be able to create
virtual machines.
3. Click on the Virtual Machine Tab; then click Create Virtual Machine.
64
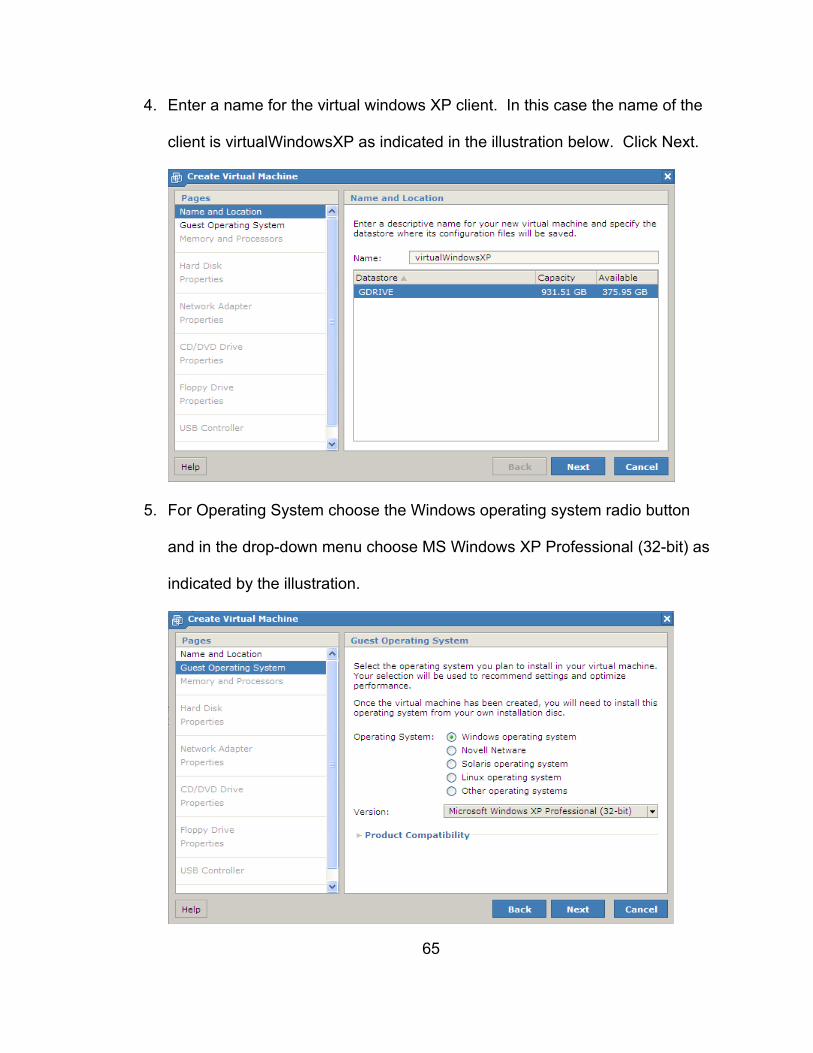
4. Enter a name for the virtual windows XP client. In this case the name of the
client is virtualWindowsXP as indicated in the illustration below. Click Next.
5. For Operating System choose the Windows operating system radio button
and in the drop-down menu choose MS Windows XP Professional (32-bit) as
indicated by the illustration.
65
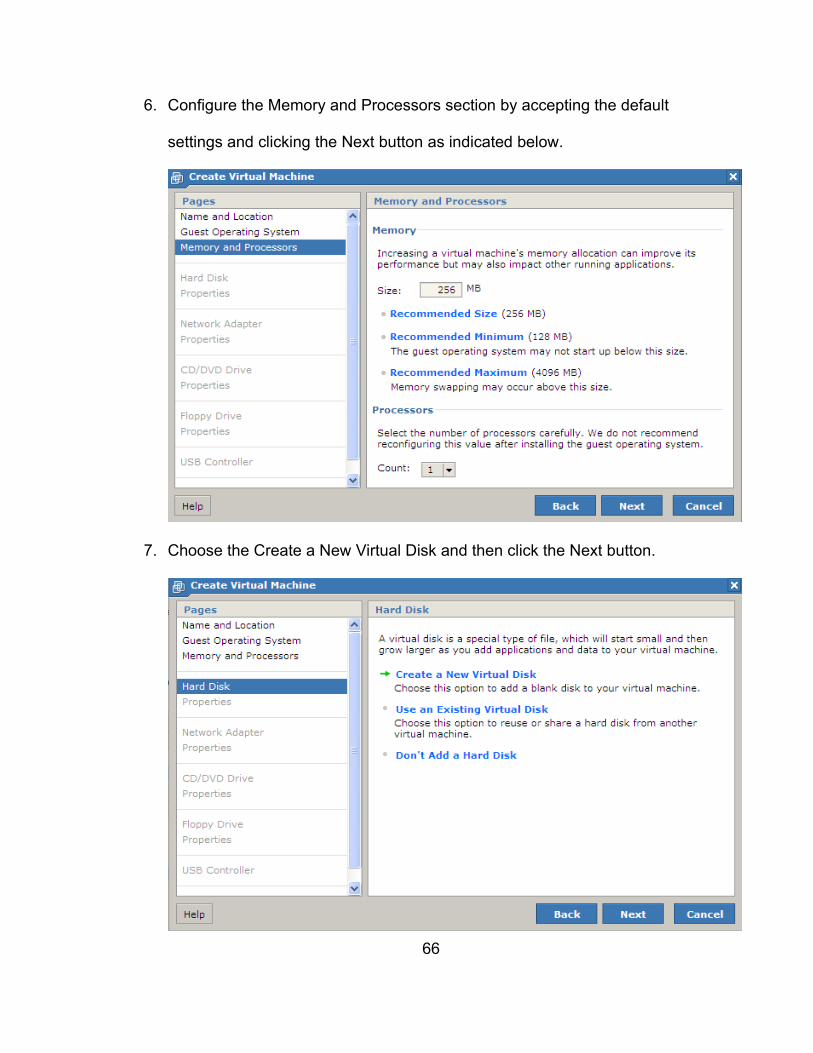
6. Configure the Memory and Processors section by accepting the default
settings and clicking the Next button as indicated below.
7. Choose the Create a New Virtual Disk and then click the Next button.
66
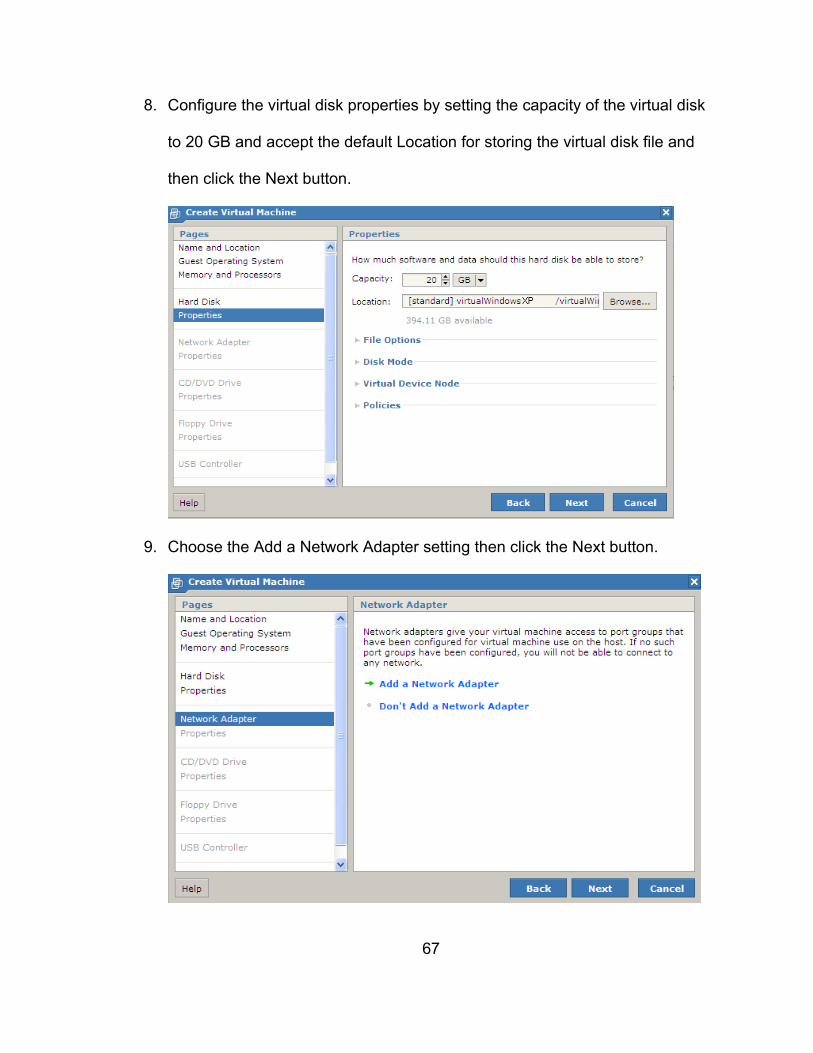
8. Configure the virtual disk properties by setting the capacity of the virtual disk
to 20 GB and accept the default Location for storing the virtual disk file and
then click the Next button.
9. Choose the Add a Network Adapter setting then click the Next button.
67
10.Accept the default setting for a NAT Connection. This creates a private
network and will segregate the virtual network environment from the physical
network environment.
11.Choose to Use a Physical CD/DVD Drive then click the Next button.
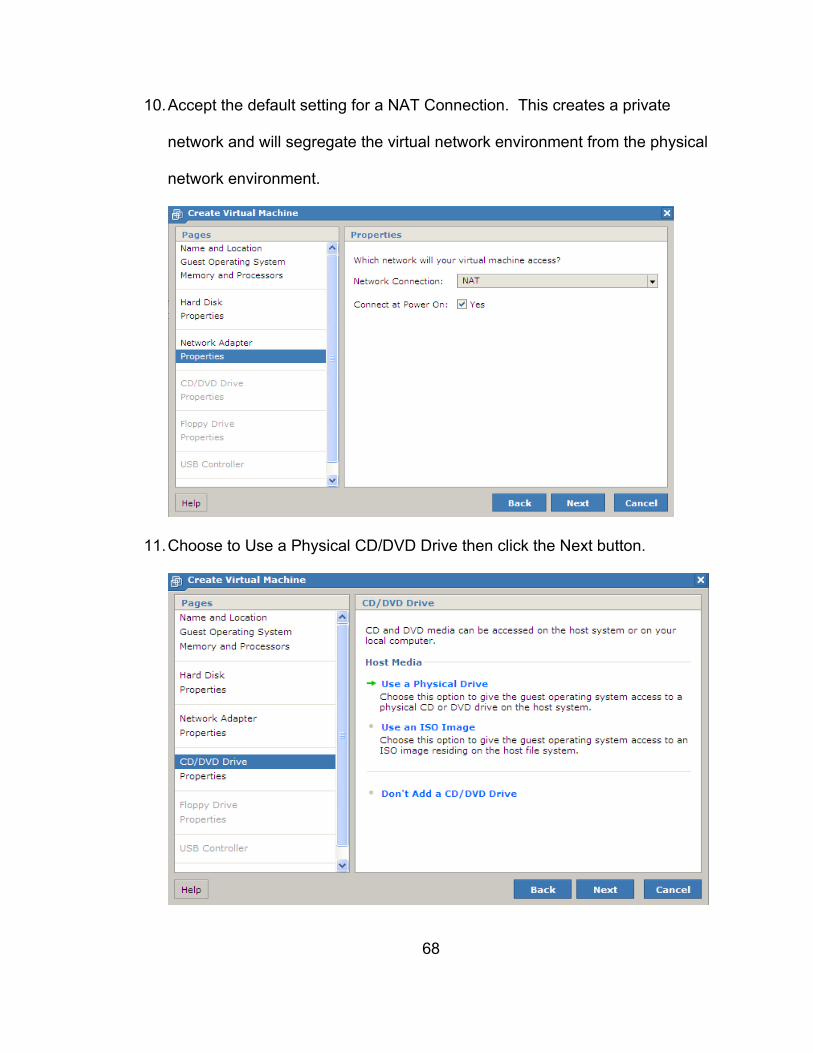
68
12.Choose the location of the CD/DVD drive then click the Next button.
13.Choose the Don’t Add a Floppy Drive setting then click the Next button.
69
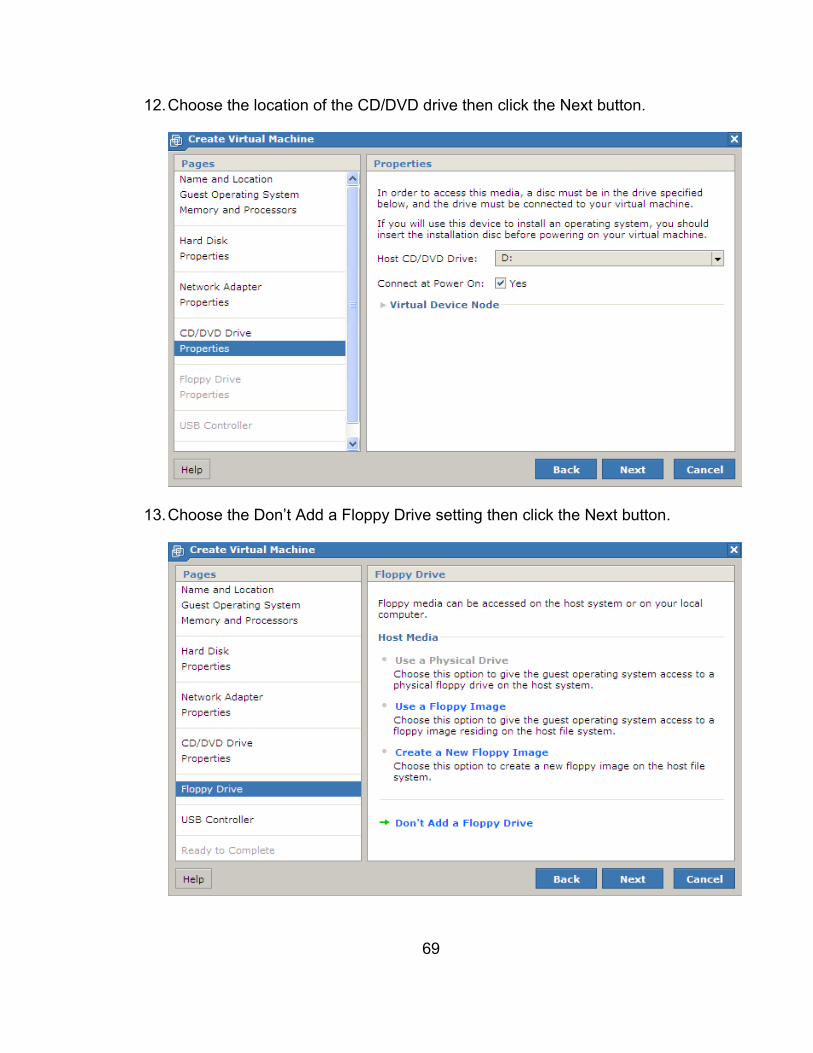
14.Choose the Add a USB Controller setting then click the Next button.
15.The configuration is ready to complete. Place the MS Windows XP
Professional CD in the laptop’s CD/DVD drive; click the Power on your virtual
machine now radio button, then click the Finish button. The process of
installing the MS Windows XP Professional OS on the Virtual Machine will
begin.
70
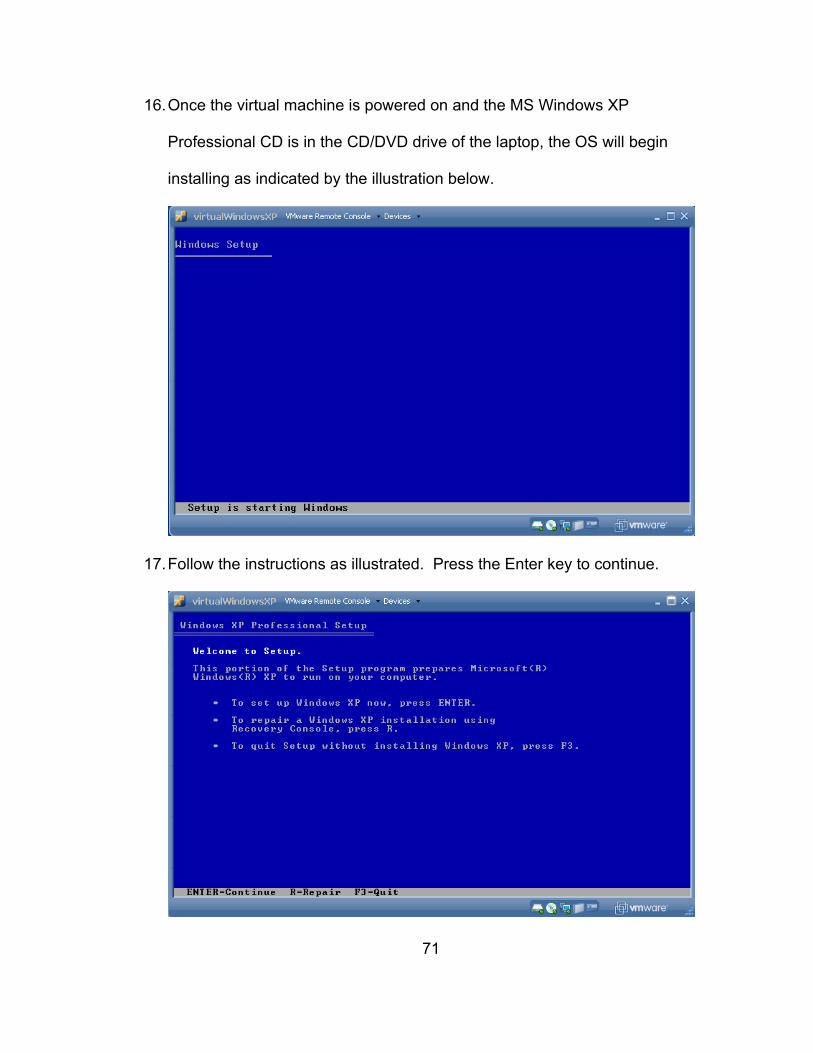
16.Once the virtual machine is powered on and the MS Windows XP
Professional CD is in the CD/DVD drive of the laptop, the OS will begin
installing as indicated by the illustration below.
17.Follow the instructions as illustrated. Press the Enter key to continue.
71
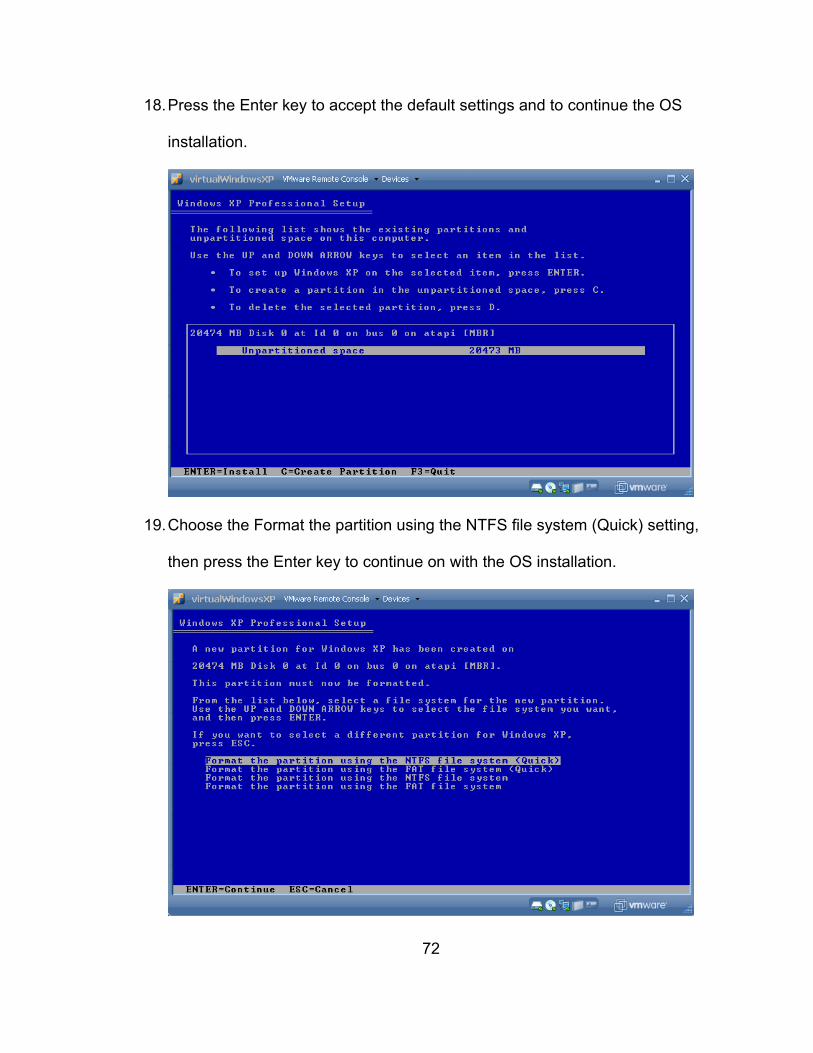
18.Press the Enter key to accept the default settings and to continue the OS
installation.
19.Choose the Format the partition using the NTFS file system (Quick) setting,
then press the Enter key to continue on with the OS installation.
72

20.The installation will begin by formatting the virtual disk as illustrated below.
21.The Setup program is copying files as illustrated below.
73
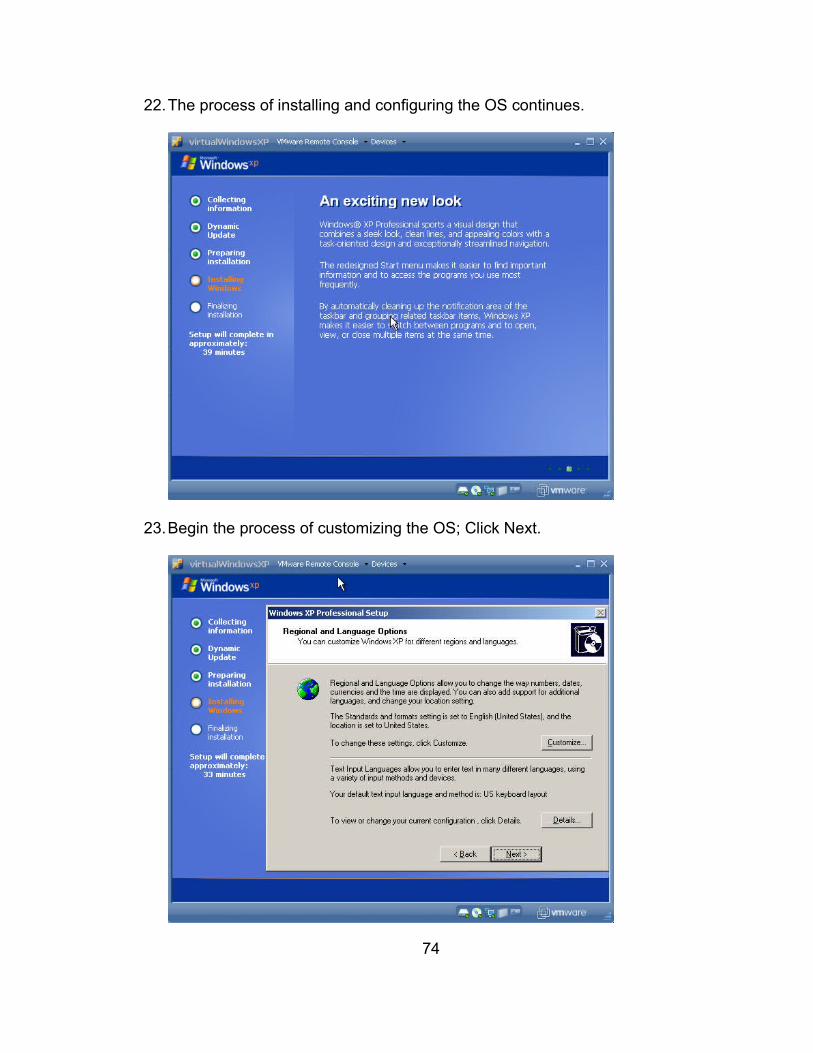
22.The process of installing and configuring the OS continues.
23.Begin the process of customizing the OS; Click Next.
74
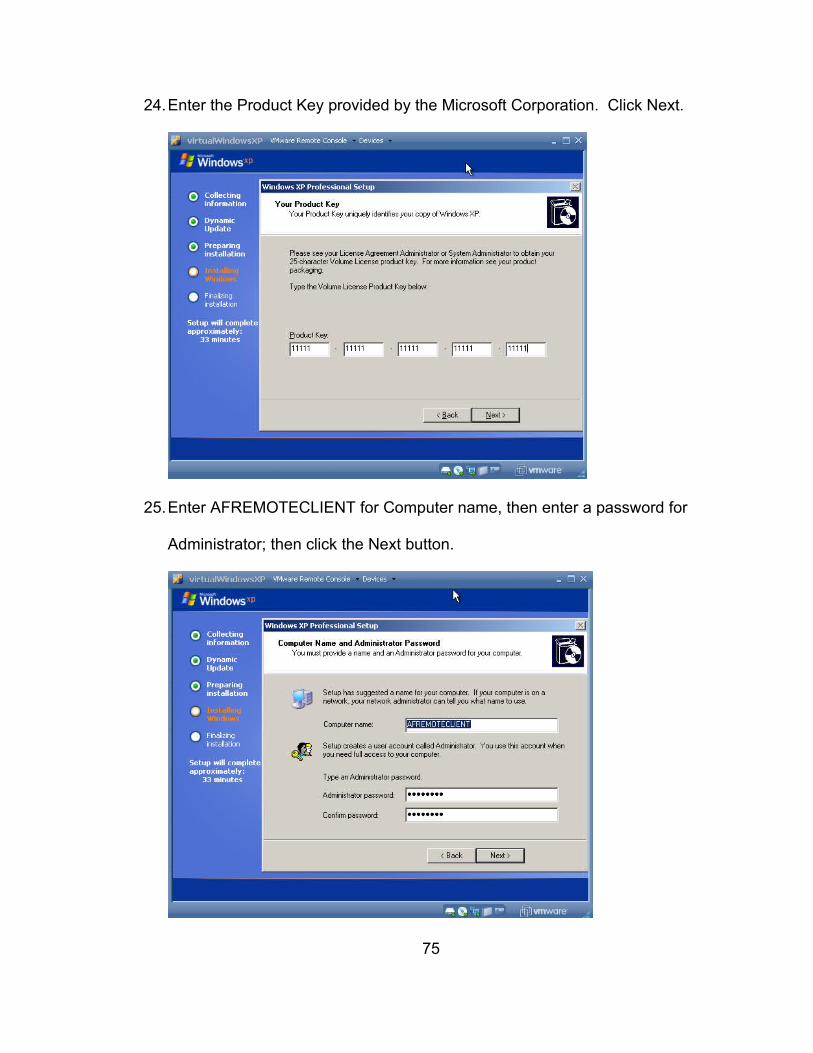
24.Enter the Product Key provided by the Microsoft Corporation. Click Next.
25.Enter AFREMOTECLIENT for Computer name, then enter a password for
Administrator; then click the Next button.
75
26.Configure the date and time accordingly and choose the correct time zone for
the pertinent location, then click the next button to continue.
27.For the networking settings choose typical settings then click Next.
76
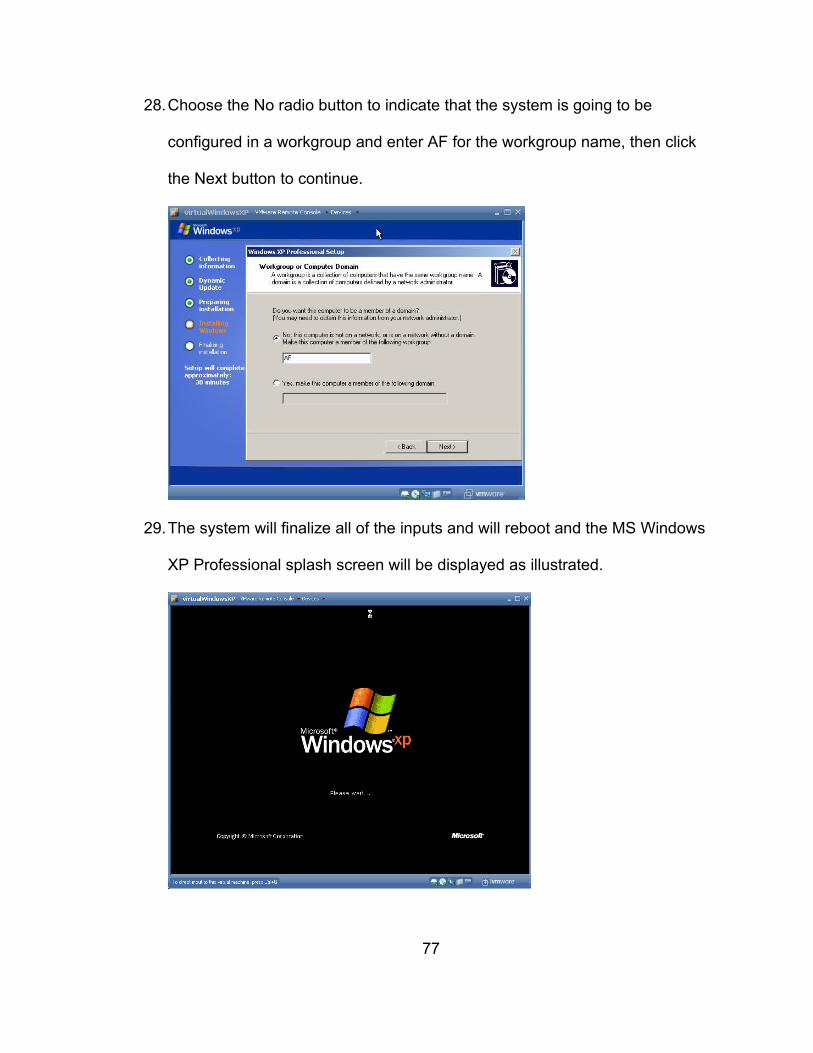
28.Choose the No radio button to indicate that the system is going to be
configured in a workgroup and enter AF for the workgroup name, then click
the Next button to continue.
29.The system will finalize all of the inputs and will reboot and the MS Windows
XP Professional splash screen will be displayed as illustrated.
77
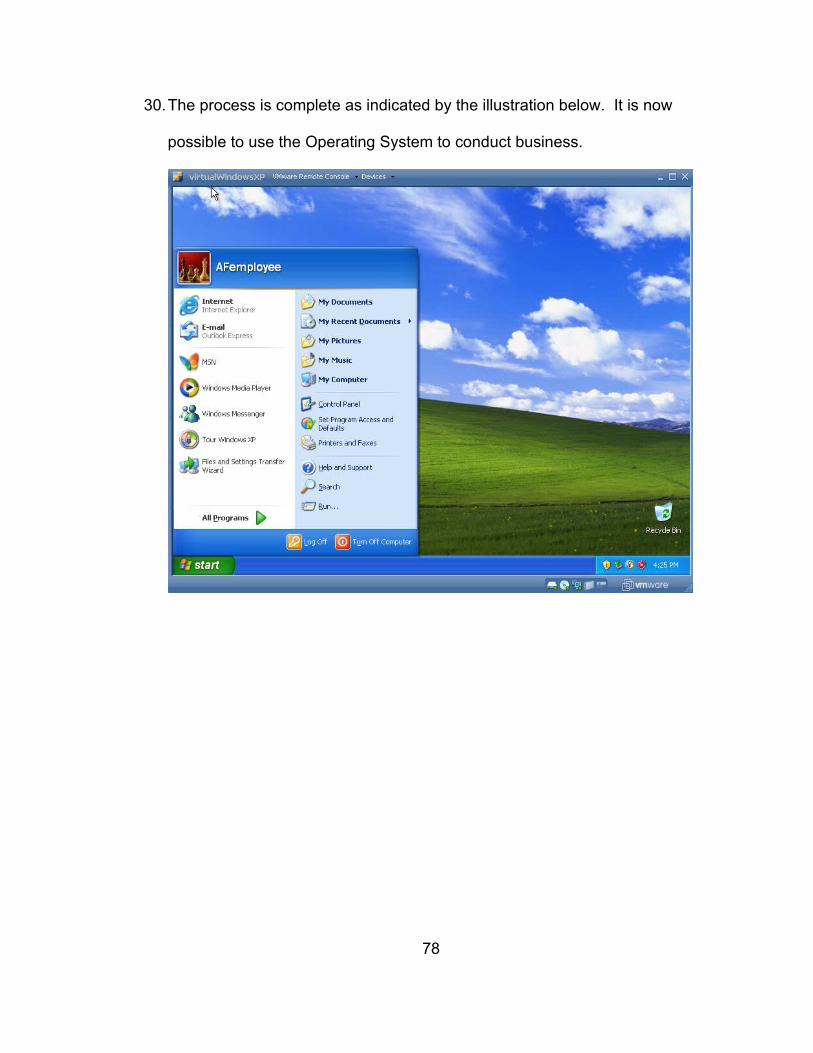
30.The process is complete as indicated by the illustration below. It is now
possible to use the Operating System to conduct business.
78
APPENDIX D
INSTALLING AND CONFIGURING THE 2X APPLICATION SERVER FOR
REMOTE ACCESS
79
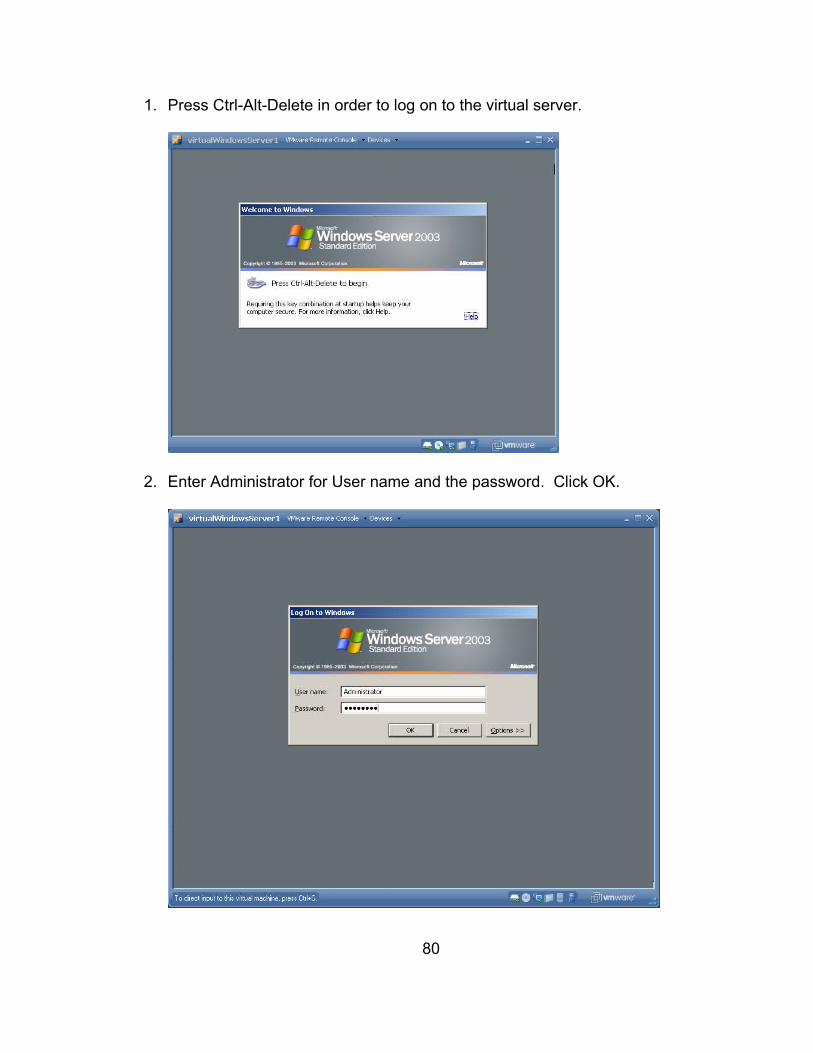
1. Press Ctrl-Alt-Delete in order to log on to the virtual server.
2. Enter Administrator for User name and the password. Click OK.
80
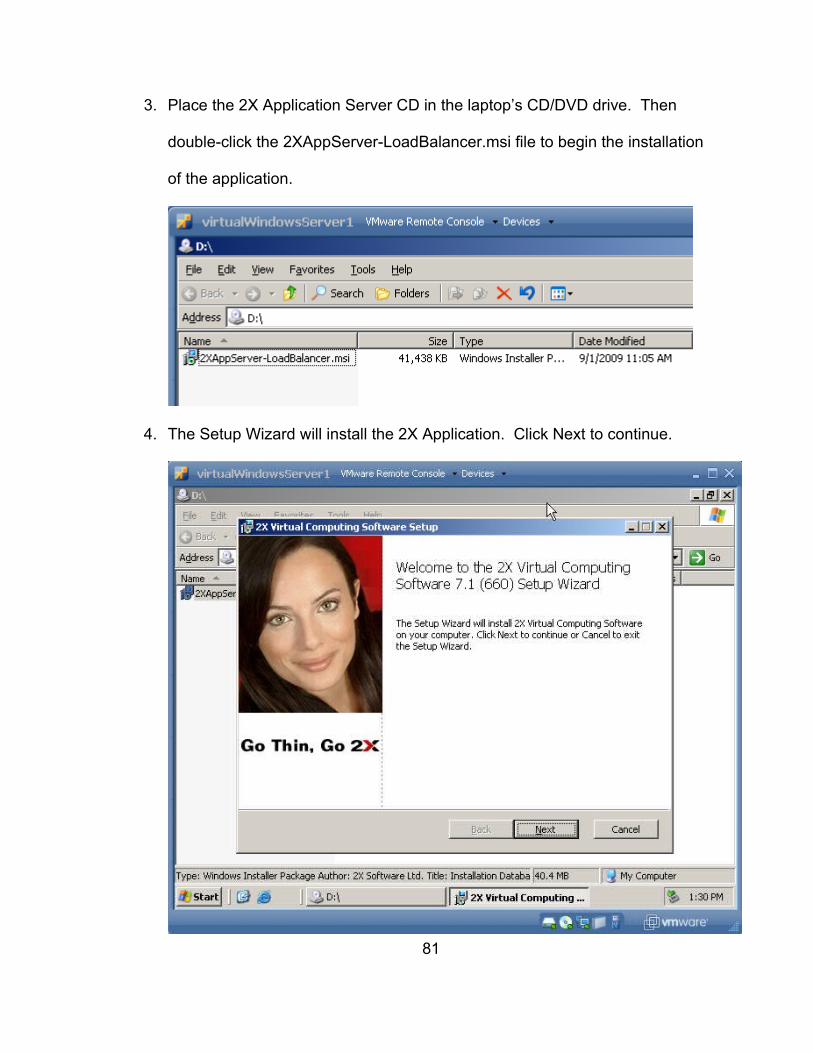
3. Place the 2X Application Server CD in the laptop’s CD/DVD drive. Then
double-click the 2XAppServer-LoadBalancer.msi file to begin the installation
of the application.
4. The Setup Wizard will install the 2X Application. Click Next to continue.
81
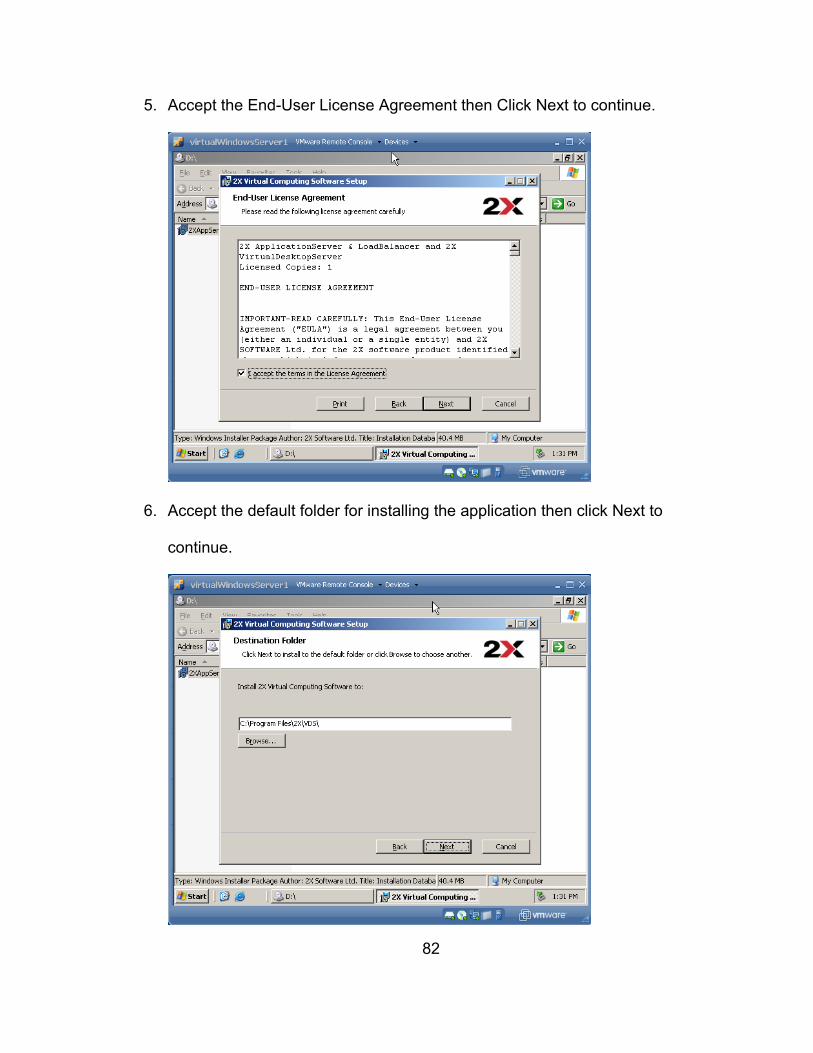
5. Accept the End-User License Agreement then Click Next to continue.
6. Accept the default folder for installing the application then click Next to
continue.
82
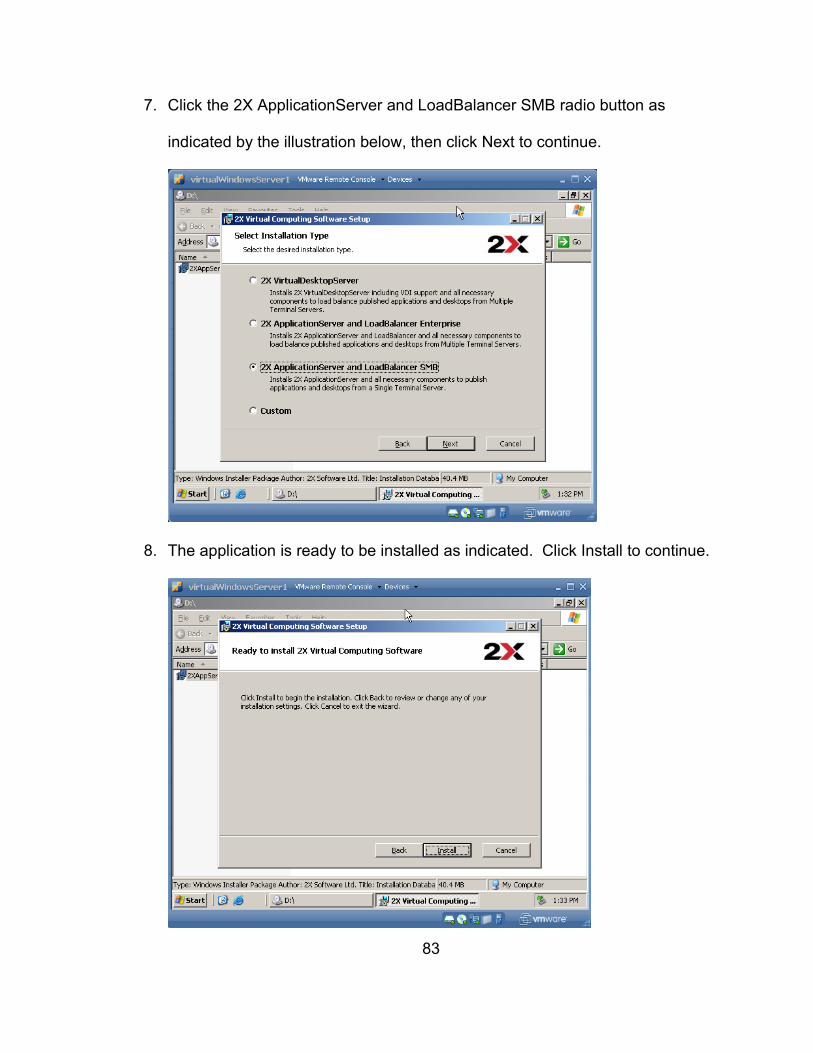
7. Click the 2X ApplicationServer and LoadBalancer SMB radio button as
indicated by the illustration below, then click Next to continue.
8. The application is ready to be installed as indicated. Click Install to continue.
83
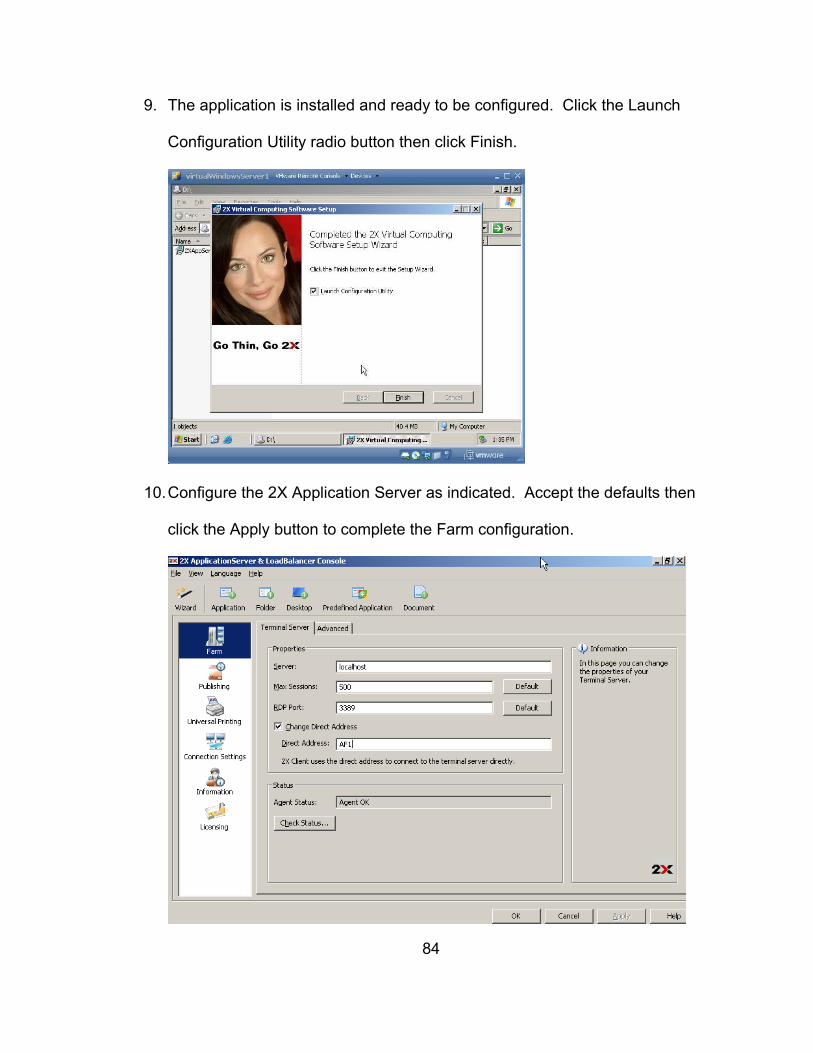
9. The application is installed and ready to be configured. Click the Launch
Configuration Utility radio button then click Finish.
10.Configure the 2X Application Server as indicated. Accept the defaults then
click the Apply button to complete the Farm configuration.
84
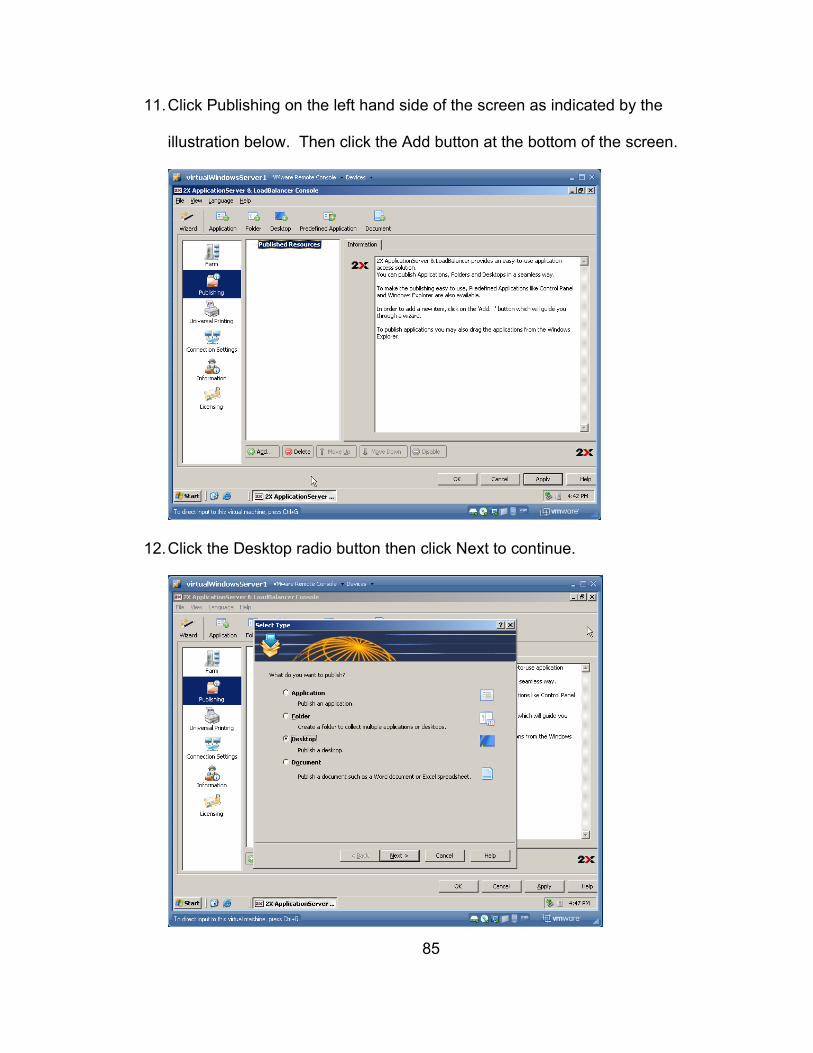
11.Click Publishing on the left hand side of the screen as indicated by the
illustration below. Then click the Add button at the bottom of the screen.
12.Click the Desktop radio button then click Next to continue.
85
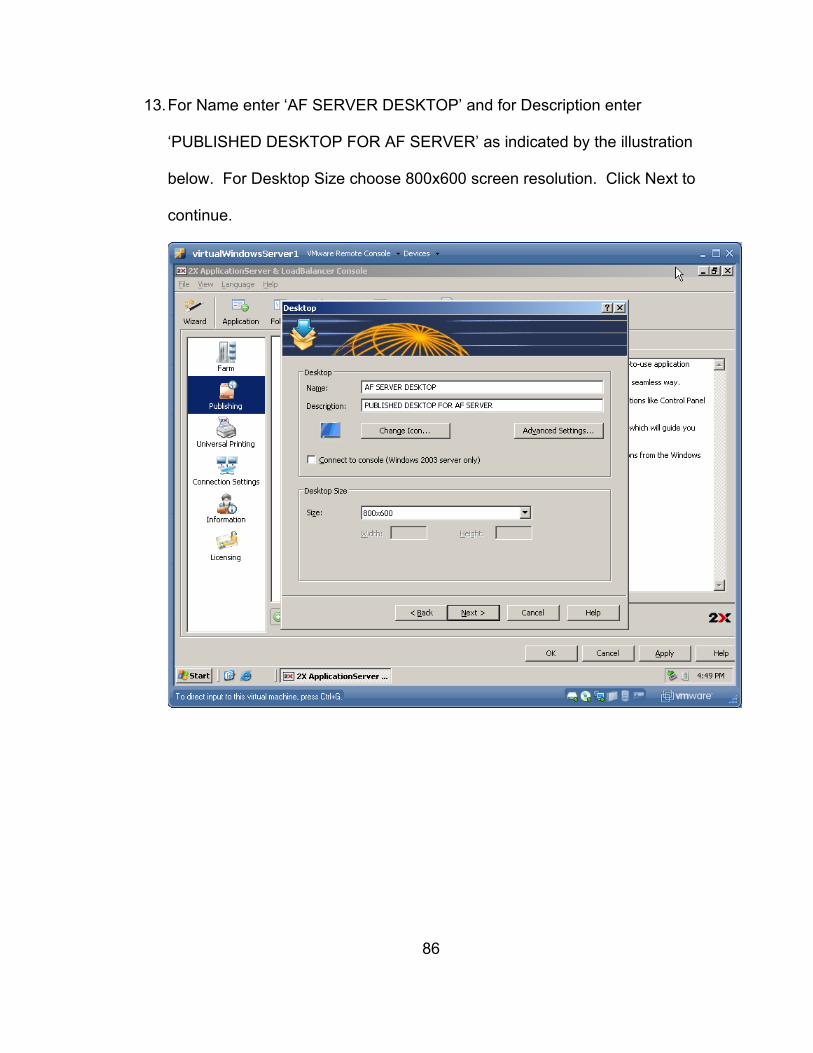
13.For Name enter ‘AF SERVER DESKTOP’ and for Description enter
‘PUBLISHED DESKTOP FOR AF SERVER’ as indicated by the illustration
below. For Desktop Size choose 800x600 screen resolution. Click Next to
continue.
86
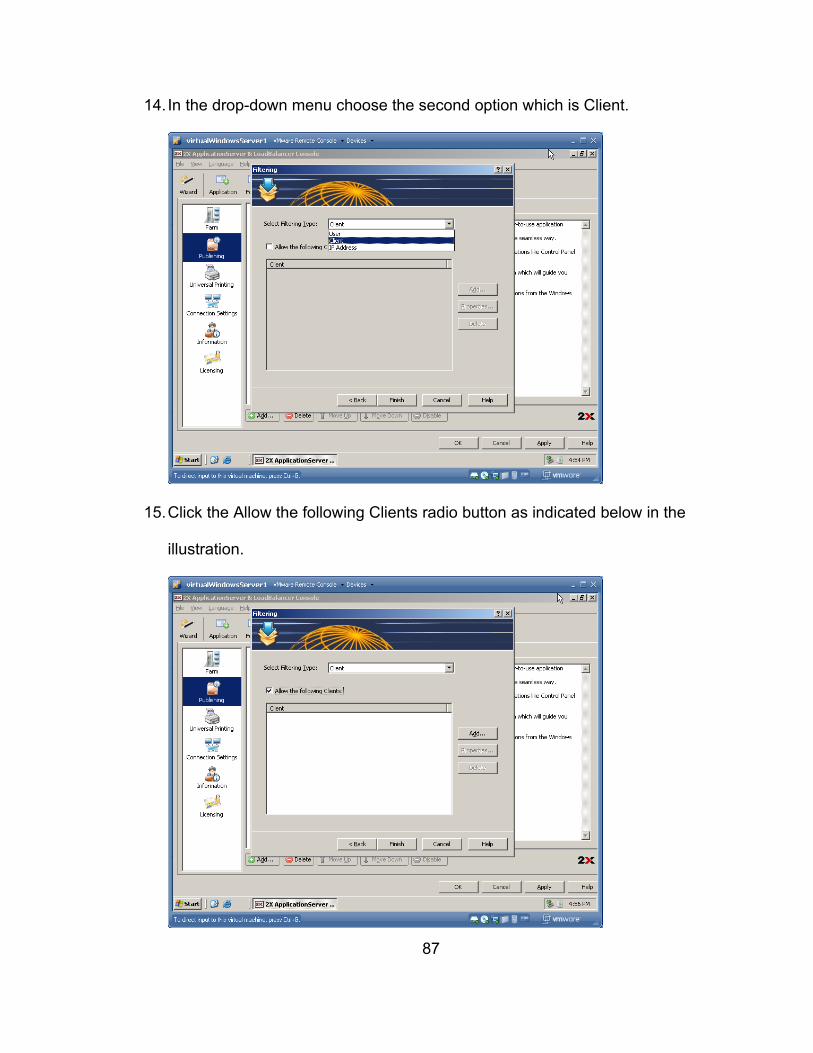
14. In the drop-down menu choose the second option which is Client.
15.Click the Allow the following Clients radio button as indicated below in the
illustration.
87
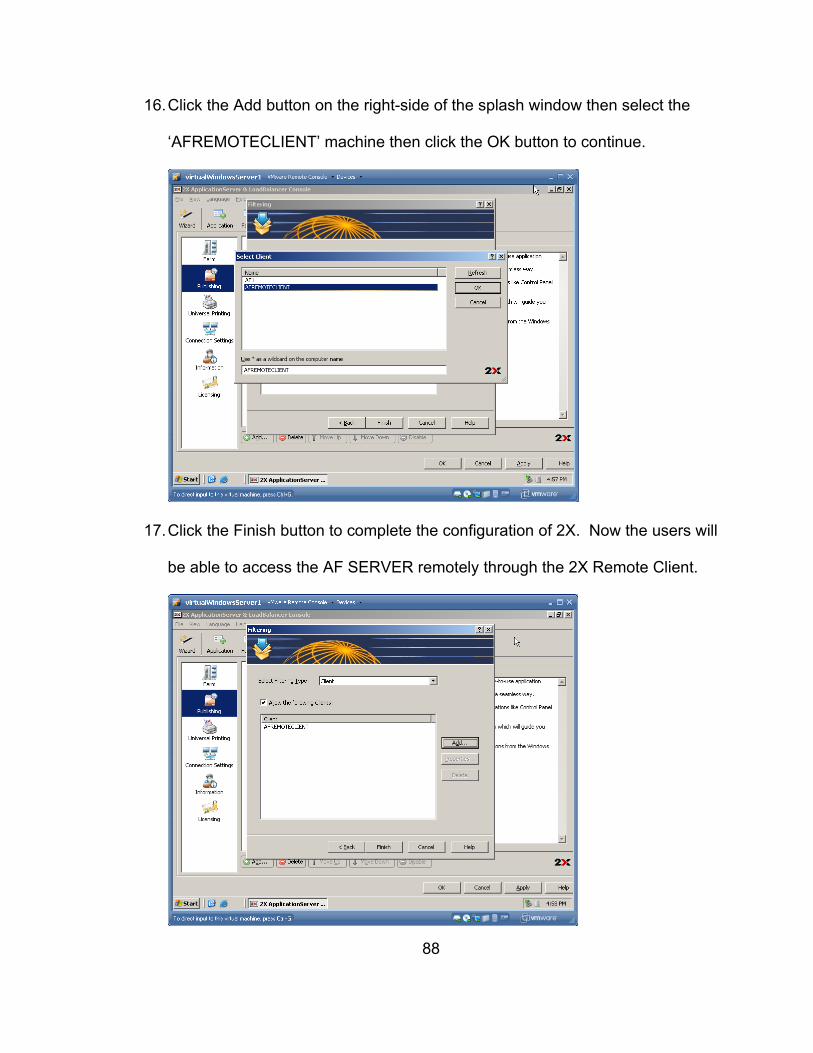
16.Click the Add button on the right-side of the splash window then select the
‘AFREMOTECLIENT’ machine then click the OK button to continue.
17.Click the Finish button to complete the configuration of 2X. Now the users will
be able to access the AF SERVER remotely through the 2X Remote Client.
88
APPENDIX E
INSTALLING AND CONFIGURING THE 2X CLIENT FOR REMOTE
ACCESS
89
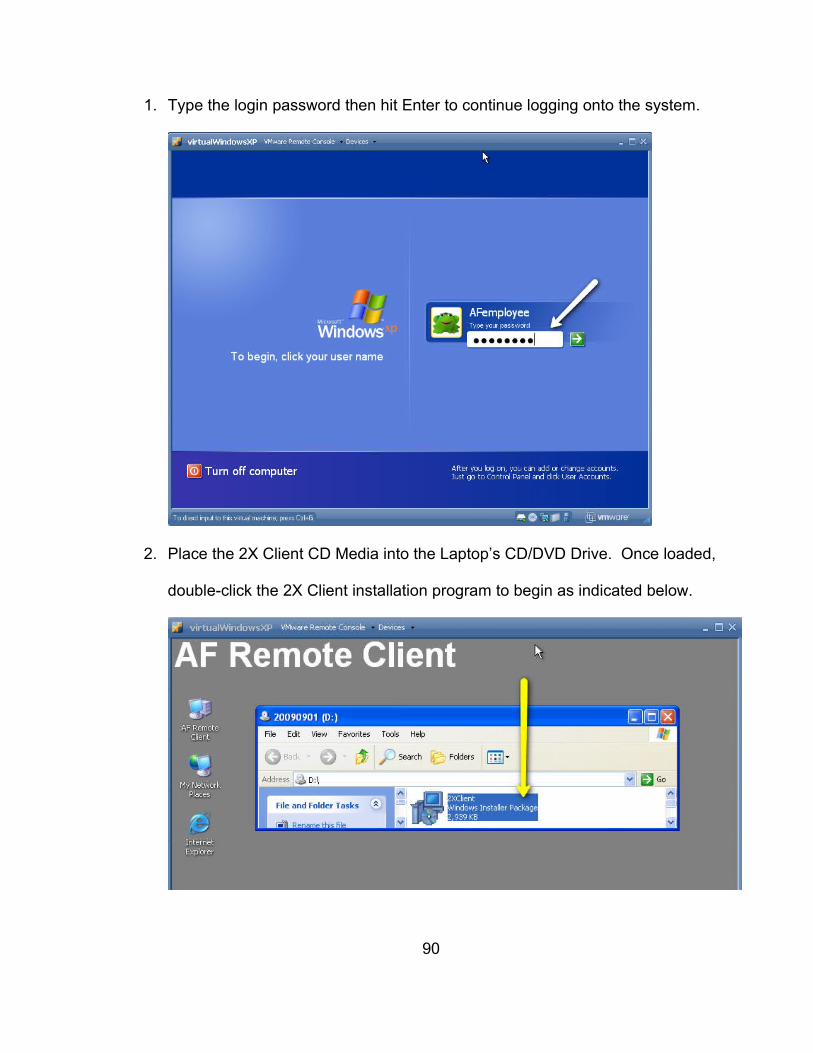
1. Type the login password then hit Enter to continue logging onto the system.
2. Place the 2X Client CD Media into the Laptop’s CD/DVD Drive. Once loaded,
double-click the 2X Client installation program to begin as indicated below.
90
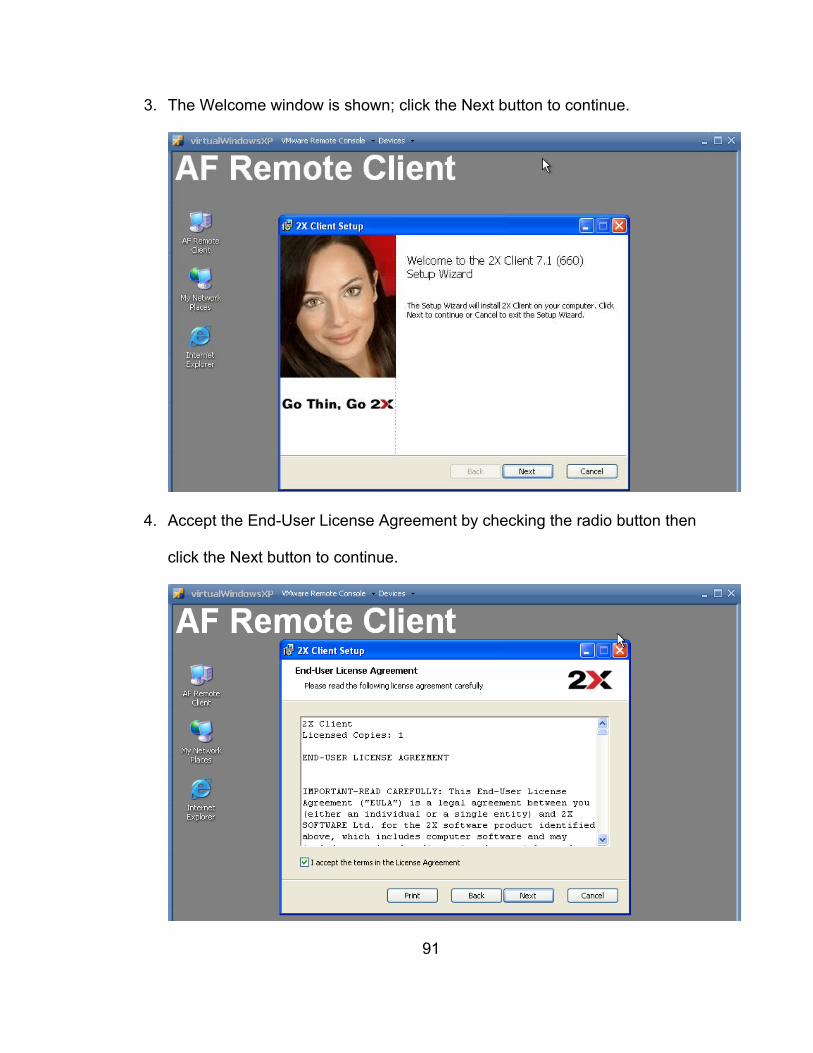
3. The Welcome window is shown; click the Next button to continue.
4. Accept the End-User License Agreement by checking the radio button then
click the Next button to continue.
91
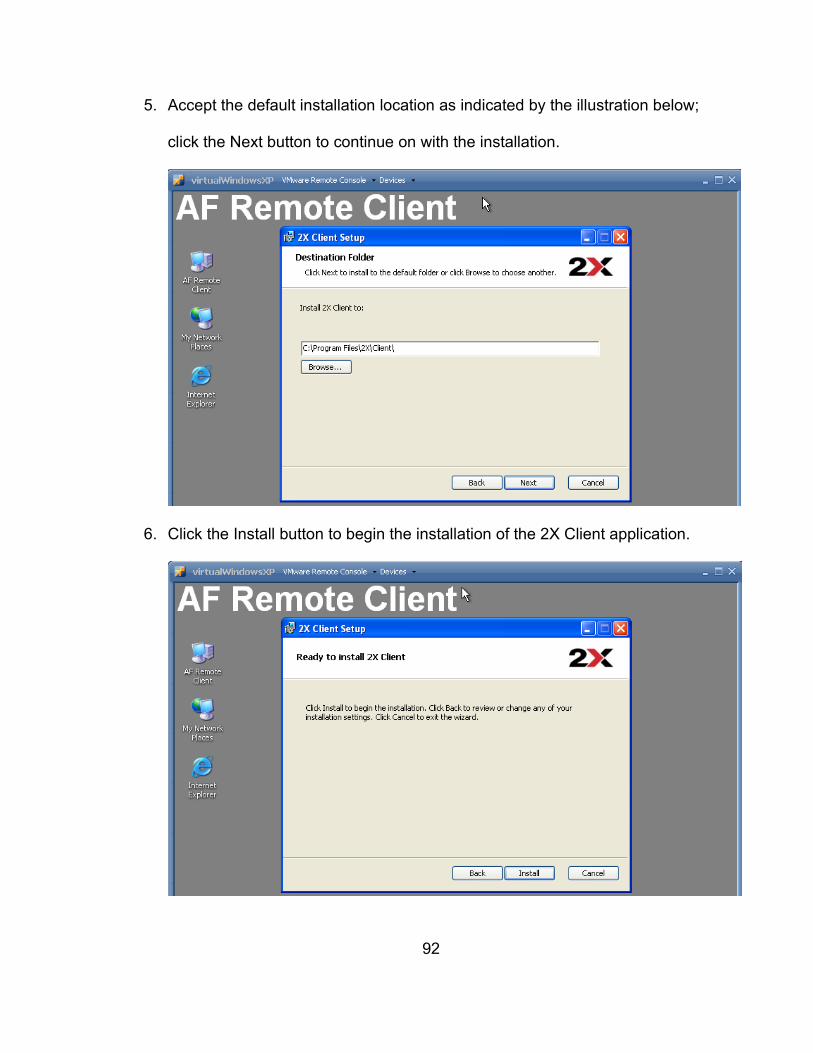
5. Accept the default installation location as indicated by the illustration below;
click the Next button to continue on with the installation.
6. Click the Install button to begin the installation of the 2X Client application.
92
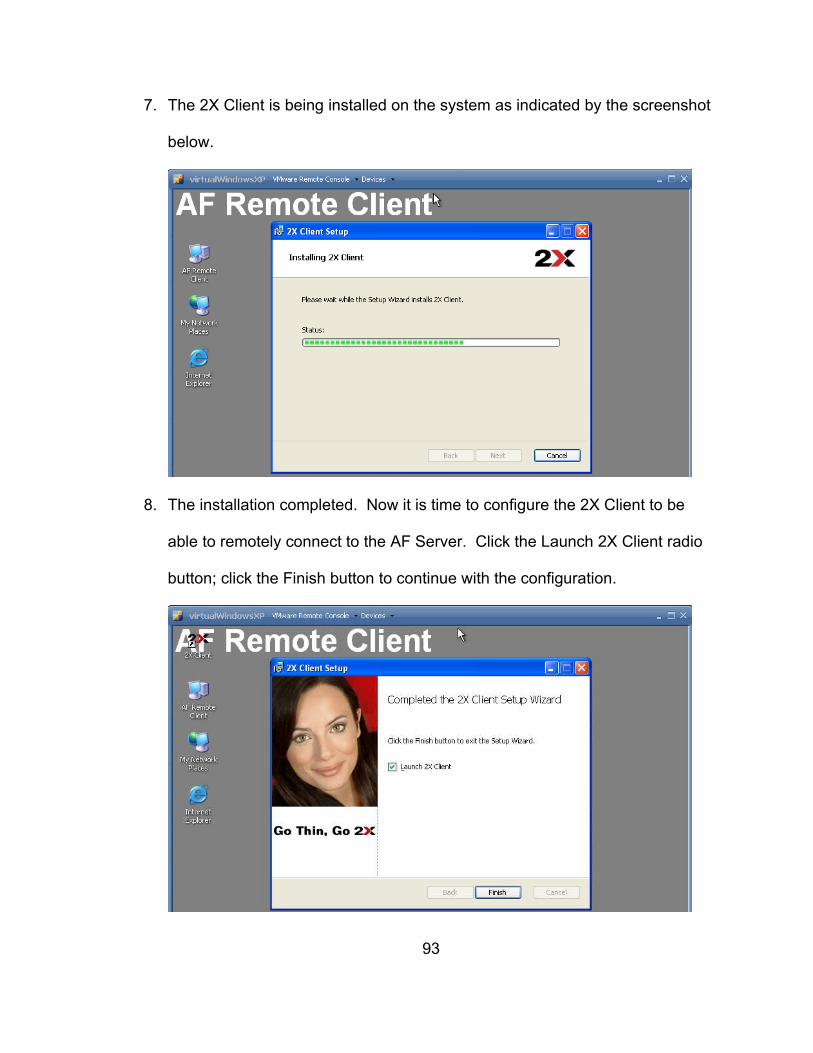
7. The 2X Client is being installed on the system as indicated by the screenshot
below.
8. The installation completed. Now it is time to configure the 2X Client to be
able to remotely connect to the AF Server. Click the Launch 2X Client radio
button; click the Finish button to continue with the configuration.
93
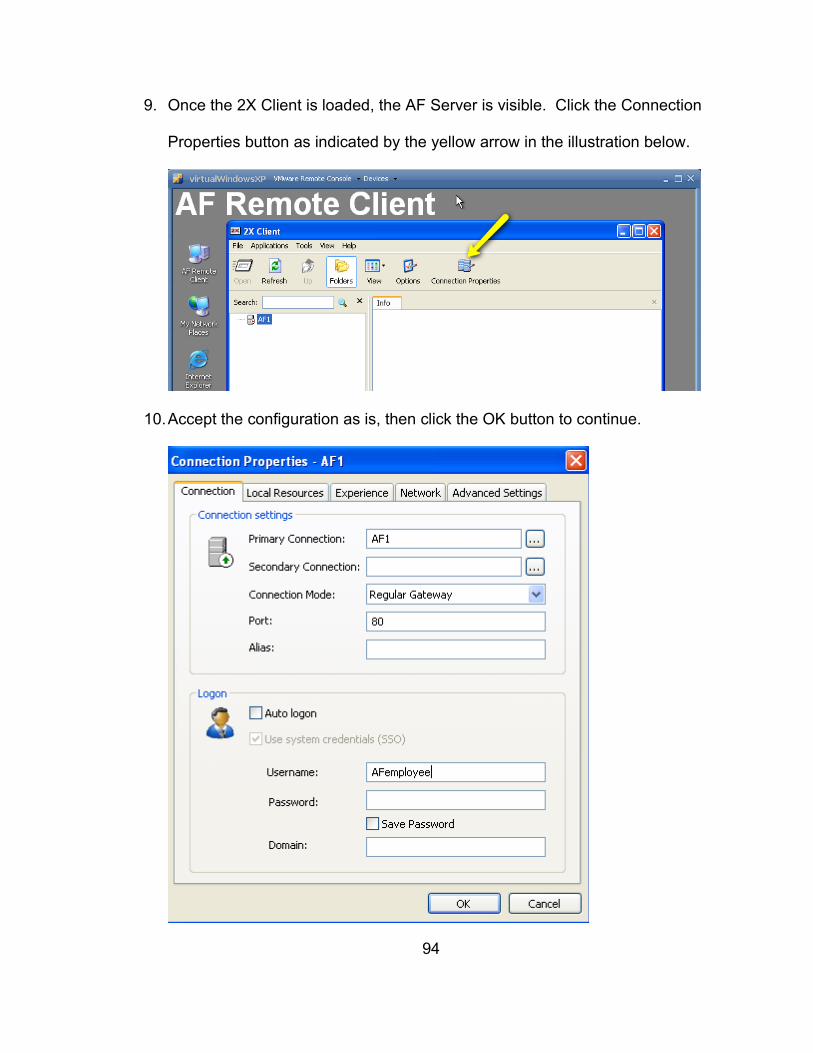
9. Once the 2X Client is loaded, the AF Server is visible. Click the Connection
Properties button as indicated by the yellow arrow in the illustration below.
10.Accept the configuration as is, then click the OK button to continue.
94

11.The 2X Client logon screen appears. This screen allows the employee to
remotely log onto the AF Server in order to use its resources and
applications. Enter the password then click the Connect button to continue.
12.The screenshot below illustrates the process of logging onto the AF Server.
95
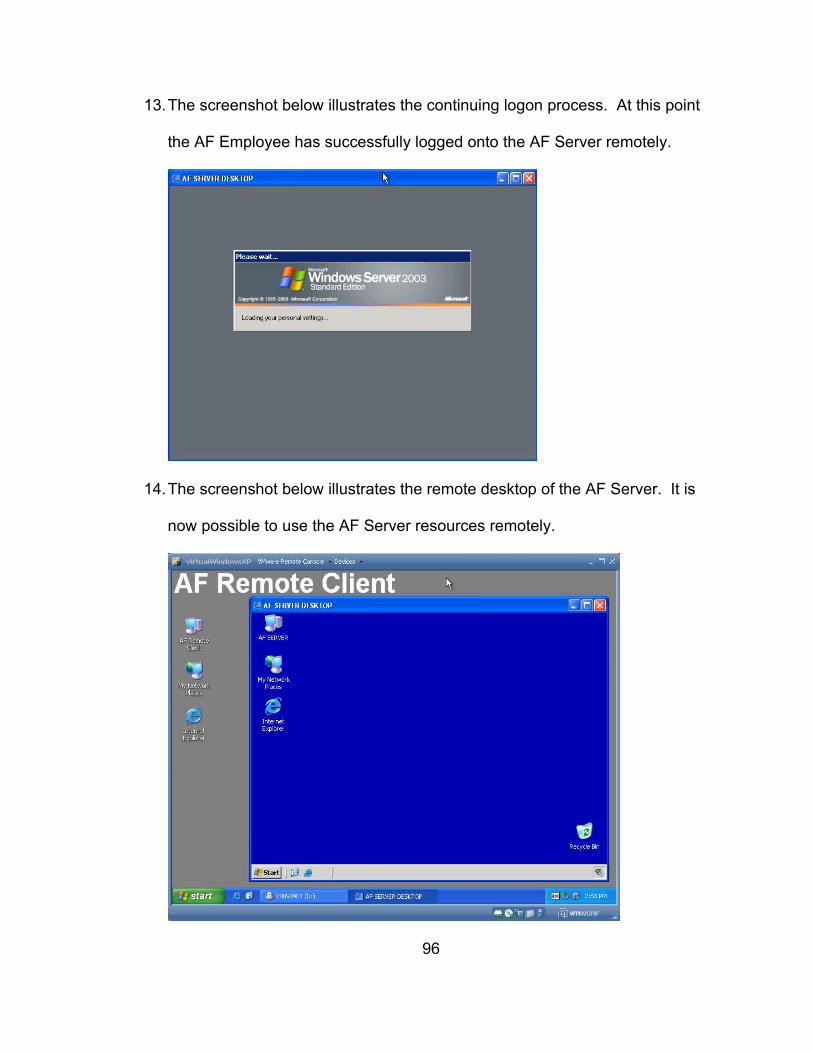
13.The screenshot below illustrates the continuing logon process. At this point
the AF Employee has successfully logged onto the AF Server remotely.
14.The screenshot below illustrates the remote desktop of the AF Server. It is
now possible to use the AF Server resources remotely.
96
APPENDIX F
INSTALLING AND CONFIGURING THE PHONEFACTOR APPLICATION
FOR TWO-FACTOR AUTHENTICATION
97

1. Press Ctrl-Alt-Delete in order to log on to the virtual server.
2. Enter Administrator for User name and the password. Click OK.
98
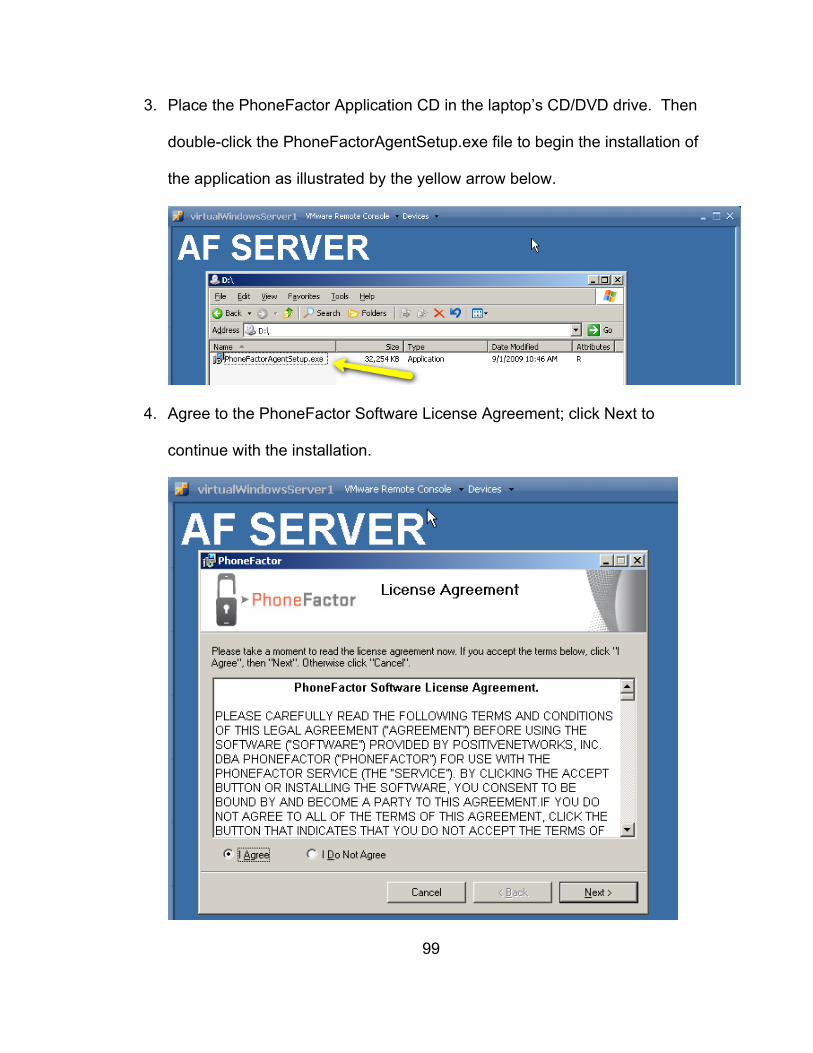
3. Place the PhoneFactor Application CD in the laptop’s CD/DVD drive. Then
double-click the PhoneFactorAgentSetup.exe file to begin the installation of
the application as illustrated by the yellow arrow below.
4. Agree to the PhoneFactor Software License Agreement; click Next to
continue with the installation.
99
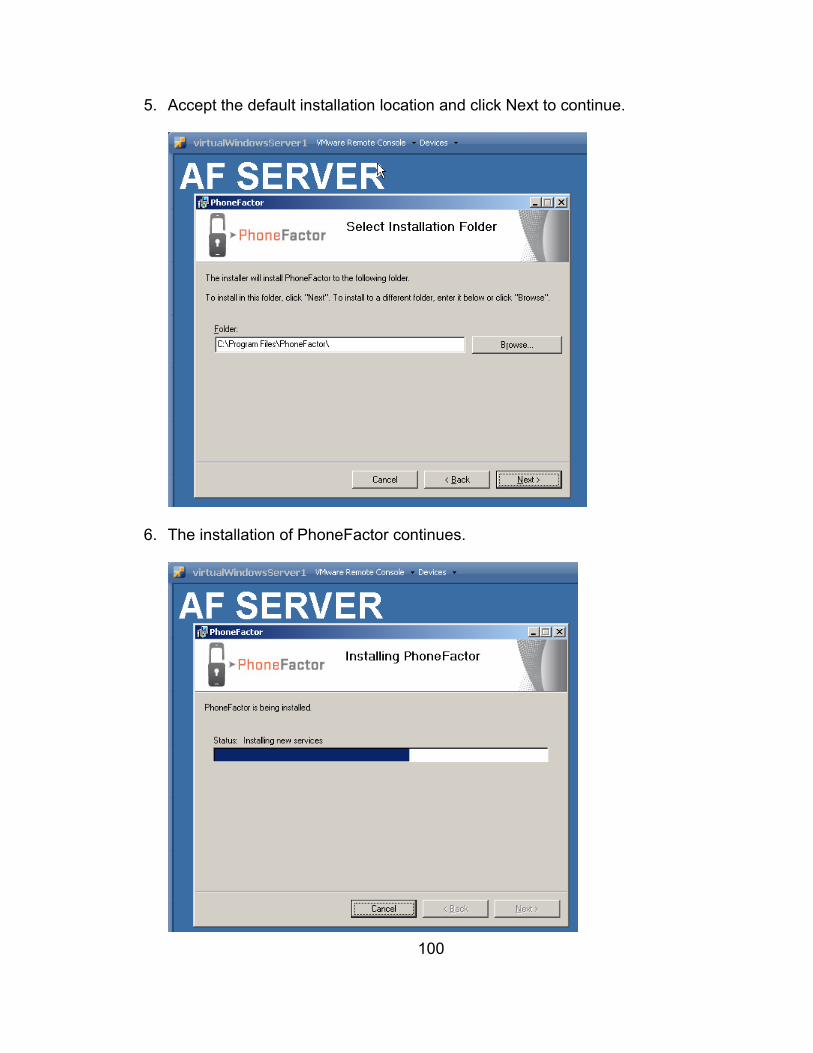
5. Accept the default installation location and click Next to continue.
6. The installation of PhoneFactor continues.
100

7. Click the Finish button to complete the PhoneFactor installation.
8. PhoneFactor will now load the application in order to configure it.
101
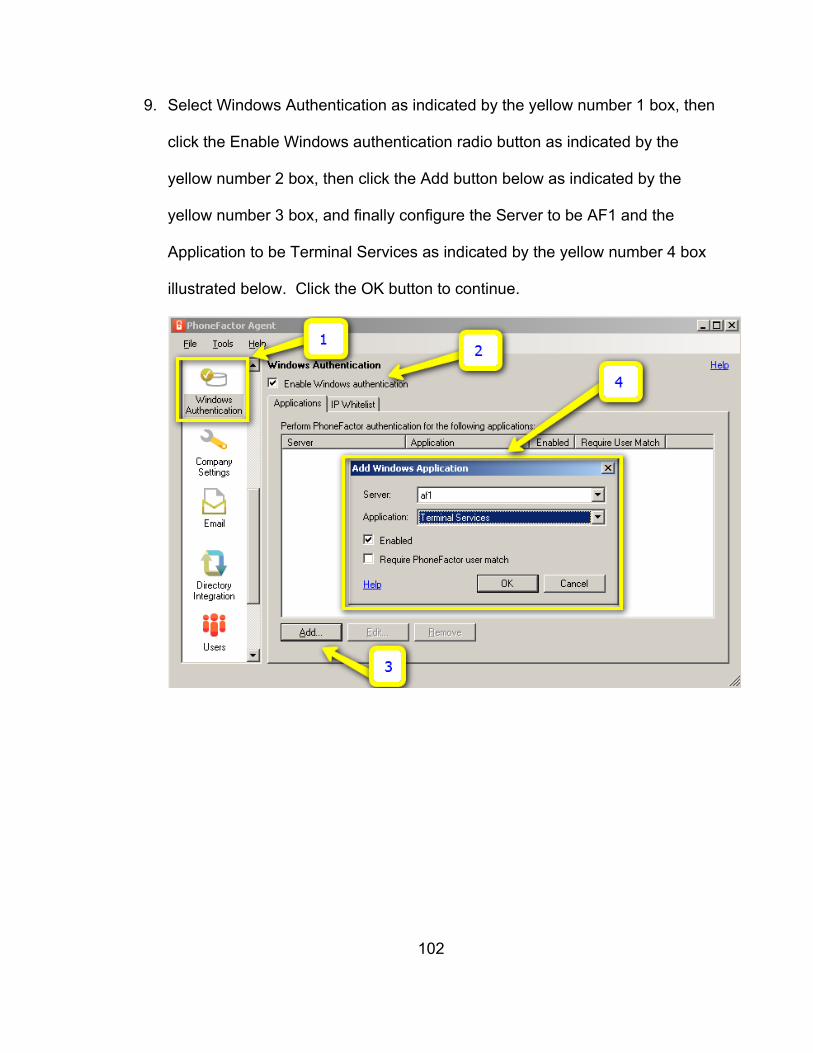
9. Select Windows Authentication as indicated by the yellow number 1 box, then
click the Enable Windows authentication radio button as indicated by the
yellow number 2 box, then click the Add button below as indicated by the
yellow number 3 box, and finally configure the Server to be AF1 and the
Application to be Terminal Services as indicated by the yellow number 4 box
illustrated below. Click the OK button to continue.
102
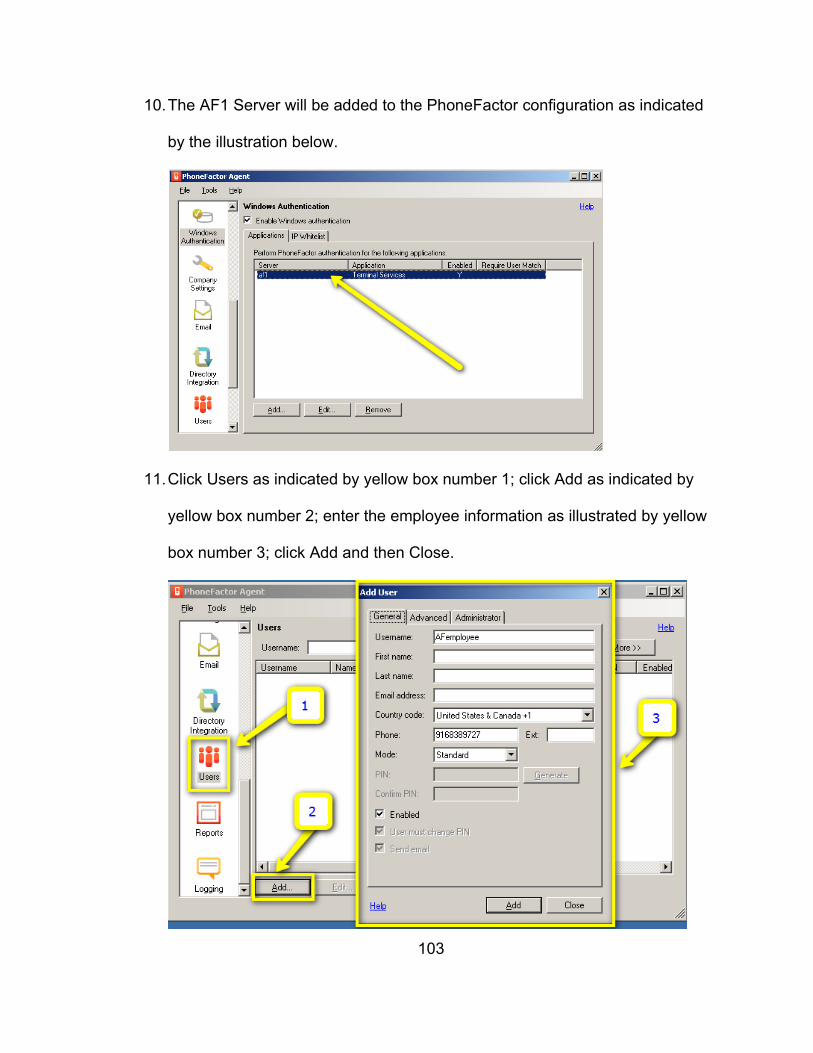
10.The AF1 Server will be added to the PhoneFactor configuration as indicated
by the illustration below.
11.Click Users as indicated by yellow box number 1; click Add as indicated by
yellow box number 2; enter the employee information as illustrated by yellow
box number 3; click Add and then Close.
103
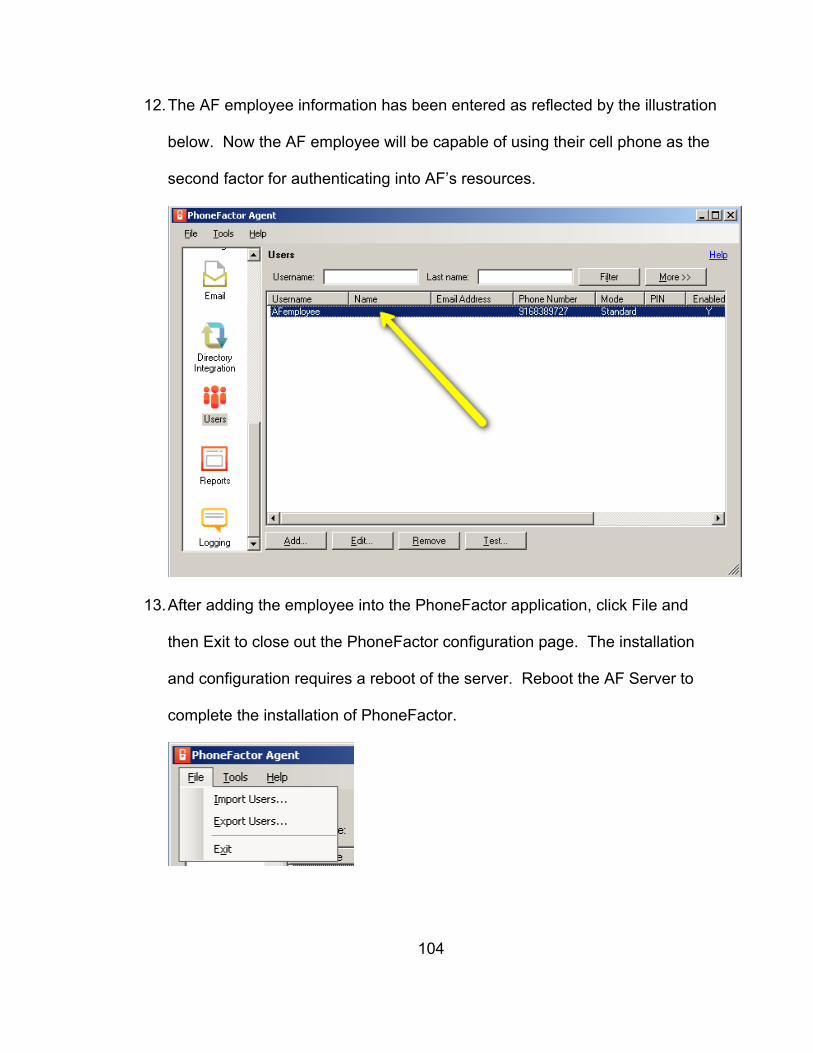
12.The AF employee information has been entered as reflected by the illustration
below. Now the AF employee will be capable of using their cell phone as the
second factor for authenticating into AF’s resources.
13.After adding the employee into the PhoneFactor application, click File and
then Exit to close out the PhoneFactor configuration page. The installation
and configuration requires a reboot of the server. Reboot the AF Server to
complete the installation of PhoneFactor.
104


![Duo Multi-Factor Authentication (MFA) · Multi-Factor Authentication (MFA) Documentation: FAQs [1] Duo Multi-Factor Authentication (MFA): Frequently Asked Questions (FAQs) What is](https://img.pdfslide.us/doc/110x75/5b65cd517f8b9a6e1f8c5f4e/duo-multi-factor-authentication-mfa-multi-factor-authentication-mfa-documentation.jpg)