Embed Size (px)
Citation preview
Page 1 of 35 www.SimpliVity.com
Implementation Guide
Installation and Configuration Guide for SAP NetWeaver (and all NetWeaver based SAP applications)
on SimpliVity OmniStack
www.SimpliVity.comPage 2 of 35
Implementation Guide
Table of ContentsIntroduction ..............................................................................................................................................................................3
Audience .............................................................................................................................................................................3
About SimpliVity OmniStack ..............................................................................................................................................3
SimpliVity OmniStack Setup .....................................................................................................................................................3
Software Components ..............................................................................................................................................................3
Virtual Machine Planning ...........................................................................................................................................................3
VM Sizing ............................................................................................................................................................................3
Define VM disk layout .........................................................................................................................................................4
Deployment and Provisioning ...................................................................................................................................................4
Create virtual machine ........................................................................................................................................................4
Installation of SLES 4 SAP ........................................................................................................................................................11
Installation .........................................................................................................................................................................11
Linux OS Post-Installation tasks .............................................................................................................................................. 15
Network interfaces and hostname resolution .................................................................................................................. 15
SWAP space ...................................................................................................................................................................... 15
Disks, partitions and mount points ................................................................................................................................... 16
Provide SAP installation media and documentation ........................................................................................................ 17
Start SAP software installation .......................................................................................................................................... 18
NetWeaver 7.5 with Sybase ASE 16 .................................................................................................................................. 19
www.SimpliVity.comPage 3 of 35
Implementation Guide
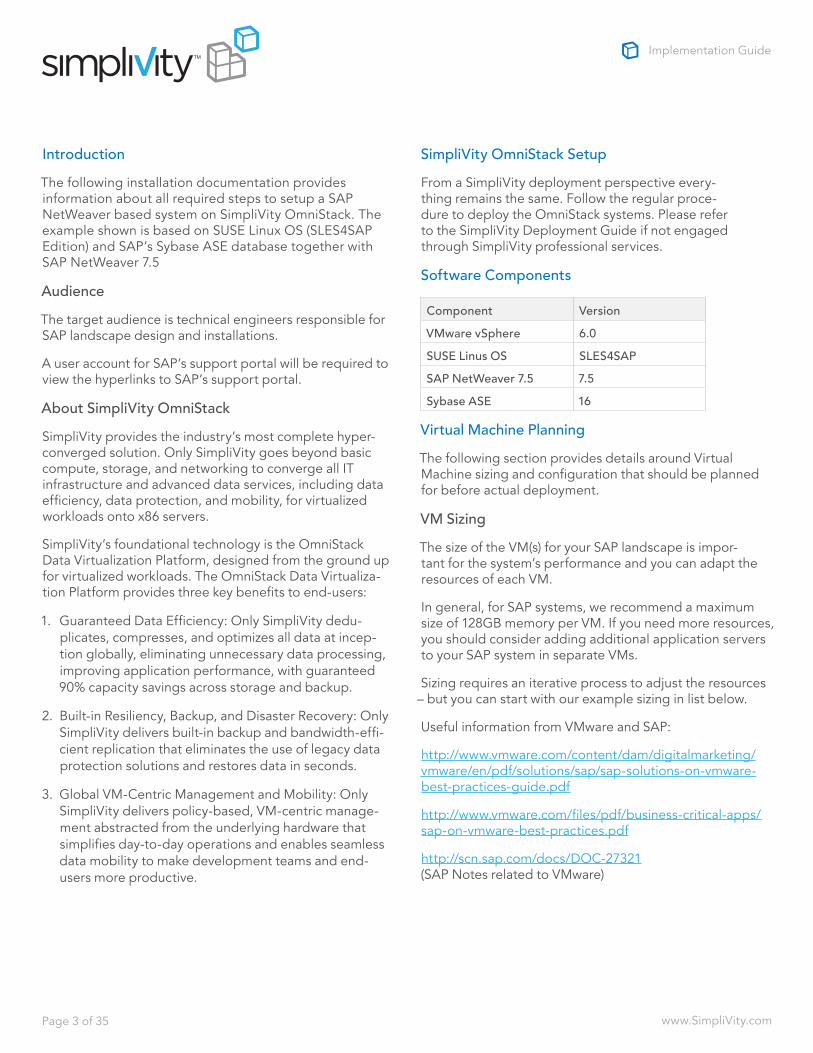
IntroductionThe following installation documentation provides information about all required steps to setup a SAP NetWeaver based system on SimpliVity OmniStack. The example shown is based on SUSE Linux OS (SLES4SAP Edition) and SAP’s Sybase ASE database together with SAP NetWeaver 7.5
AudienceThe target audience is technical engineers responsible for SAP landscape design and installations.
A user account for SAP’s support portal will be required to view the hyperlinks to SAP’s support portal.
About SimpliVity OmniStackSimpliVity provides the industry’s most complete hyper-converged solution. Only SimpliVity goes beyond basic compute, storage, and networking to converge all IT infrastructure and advanced data services, including data efficiency, data protection, and mobility, for virtualized workloads onto x86 servers.
SimpliVity’s foundational technology is the OmniStack Data Virtualization Platform, designed from the ground up for virtualized workloads. The OmniStack Data Virtualiza-tion Platform provides three key benefits to end-users:
1. Guaranteed Data Efficiency: Only SimpliVity dedu-plicates, compresses, and optimizes all data at incep-tion globally, eliminating unnecessary data processing, improving application performance, with guaranteed 90% capacity savings across storage and backup.
2. Built-in Resiliency, Backup, and Disaster Recovery: Only SimpliVity delivers built-in backup and bandwidth-effi-cient replication that eliminates the use of legacy data protection solutions and restores data in seconds.
3. Global VM-Centric Management and Mobility: Only SimpliVity delivers policy-based, VM-centric manage-ment abstracted from the underlying hardware that simplifies day-to-day operations and enables seamless data mobility to make development teams and end-users more productive.
SimpliVity OmniStack SetupFrom a SimpliVity deployment perspective every-thing remains the same. Follow the regular proce-dure to deploy the OmniStack systems. Please refer to the SimpliVity Deployment Guide if not engaged through SimpliVity professional services.
Software Components
Component VersionVMware vSphere 6.0SUSE Linus OS SLES4SAPSAP NetWeaver 7.5 7.5Sybase ASE 16
Virtual Machine PlanningThe following section provides details around Virtual Machine sizing and configuration that should be planned for before actual deployment.
VM SizingThe size of the VM(s) for your SAP landscape is impor-tant for the system’s performance and you can adapt the resources of each VM.
In general, for SAP systems, we recommend a maximum size of 128GB memory per VM. If you need more resources, you should consider adding additional application servers to your SAP system in separate VMs.
Sizing requires an iterative process to adjust the resources – but you can start with our example sizing in list below.
Useful information from VMware and SAP:
http://www.vmware.com/content/dam/digitalmarketing/vmware/en/pdf/solutions/sap/sap-solutions-on-vmware-best-practices-guide.pdf
http://www.vmware.com/files/pdf/business-critical-apps/sap-on-vmware-best-practices.pdf
http://scn.sap.com/docs/DOC-27321 (SAP Notes related to VMware)
www.SimpliVity.comPage 4 of 35
Implementation Guide
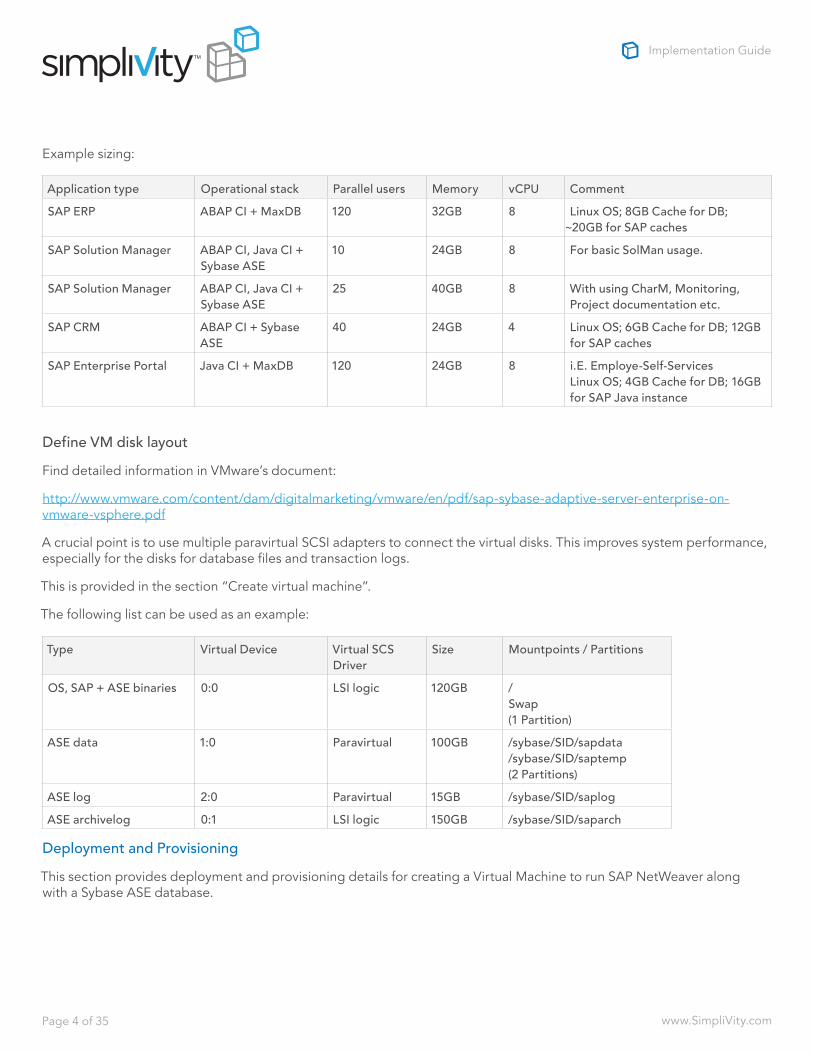
Example sizing:
Application type Operational stack Parallel users Memory vCPU CommentSAP ERP ABAP CI + MaxDB 120 32GB 8 Linux OS; 8GB Cache for DB;
~20GB for SAP cachesSAP Solution Manager ABAP CI, Java CI +
Sybase ASE10 24GB 8 For basic SolMan usage.
SAP Solution Manager ABAP CI, Java CI + Sybase ASE
25 40GB 8 With using CharM, Monitoring, Project documentation etc.
SAP CRM ABAP CI + Sybase ASE
40 24GB 4 Linux OS; 6GB Cache for DB; 12GB for SAP caches
SAP Enterprise Portal Java CI + MaxDB 120 24GB 8 i.E. Employe-Self-Services Linux OS; 4GB Cache for DB; 16GB for SAP Java instance
Define VM disk layoutFind detailed information in VMware’s document:
http://www.vmware.com/content/dam/digitalmarketing/vmware/en/pdf/sap-sybase-adaptive-server-enterprise-on-vmware-vsphere.pdf
A crucial point is to use multiple paravirtual SCSI adapters to connect the virtual disks. This improves system performance, especially for the disks for database files and transaction logs.
This is provided in the section “Create virtual machine”.
The following list can be used as an example:
Type Virtual Device Virtual SCS Driver
Size Mountpoints / Partitions
OS, SAP + ASE binaries 0:0 LSI logic 120GB /Swap(1 Partition)
ASE data 1:0 Paravirtual 100GB /sybase/SID/sapdata/sybase/SID/saptemp(2 Partitions)
ASE log 2:0 Paravirtual 15GB /sybase/SID/saplogASE archivelog 0:1 LSI logic 150GB /sybase/SID/saparch
Deployment and ProvisioningThis section provides deployment and provisioning details for creating a Virtual Machine to run SAP NetWeaver along with a Sybase ASE database.
www.SimpliVity.comPage 5 of 35
Implementation Guide
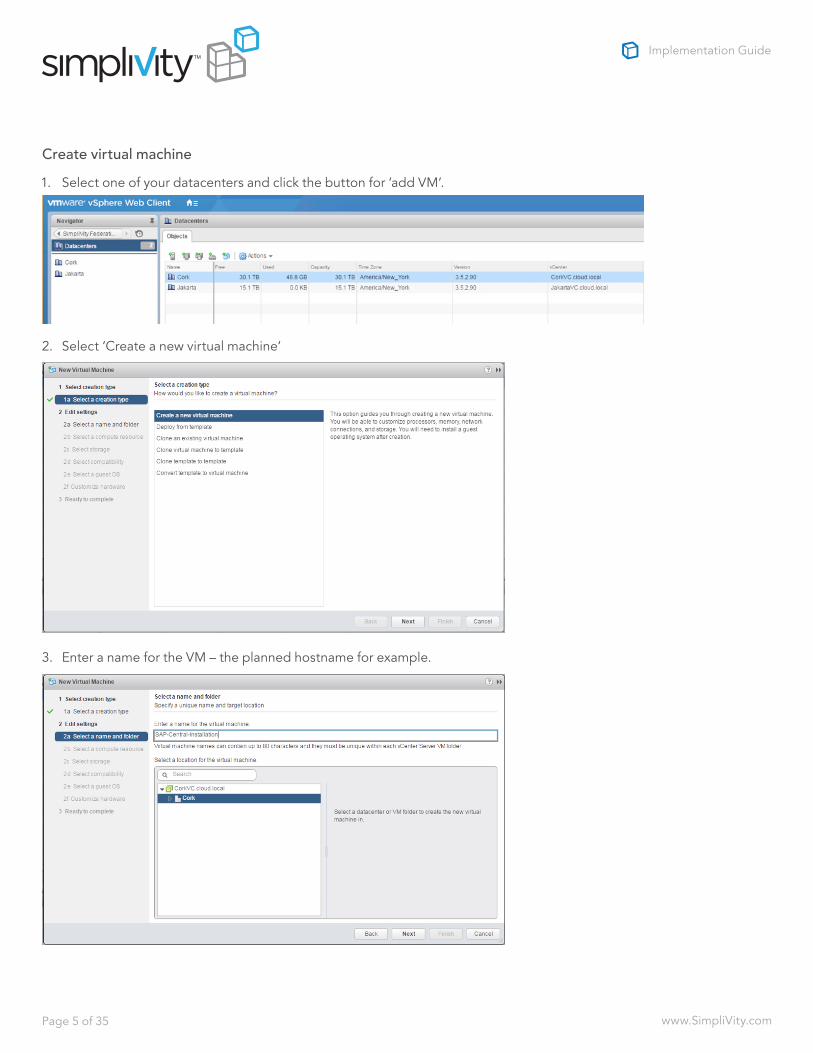
Create virtual machine1. Select one of your datacenters and click the button for ‘add VM’.
2. Select ‘Create a new virtual machine‘
3. Enter a name for the VM – the planned hostname for example.
www.SimpliVity.comPage 6 of 35
Implementation Guide
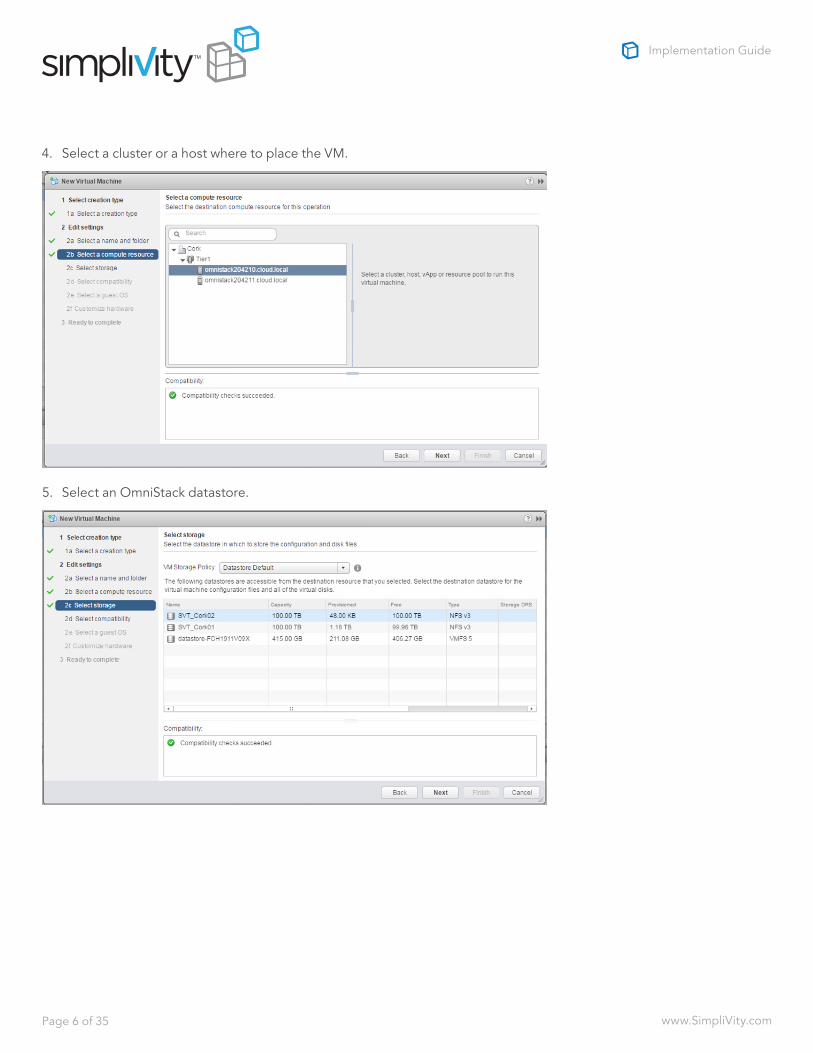
4. Select a cluster or a host where to place the VM.
5. Select an OmniStack datastore.
www.SimpliVity.comPage 7 of 35
Implementation Guide
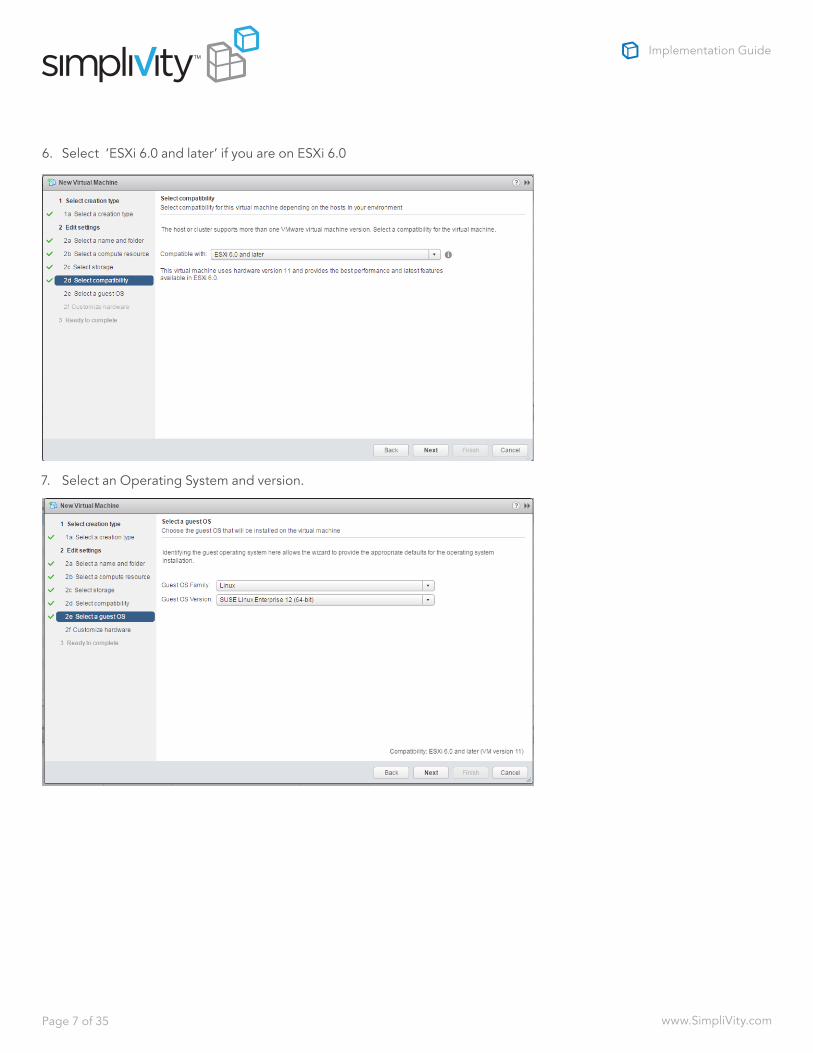
6. Select ‘ESXi 6.0 and later’ if you are on ESXi 6.0
7. Select an Operating System and version.

www.SimpliVity.comPage 8 of 35
Implementation Guide
8. Configure and Memory according to your requirements and configure your first Hard disk. This disk is recommended to be used for OS and binaries on SCSI port 0:0 – see example list in section “Define VM disk layout”.
9. Add a SCSI controller “VMware Paravirtual”
10. Add another hard disk and set the new SCSI controller (1:0) for it.

www.SimpliVity.comPage 9 of 35
Implementation Guide
11. Continue with adding SCSI controllers and hard disk. Use the list from section “Create VM disk layout”.
1.
12. Enter a size for the new hard disk
www.SimpliVity.comPage 10 of 35
Implementation Guide
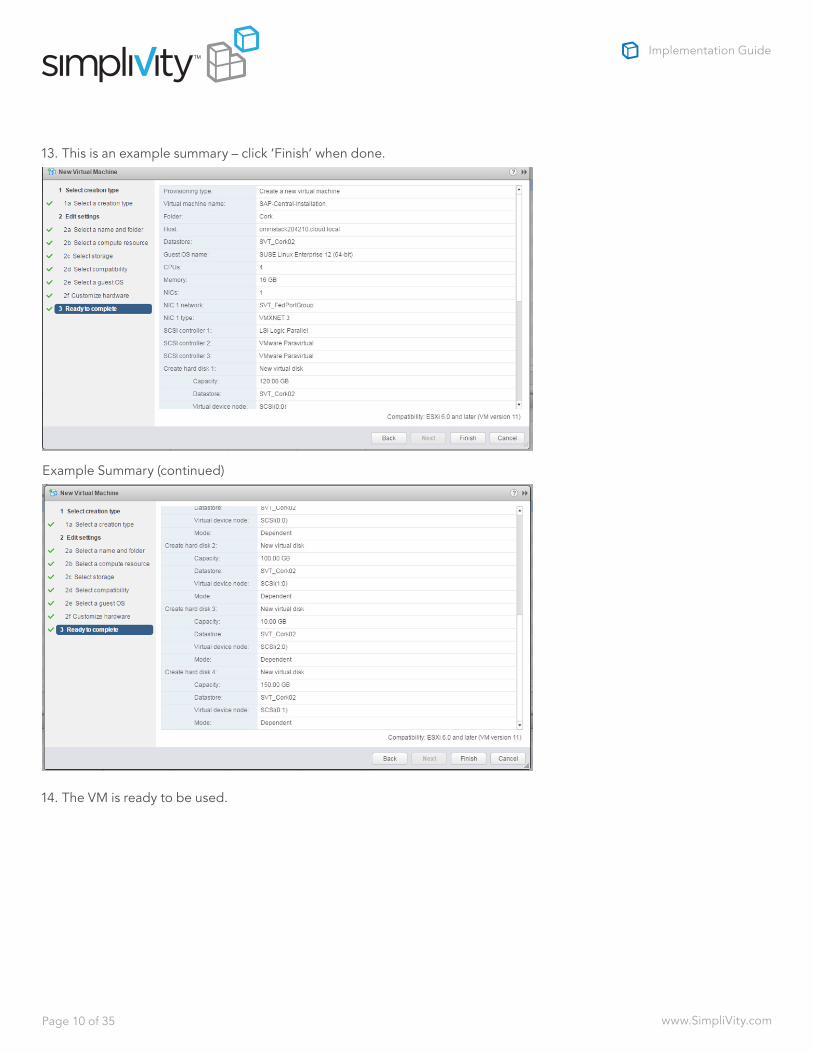
13. This is an example summary – click ‘Finish’ when done.
Example Summary (continued)
14. The VM is ready to be used.
www.SimpliVity.comPage 11 of 35
Implementation Guide
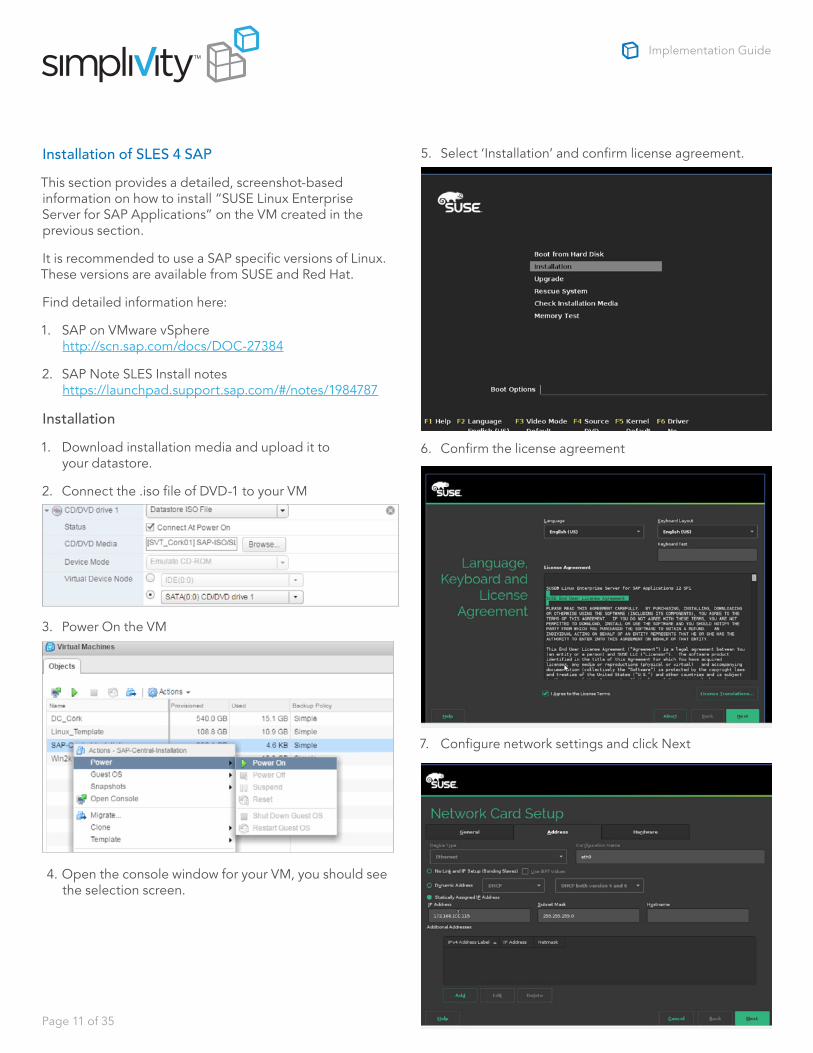
Installation of SLES 4 SAPThis section provides a detailed, screenshot-based information on how to install “SUSE Linux Enterprise Server for SAP Applications” on the VM created in the previous section.
It is recommended to use a SAP specific versions of Linux. These versions are available from SUSE and Red Hat.
Find detailed information here:
1. SAP on VMware vSphere http://scn.sap.com/docs/DOC-27384
2. SAP Note SLES Install notes https://launchpad.support.sap.com/#/notes/1984787
Installation1. Download installation media and upload it to
your datastore.
2. Connect the .iso file of DVD-1 to your VM
3. Power On the VM
4. Open the console window for your VM, you should see the selection screen.
5. Select ‘Installation’ and confirm license agreement.
6. Confirm the license agreement
7. Configure network settings and click Next
www.SimpliVity.comPage 12 of 35
Implementation Guide
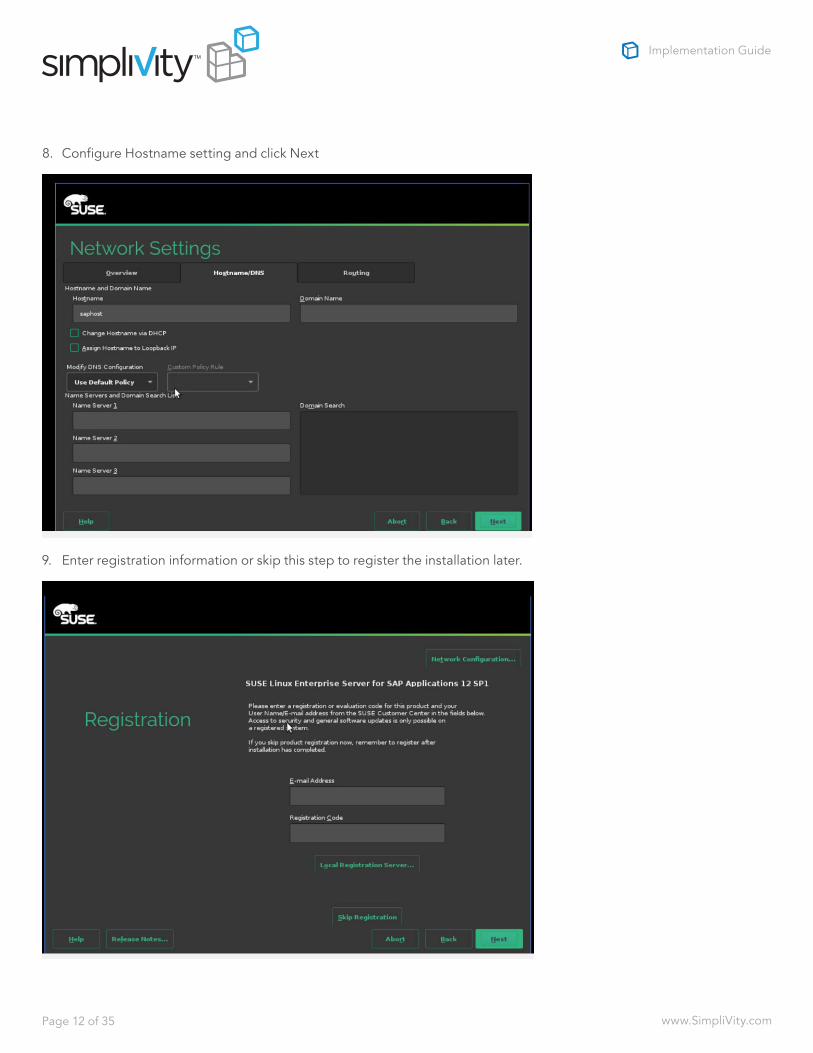
8. Configure Hostname setting and click Next
9. Enter registration information or skip this step to register the installation later.
www.SimpliVity.comPage 13 of 35
Implementation Guide
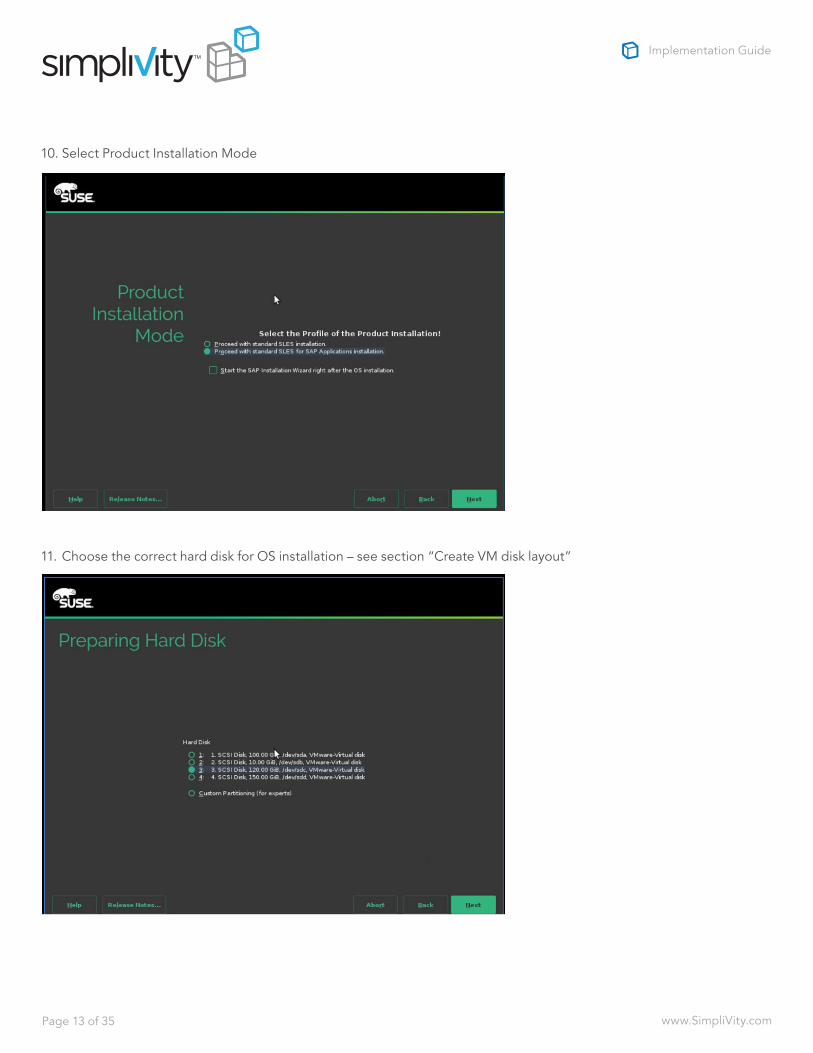
10. Select Product Installation Mode
11. Choose the correct hard disk for OS installation – see section “Create VM disk layout”
www.SimpliVity.comPage 14 of 35
Implementation Guide
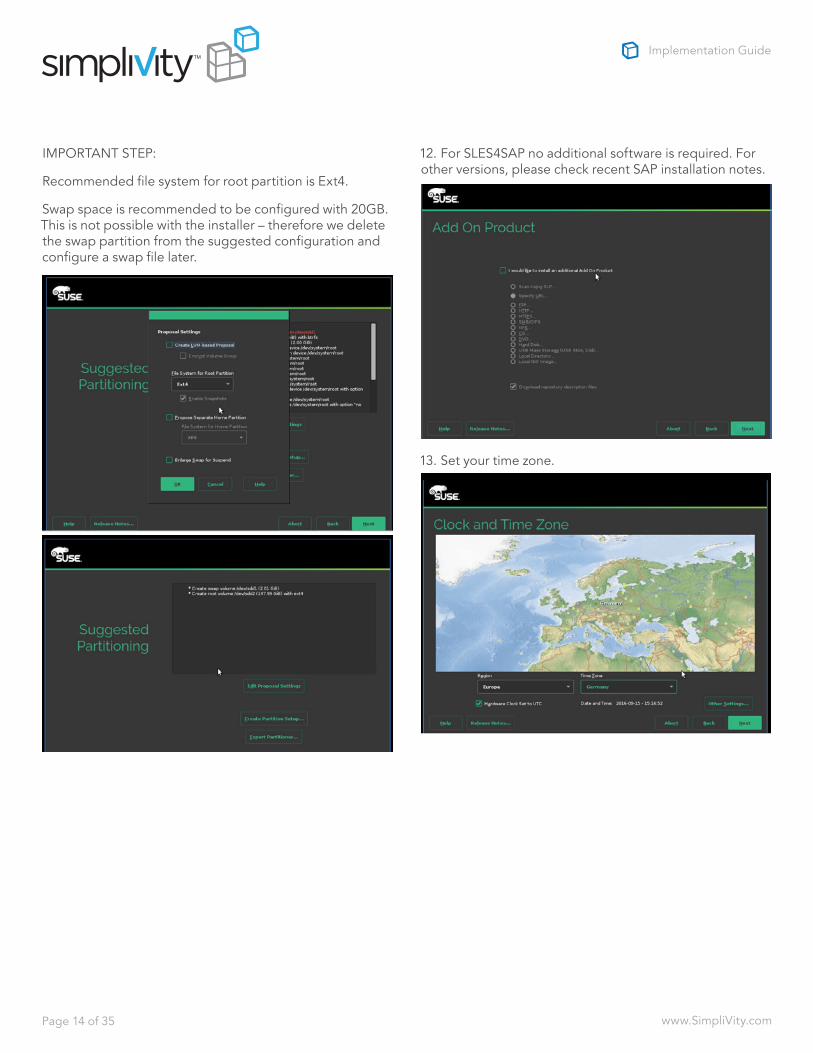
IMPORTANT STEP:
Recommended file system for root partition is Ext4.
Swap space is recommended to be configured with 20GB. This is not possible with the installer – therefore we delete the swap partition from the suggested configuration and configure a swap file later.
12. For SLES4SAP no additional software is required. For other versions, please check recent SAP installation notes.
13. Set your time zone.
www.SimpliVity.comPage 15 of 35
Implementation Guide
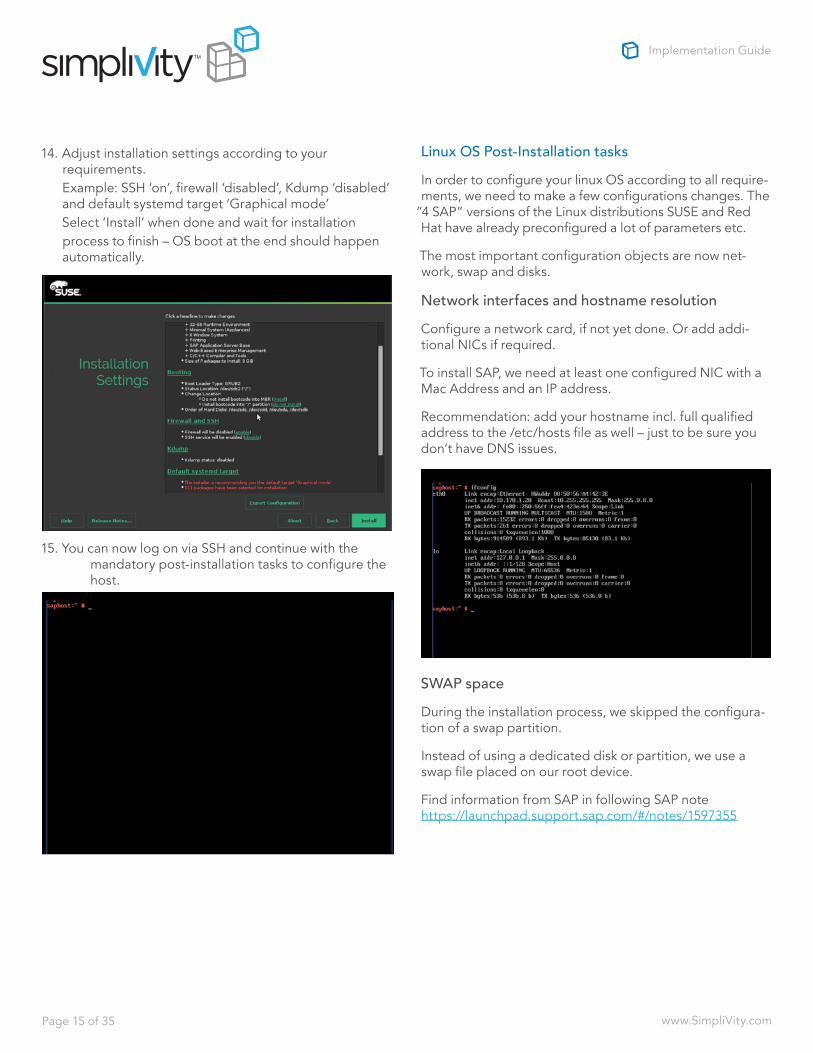
14. Adjust installation settings according to your requirements. Example: SSH ‘on’, firewall ‘disabled’, Kdump ‘disabled’ and default systemd target ‘Graphical mode’ Select ‘Install’ when done and wait for installation process to finish – OS boot at the end should happen automatically.
15. You can now log on via SSH and continue with the mandatory post-installation tasks to configure the host.
Linux OS Post-Installation tasksIn order to configure your linux OS according to all require-ments, we need to make a few configurations changes. The
“4 SAP” versions of the Linux distributions SUSE and Red Hat have already preconfigured a lot of parameters etc.
The most important configuration objects are now net-work, swap and disks.
Network interfaces and hostname resolutionConfigure a network card, if not yet done. Or add addi-tional NICs if required.
To install SAP, we need at least one configured NIC with a Mac Address and an IP address.
Recommendation: add your hostname incl. full qualified address to the /etc/hosts file as well – just to be sure you don’t have DNS issues.
SWAP spaceDuring the installation process, we skipped the configura-tion of a swap partition.
Instead of using a dedicated disk or partition, we use a swap file placed on our root device.
Find information from SAP in following SAP note https://launchpad.support.sap.com/#/notes/1597355
www.SimpliVity.comPage 16 of 35
Implementation Guide
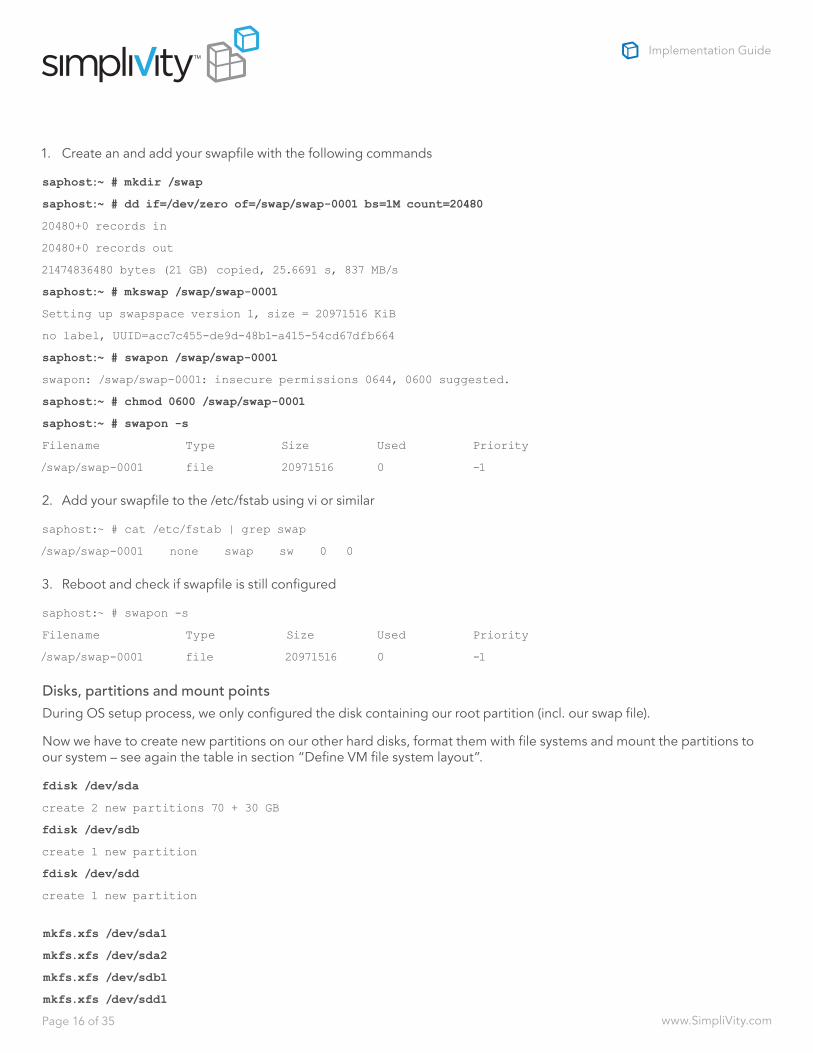
1. Create an and add your swapfile with the following commands
saphost:~ # mkdir /swap
saphost:~ # dd if=/dev/zero of=/swap/swap-0001 bs=1M count=20480
20480+0 records in
20480+0 records out
21474836480 bytes (21 GB) copied, 25.6691 s, 837 MB/s
saphost:~ # mkswap /swap/swap-0001
Setting up swapspace version 1, size = 20971516 KiB
no label, UUID=acc7c455-de9d-48b1-a415-54cd67dfb664
saphost:~ # swapon /swap/swap-0001
swapon: /swap/swap-0001: insecure permissions 0644, 0600 suggested.
saphost:~ # chmod 0600 /swap/swap-0001
saphost:~ # swapon -s
Filename Type Size Used Priority
/swap/swap-0001 file 20971516 0 -1
2. Add your swapfile to the /etc/fstab using vi or similar
saphost:~ # cat /etc/fstab | grep swap
/swap/swap-0001 none swap sw 0 0
3. Reboot and check if swapfile is still configured
saphost:~ # swapon -s
Filename Type Size Used Priority
/swap/swap-0001 file 20971516 0 -1
Disks, partitions and mount pointsDuring OS setup process, we only configured the disk containing our root partition (incl. our swap file).
Now we have to create new partitions on our other hard disks, format them with file systems and mount the partitions to our system – see again the table in section “Define VM file system layout”.
fdisk /dev/sda
create 2 new partitions 70 + 30 GB
fdisk /dev/sdb
create 1 new partition
fdisk /dev/sdd
create 1 new partition
mkfs.xfs /dev/sda1
mkfs.xfs /dev/sda2
mkfs.xfs /dev/sdb1
mkfs.xfs /dev/sdd1
www.SimpliVity.comPage 17 of 35
Implementation Guide
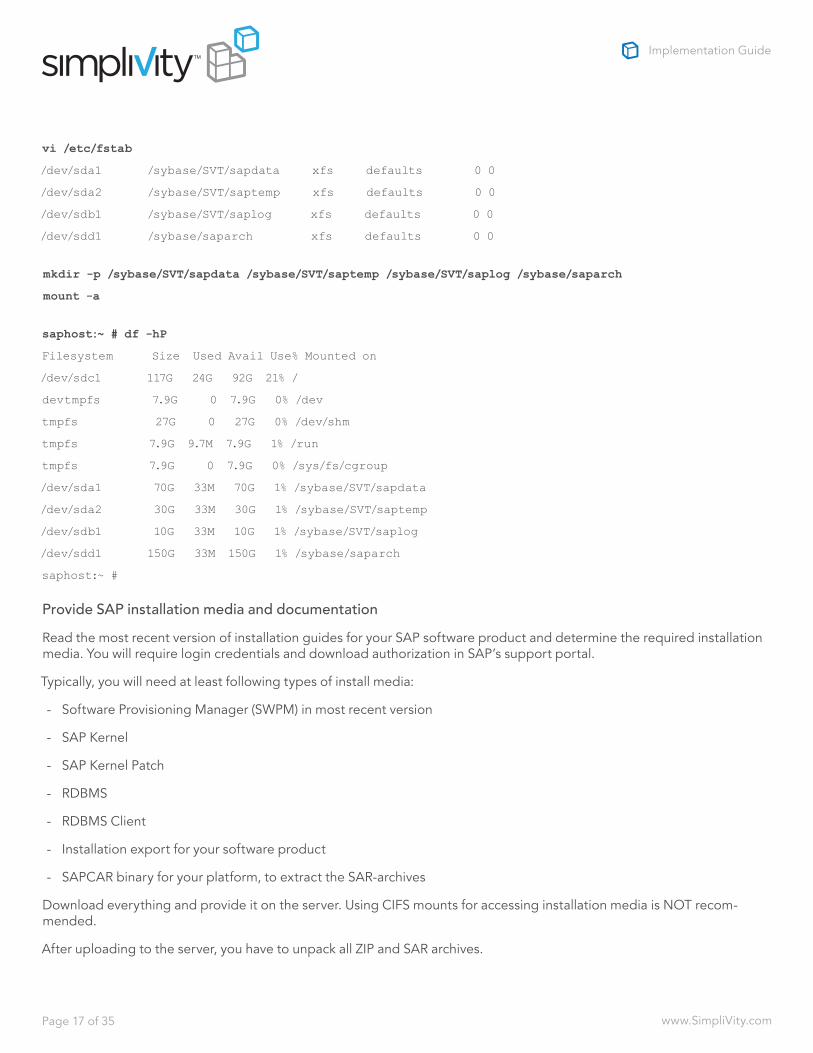
vi /etc/fstab
/dev/sda1 /sybase/SVT/sapdata xfs defaults 0 0
/dev/sda2 /sybase/SVT/saptemp xfs defaults 0 0
/dev/sdb1 /sybase/SVT/saplog xfs defaults 0 0
/dev/sdd1 /sybase/saparch xfs defaults 0 0
mkdir -p /sybase/SVT/sapdata /sybase/SVT/saptemp /sybase/SVT/saplog /sybase/saparch
mount -a
saphost:~ # df -hP
Filesystem Size Used Avail Use% Mounted on
/dev/sdc1 117G 24G 92G 21% /
devtmpfs 7.9G 0 7.9G 0% /dev
tmpfs 27G 0 27G 0% /dev/shm
tmpfs 7.9G 9.7M 7.9G 1% /run
tmpfs 7.9G 0 7.9G 0% /sys/fs/cgroup
/dev/sda1 70G 33M 70G 1% /sybase/SVT/sapdata
/dev/sda2 30G 33M 30G 1% /sybase/SVT/saptemp
/dev/sdb1 10G 33M 10G 1% /sybase/SVT/saplog
/dev/sdd1 150G 33M 150G 1% /sybase/saparch
saphost:~ #
Provide SAP installation media and documentationRead the most recent version of installation guides for your SAP software product and determine the required installation media. You will require login credentials and download authorization in SAP’s support portal.
Typically, you will need at least following types of install media:
- Software Provisioning Manager (SWPM) in most recent version
- SAP Kernel
- SAP Kernel Patch
- RDBMS
- RDBMS Client
- Installation export for your software product
- SAPCAR binary for your platform, to extract the SAR-archives
Download everything and provide it on the server. Using CIFS mounts for accessing installation media is NOT recom-mended.
After uploading to the server, you have to unpack all ZIP and SAR archives.
www.SimpliVity.comPage 18 of 35
Implementation Guide
Start SAP software installationFor single installations, we recommend using SWPM in graphical mode.
You can start SWPM from the graphical mode of your Linux distro – or you start a VNC-server and connect, or use any other method which gives you X-Window output.
Following information should be prepared before you start:
1. SAP system ID (SID)
2. SAP instance numbers for ASCS and PAS instances
3. Full qualified hostname
4. Linux UID of <sid>adm user
5. Linux GUI of group sapsys
6. Linux UID of syb<sid> user for Sybase (different for other DBs)
7. Linux UID of sapadm user
8. Passwords for all users
9. SLD connection information (if SLD available)
The UIDs and GIDs can also be auto-chosen by the installer, if you don’t have any preference. If users are already created, the password and the UIDs are not changed. Only the group assignment is updated if necessary.
The following screenshots show a sample installation on our previously created VM ‘saphost’. We install NetWeaver 7.5 with instance number 00 (PAS) and 01 (ASCS) with Sybase ASE 16 as a central installation (SAP instances and DB on same host) using the SWPM tool.
Notice the assignment of the mounted filesystems we defined in the section “Define VM disk layout”.
www.SimpliVity.comPage 19 of 35
Implementation Guide
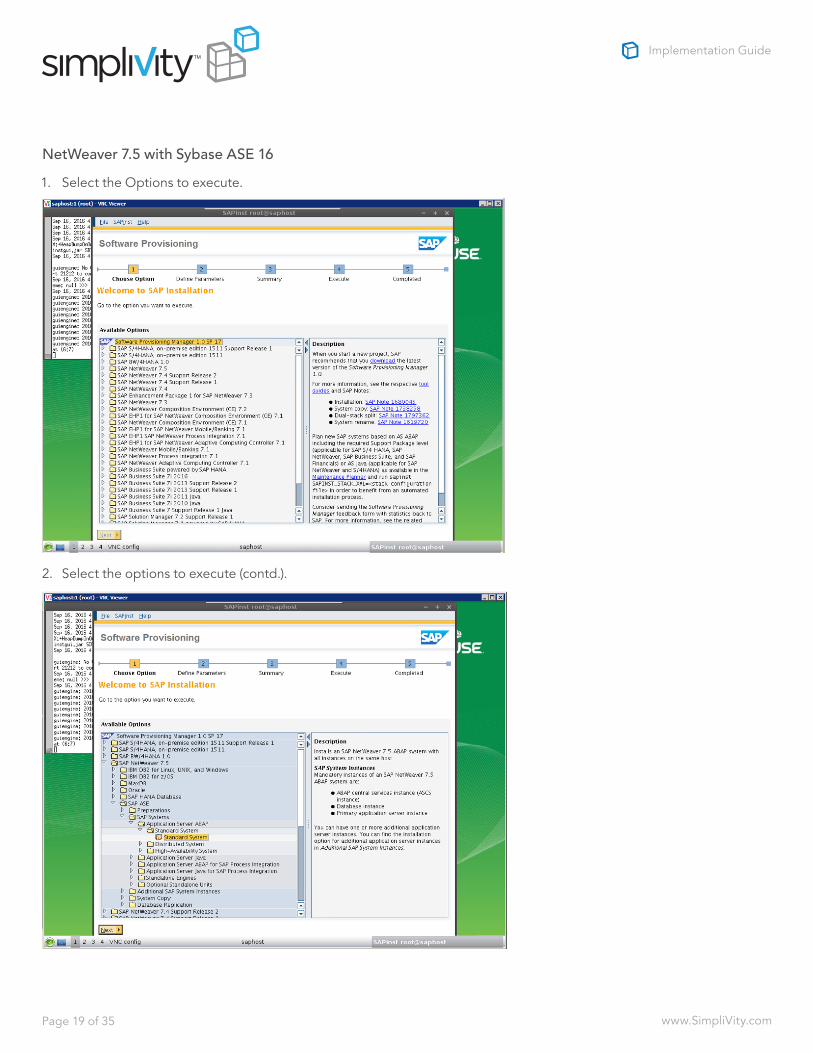
NetWeaver 7.5 with Sybase ASE 161. Select the Options to execute.
2. Select the options to execute (contd.).
www.SimpliVity.comPage 20 of 35
Implementation Guide
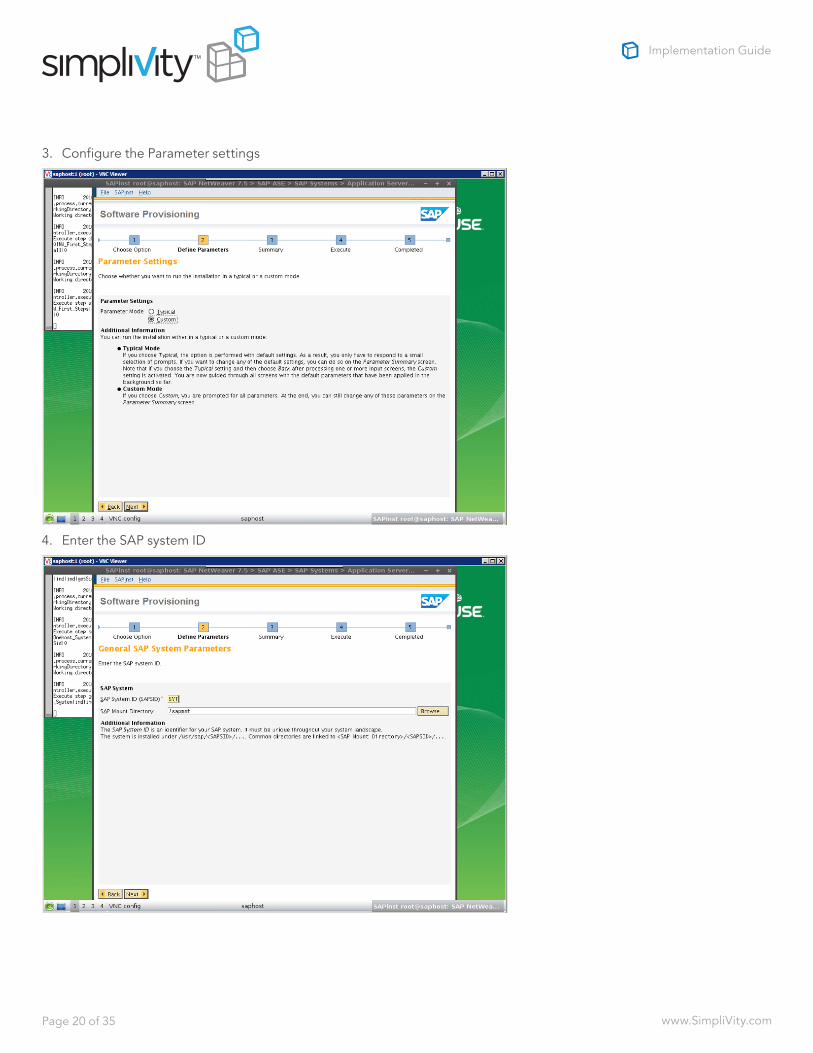
3. Configure the Parameter settings
4. Enter the SAP system ID
www.SimpliVity.comPage 21 of 35
Implementation Guide
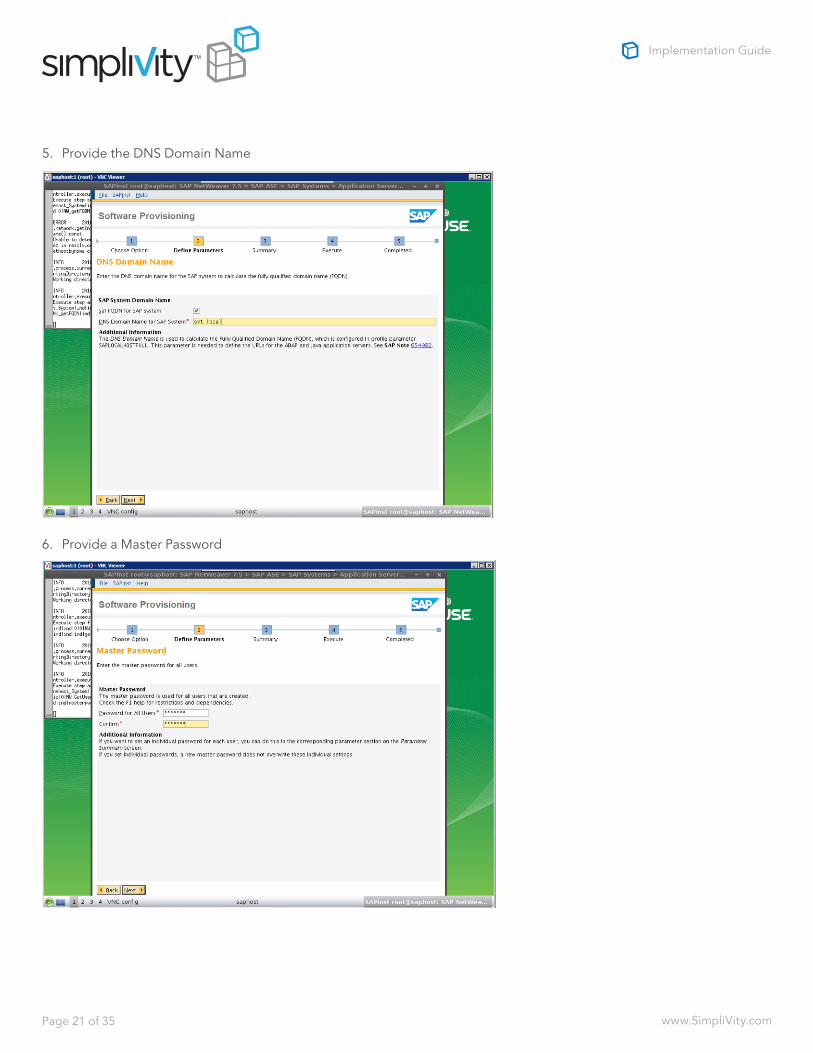
5. Provide the DNS Domain Name
6. Provide a Master Password
www.SimpliVity.comPage 22 of 35
Implementation Guide
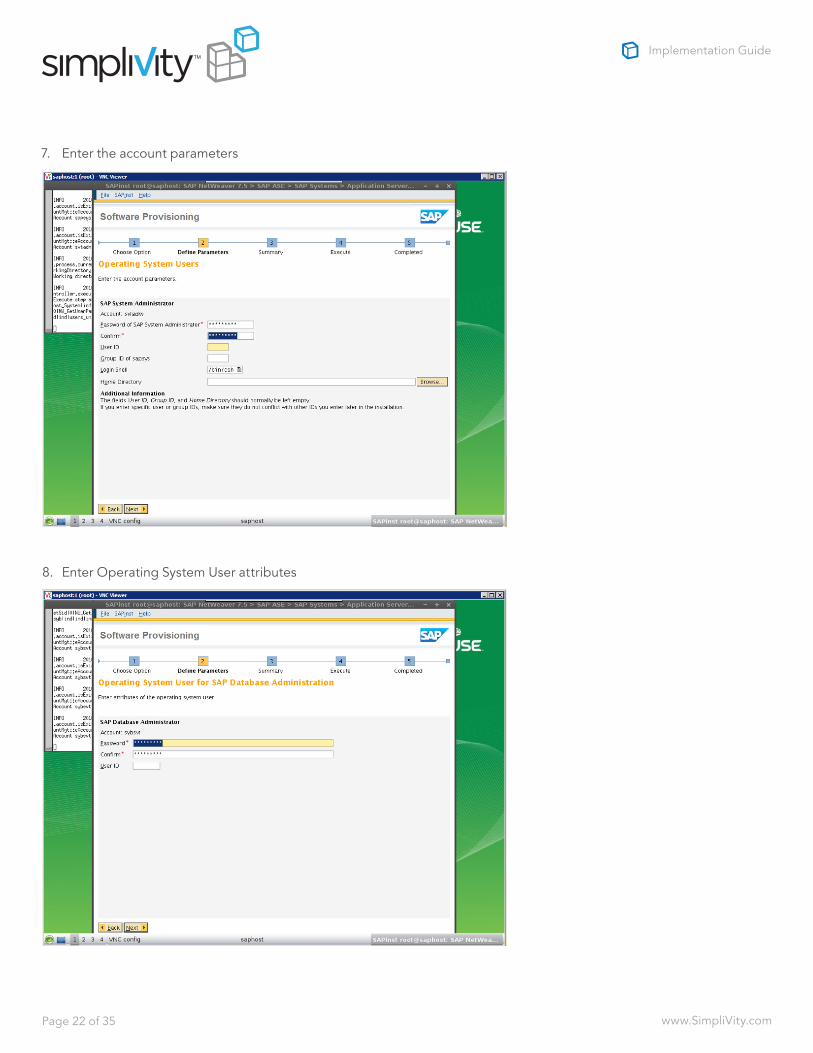
7. Enter the account parameters
8. Enter Operating System User attributes
www.SimpliVity.comPage 23 of 35
Implementation Guide
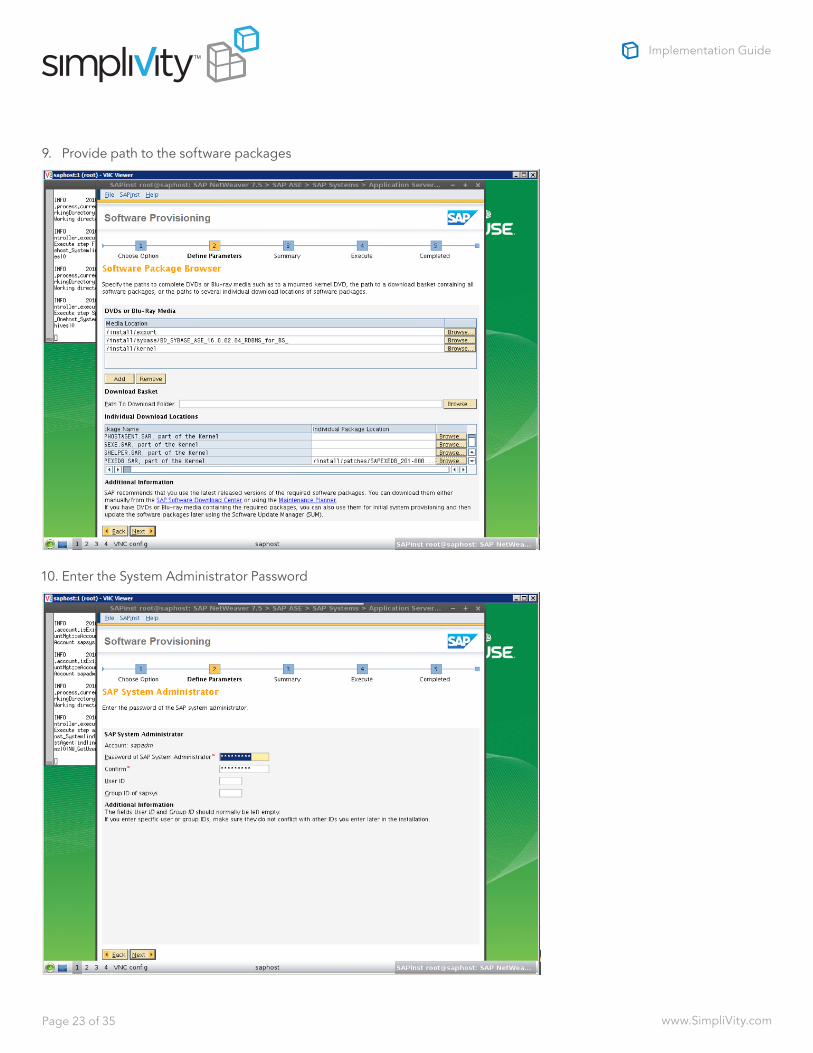
9. Provide path to the software packages
10. Enter the System Administrator Password
www.SimpliVity.comPage 24 of 35
Implementation Guide
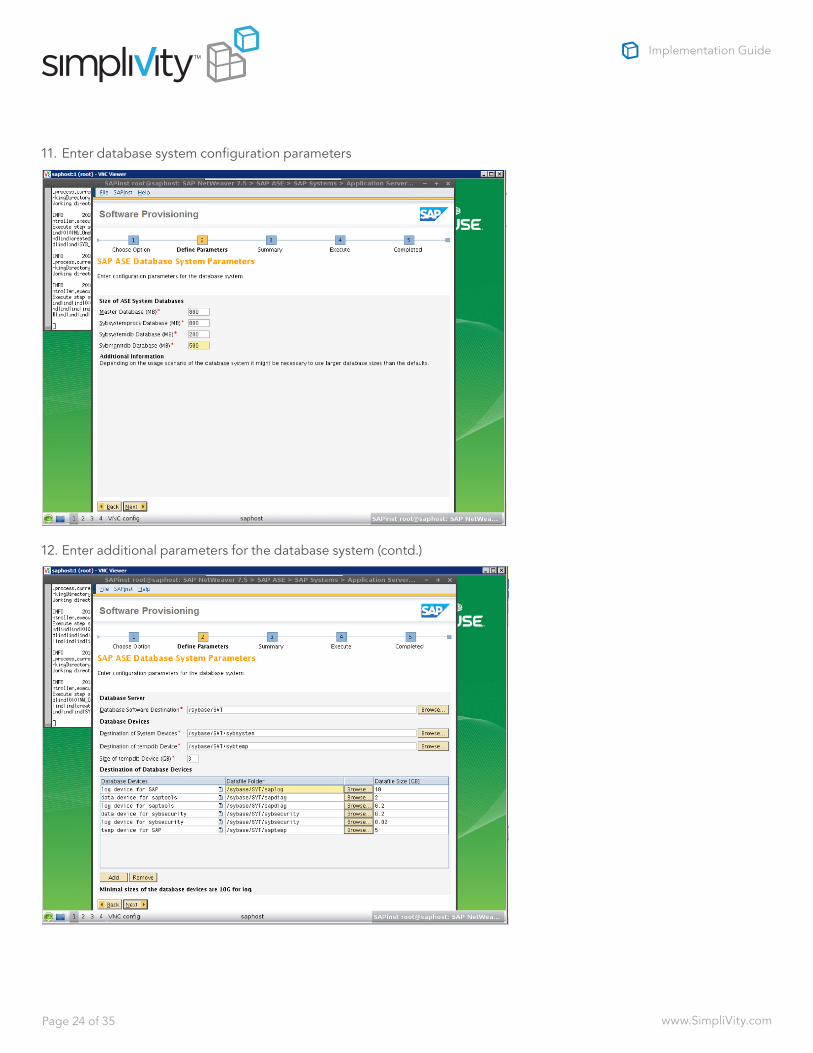
11. Enter database system configuration parameters
12. Enter additional parameters for the database system (contd.)
www.SimpliVity.comPage 25 of 35
Implementation Guide
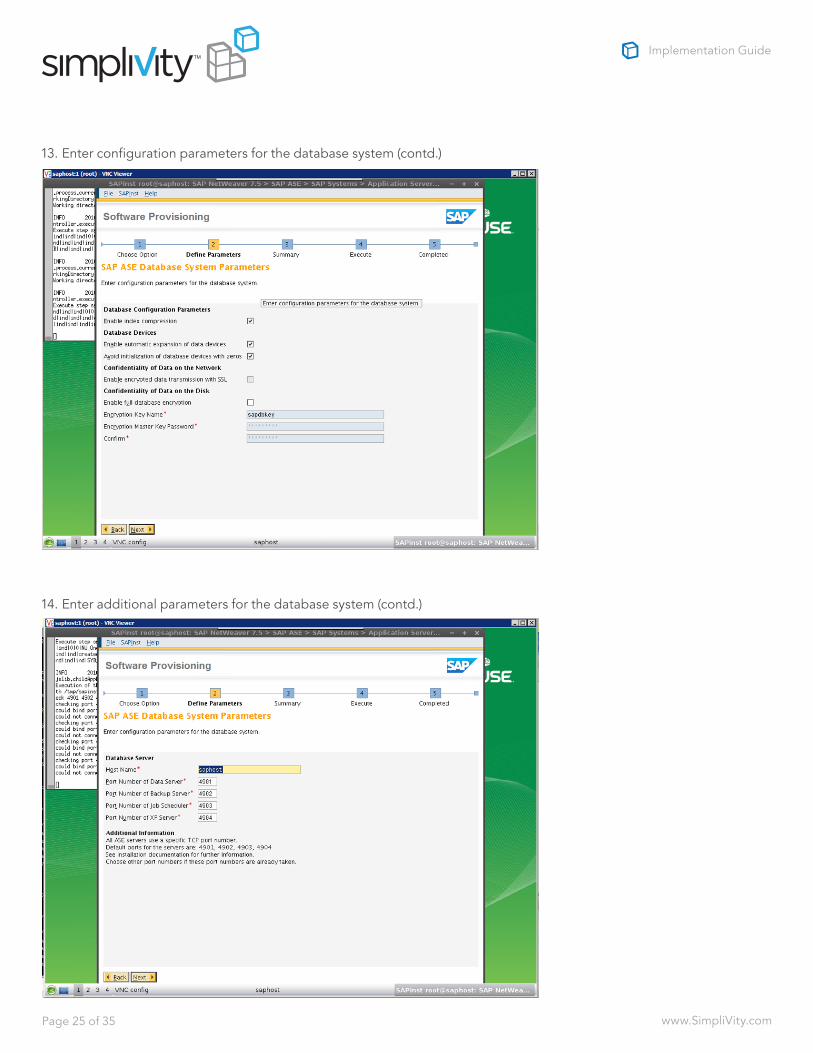
13. Enter configuration parameters for the database system (contd.)
14. Enter additional parameters for the database system (contd.)
www.SimpliVity.comPage 26 of 35
Implementation Guide
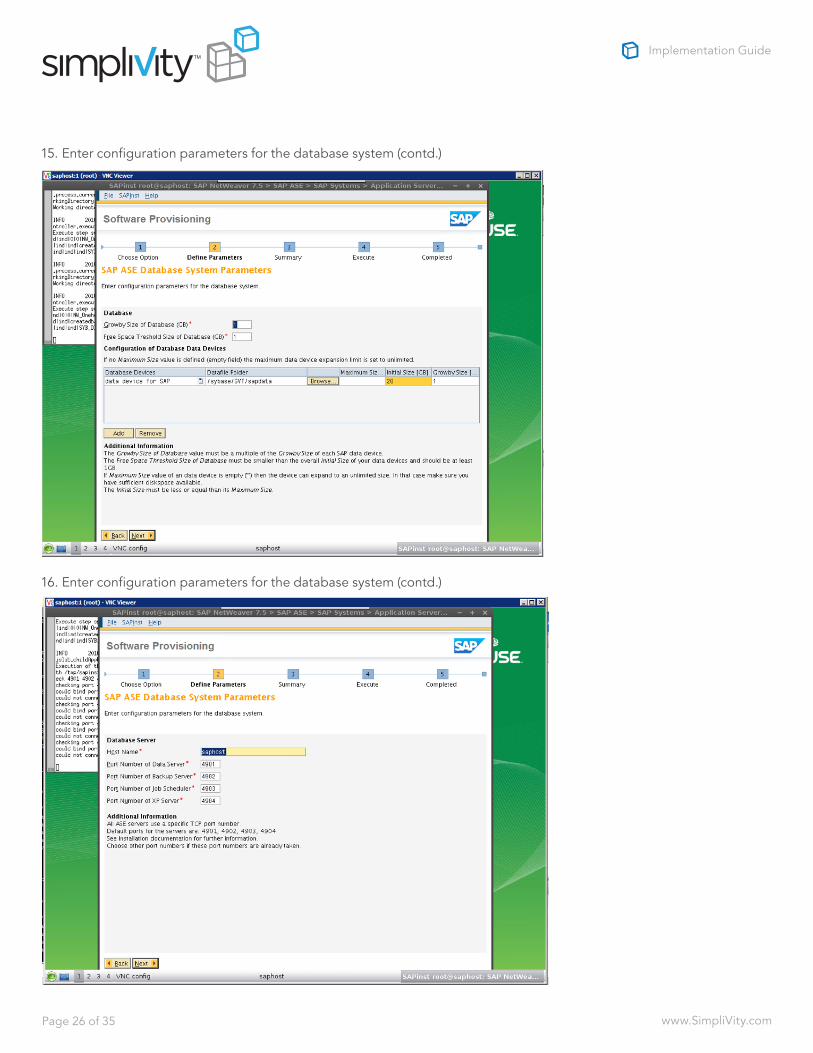
15. Enter configuration parameters for the database system (contd.)
16. Enter configuration parameters for the database system (contd.)
www.SimpliVity.comPage 27 of 35
Implementation Guide
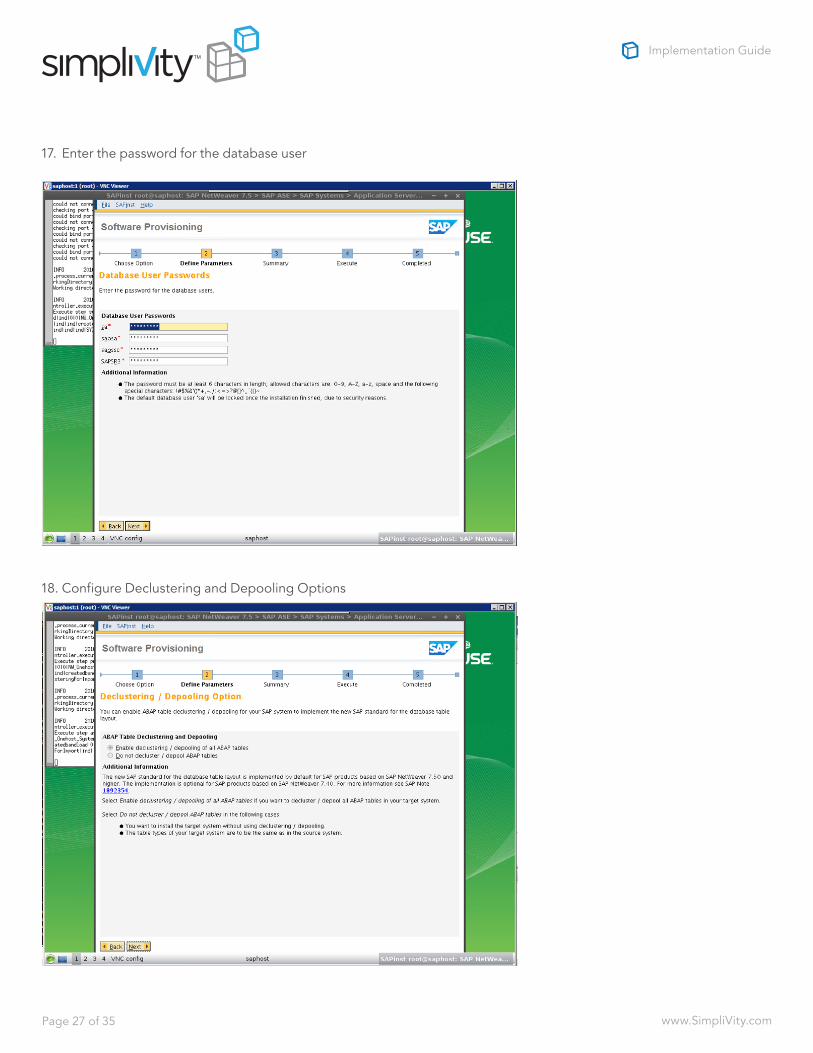
17. Enter the password for the database user
18. Configure Declustering and Depooling Options
www.SimpliVity.comPage 28 of 35
Implementation Guide
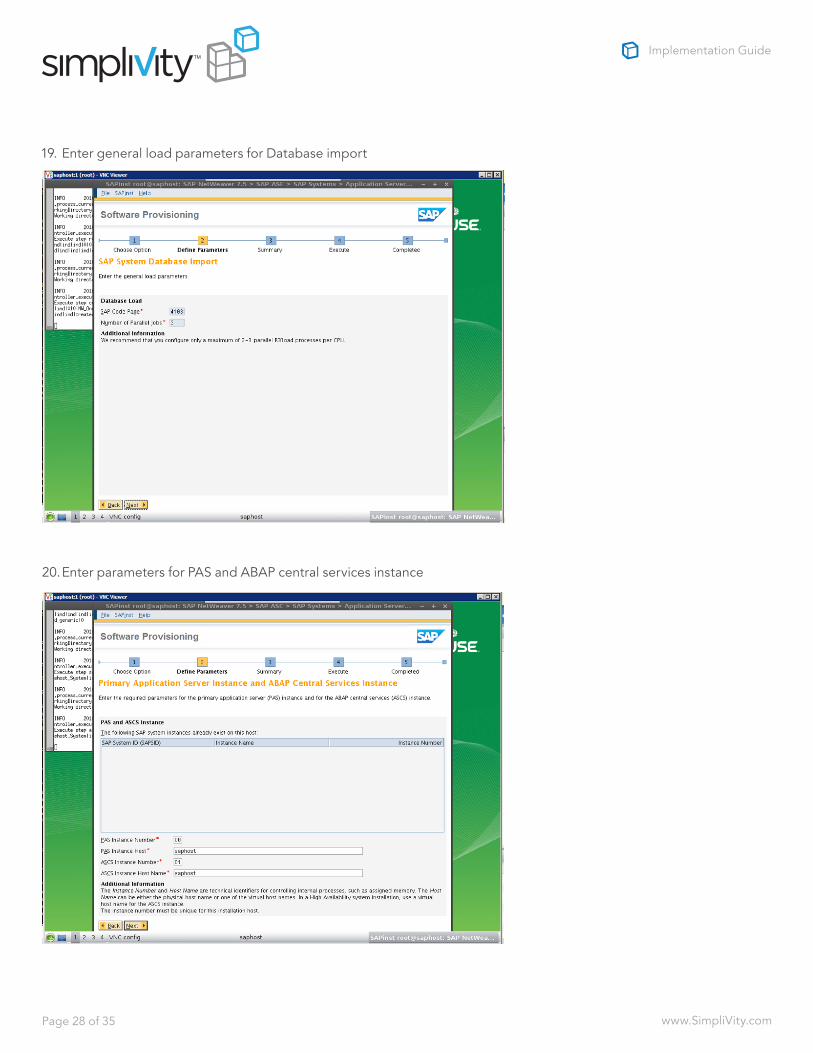
19. Enter general load parameters for Database import
20. Enter parameters for PAS and ABAP central services instance
www.SimpliVity.comPage 29 of 35
Implementation Guide
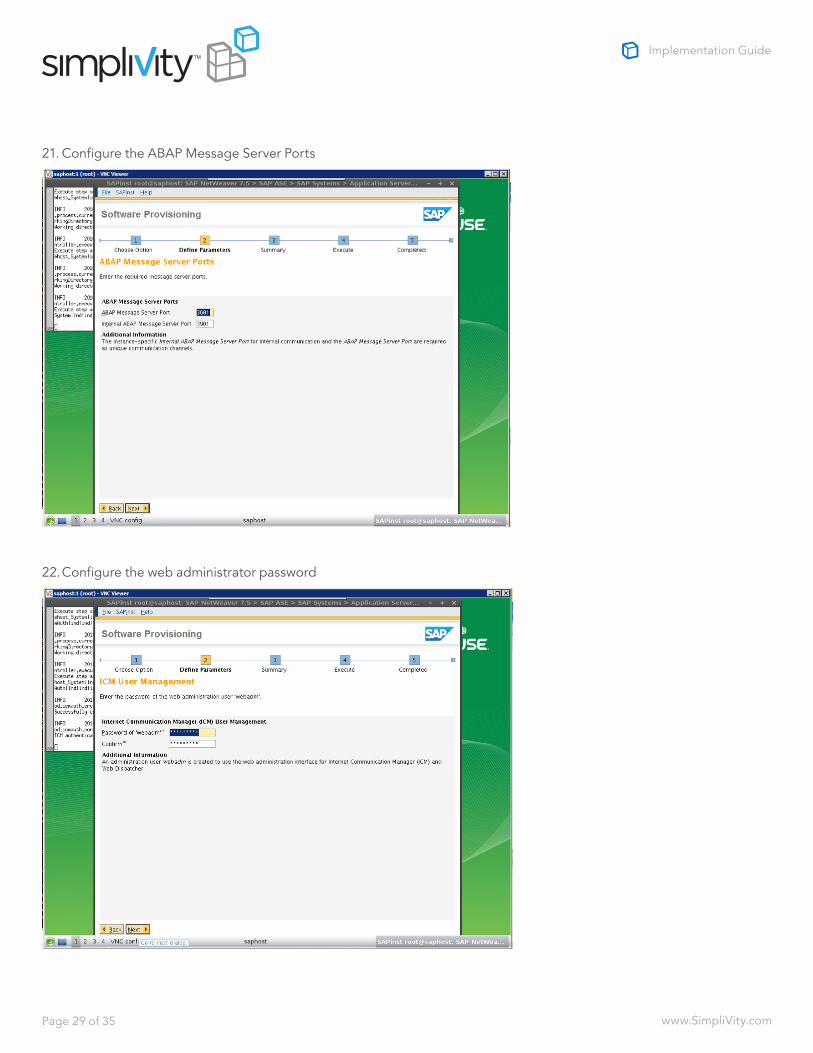
21. Configure the ABAP Message Server Ports
22. Configure the web administrator password
www.SimpliVity.comPage 30 of 35
Implementation Guide
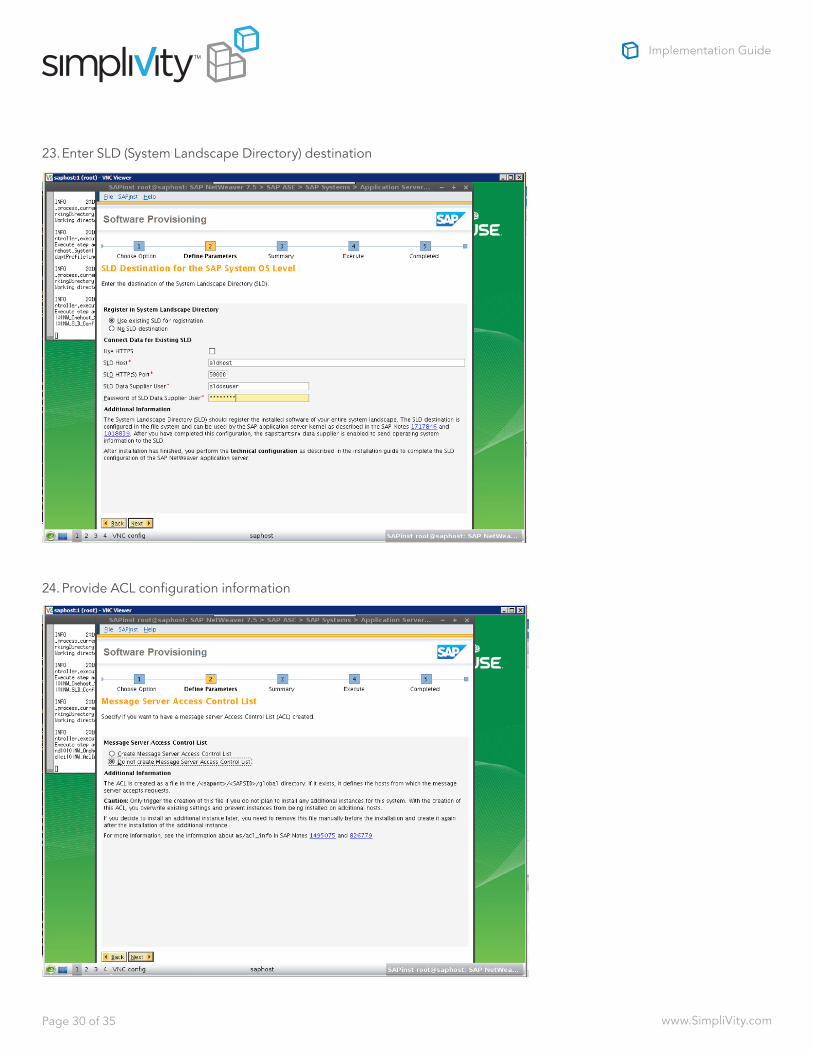
23. Enter SLD (System Landscape Directory) destination
24. Provide ACL configuration information
www.SimpliVity.comPage 31 of 35
Implementation Guide
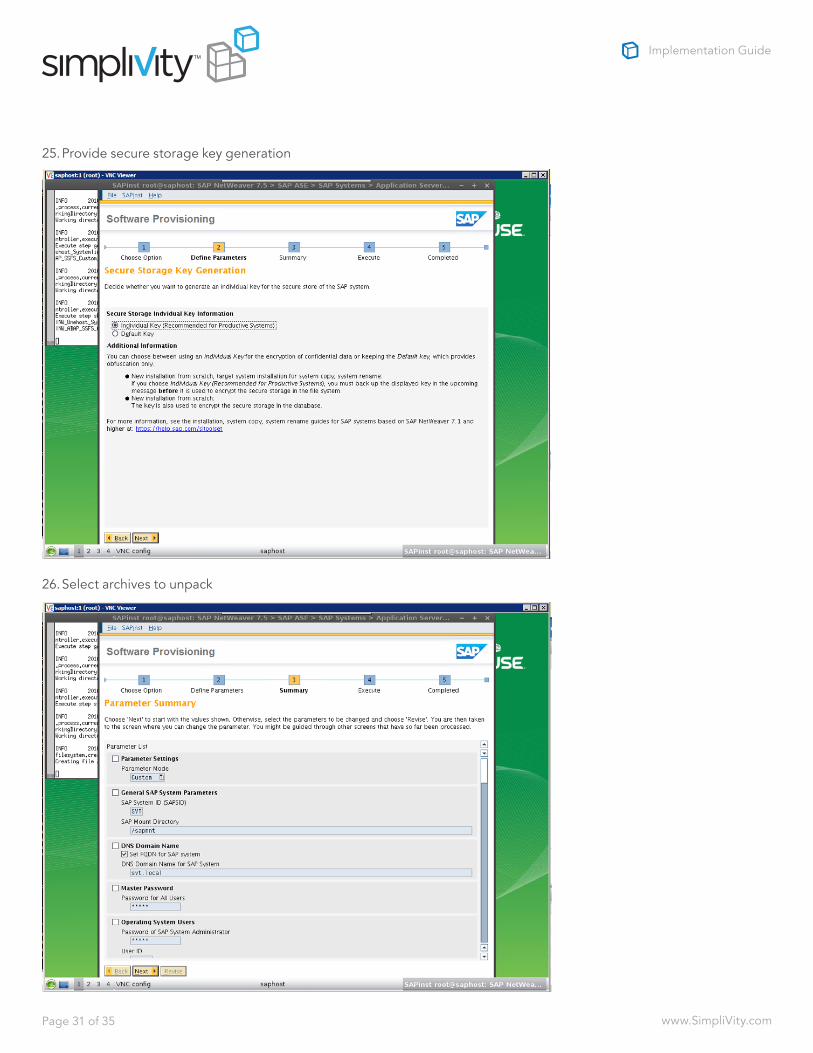
25. Provide secure storage key generation
26. Select archives to unpack
www.SimpliVity.comPage 32 of 35
Implementation Guide
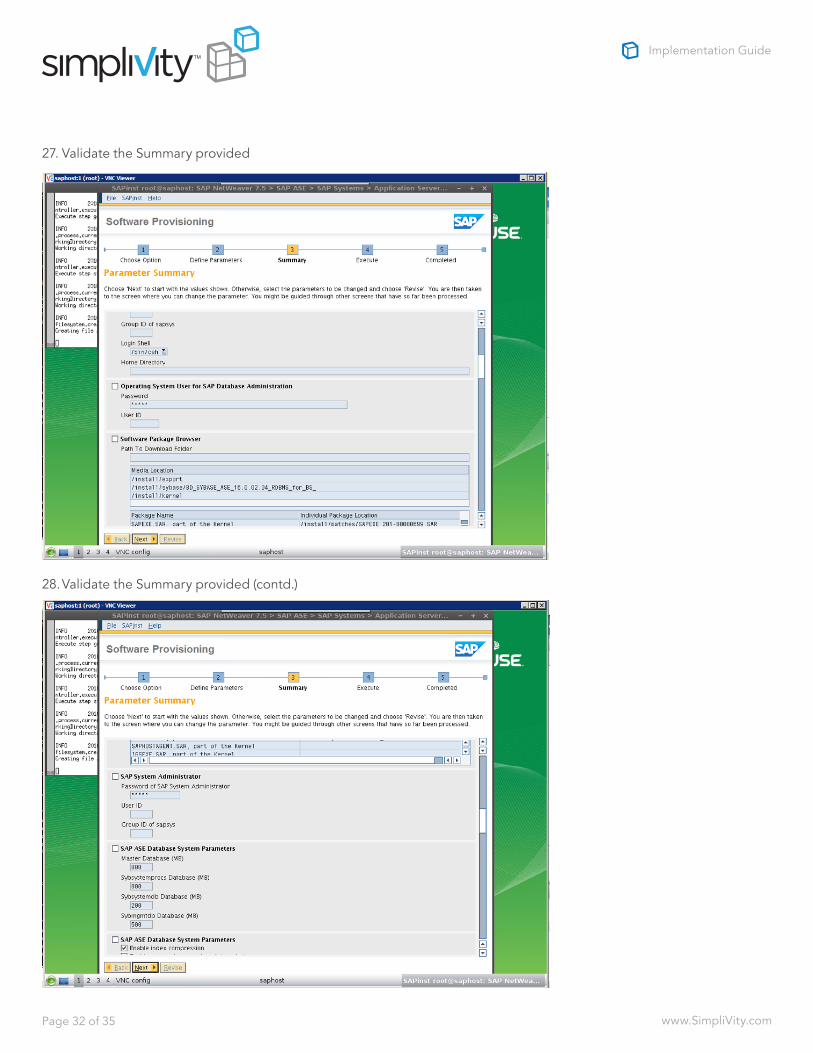
27. Validate the Summary provided
28. Validate the Summary provided (contd.)
www.SimpliVity.comPage 33 of 35
Implementation Guide
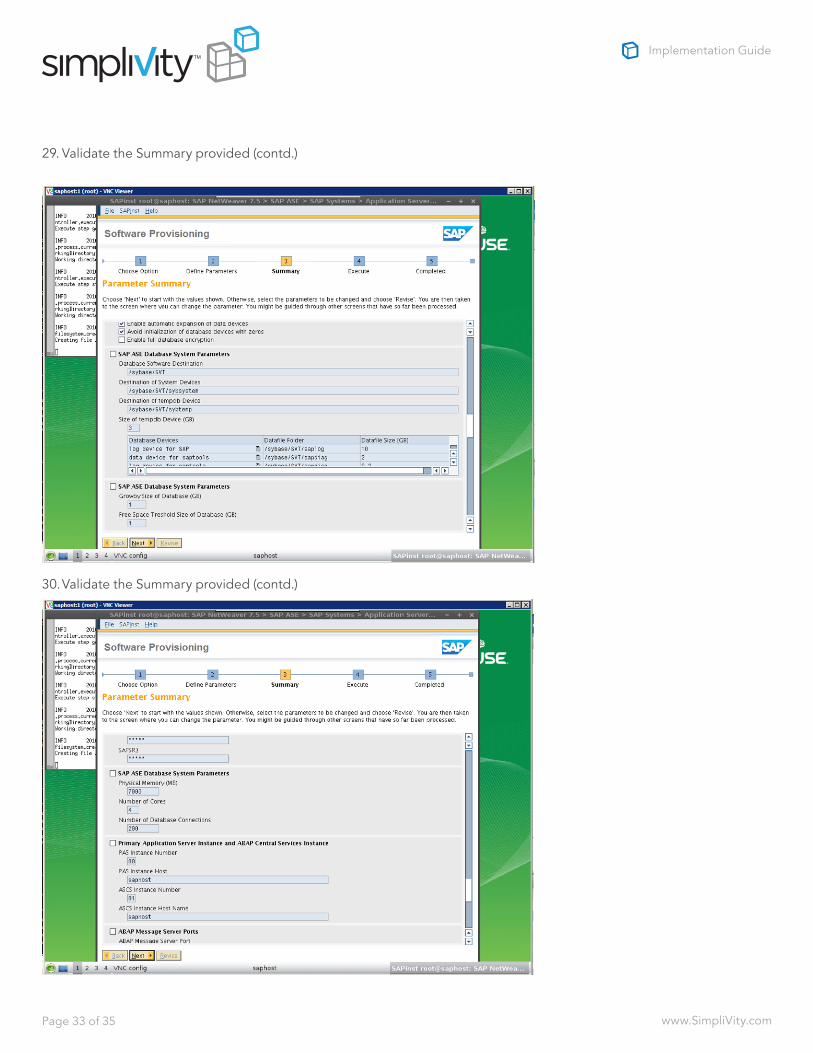
29. Validate the Summary provided (contd.)
30. Validate the Summary provided (contd.)
www.SimpliVity.comPage 34 of 35
Implementation Guide
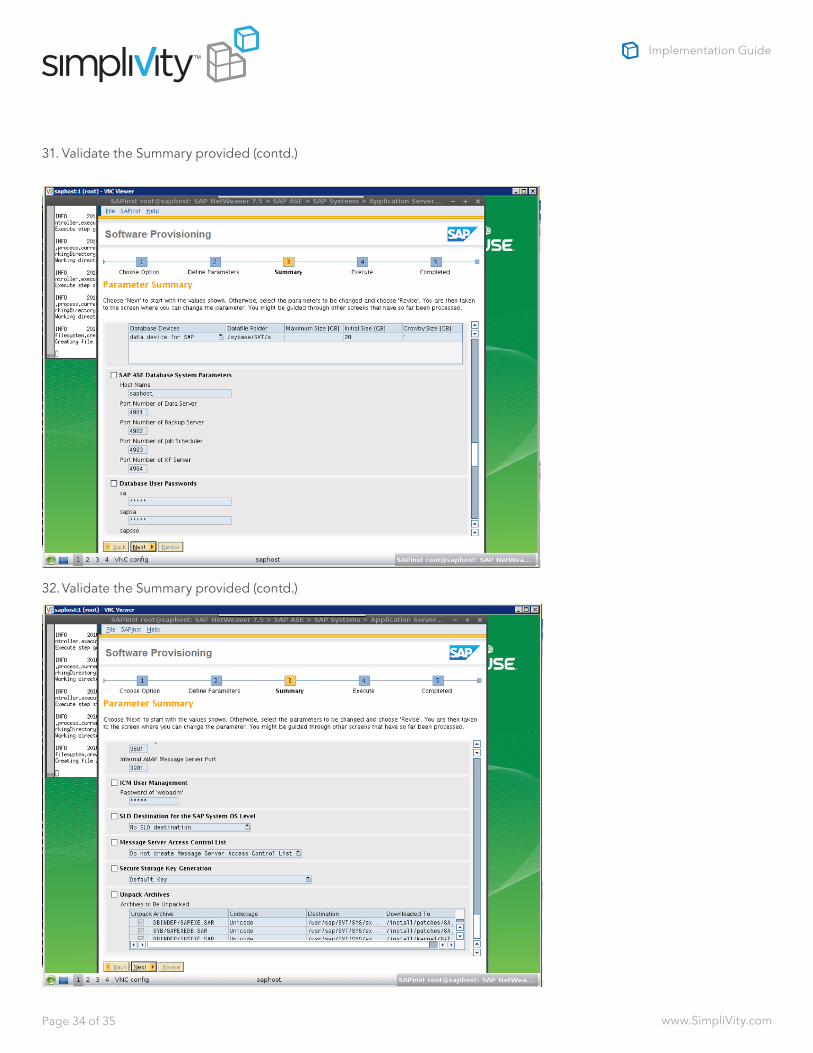
31. Validate the Summary provided (contd.)
32. Validate the Summary provided (contd.)
www.SimpliVity.comPage 35 of 35
Implementation Guide
For more information, visit:www.simplivity.com
® 2016, SimpliVity. All rights reserved. Information described herein is furnished for informational use only, is subject to change without notice. SimpliVity, the SimpliVity logo, OmniCube, OmniStack, and Data Virtualization Platform are trademarks or registered trademarks of SimpliVity Corporation in the United States and certain other countries. All other trademarks are the property of their respective owners.
117855495-SAP Implementation-1116
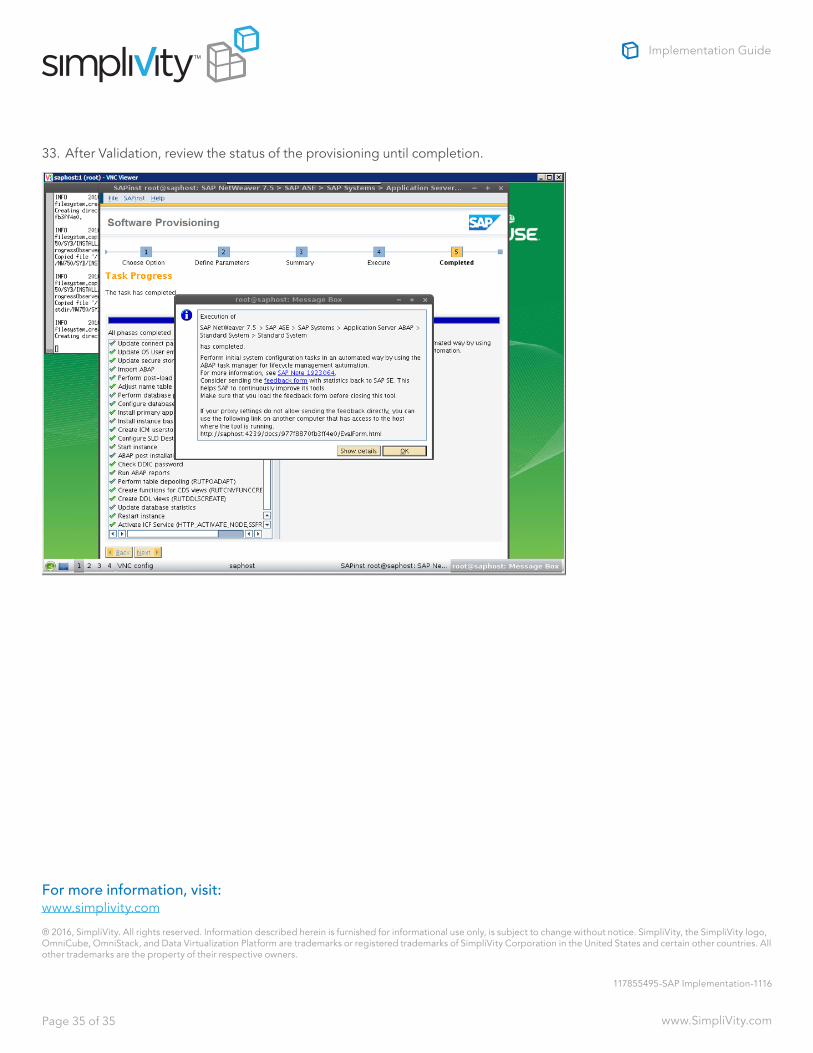
33. After Validation, review the status of the provisioning until completion.