Embed Size (px)
Citation preview

Ground Floor East, 600 Victoria Street, Richmond, 3121 | P 61 3 9426 2625 F 61 3 9864 1112 www.imgstg.com IMG Sports Technology Group ABN 71 134 641 071
IMG SPORTS TECHNOLOGY GROUP BOWLS IN AUSTRALIA – SITEDESQ MANUAL
MAY 2013
BOWLS IN AUSTRALIA – WEBSITE MANUAL Page 2 of 19
SITEDESQ CONTENT MANAGEMENT SYSTEM Your club website has been developed using the SiteDesq Content Management System within the IMG STG console. This provides a user friendly system for creating and making updates to your website with the minimum of technical experience.
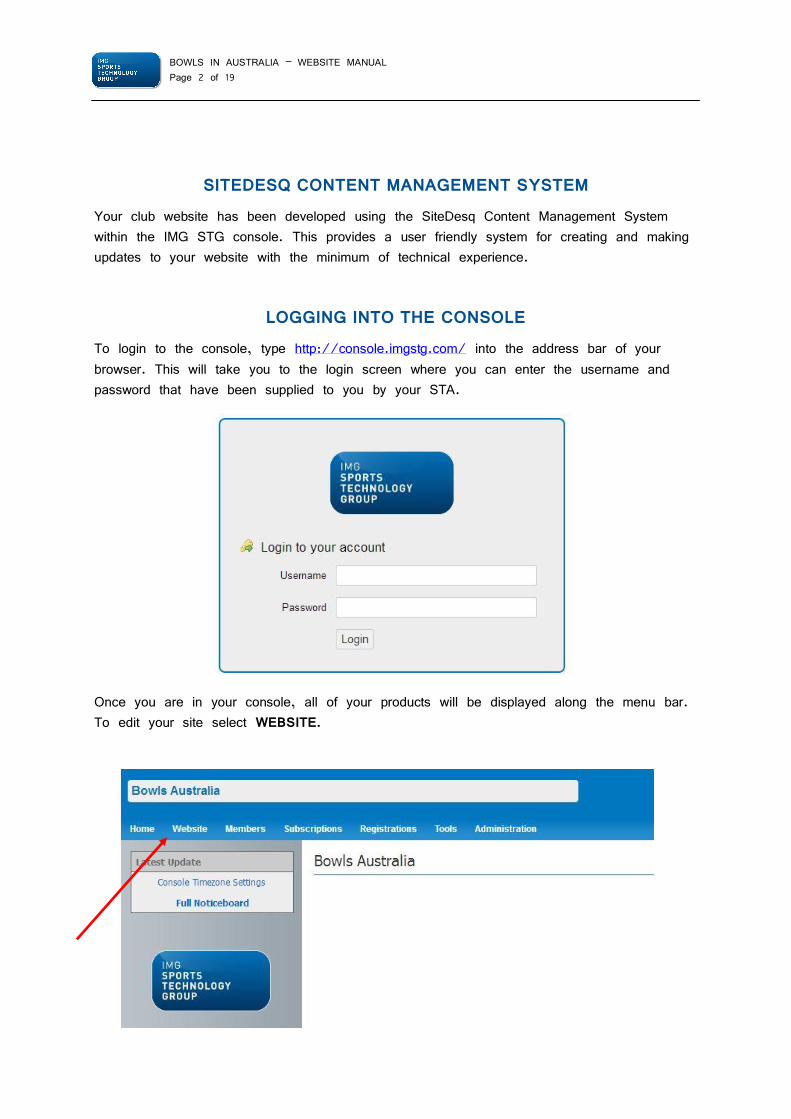
LOGGING INTO THE CONSOLE To login to the console, type http://console.imgstg.com/ into the address bar of your browser. This will take you to the login screen where you can enter the username and password that have been supplied to you by your STA.
Once you are in your console, all of your products will be displayed along the menu bar. To edit your site select WEBSITE.
BOWLS IN AUSTRALIA – WEBSITE MANUAL Page 3 of 19
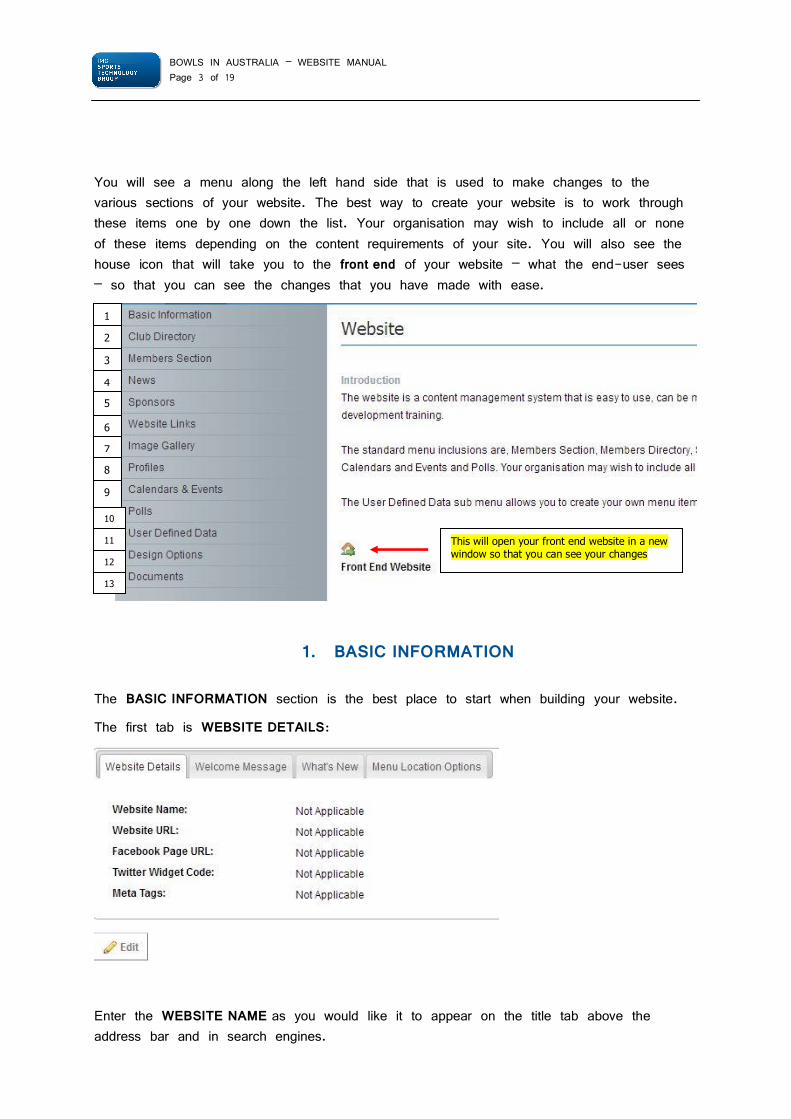
You will see a menu along the left hand side that is used to make changes to the various sections of your website. The best way to create your website is to work through these items one by one down the list. Your organisation may wish to include all or none of these items depending on the content requirements of your site. You will also see the house icon that will take you to the front end of your website – what the end-user sees – so that you can see the changes that you have made with ease.
1. BASIC INFORMATION
The BASIC INFORMATION section is the best place to start when building your website.
The first tab is WEBSITE DETAILS:
Enter the WEBSITE NAME as you would like it to appear on the title tab above the address bar and in search engines.
1
2
3
4
5
6
7
8
10
9
11
12
13
This will open your front end website in a new window so that you can see your changes
BOWLS IN AUSTRALIA – WEBSITE MANUAL Page 4 of 19
Enter the domain name of your website in the WEBSITE URL box. This is one of the steps towards getting your site live.
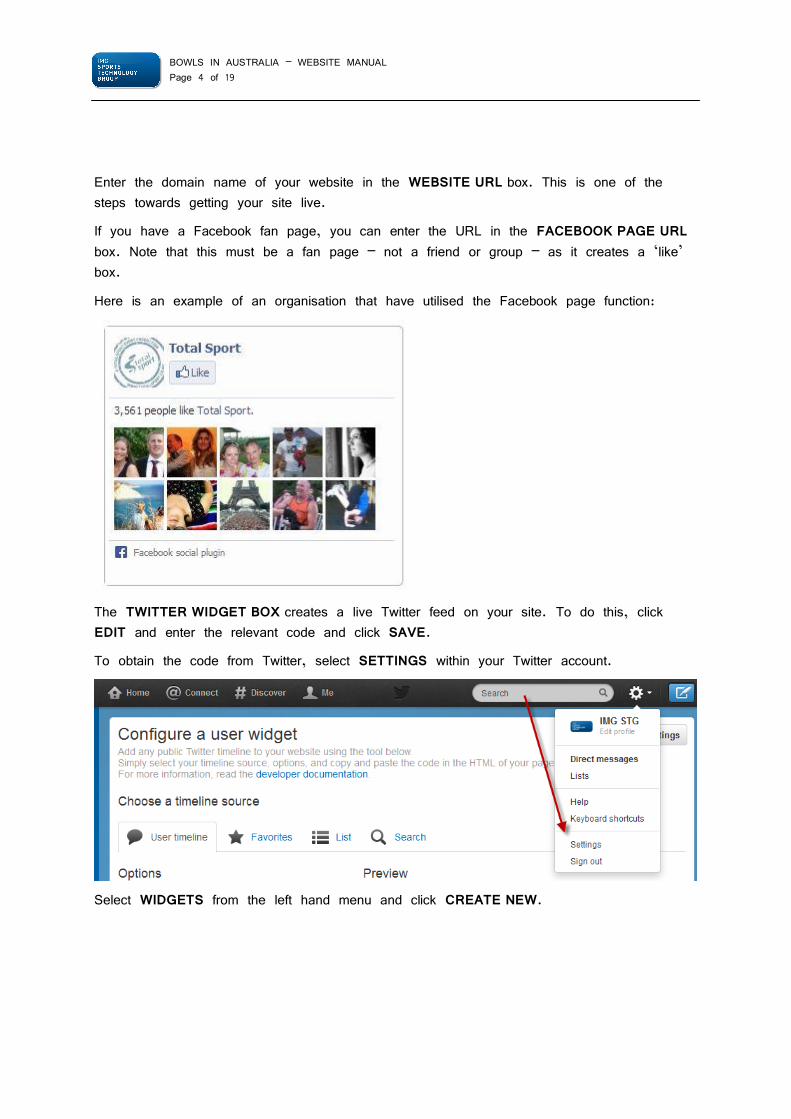
If you have a Facebook fan page, you can enter the URL in the FACEBOOK PAGE URL box. Note that this must be a fan page – not a friend or group – as it creates a ‘like’ box.
Here is an example of an organisation that have utilised the Facebook page function:
The TWITTER WIDGET BOX creates a live Twitter feed on your site. To do this, click EDIT and enter the relevant code and click SAVE.
To obtain the code from Twitter, select SETTINGS within your Twitter account.
Select WIDGETS from the left hand menu and click CREATE NEW.
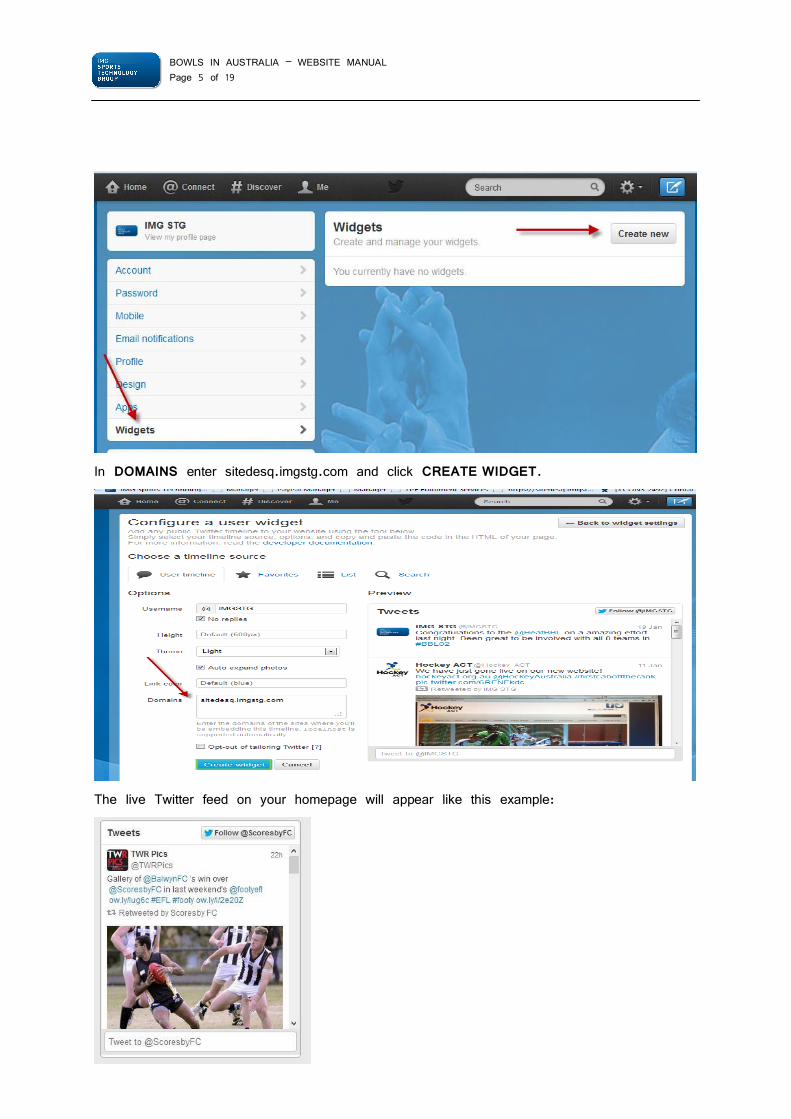
BOWLS IN AUSTRALIA – WEBSITE MANUAL Page 5 of 19
In DOMAINS enter sitedesq.imgstg.com and click CREATE WIDGET.
The live Twitter feed on your homepage will appear like this example:

BOWLS IN AUSTRALIA – WEBSITE MANUAL Page 6 of 19
META TAGS help to ensure that your website appears in search engine results. These tags are not seen by the end user, but are instead found within the code of the website to ensure that your website is picked up when a potential customer or member is searching for your page. These tags can be entered into the META TAG field and should be one to three word phrases separated by a comma. The total number of words inserted should not exceed fifteen as many search engines will not read past this total.
The second tab is WELCOME MESSAGE, which allows you to add text to your homepage:
Under TITLE you can add a header to the text. You can add the main body of text into the Rich Text Editor, which functions just as if you were using Microsoft Word or a similar text editor. The third tab is WHAT’S NEW. This creates a box in the top right corner that can be used to display any information that you want to stand out. Some examples of using this function might be important information, a major sponsor that wants to stand out or your latest memo.
2. CLUB DIRECTORY
At a national or state level, the CLUB DIRECTORY lists club contact details, e.g. URL, phone numbers, address. This is pulled from the ADMINISTRATION area of the console.
At a club level, this feature allows a club to write a summary about their club which will display on this clubs listing. There is also a NO option for a club to not appear in this list.
The benefit of the CLUB DIRECTORY is that all details can be administered and kept up to date by the club and therefore requires no input from the state level.
BOWLS IN AUSTRALIA – WEBSITE MANUAL Page 7 of 19
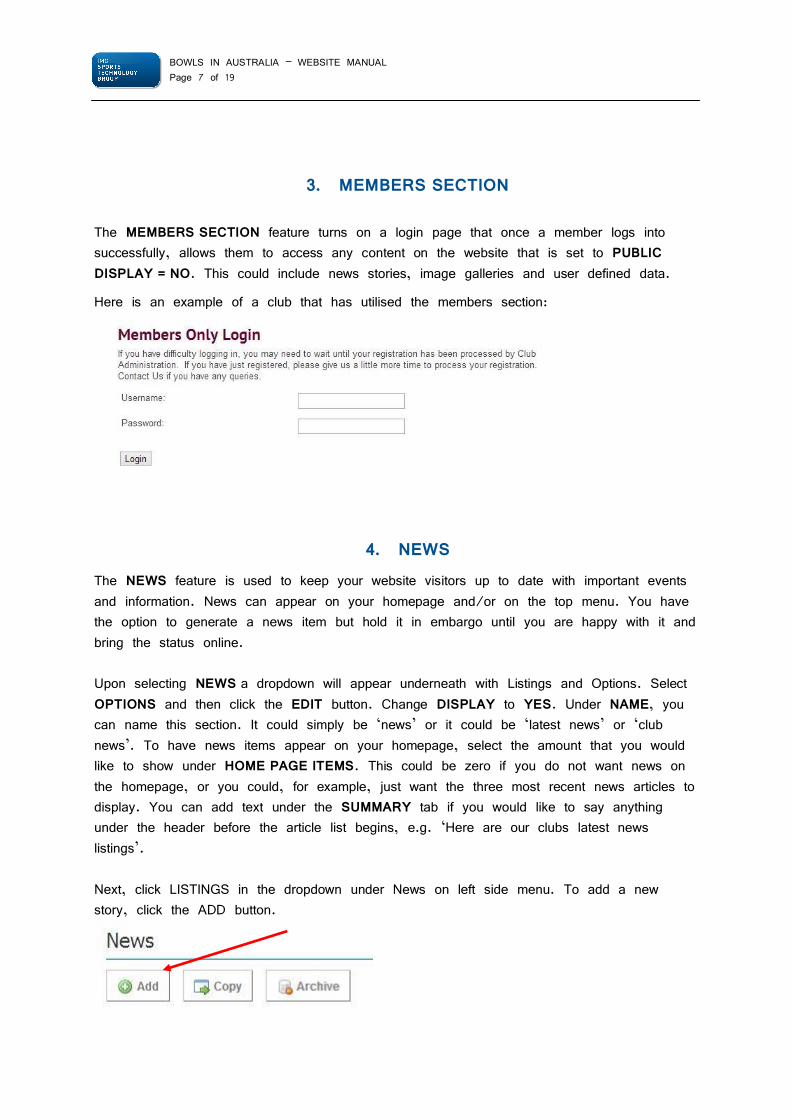
3. MEMBERS SECTION
The MEMBERS SECTION feature turns on a login page that once a member logs into successfully, allows them to access any content on the website that is set to PUBLIC DISPLAY = NO. This could include news stories, image galleries and user defined data.
Here is an example of a club that has utilised the members section:
4. NEWS The NEWS feature is used to keep your website visitors up to date with important events and information. News can appear on your homepage and/or on the top menu. You have the option to generate a news item but hold it in embargo until you are happy with it and bring the status online. Upon selecting NEWS a dropdown will appear underneath with Listings and Options. Select OPTIONS and then click the EDIT button. Change DISPLAY to YES. Under NAME, you can name this section. It could simply be ‘news’ or it could be ‘latest news’ or ‘club news’. To have news items appear on your homepage, select the amount that you would like to show under HOME PAGE ITEMS. This could be zero if you do not want news on the homepage, or you could, for example, just want the three most recent news articles to display. You can add text under the SUMMARY tab if you would like to say anything under the header before the article list begins, e.g. ‘Here are our clubs latest news listings’. Next, click LISTINGS in the dropdown under News on left side menu. To add a new story, click the ADD button.
BOWLS IN AUSTRALIA – WEBSITE MANUAL Page 8 of 19
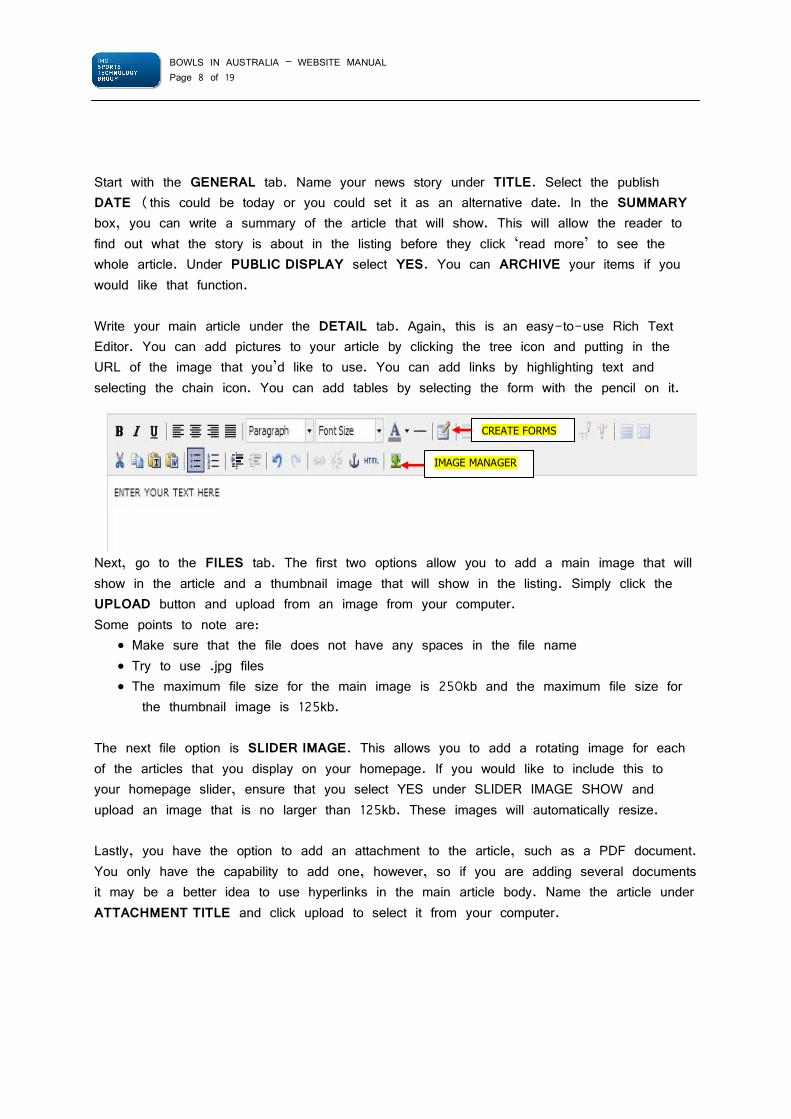
Start with the GENERAL tab. Name your news story under TITLE. Select the publish DATE (this could be today or you could set it as an alternative date. In the SUMMARY box, you can write a summary of the article that will show. This will allow the reader to find out what the story is about in the listing before they click ‘read more’ to see the whole article. Under PUBLIC DISPLAY select YES. You can ARCHIVE your items if you would like that function. Write your main article under the DETAIL tab. Again, this is an easy-to-use Rich Text Editor. You can add pictures to your article by clicking the tree icon and putting in the URL of the image that you’d like to use. You can add links by highlighting text and selecting the chain icon. You can add tables by selecting the form with the pencil on it.
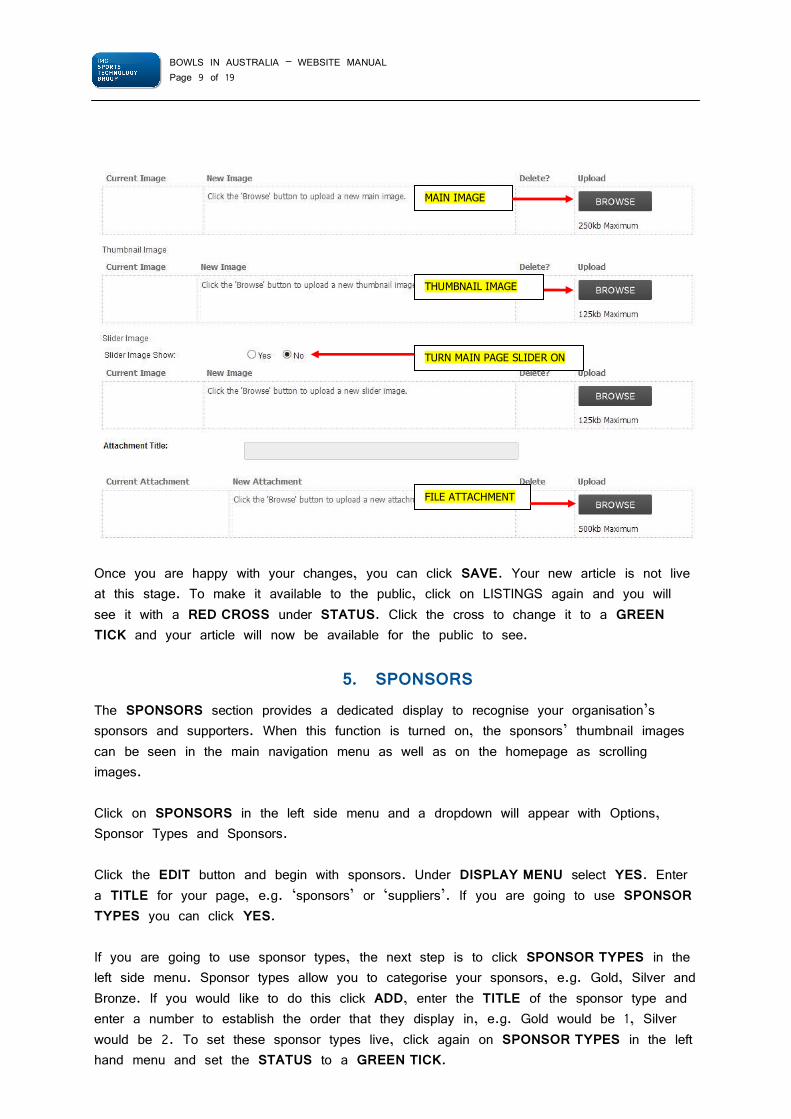
Next, go to the FILES tab. The first two options allow you to add a main image that will show in the article and a thumbnail image that will show in the listing. Simply click the UPLOAD button and upload from an image from your computer. Some points to note are:
Make sure that the file does not have any spaces in the file name Try to use .jpg files The maximum file size for the main image is 250kb and the maximum file size for
the thumbnail image is 125kb. The next file option is SLIDER IMAGE. This allows you to add a rotating image for each of the articles that you display on your homepage. If you would like to include this to your homepage slider, ensure that you select YES under SLIDER IMAGE SHOW and upload an image that is no larger than 125kb. These images will automatically resize. Lastly, you have the option to add an attachment to the article, such as a PDF document. You only have the capability to add one, however, so if you are adding several documents it may be a better idea to use hyperlinks in the main article body. Name the article under ATTACHMENT TITLE and click upload to select it from your computer.
IMAGE MANAGER
CREATE FORMS
BOWLS IN AUSTRALIA – WEBSITE MANUAL Page 9 of 19
Once you are happy with your changes, you can click SAVE. Your new article is not live at this stage. To make it available to the public, click on LISTINGS again and you will see it with a RED CROSS under STATUS. Click the cross to change it to a GREEN TICK and your article will now be available for the public to see.
5. SPONSORS The SPONSORS section provides a dedicated display to recognise your organisation’s sponsors and supporters. When this function is turned on, the sponsors’ thumbnail images can be seen in the main navigation menu as well as on the homepage as scrolling images. Click on SPONSORS in the left side menu and a dropdown will appear with Options, Sponsor Types and Sponsors. Click the EDIT button and begin with sponsors. Under DISPLAY MENU select YES. Enter a TITLE for your page, e.g. ‘sponsors’ or ‘suppliers’. If you are going to use SPONSOR TYPES you can click YES. If you are going to use sponsor types, the next step is to click SPONSOR TYPES in the left side menu. Sponsor types allow you to categorise your sponsors, e.g. Gold, Silver and Bronze. If you would like to do this click ADD, enter the TITLE of the sponsor type and enter a number to establish the order that they display in, e.g. Gold would be 1, Silver would be 2. To set these sponsor types live, click again on SPONSOR TYPES in the left hand menu and set the STATUS to a GREEN TICK.
MAIN IMAGE
THUMBNAIL IMAGE
TURN MAIN PAGE SLIDER ON
FILE ATTACHMENT
BOWLS IN AUSTRALIA – WEBSITE MANUAL Page 10 of 19
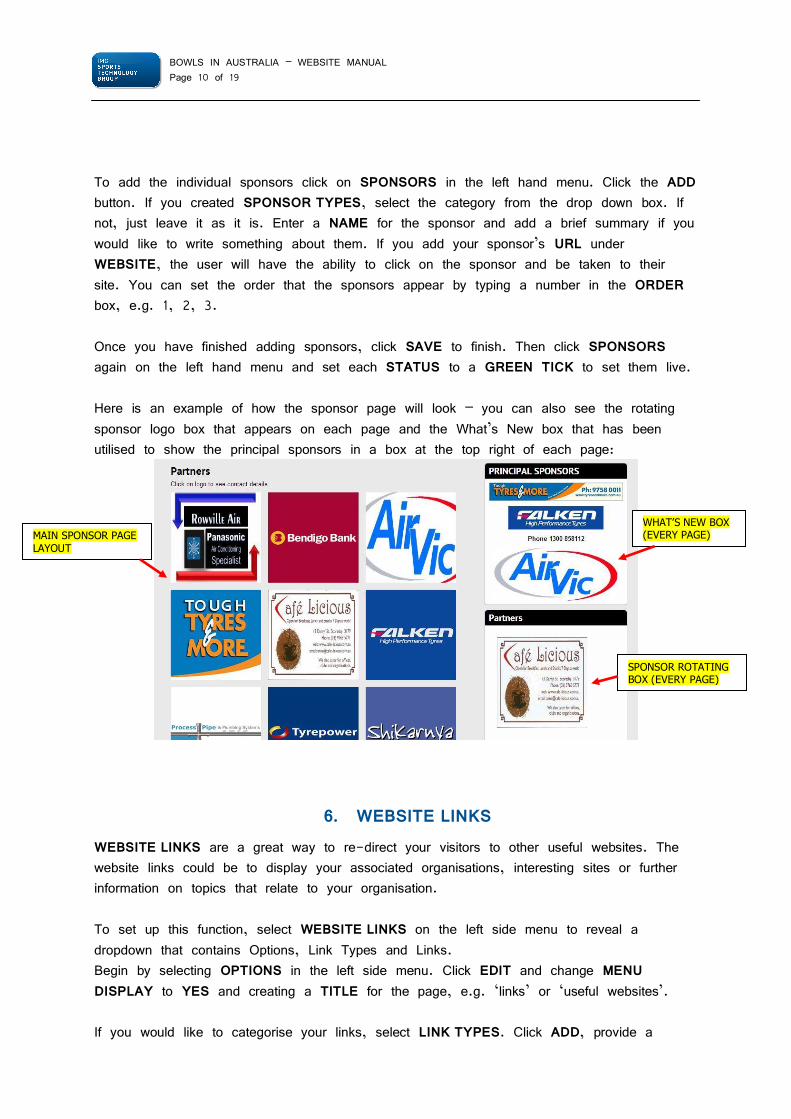
To add the individual sponsors click on SPONSORS in the left hand menu. Click the ADD button. If you created SPONSOR TYPES, select the category from the drop down box. If not, just leave it as it is. Enter a NAME for the sponsor and add a brief summary if you would like to write something about them. If you add your sponsor’s URL under WEBSITE, the user will have the ability to click on the sponsor and be taken to their site. You can set the order that the sponsors appear by typing a number in the ORDER box, e.g. 1, 2, 3. Once you have finished adding sponsors, click SAVE to finish. Then click SPONSORS again on the left hand menu and set each STATUS to a GREEN TICK to set them live. Here is an example of how the sponsor page will look – you can also see the rotating sponsor logo box that appears on each page and the What’s New box that has been utilised to show the principal sponsors in a box at the top right of each page:
6. WEBSITE LINKS WEBSITE LINKS are a great way to re-direct your visitors to other useful websites. The website links could be to display your associated organisations, interesting sites or further information on topics that relate to your organisation. To set up this function, select WEBSITE LINKS on the left side menu to reveal a dropdown that contains Options, Link Types and Links. Begin by selecting OPTIONS in the left side menu. Click EDIT and change MENU DISPLAY to YES and creating a TITLE for the page, e.g. ‘links’ or ‘useful websites’. If you would like to categorise your links, select LINK TYPES. Click ADD, provide a
MAIN SPONSOR PAGE LAYOUT
WHAT’S NEW BOX (EVERY PAGE)
SPONSOR ROTATING BOX (EVERY PAGE)
BOWLS IN AUSTRALIA – WEBSITE MANUAL Page 11 of 19
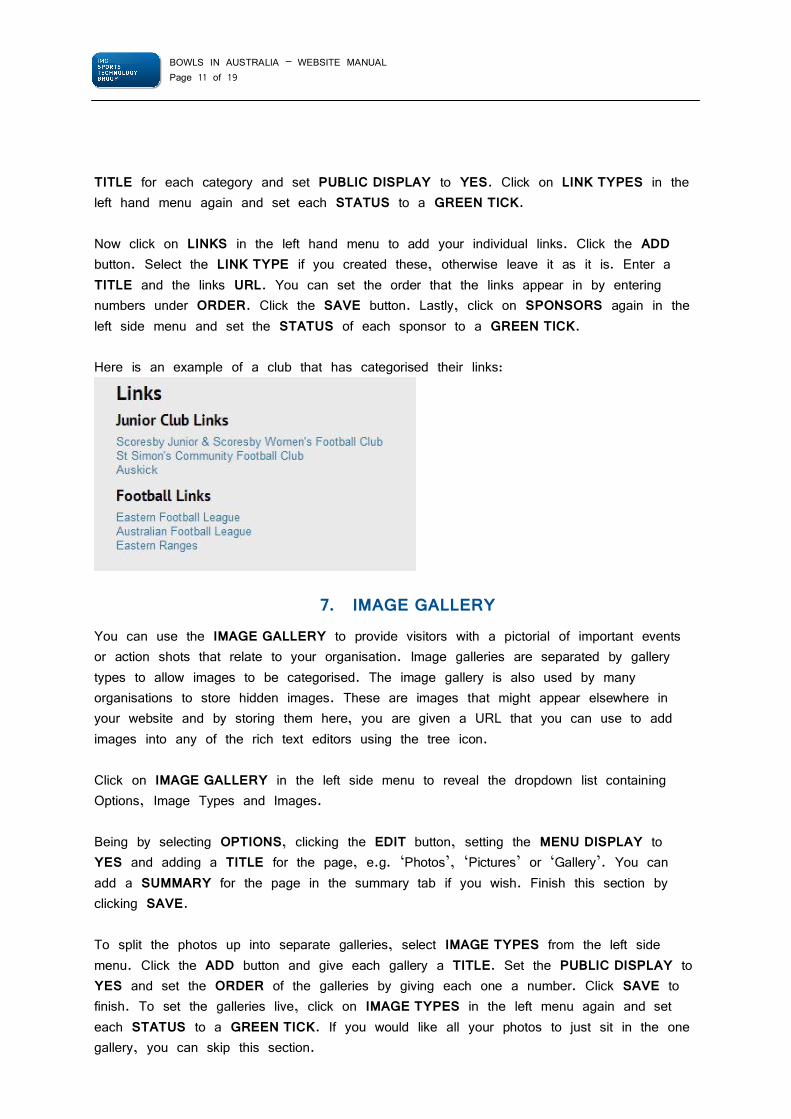
TITLE for each category and set PUBLIC DISPLAY to YES. Click on LINK TYPES in the left hand menu again and set each STATUS to a GREEN TICK. Now click on LINKS in the left hand menu to add your individual links. Click the ADD button. Select the LINK TYPE if you created these, otherwise leave it as it is. Enter a TITLE and the links URL. You can set the order that the links appear in by entering numbers under ORDER. Click the SAVE button. Lastly, click on SPONSORS again in the left side menu and set the STATUS of each sponsor to a GREEN TICK. Here is an example of a club that has categorised their links:
7. IMAGE GALLERY You can use the IMAGE GALLERY to provide visitors with a pictorial of important events or action shots that relate to your organisation. Image galleries are separated by gallery types to allow images to be categorised. The image gallery is also used by many organisations to store hidden images. These are images that might appear elsewhere in your website and by storing them here, you are given a URL that you can use to add images into any of the rich text editors using the tree icon. Click on IMAGE GALLERY in the left side menu to reveal the dropdown list containing Options, Image Types and Images. Being by selecting OPTIONS, clicking the EDIT button, setting the MENU DISPLAY to YES and adding a TITLE for the page, e.g. ‘Photos’, ‘Pictures’ or ‘Gallery’. You can add a SUMMARY for the page in the summary tab if you wish. Finish this section by clicking SAVE. To split the photos up into separate galleries, select IMAGE TYPES from the left side menu. Click the ADD button and give each gallery a TITLE. Set the PUBLIC DISPLAY to YES and set the ORDER of the galleries by giving each one a number. Click SAVE to finish. To set the galleries live, click on IMAGE TYPES in the left menu again and set each STATUS to a GREEN TICK. If you would like all your photos to just sit in the one gallery, you can skip this section.
BOWLS IN AUSTRALIA – WEBSITE MANUAL Page 12 of 19
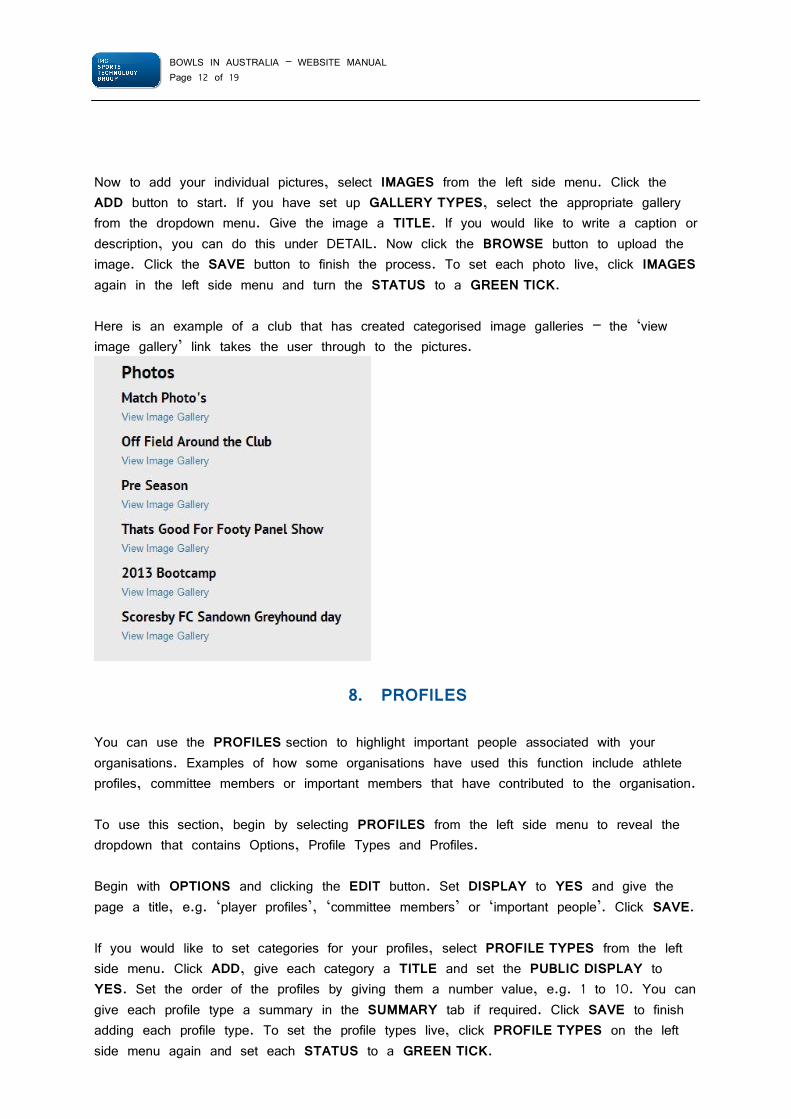
Now to add your individual pictures, select IMAGES from the left side menu. Click the ADD button to start. If you have set up GALLERY TYPES, select the appropriate gallery from the dropdown menu. Give the image a TITLE. If you would like to write a caption or description, you can do this under DETAIL. Now click the BROWSE button to upload the image. Click the SAVE button to finish the process. To set each photo live, click IMAGES again in the left side menu and turn the STATUS to a GREEN TICK. Here is an example of a club that has created categorised image galleries – the ‘view image gallery’ link takes the user through to the pictures.
8. PROFILES
You can use the PROFILES section to highlight important people associated with your organisations. Examples of how some organisations have used this function include athlete profiles, committee members or important members that have contributed to the organisation. To use this section, begin by selecting PROFILES from the left side menu to reveal the dropdown that contains Options, Profile Types and Profiles. Begin with OPTIONS and clicking the EDIT button. Set DISPLAY to YES and give the page a title, e.g. ‘player profiles’, ‘committee members’ or ‘important people’. Click SAVE. If you would like to set categories for your profiles, select PROFILE TYPES from the left side menu. Click ADD, give each category a TITLE and set the PUBLIC DISPLAY to YES. Set the order of the profiles by giving them a number value, e.g. 1 to 10. You can give each profile type a summary in the SUMMARY tab if required. Click SAVE to finish adding each profile type. To set the profile types live, click PROFILE TYPES on the left side menu again and set each STATUS to a GREEN TICK.
BOWLS IN AUSTRALIA – WEBSITE MANUAL Page 13 of 19
Next, add your individual profiles by clicking PROFILES in the left side menu. Click the ADD button and start with the GENERAL tab. If you have created PROFILE TYPES select the relevant category from the dropdown menu. If you have not created profile types, just leave the dropdown as it is. Enter a TITLE for each profile. Add an email address for the profile if you would like to give users the opportunity to email the person in the profile, e.g. if they are staff profiles and you would like contact details entered for them. You can also add an EXTERNAL LINK if required. You can set the ORDER of the profiles by giving them a number value. In the SUMMARY tab, you can enter any text that you would like to accompany that profile using the rich text editor. In the FILES tab, you can add an IMAGE by clicking the BROWSE button and uploading an image from your computer. The image file size can be a maximum of 250kb. You can also add an accompanying document if you wish, by giving it an ATTACHMENT TITLE and clicking BROWSE to upload a file from your computer. The file should be no larger than 500kb. Click SAVE to finalise your changes. To set your individual profiles live, click PROFILES on the left side menu and set the STATUS of each profile to a GREEN TICK.
9. CALENDARS & EVENTS The CALENDARS & EVENTS feature provides a dedicated menu to highlight your organisations important upcoming events, competition dates or open days. Calendars can be used to define multiple events, such as social group or state events. To enable this function, begin by clicking CALENDARS & EVENTS in the left side menu to reveal a dropdown that includes Options, Events and Calendars. To begin, select OPTIONS and click the EDIT button. Set DISPLAY to YES and give your page a title, e.g. ‘upcoming events’ or ‘club calendar’. You can add a description to this page in the SUMMARY tab if you wish. Click the SAVE button once you are happy with this. To create a calendar, select CALENDARS from the left side menu. Click the EDIT button, give the calendar a TITLE and set PUBLIC DISPLAY to YES. Once you have finished, select SAVE. To turn the calendar live, click CALENDARS again in the left side menu and set the STATUS to a GREEN TICK. Next, select EVENTS from the left side menu. Click the ADD button. In the GENERAL tab, select the CALENDAR that you wish to add the event to if you have created calendars. Give the event a TITLE, a DATE and a LOCATION. You can also add CONTACT details. In the DETAIL tab, use the rich text editor to add more detailed information on the event. In the FILES tab, you can add an image by selecting the BROWSE button to upload a picture from your computer. The file size must be no larger than 250kb. You also have the ability to add a file by giving it an ATTACHMENT TITLE and clicking the BROWSE button to upload a file from your computer. The attachment must be no larger than 500kb. Once you have completed these details, click the SAVE
BOWLS IN AUSTRALIA – WEBSITE MANUAL Page 14 of 19
button. To turn the event live, click EVENTS in the left side menu again and turn the STATUS to a GREEN TICK.
10. POLLS
The POLLS function is a way to stir user engagement on your website. To use this function, select POLLS in the left side menu and click the ADD button. Here you can enter a QUESTION and then offer some multiple choice ANSWERS for users to vote on. Set the PUBLIC DISPLAY to YES and then click SAVE to complete. Click POLLS in the left side menu and set the STATUS to a GREEN TICK to set the poll live.
11. USER DEFINED DATA The USER DEFINED DATA section allows you to add content that may not necessarily be serviced by one of the standard sections in the left side menu such as news or profiles. Options for user defined data include creating dedicated menu items that take users to an external website, creating single pages with text, images and/or attachments and creating sections and drop down menu items where you attach a number of items, each with the ability to show images, attachments and other information. Begin by selecting USER DEFINED DATA from the left side menu to show a dropdown which includes Category and Items. Begin by selecting CATEGORY and clicking the ADD button. First, select a CATEGORY TYPE. To create a menu option that takes you to an external page, select MENU OPTION. Give the item a MENU TITLE, select SITE ONLY from the MENU INCLUDED dropdown and add the URL that you would like the menu item to direct to. You can choose whether you would like the link to open in a new window or the current window. Set PUBLIC DISPLAY to YES. To create a menu option that takes you to a page within the website, select MENU OPTION WITH CUSTOM PAGE. Give the item a MENU TITLE, select SITE ONLY from the MENU INCLUDED dropdown and give the new page a HEADING. Set PUBLIC DISPLAY to YES. Use the DETAIL tab to add content to this page using the rich text editor. In the FILES tab, you have the option to add an IMAGE that is placed at the top or bottom of the page by clicking the BROWSE button and uploading an image file from your computer. Ensure that the image title has no spaces in the file name and is no bigger than 250kb. You also have the ability to add up to three ATTACHMENTS by giving them TITLES, selecting their PLACEMENT at the top or bottom of the page and uploading by clicking the BROWSE button. Ensure there are no spaces in the file names and that each file is no larger than 500kb. If you wish to add more than three attachments, a better option would be to use hyperlinks within the rich text editor instead.
BOWLS IN AUSTRALIA – WEBSITE MANUAL Page 15 of 19
To create a menu option with dropdown items within it, select MENU OPTION WITH CUSTOM DATA. Give the category a MENU TITLE, select SITE ONLY from the MENU INCLUDED dropdown and give the page a new heading. Click YES for SUB MENU FOR ATTACHED ITEMS and set PUBLIC DISPLAY to YES. You can add content to this page under the DETAIL TAB. In the FILES tab, you have the option to add an IMAGE that is placed at the top or bottom of the page by clicking the BROWSE button and uploading an image file from your computer. Ensure that the image title has no spaces in the file name and is no bigger than 250kb. You also have the ability to add up to three ATTACHMENTS by giving them TITLES, selecting their PLACEMENT at the top or bottom of the page and uploading by clicking the BROWSE button. Ensure there are no spaces in the file names and that each file is no larger than 500kb. If you wish to add more than three attachments, a better option would be to use hyperlinks within the rich text editor on the detail tab instead. Whichever of the above three menu options that you choose, click the SAVE button to finish and set each category live by clicking CATEGORY again in the left side menu and setting the STATUS to a GREEN TICK. If you created a category with a MENU OPTION WITH CUSTOM DATA, you can add the dropdown items by selecting ITEMS from the left side menu and clicking the ADD button. To create a menu item that directs the user to an external link, select MENU OPTION. Select the CATEGORY that you would like this sub-menu to come under from the dropdown menu. Give the menu item a TITLE and enter the URL that you would like it to link to. Choose whether you would like it to open in a new window or the current window. To create a menu item with its own custom page select CUSTOM PAGE. Select the CATEGORY that you would like this sub-menu to come under from the dropdown menu. Give the menu item a TITLE and add a SUMMARY if you would like one. Set the PUBLIC DISPLAY to YES. In the DETAIL TAB, add the content to your page using the rich text editor. In the FILES tab, you have the option to add a MAIN IMAGE and a THUMBNAIL IMAGE by clicking the BROWSE button and uploading an image file from your computer. Ensure that the image title has no spaces in the file name and is no bigger than 250kb. You also have the ability to add an ATTACHMENT by giving it a TITLE and uploading it by clicking the BROWSE button. Ensure there are no spaces in the file name and that the file is no larger than 500kb. If you wish to add more than one attachment, a better option would be to use hyperlinks within the rich text editor on the detail tab instead. Whichever of the above two options that you choose, click the SAVE button to finish and set each item live by clicking ITEM again in the left side menu and setting the STATUS to a GREEN TICK.
BOWLS IN AUSTRALIA – WEBSITE MANUAL Page 16 of 19
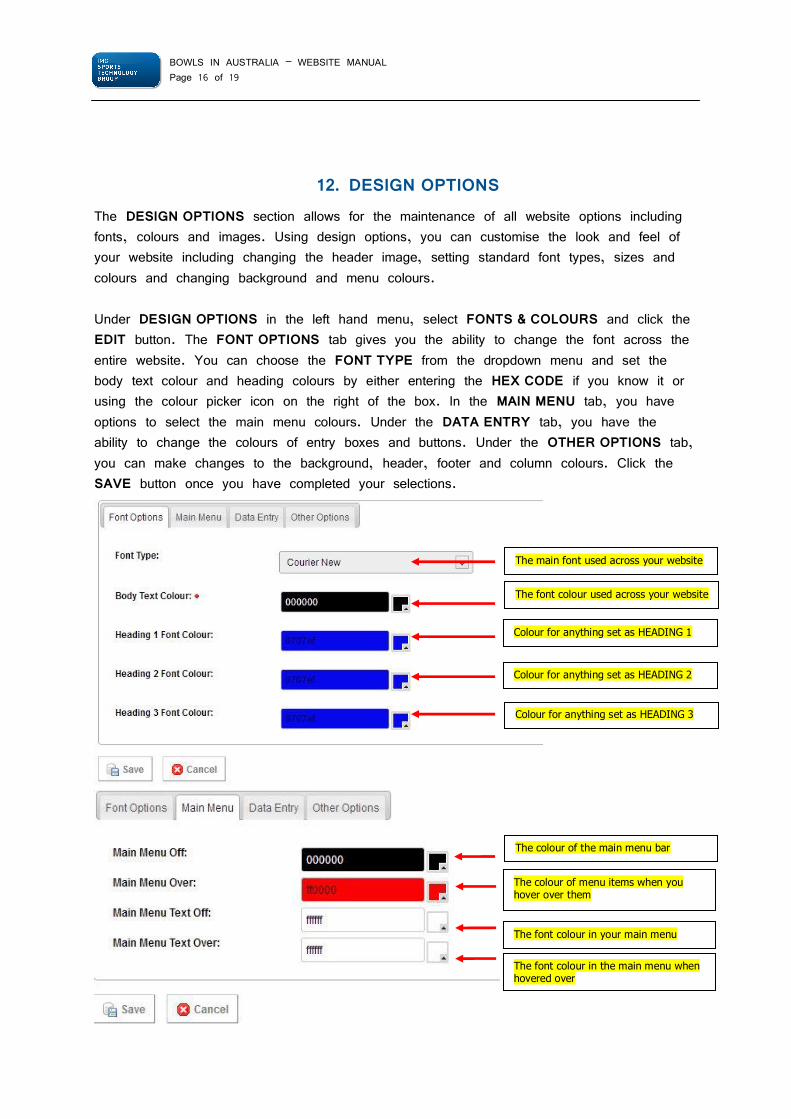
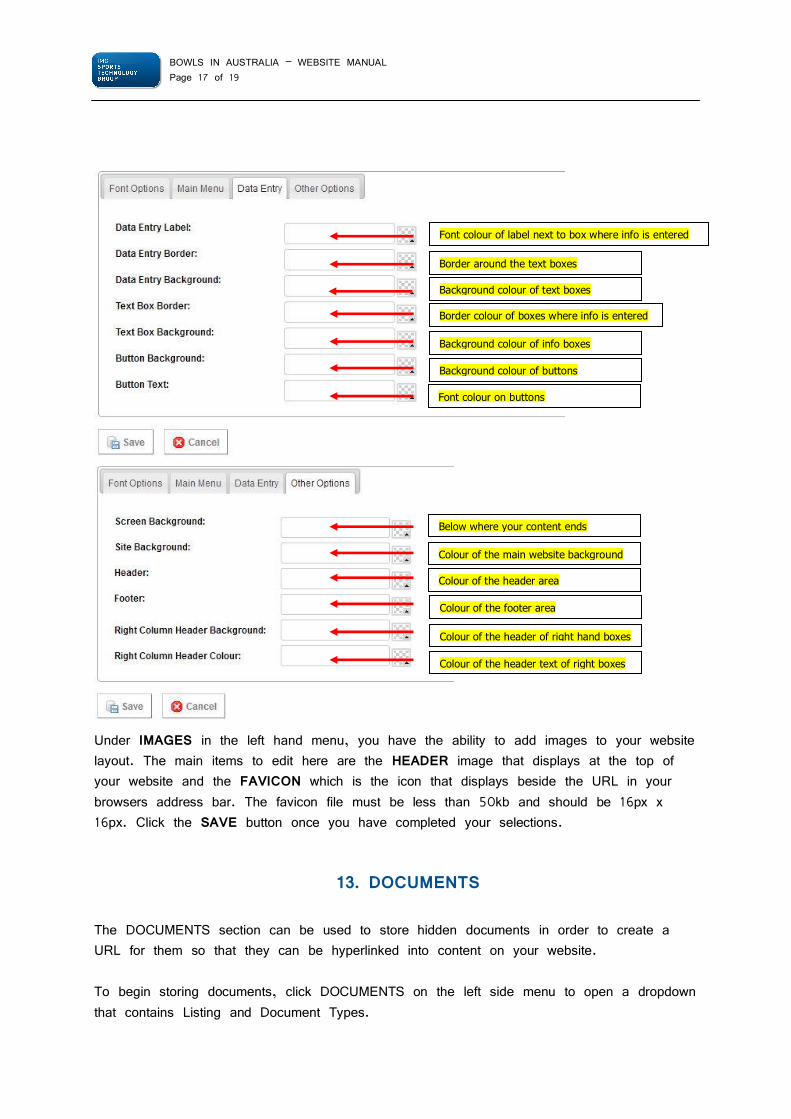
12. DESIGN OPTIONS The DESIGN OPTIONS section allows for the maintenance of all website options including fonts, colours and images. Using design options, you can customise the look and feel of your website including changing the header image, setting standard font types, sizes and colours and changing background and menu colours. Under DESIGN OPTIONS in the left hand menu, select FONTS & COLOURS and click the EDIT button. The FONT OPTIONS tab gives you the ability to change the font across the entire website. You can choose the FONT TYPE from the dropdown menu and set the body text colour and heading colours by either entering the HEX CODE if you know it or using the colour picker icon on the right of the box. In the MAIN MENU tab, you have options to select the main menu colours. Under the DATA ENTRY tab, you have the ability to change the colours of entry boxes and buttons. Under the OTHER OPTIONS tab, you can make changes to the background, header, footer and column colours. Click the SAVE button once you have completed your selections.
The main font used across your website
The font colour used across your website
Colour for anything set as HEADING 1
Colour for anything set as HEADING 2
Colour for anything set as HEADING 3
The colour of the main menu bar
The colour of menu items when you hover over them
The font colour in your main menu
The font colour in the main menu when hovered over
BOWLS IN AUSTRALIA – WEBSITE MANUAL Page 17 of 19
Under IMAGES in the left hand menu, you have the ability to add images to your website layout. The main items to edit here are the HEADER image that displays at the top of your website and the FAVICON which is the icon that displays beside the URL in your browsers address bar. The favicon file must be less than 50kb and should be 16px x 16px. Click the SAVE button once you have completed your selections.
13. DOCUMENTS
The DOCUMENTS section can be used to store hidden documents in order to create a URL for them so that they can be hyperlinked into content on your website. To begin storing documents, click DOCUMENTS on the left side menu to open a dropdown that contains Listing and Document Types.
Font colour of label next to box where info is entered
Border around the text boxes
Background colour of text boxes
Border colour of boxes where info is entered
Background colour of info boxes
Background colour of buttons
Font colour on buttons
Below where your content ends
Colour of the main website background
Colour of the header area
Colour of the footer area
Colour of the header of right hand boxes
Colour of the header text of right boxes
BOWLS IN AUSTRALIA – WEBSITE MANUAL Page 18 of 19
If you would like to categorise your documents, start by selecting DOCUMENT TYPES and clicking the ADD button. Give the category a TITLE and click SAVE. Set the document type live by clicking DOCUMENT TYPES in the left side menu again and setting the STATUS to a GREEN TICK. To add your individual documents, select LISTING on the left side menu and click ADD. If you have created categories, select the DOCUMENT TYPE from the dropdown menu. If you haven’t created categories, just leave this as it is. Give your document a TITLE and click the BROWSE button to upload the file from your computer. Ensure there are no spaces in the file name and that the file is no larger than 5MB. Click the SAVE button to finish and set each item live by clicking LISTING again in the left side menu and setting the STATUS to a GREEN TICK.
FREQUENTLY ASKED QUESTIONS CAN I START BUILDING MY WEBSITE WHILST MY DOMAIN NAME IS STILL BEING SET UP? Yes – the content can be added to the console at any time – even before the website is live. CAN I VIEW HOW MANY PEOPLE HAVE LOOKED AT MY WEBSITE? IMG Sports Technology Group utilises Google Analytics tracking codes throughout its range of products. To set this up, go to http://www.google.com/accounts. Set up a Google account and then visit http://google.com/analytics to create a website tracking code by following the prompts. If you have any issues, you can view Google Analytics Help at http://google.com/analytics/support.html. You will be provided with some tracking code during the analytics setup process to send to your website administrator. Please forward this code to [email protected] and we will load this onto your site. WHY CAN’T I SEE WHAT I HAVE JUST ADDED TO MY WEBSITE?
Check the status of the item. It is likely to be offline ( ). Click the status icon of the
corresponding item to change it to online ( ). Also ensure that the menu item is set to public = yes.
BOWLS IN AUSTRALIA – WEBSITE MANUAL Page 19 of 19
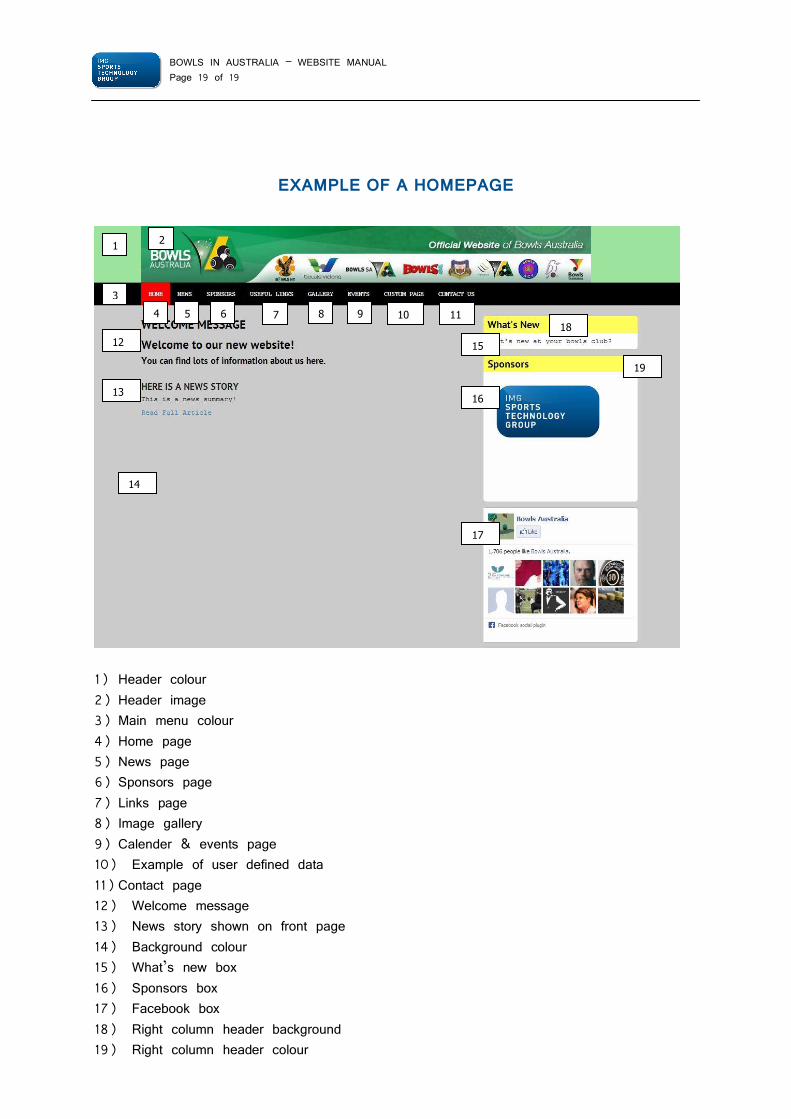
EXAMPLE OF A HOMEPAGE
1) Header colour 2) Header image 3) Main menu colour 4) Home page 5) News page 6) Sponsors page 7) Links page 8) Image gallery 9) Calender & events page 10) Example of user defined data 11) Contact page 12) Welcome message 13) News story shown on front page 14) Background colour 15) What’s new box 16) Sponsors box 17) Facebook box 18) Right column header background 19) Right column header colour
1 2
3
4 6 5 8 7 9 10 11
12
13
14
15
16
17
19
18