Embed Size (px)
Citation preview

BI-TECH
BI-TECH
SUNGARD
IFAS 7.6
Insight Guide

2 SunGard Bi-Tech LLC
NOTICE SUNGARD BI-TECH LLC MAKES NO REPRESENTATIONS OR WARRANTIES, ORAL OR WRITTEN, EXPRESS OR IMPLIED, WITH RESPECT TO THE SYSTEM, SERVICES, SOFTWARE, DOCUMENTATION, OPERATING ENVIRONMENT, ANY OTHER SOFTWARE OR SERVICES PROVIDED HEREUNDER OR ANY OTHER MATTER ADDRESSED HEREUNDER, AND SUNGARD BI-TECH LLC EXPLICITLY DISCLAIMS ALL OTHER WARRANTIES, EXPRESS OR IMPLIED, INCLUDING THE IMPLIED WARRANTIES OF TITLE, MERCHANTIBILITY AND FITNESS FOR A SPECIFIC PURPOSE. SunGard Bi-Tech LLC shall not be liable for errors contained herein or for incidental or consequential damages in connection with the furnishing, performance or use of this material. This documentation is proprietary and confidential information of SunGard Bi-Tech LLC. Copying, reproduction or distribution is strictly prohibited. All rights reserved.
Version 7.6.0 September 14, 2005
Copyright © 2005 by SunGard Bi-Tech LLC
890 Fortress Street Chico, CA 95973
Should you wish to make a comment, or if you find an error in the text, please contact us via email:

Insight Document Change Log
3 SunGard Bi-Tech LLC
Document Change Log
Version Date Change Description 7.6.0 September 14, 2005 Name change and minor format changes. 7.5.0 October 19, 2004 No Changes

Insight Document Change Log
4 SunGard Bi-Tech LLC

Insight Table of Contents
Table of Contents
1: Insight Login, Prompts, and PrintingInsight Login ...................................................................................... 9Prompts and Printing ....................................................................... 10
2: Insight OverviewAbout IFAS ...................................................................................... 12About Insight .................................................................................... 13Insight Toolbars and Menu Options ................................................. 13Tool Options and Buttons ................................................................ 14
Output ..................................................................................................................14Explorer ...............................................................................................................16
Menu Options .................................................................................. 16
3: Using Insight: TutorialOpening Insight ................................................................................ 35Using The Insight “Explorer” Option ................................................ 36Using The Insight “History” and “Type Ahead” Options 40Insight “Menu Schemes” .................................................................. 41Creating a New Menu Scheme ........................................................ 44Using Menu Scheme Functions ....................................................... 46
Icon Button Option ...............................................................................................47Menu Bar Option ..................................................................................................47Shortcut Key Option .............................................................................................47ALT Key Option....................................................................................................49
5SunGard Bi-Tech LLC

Insight Table of Contents
4: Insight Installation/SetupOverviewHost Setup ....................................................................................... 51
OpenLink ..............................................................................................................51Informix 5 / I-Star .................................................................................................51Informix 6/7 ..........................................................................................................51
Creation of System Catalog ............................................................. 52PC Setup ......................................................................................... 53
Requirements 53ODBC .............................................................................................. 54
Openlink ................................................................................................................54Informix I-Net .......................................................................................................54Standard Installation: ............................................................................................55Shared INET Installation: .....................................................................................55Shared Windows Installation ................................................................................57
Insight Installation ............................................................................ 58Insight Login Setup .......................................................................... 59
6SunGard Bi-Tech LLC

InsightSection 1: Insight Login, Prompts, and Printing
1: Insight Login, Prompts, and Printing
Insight is designed to allow users of SunGard Bi-Tech LLC’s Integrated Fund Accounting System (IFAS) to easily access any IFAS subsystem without leaving the Windows™ environment. Within Insight, the standard two-character code entries can be selected through easy point-and-click icon functionality. Insight enables IFAS users to swiftly gain access to various subsystems in a manner that is clear and logical. This point-and-click format reduces the amount of time neces-sary to learn to use IFAS, and enables experienced IFAS users to access subsystem functions with greater speed and precision. Before continuing, you should make sure that Insight has been installed on you system. If Insight has not been installed, contact your System Administrator.
Insight Login
The general Insight login process is explained in this section. After clicking the Insight icon, you will receive the ‘Connect to . . .’ window. Enter your DB User name and DB Password to establish the connection. However, if you wish to change the connection, click the ‘Pick Other. . .’ button.
When you select ‘Pick Other’ from the ‘Connect to . . . window, the ‘Bi-Tech Connection Manager’ screen is displayed. This screen enables you to choose from the available connection options.
9SunGard Bi-Tech LLC

InsightSection 1: Insight Login, Prompts, and Printing
You may select a connection from the Bi-Tech Connection Manager window. If you are the System Administrator and wish to modify connection properties, refer to the Installation/Setup information.
Prompts and Printing
A central element of many IFAS procedures is a set of prompts and questions which direct the system to perform a specific operation in a particular manner. For example, when running an Accounts Payable Batch Proof, the system will need to know the batch against which to run the proof. After choosing the function from the “Explorer,” Insight will prompt you for batch information as shown below.
10SunGard Bi-Tech LLC

InsightSection 1: Insight Login, Prompts, and Printing
In Insight, whenever a prompt (like a request for specific batch information) or a series of prompts are presented, they are displayed in a dialog box. The dialog boxes will request specific information necessary to complete a report or execute an IFAS function. An option bar is provided to help you complete the desired task quickly and easily. Specific options include:
‘Accept response’, enables you to process the requested task.
‘Cancel’, closes the dialog box and returns you to the prior screen without process-ing the function or request.
‘Add to Menu Scheme’, allows you to add a function to an existing “Menu Scheme” and establish a shortcut key as desired. Note, this key is inactive until you select a specific IFAS function, subsystem or screen.
The ‘Job Option’ check box will enable you to select that a job be run interactively or as part of a batch. Running a job as part of a batch will execute the job without tying up the terminal, leaving it free for other uses.
The ‘Special’ option allows you to set the job priority, select notification upon completion, and set the schedule. You must be in the “Output” display mode to receive notification upon completion. The ‘Special Options’ window is shown below.
11SunGard Bi-Tech LLC

InsightSection 1: Insight Login, Prompts, and Printing
Insight enables you to make changes in the information prompt format when you are launching IFAS operations. For example, suppose you are running a General Ledger report. One possible mask is GL (General Ledger), RE (Reports) SR (Standard Report), 02 (General Ledger), SH (Short Format). You will receive the corresponding list of standard job launch questions part of which is shown below.
As you answer questions, IFAS will prompt you for additional information as nec-essary. Additionally, when you right click on an open area of an information dialog window, you will receive the additional options below:
‘Show All’This option will display the information boxes that are available.
‘Normally Hidden’This option will reduce the standard information on a prompt display. If you have completed a set of questions and do not expect to make changes, you may use the Normally Hidden command to reduce the information prompt format. Note, if you wish to make changes at a later date, you can simply choose Show All to display all of the available fields.
‘Change Question Text’The Change Question Text option enables you to make changes in the wording of an individual information prompt.
‘Ask Again’In the event that you do not have sufficient space to answer a question, you can use the Ask Again option to obtain more space for your entry.
12SunGard Bi-Tech LLC
InsightSection 1: Insight Login, Prompts, and Printing
‘Delete’This command enables you to clear an item from the information prompt.
Note: The above items are not active in all dialog windows. For example, Insight will not allow you to delete information that is required for launching a job. As you gain experience using Insight, you can use these options to reduce the input required to launch an IFAS function. When you find the prompt format that best suits your needs, save the screen as a “Favorite” by clicking on the Add to Menu Scheme button.
13SunGard Bi-Tech LLC

InsightSection 2: Insight Overview
2: Insight Overview
If you are a seasoned IFAS user, Insight provides you with a new, easy-to-use interface with the data-entry and data-retrieval forms with which you are already familiar. If you are new to SunGard Bi-Tech LLC’s IFAS, Insight enables you to easily gain access to IFAS subsystems and functions simply by choosing the appropriate icons. This manual provides a brief overview of IFAS and introduces the unique way the Windows™-based Insight program enables you to navigate within IFAS to locate specific subsystem functions. If you have any questions regarding IFAS, refer to the Getting Started User Guide.
About IFAS
In order to enter and retrieve data from any of the IFAS subsystems, you will need to gain access to IFAS. Insight allows you to locate specific IFAS subsystems through a series of point-and-click selections. The IFAS windows are arranged by subsystem. An example of the main IFAS menu is shown below:
AP Accounts Payable AR Accounts ReceivableBD Budget Item Detail CK Check ManagementEN Encumbrances FA Fixed Assets InventoryFC Foreign Currency System GL General LedgerGM Grant Management HR Human Resources NU NUCLEUS PC Position Control BudgetingPE Person/Entity Data Base PO PurchasingPY Payroll System RX Ad Hoc Report WriterSI Stores/Inventory SY System Level SoftwareTD TRIAD Modules TF Table Format SystemTT Transaction Code WO Work Orders
Note:Some systems have been developed with specific clients in mind. The sub-systems to which you have access may differ slightly from the list above.
A wide variety of functions may be performed within each IFAS subsystem. For example in Accounts Payable, a new batch can be created reflecting recent “Open Hold” activity. To direct the system to carry out this function, a series of com-mands are entered. To access this specific batch file, it is first necessary to enter
12SunGard Bi-Tech LLC

InsightSection 2: Insight Overview
the Accounts Payable (AP) subsystem. Next, the Open Hold (OH) subsystem is retrieved. Then, the batch processing (BT) system is entered. And finally, a new batch file (UB) is created. Generally, to execute a specific IFAS operation, it is necessary to enter a number of these two-character codes. When these codes are strung together, they are referred to as a “mask.” Therefore, the complete mask for this function is (AP)(OH)(BT)(UB) or APOHBTUB.
About Insight
Insight is designed to provide users with a simple and efficient means of access to SunGard Bi-Tech’s Integrated Fund Accounting System (IFAS). Insight provides users with several options for locating specific subsystems and functions within IFAS. The “Explorer” option will enable you to locate desired subsystems by choosing a series of icons. However, after the necessary mask combinations become familiar, you may navigate directly to the desired subsystem functions via the “Type Ahead” option. Additionally, Insight enables you to open your most commonly used IFAS functions directly by incorporating them into a “Menu Scheme” of your “Favorite Functions.” Insight enables you to direct the system through various options by simply pointing at each mask symbol icon and double-clicking to move on to the next level. Once you have directed the system to a ter-minal node (the point at which the system will perform the desired operation, like running a report or recalling a select set of data), making the final selection directs the system to carry out that operation. Again, Insight makes it easy for you to reach this point.
Insight Toolbars and Menu Options
Insight provides you with several tool and menu options to choose from. These options are illustrated below. As you develop experience with Insight, you will determine which options best meet your needs.
13SunGard Bi-Tech LLC

InsightSection 2: Insight Overview
The toolbar is a set of buttons that provide shortcuts to commonly used functions. Toolbar functions are also accessible through the menu bar; however, the toolbar provides direct access to these functions. For example, to open Insight “Explorer,” simply click on the “Explorer” Icon ( ).
If it is not already displayed, select ‘Toolbar’ from the View menu to view the toolbar. Repeat this step to turn off the toolbar. A check mark appears next to active menu items. Note that the toolbars may be moved to best meet your needs. The process of moving toolbars is discussed in the “Customizing Your Workspace” section later in this user guide.
Tool Options and Buttons
NOTE: When you enter a specific IFAS dialog box, the IFAS tool bar will be dis-played as shown below. The IFAS screen you are currently in will be indi-cated in the title bar. In the example below, the “Batch Defaults Screen” was displayed. The eight buttons on the right side of the toolbar correspond to the eight Function Keys (F1-F8) with which most seasoned IFAS users are familiar.
The Insight toolbar options are illustrated in this section. Within Insight, users are able to function in the “Explorer” or “Output” display modes. Each mode has its own set of functional tools. It is possible to open or close the toolbars after a mode has been selected.
Output
14SunGard Bi-Tech LLC

InsightSection 2: Insight Overview
The toolbar in the “Output” mode consists of the “Explorer” ( ) and the “Add to Menu Scheme” ( ) buttons. Clicking the “Explorer” button will change the dis-play to the “Explorer” mode as shown below. Note that the “Add to Menu Scheme” button does not activate until an IFAS function, IFAS subsystem, or screen has been selected.
15SunGard Bi-Tech LLC

InsightSection 2: Insight Overview
Explorer
Menu Options
Like many Windows applications, the menu options available in Insight may vary slightly depending on what operation you are performing. There is, however, a standard set of menu options accessed through the menu which you may find use-ful during a typical Insight session.
Accelerator keys have been created for many common menu choices (i.e., ctrl+U for view output, ctrl+E to view explorer, etc.). However, these accelerators will not work when the user is viewing the output window or a telnet window. This is due to the fact that the accelerators will have different meanings in telnet and must be transmitted to the UNIX host. In order to resolve this conflict, we have created alternate accelerators for you by simply adding the shift key. For example, shift+cntl+U has the same function as cntl+U, but the shift+cntl version will con-
16SunGard Bi-Tech LLC

InsightSection 2: Insight Overview
tinue to function in the telnet window. For this reason, you may wish to become accustomed to using the shifted version of the accelerators.
The standard IFAS menu options are explained below.
The commands available under the Insight menu selection are:
Restore Returns you to the prior window format.
Move Enables you to move the Insight window on the screen. This option is useful if Insight has been minimized to a partial page view.
Size Allows you to change the size of the window.
Minimize Reduces the window to the menu bar.
Maximize Enlarges to Insight window to fill the screen.
Close This command will end the Insight session.
Next This command will
The options available under the File menu are as follows:
New Insight Session (cntrl+N):
This selection enables you to launch a second copy of Insight.
Telnet Session (cntrl+T):
Allows you to establish a Telnet Connection. A prompt will request a user ID and password.
Run Report (cntrl+R):
This selection enables you to open or run a report.
17SunGard Bi-Tech LLC

InsightSection 2: Insight Overview
<New 7.4.0>
Schedule Report (cntrl+D):
This selection enables you to schedule a report. If you make this selection you will be presented a series of questions to be answered regarding your selection.
Special
Provides you with the additional file options explained below.
‘Change Password’ allows you to change your password.
‘Execute Host Command’ will process information through the host sys-tem.
Local Printer Setup
Enables you to select a printer and make necessary adjustments as seen in the ‘Print Setup’ window below.
Print (cntrl+P): This option is used to print a file.
Exit: The Exit option allows you to close Insight.
18SunGard Bi-Tech LLC

InsightSection 2: Insight Overview
The options available under the Edit menu are:
Undo Allows you to reverse your last action. Most editing actions may be undone. However, some actions, including some style changes, cannot be undone.
Cut Allows you to remove a selection from a document. Often used in conjunction with the ‘Paste’ option discussed below. Items must be selected with the mouse prior to performing the ‘Cut’ option.
Copy Allows you to copy a selection from a document without affecting the original text. Like the ‘Cut’ option, this option is typically used with the ‘Paste’ option. Items to be copied must first be selected.
Paste The ‘Paste’ option enables you to place an item that has been cut or copied. This option may be used to move items within a document, to move information from one document to another. Pasted items are inserted at the cursor.
Customize (cntrl+M)Allows you to add and delete favorite options. This process is detailed in the tutorial section of this manual.
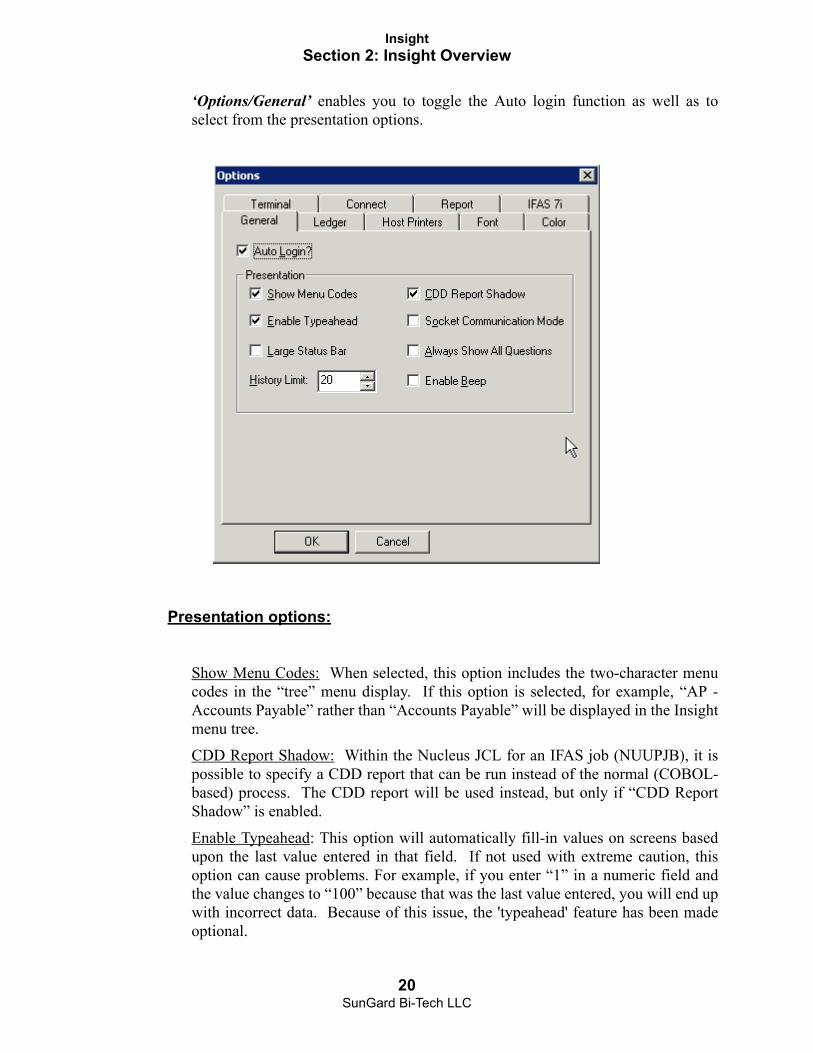
Options (cntrl+I) There are nine tabs available under Edit ‘Options.’ The figures below display these tab controls. Selecting “Cancel” in any of the tabs will exit ‘Options’ without changing the current option choices.
19SunGard Bi-Tech LLC
InsightSection 2: Insight Overview
‘Options/General’ enables you to toggle the Auto login function as well as to select from the presentation options.
Presentation options:
Show Menu Codes: When selected, this option includes the two-character menu codes in the “tree” menu display. If this option is selected, for example, “AP - Accounts Payable” rather than “Accounts Payable” will be displayed in the Insight menu tree.
CDD Report Shadow: Within the Nucleus JCL for an IFAS job (NUUPJB), it is possible to specify a CDD report that can be run instead of the normal (COBOL-based) process. The CDD report will be used instead, but only if “CDD Report Shadow” is enabled.
Enable Typeahead: This option will automatically fill-in values on screens based upon the last value entered in that field. If not used with extreme caution, this option can cause problems. For example, if you enter “1” in a numeric field and the value changes to “100” because that was the last value entered, you will end up with incorrect data. Because of this issue, the 'typeahead' feature has been made optional.
20SunGard Bi-Tech LLC
InsightSection 2: Insight Overview
Socket Communication Mode: Socket communication mode is the standard method of communication between the PC and the “back end” host processes. Disabling this option causes Insight to use an alternate communication method (where the communication is passed through the telnet session as text). Socket Communications Mode (which is the default) tends to be more reliable, but the alternate method can be used to get around restrictions placed by some firewalls. Unless you are experiencing problems associated with your firewall, use the default.
<New 7.4.0>
Large Status Bar: Selecting this option will cause a font twice regular size to be used for all messages presented in the status bar.
Always Show All Questions: When questions are presented to obtain details about a job being requested, each question provides an option of being shown or hidden. If the Always Show option is selected, all questions, including hidden ones, will be presented.
Large Status Bar: Selecting this option will cause a font twice regular size to be used for all messages presented in the status bar.
History Limit: The history limit will determine the maximum number of entries that will be stored in the history dropdown box.
Enable Beep: When selected, this option enables/disables beeping that Insight does under certain error conditions.
21SunGard Bi-Tech LLC

InsightSection 2: Insight Overview
‘Options/Ledger’ allows you to choose from the available General and Journal Ledgers.
To select a ledger, simply click on your choice, and click the ‘OK’ button.
22SunGard Bi-Tech LLC

InsightSection 2: Insight Overview
The ‘Options/Host Printers’ tab gives you control of printing functions.
23SunGard Bi-Tech LLC
InsightSection 2: Insight Overview
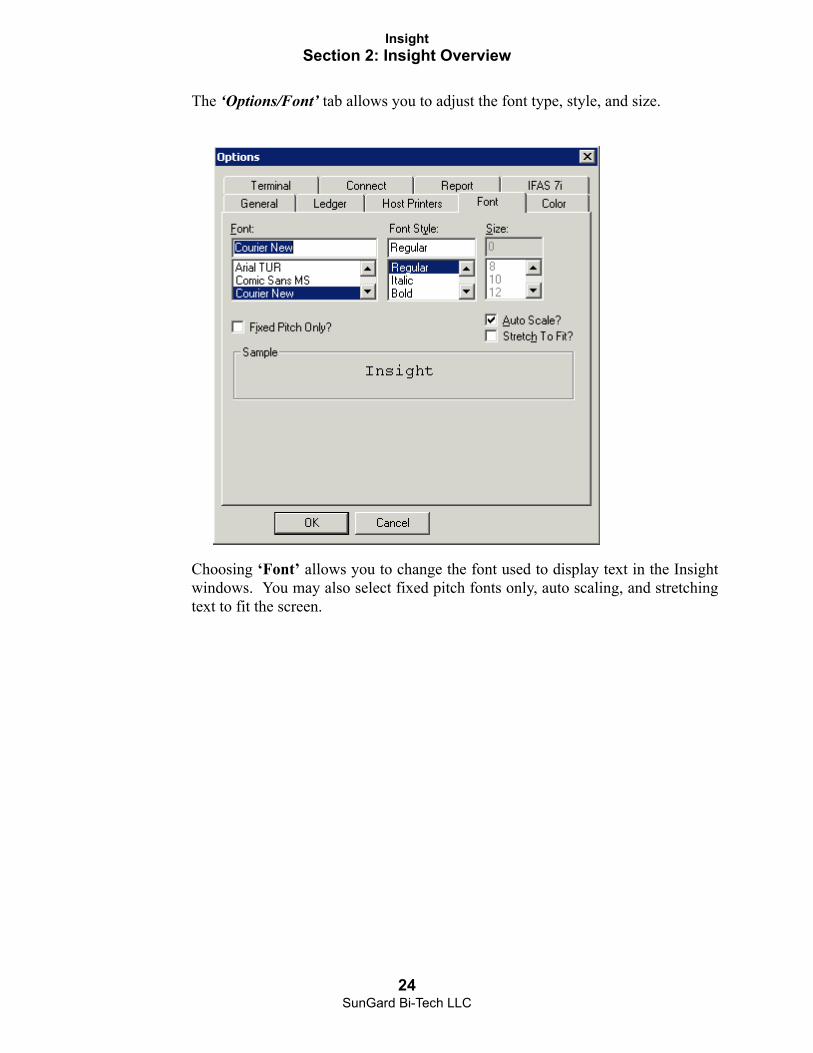
The ‘Options/Font’ tab allows you to adjust the font type, style, and size.
Choosing ‘Font’ allows you to change the font used to display text in the Insight windows. You may also select fixed pitch fonts only, auto scaling, and stretching text to fit the screen.
24SunGard Bi-Tech LLC
InsightSection 2: Insight Overview
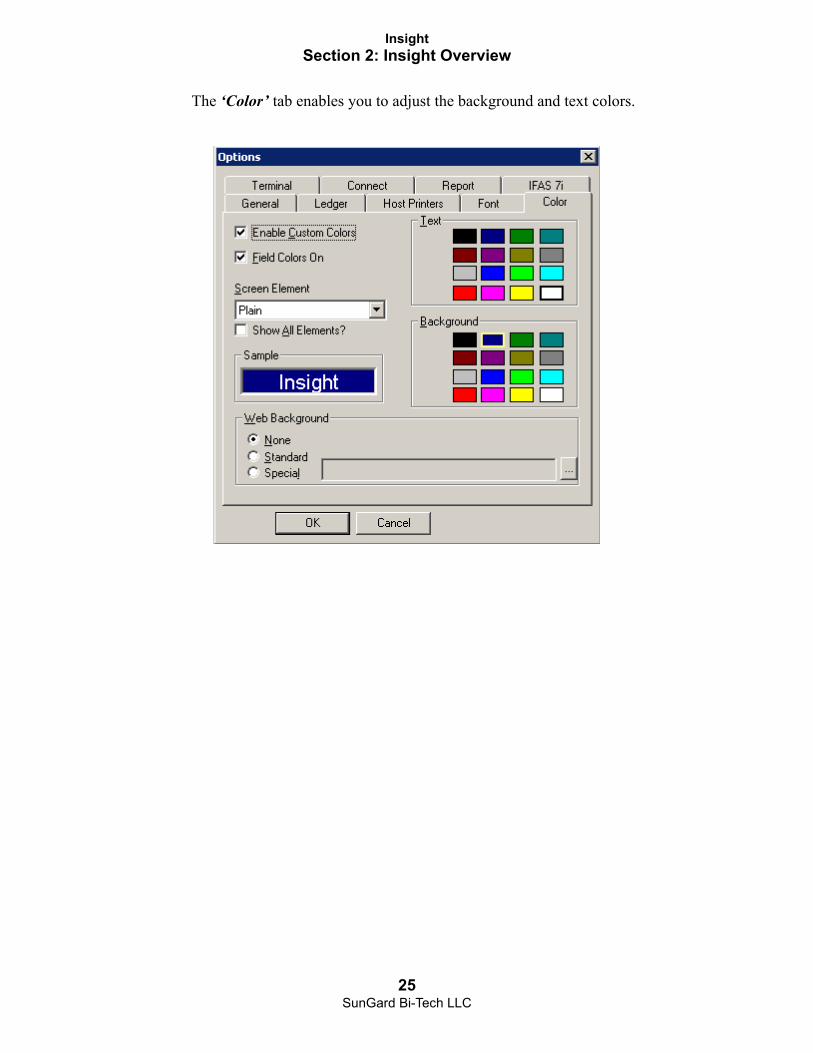
The ‘Color’ tab enables you to adjust the background and text colors.
25SunGard Bi-Tech LLC
InsightSection 2: Insight Overview
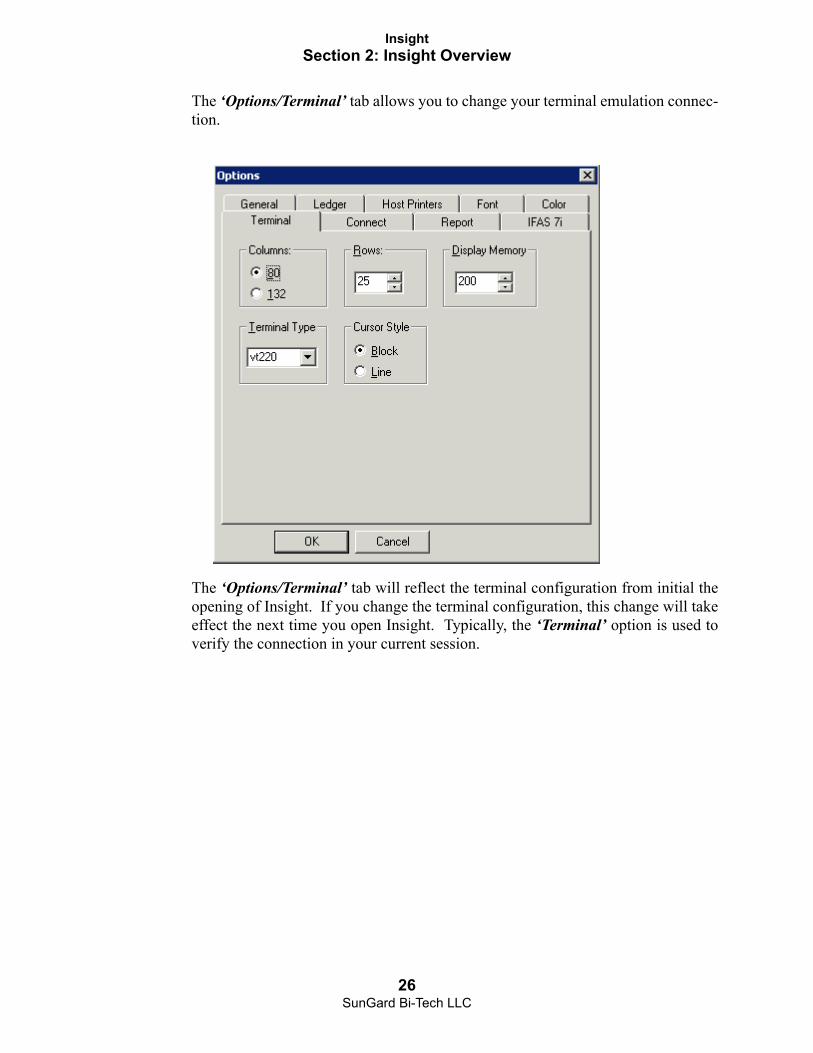
The ‘Options/Terminal’ tab allows you to change your terminal emulation connec-tion.
The ‘Options/Terminal’ tab will reflect the terminal configuration from initial the opening of Insight. If you change the terminal configuration, this change will take effect the next time you open Insight. Typically, the ‘Terminal’ option is used to verify the connection in your current session.
26SunGard Bi-Tech LLC

InsightSection 2: Insight Overview
The ‘Options/Connect’ tab enables you to adjust the initial startup procedure.
27SunGard Bi-Tech LLC

InsightSection 2: Insight Overview
The ‘Options/Report’ tab enables you to adjust title, general, and export report set-tings.
28SunGard Bi-Tech LLC

InsightSection 2: Insight Overview
The ‘Options/7i’ tab is used to enable the 7i versions of screens, if they have been loaded on your system. You may also enable/disable the 7i screens by subsystem by clicking on the Menu selection boxes.
The options available under the View menu are:
Explorer Enables you to open or close the “Explorer” option.
Output Enables you to open or close the “Output” option.
Screen Enables you to open or close the screen.
Toolbar Enables you to display the toolbar as needed. Note the different tool bars that appear by toggling between the “Output” and “Explorer” options while the toolbars are displayed. The toolbars are shown below.
Status Bar Allows you to toggle the status bar on and off. The view below is in the “Tile, Cascade” format
29SunGard Bi-Tech LLC

InsightSection 2: Insight Overview
The menu definition you assigned to your menu scheme will be inserted between the View and Window menus. Dragging down on this menu item will display the “Favorite” options included in the menu scheme you developed. Selecting an item from this list will execute that function. If you have not created a menu scheme, the menu definition option will not appear in the menu bar.
The specific menu options available under the Window selection are displayed below. You have the option to choose the ‘Cascade’ or ‘Tile’ window format. Additionally, this menu option allows you to toggle between display modes if they have been opened in the current Insight session. You may choose the display for-mat that best suits your needs.
30SunGard Bi-Tech LLC

InsightSection 2: Insight Overview
Cascade Windows:
Tile Windows
31SunGard Bi-Tech LLC
InsightSection 2: Insight Overview
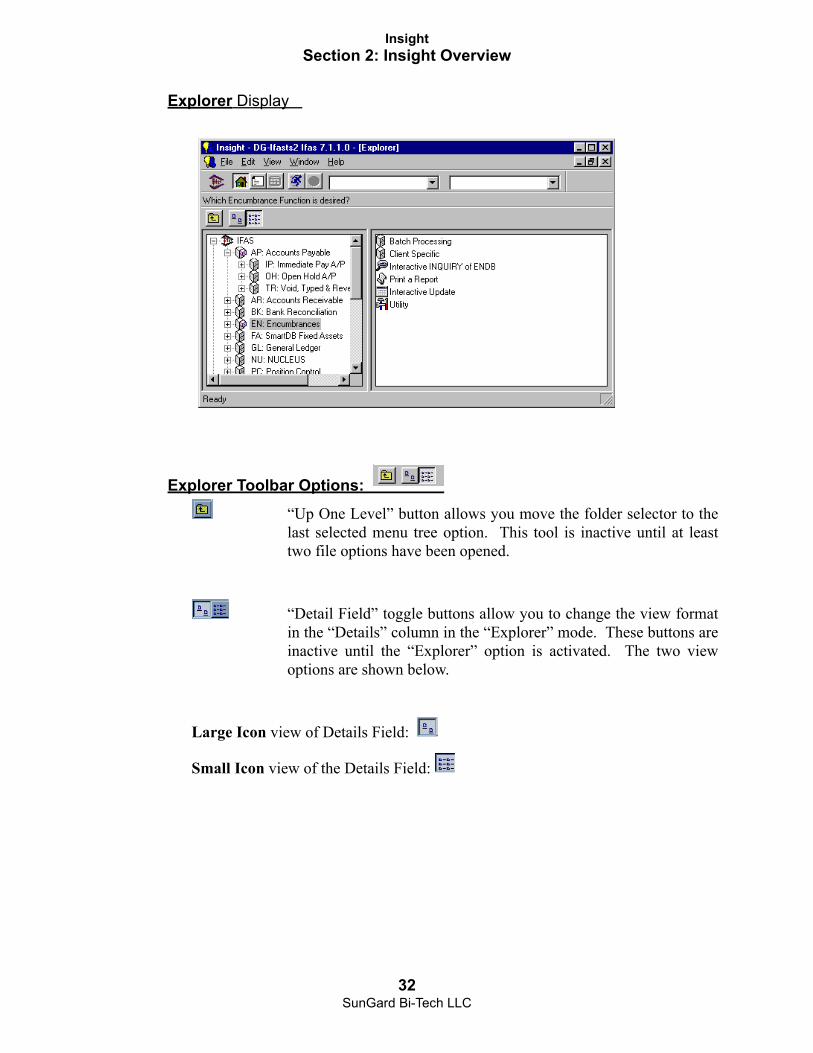
Explorer Display
Explorer Toolbar Options:
“Up One Level” button allows you move the folder selector to the last selected menu tree option. This tool is inactive until at least two file options have been opened.
“Detail Field” toggle buttons allow you to change the view format in the “Details” column in the “Explorer” mode. These buttons are inactive until the “Explorer” option is activated. The two view options are shown below.
Large Icon view of Details Field:
Small Icon view of the Details Field:
32SunGard Bi-Tech LLC

InsightSection 2: Insight Overview
Output Display
33SunGard Bi-Tech LLC

InsightSection 2: Insight Overview
The Help menu allows you to retrieve help on a variety of Insight topics. The spe-cific Help options may vary slightly on your system. The general Help options are explained below.
Online Documentation
Allows you to view the Insight online documentation.
Tip of the day
Tips for Insight users.
HFS Release Notes
Enables you to view the notes associated with the latest HFS release.
Insight Home Page
Opens your web browser and takes you to the Insight home page.
Advanced
Allows you to gain access to the “debug” settings. This information is generally used by client support experts in the event that you contact the SunGard Bi-Tech Software LLC help desk.
About Insight
Provides you with four helpful information screens. Specifically, you can access the ‘Copyright’ display that provides information about the version of Insight that you are currently running. You can also access information about your operating system through the ‘Machine’ display. Finally, you can use the ‘Database’ display to gain information about your current database. This infor-mation is very helpful in the event that you contact the SunGard Bi-Tech Software LLC help desk.
34SunGard Bi-Tech LLC
InsightSection 3: Using Insight: Tutorial
3: Using Insight: Tutorial
As stated previously, Insight provides IFAS users easy access to various subsystem functions. This tutorial helps you to gain experience with the various options available within Insight. Working through by example is the most efficient method for demonstrating the point-and-click functionality of Insight. After the process of opening Insight is illustrated, the seven options for system navigation and locating IFAS functions are discussed.
Opening Insight
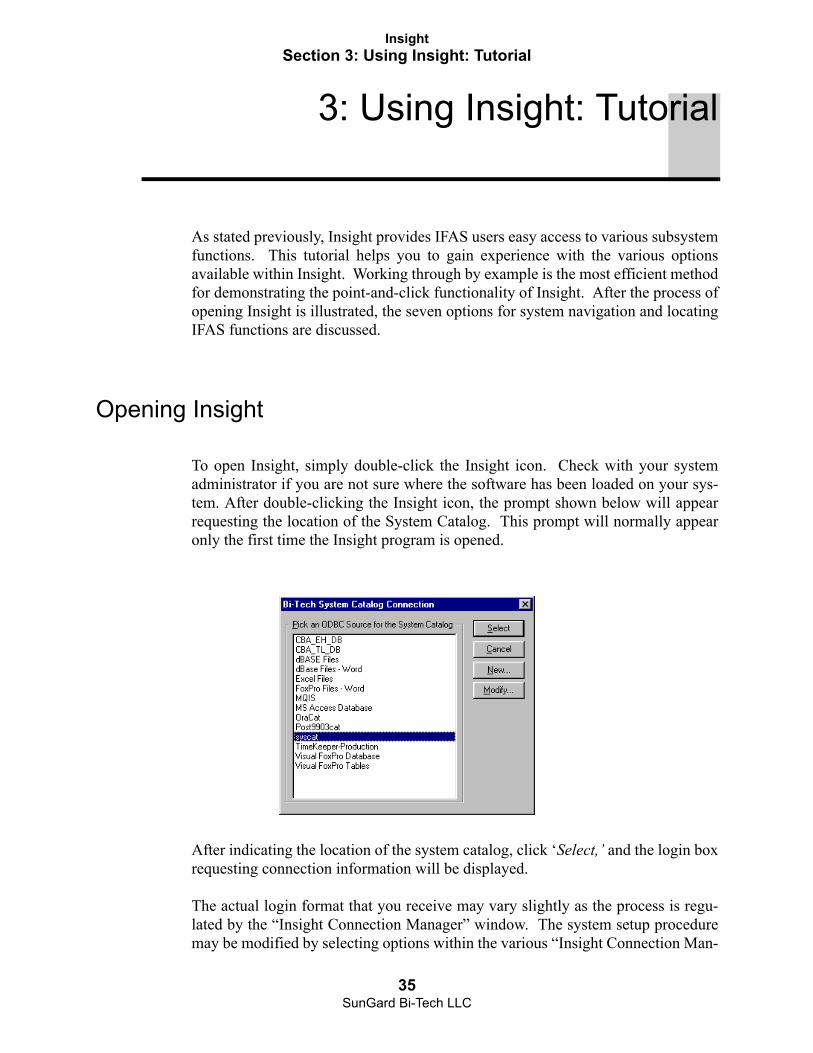
To open Insight, simply double-click the Insight icon. Check with your system administrator if you are not sure where the software has been loaded on your sys-tem. After double-clicking the Insight icon, the prompt shown below will appear requesting the location of the System Catalog. This prompt will normally appear only the first time the Insight program is opened.
After indicating the location of the system catalog, click ‘Select,’ and the login box requesting connection information will be displayed.
The actual login format that you receive may vary slightly as the process is regu-lated by the “Insight Connection Manager” window. The system setup procedure may be modified by selecting options within the various “Insight Connection Man-
35SunGard Bi-Tech LLC

InsightSection 3: Using Insight: Tutorial
ager” dialog boxes. The various connection options are displayed in the “Menu and Toolbar Options” information in section 3 of this guide.
After the Connection, Host/DB User, and Host/DB Password information has been entered, click ‘Next>’ to enter Insight.
Insight provides several simple methods for locating and retrieving IFAS sub-system functions. As detailed below, “Explorer,” “History,” “Type Ahead,” “Menu Bar,” “Icon Button,” “Shortcut Key” and “ALT Key” options enable you to gain access to IFAS subsystems using the method that best suits your needs.
An example of the standard menu bar is shown below. The initial menu bar that you receive will look slightly different as you have not yet developed items in the “Menu Scheme” or “Type Ahead/History” combination boxes. The use of these options is described later in this tutorial.
Using The Insight “Explorer” Option
To activate the “Explorer” option choose one of the actions listed below:• Click the “Explorer” icon ( ).• Choose ‘Explorer’ from the View menu option.• Press CTRL+E.
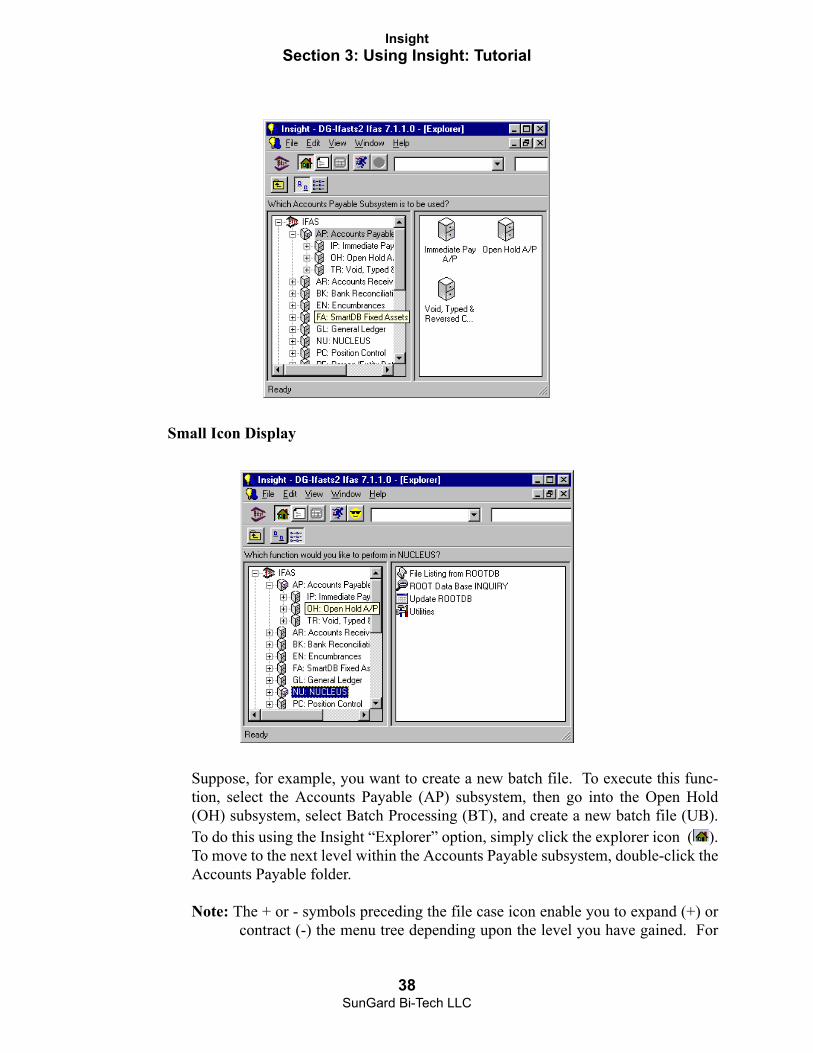
“Explorer” will provide you with an IFAS menu tree as shown below. Notice that the menu tree is completed in the left column, and the detail icons are displayed in the right column.
36SunGard Bi-Tech LLC

InsightSection 3: Using Insight: Tutorial
The “Explorer” window provides you with direct access to the IFAS subsystems and functions. Double-clicking the desired subsystem opens that subsystem for you. As you enter your choices, the next level of options is displayed. Each time you make a choice, you are taken one step closer to your desired operation.
If CDD is loaded on your system, the “Explorer” window provides you with two methods for running CDD reports. You can run reports by clicking the Run CDD Reports Button, or by selecting the CDD Reports folder. In either case, your reporting options will be displayed.
As illustrated in the screen images below, the various IFAS subsystems are dis-played on the “menu tree” (left) column, and the icons are displayed in the “details” (right) column. You have the option to choose items by double-clicking in either column. Additionally, you may re-structure the detail column layout by clicking on the large icon display format ( ) or small icon display format ( ) option in the explorer toolbar. The two versions of the detail columns are shown below.
Large Icon Display
37SunGard Bi-Tech LLC
InsightSection 3: Using Insight: Tutorial
Small Icon Display
Suppose, for example, you want to create a new batch file. To execute this func-tion, select the Accounts Payable (AP) subsystem, then go into the Open Hold (OH) subsystem, select Batch Processing (BT), and create a new batch file (UB). To do this using the Insight “Explorer” option, simply click the explorer icon ( ). To move to the next level within the Accounts Payable subsystem, double-click the Accounts Payable folder.
Note: The + or - symbols preceding the file case icon enable you to expand (+) or contract (-) the menu tree depending upon the level you have gained. For
38SunGard Bi-Tech LLC

InsightSection 3: Using Insight: Tutorial
example, a single click on the file case icon in the menu tree will open the folder and display the corresponding options in the display column. How-ever, a single click on a folder in the menu tree will not expand the menu tree. To expand the menu tree, either double-click a folder or single-click directly on the expand (+) toggle switch. When you have expanded an option in the menu tree, you may click the (-) toggle switch to contract the list.
If you have not already done so, choose the Accounts Payable option either by double-clicking the Accounts Payable folder in the menu tree, double-clicking the icon in the display column, or single-clicking the expand (+) button in front of the Accounts Payable folder in the menu tree.
Three options are available within the Accounts Payable subsystem: Immediate Pay A/P (IP), Open Hold A/P (OH), and Void, Typed & Reversed Checks A/P (TR). In our example, we are looking for the Open Hold subsystem. To move to the next level in the subsystem, select the Open Hold folder from the menu tree or icon from the details column.
Again, we are looking for the Batch Processing function. To locate this function, select the Batch Processing option. In our example, we are working to create a new batch file. Because Create/Update Batch File (UB) is a terminal node (func-tion), double-clicking this item will direct the system to execute the operation.
At this point, you are taken to the IFAS screen in which the function is carried out. In our example, IFAS first prompts for the name of the Open Hold batch that is to be updated or created. This IFAS prompt is shown below. The prompt that you will receive will depend upon the display mode and function choice. Examples of common information prompts are shown below.
39SunGard Bi-Tech LLC
InsightSection 3: Using Insight: Tutorial
If the selected operation leads directly to a data-entry or data-retrieval screen, you are taken to the IFAS window where that screen is displayed.
After gaining experience with IFAS, you may wish to move directly to your most commonly used subsystems. Insight provides you with several options to enable you to quickly reach IFAS subsystem functions directly including: “History,” “Type-Ahead,” “Icon Button,” “Menu Bar,” “Shortcut Key,” and “ALT Key” Options.
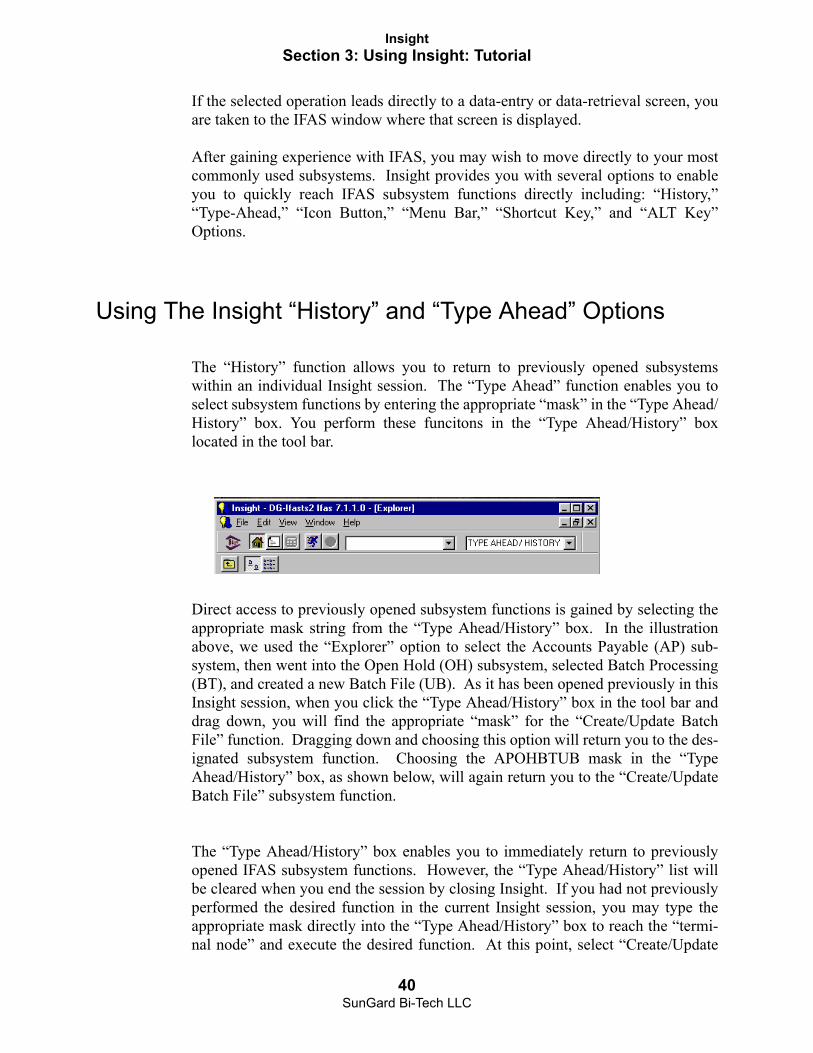
Using The Insight “History” and “Type Ahead” Options
The “History” function allows you to return to previously opened subsystems within an individual Insight session. The “Type Ahead” function enables you to select subsystem functions by entering the appropriate “mask” in the “Type Ahead/History” box. You perform these funcitons in the “Type Ahead/History” box located in the tool bar.
Direct access to previously opened subsystem functions is gained by selecting the appropriate mask string from the “Type Ahead/History” box. In the illustration above, we used the “Explorer” option to select the Accounts Payable (AP) sub-system, then went into the Open Hold (OH) subsystem, selected Batch Processing (BT), and created a new Batch File (UB). As it has been opened previously in this Insight session, when you click the “Type Ahead/History” box in the tool bar and drag down, you will find the appropriate “mask” for the “Create/Update Batch File” function. Dragging down and choosing this option will return you to the des-ignated subsystem function. Choosing the APOHBTUB mask in the “Type Ahead/History” box, as shown below, will again return you to the “Create/Update Batch File” subsystem function.
The “Type Ahead/History” box enables you to immediately return to previously opened IFAS subsystem functions. However, the “Type Ahead/History” list will be cleared when you end the session by closing Insight. If you had not previously performed the desired function in the current Insight session, you may type the appropriate mask directly into the “Type Ahead/History” box to reach the “termi-nal node” and execute the desired function. At this point, select “Create/Update
40SunGard Bi-Tech LLC

InsightSection 3: Using Insight: Tutorial
Batch File” by entering “APOHBTUB” in the “Type Ahead/History” box as shown above. Press Enter to display the “Batch File” screen. Note that you can return to this function at any time by dragging down the “Type Ahead/History” box and choosing “APOHBTUB.”
Insight “Menu Schemes”
As many IFAS users learn, they often return to the same IFAS subsystems. Insight enables you to develop a list of your most commonly used subsystem functions by including them in a “Menu Scheme.”
The “Menu Scheme” functions enable you to locate specific subsystems and exe-cute functions directly by choosing them from the “Menu Scheme” box (to the left of the “Type Ahead/History” box. Insight enables you to create your own menu schemes in order to gain direct access to your “favorite” IFAS functions, sub-systems, and screens. After you have learned the IFAS subsystems that you use most commonly, you can save them in a menu scheme for direct access.
To create a “Menu Scheme” select the ‘Customize’ function under the Edit menu, or click the “Add to Menu Scheme” icon .
You will receive the ‘General’ dialog box displayed below. In the illustration below, “Batch Menu” has previously been developed. Note: If no menu schemes have been created on your system, the edit/customize option will take you directly to the ‘Select’ window (refer to the Creating a New Menu Scheme section below).
41SunGard Bi-Tech LLC

InsightSection 3: Using Insight: Tutorial
‘General’ Window
The following buttons are available in the ‘General’ dialog box.
The “Add” button enables you to add items to a menu scheme. The options available under the “Add” button include “Add Favorite,” “Add Separator” and “Add Pop-Up.” Choose “Add Favorite” when you wish to add to a menu scheme. The separator will place a line between “favorite” items under the “menu definition” that is displayed in the menu bar. The “Add Pop-Up” option will enable you to insert a “Menu Definition” within your menu scheme, and will place a pop-up window under the “Menu Defini-tion” in the menu bar display
Clicking the “Delete” button will remove a selected item from your menu scheme.
Clicking the “Move Up” button with a menu definition or specific function selected will move that option up on the menu scheme you have created. This button enables you to change the structure of your scheme.
Clicking the “Move Down” button will move a selection down to change the structure of your menu scheme.
42SunGard Bi-Tech LLC
InsightSection 3: Using Insight: Tutorial
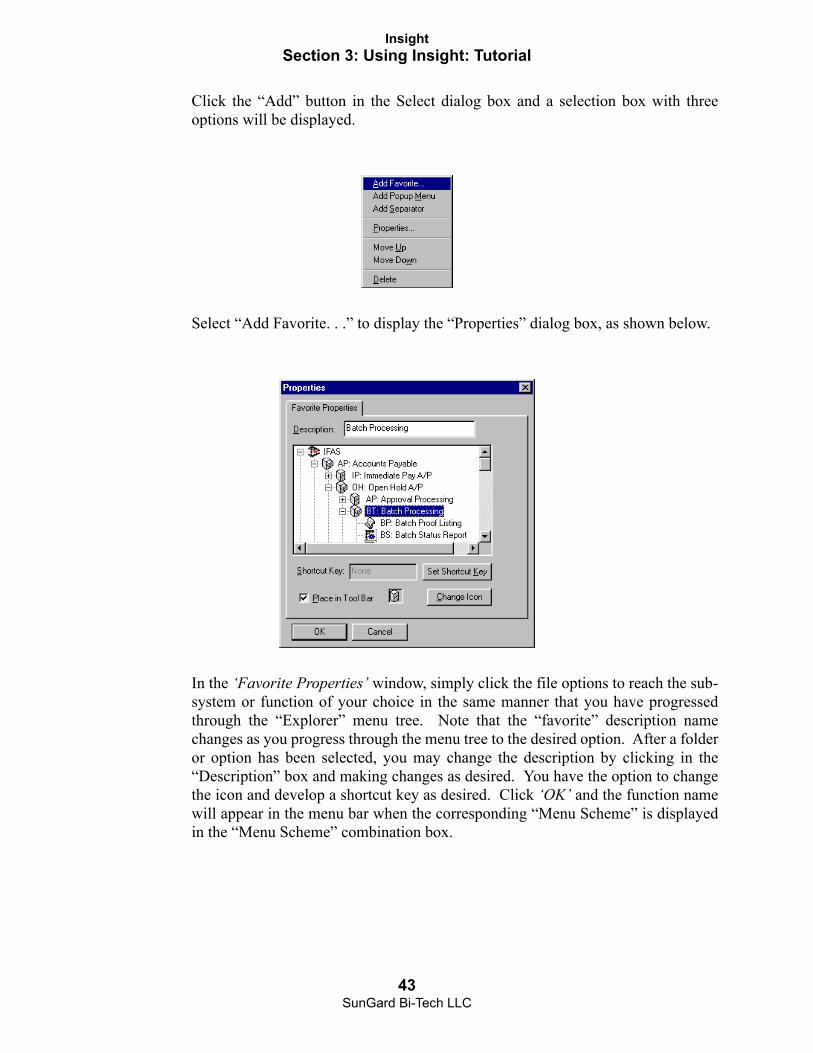
Click the “Add” button in the Select dialog box and a selection box with three options will be displayed.
Select “Add Favorite. . .” to display the “Properties” dialog box, as shown below.
In the ‘Favorite Properties’ window, simply click the file options to reach the sub-system or function of your choice in the same manner that you have progressed through the “Explorer” menu tree. Note that the “favorite” description name changes as you progress through the menu tree to the desired option. After a folder or option has been selected, you may change the description by clicking in the “Description” box and making changes as desired. You have the option to change the icon and develop a shortcut key as desired. Click ‘OK’ and the function name will appear in the menu bar when the corresponding “Menu Scheme” is displayed in the “Menu Scheme” combination box.
43SunGard Bi-Tech LLC
InsightSection 3: Using Insight: Tutorial
Creating a New Menu Scheme
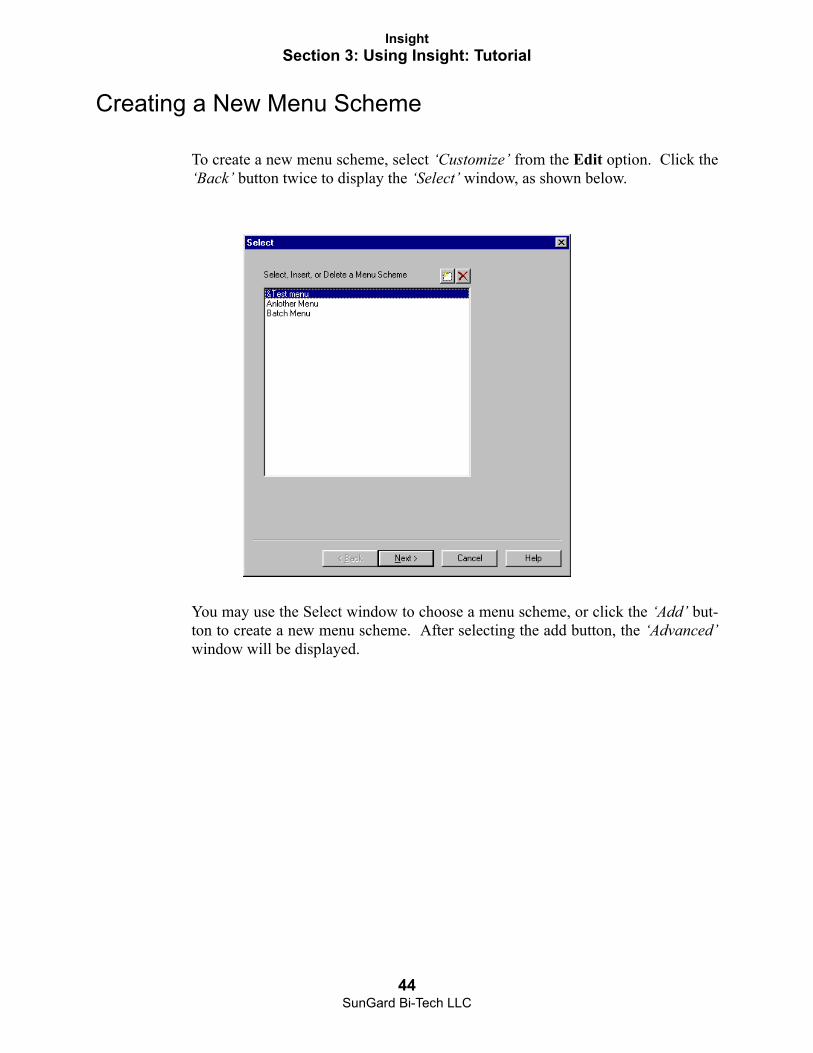
To create a new menu scheme, select ‘Customize’ from the Edit option. Click the ‘Back’ button twice to display the ‘Select’ window, as shown below.
You may use the Select window to choose a menu scheme, or click the ‘Add’ but-ton to create a new menu scheme. After selecting the add button, the ‘Advanced’ window will be displayed.
44SunGard Bi-Tech LLC

InsightSection 3: Using Insight: Tutorial
The ‘Advanced’ window enables you to set the parameters of use for your menu scheme. The ‘Advanced’ box provides you with three options. Clicking “Other users may derive from this menu scheme” will allow others on your network to use your scheme in developing menu schemes of their own. Clicking “Others may use this menu scheme” will allow others to use your scheme, but not to change it. Finally, clicking “Derive from existing menu scheme” will allow you to incorpo-rate your new “favorite” within an existing scheme. This option will be inactive until you select an existing menu scheme.
After you have set the parameters of use in the ‘Advanced’ window, click ‘Next’and you can select the name for your menu scheme in the ‘General’ window.
After opening the ‘General’ window, click in the “Menu Scheme” box, drag over “Untitled” and enter the name of your “Menu Scheme.” The menu scheme name will be displayed in the “Menu Scheme” box in the tool bar. After replacing the default name (untitled) with your menu scheme name, you can begin to develop the structure of your scheme by selecting the “Menu Definition” name.
To add a “Menu Definition,” click the “Add” ( ) icon and complete the modifica-tion process as detailed above.
45SunGard Bi-Tech LLC

InsightSection 3: Using Insight: Tutorial
Using Menu Scheme Functions
To run a specific “favorite”, simply click the “Menu Scheme” window, drag down to the desired “Menu Scheme” option and release. Note that there may be a num-ber of favorites under each “Menu Definition” heading. As you choose a “Menu Scheme” from the menu scheme box the menu definitions corresponding to that specific scheme will be displayed in the top menu bar between the View and Win-dow menu options.
In the example above, the Menu Scheme is “Menu #1.” The menu definition options are “Batch Menu” and “Another Menu.” Specific functions are available under each menu definition. Insight enables you to create several different Menu
Schemes each with its own “favorite” keys:
However, Insight also allows you to select a specific Menu Scheme by clicking the menu scheme box and typing the first letter in the name of the desired Menu Scheme. The example above includes a Menu Scheme defined as “Menu.Scheme.#1.” You may select this option by clicking the Menu Scheme Box and typing “m” on the keyboard. This direct selection method is very helpful if you have created several Menu Scheme options. If you have several menus with the same first letter, Insight will display them in alphabetical order. When select-ing an option, typing the letter again will display the next menu option that begins with that letter.
After your Menu Scheme options have been created, Insight provides you with additional methods for direct access to the IFAS functions including “Icon But-ton,” “Menu Bar,” “Shortcut Key,” and “ALT Key” options.
Using The Insight “Icon Button,” “Menu Bar,” “Shortcut Key,” and “ALT Key” Options
46SunGard Bi-Tech LLC

InsightSection 3: Using Insight: Tutorial
Icon Button Option
There are four methods for executing IFAS functions that allow you to gain direct access to specific functions via the “Menu Schemes” you have developed. The most direct method is the “Icon Button” option. As you utilize the “Add to Menu Scheme” option, the corresponding icon buttons will be placed in the menu bar as shown below. These icon buttons are displayed below the “Output” tool bar, and above the “Explorer” tool bar. In the screen displayed below, the icon buttons are displayed below the Abacus, “Explorer,” and “Add to Favorites” icons.
If the mouse pointer is held over an icon button, the name will be displayed below the icon and in the status bar at the bottom of the screen. You may execute these options simply by clicking the icon button. In addition to the icon buttons, the menu definition names are displayed in the menu bar between the View and Win-dow options.
Menu Bar Option
You may execute specific “favorites” by choosing them from the menu definitions displayed in the menu bar. To select a “favorite,” simply click the menu definition in the menu bar. The corresponding “favorite” options will be displayed. Double-click on the “favorite” of your choice, and it will be executed.
If you wish to execute your “favorite” option from the keyboard, you can simply develop a “shortcut key.”
Shortcut Key Option
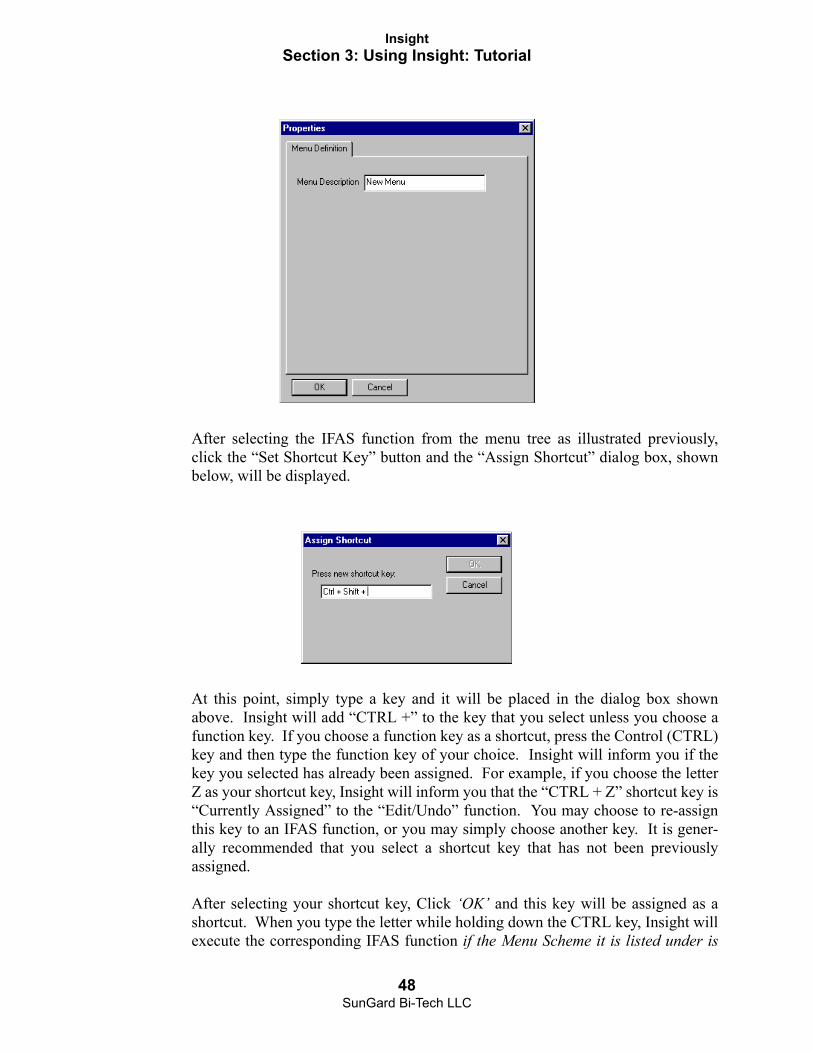
In order to develop a shortcut key for an IFAS function, choose the “Add Action” option from the ‘Customize’ option under the Edit menu or click the “Add to Menu Scheme” icon ( ). Note that the “Add to Menu” icon is inactive until you select a function, subsystem or screen. As discussed previously in the “Insight Menu Scheme” section, click the “Add” ( ) icon, and choose the “Add Action” option. This will open up the ‘Properties’ window as shown below.
47SunGard Bi-Tech LLC
InsightSection 3: Using Insight: Tutorial
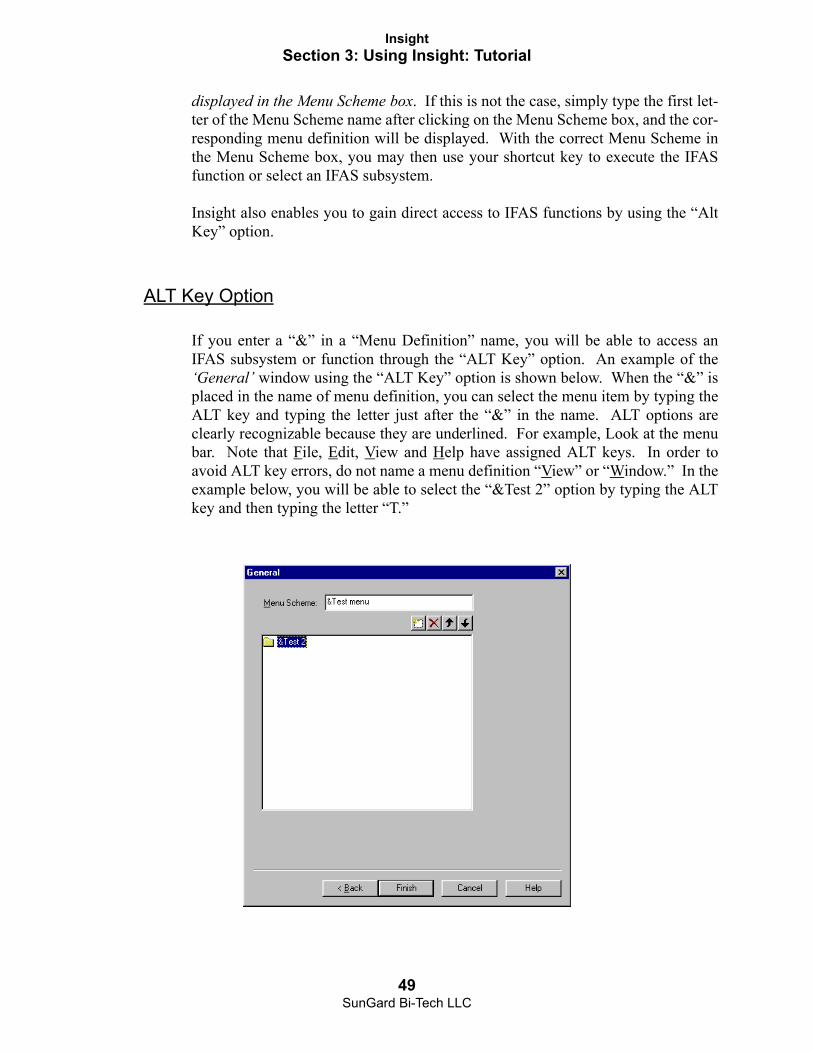
After selecting the IFAS function from the menu tree as illustrated previously, click the “Set Shortcut Key” button and the “Assign Shortcut” dialog box, shown below, will be displayed.
At this point, simply type a key and it will be placed in the dialog box shown above. Insight will add “CTRL +” to the key that you select unless you choose a function key. If you choose a function key as a shortcut, press the Control (CTRL) key and then type the function key of your choice. Insight will inform you if the key you selected has already been assigned. For example, if you choose the letter Z as your shortcut key, Insight will inform you that the “CTRL + Z” shortcut key is “Currently Assigned” to the “Edit/Undo” function. You may choose to re-assign this key to an IFAS function, or you may simply choose another key. It is gener-ally recommended that you select a shortcut key that has not been previously assigned.
After selecting your shortcut key, Click ‘OK’ and this key will be assigned as a shortcut. When you type the letter while holding down the CTRL key, Insight will execute the corresponding IFAS function if the Menu Scheme it is listed under is
48SunGard Bi-Tech LLC
InsightSection 3: Using Insight: Tutorial
displayed in the Menu Scheme box. If this is not the case, simply type the first let-ter of the Menu Scheme name after clicking on the Menu Scheme box, and the cor-responding menu definition will be displayed. With the correct Menu Scheme in the Menu Scheme box, you may then use your shortcut key to execute the IFAS function or select an IFAS subsystem.
Insight also enables you to gain direct access to IFAS functions by using the “Alt Key” option.
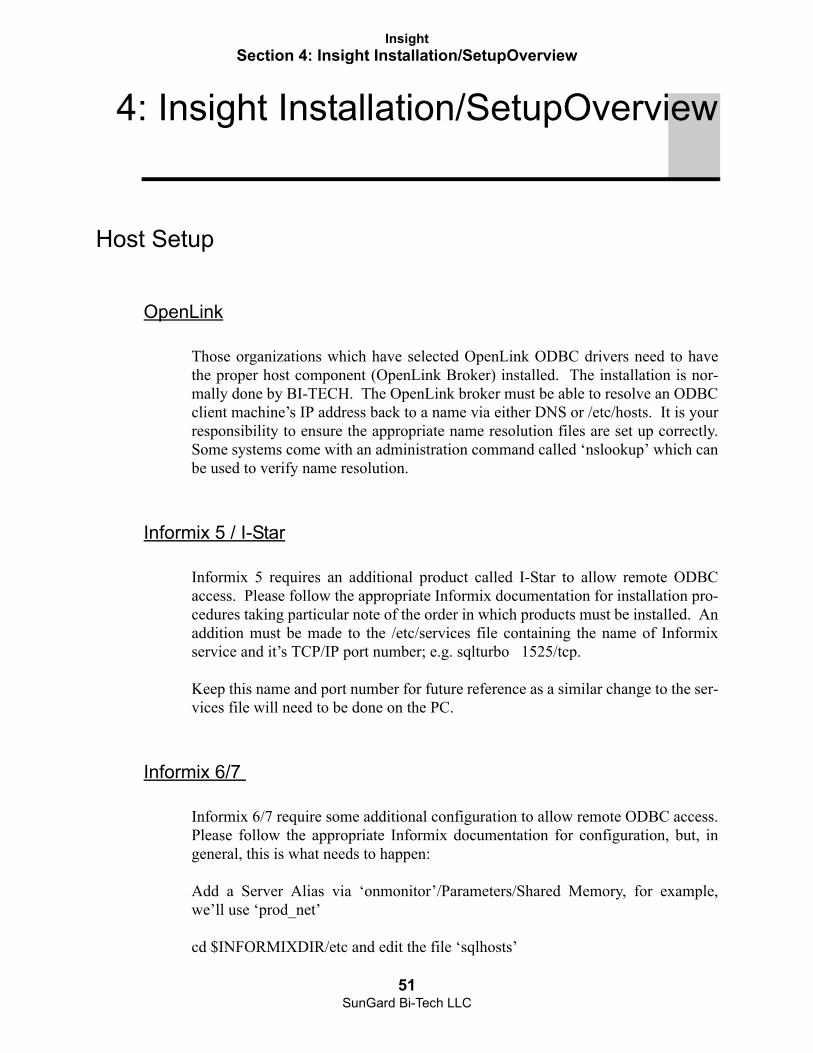
ALT Key Option
If you enter a “&” in a “Menu Definition” name, you will be able to access an IFAS subsystem or function through the “ALT Key” option. An example of the ‘General’ window using the “ALT Key” option is shown below. When the “&” is placed in the name of menu definition, you can select the menu item by typing the ALT key and typing the letter just after the “&” in the name. ALT options are clearly recognizable because they are underlined. For example, Look at the menu bar. Note that File, Edit, View and Help have assigned ALT keys. In order to avoid ALT key errors, do not name a menu definition “View” or “Window.” In the example below, you will be able to select the “&Test 2” option by typing the ALT key and then typing the letter “T.”
49SunGard Bi-Tech LLC

InsightSection 3: Using Insight: Tutorial
After the “Menu Definition” has been selected with the ALT key, you can select a “favorite” under that option by entering the first letter in the name of the desired “favorite” option. You may also assign an ALT key directly to your an IFAS func-tion by placing the “&” in the name of your “favorite”.
This tutorial has demonstrated the ease with which Insight enables you to navigate within IFAS and select subsystems, functions, and screens. As illustrated, Insight provides IFAS users with several simple methods for locating subsystems and executing functions. The “Explorer” option enables users to make a series of point-and-click choices to locate specific functions. The “Type Ahead” and “History” options enable you to return to functions or to enter the appropriate mask for direct access. Additionally, you may choose functions from the menu bar, click icon buttons, or utilize shortcut keys and ALT keys for direct execution of IFAS functions. Whether you are new to IFAS or a seasoned subsystem navigator, we are confident that you will find Insight to be a fast and efficient link to IFAS.
50SunGard Bi-Tech LLC
InsightSection 4: Insight Installation/SetupOverview
4: Insight Installation/SetupOverview
Host Setup
OpenLink
Those organizations which have selected OpenLink ODBC drivers need to have the proper host component (OpenLink Broker) installed. The installation is nor-mally done by BI-TECH. The OpenLink broker must be able to resolve an ODBC client machine’s IP address back to a name via either DNS or /etc/hosts. It is your responsibility to ensure the appropriate name resolution files are set up correctly. Some systems come with an administration command called ‘nslookup’ which can be used to verify name resolution.
Informix 5 / I-Star
Informix 5 requires an additional product called I-Star to allow remote ODBC access. Please follow the appropriate Informix documentation for installation pro-cedures taking particular note of the order in which products must be installed. An addition must be made to the /etc/services file containing the name of Informix service and it’s TCP/IP port number; e.g. sqlturbo 1525/tcp.
Keep this name and port number for future reference as a similar change to the ser-vices file will need to be done on the PC.
Informix 6/7
Informix 6/7 require some additional configuration to allow remote ODBC access. Please follow the appropriate Informix documentation for configuration, but, in general, this is what needs to happen:
Add a Server Alias via ‘onmonitor’/Parameters/Shared Memory, for example, we’ll use ‘prod_net’
cd $INFORMIXDIR/etc and edit the file ‘sqlhosts’
51SunGard Bi-Tech LLC
InsightSection 4: Insight Installation/SetupOverview
Add a line which reads:
prod_net<tab>onsoctcp<tab>yourhostname<tab>prod_remote
where prod_net is the alias you specified in onmonitor, and yourhostname is the name of your machine, and prod_remote will be the name referenced to in the PC ODBC configuration. Note: some systems use ontlitcp instead of onsoctcp.
Then edit /etc/services, find a free port number (greater than 1024), and add the line:
prod_remote 1528/tcp
replace 1528 with your free port number.
Keep this name and port number for future reference as a similar change to the ser-vices file will need to be done on the PC.
Creation of System Catalog
IFAS PC applications require a set of tables accessible via ODBC in which to store application specific information as well as data necessary to simplify the connec-tion process.
In general, there should be ONE such set of tables within an organization, and ide-ally, it should be co-located with your primary IFAS/reporting database.
An Informix script that creates the proper tables is installed with BI-TECH’s Sys-tem Administrator product; please refer to the Admin manual for further instruc-tions.
It is OK to install the software on the PC before you create the system catalog, but the first time the application is run it will prompt for the location of the system cat-alog.
52SunGard Bi-Tech LLC
InsightSection 4: Insight Installation/SetupOverview
PC Setup
Requirements
Windows 95/NT
This product requires Window 95 or NT 3.51 or greater.
Microsoft has announced a patch for Windows 95 which corrects a memory leak in programs which use WinSock heavily. In our testing without the patch, we have not experienced significant memory leak problems and therefore feel the installa-tion of the patch is entirely optional. It may however, provide some benefits if you use other WinSock-based applications.
For more information, please see:
http://www.microsoft.com/windows/software/krnlupd.htm dated April 11, 1996.
TCP/IP Configured
This product requires a properly configured TCP/IP stack; the current configura-tion can be found via the Control Panel applet ‘Network’, under the ‘Protocols’ tab. Please consult the appropriate Windows documentation for assistance in con-figuring TCP/IP.
Test Utilities
BI-TECH provides utilities to check certain components of your TCP/IP and ODBC configuration. They can be found on the ‘NETWORK CONFIGURATION TOOLS’ diskette.
When executed, DBTST.EXE will present a single menu called ‘Test’. Within this menu there are several options, including ‘Host Lookup’ and ‘Service Lookup’. We recommend that each of these options be tested and confirmed. (Note: Only run ‘Service Lookup’ if you are installing the InterSolv ODBC driver.)
When SECLIENT.EXE is executed, you will be prompted for the IP address of the host machine (this address is client specific) and the value of the echo service (this
53SunGard Bi-Tech LLC
InsightSection 4: Insight Installation/SetupOverview
value should always be 7). After these numbers have been properly entered, click ‘OK’. When configured correctly, ‘FD_READ’ messages should appear in the window.
Windows 95 and NT come with a ‘ping’ utility which can be used to verify (at a low level) that connectivity exists between the PC and the host; e.g., ping 172.20.1.4 or ping casper.
ODBC
Openlink
1. Insert the disk labeled “BITECH/OpenLink ODBC Driver” into drive A: (or any other valid drive).
2. Using the Control Panel, select ‘Add/Remove Programs’, then click on the ‘Install’ button.
3. Click GO! You will be asked to respond to the following prompts:
Data Source Name: Enter the name you will use to refer to the collection of set-tings that you are now creating (required). We recommend ‘System Catalog’.
Database Type: Select the correct Informix version from the list.
Database Name: Enter the name of the database which contains the System Cata-log.
Host Name: Enter the name of the machine which contains the above database.
User Name: Enter the users’ host login ID.
Informix I-Net
Note: If you wish to install INET onto a network server so that all users may run a shared copy of INET, proceed to the section titled “Shared INET Installa-tion.”
54SunGard Bi-Tech LLC
InsightSection 4: Insight Installation/SetupOverview
Standard Installation:
1. Insert the disk labeled “Informix INET” into drive A: (or any other valid drive)
2. Using the Control Panel, select ‘Add/Remove Programs’, then click on the ‘Install’ button.
3. You will be prompted for the installation path. It is recommended that you use the defaults whenever possible, which in this case is drive C:\. (If you are part of a network, you may wish to specify the appropriate network drive location for this installation.) After the path in the window is correct, click on the ‘OK’ button, or press RETURN.
4. The setup program will prompt you for the information it needs to create a basic connection to the database. When prompted for the host name, enter the name of the machine that holds the database to be accessed. At the prompt for Service Name, enter the name of the Informix service that is running on the host machine. You may need to contact your system administrator for this name. Finally, at the prompt for the user name, enter the logon ID of the user that will be logging on at this station.
5. After the setup program runs, you will be prompted to reboot your PC. Choose ‘Yes’ so that the changes you have made to the PC can take full effect. If you do not restart your computer at this point, your software will not function properly.
Shared INET Installation:
1. Before proceeding, you must determine whether INET has been installed to the network server. If there is no network directory titled “INFORMIX,” you probably need to install INET to the server.
2. To install INET to the server, run the standard installation process (steps 1-4), using the network path as the target installation location.
3. Once you have confirmed that INET has been installed to the network server, run the “setup.exe” program with the command line option “_fnetsetup.ins.” The system will prompt you for the path of the network location of INET.
4. The setup program will prompt you for the information it needs to create a basic connection to the database. When prompted for the host name, enter the name of the machine that holds the database to be accessed. This is usually a UNIX or HP3000 machine. At the prompt for Service Name, enter the name of the Informix service that is running on the host machine. You may need to contact
55SunGard Bi-Tech LLC

InsightSection 4: Insight Installation/SetupOverview
your system administrator for this name. Finally, at the prompt for the user name, enter the logon ID of the user that will be logging on at this station.
5. After the setup program runs, you will be prompted to reboot you PC. Choose ‘Yes’ so that the changes you have made to the PC can take full effect. If you do not restart your computer at this point, your software will not function prop-erly.
Intersolv
Note: If you are running Windows from a shared directory on a network server, proceed to the section titled “Shared Windows Installation.
Standard Installation
1. Insert the disk labeled “Informix ODBC Driver” into drive A: (or any other valid drive).
2. Using the Control Panel, select ‘Add/Remove Programs’, then click on the ‘Install’ button.
3. You will be prompted for the installation path. It is recommended that you use the defaults whenever possible, which in this case is drive C:\. (If you are part of a network, you may wish to specify the appropriate network drive location for this installation.) After the path in the window is correct, click on the ‘OK’ button, or press RETURN.
4. Next, double click on the ODBC icon from within the Control Panel. To con-figure the data source to be accessed by the ODBC Drivers select “Informix5 (Intersolv Informix5)” and click ‘Setup’. You will then be asked to respond to the following prompts:
Data Source Name: Enter the name you will use to refer to the collection of set-tings that you are now creating (required). We recommend ‘System Catalog’.
Description: Enter a brief description of the settings (optional).
Database Name: Enter the name of the database which contains the System Cata-log.
56SunGard Bi-Tech LLC
InsightSection 4: Insight Installation/SetupOverview
Default User Name: Enter the users’ host login ID.
Host Name: Enter the name of the machine which contains the above database.
Service Name: Enter the name of the service on the Host (required).
Protocol Type: Choose TCP-IP (required).
Cursor Behavior: Accept Default.
Yield Proc: Accept Default.
After entering this information, click ‘OK’ to accept these settings. Click ‘Close’.
Shared Windows Installation
1. Before proceeding, you must determine whether ODBC has been installed to the shared Window directory. To do this, browse the shared directory for the exist-ence of the following files:
QEINF506.DLLODBC.DLLODBC32.DLLODBCINST.DLL
2a. If each of these files exists in the shared directory, ODBC has most likely been installed correctly. (There are too many files in this directory to check them all, but the preceding list confirms the most critical files.)
2b. If these files are not found, the system administrator (or someone with “write permission”) must install ODBC to the shared directory. To do this, follow the Standard Installation directions (steps 1-4).
3. After confirming that ODBC is properly installed to the shared Windows direc-tory, you may install ODBC to the private directory for each user. To do this, run the “setup.exe” program with the command line option “_fnetsetup.ins.” This will configure the private Windows directory to function correctly using the ODBC files found in the shared Windows directory.
57SunGard Bi-Tech LLC

InsightSection 4: Insight Installation/SetupOverview
Insight Installation
1. Insert the disk labeled “Insight” into drive A: (or any other valid drive)
2. Using the Control Panel, select ‘Add/Remove Programs’, then click on the ‘Install’ button.
3. You will be prompted for the installation path. It is recommended that you use the defaults whenever possible, which in this case is drive C:\. (If you are part of a network, you may wish to specify the appropriate network drive location for this installation.) After the path in the window is correct, click on the ‘OK’ button, or press RETURN. Simply accept the default options and click Finish to complete the installation.
Configure Data Source for System Catalog
At least one ODBC connection must be defined via the Control Panel ‘ODBC’ applet. We recommend the name of this connection be ‘System Catalog’ as the application will prompt for this the first time (and only the first time) it is started. Because the prompt asks for the location of the System Catalog, and provides a list of available ODBC data sources, it makes the selection very easy if the System Catalog Data Source is appropriately named.
First time only, create/update the Connection Manager profiles.
Connection manager profiles allow the consolidation of a large amount of informa-tion needed to login and giving them an appropriate name.
The following information is required:
1. Database Host, Name, User, and Password2. Application Host, Name, User and Password3. IFAS User and Password
This setup need only be done once, as it is shared amongst all PCs – it is stored in the System Catalog.
The user specified during the ODBC login to the system catalog MUST be defined in Admin with Common/Connect/AddConnect privileges to configure/modify Connection profiles.
58SunGard Bi-Tech LLC

InsightSection 4: Insight Installation/SetupOverview
Note: These profiles are shared with CDD; deleting the profile will also delete any CDD reports tied to that profile. A warning box will appear enumerating every-thing that will be removed if you select OK.
From the Start Menu, select ‘IFAS’, then ‘Insight’; the Connection Manager win-dow appears.
If CDD is already installed, you may have existing profile; if appropriate, simply edit these connection profiles by double right-clicking on the icon. If no profiles appear, double click on ‘Make a new Connection.’
Some simple rules to follow: Any fields left blank will be prompted for during the login process. If the box, ‘Same as UNIX Host’, is checked, then the User/Pass-word fields will be propagated to the corresponding fields.
Resist the temptation to fill out ALL of the fields. Remember this profile is com-mon to all users, you generally want them to be prompted for at least a User and Password.
Insight Login Setup
After loading Insight, given proper security, you may modify the login process. The login process is established and modified in the ‘Edit Connection’ tabs. To access these tabs, right click on a connection option in the ‘Bi-Tech Connection Manager window and select ‘Edit Properties’ as shown below.
(Note: the ‘Bi-Tech Connection Manager’ is accessed by selecting ‘Pick Other’from the ‘Connect to . . .’ window as explained in section one.
59SunGard Bi-Tech LLC

InsightSection 4: Insight Installation/SetupOverview
The Edit Properties window contains several tabs that enable you to modify the login process.
‘General’ Tab
The ‘General’ tab enables you to select the name and icon for your connection. Note that you can select the connection icon as “Production,” “Test,” or “Other” depending upon the status of your system.
‘UNIX Host’ Tab
The ‘UNIX Host’ tab allows you to establish the host name, User ID, and user
60SunGard Bi-Tech LLC
InsightSection 4: Insight Installation/SetupOverview
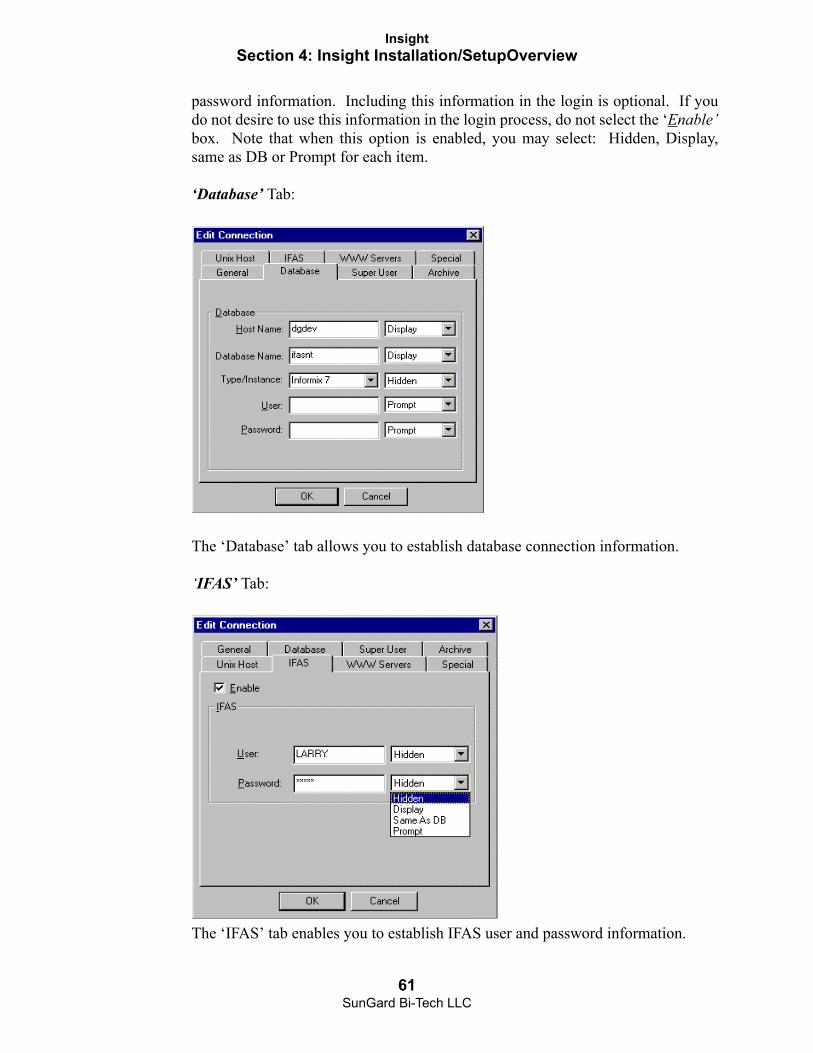
password information. Including this information in the login is optional. If you do not desire to use this information in the login process, do not select the ‘Enable’ box. Note that when this option is enabled, you may select: Hidden, Display, same as DB or Prompt for each item.
‘Database’ Tab:
The ‘Database’ tab allows you to establish database connection information.
‘IFAS’ Tab:
The ‘IFAS’ tab enables you to establish IFAS user and password information.
61SunGard Bi-Tech LLC
InsightSection 4: Insight Installation/SetupOverview
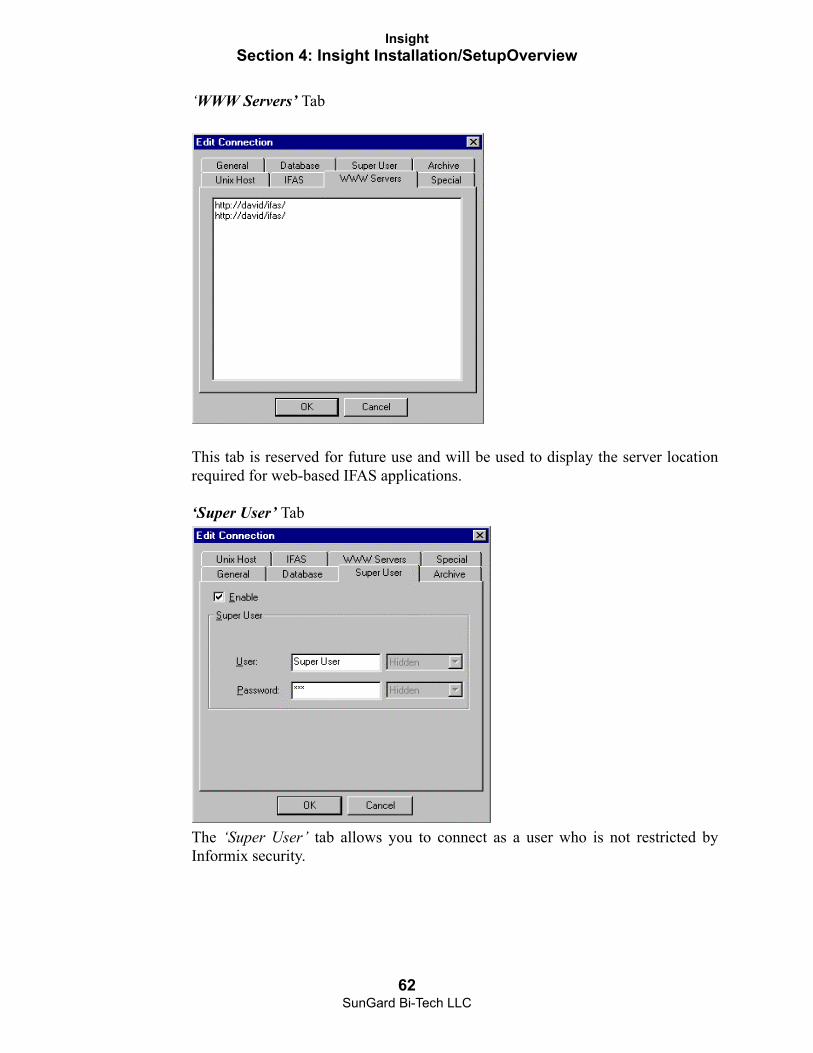
‘WWW Servers’ Tab
This tab is reserved for future use and will be used to display the server location required for web-based IFAS applications.
‘Super User’ Tab
The ‘Super User’ tab allows you to connect as a user who is not restricted by Informix security.
62SunGard Bi-Tech LLC

InsightSection 4: Insight Installation/SetupOverview
‘Special’ Tab:
The ‘Special’ tab is used to send additional commands down to the UNIX host when connecting.
‘Archive’ Tab:
This tab is used to maintain the additional database information that may be required for imaging. You may use this tab to establish an additional DB for imag-ing if necessary, or use the current DB as shown in the example above.
Insight enables you to customize the login procedure to best meet your needs. The login process can be greatly reduced by not selecting the “enable” boxes. Note that reducing the number of prompts in the login process does not compromise IFAS security.
63SunGard Bi-Tech LLC

InsightSection 4: Insight Installation/SetupOverview
64SunGard Bi-Tech LLC