Embed Size (px)
Citation preview

IBM TRIRIGA Application PlatformVersion 3 Release 4.0
Installation and Implementation Guide
���
NoteBefore using this information and the product it supports, read the information in “Notices” on page 91.
This edition applies to version 3, release 4, modification 0 of IBM TRIRIGA Application Platform and to allsubsequent releases and modifications until otherwise indicated in new editions.
© Copyright IBM Corporation 2011, 2014.US Government Users Restricted Rights – Use, duplication or disclosure restricted by GSA ADP Schedule Contractwith IBM Corp.
Contents
Chapter 1. IBM TRIRIGA ApplicationPlatform overview . . . . . . . . . . 1
Chapter 2. Installing IBM TRIRIGAApplication Platform . . . . . . . . . 3
Chapter 3. Overview of hardwareconfiguration . . . . . . . . . . . . 5Platform architecture . . . . . . . . . . . 5Servers . . . . . . . . . . . . . . . . 7Implementations . . . . . . . . . . . . . 8
Chapter 4. Installing the platform . . . . 9Overview of TRIRIGA Application Platforminstallation . . . . . . . . . . . . . . . 9
Before you install IBM TRIRIGA ApplicationPlatform . . . . . . . . . . . . . . . 9Types of installation . . . . . . . . . . 11Installation checklists . . . . . . . . . . 16
Installing TRIRIGA Application Platform on JBossApplication Server . . . . . . . . . . . . 19
Installing IBM TRIRIGA Application Platform onJBoss AS and Oracle Database . . . . . . . 19Installing IBM TRIRIGA Application Platform onJBoss AS and Microsoft SQL Server . . . . . 21
Installing IBM TRIRIGA Application Platform onRed Hat JBoss Enterprise Application Platform . . 23
Installing IBM TRIRIGA Application Platform onJBoss EAP and Oracle Database . . . . . . 23Installing IBM TRIRIGA Application Platform onJBoss EAP and Microsoft SQL Server . . . . . 25
Installing IBM TRIRIGA Application Platform onOracle WebLogic Server . . . . . . . . . . 27
Overview of IBM TRIRIGA Application Platforminstallation on WebLogic . . . . . . . . . 28Preparing WebLogic . . . . . . . . . . 28Installing IBM TRIRIGA Application Platform onWebLogic and Oracle Database . . . . . . . 29Installing IBM TRIRIGA Application Platform onWebLogic and Microsoft SQL Server . . . . . 33
Installing TRIRIGA Application Platform on IBMWebSphere Application Server . . . . . . . . 38
Overview of IBM TRIRIGA Application Platforminstallation on WebSphere . . . . . . . . 38Preparing WebSphere . . . . . . . . . . 38Installing IBM TRIRIGA Application Platform onWebSphere and Oracle Database . . . . . . 39
Installing IBM TRIRIGA Application Platform onWebSphere and Microsoft SQL Server . . . . 41
Installing IBM TRIRIGA Application Platform withOracle Database export files . . . . . . . . . 43
Overview of Oracle Database export installation 43Installing IBM TRIRIGA Application Platform onJBoss, WebLogic, or WebSphere. . . . . . . 43
Configuring IBM TRIRIGA Application Platformwith Brava . . . . . . . . . . . . . . 45
Overview of Brava installation . . . . . . . 45Verification checklist . . . . . . . . . . . 46
Chapter 5. Configuring the platform . . 49Properties files . . . . . . . . . . . . . 49
TRIRIGACONVERSION.properties . . . . . 49TRIRIGAMIDDLEWARE.properties . . . . . 50TRIRIGAWEB.properties . . . . . . . . . 51TRIRIGAWEBDYNAMIC.properties . . . . . 75TRIRIGAWEBLOGICPOOL.properties . . . . 75
License files . . . . . . . . . . . . . . 75Before IBM TRIRIGA Application Platform 3.2. . 76IBM TRIRIGA Application Platform 3.2 and later 76
Context path . . . . . . . . . . . . . . 78Connection pools . . . . . . . . . . . . 78Cross-site scripting filters . . . . . . . . . . 78Configuring agent processes . . . . . . . . . 79
Business process agents . . . . . . . . . 79Administrator console . . . . . . . . . . 80Attaching Microsoft Outlook messages . . . . 80Configuring the SMTP port in Linux . . . . . 81
Configuring JBoss settings . . . . . . . . . 82Disabling file compression in JBoss . . . . . 82Running JBoss as a service on Windows servers 82Editing the display of JBoss environment data . . 83
Chapter 6. Workflow cleanup log . . . 85Log format . . . . . . . . . . . . . . 85Reported issues . . . . . . . . . . . . . 86
Suggested actions . . . . . . . . . . . 86Automatic repairs . . . . . . . . . . . 87
Notices . . . . . . . . . . . . . . 91Privacy Policy Considerations . . . . . . . . 92Trademarks . . . . . . . . . . . . . . 93
© Copyright IBM Corp. 2011, 2014 iii

iv © Copyright IBM Corp. 2011, 2014

Chapter 1. IBM TRIRIGA Application Platform overview
The IBM® TRIRIGA® Application Platform solution provides organizations withgraphical and configuration tools to rapidly configure applications and extend theuse and value of the IBM TRIRIGA applications. The use of standards-basedtechnology and interfaces and a high-performance workflow process engine driveinteroperability with critical business systems.
The IBM TRIRIGA Application Platform is a runtime environment for the rapidprocessing of transactions. The platform provides the underlying technology forthe IBM TRIRIGA applications and includes the Administrator Console, DocumentManager, IBM TRIRIGA Connector for Business Applications for integration withexternal systems, and linkage to computer-aided design (CAD) applications. TheIBM TRIRIGA Application Platform also provides set of browser-based tools thatare used to create and modify the applications that IBM TRIRIGA delivers.
With the IBM TRIRIGA comprehensive solution, you can:v Configure IBM TRIRIGA applications without changing source code.v Create regulatory reports in the same environment as daily work processes.v Reduce time and costs to implement and maintain IBM TRIRIGA applications.v Deliver applications through consistent portals.v Protect unique configurations through application upgrades.v Modify an existing business object along with relevant data field definitions,
lifecycle states, and workflows.
© Copyright IBM Corp. 2011, 2014 1

2 © Copyright IBM Corp. 2011, 2014
Chapter 2. Installing IBM TRIRIGA Application Platform
You use the IBM TRIRIGA Application Platform to run, build, and manage theIBM TRIRIGA applications. Installing the platform involves preparing theapplication and database servers, verifying the installation, configuring theplatform settings, and inspecting log reports for installation issues. IBM TRIRIGAApplication Platform can be installed on a variety of platforms. Use thisinstallation information to plan and install IBM TRIRIGA Application Platform inthe configuration that suits your environment and your needs.
© Copyright IBM Corp. 2011, 2014 3

4 © Copyright IBM Corp. 2011, 2014

Chapter 3. Overview of hardware configuration
Before you install the IBM TRIRIGA Application Platform, you must determine theplatform architecture, server types, and implementation sizes that apply to yourbusiness needs.
Platform architectureEnterprise software applications are n-tier, where "n" can represent any number oftiers, or layers of processing. The IBM TRIRIGA Application Platform is a logicalfour-tier system: web, application (and process), tools, and database.
The layering of an application into logical tiers also separates the functions in eachtier. In terms of physical tiers, each physical tier describes the actual hardwareconfiguration, the pieces of equipment, and the function of each piece.
© Copyright IBM Corp. 2011, 2014 5
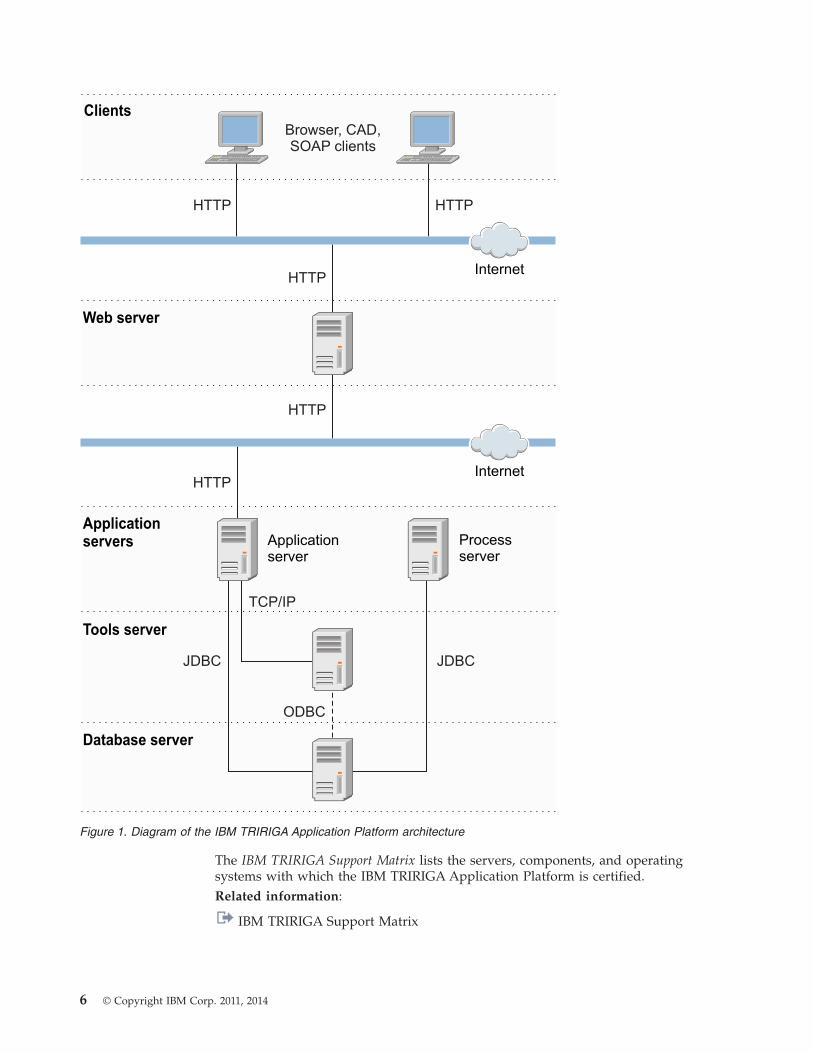
The IBM TRIRIGA Support Matrix lists the servers, components, and operatingsystems with which the IBM TRIRIGA Application Platform is certified.Related information:
IBM TRIRIGA Support Matrix
Processserver
Applicationserver
HTTP
Browser, CAD,SOAP clients
JDBC
Clients
Web server
Tools server
Database server
Applicationservers
TCP/IP
HTTP HTTP
JDBC
ODBC
InternetHTTP
HTTP
Internet
Figure 1. Diagram of the IBM TRIRIGA Application Platform architecture
6 © Copyright IBM Corp. 2011, 2014
ServersThe IBM TRIRIGA Application Platform uses many different types of servers. Theword "server" is often used to mean a physical piece of equipment, but it can alsorepresent a logical separation that is based on function. Each of these logicalservers can be collocated on physical servers, or separated so that each logical tieris installed on their own physical server.
Alternatively, each of these logical tiers can be installed on one or more virtualservers. In turn, these virtual servers can be on a physical server, or a cluster ofphysical servers in a virtual server cluster.
The following logical function-based servers are used in the IBM TRIRIGAApplication Platform:
Web serverReceives HTTP requests for web content. Also referred to as a front-endserver.
Application serverCarries out the user business logic with JBoss Application Server, Red HatJBoss Enterprise Application Platform, WebLogic Server, or WebSphere®
Application Server.
Process serverCarries out the background processing and analytics with Red Hat JBossEnterprise Application Platform, WebLogic Server, or WebSphereApplication Server.
Tools serverCarries out the reporting. Holds other third-party tools such as Brava!Enterprise Viewer for IBM TRIRIGA.
Database serverHolds the relational database and supported database management systemsuch as Oracle Database or Microsoft SQL Server.
Web server
The web server is the tier with which each user web browser communicates.Examples of web servers include IBM HTTP Server, Microsoft Internet InformationServices (IIS), and Apache HTTP Server. The web server handles HTTP requestsonly and does not run business logic. The IBM TRIRIGA Application Platform alsosupports Secure Sockets Layer (SSL) by using HTTPS. Typically, HTTP uses port 80(non-secure connection) and 443 (secure connection), but it can be configured touse other ports. Each time a user requests a JavaServer Page (JSP), the web serverpasses the request to the application server for processing. The web server is aphysical manifestation of the web tier.
Application server
The application server is a Java virtual machine (JVM) with an instance of theruntime application. This server runs most of the business logic. Application serverprocesses are CPU-intensive and require a great deal of memory. The applicationtier consists of JavaServer Pages (JSP) and Java classes. The Java™ 2 Platform,Enterprise Edition (J2EE) application server provides a JSP container, a databaseconnection pool, and transaction management services. The application server is aphysical manifestation of the application (middleware) tier.
Chapter 3. Overview of hardware configuration 7
Process server
The process server is a JVM with an instance of the runtime application that is setup as a dedicated processing or analytics engine. This server is configured almostexactly like an application server, but no users sign on to this server. It handles allworkflow requests that are queued from users or by the IBM TRIRIGA software.The process server is a physical manifestation of the application (middleware) tier.
Tools server
The tools server houses the two major third-party extensions from IBM TRIRIGA.This server can run the optional Brava! Enterprise Viewer for IBM TRIRIGA oroptional Business Intelligence and Reporting Tools (BIRT) process server or both.You can designate a IBM TRIRIGA application server as a BIRT process server. Ifyou choose to run both BIRT and IBM TRIRIGA on the same server, expect BIRTreport handling operations to increase the load on the server. BIRT is run in thesame JVM as IBM TRIRIGA in all cases.
Brava is a web-based client-server package that provides view, markup, andcollaboration functions. Viewers use a thin client to display documents that arerendered by the server. This process eliminates many compatibility issues andlowers the number of software applications that are needed by users.
Database server
The database server runs the database process. The database is where data isstored. The major database servers use Structured Query Language (SQL) to storeand retrieve data. The Oracle Database server and Microsoft SQL Server use SQL.But each server is a different database engine and each has its own extended SQLfor competitive differentiation. The application tier communicates with thedatabase tier by using JDBC connection pools. The database server is a physicalmanifestation of the database tier.
ImplementationsThe physical configuration of any system depends greatly on the number of usersand amount of data that it supports. For information about IBM TRIRIGAApplication Platform system implementations, see the IBM TRIRIGA Best Practicesfor System Performance.
Before you deploy IBM TRIRIGA in your organization, plan how the usercommunity should access TRIRIGA applications. IBM TRIRIGA requires a username and password to gain access to applications. Refer to the Single Sign-OnSetup User Guide if you want to configure single sign-on (SSO) to manage useraccess to TRIRIGA applications.Related information:
Best Practices for System Performance
8 © Copyright IBM Corp. 2011, 2014
Chapter 4. Installing the platform
You can select the IBM TRIRIGA Application Platform installation process thatapplies to your hardware configuration, whether you have a JBoss ApplicationServer (AS),Red Hat JBoss Enterprise Application Platform (EAP), Oracle WebLogicServer, or IBM WebSphere Application Server. For added flexibility, you can alsoinstall the platform with Oracle Database export files.
Overview of TRIRIGA Application Platform installationAfter you determine the platform architecture, server types, and implementationsizes that apply to your business needs, you are ready to install the TRIRIGAApplication Platform.
Before you install IBM TRIRIGA Application PlatformVerify IBM TRIRIGA Application Platform hardware and software requirementsbefore you start the installation process.
The IBM TRIRIGA Support Matrix provides information about the IBM TRIRIGAsupported software products. It lists the application servers, database servers, webservers, third-party servers, third-party components, and client options with whichthe IBM TRIRIGA Application Platform is certified.
Furthermore, the following list outlines the hardware requirements and othersoftware considerations:
MemoryThe database server must have at least 3 GB of physical dedicated memory.
Disk spaceYou must prepare the following disk space requirements:v If you download all components of an installation, you need at least 1.8
GB of disk space.v In addition, the installation occupies approximately 300 MB of disk
space.v For the installer to run, you need at least 160 MB in temporary space on
the hard disk.v For a new installation, you need at least 7 GB within the database.v Each WebSphere Application Server profile requires approximately 1 GB
of disk space.
Application server and database serverThe application server and database server must be in the same physicallocation, such as a room or building to avoid issues with network latency.Minimize the number of segments or along the path between theapplication server and the database server. The minimum network speedthat is required is fast Ethernet (100 Mbps), switched.
Application server softwareThe Red Hat JBoss Enterprise Application Platform, WebLogic Server, orWebSphere Application Server software must be installed before you runthe IBM TRIRIGA Application Platform installer.
© Copyright IBM Corp. 2011, 2014 9

Red Hat JBoss Enterprise Application PlatformIf you choose to install Red Hat JBoss Enterprise Application Platform,prepare for the following guidelines:v For JBoss Application Server (AS), you can download the
JBoss5.1.0.GA.zip installation file from http://sourceforge.net/projects/jboss/files/JBoss/JBoss-5.1.0.GA/. In Microsoft Windows, extract the.zip file to create a folder with the path of C:\JBoss\jboss-5.1.0.GA.When you are requested by the IBM TRIRIGA Application Platforminstaller, specify the C:\JBoss\jboss-5.1.0.GA folder as the completepath to your JBoss directory. This path is the typical path. If you choosean alternative path, the name of the JBoss directory must not have aspace.
v For Red Hat JBoss Enterprise Application Platform (EAP), you candownload the jboss-eap-5.1.0.zip installation file fromhttp://www.redhat.com/products/jbossenterprisemiddleware/application-platform/. In Microsoft Windows, extract the .zip file tocreate a folder with the path of C:\jboss-eap-5.1\jboss-as\. When youare requested by the IBM TRIRIGA Application Platform installer,specify the C:\jboss-eap-5.1\jboss-as\ folder as the complete path toyour JBoss directory. This path is the typical path. If you choose analternative path, the name of the JBoss directory must not have a space.
v You must not install IBM TRIRIGA Application Platform on apre-configured Red Hat JBoss Enterprise Application Platform instance.Do not modify any files after unzipping the Red Hat JBoss EnterpriseApplication Platform .zip file. You can configure Red Hat JBossEnterprise Application Platform after the IBM TRIRIGA ApplicationPlatform installation is complete.
Database server softwareOracle Database or Microsoft SQL Server must be installed before you runthe IBM TRIRIGA Application Platform installer. During the installationprocess, you are required to provide the database administrator (DBA) userID and password.
Oracle Database installationsTable spaces for new Oracle Database installations must be created beforeyou run the installer. Analyze your base data. This data includesdocuments, leases, and portfolio data, such as people, organizations, assets,and locations. Set the sizes for the TRIDATA_DATA table space andTRIDATA_INDX table space to support at least this base data. Theminimum size for the TRIDATA_DATA table space and TRIDATA_INDXtable space is 2.5 GB each. If you use existing IBM TRIRIGA table spaces,verify that the autoextend option is enabled.
Java Development KitThe Java Development Kit (JDK) must be installed before you run the IBMTRIRIGA Application Platform installer. The JDK must be installed beforeyou run the IBM TRIRIGA application. Java must be running during anIBM TRIRIGA installation.
Security privileges and directory accessThe administrator or user who runs the IBM TRIRIGA ApplicationPlatform installation must have create access and write access to theinstallation root directory.
IBM TRIRIGA licenses (keys)Starting with IBM TRIRIGA Application Platform version 3.2, IBMTRIRIGA distributes software licenses in a separate license file for each
10 © Copyright IBM Corp. 2011, 2014
product. The license file names are in the formatLICENSE_IBM_TRIRIGA_[productname].properties (for example,LICENSE_IBM_TRIRIGA_Application_Platform.properties). You can continueto use an existing TRIRIGALICENSE.properties file if you have one until itexpires or you use a new product. For more information, see the topicabout license files.
Operating systemsIf you plan to install Tivoli Directory Integrator using the IBM TRIRIGAApplication Platform installation program on an AIX system, you mustinstall the GNU version of the tar utility. You can download the GNU tarRPM package for AIX from the IBM AIX Toolbox site (http://www-03.ibm.com/systems/power/software/aix/linux/toolbox/download.html).After you have installed it, update the system PATH variable to include thepath to the GNU tar utility. Use the tar --version command to ensurethat the system is configured to use the GNU version of tar as the default.
Related information:
IBM TRIRIGA Support Matrix
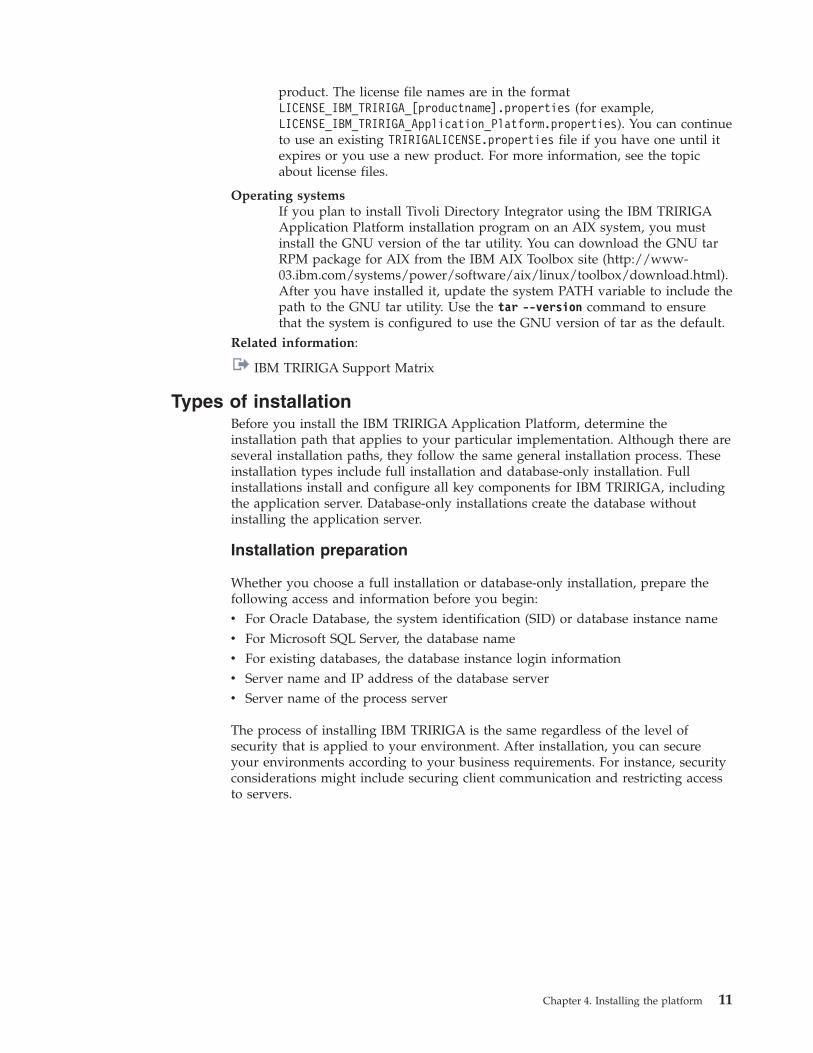
Types of installationBefore you install the IBM TRIRIGA Application Platform, determine theinstallation path that applies to your particular implementation. Although there areseveral installation paths, they follow the same general installation process. Theseinstallation types include full installation and database-only installation. Fullinstallations install and configure all key components for IBM TRIRIGA, includingthe application server. Database-only installations create the database withoutinstalling the application server.
Installation preparation
Whether you choose a full installation or database-only installation, prepare thefollowing access and information before you begin:v For Oracle Database, the system identification (SID) or database instance namev For Microsoft SQL Server, the database namev For existing databases, the database instance login informationv Server name and IP address of the database serverv Server name of the process server
The process of installing IBM TRIRIGA is the same regardless of the level ofsecurity that is applied to your environment. After installation, you can secureyour environments according to your business requirements. For instance, securityconsiderations might include securing client communication and restricting accessto servers.
Chapter 4. Installing the platform 11
Select the installer for youroperating system
Select installation location
Select installation type
Select new or upgrade installation
Installation of application serverand/or database
Select database type
Configure database connection
Configure databases
Optional: configure Brava! EnterpriseViewer for IBM TRIRIGA
Installation complete
Figure 2. Flow diagram for the general IBM TRIRIGA installation process
12 © Copyright IBM Corp. 2011, 2014

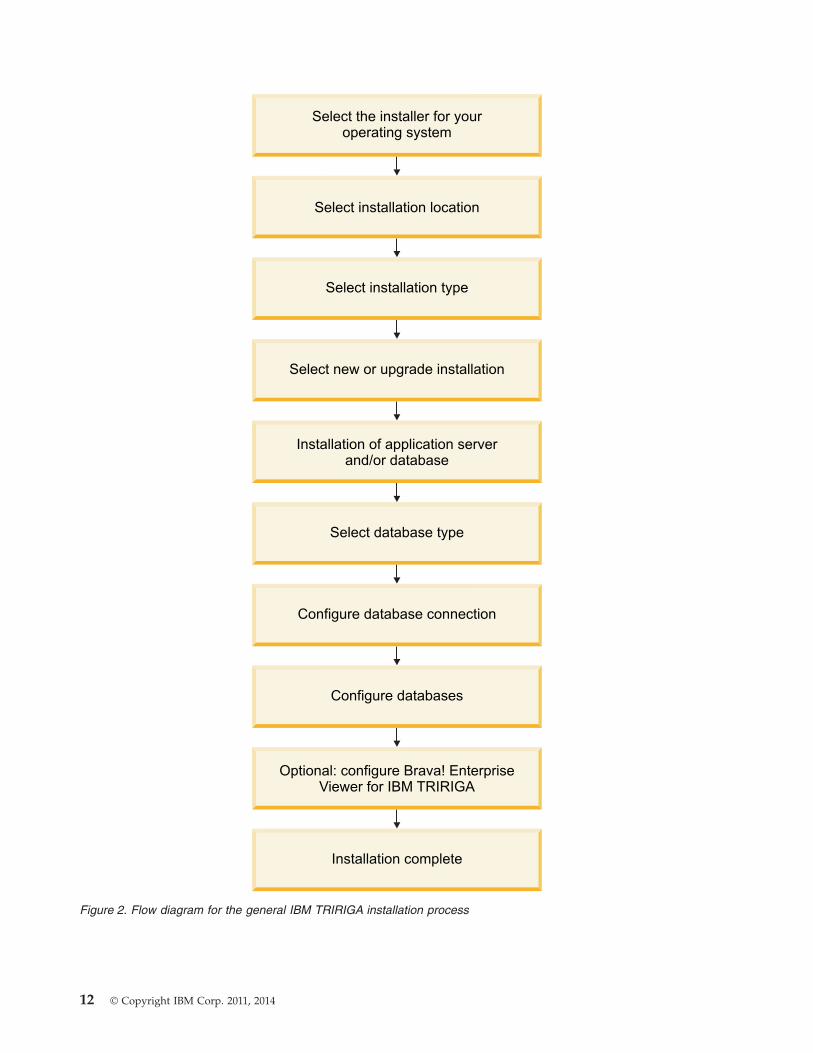
Full installation process
A full installation process includes installing the key components andconfigurations necessary for the IBM TRIRIGA platform and applications tooperate:v Application serverv Database scriptsv Databasev Optional: Configurations to connect to the tools server (or Brava server)
Chapter 4. Installing the platform 13
UpgradeNew installation
Oracle DatabaseMicrosoft SQL Server
Select the installer for youroperating system
Select installation location
Full installation
Installation of application serverand/or database
Configure database connection
Configure database
Optional: configure Brava! EnterpriseViewer for IBM TRIRIGA
Database creation
Installation complete
Figure 3. Flow diagram for the full IBM TRIRIGA installation process
14 © Copyright IBM Corp. 2011, 2014
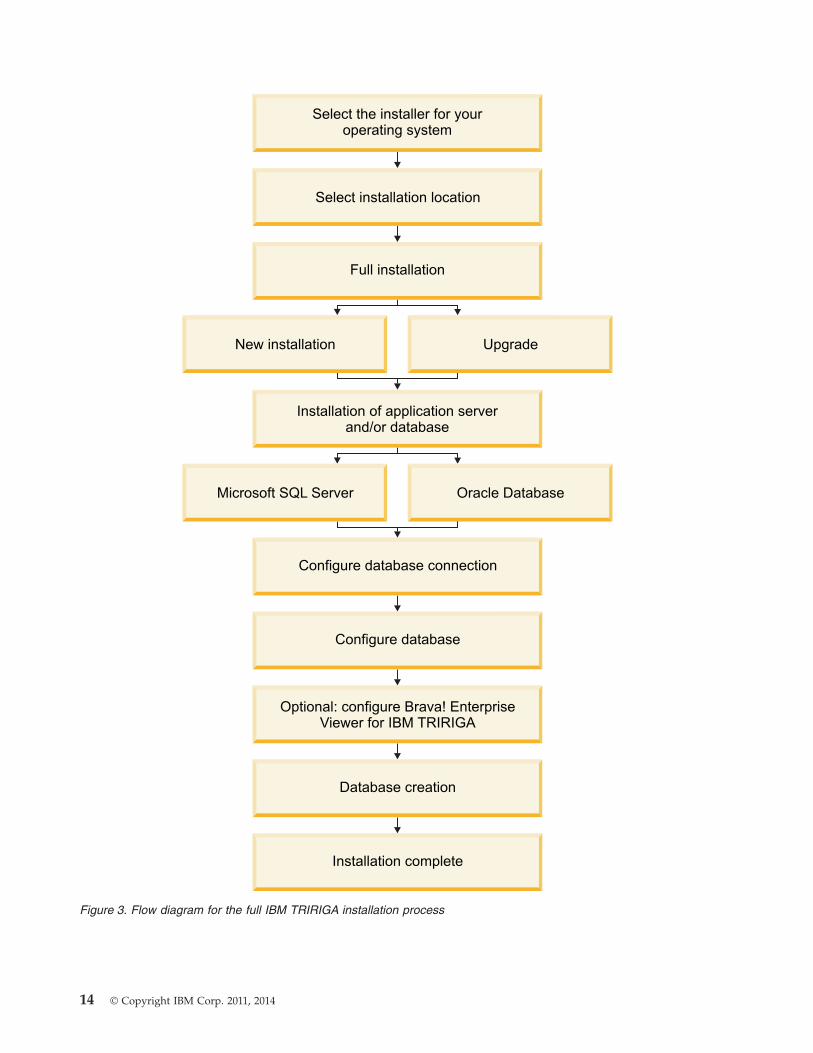
Database-only installation process
A database-only installation process creates the database without installing theapplication server. Do not select the database-only installation or upgrade unlessyou are directed to do so by the team responsible for planning the IBM TRIRIGAdeployment. If you install the database now and you install a newer version of theapplication server later, an incompatibility can occur between a new feature andthe database.
Chapter 4. Installing the platform 15
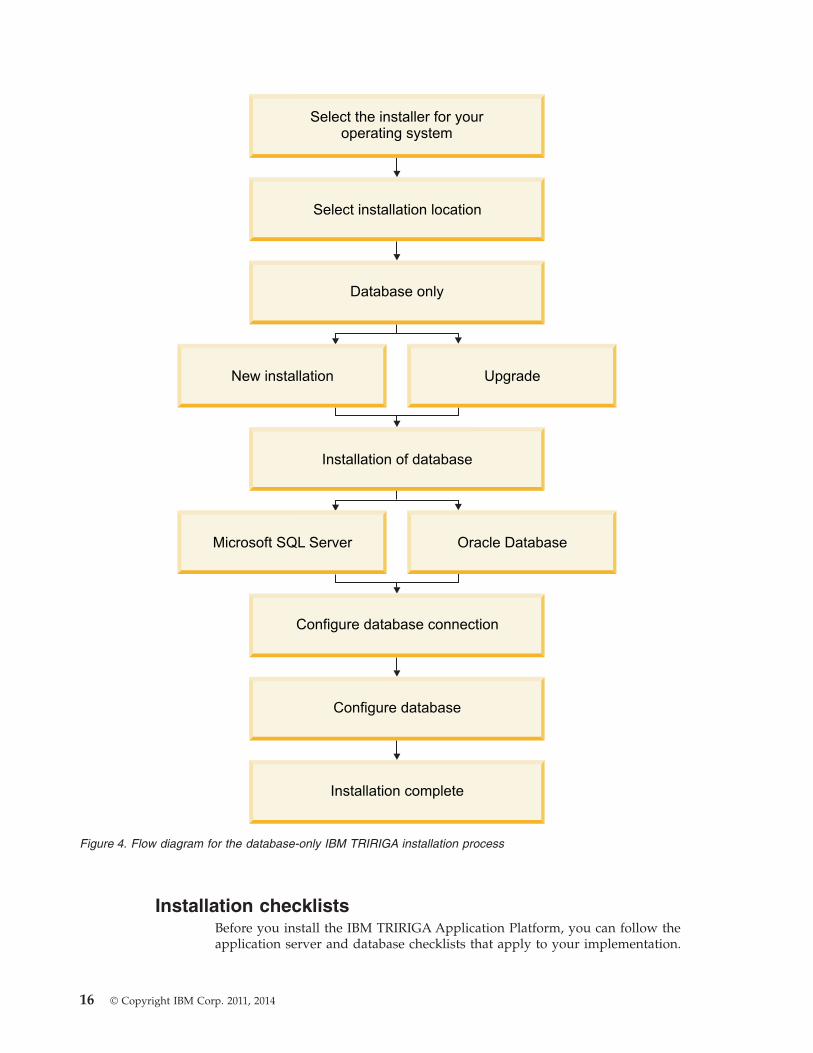
Installation checklistsBefore you install the IBM TRIRIGA Application Platform, you can follow theapplication server and database checklists that apply to your implementation.
Select the installer for youroperating system
Select installation location
Database only
Installation of database
Configure database connection
Configure database
Installation complete
New installation Upgrade
Microsoft SQL Server Oracle Database
Figure 4. Flow diagram for the database-only IBM TRIRIGA installation process
16 © Copyright IBM Corp. 2011, 2014
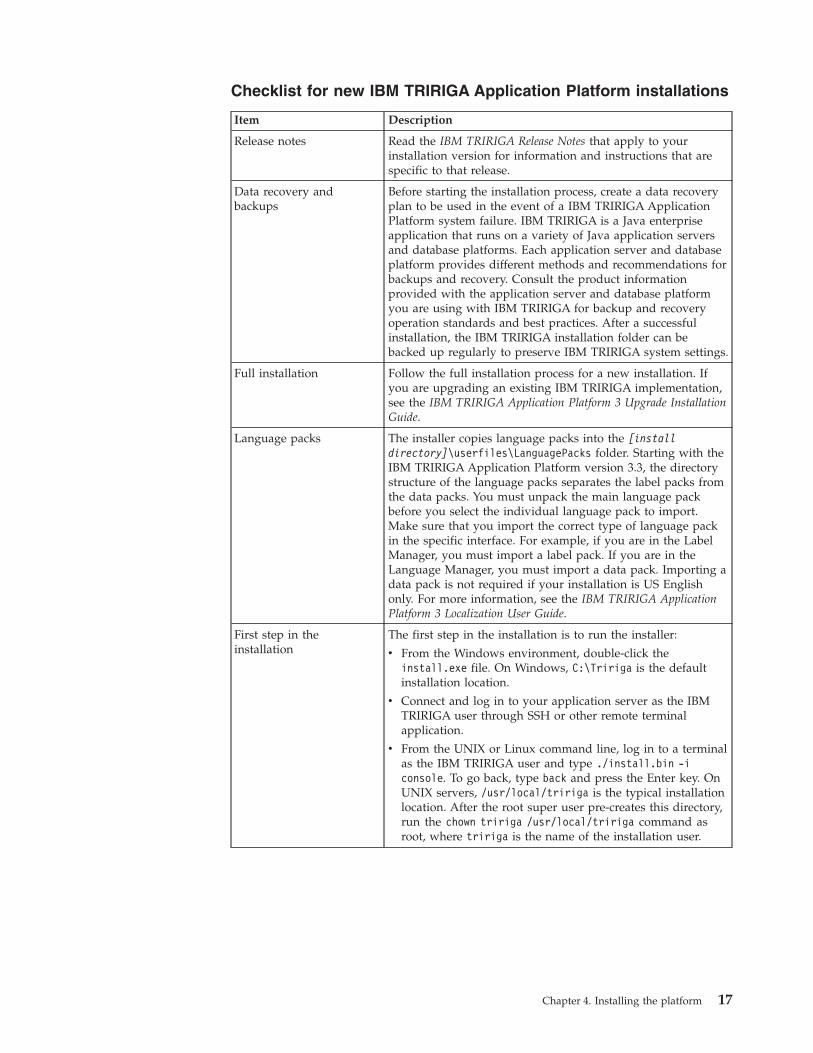
Checklist for new IBM TRIRIGA Application Platform installations
Item Description
Release notes Read the IBM TRIRIGA Release Notes that apply to yourinstallation version for information and instructions that arespecific to that release.
Data recovery andbackups
Before starting the installation process, create a data recoveryplan to be used in the event of a IBM TRIRIGA ApplicationPlatform system failure. IBM TRIRIGA is a Java enterpriseapplication that runs on a variety of Java application serversand database platforms. Each application server and databaseplatform provides different methods and recommendations forbackups and recovery. Consult the product informationprovided with the application server and database platformyou are using with IBM TRIRIGA for backup and recoveryoperation standards and best practices. After a successfulinstallation, the IBM TRIRIGA installation folder can bebacked up regularly to preserve IBM TRIRIGA system settings.
Full installation Follow the full installation process for a new installation. Ifyou are upgrading an existing IBM TRIRIGA implementation,see the IBM TRIRIGA Application Platform 3 Upgrade InstallationGuide.
Language packs The installer copies language packs into the [installdirectory]\userfiles\LanguagePacks folder. Starting with theIBM TRIRIGA Application Platform version 3.3, the directorystructure of the language packs separates the label packs fromthe data packs. You must unpack the main language packbefore you select the individual language pack to import.Make sure that you import the correct type of language packin the specific interface. For example, if you are in the LabelManager, you must import a label pack. If you are in theLanguage Manager, you must import a data pack. Importing adata pack is not required if your installation is US Englishonly. For more information, see the IBM TRIRIGA ApplicationPlatform 3 Localization User Guide.
First step in theinstallation
The first step in the installation is to run the installer:
v From the Windows environment, double-click theinstall.exe file. On Windows, C:\Tririga is the defaultinstallation location.
v Connect and log in to your application server as the IBMTRIRIGA user through SSH or other remote terminalapplication.
v From the UNIX or Linux command line, log in to a terminalas the IBM TRIRIGA user and type ./install.bin -iconsole. To go back, type back and press the Enter key. OnUNIX servers, /usr/local/tririga is the typical installationlocation. After the root super user pre-creates this directory,run the chown tririga /usr/local/tririga command asroot, where tririga is the name of the installation user.
Chapter 4. Installing the platform 17
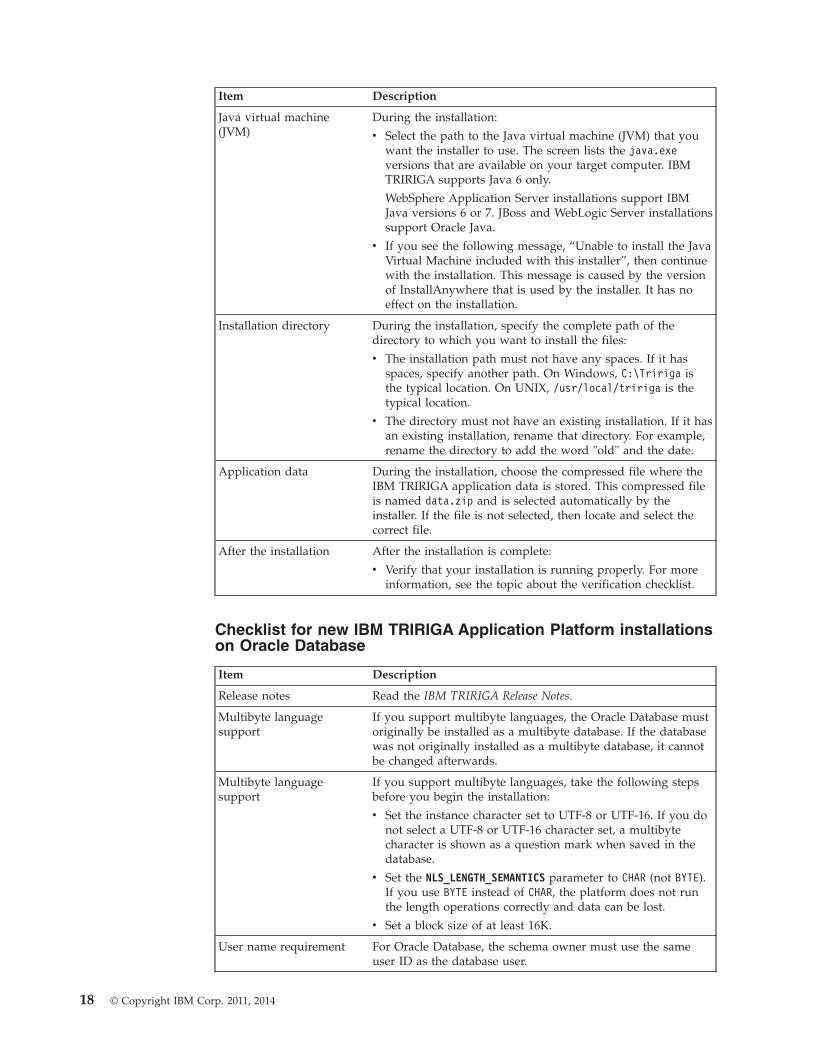
Item Description
Java virtual machine(JVM)
During the installation:
v Select the path to the Java virtual machine (JVM) that youwant the installer to use. The screen lists the java.exeversions that are available on your target computer. IBMTRIRIGA supports Java 6 only.
WebSphere Application Server installations support IBMJava versions 6 or 7. JBoss and WebLogic Server installationssupport Oracle Java.
v If you see the following message, “Unable to install the JavaVirtual Machine included with this installer”, then continuewith the installation. This message is caused by the versionof InstallAnywhere that is used by the installer. It has noeffect on the installation.
Installation directory During the installation, specify the complete path of thedirectory to which you want to install the files:
v The installation path must not have any spaces. If it hasspaces, specify another path. On Windows, C:\Tririga isthe typical location. On UNIX, /usr/local/tririga is thetypical location.
v The directory must not have an existing installation. If it hasan existing installation, rename that directory. For example,rename the directory to add the word "old" and the date.
Application data During the installation, choose the compressed file where theIBM TRIRIGA application data is stored. This compressed fileis named data.zip and is selected automatically by theinstaller. If the file is not selected, then locate and select thecorrect file.
After the installation After the installation is complete:
v Verify that your installation is running properly. For moreinformation, see the topic about the verification checklist.
Checklist for new IBM TRIRIGA Application Platform installationson Oracle Database
Item Description
Release notes Read the IBM TRIRIGA Release Notes.
Multibyte languagesupport
If you support multibyte languages, the Oracle Database mustoriginally be installed as a multibyte database. If the databasewas not originally installed as a multibyte database, it cannotbe changed afterwards.
Multibyte languagesupport
If you support multibyte languages, take the following stepsbefore you begin the installation:
v Set the instance character set to UTF-8 or UTF-16. If you donot select a UTF-8 or UTF-16 character set, a multibytecharacter is shown as a question mark when saved in thedatabase.
v Set the NLS_LENGTH_SEMANTICS parameter to CHAR (not BYTE).If you use BYTE instead of CHAR, the platform does not runthe length operations correctly and data can be lost.
v Set a block size of at least 16K.
User name requirement For Oracle Database, the schema owner must use the sameuser ID as the database user.
18 © Copyright IBM Corp. 2011, 2014

Checklist for new IBM TRIRIGA Application Platform installationson Microsoft SQL Server
Item Description
Release notes Read the IBM TRIRIGA Release Notes.
Users Verify that the database user that is being used for the newinstallation is uniquely associated to the database.
Multibyte languagesupport
If you support multibyte languages, take the following stepsduring the installation:
v Select the option to configure your database for multibytesupport.
v Choose a collation for the database.
Multibyte languagesupport and WebLogicServer
If you support multibyte languages, verify on the WebLogicServer that the JDBC URL in your DataSource-TRIRIGA-datasets the property of SendStringParametersAsUnicode to true.
Multibyte languagesupport and WebSphereApplication Server
If you support multibyte languages, verify in the WebSphereApplication Server data source that the custom property ofsendStringParametersAsUnicode is set to true.
Multibyte languagesupport and JBossEnterprise ApplicationPlatform
If you support multibyte languages, verify in the JBossEnterprise Application Platform data source, tririga-ds.xml,that the custom property of sendStringParametersAsUnicode isset to true.
User name requirement For Microsoft SQL Server, you can use different values for thedatabase name and the database user ID.
Related information:
IBM TRIRIGA Release Notes
IBM TRIRIGA Application Platform 3 Upgrade Installation Guide
Installing TRIRIGA Application Platform on JBoss Application ServerTRIRIGA Application Platform can be installed on JBoss Application Server (AS)and supported by a variety of database software. During the TRIRIGA ApplicationPlatform installation process, you can select the type of application server youwant to use. Use of JBoss Application Server (AS) is not supported for productionenvironments.
Installing IBM TRIRIGA Application Platform on JBoss AS andOracle Database
After your application server and database server are prepared, you can begin toinstall the IBM TRIRIGA Application Platform on JBoss Application Server (AS)and Oracle Database.
Before you begin
Verify that the Oracle Database and IBM WebSphere Application Server arerunning and that you have administrative authority on the servers.
Chapter 4. Installing the platform 19
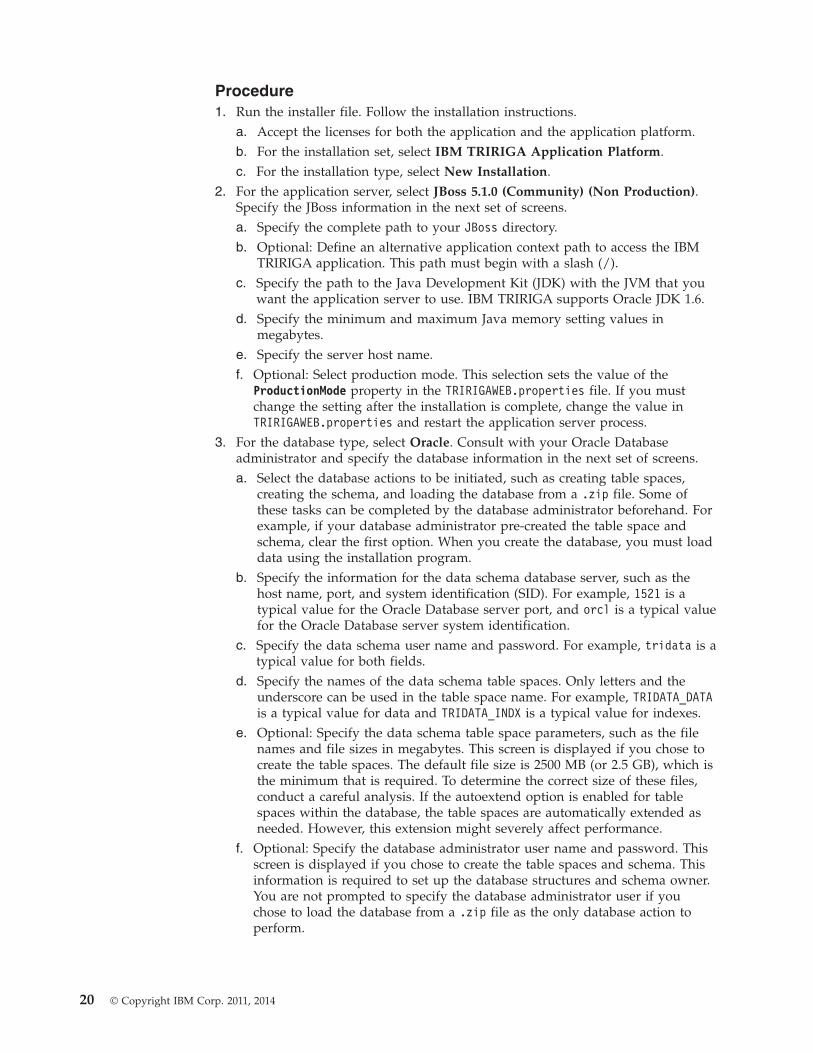
Procedure1. Run the installer file. Follow the installation instructions.
a. Accept the licenses for both the application and the application platform.b. For the installation set, select IBM TRIRIGA Application Platform.c. For the installation type, select New Installation.
2. For the application server, select JBoss 5.1.0 (Community) (Non Production).Specify the JBoss information in the next set of screens.a. Specify the complete path to your JBoss directory.b. Optional: Define an alternative application context path to access the IBM
TRIRIGA application. This path must begin with a slash (/).c. Specify the path to the Java Development Kit (JDK) with the JVM that you
want the application server to use. IBM TRIRIGA supports Oracle JDK 1.6.d. Specify the minimum and maximum Java memory setting values in
megabytes.e. Specify the server host name.f. Optional: Select production mode. This selection sets the value of the
ProductionMode property in the TRIRIGAWEB.properties file. If you mustchange the setting after the installation is complete, change the value inTRIRIGAWEB.properties and restart the application server process.
3. For the database type, select Oracle. Consult with your Oracle Databaseadministrator and specify the database information in the next set of screens.a. Select the database actions to be initiated, such as creating table spaces,
creating the schema, and loading the database from a .zip file. Some ofthese tasks can be completed by the database administrator beforehand. Forexample, if your database administrator pre-created the table space andschema, clear the first option. When you create the database, you must loaddata using the installation program.
b. Specify the information for the data schema database server, such as thehost name, port, and system identification (SID). For example, 1521 is atypical value for the Oracle Database server port, and orcl is a typical valuefor the Oracle Database server system identification.
c. Specify the data schema user name and password. For example, tridata is atypical value for both fields.
d. Specify the names of the data schema table spaces. Only letters and theunderscore can be used in the table space name. For example, TRIDATA_DATAis a typical value for data and TRIDATA_INDX is a typical value for indexes.
e. Optional: Specify the data schema table space parameters, such as the filenames and file sizes in megabytes. This screen is displayed if you chose tocreate the table spaces. The default file size is 2500 MB (or 2.5 GB), which isthe minimum that is required. To determine the correct size of these files,conduct a careful analysis. If the autoextend option is enabled for tablespaces within the database, the table spaces are automatically extended asneeded. However, this extension might severely affect performance.
f. Optional: Specify the database administrator user name and password. Thisscreen is displayed if you chose to create the table spaces and schema. Thisinformation is required to set up the database structures and schema owner.You are not prompted to specify the database administrator user if youchose to load the database from a .zip file as the only database action toperform.
20 © Copyright IBM Corp. 2011, 2014
g. Specify the minimum and maximum sizes for the database pools. Thesesettings determine the number of connections that the application serverstarts when it initializes and the number that it can grow to under load.
4. Complete and review the installation information in the final set of screens.a. Specify the names of the Simple Mail Transfer Protocol (SMTP) mail server
and web server.b. Optional: Install IBM Tivoli® Directory Integrator and specify port numbers
for IBM Tivoli Directory Integrator to use.c. Review the URL that the installer is using to test the data schema
connection.d. Review the results of the test. If the test fails, verify that Oracle Database is
running. If you see an informative message that your database might notproperly support multibyte characters and your implementation mustsupport multibyte characters, then click Cancel. Adjust your database andrestart the installer.
e. Review the pre-installation summary and click Install.5. Click Next. The database configuration process can take a long time because
the database must allocate space, create the users, and load the default schemadata.a. Optional: If you want to monitor the progress in the directory where IBM
TRIRIGA is installed, you can open the ant.log file in a log monitoringutility. In Windows, you can run the WinTail utility. In UNIX, you can runthe tail –f ant.log command.
6. When the installation is complete, click Done.7. Copy your license files into the tririga_root\config\licenses directory. All
application servers that access a database must have the same set of licenses.The only exception is the license file for the IBM TRIRIGA Connector forBusiness Applications. This product is licensed for a limited number of serversand the license file must be placed on that number of servers to stay incompliance. For more information, see the topic about license files.
8. Start IBM TRIRIGA by locating the \jboss-5.1.0.GA\bin directory that has theappropriate run batch or shell file. On Windows servers, double-click therun.bat file. On UNIX servers, run the run.sh command.a. Secure the JBoss Java Management Extensions (JMX) console.
What to do next
Vverify that your installation is running properly.Related information:
Securing the JMX Console
Installing IBM TRIRIGA Application Platform on JBoss AS andMicrosoft SQL Server
After your application server and database server are prepared, you can begin toinstall the IBM TRIRIGA Application Platform on JBoss Application Server (AS)and Microsoft SQL Server.
Before you begin
Verify that the Microsoft SQL Server and IBM WebSphere Application Server arerunning and that you have administrative authority on the servers.
Chapter 4. Installing the platform 21
Procedure1. Run the installer file. Follow the installation instructions.
a. Accept the licenses for both the application and the application platform.b. For the installation set, select IBM TRIRIGA Application Platform.c. For the installation type, select New Installation.
2. For the application server, select JBoss 5.1.0 (Community) (Non Production).Specify the JBoss information in the next set of screens.a. Specify the complete path to your JBoss directory.b. Optional: Define an alternative application context path to access the IBM
TRIRIGA application. This path must begin with a slash (/).c. Specify the path to the Java Development Kit (JDK) with the JVM that you
want the application server to use. IBM TRIRIGA supports Oracle JDK 1.6.d. Specify the minimum and maximum Java memory setting values in
megabytes.e. Specify the server host name.f. Optional: Select production mode. This selection sets the value of the
ProductionMode property in the TRIRIGAWEB.properties file. If you mustchange the setting after the installation is complete, change the value inTRIRIGAWEB.properties and restart the application server process.
3. For the database type, select Microsoft SQL Server. Consult with yourMicrosoft SQL Server administrator and specify the database information in thenext set of screens.a. Follow the instructions for downloading the Java Device Test Suite (JDTS)
driver. Specify the path to the jtds-1.2.8.jar file.b. Select the database actions to be initiated, such as creating table spaces,
creating the schema, and loading the database from a .zip file. Some ofthese tasks can be completed by the database administrator beforehand. Forexample, if your database administrator pre-created the table space andschema, clear the first option. When you create the database, you must loaddata using the installation program.
c. Specify the information for the database server connection, such as the portand name. For example, 1433 is a typical value for the Microsoft SQL Serverport, and tridata is a typical value for the Microsoft SQL Server databasename.
d. Specify the database user name and password. For example, tridata is atypical value for both fields. Verify that the database user that is being usedfor the new installation is uniquely associated to the database.
e. Optional: Select the option to configure your database for multibytelanguage support. If you do not configure the database for multibytelanguage support, you can select this option during a future upgrade.However, if you anticipate supporting multibyte languages in the future,you should configure the database for multibyte language support now.
f. Optional: Choose a collation for the Microsoft SQL Server database. Thisscreen is displayed if you chose to configure your database for multibytelanguage support.
g. Specify the database administrator user name and password. Thisinformation is required to set up the database structures and schema owner.You are not prompted to specify the database administrator user if youchose to load the database from a .zip file as the only database action toperform.
22 © Copyright IBM Corp. 2011, 2014
h. Specify the minimum and maximum sizes for the database pools. Thesesettings determine the number of connections that the application serverstarts when it initializes and the number that it can grow to under load.
4. Complete and review the installation information in the final set of screens.a. Specify the names of the Simple Mail Transfer Protocol (SMTP) mail server
and web server.b. Optional: Install IBM Tivoli Directory Integrator and specify port numbers
for IBM Tivoli Directory Integrator to use.c. Review the URL that the installer is using to test the data schema
connection.d. Review the results of the test. If the test fails, verify that Microsoft SQL
Server is running.e. Review the pre-installation summary and click Install.
5. Click Next. The database configuration process can take a long time becausethe database must allocate space, create the users, and load the default schemadata.a. Optional: If you want to monitor the progress in the directory where IBM
TRIRIGA is installed, you can open the ant.log file in a log monitoringutility. In Windows, you can run the WinTail utility. In UNIX, you can runthe tail –f ant.log command.
6. When the installation is complete, click Done.7. Copy your license files into the tririga_root\config\licenses directory. All
application servers that access a database must have the same set of licenses.The only exception is the license file for the IBM TRIRIGA Connector forBusiness Applications. This product is licensed for a limited number of serversand the license file must be placed on that number of servers to stay incompliance. For more information, see the topic about license files.
8. Start IBM TRIRIGA by locating the \jboss-5.1.0.GA\bin directory that has theappropriate run batch or shell file. On Windows servers, double-click therun.bat file. On UNIX servers, run the run.sh command.a. Secure the JBoss Java Management Extensions (JMX) console.
What to do next
Vverify that your installation is running properly.Related information:
Securing the JMX Console
Installing IBM TRIRIGA Application Platform on Red Hat JBossEnterprise Application Platform
TRIRIGA Application Platform can be installed on Red Hat JBoss EnterpriseApplication Platform (EAP) and supported by a variety of database software.During the TRIRIGA Application Platform installation process, you can select thetype of application server you want to use.
Installing IBM TRIRIGA Application Platform on JBoss EAPand Oracle Database
After your application server and database server are prepared, you can begin toinstall the IBM TRIRIGA Application Platform on Red Hat JBoss EnterpriseApplication Platform (EAP) and Oracle Database.
Chapter 4. Installing the platform 23
Before you begin
Verify that the Oracle Database and IBM WebSphere Application Server arerunning and that you have administrative authority on the servers.
Procedure1. Run the installer file. Follow the installation instructions.
a. Accept the licenses for both the application and the application platform.b. For the installation set, select IBM TRIRIGA Application Platform.c. For the installation type, select New Installation.
2. For the application server, select JBoss 5.1 EAP (Enterprise). Specify the JBossinformation in the next set of screens.a. Specify the complete path to your JBoss directory.b. Optional: Define an alternative application context path to access the IBM
TRIRIGA application. This path must begin with a slash (/).c. Specify the path to the Java Development Kit (JDK) with the JVM that you
want the application server to use. IBM TRIRIGA supports Oracle JDK 1.6.d. Specify the minimum and maximum Java memory setting values in
megabytes.e. Specify the server host name.f. Optional: Select production mode. This selection sets the value of the
ProductionMode property in the TRIRIGAWEB.properties file.3. For the database type, select Oracle. Consult with your Oracle Database
administrator and specify the database information in the next set of screens.a. Select the database actions to be initiated, such as creating table spaces,
creating the schema, and loading the database from a .zip file. Some ofthese tasks can be completed by the database administrator beforehand. Forexample, if your database administrator pre-created the table space andschema, clear the first option. When you create the database, you must loaddata using the installation program.
b. Specify the information for the data schema database server, such as thehost name, port, and system identification (SID). For example, 1521 is atypical value for the Oracle Database server port, and orcl is a typical valuefor the Oracle Database server system identification.
c. Specify the data schema user name and password. For example, tridata is atypical value for both fields.
d. Specify the names of the data schema table spaces. Only letters and theunderscore can be used in the table space name. For example, TRIDATA_DATAis a typical value for data and TRIDATA_INDX is a typical value for indexes.
e. Optional: Specify the data schema table space parameters, such as the filenames and file sizes in megabytes. This screen is displayed if you chose tocreate the table spaces. The default file size is 2500 MB (or 2.5 GB), which isthe minimum that is required. To determine the correct size of these files,conduct a careful analysis. If the autoextend option is enabled for tablespaces within the database, the table spaces are automatically extended asneeded. However, this extension might severely affect performance.
f. Optional: Specify the database administrator user name and password. Thisscreen is displayed if you chose to create the table spaces and schema. Thisinformation is required to set up the database structures and schema owner.
24 © Copyright IBM Corp. 2011, 2014
You are not prompted to specify the database administrator user if youchose to load the database from a .zip file as the only database action toperform.
g. Specify the minimum and maximum sizes for the database pools. Thesesettings determine the number of connections that the application serverstarts when it initializes and the number that it can grow to under load.
4. Complete and review the installation information in the final set of screens.a. Specify the names of the Simple Mail Transfer Protocol (SMTP) mail server
and web server.b. Optional: Install IBM Tivoli Directory Integrator and specify port numbers
for IBM Tivoli Directory Integrator to use.c. Review the URL that the installer is using to test the data schema
connection.d. Review the results of the test. If the test fails, verify that Oracle Database is
running. If you see an informative message that your database might notproperly support multibyte characters and your implementation mustsupport multibyte characters, then click Cancel. Adjust your database andrestart the installer.
e. Review the pre-installation summary and click Install.5. Click Next. The database configuration process can take a long time because
the database must allocate space, create the users, and load the default schemadata.a. Optional: If you want to monitor the progress in the directory where IBM
TRIRIGA is installed, you can open the ant.log file in a log monitoringutility. In Windows, you can run the WinTail utility. In UNIX, you can runthe tail –f ant.log command.
6. When the installation is complete, click Done.7. Copy your license files into the tririga_root\config\licenses directory. All
application servers that access a database must have the same set of licenses.The only exception is the license file for the IBM TRIRIGA Connector forBusiness Applications. This product is licensed for a limited number of serversand the license file must be placed on that number of servers to stay incompliance. For more information, see the topic about license files.
8. Start IBM TRIRIGA by locating the \jboss-eap-5.1\jboss-eap\bin directorythat has the appropriate run batch or shell file. On Windows servers,double-click the run.bat file. On UNIX servers, run the run.sh command.a. Secure the JBoss Java Management Extensions (JMX) console.
What to do next
Vverify that your installation is running properly.Related information:
Securing the JMX Console
Installing IBM TRIRIGA Application Platform on JBoss EAPand Microsoft SQL Server
After your application server and database server are prepared, you can begin toinstall the IBM TRIRIGA Application Platform on Red Hat JBoss EnterpriseApplication Platform (EAP) and Microsoft SQL Server.
Chapter 4. Installing the platform 25
Before you begin
Verify that the Microsoft SQL Server and IBM WebSphere Application Server arerunning and that you have administrative authority on the servers.
Procedure1. Run the installer file. Follow the installation instructions.
a. Accept the licenses for both the application and the application platform.b. For the installation set, select IBM TRIRIGA Application Platform.c. For the installation type, select New Installation.
2. For the application server, select JBoss 5.1 EAP (Enterprise). Specify the JBossinformation in the next set of screens.a. Specify the complete path to your JBoss directory.b. Optional: Define an alternative application context path to access the IBM
TRIRIGA application. This path must begin with a slash (/).c. Specify the path to the Java Development Kit (JDK) with the JVM that you
want the application server to use. IBM TRIRIGA supports Oracle JDK 1.6.d. Specify the minimum and maximum Java memory setting values in
megabytes.e. Specify the server host name.f. Optional: Select production mode. This selection sets the value of the
ProductionMode property in the TRIRIGAWEB.properties file.3. For the database type, select Microsoft SQL Server. Consult with your
Microsoft SQL Server administrator and specify the database information in thenext set of screens.a. Follow the instructions for downloading the Java Device Test Suite (JDTS)
driver. Specify the path to the jtds-1.2.8.jar file.b. Select the database actions to be initiated, such as creating table spaces,
creating the schema, and loading the database from a .zip file. Some ofthese tasks can be completed by the database administrator beforehand. Forexample, if your database administrator pre-created the table space andschema, clear the first option. When you create the database, you must loaddata using the installation program.
c. Specify the information for the database server connection, such as the portand name. For example, 1433 is a typical value for the Microsoft SQL Serverport, and tridata is a typical value for the Microsoft SQL Server databasename.
d. Specify the database user name and password. For example, tridata is atypical value for both fields. Verify that the database user that is being usedfor the new installation is uniquely associated to the database.
e. Optional: Select the option to configure your database for multibytelanguage support. If you do not configure the database for multibytelanguage support, you can select this option during a future upgrade.However, if you anticipate supporting multibyte languages in the future,you should configure the database for multibyte language support now.
f. Optional: Choose a collation for the Microsoft SQL Server database. Thisscreen is displayed if you chose to configure your database for multibytelanguage support.
g. Specify the database administrator user name and password. Thisinformation is required to set up the database structures and schema owner.
26 © Copyright IBM Corp. 2011, 2014

You are not prompted to specify the database administrator user if youchose to load the database from a .zip file as the only database action toperform.
h. Specify the minimum and maximum sizes for the database pools. Thesesettings determine the number of connections that the application serverstarts when it initializes and the number that it can grow to under load.
4. Complete and review the installation information in the final set of screens.a. Specify the names of the Simple Mail Transfer Protocol (SMTP) mail server
and web server.b. Optional: Install IBM Tivoli Directory Integrator and specify port numbers
for IBM Tivoli Directory Integrator to use.c. Review the URL that the installer is using to test the data schema
connection.d. Review the results of the test. If the test fails, verify that Microsoft SQL
Server is running.e. Review the pre-installation summary and click Install.
5. Click Next. The database configuration process can take a long time becausethe database must allocate space, create the users, and load the default schemadata.a. Optional: If you want to monitor the progress in the directory where IBM
TRIRIGA is installed, you can open the ant.log file in a log monitoringutility. In Windows, you can run the WinTail utility. In UNIX, you can runthe tail –f ant.log command.
6. When the installation is complete, click Done.7. Copy your license files into the tririga_root\config\licenses directory. All
application servers that access a database must have the same set of licenses.The only exception is the license file for the IBM TRIRIGA Connector forBusiness Applications. This product is licensed for a limited number of serversand the license file must be placed on that number of servers to stay incompliance. For more information, see the topic about license files.
8. Start IBM TRIRIGA by locating the \jboss-eap-5.1\jboss-eap\bin directorythat has the appropriate run batch or shell file. On Windows servers,double-click the run.bat file. On UNIX servers, run the run.sh command.a. Secure the JBoss Java Management Extensions (JMX) console.
What to do next
Vverify that your installation is running properly.Related information:
Securing the JMX Console
Installing IBM TRIRIGA Application Platform on Oracle WebLogicServer
TRIRIGA Application Platform can be installed on Oracle WebLogic Server andsupported by a variety of database software. During the TRIRIGA ApplicationPlatform installation process, you can select the type of application server youwant to use.
Chapter 4. Installing the platform 27
Overview of IBM TRIRIGA Application Platform installation onWebLogic
Before you begin the IBM TRIRIGA Application Platform installation, OracleWebLogic Server must be installed locally or on a server.
Installation phases
Installing the platform on the WebLogic Server involves several phases:v Preparing the WebLogic Server settings and shutting down the WebLogic Server.v Starting the IBM TRIRIGA installation.v Changing the WebLogic Server properties and starting the WebLogic Server.v Finishing the IBM TRIRIGA installation.
Preparing WebLogicWhen the Oracle WebLogic Server is running, you can prepare it for installation bycreating a group and user, and assigning the user to the group.
Before you begin
Verify that WebLogic Server is running and that you have administrative authorityon the application server.
Procedure1. Log in to the WebLogic Server administration console, for example,
http://localhost:7001/console.2. In the Domain Structure section, click Security Realms.3. In the main panel, click myrealm in the Name column.4. Create a group named TRIRIGA-AppGroup.5. Create a user named TRIRIGA-AppUser.6. Assign the user to the group.7. Optional: Set up IBM TRIRIGA CAD Integrator/Publisher users.8. Select Users and Groups from the breadcrumb navigation, select the Roles
and Policies tab, select the Realm Roles tab, and select Global Roles > Roles.9. Add a Global Role named TRIRIGA-Application.
10. Define TRIRIGA-AppGroup as a Global Role Condition forTRIRIGA-Application.
11. Enable tunneling.12. Click Activate Changes.13. If you are using web service transactions such as IBM TRIRIGA Connector for
Business Applications, add another user such as IBM TRIRIGA Connector forBusiness Applications and OSLC.a. Add a WebLogic Server domain user for the web service user.b. Assign this user to TRIRIGA-AppGroup.
14. Shut down the WebLogic Server.
What to do next
Install the platform with the Oracle Database or Microsoft SQL Server.
28 © Copyright IBM Corp. 2011, 2014
Installing IBM TRIRIGA Application Platform on WebLogic andOracle Database
After your application server and database server are prepared, you can begin toinstall the IBM TRIRIGA Application Platform on Oracle WebLogic Server andOracle Database.
Before you begin
Verify that the Oracle Database and IBM WebSphere Application Server arerunning and that you have administrative authority on the servers.
Procedure1. Run the installer file. Follow the installation instructions.
a. Accept the licenses for both the application and the application platform.b. For the installation set, select IBM TRIRIGA Application Platform.c. For the installation type, select New Installation.
2. For the application server, select WebLogic. Specify the WebLogic Serverinformation in the next set of screens.a. Select WebLogic Server 12c Release 2 (12.1.2).b. Specify the path to your WebLogic Server home directory where the
\server\lib directory is located.c. Specify the appropriate information for your WebLogic Server. Enter the
server password.d. Optional: Define an alternative application context path to access the IBM
TRIRIGA application. This path must begin with a slash (/).e. Specify the server host name.f. Optional: Select production mode. This selection sets the value of the
ProductionMode property in the TRIRIGAWEB.properties file.g. Follow the instructions for downloading the xercesImpl.jar file. Specify
the path to the xercesImpl.jar file.3. For the database type, select Oracle. Consult with your Oracle Database
administrator and specify the database information in the next set of screens.a. Select the database actions to be initiated, such as creating table spaces,
creating the schema, and loading the database from a .zip file. Some ofthese tasks can be completed by the database administrator beforehand.For example, if your database administrator pre-created the table spaceand schema, clear the first option. When you create the database, you mustload data using the installation program.
b. Specify the information for the data schema database server, such as thehost name, port, and system identification (SID). For example, 1521 is atypical value for the Oracle Database server port, and orcl is a typicalvalue for the Oracle Database server system identification.
c. Specify the data schema user name and password. For example, tridata isa typical value for both fields.
d. Specify the names of the data schema table spaces. Only letters and theunderscore can be used in the table space name. For example,TRIDATA_DATA is a typical value for data and TRIDATA_INDX is a typicalvalue for indexes.
e. Optional: Specify the data schema table space parameters, such as the filenames and file sizes in megabytes. This screen is displayed if you chose tocreate the table spaces. The default file size is 2500 MB (or 2.5 GB), which
Chapter 4. Installing the platform 29
is the minimum that is required. To determine the correct size of thesefiles, conduct a careful analysis. If the autoextend option is enabled fortable spaces within the database, the table spaces are automaticallyextended as needed. However, this extension might severely affectperformance.
f. Optional: Specify the database administrator user name and password. Thisscreen is displayed if you chose to create the table spaces and schema. Thisinformation is required to set up the database structures and schemaowner. You are not prompted to specify the database administrator user ifyou chose to load the database from a .zip file as the only database actionto perform.
g. Specify the minimum and maximum sizes for the database pools. Thesesettings determine the number of connections that the application serverstarts when it initializes and the number that it can grow to under load.
4. Complete and review the installation information in the final set of screens.a. Specify the names of the Simple Mail Transfer Protocol (SMTP) mail server
and web server.b. Optional: Install IBM Tivoli Directory Integrator and specify port numbers
for IBM Tivoli Directory Integrator to use.c. Review the URL that the installer is using to test the data schema
connection.d. Review the results of the test. If the test fails, verify that Oracle Database is
running. If you see an informative message that your database might notproperly support multibyte characters and your implementation mustsupport multibyte characters, then click Cancel. Adjust your database andrestart the installer.
e. Review the pre-installation summary and click Install.5. Select and copy the data that is displayed in the text box.6. Go to the WebLogic Server directory and find the setDomainEnv file.7. If you are using Windows, adjust the following properties:
a. Edit setDomainEnv.cmd.b. Find each occurrence of set PRE_CLASSPATH=. Immediately after the equal
sign (=), insert the IBM TRIRIGA class path that was copied from the StartWebLogic text box earlier, followed by a semi-colon (;). Remove theclasspath entry for axis.jar from the startup command when using thestandard Oracle JDK 7.
c. Find set WLS_MEM_ARGS and adjust the values for -Xms and -Xmx to beappropriate for your implementation.
d. Find set MEM_MAX_PERM_SIZE and adjust the value for -XX:MaxPermSize tobe appropriate for your implementation.
e. Find set JAVA_DEBUG=. Immediately after both places where%enableHotswapFlag% is displayed, specify the following text:-Doracle.jdbc.maxCachedBufferSize=18
f. To set the logging output to the appropriate location, find the line: if NOT"%LOG4J_CONFIG_FILE%"=="". Directly before that line, set theLOG4j_CONFIG_FILE property to point at the log4j.xml file in the IBMTRIRIGA installation config directory. For example:set LOG4J_CONFIG_FILE=C:\Tririga\config\log4j.xmlif NOT "%LOG4J_CONFIG_FILE%"=="" (
set JAVA_PROPERTIES=%JAVA_PROPERTIES%-Dlog4j.configuration=file:%LOG4J_CONFIG_FILE%
)
30 © Copyright IBM Corp. 2011, 2014
g. Find JAVA_OPTIONS. Add -DUseSunHttpHandler=true to the list of existingoptions. For example,set JAVA_OPTIONS=%JAVA_OPTIONS%-DUseSunHttpHandler=true
h. Save your changes to setDomainEnv.cmd.8. If you are using UNIX, adjust the following properties:
a. Edit setDomainEnv.sh.b. Find each occurrence of PRE_CLASSPATH=. Immediately after the equal sign
(=), insert the IBM TRIRIGA class path that was copied from the StartWebLogic text box earlier. Verify that the syntax is correct for your versionof UNIX. Remove the classpath entry for axis.jar from the startupcommand when using the standard Oracle JDK 7.
c. Find WLS_MEM_ARGS and adjust the values for -Xms and -Xmx to beappropriate for your implementation.
d. Find MEM_MAX_PERM_SIZE and adjust the value for -XX:MaxPermSize to beappropriate for your implementation.
e. Find JAVA_DEBUG= Immediately after both places where enableHotswapFlagis displayed, specify the following text:-Doracle.jdbc.maxCachedBufferSize=18
f. To set the logging output to the appropriate location, find the line: if ["${LOG4J_CONFIG_FILE}" != "" ] ; then. Directly before that line, set theLOG4j_CONFIG_FILE property to point at the log4j.xml file in the IBMTRIRIGA installation config directory. For example:export LOG4J_CONFIG_FILE="/usr/local/tririga/config/log4j.xml"if [ "${LOG4J_CONFIG_FILE}" != "" ] ; then
JAVA_PROPERTIES="${JAVA_PROPERTIES}-Dlog4j.configuration=file:${LOG4J_CONFIG_FILE}"export JAVA_PROPERTIES
fi
g. Find JAVA_OPTIONS. Add -DUseSunHttpHandler=true to the list of existingoptions. For example,JAVA_OPTIONS="${JAVA_OPTIONS}-DUseSunHttpHandler=true"
h. Save your changes to setDomainEnv.sh.9. Run the setDomainEnv file.
10. Start the WebLogic Server.11. Return to the IBM TRIRIGA installer and click Next.12. Click Next. The database configuration process can take a long time because
the database must allocate space, create the users, and load the default schemadata.a. Optional: If you want to monitor the progress in the directory where IBM
TRIRIGA is installed, you can open the ant.log file in a log monitoringutility. In Windows, you can run the WinTail utility. In UNIX, you can runthe tail –f ant.log command.
13. When the installation is complete, click Done.14. Copy your license files into the tririga_root\config\licenses directory. All
application servers that access a database must have the same set of licenses.The only exception is the license file for the IBM TRIRIGA Connector forBusiness Applications. This product is licensed for a limited number of serversand the license file must be placed on that number of servers to stay incompliance. For more information, see the topic about license files.
Chapter 4. Installing the platform 31
15. Start IBM TRIRIGA by locating the WebLogic Server directory with theappropriate method.v On Windows servers, from the Start menu, select Projects >
DOMAIN_NAME > Start Admin Server for WebLogic Server Domain.v On UNIX servers, run WEBLOGIC_HOME/user_projects/domains/
USER_PROJECT_NAME/startWebLogic.sh.
What to do next
If the installation failed, see the topic about validating the deployment onWebLogic Server and Oracle Database.
Vverify that your installation is running properly.
Validating the IBM TRIRIGA Application Platform deployment onWebLogic and Oracle DatabaseIf the IBM TRIRIGA Application Platform installation failed, it is still possible torun IBM TRIRIGA on Oracle WebLogic Server and Oracle Database by validatingthe data sources and deployment.
Procedure1. Verify the WebLogic Server configuration. Read the ant.log file in the root
installation directory. If the last messages in the log discuss the WebLogicServer setup, then the setup must be completed manually.
2. Log in to the WebLogic Server administration console.3. Verify that the IBM TRIRIGA Java Database Connectivity (JDBC) data sources
are created. In the Domain Structure section, select Services > Data Sources.4. In the main panel, verify that at least one data source with a Java Naming and
Directory Interface (JNDI) name of jdbc/local/DataSource-TRIRIGA-dataexists.a. If the data source exists, continue to verify that the installation is correct.b. If the data source does not exist, continue to create the data source.
5. In the main panel, click New and specify the following data sourceinformation:a. For the name, specify DataSource-TRIRIGA-data.b. For the JNDI name, specify jdbc/local/DataSource-TRIRIGA-data.c. For the database type, select Oracle, and click Next.d. For the database driver, select *Oracle’s Driver (Thin) for Instance
connections; Versions:9.0.1 and later.e. Click Next on each screen to move to the next screen.
6. For the database server, specify the database name, host name, database username, and password.
7. Specify the following database information:a. For the URL, specify jdbc:oracle:thin:@DatabaseServer:1521:orcl where
DatabaseServer is the host name or IP of your database server, 1521 is theport number of the Oracle Database, and orcl is the system identification(SID) of the Oracle Database instance.
b. For the driver class name, specify oracle.jdbc.OracleDriver.c. For the properties, do not change the default value that contains
user=schemaname such as user=tridata.
32 © Copyright IBM Corp. 2011, 2014

d. For the password, specify and confirm the password for your TRIDATAschema.
e. For the test table name, do not change the default value.f. For the database user name, specify the user name of your TRIDATA
schema.8. Click Test Configuration.9. Select the check box for the server name of the IBM TRIRIGA deployment and
click Finish.10. Validate the IBM TRIRIGA data source. In the Domain Structure section, select
Services > JDBC > Data Sources.11. In the main panel, select DataSource-TRIRIGA-data.12. Select the Configuration tab, and select the General tab. Verify that the JNDI
name is jdbc/local/DataSource-TRIRIGA-data. The JNDI name iscase-sensitive.
13. Select the Connection Pool tab. Verify that the URL, driver class name, andproperties are correct. Change the maximum capacity to 100. You might berequired to increase the maximum capacity as you add more users to theimplementation. Click Save.
14. Select the Targets tab. Select the check box for the server that ties the datasource to the server.
15. Validate the IBM TRIRIGA deployment. In the Domain Structure section,select Deployments. In the main panel, verify that the tririga-ibs applicationis deployed.
16. If the application is deployed, select tririga-ibs in the Deployments section.17. If the application is not deployed:
a. Select Install.b. For the path, select the IBM TRIRIGA installation directory, and select the
tririga-ibs.ear file. Click Next on each screen to move to the next screen.c. Select Install this deployment as an application.d. Click Finish.
18. Review the settings for the tririga-ibs application.a. Optional: Restart the WebLogic Server to verify that everything is
synchronized and in place for production.
What to do next
Verify that your installation is running properly.
Installing IBM TRIRIGA Application Platform on WebLogic andMicrosoft SQL Server
After your application server and database server are prepared, you can begin toinstall the IBM TRIRIGA Application Platform on Oracle WebLogic Server andMicrosoft SQL Server.
Before you begin
Verify that the Microsoft SQL Server and IBM WebSphere Application Server arerunning and that you have administrative authority on the servers.
Chapter 4. Installing the platform 33

Procedure1. Run the installer file. Follow the installation instructions.
a. Accept the licenses for both the application and the application platform.b. For the installation set, select IBM TRIRIGA Application Platform.c. For the installation type, select New Installation.
2. For the application server, select WebLogic. Specify the WebLogic Serverinformation in the next set of screens.a. Select WebLogic Server 12c Release 2 (12.1.2).b. Specify the path to your WebLogic Server home directory where the
\server\lib directory is located.c. Specify the appropriate information for your WebLogic Server. Enter the
server password.d. Optional: Define an alternative application context path to access the IBM
TRIRIGA application. This path must begin with a slash (/).e. Specify the server host name.f. Optional: Select production mode. This selection sets the value of the
ProductionMode property in the TRIRIGAWEB.properties file.g. Follow the instructions for downloading the xercesImpl.jar file. Specify
the path to the xercesImpl.jar file.3. For the database type, select Microsoft SQL Server. Consult with your
Microsoft SQL Server administrator and specify the database information inthe next set of screens.a. Follow the instructions for downloading the Java Device Test Suite (JDTS)
driver. Specify the path to the jtds-1.2.8.jar file.b. Select the database actions to be initiated, such as creating table spaces,
creating the schema, and loading the database from a .zip file. Some ofthese tasks can be completed by the database administrator beforehand.For example, if your database administrator pre-created the table spaceand schema, clear the first option. When you create the database, you mustload data using the installation program.
c. Specify the information for the database server connection, such as theport and name. For example, 1433 is a typical value for the Microsoft SQLServer port, and tridata is a typical value for the Microsoft SQL Serverdatabase name.
d. Specify the database user name and password. For example, tridata is atypical value for both fields. Verify that the database user that is beingused for the new installation is uniquely associated to the database.
e. Optional: Select the option to configure your database for multibytelanguage support. If you do not configure the database for multibytelanguage support, you can select this option during a future upgrade.However, if you anticipate supporting multibyte languages in the future,you should configure the database for multibyte language support now.
f. Optional: Choose a collation for the Microsoft SQL Server database. Thisscreen is displayed if you chose to configure your database for multibytelanguage support.
g. Specify the database administrator user name and password. Thisinformation is required to set up the database structures and schemaowner. You are not prompted to specify the database administrator user ifyou chose to load the database from a .zip file as the only database actionto perform.
34 © Copyright IBM Corp. 2011, 2014
h. Specify the minimum and maximum sizes for the database pools. Thesesettings determine the number of connections that the application serverstarts when it initializes and the number that it can grow to under load.
4. Complete and review the installation information in the final set of screens.a. Specify the names of the Simple Mail Transfer Protocol (SMTP) mail server
and web server.b. Optional: Install IBM Tivoli Directory Integrator and specify port numbers
for IBM Tivoli Directory Integrator to use.c. Review the URL that the installer is using to test the data schema
connection.d. Review the results of the test. If the test fails, verify that Microsoft SQL
Server is running.e. Review the pre-installation summary and click Install.
5. Select and copy the data that is displayed in the text box.6. Go to the WebLogic Server directory and find the setDomainEnv file.7. If you are using Windows, adjust the following properties:
a. Edit setDomainEnv.cmd.b. Find each occurrence of set PRE_CLASSPATH=. Immediately after the equal
sign (=), insert the IBM TRIRIGA class path that was copied from the StartWebLogic text box earlier, followed by a semi-colon (;). Remove theclasspath entry for axis.jar from the startup command when using thestandard Oracle JDK 7.
c. To set the logging output to the appropriate location, find the line: if NOT"%LOG4J_CONFIG_FILE%"=="". Directly before that line, set theLOG4j_CONFIG_FILE property to point at the log4j.xml file in the IBMTRIRIGA installation config directory. For example:set LOG4J_CONFIG_FILE=C:\Tririga\config\log4j.xmlif NOT "%LOG4J_CONFIG_FILE%"=="" (
set JAVA_PROPERTIES=%JAVA_PROPERTIES%-Dlog4j.configuration=file:%LOG4J_CONFIG_FILE%
)
d. Save your changes to setDomainEnv.cmd.8. If you are using UNIX, adjust the following properties:
a. Edit setDomainEnv.sh.b. Find each occurrence of PRE_CLASSPATH=. Immediately after the equal sign
(=), insert the IBM TRIRIGA class path that was copied from the StartWebLogic text box earlier. Verify that the syntax is correct for your versionof UNIX. Remove the classpath entry for axis.jar from the startupcommand when using the standard Oracle JDK 7.
c. To set the logging output to the appropriate location, find the line: if ["${LOG4J_CONFIG_FILE}" != "" ] ; then. Directly before that line, set theLOG4j_CONFIG_FILE property to point at the log4j.xml file in the IBMTRIRIGA installation config directory. For example:export LOG4J_CONFIG_FILE="/usr/local/tririga/config/log4j.xml"if [ "${LOG4J_CONFIG_FILE}" != "" ] ; then
JAVA_PROPERTIES="${JAVA_PROPERTIES}-Dlog4j.configuration=file:${LOG4J_CONFIG_FILE}"export JAVA_PROPERTIES
fi
d. Save your changes to setDomainEnv.sh.9. Run the setDomainEnv file.
10. Start the WebLogic Server.
Chapter 4. Installing the platform 35
11. Return to the IBM TRIRIGA installer and click Next.12. Click Next. The database configuration process can take a long time because
the database must allocate space, create the users, and load the default schemadata.a. Optional: If you want to monitor the progress in the directory where IBM
TRIRIGA is installed, you can open the ant.log file in a log monitoringutility. In Windows, you can run the WinTail utility. In UNIX, you can runthe tail –f ant.log command.
13. When the installation is complete, click Done.14. Copy your license files into the tririga_root\config\licenses directory. All
application servers that access a database must have the same set of licenses.The only exception is the license file for the IBM TRIRIGA Connector forBusiness Applications. This product is licensed for a limited number of serversand the license file must be placed on that number of servers to stay incompliance. For more information, see the topic about license files.
15. Start IBM TRIRIGA by locating the WebLogic Server directory with theappropriate method.v On Windows servers, from the Start menu, select Projects >
DOMAIN_NAME > Start Admin Server for WebLogic Server Domain.v On UNIX servers, run WEBLOGIC_HOME/user_projects/domains/
USER_PROJECT_NAME/startWebLogic.sh.
What to do next
If the installation failed, see the topic about validating the deployment onWebLogic Server and Microsoft SQL Server.
Vverify that your installation is running properly.
Validating the IBM TRIRIGA deployment on WebLogic andMicrosoft SQL ServerIf the IBM TRIRIGA Application Platform installation failed, it is still possible torun IBM TRIRIGA on Oracle WebLogic Server and Microsoft SQL Server byvalidating the data sources and deployment.
Procedure1. Verify the WebLogic Server configuration. Read the ant.log file in the root
installation directory. If the last messages in the log discuss the WebLogicServer setup, then the setup must be completed manually.
2. Log in to the WebLogic Server administration console.3. Verify that the IBM TRIRIGA Java Database Connectivity (JDBC) data sources
are created. In the Domain Structure section, select Services > Data Sources.4. In the main panel, verify that at least one data source with a Java Naming and
Directory Interface (JNDI) name of jdbc/local/DataSource-TRIRIGA-dataexists.a. If the data source exists, continue to verify that the installation is correct.b. If the data source does not exist, continue to create the data source.
5. In the main panel, click New and specify the following data sourceinformation:a. For the name, specify DataSource-TRIRIGA-data.b. For the JNDI name, specify jdbc/local/DataSource-TRIRIGA-data.c. For the database type, select MS SQL Server, and click Next.
36 © Copyright IBM Corp. 2011, 2014
d. For the database driver, select Other.e. Click Next on each screen to move to the next screen.
6. For the database server, specify the database name, host name, database username, and password.
7. Specify the following database information:a. For the URL, specify jdbc:jtds:sqlserver://hostname:db.port/
db.name;tds=8.0;SendStringParametersAsUnicode=mbcs;prepareSQL=2where hostname is the host name or IP of your database server, db.port isthe port number of the Microsoft SQL Server database (such as 1433),db.name is the database name, and mbcs is either true for multibytesupport or false for no multibyte support.
b. For the driver class name, specify net.sourceforge.jtds.jdbc.Driver.c. For the properties, specify user=username such as user=tridata.d. For the password, specify and confirm the password for your TRIDATA
schema.e. For the test table name, specify SQL SELECT 1.f. For the database user name, specify the user name of your TRIDATA
schema.8. Click Test Configuration.9. Select the check box for the server name of the IBM TRIRIGA deployment and
click Finish.10. Validate the IBM TRIRIGA data source. In the Domain Structure section, select
Services > JDBC > Data Sources.11. In the main panel, select DataSource-TRIRIGA-data.12. Select the Configuration tab, and select the General tab. Verify that the JNDI
name is jdbc/local/DataSource-TRIRIGA-data. The JNDI name iscase-sensitive.
13. Select the Connection Pool tab. Verify that the URL, driver class name, andproperties are correct. Change the maximum capacity to 100. You might berequired to increase the maximum capacity as you add more users to theimplementation. Click Save.
14. Select the Targets tab. Select the check box for the server that ties the datasource to the server.
15. Validate the IBM TRIRIGA deployment. In the Domain Structure section,select Deployments. In the main panel, verify that the tririga-ibs applicationis deployed.
16. If the application is deployed, select tririga-ibs in the Deployments section.17. If the application is not deployed:
a. Select Install.b. For the path, select the IBM TRIRIGA installation directory, and select the
tririga-ibs.ear file. Click Next on each screen to move to the next screen.c. Select Install this deployment as an application.d. Click Finish.
18. Review the settings for the tririga-ibs application.a. Optional: Restart the WebLogic Server to verify that everything is
synchronized and in place for production.
What to do next
Verify that your installation is running properly.
Chapter 4. Installing the platform 37
Installing TRIRIGA Application Platform on IBM WebSphere ApplicationServer
TRIRIGA Application Platform can be installed on IBM WebSphere ApplicationServer and supported by a variety of database software. During the TRIRIGAApplication Platform installation process, you can select the type of applicationserver you want to use.
Before you begin
Check the IBM TRIRIGA product wiki for the latest information about deployingIBM TRIRIGA on IBM WebSphere Application Server.
Overview of IBM TRIRIGA Application Platform installation onWebSphere
Before you begin the IBM TRIRIGA Application Platform installation, IBMWebSphere Application Server must be installed locally or on a server.
Installation phases
Installing the platform on the WebSphere Application Server involves severalphases:v Optionally create a WebSphere Application Server profile for IBM TRIRIGA. If
you do not create a new WebSphere Application Server profile specifically forIBM TRIRIGA, you must be prepared to specify information about an existingprofile to use with IBM TRIRIGA during the installation process.
v Running the IBM TRIRIGA installation.v Manually configuring WebSphere Application Server properties if the installer
process fails to deploy the IBM TRIRIGA application.
Timeout property in WebSphere
The IBM TRIRIGA installation with the WebSphere Application Server might fail ifthe com.ibm.SOAP.requestTimeout property value is not increased. The propertycan be found in the soap.client.props file of the WebSphere Application Serverproperties directory. For example, in UNIX, the location might look like:/usr/IBM/WebSphere/AppServer/profiles/AppSrv01/properties/soap.client.props
Setting the property value to 0 sets the timeout to unlimited.com.ibm.SOAP.requestTimeout=0
Preparing WebSphereA WebSphere Application Server profile is required to install IBM TRIRIGA. Youcan create a WebSphere Application Server profile specifically for IBM TRIRIGA ifyou do not want to use the default profile. If you do not create a new WebSphereApplication Server profile, you must be prepared to specify information about anexisting WebSphere Application Server profile to use with IBM TRIRIGA duringthe installation process. Refer to WebSphere Application Server productinformation for details about creating profiles.
What to do next
Install the platform with the Oracle Database or Microsoft SQL Server.
38 © Copyright IBM Corp. 2011, 2014
Installing IBM TRIRIGA Application Platform on WebSphereand Oracle Database
After your application server and database server are prepared, you can begin toinstall the IBM TRIRIGA Application Platform on IBM WebSphere ApplicationServer and Oracle Database.
Before you begin
Verify that the Oracle Database and IBM WebSphere Application Server arerunning and that you have administrative authority on the servers.
Procedure1. Run the installer file. Follow the installation instructions.
a. Accept the licenses for both the application and the application platform.b. For the installation set, select IBM TRIRIGA Application Platform.c. For the installation type, select New Installation.
2. Select the data file to install and click Choose.3. For the application server, select WebSphere. Specify the WebSphere
Application Server information in the next set of screens.a. Specify the information for the WebSphere Application Server configuration,
such as the cell, node, server, profile, and home. Log on to the WebSphereApplication Server and run the manageprofiles.[bat|sh] –listProfilescommand to identify the cell, node, server, profile, and home values.WebSphere Application Server home is defined as C:\ProgramFiles\IBM\WebSphere\AppServer, for example.
b. Specify the WebSphere Application Server administrator user name andpassword. The server must be running after this step to verify that theconfiguration was specified correctly and needed for the deployment.
c. Optional: Define an alternative application context path that accesses theIBM TRIRIGA application. This path must begin with a slash (/).
d. Specify the minimum and maximum Java memory setting values inmegabytes.
e. Specify the server host name.f. Optional: Select production mode. This selection sets the value of the
ProductionMode property in the TRIRIGAWEB.properties file.4. For the database type, select Oracle. Consult with your Oracle Database
administrator and specify the database information in the next set of screens.a. Select the database actions to be initiated, such as creating table spaces,
creating the schema, and loading the database from a .zip file. Some ofthese tasks can be completed by the database administrator beforehand. Forexample, if your database administrator pre-created the table space andschema, clear the first option. When you create the database, you must loaddata using the installation program.
b. Specify the information for the data schema database server, such as thehost name, port, and system identification (SID). For example, 1521 is atypical value for the Oracle Database server port, and orcl is a typical valuefor the Oracle Database server system identification.
c. Specify the data schema user name and password. For example, tridata is atypical value for both fields.
Chapter 4. Installing the platform 39

d. Specify the names of the data schema table spaces. Only letters and theunderscore can be used in the table space name. For example, TRIDATA_DATAis a typical value for data and TRIDATA_INDX is a typical value for indexes.
e. Optional: Specify the data schema table space parameters, such as the filenames and file sizes in megabytes. This screen is displayed if you chose tocreate the table spaces. The default file size is 2500 MB (or 2.5 GB), which isthe minimum that is required. To determine the correct size of these files,conduct a careful analysis. If the autoextend option is enabled for tablespaces within the database, the table spaces are automatically extended asneeded. However, this extension might severely affect performance.
f. Optional: Specify the database administrator user name and password. Thisscreen is displayed if you chose to create the table spaces and schema. Thisinformation is required to set up the database structures and schema owner.You are not prompted to specify the database administrator user if youchose to load the database from a .zip file as the only database action toperform.
g. Specify the minimum and maximum sizes for the database pools. Thesesettings determine the number of connections that the application serverstarts when it initializes and the number that it can grow to under load.
5. Complete and review the installation information in the final set of screens.a. Specify the names of the Simple Mail Transfer Protocol (SMTP) mail server
and web server.b. Optional: Install IBM Tivoli Directory Integrator and specify port numbers
for IBM Tivoli Directory Integrator to use.c. Review the URL that the installer is using to test the data schema
connection.d. Review the results of the test. If the test fails, verify that Oracle Database is
running. If you see an informative message that your database might notproperly support multibyte characters and your implementation mustsupport multibyte characters, then click Cancel. Adjust your database andrestart the installer.
e. Review the pre-installation summary and click Install.6. Click Next. The database configuration process can take a long time because
the database must allocate space, create the users, and load the default schemadata.a. Optional: If you want to monitor the progress in the directory where IBM
TRIRIGA is installed, you can open the ant.log file in a log monitoringutility. In Windows, you can run the WinTail utility. In UNIX, you can runthe tail –f ant.log command.
7. When the installation is complete, click Done.8. Copy your license files into the tririga_root\config\licenses directory. All
application servers that access a database must have the same set of licenses.The only exception is the license file for the IBM TRIRIGA Connector forBusiness Applications. This product is licensed for a limited number of serversand the license file must be placed on that number of servers to stay incompliance. For more information, see the topic about license files.
9. Restart IBM TRIRIGA by locating the WebSphere Application Server directorywith the appropriate method.v On Windows servers, start the WebSphere Application Server service IBM
WebSphere Application Server V8.5 - NODENAME from Control Panel >Administrative Tools > Services.
40 © Copyright IBM Corp. 2011, 2014
v On UNIX servers, run the stopServer and startServer commands andspecify the server name, WEBSPHERE_HOME/profiles/AppSrv01/bin/stopServer.sh SERVER_NAME and then WEBSPHERE_HOME/profiles/AppSrv01/bin/startServer.sh SERVER_NAME.
v Alternatively, you can start the application through the WebSphereApplication Server admin console. Log into the WebSphere ApplicationServer admin console, go to Applications > All Applications, select the IBMTRIRIGA application and click Stop and then Start.
What to do next
Vverify that your installation is running properly.
Installing IBM TRIRIGA Application Platform on WebSphereand Microsoft SQL Server
After your application server and database server are prepared, you can begin toinstall the IBM TRIRIGA Application Platform on IBM WebSphere ApplicationServer and Microsoft SQL Server.
Before you begin
Verify that the Microsoft SQL Server and IBM WebSphere Application Server arerunning and that you have administrative authority on the servers.
Procedure1. Run the installer file. Follow the installation instructions.
a. Accept the licenses for both the application and the application platform.b. For the installation set, select IBM TRIRIGA Application Platform.c. For the installation type, select New Installation.
2. Select the data file to install and click Choose.3. For the application server, select WebSphere. Specify the WebSphere
Application Server information in the next set of screens.a. Specify the information for the WebSphere Application Server configuration,
such as the cell, node, server, profile, and home. Log on to the WebSphereApplication Server and run the manageprofiles.[bat|sh] –listProfilescommand to identify the cell, node, server, profile, and home values.WebSphere Application Server home is defined as C:\ProgramFiles\IBM\WebSphere\AppServer, for example.
b. Specify the WebSphere Application Server administrator user name andpassword. The server must be running after this step to verify that theconfiguration was specified correctly and needed for the deployment.
c. Optional: Define an alternative application context path that accesses theIBM TRIRIGA application. This path must begin with a slash (/).
d. Specify the minimum and maximum Java memory setting values inmegabytes.
e. Specify the server host name.f. Optional: Select production mode. This selection sets the value of the
ProductionMode property in the TRIRIGAWEB.properties file.4. For the database type, select Microsoft SQL Server. Consult with your
Microsoft SQL Server administrator and specify the database information in thenext set of screens.
Chapter 4. Installing the platform 41

a. Follow the instructions for downloading the Java Device Test Suite (JDTS)driver. Specify the path to the jtds-1.2.8.jar file.
b. Select the database actions to be initiated, such as creating table spaces,creating the schema, and loading the database from a .zip file. Some ofthese tasks can be completed by the database administrator beforehand. Forexample, if your database administrator pre-created the table space andschema, clear the first option. When you create the database, you must loaddata using the installation program.
c. Specify the information for the database server connection, such as the portand name. For example, 1433 is a typical value for the Microsoft SQL Serverport, and tridata is a typical value for the Microsoft SQL Server databasename.
d. Specify the database user name and password. For example, tridata is atypical value for both fields. Verify that the database user that is being usedfor the new installation is uniquely associated to the database.
e. Optional: Select the option to configure your database for multibytelanguage support. If you do not configure the database for multibytelanguage support, you can select this option during a future upgrade.However, if you anticipate supporting multibyte languages in the future,you should configure the database for multibyte language support now.
f. Optional: Choose a collation for the Microsoft SQL Server database. Thisscreen is displayed if you chose to configure your database for multibytelanguage support.
g. Specify the database administrator user name and password. Thisinformation is required to set up the database structures and schema owner.You are not prompted to specify the database administrator user if youchose to load the database from a .zip file as the only database action toperform.
h. Specify the minimum and maximum sizes for the database pools. Thesesettings determine the number of connections that the application serverstarts when it initializes and the number that it can grow to under load.
5. Complete and review the installation information in the final set of screens.a. Specify the names of the Simple Mail Transfer Protocol (SMTP) mail server
and web server.b. Optional: Install IBM Tivoli Directory Integrator and specify port numbers
for IBM Tivoli Directory Integrator to use.c. Review the URL that the installer is using to test the data schema
connection.d. Review the results of the test. If the test fails, verify that Microsoft SQL
Server is running.e. Review the pre-installation summary and click Install.
6. Click Next. The database configuration process can take a long time becausethe database must allocate space, create the users, and load the default schemadata.a. Optional: If you want to monitor the progress in the directory where IBM
TRIRIGA is installed, you can open the ant.log file in a log monitoringutility. In Windows, you can run the WinTail utility. In UNIX, you can runthe tail –f ant.log command.
7. When the installation is complete, click Done.8. Copy your license files into the tririga_root\config\licenses directory. All
application servers that access a database must have the same set of licenses.The only exception is the license file for the IBM TRIRIGA Connector for
42 © Copyright IBM Corp. 2011, 2014

Business Applications. This product is licensed for a limited number of serversand the license file must be placed on that number of servers to stay incompliance. For more information, see the topic about license files.
9. Restart IBM TRIRIGA by locating the WebSphere Application Server directorywith the appropriate method.v On Windows servers, start the WebSphere Application Server service IBM
WebSphere Application Server V8.5 - NODENAME from Control Panel >Administrative Tools > Services.
v On UNIX servers, run the stopServer and startServer commands andspecify the server name, WEBSPHERE_HOME/profiles/AppSrv01/bin/stopServer.sh SERVER_NAME and then WEBSPHERE_HOME/profiles/AppSrv01/bin/startServer.sh SERVER_NAME.
v Alternatively, you can start the application through the WebSphereApplication Server admin console. Log into the WebSphere ApplicationServer admin console, go to Applications > All Applications, select the IBMTRIRIGA application and click Stop and then Start.
What to do next
Vverify that your installation is running properly.
Installing IBM TRIRIGA Application Platform with Oracle Databaseexport files
If you have an Oracle Database export file to import into the IBM TRIRIGAApplication Platform installation, you can run an Oracle Database exportinstallation.
Overview of Oracle Database export installationIf you have an Oracle Database export file to import into the IBM TRIRIGAApplication Platform installation, you can run an Oracle Database exportinstallation. You can run this type of installation to move an operational databaseto a test or staging environment, or restore a database after a failure.
Installation phases
Before you begin the IBM TRIRIGA Application Platform installation, theapplication server software must be installed locally or on a server. Installing theplatform with an Oracle Database export file involves several phases:v Running the IBM TRIRIGA installation as a new installation to set up the
schema (or user) and the table spaces (or database).v Importing the Oracle Database .dmp export file.v Running the IBM TRIRIGA installation as an upgrade installation to load the
database.
Installing IBM TRIRIGA Application Platform on JBoss,WebLogic, or WebSphere
After your application server and database server are prepared, you can begin toinstall the IBM TRIRIGA Application Platform with your Oracle Database exportfile.
Chapter 4. Installing the platform 43
Before you begin
Verify that the Oracle Database is running and that you have administrativeauthority on the database server.
Procedure1. Run the installer file. Follow the installation instructions.
a. For the installation set, select IBM TRIRIGA Application Platform.b. For the installation type, select New Installation.c. For the database type, select Oracle.
2. When you reach the database installation options, select the database action tocreate the schema. Clear all other options.a. Optional: If the table spaces do not exist, select the database action to
create the table spaces.3. When you reach the pre-installation summary, click Install.4. Click Next. The database configuration process can take a long time because
the database must allocate space, create the users, and load the default schemadata.a. Optional: If you want to monitor the progress in the directory where IBM
TRIRIGA is installed, you can open the ant.log file in a log monitoringutility. In Windows, you can run the WinTail utility. In UNIX, you can runthe tail –f ant.log command.
5. When the installation is complete, click Done.6. Import the Oracle Database .dmp export file.
a. Locate the export file and run the import command. For example:imp system/manager fromuser=tridata touser=tridatafile=exp_tridata.dmp log=imp_tridata.log
The database import process can take a long time.b. When the import is complete, note any warnings or errors that occurred.
7. Review the ant.log file for errors.a. If an error is found, consult your implementation team on how to proceed.b. If no errors are found, delete the ant.log file.
8. Run the installer file. Follow the installation instructions.a. For the installation set, select Database Only.b. For the installation type, select Platform Upgrade.c. For the database type, select Oracle.
9. When you reach the pre-installation summary, click Install.10. Click Next.
a. Optional: If you want to monitor the progress in the directory where IBMTRIRIGA is installed, you can open the ant.log file in a log monitoringutility.
11. When the installation is complete, click Done.12. Review the ant.log file for errors.
a. If an error is found, consult your implementation team on how to proceed.13. Verify that your license files are in the tririga_root\config\licenses
directory.14. Optional: If you made customizations that were saved in the userfiles
directory, copy those files into the upgrade installation.
44 © Copyright IBM Corp. 2011, 2014
15. Start IBM TRIRIGA by locating the application server directory with theappropriate method.
What to do next
Vverify that your installation is running properly.
Configuring IBM TRIRIGA Application Platform with BravaAlthough the IBM TRIRIGA Application Platform installation does not provide theBrava! Enterprise Viewer for IBM TRIRIGA, the platform can integrate with Bravafor multi-format document viewing and markup within the IBM TRIRIGADocument Manager. This integration involves the application server where theBrava client is installed, and the tools server where the Brava server is installed.
Overview of Brava installationBefore you begin the installation of the Brava! Enterprise Viewer for IBM TRIRIGA,you can avoid issues by becoming familiar with its administration guide. The mostrelevant sections of the administration guide contain information about setting upthe queue server and publishing Microsoft Office documents.
Administration guide
The Brava Enterprise 5.5J Administration Guide contains several sections that arerelevant to an IBM TRIRIGA installation that integrates with Brava!:v Section 1.3.3 describes how to configure the Brava queue server.v Section 3.3.5 describes how to publish files in other applications such as IBM
TRIRIGA, including the steps to publish Microsoft Word documents.v Section 4.2.2 describes how to troubleshoot the known issues of using Brava
when you view or publish Microsoft Word documents.v Brava can be installed correctly with direct console or virtual network
computing (VNC) access only. It cannot be installed correctly with MicrosoftWindows terminal services. Follow the installation instructions in the BravaEnterprise 5.5J Administration Guide.
Java job processor
You might decide to install Brava to view documents that are created in MicrosoftOffice or Adobe Acrobat. However, if your users do not have the correspondingsoftware products on their local computers, they cannot view the documents. Inthis case, you can install Brava Java Job Processor (formerly Brava Net-ItEnterprise) with the corresponding software products on the Brava server.
Resource directory
The Brava resource folder is the IGC folder that contains the SupportFiles directoryand brava.css file. On Windows, a typical location is C:\IGC.
Chapter 4. Installing the platform 45
Verification checklistAfter the IBM TRIRIGA Application Platform installation is complete, verify thatyour installation is running properly. This verification checklist is not intended toreplace your company testing and validation procedures.
Item Description
Inspecting the installationlog
Read the ant.log file. This file contains information about thatsteps that were taken during the installation. The file iswritten to the IBM TRIRIGA root installation directory. Forexample, on Windows, C:\Tririga\ant.log is the typicallocation.
A line toward the end of the file indicates whether theinstallation succeeded or failed, such as the followingexamples:
v The installation succeeded:
BUILD SUCCESSFULTotal time: 25 minutes 51 seconds
v The installation failed:
BUILD FAILEDC:\Tririga\build.xml:2586: The following erroroccurred while executing this line:C:\Tririga\build.xml:2141: Java returned: -1
Total time: 8 minutes 44 seconds
Starting the application Start IBM TRIRIGA by locating the application server directorywith the appropriate method.
Accessing the application Verify your access to the IBM TRIRIGA application as thesystem user as follows:
v Specify the URL address in your browser address field. TheURL looks something like http://[hostname:port][/context_path], where [hostname:port] and[/context_path] are the specific values for yourenvironment. If you see the error message "Unable to launchthe application", then you must set the FRONT_END_SERVERproperty.
v Sign in with your user name and password. The defaultuser name is "system" and the default password is "admin".
Accessing theadministrator console
Verify your access to the IBM TRIRIGA administrator consoleas follows.
v Specify the URL address in your browser address field. TheURL looks something like http://[hostname:port][/context_path]/html/en/default/admin, where[hostname:port] and [/context_path] are the specificvalues for your environment.
v Sign in with your user name and password. The defaultuser name is "system" and the default password is "admin".
v In the Agent Manager, start the following agents in theprocess server: Platform Maintenance Scheduler Agent,Extended Formula Agent, Formula Recalc Agent, SchedulerAgent, Workflow (WF) Agent, and Workflow (WF)Notification Agent.
v Sign out of the administrator console.
46 © Copyright IBM Corp. 2011, 2014

Item Description
Creating users and records As the system user, create and verify an IBM TRIRIGAemployee who is not an administrator as follows:
v Assign the user to several user groups, but not all of them.
v Assign the user with several user licenses, but not all ofthem.
v Sign in as the user that you created.
v Verify that the user can access everything that the employeeis meant to access, according to the assigned groups andlicenses.
v Verify that the user can create and revise records, such aspeople records and location records.
v Verify that the association tree loads in the Associations tabof an opened record.
Using the builder tools As the system user, open and verify the builder tools underTools > Builder Tools as follows:
v In the workflow builder, verify that workflows loadcompletely by opening and revising existing workflows.
v In the data modeler, verify that the state transitions loadcompletely.
v In the data modeler, verify that the simple mail transferprotocol (SMTP) email notification works by publishing atest business object.
Using the DocumentManager
As either the system user or a user with rights, open andverify the Document Manager under Tools > DocumentManager as follows:
v Verify that the user can upload new documents, such as.txt, .html, and .jpg files.
v Verify that the user can upload new documents with themultifile applet.
v Verify that the user can view documents by clicking the iconin the V column.
v Verify that the user can check in and check out documents.
v If Brava is installed, verify that the user can uploadcomputer-aided design (CAD) documents in .dxf formatand view the CAD documents by clicking the icon in the Vcolumn.
Editing project tasks As either the system user or a user with rights, verify thefunctions as follows:
v Create or open a new capital project.
v In the Schedule tab, add or open a task in the Project Taskssection.
v In the task, edit the planned start date, planned end date, orplanned working hours.
v Verify that when one field is edited, the other two fields areadjusted automatically.
Chapter 4. Installing the platform 47
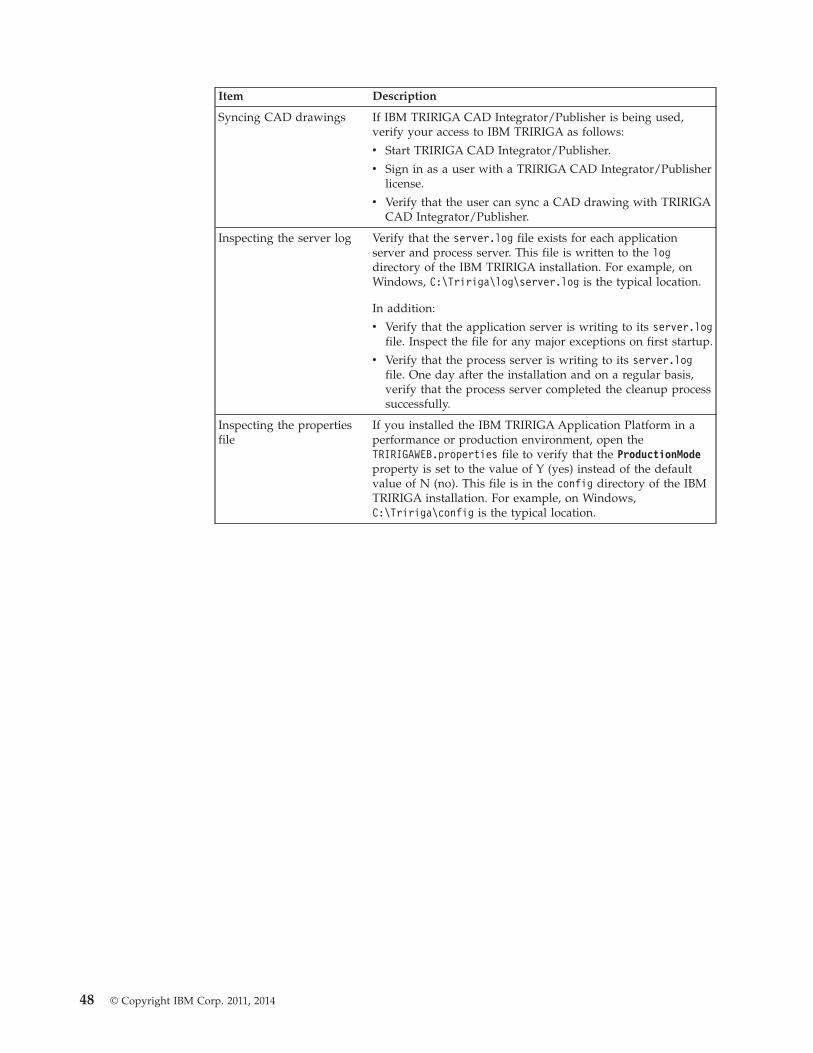
Item Description
Syncing CAD drawings If IBM TRIRIGA CAD Integrator/Publisher is being used,verify your access to IBM TRIRIGA as follows:
v Start TRIRIGA CAD Integrator/Publisher.
v Sign in as a user with a TRIRIGA CAD Integrator/Publisherlicense.
v Verify that the user can sync a CAD drawing with TRIRIGACAD Integrator/Publisher.
Inspecting the server log Verify that the server.log file exists for each applicationserver and process server. This file is written to the logdirectory of the IBM TRIRIGA installation. For example, onWindows, C:\Tririga\log\server.log is the typical location.
In addition:
v Verify that the application server is writing to its server.logfile. Inspect the file for any major exceptions on first startup.
v Verify that the process server is writing to its server.logfile. One day after the installation and on a regular basis,verify that the process server completed the cleanup processsuccessfully.
Inspecting the propertiesfile
If you installed the IBM TRIRIGA Application Platform in aperformance or production environment, open theTRIRIGAWEB.properties file to verify that the ProductionModeproperty is set to the value of Y (yes) instead of the defaultvalue of N (no). This file is in the config directory of the IBMTRIRIGA installation. For example, on Windows,C:\Tririga\config is the typical location.
48 © Copyright IBM Corp. 2011, 2014

Chapter 5. Configuring the platform
Although the IBM TRIRIGA Application Platform installation process applies mostof the required configurations, further configuration might be necessary for yourparticular implementation. You can avoid issues by determining what the keyconfigurations are and where changes can be made to optimize your environment.
Properties filesCertain IBM TRIRIGA properties must be set when they apply to your particularimplementation. The properties files are in the config directory of the IBMTRIRIGA Application Platform installation. For example, on Windows,C:\Tririga\config is the typical location.
The properties files follow the concept of “name-value pairs” where a variablename is followed by an equal sign (=) and the defined value. Lines in theproperties files that begin with a number sign (#) are comments and not read bythe implementation. Name-value pairs are case-sensitive.
The variables and settings in the properties files might change from one version ofIBM TRIRIGA to the next. Before you upgrade from a prior version of the IBMTRIRIGA software, save your old properties files. After you complete yourupgrade installation, carefully review each newly installed properties file andadjust any values that apply to your implementation.
For information about the TRIRIGACRYSTAL.properties file, see the IBM TRIRIGAApplication Platform 3 Connector for SAP BusinessObjects User Guide.
TRIRIGACONVERSION.propertiesTo adjust the IBM TRIRIGA conversion and validator properties, open theTRIRIGACONVERSION.properties file.
Conversion properties
Property Values Description
MoveTableThrdCount [Number] The number of threads to move data.
For example, 15.
PopulateAllDataThrdCount
[Number] The number of threads to populate all data.
For example, 20.
PopulateContainerDataThrdCount
[Number] The number of threads to populate containerdata.
For example, 10.
PopulateSmartSectionsThrdCount
[Number] The number of threads to populate smartsections.
For example, 10.
© Copyright IBM Corp. 2011, 2014 49
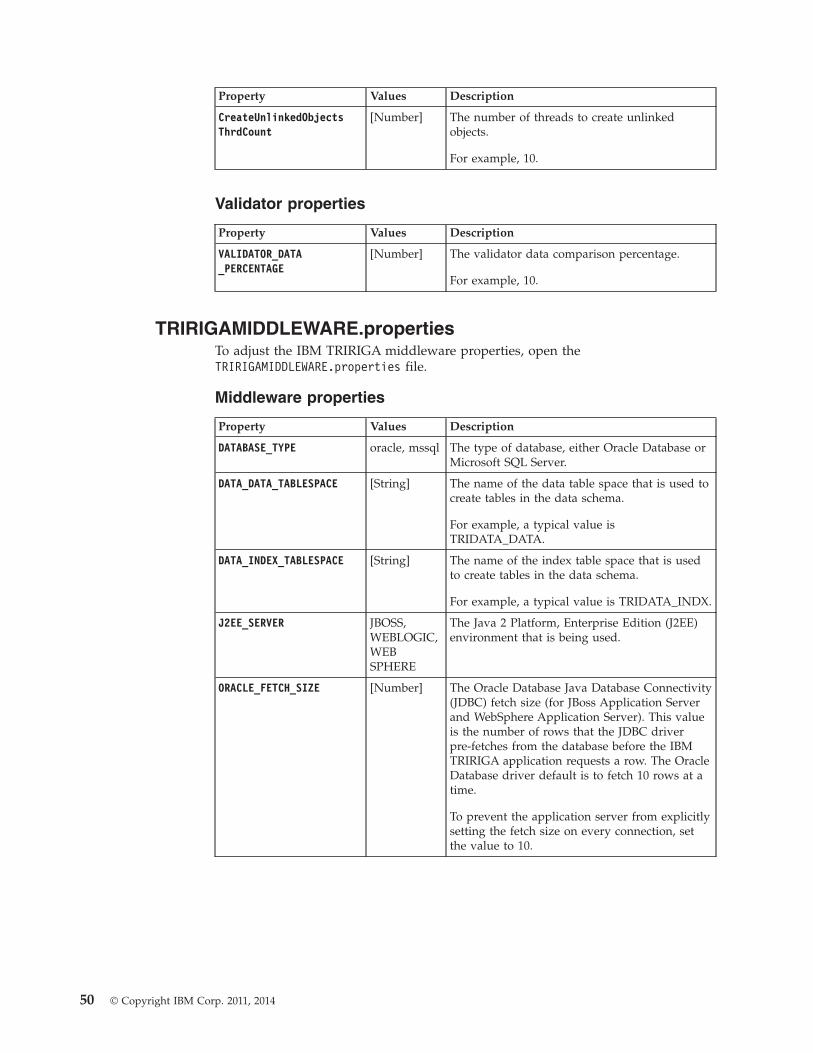
Property Values Description
CreateUnlinkedObjectsThrdCount
[Number] The number of threads to create unlinkedobjects.
For example, 10.
Validator properties
Property Values Description
VALIDATOR_DATA_PERCENTAGE
[Number] The validator data comparison percentage.
For example, 10.
TRIRIGAMIDDLEWARE.propertiesTo adjust the IBM TRIRIGA middleware properties, open theTRIRIGAMIDDLEWARE.properties file.
Middleware properties
Property Values Description
DATABASE_TYPE oracle, mssql The type of database, either Oracle Database orMicrosoft SQL Server.
DATA_DATA_TABLESPACE [String] The name of the data table space that is used tocreate tables in the data schema.
For example, a typical value isTRIDATA_DATA.
DATA_INDEX_TABLESPACE [String] The name of the index table space that is usedto create tables in the data schema.
For example, a typical value is TRIDATA_INDX.
J2EE_SERVER JBOSS,WEBLOGIC,WEBSPHERE
The Java 2 Platform, Enterprise Edition (J2EE)environment that is being used.
ORACLE_FETCH_SIZE [Number] The Oracle Database Java Database Connectivity(JDBC) fetch size (for JBoss Application Serverand WebSphere Application Server). This valueis the number of rows that the JDBC driverpre-fetches from the database before the IBMTRIRIGA application requests a row. The OracleDatabase driver default is to fetch 10 rows at atime.
To prevent the application server from explicitlysetting the fetch size on every connection, setthe value to 10.
50 © Copyright IBM Corp. 2011, 2014
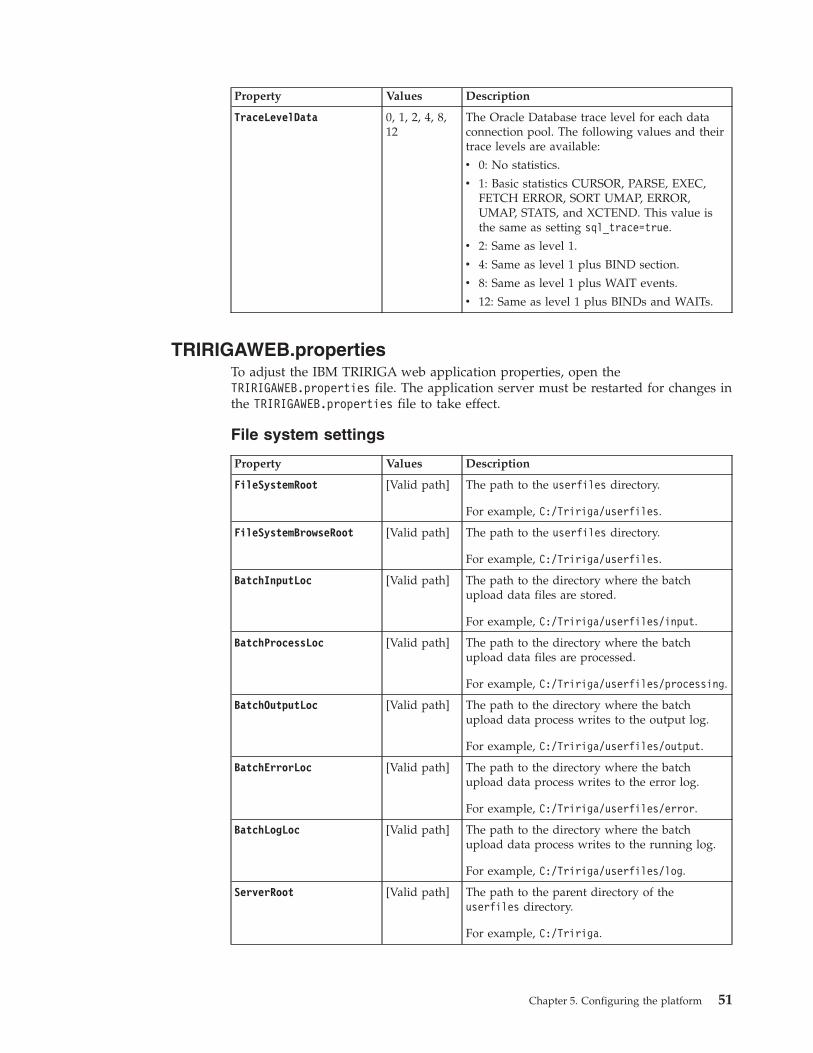
Property Values Description
TraceLevelData 0, 1, 2, 4, 8,12
The Oracle Database trace level for each dataconnection pool. The following values and theirtrace levels are available:
v 0: No statistics.
v 1: Basic statistics CURSOR, PARSE, EXEC,FETCH ERROR, SORT UMAP, ERROR,UMAP, STATS, and XCTEND. This value isthe same as setting sql_trace=true.
v 2: Same as level 1.
v 4: Same as level 1 plus BIND section.
v 8: Same as level 1 plus WAIT events.
v 12: Same as level 1 plus BINDs and WAITs.
TRIRIGAWEB.propertiesTo adjust the IBM TRIRIGA web application properties, open theTRIRIGAWEB.properties file. The application server must be restarted for changes inthe TRIRIGAWEB.properties file to take effect.
File system settings
Property Values Description
FileSystemRoot [Valid path] The path to the userfiles directory.
For example, C:/Tririga/userfiles.
FileSystemBrowseRoot [Valid path] The path to the userfiles directory.
For example, C:/Tririga/userfiles.
BatchInputLoc [Valid path] The path to the directory where the batchupload data files are stored.
For example, C:/Tririga/userfiles/input.
BatchProcessLoc [Valid path] The path to the directory where the batchupload data files are processed.
For example, C:/Tririga/userfiles/processing.
BatchOutputLoc [Valid path] The path to the directory where the batchupload data process writes to the output log.
For example, C:/Tririga/userfiles/output.
BatchErrorLoc [Valid path] The path to the directory where the batchupload data process writes to the error log.
For example, C:/Tririga/userfiles/error.
BatchLogLoc [Valid path] The path to the directory where the batchupload data process writes to the running log.
For example, C:/Tririga/userfiles/log.
ServerRoot [Valid path] The path to the parent directory of theuserfiles directory.
For example, C:/Tririga.
Chapter 5. Configuring the platform 51
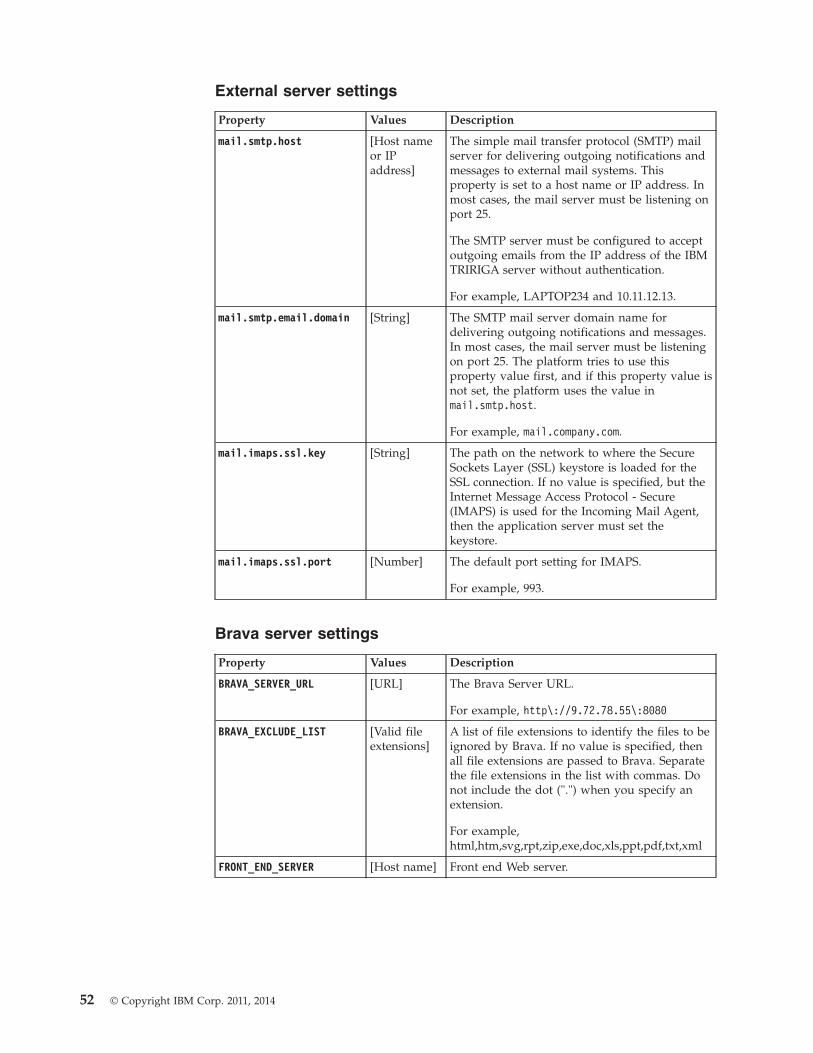
External server settings
Property Values Description
mail.smtp.host [Host nameor IPaddress]
The simple mail transfer protocol (SMTP) mailserver for delivering outgoing notifications andmessages to external mail systems. Thisproperty is set to a host name or IP address. Inmost cases, the mail server must be listening onport 25.
The SMTP server must be configured to acceptoutgoing emails from the IP address of the IBMTRIRIGA server without authentication.
For example, LAPTOP234 and 10.11.12.13.
mail.smtp.email.domain [String] The SMTP mail server domain name fordelivering outgoing notifications and messages.In most cases, the mail server must be listeningon port 25. The platform tries to use thisproperty value first, and if this property value isnot set, the platform uses the value inmail.smtp.host.
For example, mail.company.com.
mail.imaps.ssl.key [String] The path on the network to where the SecureSockets Layer (SSL) keystore is loaded for theSSL connection. If no value is specified, but theInternet Message Access Protocol - Secure(IMAPS) is used for the Incoming Mail Agent,then the application server must set thekeystore.
mail.imaps.ssl.port [Number] The default port setting for IMAPS.
For example, 993.
Brava server settings
Property Values Description
BRAVA_SERVER_URL [URL] The Brava Server URL.
For example, http\://9.72.78.55\:8080
BRAVA_EXCLUDE_LIST [Valid fileextensions]
A list of file extensions to identify the files to beignored by Brava. If no value is specified, thenall file extensions are passed to Brava. Separatethe file extensions in the list with commas. Donot include the dot (".") when you specify anextension.
For example,html,htm,svg,rpt,zip,exe,doc,xls,ppt,pdf,txt,xml
FRONT_END_SERVER [Host name] Front end Web server.
52 © Copyright IBM Corp. 2011, 2014

Agent settings
Property Values Description
AGENTS_NOT_ALLOWED [String] A comma-delimited list of agents that are notallowed to run on this server.
Manage agent settings for this server and allother IBM TRIRIGA servers on the AgentManager page of the administrator console. Formore information, see the IBM TRIRIGAApplication Platform 3 Administrator Console UserGuide.
A blank value allows any agent to be started onthis server but does not start any agentautomatically.
INSTANCE_ID [Number] Overrides the default computer ID.
When two or more IBM TRIRIGA servers arerunning on the same physical computer, theINSTANCE_NAME property must be unique forindependent agent management. When a valueis present, the value of the INSTANCE_NAMEproperty can be any alphanumeric value.
Leave this value blank if you are running asingle instance per physical computer.
INSTANCE_NAME [String] Overrides the default computer name.
When two or more IBM TRIRIGA servers arerunning on the same physical computer, theINSTANCE_NAME property must be unique forindependent agent management. When a valueis present, the value of the INSTANCE_NAMEproperty can be any alphanumeric value.
Leave this value blank if you are running asingle instance per physical computer.
ReportQueueAgentLoad [Number] The number of threads in proportion to thenumber of connections.
For example, 100.0.
ReportQueueAgentMaxThreads
[Number] The maximum number of threads.
If there is no upper limit, set to 0.
DataImportAgentLoad [Number] The number of threads in proportion to thenumber of connections.
For example, 100.0.
DataImportAgentMaxThreads
[Number] The maximum number of threads.
If there is no upper limit, set to 0.
SchedulerAgentLoad [Number] The number of threads in proportion to thenumber of connections.
For example, 100.0.
SchedulerAgentMaxThreads
[Number] The maximum number of threads.
If there is no upper limit, set to 0.
Chapter 5. Configuring the platform 53
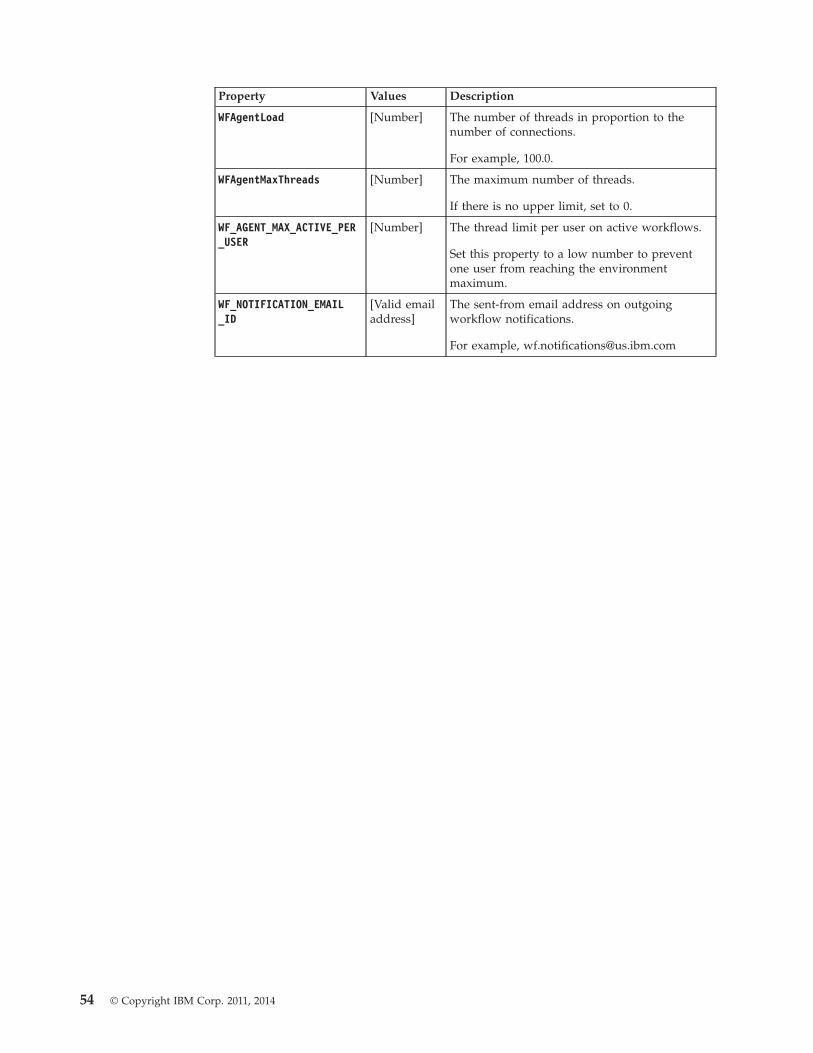
Property Values Description
WFAgentLoad [Number] The number of threads in proportion to thenumber of connections.
For example, 100.0.
WFAgentMaxThreads [Number] The maximum number of threads.
If there is no upper limit, set to 0.
WF_AGENT_MAX_ACTIVE_PER_USER
[Number] The thread limit per user on active workflows.
Set this property to a low number to preventone user from reaching the environmentmaximum.
WF_NOTIFICATION_EMAIL_ID
[Valid emailaddress]
The sent-from email address on outgoingworkflow notifications.
For example, [email protected]
54 © Copyright IBM Corp. 2011, 2014
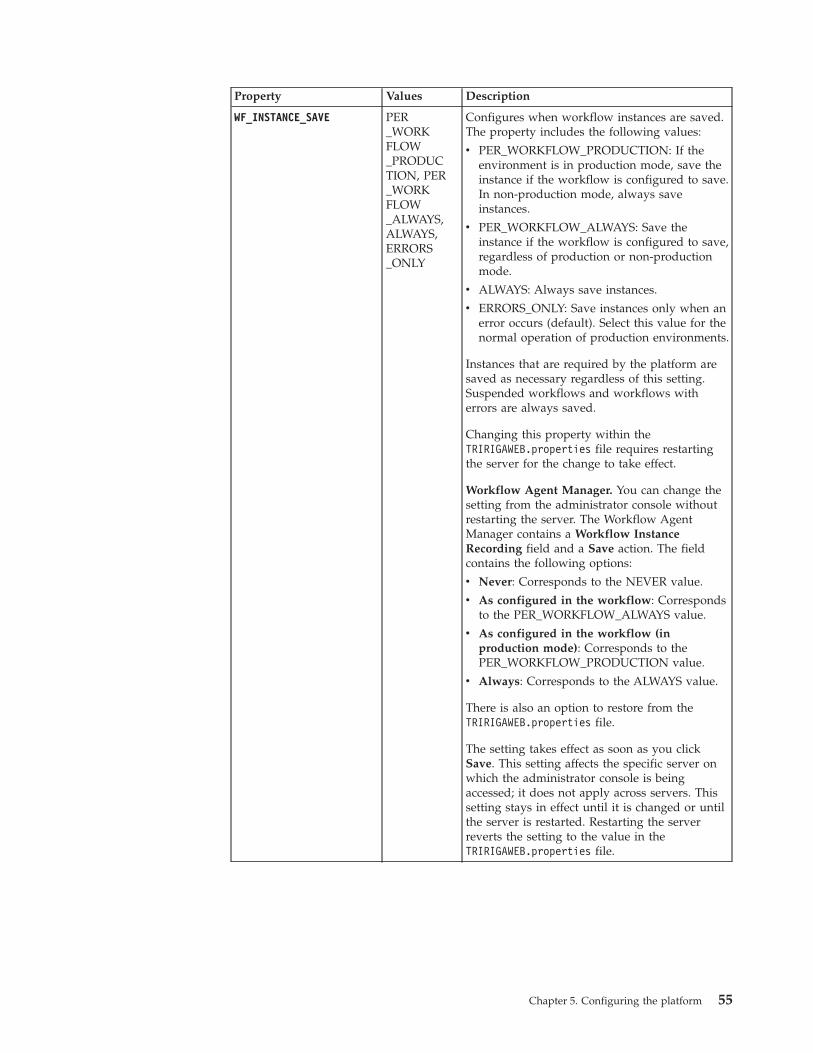
Property Values Description
WF_INSTANCE_SAVE PER_WORKFLOW_PRODUCTION, PER_WORKFLOW_ALWAYS,ALWAYS,ERRORS_ONLY
Configures when workflow instances are saved.The property includes the following values:
v PER_WORKFLOW_PRODUCTION: If theenvironment is in production mode, save theinstance if the workflow is configured to save.In non-production mode, always saveinstances.
v PER_WORKFLOW_ALWAYS: Save theinstance if the workflow is configured to save,regardless of production or non-productionmode.
v ALWAYS: Always save instances.
v ERRORS_ONLY: Save instances only when anerror occurs (default). Select this value for thenormal operation of production environments.
Instances that are required by the platform aresaved as necessary regardless of this setting.Suspended workflows and workflows witherrors are always saved.
Changing this property within theTRIRIGAWEB.properties file requires restartingthe server for the change to take effect.
Workflow Agent Manager. You can change thesetting from the administrator console withoutrestarting the server. The Workflow AgentManager contains a Workflow InstanceRecording field and a Save action. The fieldcontains the following options:
v Never: Corresponds to the NEVER value.
v As configured in the workflow: Correspondsto the PER_WORKFLOW_ALWAYS value.
v As configured in the workflow (inproduction mode): Corresponds to thePER_WORKFLOW_PRODUCTION value.
v Always: Corresponds to the ALWAYS value.
There is also an option to restore from theTRIRIGAWEB.properties file.
The setting takes effect as soon as you clickSave. This setting affects the specific server onwhich the administrator console is beingaccessed; it does not apply across servers. Thissetting stays in effect until it is changed or untilthe server is restarted. Restarting the serverreverts the setting to the value in theTRIRIGAWEB.properties file.
Chapter 5. Configuring the platform 55
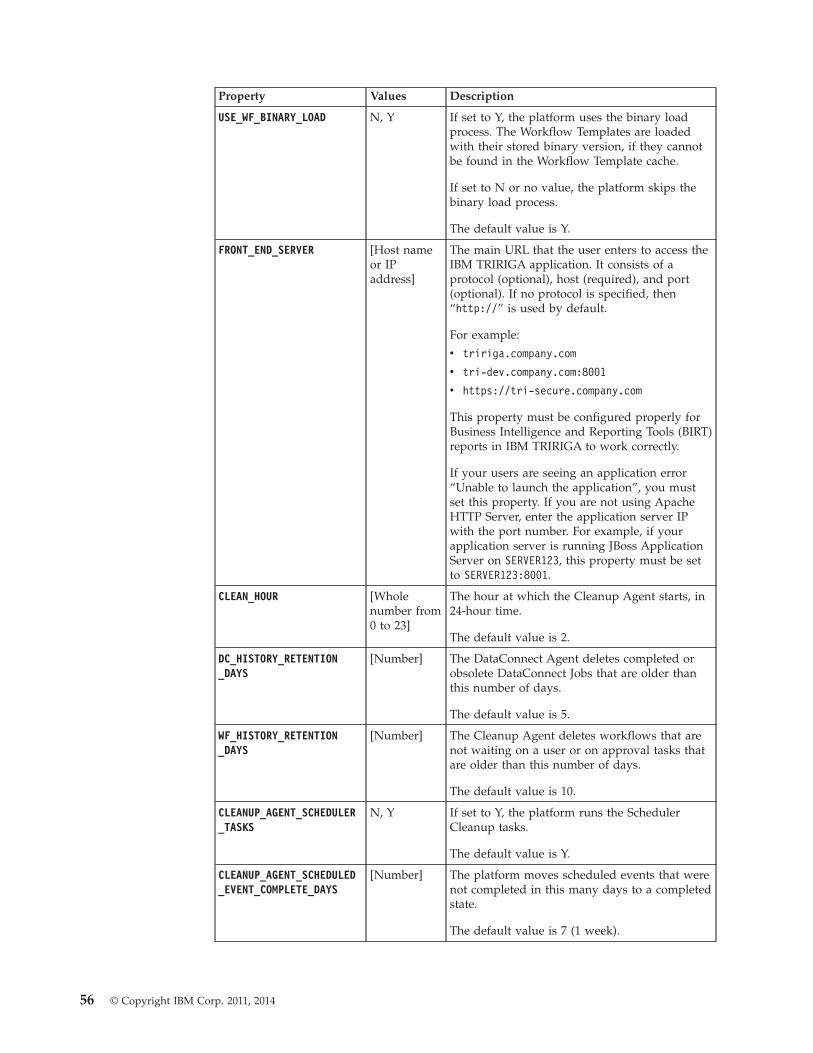
Property Values Description
USE_WF_BINARY_LOAD N, Y If set to Y, the platform uses the binary loadprocess. The Workflow Templates are loadedwith their stored binary version, if they cannotbe found in the Workflow Template cache.
If set to N or no value, the platform skips thebinary load process.
The default value is Y.
FRONT_END_SERVER [Host nameor IPaddress]
The main URL that the user enters to access theIBM TRIRIGA application. It consists of aprotocol (optional), host (required), and port(optional). If no protocol is specified, then“http://” is used by default.
For example:
v tririga.company.com
v tri-dev.company.com:8001
v https://tri-secure.company.com
This property must be configured properly forBusiness Intelligence and Reporting Tools (BIRT)reports in IBM TRIRIGA to work correctly.
If your users are seeing an application error“Unable to launch the application”, you mustset this property. If you are not using ApacheHTTP Server, enter the application server IPwith the port number. For example, if yourapplication server is running JBoss ApplicationServer on SERVER123, this property must be setto SERVER123:8001.
CLEAN_HOUR [Wholenumber from0 to 23]
The hour at which the Cleanup Agent starts, in24-hour time.
The default value is 2.
DC_HISTORY_RETENTION_DAYS
[Number] The DataConnect Agent deletes completed orobsolete DataConnect Jobs that are older thanthis number of days.
The default value is 5.
WF_HISTORY_RETENTION_DAYS
[Number] The Cleanup Agent deletes workflows that arenot waiting on a user or on approval tasks thatare older than this number of days.
The default value is 10.
CLEANUP_AGENT_SCHEDULER_TASKS
N, Y If set to Y, the platform runs the SchedulerCleanup tasks.
The default value is Y.
CLEANUP_AGENT_SCHEDULED_EVENT_COMPLETE_DAYS
[Number] The platform moves scheduled events that werenot completed in this many days to a completedstate.
The default value is 7 (1 week).
56 © Copyright IBM Corp. 2011, 2014
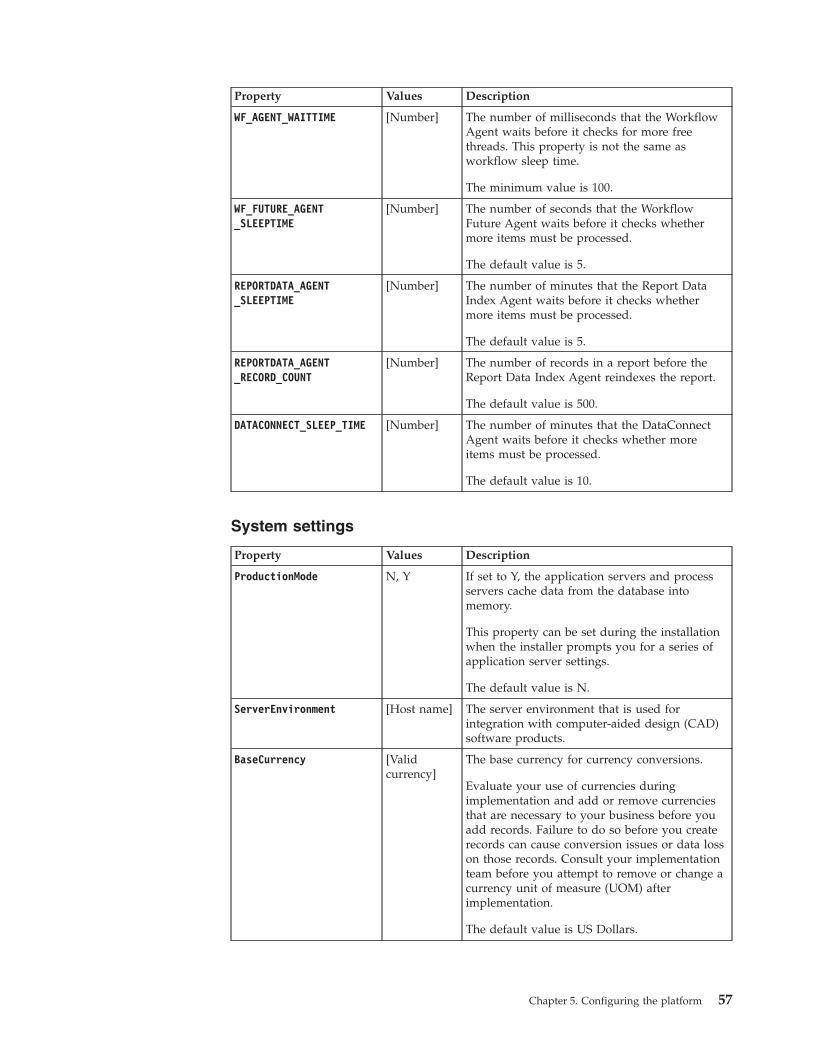
Property Values Description
WF_AGENT_WAITTIME [Number] The number of milliseconds that the WorkflowAgent waits before it checks for more freethreads. This property is not the same asworkflow sleep time.
The minimum value is 100.
WF_FUTURE_AGENT_SLEEPTIME
[Number] The number of seconds that the WorkflowFuture Agent waits before it checks whethermore items must be processed.
The default value is 5.
REPORTDATA_AGENT_SLEEPTIME
[Number] The number of minutes that the Report DataIndex Agent waits before it checks whethermore items must be processed.
The default value is 5.
REPORTDATA_AGENT_RECORD_COUNT
[Number] The number of records in a report before theReport Data Index Agent reindexes the report.
The default value is 500.
DATACONNECT_SLEEP_TIME [Number] The number of minutes that the DataConnectAgent waits before it checks whether moreitems must be processed.
The default value is 10.
System settings
Property Values Description
ProductionMode N, Y If set to Y, the application servers and processservers cache data from the database intomemory.
This property can be set during the installationwhen the installer prompts you for a series ofapplication server settings.
The default value is N.
ServerEnvironment [Host name] The server environment that is used forintegration with computer-aided design (CAD)software products.
BaseCurrency [Validcurrency]
The base currency for currency conversions.
Evaluate your use of currencies duringimplementation and add or remove currenciesthat are necessary to your business before youadd records. Failure to do so before you createrecords can cause conversion issues or data losson those records. Consult your implementationteam before you attempt to remove or change acurrency unit of measure (UOM) afterimplementation.
The default value is US Dollars.
Chapter 5. Configuring the platform 57

Property Values Description
CancelLabel [String] The label that replaces the Cancel action on allform wizards.
A blank value hides the Cancel action.
The default value is x.
CONTEXT_PATH [Path] The application context path that accesses theIBM TRIRIGA application. The first charactermust be /. If you revise this property, you mustalso revise the enterprise archive (EAR)application.xml file.
The default value is /.
SecurityScopeCacheTimeGap
[Number] The frequency at which the Security ScopeCache is refreshed in minutes.
The default value is 20.
DataRefreshTime [Number] The frequency at which the portal data isrefreshed in minutes.
The default value is 5.
SSO N, Y If set to Y, the environment runs in SingleSign-On (SSO) mode.
The default value is N.
SSO_BACKING_SERVER_PORT [Number] The port number used by the backendserver. This property must be set when SSO isenabled if the SSO server port does not matchthe backend server port.
The default value is -1. If -1 or any othernegative value is set for this property, then theport number set for the front end server is alsoset as the backend server port.
SSO_REMOTE_USER N, Y If set to Y, the environment trusts that adirectory service through a web server hasauthenticated the user. The methodrequest.getRemoteUser() is used to sign in. Theuser name must exactly match the user namethat is created in IBM TRIRIGA.
Set the value to N when the value of theSSO_USER_PRINCIPAL property is Y.
The default value is Y.
SSO_USER_PRINCIPAL N, Y If set to Y, the environment uses the HTTPheader parameter UserPrincipal.
When the value is Y, set the value of theSSO_REMOTE_USER property to N.
The default value is N.
SSO_REMOVE_DOMAIN_NAME N, Y If set to Y, the environment removes the domainname from the active directory user name that ispassed through the SSO_REMOTE_USER property.
The default value is Y.
58 © Copyright IBM Corp. 2011, 2014
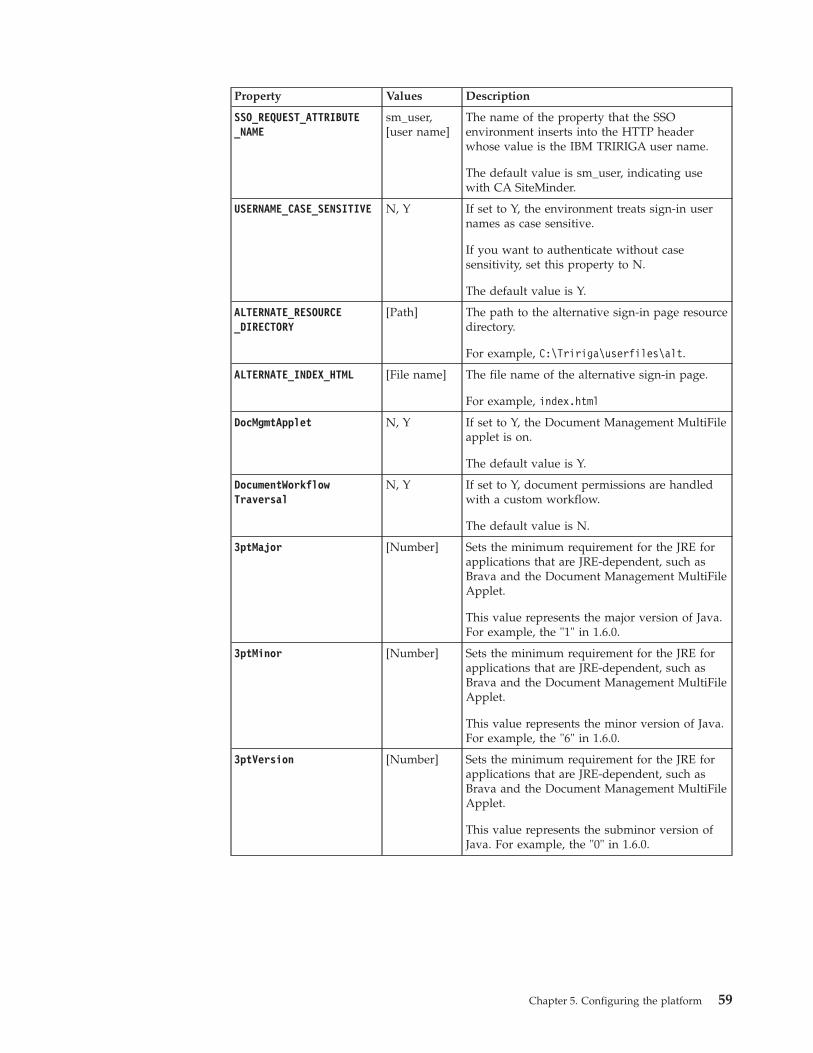
Property Values Description
SSO_REQUEST_ATTRIBUTE_NAME
sm_user,[user name]
The name of the property that the SSOenvironment inserts into the HTTP headerwhose value is the IBM TRIRIGA user name.
The default value is sm_user, indicating usewith CA SiteMinder.
USERNAME_CASE_SENSITIVE N, Y If set to Y, the environment treats sign-in usernames as case sensitive.
If you want to authenticate without casesensitivity, set this property to N.
The default value is Y.
ALTERNATE_RESOURCE_DIRECTORY
[Path] The path to the alternative sign-in page resourcedirectory.
For example, C:\Tririga\userfiles\alt.
ALTERNATE_INDEX_HTML [File name] The file name of the alternative sign-in page.
For example, index.html
DocMgmtApplet N, Y If set to Y, the Document Management MultiFileapplet is on.
The default value is Y.
DocumentWorkflowTraversal
N, Y If set to Y, document permissions are handledwith a custom workflow.
The default value is N.
3ptMajor [Number] Sets the minimum requirement for the JRE forapplications that are JRE-dependent, such asBrava and the Document Management MultiFileApplet.
This value represents the major version of Java.For example, the "1" in 1.6.0.
3ptMinor [Number] Sets the minimum requirement for the JRE forapplications that are JRE-dependent, such asBrava and the Document Management MultiFileApplet.
This value represents the minor version of Java.For example, the "6" in 1.6.0.
3ptVersion [Number] Sets the minimum requirement for the JRE forapplications that are JRE-dependent, such asBrava and the Document Management MultiFileApplet.
This value represents the subminor version ofJava. For example, the "0" in 1.6.0.
Chapter 5. Configuring the platform 59
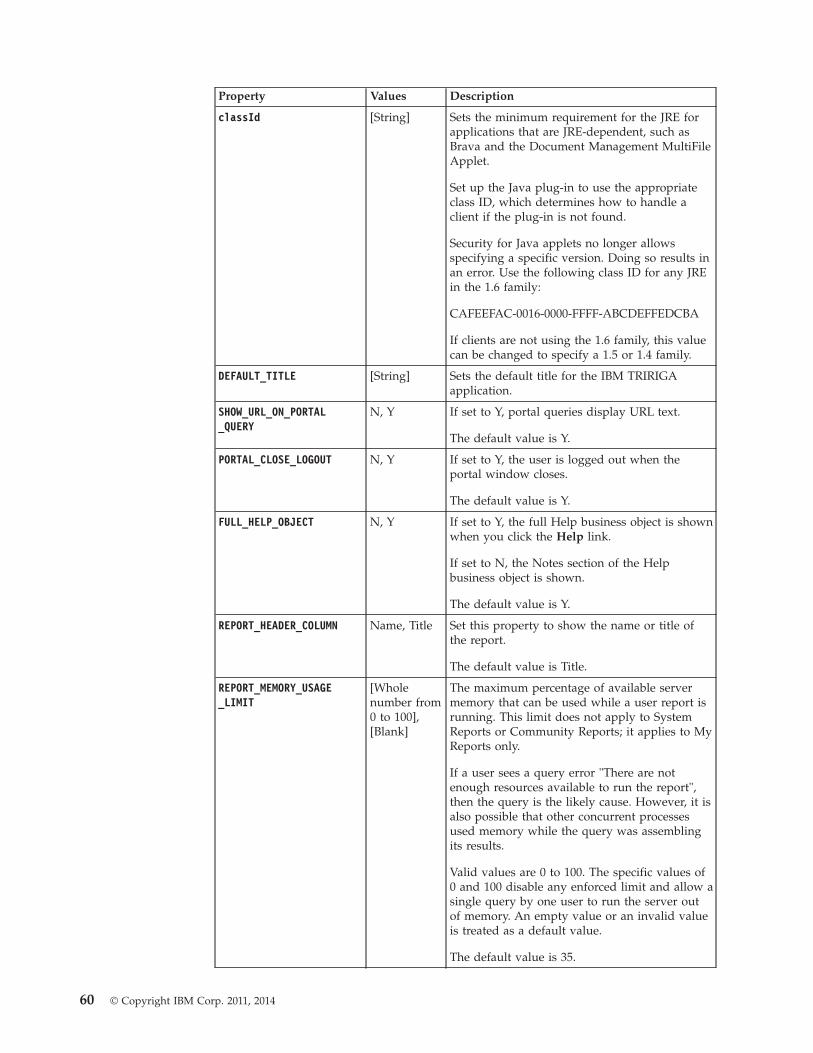
Property Values Description
classId [String] Sets the minimum requirement for the JRE forapplications that are JRE-dependent, such asBrava and the Document Management MultiFileApplet.
Set up the Java plug-in to use the appropriateclass ID, which determines how to handle aclient if the plug-in is not found.
Security for Java applets no longer allowsspecifying a specific version. Doing so results inan error. Use the following class ID for any JREin the 1.6 family:
CAFEEFAC-0016-0000-FFFF-ABCDEFFEDCBA
If clients are not using the 1.6 family, this valuecan be changed to specify a 1.5 or 1.4 family.
DEFAULT_TITLE [String] Sets the default title for the IBM TRIRIGAapplication.
SHOW_URL_ON_PORTAL_QUERY
N, Y If set to Y, portal queries display URL text.
The default value is Y.
PORTAL_CLOSE_LOGOUT N, Y If set to Y, the user is logged out when theportal window closes.
The default value is Y.
FULL_HELP_OBJECT N, Y If set to Y, the full Help business object is shownwhen you click the Help link.
If set to N, the Notes section of the Helpbusiness object is shown.
The default value is Y.
REPORT_HEADER_COLUMN Name, Title Set this property to show the name or title ofthe report.
The default value is Title.
REPORT_MEMORY_USAGE_LIMIT
[Wholenumber from0 to 100],[Blank]
The maximum percentage of available servermemory that can be used while a user report isrunning. This limit does not apply to SystemReports or Community Reports; it applies to MyReports only.
If a user sees a query error "There are notenough resources available to run the report",then the query is the likely cause. However, it isalso possible that other concurrent processesused memory while the query was assemblingits results.
Valid values are 0 to 100. The specific values of0 and 100 disable any enforced limit and allow asingle query by one user to run the server outof memory. An empty value or an invalid valueis treated as a default value.
The default value is 35.
60 © Copyright IBM Corp. 2011, 2014
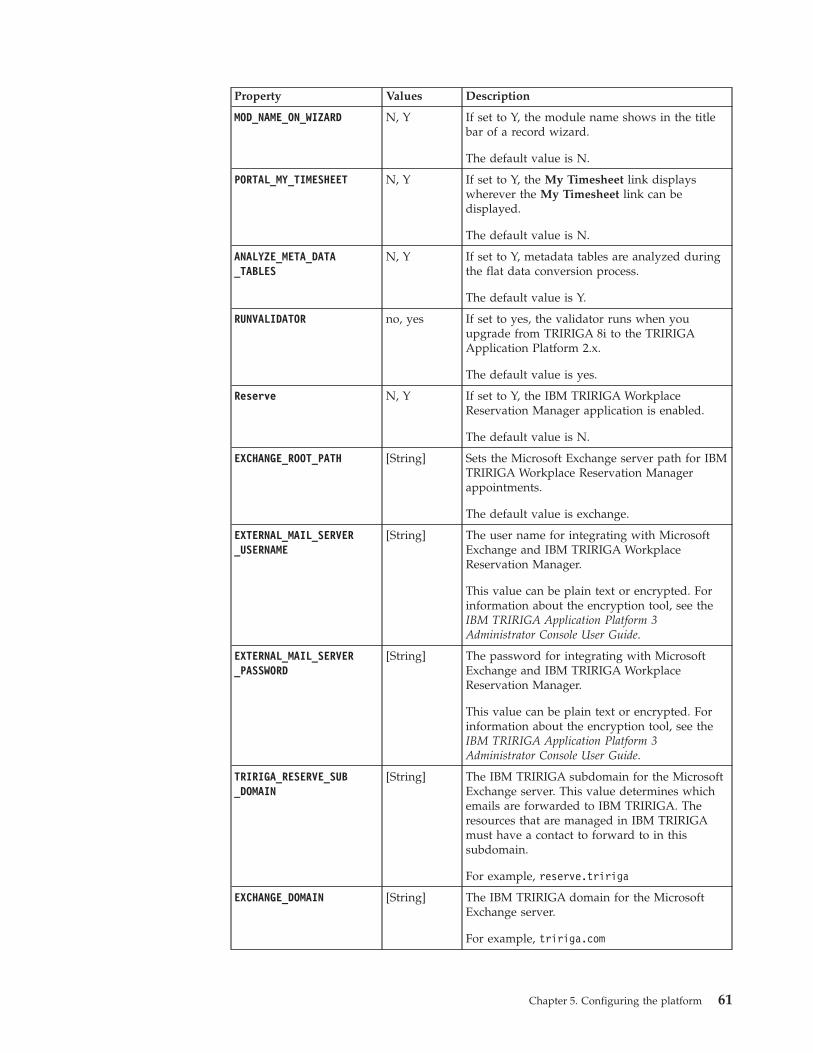
Property Values Description
MOD_NAME_ON_WIZARD N, Y If set to Y, the module name shows in the titlebar of a record wizard.
The default value is N.
PORTAL_MY_TIMESHEET N, Y If set to Y, the My Timesheet link displayswherever the My Timesheet link can bedisplayed.
The default value is N.
ANALYZE_META_DATA_TABLES
N, Y If set to Y, metadata tables are analyzed duringthe flat data conversion process.
The default value is Y.
RUNVALIDATOR no, yes If set to yes, the validator runs when youupgrade from TRIRIGA 8i to the TRIRIGAApplication Platform 2.x.
The default value is yes.
Reserve N, Y If set to Y, the IBM TRIRIGA WorkplaceReservation Manager application is enabled.
The default value is N.
EXCHANGE_ROOT_PATH [String] Sets the Microsoft Exchange server path for IBMTRIRIGA Workplace Reservation Managerappointments.
The default value is exchange.
EXTERNAL_MAIL_SERVER_USERNAME
[String] The user name for integrating with MicrosoftExchange and IBM TRIRIGA WorkplaceReservation Manager.
This value can be plain text or encrypted. Forinformation about the encryption tool, see theIBM TRIRIGA Application Platform 3Administrator Console User Guide.
EXTERNAL_MAIL_SERVER_PASSWORD
[String] The password for integrating with MicrosoftExchange and IBM TRIRIGA WorkplaceReservation Manager.
This value can be plain text or encrypted. Forinformation about the encryption tool, see theIBM TRIRIGA Application Platform 3Administrator Console User Guide.
TRIRIGA_RESERVE_SUB_DOMAIN
[String] The IBM TRIRIGA subdomain for the MicrosoftExchange server. This value determines whichemails are forwarded to IBM TRIRIGA. Theresources that are managed in IBM TRIRIGAmust have a contact to forward to in thissubdomain.
For example, reserve.tririga
EXCHANGE_DOMAIN [String] The IBM TRIRIGA domain for the MicrosoftExchange server.
For example, tririga.com
Chapter 5. Configuring the platform 61
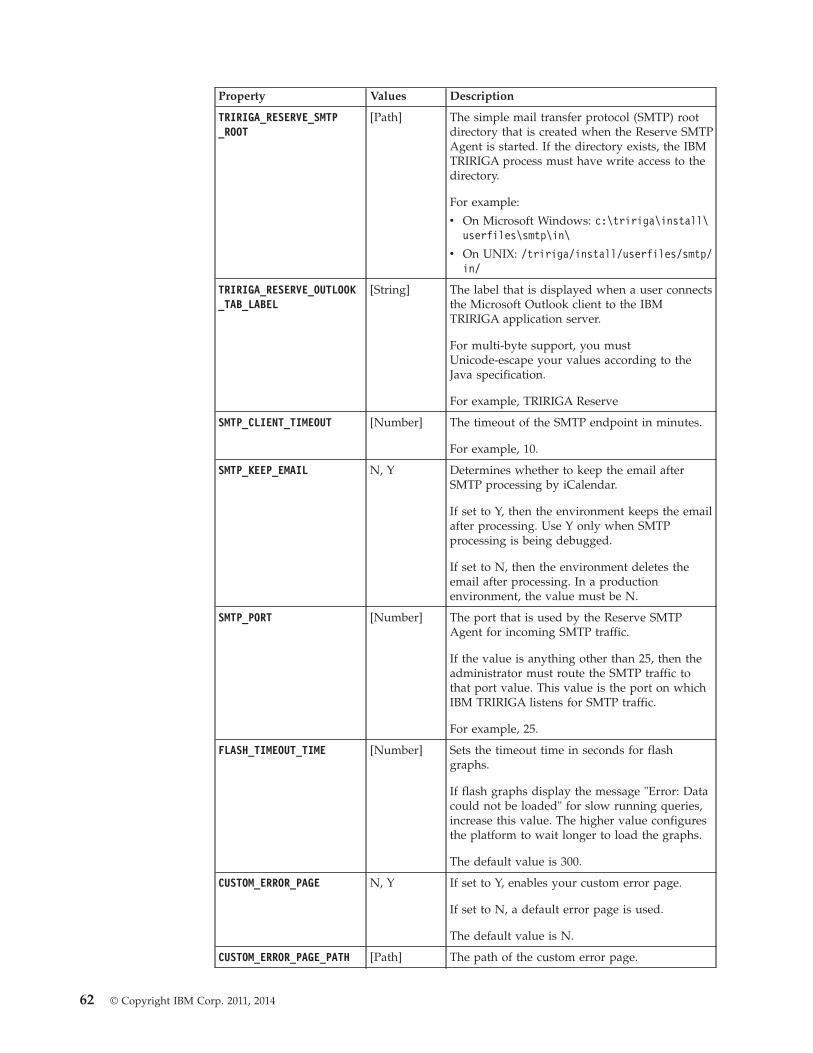
Property Values Description
TRIRIGA_RESERVE_SMTP_ROOT
[Path] The simple mail transfer protocol (SMTP) rootdirectory that is created when the Reserve SMTPAgent is started. If the directory exists, the IBMTRIRIGA process must have write access to thedirectory.
For example:
v On Microsoft Windows: c:\tririga\install\userfiles\smtp\in\
v On UNIX: /tririga/install/userfiles/smtp/in/
TRIRIGA_RESERVE_OUTLOOK_TAB_LABEL
[String] The label that is displayed when a user connectsthe Microsoft Outlook client to the IBMTRIRIGA application server.
For multi-byte support, you mustUnicode-escape your values according to theJava specification.
For example, TRIRIGA Reserve
SMTP_CLIENT_TIMEOUT [Number] The timeout of the SMTP endpoint in minutes.
For example, 10.
SMTP_KEEP_EMAIL N, Y Determines whether to keep the email afterSMTP processing by iCalendar.
If set to Y, then the environment keeps the emailafter processing. Use Y only when SMTPprocessing is being debugged.
If set to N, then the environment deletes theemail after processing. In a productionenvironment, the value must be N.
SMTP_PORT [Number] The port that is used by the Reserve SMTPAgent for incoming SMTP traffic.
If the value is anything other than 25, then theadministrator must route the SMTP traffic tothat port value. This value is the port on whichIBM TRIRIGA listens for SMTP traffic.
For example, 25.
FLASH_TIMEOUT_TIME [Number] Sets the timeout time in seconds for flashgraphs.
If flash graphs display the message "Error: Datacould not be loaded" for slow running queries,increase this value. The higher value configuresthe platform to wait longer to load the graphs.
The default value is 300.
CUSTOM_ERROR_PAGE N, Y If set to Y, enables your custom error page.
If set to N, a default error page is used.
The default value is N.
CUSTOM_ERROR_PAGE_PATH [Path] The path of the custom error page.
62 © Copyright IBM Corp. 2011, 2014
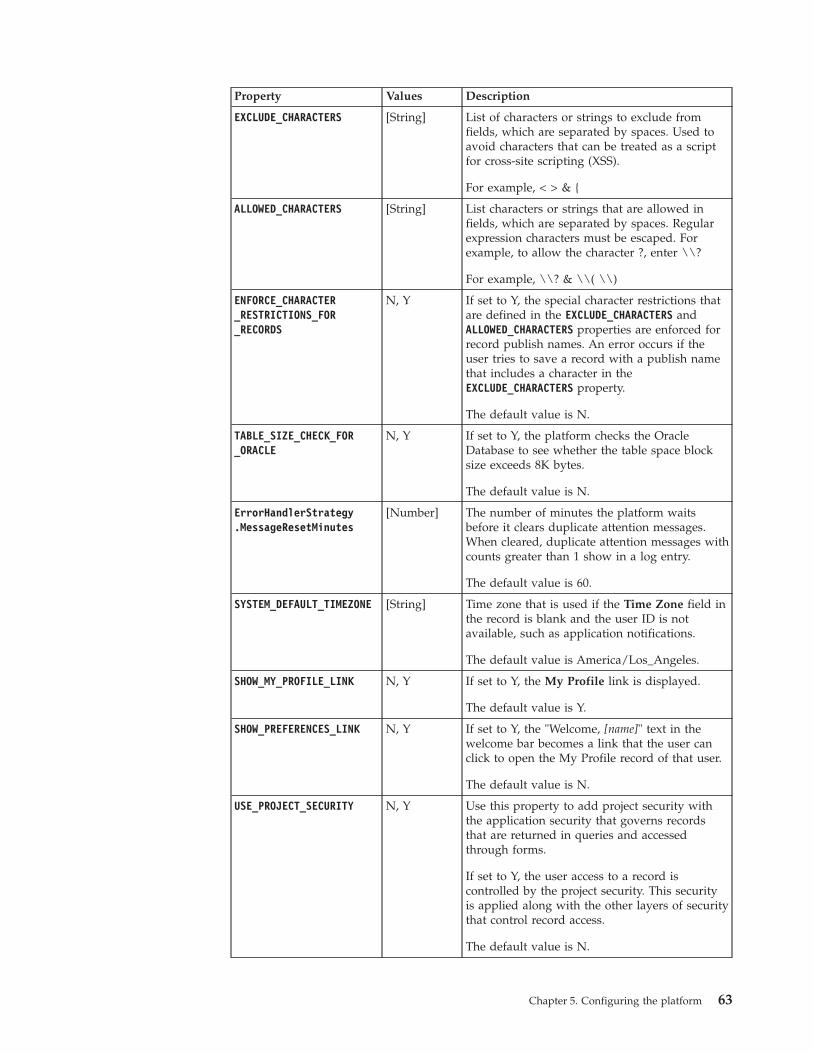
Property Values Description
EXCLUDE_CHARACTERS [String] List of characters or strings to exclude fromfields, which are separated by spaces. Used toavoid characters that can be treated as a scriptfor cross-site scripting (XSS).
For example, < > & {
ALLOWED_CHARACTERS [String] List characters or strings that are allowed infields, which are separated by spaces. Regularexpression characters must be escaped. Forexample, to allow the character ?, enter \\?
For example, \\? & \\( \\)
ENFORCE_CHARACTER_RESTRICTIONS_FOR_RECORDS
N, Y If set to Y, the special character restrictions thatare defined in the EXCLUDE_CHARACTERS andALLOWED_CHARACTERS properties are enforced forrecord publish names. An error occurs if theuser tries to save a record with a publish namethat includes a character in theEXCLUDE_CHARACTERS property.
The default value is N.
TABLE_SIZE_CHECK_FOR_ORACLE
N, Y If set to Y, the platform checks the OracleDatabase to see whether the table space blocksize exceeds 8K bytes.
The default value is N.
ErrorHandlerStrategy.MessageResetMinutes
[Number] The number of minutes the platform waitsbefore it clears duplicate attention messages.When cleared, duplicate attention messages withcounts greater than 1 show in a log entry.
The default value is 60.
SYSTEM_DEFAULT_TIMEZONE [String] Time zone that is used if the Time Zone field inthe record is blank and the user ID is notavailable, such as application notifications.
The default value is America/Los_Angeles.
SHOW_MY_PROFILE_LINK N, Y If set to Y, the My Profile link is displayed.
The default value is Y.
SHOW_PREFERENCES_LINK N, Y If set to Y, the "Welcome, [name]" text in thewelcome bar becomes a link that the user canclick to open the My Profile record of that user.
The default value is N.
USE_PROJECT_SECURITY N, Y Use this property to add project security withthe application security that governs recordsthat are returned in queries and accessedthrough forms.
If set to Y, the user access to a record iscontrolled by the project security. This securityis applied along with the other layers of securitythat control record access.
The default value is N.
Chapter 5. Configuring the platform 63
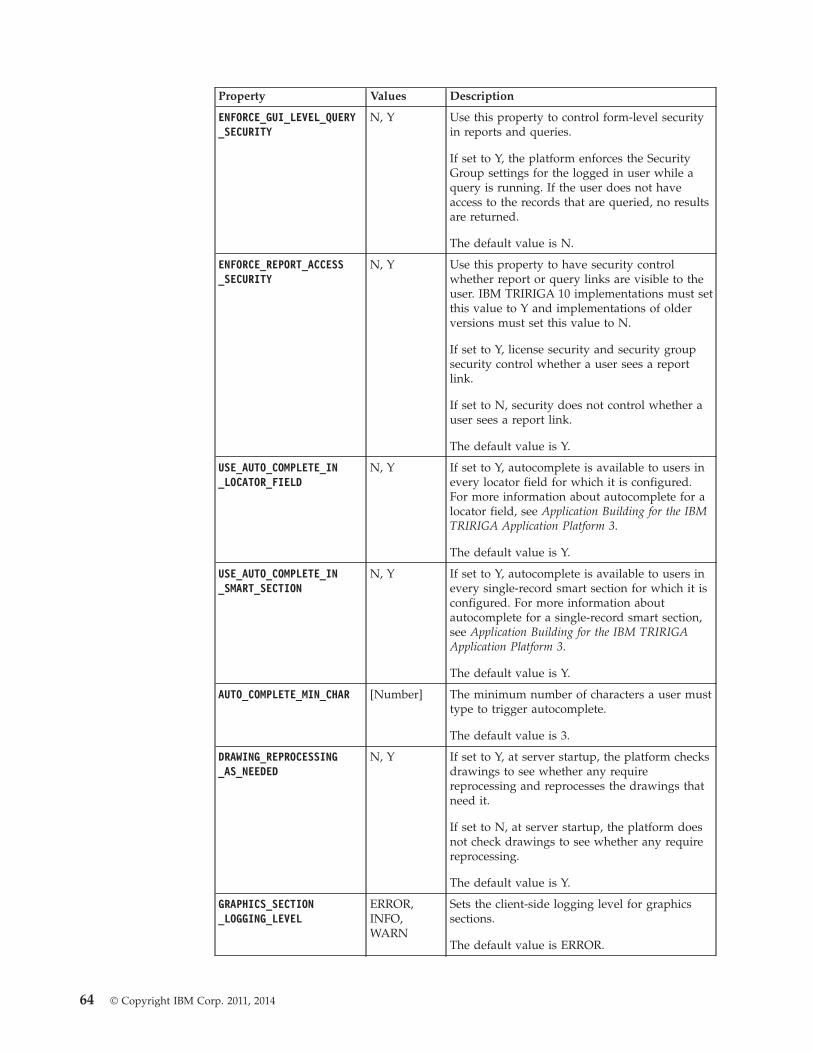
Property Values Description
ENFORCE_GUI_LEVEL_QUERY_SECURITY
N, Y Use this property to control form-level securityin reports and queries.
If set to Y, the platform enforces the SecurityGroup settings for the logged in user while aquery is running. If the user does not haveaccess to the records that are queried, no resultsare returned.
The default value is N.
ENFORCE_REPORT_ACCESS_SECURITY
N, Y Use this property to have security controlwhether report or query links are visible to theuser. IBM TRIRIGA 10 implementations must setthis value to Y and implementations of olderversions must set this value to N.
If set to Y, license security and security groupsecurity control whether a user sees a reportlink.
If set to N, security does not control whether auser sees a report link.
The default value is Y.
USE_AUTO_COMPLETE_IN_LOCATOR_FIELD
N, Y If set to Y, autocomplete is available to users inevery locator field for which it is configured.For more information about autocomplete for alocator field, see Application Building for the IBMTRIRIGA Application Platform 3.
The default value is Y.
USE_AUTO_COMPLETE_IN_SMART_SECTION
N, Y If set to Y, autocomplete is available to users inevery single-record smart section for which it isconfigured. For more information aboutautocomplete for a single-record smart section,see Application Building for the IBM TRIRIGAApplication Platform 3.
The default value is Y.
AUTO_COMPLETE_MIN_CHAR [Number] The minimum number of characters a user musttype to trigger autocomplete.
The default value is 3.
DRAWING_REPROCESSING_AS_NEEDED
N, Y If set to Y, at server startup, the platform checksdrawings to see whether any requirereprocessing and reprocesses the drawings thatneed it.
If set to N, at server startup, the platform doesnot check drawings to see whether any requirereprocessing.
The default value is Y.
GRAPHICS_SECTION_LOGGING_LEVEL
ERROR,INFO,WARN
Sets the client-side logging level for graphicssections.
The default value is ERROR.
64 © Copyright IBM Corp. 2011, 2014

Property Values Description
PDF_EXPORT_GRAPHIC_STROKE_WIDTH_OVERRIDE
[Blank] Overrides all stroke (line) widths when agraphics section is exported to a .pdf file. Onsome larger-scale drawings, the width of linescan look thick when zoomed into the .pdf file ata high magnification. This property can be usedto resolve that issue by setting the stroke widthto a small constant value such as 0.0000001.
When the value is left blank, the exported .pdffile uses the stroke width that is defined per linein the graphic, which is derived from the linewidths as published from the CAD drawing.
The default value is blank with no valuespecified.
ALLOW_PASSWORD_AUTO_COMPLETE
N, Y If set to Y, auto completion of login password isavailable.
The default value is Y. If no value is specified,this property defaults to Y.
OSLC_MYPROFILE_RESOURCE
[ProfileName]
The ID of the OSLC resource that represents theMy Profile business object.
OSLC_BASE_URI
http://hostname:port/oslc.
Use this property to define the base URI forOSLC.
MASTER_DETAIL_RECORD_VIEW_TYPE
POPUP,INLINE
Use this property to control how records aredisplayed in Master Detail navigation targetswhen clicked.
Properties for SVG rendering
A Scalable Vector Graphics (SVG) viewer is required to view SVG content in IBMTRIRIGA. Adobe support for its SVG Viewer plug-in ended January 1, 2009. IBMTRIRIGA provides and supports the IBM TRIRIGA SVG Viewer Applet. Noinstallation is required to use the IBM TRIRIGA SVG Viewer Applet. To change tothe IBM TRIRIGA SVG Viewer Applet, follow these steps:v Set the SVG_VIEW_TYPE property to APPLET.v Clear the server browser cache and close all browser windows.v Clear the browser cache and close all browser windows on all client computers.v Use a new browser instance for the first time that all client computers sign in to
IBM TRIRIGA.
When you change from the Adobe viewer to the IBM TRIRIGA SVG ViewerApplet:v Republish existing drawings that are published from IBM TRIRIGA CAD
Integrator/Publisher. Republished drawings are compatible with the Adobe SVGViewer plug-in.
v Ensure that all client computers have the Java Runtime Environment (JRE) thatis specified in the IBM TRIRIGA Support Matrix. According to the Microsoft webpage Information for Developers about Internet Explorer (at http://msdn.microsoft.com/en-us/ie/bb969055.aspx): As of April 2008, the activationbehavior is permanently removed for all customers as part of the April 2008
Chapter 5. Configuring the platform 65
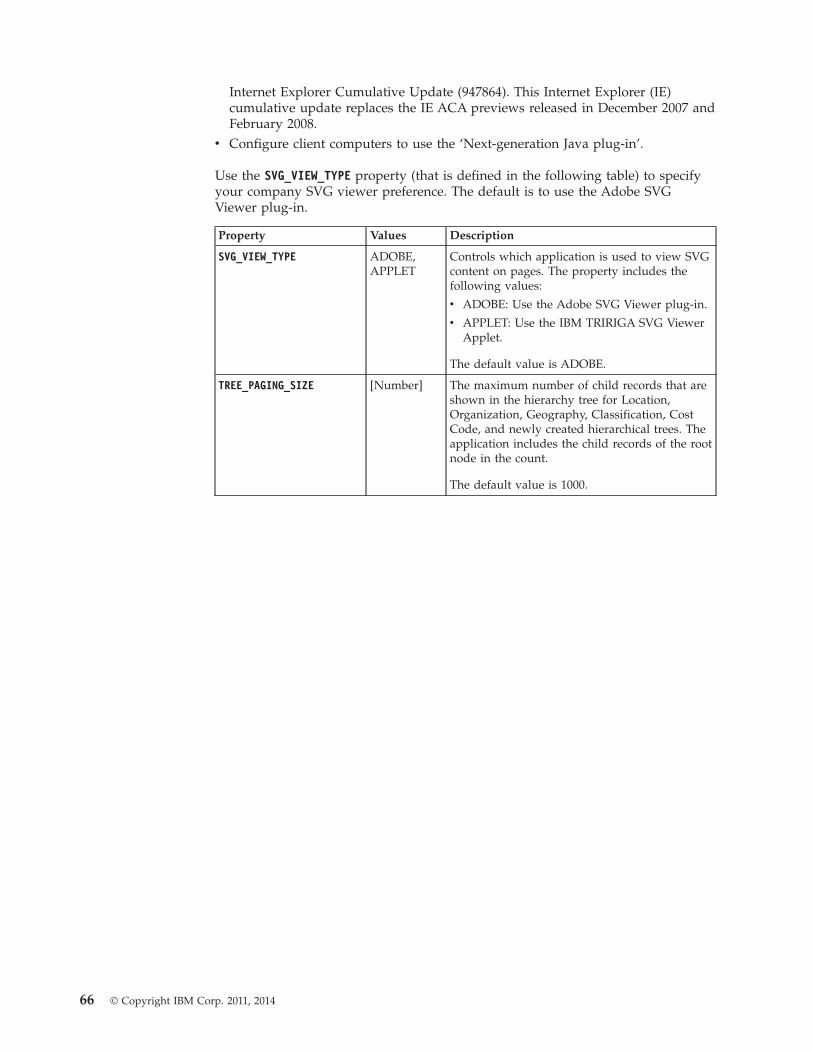
Internet Explorer Cumulative Update (947864). This Internet Explorer (IE)cumulative update replaces the IE ACA previews released in December 2007 andFebruary 2008.
v Configure client computers to use the ‘Next-generation Java plug-in’.
Use the SVG_VIEW_TYPE property (that is defined in the following table) to specifyyour company SVG viewer preference. The default is to use the Adobe SVGViewer plug-in.
Property Values Description
SVG_VIEW_TYPE ADOBE,APPLET
Controls which application is used to view SVGcontent on pages. The property includes thefollowing values:
v ADOBE: Use the Adobe SVG Viewer plug-in.
v APPLET: Use the IBM TRIRIGA SVG ViewerApplet.
The default value is ADOBE.
TREE_PAGING_SIZE [Number] The maximum number of child records that areshown in the hierarchy tree for Location,Organization, Geography, Classification, CostCode, and newly created hierarchical trees. Theapplication includes the child records of the rootnode in the count.
The default value is 1000.
66 © Copyright IBM Corp. 2011, 2014
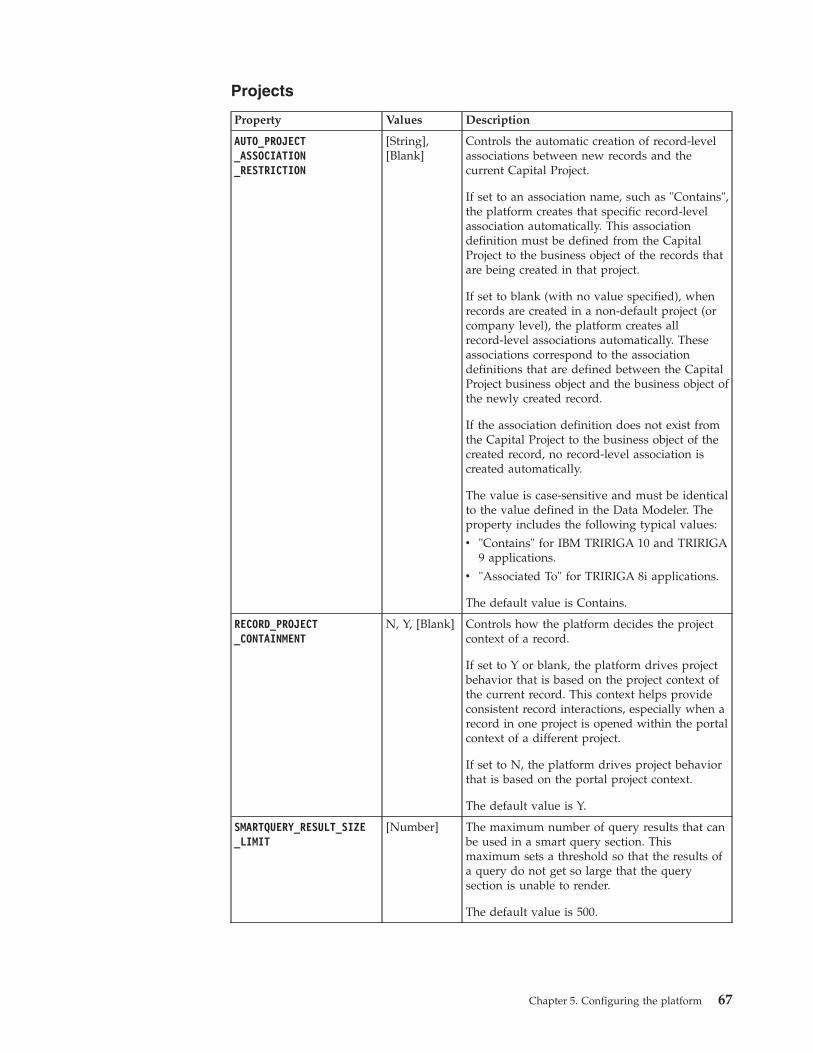
Projects
Property Values Description
AUTO_PROJECT_ASSOCIATION_RESTRICTION
[String],[Blank]
Controls the automatic creation of record-levelassociations between new records and thecurrent Capital Project.
If set to an association name, such as "Contains",the platform creates that specific record-levelassociation automatically. This associationdefinition must be defined from the CapitalProject to the business object of the records thatare being created in that project.
If set to blank (with no value specified), whenrecords are created in a non-default project (orcompany level), the platform creates allrecord-level associations automatically. Theseassociations correspond to the associationdefinitions that are defined between the CapitalProject business object and the business object ofthe newly created record.
If the association definition does not exist fromthe Capital Project to the business object of thecreated record, no record-level association iscreated automatically.
The value is case-sensitive and must be identicalto the value defined in the Data Modeler. Theproperty includes the following typical values:
v "Contains" for IBM TRIRIGA 10 and TRIRIGA9 applications.
v "Associated To" for TRIRIGA 8i applications.
The default value is Contains.
RECORD_PROJECT_CONTAINMENT
N, Y, [Blank] Controls how the platform decides the projectcontext of a record.
If set to Y or blank, the platform drives projectbehavior that is based on the project context ofthe current record. This context helps provideconsistent record interactions, especially when arecord in one project is opened within the portalcontext of a different project.
If set to N, the platform drives project behaviorthat is based on the portal project context.
The default value is Y.
SMARTQUERY_RESULT_SIZE_LIMIT
[Number] The maximum number of query results that canbe used in a smart query section. Thismaximum sets a threshold so that the results ofa query do not get so large that the querysection is unable to render.
The default value is 500.
Chapter 5. Configuring the platform 67
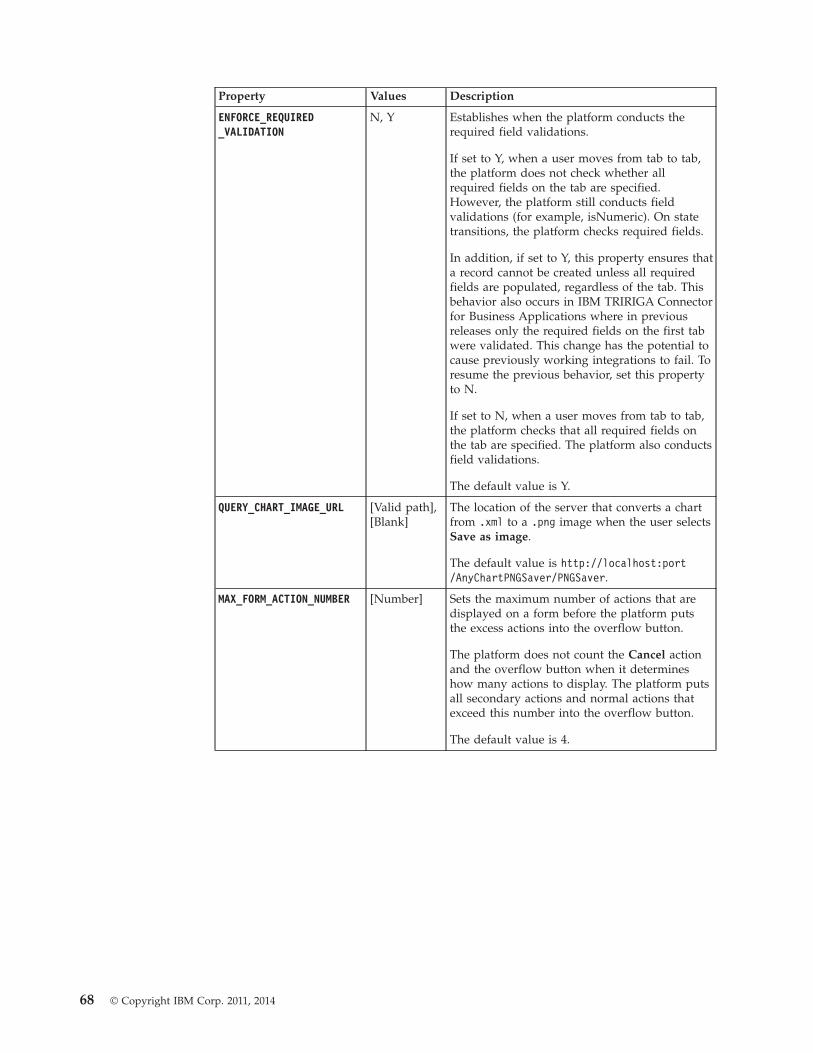
Property Values Description
ENFORCE_REQUIRED_VALIDATION
N, Y Establishes when the platform conducts therequired field validations.
If set to Y, when a user moves from tab to tab,the platform does not check whether allrequired fields on the tab are specified.However, the platform still conducts fieldvalidations (for example, isNumeric). On statetransitions, the platform checks required fields.
In addition, if set to Y, this property ensures thata record cannot be created unless all requiredfields are populated, regardless of the tab. Thisbehavior also occurs in IBM TRIRIGA Connectorfor Business Applications where in previousreleases only the required fields on the first tabwere validated. This change has the potential tocause previously working integrations to fail. Toresume the previous behavior, set this propertyto N.
If set to N, when a user moves from tab to tab,the platform checks that all required fields onthe tab are specified. The platform also conductsfield validations.
The default value is Y.
QUERY_CHART_IMAGE_URL [Valid path],[Blank]
The location of the server that converts a chartfrom .xml to a .png image when the user selectsSave as image.
The default value is http://localhost:port/AnyChartPNGSaver/PNGSaver.
MAX_FORM_ACTION_NUMBER [Number] Sets the maximum number of actions that aredisplayed on a form before the platform putsthe excess actions into the overflow button.
The platform does not count the Cancel actionand the overflow button when it determineshow many actions to display. The platform putsall secondary actions and normal actions thatexceed this number into the overflow button.
The default value is 4.
68 © Copyright IBM Corp. 2011, 2014
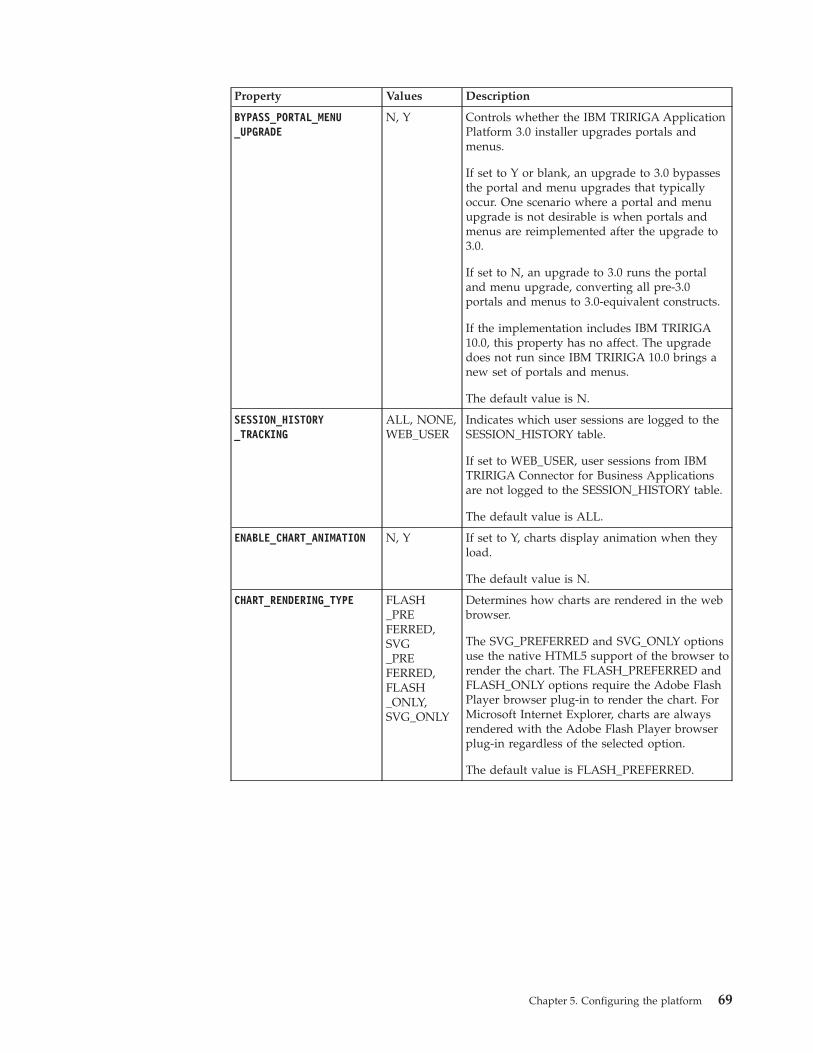
Property Values Description
BYPASS_PORTAL_MENU_UPGRADE
N, Y Controls whether the IBM TRIRIGA ApplicationPlatform 3.0 installer upgrades portals andmenus.
If set to Y or blank, an upgrade to 3.0 bypassesthe portal and menu upgrades that typicallyoccur. One scenario where a portal and menuupgrade is not desirable is when portals andmenus are reimplemented after the upgrade to3.0.
If set to N, an upgrade to 3.0 runs the portaland menu upgrade, converting all pre-3.0portals and menus to 3.0-equivalent constructs.
If the implementation includes IBM TRIRIGA10.0, this property has no affect. The upgradedoes not run since IBM TRIRIGA 10.0 brings anew set of portals and menus.
The default value is N.
SESSION_HISTORY_TRACKING
ALL, NONE,WEB_USER
Indicates which user sessions are logged to theSESSION_HISTORY table.
If set to WEB_USER, user sessions from IBMTRIRIGA Connector for Business Applicationsare not logged to the SESSION_HISTORY table.
The default value is ALL.
ENABLE_CHART_ANIMATION N, Y If set to Y, charts display animation when theyload.
The default value is N.
CHART_RENDERING_TYPE FLASH_PREFERRED,SVG_PREFERRED,FLASH_ONLY,SVG_ONLY
Determines how charts are rendered in the webbrowser.
The SVG_PREFERRED and SVG_ONLY optionsuse the native HTML5 support of the browser torender the chart. The FLASH_PREFERRED andFLASH_ONLY options require the Adobe FlashPlayer browser plug-in to render the chart. ForMicrosoft Internet Explorer, charts are alwaysrendered with the Adobe Flash Player browserplug-in regardless of the selected option.
The default value is FLASH_PREFERRED.
Chapter 5. Configuring the platform 69

Property Values Description
ENABLE_PROFILE_ROW_LEVEL_SECURITY
N, Y Controls user security access to My Profilerecords.
If set to Y, the platform uses the Access AllProfiles field in the group of the user todetermine whether the user can access the MyProfile record from another user. Additionally,the user's group controls the user access to theMy Profile form and access to tabs, sections,actions, and other form elements.
If set to N, the user has administrator access tothe user’s own My Profile record. If a user triesto access the My Profile record from anotheruser, the platform applies standard group accesscontrols.
The default value is Y.
BIRT_MEMORY_USAGE_LIMIT [Wholenumber from0 to 100],[Blank]
The maximum percentage of available servermemory that can be used while the queryresults of a BIRT report are assembled.
If the memory requirement for such a taskexceeds the limit, the query yields an errorbecause of insufficient resources. The query isthe likely cause of the error. However, it is alsopossible that other concurrent processes usedmemory while the query was assembling itsresults.
Valid values are 0 to 100. The specific values of0 and 100 disable any enforced limit and allow asingle query by one user to run the server outof memory. An empty value or an invalid valueis treated as a default value.
The default value is 35.
MEMORY_MANAGED_PROCESS_POLLING_FREQUENCY
[Number] The number of milliseconds that the platformwaits between polls of memory managedprocesses. An example of a memory managedprocess is running BIRT reports.
The default value is 1000, which equals 1second.
BIRT_PROCESS_SERVER_HOST_NAME
[Host nameor IPaddress]
The host name or IP address of the BIRT processserver. Configure this value to offload theprocessing of BIRT reports to a separate processserver.
For example:
v ProcessServer
v processserver.domain.com
v 10.1.1.1
If this value is blank, all BIRT processing isdone on the application server.
70 © Copyright IBM Corp. 2011, 2014
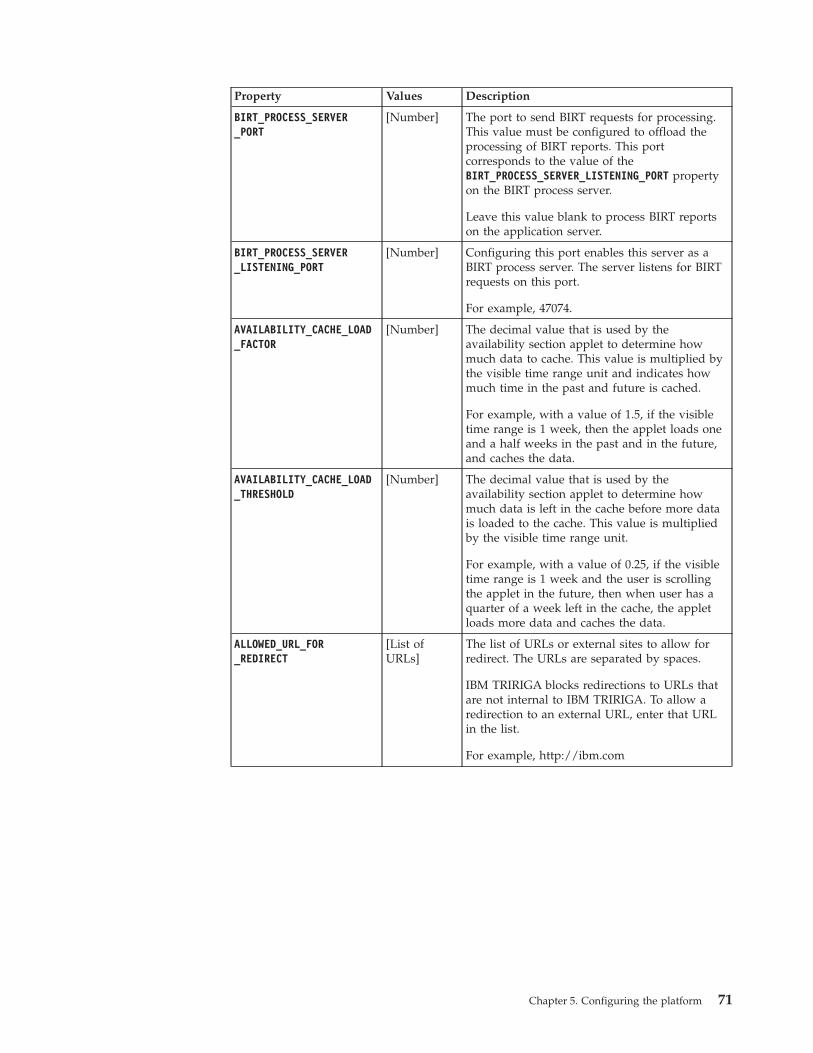
Property Values Description
BIRT_PROCESS_SERVER_PORT
[Number] The port to send BIRT requests for processing.This value must be configured to offload theprocessing of BIRT reports. This portcorresponds to the value of theBIRT_PROCESS_SERVER_LISTENING_PORT propertyon the BIRT process server.
Leave this value blank to process BIRT reportson the application server.
BIRT_PROCESS_SERVER_LISTENING_PORT
[Number] Configuring this port enables this server as aBIRT process server. The server listens for BIRTrequests on this port.
For example, 47074.
AVAILABILITY_CACHE_LOAD_FACTOR
[Number] The decimal value that is used by theavailability section applet to determine howmuch data to cache. This value is multiplied bythe visible time range unit and indicates howmuch time in the past and future is cached.
For example, with a value of 1.5, if the visibletime range is 1 week, then the applet loads oneand a half weeks in the past and in the future,and caches the data.
AVAILABILITY_CACHE_LOAD_THRESHOLD
[Number] The decimal value that is used by theavailability section applet to determine howmuch data is left in the cache before more datais loaded to the cache. This value is multipliedby the visible time range unit.
For example, with a value of 0.25, if the visibletime range is 1 week and the user is scrollingthe applet in the future, then when user has aquarter of a week left in the cache, the appletloads more data and caches the data.
ALLOWED_URL_FOR_REDIRECT
[List ofURLs]
The list of URLs or external sites to allow forredirect. The URLs are separated by spaces.
IBM TRIRIGA blocks redirections to URLs thatare not internal to IBM TRIRIGA. To allow aredirection to an external URL, enter that URLin the list.
For example, http://ibm.com
Chapter 5. Configuring the platform 71

Property Values Description
ALLOW_ETL_DETERMINE_DB_CONNECTIONS
N, Y Allows the “Extract, Transform, and Load”(ETL) processes to determine whether or not touse multiple database connections.
If set to Y, then the value of “Use UniqueConnections” on the ETL determines whether touse one connection (On) or multiple connections(Off). Setting “Use Unique Connections” to Offin the ETL can improve performance forlong-running ETLs, but can cause theapplication server to run out of databaseconnections for large ETLs with lots of stepsthat access the database. In this case, it might benecessary to increase the maximum databaseconnections for the application server.
If set to N, then the platform automatically sets“Use Unique Connections” to On when the ETLis running. Therefore only one databaseconnection is used by the ETL.
The default value is N.
SESSION_WARNING_ENABLED N, Y Allows an alert message to be displayed to auser whose session is about to expire.
If set to Y, then the session expiration redirectsthe browser to a session expiration page.
If set to N, then the session expirationredirection is disabled.
This property enables or disables the alertmessage only; it does not configure the sessionexpiration. The session expiration timeout isconfigured in your application server software.
The default value is N.
SESSION_WARNING_THRESHOLD
[Number] If the value of the SESSION_WARNING_ENABLEDproperty is set to Y, then this threshold propertyallows the alert message to be displayed at aspecific number of minutes before the session isset to expire.
This property configures the threshold time forthe alert message only; it does not configure thesession expiration. The session expirationtimeout is configured in your application serversoftware.
The default value is 2.
OOTB_G11N_EXPORT_APP_VERSION
[String] Inserts a value or description of the IBMTRIRIGA application version in the file headerof the instance data export.
For example, 10.3.1.
72 © Copyright IBM Corp. 2011, 2014
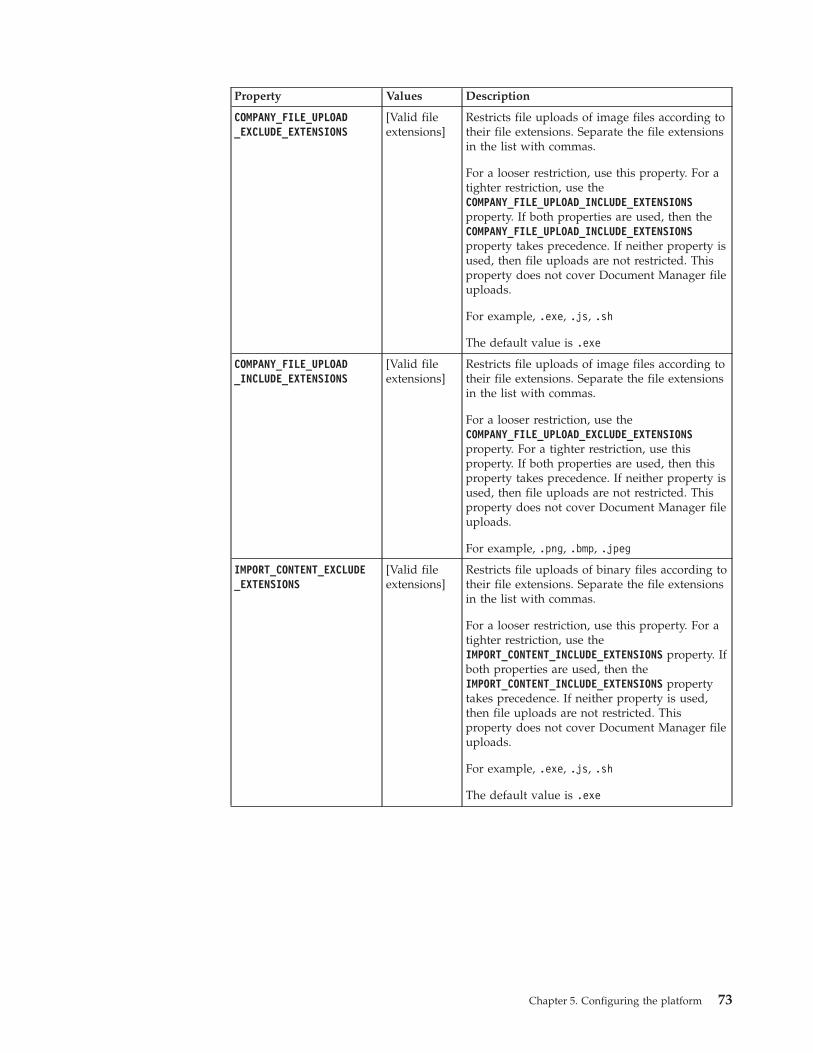
Property Values Description
COMPANY_FILE_UPLOAD_EXCLUDE_EXTENSIONS
[Valid fileextensions]
Restricts file uploads of image files according totheir file extensions. Separate the file extensionsin the list with commas.
For a looser restriction, use this property. For atighter restriction, use theCOMPANY_FILE_UPLOAD_INCLUDE_EXTENSIONSproperty. If both properties are used, then theCOMPANY_FILE_UPLOAD_INCLUDE_EXTENSIONSproperty takes precedence. If neither property isused, then file uploads are not restricted. Thisproperty does not cover Document Manager fileuploads.
For example, .exe, .js, .sh
The default value is .exe
COMPANY_FILE_UPLOAD_INCLUDE_EXTENSIONS
[Valid fileextensions]
Restricts file uploads of image files according totheir file extensions. Separate the file extensionsin the list with commas.
For a looser restriction, use theCOMPANY_FILE_UPLOAD_EXCLUDE_EXTENSIONSproperty. For a tighter restriction, use thisproperty. If both properties are used, then thisproperty takes precedence. If neither property isused, then file uploads are not restricted. Thisproperty does not cover Document Manager fileuploads.
For example, .png, .bmp, .jpeg
IMPORT_CONTENT_EXCLUDE_EXTENSIONS
[Valid fileextensions]
Restricts file uploads of binary files according totheir file extensions. Separate the file extensionsin the list with commas.
For a looser restriction, use this property. For atighter restriction, use theIMPORT_CONTENT_INCLUDE_EXTENSIONS property. Ifboth properties are used, then theIMPORT_CONTENT_INCLUDE_EXTENSIONS propertytakes precedence. If neither property is used,then file uploads are not restricted. Thisproperty does not cover Document Manager fileuploads.
For example, .exe, .js, .sh
The default value is .exe
Chapter 5. Configuring the platform 73

Property Values Description
IMPORT_CONTENT_INCLUDE_EXTENSIONS
[Valid fileextensions]
Restricts file uploads of binary files according totheir file extensions. Separate the file extensionsin the list with commas.
For a looser restriction, use theIMPORT_CONTENT_EXCLUDE_EXTENSIONS property.For a tighter restriction, use this property. Ifboth properties are used, then this propertytakes precedence. If neither property is used,then file uploads are not restricted. Thisproperty does not cover Document Manager fileuploads.
For example, .doc, .docx, .pdf
WS_RELIABLE_MESSAGING N, Y Enables (Y) or disables (N) the Web ServicesReliable Messaging Protocol(http://schemas.xmlsoap.org/ws/2005/02/rm/). Set the value to Y to enable.
The default is N.
WS_RM_INACTIVITY_TIMEOUT
[Number] The amount of time that must pass withoutreceiving a message for the Reliable Messagesequence to be considered terminated due toinactivity. This property applies only when theWS_RELIABLE_MESSAGING property is enabled.
Specify a value in milliseconds.
The default is 600000, which equals 10 minutes.
WS_RM_BASE_RETRANSMISSION_INTERVAL
[Number] The interval at which an acknowledgement isreceived by the Reliable Message source for agiven message. This property applies only whenthe WS_RELIABLE_MESSAGING property is enabled.
Specify a value in milliseconds.
The default is 4000, which equals 4 seconds.
WS_RM_ACKNOWLEDGMENT_INTERVAL
[Number] The interval at which the Reliable Messagedestination sends asynchronousacknowledgements. This property applies onlywhen the WS_RELIABLE_MESSAGING property isenabled.
Specify a value in milliseconds.
The default is 2000, which equals 2 seconds.
WS_RM_DELIVERY_ASSURANCE_TYPE
AtMostOnce,AtLeastOnce,ExactlyOnce
The delivery assurance type of the ReliableMessage. This property applies only when theWS_RELIABLE_MESSAGING property is enabled.
The default is AtMostOnce.
74 © Copyright IBM Corp. 2011, 2014

Property Values Description
WS_RM_DELIVERY_ASSURANCE_IN_ORDER
N, Y Enables (Y) or disables (N) the deliveryassurance "in order" type of the ReliableMessage. This "in order" assurance type can becombined with the delivery assurance type thatis specified by theWS_RM_DELIVERY_ASSURANCE_TYPE property. Setthe value to Y to enable.
The default is N.
Related information:
IBM TRIRIGA Support Matrix
TRIRIGAWEBDYNAMIC.propertiesTo adjust the IBM TRIRIGA web application version, open theTRIRIGAWEBDYNAMIC.properties file.
Web dynamic properties
Property Values Description
TririgaApplicationVersion
[Number] The version of the IBM TRIRIGA software thatis installed. This required value is displayed bythe Help subsystem.
For example, 3.0.
TRIRIGAWEBLOGICPOOL.propertiesTo adjust the Oracle WebLogic Server connection pool properties, open theTRIRIGAWEBLOGICPOOL.properties file.
Connection pool properties
Property Values Description
/jdbc/local/DataSource-TRIRIGA-default
[ValidWebLogicServer pool]
This value must match a connection pool that isconfigured on the WebLogic Server.
For example, jdbc:weblogic:jts:DefaultPool
/jdbc/local/DataSource-TRIRIGA-content
[ValidWebLogicServer pool]
This value must match a connection pool that isconfigured on the WebLogic Server.
For example, jdbc:weblogic:jts:ContentPool
License filesIBM TRIRIGA controls the usage of its various products with license files. Startingwith IBM TRIRIGA Application Platform 3.2, IBM TRIRIGA distributes a separatelicense for each product.
Each license file grants access to its respective functions when it is assigned to auser. The license files by themselves do not enforce license count restrictions. Eachlicense is governed by its respective software license agreement. The license file
Chapter 5. Configuring the platform 75
names are in the format LICENSE_IBM_TRIRIGA_[productname].properties; forexample, LICENSE_IBM_TRIRIGA_Application_Platform.properties.
Before IBM TRIRIGA Application Platform 3.2Before IBM TRIRIGA Application Platform 3.2, IBM TRIRIGA distributed onelicense file named TRIRIGALICENSE.properties. If you have an existingTRIRIGALICENSE.properties file, you can continue to use it until it expires or untilyou use a new product.
License types
This single-file method managed three distinct types of licenses: (1) ConcurrentUser, (2) Named User, and (3) Enterprise.
License type Description
Concurrent User The Concurrent User license offered a pool of licenses to limitthe number of users who signed into the application at anyone time. Although there might be hundreds of unique useraccounts in the application, the number of concurrent userswas restricted by the Concurrent User license.
Named User The Named User license assigned each seat in the license to auniquely named user. Users did not share licenses. If acustomer needed extra user accounts, the customer wasrequired to upgrade the license.
Enterprise The Enterprise license did not restrict the number of users in acompany by allowing an unlimited number of users.
IBM TRIRIGA Application Platform 3.2 and laterAfter the IBM TRIRIGA Application Platform installation, your[tririga_root]\config\licenses directory must contain either yourLICENSE_IBM_TRIRIGA_[productname].properties files or yourTRIRIGALICENSE.properties file, but not both.
After a new installation, copy your license files into the [tririga_root]\config\licenses directory. After an upgrade installation, verify that your license files wereautomatically copied into the [tririga_root]\config\licenses directory.
If you use the LICENSE_IBM_TRIRIGA files, do not use the TRIRIGALICENSE file. If youuse the TRIRIGALICENSE file, do not use the LICENSE_IBM_TRIRIGA files. If you areusing WebSphere Application Server and LICENSE_IBM_TRIRIGA files, set up validresource URLs for all of your licenses. If you are using WebSphere ApplicationServer and the TRIRIGALICENSE file, verify that the resource URL points to thecorrect location.
After you upgrade to the LICENSE_IBM_TRIRIGA files, you cannot return to theprevious TRIRIGALICENSE file. When you start the application server for the firsttime after you upgrade to the LICENSE_IBM_TRIRIGA files, the application attemptsto swap user licenses to the LICENSE_IBM_TRIRIGA license set. For this process to besuccessful, it is important that all of your LICENSE_IBM_TRIRIGA files exist in the[tririga_root]\config\licenses directory and that all user changes are complete.Verify that all asynchronous workflows are completed before you restart theapplication server with the LICENSE_IBM_TRIRIGA files.
76 © Copyright IBM Corp. 2011, 2014
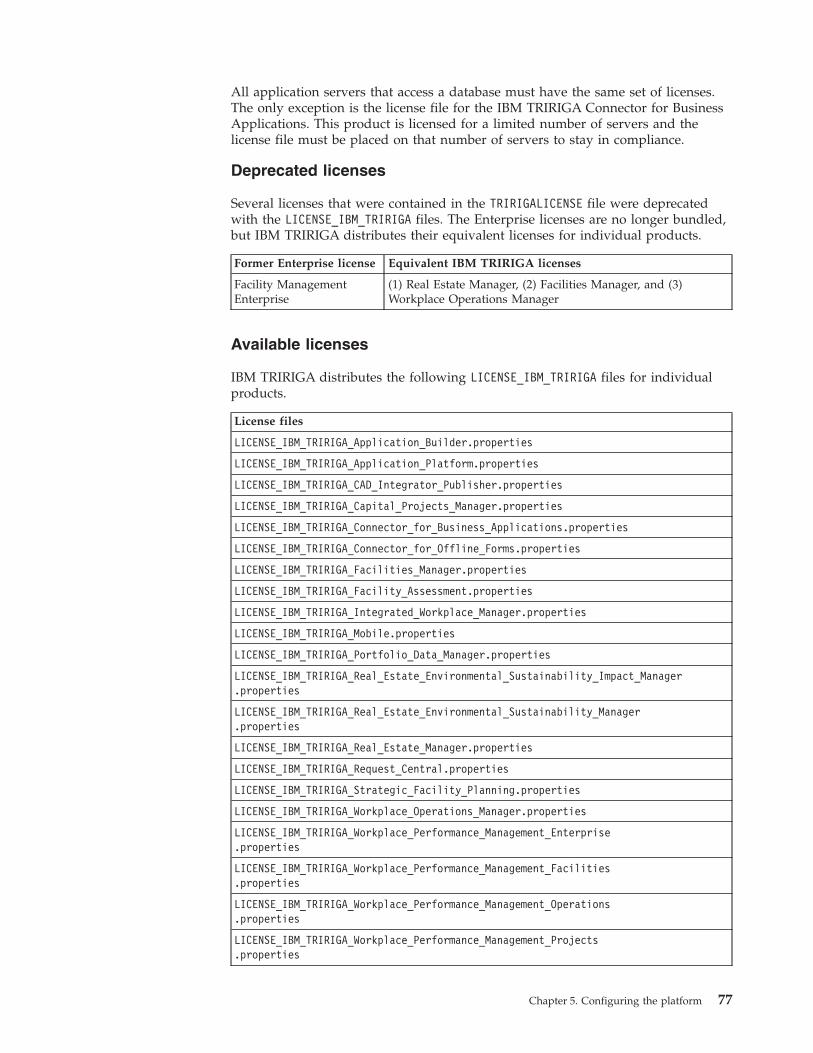
All application servers that access a database must have the same set of licenses.The only exception is the license file for the IBM TRIRIGA Connector for BusinessApplications. This product is licensed for a limited number of servers and thelicense file must be placed on that number of servers to stay in compliance.
Deprecated licenses
Several licenses that were contained in the TRIRIGALICENSE file were deprecatedwith the LICENSE_IBM_TRIRIGA files. The Enterprise licenses are no longer bundled,but IBM TRIRIGA distributes their equivalent licenses for individual products.
Former Enterprise license Equivalent IBM TRIRIGA licenses
Facility ManagementEnterprise
(1) Real Estate Manager, (2) Facilities Manager, and (3)Workplace Operations Manager
Available licenses
IBM TRIRIGA distributes the following LICENSE_IBM_TRIRIGA files for individualproducts.
License files
LICENSE_IBM_TRIRIGA_Application_Builder.properties
LICENSE_IBM_TRIRIGA_Application_Platform.properties
LICENSE_IBM_TRIRIGA_CAD_Integrator_Publisher.properties
LICENSE_IBM_TRIRIGA_Capital_Projects_Manager.properties
LICENSE_IBM_TRIRIGA_Connector_for_Business_Applications.properties
LICENSE_IBM_TRIRIGA_Connector_for_Offline_Forms.properties
LICENSE_IBM_TRIRIGA_Facilities_Manager.properties
LICENSE_IBM_TRIRIGA_Facility_Assessment.properties
LICENSE_IBM_TRIRIGA_Integrated_Workplace_Manager.properties
LICENSE_IBM_TRIRIGA_Mobile.properties
LICENSE_IBM_TRIRIGA_Portfolio_Data_Manager.properties
LICENSE_IBM_TRIRIGA_Real_Estate_Environmental_Sustainability_Impact_Manager.properties
LICENSE_IBM_TRIRIGA_Real_Estate_Environmental_Sustainability_Manager.properties
LICENSE_IBM_TRIRIGA_Real_Estate_Manager.properties
LICENSE_IBM_TRIRIGA_Request_Central.properties
LICENSE_IBM_TRIRIGA_Strategic_Facility_Planning.properties
LICENSE_IBM_TRIRIGA_Workplace_Operations_Manager.properties
LICENSE_IBM_TRIRIGA_Workplace_Performance_Management_Enterprise.properties
LICENSE_IBM_TRIRIGA_Workplace_Performance_Management_Facilities.properties
LICENSE_IBM_TRIRIGA_Workplace_Performance_Management_Operations.properties
LICENSE_IBM_TRIRIGA_Workplace_Performance_Management_Projects.properties
Chapter 5. Configuring the platform 77
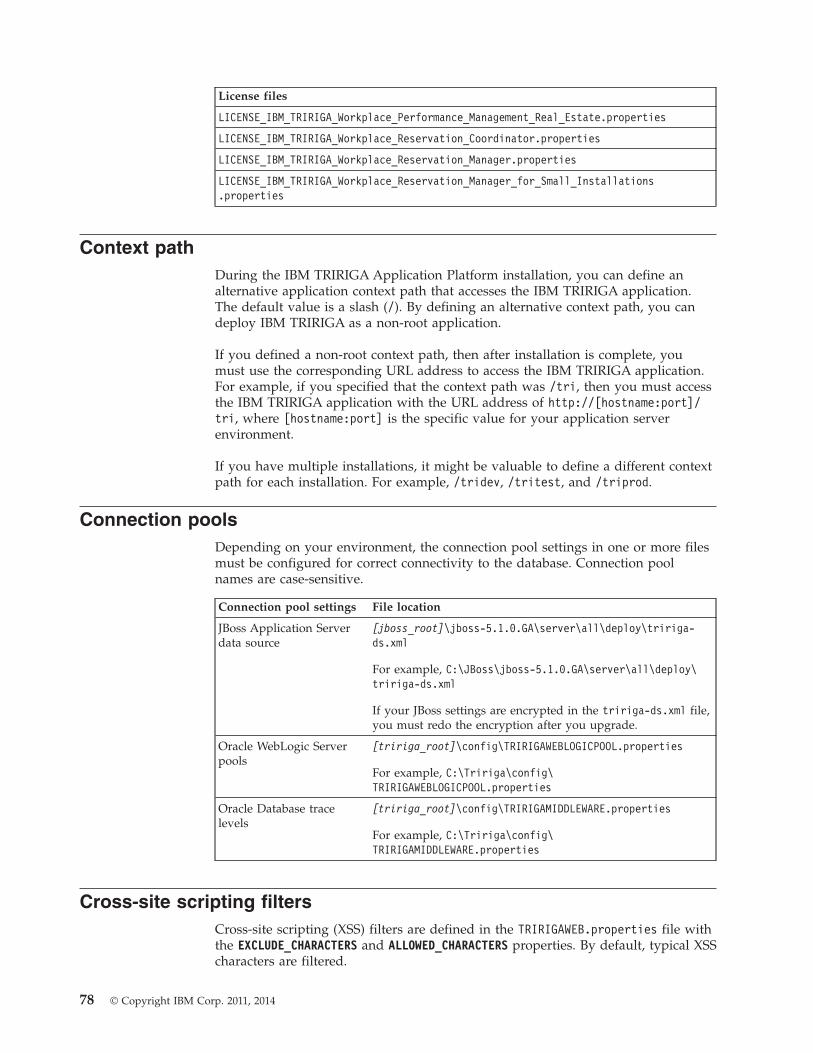
License files
LICENSE_IBM_TRIRIGA_Workplace_Performance_Management_Real_Estate.properties
LICENSE_IBM_TRIRIGA_Workplace_Reservation_Coordinator.properties
LICENSE_IBM_TRIRIGA_Workplace_Reservation_Manager.properties
LICENSE_IBM_TRIRIGA_Workplace_Reservation_Manager_for_Small_Installations.properties
Context pathDuring the IBM TRIRIGA Application Platform installation, you can define analternative application context path that accesses the IBM TRIRIGA application.The default value is a slash (/). By defining an alternative context path, you candeploy IBM TRIRIGA as a non-root application.
If you defined a non-root context path, then after installation is complete, youmust use the corresponding URL address to access the IBM TRIRIGA application.For example, if you specified that the context path was /tri, then you must accessthe IBM TRIRIGA application with the URL address of http://[hostname:port]/tri, where [hostname:port] is the specific value for your application serverenvironment.
If you have multiple installations, it might be valuable to define a different contextpath for each installation. For example, /tridev, /tritest, and /triprod.
Connection poolsDepending on your environment, the connection pool settings in one or more filesmust be configured for correct connectivity to the database. Connection poolnames are case-sensitive.
Connection pool settings File location
JBoss Application Serverdata source
[jboss_root]\jboss-5.1.0.GA\server\all\deploy\tririga-ds.xml
For example, C:\JBoss\jboss-5.1.0.GA\server\all\deploy\tririga-ds.xml
If your JBoss settings are encrypted in the tririga-ds.xml file,you must redo the encryption after you upgrade.
Oracle WebLogic Serverpools
[tririga_root]\config\TRIRIGAWEBLOGICPOOL.properties
For example, C:\Tririga\config\TRIRIGAWEBLOGICPOOL.properties
Oracle Database tracelevels
[tririga_root]\config\TRIRIGAMIDDLEWARE.properties
For example, C:\Tririga\config\TRIRIGAMIDDLEWARE.properties
Cross-site scripting filtersCross-site scripting (XSS) filters are defined in the TRIRIGAWEB.properties file withthe EXCLUDE_CHARACTERS and ALLOWED_CHARACTERS properties. By default, typical XSScharacters are filtered.
78 © Copyright IBM Corp. 2011, 2014

XSS filters are applied in the following cases: (1) the user name and passwordinput fields in the sign-in page, (2) the input fields in the IBM TRIRIGAApplication Platform builder tools, and (3) the published name input fields informs.
XSS filter properties Description
EXCLUDE_CHARACTERS This property contains a list of characters or strings to excludefrom fields, which are separated by spaces. For example: < >& {
ALLOWED_CHARACTERS This property contains a list of characters or strings to allow infields, which are separated by spaces. Regular expressioncharacters must be escaped with a double backslash (\\). Forexample, ? must be specified as \\?. To allow the followingfour characters ? & ( ), specify \\? & \\( \\)
Configuring agent processesCertain IBM TRIRIGA agents or agent processes must be configured when theyapply to your particular implementation. Before you configure the process serverto run agents, first complete the IBM TRIRIGA Application Platform installation onthe process server.
Business process agentsThe IBM TRIRIGA Application Platform agents are business process agents thatconduct the automated work for the IBM TRIRIGA applications. When theplatform identifies an event that requires an agent, the platform places the eventinto a queue where the agent can retrieve and process it.
Business process agent Description
Platform MaintenanceScheduler
This agent conducts data cleanup and runs an analysis on thedatabase. This agent removes all data in the state of null, andremoves DataConnect (DC) jobs and staging table entries thatare obsolete or completed. This agent also cleans up thecompleted workflow instances that do not have anyuser-operable tasks (such as user tasks and approval tasks)within the workflow.
Data Import Agent This agent looks for all tab-delimited files that are uploadedand imports the data into the platform.
DataConnect (DC) Agent This agent looks for DataConnect (DC) jobs in the Job Controltable that are ready to run. When the agent finds a job, itcreates an appropriate smart object for the job. Then the agentposts an asynchronous workflow event to initiate theworkflow that pulls the external data into the IBM TRIRIGAdatabase tables.
Extended Formula Agent This agent looks for and processes extended formulas.
Formula Recalc Agent This agent recalculates formulas as needed in the platform.
Incoming Mail Agent This agent downloads mail from a Post Office Protocol 3(POP3) server or Internet Message Access Protocol (IMAP)server and translates them into email message records.
Object Migration Agent This agent migrates business objects from one environment toanother environment.
Object Publish Agent This agent publishes business objects in the platform.
Chapter 5. Configuring the platform 79
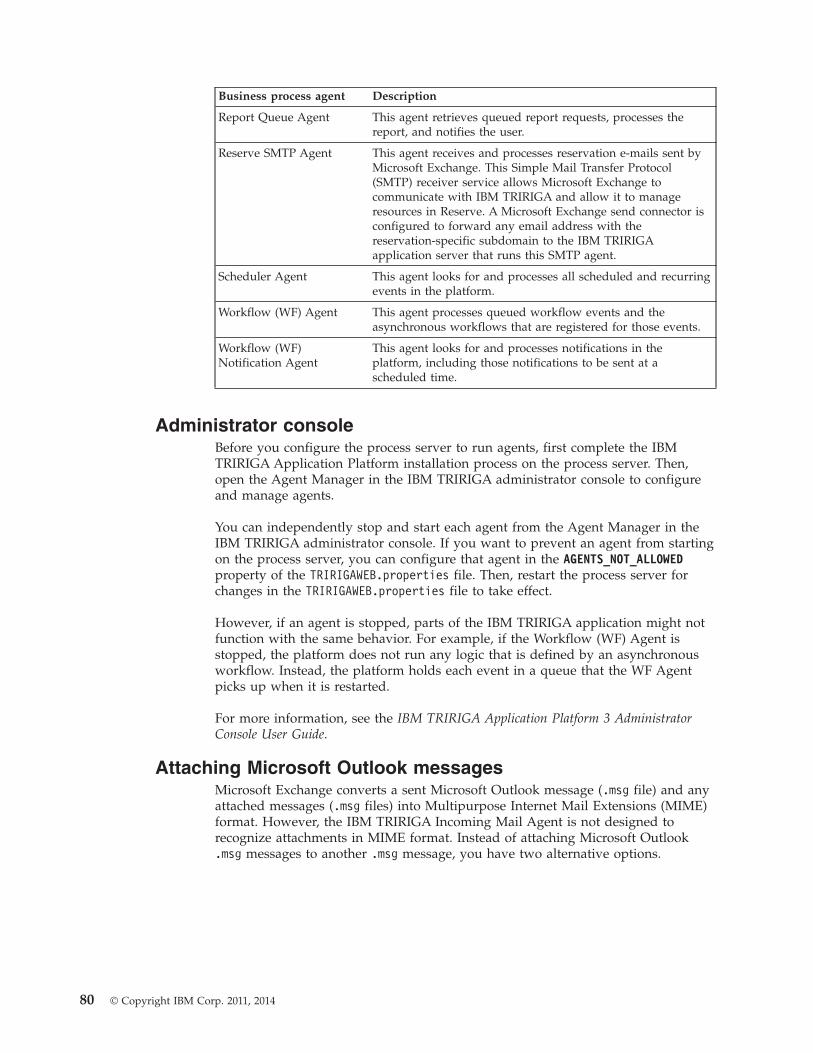
Business process agent Description
Report Queue Agent This agent retrieves queued report requests, processes thereport, and notifies the user.
Reserve SMTP Agent This agent receives and processes reservation e-mails sent byMicrosoft Exchange. This Simple Mail Transfer Protocol(SMTP) receiver service allows Microsoft Exchange tocommunicate with IBM TRIRIGA and allow it to manageresources in Reserve. A Microsoft Exchange send connector isconfigured to forward any email address with thereservation-specific subdomain to the IBM TRIRIGAapplication server that runs this SMTP agent.
Scheduler Agent This agent looks for and processes all scheduled and recurringevents in the platform.
Workflow (WF) Agent This agent processes queued workflow events and theasynchronous workflows that are registered for those events.
Workflow (WF)Notification Agent
This agent looks for and processes notifications in theplatform, including those notifications to be sent at ascheduled time.
Administrator consoleBefore you configure the process server to run agents, first complete the IBMTRIRIGA Application Platform installation process on the process server. Then,open the Agent Manager in the IBM TRIRIGA administrator console to configureand manage agents.
You can independently stop and start each agent from the Agent Manager in theIBM TRIRIGA administrator console. If you want to prevent an agent from startingon the process server, you can configure that agent in the AGENTS_NOT_ALLOWEDproperty of the TRIRIGAWEB.properties file. Then, restart the process server forchanges in the TRIRIGAWEB.properties file to take effect.
However, if an agent is stopped, parts of the IBM TRIRIGA application might notfunction with the same behavior. For example, if the Workflow (WF) Agent isstopped, the platform does not run any logic that is defined by an asynchronousworkflow. Instead, the platform holds each event in a queue that the WF Agentpicks up when it is restarted.
For more information, see the IBM TRIRIGA Application Platform 3 AdministratorConsole User Guide.
Attaching Microsoft Outlook messagesMicrosoft Exchange converts a sent Microsoft Outlook message (.msg file) and anyattached messages (.msg files) into Multipurpose Internet Mail Extensions (MIME)format. However, the IBM TRIRIGA Incoming Mail Agent is not designed torecognize attachments in MIME format. Instead of attaching Microsoft Outlook.msg messages to another .msg message, you have two alternative options.
80 © Copyright IBM Corp. 2011, 2014
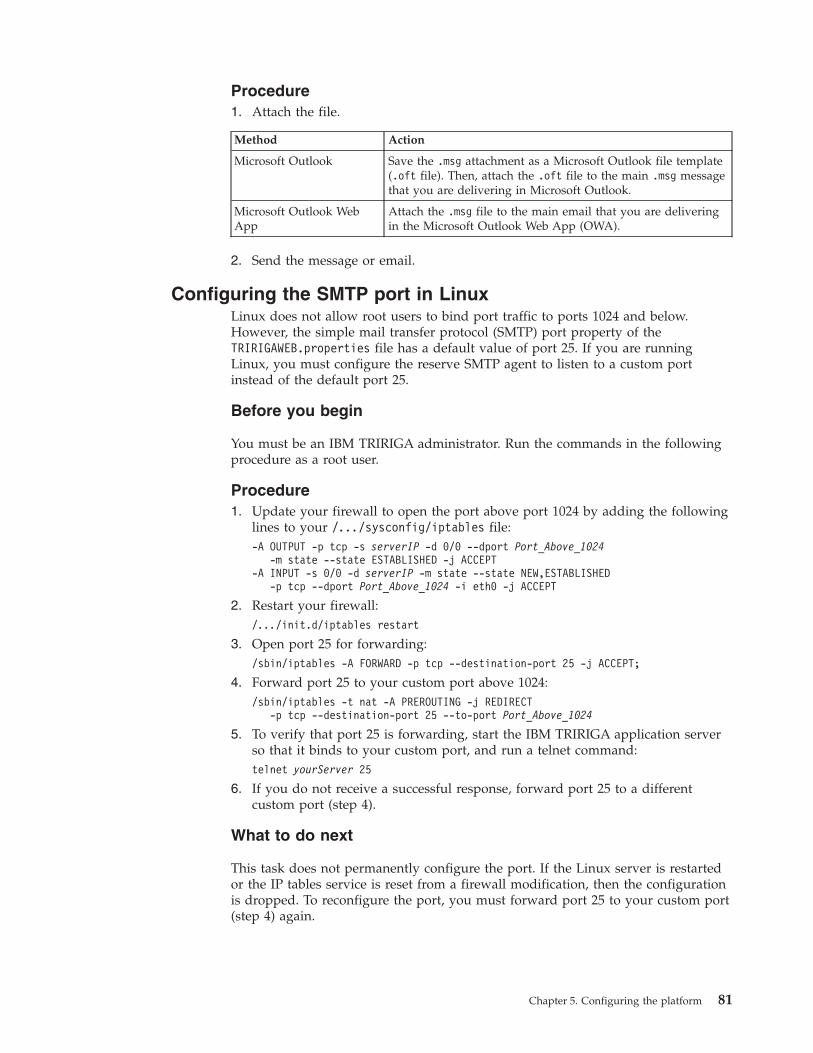
Procedure1. Attach the file.
Method Action
Microsoft Outlook Save the .msg attachment as a Microsoft Outlook file template(.oft file). Then, attach the .oft file to the main .msg messagethat you are delivering in Microsoft Outlook.
Microsoft Outlook WebApp
Attach the .msg file to the main email that you are deliveringin the Microsoft Outlook Web App (OWA).
2. Send the message or email.
Configuring the SMTP port in LinuxLinux does not allow root users to bind port traffic to ports 1024 and below.However, the simple mail transfer protocol (SMTP) port property of theTRIRIGAWEB.properties file has a default value of port 25. If you are runningLinux, you must configure the reserve SMTP agent to listen to a custom portinstead of the default port 25.
Before you begin
You must be an IBM TRIRIGA administrator. Run the commands in the followingprocedure as a root user.
Procedure1. Update your firewall to open the port above port 1024 by adding the following
lines to your /.../sysconfig/iptables file:-A OUTPUT -p tcp -s serverIP -d 0/0 --dport Port_Above_1024
-m state --state ESTABLISHED -j ACCEPT-A INPUT -s 0/0 -d serverIP -m state --state NEW,ESTABLISHED
-p tcp --dport Port_Above_1024 -i eth0 -j ACCEPT
2. Restart your firewall:/.../init.d/iptables restart
3. Open port 25 for forwarding:/sbin/iptables -A FORWARD -p tcp --destination-port 25 -j ACCEPT;
4. Forward port 25 to your custom port above 1024:/sbin/iptables -t nat -A PREROUTING -j REDIRECT
-p tcp --destination-port 25 --to-port Port_Above_1024
5. To verify that port 25 is forwarding, start the IBM TRIRIGA application serverso that it binds to your custom port, and run a telnet command:telnet yourServer 25
6. If you do not receive a successful response, forward port 25 to a differentcustom port (step 4).
What to do next
This task does not permanently configure the port. If the Linux server is restartedor the IP tables service is reset from a firewall modification, then the configurationis dropped. To reconfigure the port, you must forward port 25 to your custom port(step 4) again.
Chapter 5. Configuring the platform 81
Configuring JBoss settingsCertain Red Hat JBoss Enterprise Application Platform (EAP) settings must beconfigured when they apply to your particular implementation. These settingsinclude disabling file compression in JBoss, running JBoss as a service, and editingthe display of JBoss environment data.
Disabling file compression in JBossYou can use file compression in JBoss to conserve transactional bandwidth in yournetwork. However, if you discover that your IBM TRIRIGA Application Platformimplementation experiences problems with file compression, you can disablecompression. The default Red Hat JBoss Enterprise Application Platform (EAP)configuration enables compression, except for connections through Apache JServProtocol (AJP) for Apache.
Before you begin
You must be a IBM TRIRIGA or JBoss administrator.
Procedure1. Remove gzip from the Accept-Encoding header of the HTTP request. If there
are issues with removing gzip, continue to the next step.2. Edit the server.xml file in the [jboss_path]\server\all\deploy\jbossweb.sar
directory.3. Remove the code that begins with compression=”on”, as highlighted in the
following example:<!-- A HTTP/1.1 Connector on port changed from Jboss default 8080 to 8001 --><Connector protocol="HTTP/1.1" port="8001" address="${jboss.bind.address}"compression="on" compressableMimeType="text/html,text/xml,text/css,text/javascript,application/x-javascript,application/javascript"connectionTimeout="20000" redirectPort="8443" maxPostSize="10485760"disableUploadTimeout="true"/>
4. Save the server.xml file.
Running JBoss as a service on Windows serversThe IBM TRIRIGA Application Platform installation does not automaticallyconfigure Red Hat JBoss Enterprise Application Platform (EAP) as a service onMicrosoft Windows servers. However, you can manually configure this service.When this service is configured, starting the application server and process serveralso starts JBoss.
Before you begin
You must be a IBM TRIRIGA or JBoss administrator.
Procedure1. Edit the service.bat file in the [jboss_path]\bin directory.2. Modify the service name and parameters in the following configuration lines.
Red Hat JBoss Enterprise Application Platform is shown as an example:set SVCNAME=TRIRIGA_8001set SVCDISP=TRIRIGA (8001) - JBoss EAP 5.1set SVCDESC=TRIRIGA 8001/JBoss EAP 5.1.0 GA
3. Save the service.bat file.4. Install the service as follows:
82 © Copyright IBM Corp. 2011, 2014

a. Open the Windows command prompt.b. Change the directory to the [jboss_path]\bin directory.c. Run the service.bat install command.
5. Optional: When the service is installed, it is set to start manually. You can setthe service to start automatically as follows:a. Open the Windows Control Panel > Administrative Tools > Services
console.b. Double-click the TRIRIGA (8001) service to open its properties.c. For the startup type, select Automatic.d. Click Apply and OK.
Related information:
Securing the JMX Console
Editing the display of JBoss environment dataWhen IBM TRIRIGA is running, certain Red Hat JBoss Enterprise ApplicationPlatform (EAP) environment data is displayed in the HTTP response headers. Forexample, X-Powered-By: Servlet 2.4; JBoss-5.1.0 GA (build:SVNTag=JBoss_5_1_0_GA date=201303131313)/Tomcat-5.5. However, if this datamust be hidden for security or other reasons, you can edit the display ofinformation.
Before you begin
You must be a IBM TRIRIGA or JBoss administrator.
Procedure1. Edit the web.xml file in the [jboss_path]\server\all\deployers\
jbossweb.deployer directory.2. In the Common Filter Configuration section, remove the <init-param> tag and
tag elements, as highlighted in the following lines. Red Hat JBoss EnterpriseApplication Platform is shown as an example:<filter>
<filter-name>CommonHeadersFilter</filter-name><filter-class>
org.jboss.web.tomcat.filters.ReplyHeaderFilter</filter-class><init-param>
<param-name>X-Powered-By</param-name><param-value>Servlet 2.4; JBoss-5.1.0.GA (build: SVNTag=JBoss_5_1_0_GA
date=201303131313)/Tomcat-5.5</param-value></init-param>
</filter>
The edited <filter> tag and tag elements look like the following example:<filter>
<filter-name>CommonHeadersFilter</filter-name><filter-class>
org.jboss.web.tomcat.filters.ReplyHeaderFilter</filter-class></filter>
3. Save the web.xml file.
Chapter 5. Configuring the platform 83

84 © Copyright IBM Corp. 2011, 2014
Chapter 6. Workflow cleanup log
When you start the application server or process server for the first time after youinstall IBM TRIRIGA Application Platform, a workflow validation process isinitiated. This process identifies and reports any issues that might keep theworkflows from running as expected. The log report is namedWorkflowCleanup.log.
The workflow validation process runs for only one time, when you start the serverfor the first time after installation. The process reports any issues with publishedworkflows that require a user action to resolve, and any issues that are repairedautomatically. After the process is completed, you can review the log report tounderstand which workflows were updated and which workflows might needyour attention.
The log report is written to the log directory of the IBM TRIRIGA installation. Forexample, on Windows, C:\Tririga\log\WorkflowCleanup.log is the typicallocation.
Log formatThe format of the log report can contain as many as three main sections. The firstsection indicates that the process ran and completed. The second section lists anyissues and related workflows that cannot be repaired automatically. The thirdsection lists any issues and related workflows that were repaired automatically.
Similar issues are listed together. Within an issue, the workflows are ordered bymodule, business object, and workflow name. Many of the issues provide moreinformation to help you locate the specific step that needs review or repair. Aworkflow might be listed more than one time, depending on what issues werefound and what repairs were made. It is also possible for a workflow that wasretired by the process (because of an irreparable issue) to contain more issues thanwhat was reported.
Log example
The following sample comes from a WorkflowCleanup.log report, and highlightsthe three main sections:Workflow cleanup and repair processing pass 1.Workflow cleanup and repair processing pass 2.Workflow cleanup and repair completed in 2 passes.
The following problems could not be completely repaired.Review the identified workflow(s) and the action taken (if any) and resolve anyremaining problems to assure correct workflow execution.Condition expression is invalid. Review and correct the expression.Workflow:19124805.14 Module=exModule1 BO=-Any- Name=’exModule1 - condition’Invalid Expression[p0 == == 1] Step:0 Start(1) ’Start’Retired the workflow because of missing step definitions that could not berepaired.Workflow:10485177.0 Module=exModule1 BO=exBOName=’exModule1 - PRE-CREATE - initialize’Information about missing definition: Step:100033 Switch(14)Parent Step:100030 Modify Records(28) ’Update Examples’
© Copyright IBM Corp. 2011, 2014 85
The following problems were repaired.Review the identified workflow(s) and the resolution to assure correct workflowexecution.Removed the entry from WF_LOOKUP because the workflow is not in a publishedstate.Workflow:19122518.0 Module=exModule1 BO=-Any- Name=’A New Workflow’Retired the workflow because there isn’t a corresponding entry in WF_LOOKUP.Workflow:19122236.2 Module=exModule1 BO=-Any- Name=’Copy of A New Workflow’Flow control value was invalid. Set step to normal flow (non-swapped).Review flow and verify this is correct.Workflow:19139030.0 Module=exModule1 BO=-Any- Name=’exModule1 - Workflow 2’Invalid flow value was ’REPORT’ Step:206635 Break(21)Retired the workflow because its Module could not be found.Workflow:19122928.1 Module=<23549> BO=-Any- Name=’Example Map Source to Section’Step definition added for End step.Workflow:10179388.0 Module=exModule1 BO=exBO2Name=’Delete associated BO Values’Added the required End step structure and definition information.Workflow:18412.1 Module=exModule2 BO=exBO3Name=’exBO3 - Add Values’Changed step with missing definition to a No-Op.Workflow:12034842.1 Module=exModule1 BO=-Any-Name=’exModule1 - exUpdate - Record Update’Information about missing definition: Step:1000112 Call Workflow(38)Parent Step:1000100 Fork(13)Workflow:19111379.6 Module=exModule2 BO=exBO3Name=’exModule2 – exBO3 - Populate File’Information about missing definition: Step:205341 Populate File(36)Parent Step:0 Start(1) ’Start’
Reported issuesThe log report might identify issues that the process cannot repair automatically.When the process cannot repair a workflow automatically, it typically retires theworkflow. You can review this log report to repair any issues in the workflows thatyour business processes require, and publish the revised workflows.
Suggested actionsThe following issues cannot be repaired automatically. The table shows the issuethat is written to the WorkflowCleanup.log file and the corresponding descriptionand suggested actions.
Issue Description
Condition expression isinvalid. Review andcorrect the expression.
A workflow condition expression is invalid and the expressioncannot be processed. At run time, these conditions are treatedas though they are blank. For Start conditions, the workflow isstarted. For Switch conditions, the expression is always true.For Break conditions, the Loop or Iteration is stopped. Theinformation for the workflow lists the expression and the taskstep in which it is contained. The process leaves the workflowin the published state. The workflow must be revised, theexpression must be corrected, and the workflow must berepublished.
Retired the workflowbecause of a blockstructure error that cannotbe repaired.
A block structure within the workflow has a problem thatmakes it invalid and cannot be repaired by the process. Thefollowing task types define block structures: Switch, Loop,Iterator, Fork, and DataConnect. The process retires theworkflow. Review the retired workflow and correct anyproblems. It is possible that a workflow that is listed mightnot open in the Workflow Builder. If the listed workflowversion cannot be opened, then open older versions for review.
86 © Copyright IBM Corp. 2011, 2014

Issue Description
Retired the workflowbecause of a missing Startstep that cannot berepaired.
The workflow is missing the Start task step and cannot berepaired by the process. The process retires the workflow.Review the retired workflow and correct any problems. It ispossible that a workflow that is listed might not open in theWorkflow Builder. If the listed workflow version cannot beopened, then open older versions for review.
Retired the workflowbecause of missing Startand End steps that cannotbe repaired.
The workflow is missing the Start and End task steps andcannot be repaired by the process. The process retires theworkflow. Review the retired workflow and correct anyproblems. It is possible that a workflow that is listed mightnot open in the Workflow Builder. If the listed workflowversion cannot be opened, then open older versions for review.
Retired the workflowbecause of a structureerror that cannot berepaired.
The step-to-step structure of the workflow has a problem thatmakes it invalid and the structure cannot be repaired by theprocess. The process retires the workflow. Review the retiredworkflow and correct any problems. It is possible that aworkflow that is listed might not open in the WorkflowBuilder. If the listed workflow version cannot be opened, thenopen older versions for review.
Retired the workflowbecause of an unknowntask type <type-number>.
The workflow contains a step with a task type that cannot beunderstood by the workflow processor. Since the step uses anunknown task type, this condition cannot be repaired by theprocess. The process retires the workflow. Review the retiredworkflow and correct any problems. It is possible that aworkflow that is listed might not open in the WorkflowBuilder. If the listed workflow version cannot be opened, thenopen older versions for review.
Retired the workflowbecause of missing stepdefinitions that cannot berepaired.
The properties for one or more steps within the workflowcannot be loaded. Since the properties for the step are specificto the logic of the workflow, this condition cannot be repairedby the process. The process retires the workflow. Review theretired workflow and correct any problems. It is possible thata workflow that is listed might not open in the WorkflowBuilder. If the listed workflow version cannot be opened, thenopen older versions for review.
Unexpected problem intrying to load theworkflow.
This issue covers any problems that do not fit into any of theother categories. The process retires the workflow. Review theretired workflow and correct any problems. It is possible thata workflow that is listed might not open in the WorkflowBuilder. If the listed workflow version cannot be opened, thenopen older versions for review.
Automatic repairsThe following issues can be repaired automatically. The table shows the issue thatis written to the WorkflowCleanup.log file and the corresponding description andautomatic repairs.
Issue Description
Added the required Endstep structure anddefinition information.
Valid workflows require an End task step and one cannot befound. The process adds an End task step to the workflow.Review the workflow to verify that the step was addedcorrectly.
Chapter 6. Workflow cleanup log 87
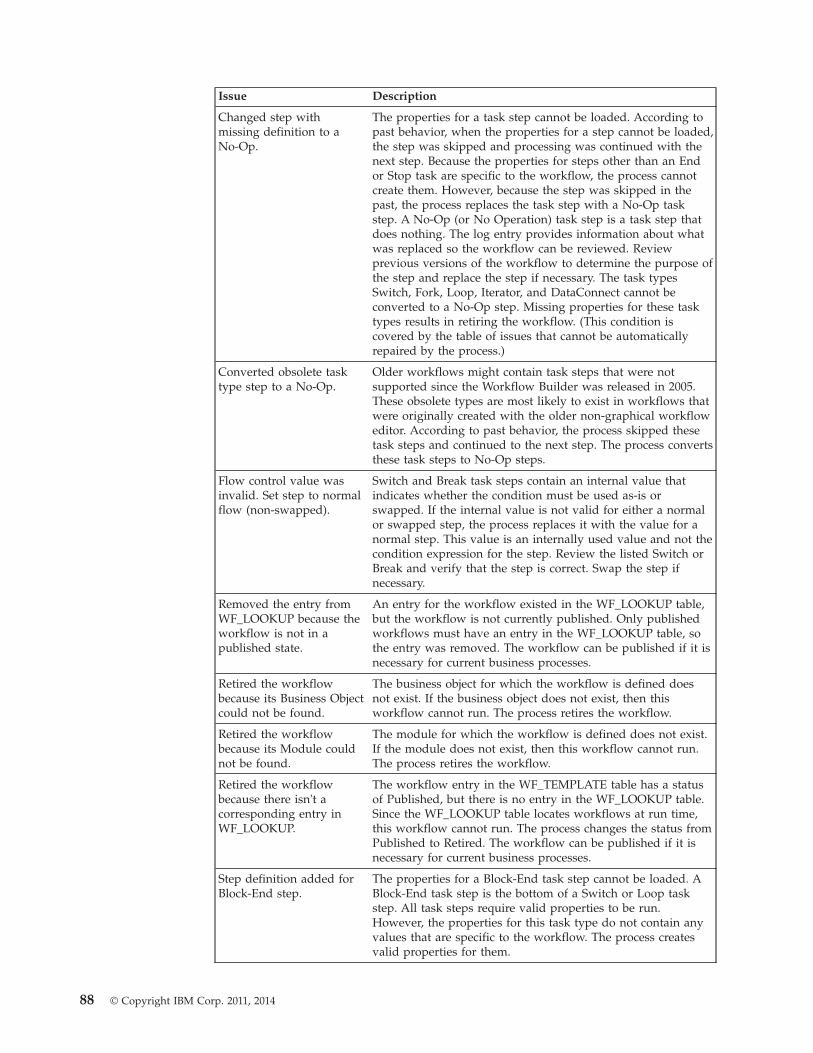
Issue Description
Changed step withmissing definition to aNo-Op.
The properties for a task step cannot be loaded. According topast behavior, when the properties for a step cannot be loaded,the step was skipped and processing was continued with thenext step. Because the properties for steps other than an Endor Stop task are specific to the workflow, the process cannotcreate them. However, because the step was skipped in thepast, the process replaces the task step with a No-Op taskstep. A No-Op (or No Operation) task step is a task step thatdoes nothing. The log entry provides information about whatwas replaced so the workflow can be reviewed. Reviewprevious versions of the workflow to determine the purpose ofthe step and replace the step if necessary. The task typesSwitch, Fork, Loop, Iterator, and DataConnect cannot beconverted to a No-Op step. Missing properties for these tasktypes results in retiring the workflow. (This condition iscovered by the table of issues that cannot be automaticallyrepaired by the process.)
Converted obsolete tasktype step to a No-Op.
Older workflows might contain task steps that were notsupported since the Workflow Builder was released in 2005.These obsolete types are most likely to exist in workflows thatwere originally created with the older non-graphical workfloweditor. According to past behavior, the process skipped thesetask steps and continued to the next step. The process convertsthese task steps to No-Op steps.
Flow control value wasinvalid. Set step to normalflow (non-swapped).
Switch and Break task steps contain an internal value thatindicates whether the condition must be used as-is orswapped. If the internal value is not valid for either a normalor swapped step, the process replaces it with the value for anormal step. This value is an internally used value and not thecondition expression for the step. Review the listed Switch orBreak and verify that the step is correct. Swap the step ifnecessary.
Removed the entry fromWF_LOOKUP because theworkflow is not in apublished state.
An entry for the workflow existed in the WF_LOOKUP table,but the workflow is not currently published. Only publishedworkflows must have an entry in the WF_LOOKUP table, sothe entry was removed. The workflow can be published if it isnecessary for current business processes.
Retired the workflowbecause its Business Objectcould not be found.
The business object for which the workflow is defined doesnot exist. If the business object does not exist, then thisworkflow cannot run. The process retires the workflow.
Retired the workflowbecause its Module couldnot be found.
The module for which the workflow is defined does not exist.If the module does not exist, then this workflow cannot run.The process retires the workflow.
Retired the workflowbecause there isn't acorresponding entry inWF_LOOKUP.
The workflow entry in the WF_TEMPLATE table has a statusof Published, but there is no entry in the WF_LOOKUP table.Since the WF_LOOKUP table locates workflows at run time,this workflow cannot run. The process changes the status fromPublished to Retired. The workflow can be published if it isnecessary for current business processes.
Step definition added forBlock-End step.
The properties for a Block-End task step cannot be loaded. ABlock-End task step is the bottom of a Switch or Loop taskstep. All task steps require valid properties to be run.However, the properties for this task type do not contain anyvalues that are specific to the workflow. The process createsvalid properties for them.
88 © Copyright IBM Corp. 2011, 2014
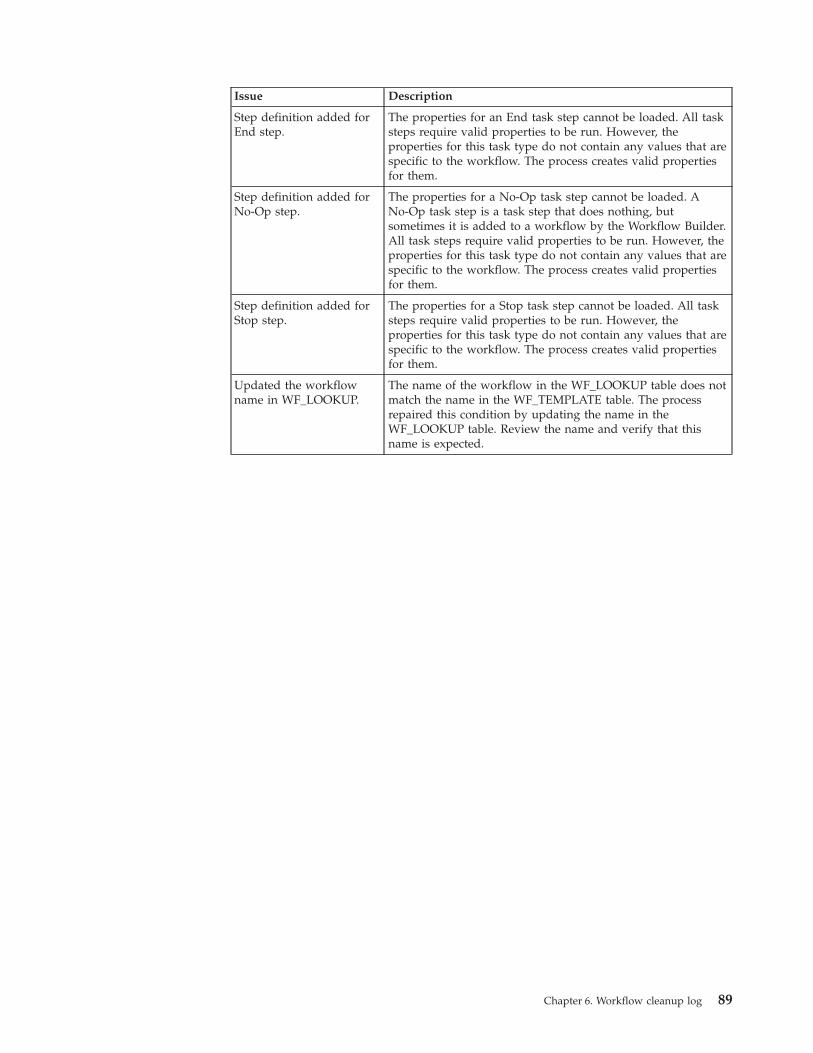
Issue Description
Step definition added forEnd step.
The properties for an End task step cannot be loaded. All tasksteps require valid properties to be run. However, theproperties for this task type do not contain any values that arespecific to the workflow. The process creates valid propertiesfor them.
Step definition added forNo-Op step.
The properties for a No-Op task step cannot be loaded. ANo-Op task step is a task step that does nothing, butsometimes it is added to a workflow by the Workflow Builder.All task steps require valid properties to be run. However, theproperties for this task type do not contain any values that arespecific to the workflow. The process creates valid propertiesfor them.
Step definition added forStop step.
The properties for a Stop task step cannot be loaded. All tasksteps require valid properties to be run. However, theproperties for this task type do not contain any values that arespecific to the workflow. The process creates valid propertiesfor them.
Updated the workflowname in WF_LOOKUP.
The name of the workflow in the WF_LOOKUP table does notmatch the name in the WF_TEMPLATE table. The processrepaired this condition by updating the name in theWF_LOOKUP table. Review the name and verify that thisname is expected.
Chapter 6. Workflow cleanup log 89

90 © Copyright IBM Corp. 2011, 2014
Notices
This information was developed for products and services offered in the U.S.A.
IBM may not offer the products, services, or features discussed in this document inother countries. Consult your local IBM representative for information on theproducts and services currently available in your area. Any reference to an IBMproduct, program, or service is not intended to state or imply that only that IBMproduct, program, or service may be used. Any functionally equivalent product,program, or service that does not infringe any IBM intellectual property right maybe used instead. However, it is the user's responsibility to evaluate and verify theoperation of any non-IBM product, program, or service.
IBM may have patents or pending patent applications covering subject matterdescribed in this document. The furnishing of this document does not grant youany license to these patents. You can send license inquiries, in writing, to:
IBM Director of LicensingIBM CorporationNorth Castle DriveArmonk, NY 10504-1785U.S.A.
For license inquiries regarding double-byte (DBCS) information, contact the IBMIntellectual Property Department in your country or send inquiries, in writing, to:
Intellectual Property LicensingLegal and Intellectual Property LawIBM Japan Ltd.19-21, Nihonbashi-Hakozakicho, Chuo-kuTokyo 103-8510, Japan
The following paragraph does not apply to the United Kingdom or any othercountry where such provisions are inconsistent with local law: INTERNATIONALBUSINESS MACHINES CORPORATION PROVIDES THIS PUBLICATION "AS IS"WITHOUT WARRANTY OF ANY KIND, EITHER EXPRESS OR IMPLIED,INCLUDING, BUT NOT LIMITED TO, THE IMPLIED WARRANTIES OFNON-INFRINGEMENT, MERCHANTABILITY OR FITNESS FOR A PARTICULARPURPOSE. Some states do not allow disclaimer of express or implied warranties incertain transactions, therefore, this statement may not apply to you.
This information could include technical inaccuracies or typographical errors.Changes are periodically made to the information herein; these changes will beincorporated in new editions of the publication. IBM may make improvementsand/or changes in the product(s) and/or the program(s) described in thispublication at any time without notice.
Any references in this information to non-IBM Web sites are provided forconvenience only and do not in any manner serve as an endorsement of thosewebsites. The materials at those websites are not part of the materials for this IBMproduct and use of those websites is at your own risk.
© Copyright IBM Corp. 2011, 2014 91

IBM may use or distribute any of the information you supply in any way itbelieves appropriate without incurring any obligation to you.
Licensees of this program who wish to have information about it for the purposeof enabling: (i) the exchange of information between independently createdprograms and other programs (including this one) and (ii) the mutual use of theinformation which has been exchanged, should contact:
IBM Corporation2Z4A/10111400 Burnet RoadAustin, TX 78758 U.S.A.
Such information may be available, subject to appropriate terms and conditions,including in some cases, payment of a fee.
The licensed program described in this document and all licensed materialavailable for it are provided by IBM under terms of the IBM Customer Agreement,IBM International Program License Agreement or any equivalent agreementbetween us.
Information concerning non-IBM products was obtained from the suppliers ofthose products, their published announcements or other publicly available sources.IBM has not tested those products and cannot confirm the accuracy ofperformance, compatibility or any other claims related to non-IBM products.Questions on the capabilities of non-IBM products should be addressed to thesuppliers of those products.
This information contains examples of data and reports used in daily businessoperations. To illustrate them as completely as possible, the examples include thenames of individuals, companies, brands, and products. All of these names arefictitious and any similarity to the names and addresses used by an actual businessenterprise is entirely coincidental.
COPYRIGHT LICENSE:
This information contains sample application programs in source language, whichillustrate programming techniques on various operating platforms. You may copy,modify, and distribute these sample programs in any form without payment toIBM, for the purposes of developing, using, marketing or distributing applicationprograms conforming to the application programming interface for the operatingplatform for which the sample programs are written. These examples have notbeen thoroughly tested under all conditions. IBM, therefore, cannot guarantee orimply reliability, serviceability, or function of these programs. The sampleprograms are provided "AS IS", without warranty of any kind. IBM shall not beliable for any damages arising out of your use of the sample programs.
Privacy Policy ConsiderationsIBM Software products, including software as service solutions, (“SoftwareOfferings”) may use cookies or other technologies to collect product usageinformation, to help improve the end user experience, to tailor interactions withthe end user or for other purposes. In many cases no personally identifiableinformation is collected by the Software Offerings. Some of our Software Offeringscan help enable you to collect personally identifiable information. If this Software
92 © Copyright IBM Corp. 2011, 2014

Offering uses cookies to collect personally identifiable information, specificinformation about this offering’s use of cookies is set forth below.
This Software Offering does not use cookies or other technologies to collectpersonally identifiable information.
If the configurations deployed for this Software Offering provide you as customerthe ability to collect personally identifiable information from end users via cookiesand other technologies, you should seek your own legal advice about any lawsapplicable to such data collection, including any requirements for notice andconsent.
For more information about the use of various technologies, including cookies, forthese purposes, see IBM’s Privacy Policy at http://www.ibm.com/privacy andIBM's Online Privacy Statement at http://www.ibm.com/privacy/details in thesection entitled “Cookies, Web Beacons and Other Technologies” and the "IBMSoftware Products and Software-as-a-Service Privacy Statement" athttp://www.ibm.com/software/info/product-privacy/.
TrademarksIBM, the IBM logo, and ibm.com are trademarks or registered trademarks ofInternational Business Machines Corp., registered in many jurisdictions worldwide.Other product and service names might be trademarks of IBM or other companies.A current list of IBM trademarks is available on the Web at “Copyright andtrademark information” at www.ibm.com/legal/copytrade.shtml.
Java and all Java-based trademarks and logos are trademarks or registeredtrademarks of Oracle and/or its affiliates.
Linux is a trademark of Linus Torvalds in the United States, other countries, orboth.
Microsoft, Windows, Windows NT, and the Windows logo are trademarks ofMicrosoft Corporation in the United States, other countries, or both.
UNIX is a registered trademark of The Open Group in the United States and othercountries.
Other product and service names might be trademarks of IBM or other companies.
Notices 93

94 © Copyright IBM Corp. 2011, 2014


����
Printed in USA