Embed Size (px)
Citation preview
IBM® Watson IoT Maximo Asset Management
Maximo 7.6 Designer 431 Report Development Guide Revision 8
CONTENTS
Revision History vi
1 Overview 7
2 Installation and Configuration 8
2.1 Download BIRT Report Designer ..................................................................... 9
2.2 Configure Report Designer for Maximo ............................................................ 9
2.3 Update Properties file .................................................................................. 112.3.1 Properties File Values ................................................................................. 112.3.2 Database username and Password .............................................................. 13
2.4 Access the Report Design Tool ...................................................................... 15
2.5 Create Maximo Project ................................................................................ 16
2.6 Install, Configuration and Platform Issues ..................................................... 19
2.7 Upgrading to BIRT Report Designer 4.3.1 ....................................................... 21
3 Report Developer Database Access 25
4 Report Design Files 27
4.1 Report File Structure .................................................................................. 294.1.1 birtplatform ............................................................................................. 294.1.2 Libraries ................................................................................................... 294.1.3 Reports .................................................................................................... 304.1.4 Script Library ............................................................................................ 304.1.5 Report Templates ...................................................................................... 314.1.6 Tools ........................................................................................................ 32
4.2 Your Custom Reports and the Report File Structure ......................................... 334.2.1 New Custom Reports – Report Design and XML file ....................................... 334.2.2 New Custom or Modified Reports – Properties file ......................................... 34
Maximo76_431_Report Development Guide
iii
4.2.3 Modifications to Delivered Reports - Report Design and XML file .................... 35
5 Developing a report 37
5.1 Specifying the Query ................................................................................... 38
5.2 Creating the Output Columns ....................................................................... 395.2.1 Maximo BIRT Data Mapping ....................................................................... 40
5.3 Updating the Fetch ..................................................................................... 41
5.4 Formatting the Report ................................................................................. 415.4.1 Formatting Notes ...................................................................................... 42
5.5 Defining the Property File ............................................................................ 435.5.1 Defining the Property File – Specific Steps .................................................... 44
6 Report Development Considerations 46
6.1 Date Methods ............................................................................................. 46
6.2 Date Formats ............................................................................................. 48
6.3 Linking Result Sets ...................................................................................... 48
6.4 Hyperlinking ............................................................................................... 49
6.5 Populating the Data Set .............................................................................. 52
6.6 Closing the Data Set ................................................................................... 52
6.7 Executing Additional Queries ....................................................................... 53
6.8 Queries in the Fetch Method ......................................................................... 53
6.9 Dynamically Filtering Data .......................................................................... 53
6.10 Testing for Null ........................................................................................... 54
6.11 Scalar Functions ......................................................................................... 54
6.12 Enabling Rich Text Formatting ..................................................................... 54
7 Parameters 56
7.1 Bound Parameters ...................................................................................... 56
7.2 Unbound parameters ................................................................................... 57
7.3 Specifying Bound parameters in the report design .......................................... 59
7.4 Specifying Unbound parameters in the report design ....................................... 597.4.1 Multi-select or single-select unbound parameters .......................................... 597.4.2 Parsing Unbound Parameters ..................................................................... 61
7.5 Creating Custom Report Parameter Lookups .................................................. 627.5.1 Option 1 - Using valuelists for parameter lookups with fields with domains .... 637.5.2 Option 2 - Using existing lookups ................................................................. 677.5.3 Option 3- Modifying existing lookups ........................................................... 67
7.6 Parameter Notes ........................................................................................ 737.6.1 Number of Parameter Values ...................................................................... 737.6.2 Utilizing Parameter Values on a Report’s Request Page ................................. 737.6.3 Boolean Parameter Values ......................................................................... 737.6.4 Optional Parameters .................................................................................. 747.6.5 YORN Lookup ........................................................................................... 747.6.6 Viewing Parameters ................................................................................... 757.6.7 Requirements for using lookups with Parameters .......................................... 75
8 Extending Ad Hoc Reports in BIRT Designer 76
9 Debugging within the BIRT Report Design tool 78
9.1 Report Designer best practices for debugging ................................................. 79
10 Miscellaneous Features 80
10.1 Database Update Functionality .................................................................... 80
10.2 Registering a Report to Multiple Applications ................................................. 81
10.3 Registering a Report with Quick Toolbar Access .............................................. 81
Maximo76_431_Report Development Guide
v
11 Importing Report Designs into the Maximo Database 83
11.1 Set Up: reporttools.properties ...................................................................... 83
11.2 Import Command Utility .............................................................................. 85
11.3 Export Command Utility .............................................................................. 8611.3.1 Export Example ......................................................................................... 8611.3.2 Additional Command Utilities notes ............................................................. 87
11.4 Understanding the reports.xml import file ...................................................... 88
11.5 Preparing the reports.xml ........................................................................... 89
11.6 Miscellaneous Utilities ................................................................................. 93
12 Reports in a Multitenancy Sysem 94
13 Best Practices 96
Reference Materials 97
13.1 Changing Report Logos ............................................................................... 97
13.2 Understanding Report Paper Sizes and Page Breaks ....................................... 97
13.3 Modifying Delivered Reports ........................................................................ 97
© Copyright International Business Machines Corporation 2019 US Government Users Restricted Rights – Use, duplication or disclosure restricted by GSA ADP Schedule Contract with IBM Corp.
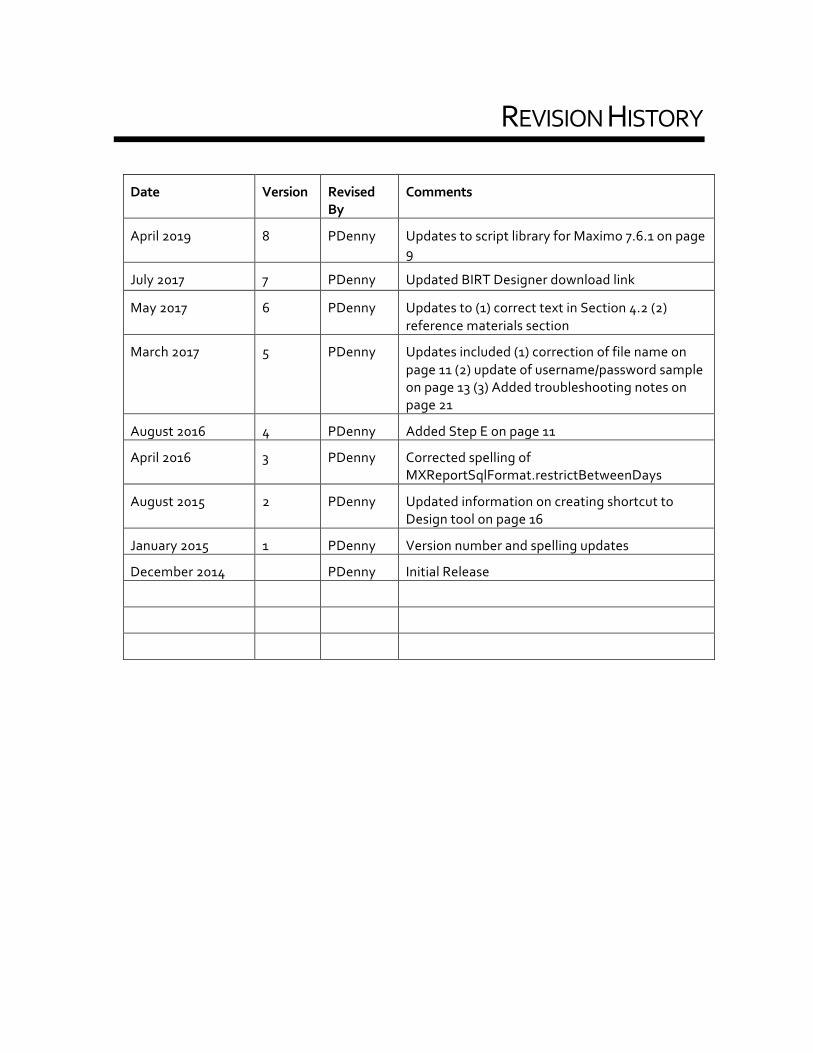
REVISION HISTORY
Date Version Revised By
Comments
April 2019 8 PDenny Updates to script library for Maximo 7.6.1 on page 9
July 2017 7 PDenny Updated BIRT Designer download link
May 2017 6 PDenny Updates to (1) correct text in Section 4.2 (2) reference materials section
March 2017 5 PDenny Updates included (1) correction of file name on page 11 (2) update of username/password sample on page 13 (3) Added troubleshooting notes on page 21
August 2016 4 PDenny Added Step E on page 11
April 2016 3 PDenny Corrected spelling of MXReportSqlFormat.restrictBetweenDays
August 2015 2 PDenny Updated information on creating shortcut to Design tool on page 16
January 2015 1 PDenny Version number and spelling updates
December 2014 PDenny Initial Release
Maximo76_ReportDesigner431_Report Development Guide
7
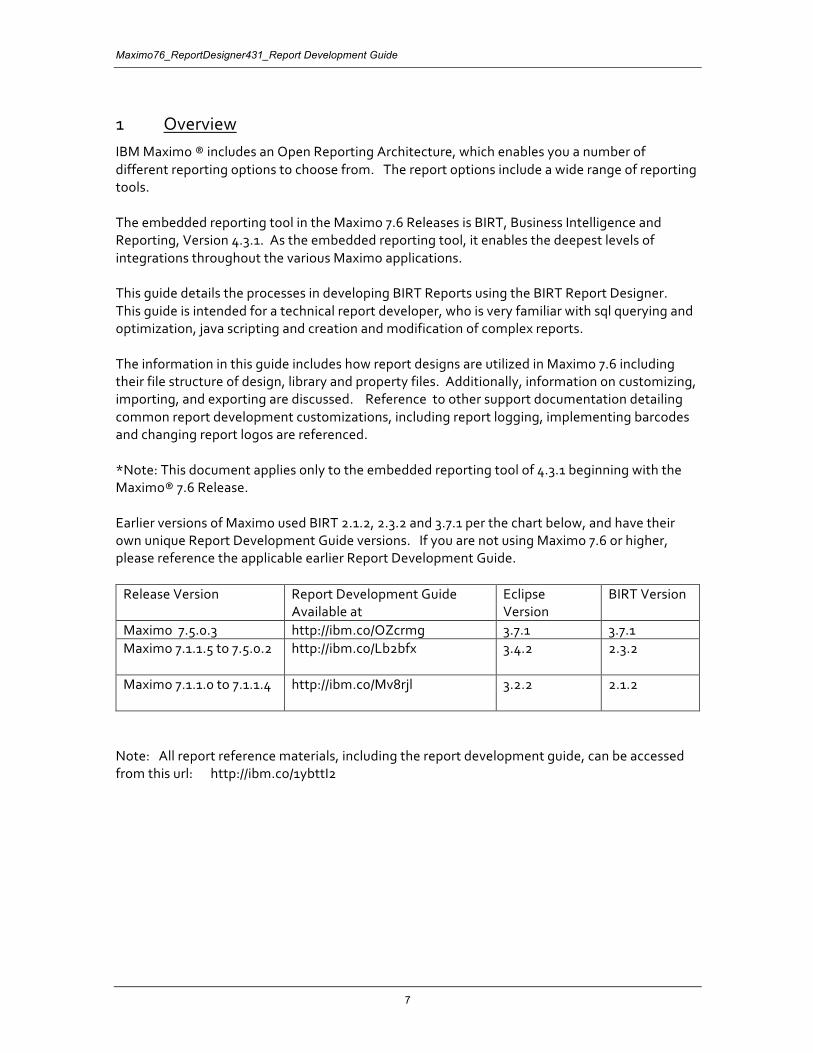
1 Overview IBM Maximo ® includes an Open Reporting Architecture, which enables you a number of different reporting options to choose from. The report options include a wide range of reporting tools. The embedded reporting tool in the Maximo 7.6 Releases is BIRT, Business Intelligence and Reporting, Version 4.3.1. As the embedded reporting tool, it enables the deepest levels of integrations throughout the various Maximo applications. This guide details the processes in developing BIRT Reports using the BIRT Report Designer. This guide is intended for a technical report developer, who is very familiar with sql querying and optimization, java scripting and creation and modification of complex reports. The information in this guide includes how report designs are utilized in Maximo 7.6 including their file structure of design, library and property files. Additionally, information on customizing, importing, and exporting are discussed. Reference to other support documentation detailing common report development customizations, including report logging, implementing barcodes and changing report logos are referenced. *Note: This document applies only to the embedded reporting tool of 4.3.1 beginning with the Maximo® 7.6 Release. Earlier versions of Maximo used BIRT 2.1.2, 2.3.2 and 3.7.1 per the chart below, and have their own unique Report Development Guide versions. If you are not using Maximo 7.6 or higher, please reference the applicable earlier Report Development Guide.
Release Version Report Development Guide Available at
Eclipse Version
BIRT Version
Maximo 7.5.0.3 http://ibm.co/OZcrmg 3.7.1 3.7.1 Maximo 7.1.1.5 to 7.5.0.2 http://ibm.co/Lb2bfx
3.4.2 2.3.2
Maximo 7.1.1.0 to 7.1.1.4 http://ibm.co/Mv8rjl
3.2.2 2.1.2
Note: All report reference materials, including the report development guide, can be accessed from this url: http://ibm.co/1ybttI2
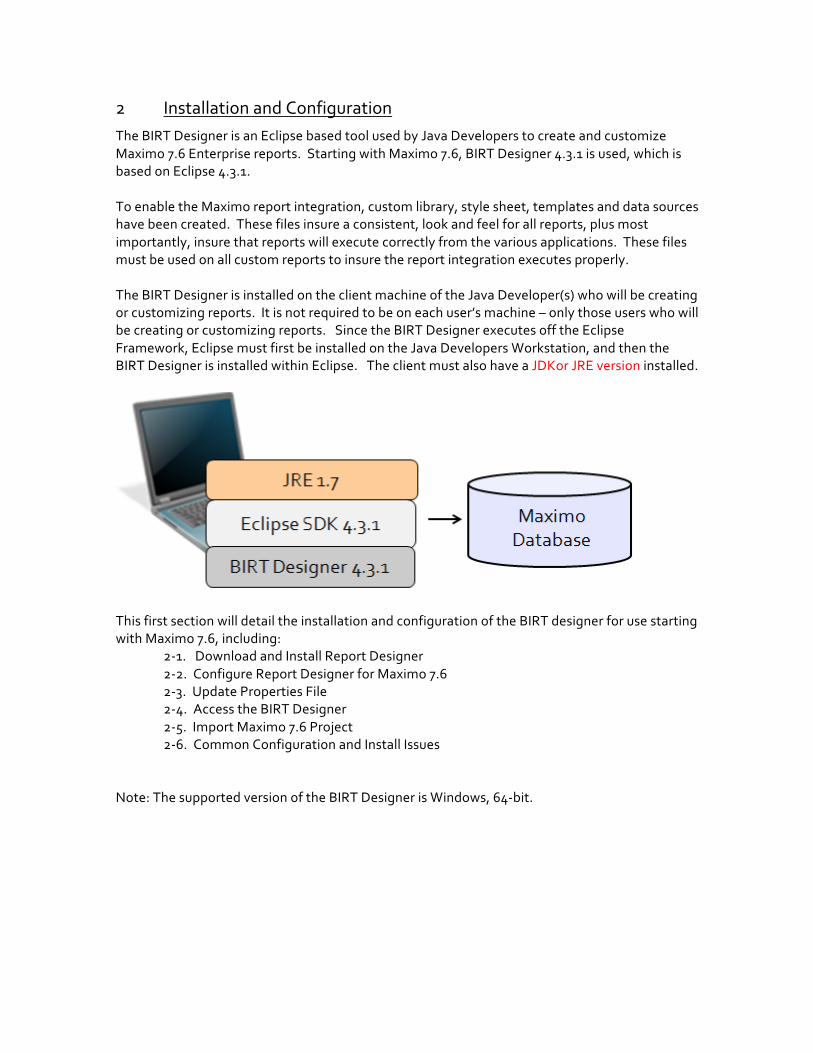
2 Installation and Configuration The BIRT Designer is an Eclipse based tool used by Java Developers to create and customize Maximo 7.6 Enterprise reports. Starting with Maximo 7.6, BIRT Designer 4.3.1 is used, which is based on Eclipse 4.3.1. To enable the Maximo report integration, custom library, style sheet, templates and data sources have been created. These files insure a consistent, look and feel for all reports, plus most importantly, insure that reports will execute correctly from the various applications. These files must be used on all custom reports to insure the report integration executes properly. The BIRT Designer is installed on the client machine of the Java Developer(s) who will be creating or customizing reports. It is not required to be on each user’s machine – only those users who will be creating or customizing reports. Since the BIRT Designer executes off the Eclipse Framework, Eclipse must first be installed on the Java Developers Workstation, and then the BIRT Designer is installed within Eclipse. The client must also have a JDKor JRE version installed.
This first section will detail the installation and configuration of the BIRT designer for use starting with Maximo 7.6, including:
2-1. Download and Install Report Designer 2-2. Configure Report Designer for Maximo 7.6 2-3. Update Properties File 2-4. Access the BIRT Designer 2-5. Import Maximo 7.6 Project 2-6. Common Configuration and Install Issues
Note: The supported version of the BIRT Designer is Windows, 64-bit.
Maximo76_ReportDesigner431_Report Development Guide
9
2.1 Download BIRT Report Designer
Perquisite: A copy of IBM JDK or JRE 7.0 must be installed on the client machine before downloading the BIRT Designer. Additionally, make sure you are using either a 32 or 64 bit JDK to correspond to either a 32 or 64 bit Birt Designer. A. Download the BIRT Report Designer 4.3.1 with Eclipse 4.3.1 from this url https://ibm.co/2uIhZTD Choose either the 64 or 32 bit Windows version. The 64 bit Windows version zip file is eclipse-reporting-kepler-SR1-win32-x86_64.zip The 32 bit Windows version zip file is birt-report-designer-all-in-one-4_3_1.zip B. Extract the downloaded zip file to a local directory which does not include any spaces Example: C:\birt_431
2.2 Configure Report Designer for Maximo
In this section, files from Maximo will be copied to the report designer for the integration. Prerequisite: Access to a Maximo 7.6.0.0 or higher instance is required. A. If you are using Maximo 7.6.1.x and higher, please refer to the following tech note http://www.ibm.com/support/docview.wss?uid=ibm10880723 Otherwise if you are using Maximo 7.6.0.x Locate the classes used for report scripting from this Maximo 7.6 directory: <maximo76>\reports\birt\scriptlibrary\classes Copy this folder to the Eclipse directory below. This will create a new classes subfolder <birt_431>\eclipse\plugins\org.eclipse.birt.report.viewer_4.3.1.v201309171028\birt\WEB-INF B. Locate the JDBC driver for the database you are using from this directory <maximo76>\applications\maximo\lib
For Oracle, it is oraclethin.jar For SQL Server, it is sqljdbc.jar For DB2, it is db2jcc.jar and db2jcc_license_cu.jar Copy the applicable database driver to: <birt_431>\eclipse\plugins\ org.eclipse.birt.report.viewer_4.3.1.v201309171028\birt\WEB-INF\lib
*Note: The sql server driver has been updated in the Maximo 76 release. Be sure to use this latest driver if you are using a sql server database. C. Open the database jar file you copied and extract the contents of the jar file to <birt_431>\eclipse\plugins\ org.eclipse.birt.report.viewer_4.3.1.v201309171028\birt\WEB-INF\classes Notes: 1. If you are using DB2, when you extract the database jar files, the second one may display a warning that you are overwriting MANIFEST.MF. Click OK to proceed. 2. If you see an exception error like ‘Class Not Found’ in BIRT Designer after following these steps, confirm that you have extracted the jar files properly. D. Locate this jar file org.eclipse.birt.report.engine_4.3.1.v201309161141.jar from your Maximo 76 instance at this subdirectory: <maximo76>\applications\maximo\maximouiweb\webmodule\WEB-INF\birt\platform\plugins\ Copy and paste it to your BIRT Designer location. This will overwrite the existing file.
<birt_431>\eclipse\plugins Note: If you do not perform this step, you may experience issues when viewing reports using dynamic text in the BIRT Designer . E. Locate the following jar file
org.eclipse.birt.data_4.3.1.v201308301349.jar
from your Maximo 76 instance at this subdirectory: <maximo76>\applications\maximo\maximouiweb\webmodule\WEB-INF\birt\platform\plugins Copy and paste it to the BIRT Designer location
<birt_431>\eclipse\plugins
Maximo76_ReportDesigner431_Report Development Guide
11
2.3 Update Properties file
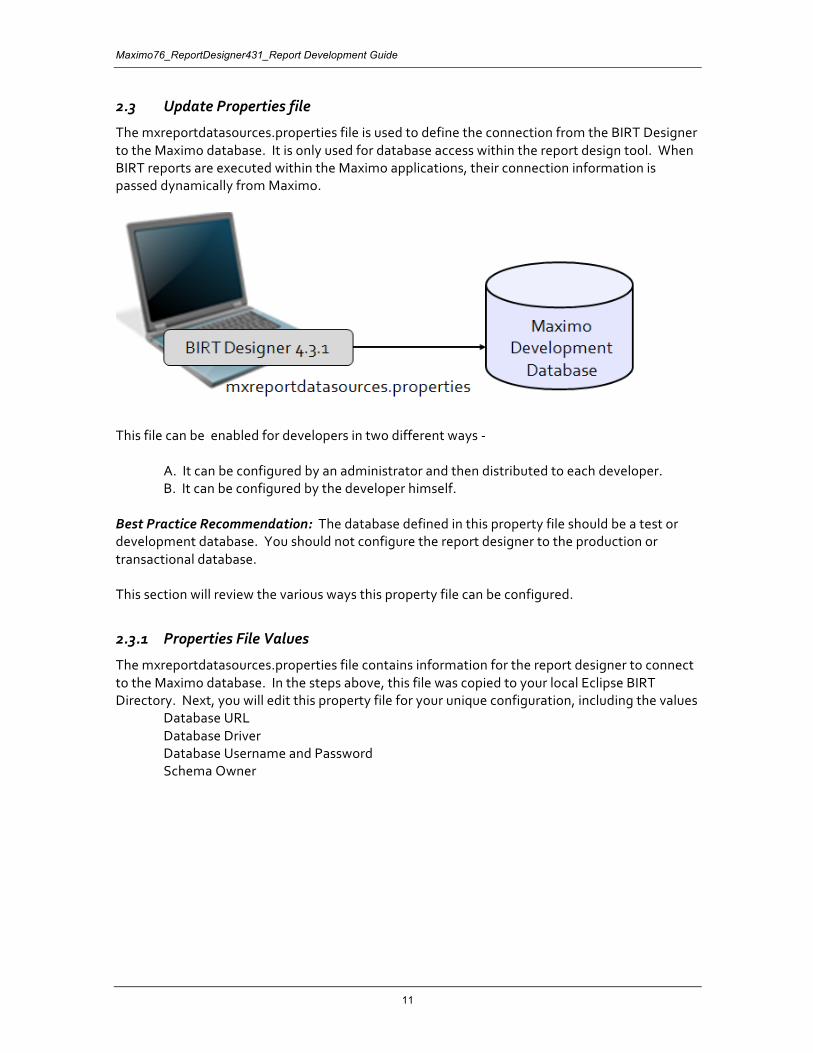
The mxreportdatasources.properties file is used to define the connection from the BIRT Designer to the Maximo database. It is only used for database access within the report design tool. When BIRT reports are executed within the Maximo applications, their connection information is passed dynamically from Maximo.
This file can be enabled for developers in two different ways - A. It can be configured by an administrator and then distributed to each developer. B. It can be configured by the developer himself. Best Practice Recommendation: The database defined in this property file should be a test or development database. You should not configure the report designer to the production or transactional database. This section will review the various ways this property file can be configured.
2.3.1 Properties File Values
The mxreportdatasources.properties file contains information for the report designer to connect to the Maximo database. In the steps above, this file was copied to your local Eclipse BIRT Directory. Next, you will edit this property file for your unique configuration, including the values
Database URL Database Driver Database Username and Password Schema Owner
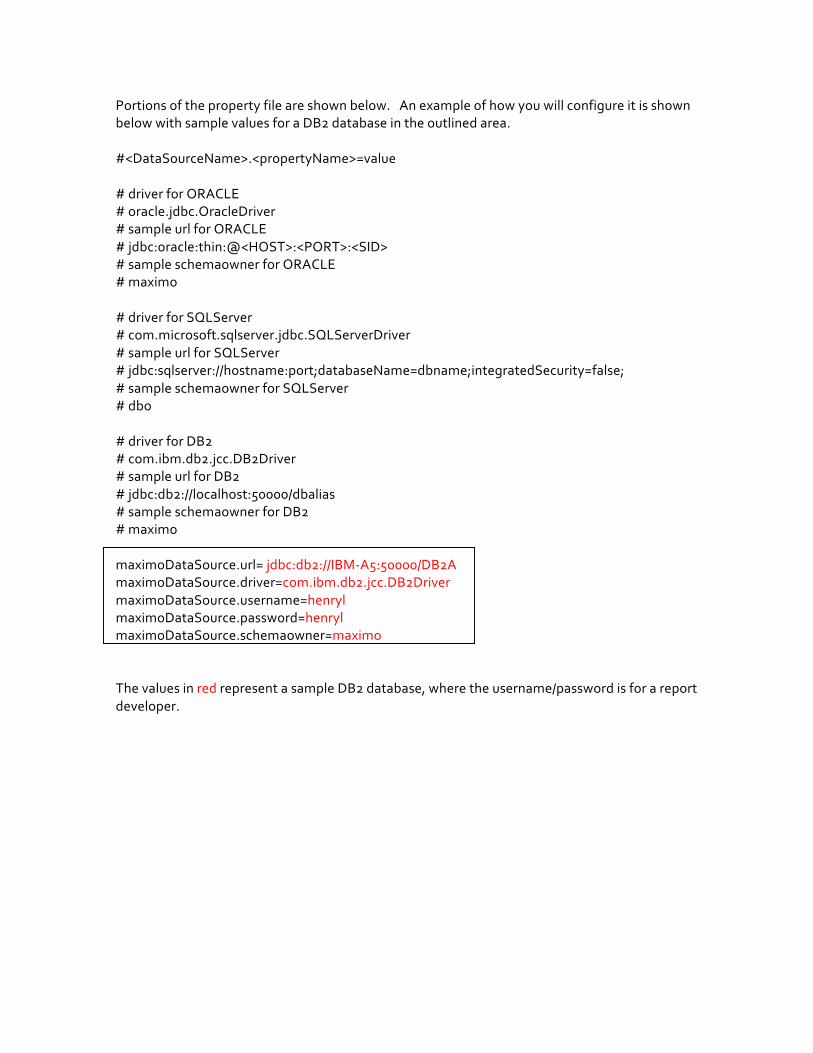
Portions of the property file are shown below. An example of how you will configure it is shown below with sample values for a DB2 database in the outlined area. #<DataSourceName>.<propertyName>=value # driver for ORACLE # oracle.jdbc.OracleDriver # sample url for ORACLE # jdbc:oracle:thin:@<HOST>:<PORT>:<SID> # sample schemaowner for ORACLE # maximo # driver for SQLServer # com.microsoft.sqlserver.jdbc.SQLServerDriver # sample url for SQLServer # jdbc:sqlserver://hostname:port;databaseName=dbname;integratedSecurity=false; # sample schemaowner for SQLServer # dbo # driver for DB2 # com.ibm.db2.jcc.DB2Driver # sample url for DB2 # jdbc:db2://localhost:50000/dbalias # sample schemaowner for DB2 # maximo maximoDataSource.url= jdbc:db2://IBM-A5:50000/DB2A maximoDataSource.driver=com.ibm.db2.jcc.DB2Driver maximoDataSource.username=henryl maximoDataSource.password=henryl maximoDataSource.schemaowner=maximo The values in red represent a sample DB2 database, where the username/password is for a report developer.
Maximo76_ReportDesigner431_Report Development Guide
13
2.3.2 Database username and Password
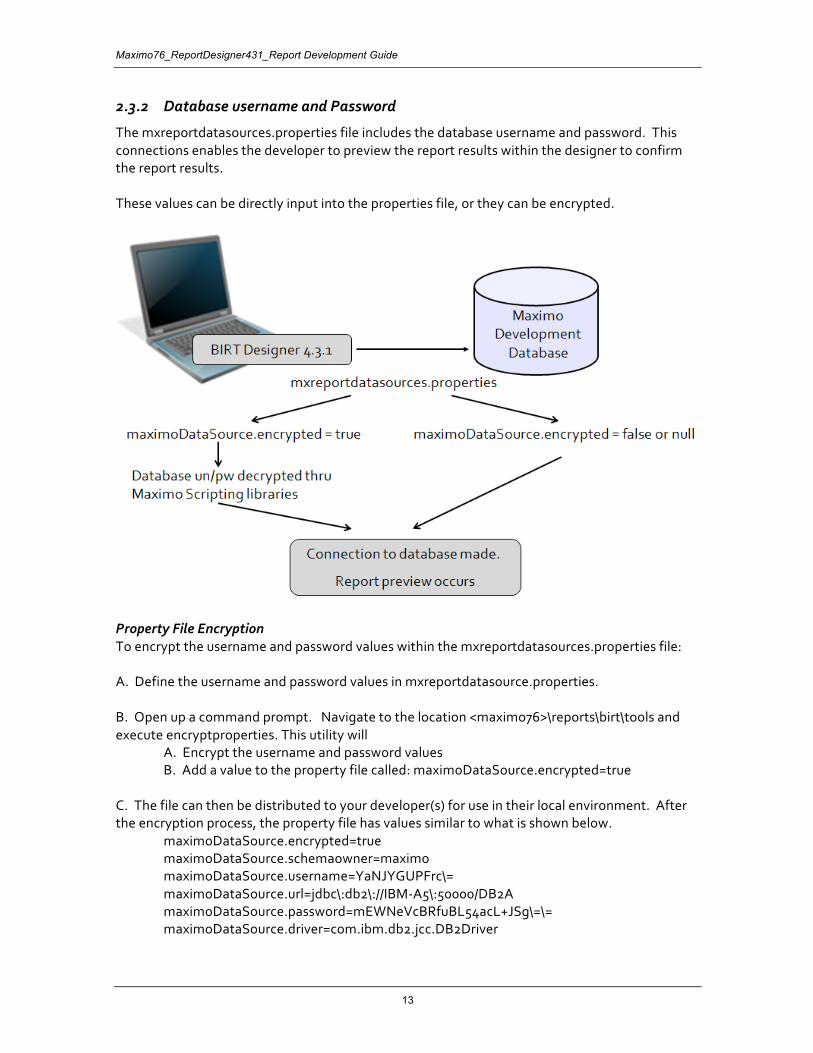
The mxreportdatasources.properties file includes the database username and password. This connections enables the developer to preview the report results within the designer to confirm the report results. These values can be directly input into the properties file, or they can be encrypted.
Property File Encryption To encrypt the username and password values within the mxreportdatasources.properties file: A. Define the username and password values in mxreportdatasource.properties. B. Open up a command prompt. Navigate to the location <maximo76>\reports\birt\tools and execute encryptproperties. This utility will A. Encrypt the username and password values B. Add a value to the property file called: maximoDataSource.encrypted=true C. The file can then be distributed to your developer(s) for use in their local environment. After the encryption process, the property file has values similar to what is shown below. maximoDataSource.encrypted=true maximoDataSource.schemaowner=maximo maximoDataSource.username=YaNJYGUPFrc\= maximoDataSource.url=jdbc\:db2\://IBM-A5\:50000/DB2A maximoDataSource.password=mEWNeVcBRfuBL54acL+JSg\=\= maximoDataSource.driver=com.ibm.db2.jcc.DB2Driver
Notes on properties file 1. UPGRADE: The keys used to enable encryption of these have been updated. If you have encrypted the values in previous Maximo 7.5 versions, repeat the encryption process for Maximo 7.6. 2. The encryption process adds escape characters to the URL, which do not affect its value 3. The encryption process only encrypts values identified by maximoDataSource values 4. You may not want to grant each report developer full database access by using the system maximo database user privileges as the developer creates and test report designs. Instead, you may want the developer to have restricted database access. This restriction usually requires that the report developer be granted ‘read only’ access to a limited number of database objects. To do this, a unique database user is required. Details in how to do this can be found in later in this guide in the section titled ‘Report Developer Database Access’.

Maximo76_ReportDesigner431_Report Development Guide
15
2.4 Access the Report Design Tool
A. Create a shortcut to BIRT Designer 431 from eclipse.exe. B. Update the shortcut’s target to include your JDK 1.7 path as highlighted in red below. C:\birt_431\eclipse\eclipse.exe -vm "C:\ibm\jdk7\jre\bin\javaw.exe" -vmargs -Xmx512m
*Note: The best practice recommended shortcut path for BIRT eclipse utilizes javaw.exe.
If this is not available, java.exe may be used but you may experience items including additional popup windows. C. Launch BIRT Designer from your new shortcut. Note: If you receive this error, confirm (1) that the version of JDK you installed matches the version of Eclipse you installed - 64 vs 32 (2) your shortcut is to the correct location of your JDK and (3) there are no spaces in your JDK install path
D. Select an applicable workspace location for your environment. Check ‘Use this as default’ field and OK, and Eclipse will open.
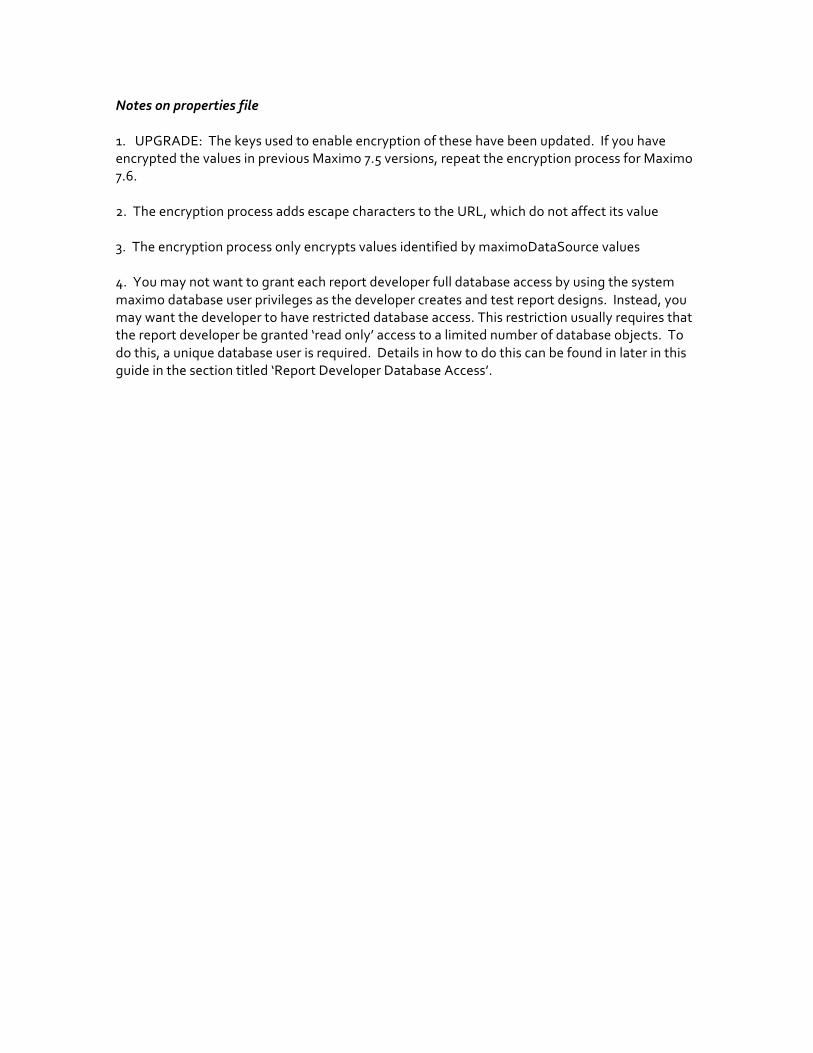
E. Click the icon (right side) that says "Workbench"
2.5 Create Maximo Project
This last configuration section will create the Maximo project within the BIRT Designer. A. First, specify the resource folder location to import the Maximo libraries.
1. From the Menu, select Window - Preferences. 2. Expand Report Design and select Resource. 3. Using the 'File System' icon, navigate to the location of your local library folder.
Select Apply. <maximo76>\reports\birt\libraries NOTE: Use forward slashes when specifying the folder paths in Eclipse.
B. Specify the templates folder location to import the Maximo templates.
1. Navigate to Report Design and select Templates. 2. Copy your local report library location to this field. Select Apply. <maximo76>\reports\birt\templates
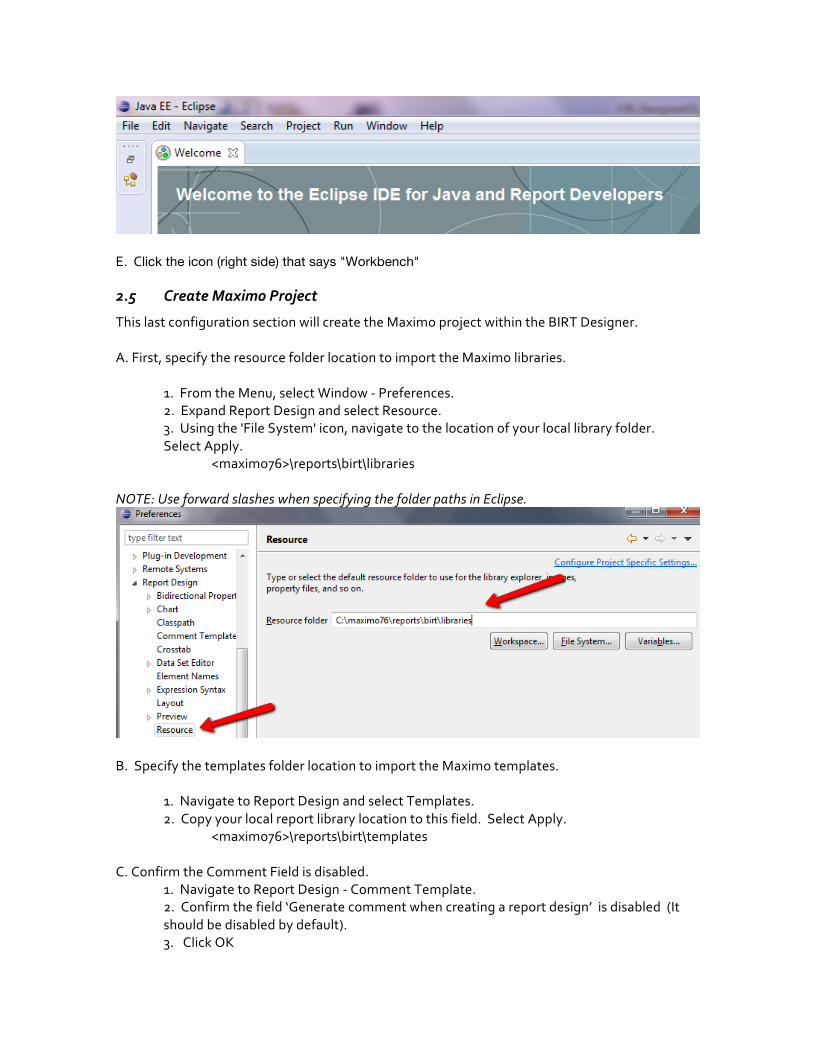
C. Confirm the Comment Field is disabled.
1. Navigate to Report Design - Comment Template. 2. Confirm the field ‘Generate comment when creating a report design’ is disabled (It should be disabled by default). 3. Click OK
Maximo76_ReportDesigner431_Report Development Guide
17
D. Next, create the report project.
1. Click File/ New/Project. Under Business Intelligence and Reporting Tools, select Report Project. Click Next. A. Enter a Project Name.
B. Either use the default location, or navigate to the location of your birt- reports subfolder as shown below. <maximo76>\reports\birt\reports C. Click Finish to import the Maximo report files.
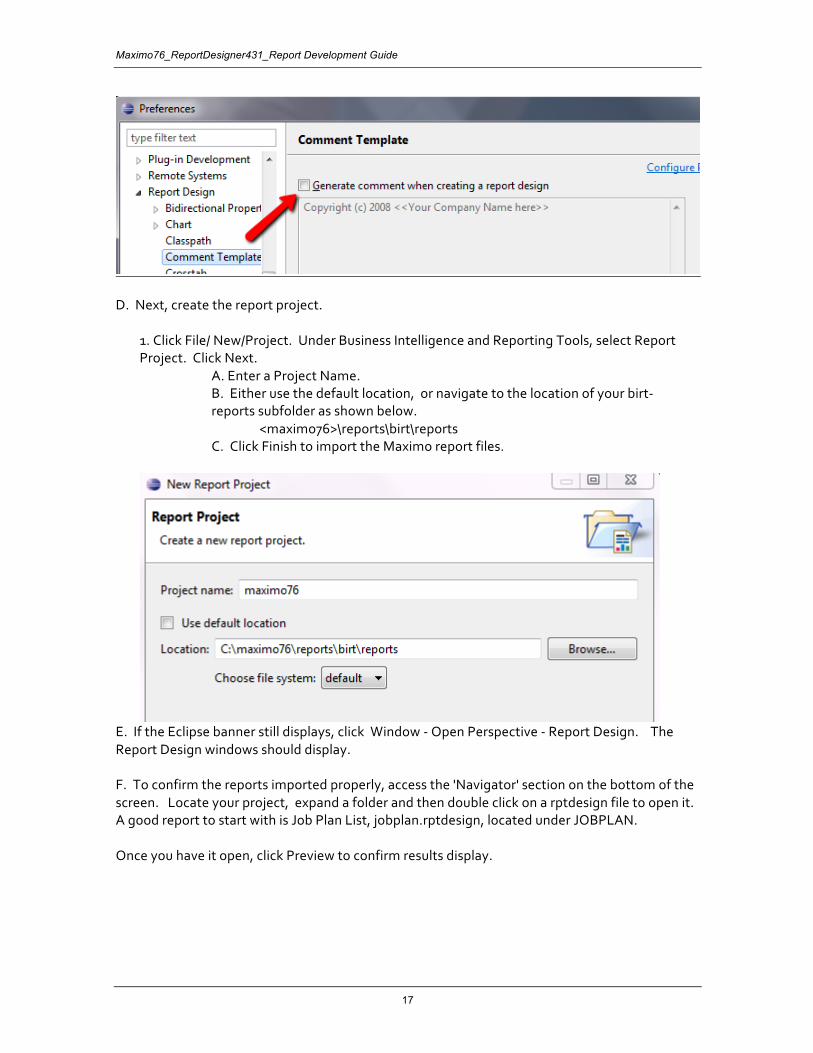
E. If the Eclipse banner still displays, click Window - Open Perspective - Report Design. The Report Design windows should display.
F. To confirm the reports imported properly, access the 'Navigator' section on the bottom of the screen. Locate your project, expand a folder and then double click on a rptdesign file to open it. A good report to start with is Job Plan List, jobplan.rptdesign, located under JOBPLAN. Once you have it open, click Preview to confirm results display.
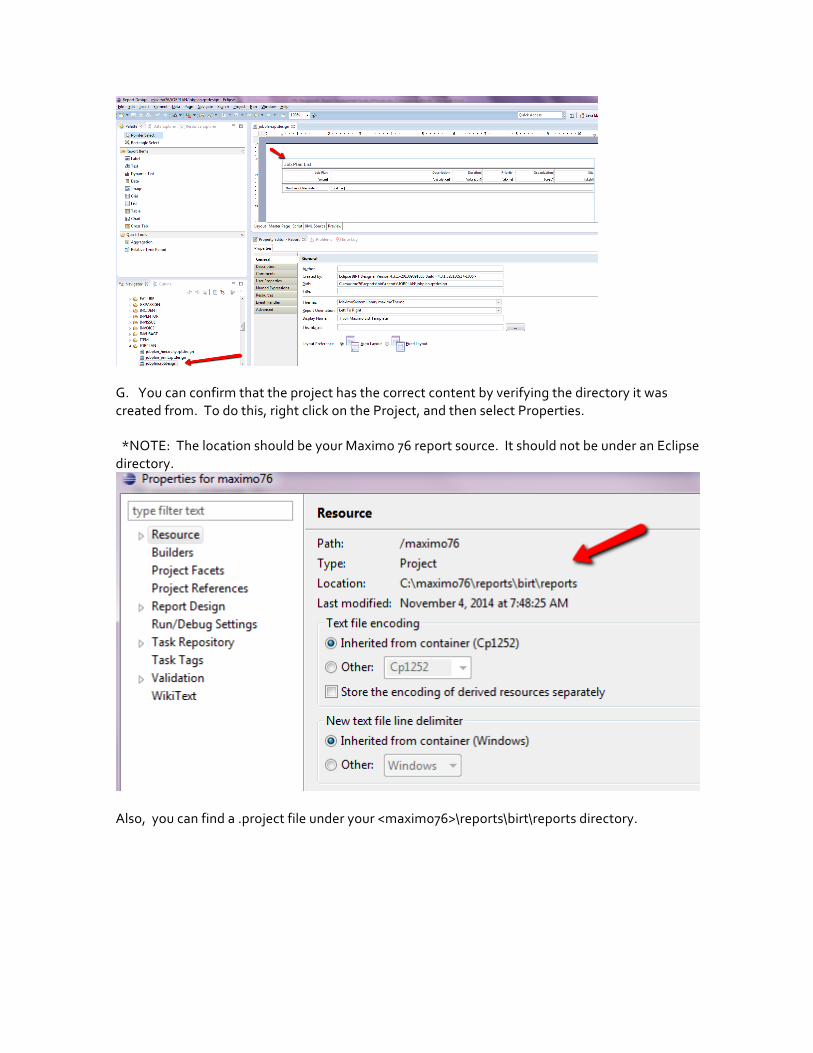
G. You can confirm that the project has the correct content by verifying the directory it was created from. To do this, right click on the Project, and then select Properties. *NOTE: The location should be your Maximo 76 report source. It should not be under an Eclipse directory.
Also, you can find a .project file under your <maximo76>\reports\birt\reports directory.
Maximo76_ReportDesigner431_Report Development Guide
19
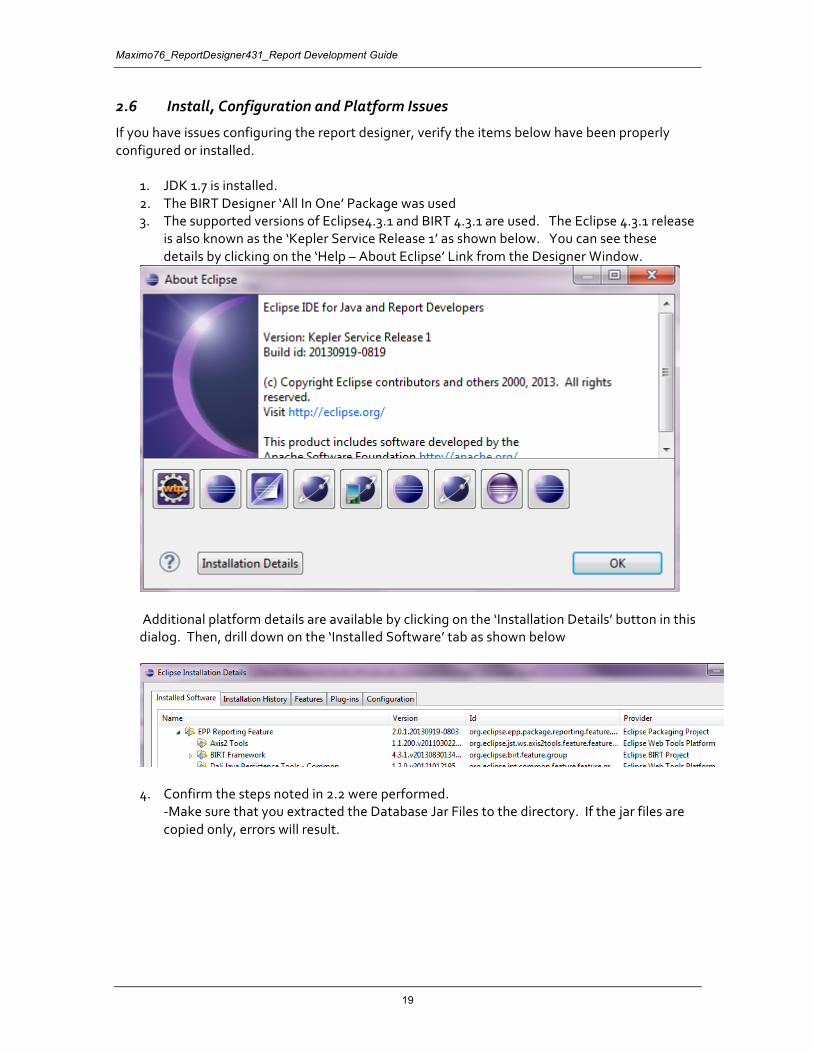
2.6 Install, Configuration and Platform Issues
If you have issues configuring the report designer, verify the items below have been properly configured or installed.
1. JDK 1.7 is installed. 2. The BIRT Designer ‘All In One’ Package was used 3. The supported versions of Eclipse4.3.1 and BIRT 4.3.1 are used. The Eclipse 4.3.1 release
is also known as the ‘Kepler Service Release 1’ as shown below. You can see these details by clicking on the ‘Help – About Eclipse’ Link from the Designer Window.
Additional platform details are available by clicking on the ‘Installation Details’ button in this dialog. Then, drill down on the ‘Installed Software’ tab as shown below
4. Confirm the steps noted in 2.2 were performed. -Make sure that you extracted the Database Jar Files to the directory. If the jar files are copied only, errors will result.
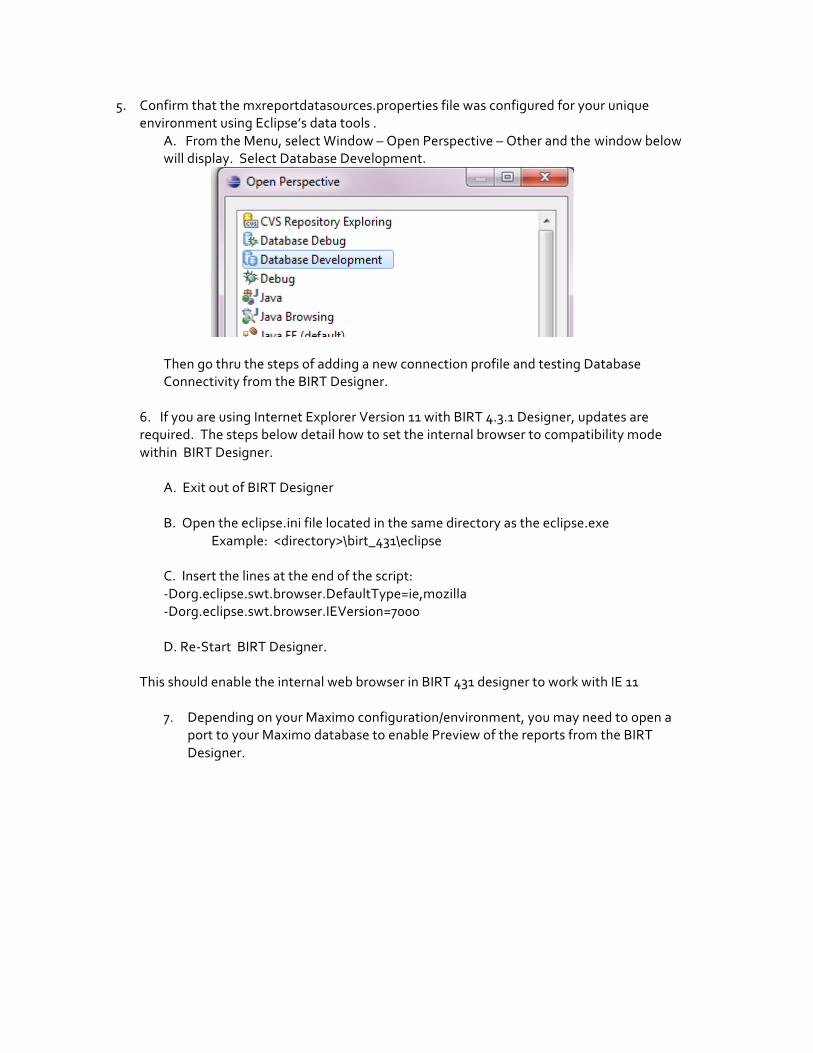
5. Confirm that the mxreportdatasources.properties file was configured for your unique environment using Eclipse’s data tools .
A. From the Menu, select Window – Open Perspective – Other and the window below will display. Select Database Development.
Then go thru the steps of adding a new connection profile and testing Database Connectivity from the BIRT Designer.
6. If you are using Internet Explorer Version 11 with BIRT 4.3.1 Designer, updates are required. The steps below detail how to set the internal browser to compatibility mode within BIRT Designer. A. Exit out of BIRT Designer B. Open the eclipse.ini file located in the same directory as the eclipse.exe Example: <directory>\birt_431\eclipse C. Insert the lines at the end of the script: -Dorg.eclipse.swt.browser.DefaultType=ie,mozilla -Dorg.eclipse.swt.browser.IEVersion=7000 D. Re-Start BIRT Designer. This should enable the internal web browser in BIRT 431 designer to work with IE 11
7. Depending on your Maximo configuration/environment, you may need to open a port to your Maximo database to enable Preview of the reports from the BIRT Designer.
Maximo76_ReportDesigner431_Report Development Guide
21
2.7 Upgrading to BIRT Report Designer 4.3.1
If you are upgrading to BIRT Designer 4.3.1 from either a 7.1 or 7.5 environment, there have been a number updates which can impact your report development environment and files. Because of these changes, it is highly recommended that you maintain two BIRT instances during your upgrade process. This means that you would continue to have your existing BIRT Report Designer installed, along with installing the new BIRT Report Designer 4.3.1 for your new Maximo 7.6 instance.
In your existing Report Designer instance, you would continue to use the existing platforms, property file and scripting classes.
In your new Report Designer 4.3.1 instance, you would use the updated designer, along with the updated Maximo 7.6 templates and scripting classes.
Additionally, please take the following key items into consideration when upgrading to BIRT 431 1. Backup your report source It is recommended that you backup your report source due whenever you do a fix pack update, and/or a BIRT version upgrade. To perform this backup, perform steps similar to what are noted below: A. Export all of your existing reports from your Maximo database to a new report directory. Name the report directory for future identification, for example <Maximo75>\reports\birt\DatabaseExport_Pre76update You can find details on exporting reports in later sections of this guide. B. Navigate to the location of your existing reports directory: <Maximo76r>\reports\birt\reports C. Copy and paste the reports directory, then rename it for ease of identification, for example: <Maximo76>reports\birt\Reportsource_Pre76update 2. BIRT 431 is upgrade compatible – but it is not backward compatible. This means that you can open a report created in BIRT 371 in BIRT 431. However, once that report design file is opened in BIRT 431 and SAVED, it cannot be re-opened in BIRT 371. Therefore, as noted above, be sure to backup your report source to maintain a set of design files for your earlier BIRT Version. 3. The fix pack upgrades BIRT to version4.3.1 and contains updated report design files. If you previously customized delivered BIRT reports and did not rename the file, your customizations may be overwritten with this release. Therefore, be sure to review your customized reports – and rename them – before applying this release. 4. After you install the fix pack, regardless of your BIRT version, you must import your report design files.
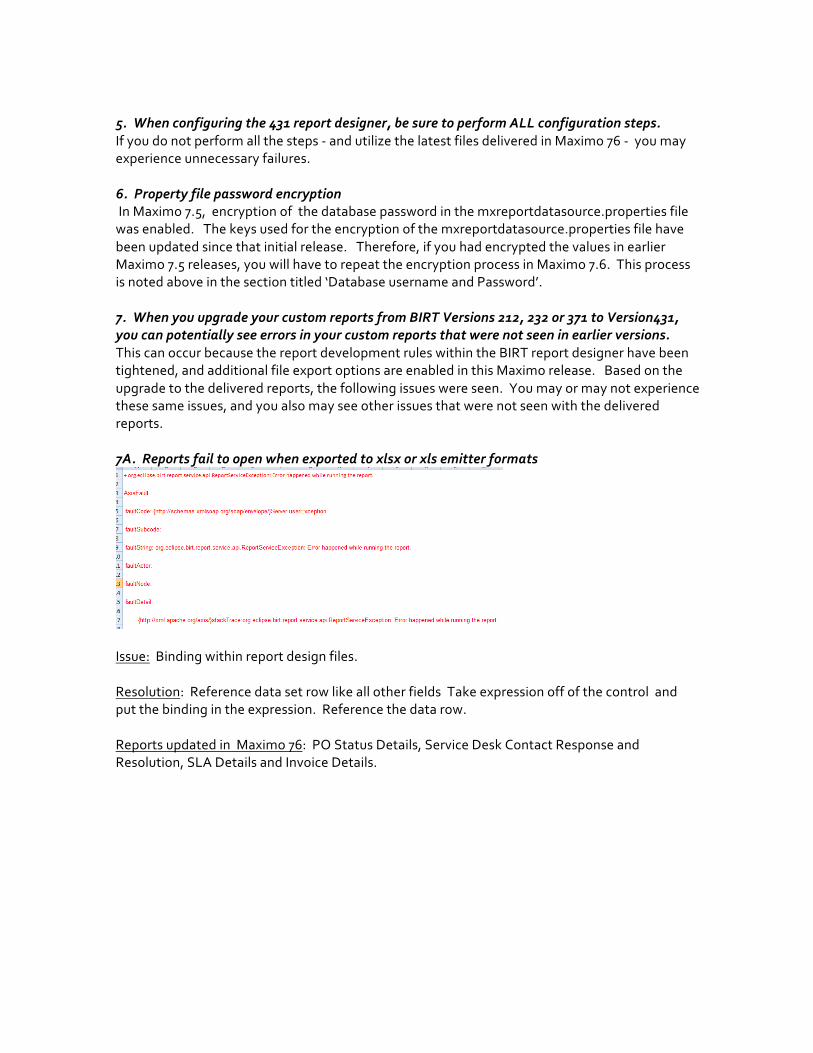
5. When configuring the 431 report designer, be sure to perform ALL configuration steps. If you do not perform all the steps - and utilize the latest files delivered in Maximo 76 - you may experience unnecessary failures. 6. Property file password encryption In Maximo 7.5, encryption of the database password in the mxreportdatasource.properties file was enabled. The keys used for the encryption of the mxreportdatasource.properties file have been updated since that initial release. Therefore, if you had encrypted the values in earlier Maximo 7.5 releases, you will have to repeat the encryption process in Maximo 7.6. This process is noted above in the section titled ‘Database username and Password’. 7. When you upgrade your custom reports from BIRT Versions 212, 232 or 371 to Version431, you can potentially see errors in your custom reports that were not seen in earlier versions. This can occur because the report development rules within the BIRT report designer have been tightened, and additional file export options are enabled in this Maximo release. Based on the upgrade to the delivered reports, the following issues were seen. You may or may not experience these same issues, and you also may see other issues that were not seen with the delivered reports. 7A. Reports fail to open when exported to xlsx or xls emitter formats
Issue: Binding within report design files. Resolution: Reference data set row like all other fields Take expression off of the control and put the binding in the expression. Reference the data row. Reports updated in Maximo 76: PO Status Details, Service Desk Contact Response and Resolution, SLA Details and Invoice Details.
Maximo76_ReportDesigner431_Report Development Guide
23
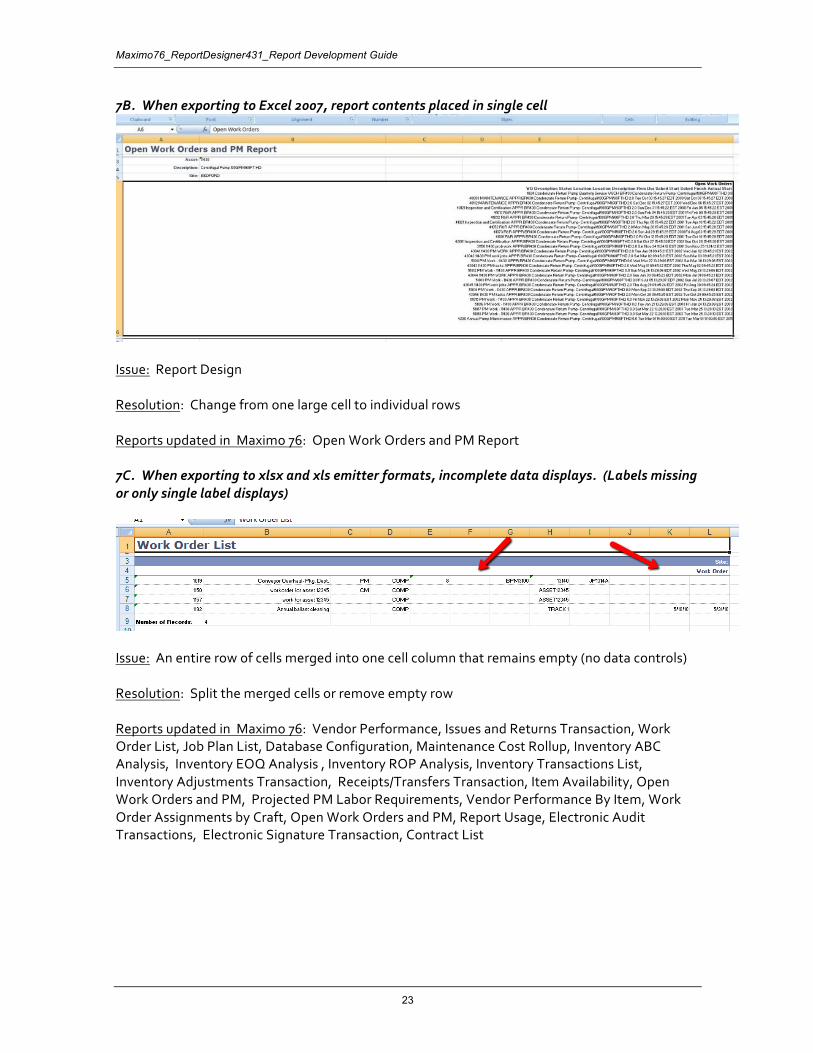
7B. When exporting to Excel 2007, report contents placed in single cell
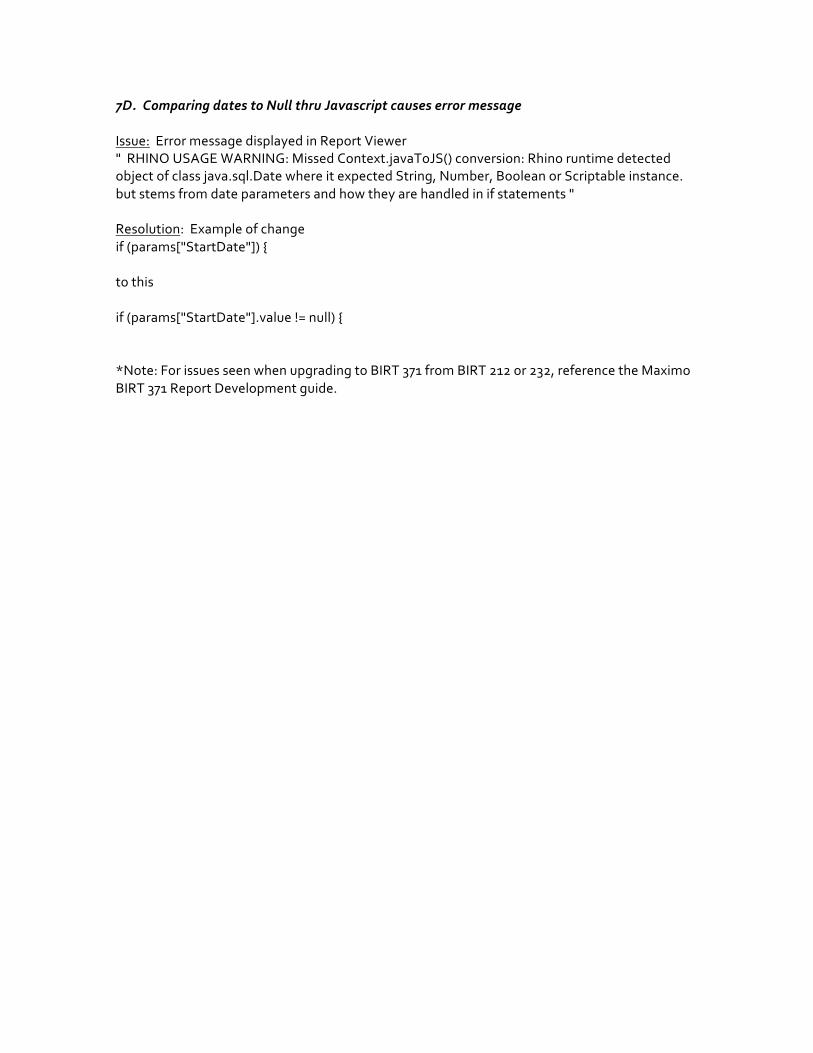
Issue: Report Design Resolution: Change from one large cell to individual rows Reports updated in Maximo 76: Open Work Orders and PM Report 7C. When exporting to xlsx and xls emitter formats, incomplete data displays. (Labels missing or only single label displays)
Issue: An entire row of cells merged into one cell column that remains empty (no data controls) Resolution: Split the merged cells or remove empty row Reports updated in Maximo 76: Vendor Performance, Issues and Returns Transaction, Work Order List, Job Plan List, Database Configuration, Maintenance Cost Rollup, Inventory ABC Analysis, Inventory EOQ Analysis , Inventory ROP Analysis, Inventory Transactions List, Inventory Adjustments Transaction, Receipts/Transfers Transaction, Item Availability, Open Work Orders and PM, Projected PM Labor Requirements, Vendor Performance By Item, Work Order Assignments by Craft, Open Work Orders and PM, Report Usage, Electronic Audit Transactions, Electronic Signature Transaction, Contract List
7D. Comparing dates to Null thru Javascript causes error message Issue: Error message displayed in Report Viewer " RHINO USAGE WARNING: Missed Context.javaToJS() conversion: Rhino runtime detected object of class java.sql.Date where it expected String, Number, Boolean or Scriptable instance. but stems from date parameters and how they are handled in if statements " Resolution: Example of change if (params["StartDate"]) { to this if (params["StartDate"].value != null) { *Note: For issues seen when upgrading to BIRT 371 from BIRT 212 or 232, reference the Maximo BIRT 371 Report Development guide.
Maximo76_ReportDesigner431_Report Development Guide
25
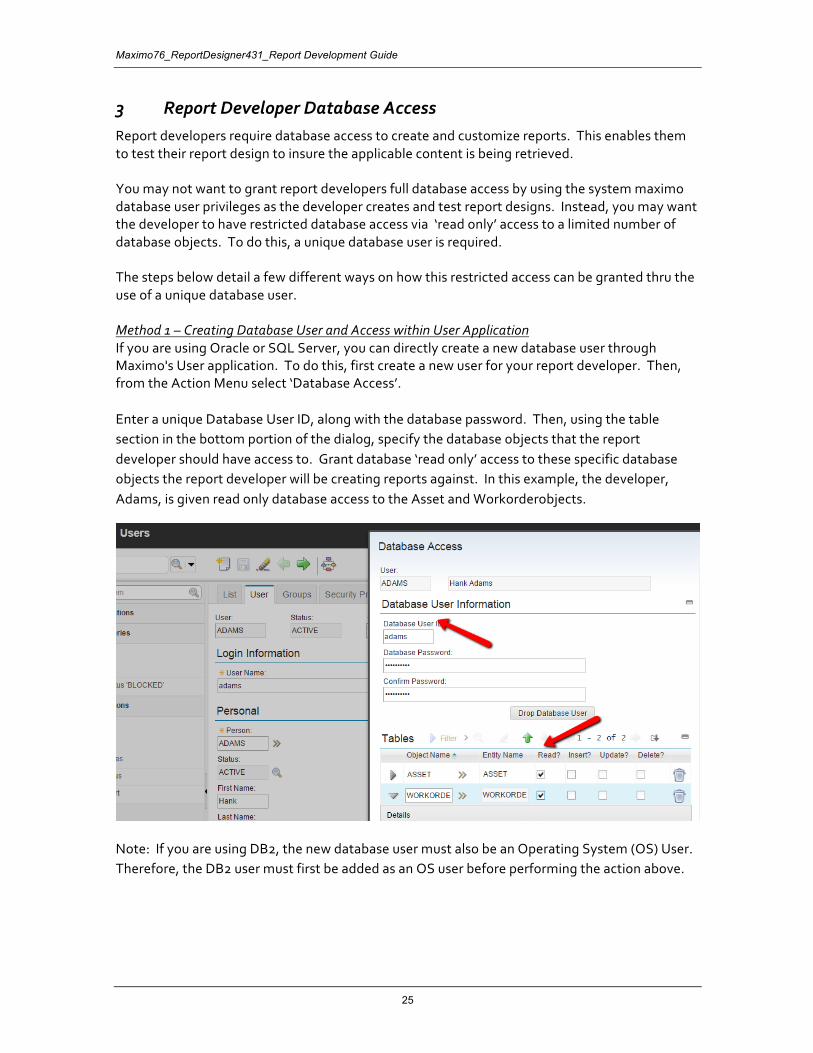
3 Report Developer Database Access Report developers require database access to create and customize reports. This enables them to test their report design to insure the applicable content is being retrieved. You may not want to grant report developers full database access by using the system maximo database user privileges as the developer creates and test report designs. Instead, you may want the developer to have restricted database access via ‘read only’ access to a limited number of database objects. To do this, a unique database user is required. The steps below detail a few different ways on how this restricted access can be granted thru the use of a unique database user. Method 1 – Creating Database User and Access within User Application If you are using Oracle or SQL Server, you can directly create a new database user through Maximo's User application. To do this, first create a new user for your report developer. Then, from the Action Menu select ‘Database Access’.
Enter a unique Database User ID, along with the database password. Then, using the table section in the bottom portion of the dialog, specify the database objects that the report developer should have access to. Grant database ‘read only’ access to these specific database objects the report developer will be creating reports against. In this example, the developer, Adams, is given read only database access to the Asset and Workorderobjects.
Note: If you are using DB2, the new database user must also be an Operating System (OS) User. Therefore, the DB2 user must first be added as an OS user before performing the action above.
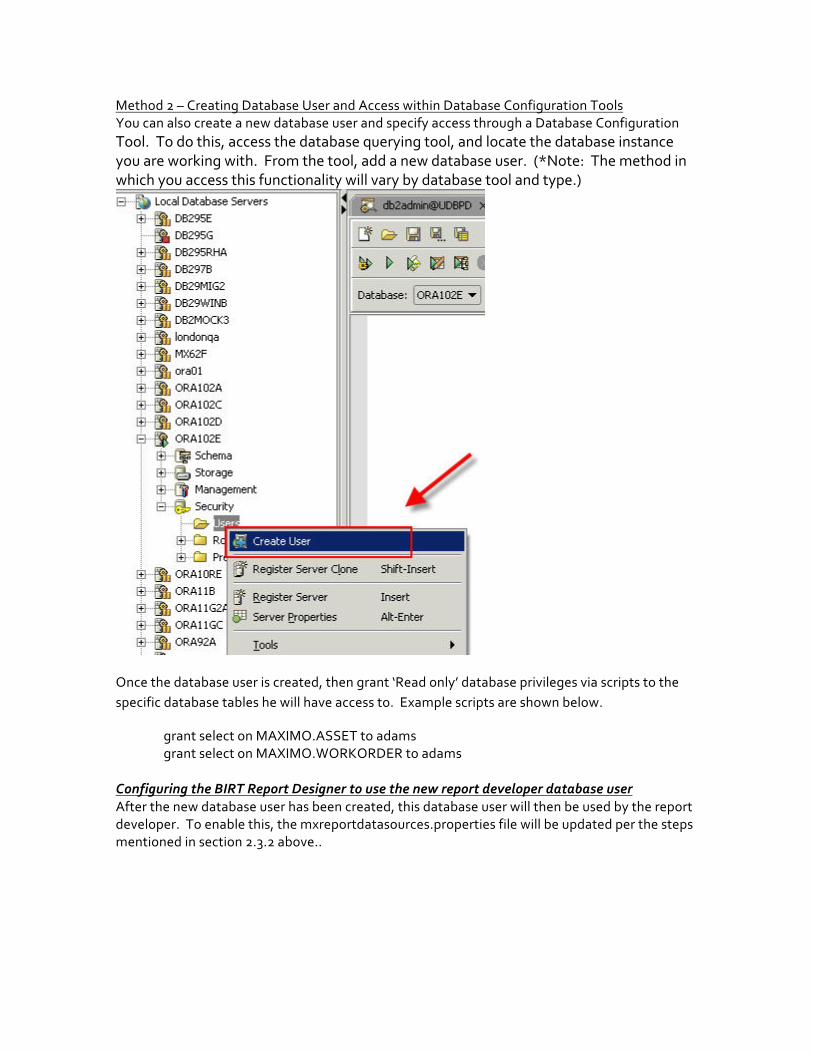
Method 2 – Creating Database User and Access within Database Configuration Tools You can also create a new database user and specify access through a Database Configuration Tool. To do this, access the database querying tool, and locate the database instance you are working with. From the tool, add a new database user. (*Note: The method in which you access this functionality will vary by database tool and type.)
Once the database user is created, then grant ‘Read only’ database privileges via scripts to the specific database tables he will have access to. Example scripts are shown below.
grant select on MAXIMO.ASSET to adams grant select on MAXIMO.WORKORDER to adams Configuring the BIRT Report Designer to use the new report developer database user After the new database user has been created, this database user will then be used by the report developer. To enable this, the mxreportdatasources.properties file will be updated per the steps mentioned in section 2.3.2 above..

Maximo76_ReportDesigner431_Report Development Guide
27
4 Report Design Files Before creating reports, a review of the report design process is detailed. Three files are created for the report designs.
1. Design File. Contains the details on the report – its sql, grouping, sorting, hyperlinking, etc. An example of this is the asset_availability.rptdesign file.
The design file uses a custom scripted data source. This is done to fully utilize the specific functionality for Runtime Data Translation and Time Zone Conversions. The scripted data source calls the JDBC Connection to execute the report against the Maximo database.
2. Properties File. Contains the text values and keys of each column label and report title.
There is one properties file for each application that has reports. This enables the same label values (ex. Description) to be used only once. This property file is one of the major components used in localization. An example of this is the asset.properties file.
3. Reports.xml File. Defines the report information (its design file name, its parameters, its
application etc.) and is used to import the report files into the database. There is one reports.xml file for each application.
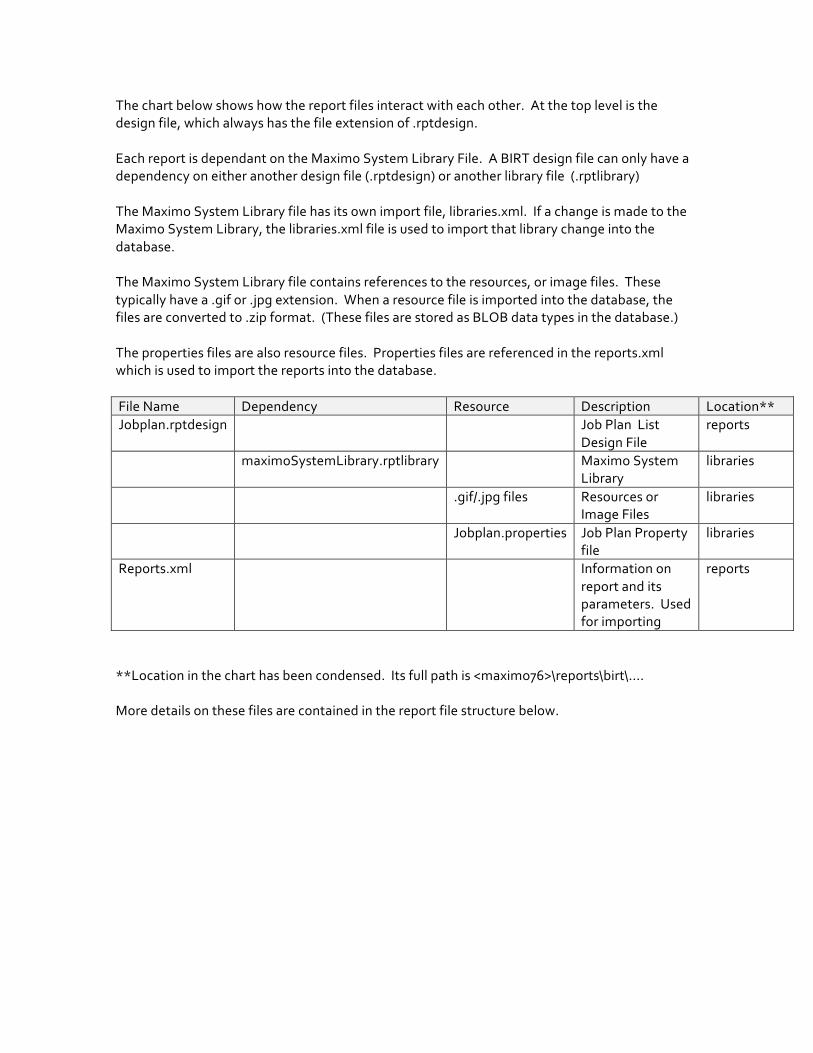
The chart below shows how the report files interact with each other. At the top level is the design file, which always has the file extension of .rptdesign. Each report is dependant on the Maximo System Library File. A BIRT design file can only have a dependency on either another design file (.rptdesign) or another library file (.rptlibrary) The Maximo System Library file has its own import file, libraries.xml. If a change is made to the Maximo System Library, the libraries.xml file is used to import that library change into the database. The Maximo System Library file contains references to the resources, or image files. These typically have a .gif or .jpg extension. When a resource file is imported into the database, the files are converted to .zip format. (These files are stored as BLOB data types in the database.) The properties files are also resource files. Properties files are referenced in the reports.xml which is used to import the reports into the database. File Name Dependency Resource Description Location** Jobplan.rptdesign Job Plan List
Design File reports
maximoSystemLibrary.rptlibrary Maximo System Library
libraries
.gif/.jpg files Resources or Image Files
libraries
Jobplan.properties Job Plan Property file
libraries
Reports.xml Information on report and its parameters. Used for importing
reports
**Location in the chart has been condensed. Its full path is <maximo76>\reports\birt\.... More details on these files are contained in the report file structure below.
Maximo76_ReportDesigner431_Report Development Guide
29
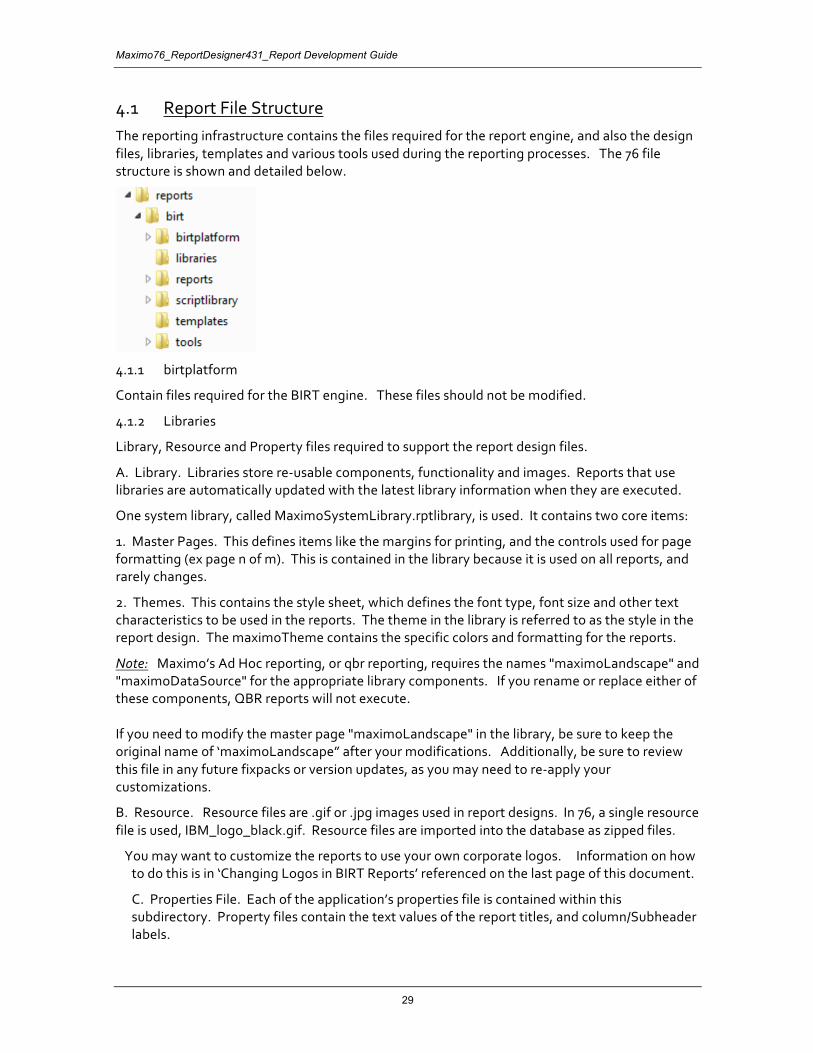
4.1 Report File Structure The reporting infrastructure contains the files required for the report engine, and also the design files, libraries, templates and various tools used during the reporting processes. The 76 file structure is shown and detailed below.
4.1.1 birtplatform
Contain files required for the BIRT engine. These files should not be modified.
4.1.2 Libraries
Library, Resource and Property files required to support the report design files.
A. Library. Libraries store re-usable components, functionality and images. Reports that use libraries are automatically updated with the latest library information when they are executed.
One system library, called MaximoSystemLibrary.rptlibrary, is used. It contains two core items:
1. Master Pages. This defines items like the margins for printing, and the controls used for page formatting (ex page n of m). This is contained in the library because it is used on all reports, and rarely changes.
2. Themes. This contains the style sheet, which defines the font type, font size and other text characteristics to be used in the reports. The theme in the library is referred to as the style in the report design. The maximoTheme contains the specific colors and formatting for the reports.
Note: Maximo’s Ad Hoc reporting, or qbr reporting, requires the names "maximoLandscape" and "maximoDataSource" for the appropriate library components. If you rename or replace either of these components, QBR reports will not execute. If you need to modify the master page "maximoLandscape" in the library, be sure to keep the original name of ‘maximoLandscape” after your modifications. Additionally, be sure to review this file in any future fixpacks or version updates, as you may need to re-apply your customizations.
B. Resource. Resource files are .gif or .jpg images used in report designs. In 76, a single resource file is used, IBM_logo_black.gif. Resource files are imported into the database as zipped files.
You may want to customize the reports to use your own corporate logos. Information on how to do this is in ‘Changing Logos in BIRT Reports’ referenced on the last page of this document.
C. Properties File. Each of the application’s properties file is contained within this subdirectory. Property files contain the text values of the report titles, and column/Subheader labels.
Property files are created at the application level, and not at the report level, because reports within an application frequently share the same text label values. (Example: Asset Reports often use the same labels of Asset, Location, Site, multiple times.)
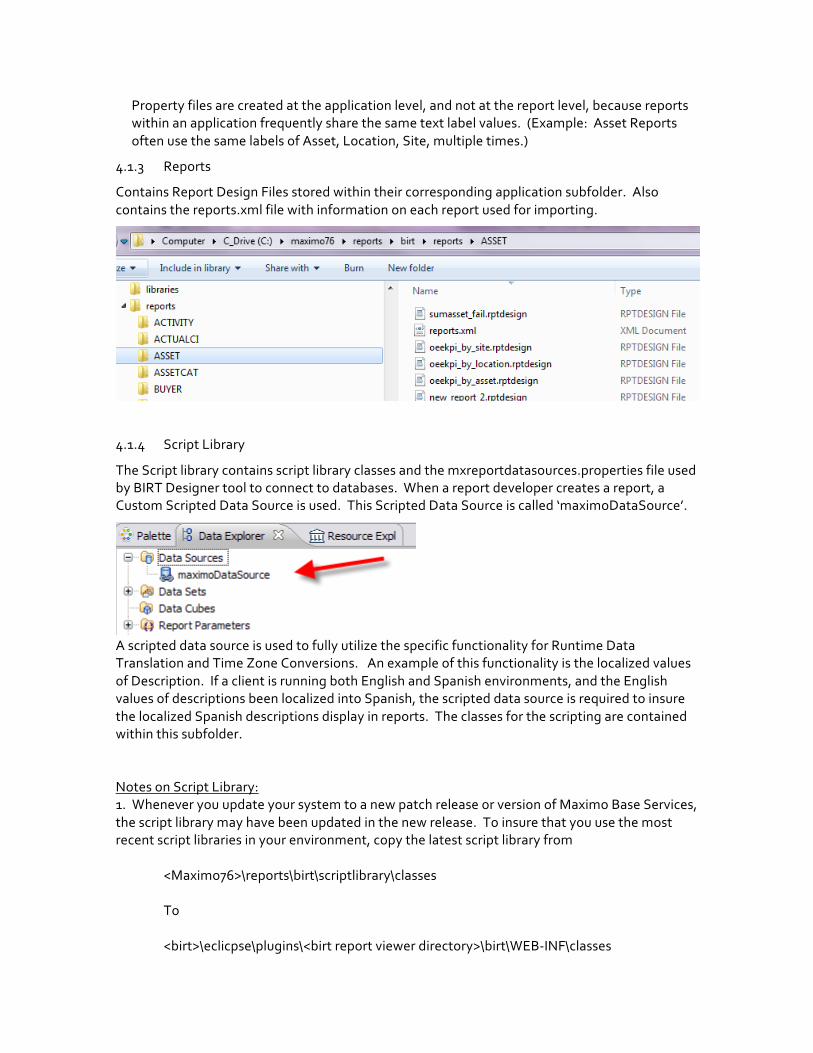
4.1.3 Reports
Contains Report Design Files stored within their corresponding application subfolder. Also contains the reports.xml file with information on each report used for importing.
4.1.4 Script Library
The Script library contains script library classes and the mxreportdatasources.properties file used by BIRT Designer tool to connect to databases. When a report developer creates a report, a Custom Scripted Data Source is used. This Scripted Data Source is called ‘maximoDataSource’.
A scripted data source is used to fully utilize the specific functionality for Runtime Data Translation and Time Zone Conversions. An example of this functionality is the localized values of Description. If a client is running both English and Spanish environments, and the English values of descriptions been localized into Spanish, the scripted data source is required to insure the localized Spanish descriptions display in reports. The classes for the scripting are contained within this subfolder. Notes on Script Library: 1. Whenever you update your system to a new patch release or version of Maximo Base Services, the script library may have been updated in the new release. To insure that you use the most recent script libraries in your environment, copy the latest script library from
<Maximo76>\reports\birt\scriptlibrary\classes
To
<birt>\eclicpse\plugins\<birt report viewer directory>\birt\WEB-INF\classes
Maximo76_ReportDesigner431_Report Development Guide
31
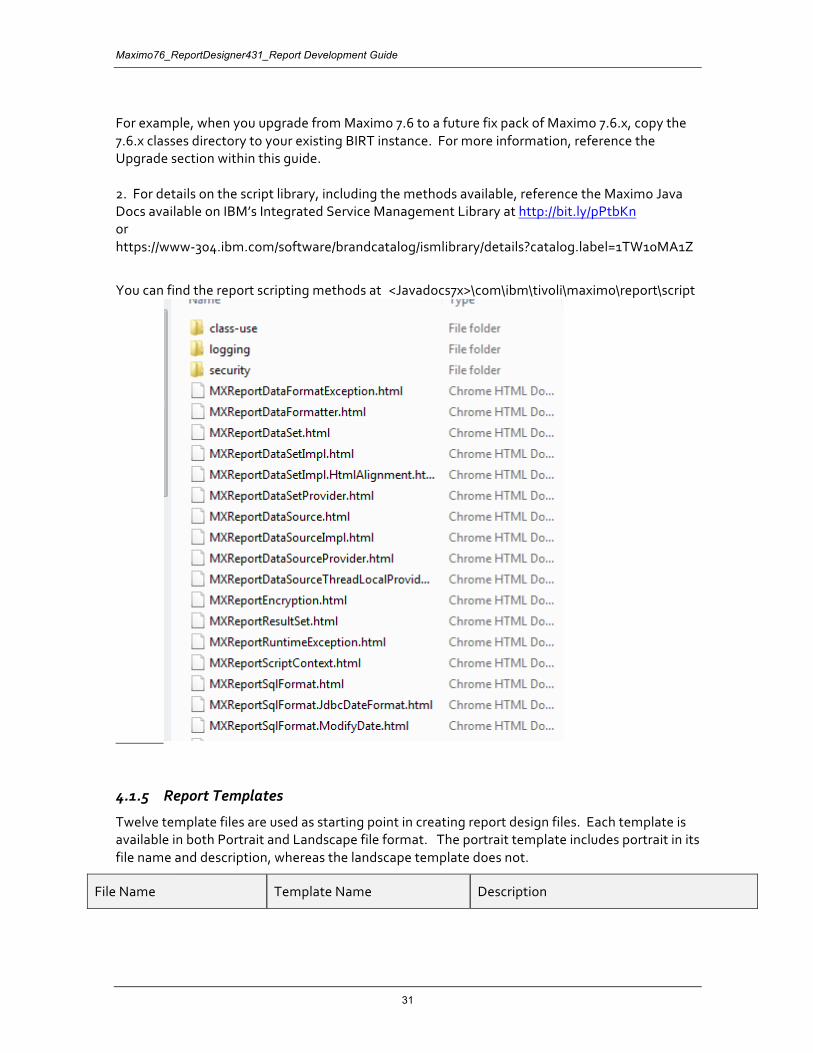
For example, when you upgrade from Maximo 7.6 to a future fix pack of Maximo 7.6.x, copy the 7.6.x classes directory to your existing BIRT instance. For more information, reference the Upgrade section within this guide. 2. For details on the script library, including the methods available, reference the Maximo Java Docs available on IBM’s Integrated Service Management Library at http://bit.ly/pPtbKn or https://www-304.ibm.com/software/brandcatalog/ismlibrary/details?catalog.label=1TW10MA1Z
You can find the report scripting methods at <Javadocs7x>\com\ibm\tivoli\maximo\report\script
4.1.5 Report Templates
Twelve template files are used as starting point in creating report design files. Each template is available in both Portrait and Landscape file format. The portrait template includes portrait in its file name and description, whereas the landscape template does not.
File Name Template Name Description
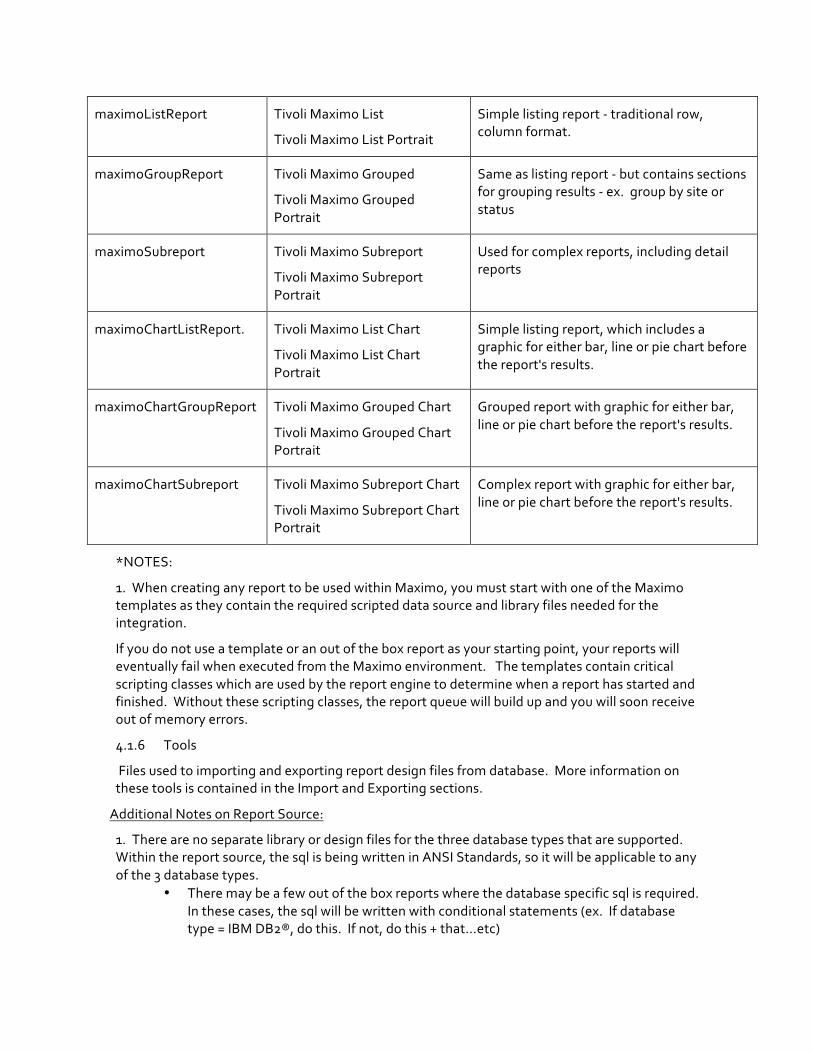
maximoListReport Tivoli Maximo List
Tivoli Maximo List Portrait
Simple listing report - traditional row, column format.
maximoGroupReport Tivoli Maximo Grouped
Tivoli Maximo Grouped Portrait
Same as listing report - but contains sections for grouping results - ex. group by site or status
maximoSubreport Tivoli Maximo Subreport
Tivoli Maximo Subreport Portrait
Used for complex reports, including detail reports
maximoChartListReport. Tivoli Maximo List Chart
Tivoli Maximo List Chart Portrait
Simple listing report, which includes a graphic for either bar, line or pie chart before the report's results.
maximoChartGroupReport Tivoli Maximo Grouped Chart
Tivoli Maximo Grouped Chart Portrait
Grouped report with graphic for either bar, line or pie chart before the report's results.
maximoChartSubreport Tivoli Maximo Subreport Chart
Tivoli Maximo Subreport Chart Portrait
Complex report with graphic for either bar, line or pie chart before the report's results.
*NOTES:
1. When creating any report to be used within Maximo, you must start with one of the Maximo templates as they contain the required scripted data source and library files needed for the integration.
If you do not use a template or an out of the box report as your starting point, your reports will eventually fail when executed from the Maximo environment. The templates contain critical scripting classes which are used by the report engine to determine when a report has started and finished. Without these scripting classes, the report queue will build up and you will soon receive out of memory errors.
4.1.6 Tools
Files used to importing and exporting report design files from database. More information on these tools is contained in the Import and Exporting sections.
Additional Notes on Report Source:
1. There are no separate library or design files for the three database types that are supported. Within the report source, the sql is being written in ANSI Standards, so it will be applicable to any of the 3 database types.
• There may be a few out of the box reports where the database specific sql is required. In these cases, the sql will be written with conditional statements (ex. If database type = IBM DB2®, do this. If not, do this + that…etc)
Maximo76_ReportDesigner431_Report Development Guide
33
4.2 Your Custom Reports and the Report File Structure
The section above reviewed the delivered report source and file structure. However, you may need to create or modify reports to meet your individual business needs. In this case, you will have new or modified report design files, reports.xml and properties file. To streamline the administration and maintenance of your custom report design files, and also to insure that they are properly updated in future hot fix and fix pack releases, it is highly recommended that you implement a file structure similar to what is shown below.
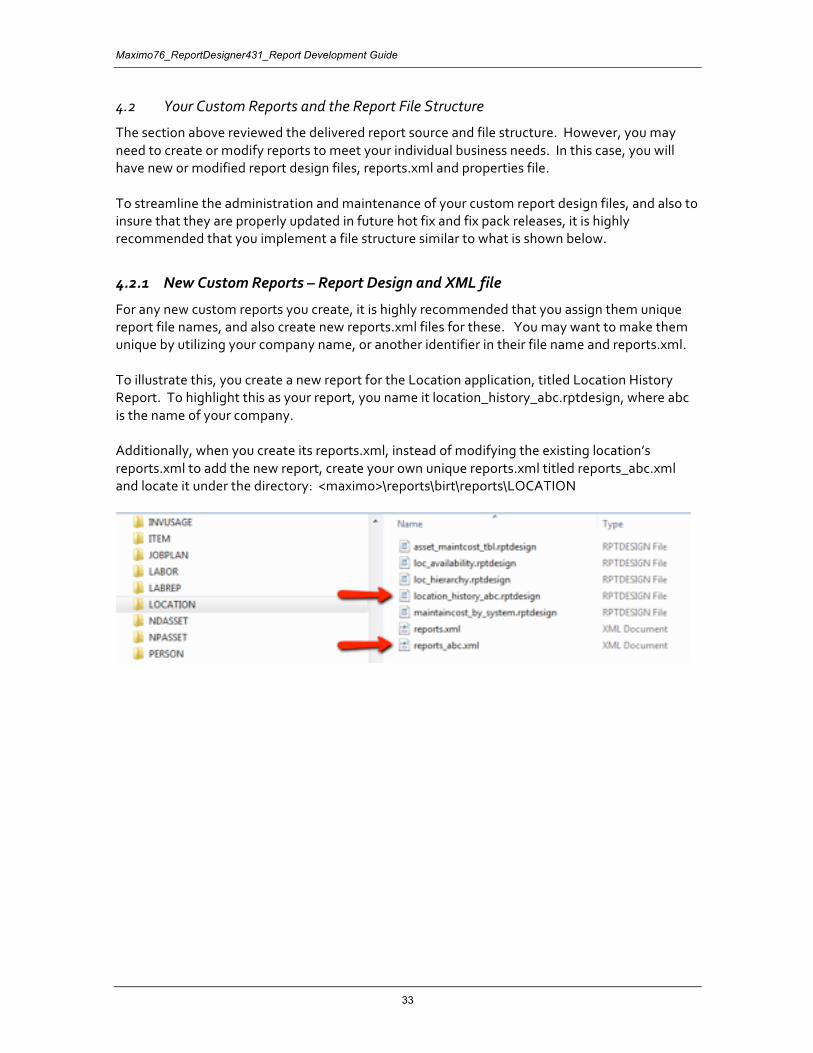
4.2.1 New Custom Reports – Report Design and XML file
For any new custom reports you create, it is highly recommended that you assign them unique report file names, and also create new reports.xml files for these. You may want to make them unique by utilizing your company name, or another identifier in their file name and reports.xml. To illustrate this, you create a new report for the Location application, titled Location History Report. To highlight this as your report, you name it location_history_abc.rptdesign, where abc is the name of your company. Additionally, when you create its reports.xml, instead of modifying the existing location’s reports.xml to add the new report, create your own unique reports.xml titled reports_abc.xml and locate it under the directory: <maximo>\reports\birt\reports\LOCATION
4.2.2 New Custom or Modified Reports – Properties file
When you create custom reports, you can choose to either modify the existing properties file for the application, or create your own new properties file. To determine the solution that is best for your environment, you may want to take the following into consideration
1. A single report design can only reference a single properties file. 2. Applications can utilize multiple properties file. During the command import process, all properties file for the application will be imported. 3. Report titles, labels may be modified during release, fix pack or hot fix updates. Therefore, if you modify the delivered properties file with your customizations, your updates may be overridden during an update.
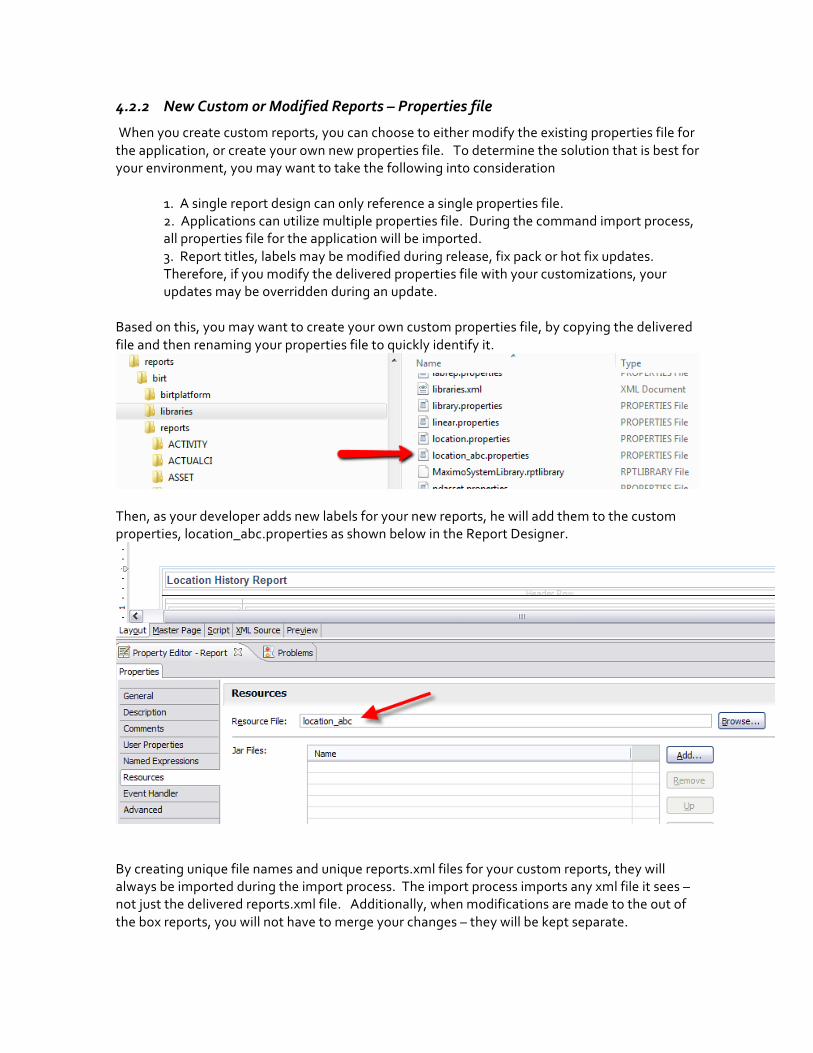
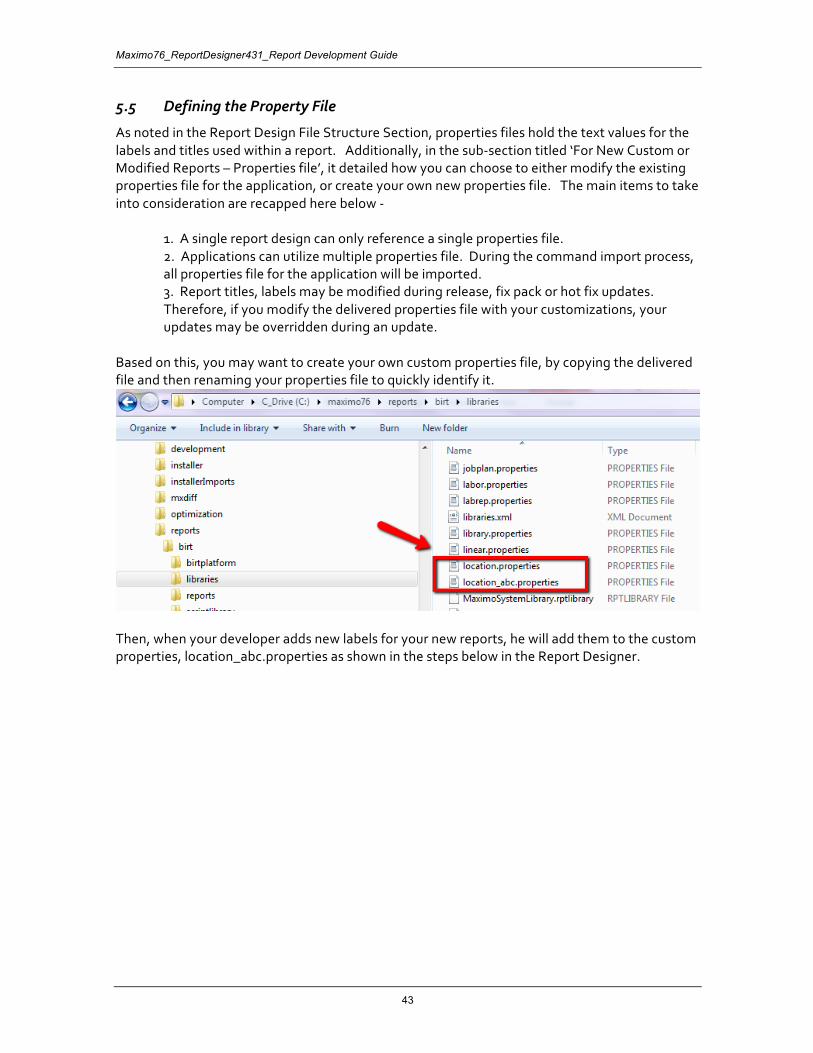
Based on this, you may want to create your own custom properties file, by copying the delivered file and then renaming your properties file to quickly identify it.
Then, as your developer adds new labels for your new reports, he will add them to the custom properties, location_abc.properties as shown below in the Report Designer.
By creating unique file names and unique reports.xml files for your custom reports, they will always be imported during the import process. The import process imports any xml file it sees – not just the delivered reports.xml file. Additionally, when modifications are made to the out of the box reports, you will not have to merge your changes – they will be kept separate.
Maximo76_ReportDesigner431_Report Development Guide
35
4.2.3 Modifications to Delivered Reports - Report Design and XML file
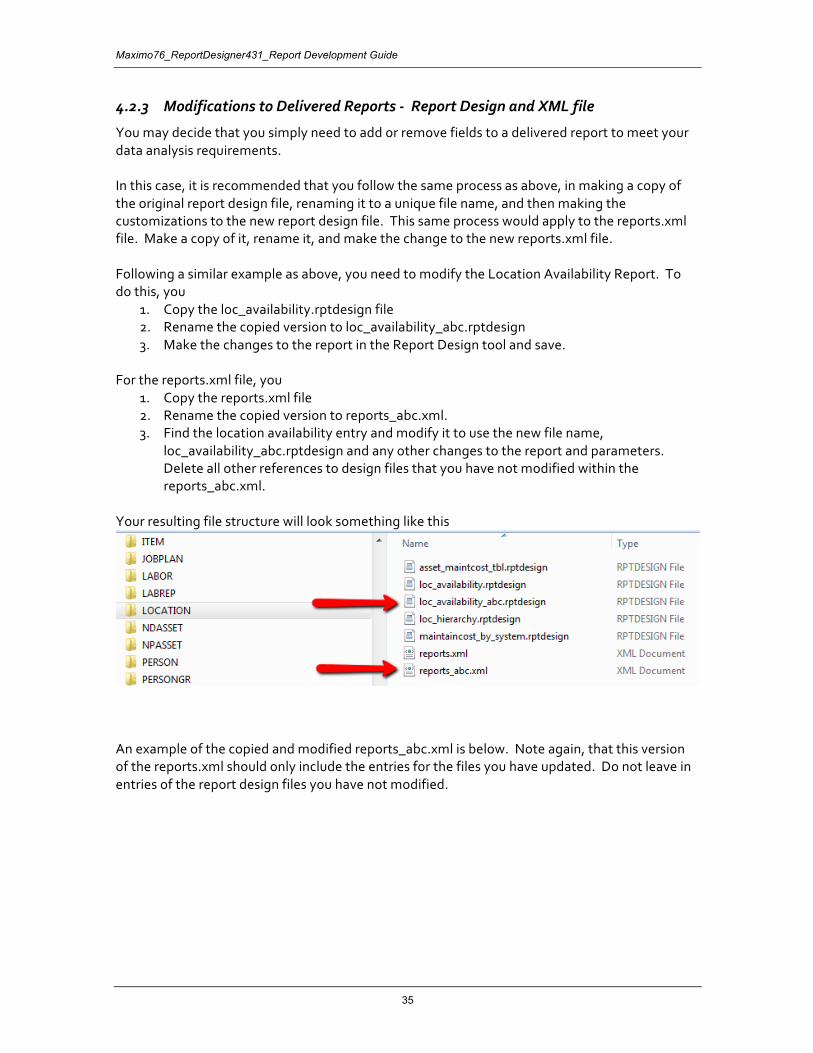
You may decide that you simply need to add or remove fields to a delivered report to meet your data analysis requirements. In this case, it is recommended that you follow the same process as above, in making a copy of the original report design file, renaming it to a unique file name, and then making the customizations to the new report design file. This same process would apply to the reports.xml file. Make a copy of it, rename it, and make the change to the new reports.xml file. Following a similar example as above, you need to modify the Location Availability Report. To do this, you
1. Copy the loc_availability.rptdesign file 2. Rename the copied version to loc_availability_abc.rptdesign 3. Make the changes to the report in the Report Design tool and save.
For the reports.xml file, you
1. Copy the reports.xml file 2. Rename the copied version to reports_abc.xml. 3. Find the location availability entry and modify it to use the new file name,
loc_availability_abc.rptdesign and any other changes to the report and parameters. Delete all other references to design files that you have not modified within the reports_abc.xml.
Your resulting file structure will look something like this
An example of the copied and modified reports_abc.xml is below. Note again, that this version of the reports.xml should only include the entries for the files you have updated. Do not leave in entries of the report design files you have not modified.

Notes: 1. With this approach on duplicating and modifying the report source and files, you will end up with two entries of the location availability report in your database and also in the Report Administration application - the original report, and the report you have customized.
A. To only make the customized version (loc_availability_abc.rptdesign) available to your users, only enable report file security to this file in the report administration application. B. Or, you could remove the original file (loc_availability.rptdesign) from the original reports.xml file. However, you would need to repeat this process for each future fix pack or release upgrade you receive.

Maximo76_ReportDesigner431_Report Development Guide
37
5 Developing a report This section details how to create a report design within the Report Designer for Maximo 7.6. Note: Before beginning this process, review the section titled ‘Extending Ad Hoc Reports in the BIRT Designer’. This section details how you can streamline the report development process by minimizing the steps below thru the use of exported ad hoc reports. This functionality has been extended even further in 7.6 by enabling export of the ad hoc tool directly from the Report Administration application. It is highly recommended that you utilize this process to save both development time and resources. If you want to create a report design file without using the expedited ad hoc process, follow these steps. 1. Specifying the query 2. Creating the output columns 3. Updating the Fetch to map the query columns to the output columns 4. Formatting the report 5. Defining the property file To begin, access the designer. Select File – New – Report or choose New Report from the dropdown list. A number of sample reports and templates are displayed. Select the desired Tivoli Maximo template from the list. As noted earlier, you must select a Tivoli Maximo template for the report to execute properly from Maximo.
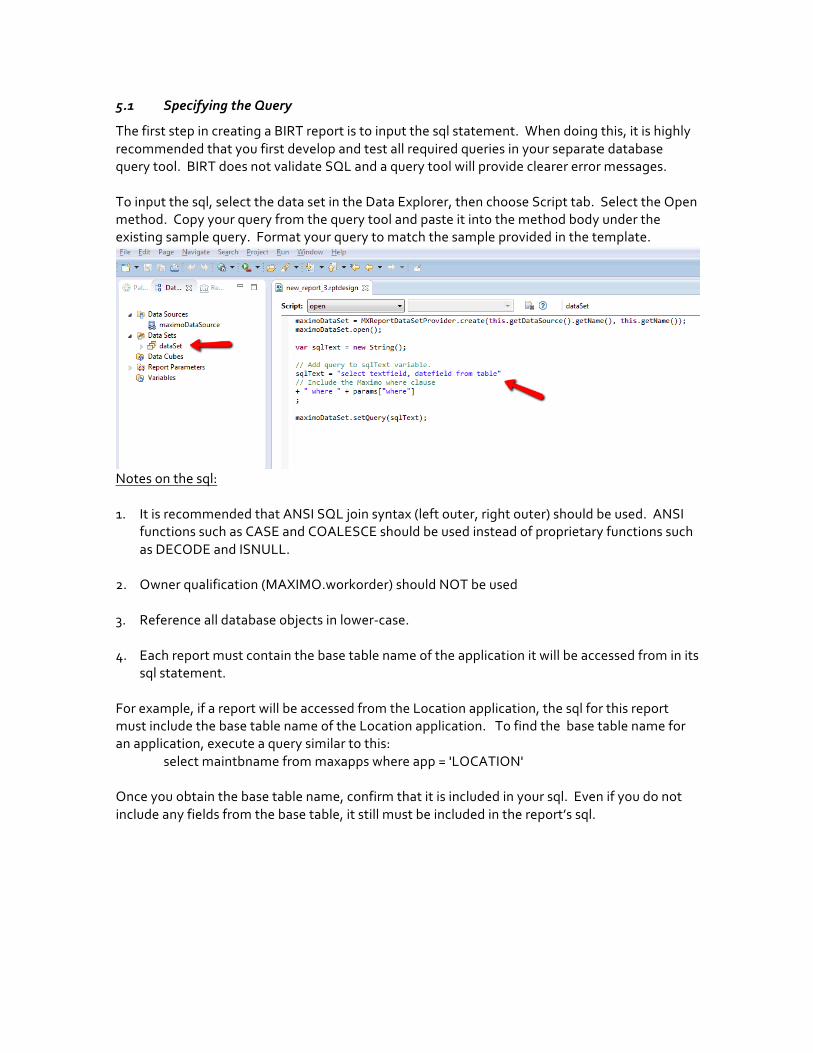
5.1 Specifying the Query
The first step in creating a BIRT report is to input the sql statement. When doing this, it is highly recommended that you first develop and test all required queries in your separate database query tool. BIRT does not validate SQL and a query tool will provide clearer error messages. To input the sql, select the data set in the Data Explorer, then choose Script tab. Select the Open method. Copy your query from the query tool and paste it into the method body under the existing sample query. Format your query to match the sample provided in the template.
Notes on the sql: 1. It is recommended that ANSI SQL join syntax (left outer, right outer) should be used. ANSI
functions such as CASE and COALESCE should be used instead of proprietary functions such as DECODE and ISNULL.
2. Owner qualification (MAXIMO.workorder) should NOT be used 3. Reference all database objects in lower-case. 4. Each report must contain the base table name of the application it will be accessed from in its
sql statement. For example, if a report will be accessed from the Location application, the sql for this report must include the base table name of the Location application. To find the base table name for an application, execute a query similar to this:
select maintbname from maxapps where app = 'LOCATION' Once you obtain the base table name, confirm that it is included in your sql. Even if you do not include any fields from the base table, it still must be included in the report’s sql.
Maximo76_ReportDesigner431_Report Development Guide
39
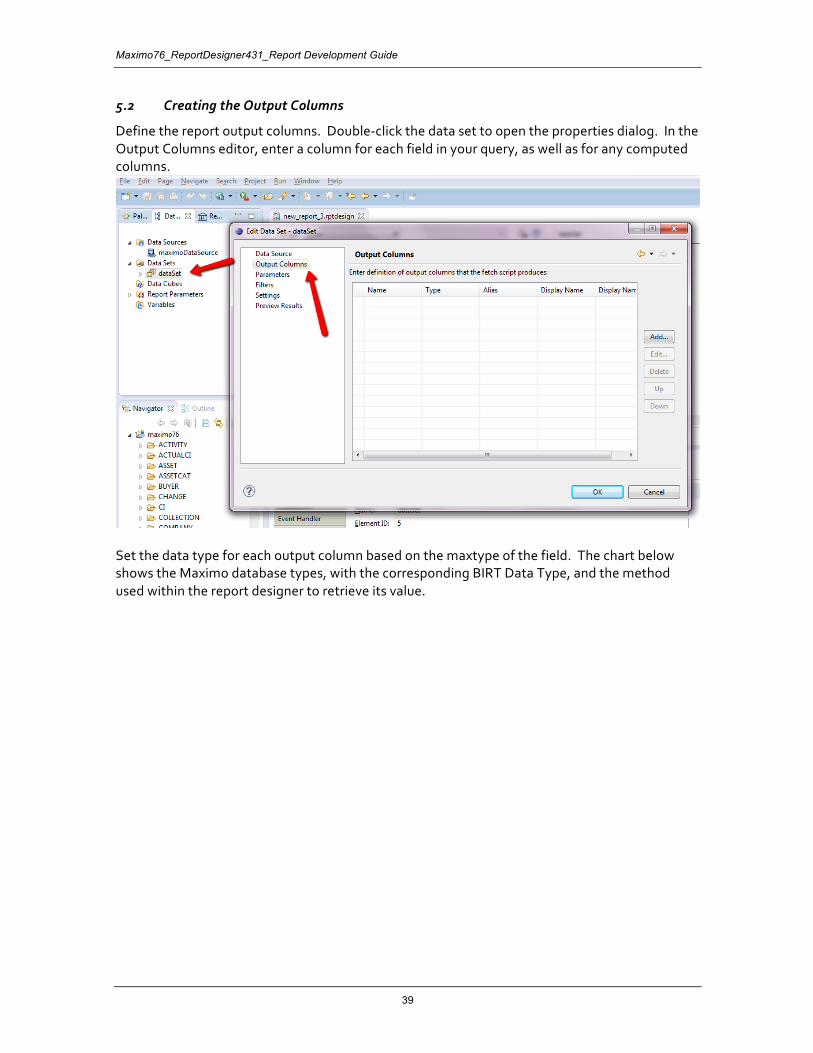
5.2 Creating the Output Columns
Define the report output columns. Double-click the data set to open the properties dialog. In the Output Columns editor, enter a column for each field in your query, as well as for any computed columns.
Set the data type for each output column based on the maxtype of the field. The chart below shows the Maximo database types, with the corresponding BIRT Data Type, and the method used within the report designer to retrieve its value.
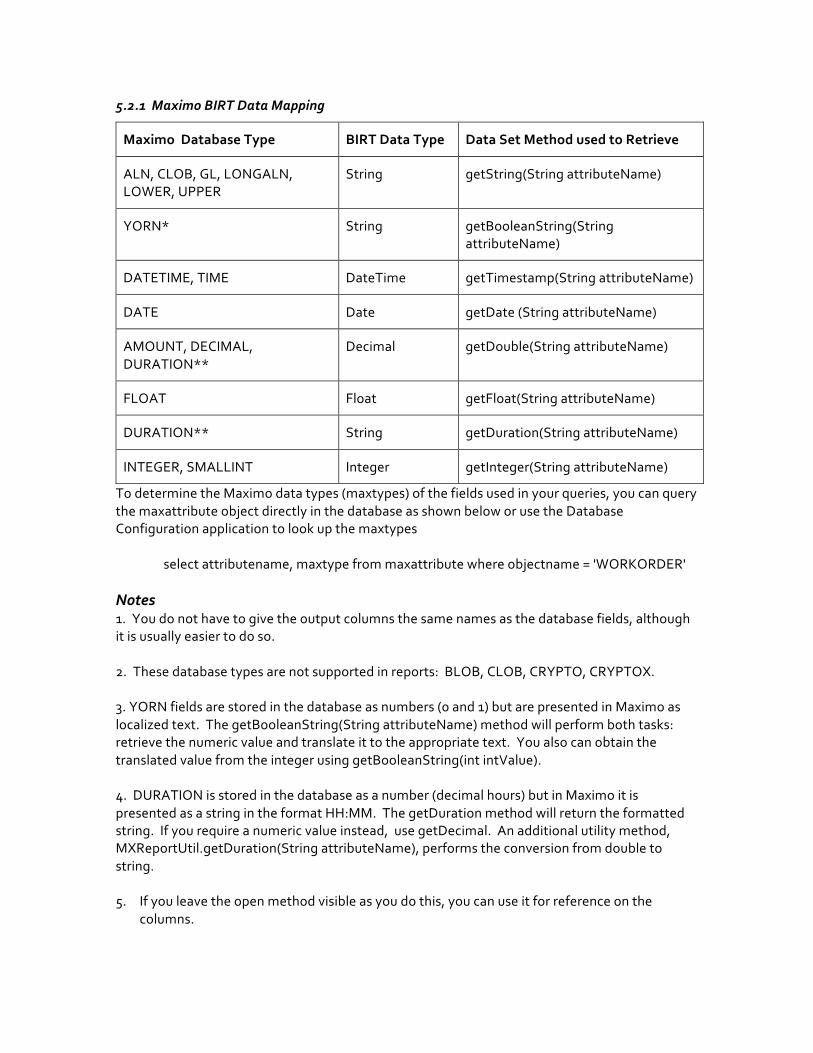
5.2.1 Maximo BIRT Data Mapping
Maximo Database Type BIRT Data Type Data Set Method used to Retrieve
ALN, CLOB, GL, LONGALN, LOWER, UPPER
String getString(String attributeName)
YORN* String getBooleanString(String attributeName)
DATETIME, TIME DateTime getTimestamp(String attributeName)
DATE Date getDate (String attributeName)
AMOUNT, DECIMAL, DURATION**
Decimal getDouble(String attributeName)
FLOAT Float getFloat(String attributeName)
DURATION** String getDuration(String attributeName)
INTEGER, SMALLINT Integer getInteger(String attributeName)
To determine the Maximo data types (maxtypes) of the fields used in your queries, you can query the maxattribute object directly in the database as shown below or use the Database Configuration application to look up the maxtypes select attributename, maxtype from maxattribute where objectname = 'WORKORDER' Notes 1. You do not have to give the output columns the same names as the database fields, although it is usually easier to do so. 2. These database types are not supported in reports: BLOB, CLOB, CRYPTO, CRYPTOX. 3. YORN fields are stored in the database as numbers (0 and 1) but are presented in Maximo as localized text. The getBooleanString(String attributeName) method will perform both tasks: retrieve the numeric value and translate it to the appropriate text. You also can obtain the translated value from the integer using getBooleanString(int intValue). 4. DURATION is stored in the database as a number (decimal hours) but in Maximo it is presented as a string in the format HH:MM. The getDuration method will return the formatted string. If you require a numeric value instead, use getDecimal. An additional utility method, MXReportUtil.getDuration(String attributeName), performs the conversion from double to string. 5. If you leave the open method visible as you do this, you can use it for reference on the
columns.
Maximo76_ReportDesigner431_Report Development Guide
41
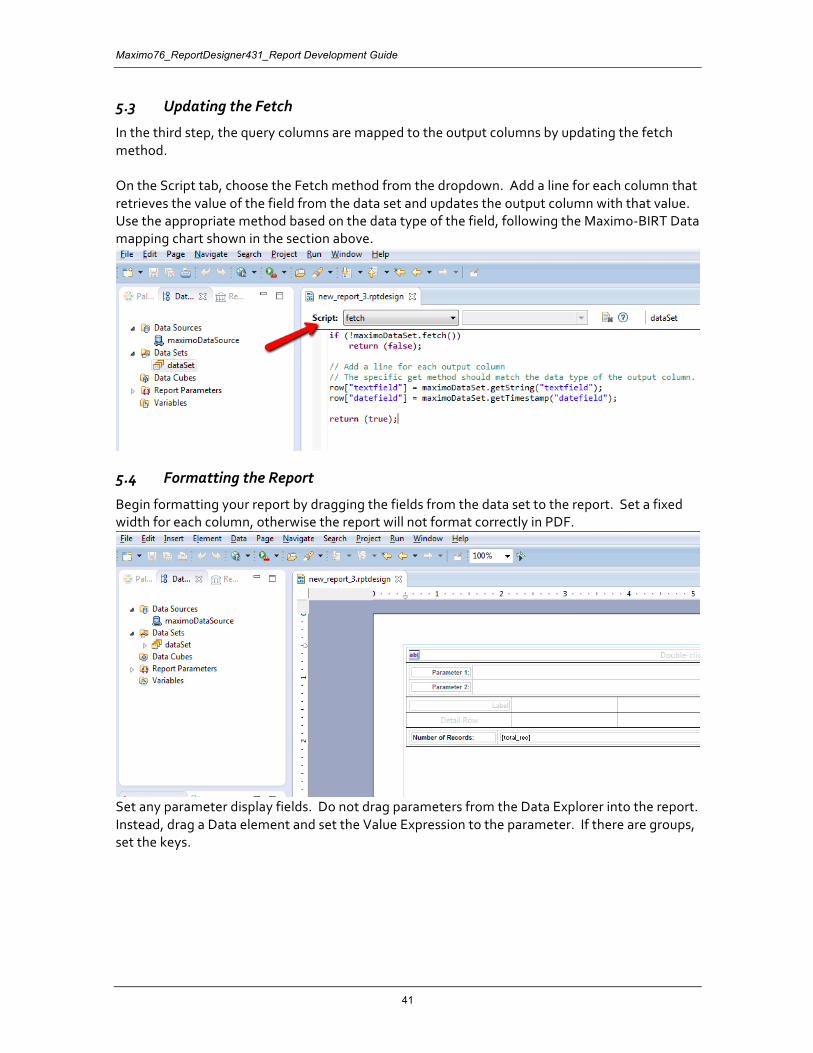
5.3 Updating the Fetch
In the third step, the query columns are mapped to the output columns by updating the fetch method. On the Script tab, choose the Fetch method from the dropdown. Add a line for each column that retrieves the value of the field from the data set and updates the output column with that value. Use the appropriate method based on the data type of the field, following the Maximo-BIRT Data mapping chart shown in the section above.
5.4 Formatting the Report
Begin formatting your report by dragging the fields from the data set to the report. Set a fixed width for each column, otherwise the report will not format correctly in PDF.
Set any parameter display fields. Do not drag parameters from the Data Explorer into the report. Instead, drag a Data element and set the Value Expression to the parameter. If there are groups, set the keys.
5.4.1 Formatting Notes
1. All Table elements should have widths set to 100%. Some templates included fixed table widths (in inches) and this is incorrect. You can also remove the height if it is set. 2. The style "titlesub" can be used for text that appears directly under the title. Examples of delivered reports using this style include detail reports ( Work Order Details) for the detail report key and description. 3. All subreports exist in a single cell, stacked on top of each other. 4. To receive a page break after the last subreport, add a group. The group key is set to the unique key for the report - for example in Person Details, it is set to Personid. The page break after property on the group is set to "Always excluding last". Now there will be a page break after each person record (including the related subreports) but not after the last person, which would cause a blank page at the end. The report footer rows have been deleted, again because this would cause a trailing blank page. 5. If you try to view your report within the designer as ‘View as PDF’, it will not work unless you install the iText jar. You will receive this error: org.eclipse.birt.report.service.api.ReportServiceException: Report engine fails to create extension to handle this request. 6. If you want to change the font of the reports to a Unicode or other format, you should change the Style Sheet used in the Report Library.
The default fonts used in the Maximo delivered reports are Verdana, Arial, Sans-serif. The font used will depend on what is available from the user’s browser. It will start with Verdana, and if that is not available, it will use Arial and then Sans-Serif.
Maximo76_ReportDesigner431_Report Development Guide
43
5.5 Defining the Property File
As noted in the Report Design File Structure Section, properties files hold the text values for the labels and titles used within a report. Additionally, in the sub-section titled ‘For New Custom or Modified Reports – Properties file’, it detailed how you can choose to either modify the existing properties file for the application, or create your own new properties file. The main items to take into consideration are recapped here below -
1. A single report design can only reference a single properties file. 2. Applications can utilize multiple properties file. During the command import process, all properties file for the application will be imported. 3. Report titles, labels may be modified during release, fix pack or hot fix updates. Therefore, if you modify the delivered properties file with your customizations, your updates may be overridden during an update.
Based on this, you may want to create your own custom properties file, by copying the delivered file and then renaming your properties file to quickly identify it.
Then, when your developer adds new labels for your new reports, he will add them to the custom properties, location_abc.properties as shown in the steps below in the Report Designer.
5.5.1 Defining the Property File – Specific Steps
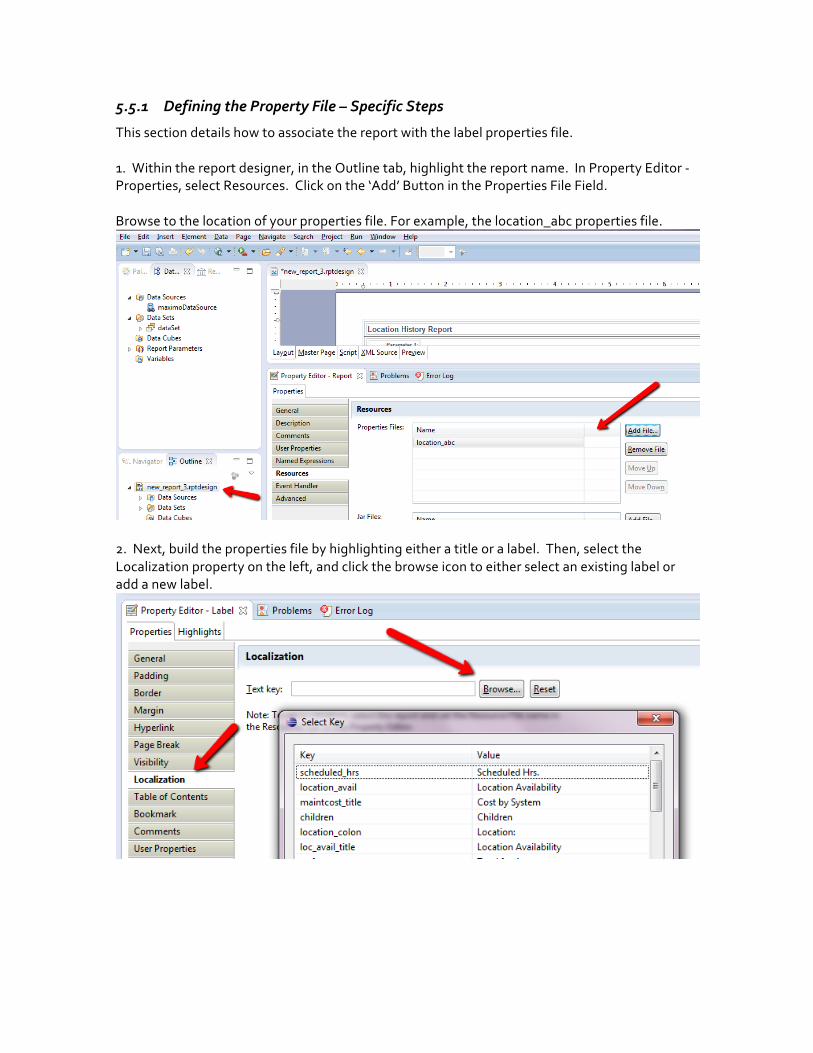
This section details how to associate the report with the label properties file. 1. Within the report designer, in the Outline tab, highlight the report name. In Property Editor - Properties, select Resources. Click on the ‘Add’ Button in the Properties File Field. Browse to the location of your properties file. For example, the location_abc properties file.
2. Next, build the properties file by highlighting either a title or a label. Then, select the Localization property on the left, and click the browse icon to either select an existing label or add a new label.
Maximo76_ReportDesigner431_Report Development Guide
45
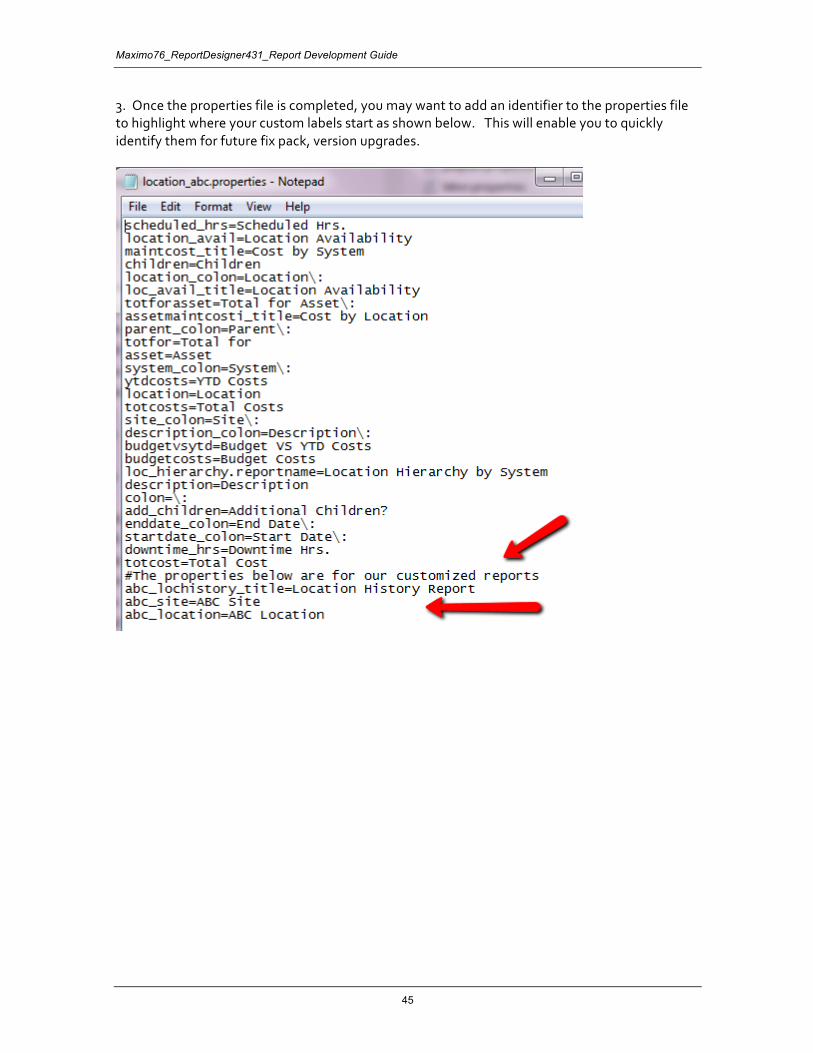
3. Once the properties file is completed, you may want to add an identifier to the properties file to highlight where your custom labels start as shown below. This will enable you to quickly identify them for future fix pack, version upgrades.
6 Report Development Considerations
6.1 Date Methods
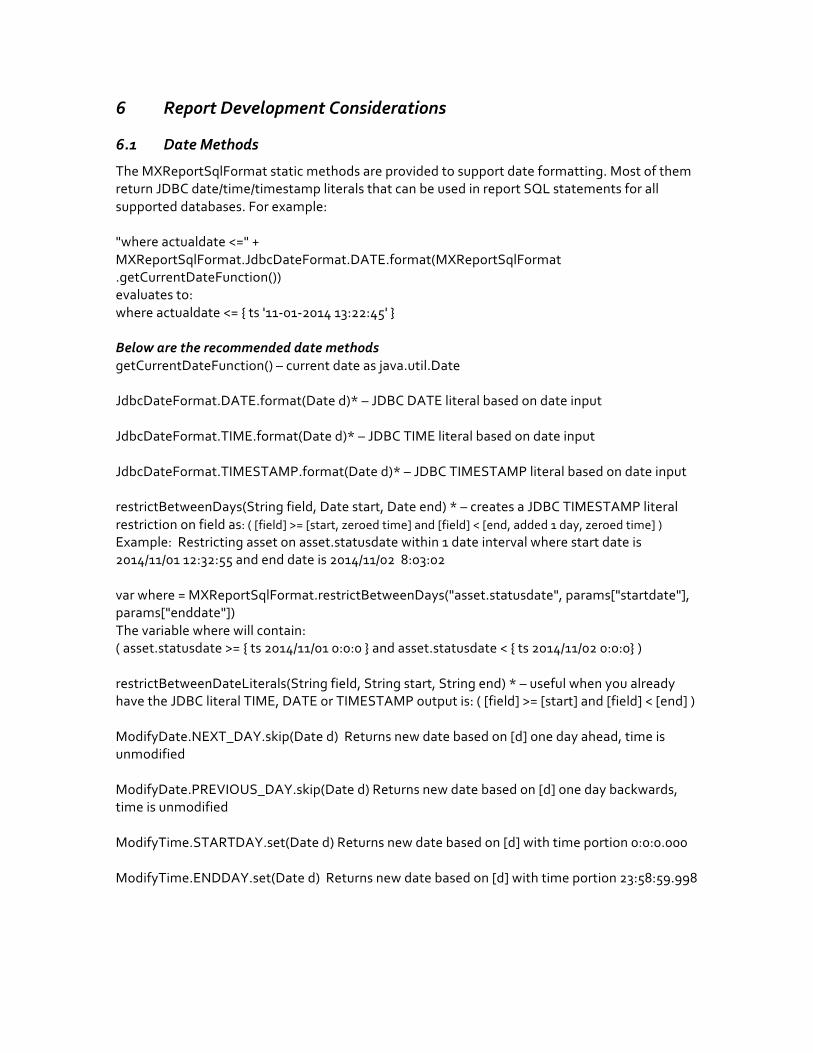
The MXReportSqlFormat static methods are provided to support date formatting. Most of them return JDBC date/time/timestamp literals that can be used in report SQL statements for all supported databases. For example: "where actualdate <=" + MXReportSqlFormat.JdbcDateFormat.DATE.format(MXReportSqlFormat .getCurrentDateFunction()) evaluates to: where actualdate <= { ts '11-01-2014 13:22:45' } Below are the recommended date methods getCurrentDateFunction() – current date as java.util.Date JdbcDateFormat.DATE.format(Date d)* – JDBC DATE literal based on date input JdbcDateFormat.TIME.format(Date d)* – JDBC TIME literal based on date input JdbcDateFormat.TIMESTAMP.format(Date d)* – JDBC TIMESTAMP literal based on date input restrictBetweenDays(String field, Date start, Date end) * – creates a JDBC TIMESTAMP literal restriction on field as: ( [field] >= [start, zeroed time] and [field] < [end, added 1 day, zeroed time] ) Example: Restricting asset on asset.statusdate within 1 date interval where start date is 2014/11/01 12:32:55 and end date is 2014/11/02 8:03:02 var where = MXReportSqlFormat.restrictBetweenDays("asset.statusdate", params["startdate"], params["enddate"]) The variable where will contain: ( asset.statusdate >= { ts 2014/11/01 0:0:0 } and asset.statusdate < { ts 2014/11/02 0:0:0} ) restrictBetweenDateLiterals(String field, String start, String end) * – useful when you already have the JDBC literal TIME, DATE or TIMESTAMP output is: ( [field] >= [start] and [field] < [end] ) ModifyDate.NEXT_DAY.skip(Date d) Returns new date based on [d] one day ahead, time is unmodified ModifyDate.PREVIOUS_DAY.skip(Date d) Returns new date based on [d] one day backwards, time is unmodified ModifyTime.STARTDAY.set(Date d) Returns new date based on [d] with time portion 0:0:0.000 ModifyTime.ENDDAY.set(Date d) Returns new date based on [d] with time portion 23:58:59.998
Maximo76_ReportDesigner431_Report Development Guide
47
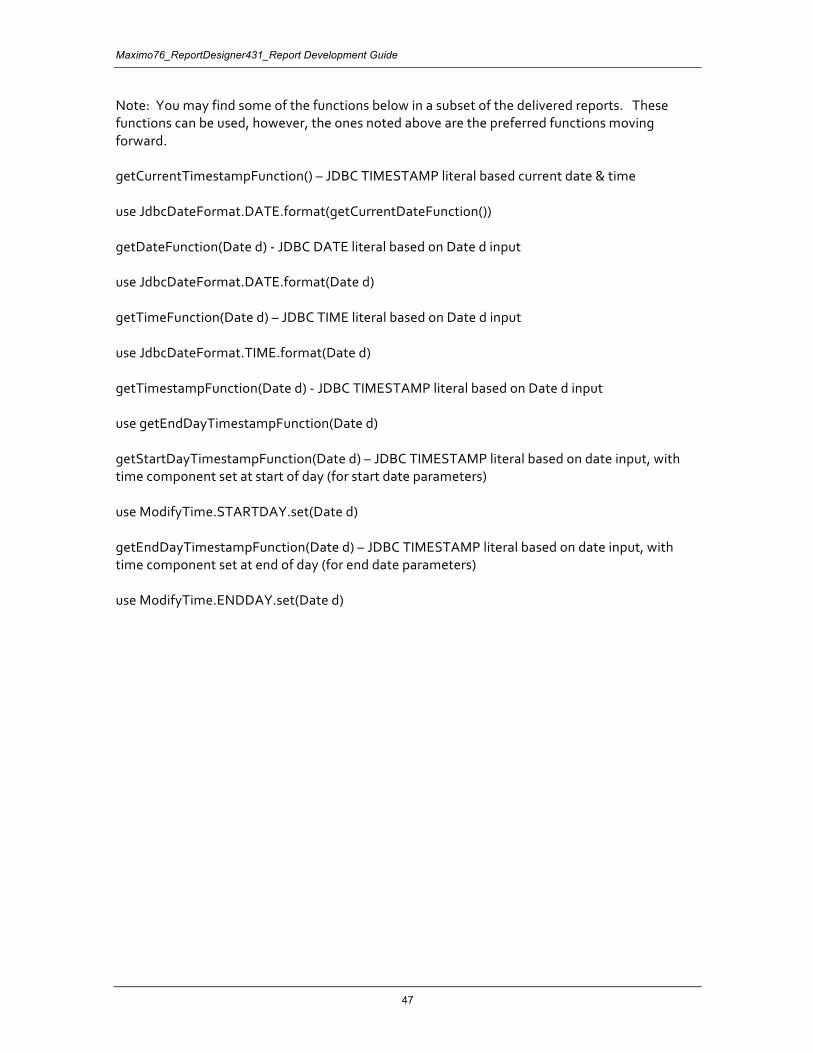
Note: You may find some of the functions below in a subset of the delivered reports. These functions can be used, however, the ones noted above are the preferred functions moving forward. getCurrentTimestampFunction() – JDBC TIMESTAMP literal based current date & time use JdbcDateFormat.DATE.format(getCurrentDateFunction()) getDateFunction(Date d) - JDBC DATE literal based on Date d input use JdbcDateFormat.DATE.format(Date d) getTimeFunction(Date d) – JDBC TIME literal based on Date d input use JdbcDateFormat.TIME.format(Date d) getTimestampFunction(Date d) - JDBC TIMESTAMP literal based on Date d input use getEndDayTimestampFunction(Date d) getStartDayTimestampFunction(Date d) – JDBC TIMESTAMP literal based on date input, with time component set at start of day (for start date parameters) use ModifyTime.STARTDAY.set(Date d) getEndDayTimestampFunction(Date d) – JDBC TIMESTAMP literal based on date input, with time component set at end of day (for end date parameters) use ModifyTime.ENDDAY.set(Date d)
6.2 Date Formats
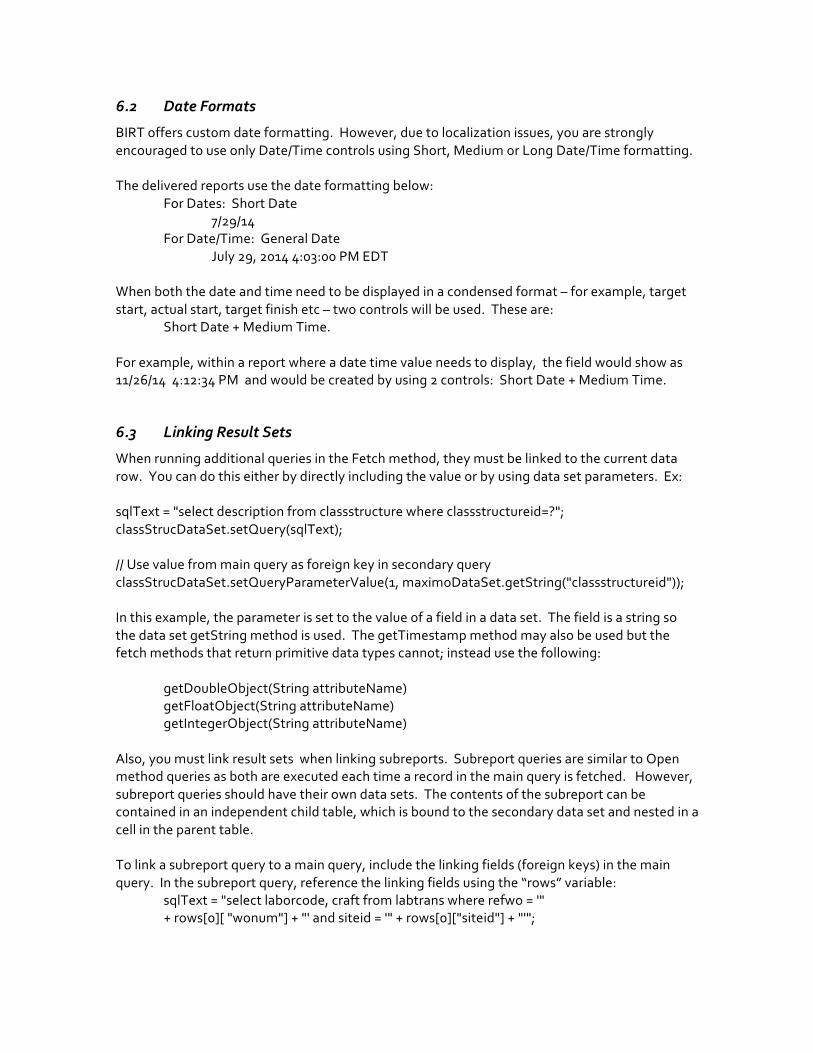
BIRT offers custom date formatting. However, due to localization issues, you are strongly encouraged to use only Date/Time controls using Short, Medium or Long Date/Time formatting. The delivered reports use the date formatting below: For Dates: Short Date 7/29/14 For Date/Time: General Date July 29, 2014 4:03:00 PM EDT When both the date and time need to be displayed in a condensed format – for example, target start, actual start, target finish etc – two controls will be used. These are: Short Date + Medium Time. For example, within a report where a date time value needs to display, the field would show as 11/26/14 4:12:34 PM and would be created by using 2 controls: Short Date + Medium Time.
6.3 Linking Result Sets
When running additional queries in the Fetch method, they must be linked to the current data row. You can do this either by directly including the value or by using data set parameters. Ex: sqlText = "select description from classstructure where classstructureid=?"; classStrucDataSet.setQuery(sqlText); // Use value from main query as foreign key in secondary query classStrucDataSet.setQueryParameterValue(1, maximoDataSet.getString("classstructureid")); In this example, the parameter is set to the value of a field in a data set. The field is a string so the data set getString method is used. The getTimestamp method may also be used but the fetch methods that return primitive data types cannot; instead use the following: getDoubleObject(String attributeName) getFloatObject(String attributeName) getIntegerObject(String attributeName) Also, you must link result sets when linking subreports. Subreport queries are similar to Open method queries as both are executed each time a record in the main query is fetched. However, subreport queries should have their own data sets. The contents of the subreport can be contained in an independent child table, which is bound to the secondary data set and nested in a cell in the parent table. To link a subreport query to a main query, include the linking fields (foreign keys) in the main query. In the subreport query, reference the linking fields using the “rows” variable: sqlText = "select laborcode, craft from labtrans where refwo = '" + rows[0][ "wonum"] + "' and siteid = '" + rows[0]["siteid"] + "'";
Maximo76_ReportDesigner431_Report Development Guide
49
6.4 Hyperlinking
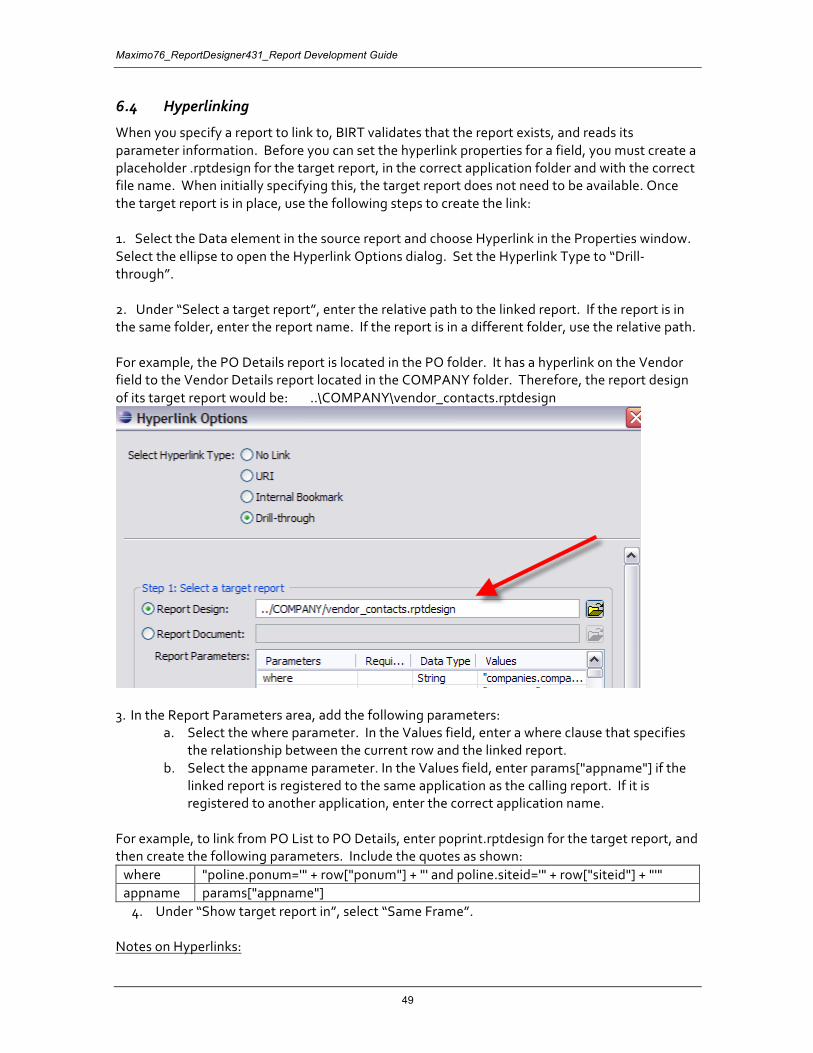
When you specify a report to link to, BIRT validates that the report exists, and reads its parameter information. Before you can set the hyperlink properties for a field, you must create a placeholder .rptdesign for the target report, in the correct application folder and with the correct file name. When initially specifying this, the target report does not need to be available. Once the target report is in place, use the following steps to create the link: 1. Select the Data element in the source report and choose Hyperlink in the Properties window. Select the ellipse to open the Hyperlink Options dialog. Set the Hyperlink Type to “Drill-through”. 2. Under “Select a target report”, enter the relative path to the linked report. If the report is in the same folder, enter the report name. If the report is in a different folder, use the relative path. For example, the PO Details report is located in the PO folder. It has a hyperlink on the Vendor field to the Vendor Details report located in the COMPANY folder. Therefore, the report design of its target report would be: ..\COMPANY\vendor_contacts.rptdesign
3. In the Report Parameters area, add the following parameters:
a. Select the where parameter. In the Values field, enter a where clause that specifies the relationship between the current row and the linked report.
b. Select the appname parameter. In the Values field, enter params["appname"] if the linked report is registered to the same application as the calling report. If it is registered to another application, enter the correct application name.
For example, to link from PO List to PO Details, enter poprint.rptdesign for the target report, and then create the following parameters. Include the quotes as shown:
where "poline.ponum='" + row["ponum"] + "' and poline.siteid='" + row["siteid"] + "'" appname params["appname"]
4. Under “Show target report in”, select “Same Frame”. Notes on Hyperlinks:
1. If you are hyperlinking to a report, and a data restriction is in place, make sure to qualify the table (object) name. If it is not qualified, the hyperlinked report may display blank data. For example, if the report is registered in the SR application The query should not be: …. pmcomtype is null and status not in ('DRAFT') Instead, the query should be qualified as: … sr.pmcomtype is null and sr.status not in ('DRAFT') 2. If you design a report to have hyperlinks targeted to the same report, the report output may not change after drilling though more than once from the initial link. This occurs as a __requestId internal parameter is used to distinguish each report executed by a user from the browser. This __requestId parameter value is unique within the user's current session for the report that is executed. When hyperlinks are involved, the Report URL for the hyperlink is generated by the report server and does not contain this internal __requestId parameter. Therefore, this parameter will have a value of null for all hyperlinks. Typically, if a hyperlink is for a different report, the null value and the combination of the hyperlinked report name act as a unique key to distinguish the report execution. But, if the hyperlink is for the same report, then any two such links to the same report will be treated as equal, as the key becomes the same. In the Maximo report integration, this unique key is used to get rid of the temporary files created when a report is run again. (For example, if the same report is run again, then the previous report information is discarded using the previous key stored in the HTTP session. ) This minimizes the generation of temporary files for repeated execution of the same report. When this logic is combined with the hyperlinks to the same report, the temporary files are never deleted, as multiple executions are treated the same, because the keys are identical. Because of this, the report output does not appear to change. To resolve the problem, the hyperlink creation has to be forced to generate the __requestId parameter. This can be accomplished by adding a parameter to the hyperlink. <structure> <property name="paramName">__requestid</property> <expression name="expression">java.lang.System.currentTimeMillis() + (hyperlinkCounter++) </expression> </structure> Note that the expression has to have a unique key that is unique to the current user and the current report. Since a report can have multiple hyperlinks, be sure to generate links that are unique within the report for that user's execution. Additionally, the hyperlinkCounter has to be declared in the initialization of the report script code.
Maximo76_ReportDesigner431_Report Development Guide
51
3. If a user hyperlinks from one report to another, no additional code is required for localization. The language code is passed through internal report context and is not passed as part of the hyperlink.
• Whether the report is a regular report or a hyperlink report, the report has to go through a single servlet that knows about the already logged in user and the user's locale/languagecode/timezone information. This information is automatically passed to the report engine or to the scripting code through a framework provided report context.
*Note: For more details on localization and how to enable for reporting, reference the Maximo Report Localization Guide. 4. Many out-of-the box reports contain hyperlinks. You may want to review their specific source code for more examples of how hyperlinks are set. To locate which reports contain hyperlinks, access the Maximo Report Booklet which is available via the link in the Reference Materials at the end of this guide. Search the reports tab for 'hyperlink' to find delivered reports with this functionality.
6.5 Populating the Data Set
If you need more than one data set (usually only required when creating subreports), you may wish to make a copy of the existing data set before starting.
6.6 Closing the Data Set
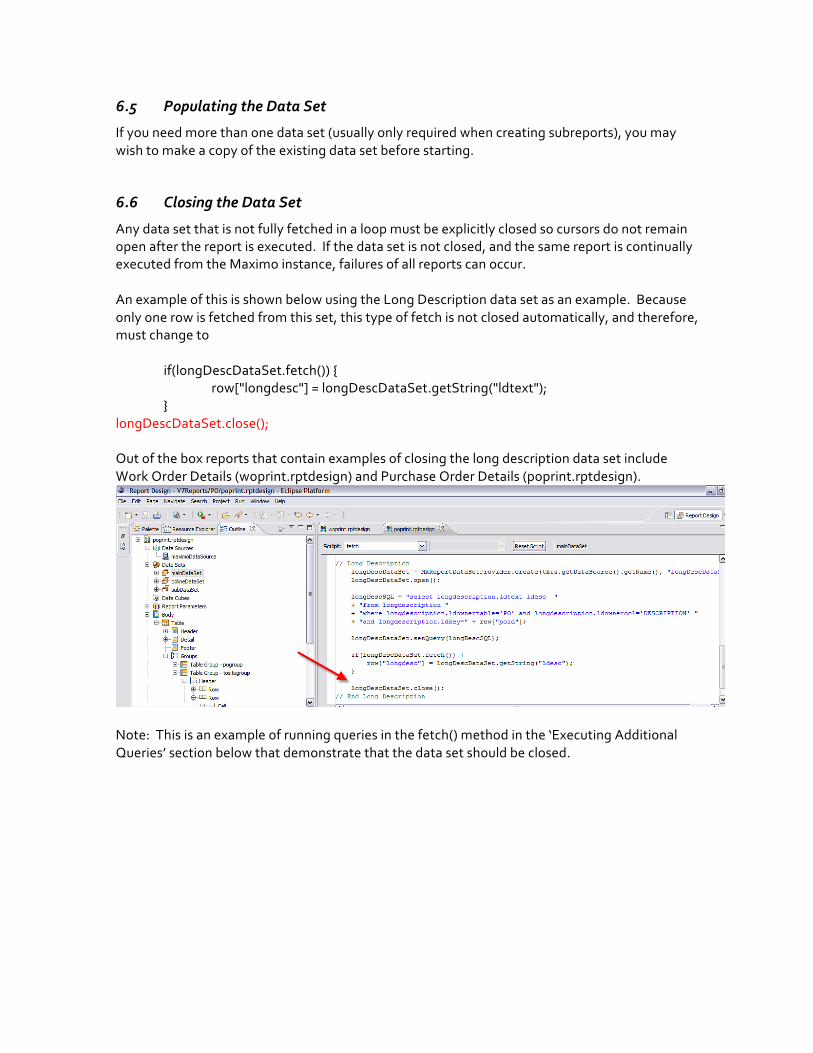
Any data set that is not fully fetched in a loop must be explicitly closed so cursors do not remain open after the report is executed. If the data set is not closed, and the same report is continually executed from the Maximo instance, failures of all reports can occur. An example of this is shown below using the Long Description data set as an example. Because only one row is fetched from this set, this type of fetch is not closed automatically, and therefore, must change to if(longDescDataSet.fetch()) { row["longdesc"] = longDescDataSet.getString("ldtext"); } longDescDataSet.close(); Out of the box reports that contain examples of closing the long description data set include Work Order Details (woprint.rptdesign) and Purchase Order Details (poprint.rptdesign).
Note: This is an example of running queries in the fetch() method in the ‘Executing Additional Queries’ section below that demonstrate that the data set should be closed.
Maximo76_ReportDesigner431_Report Development Guide
53
6.7 Executing Additional Queries
Additional queries may be run in both the Open and Fetch methods. Each method can have one or more additional queries returning one or more fields.
6.8 Queries in the Fetch Method
It may be difficult to provide all data fields for a report with a single SQL statement. You can populate most of the output columns with the main query, and run additional queries to retrieve the remaining fields, for example: if (!maximoDataSet.fetch()) return (false); // Set output columns from main query row["assetnum"] = maximoDataSet.getString("assetnum"); // Execute secondary query classStrucDataSet = MXReportDataSetProvider.create(this.getDataSource().getName(),"class"); classStrucDataSet.open(); sqlText = "select description from classstructure where classstructureid=? "; classStrucDataSet.setQuery(sqlText); // Use value from main query as foreign key in secondary query classStrucDataSet.setQueryParameterValue(1, maximoDataSet.getString("classstructureid")); if (classStrucDataSet.fetch()) { // Set output columns from secondary query row["description"] = classStrucDataSet.getString("description"); } // Always close the data set classStrucDataSet.close(); return(true); Note: queries that are executed multiple time should use setQueryParameterValue() for caching improvements.
6.9 Dynamically Filtering Data
There are several situations in which you will need to apply a dynamic filter to a report SQL statement. You may filter report results using Report Parameters, which receive values passed from Maximo. You may also use dynamic filters to link multiple queries.
6.10 Testing for Null
The COALESCE function is supported on all database types and may be used directly in the query. If you must use a proprietary null conversion function, the following data set method is provided: maximoDataSet.getNullValueFunction(String param, String nullVal) – Returns NVL, ISNULL, or COALESCE depending on the database type. For example: "select " + maximoDataSet.getNullValueFunction("parent", "wonum") evaluates to: select nvl(parent, wonum) - for Oracle select coalesce(parent, wonum) - for DB2 select isnull(parent, wonum) - for SQL Server: If nullVal is a string literal, place it in single quotes: "select" + maximoDataSet.getNullValueFunction("parent", "‘NONE’") However, be careful with using string literals this way, since they will not be localized.
6.11 Scalar Functions
The method MXReportSqlFormat.getScalarFunction(functionName, variable parameters) returns a JDBC scalar function based on the function name and a variable list of parameters. This can be used to access database functions in a database independent manner as suggested in the JDBC specification for commonly used functions.
6.12 Enabling Rich Text Formatting
Maximo users can input rich text in the long description fields of applications. This enables critical information to be highlighted and tracked. Rich text fonts can be displayed in reports, and the delivered reports using long description fields have rich text font enabled. If you have custom reports which use long description fields, you must update them to include the rich text formatting. If you do not do this, and your users input rich text font, the report may display that font as illegible text. To enable your custom report to display rich text formatting in the long description field, follow these steps in the report designer.
A. If the long description field exists in the report, delete it. B. Next, insert a Dynamic Text field.
Maximo76_ReportDesigner431_Report Development Guide
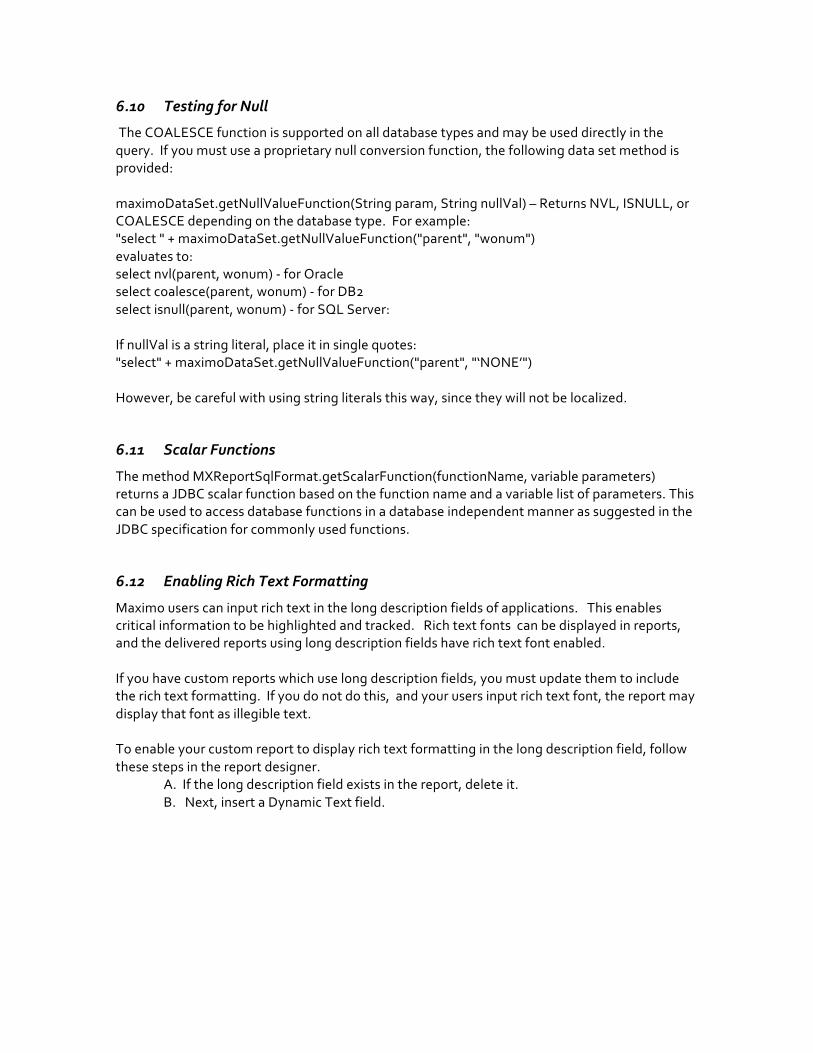
55
C. The Dynamic Text property has the HTML property set. Add the attribute of the field, longdesc.
Note: The long description attribute will vary depending on how it is defined in the query.
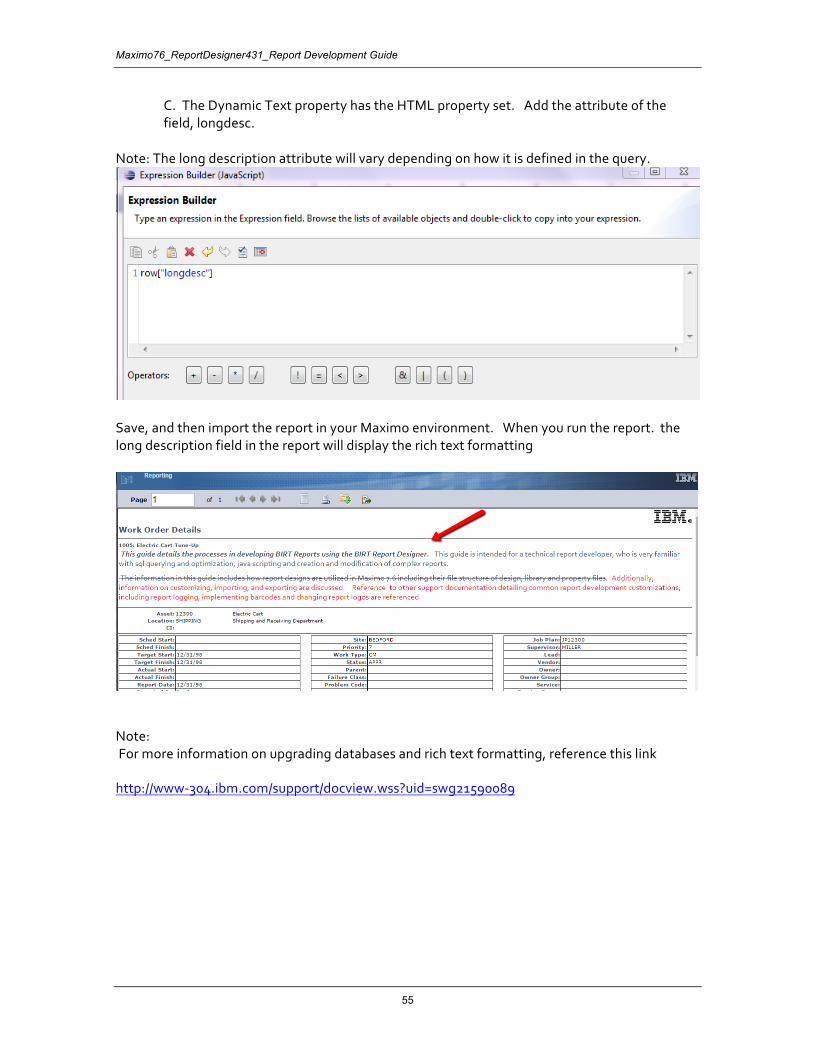
Save, and then import the report in your Maximo environment. When you run the report. the long description field in the report will display the rich text formatting
Note: For more information on upgrading databases and rich text formatting, reference this link http://www-304.ibm.com/support/docview.wss?uid=swg21590089
7 Parameters Parameters are used to filter the report data to meet the user’s individual business needs or request. Maximo reports can execute against a variety of parameter types depending on how they are configured. The three options are:
1. Parameterized Reports 2. Application Reports 3. Both Parameterized and Application Reports
Reference: For more details on the functionality of each of these parameters, reference the Report Design or Report Feature Guide accessible via the Reference Materials at the end of this document. This section focuses on Parameterized Reports, and its two types: Bound and Unbound.
7.1 Bound Parameters
Bound parameters either • exist in the main table of the application the report is registered to or • exist via a maxrelationship that has been set up for the application.
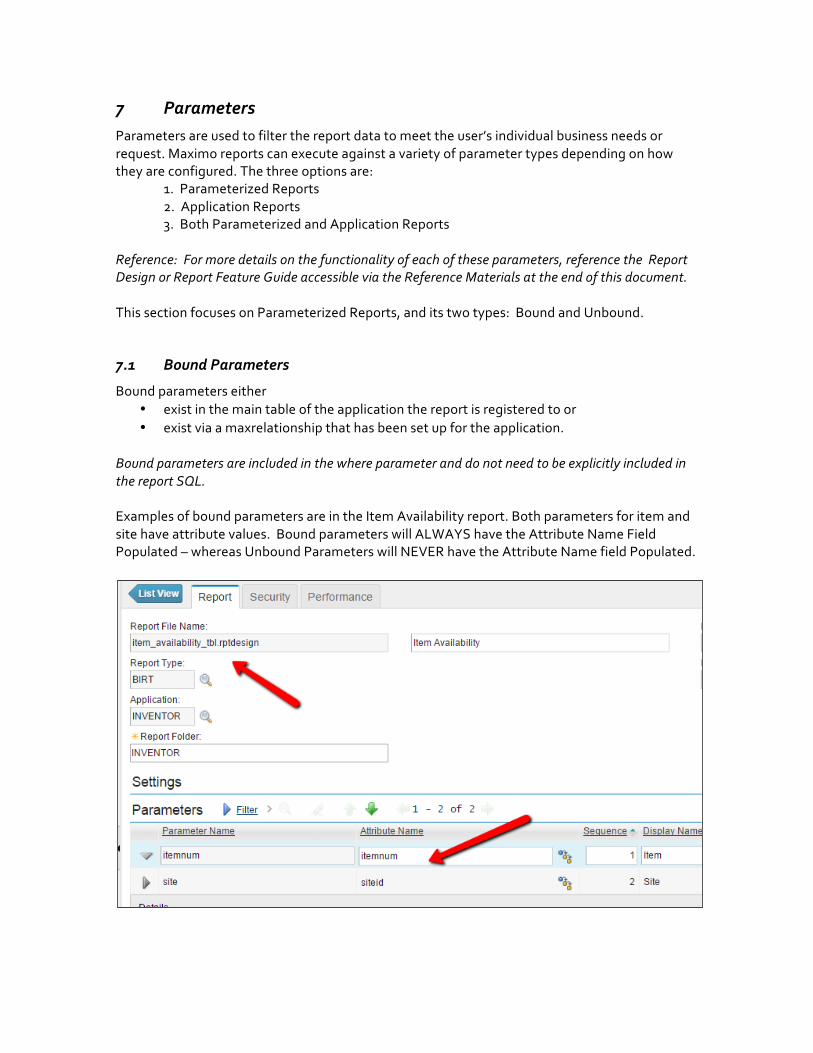
Bound parameters are included in the where parameter and do not need to be explicitly included in the report SQL. Examples of bound parameters are in the Item Availability report. Both parameters for item and site have attribute values. Bound parameters will ALWAYS have the Attribute Name Field Populated – whereas Unbound Parameters will NEVER have the Attribute Name field Populated.
Maximo76_ReportDesigner431_Report Development Guide
57
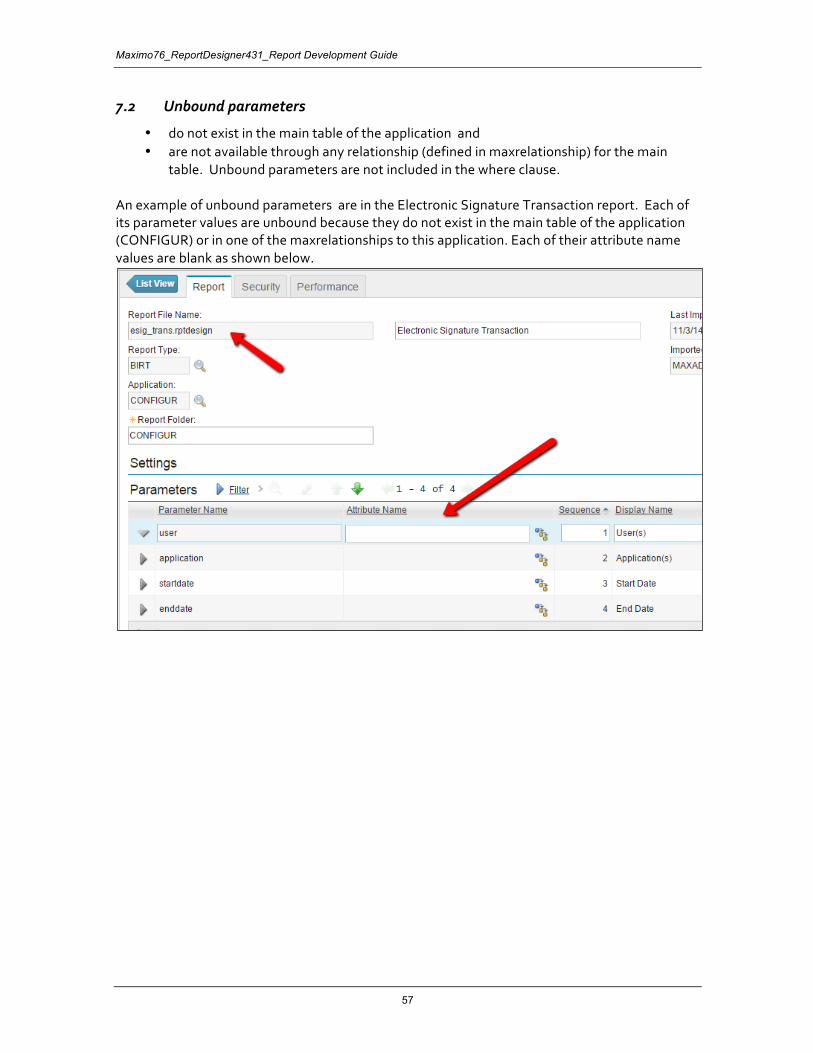
7.2 Unbound parameters
• do not exist in the main table of the application and • are not available through any relationship (defined in maxrelationship) for the main
table. Unbound parameters are not included in the where clause. An example of unbound parameters are in the Electronic Signature Transaction report. Each of its parameter values are unbound because they do not exist in the main table of the application (CONFIGUR) or in one of the maxrelationships to this application. Each of their attribute name values are blank as shown below.
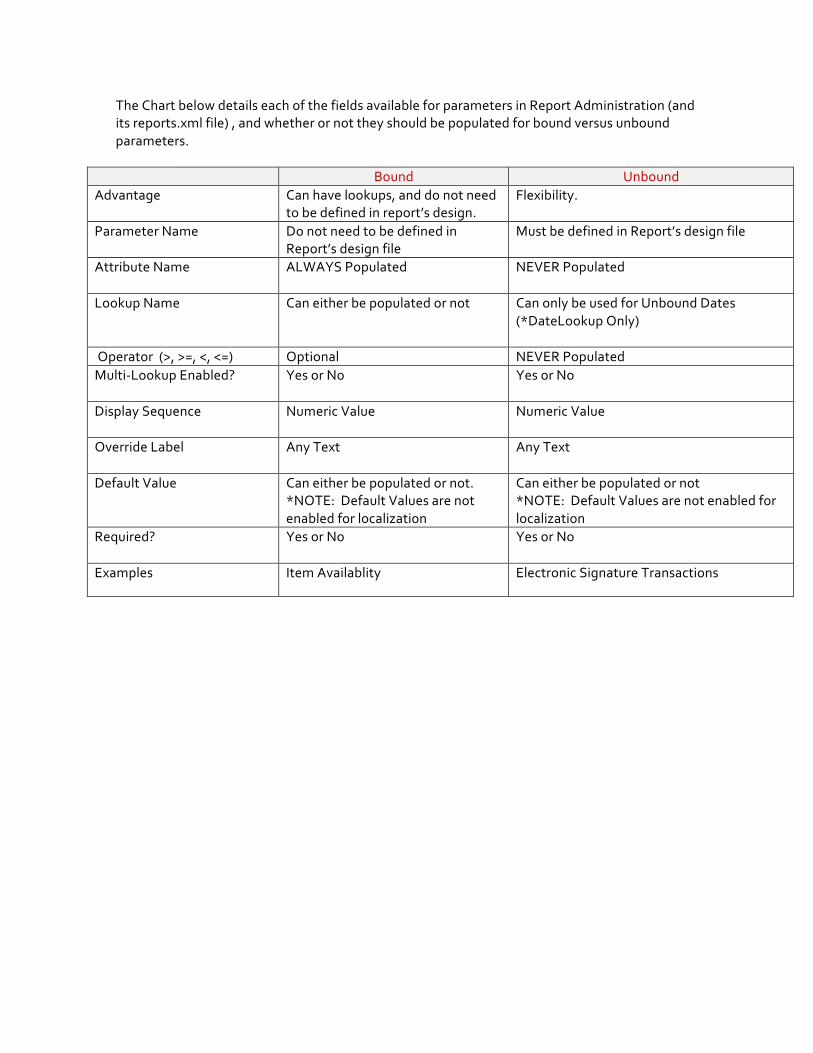
The Chart below details each of the fields available for parameters in Report Administration (and its reports.xml file) , and whether or not they should be populated for bound versus unbound parameters.
Bound Unbound Advantage Can have lookups, and do not need
to be defined in report’s design. Flexibility.
Parameter Name Do not need to be defined in Report’s design file
Must be defined in Report’s design file
Attribute Name ALWAYS Populated NEVER Populated
Lookup Name Can either be populated or not Can only be used for Unbound Dates (*DateLookup Only)
Operator (>, >=, <, <=) Optional NEVER Populated Multi-Lookup Enabled? Yes or No Yes or No
Display Sequence Numeric Value Numeric Value
Override Label Any Text Any Text
Default Value Can either be populated or not.
*NOTE: Default Values are not enabled for localization
Can either be populated or not *NOTE: Default Values are not enabled for localization
Required? Yes or No Yes or No
Examples Item Availablity Electronic Signature Transactions
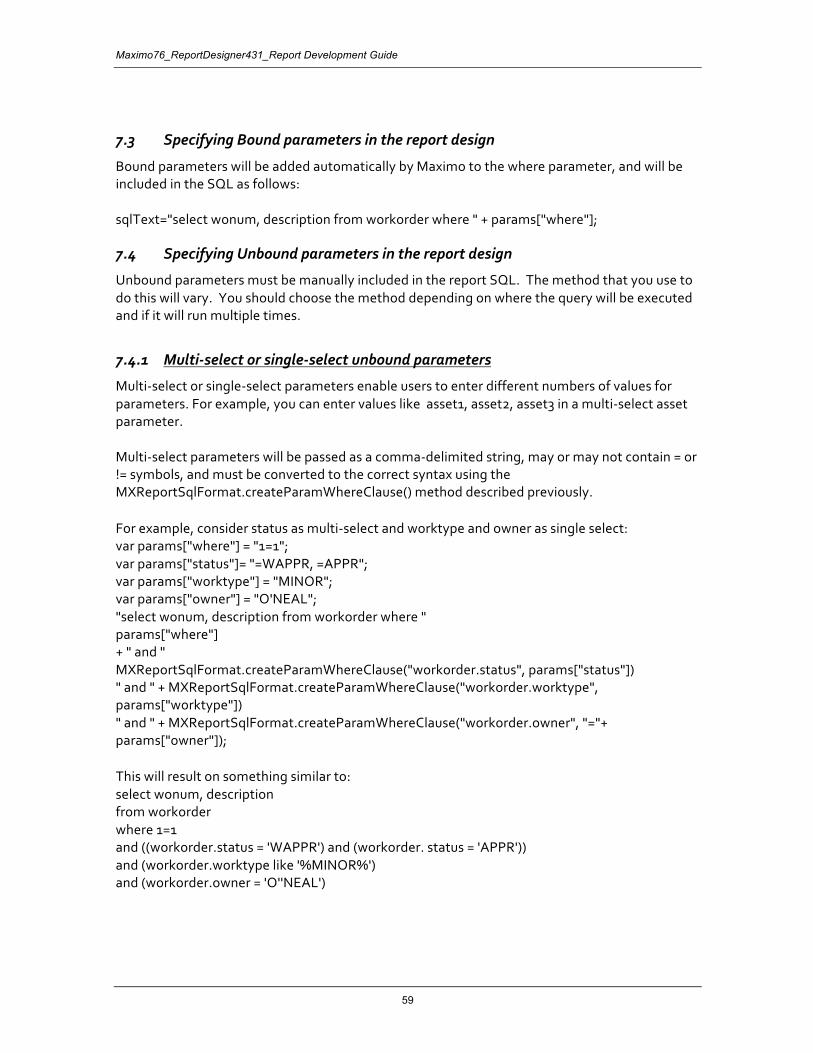
Maximo76_ReportDesigner431_Report Development Guide
59
7.3 Specifying Bound parameters in the report design
Bound parameters will be added automatically by Maximo to the where parameter, and will be included in the SQL as follows: sqlText="select wonum, description from workorder where " + params["where"];
7.4 Specifying Unbound parameters in the report design
Unbound parameters must be manually included in the report SQL. The method that you use to do this will vary. You should choose the method depending on where the query will be executed and if it will run multiple times.
7.4.1 Multi-select or single-select unbound parameters
Multi-select or single-select parameters enable users to enter different numbers of values for parameters. For example, you can enter values like asset1, asset2, asset3 in a multi-select asset parameter. Multi-select parameters will be passed as a comma-delimited string, may or may not contain = or != symbols, and must be converted to the correct syntax using the MXReportSqlFormat.createParamWhereClause() method described previously.
For example, consider status as multi-select and worktype and owner as single select: var params["where"] = "1=1"; var params["status"]= "=WAPPR, =APPR"; var params["worktype"] = "MINOR"; var params["owner"] = "O'NEAL"; "select wonum, description from workorder where " params["where"] + " and " MXReportSqlFormat.createParamWhereClause("workorder.status", params["status"]) " and " + MXReportSqlFormat.createParamWhereClause("workorder.worktype", params["worktype"]) " and " + MXReportSqlFormat.createParamWhereClause("workorder.owner", "="+ params["owner"]);
This will result on something similar to: select wonum, description from workorder where 1=1 and ((workorder.status = 'WAPPR') and (workorder. status = 'APPR')) and (workorder.worktype like '%MINOR%') and (workorder.owner = 'O''NEAL')
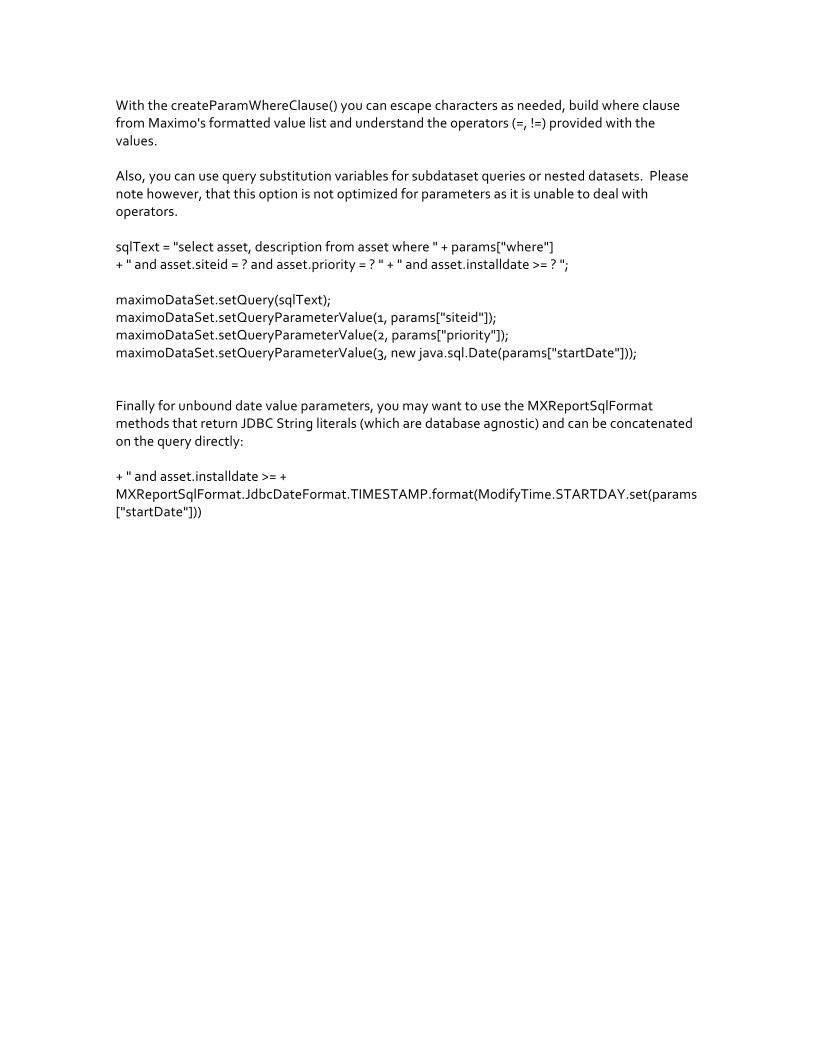
With the createParamWhereClause() you can escape characters as needed, build where clause from Maximo's formatted value list and understand the operators (=, !=) provided with the values. Also, you can use query substitution variables for subdataset queries or nested datasets. Please note however, that this option is not optimized for parameters as it is unable to deal with operators. sqlText = "select asset, description from asset where " + params["where"] + " and asset.siteid = ? and asset.priority = ? " + " and asset.installdate >= ? "; maximoDataSet.setQuery(sqlText); maximoDataSet.setQueryParameterValue(1, params["siteid"]); maximoDataSet.setQueryParameterValue(2, params["priority"]); maximoDataSet.setQueryParameterValue(3, new java.sql.Date(params["startDate"])); Finally for unbound date value parameters, you may want to use the MXReportSqlFormat methods that return JDBC String literals (which are database agnostic) and can be concatenated on the query directly: + " and asset.installdate >= + MXReportSqlFormat.JdbcDateFormat.TIMESTAMP.format(ModifyTime.STARTDAY.set(params["startDate"]))
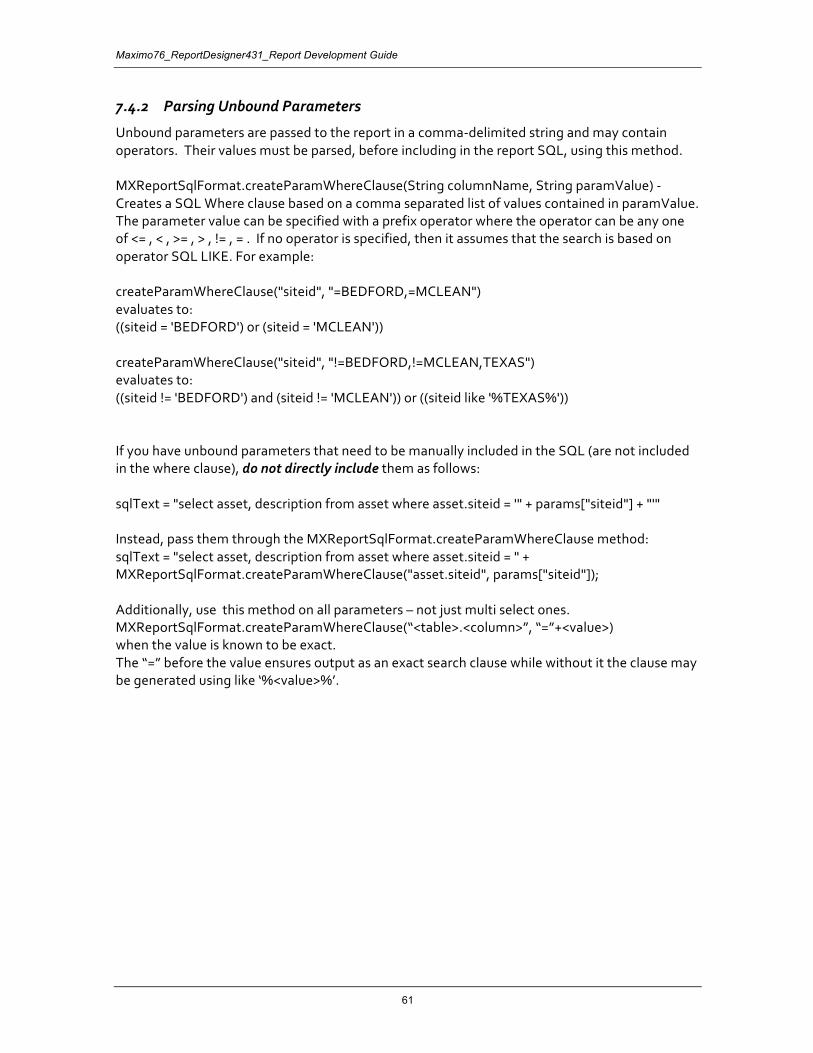
Maximo76_ReportDesigner431_Report Development Guide
61
7.4.2 Parsing Unbound Parameters
Unbound parameters are passed to the report in a comma-delimited string and may contain operators. Their values must be parsed, before including in the report SQL, using this method. MXReportSqlFormat.createParamWhereClause(String columnName, String paramValue) - Creates a SQL Where clause based on a comma separated list of values contained in paramValue. The parameter value can be specified with a prefix operator where the operator can be any one of <= , < , >= , > , != , = . If no operator is specified, then it assumes that the search is based on operator SQL LIKE. For example: createParamWhereClause("siteid", "=BEDFORD,=MCLEAN") evaluates to: ((siteid = 'BEDFORD') or (siteid = 'MCLEAN')) createParamWhereClause("siteid", "!=BEDFORD,!=MCLEAN,TEXAS") evaluates to: ((siteid != 'BEDFORD') and (siteid != 'MCLEAN')) or ((siteid like '%TEXAS%')) If you have unbound parameters that need to be manually included in the SQL (are not included in the where clause), do not directly include them as follows: sqlText = "select asset, description from asset where asset.siteid = '" + params["siteid"] + "'" Instead, pass them through the MXReportSqlFormat.createParamWhereClause method: sqlText = "select asset, description from asset where asset.siteid = " + MXReportSqlFormat.createParamWhereClause("asset.siteid", params["siteid"]); Additionally, use this method on all parameters – not just multi select ones. MXReportSqlFormat.createParamWhereClause(“<table>.<column>”, “=”+<value>) when the value is known to be exact. The “=” before the value ensures output as an exact search clause while without it the clause may be generated using like ‘%<value>%’.
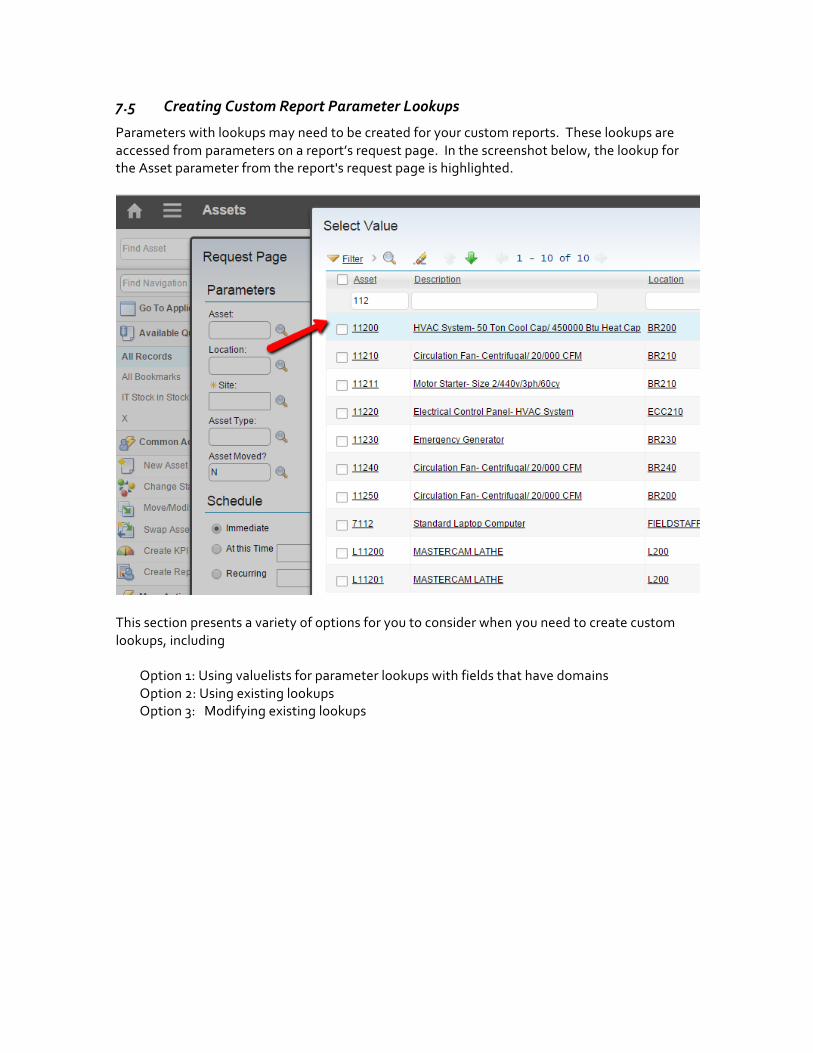
7.5 Creating Custom Report Parameter Lookups
Parameters with lookups may need to be created for your custom reports. These lookups are accessed from parameters on a report’s request page. In the screenshot below, the lookup for the Asset parameter from the report's request page is highlighted.
This section presents a variety of options for you to consider when you need to create custom lookups, including
Option 1: Using valuelists for parameter lookups with fields that have domains Option 2: Using existing lookups Option 3: Modifying existing lookups
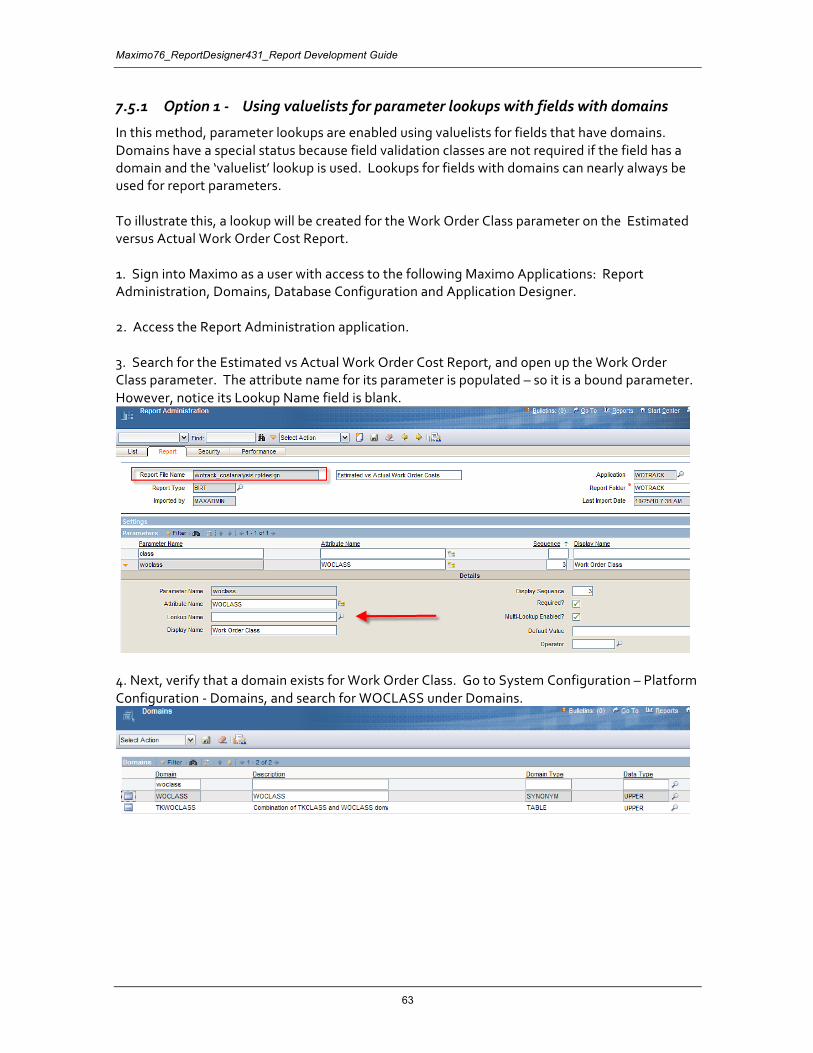
Maximo76_ReportDesigner431_Report Development Guide
63
7.5.1 Option 1 - Using valuelists for parameter lookups with fields with domains
In this method, parameter lookups are enabled using valuelists for fields that have domains. Domains have a special status because field validation classes are not required if the field has a domain and the ‘valuelist’ lookup is used. Lookups for fields with domains can nearly always be used for report parameters. To illustrate this, a lookup will be created for the Work Order Class parameter on the Estimated versus Actual Work Order Cost Report. 1. Sign into Maximo as a user with access to the following Maximo Applications: Report Administration, Domains, Database Configuration and Application Designer. 2. Access the Report Administration application. 3. Search for the Estimated vs Actual Work Order Cost Report, and open up the Work Order Class parameter. The attribute name for its parameter is populated – so it is a bound parameter. However, notice its Lookup Name field is blank.
4. Next, verify that a domain exists for Work Order Class. Go to System Configuration – Platform Configuration - Domains, and search for WOCLASS under Domains.
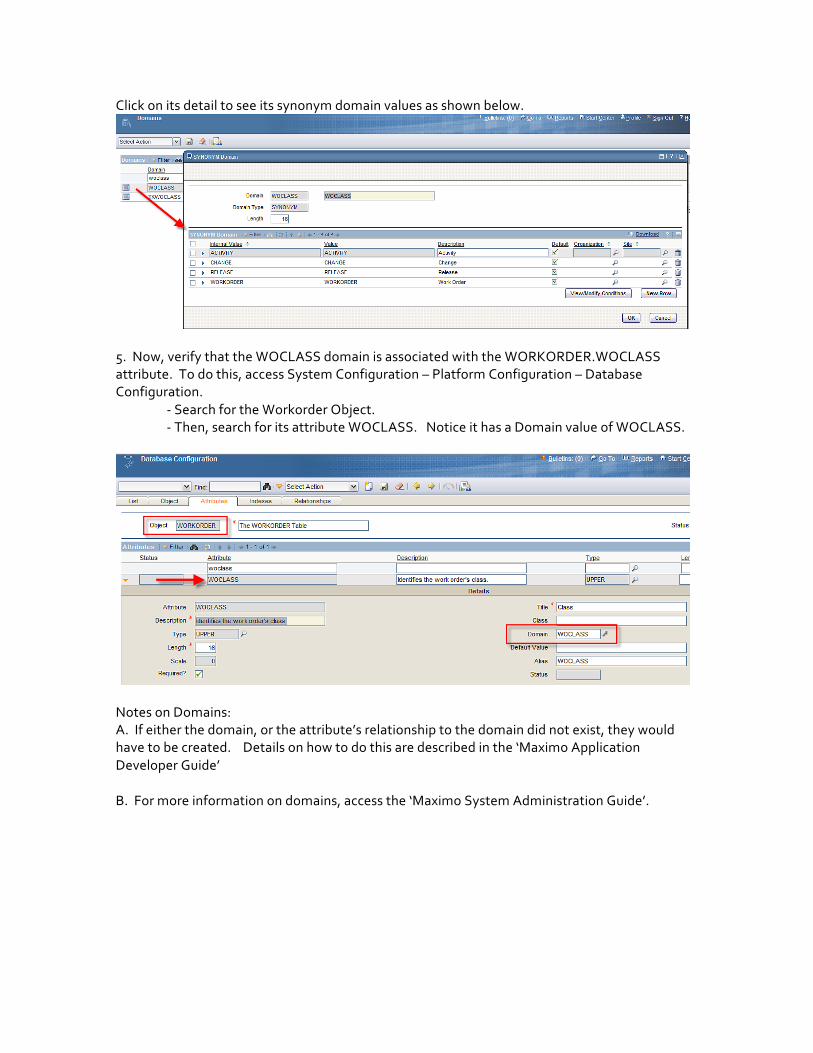
Click on its detail to see its synonym domain values as shown below.
5. Now, verify that the WOCLASS domain is associated with the WORKORDER.WOCLASS attribute. To do this, access System Configuration – Platform Configuration – Database Configuration.
- Search for the Workorder Object. - Then, search for its attribute WOCLASS. Notice it has a Domain value of WOCLASS.
Notes on Domains: A. If either the domain, or the attribute’s relationship to the domain did not exist, they would have to be created. Details on how to do this are described in the ‘Maximo Application Developer Guide’ B. For more information on domains, access the ‘Maximo System Administration Guide’.
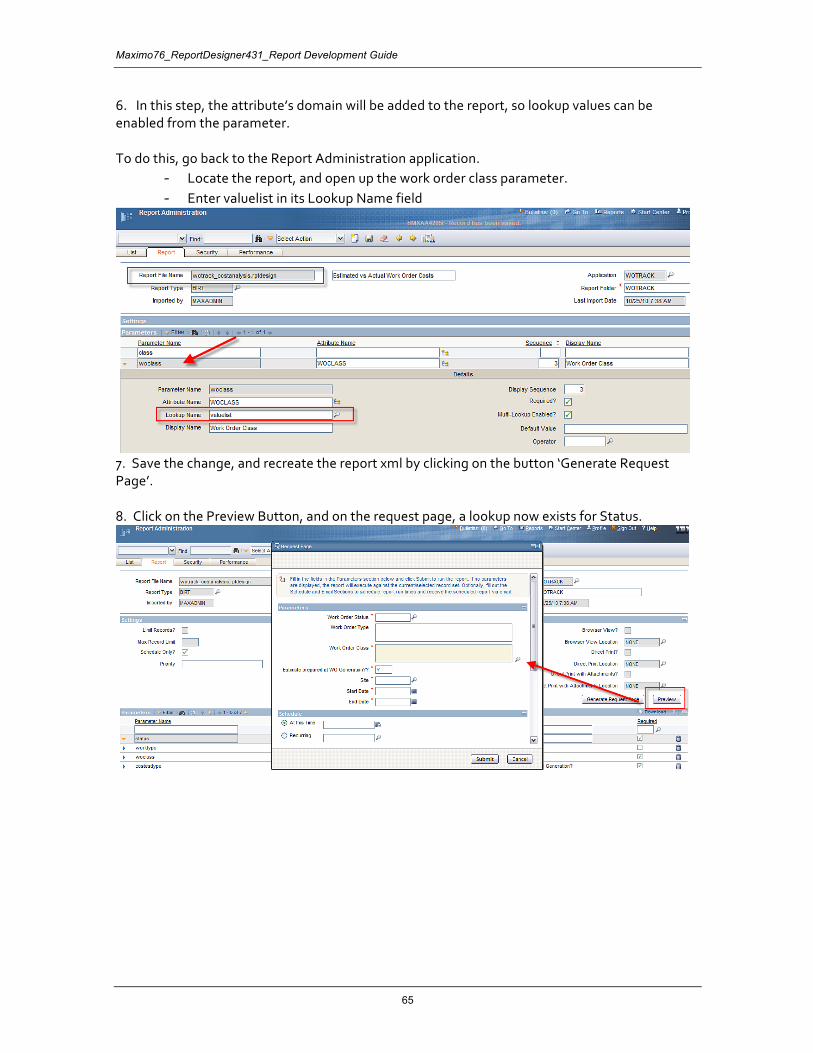
Maximo76_ReportDesigner431_Report Development Guide
65
6. In this step, the attribute’s domain will be added to the report, so lookup values can be enabled from the parameter. To do this, go back to the Report Administration application.
- Locate the report, and open up the work order class parameter. - Enter valuelist in its Lookup Name field
7. Save the change, and recreate the report xml by clicking on the button ‘Generate Request Page’. 8. Click on the Preview Button, and on the request page, a lookup now exists for Status.
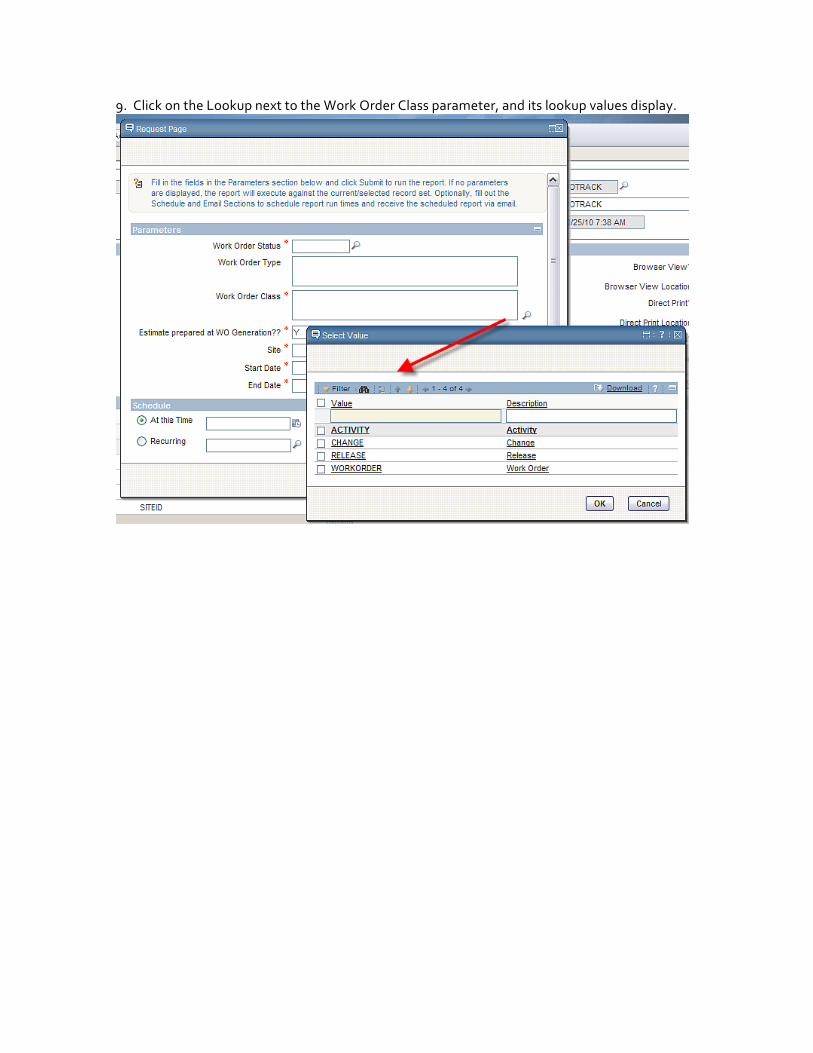
9. Click on the Lookup next to the Work Order Class parameter, and its lookup values display.
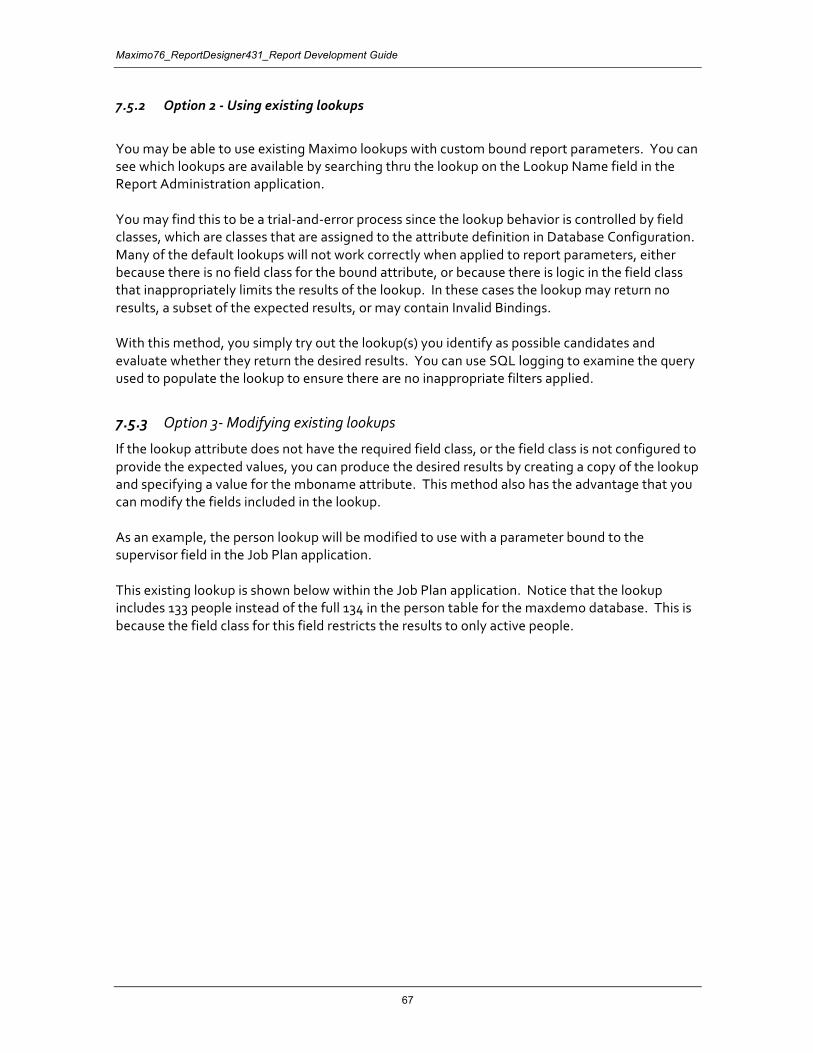
Maximo76_ReportDesigner431_Report Development Guide
67
7.5.2 Option 2 - Using existing lookups
You may be able to use existing Maximo lookups with custom bound report parameters. You can see which lookups are available by searching thru the lookup on the Lookup Name field in the Report Administration application. You may find this to be a trial-and-error process since the lookup behavior is controlled by field classes, which are classes that are assigned to the attribute definition in Database Configuration. Many of the default lookups will not work correctly when applied to report parameters, either because there is no field class for the bound attribute, or because there is logic in the field class that inappropriately limits the results of the lookup. In these cases the lookup may return no results, a subset of the expected results, or may contain Invalid Bindings. With this method, you simply try out the lookup(s) you identify as possible candidates and evaluate whether they return the desired results. You can use SQL logging to examine the query used to populate the lookup to ensure there are no inappropriate filters applied.
7.5.3 Option 3- Modifying existing lookups
If the lookup attribute does not have the required field class, or the field class is not configured to provide the expected values, you can produce the desired results by creating a copy of the lookup and specifying a value for the mboname attribute. This method also has the advantage that you can modify the fields included in the lookup. As an example, the person lookup will be modified to use with a parameter bound to the supervisor field in the Job Plan application. This existing lookup is shown below within the Job Plan application. Notice that the lookup includes 133 people instead of the full 134 in the person table for the maxdemo database. This is because the field class for this field restricts the results to only active people.
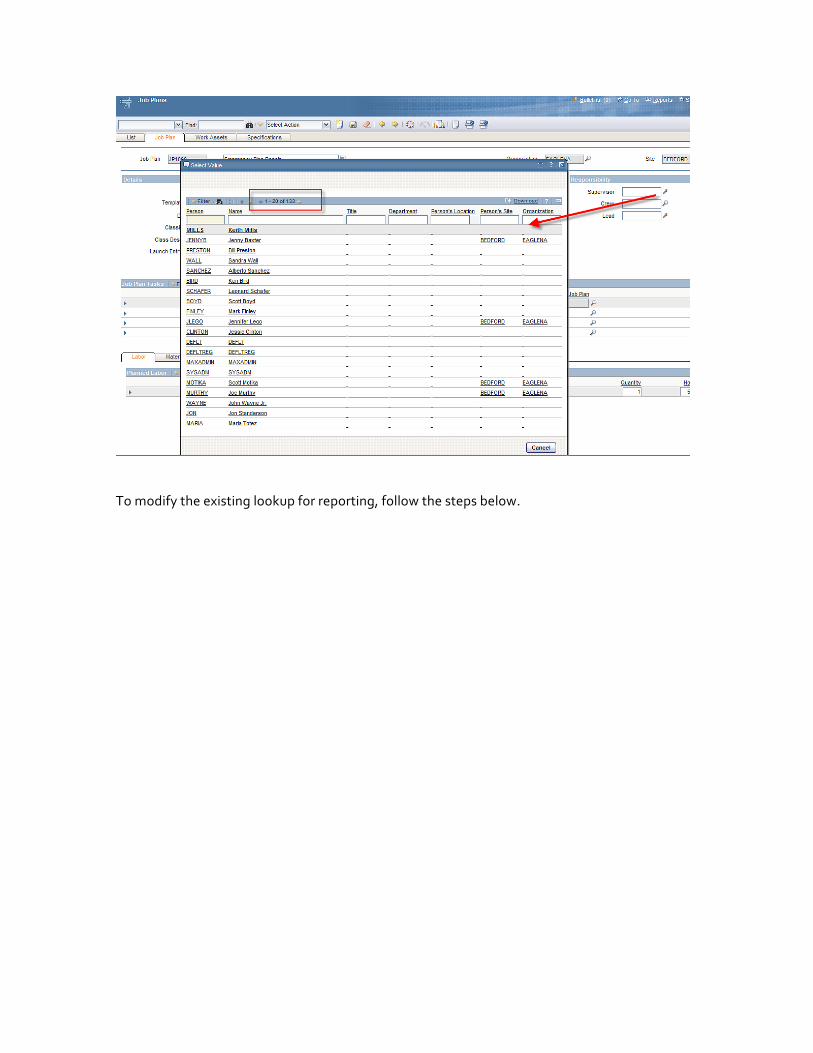
To modify the existing lookup for reporting, follow the steps below.
Maximo76_ReportDesigner431_Report Development Guide
69
1. Go to System Configuration – Platform Configuration - Application Designer and select Export System XML from the Select Action menu.
2. Open the file in a text editor. Locate the person lookup by searching for id=person. The first line of this is shown below. <table id="person" inputmode="readonly" selectmode="single"> 3. Copy the person lookup and scroll to the bottom of the file. Insert some lines before the </systemlib> . 4 Paste the copied person lookup, and then modify the first line to include the mboname attribute, for example: <table id="person" inputmode="readonly" selectmode="single" > Should be updated to <table id="person_rpt" inputmode="readonly" selectmode="single" mboname="person" > 5. Replace all remaining occurrences of 'id=”person' with 'id=”person_rpt', for example: <tablebody id="person_lookup_tablebody" filterexpanded="true" filterable="true" displayrowsperpage="20" > would become <tablebody id="person_rpt_lookup_tablebody" filterexpanded="true" filterable="true" displayrowsperpage="20" > The new entire entry is shown below.
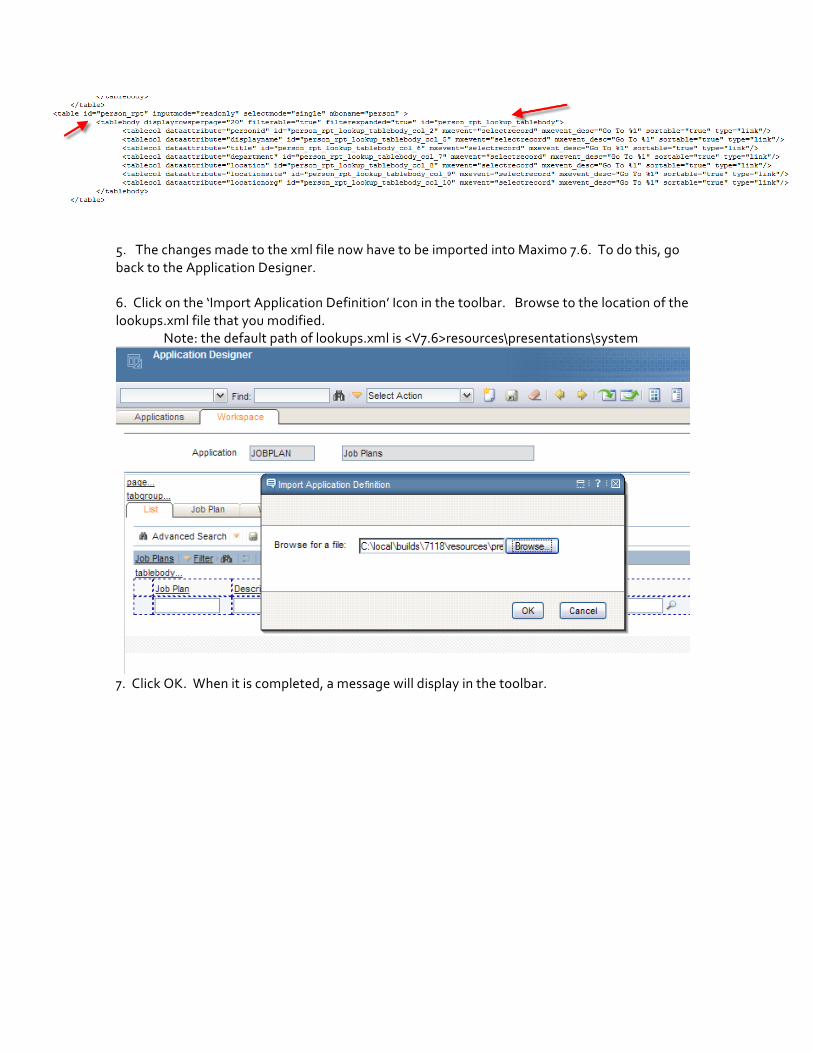
5. The changes made to the xml file now have to be imported into Maximo 7.6. To do this, go back to the Application Designer. 6. Click on the ‘Import Application Definition’ Icon in the toolbar. Browse to the location of the lookups.xml file that you modified.
Note: the default path of lookups.xml is <V7.6>resources\presentations\system
7. Click OK. When it is completed, a message will display in the toolbar.
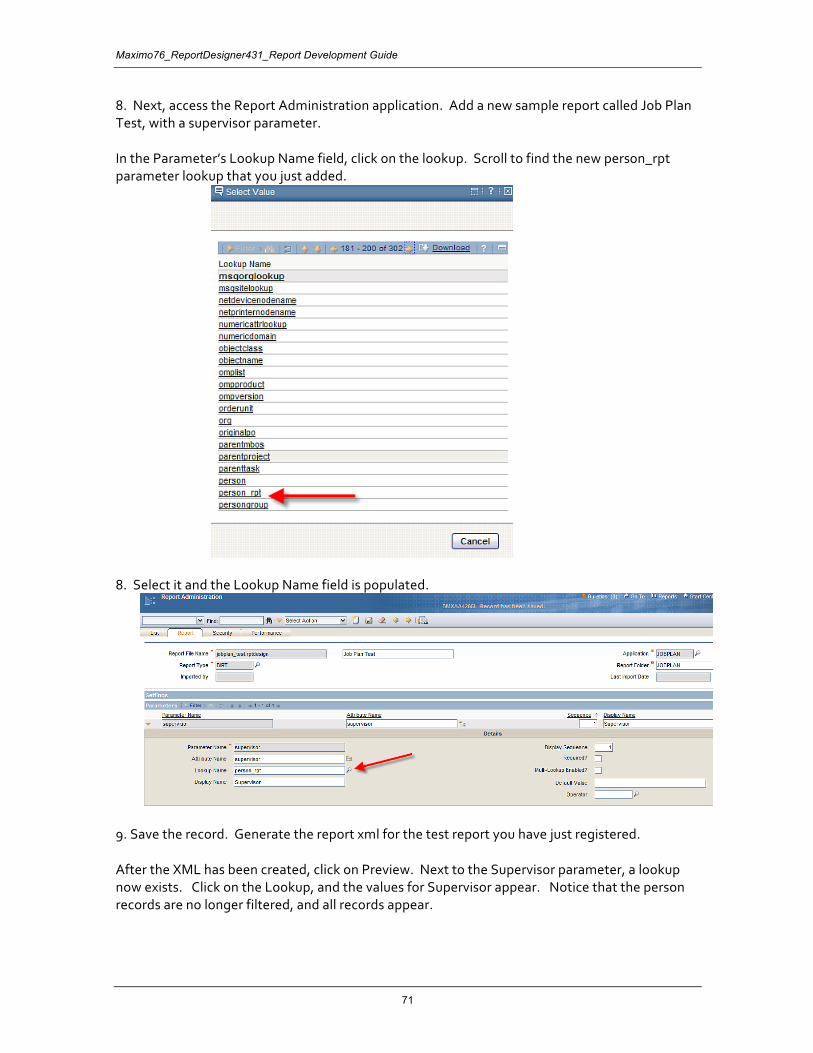
Maximo76_ReportDesigner431_Report Development Guide
71
8. Next, access the Report Administration application. Add a new sample report called Job Plan Test, with a supervisor parameter.
In the Parameter’s Lookup Name field, click on the lookup. Scroll to find the new person_rpt parameter lookup that you just added.
8. Select it and the Lookup Name field is populated.
9. Save the record. Generate the report xml for the test report you have just registered. After the XML has been created, click on Preview. Next to the Supervisor parameter, a lookup now exists. Click on the Lookup, and the values for Supervisor appear. Notice that the person records are no longer filtered, and all records appear.
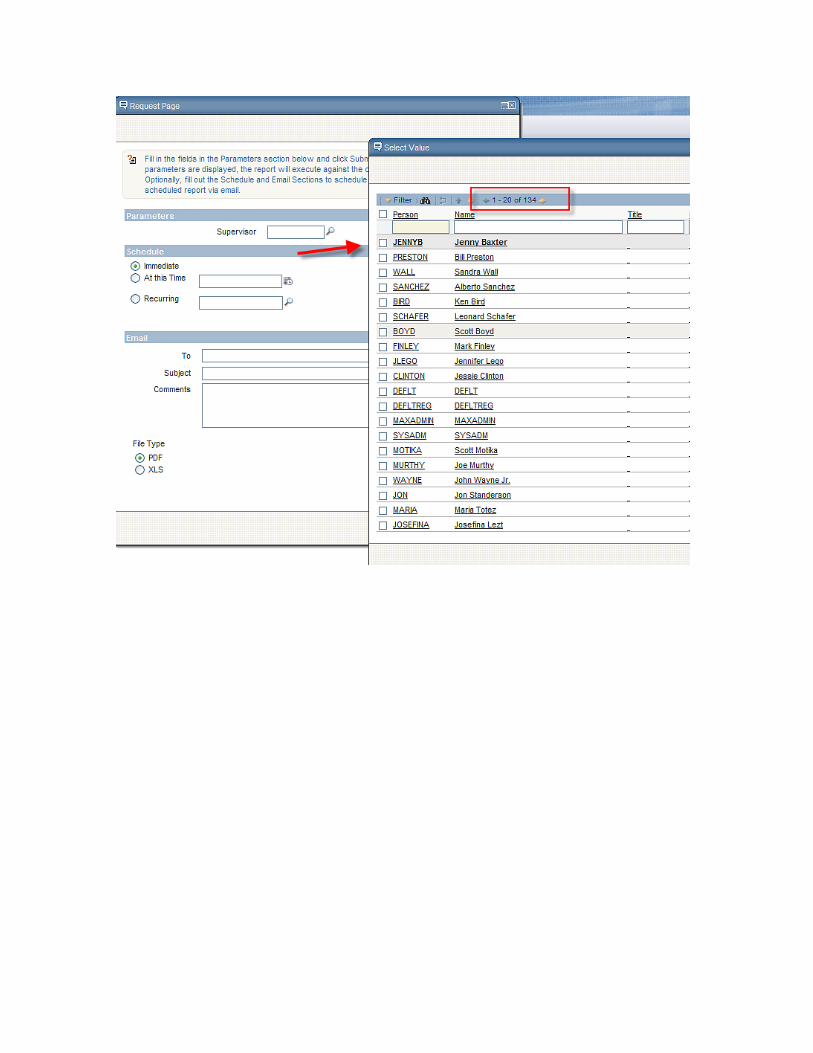

Maximo76_ReportDesigner431_Report Development Guide
73
7.6 Parameter Notes
7.6.1 Number of Parameter Values
The maximum number of User Inputted Report parameters that are enabled for reports is 23. These include 15 Non-Date Time Parameters, and 8 Date-Time parameters. If more than the 15 Non-Date and 8 Date-Time Parameters are entered, invalid bindings will display on the report’s request page.
7.6.2 Utilizing Parameter Values on a Report’s Request Page
Bound and Unbound parameters behave the same way when a user enters values on the Request Page. This means that if there is a parameter for Status, the following will occur:
User entered parameter value Report Results
=APPR Records where status = APPR
APPR Records where status = WAPPR, APPR
%APPR Records where status = WAPPR, APPR
7.6.3 Boolean Parameter Values
Reports that use boolean values as parameters must follow the guidelines below: A. The parameter in the report design must be defined as a string type to enable localization B. If the parameter value is required to be passed to a SQL statement, then the parameter value must be converted to integer value (1 or 0) as the database has 1 or 0
An API call has been added to the dataset code (getBooleanInteger(string)) that can be used for this purpose. An example of this is below:
var isActiveFlag = params["isactive"]; mySQL = "select isactive from collection where isactive=?"; myDataSet.setQuery(mySQL); myDataSet.setQueryParameterValue(1, myDataSet.getBooleanInteger(isActiveFlag)); or mySQL = "select isactive from collection where isactive=?"; myDataSet.setQuery(mySQL); myDataSet.setQueryParameterValue(1, myDataSet.getBooleanInteger(params["isactive"]));
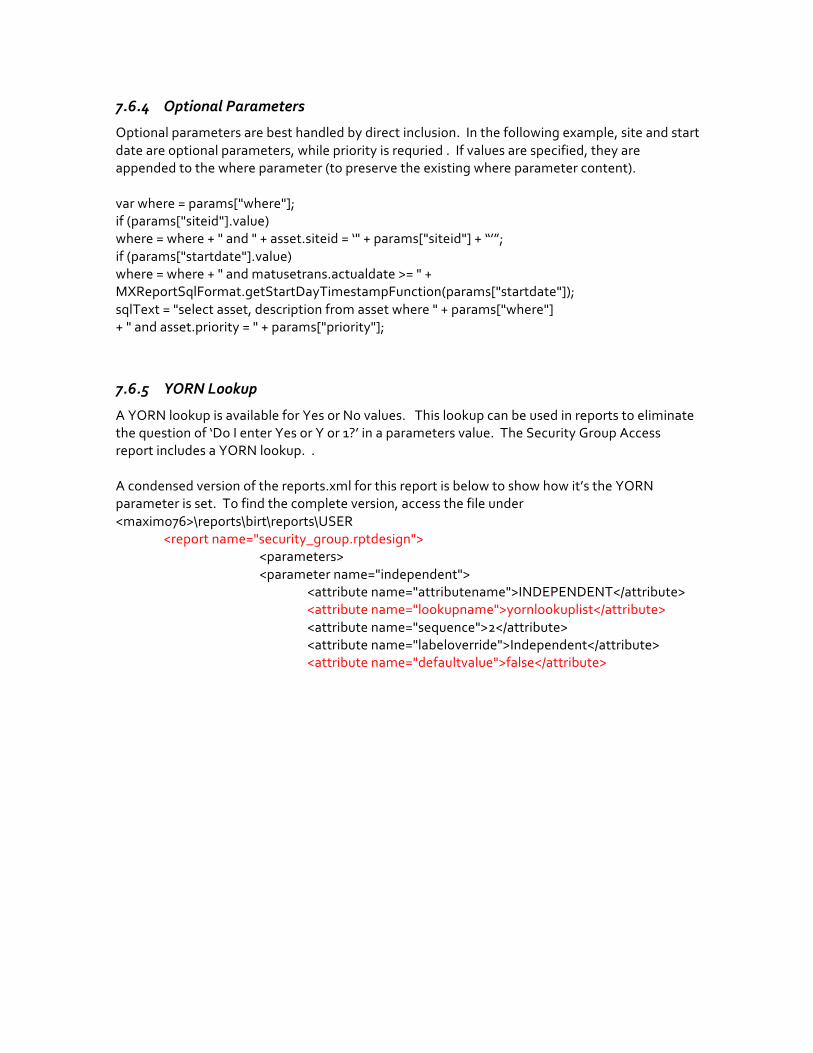
7.6.4 Optional Parameters
Optional parameters are best handled by direct inclusion. In the following example, site and start date are optional parameters, while priority is requried . If values are specified, they are appended to the where parameter (to preserve the existing where parameter content). var where = params["where"]; if (params["siteid"].value) where = where + " and " + asset.siteid = ‘" + params["siteid"] + “’”; if (params["startdate"].value) where = where + " and matusetrans.actualdate >= " + MXReportSqlFormat.getStartDayTimestampFunction(params["startdate"]); sqlText = "select asset, description from asset where " + params["where"] + " and asset.priority = " + params["priority"];
7.6.5 YORN Lookup
A YORN lookup is available for Yes or No values. This lookup can be used in reports to eliminate the question of ‘Do I enter Yes or Y or 1?’ in a parameters value. The Security Group Access report includes a YORN lookup. . A condensed version of the reports.xml for this report is below to show how it’s the YORN parameter is set. To find the complete version, access the file under <maximo76>\reports\birt\reports\USER <report name="security_group.rptdesign"> <parameters>
<parameter name="independent"> <attribute name="attributename">INDEPENDENT</attribute> <attribute name="lookupname">yornlookuplist</attribute> <attribute name="sequence">2</attribute> <attribute name="labeloverride">Independent</attribute> <attribute name="defaultvalue">false</attribute>
Maximo76_ReportDesigner431_Report Development Guide
75
7.6.6 Viewing Parameters
If you drag parameters directly on to the report, you may receive the following errors in the Web Viewer, although report content will not be affected:
A report document error occurred when loading: Subquery A report document error occurred when loading: Result Class
This happens because the bindings are created only at the cell level, not at the table level. To ensure the correct binding, insert Data elements and using the Expression Builder, set the values to the parameters (choose "Report Parameters" from the Category window).
7.6.7 Requirements for using lookups with Parameters
To enable a parameter lookup, the parameter must have an equivalent attribute. This makes the parameter bound as noted in the beginning portion of the parameter section.
Additionally, as noted above, unbound parameter values which have no attributes, cannot have a lookup. Domain lookups can only be used when bound to a field that has the domain assigned to it. The only two exceptions to this are the datelookup and yornlookuplist which can be associated to unbound parameter values.
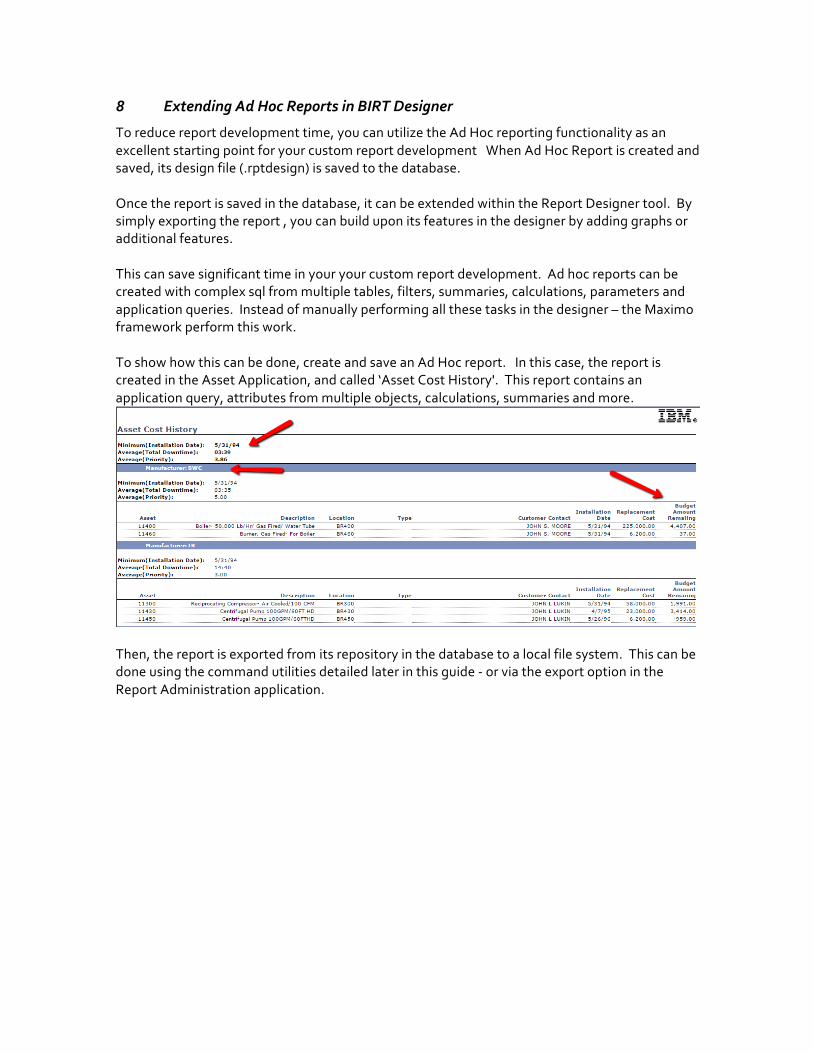
8 Extending Ad Hoc Reports in BIRT Designer
To reduce report development time, you can utilize the Ad Hoc reporting functionality as an excellent starting point for your custom report development When Ad Hoc Report is created and saved, its design file (.rptdesign) is saved to the database. Once the report is saved in the database, it can be extended within the Report Designer tool. By simply exporting the report , you can build upon its features in the designer by adding graphs or additional features. This can save significant time in your your custom report development. Ad hoc reports can be created with complex sql from multiple tables, filters, summaries, calculations, parameters and application queries. Instead of manually performing all these tasks in the designer – the Maximo framework perform this work. To show how this can be done, create and save an Ad Hoc report. In this case, the report is created in the Asset Application, and called ‘Asset Cost History'. This report contains an application query, attributes from multiple objects, calculations, summaries and more.
Then, the report is exported from its repository in the database to a local file system. This can be done using the command utilities detailed later in this guide - or via the export option in the Report Administration application.
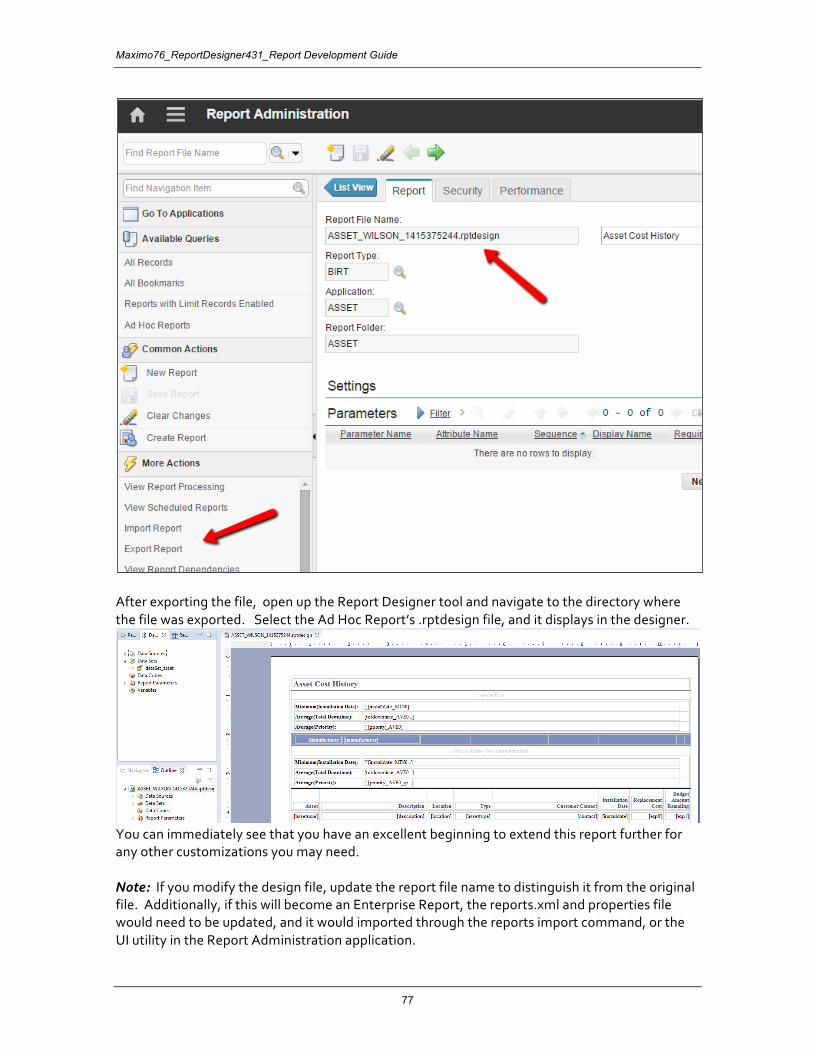
Maximo76_ReportDesigner431_Report Development Guide
77
After exporting the file, open up the Report Designer tool and navigate to the directory where the file was exported. Select the Ad Hoc Report’s .rptdesign file, and it displays in the designer.
You can immediately see that you have an excellent beginning to extend this report further for any other customizations you may need. Note: If you modify the design file, update the report file name to distinguish it from the original file. Additionally, if this will become an Enterprise Report, the reports.xml and properties file would need to be updated, and it would imported through the reports import command, or the UI utility in the Report Administration application.
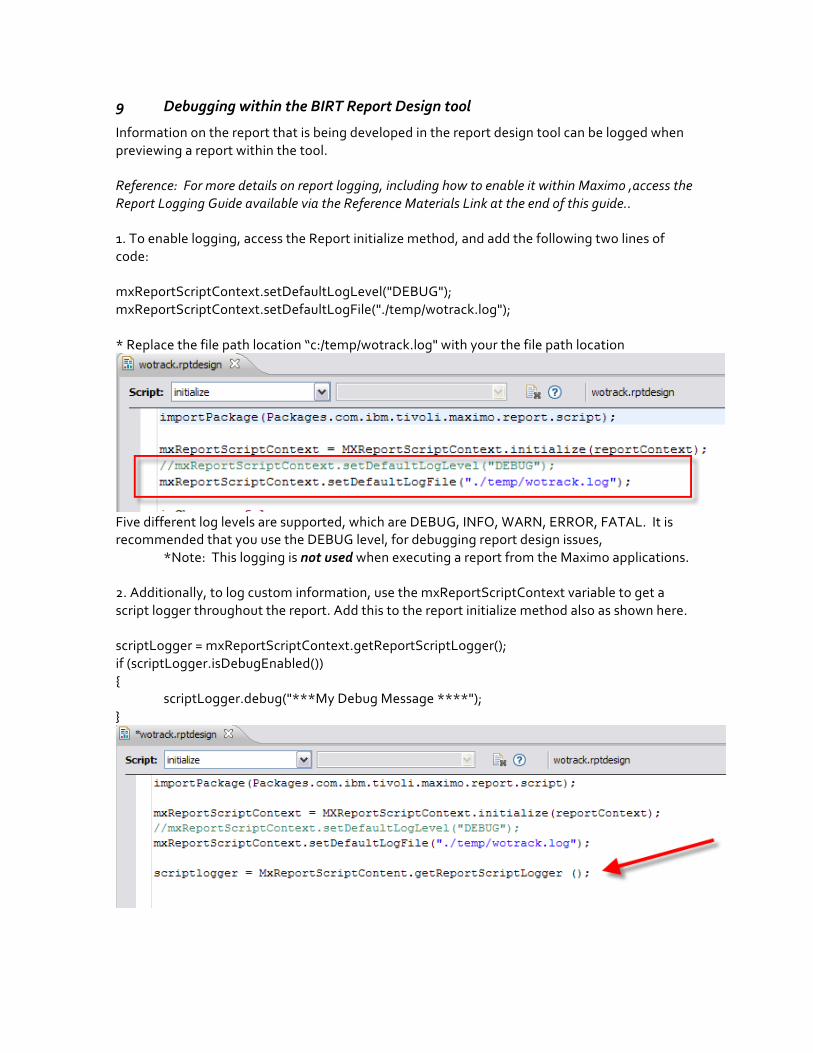
9 Debugging within the BIRT Report Design tool
Information on the report that is being developed in the report design tool can be logged when previewing a report within the tool. Reference: For more details on report logging, including how to enable it within Maximo ,access the Report Logging Guide available via the Reference Materials Link at the end of this guide.. 1. To enable logging, access the Report initialize method, and add the following two lines of code: mxReportScriptContext.setDefaultLogLevel("DEBUG"); mxReportScriptContext.setDefaultLogFile("./temp/wotrack.log"); * Replace the file path location “c:/temp/wotrack.log" with your the file path location
Five different log levels are supported, which are DEBUG, INFO, WARN, ERROR, FATAL. It is recommended that you use the DEBUG level, for debugging report design issues, *Note: This logging is not used when executing a report from the Maximo applications. 2. Additionally, to log custom information, use the mxReportScriptContext variable to get a script logger throughout the report. Add this to the report initialize method also as shown here. scriptLogger = mxReportScriptContext.getReportScriptLogger(); if (scriptLogger.isDebugEnabled()) { scriptLogger.debug("***My Debug Message ****"); }
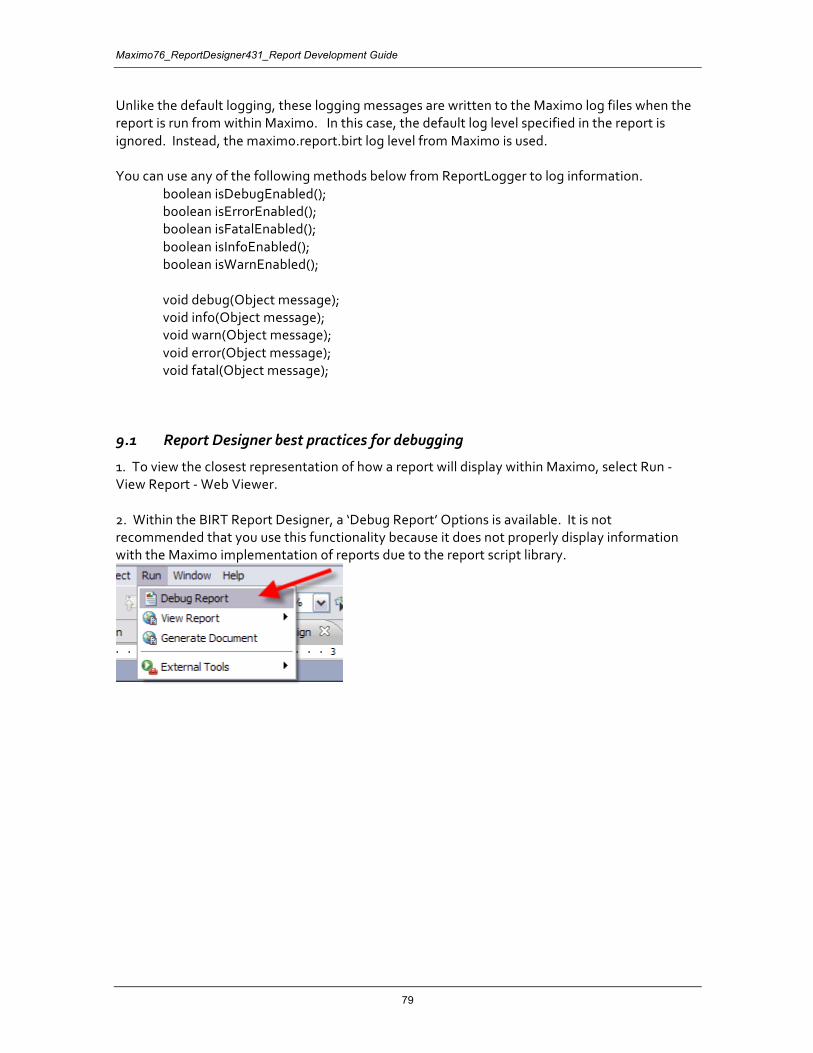
Maximo76_ReportDesigner431_Report Development Guide
79
Unlike the default logging, these logging messages are written to the Maximo log files when the report is run from within Maximo. In this case, the default log level specified in the report is ignored. Instead, the maximo.report.birt log level from Maximo is used. You can use any of the following methods below from ReportLogger to log information.
boolean isDebugEnabled(); boolean isErrorEnabled(); boolean isFatalEnabled(); boolean isInfoEnabled(); boolean isWarnEnabled();
void debug(Object message); void info(Object message); void warn(Object message); void error(Object message); void fatal(Object message);
9.1 Report Designer best practices for debugging
1. To view the closest representation of how a report will display within Maximo, select Run - View Report - Web Viewer.
2. Within the BIRT Report Designer, a ‘Debug Report’ Options is available. It is not recommended that you use this functionality because it does not properly display information with the Maximo implementation of reports due to the report script library.
10 Miscellaneous Features
10.1 Database Update Functionality
You can add database update functionality to reports. With this functionality, the reports can execute Database SQL UPDATE/INSERT/DELETE statements against a specific data source. Examples of out of the box reports that use this functionality include: Asset Cost Rollup, Inventory ABC, Inventory ROP, Inventory EOQ This example shows how this feature can be applied using an Update statement. 1. Executing the update within a DataSet (any of the open/describe/fetch/close/beforeOpen/beforeClose/onFetch/afterOpen/afterClose events) myTxn = MXReportTxnProvider.create(this.getDataSource().getName()); myStmt = myTxn.createStatement(); myStmt.setQuery("update ... set .... = ...."); myTxn.save(); 2. Executing the update outside of a DataSet myTxn = MXReportTxnProvider.create("MAXIMODATASOURCE"); myStmt = myTxn.createStatement(); myStmt.setQuery("update ... set .... = ...."); myTxn.save(); 3. Executing multiple updates myTxn = MXReportTxnProvider.create(this.getDataSource().getName()); myStmt1 = myTxn.createStatement(); myStmt1.setQuery("update ... set .... = ...."); myStmt2 = myTxn.createStatement(); myStmt2.setQuery("update ... set .... = ...."); myTxn.save(); 4. Executing with parameters. myTxn = MXReportTxnProvider.create(this.getDataSource().getName()); myStmt = myTxn.createStatement(); myStmt.setQuery("update ... set .... = ?, ... = ?"); myStmt.setQueryParameterValue(1, new Integer(0)); // using Integer object as an example. Also note the parameter index starts form 1 myStmt.setQueryParameterValue(2, "MyValue"); // using String object as an example myTxn.save();
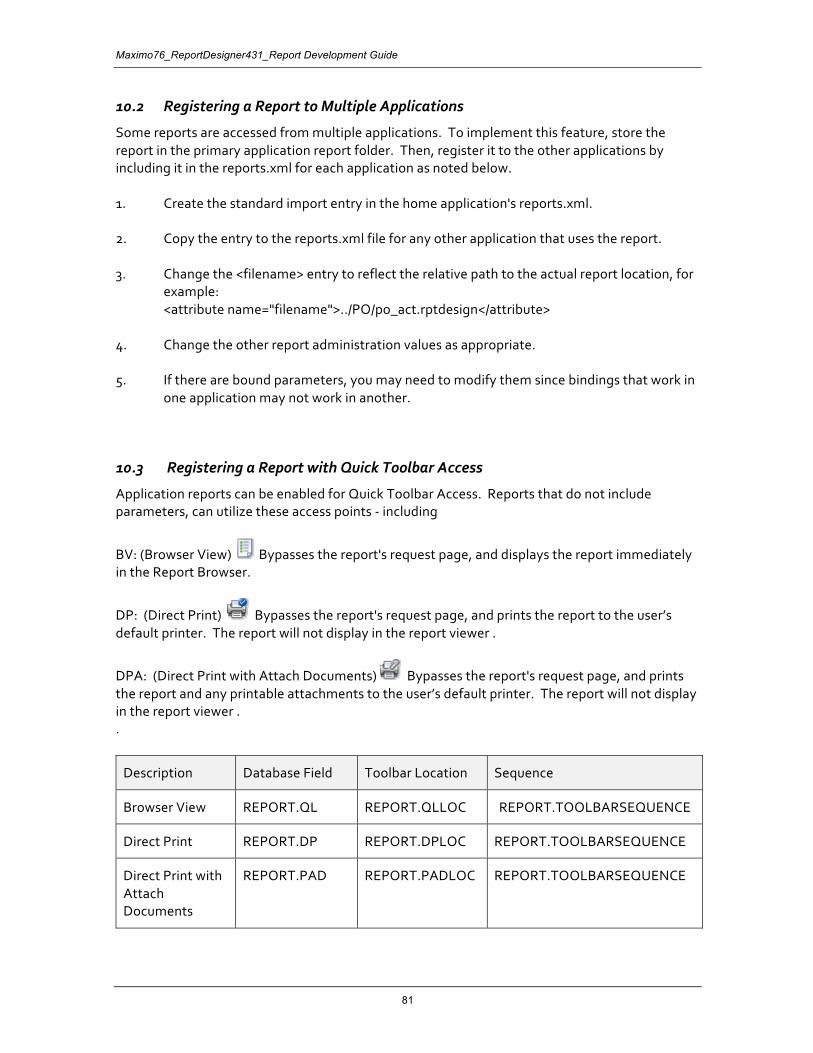
Maximo76_ReportDesigner431_Report Development Guide
81
10.2 Registering a Report to Multiple Applications
Some reports are accessed from multiple applications. To implement this feature, store the report in the primary application report folder. Then, register it to the other applications by including it in the reports.xml for each application as noted below. 1. Create the standard import entry in the home application's reports.xml. 2. Copy the entry to the reports.xml file for any other application that uses the report. 3. Change the <filename> entry to reflect the relative path to the actual report location, for example: <attribute name="filename">../PO/po_act.rptdesign</attribute> 4. Change the other report administration values as appropriate. 5. If there are bound parameters, you may need to modify them since bindings that work in one application may not work in another.
10.3 Registering a Report with Quick Toolbar Access
Application reports can be enabled for Quick Toolbar Access. Reports that do not include parameters, can utilize these access points - including
BV: (Browser View) Bypasses the report's request page, and displays the report immediately in the Report Browser.
DP: (Direct Print) Bypasses the report's request page, and prints the report to the user’s default printer. The report will not display in the report viewer .
DPA: (Direct Print with Attach Documents) Bypasses the report's request page, and prints the report and any printable attachments to the user’s default printer. The report will not display in the report viewer . .
Description Database Field Toolbar Location Sequence
Browser View REPORT.QL REPORT.QLLOC REPORT.TOOLBARSEQUENCE
Direct Print REPORT.DP REPORT.DPLOC REPORT.TOOLBARSEQUENCE
Direct Print with Attach Documents
REPORT.PAD REPORT.PADLOC REPORT.TOOLBARSEQUENCE
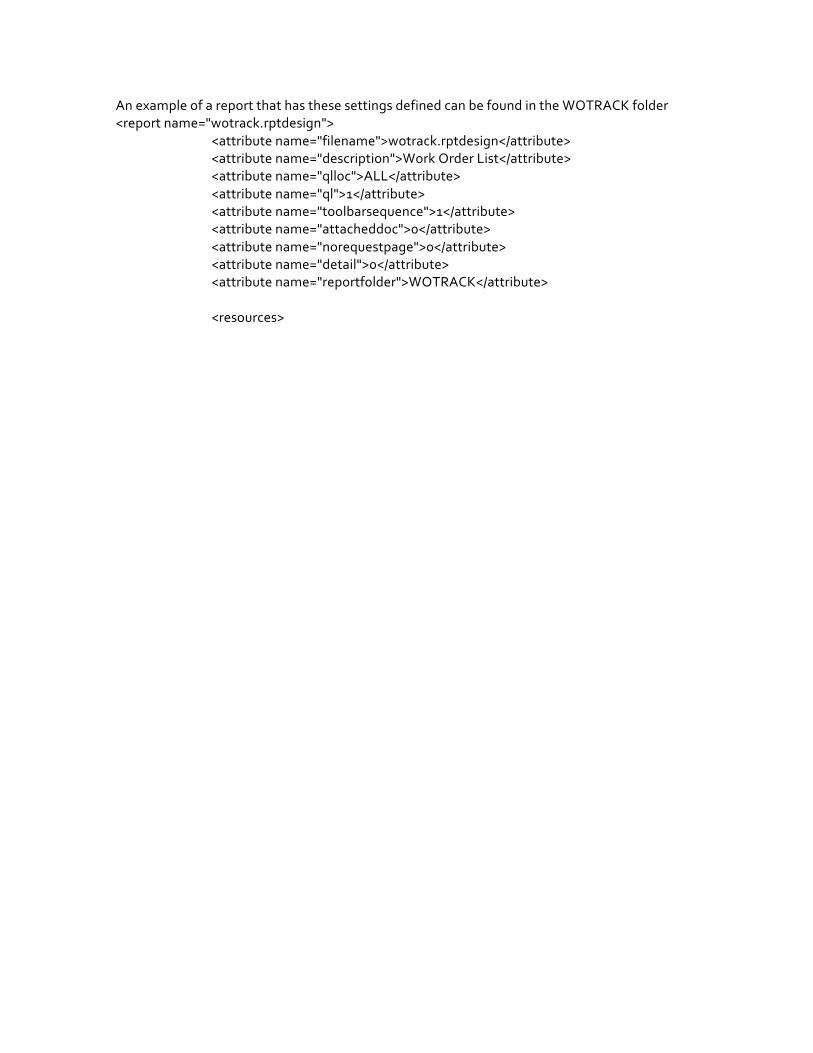
An example of a report that has these settings defined can be found in the WOTRACK folder <report name="wotrack.rptdesign"> <attribute name="filename">wotrack.rptdesign</attribute> <attribute name="description">Work Order List</attribute> <attribute name="qlloc">ALL</attribute> <attribute name="ql">1</attribute> <attribute name="toolbarsequence">1</attribute> <attribute name="attacheddoc">0</attribute> <attribute name="norequestpage">0</attribute> <attribute name="detail">0</attribute> <attribute name="reportfolder">WOTRACK</attribute> <resources>
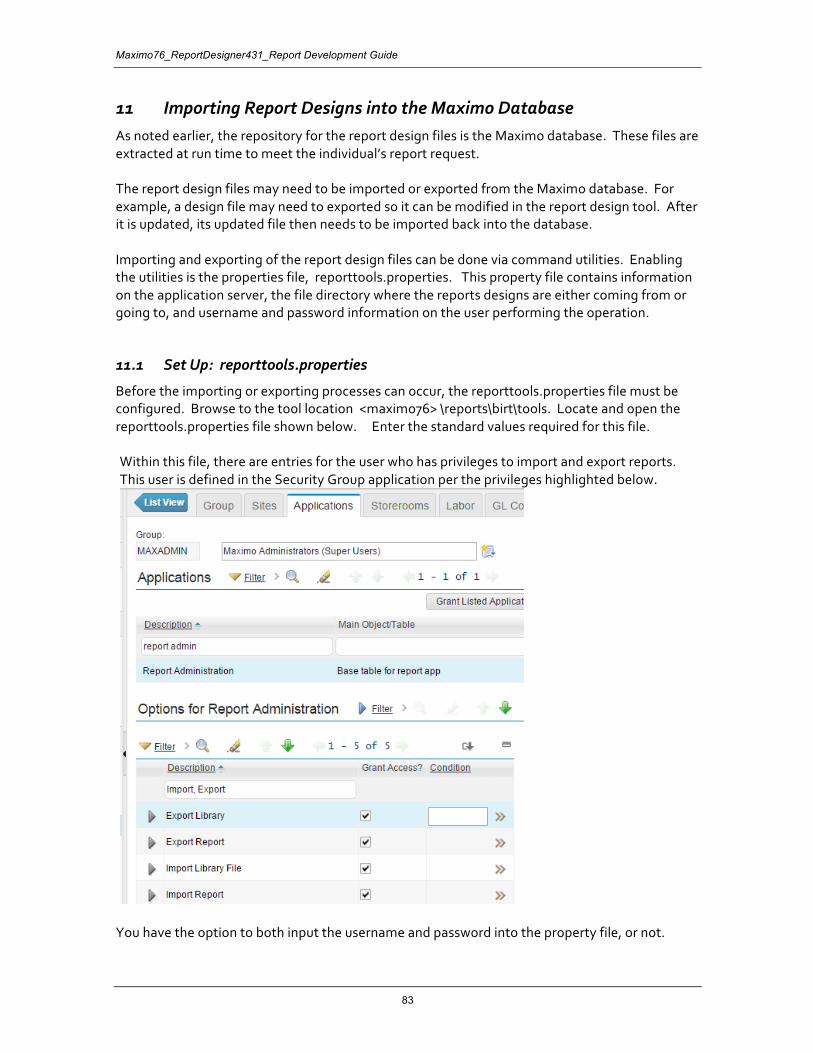
Maximo76_ReportDesigner431_Report Development Guide
83
11 Importing Report Designs into the Maximo Database As noted earlier, the repository for the report design files is the Maximo database. These files are extracted at run time to meet the individual’s report request. The report design files may need to be imported or exported from the Maximo database. For example, a design file may need to exported so it can be modified in the report design tool. After it is updated, its updated file then needs to be imported back into the database. Importing and exporting of the report design files can be done via command utilities. Enabling the utilities is the properties file, reporttools.properties. This property file contains information on the application server, the file directory where the reports designs are either coming from or going to, and username and password information on the user performing the operation.
11.1 Set Up: reporttools.properties
Before the importing or exporting processes can occur, the reporttools.properties file must be configured. Browse to the tool location <maximo76> \reports\birt\tools. Locate and open the reporttools.properties file shown below. Enter the standard values required for this file. Within this file, there are entries for the user who has privileges to import and export reports. This user is defined in the Security Group application per the privileges highlighted below.
You have the option to both input the username and password into the property file, or not.
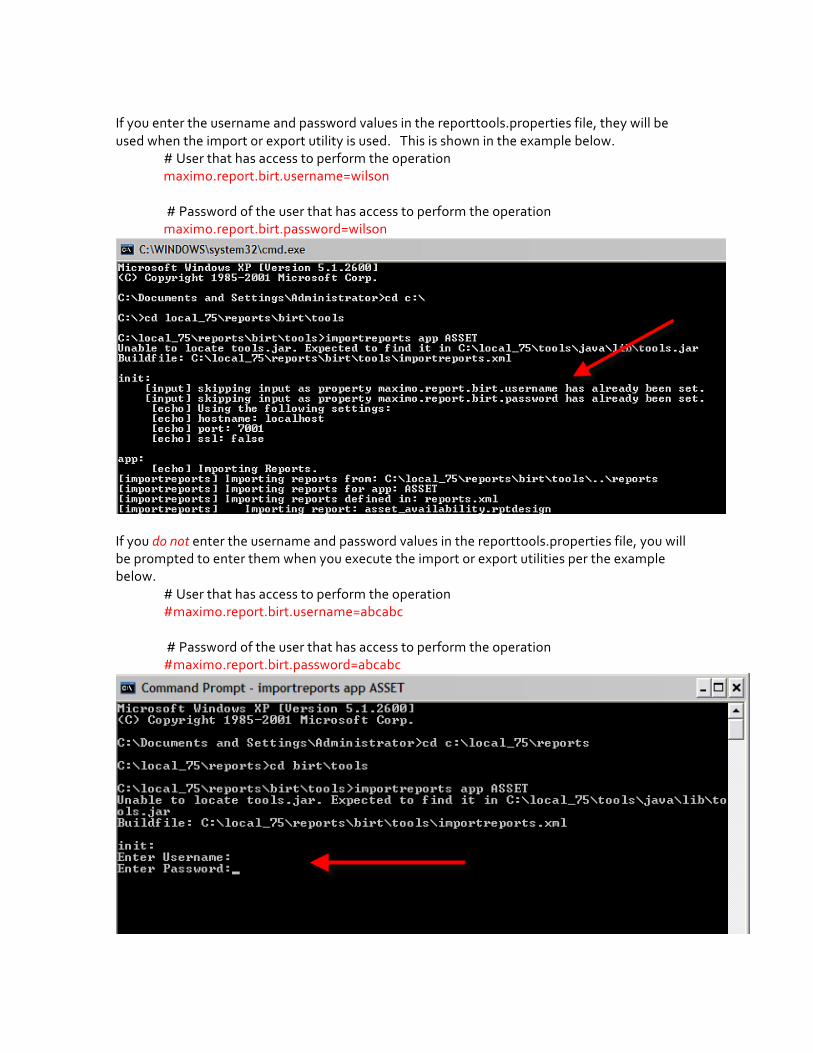
If you enter the username and password values in the reporttools.properties file, they will be used when the import or export utility is used. This is shown in the example below.
# User that has access to perform the operation maximo.report.birt.username=wilson
# Password of the user that has access to perform the operation maximo.report.birt.password=wilson
If you do not enter the username and password values in the reporttools.properties file, you will be prompted to enter them when you execute the import or export utilities per the example below.
# User that has access to perform the operation #maximo.report.birt.username=abcabc
# Password of the user that has access to perform the operation #maximo.report.birt.password=abcabc
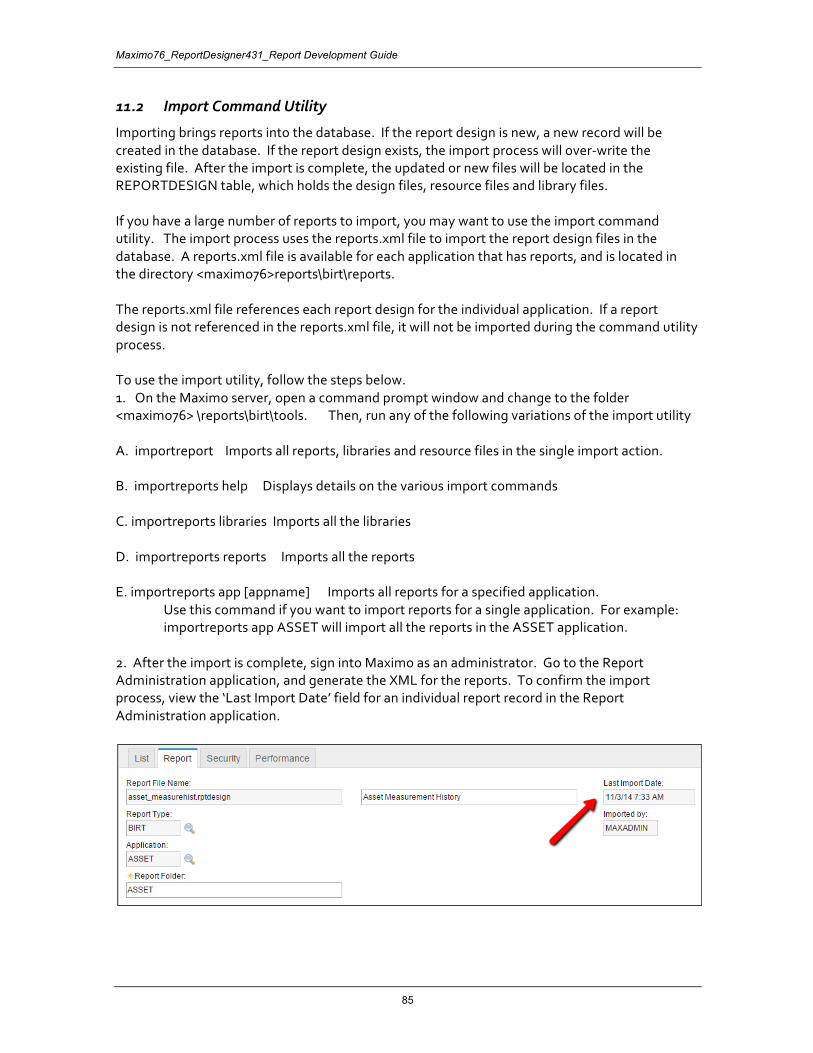
Maximo76_ReportDesigner431_Report Development Guide
85
11.2 Import Command Utility
Importing brings reports into the database. If the report design is new, a new record will be created in the database. If the report design exists, the import process will over-write the existing file. After the import is complete, the updated or new files will be located in the REPORTDESIGN table, which holds the design files, resource files and library files. If you have a large number of reports to import, you may want to use the import command utility. The import process uses the reports.xml file to import the report design files in the database. A reports.xml file is available for each application that has reports, and is located in the directory <maximo76>reports\birt\reports. The reports.xml file references each report design for the individual application. If a report design is not referenced in the reports.xml file, it will not be imported during the command utility process. To use the import utility, follow the steps below. 1. On the Maximo server, open a command prompt window and change to the folder <maximo76> \reports\birt\tools. Then, run any of the following variations of the import utility A. importreport Imports all reports, libraries and resource files in the single import action. B. importreports help Displays details on the various import commands C. importreports libraries Imports all the libraries D. importreports reports Imports all the reports E. importreports app [appname] Imports all reports for a specified application. Use this command if you want to import reports for a single application. For example: importreports app ASSET will import all the reports in the ASSET application. 2. After the import is complete, sign into Maximo as an administrator. Go to the Report Administration application, and generate the XML for the reports. To confirm the import process, view the ‘Last Import Date’ field for an individual report record in the Report Administration application.
11.3 Export Command Utility
Exporting enables you to modify or extend reports in the BIRT Designer, or create backups of your report source. Beginning in Maximo 76, you can export a single report design file from the Report Administration application. Additionally, you can use a variety of export utilities listed below. To enable exporting, go to the server, open a command prompt window and change to the folder <maximo76> \reports\birt\tools. Then, run any of the following variations of the export utility A. exportreports Exports all libraries and reports. B. exportreports report Exports all reports. C. exportreports library Exports all libraries. D. exportreports app [appname] Exports all reports for the specified application. E. exportreport report [appname] [reportfilename] Exports single, specified report for the specified application. The report(s) will be exported to the location defined by (1) the reporttools.properties file and (2) its report folder that it is registered to in the Report Administration application.
11.3.1 Export Example
To highlight the export feature, the example below uses the variety of commands for woprint.rptdesign. Reporttools.properties has been set to use the output location below. maximo.report.birt.outputfolder= <maximo76>/reports/birt/reports When the various exports commands are executed, the following will occur: 1. exportreports Exports all reports to <maximo76>/reports/birt/reports and their various subfolders AND Exports all libraries to<maximo76>/reports/birt/libraries 2. exportreports report Exports all reports to <maximo76>/reports/birt/reports and their various subfolders 3. exportreports library Export all libraries to <maximo76>/reports/birt/libraries 4. exportreports app WOTRACK Exports all reports registered to WOTRACK to <maximo76>/reports/birt/reports/WOTRACK 5. exportreport report WOTRACK woprint.rptdesign Exports woprint.rptdesign to <maximo76>/reports/birt/reports/WOTRACK
Maximo76_ReportDesigner431_Report Development Guide
87
11.3.2 Additional Command Utilities notes
A. If a report structure is not available in the location where the export is to occur, a file structure will be created.
B. If a reports.xml is not available in the location where the export is to occur, the
reports.xml will be created. • This may occur if you create a new custom report design file, and register and
import the report thru the Report Administration application. • If you do this and you make subsequent changes to the parameters or settings of
the report in the Report Administration application, make sure to export the report design file so any changes you are made are captured in the new reports.xml file.
C. If a reports.xml file does exist - the export will not overwrite the existing file.
• In this case, a new one will be created using a –filename. Ex: In WOTRACK folder, if reports.xml exists and a new export occurs, a new reports-wotrack.xml file will be created. This new reports-wotrack.xml will take precedence over the reports.xml file during any future importing actions.
D. Both the import and export command utility tools use HTTP, not RMI, to support application server security. Only BASIC authentication is supported. E. To enable the utilities for use with application server security, you must modify <maximo76>\applications\maximo\mboweb\webmodule\WEB-INF\web.xml. Open the file with a text editor and search for "AppServer security". Then, follow the instructions under the NOTE.
F. If your environment is utilizing SSL, additional steps are required to utilize the report command utilities. These utilities include import, export, and the update utilities for enterprise and ad hoc reports. The SSL certificate must be imported to each jvm in the directory: <directory>/tools/java/jre An example of a SSL certificate updated to include Maximo as a trusted source is shown below. keytool -import -alias [MY_CERT_ALIAS] -keypass changeit -keystore <maximoroot>/tools/java/jre/lib/security/cacerts -file cert.pem where MY_CERT_ALIAS is a name of the certificate and cert.pem is the certificate. *Note: These steps should be performed by the individual(s) enabling or maintaining SSL in your environment.
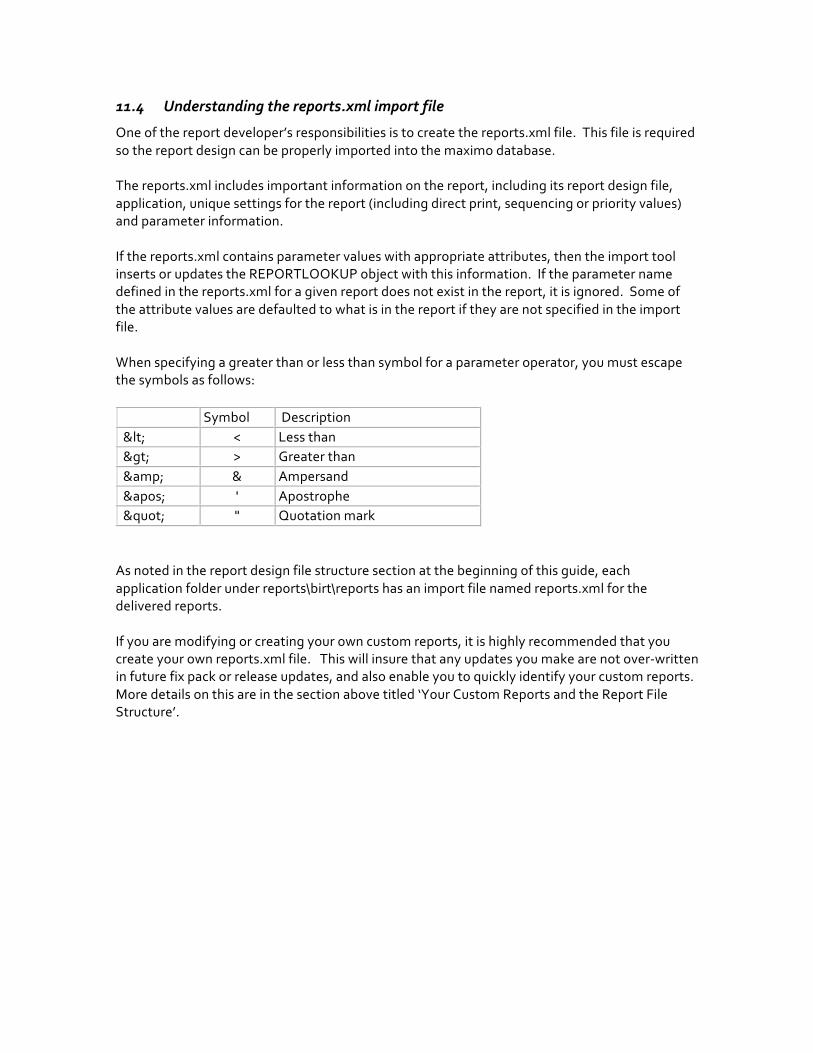
11.4 Understanding the reports.xml import file
One of the report developer’s responsibilities is to create the reports.xml file. This file is required so the report design can be properly imported into the maximo database. The reports.xml includes important information on the report, including its report design file, application, unique settings for the report (including direct print, sequencing or priority values) and parameter information. If the reports.xml contains parameter values with appropriate attributes, then the import tool inserts or updates the REPORTLOOKUP object with this information. If the parameter name defined in the reports.xml for a given report does not exist in the report, it is ignored. Some of the attribute values are defaulted to what is in the report if they are not specified in the import file. When specifying a greater than or less than symbol for a parameter operator, you must escape the symbols as follows: Symbol Description < < Less than > > Greater than & & Ampersand ' ' Apostrophe " " Quotation mark As noted in the report design file structure section at the beginning of this guide, each application folder under reports\birt\reports has an import file named reports.xml for the delivered reports. If you are modifying or creating your own custom reports, it is highly recommended that you create your own reports.xml file. This will insure that any updates you make are not over-written in future fix pack or release updates, and also enable you to quickly identify your custom reports. More details on this are in the section above titled ‘Your Custom Reports and the Report File Structure’.
Maximo76_ReportDesigner431_Report Development Guide
89
11.5 Preparing the reports.xml
If you are creating a reports.xml file for your modified or new custom report, any text editor like word pad or notepad can be used. The work to create this xml file is not done in the design tool. Create the reports.xml file by following the steps below.
1. Copy an existing reports.xml file either from the application your report will reside in – or one that is very similar to your new report requirements. 2. Rename the copied version to a unique identifier, which could include attaching your company name at the end of the file, like reports_abc.xml. 3. If you are modifying an existing report, modify the values for the new report file name and any other attribute changes. 4. If you are adding a new report, either enter new values or modify existing values for the new report content. 5. Delete all other references to design files that you have not modified. Save.
Notes: A. For an example of a report using a parameter, reference the Security Group Report (security_group.rptdesign) located in <maximo76> \reports\birt\reports\SECURITY B. For an example of reports using the application query and having various toolbar settings enabled, reference the Job Plan List and Detail reports located in
<maximo76> \reports\birt\reports\JOBPLAN C. If you are unsure what delivered reports have parameter values, access the Report Booklet referenced at the end of this guide. This contains details on each report’s parameters, along with various toolbar settings that are enabled for each report. D. Below please find more details each of the fields that can be used in defining a report in the reports.xml file. Each setting is not required, and those settings not required are noted in black text.
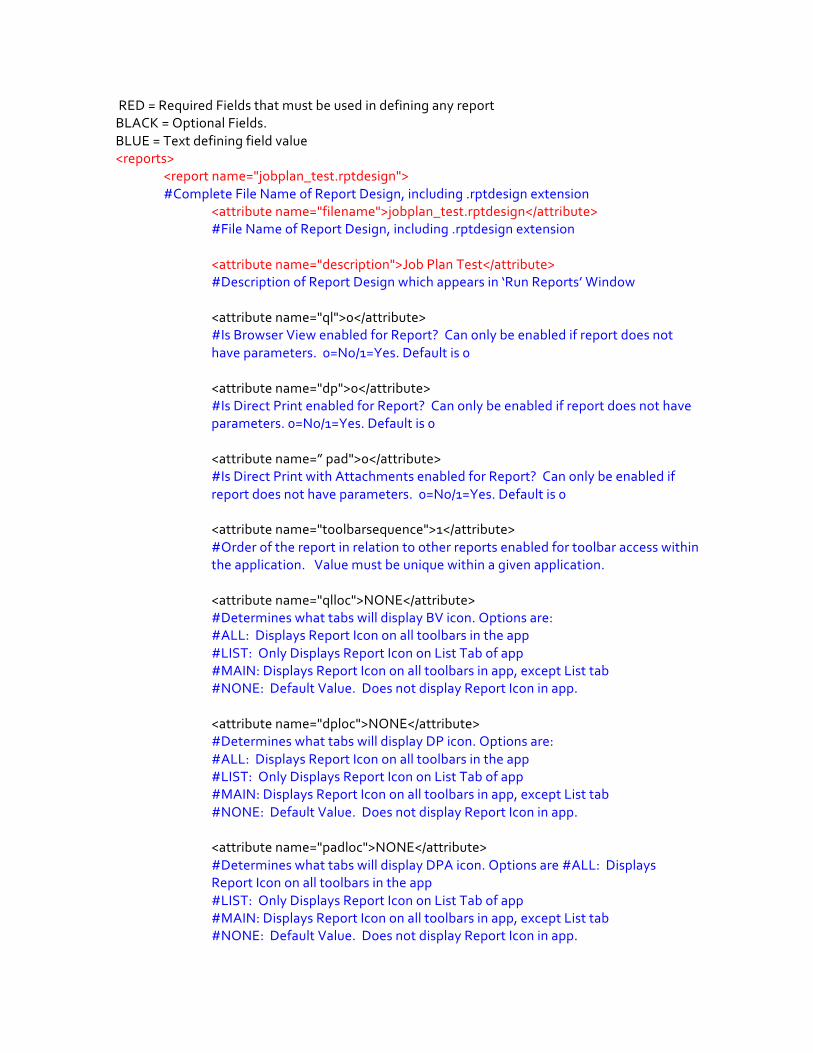
RED = Required Fields that must be used in defining any report BLACK = Optional Fields. BLUE = Text defining field value <reports> <report name="jobplan_test.rptdesign">
#Complete File Name of Report Design, including .rptdesign extension <attribute name="filename">jobplan_test.rptdesign</attribute> #File Name of Report Design, including .rptdesign extension <attribute name="description">Job Plan Test</attribute>
#Description of Report Design which appears in ‘Run Reports’ Window <attribute name="ql">0</attribute>
#Is Browser View enabled for Report? Can only be enabled if report does not have parameters. 0=No/1=Yes. Default is 0 <attribute name="dp">0</attribute> #Is Direct Print enabled for Report? Can only be enabled if report does not have parameters. 0=No/1=Yes. Default is 0 <attribute name=” pad">0</attribute> #Is Direct Print with Attachments enabled for Report? Can only be enabled if report does not have parameters. 0=No/1=Yes. Default is 0
<attribute name="toolbarsequence">1</attribute> #Order of the report in relation to other reports enabled for toolbar access within the application. Value must be unique within a given application. <attribute name="qlloc">NONE</attribute> #Determines what tabs will display BV icon. Options are: #ALL: Displays Report Icon on all toolbars in the app #LIST: Only Displays Report Icon on List Tab of app #MAIN: Displays Report Icon on all toolbars in app, except List tab #NONE: Default Value. Does not display Report Icon in app. <attribute name="dploc">NONE</attribute> #Determines what tabs will display DP icon. Options are: #ALL: Displays Report Icon on all toolbars in the app #LIST: Only Displays Report Icon on List Tab of app #MAIN: Displays Report Icon on all toolbars in app, except List tab #NONE: Default Value. Does not display Report Icon in app. <attribute name="padloc">NONE</attribute> #Determines what tabs will display DPA icon. Options are #ALL: Displays Report Icon on all toolbars in the app #LIST: Only Displays Report Icon on List Tab of app #MAIN: Displays Report Icon on all toolbars in app, except List tab #NONE: Default Value. Does not display Report Icon in app.
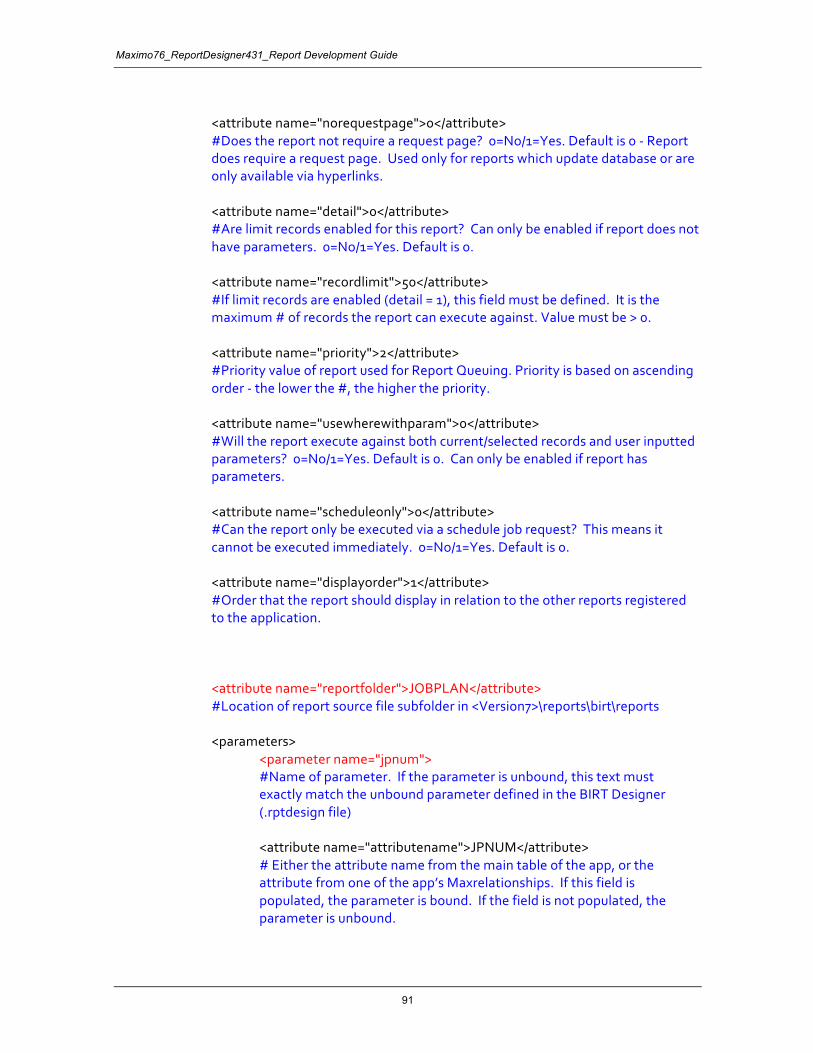
Maximo76_ReportDesigner431_Report Development Guide
91
<attribute name="norequestpage">0</attribute>
#Does the report not require a request page? 0=No/1=Yes. Default is 0 - Report does require a request page. Used only for reports which update database or are only available via hyperlinks.
<attribute name="detail">0</attribute> #Are limit records enabled for this report? Can only be enabled if report does not have parameters. 0=No/1=Yes. Default is 0.
<attribute name="recordlimit">50</attribute>
#If limit records are enabled (detail = 1), this field must be defined. It is the maximum # of records the report can execute against. Value must be > 0.
<attribute name="priority">2</attribute> #Priority value of report used for Report Queuing. Priority is based on ascending order - the lower the #, the higher the priority.
<attribute name="usewherewithparam">0</attribute> #Will the report execute against both current/selected records and user inputted parameters? 0=No/1=Yes. Default is 0. Can only be enabled if report has parameters. <attribute name="scheduleonly">0</attribute> #Can the report only be executed via a schedule job request? This means it cannot be executed immediately. 0=No/1=Yes. Default is 0. <attribute name="displayorder">1</attribute> #Order that the report should display in relation to the other reports registered to the application.
<attribute name="reportfolder">JOBPLAN</attribute>
#Location of report source file subfolder in <Version7>\reports\birt\reports <parameters> <parameter name="jpnum">
#Name of parameter. If the parameter is unbound, this text must exactly match the unbound parameter defined in the BIRT Designer (.rptdesign file)
<attribute name="attributename">JPNUM</attribute> # Either the attribute name from the main table of the app, or the attribute from one of the app’s Maxrelationships. If this field is populated, the parameter is bound. If the field is not populated, the parameter is unbound.
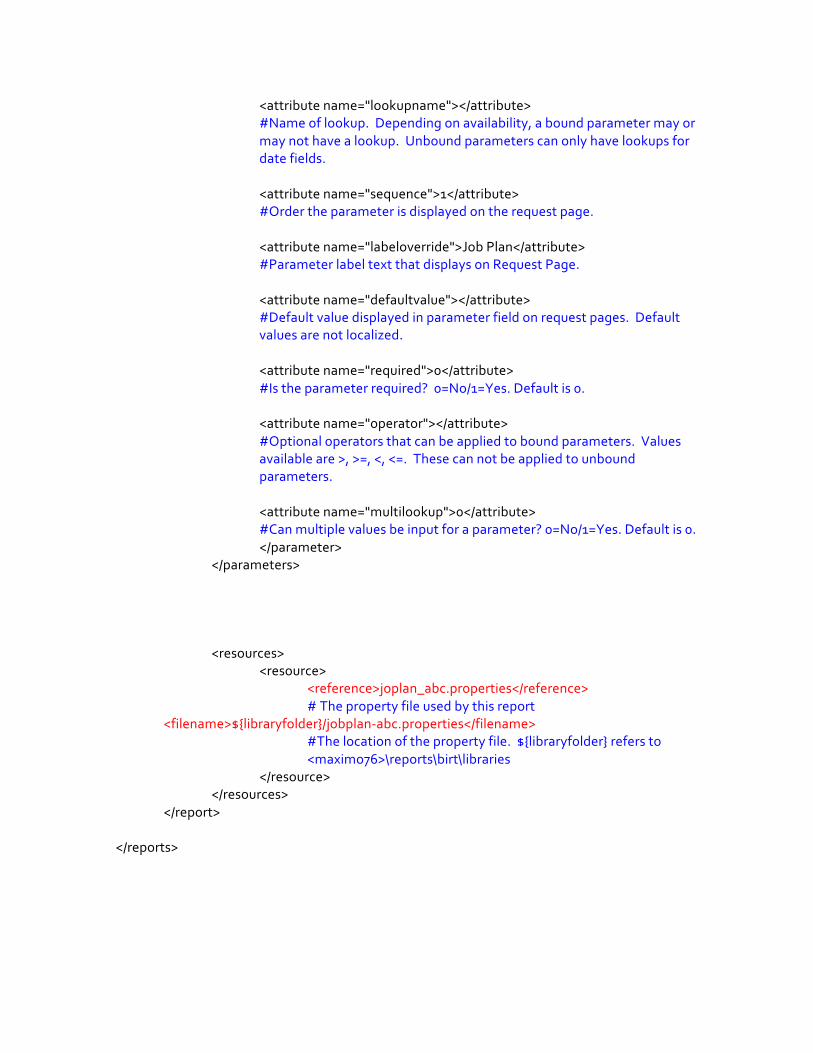
<attribute name="lookupname"></attribute> #Name of lookup. Depending on availability, a bound parameter may or may not have a lookup. Unbound parameters can only have lookups for date fields.
<attribute name="sequence">1</attribute> #Order the parameter is displayed on the request page.
<attribute name="labeloverride">Job Plan</attribute> #Parameter label text that displays on Request Page.
<attribute name="defaultvalue"></attribute> #Default value displayed in parameter field on request pages. Default values are not localized.
<attribute name="required">0</attribute>
#Is the parameter required? 0=No/1=Yes. Default is 0.
<attribute name="operator"></attribute> #Optional operators that can be applied to bound parameters. Values available are >, >=, <, <=. These can not be applied to unbound parameters.
<attribute name="multilookup">0</attribute> #Can multiple values be input for a parameter? 0=No/1=Yes. Default is 0.
</parameter> </parameters>
<resources> <resource> <reference>joplan_abc.properties</reference> # The property file used by this report <filename>${libraryfolder}/jobplan-abc.properties</filename>
#The location of the property file. ${libraryfolder} refers to <maximo76>\reports\birt\libraries
</resource> </resources> </report> </reports>
Maximo76_ReportDesigner431_Report Development Guide
93
11.6 Miscellaneous Utilities
Additional update utilities can be used to automate the process of applying updates to report designs, rather than manually editing each report. These are known as update utilities, and supplement the existing utilities of importing and exporting report designs. The update utilities are available for both Enterprise Reports, and Ad Hoc or QBR Reports. For the latest information on the Update reports utilities, reference the Maximo Report Reference Material noted here https://www.ibm.com/developerworks/community/wikis/home?lang=en#!/wiki/IBM%20Maximo%20Asset%20Management/page/Reporting%20Documentation or download a spreadsheet of the latest materials available here http://ibm.co/1I1hxh9
12 Reports in a Multitenancy Sysem
This section is for clients who have configured Maximo as a Multi-tenant environment only. As the system provider you can administer and run predefined reports. You can also import new and updated reports to the multitenancy system. You supply files to tenants that want to develop their own report definitions. As a tenant user you can run the set of reports that are delivered by the system provider. Before the system provider modifies any reports, the original reports must be backed up. When a tenant is created, template report tables and report designs are allocated to them. Tenants can develop reports to support their business needs, but before they can do this, they must request the following files from the system provider: 1. The compiled class files that are used for report scripting. The files are in the system provider's <maximo76>\reports\birt\scriptlibrary\classes directory. 2. The specific JDBC driver files for DB2: db2jcc.jar and db2jcc_license_cu.jar 3. The eclipse jar file referenced in Section 2.2.D above 4. The mxreportdatasources.properties file referenced in section 2.3 above. 5. The template files which are in <maximo76>\reports\birt\templates. The files are used when the tenant configures the BIRT report designer. In addition to the report development described in this guide, tenants can develop reports to include fields from extension tables. Extension tables are tables that hold extra columns that correspond to the default product tables. To include an extended field, the table name must be replaced with the name of the extension view in the SQL for the report query. Extended fields can be used in ad-hoc reports. The system provider can use the report command utility to import the demo data reports and to load new template reports for tenants. When using the report command utility, the system provider must specify the tenant that the system provider is importing reports for. It is not possible to concurrently import reports for multiple tenants. Enabling tenants to develop reports Before tenants can develop reports, the system provider must provide them with
Maximo76_ReportDesigner431_Report Development Guide
95
files noted above to configure the report designer. The tenant must copy and the files into their own file system. The tenant then follows the steps noted in Section 2 above to install and configure the BIRT Report Designer with Maximo. Developing reports that include extension tables Every table in the product can have a corresponding extension table that holds extra columns. Tenants can develop reports to include fields from extension tables. To include an extended field, the table name must be replaced with the name of the extension view in the SQL for the report query. If you want to develop a report that includes fields from an extension table, use this procedure in place of step 5.1 in the Developing a report section of this guide. For example, a tenant has a report that includes the following SQL: select jobplan.jobplanid, jobplan.jpnum, jobplan.description, jobplan.jpduration, jobplan.priority, jobplan.siteid from jobplan Extension view names have the format TABLENAMEEXT_TENANTID. To modify the report query SQL statement to include the extended field, replace the table name with the name of the view that includes the extension table. Then, alias the view with the original table name. So if the tenant ID is 1001, the modified SQL would be: select jobplan.jobplanid, jobplan.jpnum, jobplan.description, jobplan.jpduration, jobplan.priority, jobplan.siteid, jobplan.extended_field from jobplanext_1001 as jobplan When the query is updated with the extended field, it can be used in the report. The report is updated only if an extended field is displayed in the report output. You do not need to modify the report query SQL to enable a report to run that uses an application filter, or where clause that includes extended fields. When the report is run, the SQL is updated to reference the extension view instead of the table name of the application. Procedure 1. In your report query SQL, replace the table name with the name of the view that includes the extension table. 2. Alias the view name with the name of the table. 3. To add the extended field to the report, follow the additional steps in Section 5 of this guide.
13 Best Practices The following lists best practices to take into consideration for your custom reports
1. Hierarchy reports. Hierarchy reports should not be developed at greater than 7 levels. If more than 7 levels are required, enable a hyperlink at the seventh level to enable further drill down.
2. Minimum memory requirements. To insure optimal performance, insure that the Maximo recommended minimum memory are utilized.
Maximo76_ReportDesigner431_Report Development Guide
97
REFERENCE MATERIALS
A number of different reporting reference materials are available to you. This section will highlight some of those reference materials on customizing reports. To locate all report documentation, access this IBM Maximo Wiki Page: Maximo 7.6 Report Reference Materials: http://ibm.co/1ybttI2 Maximo 7.x Report Reference Materials: http://ibm.co/1xdsPsN Maximo 7.6 Video Recordings: http://ibm.co/1BZ4nwl
13.1 Changing Report Logos
http://www-304.ibm.com/support/docview.wss?uid=swg21304923 The Maximo 76 delivered reports contain a single corporate logo. You may want to update your reports to include your own corporate logos. Access this document to find out more details
13.2 Understanding Report Paper Sizes and Page Breaks
http://www-01.ibm.com/support/docview.wss?uid=swg21317577 This document reviews the components impacting report page sizes and orientation used in the Maximo reports. It also details how you can customize them to meet your individual business needs.
13.3 Modifying Delivered Reports
http://www-01.ibm.com/support/docview.wss?uid=swg21438532 The delivered reports may not meet your individual business needs. You may need to add or remove fields to these reports to reflect your unique environment. This document details how you can modify the out of the box. It uses the Work Order Details Report as an example. Three examples of modifications are detailed, including A. Deleting Fields from the Planned Labor Section B. Deleting Fields from the Actual Labor Section C. Adding Fields to the Actual Material Section
® © Copyright IBM Corporation 2019 IBM United States of America Produced in the United States of America US Government Users Restricted Rights - Use, duplication or disclosure restricted by GSA ADP Schedule Contract with IBM Corp. IBM may not offer the products, services, or features discussed in this document in other countries. Consult your local IBM representative for information on the products and services currently available in your area. Any reference to an IBM product, program, or service is not intended to state or imply that only that IBM product, program, or service may be used. Any functionally equivalent product, program, or service that does not infringe any IBM intellectual property right may be used instead. However, it is the user's responsibility to evaluate and verify the operation of any non-IBM product, program, or service.
IBM may have patents or pending patent applications covering subject matter described in this document. The furnishing of this document does not grant you any license to these patents. You can send license inquiries, in writing, to:
IBM Director of Licensing IBM Corporation North Castle Drive Armonk, NY 10504-1785 U.S.A.
The following paragraph does not apply to the United Kingdom or any other country where such provisions are inconsistent with local law: INTERNATIONAL BUSINESS MACHINES CORPORATION PROVIDES THIS PAPER “AS IS” WITHOUT WARRANTY OF ANY KIND, EITHER EXPRESS OR IMPLIED, INCLUDING, BUT NOT LIMITED TO, THE IMPLIED WARRANTIES OF NON-INFRINGEMENT, MERCHANTABILITY OR FITNESS FOR A PARTICULAR PURPOSE. Some states do not allow disclaimer of express or implied warranties in certain transactions, therefore, this statement may not apply to you. This information could include technical inaccuracies or typographical errors. Changes may be made periodically to the information herein; these changes may be incorporated in subsequent versions of the paper. IBM may make improvements and/or changes in the product(s) and/or the program(s) described in this paper at any time without notice. Any references in this document to non-IBM Web sites are provided for convenience only and do not in any manner serve as an endorsement of those Web sites. The materials at those Web sites are not part of the materials for this IBM product and use of those Web sites is at your own risk.
IBM may have patents or pending patent applications covering subject matter described in this document. The furnishing of this document does not give you any license to these patents. You can send license inquiries, in writing, to: IBM Director of Licensing IBM Corporation 4205 South Miami Boulevard Research Triangle Park, NC 27709 U.S.A. All statements regarding IBM's future direction or intent are subject to change or withdrawal without notice, and represent goals and objectives only.This information is for planning purposes only. The information herein is subject to change before the products described become available. If you are viewing this information softcopy, the photographs and color illustrations may not appear.