Embed Size (px)
Citation preview

IBM ThinkPad T42 TeardownBasic outline on complete disassembly of this laptop computer.
Written By: eric
IBM ThinkPad T42 Teardown
© iFixit — CC BY-NC-SA www.iFixit.com Page 1 of 16

INTRODUCTION
Disassembly outline
1. BatteryHard DriveOptical Drive
2. Memory CoverRAM Memory
3. Keyboard/Trackpad/Top CoverMini-PCI SlotWi-Fi CardInternal BatteryDisplay
4. Side BezelVideo Card / Fan
Processor5. Metal Casings6. Plastics
Motherboard
TOOLS:2.5 mm Flathead Screwdriver (1)
Phillips #0 Screwdriver (1)
IBM ThinkPad T42 Teardown
© iFixit — CC BY-NC-SA www.iFixit.com Page 2 of 16

Step 1 — Complete Disassembly
Removing the battery
Unplug the power cable before removing the battery.
Slide the 2 sliders on the under side of the laptop to the unlock position, as shown.
Grasp the battery and pull it straight out - not at an angle.
Step 2
Removing the Hard Drive
Unscrew the screw holding the Hard Drive slot in place.
Pull the hard drive out with the help of pictured ridges. Cautiously maneuver it out - it might helpto open the display slightly.
IBM ThinkPad T42 Teardown
© iFixit — CC BY-NC-SA www.iFixit.com Page 3 of 16

Step 3
Removing the Optical Drive
Remove the screw holding the optical drive on the underside of the laptop
Push the small slider to unlock position, a tab will automatically pop out.
Pull tab to dislodge the optical drive, then pull the drive out.
IBM ThinkPad T42 Teardown
© iFixit — CC BY-NC-SA www.iFixit.com Page 4 of 16

Step 4
Removing Memory Cover/Replacing RAM
Unscrew the pictured screwed holding the memory cover in place.
Pry the cover open carefully (flathead screwdriver might help)
To remove the RAM memory stick, push both metal pieces holding it in place outwards, and thestick will pop up. -picture of RAM inside -
Pull the stick out carefully. - Picture of the RAM stick -
IBM ThinkPad T42 Teardown
© iFixit — CC BY-NC-SA www.iFixit.com Page 5 of 16

Step 5
Removing Rear Cover
Unscrew the rest of the screws on the underside of the T42.
Unscrew the 4 screws on either side the rear end of the laptop.
Note: for ease of reassembly, keep track of which screws go where.
[ a line-drawing version is included so it can be printed and screws can be taped on ]
IBM ThinkPad T42 Teardown
© iFixit — CC BY-NC-SA www.iFixit.com Page 6 of 16
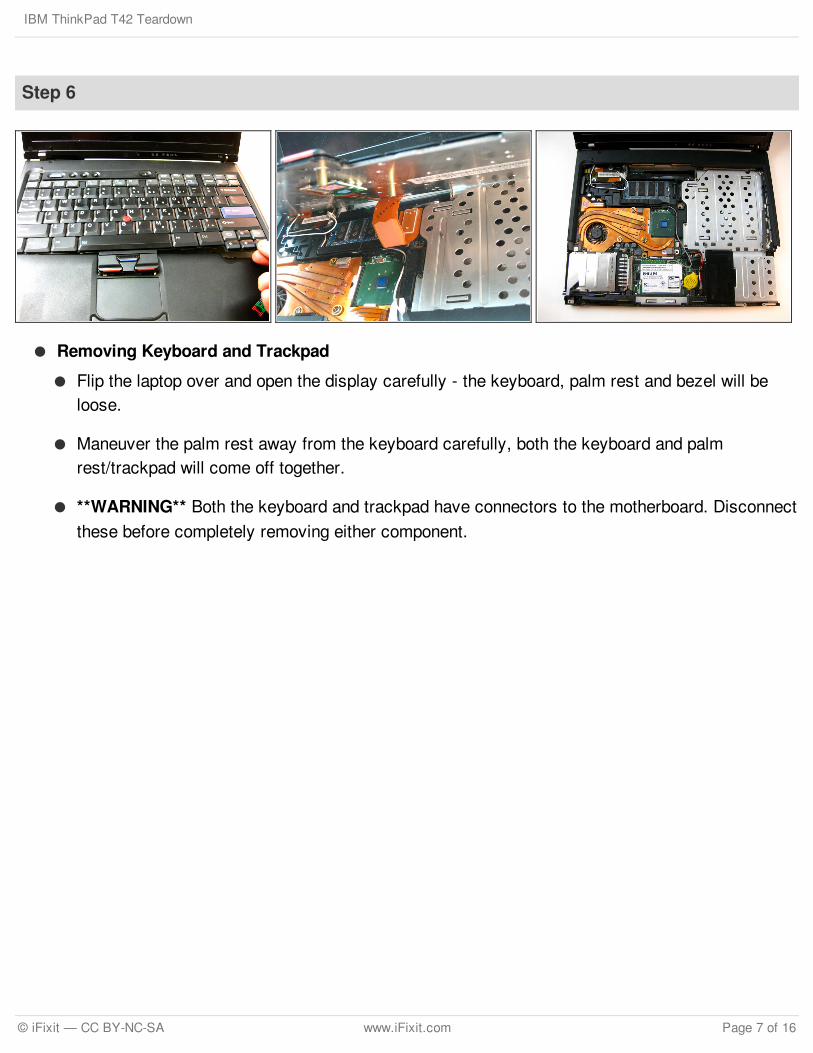
Step 6
Removing Keyboard and Trackpad
Flip the laptop over and open the display carefully - the keyboard, palm rest and bezel will beloose.
Maneuver the palm rest away from the keyboard carefully, both the keyboard and palmrest/trackpad will come off together.
**WARNING** Both the keyboard and trackpad have connectors to the motherboard. Disconnectthese before completely removing either component.
IBM ThinkPad T42 Teardown
© iFixit — CC BY-NC-SA www.iFixit.com Page 7 of 16

Step 7
From here you can remove multiple components.
Removing Wi-Fi Card
To remove Wi-Fi card, first disconnect both display wires on the top right.
Then slide both of the metal pieces holding it down outwards, and it will pop up.
Carefully pull it out.
Step 8
Removing Mini-PCI Port
Unscrew the screw holding the port's bracket down, then remove the bracket.
Carefully disconnect it from the motherboard.
IBM ThinkPad T42 Teardown
© iFixit — CC BY-NC-SA www.iFixit.com Page 8 of 16

Step 9
Removing Top Plastic
Starting from the bottom right, carefully pry off the bezel. Use a small, flathead screwdriver ifnecessary.
IBM ThinkPad T42 Teardown
© iFixit — CC BY-NC-SA www.iFixit.com Page 9 of 16

Step 10
Removing the Display
To remove the display, unscrew the screws holding it down. Along with the one pictured, there isanother one on the top right edge.
Carefully unplug the its connection with the motherboard.
Now it will be free to move. Carefully maneuver it out.
Step 11
Removing Lower Bracket
The bracket will be free to move, so remove it.
Then remove the small rubber piece covering the small battery.
IBM ThinkPad T42 Teardown
© iFixit — CC BY-NC-SA www.iFixit.com Page 10 of 16

Step 12
Removing Speakers
This component is free to move, so disconnect it's connector and pull it out carefully.
IBM ThinkPad T42 Teardown
© iFixit — CC BY-NC-SA www.iFixit.com Page 11 of 16

Step 13
Removing Fan
Unscrew the three shown screws, then unplug its connection with the motherboard.
**Since both the processor and graphics processor unit are attached to this fan with thermalpaste, removing the fan might require some force and a flathead screwdriver to separate thepaste from the fan.
IBM ThinkPad T42 Teardown
© iFixit — CC BY-NC-SA www.iFixit.com Page 12 of 16

Step 14
Removing Processor
After removal of the fan, you have access to the processor. Locate its locking mechanism.
Use a flat head screwdriver and twist it carefully to the "unlocked" position.
Carefully pull the processor out.
***CAUTION - If replacing the processor, make sure the small arrow on the corner alignswith socket.
Step 15
Removing Modem Daughter Card
Unscrew three phillips screws as shown.
The connector cables are wrapped around components for organization so follow these, unplugthem and carefully pull them free.
Then remove the bracket that was sitting beneath it.
IBM ThinkPad T42 Teardown
© iFixit — CC BY-NC-SA www.iFixit.com Page 13 of 16

Step 16
Removing Metal Casing
Unscrew the Philips head screws as shown
It is attached to the smaller black plastic piece below it - carefully maneuver both of them out atthe same time.
Step 17
Removing Plastic
This will be free to move, so pull itout.
IBM ThinkPad T42 Teardown
© iFixit — CC BY-NC-SA www.iFixit.com Page 14 of 16
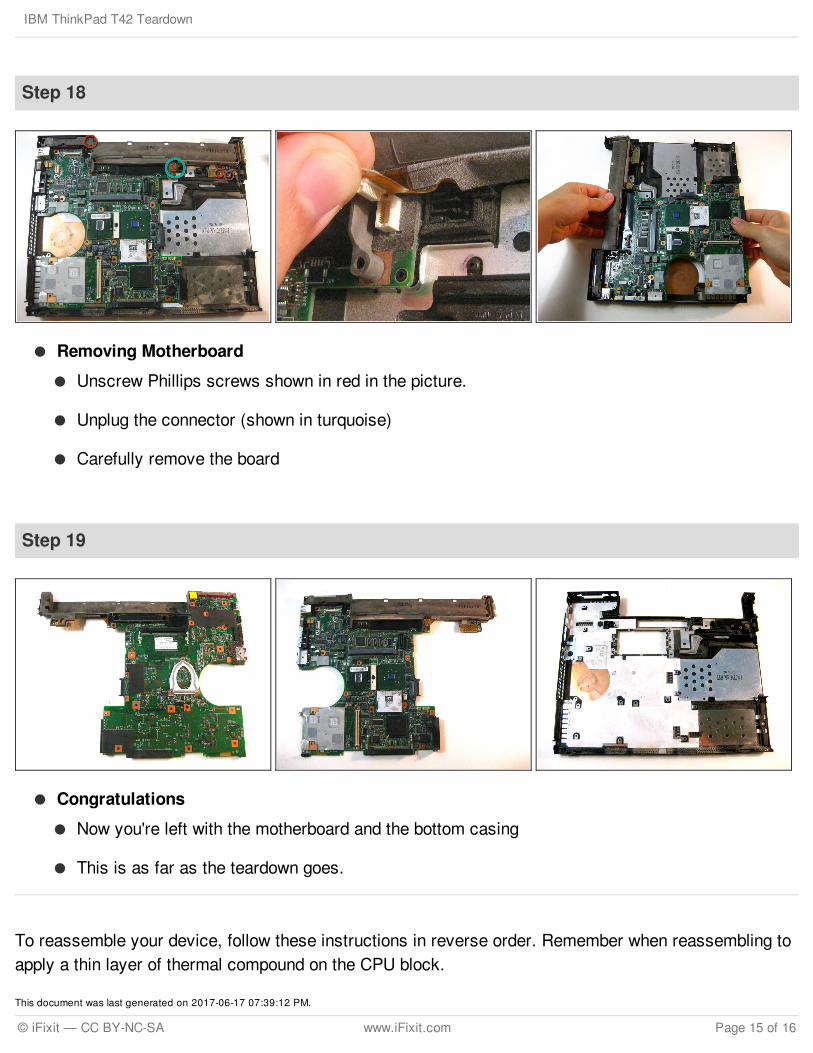
To reassemble your device, follow these instructions in reverse order. Remember when reassembling toapply a thin layer of thermal compound on the CPU block.
This document was last generated on 2017-06-17 07:39:12 PM.
Step 18
Removing Motherboard
Unscrew Phillips screws shown in red in the picture.
Unplug the connector (shown in turquoise)
Carefully remove the board
Step 19
Congratulations
Now you're left with the motherboard and the bottom casing
This is as far as the teardown goes.
IBM ThinkPad T42 Teardown
© iFixit — CC BY-NC-SA www.iFixit.com Page 15 of 16

IBM ThinkPad T42 Teardown
© iFixit — CC BY-NC-SA www.iFixit.com Page 16 of 16