Embed Size (px)
Citation preview

IAN 313476
SANDWICHERA / TOSTIERA SSMW 750 C3
SANDWICHMAKERBedienungsanleitung
SANDWICHERAInstrucciones de uso
SANDWICH TOASTEROperating instructions
TOSTADEIRAManual de instruções
TOSTIERAIstruzioni per l'uso

ES Instrucciones de uso Página 1IT / MT Istruzioni per l'uso Pagina 21PT Manual de instruções Página 41GB / MT Operating instructions Page 61DE / AT / CH Bedienungsanleitung Seite 81
Antes de empezar a leer abra la página que contiene las imágenes y, en seguida, familiarícese con todas las funciones del dispositivo.
Prima di leggere aprire la pagina con le immagini e prendere confidenza con le diverse funzioni dell'apparecchio.
Antes de começar a ler abra na página com as imagens e, de seguida, familiarize-se com todas as funções do aparelho.
Before reading, unfold the page containing the illustrations and familiarise yourself with all functions of the device.
Klappen Sie vor dem Lesen die Seite mit den Abbildungen aus und machen Sie sich anschließend mit allen Funktionen des Gerätes vertraut.

A B
E
D
C

ES │ 1 ■SSMW 750 C3
Índice
Introducción . . . . . . . . . . . . . . . . . . . . . . . . . . . . . . . . . . . . . . . . . . . . . . . . . . . 2
Derechos de autor . . . . . . . . . . . . . . . . . . . . . . . . . . . . . . . . . . . . . . . . . . . . . . . . . . . . . . . . 2Aviso legal . . . . . . . . . . . . . . . . . . . . . . . . . . . . . . . . . . . . . . . . . . . . . . . . . . . . . . . . . . . . . . 2Finalidad de uso . . . . . . . . . . . . . . . . . . . . . . . . . . . . . . . . . . . . . . . . . . . . . . . . . . . . . . . . . 2
Volumen de suministro . . . . . . . . . . . . . . . . . . . . . . . . . . . . . . . . . . . . . . . . . . 3
Evacuación del embalaje . . . . . . . . . . . . . . . . . . . . . . . . . . . . . . . . . . . . . . . . . . . . . . . . . . 3
Descripción de aparatos . . . . . . . . . . . . . . . . . . . . . . . . . . . . . . . . . . . . . . . . . 4
Características técnicas . . . . . . . . . . . . . . . . . . . . . . . . . . . . . . . . . . . . . . . . . . 5
Indicaciones de seguridad . . . . . . . . . . . . . . . . . . . . . . . . . . . . . . . . . . . . . . . 5
Sustitución de las placas de intercambio . . . . . . . . . . . . . . . . . . . . . . . . . . . 8
Inserción de las placas de intercambio . . . . . . . . . . . . . . . . . . . . . . . . . . . . . . . . . . . . . . . . 8Extracción de las placas de intercambio . . . . . . . . . . . . . . . . . . . . . . . . . . . . . . . . . . . . . . . 8
Primera puesta en funcionamiento . . . . . . . . . . . . . . . . . . . . . . . . . . . . . . . . 9
Manejo . . . . . . . . . . . . . . . . . . . . . . . . . . . . . . . . . . . . . . . . . . . . . . . . . . . . . . 10
Tostar sandwiches . . . . . . . . . . . . . . . . . . . . . . . . . . . . . . . . . . . . . . . . . . . . . . . . . . . . . . . 10Hacer gofres . . . . . . . . . . . . . . . . . . . . . . . . . . . . . . . . . . . . . . . . . . . . . . . . . . . . . . . . . . . 10Asar al grill . . . . . . . . . . . . . . . . . . . . . . . . . . . . . . . . . . . . . . . . . . . . . . . . . . . . . . . . . . . . 11
Limpieza . . . . . . . . . . . . . . . . . . . . . . . . . . . . . . . . . . . . . . . . . . . . . . . . . . . . 12
Almacenaje . . . . . . . . . . . . . . . . . . . . . . . . . . . . . . . . . . . . . . . . . . . . . . . . . . 13
Eliminación de fallos . . . . . . . . . . . . . . . . . . . . . . . . . . . . . . . . . . . . . . . . . . . 13
Recetas . . . . . . . . . . . . . . . . . . . . . . . . . . . . . . . . . . . . . . . . . . . . . . . . . . . . . . 14
Sándwich de tomate holandés . . . . . . . . . . . . . . . . . . . . . . . . . . . . . . . . . . . . . . . . . . . . . 14Sándwich italiano . . . . . . . . . . . . . . . . . . . . . . . . . . . . . . . . . . . . . . . . . . . . . . . . . . . . . . . 15Sándwich Hawai . . . . . . . . . . . . . . . . . . . . . . . . . . . . . . . . . . . . . . . . . . . . . . . . . . . . . . . . 16Gofres . . . . . . . . . . . . . . . . . . . . . . . . . . . . . . . . . . . . . . . . . . . . . . . . . . . . . . . . . . . . . . . . 16Gofres de manzana . . . . . . . . . . . . . . . . . . . . . . . . . . . . . . . . . . . . . . . . . . . . . . . . . . . . . . 17Pincho de gamba . . . . . . . . . . . . . . . . . . . . . . . . . . . . . . . . . . . . . . . . . . . . . . . . . . . . . . . . 17
Evacuación . . . . . . . . . . . . . . . . . . . . . . . . . . . . . . . . . . . . . . . . . . . . . . . . . . . 18
Garantía de Kompernass Handels GmbH . . . . . . . . . . . . . . . . . . . . . . . . . 18
Asistencia técnica . . . . . . . . . . . . . . . . . . . . . . . . . . . . . . . . . . . . . . . . . . . . . . . . . . . . . . . 20Importador . . . . . . . . . . . . . . . . . . . . . . . . . . . . . . . . . . . . . . . . . . . . . . . . . . . . . . . . . . . . . 20
■ 2 │ ES SSMW 750 C3
Introducción¡Felicidades por la compra de su aparato nuevo!
Ha optado por adquirir un producto moderno y de alta calidad . Las instruc-ciones de uso forman parte del producto . Contiene indicaciones importantes acerca de la seguridad, uso y evacuación . Antes de usar el producto familiari-cese con todas las indicaciones de manejo y de seguridad . Utilice el producto como se describe y para los ámbitos de aplicación indicados . Entregue todos los documentos cuando transfiera el producto a terceros .
Derechos de autorEsta documentación está protegida por derechos de autor .
La reproducción, o cualquier tipo de reimpresión, total o parcial, así como la reproducción de imágenes, incluso modificadas, únicamente estarán permitidas con el consentimiento escrito del fabricante .
Aviso legalTodas las informaciones técnicas, datos e indicaciones contenidos en estas instrucciones de uso, para la conexión y manejo, reflejan la situación más avanzada en el momento de la impresión y se proporcionan teniendo en cuenta nuestras experiencias y conocimientos hasta ese momento .
Los datos, ilustraciones y descripciones de estas instrucciones no pueden servir como base para posibles reclamaciones .
El fabricante no asume ninguna responsabilidad por los daños debidos a la inobservancia de las instrucciones, el uso contrario a lo previsto, las reparaciones inadecuadas, las modificaciones realizadas sin autorización o el empleo de recambios no homologados .
Finalidad de usoEste aparato ha sido diseñado exclusivamente para el tueste de tostadas rellenas, horneado de gofres y asado de alimentos .
Este aparato está destinado exclusivamente al uso doméstico privado . ¡No utilice el aparato para fines comerciales!

ES │ 3 ■SSMW 750 C3
Volumen de suministroEl aparato se suministra de serie con los componentes siguientes:
▯ Sandwichera
▯ 2 placas de intercambio "Sandwich"
▯ 2 placas de intercambio "Gofres"
▯ 2 placas de intercambio "Grill"
▯ Instrucciones de uso
1) Extraiga el aparato, las placas de intercambio y el manual de instrucciones del cartón .
2) Retire todo el material de embalaje .
ADVERTENCIA
► Compruebe la integridad de suministro y si hay daños visibles .
► Si el suministro es incompleto o hay daños debido a un embalaje deficiente o al transporte, póngase en contacto con la línea directa de asistencia (véase capítulo Asistencia técnica) .
Evacuación del embalajeEl embalaje protege el aparato durante el transporte . El material de embalaje se ha seleccionado teniendo en cuenta criterios ecológicos y de técnica de elimina-ción y por ello es reciclable .
La reintroducción del embalaje en el ciclo de materiales ahorra materias primas y reduce el volumen de residuos . Evacue los materiales de embalaje que no sean necesarios según las normativas locales aplicables .
Deseche el embalaje de forma respetuosa con el medio ambiente . Observe las indicaciones de los distintos materiales de embalaje y, si procede, recíclelos de la manera correspondiente . Los materiales de embalaje cuentan con abreviaciones (a) y cifras (b) que significan lo siguiente: 1–7: plásticos, 20–22: papel y cartón, 80–98: materiales compuestos .
ADVERTENCIA
► Si es posible, conserve el embalaje original durante el periodo de garantía del aparato para poder empaquetarlo correctamente en caso de aplica-ción de la garantía .

■ 4 │ ES SSMW 750 C3
Descripción de aparatosFigura A:1 Anclajes
2 Serpentín
3 Soportes inferiores
4 Serpentín
5 Anclajes
6 Soportes posteriores
Figura B (placas para sandwich):7 Saliente de encastre superior
8 Salientes de encastre inferior y posterior
9 Saliente de encastre delantero
Figura C (Placas de gofres):7 Saliente de encastre superior
8 Salientes de encastre inferior y posterior
9 Saliente de encastre delantero
Figura D (Placas de grill):7 Saliente de encastre superior
8 Salientes de encastre inferior y posterior
9 Saliente de encastre delantero
Figura E:0 Bloqueo de tapa
q Piloto "Power"
w Piloto "listo para su uso"
e Enrollacables

ES │ 5 ■SSMW 750 C3
Características técnicasTensión 220 – 240 V ∼ (corriente alterna), 50/60 Hz
Consumo de potencia 750 W
Todas las piezas de este aparato que entran en contacto con alimentos son aptas para su uso con alimentos .
Indicaciones de seguridad
¡ADVERTENCIA! ¡PELIGRO DE DESCARGA ELÉCTRICA!
► Deje que un especialista cambie inmediatamente el cable de red dañado o la clavija de red, para evitar riesgos .
► Utilice el aparato únicamente en espacios secos, no al aire libre .
¡No sumerja nunca el aparato en agua ni en otros líqui-dos! De lo contrario, existe peligro de muerte por descar-ga eléctrica .
► Tenga cuidado de que no entre agua en el interior del aparato al limpiarlo . Nunca limpie el aparato bajo agua corriente .
► Asegúrese de que el aparato no pueda entrar nunca en contacto con el agua . No utilice el aparato cerca del agua o junto a recipientes que contenga líquido .
► Preste atención a que el cable de red no se moje ni hume-dezca cuando está funcionando . Tiéndalo de modo que no pueda ser aplastado o dañado de forma alguna .
► Para apagar el aparato, extraiga después de cada uso la clavija de red de la base de enchufe .
► Nunca abra la carcasa del aparato .

■ 6 │ ES SSMW 750 C3
¡ADVERTENCIA! ¡PELIGRO DE LESIONES! ► Este aparato puede ser utilizado por niños a partir de 8 años así como por personas con reducidas capacidades físicas, sensoriales o mentales o a su falta de experiencia o de conocimientos, siempre que sea bajo supervisión, o bien hayan sido instruidas como usar el aparato de forma segura y comprendido los peligros que entraña .
► Los niños no deben jugar con el aparato . ► La limpieza y el mantenimiento de usuario no debe ser realizado por niños, al no ser que tengan más de 8 años y supervisados por un adulto . Los niños menores de 8 años se han de mantener alejados del aparato y de la línea de conexión .
► Los componentes del aparato se calientan durante el funcio-namiento del mismo . Por lo tanto, toque sólo las asas .
► Deje que se enfríe el aparato por completo antes de limpiarlo, reemplace las placas de intercambio antes de limpiarlo o guardarlo .
► Tenga cuidado al extraer alimentos terminados (tostadas, gofres, etc .) . Tanto el aparato como los alimentos están muy calientes .
► Utilice el aparato solamente sobre una superficie estable, antideslizante y plana .
► No utilice ningún tipo de temporizador externo o un sistema de control remoto para accionar el aparato .
¡Atención! ¡Superficie caliente!

ES │ 7 ■SSMW 750 C3
¡ATENCIÓN! ¡RIESGO DE INCENDIO! ► No se debe utilizar el aparato cerca de materiales inflamables .
► No deje el aparato sin vigilancia mientras esté en funcionamiento .
► Utilice el aparato sólo sobre una base termorresistente . ► No deje nunca el aparato en funcionamiento sin vigilancia .
¡ATENCIÓN! ¡DAÑOS MATERIALES! ► Retire los restos de alimentos sólo con una espátula de plás-tico o madera u otro objeto adecuado no metálico, para no dañar el recubrimiento antiadherente de la sandwichera .
► No utilice para la limpieza productos de limpieza agresivos ni objetos puntiagudos .

■ 8 │ ES SSMW 750 C3
Sustitución de las placas de intercambioPuede elegir entre 3 placas de intercambio diferentes:
– Placas de intercambio "Tostadas": para la preparación de tostadas rellenas .
– Placas de intercambio "Gofres": Para hornear gofres .
– Placas de intercambio "Grill": Para el asado de pescado, carne, etc .
¡ADVERTENCIA! PELIGRO DE ELECTROCUCIÓN
► Desenchufe primero la clavija de la base de enchufe, antes de limpiar las placas de intercambio .
¡ADVERTENCIA! ¡PELIGRO DE LESIONES!
► ¡Deje que se enfríe el aparato antes de reemplazar las placas de inter-cambio! ¡Peligro de quemaduras!
Inserción de las placas de intercambio1) Abra la sandwichera soltando el bloqueo de tapa 0 y levanta la tapa .
2) Placa de intercambio superior: Deslice primero los salientes de encastre inferiores 8 en los soportes inferiores 3 .
3) Presione ahora los salientes de encastre superiores 7 sobre los anclajes 1, de modo que los salientes de encastre 7 salten debajo de los anclajes 1 y la placa de intercambio asiente firmemente .
4) Placa de intercambio inferior: Deslice primero los salientes de encastre posteriores 8 en los soportes posteriores 6 .
5) Presione ahora los salientes de encastre delanteros 9 sobre los anclajes 5, de modo que los salientes de encastre 9 salten debajo de los anclajes 5 y la placa de intercambio asiente firmemente .
6) Presione una vez fuertemente en el centro de la placa de intercambio inferior para garantizar que está insertada de modo segura .
Extracción de las placas de intercambio1) Placa de intercambio superior: Deslice los anclajes 1 hacia arriba y vuelque
simultáneamente la placa de intercambio hacia delante, de modo que puede levantarla de los soportes inferiores 3 .
2) Placa de intercambio inferior: Tire de los anclajes 5 hacia delante y levante la placa de intercambio de modo que la puede extraer de los soportes posteriores 6 .

ES │ 9 ■SSMW 750 C3
Primera puesta en funcionamientoRealice el mismo procedimiento con cada de las 3 parejas de placas de inter-cambio .
■ Frote una sola vez el revestimiento antiadherente de las placas de intercambio con aceite apto para cocinar .
¡ADVERTENCIA! ¡PELIGRO DE LESIONES!
► ¡Deje que se enfríe el aparato antes de cambiar las placas de intercambio! ¡Peligro de quemaduras!
■ Coloque un par de placas de intercambio en el aparato .
■ Inserte la clavija de red en una base de enchufe .
■ Cierre el aparato y bloquee el bloqueo de tapa 0 .
■ Deje calentar el aparato durante aprox . 10 minutos .
ADVERTENCIA
► En el primer uso es posible que se produzca un ligero olor (también puede generarse un poco de humo) . Esto es normal y cesa al poco tiempo . Procure que haya suficiente ventilación . Abra, por ejemplo, una ventana .
■ Extraiga la clavija de red y deje que se enfríe el aparato .
■ Limpie las placas de intercambio y el aparato como se describe en el capítulo "Limpieza” .
El aparato está ahora listo para funcionar .

■ 10 │ ES SSMW 750 C3
ManejoTostar sandwiches
1) Seleccione las placas de intercambio "Tostadas" e insertelas .
¡ATENCIÓN! ¡DAÑOS MATERIALES!
► No utilice nunca dos placas de intercambio diferentes a la vez .
2) Cierre la tapa y bloqueela con el bloqueo de tapa 0 .
3) Inserte la clavija de red en una base de enchufe . El piloto rojo "Power" q brilla .
4) Al momento que se ha calentado el aparato, se enciende el piloto verde de "listo par su uso" w .
5) Abra la tapa e introduzca dos tostadas preparadas debajo de la placas de intercambio .
6) Cierre la tapa y bloqueela con el bloqueo de tapa 0 . Pueden seleccionar-se dos ajustes de cierre . Si el sándwich sigue siendo demasiado grueso y no puede cerrarse el bloqueo de la tapa 0, retire algo del relleno .
¡ATENCIÓN! ¡DAÑOS MATERIALES!
► Extraiga las tostadas sólo con una espátula de plástico o madera u otro objeto adecuado no metálico, para no dañar el recubrimiento antiadherente de la sandwichera .
7) Las tostadas están listas después de unos 5 – 6 minutos apróx . Esta indicación es meramente orientativa y según relleno y gusto personal puede variar . Abra la tapa y retire las tostadas .
8) Si no desea preparar más tostadas, extraiga la clavija de red de la base de enchufe .
Hacer gofres1) Seleccione las placas de intercambio "Gofres" e insertelas .
¡ATENCIÓN – DAÑOS MATERIALES!
► No utilice nunca dos placas de intercambio diferentes a la vez .
2) Cierre la tapa y bloqueela con el bloqueo de tapa 0 .
3) Inserte la clavija de red en una base de enchufe . El piloto rojo "Power" q brilla .
4) Al momento que se ha calentado el aparato, se enciende el piloto verde de "listo par su uso" w .

ES │ 11 ■SSMW 750 C3
5) Abra la tapa y ponga 2 o 3 cucharadas grandes de masa de gofre en cada una de las dos superficies de horneado de gofres de la placa de intercambio inferior .
6) Cierre la tapadera . ¡No bloquee la tapa!
¡ATENCIÓN! ¡DAÑOS MATERIALES!
► Extraiga los gofres sólo con una espátula de plástico o madera u otro objeto adecuado no metálico, para no dañar el recubrimiento antiadherente de la sandwichera .
7) Los gofres están listos después de unos 5 – 7 minutos apróx . Esta indicación es meramente orientativa y según masa de gofre y gusto personal puede variar . Abra la tapa y retire los gofres .
8) Si no desea preparar más gofres, extraiga la clavija de red de la base de enchufe .
Asar al grill1) Seleccione las placas de intercambio "Grill" e insertelas .
¡ATENCIÓN! ¡DAÑOS MATERIALES!
► No utilice nunca dos placas de intercambio diferentes a la vez .
2) Cierre la tapa y bloqueela con el bloqueo de tapa 0 .
3) Inserte la clavija de red en una base de enchufe . El piloto rojo "Power" q brilla .
4) Al momento que se ha calentado el aparato, se enciende el piloto verde de "listo par su uso" w .
5) Abra la tapa y coloque los alimentos que desea asar al grill sobre la placas de intercambio inferiores .
6) Cierre la tapadera . ¡No bloquee la tapa!
7) Controle periódicamente el grado de tueste, levantando la tapa .
¡ATENCIÓN – DAÑOS MATERIALES!
► Extraiga los alimentos sólo con una espátula de plástico o madera u otro objeto adecuado no metálico de las placas de intercambio, con el fin de no dañar el recubrimiento antiadherente .
8) Una vez que han terminado los alimentos de cocer, retirela de la placa de intercambio .
9) Cuando no necesite usar el aparato, extraiga la clavija de red de la base de enchufe .

■ 12 │ ES SSMW 750 C3
Limpieza ¡ADVERTENCIA! ¡PELIGRO DE ELECTROCUCIÓN!
► Desenchufe primero la clavija de la toma de corriente, antes de limpiar el aparato .
¡No sumerja nunca el aparato en agua ni en otros líquidos! De lo contrario, existe peligro de muerte por descarga eléctrica .
¡ADVERTENCIA! ¡PELIGRO DE LESIONES!
► Previa limpieza deje que se enfríe el aparato . ¡Peligro de quemaduras!
¡ATENCIÓN! DAÑOS MATERIALES!
► No utilice productos de limpieza agresivos ni abrasivos . Dichas sustancias corroen la superficie del aparato .
ADVERTENCIA
► No espere demasiado tiempo para realizar la limpieza . Espere hasta que se enfríe el aparato lo suficiente y pueda tocarlo sin riesgo de sufrir que-maduras . De este modo se puede eliminar mejor los restos de alimentos .
■ Limpie la carcasa con un paño seco o un trapo ligeramente humedecido .
■ Retire las placas de intercambio y limpie las placas de intercambio en agua templada añadiendo algo de detergente .
ADVERTENCIA
Para limpiar las placas de intercambio de forma cuidadosa, recomen-damos hacerlo manualmente de la manera descrita . No obstante, también pueden limpiarse las placas de intercambio en el lavavajillas .
■ Si ha penetrado grasa o alimentos debajo de las placas intermedias en el recinto donde se encuentran los serpentines calefactores 2 4, proceda del modo siguiente:
– Quite la grasa u otros líquidos usando un trozo de papel de cocina .
– Retire los restos incrustados quemados usando una espátula de madera o un pequeño pincho de madera .
■ Seque todas las piezas antes de volver a utilizarlas .
ES │ 13 ■SSMW 750 C3
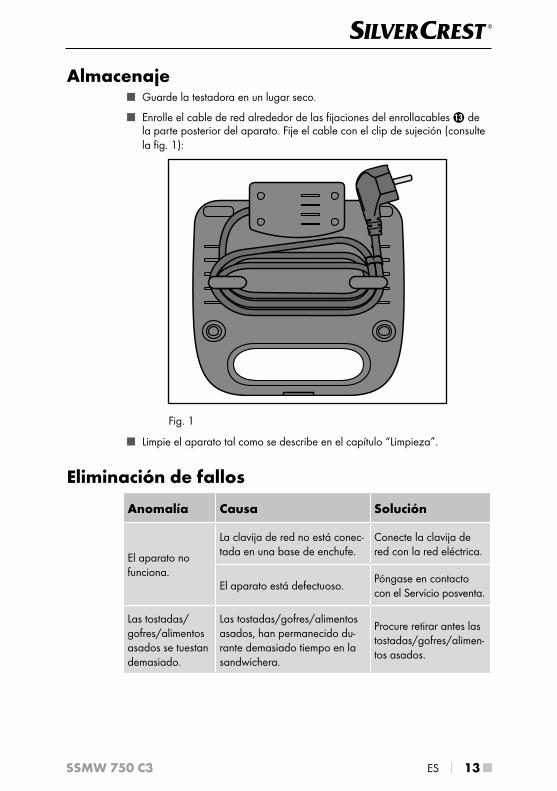
Almacenaje ■ Guarde la testadora en un lugar seco .
■ Enrolle el cable de red alrededor de las fijaciones del enrollacables e de la parte posterior del aparato . Fije el cable con el clip de sujeción (consulte la fig . 1):
Fig . 1
■ Limpie el aparato tal como se describe en el capítulo “Limpieza” .
Eliminación de fallos
Anomalía Causa Solución
El aparato no funciona .
La clavija de red no está conec-tada en una base de enchufe .
Conecte la clavija de red con la red eléctrica .
El aparato está defectuoso .Póngase en contacto con el Servicio posventa .
Las tostadas/gofres/alimentos asados se tuestan demasiado .
Las tostadas/gofres/alimentos asados, han permanecido du-rante demasiado tiempo en la sandwichera .
Procure retirar antes las tostadas/gofres/alimen-tos asados .

■ 14 │ ES SSMW 750 C3
Recetas
Sándwich de tomate holandésIngredientes
♦ 4 rebanadas de pan
♦ Agua
♦ Cebollinas
♦ 1 tomate mediano
♦ Mantequilla de hierbas
♦ 2 lonchas de jamón cocido
♦ sal
♦ pimienta recién molida
♦ 2 lonchas de queso Gouda joven
1) Lave las cebollinas y a continuación déjelas escurrir . Corte las cebollinas a la mitad longitudinalmente y cortelas a continuación en trozos grandes . Poner el agua con la sal a hervir en una cacerola . Añada las cebollinas y escardelas durante 1 minuto aprox . Introduzca a continuación las cebollinas en un colador, vierta agua fría encima y deje que escurra .
2) Lave tomates y sequelos con papel de cocina . Cortelos por la mitad y retire la espinilla verde . Corte los tomates en rodajas .
3) Unta las rodajas de tostadas con mantequilla de hierba y ponga un trozo de jamón doblado sobre la rodaja . Añada trozos de cebollinas y rodajas de tomate . Condimentar con sal y pimienta .
4) Coloque unas rodajas de queso sobre la tostada .
5) Unte otra rodaja de pan con un poco de mantequilla de especias y cubra su sandwich con la parte untada hacia abajo .

ES │ 15 ■SSMW 750 C3
Sándwich italianoIngredientes
♦ 4 rebanadas de pan
♦ 4 cucharadas de tomate concentrado
♦ 2 cucharadas de mayonesa
♦ sal
♦ Hierbas de Provenza
♦ pimienta recién molida
♦ 1 tomate mediano
♦ 1 paquete de queso mozzarella
♦ pimienta de colores recién molida
1) Mezcle el tomate concentrado, la mayonesa, la sal, las hierbas de Provenza y la pimienta . Unte con ella las rodajas de tostada .
2) Lave tomates y sequelos con papel de cocina . Cortelos por la mitad y retire la espinilla verde . Corte los tomates en rodajas .
3) Deje escurrir el queso mozzarella en un colador y córtelo en rodajas . Partir estas a su vez por la mitad .
4) Cubrir ahora la tostada ya untada, con tomate y mozzarella y espolvorearla con pimienta .
5) Cubra el sandwich con una rodaja de tostada adicional .

■ 16 │ ES SSMW 750 C3
Sándwich HawaiIngredientes
♦ 4 rebanadas de pan
♦ 2 rodajas de piña (de lata)
♦ Mantequilla
♦ 2 lonchas de jamón cocido
♦ 2 lonchas de queso blando
1) Deje escurrir la piña en un colador .
2) Unte la rebanada de pan con mantequilla .
3) Añada a la rodaja de tostada jamón cocido y piña .
4) El queso se coloca en último lugar, sobre la piña .
5) Cubra su sandwich con una tostada .
GofresIngredientes
♦ 250 g de margarina o mantequilla
♦ aprox . 200 g azúcar
♦ 2 paquetitos de vainilla azucarada
♦ 5 huevos
♦ 500 g de harina
♦ 2 cucharaditas de levadura en polvo
♦ 350 – 400 ml leche
1) Bata los huevos hasta que queden espumosos .
2) Añada el azúcar, el azúcar de vainilla y los huevos y mézclelo todo .
3) Añada la mantequilla o margarina licuada .
4) Mezcle la levadura en polvo .
5) Añada la leche sin dejar de agitar y alternativamente la harina poco a poco .
6) Mezclelo todo a máximo nivel con una batidora de mano hasta obtener una masa lisa .

ES │ 17 ■SSMW 750 C3
Gofres de manzanaIngredientes
♦ 250 g de margarina o mantequilla
♦ 75 g de azúcar
♦ 4 huevos
♦ 250 g de harina
♦ 1 cucharadita de levadura en polvo
♦ 125 ml de leche tibia
♦ 300 g manzana (pelada y cortada en dados)
♦ 50 g de almendras o nueces rayados
1) Bata los huevos hasta que queden espumosos .
2) Añada azúcar y mezclelo todo .
3) Añada la mantequilla o margarina licuada .
4) Mezcle la levadura en polvo .
5) Añada la leche sin dejar de agitar y alternativamente la harina poco a poco .
6) Por último añada las almendras o bien nueces y los dados de manzana .
7) Mezclelo todo a máximo nivel con una batidora de mano hasta obtener una masa lisa .
Pincho de gambaIngredientes
♦ 250 g gambones pelados de tamaño medio
♦ 2 dientes de ajo (picados fino)
♦ 5 cucharada de aceite de oliva
♦ 12 tomates pequeños (tomates cherry)
♦ 1 cucharada de perejil picado
♦ Pimienta, sal, pimentón
1) Añada el aceite de oliva, el ajo, algo de pimentón, sal, pimienta y perejil en una fuente y mezclelo todo .
2) Añada las gambas y mezclelo todo de modo que queden las gambas bien impregnadas con la mezcla de especies-hierbas .
3) Deje reposar las gambas durante aprox . 20 minutos en la mezcla .
4) Pinche un tomate de modo alternado y una gamba en un pincho de madera .
5) Asa al grill los pinchos durante 5 minutos aprox .

■ 18 │ ES SSMW 750 C3
EvacuaciónEn ningún caso deberá tirar el aparato a la basura doméstica . Este producto está sujeto a la directiva europea 2012/19/EU- WEEE (Waste Electrical and Electronic Equipment) .Evacue el aparato en un centro de evacuación autorizado a través de las insta-laciones de evacuación comunitarias . Preste atención a las normas en vigor . En caso de dudas póngase en contacto con su centro de evacuación .
Puede informarse acerca de las posibilidades de desecho del producto usado en su administración municipal o ayuntamiento .
Garantía de Kompernass Handels GmbHEstimado cliente:
Este aparato cuenta con una garantía de 3 años a partir de la fecha de compra . Si se detectan defectos en el producto, puede ejercer sus derechos legales frente al vendedor . Estos derechos legales no se ven limitados por la garantía descrita a continuación .
Condiciones de la garantíaEl plazo de la garantía comienza con la fecha de compra . Guarde bien el com-probante de caja original, ya que lo necesitará como justificante de compra .
Si dentro de un periodo de tres años a partir de la fecha de compra de este pro-ducto se detecta un defecto en su material o un error de fabricación, asumiremos la reparación o sustitución gratuita del producto a nuestra elección . La prestación de la garantía requiere la presentación del aparato defectuoso y del comprobante de caja, así como una breve descripción por escrito del defecto detectado y de las circunstancias en las que se haya producido dicho defecto, dentro del plazo de tres años .
Si el defecto está cubierto por nuestra garantía, le devolveremos el producto repa-rado o le suministraremos uno nuevo . La reparación o sustitución del producto no supone el inicio de un nuevo periodo de garantía .
Duración de la garantía y reclamaciones legales por viciosLa duración de la garantía no se prolonga por hacer uso de ella . Este principio también se aplica a las piezas sustituidas y reparadas . Si después de la compra del aparato, se detecta la existencia de daños o de defectos al desembalarlo, deben notificarse de inmediato . Cualquier reparación que se realice una vez finalizado el plazo de garantía estará sujeta a costes .

ES │ 19 ■SSMW 750 C3
Alcance de la garantíaEl aparato se ha fabricado cuidadosamente según estándares elevados de calidad y se ha examinado en profundidad antes de su entrega .
La prestación de la garantía solo rige para defectos en los materiales o errores de fabricación . Esta garantía no cubre las piezas del producto normalmente sometidas al desgaste y que, en consecuencia, puedan considerarse piezas de desgaste ni los daños producidos en los componentes frágiles, p . ej ., interruptores, baterías, moldes de horno o piezas de vidrio .
Se anulará la garantía si el producto se daña o no se utiliza o mantiene correctamente . Para utilizar correctamente el producto, deben observarse todas las indicaciones especificadas en las instrucciones de uso . Debe evitarse cualquier uso y manejo que esté desaconsejado o frente al que se advierta en las instrucciones de uso .
El producto está previsto exclusivamente para su uso privado y no para su uso comercial . En caso de manipulación indebida e incorrecta, uso de la fuerza y apertura del aparato por personas ajenas a nuestros centros de asistencia técnica autorizados, la garantía perderá su validez .
Proceso de reclamación conforme a la garantíaPara garantizar una tramitación rápida de su reclamación, le rogamos que observe las siguientes indicaciones:
■ Mantenga siempre a mano el comprobante de caja y el número de artículo (p . ej ., IAN 12345) como justificante de compra .
■ Podrá ver el número de artículo en la placa de características, grabado en el aparato, en la portada de las instrucciones (parte inferior izquierda) o en un adhesivo en la parte trasera o inferior del aparato .
■ Si se producen errores de funcionamiento u otros defectos, póngase primero en contacto con el departamento de asistencia técnica especificado a conti-nuación por teléfono o por correo electrónico .
■ Podrá enviar el producto calificado como defectuoso junto con el justificante de compra (comprobante de caja) y la descripción del defecto y de las circunstancias en las que se haya producido de forma gratuita a la dirección de correo proporcionada .
En www .lidl-service .com, podrá descargar este manual de usuario y muchos otros más, así como vídeos sobre los productos y software .

■ 20 │ ES SSMW 750 C3
Asistencia técnica Servicio España Tel .: 902 59 99 22 (0,08 EUR/Min . + 0,11 EUR/llamada (tarifa normal)) (0,05 EUR/Min . + 0,11 EUR/llamada (tarifa reducida)) E-Mail: kompernass@lidl .es
IAN 313476
ImportadorTenga en cuenta que la dirección siguiente no es una dirección de asistencia técnica . Póngase primero en contacto con el centro de asistencia técnica especificado .
KOMPERNASS HANDELS GMBH
BURGSTRASSE 21
DE - 44867 BOCHUM
ALEMANIA
www .kompernass .com

IT│MT │ 21 ■SSMW 750 C3
Indice
Introduzione . . . . . . . . . . . . . . . . . . . . . . . . . . . . . . . . . . . . . . . . . . . . . . . . . 22
Diritto d’autore . . . . . . . . . . . . . . . . . . . . . . . . . . . . . . . . . . . . . . . . . . . . . . . . . . . . . . . . . . 22Limitazione di responsabilità . . . . . . . . . . . . . . . . . . . . . . . . . . . . . . . . . . . . . . . . . . . . . . . 22Uso conforme . . . . . . . . . . . . . . . . . . . . . . . . . . . . . . . . . . . . . . . . . . . . . . . . . . . . . . . . . . 22
Volume della fornitura . . . . . . . . . . . . . . . . . . . . . . . . . . . . . . . . . . . . . . . . . 23
Smaltimento della confezione . . . . . . . . . . . . . . . . . . . . . . . . . . . . . . . . . . . . . . . . . . . . . . 23
Descrizione dell’apparecchio . . . . . . . . . . . . . . . . . . . . . . . . . . . . . . . . . . . . 24
Dati tecnici . . . . . . . . . . . . . . . . . . . . . . . . . . . . . . . . . . . . . . . . . . . . . . . . . . . 25
Indicazioni di sicurezza . . . . . . . . . . . . . . . . . . . . . . . . . . . . . . . . . . . . . . . . 25
Sostituzione delle piastre . . . . . . . . . . . . . . . . . . . . . . . . . . . . . . . . . . . . . . . 28
Inserimento delle piastre . . . . . . . . . . . . . . . . . . . . . . . . . . . . . . . . . . . . . . . . . . . . . . . . . . 28Estrazione delle piastre . . . . . . . . . . . . . . . . . . . . . . . . . . . . . . . . . . . . . . . . . . . . . . . . . . . 28
Prima messa in funzione . . . . . . . . . . . . . . . . . . . . . . . . . . . . . . . . . . . . . . . 29
Uso . . . . . . . . . . . . . . . . . . . . . . . . . . . . . . . . . . . . . . . . . . . . . . . . . . . . . . . . . 30
Tostatura di sandwich . . . . . . . . . . . . . . . . . . . . . . . . . . . . . . . . . . . . . . . . . . . . . . . . . . . . 30Cottura dei waffel . . . . . . . . . . . . . . . . . . . . . . . . . . . . . . . . . . . . . . . . . . . . . . . . . . . . . . . 30Grigliatura . . . . . . . . . . . . . . . . . . . . . . . . . . . . . . . . . . . . . . . . . . . . . . . . . . . . . . . . . . . . . 31
Pulizia . . . . . . . . . . . . . . . . . . . . . . . . . . . . . . . . . . . . . . . . . . . . . . . . . . . . . . 32
Conservazione . . . . . . . . . . . . . . . . . . . . . . . . . . . . . . . . . . . . . . . . . . . . . . . 33
Guasti e possibili rimedi . . . . . . . . . . . . . . . . . . . . . . . . . . . . . . . . . . . . . . . . 33
Ricette . . . . . . . . . . . . . . . . . . . . . . . . . . . . . . . . . . . . . . . . . . . . . . . . . . . . . . 34
Toast olandese ai pomodori . . . . . . . . . . . . . . . . . . . . . . . . . . . . . . . . . . . . . . . . . . . . . . . 34Toast italiano . . . . . . . . . . . . . . . . . . . . . . . . . . . . . . . . . . . . . . . . . . . . . . . . . . . . . . . . . . . 35Toast Hawaii . . . . . . . . . . . . . . . . . . . . . . . . . . . . . . . . . . . . . . . . . . . . . . . . . . . . . . . . . . . 36Waffel . . . . . . . . . . . . . . . . . . . . . . . . . . . . . . . . . . . . . . . . . . . . . . . . . . . . . . . . . . . . . . . . 36Waffel alla mela . . . . . . . . . . . . . . . . . . . . . . . . . . . . . . . . . . . . . . . . . . . . . . . . . . . . . . . . 37Spiedino di gamberi . . . . . . . . . . . . . . . . . . . . . . . . . . . . . . . . . . . . . . . . . . . . . . . . . . . . . 37
Smaltimento . . . . . . . . . . . . . . . . . . . . . . . . . . . . . . . . . . . . . . . . . . . . . . . . . 38
Garanzia della Kompernass Handels GmbH . . . . . . . . . . . . . . . . . . . . . . . 38
Assistenza . . . . . . . . . . . . . . . . . . . . . . . . . . . . . . . . . . . . . . . . . . . . . . . . . . . . . . . . . . . . . 40Importatore . . . . . . . . . . . . . . . . . . . . . . . . . . . . . . . . . . . . . . . . . . . . . . . . . . . . . . . . . . . . 40
■ 22 │ IT│MT SSMW 750 C3
IntroduzioneCongratulazioni per l’acquisto del nuovo apparecchio!
Lei ha scelto un prodotto moderno e di alta qualità . Il manuale di istruzioni è parte integrante del presente prodotto . Esso contiene importanti indicazioni per la sicurezza, l’uso e lo smaltimento . Prima di utilizzare il prodotto, si familiarizzi con tutte le indicazioni relative ai comandi e alla sicurezza . Utilizzi il prodotto solo come descritto e per i campi di impiego indicati . In caso di cessione del prodotto a terzi, consegni anche tutta la documentazione relativa .
Diritto d’autoreLa presente documentazione è tutelata dal diritto d’autore .
Qualsiasi riproduzione o ristampa, anche parziale, ovvero la riproduzione delle immagini, anche se modificate, è consentita solo previo permesso scritto del produttore .
Limitazione di responsabilitàTutte le informazioni tecniche contenute nel presente manuale di istruzioni, i dati e le indicazioni relativi al collegamento e all’uso, corrispondono allo stato più aggiornato al momento dell’invio in stampa e contengono le nostre esperienze e conoscenze più attuali .
I dati, le illustrazioni e le descrizioni contenute nel presente manuale di istruzioni non costituiscono una base valida per alcun tipo di rivendicazione .
Il produttore non si assume alcuna responsabilità per i danni derivanti da man-cata osservanza del manuale di istruzioni, uso non conforme, riparazioni non professionali, modifiche non consentite o uso di parti di ricambio non omologate .
Uso conformeQuesto apparecchio è esclusivamente previsto per la tostatura di sandwich ripieni, cottura di waffel e grigliatura di alimenti .
Questo apparecchio è destinato esclusivamente all’uso in ambienti domestici privati . Non utilizzare l’apparecchio a fini commerciali!

IT│MT │ 23 ■SSMW 750 C3
Volume della fornituraLa fornitura standard dell’apparecchio comprende i seguenti componenti:
▯ Tostiera
▯ 2 piastre “Sandwich”
▯ 2 piastre “Waffel”
▯ 2 piastre “Grill”
▯ Istruzioni per l’uso
1) Rimuovere l’apparecchio, le piastre sostituibili e il manuale di istruzioni dal cartone .
2) Rimuovere completamente il materiale di imballaggio .
AVVERTENZA
► Controllare la completezza e integrità della fornitura in relazione ai danni visibili .
► In caso di fornitura incompleta o in presenza di danni derivanti da imballag-gio insufficiente o causati dal trasporto, rivolgersi alla Hotline di assistenza (v . capitolo Assistenza) .
Smaltimento della confezioneL’imballaggio protegge l’apparecchio dai danni da trasporto . I materiali di imballaggio sono stati selezionati in relazione alla loro ecocompatibilità e alle caratteristiche di smaltimento, e pertanto sono riciclabili .
Il riciclo dell’imballaggio consente di risparmiare materie prime e riduce la generazione di rifiuti . Smaltire il materiale di imballaggio inutilizzato in conformità alle norme vigenti localmente .
Smaltire l‘imballaggio conformemente alle norme di tutela ambientale . Tenere conto dei codici presenti sui vari materiali di imballaggio ed eventualmente separare i materiali effettuando una raccolta differenziata . I materiali di imballaggio presentano codici costituiti da abbreviazioni (a) e numeri (b) con il seguente significato: 1–7: materie plastiche, 20–22: carta e cartone, 80–98: materiali compositi .
AVVERTENZA
► Durante il periodo di validità della garanzia, se possibile, conservare l'imballaggio originale, per poter imballare adeguatamente l'apparecchio in caso di intervento in garanzia .

■ 24 │ IT│MT SSMW 750 C3
Descrizione dell’apparecchioFigura A:1 Blocco
2 Serpentina
3 Supporti inferiori
4 Serpentina
5 Blocco
6 Supporti posteriori
Figura B (piastre per sandwich):7 Linguette superiori
8 Linguette inferiori e posteriori
9 Linguette anteriori
Figura C (piastra per waffel):7 Linguette superiori
8 Linguette inferiori e posteriori
9 Linguette anteriori
Figura D (piastre griglianti):7 Linguette superiori
8 Linguette inferiori e posteriori
9 Linguette anteriori
Figura E:0 Blocco coperchio
q Spia di controllo “Power”
w Spia di controllo “Pronto per l’uso”
e Avvolgicavo

IT│MT │ 25 ■SSMW 750 C3
Dati tecniciTensione 220 – 240 V ∼ (corrente alternata), 50/60 Hz
Assorbimento di potenza 750 W
Tutte le parti di questo apparecchio che vengono a contatto con alimenti sono adatti all’uso alimentare .
Indicazioni di sicurezza
AVVISO! PERICOLO DI SCOSSA ELETTRICA! ► Fare sostituire immediatamente il cavo o la spina di rete dan-neggiato da personale specializzato autorizzato, per evitare pericoli .
► Utilizzare l'apparecchio solo in ambienti asciutti, non all'aperto .
Non immergere mai l'apparecchio in acqua o altri liquidi! In caso contrario, sussiste il pericolo di morte per folgora-zione .
► Durante la pulizia, impedire la penetrazione di acqua all'interno dell'apparecchio . Non pulire mai l'apparecchio sotto l'acqua corrente .
► Impedire che l'apparecchio venga a contatto con l'acqua . Non azionare mai l'apparecchio nelle vicinanze di acqua o di contenitori pieni d'acqua .
► Impedire che il cavo di rete si bagni o inumidisca durante l'uso dell'apparecchio . Disporlo in modo tale che non venga schiacciato o possa essere danneggiato in altro modo .
► Dopo l'uso estrarre la spina di rete dalla presa per spegnere l'apparecchio .
► Non aprire mai l'alloggiamento dell'apparecchio .

■ 26 │ IT│MT SSMW 750 C3
AVVISO! PERICOLO DI LESIONI! ► Questo apparecchio può essere utilizzato dai bambini di almeno 8 anni di età e da persone con capacità fisiche, sensoriali o mentali ridotte o insufficiente esperienza o conoscenza solo se sorvegliati o istruiti sull'uso sicuro dell'apparecchio e qualora ne abbiano compreso i risultanti pericoli .
► I bambini non devono giocare con l'apparecchio . ► La pulizia e la manutenzione a cura dell'utente non devono es-sere eseguiti dai bambini, a meno che non abbiano almeno 8 anni di età e non siano sorvegliati . Tenere lontano dall'ap-parecchio i bambini di età inferiore agli 8 anni .
► I componenti dell'apparecchio possono surriscaldarsi duran-te l'uso . Toccare quindi solo la maniglia .
► Fare raffreddare l'apparecchio completamente prima della pulizia, della sostituzione delle piastre o della conservazione .
► Esercitare cautela nell'estrazione delle vivande pronte (sandwich, waffel, ecc .) . L'apparecchio e le vivande sono bollenti .
► Azionare l’apparecchio solo su una superficie stabile, anti-sdrucciolevole e piana .
► Non utilizzare timer esterni o un sistema di telecomando separato per azionare l’apparecchio .
Attenzione! Superficie bollente!

IT│MT │ 27 ■SSMW 750 C3
ATTENZIONE! PERICOLO DI INCENDIO! ► L'apparecchio non deve essere utilizzato nelle immediate vicinanze di materiali infiammabili .
► Non coprire l'apparecchio mentre è in funzione . ► Azionare l'apparecchio solo su un supporto resistente al calore .
► Non azionare mai l'apparecchio incustodito .
ATTENZIONE! DANNI MATERIALI! ► Prelevare le vivande solo con una spatola di plastica o legno o un altro oggetto idoneo non metallico, per non distruggere il rivestimento antiaderente dell'apparecchio .
► Per la pulizia non utilizzare detergenti aggressivi e oggetti acuminati .

■ 28 │ IT│MT SSMW 750 C3
Sostituzione delle piastreSi può scegliere fra 3 diverse piastre:
– Piastre “Sandwich”: per la preparazione di sandwich ripieni .
– Piastre “Waffel”: per la cottura di waffel .
– Piastre “Grill”: per la grigliatura di carne, pesce, ecc .
AVVISO! PERICOLO DI SCOSSA ELETTRICA!
► Prima di sostituire le piastre disinserire la spina dalla presa .
AVVISO! PERICOLO DI LESIONI!
► Prima della sostituzione delle piastre fare raffreddare l'apparecchio! Pericolo di ustioni!
Inserimento delle piastre1) Aprire il Sandwichmaker sbloccando i blocchi del coperchio 0 e aprendo
il coperchio .
2) Piastra superiore: spingere prima le linguette inferiori 8 nei supporti inferiori 3 .
3) Premere le linguette superiori 7 sui blocchi 1 in modo che le linguette 7 scattino sotto i blocchi 1 e la piastra sia saldamente inserita .
4) Piastra inferiore: spingere prima le linguette posteriori 8 nei supporti poste-riori 6 .
5) Premere le linguette anteriori 9 sui blocchi 5 in modo che le linguette 9 scattino sotto i blocchi 5 e la piastra sia saldamente inserita .
6) Premere una volta saldamente al centro della piastra inferiore per assicurarsi che sia inserita stabilmente .
Estrazione delle piastre1) Piastra superiore: spingere i blocchi 1 verso l’alto e ribaltare contemporanea-
mente la piastra in avanti in modo da poterla sollevare dai supporti inferiori 3 .
2) Piastra inferiore: tirare i blocchi 5 in avanti e sollevare la piastra in modo da poterla sollevare dai supporti posteriori 6 .

IT│MT │ 29 ■SSMW 750 C3
Prima messa in funzioneEffettuare la seguente procedura con ognuna delle 3 coppie di piastre .
■ Strofinare per una volta sola la superficie antiaderente delle piastre con olio idoneo per la cottura .
AVVISO! PERICOLO DI LESIONI!
► Prima della sostituzione delle piastre fare raffreddare l'apparecchio! Pericolo di ustioni!
■ Inserire un paio di piastre nell’apparecchio .
■ Inserire la spina in una presa di rete .
■ Chiudere l’apparecchio e bloccarlo con i blocchi del coperchio 0 .
■ Fare riscaldare l’apparecchio per ca . 10 minuti .
AVVERTENZA
► Durante il primo impiego può svilupparsi un leggero odore (e anche una leggera formazione di fumo) . Si tratta di un evento normale che cessa dopo poco tempo . Provvedere a una sufficiente aerazione . Aprire ad esempio una finestra .
■ Staccare la spina di rete e fare raffreddare l’apparecchio .
■ Pulire le piastre e l’apparecchio come descritto al capitolo “Pulizia” .
L’apparecchio è pronto per l’uso .
■ 30 │ IT│MT SSMW 750 C3
Uso
Tostatura di sandwich1) Selezionare le piastre “Sandwich” e inserirle .
ATTENZIONE! DANNI MATERIALI!
► Non utilizzare mai due piastre diverse contemporaneamente .
2) Chiudere il coperchio e bloccarlo con i blocchi del coperchio 0 .
3) Inserire la spina in una presa di rete . La spia di controllo rosso “Power” q si accende .
4) Non appena l’apparecchio si riscalda, la spia di controllo verde “Pronto per l’uso” w si accende .
5) Aprire il coperchio e inserire due sandwich pronti sulla piastra inferiore .
6) Chiudere il coperchio e bloccarlo con il blocco del coperchio 0 . Si può scegliere tra due impostazioni del blocco . Qualora il sandwich fosse tuttavia essere tanto spesso da impedire la chiusura del blocco coperchio 0, rimuo-vere parte del ripieno del sandwich .
ATTENZIONE! DANNI MATERIALI!
► Prelevare i sandwich solo con una spatola di plastica o legno o un altro oggetto idoneo non metallico, per non distruggere il rivestimento antiade-rente dell'apparecchio .
7) I sandwich sono pronti dopo ca . 5 – 6 minuti . Queste indicazioni temporali possono variare a seconda del ripieno utilizzato e dei gusti personali . Aprire il coperchio e prelevare i sandwich
8) Se non si desidera preparare altri sandwich, staccare la spina di rete dalla presa di corrente .
Cottura dei waffel1) Selezionare le piastre “Waffel” e inserirle .
ATTENZIONE! DANNI MATERIALI!
► Non utilizzare mai due piastre diverse contemporaneamente .
2) Chiudere il coperchio e bloccarlo con i blocchi del coperchio 0 .
3) Inserire la spina in una presa di rete . La spia di controllo rosso “Power” q si accende .
4) Non appena l’apparecchio si riscalda, la spia di controllo verde “Pronto per l’uso” w si accende .

IT│MT │ 31 ■SSMW 750 C3
5) Aprire il coperchio e versare circa 2 – 3 cucchiai di impasto per waffel in ognuna delle due superfici per waffel della piastra inferiore .
6) Chiudere il coperchio . Non bloccare il coperchio!
ATTENZIONE! DANNI MATERIALI!
► Prelevare i waffel solo con una spatola di plastica o legno o un altro og-getto idoneo non metallico, per non distruggere il rivestimento antiaderente dell'apparecchio .
7) I waffel sono pronti dopo ca . 5 – 7 minuti . Queste indicazioni temporali pos-sono variare a seconda dell’impasto utilizzato e dei gusti personali . Aprire il coperchio e prelevare i waffel .
8) Se non si desidera preparare altri waffel, staccare la spina di rete dalla presa di corrente .
Grigliatura1) Selezionare le piastre “Grill” e inserirle .
ATTENZIONE! DANNI MATERIALI!
► Non utilizzare mai due piastre diverse contemporaneamente .
2) Chiudere il coperchio e bloccarlo con i blocchi del coperchio 0 .
3) Inserire la spina in una presa di rete . La spia di controllo rosso “Power” q si accende .
4) Non appena l’apparecchio si riscalda, la spia di controllo verde “Pronto per l’uso” w si accende .
5) Aprire il coperchio e collocare gli alimenti da grigliare sulla piastra inferiore .
6) Chiudere il coperchio . Non bloccare il coperchio!
7) Controllare di tanto in tanto il grado di cottura sollevando il coperchio .
ATTENZIONE! DANNI MATERIALI!
► Prelevare le vivande solo con una spatola di plastica o legno o un altro oggetto idoneo non metallico, per non distruggere il rivestimento antiade-rente dell'apparecchio .
8) Se le vivande sono cotte rimuoverle dalla piastra .
9) Estrarre sempre la spina dalla presa se non si utilizza l’apparecchio .

■ 32 │ IT│MT SSMW 750 C3
Pulizia AVVISO! PERICOLO DI SCOSSA ELETTRICA!
► Prima di pulire l'apparecchio, disinserire la spina dalla presa .
Non immergere mai l'apparecchio in acqua o altri liquidi! In caso contrario, sussiste il pericolo di morte per folgorazione .
AVVISO! PERICOLO DI LESIONI!
► Fare raffreddare l'apparecchio prima della pulizia . Pericolo di ustioni!
ATTENZIONE! DANNI MATERIALI!
► Non utilizzare detergenti abrasivi o corrosivi . Essi attaccano la superficie dell'apparecchio .
AVVERTENZA
► Non attendere troppo per eseguire la pulizia . Attendere fino al raffredda-mento dell'apparecchio per poterlo toccare senza rischio di ustioni . In tal modo è possibile rimuovere meglio i resti di alimenti .
■ Pulire l’apparecchio con un panno asciutto o con uno straccio leggermente inumidito .
■ Prelevare le piastre e pulirle in acqua calda con un po’ di detersivo .
AVVERTENZA
Per una pulizia delicata delle piastre sostituibili, consigliamo di lavarle a mano, come descritto . Tuttavia, le piastre sostituibili possono essere lavate anche in lavastoviglie .
■ Qualora il grasso o gli alimenti finissero al di sotto delle piastre, nel vano che contiene le serpentine 2 4, procedere come segue:
– asciugare il grasso o altri liquidi con un pezzo di carta da cucina .
– Rimuovere i resti di alimenti bruciati con una spatola di legno o un piccolo spiedo di legno .
■ Fare asciugare bene tutte le parti dell’apparecchio prima di riutilizzarlo .
IT│MT │ 33 ■SSMW 750 C3
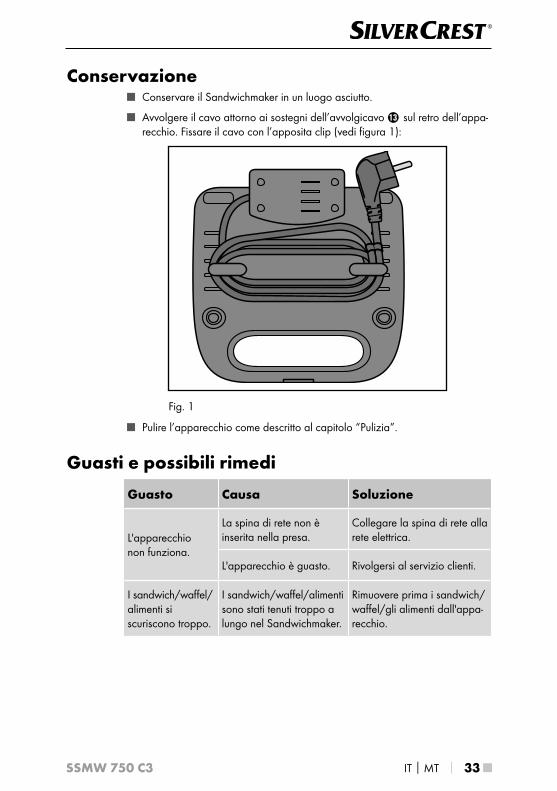
Conservazione ■ Conservare il Sandwichmaker in un luogo asciutto .
■ Avvolgere il cavo attorno ai sostegni dell’avvolgicavo e sul retro dell’appa-recchio . Fissare il cavo con l’apposita clip (vedi figura 1):
Fig . 1
■ Pulire l’apparecchio come descritto al capitolo “Pulizia” .
Guasti e possibili rimedi
Guasto Causa Soluzione
L'apparecchio non funziona .
La spina di rete non è inserita nella presa .
Collegare la spina di rete alla rete elettrica .
L'apparecchio è guasto . Rivolgersi al servizio clienti .
I sandwich/waffel/alimenti si scuriscono troppo .
I sandwich/waffel/alimenti sono stati tenuti troppo a lungo nel Sandwichmaker .
Rimuovere prima i sand wich/waffel/gli alimenti dall'appa-recchio .

■ 34 │ IT│MT SSMW 750 C3
RicetteToast olandese ai pomodori
Ingredienti
♦ 4 fette di pane per toast
♦ Acqua
♦ Cipolline
♦ 1 pomodoro di media grandezza
♦ Burro alle erbe
♦ 2 fette di prosciutto cotto
♦ Sale
♦ Pepe macinato di fresco
♦ 2 fette di formaggio Gouda non stagionato
1) Lavare le cipolline e farle sgocciolare . Dividere le cipolline in lunghezza e tagliarle a pezzi grossi . Portare l’acqua a ebollizione con il sale in un tegame . Aggiungere le cipolline e farle soffriggere per circa 1 minuto . Infine versarle in un colino, versarvi su dell’acqua fredda e farle sgocciolare .
2) Lavare i pomodori e asciugarli . Dividerli a metà e rimuovere la parte verde del picciolo . Tagliare i pomodori a fette .
3) Cospargere una fetta di toast con burro alle erbe e collocare su di essa una fetta piegata di prosciutto . Distribuire i pezzi di cipolline e le fette di pomo-doro sul prosciutto . Insaporire con sale e pepe .
4) Collocare le fette di formaggio sulla fetta di toast .
5) Imburrare un’altra fetta di pane con un po’ di burro alle erbe e coprire il sandwich con la parte imburrata rivolta verso il basso .

IT│MT │ 35 ■SSMW 750 C3
Toast italianoIngredienti
♦ 4 fette di pane per toast
♦ 4 cucchiai di concentrato di pomodoro
♦ 2 cucchiai di maionese per insalata
♦ Sale
♦ Erbe di Provenza
♦ Pepe macinato di fresco
♦ 1 pomodoro di media grandezza
♦ 1 pacchetto di mozzarella
♦ Pepe multicolore macinato di fresco
1) Mescolare il concentrato di pomodoro, la maionese, il sale, le erbe di Provenza e il pepe . Cospargerne le fette di toast .
2) Lavare i pomodori e asciugarli . Dividerli a metà e rimuovere la parte verde del picciolo . Tagliare i pomodori a fette .
3) Fare sgocciolare la mozzarella in un colino e tagliarla a fette . Dividere ancora una volta le fette .
4) La fetta di pane per toast già spalmata viene quindi ricoperta con fette di pomodoro e mozzarella e cosparsa di pepe .
5) Coprire il sandwich con l’altra fetta di pane .

■ 36 │ IT│MT SSMW 750 C3
Toast HawaiiIngredienti
♦ 4 fette di pane per toast
♦ 2 fette di ananas (in scatola)
♦ di burro
♦ 2 fette di prosciutto cotto
♦ 2 sottilette di formaggio
1) Fare sgocciolare l’ananas in un colino .
2) Ricoprire la fetta di pane con burro .
3) Coprire la fetta di toast con il prosciutto e l’ananas .
4) Il formaggio viene messo per ultimo sull’ananas .
5) Coprire il sandwich con un’altra fetta di pane .
WaffelIngredienti
♦ 250 g di margarina o burro
♦ Circa 200 g di zucchero
♦ 2 pacchetto di zucchero vanigliato
♦ 5 uova
♦ 500 g di farina
♦ 2 cucchiaini di lievito in polvere
♦ 350 – 400 ml di latte
1) Sbattere le uova fino a renderle schiumose .
2) Aggiungere lo zucchero, lo zucchero vaniglinato e mescolare il tutto .
3) Aggiungere il burro sciolto o la margarina sciolta .
4) Aggiungere la polvere lievitante .
5) Versare poco alla volta il latte alternato alla farina mescolando continuamente .
6) Mescolare tutto alla velocità massima con il mixer a mano fino a ottenere un impasto liscio .

IT│MT │ 37 ■SSMW 750 C3
Waffel alla melaIngredienti
♦ 250 g di margarina o burro
♦ 75 g di zucchero
♦ 4 uova
♦ 250 g di farina
♦ 1 cucchiaini di lievito in polvere
♦ 125 ml di latte tiepido
♦ 300 g di mele (sbucciate e tagliate a dadini)
♦ 50 g di mandorle o noci tritate
1) Sbattere le uova fino a renderle schiumose .
2) Aggiungere lo zucchero e mescolare tutto .
3) Aggiungere il burro sciolto o la margarina sciolta .
4) Aggiungere la polvere lievitante .
5) Versare poco alla volta il latte alternato alla farina mescolando continuamente .
6) Aggiungere per ultimo le mandorle/noci e le mele a dadini .
7) Mescolare tutto alla velocità massima con il mixer a mano fino a ottenere un impasto liscio .
Spiedino di gamberiIngredienti
♦ 250 g di gamberi sgusciati di media grandezza
♦ 2 spicchi d’aglio (triturati finemente)
♦ 5 cucchiaio di olio d’oliva
♦ 12 pomodorini (ciliegina)
♦ 1 cucchiaio di prezzemolo tritato
♦ Sale, pepe, paprika in polvere
1) In una ciotola versare l’olio d’oliva, l’aglio, un po’ di paprika in polvere e il prezzemolo, mescolando tutto .
2) Aggiungere i gamberi e mescolare tutto in modo tale che essi siano comple-tamente ricoperti con il miscuglio aromatico .
3) Lasciare i gamberi a marinare per circa 20 minuti .
4) Su uno spiedino di legno, infilare i gamberi alternandoli ai pomodorini .
5) Fare grigliare gli spiedini per circa 5 minuti .

■ 38 │ IT│MT SSMW 750 C3
SmaltimentoNon gettare per alcun motivo l’apparecchio insieme ai normali rifiuti domestici . Questo prodotto è soggetto alla Direttiva europea 2012/19/EU (Rifiuti da apparecchiature elettriche ed elettroniche) .Smaltire l’apparecchio attraverso un’azienda di smaltimento autorizzata o at-traverso l’ente di smaltimento comunale . Rispettare le prescrizioni attualmente in vigore . In caso di dubbi mettersi in contatto con l’ente di smaltimento competente .
Per lo smaltimento del prodotto una volta che ha terminato la sua funzione, informarsi presso l’amministrazione comunale .
Garanzia della Kompernass Handels GmbHEgregio Cliente,
Questo apparecchio ha una garanzia di 3 anni dalla data di acquisto . Qualora questo prodotto presentasse vizi, Le spettano diritti legali nei confronti del venditore del prodotto . La garanzia qui di seguito descritta non costituisce alcun limite a tali diritti legali .
Condizioni di garanziaIl periodo di garanzia decorre dalla data dell’acquisto . Si prega di conservare lo scontrino di cassa originale . Tale documento è necessario come prova di acquisto .
Qualora entro tre anni a partire dalla data dell’acquisto di questo prodotto si presentasse un vizio del materiale o di fabbricazione, provvederemo, a nostra discrezione, a riparare o a sostituire gratuitamente il prodotto . Questa prestazione di garanzia ha come presupposto che l’apparecchio difettoso e la prova di acquisto (scontrino di cassa) vengano presentati entro il termine di tre anni e che si descriva per iscritto in cosa consiste il vizio e quando si è presentato .
Se il vizio rientra nell’ambito della nostra garanzia, il Suo prodotto verrà riparato o sostituito da uno nuovo . Con la riparazione o la sostituzione del prodotto non decorre un nuovo periodo di garanzia .
Periodo di garanzia e diritti legali di rivendicazione di viziIl periodo di garanzia non viene prolungato da interventi in garanzia . Ciò vale anche per le parti sostituite e riparate . Danni e vizi eventualmente già presenti al momento dell’acquisto devono venire segnalati immediatamente dopo che l’apparecchio è stato disimballato . Le riparazioni eseguite dopo la scadenza del periodo di garanzia sono a pagamento .

IT│MT │ 39 ■SSMW 750 C3
Ambito della garanziaL’apparecchio è stato prodotto con cura secondo severe direttive qualitative e debitamente collaudato prima della consegna .
La garanzia viene prestata in caso di vizi del materiale o di fabbricazione . Questa garanzia non si estende a componenti del prodotto che sono esposti al normale logorio e possono pertanto essere considerati come componenti soggetti a usura o a danni che si verificano su componenti delicati, per es . interruttori, batterie, stampi da forno o parti realizzate in vetro .
Questa garanzia decade se il prodotto è stato danneggiato oppure utilizzato o sottoposto a interventi di manutenzione in modo non conforme . Per un utilizzo adeguato del prodotto si devono rigorosamente rispettare tutte le istruzioni esposte nel manuale di istruzioni per l’uso . Si devono assolutamente evitare modalità di utilizzo e azioni che il manuale di istruzioni per l’uso sconsiglia o da cui esso mette in guardia .
Il prodotto è destinato esclusivamente all’uso domestico e non a quello commer-ciale . La garanzia decade in caso di impiego improprio o manomissione, uso della forza e interventi non eseguiti dalla nostra filiale di assistenza autorizzata .
Trattamento dei casi di garanziaPer garantire una rapida evasione della Sua richiesta, La preghiamo di seguire le seguenti istruzioni:
■ Tenga a portata di mano per qualsiasi richiesta lo scontrino di cassa e il codice dell’articolo (per es . IAN 12345) come prova di acquisto .
■ Il codice dell’articolo è indicato sulla targhetta di modello, su un’incisione, sul frontespizio del manuale di istruzioni per l’uso (in basso a sinistro) o come adesivo sul lato posteriore o inferiore .
■ Qualora si presentassero malfunzionamenti o altri tipi di vizi, contatti innan-zitutto il reparto assistenza clienti qui di seguito indicato telefonicamente o via e-mail .
■ Una volta che il prodotto è stato registrato come difettoso, lo può poi spedire a nostro carico, provvedendo ad allegare la prova di acquisto (scontrino di cassa), una descrizione del vizio e l’indicazione della data in cui si è presen-tato, all’indirizzo del servizio di assistenza clienti che Le è stato comunicato .
Al sito www .lidl-service .com si possono scaricare questo e molti altri manuali di istruzioni per l’uso, filmati sui prodotti e software .
■ 40 │ IT│MT SSMW 750 C3
Assistenza Assistenza Italia Tel .: 02 36003201 E-Mail: kompernass@lidl .it
Service Malta Tel .: 80062230 E-Mail: kompernass@lidl .com .mt
IAN 313476
ImportatoreBadi che il seguente indirizzo non è quello del servizio di assistenza clienti . Contatti innanzitutto il servizio di assistenza clienti indicato .
KOMPERNASS HANDELS GMBH
BURGSTRASSE 21
DE - 44867 BOCHUM
GERMANIA
www .kompernass .com

PT │ 41 ■SSMW 750 C3
Índice
Introdução . . . . . . . . . . . . . . . . . . . . . . . . . . . . . . . . . . . . . . . . . . . . . . . . . . . 42
Direitos de autor . . . . . . . . . . . . . . . . . . . . . . . . . . . . . . . . . . . . . . . . . . . . . . . . . . . . . . . . 42Limitação da responsabilidade . . . . . . . . . . . . . . . . . . . . . . . . . . . . . . . . . . . . . . . . . . . . . 42Utilização correcta . . . . . . . . . . . . . . . . . . . . . . . . . . . . . . . . . . . . . . . . . . . . . . . . . . . . . . 42
Volume de fornecimento . . . . . . . . . . . . . . . . . . . . . . . . . . . . . . . . . . . . . . . 43
Eliminação da embalagem . . . . . . . . . . . . . . . . . . . . . . . . . . . . . . . . . . . . . . . . . . . . . . . . 43
Descrição do aparelho . . . . . . . . . . . . . . . . . . . . . . . . . . . . . . . . . . . . . . . . . 44
Dados técnicos . . . . . . . . . . . . . . . . . . . . . . . . . . . . . . . . . . . . . . . . . . . . . . . . 45
Indicações de segurança . . . . . . . . . . . . . . . . . . . . . . . . . . . . . . . . . . . . . . . 45
Substituição das placas removíveis . . . . . . . . . . . . . . . . . . . . . . . . . . . . . . . 48
Colocação das placas removíveis . . . . . . . . . . . . . . . . . . . . . . . . . . . . . . . . . . . . . . . . . . . 48Remoção das placas removíveis . . . . . . . . . . . . . . . . . . . . . . . . . . . . . . . . . . . . . . . . . . . . 48
Primeira colocação em funcionamento . . . . . . . . . . . . . . . . . . . . . . . . . . . . 49
Funcionamento . . . . . . . . . . . . . . . . . . . . . . . . . . . . . . . . . . . . . . . . . . . . . . . 50
Tostar sanduíches . . . . . . . . . . . . . . . . . . . . . . . . . . . . . . . . . . . . . . . . . . . . . . . . . . . . . . . . 50Fazer waffles . . . . . . . . . . . . . . . . . . . . . . . . . . . . . . . . . . . . . . . . . . . . . . . . . . . . . . . . . . . 50Grelhar . . . . . . . . . . . . . . . . . . . . . . . . . . . . . . . . . . . . . . . . . . . . . . . . . . . . . . . . . . . . . . . 51
Limpeza . . . . . . . . . . . . . . . . . . . . . . . . . . . . . . . . . . . . . . . . . . . . . . . . . . . . . 52
Guardar . . . . . . . . . . . . . . . . . . . . . . . . . . . . . . . . . . . . . . . . . . . . . . . . . . . . . 53
Resolução de problemas . . . . . . . . . . . . . . . . . . . . . . . . . . . . . . . . . . . . . . . 53
Receitas . . . . . . . . . . . . . . . . . . . . . . . . . . . . . . . . . . . . . . . . . . . . . . . . . . . . . 54
Tosta de tomate holandesa . . . . . . . . . . . . . . . . . . . . . . . . . . . . . . . . . . . . . . . . . . . . . . . . 54Tosta Italiana . . . . . . . . . . . . . . . . . . . . . . . . . . . . . . . . . . . . . . . . . . . . . . . . . . . . . . . . . . . 55Tosta Hawai . . . . . . . . . . . . . . . . . . . . . . . . . . . . . . . . . . . . . . . . . . . . . . . . . . . . . . . . . . . . 56Waffles . . . . . . . . . . . . . . . . . . . . . . . . . . . . . . . . . . . . . . . . . . . . . . . . . . . . . . . . . . . . . . . 56Waffles de maçã . . . . . . . . . . . . . . . . . . . . . . . . . . . . . . . . . . . . . . . . . . . . . . . . . . . . . . . . 57Espetada de camarão . . . . . . . . . . . . . . . . . . . . . . . . . . . . . . . . . . . . . . . . . . . . . . . . . . . . 57
Eliminação . . . . . . . . . . . . . . . . . . . . . . . . . . . . . . . . . . . . . . . . . . . . . . . . . . . 58
Garantia da Kompernass Handels GmbH . . . . . . . . . . . . . . . . . . . . . . . . . 58
Assistência Técnica . . . . . . . . . . . . . . . . . . . . . . . . . . . . . . . . . . . . . . . . . . . . . . . . . . . . . . 60Importador . . . . . . . . . . . . . . . . . . . . . . . . . . . . . . . . . . . . . . . . . . . . . . . . . . . . . . . . . . . . . 60

■ 42 │ PT SSMW 750 C3
IntroduçãoParabéns pela compra do seu novo aparelho!
Escolheu um produto moderno e de alta qualidade . O manual de instruções é parte integrante deste produto . Este contém indicações importantes para a segu-rança, utilização e eliminação . Antes da utilização do produto, familiarize-se com todas as indicações de utilização e de segurança . Utilize o aparelho apenas como descrito e nas áreas de aplicação indicadas . Ao entregar o aparelho a terceiros entregue todos os documentos .
Direitos de autorEsta documentação está protegida por direitos de autor .
Qualquer distribuição ou cópia, mesmo de extractos, bem como a reprodução de imagens, mesmo editadas, apenas podem ser realizadas mediante autoriza-ção escrita do fabricante .
Limitação da responsabilidadeTodas as informações, dados e indicações presentes neste manual de instruções relativas à montagem, ligação e operação correspondem à mais recente versão de impressão e foram elaborados da melhor forma e de acordo com a nossa experiência e conhecimentos actuais .
Excluem-se os direitos relativos dados, imagens e descrições presentes neste manual de instruções .
O fabricante não assume qualquer responsabilidade por danos resultantes da inobservância das instruções, de uma utilização incorrecta, de reparações ina-dequadas, alterações não autorizadas ou da utilização de peças de reposição não aprovadas .
Utilização correctaEste aparelho destina-se exclusivamente a tostar sanduíches recheadas, fazer waffles e grelhar alimentos .
Este aparelho destina-se exclusivamente para uso privado . Não utilize este aparelho com fins comerciais!

PT │ 43 ■SSMW 750 C3
Volume de fornecimentoPor norma, o aparelho é fornecido com os seguintes componentes:
▯ Tostadeira
▯ 2 placas removíveis de sanduíches
▯ 2 placas removíveis de waffles
▯ 2 placas removíveis para grelhar
▯ Manual de instruções
1) Retire o aparelho, as placas de substituição e o manual de instruções da caixa .
2) Retire todo o material de embalagem .
NOTA
► Verifique o fornecimento quanto à sua integridade e danos visíveis .
► No caso de um fornecimento incompleto ou de danos resultantes de uma embalagem incompleta ou do transporte, contacte a linha directa de assistência técnica (ver capítulo Assistência Técnica) .
Eliminação da embalagemA embalagem protege o aparelho de danos durante o transporte . Os materiais da embalagem devem ser seleccionados numa perspectiva ecológica e de poupança energética e, como tal, reciclados .
A reciclagem da embalagem permite a poupança de matérias-primas e reduz a formação de lixo . Elimine os materiais de embalagem que já não são necessários em conformidade com as normas locais em vigor .
Elimine a embalagem de modo ecológico . Tenha em atenção a marcação nos diversos materiais de embalagem e separe-os convenientemente . Os materiais de embalagem estão identificados com abreviaturas (a) e algarismos (b), com os seguintes significados: 1–7: plásticos, 20–22: papel e cartão, 80–98: compostos .
NOTA
► Se possível, conserve a embalagem original durante o período de garantia, para que possa embalar o aparelho correctamente em caso de devolução ou semelhante .

■ 44 │ PT SSMW 750 C3
Descrição do aparelhoFigura A:1 Dispositivos de bloqueio
2 Serpentinas de aquecimento
3 Suportes inferiores
4 Serpentinas de aquecimento
5 Dispositivos de bloqueio
6 Suportes traseiros
Figura B (placa de sanduíches):7 Saliências de encaixe superiores
8 Saliências de encaixe inferiores e traseiras
9 Saliências de encaixe dianteiras
Figura C (placas de waffles):7 Saliências de encaixe superiores
8 Saliências de encaixe inferiores e traseiras
9 Saliências de encaixe dianteiras
Figura D (placas de grelhar):7 Saliências de encaixe superiores
8 Saliências de encaixe inferiores e traseiras
9 Saliências de encaixe dianteiras
Figura E:0 Bloqueio da tampa
q Luz de controlo "Power"
w Luz de controlo "operacional"
e Dispositivo de enrolamento do cabo

PT │ 45 ■SSMW 750 C3
Dados técnicosTensão 220 – 240 V ∼ (corrente alternada), 50/60 Hz
Consumo de energia 750 W
Todas as peças deste aparelho que entram em contacto com alimentos são próprios para produtos alimentares .
Indicações de segurança
AVISO! PERIGO DE CHOQUE ELÉCTRICO! ► Um cabo de rede ou ficha de rede danificados devem ser imediatamente substituídos por técnicos especializados autorizados, de modo a evitar situações de perigo .
► Utilize o aparelho apenas em espaços secos, não ao ar livre .
Nunca mergulhe o aparelho em água ou outros líquidos! Caso contrário, existe perigo de morte por choque eléctrico .
► Ao limpar, certifique-se de que não há infiltração de água no interior do aparelho . Nunca limpe o aparelho sob água corrente .
► Certifique-se de que o aparelho nunca entra em contacto com água . Nunca utilize o aparelho perto de água ou de recipientes contendo líquidos .
► Certifique-se de que o cabo de alimentação nunca fica molhado nem húmido durante o funcionamento . Coloque-o de modo que não fique preso, nem seja danificado de qualquer outra forma .
► Após cada utilização, retire a ficha de rede da tomada para desligar o aparelho .
► Nunca abra a caixa do aparelho .
■ 46 │ PT SSMW 750 C3
AVISO! PERIGO DE FERIMENTOS! ► Este aparelho pode ser utilizado por crianças a partir dos 8 anos de idade, pessoas com capacidades físicas, sensoriais ou mentais reduzidas, bem como com falta de experiência e/ou conhecimentos, desde que estejam sob supervisão ou tenham sido instruídas relativamente à utili-zação segura do aparelho e tenham entendido os perigos inerentes à mesma .
► As crianças não devem brincar com o aparelho . ► A limpeza e manutenção de utilizador não devem ser realizadas por crianças, a não ser que tenham 8 ou mais anos e o façam com supervisão de alguém . O aparelho e o cabo de ligação devem estar fora do alcance de crianças menores de 8 anos .
► Durante o funcionamento, as peças do aparelho podem aquecer muito . Por isso, toque apenas na pega .
► Deixe o aparelho arrefecer completamente antes de o limpar, de substituir as placas ou de o arrumar .
► Proceda com o máximo cuidado ao retirar os alimentos prontos (Sanduíches, waffles, etc .) . O aparelho, tal como os alimentos, estão muito quentes .
► Utilize o aparelho apenas sobre uma superfície estável, plana e antiderrapante .
► Não utilize temporizadores externos ou sistemas de comando à distância para operar o aparelho .
Atenção! Superfície quente!

PT │ 47 ■SSMW 750 C3
ATENÇÃO! PERIGO DE INCÊNDIO! ► O aparelho não deve ser utilizado nas proximidades de materiais inflamáveis .
► Não cubra o aparelho, quando este se encontra ligado . ► Utilize o aparelho apenas em superfícies resistentes ao calor .
► Nunca deixe o aparelho a funcionar sem vigilância .
ATENÇÃO! DANOS MATERIAIS! ► Retire os alimentos apenas com uma espátula de plástico ou madeira ou outro utensílio adequado não metálico para não danificar o revestimento anti-aderente da sanduicheira .
► Não utilize detergentes agressivos nem objectos pontiagu-dos para a limpeza .

■ 48 │ PT SSMW 750 C3
Substituição das placas removíveisPode seleccionar entre 3 placas removíveis diferentes:
– Placas removíveis para “sanduíche”: para preparação de sanduíches recheadas .
– Placas removíveis para “waffles”: Para fazer waffles .
– Placas removíveis para “grelhar”: para grelhar carne, peixe, etc .
AVISO! PERIGO DE CHOQUE ELÉCTRICO!
► Retire a ficha de rede da tomada antes de substituir as placas removíveis .
AVISO! PERIGO DE FERIMENTOS!
► Antes de substituir as placas removíveis deixe arrefecer o aparelho! Perigo de queimaduras!
Colocação das placas removíveis1) Abra a sanduicheira, soltando o bloqueio 0 e levantando a tampa .
2) Placa removível superior: Primeiro, empurre as saliências de encaixe inferio-res 8 em direcção aos suportes inferiores 3 .
3) Depois, prima as saliências de encaixe superiores 7 contra os trincos 1, de modo que as saliências 7 encaixem por baixo dos trincos 1 e a placa removível fique bem assente .
4) Placa removível inferior: Primeiro, empurre as saliências de encaixe traseiras 8 em direcção aos suportes traseiros 6 .
5) Depois, prima as saliências de encaixe dianteiras 9 contra os trincos 5, de modo que as saliências 9 encaixem por baixo dos trincos 5 e a placa removível fique bem assente .
6) Pressione uma vez com firmeza no meio da placa removível inferior para assegurar que se encontra bem fixa .
Remoção das placas removíveis1) Placa removível superior: Puxe os trincos 1 para cima, inclinando simulta-
neamente a placa removível para fora, de modo que seja possível retirá-la dos suportes inferiores 3 .
2) Placa removível inferior: Puxe os trincos 5 para fora e levante a placa remo-vível, de modo que seja possível retirá-la dos suportes traseiros 6 .

PT │ 49 ■SSMW 750 C3
Primeira colocação em funcionamentoExecute os seguintes passos com cada um dos 3 pares de placas removíveis .
■ Friccione uma vez o revestimento anti-aderente das placas removíveis com um óleo alimentar adequado .
AVISO! PERIGO DE FERIMENTOS!
► Antes de substituir as placas removíveis deixe arrefecer o aparelho! Perigo de queimaduras!
■ Insira um par de placas removíveis no aparelho .
■ Insira a ficha de rede numa tomada .
■ Feche o aparelho e tranque-o com o bloqueio da tampa 0 .
■ Deixe o aparelho aquecer durante aprox . 10 minutos .
NOTA
► Na primeira utilização do aparelho, poderá verificar-se um ligeiro odor (bem como uma pequena formação de fumo) . Este é normal e dissipa-se rapida-mente . Assegure uma ventilação suficiente . Abra, por exemplo, uma janela .
■ Desligue a ficha de rede e deixe o aparelho arrefecer .
■ Limpe as placas removíveis e o aparelho tal como descrito no capítulo "Limpeza" .
O aparelho encontra-se agora operacional .

■ 50 │ PT SSMW 750 C3
Funcionamento
Tostar sanduíches1) Seleccione as placas removíveis de sanduíches e insira-as .
ATENÇÃO! DANOS MATERIAIS!
► Nunca utilize duas placas removíveis diferentes em simultâneo .
2) Feche a tampa e tranque-a com o bloqueio da tampa 0 .
3) Insira a ficha de rede numa tomada . A luz de controlo cor de vermelho "Power" q acende .
4) Assim que o aparelho está quente, a luz de controlo verde "operacional" acende w .
5) Levante a tampa e coloque duas sanduíches preparadas na placa removível inferior .
6) Feche a tampa e tranque-a com o bloqueio da tampa 0 . Pode optar entre dois tipos de bloqueio . Se, no entanto, a sanduíche for demasiado grossa, não deixando trancar o bloqueio da tampa 0, retire parte do recheio da mesma .
ATENÇÃO! DANOS MATERIAIS!
► Retire as sanduíches apenas com uma espátula de plástico ou madeira ou outro utensílio adequado não metálico para não danificar o revestimento anti-aderente da sanduicheira .
7) As sanduiches ficam prontas após aprox . 5 – 6 minutos . Este cálculo tem-poral pode variar, dependendo do recheio utilizado e do gosto pessoal . Levante a tampa e retire as sanduíches .
8) Se não pretende preparar mais sanduíches, retire a ficha de rede da tomada .
Fazer waffles1) Seleccione as placas removíveis para waffles e insira-as .
ATENÇÃO! DANOS MATERIAIS!
► Nunca utilize duas placas removíveis diferentes em simultâneo .
2) Feche a tampa e tranque-a com o bloqueio da tampa 0 .
3) Insira a ficha de rede numa tomada . A luz de controlo cor de vermelho "Power" q acende .
4) Assim que o aparelho está quente, a luz de controlo verde "operacional" acende w .

PT │ 51 ■SSMW 750 C3
5) Levante a tampa e verta cerca de 2 – 3 colheres de sopa bem cheias de massa para waffles em cada uma das superfícies de cozimento de waffles da placa removível inferior .
6) Feche a tampa . Não bloqueie a tampa!
ATENÇÃO! DANOS MATERIAIS!
► Retire os waffles apenas com uma espátula de plástico ou madeira ou outro utensílio adequado não metálico para não danificar o revestimento anti-aderente da sanduicheira .
7) Os waffles ficam prontos após aprox . 5 – 7 minutos . Este cálculo temporal pode variar, dependendo da massa para waffles utilizada e do gosto pessoal . Levante a tampa e retire os waffles .
8) Se não pretende preparar mais waffles, retire a ficha de rede da tomada .#
Grelhar1) Seleccione as placas removíveis para grelhar e insira-as .
ATENÇÃO – DANOS MATERIAIS!
► Nunca utilize duas placas removíveis diferentes em simultâneo .
2) Feche a tampa e tranque-a com o bloqueio da tampa 0 .
3) Insira a ficha de rede numa tomada . A luz de controlo cor de vermelho "Power" q acende .
4) Assim que o aparelho está quente, a luz de controlo verde "operacional" acende w .
5) Levante a tampa e coloque os alimentos a serem grelhados na placa remo-vível inferior .
6) Feche a tampa . Não bloqueie a tampa!
7) Verifique de tempos a tempos o grau de tostagem, levantando a tampa .
ATENÇÃO! DANOS MATERIAIS!
► Retire os alimentos da placa removível inferior apenas com uma espátula de plástico ou madeira ou outro utensílio adequado não metálico para não danificar o revestimento anti-aderente .
8) Quando os alimentos estão cozinhados, retire-os da placa removível inferior .
9) Se não precisar mais de utilizar o aparelho, retire a ficha da tomada .

■ 52 │ PT SSMW 750 C3
Limpeza AVISO! PERIGO DE CHOQUE ELÉCTRICO!
► Retire a ficha de rede da tomada antes de limpar o aparelho .
Nunca mergulhe o aparelho em água ou outros líquidos! Caso contrário, existe perigo de morte por choque eléctrico .
AVISO! PERIGO DE FERIMENTOS!
► Deixe o aparelho arrefecer antes de o limpar . Perigo de queimaduras!
ATENÇÃO! DANOS MATERIAIS!
► Não utilizar detergentes agressivos ou abrasivos . Estes podem danificar a superfície do aparelho .
NOTA
► Não demore muito tempo na limpeza . Aguarde até que o aparelho esteja de tal modo arrefecido que seja possível pegar nele sem perigo de quei-maduras . Deste modo é mais fácil retirar os restos de alimentos .
■ Limpe a caixa com um pano seco ou ligeiramente humedecido .
■ Retire as placas removíveis e lave-as em água morna com um pouco de detergente .
NOTA
Para uma limpeza cuidada das placas removíveis, recomendamos que estas sejam lavadas à mão, tal como descrito . No entanto, também pode lavar as placas removíveis na máquina de lavar loiça .
■ Se entrar gordura ou alimentos para o espaço por baixo da placa removível, onde se encontram as serpentinas de aquecimento 2 4, proceda do seguinte modo:
– Limpe a gordura ou outros líquidos com um pedaço de papel de cozinha .
– Remova os resíduos que ficaram presos com uma espátula ou um palito de madeira .
■ Antes de uma nova utilização, deixe secar bem todas as peças .

PT │ 53 ■SSMW 750 C3
Guardar ■ Guarde a sanduicheira num local seco .
■ Enrole o cabo em torno dos suportes do dispositivo de enrolamento do cabo e na traseira do aparelho . Fixe o cabo com a braçadeira (ver fig . 1):
Fig . 1
■ Limpe o aparelho tal como descrito no capítulo “Limpeza” .
Resolução de problemas
Avaria Causa Resolução
O aparelho não funciona .
A ficha de rede não está ligada à tomada .
Ligue a ficha de rede à rede eléctrica .
O aparelho está avariado .Dirija-se ao serviço de apoio ao cliente .
As sanduíches/os waffles/ os alimentos grelhados ficam muito escuros .
As sanduíches/os waffles/ os alimentos grelhados estiveram demasiado tempo na sanduicheira .
Retire as sanduíches/os waffles/ os alimentos grelhados mais cedo .

■ 54 │ PT SSMW 750 C3
ReceitasTosta de tomate holandesa
Ingredientes
♦ 4 fatias de pão de forma
♦ Água
♦ Alho-francês
♦ 1 tomate médio
♦ Manteiga de ervas
♦ 2 fatias de fiambre
♦ sal
♦ Pimenta moída na hora
♦ 2 fatias de queijo gouda jovem
1) Lave o alho-francês e deixe-o escorrer . Abra o alho-francês longitudinal-mente e depois corte as duas metades em pedaços grandes . Coloque a água com sal num tacho e deixe ferver . Adicione o alho-francês e deixe-o cozinhar durante cerca de 1 minuto . Em seguida, deite o alho-francês numa peneira, passe-o por água fria e deixe escorrer .
2) Lave os tomates e seque-os . Corte-os em metades e retire as sementes . Corte os tomates em fatias .
3) Espalhe manteiga de ervas numa fatia de pão de forma e coloque uma fatia dobrada de fiambre no lado barrado do pão . Distribua os pedaços de alho-francês e fatias de tomate por cima . Tempere com sal e pimenta .
4) Coloque as fatias de queijo na fatia de pão .
5) Barre mais um pão de forma com manteiga de ervas e cubra a sua sanduíche com a parte barrada para baixo .

PT │ 55 ■SSMW 750 C3
Tosta ItalianaIngredientes
♦ 4 fatias de pão de forma
♦ 4 colheres de sopa de polpa de tomate
♦ 2 colheres de sopa de molho de maionese para saladas
♦ sal
♦ Ervas de Provença
♦ Pimenta moída na hora
♦ 1 tomate médio
♦ 1 pacote de queijo mozzarella
♦ Pimenta mista moída na hora
1) Misture a polpa de tomate, a maionese, o sal, as ervas de Provença e a pimenta . Barre as fatias de pão de forma com a mistura .
2) Lave os tomates e seque-os . Corte-os em metades e retire as sementes . Corte os tomates em fatias .
3) Deixe o queijo mozzarella escorrer num coador e depois corte-o em fatias . Corte estas novamente em metades .
4) As fatias de pão já barradas são agora guarnecidas com o tomate e fatias de mozzarella e polvilhadas com pimenta .
5) Cubra a sua sanduíche com as outras fatias de pão de forma .

■ 56 │ PT SSMW 750 C3
Tosta HawaiIngredientes
♦ 4 fatias de pão de forma
♦ 2 rodelas de ananás (em lata)
♦ manteiga
♦ 2 fatias de fiambre
♦ 2 fatias de queijo
1) Escorra o ananás num coador .
2) Barre agora a fatia de pão de forma com manteiga .
3) Guarneça a fatia de pão de forma com o fiambre e o ananás .
4) O queijo é o último a ser colocado sobre o ananás .
5) Cubra a sua sanduíche com mais uma fatia de pão de forma .
WafflesIngredientes
♦ 250 g de margarina ou manteiga
♦ aprox . 200 g de açúcar
♦ 2 pacotes de açúcar baunilhado
♦ 5 ovos
♦ 500 g de farinha
♦ 2 colheres de chá de fermento
♦ 350 – 400 ml de leite
1) Bata os ovos até ficarem espumosos .
2) Adicione o açúcar e o açúcar baunilhado e mexa .
3) Acrescente a manteiga ou margarina derretida .
4) Misture o fermento em pó .
5) Mexendo sempre, adicione gradualmente o leite e a farinha alternadamente .
6) Misture tudo com a batedeira eléctrica no nível mais elevado até obter uma massa uniforme .

PT │ 57 ■SSMW 750 C3
Waffles de maçãIngredientes
♦ 250 g de margarina ou manteiga
♦ 75 g de açúcar
♦ 4 ovos
♦ 250 g de farinha
♦ 1 colher de chá de fermento
♦ 125 ml de leite morno
♦ 300 g de maçãs (descascadas e cortadas em cubos)
♦ 50 g de amêndoas ou nozes raladas
1) Bata os ovos até ficarem espumosos .
2) Adicione o açúcar e mexa .
3) Acrescente a manteiga ou margarina derretida .
4) Misture o fermento em pó .
5) Mexendo sempre, adicione gradualmente o leite e a farinha alternadamente .
6) Por último, coloque as amêndoas ou nozes e os cubos de maçã .
7) Misture tudo com a batedeira eléctrica no nível mais elevado até obter uma massa uniforme .
Espetada de camarãoIngredientes
♦ 250 g de camarão médio descascado
♦ 2 dentes de alho (picado)
♦ 5 colheres de sopa de azeite
♦ 12 tomates pequenos (tomate cherry)
♦ 1 colher de sopa de salsa picada
♦ Sal, pimenta, pimentão-doce
1) Adicione o azeite, o alho, um pouco de pimentão-doce, sal, pimenta e salsa numa tigela e misture tudo .
2) Em seguida, adicione os camarões e mexa bem para que o camarão fique completamente envolvido na mistura de condimentos .
3) Deixe o camarão repousar na mistura durante aprox . 20 minutos .
4) Introduza alternadamente um tomate e um camarão no espeto .
5) Deixe a espetada grelhar aprox . 5 minutos .

■ 58 │ PT SSMW 750 C3
EliminaçãoNunca coloque o aparelho no lixo doméstico normal . Este produto é abrangido pela Directiva Europeia 2012/19/EU (Waste Electrical and Electronic Equipment) .Elimine o aparelho através de uma instituição de recolha de resíduos autorizada ou através da instituição de recolha do seu município . Tenha atenção aos regulamentos actualmente em vigor . Em caso de dúvida, entre em contacto com a entidade de eliminação de resíduos .
Relativamente às possibilidades de eliminação do produto em fim de vida, informe-se na junta de freguesia ou câmara municipal da sua área de residência .
Garantia da Kompernass Handels GmbHEstimada Cliente, Estimado Cliente,
Este aparelho tem uma garantia de 3 anos a contar da data de compra . No caso deste produto ter defeitos, tem direitos legais contra o vendedor do produto . Estes direitos legais não são limitados pela nossa garantia que passamos a transcrever .
Condições de garantiaO prazo de garantia tem início na data da compra . Por favor, guarde bem o talão de compra original . Este documento é necessário como comprovativo da compra .
Se dentro de três anos a partir da data de compra deste produto, ocorrer um defeito de material ou fabrico, o produto será reparado ou substituído por nós – consoante a nossa preferência – gratuitamente . Esta garantia parte do princípio que o aparelho defeituoso e o comprovativo da compra (talão de compra) são apresentados dentro do prazo de três anos e é descrito brevemente, por escrito, em que consiste o defeito e quando ocorreu .
Se o defeito estiver coberto pela nossa garantia, receberá o produto reparado ou um novo produto .
Prazo de garantia e direitos legaisO período de garantia não é prolongado pelo acionamento da mesma . Isto também se aplica a peças substituídas e reparadas . Danos e defeitos que possam eventualmente já existir no momento da compra devem ser imediatamente comu-nicados, após retirar o aparelho da embalagem . Expirado o período da garantia, quaisquer reparações necessárias estão sujeitas a pagamento .

PT │ 59 ■SSMW 750 C3
Âmbito da garantiaO aparelho foi fabricado segundo diretivas de qualidade rigorosas, com o maior cuidado, e testado escrupulosamente antes da sua distribuição .
A garantia abrange apenas defeitos de material ou de fabrico . Esta garantia não abrange peças do produto, que estão sujeitas ao desgaste normal e podem ser consideradas desta forma peças de desgaste, ou danos em peças frágeis, p . ex . interruptores, acumuladores, formas para bolos ou peças de vidro .
Esta garantia perde a validade, se o produto for danificado, utilizado incorreta-mente ou se a manutenção tenha sido realizada indevidamente . Para garantir uma utilização correta do produto, é necessário cumprir todas as instruções contidas no manual de instruções . Ações ou fins de utilização que são desaconselhados, ou para os quais é alertado no manual de instruções, têm de ser impreterivelmente evitados .
O produto foi concebido apenas para uso privado e não para uso comercial . A garantia extingue-se em caso de utilização incorreta, uso de força e interven-ções que não tenham sido efetuadas pela nossa Filial de Assistência Técnica autorizada .
Procedimento em caso de acionamento da garantiaPara garantir um processamento rápido do seu pedido, siga, por favor, as seguintes instruções:
■ Para todos os pedidos de esclarecimento, tenha à mão o talão de compra e o número do artigo (p . ex . IAN 12345) como comprovativo da compra .
■ O número do artigo consta na placa de características, numa impressão, na capa do seu manual de instruções (em baixo à esquerda) ou, como autoco-lante, no verso ou no lado inferior .
■ Caso ocorram falhas de funcionamento ou outros defeitos, contacte primeiro o Serviço de Assistência Técnico, indicado em seguida, telefonicamente ou por e-mail .
■ De seguida, pode enviar gratuitamente o produto registado como defeituoso, incluindo o comprovativo da compra (talão de compra) e indique o defeito e quando este ocorreu, para a morada do Serviço de Assistência Técnica que lhe foi indicada .
Em www .lidl-service .com poderá descarregar este manual de instruções e muitos outros, bem como vídeos sobre os produtos e software .

■ 60 │ PT SSMW 750 C3
Assistência Técnica Assistência Portugal Tel .: 70778 0005 (0,12 EUR/Min .) E-Mail: kompernass@lidl .pt
IAN 313476
ImportadorPor favor, observe que a seguinte morada não é a morada do Serviço de Assis-tência Técnica . Primeiro entre em contacto com o Serviço de Assistência Técnica .
KOMPERNASS HANDELS GMBH
BURGSTRASSE 21
DE - 44867 BOCHUM
ALEMANHA
www .kompernass .com

GB│MT │ 61 ■SSMW 750 C3
Index
Introduction . . . . . . . . . . . . . . . . . . . . . . . . . . . . . . . . . . . . . . . . . . . . . . . . . . 62
Copyright . . . . . . . . . . . . . . . . . . . . . . . . . . . . . . . . . . . . . . . . . . . . . . . . . . . . . . . . . . . . . . 62Limited liability . . . . . . . . . . . . . . . . . . . . . . . . . . . . . . . . . . . . . . . . . . . . . . . . . . . . . . . . . . 62Intended use . . . . . . . . . . . . . . . . . . . . . . . . . . . . . . . . . . . . . . . . . . . . . . . . . . . . . . . . . . . 62
Items supplied . . . . . . . . . . . . . . . . . . . . . . . . . . . . . . . . . . . . . . . . . . . . . . . . 63
Disposal of the packaging . . . . . . . . . . . . . . . . . . . . . . . . . . . . . . . . . . . . . . . . . . . . . . . . . 63
Appliance description . . . . . . . . . . . . . . . . . . . . . . . . . . . . . . . . . . . . . . . . . . 64
Technical data . . . . . . . . . . . . . . . . . . . . . . . . . . . . . . . . . . . . . . . . . . . . . . . . 65
Safety instructions . . . . . . . . . . . . . . . . . . . . . . . . . . . . . . . . . . . . . . . . . . . . 65
Exchanging the removable plates . . . . . . . . . . . . . . . . . . . . . . . . . . . . . . . . 68
Placement of the removable plates . . . . . . . . . . . . . . . . . . . . . . . . . . . . . . . . . . . . . . . . . . 68Extracting the removable plate . . . . . . . . . . . . . . . . . . . . . . . . . . . . . . . . . . . . . . . . . . . . . 68
Commissioning . . . . . . . . . . . . . . . . . . . . . . . . . . . . . . . . . . . . . . . . . . . . . . . 69
Operation . . . . . . . . . . . . . . . . . . . . . . . . . . . . . . . . . . . . . . . . . . . . . . . . . . . 70
Toasting sandwiches . . . . . . . . . . . . . . . . . . . . . . . . . . . . . . . . . . . . . . . . . . . . . . . . . . . . . 70Baking waffles . . . . . . . . . . . . . . . . . . . . . . . . . . . . . . . . . . . . . . . . . . . . . . . . . . . . . . . . . . 70Grilling . . . . . . . . . . . . . . . . . . . . . . . . . . . . . . . . . . . . . . . . . . . . . . . . . . . . . . . . . . . . . . . . 71
Cleaning . . . . . . . . . . . . . . . . . . . . . . . . . . . . . . . . . . . . . . . . . . . . . . . . . . . . . 72
Storage . . . . . . . . . . . . . . . . . . . . . . . . . . . . . . . . . . . . . . . . . . . . . . . . . . . . . 73
Troubleshooting . . . . . . . . . . . . . . . . . . . . . . . . . . . . . . . . . . . . . . . . . . . . . . 73
Recipes . . . . . . . . . . . . . . . . . . . . . . . . . . . . . . . . . . . . . . . . . . . . . . . . . . . . . . 74
Dutch Tomato Toast . . . . . . . . . . . . . . . . . . . . . . . . . . . . . . . . . . . . . . . . . . . . . . . . . . . . . . 74Italian Toast . . . . . . . . . . . . . . . . . . . . . . . . . . . . . . . . . . . . . . . . . . . . . . . . . . . . . . . . . . . . 75Hawaiian Toast . . . . . . . . . . . . . . . . . . . . . . . . . . . . . . . . . . . . . . . . . . . . . . . . . . . . . . . . . 76Waffles . . . . . . . . . . . . . . . . . . . . . . . . . . . . . . . . . . . . . . . . . . . . . . . . . . . . . . . . . . . . . . . 76Apple waffles . . . . . . . . . . . . . . . . . . . . . . . . . . . . . . . . . . . . . . . . . . . . . . . . . . . . . . . . . . . 77Shrimp skewer . . . . . . . . . . . . . . . . . . . . . . . . . . . . . . . . . . . . . . . . . . . . . . . . . . . . . . . . . . 77
Disposal . . . . . . . . . . . . . . . . . . . . . . . . . . . . . . . . . . . . . . . . . . . . . . . . . . . . . 78
Kompernass Handels GmbH warranty . . . . . . . . . . . . . . . . . . . . . . . . . . . . 78
Service . . . . . . . . . . . . . . . . . . . . . . . . . . . . . . . . . . . . . . . . . . . . . . . . . . . . . . . . . . . . . . . . 80Importer . . . . . . . . . . . . . . . . . . . . . . . . . . . . . . . . . . . . . . . . . . . . . . . . . . . . . . . . . . . . . . . 80

■ 62 │ GB│MT SSMW 750 C3
IntroductionCongratulations on the purchase of your new appliance!
You have clearly decided in favour of a modern, high quality product . These operating instructions are a component of this product . They contain important information in regard to safety, use and disposal . Before using the product, familiarise yourself with all of these operating and safety instructions . Use this appliance only as described and only for the purposes indicated . In addition, pass these documents on, together with the product, to any future owner .
CopyrightThis documentation is copyright protected .
Any copying or reproduction of it, including as extracts, as well as the reproduction of images, also in an altered state, is only permitted with the written authorisation of the manufacturer .
Limited liabilityAll technical information, data and instructions for the installation, connection and operation contained in these operating instructions correspond to the latest available at the time of printing and, to the best of our knowledge, take into account our previous experience and know-how .
No claims can be derived from the details, illustrations and descriptions in these instructions .
The manufacturer assumes no responsibility for damage caused by failure to ob-serve these instructions, improper use, incompetent repairs, making unauthorised modifications or for using unapproved replacement parts .
Intended useThis appliance is intended exclusively for the toasting of filled sandwiches, baking waffles and the grilling of foodstuffs .
This appliance is intended exclusively for use in domestic households . Do not use the appliance for commercial applications!

GB│MT │ 63 ■SSMW 750 C3
Items suppliedThe appliance is delivered with the following components as standard:
▯ Sandwich Toaster
▯ 2 Removable plates “Sandwich”
▯ 2 Removable plates “Waffles”
▯ 2 Removable plates “Grill”
▯ Operating instructions
1) Remove the appliance, the removable plates and the operating instructions from the carton .
2) Remove all packing material .
NOTICE
► Check the contents to ensure everything is present and for visible damage .
► If the delivery is not complete or has been damaged due to defective packaging or transportation, contact the Service Hotline (see section Service) .
Disposal of the packagingThe packaging protects the appliance from transport damage . The packaging materials are selected from the point of view of their environmental friendliness and disposal technology and are therefore recyclable .
The recirculation of packaging into the material circuit saves on raw material and reduces the amount of waste generated . Dispose of packaging material that is no longer needed as per the regionally established regulations .
Dispose of the packaging in an environmentally friendly manner . Note the labelling on the packaging and separate the packaging material components for disposal if necessary . The packaging material is labelled with abbreviations (a) and numbers (b) with the following meanings: 1–7: Plastics, 20–22: Paper and cardboard, 80–98: Composites .
NOTICE
► If possible preserve the appliance's original packaging during the warranty period so that, in the event of a warranty claim, you can pack the appliance ideally for its return .
■ 64 │ GB│MT SSMW 750 C3
Appliance descriptionIllustration A:1 Locking device
2 Heating coil
3 Lower mountings
4 Heating coil
5 Locking devices
6 Rear mountings
Illustration B (Sandwich plates):7 Upper latches
8 Lower and rear latches
9 Front latches
Illustration C (Waffle plates):7 Upper latches
8 Lower and rear latches
9 Front latches
Illustration D (Grill plates):7 Upper latches
8 Lower and rear latches
9 Front latches
Illustration E:0 Lid locking device
q Control lamp “Power”
w Control lamp “Ready”
e Cable retainer

GB│MT │ 65 ■SSMW 750 C3
Technical dataVoltage 220 – 240 V ∼ AC, 50/60 Hz
Power consumption 750 W
All of the parts of this appliance that come into contact with food are food-safe .
Safety instructions
WARNING! RISK OF ELECTRIC SHOCK! ► Arrange for damaged power cables and/or plugs to be replaced as soon as possible by a qualified specialist or by Customer Services .
► Use the appliance only in dry indoor areas, not outdoors . NEVER submerse the appliance in water or other liquids! If you do, then you could receive a potentially fatal electric shock .
► When cleaning, ensure that water cannot permeate into the appliance . NEVER clean the appliance under running water .
► Ensure that the appliance can never come into contact with water . NEVER use the appliance adjacent to water or close to vessels containing liquids .
► Ensure that the power cable never gets wet or moist when the appliance is in use . Lay the cable such that it cannot be clamped or otherwise damaged .
► After use, disconnect the power cable from the mains power socket to turn off the unit .
► NEVER open the housing of the appliance .

■ 66 │ GB│MT SSMW 750 C3
WARNING! RISK OF INJURY! ► This appliance may be used by children of at least 8 years of age and persons with reduced physical, sensory or men-tal capabilities or lack of experience and/or knowledge if they are supervised by a person responsible for their safety or receive from this person instruction in how the appliance is to be used, and they have understood the potential risks .
► Children should not play with the appliance . ► Cleaning and user maintenance should not be performed by children, unless they are older than 8 years of age and are supervised . Children younger than 8 years of age are to be kept away from the appliance and the power cable .
► The appliance can become hot when it is in use . Therefore, only touch the handles .
► Let the appliance cool down completely before cleaning it, exchanging the removable plates or putting it into storage .
► Use caution when removing the finished foods (sandwiches, waffles, etc .) . The appliance, as well as the sandwiches, will be very hot .
► Use the appliance only on a stable, non-slippery and level surface .
► Do not use an external timing switch or a separate remote control system to operate the appliance .
Attention! Hot surfaces!

GB│MT │ 67 ■SSMW 750 C3
CAUTION! RISK OF FIRE! ► This appliance may not be used in close vicinity to flammable material .
► Do not leave the appliance unattended at any time when it is in use .
► Operate the appliance only on heat resistant surface . ► Do not operate the appliance unsupervised .
CAUTION! PROPERTY DAMAGE! ► To avoid damaging the non-stick coating of the Sandwich Maker, remove your cooked foods only with a plastic or wooden spatula or some other suitable, non-metallic implement .
► Do not use abrasive cleansers or sharp objects for cleaning .

■ 68 │ GB│MT SSMW 750 C3
Exchanging the removable platesYou can choose between 3 different removable plates:
– Removable plates “Sandwich”: for the preparation of filled sandwiches .
– Removable plates “Waffles”: for baking waffles .
– Removable plates “Grill”: for grilling meat, fish, etc .
WARNING! RISK OF ELECTRIC SHOCK
► Disconnect the plug from the mains power socket before exchanging the removable plates .
WARNING! RISK OF INJURY!
► Let the appliance cool down before exchanging the removable plates! Risk of Burns!
Placement of the removable plates1) Open the sandwich maker by releasing the lid locking device 0 and lifting
the lid .
2) Upper removable plate: First slide the lower latches 8 into the lower mountings 3 .
3) Now press the upper latches 7 onto the locking devices 1, so that the upper latches 7 spring under the locking devices 1 and the removable plate is firmly seated .
4) Lower removable plate: First slide the rear latches 8 into the rear mountings 6 .
5) Now press the front latches 9 onto the locking devices 5 so that the latches 9 spring under the locking devices 5 and the removable plate is firmly seated .
6) Press firmly once in the centre of the lower removable plate to ensure that it is securely inserted .
Extracting the removable plate1) Upper removable plate: Slide the locking devices 1 upwards and simul-
taneously tilt the removable plate forward so that you can lift it out from underneath the lower mountings 3 .
2) Lower removable plate: Pull the locking devices 5 forward and lift the removable plate so that you can pull it out from the rear mountings 6 .

GB│MT │ 69 ■SSMW 750 C3
CommissioningCarry out the following procedure with each of the 3 pairs of removable plates .
■ Smear the non-stick coating on the removable plates with oil suitable for cooking .
WARNING! RISK OF INJURY!
► Let the appliance cool down before exchanging the removable plates! Risk of Burns!
■ Install a pair of removable plates into the appliance .
■ Insert the plug into a mains power socket .
■ Close the appliance and lock it with the lid locking device 0 .
■ Let the appliance heat up for about 10 minutes .
NOTICE
► With the first usage a slight smell can arise (minimal smoke development is also possible) . This is normal and dissipates after a short time . Provide for sufficient ventilation . For example, open a window .
■ Disconnect the plug and allow the appliance to cool down .
■ Clean the removable plates and the appliance as described in the chapter “Cleaning” .
The appliance is now ready for use .

■ 70 │ GB│MT SSMW 750 C3
Operation
Toasting sandwiches1) Select the removable plates “sandwich” and install them .
CAUTION! PROPERTY DAMAGE!
► Never use two different removable plates at the same time .
2) Close the lid and lock it with the lid locking device 0 .
3) Insert the plug into a mains power socket . The red control lamp “Power” q glows .
4) As soon as the appliance is heated up, the green control lamp “Ready” w glows .
5) Open the lid and insert two prepared sandwiches on the lower removable plate .
6) Close the lid and lock it with the lid locking device 0 . You can choose from two locking positions . If the sandwich is still too thick, so that the lid locking device 0 cannot be closed, reduce the amount of filling .
CAUTION! PROPERTY DAMAGE!
► To avoid damaging the non-stick coating of the Sandwich Maker, remove your cooked foods only with a plastic or wooden spatula or some other suitable, non-metallic implement .
7) The sandwiches are ready after about 5 – 6 minutes . This time information can, depending on the type of filling and personal tastes, vary . Open the lid and take the sandwiches out .
8) When you no longer wish to prepare any more sandwiches, disconnect the plug from the mains power socket .
Baking waffles1) Select the removable plates “waffles” and install them .
CAUTION! PROPERTY DAMAGE!
► Never use two different removable plates at the same time .
2) Close the lid and lock it with the lid locking device 0 .
3) Insert the plug into a mains power socket . The red control lamp “Power” q glows .
4) As soon as the appliance is heated up, the green control lamp “Ready” w glows .

GB│MT │ 71 ■SSMW 750 C3
5) Open the lid and place about 2 – 3 large tablespoons of batter into each of the two waffle baking surfaces on the lower removable plate .
6) Now close the lid . Do not lock the lid!
CAUTION! PROPERTY DAMAGE!
► To avoid damaging the non-stick coating of the Sandwich Maker, remove your waffles only with a plastic or wooden spatula or some other suitable, non-metallic implement .
7) The waffles are ready after about 5 – 7 minutes . This time information can, depending on the type of batter used and personal tastes, vary . Open the lid and take the waffles out .
8) When you no longer wish to prepare any more waffles, disconnect the plug from the mains power socket .
Grilling1) Select the removable plates “grill” and install them .
CAUTION! PROPERTY DAMAGE!
► Never use two different removable plates at the same time .
2) Close the lid and lock it with the lid locking device 0 .
3) Insert the plug into a mains power socket . The red control lamp “Power” q glows .
4) As soon as the appliance is heated up, the green control lamp “Ready” w glows .
5) Open the lid and place the food to be grilled on the lower removable plate .
6) Now close the lid . Do not lock the lid!
7) From time to time check the degree of browning by lifting the lid .
CAUTION! PROPERTY DAMAGE!
► To avoid damaging the non-stick coating of the Sandwich Maker, remove your cooked foods only with a plastic or wooden spatula or some other suitable, non-metallic implement .
8) When the food is cooked through, take it from the removable plate .
9) When the appliance is no longer needed, remove the plug from the mains power socket .

■ 72 │ GB│MT SSMW 750 C3
Cleaning WARNING! RISK OF ELECTRIC SHOCK
► Disconnect the plug from the mains power socket before cleaning the appliance .
NEVER submerse the appliance in water or other liquids! If you do, then you could receive a potentially fatal electric shock .
WARNING! RISK OF INJURY!
► Let the appliance cool down before cleaning it . Risk of Burns!
CAUTION! PROPERTY DAMAGE!
► Do not use aggressive or abrasive cleaning agents . These can damage the upper surfaces of the appliance .
NOTICE
► Do not wait too long to start with the cleaning . Wait until the appliance has cooled down sufficiently that you can touch it without the risk of being burnt . Then the food particles can be removed more easily .
■ Clean the appliance housing only with a dry or lightly moistened cloth .
■ Detach the removable plates and clean them in warm water with a little detergent added .
NOTICE
For gentle cleaning of the removable plates, we recommend that you wash them by hand, as described above . You can, however, also clean the removable plates in the dishwasher .
■ If fats or food should be under the removable plates and in the space in which the heating coils 2 4 are located, proceed as follows:
– Dab the fats or other liquids with a piece of kitchen paper .
– Remove stuck-on burnt residues with a wooden spatula or small wooden skewers .
■ Dry all parts well before re-use .
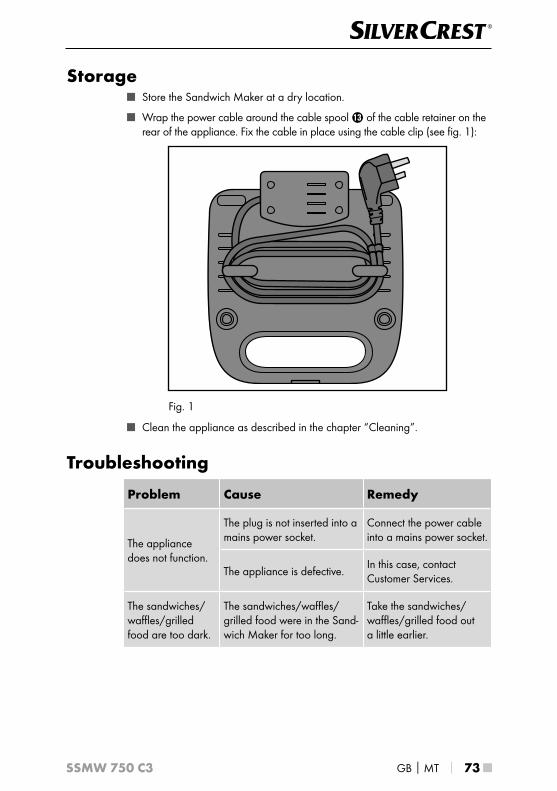
GB│MT │ 73 ■SSMW 750 C3
Storage ■ Store the Sandwich Maker at a dry location .
■ Wrap the power cable around the cable spool e of the cable retainer on the rear of the appliance . Fix the cable in place using the cable clip (see fig . 1):
Fig . 1
■ Clean the appliance as described in the chapter “Cleaning” .
Troubleshooting
Problem Cause Remedy
The appliance does not function .
The plug is not inserted into a mains power socket .
Connect the power cable into a mains power socket .
The appliance is defective .In this case, contact Customer Services .
The sandwiches/waffles/grilled food are too dark .
The sandwiches/waffles/grilled food were in the Sand-wich Maker for too long .
Take the sandwiches/ waffles/grilled food out a little earlier .

■ 74 │ GB│MT SSMW 750 C3
Recipes
Dutch Tomato ToastIngredients
♦ 4 slices of toast bread
♦ Water
♦ Spring onions
♦ 1 medium Tomato
♦ Herb butter
♦ 2 slices of cooked Ham
♦ Salt
♦ Freshly ground Pepper
♦ 2 slices of young Gouda cheese
1) Wash the spring onions and let them drip dry . Halve the onions lengthwise and then cut them into large pieces . Bring the water with salt to the boil in a pot . Add the spring onions and blanch them for about 1 minute . Then place the spring onions in a colander, douse them with cold water and let them drip dry .
2) Wash the tomatoes and dab them dry . Halve them and remove the stalks . Cut the tomatoes into slices .
3) Spread herb butter on one slice of toast and place a folded slice of ham on the smeared slice of toast bread . Distribute the pieces of spring onion and tomato slices on top . Season with salt and pepper .
4) Lay the cheese slices on the slice of toast bread .
5) Coat another slice of toast with some garlic butter and place it on your sandwich with the buttered side down .

GB│MT │ 75 ■SSMW 750 C3
Italian ToastIngredients
♦ 4 slices of Toast bread
♦ 4 tblsp . Tomato purée
♦ 2 tbsp . Salad mayonnaise
♦ Salt
♦ Herbs de Provence
♦ Freshly ground Pepper
♦ 1 medium Tomato
♦ 1 package Mozzarella cheese
♦ Freshly ground coloured Pepper
1) Stir the tomato paste, mayonnaise, salt, herbs de Provence and pepper together . Spread the slices of toast bread with it .
2) Wash the tomatoes and dab them dry . Halve them and remove the stalks . Cut the tomatoes into slices .
3) Let the Mozzarella cheese drain in a colander and then cut it into slices . Cut these in half .
4) Now lay the tomato and Mozzarella slices on the coated slice and season with pepper .
5) Cover your sandwich with another slice of toast bread .
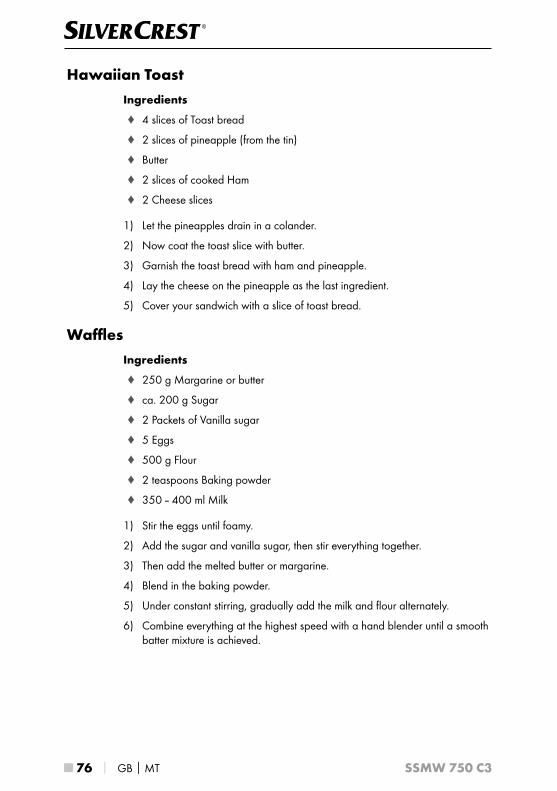
■ 76 │ GB│MT SSMW 750 C3
Hawaiian ToastIngredients
♦ 4 slices of Toast bread
♦ 2 slices of pineapple (from the tin)
♦ Butter
♦ 2 slices of cooked Ham
♦ 2 Cheese slices
1) Let the pineapples drain in a colander .
2) Now coat the toast slice with butter .
3) Garnish the toast bread with ham and pineapple .
4) Lay the cheese on the pineapple as the last ingredient .
5) Cover your sandwich with a slice of toast bread .
WafflesIngredients
♦ 250 g Margarine or butter
♦ ca . 200 g Sugar
♦ 2 Packets of Vanilla sugar
♦ 5 Eggs
♦ 500 g Flour
♦ 2 teaspoons Baking powder
♦ 350 – 400 ml Milk
1) Stir the eggs until foamy .
2) Add the sugar and vanilla sugar, then stir everything together .
3) Then add the melted butter or margarine .
4) Blend in the baking powder .
5) Under constant stirring, gradually add the milk and flour alternately .
6) Combine everything at the highest speed with a hand blender until a smooth batter mixture is achieved .

GB│MT │ 77 ■SSMW 750 C3
Apple wafflesIngredients
♦ 250 g Margarine or butter
♦ 75 g Sugar
♦ 4 Eggs
♦ 250 g flour
♦ 1 tsp of Baking powder
♦ 125 ml lukewarm Milk
♦ 300 g Apples (peeled, cut into cubes .)
♦ 50 g grated Almonds or Nuts
1) Stir the eggs until foamy .
2) Add the sugar and stir everything .
3) Then add the melted butter or margarine .
4) Blend in the baking powder .
5) Under constant stirring, gradually add the milk and flour alternately .
6) Finally, blend in the almonds/nuts and the apple cubes .
7) Combine everything at the highest speed with a hand blender until a smooth batter mixture is achieved .
Shrimp skewerIngredients
♦ 250 g medium size, peeled Shrimps
♦ 2 Garlic cloves (finely chopped)
♦ 5 tbsp . Olive oil
♦ 12 small Tomatoes (cherry tomatoes)
♦ 1 tbsp . chopped parsley
♦ Salt, pepper, paprika powder
1) Put the olive oil, garlic, a little paprika powder, salt, pepper and parsley in a bowl and mix everything .
2) Then add the shrimps and stir everything together, so that the shrimps are thoroughly moistened with the herb-spice mixture .
3) Let the shrimps marinade in the mixture for about 20 minutes .
4) Spike a tomato alternatively with a shrimp on a skewer .
5) Grill the skewers for about 5 minutes .

■ 78 │ GB│MT SSMW 750 C3
DisposalDo not dispose of this appliance in your normal domestic waste . This product is subject to the provisions of European Directive 2012/19/EU (Waste Electrical and Electronic Equipment) .Dispose of the appliance through an approved disposal centre or at your community waste facility . Observe the currently applicable regulations . In case of doubt, please contact your waste disposal centre .
Your local community or municipal authorities can provide information on how to dispose of the worn-out product .
Kompernass Handels GmbH warrantyDear Customer,
This appliance has a 3-year warranty valid from the date of purchase . If this product has any faults, you, the buyer, have certain statutory rights . Your statutory rights are not restricted in any way by the warranty described below .
Warranty conditionsThe validity period of the warranty starts from the date of purchase . Please keep your original receipt in a safe place . This document will be required as proof of purchase .
If any material or production fault occurs within three years of the date of purchase of the product, we will either repair or replace the product for you at our discretion . This warranty service is dependent on you presenting the defective appliance and the proof of purchase (receipt) and a short written description of the fault and its time of occurrence .
If the defect is covered by the warranty, your product will either be repaired or replaced by us . The repair or replacement of a product does not signify the begin-ning of a new warranty period .
Warranty period and statutory claims for defectsThe warranty period is not prolonged by repairs effected under the warranty . This also applies to replaced and repaired components . Any damage and defects present at the time of purchase must be reported immediately after unpacking . Repairs carried out after expiry of the warranty period shall be subject to a fee .
GB│MT │ 79 ■SSMW 750 C3
Scope of the warrantyThis appliance has been manufactured in accordance with strict quality guidelines and inspected meticulously prior to delivery .
The warranty covers material faults or production faults . The warranty does not extend to product parts subject to normal wear and tear or fragile parts such as switches, batteries, baking moulds or parts made of glass .
The warranty does not apply if the product has been damaged, improperly used or improperly maintained . The directions in the operating instructions for the product regarding proper use of the product are to be strictly followed . Uses and actions that are discouraged in the operating instructions or which are warned against must be avoided .
This product is intended solely for private use and not for commercial purposes . The warranty shall be deemed void in cases of misuse or improper handling, use of force and modifications / repairs which have not been carried out by one of our authorised Service centres .
Warranty claim procedureTo ensure quick processing of your case, please observe the following instructions:
■ Please have the till receipt and the item number (e .g . IAN 12345) available as proof of purchase .
■ You will find the item number on the type plate, an engraving on the front page of the instructions (bottom left), or as a sticker on the rear or bottom of the appliance .
■ If functional or other defects occur, please contact the service department listed either by telephone or by e-mail .
■ You can return a defective product to us free of charge to the service address that will be provided to you . Ensure that you enclose the proof of purchase (till receipt) and information about what the defect is and when it occurred .
You can download these instructions along with many other manuals, product videos and software on www .lidl-service .com .

■ 80 │ GB│MT SSMW 750 C3
Service Service Great Britain Tel .: 0800 404 7657 E-Mail: kompernass@lidl .co .uk
Service Malta Tel .: 80062230 E-Mail: kompernass@lidl .com .mt
IAN 313476
ImporterPlease note that the following address is not the service address . Please use the service address provided in the operating instructions .
KOMPERNASS HANDELS GMBH
BURGSTRASSE 21
DE - 44867 BOCHUM
GERMANY
www .kompernass .com

DE│AT│CH │ 81 ■SSMW 750 C3
Inhaltsverzeichnis
Einführung . . . . . . . . . . . . . . . . . . . . . . . . . . . . . . . . . . . . . . . . . . . . . . . . . . . 82
Urheberrecht . . . . . . . . . . . . . . . . . . . . . . . . . . . . . . . . . . . . . . . . . . . . . . . . . . . . . . . . . . . 82Haftungsbeschränkung . . . . . . . . . . . . . . . . . . . . . . . . . . . . . . . . . . . . . . . . . . . . . . . . . . . 82Bestimmungsgemäße Verwendung . . . . . . . . . . . . . . . . . . . . . . . . . . . . . . . . . . . . . . . . . . 82
Lieferumfang . . . . . . . . . . . . . . . . . . . . . . . . . . . . . . . . . . . . . . . . . . . . . . . . . 83
Entsorgung der Verpackung . . . . . . . . . . . . . . . . . . . . . . . . . . . . . . . . . . . . . . . . . . . . . . . 83
Gerätebeschreibung . . . . . . . . . . . . . . . . . . . . . . . . . . . . . . . . . . . . . . . . . . . 84
Technische Daten . . . . . . . . . . . . . . . . . . . . . . . . . . . . . . . . . . . . . . . . . . . . . . 85
Sicherheitshinweise . . . . . . . . . . . . . . . . . . . . . . . . . . . . . . . . . . . . . . . . . . . 85
Austauschen der Wechselplatten . . . . . . . . . . . . . . . . . . . . . . . . . . . . . . . . 88
Einsetzen der Wechselplatten . . . . . . . . . . . . . . . . . . . . . . . . . . . . . . . . . . . . . . . . . . . . . . 88Herausnehmen der Wechselplatten . . . . . . . . . . . . . . . . . . . . . . . . . . . . . . . . . . . . . . . . . . 88
Erste Inbetriebnahme . . . . . . . . . . . . . . . . . . . . . . . . . . . . . . . . . . . . . . . . . . 89
Bedienen . . . . . . . . . . . . . . . . . . . . . . . . . . . . . . . . . . . . . . . . . . . . . . . . . . . . 90
Sandwiches rösten . . . . . . . . . . . . . . . . . . . . . . . . . . . . . . . . . . . . . . . . . . . . . . . . . . . . . . . 90Waffeln backen . . . . . . . . . . . . . . . . . . . . . . . . . . . . . . . . . . . . . . . . . . . . . . . . . . . . . . . . . 90Grillen . . . . . . . . . . . . . . . . . . . . . . . . . . . . . . . . . . . . . . . . . . . . . . . . . . . . . . . . . . . . . . . . 91
Reinigen . . . . . . . . . . . . . . . . . . . . . . . . . . . . . . . . . . . . . . . . . . . . . . . . . . . . . 92
Aufbewahren . . . . . . . . . . . . . . . . . . . . . . . . . . . . . . . . . . . . . . . . . . . . . . . . 93
Fehlerbehebung . . . . . . . . . . . . . . . . . . . . . . . . . . . . . . . . . . . . . . . . . . . . . . 93
Rezepte . . . . . . . . . . . . . . . . . . . . . . . . . . . . . . . . . . . . . . . . . . . . . . . . . . . . . 94
Holländischer Tomatentoast . . . . . . . . . . . . . . . . . . . . . . . . . . . . . . . . . . . . . . . . . . . . . . . . 94Italienischer Toast . . . . . . . . . . . . . . . . . . . . . . . . . . . . . . . . . . . . . . . . . . . . . . . . . . . . . . . . 95Toast Hawaii . . . . . . . . . . . . . . . . . . . . . . . . . . . . . . . . . . . . . . . . . . . . . . . . . . . . . . . . . . . 96Waffeln . . . . . . . . . . . . . . . . . . . . . . . . . . . . . . . . . . . . . . . . . . . . . . . . . . . . . . . . . . . . . . . 96Apfelwaffeln . . . . . . . . . . . . . . . . . . . . . . . . . . . . . . . . . . . . . . . . . . . . . . . . . . . . . . . . . . . 97Garnelenspieß . . . . . . . . . . . . . . . . . . . . . . . . . . . . . . . . . . . . . . . . . . . . . . . . . . . . . . . . . . 97
Entsorgung . . . . . . . . . . . . . . . . . . . . . . . . . . . . . . . . . . . . . . . . . . . . . . . . . . . 98
Garantie der Kompernaß Handels GmbH . . . . . . . . . . . . . . . . . . . . . . . . . 98
Service . . . . . . . . . . . . . . . . . . . . . . . . . . . . . . . . . . . . . . . . . . . . . . . . . . . . . . . . . . . . . . . 100Importeur . . . . . . . . . . . . . . . . . . . . . . . . . . . . . . . . . . . . . . . . . . . . . . . . . . . . . . . . . . . . . 100

■ 82 │ DE│AT│CH SSMW 750 C3
EinführungHerzlichen Glückwunsch zum Kauf Ihres neuen Gerätes!
Sie haben sich damit für ein modernes und hochwertiges Produkt entschieden . Die Bedienungsanleitung ist Bestandteil dieses Produktes . Sie enthält wichtige Hinweise für Sicherheit, Gebrauch und Entsorgung . Machen Sie sich vor der Benutzung des Produkts mit allen Bedien- und Sicherheitshinweisen vertraut . Benutzen Sie dieses Produkt nur wie beschrieben und für die angegebenen Einsatzbereiche . Händigen Sie alle Unterlagen bei Weitergabe des Produkts an Dritte mit aus .
UrheberrechtDiese Dokumentation ist urheberrechtlich geschützt .
Jede Vervielfältigung bzw . jeder Nachdruck, auch auszugsweise, sowie die Wiedergabe der Abbildungen, auch im veränderten Zustand, ist nur mit schriftlicher Zustimmung des Herstellers gestattet .
HaftungsbeschränkungAlle in dieser Bedienungsanleitung enthaltenen technischen Informationen, Daten und Hinweise für den Anschluss und die Bedienung entsprechen dem letzten Stand bei Drucklegung und erfolgen unter Berücksichtigung unserer bisherigen Erfahrungen und Erkenntnisse nach bestem Wissen .
Aus den Angaben, Abbildungen und Beschreibungen in dieser Anleitung können keine Ansprüche hergeleitet werden .
Der Hersteller übernimmt keine Haftung für Schäden aufgrund von Nichtbeach-tung der Anleitung, nicht bestimmungsgemäßer Verwendung, unsachgemäßen Reparaturen, unerlaubt vorgenommenen Veränderungen oder Verwendung nicht zugelassener Ersatzteile .
Bestimmungsgemäße VerwendungDieses Gerät ist ausschließlich vorgesehen für das Rösten von gefüllten Sandwiches, das Backen von Waffeln und das Grillen von Lebensmitteln .
Dieses Gerät ist ausschließlich für die Benutzung in privaten Haushalten be-stimmt . Benutzen Sie das Gerät nicht gewerblich!

DE│AT│CH │ 83 ■SSMW 750 C3
LieferumfangDas Gerät wird standardmäßig mit folgenden Komponenten geliefert:
▯ Sandwichmaker
▯ 2 Wechselplatten „Sandwich“
▯ 2 Wechselplatten „Waffeln“
▯ 2 Wechselplatten „Grill“
▯ Bedienungsanleitung
1) Entnehmen Sie das Gerät, die Wechselplatten und die Bedienungsanleitung aus dem Karton .
2) Entfernen Sie sämtliches Verpackungsmaterial .
HINWEIS
► Prüfen Sie die Lieferung auf Vollständigkeit und auf sichtbare Schäden .
► Bei einer unvollständigen Lieferung oder Schäden infolge mangelhafter Verpackung oder durch Transport wenden Sie sich an die Service-Hotline (siehe Kapitel Service) .
Entsorgung der VerpackungDie Verpackung schützt das Gerät vor Transportschäden . Die Verpackungsmate-rialien sind nach umweltverträglichen und entsorgungstechnischen Gesichtspunkten ausgewählt und deshalb recyclebar .
Die Rückführung der Verpackung in den Materialkreislauf spart Rohstoffe und verringert das Abfallaufkommen . Entsorgen Sie nicht mehr benötigte Verpackungs-materialien gemäß den örtlich geltenden Vorschriften .
Entsorgen Sie die Verpackung umweltgerecht . Beachten Sie die Kennzeichnung auf den verschiedenen Verpackungsmaterialien und trennen Sie diese gegebenenfalls gesondert . Die Verpackungsmaterialien sind gekennzeichnet mit Abkürzungen (a) und Ziffern (b) mit folgender Bedeutung: 1–7: Kunststoffe, 20–22: Papier und Pappe, 80–98: Verbundstoffe .
HINWEIS
► Heben Sie, wenn möglich, die Originalverpackung während der Garantie-zeit des Gerätes auf, um das Gerät im Garantiefall ordnungsgemäß ver-packen zu können .

■ 84 │ DE│AT│CH SSMW 750 C3
GerätebeschreibungAbbildung A:1 Arretierungen
2 Heizschlange
3 untere Halterungen
4 Heizschlange
5 Arretierungen
6 hintere Halterungen
Abbildung B (Sandwichplatten):7 obere Rastnasen
8 untere und hintere Rastnasen
9 vordere Rastnasen
Abbildung C (Waffelplatten):7 obere Rastnasen
8 untere und hintere Rastnasen
9 vordere Rastnasen
Abbildung D (Grillplatten):7 obere Rastnasen
8 untere und hintere Rastnasen
9 vordere Rastnasen
Abbildung E:0 Deckelverriegelung
q Kontrollleuchte „Power“
w Kontrollleuchte „Betriebsbereit“
e Kabelaufwicklung

DE│AT│CH │ 85 ■SSMW 750 C3
Technische DatenSpannung 220 – 240 V ∼ (Wechselstrom), 50/60 Hz
Leistungsaufnahme 750 W
Alle Teile dieses Gerätes, die mit Lebensmitteln in Berührung kommen, sind lebensmittelecht .
Sicherheitshinweise WARNUNG! STROMSCHLAGGEFAHR!
► Lassen Sie beschädigte Netzkabel oder Netzstecker sofort von autorisiertem Fachpersonal ersetzen, um Gefährdungen zu vermeiden .
► Verwenden Sie das Gerät nur in trockenen Räumen, nicht im Freien .
Tauchen Sie das Gerät niemals in Wasser oder andere Flüssigkeiten! Andernfalls besteht Lebensgefahr durch elektrischen Schlag .
► Achten Sie beim Reinigen darauf, dass kein Wasser in das Innere des Gerätes gelangt . Reinigen Sie das Gerät nie unter fließendem Wasser .
► Stellen Sie sicher, dass das Gerät niemals mit Wasser in Berührung kommen kann . Betreiben Sie das Gerät niemals in der Nähe von Wasser oder neben Gefäßen, die Flüssigkeit enthalten .
► Achten Sie darauf, dass im Betrieb das Netzkabel niemals nass oder feucht wird . Führen Sie es so, dass es nicht ein-geklemmt oder anderweitig beschädigt werden kann .
► Ziehen Sie nach jedem Gebrauch den Netzstecker aus der Netzsteckdose, um das Gerät auszuschalten .
► Öffnen Sie nie das Gehäuse des Gerätes .

■ 86 │ DE│AT│CH SSMW 750 C3
WARNUNG! VERLETZUNGSGEFAHR! ► Dieses Gerät kann von Kindern ab 8 Jahren sowie von Per-sonen mit reduzierten physischen, sensorischen oder mentalen Fähigkeiten oder Mangel an Erfahrung und/oder Wissen benutzt werden, wenn sie beaufsichtigt oder bezüglich des sicheren Gebrauchs des Gerätes unterwiesen wurden und die daraus resultierenden Gefahren verstanden haben .
► Kinder dürfen nicht mit dem Gerät spielen . ► Reinigung und Benutzer-Wartung dürfen nicht durch Kinder durchgeführt werden, es sei denn, sie sind älter als 8 Jahre und beaufsichtigt . Kinder jünger als 8 Jahre sind vom Gerät und der Anschlussleitung fernzuhalten .
► Die Geräteteile können im Betrieb heiß werden . Fassen Sie daher nur die Griffe an .
► Lassen Sie das Gerät erst vollständig abkühlen, bevor Sie es reinigen, die Wechselplatten austauschen oder es verstauen .
► Seien Sie vorsichtig beim Herausnehmen der fertigen Speisen (Sandwiches, Waffeln etc .) . Das Gerät, sowie die Speisen sind sehr heiß .
► Betreiben Sie das Gerät nur auf einer stabilen, rutschfesten und ebenen Stellfläche .
► Benutzen Sie keine externe Zeitschaltuhr oder ein separates Fernwirksystem, um das Gerät zu betreiben .
Achtung! Heiße Oberfläche!

DE│AT│CH │ 87 ■SSMW 750 C3
ACHTUNG! BRANDGEFAHR! ► Das Gerät darf nicht in der Nähe von brennbaren Materialien verwendet werden .
► Decken Sie das Gerät nicht ab, solange es in Betrieb ist . ► Betreiben Sie das Gerät nur auf einer hitzebeständigen Unterlage .
► Betreiben Sie das Gerät niemals unbeaufsichtigt .
ACHTUNG! SACHSCHADEN! ► Entnehmen Sie die Speisen nur mit einem Kunststoff- oder Holzspatel oder einem anderen geeigneten, nichtmetalli-schen Gegenstand, um die Antihaftbeschichtung des Sand-wichmakers nicht zu zerstören .
► Benutzen Sie zur Reinigung keine scharfen Putzmittel und spitze Gegenstände .

■ 88 │ DE│AT│CH SSMW 750 C3
Austauschen der WechselplattenSie können zwischen 3 verschiedenen Wechselplatten wählen:
– Wechselplatten „Sandwich“: zur Zubereitung von gefüllten Sandwiches .
– Wechselplatten „Waffeln“: zum Backen von Waffeln .
– Wechselplatten „Grill“: zum Grillen von Fleisch, Fisch etc .
WARNUNG! STROMSCHLAGGEFAHR
► Ziehen Sie erst den Netzstecker aus der Steckdose, bevor Sie die Wechsel-platten austauschen .
WARNUNG! VERLETZUNGSGEFAHR!
► Lassen Sie das Gerät vor dem Austauschen der Wechselplatten abkühlen! Verbrennungsgefahr!
Einsetzen der Wechselplatten1) Öffnen Sie den Sandwichmaker, indem Sie die Deckelverriegelung 0 lösen
und den Deckel aufklappen .
2) Obere Wechselplatte: Schieben Sie zuerst die unteren Rastnasen 8 in die unteren Halterungen 3 .
3) Drücken Sie nun die oberen Rastnasen 7 auf die Arretierungen 1, so dass die Rastnasen 7 unter die Arretierungen 1 springen und die Wechselplatte fest sitzt .
4) Untere Wechselplatte: Schieben Sie zuerst die hinteren Rastnasen 8 in die hinteren Halterungen 6 .
5) Drücken Sie nun die vorderen Rastnasen 9 auf die Arretierungen 5, so dass die Rastnasen 9 unter die Arretierungen 5 springen und die Wechsel-platte fest sitzt .
6) Drücken Sie einmal kräftig auf die Mitte der unteren Wechselplatte, um sicherzustellen, dass diese sicher eingesetzt ist .
Herausnehmen der Wechselplatten1) Obere Wechselplatte: Schieben Sie die Arretierungen 1 nach oben und
kippen Sie gleichzeitig die Wechselplatte nach vorne, so dass Sie diese aus den unteren Halterungen 3 herausheben können .
2) Untere Wechselplatte: Ziehen Sie die Arretierungen 5 nach vorne und heben Sie die Wechselplatte an, so dass Sie diese aus den hinteren Halterungen 6 herausziehen können .
DE│AT│CH │ 89 ■SSMW 750 C3
Erste InbetriebnahmeFühren Sie die folgende Prozedur mit jedem der 3 Wechselplattenpaare durch .
■ Reiben Sie einmalig die Antihaftbeschichtung der Wechselplatten mit zum Kochen geeignetem Öl ein .
WARNUNG! VERLETZUNGSGEFAHR!
► Lassen Sie das Gerät vor dem Wechseln der Wechselplatten abkühlen! Verbrennungsgefahr!
■ Setzen Sie ein Paar der Wechselplatten in das Gerät ein .
■ Stecken Sie den Netzstecker in eine Netzsteckdose .
■ Schließen Sie das Gerät und verriegeln Sie es mit der Deckelverriegelung 0 .
■ Lassen Sie das Gerät ca . 10 Minuten aufheizen .
HINWEIS
► Beim ersten Gebrauch kann ein leichter Geruch entstehen (auch geringe Rauchentwicklung möglich) . Dieser ist normal und verliert sich nach kurzer Zeit . Sorgen Sie bitte für ausreichende Entlüftung . Öffnen Sie zum Beispiel ein Fenster .
■ Ziehen Sie den Netzstecker und lassen Sie das Gerät abkühlen .
■ Reinigen Sie die Wechselplatten und das Gerät wie im Kapitel „Reinigen“ beschrieben .
Das Gerät ist nun betriebsbereit .
■ 90 │ DE│AT│CH SSMW 750 C3
Bedienen
Sandwiches rösten1) Wählen Sie die Wechselplatten „Sandwich“ und setzen Sie diese ein .
ACHTUNG! SACHSCHADEN!
► Benutzen Sie niemals zwei verschiedene Wechselplatten gleichzeitig .
2) Schließen Sie den Deckel und verriegeln Sie ihn mit der Deckelverriegelung 0 .
3) Stecken Sie den Netzstecker in eine Netzsteckdose . Die rote Kontrollleuchte „Power“ q leuchtet .
4) Sobald das Gerät aufgeheizt ist, leuchtet die grüne Kontrollleuchte „Betriebs-bereit“ w .
5) Öffnen Sie den Deckel und legen Sie zwei vorbereitete Sandwiches auf die untere Wechselplatte .
6) Schließen Sie den Deckel und verriegeln Sie ihn mit der Deckelverriegelung 0 . Sie können zwischen zwei Verriegelungseinstellungen wählen . Sollte das Sand-wich dennoch zu dick sein, so dass sich die Deckelverriegelung 0 nicht schließen lässt, entfernen Sie etwas Belag von den Sandwiches .
ACHTUNG! SACHSCHADEN!
► Entnehmen Sie die Sandwiches nur mit einem Kunststoff- oder Holzspatel oder einem anderen geeigneten, nichtmetallischen Gegenstand, um die Antihaftbeschichtung des Sandwichmakers nicht zu zerstören .
7) Nach ca . 5 – 6 Minuten sind die Sandwiches fertig . Diese Zeitangabe kann, je nach verwendetem Belag und persönlichem Geschmack, variieren . Öffnen Sie den Deckel und entnehmen Sie die Sandwiches .
8) Wenn Sie keine weiteren Sandwiches mehr zubereiten wollen, ziehen Sie den Netzstecker aus der Netzsteckdose .
Waffeln backen1) Wählen Sie die Wechselplatten „Waffeln“ und setzen Sie diese ein .
ACHTUNG! SACHSCHADEN!
► Benutzen Sie niemals zwei verschiedene Wechselplatten gleichzeitig .
2) Schließen Sie den Deckel und verriegeln Sie ihn mit der Deckelverriegelung 0 .
3) Stecken Sie den Netzstecker in eine Netzsteckdose . Die rote Kontrollleuchte „Power“ q leuchtet .
4) Sobald das Gerät aufgeheizt ist, leuchtet die grüne Kontrollleuchte „Betriebs-bereit“ w .

DE│AT│CH │ 91 ■SSMW 750 C3
5) Öffnen Sie den Deckel und füllen Sie etwa 2 – 3 große EL Waffelteig in jede der beiden Waffelbackflächen der unteren Wechselplatte .
6) Schließen Sie den Deckel . Verriegeln Sie nicht den Deckel!
ACHTUNG! SACHSCHADEN!
► Entnehmen Sie die Waffeln nur mit einem Kunststoff- oder Holzspatel oder einem anderen geeigneten, nichtmetallischen Gegenstand, um die Antihaft-beschichtung des Sandwichmakers nicht zu zerstören .
7) Nach ca . 5 – 7 Minuten sind die Waffeln fertig . Diese Zeitangabe kann, je nach verwendetem Waffelteig und persönlichem Geschmack, variieren . Öffnen Sie den Deckel und entnehmen Sie die Waffeln .
8) Wenn Sie keine weiteren Waffeln mehr backen wollen, ziehen Sie den Netz-stecker aus der Netzsteckdose .
Grillen1) Wählen Sie die Wechselplatten „Grill“ und setzen Sie diese ein .
ACHTUNG! SACHSCHADEN!
► Benutzen Sie niemals zwei verschiedene Wechselplatten gleichzeitig .
2) Schließen Sie den Deckel und verriegeln Sie ihn mit der Deckelverriegelung 0 .
3) Stecken Sie den Netzstecker in eine Netzsteckdose . Die rote Kontrollleuchte „Power“ q leuchtet .
4) Sobald das Gerät aufgeheizt ist, leuchtet die grüne Kontrollleuchte „Betriebs-bereit“ w .
5) Öffnen Sie den Deckel und legen Sie die zu grillenden Lebensmittel auf die untere Wechselplatte .
6) Schließen Sie den Deckel . Verriegeln Sie nicht den Deckel!
7) Kontrollieren Sie ab und zu den Bräunungsgrad, indem Sie den Deckel anheben .
ACHTUNG! SACHSCHADEN!
► Nehmen Sie die Speisen nur mit einem Kunststoff- oder Holzspatel oder einem anderen geeigneten, nichtmetallischen Gegenstand, von den Wechsel-platten herunter, um die Antihaftbeschichtung nicht zu zerstören .
8) Wenn die Speisen durchgegart sind, nehmen Sie diese von der Wechselplatte herunter .
9) Wenn Sie das Gerät nicht mehr benötigen, ziehen Sie den Netzstecker aus der Netzsteckdose .

■ 92 │ DE│AT│CH SSMW 750 C3
Reinigen WARNUNG! STROMSCHLAGGEFAHR
► Ziehen Sie erst den Netzstecker aus der Steckdose, bevor Sie das Gerät reinigen .
Tauchen Sie das Gerät niemals in Wasser oder andere Flüssigkeiten! Andernfalls besteht Lebensgefahr durch elektrischen Schlag .
WARNUNG! VERLETZUNGSGEFAHR!
► Lassen Sie das Gerät vor der Reinigung abkühlen . Verbrennungsgefahr!
ACHTUNG! SACHSCHADEN!
► Keine scharfen oder scheuernden Reinigungsmittel verwenden . Das greift die Oberfläche des Gerätes an .
HINWEIS
► Warten Sie mit der Reinigung nicht zu lange . Warten Sie, bis sich das Gerät soweit abgekühlt hat, dass Sie es ohne Verbrennungsgefahr anfassen können . Dann lassen sich die Lebensmittelreste besser entfernen .
■ Das Gehäuse reinigen Sie mit einem trockenen Tuch oder einem leicht ange-feuchteten Lappen .
■ Nehmen Sie die Wechselplatten ab und reinigen Sie die Wechselplatten in warmem Wasser und geben Sie etwas Spülmittel hinzu .
HINWEIS
Für eine schonende Reinigung der Wechselplatten empfehlen wir diese, wie beschrieben, mit der Hand zu spülen . Sie können jedoch die Wechselplatten auch in der Spülmaschine reinigen .
■ Sollten Fett oder Lebensmittel unter die Wechselplatten in den Raum, in welchem sich die Heizschlangen 2 4 befinden, gelaufen sein, gehen Sie folgendermaßen vor:
– Tupfen Sie Fett oder andere Flüssigkeiten mit einem Stück Küchenpapier ab .
– Entfernen Sie festgebrannte Rückstände mit einem Holzspatel oder kleinem Holzspieß .
■ Trocknen Sie alle Teile vor dem erneuten Gebrauch gut ab .

DE│AT│CH │ 93 ■SSMW 750 C3
Aufbewahren ■ Bewahren Sie den Sandwichmaker an einem trockenen Ort auf .
■ Wickeln Sie das Kabel um die Kabelhalterungen der Kabelaufwicklung e an der Rückseite des Gerätes . Fixieren Sie das Kabel mit dem Kabelclip (siehe Abb . 1):
Abb . 1
■ Reinigen Sie das Gerät wie im Kapitel „Reinigen“ beschrieben .
Fehlerbehebung
Störung Ursache Abhilfe
Das Gerät funktioniert nicht .
Der Netzstecker steckt nicht in der Netzsteckdose .
Verbinden Sie den Netz-stecker mit dem Stromnetz .
Das Gerät ist defekt .Wenden Sie sich an den Kundendienst .
Die Sandwiches/ Waffeln/das Grillgut wird zu dunkel .
Die Sandwiches/Waffeln/das Grillgut war zu lange im Sandwichmaker .
Nehmen Sie die Sand-wiches/ Waffeln/das Grillgut eher heraus .

■ 94 │ DE│AT│CH SSMW 750 C3
RezepteHolländischer Tomatentoast
Zutaten
♦ 4 Scheiben Toastbrot
♦ Wasser
♦ Frühlingszwiebeln
♦ 1 mittelgroße Tomate
♦ Kräuterbutter
♦ 2 Scheiben gekochten Schinken
♦ Salz
♦ frisch gemahlener Pfeffer
♦ 2 Scheiben junger Gouda-Käse
1) Waschen Sie die Frühlingszwiebeln und lassen diese anschließend abtropfen . Halbieren Sie die Frühlingszwiebeln längs und schneiden Sie diese in große Stücke . Bringen Sie das Wasser mit Salz in einem Topf zum Kochen . Geben Sie die Frühlingszwiebeln hinzu und blanchieren Sie sie etwa 1 Minute . Anschließend geben Sie die Frühlingszwiebeln in ein Sieb, übergießen Sie sie mit kaltem Wasser und lassen Sie sie abtropfen .
2) Waschen Sie die Tomaten und tupfen Sie sie trocken . Halbieren Sie sie und entfernen Sie die Stängelansätze . Schneiden Sie die Tomaten in Scheiben .
3) Bestreichen Sie eine Toastscheibe mit Kräuterbutter und legen Sie eine zusammengeklappte Scheibe Schinken auf die bestrichene Toastscheibe . Verteilen Sie die Frühlingszwiebelstücke und Tomatenscheiben darauf . Mit Salz und Pfeffer würzen .
4) Legen Sie die Käsescheiben auf die Toastscheibe .
5) Bestreichen Sie eine weitere Toastscheibe mit etwas Kräuterbutter und decken Sie Ihr Sandwich mit der bestrichenen Seite nach unten damit zu .

DE│AT│CH │ 95 ■SSMW 750 C3
Italienischer ToastZutaten
♦ 4 Scheiben Toastbrot
♦ 4 EL Tomatenmark
♦ 2 EL Mayonnaise
♦ Salz
♦ Kräuter der Provence
♦ frisch gemahlener Pfeffer
♦ 1 mittelgroße Tomate
♦ 1 Pck . Mozzarella-Käse
♦ frisch gemahlener bunter Pfeffer
1) Verrühren Sie das Tomatenmark, die Mayonnaise, das Salz, die Kräuter der Provence und den Pfeffer miteinander . Bestreichen Sie die Toastscheiben damit .
2) Waschen Sie die Tomaten und tupfen Sie sie trocken . Halbieren Sie sie und entfernen Sie die Stängelansätze . Schneiden Sie die Tomaten in Scheiben .
3) Lassen Sie den Mozzarella-Käse in einem Sieb abtropfen und schneiden Sie ihn in Scheiben . Diese nochmals halbieren .
4) Die bereits bestrichene Toastscheibe wird nun mit Tomaten- und Mozzarella-scheiben belegt und mit Pfeffer bestreut .
5) Decken Sie Ihr Sandwich mit der anderen Toastscheibe zu .

■ 96 │ DE│AT│CH SSMW 750 C3
Toast HawaiiZutaten
♦ 4 Scheiben Toastbrot
♦ 2 Scheiben Ananas (aus der Dose)
♦ Butter
♦ 2 Scheiben gekochter Schinken
♦ 2 Käsescheibletten
1) Lassen Sie die Ananas in einem Sieb abtropfen .
2) Bestreichen Sie nun die Toastscheibe mit Butter .
3) Belegen Sie die Toastscheibe mit dem Schinken und der Ananas .
4) Der Käse wird als letztes über die Ananas gelegt .
5) Decken Sie Ihr Sandwich mit einer Toastscheibe zu .
WaffelnZutaten
♦ 250 g Margarine oder Butter
♦ ca . 200 g Zucker
♦ 2 Päckchen Vanillezucker
♦ 5 Eier
♦ 500 g Mehl
♦ 2 TL Backpulver
♦ 350 – 400 ml Milch
1) Rühren Sie die Eier schaumig .
2) Geben Sie den Zucker und den Vanillezucker hinzu und verrühren Sie alles .
3) Geben Sie die zerlassene Butter oder Margarine hinzu .
4) Rühren Sie das Backpulver unter .
5) Geben Sie unter ständigem Rühren die Milch und das Mehl abwechselnd nach und nach hinzu .
6) Vermengen Sie alles auf höchster Stufe mit dem Handmixer, bis ein glatter Teig entsteht .

DE│AT│CH │ 97 ■SSMW 750 C3
ApfelwaffelnZutaten
♦ 250 g Margarine oder Butter
♦ 75 g Zucker
♦ 4 Eier
♦ 250 g Mehl
♦ 1 TL Backpulver
♦ 125 ml lauwarme Milch
♦ 300 g Äpfel (geschält, in Würfel geschnitten)
♦ 50 g geriebene Mandeln oder Nüsse
1) Rühren Sie die Eier schaumig .
2) Geben Sie den Zucker hinzu und verrühren Sie alles .
3) Geben Sie die zerlassene Butter oder Margarine hinzu .
4) Rühren Sie das Backpulver unter .
5) Geben Sie unter ständigem Rühren die Milch und das Mehl abwechselnd nach und nach hinzu .
6) Als letztes heben Sie die Mandeln oder Nüsse und die Apfelwürfel unter .
7) Vermengen Sie alles auf höchster Stufe mit dem Handmixer, bis ein glatter Teig entsteht .
GarnelenspießZutaten
♦ 250 g mittelgroße, geschälte Garnelen
♦ 2 Knoblauchzehen (fein gehackt)
♦ 5 EL Olivenöl
♦ 12 kleine Tomaten (Cherrytomaten)
♦ 1 EL gehackte Petersilie
♦ Salz, Pfeffer, Paprikapulver
1) Geben Sie das Olivenöl, den Knoblauch, etwas Paprikapulver, Salz, Pfeffer und die Petersilie in eine Schüssel und vermischen Sie alles .
2) Geben Sie die Garnelen hinzu und verrühren Sie alles, so dass die Garnelen gut mit der Kräuter-Gewürzmischung benetzt sind .
3) Lassen Sie die Garnelen ca . 20 Minuten in der Mischung ruhen .
4) Stecken Sie eine Tomate immer abwechseln mit einer Garnele auf einen Holzspieß .
5) Grillen Sie die Spieße ca . 5 Minuten .

■ 98 │ DE│AT│CH SSMW 750 C3
EntsorgungWerfen Sie das Gerät keinesfalls in den normalen Hausmüll . Dieses Produkt unterliegt der europäischen Richtlinie 2012/19/EU (Waste Electrical and Electronic Equipment) .Entsorgen Sie das Gerät über einen zugelassenen Entsorgungsbetrieb oder über Ihre kommunale Entsorgungseinrichtung . Beachten Sie die aktuell geltenden Vorschriften . Setzen Sie sich im Zweifelsfall mit Ihrer Entsorgungseinrichtung in Verbindung .
Möglichkeiten zur Entsorgung des ausgedienten Produkts erfahren Sie bei Ihrer Gemeinde- oder Stadtverwaltung .
Garantie der Kompernaß Handels GmbHSehr geehrte Kundin, sehr geehrter Kunde,
Sie erhalten auf dieses Gerät 3 Jahre Garantie ab Kaufdatum . Im Falle von Mängeln dieses Produkts stehen Ihnen gegen den Verkäufer des Produkts gesetz-liche Rechte zu . Diese gesetzlichen Rechte werden durch unsere im Folgenden dargestellte Garantie nicht eingeschränkt .
GarantiebedingungenDie Garantiefrist beginnt mit dem Kaufdatum . Bitte bewahren Sie den Original-Kassenbon gut auf . Diese Unterlage wird als Nachweis für den Kauf benötigt .
Tritt innerhalb von drei Jahren ab dem Kaufdatum dieses Produkts ein Material- oder Fabrikationsfehler auf, wird das Produkt von uns – nach unserer Wahl – für Sie kostenlos repariert oder ersetzt . Diese Garantieleistung setzt voraus, dass innerhalb der Drei-Jahres-Frist das defekte Gerät und der Kaufbeleg (Kassenbon) vorgelegt und schriftlich kurz beschrieben wird, worin der Mangel besteht und wann er aufgetreten ist .
Wenn der Defekt von unserer Garantie gedeckt ist, erhalten Sie das reparierte oder ein neues Produkt zurück . Mit Reparatur oder Austausch des Produkts beginnt kein neuer Garantiezeitraum .
Garantiezeit und gesetzliche MängelansprücheDie Garantiezeit wird durch die Gewährleistung nicht verlängert . Dies gilt auch für ersetzte und reparierte Teile . Eventuell schon beim Kauf vorhandene Schäden und Mängel müssen sofort nach dem Auspacken gemeldet werden . Nach Ablauf der Garantiezeit anfallende Reparaturen sind kostenpflichtig .

DE│AT│CH │ 99 ■SSMW 750 C3
GarantieumfangDas Gerät wurde nach strengen Qualitätsrichtlinien sorgfältig produziert und vor Auslieferung gewissenhaft geprüft .
Die Garantieleistung gilt für Material- oder Fabrikationsfehler . Diese Garantie erstreckt sich nicht auf Produktteile, die normaler Abnutzung ausgesetzt sind und daher als Verschleißteile angesehen werden können oder für Beschädigungen an zerbrechlichen Teilen, z . B . Schalter, Akkus, Backformen oder Teile, die aus Glas gefertigt sind .
Diese Garantie verfällt, wenn das Produkt beschädigt, nicht sachgemäß benutzt oder gewartet wurde . Für eine sachgemäße Benutzung des Produkts sind alle in der Bedienungsanleitung aufgeführten Anweisungen genau einzuhalten .Verwendungszwecke und Handlungen, von denen in der Bedienungsanleitung abgeraten oder vor denen gewarnt wird, sind unbedingt zu vermeiden .
Das Produkt ist nur für den privaten und nicht für den gewerblichen Gebrauch bestimmt . Bei missbräuchlicher und unsachgemäßer Behandlung, Gewaltanwen-dung und bei Eingriffen, die nicht von unserer autorisierten Service-Niederlassung vorgenommen wurden, erlischt die Garantie .
Abwicklung im GarantiefallUm eine schnelle Bearbeitung Ihres Anliegens zu gewährleisten, folgen Sie bitte den folgenden Hinweisen:
■ Bitte halten Sie für alle Anfragen den Kassenbon und die Artikelnummer (z . B . IAN 12345) als Nachweis für den Kauf bereit .
■ Die Artikelnummer entnehmen Sie bitte dem Typenschild, einer Gravur, auf dem Titelblatt Ihrer Anleitung (unten links) oder als Aufkleber auf der Rück- oder Unterseite .
■ Sollten Funktionsfehler oder sonstige Mängel auftreten, kontaktieren Sie zunächst die nachfolgend benannte Serviceabteilung telefonisch oder per E-Mail .
■ Ein als defekt erfasstes Produkt können Sie dann unter Beifügung des Kauf-belegs (Kassenbon) und der Angabe, worin der Mangel besteht und wann er aufgetreten ist, für Sie portofrei an die Ihnen mitgeteilte Service-Anschrift übersenden .
Auf www .lidl-service .com können Sie diese und viele weitere Handbücher, Produktvideos und Software herunterladen .

■ 100 │ DE│AT│CH SSMW 750 C3
Service Service Deutschland Tel .: 0800 5435 111 (Kostenfrei aus dem dt . Festnetz/Mobilfunknetz) E-Mail: kompernass@lidl .de
Service Österreich Tel .: 0820 201 222 (0,15 EUR/Min .) E-Mail: kompernass@lidl .at
Service Schweiz Tel .: 0842 665566 (0,08 CHF/Min ., Mobilfunk max . 0,40 CHF/Min .) E-Mail: kompernass@lidl .ch
IAN 313476
ImporteurBitte beachten Sie, dass die folgende Anschrift keine Serviceanschrift ist . Kontaktieren Sie zunächst die benannte Servicestelle .
KOMPERNASS HANDELS GMBH
BURGSTRASSE 21
DE - 44867 BOCHUM
DEUTSCHLAND
www .kompernass .com

IAN 313476
KOMPERNASS HANDELS GMBHBURGSTRASSE 21 DE - 44867 BOCHUMGERMANYwww.kompernass.com
Estado de las informaciones · Versione delle informazioni · Estado das informações · Last Information Update · Stand der Informationen: 10 / 2018 · Ident.-No.: SSMW750C3-092018-1