Embed Size (px)
Citation preview

INTRODUCTIONBecause of the height of the Machine the ColumnModule is removed before the machine is shipped.The following procedure is designed to aid the userin the re-installation of the Column Module onSunnen SV560 Vertical Honing Machine Base.
TOOLS & MATERIALSThe following tools and materials are required forunpacking and installing of your Machine:
Knife Hex Wrenches Crow Bar Open End Wrenches Tin Snips Cleaning Solvent
INSTALLATIONRead the following instructions carefully andthoroughly before unpacking and inspecting theMachine:
1. Move Machine to staging/unpacking area.
2. Remove plastic wrap.
3. Remove top and sides from packing crate.
4. Remove all loose components from crate.
5. Check all components against packing list
6. Inspect Machine and components for dents,scratches, or damage resulting from improper han-dling, by carrier. If damage is evident, immediatelyfile a claim with carrier.
CAUTIONMachine Base may be forked from any side. DONOT support weight of machine on bottom ofElectrical Enclosure when lifting or moving.
7. Move Machine to desired location and lower intoplace.
NOTE: Machine should be located on a leveledconcrete floor away from heavy traffic. Allow at least1 m (3 ft) around enclosure to any adjacentequipment and walls. Refer to Floor Plan Layout foryour particular machine configuration.
8. Adjust Leveling Bolts as required to levelmachine.
9. Remove Upper Right & Left Guarding frominside the front of the Machine (see Figure 1). LayGuarding and Hardware aside for reinstallation afterColumn is installed.
10. Remove Hardware securing Wiring Conduit torear of Machine and tie Wiring Conduit off to sideof Machine (see Figure 2).11. Remove two (2) Conduit Hangers from rear ofMachine (refer to Figure 2). Lay Hangers andHardware aside for reinstallation after Column isinstalled.
12. Remove Right & Left Rear Guarding rear of theMachine (see Figure 3). Lay Guarding andHardware aside for reinstallation after Column isinstalled.
INSTALLING COLUMNTo install column, proceed as follows:
1. Obtain Fork Lift with required verticalmovement and lift capacity to lift Column intoposition on Riser Weldment.
I-SV-569D
SPECIAL INSTRUCTIONSfor
INSTALLING SV52600 COLUMN MODULE ASSEMBLYon Sunnen® SV-560 Vertical Honing Machine
http://www.sunnen.com
SUNNEN® PRODUCTS COMPANY • 7910 MANCHESTER ROAD • ST. LOUIS, MO 63143, U.S.A. • PHONE: 314-781-2100
FIGURE 1, Upper Left & Right Guarding
FIGURE 2, Wiring Conduit
CONDUIT
HANGER
LEFT
UPPERGUARDING
RIGHT
SCREWS SCREWS

2. Position Forks so they slide into Lifting Sleeves,provided on top of Machine.
3. Raise Forks and slide into Lifting Sleeves (seeFigure 4).4. If required: Secure top of Column to top of Fork
Lift using straps (see Figure 5).
5. If required: Place a Block between the Fork Liftand bottom of the Column to prevent the columnfrom swinging when it is lifted (refer to Figure 5).
CAUTIONEnsure Block is not close to Ballscrew or Motor, toprevent damage to these items while moving column.
6. If required: Secure guide straps to top andbottom of Column.
7. Raise Forks slightly to take any slack off forksand to be sure column is engaged. Then recheckstrapping.
8. Remove six (6) Screws attaching Column toShipping Base (see Figure 6).9. Carefully lift Column off Shipping Base,
ensuring Servo Motor clears shipping Base.
10. Raise Column and carefully position over RiserWeldment. (Use Guide Straps to prevent columnfrom swinging or contacting Riser or MachineGuards.)
11. Slowly lower Column onto Riser, ensuringServo Motor clears Riser (see Figure 7).12. Align Column with Riser and secure using six(6) Mounting Screws, Lockwashers, & Flatwashers(see Figure 8).13. Remove blocking and straps securing column toFork Lift. Then lower fork lift slightly and carefullyslide fork out of column.
14. Reinstall Left Rear Guarding.
15. Reinstall Right Rear Guarding and ConduitHangers.
16. Reposition Wiring Conduit in Hangers andsecure.
17. Install Linear Rail Cover on front of SpindleAssembly. Two (2) Access Holes are provided onboth sides of Spindle Assembly Guarding for attach-ing the Cover (see Figure 9).ELECTRICAL CONNECTIONSAll wiring is to be performed by a competent,Licensed Electrician in accordance with all local,state, and federal codes and regulations; along withany special information provided on machine nameplate or electrical specification plate.
2
FIGURE 3, Left & Right Rear Guarding
FIGURE 4, Fork Positioning
FORKS
SPINDLEASSMBLY
GUARDING
FIGURE 5, Column
STRAP
BLOCK
GUIDELINES
FORKS
FORKS
BALLSCREW
FORKS

CAUTIONAll wiring is to be performed by a competent,licensed electrician in accordance with all local, stateand federal codes and regulations. FAILURE TOCOMPLY CAN RESULT IN PERSONAL INJURYAND DAMAGE TO THE MACHINE.
WARNING All wiring and electrical equipment service shouldbe performed by authorized personnel ONLY.
1. Open Door to Column Electrical Enclosure.
2. Slide Cables (wire leads) through side ofEnclosure and secure Wiring Conduit by tighteningLock Ring on Conduit Connector (see Figure 10). 3. Attach numbered Wire Leads to corresponding
numbered locations inside enclosure as shown (referto Figure 10 & Chart on the folowing pages; and tothe Wiring Diagram included with you Machine).
CAUTIONAfter installation check positions of Dip Switchesinside Column Enclosure (refer to Figure 10b).
3
FIGURE 6, Shipping Base
FIGURE 7, Positioning Column
FIGURE 8, Securing Column FIGURE 9, Linear Rail Cover
SHIPPINGBASE
MOTOR
SCREW
ACCESSHOLES
COLUMN
SCREW
MOTOR
COLUMN
RISER
MOUNTINGSCREW
RISER
COVER

4
FIGURE 10a, Electrical Connections
100DRV100DRV
101DRV
102DRV
100DRV / 100DRV A
101DRV / 101DRV A
102DRV / 102DRV A
SIEMENS
P
A
S1
X100
BX101
CX103
SIEMENS
P
A
S1
X100
BX101
CX103
SIEMENS
P
A
S1
X100
BX101
CX103
100DRV A
100D
RV
100D
RV
101D
RV
102D
RV
100DRV 101DRV 102DRV
101DRV A 102DRV A
FIGURE 10b, 100DRV
SWITCH SETTINGS
100DRV S1 DOWNPROFIBUS CONNECTOR OFF
101DRV S1 DOWNPROFIBUS CONNECTOR OFF
102DRV S1 DOWNPROFIBUS CONNECTOR ON

5
100DRV / 100DRV B1
CBL5
75
100DRV / 100DRV B2
170
171
172 173
175
174
SIEMENS
P
A
S1
X100
BX101
CX103
1 0 0 D RV
170171
172173
175174
100DRV
FIGURE 10c, ECBL575
C2L1
C2L1
C2L2
C2L2
24B
24B
24B
24B
24C
24C
C0M3
COM3
104
104
COM3
C0M3
COM4
C0M4
104
104
COM4
C0M4
COM4
C0M4
50
50
101
101
52
52
51
51
24VCOM39
39
30
30
101
101
21
21
17
17
16
1624VCOM
A1+
A2--
24V
14
12
11
A1+
A2--
24V
14
12
11
H00000,00
100TB100CR
101CR
CBL686 C2L1 / 1OOTB C2L1
CBL686CBL686 C2L2 / 1OOTB C2L2
CBL686 ___ / 1OOTB GNDCOLUMN FAN POWER CABLE
C2L1
C2L2
CBL6
86 C
2L1 /
1OOT
B C2
L1C2
L1
CBL6
86 C
2L2 /
1OOT
B C2
L2C2
L1
CBL6
86 __
_ / 1O
OTB
GND
FIGURE 10d, CBL686
AWG COLOR LEGEND CONNECTION PT.
16 BLK C2L1 100TB-C2L1
16 WHT C2L2 100TB-C2L2
16 GRN - - - 100TB-GND

6
C2L1
C2L1
C2L2
C2L2
24B
24B
24B
24B
24C
24C
C0M3
COM3
104
104
COM3
C0M3
COM4
C0M4
104
104
COM4
C0M4
COM4
C0M4
50
50
101
101
52
52
51
51
24VCOM39
39
30
30
101
101
21
21
17
17
16
1624VCOM
CBL
685 2
4VB
/ 100
TB 24
B24
VB
CBL
685 3
9 / 10
0TB
3939
CBL
685 2
4VC
/ 100
TB 24
C24
VC
CBL
685 _
__ / 1
00TB
GND
CBL
685 3
0 / 10
0TB
3030
CBL
685 2
4COM
A / 1
00TB
COM
424
COMA
CBL
685 2
4COM
A / 1
00TB
COM
324
COMA
CBL
685 2
4COM
A / 1
00TB
24VC
OM24
COMA
A1+
A2--
24V
14
12
11
A1+
A2--
24V
14
12
11
H00000,00
CBL
685 7
/ 100
CR A
17
CBL
685 2
4COM
A / 1
00CR
A2
24CO
MA
CBL
685 1
16 / 1
01CR
11116
100TB100CR
101CR
CBL685
COLUMN CONTROL CABLE
CBL 685 24VB / 100TB 24B24VB
CBL 685 24COMA / 100MTR B2 (BRAKE)24COMA
CBL 685 116 / 101CR 11116
CBL 685 39 / 100TB 3939
CBL 685 24VC / 100TB 24C24VC
CBL 685 24COMA / 100CR A224COMA
CBL 685 ___ / 100TB GNDCBL 685 30 / 100TB 3030
CBL 685 24COMA / 100TB COM424COMA
CBL 685 24COMA / 100TB COM324COMA
CBL 685 7 / 100CR A17
CBL 685 24COMA / 100TB 24VCOM24COMA
CBL 685 24COMA / 100MTR B2 (BRAKE) 24COMA12
BRAKE
FIGURE 10e, CBL685
AWG COLOR LEGEND CONNECTION PT.
18 BLK 24COMA 100TB-COM4
18 RED 24VB 100TB-24B
18 WHT 24COMA 100TB-24VCOM
18 GRN - - - 100TB-GND
18 ORG 24VC 100TB-24C
18 BRN 30 100TB-30
18 YEL 39 100TB-39
18 VIO 24COMA 100TB-COM3
18 BLU 7 100CR-A1
18 GRY 24COMA 100CR-A2
18 RED/BLK 116 101CR-11
18 RED/YEL 24COMA 100MTR-B2
18 PINK - - - - -
18 TAN - - - - -
18 RED/GRN - - - - -
7
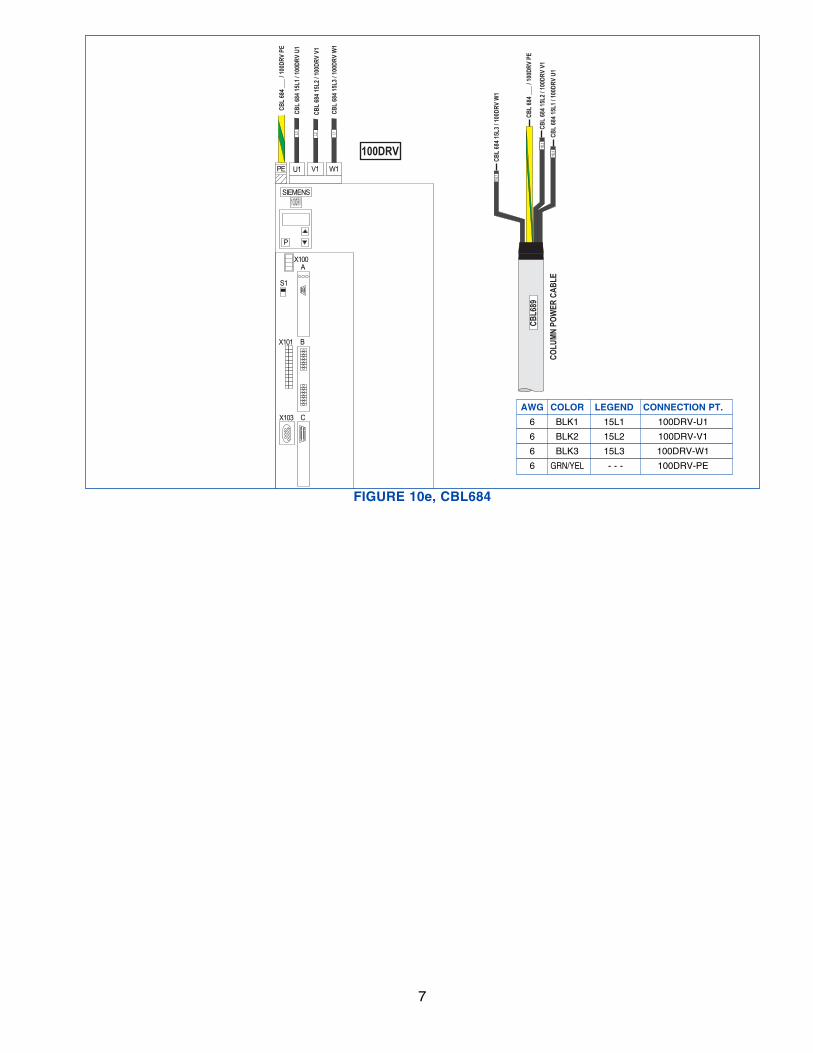
L1
100DRV
CBL6
89
COLU
MN P
OWER
CAB
LE
CBL
684 1
5L3 /
100D
RV W
115
L1
CBL
684 1
5L2 /
100D
RV V
115
L2
CBL
684 1
5L1 /
100D
RV U
115
L3
CBL
684 _
__ / 1
00DR
V PE
W1V1U1
L2L3
CBL
684 1
5L3 /
100D
RV W
1
CBL
684 _
__ / 1
00DR
V PE
CBL
684 1
5L2 /
100D
RV V
1
CBL
684 1
5L1 /
100D
RV U
1
SIEMENS
P
A
S1
X100
BX101
CX103
1 0 0 D RV
PE
FIGURE 10e, CBL684
AWG COLOR LEGEND CONNECTION PT.
6 BLK1 15L1 100DRV-U1
6 BLK2 15L2 100DRV-V1
6 BLK3 15L3 100DRV-W1
6 GRN/YEL - - - 100DRV-PE

PRINTED IN U.S.A. 1012 ©COPYRIGHT SUNNEN® PRODUCTS COMPANY 2010, ALL RIGHTS RESERVED
SUNNEN PRODUCTS COMPANY7910 Manchester Road, St. Louis, MO 63143 U.S.A.Phone: 314-781-2100 Fax: 314-781-2268U.S.A. Toll-Free Sales and Service:1-800-325-3670International Division Fax: 314-781-6128
http://www.sunnen.come-mail: [email protected]
SWITZERLAND – SUNNEN AGPhone: ++ 41 71 649 33 33 Fax: ++ 41 71 649 34 34www.sunnen.ch e-mail: [email protected] - SUNNEN ITALIA S.R.L.Phone: 39 02 383 417 1 Fax: 39 02 383 417 50www.sunnenitalia.com e-mail: [email protected] – SUNNEN SASPhone: +33 01 69 30 0000 Fax: +33 01 69 30 1111 www.sunnen.fr e-mail: [email protected] BELGIUM – SUNNEN BENELUX BVBA Phone: +32 38 80 28 00 Fax: +32 38 44 39 01 www.sunnen.be e-mail: [email protected] UK – SUNNEN PRODUCTS LTD.Phone: ++ 44 1442 39 39 39 Fax: ++ 44 1442 39 12 12www.sunnen.co.uk e-mail: [email protected] POLAND – SUNNEN POLSKA SP. Z O.O. Phone: +48 22 814 34 29 Fax: +48 22 814 34 28 www.sunnen.pl e-mail: [email protected] – SUNNEN RUS Phone: +7 495 258 43 43 Fax: +7 495 258 91 75 www.sunnen.ru e-mail: [email protected] CZECH REPUBLIC – SUNNEN S.R.O. Phone: +420 383 376 317 Fax: +420 383 376 316 www.sunnen.cz e-mail: [email protected] – SHANGHAI SUNNEN MECHANICAL CO., LTD.Phone: 86 21 5813 3322 Fax: 86 21 5813 2299www.sunnensh.com e-mail: [email protected]
Sunnen® reserves the right to change orrevise specifications and product designin connection with any feature of ourproducts contained herein. Such changesdo not entitle the buyer to correspondingchanges, improvements, additions, orreplacements for equipment, supplies oraccessories previously sold. Informationcontained herein is considered to beaccurate based on available informationat the time of printing. Should any discrepancy of information arise, Sunnenrecommends that user verify discrepancywith Sunnen before proceeding.
“SUNNEN® AND THE SUNNEN LOGO ARE REGISTERED TRADEMARKS OF SUNNEN PRODUCTS COMPANY.”


![Article 352. PVC Conduit 352.10 Uses Permitted Part I ... 3… · PVC conduit is prohibited as a wiring method for patient care areas in health care facilities [517.13(A)] or in ducts,](https://img.pdfslide.us/doc/110x75/5afeb9a37f8b9a434e8f8e93/article-352-pvc-conduit-35210-uses-permitted-part-i-3pvc-conduit-is-prohibited.jpg)