Embed Size (px)
Citation preview


I. POWERPOINT PRESENTATION
A.What Is Stop The Bleed ?
B. Why Do We Need Stop The Bleed?
C.How Exactly Does One Stop The Bleed?
II. HANDS-ON DEMO WITH INSTRUCTORS
A.Wound Packing
B.Tourniquet Application

Some images
are graphic
and may be
disturbing.

I. Uncontrolled hemorrhage = death
TRAUMA 101
Corollary: All bleeding eventually stops.
II. 40% of deaths due to hemorrhage are preventable.


SANDY HOOK, CTELEMENTARY SCHOOL
DEC 14, 2012
DIED: 28

AMERICAN COLLEGE OF SURGEONS
AMERICAN COLLEGE OF EMERGENCY PHYSICIANS
LAW ENFORCEMENT
FEDERAL GOVERNMENT
GOAL: Create A National Policy To Enhance Survivability From Shooting And Other Mass Casualty
Events.

IF: uncontrolled scene bleeding leads to preventable deaths
THEN: control of bleeding at scene must be improved
WE MUST TEACH BASIC BLEEDING CONTROL TO
BYSTANDERS!
FBI

BUT….
IS THIS REALLY NECESSARY?

20 deadliest shootings inUS history:
60% occurredin last 18 yrs.

LAS VEGAS, NV
OCT 1, 2017
DIED: 59

PULSE NIGTHCLUBORLANDO, FL
JUN 12, 2016
DIED: 50

VIRGINIA TECH,BLACKSBURG, VA
APRIL 16, 2007
DIED: 33

SUTHERLAND SPRINGS, TX
NOV 5, 2017
DIED: 27

Photo: Ariane Kunze / The Columbian
TUMWATER, WA
JUN 17, 2018
DIED: 2

Photo: Aaron Tang -https://www.flickr.com/photos/hahatango/8652829335/sizes/o/in/set-
72157633252445135/, CC BY 2.0, https://commons.wikimedia.org/w/index.php?curid=25611690
BOSTON MARATHON
APR 15, 2013
DIED: 3

AMTRAK DERAILMENTDUPONT, WADEC 18, 2017
DIED: 3

DEATH by CAR
USA: > 30,000/yr

ANYWHERE
ANY TIME
ANYONE
INJURY in the USA:
No. 1 cause of
death and disability
ages 1-40

Prevent a needless death:
With the right basic training,
YOU can save a life.
Basic help from an immediate responder can
make the difference between life and death,
even before professional rescuers arrive.

Bleeding Control Basic v. 1.0
HOW TO:
I. Ensure your own safety
II. ABCs of Bleeding
A – Alert – call 9-1-1
B – Bleeding – find the injury
C – Compress – apply pressure to stop the bleeding by:
1. Pack (fill) the wound with gauze or a clean cloth and then
applying pressure with both hands
2. Use a tourniquet

Primary Principles:
Find where the victim is bleeding from
• Open or remove the clothing so you can see the wound
Look for and identify “life-threatening” bleeding
• Blood that is spurting out of the wound
• Blood that won’t stop coming out of the wound
• Blood that is pooling on the ground
• Clothing that is soaked with blood
• Bandages that are soaked with blood
• Loss of all or part of an arm or leg
• Bleeding in a victim who is now confused or unconscious
B • Bleeding
Bleeding Control Basic v. 1.0

• BLOOD ON THE GROUND/FLOOR • BLOOD SOAKED THROUGH CLOTHING
Primary Principles:What is “life-threatening” bleeding?
Bleeding Control Basic v. 1.0

Primary Principles:What is “life-threatening” bleeding?
Blood soaking the sheet or
clothingPhoto courtesy of Norman McSwain, MD,.
Blood spurting out of a wound
Bleeding Control Basic v. 1.0

What is “life-threatening” bleeding?
Blood on the ground
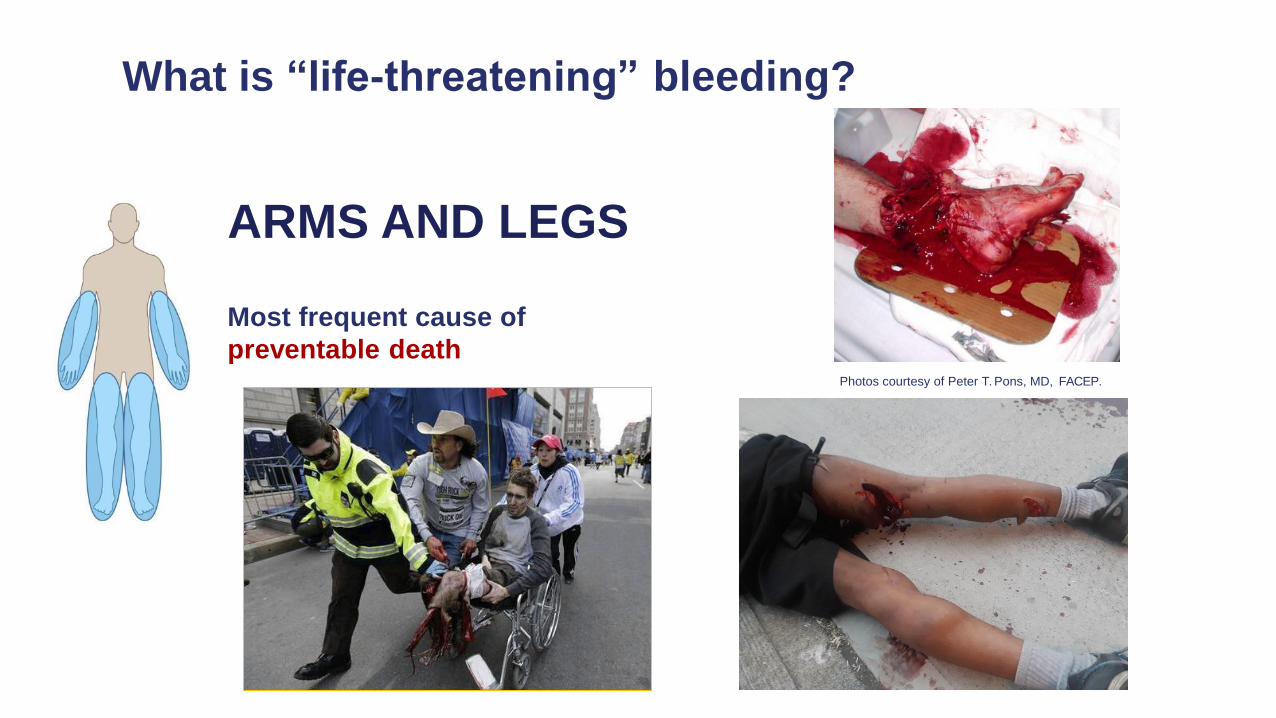
ARMS AND LEGS
Most frequent cause of
preventable death Photos courtesy of Peter T. Pons, MD, FACEP.
What is “life-threatening” bleeding?

B • Bleeding (continued)
TORSO JUNCTIONAL WOUNDS
Neck, shoulder, and groin
• Bleeding is controlled by
direct pressure & wound
packing
Bleeding Control Basic v. 1.0
What is “life-threatening” bleeding?

• Internal bleeding
CANNOT be stopped
without surgery.
• Rapid transport to a trauma
center.
• Identify these patients to
EMS when they arrive.
Multiple gunshot woundsPhoto courtesy of Peter T. Pons, MD, FACEP.
What is “life-threatening” bleeding?
TORSO

a.k.a. Packing + Direct External Compression
• Use bandages if available; if not use a shirt or other clean cloth
• Use your hand or fingers – push down HARD (it will hurt)!
Bleeding Control Basic v. 1.0
“STUFF and SQUEEZE”
C • Compression: Stop the Bleeding (continued)

C • Compression: Stop the Bleeding (continued)
Hemostatic Dressings (Bleeding Control Dressings)
• Hemostatic dressings are materials that help cause blood to clot
• Examples of hemostatic dressings include:
- QuikClot (civilian) /
Combat Gauze (military)
- Celox
- Celox Rapid
- Chitoflex
- Chitogauze© emily2k/ShutterStock, Inc. Photo courtesy of Peter T. Pons, MD, FACEP.

Do not release pressure to “check” the wound.
“STUFF and SQUEEZE” a.k.a. Packing + Direct External Compression
C • Compression: Stop the Bleeding (continued)

C • Compression: Stop the Bleeding (continued)

APPLY A TOURNIQUET
• Stops all blood flow
• May prevent the patient
from going into shock or
dying
Photo courtesy of Norman McSwain, MD, FACS, NREMT-P.
C • Compression: Stop the Bleeding (continued)


Primary Principles:
C • Compression: Stop the Bleeding (continued)
C.A.T. Tourniquet
The military’s preferred tourniquet
because it is easy to use and can
be rapidly applied.
Photo courtesy of Composite Resources, Inc.
Bleeding Control Basic v. 1.0

Primary Principles:
C • Compression: Stop the Bleeding (continued)
Tourniquet• Can be placed over clothing, if necessary
• Place 2 to 3 inches above the wound
• Tighten until the bleeding stops
BUT…• DO NOT apply directly over the knee or elbow joints
• DO NOT apply directly over a pocket that contains bulky
items
Bleeding Control Basic v. 1.0

Primary Principles:
C • Compression: Stop the Bleeding (continued)
Application of a C.A.T. Tourniquet (1 of 9)
Step 1. Insert the extremity
(arm or leg) through
the C.A.T.
Photo courtesy of Peter T. Pons, MD, FACEP.
Photo courtesy of Peter T. Pons, MD, FACEP.
Bleeding Control Basic v. 1.0
Primary Principles:
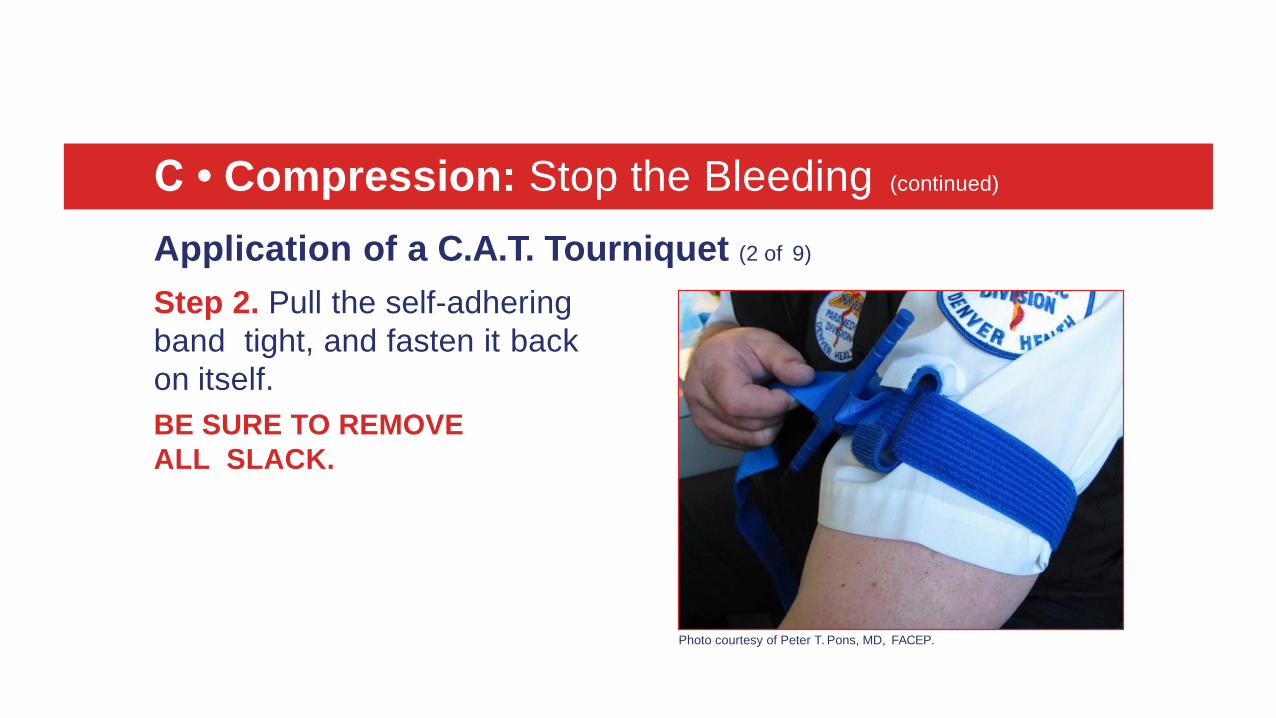
C • Compression: Stop the Bleeding (continued)
Application of a C.A.T. Tourniquet (2 of 9)
Step 2. Pull the self-adhering
band tight, and fasten it back
on itself.
BE SURE TO REMOVE
ALL SLACK.
Photo courtesy of Peter T. Pons, MD, FACEP.
Bleeding Control Basic v. 1.0

C • Compression: Stop the Bleeding (continued)
Application of a C.A.T. Tourniquet (3 of 9)
Step 3. Adhere the band around
the extremity. Do not adhere
the band past the clip.
Photo courtesy of Peter T. Pons, MD, FACEP. Photo courtesy of Peter T. Pons, MD, FACEP.
Bleeding Control Basic v. 1.0

Primary Principles:
C • Compression: Stop the Bleeding (continued)
Application of a C.A.T. Tourniquet (4 of 9)
Step 4. Twist the windlass
rod until the bleeding has
stopped.
Photo courtesy of Peter T. Pons, MD, FACEP.
Bleeding Control Basic v. 1.0

Primary Principles:
C • Compression: Stop the Bleeding (continued)
Application of a C.A.T. Tourniquet (5 of 9)
Step 5. Lock the windlass
rod in place in the windlass
clip.
Bleeding is now controlled.
Photo courtesy of Peter T. Pons, MD, FACEP.
Bleeding Control Basic v. 1.0

Primary Principles:
C • Compression: Stop the Bleeding (continued)
Application of a C.A.T. Tourniquet (6 of 9)
Step 6. Adhere the remaining
band over the rod, through
the windlass clip, and
continue around the
extremity as far as it will go.
Photo courtesy of Peter T. Pons, MD, FACEP.
Bleeding Control Basic v. 1.0

Primary Principles:
C • Compression: Stop the Bleeding (continued)
Application of a C.A.T. Tourniquet (7 of 9)
Step 7. Secure the rod and
the band with the windlass
strap.
Grasp the strap, pull it tight,
and adhere it to the opposite
hook on the windlass clip.
Photo courtesy of Peter T. Pons, MD, FACEP.
Bleeding Control Basic v. 1.0

Primary Principles:
C • Compression: Stop the Bleeding (continued)
Application of a C.A.T. Tourniquet (8 of 9)
Step 8. Note the time the
tourniquet was applied. If
you have a marker, you
can write it directly on the
tourniquet or on the skin
itself.
Photo courtesy of Peter T. Pons, MD, FACEP.
Bleeding Control Basic v. 1.0
Primary Principles:
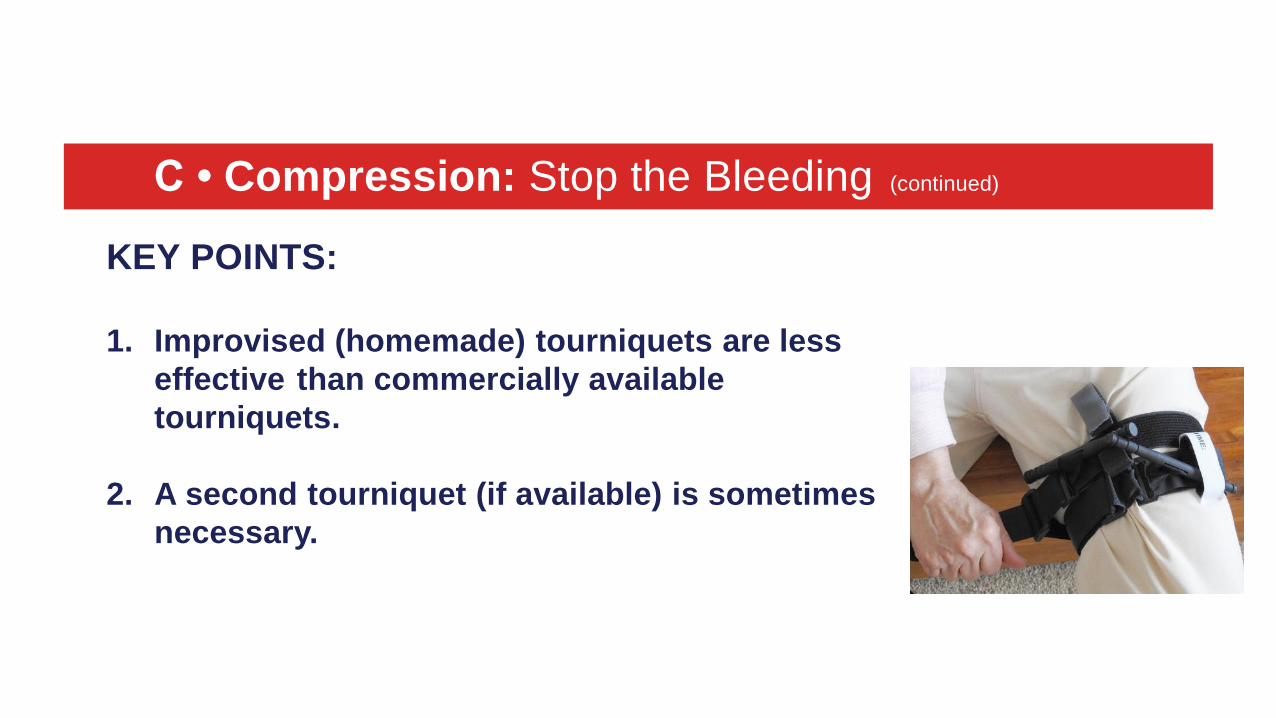
C • Compression: Stop the Bleeding (continued)
KEY POINTS:
1. Improvised (homemade) tourniquets are less
effective than commercially available
tourniquets.
2. A second tourniquet (if available) is sometimes
necessary.
Bleeding Control Basic v. 1.0
Primary Principles:
C • Compression: Stop the Bleeding (continued)
TOURNIQUET PAIN
• Tourniquets HURT when applied effectively (THEY
HURT A LOT) - explain this fact to the victim.
• Pain DOES NOT mean you put on the tourniquet
incorrectly.
• Pain DOES NOT mean you should take the tourniquet
off.
• Once paramedics arrive, they will treat the pain with
medication.Bleeding Control Basic v. 1.0

Primary Principles:
C • Compression: Stop the Bleeding (continued)
COMMON MISTAKES
1. Not using a tourniquet or waiting too long to apply it when
there is life-threatening bleeding
2. Tourniquet is not tight enough to stop the bleeding
3. Not using a second tourniquet, if needed
4. Periodically loosening the tourniquet to allow blood
flow to the injured extremity
5. Removing a tourniquet - Only a paramedic or physician
should loosen or remove it
Bleeding Control Basic v. 1.0

In all but the extremely young child, the same tourniquet used for adults can be used in children.
For the infant or very small child direct digital pressure is usually sufficient.d
Bleeding Control Basic v. 1.0
CHILDREN

STOP THE BLEED ALGORITHM
stay safe; CALL 911; ask for help
EXPOSE & ASSESS THE
WOUND
PACK WOUND DEEPLY AND
COMPRESS FIRMLY
APPLY TOURNIQUET2”-3” ABOVE
WOUND
CONTINUE TO HOLD PRESSURE
UNTIL HELP ARRIVES
Bleeding NOT
Controlled
EXTREMITY HEAD, NECK, TORSO, AXILLAor GROIN
Bleeding ControlledStep by step animation
with concurrent narration
Bleeding Control Basic v. 1.0
I. Ensure your own safety
II. ABCs of Bleeding
A – Alert – call 9-1-1
B – Bleeding – find the injury
C – Compress – apply pressure to stop the bleeding by:
1. Pack (fill) the wound with gauze or a clean cloth and then
applying pressure with both hands
2. Use a tourniquet

We would like to thank MultiCare for their support of Stop the Bleed® and for providing
funds to place bleeding control kits throughout Tacoma General and Allenmore Hospital.
Tacoma General Hospital• Main Lobby• Security offices• Emergency Department Lobby• Each Nursing Unit Charge Desk• Cafeteria• Baker Center• Jackson Hall• Phillips Pavilion Lobby
Allenmore Hospital• Main Lobby• Security Office• Emergency Department Lobby• Each Nursing Unit Charge desk• Security Vehicles

Wall-mounted bleeding control kits

Personal bleeding control kits

GlovesPacking GauzeCompression bandage or Quick Clot or
Hemostatic agentTourniquetMarking pen
What’s in the kits?

The only thing more tragic than a
death…
is a death that could have been
prevented.
Thank you for your participation.

![[PPT]PowerPoint Presentation - I. Introduction to classfaculty.evansville.edu/md7/bact02/specificimmuno/... · Web viewTitle PowerPoint Presentation - I. Introduction to class Author](https://img.pdfslide.us/doc/110x75/5af624ee7f8b9a154c90b705/pptpowerpoint-presentation-i-introduction-to-viewtitle-powerpoint-presentation.jpg)


![UNIT-I - ECONOMY & CENTRAL PROBLEM Powerpoint Presentation [Repaired]](https://img.pdfslide.us/doc/110x75/56d6bf971a28ab301696d3cb/unit-i-economy-central-problem-powerpoint-presentation-repaired.jpg)