Embed Size (px)
Citation preview

Data Label: OFFICIAL
HR21 Employee & Manager Self Service
Employee User Guide
HR Services July 2019 – Version 18

Data Label: OFFICIAL
Contents
1. WHAT IS HR21
2. PASSWORD PROTECTION
2.1 Password Rules
2.2 Password Expiry
2.3 Locked Accounts/Password Resets
3. GETTING STARTED
4. WHAT YOU CAN SEE AND DO
4.1 Changing your name
4.2 Changing your address and
4.2a Emergency Contact details
4.3 Submit a Claim for Overtime
4.4 Submit a Claim for Mileage
4.4a Submit a Claim for Expenses
4.6 View and Print a Print Payslip
4.6a View and print your P60
4.7 View your Payroll Record
4.8 View your Leave Record
4.9 View your HR Record
5. HOW TO EXIT HR21

Data Label: OFFICIAL
1. WHAT IS HR21
HR21 is a secure online system which will allow you to view and update your personal HR information held in the council’s HR and Payroll system. This means that you can be sure that important HR information about you is always up to date. You can also view basic job related information including payments made to you and submit an electronic request for any mileage and expenses incurred to your manager for approval. If you do not have access to the overtime facility, please continue to submit overtime in the format you use now. There is an online help function and relevant user information provided on each screen.
Details Manager Employee
Personal details View Update
Home address and contact details View Update
Emergency Contact details View Update
Current position details View View
The grade of your current post View View
Allowances paid to you View View
Previous payments View
Bank Account details View
Your tax code View
Salary paid to you View
Deductions from salary View
Your pension contribution rate View
Pay adjustments View
Payslip View/Print
2019 - P60 View/Print
Sick Leave View View
Maternity / Paternity leave View View
Leave for family care purposes View View
Overtime claims (if applicable) Authorise Update
Mileage and Expenses claims Authorise Update
Licence & Cert. Details Add/Update View

Data Label: OFFICIAL
2. PASSWORD PROTECTION
Employee Self Service is designed with security and accessibility in mind. 2.1 Password Rules
All passwords must contain at least 8 characters and a mix of alphabetical letters and must end in a number. E.g. Selfservice99 Users can change their password whenever they wish, however passwords are only valid for 60 days and you are unable to re-use previous passwords. Please Note: Special characters are no longer required in the password construction
2.2 Password Expiry
The system will notify you in advance of your password expiring. A message will be displayed when you log in. “Password has expired” – You must repeat the old password in the pink box then create a new password” – Access has been denied”. You must enter your old password in pink box before creating a new password. Your old password is the password sent by HR21Queries. 2.3 Locked Accounts
If an incorrect password is entered a message advising you of this is shown and after three attempts you will be locked out of the system. If your account is locked any requests for unlocks should be emailed to HR21 helpdesk at: [email protected] and your account will be unlocked.

Data Label: OFFICIAL
Self Service password resets You can reset your own password in HR21. Click on HR
Enter your login ID (Employee number) – click ok
Message appears

Data Label: OFFICIAL
Copy/paste password sent by email from HR21 Queries into white box.
This is the screen which will appear when you have entered the password in the white box (emailed by HR21 Queries), before you create a new password you must re-enter your old password in the pink box. (Passwords received by email from HR21 Queries are always your “old password”)
Before enter new
password you must
enter your old password
again in pink box

Data Label: OFFICIAL
3. GETTING STARTED
You can access HR21 through the Council’s Intranet or Google Chrome - HR21, or by going to https://hr21.westlothian.gov.uk/ Please note that the system can only be accessed from a PC connected to the council network. When you are first set up on the system you will receive an email with one time password to allow you to access the system from HR Services All employees have their own unique user id, which is their employee number and you will be asked to create a password when first accessing the system. This is the screen which will appear when you have entered the one time password issued by HR, before you create a new password you must re-enter your old password in the pink box. (Passwords received by email from HR21Queries are always your “old password”)
Once logged in, your details will appear in the tool bar. Do not use the back button, to navigate through screens as this will lock you out of the system. To go back to a previous screen, click on Previously Visited Pages. There is an online help function and relevant user information provided on each screen. If an incorrect action is performed an Error message will show. It is advisable to clear these messages after each incorrect action by clicking on Clear button. Some fields are mandatory and an error message will appear if missed.
Before enter new
password you must
enter your old password
again in pink box

Data Label: OFFICIAL
This is the navigation screen, allowing you access to all areas of the system:

Data Label: OFFICIAL
4. WHAT YOU CAN SEE AND DO
4.1 Changing your name
Select the Details option under HR on the drop down menu
Input your new name, marital status and date of change
Click Save
Data Label: OFFICIAL
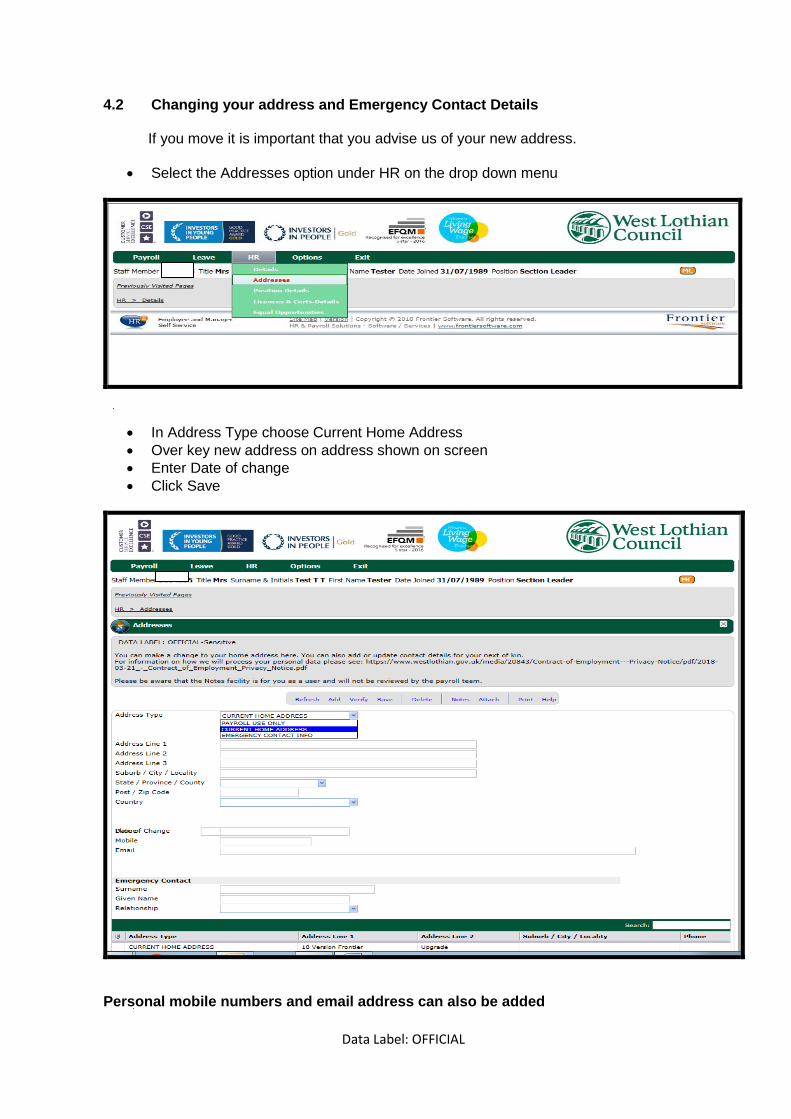
4.2 Changing your address and Emergency Contact Details If you move it is important that you advise us of your new address.
Select the Addresses option under HR on the drop down menu
In Address Type choose Current Home Address
Over key new address on address shown on screen
Enter Date of change
Click Save
Personal mobile numbers and email address can also be added

Data Label: OFFICIAL
4.2a Emergency Contact Details Staff are requested to provide the Council with emergency contact details and is expected to keep these up to date. This will allow the Council in the event of an emergency to know who the most appropriate person to contact is. To add Emergency Contact Details
Click Add
In Address Type choose Emergency Contact Info from drop down list - Input the new details
Enter Date of Change
Click Save

Data Label: OFFICIAL
To update Emergency Contact Details
In Address Type choose Emergency Contact Info from drop down list
Over key information already there with new details
Enter Date of Change
Click Save

Data Label: OFFICIAL
4.3 Submit a Claim for Overtime (if applicable) Only normal overtime working can be submitted in HR21. Standby payments / Standby overtime / Call outs and Sleep Ins claims cannot be submitted in HR21 and these should therefore continue to be submitted in the format used prior to the introduction of HR21. Arrangements for Payment of Overtime Overtime at enhanced rates will only apply when 36 hours a week have been worked. Overtime will only be paid for complete 30 minutes of work. Employees working overtime must take a break after 6 hours, this break will be unpaid. Employees graded Band I and over are not entitled to overtime payments. All claims are submitted and paid a month in arrears and will be processed up to the payroll deadline date for that month. Any claims approved after the Payroll deadline date will be carried forward to the next pay period. (Payroll deadline dates can be found on My Toolkit and in HR21 under the Options tab) If an overtime payment does not show in your salary as you expect you should check the status of your claim by selecting Request Enhanced Timesheet from the Payroll drop down menu. If the status of your claim is “Approved” but you have not received the payment this means that it was approved by your manager after the submission deadline and you will receive the payment the following month. Overtime claims which have been processed by Payroll will be visible in Timesheet History. Submitting a Claim for Overtime To make a claim for overtime select the Request Enhanced Timesheet option from the Payroll drop down menu.
Click Add to start claim
Period End Date The day you are actually making the overtime claims is the date that should be keyed to Period End Date. E.g. Monday 20th August is the day you are keying your overtime claims in HR21 this is the date that should be entered in “Period End Date”. System will only accept claims up to this date.
Date Worked – input the date(s) you are claiming overtime for. The system will not allow a duplicate claim to be made – i.e. if you already have a claim “Holding” or Requested” with the same dates you will not be able to submit a further claim and the system will not allow the same times within one claim.

Data Label: OFFICIAL
Pay element – select from the drop down box whether payment is at plain time, time and half or double time.
Details – Input the reason for the overtime working.
Time From and Time To – select the appropriate start and finish times remembering to exclude any breaks you have had. Please be aware when clicking on Time To you must choose a time from the drop down list, if a Time To is not chosen it will default to midnight and hours worked will be incorrect.
If more than six hours overtime has been worked in one day you must key two entries in your claim to show a break has been taken.
Cost Centre – When you save your overtime claim this will automatically be charged to your own cost centre – you do not have to manually key it. If it has to be charged to different cost centres please do as follows
o Click on the box containing 3 dots next to the Cost Centre field o The dialogue box that appears contains a full list of cost centres. You have the
option to search by code, cost centre or description by selecting the option you wish to use from the drop down list at the top left of the dialogue box
o After selecting the search option, enter the details of the code, cost centre or description in the search box at the top right of the dialogue box and then double click on cost centre required to update your claim. Pease ensure the correct cost centre is used
o Please note that not all cost centres are available in HR21 e.g. Capital Budget Codes. If you cannot find the cost centre you require please speak to your manager.
If OT for own
cost centre-
will
automatically
Update when
saved.
DO NOT KEY

Data Label: OFFICIAL
New - Once all details have been completed tick Requested button and then click save
You will receive a message to confirm that your entry has been added successfully and an email will be sent to your inbox, confirming that your claim has been forwarded to your manager for approval. If you want to save your claim as you may have more entries to enter before you submit it to your manager – Tick Holding and click save You will receive a further email advising whether your claim has been approved or rejected or declined. If your claim is rejected you should contact your manager in the first instance to discuss this. If your claim requires to be amended please amend claim and resubmit for approval by ticking Requested button and save. Do not submit a new claim. If your claim has been declined by your manager it will be deleted from your view. Please discuss with your manager their reason for declining the claim. Your manager must approve your claim within the 7 day escalation period (7 day period begins from the date you have submitted your claim and includes Saturday and Sunday) after this time claim will escalate to his / her manager for approval. Any claim approved after the payroll deadline date will be carried forward to the next pay period. (Payroll deadline dates can be found on My Toolkit and in HR21 under the Options tab)
OT charged to a
different cost
centre – click
on drop down
box to view list

Data Label: OFFICIAL
Timesheet History By selecting the Timesheet History option from the drop down menu you can view all overtime claims processed and paid to you in previous salaries. 4.4 Submit a Claim for Mileage
Arrangements for Paying Mileage Before submitting a claim for mileage, you must ensure you are authorised to use your own car for business journeys. You must have a valid Driving Licence / Insurance (which covers Business use) / MOT if applicable; if your car is not eligible for an MOT you must present your car registration document to your manager. As a new user you should also have completed an Own Vehicle Use Authorisation form. You must present your valid documents to your manager and only your manager can update Licence & Details screen in HR21. If there are no documents recorded or if one or all of your documents are no longer valid the system will not allow you to submit a claim. You can view the status of all of your documents by selecting the Licenses & Cert.Details option from the HR drop down menu. If any of your documents are missing or require to be updated you must present your valid documents to your manager. Only your manager can update Licence & Cert.Details screen. These documents should be reviewed on an annual basis by your manager. Changing Your Car If you change your car the current insurance document and MOT (if applicable) effectively become invalid. Therefore you must present your new insurance and MOT (if applicable) documents to your manager. If your car is not eligible for an MOT you must present your new car registration document to your manager. Your manager is required to check and update Licence & Certs.Details screen in HR21 before approving any claims. Claims for mileage and expenses must be made in accordance with the council’s Business Travel and Subsistence Policy which can be found at: http://www.westlothian.gov.uk/CHttpHandler.ashx?id=1665&p=0 All claims are submitted and paid a month in arrears and claims will be processed up to the Payroll deadline date for that month. If a mileage payment does not show in your salary as you expect you should check the status of your claim by selecting Mileage Claim from the Payroll drop down menu. If the status of your claim is “Approved” but you have not received the payment this means that it was approved by your manager after the submission deadline and you will receive the payment the following month. Mileage claims which have been processed by Payroll will be visible in Mileage History.

Data Label: OFFICIAL
Submitting a Claim for Mileage Select the Mileage Claim option from the Payroll drop down menu
Click Add to start a new claim
Month Ended Date – enter the last day of the month for which you are claiming mileage, e.g. for a submission for mileage incurred in August the month ended date would be 31/08/2018.
Date of Claim – input the date(s) you are claiming mileage for. The system will not allow a duplicate claim to be made – i.e. if you already have a claim “Holding” or “Submitted” with the same dates then you will not be able to submit a further claim.
Claim Reason – Must include a detailed account of the purpose of the journey – “Meeting” is not sufficient.
Business Miles Code – Click on the drop down list and select the appropriate journey. This is the Council’s schedule of mileage and should always be used in the first instance
Journey From/Journey To – Do not key anything in these fields, these will automatically update when the relevant journey is selected from the Schedule of mileages in Business Miles Code field.
Business Miles – Do not key anything in these fields, these will automatically update when the relevant journey is selected from the Schedule of mileages in Business Miles Code field.

Data Label: OFFICIAL
Cost Centre – When you save your mileage claim this will automatically be charged to your own cost centre – you do not have to manually key it. If it has to be charged to different cost centres please do as follows
o Click on the box containing 3 dots next to the Cost Centre field o The dialogue box that appears contains a full list of cost centres. You have the
option to search by code, cost centre or description by selecting the option you wish to use from the drop down list at the top left of the dialogue box
o After selecting the search option, enter the details of the code, cost centre or description in the search box at the top right of the dialogue box and then double click on cost centre required to update your claim. Pease ensure the correct cost centre is used
o Please note that not all cost centres are available in HR21 e.g. Capital Budget Codes. If you cannot find the cost centre you require please speak to your manager.
Registration Number – To find your Car registration number click on the drop down box and a list of car registrations will appear. To find your own car enter your registration number in Search. If your car is not on list you must email [email protected] with registration, make, model, and engine CC. You will receive a confirmation email when your car has been added.
Tick the boxes confirming that you have a valid VAT receipt, driving licence, MOT (if applicable) insurance for business use and own vehicle user form.
If you have more than 6 entries for your month’s submission you will need to submit a new claim for the additional entries.

Data Label: OFFICIAL
If you want to save your claim as you may have more entries to enter before you submit it to your manager – Tick Holding and click Save
New - Once all details have been completed tick Requested button and then click save
You will receive a message to confirm that your entry has been added successfully and an email will be sent to your inbox, confirming that your claim has been forwarded to your manager for approval. You will receive a further email advising whether your claim has been approved or rejected or declined To find out why your claim has been rejected you must contact your manager. If your claim requires to be amended please amend claim, and resubmit for approval by ticking Requested button and save. Do not submit a new claim. If your claim has been declined by your manager it will be deleted from your view. Please discuss with your manager their reason for declining the claim. Your manager must approve your claim within the 7 day escalation period (7 day period begins from the date you have submitted your claim and includes Saturday and Sunday) after this time claim will escalate to his/her manager for approval. Any claim approved after the payroll deadline date will be carried forward to the next pay period. (Payroll deadline dates can be found on My Toolkit and in HR21 under the Options tab) Entering journeys manually If the journey you are claiming for cannot be found in the Business Miles Code, you can enter details manually. E.g. currently the journeys for schools are not available on this list so all school journeys will have to be manually entered.
Journey To – From details and number of miles will have to be keyed manually

Data Label: OFFICIAL
4.4a Submitting a Claim for Expenses (Non Mileage) Arrangements for Paying Expenses Claims for expenses must be made in accordance with the council’s Business Travel and Subsistence Policy which can be found at: http://www.westlothian.gov.uk/CHttpHandler.ashx?id=1665&p=0 All claims are submitted and paid a month in arrears and claims will be processed up to the Payroll deadline date for that month. If an expense payment does not show in your salary as you expect you should check the status of your claim by selecting Expenses Claim from the Payroll drop down menu. If the status of your claim is “Approved” but you have not received the payment this means that it was approved by your manager after the submission deadline and you will receive the payment the following month. Expense claims which have been processed by Payroll will be visible in Expense History. Submitting a Claim for Expenses (Non Mileage) Select the Expenses Claim option from the Payroll drop down menu and a blank form will appear. Do not use this option to make a mileage claim
Ciick Add to start a new claim
Month Ended Date – enter the last day of the month for which you are claiming expense for e.g. for a submission of expense incurred in August the Month Ending Date would be period end date would be 31/08/2018.
Date of Claim – input the date(s) you are claiming expenses for. The system will not allow a duplicate claim to be made – i.e. if you already have a claim “Holding” or “Requested” with the same dates then you will not be able to submit a further claim.
Claim Reason – This must include a detailed account of the purpose of the expense.
Journey From/Journey To – This must include full details of journey undertaken.
Receipt -tick receipt box (all receipts should be retained by yourself for a period of 6 years +1 HMRC)
Expense Type – select expense type from the drop down list

Data Label: OFFICIAL
If you have more than 6 entries for your month’s submission you will need to submit a new claim.
If you want to save your claim as you may have more entries to enter before you submit it to your manager – Tick Holding and click Save
New - Once all details have been completed tick Requested button and then click Save
You will receive a message to confirm that your entry has been added successfully and an email will be sent to your inbox, confirming that your claim has been forwarded to your manager for approval You will receive a further email advising whether your claim has been approved or rejected or declined To find out why your claim has been rejected you must contact your manager. If your claim requires to be amended please amend claim and resubmit for approval by ticking Requested button and save. Do not submit a new claim. . If your claim has been declined by your manager it will be deleted from your view. Please discuss with your manager their reason for declining the claim. Your manager must approve your claim within the 7 day escalation period (7 day period begins from the date you have submitted your claim and includes Saturday and Sunday) after this time claim will escalate to his / her manager for approval. Any claim approved after the payroll deadline date will be carried forward to the next pay period. (Payroll deadline dates can be found on My Toolkit and in HR21 under the Options tab) Mileage /Expense History By selecting the mileage/expense history option from the drop down menu you can view all mileage and expense claims processed and paid to you in previous salaries.

Data Label: OFFICIAL
4.6 View and Print a Print Payslip To view and print your payslip
Under Payroll select Details and then Pay Slip
The most recent monthly pay details will appear on the screen. This is not your pay slip.
Your payslip is generated by clicking on the Payslip button.
This information box appears

Data Label: OFFICIAL
Payslip appears on screen – To print payslip click on print icon

Data Label: OFFICIAL
If the council logo does not appear in the print window click on Tools and go to Internet Options Open the Advanced Tab tick the Print background colours and images – click Apply then click Ok
Data Label: OFFICIAL
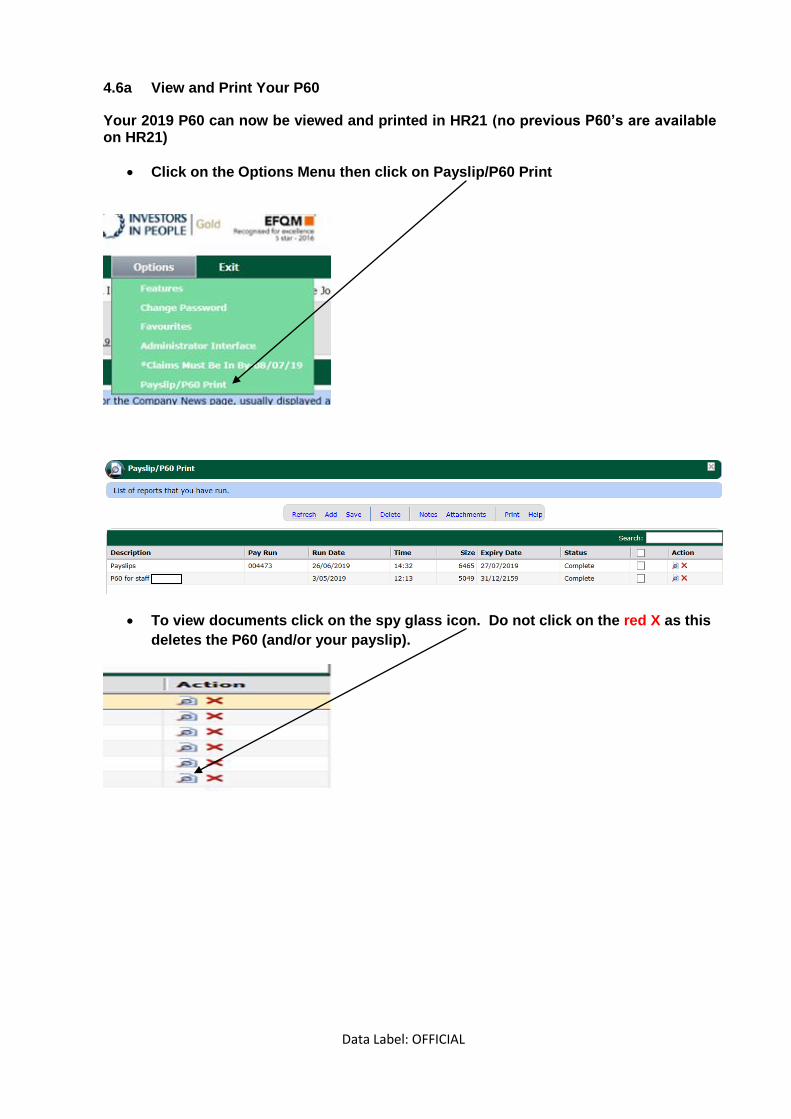
4.6a View and Print Your P60
Your 2019 P60 can now be viewed and printed in HR21 (no previous P60’s are available on HR21)
Click on the Options Menu then click on Payslip/P60 Print
To view documents click on the spy glass icon. Do not click on the red X as this
deletes the P60 (and/or your payslip).

Data Label: OFFICIAL
Cannot print Pay Slip or P60
May need to do some housekeeping on computer
Go to Internet Explorer
Tools
Internet Options
Privacy
Pop-Up Blocker – should be ticked

Data Label: OFFICIAL
Click on Settings
Check in” Allowed Sites” for the HR21 link
If link not in “Allowed sites” you will need to copy HR21 link
https://hr21.westlothian.gov.uk/HR21v3213/Interface/login.aspx into “Address
of website to allow”
Click Add
Close

Data Label: OFFICIAL
4.7 View your Payroll Record The Payroll option on the drop down menu is where you will find salary information. Details
Pay Slip – Can view / print your payslips here Bank Details – allows you to view your current bank details. If you wish to change your bank details then please complete a Bank Details Notification Form which can be accessed by clicking on form in the Bank Details screen print form, sign and send to HR Services. The form must be received in HR by the payroll deadline to allow for payroll to process the change in time for your salary to be paid into your new account. Tax Code & NI Letter – provides information on your current tax code and national insurance number. Salary Components
Salary – provides details on your current grade and rate of pay. You can also view previous salary details. If you have more than one job you will only be able to view details on your main post. Allowances – provides details of any allowances paid e.g. shift or unsocial hour’s payments. Deductions – provides details of any deductions such as Trade Union subscription, Social Club fees etc. Pay Adjustments – provides details of expenses claimed along with any overpayments being deducted or previous underpayments being paid. Pension – provides details of your pension contribution rates (If you are a member of the Teachers’ Pension Scheme (SPPA) your information will not be visible here as teachers’ pension rates are not fixed and can change each month).

Data Label: OFFICIAL
4.8 View your Leave Record The leave history screen provides information on any leave you may have had including sickness absence, maternity leave, strike days and any unpaid leave. Any annual leave or flexi leave will not be recorded here.

Data Label: OFFICIAL
4.9 View your HR Record Position details – provides information on your current post and previous posts with the council.
5. HOW TO EXIT HR21
It is important to ensure that you always securely log out of the system by clicking on the EXIT button on the top tool bar

Data Label: OFFICIAL
HR21 Employee & Manager Self
Service
Manager User Guide
HR Services July 2019 – Version 18

Data Label: OFFICIAL
Contents
1. WHAT IS HR21
2. PASSWORD PROTECTION
2.1 Password Rules
2.2 Password Expiry
2.3 Locked Accounts/Password Resets
3. GETTING STARTED
4. HOW TO VIEW YOUR STAFF
4.1 Staff
4.2 Payroll
4.3 Leave
4.4 HR
5. DRIVING LICENCES, INSURANCE AND VEHICLE MAINTENANCE
5.1 NEW USERS (Employees using own car for business journeys)
5.2 Annual Review of Existing Users
6. HOW TO ACCESS AN EMPLOYEE REQUEST
7. HOW TO PROCESS AN EMPLOYEE REQUEST
7.1 Arrangements for Payment of Overtime /Processing Claims
7.2 Arrangements for Approving Mileage and Expenses/Processing Claims
8. Annual Performance Review (ADR)
9.. HOW TO EXIT HR21
Data Label: OFFICIAL
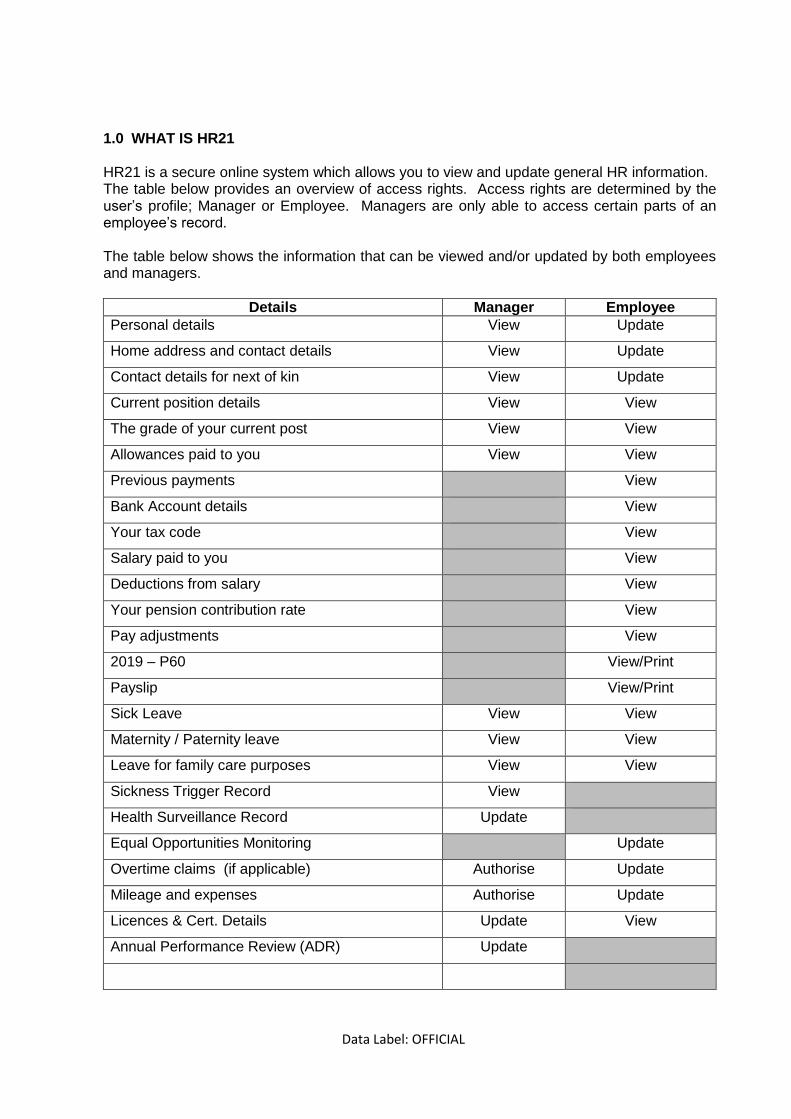
1.0 WHAT IS HR21 HR21 is a secure online system which allows you to view and update general HR information. The table below provides an overview of access rights. Access rights are determined by the user’s profile; Manager or Employee. Managers are only able to access certain parts of an employee’s record. The table below shows the information that can be viewed and/or updated by both employees and managers.
Details Manager Employee
Personal details View Update
Home address and contact details View Update
Contact details for next of kin View Update
Current position details View View
The grade of your current post View View
Allowances paid to you View View
Previous payments View
Bank Account details View
Your tax code View
Salary paid to you View
Deductions from salary View
Your pension contribution rate View
Pay adjustments View
2019 – P60 View/Print
Payslip View/Print
Sick Leave View View
Maternity / Paternity leave View View
Leave for family care purposes View View
Sickness Trigger Record View
Health Surveillance Record Update
Equal Opportunities Monitoring Update
Overtime claims (if applicable) Authorise Update
Mileage and expenses Authorise Update
Licences & Cert. Details Update View
Annual Performance Review (ADR) Update

Data Label: OFFICIAL
2. PASSWORD PROTECTION
Employee Self Service is designed with security and accessibility in mind. 2.1 Password Rules
All passwords must contain at least 8 characters and a mix of alphabetical letters and must end in a number. Special characters are no longer required in the password construction E.g. Selfservice99 Users can change their password whenever they wish, however passwords are only valid for 60 days and you are unable to re-use previous passwords. 2.2 Password Expiry The system will notify you in advance of your password expiring. A message will be displayed when you log in. “Password has expired” – You must repeat the old password in pink box then create a new password. Access has been denied. Your old password is the password sent by HR21Queries. 2.3 Locked Accounts
If an incorrect password is entered a message advising you of this is shown and after three attempts you will be locked out of system. If your account is locked any requests for unlocks you should email HR21 helpdesk at: [email protected]

Data Label: OFFICIAL
Self Service password resets You can reset your own password in HR21. Click on HR
Enter your login ID (Employee number) – click ok
Message appears
Data Label: OFFICIAL
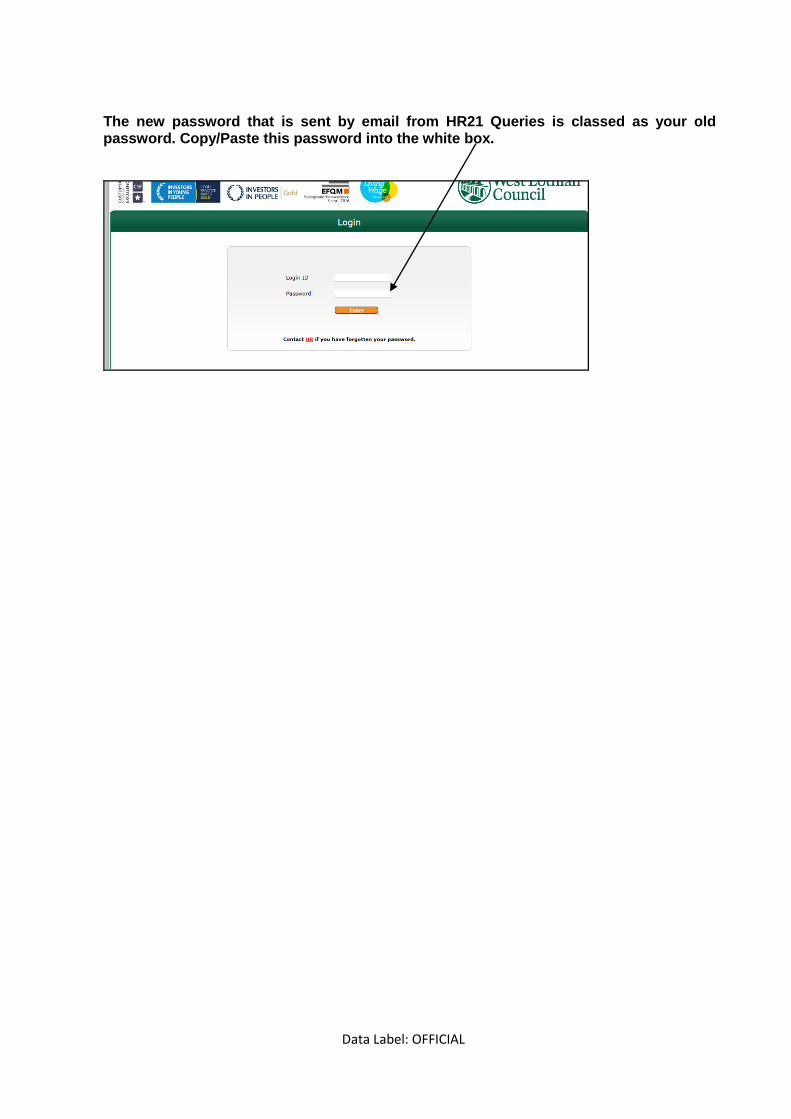
The new password that is sent by email from HR21 Queries is classed as your old password. Copy/Paste this password into the white box.

Data Label: OFFICIAL
3. GETTING STARTED
You can access HR21 through Council’s Intranet or Google Chrome - HR21 or by going to https://hr21.westlothian.gov.uk Please note that the system can only be accessed from a PC connected to the council network and through Google Chrome. When you are first set up on the system you will receive an email with one time password to allow you to access the system from HR Services. Your login ID is your employee number and you will be required to create a new password the first time you login to the system This is the screen which will appear when you have entered the one time password issued by HR, before you create a new password you must re-enter your old password in the pink box (Passwords issued by HR becomes your “old password”)
Do not use the back button, to navigate through screens as this will lock you out of the system. To go back to a previous screen click on Previously Visited Pages. There is an online help function and relevant user information provided on each screen. When you log in, your own personal details will appear on the tool bar .
Before you enter
new password you
must enter your
old password in the
pink box
Data Label: OFFICIAL
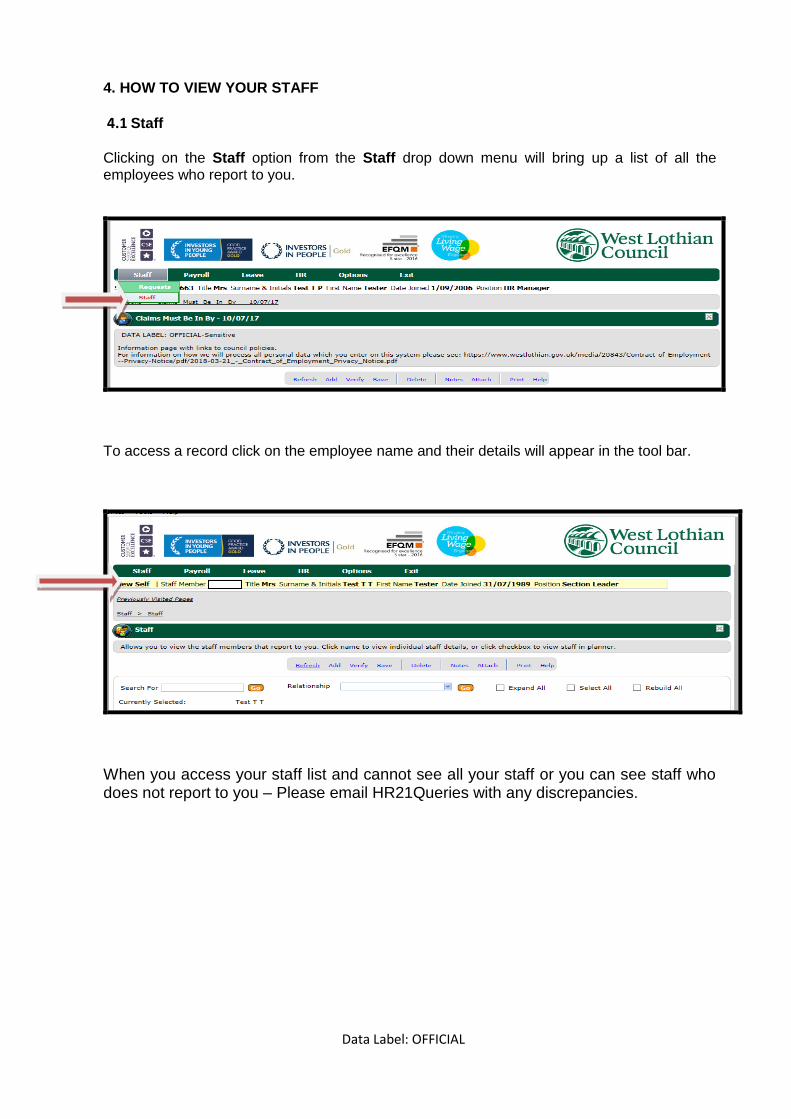
4. HOW TO VIEW YOUR STAFF
4.1 Staff Clicking on the Staff option from the Staff drop down menu will bring up a list of all the employees who report to you.
To access a record click on the employee name and their details will appear in the tool bar.
When you access your staff list and cannot see all your staff or you can see staff who does not report to you – Please email HR21Queries with any discrepancies.

Data Label: OFFICIAL
4.2 Payroll
The Payroll drop down menu is where you will find details of salary and any related allowances that are paid to members of your team.
As a manager you do not have access to view details of pay deductions, pension contributions or pay adjustments for your employees.
4.3 Leave Selecting Leave History from the Leave drop down menu provides information on any periods of absence your employees have had including sickness absence, maternity leave, strike days any other unpaid leave. Annual leave and any flexi leave taken are not recorded here.
To access a record click on an absence from the list and the reason and duration of the absence will be displayed.

Data Label: OFFICIAL
Selecting Sickness Trigger Record from the Leave drop down menu will allow you to view the details of any employees within your team who have reached the corporate trigger level and, where this information has been returned to HR, the details of what action has been taken as a result of this. Health surveillance screen – Only to be completed for any employees within your team who have been identified with an occupational hazard Details of all Health surveillance referrals in relation to identified occupational hazards for your staff will need to be entered here. Please include details of all staff that have been referred to occupational health for health surveillance purposes only; all other occupational referrals will be made through HR. On receipt of the occupational report, record the outcomes including the review periods. If employee has more than one referral at the same time you will need to add these separately Before accessing this screen please choose relevant employee from your staff list Click Add Sequence – this should be 1. If you have a referral for the employee and want to add another referral you must change the sequence number e.g. 2

Data Label: OFFICIAL
4.4 HR The HR drop down menu provides access to employee information including home address and contact details. You will also find position information including hours and place of work.

Data Label: OFFICIAL
5. DRIVING LICENCES, INSURANCE AND VEHICLE MAINTENANCE
Managers are required to verify that authorised car users, for whom they are responsible, have the relevant driving licence and a comprehensive motor insurance policy (clearly stating that they are insured to use their vehicles for work purposes) and vehicle MOT certificate. Thereafter those documents must be reviewed on an annual basis. Full details of the policy requirements can be found at: http://www.westlothian.gov.uk/CHttpHandler.ashx?id=1665&p=0 5.1 NEW USERS (Employees using own car for business journeys) Own Vehicle Use Authorisation Application Form Managers must ensure that all new users who are to use their own car on Council business
complete an Own Vehicle Use Authorisation form. This form can be found at:
http://www.westlothian.gov.uk/CHttpHandler.ashx?id=1670&p=0 The application must be authorised by the Head of Service prior to an employee using their own vehicle on council business. In authorising the application, Heads of Service must confirm that the employee’s necessary documentation (Driving Licence, Insurance, and Vehicle Maintenance) is current and valid. Thereafter, those documents must be reviewed on an annual basis by the line manager Forms should be retained by relevant service. Employees are not required to complete an annual renewal form If at any time an employee is no longer eligible to use their own car, expiry dates in this screen should be amended accordingly.

Data Label: OFFICIAL
Adding New Users
Managers are required to add all document details for new users. Once the documents have been verified you should
Select the relevant employee from your Staff list
Select Licences & Cert. Details from the HR drop down menu
Click on Add
Select document type
Enter date document checked in “First Checked”
Enter Expiry Date – should be one year from date documents checked
If employee’s car is not eligible for an MOT at this time – Date of car registration should be entered in “First Checked” and Expiry Date should be changed to three years from date of car registration
When adding driving licence also enter expiry date of 10 year photo driving licence
card
Tick “Required for mileage claims” (this must be ticked or employee will not be able to submit a claim)
Tick Valid Own Vehicle Use Form (Employee has completed form and it has been authorised by their Head of Service)
Click Save
Follow same process for each document to be added
Data Label: OFFICIAL
5.2 Annual Review of Existing Users At the annual review period, managers are required to update details of the expiry and review dates for the following: 1. Employee Driving Licence and 10 year Photo Card. An annual review is required for
driving licences as an employee may not be qualified to drive due to circumstances which occurred during the previous year. Therefore expiry date for driving licences should always be for one year from annual check and not the date the licence expires. 10 year Photo Card should be checked each year to ensure it has not expired.
2. Insurance Policy stating that they are insured to use their vehicle for work purposes.
3. MOT Certificate
If employee’s car is not eligible for an MOT at this time – Expiry Date should be three years from date of car registration – Manually add date of car registration to “First Checked” and three years from this date should be added to “Expiry Date”
Where an employee changes their car during the annual review period the current insurance document and MOT (if applicable) become invalid. Therefore, the employee must present the new insurance and MOT (if applicable) documents to their manager. If new car is not eligible for an MOT the employee must present new car registration document to their manager who is required to check and update Licence & Certs.Details screen in HR21 before approving any claims. You should receive an email reminder when an employee has a change to their car registration. Heads of Service will review vehicle user classifications annually and in the event of any material change to the duties of a post that could have implications for the nature of vehicle usage. Please note that the annual review date is one year from the previous review of driving licence, insurance for business use and MOT/car registration certificate, not the date that vehicle documents expire. The expiry date should be one year from the date you last reviewed the documents.

Data Label: OFFICIAL
Details are updated by going to the HR drop down menu and selecting Licences & Cert. Details
Select the relevant employee from your Staff list
Select Licences & Cert. Details from the HR drop down menu
Select document which requires to be updated
Change Expiry Date only (Do not add a new entry as this will restrict employee making a claim.)
There should be a tick already in “Required for mileage claims” (this must be ticked or employee will not be able to submit a claim)
There should be a tick already in “Valid Own Vehicle Use Form”
Click Save
Data Label: OFFICIAL
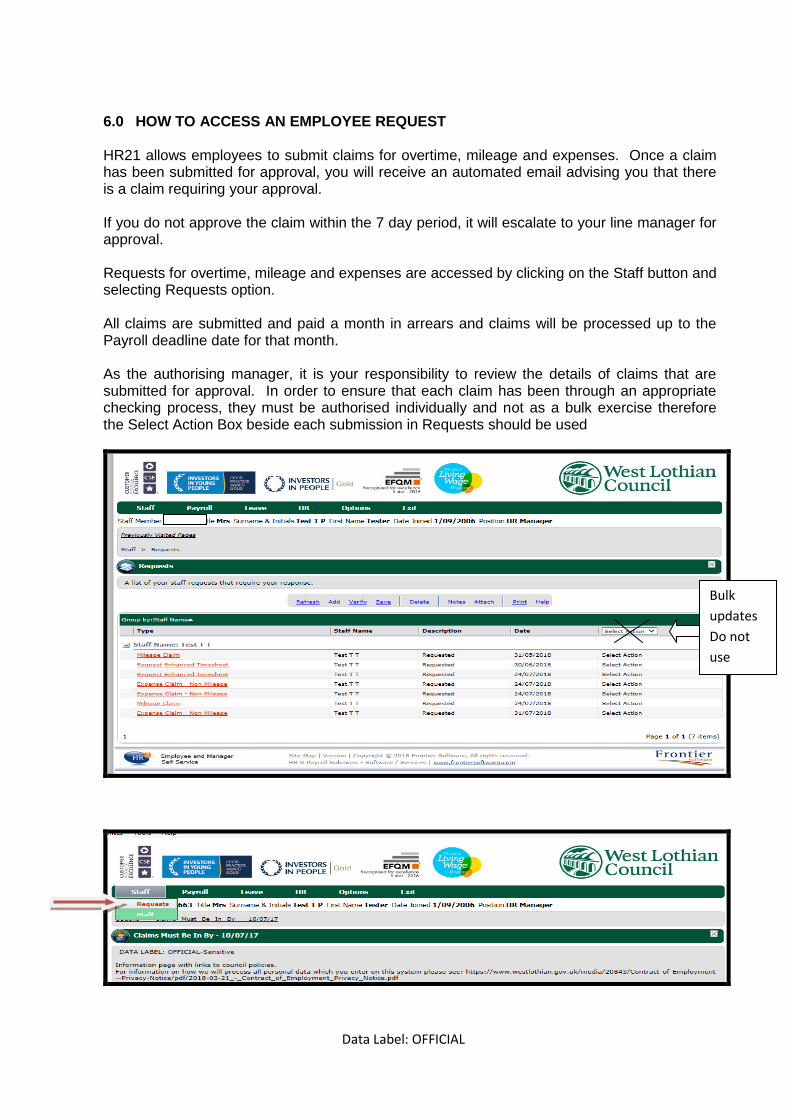
6.0 HOW TO ACCESS AN EMPLOYEE REQUEST HR21 allows employees to submit claims for overtime, mileage and expenses. Once a claim has been submitted for approval, you will receive an automated email advising you that there is a claim requiring your approval. If you do not approve the claim within the 7 day period, it will escalate to your line manager for approval. Requests for overtime, mileage and expenses are accessed by clicking on the Staff button and selecting Requests option. All claims are submitted and paid a month in arrears and claims will be processed up to the Payroll deadline date for that month. As the authorising manager, it is your responsibility to review the details of claims that are submitted for approval. In order to ensure that each claim has been through an appropriate checking process, they must be authorised individually and not as a bulk exercise therefore the Select Action Box beside each submission in Requests should be used
Bulk
updates
Do not
use

Data Label: OFFICIAL
This will bring up a list of all submissions

Data Label: OFFICIAL
7.0 HOW TO PROCESS AN EMPLOYEE REQUEST 7.1 Arrangements for Payment of Overtime Overtime at enhanced rates will only apply when 36 hours a week have been worked. Overtime will only be paid for complete 30 minutes of work. Employees working overtime must take a break after 6 hours, this break will be unpaid. Employees graded Band I and over are not entitled to overtime payments. All claims are submitted and paid a month in arrears and will be processed up to the payroll deadline date for that month. Any claims approved after the Payroll deadline date will be carried forward to the next pay period. (Payroll deadline dates can be found on My Toolkit and in HR21 under the Options tab) It is your responsibility to ensure claims are correct prior to authorising. New - Processing an Employee Overtime Claim Select each submission (highlighted in Red) to open the form and view the details. The employee’s details will now be on top of the screen. Once you have checked the details of each submission you can chose to Approve Reject or Decline the employee’s request here. Declined requests will be deleted permanently. Tick relevant box and Save – Request will no longer be visible in Requests Example Overtime Request

Data Label: OFFICIAL
Select Requests again to view remaining requests – click on View Self and the remaining requests can be accessed 7.2 Arrangements for Approving Mileage and Expenses Claims for mileage and expenses must be made in accordance with the council’s Business Travel and Subsistence Policy which can be found at: http://www.westlothian.gov.uk/CHttpHandler.ashx?id=1665&p=0 Mileages must correspond with those set out the council’s schedule of mileages which can be found at: http://www.westlothian.gov.uk/CHttpHandler.ashx?id=1666&p=0 New - Processing an Employee Mileage / Expense Claim Select each submission (highlighted in Red) to open the form and view the details. The employee’s details will now be on top of the screen. Once you have checked the details of each submission you can chose to Approve Reject or Decline the employee’s request here. Declined requests will be deleted permanently. Tick relevant box and Save – Request will no longer be visible in Requests Example Mileage Request
Select Requests again to view remaining requests – click on View Self and the remaining requests can be accessed
Data Label: OFFICIAL
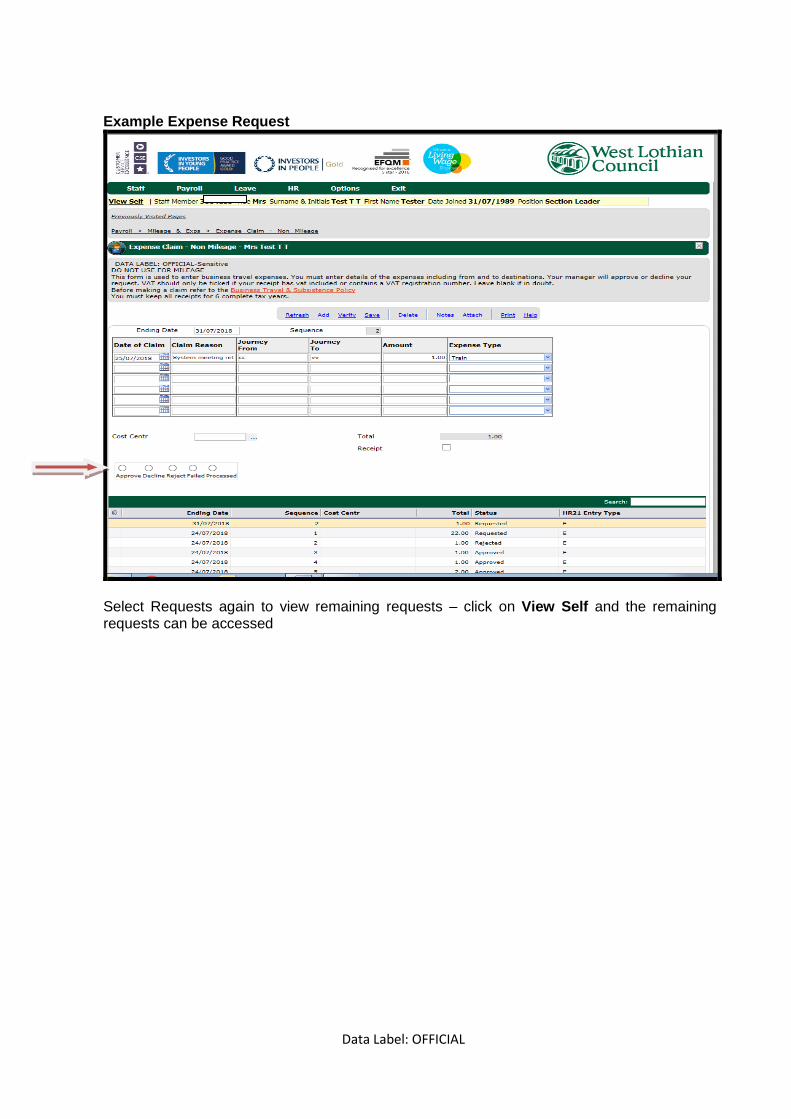
Example Expense Request
Select Requests again to view remaining requests – click on View Self and the remaining requests can be accessed

Data Label: OFFICIAL
8.0 Annual Performance Review (ADR)
The Council is committed to ensuring all employees have an opportunity for an annual performance review through the Appraisal and Development Review (ADR) process. Please record the date the last review meeting was held and the category of employee in the fields below. This information will be used to ensure compliance. Click Add Enter date of review meeting Choose category of employee from the drop down list

Data Label: OFFICIAL
9. HOW TO EXIT HR21 It is important to ensure that you always securely log out of the system by clicking on the Exit icon on top tool bar

Data Label: OFFICIAL
HR21 Employee & Manager Self Service
Troubleshooting Guide
HR Services
July 2019 – Version13

Data Label: OFFICIAL
Contents
1. New Users - Logging in first time
2. Where to find link
3. Passwords
4. Cannot access the system
5. System keep logging you out
5.1 Cannot print payslip or P60
6.Cannot see Menus
7.Cannot find car registration
8.Claims submitted not paid salary
9.Cannot submit expenses

Data Label: OFFICIAL
1. New Users - Logging in first time
When you are eligible to access HR21 you will receive an email from HR.
Example of email:
The link is: https://hr21.westlothian.gov.uk/
You log in with your 7 digit employee number .Your password is - will be
advised in email (exact format must be used)
This password will expire immediately and will now be your old password which
should be repeated in the "Pink Box. You must change your password before
you can access the system.
Passwords must contain at least 8 characters made up of upper and lower case
letters and must end in a number.
Please read User guide which is available on the Intranet before accessing the
system http://intranet.westlothian.gov.uk/article/6909/HR21
Any queries or requests for unlocks should be emailed to
[email protected] quoting your employee number.
The most common issues employees experience on first login is
Cannot access the system – not following password process correctly –
please refer to the Employee User guide “GETTING STARTED “for
further guidance.
New password not ending in a number.
You can access the system via Internet Explorer or Google Chrome

Data Label: OFFICIAL
2. Where to find the link
The link can be found on Council’s Intranet
Click on HR21
Click to access HR21
Link can also be found on emails sent by [email protected]
Data Label: OFFICIAL
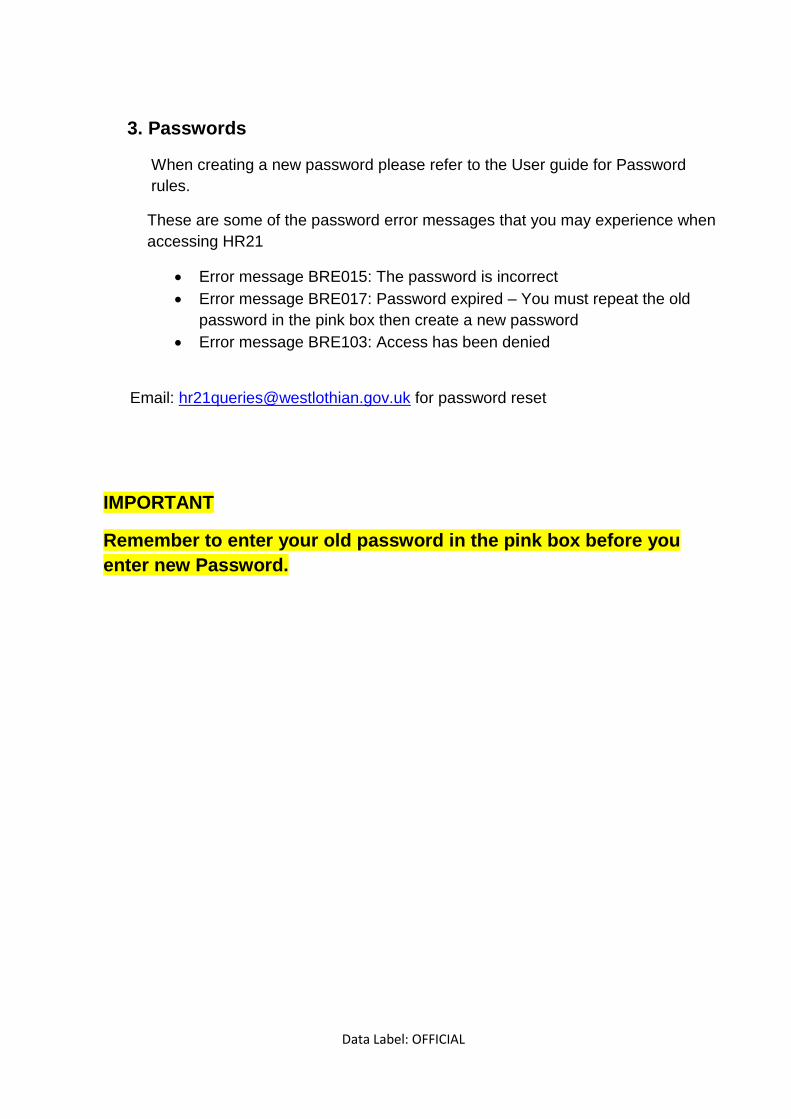
3. Passwords
When creating a new password please refer to the User guide for Password
rules.
These are some of the password error messages that you may experience when
accessing HR21
Error message BRE015: The password is incorrect
Error message BRE017: Password expired – You must repeat the old
password in the pink box then create a new password
Error message BRE103: Access has been denied
Email: [email protected] for password reset
IMPORTANT
Remember to enter your old password in the pink box before you
enter new Password.
Data Label: OFFICIAL
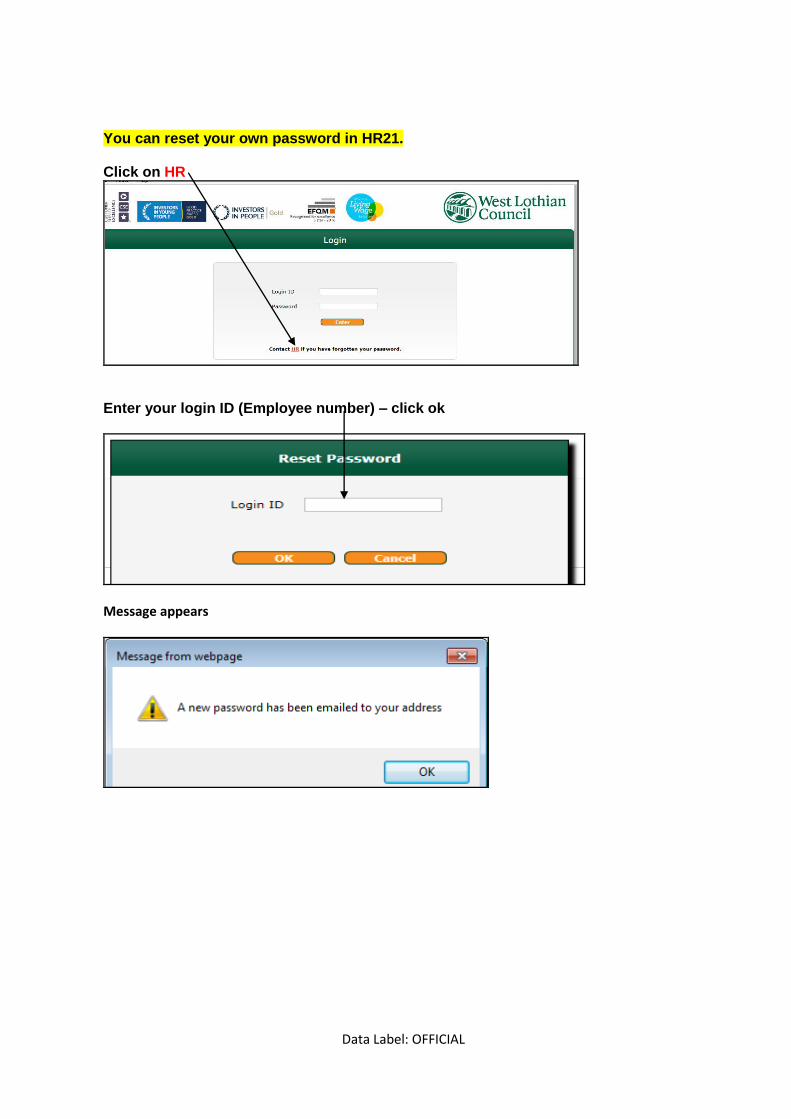
You can reset your own password in HR21. Click on HR
Enter your login ID (Employee number) – click ok
Message appears

Data Label: OFFICIAL
The new password that is sent by email from HR21 Queries is classed as your old password. Copy/Paste this password into the white box.

Data Label: OFFICIAL
4. Cannot access the system – possible reasons why
The system will lock you out after three failed attempts
Error message BRE012 – Your account is now locked – please email
Your account access has ended (This usually applies to employees
who are on temporary contracts)
Error message BRE013 – Your access has expired please email
When an system update is due HR will lock out all HR21 users to
allow update to be done
Error message BRE341 – HR21 users are currently not allowed to
access the system
Error message appears when trying to access the system – Reason
– This is an intermittent problem and it is relating to WLC server and is
currently under investigation
Error - Cannot connect to the BRE – Check the communication for this
version
PLEASE TRY LATER

Data Label: OFFICIAL
5. System keeps logging you out
5.1 Cannot print payslip
Reason: May need to do some housekeeping on computer
Go to Internet Options
Privacy

Data Label: OFFICIAL
Pop-Up Blocker
Pop-Up Blocker Settings

Data Label: OFFICIAL
Check in” Allowed Sites” for the HR21 link
If not there copy HR21 link
https://hr21.westlothian.gov.uk/HR21v3213/Interface/login.aspx to “Address of
website to allow”
Add
Close
Data Label: OFFICIAL
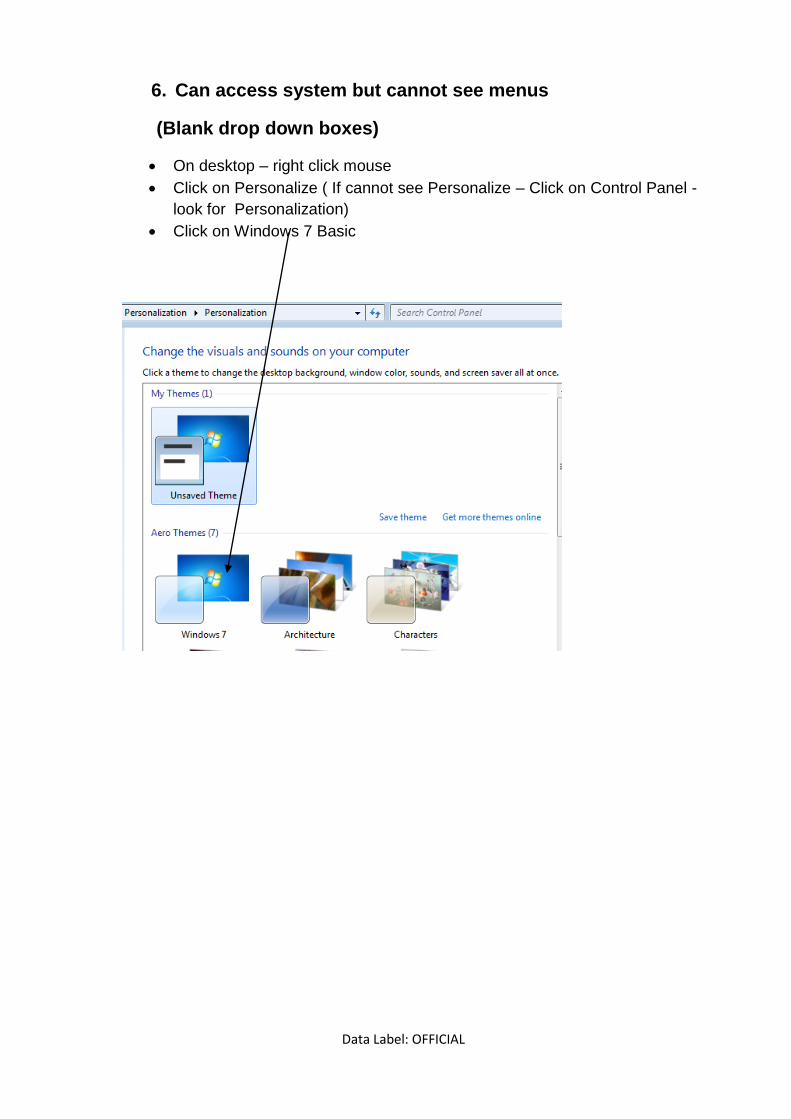
6. Can access system but cannot see menus
(Blank drop down boxes)
On desktop – right click mouse
Click on Personalize ( If cannot see Personalize – Click on Control Panel -
look for Personalization)
Click on Windows 7 Basic

Data Label: OFFICIAL
7. Cannot find Car Registration
Reason: if you cannot find your car on this list HR & Support Services have not
been notified of your car details.
To get your car added to the list - Email [email protected] with
Registration, Make/Model and Engine CC. You will receive a confirmation email when your
car has been added to system.

Data Label: OFFICIAL
8. Claims submitted not paid in salary
Reason : Claims have not been approved by your manager (you should receive
an email advising you that your claims have been approved) – Contact your
manager
Reason: Claims submitted /approved to late – missed payroll deadlines but will
be paid in the next available salary.

Data Label: OFFICIAL
9. Cannot submit expenses
You cannot have special characters or symbols within an expense claim
e.g. @ & ( ) £ “ – ‘ : = +
If you do have a special character or symbol in your claim the following
error message will appear when you try to save or request a claim
FTR-
5506-S
No reply from server: chris21live.app.westlothian.gov.uk : pool5. Last Error = "scGet :
recv failed : Other end closed connection"
FTR-
3500-S
No more messages available
FTR-
5506-S
No reply from server: chris21live.app.westlothian.gov.uk : pool5. Last Error = "scGet :
recv failed : Other end closed connection"