Embed Size (px)
Citation preview

file:///Z|/projects/s/support_tools/set2/htdocs/data/hps/related/P4%20PDFs%201%20to%2020/HPSservicePack18.html (1 of 50) [9/29/2008 2:28:16 PM]
SP18 ReadMe
HPS Service Pack 18 FLASH/Readme
TOC This is IBM pSeries High Performance Switch (HPS) Service Pack 18 Addendum 1 to support new GFW and PT code levels.
This Service Pack details updates to these components:
Hardware Management Console (HMC) 3.3.6 - Build level 20050706.1 Global Firmware (GFW) 3H060109 / 3J060109 Power Subsystem Microcode (PT Code) 26A9 SwitchNetwork Manager (SNM) 1.3.5.0 HPS/SNI LP Software (CSS) (AIX52) 1.1.3.5 HPS/SNI LP Software (CSS) (AIX53) 1.2.0.0 AIX 5L Version 5.2 5.2.0.75 AIX 5L Version 5.3 5.3.0.33 AIX LPs (HPC) as listed in the Detailed LP Level Check VSD LAPI HPS PPE LoadL GPFS CSM RSCT
This Service Pack also contains general guidelines for upgrading the components listed in Section 3: " Component update/download information". These guidelines are intended to be a supplement to the other IBM documents referred to in this document. We strongly advise that you have the referenced documents available before you begin the upgrade process. A list of referenced documents can be found in Section 1:Supporting Documentation.
The Code Levels listed in Section 3: " Component update/download information" reflect the levels available at the time of this Service Pack release. Some components support only a single version, notably the Microcode for GFW and the Power Subsystem. Subsequent released versions are expected to be backward compatible.
file:///Z|/projects/s/support_tools/set2/htdocs/data/hps/related/P4%20PDFs%201%20to%2020/HPSservicePack18.html (2 of 50) [9/29/2008 2:28:16 PM]
SP18 ReadMe
The procedure outlined in Section 4: "Recommended Installation Sequence (Overview)" is the standard sequence of installation.
Non-standard sequences and/or undocumented code levels may cause unforseen problems. In this event please contact your Customer Service Representative.
If you are upgrading to this Service Pack from a service pack that is earlier than SP9, then installing CSM1.4 is required. The recommended AIX service level is AIX 5L version 5.2 is ML7. The Maintenance package contains CSM 1.4 which requires RPM update openCIMOM 0.8(5.2).
Because '/var' is a system data repository, system administrators should check periodically to maintain /var such that there is at least 30 Mb free [use 'df -k']. If it is more than 75% full, look for the directories that contain the most data. [use 'du /var | sort -n' ]
Table of Contents:
Preface
Supporting Documentation
Software Updates/Performance Enhancements
Component update/download information
Recommended installation sequence (Overview)
Installation Guidelines
Known problems/workarounds/Restrictions
Service Pack fix list (by component)
Section 1: Supporting Documentation
1. Hardware Management Console 2. Hardware Management Console for pSeries Installation and Operations Guide 3. Hardware Management Console for pSeries Maintenance Guide (SA38-0603-05) 4. pSeries High Performance Switch (HPS) Planning, Installation and Service Guide 5. (GA22-7951-01) (HPS Guide) 6. IBM eServer pSeries 690 7. Switch Network Interface for eServer pSeries High Performance Switch Guide and 8. Reference (SC23-4869-01) 9. AIX 5.2 documentation
10. AIX 5L Version 5.2 Installation Guide and Reference 11. AIX 5L Version 5.2 Performance Management Guide 12. Reliable Scalable Cluster Technology (RSCT) Library

file:///Z|/projects/s/support_tools/set2/htdocs/data/hps/related/P4%20PDFs%201%20to%2020/HPSservicePack18.html (3 of 50) [9/29/2008 2:28:16 PM]
SP18 ReadMe
13. General Parallel File System (GPFS) Library 14. Cluster System Management (CSM) Library 15. IBM Parallel Environment for AIX 5L Installation Version 4 Release 1.1 16. IBM LoadLeveler for AIX 5L and Linux Using and Administering Version 3 Release2 17. LoadLeveler 3.2 documentation updates 18. pSeries and AIX Information Center 19. AIX 5L Version 5.3 documentation 20. System management guides 21. Installation guides
Section 2: Software Updates/Performance Enhancements
1. New SNM/FNM Features 2. MPI and LAPI Performance Enhancements 3. Support for Node Switch Board (NSB) and Intermediate Switch Board (ISB) failure 4. Application Striping and Fail-Over of packets across multiple interfaces for fault resilience 5. Application Checkpoint/Restart and preemption 6. The Web-based System Manager Remote Client a.k.a WebSM PC CLIENT may need to be
reinstalled 7. RDMA (remote direct-memory access ) transport on HPS
1. New SNM Features: back to toc
New features and functions(on The Switch Network Management Panel ): Introduced in HMC 1.3.1.0 - Service Pack 9
For details of operation please see Chapter 4. System management components and Appendix E. Switch Network Manager (SNM) in pSeries High Performance Switch (HPS) Planning, Installation and Service Guide (GA22-7951-02) (HPS Guide)
Features: HMC Fail-over: FNM/SNM daemon ("Enable SNM Software in Normal Mode") runs on up to four HMCs in the cluster. Verification mode: "Enable SNM Software for Switch Network Verification" used to check out the cluster.
Functions : On the The Switch Network Management Panel there are three(3) new tasks and one(1) renamed task: NEW: "Select Logical Topology", "Display Cluster Components", "Enable SNM Software for Switch Network Verification" RENAMED:"Enable SNM Software for Normal Mode" used to be "Enable SNM Software"
file:///Z|/projects/s/support_tools/set2/htdocs/data/hps/related/P4%20PDFs%201%20to%2020/HPSservicePack18.html (4 of 50) [9/29/2008 2:28:16 PM]
SP18 ReadMe
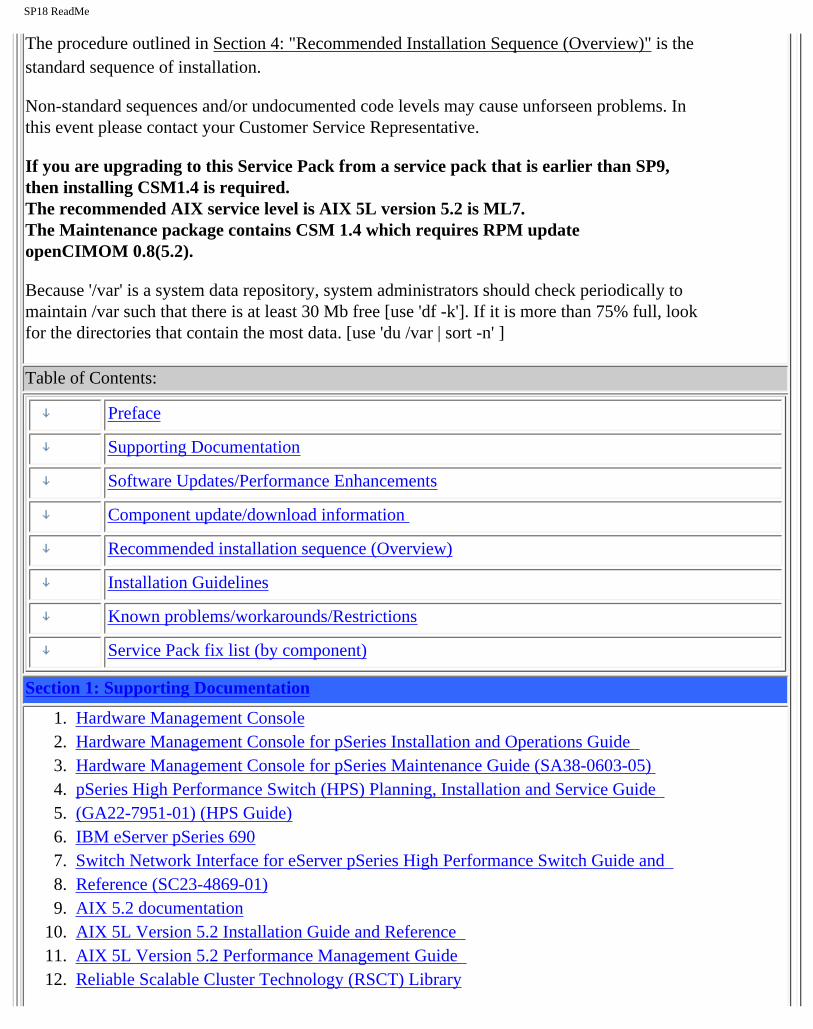
*** Select Logical Topology this introduces a requirement to set the logical topology of your system before enabling SNM software. If the logical topology has not been set, neither of the tasks to Enable SNM Software will be selectable. This is required. See note 1. Note: If you are using the SNM Fail-over support introduced in the Software Update release, the logical topology must be set on each HMC where you enable SNM software. Display Cluster Components shows the frames and cages of the cluster components with<> which SNM can communicate. This task can only be used if SNM software is NOT enabled. The lsswcomp command provides the same function as the "Display Cluster Components" task. Enable SNM Software for Switch Network Verification task is used to check out the cluster by NOT removing bad links or routes. The main purpose is to discover cable miswires and defective hardware. No Routing is modified or loaded. It is NOT intended to be used in a working environment. Enable SNM Software for Normal Mode. select this to run SNM in a normal, working environment. This is required. See note 1. Notes: 1) *** If you are upgrading from Service Pack 8 or less, then these steps are REQUIRED for an initial installation of FNM/SNM:
First Select Logical Topology then Enable SNM Software for Normal Mode.
See "Enable SNM Software" in the HPS Guide.
2) The systems topology selected needs the number of NSB' and ISB's calculated on a per plane basis. Ex: For a configuration with two NSB's and two planes, there is one NSB per plane with 16 endpoints per plane. This equates to: 1 Network, 2 Planes, 1NSB_OISB_16EP.
2. MPI and LAPI PerformanceEnhancements: back to toc
LAPI and MPI host communication stacks have been tuned, based on experience, for lower latency. These changes complement the communication performance improvements released in part 1. They are being released as one package with the LAPI and MPI striping function. Note: Beginning with the Service Pack 9: - a single MPI user-space job which wants to use HPS adapters in both of two switch planes must set MP_EUIDEVICE=sn_all(or csss). In previous releases, a single MPI/us job with multiple tasks per node could use adapters from two planes by setting MP_EUIDEVICE=sn_single (or css0). - A job which sets MP_EUIDEVICE=sn_single will only be able to use half of the HPS adapters on the nodes where it runs. - A job must set MP_EUIDEVICE=sn_all in order to use all the HPS adapters in the nodes it is using.

file:///Z|/projects/s/support_tools/set2/htdocs/data/hps/related/P4%20PDFs%201%20to%2020/HPSservicePack18.html (5 of 50) [9/29/2008 2:28:16 PM]
SP18 ReadMe
3. Support for Node Switch Board (NSB) and Intermediate Switch Board (NSB) failure: back to toc
The SNM daemon has been enhanced to ensure that the failure of an NSB and an ISB will be handled appropriately. The main enhancement is that the Switch Network Manager daemon gathers and downloads multiple path table updates into a single transaction instead of one update per transaction. An entire switch board failure or recovery will generate multiple of path entries changes. Therefore handling these updates in groups involves many fewer transactions. These can be processed in a more timely fashion and place a smaller load on SNM and the service network.
4. Application striping and fail-over of packets across multiple interfaces for fault resilience: back to toc
Striping provides a method for a single task of a parallel application to utilize multiple SNI links. This allows a single link to fail without the application using the link being terminated because there is an alternate path to all other tasks of the application. The striping method implemented is designed to provide resilience to switch or interface/link failure and is not designed to provide an increase in the aggregate network bandwidth as seen by tasks.
This link failure resilience function requires support in LoadLeveler, Parallel Environment and the host communication stack for MPI and LAPI. When an interface/link recovers, the striping function will ensure that the link is used again. Another goal of this striping design is to evenly distribute traffic over multiple switch networks to maintain a balance in the communications load.
KNOWN ISSUES/CONCERNS - In non-striping mode you only get half the links on a p655 system using a 2 plane configuration when setting MP_EUIDEVICE=sn_single. You must use MP_EUDEVICE= csss or sn_all to get all links. - Performance degradation for single task per link of 3% for unidirectional and 5% for exchange bandwidth at large messages. However, multiple tasks per link get full link bandwidth. - Striping currently limited to two links per task. Multiple tasks can use all links as long as there are more tasks than half the links available.
Note that when using RDMA, there is no large message performance penalty for striping. In fact striping greatly improves large message RDMA bandwidth. The above performance degradation occurs only in packet mode.
file:///Z|/projects/s/support_tools/set2/htdocs/data/hps/related/P4%20PDFs%201%20to%2020/HPSservicePack18.html (6 of 50) [9/29/2008 2:28:16 PM]
SP18 ReadMe
5. Checkpoint/Restart and Preemption: back to toc
Checkpoint/restart provides a way to stop and resume applications at some later time. It is a very useful tool in managing the clusters workload since applications can be check-pointed to allow other applications to run or the system made inactive for a maintenance window.
Preemption is also provided so a running application can be suspended to allow another higher priority application to execute right away.
6. The Web-based System Manager Remote Client a.k.a WebSM PC CLIENT back to toc
If the Web SM is updated, it is recommended that the existing code be reinstalled on your remote server or PC to ensure that the WebSM is compatible with this HMC Build.
To install the PC Client software on your remote server or PC go to: http://<hmc-hostname>/remote_client. html . The two versions you see there are the "legacy" websm client - "install shield" and "The future of websm clients." - webstart. Both versions can exist simultaneously on your client workstation
Install shield: If there is a currently installed install shield version of WebSM, it must be UNinstalled before the new version is installed. Uninstall : From Start -> Control Panel -> Add/Remove Programs -> Web-based System Manager Remote Client click "Change/Remove" and follow instructuions. Failure to uninstall will result in undefined behavior of the WebSM PC Client.
Install : Go to: http://<hmc-hostname>/remote_client.html -> "Install Shield" -> select the Operating System where the program will be running. Select "Open" to immediately install on the machine on which the browser is running. Selecting "Save" will allow you to store the install program for installation at a later time. NOTE: This is a 100 Mb file so either process will require about 15 minutes. Once saved it is a self extracting file that can be used to upgrade multiple PC's.
Webstart: The webstart installation is a two part installation first - install the 1.4.2 JVM that is has the webstart code. second - invokes the launch code and gets the initial classes downloaded from the HMC.
A feature of the webstart client is that when the client is launched, it will check for new jar files on the HMC and download them, so subsequent update of the HMC server code do not require the webstart client code to be constantly updated .
There may be an issue of having multiple jvms on the client workstation and the default jvm path not pointing to the IBM 1.4.2 jvm. Webstart does not work well with the sun 1.4.2 jvm, so

file:///Z|/projects/s/support_tools/set2/htdocs/data/hps/related/P4%20PDFs%201%20to%2020/HPSservicePack18.html (7 of 50) [9/29/2008 2:28:16 PM]
SP18 ReadMe
some cleanup of multiple jvms on your workstation may be needed.
The Java Web Start version requires multiple logins on launching. You have to login to the original HMC whenever you try to connect even if you're just downloading the webstart .jsp files. If you are getting the .jsp files from a regular AIX box, you will have one less login. You dont experience this in the non-webstart websm because you are not connecting to the webserver to download the .jsp files. Trying to 'cancel out' will result in multiple (up to 16) re-presentations of the login verification box.
1) Install Java Web Start: Java Web Start for Linux Install Java Web Start on a Linux platform. Once installed, return to this page to download the Remote Client. Java Web Start for Windows Install Java Web Start on a Windows platform. Once installed, return to this page to download the Remote Client.
2) Download Web-based System Manager Remote Client for Java Web Start: Remote Client Download Web-based System Manager Remote Client for Java Web Start on Linux and Windows systems. The images are quite large, so it may take some time for the download to complete.
7. RDMA transport on HPS
back to toc
Summary:
The IBM eServer pSeries High Performance Switch (HPS) with Remote Direct Memory Access (RDMA) enabled delivers 1.8GB/s of unidirectional bandwidth across a single link and over 3.5GB/s over 2 links to a single MPI task for some applications. Bidirectional bandwidth measures almost 3.0GB/s over a single link and over 5.9GB/s for a single MPI task striping over 2 links.
These measurements were achieved on 2 nodes containing 1.9GHz, Power 4+ based processors with 32 CPUs and 2 HPS adapters, and links on each of the 2 nodes. Large pages and cache-line aligned buffers were used for the MPI measurements. These results indicate nearly linear scaling of large message striping performance. A single link is able to deliver over 1.65GB/s of bandwidth over TCP/IP.
back to toc
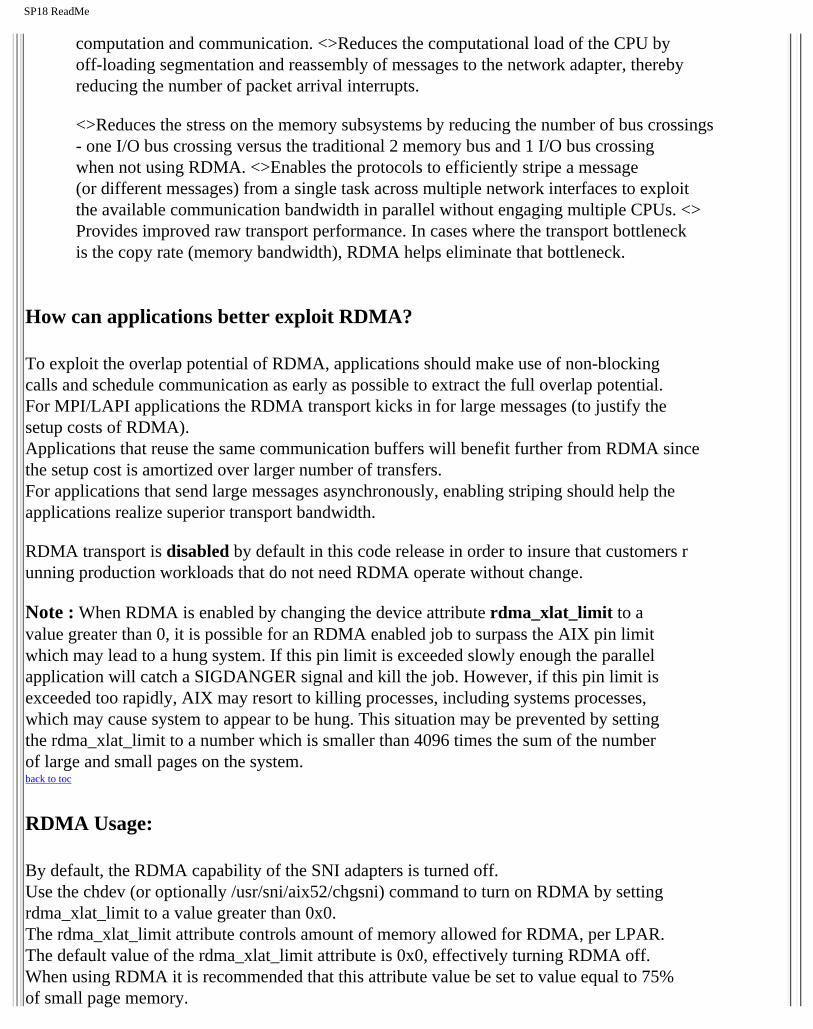
Advantages of RDMA transport:
<>Decouples the CPU from the movement of data allowing for better overlap of
file:///Z|/projects/s/support_tools/set2/htdocs/data/hps/related/P4%20PDFs%201%20to%2020/HPSservicePack18.html (8 of 50) [9/29/2008 2:28:16 PM]
SP18 ReadMe
computation and communication. <>Reduces the computational load of the CPU by off-loading segmentation and reassembly of messages to the network adapter, thereby reducing the number of packet arrival interrupts.
<>Reduces the stress on the memory subsystems by reducing the number of bus crossings - one I/O bus crossing versus the traditional 2 memory bus and 1 I/O bus crossing when not using RDMA. <>Enables the protocols to efficiently stripe a message (or different messages) from a single task across multiple network interfaces to exploit the available communication bandwidth in parallel without engaging multiple CPUs. <> Provides improved raw transport performance. In cases where the transport bottleneck is the copy rate (memory bandwidth), RDMA helps eliminate that bottleneck.
How can applications better exploit RDMA?
To exploit the overlap potential of RDMA, applications should make use of non-blocking calls and schedule communication as early as possible to extract the full overlap potential. For MPI/LAPI applications the RDMA transport kicks in for large messages (to justify the setup costs of RDMA). Applications that reuse the same communication buffers will benefit further from RDMA since the setup cost is amortized over larger number of transfers. For applications that send large messages asynchronously, enabling striping should help the applications realize superior transport bandwidth.
RDMA transport is disabled by default in this code release in order to insure that customers r unning production workloads that do not need RDMA operate without change.
Note : When RDMA is enabled by changing the device attribute rdma_xlat_limit to a value greater than 0, it is possible for an RDMA enabled job to surpass the AIX pin limit which may lead to a hung system. If this pin limit is exceeded slowly enough the parallel application will catch a SIGDANGER signal and kill the job. However, if this pin limit is exceeded too rapidly, AIX may resort to killing processes, including systems processes, which may cause system to appear to be hung. This situation may be prevented by setting the rdma_xlat_limit to a number which is smaller than 4096 times the sum of the number of large and small pages on the system. back to toc
RDMA Usage:
By default, the RDMA capability of the SNI adapters is turned off. Use the chdev (or optionally /usr/sni/aix52/chgsni) command to turn on RDMA by setting rdma_xlat_limit to a value greater than 0x0. The rdma_xlat_limit attribute controls amount of memory allowed for RDMA, per LPAR. The default value of the rdma_xlat_limit attribute is 0x0, effectively turning RDMA off. When using RDMA it is recommended that this attribute value be set to value equal to 75% of small page memory.

file:///Z|/projects/s/support_tools/set2/htdocs/data/hps/related/P4%20PDFs%201%20to%2020/HPSservicePack18.html (9 of 50) [9/29/2008 2:28:16 PM]
SP18 ReadMe
This will allow all of the large pages on the system and most of the small pages to be mapped to the sni adapters.
PLEASE NOTE: This odm attr ( rdma_xlat_limit ) is changed for ALL sni's in an LPAR with just the single command. For the change to take effect, the LPAR must be rebooted. The RDMA option MUST be turned ON OR OFF across the entire cluster. If it is not, SNI adapters will not communicate due to version mismatch failures!
NOTES: When RDMA is turned on, the IP protocol automatically uses the RDMA capability. For user space jobs, an additional LoadLeveler keyword (bulkxfer=yes) must be set in the LoadLeveler job control file to indicate that this job is requesting RDMA. This allows users to run both RDMA and non-RDMA jobs on the system. For the most current details see: LoadLeveler 3.2 documentation updates; Addition of support for Bulk Data Transfer ... For more information, please see the "LoadLeveler Using and Administration Guide".
To enable RDMA:/usr/sbin/chdev -l sniX -a rdma_xlat_limit=XLAT_LIMIT ; where XLAT_LIMIT is 75% or less of the small page memory. To disable RDMA:/usr/sbin/chdev -l sniX -a rdma_xlat_limit=0x0000000000000000 To check the RDMA status: -- run lsattr -El sni0 ; lsattr -El sni1 ; Ex: for i in `lsdev|grep sni.*Avail|awk '{print $1}'`; do lsattr -El $i|grep rdma; done chdev Usage: chdev -l Name [-a Attribute=Value]...[-p ParentName][-P|-T] chdev -l Name -a rdma_xlat_limit=size
The 'True' seen in the lsattr output is whether or not the value is user modifiable. The rdma_xlat_limit attribute is one of 5 that are not valid on just 1 sni -- so the change method updates the odm for all sni's This attribute is modified for all existing devices. Any user supplied -l option is ignored. Attribute values for rdma_xlat_limit : Default value: 0x0 (Implies RDMA is turned off) MINimum value: 0x0 MAXimum value: 0xFFFFFFFFFFFFFFFF ( Maximum amount of memory allowed for RDMA (in bytes). ) Recommended value: 75% or less of small page memory. back to toc
Regarding the use of memory by RDMA and TLP. Real memory is divided into 2 categories - Small Pages and Large pages. It is the users responsibility to achieve an optimal balance between the the 2 categories based on the expected and/or experienced needs of both SNI adapters memory requirements expressed in TLP and applications use of Small Pages as expressed in RDMA. TLP can allocate up to 75% of real memory. RDMA can pin and map up to 75% of small page application memory.
file:///Z|/projects/s/support_tools/set2/htdocs/data/hps/related/P4%20PDFs%201%20to%2020/HPSservicePack18.html (10 of 50) [9/29/2008 2:28:16 PM]
Section 3: Component update/download information
Component Service pack updates Download sites
SP18 ReadMe
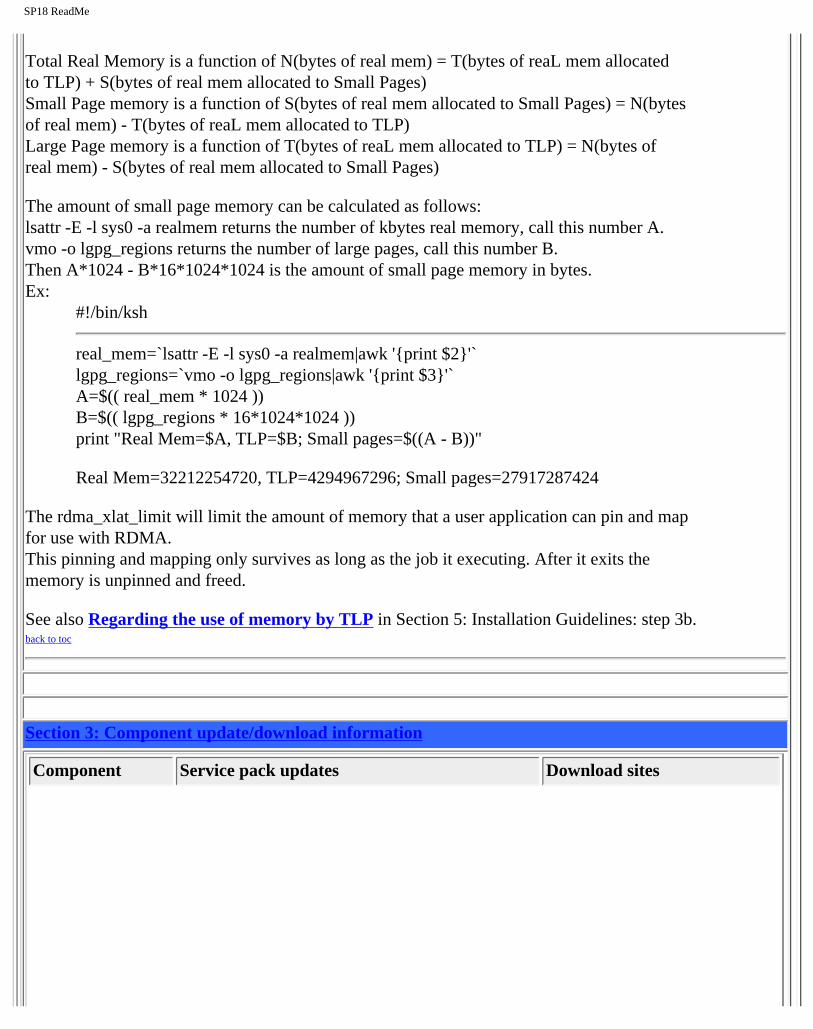
Total Real Memory is a function of N(bytes of real mem) = T(bytes of reaL mem allocated to TLP) + S(bytes of real mem allocated to Small Pages) Small Page memory is a function of S(bytes of real mem allocated to Small Pages) = N(bytes of real mem) - T(bytes of reaL mem allocated to TLP) Large Page memory is a function of T(bytes of reaL mem allocated to TLP) = N(bytes of real mem) - S(bytes of real mem allocated to Small Pages)
The amount of small page memory can be calculated as follows: lsattr -E -l sys0 -a realmem returns the number of kbytes real memory, call this number A. vmo -o lgpg_regions returns the number of large pages, call this number B. Then A*1024 - B*16*1024*1024 is the amount of small page memory in bytes. Ex:
#!/bin/ksh
real_mem=`lsattr -E -l sys0 -a realmem|awk '{print $2}'` lgpg_regions=`vmo -o lgpg_regions|awk '{print $3}'` A=$(( real_mem * 1024 )) B=$(( lgpg_regions * 16*1024*1024 )) print "Real Mem=$A, TLP=$B; Small pages=$((A - B))"
Real Mem=32212254720, TLP=4294967296; Small pages=27917287424
The rdma_xlat_limit will limit the amount of memory that a user application can pin and map for use with RDMA. This pinning and mapping only survives as long as the job it executing. After it exits the memory is unpinned and freed.
See also Regarding the use of memory by TLP in Section 5: Installation Guidelines: step 3b. back to toc

file:///Z|/projects/s/support_tools/set2/htdocs/data/hps/related/P4%20PDFs%201%20to%2020/HPSservicePack18.html (11 of 50) [9/29/2008 2:28:16 PM]
SP18 ReadMe
HMC back to toc
The HMC code level for this Service Pack is HMC V3R3.6
Choose HMC_Update_V3R3.6.zip APAR IY72718 PTF U803789
This Service Pack does not update this component.
Note: CD images cannot be downloaded directly from this site. Contact your IBM Sales Representative or Business Partner, and order Hardware Feature Code (MES) 0960 for the initial upgrade CDs.
NOTE: If you plan to use the removeable media, please read the Important Notice regarding the use of the Format Removable Media task: HMC p4 updates
HMC corrective service
OR
HMC p4 updates
SNM/FNM back to toc
The SNM code level for this Service Pack is SNM Version: 1.3.5.0-1
In the HMC 3.3.x ReadMe, Under the SNM fixes tab choose the current SNM Srvice Pack : SNM Service Pack 18 APAR IY78665 PTF U806191
This Service Pack does not update this component.
STATUS RPM Version: 1.3.5.0 SNM Version: IBMhsc.SNM-1.3.5.0-1
HMC corrective service
OR
SNM Service Pack
file:///Z|/projects/s/support_tools/set2/htdocs/data/hps/related/P4%20PDFs%201%20to%2020/HPSservicePack18.html (12 of 50) [9/29/2008 2:28:16 PM]
SP18 ReadMe
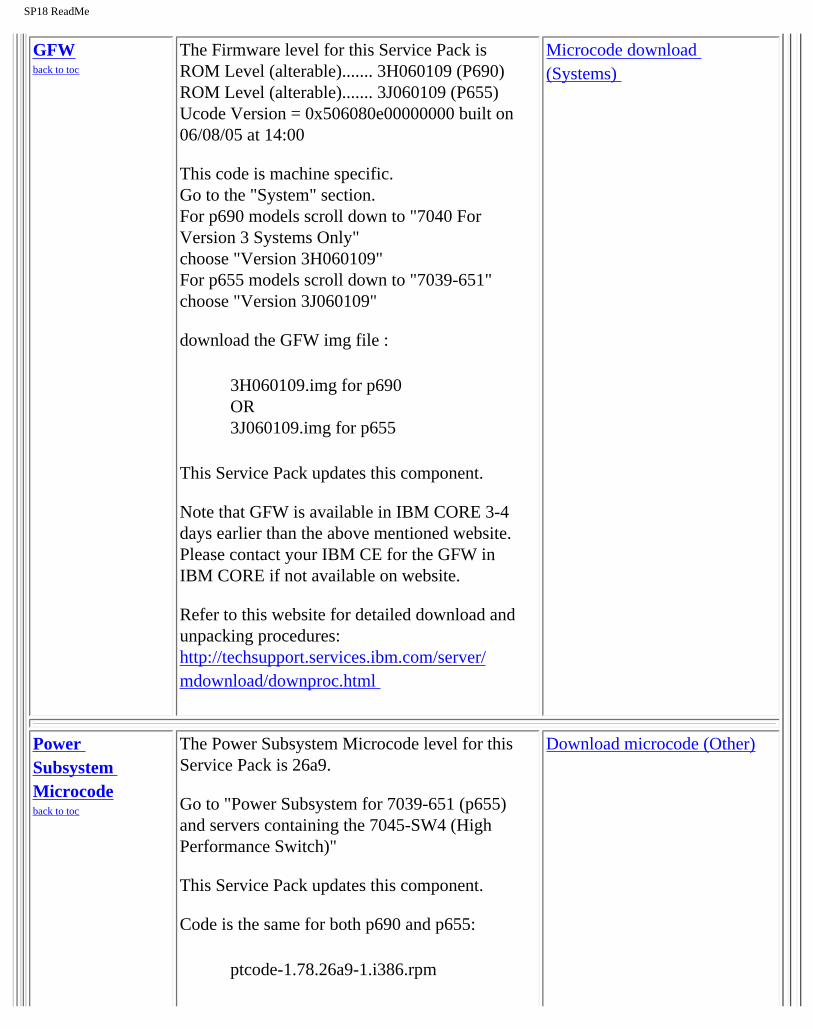
GFW back to toc
Power Subsystem Microcode back to toc
The Firmware level for this Service Pack is ROM Level (alterable)....... 3H060109 (P690) ROM Level (alterable)....... 3J060109 (P655) Ucode Version = 0x506080e00000000 built on 06/08/05 at 14:00
This code is machine specific. Go to the "System" section. For p690 models scroll down to "7040 For Version 3 Systems Only" choose "Version 3H060109" For p655 models scroll down to "7039-651" choose "Version 3J060109"
download the GFW img file :
3H060109.img for p690 OR 3J060109.img for p655
This Service Pack updates this component.
Note that GFW is available in IBM CORE 3-4 days earlier than the above mentioned website. Please contact your IBM CE for the GFW in IBM CORE if not available on website.
Refer to this website for detailed download and unpacking procedures: http://techsupport.services.ibm.com/server/ mdownload/downproc.html
The Power Subsystem Microcode level for this Service Pack is 26a9.
Go to "Power Subsystem for 7039-651 (p655) and servers containing the 7045-SW4 (High Performance Switch)"
This Service Pack updates this component.
Code is the same for both p690 and p655:
ptcode-1.78.26a9-1.i386.rpm
Microcode download (Systems)
Download microcode (Other)

file:///Z|/projects/s/support_tools/set2/htdocs/data/hps/related/P4%20PDFs%201%20to%2020/HPSservicePack18.html (13 of 50) [9/29/2008 2:28:16 PM]
SP18 ReadMe
Note that Power Subsystem Microcode is available in IBM CORE upto 1 week earlier than the above mentioned website. Please contact your IBM CE for the Power Subsystem Microcode in IBM CORE if not available on website.
The AIX52 level for this Service Pack is 5.2.0.75
Apply AIX52 ML-07 No Specific Fixes
This Service Pack does not update this component.
The AIX53 level for this Service Pack is 5.3.0.33
Apply AIX53 ML-03 via APAR IY71011 plus AIX5L Version 5.3 PTF - Specific Fixes IY77690
This Service Pack does not update this component.
CSM 1.4 requires RPM update openCIMOM 0.8 (5.2)
If you are APPLYING software for csm.server 1.4.1.1, please install the following images from the AIX Installation Media Volume 2: tcl tk expect conserver-8.1
openCIMOM update
AIX back to toc
AIX back to toc
CSM openCIMOM back to toc
pSeries support fixes
pSeries support fixes

file:///Z|/projects/s/support_tools/set2/htdocs/data/hps/related/P4%20PDFs%201%20to%2020/HPSservicePack18.html (14 of 50) [9/29/2008 2:28:16 PM]
SP18 ReadMe
AIX Licensed Program (LP) back to toc
The LP fileset fix levels listed in the Detailed LP Level Check table below indicate the latest available levels at the time this HPS Service Pack was released.They are available from the website: pSeries support fixes Order by individual APAR OR Order ALL Fixes for this HPS POWER5 Service Pack: APAR IY79152
As a convenience, the table contains an "order the latest" APAR number for each of the LPs. Clicking on the LP Component link will open a new page on the 'pSeries support fixes' website. There you will be presented with an opportunity to get the latest available fixes for that component. IY79152, or PTF U806367 Alternatively, clicking on this 'Order All the Latest' link APAR IY79152 will open a new page on the 'pSeries support fixes' website. There you will be presented with an opportunity to get all the latest available fixes for this Service Pack.
The selected APAR package will contain fix levels that are the same or higher than the levels listed below.
To check the LP service levels, on each logical partition issue: lslpp -Lc | egrep "vsd|LAPI|HPS|sni|ppe|LoadL|mmfs|rsct|csm|essl|pessl" | cut -d : -f 2,3 |sed 's/:/ /'
Table of AIX52 and AIX53 LPs
LPP AIX Version
AIX52 AIX53
PE 4.1.1 4.2.2
4.1.1 4.2.1
RSCT 2.3.8 2.4.4
CSM 1.4.1 1.4.1
HPS/ SNI
(CSS)
1.1.3 1.2.0
LAPI 2.3.3 2.4.2
LoadL 3.3.1 3.2.0
3.3.1
VSD 4.1.0 4.1.0
file:///Z|/projects/s/support_tools/set2/htdocs/data/hps/related/P4%20PDFs%201%20to%2020/HPSservicePack18.html (15 of 50) [9/29/2008 2:28:16 PM]
SP18 ReadMe
GPFS 2.3.0 2.1.0 2.2.1
2.3.0
ESSL 4.2.0 4.2.0
PESSL 3.2.0 3.2.0
List of which components are compatible with which AIXversion.
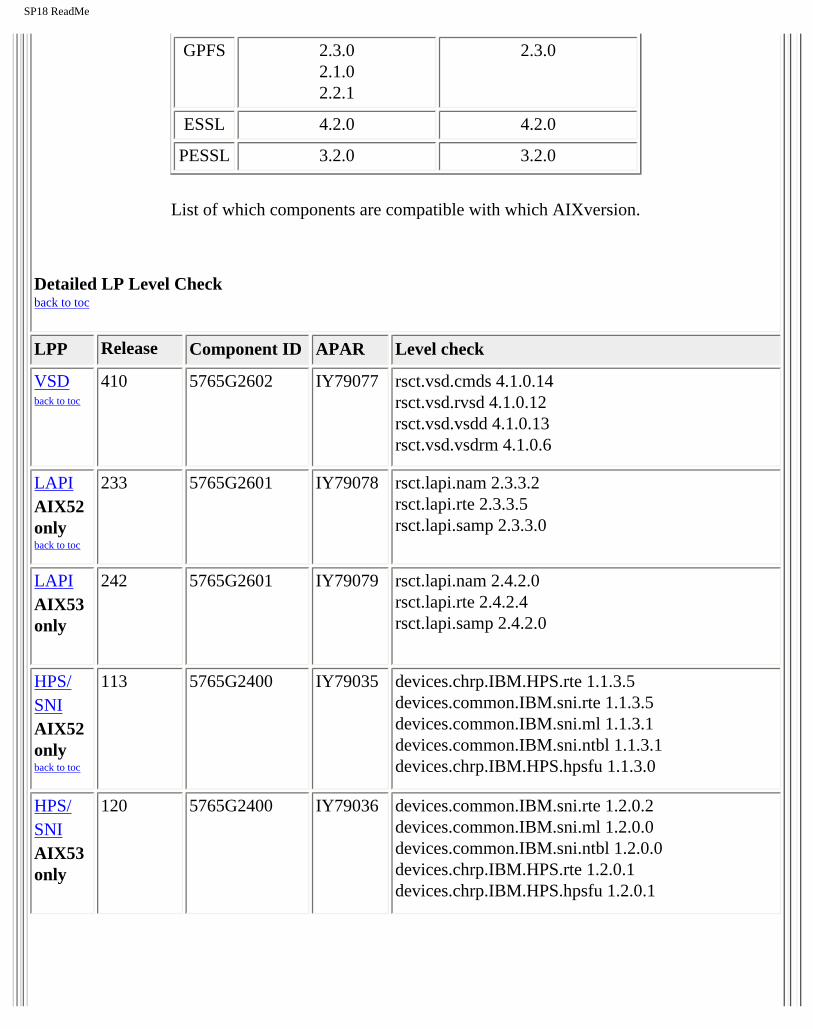
Detailed LP Level Check back to toc
LPP Release Component ID APAR Level check
VSD 410 5765G2602 back to toc
LAPI AIX52 only back to toc
233 5765G2601
LAPI AIX53 only
242 5765G2601
HPS/ 113 5765G2400 SNI AIX52 only back to toc
HPS/ 120 5765G2400 SNI AIX53 only
IY79036
IY79077
IY79078
IY79079
IY79035
rsct.vsd.cmds 4.1.0.14 rsct.vsd.rvsd 4.1.0.12 rsct.vsd.vsdd 4.1.0.13 rsct.vsd.vsdrm 4.1.0.6
rsct.lapi.nam 2.3.3.2 rsct.lapi.rte 2.3.3.5 rsct.lapi.samp 2.3.3.0
rsct.lapi.nam 2.4.2.0 rsct.lapi.rte 2.4.2.4 rsct.lapi.samp 2.4.2.0
devices.chrp.IBM.HPS.rte 1.1.3.5 devices.common.IBM.sni.rte 1.1.3.5 devices.common.IBM.sni.ml 1.1.3.1 devices.common.IBM.sni.ntbl 1.1.3.1 devices.chrp.IBM.HPS.hpsfu 1.1.3.0
devices.common.IBM.sni.rte 1.2.0.2 devices.common.IBM.sni.ml 1.2.0.0 devices.common.IBM.sni.ntbl 1.2.0.0 devices.chrp.IBM.HPS.rte 1.2.0.1 devices.chrp.IBM.HPS.hpsfu 1.2.0.1
file:///Z|/projects/s/support_tools/set2/htdocs/data/hps/related/P4%20PDFs%201%20to%2020/HPSservicePack18.html (16 of 50) [9/29/2008 2:28:16 PM]
SP18 ReadMe
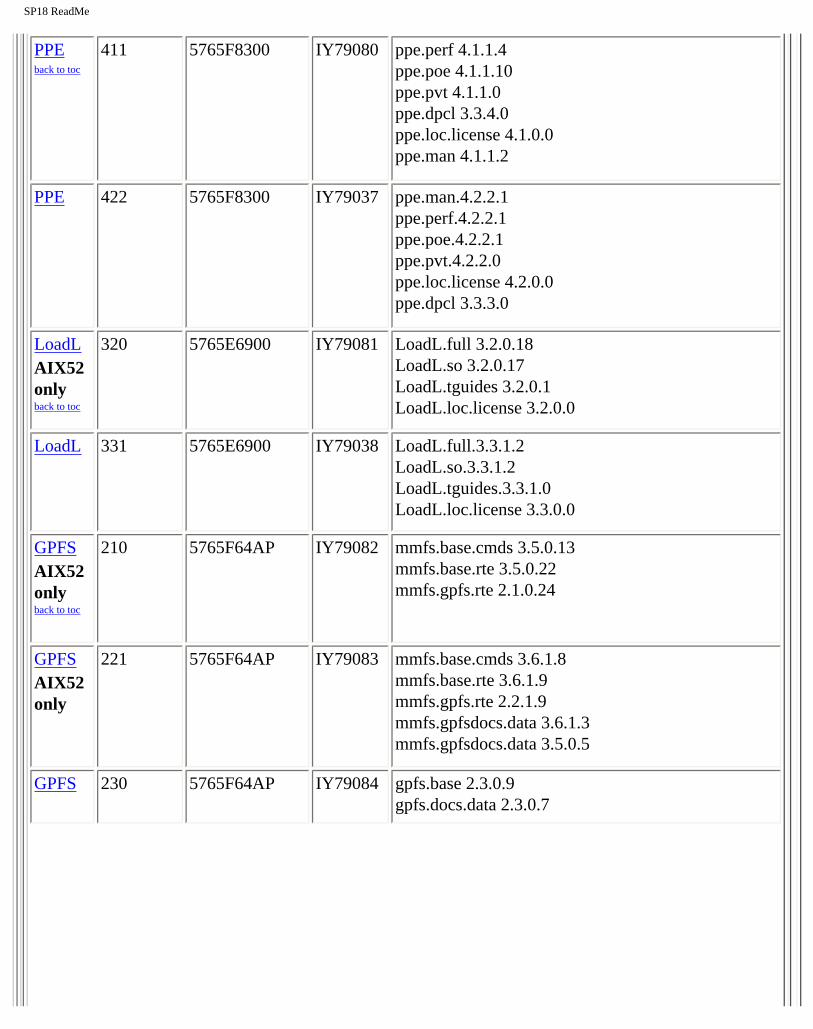
PPE back to toc
411 5765F8300 IY79080 ppe.perf 4.1.1.4 ppe.poe 4.1.1.10 ppe.pvt 4.1.1.0 ppe.dpcl 3.3.4.0 ppe.loc.license 4.1.0.0 ppe.man 4.1.1.2
PPE 422 5765F8300 IY79037 ppe.man.4.2.2.1 ppe.perf.4.2.2.1 ppe.poe.4.2.2.1 ppe.pvt.4.2.2.0 ppe.loc.license 4.2.0.0 ppe.dpcl 3.3.3.0
LoadL AIX52 only back to toc
320 5765E6900 IY79081 LoadL.full 3.2.0.18 LoadL.so 3.2.0.17 LoadL.tguides 3.2.0.1 LoadL.loc.license 3.2.0.0
LoadL 331 5765E6900 IY79038 LoadL.full.3.3.1.2 LoadL.so.3.3.1.2 LoadL.tguides.3.3.1.0 LoadL.loc.license 3.3.0.0
GPFS AIX52 only back to toc
210 5765F64AP IY79082 mmfs.base.cmds 3.5.0.13 mmfs.base.rte 3.5.0.22 mmfs.gpfs.rte 2.1.0.24
GPFS AIX52 only
221 5765F64AP IY79083 mmfs.base.cmds 3.6.1.8 mmfs.base.rte 3.6.1.9 mmfs.gpfs.rte 2.2.1.9 mmfs.gpfsdocs.data 3.6.1.3 mmfs.gpfsdocs.data 3.5.0.5
GPFS 230 5765F64AP IY79084 gpfs.base 2.3.0.9 gpfs.docs.data 2.3.0.7

file:///Z|/projects/s/support_tools/set2/htdocs/data/hps/related/P4%20PDFs%201%20to%2020/HPSservicePack18.html (17 of 50) [9/29/2008 2:28:16 PM]
SP18 ReadMe
CSM back to toc
141 5765E88AP IY79086 csm.client 1.4.1.11 csm.core 1.4.1.12 csm.diagnostics 1.4.0.10 csm.dsh 1.4.1.12 csm.gui.dcem 1.4.1.11 csm.hams 1.4.1.11 csm.gui.websm 1.4.1.10 csm.server 1.4.1.12
RPMS: expect-5.32-1 openCIMOM-0.8-1 openssl-0.9.7d-2 AIX-rpm-5.2.0.40-1 tcl-8.3.3-1 tk-8.3.3-1 conserver-8.1.7-2
RSCT
AIX52 only
back to toc
238 5765F07AP IY79089 rsct.basic.hacmp 2.3.8.0 rsct.basic.rte 2.3.8.0 rsct.basic.sp 2.3.8.0 rsct.compat.basic.hacmp 2.3.8.0 rsct.compat.basic.rte 2.3.8.0 rsct.compat.basic.sp 2.3.8.0 rsct.compat.clients.hacmp 2.3.8.0 rsct.compat.clients.rte 2.3.8.0 rsct.compat.clients.sp 2.3.8.0 rsct.core.auditrm 2.3.8.0 rsct.core.errm 2.3.8.0 rsct.core.fsrm 2.3.8.0 rsct.core.gui 2.3.8.0 rsct.core.hostrm 2.3.8.0 rsct.core.lprm 2.3.8.0 rsct.core.rmc 2.3.8.0 rsct.core.sec 2.3.8.0 rsct.core.sensorrm 2.3.8.0 rsct.core.sr 2.3.8.0 rsct.core.utils 2.3.8.0 rsct.opt.storagerm 2.3.8.0 devices.chrp.base.ServiceRM 1. 2.0.80

file:///Z|/projects/s/support_tools/set2/htdocs/data/hps/related/P4%20PDFs%201%20to%2020/HPSservicePack18.html (18 of 50) [9/29/2008 2:28:16 PM]
SP18 ReadMe
RSCT
AIX53 only
back to toc
244 5765F07AP IY79088 devices.chrp.base.ServiceRM.1.3.0.40 rsct.basic.hacmp 2.4.4.0 rsct.basic.rte 2.4.4.0 rsct.basic.sp 2.4.4.0 rsct.compat.basic.hacmp 2.4.4.0 rsct.compat.basic.rte 2.4.4.0 rsct.compat.basic.sp 2.4.4.0 rsct.compat.clients.hacmp 2.4.4.0 rsct.compat.clients.rte 2.4.4.0 rsct.compat.clients.sp 2.4.4.0 rsct.core.auditrm 2.4.4.0 rsct.core.errm 2.4.4.0 rsct.core.fsrm 2.4.4.0 rsct.core.gui 2.4.4.0 rsct.core.hostrm 2.4.4.0 rsct.core.lprm 2.4.4.0 rsct.core.rmc 2.4.4.0 rsct.core.sec 2.4.4.0 rsct.core.sensorrm 2.4.4.0 rsct.core.sr 2.4.4.0 rsct.core.utils 2.4.4.0 rsct.opt.storagerm 2.4.4.0
Parallel ESSL back to toc
320 5765F8400 pessl.loc.license 3.2.0.0 pessl.man.en_US 3.2.0.0 pessl.rte.mp 3.2.0.0 pessl.rte.up 3.2.0.0 pessl.rte.common 3.2.0.0 pessl.rte.rs1 3.2.0.0 pessl.rte.rs2 3.2.0.0 pessl.rte.smp 3.2.0.0
ESSL 420 5765F8200 PK02186 essl.loc.license 4.2.0.0 essl.man.en_US 4.2.0.0 essl.rte.mp 4.2.0.0 essl.rte.up 4.2.0.0 essl.rte.common 4.2.0.2 essl.rte.rs1 4.2.0.2 essl.rte.rs2 4.2.0.0 essl.rte.smp 4.2.0.2

file:///Z|/projects/s/support_tools/set2/htdocs/data/hps/related/P4%20PDFs%201%20to%2020/HPSservicePack18.html (19 of 50) [9/29/2008 2:28:16 PM]
SP18 ReadMe
Section 4: Recommended installation sequence (overview):
1
2
3
Install HMC Software back to toc
Important Preliminary steps: - Check if HMC is at HMC V3R3.0 or higher before you can install this update (required). - Check if BIOS update is required on HMC. - Check if BIOS hyperthreading is to be disabled on HMC - Disable the SNM/FNM software from the Switch Network Management Panel.
Perform one of the following installation tasks: - New Install HMC from Recovery CD OR - Install Upgrade from Recovebry CD OR - Update from .zip file (web)
Level Check: Verify that the HMC Code Level is the current level shown in Section 3: Component update/download information
Install SNM Software back to toc
For detailed information, link to the specified SNM ReadMe from the HMC page under the SNM tab.
For a thorough Discussion of the SNM GUI Control panel , please see: Appendix E. Switch Network Manager (SNM) in pSeries High Performance Switch Planning, Installation, and Service
Level Check: Verify that the SNM Code Level is the current level shown in Section 3: Component update/download information
Install HPS/SNI LP Software back to toc
IMPORTANT: If you are upgrading from Service Pack 6 or below - do not reboot logical partitions (LPARs) until after Step 4 Install GFW is complete! See Problem #1 in the "Known Problems" section of this document for more information.
Level Check: Verify that the HPS Code Level is the current level as shown in Section 3: Component update/download information
file:///Z|/projects/s/support_tools/set2/htdocs/data/hps/related/P4%20PDFs%201%20to%2020/HPSservicePack18.html (20 of 50) [9/29/2008 2:28:16 PM]
SP18 ReadMe
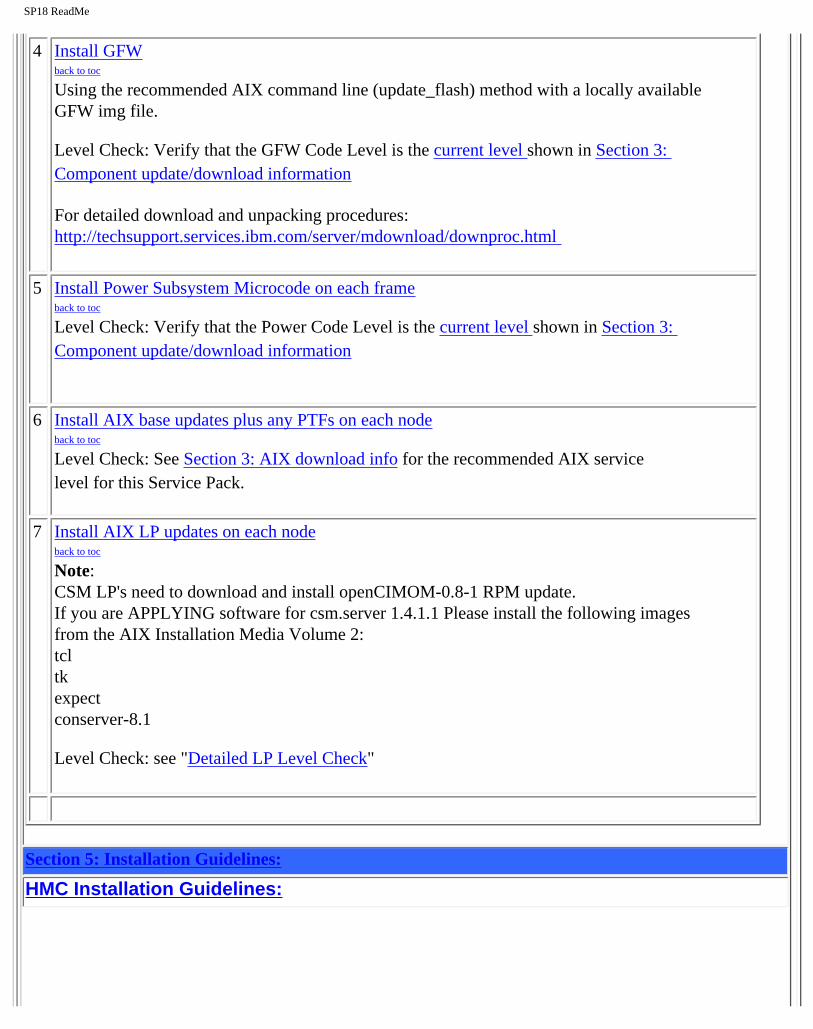
4 Install GFW back to toc
Using the recommended AIX command line (update_flash) method with a locally available GFW img file.
Level Check: Verify that the GFW Code Level is the current level shown in Section 3: Component update/download information
For detailed download and unpacking procedures: http://techsupport.services.ibm.com/server/mdownload/downproc.html
5 Install Power Subsystem Microcode on each frame back to toc
Level Check: Verify that the Power Code Level is the current level shown in Section 3: Component update/download information
6 Install AIX base updates plus any PTFs on each node back to toc
Level Check: See Section 3: AIX download info for the recommended AIX service level for this Service Pack.
7 Install AIX LP updates on each node back to toc
Note: CSM LP's need to download and install openCIMOM-0.8-1 RPM update. If you are APPLYING software for csm.server 1.4.1.1 Please install the following images from the AIX Installation Media Volume 2: tcl tk expect conserver-8.1
Level Check: see "Detailed LP Level Check"
Section 5: Installation Guidelines:
HMC Installation Guidelines:

file:///Z|/projects/s/support_tools/set2/htdocs/data/hps/related/P4%20PDFs%201%20to%2020/HPSservicePack18.html (21 of 50) [9/29/2008 2:28:16 PM]
SP18 ReadMe
1 back to toc
Install HMC Software Important Preliminary steps:
● Verify HMC Code level - at V3R3.0 or higher before installing this update (required).
● Check if BIOS update is required on HMC. ● Check if BIOS hyperthreading is to be disabled on HMC ● Disable the SNM/FNM software from the Switch Network Management Panel. ● Customer Decision regarding install, upgrade or update.
Perform one of the following installation tasks:
● New Install HMC from Recovery CD OR ● Install Upgrade from Recovery CD OR ● Update from .zip file (web)
The HMC installed with this Service Pack has an updated HMC WebSM PC CLIENT. To reinstall this version: Uninstall - reinstall HMC WebSM PC CLIENT (Install Shield version)
Level Check: Verify that the HMC Code Level is the current level shown in Section 3: Component update/download information
Important Preliminary steps:
1a back to toc
Verify HMC Code level Installation of HMC Recovery CD requires an upgrade install if you are installing an existing HMC whose version is R3 V2.6 or less. Please read HMC corrective service for important information regarding HMC Recovery CD's. Contact your IBM Sales Representative or Business Partner to order HMC Machine Specific CDs
1b back to toc
Check if BIOS update is required on HMC. There is a mandatory Bios upgrade required for these HMC PC's: 7315-C03, 7310-C03, 7315-CR2, 7310-CR2 If your HMC model is not alisted, skip this step. If you are updating the HMC on a listed model, then you must first update the BIOS of that HMC model. The BIOS and install instructions can be obtained by linking to the "BIOS Updates" for the referenced machine from the HMC Corrective Service page This BIOS will also ship as part of Feature Code 0960.
file:///Z|/projects/s/support_tools/set2/htdocs/data/hps/related/P4%20PDFs%201%20to%2020/HPSservicePack18.html (22 of 50) [9/29/2008 2:28:16 PM]
SP18 ReadMe
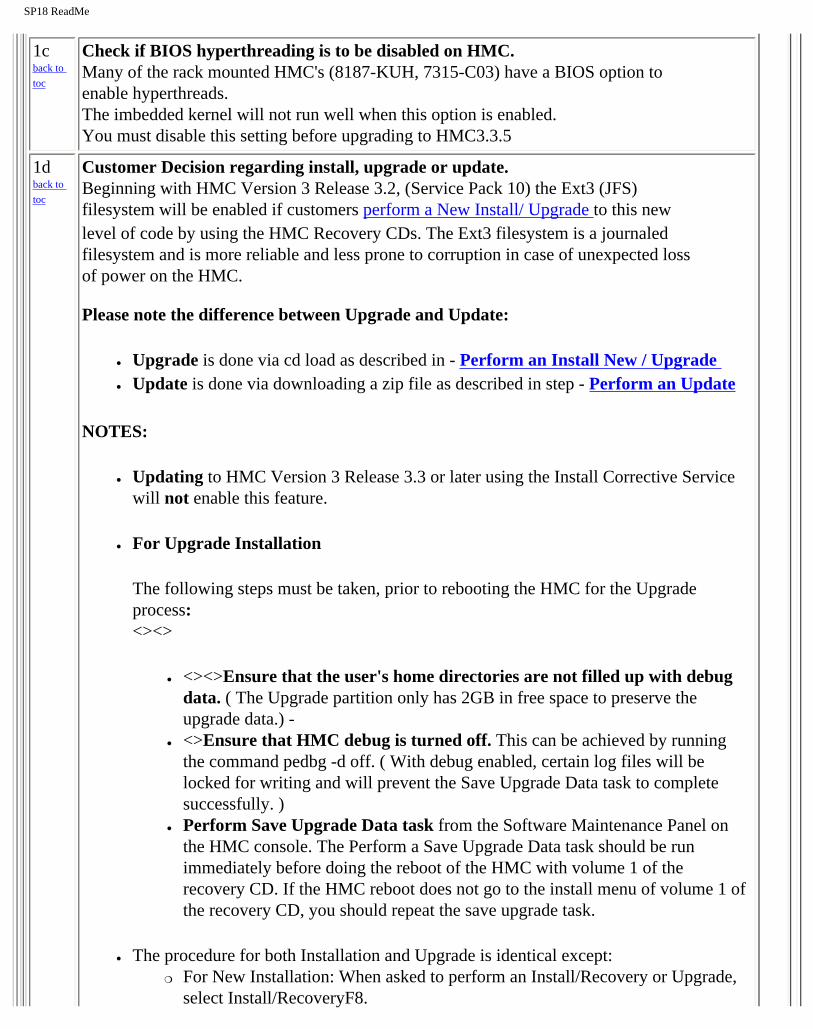
1c back to toc
Check if BIOS hyperthreading is to be disabled on HMC. Many of the rack mounted HMC's (8187-KUH, 7315-C03) have a BIOS option to enable hyperthreads. The imbedded kernel will not run well when this option is enabled. You must disable this setting before upgrading to HMC3.3.5
1d Customer Decision regarding install, upgrade or update. back to Beginning with HMC Version 3 Release 3.2, (Service Pack 10) the Ext3 (JFS)toc
filesystem will be enabled if customers perform a New Install/ Upgrade to this new level of code by using the HMC Recovery CDs. The Ext3 filesystem is a journaled filesystem and is more reliable and less prone to corruption in case of unexpected loss of power on the HMC.
Please note the difference between Upgrade and Update:
● Upgrade is done via cd load as described in - Perform an Install New / Upgrade ● Update is done via downloading a zip file as described in step - Perform an Update
NOTES:
● Updating to HMC Version 3 Release 3.3 or later using the Install Corrective Service will not enable this feature.
● For Upgrade Installation
The following steps must be taken, prior to rebooting the HMC for the Upgrade process: <><>
● <><>Ensure that the user's home directories are not filled up with debug data. ( The Upgrade partition only has 2GB in free space to preserve the upgrade data.)
● <>Ensure that HMC debug is turned off. This can be achieved by running the command pedbg -d off. ( With debug enabled, certain log files will be locked for writing and will prevent the Save Upgrade Data task to complete successfully. )
● Perform Save Upgrade Data task from the Software Maintenance Panel on the HMC console. The Perform a Save Upgrade Data task should be run immediately before doing the reboot of the HMC with volume 1 of the recovery CD. If the HMC reboot does not go to the install menu of volume 1 of the recovery CD, you should repeat the save upgrade task.
● The procedure for both Installation and Upgrade is identical except: �❍ For New Installation: When asked to perform an Install/Recovery or Upgrade,
select Install/RecoveryF8.
file:///Z|/projects/s/support_tools/set2/htdocs/data/hps/related/P4%20PDFs%201%20to%2020/HPSservicePack18.html (23 of 50) [9/29/2008 2:28:16 PM]
SP18 ReadMe
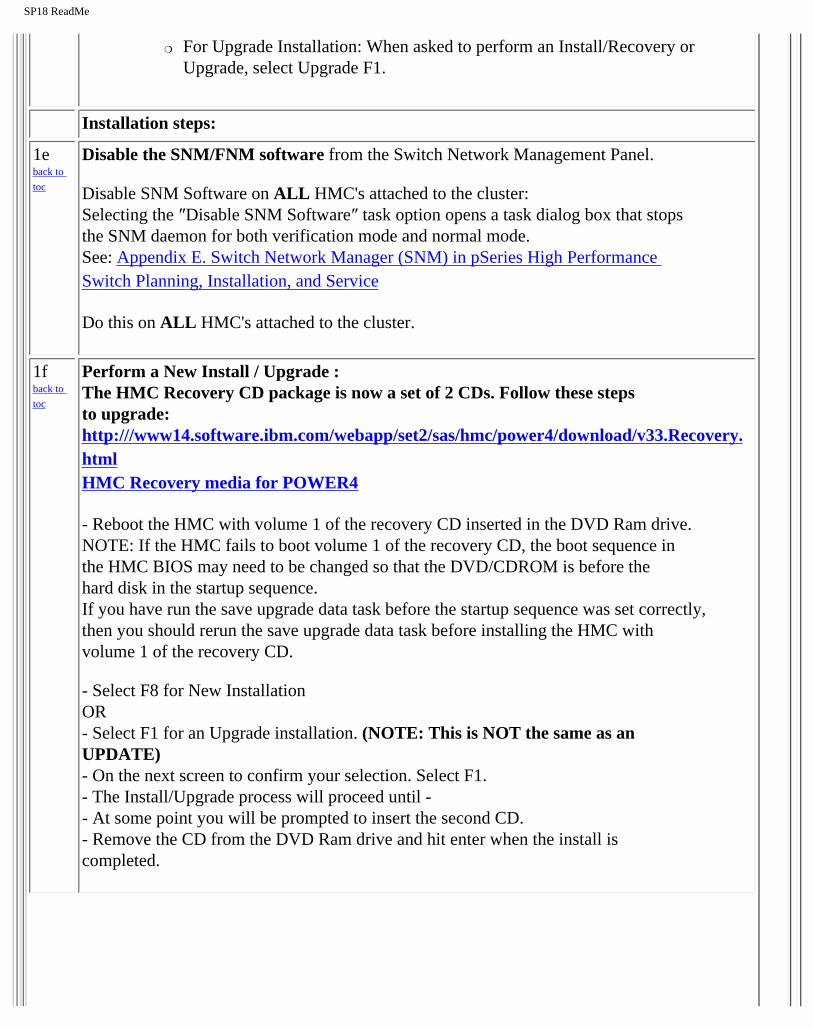
�❍ For Upgrade Installation: When asked to perform an Install/Recovery or Upgrade, select Upgrade F1.
1f back to toc
Installation steps:
1e back to toc
Disable the SNM/FNM software from the Switch Network Management Panel.
Disable SNM Software on ALL HMC's attached to the cluster: Selecting the ″Disable SNM Software″ task option opens a task dialog box that stops the SNM daemon for both verification mode and normal mode. See: Appendix E. Switch Network Manager (SNM) in pSeries High Performance Switch Planning, Installation, and Service
Do this on ALL HMC's attached to the cluster.
Perform a New Install / Upgrade : The HMC Recovery CD package is now a set of 2 CDs. Follow these steps to upgrade: http:///www14.software.ibm.com/webapp/set2/sas/hmc/power4/download/v33.Recovery. html HMC Recovery media for POWER4
- Reboot the HMC with volume 1 of the recovery CD inserted in the DVD Ram drive. NOTE: If the HMC fails to boot volume 1 of the recovery CD, the boot sequence in the HMC BIOS may need to be changed so that the DVD/CDROM is before the hard disk in the startup sequence. If you have run the save upgrade data task before the startup sequence was set correctly, then you should rerun the save upgrade data task before installing the HMC with volume 1 of the recovery CD.
- Select F8 for New Installation OR - Select F1 for an Upgrade installation. (NOTE: This is NOT the same as an UPDATE) - On the next screen to confirm your selection. Select F1. - The Install/Upgrade process will proceed until -- At some point you will be prompted to insert the second CD. - Remove the CD from the DVD Ram drive and hit enter when the install is completed.
file:///Z|/projects/s/support_tools/set2/htdocs/data/hps/related/P4%20PDFs%201%20to%2020/HPSservicePack18.html (24 of 50) [9/29/2008 2:28:16 PM]
SP18 ReadMe
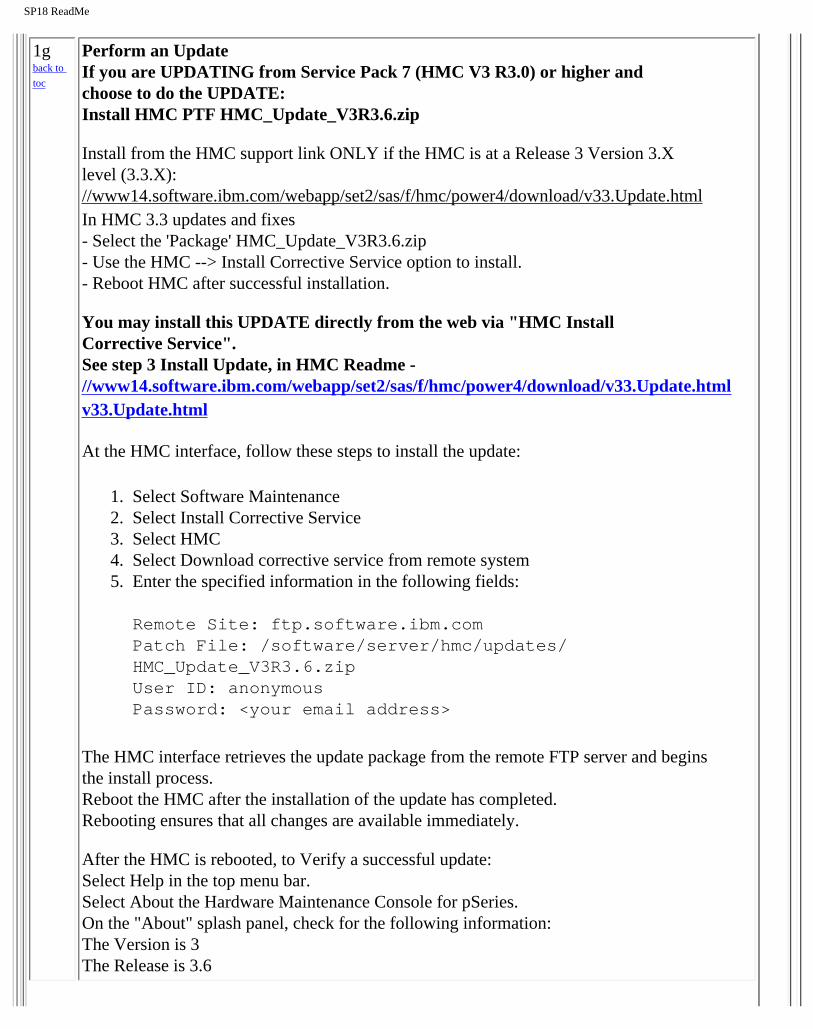
1g back to toc
Perform an Update If you are UPDATING from Service Pack 7 (HMC V3 R3.0) or higher and choose to do the UPDATE: Install HMC PTF HMC_Update_V3R3.6.zip
Install from the HMC support link ONLY if the HMC is at a Release 3 Version 3.X level (3.3.X): //www14.software.ibm.com/webapp/set2/sas/f/hmc/power4/download/v33.Update.html In HMC 3.3 updates and fixes - Select the 'Package' HMC_Update_V3R3.6.zip - Use the HMC --> Install Corrective Service option to install. - Reboot HMC after successful installation.
You may install this UPDATE directly from the web via "HMC Install Corrective Service". See step 3 Install Update, in HMC Readme - //www14.software.ibm.com/webapp/set2/sas/f/hmc/power4/download/v33.Update.html v33.Update.html
At the HMC interface, follow these steps to install the update:
1. Select Software Maintenance 2. Select Install Corrective Service 3. Select HMC 4. Select Download corrective service from remote system 5. Enter the specified information in the following fields:
Remote Site: ftp.software.ibm.comPatch File: /software/server/hmc/updates/HMC_Update_V3R3.6.zipUser ID: anonymousPassword: <your email address>
The HMC interface retrieves the update package from the remote FTP server and begins the install process. Reboot the HMC after the installation of the update has completed. Rebooting ensures that all changes are available immediately.
After the HMC is rebooted, to Verify a successful update: Select Help in the top menu bar. Select About the Hardware Maintenance Console for pSeries. On the "About" splash panel, check for the following information: The Version is 3 The Release is 3.6

file:///Z|/projects/s/support_tools/set2/htdocs/data/hps/related/P4%20PDFs%201%20to%2020/HPSservicePack18.html (25 of 50) [9/29/2008 2:28:16 PM]
SP18 ReadMe
back to
1h back to toc
1i back to toc
HMC Important Notes:toc
- Install the HMC code by following the instructions in the HPS Guide. - Have your IBM CE download the most recent copy of the HPS guide from IBM CORE to get updated HPS install information. - Also you should review the HMC information on the web page where you downloaded the images. - This Service Pack REQUIRES: HMC V3.3.0 (required since Service Pack 6 release) - HMC V3.3.0 is a NEW BASE release of the HMC introduced in Service Pack 6 that uses a new imbedded kernel. - This version MAY OVERWRITE root directories (for /, /home/root and /home/hscroot)
Web-based System Manager Remote Client a.k.a WebSM PC CLIENT
After the HMC Install New / Upgrade or Update is complete, the Install Shield version of the Web-based System Manager Remote Client a.k.a WebSM PC CLIENT may need to be reinstalled on your remote server or PC. Follow these simple instructions: uninstall, if present, existing Websm client via Control Panel "Add/Remove Programs" by selecting "Web-Based System Manager Remote Client" and clicking on 'Change/Remove". To Install: Using your preferred web browser visit the just recently installed HMC at this URL: http://<hmc-hostname>/remote_client.html (down load and install may take 10 to 20 minutes.) For pertinent information see : Section 2: Software Updates/Performance Enhancements
For complete details refer to: Hardware Management Console for pSeries Installation and Operations Guide (SA38-0590-07) - Chapter 9. Installing and Using the Remote Client
HMC Level Check: Command Line : lshmc -V shows: Version: 3 Release: 3.6 HMC Build level 20050706.1
GUI: Menu "Help" > "About Hardware Management Console" shows: Version: 3 Release: 3.6 HMC Build level 20050706.1

file:///Z|/projects/s/support_tools/set2/htdocs/data/hps/related/P4%20PDFs%201%20to%2020/HPSservicePack18.html (26 of 50) [9/29/2008 2:28:16 PM]
SP18 ReadMe
deleting any scripts that may be there. - This version MAY delete the Power Subsystem Microcode RPM images on your HMC and you will have to reaquire it for future installs. - The HMC is now installed using 2 CD's -
- The login available at virtual console 0 (via the CTRL-ALT-F1 key sequence) is no longer available. - New Installation and PTF update installation are supported for this release. - Upgrade installation is only supported when upgrading from HMC 3.2.X or greater.
As part of any system change - it is recommended to have a hard copy of network connections, 8 port/ran box configurations and Switch Group IP's. - Network connections are on the GUI: HMC Maintenance Panel => System Configuration => Customize Network Settings: IP Address and Netmask for Ethernet0 and Ethernet1, Default Gateway, Nameserver, Domain
- 8 port RAN box configurations are on the GUI: HMC Maintenance Panel => System Configuration => Configure Serial Adapter: Option 2 shows the current configuration
- Switch Group IP's are on the GUI: Switch Management => Switch Utilities => Switch Group Configuration
Known problems and issues with the HMC V3 R3.0 Environment:
● wu-ftp will be removed from the HMC distribution. One will be able to ftp out of ● the HMC but not into the HMC. The 'scp' command is available if you enable ● secure shell (ssh). ● The websm PC client has a performance decline when downloading the plugin classes ● from the server. The first time an operation is performed using the client, the task ● may be slow to launch. Subsequent use of the task, will respond as normal.
Retain Tip on how to use pesh:
To give IBM support personnel the ability to retrieve certain trace/debug information on the HMC, the customer should create a user "hscpe" and assign a password. IBM support can contact the customer to get the password, and then remotely connect to the HMC (with customer consent).
This allows IBM support to perform additional functions, such as viewing logs or starting trace to diagnose problems on the HMC. This user has access similar to the "hscroot"

file:///Z|/projects/s/support_tools/set2/htdocs/data/hps/related/P4%20PDFs%201%20to%2020/HPSservicePack18.html (27 of 50) [9/29/2008 2:28:16 PM]
----------------------------------------------------------------------------
SP18 ReadMe
user on HMC. When accessing the HMC remotely via ssh, the "hscpe" user is put into the restricted shell environment. To bypass the restricted shell, pesh command is provided. pesh command can only be run by the "hscpe" user, allowing this user to pass in the serial number of the HMC. If the serial number is correct, the user is required to enter a password obtained from IBM Support. If the password is correct, then the user is then put into the un-restricted shell as user "hscpe". Example: pesh 23A345K ( enter the serial number in upper case letters) You will be prompted for a password. Enter password that was provided by IBM Support in lower case letters.
The HMC serial number can be queried using the command, "lshmc -v | grep SE" or read from the label that is on the front of the HMC. Use the command "date" to verify that the date of the HMC is for the day you intend to use the pesh command.
Starting with HMC Version 3 Release 3.0 and Version 4 Release 1.0, user can also access the restricted shell terminal on the local HMC, by right mouse click on the desktop and selecting the Terminal--rshterm task. If one login at the HMC as user hscpe, the pesh command can also be run from the restricted shell terminal.
For HMC Version 3 Release 3.0 and below, the "hscpe" user id can be created with any role, however, in order to use some of the High Performance Switch (HPS) debug commands, the Service Rep role needs to be selected.
For new HMC installation(s) follow the instructions as described in IBM Hardware Management Console for pSeries Installation and Operations Guide. To understand how to connect the rs422/rs232 cables see the HPS Guide: Chapter 6; Step 6, "Install the Hardware Management Console (HMC)” thru Step 16. "Verify Installation is Complete"” For “Code load requirements for existing server frames” see Chapter 6 For p655 "Code load requirements for existing p655 server frames" For p690 "Code load requirements for existing p690 server frames"
SNM/FNM Installation Guidelines back to toc
2 Install SNM Software
2a Disable SNM Software on ALL HMC's attached to the cluster. The SNM/FNM software should already be disabled from procedure 1e. If not, Disable the SNM Software on ALL HMC's attached to the cluster now.
file:///Z|/projects/s/support_tools/set2/htdocs/data/hps/related/P4%20PDFs%201%20to%2020/HPSservicePack18.html (28 of 50) [9/29/2008 2:28:16 PM]
SP18 ReadMe
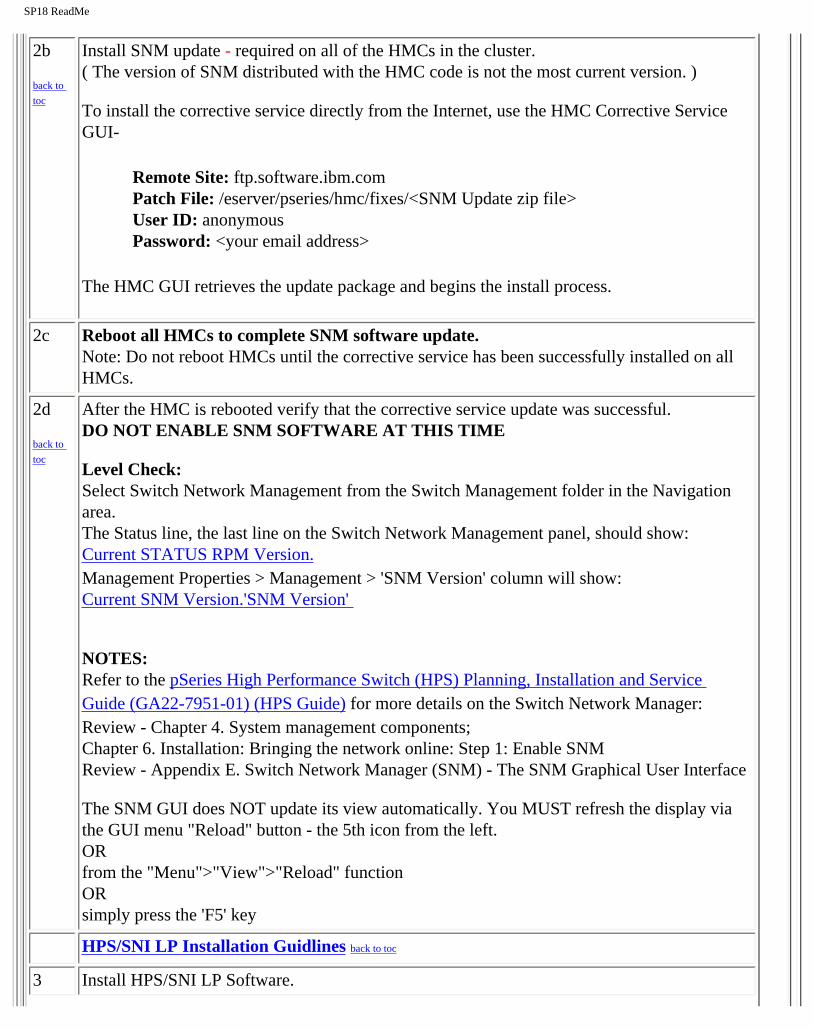
2b
back to toc
Install SNM update - required on all of the HMCs in the cluster. ( The version of SNM distributed with the HMC code is not the most current version. )
To install the corrective service directly from the Internet, use the HMC Corrective Service GUI-
Remote Site: ftp.software.ibm.com Patch File: /eserver/pseries/hmc/fixes/<SNM Update zip file> User ID: anonymous Password: <your email address>
The HMC GUI retrieves the update package and begins the install process.
2c Reboot all HMCs to complete SNM software update. Note: Do not reboot HMCs until the corrective service has been successfully installed on all HMCs.
2d
back to toc
After the HMC is rebooted verify that the corrective service update was successful. DO NOT ENABLE SNM SOFTWARE AT THIS TIME
Level Check: Select Switch Network Management from the Switch Management folder in the Navigation area. The Status line, the last line on the Switch Network Management panel, should show: Current STATUS RPM Version. Management Properties > Management > 'SNM Version' column will show: Current SNM Version.'SNM Version'
NOTES: Refer to the pSeries High Performance Switch (HPS) Planning, Installation and Service Guide (GA22-7951-01) (HPS Guide) for more details on the Switch Network Manager: Review - Chapter 4. System management components; Chapter 6. Installation: Bringing the network online: Step 1: Enable SNM Review - Appendix E. Switch Network Manager (SNM) - The SNM Graphical User Interface
The SNM GUI does NOT update its view automatically. You MUST refresh the display via the GUI menu "Reload" button - the 5th icon from the left. OR from the "Menu">"View">"Reload" function OR simply press the 'F5' key
HPS/SNI LP Installation Guidlines back to toc
3 Install HPS/SNI LP Software.
file:///Z|/projects/s/support_tools/set2/htdocs/data/hps/related/P4%20PDFs%201%20to%2020/HPSservicePack18.html (29 of 50) [9/29/2008 2:28:16 PM]
SP18 ReadMe
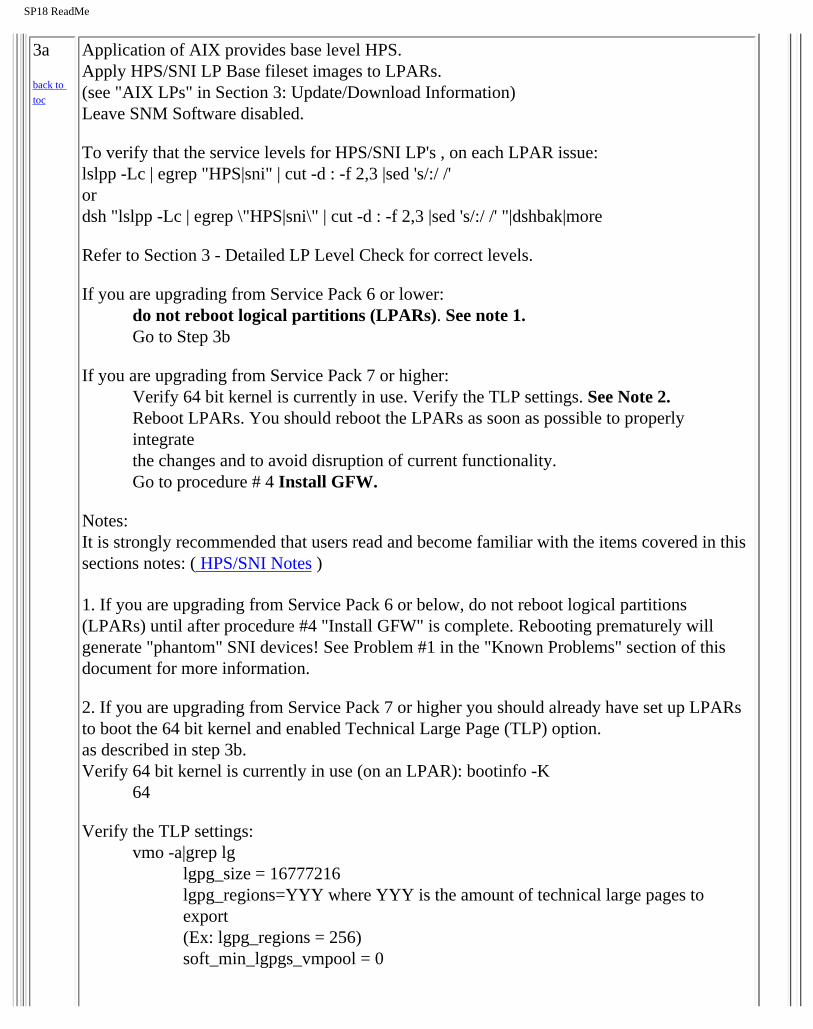
3a Application of AIX provides base level HPS. Apply HPS/SNI LP Base fileset images to LPARs.
back to toc (see "AIX LPs" in Section 3: Update/Download Information)
Leave SNM Software disabled.
To verify that the service levels for HPS/SNI LP's , on each LPAR issue: lslpp -Lc | egrep "HPS|sni" | cut -d : -f 2,3 |sed 's/:/ /' or dsh "lslpp -Lc | egrep \"HPS|sni\" | cut -d : -f 2,3 |sed 's/:/ /' "|dshbak|more
Refer to Section 3 - Detailed LP Level Check for correct levels.
If you are upgrading from Service Pack 6 or lower: do not reboot logical partitions (LPARs). See note 1. Go to Step 3b
If you are upgrading from Service Pack 7 or higher: Verify 64 bit kernel is currently in use. Verify the TLP settings. See Note 2. Reboot LPARs. You should reboot the LPARs as soon as possible to properly integrate the changes and to avoid disruption of current functionality. Go to procedure # 4 Install GFW.
Notes: It is strongly recommended that users read and become familiar with the items covered in this sections notes: ( HPS/SNI Notes )
1. If you are upgrading from Service Pack 6 or below, do not reboot logical partitions (LPARs) until after procedure #4 "Install GFW" is complete. Rebooting prematurely will generate "phantom" SNI devices! See Problem #1 in the "Known Problems" section of this document for more information.
2. If you are upgrading from Service Pack 7 or higher you should already have set up LPARs to boot the 64 bit kernel and enabled Technical Large Page (TLP) option. as described in step 3b. Verify 64 bit kernel is currently in use (on an LPAR): bootinfo -K
64
Verify the TLP settings: vmo -a|grep lg
lgpg_size = 16777216 lgpg_regions=YYY where YYY is the amount of technical large pages to export (Ex: lgpg_regions = 256) soft_min_lgpgs_vmpool = 0
file:///Z|/projects/s/support_tools/set2/htdocs/data/hps/related/P4%20PDFs%201%20to%2020/HPSservicePack18.html (30 of 50) [9/29/2008 2:28:16 PM]
SP18 ReadMe
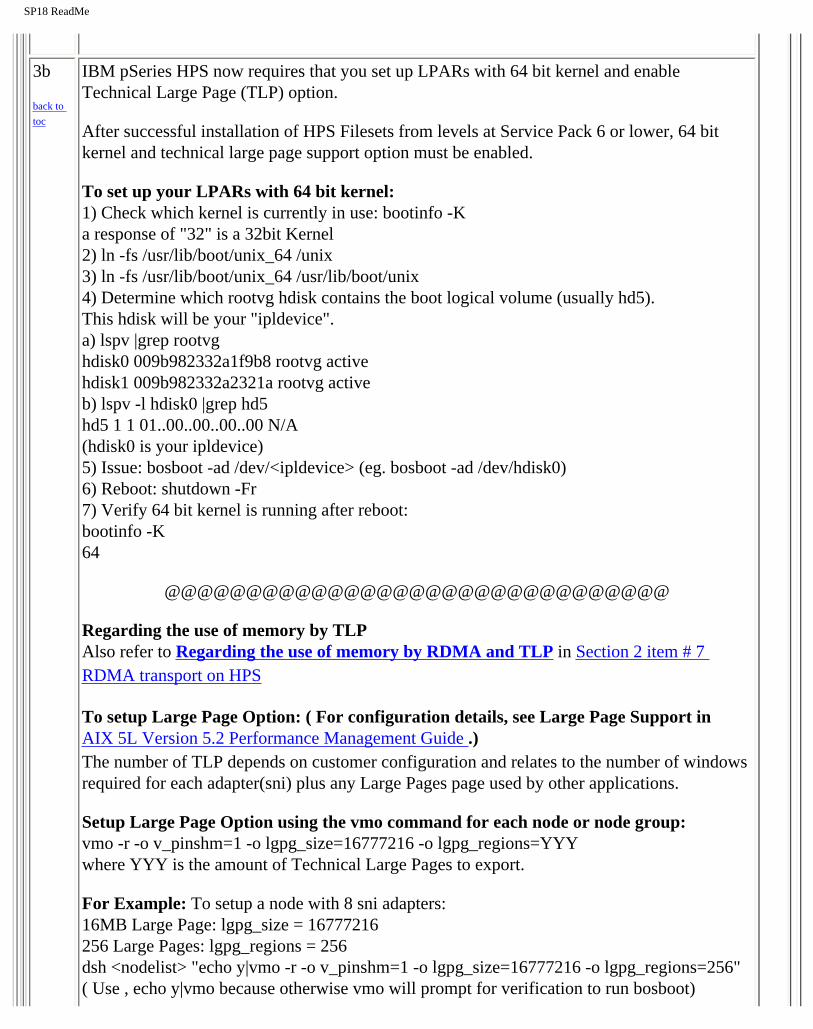
3b IBM pSeries HPS now requires that you set up LPARs with 64 bit kernel and enable Technical Large Page (TLP) option.
back to toc
After successful installation of HPS Filesets from levels at Service Pack 6 or lower, 64 bit kernel and technical large page support option must be enabled.
To set up your LPARs with 64 bit kernel: 1) Check which kernel is currently in use: bootinfo -K a response of "32" is a 32bit Kernel 2) ln -fs /usr/lib/boot/unix_64 /unix 3) ln -fs /usr/lib/boot/unix_64 /usr/lib/boot/unix 4) Determine which rootvg hdisk contains the boot logical volume (usually hd5). This hdisk will be your "ipldevice". a) lspv |grep rootvg hdisk0 009b982332a1f9b8 rootvg active hdisk1 009b982332a2321a rootvg active b) lspv -l hdisk0 |grep hd5 hd5 1 1 01..00..00..00..00 N/A (hdisk0 is your ipldevice) 5) Issue: bosboot -ad /dev/<ipldevice> (eg. bosboot -ad /dev/hdisk0) 6) Reboot: shutdown -Fr 7) Verify 64 bit kernel is running after reboot: bootinfo -K 64
@@@@@@@@@@@@@@@@@@@@@@@@@@@@@@@
Regarding the use of memory by TLP Also refer to Regarding the use of memory by RDMA and TLP in Section 2 item # 7 RDMA transport on HPS
To setup Large Page Option: ( For configuration details, see Large Page Support in AIX 5L Version 5.2 Performance Management Guide .) The number of TLP depends on customer configuration and relates to the number of windows required for each adapter(sni) plus any Large Pages page used by other applications.
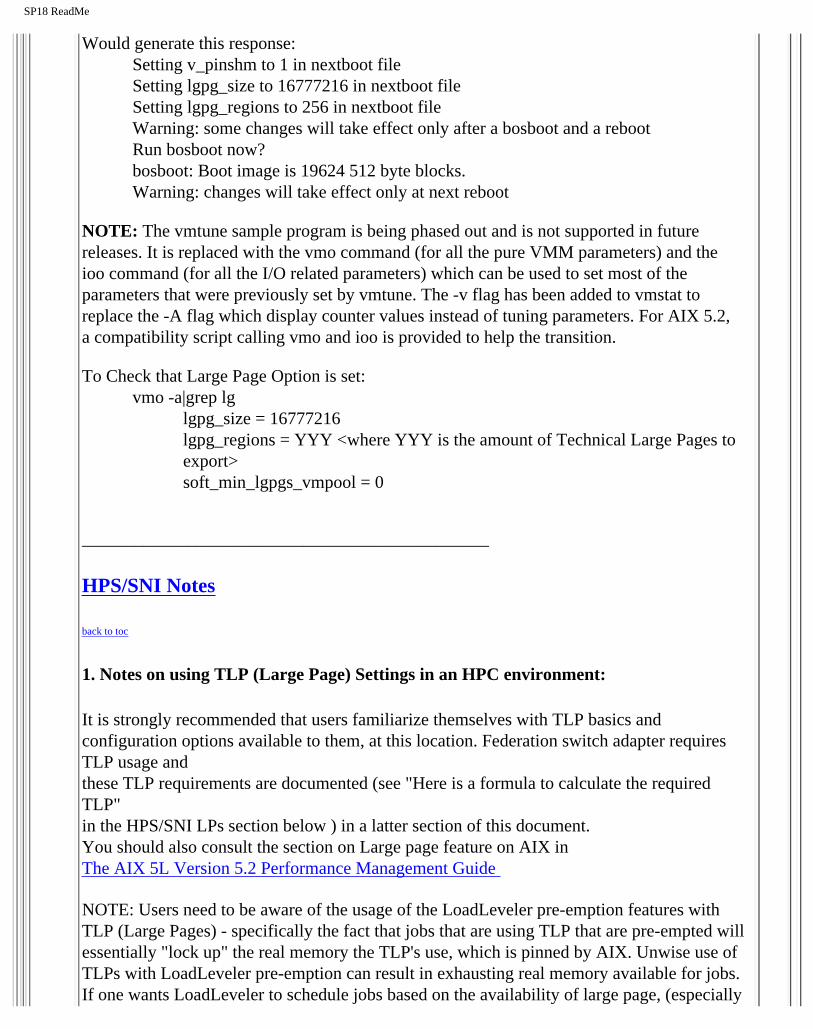
Setup Large Page Option using the vmo command for each node or node group: vmo -r -o v_pinshm=1 -o lgpg_size=16777216 -o lgpg_regions=YYY where YYY is the amount of Technical Large Pages to export.
For Example: To setup a node with 8 sni adapters: 16MB Large Page: lgpg_size = 16777216 256 Large Pages: lgpg_regions = 256 dsh <nodelist> "echo y|vmo -r -o v_pinshm=1 -o lgpg_size=16777216 -o lgpg_regions=256" ( Use , echo y|vmo because otherwise vmo will prompt for verification to run bosboot)
file:///Z|/projects/s/support_tools/set2/htdocs/data/hps/related/P4%20PDFs%201%20to%2020/HPSservicePack18.html (31 of 50) [9/29/2008 2:28:16 PM]
______________________________________________
SP18 ReadMe
Would generate this response: Setting v_pinshm to 1 in nextboot file Setting lgpg_size to 16777216 in nextboot file Setting lgpg_regions to 256 in nextboot file Warning: some changes will take effect only after a bosboot and a reboot Run bosboot now? bosboot: Boot image is 19624 512 byte blocks. Warning: changes will take effect only at next reboot
NOTE: The vmtune sample program is being phased out and is not supported in future releases. It is replaced with the vmo command (for all the pure VMM parameters) and the ioo command (for all the I/O related parameters) which can be used to set most of the parameters that were previously set by vmtune. The -v flag has been added to vmstat to replace the -A flag which display counter values instead of tuning parameters. For AIX 5.2, a compatibility script calling vmo and ioo is provided to help the transition.
To Check that Large Page Option is set: vmo -a|grep lg
lgpg_size = 16777216 lgpg_regions = YYY <where YYY is the amount of Technical Large Pages to export> soft_min_lgpgs_vmpool = 0
HPS/SNI Notes
back to toc
1. Notes on using TLP (Large Page) Settings in an HPC environment:
It is strongly recommended that users familiarize themselves with TLP basics and configuration options available to them, at this location. Federation switch adapter requires TLP usage and these TLP requirements are documented (see "Here is a formula to calculate the required TLP" in the HPS/SNI LPs section below ) in a latter section of this document. You should also consult the section on Large page feature on AIX in The AIX 5L Version 5.2 Performance Management Guide
NOTE: Users need to be aware of the usage of the LoadLeveler pre-emption features with TLP (Large Pages) - specifically the fact that jobs that are using TLP that are pre-empted will essentially "lock up" the real memory the TLP's use, which is pinned by AIX. Unwise use of TLPs with LoadLeveler pre-emption can result in exhausting real memory available for jobs. If one wants LoadLeveler to schedule jobs based on the availability of large page, (especially

file:///Z|/projects/s/support_tools/set2/htdocs/data/hps/related/P4%20PDFs%201%20to%2020/HPSservicePack18.html (32 of 50) [9/29/2008 2:28:16 PM]
SP18 ReadMe
if the job is going to run in mandatory Large Page mode) he/she may consider making use of the LoadLeveler consumable resource feature. The consumable resource function, which has already been around for several years, is documented in the LoadLeveler manual.
2. Notes on tuning Virtual Memory Settings in an HPC environment:
Customers should be advised that the AIX VMM parameters (set by the vmo command) minfree and maxfree will most likely have to be adjusted (increased) in an HPC environment based on your cluster size, the amount of system memory, and number of processors per CEC. These settings when tuned properly will ensure enough memory remains available for core cluster infrastructure applications (RSCT, GPFS, LL). The recommended initial value for these tunables are minfree = 10000 and maxfree = 12000. Users are strongly urged to consult the following AIX documentation on virtual memory and vmstat tools and tune their system accordingly.
http://publib16.boulder.ibm.com/doc_link/en_US/a_doc_lib/aixbman/prftungd/memperf.htm
http://publib16.boulder.ibm.com/doc_link/en_US/a_doc_lib/aixbman/prftungd/ memperf1.htm#i50853
The AIX 5L Version 5.2 Performance Management Guide should also be consulted.
NOTE: Tuning these settings have been shown to help users avoid conditions where core cluster applications shut down and restart due to extensive blockage caused by "out of memory" issues. Keep in mind that all cluster applications should be designed and cluster tuned accordingly as to avoid oversubscribing to the real memory available.
GFW Installation Guidelines
4
back to toc
Install GFW. The recommended installation is the AIX command line method - update_flash - using locally available GFW img file .
Important Preliminary Notes: Notes on updating GFW code (system firmware) from the AIX command line Document Reference: pSeries High Performance Switch Planning, Installation, and Service. For “Code load requirements for existing p690 and p655 server frames” please see the section in Chapter 6 titled "Step 3: p690 GFW code load" or "Step 3: p655 GFW code load" respectively in the HPS guide.
To understand how to connect the rs422/rs232 cables see the HPS Guide: Chapter 6; Step 6, "Install the Hardware Management Console (HMC)” thru Step 16. "Verify Installation is Complete"” For “Code load requirements for existing server frames” see Chapter 6
file:///Z|/projects/s/support_tools/set2/htdocs/data/hps/related/P4%20PDFs%201%20to%2020/HPSservicePack18.html (33 of 50) [9/29/2008 2:28:16 PM]
SP18 ReadMe
For p655 "Code load requirements for existing p655 server frames" For p690 "Code load requirements for existing p690 server frames"
For each CEC on which you want to install the GFW code -One partition running AIX must have "Service Authority" set. Linux does not support microcode download at this time. The "Service Authority" is set on one LPAR per CEC in the LPAR's profile "other" tab. This designates the LPAR as authorized to provide update images to the CSP. All partitions except the one with "Service Authority" must be shut down. The partition with "Service Authority" must own the device from which the microcode update image will be read. It is also recommended that the partition with "Service Authority" have a hard disk. If the required devices are not in the partition with "Service Authority", the customer or system administrator must reassign the appropriate resources to it. This requires rebooting the partition with "Service Authority". If the firmware on a full system partition is being updated, no special steps are required to perform the firmware update using the service aid. Ensure the GFW image file is not corrupted/truncated before you begin the update_flash process. Check that /var and /tmp directories are not above 50% full on the partition with the service authority. The update process can range from 20 minutes to 2 hours, depending on system configuration. The system reboots itself during the update process. Since SNM is disabled during this process, the SNI adapter interfaces will NOT be configured, or will be incorrectly configured when the LPAR(s) reactivate. It is recommended that you use the `update_flash -f` command as opposed to the shutdown -Fu method. AIX52 APAR IY49146 is required for update_flash to work correctly. Level Check by running this command on the partitions:
instfix -ik IY49146 The `update_flash` command will reboot the CEC(s) and will activate the LPAR(s). You may find some more detailed instructions provided on the website with the latest image: Http://techsupport.services.ibm.com/server/mdownload2/download.html http://techsupport.services.ibm.com/server/mdownload2/7040681F.html To install GFW update using Diskette method: For p690 systems follow the instructions in the HPS guide on "Step 3: p690 GFW (system firmware code load)" in chapter 6.
To install GFW update using NIM method: For a p655 CEC via NIM, follow the HPS guide Chapter 6, "Code load requirements for existing p655 server frames”, Step 3. GFW (system firmware) code load. back to toc
file:///Z|/projects/s/support_tools/set2/htdocs/data/hps/related/P4%20PDFs%201%20to%2020/HPSservicePack18.html (34 of 50) [9/29/2008 2:28:16 PM]
SP18 ReadMe
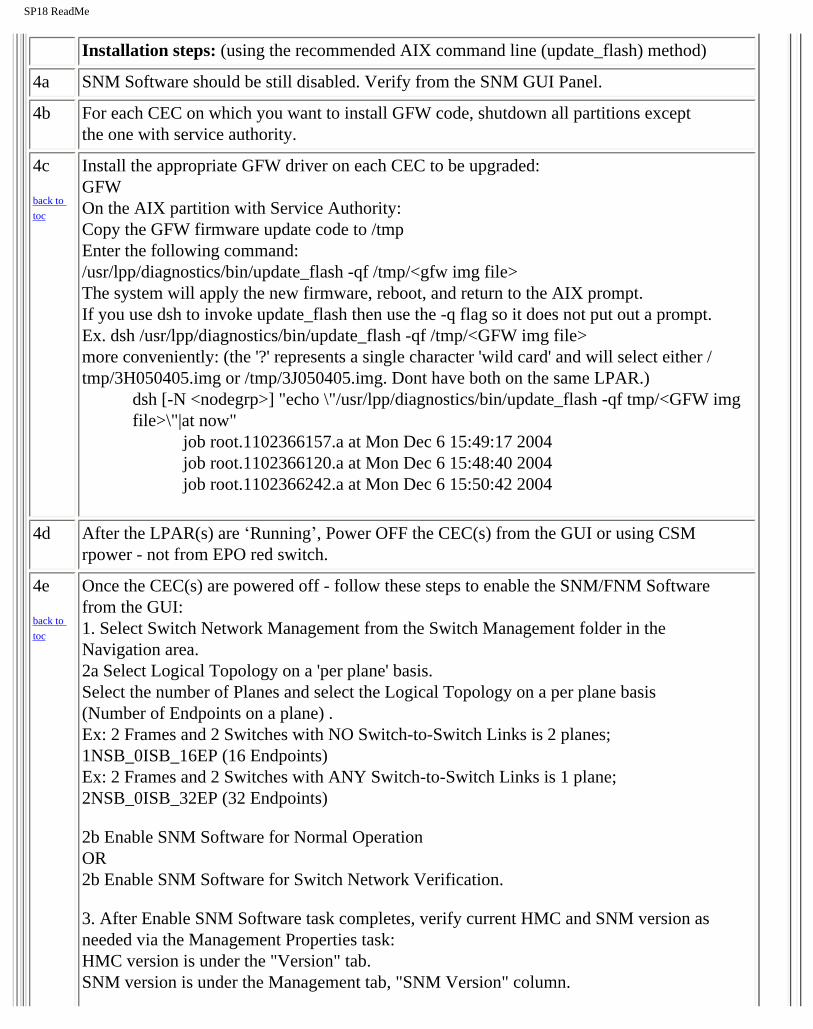
Installation steps: (using the recommended AIX command line (update_flash) method)
4a SNM Software should be still disabled. Verify from the SNM GUI Panel.
4b For each CEC on which you want to install GFW code, shutdown all partitions except the one with service authority.
4c
back to toc
Install the appropriate GFW driver on each CEC to be upgraded: GFW On the AIX partition with Service Authority: Copy the GFW firmware update code to /tmp Enter the following command: /usr/lpp/diagnostics/bin/update_flash -qf /tmp/<gfw img file> The system will apply the new firmware, reboot, and return to the AIX prompt. If you use dsh to invoke update_flash then use the -q flag so it does not put out a prompt. Ex. dsh /usr/lpp/diagnostics/bin/update_flash -qf /tmp/<GFW img file> more conveniently: (the '?' represents a single character 'wild card' and will select either / tmp/3H050405.img or /tmp/3J050405.img. Dont have both on the same LPAR.)
dsh [-N <nodegrp>] "echo \"/usr/lpp/diagnostics/bin/update_flash -qf tmp/<GFW img file>\"|at now"
job root.1102366157.a at Mon Dec 6 15:49:17 2004 job root.1102366120.a at Mon Dec 6 15:48:40 2004 job root.1102366242.a at Mon Dec 6 15:50:42 2004
4d After the LPAR(s) are ‘Running’, Power OFF the CEC(s) from the GUI or using CSM rpower - not from EPO red switch.
4e Once the CEC(s) are powered off - follow these steps to enable the SNM/FNM Software from the GUI:
back to toc 1. Select Switch Network Management from the Switch Management folder in the
Navigation area. 2a Select Logical Topology on a 'per plane' basis. Select the number of Planes and select the Logical Topology on a per plane basis (Number of Endpoints on a plane) . Ex: 2 Frames and 2 Switches with NO Switch-to-Switch Links is 2 planes; 1NSB_0ISB_16EP (16 Endpoints) Ex: 2 Frames and 2 Switches with ANY Switch-to-Switch Links is 1 plane; 2NSB_0ISB_32EP (32 Endpoints)
2b Enable SNM Software for Normal Operation OR 2b Enable SNM Software for Switch Network Verification.
3. After Enable SNM Software task completes, verify current HMC and SNM version as needed via the Management Properties task: HMC version is under the "Version" tab. SNM version is under the Management tab, "SNM Version" column.
file:///Z|/projects/s/support_tools/set2/htdocs/data/hps/related/P4%20PDFs%201%20to%2020/HPSservicePack18.html (35 of 50) [9/29/2008 2:28:16 PM]
SP18 ReadMe
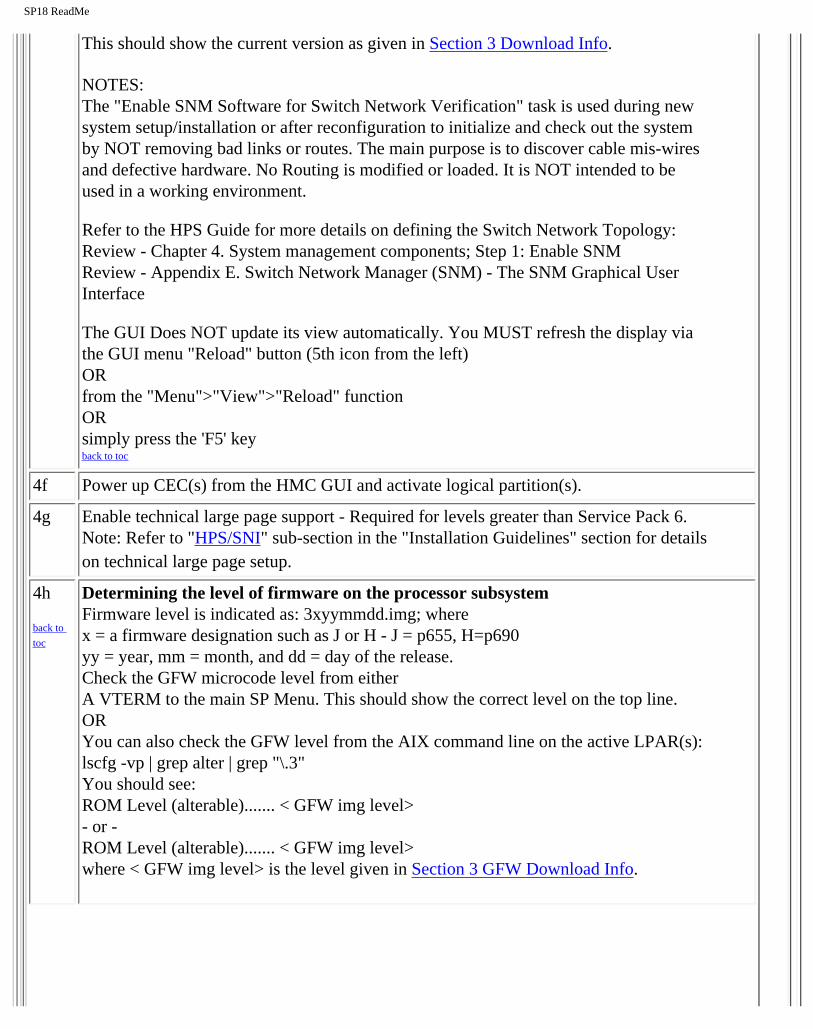
This should show the current version as given in Section 3 Download Info.
NOTES: The "Enable SNM Software for Switch Network Verification" task is used during new system setup/installation or after reconfiguration to initialize and check out the system by NOT removing bad links or routes. The main purpose is to discover cable mis-wires and defective hardware. No Routing is modified or loaded. It is NOT intended to be used in a working environment.
Refer to the HPS Guide for more details on defining the Switch Network Topology: Review - Chapter 4. System management components; Step 1: Enable SNM Review - Appendix E. Switch Network Manager (SNM) - The SNM Graphical User Interface
The GUI Does NOT update its view automatically. You MUST refresh the display via the GUI menu "Reload" button (5th icon from the left) OR from the "Menu">"View">"Reload" function OR simply press the 'F5' key back to toc
Power up CEC(s) from the HMC GUI and activate logical partition(s).4f
4g Enable technical large page support - Required for levels greater than Service Pack 6. Note: Refer to "HPS/SNI" sub-section in the "Installation Guidelines" section for details on technical large page setup.
4h
back to toc
Determining the level of firmware on the processor subsystem Firmware level is indicated as: 3xyymmdd.img; where x = a firmware designation such as J or H - J = p655, H=p690 yy = year, mm = month, and dd = day of the release. Check the GFW microcode level from either A VTERM to the main SP Menu. This should show the correct level on the top line. OR You can also check the GFW level from the AIX command line on the active LPAR(s): lscfg -vp | grep alter | grep "\.3" You should see: ROM Level (alterable)....... < GFW img level> - or -ROM Level (alterable)....... < GFW img level> where < GFW img level> is the level given in Section 3 GFW Download Info.
file:///Z|/projects/s/support_tools/set2/htdocs/data/hps/related/P4%20PDFs%201%20to%2020/HPSservicePack18.html (36 of 50) [9/29/2008 2:28:16 PM]
SP18 ReadMe
4i
back to toc
Determining the level of HPS adapter microcode The HPS adapter microcode (ucode) is shipped as part of the GFW update image. Level Check the ucode to make sure you do not have to reinstall GFW. To Level Check the ucode: From an AIX52 partition, issue: /usr/sni/aix52/debugtools/sni_get_ucode_version -l sniz From an AIX53 partition, issue: /usr/sni/aix53/debugtools/sni_get_ucode_version -l sniz where z = sni interface number on your system anywhere from 0 thru 7 (Eg. sni0) which can be seen in "netstat -in" output. This should show the current version as given in Section 3 GFW Download Info.
NOTE: You will need to reinstall the GFW update if you: - neglected to disable SNM during the GFW update - or if you added/replaced an HPS adapter. Otherwise, the HPS ucode may not have been applied correctly.
Power Subsystem Microcode Installation Guidelines back to toc
5 Install Power Subsystem Microcode on each frame by following these steps:
5a
back to toc
Download the Power Subsystem Microcode: from : https://techsupport.services.ibm.com/server/mdownload/other.html to an ftp server. Install via the HMC GUI through the Software Maintenance -> Frame panels. Receive Corrective Service Install Corrective Service If you are upgrading from Service Pack 9 or above, the installation of Power Subsystem Microcode rpm is complete. Proceed to step 5d to level check installed version.
5b If you are upgrading from Service Pack 8 or lower, the new Power Subsystem Microcode requires the switches to be recycled for the changes to become effective. Power cycle switch(s): From the HMC GUI select “Switch Network Management > Switch Topology View” For each switch plane - select "Selected > Power <Off" - refresh GUI to verify power status - select "Selected <Power <On" - refresh GUI to verify power status Repeat procedure on all switch planes.
file:///Z|/projects/s/support_tools/set2/htdocs/data/hps/related/P4%20PDFs%201%20to%2020/HPSservicePack18.html (37 of 50) [9/29/2008 2:28:16 PM]
SP18 ReadMe
5c Recycle SNM daemon using the HMC GUI: select Switch Network Management > Disable SNM Software refresh display: Menu > File > Refresh >Enable SNM Software.
back to
toc
5d
back to toc
Notes: 1. Reccommended procedure for a complete power-cycle of the cluster ("EPOW") - a.k.a. Cold Boot Procedure
In the event that power-cycling the HPS switch boards (5b) is not enough - as a last resort after trying 5b and failing - the following procedure is suggested:
For a complete discussion of the subject : See pSeries High Performance Switch Planning, Installation, and Service; Chapter 9. Service procedures; Managed system power on and power off (LPAR reboot); p. 170) The 10 minute wait is for switch frames to stabilize.
Suggested Procedure: - shutdown all the lpars - rpower -a cec_off - stop fnmd - EPOW off all the CECs and the ISB frame - start fnmd - EPOW on the ISB frame and the NSB frames - wait 10 minutes, EPOW everyone else on - check for flashing lights on the (optical) risers in the ISBs - rpower -a cec_on - tail /var/hsc/log/*Init.log until that stops - run hps_check.pl - activate all the lpars
Level Check After completing the ptcode installation, go to the HMC GUI and verify successful installation: - Select: Software Maintenance --> Frame --> Install Corrective Service - Verify that the "Installed Version" matches the version you just installed
(Important: This window may not automatically refresh when installation completes. Manually refresh the window as necessary. )
file:///Z|/projects/s/support_tools/set2/htdocs/data/hps/related/P4%20PDFs%201%20to%2020/HPSservicePack18.html (38 of 50) [9/29/2008 2:28:16 PM]
6
SP18 ReadMe
5e Verify HPS is Functioning. At this point the basic HPS installation is complete. You should now be able to ping over the switch. A general check is a good ping all script. The HPS Documentation covers this topic in the host based verification tool. - Post Installation Task 2. ( pSeries High Performance Switch Planning, Installation, and Service; "Run the host-based verification tools", p116)
If SNM Software is not running then : The "Switch Management" | Switch Network Management | views : Switch Topology View, and End Point View will not be populated and there is a dialog message indicating that and you will not be able to ping over the switch.
hps_check.pl is not available in a closed box without the root password. It should show the links as Timed and MPA Available : Lpar Name Lpar# Sni# => Adapter# Csp# Cronus# => Frame Cage Chip Port : Timed? MPA TOD c661f1rp02 1 0 0 2 5 1 1 5 2 YES YES SLV c661f1rp02 1 1 1 3 4 4 4 5 2 YES YES BAK
AIX Installation Guidelines back to toc
Install AIX base updates on each node by following these steps.
See Section 3: AIX download info for the recommended AIX service level for this Service Pack.
For complete instructions on the installation procedures please see: Document Reference: AIX 5L Version 5.2 Installation Guide and Reference
6a Download and install the recommended AIX 5L version service level for this Service Pack
back to toc
To download: Go to http://www.ibm.com/servers/eserver/support/unixservers/aixfixes.html In the "Search By" drop down box Select "APAR or abstract" In the "Search String" text box enter the specific fix as given in Section 3: AIX download info Click in "GO" This should return a text box with the specific fix requested. Select that package and click on "Add to my download list" You can view by clicking on "view my download list"
Repeat these steps for any additional fixes or PTFs When all the indicated fixes are in the download list click on "continue"

file:///Z|/projects/s/support_tools/set2/htdocs/data/hps/related/P4%20PDFs%201%20to%2020/HPSservicePack18.html (39 of 50) [9/29/2008 2:28:16 PM]
SP18 ReadMe
6b
Specify your "Current level" ( oslevel -r will give you the current level of AIX ) After "Select a download server" click on "Continue" and follow instructions for downloading the selected file sets.
Please read the "Memo to Users" in the Download fixes page for installation info and fix info.
Level check AIX by running this command on the logical partition(s):
lslpp -ha bos.mp64
Verify that filesets are at or above the given in Section 3: AIX download info for the recommended AIX service level for this Service Pack.
7
AIX LP Installation Guidelines back to toc
Install AIX LP updates on each node by following these steps. Level Check: see "Detailed LP Level Check" Notes: CSM LP's need to download and install openCIMOM-0.8-1 RPM update. Document Reference: AIX 5L Version 5.2 Installation Guide and Reference (SC23-4389-03) IBM RSCT: Administration Guide As noted in the Installation Guide, in order to use CSM LP's, you need to download and install openCIMOM-0.8-1 RPM update. You can download openCIMOM from the following web site: http://www-1.ibm.com/servers/aix/products/aixos/linux/download.html Select "Package" OpenCIMOM "Version" 0.8 (5.2) (For AIX 5.2) For complete details see: Chapter 4. Installing the management server; Step 6. Download Open Source Software of CSM Guide. Document Reference: IBM Cluster Systems Management for AIX 5L Planning and Installation Guide AIX 5L Version 5.2 Installation Guide and Reference IBM Reliable Scalable Cluster Technology Administration Guide
DPCL is no longer a part of the IBM PE for AIX licensed program. Instead, DPCL is now available as an open source offering that supports PE. For more information and to download the DPCL open source project go to: http://oss.software.ibm.com/developerworks/opensource/dpcl Document Reference: IBM Parallel Environment for AIX 5L Installation Version 4 Release 1.1 Chapter 1. Introducing PE 4.1.1 back to toc
file:///Z|/projects/s/support_tools/set2/htdocs/data/hps/related/P4%20PDFs%201%20to%2020/HPSservicePack18.html (40 of 50) [9/29/2008 2:28:16 PM]
SP18 ReadMe
7a
back to
toc
7b
7c
Download and install the applicable IBM Virtual Shared Disk(VSD) , LAPI, HPS, PPE, LoadLeveler, GPFS, Parallel ESSL, ESSL, CSM and RSCT PTF updates. Apply the listed APARs which are needed for this Service Pack. They are available from the website: http://www.ibm.com/servers/eserver/support/unixservers/aixfixes.html
If you are upgrading to this Service Pack from a service pack that is earlier than SP9, then installing CSM1.4 is required.
The Maintenance package contains CSM 1.4 which requires RPM update openCIMOM 0.8 (5.2).
To verify that the service levels for your LP's are current for this Service Pack, on each logical partition issue: lslpp -Lc | egrep "vsd|LAPI|HPS|sni|ppe|LoadL|mmfs|rsct|csm|essl|pessl" | cut -d : -f 2,3 |sed 's/:/ /' and check the levels against those listed in Detailed LP Level Check
RSCT Migration Issues: See Problem 2: "hagsglsm is not reporting the local switch membership group" For more information, refer to: RSCT Administration Guide; Chapter 3. Creating and Administering an RSCT Peer Domain; Migration back to toc
Section 6: Known problems/workarounds/Restrictions back to toc
PROBLEMS: "Phantom" SNI devices may appear after upgrade from pre-Service Pack 7 hagsglsm is not reporting the local switch membership group
RESTRICTIONS: No switch should be powered off while the SNM software is running. Rules for swapping cables for fault isolation Improved performance is more sensitive to bad links HPS Cluster recommended LPAR reboot procedure Striping mode Restrictions
file:///Z|/projects/s/support_tools/set2/htdocs/data/hps/related/P4%20PDFs%201%20to%2020/HPSservicePack18.html (41 of 50) [9/29/2008 2:28:16 PM]
SP18 ReadMe
1. "Phantom" SNI devices may appear after upgrade from pre-Service Pack 7 Users Affected: Users upgrading systems from SP6 or earlier with existing SNI devices
Problem Description: Changes in the HPS switch microcode and driver demand that it is absolutely necessary to install the HPS fileset updates and the GFW firmware updates without rebooting logical partitions before the system firmware is successfully installed. Rebooting the LPAR(s) prematurely will cause "phantom" SNI devices to be created on the partition(s).
The failure signature is: 1) There are twice the number of snX and sniX devices as expected in the "lsdev -C|grep sn" output. (where X = sni or sn interface number on your system anywhere from 0 thru 7 -- e.g. sni0 or sn0) 2) All the sn interfaces are in the Defined state. 3) Upper half of the sniX devices are in "Available" state (higher numbered devices) and lower half of the sniX devices are in "Defined" state (lower numbered devices). 4)All the sniX devices could also be in the "Defined" state. Common causes of "phantom" sniX devices: If you re-boot LPARs after upgrading HPS filesets, but prior to a successful GFW upgrade. Failure during GFW upgrade after updating HPS filesets. These events/scenarios will cause all LPARs on a CEC to reboot without upgrading the GFW via AIX command line method (i.e. update_flash command) - If you have a corrupted/truncated GFW image file. - If either /var or /tmp is too full. - If an LPAR other than the Set Service Authority LPAR is in "Running" state during update_flash - If an LPAR other than the Set Service Authority LPAR is used to run the update_flash command
Note: There may be other factors that cause LPARs to reboot after the HPS fileset is upgraded and before the GFW is successfully updated.
Recovery Procedure: 1) Complete the GFW update. - Verify that the firmware updates on all CEC(s) was successful.
2) Recover the sniX and snX devices. (Note: To recover requires at least 1 reboot. Two reboots are required if the sniX devices are busy)
2a) Remove all the SNI devices after naking note of any customization to the SNI devices such as num_windows, driver_debug, etc . Use "lsattr -El sniX" so that they can be re-applied after the recovery procedure. NOTE: This procedure will reset all values back to the defaults: To remove each logical sniX do this: for X in 0 1 2 3; do rmdev -d -l sni$X; done If the rmdev fails for any devices (e.g. device is busy), then unconfigure the device driver as follows. Otherwise, go to step 2b. - rename the configuration method for the device: mv /usr/sni/aix52/cfgsni /usr/sni/aix52/cfgsni.orig

file:///Z|/projects/s/support_tools/set2/htdocs/data/hps/related/P4%20PDFs%201%20to%2020/HPSservicePack18.html (42 of 50) [9/29/2008 2:28:16 PM]
SP18 ReadMe
- reboot each LPAR that failed - run the rmdev loop again - restore the original configuration methods name: mv /usr/sni/aix52/cfgsni.orig /usr/sni/aix52/cfgsni
2b) Remove ONLY the phantom top half of the snX devices: The lower half are real snX devices and have the ipaddr and netmask attributes in the odm. You don't want to delete these, nor do you have to. For the top HALF of logical snX devices do this: for X in 2 3; do rmdev -d -l sn$X; done
3) Reboot the LPAR(s) --> shutdown -Fr
4) Restore any customization to the SNI devices (e.g. num_windows, driver_debug, etc ...)
2. hagsglsm is not reporting the local switch membership group Component:rsct Systems Affected: All rsct Users at Service Pack 9 Description: In order to complete the migration of a peer domain and update the active RSCT version to a new level, you must enter the runact command: runact -c IBM.PeerDomain CompleteMigration Options=0" This command should be run after every RSCT release upgrade.
For a more complete discussion see: "Avoiding Domain Partitioning When Migrating From RSCT 2.2.1.x or 2.3.0.x" in IBM Reliable Scalable Cluster Technology Administration Guide; Chapter 3. Creating and Administering an RSCT Peer Domain; Migration
Restrictions
1. No switch should be powered off while the SNM software is running. Component: SNM - Switch Network Management Systems Affected: High Performance Switch (HPS) users applying from pre-Service Pack 7 Implications: - A CEC frame with a switch in it CANNOT be EPOWed. - If a CEC has to be power cycled, power down the CEC and not the frame. - If a CEC frame with a switch needs to be EPOWed, power down the frame, kill the SNM daemon after 5 minutes, power up the frame and restart the SNM daemon. - If one or more switches need to be recycled, power down the switches, power them back up and then recycle the SNM daemon after 5 minutes.
2. Rules for swapping cables for fault isolation Component: SNM - Switch Network Management Systems Affected: All HPS Users applying from pre-Service Pack 7

file:///Z|/projects/s/support_tools/set2/htdocs/data/hps/related/P4%20PDFs%201%20to%2020/HPSservicePack18.html (43 of 50) [9/29/2008 2:28:16 PM]
SP18 ReadMe
Description: Only swap SNI attached cables at the switch ports to which they are attached. Do not swap switch to switch cables with other switch to switch cables nor with SNI attached cables. Do not swap cables on the SNI ports. Do not swap cables between switches. If adapters are accidentally "miswired" during the process of swapping cables, recable the adapters to their original positions.
3. Improved performance is more sensitive to bad links
Component: HPS/LAPI
Problem Description: The protocol (MPI or LAPI) will timeout if the job runs on bad links and the link routes are not fixed. If the link failure turns into adapter failure then the job gets terminated.
Solution: To resolve this issue monitor Service Focal Point for bad links and fix them.
4. HPS Cluster recommended LPAR reboot procedure
Component: HPS/SNI
Systems Affected: All HPS Users applying from pre-Service Pack 7
Description: To ensure the HPS switch links are properly shutdown and re-enabled, it is recommended that you use the commands below, to recycle and reboot all LPAR/AIX images in your cluster: "shutdown -F" <-- to shutdown LPAR "shutdown -Fr" or "dsh -av shutdown -Fr" <-- to reboot LPAR or multiple LPARs simultaneously If not followed, en masse reboot will certainly result in one IPC1:37:CC MP Fatal event per link.
Use of the "reboot" command or "rpower" commands will not shutdown the HPS switch links in an orderly fashion - when more than one frame at a time is cycled concurrently the SNM daemon may hang and Service Focal Point could end up with artificial errors. If when these commands must be run concurrently on multiple LPARS, it is recommended that you use them one frame at a time in your cluster.
When the HMC GUI is used to cycle an LPAR, it is recommended that you use the "shutdown" option to recycle the LPAR, not the "reset" option. The "shutdown" option will ensure that the HPS switch links are shutdown and re-enabled cleanly - whereas the "reset" option(s) will essentially use the rpower command (and not do an orderly shutdown).
NOTE: Use of the rpower or HMC GUI reset options should be reserved as a "last resort" for LPARS that are not responding to a shutdown command.
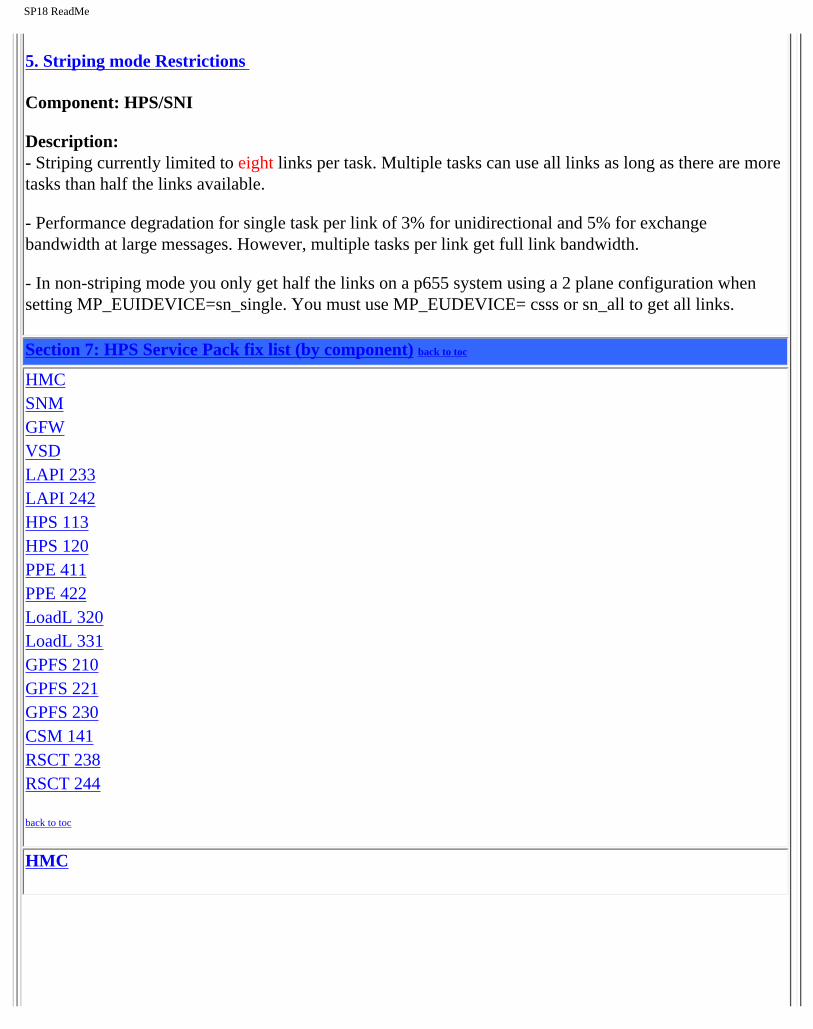
file:///Z|/projects/s/support_tools/set2/htdocs/data/hps/related/P4%20PDFs%201%20to%2020/HPSservicePack18.html (44 of 50) [9/29/2008 2:28:16 PM]
SP18 ReadMe
5. Striping mode Restrictions
Component: HPS/SNI
Description: - Striping currently limited to eight links per task. Multiple tasks can use all links as long as there are more tasks than half the links available.
- Performance degradation for single task per link of 3% for unidirectional and 5% for exchange bandwidth at large messages. However, multiple tasks per link get full link bandwidth.
- In non-striping mode you only get half the links on a p655 system using a 2 plane configuration when setting MP_EUIDEVICE=sn_single. You must use MP_EUDEVICE= csss or sn_all to get all links.
Section 7: HPS Service Pack fix list (by component) back to toc
HMC SNM GFW VSD LAPI 233 LAPI 242 HPS 113 HPS 120 PPE 411 PPE 422 LoadL 320 LoadL 331 GPFS 210 GPFS 221 GPFS 230 CSM 141 RSCT 238 RSCT 244
back to toc
HMC
file:///Z|/projects/s/support_tools/set2/htdocs/data/hps/related/P4%20PDFs%201%20to%2020/HPSservicePack18.html (45 of 50) [9/29/2008 2:28:16 PM]
SP18 ReadMe
SNM For a list of abstracts see the SNM readme at //www14.software.ibm.com/webapp/set2/sas/f/hmc/power4/download/v33.Update.html click on the 'view' link.
GFW Refer to the following links for complete list of abstracts for GFW fixes in HPS Service Pack 7 or higher: http://techsupport.services.ibm.com/server/mdownload/7040681F.html - for Regatta H http://techsupport.services.ibm.com/server/mdownload/7039651F.html - for Regatta IH
VSD VSD.SNAP GETS ERROR WHEN REMOTE FS NAMED /TM VSD.SNAP ERROR IN THE SUBROUTINE GET_CSS_STU NODE PANIC IN VSD DURING FAILOVER IN VSDD:SU VSD 2-node recovery is failing
LAPI 2.3.3.5 LAPI interrupts disabled when MP_MSG_API=MPI,
2.4.2.4 LAPI assert running dual protocol mpi/lapi in
HPS/SNI 1.1.3.5 SNI CONFIG FAILED during Cold Boot ASC:increase time-out to address lapi_init() LL says rCxt are available even when not usea CRASH IN SNI DEVICE DRIVER ASCI: SWITCH CLOG CONDITION EXPOSES IP FULL PERFORANCE PROBLEM HPS W/ P575 SNI ATTACHED
1.2.0.2 HPSGA5ST: SNI CONFIG FAILED during Cold Boot LL says rCxt are available even when not usea CRASH IN SNI DEVICE DRIVER ASCI: SWITCH CLOG CONDITION EXPOSES IP FULL PERFORANCE PROBLEM HPS W/ P575 SNI ATTACHED
file:///Z|/projects/s/support_tools/set2/htdocs/data/hps/related/P4%20PDFs%201%20to%2020/HPSservicePack18.html (46 of 50) [9/29/2008 2:28:16 PM]
SP18 ReadMe
Parallel Environment 4.1.1.10 CUSTOMER REQUEST FIELDS TO BE ADDED TO LL_GE POE CANNOT INHERIT LARGE LIMITS
4.2.2.2 SAMPLES SCRIPT /USR/LPP/PPE.POE/SAMPLES/AFS/ POE GENERATES NULL CHARACTERS ON MP_PRIORITY POE FAILS WHEN TOTALVIEW FAST CONDITIONAL BR THE PARTITION MANAGER DAEMON (PMDV4) TERMINA ASCI: MP_BUFFER_MEM second argument being ign
Loadleveler 3.2.0.18 IN THE LOADL JCF FILE THE DEPENDENCY STATEME WHEN USING API SCHEDULER AND USING LLMODIFY WHEN A MACHINE IS REMOVED FROM AN LL CLUSTER
3.3.1.2 FUU: window scrollling or resize for cluster_ Res. GUI: Error in modification of the no. of llstatus -M shows sn0/sn1 on same Sq "MCM" BG: llstatus -B shows invalid partition name BG: InQ and Run counts in llstatus -b showin IF THE NEGOTIATOR GOES DOWN WITH RUNNING STE BG: llq -s shows incorrect information remote jobs w/ copyfile on local cluster caus llstatus -X c559_Cluster hangs from it and fr routeFastPath calling verify_content twice ckpt_time_limit with interval checkpoint Provide cpu Affinity for serial jobs running 4 minor issues in GUI long string for priority field result in xloa Job submission retries causes inbound/outboun Buffer overflow when processing Bridge API me llq -s does not display start_class message Invalid params to ll_modify() can cause app. LlMCluster::route needs to return value The MCM info displayed in llsummary -lx is n MC: ckpt_execute_dir keyword support using MC BG muster llstatus -X -b -B -P options hang muster llq -X -b and -l do not display bluege "llctl version" give strange msg on AIX5.3 pl affinity:rhel4 x86 sles9 x86 jobs get rejecte StartdLinuxCpuAffinity Code Review Fixes
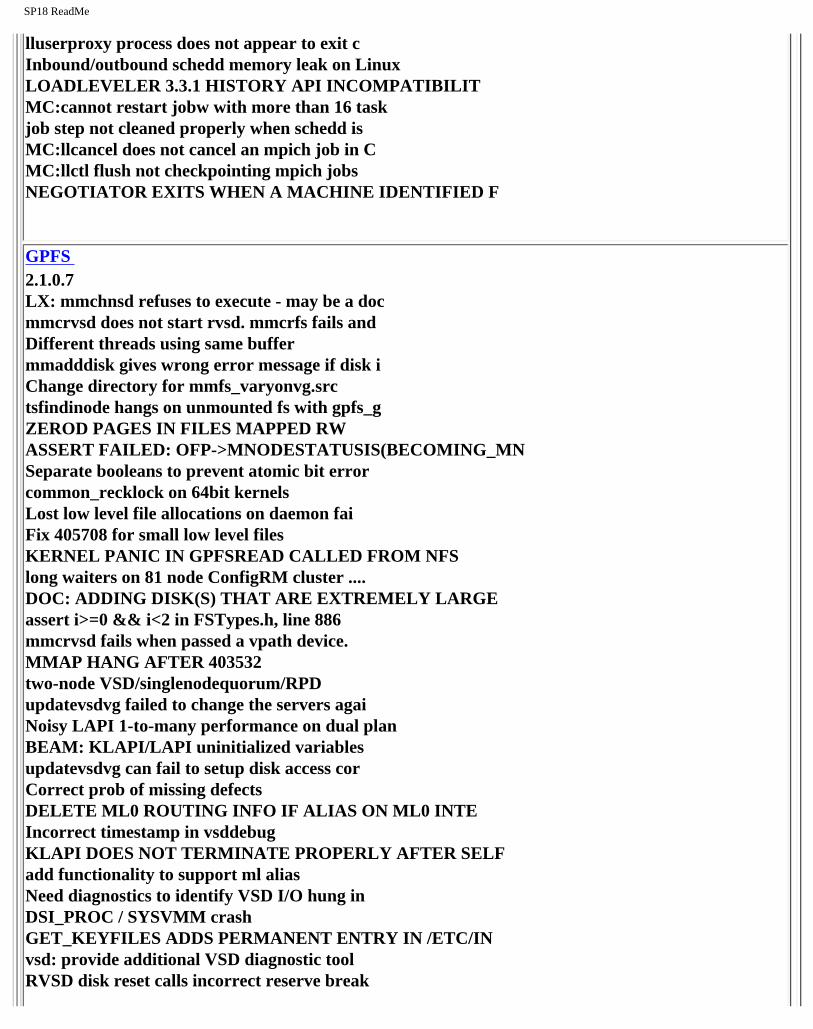
file:///Z|/projects/s/support_tools/set2/htdocs/data/hps/related/P4%20PDFs%201%20to%2020/HPSservicePack18.html (47 of 50) [9/29/2008 2:28:16 PM]
SP18 ReadMe
lluserproxy process does not appear to exit c Inbound/outbound schedd memory leak on Linux LOADLEVELER 3.3.1 HISTORY API INCOMPATIBILIT MC:cannot restart jobw with more than 16 task job step not cleaned properly when schedd is MC:llcancel does not cancel an mpich job in C MC:llctl flush not checkpointing mpich jobs NEGOTIATOR EXITS WHEN A MACHINE IDENTIFIED F
GPFS 2.1.0.7 LX: mmchnsd refuses to execute - may be a doc mmcrvsd does not start rvsd. mmcrfs fails and Different threads using same buffer mmadddisk gives wrong error message if disk i Change directory for mmfs_varyonvg.src tsfindinode hangs on unmounted fs with gpfs_g ZEROD PAGES IN FILES MAPPED RW ASSERT FAILED: OFP->MNODESTATUSIS(BECOMING_MN Separate booleans to prevent atomic bit error common_recklock on 64bit kernels Lost low level file allocations on daemon fai Fix 405708 for small low level files KERNEL PANIC IN GPFSREAD CALLED FROM NFS long waiters on 81 node ConfigRM cluster .... DOC: ADDING DISK(S) THAT ARE EXTREMELY LARGE assert i>=0 && i<2 in FSTypes.h, line 886 mmcrvsd fails when passed a vpath device. MMAP HANG AFTER 403532 two-node VSD/singlenodequorum/RPD updatevsdvg failed to change the servers agai Noisy LAPI 1-to-many performance on dual plan BEAM: KLAPI/LAPI uninitialized variables updatevsdvg can fail to setup disk access cor Correct prob of missing defects DELETE ML0 ROUTING INFO IF ALIAS ON ML0 INTE Incorrect timestamp in vsddebug KLAPI DOES NOT TERMINATE PROPERLY AFTER SELF add functionality to support ml alias Need diagnostics to identify VSD I/O hung in DSI_PROC / SYSVMM crash GET_KEYFILES ADDS PERMANENT ENTRY IN /ETC/IN vsd: provide additional VSD diagnostic tool RVSD disk reset calls incorrect reserve break
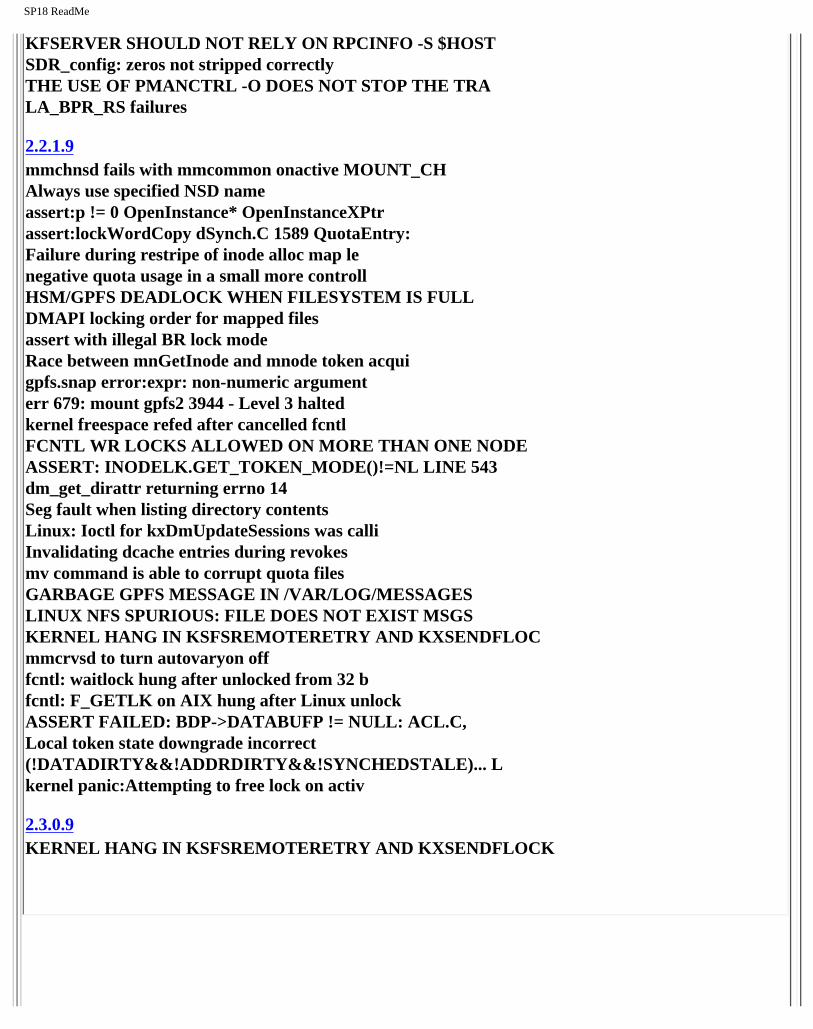
file:///Z|/projects/s/support_tools/set2/htdocs/data/hps/related/P4%20PDFs%201%20to%2020/HPSservicePack18.html (48 of 50) [9/29/2008 2:28:16 PM]
SP18 ReadMe
KFSERVER SHOULD NOT RELY ON RPCINFO -S $HOST SDR_config: zeros not stripped correctly THE USE OF PMANCTRL -O DOES NOT STOP THE TRA LA_BPR_RS failures
2.2.1.9 mmchnsd fails with mmcommon onactive MOUNT_CH Always use specified NSD name assert:p != 0 OpenInstance* OpenInstanceXPtr assert:lockWordCopy dSynch.C 1589 QuotaEntry: Failure during restripe of inode alloc map le negative quota usage in a small more controll HSM/GPFS DEADLOCK WHEN FILESYSTEM IS FULL DMAPI locking order for mapped files assert with illegal BR lock mode Race between mnGetInode and mnode token acqui gpfs.snap error:expr: non-numeric argument err 679: mount gpfs2 3944 - Level 3 halted kernel freespace refed after cancelled fcntl FCNTL WR LOCKS ALLOWED ON MORE THAN ONE NODE ASSERT: INODELK.GET_TOKEN_MODE()!=NL LINE 543 dm_get_dirattr returning errno 14 Seg fault when listing directory contents Linux: Ioctl for kxDmUpdateSessions was calli Invalidating dcache entries during revokes mv command is able to corrupt quota files GARBAGE GPFS MESSAGE IN /VAR/LOG/MESSAGES LINUX NFS SPURIOUS: FILE DOES NOT EXIST MSGS KERNEL HANG IN KSFSREMOTERETRY AND KXSENDFLOC mmcrvsd to turn autovaryon off fcntl: waitlock hung after unlocked from 32 b fcntl: F_GETLK on AIX hung after Linux unlock ASSERT FAILED: BDP->DATABUFP != NULL: ACL.C, Local token state downgrade incorrect (!DATADIRTY&&!ADDRDIRTY&&!SYNCHEDSTALE)... L kernel panic:Attempting to free lock on activ
2.3.0.9 KERNEL HANG IN KSFSREMOTERETRY AND KXSENDFLOCK
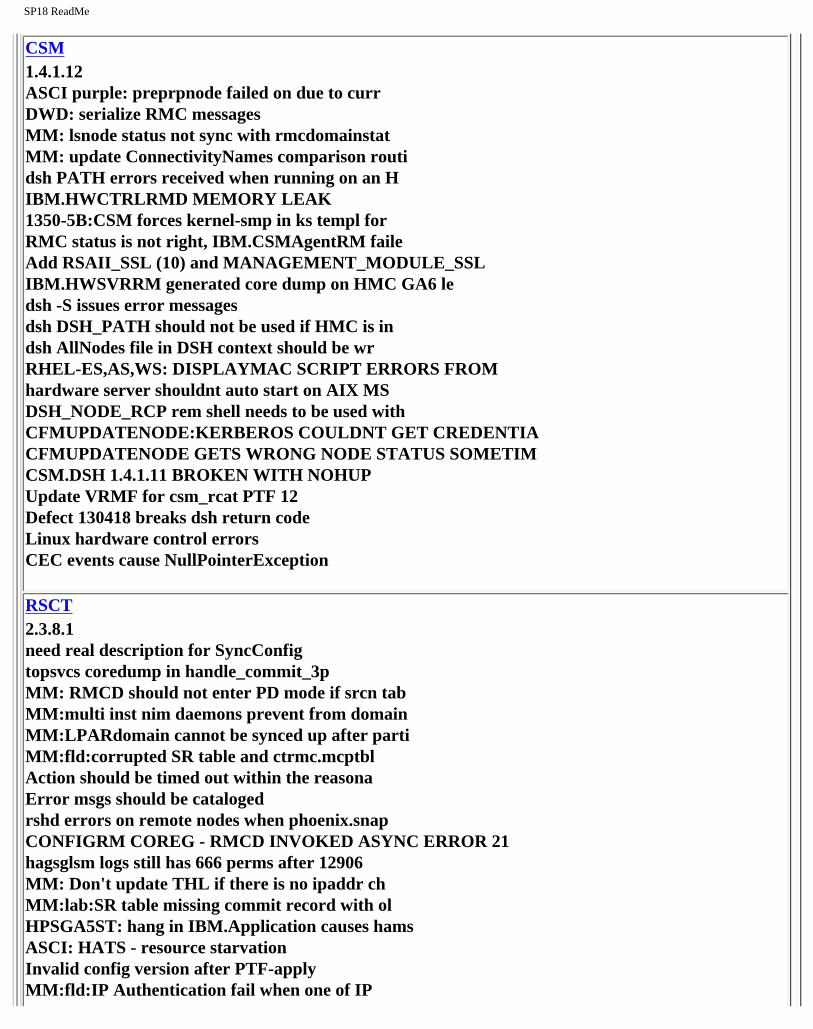
file:///Z|/projects/s/support_tools/set2/htdocs/data/hps/related/P4%20PDFs%201%20to%2020/HPSservicePack18.html (49 of 50) [9/29/2008 2:28:16 PM]
SP18 ReadMe
CSM 1.4.1.12 ASCI purple: preprpnode failed on due to curr DWD: serialize RMC messages MM: lsnode status not sync with rmcdomainstat MM: update ConnectivityNames comparison routi dsh PATH errors received when running on an H IBM.HWCTRLRMD MEMORY LEAK 1350-5B:CSM forces kernel-smp in ks templ for RMC status is not right, IBM.CSMAgentRM faile Add RSAII_SSL (10) and MANAGEMENT_MODULE_SSL IBM.HWSVRRM generated core dump on HMC GA6 le dsh -S issues error messages dsh DSH_PATH should not be used if HMC is in dsh AllNodes file in DSH context should be wr RHEL-ES,AS,WS: DISPLAYMAC SCRIPT ERRORS FROM hardware server shouldnt auto start on AIX MS DSH_NODE_RCP rem shell needs to be used with CFMUPDATENODE:KERBEROS COULDNT GET CREDENTIA CFMUPDATENODE GETS WRONG NODE STATUS SOMETIM CSM.DSH 1.4.1.11 BROKEN WITH NOHUP Update VRMF for csm_rcat PTF 12 Defect 130418 breaks dsh return code Linux hardware control errors CEC events cause NullPointerException
RSCT 2.3.8.1 need real description for SyncConfig topsvcs coredump in handle_commit_3p MM: RMCD should not enter PD mode if srcn tab MM:multi inst nim daemons prevent from domain MM:LPARdomain cannot be synced up after parti MM:fld:corrupted SR table and ctrmc.mcptbl Action should be timed out within the reasona Error msgs should be cataloged rshd errors on remote nodes when phoenix.snap CONFIGRM COREG - RMCD INVOKED ASYNC ERROR 21 hagsglsm logs still has 666 perms after 12906 MM: Don't update THL if there is no ipaddr ch MM:lab:SR table missing commit record with ol HPSGA5ST: hang in IBM.Application causes hams ASCI: HATS - resource starvation Invalid config version after PTF-apply MM:fld:IP Authentication fail when one of IP
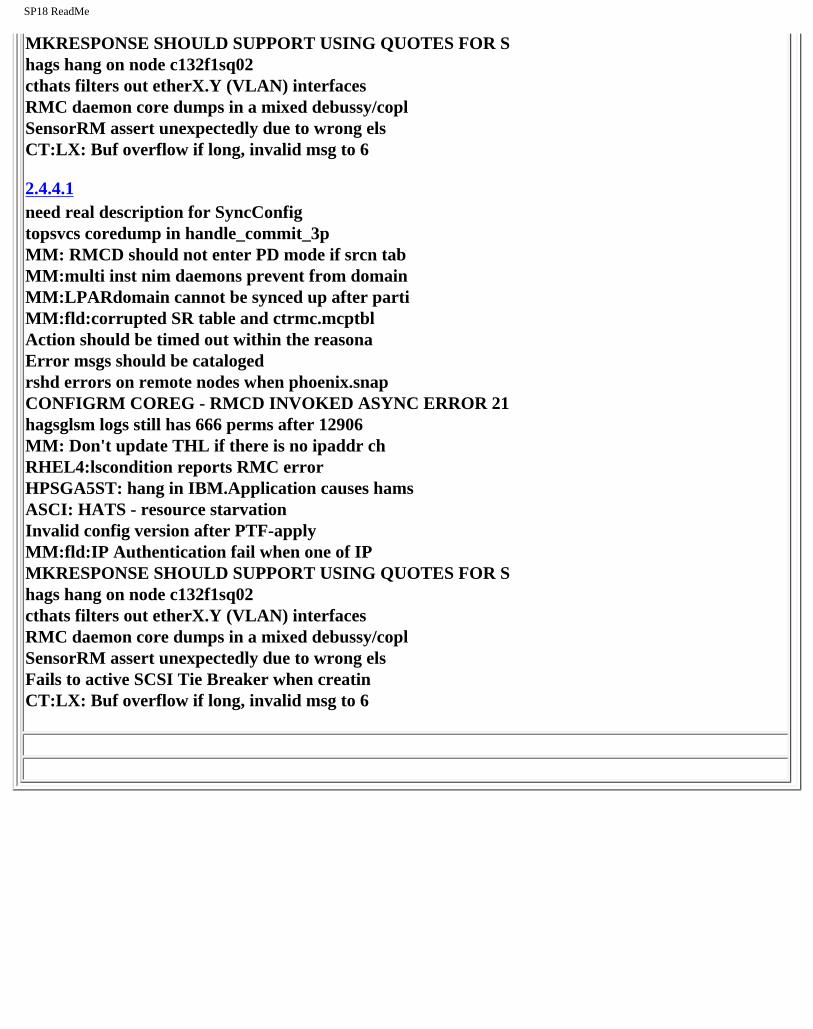
file:///Z|/projects/s/support_tools/set2/htdocs/data/hps/related/P4%20PDFs%201%20to%2020/HPSservicePack18.html (50 of 50) [9/29/2008 2:28:16 PM]
SP18 ReadMe
MKRESPONSE SHOULD SUPPORT USING QUOTES FOR S hags hang on node c132f1sq02 cthats filters out etherX.Y (VLAN) interfaces RMC daemon core dumps in a mixed debussy/copl SensorRM assert unexpectedly due to wrong els CT:LX: Buf overflow if long, invalid msg to 6
2.4.4.1 need real description for SyncConfig topsvcs coredump in handle_commit_3p MM: RMCD should not enter PD mode if srcn tab MM:multi inst nim daemons prevent from domain MM:LPARdomain cannot be synced up after parti MM:fld:corrupted SR table and ctrmc.mcptbl Action should be timed out within the reasona Error msgs should be cataloged rshd errors on remote nodes when phoenix.snap CONFIGRM COREG - RMCD INVOKED ASYNC ERROR 21 hagsglsm logs still has 666 perms after 12906 MM: Don't update THL if there is no ipaddr ch RHEL4:lscondition reports RMC error HPSGA5ST: hang in IBM.Application causes hams ASCI: HATS - resource starvation Invalid config version after PTF-apply MM:fld:IP Authentication fail when one of IP MKRESPONSE SHOULD SUPPORT USING QUOTES FOR S hags hang on node c132f1sq02 cthats filters out etherX.Y (VLAN) interfaces RMC daemon core dumps in a mixed debussy/copl SensorRM assert unexpectedly due to wrong els Fails to active SCSI Tie Breaker when creatin CT:LX: Buf overflow if long, invalid msg to 6