Embed Size (px)
Citation preview

HP Photosmart D7300 seriesUser Guide
www.hp.com/support
Australia
Central America & The Caribbean
Colombia (Bogotá)
Colombia
www.hp.com/support/australia
0-800-709-7751
(02) 6910602
México (Ciudad de México)
New Zealand
Puerto Rico
Sverige
México
www.hp.com/support
Nigeria 1 3204 999
Argentina (Buenos Aires)
Argentina
54-11-4708-1600
0-800-555-5000
www.hp.com/support
1-999-119 800-711-2884
Costa Rica
800-6160
Deutschland
55-5258-9922
01-800-472-68368
071 891 391
Rest of West Africa + 351 213 17 63 80
South Africa (international)
800 897 1415
095 777 3284812 332 4240
17212049
1-800-711-2884800-360-999
55-11-4004-7751
www.hp.com/support0850 111 256
www.hp.com/support
www.hp.com/support
www.hp.com/support
België
www.hp.com/support
(905) 206-4663
Paraguay 009 800 54 1 0006
1-800-474-6836
Trinidad & Tobago 1-800-711-2884
021 672 280
Österreich www.hp.com/support
Belgique
Brasil (Sao Paulo)
Brasil
Canada (Mississauga Area)
Canada
Chile
www.hp.com/support/china
571-606-9191
01-8000-51-4746-8368
0-800-011-1046
Danmark www.hp.com/support
El Salvador
España
France
Luxembourg
Malaysia
081 005 010
Nederland www.hp.com/support
Norge www.hp.com/support
Panamá
0-800-10111
Philippines
22 5666 000
1-877-232-0589
1-800-711-2884
0801 033 390
Singapore
Slovensko
South Africa (RSA)+ 27 11 2589301086 0001030
Suomi
www.hp.com/support
Switzerland www.hp.com/support
+90 212 444 71 71
(044) 230-51-06
600 54 47 47
United Kingdom www.hp.com/support
United States
Uruguay 0004-054-177
Venezuela (Caracas) 58-212-278-8666Venezuela 0-800-474-68368
Perú
Polska
República Dominicana
România
������ (�����)������ (���- ��������)
Türkiye
�����
Viêt Nam
www.hp.com/support
Mauritius
Reunion 0820 890 323
0800 222 47
24791773
www.hp.com/support/Japan
www.hp.com/support/korea
www.hp.com/support
www.hp.com/support
www.hp.com/support
www.hp.com/support/singapore
www.hp.com/support/taiwan
www.hp.com/support
www.hp.com/support
(262) 262 210 404
+ 30 210 6073603
810 222 222
800 9 2654
Ecuador (Andinatel)
Ecuador (Pacifitel) 1-800-225-528800-711-2884
801 11 75400
Guatemala 1-800-711-2884
www.hp.com/support/hongkong
06 40 200 629
India
Indonesia www.hp.com/support
Ireland
1-700-503-048
Italia www.hp.com/support
Jamaica 1-800-711-2884
Česká republika
Magyarország
Portugal www.hp.com/support
www.hp.com/support
www.hp.com/support/india
+971 4 224 9189
+971 4 224 9189
+971 4 224 9189
+971 4 224 9189
+971 4 224 9189
www.hp.com/support
Copyrights and trademarks© 2006 Hewlett-Packard DevelopmentCompany, L.P.The information contained herein issubject to change without notice.Reproduction, adaptation, ortranslation without prior writtenpermission is prohibited, except asallowed under the copyright laws.
Hewlett-Packard CompanynoticesThe information contained in thisdocument is subject to change withoutnotice.All rights reserved. Reproduction,adaptation, or translation of thismaterial is prohibited without priorwritten permission of Hewlett-Packard,except as allowed under copyrightlaws.The only warranties for HP productsand services are set forth in the expresswarranty statements accompanyingsuch products and services. Nothingherein should be construed asconstituting an additional warranty. HPshall not be liable for technical oreditorial errors or omissions containedherein.
TrademarksHP, the HP logo, and Photosmart areproperty of Hewlett-PackardDevelopment Company, L.P.The Secure Digital logo is a trademarkof the SD Association.Microsoft and Windows are registeredtrademarks of Microsoft Corporation.CompactFlash, CF, and the CF logo aretrademarks of the CompactFlashAssociation (CFA).Memory Stick, Memory Stick Duo,Memory Stick PRO, and Memory StickPRO Duo are trademarks or registeredtrademarks of Sony Corporation.MultiMediaCard is a trademark ofInfineon Technologies AG of Germany,and is licensed to the MMCA(MultiMediaCard Association).Microdrive is a trademark of HitachiGlobal Storage Technologies.xD-Picture Card is a trademark of FujiPhoto Film Co., Ltd., ToshibaCorporation, and Olympus Optical Co.,Ltd.Mac, the Mac logo, and Macintosh areregistered trademarks of AppleComputer, Inc.iPod is a trademark of Apple Computer,Inc.
Bluetooth is a trademark owned by itsproprietor and used by Hewlett-Packard Company under license.PictBridge and the PictBridge logo aretrademarks of the Camera & ImagingProducts Association (CIPA).Other brands and their products aretrademarks or registered trademarks oftheir respective holders.
Regulatory modelidentification numberFor regulatory identification purposes,your product is assigned a RegulatoryModel Number. The Regulatory ModelNumber for your product isVCVRA-0603. This regulatory numbershould not be confused with themarketing name (HP PhotosmartD7300 series, etc.) or product numbers(Q7057A, etc.).For complete listing of regulatorynotices see your onscreen help.
Energy consumption -Energy Star®Hewlett-Packard Company iscommitted to providing quality productsin a environmentally sound manner. Forinformation about the HP'senvironmental product stewardshipprogram see the onscreen help.
Contents
1 Welcome.................................................................................................................3Special features.......................................................................................................3Accessing the onscreen HP Photosmart printer help..............................................3Printer parts.............................................................................................................4Optional accessories...............................................................................................7Printer menu............................................................................................................7
Print..................................................................................................................8Save.................................................................................................................8Share................................................................................................................8Settings............................................................................................................8
2 Get ready to print.................................................................................................11Load paper............................................................................................................11
Choose the right paper...................................................................................11Load your paper.............................................................................................11
Insert ink cartridges...............................................................................................13Purchasing replacement ink cartridges..........................................................13Ink cartridge tips.............................................................................................14Inserting or replacing the ink cartridges.........................................................14
Insert memory cards..............................................................................................16Supported file formats....................................................................................17Inserting a memory card.................................................................................17Memory card types.........................................................................................17Removing a memory card..............................................................................18
3 Printing photos without a computer..................................................................21Printing photos.......................................................................................................21
Print photos from a memory card...................................................................21Print photos from a digital camera.................................................................23Print photos from an iPod...............................................................................24
Photo layouts.........................................................................................................25Improving photo quality.........................................................................................26Getting creative.....................................................................................................27
4 Getting connected...............................................................................................31Connecting to other devices..................................................................................31Saving photos to a computer.................................................................................33Connecting through HP Photosmart Share...........................................................33
5 Printing from a computer....................................................................................35Using creative options in the printer software.......................................................35
HP Photosmart Premier.................................................................................35HP Photosmart Essential...............................................................................35HP Photosmart Share....................................................................................36
Set print preferences.............................................................................................36Open the electronic help................................................................................37
HP Real Life technologies features.......................................................................376 Care and maintenance........................................................................................39
Clean and maintain the printer..............................................................................39
HP Photosmart D7300 series User Guide 1
Clean the outside of the printer......................................................................39Aligning the printer.........................................................................................39Print a sample page.......................................................................................39Automatically clean the printhead..................................................................40Manually clean the ink cartridge contacts......................................................40Print a self test report.....................................................................................41
Update the software..............................................................................................42Store and transport the printer and ink cartridges.................................................43
Store and transport the printer.......................................................................43Store and transport the ink cartridges............................................................43
Maintain the quality of photo paper.......................................................................437 Troubleshooting..................................................................................................45
Printer hardware problems....................................................................................45Printing problems...................................................................................................46Error messages.....................................................................................................50
Paper errors...................................................................................................50Ink cartridge errors.........................................................................................52Memory card errors........................................................................................55Computer and connectivity printing errors.....................................................58
8 HP support...........................................................................................................59Support process....................................................................................................59HP support by phone.............................................................................................59
Phone support period.....................................................................................59Placing a call..................................................................................................59After the phone support period.......................................................................60
Additional warranty options...................................................................................60A Specifications......................................................................................................61
System requirements.............................................................................................61Printer specifications.............................................................................................61
B HP Warranty.........................................................................................................65Index............................................................................................................................67
2 HP Photosmart D7300 series
1 WelcomeThank you for purchasing an HP Photosmart D7300 series printer! With this new photoprinter you can print beautiful photos, save photos to a computer, and create fun andeasy projects with or without a computer.This guide primarily explains how to print without connecting a computer. To learn howto print from a computer, install the printer software and view the electronic Help. For anoverview of using a computer and the printer together, see Printing from a computer. Forinformation about installing the software, see the Quick Start guide.Home users can learn how to:● Print borderless photos from the printer or from a computer● Choose a photo layout● Convert a color photo to black and white, or apply a color effect such as Sepia or
AntiqueThe printer comes with the following documentation:● Quick Start Guide: The Quick Start Guide explains how to set up the printer, install
the printer software, and print your first photo.● User Guide: The User Guide is the book you are reading. This guide describes the
basic features of the printer, explains how to use the printer without connecting acomputer, and contains hardware troubleshooting information.
● Onscreen help: The onscreen HP Photosmart printer help describes how to usethe printer with a computer and contains software troubleshooting information.
Special featuresNew features and media make it easier than ever to produce high-quality photos:● When you use the new HP Advanced Photo Paper (also called HP Photo Paper in
some countries/regions), special sensors in the printer detect a mark on the back ofthe paper and automatically select the optimal print settings. For more informationabout this new paper, see Choose the right paper.
● HP Real Life technologies make it easy for you to get better photos. Automatic redeye removal and adaptive lighting to enhance detail in shadows are just a few of themany technologies included. You can explore the many editing and enhancingoptions from both the control panel and from the printer software. To access thesefeatures from the control panel, see Improving photo quality. To learn how to findthem in the software, see HP Real Life technologies features.
Accessing the onscreen HP Photosmart printer helpAfter you have installed the HP Photosmart printer software on a computer, you can viewthe onscreen HP Photosmart printer help:● Windows PC: From the Start menu, select Programs (in Windows XP, select All
Programs) > HP > HP Photosmart D7300 series > Photosmart Help.● Macintosh: Select Help > Mac Help in the Finder, then select Help Center >
HP Photosmart Premier help > HP Photosmart printer help.
HP Photosmart D7300 series User Guide 3

Printer parts
Front of printer1 On: Press this button to turn on the printer.2 Top cover: Lift this cover to access the ink cartridges and to clear paper jams. To lift the cover,
grasp the top cover below the HP logo and pull upward.3 Touch Screen Display: Use this screen to view and print photos, menus, and messages.4 Output tray: Use this tray to catch your printouts. Lift this tray to access the photo tray.5 Main tray: Pull out this tray and load paper, transparencies, envelopes, or other media with
the side to be printed facing down.6 Photo tray: Lift the output tray and load small-size paper up to 10 x 15 cm (4 x 6 inch) into
the photo tray for printing with the side to be printed facing down. The paper may be tabbedor untabbed.
7 Memory card slots: Insert memory cards here. For a list of supported memory cards, seeInsert memory cards.
8 Camera port: Connect a PictBridge™ digital camera, the optional HP Bluetooth® wirelessprinter adapter, or an iPod.
Back of printer1 Power cord connection: Use this port to connect the power cord included with the printer.2 USB port: Use this port to connect the printer to a computer.3 Rear access door: Remove this door to clear paper jams or to install the optional
HP Automatic Two-sided Printing Accessory. See Optional accessories.
Chapter 1
4 HP Photosmart D7300 series
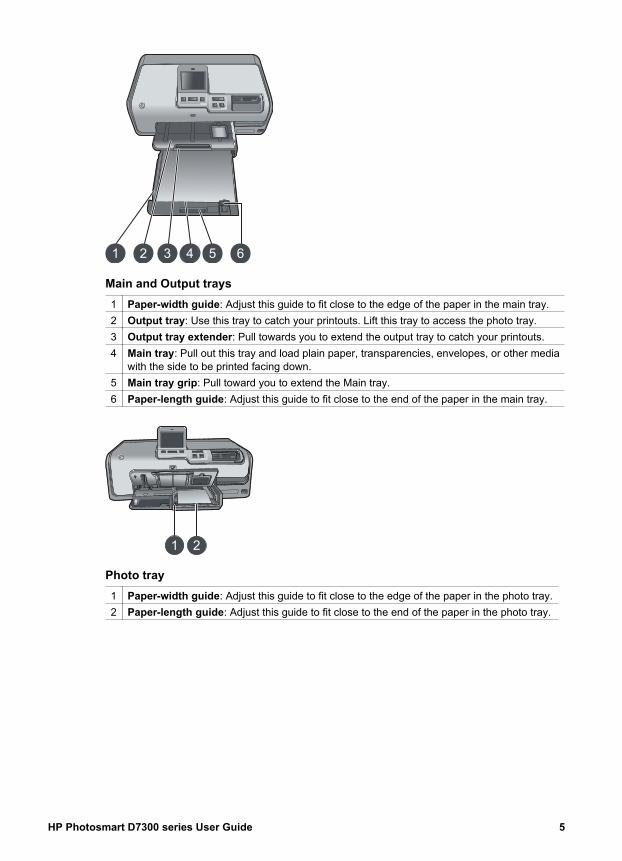
Main and Output trays1 Paper-width guide: Adjust this guide to fit close to the edge of the paper in the main tray.2 Output tray: Use this tray to catch your printouts. Lift this tray to access the photo tray.3 Output tray extender: Pull towards you to extend the output tray to catch your printouts.4 Main tray: Pull out this tray and load plain paper, transparencies, envelopes, or other media
with the side to be printed facing down.5 Main tray grip: Pull toward you to extend the Main tray.6 Paper-length guide: Adjust this guide to fit close to the end of the paper in the main tray.
Photo tray1 Paper-width guide: Adjust this guide to fit close to the edge of the paper in the photo tray.2 Paper-length guide: Adjust this guide to fit close to the end of the paper in the photo tray.
HP Photosmart D7300 series User Guide 5
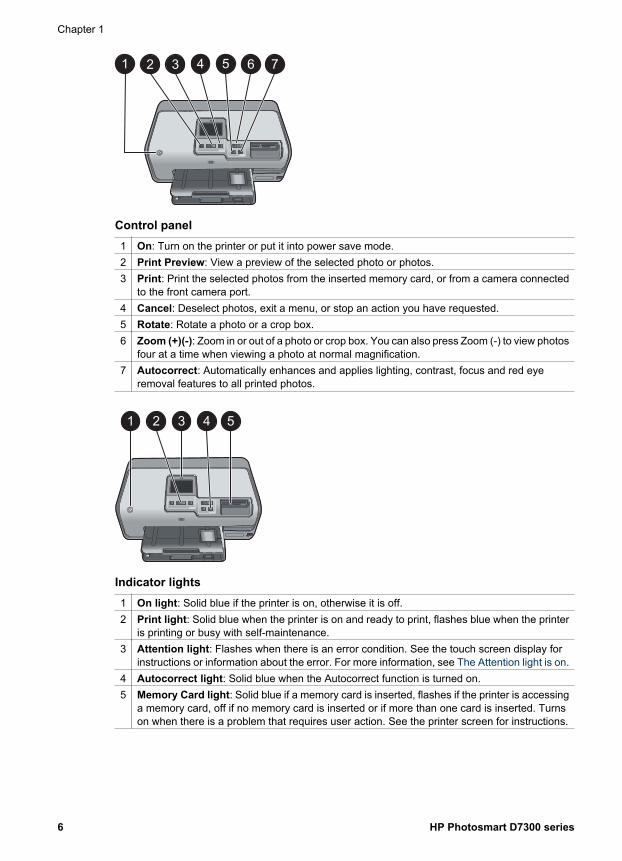
Control panel1 On: Turn on the printer or put it into power save mode.2 Print Preview: View a preview of the selected photo or photos.3 Print: Print the selected photos from the inserted memory card, or from a camera connected
to the front camera port.4 Cancel: Deselect photos, exit a menu, or stop an action you have requested.5 Rotate: Rotate a photo or a crop box.6 Zoom (+)(-): Zoom in or out of a photo or crop box. You can also press Zoom (-) to view photos
four at a time when viewing a photo at normal magnification.7 Autocorrect: Automatically enhances and applies lighting, contrast, focus and red eye
removal features to all printed photos.
Indicator lights1 On light: Solid blue if the printer is on, otherwise it is off.2 Print light: Solid blue when the printer is on and ready to print, flashes blue when the printer
is printing or busy with self-maintenance.3 Attention light: Flashes when there is an error condition. See the touch screen display for
instructions or information about the error. For more information, see The Attention light is on.4 Autocorrect light: Solid blue when the Autocorrect function is turned on.5 Memory Card light: Solid blue if a memory card is inserted, flashes if the printer is accessing
a memory card, off if no memory card is inserted or if more than one card is inserted. Turnson when there is a problem that requires user action. See the printer screen for instructions.
Chapter 1
6 HP Photosmart D7300 series
Optional accessoriesThere are several optional accessories available for the printer that enhance its portabilityfor printing anywhere, anytime. The appearance of the accessories may vary from whatis shown.To purchase supplies, go to:● www.hpshopping.com (U.S.)● www.hp.com/go/supplies (Europe)● www.hp.com/jp/supply_inkjet (Japan)● www.hp.com/paper (Asia/Pacific)
Accessory name Description
HP Automatic Two-sided PrintingAccessory
This accessory automatically flips eachpage to print on both sides. You will savemoney (two-sided printing reduces paperconsumption) and time (no need toremove the paper and reinsert it to print onthe back), plus you will make bulkydocuments more manageable.This accessory may not be available in allcountries/regions.
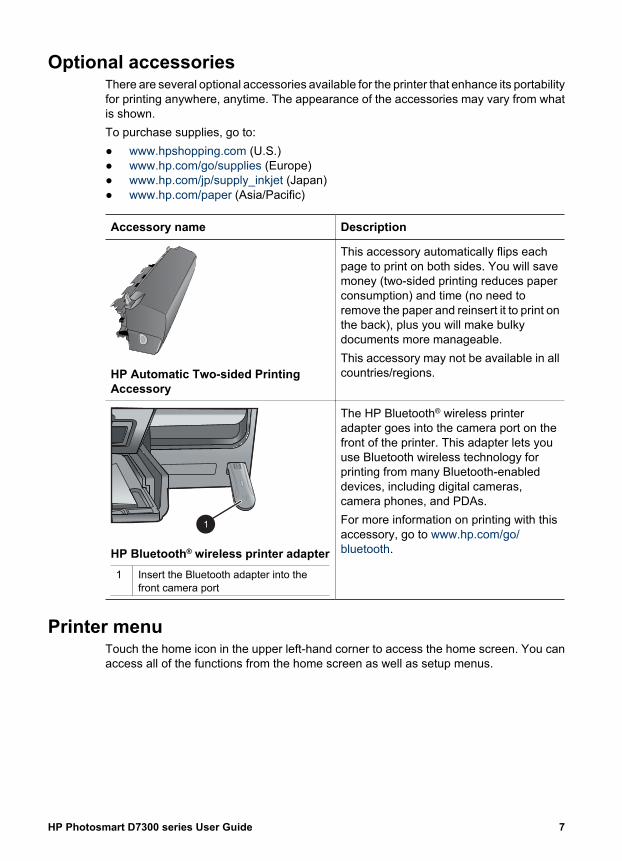
HP Bluetooth® wireless printer adapter1 Insert the Bluetooth adapter into the
front camera port
The HP Bluetooth® wireless printeradapter goes into the camera port on thefront of the printer. This adapter lets youuse Bluetooth wireless technology forprinting from many Bluetooth-enableddevices, including digital cameras,camera phones, and PDAs.For more information on printing with thisaccessory, go to www.hp.com/go/bluetooth.
Printer menuTouch the home icon in the upper left-hand corner to access the home screen. You canaccess all of the functions from the home screen as well as setup menus.
HP Photosmart D7300 series User Guide 7
PrintWizard: Use the wizard to guide you through the printing process.4×6: Use to print 4×6 inch (10 × 15 cm) photographs.Enlargement: Use Enlargement to print different photo sizes.All: Select to print all the photos from the memory card inserted in the printer.Other Projects: Use Other Projects to print panoramic, HP CD/DVD Tattoos, walletprints, and passport photos.– Panorama Prints: Select to turn panoramic printing On or Off (default). Select
On to print all selected photos with a 3:1 aspect ratio; load 10 x 30 cm (4 x 12 inch)paper before printing.
– HP CD/DVD Tattoos: Select to print labels for CD/DVDs.– Wallet Prints: Use to print wallet-sized photos.– Passport Photos: Select to print a passport photo.
SaveTouch the Save button to save selected images to a connected PC.
ShareUse the Share button to select and share photos through HP Photosmart Share.
Settings● Tools: Use tools to display the ink gauge, adjust the print quality, print a sample
page, print a test page, and to clean and align cartridges.– Display Ink Gauge: Use to enable an ink supply gauge on the home screen.– Print quality: Choose either Best (default) or Normal print quality.– Print sample page: Select to print a sample page, which is useful for checking
the print quality of the printer. This feature is not available in all printer models.– Print test page: Select to print a test page containing information about the
printer that can help in troubleshooting problems.– Clean Printhead: Select to clean the print head when white lines or streaks
appear in your printouts. After the cleaning finishes, the printer prints a self testreport. You have the option to clean the print head again if the report showsprint quality problems.
– Align printer: Select to align the printer when white lines or streaks appear inyour printouts.
● Bluetooth– Device address: Some devices with Bluetooth wireless technology require you
to enter the address of the device they are trying to locate. This menu optionshows the printer address.
– Device name: You can select a name for the printer that appears on otherdevices with Bluetooth wireless technology when they locate the printer.
– Passkey: When the Bluetooth Security level of the printer is set to High, youmust enter a passkey to make the printer available to other Bluetooth devices.The default passkey is 0000.
– Visibility: Select Visible to all (default) or Not visible. When Visibility is setto Not visible, only devices that know the printer address can print to it.
– Security level: Select Low (default) or High. The Low setting does not requireusers of other devices with Bluetooth wireless technology to enter the printer
Chapter 1
8 HP Photosmart D7300 series
passkey. High requires users of other devices with Bluetooth wirelesstechnology to enter the printer passkey.
– Reset Bluetooth options: Select to reset all items in the Bluetooth menu totheir default values.
● Help Menu: Use the help menu for instructions about using the printer.– Cartridges: Select to see an animation of how to install an ink cartridge.– Main Tray Loading: Select to read main tray paper loading instructions.– Photo Tray Loading: Select to read photo tray paper loading instructions.– Paper jams: Select to see an animation of how to clear a paper jam.– Camera connect: Select to read instructions on how to connect a PictBridge
camera to the printer.● Preferences
– Print paper size: Touch Ask before print to select the paper type and size eachtime you print (default).
– Paper Type: Touch Automatic (default) and the printer will automatically detectthe paper type and size when you print.
– Date Stamp: Use this option to include the date and/or time on your printedphotos.
– Colorspace: Choose a colorspace. The Auto-select default tells the printer touse the Adobe RGB colorspace, if available. The printer defaults to sRGB ifAdobe RGB is not available.
– PictBridge Tray Select: Use to select the default paper tray for printing throughthe PictBridge connection.
– Audio Feedback: Use to enable an audible tone when a button is touched orpressed.
– Video enhancement: Select On (default) or Off. When you select On, thequality of photos printed from video clips will be improved.
– Restore Factory Defaults: Restores factory settings for all menu items exceptSelect language and Select country/region (under Language inPreference menu) and Bluetooth settings (under Bluetooth in the main printermenu). This setting does not affect HP Instant Share or Network defaults.
HP Photosmart D7300 series User Guide 9

Chapter 1
10 HP Photosmart D7300 series
2 Get ready to printThis section includes the following topics:● Load paper● Insert ink cartridges● Insert memory cards
Load paperLearn how to choose the right paper for your print job and how to load it into the inputtray for printing.
Choose the right paperUse HP Advanced Photo Paper. It is especially designed to work with the inks in yourprinter to create beautiful photos. Other photo papers will produce inferior results.For a list of available HP-designed photo paper, or to purchase supplies, go to:● www.hpshopping.com (U.S.)● www.hp.com/eur/hpoptions (Europe)● www.hp.com/jp/supply_inkjet (Japan)● www.hp.com/paper (Asia/Pacific)The printer is set by default to print the best quality photos on HP Advanced Photo Paper.If you print on a different type of paper, be sure to change the paper type from the printermenu. See Printer menu.
Load your paperPaper loading tips:● Load paper with the side to be printed facing down.● You can print photos and documents on a wide variety of paper sizes, from 8 x 13 cm
(3 x 5 inch) up to 22 x 61 cm (8.5 x 24 inch). The 10 x 15 cm (4 x 6 inch) photopaper is available with and without tabs.
● Before loading paper, pull the out main paper tray and slide out the paper-width andpaper-length guides to make room for the paper. After loading paper, adjust theguides to fit close to the edges of the paper without bending the paper. When finishedloading paper, push the main tray back in all the way.
● Load only one type and size of paper at a time in the same tray.● After loading paper, extend the output tray extension to catch your printed pages.Use the directions in the following table to load the most commonly used paper sizes intothe printer.
Paper type How to load Tray to load
Any supported photoor plain paper media
1. Extend the main tray.2. Slide the paper-width and
paper-length guides to theiroutermost positions.
Load the main tray
HP Photosmart D7300 series User Guide 11
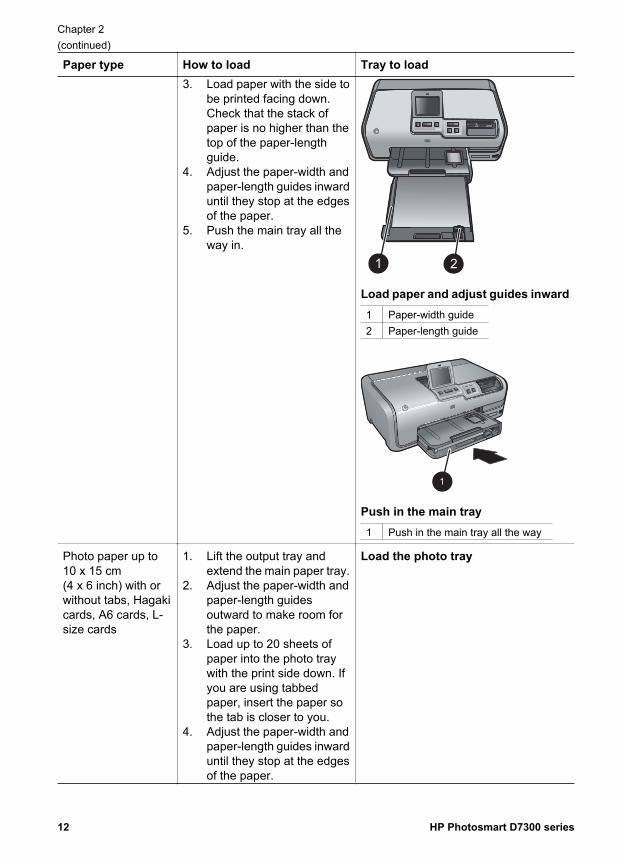
Paper type How to load Tray to load3. Load paper with the side to
be printed facing down.Check that the stack ofpaper is no higher than thetop of the paper-lengthguide.
4. Adjust the paper-width andpaper-length guides inwarduntil they stop at the edgesof the paper.
5. Push the main tray all theway in.
Load paper and adjust guides inward1 Paper-width guide2 Paper-length guide
Push in the main tray1 Push in the main tray all the way
Photo paper up to10 x 15 cm(4 x 6 inch) with orwithout tabs, Hagakicards, A6 cards, L-size cards
1. Lift the output tray andextend the main paper tray.
2. Adjust the paper-width andpaper-length guidesoutward to make room forthe paper.
3. Load up to 20 sheets ofpaper into the photo traywith the print side down. Ifyou are using tabbedpaper, insert the paper sothe tab is closer to you.
4. Adjust the paper-width andpaper-length guides inwarduntil they stop at the edgesof the paper.
Load the photo tray
Chapter 2(continued)
12 HP Photosmart D7300 series
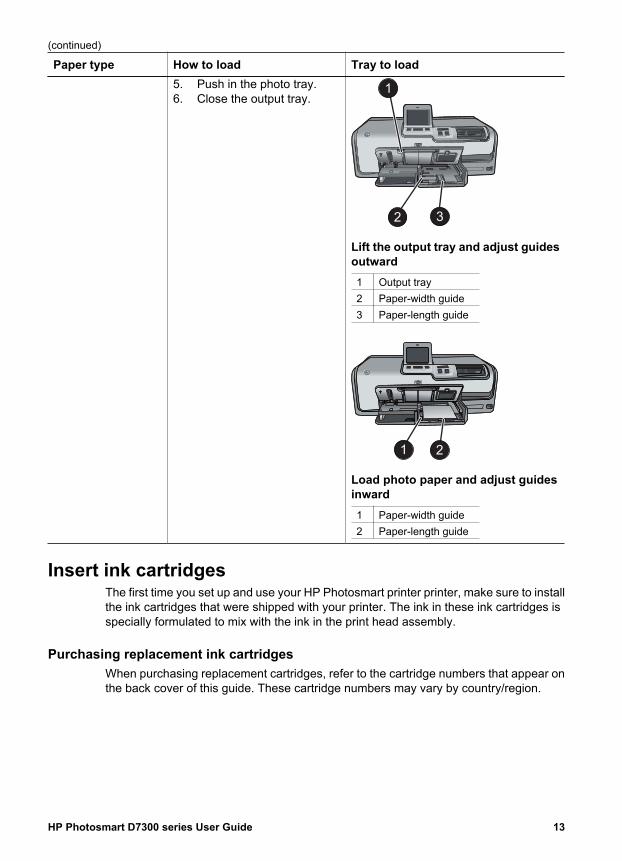
Paper type How to load Tray to load5. Push in the photo tray.6. Close the output tray.
Lift the output tray and adjust guidesoutward1 Output tray2 Paper-width guide3 Paper-length guide
Load photo paper and adjust guidesinward1 Paper-width guide2 Paper-length guide
Insert ink cartridgesThe first time you set up and use your HP Photosmart printer printer, make sure to installthe ink cartridges that were shipped with your printer. The ink in these ink cartridges isspecially formulated to mix with the ink in the print head assembly.
Purchasing replacement ink cartridgesWhen purchasing replacement cartridges, refer to the cartridge numbers that appear onthe back cover of this guide. These cartridge numbers may vary by country/region.
(continued)
HP Photosmart D7300 series User Guide 13
Note If you have already used the printer several times and you have installedthe HP Photosmart printer software, you can also find the cartridge numbers inthe printer software. Windows users: Right-click the HP Digital Imaging Monitoricon in the Windows taskbar, and select Launch/Show HP Solution Center.Select Settings, then Print Settings, and then Printer Toolbox. Click theEstimated Ink Levels tab, and then click Ink Cartridge Information. To orderink cartridges, click Shop Online. Mac users: Click HP Photosmart Premier inthe Dock. Choose Maintain Printer from the Settings pop-up menu. ClickLaunch Utility, and then choose Supplies Status from the pop-up menu.
Ink cartridge tipsHP Vivera Inks deliver true-to-life photo quality and exceptional fade resistance resultingin vivid colors that last for generations! HP Vivera Inks are specially-formulated andscientifically tested for quality, purity and fade resistance.For best print quality, HP recommends that you install all retail ink cartridges before theinstall-by date stamped on the box.For optimum printing results, HP recommends using only genuine HP ink cartridges.Genuine HP ink cartridges are designed and tested with HP printers to help you easilyproduce great results, time after time.
Note HP cannot guarantee the quality or reliability of non-HP ink. Printer serviceor repairs required as a result of printer failure or damage attributable to the useof non-HP ink will not be covered under warranty.
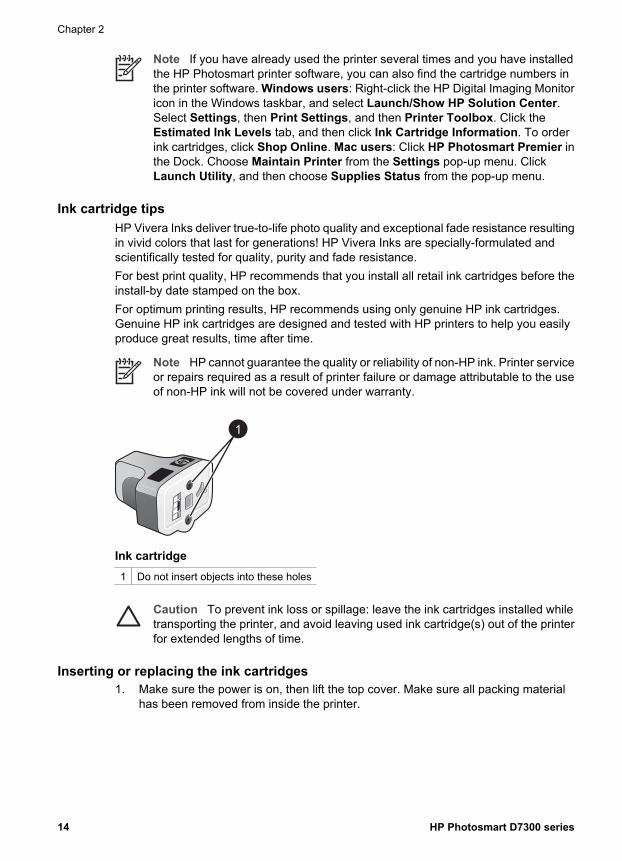
Ink cartridge1 Do not insert objects into these holes
Caution To prevent ink loss or spillage: leave the ink cartridges installed whiletransporting the printer, and avoid leaving used ink cartridge(s) out of the printerfor extended lengths of time.
Inserting or replacing the ink cartridges1. Make sure the power is on, then lift the top cover. Make sure all packing material
has been removed from inside the printer.
Chapter 2
14 HP Photosmart D7300 series
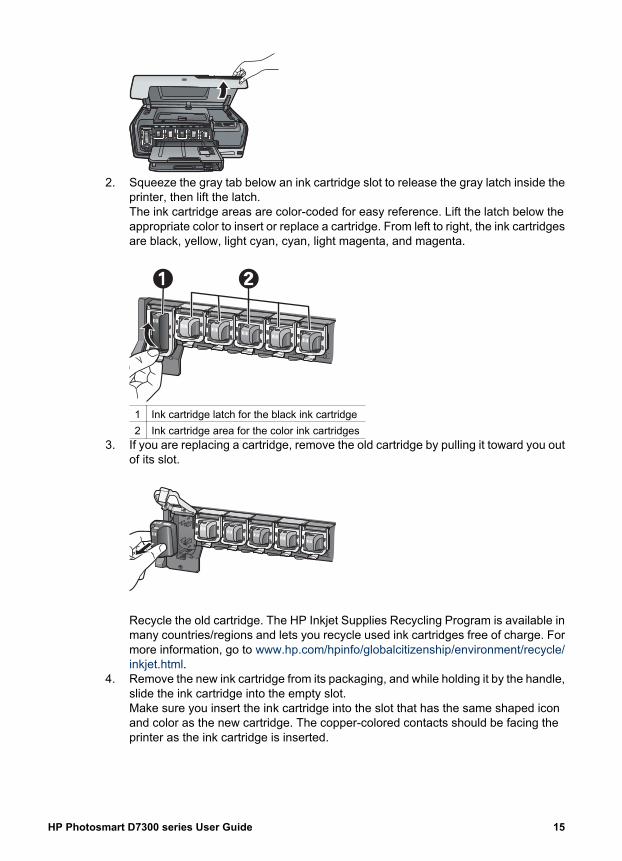
2. Squeeze the gray tab below an ink cartridge slot to release the gray latch inside theprinter, then lift the latch.The ink cartridge areas are color-coded for easy reference. Lift the latch below theappropriate color to insert or replace a cartridge. From left to right, the ink cartridgesare black, yellow, light cyan, cyan, light magenta, and magenta.
1 Ink cartridge latch for the black ink cartridge2 Ink cartridge area for the color ink cartridges
3. If you are replacing a cartridge, remove the old cartridge by pulling it toward you outof its slot.
Recycle the old cartridge. The HP Inkjet Supplies Recycling Program is available inmany countries/regions and lets you recycle used ink cartridges free of charge. Formore information, go to www.hp.com/hpinfo/globalcitizenship/environment/recycle/inkjet.html.
4. Remove the new ink cartridge from its packaging, and while holding it by the handle,slide the ink cartridge into the empty slot.Make sure you insert the ink cartridge into the slot that has the same shaped iconand color as the new cartridge. The copper-colored contacts should be facing theprinter as the ink cartridge is inserted.
HP Photosmart D7300 series User Guide 15
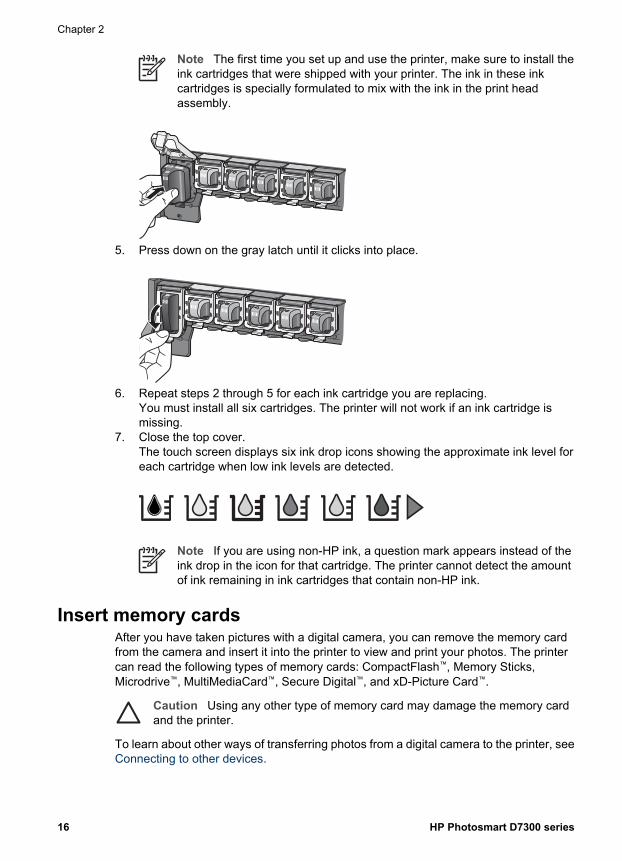
Note The first time you set up and use the printer, make sure to install theink cartridges that were shipped with your printer. The ink in these inkcartridges is specially formulated to mix with the ink in the print headassembly.
5. Press down on the gray latch until it clicks into place.
6. Repeat steps 2 through 5 for each ink cartridge you are replacing.You must install all six cartridges. The printer will not work if an ink cartridge ismissing.
7. Close the top cover.The touch screen displays six ink drop icons showing the approximate ink level foreach cartridge when low ink levels are detected.
Note If you are using non-HP ink, a question mark appears instead of theink drop in the icon for that cartridge. The printer cannot detect the amountof ink remaining in ink cartridges that contain non-HP ink.
Insert memory cardsAfter you have taken pictures with a digital camera, you can remove the memory cardfrom the camera and insert it into the printer to view and print your photos. The printercan read the following types of memory cards: CompactFlash™, Memory Sticks,Microdrive™, MultiMediaCard™, Secure Digital™, and xD-Picture Card™.
Caution Using any other type of memory card may damage the memory cardand the printer.
To learn about other ways of transferring photos from a digital camera to the printer, seeConnecting to other devices.
Chapter 2
16 HP Photosmart D7300 series
Supported file formatsThe printer can recognize and print the following file formats directly from a memory card:JPEG, uncompressed TIFF, Motion JPEG AVI, Motion-JPEG QuickTime, and MPEG-1.If your digital camera saves photos and video clips in other file formats, save the files toyour computer and print them using a software program. For more information, see theelectronic Help.
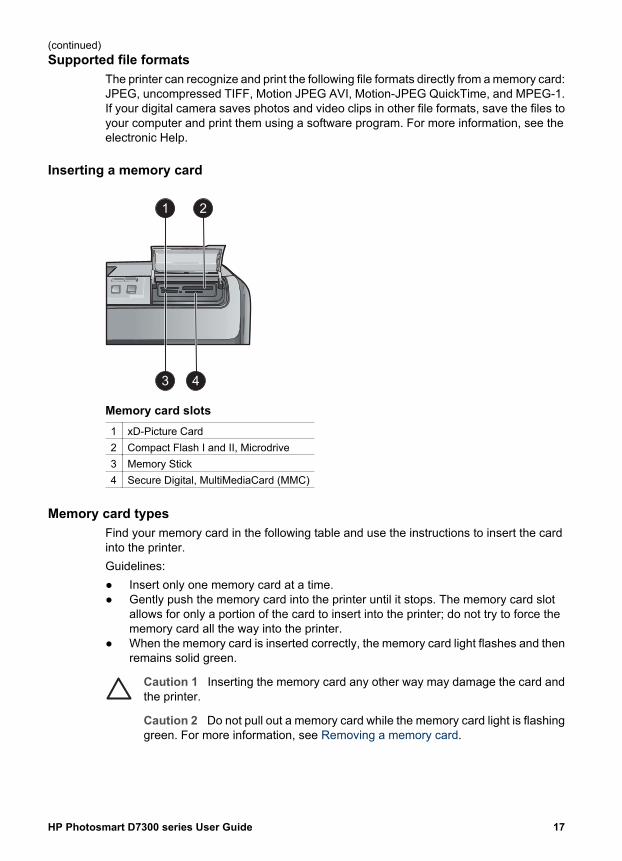
Inserting a memory card
Memory card slots1 xD-Picture Card2 Compact Flash I and II, Microdrive3 Memory Stick4 Secure Digital, MultiMediaCard (MMC)
Memory card typesFind your memory card in the following table and use the instructions to insert the cardinto the printer.Guidelines:● Insert only one memory card at a time.● Gently push the memory card into the printer until it stops. The memory card slot
allows for only a portion of the card to insert into the printer; do not try to force thememory card all the way into the printer.
● When the memory card is inserted correctly, the memory card light flashes and thenremains solid green.
Caution 1 Inserting the memory card any other way may damage the card andthe printer.
Caution 2 Do not pull out a memory card while the memory card light is flashinggreen. For more information, see Removing a memory card.
(continued)
HP Photosmart D7300 series User Guide 17
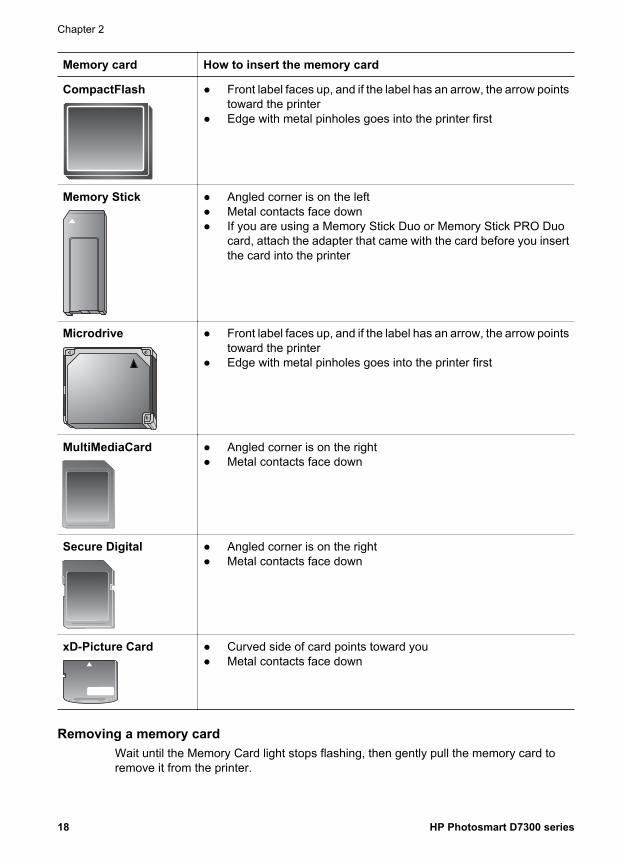
Memory card How to insert the memory card
CompactFlash ● Front label faces up, and if the label has an arrow, the arrow pointstoward the printer
● Edge with metal pinholes goes into the printer first
Memory Stick ● Angled corner is on the left● Metal contacts face down● If you are using a Memory Stick Duo or Memory Stick PRO Duo
card, attach the adapter that came with the card before you insertthe card into the printer
Microdrive ● Front label faces up, and if the label has an arrow, the arrow pointstoward the printer
● Edge with metal pinholes goes into the printer first
MultiMediaCard ● Angled corner is on the right● Metal contacts face down
Secure Digital ● Angled corner is on the right● Metal contacts face down
xD-Picture Card ● Curved side of card points toward you● Metal contacts face down
Removing a memory cardWait until the Memory Card light stops flashing, then gently pull the memory card toremove it from the printer.
Chapter 2
18 HP Photosmart D7300 series

Caution Do not pull out a memory card while the Memory Card light is flashing.A flashing light means that the printer is accessing the memory card. Removinga memory card while it is being accessed may damage the printer and the memorycard or corrupt the information on the memory card.
HP Photosmart D7300 series User Guide 19

Chapter 2
20 HP Photosmart D7300 series
3 Printing photos without acomputerThe HP Photosmart D7300 series printer lets you select, enhance, and print photoswithout even turning on the computer. Once you've set up the printer using theinstructions in the Quick Start booklet, you can insert a memory card in the printer andprint your photos using the buttons on the printer control panel.You can also print photos directly from a digital camera. For more information, see Printphotos from a digital camera.
Printing photosYou can print photos without a computer in several different ways:● Insert a memory card with photos on it into one of the memory card slots on the
printer● Connect a PictBridge digital camera to the camera port on the front of the printer● Install the optional HP Bluetooth® wireless printer adapter and print from a digital
camera with Bluetooth wireless technology
Print photos from a memory cardYou can print photos from a memory card by inserting the card into the printer and usingthe printer control panel to view, select, enhance, and print photos. You can also printcamera-selected photos—photos you marked for printing using a digital camera—directly from a memory card.Printing from a memory card is quick and easy, and does not drain the digital camerabatteries.
If you want to… Follow these steps:
Print one or more photosBefore you begin, make surethat the memory card is insertedin the printer and the paper trayyou want to use is loaded withthe correct paper.Check the Photo tray light toverify that the correct tray isselected — the light should beoff for the Main tray and on forthe Photo tray.
1. Touch Print.2. Touch 4×6 or Enlargement to select your
desired photo size.3. Touch the desired paper size.4. Using the left and right arrow keys, scroll
through the available photos.5. Touch the desired photos to select one or more
images.
Note Press Zoom - to view 4 imageson the touch screen display.
6. Press Print to print the selected photographs.
Print all photos on thememory cardBefore you begin, make surethat the memory card is insertedin the printer and the paper tray
1. Touch Print.2. Touch All.3. Touch the desired paper size.4. Touch the desired photo size.
HP Photosmart D7300 series User Guide 21
If you want to… Follow these steps:you want to use is loaded withthe correct paper.
Print camera-selected photosfrom a memory cardWhen you select photos forprinting using a digital camera,the camera creates a DigitalPrint Order Format (DPOF)file that identifies the selectedphotos. The printer can readDPOF 1.0 and 1.1 files directlyfrom a memory card.
1. Use the digital camera to select the photos youwant to print. For more information, see thedocumentation that came with the camera.
2. If you select default as the photo layout with thecamera, touch the Layout to select a photolayout.If you select a photo layout other than defaultwith the camera, photos print in the camera-selected layout regardless of the printer setting.
3. Load the desired paper.4. Remove the memory card from the digital
camera and insert it into the printer.5. When a message appears on the printer screen
asking if you want to print the camera-selectedphotos, touch .The photos you selected with the camera beginprinting.
If the printer cannot find or read all of the camera-selected photos on the card, it prints the photos thatit can read.After printing, the printer deletes the DPOF file andunmarks the photos.
Print using the WizardThe print wizard providesdetailed instructions aboutselecting, sizing, editing, andprinting photographs.
1. Touch Print.2. Touch Wizard.3. Follow the prompts to print your desired photo
or photos.
Print photos from video clipsYou can view video clips on thetouch screen display, and selectand print individual frames.When you first insert a memorycard containing a video clip, theprinter uses the first frame of thevideo clip to represent the clipon the printer screen.The printer recognizes videoclips recorded in these formats:● Motion-JPEG AVI● Motion-JPEG QuickTime● MPEG-1
1. Touch Print.2. Touch 4×6 or Enlargement to select your
desired photo size.3. Scroll to select the available videos using the left
and right arrows.Note Videos display a video cameraicon in the center of the image.
4. Touch the play icon to play the video.You can fast-forward or rewind the video bytouching the forward and reverse arrows.
5. To select a frame to print, pause the video bytouching the pause icon. The video must bepaused to select frames for printing.
Note Touch the forward or reverseicons to advance or rewind the videoframe-by-frame.
Chapter 3(continued)
22 HP Photosmart D7300 series

If you want to… Follow these steps:The printer ignores video clipsin any other format.Before you begin, make surethat the memory card is insertedin the printer and the paper trayyou want to use is loaded withthe correct paper.
6. Touch the desired frame to select it for printing.7. Touch Print to print the selected frames.
Print a photo indexA photo index shows thumbnailviews and index numbers for upto 2000 photos on a memorycard. Use plain paper instead ofphoto paper to reduce costs.A photo index may be severalpages long.Before you begin, make surethat the memory card is insertedin the printer and the paper trayyou want to use is loaded withthe correct paper.
1. Touch Print.2. Touch All.3. Select 8.5×11 paper.4. Touch the index sheet icon.
Stop printing To stop a print job in progress, press Cancel.
Print photos from a digital cameraYou can print photos by connecting a PictBridge digital camera directly to the cameraport of the printer with a USB cable. If you have a digital camera with Bluetooth wirelesstechnology, you can insert the optional HP Bluetooth® wireless printer adapter in theprinter and send photos to the printer wirelessly.When you print from a digital camera, the printer uses the settings that you selected onthe camera. For more information, see the documentation that came with the camera.
To print photos from a… Follow these steps
Digital camera with Bluetoothwireless technologyIf you have a digital camera withBluetooth wireless technology,you can purchase the optionalHP Bluetooth® wireless printeradapter and print from a camerausing a Bluetooth wirelessconnection.
1. Set the Bluetooth options for the printer usingthe Bluetooth menu on the touch screen display.For more information, see Bluetooth.
2. Load printer paper.3. Insert the HP Bluetooth® wireless printer
adapter into the camera port on the front of theprinter.The light on the adapter flashes when theadapter is ready to receive data.
4. Follow the instructions in the documentationthat came with the digital camera to send photosto the printer.
(continued)
HP Photosmart D7300 series User Guide 23
To print photos from a… Follow these stepsNote You can alsoprint from other deviceswith Bluetooth wirelesstechnology, such asPDAs and cameraphones. For moreinformation, seeConnecting to otherdevices and thedocumentation thatcame with yourBluetooth adapter.
Digital camera withPictBridge technology
1. Turn on the PictBridge digital camera and selectthe photos you want to print.
2. Load paper.3. Make sure the camera is in PictBridge mode,
then connect it to the camera port on the frontof the printer using the USB cable that camewith the camera.Once the printer recognizes the PictBridgecamera, the selected photos print automatically.
Print photos from an iPodIf you have an iPod that can store photos, you can connect your iPod to the printer andprint the photos.
Before you beginCheck that the images you copy to the iPod are in JPEG format.
Note iPods might not be available in your country/region.
To import photos to an iPod1. Copy photos from a memory card to your iPod using the Belkin Media Reader for
iPod.2. Verify that photos are on your iPod by selecting Photo Import on the iPod menu.
Photos appear as Rolls.
To print photos from an iPod1. Connect the iPod to the camera port on the front of the printer using the USB cable
that came with the iPod. The printer screen displays Reading Device for severalminutes while the photos are read. Then the photos appear on the printer screen.
2. Select the photo(s) you want to print and press Print. For more information onselecting and printing photos, see Printing photos.
Chapter 3(continued)
24 HP Photosmart D7300 series
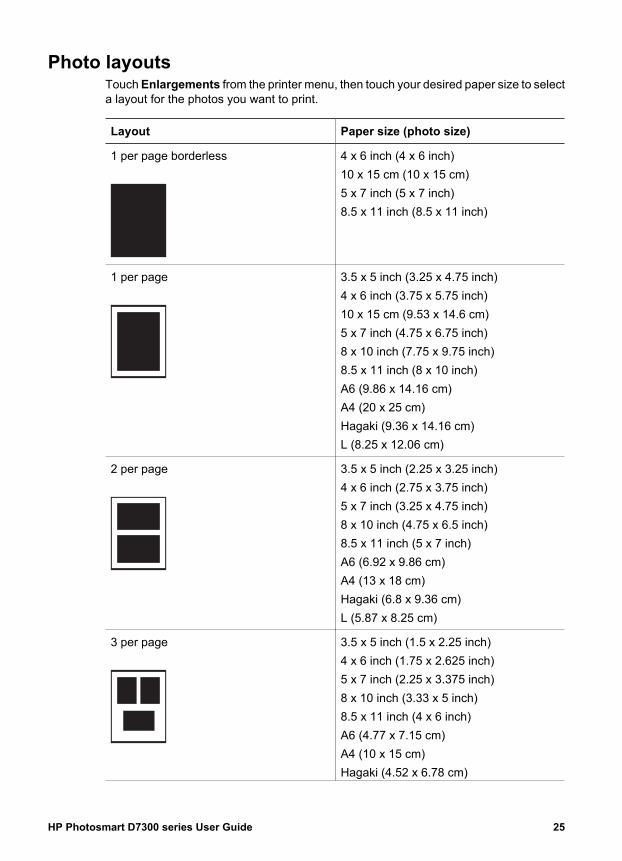
Photo layoutsTouch Enlargements from the printer menu, then touch your desired paper size to selecta layout for the photos you want to print.
Layout Paper size (photo size)
1 per page borderless 4 x 6 inch (4 x 6 inch)10 x 15 cm (10 x 15 cm)5 x 7 inch (5 x 7 inch)8.5 x 11 inch (8.5 x 11 inch)
1 per page 3.5 x 5 inch (3.25 x 4.75 inch)4 x 6 inch (3.75 x 5.75 inch)10 x 15 cm (9.53 x 14.6 cm)5 x 7 inch (4.75 x 6.75 inch)8 x 10 inch (7.75 x 9.75 inch)8.5 x 11 inch (8 x 10 inch)A6 (9.86 x 14.16 cm)A4 (20 x 25 cm)Hagaki (9.36 x 14.16 cm)L (8.25 x 12.06 cm)
2 per page 3.5 x 5 inch (2.25 x 3.25 inch)4 x 6 inch (2.75 x 3.75 inch)5 x 7 inch (3.25 x 4.75 inch)8 x 10 inch (4.75 x 6.5 inch)8.5 x 11 inch (5 x 7 inch)A6 (6.92 x 9.86 cm)A4 (13 x 18 cm)Hagaki (6.8 x 9.36 cm)L (5.87 x 8.25 cm)
3 per page 3.5 x 5 inch (1.5 x 2.25 inch)4 x 6 inch (1.75 x 2.625 inch)5 x 7 inch (2.25 x 3.375 inch)8 x 10 inch (3.33 x 5 inch)8.5 x 11 inch (4 x 6 inch)A6 (4.77 x 7.15 cm)A4 (10 x 15 cm)Hagaki (4.52 x 6.78 cm)
HP Photosmart D7300 series User Guide 25
Layout Paper size (photo size)L (3.96 x 5.94 cm)
4 per page 3.5 x 5 inch (1.5 x 2.25 inch)4 x 6 inch (1.75 x 2.5 inch)5 x 7 inch (2.2 x 3.25 inch)8 x 10 inch (3.5 x 4.75 inch)8.5 x 11 inch (3.5 x 5 inch)A6 (4.77 x 6.92 cm)A4 (9 x 13 cm)Hagaki (4.52 x 6.5 cm)L (3.96 x 5.7 cm)
9 per page 3.5 x 5 inch (1 x 1.375 inch)4 x 6 inch (1.125 x 1.5 inch)5 x 7 inch (1.5 x 2 inch)8 x 10 inch (2.25 x 3 inch)8.5 x 11 inch (2.5 x 3.25 inch) – WalletsizeA6 (3.07 x 4.05 cm)A4 (6.4 x 8.4 cm)Hagaki (2.9 x 3.86 cm)L (2.53 x 3.36 cm)
Note The printer may rotate the photos to fit the layout.
Improving photo qualityThe printer provides a variety of enhancements that can improve the quality of a photoprinted from a memory card. These print settings do not change the original photo. Theyonly affect printing.
Problem How to correct it
Photos with poor brightness 1. Touch Print.2. Touch 4×6 or Enlargement to select
your desired photo size.3. Touch the desired paper size.4. Touch Edit, then touch Photo
Brightness.5. Touch the brightness slider to
increase or decrease the photobrightness to the desired level, thentouch OK.
Chapter 3(continued)
26 HP Photosmart D7300 series
Problem How to correct it
Photos with red eye The automatic red eye removal feature isenabled when you turn on the Photo fixfunction. Enabling the Photo Fix functionapplies Smart Focus, Adaptive Lighting,and red eye removal features to selectedphotos.➔ Press Autocorrect to enable the
Photo Fix function.
Poor-quality video clipsThis preference affects photos printedfrom video clips.
Note This feature does notimprove photos printed using theVideo action prints feature in thePrint Options menu. This featurealso does not work with photosprinted in the 9-per-page layout.
Improve the quality of photos printedfrom video clips1. Touch Settings.2. Touch the arrows to scroll and locate
Preferences.3. Touch Preferences.4. Using the arrows, locate then touch
Video Enhancement.5. Touch On, then touch OK.For information about printing photos fromvideo clips, see Print photos from amemory card.
Getting creativeThe printer provides a variety of tools and effects that let you use your photos in creativeways. These print settings do not change the original photo. They only affect printing.
To try these features… Follow these steps
Add a color effectYou can set the printer tochange the color option appliedto a photo from Color (default)to Black & white, Sepia, orAntique.Photos printed in Sepia print inbrown tones and look similar tophotos produced in the early1900s. Photos printed inAntique print in the samebrown tones, but with some palecolors added to give theappearance that the photos arehand-colored.
1. Touch Print.2. Touch 4×6 or Enlargements and select your
desired photo size.3. Touch the desired paper size.4. Touch the desired photos to select one or more
images.5. Touch Edit from a selected photo.6. Use the arrows to locate the Color Effect
function. Touch Color Effect.7. Touch the desired color effect.
(continued)
HP Photosmart D7300 series User Guide 27
To try these features… Follow these steps
Add the date and time to yourprintsYou can print a stamp on thefront of your photos that showswhen the photo was taken. Thispreference affects all prints.
1. Touch Settings.2. Touch Preferences, then touch Date Stamp.3. Touch one of the following date/time stamp
options:– Date and Time– Date Only– Off
If you use a computer to modify the photo and thensave your changes, the original date and timeinformation are lost. Changes that you make to thephoto using the printer control panel do not affect thedate and time information.
Change the print qualityYou can change the print qualityfor photos. Best quality is thedefault and produces thehighest quality photos. Normalquality conserves ink and printsfaster.
To change the print quality to Normal for oneprint job:1. Touch Settings.2. Touch Tools, then touch Print quality.3. Touch Normal, then touch OK.Print quality will revert to Best after the next print job.
Crop a photoPress Zoom + and Zoom – toincrease or decrease themagnification by 1.25×. Themaximum level is 5.0×.
1. Touch Print.2. Touch 4×6 or Enlargement to select your
desired photo size.3. Touch the desired paper size.4. Touch the desired photo to select the image.5. Press Zoom + to increase the magnification of
the photo by 1.25×. The green crop boxappears. Press Zoom + repeatedly until youreach the desired magnification. (After zoomingin, you can zoom back out by pressing Zoom –.)
Note The crop box changes fromgreen to yellow if printing at the selectedmagnification will noticeably reduce theprint quality.
6. At any magnification level, touch the arrows tomove the crop box left, right, up, or down.
7. Touch Crop when the portion of the image youwant to print is in the crop box.Cropping does not change the original photo. Itonly affects printing.
Print panoramic photos 1. Touch Print.2. Touch Other Projects, then touch Panorama
Prints.
Chapter 3(continued)
28 HP Photosmart D7300 series

To try these features… Follow these steps3. Follow the prompt to load 10 x 30 cm
(4 x 12 inch) media, then touch OK.4. Touch a photo to select it. If desired, crop the
photo before printing. See The crop box has a3:1 aspect ratio.
Note All photos printed in panoramic modeare printed borderless.
(continued)
HP Photosmart D7300 series User Guide 29

Chapter 3
30 HP Photosmart D7300 series
4 Getting connectedUse the printer to stay connected to other devices and people.
Connecting to other devicesThis printer offers several ways of connecting to computers or other devices. Eachconnection type lets you do different things.
Connection type and what you need This lets you...
Memory cards
A memory card
A compatible digital camera memory cardInsert the memory card into theappropriate memory card slot on the frontof the printer.
● Print directly from a memory card tothe printer.
● Save photos from a memory cardinserted in the printer to a computerwhere you can enhance or organizethem in the HP Photosmart Premieror other software. For moreinformation, see Saving photos to acomputer and Print photos from amemory card.
USB● A Universal Serial Bus (USB) 2.0 full-
speed compliant cable 3 meters (10feet) or less in length. For instructionsabout connecting the printer with aUSB cable, see the Quick Startbooklet.
● A computer with Internet access (touse HP Photosmart Share).
● Print from a computer to the printer.See Printing from a computer.
● Save photos from a memory cardinserted in the printer to a computerwhere you can enhance or organizethem in the HP Photosmart Premieror other software.
● Share photos through HP PhotosmartShare.
● Print directly from an HP Photosmartdirect-printing digital camera to theprinter. For more information, seePrint photos from a digital camera andthe camera documentation.
PictBridge Print directly from a PictBridge-compatibledigital camera to the printer.For more information, see Print photosfrom a digital camera and the cameradocumentation.
HP Photosmart D7300 series User Guide 31
Connection type and what you need This lets you...
The PictBridge symbol
A PictBridge-compatible digital cameraand a USB cable.Connect the camera to the camera port onthe front of the printer.
BluetoothThe optional HP Bluetooth wireless printeradapter.If the printer came with this accessory oryou have purchased it separately, see theaccompanying documentation and theonscreen Help for instructions.
Print from any device with Bluetoothwireless technology—such as a digitalcamera, a camera phone, or a PDA—tothe printer.If you connect the optional HP Bluetoothwireless printer adapter to the printerthrough the camera port, be sure to set theBluetooth printer menu options asneeded. See Settings.
HP iPodAn HP iPod and the USB cable that camewith it. Connect the HP iPod to the cameraport on the front of the printer.
Print directly from an HP iPod (with photosstored in it) to the printer. For moreinformation, see Print photos from aniPod.
Chapter 4(continued)
32 HP Photosmart D7300 series
Saving photos to a computerYou can save photos to a computer from any memory card inserted in the printer, if youset up a USB connection between the two devices.
If you are using a Windows computerUse either of these methods to save photos to your computer.● Insert a memory card into the printer. TheHP Photosmart Premier transfer software
(HP Transfer and Quick Print) opens on your computer screen and allows you todesignate a location on the computer to save images. For more information, see theonscreen HP Photosmart printer software help.
● Insert a memory card into the printer. The memory card appears in WindowsExplorer as a removable drive. Open the removable drive and drag photos from thecard to any location on your computer.
If you are using a Macintosh1. Insert a memory card into the printer.2. Wait for iPhoto to start and read the contents of the memory card.3. Click Import to save the photos on the card to your Macintosh.
Note The memory card also appears on the desktop as a drive icon. You canopen it and drag photos from the card to any location on your Macintosh.
Connecting through HP Photosmart ShareUse HP Photosmart Share to share photos with friends and relatives using e-mail, onlinealbums, or an online photo finishing service. Your printer must be connected through aUSB cable to a computer with Internet access and have all the HP software installed. Ifyou try to use Share and do not have all the required software installed or configured, amessage prompts you through the required steps.
Use Share (USB) to send photos (Windows users):1. Insert a memory card and select some photos.2. Touch Share on the printer screen.3. Follow the instructions on your computer to share the selected photos with others.
Use Share (USB) to send photos (Mac users)1. Open HP Photosmart Premier and select photos to share. For information about
HP Photosmart Premier, see HP Photosmart Premier.2. Click the Applications tab in HP Photosmart Premier, then double-click HP
Photosmart Share.3. Follow the instructions on your computer to share the selected photos with others.See the onscreen software help for more information about using HP Photosmart Share
HP Photosmart D7300 series User Guide 33

Chapter 4
34 HP Photosmart D7300 series
5 Printing from a computerTo print from a computer, the printer software must be installed. During softwareinstallation, either HP Photosmart Premier (Mac users and Windows Full-install users)or HP Photosmart Essential (Windows Express-install users) is installed on yourcomputer, allowing you to organize, share, edit, and print photos.For more information on installing the software, see the Quick Start Guide. Update thesoftware regularly to ensure you have the latest features and improvements; forinstructions, see Update the software.To work with photos, you need to transfer them to a computer that is connected to theprinter. See Saving photos to a computer.
Note Windows users: HP Photosmart Premier can only be used on computerswith processors that have Intel® Pentium® III (or equivalent) and higher.
Using creative options in the printer softwareRead through these tips on how to open and use HP Photosmart Premier,HP Photosmart Essential, and HP Photosmart Share.
HP Photosmart PremierHP Photosmart Premier is an easy-to-use software program that gives you everythingyou need to have fun with your photos, in addition to basic photo editing and printing.This software also gives you access to HP Photosmart Share so that you can easily shareyour photos.
Open HP Photosmart Premier (Windows users)➔ Double-click the HP Photosmart Premier icon on your desktop. If you need help,
see the software help within HP Photosmart Premier.
Open HP Photosmart Premier (Mac users)➔ Click the HP Photosmart Premier icon in the Dock. If you need help, select
HP Photosmart Premier help from the help menu.Explore the many features of HP Photosmart Premier:● View — View photos in multiple sizes and ways. Easily organize and manage your
photos.● Edit — Crop your photos and fix photos with red eye. Automatically adjust and
enhance your photos in different sizes and in multiple layouts.● Print — Print your photos in different sizes and in multiple layouts.● Share — Send photos to family and friends without the bulky attachments using HP
Photosmart Share, a better way to send e-mail.● Create — Easily create album pages, cards, calendars, panoramic photos, CD
labels, and more.● Back-up — Make back-up copies of your photos to store and save.
HP Photosmart EssentialHP Photosmart Essential is an easy-to-use software program that gives you basic photoediting and printing capabilities. This software also gives you access to HP Photosmart
HP Photosmart D7300 series User Guide 35
Share so that you can easily share your photos. HP Photosmart Essential is onlyavailable for Windows users.
Open HP Photosmart Essential (Windows users)➔ Double-click the HP Photosmart Essential icon on your desktop. If you need help,
see the software help within HP Photosmart Essential.Explore the many features of HP Photosmart Essential:● View — View photos in multiple sizes and ways. Easily organize and manage your
photos.● Edit — Crop your photos and fix photos with red eye. Automatically adjust and
enhance your photos to make them perfect.● Print — Print your photos in different sizes and in multiple layouts.● Share — Send photos to family and friends without the bulky attachments with HP
Photosmart Share, a better way to send e-mail.
HP Photosmart ShareHP Photosmart Share allows you to send photos to family and friends without bulky e-mail attachments. For more information, see Connecting through HP PhotosmartShare and the HP Photosmart Premier or HP Photosmart Essential help.
Open HP Photosmart Share (Windows users)➔ Click the HP Photosmart Share tab within HP Photosmart Premier or
HP Photosmart Essential.
Open HP Photosmart Share (Mac users)➔ Click the Applications tab in HP Photosmart Premier, then double-click HP
Photosmart Share.
Set print preferencesPrint preferences are set by default, but can be altered to suit your needs. You can setspecific job settings when you print from the computer. When you change settings beforeprinting, the changes only affect the current print job. In some Windows softwareprograms, you need to click Properties or Preferences within the Print dialog box toaccess the advanced printing features. See the electronic Help for more informationabout printing preferences.
Access print preferences (Windows users)1. Open the Print dialog box, usually by selecting Print from the File menu.2. Change the printing preferences in the Print dialog box tabs, or click Properties or
Preferences to access more printing preferences.
Access print preferences (Mac users)1. Open the Print dialog box, usually by selecting Print from the File menu.2. Change the printing preferences in the Print dialog box by selecting the print options
you want to change in the Copies & Pages drop-down menu.For more information on changing the printing preferences, see the electronic Help.
Chapter 5
36 HP Photosmart D7300 series
Open the electronic help
Windows users:● Press F1 on your keyboard.● For field-level help, click the ? in the top right corner of the Print dialog box.
Mac users:1. From the Finder menu, select Help, and then Mac Help.2. Select HP Photosmart Premier help from the Library, and then select HP
Photosmart printer help.
HP Real Life technologies featuresExplore the many photo editing and enhancing options in the HP Real Life technologiessoftware features. These features—such as automatic red eye removal and adaptivelighting—make it easy for you to print high-quality photos.
Access Real Life technologies features (Windows users)1. Open the Print dialog box, usually by selecting Print from the File menu.2. Click the Paper/Quality tab, then click the Real Life Digital Photography button
—OR— Click the Properties or Preferences button, and then click the Real LifeDigital Photography button.
Access Real Life technologies features (Mac users)1. Open the Print dialog box, usually by selecting Print from the File menu.2. Select Real Life Digital Photography from the Copies & Pages drop-down menu.
HP Photosmart D7300 series User Guide 37

Chapter 5
38 HP Photosmart D7300 series
6 Care and maintenanceThe printer requires very little maintenance. Follow the guidelines in this section to extendthe life span of the printer and printing supplies, and to ensure that the photos you printare always of the highest quality.● Clean and maintain the printer● Update the software● Store and transport the printer and ink cartridges● Maintain the quality of photo paper
Clean and maintain the printerKeep the printer and print cartridge clean and well maintained using the simpleprocedures in this section.
Clean the outside of the printer1. Turn off the printer, then disconnect the power cord from the back of the printer.2. Wipe the outside of the printer with a soft cloth that has been lightly moistened with
water.
Caution Do not use any type of cleaning solution. Household cleaners anddetergents may damage the printer finish. Do not clean the interior of the printer.Keep all fluids away from the interior. Do not lubricate the metal rod on which theprint head slides. Noise is normal when the print head moves back and forth.
Aligning the printerUse the following procedure when the self test report shows streaking or white linesthrough any of the blocks of color.If you still have print quality problems after aligning the printer, try cleaning the print headusing the procedure described in Care and maintenance. If print quality problems persistafter aligning and cleaning, contact HP Support.1. Load letter or A4 unused plain white paper into the Main tray.2. Touch Settings.3. Touch Tools, then scroll and find Align printer.4. Touch Align printer.
The printer aligns the print head, prints an alignment page, and calibrates the printer.Recycle or discard the alignment page.
5. Touch OK.
Print a sample pageYou can print a sample page to test the printer photo printing quality and to make surethe paper is loaded correctly.1. Load paper in the Main tray. Use plain paper to conserve photo paper.2. Touch Settings.3. Touch Tools, then touch Print sample page.
HP Photosmart D7300 series User Guide 39

Automatically clean the printheadIf you notice white lines or streaks on the photos you print, or in the color blocks of theself test report, use this procedure to clean the print head. Do not clean the print headunnecessarily, as this wastes ink and shortens the life of the ink nozzles on the print head.1. Load paper in the Main tray. Use plain paper to conserve photo paper.2. Touch Settings.3. Touch Tools, then scroll to Clean printhead.4. Touch Clean printhead.If print quality still seems poor after you clean the print head, try aligning the printer usingthe procedure described in Aligning the printer. If print quality problems persist aftercleaning and aligning, contact HP support.
Manually clean the ink cartridge contactsClean the copper-colored ink cartridge contacts if a message appears on the printerscreen that says a cartridge is missing or damaged.Before cleaning the ink cartridge contacts, remove the ink cartridge and verify thatnothing is covering the ink cartridge contacts or the ink cartridge slot, then reinstall theink cartridge. If you continue to get a message that says a cartridge is missing ordamaged, clean the ink cartridge contacts. If you still get this message after cleaning thecontacts, you will need a replacement ink cartridge. Remove the affected ink cartridgeand look at the end-of-warranty date on the bottom, in YYYY/MMM/DD format. If it isbefore the end-of-warranty date, contact HP support to obtain a replacement inkcartridge.
To clean the ink cartridge contacts:1. Gather the following items to clean the contacts:
– Distilled, filtered, or bottled water (tap water may contain contaminants that candamage the ink cartridge)
Caution Do not use platen cleaners or alcohol to clean the ink cartridgecontacts. These can damage the ink cartridge or the HP Photosmartprinter printer.
– Dry foam rubber swabs, lint-free cloth, or any soft material that will not comeapart or leave fibers.
2. Open the top cover of the printer.3. Squeeze the gray tab below an ink cartridge slot to release the gray latch inside the
printer, then lift the latch.
Caution Do not remove multiple ink cartridges at the same time. Removeand clean each ink cartridge one at a time. Do not leave the ink cartridgeoutside the printer for more than 30 minutes.
4. Lightly moisten a swab or cloth with water and squeeze out any excess water.5. Hold the ink cartridge by its handle and gently wipe only the copper-colored contacts
with the swab or cloth.
Chapter 6
40 HP Photosmart D7300 series
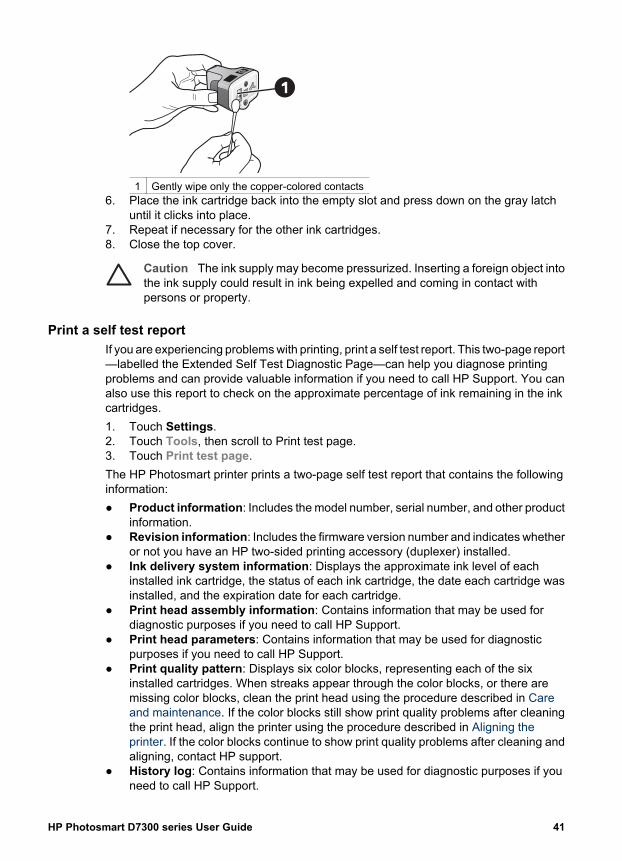
1 Gently wipe only the copper-colored contacts6. Place the ink cartridge back into the empty slot and press down on the gray latch
until it clicks into place.7. Repeat if necessary for the other ink cartridges.8. Close the top cover.
Caution The ink supply may become pressurized. Inserting a foreign object intothe ink supply could result in ink being expelled and coming in contact withpersons or property.
Print a self test reportIf you are experiencing problems with printing, print a self test report. This two-page report—labelled the Extended Self Test Diagnostic Page—can help you diagnose printingproblems and can provide valuable information if you need to call HP Support. You canalso use this report to check on the approximate percentage of ink remaining in the inkcartridges.1. Touch Settings.2. Touch Tools, then scroll to Print test page.3. Touch Print test page.The HP Photosmart printer prints a two-page self test report that contains the followinginformation:● Product information: Includes the model number, serial number, and other product
information.● Revision information: Includes the firmware version number and indicates whether
or not you have an HP two-sided printing accessory (duplexer) installed.● Ink delivery system information: Displays the approximate ink level of each
installed ink cartridge, the status of each ink cartridge, the date each cartridge wasinstalled, and the expiration date for each cartridge.
● Print head assembly information: Contains information that may be used fordiagnostic purposes if you need to call HP Support.
● Print head parameters: Contains information that may be used for diagnosticpurposes if you need to call HP Support.
● Print quality pattern: Displays six color blocks, representing each of the sixinstalled cartridges. When streaks appear through the color blocks, or there aremissing color blocks, clean the print head using the procedure described in Careand maintenance. If the color blocks still show print quality problems after cleaningthe print head, align the printer using the procedure described in Aligning theprinter. If the color blocks continue to show print quality problems after cleaning andaligning, contact HP support.
● History log: Contains information that may be used for diagnostic purposes if youneed to call HP Support.
HP Photosmart D7300 series User Guide 41
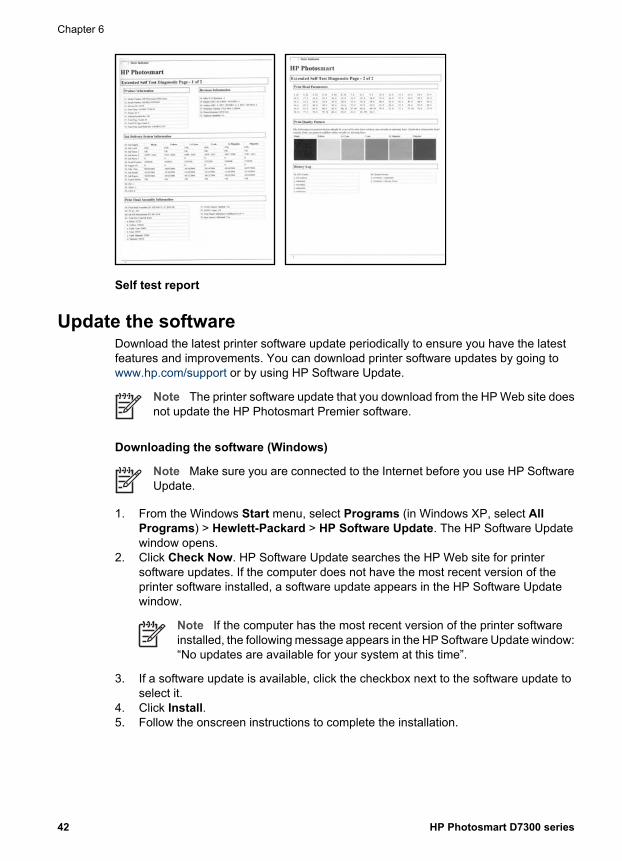
Self test report
Update the softwareDownload the latest printer software update periodically to ensure you have the latestfeatures and improvements. You can download printer software updates by going towww.hp.com/support or by using HP Software Update.
Note The printer software update that you download from the HP Web site doesnot update the HP Photosmart Premier software.
Downloading the software (Windows)
Note Make sure you are connected to the Internet before you use HP SoftwareUpdate.
1. From the Windows Start menu, select Programs (in Windows XP, select AllPrograms) > Hewlett-Packard > HP Software Update. The HP Software Updatewindow opens.
2. Click Check Now. HP Software Update searches the HP Web site for printersoftware updates. If the computer does not have the most recent version of theprinter software installed, a software update appears in the HP Software Updatewindow.
Note If the computer has the most recent version of the printer softwareinstalled, the following message appears in the HP Software Update window:“No updates are available for your system at this time”.
3. If a software update is available, click the checkbox next to the software update toselect it.
4. Click Install.5. Follow the onscreen instructions to complete the installation.
Chapter 6
42 HP Photosmart D7300 series
Downloading the software (Mac)
Note Make sure you are connected to the Internet before you useHP Photosmart Updater.
1. On your Mac in the Finder, choose Go > Applications.2. Choose Hewlett-Packard > Photosmart > HP Photosmart Updater.3. Follow the onscreen instructions to check for software updates.
If you are behind a firewall, you need to enter the proxy server information in theupdater.
Store and transport the printer and ink cartridgesProtect the printer and ink cartridges by storing them properly when you are not usingthem.
Store and transport the printerThe printer is built to withstand long or short periods of inactivity. Store the printer indoorsout of direct sunlight in a place without temperature extremes.
Caution To prevent ink loss or spillage: do not transport or store the printer onits side, and leave the ink cartridges installed while storing and transporting theprinter.
Store and transport the ink cartridgesWhen you transport or store the printer, always leave the active ink cartridge inside theprinter to prevent the ink from drying out.
Caution 1 To prevent ink loss or spillage: leave the ink cartridges installed whilestoring and transporting the printer, and avoid leaving used ink cartridge(s) out ofthe printer for extended lengths of time.
Caution 2 Make sure the printer completes its power-down cycle before youunplug the power cord. This allows the printer to store the print head properly.
Follow this tip to help maintain your HP ink cartridges and ensure consistent print quality:Keep all unused ink cartridges in their original sealed packages until they are needed.Store ink cartridges at room temperature (15-35 °C or 59-95 °F).
Maintain the quality of photo paperFor best results with photo paper, follow the guidelines in this section.
To store photo paper● Store the photo paper in its original packaging or in a resealable plastic bag.● Store the packaged photo paper on a flat, cool, and dry surface.● Return unused photo paper to the plastic bag. Paper left in the printer or exposed
to the elements may curl.
HP Photosmart D7300 series User Guide 43
To handle photo paper● Always hold photo paper by the edges to avoid fingerprints.● If the photo paper has curled edges, place it in its plastic storage bag and gently
bend it in the opposite direction of the curl until the paper lies flat.
Chapter 6
44 HP Photosmart D7300 series
7 TroubleshootingThe HP Photosmart printer is designed to be reliable and easy to use. This chapteranswers frequently asked questions about using the printer and printing without acomputer. It contains information about the following topics:● Printer hardware problems● Printing problems● Error messagesFor additional troubleshooting information, see:● Software installation troubleshooting: The Quick Start guide that came with the
printer.● Printer software and printing from a computer troubleshooting: The onscreen
HP Photosmart Printer Help. For information about viewing the onscreenHP Photosmart Printer Help, see Welcome. Mac users should also check fortroubleshooting and readme options on the HP Photosmart Menu in the Dock.
Printer hardware problemsBefore contacting HP support, read this section for troubleshooting tips or go to the onlinesupport services at www.hp.com/support.
Note If you want to connect the printer to a computer with a USB cable, HPrecommends using a 2.0 high-speed compliant cable 3 meters (10 feet) or lessin length.
The Print light is flashing blue but the printer is not printingSolution The printer is busy processing information; wait for it to finish.
The Attention light is on
Solution● Check the printer screen for instructions. If a digital camera is connected to the
printer, check the camera screen for instructions. If the printer is connected toa computer, check the computer monitor for instructions.
● Turn off the printer, then unplug its power cord. Wait about 10 seconds, thenplug it in again. Turn on the printer.
If the Attention light stays on after trying the above solutions, go to www.hp.com/support, or contact HP Support for help.
HP Photosmart D7300 series User Guide 45
The printer does not find the photos I stored on my memory cardSolution The memory card may contain file types the printer cannot read directlyfrom the card.● Save the photos to a computer, then print them from the computer. For more
information, see the onscreen HP Photosmart Printer Help and thedocumentation that came with the camera.
● The next time you take photos, set the digital camera to save them in a fileformat the printer can read directly from the memory card. For a list of supportedfile formats, see Printer specifications. For instructions on setting the digitalcamera to save photos in specific file formats, see the documentation that camewith the camera.
The memory card may need to be reformatted if the problem persists.
The printer is plugged in but will not turn on
Solution● The printer may have drawn too much power. Unplug the printer power cord.
Wait about 10 seconds, then plug the cord back in. Turn on the printer.● The printer may be plugged into a power strip that is turned off. Turn on the
power strip, then turn on the printer.● The power cord could be defective. Make sure the green light on the power cord
is lit.
The printer makes noises when I turn it on, or starts making noises after sittingunused for a while
Solution The printer may make noises after long periods of inactivity(approximately 2 weeks) or when its power supply has been interrupted and thenrestored. This is normal operation. The printer is performing an automaticmaintenance procedure to ensure it produces the best quality output.
All the lights are flashing on the printerSolution The printer has encountered a hardware error and may need to beserviced. Unplug the power cord to the printer. Wait about 10 seconds, and thenplug it in again. Turn on the printer. If the lights are still flashing, please go towww.hp.com/support, or contact HP Support for help.
Printing problemsBefore contacting HP support, read this section for troubleshooting tips or go to the onlinesupport services at www.hp.com/support.
Chapter 7
46 HP Photosmart D7300 series
The printer does not print borderless photos when I print from the control panelSolution Make sure the correct layout is selected when setting up the print job.When selecting photo and papaer size, the image rectangle must be solidly filledwith orange to indicate a borderless print.
Printing is very slowSolution You may have one of the following situations: 1) you may be printing aPDF or a project containing high-resolution graphics or photos or 2) you may haveselected the highest resolution for your printout. Large, complex projects containinggraphics or photos print slower than text documents, especially at higher resolutions.
Paper does not feed into the printer correctly from the Main tray
Solution● There may be too much paper loaded in the tray. Remove some paper and try
printing again.● The Main tray may not be pushed in all the way. Push the Main tray all the way in.● The paper guides may not be adjusted correctly. Make sure the paper-width
and paper-length guides fit close to the edges of the paper without bending thepaper.
● Two or more pieces of paper may be sticking together. Remove the paper fromthe Main tray, fan the edges of the stack to separate the sheets of paper, thenreload the paper and try printing again.
● If the paper is wrinkled or bent, try using different paper.● The paper may be too thin or too thick. Use HP inkjet paper for best results. For
more information, see Choose the right paper.
Printed pages are dropping off of the Output traySolution Always extend the Output tray extension when you print.
The printout is rippled or curledSolution The project you are printing uses a larger amount of ink than normal.Print the project from a computer, and use the printer software to lower the inksaturation level. See the onscreen HP Photosmart Printer Help for more information.
The document printed at an angle or is off-center
Solution● The paper may not be loaded correctly. Reload the paper, making sure it is
correctly oriented in the Main tray and that the paper-width and paper-length
HP Photosmart D7300 series User Guide 47
guides fit close to the edges of the paper. For paper-loading instructions, seeLoad your paper.
● If you are using a two-sided printing accessory, try removing it, replacing therear access door, and printing again.
● The printer may need to be aligned. For more information, see Aligning theprinter.
Colors are not printing satisfactorily
Solution● One of the color ink cartridges may be very low on ink, resulting in another color
being substituted during printing. Check the estimated ink levels by touchingthe ink icons on the home screen. If an ink cartridge is low on ink, replace it.For more information, see Insert ink cartridges.
● The printer may need to be aligned. For more information, see Aligning theprinter.
● The print head may need to be cleaned. For more information, see Care andmaintenance.
No page came out of the printer or the paper jammed while printing
Solution● The printer may need attention. Read the printer screen for instructions.● The power may be off or there may be a loose connection. Make sure the power
is on and the power cord is securely connected.● You may not have any paper in the Main tray or Photo tray. Check that the paper
is loaded correctly. For paper-loading instructions, see Load your paper.● If the paper jammed while printing, try the following:
– Turn off the printer, then unplug it from the power source. Clear the printerof any paper obstructing the paper path. Remove the rear access door.Gently remove the jammed paper from the printer, then replace the rearaccess door. If all jammed paper cannot be removed from the rear area ofthe printer, try removing paper jammed in the middle of the printer byopening the paper jam door located inside the top cover. For illustrationsof the two places to clear a paper jam, see Paper errors. When you arefinished clearing the paper jam, plug the printer back in, turn it on, and tryprinting again.
– If you were printing labels, make sure a label did not become unglued fromthe label sheet while going through the printer.
A blank page came out of the printer
Solution● You may have begun printing and then cancelled the print job.
Chapter 7
48 HP Photosmart D7300 series
If you cancelled the print job before printing started, the printer may have alreadyloaded paper in preparation for printing. The next time you print, the printerejects the blank page before starting the new printing project.
● A print job with a large amount of data may have been sent to the printer.Wait for the printer to service the print head before it continues printing.
The printer asked me to print an alignment pageSolution Periodically, the printer needs to perform a print head alignment tomaintain optimal print quality.When prompted, load plain letter or A4 paper. Discard or recycle the alignment page.
The photo did not print using the default print settingsSolution You may have changed the print settings for the selected photo. Printsettings you apply to an individual photo override the default print settings. Discardall print settings that have been applied to an individual photo by deselecting thephoto. For more information, see Settings.
The printer ejects the paper when preparing to printSolution Direct sunlight could be interfering with the operation of the automaticpaper sensor. Move the printer out of direct sunlight.
Print quality is poor
Solution● One of the ink cartridges may be very low on ink, resulting in another color being
substituted during printing. Check the estimated ink levels by touching the inkicons on the home screen. If an ink cartridge is low on ink, replace it. For moreinformation, see Insert ink cartridges.
● Use photo paper designed for the printer. For best results, use the papersrecommended in Choose the right paper.
● You may be printing on the wrong side of the paper. Make sure the paper isloaded with the side to be printed facing down.
● You may have selected a low-resolution setting on the digital camera. Reducethe size of the image and try printing again. For better results in the future, setthe digital camera to a higher photo resolution.
● There may be a problem with an ink cartridge or with the print head. Try thefollowing:– Remove and then reinsert each ink cartridge, one at a time, to make sure
they are all properly seated.– Run the automatic print head cleaning procedure. For more information,
see Care and maintenance.
HP Photosmart D7300 series User Guide 49
– Align the printer. For more information, see Aligning the printer.– If print quality problems persist after you have tried all of the above
solutions, contact HP Support.
Photos are not printing correctly
Solution● You may have loaded the photo paper incorrectly. Load the photo paper with
the side to be printed facing down.● The photo paper may not have fed into the printer correctly. Try the following:
– Check for a paper jam. For more information, see Paper errors.– Insert the photo paper as far as it will go into the Photo tray.– Load one sheet of photo paper at a time.
The photos I marked for printing in the digital camera do not printSolution Some digital cameras let you mark photos for printing in both thecamera's internal memory and on the memory card. If you mark photos in the internalmemory, and then move photos from the camera's internal memory to the memorycard, the marks do not transfer. Mark photos for printing after you transfer them fromthe digital camera's internal memory to the memory card.
Error messagesBefore contacting HP support, read this section for troubleshooting tips or go to the onlinesupport services at www.hp.com/support.Error messages that appear on the printer screen can be divided into the following types:● Paper errors● Ink cartridge errors● Memory card errors● Computer printing errors
Paper errorsBefore contacting HP support, read this section for troubleshooting tips or go to the onlinesupport services at www.hp.com/support.
Error message: Paper jam. Clear jam then press OK.Solution Turn off the printer, then unplug it from the power source. Clear theprinter of any paper that may be obstructing the paper path. Remove the rear accessdoor. Gently remove the jammed paper from the printer, then replace the rear accessdoor.
Chapter 7
50 HP Photosmart D7300 series
1 Remove the rear access door to clear paper jams.
If you cannot remove all jammed paper from the rear area of the printer, try removingpaper jammed in the middle of the printer by opening the paper jam door locatedinside the top cover.
1 Open the paper jam door to clear paper jams in the middle of the printer.
Plug the printer back in and turn it on.
Error message: Out of paper. Load paper then press OK.Solution Load paper, then touch OK to print again. For paper-loading instructions,see Load your paper.
Error message: Unsupported media size.Solution The printer cannot use the size of paper loaded in the paper tray. TouchOK, then load a supported paper size instead. For a list of supported paper sizes,see Printer specifications.
HP Photosmart D7300 series User Guide 51

Error message: Automatic paper sensor failed.Solution The automatic paper sensor is obstructed or damaged. Try moving theprinter out of direct sunlight, then touch OK and try printing again. If this does notwork, go to www.hp.com/support or contact HP Support.
Ink cartridge errorsBefore contacting HP support, read this section for troubleshooting tips or go to the onlinesupport services at www.hp.com/support.
Error message: Wrong ink cartridge(s) installedSolution The first time you set up and use your HP Photosmart printer printer,make sure to install the ink cartridges that were shipped with your printer. The inkin these ink cartridges is specially formulated to mix with the ink in the print headassembly.To resolve this error, replace the affected ink cartridge(s) with the ink cartridges thatwere shipped with your HP Photosmart printer printer.For more information on replacing ink cartridges, see Insert ink cartridges.
Error message: Incorrect ink cartridgeSolution The indicated ink cartridge(s) cannot be used after the device hasundergone initialization. Replace the ink cartridge(s) with the appropriate inkcartridges for your HP Photosmart printer printer. The cartridge numbers you canuse with this printer appear on the back cover of this printed guide.For more information on replacing ink cartridges, see Insert ink cartridges.
Error message: Replace cartridges soonSolution The indicated ink cartridge(s) are low on ink.You might be able to continue printing for a short period of time with ink remainingin the print head assembly. Replace the indicated ink cartridge(s) or touch OK tocontinue.For more information on replacing ink cartridges, see Insert ink cartridges.
Error message: Ink cartridge(s) are emptySolution Replace the indicated ink cartridge(s) with new ink cartridge(s).● If the black ink cartridge is empty, you can continue printing with the other color
ink cartridges by selecting that option in the displayed printer screen prompts.● If a color ink cartridge is empty, you can continue printing with the black ink
cartridge by selecting that option in the displayed printer screen prompts.Depending on the status of your print job, you can touch OK to continue. If the HPPhotosmart printer printer is in the middle of a print job, press Cancel and restartyour print job.
Chapter 7
52 HP Photosmart D7300 series
Note Text and photo quality will differ from those printed when using all inkcartridges. If the empty ink cartridge(s) are not replaced soon, all printing willstop.
For more information on replacing ink cartridges, see Insert ink cartridges.
Error message: Cannot printSolution The indicated ink cartridge(s) are out of ink.Replace the indicated ink cartridge(s) immediately so that you can resume printing.The HP Photosmart printer printer cannot continue printing until the indicated inkcartridge(s) are replaced. All printing will stop.For more information on replacing ink cartridges, see Insert ink cartridges.
Error message: Ink cartridge problemSolution The indicated ink cartridge(s) are missing or damaged.Replace the indicated ink cartridge(s) immediately so that you can resume printing.If there are no ink cartridges missing from the HP Photosmart printer printer, the inkcartridge contacts might need to be cleaned.For more information on replacing ink cartridges, see Insert ink cartridges. For moreinformation on cleaning the ink cartridge contacts, see Care and maintenance.If there are no ink cartridges missing from the HP Photosmart printer printer, andyou still receive this message after cleaning the ink cartridge contacts, you will needa replacement ink cartridge. Remove the affected ink cartridge and look at the end-of-warranty date on the bottom, in YYYY/MMM/DD format. If it is before the end-of-warranty date, contact HP Support to obtain a replacement ink cartridge.
Error message: Ink expiration nearSolution If the current date is near the expiration date, consider replacing the inkcartridge(s) to achieve best print quality. You can continue printing by touchingOK. HP cannot guarantee the quality or reliability of expired ink.For more information on replacing ink cartridges, see Insert ink cartridges.
Error message: Ink cartridge(s) are expiredSolution If the ink cartridge(s) are expired, replace the ink cartridge(s) to achievebest print quality. You can continue printing by touching OK. HP cannot guaranteethe quality or reliability of expired ink.For more information on replacing ink cartridges, see Insert ink cartridges.
HP Photosmart D7300 series User Guide 53
Note Each ink cartridge has an expiration date. When you receive an inkexpiration message, remove and replace the expired ink cartridge, and thenclose the message. You can also continue printing without replacing the inkcartridge, by selecting OK on the ink expiration message. HP recommendsreplacing the expired ink cartridges. HP cannot guarantee the quality orreliability of expired ink cartridges.
Error message: Non-HP inkSolution Replace the indicated ink cartridge(s) or touch OK to continue.HP recommends that you use genuine HP ink cartridges. Genuine HP ink cartridgesare designed and tested with HP printers to help you easily produce great results,time after time.
Note HP cannot guarantee the quality or reliability of non-HP ink. Printerservice or repairs required as a result of printer failure or damage attributableto the use of non-HP ink will not be covered under warranty.
If you believe you purchased genuine HP ink cartridge(s), go to:www.hp.com/go/anticounterfeit
Error message: Original HP ink depletedSolution Replace the indicated ink cartridge(s) or touch OK to continue.HP recommends that you use genuine HP ink cartridges. Genuine HP ink cartridgesare designed and tested with HP printers to help you easily produce great results,time after time.
Note HP cannot guarantee the quality or reliability of non-HP ink. Printerservice or repairs required as a result of printer failure or damage attributableto the use of non-HP ink will not be covered under warranty.
If you believe you purchased genuine HP ink cartridge(s), go to:www.hp.com/go/anticounterfeit
Error message: Scheduled maintenanceSolution You must align the printer to ensure excellent print quality. With letter orA4 unused plain white paper in the Main tray, touch OK. The HP Photosmart printerprinter aligns the print head, calibrates the printer, and then prints a test page.Recycle or discard the test page.
Error message: Calibration error
Solution● If you have color or photo paper loaded in the Main tray when you align the
printer, the alignment might fail. Load unused plain white letter or A4 paper into
Chapter 7
54 HP Photosmart D7300 series
the Main tray, and then try the alignment again. If the alignment fails again, youmight have a defective sensor or ink cartridge; contact HP Support.
● The ink cartridge or sensor is defective. Contact HP support.
Error message: Print cartridge cradle is stuckSolution Remove any objects that are blocking the print head assembly.
To clear the print head assembly1. Open the top cover, then open the paper jam door.
1 Open the paper jam door to clear the print head assembly.2. Remove any objects that are blocking the print head assembly, including paper
and any packing materials.3. Turn the printer off, then turn it on again.4. Close the paper jam door and the top cover.
Error message: Ink System FailureSolution The print head assembly or the ink delivery system has failed and theHP Photosmart printer printer can no longer print.Turn off the printer, then unplug its power cord. Wait about 10 seconds, then plug itin again. If this does not clear the error message, please contact HP Support.
Memory card errorsBefore contacting HP support, read this section for troubleshooting tips or go to the onlinesupport services at www.hp.com/support.
Error message: Photo is missing. —OR— Some photos are missing.Solution The printer cannot read the file on the memory card, or one or more filesspecified for the job are missing from the memory card. Try saving the photos to the
HP Photosmart D7300 series User Guide 55
computer using the digital camera rather than the memory card. If a photo is missing,you may have accidentally deleted the photo from the card.
Error message: Card access error. Job was cancelled. Press OK.—OR— Filedirectory structure is corrupted. —OR— Card may be damaged. Job wascancelled. Touch OK.
Solution The printer cannot read the data on the memory card and cannotcomplete any current print jobs. The data may be corrupted or there may be aphysical problem with the memory card.● Save the files to the computer and access them from there.● If this does not work, use a new memory card or reformat the memory card
using the digital camera. Any photos on the memory card will be lost.● If this does not work, the photo files may be damaged or unreadable. Before
you contact HP Support, try another memory card to determine if it is the printeror the memory card that is failing.
Error message: Cannot print photos.Solution More than 10 photos specified for a print job may be corrupted, missing,or are an unsupported file type. For information about supported file types, seePrinter specifications.● Save the photos to the computer using the digital camera rather than the
memory card.● Save the files to the computer and print from the computer.● Print a photo index and reselect photos. For more information, see Printing
photos.
Error message: Card is password protected. Cannot access card.Solution The printer cannot read the memory card because the card is password-protected. Follow these steps:1. Remove the memory card from the printer.2. Insert the memory card in the device you originally used to store the password
on the memory card.3. Remove the password from the memory card.4. Remove the memory card and reinsert it in the printer memory card slot.5. Try printing again.
Error message: Card is locked. Cannot access card.Solution Make sure the lock switch on the card is in the unlocked position.
Chapter 7
56 HP Photosmart D7300 series
Error message: Card is not fully inserted. Push card in a little more.Solution The printer can detect the memory card but cannot read it. Push thememory card gently into the memory card slot until it stops. For more information,see Insert memory cards.
Error message: Use only one (1) card at a time. Please remove a memory card. —OR— Use only one (1) device at a time. Please remove/disconnect a device.
Solution The printer has two or more different types of memory cards insertedsimultaneously, or a memory card is inserted and a digital camera is connected tothe camera port at the same time. Remove memory cards or disconnect the camerauntil only one card is in the printer or only a camera is connected.
Error message: Card was removed. Job was cancelled. Touch OK.Solution You removed a memory card from the printer while it was busy printinga file from the card. Follow these steps:1. Touch OK.2. Reinsert the memory card and print the selected photos again. The memory
card must remain inserted until the print job is complete.To avoid damage to memory cards in the future, do not remove them from the printermemory card slot while they are being accessed. For more information, seeRemoving a memory card.
Error message: Camera selections (DPOF) file has error.Solution The printer is unable to read a DPOF file due to corrupted data or anerror on the memory card. Use the printer control panel to reselect the photos. Formore information, see Print photos from a memory card.
Error message: Some camera-selected photos are not on card.Solution Some camera-selected photos are missing or have been deleted. Trythe following:● Confirm that you did not accidentally delete the photo from the memory card.● Reselect the photos again using the digital camera.● Print a new photo index to see the index numbers associated with each photo.
For more information, see Printing photos.
Error message: Cannot display this photo. —OR— Cannot display all photos. —OR— Photos are corrupted.
Solution The memory card contains image formats the printer does not support,or the files are corrupted. For a list of supported image formats, see Printerspecifications. Access photos using the computer. For information about accessingphotos through the computer, see Printing from a computer.
HP Photosmart D7300 series User Guide 57
Error message: Unsupported card type.Solution Use your camera to transfer the photos to your computer, and then printfrom your computer.
Error message: Some photo numbers are not on card.Solution Use your camera to transfer the photos to your computer, and then printfrom your computer. If some photos are still missing, they may have been deletedfrom the memory card.
Computer and connectivity printing errorsBefore contacting HP Support, read this section for troubleshooting tips or go to theonline support services at www.hp.com/support.
Error message: Printer memory is full. Job was cancelled. Press OK.Solution The printer encountered a problem when printing photos. Try thefollowing:● To clear the printer memory, turn the printer off, then turn it on again.● Print fewer photos at a time.● Save the photos to the computer and print from there.● Save the files to the computer using a memory card reader and then print from
the computer.
Error message: Communication error. Check computer connection. Press OK. —OR— Data was not received. Check computer connection. Press OK to continue.—OR— No response from computer.
Solution The printer cannot communicate properly with the computer. The printersoftware may not be working or a cable may be loose. Make sure the USB cable issecurely attached to both the computer and to the USB port on the back of the printer.If the cable is secure, verify that the printer software is installed.
Error message: Camera disconnected during print job.Solution The print job will be cancelled. Reattach the USB cable to the cameraand printer and resend the print job.
Chapter 7
58 HP Photosmart D7300 series
8 HP support
Support process
If you have a problem, follow these steps:1. Check the documentation that came with the HP Photosmart printer.2. Visit the HP online support Web site at www.hp.com/support. HP online support is
available to all HP customers. It is the fastest source for up-to-date deviceinformation and expert assistance and includes the following features:– Fast access to qualified online support specialists– Software and driver updates for the HP Photosmart printer– Valuable HP Photosmart printer and troubleshooting information for common
problems– Proactive device updates, support alerts, and HP newsgrams that are available
when you register the HP Photosmart printer3. For Europe only: Contact your local point of purchase. If the HP Photosmart printer
has a hardware failure, you will be asked to bring it back to your local point ofpurchase. (Service is provided at no charge during the device limited warrantyperiod. After the warranty period, you will be quoted a service charge.)
4. Call HP support. Support options and availability vary by device, country/region, andlanguage.
HP support by phoneFor a list of support phone numbers, see the phone number list on the inside of the frontcover.
Phone support periodOne year of phone support is available in North America, Asia Pacific, and Latin America(including Mexico). To determine the duration of phone support in Europe, the MiddleEast, and Africa, go to www.hp.com/support. Standard phone company charges apply.
Placing a callCall HP support while you are in front of the computer and the HP Photosmart printer.Be prepared to provide the following information:● Device model number (located on the label on the front of the device)● Device serial number (located on the back or bottom of the device)● Messages that appear when the situation occurs● Answers to these questions:
– Has this situation happened before?– Can you re-create it?– Did you add any new hardware or software to your computer at about the time
that this situation began?– Did anything else occur prior to this situation (such as a thunderstorm, device
was moved, etc.)?
HP Photosmart D7300 series User Guide 59

After the phone support periodAfter the phone support period, help is available from HP at an additional cost. Help mayalso be available at the HP online support Web site: www.hp.com/support. Contact yourHP dealer or call the support phone number for your country/region to learn more aboutsupport options.
Additional warranty optionsExtended service plans are available for the printer at additional costs. Go towww.hp.com/support, select your country/region and language, then explore theservices and warranty area for information about the extended service plans.
Chapter 8
60 HP Photosmart D7300 series
A SpecificationsThis section lists the minimum system requirements for installation of the HP Photosmart printersoftware, and provides selected printer specifications.For a complete list of printer specifications and system requirements, see the onscreenHP Photosmart Printer Help. For information about viewing the onscreen HP Photosmart PrinterHelp, see Welcome.
System requirements
Component Windows PC minimum Macintosh minimum
Operating system Microsoft® Windows 98, 2000Professional, Me, XP Home,and XP Professional
Mac® OS X 10.3, 10.4, andlater
Processor Intel® Pentium® II (orequivalent) and higher
G3 or greater
RAM 64 MB (128 MBrecommended)
Mac OS X 10.3, 10.4, andlater: 128 MB
Free disk space 500 MB 150 MB
Video display 800 x 600, 16-bit or higher 800 x 600, 16-bit or higher
CD-ROM drive 4x 4x
Connectivity USB: Microsoft Windows 98,2000 Professional, Me, XPHome, and XP ProfessionalPictBridge: using frontcamera portBluetooth: using optionalHP Bluetooth WirelessAdapter
USB: Front and back ports(Mac OS X 10.3, 10.4, andlater)PictBridge: using frontcamera portBluetooth: using optionalHP Bluetooth WirelessAdapter
Browser Microsoft Internet Explorer 5.5or later
—
Printer specifications
Category Specifications
Connectivity USB: Microsoft Windows 98, 2000 Professional, Me, XPHome, and XP Professional; Mac OS X 10.3, 10.4, and later
Image file formats JPEG BaselineTIFF 24-bit RGB uncompressed interleavedTIFF 24-bit YCbCr uncompressed interleavedTIFF 24-bit RGB packbits interleaved
HP Photosmart D7300 series User Guide 61
Category SpecificationsTIFF 8-bit gray uncompressed/packbitsTIFF 8-bit palette color uncompressed/packbitsTIFF 1-bit uncompressed/packbits/1D Huffman
Video file formats Motion-JPEG AVIMotion-JPEG QuickTimeMPEG-1
Media specifications Recommended maximum length: 61 cm (24 inch)Recommended maximum paper thickness: 292 µm (11.5mil)Recommended maximum envelope thickness: 673 µm(26.5 mil)
Media sizes supported Supported sizes when printing from a computer7.6 x 12.7 cm to 22 x 61 cm (3 x 5 inch to 8.5 x 24 inch)Supported sizes when printing from the control panelMetric: A6, A4, 10 x 15 cm (with and without tab); Imperial:3.5 x 5 inch, 4 x 6 inch (with and without tab), 4 x 12 inch,5 x 7 inch, 8 x 10 inch, 8.5 x 11 inch; Other: Hagaki and L-size
Media types supported Paper (plain, inkjet, photo, and panoramic photo)EnvelopesTransparenciesLabelsCards: index, greeting, Hagaki, A6, L-sizeIron-on transfersAvery C6611 and C6612 photo sticker paper: 10 x 15 cm(4 x 6 inch), 16 rectangular or oval stickers per page
Memory cards CompactFlash Type I and IIMicrodriveMultiMediaCardSecure DigitalMemory SticksxD-Picture Card
Memory card-supported fileformats
Printing: See Image file formats earlier in this table.Saving: All file formats
Paper tray – media sizessupported
Main tray8 x 13 cm to 22 x 61 cm (3 x 5 inch to 8.5 x 24 inch)Photo trayUp to 10 x 15 cm (4 x 6 inch), with or without tabOutput trayAll supported Main tray and Photo tray sizes
Appendix A(continued)
62 HP Photosmart D7300 series
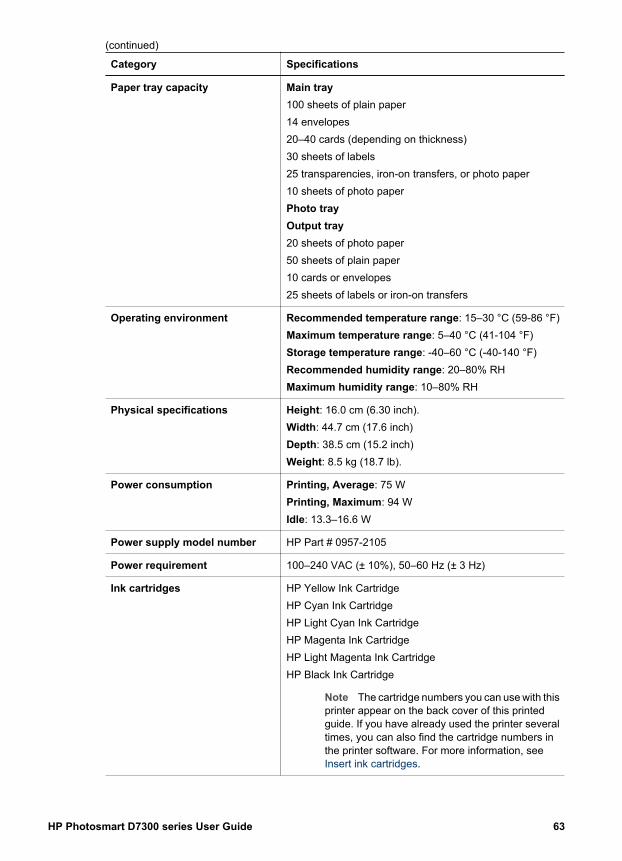
Category Specifications
Paper tray capacity Main tray100 sheets of plain paper14 envelopes20–40 cards (depending on thickness)30 sheets of labels25 transparencies, iron-on transfers, or photo paper10 sheets of photo paperPhoto trayOutput tray20 sheets of photo paper50 sheets of plain paper10 cards or envelopes25 sheets of labels or iron-on transfers
Operating environment Recommended temperature range: 15–30 °C (59-86 °F)Maximum temperature range: 5–40 °C (41-104 °F)Storage temperature range: -40–60 °C (-40-140 °F)Recommended humidity range: 20–80% RHMaximum humidity range: 10–80% RH
Physical specifications Height: 16.0 cm (6.30 inch).Width: 44.7 cm (17.6 inch)Depth: 38.5 cm (15.2 inch)Weight: 8.5 kg (18.7 lb).
Power consumption Printing, Average: 75 WPrinting, Maximum: 94 WIdle: 13.3–16.6 W
Power supply model number HP Part # 0957-2105
Power requirement 100–240 VAC (± 10%), 50–60 Hz (± 3 Hz)
Ink cartridges HP Yellow Ink CartridgeHP Cyan Ink CartridgeHP Light Cyan Ink CartridgeHP Magenta Ink CartridgeHP Light Magenta Ink CartridgeHP Black Ink Cartridge
Note The cartridge numbers you can use with thisprinter appear on the back cover of this printedguide. If you have already used the printer severaltimes, you can also find the cartridge numbers inthe printer software. For more information, seeInsert ink cartridges.
(continued)
HP Photosmart D7300 series User Guide 63
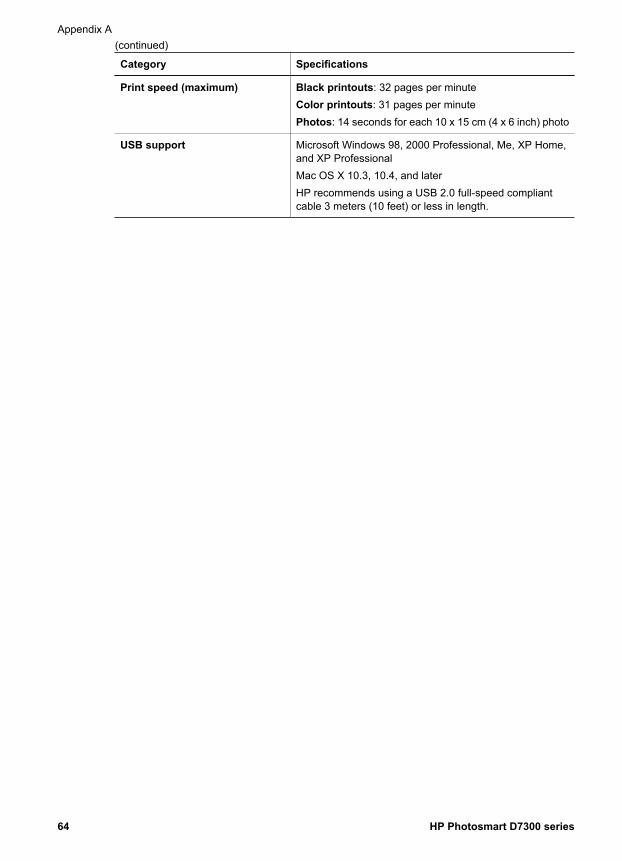
Category Specifications
Print speed (maximum) Black printouts: 32 pages per minuteColor printouts: 31 pages per minutePhotos: 14 seconds for each 10 x 15 cm (4 x 6 inch) photo
USB support Microsoft Windows 98, 2000 Professional, Me, XP Home,and XP ProfessionalMac OS X 10.3, 10.4, and laterHP recommends using a USB 2.0 full-speed compliantcable 3 meters (10 feet) or less in length.
Appendix A(continued)
64 HP Photosmart D7300 series
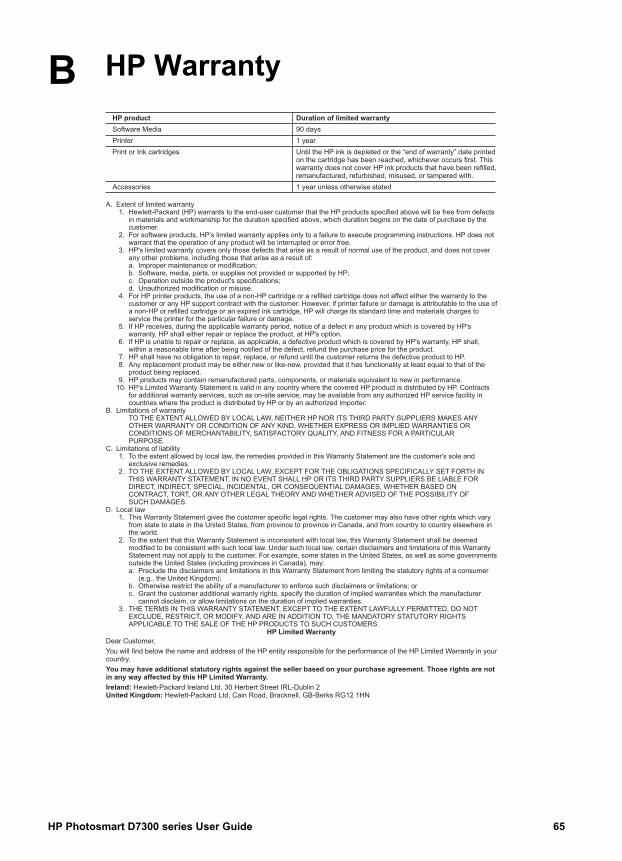
B HP Warranty
HP Photosmart D7300 series User Guide 65

Appendix B
66 HP Photosmart D7300 series
Index
Aaccessories 7accessories, two-sided
printing 7after the support period 60aligning the printer 39alignment page 39alignment, required 54antique coloration 27
BBluetooth
connecting to printer 21,31
menu settings 7wireless printer adapter 7
borderless prints 27buttons 6
Ccalling HP support 59cameras
connecting to printer 21,31
direct-printing 23PictBridge 23port 4printing from 23
care and maintenance 39cartridges. See ink cartridgescleaning
copper-colored contacts40
print head 40printer 39
color effects 27CompactFlash 16computer
connecting to printer 31printing from 35saving photos to 33system requirements 61
control panel 6
Ddamaged, ink cartridge 53date and time stamps 27
digital cameras. See camerasDigital Print Order Format 22documentation, printer 3DPOF 22
Ee-mailing photos 33energy consumption 4Energy Star 4error messages 50
Ffile formats, supported 17, 61Frequently asked questions
45
GGetting help 45
HHelp 45Hewlett-Packard Company
notices 4home, screen 7HP direct-printing digital
cameras 23HP Instant Share 31HP iPod 32HP Photosmart Essential 35HP Photosmart Premier 35HP Photosmart Share 33, 36HP Software Update 42
Iink
checking level 41empty 52replace soon 52
ink cartridgesdamaged 53empty 52expired 53HP ink depleted 54incorrect 52ink level, checking 14inserting 14missing 53
non-HP ink 54printer alignment 54replace soon 52replacing 14storing 43testing 41
ink level, checking 14inserting
ink cartridges 14memory cards 17
JJPEG file formats 17
Llayout and photo size 25lights 6Load paper 11loading paper 11
Mmemory cards
inserting 17printing from 21removing 18saving photos to a
computer 33supported types 16
Memory Sticks 16Microdrive 16missing ink cartridge 53MPEG-1 file format 17MultiMediaCard 16
PPaper
load 11paper
buying and choosing 11loading 11maintaining 11, 43specifications 61trays 4
phone support 59phone support period
period for support 59photos
HP Photosmart D7300 series User Guide 67
antique coloration 27cropping 27date and time stamp 27e-mailing 33framing 27improving quality 26printing 21saving to computer 31sepia tones 27supported file formats 17zooming 27
Photosmart Share. SeeHP Photosmart Share
PictBridge cameras 23placing a call 59print head
cleaning 40failure 55stalled 55
print qualitychanging 21
PrinterSpecifications 61
printeraccessories 7care and maintenance 39cleaning 39connecting 21, 31documentation 3error messages 50home 7parts 4specifications 61storing 43
printer softwareupdating 42
printer software, updating 35printing
from a computer 35from BlueTooth device 21from cameras 23from memory cards 21from PictBridge camera 21photos 21range of photos 21test page 41without computer 21
Qquality
photo paper 43photos 26printing test page 41
Questions and Answers 45
Rrange
printing 21regulatory notices
regulatory modelidentification number 4
removing memory cards 18replacing ink cartridges 14
Ssaving photos to computer 31Secure Digital 16sepia tones 27Sony Memory Sticks. See
Memory SticksSpecifications 61storing
ink cartridges 43photo paper 43printer 43
support 59support process 59system requirements 61
Ttest page 41TIFF file format 17transporting printer 7trays, paper 4Troubleshooting 45troubleshooting
error messages 50two-sided printing 7
UUSB
connection type 31port 4specifications 61
Vvideo clip
supported file formats 17
XxD-Picture Card 16
68 HP Photosmart D7300 series