Embed Size (px)
Citation preview
hp photosmart 230
basics guide


i
ge . . . . . . . . . . . . . . . . . 1 . . . . . . . . . . . . . . . . . . . 1
. . . . . . . . . . . . . . . . . . . 4
. . . . . . . . . . . . . . . . . . . 8
. . . . . . . . . . . . . . . . . . 12
. . . . . . . . . . . . . . . . . . 16
. . . . . . . . . . . . . . . . . . 21
. . . . . . . . . . . . . . . . 23 . . . . . . . . . . . . . . . . . . 23
. . . . . . . . . . . . . . . . . . 32
. . . . . . . . . . . . . . . . 35 . . . . . . . . . . . . . . . . . . 36
. . . . . . . . . . . . . . . . . . 37
use
trou
contentst started . . . . . . . . . . . . . . . . . . . . . . . . . . . . . .welcome. . . . . . . . . . . . . . . . . . . . . . . . . . . . . . . . . .
quick reference . . . . . . . . . . . . . . . . . . . . . . . . . . . . .
printer parts . . . . . . . . . . . . . . . . . . . . . . . . . . . . . . .
paper information . . . . . . . . . . . . . . . . . . . . . . . . . . .
print cartridge information . . . . . . . . . . . . . . . . . . . . .
use the control panel . . . . . . . . . . . . . . . . . . . . . . . . .
your printer with a digital camera . . . . . . . . .print from a memory card . . . . . . . . . . . . . . . . . . . . . .
print camera-selected photos . . . . . . . . . . . . . . . . . . . .
bleshooting . . . . . . . . . . . . . . . . . . . . . . . . . .print a test page . . . . . . . . . . . . . . . . . . . . . . . . . . . .
printer problems . . . . . . . . . . . . . . . . . . . . . . . . . . . .
printing problems . . . . . . . . . . . . . . . . . . . . . . . . . . . . . . . . . . . . . . . . . . . . . . 40
. . . . . . . . . . . . . . . . 49 . . . . . . . . . . . . . . . . . . . 49
. . . . . . . . . . . . . . . . . . . 50
. . . . . . . . . . . . . . . . . 53
cont
ents
ii
specifications . . . . . . . . . . . . . . . . . . . . . . . . . . . .system requirements . . . . . . . . . . . . . . . . . . . . . . . . . .
printer specifications . . . . . . . . . . . . . . . . . . . . . . . . .
index . . . . . . . . . . . . . . . . . . . . . . . . . . . . . . . . .
1
1
weur new, easy-to-use, compact
card without using a computer.
ur digital camera’s memory
our photos to the hard disk, ily via E-mail, and use your
Thanpho
•
•
•
Youenhapho
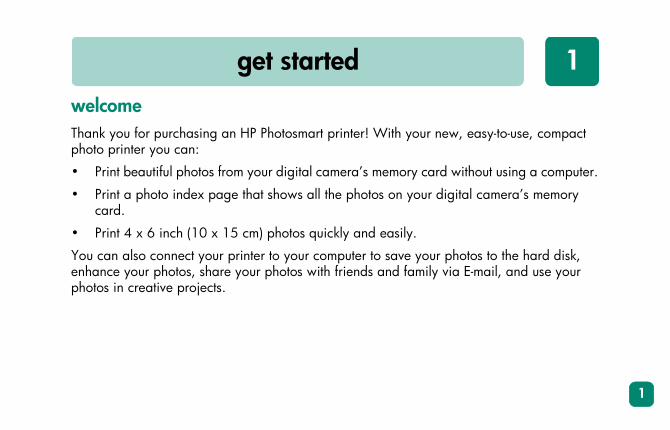
get startedlcomek you for purchasing an HP Photosmart printer! With yo
to printer you can:
Print beautiful photos from your digital camera’s memory
Print a photo index page that shows all the photos on yocard.
Print 4 x 6 inch (10 x 15 cm) photos quickly and easily.
can also connect your printer to your computer to save ynce your photos, share your photos with friends and fam
tos in creative projects.
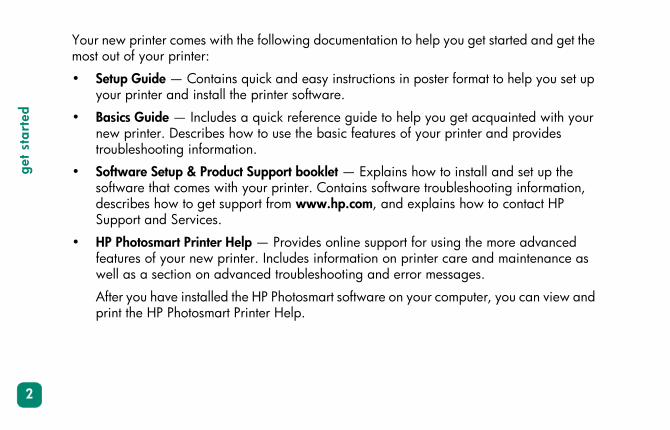
Your new printer comes with the following documentation to help you get started and get the
oster format to help you set up
you get acquainted with your our printer and provides
w to install and set up the troubleshooting information, plains how to contact HP
r using the more advanced ter care and maintenance as messages.
ur computer, you can view and
get
star
ted
2
most out of your printer:
• Setup Guide — Contains quick and easy instructions in pyour printer and install the printer software.
• Basics Guide — Includes a quick reference guide to helpnew printer. Describes how to use the basic features of ytroubleshooting information.
• Software Setup & Product Support booklet — Explains hosoftware that comes with your printer. Contains softwaredescribes how to get support from www.hp.com, and exSupport and Services.
• HP Photosmart Printer Help — Provides online support fofeatures of your new printer. Includes information on prinwell as a section on advanced troubleshooting and error
After you have installed the HP Photosmart software on yoprint the HP Photosmart Printer Help.
get started
3
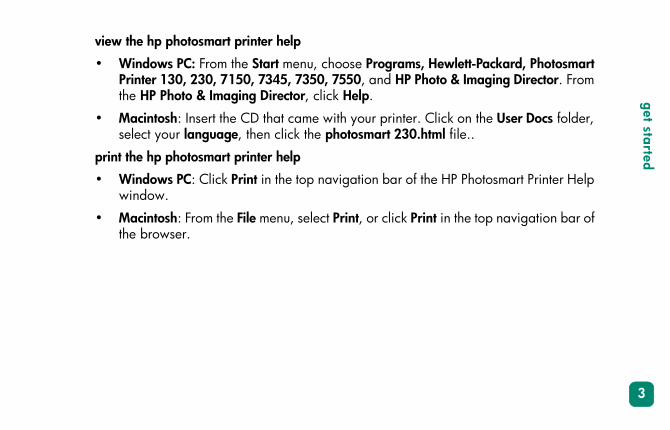
view the hp photosmart printer help
, Hewlett-Packard, Photosmart hoto & Imaging Director. From
Click on the User Docs folder, html file..
the HP Photosmart Printer Help
int in the top navigation bar of
• Windows PC: From the Start menu, choose ProgramsPrinter 130, 230, 7150, 7345, 7350, 7550, and HP Pthe HP Photo & Imaging Director, click Help.
• Macintosh: Insert the CD that came with your printer.select your language, then click the photosmart 230.
print the hp photosmart printer help
• Windows PC: Click Print in the top navigation bar of window.
• Macintosh: From the File menu, select Print, or click Prthe browser.

quick referencertridge, insert a memory card
Tip: Press the UP or DOWN arrow to view selected photos only.
OK button
Arrow keys
get
star
ted
4
Printing photos is easy! Load photo paper, install the print cacontaining photos, then...
Ready...
Press the LEFT or RIGHT arrow to navigate to each photo you want to print, then press the OK button to select it. Try it!
get started
5
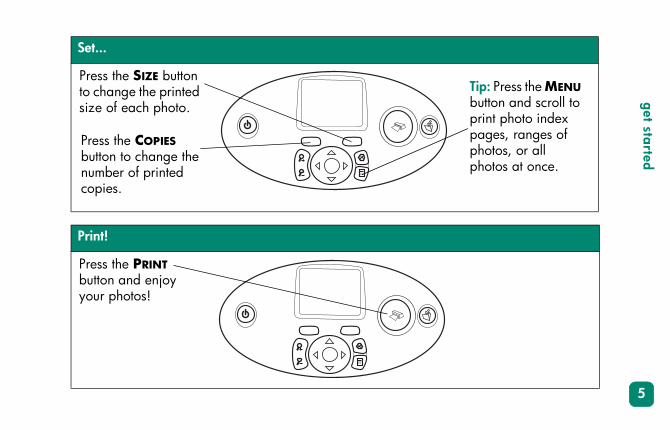
Set...
Tip: Press the MENU button and scroll to print photo index pages, ranges of photos, or all photos at once.
Print!
Press the SIZE button to change the printed size of each photo.
Press the COPIES button to change the number of printed copies.
Press the PRINT button and enjoy your photos!

r with tab 15 cm with 1.25 cm tab)
r without tab5 cm)
5 cm)
get
star
ted
6
To print... Use this paper...
borderless photos glossy photo pape4 x 6.5 inch (10 x
photos with a border on the bottom edge
glossy photo pape4 x 6 inch (10 x 1
test and calibration pages
plain index cards4 x 6 inch (10 x 1
get started
7
pages
ex page = a print showing “thumbnails” of the photos emory card.oto index page to help you photos you want to print.
e photo sizes:x 15 cm)
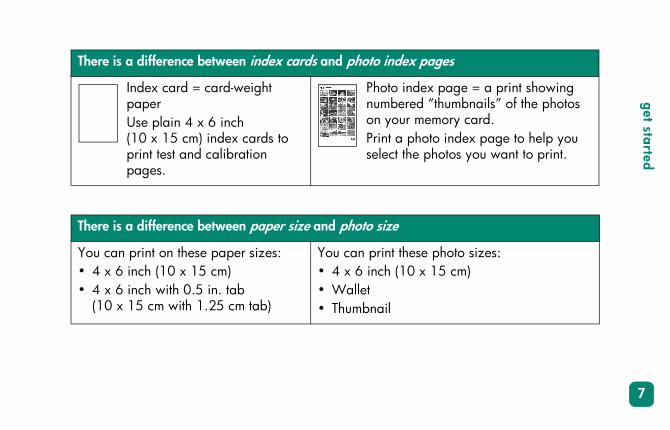
There is a difference between index cards and photo index
Index card = card-weight paperUse plain 4 x 6 inch (10 x 15 cm) index cards to print test and calibration pages.
Photo indnumberedon your mPrint a phselect the
There is a difference between paper size and photo size
You can print on these paper sizes:• 4 x 6 inch (10 x 15 cm)• 4 x 6 inch with 0.5 in. tab
(10 x 15 cm with 1.25 cm tab)
You can print thes• 4 x 6 inch (10 • Wallet• Thumbnail

printer parts
Control panel(for more information, see “control panel” on page 11)
t cartridge door
get
star
ted
8
front
Paper tray door Prin
get started
9
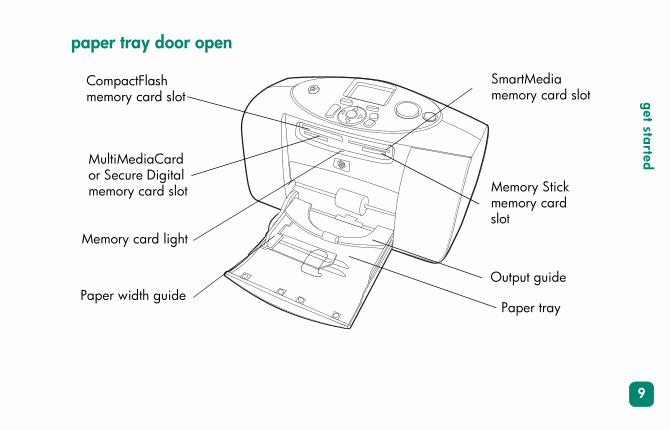
paper tray door open
SmartMedia memory card slot
Memory Stick memory card slot
Paper tray
Output guide
Memory card light
CompactFlash memory card slot
MultiMediaCard or Secure Digital memory card slot
Paper width guide
1
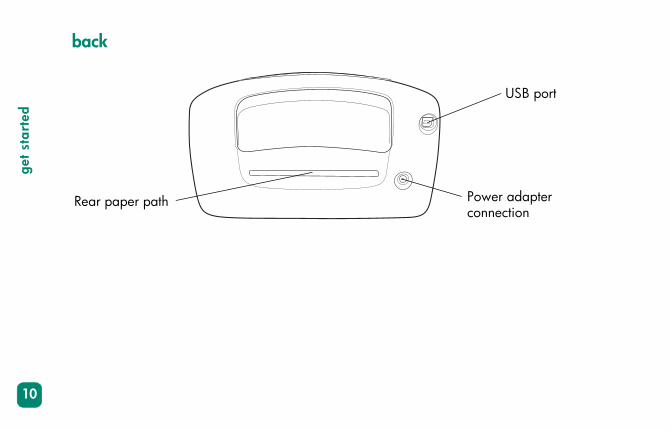
back
USB port
Power adapter connection
get
star
ted
0
Rear paper path
get started
11
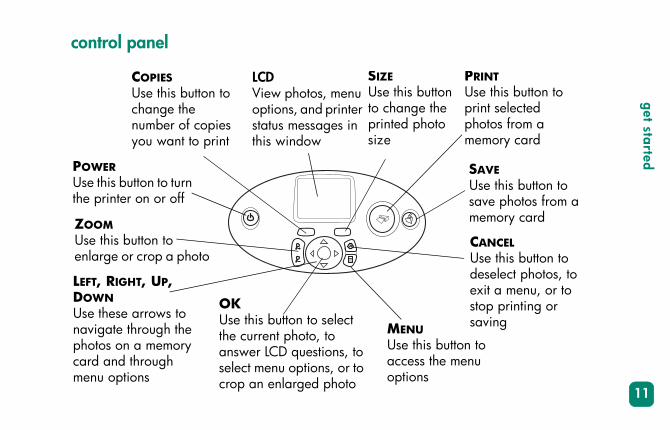
control panel
PRINTUse this button to print selected photos from a memory card
is button to s the menu s
CANCELUse this button to deselect photos, to exit a menu, or to stop printing or saving
utton the
hoto
SAVEUse this button to save photos from a memory card
POWERUse this button to turn the printer on or off
COPIESUse this button to change the number of copies you want to print
ZOOMUse this button to enlarge or crop a photo
MENUUse thaccesoption
LCDView photos, menu options, and printer status messages in this window
SIZEUse this bto changeprinted psize
LEFT, RIGHT, UP, DOWNUse these arrows to navigate through the photos on a memory card and through menu options
OKUse this button to select the current photo, to answer LCD questions, to select menu options, or to crop an enlarged photo

1
paper informationaper (with or without a tear-off HP Photo Paper. HP paper can Web at:
get
star
ted
2
You can print color photos on 4 x 6 inch (10 x 15 cm) photo ptab), plain paper, or index cards. For best printing results, usebe found at most computer and office supply stores or on the
• www.hpshopping.com (U.S.)
• www.hp-go-supplies.com (Europe)
• www. hp.com/paper (Asia Pacific)

get started
13
Your printer supports the following paper types:
r
m- to high-resolution photos, ots, photo album prints, to archive, and borderless
to share with friends, ots to enclose with letters and
reprints, digital photography, usiness photos
artridge calibration pages, ges, draft prints, children’s ts, and photo index pages (to rve photo paper)
and photo index pages
Name or type Size Use fo
HP Premium Photo Paper
4 x 6 inch (with 0.5 inch tab)10 x 15 cm (with 1.25 cm tab)
Mediusnapshphotosphotos
HP Photo Paper 4 x 6 inch (with 0.5 inch tab)10 x 15 cm (with 1.25 cm tab)
Photossnapshcards,and b
Index cards 4 x 6 inch (10 x 15 cm) Print ctest paprojecconse
Other brands of photo paper
4 x 6 inch (10 x 15 cm)A6 (105 x 148.5 mm)
Photos

1
As it prints, the printer pulls the paper straight through the paper slot, out the re the rear paper path of the uction.
get
star
ted
4
back, and then through to the front again. Be suprinter is at least 10 inches away from any obstr
Output guide
Paper width guide
get started
15
load papererneath the output guide.
g up. If you are using photo using tabbed paper, load the r first.
For more information, see the
paper types or sizes in the
to the left edge of the paper into the printer correctly so that
r, you may experience paper heets of paper and be sure the e paper without bending the
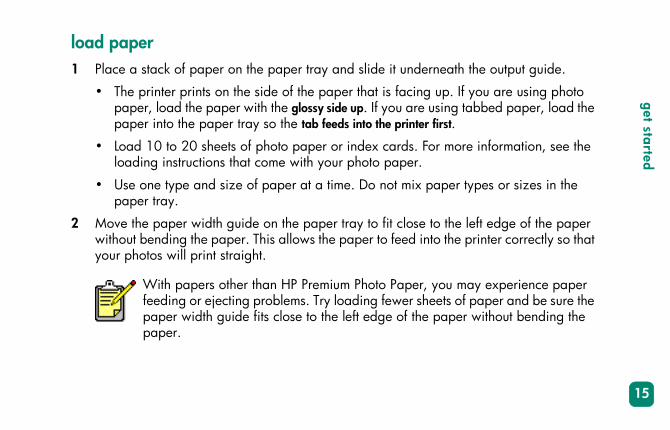
1 Place a stack of paper on the paper tray and slide it und
• The printer prints on the side of the paper that is facinpaper, load the paper with the glossy side up. If you arepaper into the paper tray so the tab feeds into the printe
• Load 10 to 20 sheets of photo paper or index cards. loading instructions that come with your photo paper.
• Use one type and size of paper at a time. Do not mixpaper tray.
2 Move the paper width guide on the paper tray to fit closewithout bending the paper. This allows the paper to feed your photos will print straight.
With papers other than HP Premium Photo Papefeeding or ejecting problems. Try loading fewer spaper width guide fits close to the left edge of thpaper.
1
print cartridge information57A) tri-color print cartridge.
r is on or off. When you insert lly prints a calibration page. If tion page will not print.
ge (HP #57). Damage to the n or refilling of HP print nty coverage.
ge, the calibration page prints
get
star
ted
6
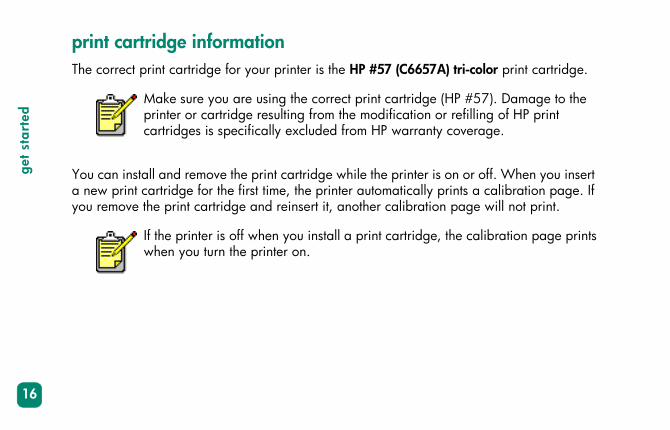
The correct print cartridge for your printer is the HP #57 (C66
You can install and remove the print cartridge while the printea new print cartridge for the first time, the printer automaticayou remove the print cartridge and reinsert it, another calibra
Make sure you are using the correct print cartridprinter or cartridge resulting from the modificatiocartridges is specifically excluded from HP warra
If the printer is off when you install a print cartridwhen you turn the printer on.
get started
17
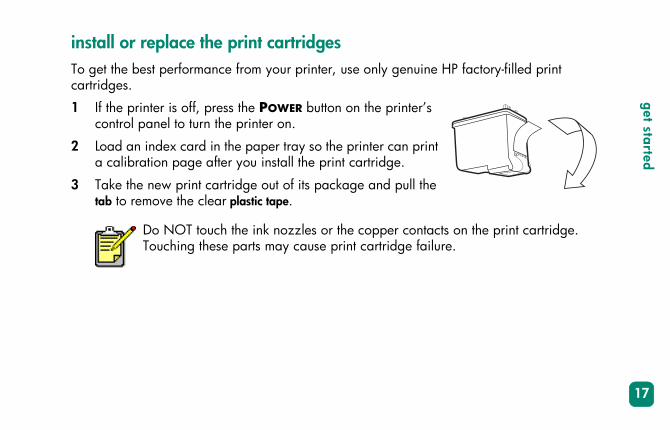
install or replace the print cartridgesine HP factory-filled print
’s
rint
the
tacts on the print cartridge. ailure.
To get the best performance from your printer, use only genucartridges.
1 If the printer is off, press the POWER button on the printercontrol panel to turn the printer on.
2 Load an index card in the paper tray so the printer can pa calibration page after you install the print cartridge.
3 Take the new print cartridge out of its package and pull tab to remove the clear plastic tape.
Do NOT touch the ink nozzles or the copper conTouching these parts may cause print cartridge f
1
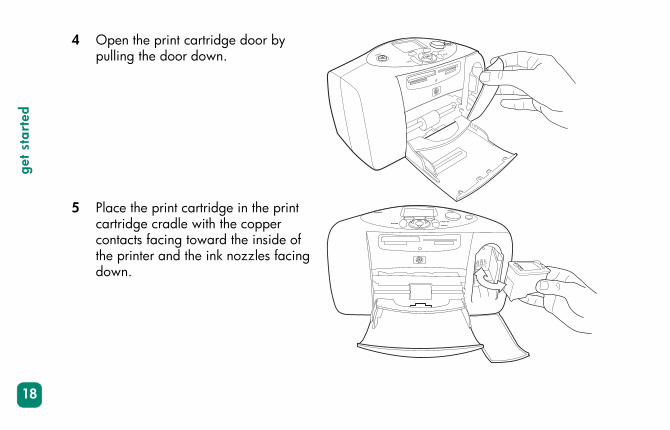
4 Open the print cartridge door by
POWER
CANCELMENUCOPIES
SIZE
OK
MENU
CANCEL
get
star
ted
8
pulling the door down.
5 Place the print cartridge in the print cartridge cradle with the copper contacts facing toward the inside of the printer and the ink nozzles facing down.
ZOOM
ZOOM
POWER
get started
19
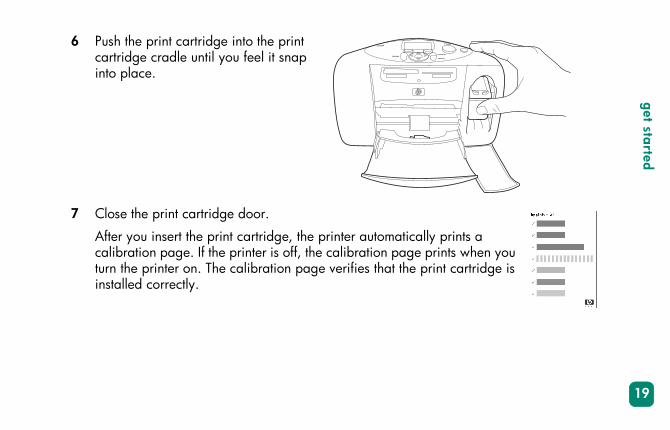
6 Push the print cartridge into the print
lly prints a prints when you print cartridge is
ZOOM
MENU
CANCEL
PRINTPOWER
cartridge cradle until you feel it snap into place.
7 Close the print cartridge door.
After you insert the print cartridge, the printer automaticacalibration page. If the printer is off, the calibration pageturn the printer on. The calibration page verifies that the installed correctly.

2
remove the print cartridge
dge to unsnap it from the print
get
star
ted
0
1 Open the print cartridge door.
2 Push down and pull outward on the top of the print cartricartridge cradle.
3 Remove the print cartridge from the printer.
get started
21
use the control panel
s you want to print.
essages in this window.
hen this light is green, the r is busy. When this light is
emory card.
ard.
enu, or to stop printing or
e through menu options. Use n a memory card. Use the UP
er LCD questions, to select
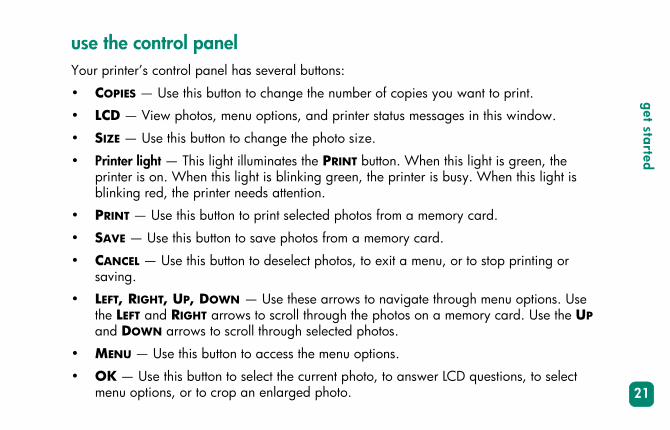
Your printer’s control panel has several buttons:
• COPIES — Use this button to change the number of copie
• LCD — View photos, menu options, and printer status m
• SIZE — Use this button to change the photo size.
• Printer light — This light illuminates the PRINT button. Wprinter is on. When this light is blinking green, the printeblinking red, the printer needs attention.
• PRINT — Use this button to print selected photos from a m
• SAVE — Use this button to save photos from a memory c
• CANCEL — Use this button to deselect photos, to exit a msaving.
• LEFT, RIGHT, UP, DOWN — Use these arrows to navigatthe LEFT and RIGHT arrows to scroll through the photos oand DOWN arrows to scroll through selected photos.
• MENU — Use this button to access the menu options.
• OK — Use this button to select the current photo, to answmenu options, or to crop an enlarged photo.
2
• ZOOM — Use this button to change the magnification of the selected photo or crop the
ow at least ten seconds for the n.
get
star
ted
2
photo.
• POWER — Use this button to turn the printer on or off. Allprinter to perform internal verifications when you turn it o

2
23
You your digital camera without usin
u can insert the memory card . The printer’s LCD guides you
are manufactured by several You can purchase memory omputer supply stores.
u camera
prinIf youinto tthrou
Yourvendcards
r HP Photosmart printer lets you print beautiful photos fromg your computer.
t from a memory cardr digital camera uses a memory card to store photos, yohe printer to print your photos without using a computergh the process.
printer supports six different memory cards. These cardsors and are available in a variety of storage capacities. where you purchased your digital camera or at most c
se your printer with a digital
ra
2
supported memory cardsed Type I or II, SmartMedia™, mory cards.
emory card and the printer.
be able to save photos in , FlashPix, and RAW. You can ory card. To print other file a software application.
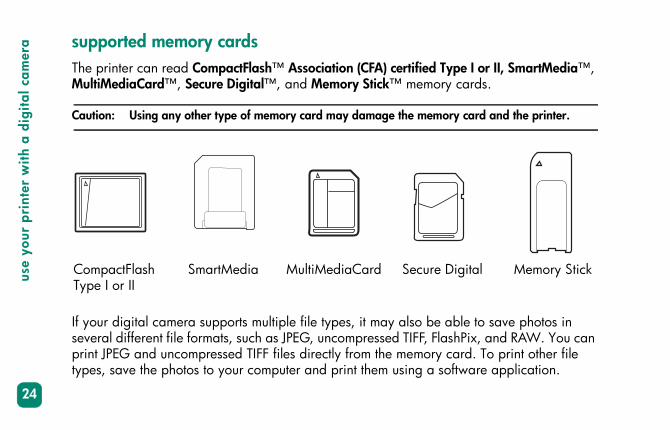
Memory Stickure Digital
useyour
pri
nter
with
a d
igita
l cam
e
4
The printer can read CompactFlash™ Association (CFA) certifiMultiMediaCard™, Secure Digital™, and Memory Stick™ me
Caution: Using any other type of memory card may damage the m
If your digital camera supports multiple file types, it may alsoseveral different file formats, such as JPEG, uncompressed TIFFprint JPEG and uncompressed TIFF files directly from the memtypes, save the photos to your computer and print them using
CompactFlashType I or II
SecSmartMedia MultiMediaCard

use your printer with a digital cam
era
25
insert a memory cardn insert a memory card into ave the photos to your
ght illuminates. The LCD briefly ys the first photo.
light is blinking. Removing a printer or the memory card, or formation see the HP Photosmart
e memory card slot you use
t at a time.
After you have taken photos with your digital camera, you cayour printer to print photos immediately or use the printer to scomputer.
When you insert a memory card correctly, the memory card lishows the number of photos on the memory card, then displa
Caution: Do not pull out the memory card while the memory card memory card while it is being accessed may damage thecorrupt the information on the memory card. For more inPrinter Help.
There are four different memory card slots on your printer. Thdepends on the type of memory card you have.
The printer can only access one memory card slo
ra
2
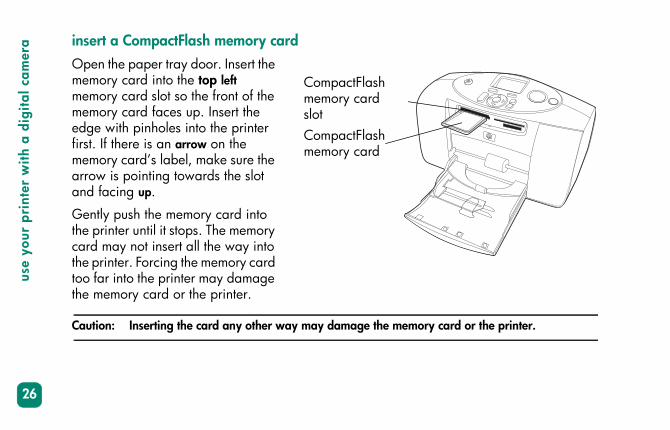
insert a CompactFlash memory card
ry card or the printer.
use
your
pri
nter
with
a d
igita
l cam
e
6
Open the paper tray door. Insert the memory card into the top left memory card slot so the front of the memory card faces up. Insert the edge with pinholes into the printer first. If there is an arrow on the memory card’s label, make sure the arrow is pointing towards the slot and facing up.
Gently push the memory card into the printer until it stops. The memory card may not insert all the way into the printer. Forcing the memory card too far into the printer may damage the memory card or the printer.
Caution: Inserting the card any other way may damage the memo
CompactFlash memory card slotCompactFlash memory card

use your printer with a digital cam
era
27
insert a MultiMediaCard or Secure Digital memory card
ry card or the printer.
Open the paper tray door. Insert the memory card into the bottom left memory card slot with the label facing up and the side with the metal contacts facing down. Insert the end with the metal contacts into the printer first.
Gently push the memory card into the printer until it stops. The memory card may not insert all the way into the printer. Forcing the memory card in too far may damage the memory card or the printer.
Caution: Inserting the card any other way may damage the memo
MultiMediaCardor Secure Digital memory card slot
MultiMediaCard or Secure Digital memory card
ra
2
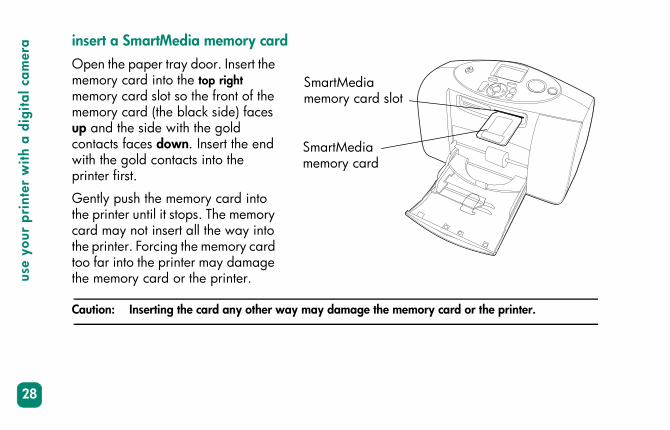
insert a SmartMedia memory card
ry card or the printer.
use
your
pri
nter
with
a d
igita
l cam
e
8
Open the paper tray door. Insert the memory card into the top right memory card slot so the front of the memory card (the black side) faces up and the side with the gold contacts faces down. Insert the end with the gold contacts into the printer first.
Gently push the memory card into the printer until it stops. The memory card may not insert all the way into the printer. Forcing the memory card too far into the printer may damage the memory card or the printer.
Caution: Inserting the card any other way may damage the memo
SmartMediamemory card slot
SmartMedia memory card

use your printer with a digital cam
era
29
insert a Memory Stick memory card
ry card or the printer.
Open the paper tray door. Insert the memory card into the bottom right memory card slot with the metal contacts facing down. Insert the end with the metal contacts into the printer first.
Gently push the memory card into the printer until it stops. The memory card may not insert all the way into the printer. Forcing the memory card too far into the printer may damage the memory card or the printer.
Caution: Inserting the card any other way may damage the memo
Memory Stickmemory card slot
Memory Stick memory card

ra
3
decide which photos to printon the printer’s LCD or by
lay on the LCD, then press the ress an arrow, a new photo
lay on the LCD, then press the
hlighted on the LCD, then press
emory card, see the
use
your
pri
nter
with
a d
igita
l cam
e
0
You can decide which photos to print by viewing the photos printing a photo index page.
view photos on the LCD1 Insert a memory card into the printer’s memory card slot.
2 Wait for the first photo stored on the memory card to dispLEFT or RIGHT arrow to view the photos. Each time you pappears on the LCD.
print a photo index page1 Insert a memory card into the printer’s memory card slot.
2 Wait for the first photo stored on the memory card to dispMENU button on the printer’s control panel.
3 Press the DOWN arrow until Print Index Page appears higthe OK button.
For more information on printing and saving photos from a mHP Photosmart Printer Help.
use your printer with a digital cam
era
31
print photos from the control panel memory card into the printer’s pressing the PRINT button.
ear on the LCD, then press the pears in the LCD.
s.
K button to select each photo. lected photos.
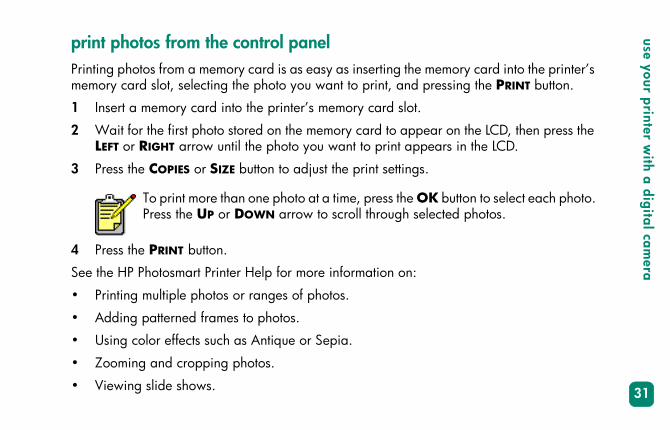
Printing photos from a memory card is as easy as inserting thememory card slot, selecting the photo you want to print, and
1 Insert a memory card into the printer’s memory card slot.
2 Wait for the first photo stored on the memory card to appLEFT or RIGHT arrow until the photo you want to print ap
3 Press the COPIES or SIZE button to adjust the print setting
4 Press the PRINT button.
See the HP Photosmart Printer Help for more information on:
• Printing multiple photos or ranges of photos.
• Adding patterned frames to photos.
• Using color effects such as Antique or Sepia.
• Zooming and cropping photos.
• Viewing slide shows.
To print more than one photo at a time, press the OPress the UP or DOWN arrow to scroll through se

ra
3
print camera-selected photos your printer to print camera-
USB port
USB cable
use
your
pri
nter
with
a d
igita
l cam
e
2
If you have an HP direct-printing digital camera, you can useselected photos.
select and print photos1 Use your camera’s Share menu to select
the photos you want to print. For more information, see the documentation that came with your camera.
2 Connect the camera to the USB port on the back of your printer using the special USB cable that came with your camera.
When you connect the camera to the printer, the camera’s Print Setup menu appears. Use this menu to:
• Change the photos you have selected for printing.
• Select the photo paper type.
• Select the photo size.
use your printer with a digital cam
era
33
3 When you are ready to print, follow the instructions on your camera’s LCD.
s, see the documentation that
To learn more about using camera-selected photocame with your camera.
ra
3
use
your
pri
nter
with
a d
igita
l cam
e
4
3
35
You y to use. This section offers tips and you begin, make sure:
uter are secure.
to www.hp.com to check for & Product Support booklet that
indows PC and Macintosh
• A
• Ysoca
troubleshooting
r HP Photosmart printer is designed to be reliable and eas advice for addressing frequently asked questions. Before
ll the cable connections between your printer and comp
ou are using the most recent version of the software. Goftware updates. See the HP Photosmart Software Setup me with your printer for contact information.
The information in this chapter pertains to both Woperating systems.
3
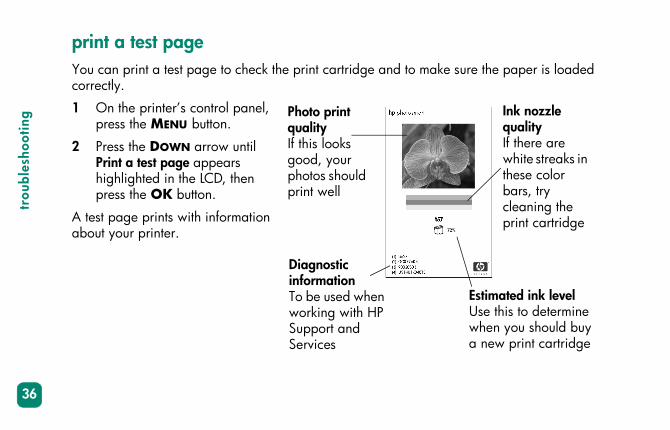
print a test pagemake sure the paper is loaded
Ink nozzle qualityIf there are white streaks in these color bars, try cleaning the print cartridge
Estimated ink levelUse this to determine when you should buy a new print cartridge
trou
bles
hoot
ing
6
You can print a test page to check the print cartridge and to correctly.
1 On the printer’s control panel, press the MENU button.
2 Press the DOWN arrow until Print a test page appears highlighted in the LCD, then press the OK button.
A test page prints with information about your printer.
Photo print qualityIf this looks good, your photos should print well
Diagnostic informationTo be used when working with HP Support and Services
troubleshooting
37
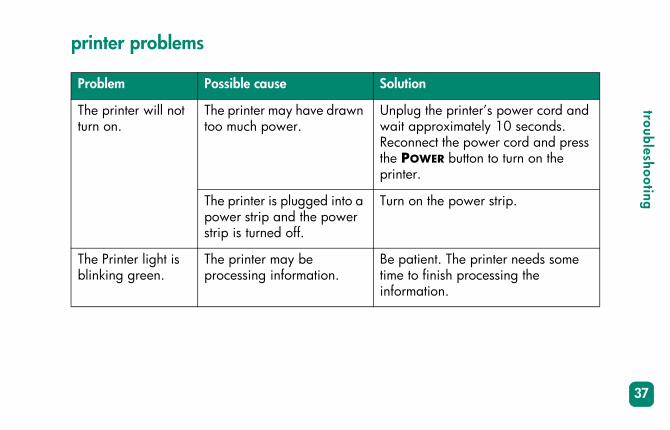
printer problems
the printer’s power cord and proximately 10 seconds. ect the power cord and press WER button to turn on the
the power strip.
ent. The printer needs some finish processing the tion.
Problem Possible cause Solution
The printer will not turn on.
The printer may have drawn too much power.
Unplugwait apReconnthe POprinter.
The printer is plugged into a power strip and the power strip is turned off.
Turn on
The Printer light is blinking green.
The printer may be processing information.
Be patitime to informa
3
following: k the printer’s LCD and the
puter monitor for instructions. does not work, and you have ital camera connected to the
er, check the camera’s LCD for ctions.
s does not work, turn the er off. Unplug the printer’s er cord, wait one minute, then it in again. Turn the printer
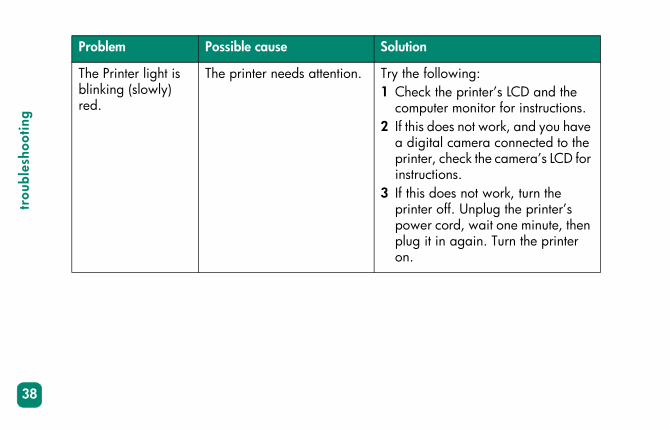
Problem Possible cause Solution
trou
bles
hoot
ing
8
The Printer light is blinking (slowly) red.
The printer needs attention. Try the1 Chec
com2 If this
a digprintinstru
3 If thiprintpowplugon.
troubleshooting
39
following:the printer off. Unplug the er’s power cord, wait one te, then plug it in again. Turn rinter on. does not work, check .hp.com or contact HP ort and Services. For contact mation, see the Software & Product Support booklet
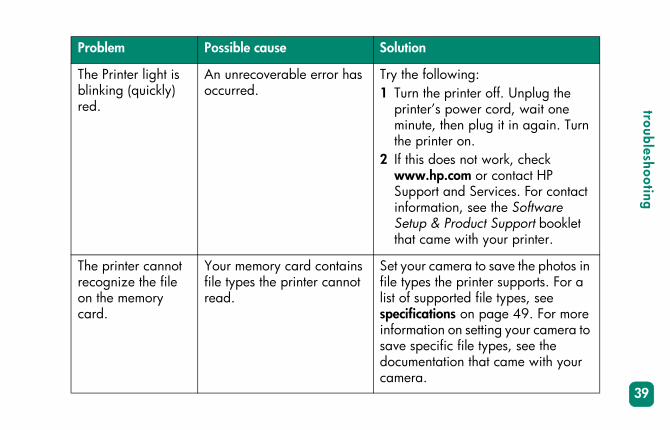
came with your printer.
r camera to save the photos in s the printer supports. For a
upported file types, see ations on page 49. For more tion on setting your camera to ecific file types, see the ntation that came with your .
Problem Possible cause Solution
The Printer light is blinking (quickly) red.
An unrecoverable error has occurred.
Try the 1 Turn
printminuthe p
2 If thiswwwSuppinforSetupthat
The printer cannot recognize the file on the memory card.
Your memory card contains file types the printer cannot read.
Set youfile typelist of sspecificinformasave spdocumecamera

4
ent. High resolution photos owly.
n
he paper width guide on the ray to fit close to the left edge aper without bending the
following:t the photo paper as far as it o into the paper tray. one sheet of photo paper at e.
Problem Possible cause Solution
trou
bles
hoot
ing
0
printing problems
Printing is very slow.
You may be trying to print a high resolution photo.
Be patiprint sl
Problem Possible cause Solutio
Photo paper does not feed into the printer correctly.
Photo paper is not aligned properly in the paper tray.
Move tpaper tof the ppaper.
You are in an extremely high or low humidity environment.
Try the• Inser
will g• Load
a tim
troubleshooting
41
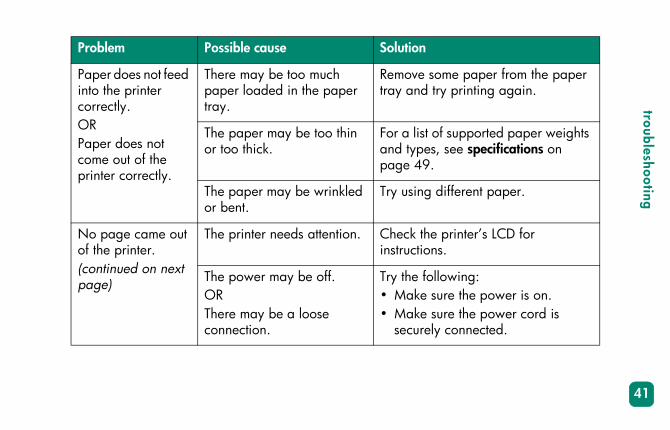
some paper from the paper d try printing again.
st of supported paper weights es, see specifications on 9.
g different paper.
the printer’s LCD for ions.
following:e sure the power is on.e sure the power cord is rely connected.
Problem Possible cause Solution
Paper does not feed into the printer correctly.ORPaper does not come out of the printer correctly.
There may be too much paper loaded in the paper tray.
Removetray an
The paper may be too thin or too thick.
For a liand typpage 4
The paper may be wrinkled or bent.
Try usin
No page came out of the printer. (continued on next page)
The printer needs attention. Check instruct
The power may be off.ORThere may be a loose connection.
Try the • Mak• Mak
secu

4
that paper is loaded correctly aper tray. See paper tion on page 12 for paper instructions.
he printer’s print cartridge
Problem Possible cause Solution
trou
bles
hoot
ing
2
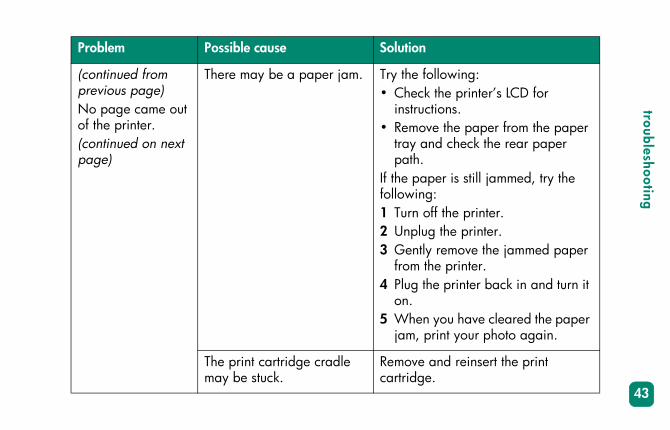
(continued from previous page)No page came out of the printer.(continued on next page)
You may not have any paper in the paper tray.
Check in the pinformaloading
The printer’s print cartridge door may be open.
Close tdoor.
troubleshooting
43
following:k the printer’s LCD for ctions.ve the paper from the paper
and check the rear paper .aper is still jammed, try the g:off the printer.ug the printer.tly remove the jammed paper the printer.the printer back in and turn it
n you have cleared the paper print your photo again.
and reinsert the print e.
Problem Possible cause Solution
(continued from previous page)No page came out of the printer.(continued on next page)
There may be a paper jam. Try the • Chec
instru• Remo
tray path
If the pfollowin1 Turn 2 Unpl3 Gen
from4 Plug
on.5 Whe
jam,
The print cartridge cradle may be stuck.
Removecartridg
4
following:k the printer’s LCD for error ages. a test page and replace the cartridge if necessary.
ent. High resolution photos wly.
test page and replace the print e if necessary.
ancel a print job before the file rinting, the printer may have loaded paper in preparation ting. When you start the next b, the printer ejects the blank efore continuing with the job.
Problem Possible cause Solution
trou
bles
hoot
ing
4
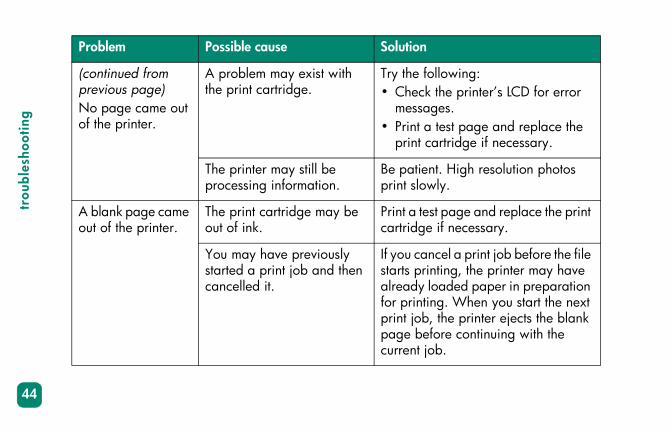
(continued from previous page)No page came out of the printer.
A problem may exist with the print cartridge.
Try the• Chec
mess• Print
The printer may still be processing information.
Be patiprint slo
A blank page came out of the printer.
The print cartridge may be out of ink.
Print a cartridg
You may have previously started a print job and then cancelled it.
If you cstarts palreadyfor prinprint jopage bcurrent
troubleshooting
45
ure the paper is correctly d in the paper tray. For paper- instructions, see load paper e 15.
test page.
int cartridge is running low on lace the print cartridge.
ure you are using a paper ended for the printer. For best use HP Photo Paper.
ure the photo paper is loaded glossy side up.
Problem Possible cause Solution
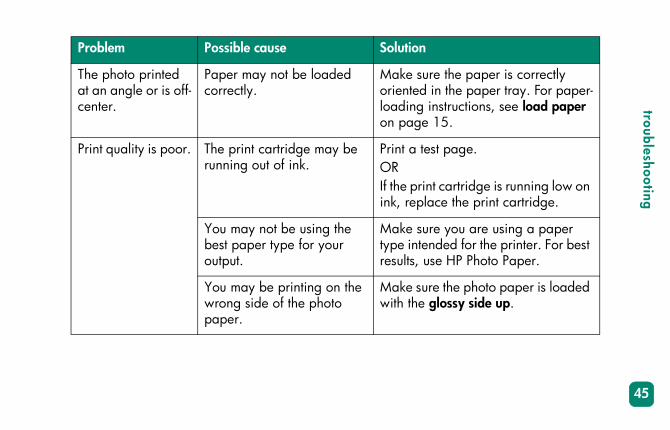
The photo printed at an angle or is off-center.
Paper may not be loaded correctly.
Make sorienteloadingon pag
Print quality is poor. The print cartridge may be running out of ink.
Print a ORIf the prink, rep
You may not be using the best paper type for your output.
Make stype intresults,
You may be printing on the wrong side of the photo paper.
Make swith the
4
e photo paper with the glossy . If you are using tabbed load the paper so the tab first.
for a paper jam, then try the g:t the photo paper as far as it o into the paper tray. one sheet of photo paper at e.
photo index page. Use the r shown on the photo index select the photos to print.
Problem Possible cause Solution
trou
bles
hoot
ing
6
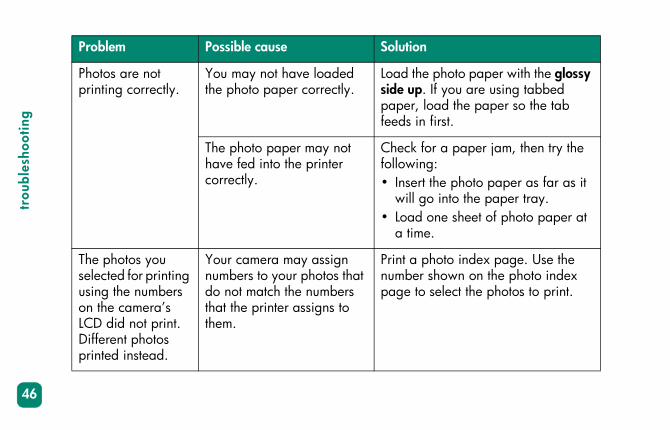
Photos are not printing correctly.
You may not have loaded the photo paper correctly.
Load thside uppaper,feeds in
The photo paper may not have fed into the printer correctly.
Check followin• Inser
will g• Load
a tim
The photos you selected for printing using the numbers on the camera’s LCD did not print. Different photos printed instead.
Your camera may assign numbers to your photos that do not match the numbers that the printer assigns to them.
Print a numbepage to
troubleshooting
47
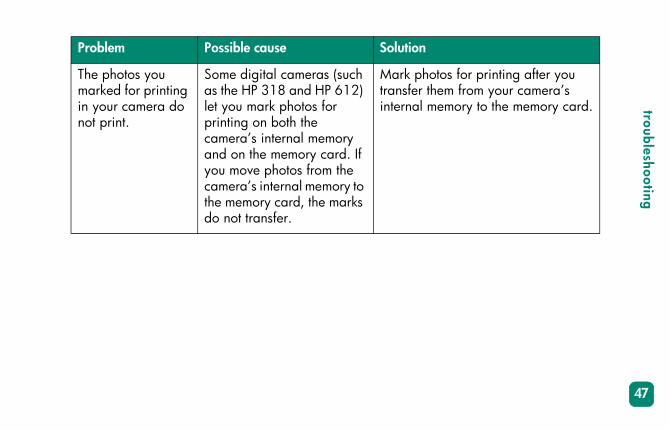
hotos for printing after you them from your camera’s l memory to the memory card.
Problem Possible cause Solution
The photos you marked for printing in your camera do not print.
Some digital cameras (such as the HP 318 and HP 612) let you mark photos for printing on both the camera’s internal memory and on the memory card. If you move photos from the camera’s internal memory to the memory card, the marks do not transfer.
Mark ptransferinterna

4
See the HP Photosmart Printer Help for more information on:
troubl
esho
otin
g
8
• Windows PC connection problems.
• Macintosh connection problems.
• USB connection problems.
• More printer problems.
• More printing problems.
• LCD error messages

4
49
sy
cintosh minimum
cintosh® OS 9.x, OS X 10.1 later
or greater
9.x: 64 MB (128 MB ommended) X: 128 MB
0 MB
0 x 600, 16-bit or higher
Comp
Oper
Proce
RAM
Free
Vide
CD-R
specificationsstem requirements
onent Windows PC minimum Ma
ating system Windows 98, 2000 Professional, ME, XP Home, and XP Professional
Maor
ssor Pentium® ll (or equivalent) or higher
G3
64 MB (128 MB recommended) OSrecOS
disk space 500 MB 30
o display 800 x 600, 16-bit or higher 80
OM drive 4x 4x
5
B port and USB cable
ray
gesrds
ynky
its Huffman
Component Windows PC minimum Macintosh minimum
spec
ific
atio
ns
0
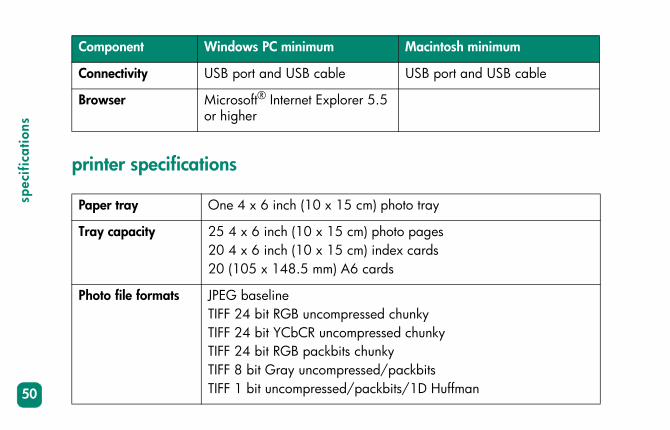
printer specifications
Connectivity USB port and USB cable US
Browser Microsoft® Internet Explorer 5.5 or higher
Paper tray One 4 x 6 inch (10 x 15 cm) photo t
Tray capacity 25 4 x 6 inch (10 x 15 cm) photo pa20 4 x 6 inch (10 x 15 cm) index ca20 (105 x 148.5 mm) A6 cards
Photo file formats JPEG baselineTIFF 24 bit RGB uncompressed chunkTIFF 24 bit YCbCR uncompressed chuTIFF 24 bit RGB packbits chunkyTIFF 8 bit Gray uncompressed/packbTIFF 1 bit uncompressed/packbits/1D
specifications
51
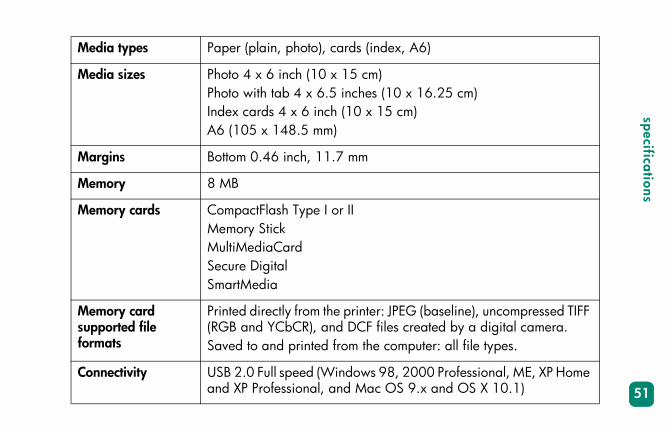
Media types Paper (plain, photo), cards (index, A6)
6.25 cm)
(baseline), uncompressed TIFF ated by a digital camera.ter: all file types.
0 Professional, ME, XP Home x and OS X 10.1)
Media sizes Photo 4 x 6 inch (10 x 15 cm)Photo with tab 4 x 6.5 inches (10 x 1Index cards 4 x 6 inch (10 x 15 cm)A6 (105 x 148.5 mm)
Margins Bottom 0.46 inch, 11.7 mm
Memory 8 MB
Memory cards CompactFlash Type I or IIMemory StickMultiMediaCardSecure DigitalSmartMedia
Memory card supported file formats
Printed directly from the printer: JPEG (RGB and YCbCR), and DCF files creSaved to and printed from the compu
Connectivity USB 2.0 Full speed (Windows 98, 200and XP Professional, and Mac OS 9.

5
Power adapter C8442-60026 adapter: 120–127Vac, 50/60Hz, 500mAc, 50/60Hz, 500mA
ptimized dpi
SmartFocus, Automatic
g
135 mm)
00 Professional, ME, XP Home .x, and Macintosh OS X 10.1. meters.
spec
ific
atio
ns
2
C8442-60027 adapter: 100–240Va
Print quality, color HP PhotoREt lll, up to 4800 x 1200 o
Technology, color HP PhotoREt lll, HP ColorSmart III, HPContrast Enhancement
Print technology Drop-on-demand thermal inkjet printin
Print cartridge 1 tri-color HP #57 (C6657A)
Prints color Yes
Print languages HP PCL 3
Dimensions 8.8 x 4.3 x 5.3 inches (225 x 110 x
Weight 3.06 lb (1.39 kg)
USB support USB 2.0 Full speed (Windows 98, 20and XP Professional, Macintosh OS 9USB cable must be no longer than 3
53
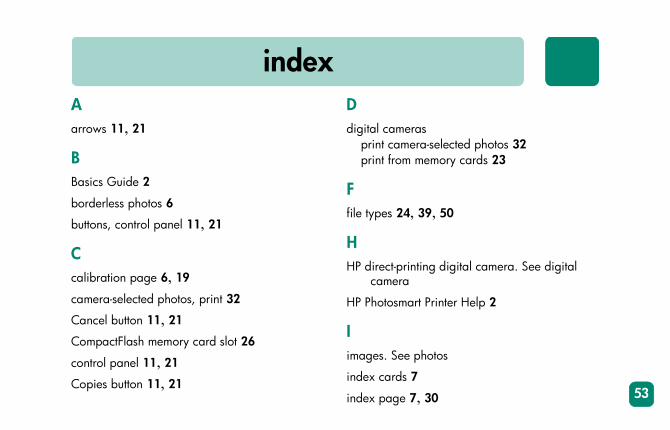
Aarro s
a-selected photos 32emory cards 23
9, 50
ing digital camera. See digital
Printer Help 2
hotos
30
BBasic
bord
butto
Ccalib
came
Canc
Com
contr
Cop
index
ws 11, 21
s Guide 2erless photos 6ns, control panel 11, 21
ration page 6, 19
ra-selected photos, print 32
el button 11, 21
pactFlash memory card slot 26
ol panel 11, 21
ies button 11, 21
Ddigital camera
print camerprint from m
Ffile types 24, 3
HHP direct-print
camera
HP Photosmart
Iimages. See p
index cards 7index page 7,

5
ink. See print cartridges O 21
5
0izes 13, 50y 12
7, 30a-selected photos 32e control panel 31
1, 22
ry cards 23ntrol panel 31
inde
x
4
insert memory cards 25–29
install print cartridges 17
LLCD 11, 21
load paper 15
Mmedia types and sizes 13, 50
memory cardscard slots 9insert 25–29print from 23remove 25supported types 24
Memory Stick memory card slot 29
Menu button 11, 21
MultiMediaCard memory card slot 27
OK button 11,output guide 1
Ppaper
load 15rear path 1types and swhere to bu
photosborders 6file types 24index pageprint camerprint from thview 30
Power button 1print
from memofrom the co
index
55
photo index page 30 Rth 10, 14
ds 25ges 20
, 21
memory card slot 27
, 21
emory card slot 28
& Product Support booklet 250
6
age 36
test page 36
Print button 11, 21
print cartridgescalibration page 19install 17remove 20supported 16test page 36
printerdiagrams of 8–11documentation 1light 21problems 37–39specifications 50
printing problems 40–47
Qquick reference 4
rear paper pa
removememory carprint cartrid
SSave button 11
Secure Digital
Setup Guide 2Size button 11
SmartMedia m
Software Setup
specifications
Ttest page 6, 3troubleshooting
print a test p

5
printer problems 37–39printing problems 40–47
inde
x
6
UUSB port 10
ZZoom button 11, 22


© Copyright 2002 Hewlett-Packard Company
All rights are reserved. No part of this document may be photocopied, reproduced, or translated to another language without the prior written consent of Hewlett-Packard Company.
The information contained in this document is subject to change without notice. Hewlett-Packard shall not be liable for errors contained herein or for consequential damages in connection with the furnishing, performance, or use of this material.
HP, the HP logo, and Photosmart are property of Hewlett-Packard Company.
Microsoft and Windows are registered trademarks of Microsoft Corporation.CompactFlash, CF, and the CF logo are trademarks of the CompactFlash Association (CFA).
Mac, the Mac logo, and Macintosh are registered trademarks of Apple Computer, Inc.
IBM is a registered trademark of International Business Machines Corporation.
Other brands and their products are trademarks or registered trademarks of their respective holders.
The copyrights to certain photos within this document are retained by the original owners.

Printed on recycled paperPrinted in US, 6/02
ENERGY STAR® is a U.S. registered mark. As an ENERGY STAR® partner, Hewlett-Packard Company has determined that this product meets the ENERGY STAR® guidelines for energy efficiency.
www.hp.com©2002 Hewlett-Packard Company
Q3000-90163