Embed Size (px)
Citation preview
HP Operations OrchestrationFor Windows ® and Linux operating systems
Software Version: 9.07
Studio Authoring Guide
Document Release Date: January 2013
Software Release Date: January 2013
Legal NoticesWarranty
The only warranties for HP products and services are set forth in the express warranty statementsaccompanying such products and services. Nothing herein should be construed as constituting anadditional warranty. HP shall not be liable for technical or editorial errors or omissions containedherein.
The information contained herein is subject to change without notice.
Restricted Rights LegendConfidential computer software. Valid license from HP required for possession, use or copying.Consistent with FAR 12.211 and 12.212, Commercial Computer Software, Computer SoftwareDocumentation, and Technical Data for Commercial Items are licensed to the U.S. Governmentunder vendor's standard commercial license.
Copyright Notice© Copyright 2005-2013 Hewlett-Packard Development Company, L.P.
Trademark NoticesAdobe™ is a trademark of Adobe Systems Incorporated.
Microsoft® andWindows® are U.S. registered trademarks of Microsoft Corporation.
UNIX® is a registered trademark of TheOpenGroup.
This product includes an interface of the 'zlib' general purpose compression library, which isCopyright © 1995-2002 Jean-loupGailly andMark Adler.
HP Operations Orchestration (9.07)Page 2 of 301
Studio Authoring Guide
Documentation UpdatesThe title page of this document contains the following identifying information:
l Software Version number, which indicates the software version.
l Document Release Date, which changes each time the document is updated.
l Software Release Date, which indicates the release date of this version of the software.
To check for recent updates or to verify that you are using themost recent edition of a document, goto:
http://h20230.www2.hp.com/selfsolve/manuals
This site requires that you register for an HP Passport and sign in. To register for an HP PassportID, go to:
http://h20229.www2.hp.com/passport-registration.html
Or click theNew users - please register link on the HP Passport login page.
You will also receive updated or new editions if you subscribe to the appropriate product supportservice. Contact your HP sales representative for details.
HP Operations Orchestration (9.07)Page 3 of 301
Studio Authoring Guide
SupportVisit the HP Software Support Online web site at:
http://www.hp.com/go/hpsoftwaresupport
This web site provides contact information and details about the products, services, and supportthat HP Software offers.
HP Software online support provides customer self-solve capabilities. It provides a fast andefficient way to access interactive technical support tools needed tomanage your business. As avalued support customer, you can benefit by using the support web site to:
l Search for knowledge documents of interest
l Submit and track support cases and enhancement requests
l Download software patches
l Manage support contracts
l Look up HP support contacts
l Review information about available services
l Enter into discussions with other software customers
l Research and register for software training
Most of the support areas require that you register as an HP Passport user and sign in. Many alsorequire a support contract. To register for an HP Passport ID, go to:
http://h20229.www2.hp.com/passport-registration.html
To findmore information about access levels, go to:
http://h20230.www2.hp.com/new_access_levels.jsp
HP Operations Orchestration (9.07)Page 4 of 301
Studio Authoring Guide

ContentsStudio Authoring Guide 1
Contents 5
Introduction to flows 15
Key parts of a flow 15
What a flow needs to be valid 16
Taking a flow beyond the basics 17
Operations: Models for steps 18
Advanced flow architecture and concepts 20
How steps are executed 20
Operations: architecture and datamovement 21
Advanced flow, step, and operation concepts 24
Flow variables vs. global variables 24
Steps vs. operations 24
Flow, step, and operation inputs 25
Outputs and results 25
Multiple authors and version control 27
Starting HP OO Studio 28
Visual overview of Studio 29
Repository pane 30
My Changes/Checkouts panel 31
Authoring pane 32
Step palette 33
View Options palette 33
View Options palette 33
Flow diagram 34
Bookmarks panel 35
Icons panel 36
HP Operations Orchestration (9.07)Page 5 of 301

Flow Variables panel - overview 37
Resizing and repositioning panels 38
Object Properties sheets 39
Locating a step 39
Keyboard and Mouse shortcuts in Studio 41
Repository pane keyboard shortcuts 41
Authoring pane keyboard shortcuts 41
Properties Editors / Inspector keyboard shortcuts 42
Scriptlet tab keyboard shortcuts 42
Bookmarks panel keyboard shortcuts 42
Debugger keyboard shortcuts 42
Closing the editor with themiddlemouse button 42
Version control of Library objects 43
Checking out and checking in a Library object 44
Checking out a Library object 45
Checking in a Library object 46
Resolving conflicts between two authors’ versions of an object 47
Forcible checkins by an Administrator 48
Managing versions 49
Abandoning changes 49
Opening an earlier version of an object 50
Restoring an object to an earlier version 51
Comparing versions of an object 51
Creating a folder 52
Creating flows 53
Creating a flow 54
Creating a flow from a template 55
Adding callouts to a flow 57
Finding a flow or operation 58
Searching for a flow or operation 59
Defining a search 59
Searching with Lucene syntax 62
HP Operations Orchestration (9.07)Page 6 of 301
Studio Authoring GuideContents
Accessing an operation from the Search panel 63
Descriptions: Information for successfully using operations 64
Viewing a folder’s description 65
Viewing a flow’s description 66
Viewing an operation’s description 66
Viewing many operation and flow descriptions 67
Enabling Central users to generate documentation 70
Generating documentation in a custom format 72
.vm template file descriptions 73
Folder_template.vm 73
All_folders_template.vm 74
All_ops_template.vm 74
Folder_overview_template.vm 74
Op_template.vm 75
Flow_template.vm 75
Folder_contents.vm 75
Header.html 75
Header.css 75
Hp_rockwell.css 76
Hp_steps_307x39.jpg 76
Logo_hp_smallmasthead.gif 76
Structure of Generate Documentation output 76
Modifying Generate Documentation templates 77
Analyzing the impact of changing a flow or operation 79
Finding out which flows use an operation 80
Finding out which flows use a domain term 80
Copying flows and operations 82
Renaming flows or operations 84
Bookmarking flows and operations 85
Bookmarks: adding and removing flows and operations 85
Bookmarks shelves: adding, removing, and renaming 86
Bookmarks shelves: showing, hiding, andmoving 86
HP Operations Orchestration (9.07)Page 7 of 301
Studio Authoring GuideContents
Sharing Studio Bookmarks 86
Exporting Bookmarks 86
Importing Bookmarks 88
Restoring deleted Library objects 90
Creating steps 92
Adding steps to a flow 92
Creating a step from commonly used flows and operations 94
Changing the start step 95
Copying steps 95
Modifying a step 96
Re-arranging steps in the flow diagram 96
Prompting the user before running the step 96
Transitions: connecting steps 98
Adding a transition 100
Re-arranging transitions 101
Return steps 103
Adding a return step 103
Changing a return step’s response 104
Inputs: Providing data to operations 105
Creating an input 106
Specifying how an input gets its value 108
Creating a single constant input value 111
Creating a single input value from what the flow user types 111
Creating a single input value from a flow user selection 112
Creating a constant list of input values 113
Creating an input value list from text the flow user types 114
Creating an input value list from flow user selections 114
Creating the input’s value from the previous step’s result 115
Assigning credentials as the input’s value 116
Making the default input value not-assigned 117
Validating the format of an input 118
Inputs and flow run scheduling 118
HP Operations Orchestration (9.07)Page 8 of 301
Studio Authoring GuideContents
Removing an input 119
Flow variables: Making data available for reuse 120
Creating and assigning a value to a flow variable 120
Managing flow variables 122
Flow Variables panel 123
Filtering in the Flow Variables panel 124
Locating usage of a flow variable in the flow diagram 125
Global variables 126
Obtaining or changing the values of global variables 126
Concurrent execution: Running several threads at the same time 128
Parallel split steps 129
Lane order: starting and finishing 130
Creating parallel split steps 130
Moving or copying parallel split steps and their components 132
Adding a lane 133
Duplicating a lane 133
Deleting a lane 133
Resizing a lane 133
Renaming a lane 134
Changing a lane’s start step 134
Moving data into and out of a parallel split step 134
Debugging a parallel split step 135
Multi-instance steps 135
Usingmulti-instance steps in flow design 136
Creatingmulti-instance steps 138
Moving data into and out of amulti-instance step 139
List inputs, flow variables, andmulti-instance steps 140
Throttling amulti-instance step 141
Debugging amulti-instance step in a flow 141
Making steps nonblocking 141
Making a step single response 143
Checkpoints: Saving a flow run’s progress for recovery 144
HP Operations Orchestration (9.07)Page 9 of 301
Studio Authoring GuideContents
Saving the output of a step 146
Scriptlets 147
Creating a scriptlet 148
Filtering results with scriptlets 148
Creating scriptlet rules for operation responses 149
Debugging a scriptlet 149
Saving a scriptlet for use elsewhere 151
Using a scriptlet from the Configuration folder 151
Outputs, responses, and step results 152
Operation outputs 152
Specifying an operation’s primary output 153
Adding a secondary output 153
Deleting an output 154
Changing the source of an output 154
Responses 154
Step results 154
Adding step results 155
Deleting step results 156
Changing the source of a result 156
Filtering outputs and results 157
Creating a filter 157
Filter details 159
Diff Case 160
Extract Number 160
Format 160
Line Count 161
Regular Expression 161
Remove Duplicate Lines 161
Replace 162
Round Number 162
Scriptlet 163
Select Line 163
HP Operations Orchestration (9.07)Page 10 of 301
Studio Authoring GuideContents
Select Range 164
Sort 165
Strip 165
StripWhitespace 166
Table 166
XML filters 168
XMLGet Attribute 169
XMLGet Element 170
XMLGet Element Value 173
XPath Query 173
Saving and re-using filters 174
Changing a step’s icon 175
System properties 176
Creating system properties 176
Obtaining the values of system properties 177
Changing the value of a system property 177
Flow design 178
Using subflows to simplify flow design 178
Passing data from a subflow to a parent flow 179
Changing which operation a step is based on 181
Step descriptions 183
Running flows automatically 184
Debugging flows 185
Debugging a flow 185
Stepping into and out of a subflow 191
Resetting and restarting a flow in the debugger 192
Changing values of flow variables within the debugger 192
Working with breakpoints 193
Overriding responses in a debug run 194
Logging on as another user 196
Responses: evaluating results 196
HP Operations Orchestration (9.07)Page 11 of 301
Studio Authoring GuideContents
Adding responses to the flow 199
Deleting responses from a flow 200
Repositories: Libraries for flows and their objects 201
Adding a repository 202
Opening a repository for authoring 203
Moving flow elements between repositories 203
Setting a target repository 204
Setting no target repository 204
Publishing to and updating from the public repository 205
Publishing a repository: how to 206
Updating a repository: how to 208
Rolling back a publish or update 211
Exporting a repository 211
Importing a repository 213
Validating repositories 216
Encrypting repositories 216
Encrypting a repository 216
Opening an encrypted repository 217
Decrypting a repository 217
Creating a second encrypted copy of a repository 218
Backing up and restoring repositories 218
Repository snapshots 219
Creating snapshots 220
Editing a snapshot’s name or description 222
Viewing a snapshot 222
Closing a snapshot 223
Filtering the snapshots list 223
Deleting a snapshot 225
Restoring from a snapshot 225
Creating operations fromWeb services 227
Creating operations using theWeb Services Wizard 227
Logging theWeb Services Wizard 231
HP Operations Orchestration (9.07)Page 12 of 301
Studio Authoring GuideContents
Operating outside Central with Remote Action Services 232
How Central runs RAS-dependent operations 234
Checking the availability of a RAS 234
Controlling access to a RAS 235
Adding a RAS reference from an existing RAS 235
Adding a RAS reference 235
Reconfiguring an existing RAS reference 237
Removing a RAS reference 239
Changing RAS references 239
Creating operations that access Web services 240
Troubleshooting the running of RAS-dependent operations 241
RAS-based operations: an example: a flow that runs in any of multiple domains 241
Creating operations from RASes 242
Creating operations from aRAS 243
Adding an operation that is not in the default RAS 243
Importing RAS content as operations 244
Evaluating data for correct format 247
Creating an evaluator 248
Editing evaluators 248
Deleting an evaluator 249
Recording values for reporting 250
Domain terms for Dashboard charting 252
Adding, renaming, and removing domain terms 253
Adding, changing, and removing domain term values 254
Displaying messages to users 256
Categories: classifying flows 257
Selection lists for user prompts 258
System accounts: secure credentials 260
Creating a system account 260
Editing a system account 261
Deleting a system account 261
HP Operations Orchestration (9.07)Page 13 of 301
Studio Authoring GuideContents
Controlling access to HP OO objects 262
Setting permissions for folders and HP OO objects 264
Setting default access permissions for groups 266
Creating a new operation 268
Types of operations: setting properties 269
Cmd (command-line) operation 270
Flow RunCounter operation 271
Flow Run Summary Report operation 272
HTTP operation 274
Perl script operation 275
RAS operation: IAction programming for a RAS 277
Scriptlet operation 279
Secure shell (ssh) operation 281
Telnet operation 282
Shell operation 284
Shell Wizard: creating a flow that uses a shell operation 285
Using a shell operation 290
Working with regular expressions 291
Testing and deploying flows 294
Restricting use of flows 295
Controlling who can see a flow in Central 295
Creating IActions for operations 297
Overview of creating operations that implement IActions 297
Viewing messages to the author 298
Troubleshooting 299
HP Operations Orchestration (9.07)Page 14 of 301
Studio Authoring GuideContents
Introduction to flowsA flow is a set of actions that are linked by decision-making logic and automate tasks such ashealth checks, troubleshooting or any other repetitive IT support tasks. A run is the execution of aflow.
Say you want to verify that a page on yourWeb site contains the correct, current data, such as acertain piece of text. If the desired data is not on theWeb page, you want to push new content tothe site.
Without Operations Orchestration software, your options might be:
l Assign someone to look at theWeb site every 15minutes and, if necessary, manually publishcontent to the site.
l Program amonitoring system to check the site and raise events or alerts if the content isn’tcorrect, with manual content publishing. One of your technical support personnel would have tosee what is going wrong.
Or, with Studio, you could author a flow to do all those tasks automatically: check theWeb siteperiodically, create an event or alert, publish content to the site, troubleshoot and repair theunderlying problem, and document the steps taken.
Let’s use this example to learn about the basic concepts of a flow. A manual runbook or procedurefor a person to do this site check might read something like this:
Step 1. Browse tomysite.com/mypage.htm. If it does not contain the text “needed text” then doStep 2.
Step 2. Copy mypage.htm from server development1 to server production1.
Step 3. Keep track of how often theWeb page has the correct text and how often you need to fix theproblem
Studio is the software in which you create the flows that automate the triage, diagnosis, andresolution of problems, perform system and application health checks and handle repetitivemaintenance procedures in your operations or data center. Just like themanual procedure, a flowhas steps that gather data or take actions. Each step accepts data and responds to it, the step’sresponse differing according to what it detects. Steps can also provide complete tracking of theiractions by recording the data used in each step and what took place.
Key parts of a flowSteps are the basic units of a flow.
In addition to steps, flows have several other key elements:
l Operations do the actual work of the flow. Step 1 in our example above uses an operation thatchecks aWeb page to see whether it contains specific text. Step 2 uses an operation to copy a
HP Operations Orchestration (9.07)Page 15 of 301
file. Steps are created from operations, which are the templates for steps. Thus, operations arethe building blocks of any flow.
l Inputs give the operation the data that they need to act upon. Our operation to check aWeb pageneeds to know which page to check (mysite.com/mypage.htm) and what text to look for(“needed text”). Our copy file operation needs a source location and a destination. Inputs can be:
n Entered by the person running the flow.
n Set to a specific value.
n Obtained from information gathered by another step.
l Responses are the possible outcomes of the operation. Our get Web page operation has threeresponses: “page not found”, “text not found”, and “success” (if we got the page and it has thedesired text). Our copy file operationmight have just “success” and “failure”.
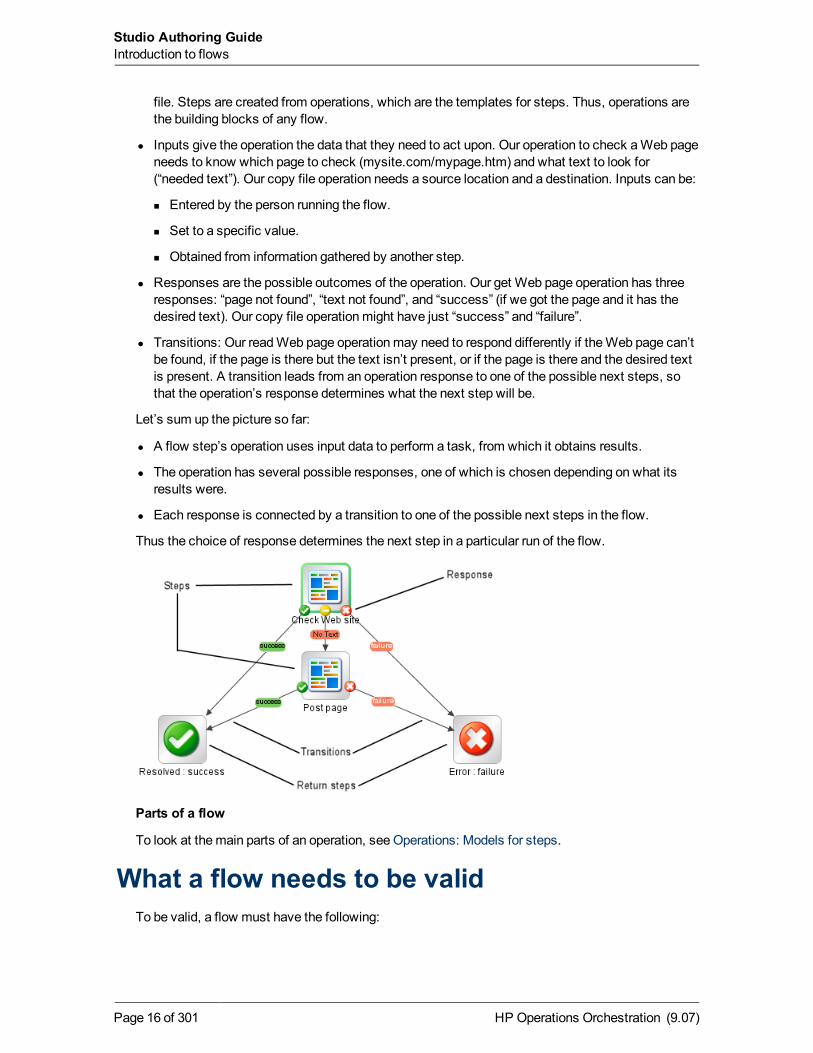
l Transitions: Our readWeb page operationmay need to respond differently if theWeb page can’tbe found, if the page is there but the text isn’t present, or if the page is there and the desired textis present. A transition leads from an operation response to one of the possible next steps, sothat the operation’s response determines what the next step will be.
Let’s sum up the picture so far:
l A flow step’s operation uses input data to perform a task, from which it obtains results.
l The operation has several possible responses, one of which is chosen depending on what itsresults were.
l Each response is connected by a transition to one of the possible next steps in the flow.
Thus the choice of response determines the next step in a particular run of the flow.
Parts of a flow
To look at themain parts of an operation, seeOperations: Models for steps.
What a flow needs to be validTo be valid, a flow must have the following:
HP Operations Orchestration (9.07)Page 16 of 301
Studio Authoring GuideIntroduction to flows
l At least one step, with one of the steps designated as the start step.
l For each step, from each response of the step’s underlying operation, a transition connecting thestep to a subsequent step. Most operations havemore than one response, somost steps musthavemore than one transition connecting them to one or more subsequent steps. A step’soperation responses are represented in flow diagrams by their names, attached to the step, as inthe following:
A step and its operation’s failure and success responses
l A way for each step in the flow to be reached in one run or another.
l A return step to return a value and end the flow.
l Assignment (definition) of how each input gets its value.
Those are the essential features of a flow. Provide them, and you will have a productive flow. Tosee how you can increase a flow’s value, see the next topic, Taking a flow beyond the basics andother topics referenced therein.
Taking a flow beyond the basicsThere aremany dimensions that you can add to a flow’s usefulness. The following list includessome of the initial ways you can enhance a flow’s capabilities, robustness, and ability to returnmore information to the user. Some of these subjects, such as inputs and transitions, are listed inthe preceding topic, but you get more out of them according to how you use them.
l Enable the flow to adapt to conditions in real time by how you assign data to inputs.
For information on the different ways you can assign data to inputs, see Inputs: Providing data tooperations.
l By storing data in flow variables for passing between steps in the flow or from a subflow to itsparent flow (the flow in which the subflow is a step).
For creating and assigning values to flow variables that you can use in other steps in a flow, seeCreating and assigning a value to a flow variable.
For passing flow variables to another flow, see Passing data from a subflow to a parent flow.
l Capture andmanipulate information that you can then use elsewhere.
For capturing data as a result and using filters to refine, manipulate, or format the data that youcapture, seeOutputs, responses, and step results.
l Tell Central users what happened in each step of the flow, presenting them with information thatthe flow captured.
For telling Central users what happened in each step, see Adding a transition.
l Record key information for charting in Central Dashboards that the Central users define.
For recording information for Dashboard reporting, see Recording values for reporting.
HP Operations Orchestration (9.07)Page 17 of 301
Studio Authoring GuideIntroduction to flows
Operations: Models for stepsIn addition to its responses, an operation is made up of the following:
l Command: This dictates most of what the operation actually does. (The operationmay alsocontain a scriptlet, which processes data.) The commandmay be any of several types ofcommands, including command-line, an http operation, or a script to run. For example, anoperationmight get a directory listing, check to see if a service is running, execute aWebservice, or run a Unix vmstat command.
l Results: When a command runs, it returns data, called results. For example, the results returnedby a dir command include a file list. A ps command results are a list of processes. Mostcommands havemore than one result, returning data such as a return code, standard output(stdout), and error output (stderr). Our get http page operation needs results for the http returncode (200, 302, 404, etc) and the data on the page.
Some commands can return a lot of data that wemay want to use later on in our flow. Using asingle command, an operation to get memory statistics on Linux can tell us how muchmemory isfree, how much total memory is available, how much swapmemory is being used andmuchmore.
l Flow Variables: You can store the results data in flow variables that you create. You can use thisdata as inputs to other steps later in the flow.
l Filters: Figuring out what response to take based on the data that a command returns mayrequire filtering a key piece of data out of a result or creating a scriptlet that manipulates the data.
l Rules: Rules evaluate the operation’s results to determine which operation response to takewhen the step runs. Rules can evaluate any of the results fields, the data strings, return codes,or error codes.
A given response for an operation is selected when the conditions described in the response’srule match the data that you have specified in or extracted from the one of the results fields. Therules that you create are comparisons or matches between a string of text that you describe inthe rule and the results field that you select for the rule.
Consider the get Web page operation in our example:
n The “page not found” response would be selected if the http return code were 404.
n The “text not found” response would be selected if text to check were not contained in thedata on the page.
l Scriptlets: Scriptlets (written in JavaScript or Perl) are optional parts of an operation that you canuse tomanipulate data from either the operation’s inputs or results for use in other parts of theoperation or flow.
The following diagram shows how:
l Operations can get values from flow, step, and their own operation inputs.
l Data in operation results can be passed to flow variables, thus becoming available to other partsof the flow.
HP Operations Orchestration (9.07)Page 18 of 301
Studio Authoring GuideIntroduction to flows
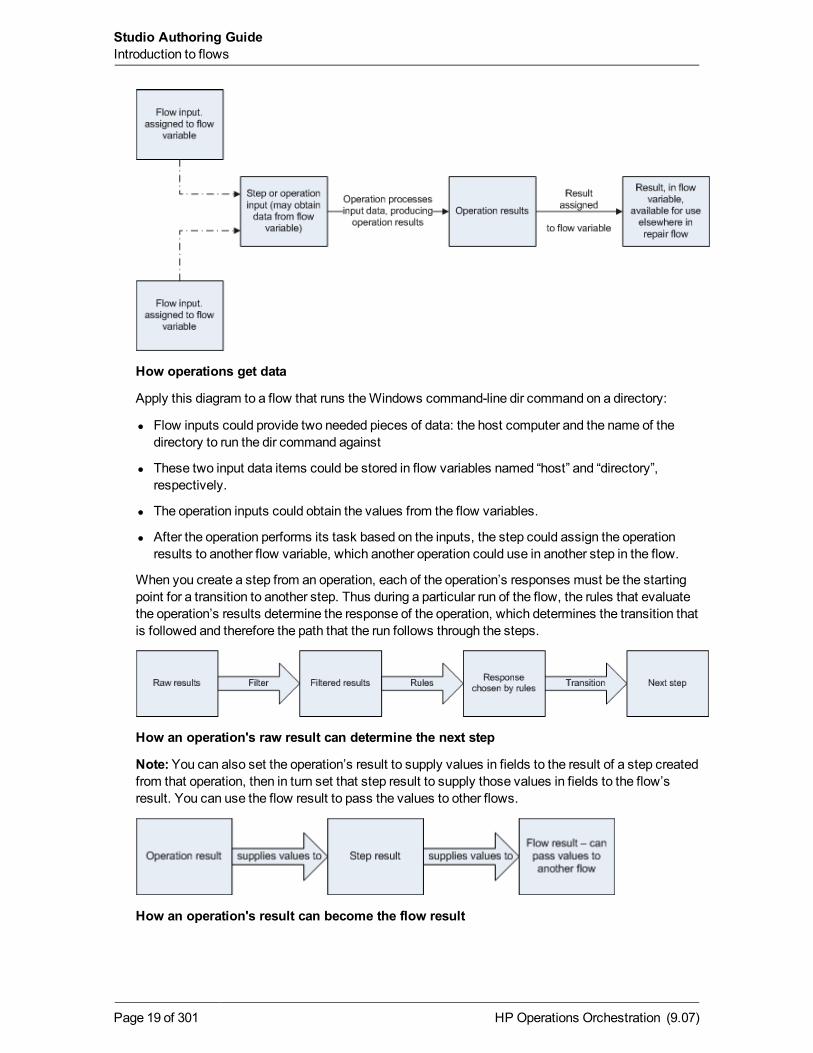
How operations get data
Apply this diagram to a flow that runs theWindows command-line dir command on a directory:
l Flow inputs could provide two needed pieces of data: the host computer and the name of thedirectory to run the dir command against
l These two input data items could be stored in flow variables named “host” and “directory”,respectively.
l The operation inputs could obtain the values from the flow variables.
l After the operation performs its task based on the inputs, the step could assign the operationresults to another flow variable, which another operation could use in another step in the flow.
When you create a step from an operation, each of the operation’s responses must be the startingpoint for a transition to another step. Thus during a particular run of the flow, the rules that evaluatethe operation’s results determine the response of the operation, which determines the transition thatis followed and therefore the path that the run follows through the steps.
How an operation's raw result can determine the next step
Note:You can also set the operation’s result to supply values in fields to the result of a step createdfrom that operation, then in turn set that step result to supply those values in fields to the flow’sresult. You can use the flow result to pass the values to other flows.
How an operation's result can become the flow result
HP Operations Orchestration (9.07)Page 19 of 301
Studio Authoring GuideIntroduction to flows
Advanced flow architecture and conceptsIntroduction to flows introduced you to basic flow concepts and information on how tomake simplemodifications to existing flows. This chapter explores the following concepts in greater depth:
l The order of actions performed in the execution of a step.
l Operation architecture and information flow.
l Step and operation requirements such as defining data sources for inputs and definingresponses.
l Flows, steps, and operations as HP OO objects.
l Creating scriptlets that make possible the additional manipulation of an operation’s output data.
Scriptlets are JavaScript or Perl scripts contained within an operation. Scriptlets are good forprogramming quickly, with relatively little customization of the operation.
In addition to writing scripts in JavaScript, this level of authoring requires that you understand:
l Input and flow variables.
l Distinctions between steps and operations.
l Distinctions between results, raw results, and responses.
l Data filters.
How steps are executedWhen a step is carried out, the following actions are carried out, in this sequence:
1. Input values are obtained from the collection of flow variables and global data values andapplied to the inputs, making them available to the step’s operation.
2. Any changes to the input values are applied to the collection of flow variables and global datavalues.
3. The step’s operation is carried out.
For details on how information is obtained, moves through, and can bemodified within anoperation, see the following section, Operations: architecture and datamovement.
4. If the operation has a scriptlet, the operation’s scriptlet is executed.
The operation’s scriptlet can do the following:
a. Select the operation response.
b. Set the operation’s primary output.
HP Operations Orchestration (9.07)Page 20 of 301
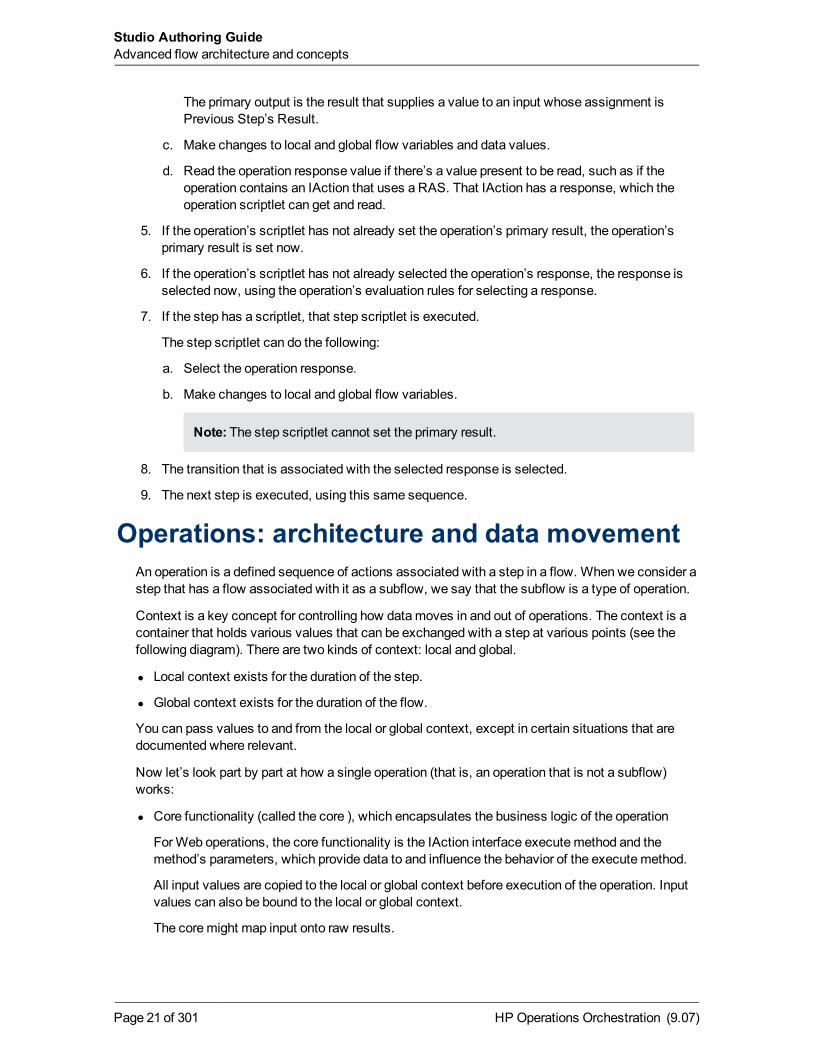
The primary output is the result that supplies a value to an input whose assignment isPrevious Step’s Result.
c. Make changes to local and global flow variables and data values.
d. Read the operation response value if there’s a value present to be read, such as if theoperation contains an IAction that uses a RAS. That IAction has a response, which theoperation scriptlet can get and read.
5. If the operation’s scriptlet has not already set the operation’s primary result, the operation’sprimary result is set now.
6. If the operation’s scriptlet has not already selected the operation’s response, the response isselected now, using the operation’s evaluation rules for selecting a response.
7. If the step has a scriptlet, that step scriptlet is executed.
The step scriptlet can do the following:
a. Select the operation response.
b. Make changes to local and global flow variables.
Note: The step scriptlet cannot set the primary result.
8. The transition that is associated with the selected response is selected.
9. The next step is executed, using this same sequence.
Operations: architecture and data movementAn operation is a defined sequence of actions associated with a step in a flow. When we consider astep that has a flow associated with it as a subflow, we say that the subflow is a type of operation.
Context is a key concept for controlling how datamoves in and out of operations. The context is acontainer that holds various values that can be exchanged with a step at various points (see thefollowing diagram). There are two kinds of context: local and global.
l Local context exists for the duration of the step.
l Global context exists for the duration of the flow.
You can pass values to and from the local or global context, except in certain situations that aredocumented where relevant.
Now let’s look part by part at how a single operation (that is, an operation that is not a subflow)works:
l Core functionality (called the core ), which encapsulates the business logic of the operation
ForWeb operations, the core functionality is the IAction interface executemethod and themethod’s parameters, which provide data to and influence the behavior of the executemethod.
All input values are copied to the local or global context before execution of the operation. Inputvalues can also be bound to the local or global context.
The coremight map input onto raw results.
HP Operations Orchestration (9.07)Page 21 of 301
Studio Authoring GuideAdvanced flow architecture and concepts
l Further processing of raw results by a scriptlet (optional)
l Determination of a response
In datamovement through an operation, as shown in the following diagram, these parts of anoperation play roles:
l Raw results
If the IAction interface is part of the core functionality, the raw results are the data and state.
l Scriptlet
An optional interpretive program that may be executed at the end of a step. The scriptlet oftenevaluates the raw results of the operation and produces the output data of the operation.
l Output data
The data produced by the operation, if any.
l Response
The evaluation of the operation’s output and the resulting determination of the transition fromamong the possible transitions for the operation’s step.
The following illustration shows how datamoves throughout an operation's execution.
HP Operations Orchestration (9.07)Page 22 of 301
Studio Authoring GuideAdvanced flow architecture and concepts
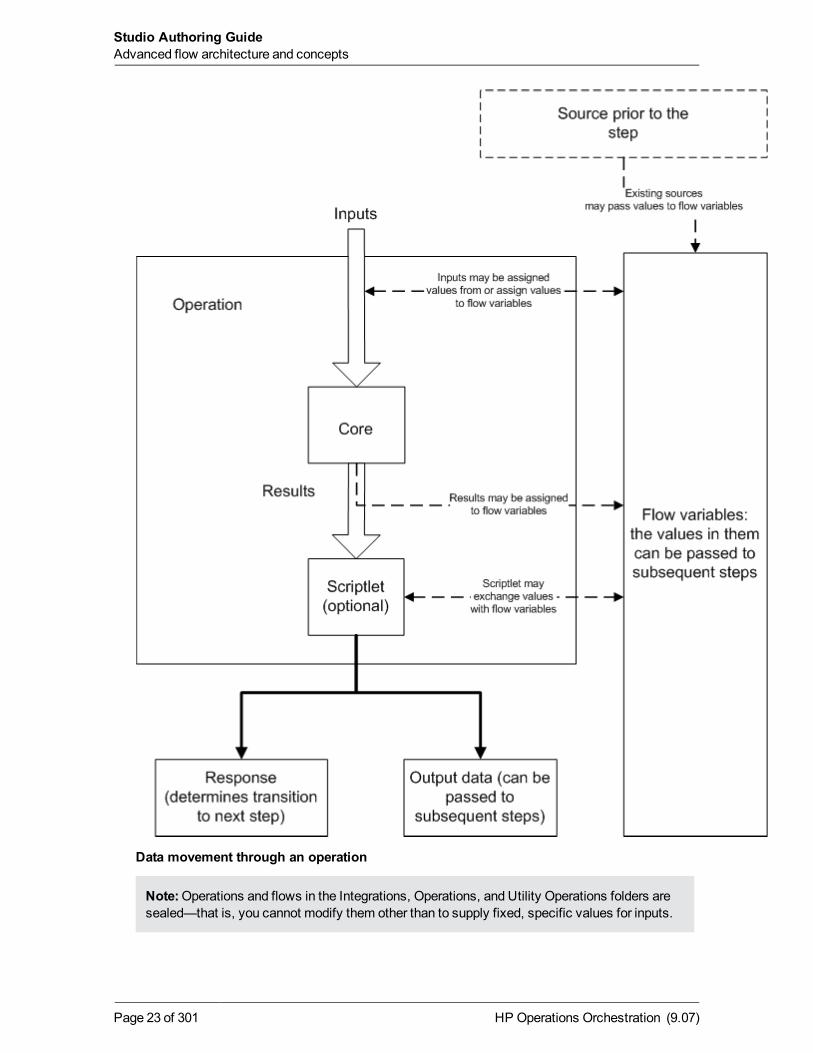
Data movement through an operation
Note:Operations and flows in the Integrations, Operations, and Utility Operations folders aresealed—that is, you cannot modify them other than to supply fixed, specific values for inputs.
HP Operations Orchestration (9.07)Page 23 of 301
Studio Authoring GuideAdvanced flow architecture and concepts
Advanced flow, step, and operationconcepts
The following concepts are important to successfully authoring flows.
l Flow variables vs. global variables
l Steps vs. operations
l Flow, step, and operation inputs
l Outputs and results
Flow variables vs. global variablesFlow variables, which are local in scope, and global variables make data available in a flow’s run.
l Global variables are name/value pairs that come from system properties and selection lists andare provided to a flow run at its start.
l Within a run of a flow, global variables are available to the flow and (with proper flow design) anyof its subflows.
l Flow variables are available only for the flow within which they are defined.
For more information on global variables and flow variables, see respectively Global variables andFlow variables: Making data available for reuse.
Steps vs. operationsThe basic difference between steps and operations is that steps are instances of operations.
l Operations and flows tell HP OO how to do something. This is why a flow is a kind of operation(remember this particularly when you use the flow to create a step in another flow).
l A step is always an instance of an operation or flow. Thus, an operation is a template from whichyou create a step when you drag the operation onto a flow’s authoring canvas.
There are significant differences between the operation and the resulting step:
l Youmodify the step (for instance, define inputs for the step) on the step’s Inspector, not byaccessing the operation from the step.
If youmodify the operation, you aremodifying the template that is the basis for all the stepsassociated with that operation. This means that you are changing all the steps associated withthat operation, regardless of which flows the steps are part of. Thus, unless you are careful,making changes to the operation can break flows that use that operation.
l There are also distinctions between scriptlets that are created on the step and on the operation.For instance:
HP Operations Orchestration (9.07)Page 24 of 301
n Operation scriptlets cannot read the value of the response of the operation.
n The operation scriptlet does not appear in the Scriptlet tab of the step created from theoperation.
n A step’s scriptlet result cannot be passed to the step’s result. (You can get around thislimitation by performing the task you want in a scriptlet filter for the step’s result rather than inthe step’s scriptlet.)
Flow, step, and operation inputsEach input is mapped to a variable, whose value can come from a variety of sources.
Which element you add an input to can determine when the input’s value is obtained:
l An input for a flow obtains a value before the first step runs.
It is best practice to set any inputs that the flow needs and that are not produced by processingwithin the flow in the flow’s properties, thus making these input values available to the flowbefore it begins to run.
l An input for a step obtains a value before the step’s operation runs.
Inputs also reflect the distinctions between elements:
l An input that you create for a step (on the step’s Inspector) is not an input for the operationassociated with the step. Its value is obtained before the operation runs.
l When you change an input for the operation in the library (on theProperties sheet that you openby right-clicking the operation in the Library), all instances of the operation that you subsequentlycreate reflect the change that youmade.
For information on defining the data source for an input, see Inputs: Providing data to operations.
Outputs and resultsOperations (including flows) generate outputs that are the sources for operation and flow outputsthat the author creates. From the outputs, authors define step results.
One of the operation’s outputs is the primary output, which the operation author can designate assuch. The primary output is the output used to populate a step's primary result. For information onhow to designate an output field as a primary output, see Specifying an operation’s primary output.
There are two kinds of step results:
l Raw result, which the step obtains from the collection of key value pairs representing the rawdata (or “raw output”) that was returned from an operation executed in the context of a flow.
For example, if you execute the ping operation on a windows XP machine, you will get thefollowing results:
{Code = “0”Error String = “”Output String =
HP Operations Orchestration (9.07)Page 25 of 301
Studio Authoring GuideAdvanced flow, step, and operation concepts
“Pinging apple.com [17.254.3.183] with 32 bytes of data:
Reply from 17.254.3.183: bytes=32 time=24ms TTL=244Reply from 17.254.3.183: bytes=32 time=24ms TTL=244Reply from 17.254.3.183: bytes=32 time=25ms TTL=244Reply from 17.254.3.183: bytes=32 time=26ms TTL=244
Ping statistics for 17.254.3.183:Packets: Sent = 4, Received = 4, Lost = 0 (0% loss),Approximate round trip times in milli-seconds:Minimum = 24ms, Maximum = 26ms, Average = 24ms”}
You can filter the values of the raw results to create amore refined result. For example, if in theabove data you are interested only in the average latency of the ping operation, then in Studio, inthe ping operation's Properties sheet, you can select Primary Output From field and specifya series of filters which extract the ‘24ms’ token at the end of the string. For more information,see Filtering outputs and results.
l Other results, which are the results that the flow author has created on the Results tab of thestep's editor.
Responses are the outcomes that are connected, each response by one transition, to a followingstep. Because you link a response to a subsequent step, the response is the determination of whatthe flow does next. Return steps are an exception: Return-step responses return an outcome for theentire flow.
l Raw outputs, outputs, and responses are related to operations (including flows, which are a kindof operation).
l You can add results to steps.
Note, however, that you cannot change the handling of outputs for sealed operations.
HP Operations Orchestration (9.07)Page 26 of 301
Studio Authoring GuideAdvanced flow, step, and operation concepts
Multiple authors and version controlMultiple instances of Studio can be connected to the public repository of Central at the same time.The checkin/checkout feature avoids andmediates change conflicts whenmore than one author isworking in the Central repository at the same time, and gives your authoring team version control.The checkin/checkout feature requires that you check out a flow, operation, or Configuration-folderobject in the public repository before working on it and check it back in before other authors can seeyour changes to it.
For more information on checking repository objects out and what this means in practical terms,see Version control of Library objects.
HP Operations Orchestration (9.07)Page 27 of 301
Starting HP OO StudioTo start Studio
l In the HP OO home directory (by default, C:\Program Files\Hewlett-Packard\OperationsOrchestration), in theStudio subdirectory, double-click Studio.exe.
OR
Start Studio from theWindows Start button. In the list of programs, point toHewlett-Packard,thenOperations Orchestration, and then click HP Operations Orchestration Studio.
OR
If there is a Studio shortcut on your desktop or in the programs above theStart button, click theshortcut.
In general, you should start and log in to a given instance of Studio as a single user, on a singlecomputer. Make sure you understand the following discussion of this stricture:
Key information:l Do not start multiple instances of Studio on the same computer, usingmultiple remote
desktop programs from other computers, whether you log in as the same user or as differentusers. Doing so can result in data corruption and/or loss, or can cause unexpected behaviorin Studio, including crashes.
l Do not connect to the public repository for the same installation of Central when logged into two different instances of Studio as the same user. If you do, the user’s workspace in therepository can become corrupted. This can also occur when Central is clustered.
HP Operations Orchestration (9.07)Page 28 of 301
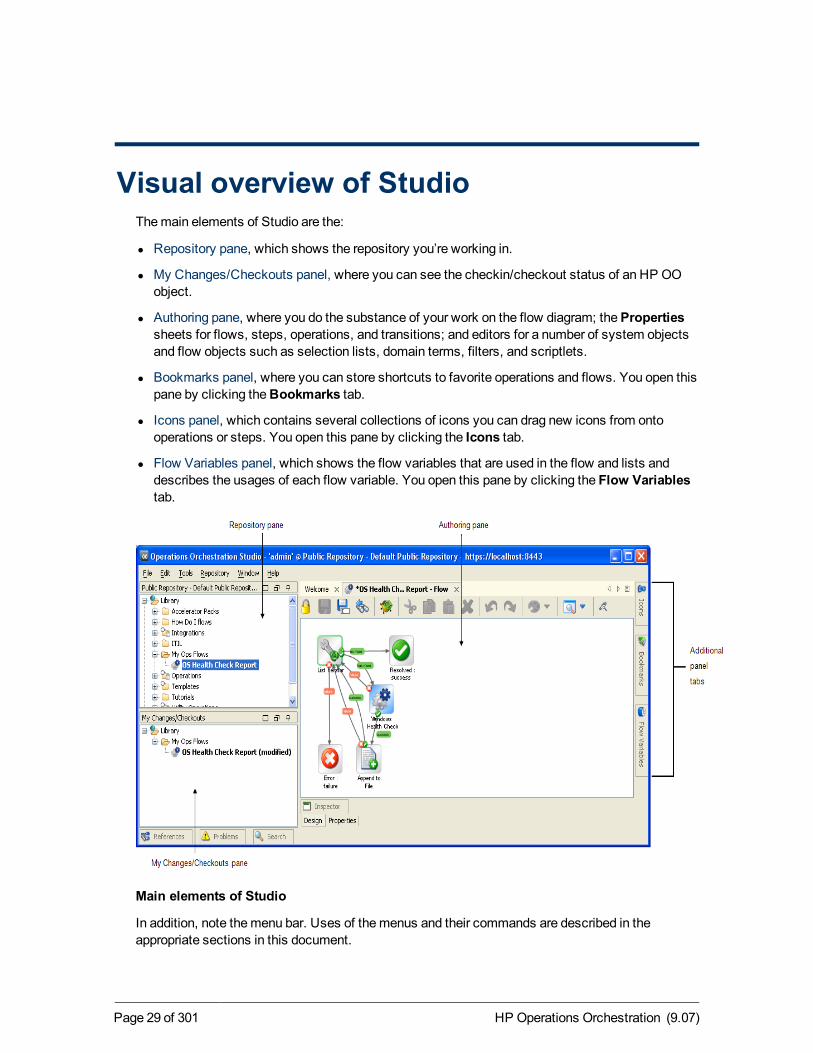
Visual overview of StudioThemain elements of Studio are the:
l Repository pane, which shows the repository you’re working in.
l My Changes/Checkouts panel, where you can see the checkin/checkout status of an HP OOobject.
l Authoring pane, where you do the substance of your work on the flow diagram; thePropertiessheets for flows, steps, operations, and transitions; and editors for a number of system objectsand flow objects such as selection lists, domain terms, filters, and scriptlets.
l Bookmarks panel, where you can store shortcuts to favorite operations and flows. You open thispane by clicking theBookmarks tab.
l Icons panel, which contains several collections of icons you can drag new icons from ontooperations or steps. You open this pane by clicking the Icons tab.
l Flow Variables panel, which shows the flow variables that are used in the flow and lists anddescribes the usages of each flow variable. You open this pane by clicking the Flow Variablestab.
Main elements of Studio
In addition, note themenu bar. Uses of themenus and their commands are described in theappropriate sections in this document.
HP Operations Orchestration (9.07)Page 29 of 301
Note, however, that commands related to the repository are located on theRepositorymenu, withthe exception of Export as New Repository. TheExport as New Repository command resideson the Filemenu.
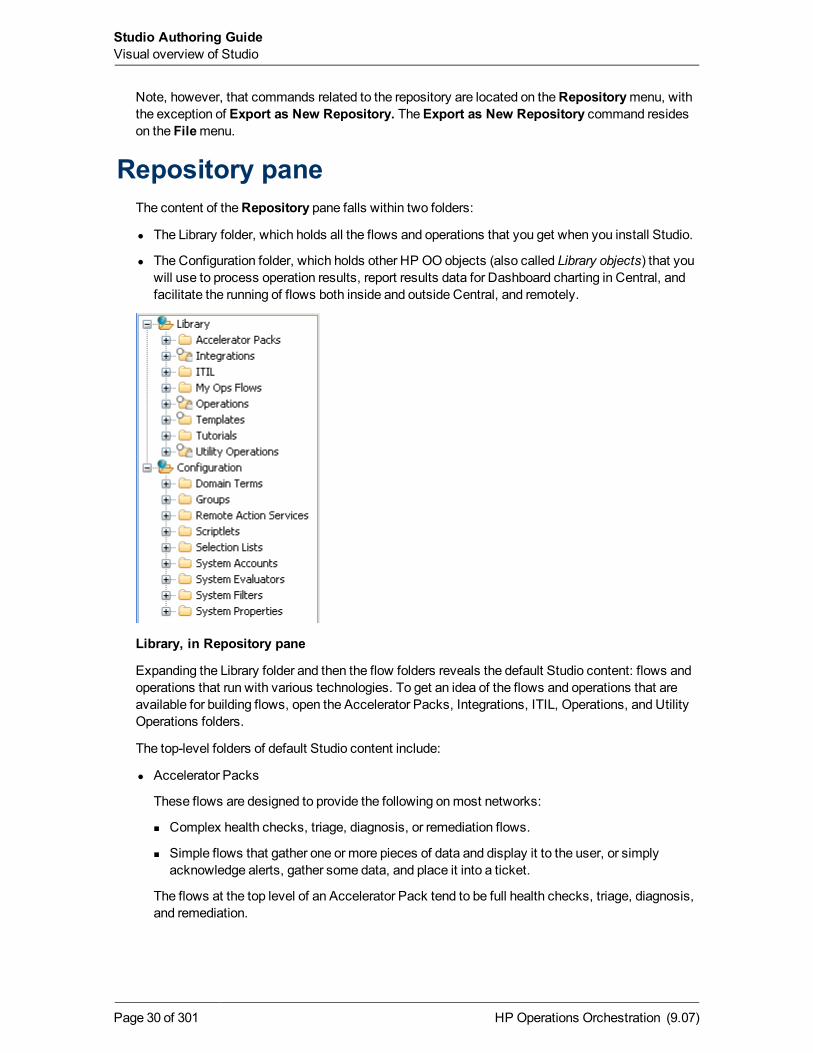
Repository paneThe content of theRepository pane falls within two folders:
l The Library folder, which holds all the flows and operations that you get when you install Studio.
l The Configuration folder, which holds other HP OO objects (also called Library objects) that youwill use to process operation results, report results data for Dashboard charting in Central, andfacilitate the running of flows both inside and outside Central, and remotely.
Library, in Repository pane
Expanding the Library folder and then the flow folders reveals the default Studio content: flows andoperations that run with various technologies. To get an idea of the flows and operations that areavailable for building flows, open the Accelerator Packs, Integrations, ITIL, Operations, and UtilityOperations folders.
The top-level folders of default Studio content include:
l Accelerator Packs
These flows are designed to provide the following onmost networks:
n Complex health checks, triage, diagnosis, or remediation flows.
n Simple flows that gather one or more pieces of data and display it to the user, or simplyacknowledge alerts, gather some data, and place it into a ticket.
The flows at the top level of an Accelerator Pack tend to be full health checks, triage, diagnosis,and remediation.
HP Operations Orchestration (9.07)Page 30 of 301
Studio Authoring GuideVisual overview of Studio
l Integrations
Operations and flows that can be used from HP OO to interact with third-party systems-management products.
l ITIL
This folder contains flows that automate integrations to other Enterprise-level software inaccordance with ITIL specifications.
l Operations
This folder contains general-purpose operations that work with common technologies. Theseoperations are sealed and cannot be changed once you have installed HP OOCentral (Central).
Because you cannot change operations in the Operations folder, they should not have any staticvalues set for inputs. All inputs should either prompt the user or be Not Assigned. There areexceptions to this rule, such as when a very general purpose operation such as aWMIcommand is used.
The flows in the Operations folder and subfolders aremeant to work as subflows or operations.Flows that you would want to run as the parent flow are in the Accelerator Packs.
l Utility Operations
This folder contains operations and subflows that gather and display data, replace simplecommand-line operations, manipulate and analyze data, provide structure to flows, and othernon-technology-specific functions.
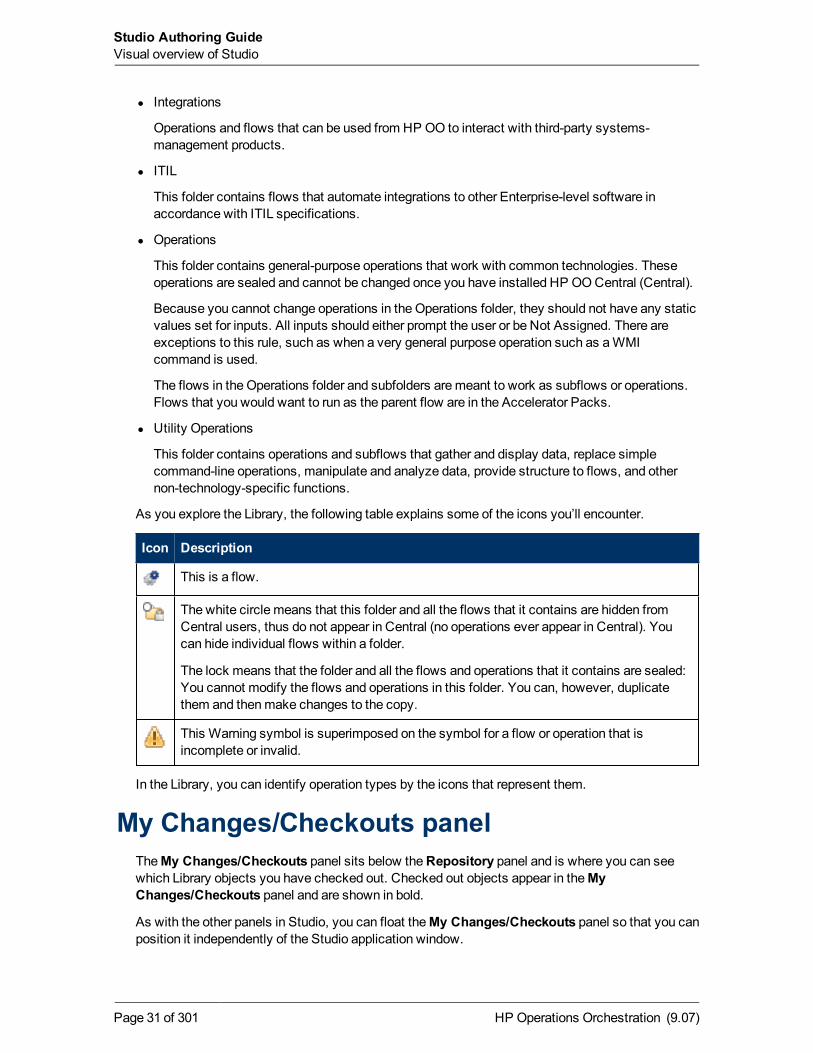
As you explore the Library, the following table explains some of the icons you’ll encounter.
Icon Description
This is a flow.
The white circle means that this folder and all the flows that it contains are hidden fromCentral users, thus do not appear in Central (no operations ever appear in Central). Youcan hide individual flows within a folder.
The lock means that the folder and all the flows and operations that it contains are sealed:You cannot modify the flows and operations in this folder. You can, however, duplicatethem and thenmake changes to the copy.
This Warning symbol is superimposed on the symbol for a flow or operation that isincomplete or invalid.
In the Library, you can identify operation types by the icons that represent them.
My Changes/Checkouts panelTheMy Changes/Checkouts panel sits below theRepository panel and is where you can seewhich Library objects you have checked out. Checked out objects appear in theMyChanges/Checkouts panel and are shown in bold.
As with the other panels in Studio, you can float theMy Changes/Checkouts panel so that you canposition it independently of the Studio application window.
HP Operations Orchestration (9.07)Page 31 of 301
Studio Authoring GuideVisual overview of Studio
This can be helpful in managing your screen real estate when you’re working with the flow graphand/or the debugger in Studio.
To resize and reposition theMy Changes/Checkouts panel, see Resizing and repositioning thepanels.
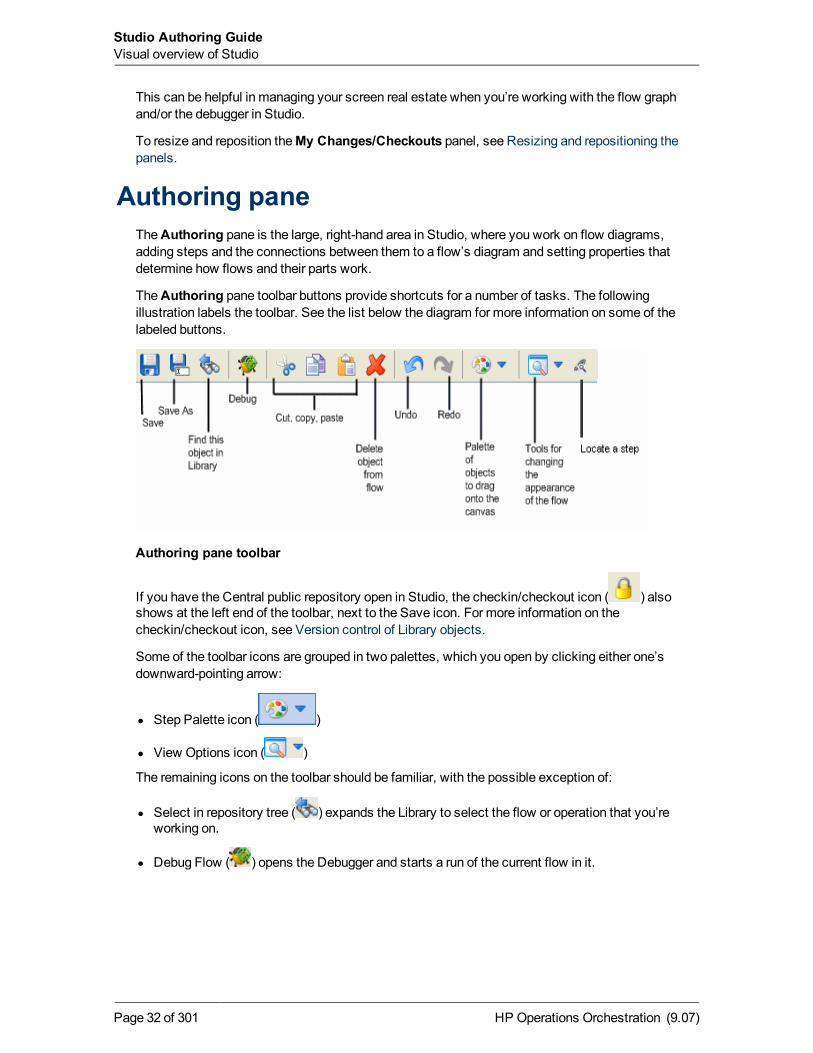
Authoring paneTheAuthoring pane is the large, right-hand area in Studio, where you work on flow diagrams,adding steps and the connections between them to a flow’s diagram and setting properties thatdetermine how flows and their parts work.
TheAuthoring pane toolbar buttons provide shortcuts for a number of tasks. The followingillustration labels the toolbar. See the list below the diagram for more information on some of thelabeled buttons.
Authoring pane toolbar
If you have the Central public repository open in Studio, the checkin/checkout icon ( ) alsoshows at the left end of the toolbar, next to the Save icon. For more information on thecheckin/checkout icon, see Version control of Library objects.
Some of the toolbar icons are grouped in two palettes, which you open by clicking either one’sdownward-pointing arrow:
l Step Palette icon ( )
l View Options icon ( )
The remaining icons on the toolbar should be familiar, with the possible exception of:
l Select in repository tree ( ) expands the Library to select the flow or operation that you’reworking on.
l Debug Flow ( ) opens the Debugger and starts a run of the current flow in it.
HP Operations Orchestration (9.07)Page 32 of 301
Studio Authoring GuideVisual overview of Studio
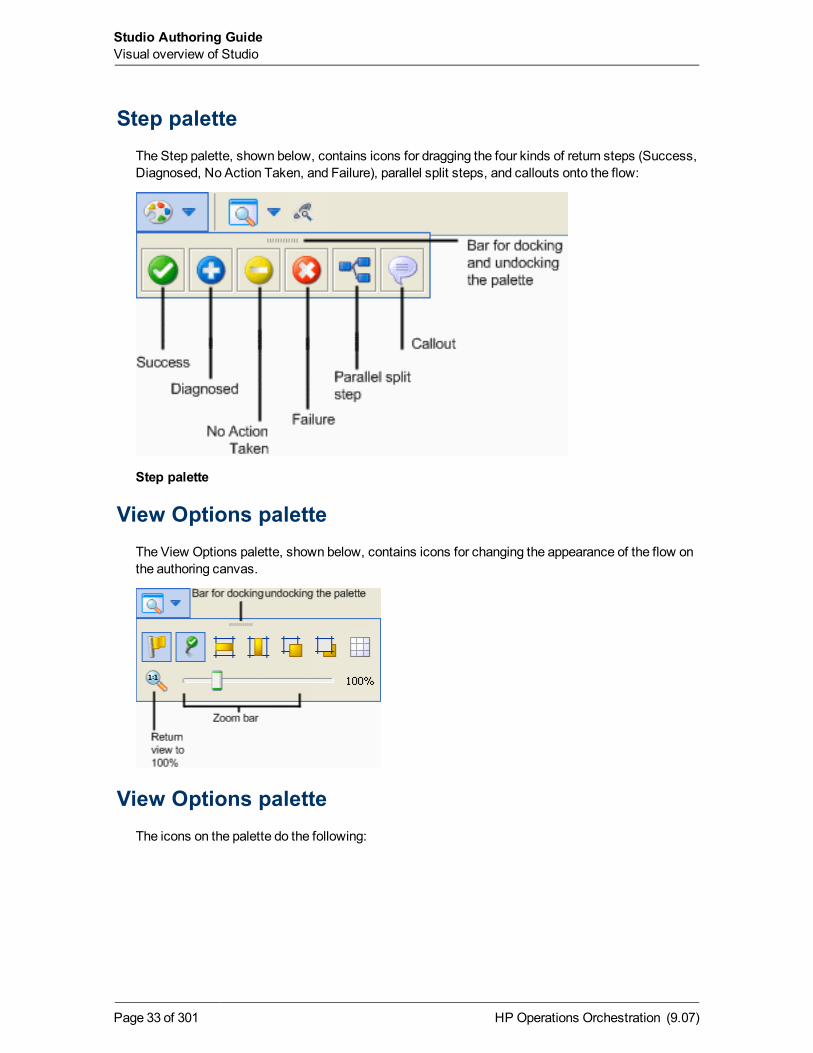
Step paletteThe Step palette, shown below, contains icons for dragging the four kinds of return steps (Success,Diagnosed, No Action Taken, and Failure), parallel split steps, and callouts onto the flow:
Step palette
View Options paletteThe View Options palette, shown below, contains icons for changing the appearance of the flow onthe authoring canvas.
View Options paletteThe icons on the palette do the following:
HP Operations Orchestration (9.07)Page 33 of 301
Studio Authoring GuideVisual overview of Studio
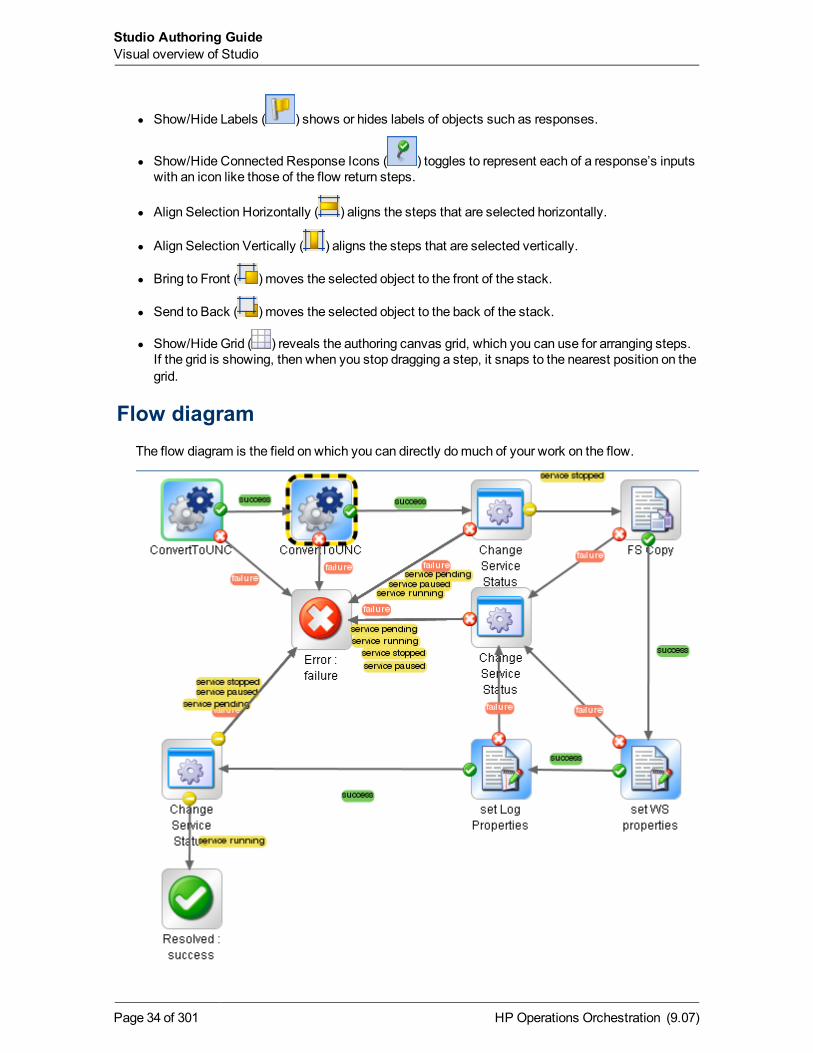
l Show/Hide Labels ( ) shows or hides labels of objects such as responses.
l Show/Hide Connected Response Icons ( ) toggles to represent each of a response’s inputswith an icon like those of the flow return steps.
l Align Selection Horizontally ( ) aligns the steps that are selected horizontally.
l Align Selection Vertically ( ) aligns the steps that are selected vertically.
l Bring to Front ( ) moves the selected object to the front of the stack.
l Send to Back ( ) moves the selected object to the back of the stack.
l Show/Hide Grid ( ) reveals the authoring canvas grid, which you can use for arranging steps.If the grid is showing, then when you stop dragging a step, it snaps to the nearest position on thegrid.
Flow diagramThe flow diagram is the field on which you can directly domuch of your work on the flow.
HP Operations Orchestration (9.07)Page 34 of 301
Studio Authoring GuideVisual overview of Studio
Flow diagram
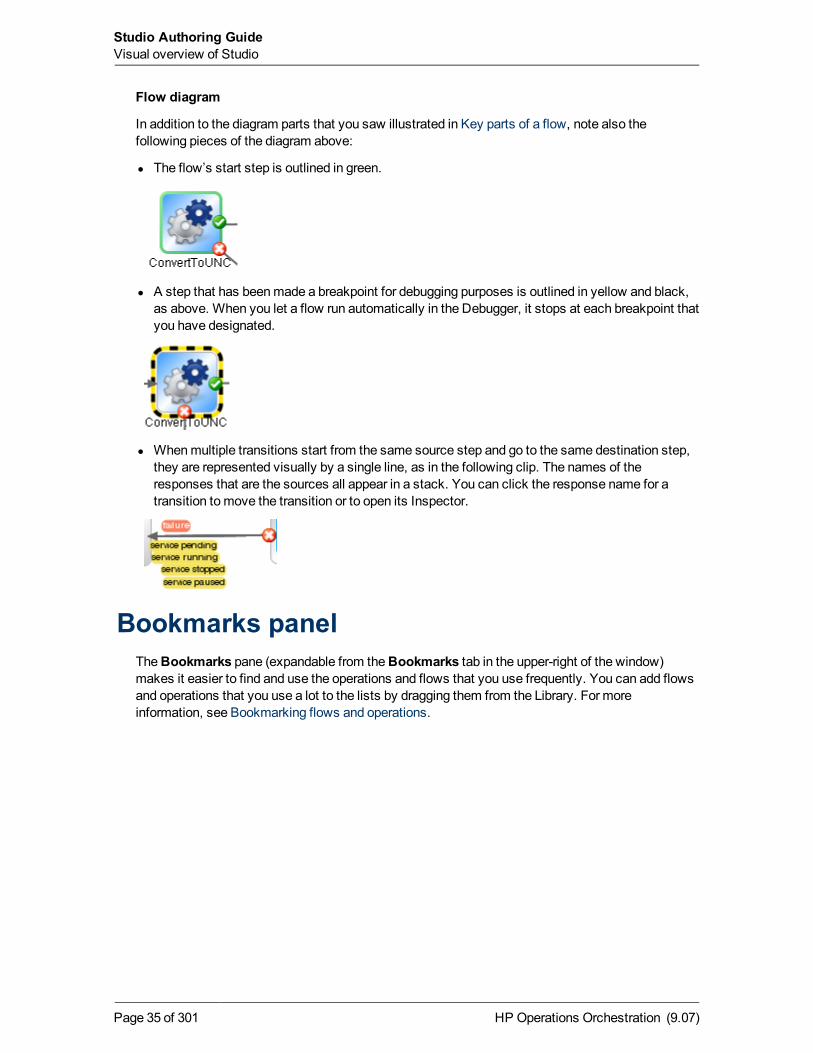
In addition to the diagram parts that you saw illustrated in Key parts of a flow, note also thefollowing pieces of the diagram above:
l The flow’s start step is outlined in green.
l A step that has beenmade a breakpoint for debugging purposes is outlined in yellow and black,as above. When you let a flow run automatically in the Debugger, it stops at each breakpoint thatyou have designated.
l Whenmultiple transitions start from the same source step and go to the same destination step,they are represented visually by a single line, as in the following clip. The names of theresponses that are the sources all appear in a stack. You can click the response name for atransition tomove the transition or to open its Inspector.
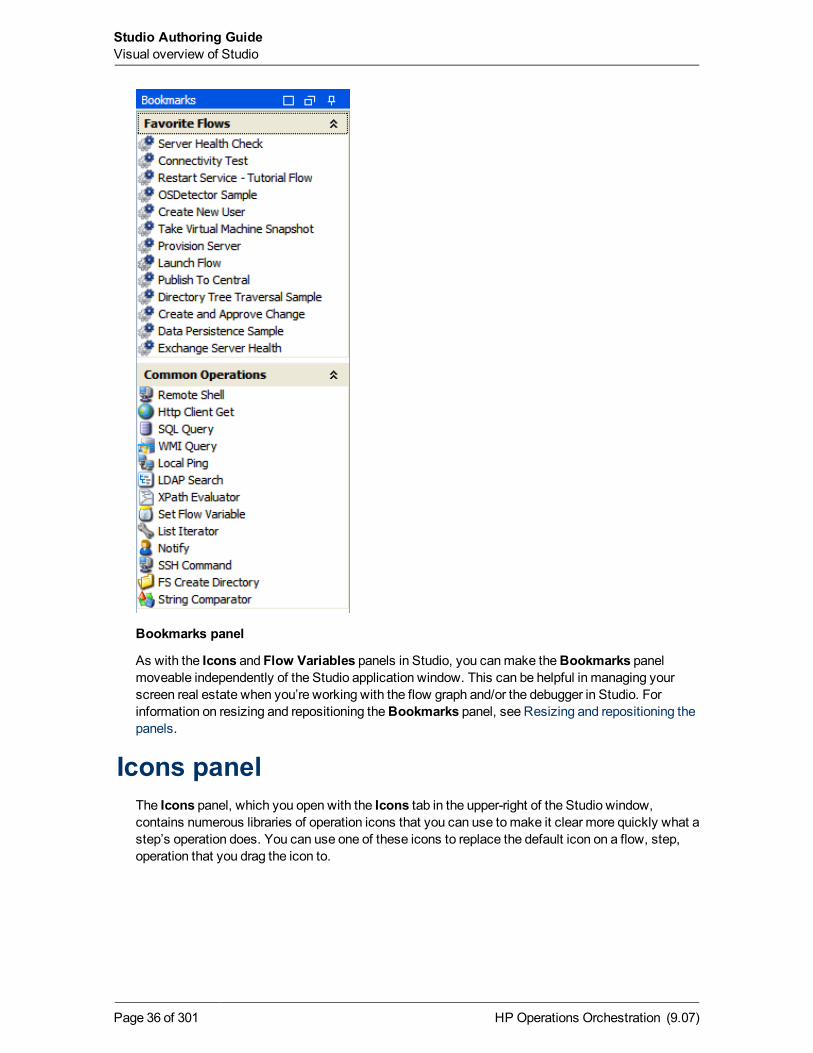
Bookmarks panelTheBookmarks pane (expandable from theBookmarks tab in the upper-right of the window)makes it easier to find and use the operations and flows that you use frequently. You can add flowsand operations that you use a lot to the lists by dragging them from the Library. For moreinformation, see Bookmarking flows and operations.
HP Operations Orchestration (9.07)Page 35 of 301
Studio Authoring GuideVisual overview of Studio
Bookmarks panel
As with the Icons and Flow Variables panels in Studio, you canmake theBookmarks panelmoveable independently of the Studio application window. This can be helpful in managing yourscreen real estate when you’re working with the flow graph and/or the debugger in Studio. Forinformation on resizing and repositioning theBookmarks panel, see Resizing and repositioning thepanels.
Icons panelThe Icons panel, which you open with the Icons tab in the upper-right of the Studio window,contains numerous libraries of operation icons that you can use tomake it clear more quickly what astep’s operation does. You can use one of these icons to replace the default icon on a flow, step,operation that you drag the icon to.
HP Operations Orchestration (9.07)Page 36 of 301
Studio Authoring GuideVisual overview of Studio
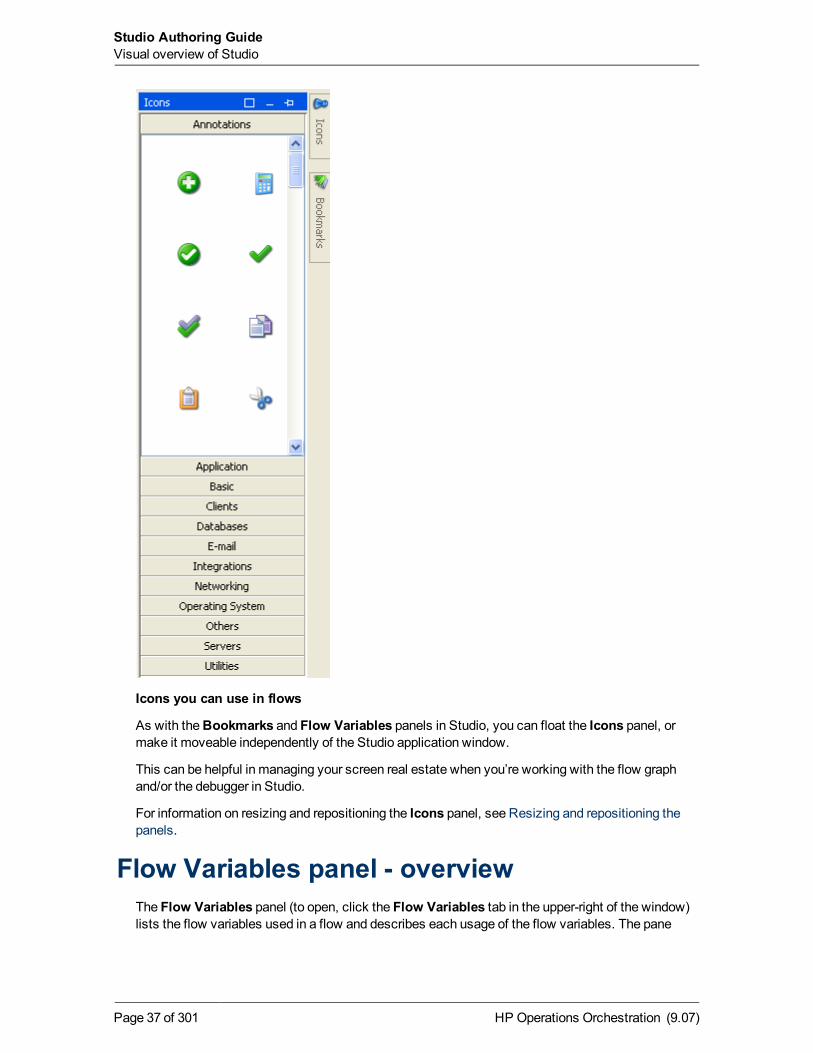
Icons you can use in flows
As with theBookmarks and Flow Variables panels in Studio, you can float the Icons panel, ormake it moveable independently of the Studio application window.
This can be helpful in managing your screen real estate when you’re working with the flow graphand/or the debugger in Studio.
For information on resizing and repositioning the Icons panel, see Resizing and repositioning thepanels.
Flow Variables panel - overviewThe Flow Variables panel (to open, click the Flow Variables tab in the upper-right of the window)lists the flow variables used in a flow and describes each usage of the flow variables. The pane
HP Operations Orchestration (9.07)Page 37 of 301
Studio Authoring GuideVisual overview of Studio
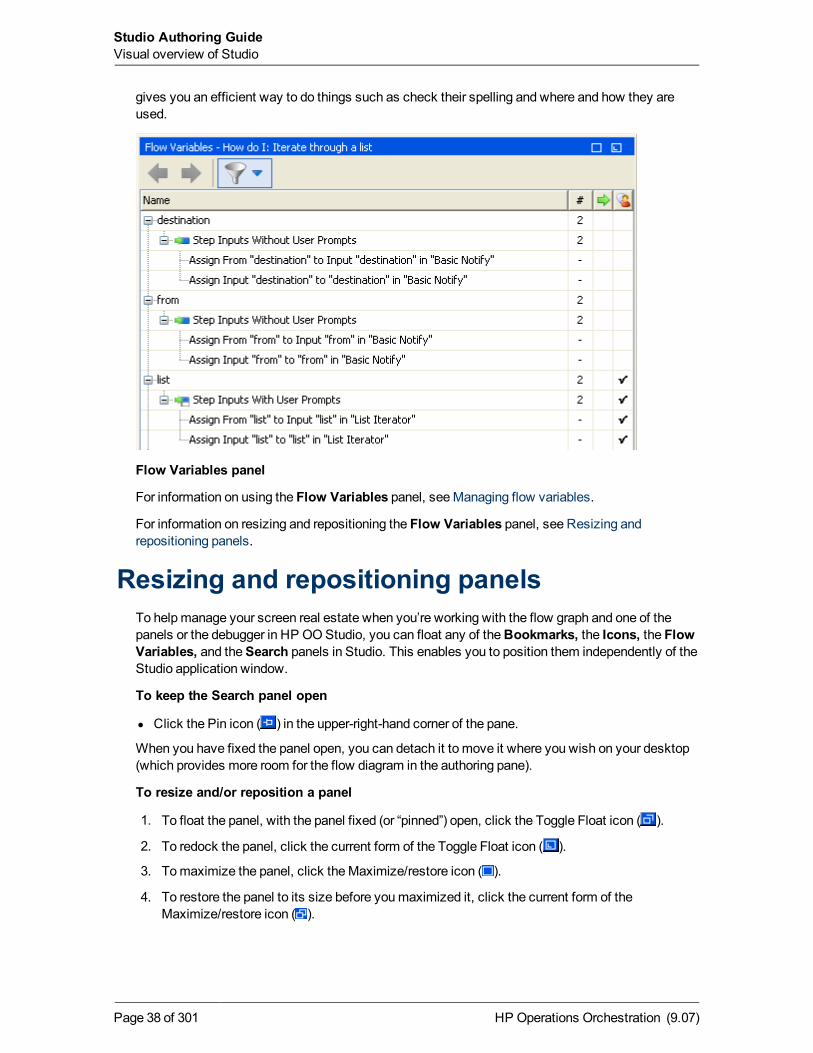
gives you an efficient way to do things such as check their spelling and where and how they areused.
Flow Variables panel
For information on using the Flow Variables panel, seeManaging flow variables.
For information on resizing and repositioning the Flow Variables panel, see Resizing andrepositioning panels.
Resizing and repositioning panelsTo helpmanage your screen real estate when you’re working with the flow graph and one of thepanels or the debugger in HP OOStudio, you can float any of theBookmarks, the Icons, the FlowVariables, and theSearch panels in Studio. This enables you to position them independently of theStudio application window.
To keep the Search panel open
l Click the Pin icon ( ) in the upper-right-hand corner of the pane.
When you have fixed the panel open, you can detach it to move it where you wish on your desktop(which provides more room for the flow diagram in the authoring pane).
To resize and/or reposition a panel
1. To float the panel, with the panel fixed (or “pinned”) open, click the Toggle Float icon ( ).
2. To redock the panel, click the current form of the Toggle Float icon ( ).
3. Tomaximize the panel, click theMaximize/restore icon ( ).
4. To restore the panel to its size before youmaximized it, click the current form of theMaximize/restore icon ( ).
HP Operations Orchestration (9.07)Page 38 of 301
Studio Authoring GuideVisual overview of Studio
Note: If youminimize a panel while it is on the left side of Studio, the panel tab attachesitself to Studio’s left border.
To move a panel tab back to the right side of the Studio window
l On theWindowmenu, click Reset Window Layout.
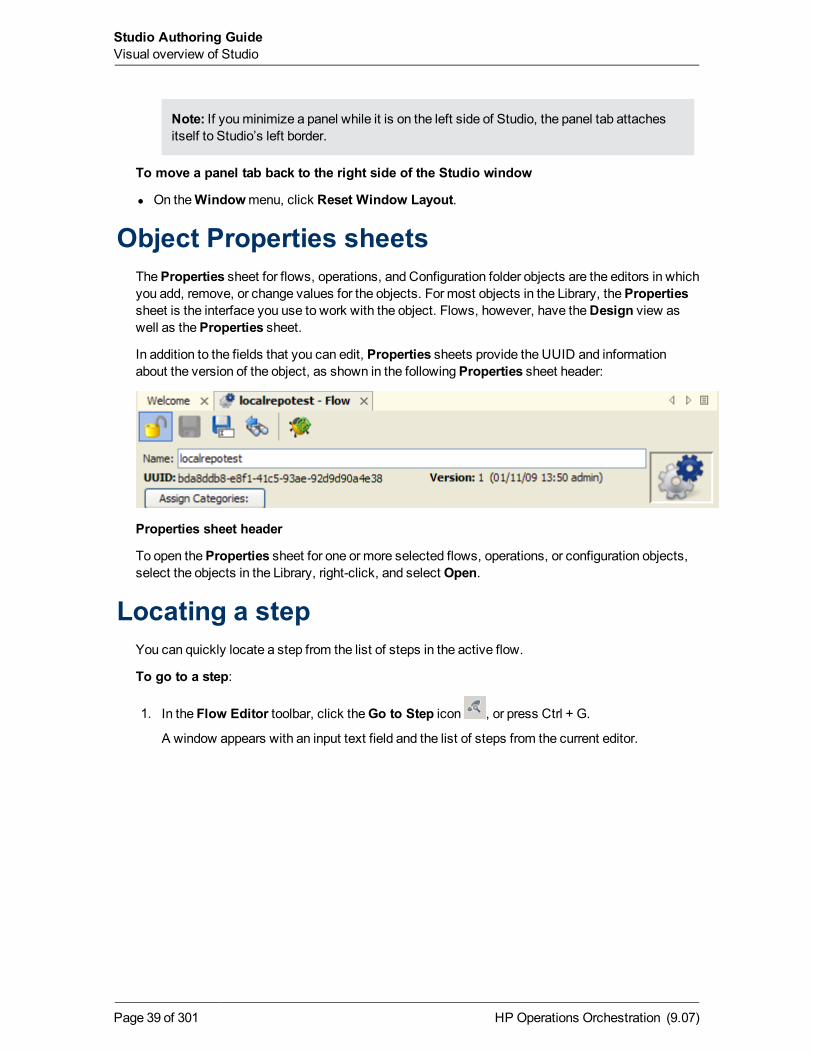
Object Properties sheetsTheProperties sheet for flows, operations, and Configuration folder objects are the editors in whichyou add, remove, or change values for the objects. For most objects in the Library, thePropertiessheet is the interface you use to work with the object. Flows, however, have theDesign view aswell as theProperties sheet.
In addition to the fields that you can edit, Properties sheets provide the UUID and informationabout the version of the object, as shown in the followingProperties sheet header:
Properties sheet header
To open theProperties sheet for one or more selected flows, operations, or configuration objects,select the objects in the Library, right-click, and select Open.
Locating a stepYou can quickly locate a step from the list of steps in the active flow.
To go to a step:
1. In the Flow Editor toolbar, click theGo to Step icon , or press Ctrl + G.
A window appears with an input text field and the list of steps from the current editor.
HP Operations Orchestration (9.07)Page 39 of 301
Studio Authoring GuideVisual overview of Studio
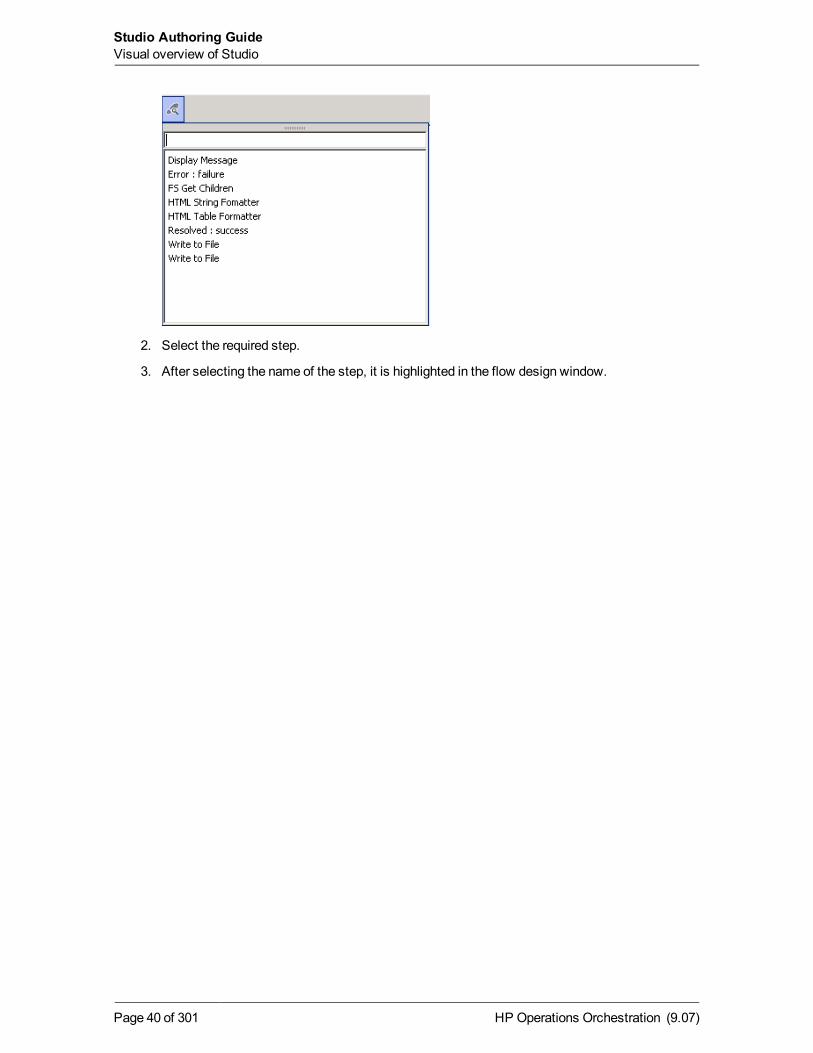
2. Select the required step.
3. After selecting the name of the step, it is highlighted in the flow design window.
HP Operations Orchestration (9.07)Page 40 of 301
Studio Authoring GuideVisual overview of Studio
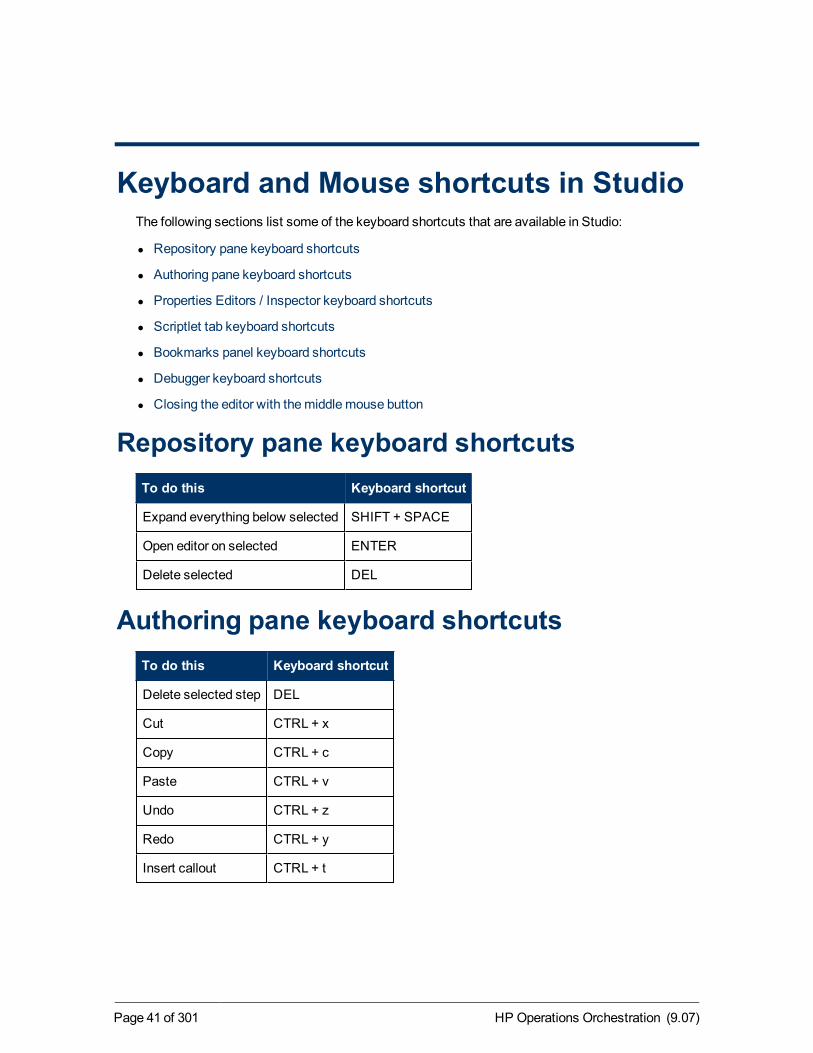
Keyboard and Mouse shortcuts in StudioThe following sections list some of the keyboard shortcuts that are available in Studio:
l Repository pane keyboard shortcuts
l Authoring pane keyboard shortcuts
l Properties Editors / Inspector keyboard shortcuts
l Scriptlet tab keyboard shortcuts
l Bookmarks panel keyboard shortcuts
l Debugger keyboard shortcuts
l Closing the editor with themiddlemouse button
Repository pane keyboard shortcutsTo do this Keyboard shortcut
Expand everything below selected SHIFT + SPACE
Open editor on selected ENTER
Delete selected DEL
Authoring pane keyboard shortcutsTo do this Keyboard shortcut
Delete selected step DEL
Cut CTRL + x
Copy CTRL + c
Paste CTRL + v
Undo CTRL + z
Redo CTRL + y
Insert callout CTRL + t
HP Operations Orchestration (9.07)Page 41 of 301
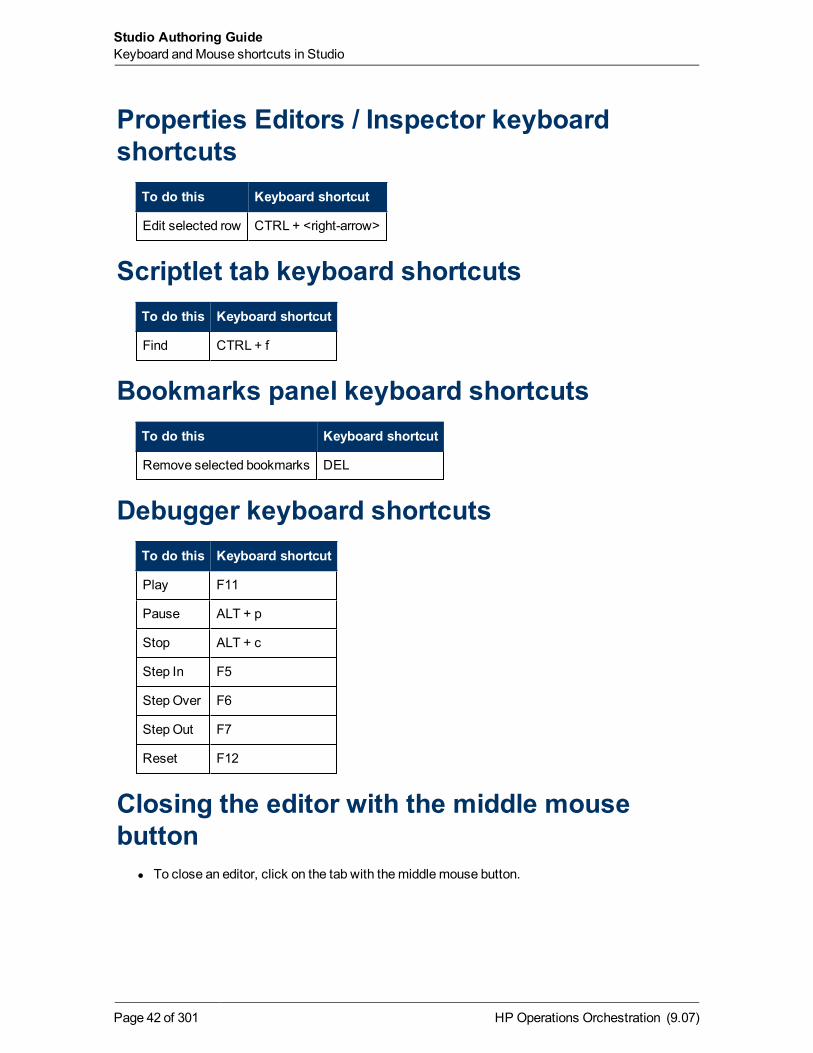
Properties Editors / Inspector keyboardshortcuts
To do this Keyboard shortcut
Edit selected row CTRL + <right-arrow>
Scriptlet tab keyboard shortcutsTo do this Keyboard shortcut
Find CTRL + f
Bookmarks panel keyboard shortcutsTo do this Keyboard shortcut
Remove selected bookmarks DEL
Debugger keyboard shortcutsTo do this Keyboard shortcut
Play F11
Pause ALT + p
Stop ALT + c
Step In F5
StepOver F6
StepOut F7
Reset F12
Closing the editor with the middle mousebutton
l To close an editor, click on the tab with themiddlemouse button.
HP Operations Orchestration (9.07)Page 42 of 301
Studio Authoring GuideKeyboard andMouse shortcuts in Studio
Version control of Library objectsVersion control enables members of amulti-author team to work together in the Central repositorywithout conflicts between various authors’ changes. HP OO enforces version control through thecheckin/checkout feature, which applies to flows, operations, and other Library objects (such assystem accounts and filters).
Youmust check out an object in order to work on it. When you have the object checked out, you areworking on it in your private workspace. All the other authors only see the object as it was the lasttime it was checked in. Saving your changes saves them in your workspace. After you have savedyour changes, checking the object back in to the public repository makes your new versionavailable for other authors to see and check out.
Note:Only the development/testing installation of Central should havemultiple authors work init. (Specifically, multiple authors should never have access to the Central installation in yourproduction environment.)
When you are connected to the Public repository, the version number is incremented by .1 eachtime you save the object. When you check the object in, its version number is set to the next higherwhole integer.
For example, suppose that FlowA is at version 2 whenGloria checks it out:
l As soon as Gloria saves changes to FlowA, its version number changes from 2 to 2.1.
l When any other author opens FlowA in Studio, he or she sees version 2 of FlowA.
l After Gloria checks FlowA back in, its version number is set to 3. Others can see the now-current version (version 3) of FlowA, and it is available for checkout.
The object’s checkin/checkout status is indicated by the following:
l When an object is checked out by a different author from yourself:
n In theRepository pane’s library tree, the object’s name is in italic.
n If you hover the cursor over the object’s name, the name of the account that has the objectchecked out appears.
l When an object is either not checked out or is checked out by a different author:
n For flows, the canvas in the authoring pane is gray rather than white, and is disabled.
n For all objects, theProperties sheet is disabled.
l When you have an object checked out:
n For flows, the canvas in the authoring pane is white, and you can work in it.
n For all objects, you can work in theProperties sheet.
n In theRepository pane’s library tree, the object’s name is bold.
HP Operations Orchestration (9.07)Page 43 of 301
An administrator (a user who is amember of a group with the ADMINISTRATOR capability) canforcibly check in an object that an author has checked out, even if that author is anotheradministrator. When the administrator forcibly checks in an object, a message alerts the author whois working in it.
More information on these features is in these subsections of this section:
l Checking out and checking in a Library object
l Managing versions
Checking out and checking in a Library objectWhen you are authoring in a public repository, youmust check out a flow, operation, orConfiguration folder object in order to work on it. When you have an object checked out, otherauthors cannot work on it. As you work on it, you are working in your ownworkspace, so your workis not visible to other authors.
Key information:Do not connect to the public repository for the same installation of Central whenlogged in to two different instances of Studio as the same user. If you do, the user’s workspace inthe repository can become corrupted. This can also occur when Central is clustered.
The difference between checkin/checkout and publishing/updating is whether your Studio is directlyconnected to the public (Central) repository—that is, whether the public repository has been addedto and is open in your Studio. If you are directly connected to the public repository, you check outLibrary objects and work on them in your workspace of the public repository, then you check themback in to convey your changes to them to the public repository and tomake them available to otherauthors.
In Studio's Authoring pane, you can see several visual cues to the checkin/checkout status of anobject:
l For the author who has checked out the object:
n Can be changed; if it is a flow, its canvas is white.
n Appears in theMy Changes/Checkouts pane.
n Is bold in theRepository pane and in theMy Changes/Checkouts pane.
n On the toolbar, the checkin/checkout icon is an open lock ( ).
n Each time you save changes, the version number, which appears on the object’s Propertiessheet, increments by one to the right of the decimal (1.1, 1.2, etc.). Each time you check theobject in, the version number increments by one to the left of the decimal and returns zero to theright of the decimal (2.0, 3.0, etc.).
Note: If you are working in a local repository, there is no checkout/checkin. When yousave an object, its version number increments to the next higher whole integer.
l For the authors to whom the object is not checked out:
HP Operations Orchestration (9.07)Page 44 of 301
Studio Authoring GuideVersion control of Library objects

n The object’s fields are disabled, or grayed out, and if the object is a flow, its canvas is gray.
n The checkin/checkout icon on the toolbar shows as a closed lock ( ), indicating that theobject cannot be edited.
Following are a few limitations and considerations for the checkin/checkout feature:
l To check out an object, youmust have READ andWRITE permissions for the object.
l You can check out a folder and its contents, including subfolders—as long as no one else hasalready checked out a subfolder.
l When you check out an object, you are checking out only the object (unless you’re checking outa folder and its contents, as described above). You are not checking out objects referenced bythe object. For instance, if a flow uses an operation that uses a system account, when youcheck out the flow, neither the operation nor the system account are checked out by virtue ofyour having checked out the flow.
l When you do any of the following with an object, it is automatically checked out to you. Toconvey these changes to the public repository, youmust check the affected objects in.
n Paste
n Cut
n Rename
n Move
n Delete
n Import a repository
l Tomove, rename, or delete a folder, youmust be able to check out all the objects within thefolder—that is to say, youmust have READ andWRITE permissions on all of them.
Topics within this section:
l Checking out a Library object
l Checking in a Library object
l Resolving conflicts between two authors’ versions of an object
l Forcible checkins by an Administrator
Checking out a Library object
Note:When you have an object checked out, the administrator can forcibly check in the object,even if you’re amember of a group that has the ADMINISTRATOR capability. If this happens,you will see amessage alerting you that your checkout has been reverted.
You can check out an entire folder and its subfolders.
To check out a Library object
HP Operations Orchestration (9.07)Page 45 of 301
Studio Authoring GuideVersion control of Library objects
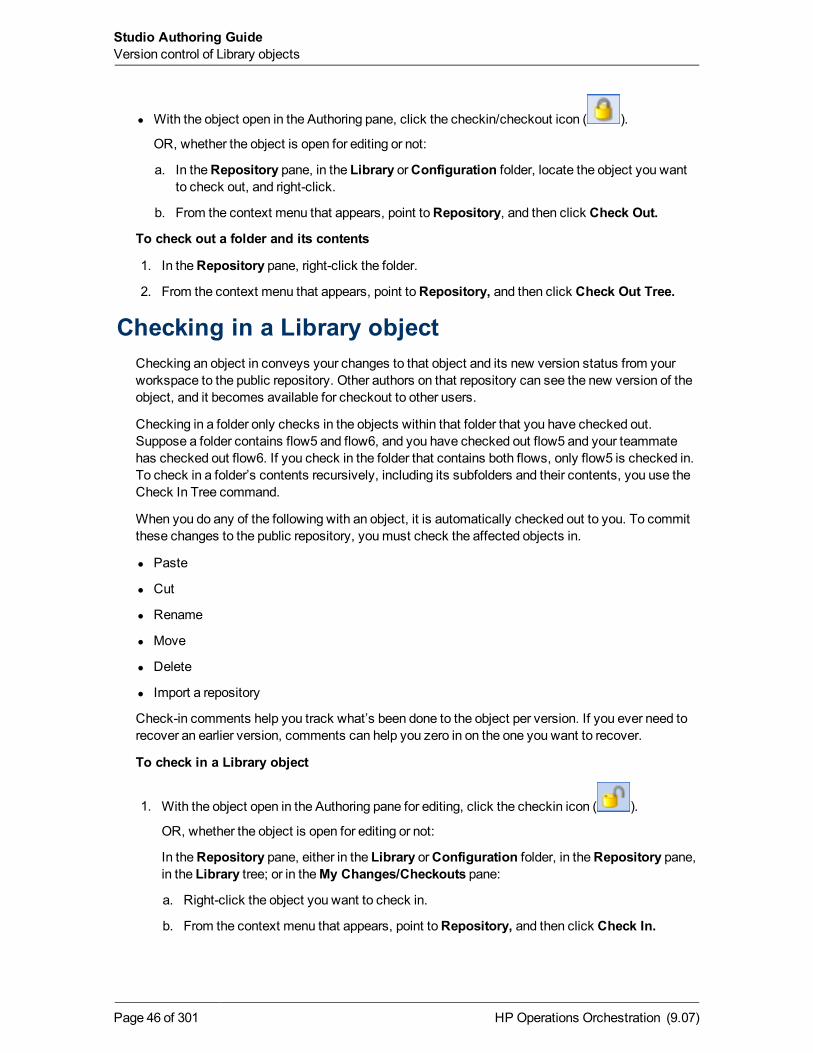
l With the object open in the Authoring pane, click the checkin/checkout icon ( ).
OR, whether the object is open for editing or not:
a. In theRepository pane, in the Library orConfiguration folder, locate the object you wantto check out, and right-click.
b. From the context menu that appears, point toRepository, and then click Check Out.
To check out a folder and its contents
1. In theRepository pane, right-click the folder.
2. From the context menu that appears, point toRepository, and then click Check Out Tree.
Checking in a Library objectChecking an object in conveys your changes to that object and its new version status from yourworkspace to the public repository. Other authors on that repository can see the new version of theobject, and it becomes available for checkout to other users.
Checking in a folder only checks in the objects within that folder that you have checked out.Suppose a folder contains flow5 and flow6, and you have checked out flow5 and your teammatehas checked out flow6. If you check in the folder that contains both flows, only flow5 is checked in.To check in a folder’s contents recursively, including its subfolders and their contents, you use theCheck In Tree command.
When you do any of the following with an object, it is automatically checked out to you. To committhese changes to the public repository, youmust check the affected objects in.
l Paste
l Cut
l Rename
l Move
l Delete
l Import a repository
Check-in comments help you track what’s been done to the object per version. If you ever need torecover an earlier version, comments can help you zero in on the one you want to recover.
To check in a Library object
1. With the object open in the Authoring pane for editing, click the checkin icon ( ).
OR, whether the object is open for editing or not:
In theRepository pane, either in the Library orConfiguration folder, in theRepository pane,in the Library tree; or in theMy Changes/Checkouts pane:
a. Right-click the object you want to check in.
b. From the context menu that appears, point toRepository, and then click Check In.
HP Operations Orchestration (9.07)Page 46 of 301
Studio Authoring GuideVersion control of Library objects
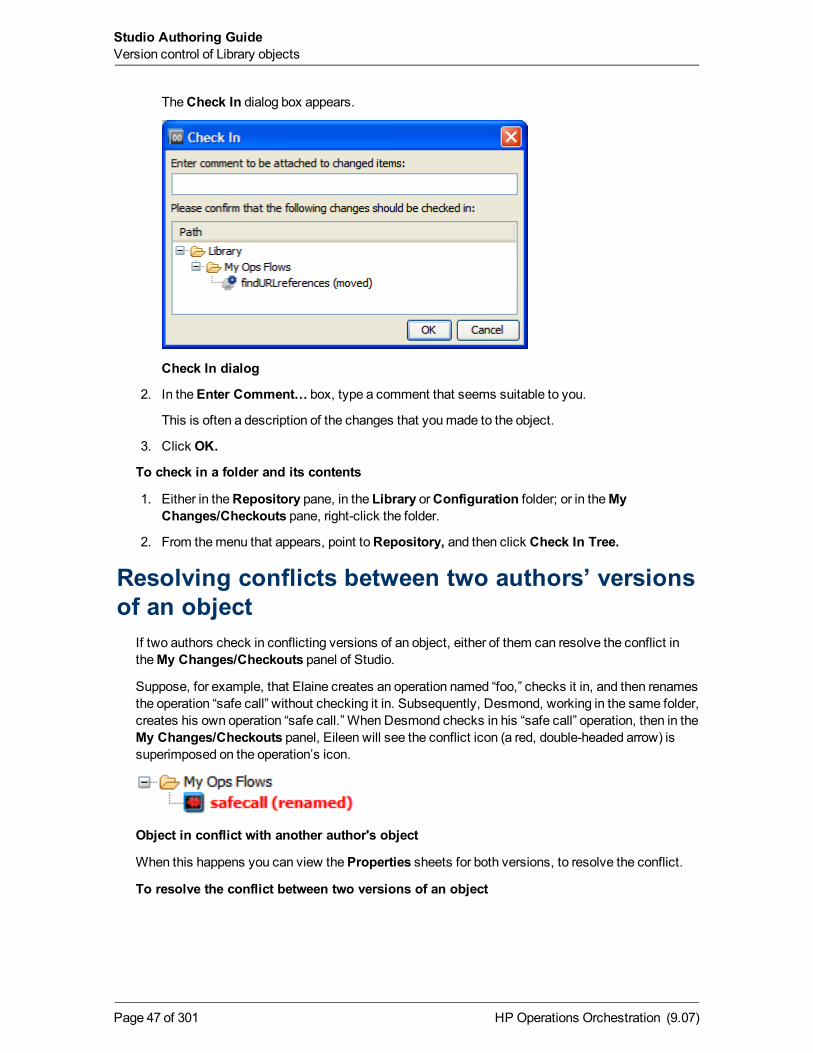
TheCheck In dialog box appears.
Check In dialog
2. In theEnter Comment… box, type a comment that seems suitable to you.
This is often a description of the changes that youmade to the object.
3. Click OK.
To check in a folder and its contents
1. Either in theRepository pane, in the Library orConfiguration folder; or in theMyChanges/Checkouts pane, right-click the folder.
2. From themenu that appears, point toRepository, and then click Check In Tree.
Resolving conflicts between two authors’ versionsof an object
If two authors check in conflicting versions of an object, either of them can resolve the conflict intheMy Changes/Checkouts panel of Studio.
Suppose, for example, that Elaine creates an operation named “foo,” checks it in, and then renamesthe operation “safe call” without checking it in. Subsequently, Desmond, working in the same folder,creates his own operation “safe call.” When Desmond checks in his “safe call” operation, then in theMy Changes/Checkouts panel, Eileen will see the conflict icon (a red, double-headed arrow) issuperimposed on the operation’s icon.
Object in conflict with another author's object
When this happens you can view theProperties sheets for both versions, to resolve the conflict.
To resolve the conflict between two versions of an object
HP Operations Orchestration (9.07)Page 47 of 301
Studio Authoring GuideVersion control of Library objects
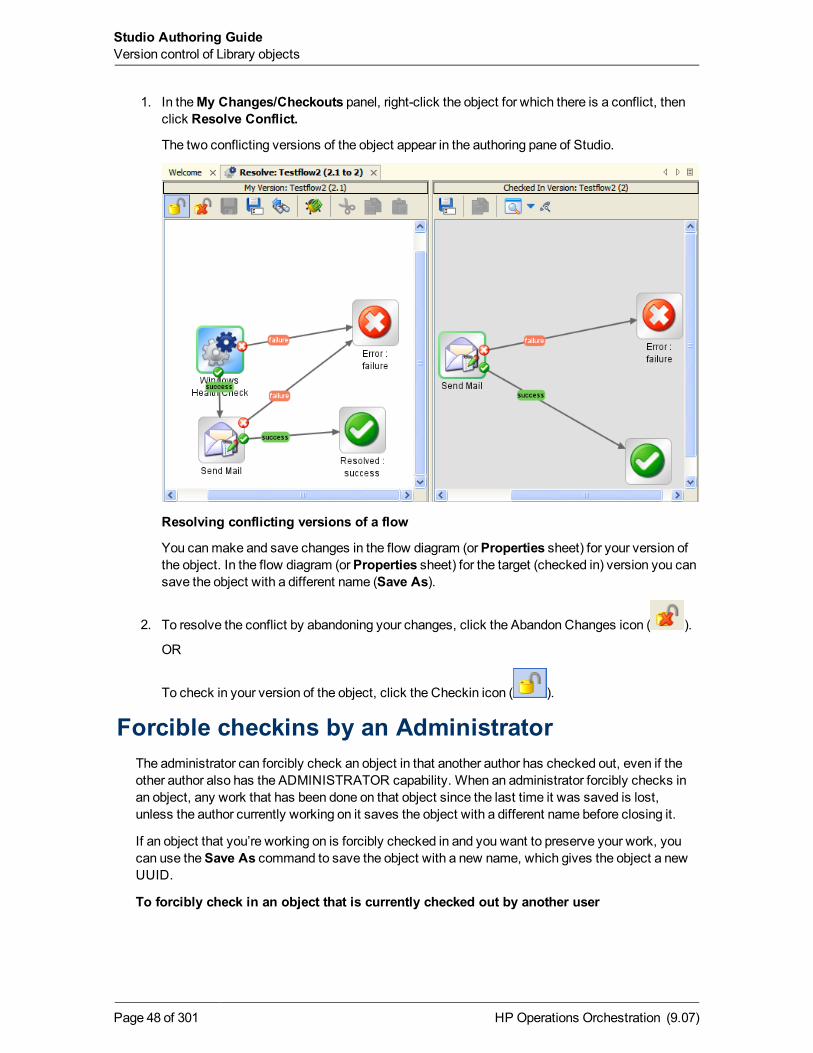
1. In theMy Changes/Checkouts panel, right-click the object for which there is a conflict, thenclick Resolve Conflict.
The two conflicting versions of the object appear in the authoring pane of Studio.
Resolving conflicting versions of a flow
You canmake and save changes in the flow diagram (orProperties sheet) for your version ofthe object. In the flow diagram (orProperties sheet) for the target (checked in) version you cansave the object with a different name (Save As).
2. To resolve the conflict by abandoning your changes, click the Abandon Changes icon ( ).
OR
To check in your version of the object, click the Checkin icon ( ).
Forcible checkins by an AdministratorThe administrator can forcibly check an object in that another author has checked out, even if theother author also has the ADMINISTRATOR capability. When an administrator forcibly checks inan object, any work that has been done on that object since the last time it was saved is lost,unless the author currently working on it saves the object with a different name before closing it.
If an object that you’re working on is forcibly checked in and you want to preserve your work, youcan use theSave As command to save the object with a new name, which gives the object a newUUID.
To forcibly check in an object that is currently checked out by another user
HP Operations Orchestration (9.07)Page 48 of 301
Studio Authoring GuideVersion control of Library objects
1. Log in to Studio as a user who has the ADMINISTRATOR capability.
2. Right-click the object that you want to force checkin of, point toRepository, and then clickForce Check In.
Managing versionsYou can open an earlier version of an object and compare it to the current version (for moreinformation, seeOpening an earlier version of an object and Comparing versions of an object).Depending on what you want to do with the various versions, you can:
l Abandon any saved changes that youmade to the object while it was checked out.
Abandoning changes does away with changes that have beenmade since the object was lastchecked out. Once the object is checked back in, there is no checkout to revert.
For more information, see Abandoning changes.
l Recover an earlier state of the object by doing one of the following:
n Open a previous version of the object and then save it with a new name.
Opening an earlier version of an object
n Restore the object to an earlier version of itself.
For information on doing so, see Restoring an object to an earlier version
Abandoning changesSuppose you’vemade some changes to an object and saved the changes, and now you don’t wantthe changes to be preserved. You can abandon the changes. Abandoning changes automaticallychecks the object back in to the public repository. Checking an object in and abandoning thechanges youmade to it while you had it checked out restores the object’s status in the publicrepository to checked in and restores its state to what it was before checked out. Other authors cancheck the object out.
To abandon changes
1. In theRepository pane, right-click the object whose changes you don’t want to preserve.
2. In the context menu that appears, point toRepository, and then click Abandon Change(s).
TheConfirm dialog box appears.
HP Operations Orchestration (9.07)Page 49 of 301
Studio Authoring GuideVersion control of Library objects
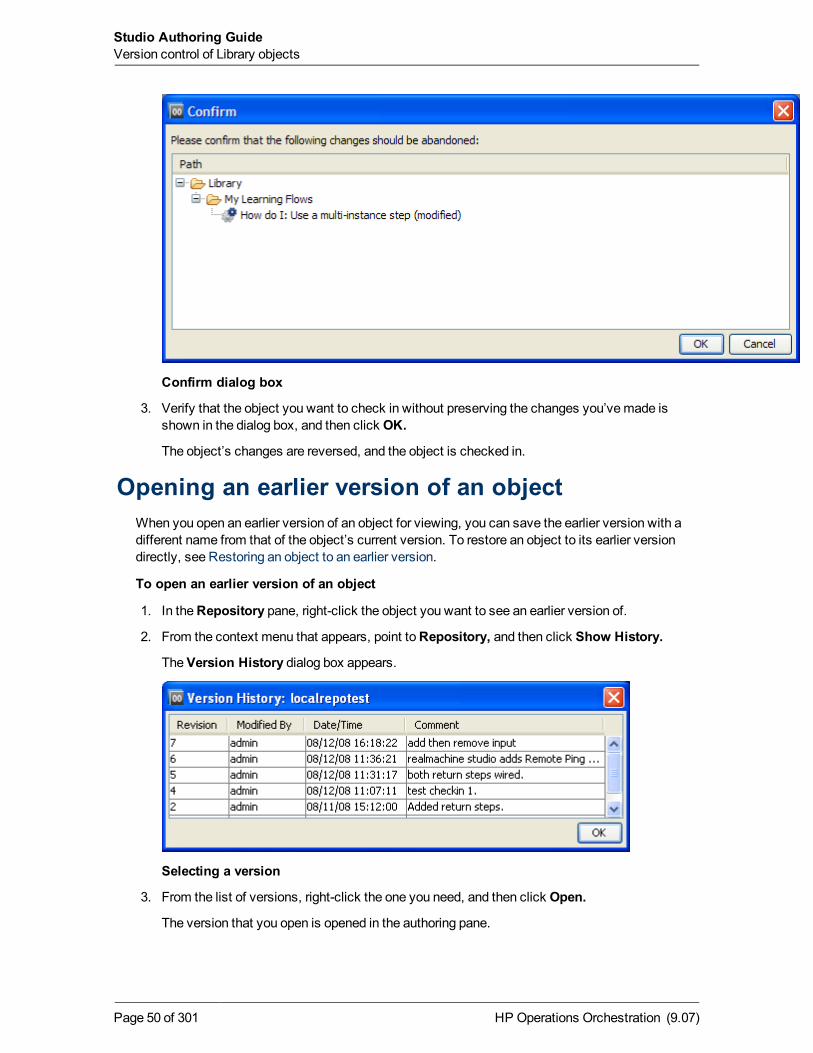
Confirm dialog box
3. Verify that the object you want to check in without preserving the changes you’vemade isshown in the dialog box, and then click OK.
The object’s changes are reversed, and the object is checked in.
Opening an earlier version of an objectWhen you open an earlier version of an object for viewing, you can save the earlier version with adifferent name from that of the object’s current version. To restore an object to its earlier versiondirectly, see Restoring an object to an earlier version.
To open an earlier version of an object
1. In theRepository pane, right-click the object you want to see an earlier version of.
2. From the context menu that appears, point toRepository, and then click Show History.
TheVersion History dialog box appears.
Selecting a version
3. From the list of versions, right-click the one you need, and then click Open.
The version that you open is opened in the authoring pane.
HP Operations Orchestration (9.07)Page 50 of 301
Studio Authoring GuideVersion control of Library objects
Using this procedure, you cannot save the version with the name of the object.
4. To preserve the version that you have opened, click the Save As icon ( ) and give it a uniquename.
The earlier version of the object is now a new object.
5. Check in the new object.
Restoring an object to an earlier versionThis procedure restores an object to an earlier version of itself. To keep both the current and earlierversions of the object, seeOpening an earlier version of an object.
To restore an object to an earlier version
1. In theRepository pane, right-click the object whose earlier version you want to restore.
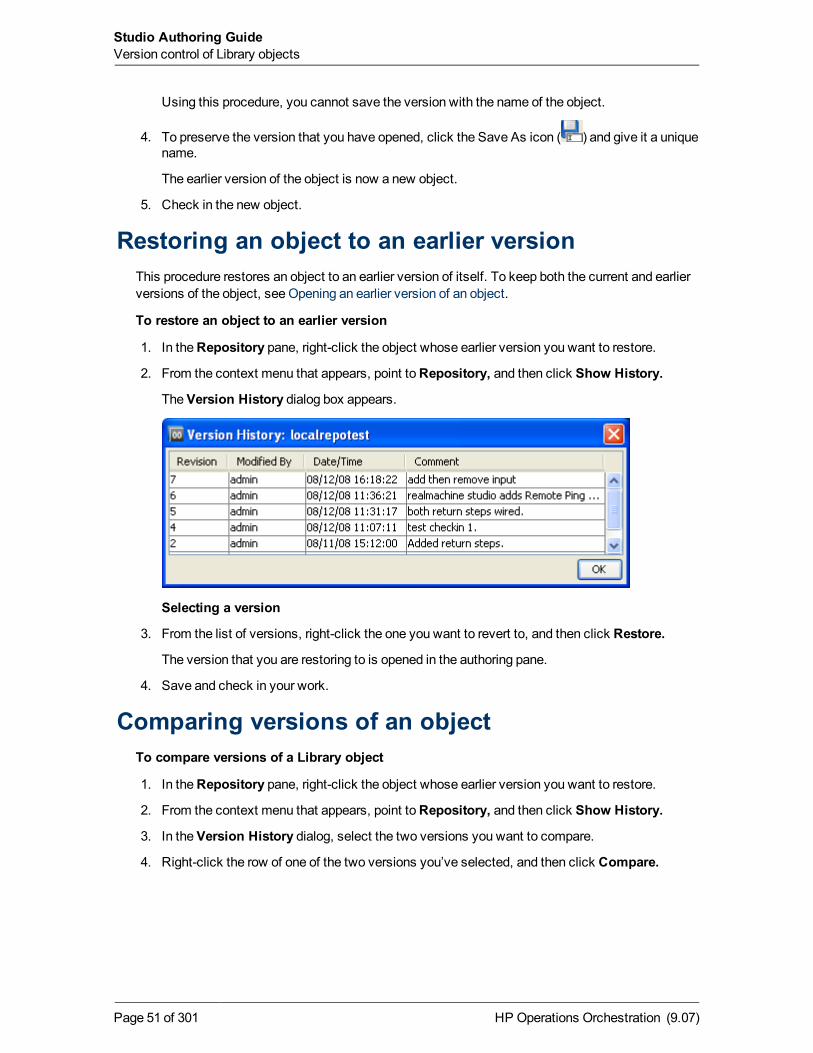
2. From the context menu that appears, point toRepository, and then click Show History.
TheVersion History dialog box appears.
Selecting a version
3. From the list of versions, right-click the one you want to revert to, and then click Restore.
The version that you are restoring to is opened in the authoring pane.
4. Save and check in your work.
Comparing versions of an objectTo compare versions of a Library object
1. In theRepository pane, right-click the object whose earlier version you want to restore.
2. From the context menu that appears, point toRepository, and then click Show History.
3. In theVersion History dialog, select the two versions you want to compare.
4. Right-click the row of one of the two versions you’ve selected, and then click Compare.
HP Operations Orchestration (9.07)Page 51 of 301
Studio Authoring GuideVersion control of Library objects
Creating a folderWhether you create a flow or copy one for modifying, youmay want to create a new folder for it.
To create a folder
1. Right-click the Library folder in theRepository pane, point toNew, and then click Folder.
2. In the dialog box that appears, type the name of the new folder in the text box, and then clickOK.
Notes:n Naming in Studio is not case-sensitive.
n Names can be amaximum of 128 characters long.
n The folder you create is automatically checked out to you.
HP Operations Orchestration (9.07)Page 52 of 301
Creating flowsLet’s suppose you want to check a network connection between your computer and a server. Thefollowing topics will guide you through creating andmodifying a flow that pings the server and runs atraceroute command on the network between your computer and the server.
Wewill change the flow inputs from user prompts to specific values, in order to make it possible forthe flow to run fully automatically. Our work will follow approximately these general steps:
1. Create a folder for holding the flow and its operations.
2. Get started with one of the followingmeans:
n Finding the flow that you want to use andmaking a copy of the flow. For more information,see Finding a flow or operation.
To get the flow that you want to work on, youmight need to import a repository. In ourexample you don’t, but for information on importing a repository, see Importing a repository.
n Starting a new flow from a template (see Creating a flow from a template).
3. If necessary, change how values are assigned to inputs.
4. Record reporting data (identifiers for aspects of the flow) for the inputs.
5. Look at the results and filters of each operation tomake sure you’re getting the data you needout of the operations.
6. If you needmore flow variables, create them.
7. Review the flow, step, operation, and transition descriptions for usefulness to Central users.
Best Practice: To help Central users as well as authors who will create flows using theoperations you create, add the following information to the operation’s Description tab. (Ifyou createmultiple flows or operations that interact with the same technology, group theminto a single folder and provide this information in the folder’s Description tab. This is thepractice for default HP OO content.) Note that putting this information on the Descriptiontabmakes it available to authors and Central users through theGenerate Documentationfeature. For more information onGenerate Documentation, see Viewingmany operationand flow descriptions.
n A description of what the operation does
n Inputs that the operation requires, including where users and authors can find the data thatthe inputs require and the required format for the data
n Responses, including themeaning of each response
n Result fields, including a description of the data supplied in each result field
n Any additional implementation notes, such as:
HP Operations Orchestration (9.07)Page 53 of 301
o Supported platforms or applications, including version information
o Application orWeb service APIs that the flow interacts with (this can be particularlyimportant for flows that require an RAS to run, because the RAS operation can hide thisinformation from the author or user of the flow.
o Other environmental or usage requirements
Youmight choose to further document the flow with callouts. For more information, see Addingcallouts to a flow.
8. Test the flow.
9. Tomake the flow available to Central users, you publish your repository.
Creating a flowThemain steps of creating a flow, once you have created or imported the operations that you willuse in it, are:
1. Creating a folder for holding the flow and its operations.
For instructions, see Creating a folder.
2. Creating the flow, as described in this section.
3. Adding operations as steps.
4. Creating connections (known as “transitions”) between steps so each response for a steptakes the flow to another step.
5. Creating one or more return steps to end the flow and assigning each return step a flowresponse.
6. Saving the flow.
7. Debugging the flow.
For information on debugging a flow in Studio, see Debugging a flow in Studio.
Tip: To help with understanding the steps, open the Restart Service – Tutorial Flow.
Note: To create a blank flow, right-click a folder, point to New, and then select Flow.
To create a flow
1. Highlight the folder in which you want to create the flow.
2. From the Filemenu, point toNew and then click Flow.
3. In the dialog box that appears, type a name for the flow, using standard characters, and thenclick OK.
Notes:n If two flows reside within the same folder, you cannot give them the same name.
n Naming in Studio is not case-sensitive.
HP Operations Orchestration (9.07)Page 54 of 301
Studio Authoring GuideCreating flows
n Names can be amaximum of 128 characters long.
The new flow is automatically checked out to you, and its diagram appears in the Authoringpane.
You can also create a flow from one of several templates that are designed specifically forcompleting some frequently undertaken tasks. These templates give you a head start by providingthe steps needed to complete those common tasks. For information on creating a flow from atemplate, see Creating a flow from a template.
In the Library, the new flow’s name appears in red as long as it is incomplete. Moving the cursorover the name of an incomplete flow displays a tool tip that specifies how the flow is incomplete.
To open an existing flow
1. Right-click one or more flows in the Library.
2. From themenu that appears, select Open.
The selected flow (or flows) opens in the authoring pane.
Creating a flow from a templateThe templates provided with Studio provide steps for flows that perform certain frequently usedtasks. For example, there is a template (Restart Service) for creating a flow to restart a service, soyou could start your flow that way.
And there is a template for a flow that pings a server and checks the network between yourcomputer and a server (Network Check).
Or, if you want to start with only the Success and Error return steps (return steps are possible laststeps of a flow), the Blank Flow template provides you with them.
To create a flow from a template
1. In the Authoring pane, click theWelcome tab to open Studio'sWelcome page, and then clicktheNew Flow icon.
In the list of templates that appears, when you highlight a flow template, its descriptionappears.
HP Operations Orchestration (9.07)Page 55 of 301
Studio Authoring GuideCreating flows
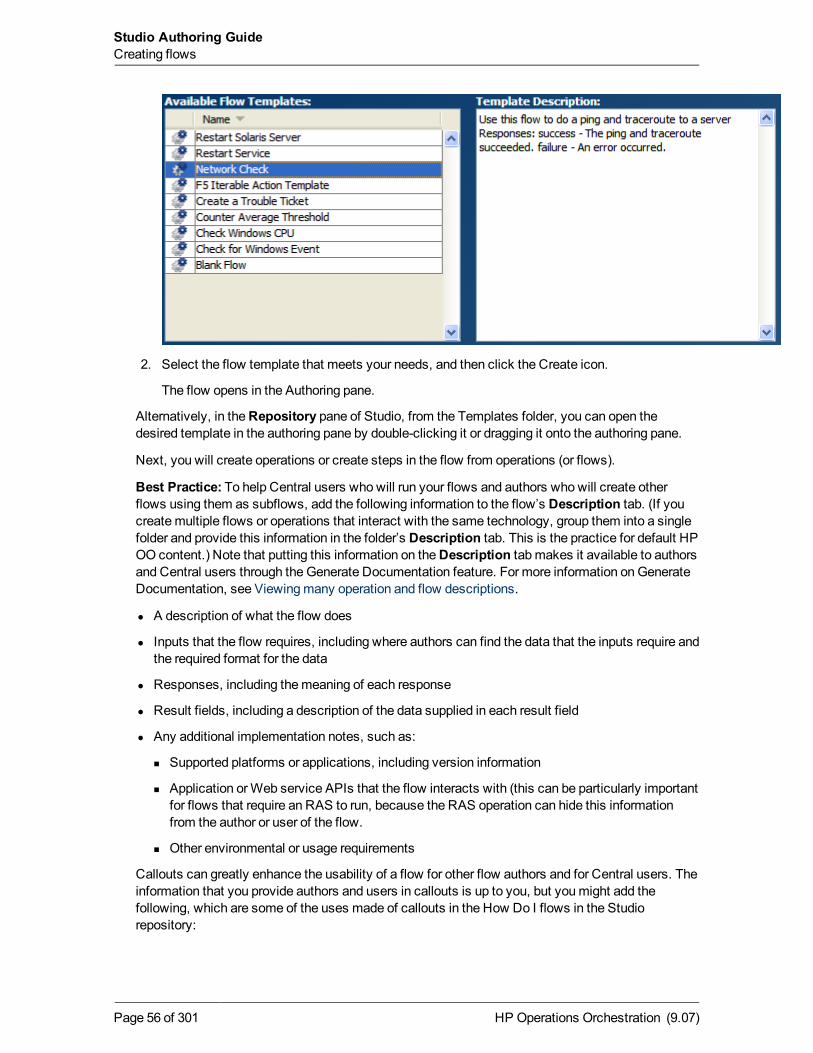
2. Select the flow template that meets your needs, and then click the Create icon.
The flow opens in the Authoring pane.
Alternatively, in theRepository pane of Studio, from the Templates folder, you can open thedesired template in the authoring pane by double-clicking it or dragging it onto the authoring pane.
Next, you will create operations or create steps in the flow from operations (or flows).
Best Practice: To help Central users who will run your flows and authors who will create otherflows using them as subflows, add the following information to the flow’s Description tab. (If youcreatemultiple flows or operations that interact with the same technology, group them into a singlefolder and provide this information in the folder’s Description tab. This is the practice for default HPOO content.) Note that putting this information on theDescription tabmakes it available to authorsand Central users through theGenerate Documentation feature. For more information onGenerateDocumentation, see Viewingmany operation and flow descriptions.
l A description of what the flow does
l Inputs that the flow requires, including where authors can find the data that the inputs require andthe required format for the data
l Responses, including themeaning of each response
l Result fields, including a description of the data supplied in each result field
l Any additional implementation notes, such as:
n Supported platforms or applications, including version information
n Application orWeb service APIs that the flow interacts with (this can be particularly importantfor flows that require an RAS to run, because the RAS operation can hide this informationfrom the author or user of the flow.
n Other environmental or usage requirements
Callouts can greatly enhance the usability of a flow for other flow authors and for Central users. Theinformation that you provide authors and users in callouts is up to you, but youmight add thefollowing, which are some of the uses made of callouts in the How Do I flows in the Studiorepository:
HP Operations Orchestration (9.07)Page 56 of 301
Studio Authoring GuideCreating flows
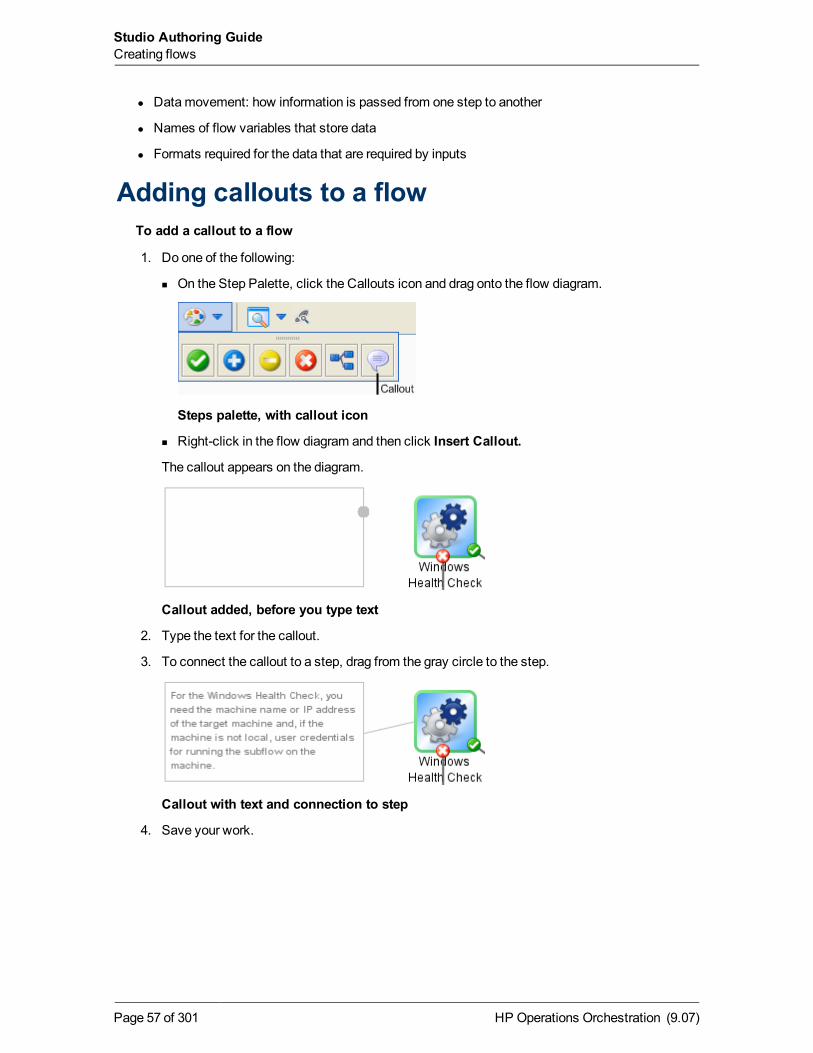
l Datamovement: how information is passed from one step to another
l Names of flow variables that store data
l Formats required for the data that are required by inputs
Adding callouts to a flowTo add a callout to a flow
1. Do one of the following:
n On the Step Palette, click the Callouts icon and drag onto the flow diagram.
Steps palette, with callout icon
n Right-click in the flow diagram and then click Insert Callout.
The callout appears on the diagram.
Callout added, before you type text
2. Type the text for the callout.
3. To connect the callout to a step, drag from the gray circle to the step.
Callout with text and connection to step
4. Save your work.
HP Operations Orchestration (9.07)Page 57 of 301
Studio Authoring GuideCreating flows
Finding a flow or operationFlows and operations are stored in subfolders of the Library folder of the Repository pane in Studio.Themain folders in the Library are:
l Accelerator Packs
Themost commonly used flows, organized into subfolders by technology.
l How Do I flows
Flows that document how to build commonly needed flows. The flows are annotated withcallouts, focusing particularly on how data is moved through the flow via inputs, flow variables,and step results.
l My Ops Flows
A folder for storing flows that you create. A new flow that you create from a template isautomatically stored here. (For information on creating a flow from a template, see Creatingflows.)
l Operations
This folder contains the essential pre-configured operations and subflows that are the buildingblocks of the Accelerator Packs andmany of the flows you will create. Many of these foldersalso contain a folder called Samples which show you examples of usingmany of theseoperations.
Note that the Accelerator Packs, Integrations, Operations, and Utility Operations folders are
sealed, as indicated by the lock on the folder icon ( ). It contains sealed (read-only) flows andoperations. Sealed flows and operations are so widely useful and fundamentally important thatHP OO does not allow them to bemodified. You canmake copies of sealed flows andoperations andmodify the copies.
Tip: To provide yourself with quick access to flows and operations that you commonly use,drag them to theBookmarks pane.
l Templates
Flow templates that give you a head start on creating flows to accomplish some of themostcommonly needed tasks.
l Utility operations
Operations that perform tasks that aremost frequently used when creating flows.
For finding a flow or operation, the Search tab is a very useful alternative to browsing the Library.The Studio Search engine uses the Apache Lucene syntax. For more information on using theSearch tab and the Apache Lucene syntax in Studio, see Searching for a flow or operation.
HP Operations Orchestration (9.07)Page 58 of 301
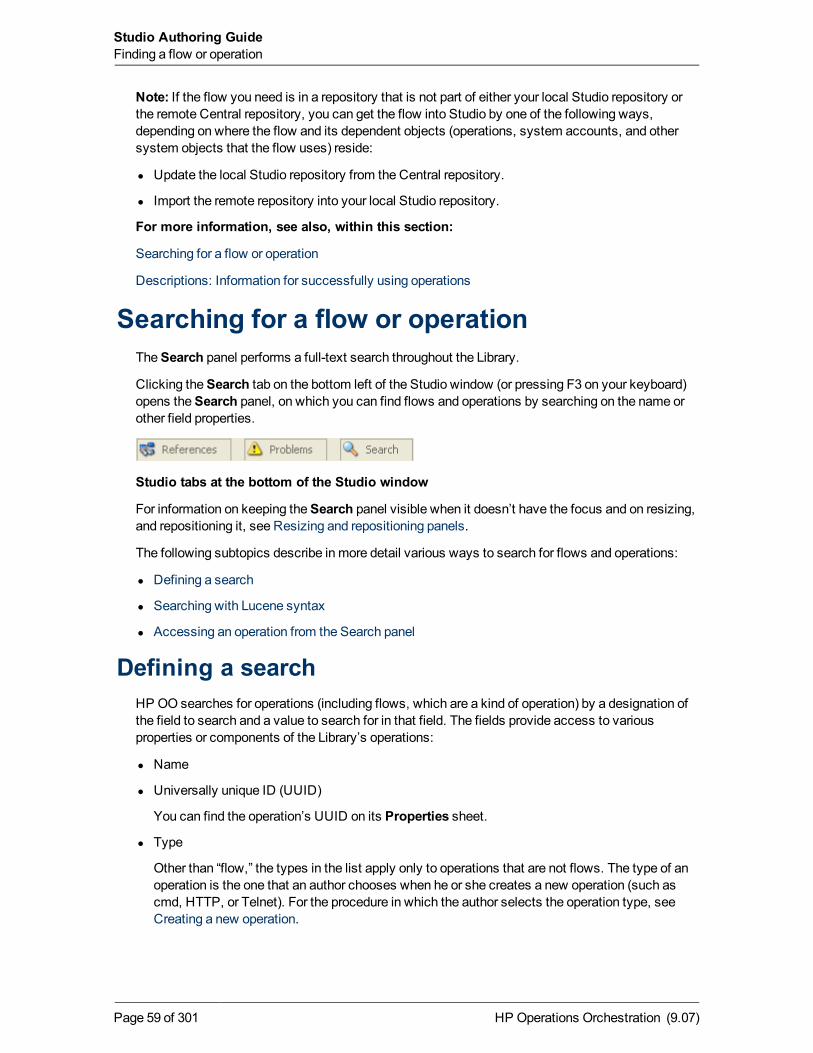
Note: If the flow you need is in a repository that is not part of either your local Studio repository orthe remote Central repository, you can get the flow into Studio by one of the following ways,depending on where the flow and its dependent objects (operations, system accounts, and othersystem objects that the flow uses) reside:
l Update the local Studio repository from the Central repository.
l Import the remote repository into your local Studio repository.
For more information, see also, within this section:
Searching for a flow or operation
Descriptions: Information for successfully using operations
Searching for a flow or operationTheSearch panel performs a full-text search throughout the Library.
Clicking theSearch tab on the bottom left of the Studio window (or pressing F3 on your keyboard)opens theSearch panel, on which you can find flows and operations by searching on the name orother field properties.
Studio tabs at the bottom of the Studio window
For information on keeping theSearch panel visible when it doesn’t have the focus and on resizing,and repositioning it, see Resizing and repositioning panels.
The following subtopics describe in more detail various ways to search for flows and operations:
l Defining a search
l Searching with Lucene syntax
l Accessing an operation from the Search panel
Defining a searchHP OO searches for operations (including flows, which are a kind of operation) by a designation ofthe field to search and a value to search for in that field. The fields provide access to variousproperties or components of the Library’s operations:
l Name
l Universally unique ID (UUID)
You can find the operation’s UUID on its Properties sheet.
l Type
Other than “flow,” the types in the list apply only to operations that are not flows. The type of anoperation is the one that an author chooses when he or she creates a new operation (such ascmd, HTTP, or Telnet). For the procedure in which the author selects the operation type, seeCreating a new operation.
HP Operations Orchestration (9.07)Page 59 of 301
Studio Authoring GuideFinding a flow or operation
l Description
Any string that occurs on theDescription tab of the operation's or flow's Properties sheet.
l Categories
The category to which the flow has been assigned. Category is one of the domain terms that canbe associated with a flow. If one has been assigned, the assignment appears in the flow’sProperties sheet. Flows are assigned to a category by author action only. For more informationon categories, see Categories: classifying flows.
l Inputs
The name of an input to a flow or operation. For more information on inputs, see Inputs:Providing data to operations.
l Domain term
A domain term that has been assigned to the flow or operation. Domain terms are specializedselection lists that have certain advantages over manually created selection lists, and areassigned by authors. For more information, see, Domain terms for Dashboard charting.
You can also search for a combination of fields by using Lucene search syntax.
To search for an operation
1. To open theSearch panel, click theSearch tab at the bottom of the Studio window.
2. In theSearch drop-down list, select a field to search on.
OR
To include all the fields in your search, leave theSearch drop-down set to <all fields>.
OR
To construct a search with the Lucene syntax, see Searching with Lucene syntax.
3. In the for text box, type the string you want to search for.
If the search string contains a space, you can specify either an exact search or a “fuzzy”search. An exact search treats the entire string, including any spaces that it contains, as asingle search value. A “fuzzy” search looks for all of the strings that are separated by spaces.
Note: Lucene syntax controls this aspect of searching, so theExact checkbox is disabledwhen the search is specified using Lucene syntax.
4. To specify a search that treats spaces as part of a single search string, select theExactcheckbox.
OR
To specify a search that treats spaces are separators for alternate search strings, remove theselection from theExact checkbox.
5. Click the search icon ( ).
If you have selectedCategories or Type in the Search drop-down list, the for box becomes adrop-down list from which you can select the available operation types or currently definedcategories.
HP Operations Orchestration (9.07)Page 60 of 301
Studio Authoring GuideFinding a flow or operation
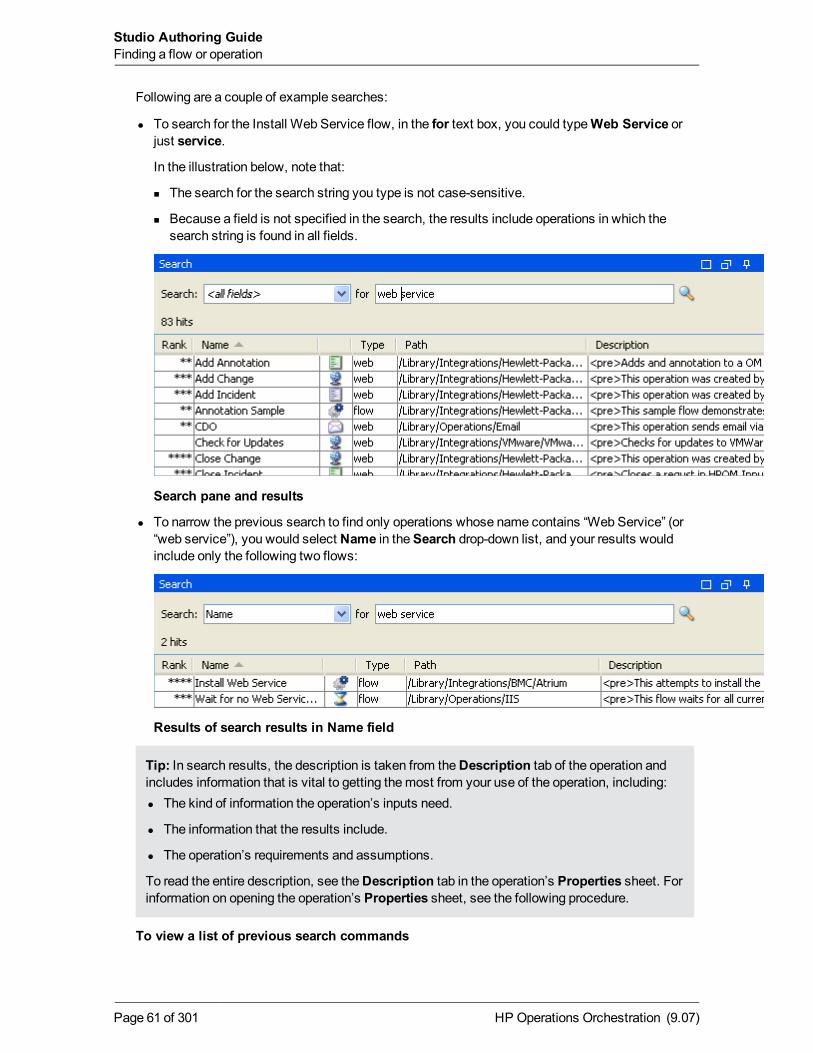
Following are a couple of example searches:
l To search for the Install Web Service flow, in the for text box, you could typeWeb Service orjust service.
In the illustration below, note that:
n The search for the search string you type is not case-sensitive.
n Because a field is not specified in the search, the results include operations in which thesearch string is found in all fields.
Search pane and results
l To narrow the previous search to find only operations whose name contains “Web Service” (or“web service”), you would select Name in theSearch drop-down list, and your results wouldinclude only the following two flows:
Results of search results in Name field
Tip: In search results, the description is taken from theDescription tab of the operation andincludes information that is vital to getting themost from your use of the operation, including:l The kind of information the operation’s inputs need.
l The information that the results include.
l The operation’s requirements and assumptions.
To read the entire description, see theDescription tab in the operation’s Properties sheet. Forinformation on opening the operation’s Properties sheet, see the following procedure.
To view a list of previous search commands
HP Operations Orchestration (9.07)Page 61 of 301
Studio Authoring GuideFinding a flow or operation
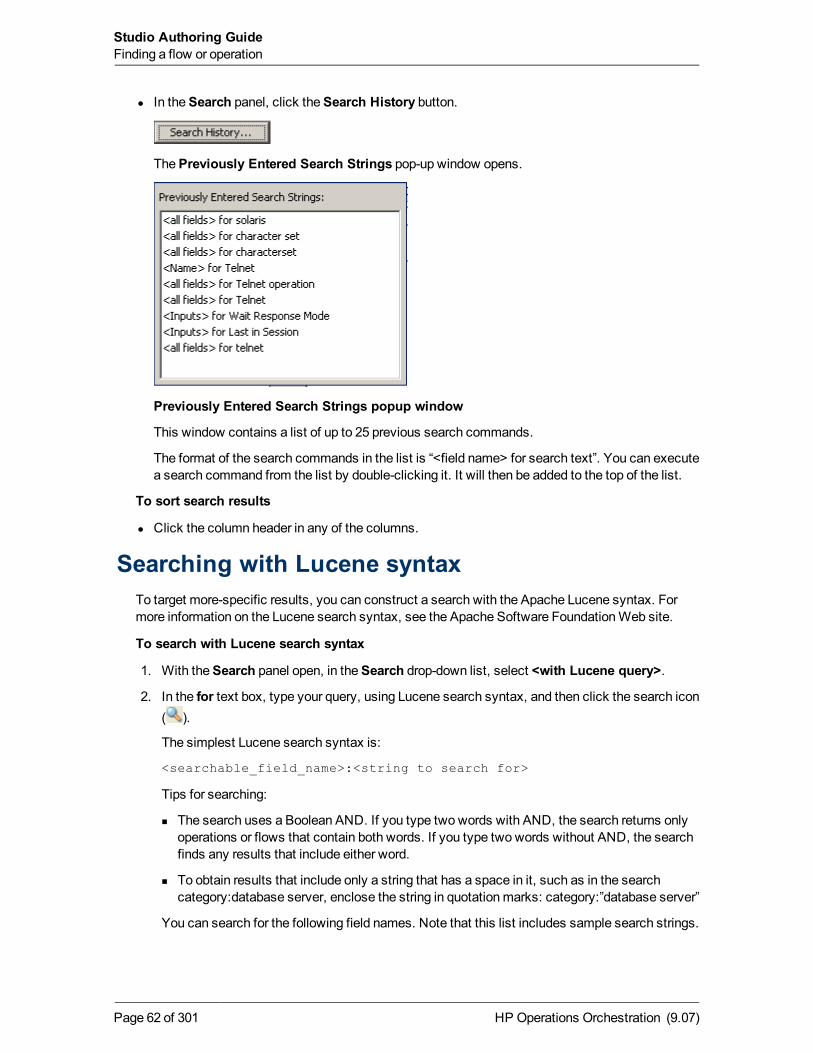
l In theSearch panel, click theSearch History button.
ThePreviously Entered Search Strings pop-up window opens.
Previously Entered Search Strings popup window
This window contains a list of up to 25 previous search commands.
The format of the search commands in the list is “<field name> for search text”. You can executea search command from the list by double-clicking it. It will then be added to the top of the list.
To sort search results
l Click the column header in any of the columns.
Searching with Lucene syntaxTo target more-specific results, you can construct a search with the Apache Lucene syntax. Formore information on the Lucene search syntax, see the Apache Software FoundationWeb site.
To search with Lucene search syntax
1. With theSearch panel open, in theSearch drop-down list, select <with Lucene query>.
2. In the for text box, type your query, using Lucene search syntax, and then click the search icon( ).
The simplest Lucene search syntax is:
<searchable_field_name>:<string to search for>
Tips for searching:
n The search uses a Boolean AND. If you type two words with AND, the search returns onlyoperations or flows that contain both words. If you type two words without AND, the searchfinds any results that include either word.
n To obtain results that include only a string that has a space in it, such as in the searchcategory:database server, enclose the string in quotationmarks: category:”database server”
You can search for the following field names. Note that this list includes sample search strings.
HP Operations Orchestration (9.07)Page 62 of 301
Studio Authoring GuideFinding a flow or operation
n Flow or operation name
Examples:
name:Get Temp Dirname:Clear Temp Dir
n Operation type
Example:
type:cmd
n Category
Example:
category:network
n Input name
Example:
inputs:server
n Flow or operation UUID
Example:
id:1234-3453-3242-32423
n String contained in flow or operation descriptions
Example:
description:clear
n RAS over which the operation or flow runs
Example:
ras:RAS_Operator_Path
Accessing an operation from the Search panelYou can work with operations and flows directly from the search results, opening them for editing oradding them to a flow that is open in the authoring pane. (Remember that for the purpose of creatinga step in one flow from another flow, the flow from which you're creating the step is an operation.)
To access or employ an operation or flow directly from the list of search results
l To open an operation’s Properties sheet or a flow’s diagram, double-click in the row of theoperation of interest.
Note: You can also select multiple result rows. Right-click and select Open, to open thediagrams orProperties sheets of all the selected results.
OR
To create a step from an operation, drag the operation onto a flow diagram.
HP Operations Orchestration (9.07)Page 63 of 301
Studio Authoring GuideFinding a flow or operation
Descriptions: Information for successfullyusing operations
Suppose you want to test connectivity with a server. You do a search on the Search tab using theterm “connectivity,” and come up with the Connectivity Test and Iterative Connectivity Test flows.Which one is really the right flow? You can find out by looking at the description for each of the twoflows.
Similarly, you can look at an operation’s description, or the description for an entire folder ofoperations and/or flows in the default HP OO content (the collection of operations and flows thatcomewith Studio, which are included in the Accelerator Packs, Integrations, Operations, and UtilityOperations folders in the StudioRepository panel).
The descriptions for many folders in default HP OO content contain information, such as thefollowing, that is key to successfully using the flows and operations in the folder:
l A description of what the flow or operation does
l Inputs that the flow or operation requires, including where authors can find the data that theinputs require and the required format for the data
l Responses, including themeaning of each response
l Result fields, including a description of the data supplied in each result field
l Any additional implementation notes, such as:
n Supported platforms or applications, including version information
n Application orWeb service APIs that the flow or operation interacts with (this can beparticularly important for flows and operations that require an RAS to run, because the RASoperation can hide this information from the author or user of the flow.
n Other environmental or usage requirements
If you want to further explore an operation, highlight the step whose operation you’re interested in,open its Inspector, and click the Description tab. Because the step was created from its operation,its description is the description of the operation. The description tells you about the operation’s(and step’s) inputs and the operation’s responses and results, explaining each one. It may alsoinclude notes on restrictions and tips on usage, as in the following description of the ExchangeServer Info operation.
HP Operations Orchestration (9.07)Page 64 of 301
Studio Authoring GuideFinding a flow or operation

Operation description
You can also use Studio’s Generate Documentation feature to gather this information for manyflows and operations into one place. For more information onGenerate Documentation, seeViewingmany operation and flow descriptions.
Tip:You can see operation and flow descriptions in the results area of the Search tab. Forinformation on searching for an operation or flow, see Searching for a flow or operation.
Viewing a folder’s descriptionFolder descriptions provide an overview of the flows and operations contained in the folder andinformation, where relevant, such as:
l Supported versions of the software that the operations run against.
l Requirements for using the operations.
l Interfaces or APIs that the operations use.
For more information on what may be included in folder descriptions, see Descriptions: Informationfor successfully using operations.
To see a folder’s description
1. Right-click the folder in theRepository pane, and then click Properties.
2. On the folder’s Properties sheet, click theDescription tab.
HP Operations Orchestration (9.07)Page 65 of 301
Studio Authoring GuideFinding a flow or operation
Viewing a flow’s descriptionAlthough a flow is a kind operation, you view its description a little differently from
Formore information on what may be included in flow descriptions, see Descriptions: Informationfor successfully using operations.
To see a flow’s description
l Open the flow in the Authoring pane and click Properties (at the bottom of the pane), then clickthe Description tab.
OR
In theRepository pane, right-click the flow and then click Properties.
Note:Besides describing the flow, the description also tells you about the flow inputs, givingyou hints to the kind of values to provide the inputs.
Viewing an operation’s descriptionFormore information on what may be included in operation descriptions, see Descriptions:Information for successfully using operations.
To see an operation’s description
1. Open the operation in the Authoring pane.
OR
Right-click a step that was created from the operation, and then click Open Operation.
2. On the operation’s Properties sheet, click theDescription tab.
HP Operations Orchestration (9.07)Page 66 of 301
Studio Authoring GuideFinding a flow or operation
Viewing many operation and flowdescriptions
Colleagues who run flows in Central and those who author flows may need detailed descriptions offlows and operations, including:
l What kind of data their inputs need.
l The data that they generate in results.
l What their responses are.
l What steps try to do in a run of the flow.
TheGenerate Documentation feature pulls this information from what flow authors have providedon theDescription tab for each flow and operation and presents this self-documentation in acoherent, linked list of HTML files.
There are two ways to generate this information for individual operations or flows, or for thecontents of folders:
l Using the (right-click)Generate Documentation command and distributing the output HTMLfiles to Central users. For more information on theGenerate Documentation command, see thefollowing procedure, “To generate documentation of flows with the right-click command.”
l Creating a flow using the Generate Documentation operation and promoting the flow to yourproduction installation of Central. For more information on theGenerate Documentationoperation, see Enabling Central users to generate documentation.
You can also customize the format of the self-documentation that you generate. For moreinformation, seeGenerating documentation in a custom format.
Note: The Integrations, Operations, and Utility Operations folders are hidden from Central. Togenerate documentation on the contents of these folders, youmust create a flow that uses theGenerate Documentation with Hidden Folders operation.
To generate documentation of flows
1. Right-click the folder whose contents you want to see information about.
2. In the context menu that appears, point toGenerate Documentation, and then click StandardFormat.
OR
Create a flow that uses either the Generate Documentation or the Generate Documentation withHidden Folders operation.
HP Operations Orchestration (9.07)Page 67 of 301

For information on using these operations, see Enabling Central users to generatedocumentation.
For information on using the custom format to customize what the Generate Documentationoutput presents to you, seeGenerating documentation in a custom format.
3. In theChoose an output directory dialog, specify where HP OO should put the HTML files,and then click Save.
After the flow and operation self-documentation is generated, the results appear in yourWebbrowser.
Generated documentation for the Application Servers Accelerator Pack
4. To view the operations in a subfolder, click the subfolder in either of the Folders in Databasepanes. The operations in the selected subfolder appear in the lower-left pane.
Operations in the Accelerator Packs/Database/Microsoft SQL Server/Health Check/subfolder
5. To view the documentation for a single operation or flow, do one of the following:
n In the folder that contains the operation you're interested in, click All Operations in , andthen, in the list in the lower-left pane, click the operation or flow you’re interested in.
HP Operations Orchestration (9.07)Page 68 of 301
Studio Authoring GuideViewingmany operation and flow descriptions
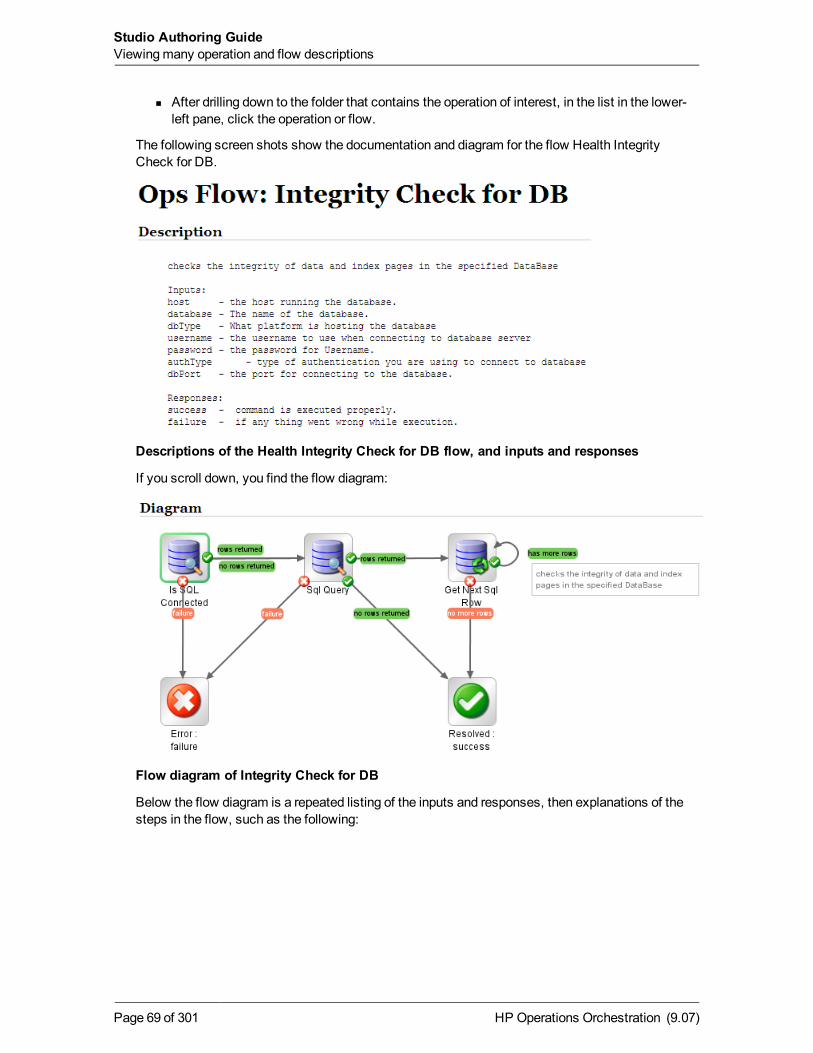
n After drilling down to the folder that contains the operation of interest, in the list in the lower-left pane, click the operation or flow.
The following screen shots show the documentation and diagram for the flow Health IntegrityCheck for DB.
Descriptions of the Health Integrity Check for DB flow, and inputs and responses
If you scroll down, you find the flow diagram:
Flow diagram of Integrity Check for DB
Below the flow diagram is a repeated listing of the inputs and responses, then explanations of thesteps in the flow, such as the following:
HP Operations Orchestration (9.07)Page 69 of 301
Studio Authoring GuideViewingmany operation and flow descriptions
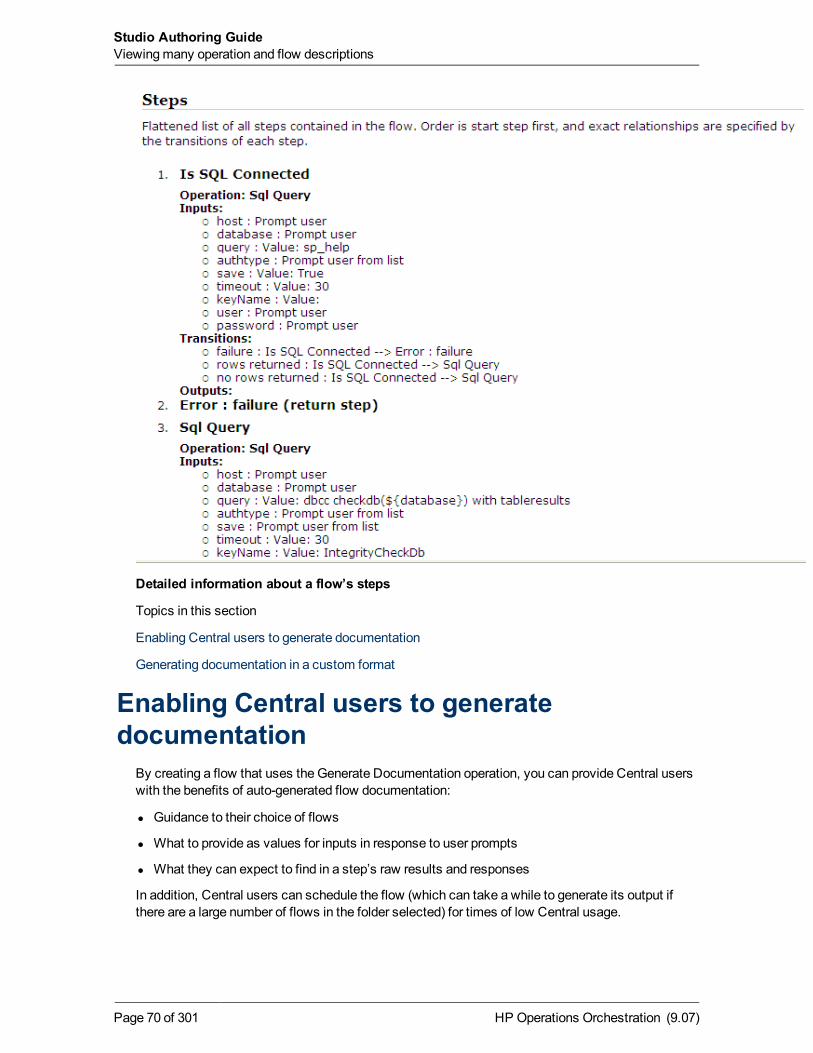
Detailed information about a flow’s steps
Topics in this section
Enabling Central users to generate documentation
Generating documentation in a custom format
Enabling Central users to generatedocumentation
By creating a flow that uses the Generate Documentation operation, you can provide Central userswith the benefits of auto-generated flow documentation:
l Guidance to their choice of flows
l What to provide as values for inputs in response to user prompts
l What they can expect to find in a step’s raw results and responses
In addition, Central users can schedule the flow (which can take a while to generate its output ifthere are a large number of flows in the folder selected) for times of low Central usage.
HP Operations Orchestration (9.07)Page 70 of 301
Studio Authoring GuideViewingmany operation and flow descriptions
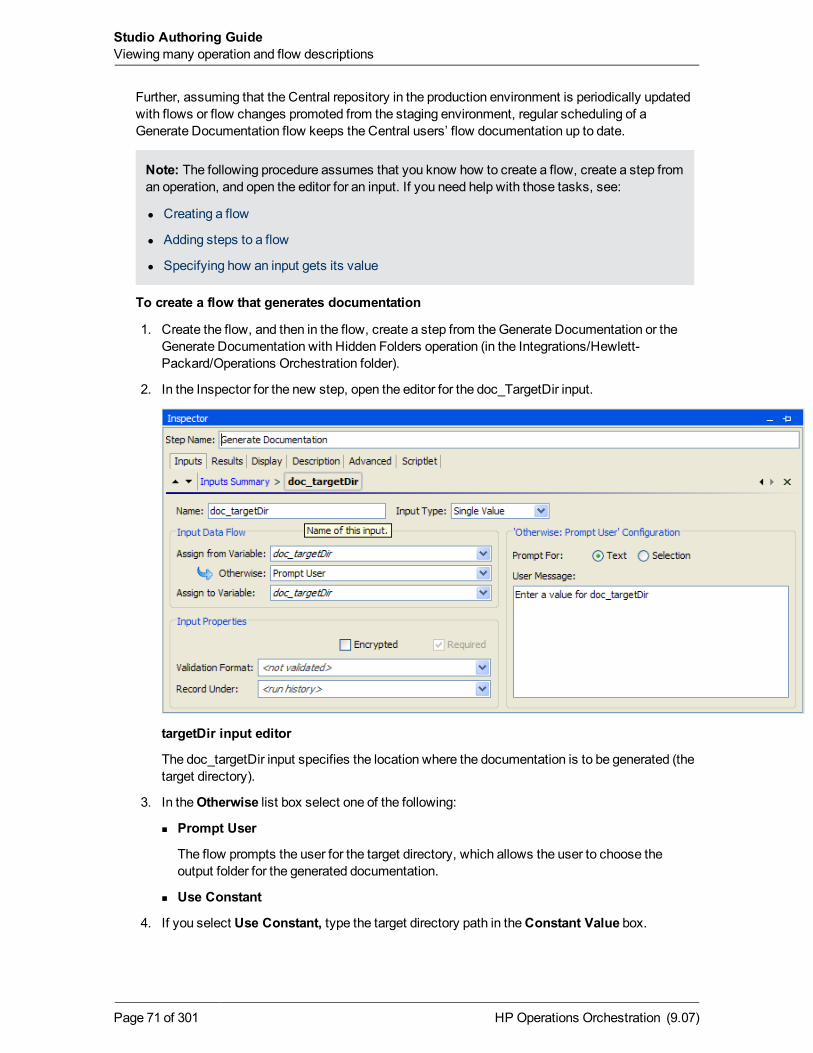
Further, assuming that the Central repository in the production environment is periodically updatedwith flows or flow changes promoted from the staging environment, regular scheduling of aGenerate Documentation flow keeps the Central users’ flow documentation up to date.
Note: The following procedure assumes that you know how to create a flow, create a step froman operation, and open the editor for an input. If you need help with those tasks, see:
l Creating a flow
l Adding steps to a flow
l Specifying how an input gets its value
To create a flow that generates documentation
1. Create the flow, and then in the flow, create a step from theGenerate Documentation or theGenerate Documentation with Hidden Folders operation (in the Integrations/Hewlett-Packard/Operations Orchestration folder).
2. In the Inspector for the new step, open the editor for the doc_TargetDir input.
targetDir input editor
The doc_targetDir input specifies the location where the documentation is to be generated (thetarget directory).
3. In theOtherwise list box select one of the following:
n Prompt User
The flow prompts the user for the target directory, which allows the user to choose theoutput folder for the generated documentation.
n Use Constant
4. If you select Use Constant, type the target directory path in theConstant Value box.
HP Operations Orchestration (9.07)Page 71 of 301
Studio Authoring GuideViewingmany operation and flow descriptions
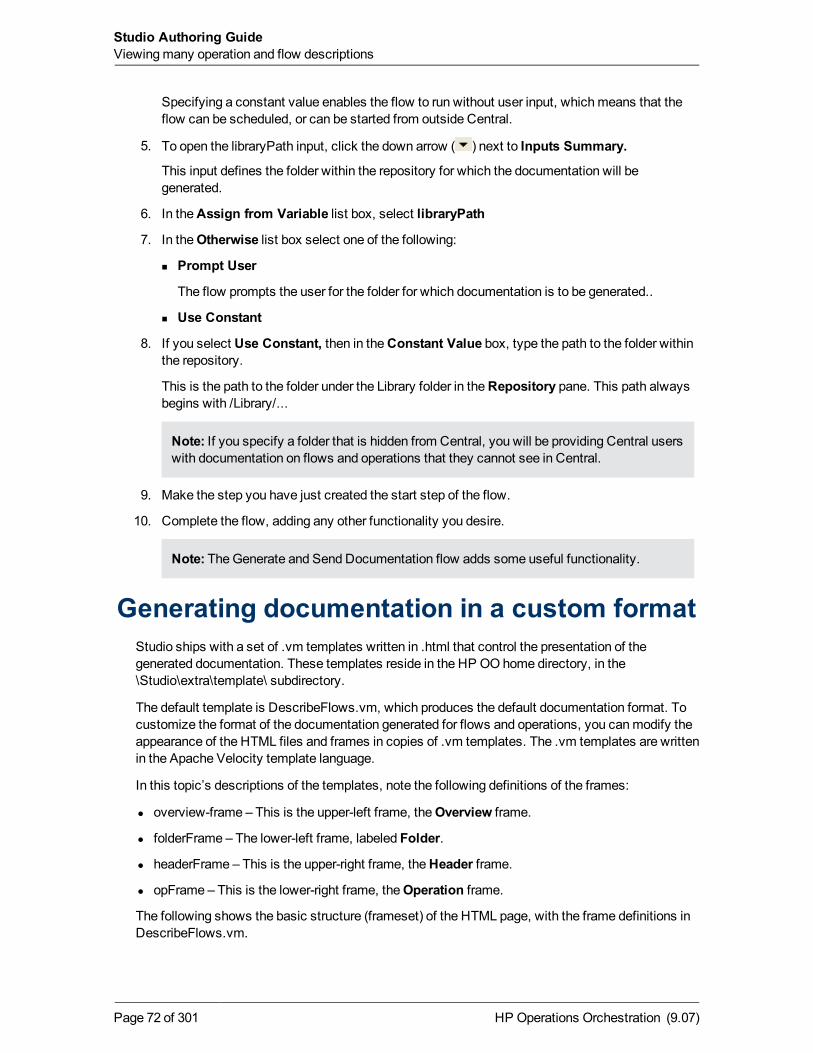
Specifying a constant value enables the flow to run without user input, whichmeans that theflow can be scheduled, or can be started from outside Central.
5. To open the libraryPath input, click the down arrow ( ) next to Inputs Summary.
This input defines the folder within the repository for which the documentation will begenerated.
6. In theAssign from Variable list box, select libraryPath
7. In theOtherwise list box select one of the following:
n Prompt User
The flow prompts the user for the folder for which documentation is to be generated..
n Use Constant
8. If you select Use Constant, then in theConstant Value box, type the path to the folder withinthe repository.
This is the path to the folder under the Library folder in theRepository pane. This path alwaysbegins with /Library/...
Note: If you specify a folder that is hidden from Central, you will be providing Central userswith documentation on flows and operations that they cannot see in Central.
9. Make the step you have just created the start step of the flow.
10. Complete the flow, adding any other functionality you desire.
Note: TheGenerate and Send Documentation flow adds some useful functionality.
Generating documentation in a custom formatStudio ships with a set of .vm templates written in .html that control the presentation of thegenerated documentation. These templates reside in the HP OO home directory, in the\Studio\extra\template\ subdirectory.
The default template is DescribeFlows.vm, which produces the default documentation format. Tocustomize the format of the documentation generated for flows and operations, you canmodify theappearance of the HTML files and frames in copies of .vm templates. The .vm templates are writtenin the Apache Velocity template language.
In this topic’s descriptions of the templates, note the following definitions of the frames:
l overview-frame – This is the upper-left frame, theOverview frame.
l folderFrame – The lower-left frame, labeled Folder.
l headerFrame – This is the upper-right frame, theHeader frame.
l opFrame – This is the lower-right frame, theOperation frame.
The following shows the basic structure (frameset) of the HTML page, with the frame definitions inDescribeFlows.vm.
HP Operations Orchestration (9.07)Page 72 of 301
Studio Authoring GuideViewingmany operation and flow descriptions
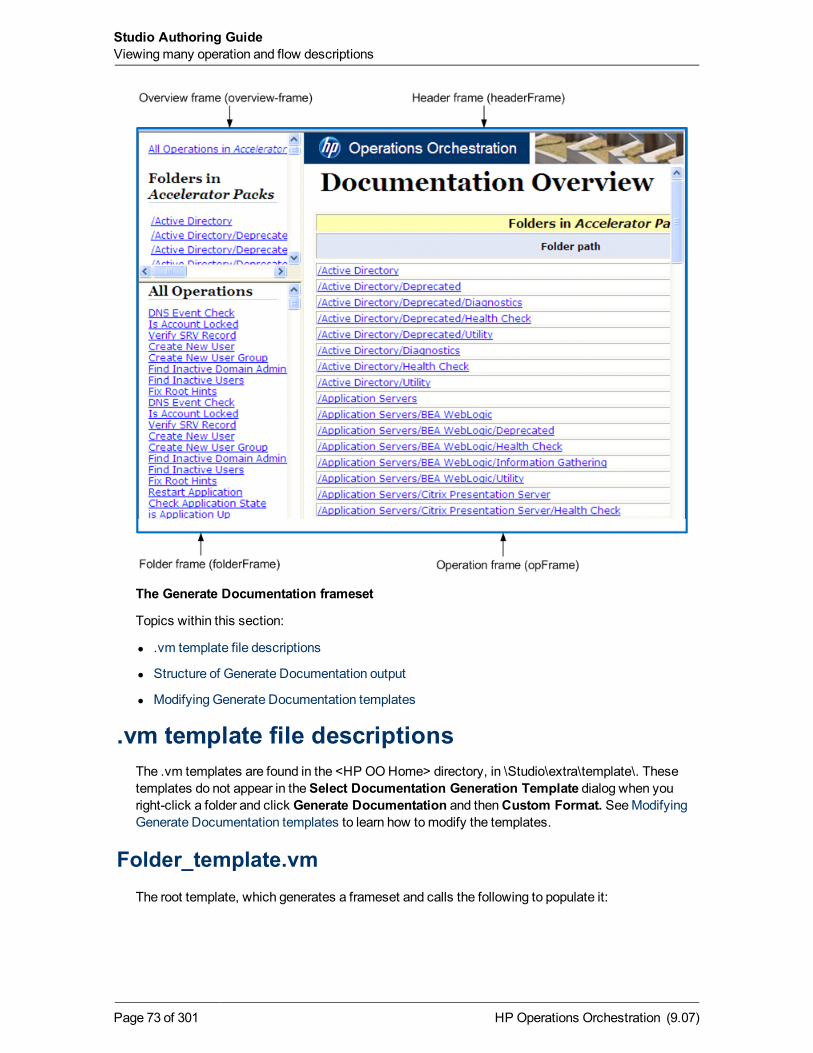
The Generate Documentation frameset
Topics within this section:
l .vm template file descriptions
l Structure of Generate Documentation output
l Modifying Generate Documentation templates
.vm template file descriptionsThe .vm templates are found in the <HP OOHome> directory, in \Studio\extra\template\. Thesetemplates do not appear in theSelect Documentation Generation Template dialog when youright-click a folder and click Generate Documentation and thenCustom Format. SeeModifyingGenerate Documentation templates to learn how tomodify the templates.
Folder_template.vmThe root template, which generates a frameset and calls the following to populate it:
HP Operations Orchestration (9.07)Page 73 of 301
Studio Authoring GuideViewingmany operation and flow descriptions
l All_folders_template.vm
Generates a list of the subfolders of the folder and places it in overview-frame (upper-left).
l All_ops_template.vm
Generates a list of all operations and places it in folderFrame (lower left).
l Header.html
Places the header in headerFrame (upper right).
l Folder_overview_template.vm
Generates information about one or more operations and places it in opFrame (lower right).
All_folders_template.vmGenerates a table of contents for the folders.
l Header.css
See definition below.
l All_ops_template.vm
Generates a list of all operations and creates a link to display it in folderFrame (lower left).
l Folder_contents.vm
Generates a list of the selected folder’s contents and creates a link to display it in folderFrame(lower left).
All_ops_template.vmGenerates a table of contents for all operations and the documentation for every child operation.
l Header.css
See definition below.
l Op_template.vm
Generates and creates a link to display it in opFrame (lower right).
Folder_overview_template.vmGenerates a tabular summary describing the contents of a folder.
l Header.css
See definition below.
l Folder_contents.vm
Generates and creates a link to display it in folderFrame (lower left).
HP Operations Orchestration (9.07)Page 74 of 301
Studio Authoring GuideViewingmany operation and flow descriptions
Op_template.vmGenerates documentation for a single operation.
l Header.css
See definition below.
l Folder_template.vm
Generates and creates a link to display it in same frame (up to parent folder).
l Folder_contents.vm
Displays the folder contents in folderFrame.
Flow_template.vmGenerates the documentation for a single flow.
l Header.css
See definition below.
l Flow_template.vm
Generates and creates a link to display it in same frame (up to parent folder).
l Folder_contents.vm
Generates a list of the folder contents and creates link to display it in folderFrame (lower left).
l Op_template.vm
Generates and creates a link to display it in opFrame (lower right).
Folder_contents.vmGenerates a table of contents for a single folder.
l Header.css
See definition below.
l Op_template.vm
Generates and creates a link to display it in opFrame (lower right).
Header.htmlThe Hewlett-Packard banner.
Header.cssStyle sheet used for general fonts, colors, etc.
HP Operations Orchestration (9.07)Page 75 of 301
Studio Authoring GuideViewingmany operation and flow descriptions
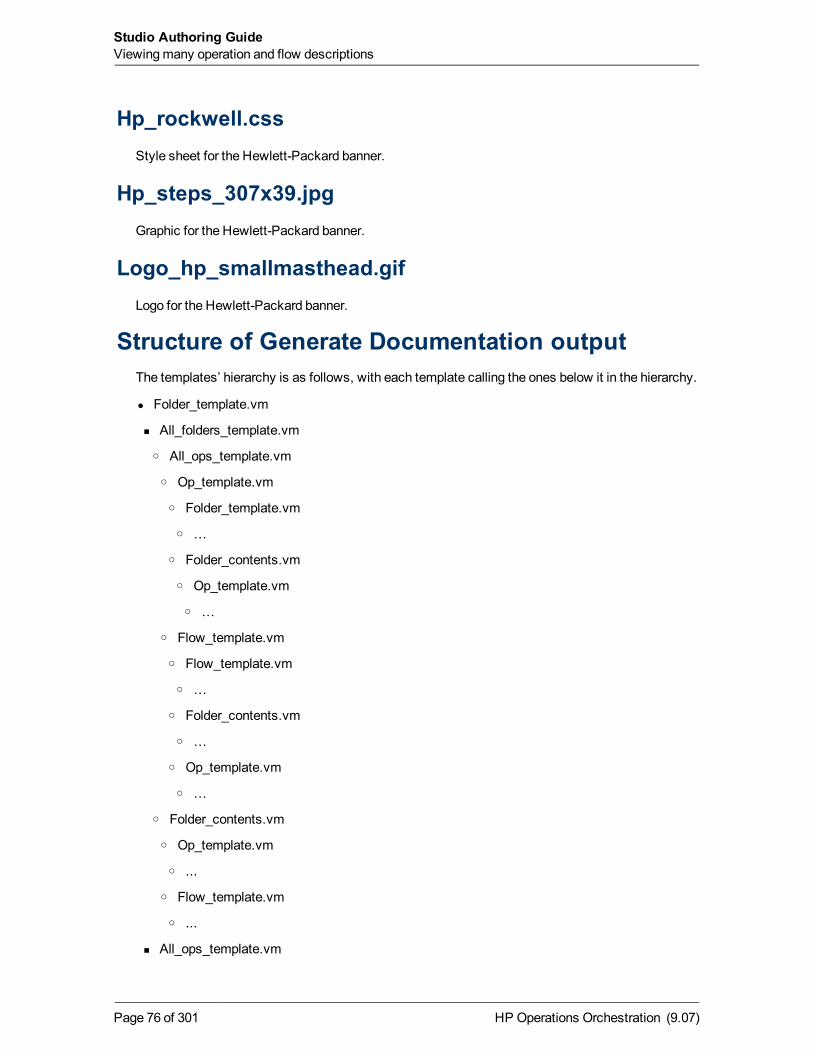
Hp_rockwell.cssStyle sheet for the Hewlett-Packard banner.
Hp_steps_307x39.jpgGraphic for the Hewlett-Packard banner.
Logo_hp_smallmasthead.gifLogo for the Hewlett-Packard banner.
Structure of Generate Documentation outputThe templates’ hierarchy is as follows, with each template calling the ones below it in the hierarchy.
l Folder_template.vm
n All_folders_template.vm
o All_ops_template.vm
o Op_template.vm
o Folder_template.vm
o …
o Folder_contents.vm
o Op_template.vm
o …
o Flow_template.vm
o Flow_template.vm
o …
o Folder_contents.vm
o …
o Op_template.vm
o …
o Folder_contents.vm
o Op_template.vm
o ...
o Flow_template.vm
o ...
n All_ops_template.vm
HP Operations Orchestration (9.07)Page 76 of 301
Studio Authoring GuideViewingmany operation and flow descriptions
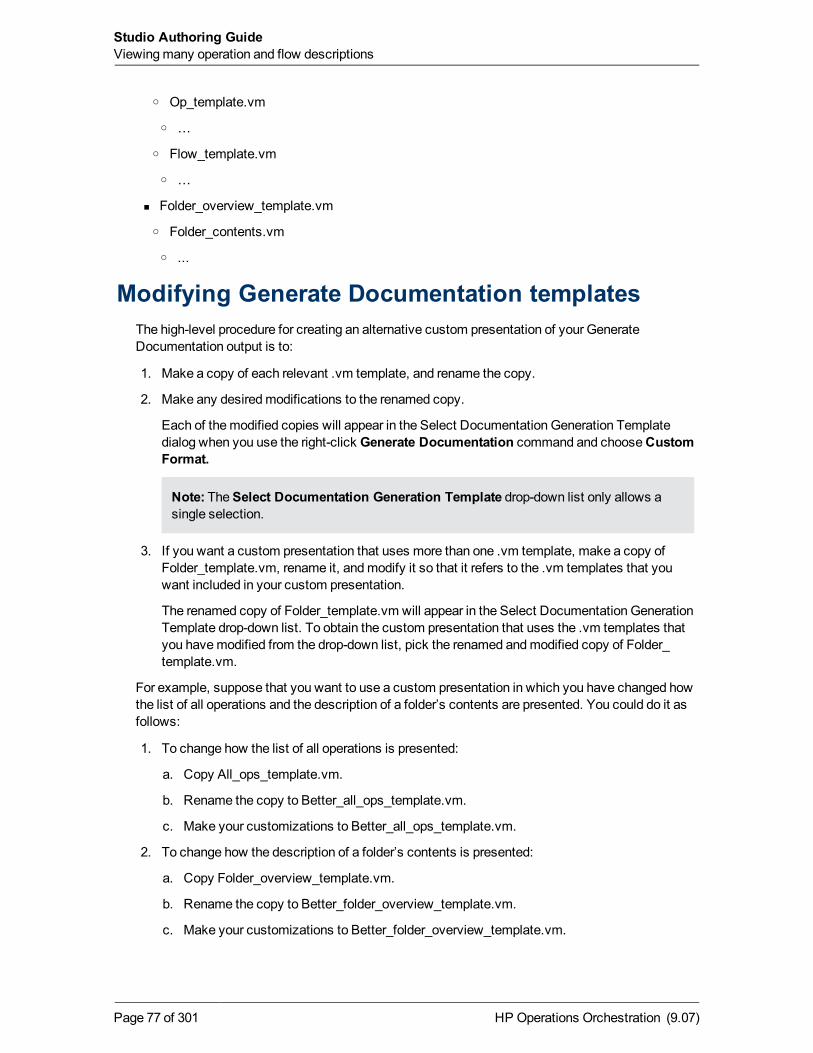
o Op_template.vm
o …
o Flow_template.vm
o …
n Folder_overview_template.vm
o Folder_contents.vm
o ...
Modifying Generate Documentation templatesThe high-level procedure for creating an alternative custom presentation of your GenerateDocumentation output is to:
1. Make a copy of each relevant .vm template, and rename the copy.
2. Make any desiredmodifications to the renamed copy.
Each of themodified copies will appear in the Select Documentation Generation Templatedialog when you use the right-click Generate Documentation command and chooseCustomFormat.
Note: TheSelect Documentation Generation Template drop-down list only allows asingle selection.
3. If you want a custom presentation that uses more than one .vm template, make a copy ofFolder_template.vm, rename it, andmodify it so that it refers to the .vm templates that youwant included in your custom presentation.
The renamed copy of Folder_template.vm will appear in the Select Documentation GenerationTemplate drop-down list. To obtain the custom presentation that uses the .vm templates thatyou havemodified from the drop-down list, pick the renamed andmodified copy of Folder_template.vm.
For example, suppose that you want to use a custom presentation in which you have changed howthe list of all operations and the description of a folder’s contents are presented. You could do it asfollows:
1. To change how the list of all operations is presented:
a. Copy All_ops_template.vm.
b. Rename the copy to Better_all_ops_template.vm.
c. Make your customizations to Better_all_ops_template.vm.
2. To change how the description of a folder’s contents is presented:
a. Copy Folder_overview_template.vm.
b. Rename the copy to Better_folder_overview_template.vm.
c. Make your customizations to Better_folder_overview_template.vm.
HP Operations Orchestration (9.07)Page 77 of 301
Studio Authoring GuideViewingmany operation and flow descriptions
3. To change which .vm files are used in the presentation:
a. Copy Folder_template.vm.
b. Rename the copy to Better_folder_template.vm.
c. In Better_folder_template.vm:
i. Change the All_ops_template.vm reference to refer to Better_all_ops_template.vm.
ii. Change the Folder_overview_template.vm reference to refer to Better_folder_overview_template.vm.
Now, when you use theGenerate Documentation command, the following will appear in theSelect Documentation Generation Template drop-down list:
n Better_all_ops_template.vm
n Better_folder_overview_template.vm
n Better_folder_template.vm
4. From the drop-down list, pick Better_folder_template.vm.
For information on the structure of the .vm files and interaction of the frames that they define, see.vm Template file descriptions and Structure of Generate Documentation output.
To generate documentation in a custom format
1. Navigate to the <HP OOHome> directory, \Studio\extra\template.
2. For any template that you want to customize:
n Make a backup copy of the template.
n Make a copy of the template.
n Rename the copy.
n In a text editor, make your changes to the copy.
n Back up the custom version of the template.
When you upgrade Studio, the templates will be overwritten. You can use the backups of yourchanged templates to restore your changes to the upgraded templates.
3. In Studio, right-click the folder whose contents you want to see information about.
4. From the context menu that appears, point to Generate Documentation, and then to CustomFormat.
5. In theSelect Documentation Generation Template dialog that appears, from the drop-downlist, pick the custom template that you want to use.
6. In the Specify root file name dialog, navigate to an existing folder in which you want thegenerated HTML files to be placed.
7. In the File name box, type the name of the start-page file, and then click Save.
By default, the name of the start file is index.html, which automatically opens in your defaultWeb browser. If you give it a different name and/or extension, you will have tomanuallychoose the program to use for opening the start page.
The documentation is generated.
HP Operations Orchestration (9.07)Page 78 of 301
Studio Authoring GuideViewingmany operation and flow descriptions
Analyzing the impact of changing a flowor operation
Changing an operation or flow can break other flows that use them, so after you have created yourown operations and flows, you should not change them until you analyze the impact that a changewill have.
Studio offers the following ways to determine the impact of change to a flow or operation:
l References to the operation or flow. These are the flows that have a step created from theoperation or flow.
l References from the operation or flow. These are the objects, such as selection lists,permissions assigned to groups, system filters, and so on, that the operation or flow makes useof. In the case of flows, these are the operations (including subflows) from which the flow’ssteps were created.
See "Finding out which flows use an operation" on page 80.
HP Operations Orchestration (9.07)Page 79 of 301
Studio Authoring GuideAnalyzing the impact of changing a flow or operation
Finding out which flows use an operationYou can learnmore about ways to use and implement an operation or flow by looking at how it isused in existing flows.
Note: Changing an operation or flow can break other flows that use them, so after you havecreated your own operations and flows, you should not change them until you confirm whichother flows use them
To view an operation’s references
1. In theRepository pane, right-click the operation or flow.
2. Do one of the following:
n To view the references from the operation or flow, click References and then clickWhatdoes this use?
n To view the references to the operation or flow, click References and then clickWhat usesthis?
TheReferences pane opens, displaying the references to or from the operation or flow.
3. To bring the last obtained references back up after you close theReferences pane, click theReferences tab.
Finding out which flows use a domain termTo search for flows and operations that use a Domain Term:
HP Operations Orchestration (9.07)Page 80 of 301
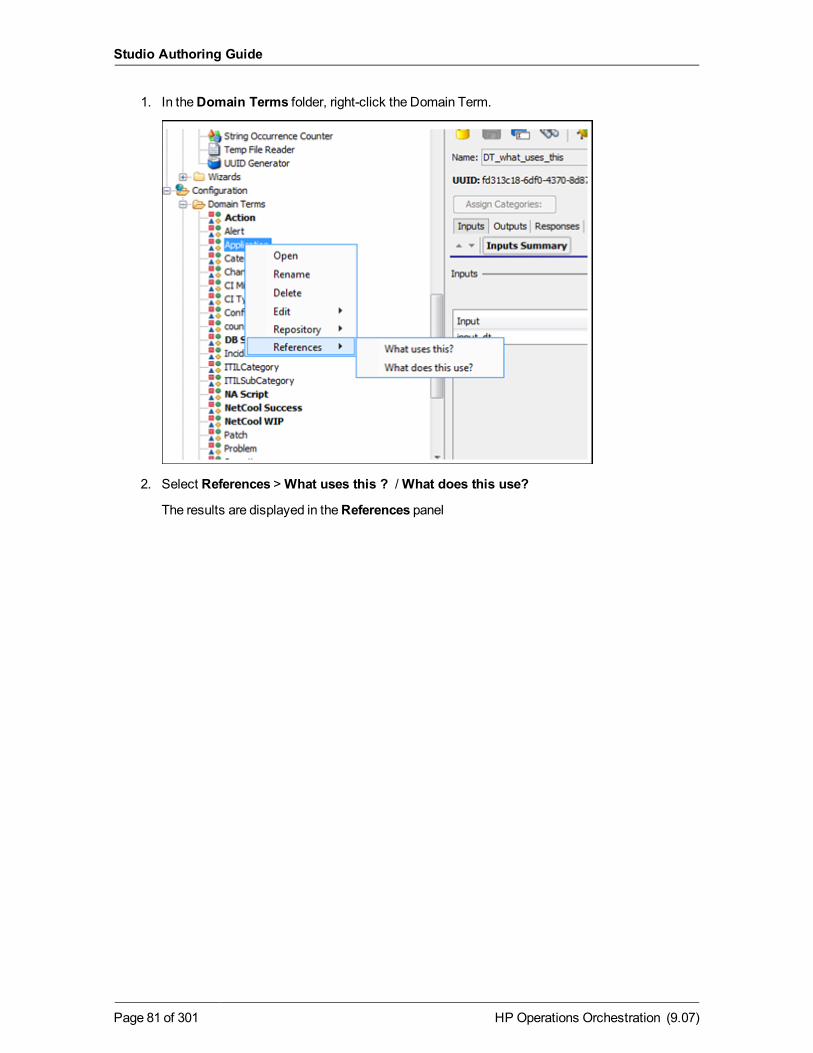
1. In theDomain Terms folder, right-click the Domain Term.
2. Select References >What uses this ? /What does this use?
The results are displayed in theReferences panel
HP Operations Orchestration (9.07)Page 81 of 301
Studio Authoring Guide
Copying flows and operationsWhen you’ve found a flow or operation that you want to modify, best practice is to make a copy andthen work on the copy. This best practice is enforced on you for flows and operations in the
following folders of the Library. As indicated by the lock on the folder icon ( )in theRepositorypane these folders’ contents cannot bemodified. To work with modifications of them, youmustmake a copy andmodify the copy.
l Accelerator Packs
l Integrations
l Operations
l Utility Operations
Here’s why: Suppose that the operation you want to change has an input, InputA. And suppose thatthe step that you have already made from the operation is used in a flow, FlowAlpha that has a flowinput that supplies InputA with a value. Now suppose you add InputB to the operation. The step thatyou already created from the operation doesn’t have any way of obtaining a value for InputB. Whena way of getting a value is not defined for an input, the input presents a prompt to the user to get itsvalue. However, if a Central user has created a schedule for automatic runs of FlowAlpha,FlowAlpha will break during those runs, because a requirement of running fully automatically is thata run not require any user inputs.
Note: If the changes you want to make are necessary only for a few uses and can bemade in astep that was created from the operation, youmay not need tomodify the operation, butinstead tomake the necessary changes in the step. For more information on the differencesbetween steps and operations, see Advanced flow, step, and operation concepts.
For information onmodifying steps, see the following topics:
l Inputs: Providing data to operations
l Outputs, responses, and step results
l Changing which operation a step is based on
Using the context (right-click) menu, you can copy or duplicate flows and operations, as long asthey are in unsealed folders. You can copy flows and operations in sealed folders, but you cannotduplicate them. Thus the options available in the context menu depend on whether the flows andoperations are in sealed (such as Integrations) or unsealed (such as My Ops Flows) folders:
To copy or duplicate flows or operations
1. In theRepository pane, find and right-click the flow or operation you want to copy.
2. Point toEdit, then click eitherCopy, Copy Deep, orDuplicate.
HP Operations Orchestration (9.07)Page 82 of 301

n If you copy the operation, you can paste it (CTRL+V) in any folder that is not sealed.
n If you click Copy Deep, not only the flow but also all the operations that the flow uses arecopied.
n If you duplicate the operation, the duplicate is automatically placed in the same folder as itsoriginal.
3. If you clickedCopy, navigate to the location where you want to place the copy and then pressCTL+V.
You can rename the copy.
Now you’re ready to work with the flow.
HP Operations Orchestration (9.07)Page 83 of 301
Studio Authoring GuideCopying flows and operations
Renaming flows or operationsUsing the context menu, you can rename flows and operations that reside in unsealed folders. Youcannot rename flows or operations that reside in sealed folders.
To rename flows or operations
1. In theRepository panel, find and right-click the flow or operation.
2. Click Rename.
3. Type the new name in the highlighted field, then press ENTER and save your work.
HP Operations Orchestration (9.07)Page 84 of 301
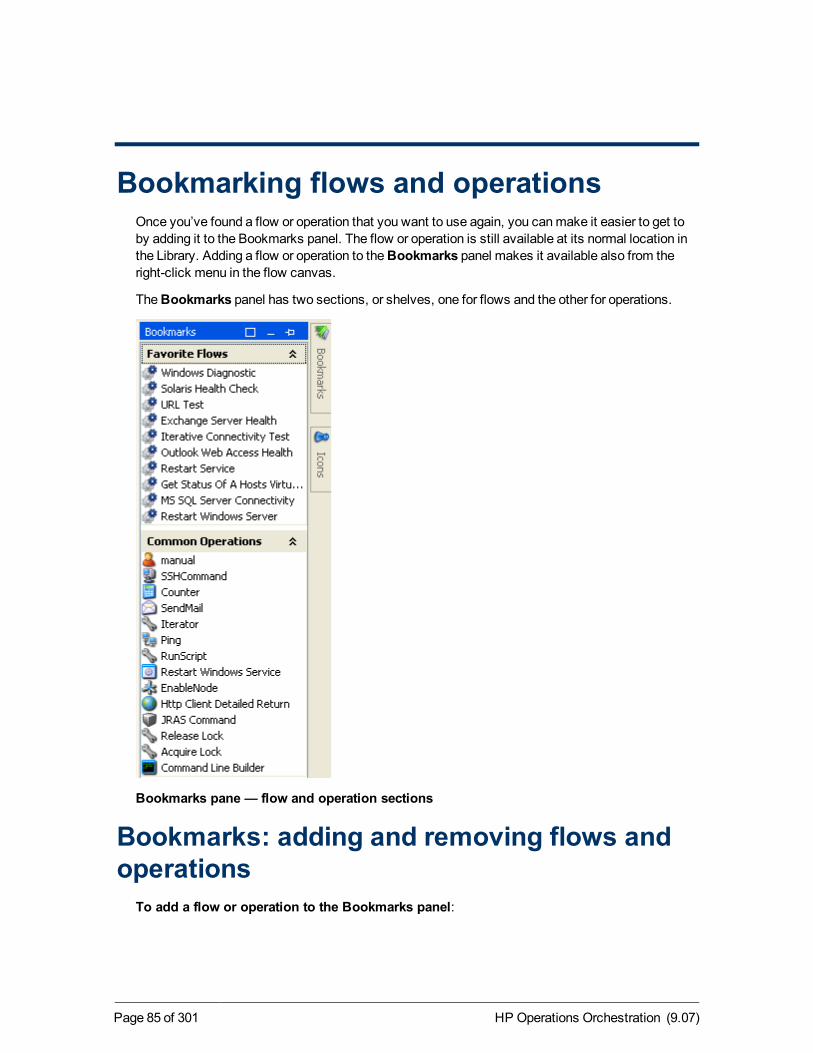
Bookmarking flows and operationsOnce you’ve found a flow or operation that you want to use again, you canmake it easier to get toby adding it to the Bookmarks panel. The flow or operation is still available at its normal location inthe Library. Adding a flow or operation to theBookmarks panel makes it available also from theright-click menu in the flow canvas.
TheBookmarks panel has two sections, or shelves, one for flows and the other for operations.
Bookmarks pane — flow and operation sections
Bookmarks: adding and removing flows andoperations
To add a flow or operation to the Bookmarks panel:
HP Operations Orchestration (9.07)Page 85 of 301
1. To open theBookmarks panel, click theBookmarks tab.
2. To keep the panel open, click the Pin icon ( ) in the upper-right-hand corner of the panel.
3. Drag the flow or operation from the Library or theSearch box results to the appropriate shelf oftheBookmarks panel.
Bookmarks shelves: adding, removing, andrenaming
To remove, add, or rename a shelf:
1. Right-click in the title bar of one of the shelves of theBookmarks panel, and then select theaction that you want to carry out.
2. Where appropriate, supply the information in the dialog box that appears.
Bookmarks shelves: showing, hiding, andmoving
To hide, show, or collapse a shelf:
1. To hide a shelf on theBookmarks panel, right-click in the shelf’s title bar, then click Hide.
2. To show a hidden shelf, right-click in a blank area of theBookmarks panel, and then clickShow All.
OR
Click Show and then, from the list of hidden shelves, select the shelf that you want to show.
3. To collapse a shelf, in the shelf’s title bar, click the double chevrons ( ).
4. To re-expand the shelf, double-click the double chevrons again.
To move a shelf:
l Right-click in the shelf’s title bar, then click Move Up orMove Down.
Sharing Studio BookmarksYou can share your Studio bookmarks with another Studio, by exporting them and then import to therequired Studio.
Exporting BookmarksTo export a bookmark from Studio :
1. To open theBookmarks panel, click theBookmarks tab.
2. Right-click anywhere inside theBookmarks panel, and select Export from the drop-downmenu.
HP Operations Orchestration (9.07)Page 86 of 301
Studio Authoring GuideBookmarking flows and operations
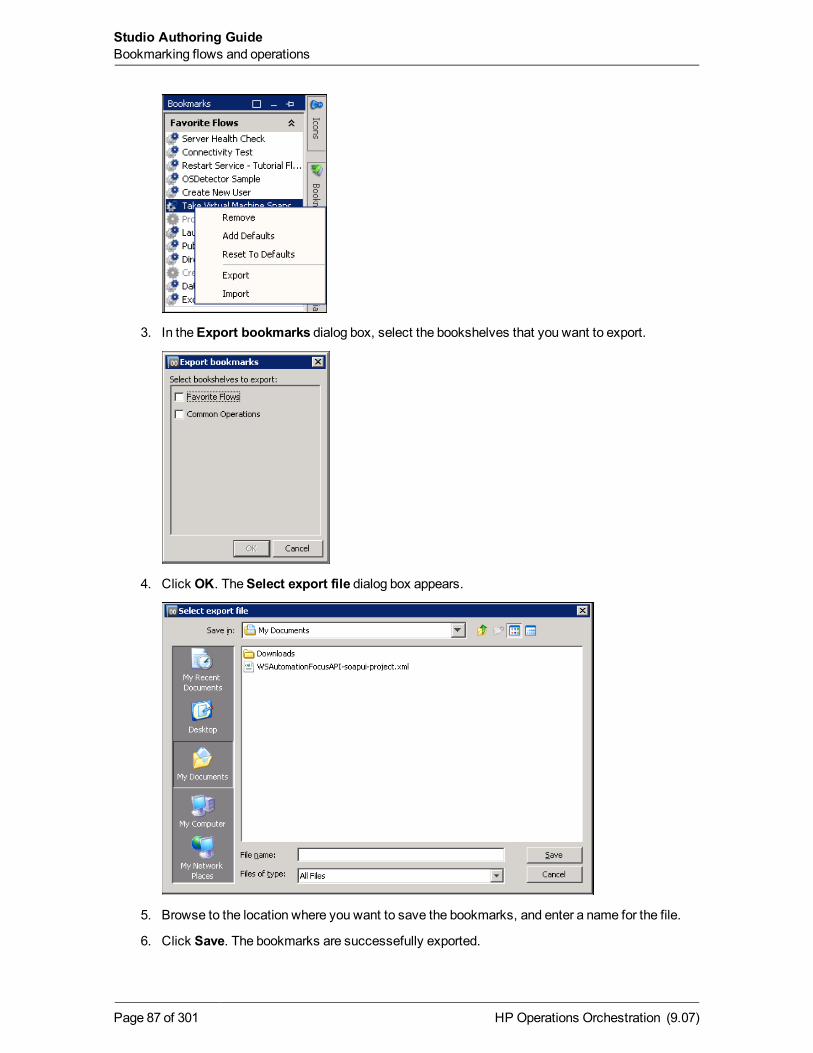
3. In theExport bookmarks dialog box, select the bookshelves that you want to export.
4. Click OK. TheSelect export file dialog box appears.
5. Browse to the location where you want to save the bookmarks, and enter a name for the file.
6. Click Save. The bookmarks are successefully exported.
HP Operations Orchestration (9.07)Page 87 of 301
Studio Authoring GuideBookmarking flows and operations
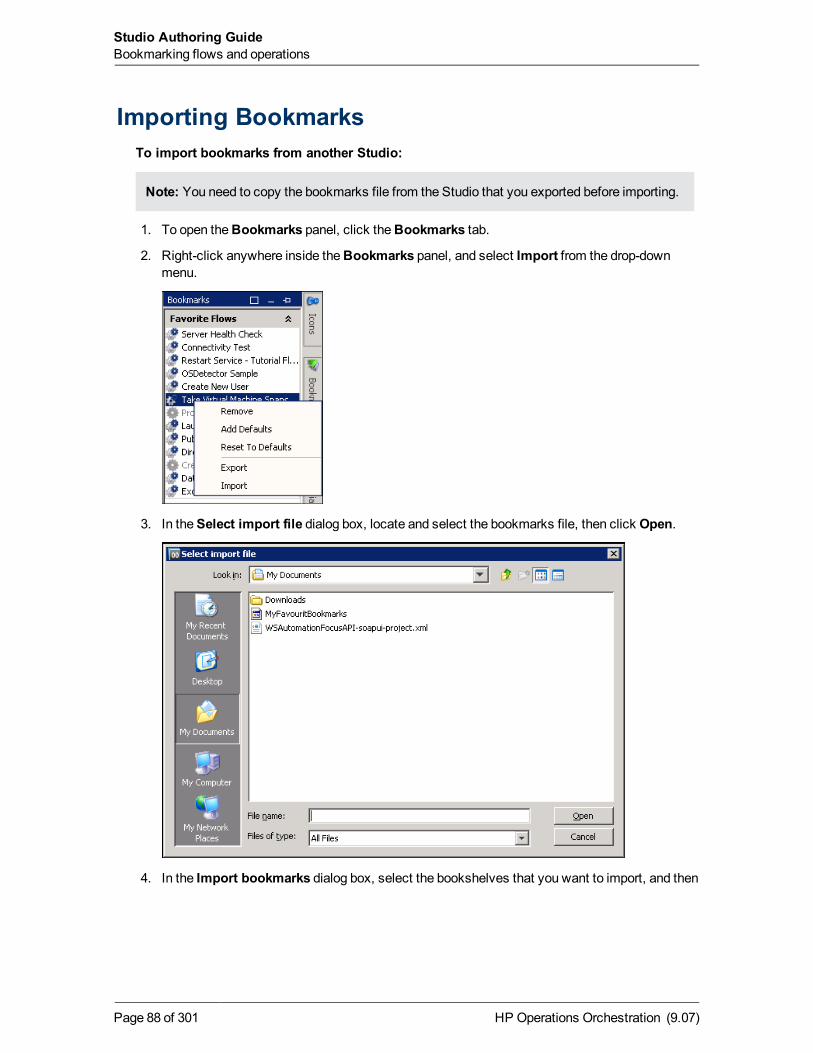
Importing BookmarksTo import bookmarks from another Studio:
Note: You need to copy the bookmarks file from the Studio that you exported before importing.
1. To open theBookmarks panel, click theBookmarks tab.
2. Right-click anywhere inside theBookmarks panel, and select Import from the drop-downmenu.
3. In theSelect import file dialog box, locate and select the bookmarks file, then click Open.
4. In the Import bookmarks dialog box, select the bookshelves that you want to import, and then
HP Operations Orchestration (9.07)Page 88 of 301
Studio Authoring GuideBookmarking flows and operations
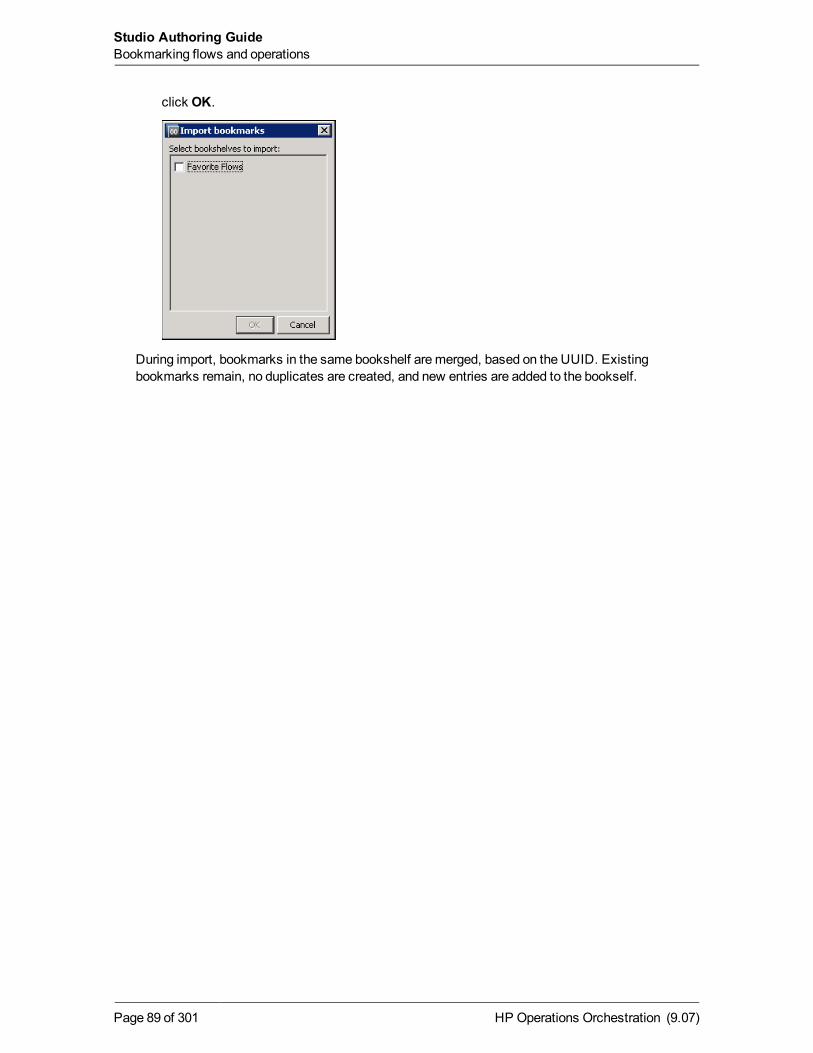
click OK.
During import, bookmarks in the same bookshelf aremerged, based on the UUID. Existingbookmarks remain, no duplicates are created, and new entries are added to the bookself.
HP Operations Orchestration (9.07)Page 89 of 301
Studio Authoring GuideBookmarking flows and operations
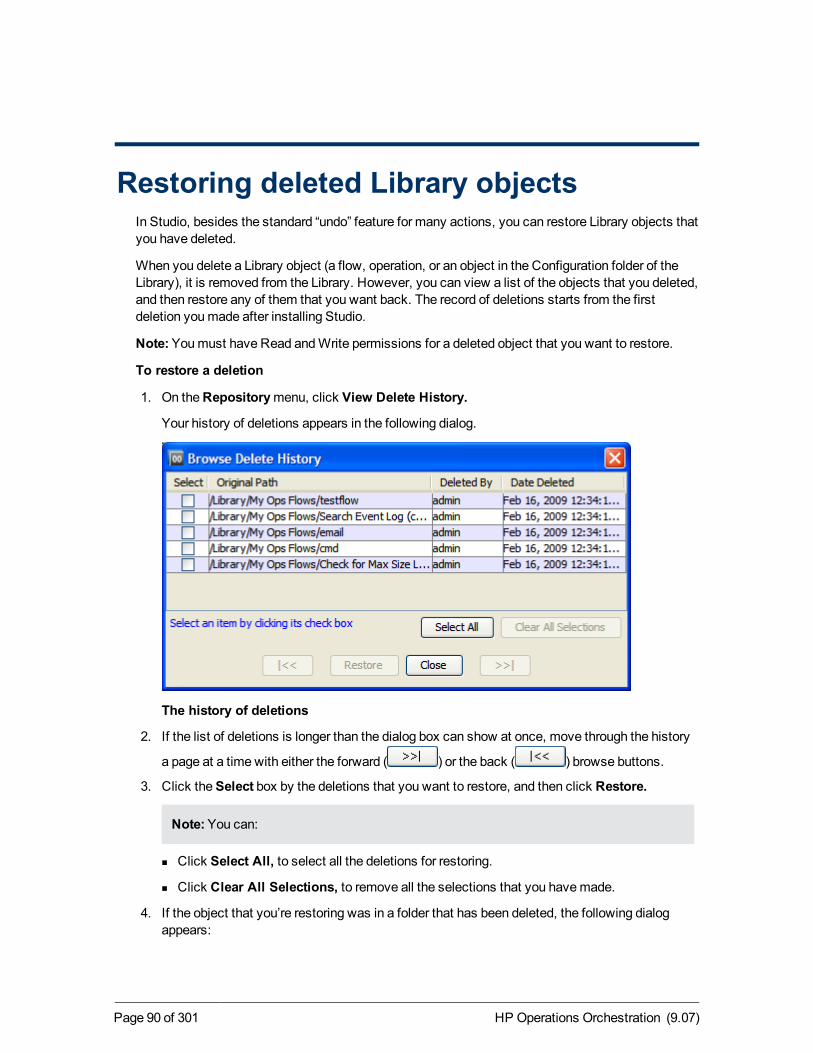
Restoring deleted Library objectsIn Studio, besides the standard “undo” feature for many actions, you can restore Library objects thatyou have deleted.
When you delete a Library object (a flow, operation, or an object in the Configuration folder of theLibrary), it is removed from the Library. However, you can view a list of the objects that you deleted,and then restore any of them that you want back. The record of deletions starts from the firstdeletion youmade after installing Studio.
Note:Youmust have Read andWrite permissions for a deleted object that you want to restore.
To restore a deletion
1. On theRepositorymenu, click View Delete History.
Your history of deletions appears in the following dialog.
The history of deletions
2. If the list of deletions is longer than the dialog box can show at once, move through the history
a page at a time with either the forward ( ) or the back ( ) browse buttons.
3. Click theSelect box by the deletions that you want to restore, and then click Restore.
Note:You can:
n Click Select All, to select all the deletions for restoring.
n Click Clear All Selections, to remove all the selections that you havemade.
4. If the object that you’re restoring was in a folder that has been deleted, the following dialogappears:
HP Operations Orchestration (9.07)Page 90 of 301
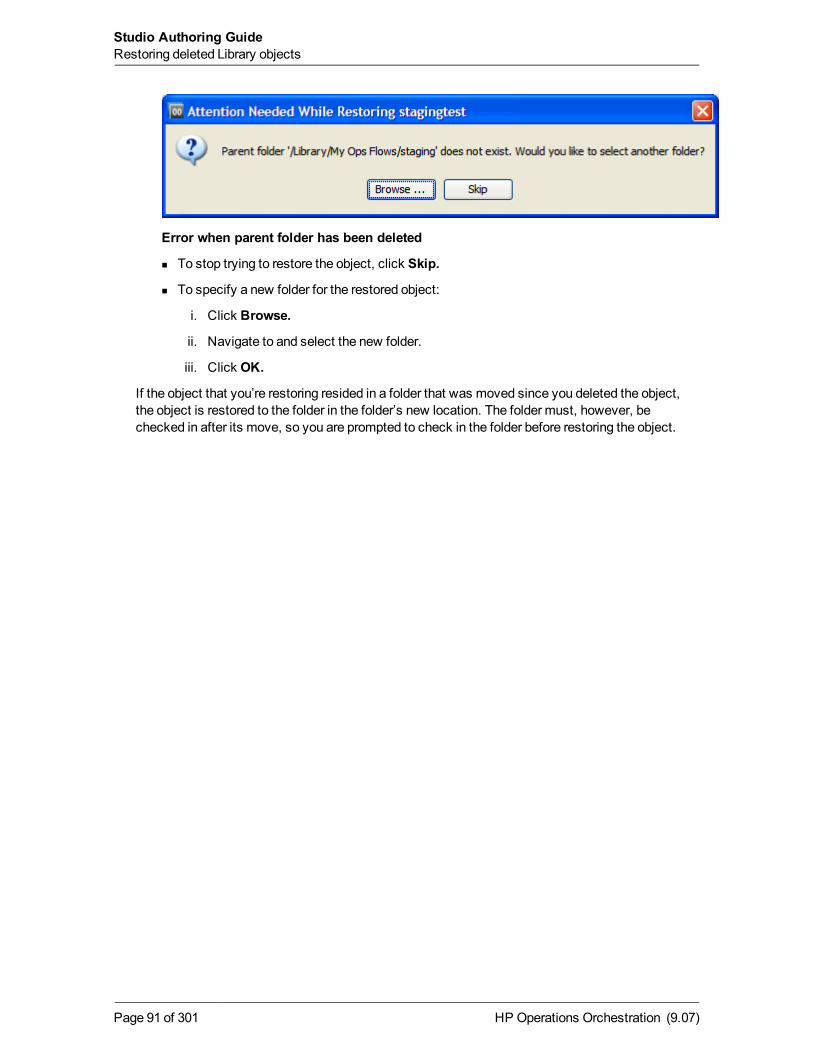
Error when parent folder has been deleted
n To stop trying to restore the object, click Skip.
n To specify a new folder for the restored object:
i. Click Browse.
ii. Navigate to and select the new folder.
iii. Click OK.
If the object that you’re restoring resided in a folder that was moved since you deleted the object,the object is restored to the folder in the folder’s new location. The folder must, however, bechecked in after its move, so you are prompted to check in the folder before restoring the object.
HP Operations Orchestration (9.07)Page 91 of 301
Studio Authoring GuideRestoring deleted Library objects
Creating stepsThere are several simple ways to create a step from an operation or flow (remember that when youcreate a step from a flow the flow is treated as a kind of operation).
When you create a step from an operation, the step is an instance of the operation and so inheritsthe operation’s inputs, results, references, and other characteristics. You can change thoseelements of a step without affecting the operation from which the step was created.
Important!Changing inputs or results in the operation that underlies the step also changes theinputs or results for every step that is an instance of that operation. Making changes to operationscan therefore break any step (and its flow) that was created before you changed the inputs orresults in the operation.
Operations should be generic enough to basemany particular steps on them. Then you canmakechanges in the step to respond to particular situations.
l Adding steps to a flow
l Creating a step from commonly used flows and operations
l Changing the Start Step
l Copying steps
l Modifying a step
l Re-arranging steps in the flow diagram
l Prompting the user before running the step
Adding steps to a flowThe first place to look for operations or flows that you can use tomake a step is the Library foldersthat contain flows and operations in the default content (that is, the flows and operations that wereprovided with the installation). You will usually need tomodify the contents of these folders in orderto use them, but they are sealed, meaning that you can only modify copies of them. Therefore, touse one of these flows and operations, youmake a copy of it, thenmodify and create steps from thecopy.
For information on copying a step, see Copying steps.
The following folders contain default content:
l Accelerator Packs
This folder contains flows designed to solve common IT problems by providing the following onmost networks:
HP Operations Orchestration (9.07)Page 92 of 301
n Complex health checks, triage, diagnosis, or remediation flows.
n Simple flows that gather one or more pieces of data and display it to the user, or simplyacknowledge alerts, gather some data, and place it into a ticket.
The flows at the top level of an Accelerator Pack tend to be full health checks, triage, diagnosis,and remediation.
l Integrations
This folder contains operations and samples for using them that integrate HP OOwith otherenterprise software products, such as Hewlett-Packard Network NodeManager and BMCRemedy. Using thesemay require a creating a custom flow, because of the level ofcustomization typical of enterprise software products that are used in a given datacenter.
l ITIL
This folder contains flows that automate integrations to other Enterprise-level software inaccordance with ITIL specifications.
l Operations
This folder contains general-purpose operations that work with common protocols and softwaresystems, such as LDAP and Linux.
These operations are sealed and cannot be changed. Because you cannot change them, they donot have any static values set for inputs. All inputs either have no assigned value (NoAssignment) or prompt the user for a value. There are exceptions to this rule, such as when avery general purpose operation such as aWMI command is used.
The flows in the Operations folder and its subfolders aremeant to work as subflows. Flows thatyou would want to run as the parent flow are in the Accelerator Packs folder.
l Utility Operations
This folder contains flows and operations that provide low-level functions that can be usedacross nearly the entire spectrum of technologies. These flows and operations providecapabilities such as calculating and filtering date and time, and performingmathematicalmanipulations and comparisons.
Notes:l When you create a step in a flow by dragging a flow from the Library to the current flow
canvas, the flow that you drag becomes a subflow of the flow into which you drag it.
l The step that you create should not be confused with the operation or subflow that the stepis associated with. Steps are particular instances of operations or flows. If you want tomake changes to an operation to create effects that are specific to your flow’s currentneeds, you shouldmake these changes to the step.
For instance, to specify a host machine for the operation to run against, you should specifythe host in an input to the step rather than to the operation. If you were to specify a particularmachine in one of the operation’s inputs, the operation would break any flow that theoperation was part of and that depended on the operation’s running against a differentmachine.
To add a step to a flow
HP Operations Orchestration (9.07)Page 93 of 301
Studio Authoring GuideCreating steps
1. Open a flow (or flows) by right-clicking the flow in the Library and selectingOpen.
2. From any one of the following, drag an operation or flow onto the authoring canvas:
n Repository pane
n Search results
n Bookmarks panel
The first step that you drag to the flow’s canvas automatically becomes the start step of theflow, which is signified by a green outline of the step.
You probably want to rename the step to reflect its function within the flow (operation namesaremore generic than their use in a particular step).
3. To rename the step:
a. In the flow diagram, right-click the step.
b. Click Rename, then type the new name in the highlighted field.
c. Press ENTER.
4. Configure the step as needed:
n Adding and defining data sources for inputs.
For more information, see Inputs: Providing data to operations.
n Adding results, defining and filtering their data sources, and storing their values in flowvariables, and adding responses that determine the next step in the flow.
For more information on these items, seeOutputs, responses, and step results.
n Adding transitions.
For more information, see Transitions: connecting steps.
n (Optional) Set aStep Persistence flag for the step, to make it possible to to restart the flowfrom an intermediary step.
For more information, see Checkpoints: Saving a flow run’s progress for recovery.
In addition to creating a step by dragging an operation or flow onto a flow’s authoring canvas, youcan create a step by copying an existing one. For more information, see Copying steps.
Creating a step from commonly used flowsand operations
The right-click menu facilitates creating steps from some of themost-often-used operations andflows.
To see the lists of these operations and flows, use the following procedure. See what’s there!
To create a step from a Favorite Flow or Common Operation
HP Operations Orchestration (9.07)Page 94 of 301
Studio Authoring GuideCreating steps
1. Open your flow in the flow canvas of Studio.
2. Do one of the following:
n In a blank area of the flow’s authoring canvas:
i. Right-click, point to Insert, and then to either Favorite Flows orCommonOperations.
ii. In themenu that appears, click the operation or flow that you want to add to the flow.
OR
n Click theBookmarks tab and then, in theBookmarks panel that appears, drag a flow fromFavorite Flows or an operation from Common Operations to the flow diagram.
3. Modify the step as needed, and connect it to its preceding and succeeding steps in the flow.
Changing the start stepTo change which step is the start step
l Right-click the step that you want to start the flow and, from the context menu that appears,select Set Start Step.
Copying stepsYou can create a copy of an existing step in the same or a different flow, by copying the step, thenmodify the copy.
Doing so saves some time in defining inputs, and creating filters, results, and other flow objects.
Tip: In addition to the following twomethods, you can also copy a step by holding downCTRLand dragging the step where you want a copy of it.
To copy a step
1. On the canvas, right-click the step and then click Copy.
2. Right-click anywhere on the canvas and click Paste.
To copy a step from one flow to another
1. Open theDesign tab of the flow that has the step you want to copy.
2. Highlight the step, and then copy it using the right-click menu or the standardWindowsaccelerator keys for Copy (CTRL+C).
3. Open theDesign tab of the flow where you want to use the step.
4. Paste the step where you want it.
5. Save your work.
HP Operations Orchestration (9.07)Page 95 of 301
Studio Authoring GuideCreating steps
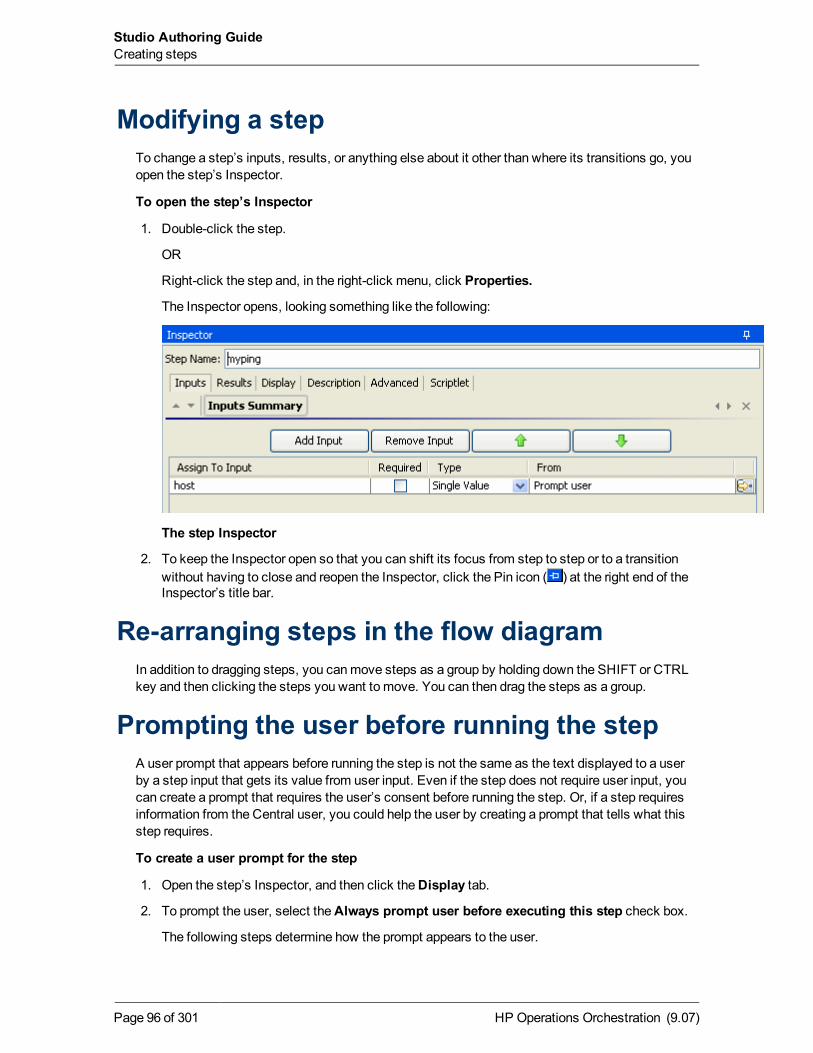
Modifying a stepTo change a step’s inputs, results, or anything else about it other than where its transitions go, youopen the step’s Inspector.
To open the step’s Inspector
1. Double-click the step.
OR
Right-click the step and, in the right-click menu, click Properties.
The Inspector opens, looking something like the following:
The step Inspector
2. To keep the Inspector open so that you can shift its focus from step to step or to a transitionwithout having to close and reopen the Inspector, click the Pin icon ( ) at the right end of theInspector’s title bar.
Re-arranging steps in the flow diagramIn addition to dragging steps, you canmove steps as a group by holding down the SHIFT or CTRLkey and then clicking the steps you want to move. You can then drag the steps as a group.
Prompting the user before running the stepA user prompt that appears before running the step is not the same as the text displayed to a userby a step input that gets its value from user input. Even if the step does not require user input, youcan create a prompt that requires the user’s consent before running the step. Or, if a step requiresinformation from the Central user, you could help the user by creating a prompt that tells what thisstep requires.
To create a user prompt for the step
1. Open the step’s Inspector, and then click theDisplay tab.
2. To prompt the user, select theAlways prompt user before executing this step check box.
The following steps determine how the prompt appears to the user.
HP Operations Orchestration (9.07)Page 96 of 301
Studio Authoring GuideCreating steps
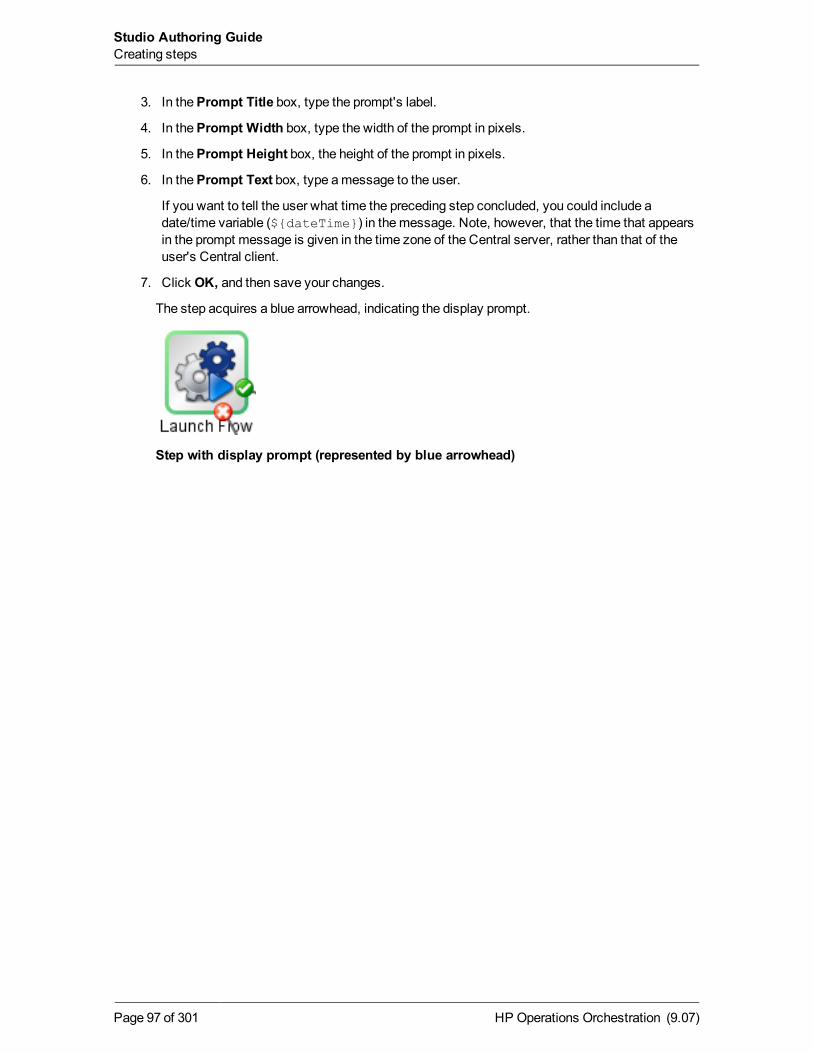
3. In thePrompt Title box, type the prompt's label.
4. In thePrompt Width box, type the width of the prompt in pixels.
5. In thePrompt Height box, the height of the prompt in pixels.
6. In thePrompt Text box, type amessage to the user.
If you want to tell the user what time the preceding step concluded, you could include adate/time variable (${dateTime}) in themessage. Note, however, that the time that appearsin the prompt message is given in the time zone of the Central server, rather than that of theuser's Central client.
7. Click OK, and then save your changes.
The step acquires a blue arrowhead, indicating the display prompt.
Step with display prompt (represented by blue arrowhead)
HP Operations Orchestration (9.07)Page 97 of 301
Studio Authoring GuideCreating steps
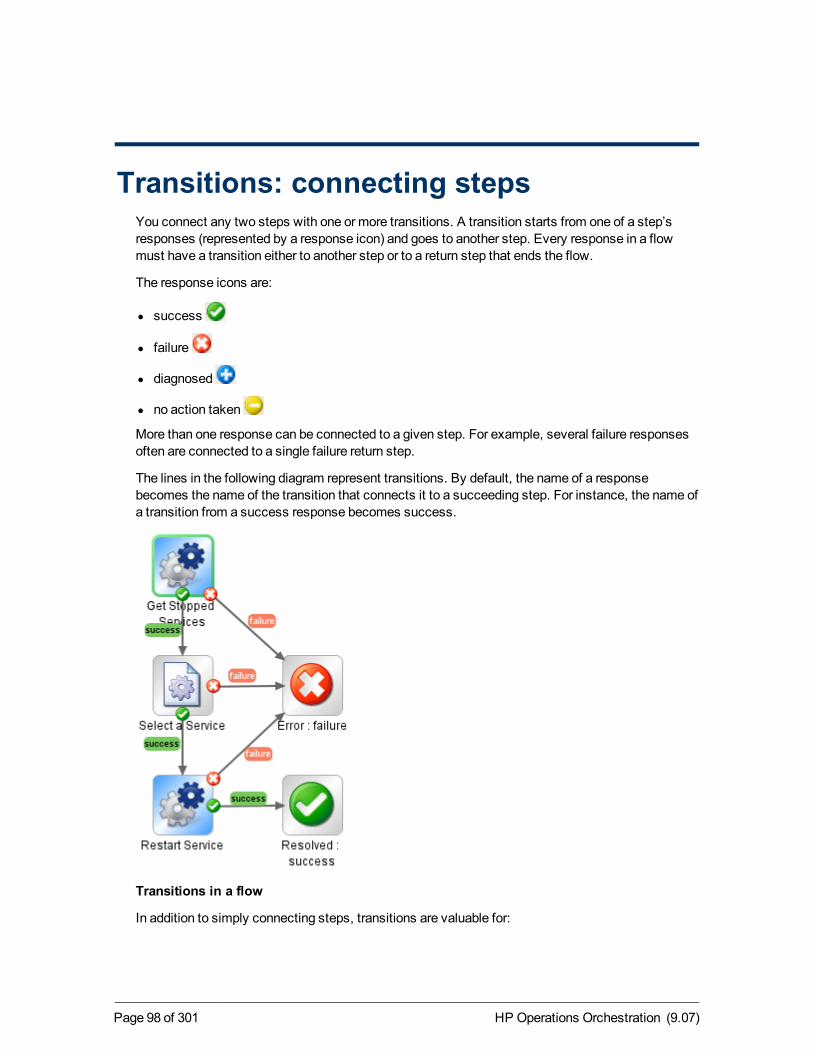
Transitions: connecting stepsYou connect any two steps with one or more transitions. A transition starts from one of a step’sresponses (represented by a response icon) and goes to another step. Every response in a flowmust have a transition either to another step or to a return step that ends the flow.
The response icons are:
l success
l failure
l diagnosed
l no action taken
More than one response can be connected to a given step. For example, several failure responsesoften are connected to a single failure return step.
The lines in the following diagram represent transitions. By default, the name of a responsebecomes the name of the transition that connects it to a succeeding step. For instance, the name ofa transition from a success response becomes success.
Transitions in a flow
In addition to simply connecting steps, transitions are valuable for:
HP Operations Orchestration (9.07)Page 98 of 301
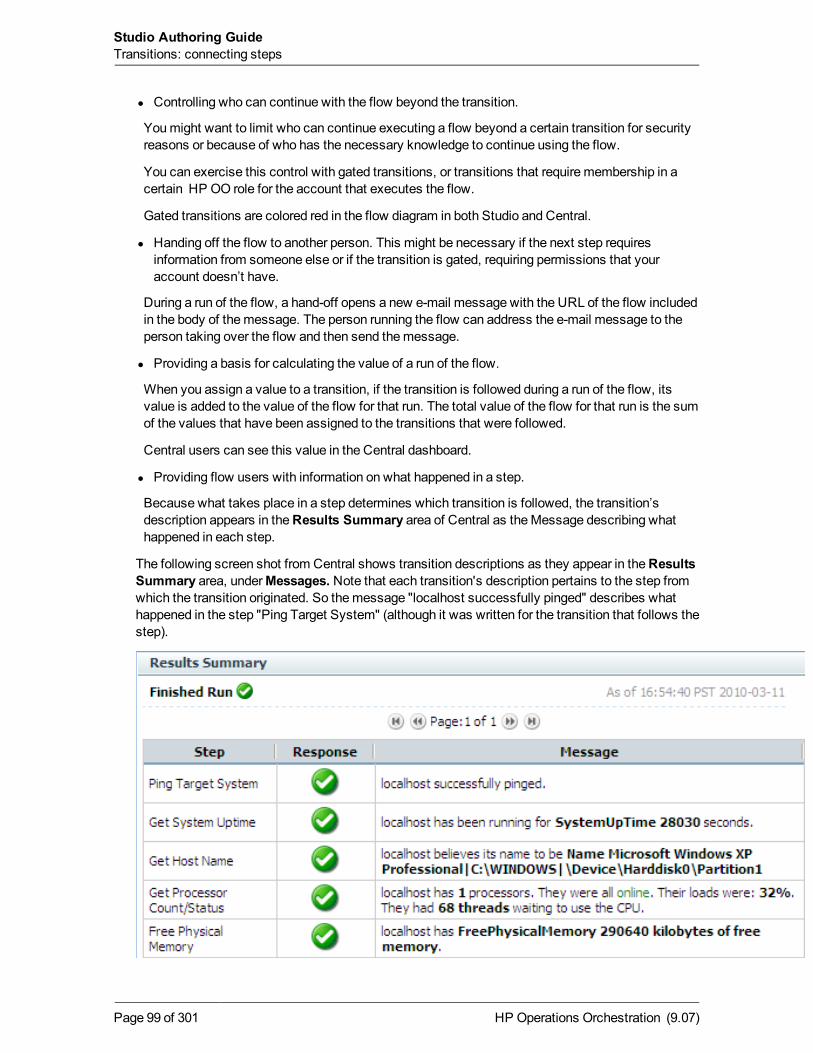
l Controlling who can continue with the flow beyond the transition.
Youmight want to limit who can continue executing a flow beyond a certain transition for securityreasons or because of who has the necessary knowledge to continue using the flow.
You can exercise this control with gated transitions, or transitions that require membership in acertain HP OO role for the account that executes the flow.
Gated transitions are colored red in the flow diagram in both Studio and Central.
l Handing off the flow to another person. This might be necessary if the next step requiresinformation from someone else or if the transition is gated, requiring permissions that youraccount doesn’t have.
During a run of the flow, a hand-off opens a new e-mail message with the URL of the flow includedin the body of themessage. The person running the flow can address the e-mail message to theperson taking over the flow and then send themessage.
l Providing a basis for calculating the value of a run of the flow.
When you assign a value to a transition, if the transition is followed during a run of the flow, itsvalue is added to the value of the flow for that run. The total value of the flow for that run is the sumof the values that have been assigned to the transitions that were followed.
Central users can see this value in the Central dashboard.
l Providing flow users with information on what happened in a step.
Because what takes place in a step determines which transition is followed, the transition’sdescription appears in theResults Summary area of Central as theMessage describing whathappened in each step.
The following screen shot from Central shows transition descriptions as they appear in theResultsSummary area, underMessages. Note that each transition's description pertains to the step fromwhich the transition originated. So themessage "localhost successfully pinged" describes whathappened in the step "Ping Target System" (although it was written for the transition that follows thestep).
HP Operations Orchestration (9.07)Page 99 of 301
Studio Authoring GuideTransitions: connecting steps
Central Results Summary
In the transition description, you can include dynamically changing data that came from the step’soperation or elsewhere in the flow run. You do so by storing the data in a flow variable, then, in thedescription, including a reference to the flow variable. The reference has the format ${flow variablename}.
For example, a step that carries out a ping command can place the host machine’s name into a flowvariable called host. To use this value in the transition description you can reference it with thesyntax ${host}. A description from the success responsemight read “Successfully pinged ${host}.” When this is run in Central against a host named “server1”, the summary description will read“Successfully pinged server1.”
Related topics:
l Adding a transition
l Re-arranging transitions
Adding a transitionThe following procedure assumes that you have created a flow and added at least two steps to it,but not connected them with a transition.
To add a transition
1. Open the flow on the Authoring pane in Studio (inDesign view).
2. On the step that you want to connect to the next step, click either the response name or theicon that represents one of the responses, and drag to the destination step for that response.
The transition that you create is labeled with the response from which it originated.
3. To open the Inspector for the transition, double-click the transition.
OR
Select the transition by single-clicking it or its name, and then click the Inspector tab at thebottom of the flow canvas.
The following is the Inspector for a success transition.
HP Operations Orchestration (9.07)Page 100 of 301
Studio Authoring GuideTransitions: connecting steps
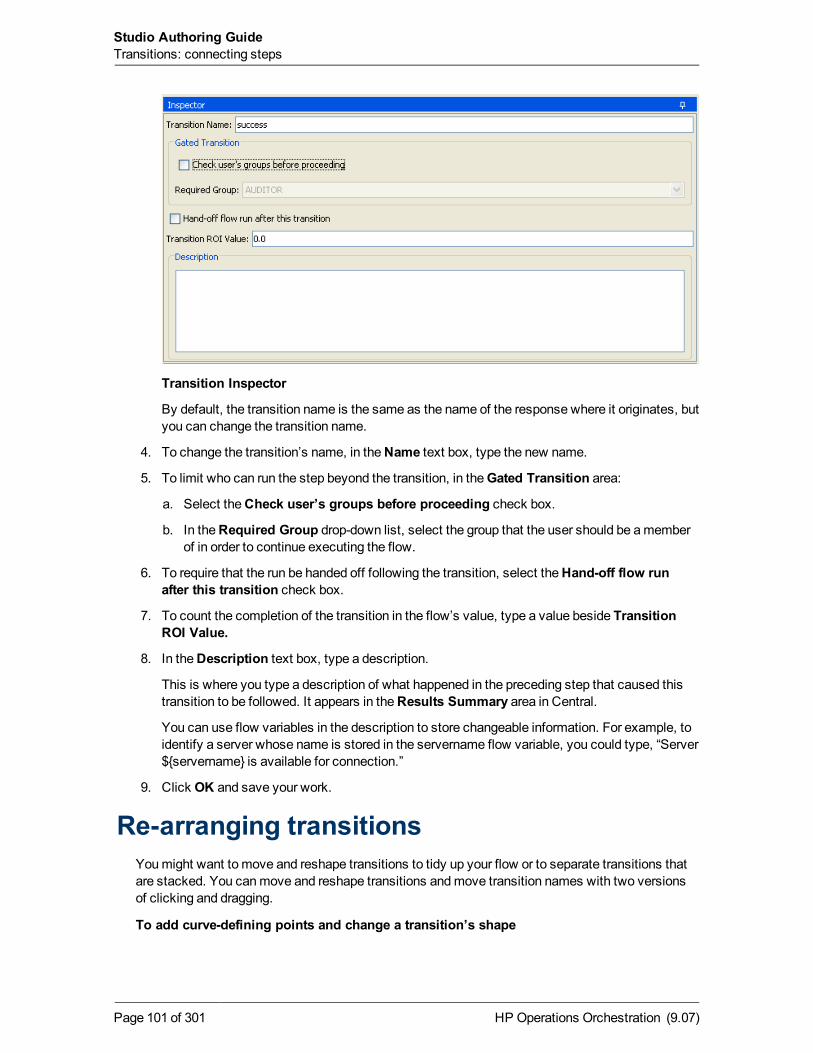
Transition Inspector
By default, the transition name is the same as the name of the response where it originates, butyou can change the transition name.
4. To change the transition’s name, in theName text box, type the new name.
5. To limit who can run the step beyond the transition, in theGated Transition area:
a. Select theCheck user’s groups before proceeding check box.
b. In theRequired Group drop-down list, select the group that the user should be amemberof in order to continue executing the flow.
6. To require that the run be handed off following the transition, select theHand-off flow runafter this transition check box.
7. To count the completion of the transition in the flow’s value, type a value beside TransitionROI Value.
8. In theDescription text box, type a description.
This is where you type a description of what happened in the preceding step that caused thistransition to be followed. It appears in theResults Summary area in Central.
You can use flow variables in the description to store changeable information. For example, toidentify a server whose name is stored in the servername flow variable, you could type, “Server${servername} is available for connection.”
9. Click OK and save your work.
Re-arranging transitionsYoumight want to move and reshape transitions to tidy up your flow or to separate transitions thatare stacked. You canmove and reshape transitions andmove transition names with two versionsof clicking and dragging.
To add curve-defining points and change a transition’s shape
HP Operations Orchestration (9.07)Page 101 of 301
Studio Authoring GuideTransitions: connecting steps
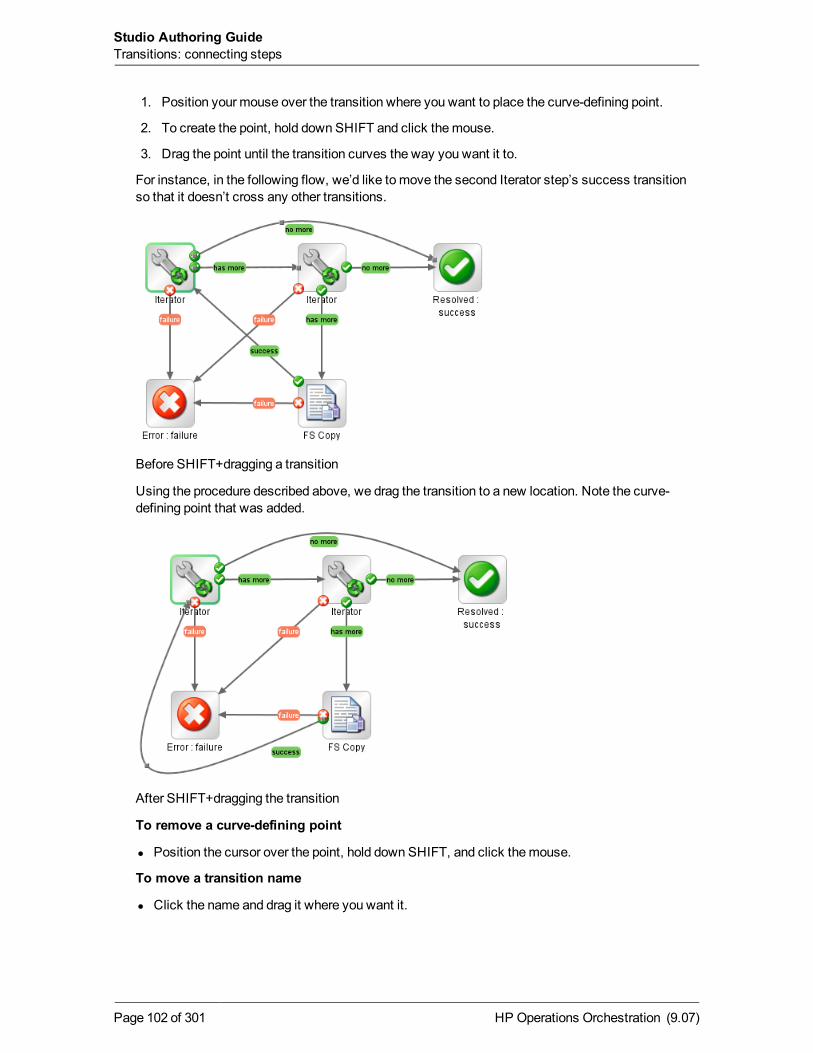
1. Position your mouse over the transition where you want to place the curve-defining point.
2. To create the point, hold down SHIFT and click themouse.
3. Drag the point until the transition curves the way you want it to.
For instance, in the following flow, we’d like tomove the second Iterator step’s success transitionso that it doesn’t cross any other transitions.
Before SHIFT+dragging a transition
Using the procedure described above, we drag the transition to a new location. Note the curve-defining point that was added.
After SHIFT+dragging the transition
To remove a curve-defining point
l Position the cursor over the point, hold down SHIFT, and click themouse.
To move a transition name
l Click the name and drag it where you want it.
HP Operations Orchestration (9.07)Page 102 of 301
Studio Authoring GuideTransitions: connecting steps
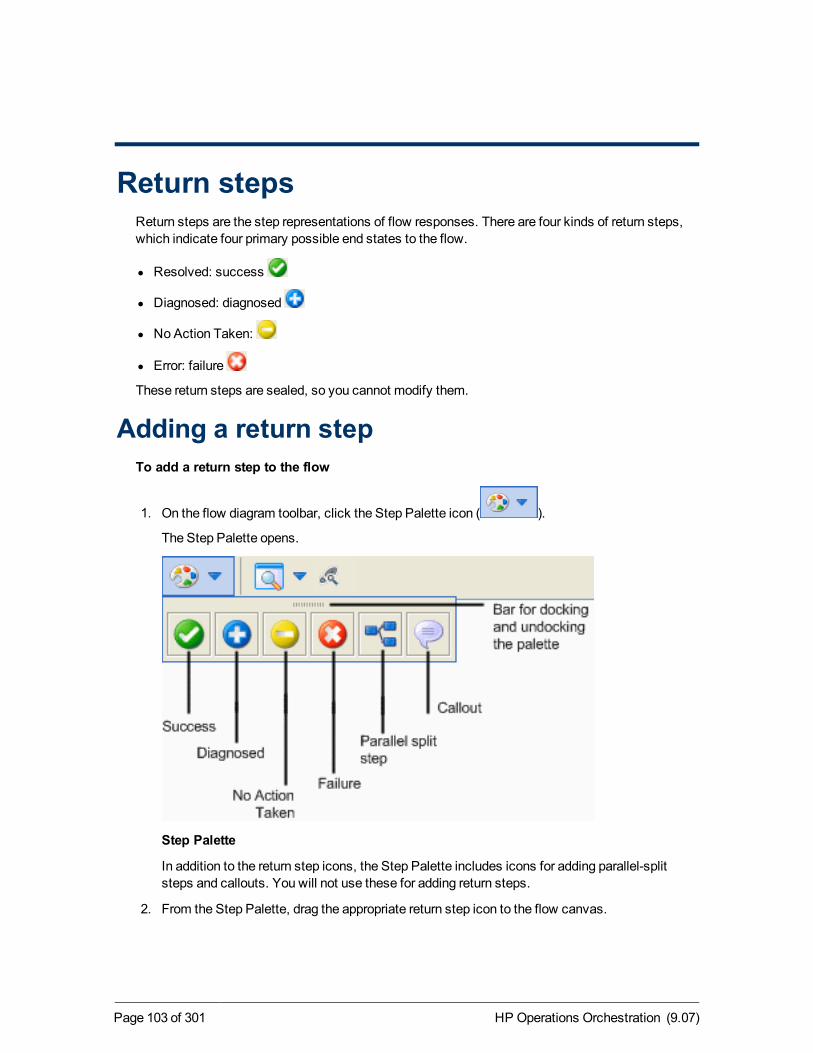
Return stepsReturn steps are the step representations of flow responses. There are four kinds of return steps,which indicate four primary possible end states to the flow.
l Resolved: success
l Diagnosed: diagnosed
l NoAction Taken:
l Error: failure
These return steps are sealed, so you cannot modify them.
Adding a return stepTo add a return step to the flow
1. On the flow diagram toolbar, click the Step Palette icon ( ).
The Step Palette opens.
Step Palette
In addition to the return step icons, the Step Palette includes icons for adding parallel-splitsteps and callouts. You will not use these for adding return steps.
2. From the Step Palette, drag the appropriate return step icon to the flow canvas.
HP Operations Orchestration (9.07)Page 103 of 301
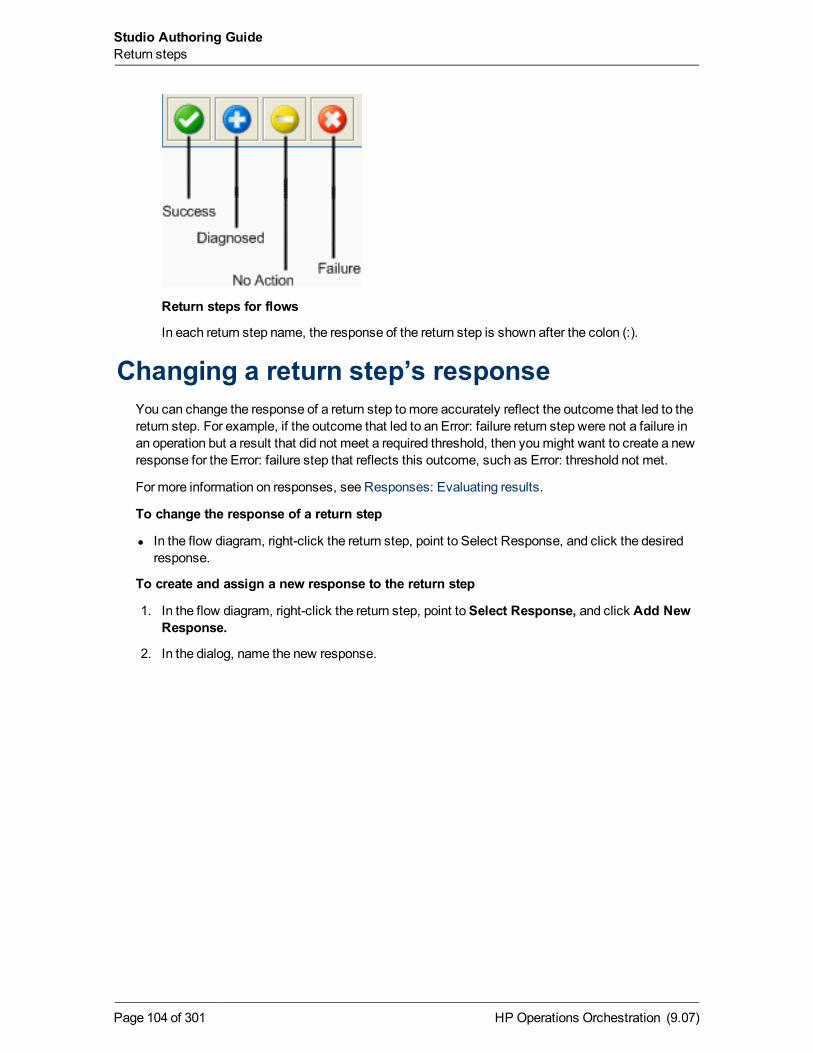
Return steps for flows
In each return step name, the response of the return step is shown after the colon (:).
Changing a return step’s responseYou can change the response of a return step tomore accurately reflect the outcome that led to thereturn step. For example, if the outcome that led to an Error: failure return step were not a failure inan operation but a result that did not meet a required threshold, then youmight want to create a newresponse for the Error: failure step that reflects this outcome, such as Error: threshold not met.
For more information on responses, see Responses: Evaluating results.
To change the response of a return step
l In the flow diagram, right-click the return step, point to Select Response, and click the desiredresponse.
To create and assign a new response to the return step
1. In the flow diagram, right-click the return step, point toSelect Response, and click Add NewResponse.
2. In the dialog, name the new response.
HP Operations Orchestration (9.07)Page 104 of 301
Studio Authoring GuideReturn steps
Inputs: Providing data to operationsInputs are themeans by which you specify how the steps in a flow obtain the data that they need,and when the data is obtained.
For example, in the Network Check flow, the start step’s operation pings a server, so it needs theIP address of the server to ping. You provide the IP address in an input.
You can create an input to supply the IP address:
l On the flow (that is, in the flow’s properties).
You can assign the value of an input to a flow variable, which you can then reference throughoutthe flow. This is recommended for data that is provided from outside the flow.
Flow inputs are very useful for providing data to steps that report data for recording in Centralcharts. (Such steps are typically return steps, which usually get their data from flow variables.You can assign the flow variables their values from flow inputs or step outputs.)
l On the step that is associated with the operation.
A step input supplies its value to the step’s particular application of its operation. As a step input’svalue, you can assign data obtained from earlier steps in the flow.
l On the operation itself.
Operations are the base from which steps aremade, and each step executes the operation fromwhich it is made. Thus, step inputs are created from the inputs of the operation from which the stepwas created. Therefore, data assigned to an operation input can be used in the steps created fromthe operation. However, in a flow, a step’s input provides the value that the operation input uses inthat particular instance. You can change which source a step input gets its value from. Forinstance, an operation input may get its value from flowvariable1. When you create a flow step fromthat operation, you can specify that the step input get its value not from flowvariable1, but fromflowvariable2. Thus, you can tailor the step’s inputs to the needs of a particular flow.
For an example, let’s return to the Network Check flow: The ping operation gets the target IPaddress from the host input (which is defined in the operation as a user prompt). When we create astep in a flow from the operation, we can change the step’s host input data assignment to a specificvalue: the target IP address for that particular flow.
You can assign a flow input’s value to a flow variable and configure a step input to get its value fromthat flow variable. You can also configure alternative data sources (such as a user prompt, aconstant, user credentials) for a step input if the flow variable that is its data source has not beendefined.
If you don’t specify a valid data source for a step input, the default action is for the input to promptthe user for the input. This requires that the user have the information necessary to supply for theflow to do its work. Another limitation is that to run the flow from outside Central, the flow must nothave any inputs that require user input. By default, when you create an input, its data source is setas a flow variable that has the same name as the input. You can, however, configure Studio to not
HP Operations Orchestration (9.07)Page 105 of 301
assign a data source for the input. For information on how to do so, seeMaking the default inputvalue not-assigned.
For other tasks related to inputs, see the following:
l Creating an input
l Specifying how an input gets its value
l Inputs and flow run scheduling
l Removing an input
Creating an inputWhether you create an input on a flow, a step, or an operation, the procedure is essentially thesame.
To create an input
1. Open a flow (or flows) by right-clicking the flow (or flows) in the Library and selectingOpen.
2. To open the flow or operation’s Properties sheet, in theRepository pane, navigate to anddouble-click the flow name and then click theProperties tab at the bottom of the Authoringpane.
OR
To open a step’s Inspector, with the flow open in the authoring pane, double-click the step.
3. In theProperties sheet or Inspector, on the Inputs tab, click Add Input, and then name theinput.
Warning:Do not name the input “service” or “sp”. Doing so can create errors in flow runsin certain situations. For more information, see the HP OOCentral Users’ Guide (Central_UsersGuide.pdf) or the HP OOSDK Guide (SDKGuide.pdf).
Tip: If you type the exact name of a default input that has been removed, the input isrestored. Default inputs are those that were created as part of the operation on which thestep is based. Default inputs that have been removed appear in the list of inputs grayed-out and italicized.
The new input appears in its own row, which in the following illustration is selected.
HP Operations Orchestration (9.07)Page 106 of 301
Studio Authoring GuideInputs: Providing data to operations
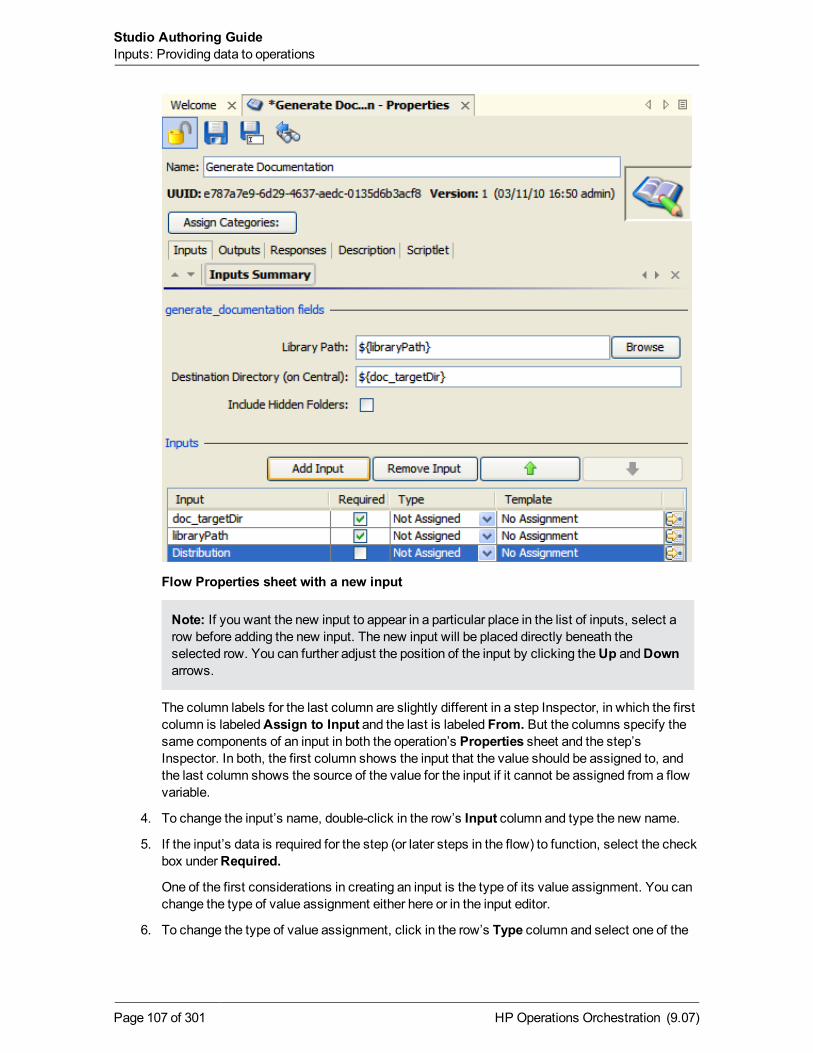
Flow Properties sheet with a new input
Note: If you want the new input to appear in a particular place in the list of inputs, select arow before adding the new input. The new input will be placed directly beneath theselected row. You can further adjust the position of the input by clicking theUp andDownarrows.
The column labels for the last column are slightly different in a step Inspector, in which the firstcolumn is labeledAssign to Input and the last is labeled From. But the columns specify thesame components of an input in both the operation’s Properties sheet and the step’sInspector. In both, the first column shows the input that the value should be assigned to, andthe last column shows the source of the value for the input if it cannot be assigned from a flowvariable.
4. To change the input’s name, double-click in the row’s Input column and type the new name.
5. If the input’s data is required for the step (or later steps in the flow) to function, select the checkbox underRequired.
One of the first considerations in creating an input is the type of its value assignment. You canchange the type of value assignment either here or in the input editor.
6. To change the type of value assignment, click in the row’s Type column and select one of the
HP Operations Orchestration (9.07)Page 107 of 301
Studio Authoring GuideInputs: Providing data to operations
assignment types from the drop-down list:
n Single Value
n List of Values
n Credentials
n Not Assigned
TheNot Assigned type is available in this column only for operations and flows.
You define how the input gets its data and how it behaves otherwise in the input editor.
7. To open the input's editor, click the right-pointing arrow ( ) at the end of the input’s line.
For more information on how to specify the data source of an input, see Specifying how an inputgets its value.
Specifying how an input gets its valueOn the Inputs tab of a flow’s or operation’s Properties sheet or a step’s Inspector, you created aminimal definition of the type of input. If you don’t do anythingmore to define how the input gets itsvalue, the operation or step gets its value either from a flow variable of the same name as the input(if one has a value assigned to it) or, if there is not such a flow variable, from the flow user’sresponse to a user prompt.
However, youmay want to define other ways for the input to get its value. The following flowdesigns require that inputs not get their values from user prompts:
l Running a flow automatically
l Getting credentials from a system account or from the credentials of the user who is logged in onthe system that is running the flow
l Getting the input value from an earlier step’s result or from a flow variable
l Scheduling a flow
l Running a flow from outside Central
On the other hand, your flow may require that your input not have any assigned source of ordestination for its value. For information on specifying that by default there is no value source ordestination assigned to an input, seeMaking the default input value not-assigned.
To define the data source for an input
1. To open the input editor for defining how the input gets its data and how it behaves otherwise,on the Inputs tab, on the line of the input of interest, click the right-pointing arrow ( ).
The input editor looks like the following:
HP Operations Orchestration (9.07)Page 108 of 301
Studio Authoring GuideInputs: Providing data to operations

Input editor
Here as well as on the Inputs tab, you can:
n Change the input’s name and type.
n Make the input required (or not).
There are basically two kinds of values for inputs:
n Values (either single values or lists of values)
n Credentials
2. To select how the input gets its value, from the Input Type list, select one of the following:
n Single Value
n List of Values
Select this input type for an input that provides multiple values to amulti-instance step or aniterator step.
n Credentials
n Not Assigned
Next you specify where the input gets its value.
3. To assign the input’s value from a flow variable, in theAssign from Variable box, select ortype the name of the flow variable or choose the source from the drop-down list, which includesother available sources.
By default, the box contains the name of the input as the name of the flow variable.
OR
To specify explicitly that the input not get its value from a flow variable, select <notassigned>.
HP Operations Orchestration (9.07)Page 109 of 301
Studio Authoring GuideInputs: Providing data to operations
Notes:n You can also specify in this box that the input get its value from a global variable. The
values of global variables aremade available for referencing anywhere in the flow whenits run is initiated.
n When you specify a global variable as the source of the input’s value, a flow variablewith the global variable’s name and value is created and becomes the actual source forthe input’s value. For more information on global variables, seeGlobal variables.
n If you specify a global variable (selection list or system property) and there exists a flowvariable of the same as the global variable, the input gets the value of the flow variable.
n If the Input Type is Not Assigned and you chooseNot Assigned in theAssign fromVariable box, the operation will fail.
n If you assign an input a specific value but leave the input’s name in theAssign fromVariable box, the input tries to obtain its value from a flow variable of the same nameas the input. As a result, a Central user who creates a schedule for the flow can assigna different value (in theScheduler dialog box) to the input. If you do not enable the inputto get its value from a flow variable of the same name, then even if the Central userspecifies a different value for the input’s namewhen scheduling the flow, the scheduledflow run(s) will still use the specific value that you have assigned the input in Studio.
If you selected <not assigned> in theAssign from Variable box, or if the flow variable thatyou specify there doesn’t exist or has no value stored in it, the input gets its value by themeans you select in theOtherwise list box.
You can encrypt the input’s value, so that it appears as a row of asterisks when the flow is runin Central.
4. To encrypt the input’s value, under Input Properties, select theEncrypted check box.
If you want to enter multiple lines of encrypted information, use only copy and paste. When youpaste the information, the new line character is retained. If you typemultiple lines and press theEnter key to start a new line, the dialog box submits the information and does not retain thenew line.
Note:When the input’s assignment is Logged-in User Credentials, its value is alwaysencrypted.
5. Tomake the input required, select theRequired box.
For constant values, user prompts, and using the previous step result, you can record the valueof the input for showing in the history of each run or assigning it as the value of a domain term.Recording the valuemakes it available for diagnostics or auditing.
6. To record the value, in theRecord Under drop-down list box, select one of the following:
n <run history>
n <not recorded>
n One of the domain terms in the list
For more information on recording values, see Recording values for reporting.
HP Operations Orchestration (9.07)Page 110 of 301
Studio Authoring GuideInputs: Providing data to operations
Formore information on domain terms, see Domain terms for Dashboard charting.
You canmake sure that the value fits a certain format, such as e-mail, filename, IP address,alphanumeric, a phone number, etc.
7. To validate the input’s value with a format, in theValidation Format drop-down list, select aformat.
The Input Data Flow andConfiguration sections of the input editor change according to theinput type that you selected.
To specify the data source for the input, use one of the following procedures:
n Creating a single constant input value
n Creating a single input value from what the flow user types
n Creating a single input value from a flow user selection
n Creating a constant list of input values
n Creating an input value list from text the flow user types
n Creating an input value list from flow user selections
n Creating the input’s value from the previous step’s result
n Assigning credentials as the input’s value
8. Tomodify another input without closing the input editor, scroll through the step’s inputs byclicking the up or down arrow ( ) to the left of Inputs Summary.
Creating a single constant input valueTo specify a single constant input value
1. After completing the procedure To define the data source for an input (in the section Specifyinghow an input gets its value), chooseUse Constant in theOtherwise list box.
2. In the 'Otherwise: Use Constant' Configuration section, in theConstant Value box, typethe value for the input.
OR
Type a variable reference, using the following format:
${variablename}
Tip: To specify a null value, after selecting Use Constant in the Otherwise list box, click inthe Constant Value box, but do not type anything.
Creating a single input value from what the flowuser types
To specify a constant input value obtained from user-entered text
HP Operations Orchestration (9.07)Page 111 of 301
Studio Authoring GuideInputs: Providing data to operations
1. When completing the procedure "To define the data source for an input" (in the sectionSpecifying how an input gets its value), chooseSingle Value in the Input Type list box.
2. In theOtherwise list box, select Prompt User.
3. In the ‘Otherwise: Prompt User’ Configuration section, besidePrompt For, select Text.
4. In theUser Message box, type the prompt text that lets the flow user know what kind of data isneeded.
Creating a single input value from a flow userselection
To specify a single input value from the user’s selection from a list
1. When completing the procedure "To define the data source for an input" (in the sectionSpecifying how an input gets its value), chooseSingle Value in the Input Type list box.
2. In theOtherwise list box, select Prompt User.
3. In the ‘Otherwise: Prompt User’ Configuration section, besidePrompt For, selectSelection.
4. In the List Source list box, select one of the following:
n Selection List
This enables you to select from a set of pre-defined lists to present to the user. You can addto the set of pre-defined lists by creating a list. For information on creating a list, seeSelection lists for user prompts.
o In theNamed list box, select the list you want to present to the user.
n Domain Term
Domain terms are specialized selection lists that have certain advantages over manuallycreated selection lists, such as facilitating Dashboard reporting andmore rigorous flowauditing.
For instance, to specify that a flow run against certain classes of servers and not others,you could add domain terms for the various kinds of servers in your system and provide auser prompt in which the user could select the classes of servers that you want to run agiven flow against.
For more information on domain terms, see Domain terms for Dashboard charting.
o In theNamed list box, select the domain term list you want to present to the user.
n Flow Variable
The list presented to the user is populated by the contents of a flow variable.
i. In theNamed list, type or select the flow variable that contains the list.
ii. In theSource Delimiter box, type the character (or characters) that divide theelements of the list from each other.
5. In theUser Message box, type the prompt text that lets the flow user know what kind of datayou need from him/her.
HP Operations Orchestration (9.07)Page 112 of 301
Studio Authoring GuideInputs: Providing data to operations
Creating a constant list of input valuesA list of values for a single input enables you to run an operation against multiple targets. Forinstance, you can use this method with a step configured as amulti-instance step to run anoperating system Health Check or install a software update onmultiple machines.
To specify a constant list of input values
1. When completing the procedure "To define the data source for an input" (in the sectionSpecifying how an input gets its value), choose List of Values in the Input Type list box.
2. Under Input Properties, in the Input Delimiter box, type the character or character sequencethat separates the elements in the list.
3. In theOtherwise list box, select Use Constant.
4. In the ‘Otherwise: Use Constant’ Configuration section, in theConstant Value box, do oneof the following:
n Separating each of the values with the character or character sequence you typed in theInput Delimiter box, type the values for the input to use.
For the operation that uses this input to succeed as you intend it to, the character(s) thatseparate the values in the list must be exactly as you typed it (or them) in the InputDelimiter box, including spaces or the lack of spaces. For example, if the input delimiter isa comma (,) the list “red,blue” is an acceptable list, but “red, blue” is not.
n Type one or more flow variable references, using the following format:
${flowvariablename1}<delimiter>${flowvariablename2}<delimiter>${flowvariablename3}
You can provide the list from a list of flow variable references that each contains lists, or a listof a combination of values and flow variables that contain single values or lists of values. Theonly requirement is that the delimiter used between the list items, whether inside or outside theflow variables, be the delimiter you defined in the Input Delimiter box.
For example, assume that:
n For the input "host", the pipe character (|) is the delimiter
n flowvariableA contains: 10.51.0.5|12.225.8.71
n flowvariableB contains: 220.220.3.9|10.51.110.12
In theConstant Value box, the following would be acceptable:
10.2.0.200|18.35.100.7|${flowvariableA}|${flowvariableB}
In this case, the operation that uses this host input would run on themachines with thefollowing IP addresses:
n 10.2.0.200
n 18.35.100.7
n 10.51.0.5
n 12.225.8.71
HP Operations Orchestration (9.07)Page 113 of 301
Studio Authoring GuideInputs: Providing data to operations
n 220.220.3.9
n 10.51.110.12
For more information on assigning the value of amulti-instance step’s list input to a flow variable,seeMoving data into and out of amulti-instance step.
Creating an input value list from text the flow usertypes
When you prompt the user to type a list of values for the input to use, the user’s list must use thedelimiter specified in the input for separating values.
To specify a constant list of input values obtained from user-typed text
1. When completing the procedure "To define the data source for an input" (in the sectionSpecifying how an input gets its value), choose List of Values in the Input Type list box.
2. Under Input Properties, in the Input Delimiter box, type the character or character sequencethat separates the elements in the list.
3. In theOtherwise list box, select Prompt User.
4. In the ‘Otherwise: Prompt User’ Configuration section, besidePrompt For, select Text.
5. In theUser Message box, type the prompt text that lets the flow user know what kind of datathe operation needs.
Make sure that the prompt text tells the user how to type a successful list, particularly withattention to the delimiter character (or character sequence) that is required. Note particularlythat including a space between list elements when the delimiter character sequence doesn’tspecify one would cause the operation to fail.
Creating an input value list from flow userselections
When you specify that the input is a list value, the list that you present to a user in the user promptis amulti-selection list. This could be handy for, say, enabling a flow user to pick a list of machinesfor the flow to target.
To specify a list of input values from user selections from a list
1. When completing the procedure "To define the data source for an input" (in the sectionSpecifying how an input gets its value), choose List of Values in the Input Type list box.
2. Under Input Properties, in the Input Delimiter box, type the character or character sequencethat separates the elements in the list.
3. In theOtherwise list box, select Prompt User.
4. In the ‘Otherwise: Prompt User’ Configuration section, besidePrompt For, selectSelection.
5. In the List Source list box, select one of the following:
HP Operations Orchestration (9.07)Page 114 of 301
Studio Authoring GuideInputs: Providing data to operations
n Selection List
This enables you to select from a set of pre-defined lists to present to the user. You can addto the set of pre-defined lists by creating a list. For information on creating a list, seeSelection lists for user prompts.
o In theNamed list box, select the list you want to present to the user.
n Domain Term
Domain terms are specialized selection lists that have certain advantages over manuallycreated selection lists, such as facilitating Dashboard reporting andmore rigorous flowauditing.
For instance, to specify that a flow run against certain classes of servers and not others,you could add domain terms for the various kinds of servers in your system and provide auser prompt in which the user could select the classes of servers that you want to run agiven flow against.
For more information on domain terms, see Domain terms for Dashboard charting.
o In theNamed list box, select the domain term list you want to present to the user.
n Flow Variable
The list presented to the user is populated by the contents of a flow variable.
i. In theNamed list, type or select the flow variable that contains the list.
ii. In theSource Delimiter box, type the character (or characters) that divide theelements of the list from each other.
6. In theUser Message box, type the information that the user needs to see in the prompt, suchas:
n What kind of data the flow needs
n In the case of list prompts, whether multiple selections are possible.
Creating the input’s value from the previous step’sresult
The data source is the result of the previous step as modified by any filters you have created on thatstep. There are no details to specify for this data source type.
To specify the previous step’s result as the source of the input value(s)
1. When completing the procedure "To define the data source for an input" (in the sectionSpecifying how an input gets its value), in the Input Type list box, chooseSingle Value orList of Values, depending on whether you want multiple values for the input.
2. In theOtherwise list box, select Use Previous Step Result.
3. If the input value comprises more than one value, then under Input Properties, in the InputDelimiter box, type the character or character sequence that separates the elements in thelist.
HP Operations Orchestration (9.07)Page 115 of 301
Studio Authoring GuideInputs: Providing data to operations
If the input delimiter that you specify does not match the delimiter in the previous step’s result,the operation will fail.
Assigning credentials as the input’s valueBesides a user prompt, you can use the logged-in user’s credentials or a system account to assigna set of credentials to an input’s value.
Logged-in user credentials provide credentials to the operation when the log-in account on which theflow is being run has the required access permissions to perform the flow’s tasks.
A system account is a reference to a set of user credentials. System accounts enable the flow toperform tasks that require account credentials, while protecting the credentials from exposure bykeeping them hidden behind the system account name. For information on creating systemaccounts, see System accounts: secure credentials.
To specify user credentials as the source of the input value
1. When completing the procedure "To define the data source for an input" (in the sectionSpecifying how an input gets its value), in the Input Type list box, chooseCredentials.
2. In theOtherwise list box, select one of the following:
n Prompt User
o If you select Prompt User, then in the ‘Otherwise: Prompt User’ Configurationsection, in theUser Name and Password Message box, type the prompt message forthe user.
n System Account
o If you select System Account, then in the ‘Otherwise: System Account’Configuration section, in theAccount Named list box, select the system account touse for the operation’s credentials.
The input will obtain its value from the appropriate part of the system account as long asthe input abides by the following input-name requirements:
o To assign the input the username portion of the system account, the input must benamed one of the following (note that the case requirement is exact):
username
Username
userName
user
User
o To assign the input the password portion of the system account, the input must benamed one of the following (note that the case requirement is exact):
password
Password
HP Operations Orchestration (9.07)Page 116 of 301
Studio Authoring GuideInputs: Providing data to operations
pass
Pass
n Logged-in User Credentials
The logged-in user is considered to be the user account under which the flow is started.
Making the default input value not-assignedBy default, when you create a new input in an operation or a flow step, the source of the input'svalue is specified as a flow variable of the same name as the input. (If such a variable will not existor will not have a value assigned to it when you run the flow, then in the input editor, you can specifythe alternate source for the input's value.) Some flows may function correctly, however, even if oneor more inputs have not been assigned either values or sources from which to obtain values.
Similarly, by default, Studio assigns the input's value after the operation is complete to a flowvariable that has the same name as the input. Again, your flow may require that the input's value notbe assigned to a flow variable.
You can configure Studio so that its default behavior is to not assign either or both of the source ofthe input's value and the flow variable to which its value is assigned. You do so in theStudio.properties file.
Changing the setting's value from "default" to "not-assigned" results in the default specification intheAssign from Variable orAssign to Variable boxes being not assignedwhen you:
l Add a new input to an operation or flow step
l Create a new step in a flow
l Create a new operation
l Create new operations from aRAS
To control the default value of the Assign from Variable and Assign to Variabledrop-downlist boxes
1. InWindows Explorer, in the HP OO home directory, navigate to the \Studio\conf directory.
2. Open the Studio.properties file for editing.
3. In the file, find the following two lines:
n dharma.studio.ui.inputinspector.assignfrom.selected=default
n dharma.studio.ui.inputinspector.assignto.selected=default
For each setting, the possible values and their effects are:
n default
The default assignment, which is from or to a flow variable of the same name as the input.
n not-assigned
To specify that no value is assigned to or from the input.
4. Change the setting value to result in the behavior you need.
HP Operations Orchestration (9.07)Page 117 of 301
Studio Authoring GuideInputs: Providing data to operations
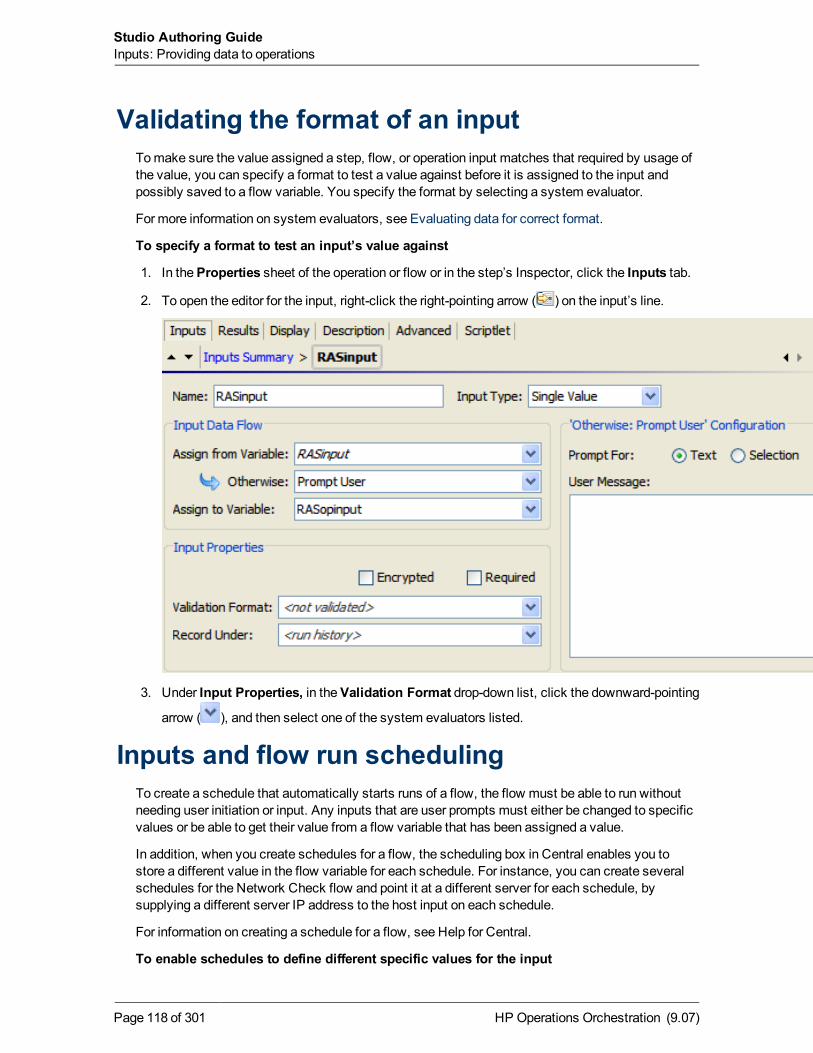
Validating the format of an inputTomake sure the value assigned a step, flow, or operation input matches that required by usage ofthe value, you can specify a format to test a value against before it is assigned to the input andpossibly saved to a flow variable. You specify the format by selecting a system evaluator.
For more information on system evaluators, see Evaluating data for correct format.
To specify a format to test an input’s value against
1. In theProperties sheet of the operation or flow or in the step’s Inspector, click the Inputs tab.
2. To open the editor for the input, right-click the right-pointing arrow ( ) on the input’s line.
3. Under Input Properties, in theValidation Format drop-down list, click the downward-pointing
arrow ( ), and then select one of the system evaluators listed.
Inputs and flow run schedulingTo create a schedule that automatically starts runs of a flow, the flow must be able to run withoutneeding user initiation or input. Any inputs that are user prompts must either be changed to specificvalues or be able to get their value from a flow variable that has been assigned a value.
In addition, when you create schedules for a flow, the scheduling box in Central enables you tostore a different value in the flow variable for each schedule. For instance, you can create severalschedules for the Network Check flow and point it at a different server for each schedule, bysupplying a different server IP address to the host input on each schedule.
For information on creating a schedule for a flow, see Help for Central.
To enable schedules to define different specific values for the input
HP Operations Orchestration (9.07)Page 118 of 301
Studio Authoring GuideInputs: Providing data to operations
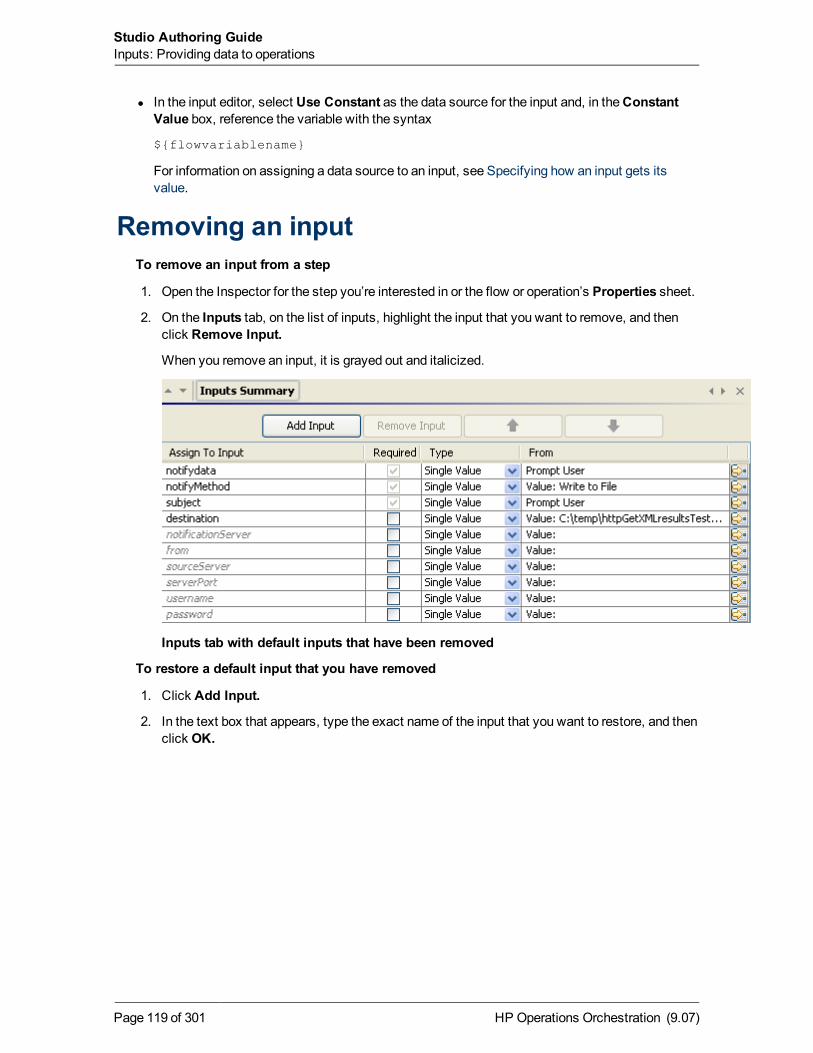
l In the input editor, select Use Constant as the data source for the input and, in theConstantValue box, reference the variable with the syntax
${flowvariablename}
For information on assigning a data source to an input, see Specifying how an input gets itsvalue.
Removing an inputTo remove an input from a step
1. Open the Inspector for the step you’re interested in or the flow or operation’s Properties sheet.
2. On the Inputs tab, on the list of inputs, highlight the input that you want to remove, and thenclick Remove Input.
When you remove an input, it is grayed out and italicized.
Inputs tab with default inputs that have been removed
To restore a default input that you have removed
1. Click Add Input.
2. In the text box that appears, type the exact name of the input that you want to restore, and thenclick OK.
HP Operations Orchestration (9.07)Page 119 of 301
Studio Authoring GuideInputs: Providing data to operations
Flow variables: Making data available forreuse
You can use flow variables tomove data within and between flows. You do so by referencing, inone of the following places, a flow variable containing the data:
l In different steps in a flow or in a different flow from the one in which you created the flowvariable
Once you create a flow variable, you can then reference it (and the data that it stores) in anotherflow, step, or operation input.
l In flow, step, and transition descriptions
For example, the Ping Latency operation filters out the average duration of the ping. A stepassociated with this operation could save the average duration as the flow variable latency, thenthe transition that follows this step could report that value to the user.
l Within a lane in a parallel split step
A lane step can use a flow variable’s value that was written to the flow variable by an earlier stepin the same lane or prior to the parallel split step.
Note, however, a step in one lane cannot use a flow variable’s value that a step in a differentlane wrote to the flow variable.
l As part of the data you are testing with a response rule
To see whether an output string or error string contains a value that you have stored in a flowvariable.
l In scriptlets
Tomake a scriptlet result available outside of the step, the scriptlet must create a flow variable(if the desired one doesn’t already exist), and assign the result to it.
l In operation parameters
If an operation parameter takes a value, you can access that value by referencing a flow variablethat contains it.
Creating and assigning a value to a flowvariable
Creating a step or flow input by default creates a flow variable with the same name that has theinput’s value stored in it. However, you can specify that the input’s value be saved to or that theinput get its value from another flow variable.
HP Operations Orchestration (9.07)Page 120 of 301
You can take advantage of this feature by adding several operations that act on a server and havingthe first operation prompt the user for the server. If you assign the value of the user-prompt input toa flow variable, any subsequent operation that has an input of that namewill automatically use thatserver name (unless you specify a different source for that input).
You can create and assign values to flow variables from operation, step, or flow inputs or results.Themethod for doing each is the same. Naming a flow variable for a value to be assigned to createsthe flow variable as well as specifying that the value be assigned to it.
Note: The procedures in this topic assume a basic knowledge of how to create inputs and stepresults. If you are not familiar with the following concepts, youmight consult the topics linkedin this list.l For information on creating inputs, see Inputs: Providing data to operations.
l For information on creating operation outputs, seeOperation outputs and Filtering outputsand results.
l For information on creating step results, see Step results and Filtering outputs and results.
The first procedure below explains how to assign an input's value to a flow variable. By default, theinput's value is assigned to a flow variable with the same name as the input. However, your flowsmay require that your input not have any assigned destination for its value. For information onspecifying that by default there is no destination assigned to an input's value, seeMaking thedefault input value not-assigned.
To assign an input’s value to a flow variable
1. Open the operation’s or flow’s Properties sheet or the step Inspector.
2. On the Inputs tab, select an input or create a new one.
3. On the input’s row, click the right-pointing arrow ( ).
The input editor opens.
4. In the editor, in theAssign to Variable box, name the variable that you want the valueassigned to.
5. Save your work.
To assign a result to a flow variable
1. Open the operation’s Properties sheet or the step Inspector.
2. On theResults tab, in the row of the result of interest, underAssign To, select FlowVariable.
3. UnderName, specify the name of the flow variable.
4. Under From, specify the source of the value.
5. If necessary, to obtain the precise results you want, create one or more filters the result.
For more information on creating a filter, see Filtering outputs and results.
6. Save your work.
You can also create and assign a value to a flow variable in a Scriptlet-type operation
HP Operations Orchestration (9.07)Page 121 of 301
Studio Authoring GuideFlow variables: Making data available for reuse
To create and assign a value to a flow variable from a scriptlet
l In the scriptlet, include a commandwith the following syntax
scriptletContext.putLocal("<localflowvariablename>", <value>);
where <value> can be a variable or an object created within the scriptlet.
For more information on creating scriptlets, see Scriptlets.
Managing flow variablesOne of themost important aspects of developing flows is tracking the storage of data in flowvariables:
l How the flow uses flow variables tomake data available where it’s needed
l Where the flow variables obtain their data
It can be difficult to discover how a flow variable got the value it has in a particular step. Did a flowinput or an earlier step input pass the flow variable its value? Did an earlier step input pass the flowvariable its value from a different flow variable?Was an earlier step’s result assigned to this flowvariable?
The Flow Variables panel puts answers such as this one in front of you in a tree structure. TheFlow Variables panel shows all the flow variables used in the current flow, listing each flowvariable’s creation and/or usages. Any changes youmake to a flow variable in the flow areautomatically reflected in the Flow Variables panel.
The Flow Variables panel helps you:
l Avoidmismanagement of flow variable names: inadvertently re-using a flow variable namewhere you don’t want to use it, or misnaming it in another flow step where you do want to use it.
l Identify points at which a flow variable’s valuemight be changed.
l Identify which flow variables come from step results or user inputs.
l Quickly review all the usages of the flow variable to make sure that it is being used correctly.
l Locate in the flow diagram a particular usage of a flow variable.
l Open the editor for the input, result, or scriptlet that uses the flow variable.
To examine the Flow Variables panel more closely, let’s take as an example the “How Do I: Iteratethrough a list” flow. The flow assigns each folder name in a list of folders to a flow variable. Youmight want to open the flow in Studio for reference. The flow is in the How Do I flows folder.
For more information, see the topics within this section:
l Flow Variables panel
l Filtering in the Flow Variables panel
l Locating usage of a flow variable in the flow diagram
HP Operations Orchestration (9.07)Page 122 of 301
Studio Authoring GuideFlow variables: Making data available for reuse
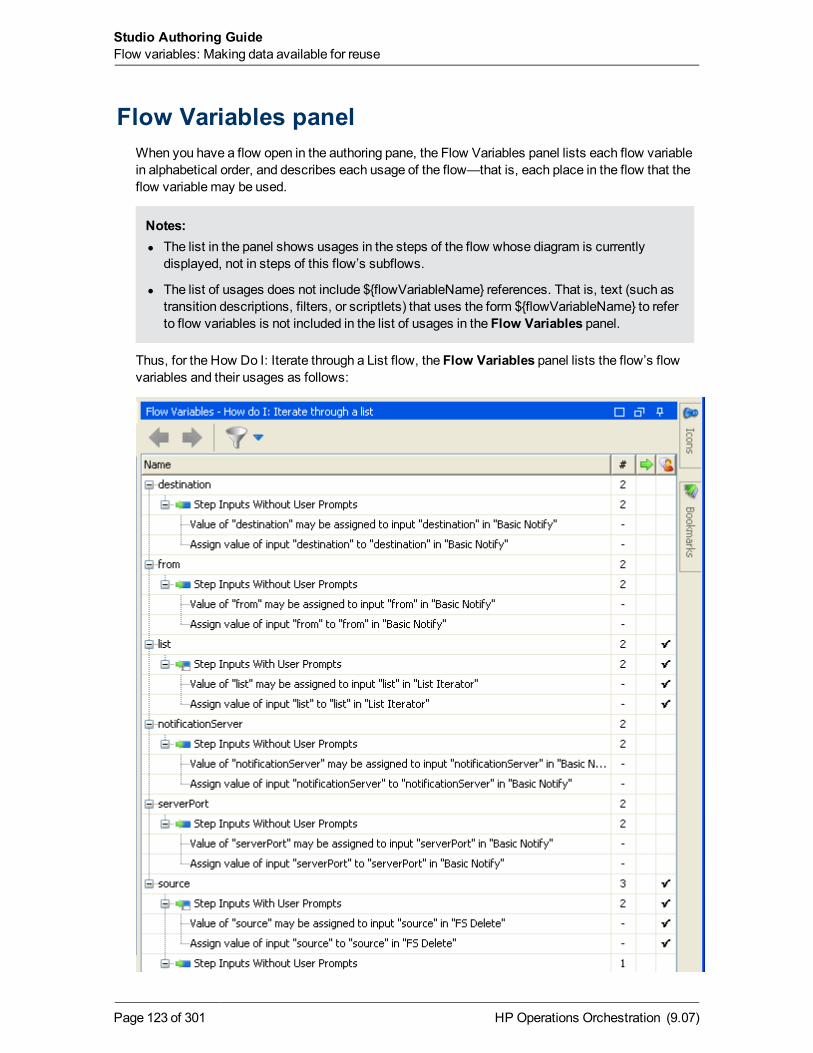
Flow Variables panelWhen you have a flow open in the authoring pane, the Flow Variables panel lists each flow variablein alphabetical order, and describes each usage of the flow—that is, each place in the flow that theflow variable may be used.
Notes:l The list in the panel shows usages in the steps of the flow whose diagram is currently
displayed, not in steps of this flow’s subflows.
l The list of usages does not include ${flowVariableName} references. That is, text (such astransition descriptions, filters, or scriptlets) that uses the form ${flowVariableName} to referto flow variables is not included in the list of usages in the Flow Variables panel.
Thus, for the How Do I: Iterate through a List flow, the Flow Variables panel lists the flow’s flowvariables and their usages as follows:
HP Operations Orchestration (9.07)Page 123 of 301
Studio Authoring GuideFlow variables: Making data available for reuse
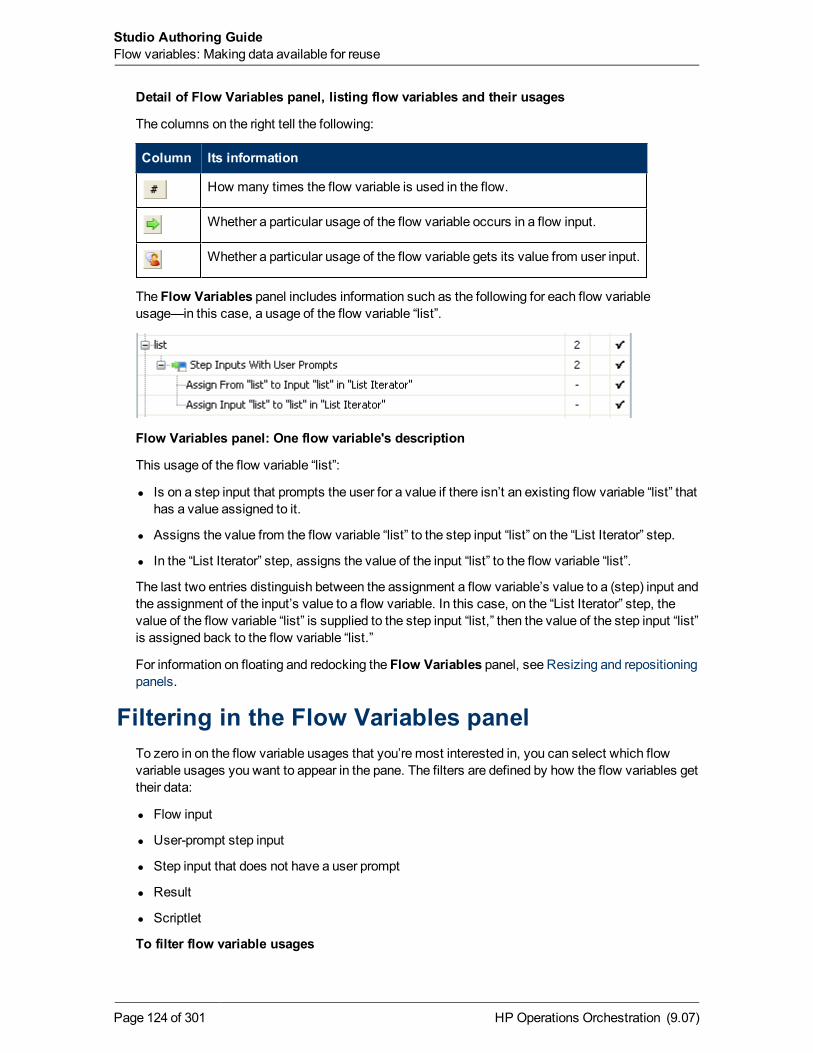
Detail of Flow Variables panel, listing flow variables and their usages
The columns on the right tell the following:
Column Its information
How many times the flow variable is used in the flow.
Whether a particular usage of the flow variable occurs in a flow input.
Whether a particular usage of the flow variable gets its value from user input.
The Flow Variables panel includes information such as the following for each flow variableusage—in this case, a usage of the flow variable “list”.
Flow Variables panel: One flow variable's description
This usage of the flow variable “list”:
l Is on a step input that prompts the user for a value if there isn’t an existing flow variable “list” thathas a value assigned to it.
l Assigns the value from the flow variable “list” to the step input “list” on the “List Iterator” step.
l In the “List Iterator” step, assigns the value of the input “list” to the flow variable “list”.
The last two entries distinguish between the assignment a flow variable’s value to a (step) input andthe assignment of the input’s value to a flow variable. In this case, on the “List Iterator” step, thevalue of the flow variable “list” is supplied to the step input “list,” then the value of the step input “list”is assigned back to the flow variable “list.”
For information on floating and redocking the Flow Variables panel, see Resizing and repositioningpanels.
Filtering in the Flow Variables panelTo zero in on the flow variable usages that you’re most interested in, you can select which flowvariable usages you want to appear in the pane. The filters are defined by how the flow variables gettheir data:
l Flow input
l User-prompt step input
l Step input that does not have a user prompt
l Result
l Scriptlet
To filter flow variable usages
HP Operations Orchestration (9.07)Page 124 of 301
Studio Authoring GuideFlow variables: Making data available for reuse
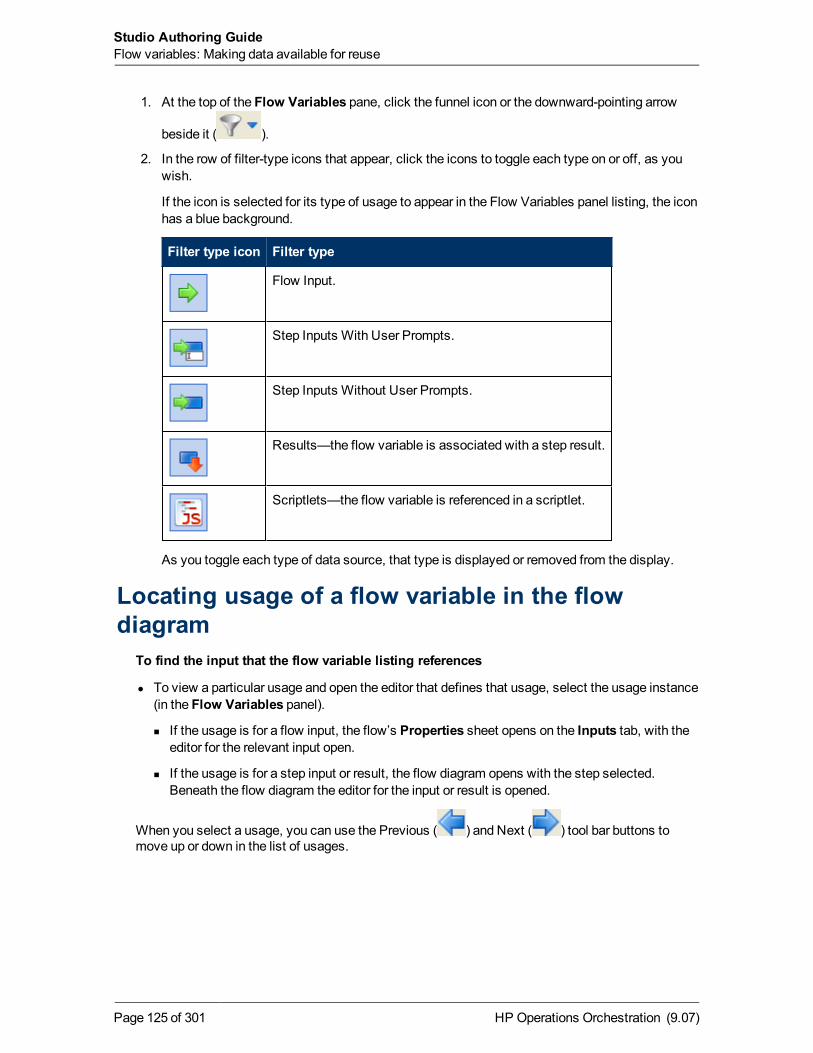
1. At the top of the Flow Variables pane, click the funnel icon or the downward-pointing arrow
beside it ( ).
2. In the row of filter-type icons that appear, click the icons to toggle each type on or off, as youwish.
If the icon is selected for its type of usage to appear in the Flow Variables panel listing, the iconhas a blue background.
Filter type icon Filter type
Flow Input.
Step Inputs With User Prompts.
Step Inputs Without User Prompts.
Results—the flow variable is associated with a step result.
Scriptlets—the flow variable is referenced in a scriptlet.
As you toggle each type of data source, that type is displayed or removed from the display.
Locating usage of a flow variable in the flowdiagram
To find the input that the flow variable listing references
l To view a particular usage and open the editor that defines that usage, select the usage instance(in the Flow Variables panel).
n If the usage is for a flow input, the flow’s Properties sheet opens on the Inputs tab, with theeditor for the relevant input open.
n If the usage is for a step input or result, the flow diagram opens with the step selected.Beneath the flow diagram the editor for the input or result is opened.
When you select a usage, you can use the Previous ( ) and Next ( ) tool bar buttons tomove up or down in the list of usages.
HP Operations Orchestration (9.07)Page 125 of 301
Studio Authoring GuideFlow variables: Making data available for reuse

Global variablesGlobal variables are keyname-and-value pairs that are part of the global context, and so are alwaysavailable for use or reference in any flow run. (By contrast, a flow variable is part of the localcontext, and so can be used only in a run of the flow in which it was created.)
If a flow variable and a global variable have the same name, then a reference to that variable name,either for assigning a value to it or for getting its value, accesses the (local) flow variable of thatname, not the global variable.
For example, there is a global variable namedHost Type. Suppose that in a flow you create a flowvariable also namedHost Type, then assign the value “local host” to Host Type. Suppose then thatlater in the flow a Notify step displays the value of Host Type to the user. The value that isdisplayed will be “local host”.
When you specify that an input get its value from a global variable, a flow variable is created thathas the value of the global variable, and then the value is supplied from the flow variable to theinput.
By default, the global variables are the contents of the Selection Lists folder. If you create a systemproperty (stored in the System Properties folder) the system property is stored as a global variable.For information on creating system properties, see System properties.
Tip: To view all the global variables, debug a flow. The global variables (as well as the flowvariables) and their current values are listed in the Context Inspector. (For more information onthe Context Inspector, see Debugging a flow.)
Obtaining or changing the values of globalvariables
Important:Before you change the value of a global variable, remember this: Global variablesare available in any run of any flow. Therefore, changing the value of a global variable can breakany flow or operation that uses that global variable’s value.
There are a number of ways to obtain or change global variables and their values:
l In property, step, or flow inputs.
For information on the effect of assigning an input’s value from or to a global variable, see Inputs:Providing data to operations.
l The values of the global variables that are selection lists and system properties can beaccessed as such. (For more information, see Selection lists for user prompts and Systemproperties.)
HP Operations Orchestration (9.07)Page 126 of 301

l You can view the values of global variables at each step in a flow by debugging the flow.
You can also change values of global variables by using scriptlets.
For the syntax for using scriptletcontext.putGlobal(), on the Scriptlet tab of an operation or step,insert the JavaScript template. For information on using scriptlets, see Scriptlets and its subtopics.
HP Operations Orchestration (9.07)Page 127 of 301
Studio Authoring GuideGlobal variables
Concurrent execution: Running severalthreads at the same time
Within a flow, you can enable concurrent execution, also called parallel execution. Let’s look atwhat this canmean for you in a few scenarios:
l To diagnose a problem, you need to run health checks against a database server, an applicationserver, a web server, and a router. You could find your diagnosis muchmore quickly if you couldrun the four health checks simultaneously.
l You have a software upgrade to install on 100 servers. If you could install it on 25 serverssimultaneously, you could upgrade all the servers in a quarter of the time it would take toupgrade them all one at a time.
l One of the steps in a diagnostic flow creates a trouble ticket or creates and sends an e-mail. Itwould speed up resolution if the flow could keep running with subsequent steps while the onestep is creating the ticket or e-mail.
HP OO provides multiple ways to achieve such parallel execution.
l To run entire flows in parallel, you can do either of the following:
n On the Schedule tab in Central, schedule simultaneous runs of a flow.
n Specify parallel automatic runs of a flow by a URL.
l Within a flow, you can use a step that has concurrent processing.
The three kinds of steps that have concurrent processing are:
n Parallel split step, in which one step contains several series of steps that executesimultaneously.
Parallel split steps are intended for performing dissimilar and separate series of steps at once.Each series of steps is called and represented visually in the flow diagram as a lane. Thesteps contained in each lane are called lane steps. The lane’s series of lane steps aremuchlike a subflow and youmight think of them as such, but in several respects, includingmovement of data into and out of them, they are very different from a subflow or flow.
In the scenario in which you want to run several different kinds of health checkssimultaneously, you could create a parallel split step with four lanes. In one lane, you wouldcreate the lane steps necessary to run a health check on the database server; in the next thesteps necessary to run a health check on the application server, and so forth.
For more information, see Parallel split steps.
n Multi-instance step, which executes simultaneously with multiple members of a list providedfor a value in an input of the step’s operation. You can throttle amulti-instance step, whichmeans limiting how many values it can process at once.
HP Operations Orchestration (9.07)Page 128 of 301
In the example of upgradingmany servers at once, let’s assume that you have a step that isassociated with the subflow that performs the upgrade and that this step takes the targetinput that specifies which server the subflow runs against. You could turn this step into amulti-instance step and supply it with a list of the servers you want the subflow to upgrade.The step would then run the check against all those servers simultaneously.
If running the subflow against toomany target servers simultaneously would bog down yourinfrastructure, you could throttle themulti-instance step by specifying that it would onlyprocess, say, 25 target inputs at once.
For more information, seeMulti-instance steps.
n Nonblocking step, which allows the flow to continue with subsequent steps while thenonblocking step is still executing.
In the case of a step that opens a trouble ticket, you couldmake the step a nonblocking step,thus allowing the flow to proceed while the step creates the ticket.
For more information, seeMaking steps nonblocking.
Parallel split stepsA parallel split step is a set of step sequences that are carried out simultaneously. Each sequenceis called a lane, and the steps within the lane are called lane steps. The collection of flow variablesfor a lane is collectively called the lane context.
Parallel split steps are best used for doing dissimilar things simultaneously and independently ofeach other. Note the contrast with multi-instance steps, whose instances do the same thing withmultiple variations of a single input.
For example, youmight use a parallel split step for installing a patch and sending e-mail about theinstallation to the appropriate person in IT:
l One lane could include a stepmade from a flow that installs the patch.
l The other lane could send the e-mail.
When working with parallel split steps, also keep the following inmind:
l Data cannot be exchanged between lanes, because the steps in each lane only have the valuesthat were available when the parallel split step (all its lanes) started.
l There is only one output/response for a parallel split step: All the lanes have completed.
l If steps in two lanes write to a single flow variable, the value that the last lane to complete writesis the value that remains in the flow variable after the parallel split step has completed. Note thatthis is not necessarily the same as the value of the last write operation to complete.
For example, suppose the following events take place in the following order:
a. In Lane A, step A1 passes “42” to threshold.
b. In Lane B, step B2 passes “34” to threshold.
c. Lane B completes.
d. Lane A completes.
HP Operations Orchestration (9.07)Page 129 of 301
Studio Authoring GuideConcurrent execution: Running several threads at the same time
The value in threshold would be “42”, even though step B2 passed its value (“34”) to threshold afterstep A1 passed its value (“42”) to threshold.
l For parallel split steps, permissions for execution of flows and operations and for use of otherelements (such as system accounts) are determined by the permissions granted for the parentflow.
l Gated transitions in lanes can’t be handed off. If the user does not have the required groupmembership, the run fails, with an error message that tells the user that he or she is not amember of the required group.
l Similarly, transitions in lanes cannot be configured as handoffs.
l Parallel split steps and their lane steps are all checkpointed, and you cannot remove thecheckpoints. This means that if a run is interrupted while the parallel split step is running, thenwhen you restore the run, it is restored to the point just before the parallel split step started. Formore information on checkpoints, see Checkpoints: Saving a flow run’s progress for recovery.
This section includes topics on:
l Starting and finishing lane order
l Creating parallel split steps
l Moving or copying parallel split steps and their components
l Adding a lane
l Duplicating a lane
l Deleting a lane
l Resizing a lane
l Renaming a lane
l Changing a lane’s start step
l Moving data into and out of a parallel step
l Debugging a parallel split step
Lane order: starting and finishingLanes start and run simultaneously in Central, but are executed as a series in the debugger. Youcannot control the order in which lanes are run in the debugger, but by giving them unique names,you can see the order in which they ran.
Creating parallel split stepsWhen you create parallel split steps, keep the following inmind:
l You cannot pass data between lanes (the order in which steps in any two lanes are carried outrelative to each other cannot be controlled or predicted).
l A parallel split step has only one response: Success, whichmeans that all the lanes havecompleted.
HP Operations Orchestration (9.07)Page 130 of 301
Studio Authoring GuideConcurrent execution: Running several threads at the same time
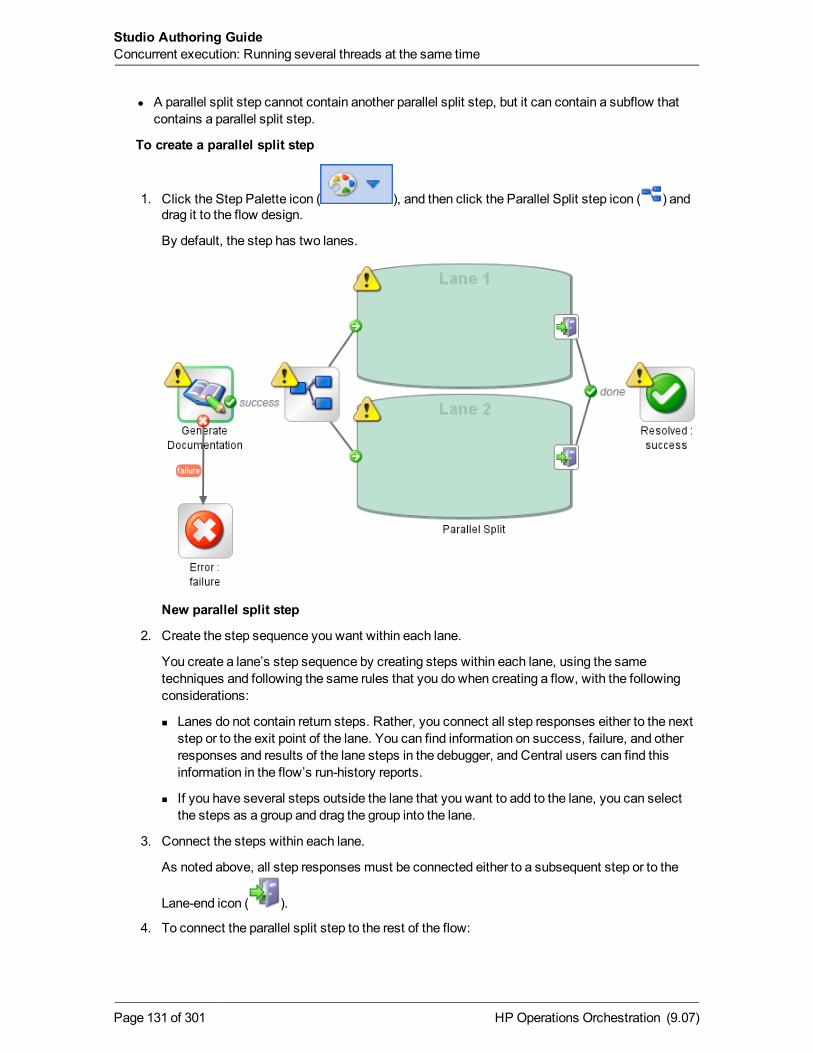
l A parallel split step cannot contain another parallel split step, but it can contain a subflow thatcontains a parallel split step.
To create a parallel split step
1. Click the Step Palette icon ( ), and then click the Parallel Split step icon ( ) anddrag it to the flow design.
By default, the step has two lanes.
New parallel split step
2. Create the step sequence you want within each lane.
You create a lane’s step sequence by creating steps within each lane, using the sametechniques and following the same rules that you do when creating a flow, with the followingconsiderations:
n Lanes do not contain return steps. Rather, you connect all step responses either to the nextstep or to the exit point of the lane. You can find information on success, failure, and otherresponses and results of the lane steps in the debugger, and Central users can find thisinformation in the flow’s run-history reports.
n If you have several steps outside the lane that you want to add to the lane, you can selectthe steps as a group and drag the group into the lane.
3. Connect the steps within each lane.
As noted above, all step responses must be connected either to a subsequent step or to the
Lane-end icon ( ).
4. To connect the parallel split step to the rest of the flow:
HP Operations Orchestration (9.07)Page 131 of 301
Studio Authoring GuideConcurrent execution: Running several threads at the same time
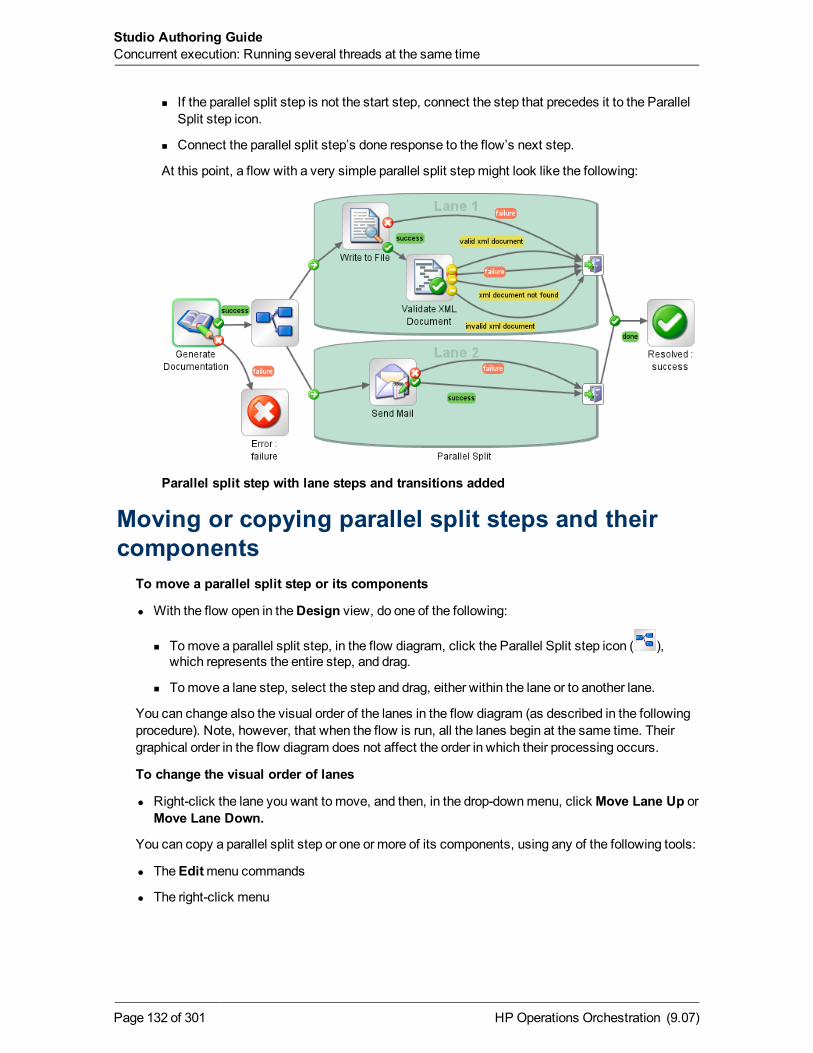
n If the parallel split step is not the start step, connect the step that precedes it to the ParallelSplit step icon.
n Connect the parallel split step’s done response to the flow’s next step.
At this point, a flow with a very simple parallel split stepmight look like the following:
Parallel split step with lane steps and transitions added
Moving or copying parallel split steps and theircomponents
To move a parallel split step or its components
l With the flow open in theDesign view, do one of the following:
n Tomove a parallel split step, in the flow diagram, click the Parallel Split step icon ( ),which represents the entire step, and drag.
n Tomove a lane step, select the step and drag, either within the lane or to another lane.
You can change also the visual order of the lanes in the flow diagram (as described in the followingprocedure). Note, however, that when the flow is run, all the lanes begin at the same time. Theirgraphical order in the flow diagram does not affect the order in which their processing occurs.
To change the visual order of lanes
l Right-click the lane you want to move, and then, in the drop-downmenu, click Move Lane Up orMove Lane Down.
You can copy a parallel split step or one or more of its components, using any of the following tools:
l TheEditmenu commands
l The right-click menu
HP Operations Orchestration (9.07)Page 132 of 301
Studio Authoring GuideConcurrent execution: Running several threads at the same time
l Keyboard combinations (CTRL+C, CTRL+V)
l The copy ( ) and paste ( ) icons on the Authoring pane toolbar.
The following procedure describes using theEditmenu.
To copy a parallel split step or its components
1. With the flow open in theDesign view, select the element(s) you want to copy.
To copy the entire parallel split step, right-click the Parallel Split step icon ( ).
2. On theEditmenu, click Copy and thenPaste.
If you copy a lane, do not place the cursor outside the lane when you carry out thePastecommand.
Adding a laneTo add a new lane
l Right-click in an existing lane, and then, from the drop-downmenu, click Add Lane.
The new, empty lane is added below the currently selected lane.
Duplicating a laneTo duplicate a lane
l Right-click in a lane, and then, in the drop-downmenu, click Duplicate Lane.
A new, empty lane with the same title as the one you copied appears directly below it.
Deleting a laneYou can delete a parallel split lane using any of the following tools:
l Editmenu commands
l Right-click menu
l The keyboard combination CTRL+X
l The Remove icon ( ) or Cut icon ( ) on the Authoring pane toolbar.
The following procedure describes using theEditmenu:
To delete a lane
Select the lane and then, on the Edit menu, click Cut.
Resizing a laneTo resize a lane
HP Operations Orchestration (9.07)Page 133 of 301
Studio Authoring GuideConcurrent execution: Running several threads at the same time
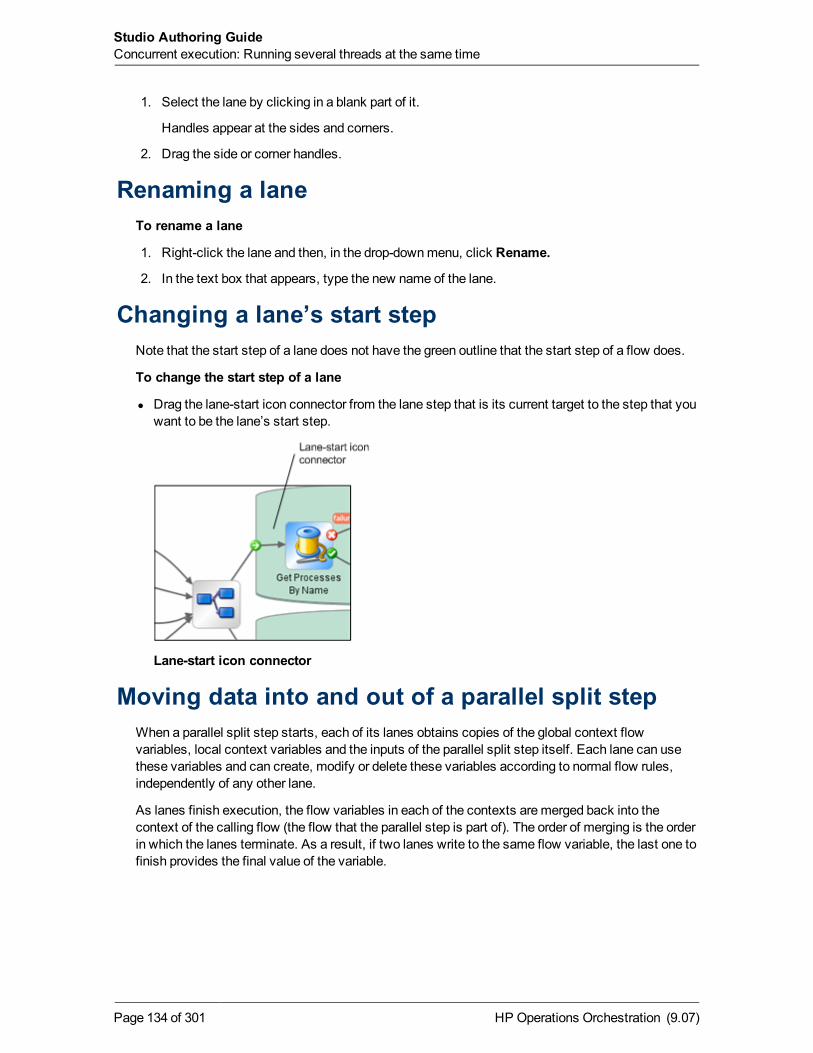
1. Select the lane by clicking in a blank part of it.
Handles appear at the sides and corners.
2. Drag the side or corner handles.
Renaming a laneTo rename a lane
1. Right-click the lane and then, in the drop-downmenu, click Rename.
2. In the text box that appears, type the new name of the lane.
Changing a lane’s start stepNote that the start step of a lane does not have the green outline that the start step of a flow does.
To change the start step of a lane
l Drag the lane-start icon connector from the lane step that is its current target to the step that youwant to be the lane’s start step.
Lane-start icon connector
Moving data into and out of a parallel split stepWhen a parallel split step starts, each of its lanes obtains copies of the global context flowvariables, local context variables and the inputs of the parallel split step itself. Each lane can usethese variables and can create, modify or delete these variables according to normal flow rules,independently of any other lane.
As lanes finish execution, the flow variables in each of the contexts aremerged back into thecontext of the calling flow (the flow that the parallel step is part of). The order of merging is the orderin which the lanes terminate. As a result, if two lanes write to the same flow variable, the last one tofinish provides the final value of the variable.
HP Operations Orchestration (9.07)Page 134 of 301
Studio Authoring GuideConcurrent execution: Running several threads at the same time
Notes:l In a parallel split step, a step within a lane cannot pass values to a step in another lane.
l Steps within a parallel split step’s lanes can both obtain data from the local and globalcontexts and save data to local context. Lane steps can only write to the global context bymeans of a scriptlet that uses the scriptletcontext.putGlobal() method.
For the syntax for using scriptletcontext.putGlobal(), on theScriptlet tab of an operation orstep, insert the JavaScript template.
Debugging a parallel split stepWhen debugging a parallel split step, remember that the debugger processes parallel split stepsserially rather than in true parallel execution. This is one way in which the debugger does notprecisely reproduce the behavior of a flow in a production environment. On the other hand, serialexecution in the debugger of parallel split steps enables you to perform controlled tests for variousconditions.
You debug a flow containing a parallel split, multi-instance or nonblocking step the sameway youdebug a flow without such steps.
For information on how to debug flows, see Debugging flows.
Multi-instance stepsSuppose you want to run theWindows Diagnostic flow on 100 servers. Rather than creating a stepthat runs the flow on a single server, you canmake the step that is associated with the flow into amulti-instance step and run the flow on all 100 servers at once.
A multi-instance step is a step that starts multiple, simultaneously running instances of the step,each instance using one of multiple values that you supply to one of the step’s inputs. This enablesthe flow that contains the step to simultaneously run, for instance, many instances of the sameoperation on different targets.
If running the flow on 100 servers simultaneously will slow down your system’s performance, youcan set a throttle level for the flow by specifying how many servers themulti-instance step shouldsimultaneously start the flow for.
The operation that you create the step from can be either a flow or a simple operation. If themulti-instance step is created from a flow (which is therefore a subflow), keep inmind that the localcontext of the parent flow is not accessible to the data stored in the flow variables and inputs ineach of the runs of themulti-instance step's subflow. To pass the data from themulti-instancestep's child runs to the parent flow (the flow that contains themulti-instance step), youmust use themethod described in Passing data from a subflow to a parent flow.
Multi-instance steps are always checkpointed, and you cannot remove the checkpoint. This meansthat if a run is interrupted while themulti-instance step is running, then when you restore the run, itis restored to the point just before themulti-instance step started. For more information oncheckpoints, see Checkpoints: Saving a flow run’s progress for recovery.
HP Operations Orchestration (9.07)Page 135 of 301
Studio Authoring GuideConcurrent execution: Running several threads at the same time
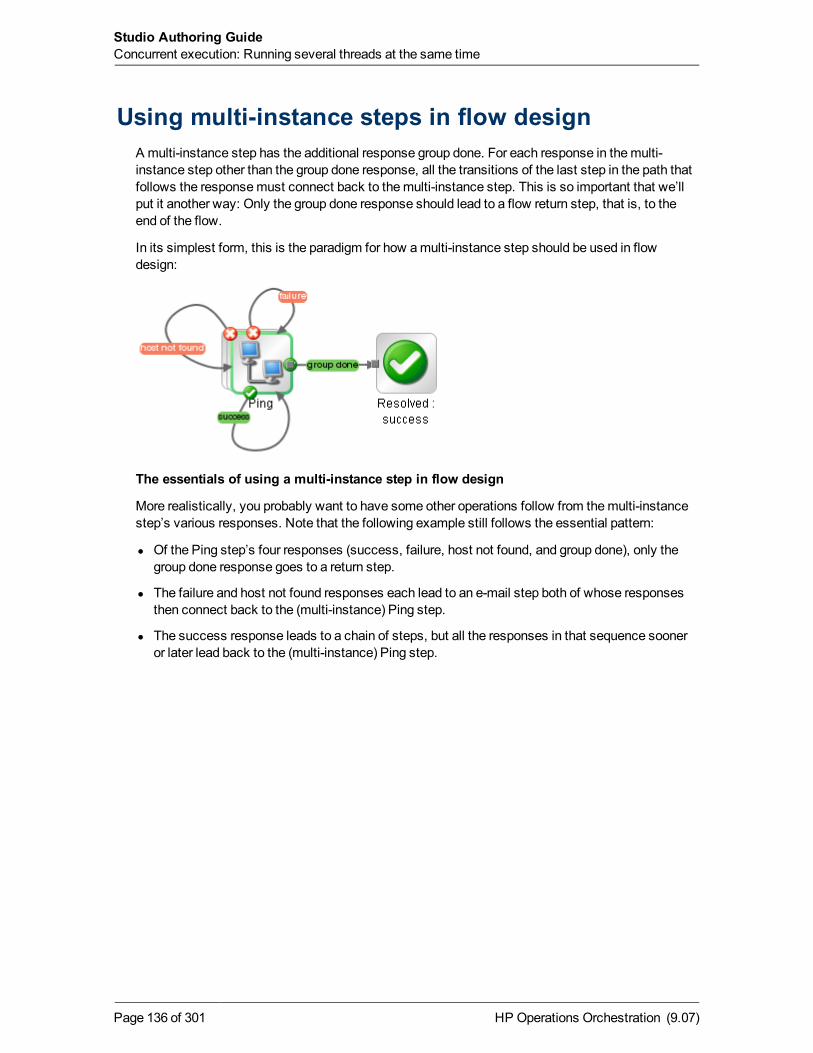
Using multi-instance steps in flow designA multi-instance step has the additional response group done. For each response in themulti-instance step other than the group done response, all the transitions of the last step in the path thatfollows the responsemust connect back to themulti-instance step. This is so important that we’llput it another way: Only the group done response should lead to a flow return step, that is, to theend of the flow.
In its simplest form, this is the paradigm for how amulti-instance step should be used in flowdesign:
The essentials of using a multi-instance step in flow design
More realistically, you probably want to have some other operations follow from themulti-instancestep’s various responses. Note that the following example still follows the essential pattern:
l Of the Ping step’s four responses (success, failure, host not found, and group done), only thegroup done response goes to a return step.
l The failure and host not found responses each lead to an e-mail step both of whose responsesthen connect back to the (multi-instance) Ping step.
l The success response leads to a chain of steps, but all the responses in that sequence sooneror later lead back to the (multi-instance) Ping step.
HP Operations Orchestration (9.07)Page 136 of 301
Studio Authoring GuideConcurrent execution: Running several threads at the same time
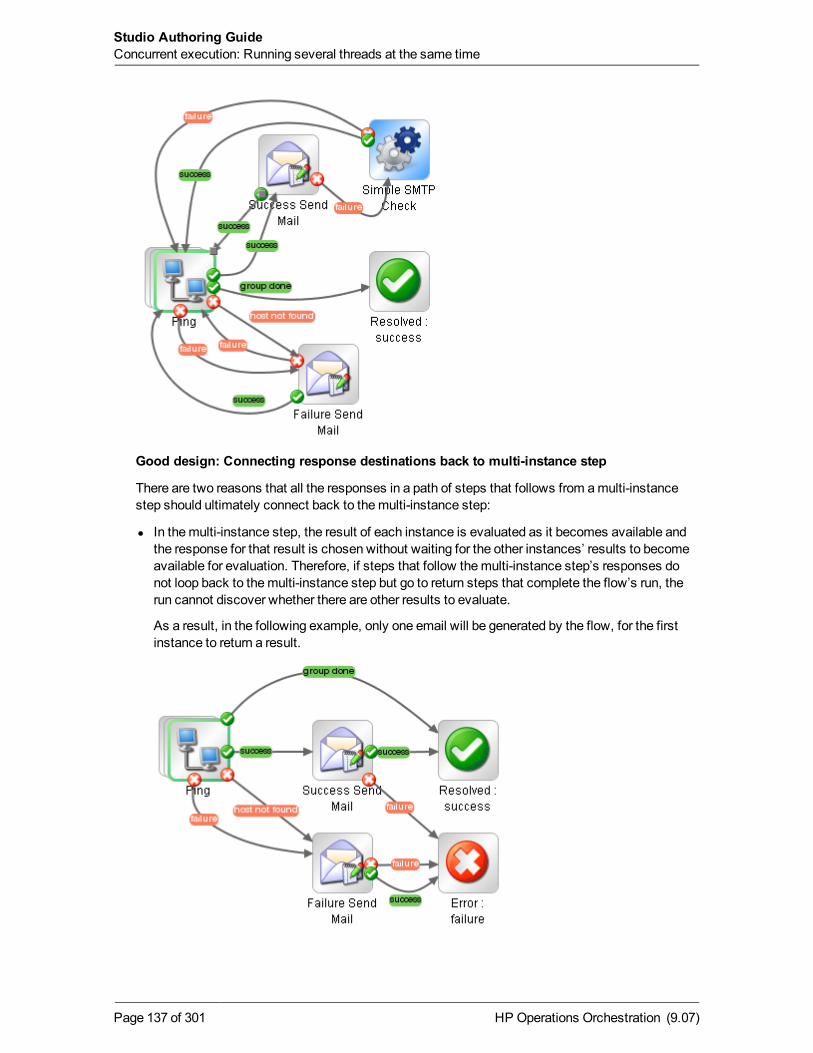
Good design: Connecting response destinations back to multi-instance step
There are two reasons that all the responses in a path of steps that follows from amulti-instancestep should ultimately connect back to themulti-instance step:
l In themulti-instance step, the result of each instance is evaluated as it becomes available andthe response for that result is chosen without waiting for the other instances’ results to becomeavailable for evaluation. Therefore, if steps that follow themulti-instance step’s responses donot loop back to themulti-instance step but go to return steps that complete the flow’s run, therun cannot discover whether there are other results to evaluate.
As a result, in the following example, only one email will be generated by the flow, for the firstinstance to return a result.
HP Operations Orchestration (9.07)Page 137 of 301
Studio Authoring GuideConcurrent execution: Running several threads at the same time
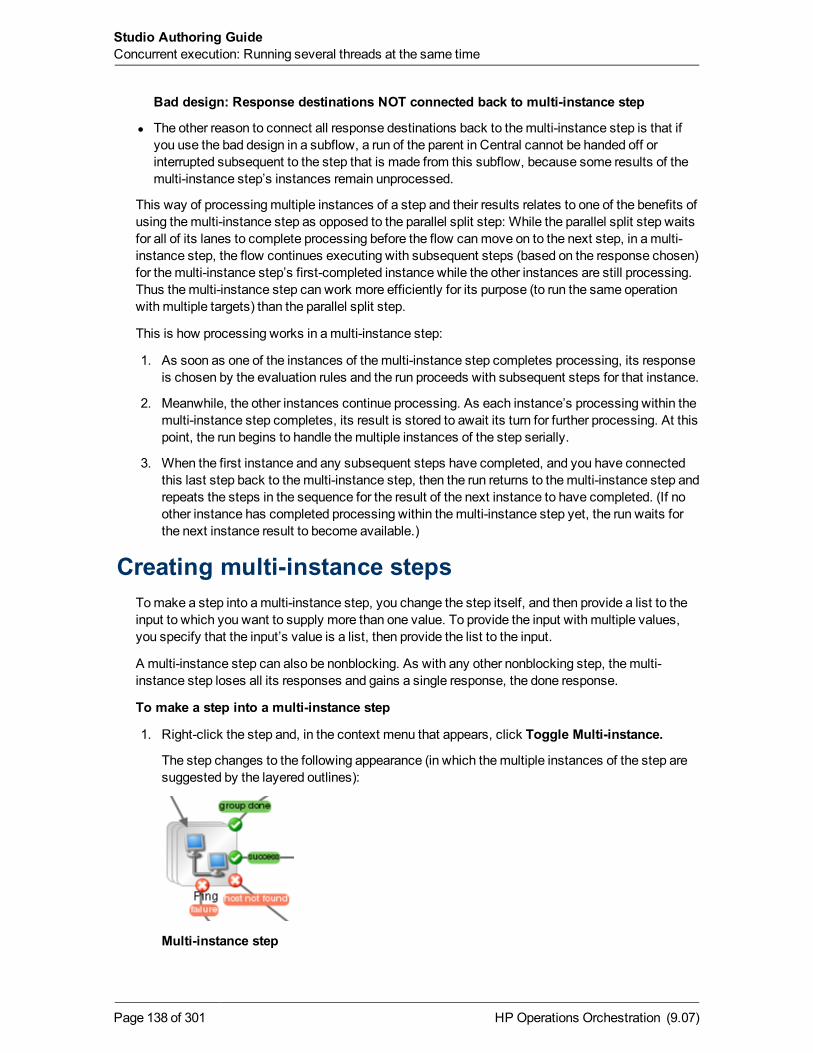
Bad design: Response destinations NOT connected back to multi-instance step
l The other reason to connect all response destinations back to themulti-instance step is that ifyou use the bad design in a subflow, a run of the parent in Central cannot be handed off orinterrupted subsequent to the step that is made from this subflow, because some results of themulti-instance step’s instances remain unprocessed.
This way of processingmultiple instances of a step and their results relates to one of the benefits ofusing themulti-instance step as opposed to the parallel split step: While the parallel split step waitsfor all of its lanes to complete processing before the flow canmove on to the next step, in amulti-instance step, the flow continues executing with subsequent steps (based on the response chosen)for themulti-instance step’s first-completed instance while the other instances are still processing.Thus themulti-instance step can work more efficiently for its purpose (to run the same operationwith multiple targets) than the parallel split step.
This is how processing works in amulti-instance step:
1. As soon as one of the instances of themulti-instance step completes processing, its responseis chosen by the evaluation rules and the run proceeds with subsequent steps for that instance.
2. Meanwhile, the other instances continue processing. As each instance’s processing within themulti-instance step completes, its result is stored to await its turn for further processing. At thispoint, the run begins to handle themultiple instances of the step serially.
3. When the first instance and any subsequent steps have completed, and you have connectedthis last step back to themulti-instance step, then the run returns to themulti-instance step andrepeats the steps in the sequence for the result of the next instance to have completed. (If noother instance has completed processing within themulti-instance step yet, the run waits forthe next instance result to become available.)
Creating multi-instance stepsTomake a step into amulti-instance step, you change the step itself, and then provide a list to theinput to which you want to supply more than one value. To provide the input with multiple values,you specify that the input’s value is a list, then provide the list to the input.
A multi-instance step can also be nonblocking. As with any other nonblocking step, themulti-instance step loses all its responses and gains a single response, the done response.
To make a step into a multi-instance step
1. Right-click the step and, in the context menu that appears, click Toggle Multi-instance.
The step changes to the following appearance (in which themultiple instances of the step aresuggested by the layered outlines):
Multi-instance step
HP Operations Orchestration (9.07)Page 138 of 301
Studio Authoring GuideConcurrent execution: Running several threads at the same time
Note that the step now has the additional response group done. For more information on usingthe group done response, see Usingmulti-instance steps in flow design.
2. Open the step Inspector, and then open the input editor for the input to which you want tosupply multiple values.
3. To specify that the input’s value is a list, in the Input Type drop-down list, select List ofValues, and then, in the Input Delimiter text box, type a delimiter (a character that separatesthe elements in the list).
By default, the delimiter is a comma.
Notes:n Your delimiter must accurately reflect the character or combination of characters that
separates the list elements.
For instance, if your list includes a space between list elements, youmust include thespace in the delimiter that you specify. Consider the following list:
10.51.0.36, 10.51.0.37
If you specified only the comma (,) as the delimiter, the value for the input in one of thestep’s instances would be “ 10.51.0.37”, which could cause an error.
n Central users who schedule flows that contain multi-instance steps must know whatthe delimiter is, so be sure to let them know on theDescription tab for the step.
n When youmake a step into amulti-instance step, you cannot add or removespecification of the step as a checkpoint.
4. Provide the input (or the flow variable from which the input gets its value) with a list that usesthe same delimiter as that which you specified.
How you supply the list depends on how you obtain the list. For instance, youmight get it froman integration with another program.
From within the flow, you can supply the list to themulti-instance step directly, in the ConstantValue text box (when you select Use Constant for the input’s assignment); or you can get thelist from a flow variable.
5. To revert the step to a single instance step, right-click the step and, in the context menu thatappears, click Toggle Multi-instance again.
Moving data into and out of a multi-instance stepValues are passed to themulti-instance step as to any other step, with global flow variables of theparent merged into the global flow variables of the child runs (the runs of the instances). Then themulti-instance step’s inputs become global flow variables of the child run.
Any flow variables that are created in an instance of themulti-instance step are local to the instancein which they are created and populated. Only global flow variables (created by scriptlets) continueafter the instance’s run completes.
Youmake data generated within the step available outside the step the same as you do for anyother type of step: by creating a global flow variable in a scriptlet or (when the step is a subflow) bycreating a flow output field.
HP Operations Orchestration (9.07)Page 139 of 301
Studio Authoring GuideConcurrent execution: Running several threads at the same time
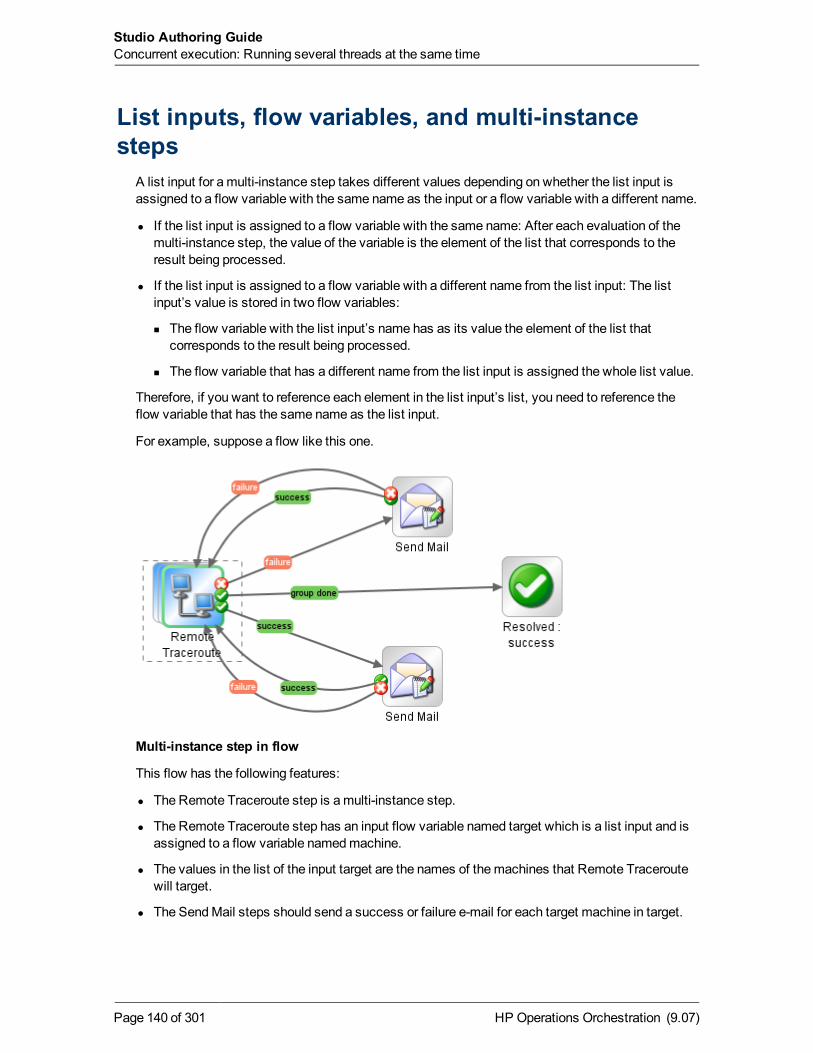
List inputs, flow variables, and multi-instancesteps
A list input for amulti-instance step takes different values depending on whether the list input isassigned to a flow variable with the same name as the input or a flow variable with a different name.
l If the list input is assigned to a flow variable with the same name: After each evaluation of themulti-instance step, the value of the variable is the element of the list that corresponds to theresult being processed.
l If the list input is assigned to a flow variable with a different name from the list input: The listinput’s value is stored in two flow variables:
n The flow variable with the list input’s name has as its value the element of the list thatcorresponds to the result being processed.
n The flow variable that has a different name from the list input is assigned the whole list value.
Therefore, if you want to reference each element in the list input’s list, you need to reference theflow variable that has the same name as the list input.
For example, suppose a flow like this one.
Multi-instance step in flow
This flow has the following features:
l The Remote Traceroute step is amulti-instance step.
l The Remote Traceroute step has an input flow variable named target which is a list input and isassigned to a flow variable namedmachine.
l The values in the list of the input target are the names of themachines that Remote Traceroutewill target.
l The SendMail steps should send a success or failure e-mail for each target machine in target.
HP Operations Orchestration (9.07)Page 140 of 301
Studio Authoring GuideConcurrent execution: Running several threads at the same time
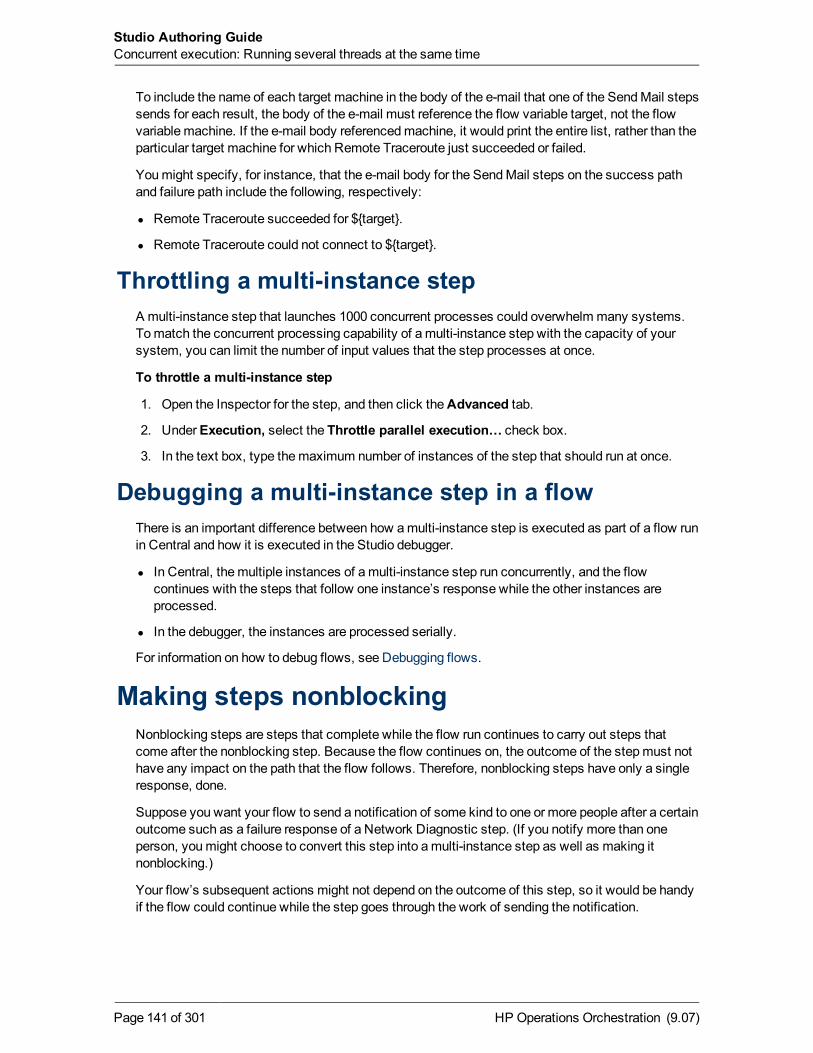
To include the name of each target machine in the body of the e-mail that one of the SendMail stepssends for each result, the body of the e-mail must reference the flow variable target, not the flowvariable machine. If the e-mail body referencedmachine, it would print the entire list, rather than theparticular target machine for which Remote Traceroute just succeeded or failed.
Youmight specify, for instance, that the e-mail body for the SendMail steps on the success pathand failure path include the following, respectively:
l Remote Traceroute succeeded for ${target}.
l Remote Traceroute could not connect to ${target}.
Throttling a multi-instance stepA multi-instance step that launches 1000 concurrent processes could overwhelm many systems.Tomatch the concurrent processing capability of amulti-instance step with the capacity of yoursystem, you can limit the number of input values that the step processes at once.
To throttle a multi-instance step
1. Open the Inspector for the step, and then click theAdvanced tab.
2. UnderExecution, select the Throttle parallel execution… check box.
3. In the text box, type themaximum number of instances of the step that should run at once.
Debugging a multi-instance step in a flowThere is an important difference between how amulti-instance step is executed as part of a flow runin Central and how it is executed in the Studio debugger.
l In Central, themultiple instances of amulti-instance step run concurrently, and the flowcontinues with the steps that follow one instance’s response while the other instances areprocessed.
l In the debugger, the instances are processed serially.
For information on how to debug flows, see Debugging flows.
Making steps nonblockingNonblocking steps are steps that complete while the flow run continues to carry out steps thatcome after the nonblocking step. Because the flow continues on, the outcome of the stepmust nothave any impact on the path that the flow follows. Therefore, nonblocking steps have only a singleresponse, done.
Suppose you want your flow to send a notification of some kind to one or more people after a certainoutcome such as a failure response of a Network Diagnostic step. (If you notify more than oneperson, youmight choose to convert this step into amulti-instance step as well as making itnonblocking.)
Your flow’s subsequent actions might not depend on the outcome of this step, so it would be handyif the flow could continue while the step goes through the work of sending the notification.
HP Operations Orchestration (9.07)Page 141 of 301
Studio Authoring GuideConcurrent execution: Running several threads at the same time
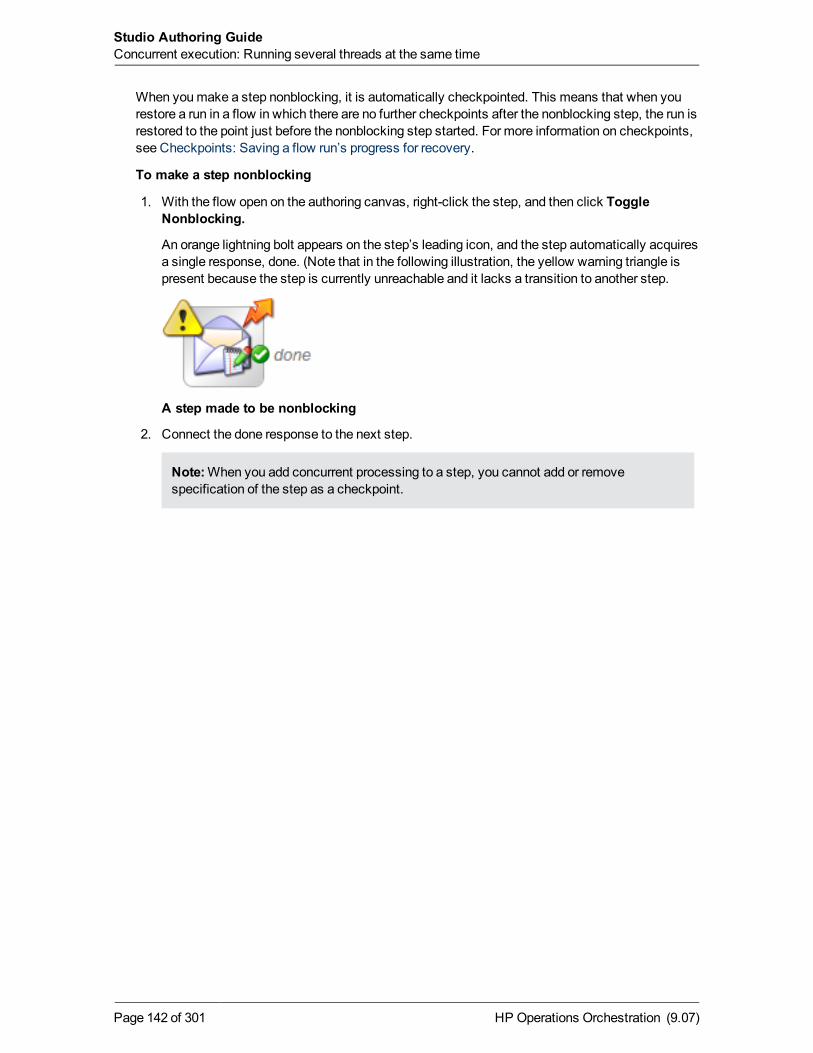
When youmake a step nonblocking, it is automatically checkpointed. This means that when yourestore a run in a flow in which there are no further checkpoints after the nonblocking step, the run isrestored to the point just before the nonblocking step started. For more information on checkpoints,see Checkpoints: Saving a flow run’s progress for recovery.
To make a step nonblocking
1. With the flow open on the authoring canvas, right-click the step, and then click ToggleNonblocking.
An orange lightning bolt appears on the step’s leading icon, and the step automatically acquiresa single response, done. (Note that in the following illustration, the yellow warning triangle ispresent because the step is currently unreachable and it lacks a transition to another step.
A step made to be nonblocking
2. Connect the done response to the next step.
Note:When you add concurrent processing to a step, you cannot add or removespecification of the step as a checkpoint.
HP Operations Orchestration (9.07)Page 142 of 301
Studio Authoring GuideConcurrent execution: Running several threads at the same time
Making a step single responseIf all of a step’s responses go to the same destination step and the transitions all have the sameproperties (such as the same description and ROI value), you can collapse all these responses intoa single response (which you connect to the destination step).
To convert a step’s responses to a single response
l With the flow diagram open, right-click the step and, in the drop-downmenu, select ToggleSingle Response.
To restore a single-response step’s multiple responses
l With the flow diagram open, right-click the step and, in the drop-downmenu, select ToggleSingle Response.
HP Operations Orchestration (9.07)Page 143 of 301
Checkpoints: Saving a flow run’sprogress for recovery
A checkpoint is like a bookmark in a flow. During a run of the flow, each checkpoint gathers eitherthe entire state of the flow or just the run history and saves it to the Central database. The flow'sstate comprises all the data necessary to completely reconstruct the run in case the flow isinterrupted.
If a step has had a checkpoint set, it will be possible to restart a finished run from theReports pagefrom an intermediary step.
If you have configured a failover/run recovery cluster for Central and the Central server running aflow fails, other nodes in the cluster resume the flow runs that were taking place on the failedCentral server. If a flow has no checkpoints, the run is resumed at the start of the flow. But if thereare checkpointed steps in the flow, the run is resumed from the last checkpoint that was reachedwhen the server failed. By default, a checkpoint is created for a step when you create the step.
Note:When a user pauses or interrupts a run, the state of the run at the time of the interruptionis saved to the database, so checkpointing is not necessary for resuming the run at the point atwhich the user paused or interrupted it. Checkpointing is for resuming runs that were lost due toa system failure or for restarting finished runs from theReports page from intermediarycheckpointed steps.
Because a checkpoint is set by default for each step that you create, the amount of information inthe flow state can become quite large. Frequent writing of such large amounts of data to thedatabase can affect the flow’s performance, so youmight want to reduce the number ofcheckpoints in the flow. For instance, youmight remove checkpointing from some steps in loops. Ifyou remove a checkpoint from a step, a run of the flow will be resumed from the last checkpointbefore the one you removed.
You can also reduce the amount of data that is saved at a checkpoint by specifying that thecheckpoint save only the run history, rather than the entire flow state for that run.
Notes:l Removing checkpoints doesn’t change how much data is sent to the database in the course
of a flow run, but only at what points data is sent.
l If you remove a checkpoint from a step that was created from a subflow, none of the stepsin the subflow (or the steps in the subflow’s steps’ subflows) are checkpointed, regardlessof whether they have had checkpoints set for them or not.
l Steps with concurrent processing—that is, parallel split, multi-instance, and nonblockingsteps—are checkpointed, and you cannot remove the checkpoint from the step. When yourestore a run that was interrupted while a concurrent-processing step was running, thecheckpoint means that the run is restored immediately prior to the step.
HP Operations Orchestration (9.07)Page 144 of 301
l All the lane steps in a parallel split step are checkpointed, and you cannot remove thecheckpoints.
l You can remove the checkpoint from the steps that process each of amulti-instance step’sinstances.
To create a checkpoint in a step
1. Open the flow diagram inDesign view, and open the Inspector for the step to which you wantto add the checkpoint.
2. On theAdvanced tab, in theStep Persistence area, select the This step saves the wholerun state and This step saves the run history check boxes.
3. To save only the run history, select the This step saves the run history checkbox only.
Note: The whole run state includes all the data of the run history, so when you select theThis step saves the whole run state checkbox, the checkbox for This step saves therun history is disabled.
To remove or reduce the contents of a checkpoint from a step
l In the Step Inspector, on theAdvanced tab, in theStep Persistence area, unselect the Thisstep saves the whole run state or the This step saves the run history check box, asappropriate.
HP Operations Orchestration (9.07)Page 145 of 301
Studio Authoring GuideCheckpoints: Saving a flow run’s progress for recovery
Saving the output of a stepYou can specify whether a step’s raw results, primary result, or no result at all is saved to thedatabase. Youmight choose not to save step results if you find that they are not important to yourflow. Many flows use results from another step, so you should be careful about which steps youdon’t save the results of. The advantage to not saving results, besides reduction of data to filter foryour authors, users, and analysts, is improved performance.
To save the output of a step
1. Open the flow diagram inDesign view, and open the Inspector for the step to which you wantto add the checkpoint.
2. On the Advanced tab, in theStep Persistence area, select the check box by This step savesthe raw output.
OR
To save only the primary output, select the This step saves the primary output checkbox.
To remove or reduce the saving of a step’s output
l In the step Inspector, on theAdvanced tab, in theStep Persistence area, unselect either theThis step saves the whole run state or the This step saves the run history check box, asappropriate.
HP Operations Orchestration (9.07)Page 146 of 301
ScriptletsWhen you have obtained data from an operation such as Ping, Traceroute, or HTTP Client Get, youprobably want to test, format, manipulate, or isolate a particular piece of the results. Or perhaps youwant to use a value from a flow variable to compare your results against. Using a scriptlet, you canperform these tasks and anything else that is possible with JavaScript or Perl.
Scriptlets are also uniquely suited to obtain various side effects subsequent to the operation’s coreactions and to otherwise extend the operation’s capabilities.
A scriptlet is a Sleep or JavaScript (Rhino) script that is contained in an operation. Scriptletsprovidemore control than operation output filters and responses, for evaluating output, determiningresults and responses, or adding variables to the flow.
Note:Sleep scripts are deprecated. It is recommended that you not use them, as they maycause system performance to degrade over time.
You can use JavaScript or Perl scriptlets:
l To filter a flow, step, or operation’s results.
One of the uses for filtering an operation’s results is as part of a rule that determines an operation’sresponse.
l In the body of an operation, step, or flow (on the Scriptlet tab of each).
This is not a generally recommended use of a scriptlet. Scriptlets are best used for filtering results.
Tip: If you know how to script in either of the two scripting languages used in HP OO—JavaScript(Rhino) or Sleep—the HP OO scriptlet templates for those languages define the syntax and objectsthat HP OO requires for exchanging information with the scripting language. The scriptlet templatesare available on theScriptlet tab of an operation’s Properties sheet or a step’s Inspector.
Following are some considerations to remember when using a scriptlet:
l As with other uses of operations, you create a scriptlet on an operation for a generic use that youcan apply over and over.
l You create a scriptlet on a step when the scriptlet is specialized to the conditions of that step.
For instance, youmight add a scriptlet to a step to evaluate and/or format data that is returnedfrom the step’s operation. If you then store the data in a flow variable and pass it to one of thefields in the flow’s result and repeat this with other results, you can incrementally create a trail ofthe data that you’ve discovered.
l Youmight add a scriptlet to a flow (on theScriptlet tab of the flow’s Properties tab) when theflow will be used as a subflow within another flow and thus will function as an operation. Afterthe subflow has obtained some data that you have passed to a field in the flow result, youmightmanipulate the data in the flow result field before passing it to the parent flow.
HP Operations Orchestration (9.07)Page 147 of 301
l HP OO automatically creates from each input a variable of the same name. Therefore, a scriptletcan access values by using variables with the same name as the inputs.
Creating a scriptletThere are three sources to help you write scriptlets:
l The scriptlet template
l The default scriptlets in the Configuration\Scriptlets folder
l Existing scriptlets in default content
To create a scriptlet
1. On an operation’s or flow’s Properties sheet or on a step’s Inspector, click theScriptlet tab.
2. Do one of the following:
n To view the scriptlet template, select the language in which you will write your script in theType drop-down list, and then click Insert Template.
n Open one of the scriptlets in the Configuration\Scriptlets folder and copy the scriptlet ontoyour flow’s, operation’s, or step’s Scriptlet tab and thenmodify it to suit your needs.
n From one of the operations in default content that contain scriptlets (such as the operationsin the Operations\Operating Systems\Linux\Red Hat folder), copy the scriptlet to yourflow’s, operation’s, or step’s Scriptlet tab and thenmodify it to suit your needs.
Filtering results with scriptletsTo filter step or flow results with a scriptlet
1. On theResults tab, to open the filter editor of the result that you want to filter, right-click theright-pointing arrow on the result’s row ( ).
2. To create a new filter, in the filter editor, click Add.
3. In theSelect Filter dialog, select Scriptlet.
A scriptlet line appears by default.
To see the syntax for other functions that may help you, click Insert Template. The scriptlettemplate provides commonly used functions and their syntax.
For more information on creating filters, see Filtering outputs and results.
4. Create the scriptlet, test the filter, and save your work.
Best Practice:When creating a scriptlet operation, in the scriptlet, specify the scriptlet responseas success. Then, on the Responses tab of the operation, select failure as the default response.
HP Operations Orchestration (9.07)Page 148 of 301
Studio Authoring GuideScriptlets
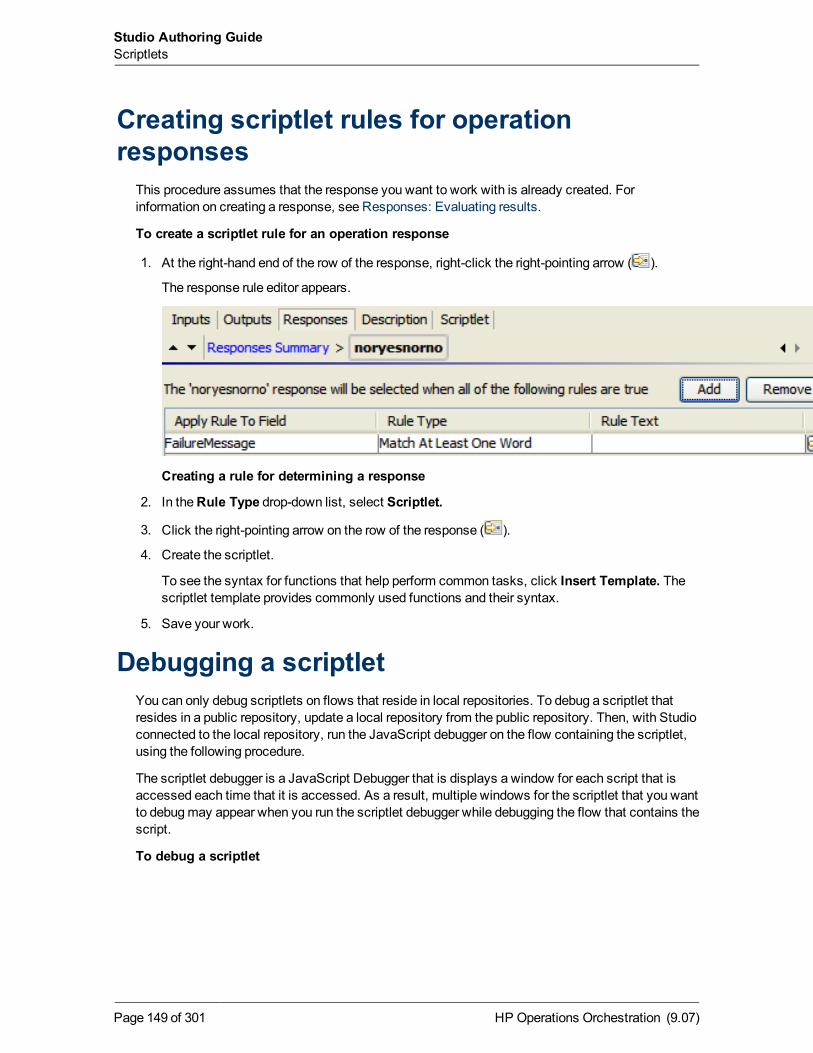
Creating scriptlet rules for operationresponses
This procedure assumes that the response you want to work with is already created. Forinformation on creating a response, see Responses: Evaluating results.
To create a scriptlet rule for an operation response
1. At the right-hand end of the row of the response, right-click the right-pointing arrow ( ).
The response rule editor appears.
Creating a rule for determining a response
2. In theRule Type drop-down list, select Scriptlet.
3. Click the right-pointing arrow on the row of the response ( ).
4. Create the scriptlet.
To see the syntax for functions that help perform common tasks, click Insert Template. Thescriptlet template provides commonly used functions and their syntax.
5. Save your work.
Debugging a scriptletYou can only debug scriptlets on flows that reside in local repositories. To debug a scriptlet thatresides in a public repository, update a local repository from the public repository. Then, with Studioconnected to the local repository, run the JavaScript debugger on the flow containing the scriptlet,using the following procedure.
The scriptlet debugger is a JavaScript Debugger that is displays a window for each script that isaccessed each time that it is accessed. As a result, multiple windows for the scriptlet that you wantto debugmay appear when you run the scriptlet debugger while debugging the flow that contains thescript.
To debug a scriptlet
HP Operations Orchestration (9.07)Page 149 of 301
Studio Authoring GuideScriptlets
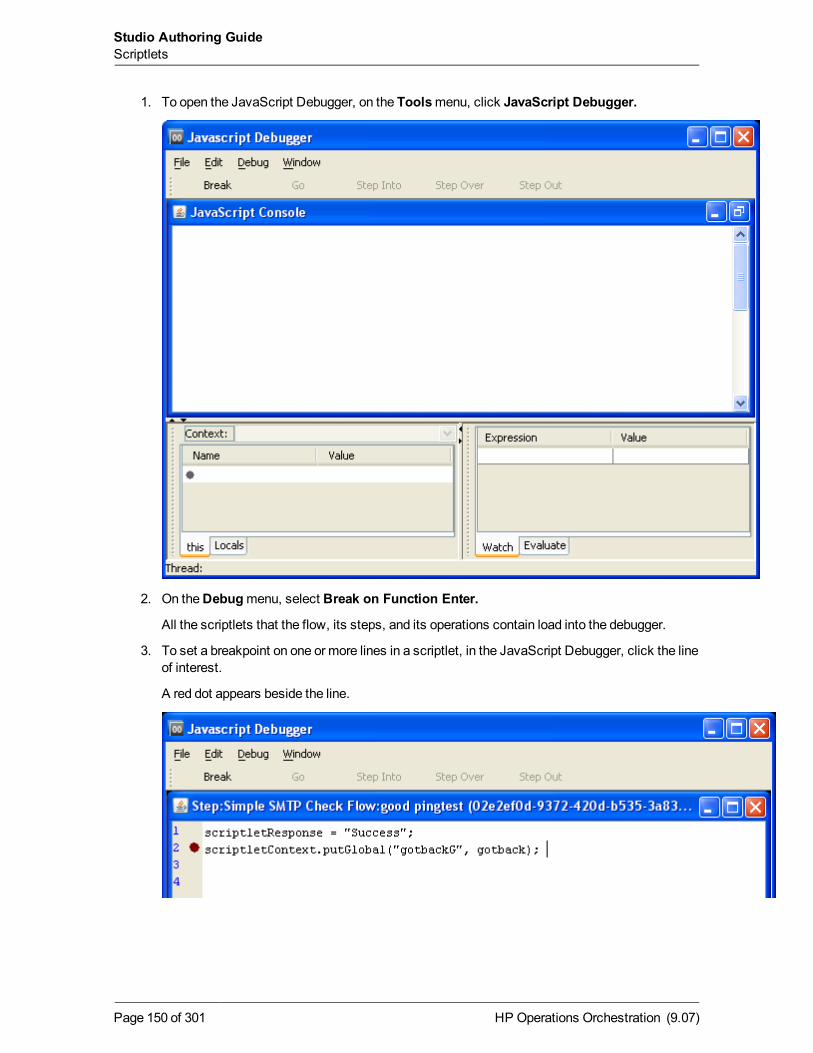
1. To open the JavaScript Debugger, on the Toolsmenu, click JavaScript Debugger.
2. On theDebugmenu, select Break on Function Enter.
All the scriptlets that the flow, its steps, and its operations contain load into the debugger.
3. To set a breakpoint on one or more lines in a scriptlet, in the JavaScript Debugger, click the lineof interest.
A red dot appears beside the line.
HP Operations Orchestration (9.07)Page 150 of 301
Studio Authoring GuideScriptlets
Note: If you have created a breakpoint on a scriptlet line, when the JavaScript Debugger isclosed, it does not stop the script at the breakpoint.
4. In Studio, to set a breakpoint on the step, right-click the step, point toDebugging, and thenclick Set Breakpoint.
5. To start debugging the flow, in Studio, click the Debug Flow button ( ).
The debugger starts, debugging the flow either in Central (if the flow is in the public repository)or in Studio (if the flow is in a private repository).
When the Studio debugger reaches a step with a script in it, focus switches to the JavaScriptDebugger.
As the scriptlet runs, the current values of local and global flow variables in the context appearin the Value column of the Context pane.
When the JavaScript Debugger reaches the breakpoint that you set, you can set a particularflow variable’s value to watch.
6. To watch a particular flow variable, with the scriptlet paused, in the lower-right panel, type thename of the flow variable to watch in theExpression box.
Saving a scriptlet for use elsewhereTo save a scriptlet to the Configuration\Scriptlets folder
1. In the Inspector for the step containing the scriptlet, open the scriptlet editor.
2. Select the scriptlet, then click the Scriptlet icon ( ) and drag to the Configuration\Scriptletsfolder.
3. In the Configuration\Scriptlets folder, name the scriptlet.
4. Save your work.
Using a scriptlet from the Configuration folderTo use a scriptlet from the Configuration folder
1. In theRepository pane, open the Configuration\Scriptlets folder.
2. Drag the scriptlet you want to use from the folder into the scriptlet editor.
3. To change from aConfiguration\Scriptlets scriptlet to one that you write yourself, click Switchto a custom scriptlet.
HP Operations Orchestration (9.07)Page 151 of 301
Studio Authoring GuideScriptlets
Outputs, responses, and step resultsOutputs, responses, and step results are related to each other in flow authoring.
l Outputs are all or part of the output of an operation.
Remember that a flow is a kind of operation. This is particularly apparent when a step in a flow isassociated with another flow. Thus flows also have outputs.
l Responses are the outcomes of evaluations of operation outputs.
For information on defining rules for testing results to determine responses, see Responses:Evaluating results.
l Step results are analogs to operation outputs and obtain their content from outputs.
In addition, you can pass step results to the flow as fields in the flow result.
You can filter outputs and results in order to fine tune the data available for testing or for passing toanother operation. For information on creating filters, see Filtering outputs and results.
Operation outputsThere are two kinds of operation outputs.
l The raw output is all of the operation’s return code, data output, and error string.
The raw output is not directly visible in Studio, except as the raw result of a step that wascreated from the operation.
l The primary and other outputs are portions of the raw output—for example, success code,output string, error string, or failuremessage—that you specify as an output. You can narrow aprimary or other output to amore highly focused selection by creating one or more filters for theoutput.
For more information on filtering outputs, see Filtering outputs and results.
Besides evaluating outputs, you can pass them as data to other steps in the flow or to other flowsby storing their values in flow variables. You can create filters to extract andmodify parts of theresult.
Most operations have outputs that are specific to the operation. Even so, you will frequentlyencounter the following outputs when working with operations in the Library’s Accelerator Packs,Integrations, andOperations folders:
l returnResult
The primary output of the operation. When you see “returns:” with no field named, this is usuallythe output. The primary output is also accessible via Result with a capital R (which is universal).
l response (or returnCode)
A code or string used to determine the response the operation will take.
HP Operations Orchestration (9.07)Page 152 of 301
l failureMessage
An internal output provided by the infrastructure. If an operations returns a failure, this outputprovides the exception. Note that many operations do not use this output.
Specifying an operation’s primary outputWhen you create an operation, you can specify its primary output. Once you have created a primaryoutput, you can change its source, but you cannot return to having no primary output.
For more information on outputs and results, seeOutputs and results.
The following procedure assumes that the operation is editable. If the operation is locked or sealed,make a copy of it, and thenmake changes to the copy.
To specify an operation’s primary output
1. To open the operation’s Properties sheet for editing, in theRepository pane, double-click theoperation.
2. In theProperties sheet, click theOutputs tab.
3. From theExtract Primary Output from Field drop-down list, select a source field.
For information on the data that are provided in each output field, click the operation’sDescription tab.
Youmight want to create a filter or series of filters in order to extract from the output the particulardata you want.
For information on creating filters, see Filtering outputs and results.
Adding a secondary outputTo add a secondary output for an operation
1. To add a secondary output (another output in addition to the primary output), click AddOutputand then, in the dialog that appears, type the name of the output.
Note:You can change the output’s name or source field by changing those values in theName andOutput Field columns of the output’s row under Available Outputs.
2. To create filters for the output data in the secondary output, click the right-pointing arrow ( )at the end of the row.
The filter editor opens for you to create filters. For information on creating filters, see Filteringoutputs and results
After creating the filter or filters you need, close the filter editor. The Filters column in theoutput’s row reports the filter that you have created or, if you’ve createdmore than one, howmany filters you have created.
3. Save your work.
HP Operations Orchestration (9.07)Page 153 of 301
Studio Authoring GuideOutputs, responses, and step results
Deleting an outputTo delete an output from an operation
l On the operation’s Properties sheet, on theOutputs tab, select the output you want to delete,and then click Remove Output.
Changing the source of an outputThis topic is about changing the source of an operation’s or flow’s output. For information onchanging the source of a step’s result, see Changing the source of a result.
To change the field from which an output gets its data
1. To change the field for the primary output, click the downward-pointing arrow to the right of theExtract Primary Output From Field box, and then pick the desired field from the list.
OR
To change the field for a secondary output, click in theOutput Field column of the output’srow, and then pick the field you want from the drop-down list.
2. Create any filters you want for the output. After creating the filter or filters you need, close thefilter editor.
For information on creating filters, see Filtering outputs and results.
ResponsesResponses are the outcomes of operations. In a step created from an operation, each response isthe starting point from which a transitionmay be connected to another step (or back to the samestep). Rules that evaluate the operation’s output fields determine which of the several availableresponses will be the operation’s actual response for the current run. Thus the outcome of theevaluation of one step’s operation outcome determines which will be the next step in the flow run.
For information on creating responses and their rules, see Responses: Evaluating results.
Step resultsStep results are the step’s analog to the outputs of the operation from which the step was created.You create the step results
You can pass step results as data to other steps in the flow or to other flows. You can create filtersto extract andmodify parts of the operation’s output.
For example, suppose you only want themaximum, minimum, and average round-trip times for aping operation to a certain server. You could extract all three pieces of information from the pingoperation’s raw results into several filtered results for the operation by filtering the raw results intothree filtered results. Then you can use those filtered results to do the following:
l Create response rules (evaluators) that test one or more of the filtered data results to determinethe next step of the flow.
HP Operations Orchestration (9.07)Page 154 of 301
Studio Authoring GuideOutputs, responses, and step results
l By passing the filtered data as values to flow variables, make them accessible to operations andtransitions later in the flow, and through prompts that reference the flow variables, to the users ofthe flow.
l If the flow is a step in another flow (that is, a subflow of a parent flow), pass the data in thefiltered results to fields in the flow’s result, thus making the properties available to operations,steps, and transitions in the parent flow.
For more information on filtering outputs, see Filtering outputs and results.
You can pass the step result’s value to either:
n A local flow variable.
n A flow output field for the flow.
Adding step resultsThe step’s raw and primary results come from the underlying operation’s raw output and primaryoutput. In the step’s Inspector, you can create and specify secondary results.
To add a result to a step
1. To add a secondary result, do one of the following:
n If no result currently exists, open the step Inspector and, on theResults tab, click AddResult.
In the new row that appears in the list of results, the name of the result is by default namedfor the source of the result.
n If there is an existing result, the new result is a copy of the existing result.
2. Tomake changes to the result’s definition, click in the row in one of the following fields andmake changes as appropriate:
n In theName field, type a new name.
Note: A step result cannot be named "Result" .
n In the From field, from the list that drops downwhen you click the field, select the source forthe result.
n In theAssign To field:
o To store the value in a flow variable, select Flow Variable.
o Tomake the value available to a parent flow, select Flow Output Field.
n In theAssignment Action list, select the appropriate action:
o OVERWRITE
Replace the current value of the flow variable or flow output field with this value.
o APPEND
Place this value at the end of the current value of the flow variable or flow output field.
HP Operations Orchestration (9.07)Page 155 of 301
Studio Authoring GuideOutputs, responses, and step results
o PREPEND
Place this value in front of the current value of the flow variable or flow output field.
o There are four arithmetic assignment actions that you can select: ADD, SUB,MULTIPLY, andDIVIDE.
These specify that you use this value to arithmetically modify the current value of theflow variable or flow output field.
For example, if the step result were 3.14, and you selectedMULTIPLY, the effect wouldbe tomultiply the current value of the flow variable or flow output field by 3.14.
Or suppose you have a flow variable named “timeout” and the step result’s value is 1.You could subtract 1 from the value of “timeout” by choosingSUB as theAssignmentAction (having selected Flow Variable in theAssign To field).
3. To create filters for the output data in the secondary output, click the right-pointing arrow ( )at the end of the row.
The filter editor opens for you to create filters. For information on creating filters, see Filteringoutputs and results.
4. After creating the filter or filters you need, close the filter editor.
The Filters column in the output’s row reports the filter that you have created or, if you’vecreatedmore than one, how many filters you have created.
Deleting step resultsTo delete a result from a step
l On theResults tab of the step’s Inspector, select the result you want to delete, and then clickRemove Result.
Changing the source of a resultTo change the field from which a result gets its data
l To change the field from which a secondary result gets its data, click in the From column of theoutput’s row, and then pick the field you want from the list.
HP Operations Orchestration (9.07)Page 156 of 301
Studio Authoring GuideOutputs, responses, and step results
Filtering outputs and resultsIf you’re diagnosing a network connectivity problem, youmight want to extract pieces of data suchas themaximum, minimum, and average round-trip times, or the percent of packets that were lost.Youmight want to use this data either in or outside of the flow.
Suppose you only want themaximum, minimum, and average round-trip times for a ping operationto a certain server. You can isolate and extract all three pieces of information from the pingoperation’s raw output by filtering the raw output into three outputs. Then you can use those outputsto do the following:
l Create response rules (evaluators) that test data in the outputs to determine the next step of theflow.
Note:Or you can assign the raw data to the outputs and create your filters in the responserule.
l By assigning the filtered data as values to flow variables, you canmake the data accessible tooperations later in the flow. In addition:
n In prompts and transition descriptions that reference the flow variables, you canmake thedata available to the users of the flow.
n In steps that reference the flow variables in order to send email or write the filtered data tofiles, you canmake the data available to anyone in your organization.
l If the flow is a step in another flow (that is, a subflow of a parent flow), pass the data in thefiltered outputs to fields in the flow’s result, thus making the properties available to operations,steps, and transitions in the parent flow.
Note: Towork with a ping operation, you can either create your own ping operation or copy theexisting Ping operation and work with the copy. If you are working with a copy of the existingPing operation, you’ll note that some results that are available by default extract the data thatyou would otherwise isolate with filters.
Creating a filterFilters, whether single or in a series, extract the data you need from operation outputs and stepresults. In addition to single filters, you can create a series of filters to remove extraneous data fromoutputs and results .
To filter an operation output or step result
1. To filter an operation’s primary output, with the operation’s Properties sheet open on theOutputs tab, click theEdit Filters button.
HP Operations Orchestration (9.07)Page 157 of 301
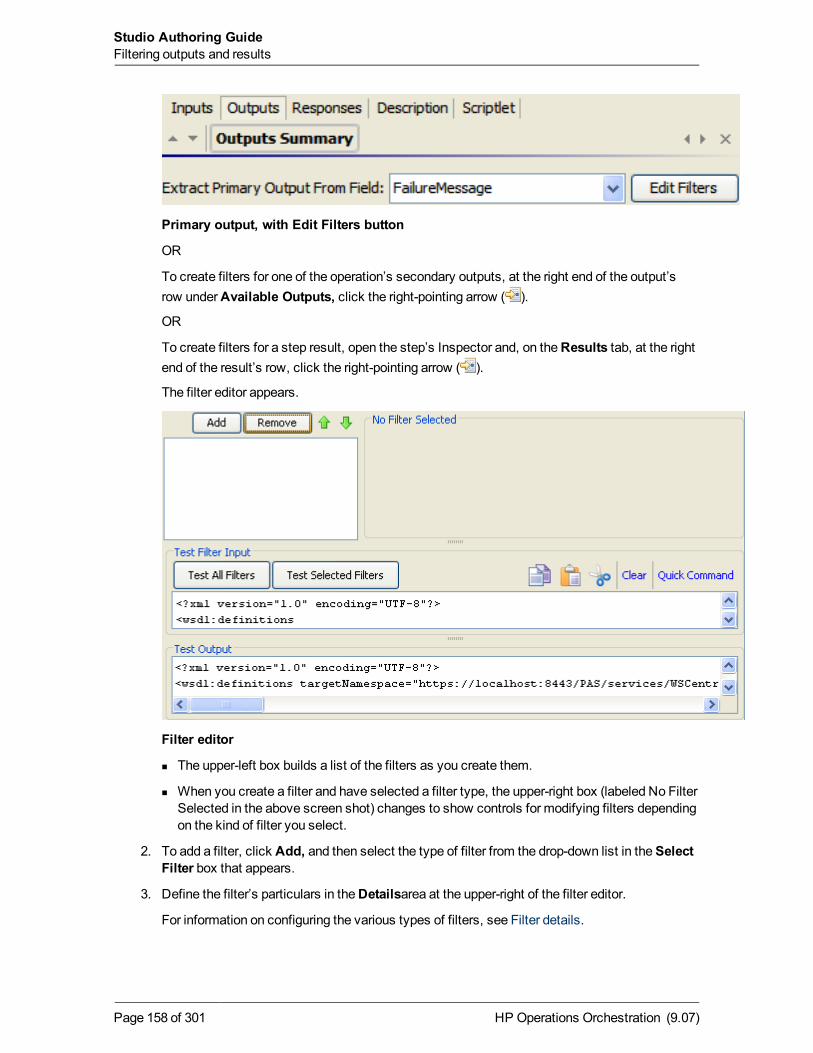
Primary output, with Edit Filters button
OR
To create filters for one of the operation’s secondary outputs, at the right end of the output’srow underAvailable Outputs, click the right-pointing arrow ( ).
OR
To create filters for a step result, open the step’s Inspector and, on theResults tab, at the rightend of the result’s row, click the right-pointing arrow ( ).
The filter editor appears.
Filter editor
n The upper-left box builds a list of the filters as you create them.
n When you create a filter and have selected a filter type, the upper-right box (labeled No FilterSelected in the above screen shot) changes to show controls for modifying filters dependingon the kind of filter you select.
2. To add a filter, click Add, and then select the type of filter from the drop-down list in theSelectFilter box that appears.
3. Define the filter’s particulars in theDetailsarea at the upper-right of the filter editor.
For information on configuring the various types of filters, see Filter details.
HP Operations Orchestration (9.07)Page 158 of 301
Studio Authoring GuideFiltering outputs and results
Tip:While you have the filter editor open, you can click the upward- or downward-pointingarrows ( ) besideOutputs Summary to create a filter for a different result.
When you filter an output’s or result’s data, the data is the filter’s input. In the filter editor, theTest Filter Input box contains the test data. To test the filter with realistic data, you can putthe output’s or result’s data in the Test Filter Input box.
4. To clear the Test Filter Input box, click Clear.
5. To put data of your choosing in the Test Filter Input box, do one of the following:
n If the data can be generated by a local command-line command:
i. Click Quick Command.
ii. In the text box that appears, type a command that generates the desired data.
iii. Click OK.
The output of the command appears in the Test Filter Input box.
n If the data is produced by means that you cannot reproduce with a simple command-linecommand, you can:
i. Run the flow in the debugger.
ii. Highlight the relevant step.
iii. In theStep Result Inspector panel, copy the contents of theRaw Result tab.
iv. In the filter editor, paste the contents into the Test Filter Input box.
6. In the filter editor, click Test All Filters.
OR
Select the filters you want to test and click Test Selected Filters.
The filters are applied (in top-to-bottom order) to the data in the Test Filter Input box, and thefiltered results appear in the Test Output box.
For specifics on the kinds of filters you can create and on saving filters, see Filter details.
Filter detailsSee the following subtopics for defining particulars of each kind filter (for information on creatingfilters, see Creating a filter):
l Diff Case
l Extract Number
l Format
l Line Count
l Regular Expression
l Remove Duplicate Lines
l Replace
HP Operations Orchestration (9.07)Page 159 of 301
Studio Authoring GuideFiltering outputs and results
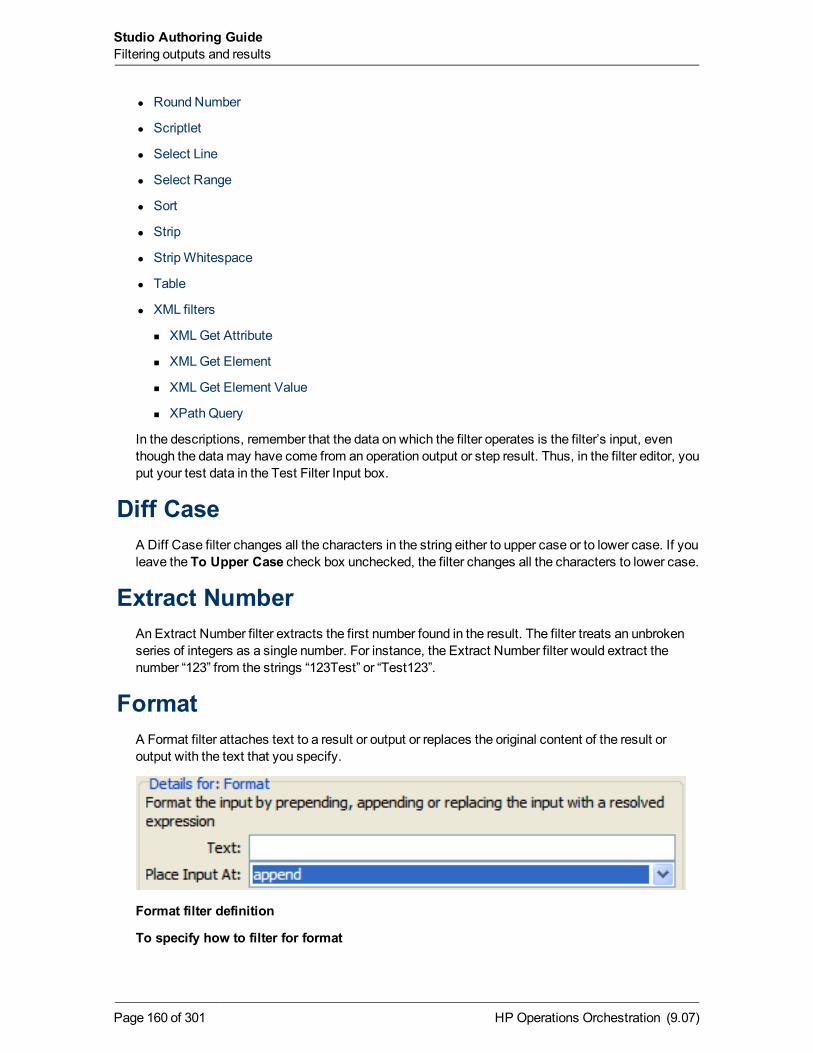
l Round Number
l Scriptlet
l Select Line
l Select Range
l Sort
l Strip
l StripWhitespace
l Table
l XML filters
n XMLGet Attribute
n XMLGet Element
n XMLGet Element Value
n XPath Query
In the descriptions, remember that the data on which the filter operates is the filter’s input, eventhough the datamay have come from an operation output or step result. Thus, in the filter editor, youput your test data in the Test Filter Input box.
Diff CaseA Diff Case filter changes all the characters in the string either to upper case or to lower case. If youleave the To Upper Case check box unchecked, the filter changes all the characters to lower case.
Extract NumberAn Extract Number filter extracts the first number found in the result. The filter treats an unbrokenseries of integers as a single number. For instance, the Extract Number filter would extract thenumber “123” from the strings “123Test” or “Test123”.
FormatA Format filter attaches text to a result or output or replaces the original content of the result oroutput with the text that you specify.
Format filter definition
To specify how to filter for format
HP Operations Orchestration (9.07)Page 160 of 301
Studio Authoring GuideFiltering outputs and results
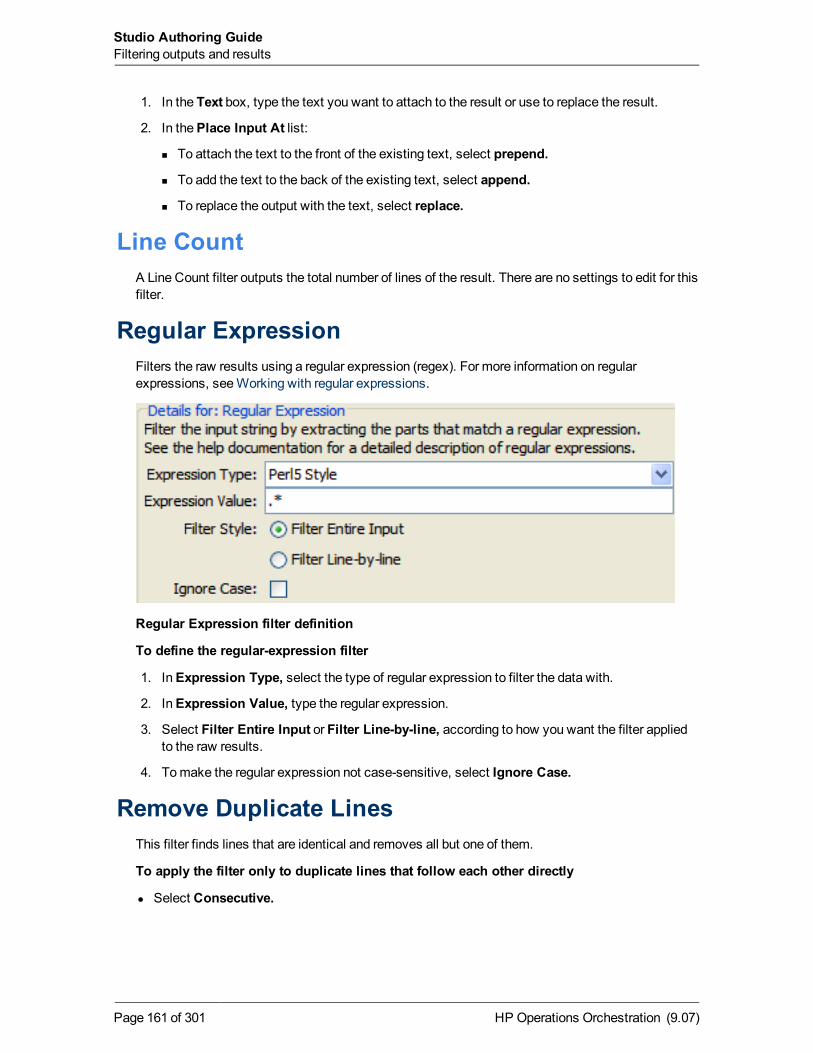
1. In the Text box, type the text you want to attach to the result or use to replace the result.
2. In thePlace Input At list:
n To attach the text to the front of the existing text, select prepend.
n To add the text to the back of the existing text, select append.
n To replace the output with the text, select replace.
Line CountA Line Count filter outputs the total number of lines of the result. There are no settings to edit for thisfilter.
Regular ExpressionFilters the raw results using a regular expression (regex). For more information on regularexpressions, seeWorking with regular expressions.
Regular Expression filter definition
To define the regular-expression filter
1. InExpression Type, select the type of regular expression to filter the data with.
2. InExpression Value, type the regular expression.
3. Select Filter Entire Input or Filter Line-by-line, according to how you want the filter appliedto the raw results.
4. Tomake the regular expression not case-sensitive, select Ignore Case.
Remove Duplicate LinesThis filter finds lines that are identical and removes all but one of them.
To apply the filter only to duplicate lines that follow each other directly
l Select Consecutive.
HP Operations Orchestration (9.07)Page 161 of 301
Studio Authoring GuideFiltering outputs and results
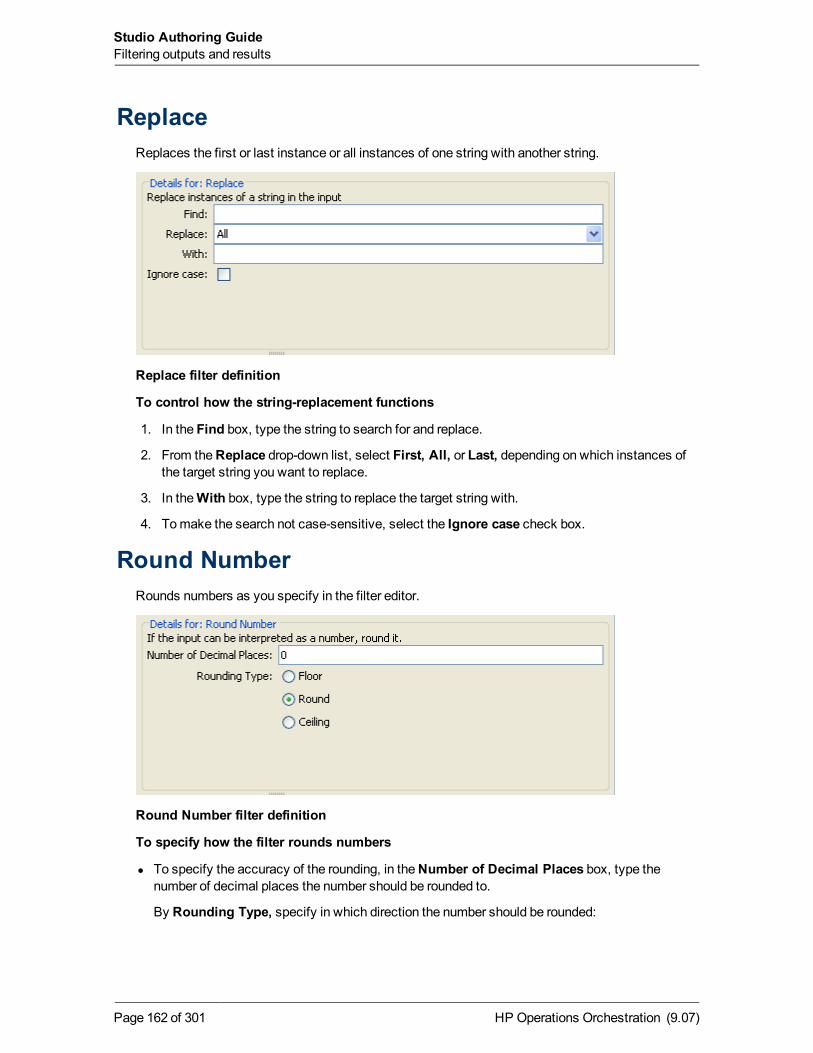
ReplaceReplaces the first or last instance or all instances of one string with another string.
Replace filter definition
To control how the string-replacement functions
1. In the Find box, type the string to search for and replace.
2. From theReplace drop-down list, select First, All, or Last, depending on which instances ofthe target string you want to replace.
3. In theWith box, type the string to replace the target string with.
4. Tomake the search not case-sensitive, select the Ignore case check box.
Round NumberRounds numbers as you specify in the filter editor.
Round Number filter definition
To specify how the filter rounds numbers
l To specify the accuracy of the rounding, in theNumber of Decimal Places box, type thenumber of decimal places the number should be rounded to.
By Rounding Type, specify in which direction the number should be rounded:
HP Operations Orchestration (9.07)Page 162 of 301
Studio Authoring GuideFiltering outputs and results
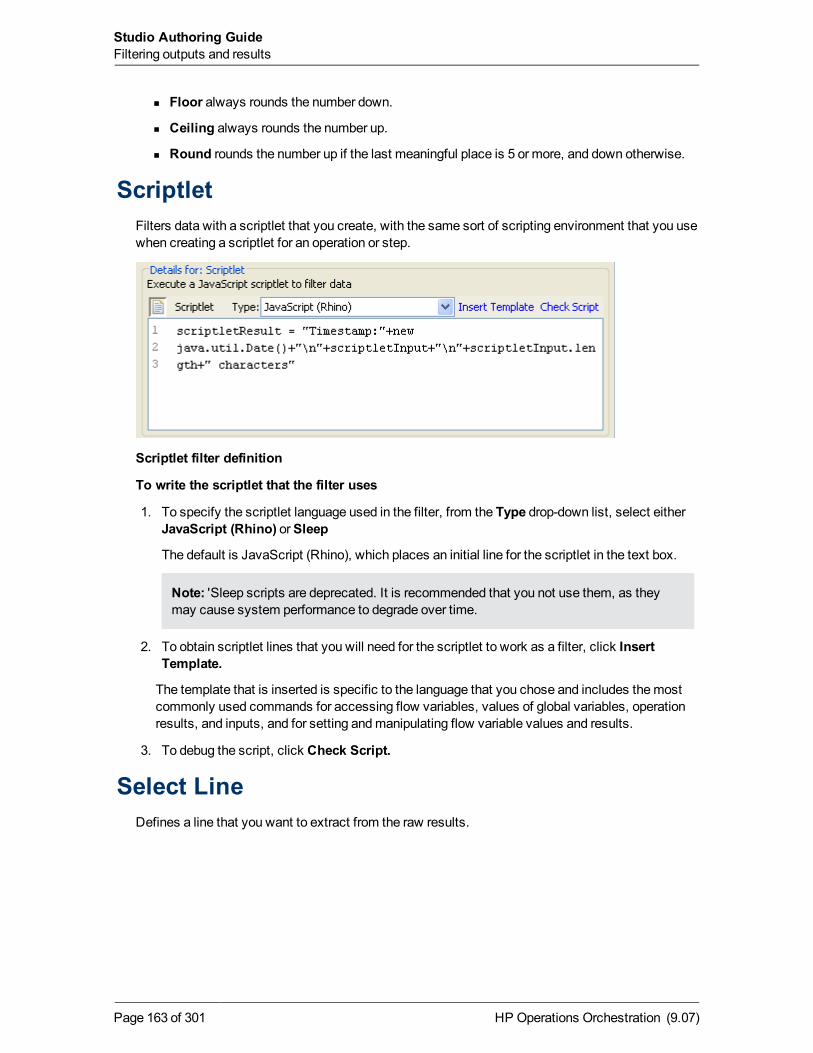
n Floor always rounds the number down.
n Ceiling always rounds the number up.
n Round rounds the number up if the last meaningful place is 5 or more, and down otherwise.
ScriptletFilters data with a scriptlet that you create, with the same sort of scripting environment that you usewhen creating a scriptlet for an operation or step.
Scriptlet filter definition
To write the scriptlet that the filter uses
1. To specify the scriptlet language used in the filter, from the Type drop-down list, select eitherJavaScript (Rhino) orSleep
The default is JavaScript (Rhino), which places an initial line for the scriptlet in the text box.
Note: 'Sleep scripts are deprecated. It is recommended that you not use them, as theymay cause system performance to degrade over time.
2. To obtain scriptlet lines that you will need for the scriptlet to work as a filter, click InsertTemplate.
The template that is inserted is specific to the language that you chose and includes themostcommonly used commands for accessing flow variables, values of global variables, operationresults, and inputs, and for setting andmanipulating flow variable values and results.
3. To debug the script, click Check Script.
Select LineDefines a line that you want to extract from the raw results.
HP Operations Orchestration (9.07)Page 163 of 301
Studio Authoring GuideFiltering outputs and results
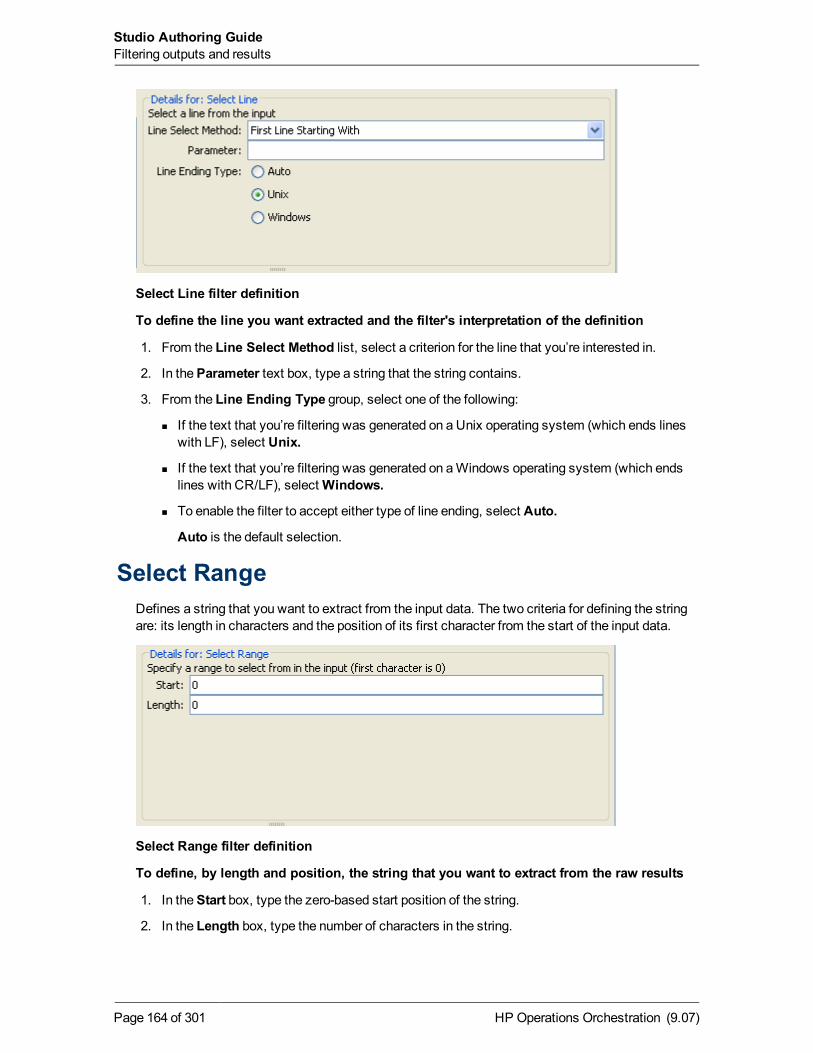
Select Line filter definition
To define the line you want extracted and the filter's interpretation of the definition
1. From the Line Select Method list, select a criterion for the line that you’re interested in.
2. In theParameter text box, type a string that the string contains.
3. From the Line Ending Type group, select one of the following:
n If the text that you’re filtering was generated on a Unix operating system (which ends lineswith LF), select Unix.
n If the text that you’re filtering was generated on aWindows operating system (which endslines with CR/LF), selectWindows.
n To enable the filter to accept either type of line ending, select Auto.
Auto is the default selection.
Select RangeDefines a string that you want to extract from the input data. The two criteria for defining the stringare: its length in characters and the position of its first character from the start of the input data.
Select Range filter definition
To define, by length and position, the string that you want to extract from the raw results
1. In theStart box, type the zero-based start position of the string.
2. In the Length box, type the number of characters in the string.
HP Operations Orchestration (9.07)Page 164 of 301
Studio Authoring GuideFiltering outputs and results
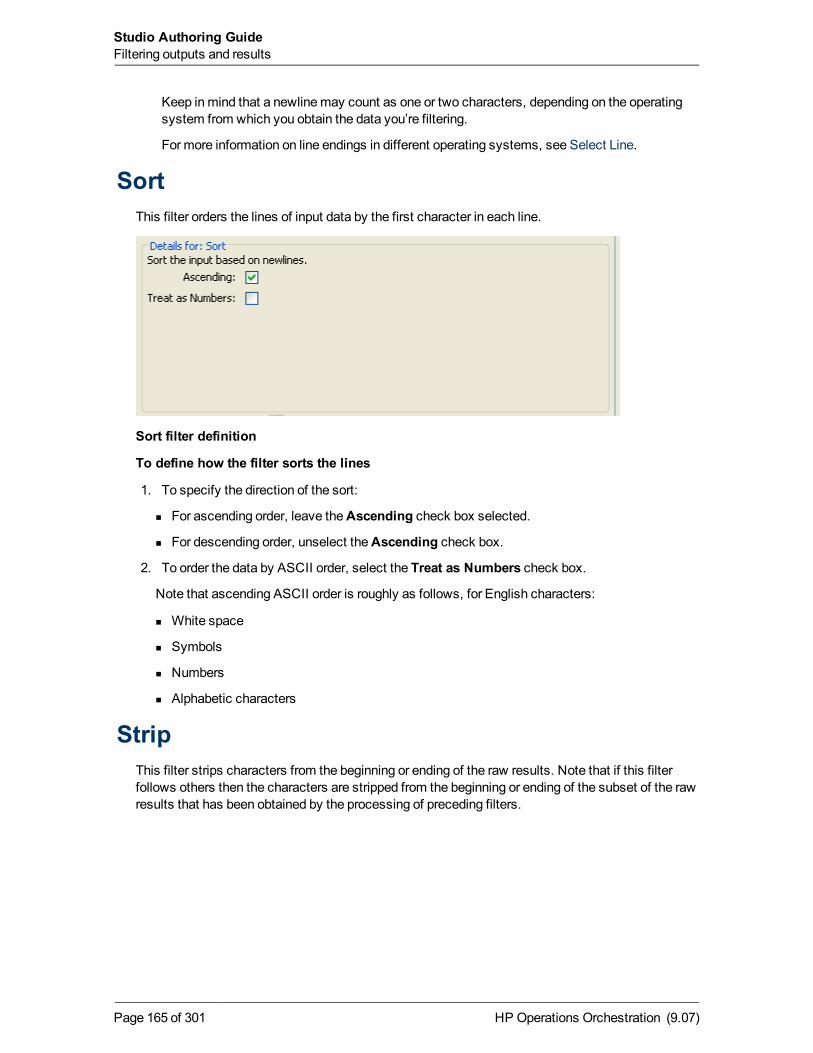
Keep inmind that a newlinemay count as one or two characters, depending on the operatingsystem from which you obtain the data you’re filtering.
For more information on line endings in different operating systems, see Select Line.
SortThis filter orders the lines of input data by the first character in each line.
Sort filter definition
To define how the filter sorts the lines
1. To specify the direction of the sort:
n For ascending order, leave theAscending check box selected.
n For descending order, unselect theAscending check box.
2. To order the data by ASCII order, select the Treat as Numbers check box.
Note that ascending ASCII order is roughly as follows, for English characters:
n White space
n Symbols
n Numbers
n Alphabetic characters
StripThis filter strips characters from the beginning or ending of the raw results. Note that if this filterfollows others then the characters are stripped from the beginning or ending of the subset of the rawresults that has been obtained by the processing of preceding filters.
HP Operations Orchestration (9.07)Page 165 of 301
Studio Authoring GuideFiltering outputs and results
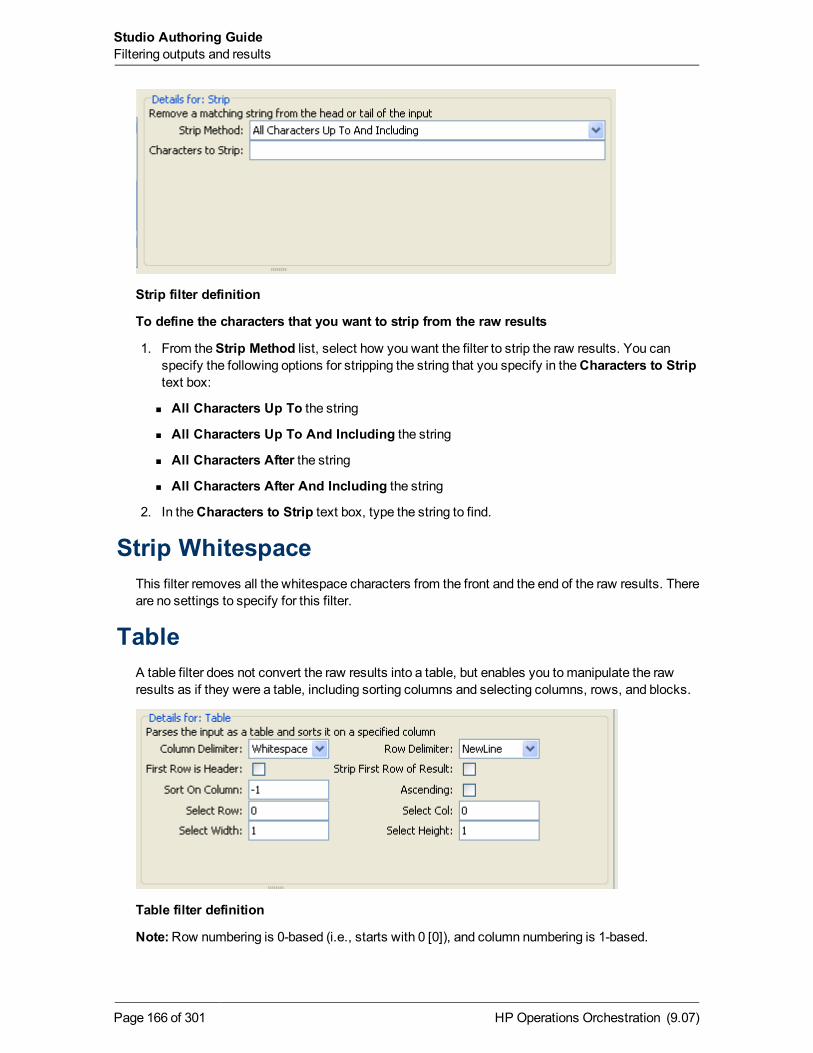
Strip filter definition
To define the characters that you want to strip from the raw results
1. From theStrip Method list, select how you want the filter to strip the raw results. You canspecify the following options for stripping the string that you specify in theCharacters to Striptext box:
n All Characters Up To the string
n All Characters Up To And Including the string
n All Characters After the string
n All Characters After And Including the string
2. In theCharacters to Strip text box, type the string to find.
Strip WhitespaceThis filter removes all the whitespace characters from the front and the end of the raw results. Thereare no settings to specify for this filter.
TableA table filter does not convert the raw results into a table, but enables you tomanipulate the rawresults as if they were a table, including sorting columns and selecting columns, rows, and blocks.
Table filter definition
Note:Row numbering is 0-based (i.e., starts with 0 [0]), and column numbering is 1-based.
HP Operations Orchestration (9.07)Page 166 of 301
Studio Authoring GuideFiltering outputs and results
To define how the results are presented in a table
1. In theColumn Delimiter list, choose the character that will serve to divide the data intocolumns in ameaningful way.
2. In theRow Delimiter list, choose the character that will serve to divide the data into rows in ameaningful way.
Note: Two ormore consecutive white spaces count as a single white space, so a columnmaybe occupied by data that you expected to find in a column to the right. For example, thisbehavior will appear if you apply this filter to the output of a “dir” command-line commandwithwhitespace specified as the column delimiter.
3. To treat themembers of the first row as column headers, select First Row is Header.
4. To remove the first row, select Strip First Row of Result.
5. To sort on a column, type the (1-based) column number in theSort On Column box.
The value -1means do not sort on any column.
6. To specify ascending order, select theAscending box.
By default, the sort order is descending.
7. To select a row you want the filter to extract:
n inSelect Row, type the (0-based) row number.
InSelect Row, -1 selects all the rows in the data.
n InSelect Width, type the number of columns in that row that you want extracted.
InSelect Width, -1 selects all the remaining columns in the data to the right of the columnspecified inSelect Col.
8. To select a column you want the filter to extract:
n InSelect Col, type the column number.
InSelect Col, -1 selects all the columns in the data.
n InSelect Height, type the number of rows in that column that you want extracted.
InSelect Height, -1 selects all the remaining rows in the data below the row specified inSelect Row.
For example, to extract the first 5 rows of the 2nd through 4th columns, you would specify thefollowing. In these settings, the first two settings define the rows selected, and the second twosettings define the rows selected.
l In Select Row: 0
l In Select Height: 5
l In Select Col: 2
l In Select Width: 3
HP Operations Orchestration (9.07)Page 167 of 301
Studio Authoring GuideFiltering outputs and results
XML filtersXML filters enable you to parse XMLwithin a step, the XML being obtained from the step’s input orresult rather than having to create a flow to and pass the XML to one of the XML-processingoperations in HP OO default content.
Using XML filters in an operation and using the XML-processing operations in default content differsin several respects. First, there is the difference between accomplishing the task within anoperation and using the infrastructure of a flow to accomplish the task. In addition, filters within anoperation have some limits that the XML-processing operations do not have. These limitations aredescribed in the following sections on the particular filters. Whether you choose to filter input XMLwith a filter or an operationmay depend on how you obtain the XML.
Following are the XML filters:
l XMLGet Attribute
l XMLGet Element
l XMLGet Element Value
l XPath Query
For illustration of each XML filters, these topics examples reference the following XML example:
<?xml version="1.0" encoding="utf-8"?><tickets>
<ticket id="1448" severity="3"><customer firstName="John" lastName="Doe">
<volume>30000</volume><company>myOrg</company><position>CIO</position><contactInfo>
<email>[email protected]</email><email>[email protected]</email><mobile>12065551212</mobile><description internal="1">Private contact info</description><description>Partial contact info</description>
</contactInfo><description>Our best customer</description>
</customer><details>
<description>A simple Test xml</description><comment user="john"> Initially raising ticket</comment><comment user="frank"> Problem diagnosed, not a real
issue</comment><comment user="albert">ok, I'm going to close it.</comment><state>Closed</state>
</details></ticket><ticket id="1886" severity="5">
<customer firstName="Elaine" lastName="Benson"><volume>50000</volume>
HP Operations Orchestration (9.07)Page 168 of 301
Studio Authoring GuideFiltering outputs and results

<company>herCompany</company><position>CEO</position><contactInfo>
<email>[email protected]</email><mobile>011445551212</mobile><description internal="1">Private contact info</description><description>Partial contact info</description>
</contactInfo><description>Our other best customer</description>
</customer><details>
<description>datastream bug</description><comment user="jack">Customer found bug.</comment><comment user="elsbeth">It is a third-party supplier
bug.</comment><state>Closed</state>
</details></ticket>
</tickets>
XML Get AttributeThe XMLGet Attribute filter extracts the value for each of one or more instances of the attribute thatyou specify. In the filter editor, you can control which instance of the attribute the filter is applied toby specifying an element path to the attribute.
You can obtain the value for a single instance of the attribute or for multiple instances, returned in atable. In such a table, the columns are comma-delimited and the rows are newline-delimited.
XML Get Attribute filter definition
To specify how the XMLGet Attribute filter extracts data
1. In theElement Path box, specify the path of the element that contains the attribute whosevalue you want to extract. Use forward slashes to separate the parts of the path to the element.
To control which instance of the element the filter gets the attribute’s value from, add aspecification such as [2] or [3]. The numbering of elements is 1-based (i.e., starts with [1]). Thusto specify the second instance of an element, you would use [2].
2. To search child elements of the element you’ve specified, select the Include sub-elementscheck box.
HP Operations Orchestration (9.07)Page 169 of 301
Studio Authoring GuideFiltering outputs and results
3. In theAttribute Name box, type the name of the attribute whose value you want.
4. To restrict the result extracted to the value of a single instance of an attribute, select SingleMatch.
OR
To extract the value of all the instances of the attribute you have named, select As Table.
For instance, in the example XML (given in the topic XML filters):
l To find the name of a user for one of the comments:
n In theElement Path box, type:
/ticket/details/comment
OR
n To get the name of the user for a particular comment—say, the second one—in theElementPath box, type:
/ticket/details/comment[2]
n In theAttribute Name box, type:
user
n BesideResult, select Single Match.
The output will be john.
l To find the name of the user for each comment:
n In theElement Path box, type:
/ticket/details/comment
n In theAttribute Name box, type:
user
n BesideResult, select As Table.
The output will be as follows:
Path,user
/ticket/details/comment[1],john
/ticket/details/comment[2],frank
/ticket/details/comment[3],albert
XML Get ElementThe XMLGet Element filter enables you to extract an element in its entirety (including childelements, values and attributes) by describing it in any of the following ways:
HP Operations Orchestration (9.07)Page 170 of 301
Studio Authoring GuideFiltering outputs and results

l By a relative or absolute path
l By a child element of the element you want to extract. You can also search by a specific value ofthe child element.
l By an attribute of the element you want to extract. You can also search by a specific value of theattribute.
XML Get Element filter definition
In the following procedure, you can enter specifications in any one or combination of the text boxes.
To specify the element that you want to extract
1. In theElement Path box, type an absolute path to the element.
Within the path, a relative path indicator indicates location relative to the element that precedesthe relative path indicator.
n ../ specifies the parent of the last-named element.
n ./ specifies the last-named element.
For instance, in the XML example, <volume> and <company> are sibling elements, bothchildren of the <customer> element. You could specify the <company> element with thefollowing relative path:
/tickets/ticket/customer/volume/../company
If there is more than one instance of the identified element, simply specifying the path, as in thepreceding example returns all the instances of the element.
You can specify a particular instance of any element in the path with an integer inside squarebrackets. For instance:
/tickets/ticket/details/comment specifies all the comments in the details for all thetickets.
/tickets/ticket/details/comment[2] specifies the second comment for each ticket.
/tickets/ticket[2]/details/comment specifies all the comments for the secondticket.
2. In theChild Named box, type the name of an element that is a child of the element (orelements) that you want to extract. If the child element has a value, you can narrow the resultsby typing that value in theValue box.
HP Operations Orchestration (9.07)Page 171 of 301
Studio Authoring GuideFiltering outputs and results

Notes:n TheChild Named box works for only one level of child elements. That is, the filter only
returns the direct parent of the child element that you specify.
n TheValue box is intended for brief values; the value that you type theremust be anexact match of the value of the child element of the element that you want to extract.
3. In theAttribute Named box, type the name of an attribute that is unique to the element youwant to extract. To further narrow the results, you can type a value of the attribute in the Valuebox.
For instance, in the example XML, there are several ways to extract the customer element and all ofits contents:
l In theElement Path box, type:
/ticket/customer
l In theChild Named box, type any of the child elements of customer:
company
position
contactInfo
If you type company in theChild box, then in the accompanyingValue box, you could also typemyOrg
l In theAttribute named box, type one of the following:
firstname
lastname
In the accompanyingValue box, you could type the respective value for those attributes:
John
Doe
For each of these filters, the output is the customer element, as follows:
<customer firstName="John" lastName="Doe"><company>myOrg</company><position>CIO</position><contactInfo>
<email>[email protected]</email><email>[email protected]</email><mobile>12065551212</mobile><description internal="1">Private contact info</description><description>Partial contact info</description>
</contactInfo><description>Our best customer</description>
</customer>
HP Operations Orchestration (9.07)Page 172 of 301
Studio Authoring GuideFiltering outputs and results
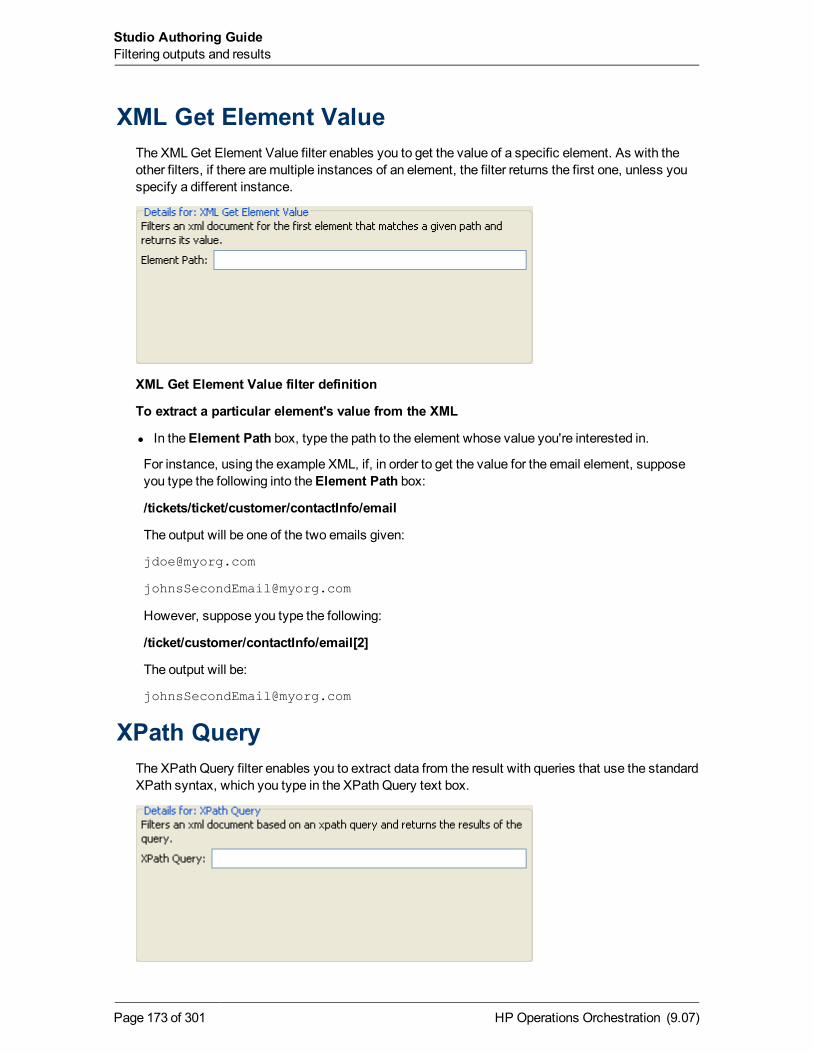
XML Get Element ValueThe XMLGet Element Value filter enables you to get the value of a specific element. As with theother filters, if there aremultiple instances of an element, the filter returns the first one, unless youspecify a different instance.
XML Get Element Value filter definition
To extract a particular element's value from the XML
l In theElement Path box, type the path to the element whose value you're interested in.
For instance, using the example XML, if, in order to get the value for the email element, supposeyou type the following into theElement Path box:
/tickets/ticket/customer/contactInfo/email
The output will be one of the two emails given:
However, suppose you type the following:
/ticket/customer/contactInfo/email[2]
The output will be:
XPath QueryThe XPath Query filter enables you to extract data from the result with queries that use the standardXPath syntax, which you type in the XPath Query text box.
HP Operations Orchestration (9.07)Page 173 of 301
Studio Authoring GuideFiltering outputs and results
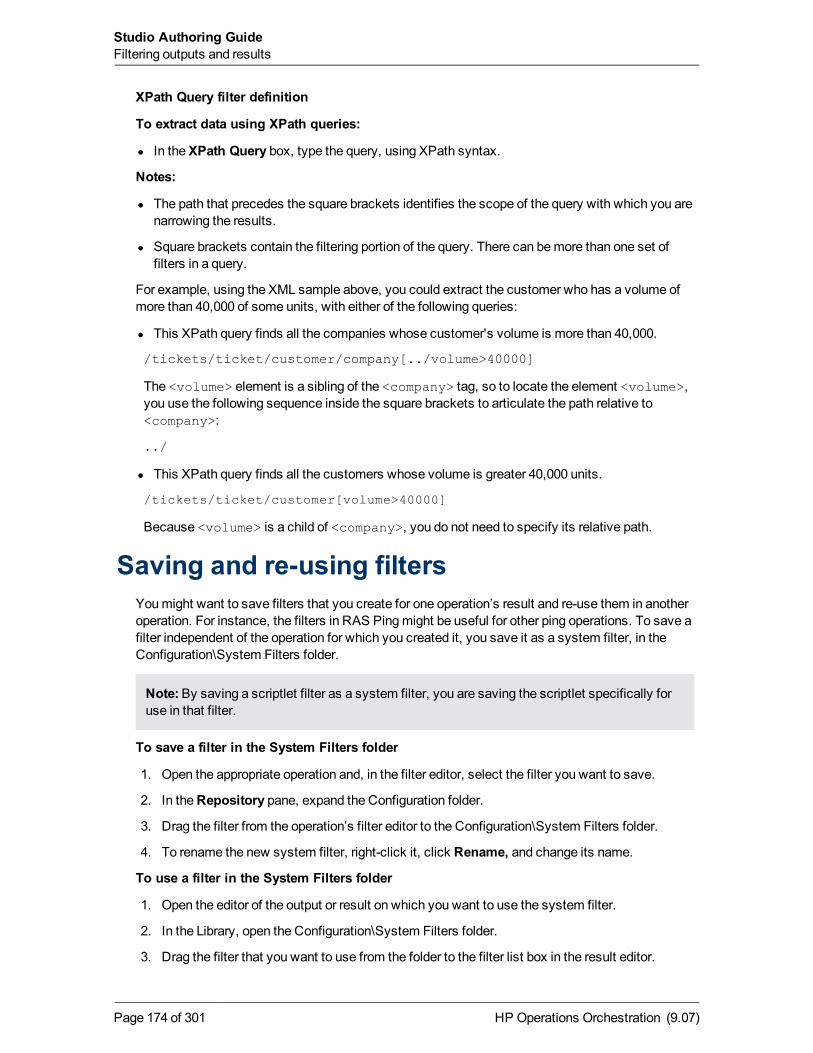
XPath Query filter definition
To extract data using XPath queries:
l In theXPath Query box, type the query, using XPath syntax.
Notes:
l The path that precedes the square brackets identifies the scope of the query with which you arenarrowing the results.
l Square brackets contain the filtering portion of the query. There can bemore than one set offilters in a query.
For example, using the XML sample above, you could extract the customer who has a volume ofmore than 40,000 of some units, with either of the following queries:
l This XPath query finds all the companies whose customer's volume is more than 40,000.
/tickets/ticket/customer/company[../volume>40000]
The <volume> element is a sibling of the <company> tag, so to locate the element <volume>,you use the following sequence inside the square brackets to articulate the path relative to<company>:
../
l This XPath query finds all the customers whose volume is greater 40,000 units.
/tickets/ticket/customer[volume>40000]
Because <volume> is a child of <company>, you do not need to specify its relative path.
Saving and re-using filtersYoumight want to save filters that you create for one operation’s result and re-use them in anotheroperation. For instance, the filters in RAS Pingmight be useful for other ping operations. To save afilter independent of the operation for which you created it, you save it as a system filter, in theConfiguration\System Filters folder.
Note:By saving a scriptlet filter as a system filter, you are saving the scriptlet specifically foruse in that filter.
To save a filter in the System Filters folder
1. Open the appropriate operation and, in the filter editor, select the filter you want to save.
2. In theRepository pane, expand the Configuration folder.
3. Drag the filter from the operation’s filter editor to the Configuration\System Filters folder.
4. To rename the new system filter, right-click it, click Rename, and change its name.
To use a filter in the System Filters folder
1. Open the editor of the output or result on which you want to use the system filter.
2. In the Library, open the Configuration\System Filters folder.
3. Drag the filter that you want to use from the folder to the filter list box in the result editor.
HP Operations Orchestration (9.07)Page 174 of 301
Studio Authoring GuideFiltering outputs and results
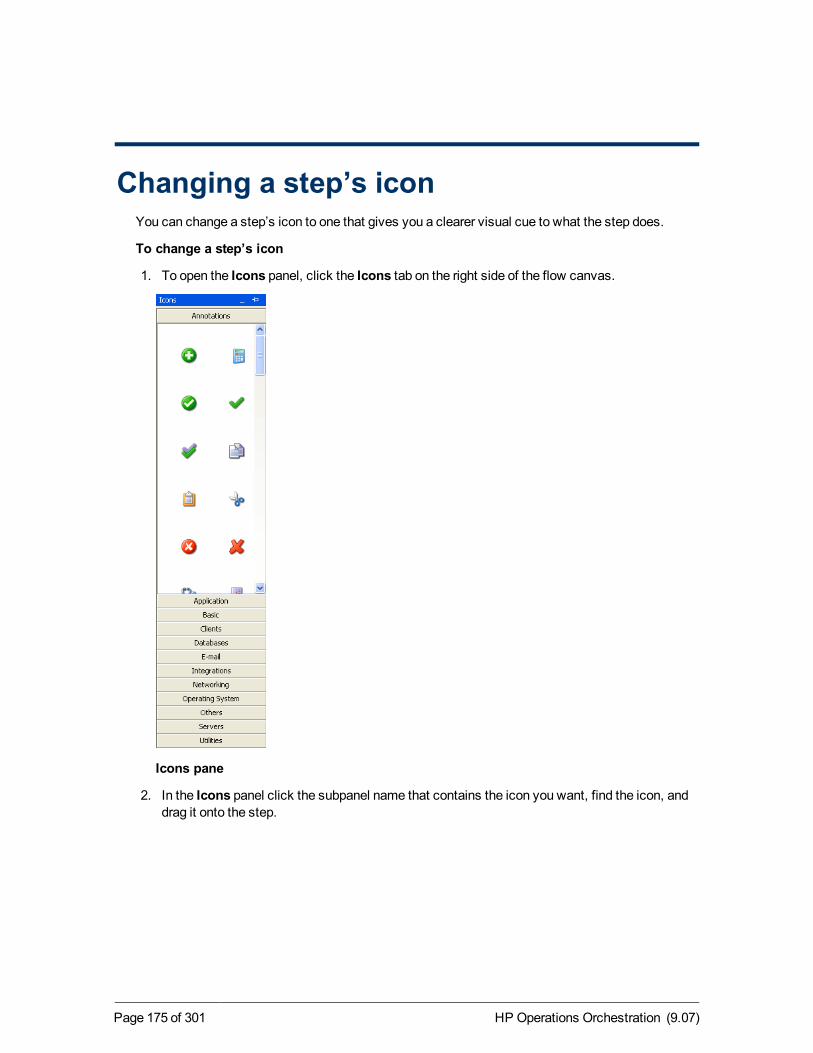
Changing a step’s iconYou can change a step’s icon to one that gives you a clearer visual cue to what the step does.
To change a step’s icon
1. To open the Icons panel, click the Icons tab on the right side of the flow canvas.
Icons pane
2. In the Icons panel click the subpanel name that contains the icon you want, find the icon, anddrag it onto the step.
HP Operations Orchestration (9.07)Page 175 of 301

System propertiesSystem properties are global variables: name/value pairs that are stored in the HP OO globalcontext and are provided to any flow run when it starts. Any reference to the system propertyobtains the system property’s value. This can create desirable efficiencies of authoring and runningflows.
You should, however, be cautious about creating system properties or changing their valuesbecause they:
l Have global scope, becoming part of any flow run’s context when the run is begun.
As a result, changing a system property’s value can break existing operations and flows.
l Become part of the context of a flow run when the run begins.
l Are not readily visible.
System properties are visible in the Studio Debugger (in theContext Inspector, underSystemProperties) and, under theRepository pane’s Configuration folder, in the System Propertiesfolder.
In addition, creating an input when you create a flow automatically creates a flow variable of thesame name as the input when the flow is run. Thus you can unwittingly create an empty flowvariable of the same name as the system property, thus obtaining unexpected behavior.
l Are superseded by flow variables of the same name.
If an input can get its value from a flow variable—that is, if the flow variable exists and has a valueassigned to it—then the flow variable has priority over the system property as the source of theinput’s value.
On the other hand, the value of a system property cannot be changed by the assignment of an inputvalue or result to the system property. When you assign a value from either of those two sources toa system property, you are really creating a flow variable with the same name as the systemproperty and assigning the value to that flow variable.
The following topics cover the tasks involved in using system properties:
l Creating system properties
l Obtaining the values of system properties
l Changing the value of a system property
Creating system propertiesTo create a system property
1. In theRepository pane of Studio, open the Configuration folder, right-click the SystemProperties folder, and then click New.
HP Operations Orchestration (9.07)Page 176 of 301
2. In the text dialog box that appears, type a name for the new system property, and then clickOK.
The system property’s Properties sheet appears.
3. In theDescription box, type a description of the system property.
4. In theProperty Value box, type a value for the system property.
For example, to create a system property that provides a RAS override throughout the HP OOrepository, you would:
1. Name the system property (such as "overrideRAS").
2. Assign as its value the name of a valid RAS reference, such as RAS_Operator_Path.
In this example, the system property’s reference in any flows would be:
${overrideRAS}
Obtaining the values of system propertiesTo use the value of a system property in a flow:
1. Specify it as the data source for a flow or step input.
2. In a scriptlet, use the appropriate command to obtain the system property’s value.
For information on the required command and its syntax, on theScriptlet tab of an operation, clickInsert Template. The template provides the necessary commands for working with the globalcontext.
Changing the value of a system propertyThere are several ways to change the value of a system property:
l In a scriptlet
This affects the change in the value from the point at which script is run. For information on therequired command and its syntax, on theScriptlet tab of an operation, click Insert Template. Thetemplate provides the necessary commands for working with the global context.
l By creating an operation that sets the system property’s value.
l By locating the system property in the Configurations\System Properties folder, opening it, andchanging the value.
HP Operations Orchestration (9.07)Page 177 of 301
Studio Authoring GuideSystem properties
Flow designWhen creating flows, keep the following inmind:
l Do not create flows that create unlimited growth in memory.
For example, a flow that runs an infinite loop, in which the flow sleeps, performs some tasks, thengoes back to sleep. In this case, the Run History grows until the system runs out of memory.
l You can use subflows to simplify flow design.
Using subflows to simplify flow designYou can simplify a flow by creating steps from subflows. This way, you can:
l Separate the programming tasks into smaller, moremanageable pieces.
l Test parts of the flow individually.
l Reuse the pieces that you create.
For example, suppose you want to copy a set of files from one server share to another. You could:
1. Create a step from the List Iterator operation, providing some list inputs such as the following(and specifying a semicolon [;] as the separator between themembers of the list):
\\server1\share1\fileAAA.zip,\\server2\share2\fileAAA.zip;\\server1\share1\fileBBB.zip,\\server2\share2\fileBBB.zip;
On the first iteration, the List Iterator step extracts the following:
\\server1\share1\fileAAA.zip,\\server2\share2\fileAAA.zip.
2. To use \\server1\share1\fileAAA.zip as the source pathname and\\server2\share2\fileAAA.zip as the destination pathname, you create twoListItemGrabber steps, one to extract the source pathname and one to extract the destinationpathname.
Alternatively, you could simplify the flow and create a reusable piece by doing the following:
1. Create a flow that consists only of the two ListItemGrabber steps and the success and failurereturn steps.
2. Drag the flow onto the parent flow, to create a step from the subflow.
In this case, you need to enable the parent flow to use data that have been created or modified bythe subflow. In this example, a copy step in the parent flow needs each source pathname anddestination pathname. For the technique for passing information from a subflow to its parent flow,see Passing data from a subflow to a parent flow.
HP Operations Orchestration (9.07)Page 178 of 301
Passing data from a subflow to a parentflow
Subflows often generate data that steps in the parent flow need to access. Flow variables that youcreate within a flow cannot be referenced outside that flow. However, you can pass values outsidethe flow to a parent flow by obtaining for a step result the value of a flow output field of the subflowthat that step was made from.
When you complete the change of assignments that makes this possible, the datamovement goesroughly like this:
1. Within a subflow, on a step, a result’s data is assigned to a flow output field.
2. In the parent flow, on a stepmade from the subflow, the step result gets its value from the flowoutput field of the operation (the subflow) that the step was made from.
3. Still in the parent flow, the step result is passed to a flow variable for use later in the parentflow.
Here is an example that describes the process in more detail. These steps assume that you havedone the other things tomake a flow valid, and that you know how to create results and assignvalues to inputs.
1. Create a command operation, and have it execute “dir C:\”. Let’s call it “dir.”
2. Create a flow called “flowdir”.
3. In the “flowdir” flow, create a step using the operation “dir”.
4. On the “dir” step, add a result that comes from the operation’s output string.
5. Assign the result to a flow output field, and name the result “foo”.
Now the flow has a flow output field also named “foo.”
6. Create another flow. Let’s call it “parentflow”.
7. In “parentflow,” create a step from “flowdir”.
8. Add a result to the “flowdir” step that you just created.
By default, the new result is named “foo”, it obtains its value from the Result Field: foo, and thevalue is assigned to a flow variable also named “foo”.
The result “foo” of the subflow’s step “dir” is now available to transitions and steps that comeafter the “flowdir” step in the parent flow.
9. To test this, add, after the “flowdir” step, a step created from the Basic Notify operation.
In this new step:
n Define the notifyData input as being a single value, that uses a constant value, and specifythat the constant value is ${foo}.
HP Operations Orchestration (9.07)Page 179 of 301
n Define the notifyMethod input as being a single value, that uses a constant value, andspecify that the constant value is Display.
n To avoid a user prompt, define the subject input as being a single value, that uses a constantvalue, and specify that the constant value is something like “If this worked, the flow outputfield says: "contents of outputString, aka foo"
n Debug the flow.
Here is the detailed procedure:
To make data from a step in the subflow available in the parent flow
1. On the subflow’s authoring canvas, open the Inspector for the step whose data you want tomake available to the parent flow.
For information on opening the Inspector for a step, seeModifying a step.
2. Click theResults tab and add a result, using the procedure described in Step results.
3. In the row that appears for configuring the result:
n UnderAssign To, select Flow Output Field.
This stores the value in an output field for the subflow, whichmakes the data available outsideof the subflow.
n UnderName, type a name for the flow output field.
n Under From, select Result Field:Result.
n To filter the result, create a filter (see Filtering outputs and results).
4. In the parent flow’s authoring canvas, open the Inspector for the step that was created from thesubflow.
5. Click theResults tab and create a step result.
By default, the new result:
l Obtains its value from the result field that has the name of the subflow’s flow output field.
l Has the same name as that of the subflow’s flow output field.
l Is assigned to a flow variable, which by default has the same name as the result, and which isnow available for use in transitions and steps that follow this step.
HP Operations Orchestration (9.07)Page 180 of 301
Studio Authoring GuidePassing data from a subflow to a parent flow
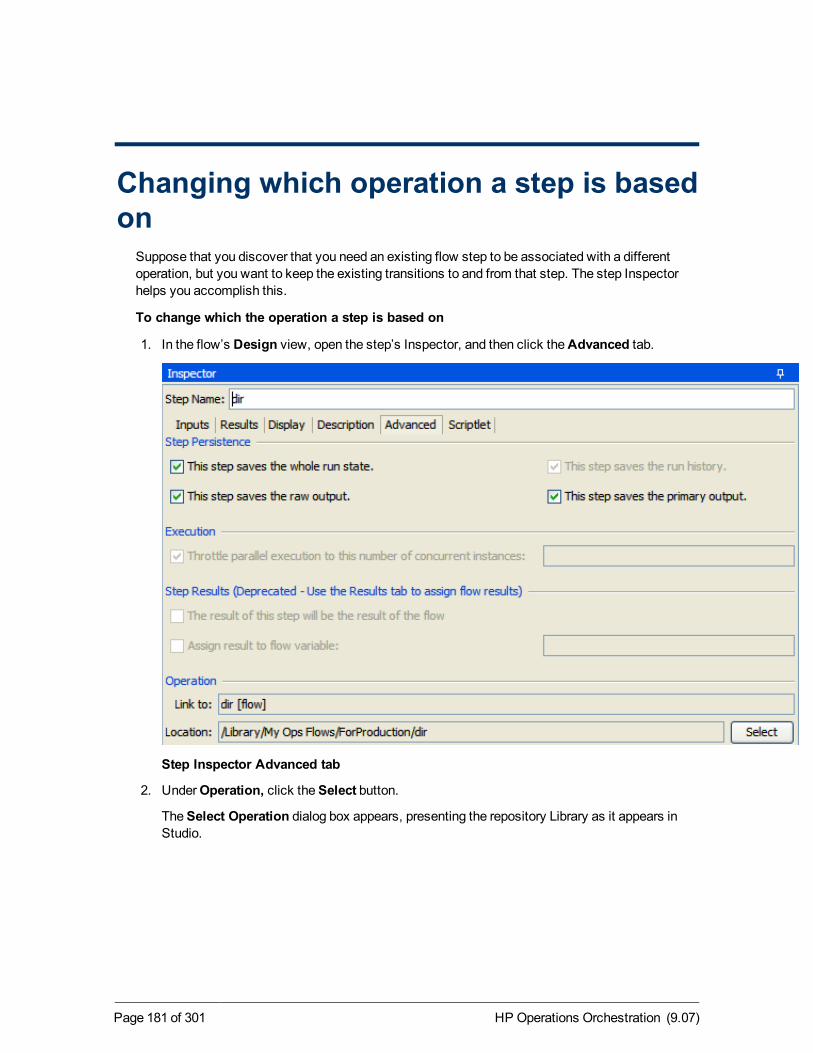
Changing which operation a step is basedon
Suppose that you discover that you need an existing flow step to be associated with a differentoperation, but you want to keep the existing transitions to and from that step. The step Inspectorhelps you accomplish this.
To change which the operation a step is based on
1. In the flow’s Design view, open the step’s Inspector, and then click theAdvanced tab.
Step Inspector Advanced tab
2. UnderOperation, click theSelect button.
TheSelect Operation dialog box appears, presenting the repository Library as it appears inStudio.
HP Operations Orchestration (9.07)Page 181 of 301
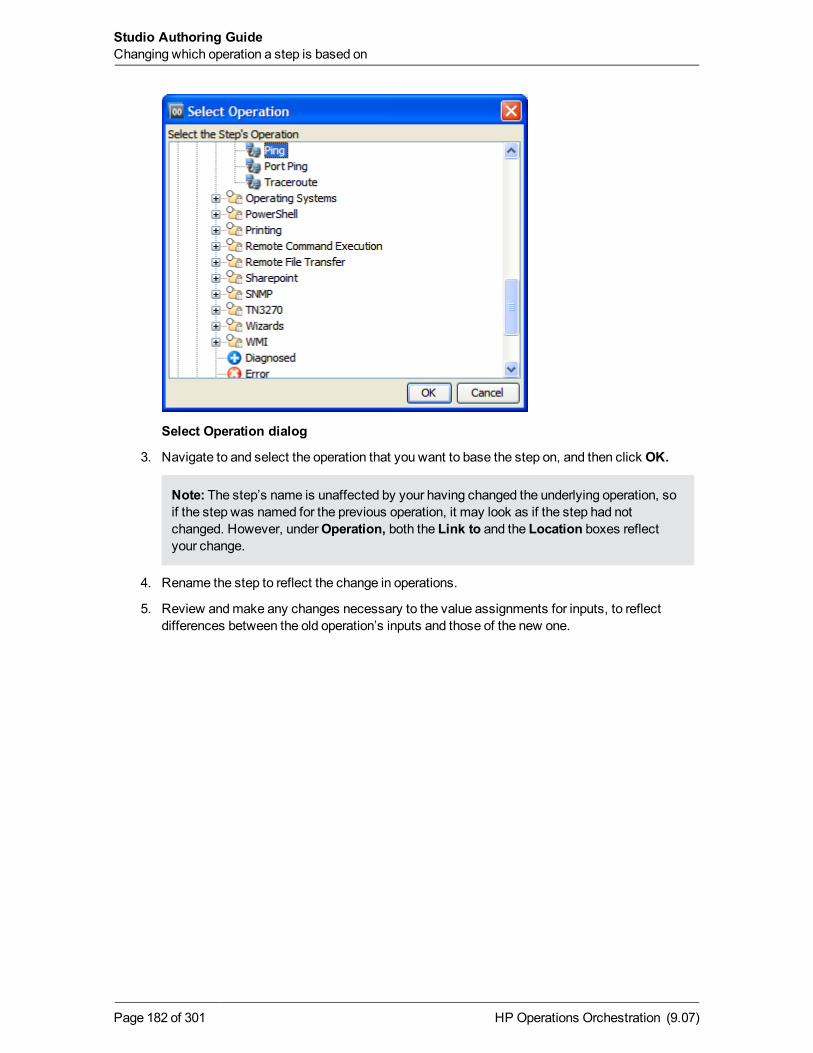
Select Operation dialog
3. Navigate to and select the operation that you want to base the step on, and then click OK.
Note: The step’s name is unaffected by your having changed the underlying operation, soif the step was named for the previous operation, it may look as if the step had notchanged. However, underOperation, both the Link to and the Location boxes reflectyour change.
4. Rename the step to reflect the change in operations.
5. Review andmake any changes necessary to the value assignments for inputs, to reflectdifferences between the old operation’s inputs and those of the new one.
HP Operations Orchestration (9.07)Page 182 of 301
Studio Authoring GuideChanging which operation a step is based on
Step descriptionsStep descriptions are the description of the operation or flow from which the step was made. Thus,step descriptions include search words that are likely to help you or others find your flow. Suppose,for example, that you want to find an operation that has the description “Performs a ping and atraceroute to the server”. Youmight specify the following search criteria on theSearch tab:
description:ping traceroute
The results produced by such a search would include flows and operations that have either or bothof the words “ping” and “traceroute” in the description of the flow or one of its steps.
For more information on using theSearch tab, see Defining a search.
To create a description for the step or flow
1. On the flow’s Properties sheet or step’s Inspector, click theDescription tab and type adescription of the step.
2. Click OK, and then save your changes.
HP Operations Orchestration (9.07)Page 183 of 301
Running flows automaticallyWhen a flow can run automatically, Central users can schedule the flow’s runs, and the flow can bestarted from aURL. Running automatically means that a flow does not require human interventionto start or complete, whichmeans that it cannot have any inputs that get data from user prompts.More, if the flow’s inputs get their data from flow variables, the Central user who schedules the runscan control the data that are assigned to the inputs for each run.
To enable a flow to run automatically
1. For any inputs that get their data from user prompts, change the data source to Use Constant.
2. To enable a Central user to assign inputs different data on different runs, create a flow variableand reference the flow variable for the value in the input’s Use Constant data sourceassignment.
For information on changing data sources for inputs, see Inputs: Providing data to operations.
For information on creating schedules that run flows automatically, see the HP OOCentral User'sGuide (Central_UsersGuide.pdf).
For information on running flows from outside Central, see the HP OOCentral User's Guide(Central_UsersGuide.pdf) and the HP OOAdministrator's Guide (AdminGuide.pdf).
HP Operations Orchestration (9.07)Page 184 of 301
Debugging flowsThe debugger in Studio helps you track down the causes of errors and unexpected behaviors inflows that you test there. It does so by displaying the following information:
l A tree showing the steps executed
l Step results and operation outputs generated for each step
l Flow variable values in the various contexts current to each step
l The transition description for each transition followed
You can also set breakpoints for the debugger and force response choices in order to zero in on thebehavior you want to test.
All of this capability focuses on fixing broken flows and on the types of data described. To learnparticularly how a flow that has steps that use parallel processing will behave in Central, there is nosubstitute for running the flow in Central in a staging environment after testing the flow in the Studiodebugger.
The Studio debugger debugs a flow in Central if the flow is in the public repository or in Studio if theflow is in a private repository. This is especially important to be aware of when a flow containsparallel processing, as it behaves differently in Studio than it does in Central.
Notes:l Parallel processing in a flow (processing carried out in one or more nonblocking, multi-
instance, or parallel split steps) that takes place in parallel in Central, runs serially in theStudio debugger.
l In a parallel split step, the lanes always execute serially. In Central, they all begin at thesame time, and the order in which they finish depends on variable factors that cannot bepredicted in Studio. Thus the debugger cannot predict considerations such as in the case ofconflicting writes to the same flow variable, which lane writes to the flow variable last. Onthe other hand, in Studio, you canmanipulate the order in which the lanes will finish in thedebugger in order to test, in a controlled fashion, various scenarios.
l In amulti-instance step, the instances are executed serially. While this means that you arenot testing under actual conditions, it does allow you to examine how long it takes eachinstance to finish.
l Nonblocking steps do not behave as nonblocking steps in the debugger. That is, in thedebugger, steps that follow a nonblocking step do not execute until the nonblocking stephas completed.
Debugging a flowWhen you debug a flow using the Studio debugger:
HP Operations Orchestration (9.07)Page 185 of 301
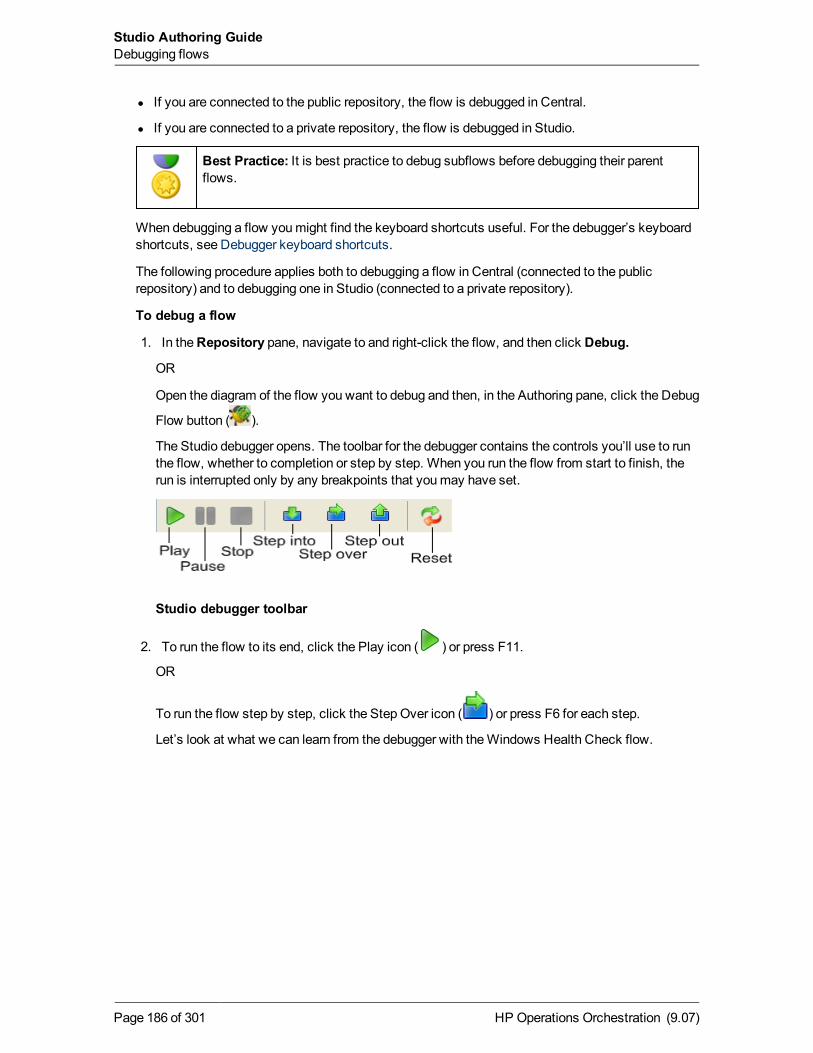
l If you are connected to the public repository, the flow is debugged in Central.
l If you are connected to a private repository, the flow is debugged in Studio.
Best Practice: It is best practice to debug subflows before debugging their parentflows.
When debugging a flow youmight find the keyboard shortcuts useful. For the debugger’s keyboardshortcuts, see Debugger keyboard shortcuts.
The following procedure applies both to debugging a flow in Central (connected to the publicrepository) and to debugging one in Studio (connected to a private repository).
To debug a flow
1. In theRepository pane, navigate to and right-click the flow, and then click Debug.
OR
Open the diagram of the flow you want to debug and then, in the Authoring pane, click the Debug
Flow button ( ).
The Studio debugger opens. The toolbar for the debugger contains the controls you’ll use to runthe flow, whether to completion or step by step. When you run the flow from start to finish, therun is interrupted only by any breakpoints that youmay have set.
Studio debugger toolbar
2. To run the flow to its end, click the Play icon ( ) or press F11.
OR
To run the flow step by step, click the StepOver icon ( ) or press F6 for each step.
Let’s look at what we can learn from the debugger with theWindows Health Check flow.
HP Operations Orchestration (9.07)Page 186 of 301
Studio Authoring GuideDebugging flows
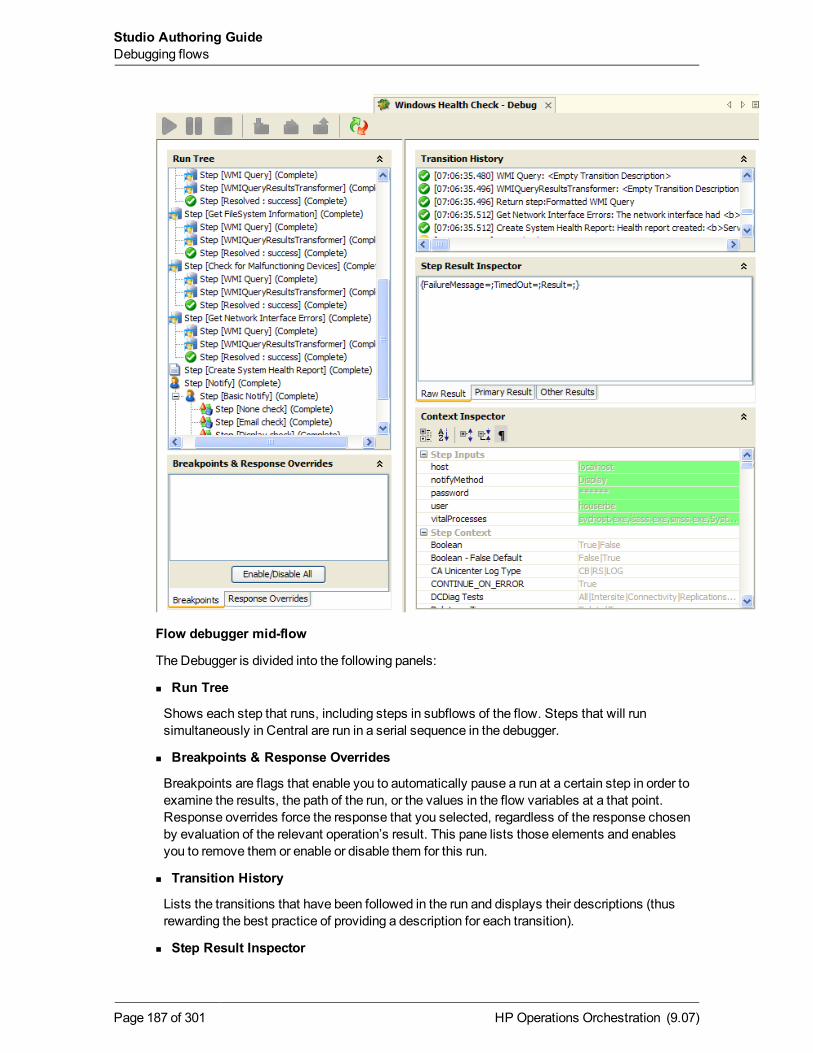
Flow debugger mid-flow
The Debugger is divided into the following panels:
n Run Tree
Shows each step that runs, including steps in subflows of the flow. Steps that will runsimultaneously in Central are run in a serial sequence in the debugger.
n Breakpoints & Response Overrides
Breakpoints are flags that enable you to automatically pause a run at a certain step in order toexamine the results, the path of the run, or the values in the flow variables at a that point.Response overrides force the response that you selected, regardless of the response chosenby evaluation of the relevant operation’s result. This pane lists those elements and enablesyou to remove them or enable or disable them for this run.
n Transition History
Lists the transitions that have been followed in the run and displays their descriptions (thusrewarding the best practice of providing a description for each transition).
n Step Result Inspector
HP Operations Orchestration (9.07)Page 187 of 301
Studio Authoring GuideDebugging flows
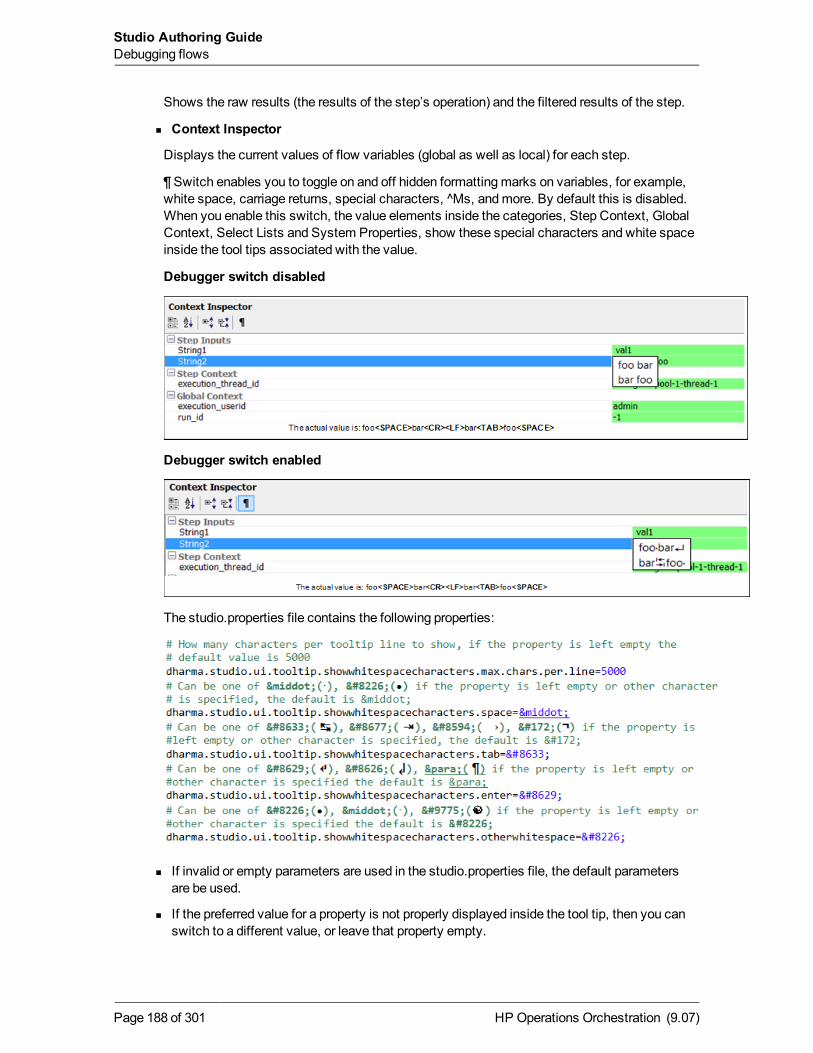
Shows the raw results (the results of the step’s operation) and the filtered results of the step.
n Context Inspector
Displays the current values of flow variables (global as well as local) for each step.
¶ Switch enables you to toggle on and off hidden formattingmarks on variables, for example,white space, carriage returns, special characters, ^Ms, andmore. By default this is disabled.When you enable this switch, the value elements inside the categories, Step Context, GlobalContext, Select Lists and System Properties, show these special characters and white spaceinside the tool tips associated with the value.
Debugger switch disabled
Debugger switch enabled
The studio.properties file contains the following properties:
n If invalid or empty parameters are used in the studio.properties file, the default parametersare be used.
n If the preferred value for a property is not properly displayed inside the tool tip, then you canswitch to a different value, or leave that property empty.
HP Operations Orchestration (9.07)Page 188 of 301
Studio Authoring GuideDebugging flows
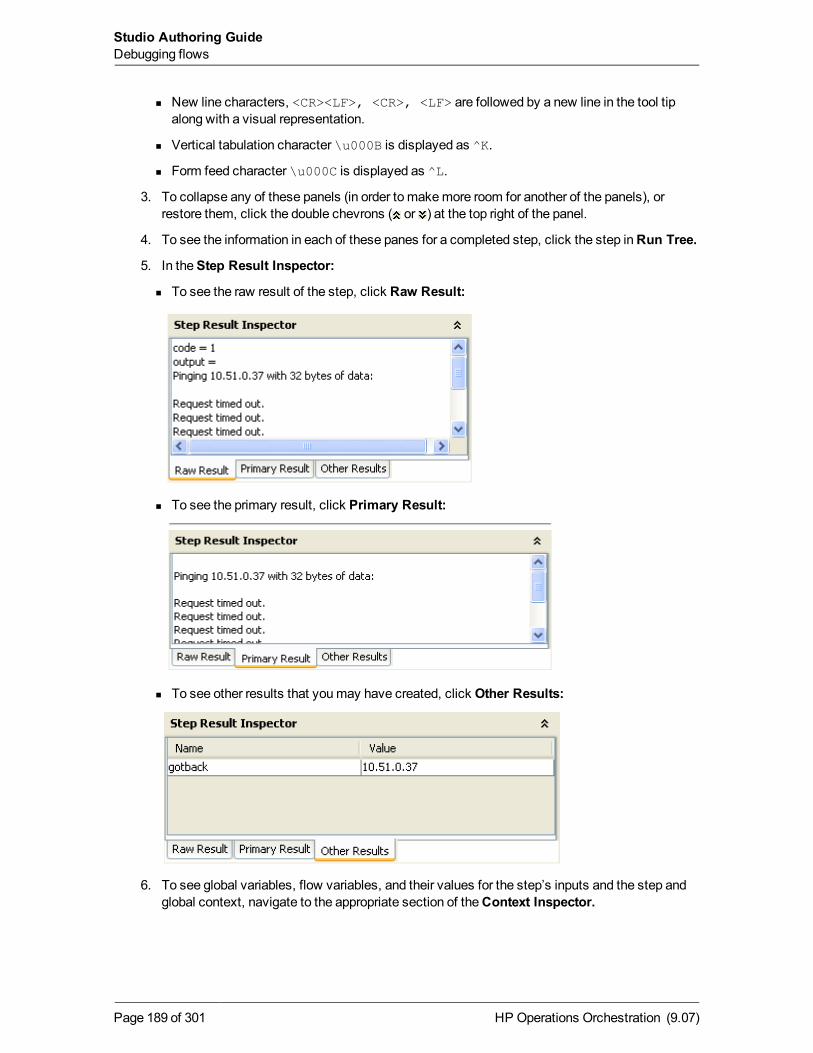
n New line characters, <CR><LF>, <CR>, <LF> are followed by a new line in the tool tipalong with a visual representation.
n Vertical tabulation character \u000B is displayed as ^K.
n Form feed character \u000C is displayed as ^L.
3. To collapse any of these panels (in order to makemore room for another of the panels), orrestore them, click the double chevrons ( or ) at the top right of the panel.
4. To see the information in each of these panes for a completed step, click the step inRun Tree.
5. In theStep Result Inspector:
n To see the raw result of the step, click Raw Result:
n To see the primary result, click Primary Result:
n To see other results that youmay have created, click Other Results:
6. To see global variables, flow variables, and their values for the step’s inputs and the step andglobal context, navigate to the appropriate section of theContext Inspector.
HP Operations Orchestration (9.07)Page 189 of 301
Studio Authoring GuideDebugging flows
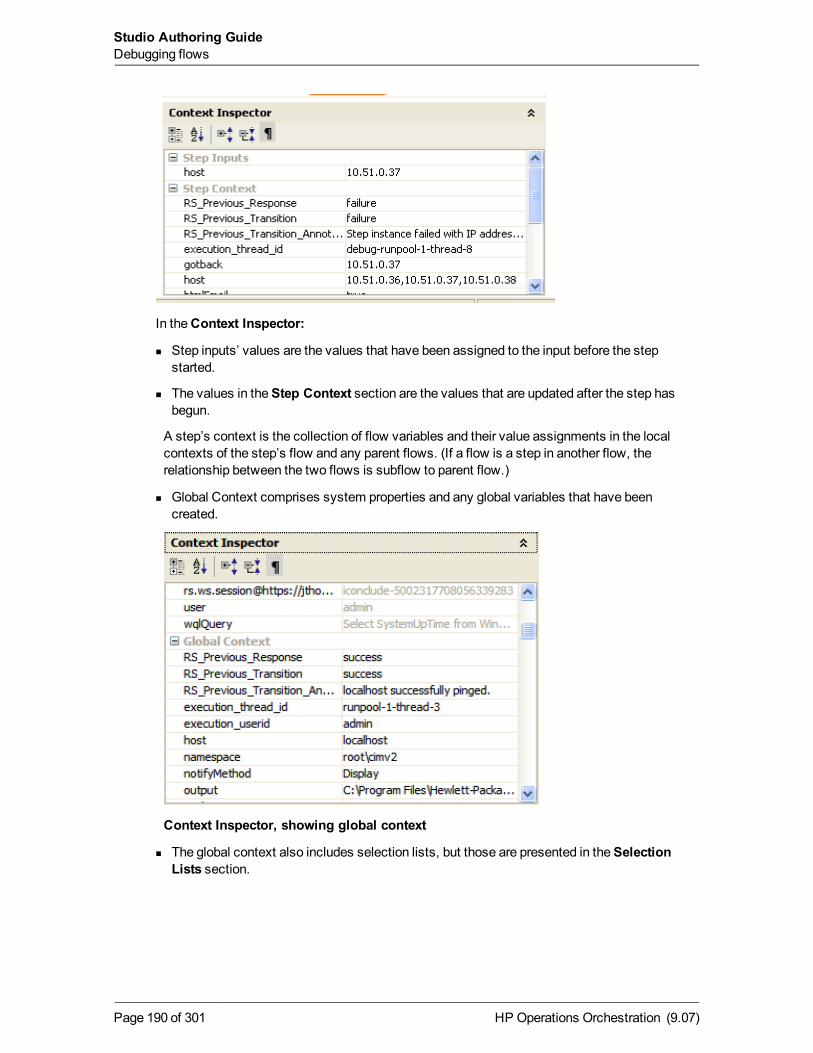
In theContext Inspector:
n Step inputs’ values are the values that have been assigned to the input before the stepstarted.
n The values in theStep Context section are the values that are updated after the step hasbegun.
A step’s context is the collection of flow variables and their value assignments in the localcontexts of the step’s flow and any parent flows. (If a flow is a step in another flow, therelationship between the two flows is subflow to parent flow.)
n Global Context comprises system properties and any global variables that have beencreated.
Context Inspector, showing global context
n The global context also includes selection lists, but those are presented in theSelectionLists section.
HP Operations Orchestration (9.07)Page 190 of 301
Studio Authoring GuideDebugging flows
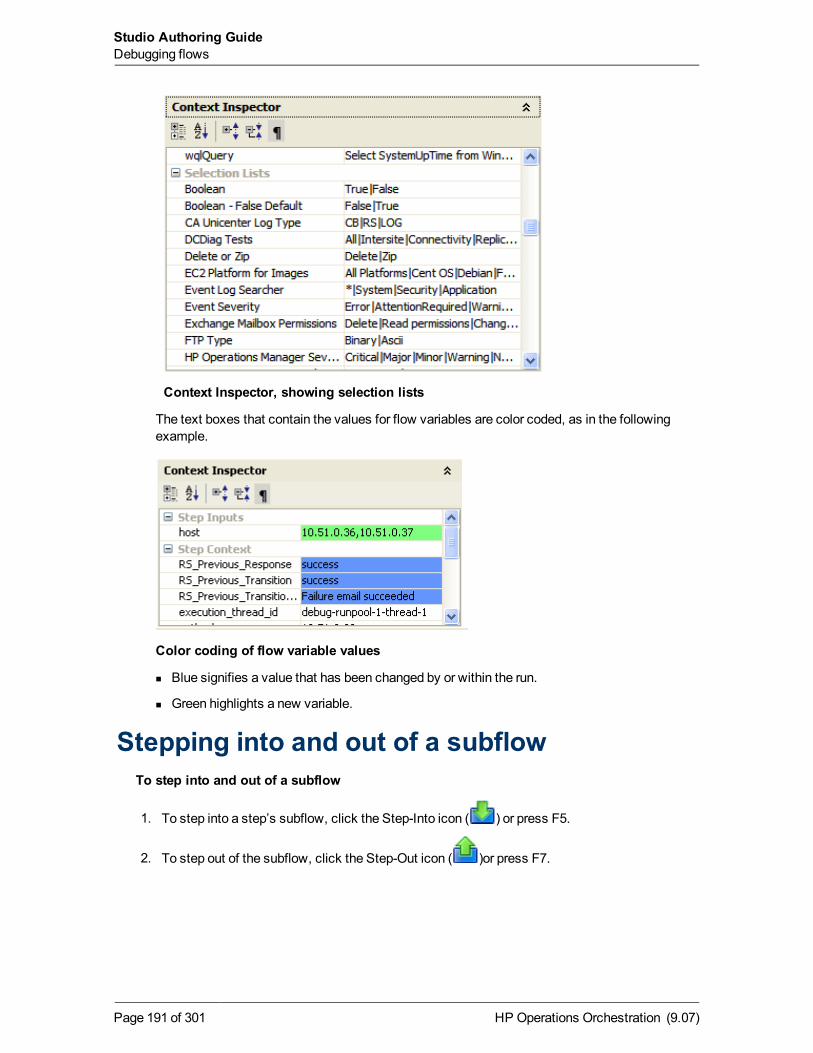
Context Inspector, showing selection lists
The text boxes that contain the values for flow variables are color coded, as in the followingexample.
Color coding of flow variable values
n Blue signifies a value that has been changed by or within the run.
n Green highlights a new variable.
Stepping into and out of a subflowTo step into and out of a subflow
1. To step into a step’s subflow, click the Step-Into icon ( ) or press F5.
2. To step out of the subflow, click the Step-Out icon ( )or press F7.
HP Operations Orchestration (9.07)Page 191 of 301
Studio Authoring GuideDebugging flows
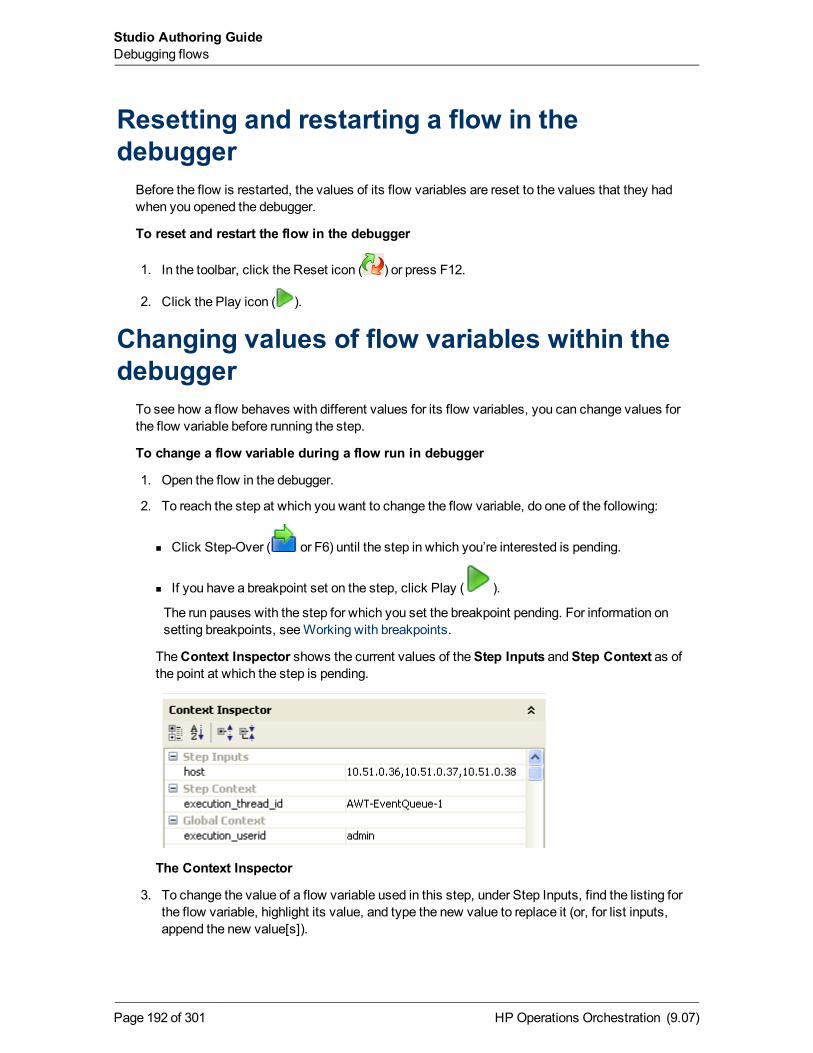
Resetting and restarting a flow in thedebugger
Before the flow is restarted, the values of its flow variables are reset to the values that they hadwhen you opened the debugger.
To reset and restart the flow in the debugger
1. In the toolbar, click the Reset icon ( ) or press F12.
2. Click the Play icon ( ).
Changing values of flow variables within thedebugger
To see how a flow behaves with different values for its flow variables, you can change values forthe flow variable before running the step.
To change a flow variable during a flow run in debugger
1. Open the flow in the debugger.
2. To reach the step at which you want to change the flow variable, do one of the following:
n Click Step-Over ( or F6) until the step in which you’re interested is pending.
n If you have a breakpoint set on the step, click Play ( ).
The run pauses with the step for which you set the breakpoint pending. For information onsetting breakpoints, seeWorking with breakpoints.
TheContext Inspector shows the current values of theStep Inputs andStep Context as ofthe point at which the step is pending.
The Context Inspector
3. To change the value of a flow variable used in this step, under Step Inputs, find the listing forthe flow variable, highlight its value, and type the new value to replace it (or, for list inputs,append the new value[s]).
HP Operations Orchestration (9.07)Page 192 of 301
Studio Authoring GuideDebugging flows
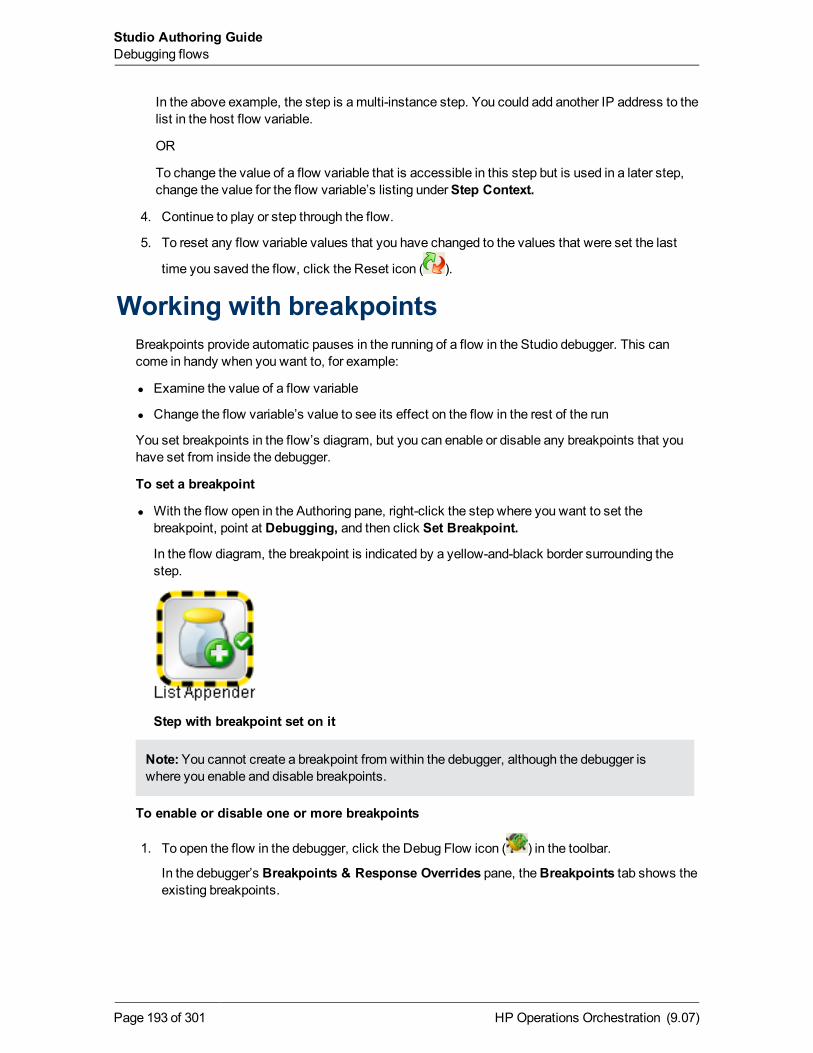
In the above example, the step is amulti-instance step. You could add another IP address to thelist in the host flow variable.
OR
To change the value of a flow variable that is accessible in this step but is used in a later step,change the value for the flow variable’s listing underStep Context.
4. Continue to play or step through the flow.
5. To reset any flow variable values that you have changed to the values that were set the last
time you saved the flow, click the Reset icon ( ).
Working with breakpointsBreakpoints provide automatic pauses in the running of a flow in the Studio debugger. This cancome in handy when you want to, for example:
l Examine the value of a flow variable
l Change the flow variable’s value to see its effect on the flow in the rest of the run
You set breakpoints in the flow’s diagram, but you can enable or disable any breakpoints that youhave set from inside the debugger.
To set a breakpoint
l With the flow open in the Authoring pane, right-click the step where you want to set thebreakpoint, point at Debugging, and then click Set Breakpoint.
In the flow diagram, the breakpoint is indicated by a yellow-and-black border surrounding thestep.
Step with breakpoint set on it
Note:You cannot create a breakpoint from within the debugger, although the debugger iswhere you enable and disable breakpoints.
To enable or disable one or more breakpoints
1. To open the flow in the debugger, click the Debug Flow icon ( ) in the toolbar.
In the debugger’s Breakpoints & Response Overrides pane, theBreakpoints tab shows theexisting breakpoints.
HP Operations Orchestration (9.07)Page 193 of 301
Studio Authoring GuideDebugging flows
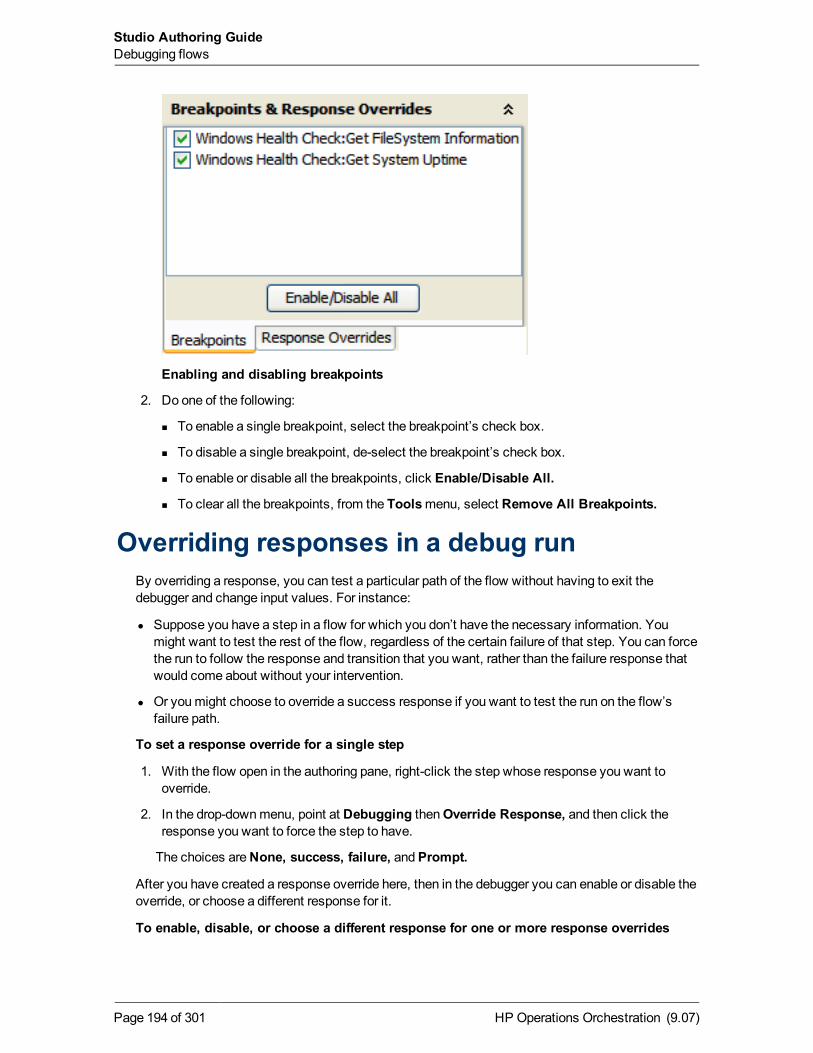
Enabling and disabling breakpoints
2. Do one of the following:
n To enable a single breakpoint, select the breakpoint’s check box.
n To disable a single breakpoint, de-select the breakpoint’s check box.
n To enable or disable all the breakpoints, click Enable/Disable All.
n To clear all the breakpoints, from the Toolsmenu, select Remove All Breakpoints.
Overriding responses in a debug runBy overriding a response, you can test a particular path of the flow without having to exit thedebugger and change input values. For instance:
l Suppose you have a step in a flow for which you don’t have the necessary information. Youmight want to test the rest of the flow, regardless of the certain failure of that step. You can forcethe run to follow the response and transition that you want, rather than the failure response thatwould come about without your intervention.
l Or youmight choose to override a success response if you want to test the run on the flow’sfailure path.
To set a response override for a single step
1. With the flow open in the authoring pane, right-click the step whose response you want tooverride.
2. In the drop-downmenu, point at Debugging thenOverride Response, and then click theresponse you want to force the step to have.
The choices areNone, success, failure, andPrompt.
After you have created a response override here, then in the debugger you can enable or disable theoverride, or choose a different response for it.
To enable, disable, or choose a different response for one or more response overrides
HP Operations Orchestration (9.07)Page 194 of 301
Studio Authoring GuideDebugging flows
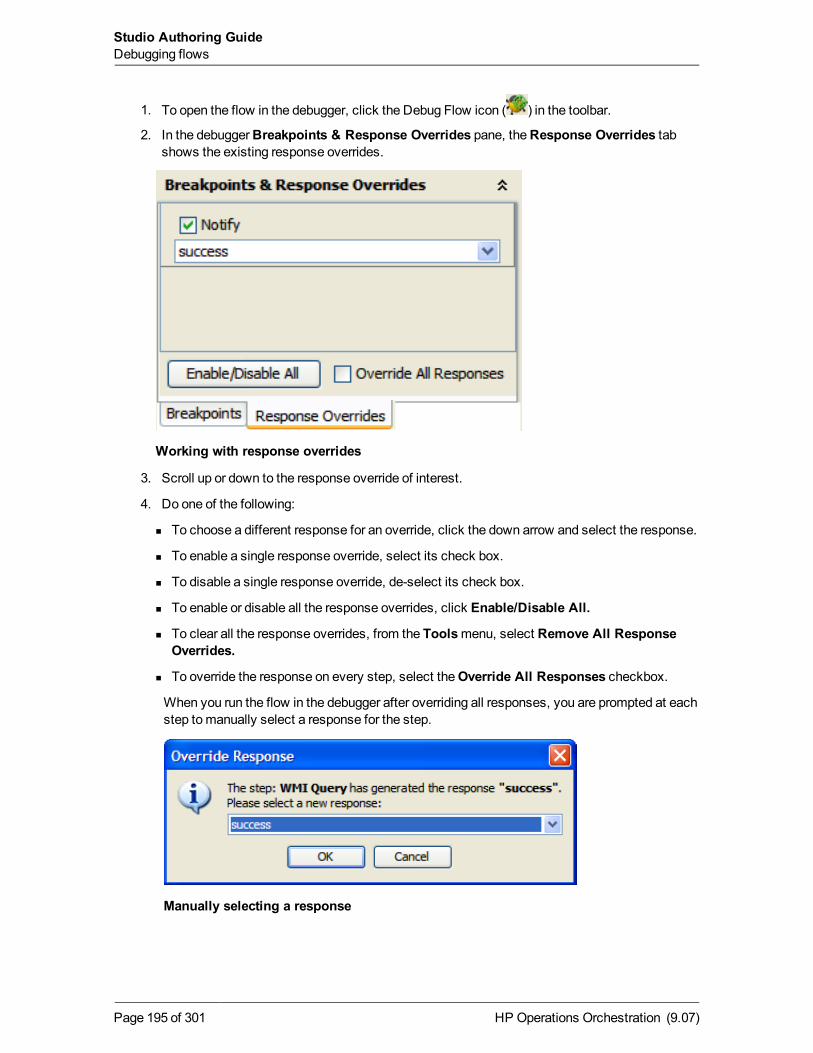
1. To open the flow in the debugger, click the Debug Flow icon ( ) in the toolbar.
2. In the debuggerBreakpoints & Response Overrides pane, theResponse Overrides tabshows the existing response overrides.
Working with response overrides
3. Scroll up or down to the response override of interest.
4. Do one of the following:
n To choose a different response for an override, click the down arrow and select the response.
n To enable a single response override, select its check box.
n To disable a single response override, de-select its check box.
n To enable or disable all the response overrides, click Enable/Disable All.
n To clear all the response overrides, from the Toolsmenu, select Remove All ResponseOverrides.
n To override the response on every step, select theOverride All Responses checkbox.
When you run the flow in the debugger after overriding all responses, you are prompted at eachstep tomanually select a response for the step.
Manually selecting a response
HP Operations Orchestration (9.07)Page 195 of 301
Studio Authoring GuideDebugging flows
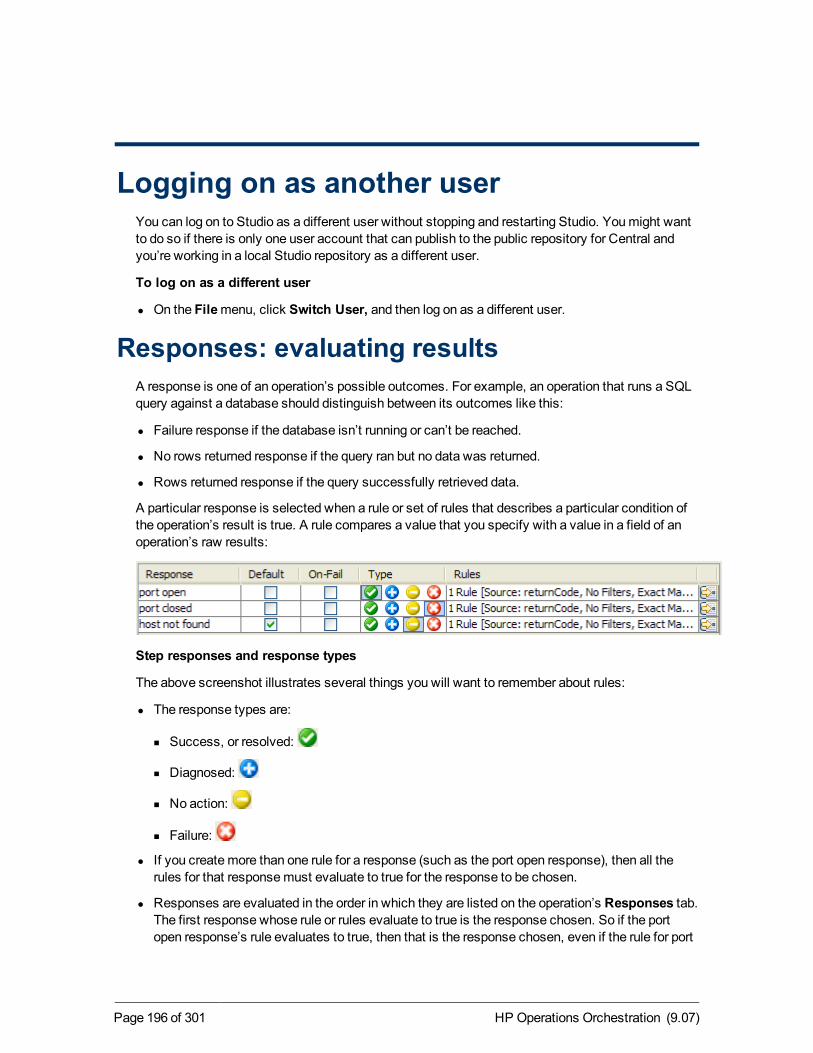
Logging on as another userYou can log on to Studio as a different user without stopping and restarting Studio. Youmight wantto do so if there is only one user account that can publish to the public repository for Central andyou’re working in a local Studio repository as a different user.
To log on as a different user
l On the Filemenu, click Switch User, and then log on as a different user.
Responses: evaluating resultsA response is one of an operation’s possible outcomes. For example, an operation that runs a SQLquery against a database should distinguish between its outcomes like this:
l Failure response if the database isn’t running or can’t be reached.
l No rows returned response if the query ran but no data was returned.
l Rows returned response if the query successfully retrieved data.
A particular response is selected when a rule or set of rules that describes a particular condition ofthe operation’s result is true. A rule compares a value that you specify with a value in a field of anoperation’s raw results:
Step responses and response types
The above screenshot illustrates several things you will want to remember about rules:
l The response types are:
n Success, or resolved:
n Diagnosed:
n No action:
n Failure:
l If you createmore than one rule for a response (such as the port open response), then all therules for that responsemust evaluate to true for the response to be chosen.
l Responses are evaluated in the order in which they are listed on the operation’s Responses tab.The first response whose rule or rules evaluate to true is the response chosen. So if the portopen response’s rule evaluates to true, then that is the response chosen, even if the rule for port
HP Operations Orchestration (9.07)Page 196 of 301
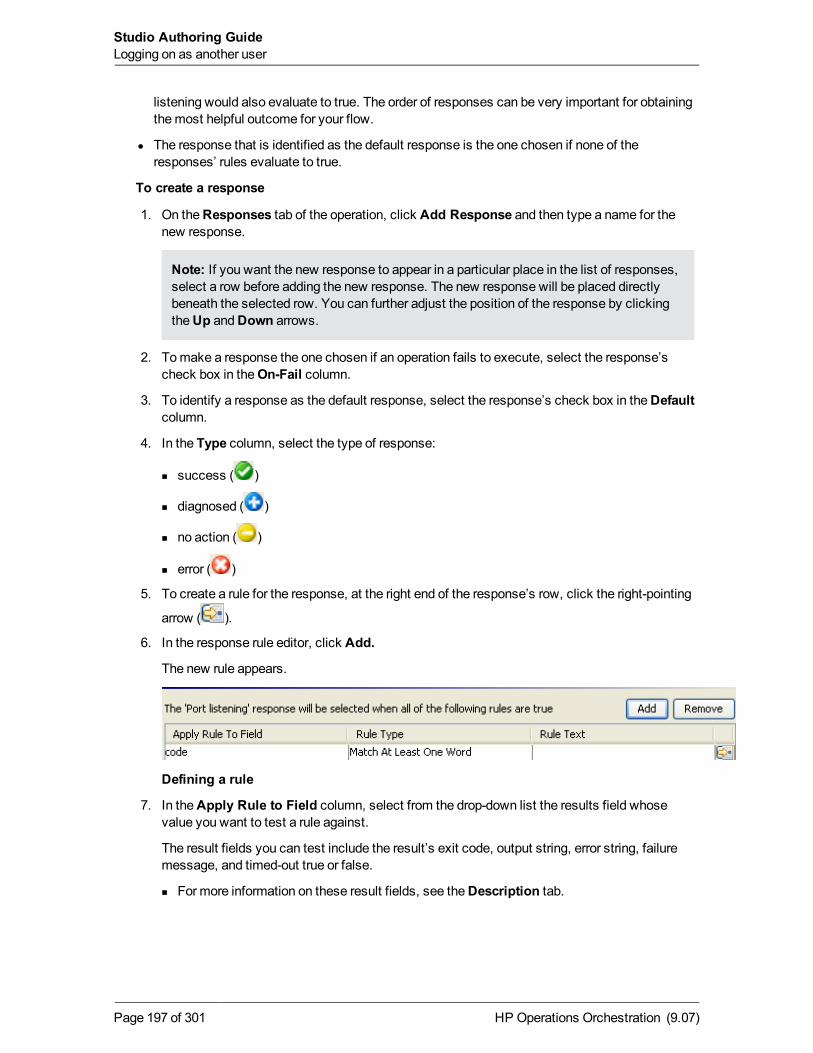
listening would also evaluate to true. The order of responses can be very important for obtainingthemost helpful outcome for your flow.
l The response that is identified as the default response is the one chosen if none of theresponses’ rules evaluate to true.
To create a response
1. On theResponses tab of the operation, click Add Response and then type a name for thenew response.
Note: If you want the new response to appear in a particular place in the list of responses,select a row before adding the new response. The new response will be placed directlybeneath the selected row. You can further adjust the position of the response by clickingtheUp andDown arrows.
2. Tomake a response the one chosen if an operation fails to execute, select the response’scheck box in theOn-Fail column.
3. To identify a response as the default response, select the response’s check box in theDefaultcolumn.
4. In the Type column, select the type of response:
n success ( )
n diagnosed ( )
n no action ( )
n error ( )
5. To create a rule for the response, at the right end of the response’s row, click the right-pointing
arrow ( ).
6. In the response rule editor, click Add.
The new rule appears.
Defining a rule
7. In theApply Rule to Field column, select from the drop-down list the results field whosevalue you want to test a rule against.
The result fields you can test include the result’s exit code, output string, error string, failuremessage, and timed-out true or false.
n Formore information on these result fields, see theDescription tab.
HP Operations Orchestration (9.07)Page 197 of 301
Studio Authoring GuideLogging on as another user
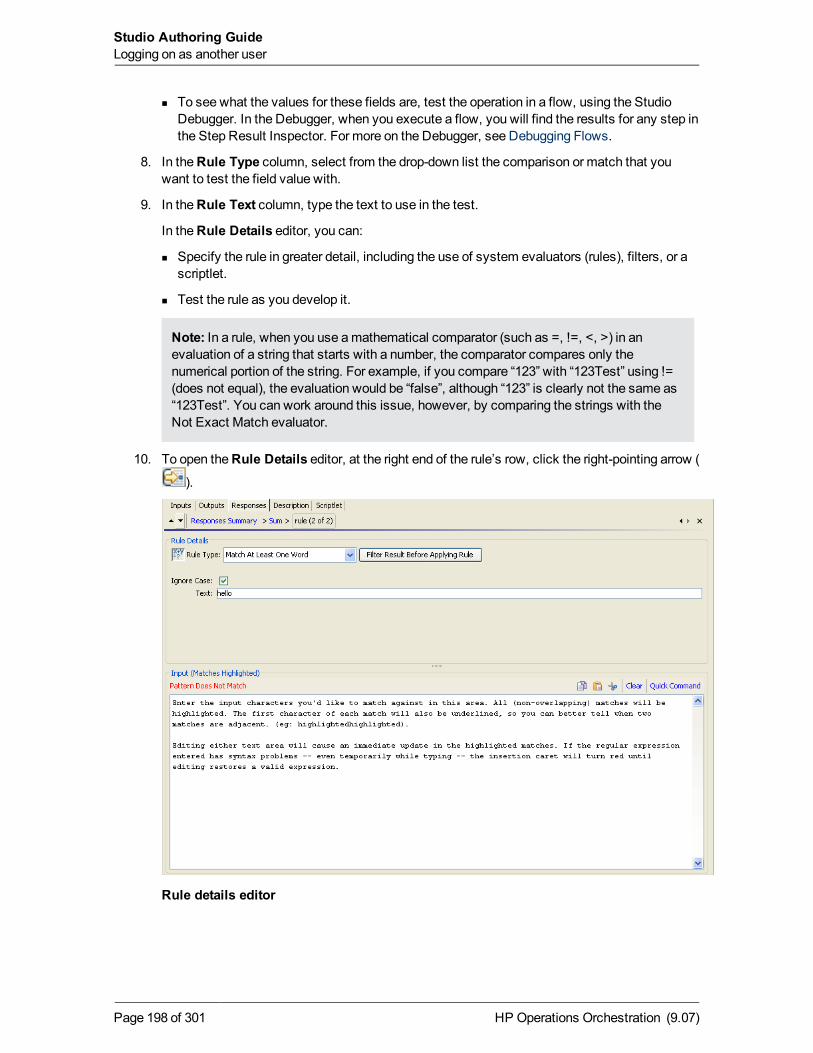
n To see what the values for these fields are, test the operation in a flow, using the StudioDebugger. In the Debugger, when you execute a flow, you will find the results for any step inthe Step Result Inspector. For more on the Debugger, see Debugging Flows.
8. In theRule Type column, select from the drop-down list the comparison or match that youwant to test the field value with.
9. In theRule Text column, type the text to use in the test.
In theRule Details editor, you can:
n Specify the rule in greater detail, including the use of system evaluators (rules), filters, or ascriptlet.
n Test the rule as you develop it.
Note: In a rule, when you use amathematical comparator (such as =, !=, <, >) in anevaluation of a string that starts with a number, the comparator compares only thenumerical portion of the string. For example, if you compare “123” with “123Test” using !=(does not equal), the evaluation would be “false”, although “123” is clearly not the same as“123Test”. You can work around this issue, however, by comparing the strings with theNot Exact Match evaluator.
10. To open theRule Details editor, at the right end of the rule’s row, click the right-pointing arrow (
).
Rule details editor
HP Operations Orchestration (9.07)Page 198 of 301
Studio Authoring GuideLogging on as another user
Note: If you chooseScriptlet as the rule type, the Rule Details editor changes to ascriptlet editor, as when you create a scriptlet or scriptlet filter. For more information on theeditor for scriptlets and scriptlet filters, see Scriptlets and Filtering outputs and results,respectively.
Now you can test the rule and/or create a filter for filtering the results in the field before applyingthe rule.
The rule type that you chose in the response rule editor appears in theRule Details editor,already selected in theRule Type drop-down list.
11. To choose another rule type, select a different one in theRule Type drop-down list.
12. To filter the result before applying the rule, click Filter Result Before Applying Rule and, inthe filter editor that appears, create the filter.
For information on using the filter editor to create filters, see Filtering outputs and results, andfor details on filter types, see Filter details.
13. For most of the rule types, in the Text box, type the text that you want to test comparison withand, if you want to ignore case, select the Ignore Case check box.
OR
For Regular Expression rules, specify the regular expression and its application as you dowhen creating a Regular Expression filter for operation results. For information on creatingRegular Expression filters, see Filtering outputs and results, and for details on filter types, seeFilter details.
14. To work on another rule for the operation’s response, click the up or down arrow besideResponses Summary.
Tip:Response rules are evaluated in the order in which they appear in the operation’sResponses tab. When you run a flow, the response of the first rule that evaluates to true isselected as the response of the step. So the order you provide to the responses can determinewhether users obtain the desired results from the flow.
Adding responses to the flowFlow responses are the possible outcomes of the flow run—such as, whether the system that theflow appraised needed fixing or whether the action was successful.
For example, the Find Inactive Domain Administrators flow has three responses. To see how thefollowing responses are obtained, in Studio, find and double-click the Find Inactive DomainAdministrators flow in the Library.
l Failure
The flow was unable to get a list of inactive domain administrators for some reason.
l Success
The flow did not find any inactive domain administrators.
HP Operations Orchestration (9.07)Page 199 of 301
Studio Authoring GuideLogging on as another user
l Diagnosed
The flow found inactive domain administrators.
To add a response to the flow
1. On the flow Properties sheet (with the flow diagram open, click theProperties tab at thebottom of the window), click theResponses tab.
2. Click Add Response and then, in the text box that appears, type the name of the response.
Deleting responses from a flowTo delete a response from a flow
l To delete a flow response, on theResponses tab, click the response, and then click RemoveResponse.
HP Operations Orchestration (9.07)Page 200 of 301
Studio Authoring GuideLogging on as another user
Repositories: Libraries for flows and theirobjects
Flows, operations, and any HP OO objects (such as domain terms, remote action services,scriptlets, and selection lists) that they reference are stored in a repository, a structured set of XMLfiles.
When Studio is installed, it is by default connected to the Central public repository. You can,however, work in a local repository—that is, a private repository that is local to Studio and externalto the Central server. This means that there are two ways you can develop flows:
l Work in the public repository.
This assumes that you have one Central server for developing flows without affecting your ITinfrastructure, and another Central server in the production environment, where flows are run inthe real world.
If you work this way and there aremultiple authors creating flows, you check out flows,operations, and other repository objects such as system accounts, system filters, and domainterms to work on them, then check them in to commit your changes to the public repository. Thecheckout/checkin requirement for working in the public directory prevents change conflicts.
Note:Any one user account must not connect to the public repository for the sameinstallation of Central from two different instances of Studio. If this happens, the user’sworkspace in the repository can become corrupted. This can also occur when Central isclustered.
When a flow that you have perfected on the development server is ready for the real world, youthen publish the flow from the development Central server to the Central server in the productionenvironment.
l You develop flows offline, in your local repository, then publish them to the public repository onthe Central server.
When you work offline (that is, you are not working in a public Central repository), you do notneed to check out an object to work on it. Publishing to the Central repository will, however,involve checking affected objects in to the Central repository.
When you are offline, you can also export and import selected portions of a repository.
Only the author who creates a local repository has access to it. No one can either update or publishto a local repository that you created except you.
For information on repository-related tasks, see:
l Adding a repository
l Opening a repository for authoring
l Moving flow elements between repositories
HP Operations Orchestration (9.07)Page 201 of 301
l Setting a target repository
l Publishing a repository: how to
l Updating from a repository: how to
l Rolling back a publish or update
l Exporting a repository
l Importing a repository
l Validating repositories
l Encrypting repositories and the procedure for encrypting a repository
l Opening an encrypted repository
l Decrypting repositories
l Creating a second encrypted copy of a repository
l Backing up and restoring repositories
l Repository snapshots
Adding a repositoryYoumight want to work in another repository besides your default public repository in order to:
l Work in amulti-author environment.
l Keep work on one version of a flow separate from the rest of your flows.
For discussion of the scenarios in which youmight want to usemultiple repositories, seeRepositories: Libraries for flows and their objects.
To work in another repository, you add it and then open it.
To add a repository
1. On theRepositorymenu, click Add Repository.
The following dialog box appears:
HP Operations Orchestration (9.07)Page 202 of 301
Studio Authoring GuideRepositories: Libraries for flows and their objects
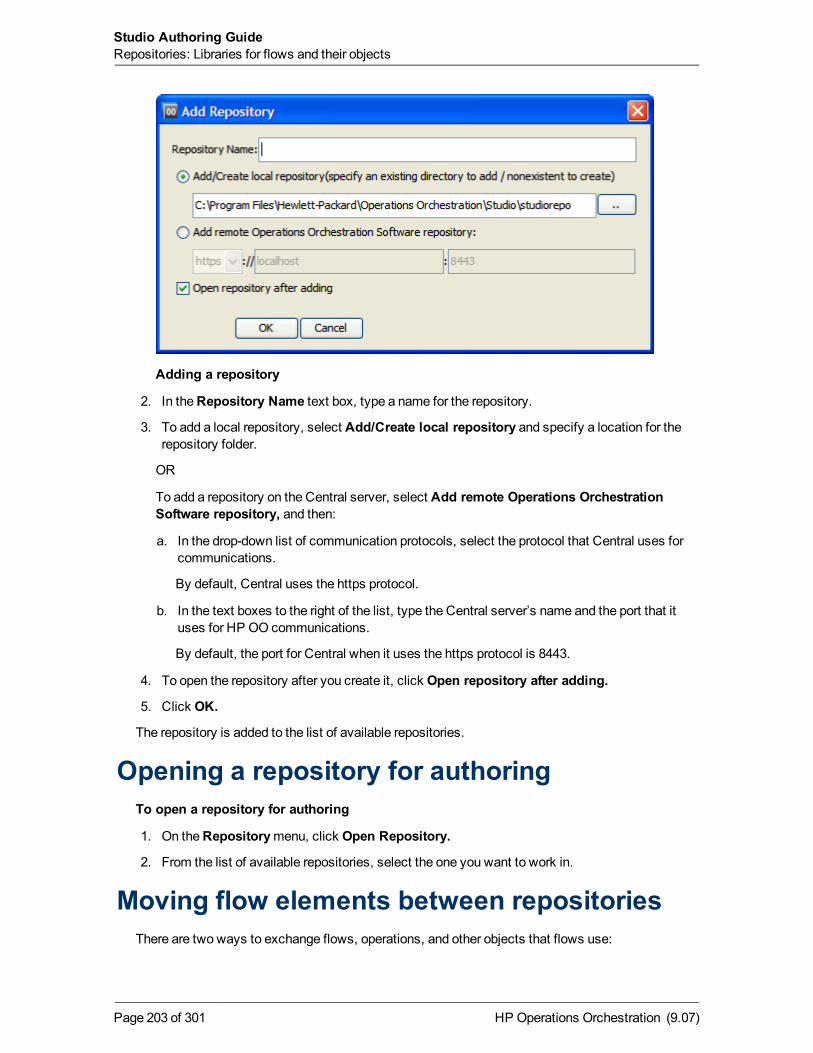
Adding a repository
2. In theRepository Name text box, type a name for the repository.
3. To add a local repository, select Add/Create local repository and specify a location for therepository folder.
OR
To add a repository on the Central server, select Add remote Operations OrchestrationSoftware repository, and then:
a. In the drop-down list of communication protocols, select the protocol that Central uses forcommunications.
By default, Central uses the https protocol.
b. In the text boxes to the right of the list, type the Central server’s name and the port that ituses for HP OO communications.
By default, the port for Central when it uses the https protocol is 8443.
4. To open the repository after you create it, click Open repository after adding.
5. Click OK.
The repository is added to the list of available repositories.
Opening a repository for authoringTo open a repository for authoring
1. On theRepositorymenu, click Open Repository.
2. From the list of available repositories, select the one you want to work in.
Moving flow elements between repositoriesThere are two ways to exchange flows, operations, and other objects that flows use:
HP Operations Orchestration (9.07)Page 203 of 301
Studio Authoring GuideRepositories: Libraries for flows and their objects
l Exporting and importing repositories or parts of them is intended for exchanging flows andrelated objects with authors who are outside your company.
Exporting a repository creates a standalone repository. When an author imports an exportedflow, he or shemust manually resolve any conflicts in his repository.
When importing a repository, you can select which of its objects you want to import.
l Updating and publishing repositories or parts of them is for making flows and related objectsavailable to other authors who share access to the same public (Central) repository.
For procedures for importing, exporting, updating, and publishing, see the following topics in thissection:
l Setting a target repository
l Publishing a repository: how to
l Updating from a repository: how to
l Rolling back a publish or update
l Exporting a repository
l Importing a repository
To publish or update flows, operations, and other HP OO objects from one repository to another,youmust first set a target repository. The repository that is not the target repository is the sourcerepository.
Note:You cannot set the open repository as the target repository.
Because storage of the repositories resides outside of Studio, you do not need to set a targetrepository for exporting or importing
l When you publish, you are publishing from the source to the target.
l When you update, you are updating from the target to the source.
Setting a target repositoryOnly a public repository can be set as the target repository.
To set a target repository
1. If the public repository that is open is the one that you want to set as the target repository, openanother repository.
2. On theRepositorymenu, point toSet Target Repository, and then click the repository thatyou want to be the target.
For the procedure for setting no target repository, see Setting no target repository.
Setting no target repositoryTo set no target repository
HP Operations Orchestration (9.07)Page 204 of 301
Studio Authoring GuideRepositories: Libraries for flows and their objects
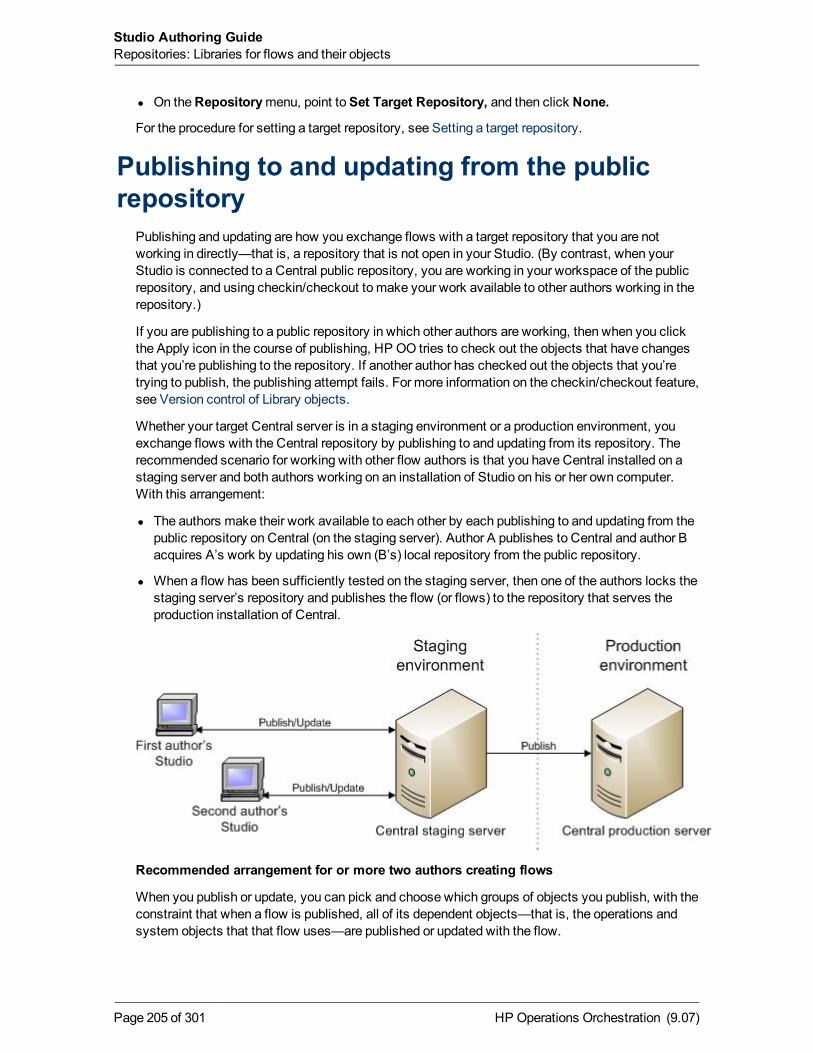
l On theRepositorymenu, point toSet Target Repository, and then click None.
For the procedure for setting a target repository, see Setting a target repository.
Publishing to and updating from the publicrepository
Publishing and updating are how you exchange flows with a target repository that you are notworking in directly—that is, a repository that is not open in your Studio. (By contrast, when yourStudio is connected to a Central public repository, you are working in your workspace of the publicrepository, and using checkin/checkout to make your work available to other authors working in therepository.)
If you are publishing to a public repository in which other authors are working, then when you clickthe Apply icon in the course of publishing, HP OO tries to check out the objects that have changesthat you’re publishing to the repository. If another author has checked out the objects that you’retrying to publish, the publishing attempt fails. For more information on the checkin/checkout feature,see Version control of Library objects.
Whether your target Central server is in a staging environment or a production environment, youexchange flows with the Central repository by publishing to and updating from its repository. Therecommended scenario for working with other flow authors is that you have Central installed on astaging server and both authors working on an installation of Studio on his or her own computer.With this arrangement:
l The authors make their work available to each other by each publishing to and updating from thepublic repository on Central (on the staging server). Author A publishes to Central and author Bacquires A’s work by updating his own (B’s) local repository from the public repository.
l When a flow has been sufficiently tested on the staging server, then one of the authors locks thestaging server’s repository and publishes the flow (or flows) to the repository that serves theproduction installation of Central.
Recommended arrangement for or more two authors creating flows
When you publish or update, you can pick and choose which groups of objects you publish, with theconstraint that when a flow is published, all of its dependent objects—that is, the operations andsystem objects that that flow uses—are published or updated with the flow.
HP Operations Orchestration (9.07)Page 205 of 301
Studio Authoring GuideRepositories: Libraries for flows and their objects
For information on publishing and updating flows, operations, and system objects, seeMoving flowelements between repositories.
Publishing a repository: how toPublishing is the copying of objects that are new or have changed from a source repository to atarget repository. The source repository is the repository from which you initiate a publish or update.It must be a local repository, and the target must be the public repository of the Central to whichStudio is connected.
Note:When you publish, changes that you previously published to the target that are notpresent in the source are not overwritten by the local (source) state of the repository. Supposethat you have two local (source) repositories, A and B, publishing to a public (target) repository,in the following sequence of events.
1. The versions of Testflow1 on local (source) repositories A and B are in sync, identical.
2. Author A adds a step to Testflow1 and publishes to the public (target) repository.
3. The public repository now has the new step.
4. The two authors agree that adding the new step was amistake.
5. To correct themistake in the public repository, author B tries to publish the original version ofTestflow1 to the public repository.
When author B publishes, he gets themessage that there are no changes, and Testflow1 in thepublic repository retains the new step.
You can get the undesired step out of the public repository’s version of Testflow1 in thepreview stage of updating or publishing. In the Update/Publish Preview pane, you select whichobjects you want to publish or update.
Note:You can in effect undo a publish by importing the target repository’s backup. Forinformation on how to do so, see Rolling back a publish or update.
This section includes procedures for both publishing and previewing a publish.
Reminders:
l Before you try to publish or update a repository, make sure you have set a target repository andthat the source repository is open. For information on setting a target repository, see Setting atarget repository.
l If you are updating a local repository from a public repository, make sure you have checked inthe flows that you want to get onto the local repository.
l When you publish, you are publishing from the source to the target.
l When you update, you are updating from the target to the source.
l Your publish action cannot delete a folder unless you have write permission for every item withinthe folder.
To publish a repository
HP Operations Orchestration (9.07)Page 206 of 301
Studio Authoring GuideRepositories: Libraries for flows and their objects
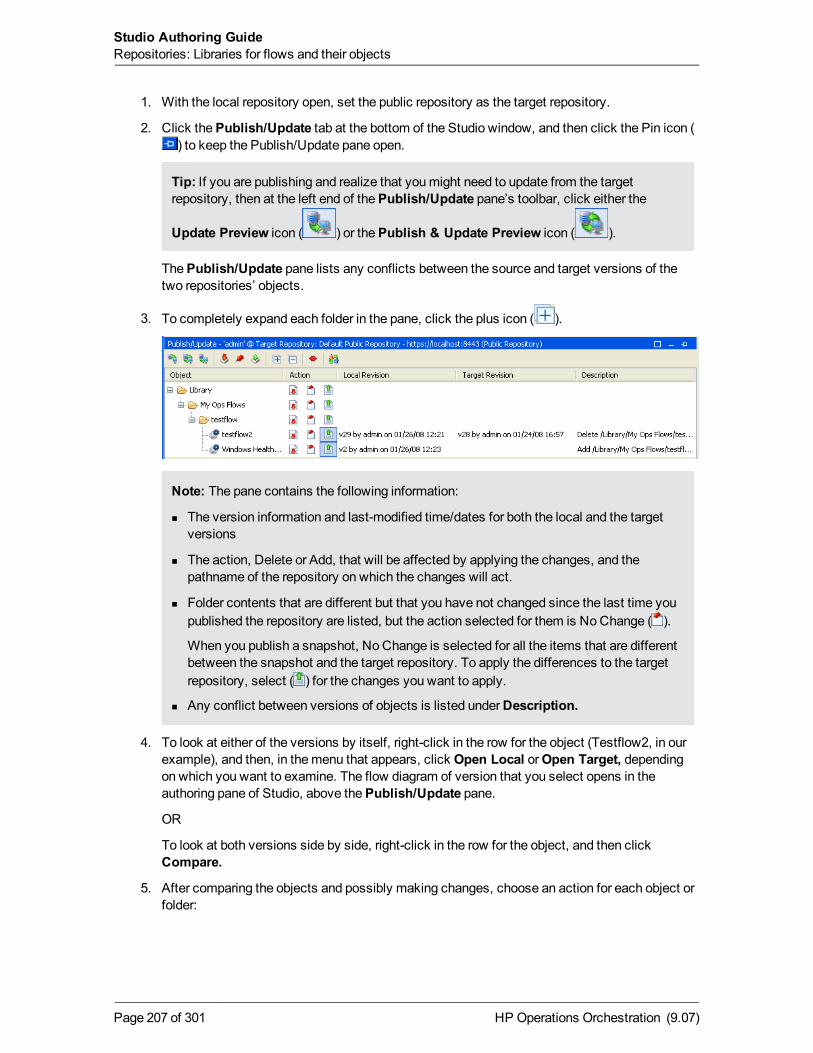
1. With the local repository open, set the public repository as the target repository.
2. Click thePublish/Update tab at the bottom of the Studio window, and then click the Pin icon () to keep the Publish/Update pane open.
Tip: If you are publishing and realize that youmight need to update from the targetrepository, then at the left end of thePublish/Update pane’s toolbar, click either the
Update Preview icon ( ) or thePublish & Update Preview icon ( ).
ThePublish/Update pane lists any conflicts between the source and target versions of thetwo repositories’ objects.
3. To completely expand each folder in the pane, click the plus icon ( ).
Note: The pane contains the following information:
n The version information and last-modified time/dates for both the local and the targetversions
n The action, Delete or Add, that will be affected by applying the changes, and thepathname of the repository on which the changes will act.
n Folder contents that are different but that you have not changed since the last time youpublished the repository are listed, but the action selected for them is NoChange ( ).
When you publish a snapshot, No Change is selected for all the items that are differentbetween the snapshot and the target repository. To apply the differences to the targetrepository, select ( ) for the changes you want to apply.
n Any conflict between versions of objects is listed underDescription.
4. To look at either of the versions by itself, right-click in the row for the object (Testflow2, in ourexample), and then, in themenu that appears, click Open Local orOpen Target, dependingon which you want to examine. The flow diagram of version that you select opens in theauthoring pane of Studio, above thePublish/Update pane.
OR
To look at both versions side by side, right-click in the row for the object, and then clickCompare.
5. After comparing the objects and possibly making changes, choose an action for each object orfolder:
HP Operations Orchestration (9.07)Page 207 of 301
Studio Authoring GuideRepositories: Libraries for flows and their objects
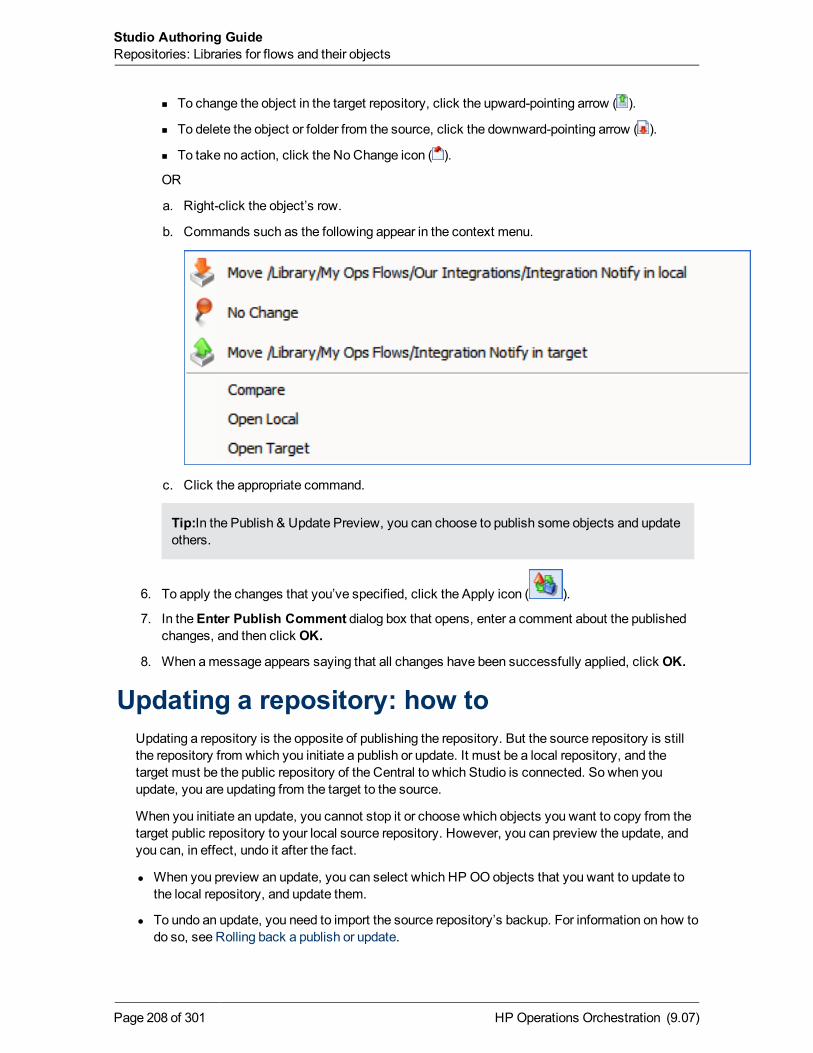
n To change the object in the target repository, click the upward-pointing arrow ( ).
n To delete the object or folder from the source, click the downward-pointing arrow ( ).
n To take no action, click the NoChange icon ( ).
OR
a. Right-click the object’s row.
b. Commands such as the following appear in the context menu.
c. Click the appropriate command.
Tip:In the Publish & Update Preview, you can choose to publish some objects and updateothers.
6. To apply the changes that you’ve specified, click the Apply icon ( ).
7. In theEnter Publish Comment dialog box that opens, enter a comment about the publishedchanges, and then click OK.
8. When amessage appears saying that all changes have been successfully applied, click OK.
Updating a repository: how toUpdating a repository is the opposite of publishing the repository. But the source repository is stillthe repository from which you initiate a publish or update. It must be a local repository, and thetarget must be the public repository of the Central to which Studio is connected. So when youupdate, you are updating from the target to the source.
When you initiate an update, you cannot stop it or choose which objects you want to copy from thetarget public repository to your local source repository. However, you can preview the update, andyou can, in effect, undo it after the fact.
l When you preview an update, you can select which HP OO objects that you want to update tothe local repository, and update them.
l To undo an update, you need to import the source repository’s backup. For information on how todo so, see Rolling back a publish or update.
HP Operations Orchestration (9.07)Page 208 of 301
Studio Authoring GuideRepositories: Libraries for flows and their objects
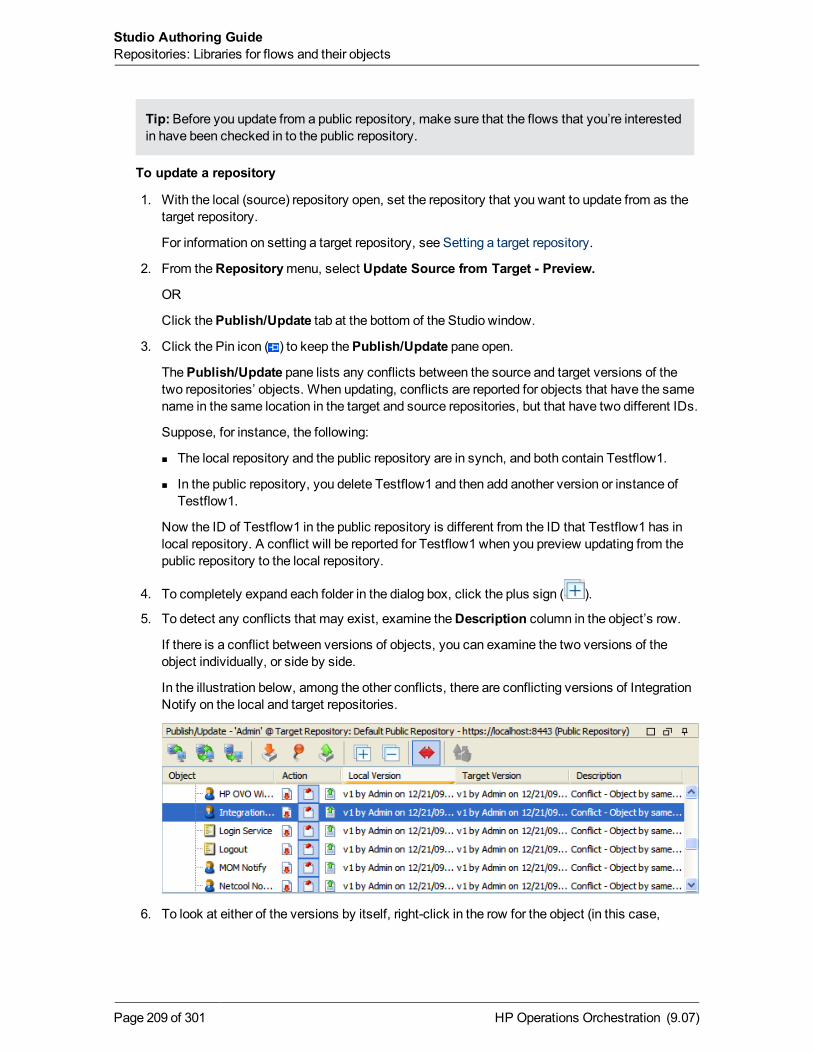
Tip:Before you update from a public repository, make sure that the flows that you’re interestedin have been checked in to the public repository.
To update a repository
1. With the local (source) repository open, set the repository that you want to update from as thetarget repository.
For information on setting a target repository, see Setting a target repository.
2. From theRepositorymenu, select Update Source from Target - Preview.
OR
Click thePublish/Update tab at the bottom of the Studio window.
3. Click the Pin icon ( ) to keep thePublish/Update pane open.
ThePublish/Update pane lists any conflicts between the source and target versions of thetwo repositories’ objects. When updating, conflicts are reported for objects that have the samename in the same location in the target and source repositories, but that have two different IDs.
Suppose, for instance, the following:
n The local repository and the public repository are in synch, and both contain Testflow1.
n In the public repository, you delete Testflow1 and then add another version or instance ofTestflow1.
Now the ID of Testflow1 in the public repository is different from the ID that Testflow1 has inlocal repository. A conflict will be reported for Testflow1 when you preview updating from thepublic repository to the local repository.
4. To completely expand each folder in the dialog box, click the plus sign ( ).
5. To detect any conflicts that may exist, examine theDescription column in the object’s row.
If there is a conflict between versions of objects, you can examine the two versions of theobject individually, or side by side.
In the illustration below, among the other conflicts, there are conflicting versions of IntegrationNotify on the local and target repositories.
6. To look at either of the versions by itself, right-click in the row for the object (in this case,
HP Operations Orchestration (9.07)Page 209 of 301
Studio Authoring GuideRepositories: Libraries for flows and their objects
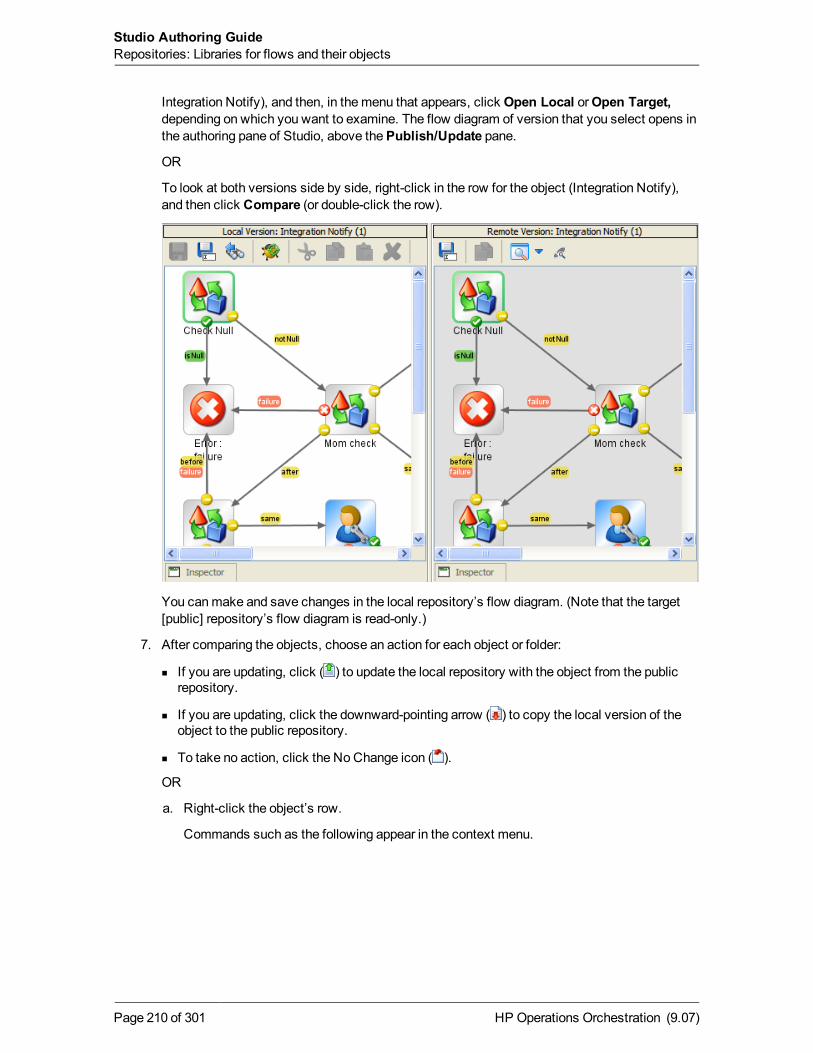
Integration Notify), and then, in themenu that appears, click Open Local orOpen Target,depending on which you want to examine. The flow diagram of version that you select opens inthe authoring pane of Studio, above thePublish/Update pane.
OR
To look at both versions side by side, right-click in the row for the object (Integration Notify),and then click Compare (or double-click the row).
You canmake and save changes in the local repository’s flow diagram. (Note that the target[public] repository’s flow diagram is read-only.)
7. After comparing the objects, choose an action for each object or folder:
n If you are updating, click ( ) to update the local repository with the object from the publicrepository.
n If you are updating, click the downward-pointing arrow ( ) to copy the local version of theobject to the public repository.
n To take no action, click the NoChange icon ( ).
OR
a. Right-click the object’s row.
Commands such as the following appear in the context menu.
HP Operations Orchestration (9.07)Page 210 of 301
Studio Authoring GuideRepositories: Libraries for flows and their objects
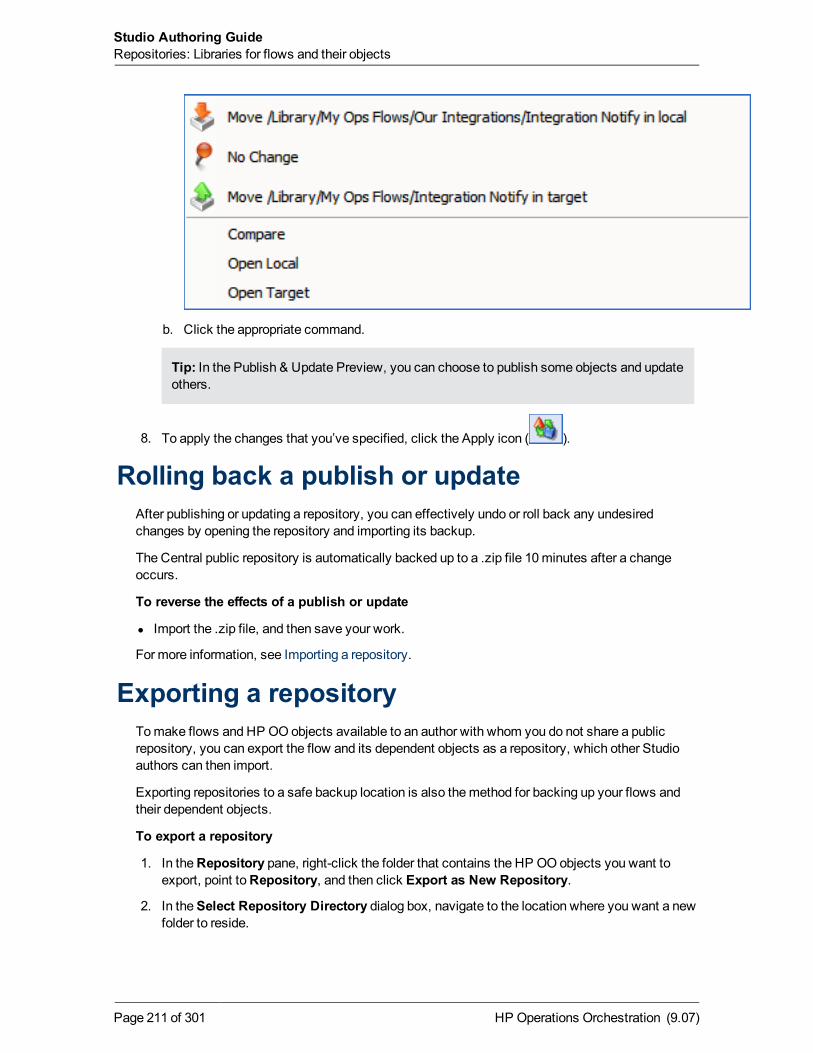
b. Click the appropriate command.
Tip: In the Publish & Update Preview, you can choose to publish some objects and updateothers.
8. To apply the changes that you’ve specified, click the Apply icon ( ).
Rolling back a publish or updateAfter publishing or updating a repository, you can effectively undo or roll back any undesiredchanges by opening the repository and importing its backup.
The Central public repository is automatically backed up to a .zip file 10minutes after a changeoccurs.
To reverse the effects of a publish or update
l Import the .zip file, and then save your work.
For more information, see Importing a repository.
Exporting a repositoryTomake flows and HP OO objects available to an author with whom you do not share a publicrepository, you can export the flow and its dependent objects as a repository, which other Studioauthors can then import.
Exporting repositories to a safe backup location is also themethod for backing up your flows andtheir dependent objects.
To export a repository
1. In theRepository pane, right-click the folder that contains the HP OO objects you want toexport, point toRepository, and then click Export as New Repository.
2. In theSelect Repository Directory dialog box, navigate to the location where you want a newfolder to reside.
HP Operations Orchestration (9.07)Page 211 of 301
Studio Authoring GuideRepositories: Libraries for flows and their objects
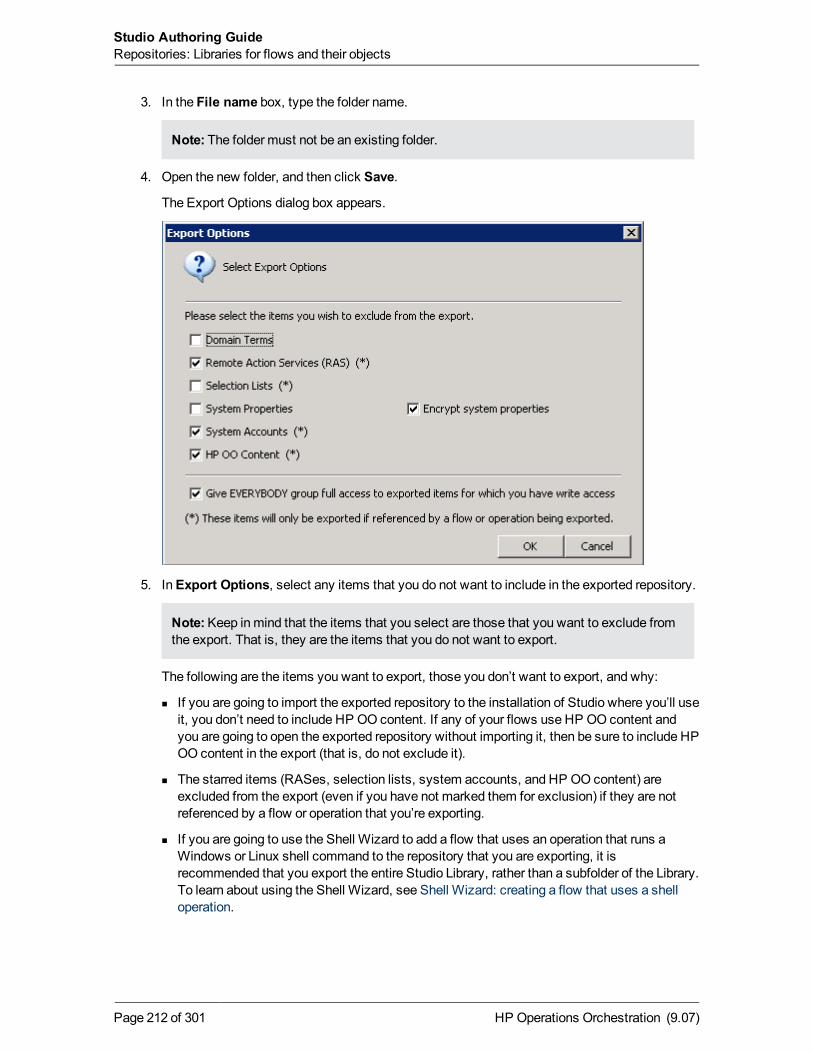
3. In the File name box, type the folder name.
Note: The folder must not be an existing folder.
4. Open the new folder, and then click Save.
The Export Options dialog box appears.
5. InExport Options, select any items that you do not want to include in the exported repository.
Note:Keep inmind that the items that you select are those that you want to exclude fromthe export. That is, they are the items that you do not want to export.
The following are the items you want to export, those you don’t want to export, and why:
n If you are going to import the exported repository to the installation of Studio where you’ll useit, you don’t need to include HP OO content. If any of your flows use HP OO content andyou are going to open the exported repository without importing it, then be sure to include HPOO content in the export (that is, do not exclude it).
n The starred items (RASes, selection lists, system accounts, and HP OO content) areexcluded from the export (even if you have not marked them for exclusion) if they are notreferenced by a flow or operation that you’re exporting.
n If you are going to use the Shell Wizard to add a flow that uses an operation that runs aWindows or Linux shell command to the repository that you are exporting, it isrecommended that you export the entire Studio Library, rather than a subfolder of the Library.To learn about using the Shell Wizard, see Shell Wizard: creating a flow that uses a shelloperation.
HP Operations Orchestration (9.07)Page 212 of 301
Studio Authoring GuideRepositories: Libraries for flows and their objects
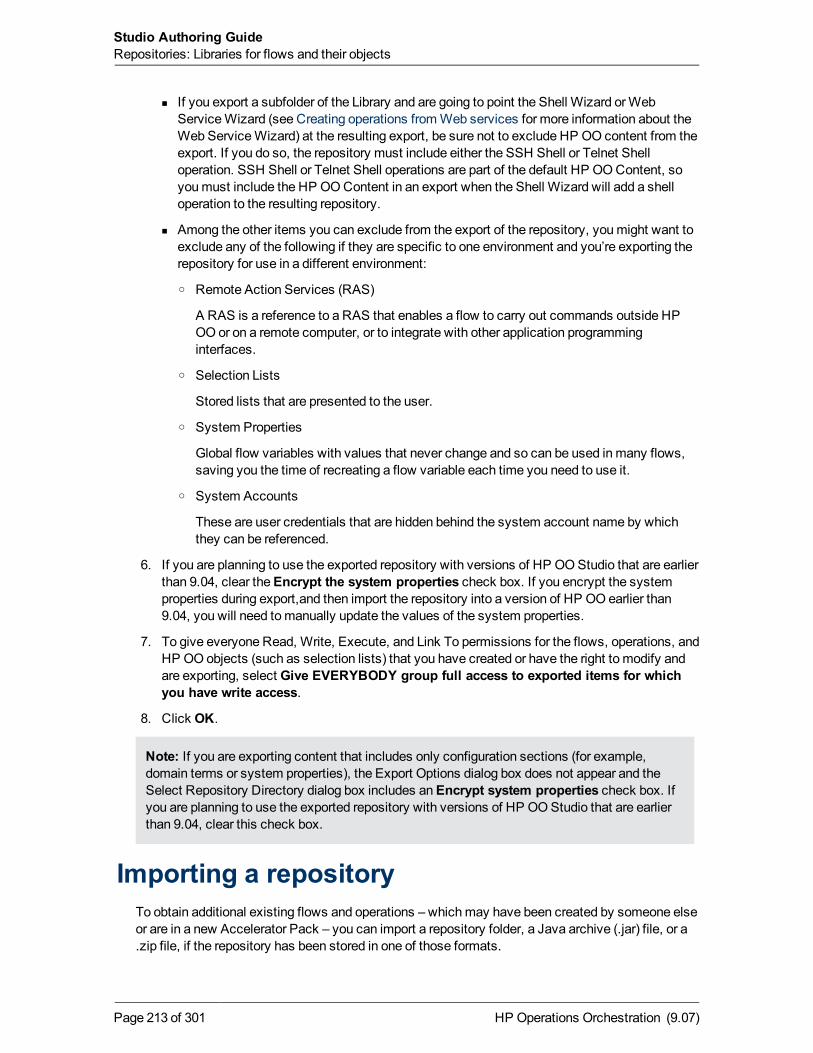
n If you export a subfolder of the Library and are going to point the Shell Wizard orWebServiceWizard (see Creating operations fromWeb services for more information about theWeb ServiceWizard) at the resulting export, be sure not to exclude HP OO content from theexport. If you do so, the repository must include either the SSH Shell or Telnet Shelloperation. SSH Shell or Telnet Shell operations are part of the default HP OOContent, soyoumust include the HP OOContent in an export when the Shell Wizard will add a shelloperation to the resulting repository.
n Among the other items you can exclude from the export of the repository, youmight want toexclude any of the following if they are specific to one environment and you’re exporting therepository for use in a different environment:
o Remote Action Services (RAS)
A RAS is a reference to a RAS that enables a flow to carry out commands outside HPOO or on a remote computer, or to integrate with other application programminginterfaces.
o Selection Lists
Stored lists that are presented to the user.
o System Properties
Global flow variables with values that never change and so can be used inmany flows,saving you the time of recreating a flow variable each time you need to use it.
o System Accounts
These are user credentials that are hidden behind the system account name by whichthey can be referenced.
6. If you are planning to use the exported repository with versions of HP OOStudio that are earlierthan 9.04, clear theEncrypt the system properties check box. If you encrypt the systemproperties during export,and then import the repository into a version of HP OO earlier than9.04, you will need tomanually update the values of the system properties.
7. To give everyone Read, Write, Execute, and Link To permissions for the flows, operations, andHP OO objects (such as selection lists) that you have created or have the right to modify andare exporting, select Give EVERYBODY group full access to exported items for whichyou have write access.
8. Click OK.
Note: If you are exporting content that includes only configuration sections (for example,domain terms or system properties), the Export Options dialog box does not appear and theSelect Repository Directory dialog box includes anEncrypt system properties check box. Ifyou are planning to use the exported repository with versions of HP OOStudio that are earlierthan 9.04, clear this check box.
Importing a repositoryTo obtain additional existing flows and operations – whichmay have been created by someone elseor are in a new Accelerator Pack – you can import a repository folder, a Java archive (.jar) file, or a.zip file, if the repository has been stored in one of those formats.
HP Operations Orchestration (9.07)Page 213 of 301
Studio Authoring GuideRepositories: Libraries for flows and their objects
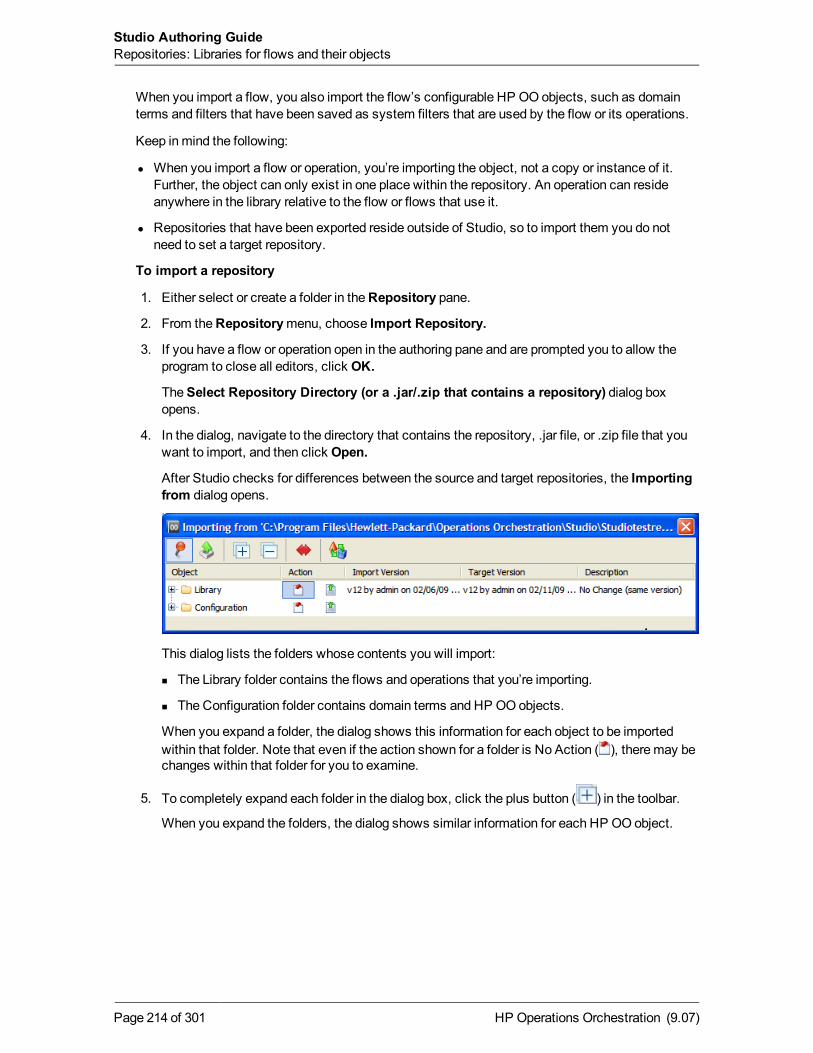
When you import a flow, you also import the flow’s configurable HP OO objects, such as domainterms and filters that have been saved as system filters that are used by the flow or its operations.
Keep inmind the following:
l When you import a flow or operation, you’re importing the object, not a copy or instance of it.Further, the object can only exist in one place within the repository. An operation can resideanywhere in the library relative to the flow or flows that use it.
l Repositories that have been exported reside outside of Studio, so to import them you do notneed to set a target repository.
To import a repository
1. Either select or create a folder in theRepository pane.
2. From theRepositorymenu, choose Import Repository.
3. If you have a flow or operation open in the authoring pane and are prompted you to allow theprogram to close all editors, click OK.
TheSelect Repository Directory (or a .jar/.zip that contains a repository) dialog boxopens.
4. In the dialog, navigate to the directory that contains the repository, .jar file, or .zip file that youwant to import, and then click Open.
After Studio checks for differences between the source and target repositories, the Importingfrom dialog opens.
This dialog lists the folders whose contents you will import:
n The Library folder contains the flows and operations that you’re importing.
n The Configuration folder contains domain terms and HP OO objects.
When you expand a folder, the dialog shows this information for each object to be importedwithin that folder. Note that even if the action shown for a folder is No Action ( ), theremay bechanges within that folder for you to examine.
5. To completely expand each folder in the dialog box, click the plus button ( ) in the toolbar.
When you expand the folders, the dialog shows similar information for each HP OO object.
HP Operations Orchestration (9.07)Page 214 of 301
Studio Authoring GuideRepositories: Libraries for flows and their objects
Note particularly the following information for the items in the target repository that exist in boththe target and the source:
n The Revision (version) number for the item in the target and in the source.
n Who created or changed the item, and on what date.
n A description of the change, or notation that there is no difference between the two apartfrom a date stamp.
n In this example, by the way, the folders and their contents have not been changed sincethey were exported. When you import a folder or HP OO object that you haven’t changedsince you exported it, the folder or object is listed, but the NoChange icon ( ) is highlighted
for it. When you click the Apply button ( ), no action will be taken on that item.
Note:You can view only the conflicts by clicking the View Conflicts Only button ( ).
6. To import a folder and its contents or an HP OO object to the target repository, under Action,click the upward-pointing arrow icon ( ) for the appropriate row.
OR
To leave an object as it is in the source, click the NoChange icon ( ).
Tip:You can take the same action for all the objects within a folder by clicking the upward-pointing arrow or the NoChange icon for the parent folder.
7. In the toolbar of the dialog, click the Apply button ( ).
HP Operations Orchestration (9.07)Page 215 of 301
Studio Authoring GuideRepositories: Libraries for flows and their objects
Validating repositoriesFor a flow to run, the flow itself, its operations, and any system accounts used in the flow must bevalid. You can check an individual flow or operation for problems (by highlighting the flow oroperation in theRepository pane and then clicking theProblems tab). (SeeWhat a flow needs tobe valid.)
Or, to discover and correct in one sweep any problems that theremight be, you can validate anentire repository. This validates all the flows, operations, and system accounts in the repository.
Tip:Validating the repository can go on in the background of certain tasks.
To validate a repository
l With the repository open, on the Toolsmenu, click Validate Flows and Operations.
A list of any problems, with their locations and descriptions, appears, as it does when you usetheProblems tab, to guide you in repairing the problems.
Encrypting repositoriesCreating encrypted copies of local repositories protects snapshots of your work from tampering ortheft. When you encrypt a local repository, you aremaking a copy of the repository and encryptingthe copy. Tomodify an encrypted repository in any way, publish to, update from, import to, or exportan encrypted repository, youmust type the correct password.
Note:l You can only encrypt a local repository. If Studio has the public repository open, the
commands related to encrypting repositories are unavailable.
l The entire repository is exported to the encrypted copy, regardless of which folder within therepository is selected.
l When you encrypt a repository, the original, unencrypted repository remains open in Studio.
l Once you have created an encrypted repository copy in a given location, you cannot re-encrypt a repository or encrypt another repository to the same location.
Encrypting a repositoryWhen you encrypt a repository, you are exporting it and encrypting the export of the repository.
To encrypt a repository
1. With the local repository that you want to encrypt open, on theRepositorymenu, clickEncrypt Repository.
The following dialog appears:
HP Operations Orchestration (9.07)Page 216 of 301
Studio Authoring GuideRepositories: Libraries for flows and their objects
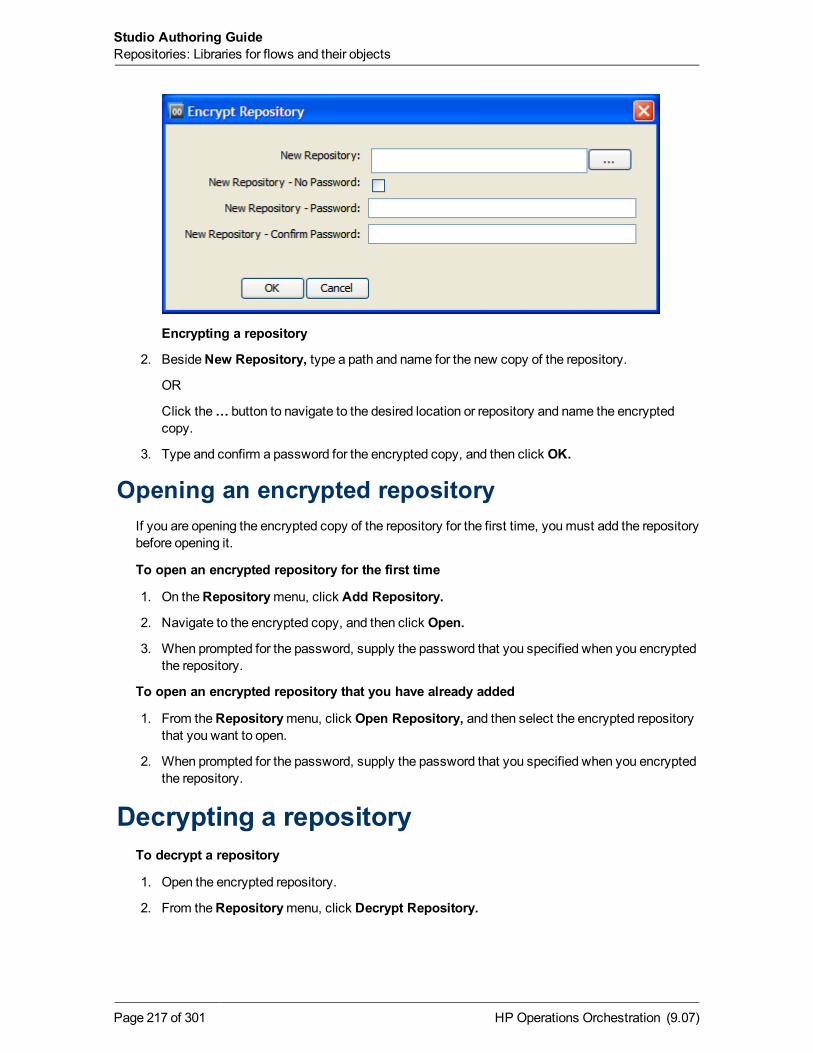
Encrypting a repository
2. BesideNew Repository, type a path and name for the new copy of the repository.
OR
Click the… button to navigate to the desired location or repository and name the encryptedcopy.
3. Type and confirm a password for the encrypted copy, and then click OK.
Opening an encrypted repositoryIf you are opening the encrypted copy of the repository for the first time, youmust add the repositorybefore opening it.
To open an encrypted repository for the first time
1. On theRepositorymenu, click Add Repository.
2. Navigate to the encrypted copy, and then click Open.
3. When prompted for the password, supply the password that you specified when you encryptedthe repository.
To open an encrypted repository that you have already added
1. From theRepositorymenu, click Open Repository, and then select the encrypted repositorythat you want to open.
2. When prompted for the password, supply the password that you specified when you encryptedthe repository.
Decrypting a repositoryTo decrypt a repository
1. Open the encrypted repository.
2. From theRepositorymenu, click Decrypt Repository.
HP Operations Orchestration (9.07)Page 217 of 301
Studio Authoring GuideRepositories: Libraries for flows and their objects
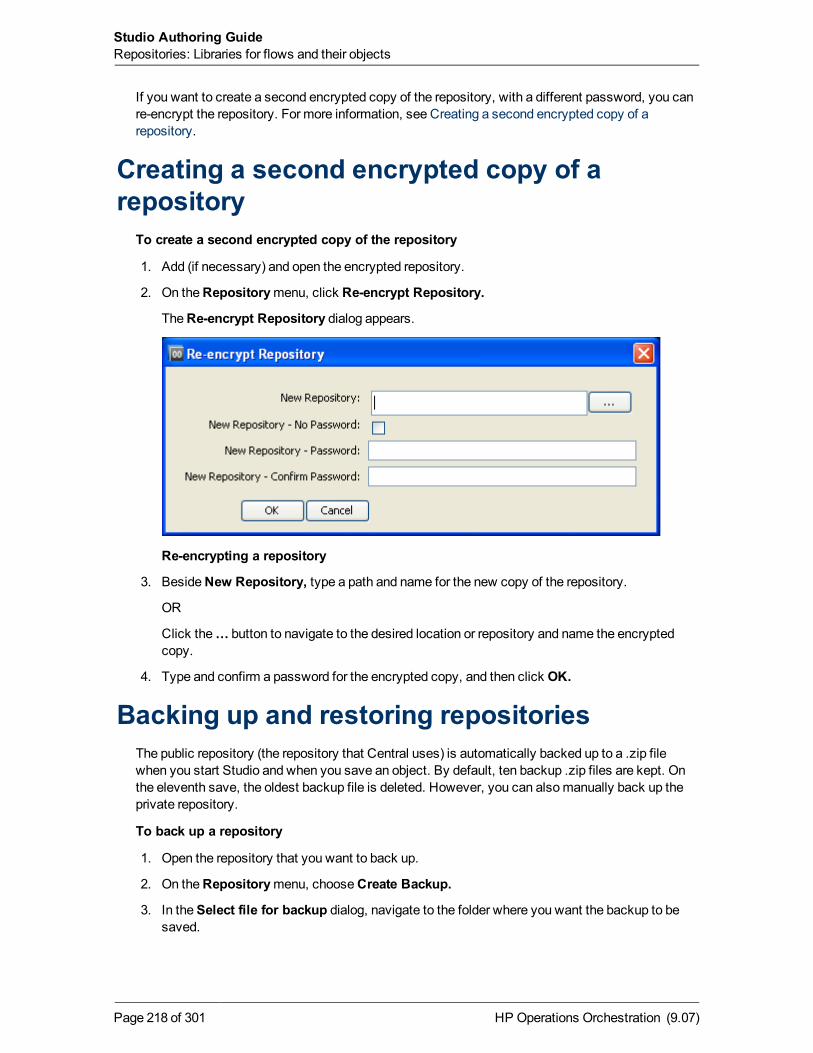
If you want to create a second encrypted copy of the repository, with a different password, you canre-encrypt the repository. For more information, see Creating a second encrypted copy of arepository.
Creating a second encrypted copy of arepository
To create a second encrypted copy of the repository
1. Add (if necessary) and open the encrypted repository.
2. On theRepositorymenu, click Re-encrypt Repository.
TheRe-encrypt Repository dialog appears.
Re-encrypting a repository
3. BesideNew Repository, type a path and name for the new copy of the repository.
OR
Click the… button to navigate to the desired location or repository and name the encryptedcopy.
4. Type and confirm a password for the encrypted copy, and then click OK.
Backing up and restoring repositoriesThe public repository (the repository that Central uses) is automatically backed up to a .zip filewhen you start Studio and when you save an object. By default, ten backup .zip files are kept. Onthe eleventh save, the oldest backup file is deleted. However, you can alsomanually back up theprivate repository.
To back up a repository
1. Open the repository that you want to back up.
2. On theRepositorymenu, chooseCreate Backup.
3. In theSelect file for backup dialog, navigate to the folder where you want the backup to besaved.
HP Operations Orchestration (9.07)Page 218 of 301
Studio Authoring GuideRepositories: Libraries for flows and their objects
The folder must be empty.
4. Click Save.
To restore a repository
1. From theRepositorymenu, choose Import Repository.
2. In theSelect Repository Directory (or a .jar/.zip… dialog, navigate to the backup that youwant to restore, and then click Open.
A folder that contains a repository has three subfolders: .idx, .tmp, and data.
After checking the public repository for version conflicts with the objects that you want toimport, HP OO imports the repository.
3. If there are conflicts, resolve them as you do when you import repositories.
For more information on importing repositories, see Importing a repository.
Repository snapshotsRepositories can be constantly in flux, with flow-authoring teams frequently adding to and pruningtheir repositories and improving or adapting their flows and operations. The snapshot featureenables you to look at an earlier state of a public repository by capturing that state at any point intime and viewing it later. You can revert the current public repository to the snapshot by publishingthe snapshot to the current repository. The snapshot then becomes the current state, and you cando any work you choose to in it.
The public repository that you publish a snapshot to can be either the one of which you took thesnapshot or a different one. For instance, if you have HP OO installations in both development andtesting environments, you can publish a snapshot of the public repository in the developmentenvironment:
l To itself, which reverts the development public repository to its state when you took thesnapshot.
OR
l To the public repository in the testing environment.
If a repository is promoted for testing and some of its flows fail, having a snapshot of a therepository’s last-known-good state enables you to publish that last-known-good version of thedevelopment environment’s public repository to the testing environment’s public repository.
Notes:l Before working with snapshots, you should have a thorough understanding of repositories
and of publishing repositories.
l Snapshots can be taken only of a public repository and can only be published to a publicrepository.
l Snapshots preserve the current state of the repository at the time they are taken. Therepository’s state at any given time includes any objects that have been created, and anychecked-in changes to objects. Objects that have been created but not checked in are partof the snapshot because, when you create an object, it is created in the repository. It is thus
HP Operations Orchestration (9.07)Page 219 of 301
Studio Authoring GuideRepositories: Libraries for flows and their objects
part of the current state of the repository, which is what a snapshot preserves. However,when youmake a change to an object, the change is not part of the current state of therepository until it is checked in.
l When you publish a snapshot to a public repository, any object that was not checked inwhen the snapshot was taken cannot be applied to the public repository.
l Snapshots are not taken of a single user’s workspace, but of the whole repository. Thuswhen you view a snapshot, you are viewing an entire public repository, in its state followingthemost recent checkins of the contributing authors’ work. When you publish a snapshot,the NoChange column ( ) is selected for all the items that are different between thesnapshot and the target repository.
To apply the differences to the target repository, select ( ) for the changes you want to
apply, then click the Apply Changes icon ( ). For information on publishing, seePublishing a repository: how to.
l To create a snapshot, edit the name or description of, publish or delete snapshots, youmustbe amember of the HP OOCentral ADMINISTRATOR or PROMOTER group.
Creating snapshotsTo take a snapshot of a repository
1. On theRepositorymenu, click Manage Snapshots.
TheManage Snapshots dialog opens.
HP Operations Orchestration (9.07)Page 220 of 301
Studio Authoring GuideRepositories: Libraries for flows and their objects
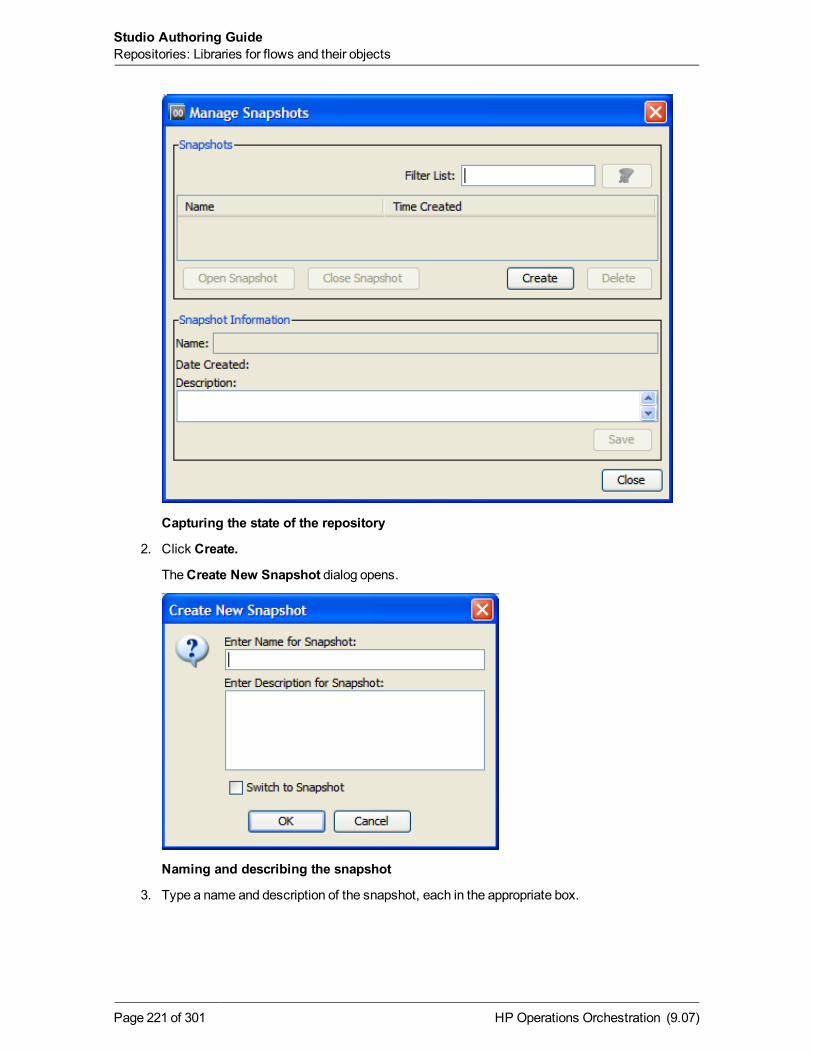
Capturing the state of the repository
2. Click Create.
TheCreate New Snapshot dialog opens.
Naming and describing the snapshot
3. Type a name and description of the snapshot, each in the appropriate box.
HP Operations Orchestration (9.07)Page 221 of 301
Studio Authoring GuideRepositories: Libraries for flows and their objects
Best Practice:Depending on your development methods and topology of HP OO installations,it can be very important that the snapshot’s description tell you at a glance information such thestate that the snapshot preserves, or which, if any, other snapshots it is in synch with.
4. To specify that after you create the snapshot it is selected in theManage Snapshots list ofsnapshots and appears in Studio, select Switch to Snapshot.
5. Click OK, and then, in theManage Snapshots dialog, click Close.
Editing a snapshot’s name or descriptionTo edit a snapshot’s name or description
1. On theRepositorymenu, click Manage Snapshots.
2. In theManage Snapshots dialog, in the list underSnapshots, select the snapshot whoseinformation you want to edit.
3. In theName and/orDescription boxes, make the desired changes, and then click Save.
Viewing a snapshotA snapshot is a read-only view of the repository. Viewing a snapshot does not make it the publicrepository’s current state.
(To change the public repository’s state to that of the snapshot and thenmake changes to it, youpublish the snapshot to the repository. For information on publishing a snapshot, see Restoringfrom a snapshot.)
To view a snapshot
1. On theRepositorymenu, click Manage Snapshots.
TheManage Snapshots dialog opens.
HP Operations Orchestration (9.07)Page 222 of 301
Studio Authoring GuideRepositories: Libraries for flows and their objects
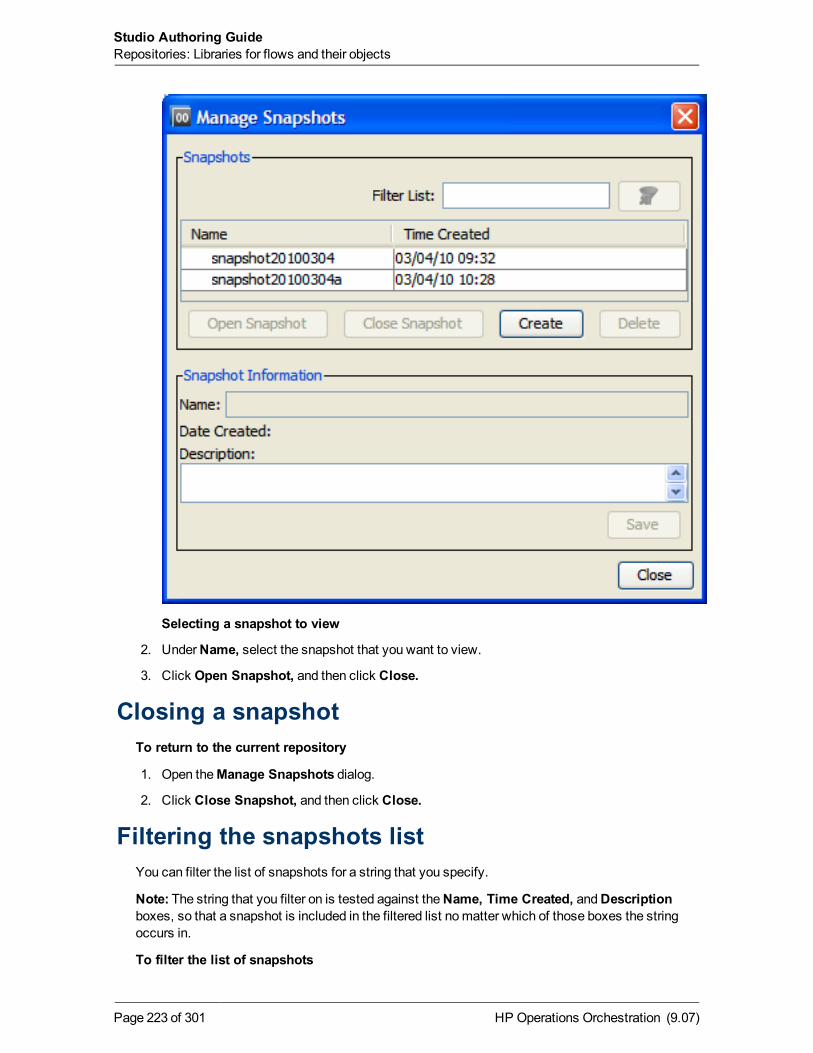
Selecting a snapshot to view
2. UnderName, select the snapshot that you want to view.
3. Click Open Snapshot, and then click Close.
Closing a snapshotTo return to the current repository
1. Open theManage Snapshots dialog.
2. Click Close Snapshot, and then click Close.
Filtering the snapshots listYou can filter the list of snapshots for a string that you specify.
Note: The string that you filter on is tested against theName, Time Created, andDescriptionboxes, so that a snapshot is included in the filtered list nomatter which of those boxes the stringoccurs in.
To filter the list of snapshots
HP Operations Orchestration (9.07)Page 223 of 301
Studio Authoring GuideRepositories: Libraries for flows and their objects
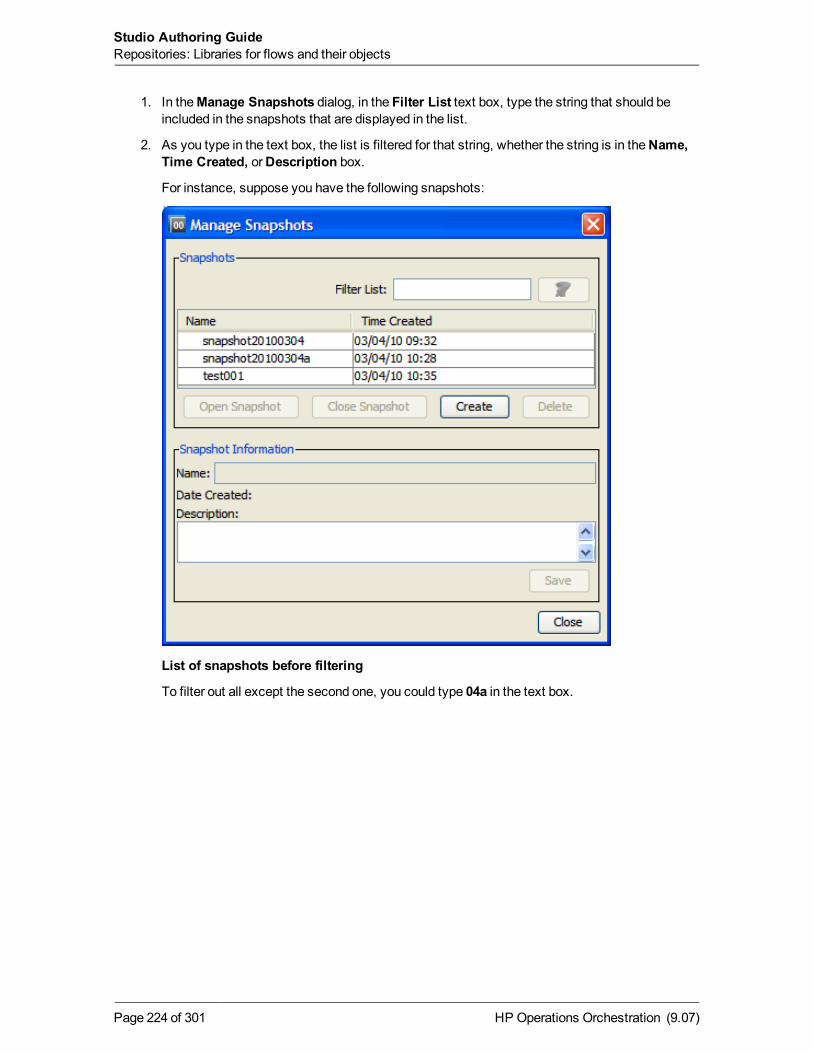
1. In theManage Snapshots dialog, in the Filter List text box, type the string that should beincluded in the snapshots that are displayed in the list.
2. As you type in the text box, the list is filtered for that string, whether the string is in theName,Time Created, orDescription box.
For instance, suppose you have the following snapshots:
List of snapshots before filtering
To filter out all except the second one, you could type 04a in the text box.
HP Operations Orchestration (9.07)Page 224 of 301
Studio Authoring GuideRepositories: Libraries for flows and their objects
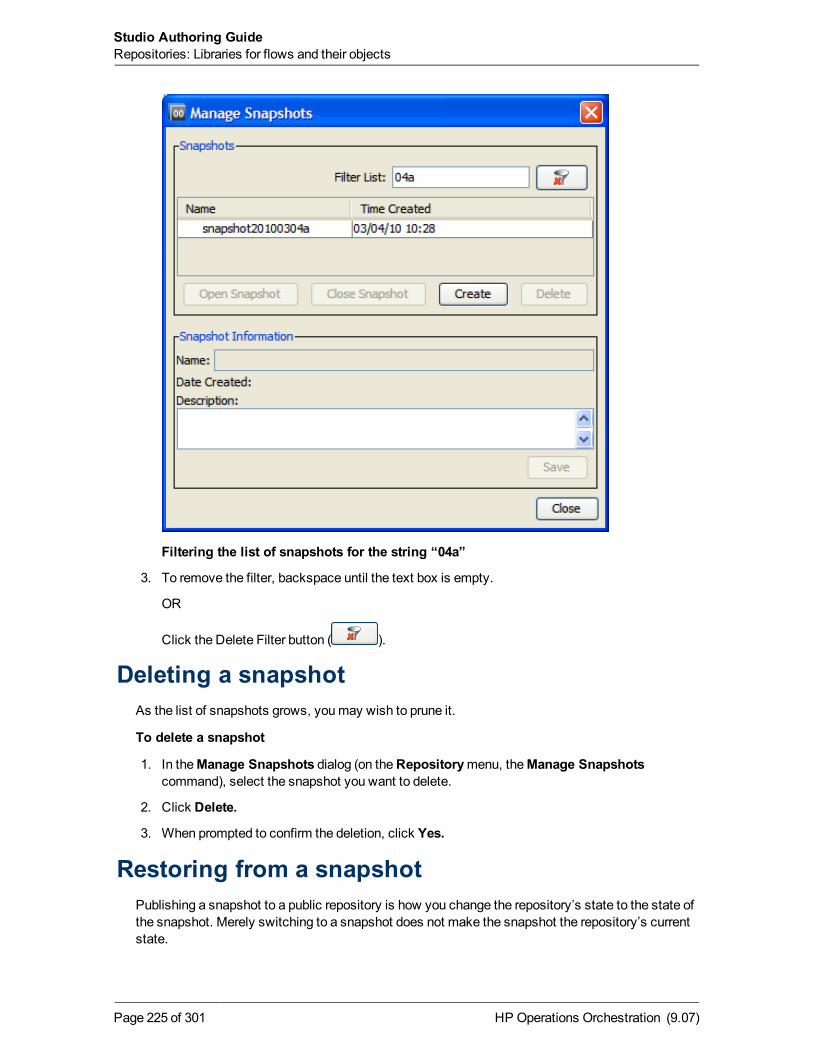
Filtering the list of snapshots for the string “04a”
3. To remove the filter, backspace until the text box is empty.
OR
Click the Delete Filter button ( ).
Deleting a snapshotAs the list of snapshots grows, youmay wish to prune it.
To delete a snapshot
1. In theManage Snapshots dialog (on theRepositorymenu, theManage Snapshotscommand), select the snapshot you want to delete.
2. Click Delete.
3. When prompted to confirm the deletion, click Yes.
Restoring from a snapshotPublishing a snapshot to a public repository is how you change the repository’s state to the state ofthe snapshot. Merely switching to a snapshot does not make the snapshot the repository’s currentstate.
HP Operations Orchestration (9.07)Page 225 of 301
Studio Authoring GuideRepositories: Libraries for flows and their objects
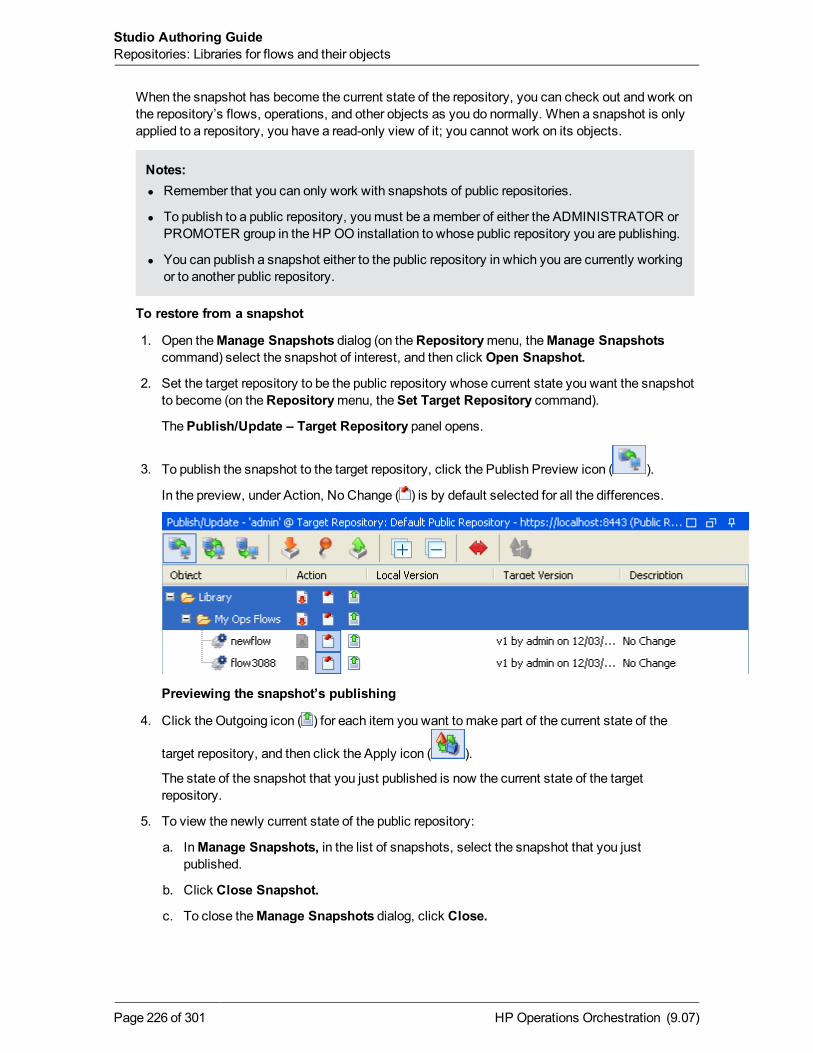
When the snapshot has become the current state of the repository, you can check out and work onthe repository’s flows, operations, and other objects as you do normally. When a snapshot is onlyapplied to a repository, you have a read-only view of it; you cannot work on its objects.
Notes:l Remember that you can only work with snapshots of public repositories.
l To publish to a public repository, youmust be amember of either the ADMINISTRATOR orPROMOTER group in the HP OO installation to whose public repository you are publishing.
l You can publish a snapshot either to the public repository in which you are currently workingor to another public repository.
To restore from a snapshot
1. Open theManage Snapshots dialog (on theRepositorymenu, theManage Snapshotscommand) select the snapshot of interest, and then click Open Snapshot.
2. Set the target repository to be the public repository whose current state you want the snapshotto become (on theRepositorymenu, theSet Target Repository command).
ThePublish/Update – Target Repository panel opens.
3. To publish the snapshot to the target repository, click the Publish Preview icon ( ).
In the preview, under Action, No Change ( ) is by default selected for all the differences.
Previewing the snapshot’s publishing
4. Click the Outgoing icon ( ) for each item you want to make part of the current state of the
target repository, and then click the Apply icon ( ).
The state of the snapshot that you just published is now the current state of the targetrepository.
5. To view the newly current state of the public repository:
a. InManage Snapshots, in the list of snapshots, select the snapshot that you justpublished.
b. Click Close Snapshot.
c. To close theManage Snapshots dialog, click Close.
HP Operations Orchestration (9.07)Page 226 of 301
Studio Authoring GuideRepositories: Libraries for flows and their objects
Creating operations from Web servicesTheWeb Services Wizard creates HP OO operations based on the API described in theWebService Definition Language (WSDL) of theWeb service that you identify in the wizard. (A Webservice is a piece of business logic that resides on the Internet.)
A WSDL is a description of requests to and responses from aWeb Service. All Web Services thatare based on the Simple Object Access Protocol (SOAP) and are compliant with theWeb ServicesInteroperability (WS-I) standard have aWSDL.
When you run theWeb Services Wizard, you provide it with theWSDL for a givenWeb service.TheWSDL string you provide as a pointer can be a file’s location and name or a URL.
For instance, suppose you have an application calledMyAlert that creates a ticket through aWebservice and API, and you want to tell MyAlert to create a ticket. TheWeb Services Wizard extracts,from theWeb service’s WSDL, the application’s APIs for the actions that can be performed with theapplication, such as creating or changing a ticket. TheWSDL defines theWeb service’s methods,the inputs that eachmethod needs, and the required format for each input.
When you provide the wizard with theWSDL (in our example, for MyAlert) and run the wizard, itgenerates flows and operations that can run against theWeb service. The flows and operationsappear in the Studio Library, with the required inputs created. Running the flows requires a RemoteAction Service (RAS) reference that points to theWeb service. For information on creating andconfiguring RAS references, seeOperating outside Central with Remote Action Services andappropriate subsections.
For more notes on creating operations fromWeb Services and for the procedure for using theWebServices Wizard to create operations fromWeb Services, see Creating operations using theWebServices Wizard.
Creating operations using the Web ServicesWizard
TheWeb Services Wizard creates HP OO operations based on the API described in theWebService Definition Language (WSDL) of theWeb service that you identify in the wizard.
For more information onWeb Services, WSDLs, and theWeb Services Wizard, see Creatingoperations fromWeb Services.
Notes:l WebServiceWizard uses the SOAP UI utility to parse theWSDL into XML.
l In addition to inputs, the parsing obtains results that can be captured as operation outputs(which are expressed as results in steps). Any arrays in the XML are extracted only as asingle XML result, from which the flow author can extract narrow subsets.
HP Operations Orchestration (9.07)Page 227 of 301
l In the flows that theWeb Services Wizard generates, the flow inputs that correspond toWeb service inputs are optional. It is frequently the case that some of the inputs that Webservice definitions indicate to be required are not actually required, andmirroring thosesettings in the flow would force the flow user to enter unused values when running the flow.Thus theWeb Services Wizard sets all the inputs to be optional. When theWeb servicedoes indicate that a field is optional, it precedes the field with the comment "<!--Optional:-->" or "<!--zero or more repetitions-->". For information on which inputs should be required,see the documentation for theWeb Service for which you create operations.
l If theWeb Service whoseWSDL you are accessing resides on the other side of a firewallfrom your Studio machine, youmust specify an HTTP proxy with which to reach theWebService. The way to do so is included in the following procedure.
To create operations for a Web service with the Web Services Wizard
1. If you need to specify a proxy:
a. In the HP OO home directory, in the \Studio\tools\conf\ folder, open the wsw.properties filein a text editor.
b. Locate and uncomment (i.e., remove the leading pound or hash [#] sign from) the followinglines:
# http.proxyHost=myproxyhost.com
# http.proxyPort=8080
c. In each line, replace the string on the right side of the equals (=) sign with the appropriatevalue: your HTTP proxy and your proxy port, respectively.
2. In the HP OO home directory, in the \Studio\tools\ folder, double-click wswizard.exe.
TheWeb Services Wizard starts.
HP Operations Orchestration (9.07)Page 228 of 301
Studio Authoring GuideCreating operations fromWeb services
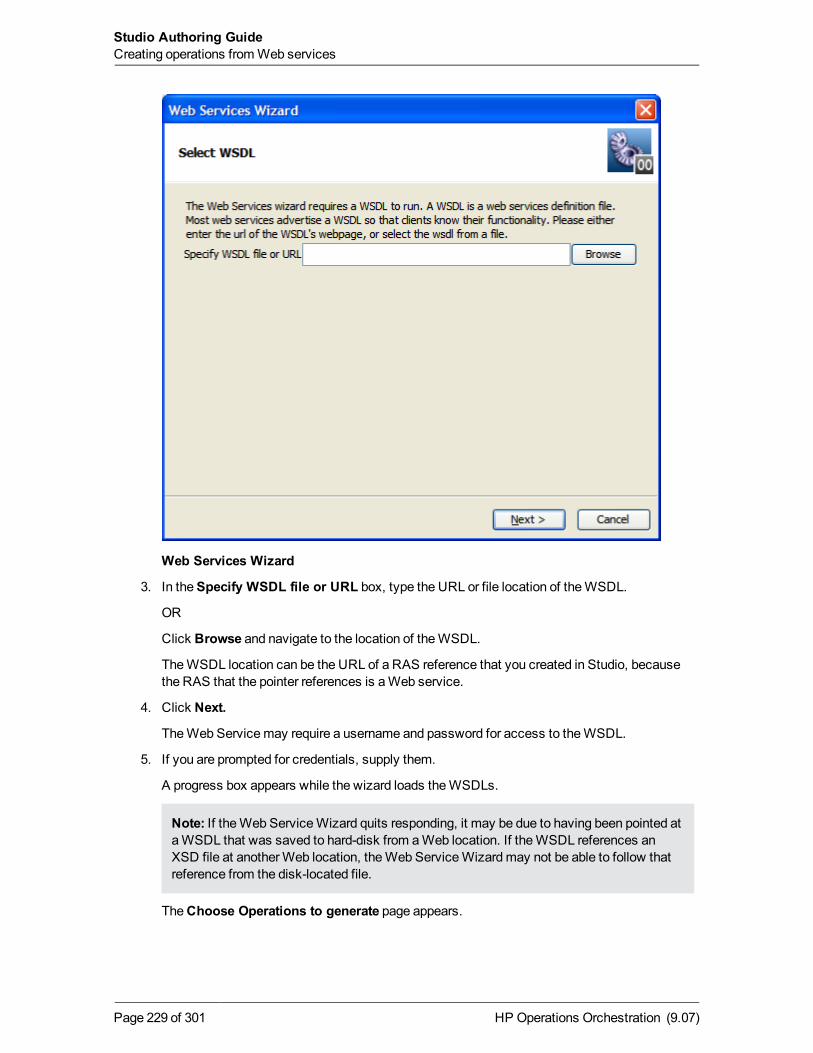
Web Services Wizard
3. In theSpecify WSDL file or URL box, type the URL or file location of theWSDL.
OR
Click Browse and navigate to the location of theWSDL.
TheWSDL location can be the URL of a RAS reference that you created in Studio, becausethe RAS that the pointer references is aWeb service.
4. Click Next.
TheWeb Servicemay require a username and password for access to theWSDL.
5. If you are prompted for credentials, supply them.
A progress box appears while the wizard loads theWSDLs.
Note: If theWeb ServiceWizard quits responding, it may be due to having been pointed ataWSDL that was saved to hard-disk from aWeb location. If theWSDL references anXSD file at anotherWeb location, theWeb ServiceWizardmay not be able to follow thatreference from the disk-located file.
TheChoose Operations to generate page appears.
HP Operations Orchestration (9.07)Page 229 of 301
Studio Authoring GuideCreating operations fromWeb services
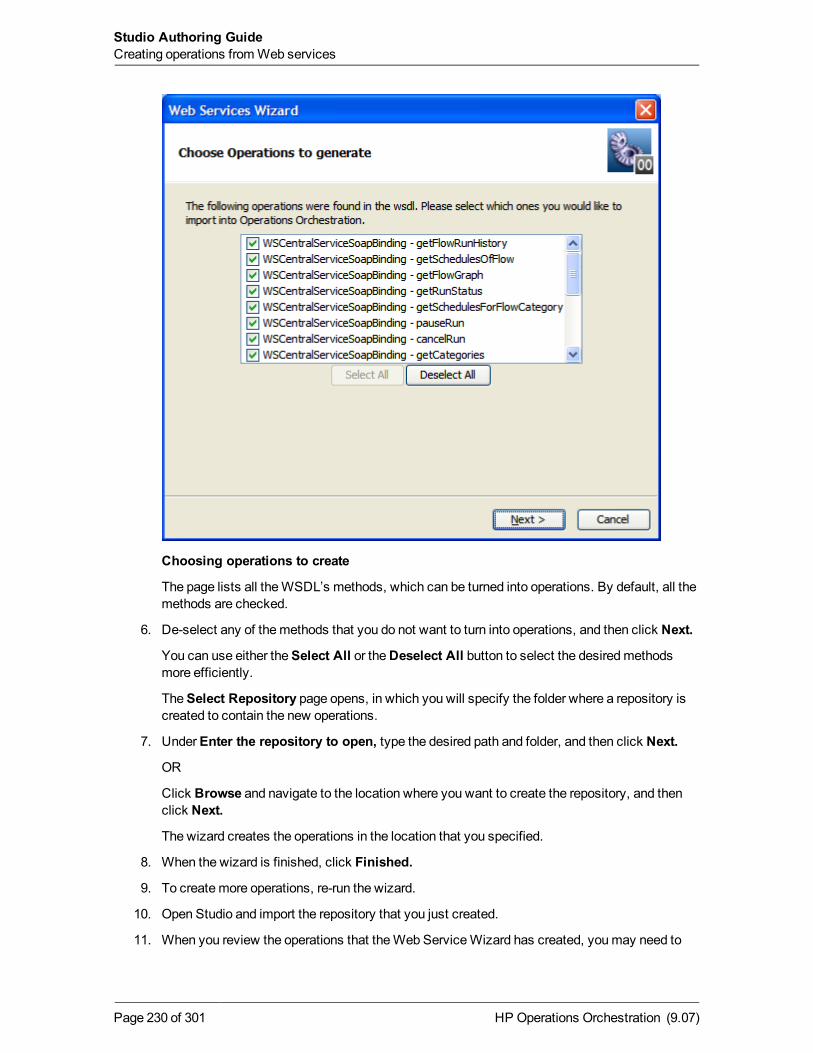
Choosing operations to create
The page lists all theWSDL’s methods, which can be turned into operations. By default, all themethods are checked.
6. De-select any of themethods that you do not want to turn into operations, and then click Next.
You can use either theSelect All or theDeselect All button to select the desiredmethodsmore efficiently.
TheSelect Repository page opens, in which you will specify the folder where a repository iscreated to contain the new operations.
7. UnderEnter the repository to open, type the desired path and folder, and then click Next.
OR
Click Browse and navigate to the location where you want to create the repository, and thenclick Next.
The wizard creates the operations in the location that you specified.
8. When the wizard is finished, click Finished.
9. To createmore operations, re-run the wizard.
10. Open Studio and import the repository that you just created.
11. When you review the operations that theWeb ServiceWizard has created, youmay need to
HP Operations Orchestration (9.07)Page 230 of 301
Studio Authoring GuideCreating operations fromWeb services
make some inputs required.
For the reasons described in the introductory material to this section, theWeb ServiceWizardtreats all inputs forWSDL-generated operations as optional.
Note: For information on which inputs should be required, see the documentation for theWeb Service for which you have created this set of operations.
Logging the Web Services WizardTheWeb Services Wizard generates a log file, WebServiceWizard.log, that resides in the HP OOhome directory, in the \Studio\tools\ subdirectory. The log describes all the activity of theWebServices Wizard, including informational, warning, and error log entries. You can configure thelogging in the \Studio\tools\conf\wsw.log4j.properties file.
HP Operations Orchestration (9.07)Page 231 of 301
Studio Authoring GuideCreating operations fromWeb services
Operating outside Central with RemoteAction Services
A Remote Action Service (RAS, which wewill pronounce phonetically) is an instance of a servicethat interacts with both Java and .NET to enable a flow to run onmachines, using commands, oragainst APIs that would be otherwise inaccessible to HP OO flows.
For example, you could use a RAS to accomplish the following:
l Integrating with the Exchange API.
l Restarting a server in a different domain from the one in which Central is installed.
l Carrying out an operation on aWindows server when Central was installed on a Linux server.
Depending on what you need a RAS for, you can use the RAS that is by default included when youinstall Central, or youmay need to install a standalone RAS remotely.
If the RAS provides Central with access to a different domain, it only needs to be installed in thatdomain.
If the RAS provides Central with access to a different API, it does so either by accessing aWebservice that provides access to the API or by having operations that use the API added to the RAS.
For the RAS to give Central access to commands andmachines that it would not otherwise haveaccess to the following are required:
l The RAS must be provided with or have access to the code that it in turn enables HP OO flowsto execute.
A RAS can obtain code or access to it in one of two ways:
n If the RAS interacts with aWeb service: The RAS already has the code (an IAction) requiredto interact with any Web service.
Although the RAS can interact with aWeb service, Central needs the commands and inputsthat theWeb service requires so that the flow author can create flows that use them.Therefore, HP OO provides authors with theWeb Service wizard for creating operations fromthe target Web service. For information on using theWeb Service wizard, see Creatingoperations fromWeb services.
n If the RAS interacts with an API without themediation of aWeb service, the operation authormust create an IAction that contains the code required for interaction with the commands ofthe API.
You use either Java or a programming language that is supported by .NET to create anIAction. This level of authoring requires the ability to program with .NET or Java as well asWindows Scripting Host or Perl scripting.
HP Operations Orchestration (9.07)Page 232 of 301
After creating the IAction, the developer compiles it into a Java archive (.jar) file or dynamic-link library (.dll) and adds it to the RAS’s Repository folder. Detailed information on creatingIActions and adding them to a RAS is in the HP OOSoftware Development Kit Guide(SDKGuide.pdf).
As with aWeb service, Central needs the commands and inputs in the IAction(s) in order forflows to be created that use the IAction. To provide Central with the needed commands, HPOO enables authors to import operations from aRAS. For information on importing operationsfrom aRAS, see Creating operations from aRAS.
l Central must be directed to the RAS.
You direct Central to the RAS by creating a RAS reference in Studio, then dragging the RASreference onto a RAS-enabled operation. The RAS reference has a name and a URL thataccesses the RAS. The default RAS reference in Studio is RAS_Operator_Path.
Note:Not all operations can have a RAS reference added to them. RAS-enabledoperations, which have a field on their Inputs tab for adding a RAS reference, include thefollowing:
n Operations that are created from aRAS or aWeb service.
n A new operation that you create in Studio and that is of the RAS operation type.
n The operations in default HP OO content that must run on a RAS.
Many operations in default HP OO content have RAS-enabled counterparts, such as those inthe Operations\Remote Command Execution folder in the Studio Repository pane.
Note: To use an operation or flow that uses a RAS, the author and flow user must have theRead and Execute permissions for the RAS. Tomodify a RAS’s reference, the author musthave Read andWrite permissions for the RAS. For more information, see Controlling accessto a RAS.
The following topics in this section describe the various tasks involved in working withRASes:
l How Central runs RAS-dependent operations
l Checking the availability of a RAS
l Controlling access to a RAS
l Adding a RAS reference from an existing RAS
l Adding a RAS reference
l Reconfiguring an existing RAS reference
l Removing a RAS reference
l Changing RAS references
l Creating operations from RASes
l Adding an operation that is not in the default RAS
l RAS-based operations: an example: a flow that runs in any of multiple domains
HP Operations Orchestration (9.07)Page 233 of 301
Studio Authoring GuideOperating outside Central with Remote Action Services
l Troubleshooting the running of RAS-dependent operations
l Importing RAS content
How Central runs RAS-dependent operationsThe RAS contains a dynamic-link library (DLL, or .dll) and Java archive (.jar) that containsdefinitions of operation classes. When the RAS is called, it runs an instance of the class of therequired operation.
A RAS-dependent operation contains the information that Central needs to identify the RAS onwhich the operationmust run:
l Action Class is the name of the operation that is inside the archive or DLL and is the operationthat you want to run.
l Archive is a .dll or .jar, such as Dotwebactions.dll, that contains operations.
l RAS is the RAS reference that the operation uses.
These pieces of information are specified in the RAS Operation fields on the operation’s Propertiessheet. Operations in the Integrations, Operations, and Utility Operations folders in the Libraryalready have this information provided. If you change the URL of the RAS, youmust also changethe URL of the RAS reference in Studio. Creating a RAS-dependent operation from scratch,includes:
l Creating a .dll or .jar to contain the operation’s definition.
l Specifying that .dll or .jar in the installation of a RAS service for running the operation.
l in the operation’s RAS Operation fields, providing the name of the operation class, the .dll or .jar,and the name of the RAS pointer.
For information on specifying values for the RAS Operation fields on a RAS operation’s Propertiessheet, see RAS operation: IAction programming for a RAS.
Checking the availability of a RASFor an overview of Remote Action Services, seeOperating outside Central with Remote ActionServices.
To check the availability of an existing RAS
1. In theRepository pane, right-click the Configuration\Remote Action Services folder and clickProperties.
2. In theRemote Action Services sheet, highlight the RAS whose availability you want tocheck, and then click Check Availability.
HP Operations Orchestration (9.07)Page 234 of 301
Studio Authoring GuideOperating outside Central with Remote Action Services
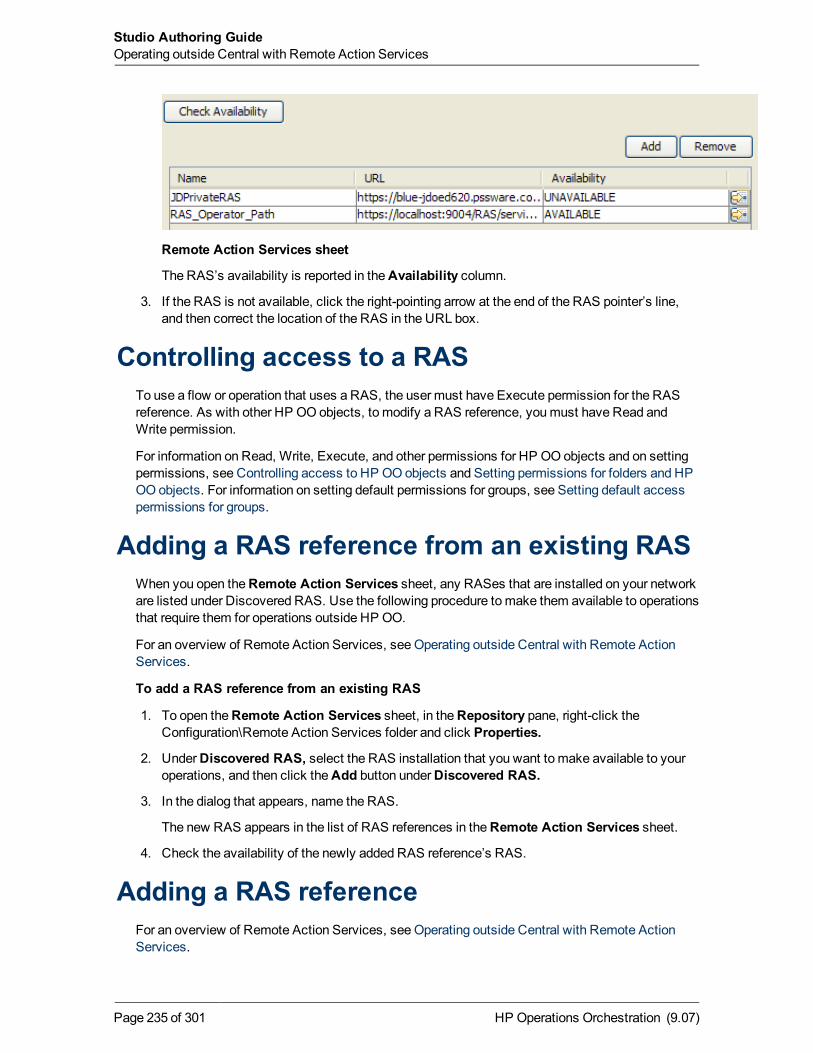
Remote Action Services sheet
The RAS’s availability is reported in theAvailability column.
3. If the RAS is not available, click the right-pointing arrow at the end of the RAS pointer’s line,and then correct the location of the RAS in the URL box.
Controlling access to a RASTo use a flow or operation that uses a RAS, the user must have Execute permission for the RASreference. As with other HP OO objects, to modify a RAS reference, youmust have Read andWrite permission.
For information on Read, Write, Execute, and other permissions for HP OO objects and on settingpermissions, see Controlling access to HP OO objects and Setting permissions for folders and HPOO objects. For information on setting default permissions for groups, see Setting default accesspermissions for groups.
Adding a RAS reference from an existing RASWhen you open theRemote Action Services sheet, any RASes that are installed on your networkare listed under Discovered RAS. Use the following procedure tomake them available to operationsthat require them for operations outside HP OO.
For an overview of Remote Action Services, seeOperating outside Central with Remote ActionServices.
To add a RAS reference from an existing RAS
1. To open theRemote Action Services sheet, in theRepository pane, right-click theConfiguration\Remote Action Services folder and click Properties.
2. UnderDiscovered RAS, select the RAS installation that you want to make available to youroperations, and then click theAdd button underDiscovered RAS.
3. In the dialog that appears, name the RAS.
The new RAS appears in the list of RAS references in theRemote Action Services sheet.
4. Check the availability of the newly added RAS reference’s RAS.
Adding a RAS referenceFor an overview of Remote Action Services, seeOperating outside Central with Remote ActionServices.
HP Operations Orchestration (9.07)Page 235 of 301
Studio Authoring GuideOperating outside Central with Remote Action Services
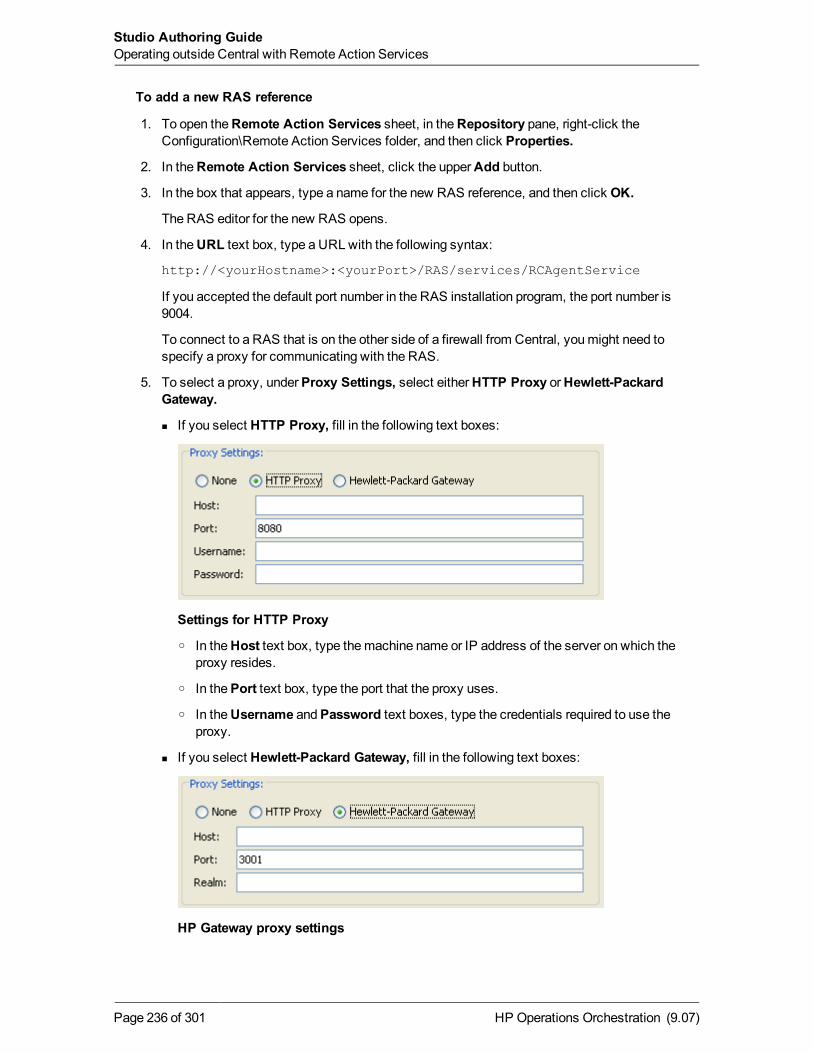
To add a new RAS reference
1. To open theRemote Action Services sheet, in theRepository pane, right-click theConfiguration\Remote Action Services folder, and then click Properties.
2. In theRemote Action Services sheet, click the upperAdd button.
3. In the box that appears, type a name for the new RAS reference, and then click OK.
The RAS editor for the new RAS opens.
4. In theURL text box, type a URLwith the following syntax:
http://<yourHostname>:<yourPort>/RAS/services/RCAgentService
If you accepted the default port number in the RAS installation program, the port number is9004.
To connect to a RAS that is on the other side of a firewall from Central, youmight need tospecify a proxy for communicating with the RAS.
5. To select a proxy, underProxy Settings, select eitherHTTP Proxy orHewlett-PackardGateway.
n If you select HTTP Proxy, fill in the following text boxes:
Settings for HTTP Proxy
o In theHost text box, type themachine name or IP address of the server on which theproxy resides.
o In thePort text box, type the port that the proxy uses.
o In theUsername andPassword text boxes, type the credentials required to use theproxy.
n If you select Hewlett-Packard Gateway, fill in the following text boxes:
HP Gateway proxy settings
HP Operations Orchestration (9.07)Page 236 of 301
Studio Authoring GuideOperating outside Central with Remote Action Services
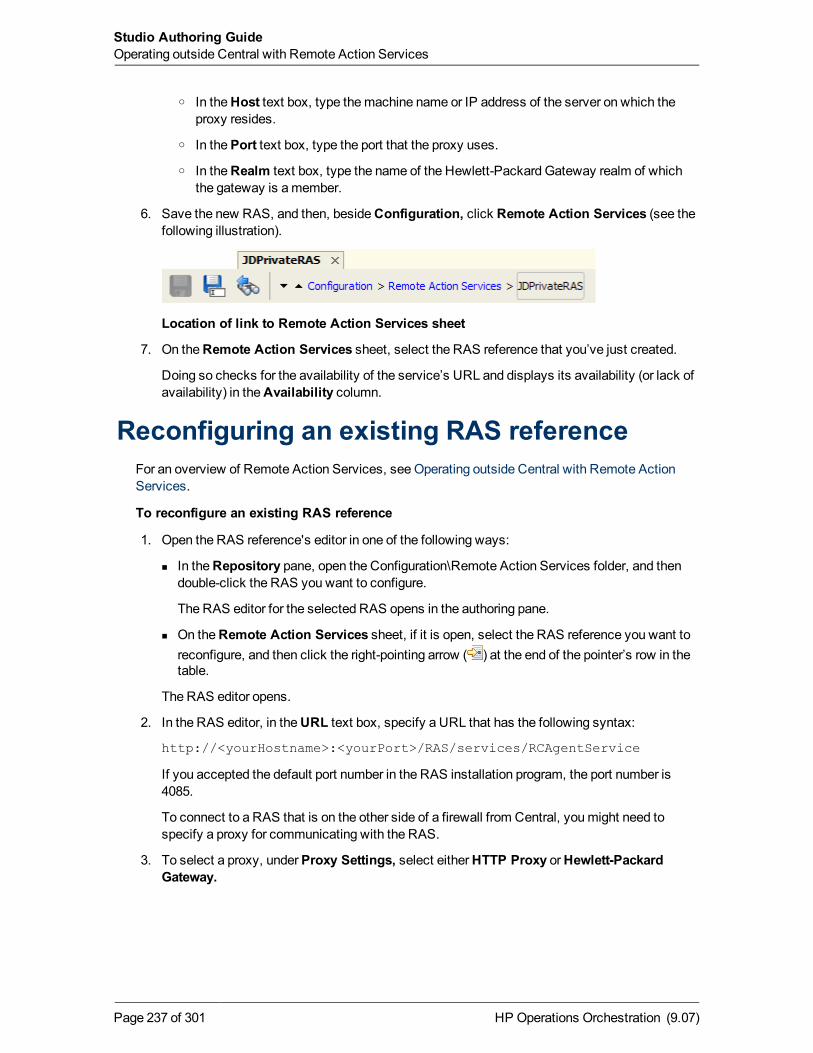
o In theHost text box, type themachine name or IP address of the server on which theproxy resides.
o In thePort text box, type the port that the proxy uses.
o In theRealm text box, type the name of the Hewlett-Packard Gateway realm of whichthe gateway is amember.
6. Save the new RAS, and then, besideConfiguration, click Remote Action Services (see thefollowing illustration).
Location of link to Remote Action Services sheet
7. On theRemote Action Services sheet, select the RAS reference that you’ve just created.
Doing so checks for the availability of the service’s URL and displays its availability (or lack ofavailability) in theAvailability column.
Reconfiguring an existing RAS referenceFor an overview of Remote Action Services, seeOperating outside Central with Remote ActionServices.
To reconfigure an existing RAS reference
1. Open the RAS reference's editor in one of the following ways:
n In theRepository pane, open the Configuration\Remote Action Services folder, and thendouble-click the RAS you want to configure.
The RAS editor for the selected RAS opens in the authoring pane.
n On theRemote Action Services sheet, if it is open, select the RAS reference you want toreconfigure, and then click the right-pointing arrow ( ) at the end of the pointer’s row in thetable.
The RAS editor opens.
2. In the RAS editor, in theURL text box, specify a URL that has the following syntax:
http://<yourHostname>:<yourPort>/RAS/services/RCAgentService
If you accepted the default port number in the RAS installation program, the port number is4085.
To connect to a RAS that is on the other side of a firewall from Central, youmight need tospecify a proxy for communicating with the RAS.
3. To select a proxy, underProxy Settings, select eitherHTTP Proxy orHewlett-PackardGateway.
HP Operations Orchestration (9.07)Page 237 of 301
Studio Authoring GuideOperating outside Central with Remote Action Services
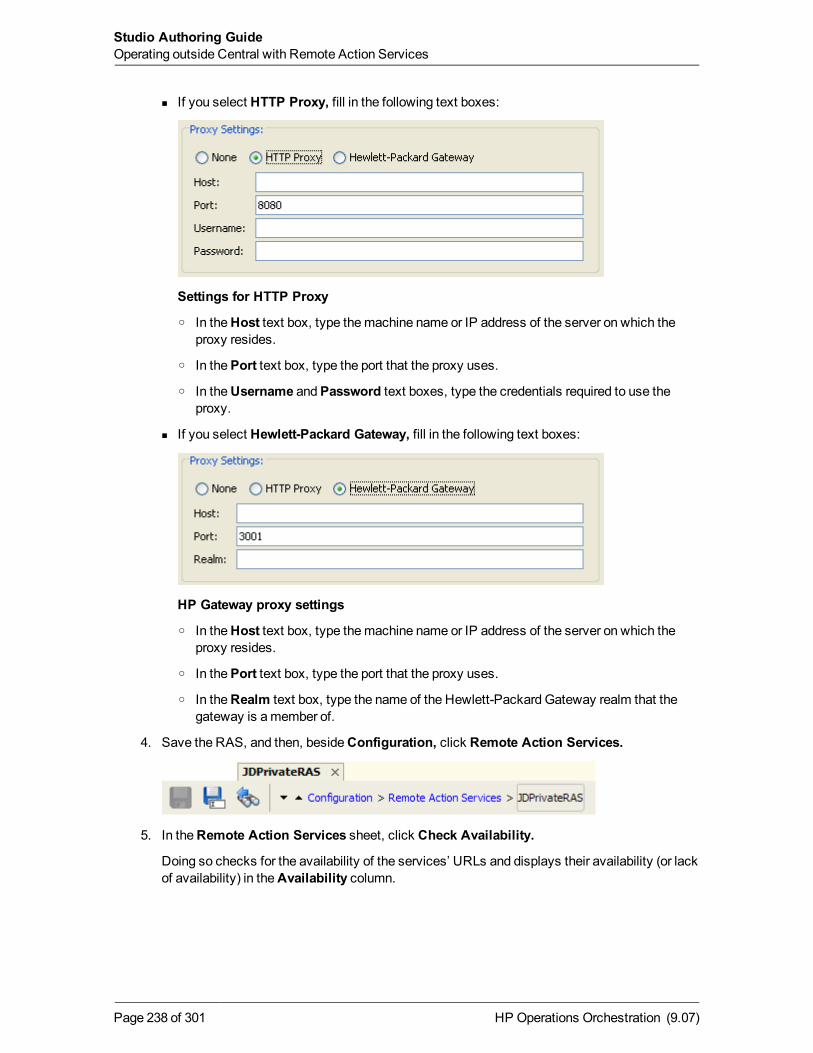
n If you select HTTP Proxy, fill in the following text boxes:
Settings for HTTP Proxy
o In theHost text box, type themachine name or IP address of the server on which theproxy resides.
o In thePort text box, type the port that the proxy uses.
o In theUsername andPassword text boxes, type the credentials required to use theproxy.
n If you select Hewlett-Packard Gateway, fill in the following text boxes:
HP Gateway proxy settings
o In theHost text box, type themachine name or IP address of the server on which theproxy resides.
o In thePort text box, type the port that the proxy uses.
o In theRealm text box, type the name of the Hewlett-Packard Gateway realm that thegateway is amember of.
4. Save the RAS, and then, besideConfiguration, click Remote Action Services.
5. In theRemote Action Services sheet, click Check Availability.
Doing so checks for the availability of the services’ URLs and displays their availability (or lackof availability) in theAvailability column.
HP Operations Orchestration (9.07)Page 238 of 301
Studio Authoring GuideOperating outside Central with Remote Action Services
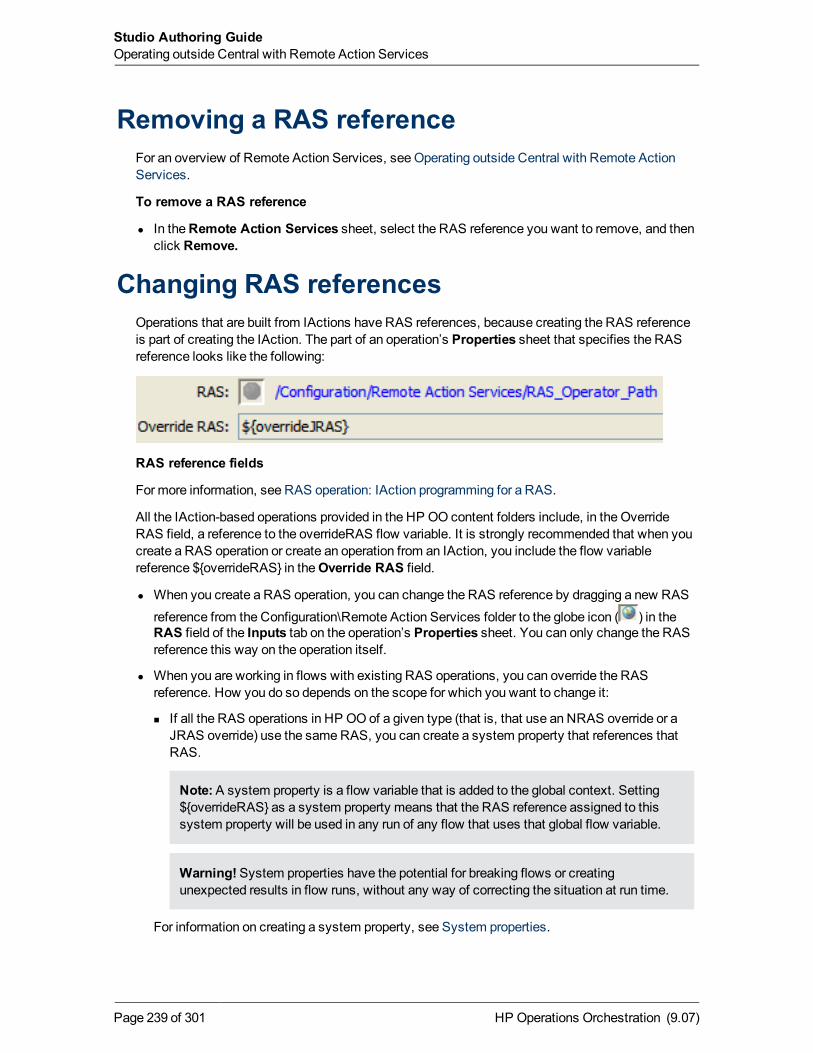
Removing a RAS referenceFor an overview of Remote Action Services, seeOperating outside Central with Remote ActionServices.
To remove a RAS reference
l In theRemote Action Services sheet, select the RAS reference you want to remove, and thenclick Remove.
Changing RAS referencesOperations that are built from IActions have RAS references, because creating the RAS referenceis part of creating the IAction. The part of an operation’s Properties sheet that specifies the RASreference looks like the following:
RAS reference fields
Formore information, see RAS operation: IAction programming for a RAS.
All the IAction-based operations provided in the HP OO content folders include, in the OverrideRAS field, a reference to the overrideRAS flow variable. It is strongly recommended that when youcreate a RAS operation or create an operation from an IAction, you include the flow variablereference ${overrideRAS} in theOverride RAS field.
l When you create a RAS operation, you can change the RAS reference by dragging a new RAS
reference from the Configuration\Remote Action Services folder to the globe icon ( ) in theRAS field of the Inputs tab on the operation’s Properties sheet. You can only change the RASreference this way on the operation itself.
l When you are working in flows with existing RAS operations, you can override the RASreference. How you do so depends on the scope for which you want to change it:
n If all the RAS operations in HP OO of a given type (that is, that use an NRAS override or aJRAS override) use the sameRAS, you can create a system property that references thatRAS.
Note:A system property is a flow variable that is added to the global context. Setting${overrideRAS} as a system property means that the RAS reference assigned to thissystem property will be used in any run of any flow that uses that global flow variable.
Warning!System properties have the potential for breaking flows or creatingunexpected results in flow runs, without any way of correcting the situation at run time.
For information on creating a system property, see System properties.
HP Operations Orchestration (9.07)Page 239 of 301
Studio Authoring GuideOperating outside Central with Remote Action Services
l To change the RAS reference in a flow run for all RAS operations of a given type, set the RASoverride as a flow variable, assigned from either a flow or a step input. Note: This changes thevalue of a flow variable (which is local in scope, that is, has scope that is limited to the currentrun of the flow, not including any child flows) of the same name as the global variable. It does notchange the value of the global variable overrideRAS.
Thus, setting the RAS override as a flow variable assigned from a step input changes the RASreference only from that step onward in the flow run.
l When in a flow run you want to change the RAS reference for a RAS operation that is the basisonly for a given step, assign the RAS override to a step input, but make sure that it is notassigned to a flow variable.
To change the RAS reference on a RAS operation
l On the Inputs tab of the RAS operation’s Properties sheet, drag a RAS reference from the
Configuration\Remote Action Services folder to the globe icon ( ) beside theRAS field label.
To override the default RAS reference with another RAS reference
1. In a flow, create one of the following:
n A flow input.
n On the step created from the operation containing the RAS reference, create a step input.
2. Specify that the input assign its value to the flow variable that is referenced in the relevantoperation’s Properties sheet Inputs tab, in theOverride RAS field.
In operations provided in HP OO content, the flow variable referenced in theOverride RASfield is overrideJRAS or overrideNRAS.
3. Make sure that theOverride RAS field references the flow variable that gets its value from theflow input you created in the preceding step.
Creating operations that access Web servicesAWeb service is aWeb-based piece of programming logic that performs a particular set offunctions. If you want to integrate a flow with aWeb service, monitor it, or validate that it is running,you can access theWeb service through themethods that are defined in theWeb service’s WSDL(Web Service Description Language) file, which defines the interface of theWeb service. Toaccess aWeb service, you create a SOAP (Simple Object Access Protocol) message (written inXML) and send it to theWeb service. TheWeb service responds to the SOAP message and returnsXML.
For the purposes of a flow, theWSDL defines themethods that a flow operation can use to interactwith theWeb service. TheWeb ServiceWizard is a tool that displays a list of themethods in theinterface of theWeb service that you specify in the wizard. Within the wizard, you pick themethodsthat you want to use, and with one click, for eachmethod you have selected, the wizard creates anHP OO operation that can execute themethod.
Or suppose that you want an operation to perform aWeb search using the Google search engine.You would locate the GoogleSearchWeb serviceWSDL and navigate to theWSDL in theWebServiceWizard. From the list of methods that appear in the wizard, you would select
HP Operations Orchestration (9.07)Page 240 of 301
Studio Authoring GuideOperating outside Central with Remote Action Services
doGoogleSearch and, by clickingGenerate XML, create the XML that defines an operation thatperforms theGoogle search.
Note: To use RAS-dependent operations, youmust also configure HP OO for extendedfunctionality. For information on doing so, see Administering Operations OrchestrationSoftware (AdminGuide.pdf).
For information on using theWeb ServiceWizard, see Creating operations fromWeb services.
Troubleshooting the running of RAS-dependent operations
There are three reasons that Central could fail when attempting to run a RAS-dependent operation:
l The RAS reference does not point at the correct RAS service (the RAS that contains the .dll or.jar that contains the definition of the operation you want to run or that is installed in the domainof the target machine).
For more information on adding, configuring, and replacing RAS references for RAS operations,see the relevant topics in this section, Operating outside Central with Remote Action Services.
l The RAS service was never installed on the target machine.
l The library is not present in the RAS service.
RAS-based operations: an example: a flowthat runs in any of multiple domains
By using a flow variable, you can create a flow that chooses the correct RAS onwhich to run anoperation remotely. Basically, you store the name of the desired RAS reference in the flow variable,and create a flow whose logic determines which RAS reference that is.
Suppose you want to restart either ServerA in DomainA or ServerB in DomainB. With the followingsteps in the flow, the Central user can decide, when he or she runs the flow, which server to run theflow against.
1. Create a step with an input that prompts the user for the domain\server name, including thedomain name.
Tip: The Display operation (in the Utility Operations folder) is handy when you don’t want astep to do anything except filter some data that is provided by a user prompt.
2. In the Display step, create a step result, providing its data from the input that you created.
3. For the result, create a filter that extracts the domain name, which you then store in a flowvariable named, say, domainName.
HP Operations Orchestration (9.07)Page 241 of 301
Studio Authoring GuideOperating outside Central with Remote Action Services
Note:Youwill also need to assign the server name to a flow variable for later use, but ourfocus here is selecting the correct RAS service based on which domain the user wants theflow to run in.
4. Design your flow so that it maps the value of domainName to the name of the RAS referencethat runs the flow through the RAS service for that domain and stores the name of the RASreference in a flow variable, say, rasName.
The easiest way to do this is to use the List Map subflow, which takes two lists as inputs. Inone list you supply the possible domain names, and in the other list, in the same order as thefirst, you supply the names of the RAS references that should be chosen according to thedomain name that the user specified.
5. Provide the flow variable rasname (and the flow variable containing the server name) as aninput to the RAS operation that restarts the server.
Creating operations from RASesTo create operations that use a RAS, you can:
l Create your ownRAS and operations.
After you import yourWeb service and operations, youmove the operations from the locationwhere they are originally imported in the Library. If you leave the operations in their originallocation and subsequently export any flows that use these operations, the operations are notexported with the flows. The exported flows will not work on any other machine. Moving theoperations to another folder within the Library avoids this situation.
For information on importing RAS content as operations, see Importing RAS content asoperations.
l Import and use HP OO content that uses the Remote Action Service (pointed to by the RASreference named “RAS_Operator_Path,” which is provided by default in HP OO).
To import customWeb service content, you create a RAS reference and assign it the URL of aRAS that contains theWeb service content you want. Identification of the RAS primarily by namerather than by URLmeans that changing the URL in Studio enables you to use the RAS inmultiplelocations.
The Configuration folder contains a Remote Action Services folder that holds the existing RASpointer.
For information on adding or changing the configuration of a RAS reference, see one of thefollowing:
l Adding a RAS reference from an existing RAS
l Adding a RAS reference
l Reconfiguring an existing RAS reference
After you have a RAS reference that points at the RAS of interest, you’re ready to import Webservice content (operations and flows) from aRAS.
Topics in this section
HP Operations Orchestration (9.07)Page 242 of 301
Studio Authoring GuideOperating outside Central with Remote Action Services
l Creating operations from aRAS
l Adding an operation that is not in the default RAS
Creating operations from a RASThe operations that you create by importing RAS content are like any other operations. Forinformation on working with them in flows, see:
l Importing RAS content as operations
l Creating steps
l Inputs: Providing data to operations
l Flow variables: Making data available for reuse
l Outputs, responses, and step results
l Responses: evaluating results
l Step descriptions
For an overview of Remote Action Services (RASes), seeOperating outside Central with RemoteAction Services.
Adding an operation that is not in the default RASYou can create the basis for RAS-dependent operations by adding IActions contained in a Javaarchive (.jar) or dynamic-link library (.dll) file to the RAS. Then, to create HP OO operations that youcan use in HP OO flows, you create operations from the RAS.
For an overview of Remote Action Services and their relationship with actions that are not includedin or accessible from the Central repository, seeOperating outside Central with Remote ActionServices.
To add an operation that is not included in an available RAS
1. Create an IAction that performs the task you want an operation to accomplish and store theIAction in a dynamic-link library (.dll) or .jar file.
OR
Obtain a third-party .dll or .jar that contains the desiredmethod or function.
2. To add the .dll or .jar to the RAS, copy it to the appropriate one of the following locations withinthe HP OO home directory:
n Copy a .dll (added to RAS), whether it is your own or comes from a third party, to thefollowing location, or a .jar:
\RAS\Java\Default\repository\
n A third-party .jar (added to RAS):
\RAS\Java\Default\webapp\WEB_INF\lib\
HP Operations Orchestration (9.07)Page 243 of 301
Studio Authoring GuideOperating outside Central with Remote Action Services
Note:Because all RAS actions have to implement the IAction interface, in order tomake the third-party library work, you probably must build an IAction class that containsthe library.
3. Tomake sure that your remote or extended RAS operations function correctly:
n After the RAS that you need is installed and configured in Studio, be sure to check itsavailability in Studio.
For information on checking the availability of an RAS, see Checking the availability of aRAS.
n Youmay also want to make sure that the RAS you’re using supports your operation. To doso, you can import the operations in the RAS and review them. See Creating operationsfrom RASes.
Note:By default, the operation that you create from the IAction bases any responses only onIAction return codes. However, after you have created the operation, you can create responserules that test any other output of the IAction.
To learn how to create IActions, see thematerial on authoring IActions in the HP OOSDK Guide(SDKGuide.pdf).
Importing RAS content as operationsFor an overview of Remote Action Services, seeOperating outside Central with Remote ActionServices.
To import RAS content
1. Install the RAS that contains the operations you’re interested in.
For information on installing a RAS by itself, see Installing Operations Orchestration Software(InstallGuide.pdf).
2. Open Studio.
3. To import the RAS content, select the folder into which you want to import it and then, from theFilemenu, chooseCreate Operations from RAS.
TheCreate Operations from RAS dialog appears.
HP Operations Orchestration (9.07)Page 244 of 301
Studio Authoring GuideOperating outside Central with Remote Action Services
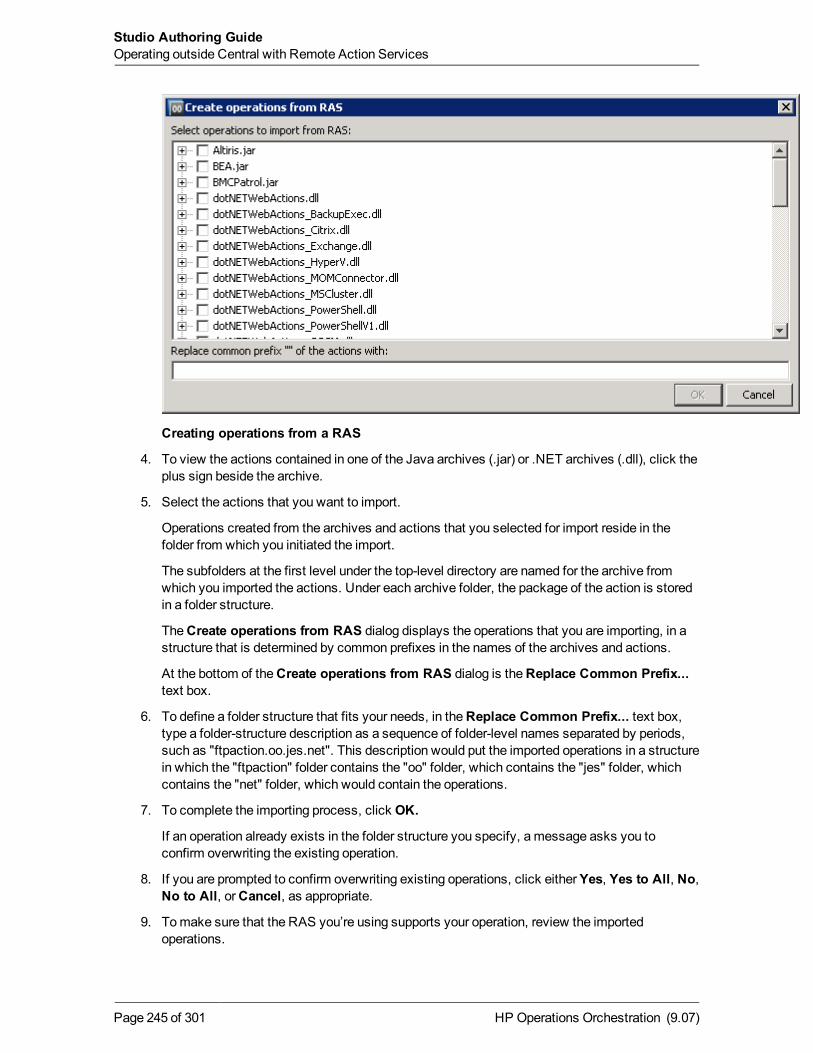
Creating operations from a RAS
4. To view the actions contained in one of the Java archives (.jar) or .NET archives (.dll), click theplus sign beside the archive.
5. Select the actions that you want to import.
Operations created from the archives and actions that you selected for import reside in thefolder from which you initiated the import.
The subfolders at the first level under the top-level directory are named for the archive fromwhich you imported the actions. Under each archive folder, the package of the action is storedin a folder structure.
TheCreate operations from RAS dialog displays the operations that you are importing, in astructure that is determined by common prefixes in the names of the archives and actions.
At the bottom of theCreate operations from RAS dialog is theReplace Common Prefix...text box.
6. To define a folder structure that fits your needs, in theReplace Common Prefix... text box,type a folder-structure description as a sequence of folder-level names separated by periods,such as "ftpaction.oo.jes.net". This description would put the imported operations in a structurein which the "ftpaction" folder contains the "oo" folder, which contains the "jes" folder, whichcontains the "net" folder, which would contain the operations.
7. To complete the importing process, click OK.
If an operation already exists in the folder structure you specify, a message asks you toconfirm overwriting the existing operation.
8. If you are prompted to confirm overwriting existing operations, click eitherYes, Yes to All, No,No to All, orCancel, as appropriate.
9. Tomake sure that the RAS you’re using supports your operation, review the importedoperations.
HP Operations Orchestration (9.07)Page 245 of 301
Studio Authoring GuideOperating outside Central with Remote Action Services

Note: The RAS (RAS_Operator_Path) that is installed with HP OO contains all theoperations used in the Accelerator Packs and default Library content.
HP Operations Orchestration (9.07)Page 246 of 301
Studio Authoring GuideOperating outside Central with Remote Action Services
Evaluating data for correct formatEvaluators are string formats used to validate inputs for any data sources except system accounts.They can be particularly useful for validating data obtained from the following data assignments forinputs:
l User prompt
l Constant
If the constant value contains a flow variable (such as ${domain}), the evaluator is applied to theconstant value with the variable’s value (rather than the variable reference) included in theconstant value.
l Previous step’s result
Studio has standard system evaluators listed for validating the following:
l Alphanumeric
l Email
l Filename
l IP address
l Nowhite space
l Numeric
l Phone number
The default data evaluator for phone numbers supports only the North American telephone-number format (1-nnn-nnn-nnnn) for calling from within North America. Validating other regionalphone-number formats requires different evaluators. For information on creating a new systemevaluator, see Creating an evaluator.
l UUID
Evaluators can use standard evaluators such as =, !=, Begins with, Contains, Match All Words,andMatch At Least OneWord, or they can use evaluation tools such as the following:
l Regular expressions
For information on creating regular expressions, seeWorking with regular expressions.
l Scriptlets
l References to shared evaluators
HP Operations Orchestration (9.07)Page 247 of 301
Creating an evaluatorNote: The default Telephone Number system evaluator validates against the North Americantelephone-number format (1-nnn-nnn-nnnn) for calling from within North America. To create anevaluator that validates telephone numbers against regional telephone-number formats, you willprobably want to use a regular expression. For more on regular expressions, seeWorking withregular expressions.
To create an evaluator
1. In theRepository pane, in the Configurations folder, right-click the System Evaluators folder,and then click New.
OR
Having right-clicked the System Evaluators folder, click Properties, and in theSystemEvaluators sheet that appears, click Add.
2. In theSelect Evaluator dialog, in the drop-down list that appears, select an evaluator orevaluation tool, and then click OK.
3. In the next dialog that appears, name the evaluator, and then click OK.
n If you clickedNew, the system evaluator editor for the new evaluator opens.
n If you clickedProperties, the new evaluator appears in the list of evaluators in theSystem
Evaluators sheet. Click the right-pointing arrow ( ) at the right end of the row to open thesystem evaluator's editor.
The appearance of the system-evaluator editor depends on the kind of evaluator you selected.
4. Type the text, string, expression value, or scriptlet with which the evaluator should test theinput.
5. To provide your own data for testing the evaluator:
a. To clear the contents of the Test Filter Input box, click Clear.
b. In the Test Filter Input box, paste or type in your own data.
OR
To use a command to obtain the output that you want to test or validate:
i. Click Quick Command.
ii. In the Input box that appears, type the command and arguments, and then click OK.
The report under Test Filter Input reports either amatch (and the number of occurrences of thematch) or the lack of amatch.
6. Save your work.
The evaluator is saved in the Configurations\System Evaluators folder.
Editing evaluatorsTo modify an evaluator
HP Operations Orchestration (9.07)Page 248 of 301
Studio Authoring GuideEvaluating data for correct format
1. In theRepository pane, open the Configuration\System Evaluators folder.
2. Right-click the evaluator you want to modify, and then click Open.
3. Make changes as you did in the procedure for creating an evaluator, in Creating an evaluator.
To edit another evaluator without closing the editor
l Click the up or down arrow ( ) besideConfiguration.
Deleting an evaluatorTo delete an evaluator
1. Open theSystem Evaluators sheet.
2. In the list of evaluators, select the one you want to delete, and then click Remove.
HP Operations Orchestration (9.07)Page 249 of 301
Studio Authoring GuideEvaluating data for correct format

Recording values for reportingRecording data from a flow for use in Central Dashboard charts takes place in the inputs for a singlestep in the flow. On the step, you create inputs that get their data from the flow variables where youstored the data you want to record. Because all the values must be recorded on one step, that stepmust follow the last step in which one of the values you want to report is generated. This is often thesuccess return step.
You specify a domain term to record the input’s value. A Central Dashboard bar chart then has theinformation it needs to record the input’s value in this flow. The domain term is either the vertical orthe horizontal axis of the bar chart, and the input value is charted on that axis. The chart mightdepict the names of flows on the horizontal axis and the servers that the flows were run against onthe vertical axis.
The data that you want to correlate for reporting purposes must all be input values on a single step.Therefore, the stepmust follow the last of the steps that obtained the data that you want to recordfor reporting and have correlated with each other. This means that return steps and steps thatcontain remedies for a problem are frequently the steps in which all the necessary inputs forDashboard reporting are both defined and recorded. You can create inputs on these steps that don’tdo anything except record values.
For example, suppose that an IT manager wants to see, in Central, a Dashboard chart that showswhich servers the Restart Windows Server flow was run against and what the actions were. Foreither the Ping or the TraceRoute step, you could record the host input as a domain term that one ofthe Dashboard charts in Central uses. One such domain term would be Configuration Item, whichobtains the names or IP addresses of applications, and hardware components, including servers.The IT manager could choose the Alerts Per Configuration Item chart, which would show the IPaddresses or domain names of the servers that the flow was run against. If themanager adds theFlows Per Configuration Item chart to the Dashboard, he or she can see instantly which flows havebeen run against those servers. Further, by double-clicking a bar representing Restart WindowsServer flow when it ran against a certain server, he can see the results of the flow.
There aremany other possible uses for reporting. For instance, if you have a step that takes anaction on the target server such as restarting the server, you could record the appropriate input asan Action. In order to see how many times a given server was restarted, in Central you could thenview the All CI’s Organized by Action chart.
Let’s see how we’re going to record this information for reporting. We’ll record this input with thedomain term Configuration Item.
In Central, you can then add a chart that charts that domain term. For information on viewing andcreating Dashboard charts, see Help for Central.
To record an input for Dashboard reporting
1. In the flow's Properties sheet or step Inspector, open the input editor for the input you want torecord.
HP Operations Orchestration (9.07)Page 250 of 301

2. Under Input Properties, select Record Under and in the drop-down list select the domainterm under which you want it recorded.
The value of the input for this flow will be reported to Central. Any Dashboard chart that has an axisthat presents data recorded for the domain term that you chose will show this inputs value on thataxis.
HP Operations Orchestration (9.07)Page 251 of 301
Studio Authoring GuideRecording values for reporting
Domain terms for Dashboard chartingDomain terms are attributes that you can assign to flows and inputs, usually to be associated withspecific data that the flows obtain—such as the kind of IT component and the specific ITcomponent that the flow ran against, the type of trouble ticket that prompted the running of the flow,or the action that the flow took. Once associated with such specific data, domain terms add to thecapability of Central as a diagnostic tool for your IT infrastructure.
Suppose that you run a flow that takes an IP address as that of the server that it will run against andyou assign the domain term Configuration Item to that input. After the flow has run in Central, theCentral user could view charts that report other factors against Configuration Items, such as theFlows per Configuration Item for the Last 7 Days chart. If the flow ran against 192.118.55.109, therewould be a row in the chart labeled “192.118.55.109,” with bars that break down the flows that ranagainst that server.
In Central, on theDashboard tab, users can view charts that collate different combinations ofdomain terms and the values of the inputs associated with them to bring to the surface analysesthat reveal trends in your IT infrastructure, such as:
l Overall usage and results of flows
l What kinds of and how many alerts or events have occurred
l Configuration items (such as servers and applications) that have been affected.
Some domain terms have values by default; others obtain their values from the flow’s inputs; yetothers have the values that you specify for them.
The domain terms that you can use for reporting data to Dashboard charts include the following.(For information on how to add domain terms or add specified values to them, see Adding,renaming, or removing domain terms and Adding, changing, and removing domain term values.)
l Action
The action that the flow performed. You add these values to the list, then enter them as values ofinputs that are associated with this term.
l Alert
The identity of the alert that you want to associate with the flow. The value associated withIncident can be supplied by a flow input.
l Category
The category of the flow. A number of categories are supplied by default; you can add to the listof categories.
l CI Minor Type
These terms could be the divisions of CI Types (see next domain term). For instance, if “networkhardware” is a CI Type term, then CI Minor Type terms might include “router,” server,” or
HP Operations Orchestration (9.07)Page 252 of 301
“gateway.”. You add these values to the list, then enter them as values of inputs that areassociated with this term.
l CI Type
These terms could be themajor divisions of IT infrastructure elements, such as “networkhardware.” You add these values to the list, then enter them as values of inputs that areassociated with this term.
l Configuration Item
Specific servers, routers, switchers, applications or other elements in your IT establishment.The value associated with Configuration Item can be supplied by a flow input.
l Incident
The incident that triggered the running of the flow. The value associated with Incident can besupplied by a flow input.
l Problem
The issue that the running of the flow is meant to correct. You add these values to the list, thenenter as values of inputs that are associated with this term.
l Severity
The severity of the problem, incident, or alert that triggered the flow.
Adding, renaming, and removing domainterms
The domain terms are listed in the Repository pane, in the Configuration\Domain Terms folder.You create values for a domain term or otherwise change the domain term in its editor.
To add a domain term
1. In theRepository pane, expand the Configuration folder.
2. Right-click the Domain Terms folder, and then click New.
3. In the naming dialog that appears, type the new domain-term’s name in theName text box, andthen click OK.
The new domain term’s editor appears.
HP Operations Orchestration (9.07)Page 253 of 301
Studio Authoring GuideDomain terms for Dashboard charting
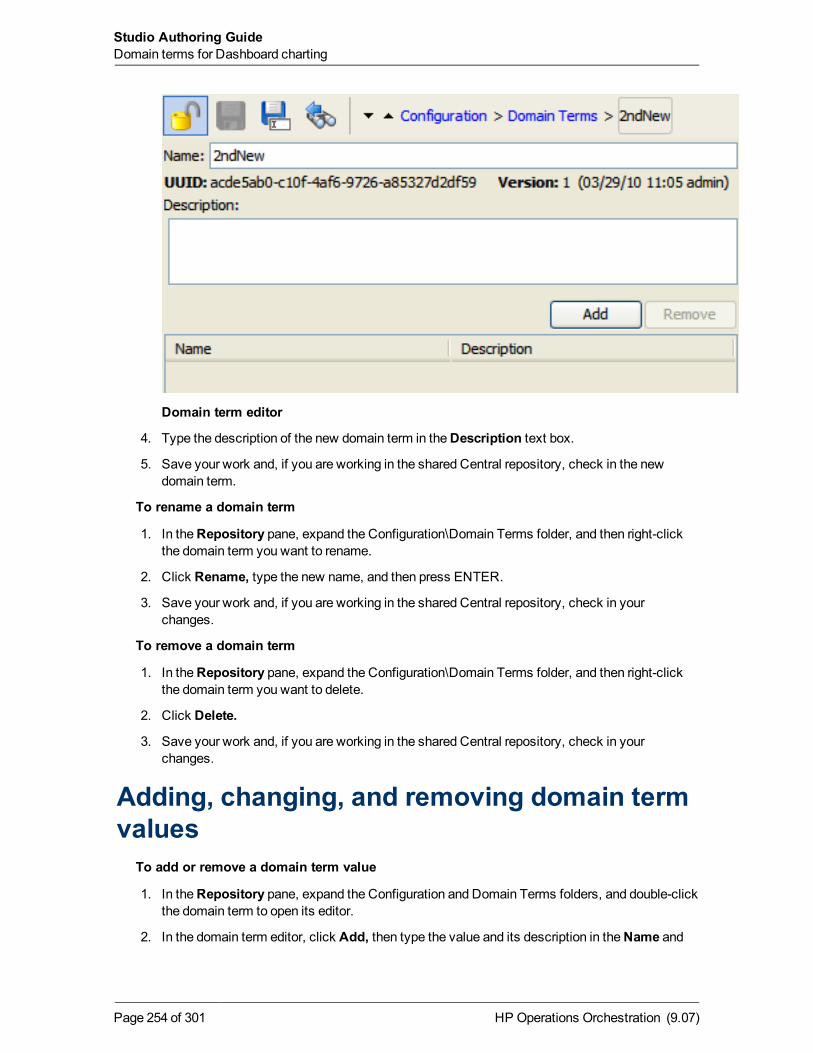
Domain term editor
4. Type the description of the new domain term in theDescription text box.
5. Save your work and, if you are working in the shared Central repository, check in the newdomain term.
To rename a domain term
1. In theRepository pane, expand the Configuration\Domain Terms folder, and then right-clickthe domain term you want to rename.
2. Click Rename, type the new name, and then press ENTER.
3. Save your work and, if you are working in the shared Central repository, check in yourchanges.
To remove a domain term
1. In theRepository pane, expand the Configuration\Domain Terms folder, and then right-clickthe domain term you want to delete.
2. Click Delete.
3. Save your work and, if you are working in the shared Central repository, check in yourchanges.
Adding, changing, and removing domain termvalues
To add or remove a domain term value
1. In theRepository pane, expand the Configuration and Domain Terms folders, and double-clickthe domain term to open its editor.
2. In the domain term editor, click Add, then type the value and its description in theName and
HP Operations Orchestration (9.07)Page 254 of 301
Studio Authoring GuideDomain terms for Dashboard charting
Description columns, respectively.
Note: If you want the new value to appear in a particular place in the list of values, select arow before adding the new value. The new value will be placed directly beneath theselected row. You can further adjust the position of the value by clicking theUp andDownarrows.
3. To remove a domain term value, highlight the value and click Remove.
To change a domain term value
l With the domain term’s editor open, in the list of domain-term values, in theName column,double-click the value you want to change and type the new value.
HP Operations Orchestration (9.07)Page 255 of 301
Studio Authoring GuideDomain terms for Dashboard charting
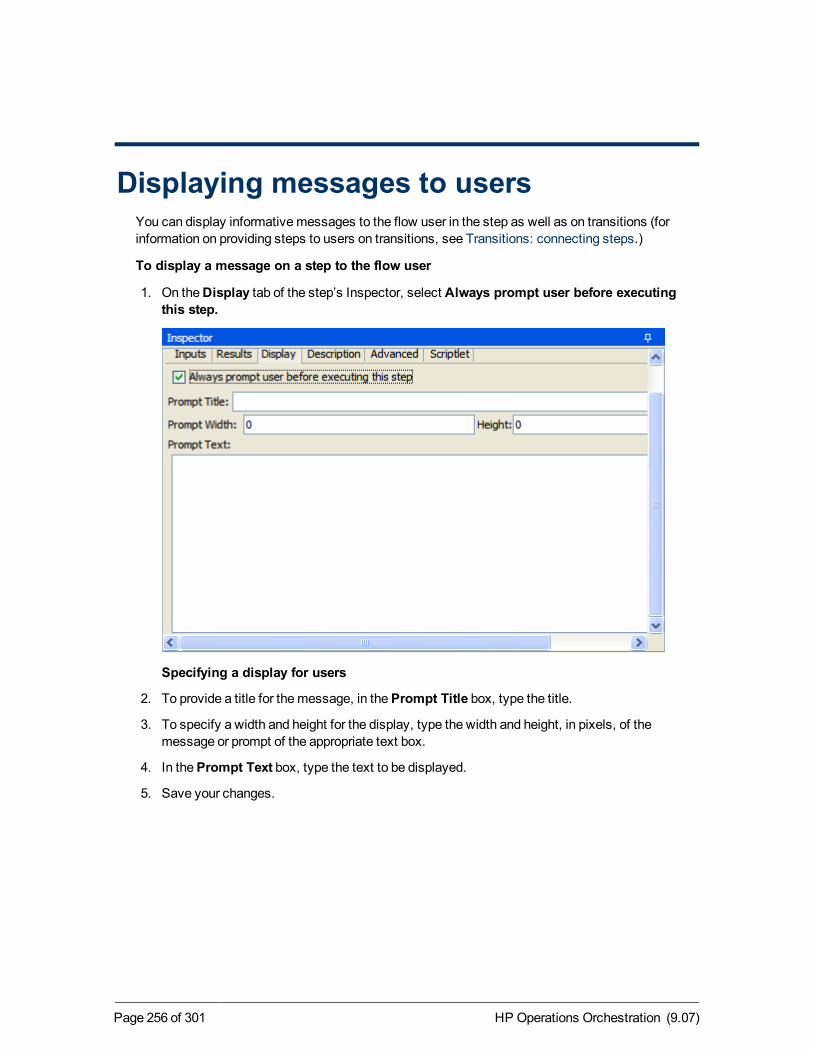
Displaying messages to usersYou can display informativemessages to the flow user in the step as well as on transitions (forinformation on providing steps to users on transitions, see Transitions: connecting steps.)
To display a message on a step to the flow user
1. On theDisplay tab of the step’s Inspector, select Always prompt user before executingthis step.
Specifying a display for users
2. To provide a title for themessage, in thePrompt Title box, type the title.
3. To specify a width and height for the display, type the width and height, in pixels, of themessage or prompt of the appropriate text box.
4. In thePrompt Text box, type the text to be displayed.
5. Save your changes.
HP Operations Orchestration (9.07)Page 256 of 301
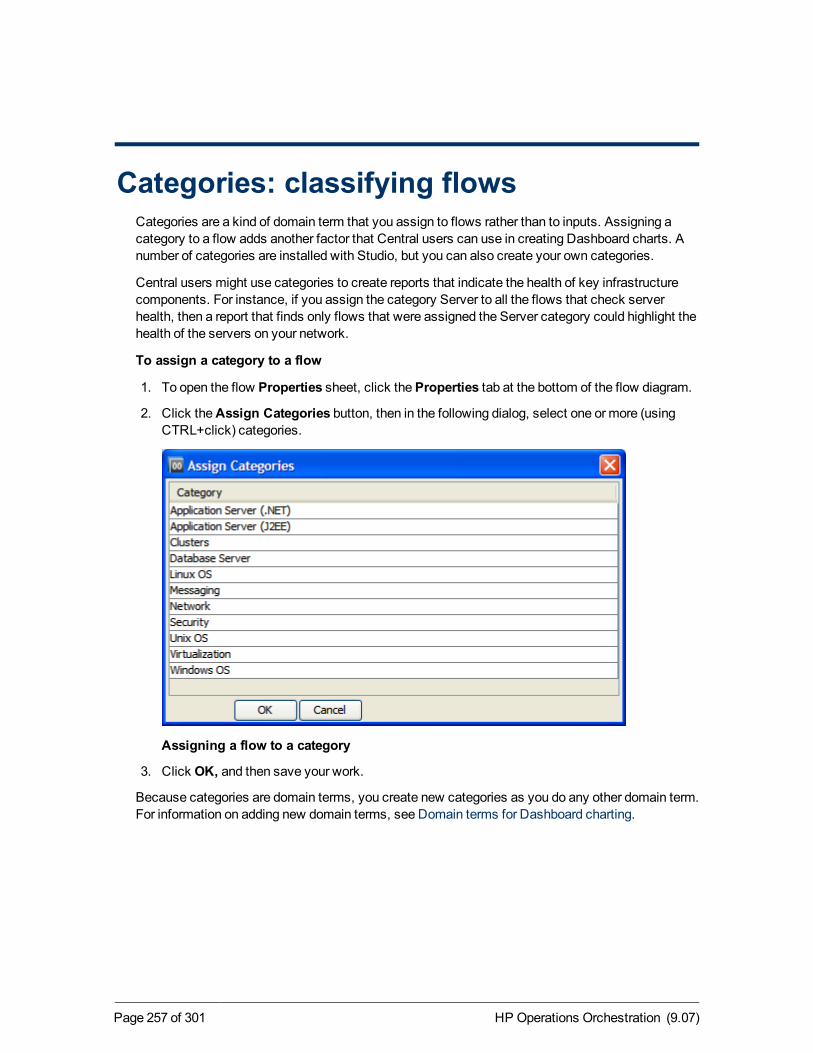
Categories: classifying flowsCategories are a kind of domain term that you assign to flows rather than to inputs. Assigning acategory to a flow adds another factor that Central users can use in creating Dashboard charts. Anumber of categories are installed with Studio, but you can also create your own categories.
Central users might use categories to create reports that indicate the health of key infrastructurecomponents. For instance, if you assign the category Server to all the flows that check serverhealth, then a report that finds only flows that were assigned the Server category could highlight thehealth of the servers on your network.
To assign a category to a flow
1. To open the flow Properties sheet, click theProperties tab at the bottom of the flow diagram.
2. Click theAssign Categories button, then in the following dialog, select one or more (usingCTRL+click) categories.
Assigning a flow to a category
3. Click OK, and then save your work.
Because categories are domain terms, you create new categories as you do any other domain term.For information on adding new domain terms, see Domain terms for Dashboard charting.
HP Operations Orchestration (9.07)Page 257 of 301
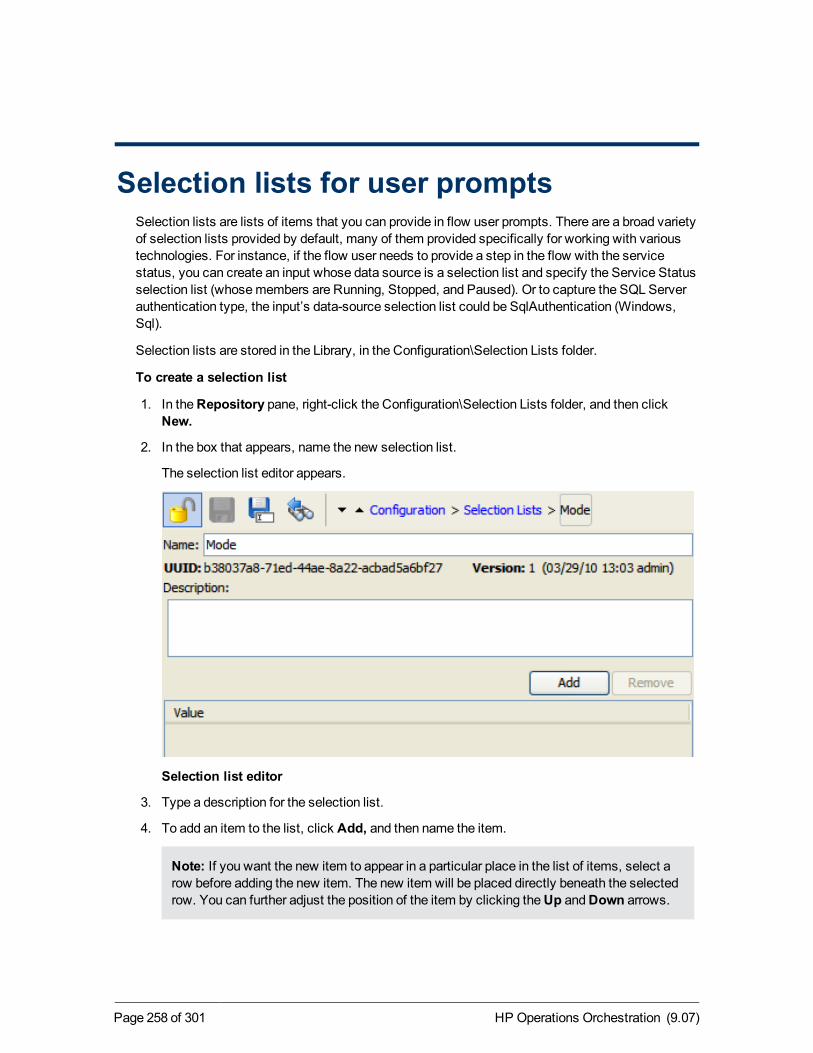
Selection lists for user promptsSelection lists are lists of items that you can provide in flow user prompts. There are a broad varietyof selection lists provided by default, many of them provided specifically for working with varioustechnologies. For instance, if the flow user needs to provide a step in the flow with the servicestatus, you can create an input whose data source is a selection list and specify the Service Statusselection list (whosemembers are Running, Stopped, and Paused). Or to capture the SQL Serverauthentication type, the input’s data-source selection list could be SqlAuthentication (Windows,Sql).
Selection lists are stored in the Library, in the Configuration\Selection Lists folder.
To create a selection list
1. In theRepository pane, right-click the Configuration\Selection Lists folder, and then clickNew.
2. In the box that appears, name the new selection list.
The selection list editor appears.
Selection list editor
3. Type a description for the selection list.
4. To add an item to the list, click Add, and then name the item.
Note: If you want the new item to appear in a particular place in the list of items, select arow before adding the new item. The new item will be placed directly beneath the selectedrow. You can further adjust the position of the item by clicking theUp andDown arrows.
HP Operations Orchestration (9.07)Page 258 of 301
5. To remove an item, click Remove.
6. To close the selection list editor, click theX that is on the selection list’s tab.
To edit a selection list
1. In theRepository pane, right-click the Configuration\Selection Lists folder. and then clickProperties.
The list of selection lists appears.
2. To edit the list, click the right-pointing arrow ( ) at the right end of the list’s row.
3. To add an item to the list, click Add, and then name the item.
4. To remove an item, click Remove.
To remove a selection list
1. In theRepository pane, expand the Configuration\Selection Lists folder.
2. Right-click the selection list that you want to remove, and then click Delete.
3. In themessage box that appears, click OK, and then save your work.
HP Operations Orchestration (9.07)Page 259 of 301
Studio Authoring GuideSelection lists for user prompts
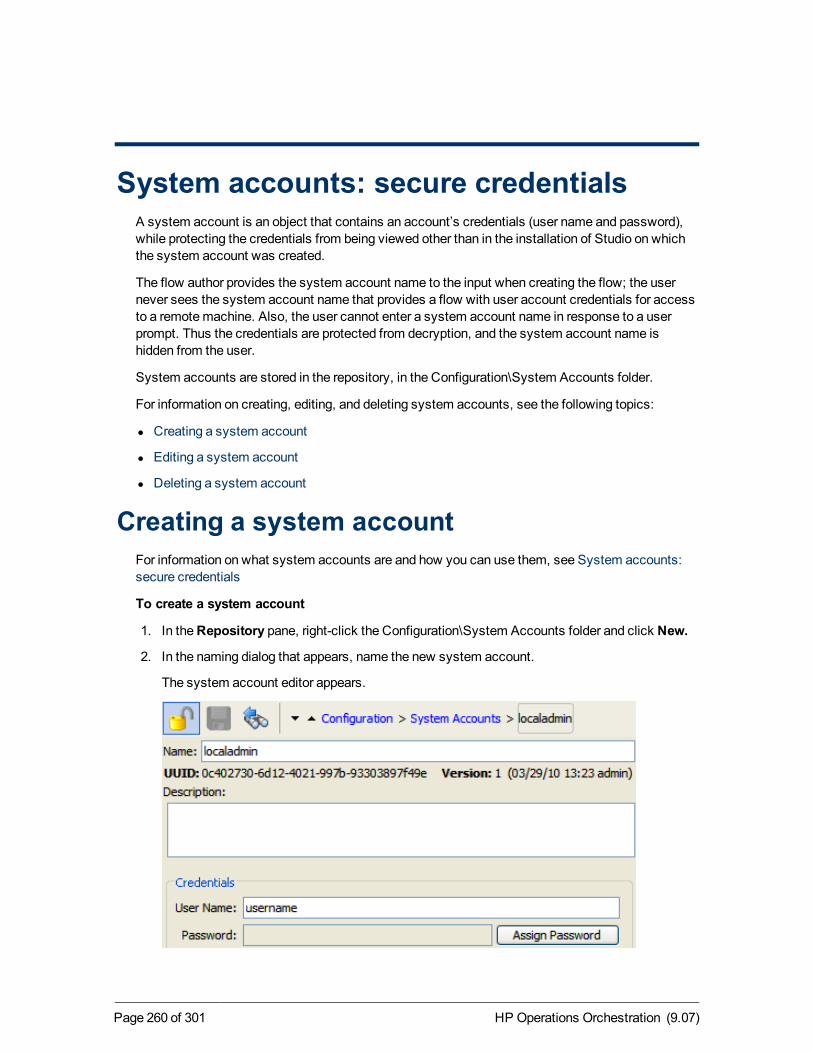
System accounts: secure credentialsA system account is an object that contains an account’s credentials (user name and password),while protecting the credentials from being viewed other than in the installation of Studio on whichthe system account was created.
The flow author provides the system account name to the input when creating the flow; the usernever sees the system account name that provides a flow with user account credentials for accessto a remotemachine. Also, the user cannot enter a system account name in response to a userprompt. Thus the credentials are protected from decryption, and the system account name ishidden from the user.
System accounts are stored in the repository, in the Configuration\System Accounts folder.
For information on creating, editing, and deleting system accounts, see the following topics:
l Creating a system account
l Editing a system account
l Deleting a system account
Creating a system accountFor information on what system accounts are and how you can use them, see System accounts:secure credentials
To create a system account
1. In theRepository pane, right-click the Configuration\System Accounts folder and click New.
2. In the naming dialog that appears, name the new system account.
The system account editor appears.
HP Operations Orchestration (9.07)Page 260 of 301
System account editor
3. Give the system account a description, as desired.
4. In theUser Name box, type the user name of the account that the system account represents,using the following syntax:
<domain>\<username>
5. Click Assign Password.
TheEnter Password dialog appears.
6. In thePassword box, type the password, then in theConfirm Password box type it again.
7. Click the Save icon and then, to close the system account editor, click theX that is on theselection list’s tab.
Editing a system accountFor information on what system accounts are and how you can use them, see System accounts:secure credentials
To edit a system account
1. In theRepository pane, expand the Configuration\System Accounts folder, right-click thesystem account that you want to edit, and then click Open.
2. Make any changes necessary and save your work.
Deleting a system accountFor information on what system accounts are and how you can use them, see System accounts:secure credentials
To delete a system account
l In theRepository pane, open the Configuration\System Accounts folder, right-click the systemaccount that you want to remove, and then click Delete.
HP Operations Orchestration (9.07)Page 261 of 301
Studio Authoring GuideSystem accounts: secure credentials
Controlling access to HP OO objectsPermissions are access rights to individual objects, such as individual folders, flows, operations, orsystem accounts.
You assign permissions to groups, rather than individuals. Groups may be the default groups(ADMINISTRATOR, AUDITOR, EVERYBODY, PROMOTER, LEVEL_ONE, LEVEL_TWO, andLEVEL_THREE) or groups that you have created and assigned the capabilities of the default HPOO groups. So if you publish your repository but don’t want another author who updates therepository to be able to work on the flow, you could specify that that author’s group does not havewrite permission for the flow. For information on defining HP OO roles or mapping external roles orgroups to the HP OO groups described here, see the HP OOAdministration Guide and Help forCentral.
You can also set default access permissions for groups, so that they have the permissions youspecify for every new object that you create. For instance, to allow a group to debug but not authorflows, you could grant its members Read, Execute, and Link To permissions, but not Write.
For information on groups and onmanaging groupmembership and capabilities, see Help forCentral.
Topics in this section are:
l Setting permissions for folders and HP OO objects
l Setting default access permissions for groups
Note:You cannot specify permissions for the ADMINISTRATOR role, because it has allpermission for all the objects in HP OO, and these permissions cannot be revoked.
Following are the permissions that are applied to objects:
l Read
Only with this permission can an author see an object in Studio or a user see a flow in Central.
l Write
Required for an author to modify or delete an object.
l Execute
Enables a user to start a run of the flow, in either Studio or Central. For a Central user to run aflow or for an author to debug a flow, he or shemust have Read and Execute permission forevery object, such as operations and configurable items associated with the flow, as well asdependent subflows.
l Link To
Allows an author to use an object in a flow, such as creating a step from a flow or operation.
Thus, to find and run a flow in Central, users must have Read and Execute permissions for the flow.
HP Operations Orchestration (9.07)Page 262 of 301

In Studio:
l To debug a flow, an author must have the Execute permission for that flow.
l A flow author must have the Link To permission for any flow or operation from which he or shecreates a step in a flow.
l To change a system account, an author must have the Read andWrite permissions for thesystem account.
The following table relates the Library objects and the actions you can perform on them to thepermissions required to do so.
HP OO objects and the permissions needed to work with them
Object Action Necessary permission(s)
Folder
View contents Read
Add to contents Read, Write (also needed for all children of thefolder)
Move Read, Write
Rename Read, Write
Flow oroperation
View/open Read
Modify Read, Write
Rename Read, Write
Execute/Run Read, Execute
Use as a step or sub-flow Read, Link To
RAS references
View Read
Rename Read, Write
Use in flow or operation Read, Link To
Use at runtime Read, Execute
Systemaccounts
View name Read
HP Operations Orchestration (9.07)Page 263 of 301
Studio Authoring GuideControlling access to HP OO objects
Change accountpassword
Read, Write
Rename account Read, Write
Use in flow or operation Read, Link To
Use at runtime Read, Execute
Setting permissions for folders and HP OOobjects
You can set permissions directly for:
l Folders
l Flows and operations
l System accounts
l Selection lists
l RAS references and system accounts (in the Configuration folder)
How your changes to permissions are applied differs slightly, according to whether you apply themto an object or a folder:
l For a folder, you can choose to apply the permissions to all the contents of the folder,recursively.
l For a flow or operation, you can choose to apply the permissions to all the flows, operations, andsystem objects (such as domain terms and RAS references in the Configuration folder) thatreference or are referenced by the flow or operation for which you’re defining permissions.References can be indirect as well as direct.
Note:While you can set permissions directly for system accounts, you can only implicitlyset permissions for all the other system objects in the Configuration folder (by specifyingthat the permissions you set for a flow or operation be applied to all the objects that the flowor operation references).
For more information on how permissions relate to the actions that are carried out on HPOO objects, see Controlling access to HP OO objects.
To set permissions for folders or HP OO objects
1. In theRepository pane, right-click the folder, flow, operation, or system account and, on theright-click menu, click Permissions.
One of two forms of the following dialog box, theApply To dialog, appears.
HP Operations Orchestration (9.07)Page 264 of 301
Studio Authoring GuideControlling access to HP OO objects
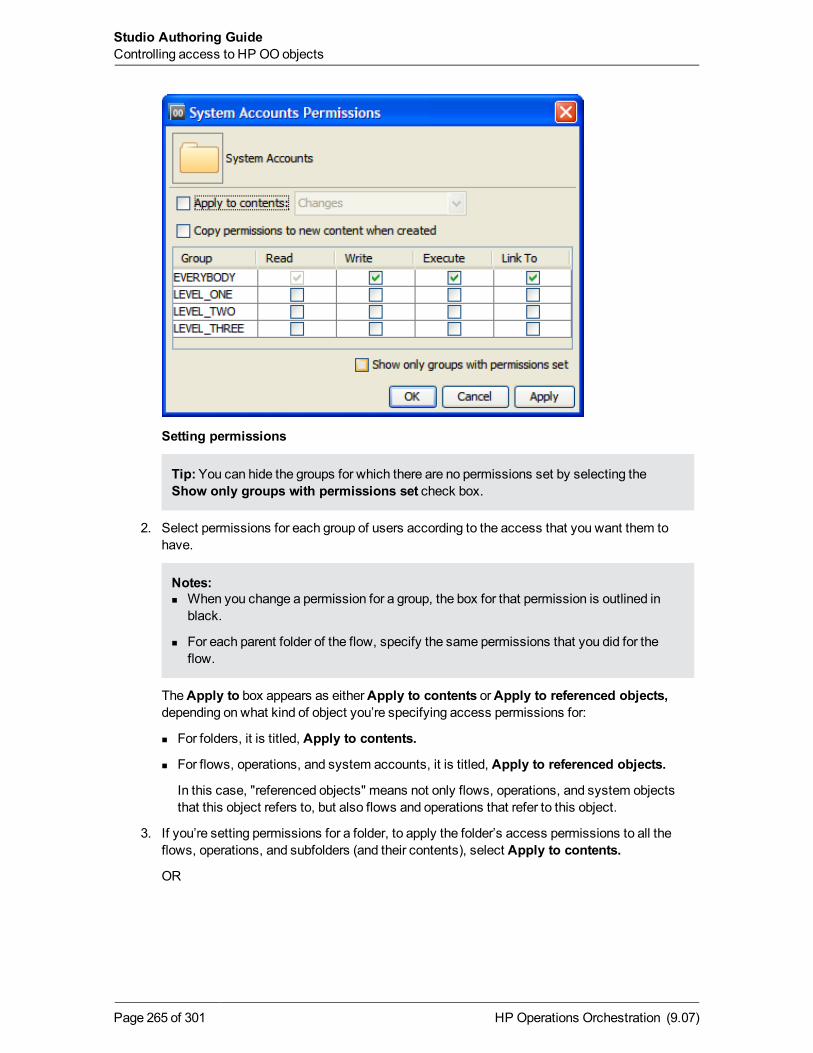
Setting permissions
Tip:You can hide the groups for which there are no permissions set by selecting theShow only groups with permissions set check box.
2. Select permissions for each group of users according to the access that you want them tohave.
Notes:n When you change a permission for a group, the box for that permission is outlined in
black.
n For each parent folder of the flow, specify the same permissions that you did for theflow.
TheApply to box appears as eitherApply to contents orApply to referenced objects,depending on what kind of object you’re specifying access permissions for:
n For folders, it is titled, Apply to contents.
n For flows, operations, and system accounts, it is titled, Apply to referenced objects.
In this case, "referenced objects" means not only flows, operations, and system objectsthat this object refers to, but also flows and operations that refer to this object.
3. If you’re setting permissions for a folder, to apply the folder’s access permissions to all theflows, operations, and subfolders (and their contents), select Apply to contents.
OR
HP Operations Orchestration (9.07)Page 265 of 301
Studio Authoring GuideControlling access to HP OO objects
If you’re setting permissions for a flow, operation, or system account, to apply the object’saccess permissions to all the flows, operations, and other system accounts that refer to theobject or that the object refers to, select Apply to referenced objects.
Now, do you want to apply only the changes in permissions that you havemade and not yetapplied (those which are bold in the grid), or all the permissions that currently appear in thematrix?
4. To apply only the changes that have not already been applied to the folder or object, in the drop-down list beside theApply to… box, select Changes.
OR
To apply all the permissions currently specified in the grid, including the settings you have justspecified, in the drop-down list beside theApply to… box, select All.
The following step assumes that you are specifying permissions for a folder. If you are not,skip to the step after this step.
5. To apply these permissions to any flows, operations, or system accounts that aresubsequently created within the folder, select Copy permissions to new content whencreated.
When you select this check box, the permissions that you have set for the folder overridedefault permissions that you have set for a group. For example, suppose you have:
n Set theWrite permission in the default groupmask for the LEVEL_THREE group.
n In the permissions for folder A, set only the Read permission for the LEVEL_THREE group.
n Specified that the folder A permissions be applied to anything created in the folder in thefuture.
If you then create a flow in folder A, the LEVEL_THREE group will have Read but not Writepermission for the new flow. (You can subsequently change the LEVEL_THREE group’spermissions for the new flow.)
For information on setting default permissions for a group, see Setting default accesspermissions for groups.
6. Click OK and save your work.
Setting default access permissions for groupsYou can set the access permissions that groups have by default for any new objects that arecreated. Sets of default access permissions are called groupmasks. Note, however, that if a groupmask conflicts with access permissions that have been set for any objects as they are created in afolder, then the access-permission settings for that folder prevail.
For example, suppose you do the following:
l In the default groupmask for the LEVEL_THREE group, set theWrite permission.
l In the permissions for folder A, set only the Read permission for the LEVEL_THREE group.
l Specify that the folder A permissions be applied to anything created in the folder in the future.
HP Operations Orchestration (9.07)Page 266 of 301
Studio Authoring GuideControlling access to HP OO objects
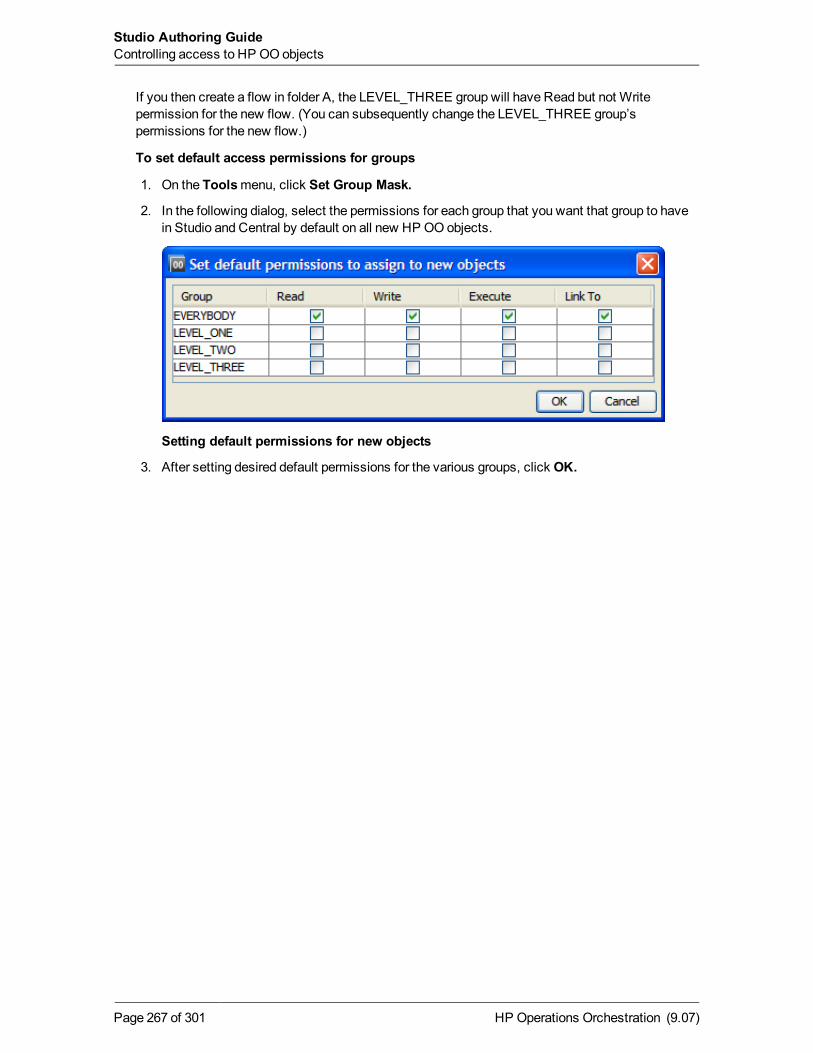
If you then create a flow in folder A, the LEVEL_THREE group will have Read but not Writepermission for the new flow. (You can subsequently change the LEVEL_THREE group’spermissions for the new flow.)
To set default access permissions for groups
1. On the Toolsmenu, click Set Group Mask.
2. In the following dialog, select the permissions for each group that you want that group to havein Studio and Central by default on all new HP OO objects.
Setting default permissions for new objects
3. After setting desired default permissions for the various groups, click OK.
HP Operations Orchestration (9.07)Page 267 of 301
Studio Authoring GuideControlling access to HP OO objects
Creating a new operationA valid operation requires:
l One ormore inputs.
l Responses that aremapped to valid expressions describing outcomes of the operation.
l Properties specified as necessary for the type of operation.
The following steps summarize how you create operations:
To create an operation
1. Right-click the folder in which you want to create the operation, point toNew, then toOperation, and then select the desired type of operation from the list that appears.
2. In the dialog box that appears, type a name for the new operation in the text box, and then clickOK.
Notes:n Naming in Studio is not case-sensitive, and you cannot give two operations the same
name.
n Names can be amaximum of 128 characters long.
n TheProperties sheet for the new operation appears in the authoring pane.
3. To assign the operation to a category for search purposes, click Assign Categories and thenselect a category from the list.
4. To create an input, click the Inputs tab and then click Add Input.
5. In the dialog that appears, type the input name and then click OK.
n For information on what inputs are and how to use them, see Inputs: Providing data tooperations.
n For information on defining an input data source, see Specifying how an input gets its value.
n For information on using flow variables when assigning a data source to an input, see Flowvariables: Making data available for reuse. For instance, in addition to specifying a data forthe input, youmight want to also store it in a flow variable.
6. Add and define any output data.
For information on adding and working with output data (results), seeOutputs, responses, andstep results. Note that one of the primary things to do with output data is store it in a flowvariable for subsequent use in the flow.
7. Create any responses needed andmap results to the responses.
HP Operations Orchestration (9.07)Page 268 of 301
For information on defining rules that govern which responses are chosen for the operation, seeResponses: Evaluating results.
8. Specify any properties that are specific to the type of operation you have created, as describedin the following sections (under Types of operations: setting properties):
n Cmd (command-line) operation
n Flow RunCounter operation
n Flow Run Summary Report operation
n HTTP operation
n Perl script operation
n RAS operation: IAction programming for an RAS
n Scriptlet operation
n Secure shell (ssh) operation
n Telnet operation
9. Assign the operation’s access permissions to HP OO roles as appropriate.
10. To document the operation for the Central user, click theDescription tab and write thedescription in the text box.
For the information that you should include on theDescription tab for the benefit of otherauthors whomight use your operation, see the default state of theDescription tab thatappears in the operation that you create.
It is very helpful to other authors to also include the following for each input:
n The necessary syntax, if any is required, of the data that the input takes.
n Meaningful descriptions of required inputs.
n Sample data needed for inputs, in correct format.
n Any environmental limitations of the operation that limit the circumstances in which it canrun.
11. Click OK.
If the new operation is invalid or incomplete, its name is displayed in theRepository pane in redtype. Moving the cursor over the name displays a tool tip that specifies how the operation isincomplete. (To review the requirements for a valid operation, see the list that comes before thisprocedure.)
Types of operations: setting propertiesFor some of these operation types, there are various ways to create the operation.
In the screen shots of the following sections, note that theProperties sheet for an operationincludes the operation’s universally unique identifier (UUID) and last modified date.
HP Operations Orchestration (9.07)Page 269 of 301
Studio Authoring GuideCreating a new operation
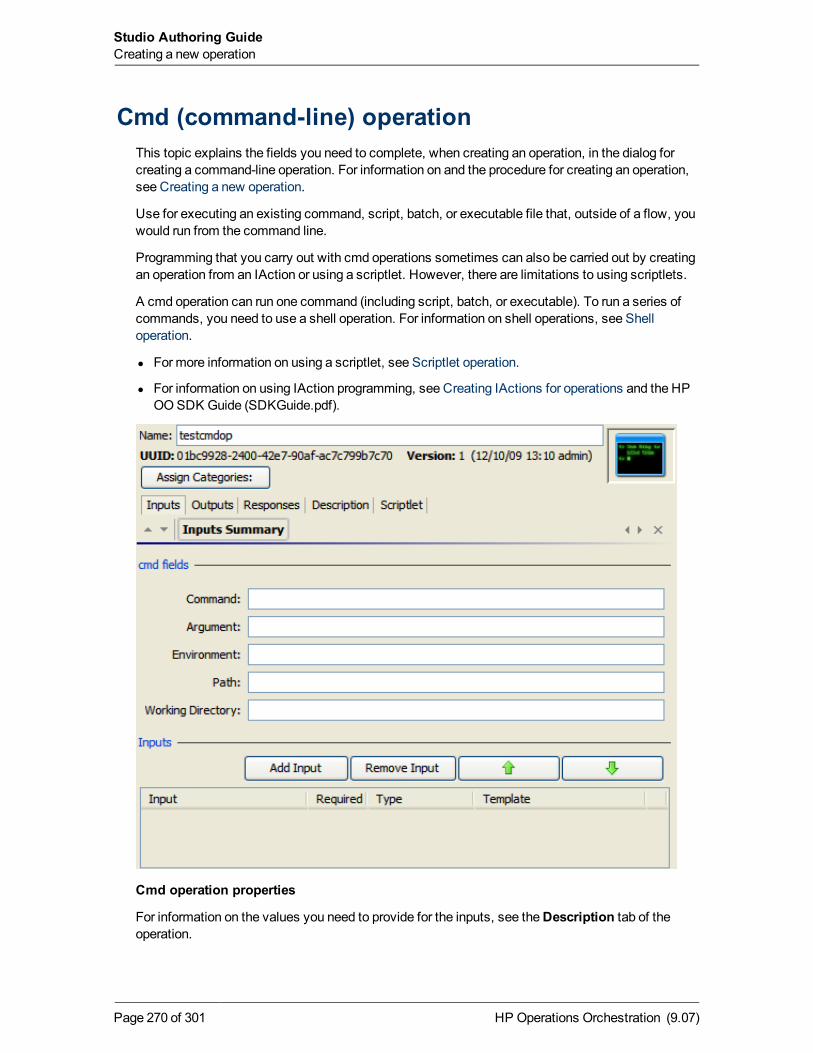
Cmd (command-line) operationThis topic explains the fields you need to complete, when creating an operation, in the dialog forcreating a command-line operation. For information on and the procedure for creating an operation,see Creating a new operation.
Use for executing an existing command, script, batch, or executable file that, outside of a flow, youwould run from the command line.
Programming that you carry out with cmd operations sometimes can also be carried out by creatingan operation from an IAction or using a scriptlet. However, there are limitations to using scriptlets.
A cmd operation can run one command (including script, batch, or executable). To run a series ofcommands, you need to use a shell operation. For information on shell operations, see Shelloperation.
l Formore information on using a scriptlet, see Scriptlet operation.
l For information on using IAction programming, see Creating IActions for operations and the HPOOSDK Guide (SDKGuide.pdf).
Cmd operation properties
For information on the values you need to provide for the inputs, see theDescription tab of theoperation.
HP Operations Orchestration (9.07)Page 270 of 301
Studio Authoring GuideCreating a new operation
On theResponses tab, in the response editor (which you open by clicking the right-pointing arrowin the response’s line—for more information, see Responses: Evaluating results), you can use thefollowing terms in theApply Rule to Field column for building statements to which a response isbound. For more information on these terms, see theDescription tab of the operation, underResult Fields.
l Code
l Output String
l Error String
l FailureMessage
l TimedOut
l Result
Note: Note that inWindows Vista, running aGUI program (for example, Excel) from a cmdoperation will start the program, but in theWindows session id = 0 (meaning that it is reservedexclusively toWindows services). As a result, the application will not be visible to the user.
Flow Run Counter operationThis topic explains the fields you need to complete, when creating an operation, in the dialog forcreating a flow-run counter operation. For information on and the procedure for creating anoperation, see Creating a new operation.
Use a flow-run counter operation to counting the number of completed runs of one or more flowsthat you specify with one or more of the following inputs to the operation:
l TimeWindow
Within a certain time window that you specify by number of minutes relative to the present.
l Input Constraints
With inputs name=value pairs that you specify. You can specify more than one inputname=value pair, separating each one from the next by a semicolon (;).
The syntax for the Input Constraints input enables some flexibility in your specification. TheDescription tab on the operation’s Properties sheet shows the syntax, examples, anddiscussion of the implications of acceptable syntax.
l Only Flow Inputs
Setting this to Truemeans that the specification you defined in the Input Constraints inputapplies only to flow inputs. Otherwise, it applies to all the step inputs.
HP Operations Orchestration (9.07)Page 271 of 301
Studio Authoring GuideCreating a new operation
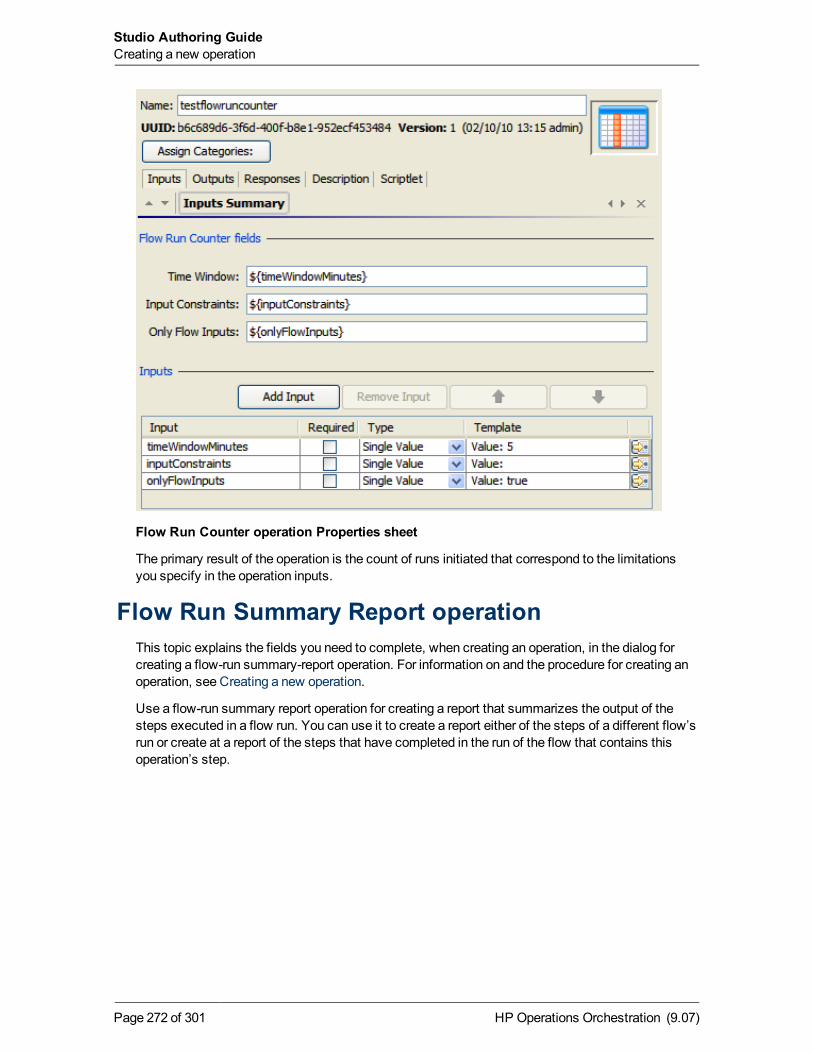
Flow Run Counter operation Properties sheet
The primary result of the operation is the count of runs initiated that correspond to the limitationsyou specify in the operation inputs.
Flow Run Summary Report operationThis topic explains the fields you need to complete, when creating an operation, in the dialog forcreating a flow-run summary-report operation. For information on and the procedure for creating anoperation, see Creating a new operation.
Use a flow-run summary report operation for creating a report that summarizes the output of thesteps executed in a flow run. You can use it to create a report either of the steps of a different flow’srun or create at a report of the steps that have completed in the run of the flow that contains thisoperation’s step.
HP Operations Orchestration (9.07)Page 272 of 301
Studio Authoring GuideCreating a new operation
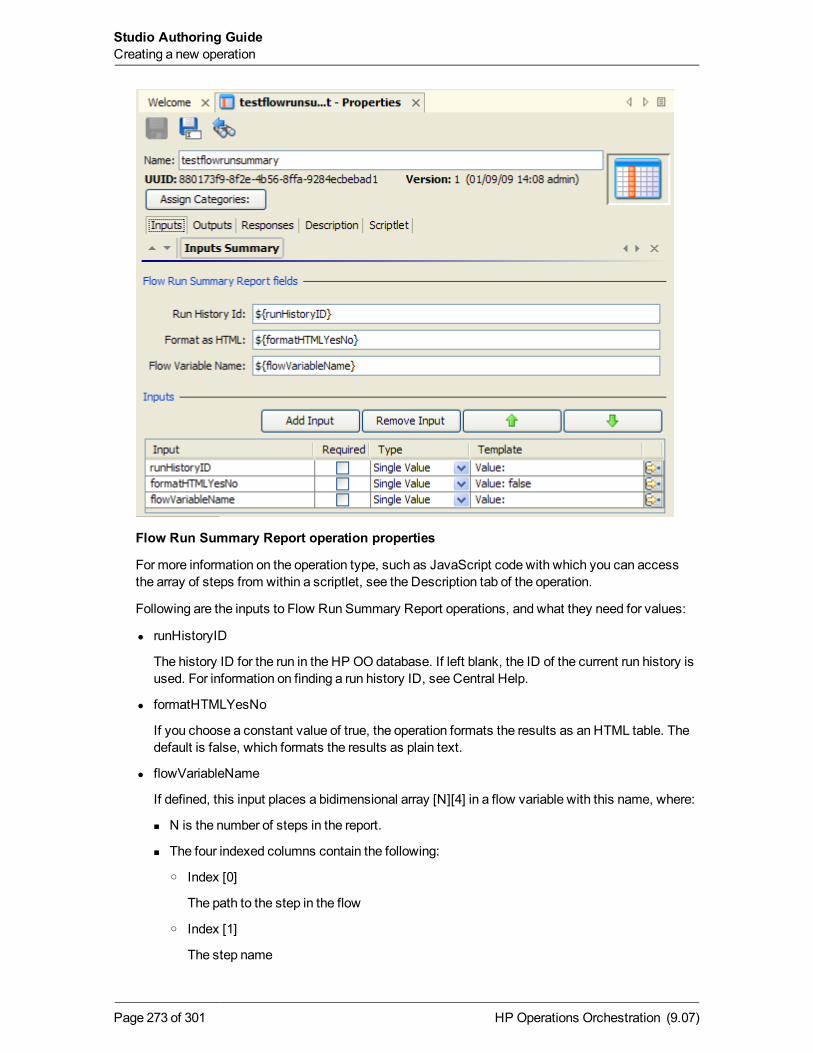
Flow Run Summary Report operation properties
Formore information on the operation type, such as JavaScript code with which you can accessthe array of steps from within a scriptlet, see the Description tab of the operation.
Following are the inputs to Flow Run Summary Report operations, and what they need for values:
l runHistoryID
The history ID for the run in the HP OO database. If left blank, the ID of the current run history isused. For information on finding a run history ID, see Central Help.
l formatHTMLYesNo
If you choose a constant value of true, the operation formats the results as an HTML table. Thedefault is false, which formats the results as plain text.
l flowVariableName
If defined, this input places a bidimensional array [N][4] in a flow variable with this name, where:
n N is the number of steps in the report.
n The four indexed columns contain the following:
o Index [0]
The path to the step in the flow
o Index [1]
The step name
HP Operations Orchestration (9.07)Page 273 of 301
Studio Authoring GuideCreating a new operation
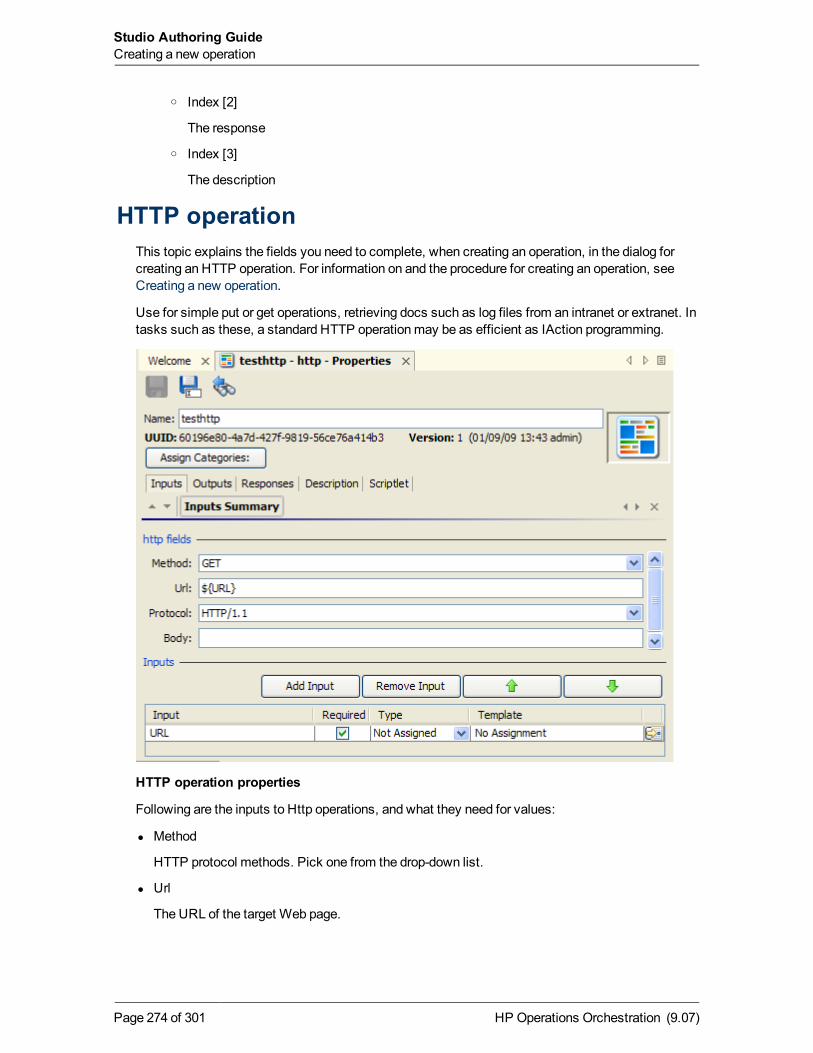
o Index [2]
The response
o Index [3]
The description
HTTP operationThis topic explains the fields you need to complete, when creating an operation, in the dialog forcreating an HTTP operation. For information on and the procedure for creating an operation, seeCreating a new operation.
Use for simple put or get operations, retrieving docs such as log files from an intranet or extranet. Intasks such as these, a standard HTTP operationmay be as efficient as IAction programming.
HTTP operation properties
Following are the inputs to Http operations, and what they need for values:
l Method
HTTP protocol methods. Pick one from the drop-down list.
l Url
The URL of the target Web page.
HP Operations Orchestration (9.07)Page 274 of 301
Studio Authoring GuideCreating a new operation
l Protocol
The version of the HTTP protocol. Pick the version that the target server supports.
l Body
If the request has a body, the data of the body, as defined in RFC 2616.
On theResponses tab, in the response editor (which you open by clicking the right-pointing arrowin the response’s line), you can use the following terms in theApply Rule to Field column forbuilding statements to which a response is bound.
l code
HTTP return code as described in RFC 2616.
l reason
A text string for the return code as described in RFC 2616.
l headers
Response headers as defined in RFC 2616.
l document
The actual document that was returned by the server.
l FailureMessage
Themessage that you receive on failure.
l TimedOut
Compare TimedOut to “true” (without the quotationmarks).
l Result
The result of the operation.
Perl script operationThis topic explains the fields you need to complete, when creating an operation, in the dialog forcreating a Perl script operation. For information on and the procedure for creating an operation, seeCreating a new operation.
Use this type of operation for calling a Perl script that executes your Perl scriptlet. You can passvariables to andmodify their values with a Perl scriptlet within the flow, then pass themodifiedvalues back to the Perl script.
HP Operations Orchestration (9.07)Page 275 of 301
Studio Authoring GuideCreating a new operation
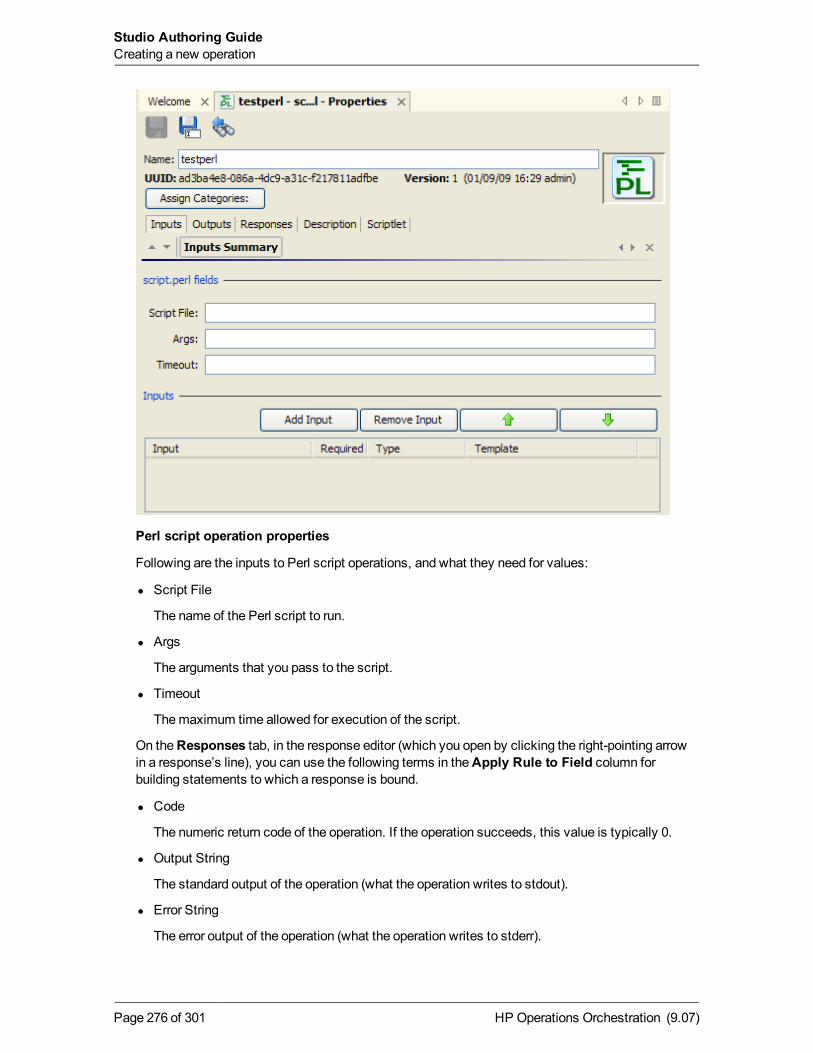
Perl script operation properties
Following are the inputs to Perl script operations, and what they need for values:
l Script File
The name of the Perl script to run.
l Args
The arguments that you pass to the script.
l Timeout
Themaximum time allowed for execution of the script.
On theResponses tab, in the response editor (which you open by clicking the right-pointing arrowin a response’s line), you can use the following terms in theApply Rule to Field column forbuilding statements to which a response is bound.
l Code
The numeric return code of the operation. If the operation succeeds, this value is typically 0.
l Output String
The standard output of the operation (what the operation writes to stdout).
l Error String
The error output of the operation (what the operation writes to stderr).
HP Operations Orchestration (9.07)Page 276 of 301
Studio Authoring GuideCreating a new operation
l Script Response
For script operations, the string that is returned by the script.
l Script Result
For script operations, the output that is returned by the script.
l FailureMessage
Themessage that you receive on failure.
l TimedOut
Compare TimedOut to “true” (without the quotationmarks).
l Result
The result of the operation.
RAS operation: IAction programming for a RASThis topic explains the fields you need to complete, when creating an operation, in the dialog forcreating a RAS operation with IAcion programming. For information on and the procedure forcreating an operation, see Creating a new operation.
The advantages of IAction programming include:
l More capacity for passing large amounts of data.
l Greater speed.
l Less overhead when launching processes.
l Improved performance.
l Greater scalability.
l Greater stability.
l Ease of reuse.
Programming that you carry out with scriptlet operations can also be carried out with command orIAction programming operations. For more information on when command or IAction programmingoperations are indicated, see their descriptions in this list.
HP Operations Orchestration (9.07)Page 277 of 301
Studio Authoring GuideCreating a new operation
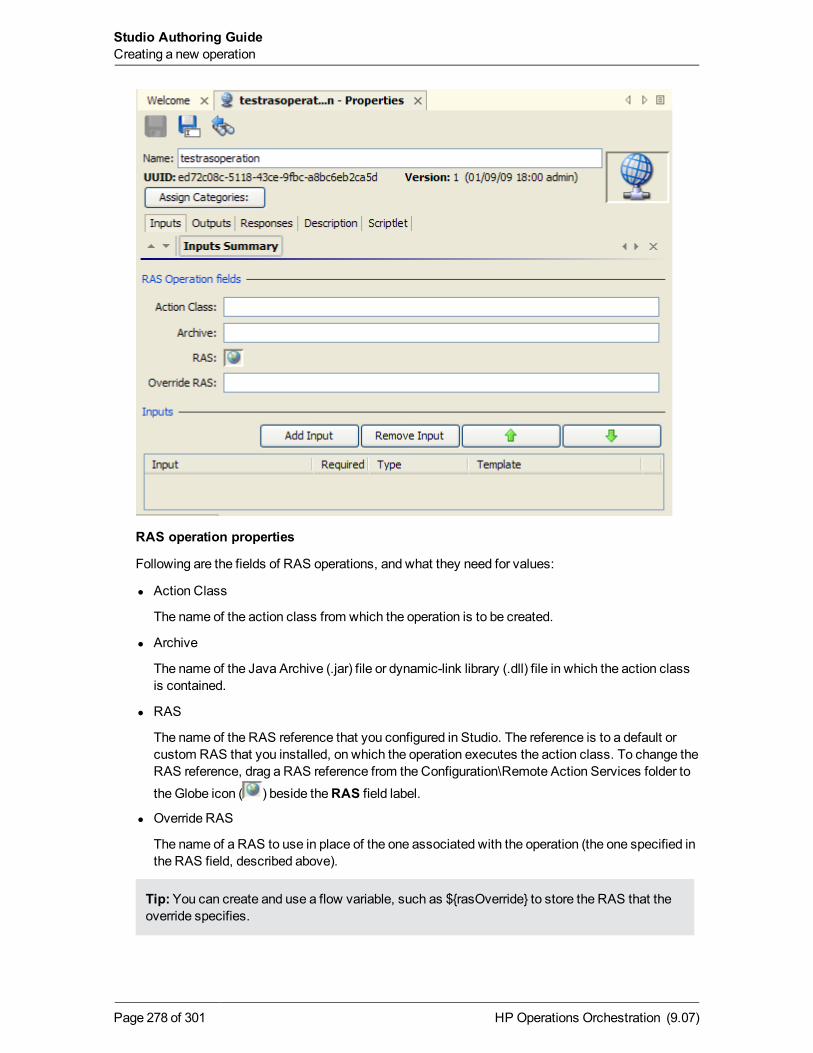
RAS operation properties
Following are the fields of RAS operations, and what they need for values:
l Action Class
The name of the action class from which the operation is to be created.
l Archive
The name of the Java Archive (.jar) file or dynamic-link library (.dll) file in which the action classis contained.
l RAS
The name of the RAS reference that you configured in Studio. The reference is to a default orcustom RAS that you installed, on which the operation executes the action class. To change theRAS reference, drag a RAS reference from the Configuration\Remote Action Services folder to
the Globe icon ( ) beside theRAS field label.
l Override RAS
The name of a RAS to use in place of the one associated with the operation (the one specified inthe RAS field, described above).
Tip:You can create and use a flow variable, such as ${rasOverride} to store the RAS that theoverride specifies.
HP Operations Orchestration (9.07)Page 278 of 301
Studio Authoring GuideCreating a new operation
For information on changing the RAS reference in the operation or overriding it in the step, seeChanging RAS references.
On theResponses tab, in the response editor (which you open by clicking the right-pointing arrowin the response’s line), you can use the following terms in theApply Rule to Field column forbuilding statements to which a response is bound. For more information on these terms, see theDescription tab of the operation, underExtra Results.
l FailureMessage
Themessage that you receive on failure.
l TimedOut
Compare TimedOut to “true” (without the quotationmarks).
l Result
The primary result of the operation.
For more information on RASes, .jars, and .dlls and how you can use them to extend thefunctionality of flows, seeOperating outside Central with Remote Action Services and CreatingIActions for operations.
Scriptlet operationThis topic explains the fields you need to complete, when creating an operation, in the dialog that isspecific to a scriptlet operation. For information on and the procedure for creating an operation, seeCreating a new operation.
Use this type of operation to run a scriptlet that you want to have available for reuse inmultipleflows.
HP Operations Orchestration (9.07)Page 279 of 301
Studio Authoring GuideCreating a new operation
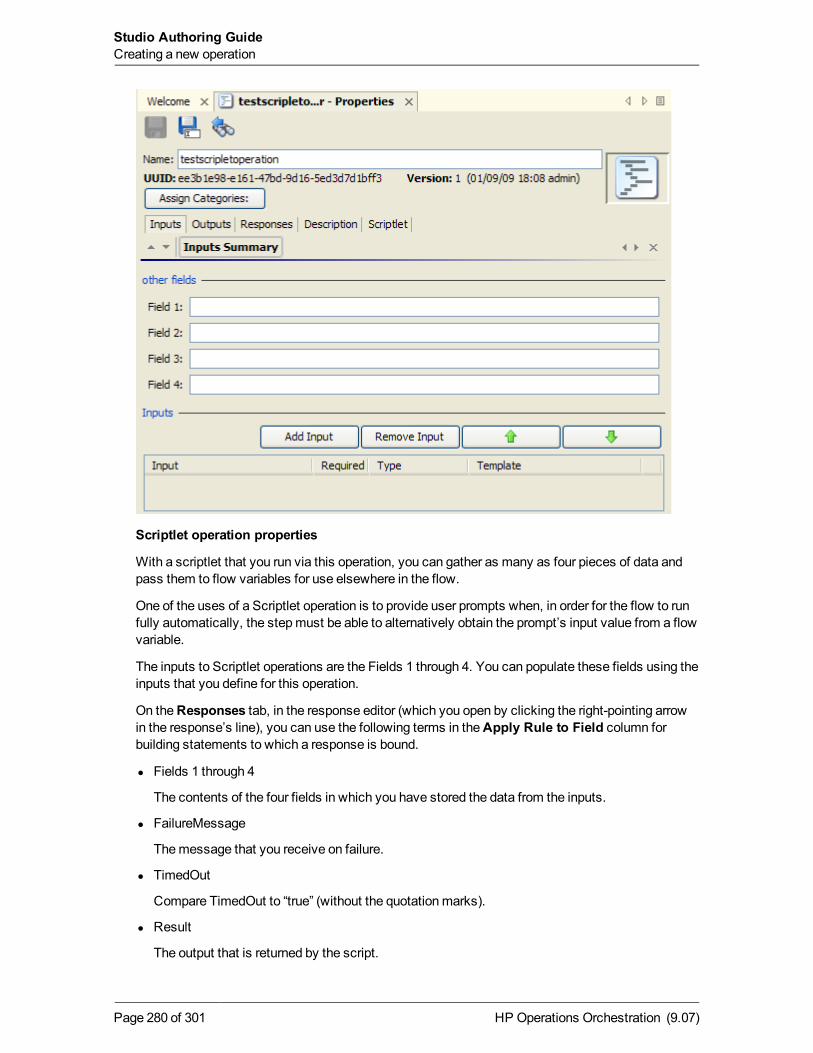
Scriptlet operation properties
With a scriptlet that you run via this operation, you can gather as many as four pieces of data andpass them to flow variables for use elsewhere in the flow.
One of the uses of a Scriptlet operation is to provide user prompts when, in order for the flow to runfully automatically, the stepmust be able to alternatively obtain the prompt’s input value from a flowvariable.
The inputs to Scriptlet operations are the Fields 1 through 4. You can populate these fields using theinputs that you define for this operation.
On theResponses tab, in the response editor (which you open by clicking the right-pointing arrowin the response’s line), you can use the following terms in theApply Rule to Field column forbuilding statements to which a response is bound.
l Fields 1 through 4
The contents of the four fields in which you have stored the data from the inputs.
l FailureMessage
Themessage that you receive on failure.
l TimedOut
Compare TimedOut to “true” (without the quotationmarks).
l Result
The output that is returned by the script.
HP Operations Orchestration (9.07)Page 280 of 301
Studio Authoring GuideCreating a new operation
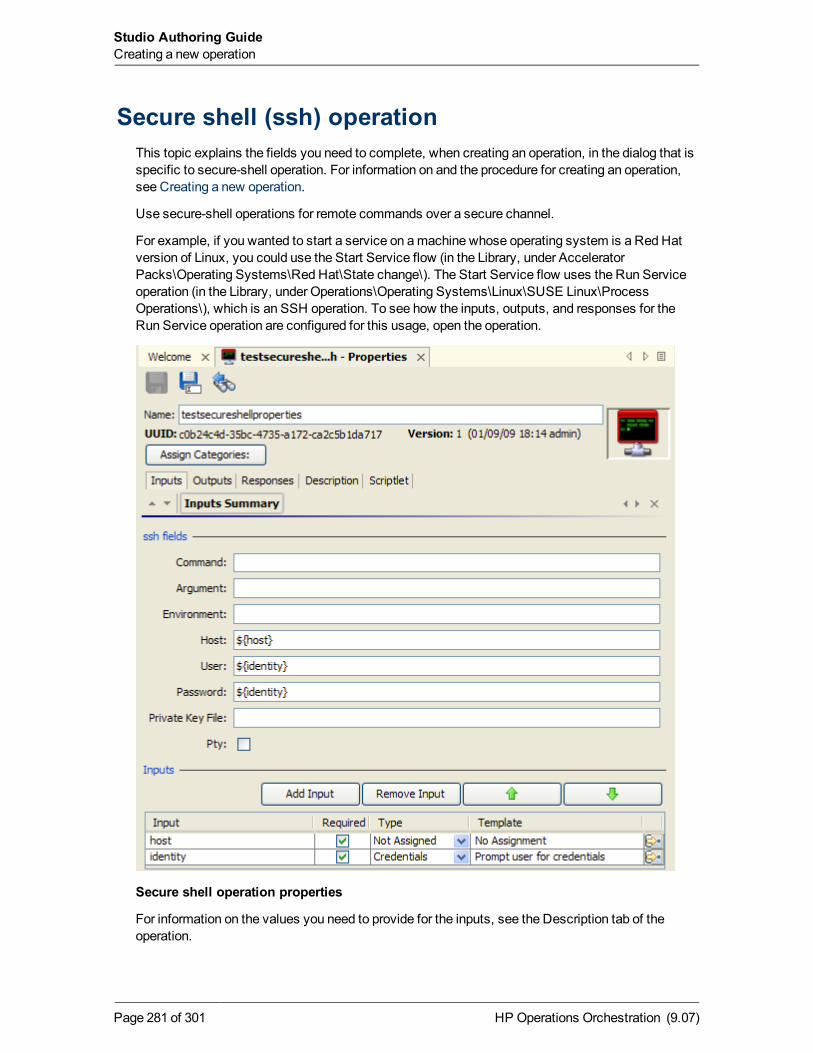
Secure shell (ssh) operationThis topic explains the fields you need to complete, when creating an operation, in the dialog that isspecific to secure-shell operation. For information on and the procedure for creating an operation,see Creating a new operation.
Use secure-shell operations for remote commands over a secure channel.
For example, if you wanted to start a service on amachine whose operating system is a Red Hatversion of Linux, you could use the Start Service flow (in the Library, under AcceleratorPacks\Operating Systems\Red Hat\State change\). The Start Service flow uses the Run Serviceoperation (in the Library, under Operations\Operating Systems\Linux\SUSE Linux\ProcessOperations\), which is an SSH operation. To see how the inputs, outputs, and responses for theRun Service operation are configured for this usage, open the operation.
Secure shell operation properties
For information on the values you need to provide for the inputs, see the Description tab of theoperation.
HP Operations Orchestration (9.07)Page 281 of 301
Studio Authoring GuideCreating a new operation
Notes:l In the Host input, to specify a particular port for the host, specify the host and port with the
following syntax:
<hostname>:<portname>
l ThePty check box creates a pseudoterminal so that Unix operations that require a terminalcan be run from a secure shell operation that you create.
Warning:A pseudoterminal does not distinguish between the standard output (or outputstring) and standard error (or error string) but takes both. As a result, the error string isalways empty.
On theResponses tab, in the response editor (which you open by clicking the right-pointing arrowin a response’s line), you can use the following terms in theApply Rule to Field column forbuilding statements to which a response is bound. For more information on these terms, see theDescription tab of the operation, underExtra Results.
l Code
l Output String
l Error String
l FailureMessage
l TimedOut
l Result
Telnet operationThis topic explains the fields you need to complete, when creating an operation, in the dialog that isspecific to a Telnet operation. For information on and the procedure for creating an operation, seeCreating a new operation.
Use for sendingmessages or commands to a server using the Telnet protocol.
HP Operations Orchestration (9.07)Page 282 of 301
Studio Authoring GuideCreating a new operation
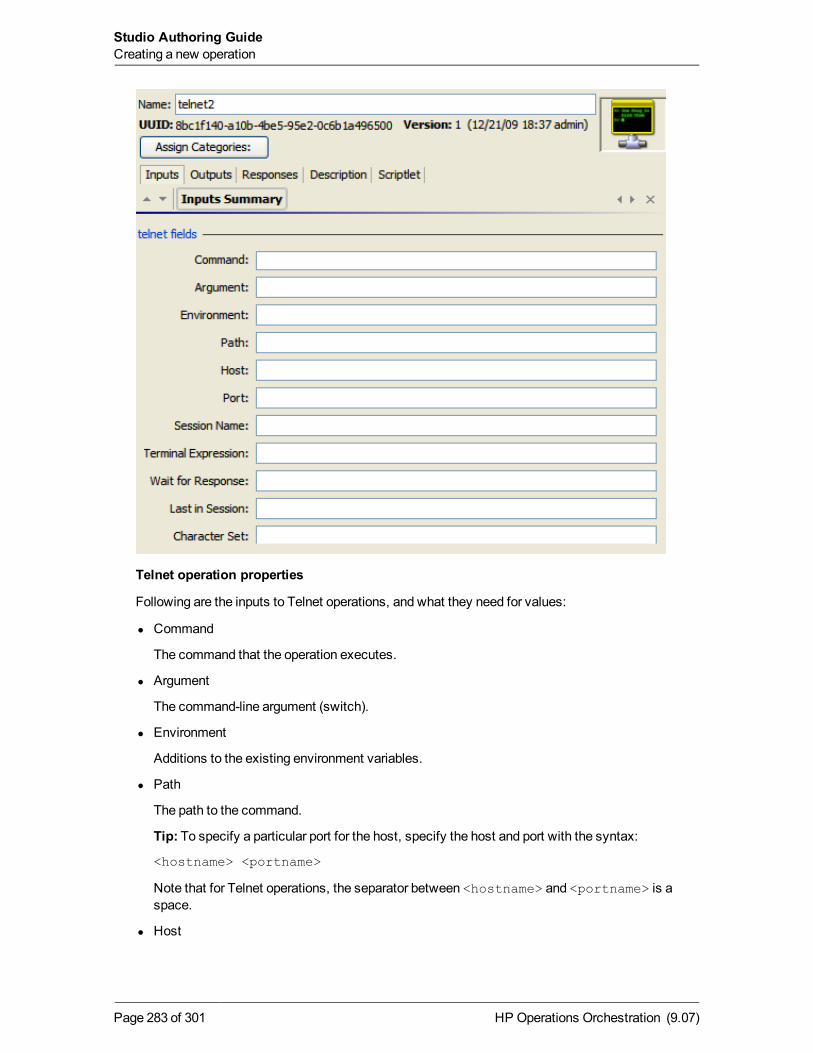
Telnet operation properties
Following are the inputs to Telnet operations, and what they need for values:
l Command
The command that the operation executes.
l Argument
The command-line argument (switch).
l Environment
Additions to the existing environment variables.
l Path
The path to the command.
Tip: To specify a particular port for the host, specify the host and port with the syntax:
<hostname> <portname>
Note that for Telnet operations, the separator between <hostname> and <portname> is aspace.
l Host
HP Operations Orchestration (9.07)Page 283 of 301
Studio Authoring GuideCreating a new operation
The target computer for the command.
l Port
The port through which the operation connects to the target computer.
l Session Name
The name for the session that you want to store in the context.
l Terminal Expression
A regular expression that you can use to search the operation’s response for a sequence thatindicates that the operation has completed. This can vary from command to command, so usingthis field requires knowledge of the returns of telnet commands. If you do not use this field, thetelnet operation allows the command to run until the telnet timeout value is reached.
l Wait for Response
The timeout limit.
l Last in Session
A boolean optional input for which “yes” or “true” means close the telnet session after thisoperation completes.
l Character Set
The character set for telnet to use. The default value is UTF-8.
On theResponses tab, in the response editor (which you open by clicking the right-pointing arrowin the response’s line), you can use the following terms in theApply Rule to Field column forbuilding statements to which a response is bound.
l Code
The numeric return code of the operation. If the operation succeeds, this value is typically 0.
l Output String
The standard output of the operation (what the operation writes to stdout).
l Error String
The error output of the operation (what the operation writes to stderr).
l FailureMessage
Themessage that you receive on failure.
l TimedOut
Compare TimedOut to “true” (without the quotationmarks).
l Result
The result of the operation.
Shell operationFormore information on operations, see Creating a new operation.
HP Operations Orchestration (9.07)Page 284 of 301
Studio Authoring GuideCreating a new operation
In contrast to a command-line operation, which can run only one command, a shell operation canrun a series of commands, which are specified in an input to a step created from the shell operation.There are twomeans of using shell operations:
l Use one of the three shell operations that are supplied in default HP OO content (the collectionof flows and operations that are installed when Studio is installed). Of these three shelloperations, one uses the SSH protocol, one uses the telnet protocol, and one uses eitherprotocol.
l Use the Shell Wizard to create a flow that uses a shell operation.
For information on using the Shell Wizard, see the following topic, Shell Wizard: creating a flow thatuses a shell operation.
For information on using a shell operation, see Using a shell operation.
Shell Wizard: creating a flow that uses a shelloperation
The Shell Wizard guides you through creating a flow that contains a shell operation based on eitherthe Secure Sockets (SSH) or the telnet protocol. The wizard includes recorder-like technology thatcreates steps in a flow from the commands that you carry out in the wizard’s shell window.
To run the wizard, you will need to have available the connection information on the host (themachine on which the commands you specify execute):
l Host name
l Name and password of the user account under which the command(s) will execute on the host
Note: The Shell Wizard cannot communicate with a server that does not have either an SSH ora Telnet server installed.
To create a flow that uses a shell operation
1. In the HP OO home directory, in \Studio\tools\, click or double-click shellwizard.exe.
The Shell Wizard starts.
2. In theSelect repository page, type the location of the repository in which you want to create acommand-line (or shell) operation.
OR
Click Browse, navigate to the location of the repository, and then click Open.
Notes:n If you point to an empty or nonexistent folder, the wizard creates a folder of that name in
that location, if necessary, and creates a new repository. The new repository containsonly what is needed to run the operations that you create, including either the SSH Shellor Telnet Shell operation, which enables the running of the operations that you create inthis wizard.
HP Operations Orchestration (9.07)Page 285 of 301
Studio Authoring GuideCreating a new operation
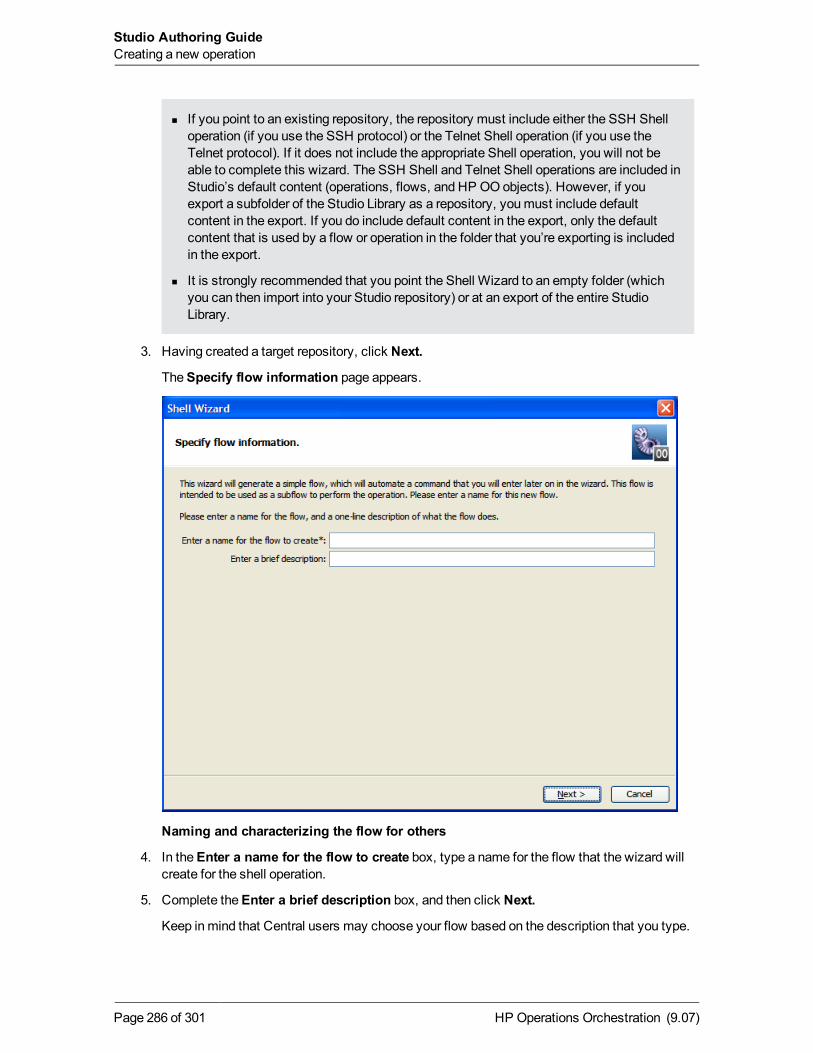
n If you point to an existing repository, the repository must include either the SSH Shelloperation (if you use the SSH protocol) or the Telnet Shell operation (if you use theTelnet protocol). If it does not include the appropriate Shell operation, you will not beable to complete this wizard. The SSH Shell and Telnet Shell operations are included inStudio’s default content (operations, flows, and HP OO objects). However, if youexport a subfolder of the Studio Library as a repository, youmust include defaultcontent in the export. If you do include default content in the export, only the defaultcontent that is used by a flow or operation in the folder that you’re exporting is includedin the export.
n It is strongly recommended that you point the Shell Wizard to an empty folder (whichyou can then import into your Studio repository) or at an export of the entire StudioLibrary.
3. Having created a target repository, click Next.
TheSpecify flow information page appears.
Naming and characterizing the flow for others
4. In theEnter a name for the flow to create box, type a name for the flow that the wizard willcreate for the shell operation.
5. Complete theEnter a brief description box, and then click Next.
Keep inmind that Central users may choose your flow based on the description that you type.
HP Operations Orchestration (9.07)Page 286 of 301
Studio Authoring GuideCreating a new operation
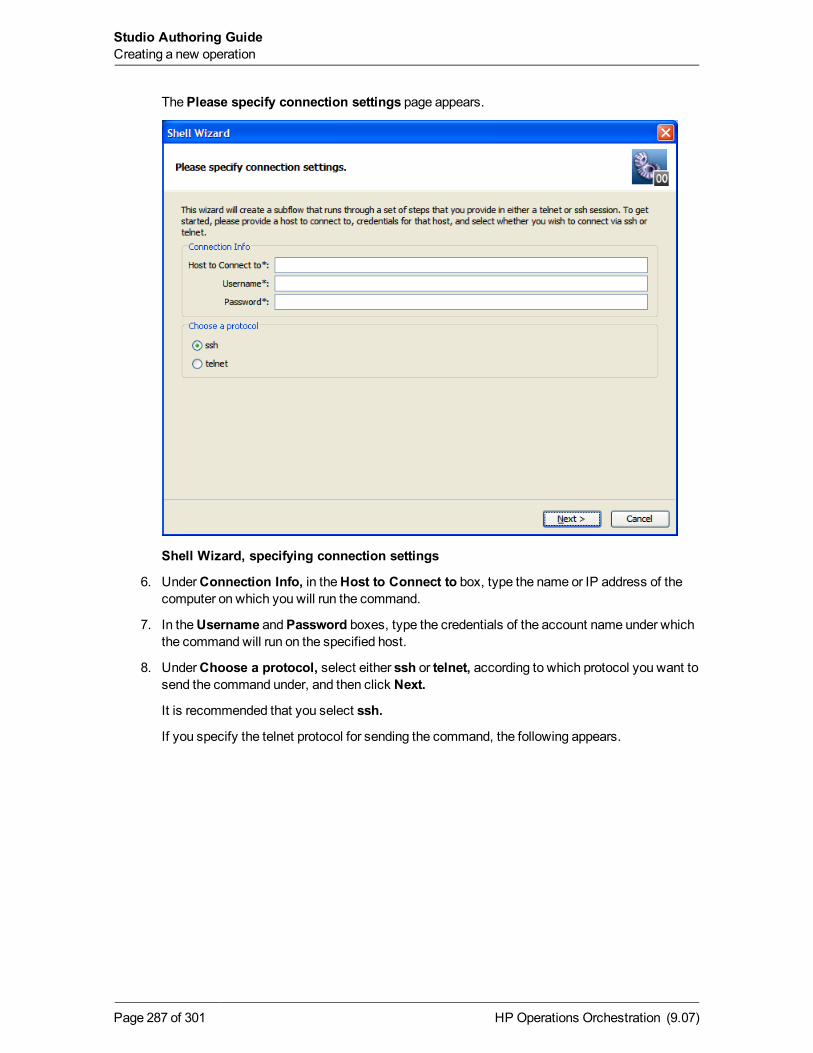
ThePlease specify connection settings page appears.
Shell Wizard, specifying connection settings
6. UnderConnection Info, in theHost to Connect to box, type the name or IP address of thecomputer on which you will run the command.
7. In theUsername andPassword boxes, type the credentials of the account name under whichthe commandwill run on the specified host.
8. UnderChoose a protocol, select either ssh or telnet, according to which protocol you want tosend the command under, and then click Next.
It is recommended that you select ssh.
If you specify the telnet protocol for sending the command, the following appears.
HP Operations Orchestration (9.07)Page 287 of 301
Studio Authoring GuideCreating a new operation

Specifying the host prompts for credentials
9. If you know what the username and password prompts are on the host machine, enter them.
The next page of the wizard contains a commandwindow on the host machine.
HP Operations Orchestration (9.07)Page 288 of 301
Studio Authoring GuideCreating a new operation
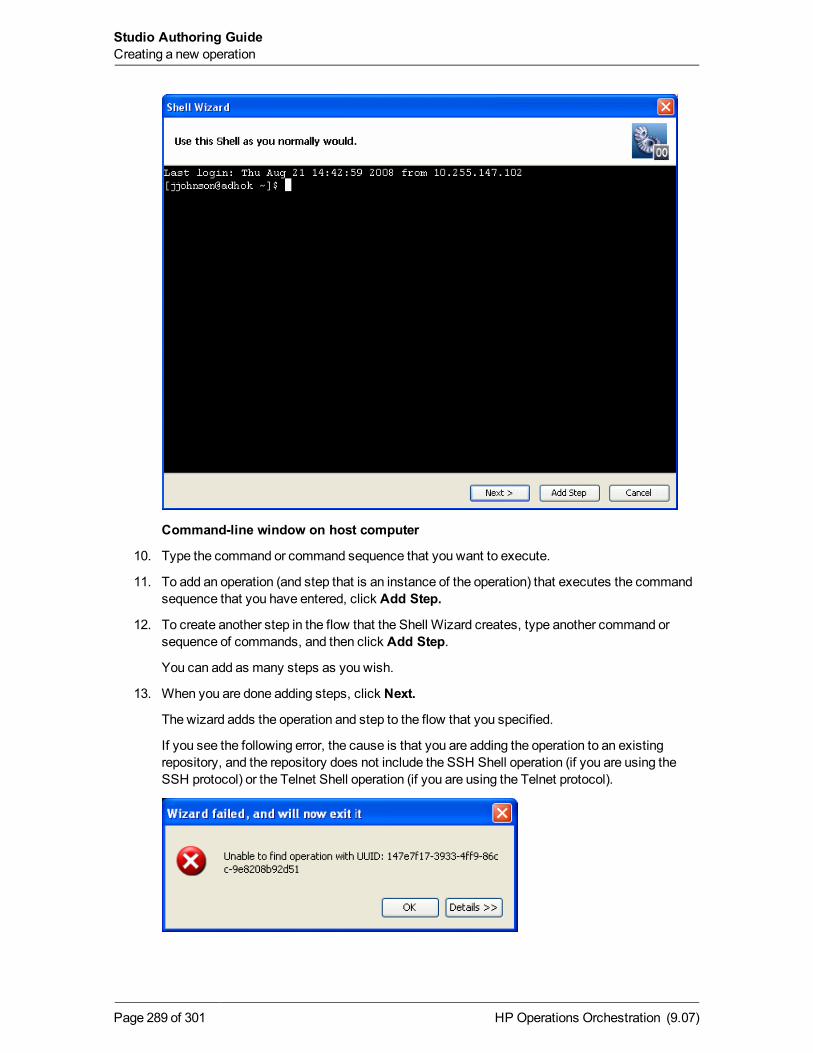
Command-line window on host computer
10. Type the command or command sequence that you want to execute.
11. To add an operation (and step that is an instance of the operation) that executes the commandsequence that you have entered, click Add Step.
12. To create another step in the flow that the Shell Wizard creates, type another command orsequence of commands, and then click Add Step.
You can add as many steps as you wish.
13. When you are done adding steps, click Next.
The wizard adds the operation and step to the flow that you specified.
If you see the following error, the cause is that you are adding the operation to an existingrepository, and the repository does not include the SSH Shell operation (if you are using theSSH protocol) or the Telnet Shell operation (if you are using the Telnet protocol).
HP Operations Orchestration (9.07)Page 289 of 301
Studio Authoring GuideCreating a new operation
14. If you see this error, click OK, and then do one of the following:
n Export the default public repository (in Studio, the Library folder, not a subfolder of theLibrary) to the repository that you created for this wizard, and then re-run the wizard.
n Re-run the wizard, pointing it to an empty or non-existent folder.
15. In theWizard is Finished page, click Finish.
Best Practice: To help authors who will create flows using the operations you create, add thefollowing information to the operation’s Description tab. (If you createmultiple flows or operationsthat interact with the same technology, group them into a single folder and provide this informationin the folder’s Description tab. This is the practice for default HP OO content.) Note that puttingthis information on theDescription tabmakes it available to authors and Central users through theGenerate Documentation feature. For more information onGenerate Documentation, see Viewingmany operation and flow descriptions.
l A description of what the operation does
l Inputs that the operation requires, including where authors can find the data that the inputsrequire and the required format for the data
l Responses, including themeaning of each response
l Result fields, including a description of the data supplied in each result field
l Any additional implementation notes, such as:
n Supported platforms or applications, including version information
n Application orWeb service APIs that the flow interacts with (this can be particularly importantfor flows that require an RAS to run, because the RAS operation can hide this informationfrom the author or user of the flow.
n Other environmental or usage requirements
Using a shell operationTo use a shell operation, you either:
l Create a step in a flow from one of the shell operations in HP OO default content.
l Use the flow you created with the Shell Wizard.
The primary result for a shell operation is the raw output (character stream) of its SSH or telnetsession. If the commands that you are executing with the shell operation aremenu-driven, arevisually formatted (for instance, in tables), include nonprintable characters, or present more thanscreen, obtaining visualized results will help you read and filter on the results.
Visualized results are the representation of the results in XML format, which preserves theformatting such as tables and presents the results in the screens in which they appear.
The following procedure assumes that you have created a flow that contains a step that is based ona shell operation.
To obtain visualized results of a shell operation
1. In the flow or subflow, open the Inspector for the step that is based on the shell op.
2. On theResults tab, add a new result and, in the From column, select Field:visualized.
HP Operations Orchestration (9.07)Page 290 of 301
Studio Authoring GuideCreating a new operation
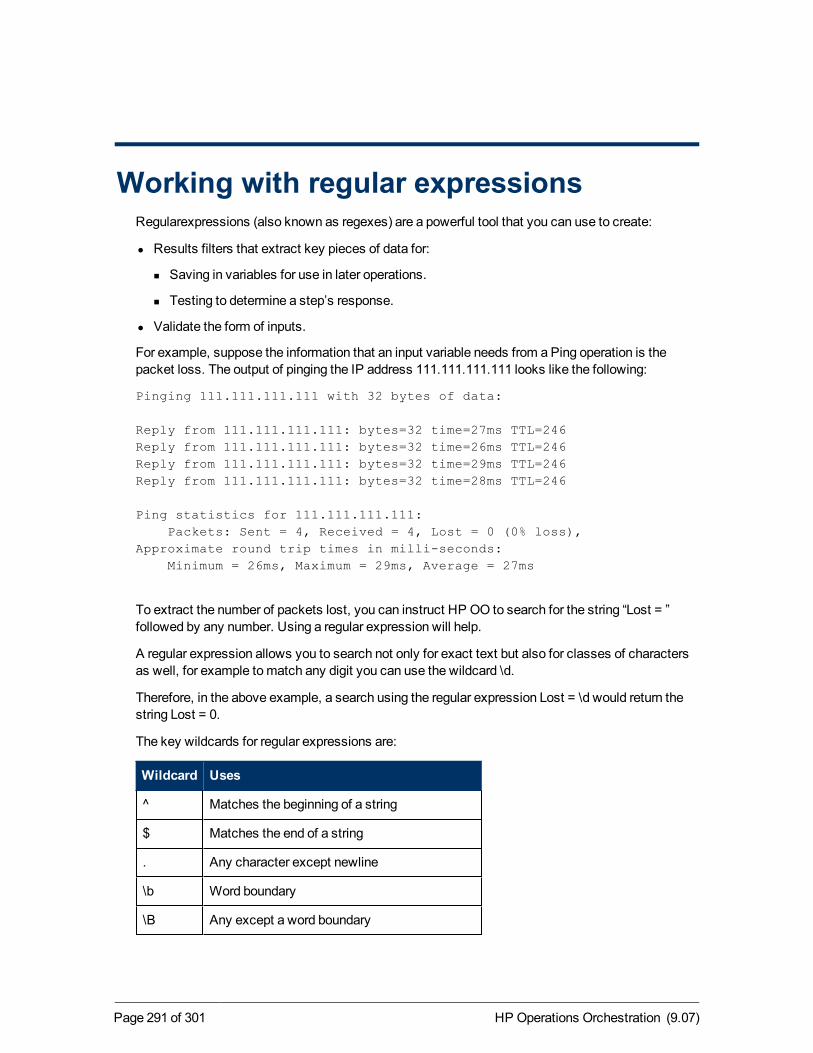
Working with regular expressionsRegularexpressions (also known as regexes) are a powerful tool that you can use to create:
l Results filters that extract key pieces of data for:
n Saving in variables for use in later operations.
n Testing to determine a step’s response.
l Validate the form of inputs.
For example, suppose the information that an input variable needs from a Ping operation is thepacket loss. The output of pinging the IP address 111.111.111.111 looks like the following:
Pinging 111.111.111.111 with 32 bytes of data:
Reply from 111.111.111.111: bytes=32 time=27ms TTL=246Reply from 111.111.111.111: bytes=32 time=26ms TTL=246Reply from 111.111.111.111: bytes=32 time=29ms TTL=246Reply from 111.111.111.111: bytes=32 time=28ms TTL=246
Ping statistics for 111.111.111.111:Packets: Sent = 4, Received = 4, Lost = 0 (0% loss),
Approximate round trip times in milli-seconds:Minimum = 26ms, Maximum = 29ms, Average = 27ms
To extract the number of packets lost, you can instruct HP OO to search for the string “Lost = ”followed by any number. Using a regular expression will help.
A regular expression allows you to search not only for exact text but also for classes of charactersas well, for example tomatch any digit you can use the wildcard \d.
Therefore, in the above example, a search using the regular expression Lost = \d would return thestring Lost = 0.
The key wildcards for regular expressions are:
Wildcard Uses
^ Matches the beginning of a string
$ Matches the end of a string
. Any character except newline
\b Word boundary
\B Any except a word boundary
HP Operations Orchestration (9.07)Page 291 of 301
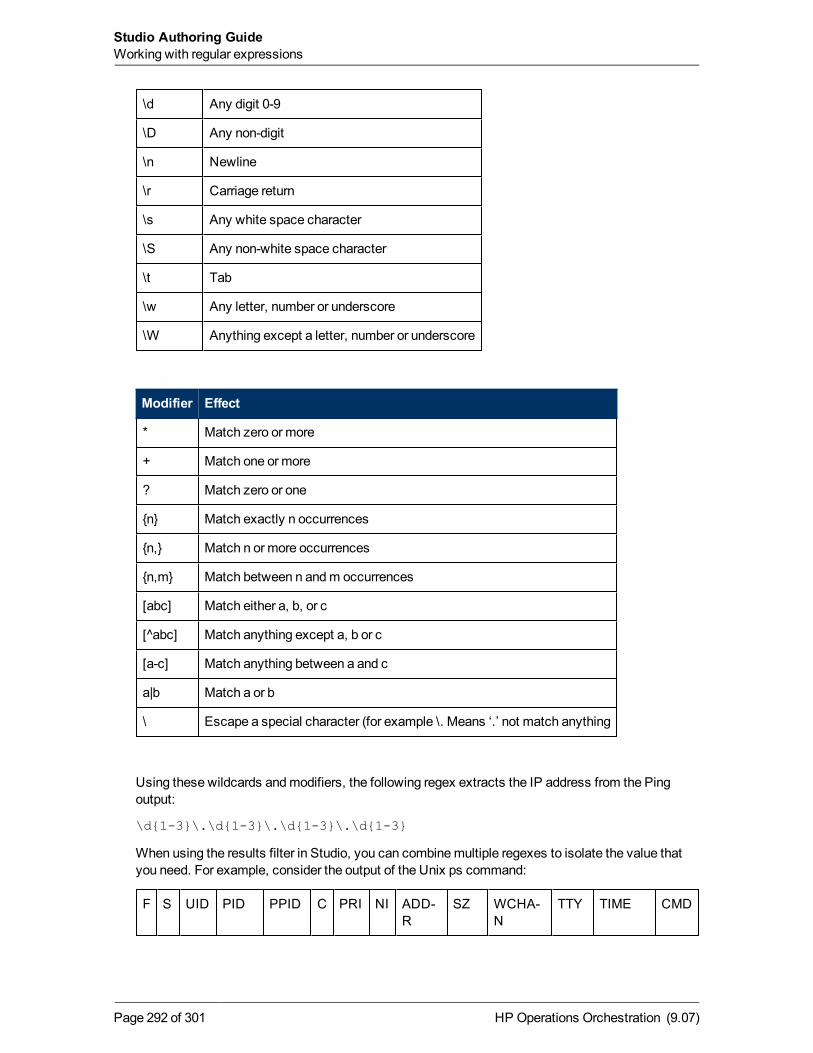
\d Any digit 0-9
\D Any non-digit
\n Newline
\r Carriage return
\s Any white space character
\S Any non-white space character
\t Tab
\w Any letter, number or underscore
\W Anything except a letter, number or underscore
Modifier Effect
* Match zero or more
+ Match one or more
? Match zero or one
{n} Match exactly n occurrences
{n,} Match n or more occurrences
{n,m} Match between n andm occurrences
[abc] Match either a, b, or c
[^abc] Match anything except a, b or c
[a-c] Match anything between a and c
a|b Match a or b
\ Escape a special character (for example \. Means ‘.’ not match anything
Using these wildcards andmodifiers, the following regex extracts the IP address from the Pingoutput:
\d{1-3}\.\d{1-3}\.\d{1-3}\.\d{1-3}
When using the results filter in Studio, you can combinemultiple regexes to isolate the value thatyou need. For example, consider the output of the Unix ps command:
F S UID PID PPID C PRI NI ADD-R
SZ WCHA-N
TTY TIME CMD
HP Operations Orchestration (9.07)Page 292 of 301
Studio Authoring GuideWorking with regular expressions
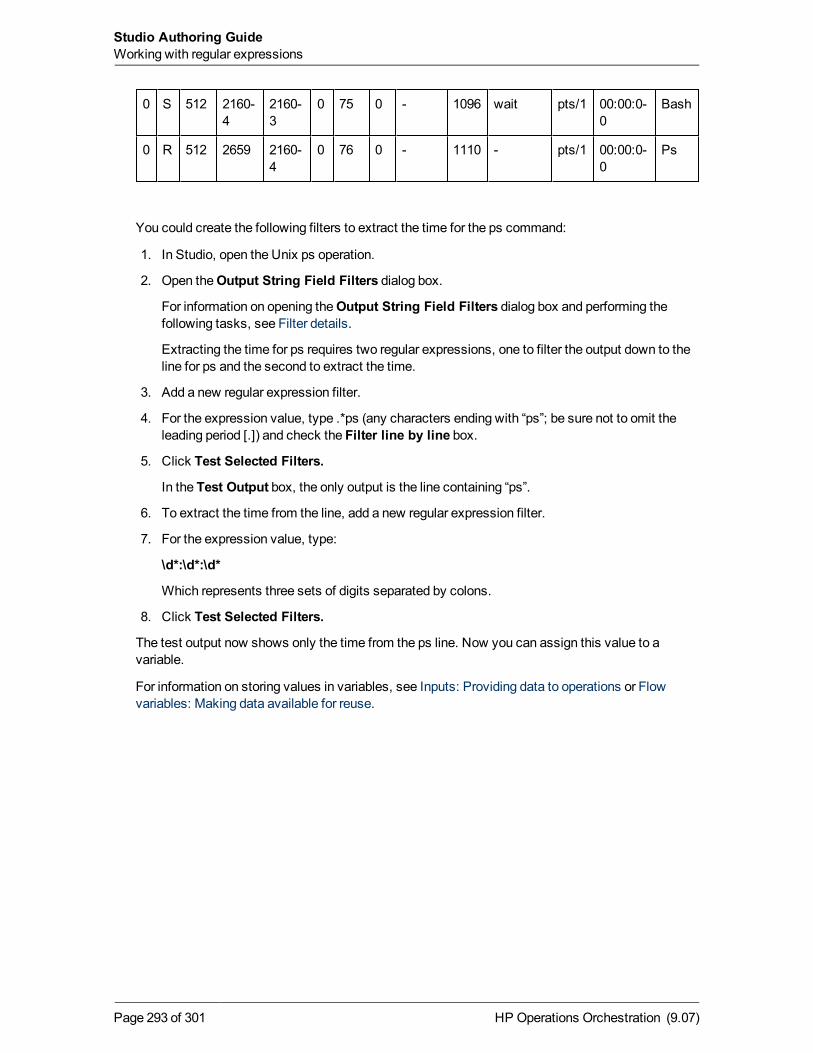
0 S 512 2160-4
2160-3
0 75 0 - 1096 wait pts/1 00:00:0-0
Bash
0 R 512 2659 2160-4
0 76 0 - 1110 - pts/1 00:00:0-0
Ps
You could create the following filters to extract the time for the ps command:
1. In Studio, open the Unix ps operation.
2. Open theOutput String Field Filters dialog box.
For information on opening theOutput String Field Filters dialog box and performing thefollowing tasks, see Filter details.
Extracting the time for ps requires two regular expressions, one to filter the output down to theline for ps and the second to extract the time.
3. Add a new regular expression filter.
4. For the expression value, type .*ps (any characters ending with “ps”; be sure not to omit theleading period [.]) and check the Filter line by line box.
5. Click Test Selected Filters.
In the Test Output box, the only output is the line containing “ps”.
6. To extract the time from the line, add a new regular expression filter.
7. For the expression value, type:
\d*:\d*:\d*
Which represents three sets of digits separated by colons.
8. Click Test Selected Filters.
The test output now shows only the time from the ps line. Now you can assign this value to avariable.
For information on storing values in variables, see Inputs: Providing data to operations or Flowvariables: Making data available for reuse.
HP Operations Orchestration (9.07)Page 293 of 301
Studio Authoring GuideWorking with regular expressions
Testing and deploying flowsTo safely make and deploy changes to flows, follow this order of work:
1. Work in a local repository or in a public repository on a development server’s installation ofCentral.
2. Test your work on a staging server.
3. Deploy the changed version of the flow during non-production hours.
To deploy changes to an existing flow from a test server
1. On the development server, make changes to and test the flow.
2. After saving changes, export the flow as a repository.
Unsaved changes in a flow or operation are not included in the export.
3. Publish the flow to the staging server and test it there.
4. To see whether there are any current runs of the flow:
a. Open the Central Web site, logging in with an account that has HP OOAdministratorrights.
b. Click theAdministration tab.
Any current runs of flows are listed underRun Administration.
5. Cancel any current runs of the flow you’re going to change, and instruct Central users not tostart any new runs of the flow.
6. Publish from the staging server to the production server.
7. To test the flow on the production server, set its properties so that only you have accesspermissions to run the flow, then test it.
8. After the flow tests successfully, grant access permissions to appropriate end-users.
HP Operations Orchestration (9.07)Page 294 of 301
Restricting use of flowsYou can restrict who can use a flow by:
l Restricting access permissions, specifying which groups of users can see a flow and start a runof the flow.
For information on assigning access permissions for HP OO objects, see Controlling access toHP OO objects.
For information on defining HP OO roles or mapping external roles or groups to the HP OOgroups described here, see the HP OOAdministration Guide (AdminGuide.pdf) and Help forCentral.
l Hiding the flow from Central users.
If your organization does not use a staging server for testing flows and you publish a flow that isnot ready for production use in Central, you can hide it from Central users.
For more information, see the next topic, Controlling who can see a flow in Central.
l Limiting access to a flow beyond a given transition: Specifying in a transition’s properties whichHP OO rolemembers can continue running the flow beyond the transition.
Suppose one part of a flow can be run by amember of the LEVEL_ONE HP OO role but asubsequent part of the flow needs to be escalated because it requires user credentials that aLEVEL_ONE user doesn’t have. When you create the flow, you couldmake a gated transition ofthe transition that leads to the step where the credentials are required. A gated transition is onethat requires membership in a certain role for the user to continue running the flow.
For more information on creating gated transitions, see Transitions: connecting steps.
l Adding an Acquire Lock step to the flow that prevents anyone but a user who possesses the keyto the lock from continuing the flow run beyond that point.
The Acquire Lock and Release Lock operations are part of the default HP OO content. For moreinformation using them, see theirDescription tabs.
Controlling who can see a flow in CentralThere are two ways to hide flows from Central users:
l Marking the flow as hidden hides it from all Central users, regardless of their accesspermissions or group capabilities.
l To specify who can see the flow and who can’t, specify which groups have read permissions forthe flow.
To mark a flow as hidden
HP Operations Orchestration (9.07)Page 295 of 301
1. To open the flow’s Properties sheet, in theRepository pane, navigate to and right-click theflow and then click Properties.
2. On theAdvanced tab of theProperties sheet, select Hide in Central, and then save yourwork.
To select which groups have the read permission
1. In theRepository pane, right-click the flow, and then click Permissions.
2. In thePermissions dialog that appears, select the Read permission for the groups you want tobe able to see the flow in Central and Studio, and then click OK.
HP Operations Orchestration (9.07)Page 296 of 301
Studio Authoring GuideRestricting use of flows
Creating IActions for operationsIn advanced operations authoring, you use the Remote Action Service (RAS) to execute the core ofan operation outside HP OO.
The RAS is a service that manages remote actions. The RAS instance that you install contains theIAction interface and is an implementation of the RAS. The RAS communicates with the CentralWeb application and Studio using the SOAP/HTTP(S) protocol. The RAS manages a databaserepository of IAction implementations, which are contained in Java archives (.jar files) for use in aJava environment and in dynamic-link libraries (.dll files) for use in a .NET environment.
The IAction interface uses the execute() method andmethods that are specific to theWebapplication, standalone application, platform, or extension service on which you want actionsperformed. Thesemethods map actions in the HP OOSDK to actions of the target system’s orapplication’s SDK. The IAction interface thus mediates between HP OO and systems external toHP OO.
Standard operations interact with the HP OO infrastructure (the database and Internet InformationServices) and are limited to the actions that are possible within the infrastructure. When youprogram the IAction interface in the operation, you can interact (via the extension services) withentities outside HP. Thus you can create operations that:
l Interact with systems throughout the network or Internet.
l Integrate HP OOwith other entities that RAS can interact with through IActions.
Programming operations withWeb extensions requires .NET or Java programming skills.
For more information on creating IActions, see thematerial on authoring IActions in the HP OOSDK Guide (SDKGuide.pdf).
Overview of creating operations thatimplement IActions
Overall, the authoring process involves creating one or more IAction implementation classes andmoving them into Studio:
1. Create custom IAction implementation classes in your development environment and compilethem into a dynamic-link library (.dll) or Java Archive (.jar) file.
2. Copy the .dll or .jar into yourWeb service (yourWeb server’s \bin\Actions directory).
3. Import theWeb service into Studio.
To learn how to author and implement IActions, see thematerial on authoring IActions in the HP OOSDK Guide (SDKGuide,pdf).
HP Operations Orchestration (9.07)Page 297 of 301

Viewing messages to the authorStudiomay display amessage to the currently logged in author.
To view messages
l Click theMessages tab at the bottom of Studio.
Messages tab, in the Studio tab panel
HP Operations Orchestration (9.07)Page 298 of 301
TroubleshootingTroubleshooting: Changes not synchronized between instances of Studio with sharedlogin account
Title: I am logged into two instances of Studio connected to the same public repository, andmychanges inmy workspace in one instance of Studio are not reflected in the other Studio.
Description: This should never occur, because two instances of Studio should never be connectedto the public repository for the same installation of Central using a single user account for bothconnections. If this happens, the user’s workspace in the repository can become corrupted. Thiscan also occur when Central is clustered.
Troubleshooting: A flow, operation, or system object that I know exists does not appear inmy Library.
Youmay not have Read permission for the item. If you do not have read permission for an object, itdoes not appear in theRepository pane.
Troubleshooting: The scriptlet in my operation does not run correctly.
By default, Central expects to find scripts in the HP OO home directory, in the \Central\scripts\subdirectory. This default location is specified in the Central.properties file.
If the script that the operation uses does not reside in the \Central\scripts\ subdirectory, do one ofthe following:
1. Move the script to the \scripts\ subdirectory.
2. In Central.properties, located in the HP OO home directory in the \Central\conf\ subdirectory,find the following line:
dharma.app.script.repository=${iconclude.home}/Central/scripts
3. Append to the line a semicolon separator and the location of any scripts that you want to use.
For example, to execute scripts residing in the c:\MyScripts directory, you wouldmodify the line toread as follows:
dharma.app.script.repository=C:\Program Files\Hewlett-Packard\Operations Orchestration\Central\scripts;c:\MyScripts
Troubleshooting: An error reports that I have lost the lock on the public repository
This error might appear when you try to import a repository to the public repository. One possiblecause is that Central was re-started while Studio was open. This can happen if, for instance, yourcomputer has a power-saving scheme that causes it to hibernate after some period of inactivity.
To regain a lock on the public repository: In Studio, open a private repository and then open thepublic repository.
Troubleshooting: After deleting a step then undoing the deletion, changes are not saved
Steps to reproduce:
HP Operations Orchestration (9.07)Page 299 of 301
1. With a flow diagram open, delete a step.
2. Save your work.
3. Undo the deletion.
4. Make changes to the step that you deleted.
5. Save your work.
Expected result: The changes that youmake to the step after undoing its deletion are saved.
Actual result: The changes that youmake to the step after undoing its deletion are not saved.
Subsequent saves work correctly.
Workaround: After undoing the deletion, editing and saving, move the step again and save.Subsequent changes will be saved correctly.
HP Operations Orchestration (9.07)Page 300 of 301
Studio Authoring GuideTroubleshooting