Embed Size (px)
Citation preview

Common Criteria Evaluated Configuration Guide for HP Document Scanners
HP Digital Sender Flow 8500 fn2 Document Capture Workstation HP ScanJet Enterprise Flow N9120 fn2 Document Scanner

Common Criteria Evaluated Configuration Guide for HP Document Scanners HP Digital Sender Flow 8500 fn2 Document Capture Workstation HP ScanJet Enterprise Flow N9120 fn2 Document Scanner

Copyright and license © Copyright 2021 HP Development Company, L.P. Reproduction, adaptation, or translation without prior written permission is prohibited, except as allowed under the copyright laws. The information contained herein is subject to change without notice. The only warranties for HP products and services are set forth in the express warranty statements accompanying such products and services. Nothing herein should be construed as constituting an additional warranty. HP shall not be liable for technical or editorial errors or omissions contained herein. Edition 1, 5/2021
Trademark credits PostScript®, and the Acrobat logo® are trademarks of Adobe Systems Incorporated. Microsoft®, Windows®, and SharePoint® are U.S. registered trademarks of Microsoft Corporation. AirPrint is a trademark of Apple Inc., registered in the U.S. and other countries. Wireshark® is a registered trademark of the Wireshark Foundation.
Table of contents
1 Introduction .............................................................................................................................................................. 1
Purpose .................................................................................................................................................................... 2
The Target of Evaluation ....................................................................................................................................... 2
About this guide ...................................................................................................................................................... 2
Additional documentation ..................................................................................................................................... 2
2 Secure acceptance of the TOE ................................................................................................................................ 4
Verify the TOE hardware ........................................................................................................................................ 5
Identify the TOE hardware..................................................................................................................................... 5
Acquire the TOE firmware and guidance documentation files ......................................................................... 5
TOE firmware, guidance documentation, and configuration files ............................................................ 6
Download the TOE files from the HP SW Depot ......................................................................................... 6
Verify the integrity of the HP SW Depot download .................................................................................... 7
3 Operational environment ........................................................................................................................................ 9
Assumptions ........................................................................................................................................................ 10
Physical ......................................................................................................................................................... 10
Personnel...................................................................................................................................................... 10
Connectivity .................................................................................................................................................. 10
Organizational security policies ......................................................................................................................... 10
Security objectives............................................................................................................................................... 11
Non-TOE components ........................................................................................................................................ 11
TOE users.............................................................................................................................................................. 12
4 Before configuring the HCD .................................................................................................................................. 13
Restrictions for the evaluated configuration ................................................................................................... 14
Pre-configuration tasks ...................................................................................................................................... 15
Physically secure the HCD .......................................................................................................................... 15
Other pre-configuration tasks ................................................................................................................... 15
5 Configure the HCD .................................................................................................................................................. 17
Introduction .......................................................................................................................................................... 18
Configuration methods ............................................................................................................................... 18
IP network settings ............................................................................................................................................. 19
Certified TOE firmware ........................................................................................................................................ 19
Update the firmware ................................................................................................................................... 19
Verify the certified TOE firmware version ................................................................................................ 19
System and network settings (excluding IPsec) .............................................................................................. 20
Trusted Platform Module ........................................................................................................................... 20
Cold reset ...................................................................................................................................................... 21
Preboot menu administrator password ................................................................................................... 21
Service access .............................................................................................................................................. 21
SNMP over HTTP .......................................................................................................................................... 22
SNMP ............................................................................................................................................................. 23
Control panel inactivity timeout ................................................................................................................ 23
Home screen customization ...................................................................................................................... 23
Welcome message ...................................................................................................................................... 24
Date and time ............................................................................................................................................... 24
Scan to Email ................................................................................................................................................ 25
Scan to Network Folder .............................................................................................................................. 25
Scan to SharePoint® .................................................................................................................................... 25
Digital sending software ............................................................................................................................. 25
Fax send ........................................................................................................................................................ 26
Local administrator password ................................................................................................................... 26
Remote configuration password ............................................................................................................... 26
EWS session timeout .................................................................................................................................. 27
Remote user auto capture ......................................................................................................................... 27
Firmware upgrade security ........................................................................................................................ 27
Near Field Communication ......................................................................................................................... 27
Bluetooth Low Energy ................................................................................................................................ 28
Hardware ports ............................................................................................................................................ 28
HP JetAdvantage Link Platform ................................................................................................................. 28
Account policy .............................................................................................................................................. 29
Access control .............................................................................................................................................. 30
Drive-lock password ................................................................................................................................... 41
Managing temporary job files .................................................................................................................... 42
Certificates .................................................................................................................................................... 42
HP web services ........................................................................................................................................... 44
HP JetAdvantage ......................................................................................................................................... 44
Smart Cloud Print ........................................................................................................................................ 44
Wireless station ........................................................................................................................................... 45
Enhanced security event logging .............................................................................................................. 45
Device discovery .......................................................................................................................................... 46
Name resolution .......................................................................................................................................... 46
WebScan ....................................................................................................................................................... 47
Management protocols............................................................................................................................... 47
IPsec ...................................................................................................................................................................... 47
IPsec requirements ..................................................................................................................................... 48
Configure IPsec on the HCD ........................................................................................................................ 52
Configure the IPsec on the computers ..................................................................................................... 64
Test the IPsec connections ......................................................................................................................... 65
Disable failsafe option in the IPsec/Firewall policy on the HCD............................................................. 65
6 Operational guidance ............................................................................................................................................ 67
How to report a security vulnerability .............................................................................................................. 68
Operational modes of the HCD .......................................................................................................................... 68
Whitelisting ........................................................................................................................................................... 69
Verify the presence of the Whitelisting feature ....................................................................................... 69
33.05.1X Whitelisting error codes for security events ........................................................................... 69
User authentication ............................................................................................................................................. 71
EWS and control panel authentication ..................................................................................................... 71
REST Web Services authentication ............................................................................................................ 74
Back up and restore HCD data ........................................................................................................................... 75
Perform a backup ........................................................................................................................................ 75
Restore data ................................................................................................................................................. 75
Check version of installed TOE firmware .......................................................................................................... 76
Use the EWS ................................................................................................................................................. 76
Use the control panel .................................................................................................................................. 76
Update the TOE firmware ................................................................................................................................... 77
Manage the HCD security ................................................................................................................................... 77
7 Enhanced security event logging messages ...................................................................................................... 79
Enhanced security event logging ...................................................................................................................... 80
Syslog message format ...................................................................................................................................... 80
Variables within syslog messages ............................................................................................................ 80
Syslog messages ................................................................................................................................................. 81
Enhanced security event logging .............................................................................................................. 81
System time ................................................................................................................................................. 81
User authentication ..................................................................................................................................... 82
Account lockout ........................................................................................................................................... 83

IPsec .............................................................................................................................................................. 84
Job Completion ............................................................................................................................................ 88
Use of the management functions ........................................................................................................... 91

© Copyright 2021 HP Development Company, L. 1
1 Introduction
• Purpose
• The Target of Evaluation
• About this guide • Additional documentation
© Copyright 2021 HP Development Company, L. 2
Purpose
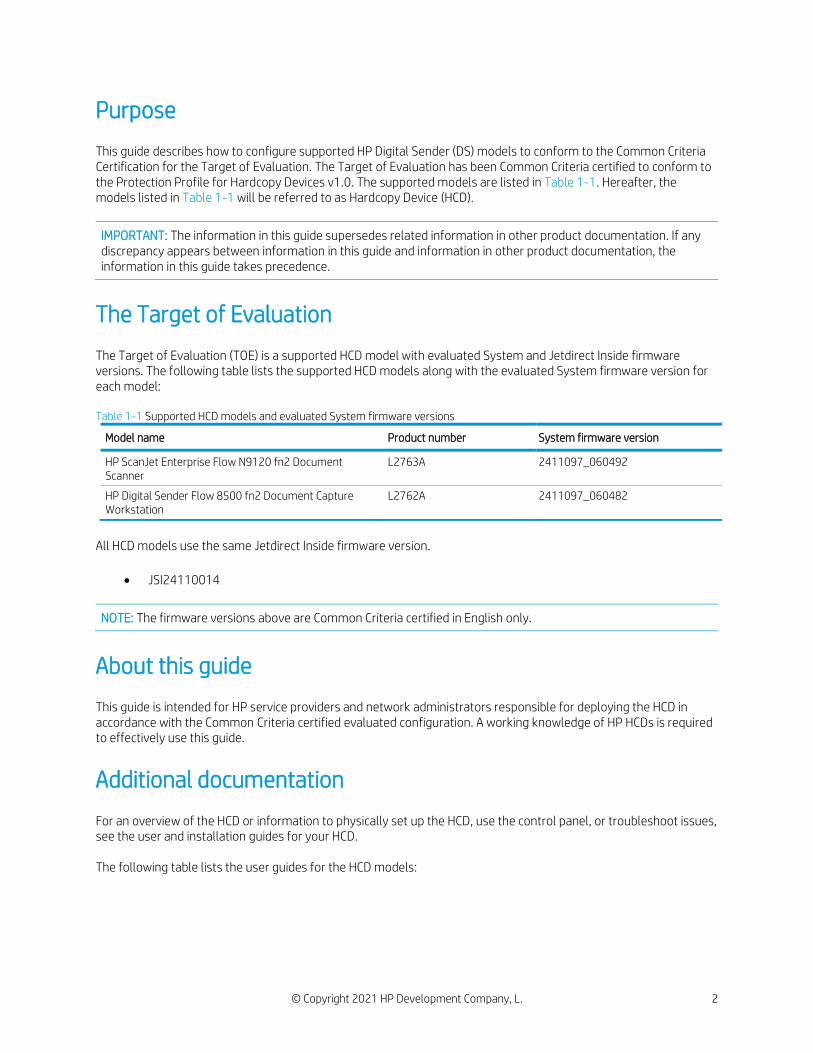
This guide describes how to configure supported HP Digital Sender (DS) models to conform to the Common Criteria Certification for the Target of Evaluation. The Target of Evaluation has been Common Criteria certified to conform to the Protection Profile for Hardcopy Devices v1.0. The supported models are listed in Table 1-1. Hereafter, the models listed in Table 1-1 will be referred to as Hardcopy Device (HCD).
IMPORTANT: The information in this guide supersedes related information in other product documentation. If any discrepancy appears between information in this guide and information in other product documentation, the information in this guide takes precedence.
The Target of Evaluation
The Target of Evaluation (TOE) is a supported HCD model with evaluated System and Jetdirect Inside firmware versions. The following table lists the supported HCD models along with the evaluated System firmware version for each model: Table 1-1 Supported HCD models and evaluated System firmware versions
Model name Product number System firmware version
HP ScanJet Enterprise Flow N9120 fn2 Document Scanner
L2763A
2411097_060492
HP Digital Sender Flow 8500 fn2 Document Capture Workstation
L2762A 2411097_060482
All HCD models use the same Jetdirect Inside firmware version.
• JSI24110014
NOTE: The firmware versions above are Common Criteria certified in English only.
About this guide
This guide is intended for HP service providers and network administrators responsible for deploying the HCD in accordance with the Common Criteria certified evaluated configuration. A working knowledge of HP HCDs is required to effectively use this guide.
Additional documentation
For an overview of the HCD or information to physically set up the HCD, use the control panel, or troubleshoot issues, see the user and installation guides for your HCD. The following table lists the user guides for the HCD models:
© Copyright 2021 HP Development Company, L. 3
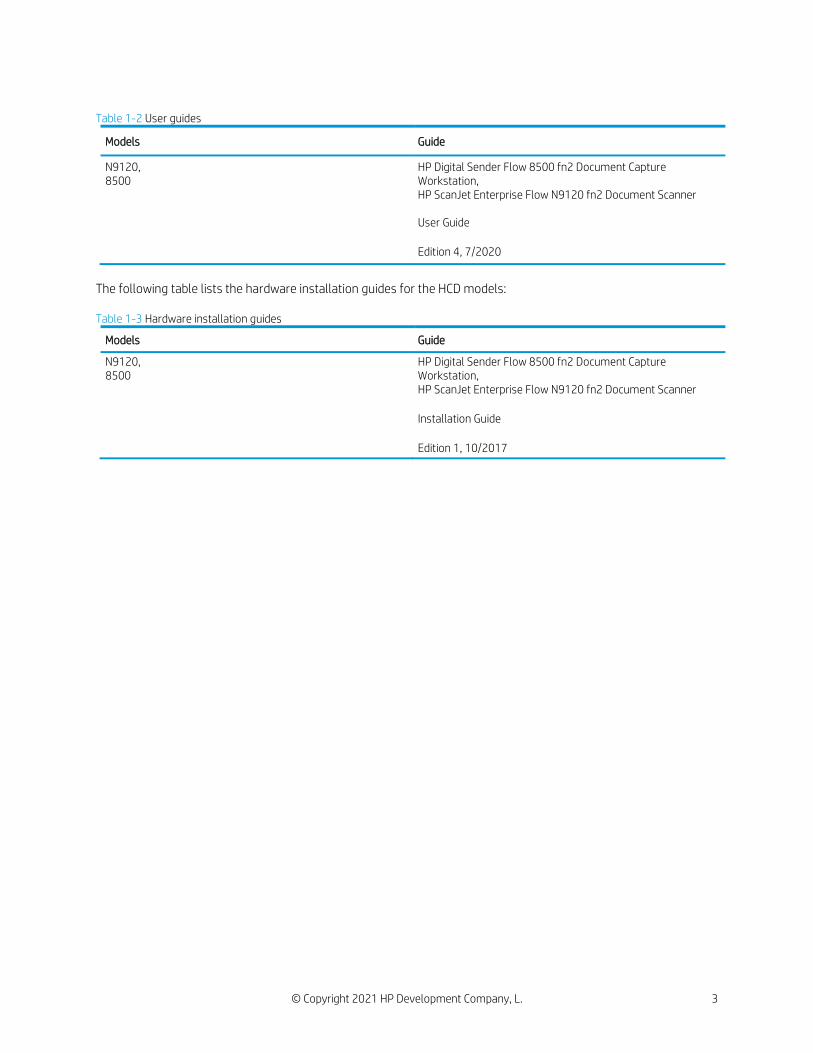
Table 1-2 User guides
Models Guide
N9120, 8500
HP Digital Sender Flow 8500 fn2 Document Capture Workstation, HP ScanJet Enterprise Flow N9120 fn2 Document Scanner User Guide Edition 4, 7/2020
The following table lists the hardware installation guides for the HCD models: Table 1-3 Hardware installation guides
Models Guide
N9120, 8500
HP Digital Sender Flow 8500 fn2 Document Capture Workstation, HP ScanJet Enterprise Flow N9120 fn2 Document Scanner Installation Guide Edition 1, 10/2017
© Copyright 2021 HP Development Company, L. 4
2 Secure acceptance of the TOE
• Verify the TOE hardware
• Identify the TOE hardware
• Acquire the TOE firmware and guidance documentation files
© Copyright 2021 HP Development Company, L. 5
Verify the TOE hardware
You must verify the TOE hardware has not been tampered with during delivery and the correct TOE hardware model was received. Use the following steps to verify the TOE hardware has not been tampered with during delivery:
• Inspect the cardboard box the TOE hardware was delivered in. Ensure the cardboard box contains the HP logo, has not been opened and resealed, the product information label is present, and no major physical damage exists.
• Inspect the contents of the cardboard box. Ensure all expected items have been delivered, the packaging the TOE hardware is contained in has not been tampered, and no missing or reapplied tape exists on the TOE hardware.
Use the following steps to verify the delivered TOE hardware is the correct model:
• Verify the full product model name, serial number and product number in the order confirmation is consistent with the label on the cardboard box.
• Verify the invoice located in the cardboard box the TOE hardware was delivered in is consistent with the order confirmation.
• Verify the serial number and product number on the product label on the back of the TOE hardware is consistent with the order confirmation.
After verifying the TOE hardware has not been tampered with during delivery and the TOE hardware is the correct model, use the information below to identify the TOE hardware.
Identify the TOE hardware
Before installing the TOE hardware, you must verify that the model name and product number of the TOE hardware is listed in Table 1-1. You can locate the model name on the front of the TOE hardware and the product number on the product label on the back. Each full product model name has an associated product number. Go to hp.com or use the product user guide to determine the full product model name using the product number. Verify the product name matches the order confirmation. Once you have verified the model name and product number of the TOE hardware, continue with physically installing and setting up the hardware using the information in the installation guide for your TOE model. After the installation of the TOE hardware is complete, use the information below to acquire the certified TOE firmware and guidance documentation files.
Acquire the TOE firmware and guidance documentation files
The certified TOE firmware and guidance documentation files are available for free on the HP SW Depot, an electronic storefront. Use the following information to download the certified TOE firmware and guidance documentation from the HP SW Depot.
© Copyright 2021 HP Development Company, L. 6
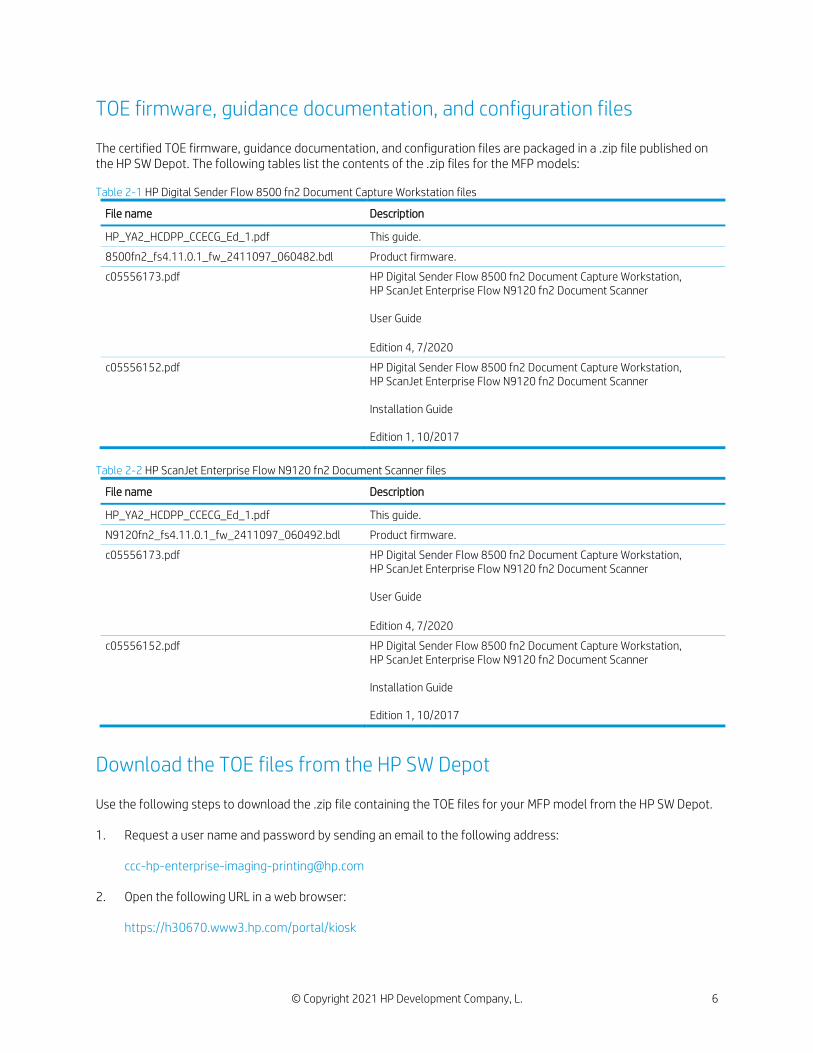
TOE firmware, guidance documentation, and configuration files
The certified TOE firmware, guidance documentation, and configuration files are packaged in a .zip file published on the HP SW Depot. The following tables list the contents of the .zip files for the MFP models: Table 2-1 HP Digital Sender Flow 8500 fn2 Document Capture Workstation files
File name Description
HP_YA2_HCDPP_CCECG_Ed_1.pdf This guide.
8500fn2_fs4.11.0.1_fw_2411097_060482.bdl Product firmware.
c05556173.pdf HP Digital Sender Flow 8500 fn2 Document Capture Workstation, HP ScanJet Enterprise Flow N9120 fn2 Document Scanner User Guide Edition 4, 7/2020
c05556152.pdf HP Digital Sender Flow 8500 fn2 Document Capture Workstation, HP ScanJet Enterprise Flow N9120 fn2 Document Scanner Installation Guide Edition 1, 10/2017
Table 2-2 HP ScanJet Enterprise Flow N9120 fn2 Document Scanner files
File name Description
HP_YA2_HCDPP_CCECG_Ed_1.pdf This guide.
N9120fn2_fs4.11.0.1_fw_2411097_060492.bdl Product firmware.
c05556173.pdf HP Digital Sender Flow 8500 fn2 Document Capture Workstation, HP ScanJet Enterprise Flow N9120 fn2 Document Scanner User Guide Edition 4, 7/2020
c05556152.pdf HP Digital Sender Flow 8500 fn2 Document Capture Workstation, HP ScanJet Enterprise Flow N9120 fn2 Document Scanner Installation Guide Edition 1, 10/2017
Download the TOE files from the HP SW Depot
Use the following steps to download the .zip file containing the TOE files for your MFP model from the HP SW Depot. 1. Request a user name and password by sending an email to the following address:
[email protected] 2. Open the following URL in a web browser:
https://h30670.www3.hp.com/portal/kiosk
© Copyright 2021 HP Development Company, L. 7
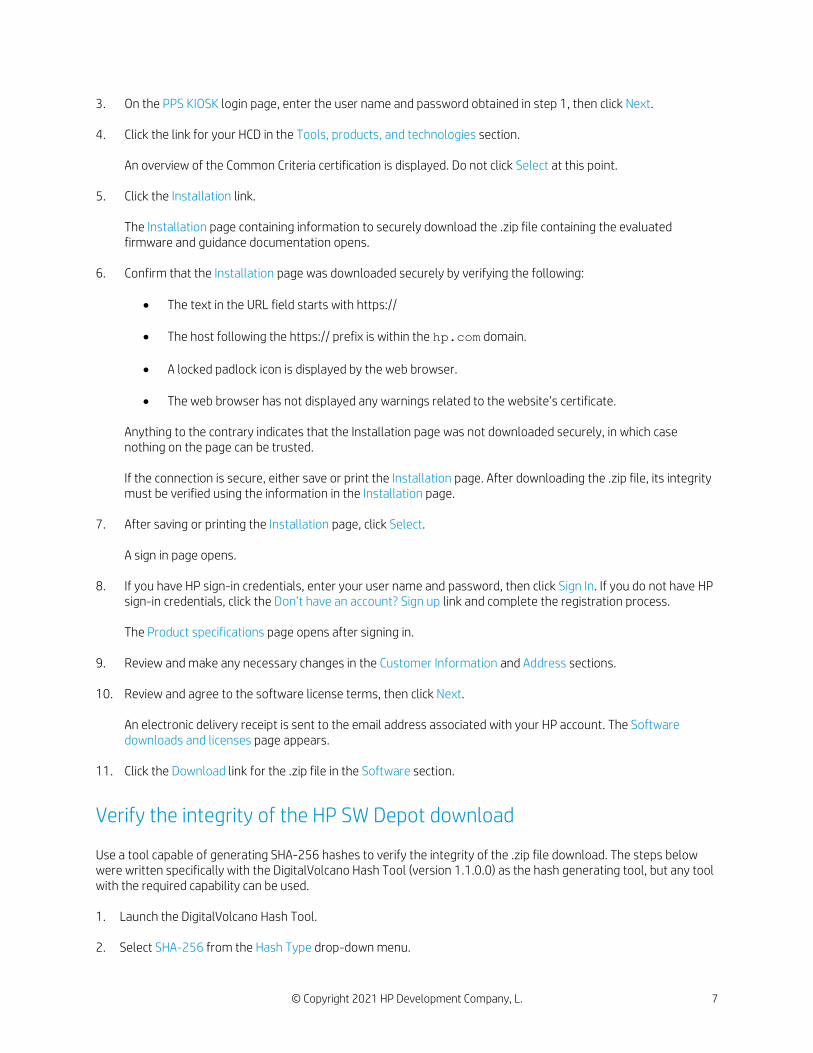
3. On the PPS KIOSK login page, enter the user name and password obtained in step 1, then click Next.
4. Click the link for your HCD in the Tools, products, and technologies section. An overview of the Common Criteria certification is displayed. Do not click Select at this point.
5. Click the Installation link.
The Installation page containing information to securely download the .zip file containing the evaluated firmware and guidance documentation opens.
6. Confirm that the Installation page was downloaded securely by verifying the following:
• The text in the URL field starts with https://
• The host following the https:// prefix is within the hp.com domain.
• A locked padlock icon is displayed by the web browser.
• The web browser has not displayed any warnings related to the website’s certificate.
Anything to the contrary indicates that the Installation page was not downloaded securely, in which case nothing on the page can be trusted. If the connection is secure, either save or print the Installation page. After downloading the .zip file, its integrity must be verified using the information in the Installation page.
7. After saving or printing the Installation page, click Select.
A sign in page opens.
8. If you have HP sign-in credentials, enter your user name and password, then click Sign In. If you do not have HP
sign-in credentials, click the Don’t have an account? Sign up link and complete the registration process.
The Product specifications page opens after signing in.
9. Review and make any necessary changes in the Customer Information and Address sections. 10. Review and agree to the software license terms, then click Next.
An electronic delivery receipt is sent to the email address associated with your HP account. The Software downloads and licenses page appears.
11. Click the Download link for the .zip file in the Software section.
Verify the integrity of the HP SW Depot download
Use a tool capable of generating SHA-256 hashes to verify the integrity of the .zip file download. The steps below were written specifically with the DigitalVolcano Hash Tool (version 1.1.0.0) as the hash generating tool, but any tool with the required capability can be used. 1. Launch the DigitalVolcano Hash Tool.
2. Select SHA-256 from the Hash Type drop-down menu.

© Copyright 2021 HP Development Company, L. 8
3. Click the Select File(s) button in the Input Field section and browse to the .zip file.
The DigitalVolcano Hash Tool generates a SHA-256 hash of the .zip file and displays it in the area labeled Last Hash.
4. Visually compare the SHA-256 hash generated in the previous step with the SHA-256 hash contained in the
Installation page from the HP SW Depot.
If the hashes match, then the .zip file has not been compromised. If the hashes don't match, then either an error occurred during the download or the .zip file on the server is not the same as the original. Try downloading the .zip file again and repeat the verification steps. If on the successive attempt the hashes still do not match, and you are certain that the download proceeded without any issues, send an email to [email protected] describing the comparison failure.
© Copyright 2021 HP Development Company, L. 9
3 Operational environment
• Assumptions
• Organizational security policies
• Security objectives
• Non-TOE components
• TOE users
© Copyright 2021 HP Development Company, L. 10
Assumptions
This section describes the physical, personnel, and connectivity assumptions that must be satisfied by the Operational Environment to maintain the security of the TOE.
Physical
• Physical security, commensurate with the value of the TOE and the data it stores or processes, is assumed to be provided by the environment.
Personnel
• TOE Administrators are trusted to administer the TOE according to site security policies.
• Authorized Users are trained to use the TOE according to site security policies.
Connectivity
• The Operational Environment is assumed to protect the TOE from direct, public access to its LAN interface.
Organizational security policies
The following requirements detail restrictions to TOE use and functionality. These requirements must be followed in the evaluated configuration.
• Users must be authorized before performing document processing and administrative functions.
• Security-relevant activities must be audited, and the log of such actions must be protected and transmitted to an External IT Entity.
• The TOE must be able to identify itself to other devices on the LAN. • If the TOE stores User Document Data or Confidential TSF Data on Field-Replaceable Nonvolatile Storage
Devices, it will encrypt such data on those devices. • Cleartext keys, submasks, random numbers, or any other values that contribute to the creation of
encryption keys for Field-Replaceable Nonvolatile Storage of User Document Data or Confidential TSF Data must be protected from unauthorized access and must not be stored on that storage device.
• If the TOE provides a PSTN fax function, it will ensure separation between the PSTN fax line and the LAN. • Upon completion or cancellation of a document processing job, the TOE shall overwrite residual image data
from its Field-Replaceable Nonvolatile Storage Device.
© Copyright 2021 HP Development Company, L. 11
Security objectives
The following are the security objectives for the Operational Environment that must be met in the evaluated configuration.
• The Operational Environment shall provide physical security, commensurate with the value of the TOE and the data it stores or processes.
• The Operational Environment shall provide network security to protect the TOE from direct, public access to
its LAN interface.
• The TOE Owner shall establish trust that Administrators will not use their privileges for malicious purposes.
• The TOE Owner shall ensure that Users are aware of site security policies and have the competence to follow them.
• The TOE Owner shall ensure that Administrators are aware of site security policies and have the
competence to use manufacturer’s guidance to correctly configure the TOE and protect passwords and keys accordingly.
Non-TOE components
The following are the required components for the Operational Environment:
• One administrative client computer network connected to the TOE in the role of an Administrative Computer • Web browser installed on the administrative client computer network connected to the TOE in the role of an
Administrative Computer • Domain Name System (DNS) server • Network Time Service (NTS) server
• Windows Internet Name Service (WINS) server
• Syslog server • At least one of the following remote authentication servers:
o Windows domain controller/Kerberos server
o Lightweight Directory Access Protocol (LDAP) server
The following are the optional components for the Operational Environment:
• Remote file systems:
o Server Message Block (SMB)
o File Transfer Protocol (FTP) • Microsoft SharePoint® server (useful with Flow models only)
© Copyright 2021 HP Development Company, L. 12
• Simple Mail Transfer Protocol (SMTP) gateway
TOE users
This guide defines Users as entities external to the TOE and which interact with the TOE. There are two types of Users:
• U.NORMAL – A user who is identified and authenticated and does not have an administrative role.
• U.ADMIN – A user who is identified and authenticated and has an administrative role. For clarity in this guide, the following distinctions are made:
• Control panel users – U.NORMAL and U.ADMIN users who physically access the TOE’s control panel.
• EWS users – U.ADMIN users who access the TOE’s embedded web server through a web browser.
• REST users – U.ADMIN users who access the TOE’s REST Web Services interface using HTTP.

© Copyright 2021 HP Development Company, L. 13
4 Before configuring the HCD
• Restrictions for the evaluated configuration
• Pre-configuration tasks
© Copyright 2021 HP Development Company, L. 14
Restrictions for the evaluated configuration
The following items must be adhered to in the evaluated configuration.
• Only one Administrative Computer must be used to manage the TOE. • Third-party solutions must not be installed on the TOE.
• Licenses must not be installed to enable features beyond what is supported in the evaluated
configuration. • Firmware upgrades through any means other than the EWS and USB must be disabled.
• Device USB and Host USB plug and play must be disabled.
• SNMP must be disabled. • Jetdirect Inside management via telnet and FTP must be disabled. • Jetdirect XML Services must be disabled. • Wireless functionality must be disabled:
o Near Field Communication (NFC) must be disabled.
o Bluetooth Low Energy (BLE) must be disabled.
o Wireless station must be disabled.
• Access must be blocked to the following Web Services (WS):
o Open Extensibility Platform device (OXPd) Web Services o WS* Web Services
• Remote Control-Panel use is disallowed.
• Device Administrator Password must be set.
• Remote Configuration Password must not be set.
• The Service PIN, used by a customer support engineer to access functions available to HP support
personnel, must be disabled.
• Control Panel Mandatory Sign-in must be enabled (this disables the Guest role). • When using Windows Sign In, the Windows domain must reject Microsoft NT LAN Manager (NTLM)
connections.
• Local Device Sign In accounts must not be created (i.e., only the Device Administrator account is allowed as a Local Device Sign In account).
• Only X.509v3 certificates and pre-shared key are supported methods for IPsec authentication.
© Copyright 2021 HP Development Company, L. 15
• IPsec Authentication Headers (AH) must be disabled.
• HP JetAdvantage Link Platform must be disabled.
• HP Digital Sending Software (DSS) must be disabled.
• Fax Send must be disabled.
• OAUTH2 use is disallowed.
• Firmware updates through REST Web Services is disallowed.
Pre-configuration tasks
Use the information and steps in the following sections to perform the pre-configuration tasks.
Physically secure the HCD
The HCD must be placed in a restricted and/or monitored environment that provides protection from unmanaged access to physical components and data interfaces. For additional protection, you must use the information below to physically secure the HCD’s formatter cage to the HCD chassis.
Install a cable lock designed for use with a Kensington Security Slot (K Slot)
This type of lock is the industry standard for securing electronic equipment such as laptop computers. Various models of key-operated and combination-operated K-Slot cable-locks are available. Two of the most well-known brands of these locks are Kensington and PC Guardian. Follow these steps to install the cable lock: 1. (Optional) Wrap the lock’s cable around an immoveable or difficult-to-move object and pass the lock through
the cable. Once the lock is securely attached to an HCD, it will help protect the HCD from being moved by unauthorized personnel. If this wrap-around step is skipped, the lock will not protect the HCD against unauthorized moving but will still protect it against unauthorized tampering with its internal ports and storage devices.
2. Insert the key in the lock and turn it clockwise until it stops. The lock is now unlocked and ready to be installed. 3. Insert the lock in the HCD’s K Slot (or in the adapter’s K Slot where applicable). Turn the key counter-clockwise
until it stops and remove the key. The lock is now locked. It holds the metal formatter housing closed and keeps it attached to the HCD, thus securing the HCD’s sensitive internal components.
Other pre-configuration tasks
The following are other pre-configuration tasks that must be performed:
• If X.509v3 certificates are to be used for IPsec authentication:
© Copyright 2021 HP Development Company, L. 16
o Install an identity certificate generated and signed by a trusted Certificate Authority (CA) on the computers for IPsec authentication.
o Obtain an identity certificate with private key generated and signed by a trusted CA that can be
used for IPsec authentication. You will install the identity certificate in the HCD’s certification store as part of the evaluated configuration process.
o Install the certificate of a trusted CA on the computers that can validate the identity certificate that
will be installed on the HCD for IPsec authentication.
o Obtain the certificate of a trusted CA that can be used by the HCD to validate the identity certificates installed on computers for IPsec authentication. You will install the CA certificate on the HCD as part of the evaluated configuration process.
• If passive mode FTP is to be used, obtain the range of ports for data transfers configured on the FTP
server.
© Copyright 2021 HP Development Company, L. 17
5 Configure the HCD
• Introduction
• IP network settings
• Certified TOE firmware
• System and network settings (excluding IPsec)
• IPsec
© Copyright 2021 HP Development Company, L. 18
Introduction
This chapter describes how to configure the HCD to match the evaluated configuration that has been Common Criteria certified.
Configuration methods
The following methods are used to configure the scanner:
• Control panel – This method involves using the control panel located on the front of the HCD. • Embedded Web Server (EWS) – This method involves using a web browser to connect to the EWS on the
HCD. • SNMP – This method involves using an SNMP tool capable of sending SNMPv3 requests to the HCD’s SNMP
interface.
NOTE: The SNMP interface is used to apply configurations in the evaluated configuration process. After the evaluated configuration process is finished, this interface is disabled in the resultant evaluated configuration.
How to find the HCD’s IP address or hostname
Use the following steps to find the HCD’s IP address or hostname.
1. On the HCD control panel, touch the Information button.
2. Select the Network icon to display the IP address or hostname.
How to access the preboot menu
Use the following steps to access the preboot menu. 1. Power off the HCD and then power it back on. 2. As soon as the HCD boots up and the HP logo is displayed on the control panel touchscreen display, tap the
touchscreen just below the HP logo.
How to access the EWS
1. On the Administrative Computer, open a web browser.
2. In the address line, type the HCD’s IP address or hostname exactly as it displays on the HCD control panel. 3. Press the Enter key on the computer keyboard. The EWS opens.
NOTE: If your web browser displays a message indicating that accessing the website might not be safe, select the option to continue to the website. Accessing this website will not harm the computer.
© Copyright 2021 HP Development Company, L. 19
IP network settings
Use the information and steps described in the Manage the scanner > Configure IP network settings section in the user guide to configure the IP network settings.
Certified TOE firmware
In the evaluated configuration, the HCD must be running the certified TOE firmware.
Update the firmware
Use the following steps to install the certified TOE firmware. 1. Open the General tab of the EWS. 2. Select the Firmware Upgrade menu item. 3. Clear the Automatic Back up/Restore check box.
NOTE: Clearing the Automatic Back up/Restore check box will delete any previously saved automatic backup files of HCD settings.
4. Click Save. 5. In the Install New Firmware area, click Choose File and browse to the product firmware bundle file acquired from
the HP SW Depot. 6. Click Install.
The web browser will transfer the product firmware bundle file to the HCD.
7. If the certified TOE firmware version is older than the current firmware version, a Confirmation Page will be displayed prompting you to confirm “rolling back” to an older version of firmware. Click Rollback.
The HCD will turn itself off and then back on. On boot, the HCD will update its firmware to the certified TOE firmware version.
Verify the certified TOE firmware version
Use the following steps to verify the HCD is running the certified TOE firmware version. 1. Open the Information tab of the EWS.
2. Select the Configuration Page menu item.
3. In the Device Information area, verify the Firmware Revision number matches the evaluated System firmware
version number using the following table:
© Copyright 2021 HP Development Company, L. 20
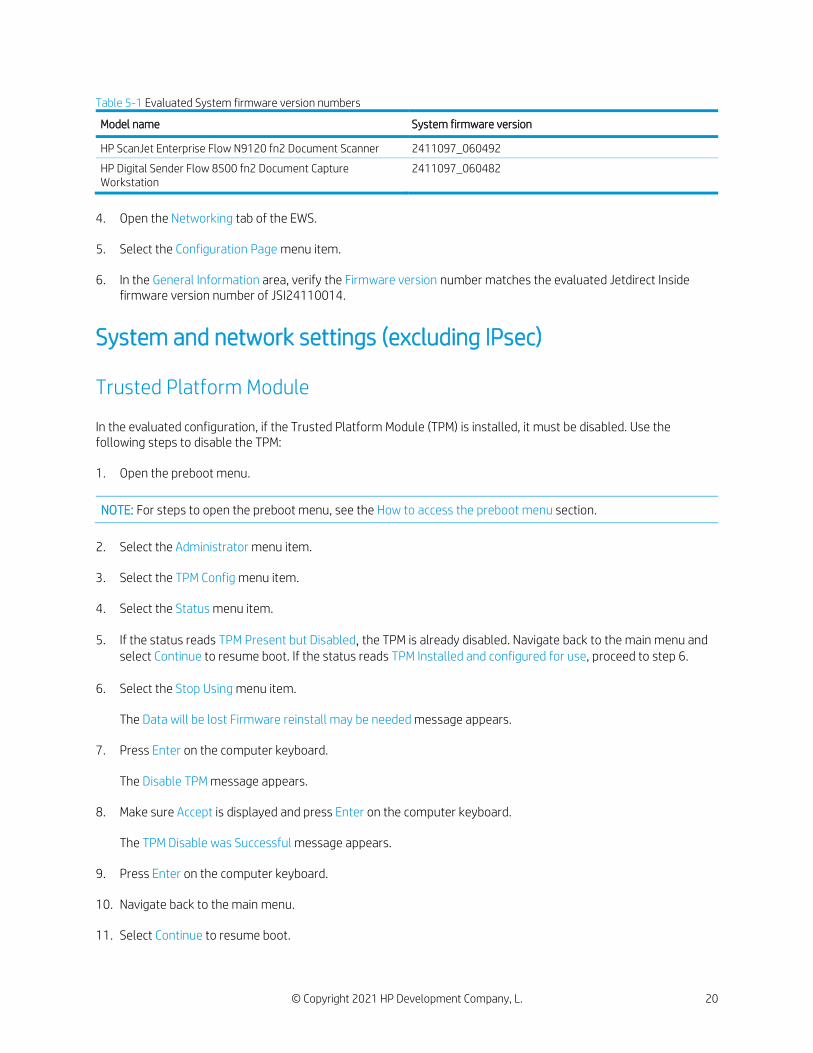
Table 5-1 Evaluated System firmware version numbers
Model name System firmware version
HP ScanJet Enterprise Flow N9120 fn2 Document Scanner 2411097_060492
HP Digital Sender Flow 8500 fn2 Document Capture Workstation
2411097_060482
4. Open the Networking tab of the EWS.
5. Select the Configuration Page menu item.
6. In the General Information area, verify the Firmware version number matches the evaluated Jetdirect Inside
firmware version number of JSI24110014.
System and network settings (excluding IPsec)
Trusted Platform Module
In the evaluated configuration, if the Trusted Platform Module (TPM) is installed, it must be disabled. Use the following steps to disable the TPM: 1. Open the preboot menu.
NOTE: For steps to open the preboot menu, see the How to access the preboot menu section.
2. Select the Administrator menu item.
3. Select the TPM Config menu item. 4. Select the Status menu item. 5. If the status reads TPM Present but Disabled, the TPM is already disabled. Navigate back to the main menu and
select Continue to resume boot. If the status reads TPM Installed and configured for use, proceed to step 6.
6. Select the Stop Using menu item.
The Data will be lost Firmware reinstall may be needed message appears. 7. Press Enter on the computer keyboard.
The Disable TPM message appears. 8. Make sure Accept is displayed and press Enter on the computer keyboard.
The TPM Disable was Successful message appears.
9. Press Enter on the computer keyboard.
10. Navigate back to the main menu. 11. Select Continue to resume boot.
© Copyright 2021 HP Development Company, L. 21
Cold reset
Use the following steps to perform a cold reset to restore factory defaults on the HCD. 12. Open the preboot menu.
NOTE: For steps to open the preboot menu, see the How to access the preboot menu section.
13. Select the Administrator menu item.
14. Select the Startup Options menu item. 15. Scroll down the list of items and locate the Cold Reset check box. 16. Check the Cold Reset check box by selecting this menu item and then selecting OK. 17. Navigate back to the main preboot menu. 18. Select Continue to resume boot.
Preboot menu administrator password
A preboot menu administrator password can be configured to restrict access to maintenance and administrative functions available in the preboot menu. In the evaluated configuration, a preboot menu administrator password must be configured. Use the following steps to configure a preboot menu administrator password. 1. Open the preboot menu.
NOTE: For steps to open the preboot menu, see the How to access the preboot menu section.
2. Select the Administrator menu item.
3. Select the Change Password menu item. 4. Enter a password that is at least 8 digits long, then accept the password by selecting OK. 5. Re-enter the password, then accept the password by selecting OK. If the passwords match, the New Password
Accepted message appears. 6. Navigate back to the main menu. 7. Select Continue to resume boot.
Service access
The HCD contains a built-in service account designed for use by authorized service personnel to perform maintenance and repair functions. In the evaluated configuration, the built-in service account must be disabled.
© Copyright 2021 HP Development Company, L. 22
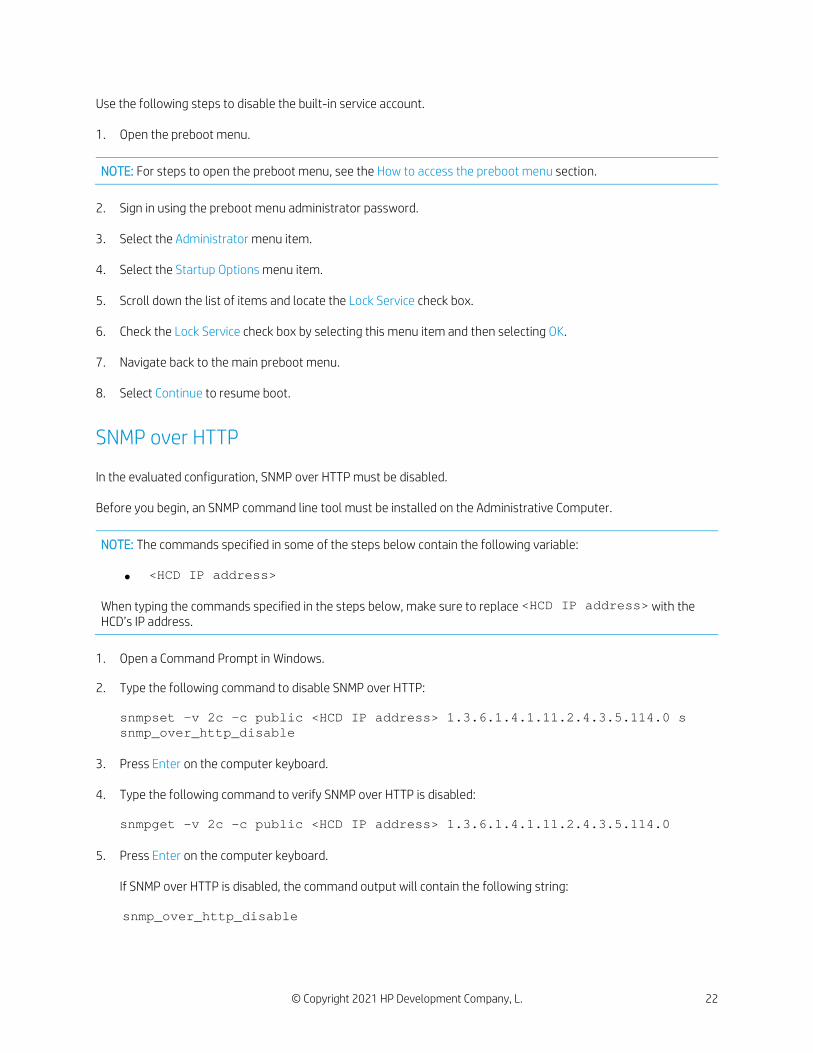
Use the following steps to disable the built-in service account.
1. Open the preboot menu.
NOTE: For steps to open the preboot menu, see the How to access the preboot menu section.
2. Sign in using the preboot menu administrator password.
3. Select the Administrator menu item. 4. Select the Startup Options menu item. 5. Scroll down the list of items and locate the Lock Service check box. 6. Check the Lock Service check box by selecting this menu item and then selecting OK. 7. Navigate back to the main preboot menu. 8. Select Continue to resume boot.
SNMP over HTTP
In the evaluated configuration, SNMP over HTTP must be disabled. Before you begin, an SNMP command line tool must be installed on the Administrative Computer.
NOTE: The commands specified in some of the steps below contain the following variable:
• <HCD IP address> When typing the commands specified in the steps below, make sure to replace <HCD IP address> with the HCD’s IP address.
1. Open a Command Prompt in Windows.
2. Type the following command to disable SNMP over HTTP:
snmpset -v 2c -c public <HCD IP address> 1.3.6.1.4.1.11.2.4.3.5.114.0 s snmp_over_http_disable
3. Press Enter on the computer keyboard. 4. Type the following command to verify SNMP over HTTP is disabled:
snmpget -v 2c -c public <HCD IP address> 1.3.6.1.4.1.11.2.4.3.5.114.0
5. Press Enter on the computer keyboard.
If SNMP over HTTP is disabled, the command output will contain the following string: snmp_over_http_disable

© Copyright 2021 HP Development Company, L. 23
SNMP
In the evaluated configuration, SNMP must be disabled. 1. Open the Networking tab of the EWS. 2. Select the Network Settings menu item. 3. In the SNMPv1/v2 area, select the Disable SNMPv1/v2 radio button. 4. In the SNMPv3 area, clear the Enable SNMPv3 check box. 5. Click Apply.
Control panel inactivity timeout
The HCD automatically signs out a control panel user when their session has been inactive for the inactivity-timeout. By default, the inactivity-timeout is set to 60 seconds. In the evaluated configuration, the inactivity-timeout must be set to value in the range of 10-60 seconds. Use the following steps to configure the Inactivity Timeout for the control panel. 1. Open the General tab of the EWS.
2. Select the Display Settings menu item. 3. In the Inactivity Timeout field, enter a value in the range of 10-60. 4. Click Apply.
Home screen customization
In the evaluated configuration, only certain applications may be shown on the control panel home screen. The following are these applications:
• Scan to Email • Reports • Job Log • Support Tools
• Scan to Network Folder • Quick Sets • Settings • Contacts
• Scan to SharePoint® • Supplies • Accessibility
All other applications must be hidden. Use the following steps to hide applications on the control panel home screen. 1. Open the General tab of the EWS.
2. Select the Home Screen Customization menu item.
NOTE: The Home Screen Customization menu item is only available when you are signed into the EWS with administrative privileges.
© Copyright 2021 HP Development Company, L. 24
3. Under the Home Screen Customization area, hide applications that must not be shown in the Home Screen.
Welcome message
A welcome message for control panel users may optionally be configured. If a welcome message is configured, control panel users must first accept the welcome message prior to sign-in. If a welcome message is to be used, use the following steps to configure the welcome message. 1. Open the General tab of the EWS.
2. Select the Display Settings menu item.
3. Check the Show Welcome Message check box.
4. In the Title and Text fields, enter the desired text. 5. Select the preferred header background color for the welcome message. 6. Click Apply.
Date and time
In the evaluated configuration, the HCD must be configured to synchronize its system time with a network time server.
Time zone
Use the following steps to configure the time zone. 1. Open the General tab of the EWS.
2. Select the Date/Time Settings menu item.
3. In the Product Time area, click the Change button next to the currently configured time zone.
4. From the Time Zone drop-down menu, select the time zone for your locality.
5. Click Apply.
Network time server
Use the following steps to configure the HCD to synchronize its system time with a network time server. 1. Open the General tab of the EWS. 2. Select the Date/Time Settings menu item. 3. In the Network Time Server area, check the Automatically synchronize with a Network Time Server check box. 4. Click Apply.
© Copyright 2021 HP Development Company, L. 25
5. In the Network Time Server area, click the NTS Settings button. 6. In the Network Time Server Address field, enter the IP address or hostname of the network time server. 7. In the Local Port to Receive Time from Server field, enter 1230 if not already specified. 8. In the Synchronize Time with Server every field, enter a value in the range of 1-24. 9. Click the Synchronize Now button.
If the HCD successfully synchronizes its system time with the network time server, the Time Server Status field will display the string “The server has been configured and is responding.”
10. Click Apply.
Scan to Email
If email is to be used, use the information and steps in the Use the scanner > Set up Scan to Email section in the user guide for your HCD.
Scan to Network Folder
If Scan to Network Folder is to be used, use the information and steps in the Use the scanner > Set up Scan to Network Folder section in the user guide for your HCD.
Scan to SharePoint®
If Scan to SharePoint® is to be used, use the information and steps in the Use the scanner > Set up Scan to SharePoint® section in the user guide for your HCD.
Digital sending software
HP Digital Sending Software (DSS) is a server-based software solution designed to manage the HCD and enhance digital sending functionality. In the evaluated configuration, the HCD must be configured to disallow the use of a DSS server. Use the following steps to configure the HCD to disallow the use of a DSS server. 1. Open the Scan/Digital Send tab of the EWS. 2. Select the Digital Sending Software Setup menu item. 3. Clear the Allow use of a DSS server check box. 4. Click Apply.
© Copyright 2021 HP Development Company, L. 26
Fax send
The fax send feature can be used to send faxes of scanned documents via the LAN Fax Service or Internet Fax Service. In the evaluated configuration, fax send must be disabled. 1. Open the Fax tab of the EWS.
2. Select the Fax Send Setup Default Job Options menu item. 3. Clear the Enable Fax Send check box. 4. Click Apply.
Local administrator password
The local administrator password (a.k.a. device administrator password) can be used to sign into the control panel and EWS, and to authenticate to the REST Web Services interface. In the evaluated configuration, the local administrator must be configured to restrict access to the HCD’s security settings to administrators. Use the following steps to configure the local administrator password. 1. Open the Security tab of the EWS. 2. Select the General Security menu item. 3. Under the Set the Local Administrator Password area, in the New Password field, enter a password that is at
least eight characters long and contains characters from three of the four following categories: uppercase letters, lowercase letters, numbers, and special characters ("!", "@", "#", "$", "%", "^", "&", "*", "(", ")", """, "'", "+", ",", "-", ".", ":", ";", "<", "=", ">", "?", "[", "/", "\", "]", "_", "`", "|", "~", "{", "}").
4. In the Verify Password field, re-enter the password.
NOTE: To change an existing password, first enter the existing password in the Old Password field.
5. Click Apply.
Remote configuration password
By default, HP Digital Sending Software (DSS) uses the local administrator password to connect to a HCD. If the Remote Configuration Password has been configured, it can be used by the DSS and other remote configuration tools to connect. This allows the administrator to use separate EWS and DSS administrator passwords. In the evaluated configuration, the Remote Configuration Password must not be configured. Use the following steps to clear the Remote Configuration Password. 1. Open the Security tab of the EWS.
2. Select the General Security menu item.
3. In the Set the Remote Configuration Password area, clear both the Password and Verify Password fields.
© Copyright 2021 HP Development Company, L. 27
4. Click Apply.
EWS session timeout
The HCD automatically signs out a user when their EWS session has been inactive for the EWS session timeout. By default, the EWS session timeout is set to 30 minutes. In the evaluated configuration, the EWS session timeout must be set to a value in the range of 3-10 minutes. 1. Open the Security tab of the EWS.
2. Select the General Security menu item.
3. In the Embedded Web Server Options area, enter a value in the range of 3-10 in the EWS Session Timeout field.
4. Click Apply.
Remote user auto capture
The remote user auto capture setting can be used to allow remote users to receive scanned pages from the HCD without permission. In the evaluated configuration, the remote user auto capture setting must be disabled. Use the following steps to disable the remote user auto capture setting. 1. Open the Security tab of the EWS.
2. Select the General Security menu item.
3. In the WebScan Auto Capture Jobs area, clear the Enable Remote User Auto Capture check box.
4. Click Apply.
Firmware upgrade security
In the evaluated configuration, the installation of legacy packages signed with the SHA-1 hashing algorithm is disallowed. Use the following steps to configure firmware upgrade security. 1. Open the Security tab of the EWS.
2. Select the General Security menu item.
3. In the Firmware Upgrade Security area, clear the Allow installation of legacy packages signed with SHA-1
Hashing algorithm check box.
4. Click Apply.
Near Field Communication
If your HCD supports Near Field Communication (NFC), it must be disabled in the evaluated configuration.

© Copyright 2021 HP Development Company, L. 28
Use the following steps to disable NFC. 1. Open the Security tab of the EWS.
2. Select the General Security menu item.
3. In the Near Field Communication (NFC) area, clear the Enable Near Field Communication (NFC) check box.
4. Click Apply.
Bluetooth Low Energy
If your HCD supports Bluetooth Low Energy (BLE), it must be disabled in the evaluated configuration. Use steps below to disable BLE. 1. Open the Security tab of the EWS.
2. Select the General Security menu item.
3. In the Bluetooth Low Energy (BLE) area, select Disabled from the drop-down menu.
4. Click Apply.
Hardware ports
In the evaluated configuration, device USB and host USB plug and play must be disabled. Use the following steps to disable device USB and host USB plug and play. 1. Open the Security tab of the EWS.
2. Select the General Security menu item.
3. In the Hardware Ports area, clear the Enable Device USB and Enable Host USB plug and play check boxes.
4. Click Apply.
HP JetAdvantage Link Platform
If your HCD supports the HP JetAdvantage Link Platform, it must be disabled in the evaluated configuration. Use the following steps to disable HP JetAdvantage Link Platform. 1. Open the Security tab of the EWS.
2. Select the General Security menu item.
3. In the HP JetAdvantage Link Platform area, click the Disable button if available.
© Copyright 2021 HP Development Company, L. 29
4. Click Apply.
Account policy
The HCD implements account policies for the local administrator. These include account policies for account lockout, password complexity, and minimum password length. Use the following steps to configure the account policies for the local administrator user account to achieve the evaluated configuration. After achieving the evaluated configuration, use the following steps to manage the account lockout and minimum password length policies for the local administrator user account.
Local administrator account
Account lockout
Use the following steps to enable and configure account lockout. 1. Open the Security tab of the EWS. 2. Select the Account Policy menu item. 3. In the Local Administrator Password area, check the Enable account lockout check box. 4. In the Maximum attempts field, enter a value in the range of 3-10. 5. In the Lockout interval field, enter a value in the range of 60-1800. 6. In the Reset lockout counter interval field, enter a value in the range of 60-1800. 7. Click Apply.
Password complexity
Use the following steps to enable password complexity for the local administrator password.
1. Open the Security tab of the EWS. 2. Select the Account Policy menu item. 3. In the Local Administrator Password area, check the Enable password complexity check box. 4. Click Apply.
Minimum password length
Use the following steps to enable and set the minimum password length for the local administrator password. 1. Open the Security tab of the EWS. 2. Select the Account Policy menu item. 3. In the Local Administrator Password area, enter a value in the range of 8-16 in the Minimum password length
© Copyright 2021 HP Development Company, L. 30
4. Click Apply.
Access control
Configure and enable sign-in methods
In the evaluated configuration, all users must sign in before they can access the HCD’s protected applications and features. The following sign-in methods are supported:
• Local Device - This sign-in method uses an authentication database stored on the HCD’s storage drive to authenticate users. In the evaluated configuration, only the local administrator account is supported.
• LDAP - This sign-in method depends on an LDAP server on the network to authenticate users.
• Windows - This sign-in method depends on a Windows Active Directory domain on the network to authenticate users.
The Local Device sign-in method is always available and does not require any configuration. The LDAP sign-in method and Windows sign-in method must be configured and enabled before they can be used. In the evaluated configuration, at least one of the sign-in methods that depends on an authentication server (e.g. LDAP server) must be configured and enabled.
Delete device user accounts
In the evaluated configuration, device user accounts are not supported for Local Device sign-in. Use the following steps to delete any device user accounts that have been created. 1. Open the Security tab of the EWS. 2. Select the Access Control menu item. 3. In the Device User Accounts area, if any device user accounts have been created, click Delete All. 4. Click Delete.
Configure and enable LDAP sign-in method
If this sign-in method is to be used, use the following steps to configure and enable the sign-in method. 1. Open the Security tab of the EWS. 2. Select the Access Control menu item. 3. In the Enable and Configure Sign-in Methods area, click Setup next to LDAP. 4. Check the Enable LDAP Sign-In check box. 5. In the LDAP Server Address field, enter the IP address or fully-qualified domain name (FQDN) of the LDAP server. 6. Clear the Use a secure connection (SSL) check box.

© Copyright 2021 HP Development Company, L. 31
7. In the Port field, enter the port used by the server for LDAP communication.
8. In the Server Authentication Requirements area, perform the following:
a. If the credentials entered by the user at the control panel are to be used to bind to the LDAP server, select the Use product user’s credentials option and enter the bind prefix in the Bind Prefix field.
b. If a global set of credentials are to be used to bind to the LDAP server, select the Use LDAP Administrator’s Credentials option and enter the administrator’s distinguished name in the LDAP Administrator DN field and password in the Password field.
9. In the Bind and Search Root field, enter the search root for looking up the user’s name and email address, and then click Add.
10. In the Match the name entered with this attribute field, enter the attribute whose contents should be compared to the user name entered at the control panel.
11. In the Retrieve the device user’s email address using this attribute field, enter the attribute for looking up the user’s email address.
12. In the Retrieve the device user’s name using this attribute field, enter the attribute for looking up the user’s name.
13. In the Retrieve the device user’s group using this attribute field, enter the attribute for looking up the groups the user belongs to. By default, the HCD uses the objectClass attribute.
14. If the HCD is to perform an exact match on the group attribute when determining group membership for the user, check the Exact match on Group attribute check box.
15. To verify the LDAP Sign In configuration, perform the following steps in the Test LDAP Sign-In area:
a. Enter a user name in the User Name field.
b. Enter the password for the user name in the Password field.
c. Click Test.
16. Click OK.
Configure and enable Windows sign-in method
If this sign-in method is to be used, use the following steps to configure and enable the sign-in method. 1. Open the Security tab of the EWS. 2. Select the Access Control menu item. 3. In the Enable and Configure Sign-in Methods area, click Setup next to Windows. 4. Check the Enable Windows Sign-In (Kerberos and NTLM) check box.
5. Enter the Windows Active Directory domain in the Trusted Domains field, then click Add.
a. Repeat step 5 to add any additional domains that are to be recognized by the HCD.
© Copyright 2021 HP Development Company, L. 32
b. If multiple Windows Active Directory domains have been added, select the default domain from the Default Windows Domain drop-down menu.
6. If multiple domain servers exist, check the Show Preferred Domain Servers check box and add the applicable
domain servers.
NOTE: The specified Preferred Domain Servers will be used first, and if these servers do not work, the HCD will find domain servers based on the Trusted Domains list.
7. Clear the Use a secure connection (SSL) check box.
8. If the HCD is to perform reverse DNS lookups, check the Enable reverse DNS lookups check box.
9. In the Match the name entered with this attribute field, enter the attribute whose contents should be compared
to the user name entered at the control panel. By default, the sAMAccountName attribute is used.
10. In the Retrieve the device user’s email address using this attribute field, enter the attribute that is used for looking up the user’s email address. By default, the mail attribute is used.
11. In the Retrieve the device user’s name using this attribute field, enter the attribute that is used for looking up the user’s name. By default, the displayName attribute is used.
12. In the Nested Group Behavior area, optionally check the Inherit parent permissions check box.
13. To validate the Windows Sign In configuration, perform the following steps in the Test Windows Sign-In area:
a. If multiple Windows Active Directory domains were added above, select a domain from the Domain drop-down menu.
b. Enter a user name in the User Name field.
c. Enter the password associated with the user in the Password field.
d. Click Test.
14. Click OK.
Configure permission sets
The HCD applies a permission set to the control panel session. The permission set applied to the control panel session determines which protected applications and features a user can access. The HCD contains the following built-in permission sets:
• Device Guest – This permission set is automatically applied to all users. This permission set’s permissions are configurable. In the evaluated configuration, all permissions in this permission set must be configured to deny access.
• Device Administrator – This permission set is granted to administrators (U.ADMINISTRATOR). This permission set’s permissions are not configurable. All permissions in this permission set are hardcoded to grant access.
• Device User – This permission set is granted to non-administrative users (U.NORMAL). This permission set’s
permissions are configurable. In the evaluated configuration, the permissions in this permission set must be
© Copyright 2021 HP Development Company, L. 33
configured to grant access to non-administrative functions and configured to deny access to administrative functions.
In addition to the built-in permission sets above, custom permission sets can optionally be added. If custom permission sets are added in the evaluated configuration, they must not be configured to be more permissive (i.e., grant access to additional protected applications or features) than the Device User permission set.
Configure custom permission sets
In the evaluated configuration, custom permission sets can optionally be added to further subdivide non-administrative users into roles. If custom permission sets are to be used, use the following steps to create, edit, and delete custom permission sets.
Add a custom permission set
Use the following steps to add a custom permission set. 1. Open the Security tab of the EWS. 2. Select the Access Control menu item. 3. In the Sign-In and Permission Policies area, click Manage Permission Sets… 4. Click New…
5. Enter the custom permission set name in the Name field. 6. Click OK. 7. Click Back to return to the main Access Control EWS page.
Copy a custom permission set
Use the following steps to copy a custom permission set. 1. Open the Security tab of the EWS. 2. Select the Access Control menu item. 3. In the Sign-In and Permission Policies area, click Manage Permission Sets… 4. Select the permission set to copy.
5. Click Copy… 6. Enter the custom permission set name in the Name field. 7. Click OK. 8. Click Back to return to the main Access Control EWS page.
Edit a custom permission set
Use the following steps to edit a custom permission set.
© Copyright 2021 HP Development Company, L. 34
1. Open the Security tab of the EWS. 2. Select the Access Control menu item. 3. In the Sign-In and Permission Policies area, click Manage Permission Sets… 4. Check the check box for the custom permission set to edit. 5. Click Edit… 6. In the Name field, modify the name as desired. 7. Click OK. 8. Click Back to return to the main Access Control EWS page.
Delete a custom permission set
Use the following steps to delete a custom permission set. 1. Open the Security tab of the EWS. 2. Select the Access Control menu item. 3. In the Sign-In and Permission Policies area, click Manage Permission Sets… 4. Check the check box for the custom permission set to delete. 5. Click Delete… 6. Click OK to confirm the deletion of the custom permission set. 7. Click Back to return to the main Access Control EWS page.
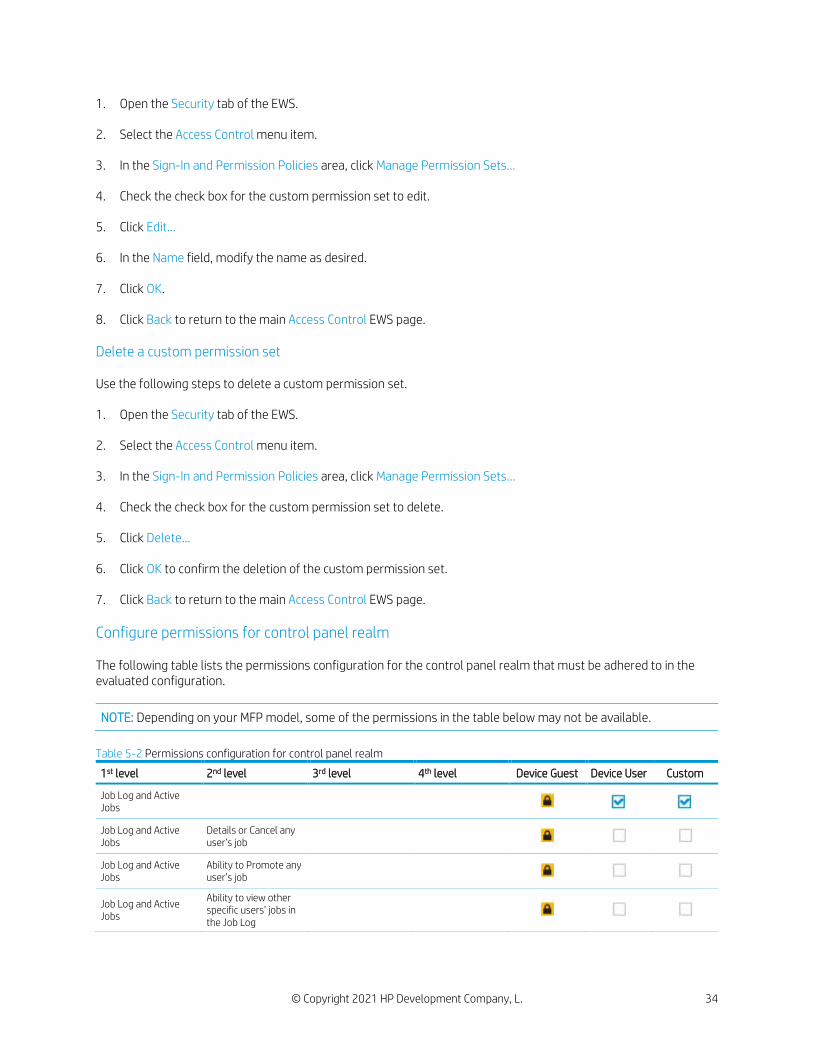
Configure permissions for control panel realm
The following table lists the permissions configuration for the control panel realm that must be adhered to in the evaluated configuration.
NOTE: Depending on your MFP model, some of the permissions in the table below may not be available.
Table 5-2 Permissions configuration for control panel realm
1st level 2nd level 3rd level 4th level Device Guest Device User Custom
Job Log and Active Jobs
Job Log and Active Jobs
Details or Cancel any user’s job
Job Log and Active Jobs
Ability to Promote any user’s job
Job Log and Active Jobs
Ability to view other specific users’ jobs in the Job Log
© Copyright 2021 HP Development Company, L. 35
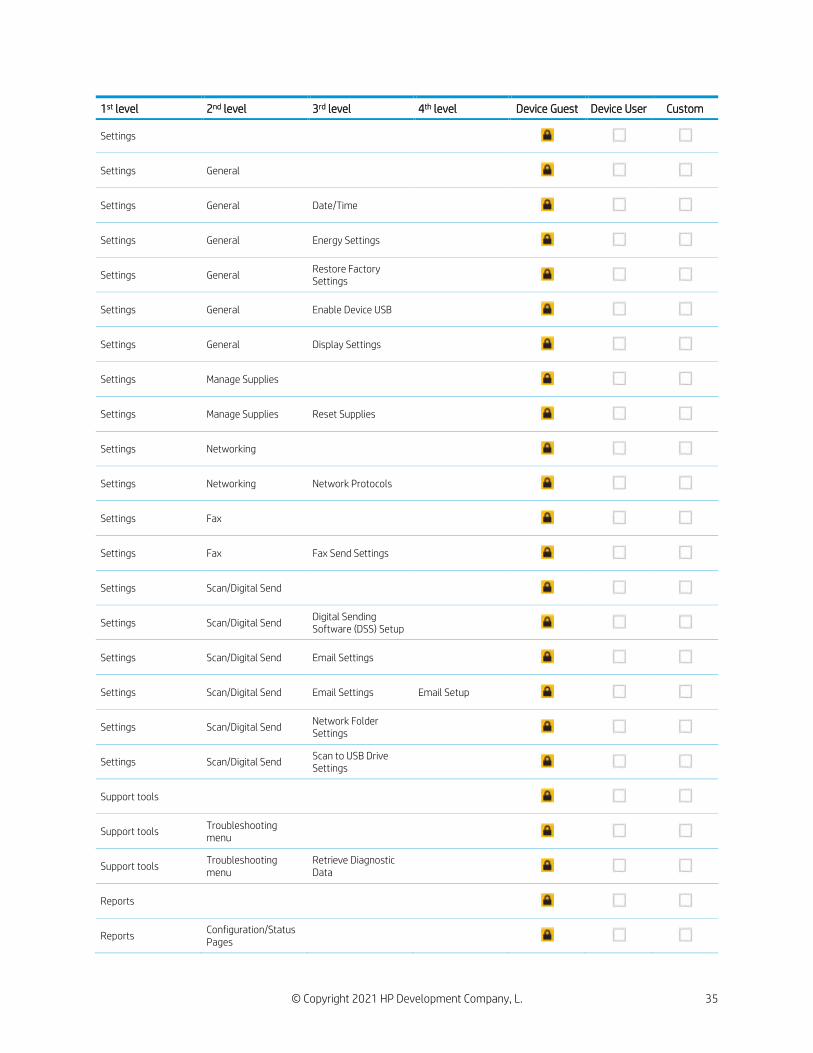
1st level 2nd level 3rd level 4th level Device Guest Device User Custom
Settings
Settings General
Settings General Date/Time
Settings General Energy Settings
Settings General Restore Factory Settings
Settings General Enable Device USB
Settings General Display Settings
Settings Manage Supplies
Settings Manage Supplies Reset Supplies
Settings Networking
Settings Networking Network Protocols
Settings Fax
Settings Fax Fax Send Settings
Settings Scan/Digital Send
Settings Scan/Digital Send Digital Sending Software (DSS) Setup
Settings Scan/Digital Send Email Settings
Settings Scan/Digital Send Email Settings Email Setup
Settings Scan/Digital Send Network Folder Settings
Settings Scan/Digital Send Scan to USB Drive Settings
Support tools
Support tools Troubleshooting menu
Support tools Troubleshooting menu
Retrieve Diagnostic Data
Reports
Reports Configuration/Status Pages
© Copyright 2021 HP Development Company, L. 36
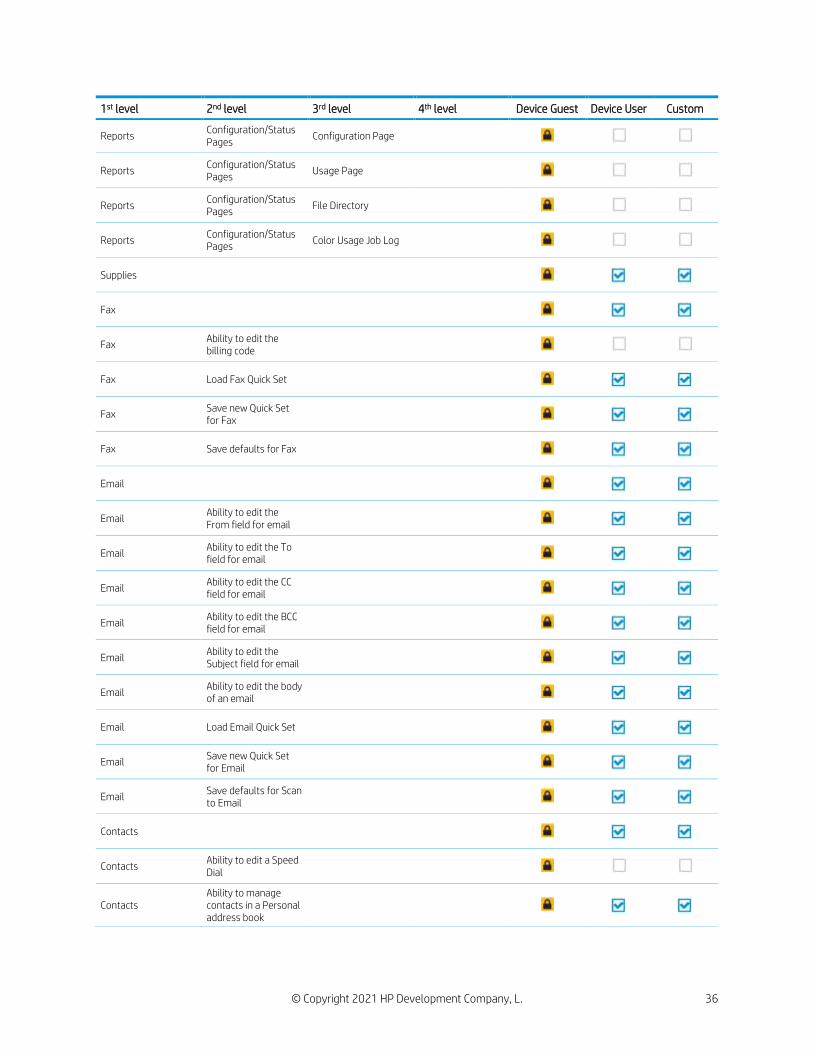
1st level 2nd level 3rd level 4th level Device Guest Device User Custom
Reports Configuration/Status Pages Configuration Page
Reports Configuration/Status Pages Usage Page
Reports Configuration/Status Pages File Directory
Reports Configuration/Status Pages Color Usage Job Log
Supplies
Fax
Fax Ability to edit the billing code
Fax Load Fax Quick Set
Fax Save new Quick Set for Fax
Fax Save defaults for Fax
Email Ability to edit the From field for email
Email Ability to edit the To field for email
Email Ability to edit the CC field for email
Email Ability to edit the BCC field for email
Email Ability to edit the Subject field for email
Email Ability to edit the body of an email
Email Load Email Quick Set
Email Save new Quick Set for Email
Email Save defaults for Scan to Email
Contacts
Contacts Ability to edit a Speed Dial
Contacts Ability to manage contacts in a Personal address book
© Copyright 2021 HP Development Company, L. 37
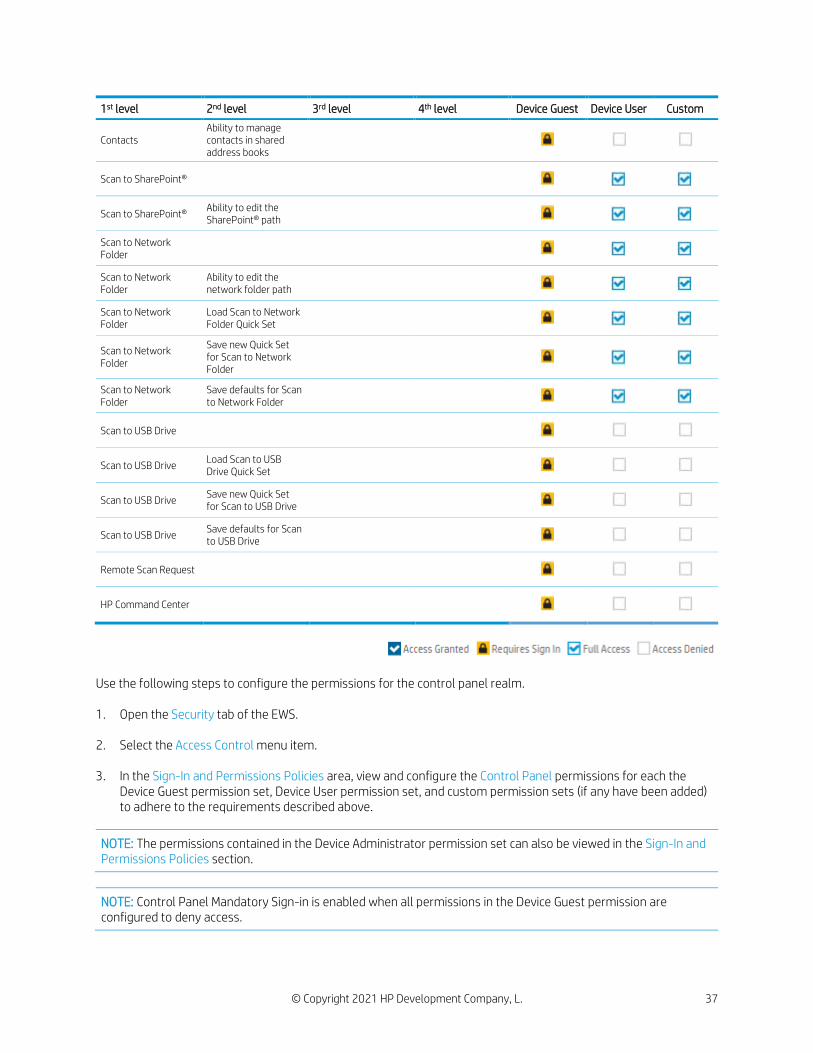
1st level 2nd level 3rd level 4th level Device Guest Device User Custom
Contacts Ability to manage contacts in shared address books
Scan to SharePoint®
Scan to SharePoint® Ability to edit the SharePoint® path
Scan to Network Folder
Scan to Network Folder
Ability to edit the network folder path
Scan to Network Folder
Load Scan to Network Folder Quick Set
Scan to Network Folder
Save new Quick Set for Scan to Network Folder
Scan to Network Folder
Save defaults for Scan to Network Folder
Scan to USB Drive
Scan to USB Drive Load Scan to USB Drive Quick Set
Scan to USB Drive Save new Quick Set for Scan to USB Drive
Scan to USB Drive Save defaults for Scan to USB Drive
Remote Scan Request
HP Command Center
Use the following steps to configure the permissions for the control panel realm. 1. Open the Security tab of the EWS. 2. Select the Access Control menu item. 3. In the Sign-In and Permissions Policies area, view and configure the Control Panel permissions for each the
Device Guest permission set, Device User permission set, and custom permission sets (if any have been added) to adhere to the requirements described above.
NOTE: The permissions contained in the Device Administrator permission set can also be viewed in the Sign-In and Permissions Policies section.
NOTE: Control Panel Mandatory Sign-in is enabled when all permissions in the Device Guest permission are configured to deny access.
© Copyright 2021 HP Development Company, L. 38
4. Click Apply.
Configure permissions for the EWS realm
In the evaluated configuration, only administrators must be granted access to the EWS. Use the following steps to configure the permissions for the EWS realm. 1. Open the Security tab of the EWS. 2. Select the Access Control menu item. 3. In the Sign-In and Permissions Policies area, view and configure all EWS permissions for each the Device Guest
permission set, Device User permission set, and custom permission sets (if any have been added) to deny access.
NOTE: The permissions contained in the Device Administrator permission set can also be viewed in the Sign-In and Permissions Policies section.
4. Click Apply.
Set the default sign-in method for the control panel
By default, the Local Device sign-in method is the default sign-in method for the control panel. You can optionally set another sign-in method as the default.
NOTE: When signing into the control panel, a user can select any of the available sign-in methods to sign in.
Use the following steps to set a new default sign-in method for the control panel.
1. Open the Security tab of the EWS. 2. Select the Access Control menu item. 3. In the Sign-In and Permission Policies area, select the sign-in method from the Sign-In Method drop-down menu
for the Control Panel.
4. Click Apply.
Set the default sign-in method for the EWS
By default, the Local Device sign-in method is the default sign-in method for the EWS. You can optionally set another sign-in method as the default for the EWS.
NOTE: When signing into the EWS, a user can select any of the available sign-in methods to sign in.
Use following steps to set a new default sign-in method for the EWS.
1. Open the Security tab of the EWS. 2. Select the Access Control menu item.

© Copyright 2021 HP Development Company, L. 39
3. In the Sign-In and Permission Policies area, select the sign-in method from the Sign-In Method drop-down menu
for the EWS.
4. Click Apply.
Lock control panel applications to sign-in methods
Control panel applications can optionally be locked to sign-in methods. When a control panel application is locked to a sign-in method, the user must sign in using the sign-in method assigned to an application in order to access the application. If control panel applications are to be locked to sign-in methods in your operational environment, use the following steps to apply this configuration. 1. Open the Security tab of the EWS. 2. Select the Access Control menu item. 3. In the Sign-In and Permission Policies area, select a sign-in method from the Sign-In Method drop-down menu
for each control panel application (e.g. Settings application). 4. Clear the Allow users to choose alternate sign-in methods at the product control panel check box. 5. Click Apply.
Job behavior
The HCD contains an Automatically sign out feature that can be enabled to automatically sign out a control panel user after they start a job. In the evaluated configuration, this feature must be disabled. Use the following steps to disable the Automatically sign out feature. 1. Open the Security tab of the EWS. 2. Select the Access Control menu item. 3. In the Job Behavior area, clear the Automatically sign out check box. 4. Click Apply.
Set the default permission set for network users/groups
Network users are granted a default permission set when they sign in. Use the following steps to specify the default permission set for network users/groups. 1. Open the Security tab of the EWS. 2. Select the Access Control menu item. 3. In the Relationships Between Network Users or Groups and Device Permissions area:

© Copyright 2021 HP Development Company, L. 40
a. If the LDAP sign-in method is to be used, select the permission set from the Default Permission Set for all Users/Groups drop-down menu for LDAP that is to be the default permission set for LDAP sign-in method users.
b. If the Windows sign-in method is to be used, select the permission set from the Default Permission Set for all Users/Groups drop-down menu for Windows that is to be the default permission set for Windows sign-in method users.
4. Click Apply.
Add specific network user or group to permission set relationships
Network user or groups can optionally be added if they need different permissions from the default permissions. Use the following steps to add, edit, and delete network user or group to permission set relationships.
Add a network user or group to permission set relationship
Use the following steps to add a network user or group to permission set relationship. 1. Open the Security tab of the EWS. 2. Select the Access Control menu item. 3. In the Relationships Between Network Users or Groups and Device Permissions area, click New... 4. From the User or Group drop-down menu, select either User or Group. 5. From the Permission Set drop-down menu, select a permission set to associate with the user or group. 6. From the Sign-In Method drop-down menu, select either LDAP or Windows. 7. In the Network User or Group Name field, enter the user or group name. 8. Click OK.
Edit a network user or group to permission set relationship
Use the following steps to edit a network user or group to permission set relationship. 1. Open the Security tab of the EWS. 2. Select the Access Control menu item. 3. In the Relationships Between Network Users or Groups and Device Permissions area, select the check box for
the network user or group permission set relationship to edit.
4. Click Edit... 5. From the User or Group drop-down menu, select either User or Group. 6. From the Permission Set drop-down menu, select a permission set to associate with the user or group. 7. From the Sign-In Method drop-down menu, select either LDAP or Windows.
© Copyright 2021 HP Development Company, L. 41
8. In the Network User or Group Name field, enter the user or group name. 9. Click OK.
Delete a network user or group to permission set relationship
Use the following steps to delete a network user or group to permission set relationship. 1. Open the Security tab of the EWS. 2. Select the Access Control menu item. 3. In the Relationships Between Network Users or Groups and Device Permissions area, check the check box(es) for
the network user or group permission set relationship(s) to delete.
4. Click Delete... 5. To confirm the deletion of the network user or group to permission set relationship(s), click Delete.
Drive-lock password
The HCD contains a self-encrypting drive (SED) that is locked to the HCD using a drive-lock password. As part of achieving the evaluated configuration, a new, random drive-lock password must be generated.
IMPORTANT: After achieving the evaluated configuration, the drive-lock password must not be changed.
The TOE firmware contains the HP FutureSmart OpenSSL FIPS Object Module 2.0.4. Before generating a new drive-lock password, FIPS-140 mode in the HP FutureSmart OpenSSL FIPS Object Module 2.0.4 must be enabled. Use the following steps to enable FIPS-140 mode. 1. Open the Networking tab of the EWS. 2. Select the Secure Communication menu item. 3. In the FIPS Configuration area, check the Enable FIPS-140 check box. 4. Click Apply. Use the following steps to generate a new drive-lock password. 1. Open the Security tab of the EWS. 2. Select the Protect Stored Data menu item. 3. In the Change Password for Encrypted Drives area, click Change Password…
NOTE: The CTR_DRBG(AES) in the HP FutureSmart OpenSSL FIPS Object Module 2.0.4 is used to generate the drive-lock password.
4. Click Continue to confirm the operation.
The HCD will reboot and return to a ready state.
© Copyright 2021 HP Development Company, L. 42
Managing temporary job files
The HCD can generate temporary job files and store them on the storage drive during document-processing job operations. In the evaluated configuration, the Managing Temporary Job Files feature must be configured to erase temporary job files stored on the storage drive when document-processing jobs are completed. Use the following steps to set the file erase mode for the Managing Temporary Job Files feature. 1. Open the Security tab of the EWS. 2. Select the Protect Stored Data menu item. 3. In the Managing Temporary Job Files area, select either the Secure Fast Erase (Overwrite 1 time) or Secure
Sanitize Erase (Overwrite 3 times) radio button. 4. Click Apply.
Certificates
If X.509v3 certificates are to be used for IPsec authentication, the following configuration tasks must be performed in order to achieve the evaluated configuration: 1. Import identity certificate with private key.
2. Designate the imported identity certificate for network identity.
3. Install the CA certificates required to verify the identity certificates received from computers. Use the following steps to perform configurations 1-3 above for your operation environment to achieve the evaluated configuration. After achieving the evaluated configuration, refer to the following sections to manage X.509v3 certificates used for IPsec authentication.
NOTE: In the evaluated configuration, only certificates with a 2048-bit or 3072-bit RSA key length and SHA-256, SHA-384 or SHA-512 signature algorithm are supported for IPsec authentication.
Install CA certificates
The CA certificates required to verify the identity certificates received from computers for IPsec authentication must be installed. After acquiring these CA certificates for your operational environment, use the following steps to install the CA certificates. 1. Open the Security tab of the EWS. 2. Select the Certificate Management menu item. 3. In the CA Certificates area, click the Choose File button and navigate to the CA certificate.
4. Click Install.
© Copyright 2021 HP Development Company, L. 43
Import identity certificate
An identity certificate with private key that has been generated in the operational environment and signed by an external CA is required. After acquiring this identity certificate with private key for your operational environment, use the following steps to import the identity certificate. 1. Open the Security tab of the EWS. 2. Select the Certificate Management menu item. 3. In the Install Identity Certificate area, perform the following:
a. Select Import Identity Certificate with Private Key.
b. Click Choose File and browse to the .pfx file containing the identity certificate with private key.
c. In the Certificate Password field, enter the password that was used to protect the private key.
d. If the private key is to be exportable, check the Mark private key as exportable check box.
e. Click Install.
Select new identity certificate for network identity
In order to use the identity certificate imported for IPsec authentication, the identity certificate must be designated for network identity. Use the following steps to use the imported identity certificate for network identity. 1. Open the Security tab of the EWS. 2. Select the Certificate Management menu item. 3. In the Certificates area, perform the following:
a. Select the imported identity certificate.
b. Click Use for Network Identity.
c. Click Continue.
Remove a certificate
Use the following steps to remove a certificate. 1. Open the Security tab of the EWS. 2. Select the Certificate Management menu item. 3. Select a certificate from the Certificates area. 4. Click Remove… 5. Confirm the removal operation in the warning dialog box that displays.
© Copyright 2021 HP Development Company, L. 44
View the details of a certificate
Use the following steps to view the details of a certificate. 1. Open the Security tab of the EWS.
2. Select the Certificate Management menu item.
3. Select a certificate from the Certificates area.
4. Click View Details.
HP web services
HP Web Services allows a connection to the HP ePrintCenter. In the evaluated configuration, HP Web Services must be disabled. Use the following steps to disable HP Web Services. 1. Open the HP Web Services tab of the EWS. 2. If HP Web Services is enabled, click Disable HP Web Services.
HP JetAdvantage
HP JetAdvantage allows users to access applications that extend the capabilities of the HCD. In the evaluated configuration, HP JetAdvantage must be disabled. Use the following steps to disable HP JetAdvantage. 1. Open the HP Web Services tab of the EWS. 2. Select the HP JetAdvantage menu item. 3. In the HP JetAdvantage Setup area, clear the Enable HP JetAdvantage check box. 4. Click Apply.
Smart Cloud Print
The Smart Cloud Print feature allows users to access web-based apps that extend the capabilities of the HCD. In the evaluated configuration, Smart Cloud Print must be disabled. Use the following steps to disable Smart Cloud Print. 1. Open the HP Web Services tab of the EWS. 2. Select the Smart Cloud Print menu item. 3. In the Smart Cloud Print area, clear the Enable Smart Cloud Print check box.
© Copyright 2021 HP Development Company, L. 45
4. Click Apply.
Wireless station
If the HCD contains integrated wireless functionality, it must be disabled in the evaluated configuration. Use the following steps to disable wireless station capabilities. 1. Open the Networking tab of the EWS. 2. Select the Wireless Station menu item. 3. In the Wireless Status area, select the Off radio button. 4. Click Apply.
Enhanced security event logging
In the evaluated configuration, the HCD must be configured to audit document-processing jobs and security-relevant events. Audit records generated for auditable events are forwarded to a syslog server on the network. The HCD contains two in-memory audit record message queues. One queue is for network audit records (e.g., IPsec records) generated and maintained by the JDI firmware and the other queue is for HCD audit records (e.g., Control Panel Sign In events) generated and maintained by the System firmware. These in-memory message queues are not accessible through any HCD interface and, thus, are protected against unauthorized access. The network queue holds up to 15 audit records. New audit records are discarded when the network queue becomes full. The HCD queue holds up to 1000 audit records. New audit records replace the oldest audit records when the HCD queue becomes full. The HCD establishes a persistent connection to the external syslog server. An audit record is generated, added to a queue, immediately sent from the queue to the syslog server, and then removed from the queue once the record has been successfully received by the syslog server. If the connection is interrupted (e.g. network outage), the HCD will make 5 attempts to reestablish the connection where each attempt lasts for approximately 30 seconds. If all attempts fail, the HCD will repeat the reestablishment process again when a new audit record is added to the HCD queue. Once the connection is reestablished, the records from both queues are immediately sent to the syslog server. If the HCD is powered off, any audit records remaining in the two in-memory messages queues at the time of power-off will be discarded. The HCD also stores up to 500 audit records on the SED replacing the oldest audit records with new audit records, but these records are not accessible through any external interface in the evaluated configuration and, thus, are protected against unauthorized access. In the evaluated configuration, the syslog settings must be configured, and enhanced security event logging must be enabled using the following steps.
1. Open the Networking tab of the EWS. 2. Select the Other Settings menu item. 3. In the Enabled Features area, select LPR from the Syslog Facility drop-down menu.
© Copyright 2021 HP Development Company, L. 46
4. Click Apply. 5. Select the TCP/IP Settings menu item. 6. Click the Advanced tab. 7. In the Syslog Server field, enter the IPv4 address of the syslog server. 8. From the Syslog Protocol drop-down menu, select TCP. 9. In the Syslog Port field, enter 514. 10. In the Syslog Maximum Messages field, enter 1000. 11. In the Syslog Priority field, enter 7. 12. Check the Enhanced security event logging check box. 13. Click Apply.
Device discovery
In the evaluated configuration, all device discovery protocols must be disabled. Use the following steps to disable device discovery protocols. 1. Open the Networking tab of the EWS. 2. Select the Mgmt. Protocols menu item. 3. Select the Other tab. 4. In the Enable Device Discovery area, clear all check boxes. 5. Click Apply.
Name resolution
In the evaluated configuration, WINS port and WINS registration must be enabled and LLMNR must be disabled. Use the following steps to enable WINS port and WINS registration and to disable LLMNR. 1. Open the Networking tab of the EWS. 2. Select the Mgmt. Protocols menu item. 3. Select the Other tab. 4. In the Name Resolution area, check the Enable WINS Port and WINS Registration check boxes, and clear the
LLMNR check box. 5. Click Apply.
© Copyright 2021 HP Development Company, L. 47
WebScan
WebScan is a feature of the EWS that allows users to scan documents from the HCD to their computer using a web browser. In the evaluated configuration, WebScan must be disabled. Use the following steps to disable WebScan. 1. Open the Networking tab of the EWS. 2. Select the Mgmt. Protocols menu item. 3. Select the Other tab. 4. In the Other area, clear the WebScan and Secure WebScan check boxes. 5. Click Apply.
Management protocols
In the evaluated configuration, the following management protocols must be disabled:
• Telnet
• HP Jetdirect XML Services
• TFTP Configuration File
Use the following steps to disable the management protocols above. 1. Open the Networking tab of the EWS. 2. Select the Mgmt. Protocols menu item. 3. Select the Other tab. 4. In the Enable Management Protocols area, clear all check boxes. 5. Click Apply.
IPsec
In the evaluated configuration, the HCD must be configured to protect network communications between itself and computers using IPsec. This guide classifies computers into one of the following roles:
• Administrative Computer – Only one network computer can be used as the Administrative Computer. This network computer is used for administration of the HCD.
• Trusted IT Product – These are computers that the HCD connects to. The HCD contacts these computers either to send data to them (e.g., send email alert to the SMTP gateway) or to request information from them (e.g., authenticate a user using LDAP).
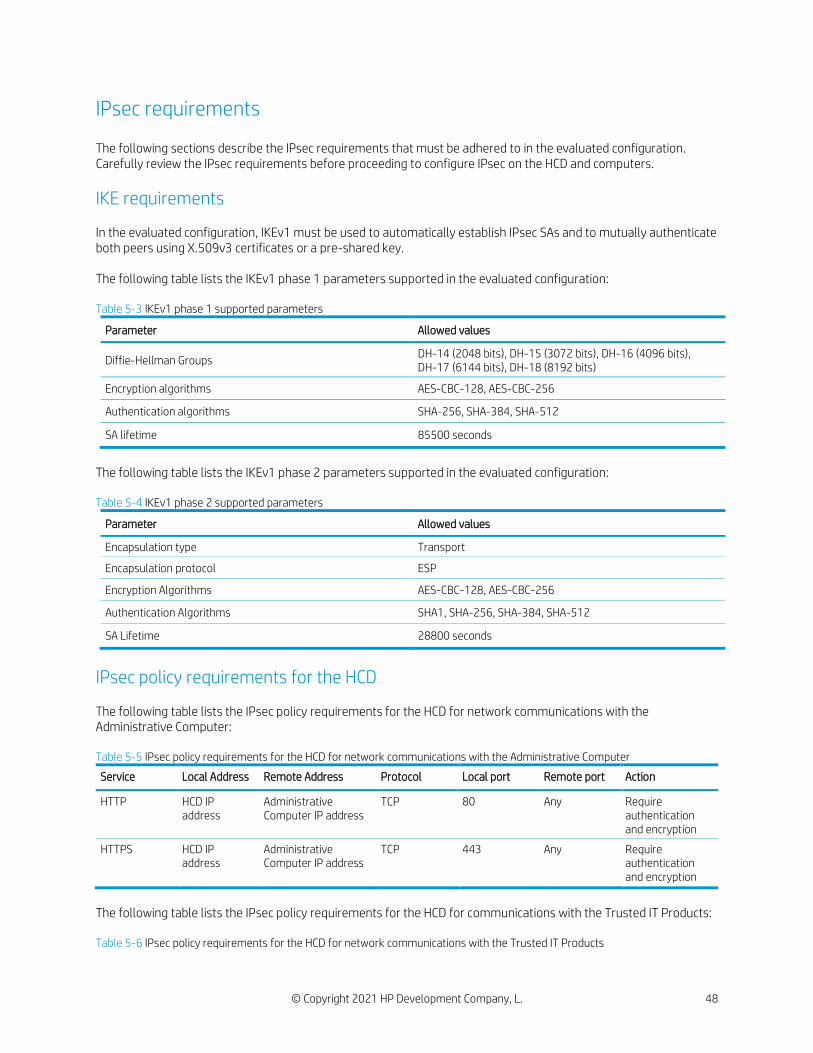
© Copyright 2021 HP Development Company, L. 48
IPsec requirements
The following sections describe the IPsec requirements that must be adhered to in the evaluated configuration. Carefully review the IPsec requirements before proceeding to configure IPsec on the HCD and computers.
IKE requirements
In the evaluated configuration, IKEv1 must be used to automatically establish IPsec SAs and to mutually authenticate both peers using X.509v3 certificates or a pre-shared key. The following table lists the IKEv1 phase 1 parameters supported in the evaluated configuration: Table 5-3 IKEv1 phase 1 supported parameters
Parameter Allowed values
Diffie-Hellman Groups DH-14 (2048 bits), DH-15 (3072 bits), DH-16 (4096 bits), DH-17 (6144 bits), DH-18 (8192 bits)
Encryption algorithms AES-CBC-128, AES-CBC-256
Authentication algorithms SHA-256, SHA-384, SHA-512
SA lifetime 85500 seconds
The following table lists the IKEv1 phase 2 parameters supported in the evaluated configuration: Table 5-4 IKEv1 phase 2 supported parameters
Parameter Allowed values
Encapsulation type Transport
Encapsulation protocol ESP
Encryption Algorithms AES-CBC-128, AES-CBC-256
Authentication Algorithms SHA1, SHA-256, SHA-384, SHA-512
SA Lifetime 28800 seconds
IPsec policy requirements for the HCD
The following table lists the IPsec policy requirements for the HCD for network communications with the Administrative Computer: Table 5-5 IPsec policy requirements for the HCD for network communications with the Administrative Computer
Service Local Address Remote Address Protocol Local port Remote port Action
HTTP HCD IP address
Administrative Computer IP address
TCP 80 Any Require authentication and encryption
HTTPS HCD IP address
Administrative Computer IP address
TCP 443 Any Require authentication and encryption
The following table lists the IPsec policy requirements for the HCD for communications with the Trusted IT Products: Table 5-6 IPsec policy requirements for the HCD for network communications with the Trusted IT Products
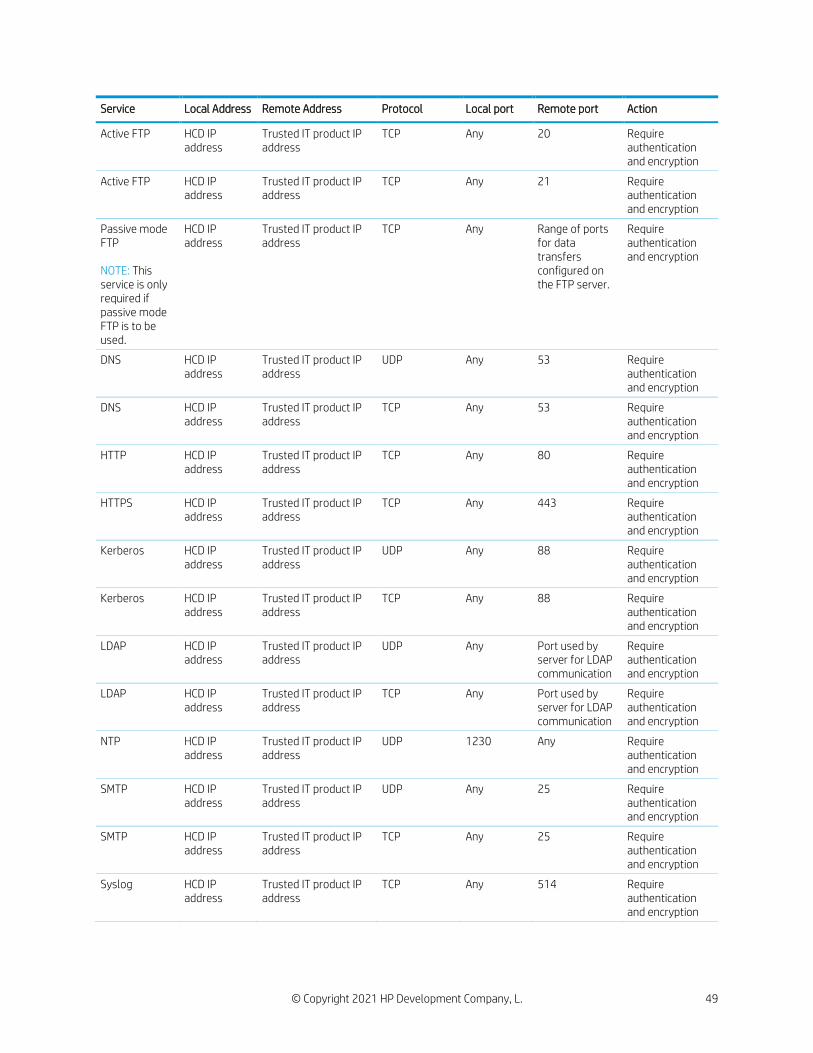
© Copyright 2021 HP Development Company, L. 49
Service Local Address Remote Address Protocol Local port Remote port Action
Active FTP HCD IP address
Trusted IT product IP address
TCP Any 20 Require authentication and encryption
Active FTP HCD IP address
Trusted IT product IP address
TCP Any 21 Require authentication and encryption
Passive mode FTP NOTE: This service is only required if passive mode FTP is to be used.
HCD IP address
Trusted IT product IP address
TCP Any Range of ports for data transfers configured on the FTP server.
Require authentication and encryption
DNS HCD IP address
Trusted IT product IP address
UDP Any 53 Require authentication and encryption
DNS HCD IP address
Trusted IT product IP address
TCP Any 53 Require authentication and encryption
HTTP HCD IP address
Trusted IT product IP address
TCP Any 80 Require authentication and encryption
HTTPS HCD IP address
Trusted IT product IP address
TCP Any 443 Require authentication and encryption
Kerberos HCD IP address
Trusted IT product IP address
UDP Any 88 Require authentication and encryption
Kerberos HCD IP address
Trusted IT product IP address
TCP Any 88 Require authentication and encryption
LDAP HCD IP address
Trusted IT product IP address
UDP Any Port used by server for LDAP communication
Require authentication and encryption
LDAP HCD IP address
Trusted IT product IP address
TCP Any Port used by server for LDAP communication
Require authentication and encryption
NTP HCD IP address
Trusted IT product IP address
UDP 1230 Any Require authentication and encryption
SMTP HCD IP address
Trusted IT product IP address
UDP Any 25 Require authentication and encryption
SMTP HCD IP address
Trusted IT product IP address
TCP Any 25 Require authentication and encryption
Syslog HCD IP address
Trusted IT product IP address
TCP Any 514 Require authentication and encryption
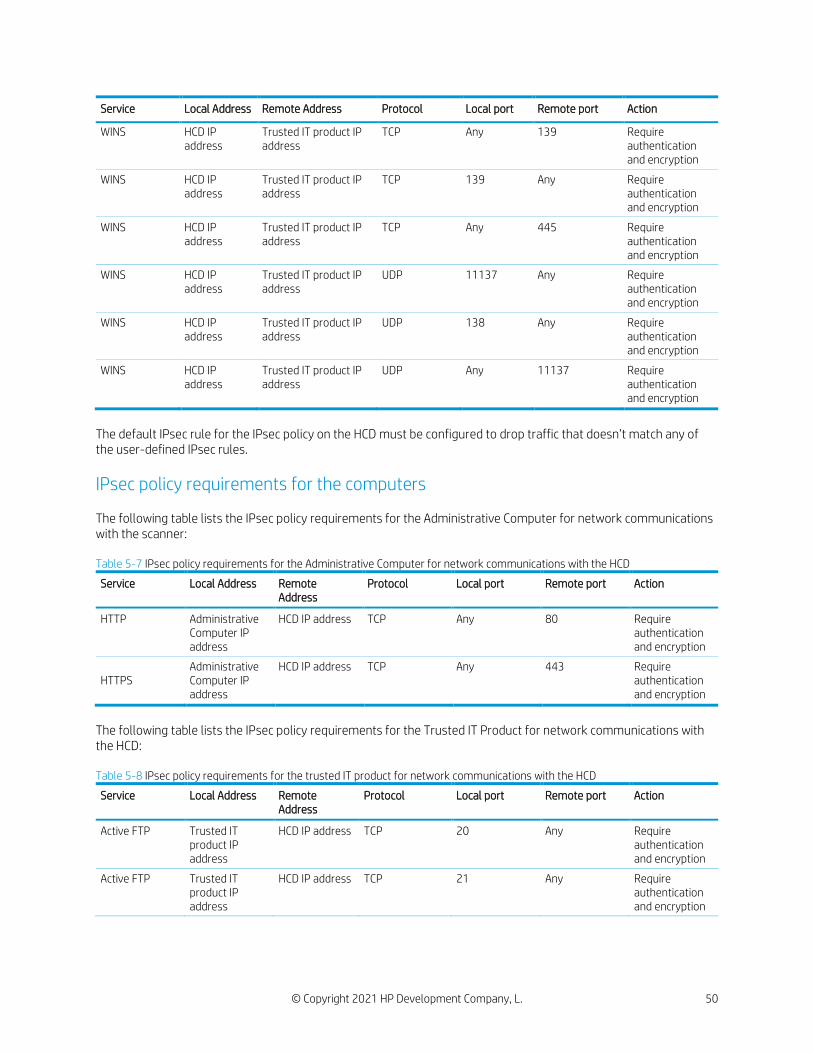
© Copyright 2021 HP Development Company, L. 50
Service Local Address Remote Address Protocol Local port Remote port Action
WINS HCD IP address
Trusted IT product IP address
TCP Any 139 Require authentication and encryption
WINS HCD IP address
Trusted IT product IP address
TCP 139 Any Require authentication and encryption
WINS HCD IP address
Trusted IT product IP address
TCP Any 445 Require authentication and encryption
WINS HCD IP address
Trusted IT product IP address
UDP 11137 Any Require authentication and encryption
WINS HCD IP address
Trusted IT product IP address
UDP 138 Any Require authentication and encryption
WINS HCD IP address
Trusted IT product IP address
UDP Any 11137 Require authentication and encryption
The default IPsec rule for the IPsec policy on the HCD must be configured to drop traffic that doesn’t match any of the user-defined IPsec rules.
IPsec policy requirements for the computers
The following table lists the IPsec policy requirements for the Administrative Computer for network communications with the scanner: Table 5-7 IPsec policy requirements for the Administrative Computer for network communications with the HCD
Service Local Address Remote Address
Protocol Local port Remote port Action
HTTP Administrative Computer IP address
HCD IP address TCP Any 80 Require authentication and encryption
HTTPS Administrative Computer IP address
HCD IP address TCP Any 443 Require authentication and encryption
The following table lists the IPsec policy requirements for the Trusted IT Product for network communications with the HCD: Table 5-8 IPsec policy requirements for the trusted IT product for network communications with the HCD
Service Local Address Remote Address
Protocol Local port Remote port Action
Active FTP Trusted IT product IP address
HCD IP address TCP 20 Any Require authentication and encryption
Active FTP Trusted IT product IP address
HCD IP address TCP 21 Any Require authentication and encryption
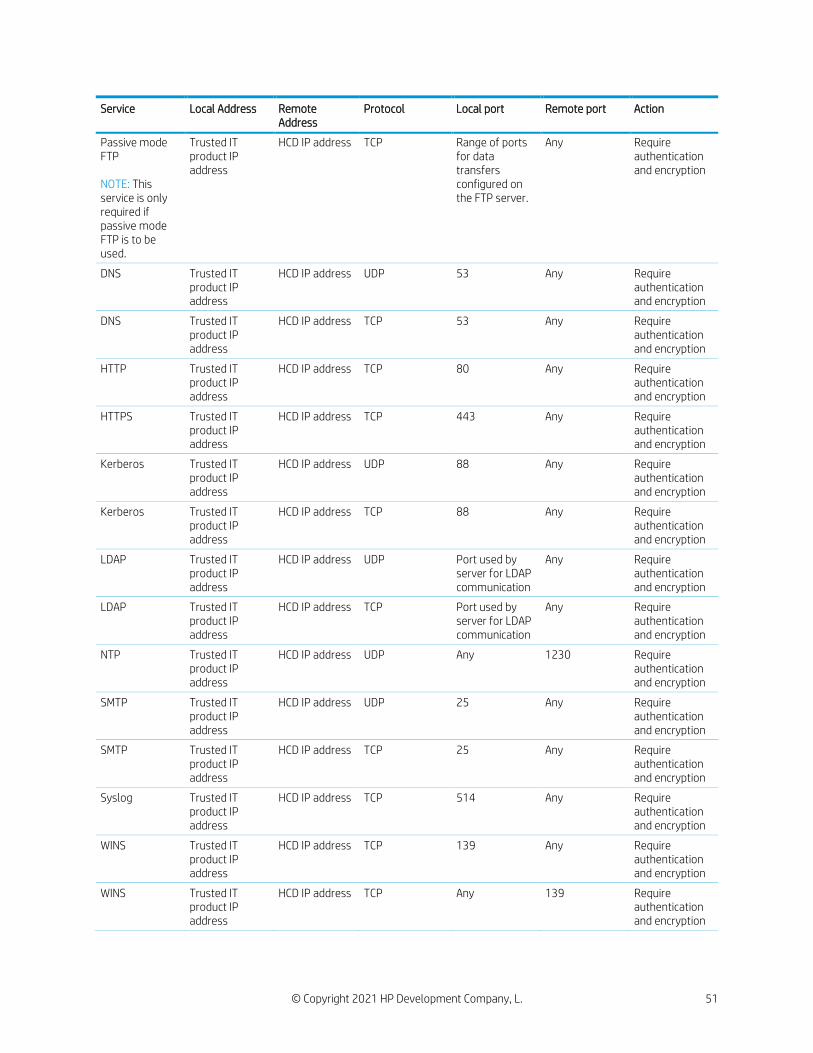
© Copyright 2021 HP Development Company, L. 51
Service Local Address Remote Address
Protocol Local port Remote port Action
Passive mode FTP NOTE: This service is only required if passive mode FTP is to be used.
Trusted IT product IP address
HCD IP address TCP Range of ports for data transfers configured on the FTP server.
Any Require authentication and encryption
DNS Trusted IT product IP address
HCD IP address UDP 53 Any Require authentication and encryption
DNS Trusted IT product IP address
HCD IP address TCP 53 Any Require authentication and encryption
HTTP Trusted IT product IP address
HCD IP address TCP 80 Any Require authentication and encryption
HTTPS Trusted IT product IP address
HCD IP address TCP 443 Any Require authentication and encryption
Kerberos Trusted IT product IP address
HCD IP address UDP 88 Any Require authentication and encryption
Kerberos Trusted IT product IP address
HCD IP address TCP 88 Any Require authentication and encryption
LDAP Trusted IT product IP address
HCD IP address UDP Port used by server for LDAP communication
Any Require authentication and encryption
LDAP Trusted IT product IP address
HCD IP address TCP Port used by server for LDAP communication
Any Require authentication and encryption
NTP Trusted IT product IP address
HCD IP address UDP Any 1230 Require authentication and encryption
SMTP Trusted IT product IP address
HCD IP address UDP 25 Any Require authentication and encryption
SMTP Trusted IT product IP address
HCD IP address TCP 25 Any Require authentication and encryption
Syslog Trusted IT product IP address
HCD IP address TCP 514 Any Require authentication and encryption
WINS Trusted IT product IP address
HCD IP address TCP 139 Any Require authentication and encryption
WINS Trusted IT product IP address
HCD IP address TCP Any 139 Require authentication and encryption
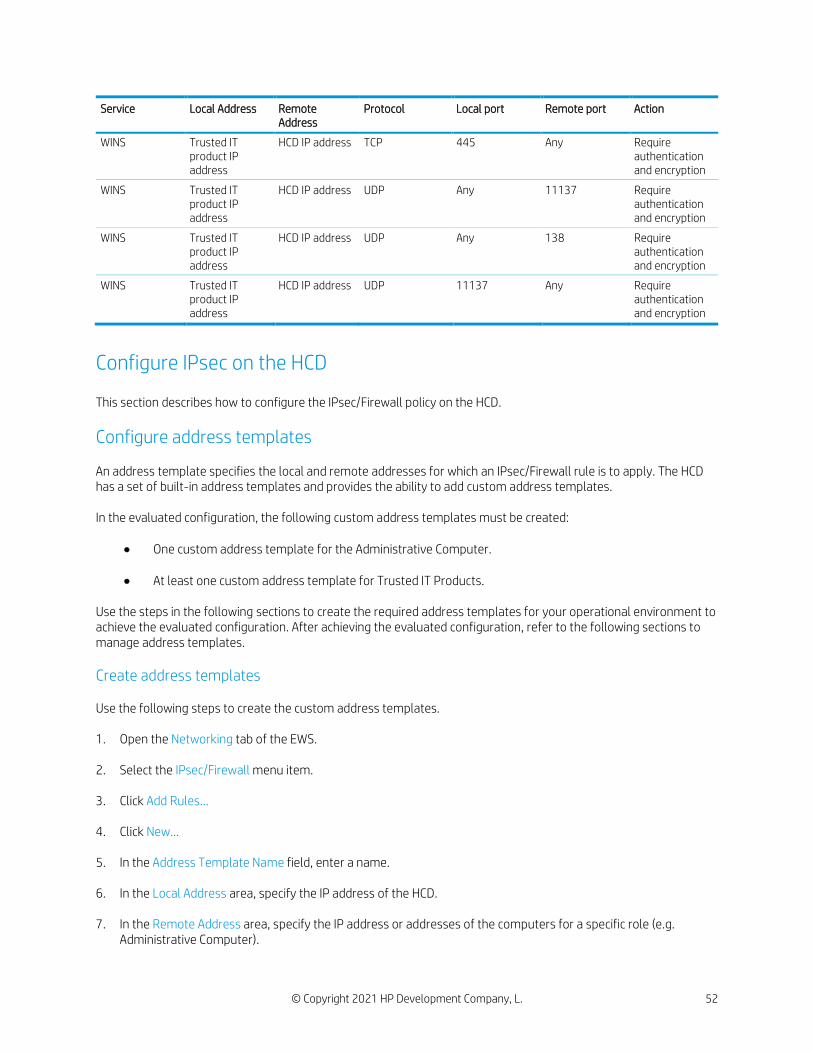
© Copyright 2021 HP Development Company, L. 52
Service Local Address Remote Address
Protocol Local port Remote port Action
WINS Trusted IT product IP address
HCD IP address TCP 445 Any Require authentication and encryption
WINS Trusted IT product IP address
HCD IP address UDP Any 11137 Require authentication and encryption
WINS Trusted IT product IP address
HCD IP address UDP Any 138 Require authentication and encryption
WINS Trusted IT product IP address
HCD IP address UDP 11137 Any Require authentication and encryption
Configure IPsec on the HCD
This section describes how to configure the IPsec/Firewall policy on the HCD.
Configure address templates
An address template specifies the local and remote addresses for which an IPsec/Firewall rule is to apply. The HCD has a set of built-in address templates and provides the ability to add custom address templates. In the evaluated configuration, the following custom address templates must be created:
• One custom address template for the Administrative Computer.
• At least one custom address template for Trusted IT Products. Use the steps in the following sections to create the required address templates for your operational environment to achieve the evaluated configuration. After achieving the evaluated configuration, refer to the following sections to manage address templates.
Create address templates
Use the following steps to create the custom address templates. 1. Open the Networking tab of the EWS. 2. Select the IPsec/Firewall menu item. 3. Click Add Rules… 4. Click New… 5. In the Address Template Name field, enter a name. 6. In the Local Address area, specify the IP address of the HCD. 7. In the Remote Address area, specify the IP address or addresses of the computers for a specific role (e.g.
Administrative Computer).
© Copyright 2021 HP Development Company, L. 53
8. Click OK.
The newly created custom address template appears in the Address Templates: list. 9. Repeat steps 4 – 8 to create all the custom address templates needed for the computers in your operational
environment.
10. Click Cancel to return to the main IPsec/Firewall Policy EWS page.
Modify a custom address template
Use the following steps to modify a custom address template. 1. Open the Networking tab of the EWS. 2. Select the IPsec/Firewall menu item. 3. In the list of IPsec/Firewall Rules, click on the custom address template to modify. 4. Click Modify Template… 5. Make the desired modifications to the custom address template’s parameters. 6. Click OK. 7. Click Apply.
Delete a custom address template
Use the following steps to delete an address template.
NOTE: A custom address template can only be deleted if it is not being used in an IPsec/Firewall rule.
1. Open the Networking tab of the EWS. 2. Select the IPsec/Firewall menu item. 3. Click Add Rules… 4. In the Address Templates list, select the custom address template to delete. 5. Click Delete. 6. Click Yes to confirm the deletion of the custom address template. 7. Click Cancel to return to the main IPsec/Firewall Policy EWS page.
Configure service templates
A service template specifies the services for which an IPsec/Firewall rule is to apply. The HCD includes a set of built-in service templates and provides the ability to create custom service templates. In the evaluated configuration, the following custom service templates must be created:
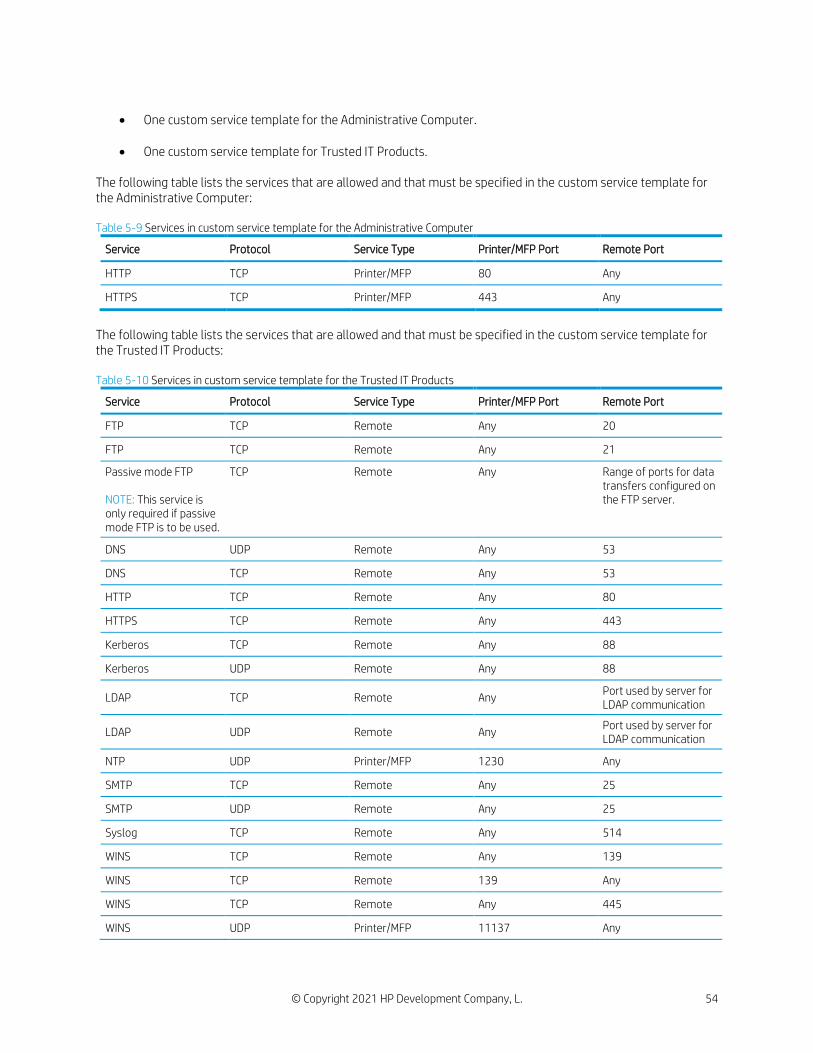
© Copyright 2021 HP Development Company, L. 54
• One custom service template for the Administrative Computer. • One custom service template for Trusted IT Products.
The following table lists the services that are allowed and that must be specified in the custom service template for the Administrative Computer: Table 5-9 Services in custom service template for the Administrative Computer
Service Protocol Service Type Printer/MFP Port Remote Port
HTTP TCP Printer/MFP 80 Any
HTTPS TCP Printer/MFP 443 Any
The following table lists the services that are allowed and that must be specified in the custom service template for the Trusted IT Products: Table 5-10 Services in custom service template for the Trusted IT Products
Service Protocol Service Type Printer/MFP Port Remote Port
FTP TCP Remote Any 20
FTP TCP Remote Any 21
Passive mode FTP NOTE: This service is only required if passive mode FTP is to be used.
TCP Remote Any Range of ports for data transfers configured on the FTP server.
DNS UDP Remote Any 53
DNS TCP Remote Any 53
HTTP TCP Remote Any 80
HTTPS TCP Remote Any 443
Kerberos TCP Remote Any 88
Kerberos UDP Remote Any 88
LDAP TCP Remote Any Port used by server for LDAP communication
LDAP UDP Remote Any Port used by server for LDAP communication
NTP UDP Printer/MFP 1230 Any
SMTP TCP Remote Any 25
SMTP UDP Remote Any 25
Syslog TCP Remote Any 514
WINS TCP Remote Any 139
WINS TCP Remote 139 Any
WINS TCP Remote Any 445
WINS UDP Printer/MFP 11137 Any
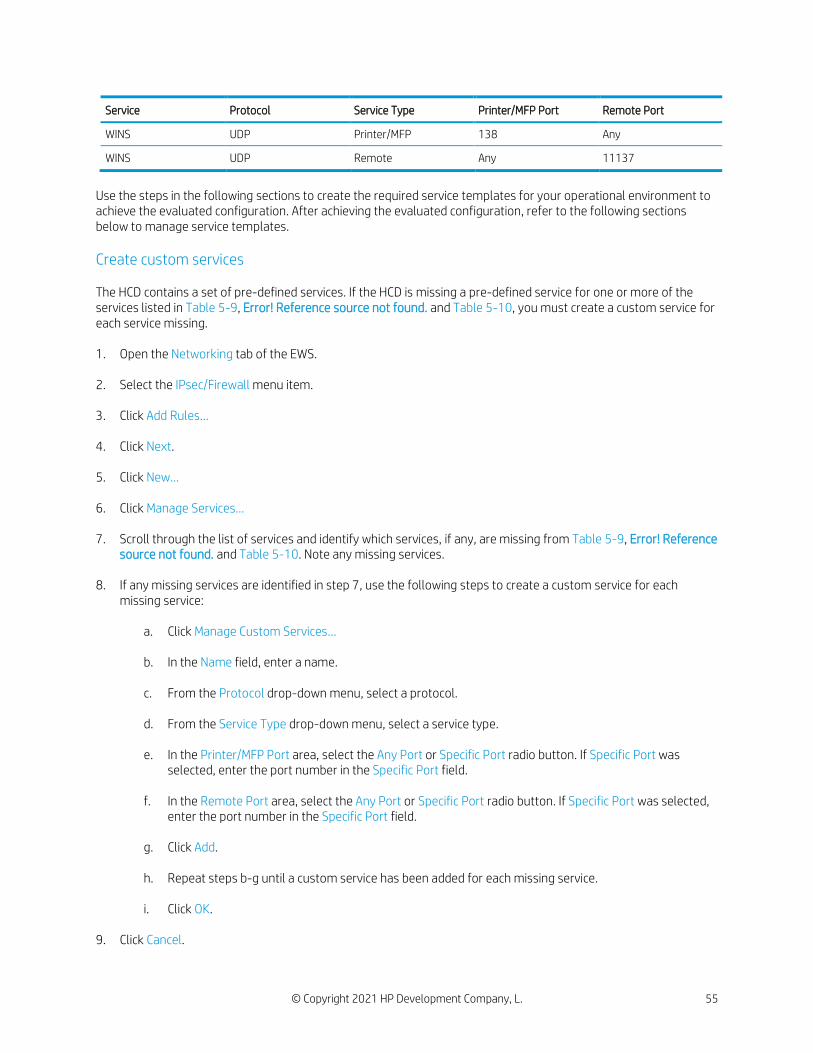
© Copyright 2021 HP Development Company, L. 55
Service Protocol Service Type Printer/MFP Port Remote Port
WINS UDP Printer/MFP 138 Any
WINS UDP Remote Any 11137
Use the steps in the following sections to create the required service templates for your operational environment to achieve the evaluated configuration. After achieving the evaluated configuration, refer to the following sections below to manage service templates.
Create custom services
The HCD contains a set of pre-defined services. If the HCD is missing a pre-defined service for one or more of the services listed in Table 5-9, Error! Reference source not found. and Table 5-10, you must create a custom service for each service missing. 1. Open the Networking tab of the EWS. 2. Select the IPsec/Firewall menu item. 3. Click Add Rules… 4. Click Next. 5. Click New… 6. Click Manage Services… 7. Scroll through the list of services and identify which services, if any, are missing from Table 5-9, Error! Reference
source not found. and Table 5-10. Note any missing services. 8. If any missing services are identified in step 7, use the following steps to create a custom service for each
missing service:
a. Click Manage Custom Services…
b. In the Name field, enter a name.
c. From the Protocol drop-down menu, select a protocol.
d. From the Service Type drop-down menu, select a service type.
e. In the Printer/MFP Port area, select the Any Port or Specific Port radio button. If Specific Port was selected, enter the port number in the Specific Port field.
f. In the Remote Port area, select the Any Port or Specific Port radio button. If Specific Port was selected,
enter the port number in the Specific Port field.
g. Click Add.
h. Repeat steps b-g until a custom service has been added for each missing service.
i. Click OK. 9. Click Cancel.
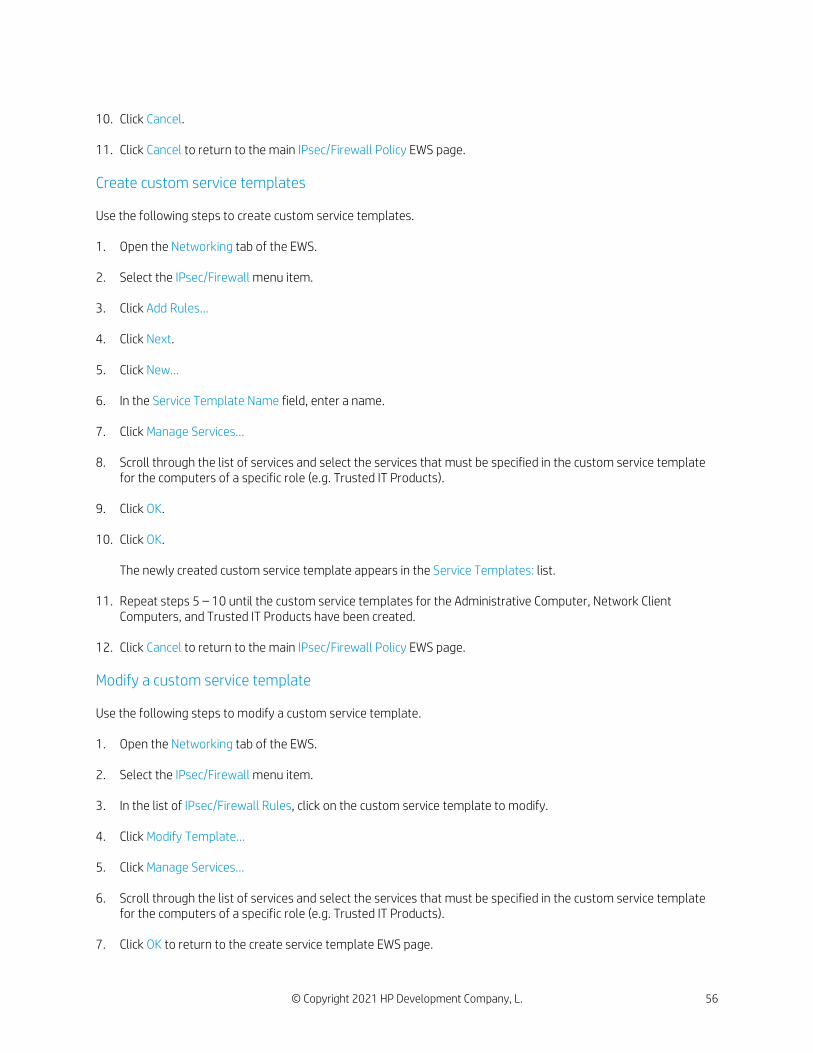
© Copyright 2021 HP Development Company, L. 56
10. Click Cancel. 11. Click Cancel to return to the main IPsec/Firewall Policy EWS page.
Create custom service templates
Use the following steps to create custom service templates. 1. Open the Networking tab of the EWS. 2. Select the IPsec/Firewall menu item. 3. Click Add Rules… 4. Click Next. 5. Click New… 6. In the Service Template Name field, enter a name. 7. Click Manage Services… 8. Scroll through the list of services and select the services that must be specified in the custom service template
for the computers of a specific role (e.g. Trusted IT Products). 9. Click OK. 10. Click OK.
The newly created custom service template appears in the Service Templates: list. 11. Repeat steps 5 – 10 until the custom service templates for the Administrative Computer, Network Client
Computers, and Trusted IT Products have been created.
12. Click Cancel to return to the main IPsec/Firewall Policy EWS page.
Modify a custom service template
Use the following steps to modify a custom service template. 1. Open the Networking tab of the EWS. 2. Select the IPsec/Firewall menu item. 3. In the list of IPsec/Firewall Rules, click on the custom service template to modify. 4. Click Modify Template… 5. Click Manage Services… 6. Scroll through the list of services and select the services that must be specified in the custom service template
for the computers of a specific role (e.g. Trusted IT Products). 7. Click OK to return to the create service template EWS page.
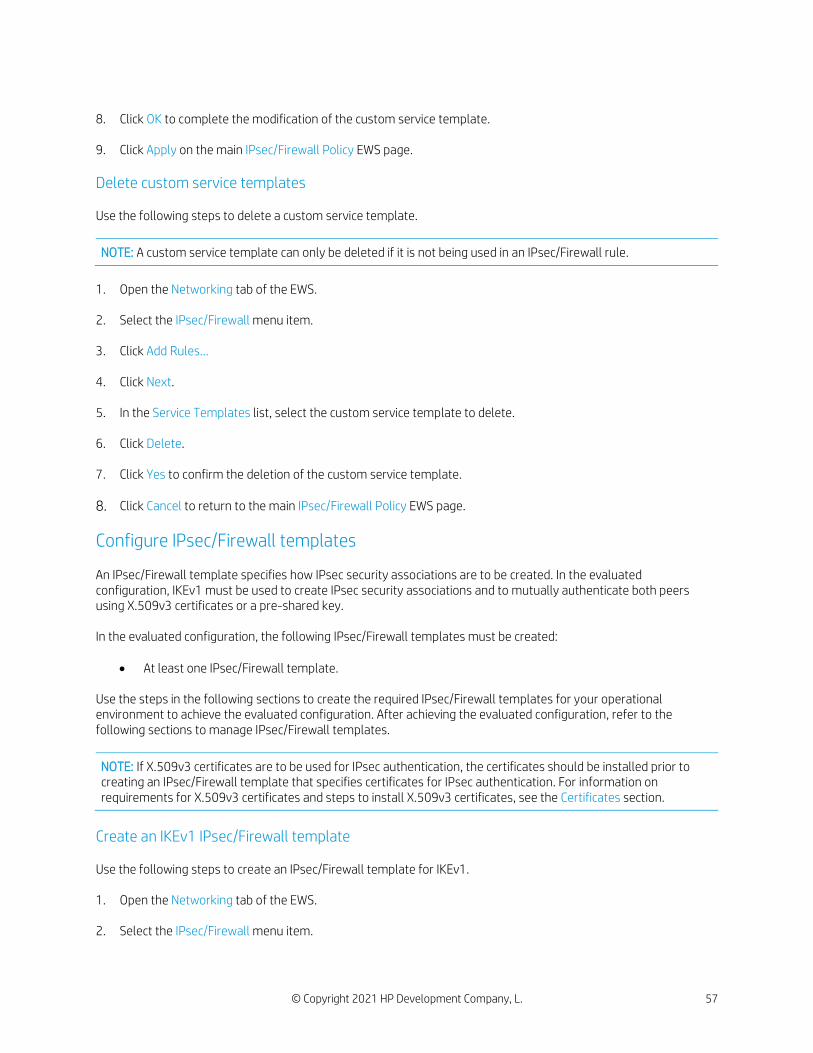
© Copyright 2021 HP Development Company, L. 57
8. Click OK to complete the modification of the custom service template. 9. Click Apply on the main IPsec/Firewall Policy EWS page.
Delete custom service templates
Use the following steps to delete a custom service template.
NOTE: A custom service template can only be deleted if it is not being used in an IPsec/Firewall rule.
1. Open the Networking tab of the EWS. 2. Select the IPsec/Firewall menu item. 3. Click Add Rules… 4. Click Next. 5. In the Service Templates list, select the custom service template to delete. 6. Click Delete. 7. Click Yes to confirm the deletion of the custom service template. 8. Click Cancel to return to the main IPsec/Firewall Policy EWS page.
Configure IPsec/Firewall templates
An IPsec/Firewall template specifies how IPsec security associations are to be created. In the evaluated configuration, IKEv1 must be used to create IPsec security associations and to mutually authenticate both peers using X.509v3 certificates or a pre-shared key. In the evaluated configuration, the following IPsec/Firewall templates must be created:
• At least one IPsec/Firewall template. Use the steps in the following sections to create the required IPsec/Firewall templates for your operational environment to achieve the evaluated configuration. After achieving the evaluated configuration, refer to the following sections to manage IPsec/Firewall templates.
NOTE: If X.509v3 certificates are to be used for IPsec authentication, the certificates should be installed prior to creating an IPsec/Firewall template that specifies certificates for IPsec authentication. For information on requirements for X.509v3 certificates and steps to install X.509v3 certificates, see the Certificates section.
Create an IKEv1 IPsec/Firewall template
Use the following steps to create an IPsec/Firewall template for IKEv1. 1. Open the Networking tab of the EWS. 2. Select the IPsec/Firewall menu item.

© Copyright 2021 HP Development Company, L. 58
3. Click Add Rules… 4. Click Next. 5. Click Next. 6. Select the Require traffic to be protected with an IPsec/Firewall policy radio button. 7. Click Next. 8. Click New… 9. In the IPsec Template Name field, enter a name. 10. In the Authentication Type area, select the Internet Key Exchange radio button. 11. From the Version drop-down menu, select IKEv1. 12. From the Set IKE Defaults drop-down menu, select Specify Custom Profile. 13. Click Next.
14. If X.509v3 certificates are to be used for IPsec authentication, select the Certificates radio button and then move
onto step 16 below. 15. If a pre-shared key is to be used for IPsec authentication:
The HCD supports text-based pre-shared keys and accepts bit-based pre-shared keys.
The text-based keys can be from 22 characters to 128 characters in length and be composed of any combination of upper and lower case letters, numbers, and special characters that include the characters: "!", "@", "#", "$", "%", "^", "&", "*", "(", and ")". The text-based keys are conditioned using SHA-1, SHA2-256, or SHA2-512 hash algorithms.
The HCD accepts bit-based pre-shared keys generated outside of the HCD. It allows you to enter a hexadecimal bit-based pre-shared key.
a. If a text-based pre-shared key is to be used, perform the following:
i. Select the Pre-Shared Key radio button.
ii. Check the Hash check box.
iii. If another hash algorithm other than SHA1 is to be used to condition the test-based key, select
either the SHA-256 or SHA-512 radio button.
iv. In the field, enter a text-based key that is at least 22 characters long.
b. If a bit-based pre-shared key is to be used, perform the following:
i. Select the Pre-Shared Key radio button.
ii. Select the Hex radio button.
iii. In the field, enter a bit-based key in hexadecimal form that is at least 22 characters long.
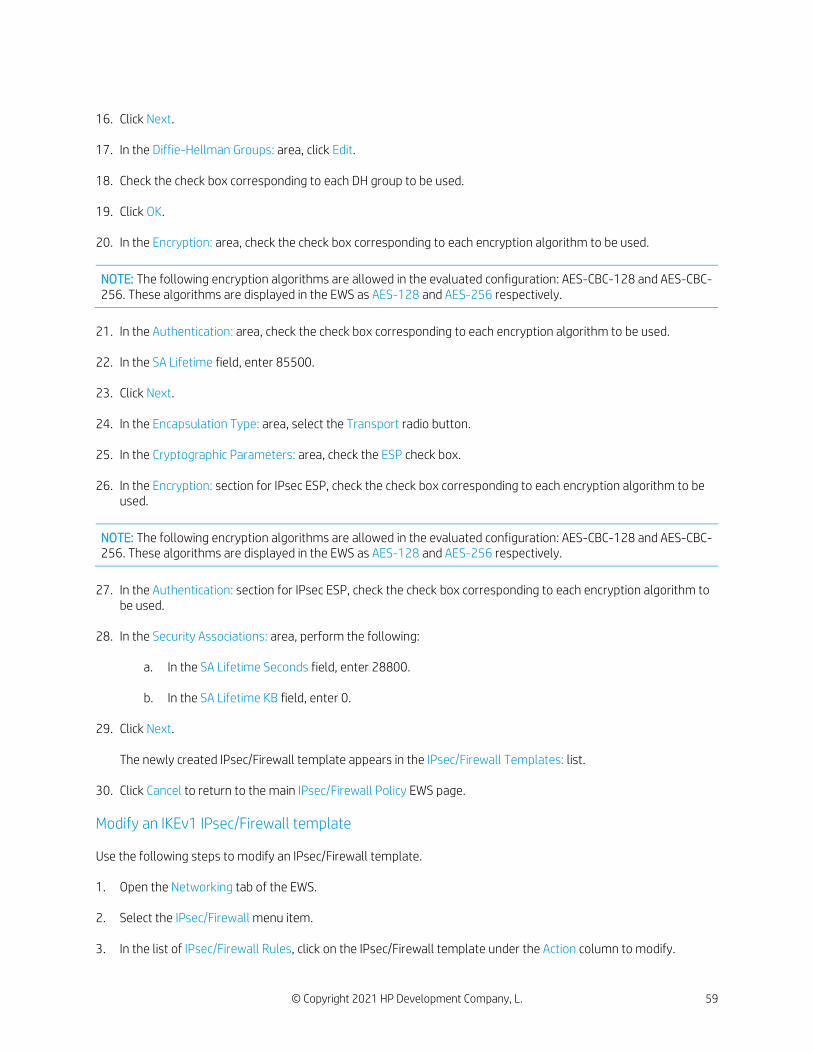
© Copyright 2021 HP Development Company, L. 59
16. Click Next. 17. In the Diffie-Hellman Groups: area, click Edit. 18. Check the check box corresponding to each DH group to be used. 19. Click OK.
20. In the Encryption: area, check the check box corresponding to each encryption algorithm to be used.
NOTE: The following encryption algorithms are allowed in the evaluated configuration: AES-CBC-128 and AES-CBC-256. These algorithms are displayed in the EWS as AES-128 and AES-256 respectively.
21. In the Authentication: area, check the check box corresponding to each encryption algorithm to be used. 22. In the SA Lifetime field, enter 85500.
23. Click Next. 24. In the Encapsulation Type: area, select the Transport radio button. 25. In the Cryptographic Parameters: area, check the ESP check box. 26. In the Encryption: section for IPsec ESP, check the check box corresponding to each encryption algorithm to be
used.
NOTE: The following encryption algorithms are allowed in the evaluated configuration: AES-CBC-128 and AES-CBC-256. These algorithms are displayed in the EWS as AES-128 and AES-256 respectively.
27. In the Authentication: section for IPsec ESP, check the check box corresponding to each encryption algorithm to
be used. 28. In the Security Associations: area, perform the following:
a. In the SA Lifetime Seconds field, enter 28800.
b. In the SA Lifetime KB field, enter 0.
29. Click Next.
The newly created IPsec/Firewall template appears in the IPsec/Firewall Templates: list.
30. Click Cancel to return to the main IPsec/Firewall Policy EWS page.
Modify an IKEv1 IPsec/Firewall template
Use the following steps to modify an IPsec/Firewall template. 1. Open the Networking tab of the EWS. 2. Select the IPsec/Firewall menu item. 3. In the list of IPsec/Firewall Rules, click on the IPsec/Firewall template under the Action column to modify.

© Copyright 2021 HP Development Company, L. 60
4. Click Modify Template… 5. In the Authentication Type area, select the Internet Key Exchange radio button. 6. From the Version drop-down menu, select IKEv1. 7. From the Set IKE Defaults drop-down menu, select Specify Custom Profile. 8. Click Next.
9. If X.509v3 certificates are to be used for IPsec authentication, select the Certificates radio button and then move
onto step 11 below. 10. If a pre-shared key is to be used for IPsec authentication:
The HCD supports text-based pre-shared keys and accepts bit-based pre-shared keys.
The text-based keys can be from 22 characters to 128 characters in length and be composed of any combination of upper and lower case letters, numbers, and special characters that include the characters: "!", "@", "#", "$", "%", "^", "&", "*", "(", and ")". The text-based keys are conditioned using SHA-1, SHA2-256, or SHA2-512 hash algorithms.
The HCD accepts bit-based pre-shared keys generated outside of the HCD. It allows you to enter a hexadecimal bit-based pre-shared key.
a. If a text-based pre-shared key is to be used, perform the following:
i. Select the Pre-Shared Key radio button.
ii. Check the Hash check box.
iii. If another hash algorithm other than SHA1 is to be used to condition the test-based key, select
either the SHA-256 or SHA-512 radio button.
iv. In the field, enter a text-based key that is at least 22 characters long.
b. If a bit-based pre-shared key is to be used, perform the following:
i. Select the Pre-Shared Key radio button.
ii. Select the Hex radio button.
iii. In the field, enter a bit-based key in hexadecimal form that is at least 22 characters long. 11. Click Next. 12. In the Diffie-Hellman Groups: area, click Edit. 13. Check the check box corresponding to each DH group to be used. 14. Click OK.
15. In the Encryption: area, check the check box corresponding to each encryption algorithm to be used.
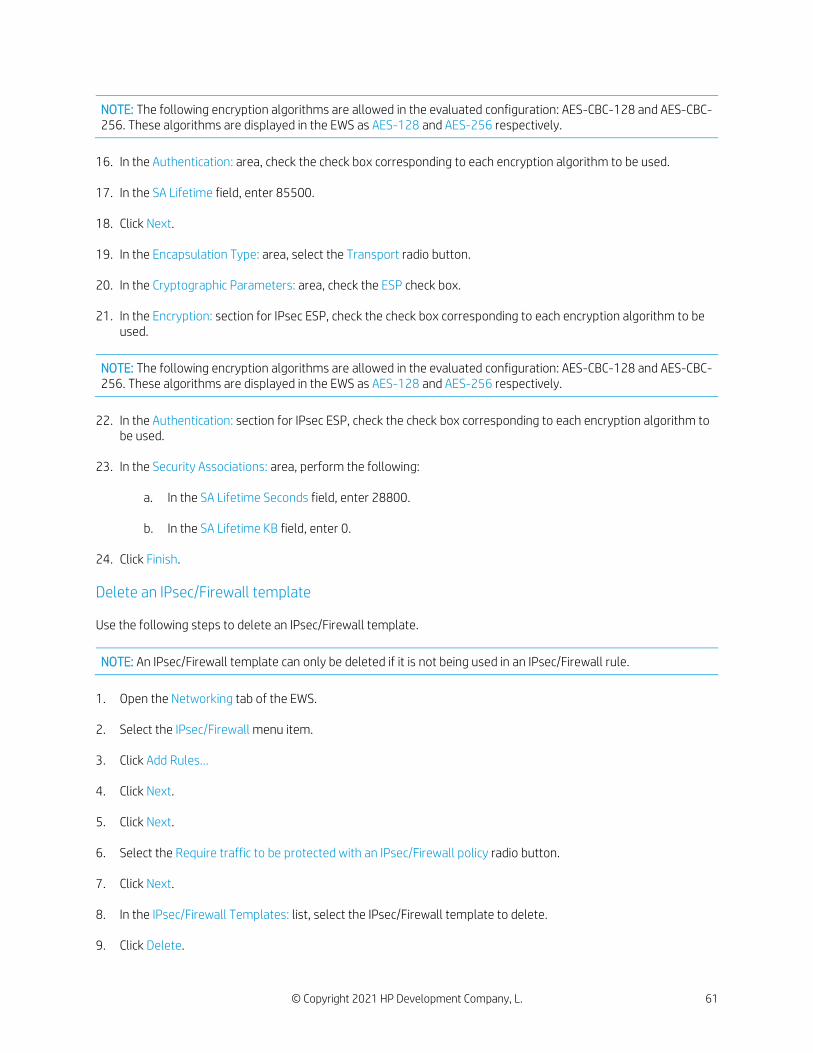
© Copyright 2021 HP Development Company, L. 61
NOTE: The following encryption algorithms are allowed in the evaluated configuration: AES-CBC-128 and AES-CBC-256. These algorithms are displayed in the EWS as AES-128 and AES-256 respectively.
16. In the Authentication: area, check the check box corresponding to each encryption algorithm to be used. 17. In the SA Lifetime field, enter 85500. 18. Click Next. 19. In the Encapsulation Type: area, select the Transport radio button. 20. In the Cryptographic Parameters: area, check the ESP check box. 21. In the Encryption: section for IPsec ESP, check the check box corresponding to each encryption algorithm to be
used.
NOTE: The following encryption algorithms are allowed in the evaluated configuration: AES-CBC-128 and AES-CBC-256. These algorithms are displayed in the EWS as AES-128 and AES-256 respectively.
22. In the Authentication: section for IPsec ESP, check the check box corresponding to each encryption algorithm to
be used. 23. In the Security Associations: area, perform the following:
a. In the SA Lifetime Seconds field, enter 28800.
b. In the SA Lifetime KB field, enter 0.
24. Click Finish.
Delete an IPsec/Firewall template
Use the following steps to delete an IPsec/Firewall template.
NOTE: An IPsec/Firewall template can only be deleted if it is not being used in an IPsec/Firewall rule.
1. Open the Networking tab of the EWS. 2. Select the IPsec/Firewall menu item. 3. Click Add Rules… 4. Click Next. 5. Click Next. 6. Select the Require traffic to be protected with an IPsec/Firewall policy radio button. 7. Click Next. 8. In the IPsec/Firewall Templates: list, select the IPsec/Firewall template to delete. 9. Click Delete.

© Copyright 2021 HP Development Company, L. 62
10. Click Yes to confirm the deletion of the IPsec/Firewall template. 11. Click Cancel to return to the main IPsec/Firewall Policy EWS page.
Configure IPsec/Firewall rules
A rule is comprised of an address template, service template, and an IPsec/Firewall template. In the evaluated configuration, the following rules must be created:
• One rule for the Administrative Computer
• At least one rule for the Network Client Computers
• At least one rule for the Trusted IT Products Use the steps in the following sections to create the required IPsec/Firewall rules for your operational environment to achieve the evaluated configuration. After achieving the evaluated configuration, refer to the following sections below to manage IPsec/Firewall rules.
Create IPsec/Firewall rules
Use the following steps to create the rules.
1. Open the Networking tab of the EWS. 2. Select the IPsec/Firewall menu item. 3. Click Add Rules… 4. In the Address Templates list, select the custom address template that corresponds to the computer(s) of a
specific role (e.g. Administrative Computer). 5. Click Next. 6. In the Service Templates list, select the custom service template that corresponds to the computer(s) of a
specific role (e.g. Administrative Computer). 7. Click Next. 8. Select the Require traffic to be protected with an IPsec/Firewall policy radio button.
9. Click Next. 10. From the IPsec/Firewall Templates list, select an IPsec/Firewall template created in the Step 3 – Create the
IPsec/Firewall templates section. 11. Click Next.
The newly created IPsec/Firewall rule appears in the IPsec/Firewall Rules: list. 12. Click Create Another Rule.

© Copyright 2021 HP Development Company, L. 63
13. Repeat steps 4 -12 until all IPsec/Firewall rules for the computers in your operational environment have been created.
14. Click Finish. 15. For the Would you like to enable the policy now? question, select the Yes radio button. 16. For the Would you like to enable the Failsafe Option? question, select the Yes radio button.
NOTE: The Failsafe Option will be disabled in Disable failsafe option in the IPsec/Firewall policy on the HCD section after the IPsec connections have been tested.
17. Click OK.
Delete IPsec/Firewall rules
Use the following steps to delete one or more rules. 1. Open the Networking tab of the EWS. 2. Select the IPsec/Firewall menu item. 3. Click Delete Rules… 4. Check the check boxes corresponding to the rule(s) to delete. 5. Click OK.
Enable IPsec/Firewall rules
Use the following steps to enable one or more rules. 1. Open the Networking tab of the EWS. 2. Select the IPsec/Firewall menu item. 3. In the IPsec/Firewall Rules area, check the check box under the Enable column corresponding to each rule to
enable. 4. Click Apply.
Disable IPsec/Firewall rules
Use the following steps to disable one or more rules. 1. Open the Networking tab of the EWS. 2. Select the IPsec/Firewall menu item. 3. In the IPsec/Firewall Rules area, clear the check box under the Enable column corresponding to each rule to
disable. 4. Click Apply.
© Copyright 2021 HP Development Company, L. 64
Modify the order of IPsec/Firewall rules in the rules list
Use the following steps to modify the order of two or more rules in the rules list. 1. Open the Networking tab of the EWS. 2. Select the IPsec/Firewall menu item. 3. In the IPsec/Firewall Rules area, under the Rule column, modify the index numbers to modify the order of rules. 4. Click Apply.
Set the action for the default IPsec/Firewall rule to drop traffic
When incoming or outgoing traffic does not match any of the user-defined IPsec/Firewall rules, the traffic is processed by the default IPsec/Firewall rule. In the evaluated configuration, the action-on-match for the default IPsec/Firewall rule must be set to drop traffic. Use the following steps to set the action-on-match for the default IPsec/Firewall rule to drop traffic. 1. Open the Networking tab of the EWS. 2. Select the IPsec/Firewall menu item. 3. In the IPsec/Firewall Rules list, if the action Allow is set for the Default Rule, select Drop from the drop-down
menu. 4. Click Apply.
Configure broadcast and multicast bypass options
In the evaluated configuration, the traffic for DHCPv4/BOOTP, DHCPv6, ICMPv4, and ICMPv6 services must be allowed to bypass the IPsec/Firewall Policy. The traffic for all other services must be processed using the rules in the IPsec/Firewall policy. Use the following steps to configure the broadcast and multicast bypass options. 1. Open the Networking tab of the EWS. 2. Select the IPsec/Firewall menu item. 3. Click Advanced. 4. In the Broadcast and Multicast Bypass area, check the check boxes corresponding to DHCPv4/BOOTP, DHCPv6,
ICMPv4, and ICMPv6 and uncheck the check boxes corresponding to all other services. 5. Click Apply.
Configure the IPsec on the computers
You must configure IPsec on the computers adhering to the requirements for the evaluated configuration. For information on the IPsec requirements for the evaluated configuration, see the IPsec requirements section.
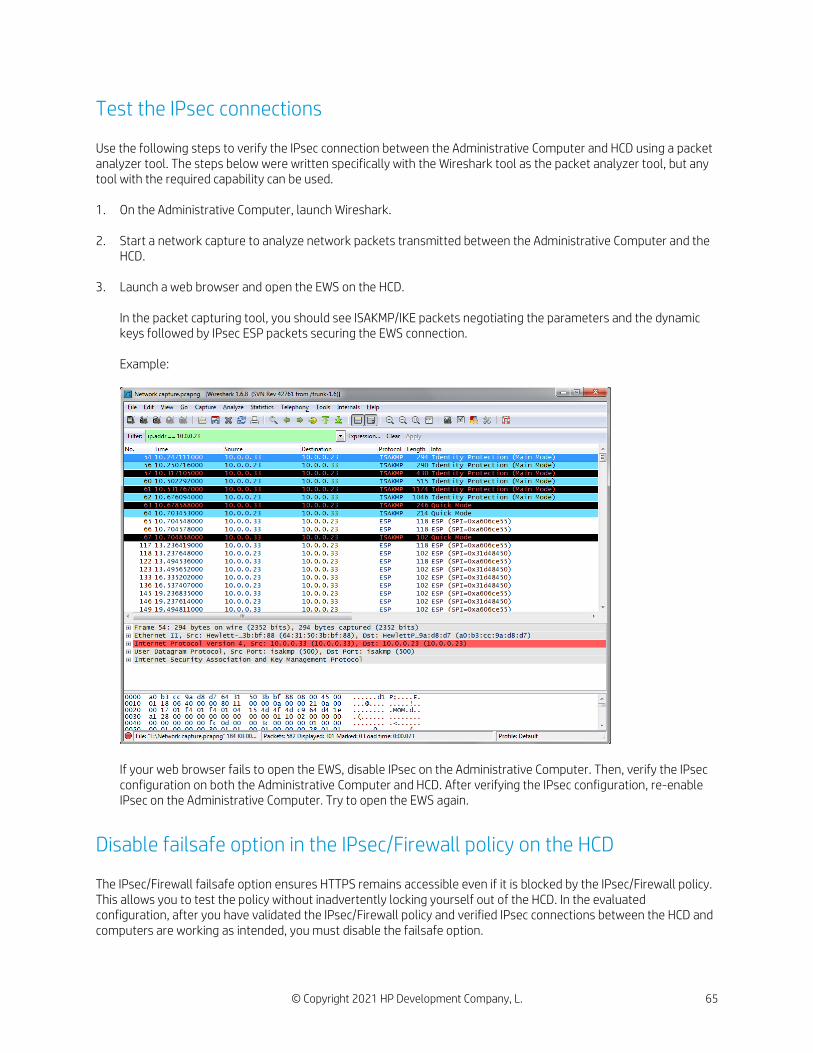
© Copyright 2021 HP Development Company, L. 65
Test the IPsec connections
Use the following steps to verify the IPsec connection between the Administrative Computer and HCD using a packet analyzer tool. The steps below were written specifically with the Wireshark tool as the packet analyzer tool, but any tool with the required capability can be used. 1. On the Administrative Computer, launch Wireshark. 2. Start a network capture to analyze network packets transmitted between the Administrative Computer and the
HCD. 3. Launch a web browser and open the EWS on the HCD.
In the packet capturing tool, you should see ISAKMP/IKE packets negotiating the parameters and the dynamic keys followed by IPsec ESP packets securing the EWS connection. Example:
If your web browser fails to open the EWS, disable IPsec on the Administrative Computer. Then, verify the IPsec configuration on both the Administrative Computer and HCD. After verifying the IPsec configuration, re-enable IPsec on the Administrative Computer. Try to open the EWS again.
Disable failsafe option in the IPsec/Firewall policy on the HCD
The IPsec/Firewall failsafe option ensures HTTPS remains accessible even if it is blocked by the IPsec/Firewall policy. This allows you to test the policy without inadvertently locking yourself out of the HCD. In the evaluated configuration, after you have validated the IPsec/Firewall policy and verified IPsec connections between the HCD and computers are working as intended, you must disable the failsafe option.

© Copyright 2021 HP Development Company, L. 66
Use the following steps to disable the failsafe option. 1. Open the Networking tab of the EWS. 2. Select the IPsec/Firewall menu item. 3. Click Advanced. 4. In the Failsafe area, clear the Enable Failsafe Option check box. 5. Click Apply.
© Copyright 2021 HP Development Company, L. 67
6 Operational guidance
• How to report a security vulnerability
• Operational modes of the HCD
• Whitelisting
• User authentication
• Back up and restore HCD data
• Check version of installed TOE firmware
• Update the TOE firmware
• Manage the HCD security
© Copyright 2021 HP Development Company, L. 68
How to report a security vulnerability
The HP Product Security Response Team (PSRT) is a dedicated, global team that manages the receipt, investigation, and public reporting of security vulnerability information related to HP supported software/firmware products. If you have encountered a potential security vulnerability, you can report the vulnerability to the HP PSRT. Use the following steps to report a potential security vulnerability to the HPSRT. 1. Open a web browser and go to the following address:
https://ssl.www8.hp.com/h41268/live/index.aspx?qid=25434
2. Fill out all the required fields and then click Submit.
Operational modes of the HCD
The following table lists the HCD modes of operation: Table 6-1 HCD modes of operation
Operational mode Description
Ready The HCD is powered on and fully operational.
Sleep mode In this mode, the HCD provides:
• IPsec/Firewall capabilities to restrict access to the HCD’s functions over the network.
• IPsec trusted channel functions to secure all network data exchanges with computers.
• Enhanced security event logging capabilities to audit
security-relevant events. The HCD must first exit sleep mode before users can access any available functions from the control panel. The HCD enters sleep mode when a predefined period of user inactivity (sleep delay) is reached, or per a sleep schedule. The user can also press the sleep button on the control panel to put the HCD in sleep mode. The HCD exits sleep mode when certain events occur, or per a wake schedule.
Powered off In this mode, the HCD doesn’t accept user input through any of its interfaces. Any user with physical access to the HCD can power it on.
Boot up During system initialization, the user can interact with the control panel to enter the preboot menu. To access any diagnostic functions in the preboot menu, the user must sign in with the preboot menu administrator password. Besides the diagnostic functions available in the preboot menu, there are no other functions the user can access through the control panel prior to system initialization completing.
Error condition Depending on the error condition, the HCD may or may not accept user input through its interfaces. For most error
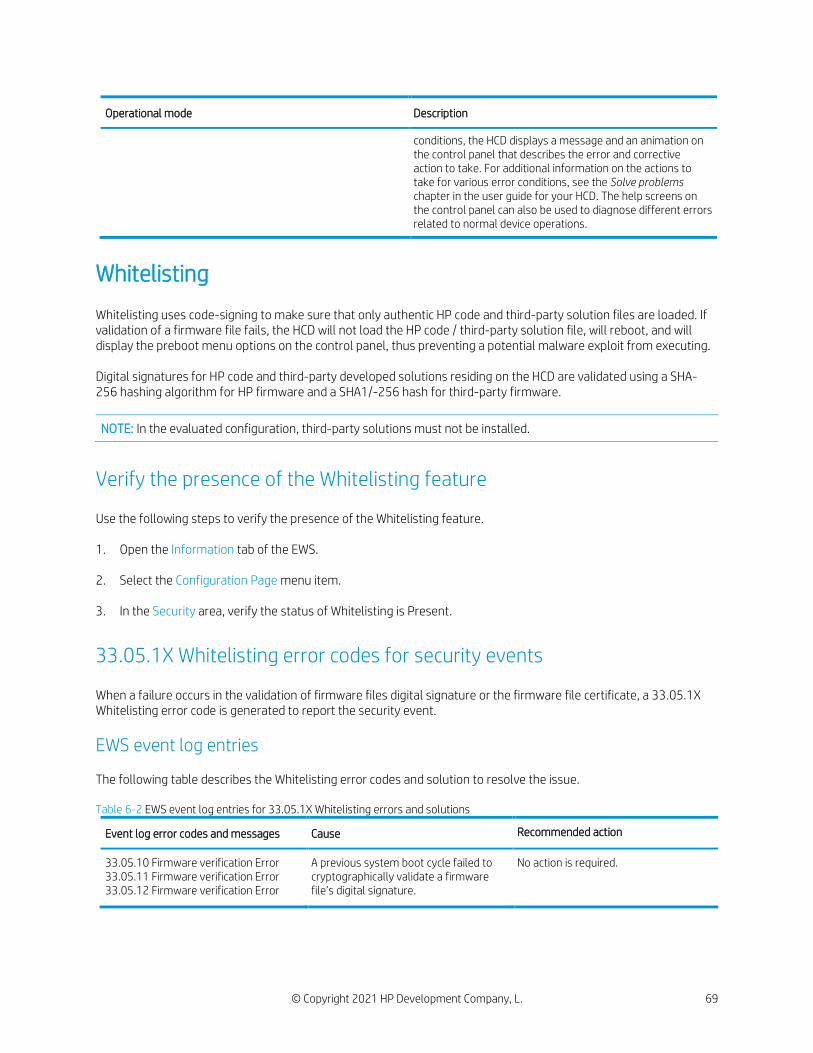
© Copyright 2021 HP Development Company, L. 69
Operational mode Description
conditions, the HCD displays a message and an animation on the control panel that describes the error and corrective action to take. For additional information on the actions to take for various error conditions, see the Solve problems chapter in the user guide for your HCD. The help screens on the control panel can also be used to diagnose different errors related to normal device operations.
Whitelisting
Whitelisting uses code-signing to make sure that only authentic HP code and third-party solution files are loaded. If validation of a firmware file fails, the HCD will not load the HP code / third-party solution file, will reboot, and will display the preboot menu options on the control panel, thus preventing a potential malware exploit from executing. Digital signatures for HP code and third-party developed solutions residing on the HCD are validated using a SHA-256 hashing algorithm for HP firmware and a SHA1/-256 hash for third-party firmware.
NOTE: In the evaluated configuration, third-party solutions must not be installed.
Verify the presence of the Whitelisting feature
Use the following steps to verify the presence of the Whitelisting feature. 1. Open the Information tab of the EWS.
2. Select the Configuration Page menu item.
3. In the Security area, verify the status of Whitelisting is Present.
33.05.1X Whitelisting error codes for security events
When a failure occurs in the validation of firmware files digital signature or the firmware file certificate, a 33.05.1X Whitelisting error code is generated to report the security event.
EWS event log entries
The following table describes the Whitelisting error codes and solution to resolve the issue. Table 6-2 EWS event log entries for 33.05.1X Whitelisting errors and solutions
Event log error codes and messages Cause Recommended action
33.05.10 Firmware verification Error 33.05.11 Firmware verification Error 33.05.12 Firmware verification Error
A previous system boot cycle failed to cryptographically validate a firmware file’s digital signature.
No action is required.
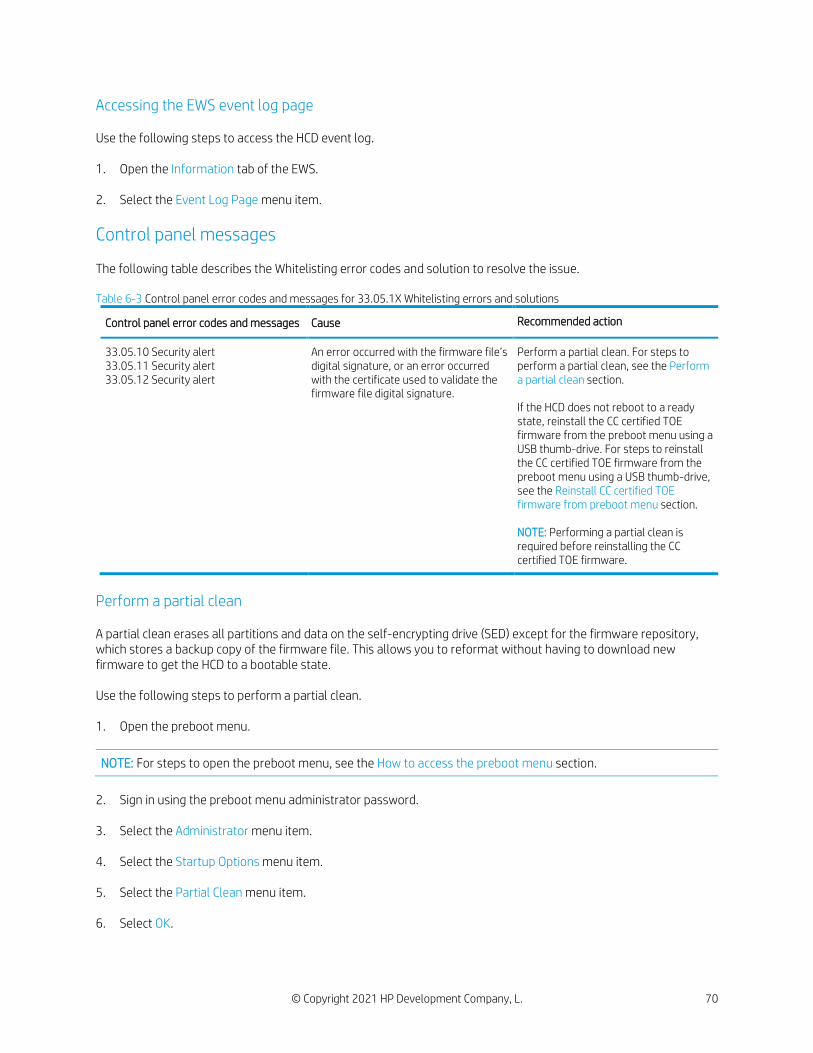
© Copyright 2021 HP Development Company, L. 70
Accessing the EWS event log page
Use the following steps to access the HCD event log. 1. Open the Information tab of the EWS.
2. Select the Event Log Page menu item.
Control panel messages
The following table describes the Whitelisting error codes and solution to resolve the issue. Table 6-3 Control panel error codes and messages for 33.05.1X Whitelisting errors and solutions
Control panel error codes and messages Cause Recommended action
33.05.10 Security alert 33.05.11 Security alert 33.05.12 Security alert
An error occurred with the firmware file’s digital signature, or an error occurred with the certificate used to validate the firmware file digital signature.
Perform a partial clean. For steps to perform a partial clean, see the Perform a partial clean section. If the HCD does not reboot to a ready state, reinstall the CC certified TOE firmware from the preboot menu using a USB thumb-drive. For steps to reinstall the CC certified TOE firmware from the preboot menu using a USB thumb-drive, see the Reinstall CC certified TOE firmware from preboot menu section. NOTE: Performing a partial clean is required before reinstalling the CC certified TOE firmware.
Perform a partial clean
A partial clean erases all partitions and data on the self-encrypting drive (SED) except for the firmware repository, which stores a backup copy of the firmware file. This allows you to reformat without having to download new firmware to get the HCD to a bootable state. Use the following steps to perform a partial clean.
1. Open the preboot menu.
NOTE: For steps to open the preboot menu, see the How to access the preboot menu section.
2. Sign in using the preboot menu administrator password.
3. Select the Administrator menu item. 4. Select the Startup Options menu item. 5. Select the Partial Clean menu item. 6. Select OK.
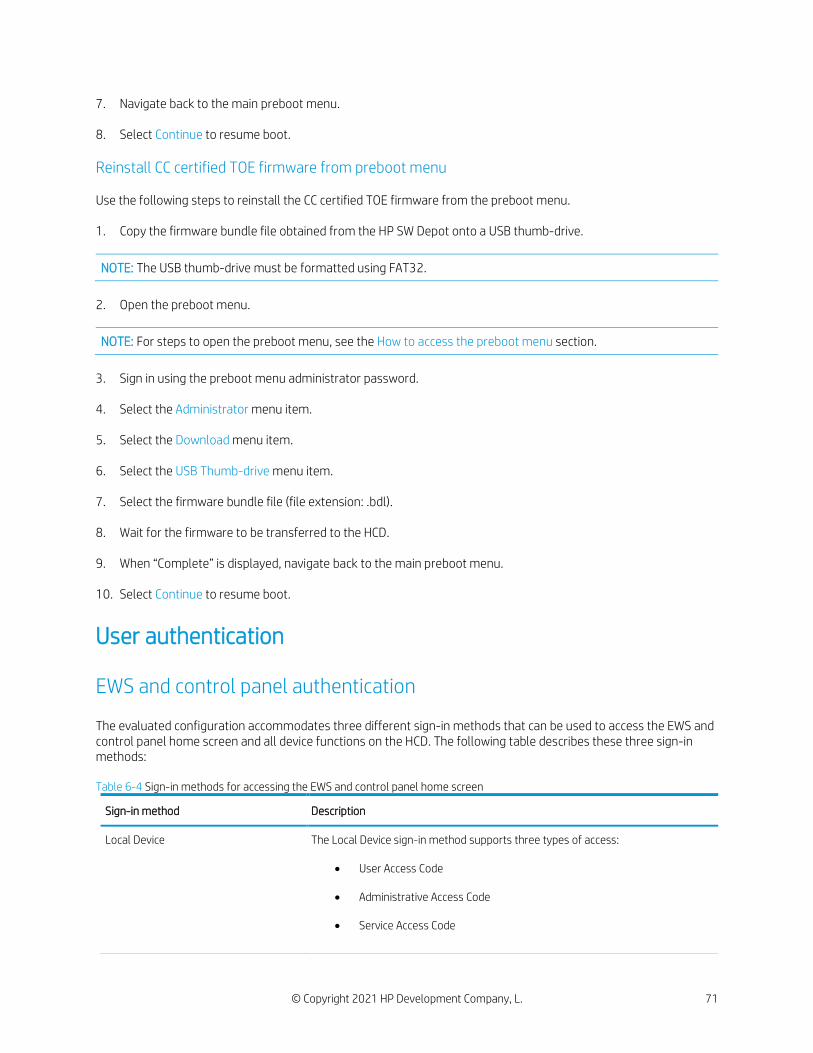
© Copyright 2021 HP Development Company, L. 71
7. Navigate back to the main preboot menu. 8. Select Continue to resume boot.
Reinstall CC certified TOE firmware from preboot menu
Use the following steps to reinstall the CC certified TOE firmware from the preboot menu. 1. Copy the firmware bundle file obtained from the HP SW Depot onto a USB thumb-drive.
NOTE: The USB thumb-drive must be formatted using FAT32.
2. Open the preboot menu.
NOTE: For steps to open the preboot menu, see the How to access the preboot menu section.
3. Sign in using the preboot menu administrator password.
4. Select the Administrator menu item. 5. Select the Download menu item. 6. Select the USB Thumb-drive menu item. 7. Select the firmware bundle file (file extension: .bdl). 8. Wait for the firmware to be transferred to the HCD. 9. When “Complete” is displayed, navigate back to the main preboot menu. 10. Select Continue to resume boot.
User authentication
EWS and control panel authentication
The evaluated configuration accommodates three different sign-in methods that can be used to access the EWS and control panel home screen and all device functions on the HCD. The following table describes these three sign-in methods: Table 6-4 Sign-in methods for accessing the EWS and control panel home screen
Sign-in method Description
Local Device The Local Device sign-in method supports three types of access:
• User Access Code
• Administrative Access Code
• Service Access Code
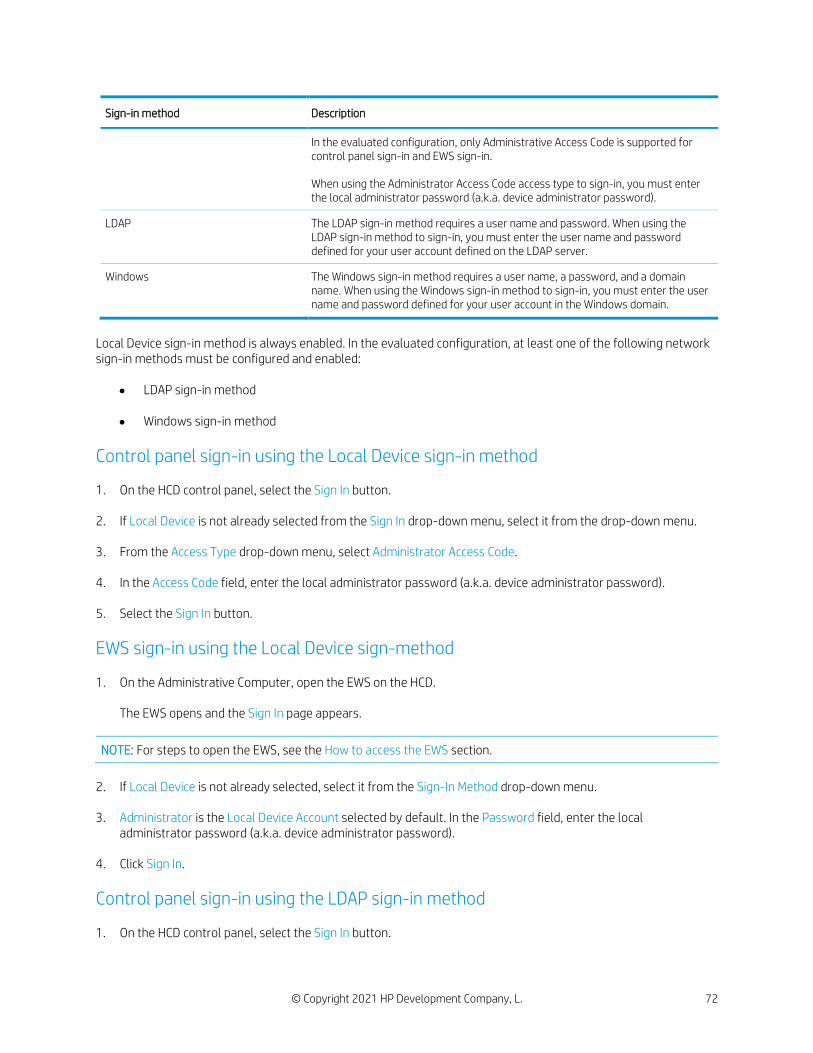
© Copyright 2021 HP Development Company, L. 72
Sign-in method Description
In the evaluated configuration, only Administrative Access Code is supported for control panel sign-in and EWS sign-in. When using the Administrator Access Code access type to sign-in, you must enter the local administrator password (a.k.a. device administrator password).
LDAP The LDAP sign-in method requires a user name and password. When using the LDAP sign-in method to sign-in, you must enter the user name and password defined for your user account defined on the LDAP server.
Windows The Windows sign-in method requires a user name, a password, and a domain name. When using the Windows sign-in method to sign-in, you must enter the user name and password defined for your user account in the Windows domain.
Local Device sign-in method is always enabled. In the evaluated configuration, at least one of the following network sign-in methods must be configured and enabled:
• LDAP sign-in method
• Windows sign-in method
Control panel sign-in using the Local Device sign-in method
1. On the HCD control panel, select the Sign In button. 2. If Local Device is not already selected from the Sign In drop-down menu, select it from the drop-down menu. 3. From the Access Type drop-down menu, select Administrator Access Code. 4. In the Access Code field, enter the local administrator password (a.k.a. device administrator password). 5. Select the Sign In button.
EWS sign-in using the Local Device sign-method
1. On the Administrative Computer, open the EWS on the HCD.
The EWS opens and the Sign In page appears.
NOTE: For steps to open the EWS, see the How to access the EWS section.
2. If Local Device is not already selected, select it from the Sign-In Method drop-down menu. 3. Administrator is the Local Device Account selected by default. In the Password field, enter the local
administrator password (a.k.a. device administrator password). 4. Click Sign In.
Control panel sign-in using the LDAP sign-in method
1. On the HCD control panel, select the Sign In button.
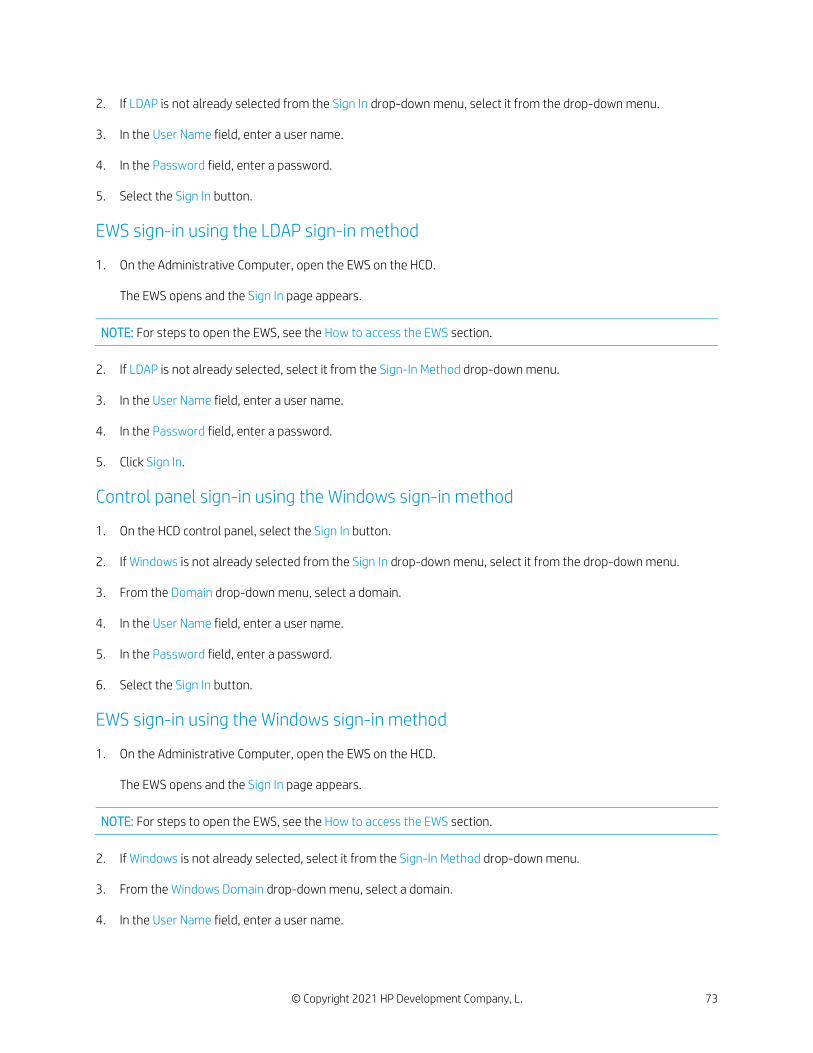
© Copyright 2021 HP Development Company, L. 73
2. If LDAP is not already selected from the Sign In drop-down menu, select it from the drop-down menu. 3. In the User Name field, enter a user name. 4. In the Password field, enter a password. 5. Select the Sign In button.
EWS sign-in using the LDAP sign-in method
1. On the Administrative Computer, open the EWS on the HCD.
The EWS opens and the Sign In page appears.
NOTE: For steps to open the EWS, see the How to access the EWS section.
2. If LDAP is not already selected, select it from the Sign-In Method drop-down menu. 3. In the User Name field, enter a user name. 4. In the Password field, enter a password. 5. Click Sign In.
Control panel sign-in using the Windows sign-in method
1. On the HCD control panel, select the Sign In button. 2. If Windows is not already selected from the Sign In drop-down menu, select it from the drop-down menu. 3. From the Domain drop-down menu, select a domain. 4. In the User Name field, enter a user name. 5. In the Password field, enter a password. 6. Select the Sign In button.
EWS sign-in using the Windows sign-in method
1. On the Administrative Computer, open the EWS on the HCD.
The EWS opens and the Sign In page appears.
NOTE: For steps to open the EWS, see the How to access the EWS section.
2. If Windows is not already selected, select it from the Sign-In Method drop-down menu. 3. From the Windows Domain drop-down menu, select a domain. 4. In the User Name field, enter a user name.
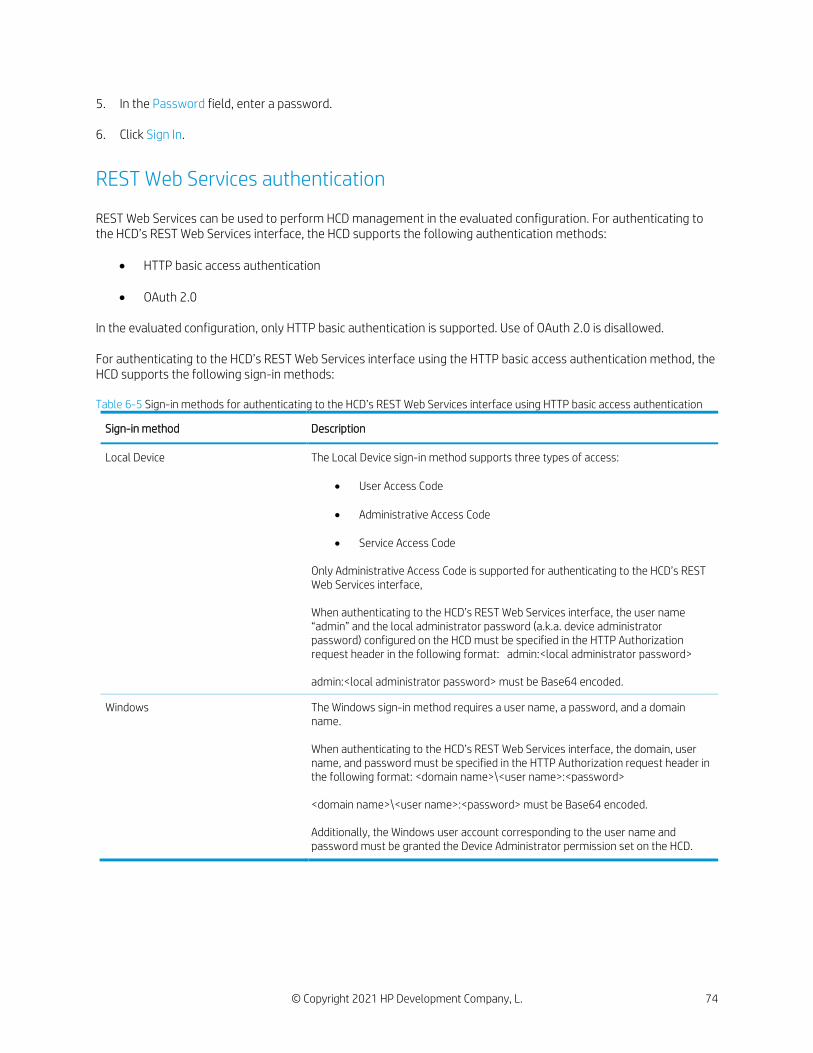
© Copyright 2021 HP Development Company, L. 74
5. In the Password field, enter a password. 6. Click Sign In.
REST Web Services authentication
REST Web Services can be used to perform HCD management in the evaluated configuration. For authenticating to the HCD’s REST Web Services interface, the HCD supports the following authentication methods:
• HTTP basic access authentication
• OAuth 2.0
In the evaluated configuration, only HTTP basic authentication is supported. Use of OAuth 2.0 is disallowed. For authenticating to the HCD’s REST Web Services interface using the HTTP basic access authentication method, the HCD supports the following sign-in methods: Table 6-5 Sign-in methods for authenticating to the HCD’s REST Web Services interface using HTTP basic access authentication
Sign-in method Description
Local Device The Local Device sign-in method supports three types of access:
• User Access Code
• Administrative Access Code
• Service Access Code Only Administrative Access Code is supported for authenticating to the HCD’s REST Web Services interface, When authenticating to the HCD’s REST Web Services interface, the user name “admin” and the local administrator password (a.k.a. device administrator password) configured on the HCD must be specified in the HTTP Authorization request header in the following format: admin:<local administrator password> admin:<local administrator password> must be Base64 encoded.
Windows The Windows sign-in method requires a user name, a password, and a domain name. When authenticating to the HCD’s REST Web Services interface, the domain, user name, and password must be specified in the HTTP Authorization request header in the following format: <domain name>\<user name>:<password> <domain name>\<user name>:<password> must be Base64 encoded. Additionally, the Windows user account corresponding to the user name and password must be granted the Device Administrator permission set on the HCD.
© Copyright 2021 HP Development Company, L. 75
Back up and restore HCD data
The Back up and Restore feature allows you to back up data on the HCD or to restore data files from a previous backup.
Perform a backup
1. Open the General tab of the EWS. 2. Select the Back up and Restore menu item. 3. In the Back up/Restore area, select the Backup radio button. 4. In the UNC Folder Path field, enter the UNC folder path to store the backup file. Do not include the file name in
the UNC Folder Path field. 5. In the Encryption Key field, enter an encryption key.
NOTE: The encryption key will be used to encrypt the backup file. NOTE: The encryption key must contain between 1 and 255 standard characters. For maximum security, do not use a key that spells a word, and include a mixture of keyboard symbols, numbers, and uppercase and lowercase letters
6. In the Windows Domain, User Name, and Password fields, enter the authentication credentials needed to access
the UNC folder path.
7. Click OK.
A progress bar displays, and then a message displays stating that the process is complete.
Restore data
If you need to restore data to the HCD from a backup file, you must follow these steps: 1. Remove the HCD from the production network. 2. Use the backup file to restore data to the HCD. 3. Use the information in this guide to achieve the evaluated configuration. 4. Place the HCD back onto the production network. Use the following steps to restore data to the HCD from a backup file. 1. Open the General tab of the EWS. 2. Select the Back up and Restore menu item. 3. In the Back up/Restore area, select the Restore radio button.
© Copyright 2021 HP Development Company, L. 76
4. In the Backup file to restore field, enter the UNC folder path to the backup file. Include the file name in the Backup file to restore field.
5. In the Encryption Key field, enter the encryption key that was used encrypt the backup file. 6. In the Windows Domain, User Name, and Password fields, enter the authentication credentials needed to access
the UNC folder path.
7. Click OK. 8. Click Restore.
A progress bar displays, and then a message displays stating that the process is complete.
Check version of installed TOE firmware
Use the EWS
Use the following steps to check the installed System firmware and JDI firmware versions. 1. Open the Information tab of the EWS.
2. Select the Configuration Page menu item.
3. In Device Information area, to check the installed System firmware version, locate Firmware Revision:. 4. Open the Networking tab of the EWS.
5. Select the Configuration Page menu item.
6. In the General Information area, to check the installed JDI firmware version, locate Firmware Version:.
Use the control panel
Use the following steps to check the installed System firmware and JDI firmware versions. 1. On the control panel home screen, open the Reports application.
2. Open the Configuration/Status Pages menu item. 3. Select the Configuration Page check box. 4. Touch the ( )or ( ) icons to either view or print the configuration page, respectively. 5. In the Configuration Page, under the Device Information area, locate Firmware Revision: to check the System
firmware version.
6. In the Embedded HP Jetdirect page, under the General Information area, locate Firmware Version: to check the JDI firmware version.

© Copyright 2021 HP Development Company, L. 77
Update the TOE firmware
Use the following steps to update the TOE firmware. 1. Open the General tab of the EWS. 2. Select the Firmware Upgrade menu item. 3. Clear the Automatic Back up/Restore check box.
NOTE: Clearing the Automatic Back up/Restore check box will delete any previously saved automatic backup files of HCD settings.
4. Click Save. 5. In the Install New Firmware area, click Choose File and browse to the product firmware bundle. 6. Click Install. 7. If the TOE firmware version is older than the current TOE firmware version, a Confirmation Page will be appear
prompting you to confirm “rolling back” to an older version of firmware. Click Rollback.
The HCD will turn itself off and then back on. On boot, the HCD will update its firmware.
Manage the HCD security
The following table provides a quick index to the operational guidance in this guide for each management function claimed in FMT_SMF.1 in the Security Target: Table 6-6 Operational guidance index for management functions claimed in FMT_SMF.1
Management function SFR Section in this guide providing the operational guidance
Management of Device Administrator password FMT_MTD.1 5 Configure the HCD > System and network settings (excluding IPsec) > Local administrator password
Management of account lockout policy FMT_MTD.1 5 Configure the HCD > System and network settings (excluding IPsec) > Account policy
Management of minimum length password settings FMT_MTD.1 5 Configure the HCD > System and network settings (excluding IPsec) > Account policy
Management of session inactivity timeouts FMT_MTD.1 5 Configure the HCD > System and network settings (excluding IPsec) settings > Control panel inactivity timeout; 5 Configure the HCD > System and network settings (excluding IPsec) settings > EWS session timeout
Management of permission set associations FMT_MTD.1 5 Configure the HCD > System settings > Access control > Set the default permission set for network users/groups;
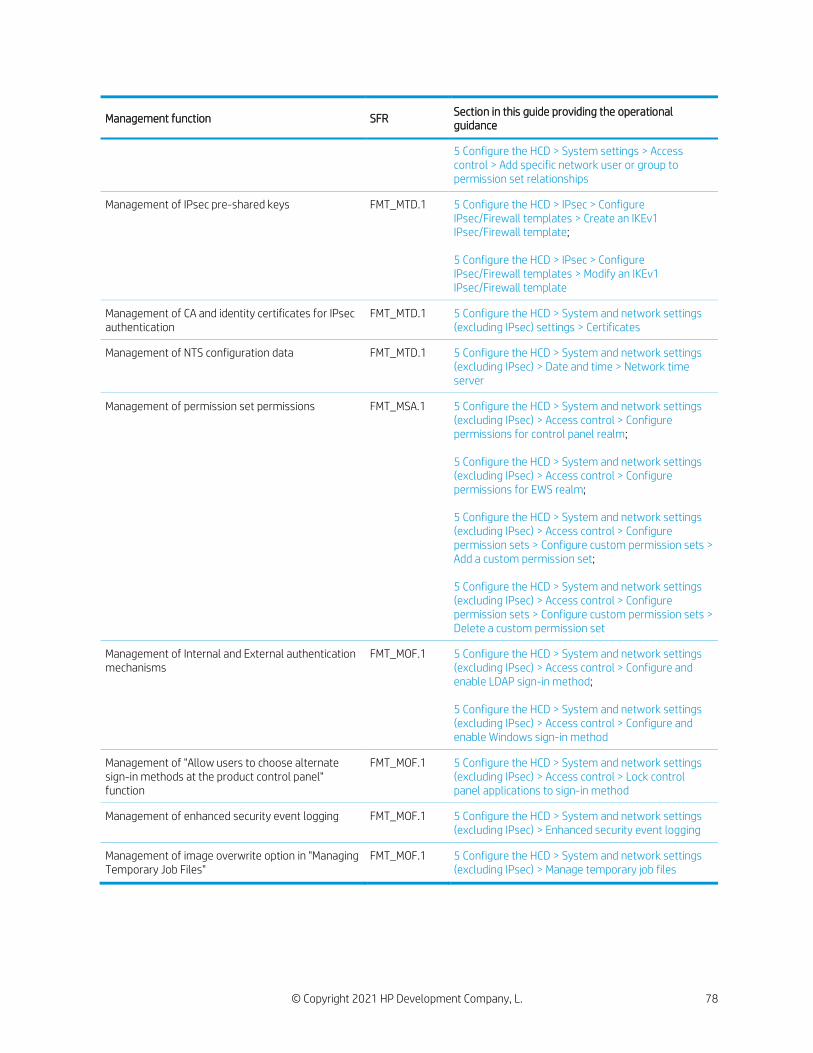
© Copyright 2021 HP Development Company, L. 78
Management function SFR Section in this guide providing the operational guidance
5 Configure the HCD > System settings > Access control > Add specific network user or group to permission set relationships
Management of IPsec pre-shared keys FMT_MTD.1 5 Configure the HCD > IPsec > Configure IPsec/Firewall templates > Create an IKEv1 IPsec/Firewall template; 5 Configure the HCD > IPsec > Configure IPsec/Firewall templates > Modify an IKEv1 IPsec/Firewall template
Management of CA and identity certificates for IPsec authentication
FMT_MTD.1 5 Configure the HCD > System and network settings (excluding IPsec) settings > Certificates
Management of NTS configuration data FMT_MTD.1 5 Configure the HCD > System and network settings (excluding IPsec) > Date and time > Network time server
Management of permission set permissions FMT_MSA.1 5 Configure the HCD > System and network settings (excluding IPsec) > Access control > Configure permissions for control panel realm; 5 Configure the HCD > System and network settings (excluding IPsec) > Access control > Configure permissions for EWS realm; 5 Configure the HCD > System and network settings (excluding IPsec) > Access control > Configure permission sets > Configure custom permission sets > Add a custom permission set; 5 Configure the HCD > System and network settings (excluding IPsec) > Access control > Configure permission sets > Configure custom permission sets > Delete a custom permission set
Management of Internal and External authentication mechanisms
FMT_MOF.1 5 Configure the HCD > System and network settings (excluding IPsec) > Access control > Configure and enable LDAP sign-in method; 5 Configure the HCD > System and network settings (excluding IPsec) > Access control > Configure and enable Windows sign-in method
Management of "Allow users to choose alternate sign-in methods at the product control panel" function
FMT_MOF.1 5 Configure the HCD > System and network settings (excluding IPsec) > Access control > Lock control panel applications to sign-in method
Management of enhanced security event logging FMT_MOF.1 5 Configure the HCD > System and network settings (excluding IPsec) > Enhanced security event logging
Management of image overwrite option in "Managing Temporary Job Files"
FMT_MOF.1 5 Configure the HCD > System and network settings (excluding IPsec) > Manage temporary job files
© Copyright 2021 HP Development Company, L. 79
7 Enhanced security event logging messages
• Enhanced security event logging
• Syslog message format
• Syslog messages
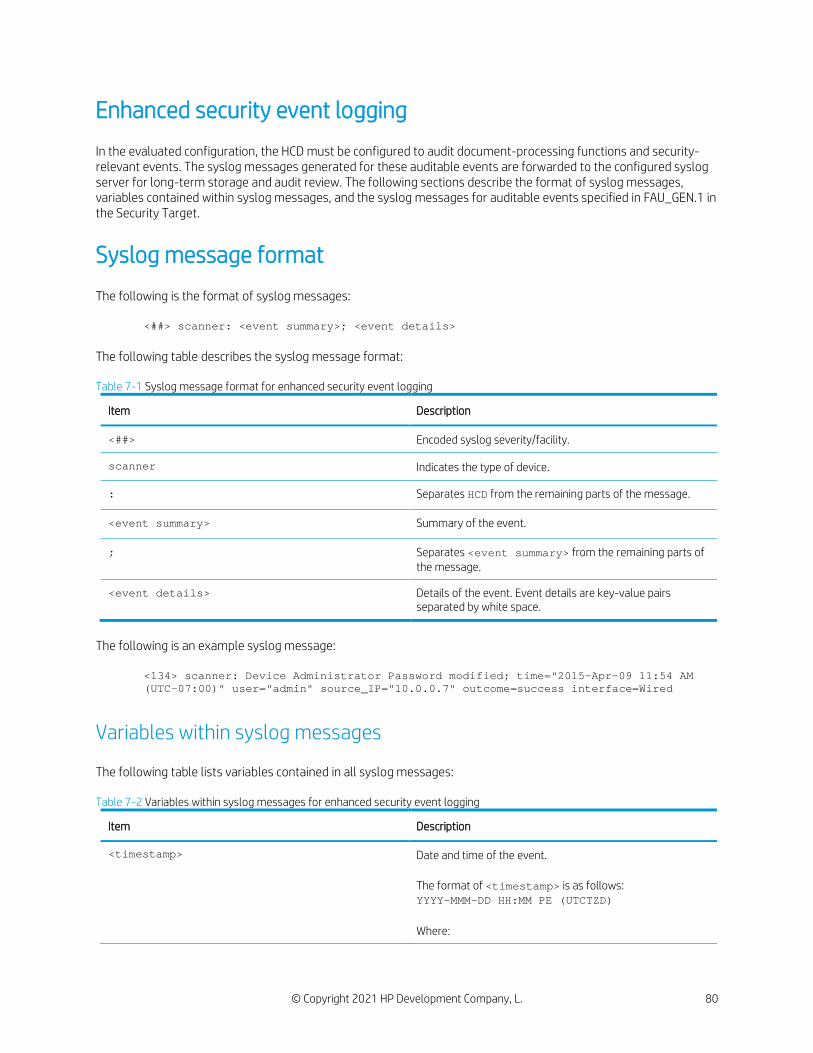
© Copyright 2021 HP Development Company, L. 80
Enhanced security event logging
In the evaluated configuration, the HCD must be configured to audit document-processing functions and security-relevant events. The syslog messages generated for these auditable events are forwarded to the configured syslog server for long-term storage and audit review. The following sections describe the format of syslog messages, variables contained within syslog messages, and the syslog messages for auditable events specified in FAU_GEN.1 in the Security Target.
Syslog message format
The following is the format of syslog messages:
<##> scanner: <event summary>; <event details> The following table describes the syslog message format: Table 7-1 Syslog message format for enhanced security event logging
Item Description
<##> Encoded syslog severity/facility.
scanner Indicates the type of device.
: Separates HCD from the remaining parts of the message.
<event summary> Summary of the event.
; Separates <event summary> from the remaining parts of the message.
<event details> Details of the event. Event details are key-value pairs separated by white space.
The following is an example syslog message:
<134> scanner: Device Administrator Password modified; time="2015-Apr-09 11:54 AM (UTC-07:00)" user="admin" source_IP="10.0.0.7" outcome=success interface=Wired
Variables within syslog messages
The following table lists variables contained in all syslog messages: Table 7-2 Variables within syslog messages for enhanced security event logging
Item Description
<timestamp> Date and time of the event. The format of <timestamp> is as follows: YYYY-MMM-DD HH:MM PE (UTCTZD) Where:
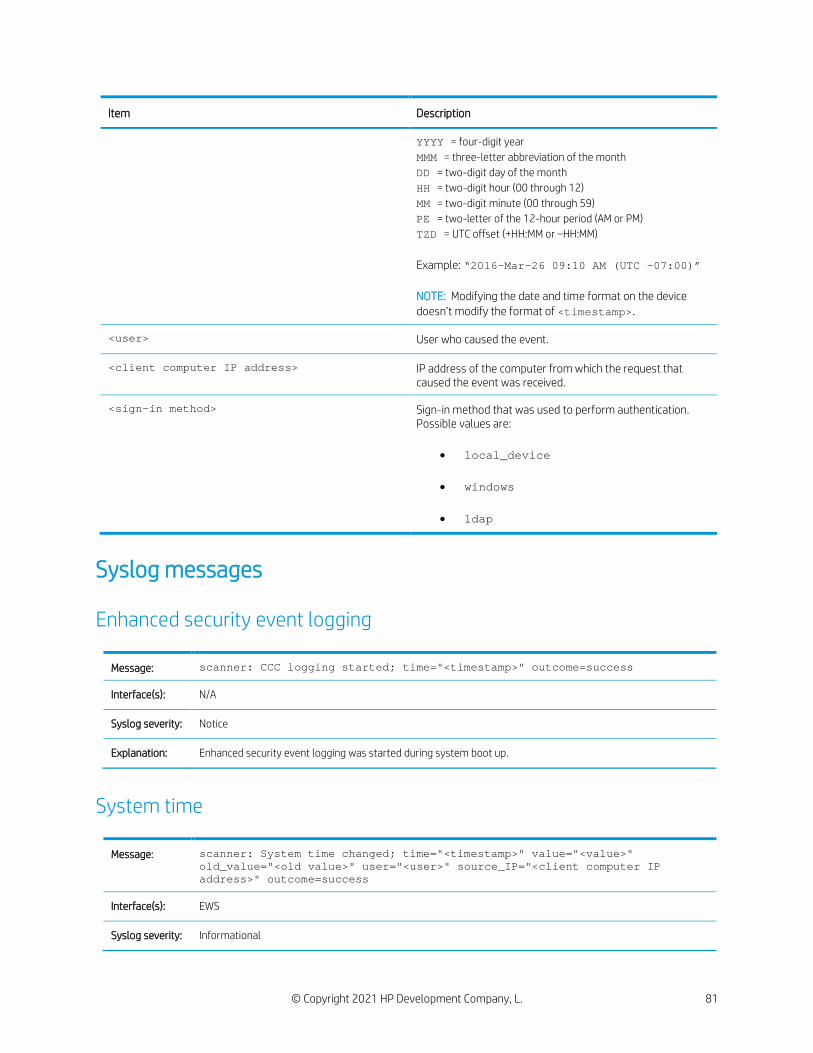
© Copyright 2021 HP Development Company, L. 81
Item Description
YYYY = four-digit year MMM = three-letter abbreviation of the month DD = two-digit day of the month HH = two-digit hour (00 through 12) MM = two-digit minute (00 through 59) PE = two-letter of the 12-hour period (AM or PM) TZD = UTC offset (+HH:MM or –HH:MM) Example: “2016-Mar-26 09:10 AM (UTC -07:00)” NOTE: Modifying the date and time format on the device doesn’t modify the format of <timestamp>.
<user> User who caused the event.
<client computer IP address> IP address of the computer from which the request that caused the event was received.
<sign-in method> Sign-in method that was used to perform authentication. Possible values are:
• local_device
• windows
• ldap
Syslog messages
Enhanced security event logging
Message: scanner: CCC logging started; time="<timestamp>" outcome=success
Interface(s): N/A
Syslog severity: Notice
Explanation: Enhanced security event logging was started during system boot up.
System time
Message: scanner: System time changed; time="<timestamp>" value="<value>" old_value="<old value>" user="<user>" source_IP="<client computer IP address>" outcome=success
Interface(s): EWS
Syslog severity: Informational
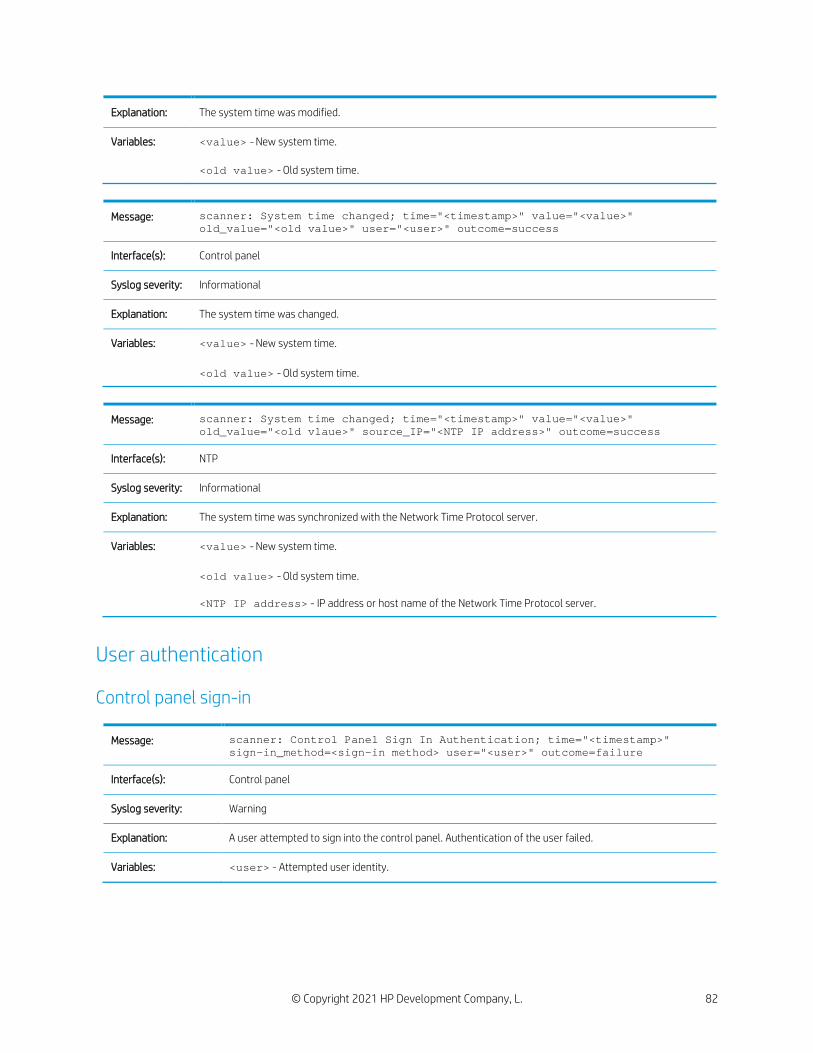
© Copyright 2021 HP Development Company, L. 82
Explanation: The system time was modified.
Variables: <value> - New system time. <old value> - Old system time.
Message: scanner: System time changed; time="<timestamp>" value="<value>" old_value="<old value>" user="<user>" outcome=success
Interface(s): Control panel
Syslog severity: Informational
Explanation: The system time was changed.
Variables: <value> - New system time. <old value> - Old system time.
Message: scanner: System time changed; time="<timestamp>" value="<value>" old_value="<old vlaue>" source_IP="<NTP IP address>" outcome=success
Interface(s): NTP
Syslog severity: Informational
Explanation: The system time was synchronized with the Network Time Protocol server.
Variables: <value> - New system time. <old value> - Old system time. <NTP IP address> - IP address or host name of the Network Time Protocol server.
User authentication
Control panel sign-in
Message: scanner: Control Panel Sign In Authentication; time="<timestamp>" sign-in_method=<sign-in method> user="<user>" outcome=failure
Interface(s): Control panel
Syslog severity: Warning
Explanation: A user attempted to sign into the control panel. Authentication of the user failed.
Variables: <user> - Attempted user identity.
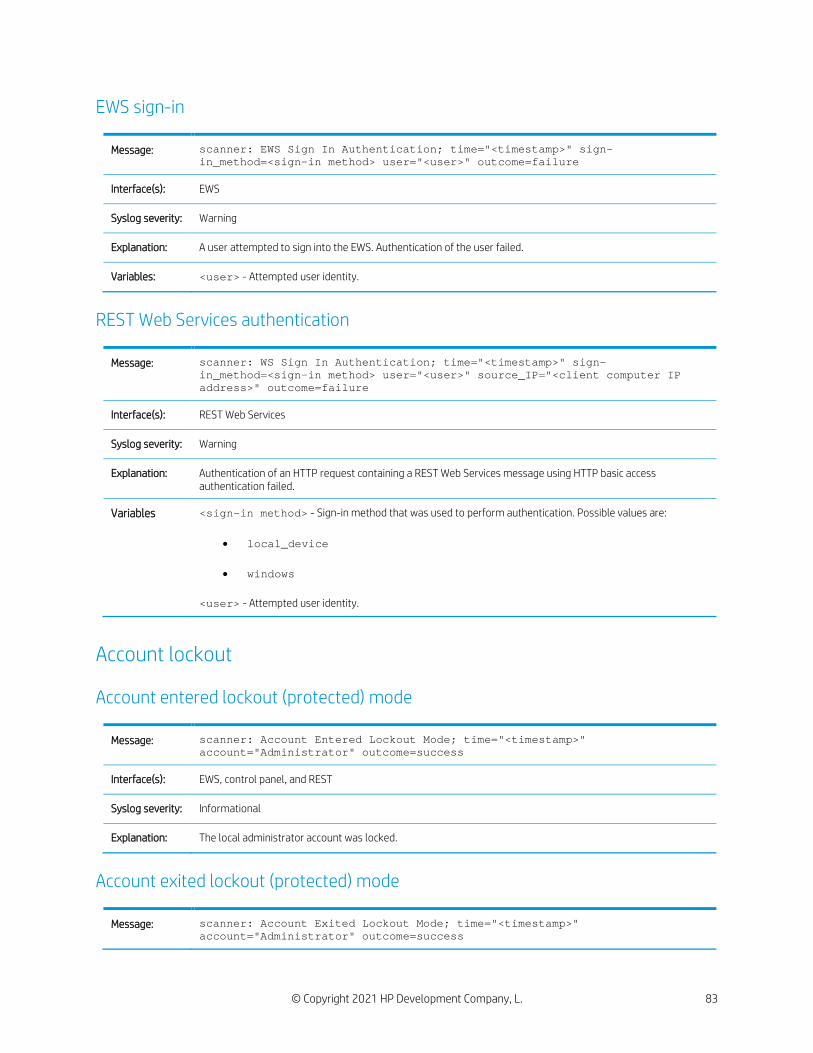
© Copyright 2021 HP Development Company, L. 83
EWS sign-in
Message: scanner: EWS Sign In Authentication; time="<timestamp>" sign-in_method=<sign-in method> user="<user>" outcome=failure
Interface(s): EWS
Syslog severity: Warning
Explanation: A user attempted to sign into the EWS. Authentication of the user failed.
Variables: <user> - Attempted user identity.
REST Web Services authentication
Message: scanner: WS Sign In Authentication; time="<timestamp>" sign-in_method=<sign-in method> user="<user>" source_IP="<client computer IP address>" outcome=failure
Interface(s): REST Web Services
Syslog severity: Warning
Explanation: Authentication of an HTTP request containing a REST Web Services message using HTTP basic access authentication failed.
Variables <sign-in method> - Sign-in method that was used to perform authentication. Possible values are:
• local_device
• windows <user> - Attempted user identity.
Account lockout
Account entered lockout (protected) mode
Message: scanner: Account Entered Lockout Mode; time="<timestamp>" account="Administrator" outcome=success
Interface(s): EWS, control panel, and REST
Syslog severity: Informational
Explanation: The local administrator account was locked.
Account exited lockout (protected) mode
Message: scanner: Account Exited Lockout Mode; time="<timestamp>" account="Administrator" outcome=success
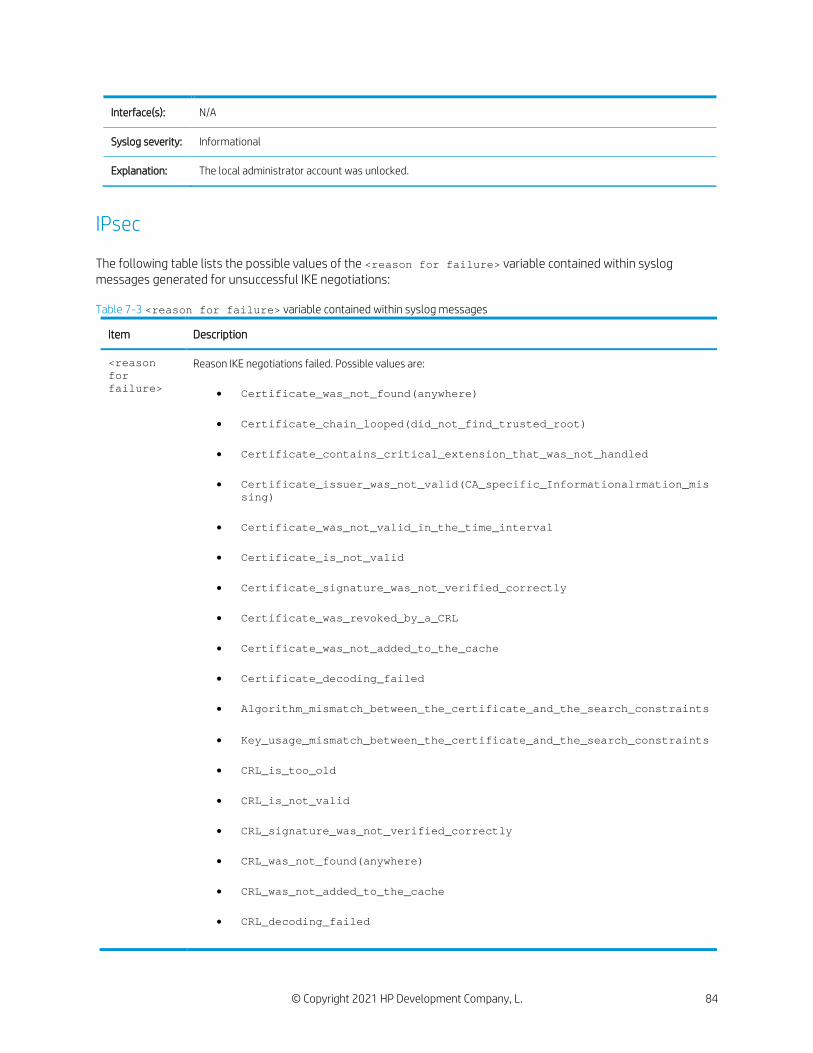
© Copyright 2021 HP Development Company, L. 84
Interface(s): N/A
Syslog severity: Informational
Explanation: The local administrator account was unlocked.
IPsec
The following table lists the possible values of the <reason for failure> variable contained within syslog messages generated for unsuccessful IKE negotiations: Table 7-3 <reason for failure> variable contained within syslog messages
Item Description
<reason for failure>
Reason IKE negotiations failed. Possible values are:
• Certificate_was_not_found(anywhere)
• Certificate_chain_looped(did_not_find_trusted_root)
• Certificate_contains_critical_extension_that_was_not_handled
• Certificate_issuer_was_not_valid(CA_specific_Informationalrmation_missing)
• Certificate_was_not_valid_in_the_time_interval
• Certificate_is_not_valid
• Certificate_signature_was_not_verified_correctly
• Certificate_was_revoked_by_a_CRL
• Certificate_was_not_added_to_the_cache
• Certificate_decoding_failed
• Algorithm_mismatch_between_the_certificate_and_the_search_constraints
• Key_usage_mismatch_between_the_certificate_and_the_search_constraints
• CRL_is_too_old
• CRL_is_not_valid
• CRL_signature_was_not_verified_correctly
• CRL_was_not_found(anywhere)
• CRL_was_not_added_to_the_cache
• CRL_decoding_failed
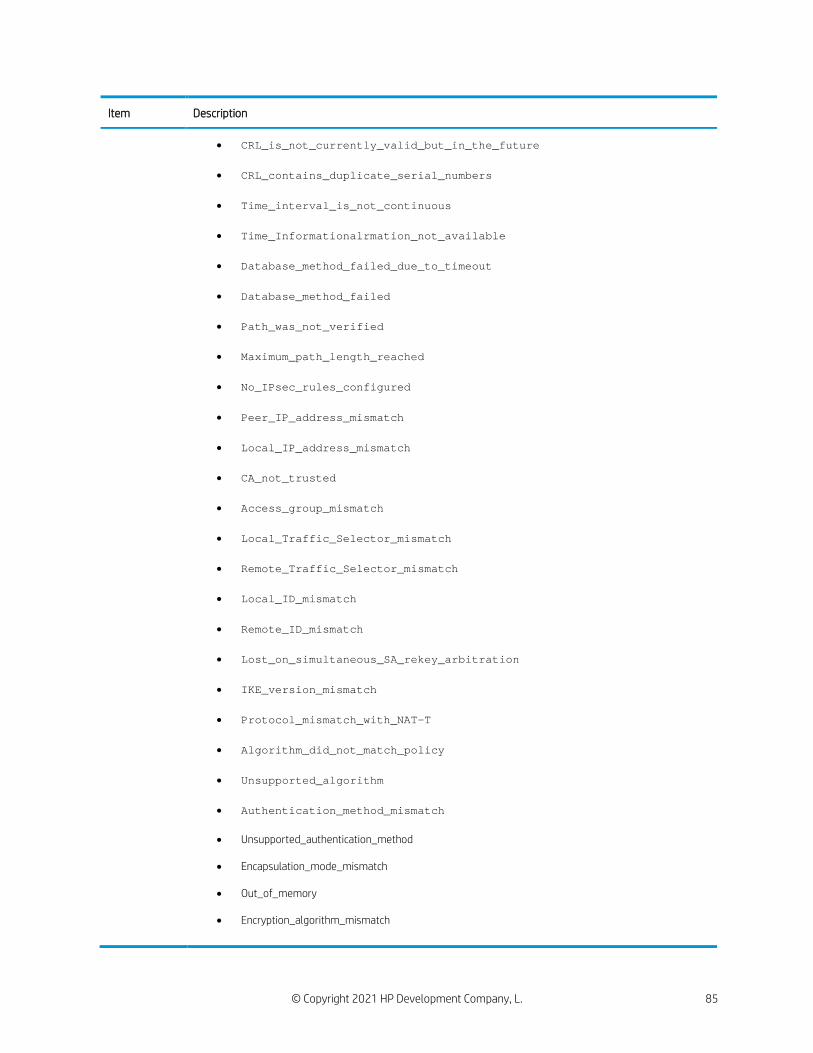
© Copyright 2021 HP Development Company, L. 85
Item Description
• CRL_is_not_currently_valid_but_in_the_future
• CRL_contains_duplicate_serial_numbers
• Time_interval_is_not_continuous
• Time_Informationalrmation_not_available
• Database_method_failed_due_to_timeout
• Database_method_failed
• Path_was_not_verified
• Maximum_path_length_reached
• No_IPsec_rules_configured
• Peer_IP_address_mismatch
• Local_IP_address_mismatch
• CA_not_trusted
• Access_group_mismatch
• Local_Traffic_Selector_mismatch
• Remote_Traffic_Selector_mismatch
• Local_ID_mismatch
• Remote_ID_mismatch
• Lost_on_simultaneous_SA_rekey_arbitration
• IKE_version_mismatch
• Protocol_mismatch_with_NAT-T
• Algorithm_did_not_match_policy
• Unsupported_algorithm
• Authentication_method_mismatch
• Unsupported_authentication_method
• Encapsulation_mode_mismatch
• Out_of_memory
• Encryption_algorithm_mismatch
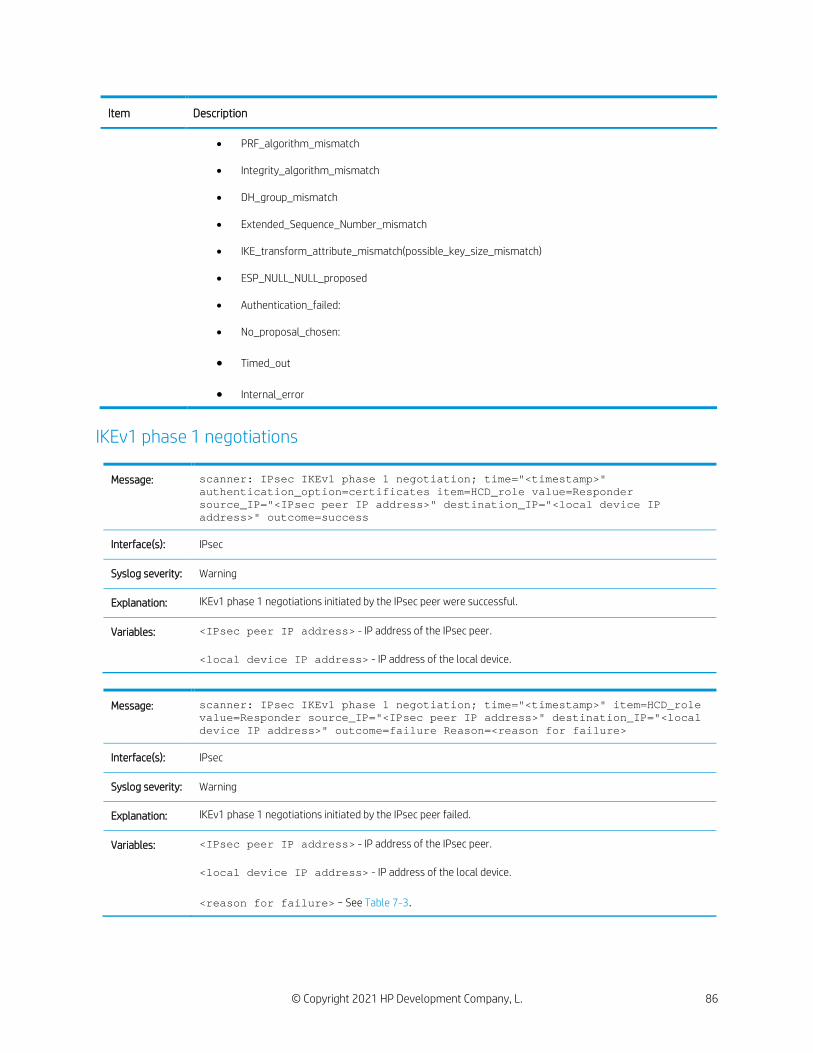
© Copyright 2021 HP Development Company, L. 86
Item Description
• PRF_algorithm_mismatch
• Integrity_algorithm_mismatch
• DH_group_mismatch
• Extended_Sequence_Number_mismatch
• IKE_transform_attribute_mismatch(possible_key_size_mismatch)
• ESP_NULL_NULL_proposed
• Authentication_failed:
• No_proposal_chosen:
• Timed_out
• Internal_error
IKEv1 phase 1 negotiations
Message: scanner: IPsec IKEv1 phase 1 negotiation; time="<timestamp>" authentication_option=certificates item=HCD_role value=Responder source_IP="<IPsec peer IP address>" destination_IP="<local device IP address>" outcome=success
Interface(s): IPsec
Syslog severity: Warning
Explanation: IKEv1 phase 1 negotiations initiated by the IPsec peer were successful.
Variables: <IPsec peer IP address> - IP address of the IPsec peer. <local device IP address> - IP address of the local device.
Message: scanner: IPsec IKEv1 phase 1 negotiation; time="<timestamp>" item=HCD_role value=Responder source_IP="<IPsec peer IP address>" destination_IP="<local device IP address>" outcome=failure Reason=<reason for failure>
Interface(s): IPsec
Syslog severity: Warning
Explanation: IKEv1 phase 1 negotiations initiated by the IPsec peer failed.
Variables: <IPsec peer IP address> - IP address of the IPsec peer. <local device IP address> - IP address of the local device. <reason for failure> - See Table 7-3.
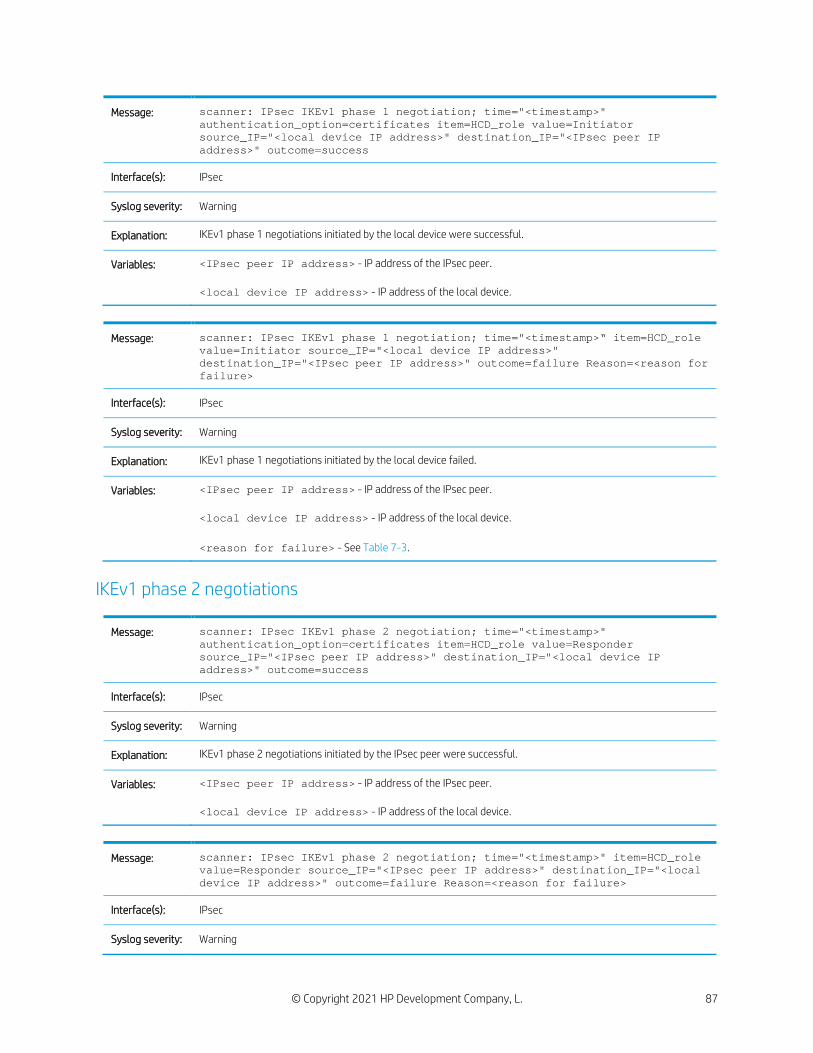
© Copyright 2021 HP Development Company, L. 87
Message: scanner: IPsec IKEv1 phase 1 negotiation; time="<timestamp>" authentication_option=certificates item=HCD_role value=Initiator source_IP="<local device IP address>" destination_IP="<IPsec peer IP address>" outcome=success
Interface(s): IPsec
Syslog severity: Warning
Explanation: IKEv1 phase 1 negotiations initiated by the local device were successful.
Variables: <IPsec peer IP address> - IP address of the IPsec peer. <local device IP address> - IP address of the local device.
Message: scanner: IPsec IKEv1 phase 1 negotiation; time="<timestamp>“ item=HCD_role value=Initiator source_IP="<local device IP address>" destination_IP="<IPsec peer IP address>" outcome=failure Reason=<reason for failure>
Interface(s): IPsec
Syslog severity: Warning
Explanation: IKEv1 phase 1 negotiations initiated by the local device failed.
Variables: <IPsec peer IP address> - IP address of the IPsec peer. <local device IP address> - IP address of the local device. <reason for failure> - See Table 7-3.
IKEv1 phase 2 negotiations
Message: scanner: IPsec IKEv1 phase 2 negotiation; time="<timestamp>" authentication_option=certificates item=HCD_role value=Responder source_IP="<IPsec peer IP address>" destination_IP="<local device IP address>" outcome=success
Interface(s): IPsec
Syslog severity: Warning
Explanation: IKEv1 phase 2 negotiations initiated by the IPsec peer were successful.
Variables: <IPsec peer IP address> - IP address of the IPsec peer. <local device IP address> - IP address of the local device.
Message: scanner: IPsec IKEv1 phase 2 negotiation; time="<timestamp>" item=HCD_role value=Responder source_IP="<IPsec peer IP address>" destination_IP="<local device IP address>" outcome=failure Reason=<reason for failure>
Interface(s): IPsec
Syslog severity: Warning
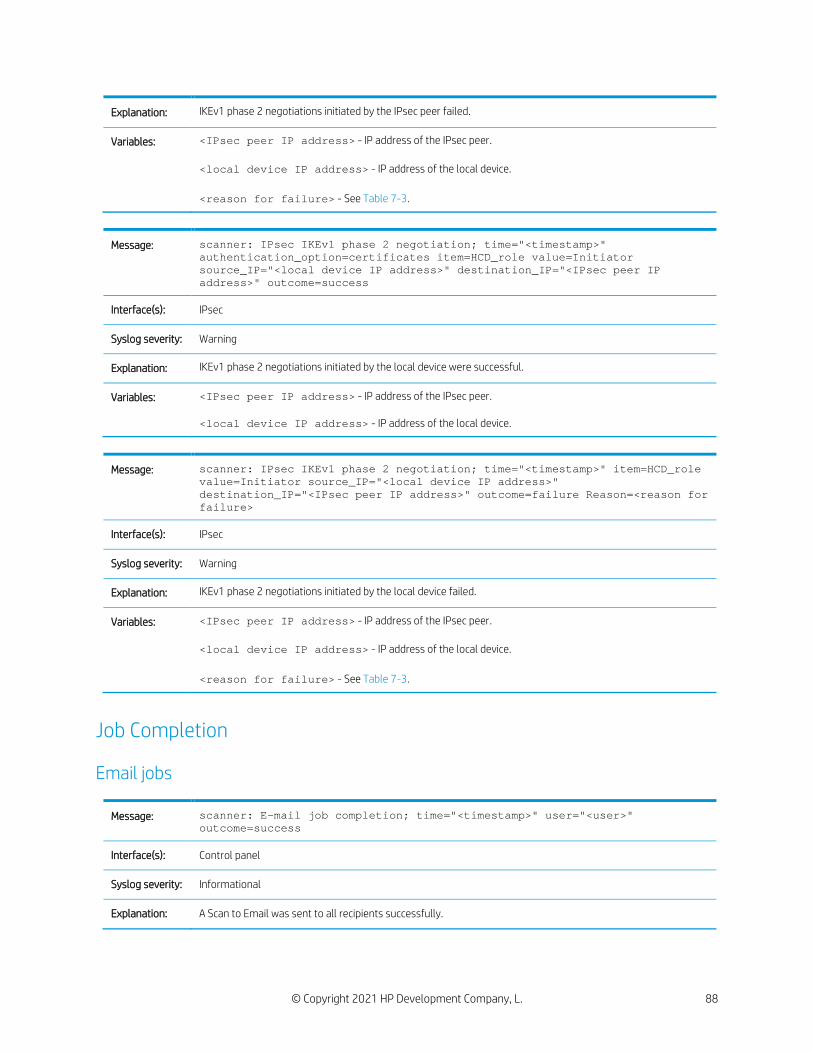
© Copyright 2021 HP Development Company, L. 88
Explanation: IKEv1 phase 2 negotiations initiated by the IPsec peer failed.
Variables: <IPsec peer IP address> - IP address of the IPsec peer. <local device IP address> - IP address of the local device. <reason for failure> - See Table 7-3.
Message: scanner: IPsec IKEv1 phase 2 negotiation; time="<timestamp>" authentication_option=certificates item=HCD_role value=Initiator source_IP="<local device IP address>" destination_IP="<IPsec peer IP address>" outcome=success
Interface(s): IPsec
Syslog severity: Warning
Explanation: IKEv1 phase 2 negotiations initiated by the local device were successful.
Variables: <IPsec peer IP address> - IP address of the IPsec peer. <local device IP address> - IP address of the local device.
Message: scanner: IPsec IKEv1 phase 2 negotiation; time="<timestamp>" item=HCD_role value=Initiator source_IP="<local device IP address>" destination_IP="<IPsec peer IP address>" outcome=failure Reason=<reason for failure>
Interface(s): IPsec
Syslog severity: Warning
Explanation: IKEv1 phase 2 negotiations initiated by the local device failed.
Variables: <IPsec peer IP address> - IP address of the IPsec peer. <local device IP address> - IP address of the local device. <reason for failure> - See Table 7-3.
Job Completion
Email jobs
Message: scanner: E-mail job completion; time="<timestamp>" user="<user>" outcome=success
Interface(s): Control panel
Syslog severity: Informational
Explanation: A Scan to Email was sent to all recipients successfully.
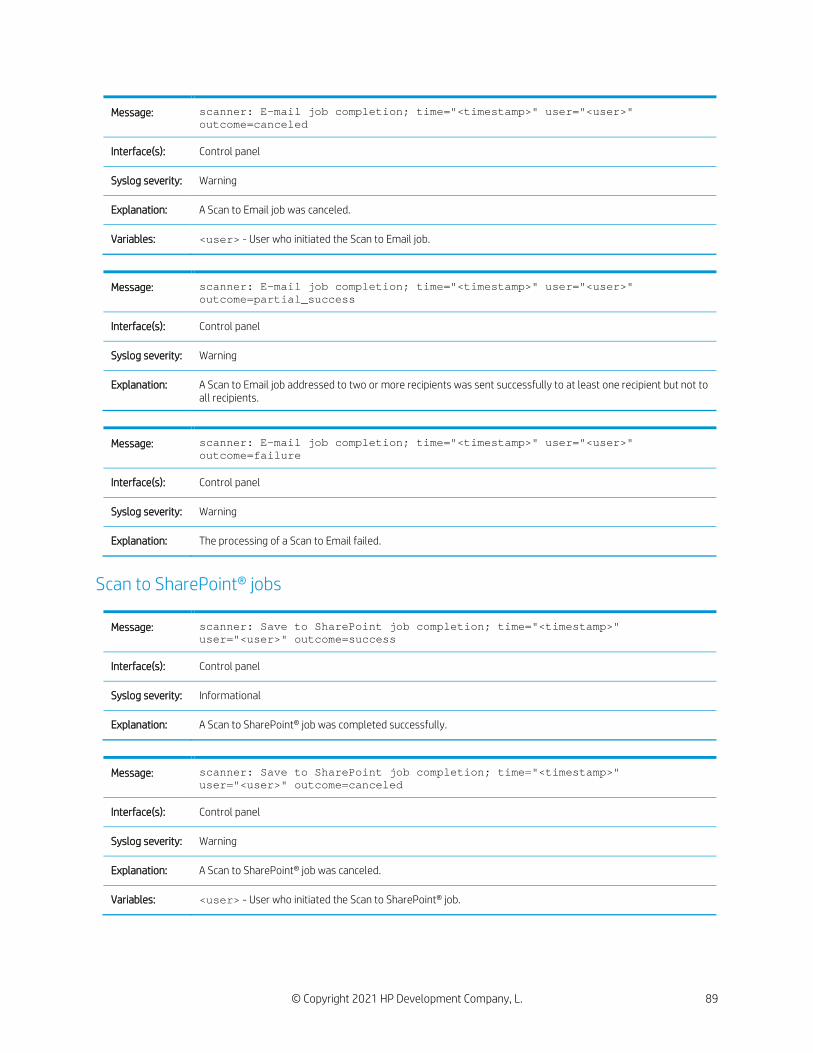
© Copyright 2021 HP Development Company, L. 89
Message: scanner: E-mail job completion; time="<timestamp>" user="<user>" outcome=canceled
Interface(s): Control panel
Syslog severity: Warning
Explanation: A Scan to Email job was canceled.
Variables: <user> - User who initiated the Scan to Email job.
Message: scanner: E-mail job completion; time="<timestamp>" user="<user>" outcome=partial_success
Interface(s): Control panel
Syslog severity: Warning
Explanation: A Scan to Email job addressed to two or more recipients was sent successfully to at least one recipient but not to all recipients.
Message: scanner: E-mail job completion; time="<timestamp>" user="<user>" outcome=failure
Interface(s): Control panel
Syslog severity: Warning
Explanation: The processing of a Scan to Email failed.
Scan to SharePoint® jobs
Message: scanner: Save to SharePoint job completion; time="<timestamp>" user="<user>" outcome=success
Interface(s): Control panel
Syslog severity: Informational
Explanation: A Scan to SharePoint® job was completed successfully.
Message: scanner: Save to SharePoint job completion; time="<timestamp>" user="<user>" outcome=canceled
Interface(s): Control panel
Syslog severity: Warning
Explanation: A Scan to SharePoint® job was canceled.
Variables: <user> - User who initiated the Scan to SharePoint® job.
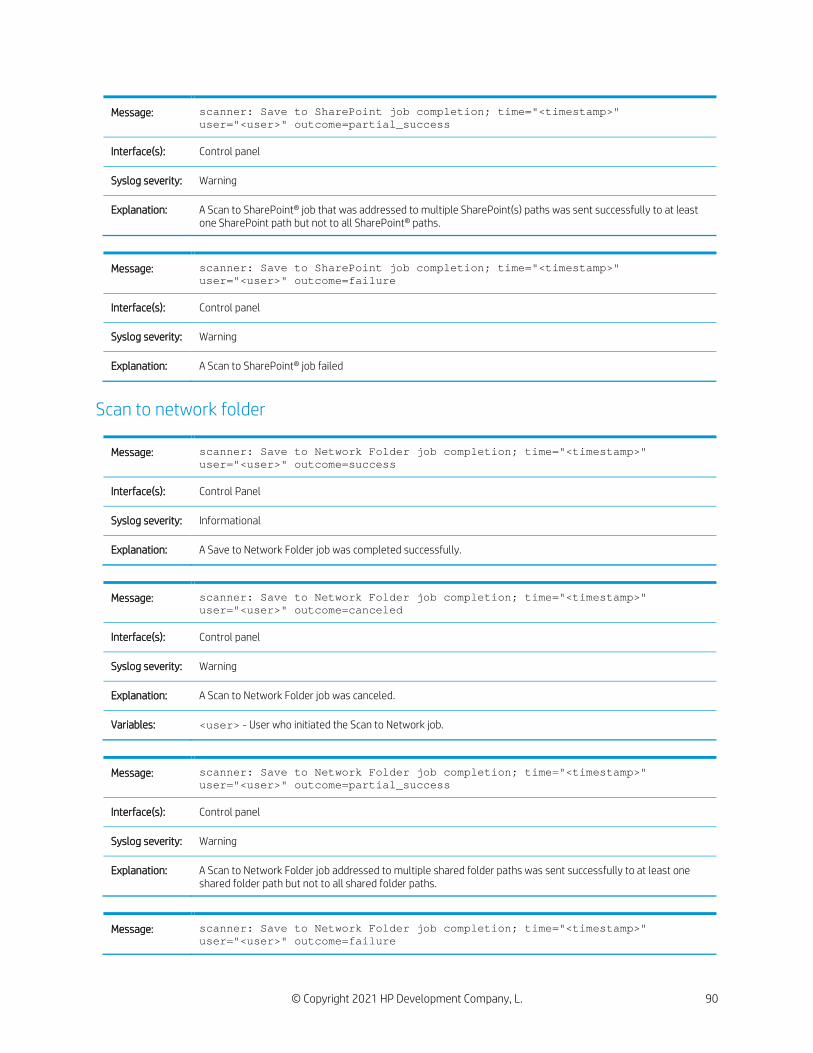
© Copyright 2021 HP Development Company, L. 90
Message: scanner: Save to SharePoint job completion; time="<timestamp>" user="<user>" outcome=partial_success
Interface(s): Control panel
Syslog severity: Warning
Explanation: A Scan to SharePoint® job that was addressed to multiple SharePoint(s) paths was sent successfully to at least one SharePoint path but not to all SharePoint® paths.
Message: scanner: Save to SharePoint job completion; time="<timestamp>" user="<user>" outcome=failure
Interface(s): Control panel
Syslog severity: Warning
Explanation: A Scan to SharePoint® job failed
Scan to network folder
Message: scanner: Save to Network Folder job completion; time="<timestamp>" user="<user>" outcome=success
Interface(s): Control Panel
Syslog severity: Informational
Explanation: A Save to Network Folder job was completed successfully.
Message: scanner: Save to Network Folder job completion; time="<timestamp>" user="<user>" outcome=canceled
Interface(s): Control panel
Syslog severity: Warning
Explanation: A Scan to Network Folder job was canceled.
Variables: <user> - User who initiated the Scan to Network job.
Message: scanner: Save to Network Folder job completion; time="<timestamp>" user="<user>" outcome=partial_success
Interface(s): Control panel
Syslog severity: Warning
Explanation: A Scan to Network Folder job addressed to multiple shared folder paths was sent successfully to at least one shared folder path but not to all shared folder paths.
Message: scanner: Save to Network Folder job completion; time="<timestamp>" user="<user>" outcome=failure
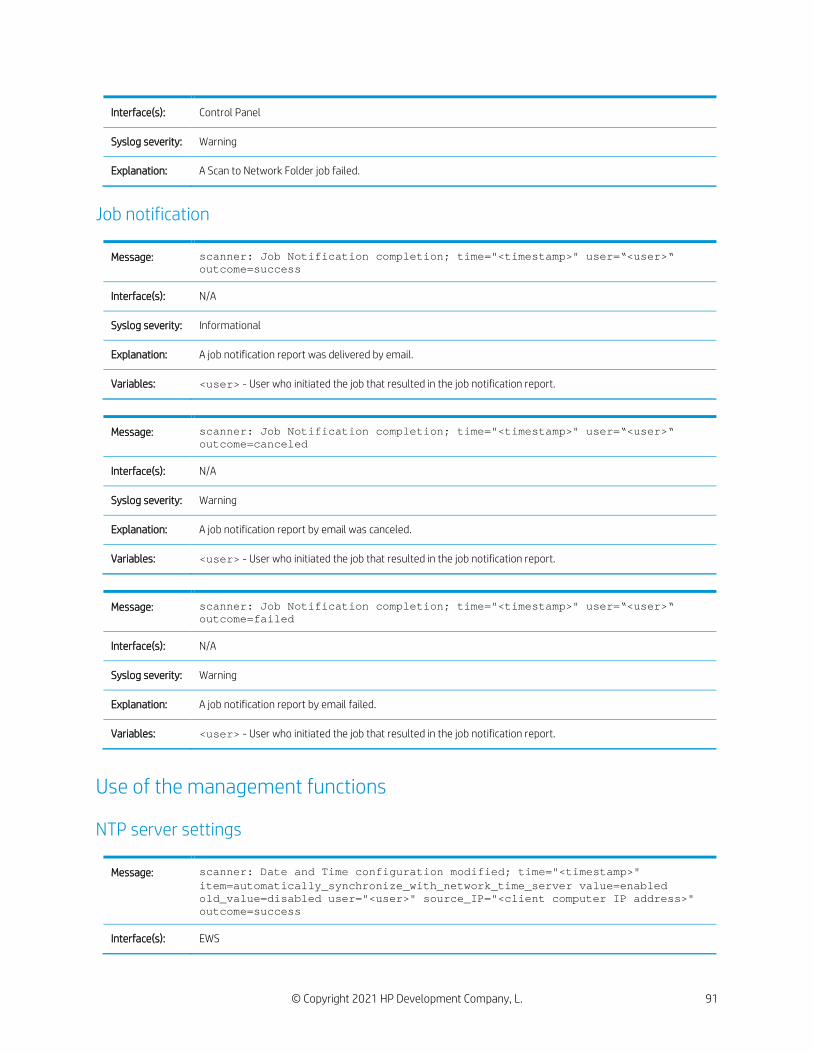
© Copyright 2021 HP Development Company, L. 91
Interface(s): Control Panel
Syslog severity: Warning
Explanation: A Scan to Network Folder job failed.
Job notification
Message: scanner: Job Notification completion; time="<timestamp>" user=“<user>“ outcome=success
Interface(s): N/A
Syslog severity: Informational
Explanation: A job notification report was delivered by email.
Variables: <user> - User who initiated the job that resulted in the job notification report.
Message: scanner: Job Notification completion; time="<timestamp>" user=“<user>“ outcome=canceled
Interface(s): N/A
Syslog severity: Warning
Explanation: A job notification report by email was canceled.
Variables: <user> - User who initiated the job that resulted in the job notification report.
Message: scanner: Job Notification completion; time="<timestamp>" user=“<user>“ outcome=failed
Interface(s): N/A
Syslog severity: Warning
Explanation: A job notification report by email failed.
Variables: <user> - User who initiated the job that resulted in the job notification report.
Use of the management functions
NTP server settings
Message: scanner: Date and Time configuration modified; time="<timestamp>" item=automatically_synchronize_with_network_time_server value=enabled old_value=disabled user="<user>" source_IP="<client computer IP address>" outcome=success
Interface(s): EWS
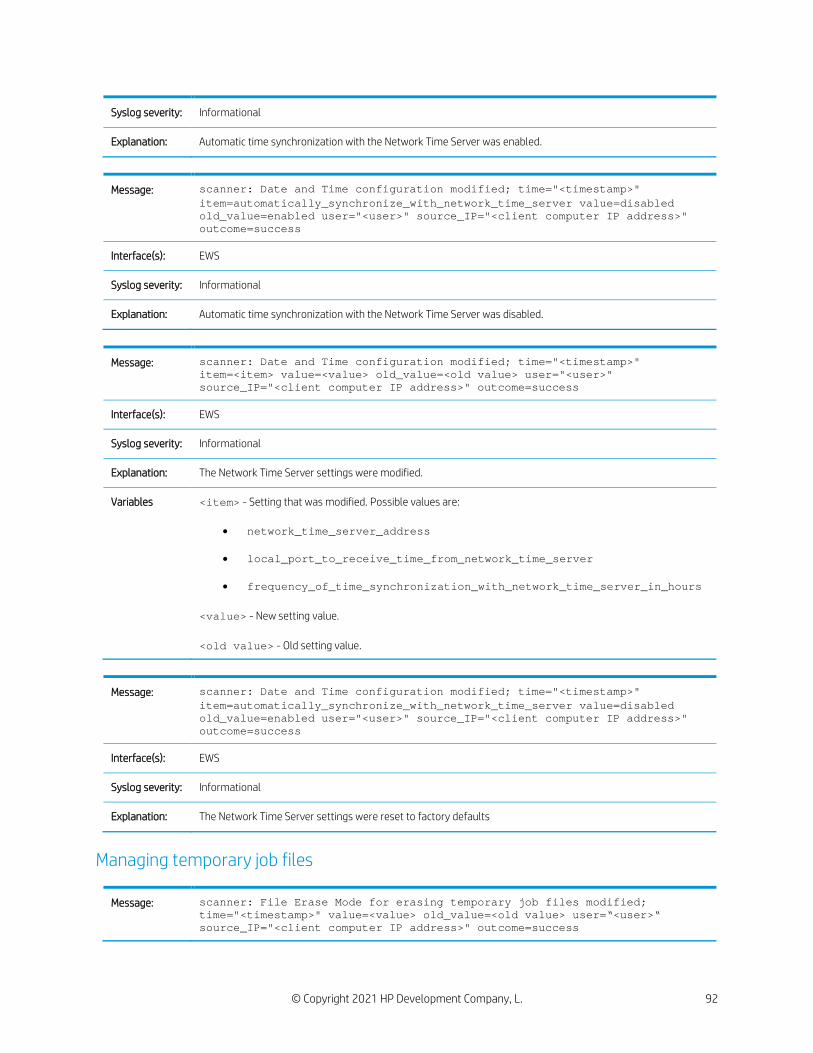
© Copyright 2021 HP Development Company, L. 92
Syslog severity: Informational
Explanation: Automatic time synchronization with the Network Time Server was enabled.
Message: scanner: Date and Time configuration modified; time="<timestamp>" item=automatically_synchronize_with_network_time_server value=disabled old_value=enabled user="<user>" source_IP="<client computer IP address>" outcome=success
Interface(s): EWS
Syslog severity: Informational
Explanation: Automatic time synchronization with the Network Time Server was disabled.
Message: scanner: Date and Time configuration modified; time="<timestamp>" item=<item> value=<value> old_value=<old value> user="<user>" source_IP="<client computer IP address>" outcome=success
Interface(s): EWS
Syslog severity: Informational
Explanation: The Network Time Server settings were modified.
Variables <item> - Setting that was modified. Possible values are:
• network_time_server_address
• local_port_to_receive_time_from_network_time_server
• frequency_of_time_synchronization_with_network_time_server_in_hours <value> - New setting value. <old value> - Old setting value.
Message: scanner: Date and Time configuration modified; time="<timestamp>" item=automatically_synchronize_with_network_time_server value=disabled old_value=enabled user="<user>" source_IP="<client computer IP address>" outcome=success
Interface(s): EWS
Syslog severity: Informational
Explanation: The Network Time Server settings were reset to factory defaults
Managing temporary job files
Message: scanner: File Erase Mode for erasing temporary job files modified; time="<timestamp>" value=<value> old_value=<old value> user=“<user>“ source_IP="<client computer IP address>" outcome=success
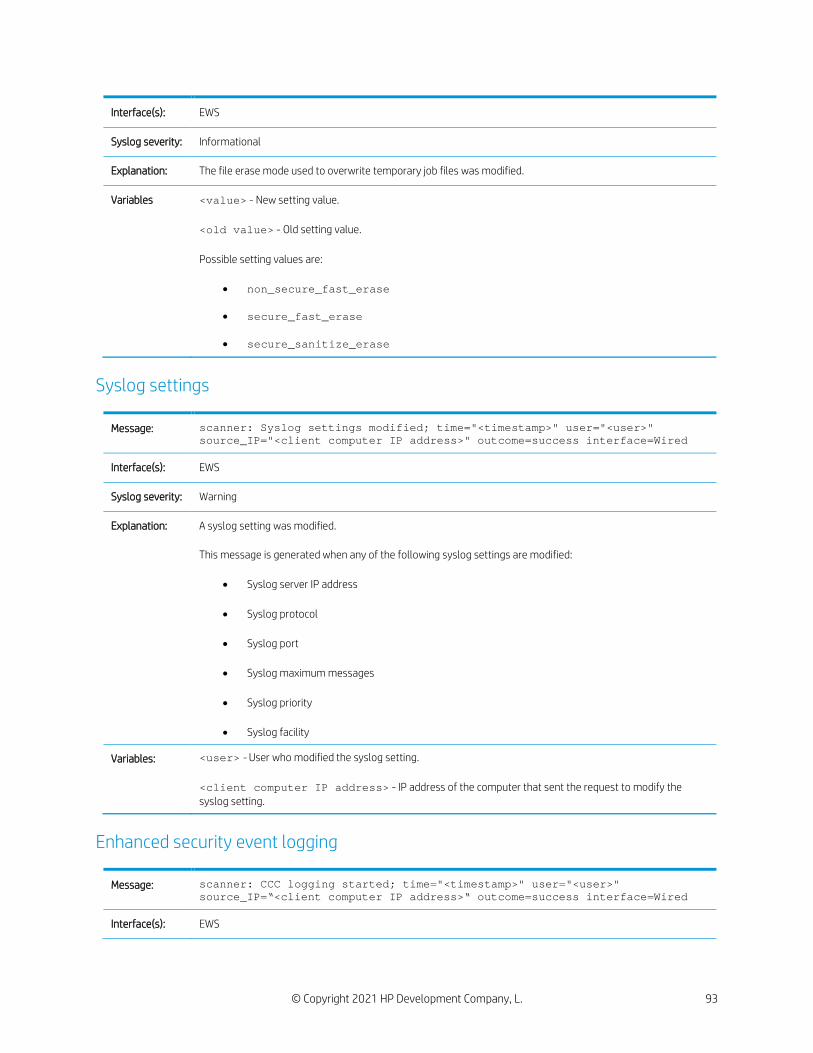
© Copyright 2021 HP Development Company, L. 93
Interface(s): EWS
Syslog severity: Informational
Explanation: The file erase mode used to overwrite temporary job files was modified.
Variables <value> - New setting value. <old value> - Old setting value. Possible setting values are:
• non_secure_fast_erase
• secure_fast_erase
• secure_sanitize_erase
Syslog settings
Message: scanner: Syslog settings modified; time="<timestamp>" user="<user>" source_IP="<client computer IP address>" outcome=success interface=Wired
Interface(s): EWS
Syslog severity: Warning
Explanation: A syslog setting was modified. This message is generated when any of the following syslog settings are modified:
• Syslog server IP address
• Syslog protocol
• Syslog port
• Syslog maximum messages
• Syslog priority
• Syslog facility
Variables: <user> - User who modified the syslog setting. <client computer IP address> - IP address of the computer that sent the request to modify the syslog setting.
Enhanced security event logging
Message: scanner: CCC logging started; time="<timestamp>" user="<user>" source_IP=“<client computer IP address>“ outcome=success interface=Wired
Interface(s): EWS
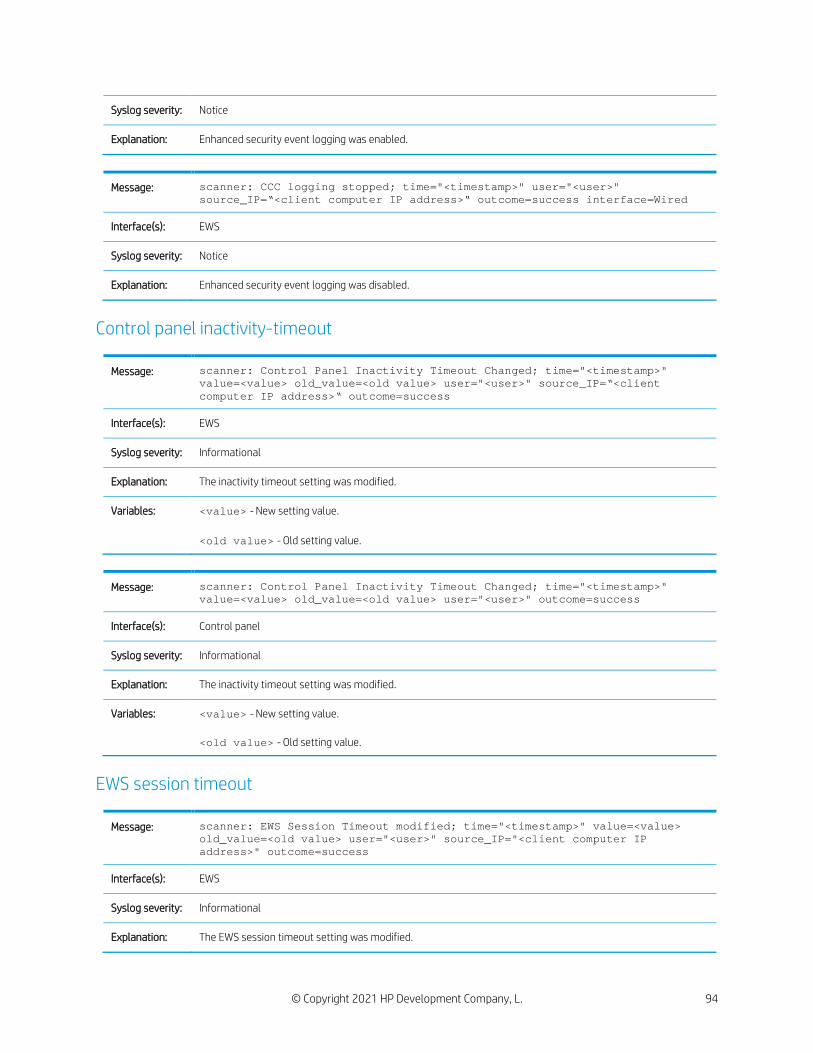
© Copyright 2021 HP Development Company, L. 94
Syslog severity: Notice
Explanation: Enhanced security event logging was enabled.
Message: scanner: CCC logging stopped; time="<timestamp>" user="<user>" source_IP=“<client computer IP address>“ outcome=success interface=Wired
Interface(s): EWS
Syslog severity: Notice
Explanation: Enhanced security event logging was disabled.
Control panel inactivity-timeout
Message: scanner: Control Panel Inactivity Timeout Changed; time="<timestamp>" value=<value> old_value=<old value> user="<user>" source_IP=“<client computer IP address>“ outcome=success
Interface(s): EWS
Syslog severity: Informational
Explanation: The inactivity timeout setting was modified.
Variables: <value> - New setting value. <old value> - Old setting value.
Message: scanner: Control Panel Inactivity Timeout Changed; time="<timestamp>" value=<value> old_value=<old value> user="<user>" outcome=success
Interface(s): Control panel
Syslog severity: Informational
Explanation: The inactivity timeout setting was modified.
Variables: <value> - New setting value. <old value> - Old setting value.
EWS session timeout
Message: scanner: EWS Session Timeout modified; time="<timestamp>" value=<value> old_value=<old value> user="<user>" source_IP="<client computer IP address>" outcome=success
Interface(s): EWS
Syslog severity: Informational
Explanation: The EWS session timeout setting was modified.
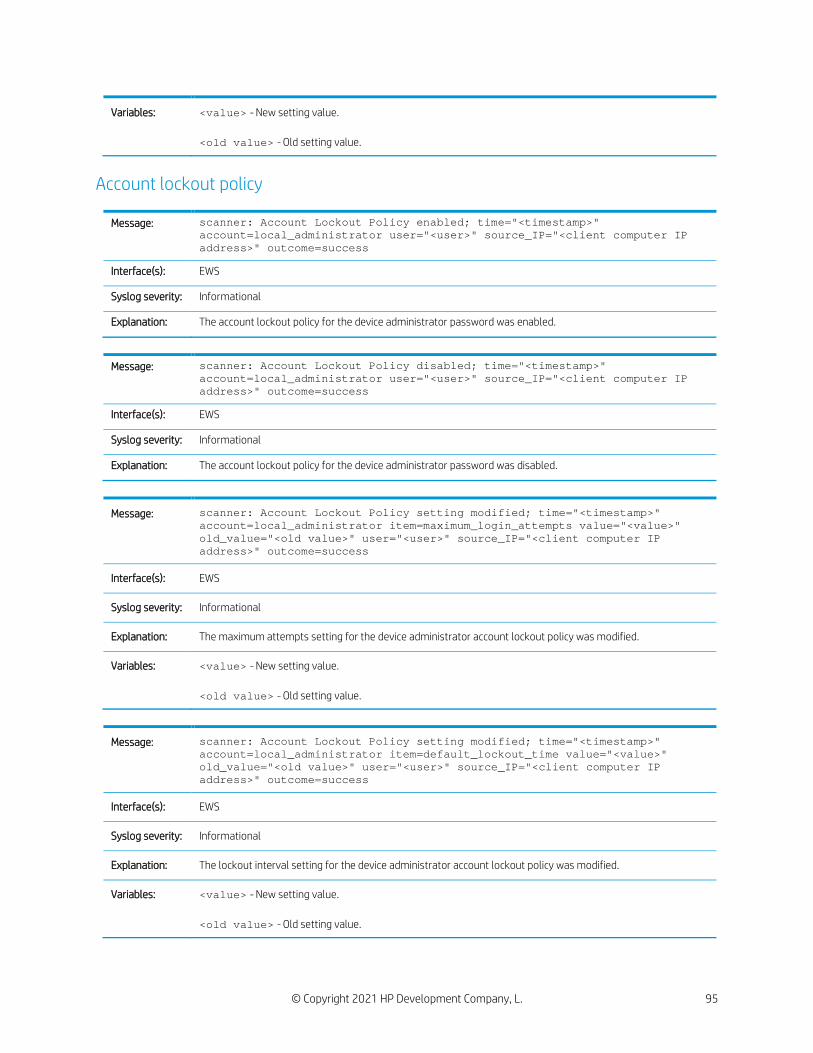
© Copyright 2021 HP Development Company, L. 95
Variables: <value> - New setting value. <old value> - Old setting value.
Account lockout policy
Message: scanner: Account Lockout Policy enabled; time="<timestamp>" account=local_administrator user="<user>" source_IP="<client computer IP address>" outcome=success
Interface(s): EWS
Syslog severity: Informational
Explanation: The account lockout policy for the device administrator password was enabled.
Message: scanner: Account Lockout Policy disabled; time="<timestamp>" account=local_administrator user="<user>" source_IP="<client computer IP address>" outcome=success
Interface(s): EWS
Syslog severity: Informational
Explanation: The account lockout policy for the device administrator password was disabled.
Message: scanner: Account Lockout Policy setting modified; time="<timestamp>" account=local_administrator item=maximum_login_attempts value="<value>" old_value="<old value>" user="<user>" source_IP="<client computer IP address>" outcome=success
Interface(s): EWS
Syslog severity: Informational
Explanation: The maximum attempts setting for the device administrator account lockout policy was modified.
Variables: <value> - New setting value. <old value> - Old setting value.
Message: scanner: Account Lockout Policy setting modified; time="<timestamp>" account=local_administrator item=default_lockout_time value="<value>" old_value="<old value>" user="<user>" source_IP="<client computer IP address>" outcome=success
Interface(s): EWS
Syslog severity: Informational
Explanation: The lockout interval setting for the device administrator account lockout policy was modified.
Variables: <value> - New setting value. <old value> - Old setting value.
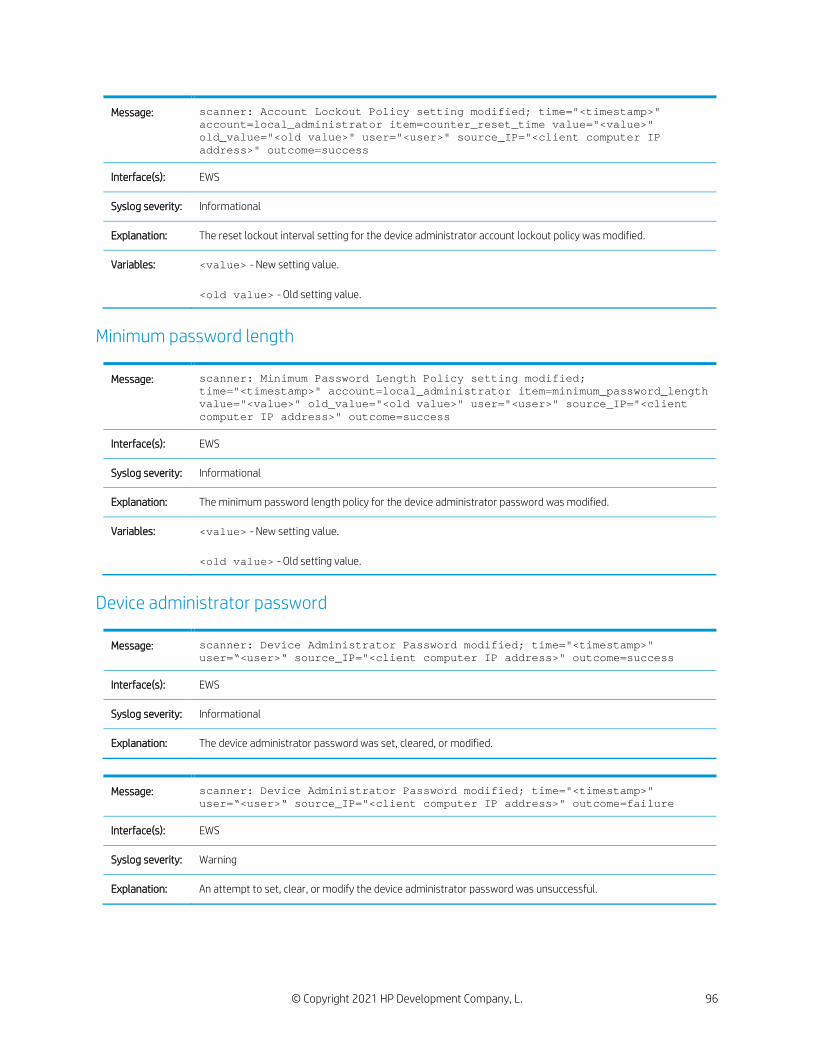
© Copyright 2021 HP Development Company, L. 96
Message: scanner: Account Lockout Policy setting modified; time="<timestamp>" account=local_administrator item=counter_reset_time value="<value>" old_value="<old value>" user="<user>" source_IP="<client computer IP address>" outcome=success
Interface(s): EWS
Syslog severity: Informational
Explanation: The reset lockout interval setting for the device administrator account lockout policy was modified.
Variables: <value> - New setting value. <old value> - Old setting value.
Minimum password length
Message: scanner: Minimum Password Length Policy setting modified; time="<timestamp>" account=local_administrator item=minimum_password_length value="<value>" old_value="<old value>" user="<user>" source_IP="<client computer IP address>" outcome=success
Interface(s): EWS
Syslog severity: Informational
Explanation: The minimum password length policy for the device administrator password was modified.
Variables: <value> - New setting value. <old value> - Old setting value.
Device administrator password
Message: scanner: Device Administrator Password modified; time="<timestamp>" user=“<user>“ source_IP="<client computer IP address>" outcome=success
Interface(s): EWS
Syslog severity: Informational
Explanation: The device administrator password was set, cleared, or modified.
Message: scanner: Device Administrator Password modified; time="<timestamp>" user=“<user>“ source_IP="<client computer IP address>" outcome=failure
Interface(s): EWS
Syslog severity: Warning
Explanation: An attempt to set, clear, or modify the device administrator password was unsuccessful.
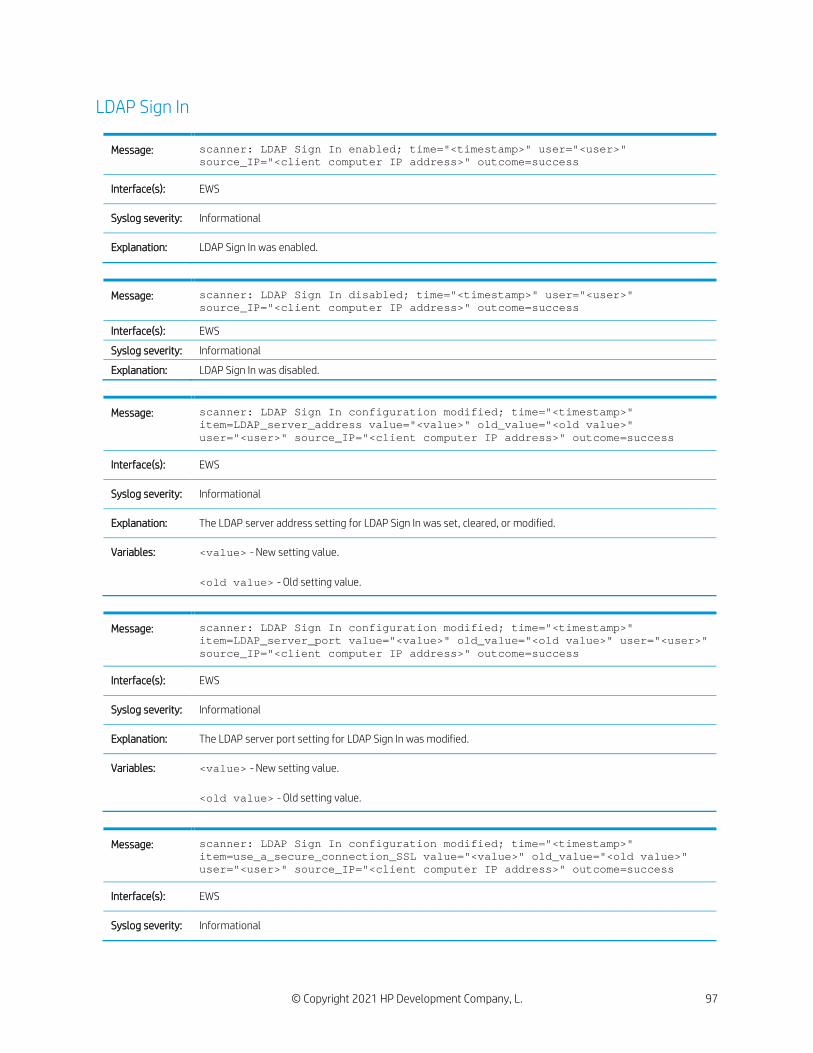
© Copyright 2021 HP Development Company, L. 97
LDAP Sign In
Message: scanner: LDAP Sign In enabled; time="<timestamp>" user="<user>" source_IP="<client computer IP address>" outcome=success
Interface(s): EWS
Syslog severity: Informational
Explanation: LDAP Sign In was enabled.
Message: scanner: LDAP Sign In disabled; time="<timestamp>" user="<user>" source_IP="<client computer IP address>" outcome=success
Interface(s): EWS
Syslog severity: Informational
Explanation: LDAP Sign In was disabled.
Message: scanner: LDAP Sign In configuration modified; time="<timestamp>" item=LDAP_server_address value="<value>" old_value="<old value>" user="<user>" source_IP="<client computer IP address>" outcome=success
Interface(s): EWS
Syslog severity: Informational
Explanation: The LDAP server address setting for LDAP Sign In was set, cleared, or modified.
Variables: <value> - New setting value. <old value> - Old setting value.
Message: scanner: LDAP Sign In configuration modified; time="<timestamp>" item=LDAP_server_port value="<value>" old_value="<old value>" user="<user>" source_IP="<client computer IP address>" outcome=success
Interface(s): EWS
Syslog severity: Informational
Explanation: The LDAP server port setting for LDAP Sign In was modified.
Variables: <value> - New setting value. <old value> - Old setting value.
Message: scanner: LDAP Sign In configuration modified; time="<timestamp>" item=use_a_secure_connection_SSL value="<value>" old_value="<old value>" user="<user>" source_IP="<client computer IP address>" outcome=success
Interface(s): EWS
Syslog severity: Informational
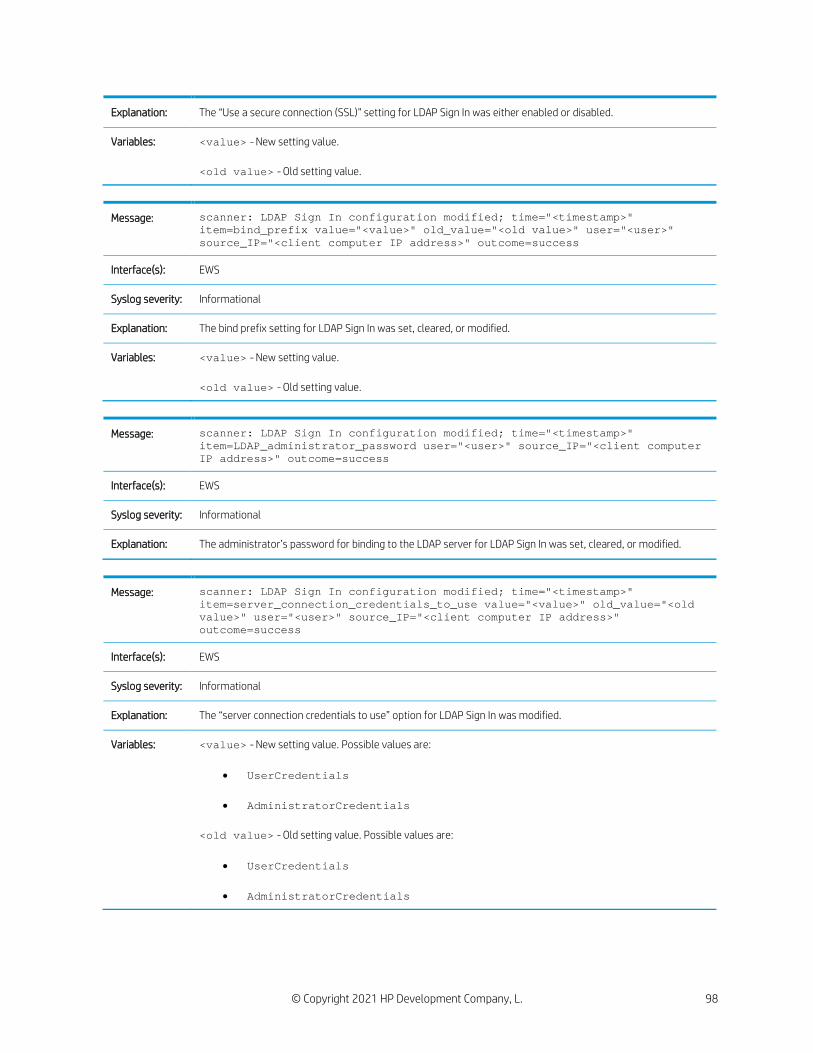
© Copyright 2021 HP Development Company, L. 98
Explanation: The “Use a secure connection (SSL)” setting for LDAP Sign In was either enabled or disabled.
Variables: <value> - New setting value. <old value> - Old setting value.
Message: scanner: LDAP Sign In configuration modified; time="<timestamp>" item=bind_prefix value="<value>" old_value="<old value>" user="<user>" source_IP="<client computer IP address>" outcome=success
Interface(s): EWS
Syslog severity: Informational
Explanation: The bind prefix setting for LDAP Sign In was set, cleared, or modified.
Variables: <value> - New setting value. <old value> - Old setting value.
Message: scanner: LDAP Sign In configuration modified; time="<timestamp>" item=LDAP_administrator_password user="<user>" source_IP="<client computer IP address>" outcome=success
Interface(s): EWS
Syslog severity: Informational
Explanation: The administrator’s password for binding to the LDAP server for LDAP Sign In was set, cleared, or modified.
Message: scanner: LDAP Sign In configuration modified; time="<timestamp>" item=server_connection_credentials_to_use value="<value>" old_value="<old value>" user="<user>" source_IP="<client computer IP address>" outcome=success
Interface(s): EWS
Syslog severity: Informational
Explanation: The “server connection credentials to use” option for LDAP Sign In was modified.
Variables: <value> - New setting value. Possible values are:
• UserCredentials
• AdministratorCredentials <old value> - Old setting value. Possible values are:
• UserCredentials
• AdministratorCredentials
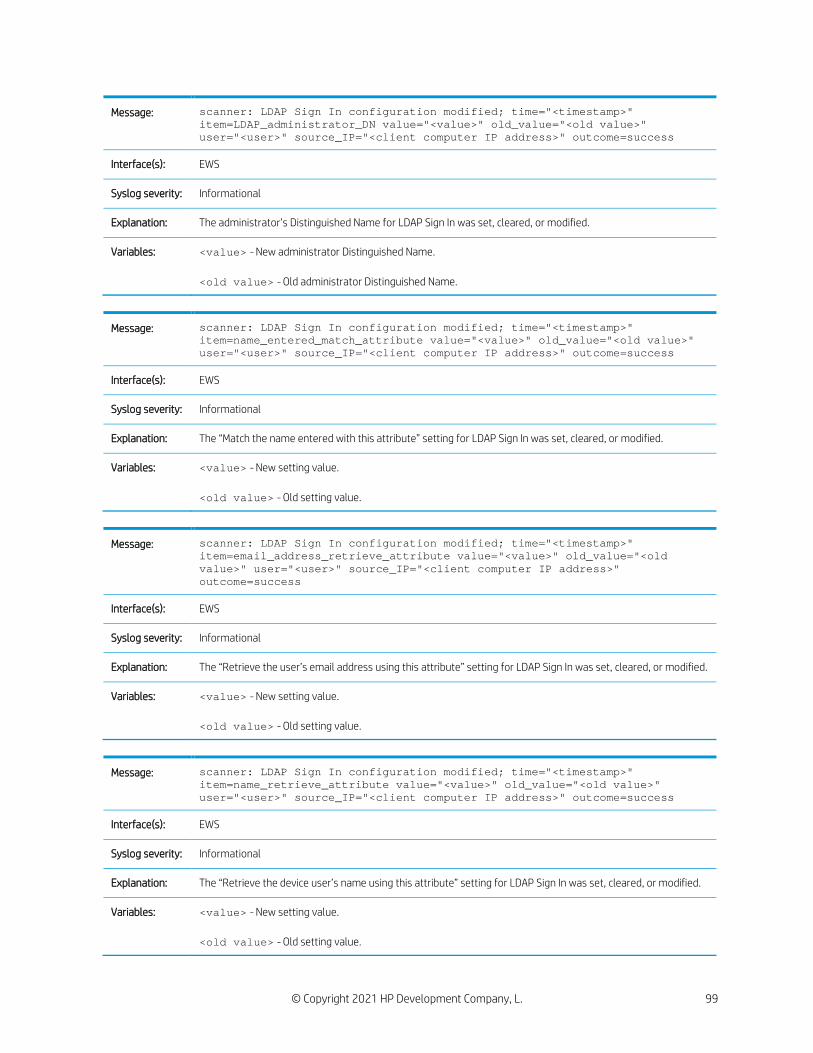
© Copyright 2021 HP Development Company, L. 99
Message: scanner: LDAP Sign In configuration modified; time="<timestamp>" item=LDAP_administrator_DN value="<value>" old_value="<old value>" user="<user>" source_IP="<client computer IP address>" outcome=success
Interface(s): EWS
Syslog severity: Informational
Explanation: The administrator’s Distinguished Name for LDAP Sign In was set, cleared, or modified.
Variables: <value> - New administrator Distinguished Name. <old value> - Old administrator Distinguished Name.
Message: scanner: LDAP Sign In configuration modified; time="<timestamp>" item=name_entered_match_attribute value="<value>" old_value="<old value>" user="<user>" source_IP="<client computer IP address>" outcome=success
Interface(s): EWS
Syslog severity: Informational
Explanation: The “Match the name entered with this attribute” setting for LDAP Sign In was set, cleared, or modified.
Variables: <value> - New setting value. <old value> - Old setting value.
Message: scanner: LDAP Sign In configuration modified; time="<timestamp>" item=email_address_retrieve_attribute value="<value>" old_value="<old value>" user="<user>" source_IP="<client computer IP address>" outcome=success
Interface(s): EWS
Syslog severity: Informational
Explanation: The “Retrieve the user’s email address using this attribute” setting for LDAP Sign In was set, cleared, or modified.
Variables: <value> - New setting value. <old value> - Old setting value.
Message: scanner: LDAP Sign In configuration modified; time="<timestamp>" item=name_retrieve_attribute value="<value>" old_value="<old value>" user="<user>" source_IP="<client computer IP address>" outcome=success
Interface(s): EWS
Syslog severity: Informational
Explanation: The “Retrieve the device user’s name using this attribute” setting for LDAP Sign In was set, cleared, or modified.
Variables: <value> - New setting value. <old value> - Old setting value.
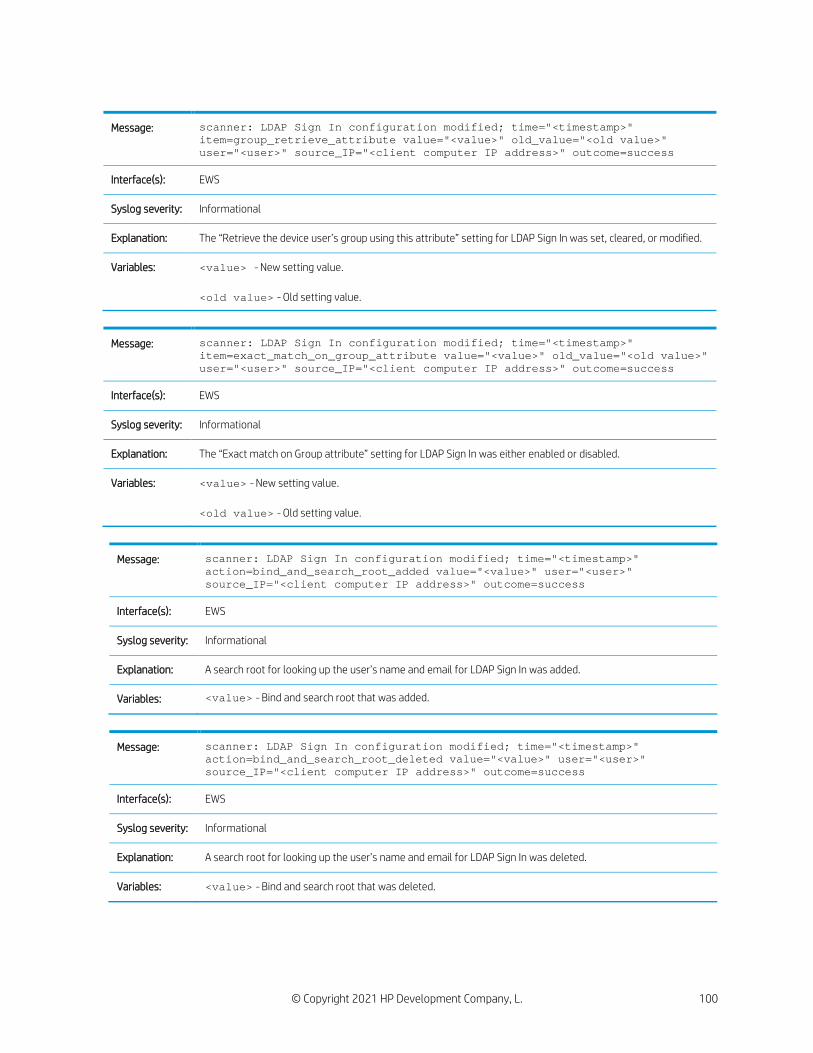
© Copyright 2021 HP Development Company, L. 100
Message: scanner: LDAP Sign In configuration modified; time="<timestamp>" item=group_retrieve_attribute value="<value>" old_value="<old value>" user="<user>" source_IP="<client computer IP address>" outcome=success
Interface(s): EWS
Syslog severity: Informational
Explanation: The “Retrieve the device user’s group using this attribute” setting for LDAP Sign In was set, cleared, or modified.
Variables: <value> - New setting value. <old value> - Old setting value.
Message: scanner: LDAP Sign In configuration modified; time="<timestamp>" item=exact_match_on_group_attribute value="<value>" old_value="<old value>" user="<user>" source_IP="<client computer IP address>" outcome=success
Interface(s): EWS
Syslog severity: Informational
Explanation: The “Exact match on Group attribute” setting for LDAP Sign In was either enabled or disabled.
Variables: <value> - New setting value. <old value> - Old setting value.
Message: scanner: LDAP Sign In configuration modified; time="<timestamp>" action=bind_and_search_root_added value="<value>" user="<user>" source_IP="<client computer IP address>" outcome=success
Interface(s): EWS
Syslog severity: Informational
Explanation: A search root for looking up the user’s name and email for LDAP Sign In was added.
Variables: <value> - Bind and search root that was added.
Message: scanner: LDAP Sign In configuration modified; time="<timestamp>" action=bind_and_search_root_deleted value="<value>" user="<user>" source_IP="<client computer IP address>" outcome=success
Interface(s): EWS
Syslog severity: Informational
Explanation: A search root for looking up the user’s name and email for LDAP Sign In was deleted.
Variables: <value> - Bind and search root that was deleted.
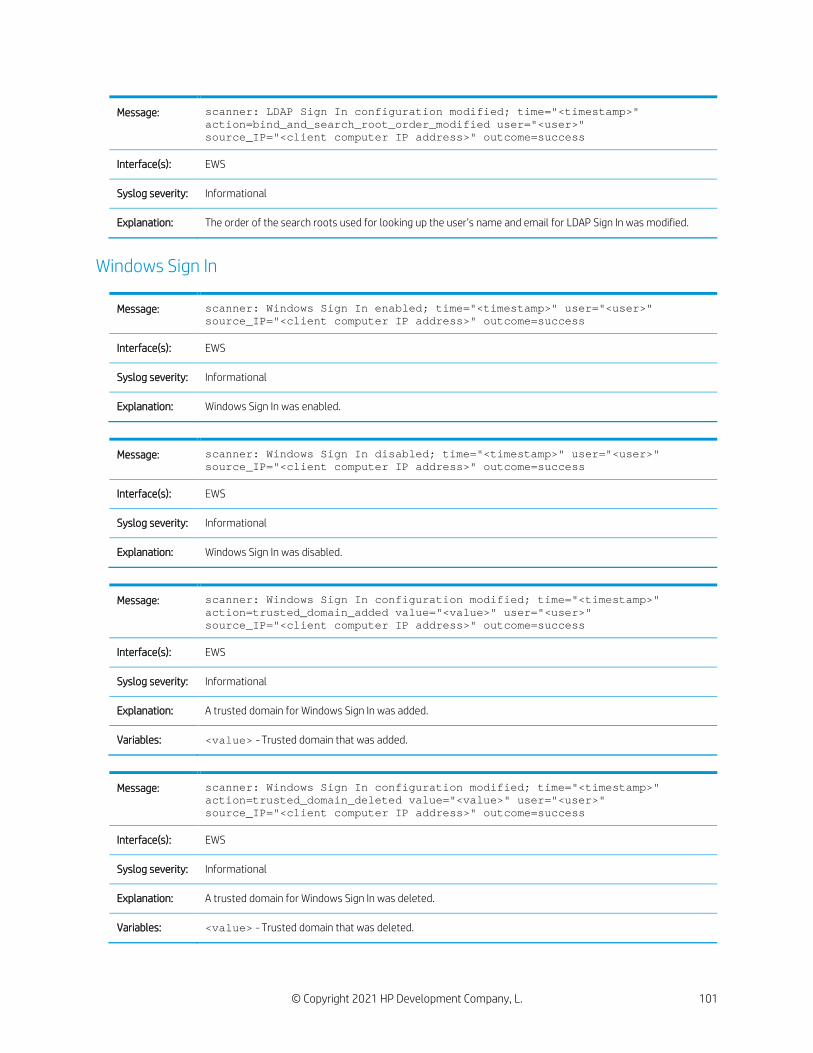
© Copyright 2021 HP Development Company, L. 101
Message: scanner: LDAP Sign In configuration modified; time="<timestamp>" action=bind_and_search_root_order_modified user="<user>" source_IP="<client computer IP address>" outcome=success
Interface(s): EWS
Syslog severity: Informational
Explanation: The order of the search roots used for looking up the user’s name and email for LDAP Sign In was modified.
Windows Sign In
Message: scanner: Windows Sign In enabled; time="<timestamp>" user="<user>" source_IP="<client computer IP address>" outcome=success
Interface(s): EWS
Syslog severity: Informational
Explanation: Windows Sign In was enabled.
Message: scanner: Windows Sign In disabled; time="<timestamp>" user="<user>" source_IP="<client computer IP address>" outcome=success
Interface(s): EWS
Syslog severity: Informational
Explanation: Windows Sign In was disabled.
Message: scanner: Windows Sign In configuration modified; time="<timestamp>" action=trusted_domain_added value="<value>" user="<user>" source_IP="<client computer IP address>" outcome=success
Interface(s): EWS
Syslog severity: Informational
Explanation: A trusted domain for Windows Sign In was added.
Variables: <value> - Trusted domain that was added.
Message: scanner: Windows Sign In configuration modified; time="<timestamp>" action=trusted_domain_deleted value="<value>" user="<user>" source_IP="<client computer IP address>" outcome=success
Interface(s): EWS
Syslog severity: Informational
Explanation: A trusted domain for Windows Sign In was deleted.
Variables: <value> - Trusted domain that was deleted.
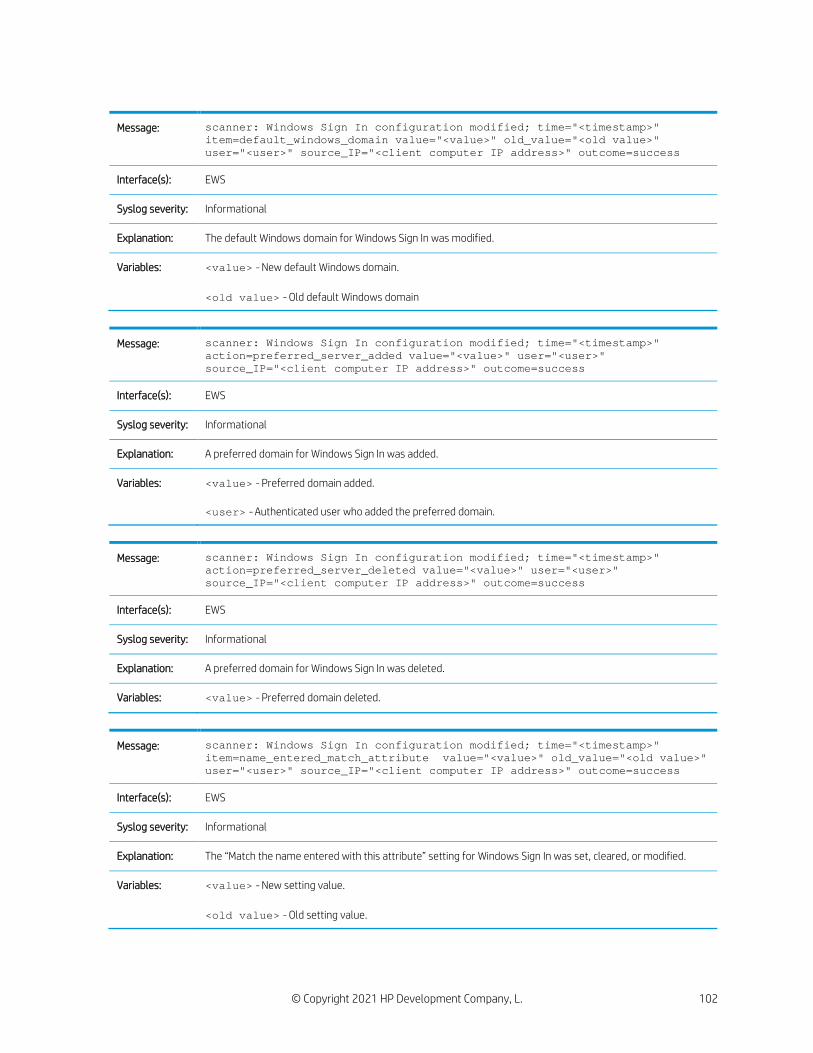
© Copyright 2021 HP Development Company, L. 102
Message: scanner: Windows Sign In configuration modified; time="<timestamp>" item=default_windows_domain value="<value>" old_value="<old value>" user="<user>" source_IP="<client computer IP address>" outcome=success
Interface(s): EWS
Syslog severity: Informational
Explanation: The default Windows domain for Windows Sign In was modified.
Variables: <value> - New default Windows domain. <old value> - Old default Windows domain
Message: scanner: Windows Sign In configuration modified; time="<timestamp>" action=preferred_server_added value="<value>" user="<user>" source_IP="<client computer IP address>" outcome=success
Interface(s): EWS
Syslog severity: Informational
Explanation: A preferred domain for Windows Sign In was added.
Variables: <value> - Preferred domain added. <user> - Authenticated user who added the preferred domain.
Message: scanner: Windows Sign In configuration modified; time="<timestamp>" action=preferred_server_deleted value="<value>" user="<user>" source_IP="<client computer IP address>" outcome=success
Interface(s): EWS
Syslog severity: Informational
Explanation: A preferred domain for Windows Sign In was deleted.
Variables: <value> - Preferred domain deleted.
Message: scanner: Windows Sign In configuration modified; time="<timestamp>" item=name_entered_match_attribute value="<value>" old_value="<old value>" user="<user>" source_IP="<client computer IP address>" outcome=success
Interface(s): EWS
Syslog severity: Informational
Explanation: The “Match the name entered with this attribute” setting for Windows Sign In was set, cleared, or modified.
Variables: <value> - New setting value. <old value> - Old setting value.
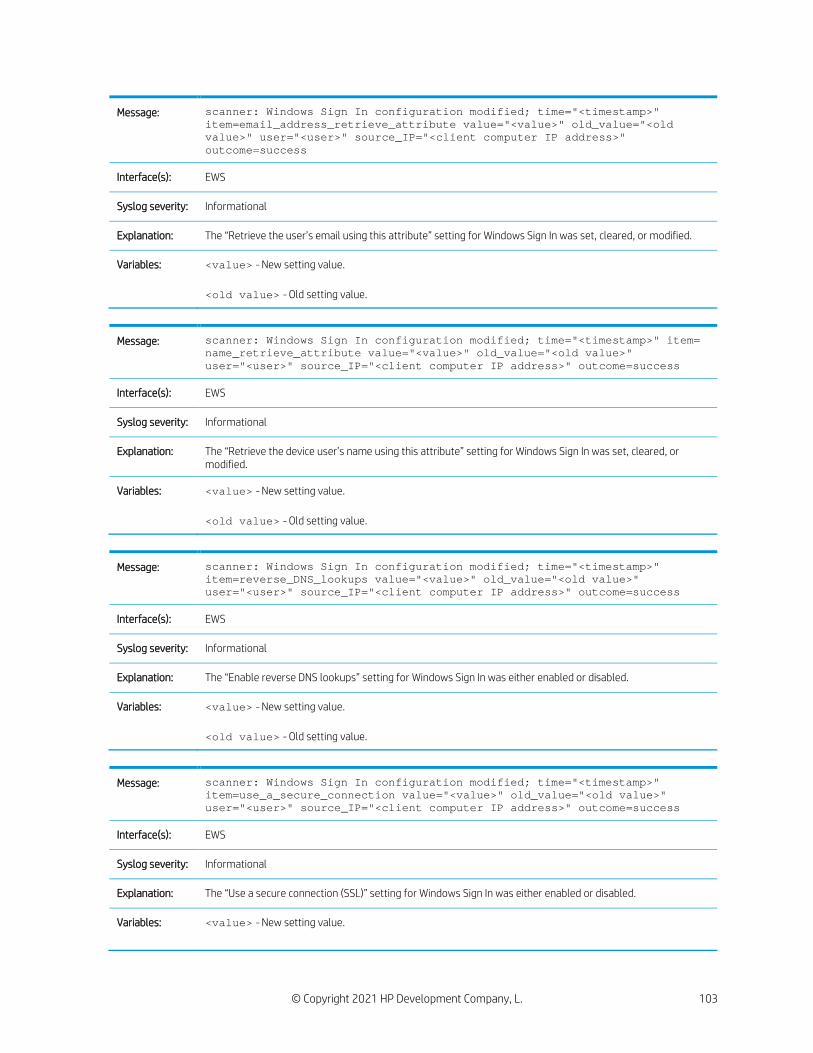
© Copyright 2021 HP Development Company, L. 103
Message: scanner: Windows Sign In configuration modified; time="<timestamp>" item=email_address_retrieve_attribute value="<value>" old_value="<old value>" user="<user>" source_IP="<client computer IP address>" outcome=success
Interface(s): EWS
Syslog severity: Informational
Explanation: The “Retrieve the user’s email using this attribute” setting for Windows Sign In was set, cleared, or modified.
Variables: <value> - New setting value. <old value> - Old setting value.
Message: scanner: Windows Sign In configuration modified; time="<timestamp>" item= name_retrieve_attribute value="<value>" old_value="<old value>" user="<user>" source_IP="<client computer IP address>" outcome=success
Interface(s): EWS
Syslog severity: Informational
Explanation: The “Retrieve the device user’s name using this attribute” setting for Windows Sign In was set, cleared, or modified.
Variables: <value> - New setting value. <old value> - Old setting value.
Message: scanner: Windows Sign In configuration modified; time="<timestamp>" item=reverse_DNS_lookups value="<value>" old_value="<old value>" user="<user>" source_IP="<client computer IP address>" outcome=success
Interface(s): EWS
Syslog severity: Informational
Explanation: The “Enable reverse DNS lookups” setting for Windows Sign In was either enabled or disabled.
Variables: <value> - New setting value. <old value> - Old setting value.
Message: scanner: Windows Sign In configuration modified; time="<timestamp>" item=use_a_secure_connection value="<value>" old_value="<old value>" user="<user>" source_IP="<client computer IP address>" outcome=success
Interface(s): EWS
Syslog severity: Informational
Explanation: The “Use a secure connection (SSL)” setting for Windows Sign In was either enabled or disabled.
Variables: <value> - New setting value.
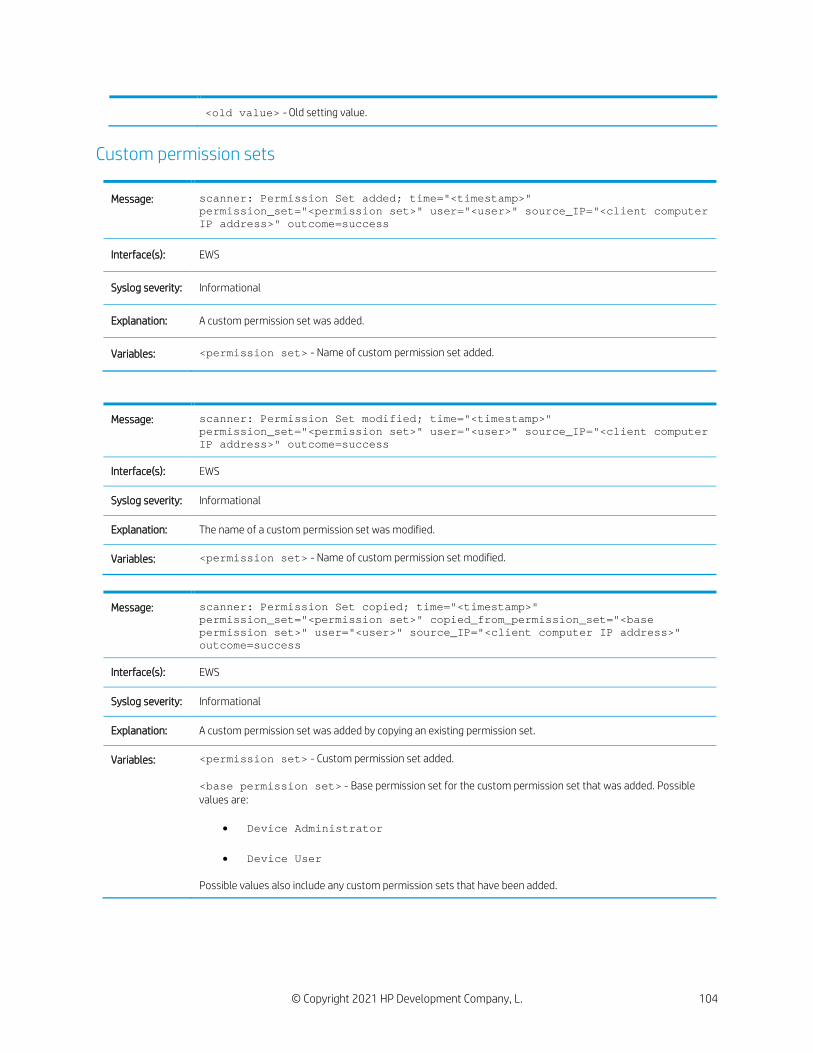
© Copyright 2021 HP Development Company, L. 104
<old value> - Old setting value.
Custom permission sets
Message: scanner: Permission Set added; time="<timestamp>" permission_set="<permission set>" user="<user>" source_IP="<client computer IP address>" outcome=success
Interface(s): EWS
Syslog severity: Informational
Explanation: A custom permission set was added.
Variables: <permission set> - Name of custom permission set added.
Message: scanner: Permission Set modified; time="<timestamp>" permission_set="<permission set>" user="<user>" source_IP="<client computer IP address>" outcome=success
Interface(s): EWS
Syslog severity: Informational
Explanation: The name of a custom permission set was modified.
Variables: <permission set> - Name of custom permission set modified.
Message: scanner: Permission Set copied; time="<timestamp>" permission_set="<permission set>" copied_from_permission_set="<base permission set>" user="<user>" source_IP="<client computer IP address>" outcome=success
Interface(s): EWS
Syslog severity: Informational
Explanation: A custom permission set was added by copying an existing permission set.
Variables: <permission set> - Custom permission set added. <base permission set> - Base permission set for the custom permission set that was added. Possible values are:
• Device Administrator
• Device User
Possible values also include any custom permission sets that have been added.
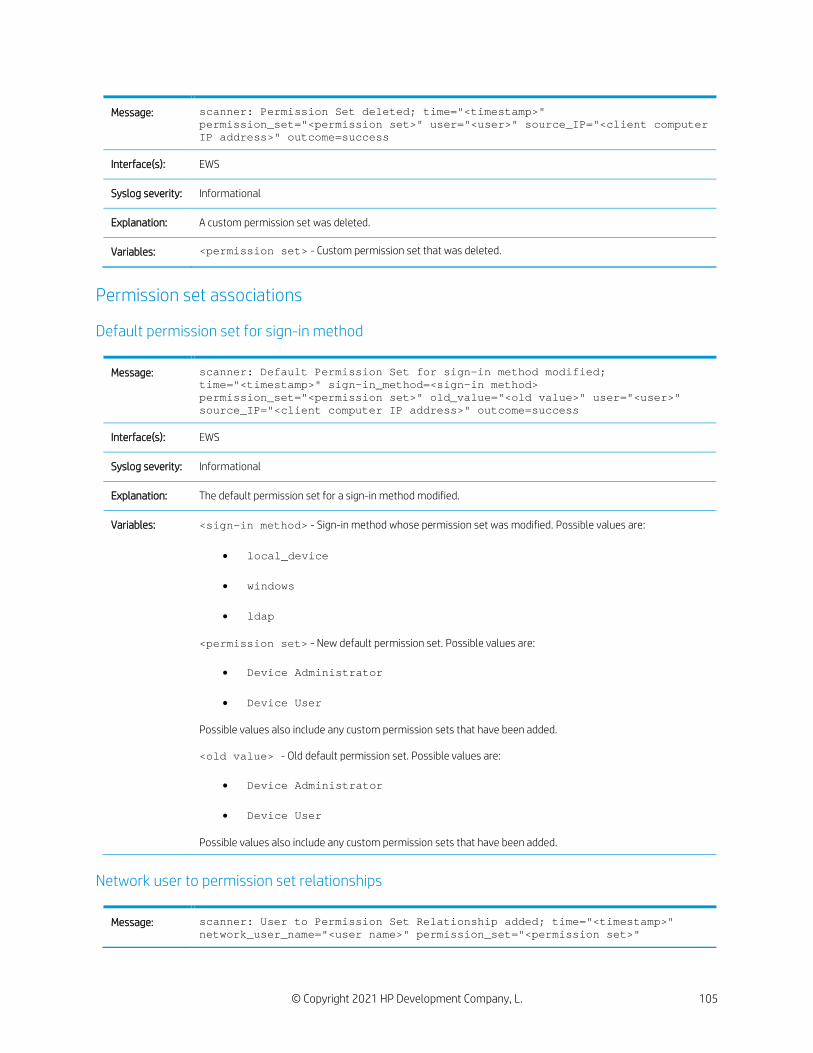
© Copyright 2021 HP Development Company, L. 105
Message: scanner: Permission Set deleted; time="<timestamp>" permission_set="<permission set>" user="<user>" source_IP="<client computer IP address>" outcome=success
Interface(s): EWS
Syslog severity: Informational
Explanation: A custom permission set was deleted.
Variables: <permission set> - Custom permission set that was deleted.
Permission set associations
Default permission set for sign-in method
Message: scanner: Default Permission Set for sign-in method modified; time="<timestamp>" sign-in_method=<sign-in method> permission_set="<permission set>" old_value="<old value>" user="<user>" source_IP="<client computer IP address>" outcome=success
Interface(s): EWS
Syslog severity: Informational
Explanation: The default permission set for a sign-in method modified.
Variables: <sign-in method> - Sign-in method whose permission set was modified. Possible values are:
• local_device
• windows
• ldap <permission set> - New default permission set. Possible values are:
• Device Administrator
• Device User Possible values also include any custom permission sets that have been added. <old value> - Old default permission set. Possible values are:
• Device Administrator
• Device User Possible values also include any custom permission sets that have been added.
Network user to permission set relationships
Message: scanner: User to Permission Set Relationship added; time="<timestamp>" network_user_name="<user name>" permission_set="<permission set>"
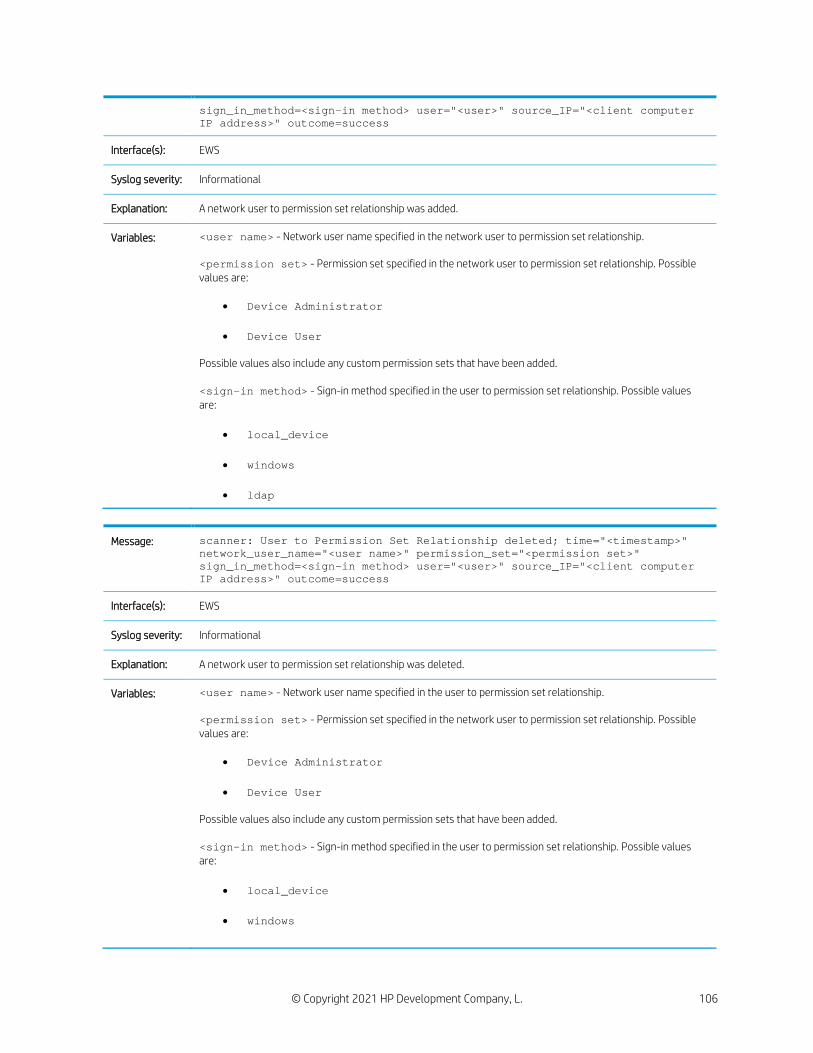
© Copyright 2021 HP Development Company, L. 106
sign_in_method=<sign-in method> user="<user>" source_IP="<client computer IP address>" outcome=success
Interface(s): EWS
Syslog severity: Informational
Explanation: A network user to permission set relationship was added.
Variables: <user name> - Network user name specified in the network user to permission set relationship. <permission set> - Permission set specified in the network user to permission set relationship. Possible values are:
• Device Administrator
• Device User Possible values also include any custom permission sets that have been added. <sign-in method> - Sign-in method specified in the user to permission set relationship. Possible values are:
• local_device
• windows
• ldap
Message: scanner: User to Permission Set Relationship deleted; time="<timestamp>" network_user_name="<user name>" permission_set="<permission set>" sign_in_method=<sign-in method> user="<user>" source_IP="<client computer IP address>" outcome=success
Interface(s): EWS
Syslog severity: Informational
Explanation: A network user to permission set relationship was deleted.
Variables: <user name> - Network user name specified in the user to permission set relationship. <permission set> - Permission set specified in the network user to permission set relationship. Possible values are:
• Device Administrator
• Device User Possible values also include any custom permission sets that have been added. <sign-in method> - Sign-in method specified in the user to permission set relationship. Possible values are:
• local_device
• windows
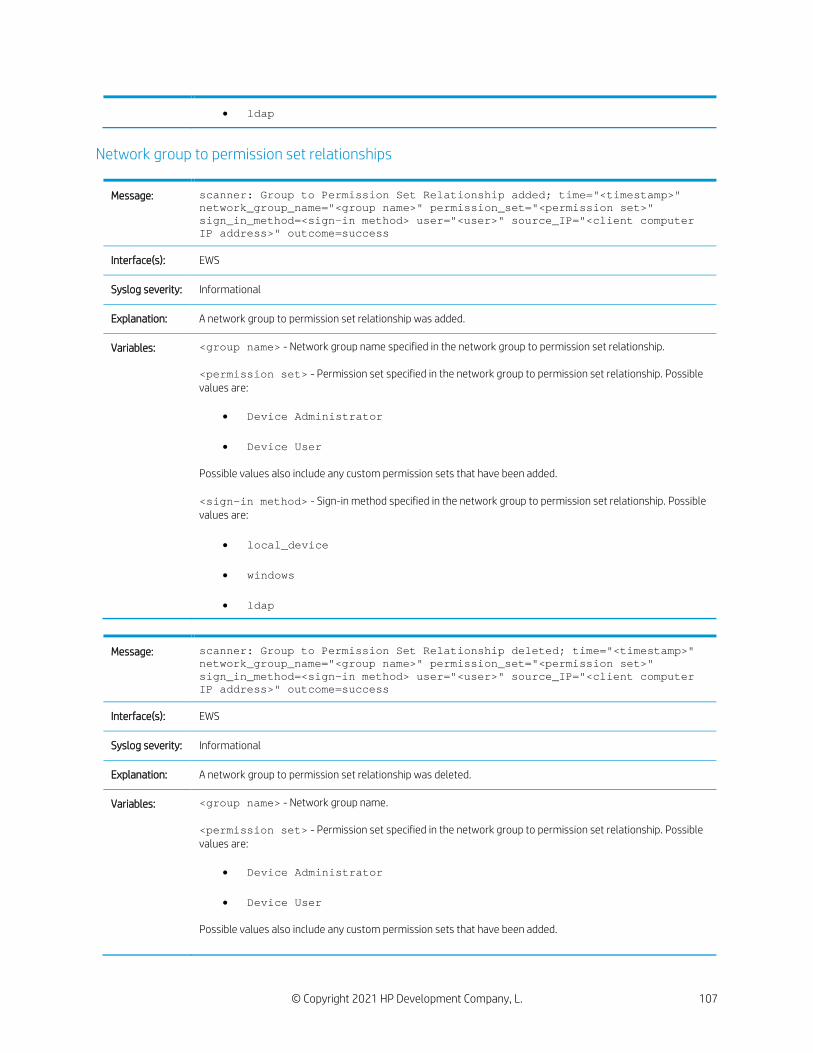
© Copyright 2021 HP Development Company, L. 107
• ldap
Network group to permission set relationships
Message: scanner: Group to Permission Set Relationship added; time="<timestamp>" network_group_name="<group name>" permission_set="<permission set>" sign_in_method=<sign-in method> user="<user>" source_IP="<client computer IP address>" outcome=success
Interface(s): EWS
Syslog severity: Informational
Explanation: A network group to permission set relationship was added.
Variables: <group name> - Network group name specified in the network group to permission set relationship. <permission set> - Permission set specified in the network group to permission set relationship. Possible values are:
• Device Administrator
• Device User Possible values also include any custom permission sets that have been added. <sign-in method> - Sign-in method specified in the network group to permission set relationship. Possible values are:
• local_device
• windows
• ldap
Message: scanner: Group to Permission Set Relationship deleted; time="<timestamp>" network_group_name="<group name>" permission_set="<permission set>" sign_in_method=<sign-in method> user="<user>" source_IP="<client computer IP address>" outcome=success
Interface(s): EWS
Syslog severity: Informational
Explanation: A network group to permission set relationship was deleted.
Variables: <group name> - Network group name. <permission set> - Permission set specified in the network group to permission set relationship. Possible values are:
• Device Administrator
• Device User Possible values also include any custom permission sets that have been added.
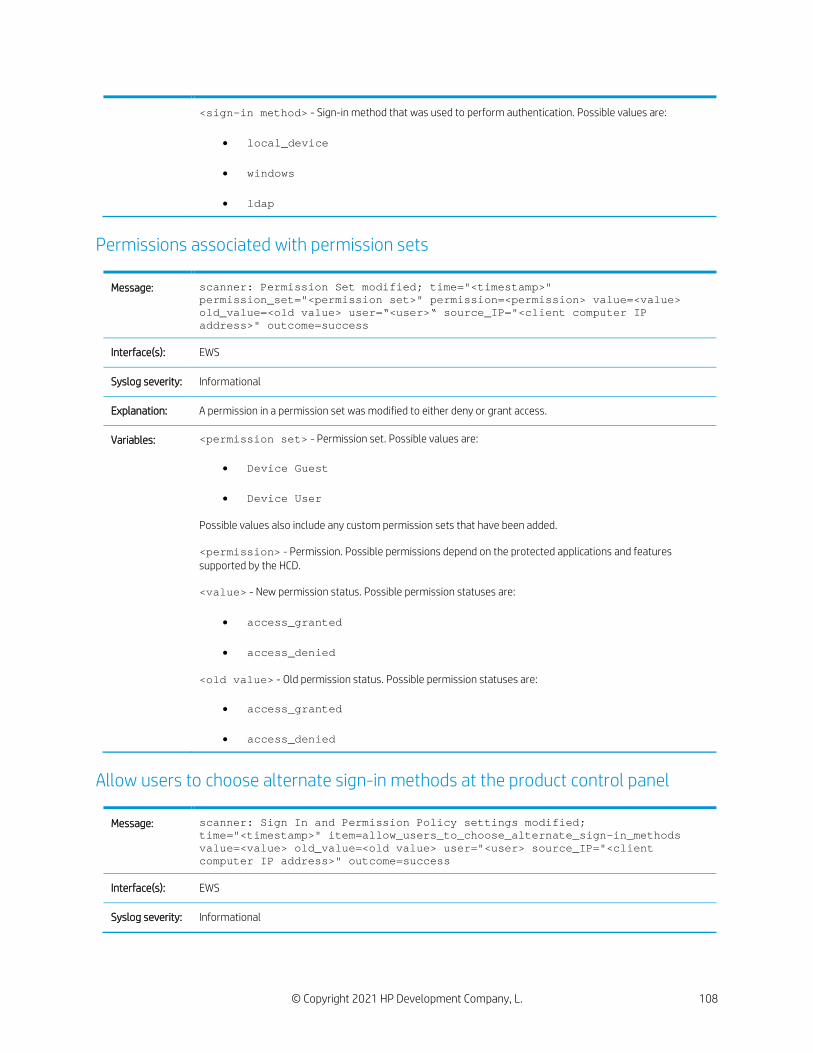
© Copyright 2021 HP Development Company, L. 108
<sign-in method> - Sign-in method that was used to perform authentication. Possible values are:
• local_device
• windows
• ldap
Permissions associated with permission sets
Message: scanner: Permission Set modified; time="<timestamp>" permission_set="<permission set>" permission=<permission> value=<value> old_value=<old value> user=“<user>“ source_IP="<client computer IP address>" outcome=success
Interface(s): EWS
Syslog severity: Informational
Explanation: A permission in a permission set was modified to either deny or grant access.
Variables: <permission set> - Permission set. Possible values are:
• Device Guest
• Device User Possible values also include any custom permission sets that have been added. <permission> - Permission. Possible permissions depend on the protected applications and features supported by the HCD. <value> - New permission status. Possible permission statuses are:
• access_granted
• access_denied
<old value> - Old permission status. Possible permission statuses are:
• access_granted
• access_denied
Allow users to choose alternate sign-in methods at the product control panel
Message: scanner: Sign In and Permission Policy settings modified; time="<timestamp>" item=allow_users_to_choose_alternate_sign-in_methods value=<value> old_value=<old value> user="<user> source_IP="<client computer IP address>" outcome=success
Interface(s): EWS
Syslog severity: Informational
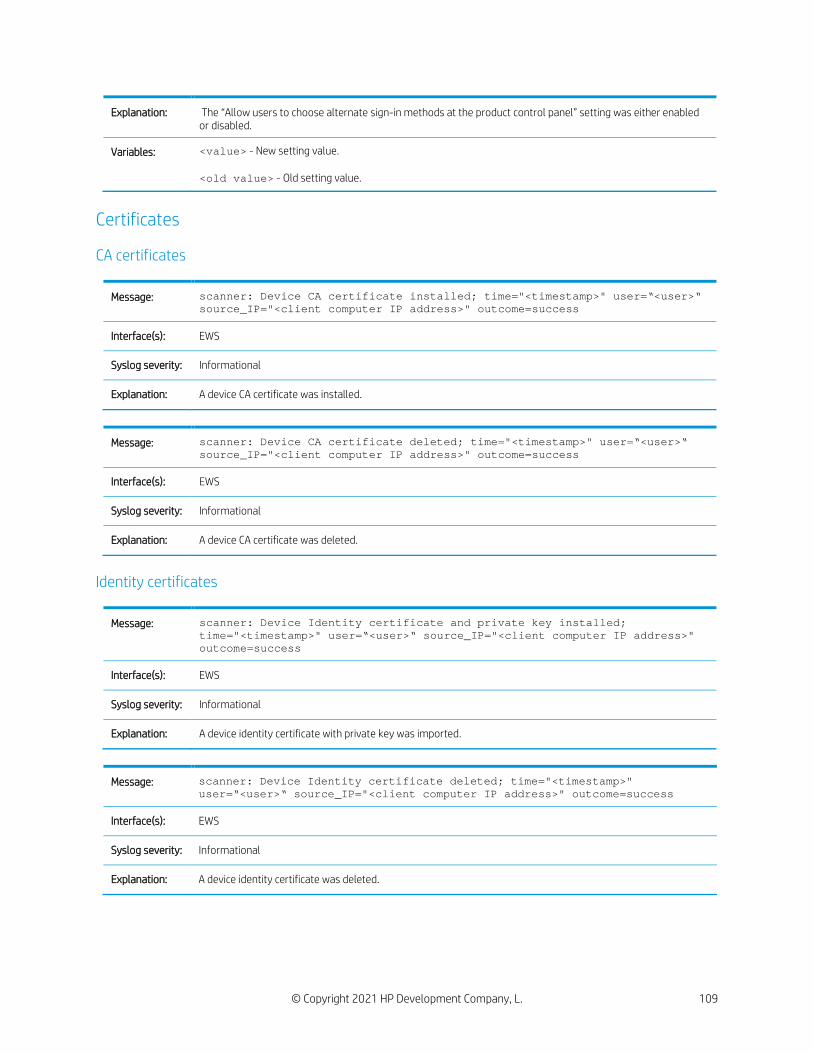
© Copyright 2021 HP Development Company, L. 109
Explanation: The “Allow users to choose alternate sign-in methods at the product control panel” setting was either enabled or disabled.
Variables: <value> - New setting value. <old value> - Old setting value.
Certificates
CA certificates
Message: scanner: Device CA certificate installed; time="<timestamp>" user=“<user>“ source_IP="<client computer IP address>" outcome=success
Interface(s): EWS
Syslog severity: Informational
Explanation: A device CA certificate was installed.
Message: scanner: Device CA certificate deleted; time="<timestamp>" user=“<user>“ source_IP="<client computer IP address>" outcome=success
Interface(s): EWS
Syslog severity: Informational
Explanation: A device CA certificate was deleted.
Identity certificates
Message: scanner: Device Identity certificate and private key installed; time="<timestamp>" user=“<user>“ source_IP="<client computer IP address>" outcome=success
Interface(s): EWS
Syslog severity: Informational
Explanation: A device identity certificate with private key was imported.
Message: scanner: Device Identity certificate deleted; time="<timestamp>" user=“<user>“ source_IP="<client computer IP address>" outcome=success
Interface(s): EWS
Syslog severity: Informational
Explanation: A device identity certificate was deleted.
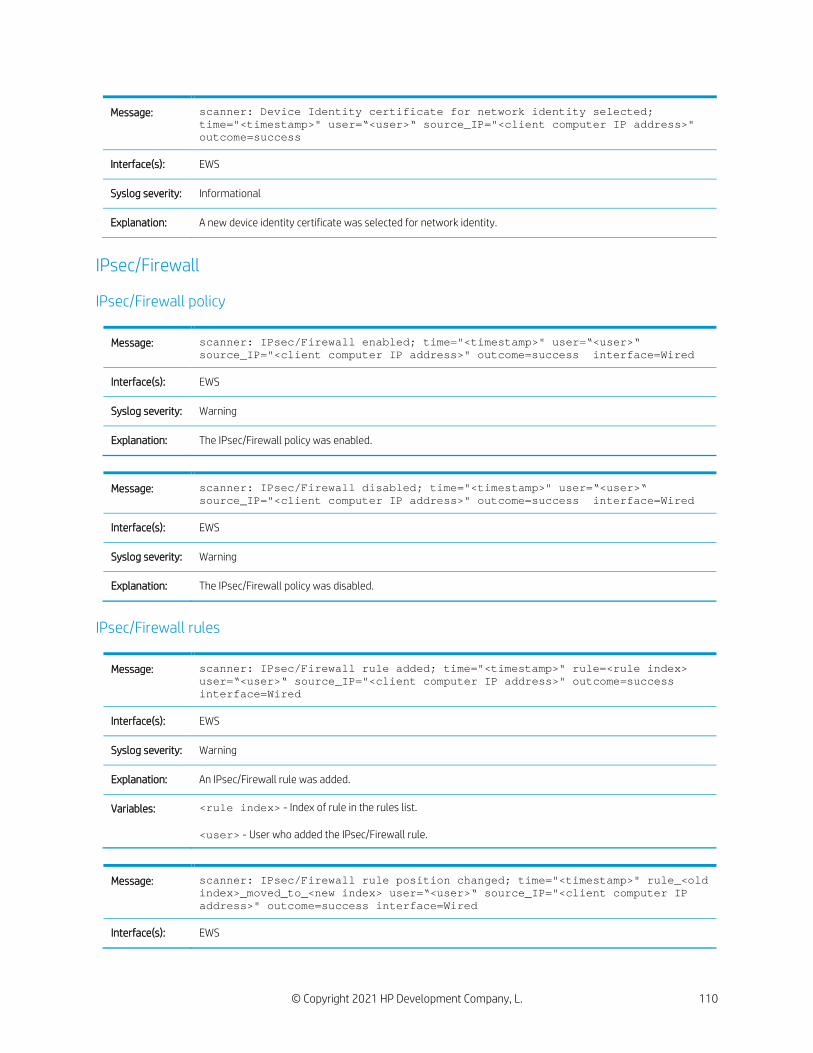
© Copyright 2021 HP Development Company, L. 110
Message: scanner: Device Identity certificate for network identity selected; time="<timestamp>" user=“<user>“ source_IP="<client computer IP address>" outcome=success
Interface(s): EWS
Syslog severity: Informational
Explanation: A new device identity certificate was selected for network identity.
IPsec/Firewall
IPsec/Firewall policy
Message: scanner: IPsec/Firewall enabled; time="<timestamp>" user=“<user>“ source_IP="<client computer IP address>" outcome=success interface=Wired
Interface(s): EWS
Syslog severity: Warning
Explanation: The IPsec/Firewall policy was enabled.
Message: scanner: IPsec/Firewall disabled; time="<timestamp>" user=“<user>“ source_IP="<client computer IP address>" outcome=success interface=Wired
Interface(s): EWS
Syslog severity: Warning
Explanation: The IPsec/Firewall policy was disabled.
IPsec/Firewall rules
Message: scanner: IPsec/Firewall rule added; time="<timestamp>" rule=<rule index> user=“<user>“ source_IP="<client computer IP address>" outcome=success interface=Wired
Interface(s): EWS
Syslog severity: Warning
Explanation: An IPsec/Firewall rule was added.
Variables: <rule index> - Index of rule in the rules list. <user> - User who added the IPsec/Firewall rule.
Message: scanner: IPsec/Firewall rule position changed; time="<timestamp>" rule_<old index>_moved_to_<new index> user=“<user>“ source_IP="<client computer IP address>" outcome=success interface=Wired
Interface(s): EWS
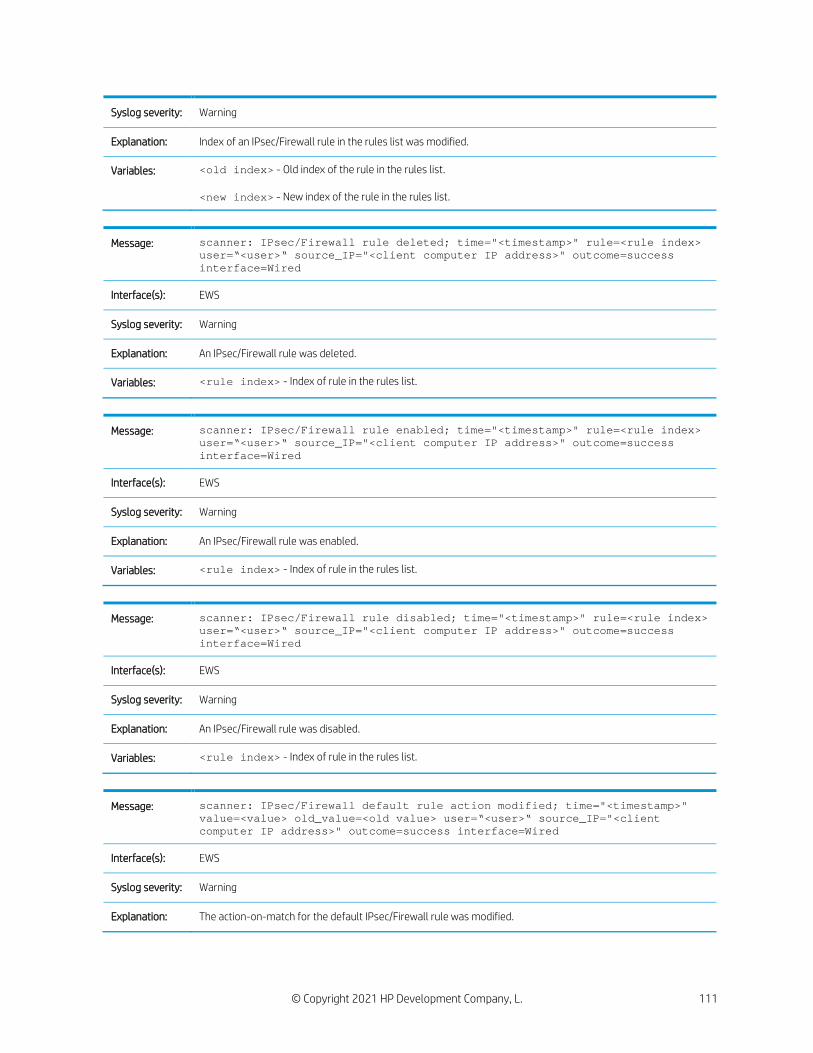
© Copyright 2021 HP Development Company, L. 111
Syslog severity: Warning
Explanation: Index of an IPsec/Firewall rule in the rules list was modified.
Variables: <old index> - Old index of the rule in the rules list. <new index> - New index of the rule in the rules list.
Message: scanner: IPsec/Firewall rule deleted; time="<timestamp>" rule=<rule index> user=“<user>“ source_IP="<client computer IP address>" outcome=success interface=Wired
Interface(s): EWS
Syslog severity: Warning
Explanation: An IPsec/Firewall rule was deleted.
Variables: <rule index> - Index of rule in the rules list.
Message: scanner: IPsec/Firewall rule enabled; time="<timestamp>" rule=<rule index> user=“<user>“ source_IP="<client computer IP address>" outcome=success interface=Wired
Interface(s): EWS
Syslog severity: Warning
Explanation: An IPsec/Firewall rule was enabled.
Variables: <rule index> - Index of rule in the rules list.
Message: scanner: IPsec/Firewall rule disabled; time="<timestamp>" rule=<rule index> user=“<user>“ source_IP="<client computer IP address>" outcome=success interface=Wired
Interface(s): EWS
Syslog severity: Warning
Explanation: An IPsec/Firewall rule was disabled.
Variables: <rule index> - Index of rule in the rules list.
Message: scanner: IPsec/Firewall default rule action modified; time="<timestamp>" value=<value> old_value=<old value> user=“<user>“ source_IP="<client computer IP address>" outcome=success interface=Wired
Interface(s): EWS
Syslog severity: Warning
Explanation: The action-on-match for the default IPsec/Firewall rule was modified.
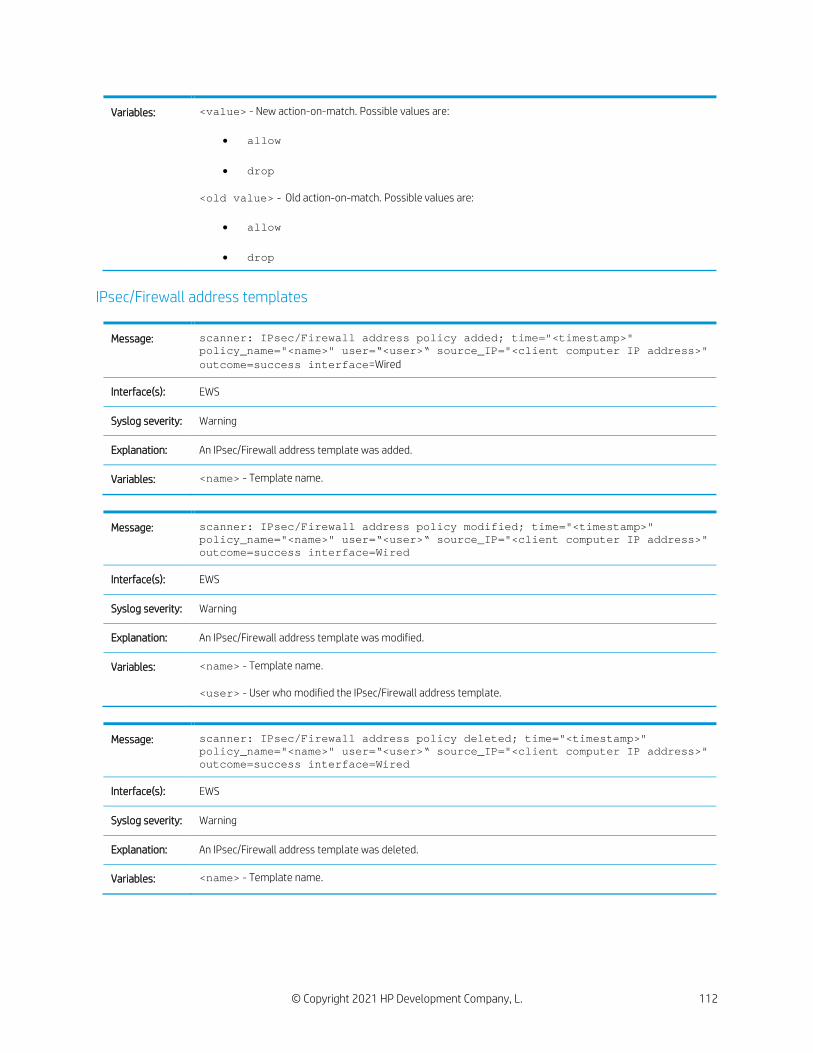
© Copyright 2021 HP Development Company, L. 112
Variables: <value> - New action-on-match. Possible values are:
• allow
• drop <old value> - Old action-on-match. Possible values are:
• allow
• drop
IPsec/Firewall address templates
Message: scanner: IPsec/Firewall address policy added; time="<timestamp>" policy_name="<name>" user=“<user>“ source_IP="<client computer IP address>" outcome=success interface=Wired
Interface(s): EWS
Syslog severity: Warning
Explanation: An IPsec/Firewall address template was added.
Variables: <name> - Template name.
Message: scanner: IPsec/Firewall address policy modified; time="<timestamp>" policy_name="<name>" user=“<user>“ source_IP="<client computer IP address>" outcome=success interface=Wired
Interface(s): EWS
Syslog severity: Warning
Explanation: An IPsec/Firewall address template was modified.
Variables: <name> - Template name. <user> - User who modified the IPsec/Firewall address template.
Message: scanner: IPsec/Firewall address policy deleted; time="<timestamp>" policy_name="<name>" user=“<user>“ source_IP="<client computer IP address>" outcome=success interface=Wired
Interface(s): EWS
Syslog severity: Warning
Explanation: An IPsec/Firewall address template was deleted.
Variables: <name> - Template name.
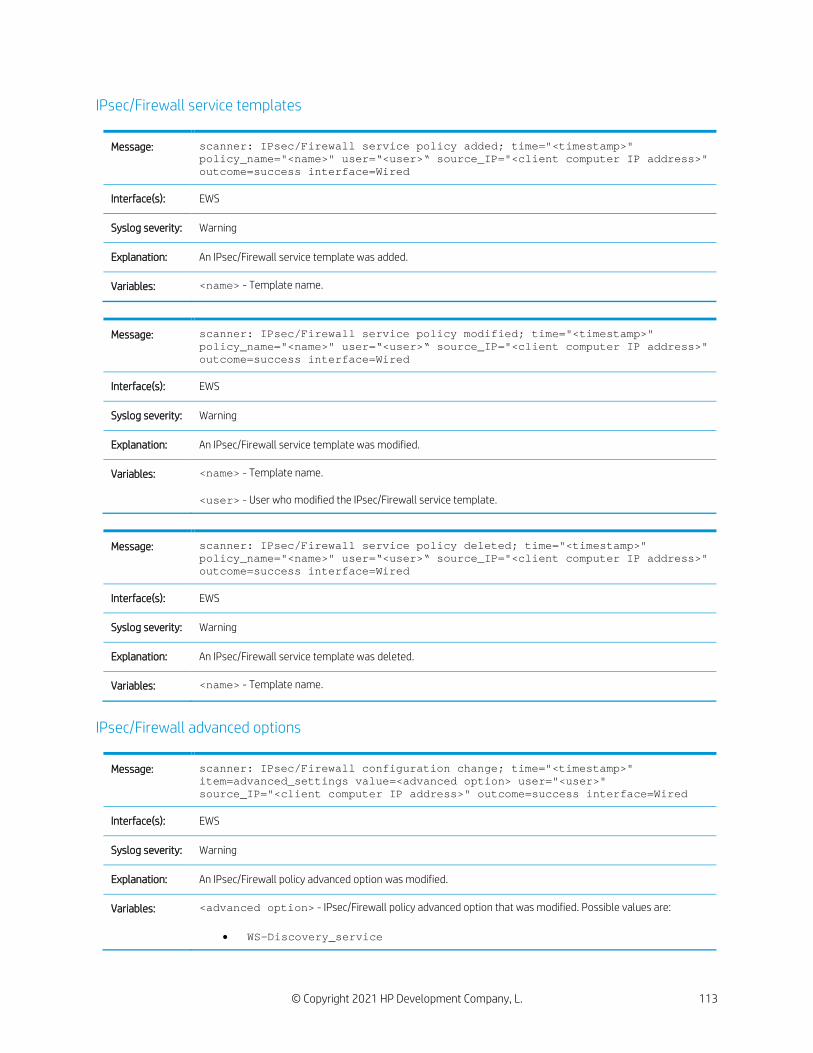
© Copyright 2021 HP Development Company, L. 113
IPsec/Firewall service templates
Message: scanner: IPsec/Firewall service policy added; time="<timestamp>" policy_name="<name>" user=“<user>“ source_IP="<client computer IP address>" outcome=success interface=Wired
Interface(s): EWS
Syslog severity: Warning
Explanation: An IPsec/Firewall service template was added.
Variables: <name> - Template name.
Message: scanner: IPsec/Firewall service policy modified; time="<timestamp>" policy_name="<name>" user=“<user>“ source_IP="<client computer IP address>" outcome=success interface=Wired
Interface(s): EWS
Syslog severity: Warning
Explanation: An IPsec/Firewall service template was modified.
Variables: <name> - Template name. <user> - User who modified the IPsec/Firewall service template.
Message: scanner: IPsec/Firewall service policy deleted; time="<timestamp>" policy_name="<name>" user=“<user>“ source_IP="<client computer IP address>" outcome=success interface=Wired
Interface(s): EWS
Syslog severity: Warning
Explanation: An IPsec/Firewall service template was deleted.
Variables: <name> - Template name.
IPsec/Firewall advanced options
Message: scanner: IPsec/Firewall configuration change; time="<timestamp>" item=advanced_settings value=<advanced option> user="<user>" source_IP="<client computer IP address>" outcome=success interface=Wired
Interface(s): EWS
Syslog severity: Warning
Explanation: An IPsec/Firewall policy advanced option was modified.
Variables: <advanced option> - IPsec/Firewall policy advanced option that was modified. Possible values are:
• WS-Discovery_service
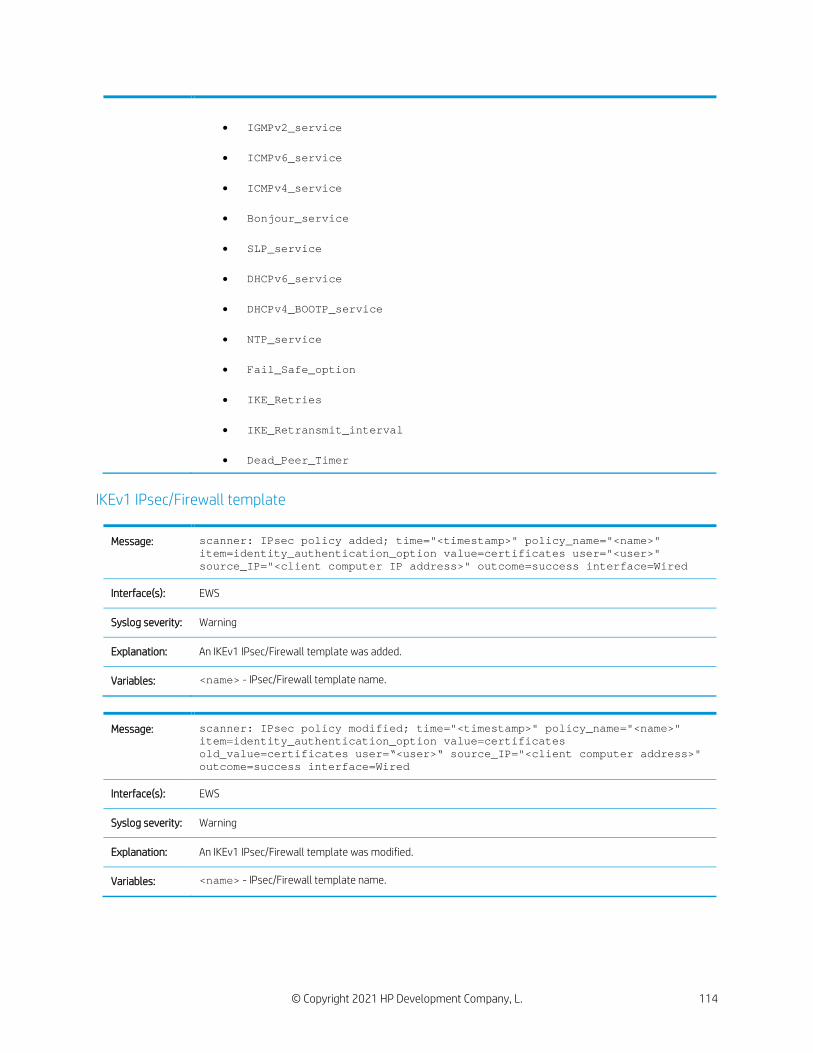
© Copyright 2021 HP Development Company, L. 114
• IGMPv2_service
• ICMPv6_service
• ICMPv4_service
• Bonjour_service
• SLP_service
• DHCPv6_service
• DHCPv4_BOOTP_service
• NTP_service
• Fail_Safe_option
• IKE_Retries
• IKE_Retransmit_interval
• Dead_Peer_Timer
IKEv1 IPsec/Firewall template
Message: scanner: IPsec policy added; time="<timestamp>" policy_name="<name>" item=identity_authentication_option value=certificates user="<user>" source_IP="<client computer IP address>" outcome=success interface=Wired
Interface(s): EWS
Syslog severity: Warning
Explanation: An IKEv1 IPsec/Firewall template was added.
Variables: <name> - IPsec/Firewall template name.
Message: scanner: IPsec policy modified; time="<timestamp>" policy_name="<name>" item=identity_authentication_option value=certificates old_value=certificates user=“<user>“ source_IP="<client computer address>" outcome=success interface=Wired
Interface(s): EWS
Syslog severity: Warning
Explanation: An IKEv1 IPsec/Firewall template was modified.
Variables: <name> - IPsec/Firewall template name.

© Copyright 2021 HP Development Company, L. 115
Message: scanner: IPsec policy deleted; time="<timestamp>" policy_name="<name>" item=identity_authentication_option value=certificates user="<user>" source_IP="<client computer IP address>" outcome=success interface=Wired
Interface(s): EWS
Syslog severity: Warning
Explanation: An IKEv1 IPsec/Firewall template was deleted.
Variables: <name> - IPsec/Firewall template name.

© Copyright 2021 HP Development Company, L.P. www.hp.com