Embed Size (px)
Citation preview

1
How to Update and Maintain Your SharePoint Site
Updated: 12 Jul 2012

How to Update and Maintain Your WPC (SharePoint) Site
Page 2 of 25
Table of Contents
Owner/Editor Tasks 4
Site Editors 4
Site Owners 4
Adding Editors and Owners 4
Navigation 5
Understanding Global and Current Navigation Settings 5
Modifying the Navigation Menu 6
Pages - Creating and Editing 7
Creating New Pages 7
Updating a New Page 8
Required Content and Meta Data 8
Updating Existing Pages 10
Adding Web Parts 10
Editing a New Web Part 11
Adding HTML code created in Dreamweaver 12
Adding a Link List Web Part 12
Examples of Link List Styles 14
Images – Uploading and Adding to a Page 14
Uploading Images to the Images folder 14
Adding Images to a Page 15
Documents - Uploading and Linking 16
Uploading documents to the Documents folder 16
Linking to documents stored in the Documents folder 17
Tips and Hints 18
Commonly Used Web Parts 18
Web Part Parts 18
Title 18
Chrome 18
Images 18
Images Folders 18
Where to find images 19
How to Update and Maintain Your WPC (SharePoint) Site
Page 3 of 25
Selecting the Site Collection Images folder 19
Finding an Image in the Images Folder 19
Finding Head Shot Images for IT Manager and Other IT People 20
Thumbnail Image Sizes 20
Image Sizes for Specific Image Containers 20
Article Page Select Image container Images sizes 21
Link List Browse for Image 21
Creating Images - using the Snipping Tool available in Accessories 22
Resizing images – using Microsoft Paint 22
How to capture a screen shot 25
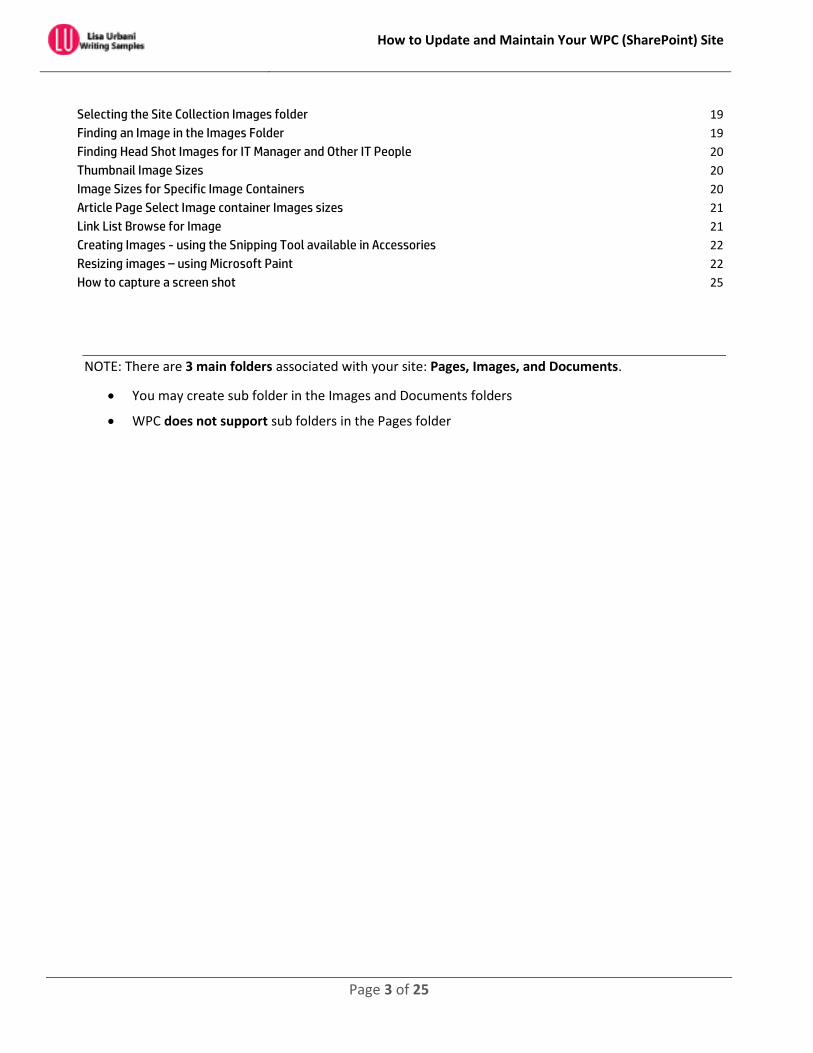
NOTE: There are 3 main folders associated with your site: Pages, Images, and Documents.
You may create sub folder in the Images and Documents folders
WPC does not support sub folders in the Pages folder

How to Update and Maintain Your WPC (SharePoint) Site
Page 4 of 25
Owner/Editor Tasks
Site Editors Site editors can create, edit, change, delete and publish pages, images and documents within this site
Site Owners Site owners have the same privileges as editors - they can also add editors and owners. They have full control of
the site.
Adding Editors and Owners
1. Click the "Sign in" link at the bottom of the page (if you have not already done so). 2. Click Site Actions at the top of the screen. 3. Click Site Settings > People and Groups 4. Select the group you want to add someone to from the list of groups on the left
5. Click New. The add users dialog box will display
6. Click the find names icon. 7. Enter the person’s name in this format, Last, First. 8. Select the name from the list displayed.
9. Repeat to add another, click OK to finish. 10. Leave the default settings in the Give Permissions section
11. Leave the default or uncheck "Send welcome e-mail to the new users" checkbox depending on how you want to notify the new users.
12. Click OK.

How to Update and Maintain Your WPC (SharePoint) Site
Page 5 of 25
Navigation Most sub sites in a site collection will use the top navigation menu from the parent. In the case of IT site
collections HPIT/WW and HPIT/Sites (note: the top navigation menu for these collections is the same).
Each sub site can have its own left navigation menu. You can add headings (linkable or not) and links. Images
cannot be added to the left or top navigation menus.
Understanding Global and Current Navigation Settings
Global Navigation is the horizontal navigation
menu that appears across the top of the web
site. It is usually the same for all sites in the
collection.
Current Navigation is the left-hand navigation
menu. It can be unique for all sites.
Add Heading allows you to add clickable (or
not) section headings to your navigation menu.
Headings can be repositioned by clicking on
them to select and them using the Move Up
and Move Down buttons.
Add Link allows you to add link to the
navigation menu. Links can be placed under a
heading or used without headings. Links under
headings will be indented.
Current Navigation
Global Navigation
How to Update and Maintain Your WPC (SharePoint) Site
Page 6 of 25
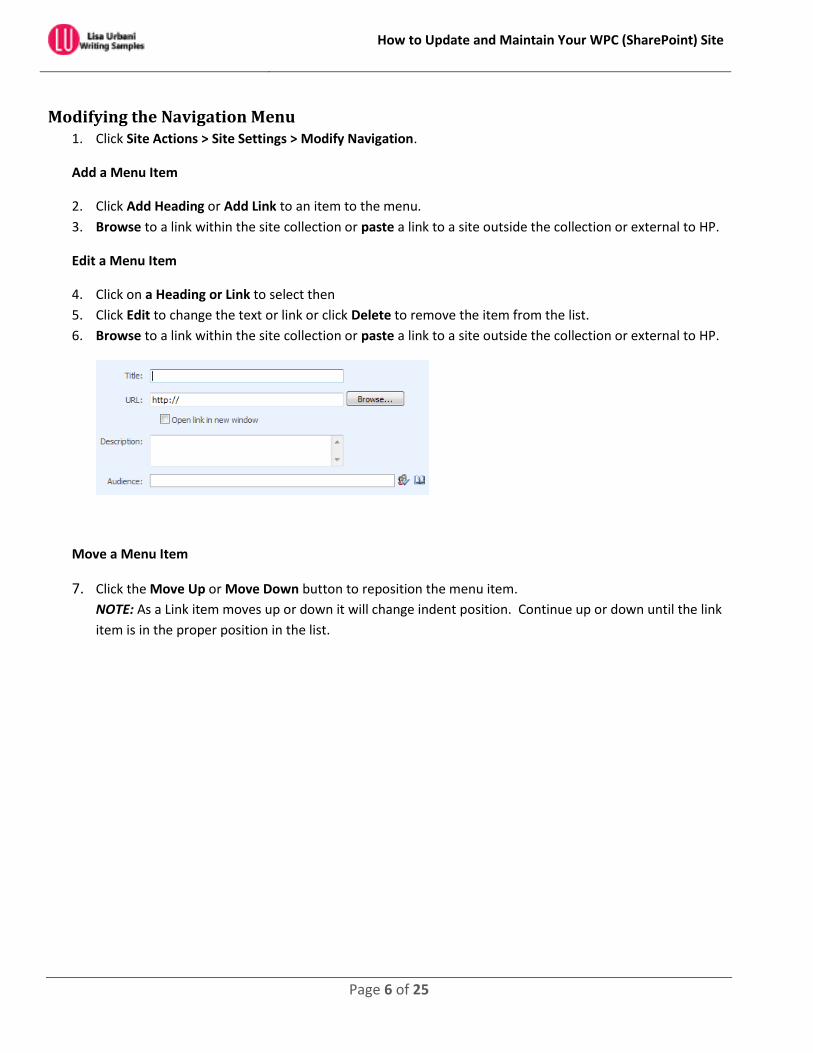
Modifying the Navigation Menu 1. Click Site Actions > Site Settings > Modify Navigation.
Add a Menu Item
2. Click Add Heading or Add Link to an item to the menu.
3. Browse to a link within the site collection or paste a link to a site outside the collection or external to HP.
Edit a Menu Item
4. Click on a Heading or Link to select then
5. Click Edit to change the text or link or click Delete to remove the item from the list.
6. Browse to a link within the site collection or paste a link to a site outside the collection or external to HP.
Move a Menu Item
7. Click the Move Up or Move Down button to reposition the menu item.
NOTE: As a Link item moves up or down it will change indent position. Continue up or down until the link
item is in the proper position in the list.

How to Update and Maintain Your WPC (SharePoint) Site
Page 7 of 25
Pages - Creating and Editing
Creating New Pages
1. Click the "Sign in" link at the bottom of the page (if you have not already done so). 2. Click Site Actions at the top of the screen. 3. Click Create Page.
4. Enter a title in the Title field. NOTE - once you click out of this field, this title without spaces will be automatically populated as the file name. You may change the file name.
5. Enter a description - NOTE - this is what will display in search results in a Portal Search.
6. Select the appropriate layout template in the Page Layout section. o (WPC Archive Page) Archive Page o (WPC Article Page) Article Page o (WPC homepage) Home Page o (WPC Page) One Column Page o (WPC Page) Three Column Page o (WPC sitemap Page) Sitemap Page o (WPC Two Column Page) Two Column Page with 50%:50% layout o (WPC Two Column Page) Two Column Page with 66%:33% layout
7. Click the Create button. 8. The page will be saved and the browser will display the pages folder.
Step 4 - Enter a title
Step 5 - Enter a description
Step 4 NOTE – File name
automatically created
Step 6 – Select the Page Layout.
Select Article Page if you want it
to display in an Article Abstract
(News module).

How to Update and Maintain Your WPC (SharePoint) Site
Page 8 of 25
9. To edit this new page, follow the instructions in Updating a New Page.
Updating a New Page After creating a page, the Pages folder will be displayed in the browser.
1. Locate the page you just created. (TIP: Sort the Modified Date column by Descending Date to display
your new page at the top of the list.) NOTE: Your new page will be in Draft status AND checked out to
you.
2. Click the file name to open the file for editing and begin with Step 6 in Updating Existing Pages.
Required Content and Meta Data
Content or Meta Data Where to add content
Title
(Title must be unique and is displayed in search
results)
Article Date
(Article Date is used in Query web parts)

How to Update and Maintain Your WPC (SharePoint) Site
Page 9 of 25
Content or Meta Data Where to add content
Keywords
Language Tag
Location Tag
Feedback URL &
Support URL
(If blank and the Feedback and Support URLs are
set in the Property Settings this info will be used
in the Feedback and Support links at the bottom
of every page in your site. If neither is
completed, the links will not work.)
TIP: Setting to use here or in the Property Setting
Mailto:[email protected]?subject=Feedback for Site Name
Mailto: is HTML code to generate an email to the fowllowing email address(es)
?subject= is HTML code setting the subject that will automatically be filled in
when the Outlook message is generated
Security label
(Use Restricted unless your content is
Confidential)
Creator email
Not required but a good practice to fill in)
Always select these options:
Language Tag: en_US
Location Tag:
Geography: ALL
Region: (None)
Country: (None)
How to Update and Maintain Your WPC (SharePoint) Site
Page 10 of 25
Content or Meta Data Where to add content
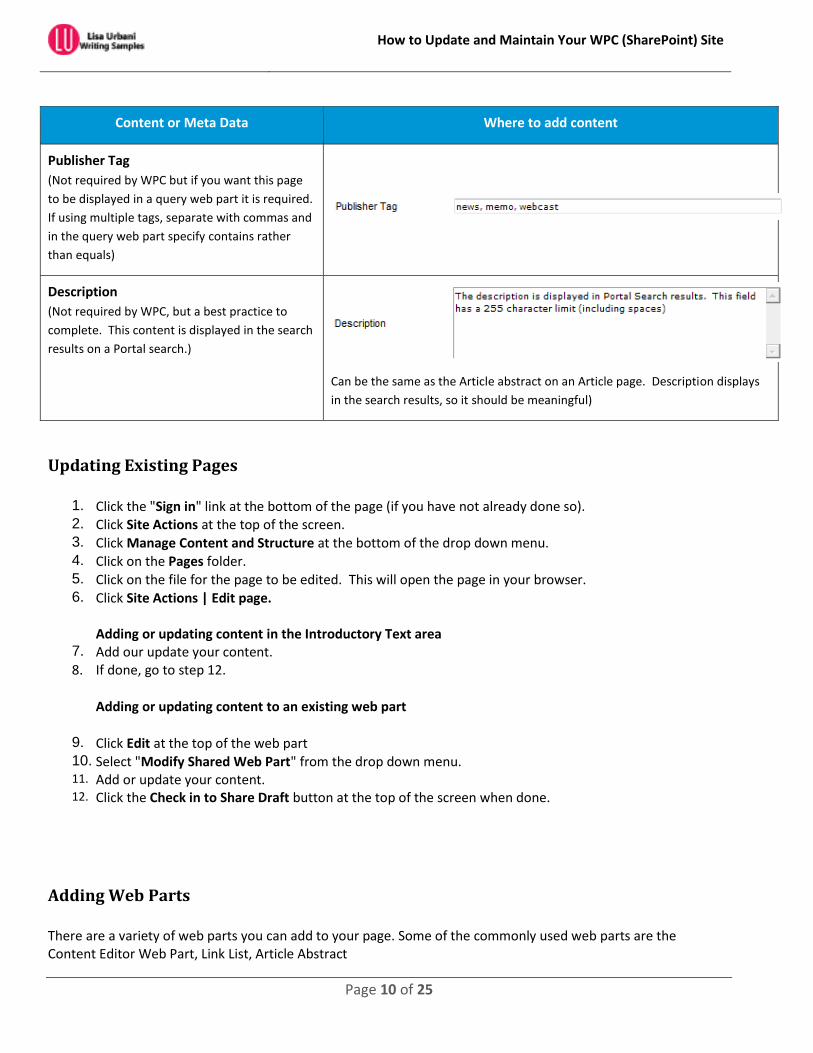
Publisher Tag
(Not required by WPC but if you want this page
to be displayed in a query web part it is required.
If using multiple tags, separate with commas and
in the query web part specify contains rather
than equals)
Description
(Not required by WPC, but a best practice to
complete. This content is displayed in the search
results on a Portal search.)
Can be the same as the Article abstract on an Article page. Description displays
in the search results, so it should be meaningful)
Updating Existing Pages
1. Click the "Sign in" link at the bottom of the page (if you have not already done so). 2. Click Site Actions at the top of the screen. 3. Click Manage Content and Structure at the bottom of the drop down menu. 4. Click on the Pages folder.
5. Click on the file for the page to be edited. This will open the page in your browser. 6. Click Site Actions | Edit page.
Adding or updating content in the Introductory Text area
7. Add our update your content.
8. If done, go to step 12.
Adding or updating content to an existing web part
9. Click Edit at the top of the web part 10. Select "Modify Shared Web Part" from the drop down menu. 11. Add or update your content. 12. Click the Check in to Share Draft button at the top of the screen when done.
Adding Web Parts
There are a variety of web parts you can add to your page. Some of the commonly used web parts are the Content Editor Web Part, Link List, Article Abstract
How to Update and Maintain Your WPC (SharePoint) Site
Page 11 of 25
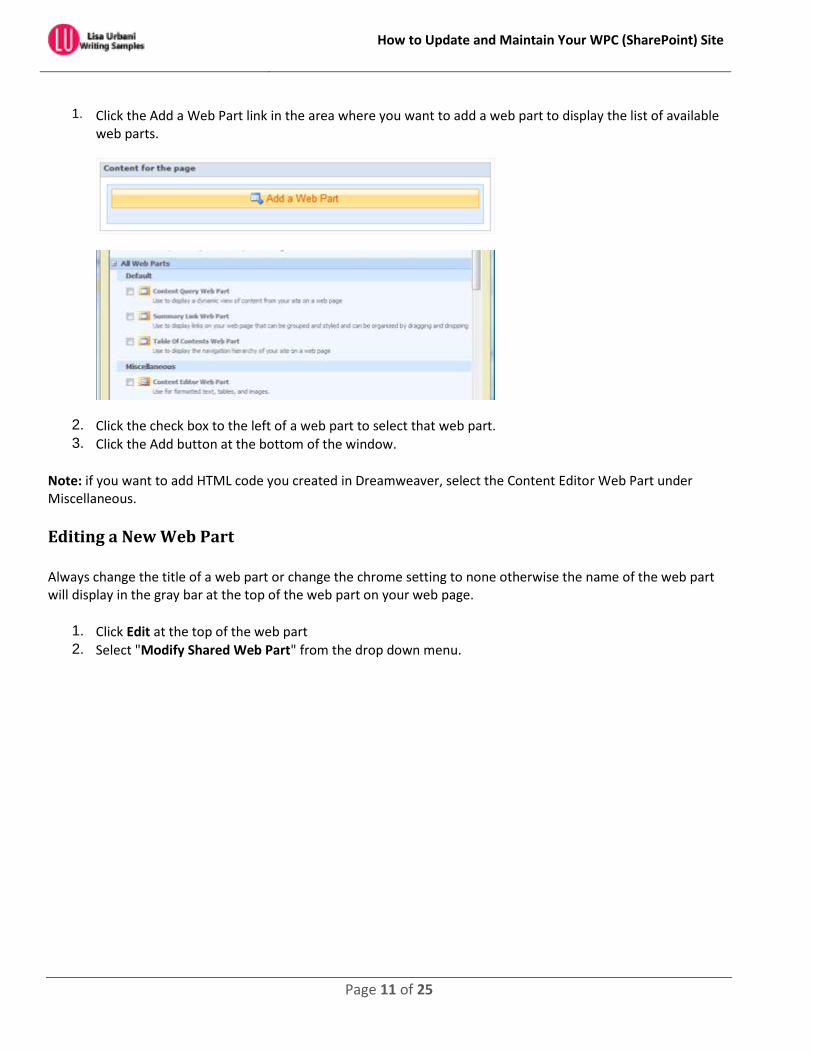
1. Click the Add a Web Part link in the area where you want to add a web part to display the list of available web parts.
2. Click the check box to the left of a web part to select that web part.
3. Click the Add button at the bottom of the window.
Note: if you want to add HTML code you created in Dreamweaver, select the Content Editor Web Part under Miscellaneous.
Editing a New Web Part
Always change the title of a web part or change the chrome setting to none otherwise the name of the web part will display in the gray bar at the top of the web part on your web page.
1. Click Edit at the top of the web part 2. Select "Modify Shared Web Part" from the drop down menu.
How to Update and Maintain Your WPC (SharePoint) Site
Page 12 of 25
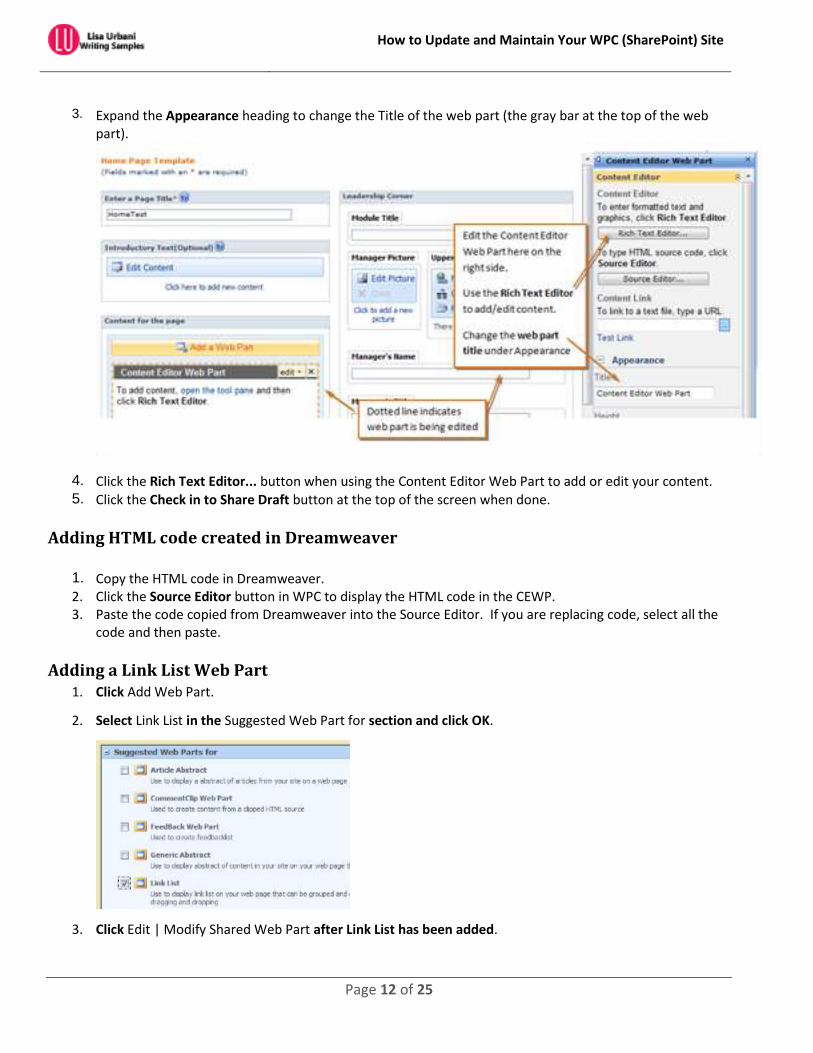
3. Expand the Appearance heading to change the Title of the web part (the gray bar at the top of the web part).
4. Click the Rich Text Editor... button when using the Content Editor Web Part to add or edit your content.
5. Click the Check in to Share Draft button at the top of the screen when done.
Adding HTML code created in Dreamweaver
1. Copy the HTML code in Dreamweaver.
2. Click the Source Editor button in WPC to display the HTML code in the CEWP. 3. Paste the code copied from Dreamweaver into the Source Editor. If you are replacing code, select all the
code and then paste.
Adding a Link List Web Part 1. Click Add Web Part.
2. Select Link List in the Suggested Web Part for section and click OK.
3. Click Edit | Modify Shared Web Part after Link List has been added.

How to Update and Maintain Your WPC (SharePoint) Site
Page 13 of 25
4. Determine the type of link list you want to add: simple
list of links or collapsible groups of links. Note: You can
setup groups after links are created. You would then
modify the links to assign to a group.
5. OPTIONAL: Click New Group to create a group if you
want the links to display in groups.
6. Click New Link to add a link
7. Select Create a link to an item (this is what you will use
to create a kink to another page, document, or external
link).
8. Enter the text for the link in the Title field.
9. Enter the URL for the link URL field (you can browse the
Pages or Documents folder of your site or any other site
in the site collection or past a link from an external site.)
10. OPTIONAL: Select a group from Group drop down menu.
11. Select the link Style. NOTE: If you entered data in the
Description and/or Image fields you will need to select
Full Abstract for these items to display. Otherwise select
LinkItem or AbstractItem.

How to Update and Maintain Your WPC (SharePoint) Site
Page 14 of 25
Examples of Link List Styles
LinkItem style adds a link is regular style
font preceeded by an arrow bullet
AbstractItem style add a link in bold style
font
FullAbstract style adds the link title in bold,
abstract, a Read More link and an image.
Linking to an image is not required.
Title and Description style adds the link to
the title with the description below.
Notes:
Font size cannot be adjusted on Link
Lists
Full Abstract and Title and
Description style links will not
collapse
Images – Uploading and Adding to a Page
Uploading Images to the Images folder
Best Practices:
Before you add images to your site's images folder, check the Site Collection Images folder - there are many images available and easily accessible from any site in the site collection. This saves disk space as we only need one copy of images that are frequently used by many web pages.
When naming images or documents for use on web sites, do not include spaces in the file name .
UseNoSpaces or Use_Underscores_for_spaces.
When updating documents or images - always use the same file name, this way you will not need to recreate the link to the document from the page(s) that link to it.
When uploading revised documents or images you will need to check out the existing document or image first.
How to Update and Maintain Your WPC (SharePoint) Site
Page 15 of 25
1. Click the "Sign in" link at the bottom of the page (if you have not already done so). 2. Click Site Actions at the top of the screen. 3. Click Manage Content and Structure. 4. Click the Images folder link in the right pane. 5. Click New > Item.
6. Click Upload Multiple Items (you can use this option even if you are loading one or many images). 7. Navigate to and select the image(s) you want to upload. 8. Click the OK then click Yes.
NOTE: Once the items are uploaded you will need to publish them so that the Approval Status is Approved to ensure everyone accessing the site can see them. If the Approval Status of an image is Pending or Draft it will not be accessible to site visitors.
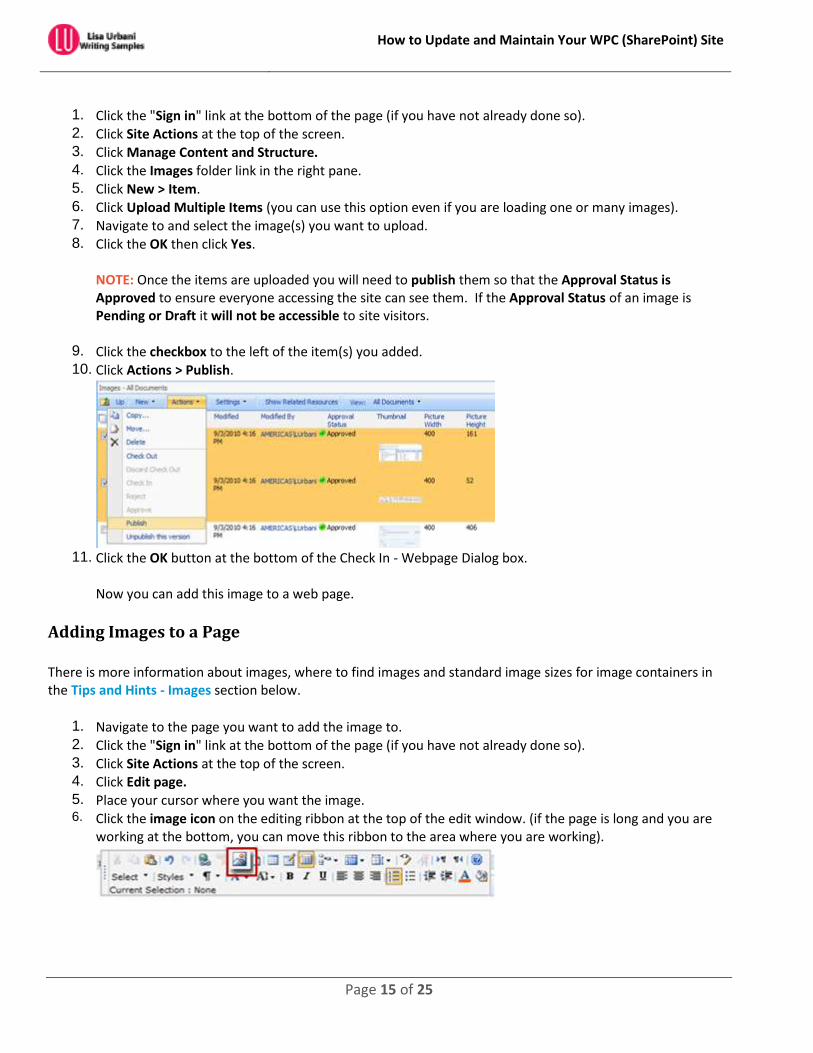
9. Click the checkbox to the left of the item(s) you added. 10. Click Actions > Publish.
11. Click the OK button at the bottom of the Check In - Webpage Dialog box. Now you can add this image to a web page.
Adding Images to a Page
There is more information about images, where to find images and standard image sizes for image containers in the Tips and Hints - Images section below.
1. Navigate to the page you want to add the image to. 2. Click the "Sign in" link at the bottom of the page (if you have not already done so). 3. Click Site Actions at the top of the screen. 4. Click Edit page.
5. Place your cursor where you want the image. 6. Click the image icon on the editing ribbon at the top of the edit window. (if the page is long and you are
working at the bottom, you can move this ribbon to the area where you are working).
How to Update and Maintain Your WPC (SharePoint) Site
Page 16 of 25
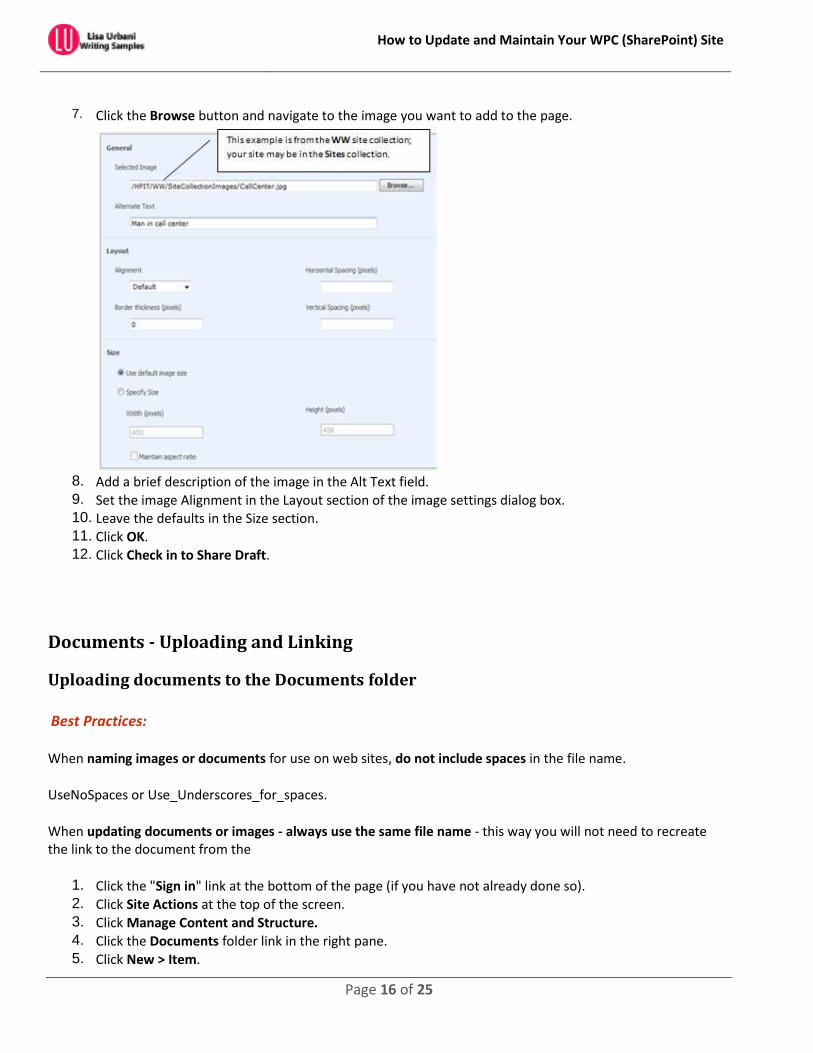
7. Click the Browse button and navigate to the image you want to add to the page.
8. Add a brief description of the image in the Alt Text field.
9. Set the image Alignment in the Layout section of the image settings dialog box. 10. Leave the defaults in the Size section.
11. Click OK. 12. Click Check in to Share Draft.
Documents - Uploading and Linking
Uploading documents to the Documents folder
Best Practices:
When naming images or documents for use on web sites, do not include spaces in the file name.
UseNoSpaces or Use_Underscores_for_spaces.
When updating documents or images - always use the same file name - this way you will not need to recreate the link to the document from the page(s) that link to it.
1. Click the "Sign in" link at the bottom of the page (if you have not already done so). 2. Click Site Actions at the top of the screen. 3. Click Manage Content and Structure.
4. Click the Documents folder link in the right pane. 5. Click New > Item.

How to Update and Maintain Your WPC (SharePoint) Site
Page 17 of 25
6. Click Upload Multiple Items (you can use this option even if you are loading one or many images). 7. Navigate to and select the document(s) you want to upload. 8. Click the OK then click Yes.
Once the items are uploaded, you will need to publish them to ensure the others reviewing the site can see them.
9. Highlight the document you just added and click the dropdown arrow on the right.
10. Click Publish. 11. Click the OK button at the bottom of the Check In - Webpage Dialog box.
Now you can add links to this document from a web page. mage fir
Linking to documents stored in the Documents folder
1. Navigate to the page you want to add the image to. 2. Click the "Sign in" link at the bottom of the page (if you have not already done so). 3. Click Site Actions at the top of the screen.
4. Click Edit page.
5. Highlight the text that you want to link to a document. 6. Click the link icon on the editing ribbon at the top of the edit window. (if your page is long and your are
working at the bottom, you can move this ribbon to the area where you are working).
7. Click the Browse button and navigate to the document you want to link to.
8. Click OK. 9. Click Check in to Share Draft
How to Update and Maintain Your WPC (SharePoint) Site
Page 18 of 25
Tips and Hints
Commonly Used Web Parts
Content Editor Web Part (CEWP)
This is a very versatile web part. You can use this web part to add lists of links, sentences/paragraphs, and images, tables for content or layout.
Article Abstract (a Query Web Part)
This is the web part used to create the News module. It will display content based on the criteria and appearance settings you set for the web part.
Link List This web part is used to add a list of links. Link lists can be simple list of links or you can include descriptions and images.
Web Part Parts
Title - the content that displays in the gray bar (chrome) of the web part. When adding Web Parts, be sure to change the default title or set the chrome to none.
Edit the content that displays in the Chrome (gray bar) of the web part
1. Click Edit in the upper right corner of the web part 2. Click Modify shared web part
3. Expand Appearance 4. Enter a title or heading in the Title field
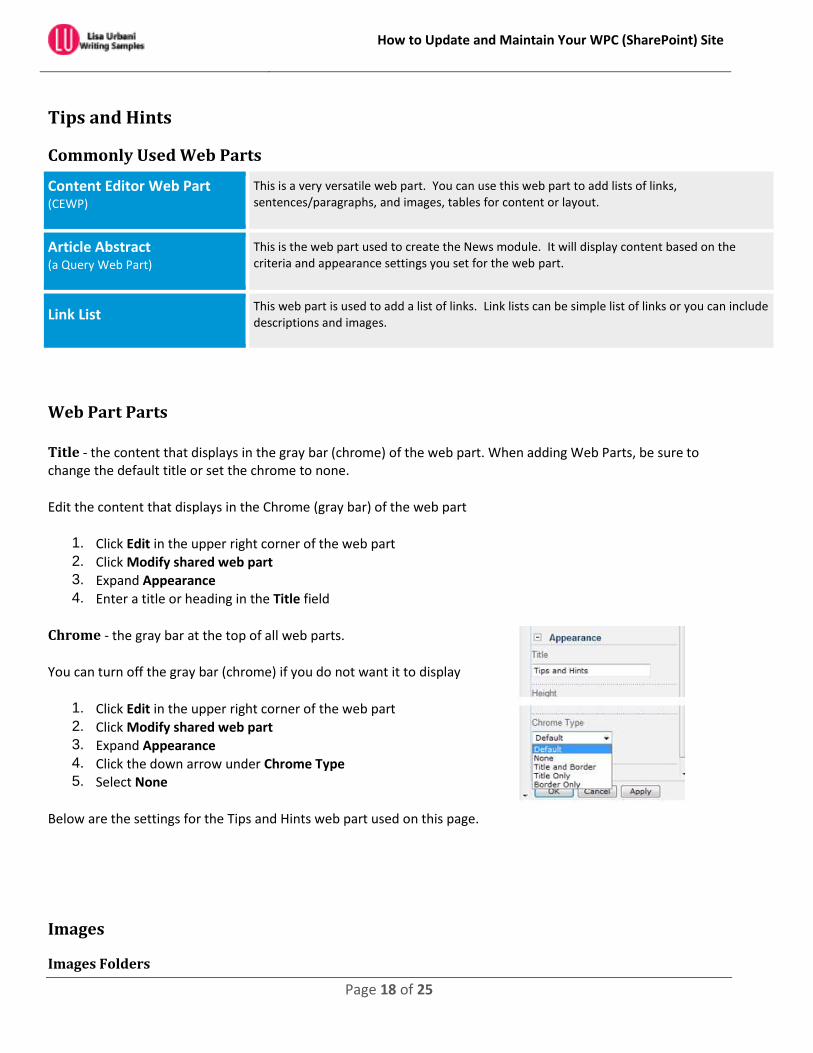
Chrome - the gray bar at the top of all web parts.
You can turn off the gray bar (chrome) if you do not want it to display
1. Click Edit in the upper right corner of the web part 2. Click Modify shared web part 3. Expand Appearance
4. Click the down arrow under Chrome Type
5. Select None
Below are the settings for the Tips and Hints web part used on this page.
Images
Images Folders

How to Update and Maintain Your WPC (SharePoint) Site
Page 19 of 25
There are two main images folders available to you
The images folder within your site. The Site Collection Images folder.
Where to find images
There is a wide variety of images stored in the Site Collection Images folder of the HPIT/WW site collection and the HPIT/Sites site collection. The Site Collection Images folder is easily accessible (1) from any site’s Select an Image – Webpage Dialog.
You may use any image stored in the Site Collection Images folder. All IT management images (L2, L3, L4, Global Function Partners) should be stored in the Site Collection
Images ITMgmt folder. Other images, specific to your site, can be stored in the Images folder for your site. You can link to images in any other site in the collection by navigating to another site’s images folder.
Use the Up button (2) to navigate up the collection
Selecting the Site Collection Images folder
1. Click the image icon on the editing ribbon at the top of the edit window. (if your page is long and you are working at the bottom, you can move this ribbon to the area where you are working).
2. Click the Site Collection Images icon (1) in the Look In column of the Select an Image -- Webpage Dialog window.
3. Select an image from the default Site Collection Images folder or one of the other folders.
Finding an Image in the Images Folder
Click the Thumbnail dropdown and select All Documents.
From this view you can see the image size to the right of the thumbnail and you can sort images by:
name date modified

How to Update and Maintain Your WPC (SharePoint) Site
Page 20 of 25
Finding Head Shot Images for IT Manager and Other IT People
All IT management images (L2, L3, L4, Global Function Partners) should be stored in the Site Collection Images ITMgmt folder.
When creating images to use in the Leadership Corner of the Home Page template, use the standard portrait size of 60x83.
Manager images used on biography pages may be any size.
Home Page Leadership Corner Manager Picture container
Portrait only = 60x83
1. Click Edit Picture
2. Click Browse
3. Click the Site Collection Images folder icon on the left under Look In
4. Open the ITMgmt folder
5. Locate the image of your executive
6. Click OK
Thumbnail Image Sizes
Other images, specific to your site, can be stored in the Images folder for that site.
You can link to images in any other site in the collection by navigating to another site’s images folder. Use the Up button (2) to navigate up the collection
Image Sizes for Specific Image Containers
The image containers on the Home Page template and the Article template and in Link Lists have a preset size. If the image used in the image container is a different size that the size of the container, the image will appear distorted when displayed on the page.
How to Update and Maintain Your WPC (SharePoint) Site
Page 21 of 25
The sizes for these containers are:
Home Page Template – Leadership Corner image container is portrait only.
Image size: width = 60 px wide x height = 83 px
Article page image container image can be landscape or portrait.
Image size: width = 56 px x height = 74 px
Image size: width = 74 px x height = 56 px
(Note: the image does not display on the article page when viewed in the browser – it displays in the Article Abstract or Query Web Part when Full Abstract is selected.)
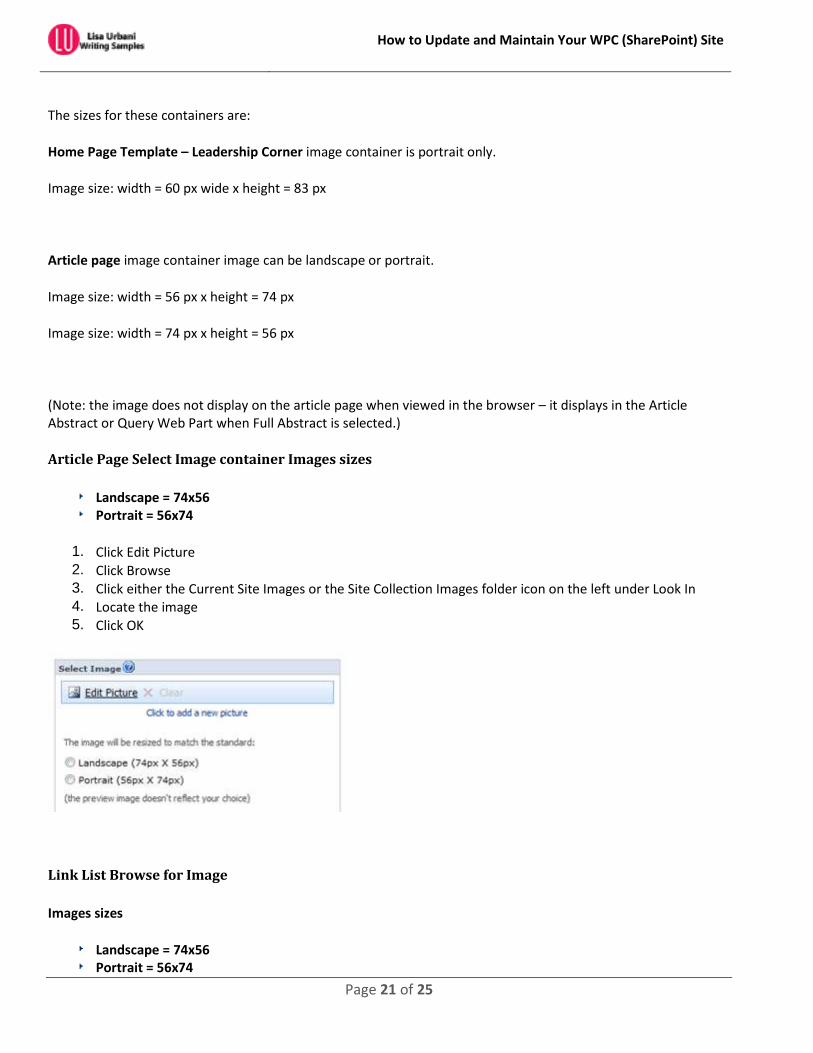
Article Page Select Image container Images sizes
Landscape = 74x56 Portrait = 56x74
1. Click Edit Picture
2. Click Browse
3. Click either the Current Site Images or the Site Collection Images folder icon on the left under Look In
4. Locate the image
5. Click OK
Link List Browse for Image
Images sizes
Landscape = 74x56 Portrait = 56x74
How to Update and Maintain Your WPC (SharePoint) Site
Page 22 of 25
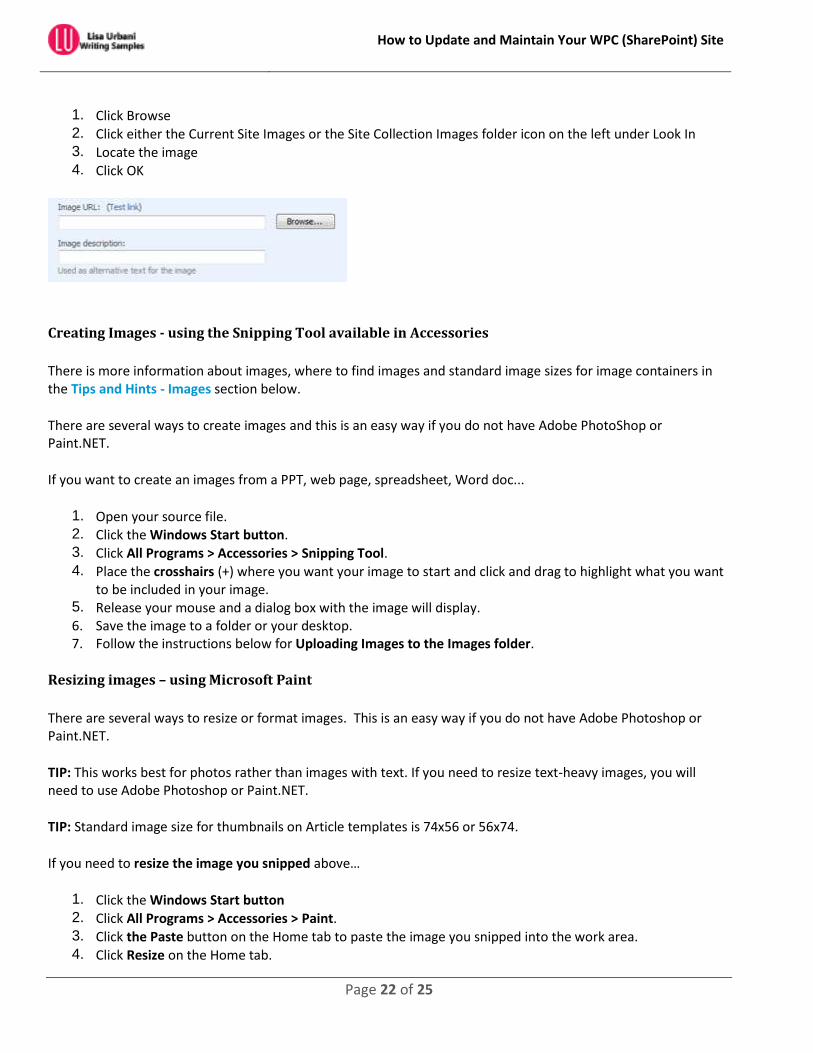
1. Click Browse
2. Click either the Current Site Images or the Site Collection Images folder icon on the left under Look In
3. Locate the image 4. Click OK
Creating Images - using the Snipping Tool available in Accessories
There is more information about images, where to find images and standard image sizes for image containers in the Tips and Hints - Images section below.
There are several ways to create images and this is an easy way if you do not have Adobe PhotoShop or Paint.NET.
If you want to create an images from a PPT, web page, spreadsheet, Word doc...
1. Open your source file. 2. Click the Windows Start button. 3. Click All Programs > Accessories > Snipping Tool.
4. Place the crosshairs (+) where you want your image to start and click and drag to highlight what you want to be included in your image.
5. Release your mouse and a dialog box with the image will display.
6. Save the image to a folder or your desktop. 7. Follow the instructions below for Uploading Images to the Images folder.
Resizing images – using Microsoft Paint
There are several ways to resize or format images. This is an easy way if you do not have Adobe Photoshop or Paint.NET.
TIP: This works best for photos rather than images with text. If you need to resize text-heavy images, you will need to use Adobe Photoshop or Paint.NET.
TIP: Standard image size for thumbnails on Article templates is 74x56 or 56x74.
If you need to resize the image you snipped above…
1. Click the Windows Start button 2. Click All Programs > Accessories > Paint.
3. Click the Paste button on the Home tab to paste the image you snipped into the work area. 4. Click Resize on the Home tab.

How to Update and Maintain Your WPC (SharePoint) Site
Page 23 of 25
5. Ensure that Maintain aspect ratio is checked in the Resize section of the Resize and Skew dialog box. 6. Set the Resize By settings to either Percentage or Pixels. 7. Change the Horizontal or Vertical setting to the dimension you need. (Since maintain aspect ratio is set,
changing one will change the other.)
8. Click OK.
9. If you need to Crop the image, you can grab one of the handles and move in to crop. You can view the horizontal and vertical dimensions in the lower portion of the screen.
10. Click File > Save As and save the image to your local hard drive. 11. Follow the instructions below for Uploading Images to the Images folder.
If you need to resize a photo or image you already have available on your local or network drive…
1. Click the Windows Start button
2. Click All Programs > Accessories > Paint. 3. Navigate to the folder location of the photo or image to be resized. 4. Double click to open the image file. 5. Click Resize on the Home tab.
6. Ensure that Maintain aspect ratio is checked in the Resize section of the Resize and Skew dialog box. 7. Change the Horizontal or Vertical setting to the dimension you need. (Since maintain aspect ratio is set,
changing one will change the other.) 8. Click OK

How to Update and Maintain Your WPC (SharePoint) Site
Page 24 of 25
9. If you need to Crop the image, you can grab one of the handles and move in to crop. You can view the horizontal and vertical dimensions in the lower portion of the screen.
10. Click File > Save As and save the image with a new name. 11. Follow the instructions above for Uploading Images to the Images folder.

How to Update and Maintain Your WPC (SharePoint) Site
Page 25 of 25
How to capture a screen shot
The entire screen - You can capture then entire screen buy pressing the Alt +Print Screen buttons on your
keyboard.
The dialog box or popup window only - You can capture the window only by pressing the Print Screen button on
your keyboard.
You can them paste the captured image into Paint, PhotoShop or Paint.NET.