Embed Size (px)
Citation preview

1 Sally Kyvernitis, Temple University
How to Publish Your Web Site to cis-linux2.temple.edu
(a simple project that does not have any java classes)
1. OVERVIEW ...................................................................................................................................................................................... 2
2. INSTALL SECURE FTP PROGRAM .......................................................................................................................................................... 2
3. LEARN WHERE YOUR NETBEANS PROJECT IS LOCATED ............................................................................................................................. 2
4. CONNECT TO CIS-LINUX2 USING SECURE FILE TRANSFER CLIENT ................................................................................................................. 3
5. PUBLISH JSP PAGES (AND AUXILIARY FILES: HTML, CSS, JAVASCRIPT, IMAGES) ............................................................................................ 4
6. TEST YOUR PAGE .............................................................................................................................................................................. 4
7. TROUBLESHOOTING........................................................................................................................................................................... 5

2 Sally Kyvernitis, Temple University
1. Overview
In this document, you will learn how to:
publish a simple jsp page (a page that uses no java classes) using “Secure File Transfer Client”, then
test to ensure it worked.
2. Install Secure FTP program
If you have a PC and you do not have Secure Shell installed, download it (called “SSH”) from this page:
https://download.temple.edu/ If you have a Mac, there is a separate document for you. It has you install (free) Cyberduck and us that as your FTP
program.
3. Learn Where Your NetBeans Project is Located
In order to publish a JSP web application to the web server, you must become familiar with the folder structure of the project files – as they are displayed in the NetBeans UI as well as how they are stored in the file system. To see where your NetBeans project files are stored (on disk),
right click on the project name (from NetBeans Project pane) and select properties.
You will probably find your files stored under mydocuments\NetBeansProjects\ProjectName
See where the jsp pages are stored, in the NetBeans Project Pane, and in your file system.
FROM NETBEANS Project Pane
SAME WEB APP From Windows Explorer

3 Sally Kyvernitis, Temple University
4. Connect to cis-linux2 using Secure File Transfer Client
Now that we know where everything is stored (the jsp pages, the java class files), we are ready to try to publish the web application, so run secure ftp:
Menu option: File – Connect
Enter the name of the temple web server, enter your Net Access Username, then click Connect.
Then type in your Net Access password (your tumail password).
4 Sally Kyvernitis, Temple University
5. Publish JSP Pages (and auxiliary files: HTML, CSS, javascript, images)
Once connected to cis-linux2.temple.edu using secure shell,
On the left side (your local machine), browse to the web folder within your project folder (in Documents\NetBeansProjects).
On the right side (the remote web server), browse to your web root folder by typing "/var/lib/tomcat7/webapps/" then your semester, course number, and net access username.
Copy the files and folders from your local machine to the web server, as shown below. DO NOT copy the WEB-INF folder.
Please be very careful and navigate to the correct folder on BOTH MACHINES. Otherwise, I’ll have to bail you out and it is tedious.
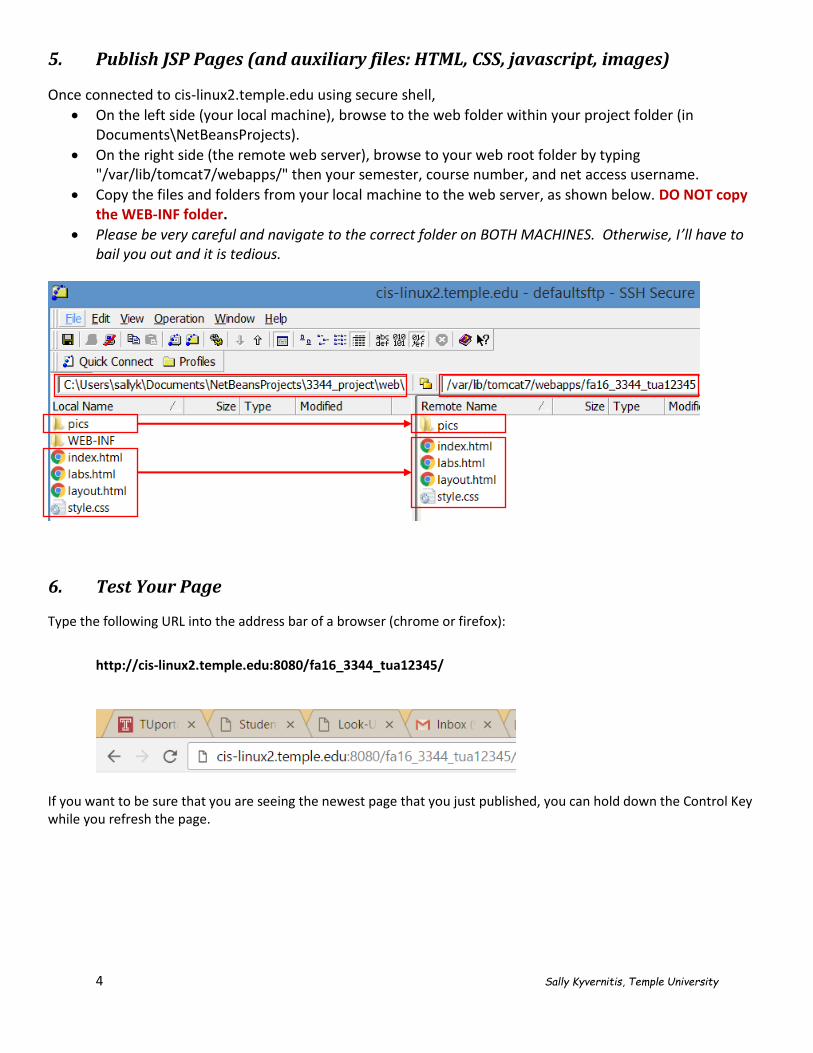
6. Test Your Page
Type the following URL into the address bar of a browser (chrome or firefox):
http://cis-linux2.temple.edu:8080/fa16_3344_tua12345/
If you want to be sure that you are seeing the newest page that you just published, you can hold down the Control Key while you refresh the page.

5 Sally Kyvernitis, Temple University
7. Troubleshooting
If the page does not display (and you are sure you have refreshed your browser, check the permissions of the files and
folders on the server. To check or change permissions, from within Secure File Transfer Client, right click on the file and
select Properties.
All FILEs should have a permission where:
The owner (you) can read and write. This means you can publish your pages. The group (probably you and me) can also read and write. “Other” (the user) can only read. This means anyone can view your page. Do not let them write and/or execute
– this would be a big security risk.
If you have any folders (e.g., holding images), the folders should have Permission Mode 771. Everyone can
execute but only you and your group can read/write.


![Some material adapted from Upenn cmpe391 slides and other … · read-eval-print loop [finin@linux2 ~]$ python Python 2.4.3 (#1, Jan 14 2008, 18:32:40) [GCC 4.1.2 20070626 (Red Hat](https://img.pdfslide.us/doc/110x75/60810dbd4bc2ed274d2957b9/some-material-adapted-from-upenn-cmpe391-slides-and-other-read-eval-print-loop-fininlinux2.jpg)


![Digital Signal Processingbp1@bp1-ThinkPad-X220:~$ python Python 2.7.12 (default, Nov 19 2016, 06:48:10) [GCC 5.4.0 20160609] on linux2 Type "help", "copyright", "credits" or "license"](https://img.pdfslide.us/doc/110x75/5f2e4d815d23fb09b77288e2/digital-signal-processing-bp1bp1-thinkpad-x220-python-python-2712-default.jpg)