Embed Size (px)
Citation preview

Technical Guide of TP-Link EAP series
1 / 14
How to deploy Auranet Controller
on a private cloud (AWS EC2)
Updated at 2016/11
This article applies to Auranet Controller 2.0.3 and later non-cloud-based controller.
YouTube Tutorial
Overview
Auranet Controller (2.0.3 and newer non-cloud versions) supports L3
management. An Auranet Controller can manage EAPs of multiple remote
networks crossing internet. However, it will require to set up port-forwarding or
VPN tunnels if there are NAT firewalls in front of Auranet Controller. (See
FAQ913)

Technical Guide of TP-Link EAP series
2 / 14
Some users may want to install the Auranet Controller on a private cloud
platform, so as to achieve L3 management from anywhere without hosting a
LAN PC. Moreover, if the cloud server comes with public IP addresses, it can
also save the work of setting up port-forwarding or VPN tunnels for penetrating
through NAT firewalls.
A Workaround
Although Auranet Controller is a non-cloud-application, it can still be installed
on a cloud-based Windows host, which can be a workaround to achieve part of
the demand.
In this article, readers will learn how to install and run an Auranet Controller
on an AWS EC2 Windows host.

Technical Guide of TP-Link EAP series
3 / 14
About AWS EC2
Amazon Elastic Compute Cloud (Amazon EC2) provides scalable computing
capacity in the Amazon Web Services (AWS) cloud. One significant feature of
EC2 is virtual computing environments, known as instances, which includes
Windows virtual hosts.
The Amazon Web Services (AWS) Free Tier provides new registered users with
750 hours per month of Windows t2.micro instance usage for free within certain
usage limits. You are now strongly recommended to refer to the page of AWS
Free Tier for detailed information. All information given herein are subject to
changes or update by AWS without prior notice.
Here we take AWS EC2 as an example to introduce how to install and run an
Auranet Controller on a private cloud.

Technical Guide of TP-Link EAP series
4 / 14
Part 1: Get AWS EC2 Ready
1.1 Create an AWS account
- Open http://aws.amazon.com/, and then choose Create an AWS Account.
- Follow the online instructions to create an AWS account.
Note: Skip this step 1 and login directly if you have already an AWS account.
About Region
Amazon has data centers in different areas of the world (for example, North
America, Europe, and Asia). Correspondingly, Amazon EC2 is available to use
in different regions. By launching instances in separate regions, you can design
your application to be closer to specific customers or to meet legal or other
requirements.
You can choose a preferred region before creating a Windows instance.
1.2 Launch a Windows instance
(Note: Skip this step 2 if you have already a Windows instance available for
running an Auranet Controller.)
- Open the Amazon EC2 console at https://console.aws.amazon.com/ec2/.
From the console dashboard, choose Launch Instance.
- The Choose an Amazon Machine Image (AMI) page displays a list of
basic configurations, called Amazon Machine Images (AMIs), which serve as
templates for your instance. Select the AMI for Microsoft Windows Server.
Notice that in this tutorial we choose Windows Server 2012 R2 marked "Free
tier eligible" as an example.

Technical Guide of TP-Link EAP series
5 / 14
- On the Choose an Instance Type page, you can select the hardware
configuration of your instance. Select the t2.micro type, which is selected
by default. Notice that this instance type is eligible for the free tier.
- Choose Review and Launch to let the wizard complete the other
configuration settings for you.
- On the Review Instance Launch page, under Security Groups, you'll see
that the wizard created and selected a security group for you. Now
choose Edit security groups.
Security Group Settings (Important)
A security group is a set of firewall rules that control the traffic for your instance.
To achieve the goal of managing remote EAPs, add rules that allow unrestricted
access to the following ports.
TCP PORT 8088
TCP PORT 8043
UDP PORT 29810
TCP PORT 29811
TCP PORT 29812
TCP PORT 29813
Also allow RDP access for Windows Remote Desktop access.
- Then choose Review and Launch.

Technical Guide of TP-Link EAP series
6 / 14
- On the Review Instance Launch page, choose Launch.
- When prompted for a key pair, select the key pair that you created if you
have one. Otherwise, you can create a new key pair. Select Create a new
key pair, enter a name for the key pair, and then choose Download Key
Pair. This is the only chance for you to save the private key file, so be sure
to download it. Save the private key file in a safe place. You'll need to
provide the name of your key pair when you launch an instance and the
corresponding private key each time you connect to the instance.
Caution: Don't select the Proceed without a key pair option. If you launch
your instance without a key pair, then you can't connect to it.
- When you are ready, select the acknowledgement check box, and then
choose Launch Instances.
- A confirmation page lets you know that your instance is launching.
Choose View Instances at the bottom of the page to close the
confirmation page and return to the EC2 console.
- Back to EC2 console Instances menu, you can see that the newly
launched Windows instance is now running.
1.3 Assign an Elastic IP address for the Windows host
Although it shows that the instance is assigned a public IP address now, but
this default IP address is not permanent. Once you shut down or reboot the
instance, it can be released or changed to another one.
To have static public IP address for the Windows, we need to create an Elastic
IP address and assign it to the instance. An Elastic IP address is a static public
IP address that you can allocate to your account. You can associate it to and
from instances as you require, and it's allocated to your account until you
choose to release it.
In the EC2 console, navigate to NETWORK & SECURITY -> Elastic IPs, the

Technical Guide of TP-Link EAP series
7 / 14
list should be empty if you haven’t create any. Now click Allocate New Address,
confirm to allocate when prompted.
Then a new Elastic IP address entry will be shown in the list.
Select the entry, click Actions -> Associate Address.
Click the Instance input box and choose the Windows instance in the drop-
down list. Click Associate to associate this Elastic IP address to the Windows
instance.
Go back to Instances menu, now you can see the Windows instance is now
associated with the Elastic IP address.
With all the above steps, the AWS EC2 Windows host is now ready.
Technical Guide of TP-Link EAP series
8 / 14
Part 2: Install Auranet Controller on EC2
2.1 Connect to Windows through Remote Desktop
In EC2 console, select the Windows instance and click Connect.
You can connect to your Windows instance using a remote desktop client of
your choice, and by downloading and running the RDP shortcut file as the
prompted instruction says.
Before actually connect through RDP, you must Get Password using your Key
file which is saved in previous steps. Upload the Key file and then choose
Decrypt Password to get your password.
With the provided username/password now you can connect to the Windows
instance through remote desktop (RDP) client from any remote PC at anywhere
you like.

Technical Guide of TP-Link EAP series
9 / 14
2.2 Download and Install Auranet Controller on EC2
TIPs: When the IE ESC is enabled, you get pop-up all the time and you are
asked to add every new URL to the IE trusted sites zone. You may want to
disable IE ESC temporarily for the convenience of downloading the Auranet
Controller from TP-Link official websites.
To disable IE enhanced security in windows server 2012 R2, launch the Server
Manager, on the left hand side click on Local Server. On the right hand side
click on the On link next to IE Enhanced Security Configuration.
In the prompted windows, click on Off to turn off the IE ESC.
Then visit www.tp-link.com, search any model of the EAP series, e.g. EAP220.
In the product page, navigate to Support page and download the latest
Technical Guide of TP-Link EAP series
10 / 14
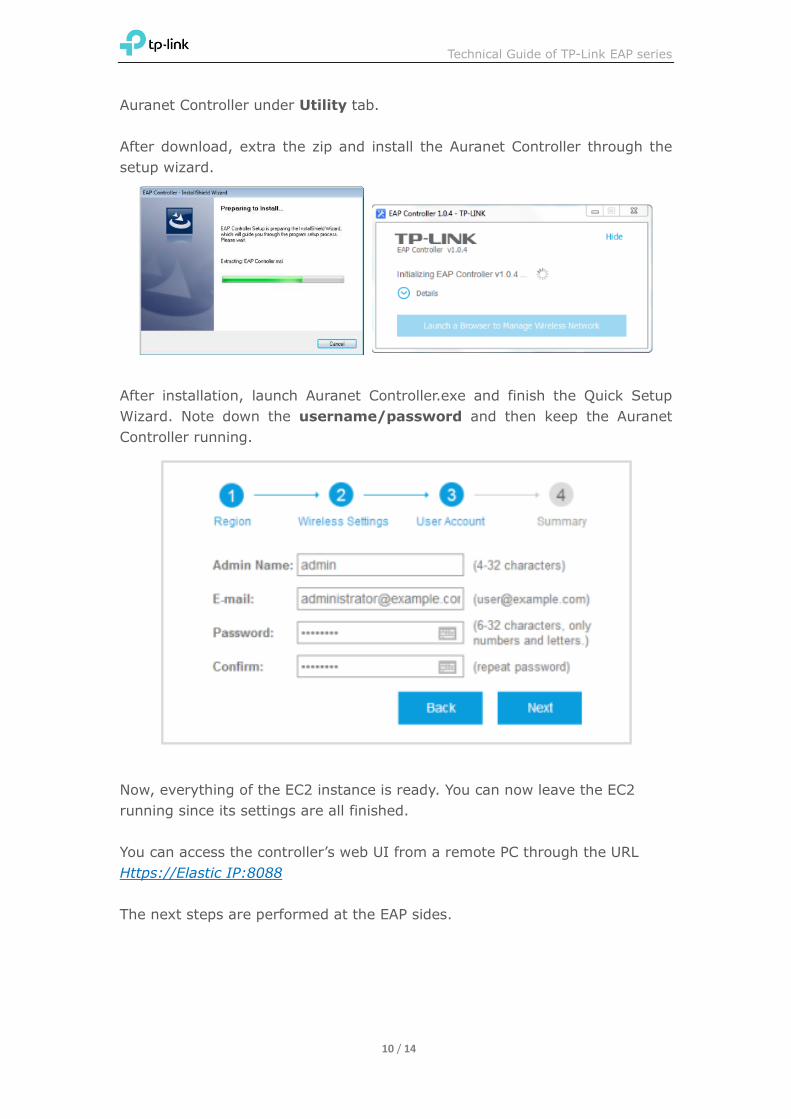
Auranet Controller under Utility tab.
After download, extra the zip and install the Auranet Controller through the
setup wizard.
After installation, launch Auranet Controller.exe and finish the Quick Setup
Wizard. Note down the username/password and then keep the Auranet
Controller running.
Now, everything of the EC2 instance is ready. You can now leave the EC2
running since its settings are all finished.
You can access the controller’s web UI from a remote PC through the URL
Https://Elastic IP:8088
The next steps are performed at the EAP sides.

Technical Guide of TP-Link EAP series
11 / 14
Part 3: Settings at EAP side
Still take the following topology as an example.
First of all, the EAPs must have internet access, which means you should assign
them correct IP/gateway parameters through DHCP (recommended) or manual
configuration. The EAPs default to DHCP so this shouldn’t be a problem as long
as there is proper DHCP service in LAN.
Then comes the most important part. At EAP sides the controller’s public IP
address, in the above example 54.169.x.x need to be configured into each EAP
device, so that the EAPs can know where to find the Auranet Controller through
internet. There are two methods to configure the controller’s IP address into
the EAPs.

Technical Guide of TP-Link EAP series
12 / 14
Method 1. Via EAP Discover Utility
1. Download Auranet Controller from TP-Link website. Install Auranet
Controller on a PC at site Branch 1. The PC should be in the same IP subnet
as EAPs. In the example it is PC1.
2. Run EAP Discover Utility (You will find it at C:\Program Files (x86)\TP-
Link\Auranet Controller\bin if you haven’t changed the installation path). All
the EAP devices in the local network will be listed.
3. Since all the EAPs have the same Username and Password, you may
use Batch Setting to set controller IP for them all. If your EAP devices
have different username and password you can use the manage button to
set the controller hostname/IP respectively.
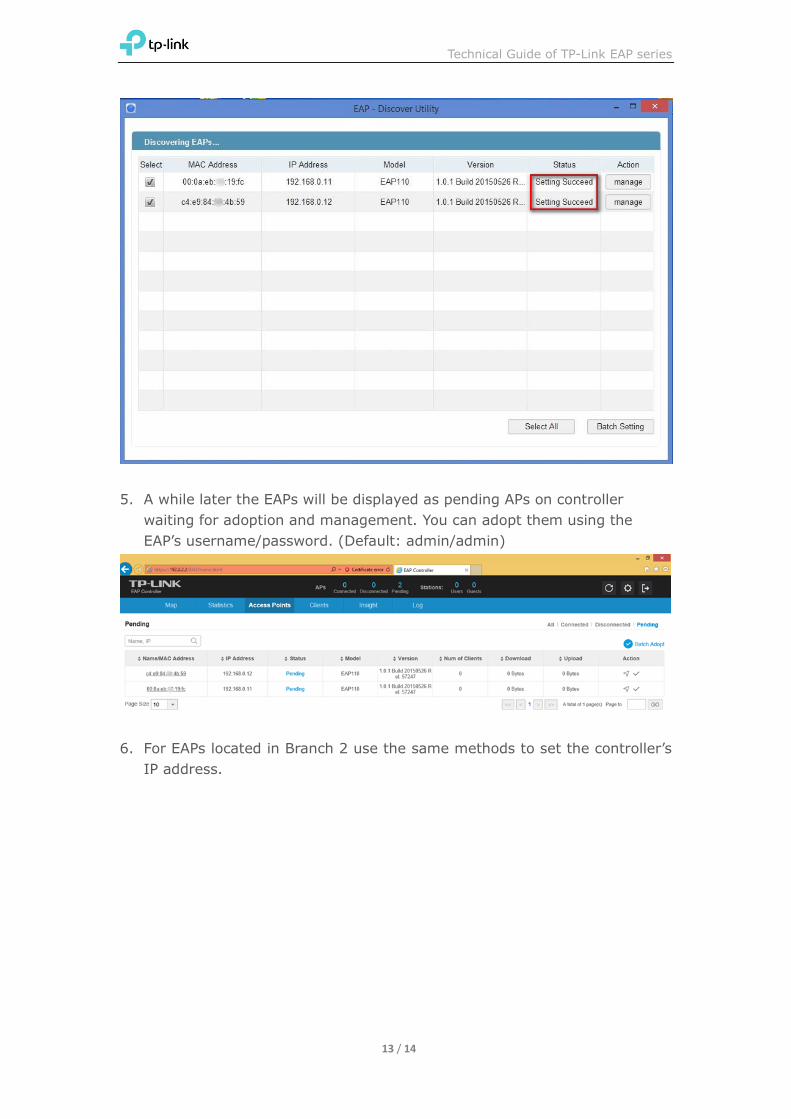
4. Wait until the status show as Setting Succeed.
Technical Guide of TP-Link EAP series
13 / 14
5. A while later the EAPs will be displayed as pending APs on controller
waiting for adoption and management. You can adopt them using the
EAP’s username/password. (Default: admin/admin)
6. For EAPs located in Branch 2 use the same methods to set the controller’s
IP address.

Technical Guide of TP-Link EAP series
14 / 14
Method 2. Set option 138 on DHCP server
EAP devices can request controller IP via option 138 through DHCP.
Take Branch 1 as example.
1. Suppose the DHCP server in Branch 1 is capable of configure variable DHCP
options. Set the controller IP as the option 138 value on it.
2. All the EAPs in the local network will be aware of the controller’s IP address
automatically through DHCP communication right after boot up.
How to set option 138 on DHCP server varies from implementation to
implementation which is out of the scope of this document. Please refer to
DHCP server documentation for help. The below two examples used in our test
are for your reference.
Cisco IOS CLI:
ip dhcp pool test
network 192.168.1.0 255.255.255.0
default-router 192.168.1.1
dns-server 8.8.8.8
option 138 ip 56.169.x.x
For more details please refer to Cisco website.
MikroTik RouterOS CLI:
#Assume you have already setup a dhcp server with item number 0
#0xC0000002 equeals 56.169.x.x
/ip dhcp-server option add code=138 name=controller value=0xC0000002
/ip dhcp-server network set 0 dhcp-option=controller
For more details please refer to MikroTik manual.