Embed Size (px)
Citation preview

HOW TO APPLY FOR PROGRAM FUNDING
BY USING DCED’S
ELECTRONIC SINGLE APPLICATION (ESA):
A SHORT APP WALKTHROUGH
DCED, Customer ServiceNovember 2016

How to Log In to Single Application
Go to dced.pa.gov – click on “Programs and Funding – then click on “Single Application”
to log in.
2

Login:
3
1. New Users – Click the “Register” button to create a
new PA PowerPort Login Account
2. Existing Users – Login with user name and password
and update account information
3. Forgotten Password for Existing Users – Click on the
“Forgot Password” button
Enter the e-mail address associated with the PA
PowerPort Login Account
Click “Forgot Password” (e-mail automatically
sent with a new password)

PA PowerPort Login/Change or Update AccountPA PowerPort website: https://www.login.state.pa.us/login/
IMPORTANT NOTE: This is the PA PowerPort website. You must return to the
Single Application website to log in and complete an application.
1. Forgotten Password for Existing Users – Click on “Forgot Password.”
a. Enter the e-mail address associated with the PA PowerPort Login Account
b. Enter new password and enter again to confirm
2. Update PA PowerPort Login Account Information (see important note below)
a. Click “Update Account Information” – update and save changes
4
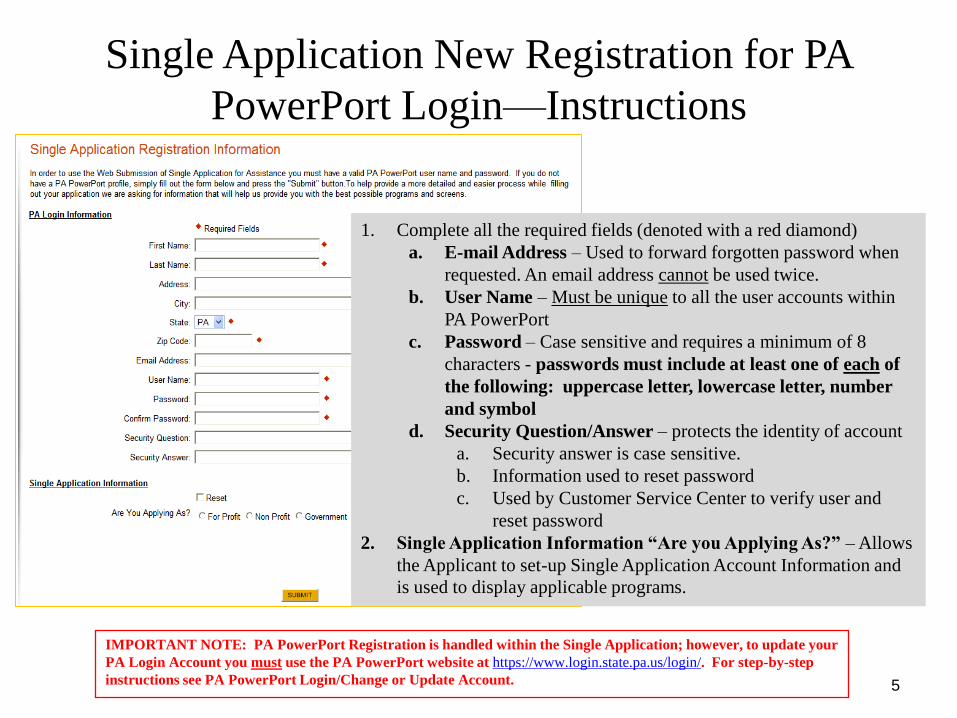
Single Application New Registration for PA
PowerPort Login—Instructions
5
1. Complete all the required fields (denoted with a red diamond)
a. E-mail Address – Used to forward forgotten password when
requested. An email address cannot be used twice.
b. User Name – Must be unique to all the user accounts within
PA PowerPort
c. Password – Case sensitive and requires a minimum of 8
characters - passwords must include at least one of each of
the following: uppercase letter, lowercase letter, number
and symbol
d. Security Question/Answer – protects the identity of account
a. Security answer is case sensitive.
b. Information used to reset password
c. Used by Customer Service Center to verify user and
reset password
2. Single Application Information “Are you Applying As?” – Allows
the Applicant to set-up Single Application Account Information and
is used to display applicable programs.
IMPORTANT NOTE: PA PowerPort Registration is handled within the Single Application; however, to update your
PA Login Account you must use the PA PowerPort website at https://www.login.state.pa.us/login/. For step-by-step
instructions see PA PowerPort Login/Change or Update Account.

Single Application New Registration Account Information
Continued…
6
This information is used to display the programs the
organization may be eligible for based on the information
provided.
Are You Applying As? – Selection will determine the choices
available under Company/Entity Type.
Company/Entity Type – Choose one of the options available
Federal Employers Identification Number (FEIN) – provide
FEIN of the company/organization applying (*do not enter the
dash).
SAP Vendor Number – will be required only if receiving
monies from the state
Required fields are denoted by a red diamond.

Single Application – USER SETTNGS –Account
Information FOR PROFIT Companies
7
For pre-existing Login accounts - complete this information to
correctly display the programs eligible to the business
For newly registered Login accounts – review and complete any
additional information to correctly display the programs eligible
to the business.
The Single Application Account Information is used to
display the programs the company/organization may
be eligible for based on the information provided.
1. Are You Applying As? – Selection will determine the choices available under
Company/Entity Type *FOR PROFIT
2. Company/Entity Type – Choose one of the options available
3. Federal Employers Identification Number (FEIN) – provide FEIN of the
business (without the dash)
4. SAP Vendor Number – will be required only if receiving monies from the
state.
5. Update Account Information – make appropriate changes, click “Update”
6. Required fields are denoted by a red diamond
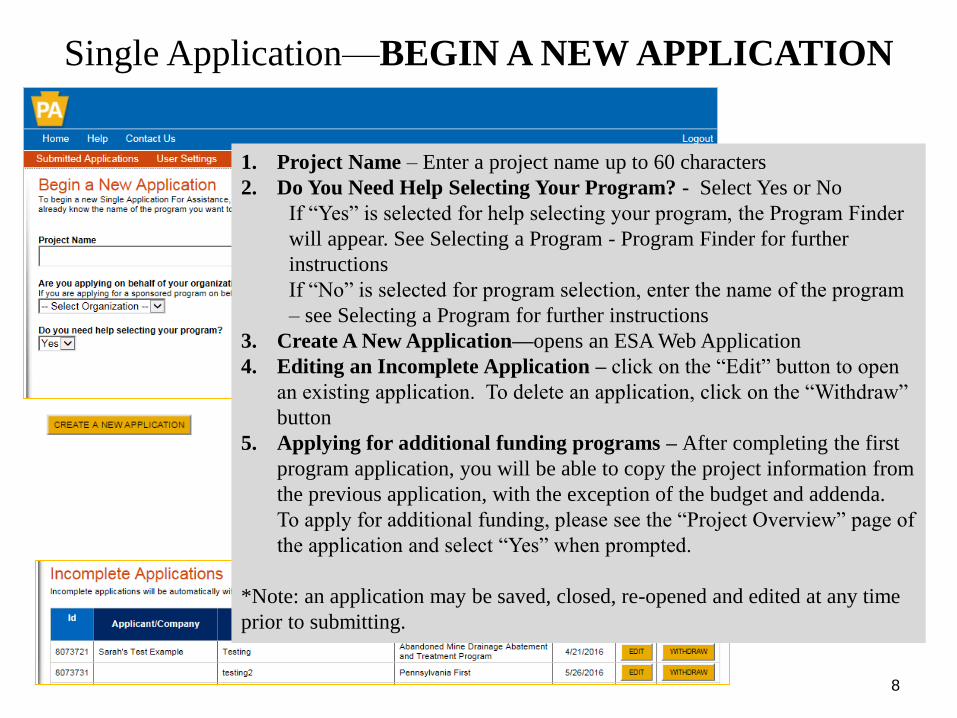
Single Application—BEGIN A NEW APPLICATION
8
1. Project Name – Enter a project name up to 60 characters
2. Do You Need Help Selecting Your Program? - Select Yes or No
If “Yes” is selected for help selecting your program, the Program Finder
will appear. See Selecting a Program - Program Finder for further
instructions
If “No” is selected for program selection, enter the name of the program
– see Selecting a Program for further instructions
3. Create A New Application—opens an ESA Web Application
4. Editing an Incomplete Application – click on the “Edit” button to open
an existing application. To delete an application, click on the “Withdraw”
button
5. Applying for additional funding programs – After completing the first
program application, you will be able to copy the project information from
the previous application, with the exception of the budget and addenda.
To apply for additional funding, please see the “Project Overview” page of
the application and select “Yes” when prompted.
*Note: an application may be saved, closed, re-opened and edited at any time
prior to submitting.

Single Application –Select Program –Program Finder
9
1. Toggle between Non-Profit/Government and For
Profit Enterprise Types – Selection displayed is
defaulted based upon the account information provided.
2. Sort By – Programs displayed by Single Application
Programs First or alphabetically by Program name
3. Display Page Results– click additional page numbers to
view more programs
4. Apply – If able to apply directly for the program, the
“Apply” button will be displayed; to view program
factsheets or guidelines click on the link below the
program name.
5. Additional Information – click to view program fact
sheet to determine eligibility or submission requirements

Single Application—Program Search Continued
10
Search by Program Name or Acronym

Single Application –SELECTING A PROGRAM
11
1. Program Name – This is a smart Search – Enter desired
program name or acronym, click “Search” or enter the
acronym or specific words in the program name to
narrow the search
2. Sorting the View - Search can be displayed by:
Program Name – programs listed alphabetically by
program name
Show Single Application Programs First –programs
that can be directly applied for using the Single
Application. Other programs will direct applicant
where to apply or provide other information.

Single Application –Selecting a Program Continued
12
Program Finder: • Displays programs for specific entity type and/or use of funds selected
Sort By: • Single Application Programs First (alphabetically)• Program Name
Search to
display results

Single Application –Program Finder Results
13
Program Results
Apply for Program
Guidelines
• Unique to each Program’s
requirements
Program Fact Sheet
• Detailed Overview
• Eligibility & Deadlines

Single Application-Applicant Information
14
Required Fields – all fields with a red diamond are
required and must be completed.
“Use Account Information” button to pre-fill fields
entered in your user settings
Enterprise Type – select all that apply

Single Application- EITC/OSTC SHORT APP.Confirm in your “User Settings” on the Home screen, that you are applying as “for profit” for the EITC
and OSTC Short Application buttons to populate when creating a new application.
If you are applying for EITC or OSTC, click the appropriate
program button for a shortened application process.
Applicant information page will generate—click
“Use Account Information” to pre-populate the
majority of required fields on the page.
*Note: Additional information will still need to be
entered prior to clicking on continue.

Single Application- EITC/OSTC SHORT APP. Cont.
By clicking on the EITC/OSTC Application button, the application
was reduced from 8 pages to 3: Applicant, Addenda, Certification
• Applicant information, Addenda (program specific) and Certification pages
will need to be completed prior to the “Submit Application” button appearing
on the Certification Page.
• Any changes that need to be made to the application must be done prior to
submitting.

Single Application—Program Addenda
17
Program Addenda – Program specific information required by the program in accordance with the
program guidelines. Addenda varies per program and may be required up front.
Review Information Bar – Will display informational reminders per
tab once page is saved.
Yes/No Questions – drop down for selection
Text Box – type response in text form
Download Forms – download form, print, save and upload to
application
Upload Attached Files – click browse – select by highlighting file –
click open to select file – click continue or save to upload the file.
Attached files may be viewed or deleted once attached.
Checkbox(s) – read the statement and check the box indicating you
have read and will attach requested documents via the application
electronically or submit by mail with the application signature page.

Single Application- Certification
18
Certification Page can be used as
an application checklist to confirm
that all required data has been
satisfied.
Incomplete Application: If information “required” has not been satisfied, the
application cannot be submitted. A list of the required files will be displayed.
To access the incomplete sections of the application – click the heading link which
opens the application page to that section.
If you are having difficulty, or need additional assistance, please record your Web
Application # and contact DCED Customer Service: 1-800-379-7448.

Single Application- Certification cont.
NAME HERE
Once all required information and/or errors have been satisfied;
Submit Application button is displayed.
Application cannot be modified or updated once submitted.
Contact the Program Office if modifications need to be made to a
Submitted Application.
Check ALL Boxes on application page and type your name
PRIOR to clicking submit application button.
19

Single Application- Certification cont.
Successfully Submitted Application: Displays option to print application and/or signature page,
where to mail documents and (if selected in project overview) option to create another application.
12 – digit Single Application ID
number generated
Instant Confirmation
Option to print the signature page
and/or the entire application
Option to apply for additional
DCED funding for the same
project.
Select additional program
Complete Budget and
Addenda sections
20
Mailing instructions and address will
vary by program

User Tips:
21
• If you allow your screen to sit idle for more than 30 minutes, you will lose the data
entered since last save and have to re-enter it.
• Save frequently.
• Electronic Single Application works best when accessed through Internet Explorer
• Once you have created a Single Application, there are 2 ribbons that will help you
navigate through the entire process; BLUE and RED.
BLUE Ribbon Links: HOME (will take you to the home screen to see your submitted applications and incomplete applications).• Home will allow you to view “User Settings” and submit applications.RED Ribbon Links: Page-by-page Navigation through the single application.• Certification Page: a checklist for completion. At any time during the
application process, you can click on Certification to see if you’ve satisfied all required information for each page. If not, a link to the page and a list of errors will appear.
• Once all required information has been submitted, submit application will appear.

1-800-379-7448
For additional assistance please contact:
Customer Service Center
1-800-379-7448
Kristopher Adams
Christina Kurtz
Melody Miller
Sarah Smith