Embed Size (px)
Citation preview

Structuring and designing contentHow can you improve your content?
The Institute of Scientific and Technical CommunicatorsAutumn 2019
Product reviews for PerfectIt, FrameMaker and RoboHelp
Tips on using colour in your content
Information 4.0 tools: the comments
Meet the needs of your e-learning audience
Communicator
Communicator Autumn 2019
41Adobe tips
Back to school: tips and tricks for authors!Bernard Aschwanden shares tips when using Adobe FrameMaker and RoboHelp 2019 to make the best use of metadata possible and prepare your content for the future.
It’s autumn. Children have returned to classes (or are about to). Today they’ll learn skills and apply ideas that will improve their future. Let’s do the same with our tools. Let’s set up content today to take advantage of it when we repurpose and publish it in the future!
Two of the most common tools in technical communications are Adobe FrameMaker and Adobe RoboHelp. In the past year, both tools have had a 2019 release. This article explores features you may not know about (or may not remember having used) to make what content does in the present, and what it can do in the future, much better.
For a full overview of what is new, and what is enhanced, make sure you visit the Adobe site where you can read more, as well as watch video highlights: � www.adobe.com/products/ robohelp/features.html
� www.adobe.com/products/framemaker/features.html
Metadata today helps you (and your readers) tomorrowIn both FrameMaker and RoboHelp there are a few simple things to do early-on to make your content more potent in the future. Many people either never set up content with metadata (think of it as information about your information), or don’t do so regularly.
With today’s focus on findability, search engine optimisation, and taxonomies it’s a great idea to perform a few basic steps when you create any content. Assigning metadata means tools like component content management systems (including Adobe’s own AEM1 tool!) can take advantage of you doing it right the first time. We’ll look at what you can do with structured standards (like DITA) and unstructured FrameMaker, and explore considerations when creating projects or topics in RoboHelp.
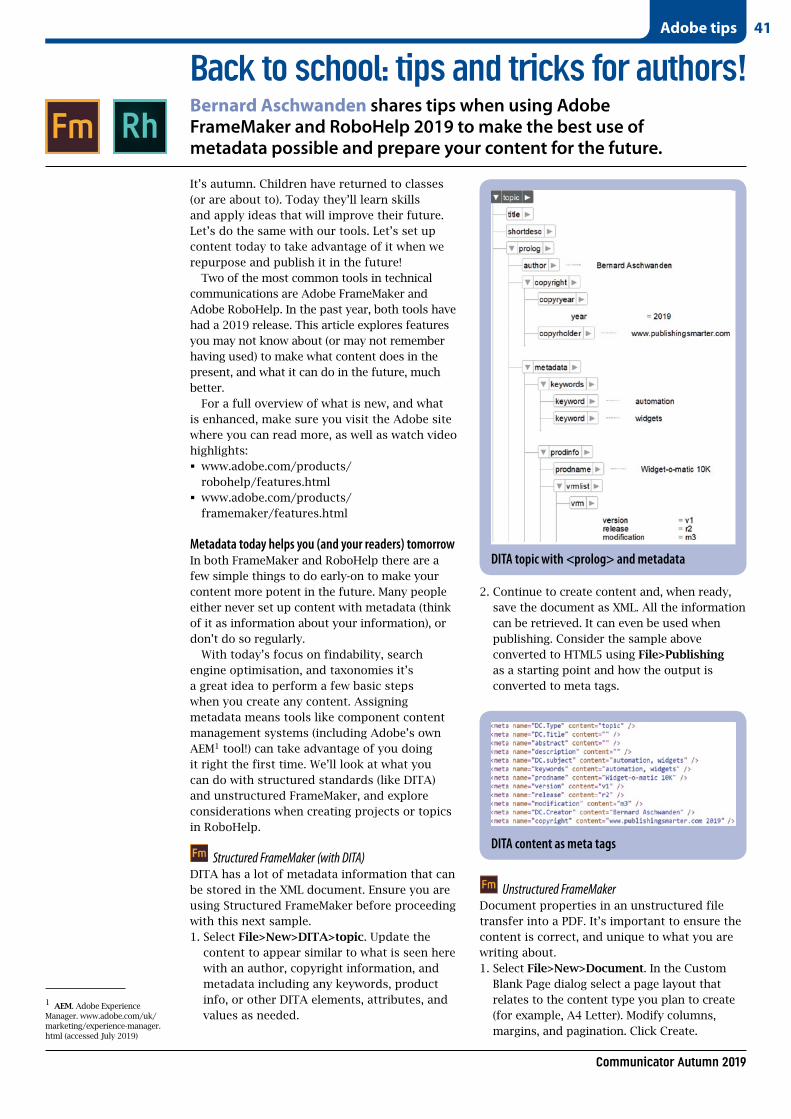
Structured FrameMaker (with DITA)DITA has a lot of metadata information that can be stored in the XML document. Ensure you are using Structured FrameMaker before proceeding with this next sample.1. Select File>New>DITA>topic. Update the
content to appear similar to what is seen here with an author, copyright information, and metadata including any keywords, product info, or other DITA elements, attributes, and values as needed.
2. Continue to create content and, when ready, save the document as XML. All the information can be retrieved. It can even be used when publishing. Consider the sample above converted to HTML5 using File>Publishing as a starting point and how the output is converted to meta tags.
Unstructured FrameMakerDocument properties in an unstructured file transfer into a PDF. It’s important to ensure the content is correct, and unique to what you are writing about.1. Select File>New>Document. In the Custom
Blank Page dialog select a page layout that relates to the content type you plan to create (for example, A4 Letter). Modify columns, margins, and pagination. Click Create.
1 AEM. Adobe Experience Manager. www.adobe.com/uk/marketing/experience-manager.html (accessed July 2019)
DITA topic with <prolog> and metadata
DITA content as meta tags
Communicator Autumn 2019
42
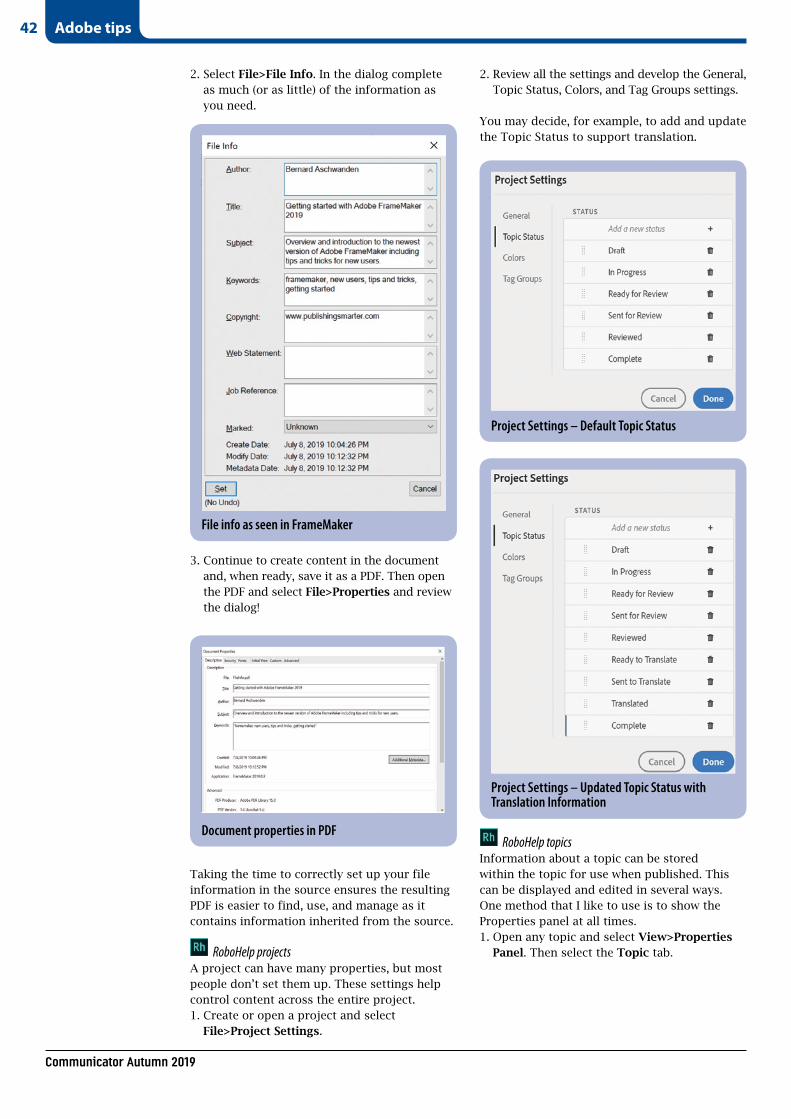
2. Select File>File Info. In the dialog complete as much (or as little) of the information as you need.
3. Continue to create content in the document and, when ready, save it as a PDF. Then open the PDF and select File>Properties and review the dialog!
Taking the time to correctly set up your file information in the source ensures the resulting PDF is easier to find, use, and manage as it contains information inherited from the source.
RoboHelp projectsA project can have many properties, but most people don’t set them up. These settings help control content across the entire project.1. Create or open a project and select
File>Project Settings.
2. Review all the settings and develop the General, Topic Status, Colors, and Tag Groups settings.
You may decide, for example, to add and update the Topic Status to support translation.
RoboHelp topicsInformation about a topic can be stored within the topic for use when published. This can be displayed and edited in several ways. One method that I like to use is to show the Properties panel at all times.1. Open any topic and select View>Properties
Panel. Then select the Topic tab.
Adobe tips
Project Settings – Default Topic Status
Project Settings – Updated Topic Status with Translation Information
File info as seen in FrameMaker
Document properties in PDF
Communicator Autumn 2019
43
2. Assign the status as required.
RoboHelp Topic ListThe Topic List allows you to see all of the topics and, by clicking on the header of any column, sort them.1. After defining the Status for your topics,
select View>Topic List. Review the panel and sort topics.
Alt properties for imagesGraphics require properties to define the height, width, and placement, but the use of alternate text prepares your content for the future. It adds information that can be used by search engines and other tools.
Structured FrameMaker (with DITA)There are elements such as <fig> and <image> in DITA that are used to insert a figure, title, and picture. However, they also support metadata in several unique ways.1. Insert a <fig> element in a DITA topic, then
insert nested <title> and <desc> elements.2. Populate the <desc> with more information
about the image. This could, for example, be a sentence to describe its appearance.
3. Once the <image> is added, the attribute for longdescref can be populated. This may contain a link to a DITA topic that provides a much richer background about the image.
Unstructured FrameMakerIf you plan to export your document to a tagged PDF or to XML, you can include object attribute information for your anchored frames.
When you provide alternate text attribute on an anchored frame, the corresponding figure elements in PDF and graphic elements in XML
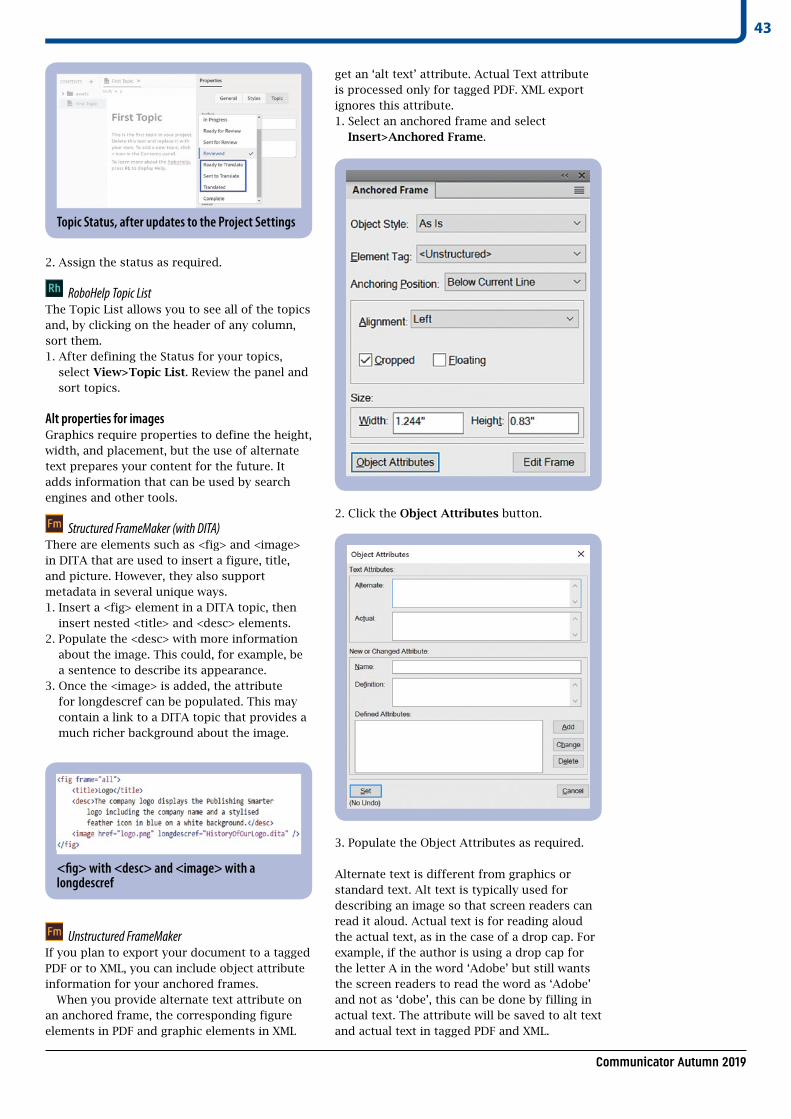
get an ‘alt text’ attribute. Actual Text attribute is processed only for tagged PDF. XML export ignores this attribute.1. Select an anchored frame and select
Insert>Anchored Frame.
2. Click the Object Attributes button.
3. Populate the Object Attributes as required.
Alternate text is different from graphics or standard text. Alt text is typically used for describing an image so that screen readers can read it aloud. Actual text is for reading aloud the actual text, as in the case of a drop cap. For example, if the author is using a drop cap for the letter A in the word ‘Adobe’ but still wants the screen readers to read the word as ‘Adobe’ and not as ‘dobe’, this can be done by filling in actual text. The attribute will be saved to alt text and actual text in tagged PDF and XML.
Topic Status, after updates to the Project Settings
<fig> with <desc> and <image> with a longdescref
Communicator Autumn 2019
44
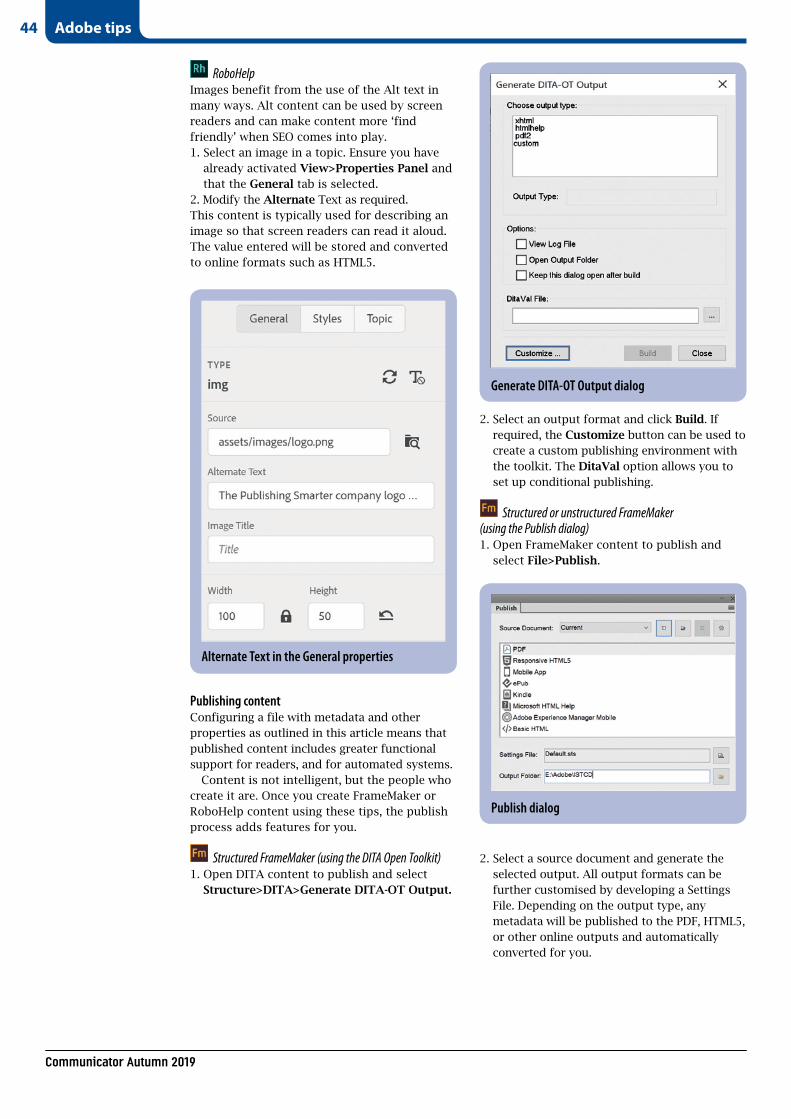
RoboHelpImages benefit from the use of the Alt text in many ways. Alt content can be used by screen readers and can make content more ‘find friendly’ when SEO comes into play.1. Select an image in a topic. Ensure you have
already activated View>Properties Panel and that the General tab is selected.
2. Modify the Alternate Text as required. This content is typically used for describing an image so that screen readers can read it aloud. The value entered will be stored and converted to online formats such as HTML5.
Publishing contentConfiguring a file with metadata and other properties as outlined in this article means that published content includes greater functional support for readers, and for automated systems.
Content is not intelligent, but the people who create it are. Once you create FrameMaker or RoboHelp content using these tips, the publish process adds features for you.
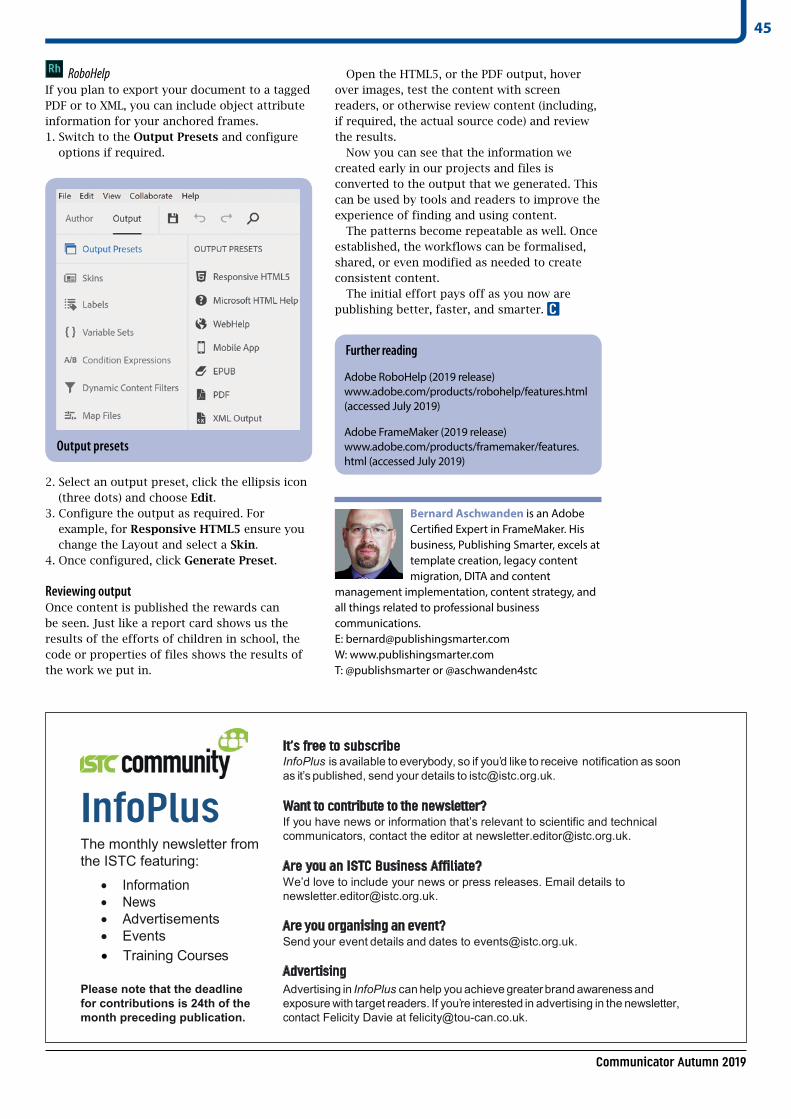
Structured FrameMaker (using the DITA Open Toolkit)1. Open DITA content to publish and select
Structure>DITA>Generate DITA-OT Output.
2. Select an output format and click Build. If required, the Customize button can be used to create a custom publishing environment with the toolkit. The DitaVal option allows you to set up conditional publishing.
Structured or unstructured FrameMaker (using the Publish dialog)1. Open FrameMaker content to publish and
select File>Publish.
2. Select a source document and generate the selected output. All output formats can be further customised by developing a Settings File. Depending on the output type, any metadata will be published to the PDF, HTML5, or other online outputs and automatically converted for you.
Adobe tips
Alternate Text in the General properties
Generate DITA-OT Output dialog
Publish dialog
Communicator Autumn 2019
45
RoboHelpIf you plan to export your document to a tagged PDF or to XML, you can include object attribute information for your anchored frames.1. Switch to the Output Presets and configure
options if required.
2. Select an output preset, click the ellipsis icon (three dots) and choose Edit.
3. Configure the output as required. For example, for Responsive HTML5 ensure you change the Layout and select a Skin.
4. Once configured, click Generate Preset.
Reviewing outputOnce content is published the rewards can be seen. Just like a report card shows us the results of the efforts of children in school, the code or properties of files shows the results of the work we put in.
Open the HTML5, or the PDF output, hover over images, test the content with screen readers, or otherwise review content (including, if required, the actual source code) and review the results.
Now you can see that the information we created early in our projects and files is converted to the output that we generated. This can be used by tools and readers to improve the experience of finding and using content.
The patterns become repeatable as well. Once established, the workflows can be formalised, shared, or even modified as needed to create consistent content.
The initial effort pays off as you now are publishing better, faster, and smarter. C
Further reading
Adobe RoboHelp (2019 release) www.adobe.com/products/robohelp/features.html (accessed July 2019)
Adobe FrameMaker (2019 release) www.adobe.com/products/framemaker/features.html (accessed July 2019)
Bernard Aschwanden is an Adobe Certified Expert in FrameMaker. His business, Publishing Smarter, excels at template creation, legacy content migration, DITA and content
management implementation, content strategy, and all things related to professional business communications. E: [email protected] W: www.publishingsmarter.com T: @publishsmarter or @aschwanden4stc
Output presets