Embed Size (px)
Citation preview
HOMEOWNER’S WARRANTY AND INFORMATION MANUAL
This Limited Home Warranty Agreement (Warranty) is made by and between Windmills, LLC (WINDMILLS) and the
purchasers of the home built by WINDMILLS whose signatures appear upon this Agreement (Purchasers).
PROPERTY. The property to which this Warranty extends is (Name) Subdivision and is known as and numbered (Address), Milliken, CO 80543
We at Windmill Homes are proud of the homes we build, and the neighborhoods in which they are built. We strive to
create lasting value by using carefully selected materials and skilled craftsmen, working from our unique plans and
specifications. Your home is a handcrafted and unique product, that is different from every other home. Once you
become a homeowner you have all the joys and responsibilities of caring for your home.
Natural fluctuations in temperature and humidity, the inherent nature of materials, and normal wear and tear
necessitate regular service and maintenance of the features and systems in your home. Regular care will save you
more serious, time-consuming, and sometimes more costly repairs later. It is important to understand that neglecting
routine maintenance can void applicable limited warranty coverage. You will find that the time and attention you
dedicate to maintenance efforts pay off directly in preserving the value, comforts and condition of you home and
contribute significantly to the overall desirability of the community.
Windmill Homes Customer Service Department administers the terms of your Limited Warranty Program through
representatives trained to respond to your needs promptly and professionally. Please review each section of this
manual carefully so that you can assist us in handling your claims efficiently. If you have questions regarding the
warranty, please direct them to our Customer Service Department.
In this manual, we describe the most common maintenance situations. Please be aware that we cannot anticipate every
question you may have.
WARRANTY SERVICE POLICY
It is our policy to respond to all warranty service claims as quickly and efficiently as possible. In most cases, we will
inspect the problem so that we have a complete understanding of the request. We are generally able to schedule
repairs for the covered warranty items within thirty (30) days of our receipt of your written request. Occasionally, this
process may take longer due to circumstances beyond our control, such as material shortages, back-ordered parts, labor
scheduling and weather. The scope of the work also impacts scheduling. For example, drywall repairs might be done at
one time, and repairs to the doors and cabinets at another, so that work in several locations can be coordinated and
completed efficiently.

If you believe that you have a warranty claim, we suggest that you review the relevant Limited Warranty sections of
this manual before you request service. This will help you understand whether the claim is covered by the Limited
Warranty, by a manufacturer’s warranty or is you responsibility.
If you believe you have an emergency requiring immediate attention, please refer to the Emergency section below. If
your situation is not an emergency, please follow the steps below to request service.
IN CASE OF EMERGENCY
In case of an emergency, your first priority is to protect you family members and yourself from harm. Once you are
certain of your family’s safety, take steps to correct or lessen the effects of the emergency. For example, damage from a
water leak can be minimized by turning off the water to a particular fixture, or turning off the water main to your home.
The water main shutoff valves are usually located in the basement where the water line enters the home. Do not delay
in reporting an emergency. Damage that could have been avoided had you reported the problem promptly or taken
steps to minimize the problem is not the responsibility of Windmill Homes. Damage to personal property is not covered
by the Limited Warranty, but may be covered under your homeowner’s insurance policy.
Emergencies are problems that require immediate attention to protect your family and you from harm, or to prevent
damage to your property. The problems include:
Total loss of heat. Check to be sure that the blower cover is in place, power switch is on and the thermostat is
on. Also check the circuit breaker in the panel located in your garage.
Gas Leak. If you smell gas, evacuate you home, and from a neighbor’s house, contact your utility provider or
fire department.
A total stoppage of the plumbing drain system. If your plumbing system ceases to work, none of your sinks,
tubs or toilets will drain. Depending on the cause this may not be covered under the Limited Warranty.
A Water leak that required that the main water supply to your home be shut off to avoid serious water
damage. A leak that can be isolated by the shut-off valves under the cabinet or plumbing fixture is not an
emergency. The main water shut-off is generally located in the basement where the water line enters the
home.
A total electrical failure in your home, other than an outage in the neighborhood.
Names and numbers of specific subcontractors who might be called for emergencies after hours are listed on the
Emergency Sticker in your kitchen.
Though inconvenient, situations such as a lack of air conditioning, cook appliances, and refrigerators are not
emergencies. Appliance warranties are covered by the manufacturer. If your situation does not fall within the
emergency guidelines, use the procedure outlines below to request routine warranty service.
LIMITED WARRANTY
Windmill Homes warrants that every Windmill Homes home has be constructed with materials and workmanship of
the quality that is standard in the industry for residential production building. Windmill Homes further warrants that
each home will be free of structural and non-structural defects for a period of one (1) year on workmanship and
materials). Windmill Homes agrees to make all necessary repairs and replacements for items covered under the limited
warranty within the applicable warranty period.
Modifications and additions to your home after closing will not be covered under this warranty. Windmill Homes will
not be responsible for damage to such additions as a result of a problem with a covered item. We suggest any such
additions not be performed during the material and workmanship coverage period. Windmill Homes is not

responsible for the restoration of modification or additions that may be altered as the result of repair to a covered
item.
Appliances and some manufactured items are covered under manufacturer’s warranties.
The Windmill Homes Limited Warranty does not apply to conditions or defects caused by or arising from normal wear
and tear, climatic conditions, the normal characteristics of certain building materials, expansion, contraction, moisture,
humidity or any damage resulting from negligence, improper maintenance, or abnormal use.
BUYER’S RIGHTS AND WINDMILL HOMES OBLIGATIONS UNDER THIS WARRANTY ARE LIMITED TO REPAIR AND/OR
REPLACEMENT.
Windmill Homes reserves the right to make repairs, correct defects or replace items for which it is responsible,
according to the terms of this Limited Warranty, at the time and in the manner determined most appropriate in the
company’s sole discretion.
Materials and workmanship will be based on the production building industry standards and practices that are generally
employed in warranty service. Windmill Homes has no duty to install upgrades under the Limited Warranty. We will
not be responsible for consequential damages or expenses, such as lost wages. Our Customer Service Technicians in the
field do not have the authority to extend or alter your Limited Warranty in any way. Windmill Homes will not honor or
reimburse bills for labor, materials, utilities or any other homeowner expense furnished by you, or at your direction,
without prior authorization by a managing representative in writing.
We take pride in the employees and subcontractors we have selected to perform warranty work. If you are dissatisfied
with the quality of work, or the level of professionalism displayed by one of our employees or subcontractors, please
contact our Customer Service Department immediately. Your comments help us to maintain the high level of service
you expect from Windmill Homes.
HOW TO REQUEST WARRANTY SERVICE
Requests for service must be submitted in writing by email, mail, or online. Please completely fill out the Warranty
Service Request form (samples are contained at the end of the manual), including your name, street address, work, cell
and home telephone numbers. Provide a brief description of the work requested and its locations in your home. For
example, indicate the room, location in the room and general description of the problem, such as “main floor guest bath
– right cabinet door not closing properly”.
Email: [email protected]
Online: www.mywindmillhomes.com/homeowner-support
Address: Customer Service Department
Windmill Home
301 Centennial Drive
Milliken, CO 80543
When Windmill Homes receives your Request for Service, we will schedule an appointment to conduct a warranty inspection before determining coverage of a particular item. If the item is routine homeowner maintenance, we will review the maintenance steps with you and offer informational assistance. If a trade contractor or a Windmill Homes service representative will be performing your repairs, you will receive a Customer Confirmation Letter confirming the

agreed-upon date for repairs. *Remember, all appointments are scheduled Monday through Friday, 8:00 a.m. to 2:00 p.m. HOME ACCESS Interior warranty items can only be inspected and addressed when a person 18 years of age or older is available to accompany our representative and point out the items you have listed. This person must have your authorization to admit service personnel and sign completed work orders. We do not accept keys. Exterior repairs may be delayed due to inclement weather. Exterior repairs that cannot be completed on the service appointment date will be completed as soon as weather permits and personnel are available. To prevent the possibility of a pet getting injured or lost, we ask that you restrict all animals to a location away from the work area, inside or outside, during any warranty visit, whether for inspection or repair work. This policy is also for the protection of our employees and trade personnel. We may elect to reschedule an appointment if a pet has access to the work area. Pets must also be secured such that ingress and egress from your home and property does not create opportunity for their escape. When warranty work is needed in your home, we ask that you secure your valuables and remove any items of personal property that might make performing the repair difficult. We may reschedule the repair appointment if you have not provided access to the affected area or if we are concerned that proceeding with the repair would risk damaging your belongings. It is your responsibility to make the area in need of repair accessible. When work Is performed in your home, the person doing the repair will ask you to sign a work order acknowledging completion of the items listed. Please provide feedback you may have about any service we provide on the work order. We welcome your comments. SCHEDULING Warranty inspections and repairs are conducted Monday through Friday, between 8:00 a.m. and 2:00 p.m. At times, appointments may be postponed or rescheduled. We will do our best to notify you if a Windmill Homes representative will not be at your home as scheduled, and we ask that subcontractors do the same. We appreciate the same consideration from you. Please give us as much notice as possible of any scheduling change, so we may notify employees and contractors. Good communication is key to efficient completion of warranty items. SUGGESTED MAINTENANCE For your convenience, we have created a schedule of suggested homeowner maintenance. By completing these maintenance items as recommended, you will help preserve the value and fine condition of your home, and avoid costly repairs later. MAINTENANCE SCHEDULE Begin care of you home with organized records, including information about all of its components and your furnishings. This information will make caring for your home easier. The records may be useful in completing tax returns, and will be valuable when you sell your home. Another worthwhile step is to inventory all the equipment, appliances, furnishings, and personal belongings. A photo album containing pictures of each room is an excellent supplemental item. In addition to normal daily and weekly care, develop a schedule of preventive routines based upon the information in this manual and the manufacturer’s literature you receive. A change of season creates special maintenance needs, so plan for “winterizing” and “summerizing” your home. ARBITRATION

Should the disagreement between WINDMILLS and Purchasers be unresolved as set forth in the previous paragraph, WINDMILLS and Purchasers shall agree upon the appointment of an arbitrator within fifteen (15) days following notice from Purchasers to WINDMILLS of its decision to cause such arbitration. Should the parties be unable to agree upon an arbitrator, WINDMILLS and Purchasers shall, within ten (10) days thereafter, each select an arbitrator and the two arbitrators shall, within fifteen (15) days thereafter appoint a third arbitrator. The arbitrators shall make every effort to reach a decision within thirty (30) days and both Purchasers and WINDMILLS agree to cooperate with the arbitrators to that end. The parties agree to be bound by the results of the arbitration and decision of such arbitration may be filed and enforced as a judgement in the District Court in and for the County in which the property is located. The arbitrators shall be bound by the Expedited Home Construction Arbitration Rules of the American Arbitration Association as the same may be amended from time to time. THE PARTY SUFFERING THE ADVERSE DECISION AS A RESULT OF THE ARBITRATION SHALL PAY THE COSTS AND FEES OF THE PARTY RECEIVING THE FAVORABLE DETERMINATION BY THE ARBITRATORS. SOULD THE DECISION OF THE ARBITRATORS BE SUCH THAT IT IS NOT WHOLLY IN THE FAVOR OF ONE OF THE PARTIES, THE ARBITRATORS SHALL ALLOCATE THE COSTS AND FEES OF THE PARTIES AS PART OF THE ARBITRATION. SUCCESSORS AND ASSIGNS. This Warranty shall be binding upon the successors and assigns of the parties hereto for the periods set forth above. In the event the purchaser sells the home to another party within the one year period, this warranty is not transferable and becomes null and void. ENTIRE AGREEMENT. THIS WARRANTY AGREEMENT CONSTITUTES THE ENTIRE AGREEMENT BETWEEN WINDMILLS AND PURCHASERS AND IS MADE IN LIEU OF ANY EXPRESS OR IMPLIED WARRANTIES WHATSOEVER. THE TERMS HEREOF MAY NEITHER BE MODIFIED NOR AMENDED EXCEPT BY WRITING EXECUTED BY THE PARTIES HERETO. TRANSFER OF UTILITIES. All utilities must be transferred from WINDMILLS to homeowner’s name within three (3) days of homeowner taking title. All bills associated with the failure of homeowner to transfer utilities to their name shall be prorated from the third day and billed to the homeowner by WINDMILLS plus a 20% handling fee for time, postage, etc.
Executed by the parties here to this _______ day of _______________________, 20______.
Windmills, LLC
_________________________________________
Owner(s):
_________________________________________
_________________________________________
USE AND MAINTENANCE GUIDELINES AND RELATED LIMITED WARRANTY APPLIANCES
HOMEOWNER USE AND MAINTENANCE GUIDELINES Warranties on appliances are supplied directly to you from the manufacturer. For care and maintenance tips, the terms of warranty coverage and to locate service phone numbers, please read the manufacturer’s literature. When you call the manufacturer, be prepared to provide the model and serial number of the item and the closing date on your home.
LIMITED WARRANTY Windmill Homes does not provide a warranty for appliances. Your appliances are covered by warranties from the manufacturers directly to you. Contact the appropriate manufacturer or distributor for service information or to answer questions about the care and use of these appliances.
CABINETS
HOMEOWNERS USE AND MAINTENANCE GUIDELINES If your cabinet fronts are made from finished hardwood, proper care will prolong the beauty and utility of your cabinets for many years. Remove splashes and splatters promptly to avoid permanent stains. Wood is a natural product that is subject to drying and warping. Protect and preserve your wood finishes by using quality furniture polish and lemon oil no more than once every 3 to 6 months to avoid excessive build-up. Expect differences in grain and color between the cabinet components due to natural variations in wood and the way wood absorbs the stain. Cabinet panels shrink, unstained areas that were inside the frame may be exposed. Minor scratches can be covered with putty stick that matches the finish of your cabinets and can be purchased at paint or hardware stores. If hinges catch or drawer glides become sluggish a small amount of silicone lubricant will improve their performance. Apply a very small drop to the top of the hinge or the center of the drawer glide and move the door or the drawer glide back and forth several times so the lubricant will work into the hinge or glide. Wipe away any excess lubricant away with a dry paper towel. Damaging and warping of cabinet surfaces can result from operating appliances that generate large amounts of moisture (such as a crock pot or coffee pot) too near a cabinet. When you use these appliances, place them in a location that is not directly under a cabinet. Cabinet doors are generally made of natural wood that contains variations in grain structure, porosity and color tones. The cabinets will show these variations of grain and color. Certain stains, such as natural, are quite transparent and provide little or no coverage of these variations. Other stains provide slightly more coverage due to the presence of more pigment in the stain. No stain will eliminate the color variations in the cabinets. These variations in color and grain are the result of using natural materials to build the cabinets and are not considered defects. Rather, they are a natural characteristic of the product. Additionally, your cabinets may be protected from natural and artificial lights by a seal coat; however, the natural tendency of wood to yellow (or patina) will occur over a period of years. If replacement of cabinet doors or drawer fronts are needed, the color most likely will not match.
LIMITED WARRANTY If you notice drawers sticking or drawers or cabinet doors not closing properly during the warranty period, notify the Customer Service Department in writing. If a cabinet separates from the wall or ceiling farther than ¼ inch, or a cabinet door or drawer front warps more than 3/8 inch as measured from the cabinet frame, Windmills Homes will correct the

problem. *Chips, Cracks, and scratches will only be corrected if documented during the homeowner orientation walk-through.
CARPET
HOMEOWNERS USE AND GUIDELINES Regular and thorough cleaning can maintain the beauty and prolong the life of you carpet. Vacuum you carpet frequently to avoid buildup of dirt and grime to maintain the upright position of the nap. Carpet wears out because of foot traffic and dirt particles that are ground into the pile. The dirt particles wear down the fibers and dull the look of the carpet. A vacuum cleaner with a beater bar agitates the pile and may be more effective in bringing dirt to the surface for easy removal, but it can be hard on the carpet. The beater should be adjusted so that it barely touches the tops of the carpet fibers. Wipe spills and clean stains immediately. For best results, blot or dab any spills or stains…avoid rubbing. Stain-resistant carpet is not stain proof. Do not use cleaners that have not been tested for the type of carpet in your home. We generally recommend an overall cleaning of you carpet after 18 months in your home and once a year after that. While do-it-yourself shampoo devices are inexpensive, the supplies, equipment and experience that a professional carpet cleaner brings to the job will prolong the life of your carpet. After installation, loose carpet fibers will work their way to the surface for quite some time. This is known as fluffing or shedding. Your routine cleaning should include vacuuming up these fibers. If a tuft of carpet appears that is longer than the surrounding carpet, do not try to pull it out. It is probably attached to the backing and simply needs to be trimmed to the height of the surrounding pile. Visible carpet seams are to be expected and are not the indication of a flaw in the carpet. Most rolls of carpet are produced in 12 foot widths. Most of your rooms will therefore have at least one seam. Professional installers will attempt to install your carpet with the minimal number of seams and without excessive waste. Seams are most visible in a new home before it has been furnished and occupied. They are not considered a defect unless they have been improperly made or the material is defective. Variations in dye lots are acceptable if they adjoin doorways or occur on stairways.
LIMITED WARRANTY Windmill Homes will follow manufacturer’s guidelines as to carpet warranty.
CAULKING
HOMEOWNER USE AND MAINTENACE GUIDELINES During the first few years, caulking will dry and shrink. When this happens, it no longer provides a good seal against moisture. As part of your routine maintenance, inspect caulking around your sink tops, tubs, windows and ceramic tiles and repair as needed. Caulking compounds and dispenser guns are available at hardware stores. Read the manufacturer’s instructions carefully to be certain that you select an appropriate compound for your intended purpose.
LIMITED WARRANTY During the orientation we confirm that appropriate areas are adequately caulked. Caulking is part of routine maintenance and not covered under the Limited Warranty.

CERAMIC TILE, PORCELAIN TILE, STONE AND GROUT
HOMEOWNER USE AND MAINTENANCE GUIDELINES Ceramic tile is durable, comes in a variety of colors and designs, and is easy to maintain. The tiles are produced in dye lots that have the same texture and color. Because dye lots vary, replacement is rarely an exact match. We urge you to take special care to avoid breaking or damaging your tile. Despite its durability, ceramic tile can be broken and scratched. Always use a cutting board or other surface to protect ceramic tile on your countertops when you are working in your kitchen. To avoid staining your tile, wipe spills away promptly with warm soapy water. A tile cleaner can be used to keep your tile bright and shiny. Routine scrubbing of the grout with warm, soapy water will keep it fresh and clean. Avoid using strong cleaners as they can stain the grout. Necessary routine maintenance of the grout is the homeowner’s responsibility. Windmill Homes does not use grout sealer. If you choose to apply a grout sealer yourself, any later repairs will not be re-sealed. Windmill Homes does not recommend that you seal all grout. Expect slight separations or shrinkage to occur in the grout between tiles and around countertops. This is the caused by normal drying of the grout and shrinkage of the wood members as they dry out. When cracks appear, fill them in using an appropriate grout for the particular tile, which can be purchased at hardware stores and home centers. Directions are on the package. This maintenance is important to protect the underlying surface from water damage. Tile products (wall, countertop or floor tile) are manufactured and then glazed and kiln-fired. The nature of the firing process, as well as the types of materials and glazes used, determine the characteristics of any given tile. Tile products are subject to variations in color, texture and marking and may include small imperfections within each tile. High-gloss tile products tend to show scratches more, especially dark or black-colored tile products. The samples displayed in the Windmill Homes Design Center are examples of average color range, and colors from one production lot to the next may be lighter or darker than the samples. Exact layouts and grout joint widths are determined by the tile installer at the time of installation and are governed by actual size and shape of the tile and exact dimensions of the areas to be covered. Tile products are one of the most durable and easiest to maintain surfaces you can choose. Thoroughly clean the tile products, including the grout joints, following the manufacturer’s instructions. Using a detergent on a glazed floor can leave a soap film, giving a dull appearance. Sweeping or vacuuming regularly will prevent loose dirt from abrading your floor. Protect your tile floors by installing floor protectors on all furniture legs. Hard plastic casters and cups are ideal. Do not push or pull furniture or appliances across your floor without first protecting your floor. The natural stone installed in your new home will be unique. No two pieces of stone are alike. Natural stone products, such as granite, marble, limestone, travertine, slate or other quarried products, have been cut from carefully selected stone blocks quarried from the earth. Please understand that because it is a natural product, the characteristics of natural stone vary in terms of hardness, porosity, ability to polish and consistency of polish. Natural stone may also contain naturally inherent imperfections, including color and shade variations, irregular markings, veins, fissures, cracks, lines, pits, inclusions and minor separations. The natural stone put into your home will not match exactly with the samples in the Windmill Homes Design Center. Color distribution, shading and vein shapes differ, even among pieces cut from the same quarry block. It is standard practice by the manufacturer to repair the largest voids and separations by one or more of the following methods: waxing, filling or reinforcements with non-stone products. Some manufacturers even highlight these practices and brand their “improved” stone product. All of these variations and characteristics are common, and will not impair the function or wearing of the natural stone. When a stone countertop is selected, you will have seams, which are small but visible. The fabricator determines the location and quantity of seams. This takes into account stone slab sizes, sink or cook top cutouts, project design and jobsite access. In most cases, natural stone is not easy to repair. To help avoid having problems with your stone material, be sure to follow these guidelines.

Avoid exposing your stone to strong chemicals, such as paint removers, oven cleaners, acids, oil, juices, etc. Natural stone, especially polished stone, is sensitive to harsh chemicals. If contact occurs, quickly flush the surface with water and blot dry.
Do not cut directly on your stone. This can cause deep and permanent scratches to appear.
To prevent staining, we recommend that you seal your natural stone every six to 18 months depending upon use. This will help prevent staining from liquids that are spilled on the surface. Good sealers are readily available through most building suppliers.
Avoid directly dropping heavy or sharp objects on your natural stone.
Avoid applying intense heat directly to your natural stone. Cleaning your stone is very easy. Common household products will keep your stone looking beautiful for a long time. Recommended cleaners are soapy water and any neutral non-abrasive cleaner. Review your manufacturers’ materials for further information related to your natural stone upkeep. Grout colors will vary from samples, and colors may even vary from place to place within one job. These variations are natural and are due to temperature, humidity, finishing techniques and working conditions at the time of grouting and are considered to be normal. If the same color group is ordered for countertops and flooring, be aware that the two grouts may not match due to different installation methods, conditions and dates of installation. Tile and grout can stain, therefore food and chemical spills should always be cleaned immediately. Grout will crack and needs to be maintained on a regular basis. Tubs and showers should be given particular attention as to the grout condition and any cracked grout and joints should be maintained with regular caulking. Grout joints vary in width to accommodate any inconsistencies in the shape of tiles. The typical grout joint for tile is 3/32 inch to ¼ inch in size. The more rustic or uneven the tile or stone, the wider the joint will be. Many tile and stone products have radiuses or eased edges, which will create a wider finished joint. In addition, installers will adjust joint size to provide for the best possible layout of the overall installation. When selecting a backsplash, whether in tile, stone or slab granite, electrical and phone outlet locations will fall within a planned tile and/or trim layout or pattern. When using different products on the splash from those used on the counter, grout joints typically will not line up perfectly.
LIMITED WARRANTY Windmill Homes will correct cracks in grout joints that exceed 1/8 inch width, one time only during the warranty period. Routine maintenance of grout is the homeowner’s responsibility.
CONCRETE FLATWORK
HOMEOWNER USE AND MAINTENANCE GUIDELINES
Due to weather and soil conditions in Colorado and the nature of the material itself, concrete slabs cannot be designed to resist cracking or vertical heaving, or to prevent shrinking and expansion. Soil movement can result in displacement of the slab and hairline cracks on the surface, which do not affect the strength, performance or purpose of the concrete. Each homebuyer is given a copy of A Guide to Swelling Soil for Colorado Homebuyers and Homeowners (the “Guide”) as the time that they enter into a purchase agreement for their new home. The Guide, which is published by the Colorado Geological Survey and Special Publication 43 (revised, 2007), explains the homeowner’s shared responsibility for reducing swelling soil damage including landscaping and maintenance practices (some of which are described below). The Guide goes on to say that homeowners in Colorado should accept the fact that exterior flatwork, including driveways, sidewalks, patios and porches, are likely to undergo some heaving and cracking in areas of swelling soil and that some cracking will occur in virtually all new concrete slabs and walls due to curing, temperature and humidity changes. Exterior flatwork may also react seasonally - rising as soils become wet during the late winter and spring – and sinking as the soils dry out later in the year. Small cracks, which are the result of contraction and expansion of the soil are characteristic of concrete and do not affect its performance or durability.

Because replacement or repair of concrete flatwork, including walkways, driveways, garage and basement floors, can be costly, it is important to minimize potential damage by maintaining good drainage, keeping your concrete clean and dry and using the surfaces as they are intended to be used. Do not allow road salts, dirt, debris, oil or grease to accumulate on your concrete. Ice melting products and salts will cause scaling of the surface. We recommend regular sweeping and prompt snow and ice removal. Scaling of, and defects in, exterior concrete are common in Colorado and are not covered under the homeowner’s warranty. Driveways should be rinsed off as soon as possible to eliminate any seepage of ice melt products that have been used by the municipality to keep the streets clear. Do not run water or allow water to pond near the foundation, patios, garage floor, walks or driveways. Water seeping into the soil can increase soil movement which may result in fractures to the concrete as well as movement within the home. In summer months, washing exterior concrete slabs with cold water from the outside faucet when temperatures are high can damage the surface bond of the concrete. Do not permit large trucks, delivery vans, dumpsters or heavy equipment to stand on your driveway. We install joints in the concrete flatwork to allow for and to help control expansion. During the summer, moisture may infiltrate the concrete along the edges or through surface cracks. In winter, frost can lift the concrete and increase cracking of the flatwork. Cracks should be sealed as soon as possible using a quality exterior acrylic caulking compound or equivalent products manufactured for this purpose and available at your local hardware or home improvement center.
COUNTERTOPS
HOMEOWNERS USE AND MAINTENANCE GUIDELINES The countertops in your home may be constructed of granite, glazed ceramic tile, porcelain tile, plastic laminate, or Corian. They are designed to provide years of use. After you have moved in, the care of your countertops is yours alone. We offer these suggestions to help you maintain the beauty and functionality of your countertops.
Use a cutting board to protect your countertops when you prepare food. While minor scratches that result from cutting or chopping may not be noticeable at first, in time they will dull and mar the luster of the finish.
Wipe up spills immediately. Some liquids, particularly hot ones, cause stains on ceramic tile grout and plastic laminate. In time, the stains may darken and become unsightly.
Avoid sliding paper bags across the surface as it can cause slight scratching.
Do not place grocery items with ink labels, such as meat and produce, directly on your countertops. The ink stains many surfaces easily and is difficult to remove.
Avoid dropping pots and pans and kitchen tools on your countertops. They can break or chip the surface.
Do not place hot pots and pans on your countertops without a head protector pad. Some countertop finishes will show burns or discoloration from heat.
Countertops can be damaged by sitting on them. Excessive weight can cause warping, drawer malfunction or may cause the top to pull away from the wall.
Coffee makers should be placed on heat protector pads or cutting boards to avoid discoloring the countertop.
Do not drain your dishes on the countertop. Standing water can seep into the seams in the countertop causing laminates to warp and blister and seams to buckle and become uneven.
Maintain a good seal in the caulking between the countertop and the wall, along the joint at the back splash and around the sink to prevent moisture from reaching the wood under the laminates and to prevent warping. Seal seams in the surface as needed.

Avoid using abrasive cleaners that will damage the luster of the surface.
LIMITED WARRANTY Repair and maintenance of countertops is one of your home maintenance responsibilities. Any damage to surfaces must be noted at your orientation walk-through.
CRAWL SPACE
HOMEOWNERS USE AND MAINTANCE GUIDELINES The crawl space is not intended as a storage area. You may notice slight dampness in the crawl space, but there should not be standing water. To help keep water away from the foundation and from entering the crawl space, landscaping must be installed in such a way that drainage patterns are preserved and the slope away from the foundation is maintained.
DECKS
HOMEOWNERS USE AND MAINTENANCE GUIDELINES Your new home may feature an untreated redwood deck. Wood decks add to the style and function of your home and require a certain amount of routine maintenance so that they will remain functional and attractive. Redwood decks are more resistant to changing weather conditions than traditional lumber, but are subject to discoloration, shrinkage, cracking and splitting over time. Treat your deck with a wood preservative or protective agent after you move into your home, and at least once a year thereafter. Do not allow heavy snow or ice to remain on the deck for prolonged periods of time. Use caution in shoveling the surface, to avoid scratching the deck boards. Nails and screws may work loose and need to be reinserted. Your regular careful attention to deck maintenance will preserve the attractive appearance and help avoid costly repairs. Consult the Declaration of Covenants, Conditions and Restrictions for your community or your Homeowner’s Association before making structural or cosmetic changes to your deck.
LIMITED WARRANTY Maintenance of wood decks is a homeowner responsibility.
DOORS AND LOCKS
HOMEOWNER USE AND MAINTENANCE GUIDELINES The doors and frames in your new home may expand and contract with changes in temperature and humidity. Allow your home to go through at least one cycle of seasons before you make changes. Sticking doors can usually be corrected by carefully sanding small areas. In most cases, it is not necessary to take the door off the hinges. After sanding, promptly cover the exposed area with touchup paint or lacquer. The hinges and locks on your doors may requires lubrication from time to time, to take care of squeaks and for proper maintenance. You will likely see dusting (black dust) around the hinges from time to time. Simply wipe the area clean as
part of your routine cleaning. Use an oil-free silicone lubricant on the hinges. We do not recommend using oil because it attracts dust. Slamming can damage doors and jambs and can cause cracking in walls. Doors can also be damaged when children hang on the doorknob. The hardware becomes loose and the door may sag or stick. Interior Doors Remove finger smudges from paint or lacquered interior doors by washing with warm water and a soft cloth or sponge. Dry the surface thoroughly. Check your interior doors frequently and use touchup paint or lacquer when necessary. If your closets feature sliding doors, keep the tracks clean and keep clothes and other items away from the doors and tracks so they do not obstruct operation. These simple steps will keep your interior doors beautiful and in top condition. Exterior Doors To ensure longer life for your exterior doors, check the finish several times a year. Doors that receive direct sunlight should be inspected more often. Use touch-up paint or repaint or refinish as needed. If you notice that the finish is beginning to crack or peal, refinish the door promptly. If neglected, cracking and peeling will progress rapidly and destroy the surface of the door. Water can severely damage door surfaces, so make certain that your sprinklers do not spray on your doors. Installation of a storm door can assist in protecting exterior doors.
LIMITED WARRANTY Warping of interior or exterior doors which exceed ¼ inch measured vertically, horizontally or diagonally will be corrected. Gaps under interior doors are intended to promote adequate air flow. If a gap under an interior door exceeds 1 ½ inches between the bottom of the passage door and the finished floor or 2 inched between the bottom of a closet door and a finished floor, Windmill Homes will make a correction. An exterior door that binds, sticks, or does not latch due to faulty workmanship or materials will be repaired. A split in the door panel will be corrected if it allows the entrance of elements. Other splits are matters of homeowner maintenance. Under extreme conditions, some entry of outside elements under doors can be expected. If daylight is visible or if elements enter under normal conditions, a correction of the threshold or other parts of the door will be made.
EXTERIOR FINISHES
HOMEOWNERS USE AND GUIDELINES The primary exterior finishes on your new home are wood, brick, stone, stucco, cement-based siding and hardboard siding. These finishes were chosen for their beauty and durability in this climate. Because these materials are exposed to frequently changing weather conditions, they require routine maintenance and care. We recommend that you inspect the exterior surfaces of your home every three months. Stucco Stucco is a cement product that is subject to expansion and contraction with changing environmental conditions. Minor hairline cracks will develop in the outer layer of stucco. This is normal and does not reduce the function of the stucco in any way. The white powdery substance that sometimes forms on stucco surfaces is called efflorescence. This is a natural phenomenon and cannot be prevented. In some cases, it can be removed by scrubbing with a stiff brush or vinegar. Consult your home center or hardware store for commercial products to remove efflorescence.
Avoid spraying water from irrigation or watering systems on stucco surfaces. Check the spray from your sprinkler systems frequently to make certain that water is not spraying on stucco surfaces. Keep soil a minimum
of 6 inches below the bottom of the stucco finish. Do not pour concrete; construct masonry or brick walls, or place soil on the stucco finish.
Brick/Stone
Brick/stone is one of the most durable and lowest maintenance exterior home finishes. Efflorescence (as described in
the Stucco section above) may also form on brick surfaces and may be removed by scrubbing with a stiff brush or
vinegar. After several years, brick may require tuck-pointing (repairing the mortar between the bricks). You may notice
small holes in the mortar along the lower rows of bricks. These holes allow moisture that has accumulated behind the
brinks to escape. Do not fill these weep holes or permit landscaping materials to cover them.
Siding
Siding expands and contracts as humidity and temperature change. Slight waves are visible in siding under moist
weather conditions, and shrinkage and separations will be more noticeable in dry conditions. Wood-product and
cement-based siding require routine painting and regular caulking. The timing will vary with climate conditions and
exposure to the elements. Caulking minimizes moisture entry into the siding.
LIMITED WARRANTY
One time during the warranty period, we will repair masonry cracks that exceed ¼ inch in width. Stucco cracks that
exceed 1/8” in width, and separations in siding that exceed 3/8 inch in width. Some cracking is common in stucco,
masonry and mortar joints. Minor cracks, imperfections and variations in color, size and shape of brick and stone are
normal.
ELECTRICAL SYSTEM
HOMEOWNER USE AND MAINTENANCE GUIDELINES
The electrical system in your new home was designed by professionals to comply with all applicable building codes. It is
intended for normal residential use. Any changes or additions to your electrical system may void your warranty and can
result in damage to your home.
We highly recommend that you consult a licensed electrician before making changes or additions to your electrical
system. Please note that a permit may be required.
Circuit Breakers
During your homeowner orientation, our representative will point out the location of the circuit breaker panel. There
will be one master circuit breaker and several individual circuit breakers. Circuit breakers can trip under excessive
electrical load, when there is a worn cord or defective appliance, or during the operation of an appliance with too high a
voltage requirement for the circuit.
If the power is lost in one area of your home and available in other areas, it is likely that an individual circuit breaker has
tripped. Follow these steps:
Unplug or turn off any appliances in the area that are without power prior to resetting circuit breaker.
Check the appropriate circuit breaker and, if necessary, reset it by moving it to the OFF position and then to the
On position.

If the circuit breaker fails repeatedly, you may have either a short circuit in one of your appliances or a short
circuit in the electrical system in your home.
Call a licensed electrician or Windmill Homes Customer Service Department if you home is still covered under
the Limited Warranty.
If the power is lost throughout your home,
Check the master circuit breaker.
If the master circuit breaker has tripped reset it.
Ground Fault Circuit Interrupt Devices
During your Homeowners Orientation Walk-Through, our representative will point out the location of the ground fault
circuit interrupt devices (GFCI outlets). Usually, GFCI outlets are located near tubs and bathroom sinks and in the
kitchen, garage and exterior locations. There are special circuit breakers that are designed to break the flow of
electricity in the event of a short circuit to prevent dangerous electrical shock. When the circuit is interrupted, the GFCI
circuit will have to be reset according to the manufacturer’s instructions. One outlet on a GFCI circuit will have a reset
button. Often a single GFCI outlet will control multiple outlets, sometimes in other rooms. If you are experiencing loss
of power in any wet areas, i.e. laundry, baths, garage, basement or kitchen, check all GFCI outlets and reset as
necessary.
Do not plug appliances such as power tools, air conditioners, freezers or refrigerators into GFCI outlets. The electrical
surge that occurs when these appliances cycle will trip the GFCI outlets and break the circuit.
Lighting
The lighting fixtures in your new home are designed for standard wattage bulbs. To avoid excessive heat, follow the
manufacturer’s recommendations attached to the fixture.
Outlets and Fixtures
Electrical outlets have been placed at appropriate locations in each room in your home as set forth in the plans. Do not
exceed the capacity for which the outlet was designed. Devices which increase the capacity of electrical outlets, such as
extra plugs and extension cords can create a fire hazard.
If any electrical outlet does not have power, there are two possible explanations:
The outlet is controlled by a wall switch, and the switch is turned off. Plug the appliance into the outlet and turn
on the nearby wall switches to see if the problem is corrected.
Check the circuit breaker. If the circuit breaker has been tripped, reset it and try the outlet again. If the circuit
breaker trips repeatedly, call a licensed electrician or Windmill Homes if this occurs during the Limited Warranty
period.
CAUTION: Small children can be injured by poking objects into wall outlets. You can prevent this by installing child
proof devices on all electrical outlets. These devices are available at grocery, drug and hardware stores.
LIMITED WARRANTY
During the one-year Limited Warranty period, Windmill Homes will correct the problem if circuit breakers trip frequently
under normal use. If outlets, switches or fixtures malfunction, the problem will be corrected if caused by defective
workmanship, materials or installation. If wiring fails to carry the specified load, Windmill Homes will correct the
problem if the failure is due to improper installation of materials, during the two-year Limited Warranty period.
Modifications of your electrical system may void your Limited Warranty.
FENCING HOMEOWNER USE AND MAINTENANCE GUIDELINES
Depending on the community in which your home is located, fencing may be included with your home, it may be an
optional item, or it may be an item you consider adding after you move in. Please note that the fencing height around
your home may vary from that in the models and homes with different grade evaluations.
When adding fencing to your property, we recommend that you use a professional fencing contractor. It is your
responsibility to locate the property lines and have your fencing installed in the appropriate location and in
conformance with local building codes, zoning and the provisions of the Declaration of Covenants, Conditions and
Restrictions for your community. When installing and maintaining your fencing, you must insure that you allow existing
drainage patterns to function unimpeded. Make certain that any soil removed to set fence posts is only distributed in
such a way that drainage swales are maintained and that sufficient space remains under the bottom of the fence for
water to pass through.
Before you install fencing, refer any questions you may have to the local building authorities and you homeowner’s
association, if applicable, for approval.
Do not allow sprinklers to spray on fencing. Check regularly to confirm that water does not stand around the fence
posts, and make corrections to drainage as needed.
LIMITED WARRANTY
Refer to Declarations of Covenants, Conditions and Restrictions for your community to determine whether it is the
responsibility of the home owner or the Homeowner’s Association to maintain fencing. Fencing is not covered under
your builder’s warranty.
FIREPLACE
HOMEOWNER USE AND MAINTENANCE GUIDELINES
The fireplaces in your home are designed to create atmosphere and beauty. The fireplaces are not designed nor
intended to heat the home. Read all Direction from the manufacturer before using your fireplace.
A slight delay between turning the switch on and flame ignition is normal. The flames should ignite gently and quietly. If
you detect an odor of gas, turn off the main gas supply, immediately evacuate the home and call the gas company from
a neighbor’s house.
LIMITED WARRANTY
Review the manufacture’s manual for warranty information, or submit a written warranty request to Windmill Homes.
FIXTURES
HOMEOWNER USE AND MAINTENANCE GUIDELINES
Faucets and other plumbing fixtures are designed as attractive accents and to provide trouble-free use. Fixtures are
plated with various finishes. These finish materials are resistant to water corrosion under normal use and maintenance,

but are not impervious to wear and tear. Abrasive cleansers, caustic agents, scouring pads and tools can cause damage.
Clean the fixture with warm soapy water and a soft sponge or cloth. Rinse with clear water and wipe dry to prevent
spotting. If water accumulates and stands at the base of the fixtures, spotting, corrosion and tarnishing can occur.
Always wipe the base of the fixture dry. To extend the life of the seals in your faucets and to avoid frequent repairs, do
not use excessive force when you turn the faucets on and off. Faucets are equipped with aerators which mix air with the
water to prevent splashing. They need to be cleaned occasionally to remove buildup of mineral deposits. When you
notice the stream of water has lessened, unscrew the aerator from the mouth of the faucet, remove the debris and rinse
the washers and screens. Replace the part in the appropriate order and screw the aerator onto the faucet.
LIMITED WARRANTY
Maintenance of plumbing fixtures is a homeowner responsibility. Leaks and malfunctions will be corrected during the
one-year Limited Warranty period if they are due to faulty workmanship or materials.
FLOOR SYSTEMS Most flooring systems are made up of engineered I-joists and oriented strand board to employing the latest technology
in the industry.
LIMITED WARRANTY
The Limited Warranty covers flooring materials installed by Windmill Homes. A squeak-proof floor cannot be
guaranteed. Lumber shrinkage as well as variation in temperature and humidity can cause squeaks. Windmill Homes
will attempt to eliminate floor squeaks if they are caused by a defective joist or improperly installed sub floor, on a one-
time basis and only during the first year. We recommend that you wait until the tenth month after closing before
submitting you request for service. High and low areas in the floor will be corrected if the differential exceeds ¼ inch
within a 32 inch measurement.
GARAGE OVERHEAD DOOR
HOMEOWNER USE AND MAINTENANCE GUIDELINES
The overhead garage door requires periodic maintenance for reliable operation. Garage overhead doors are not
airtight. Some light will be visible around the edges and across the top of the door. Weather conditions may result in
some precipitation and dust entering around the door.
Every 3-6 months, apply a lubricant such as a silicone spray to all moving parts: track, rollers, hinges, pulleys, locks and
springs. Use lubricant sparingly, as over lubricating can result in drips on vehicles and the concrete floor. Check to make
sure that all hardware is tight and operating as intended without binding or scraping.
To prevent damage to a garage door opener be sure the door is completely unlocked before using the operator. If you
have an opener installed after closing on your home, we suggest that you order it from the company that installed the
garage door. Be familiar with the steps for manual operation of the door in the event of a power failure.
If you selected a garage opener as one of your options, we will demonstrate the use of the opener during the
orientation, and show you where remotes are located.
Follow the manufacturer’s instructions for safe and reliable operation. Do not allow anyone near the door except the
handle. Do not allow children to play with or around the door. Any needed adjustments should be made by a qualified
specialist. The door springs are under a considerable amount of tension and require special tools and knowledge for
accurate and safe servicing. Have the door inspected by a professional garage door technician after any significant
impact to the door.
LIMITED WARRANTY
The garage door should operate smoothly and with reasonable ease. Windmill Homes will correct a garage door that
does not operate properly. If you install a garage door opener, Windmill Homes will not be responsible for the
operation of the garage door.
GARBAGE DISPOSAL
HOMEOWNERS USE AND MAINENANCE GUIDELINES
For proper operation, turn on the cold water and start the disposal. Do not load the disposal with food before turning
it on. After it is running, drop food items slowly into the unit. It is important to use plenty of cold water to allow the
food to be cut by the blades and flushed into the sewer lines. Only foods that are non-fibrous and easily pulverized
should be placed into the disposal. Do NOT place such things as corn husks, celery, onion skins, olive pits, bones or
solid or liquid grease, to name a few, into the unit. Greasy items may liquefy in hot water, then cool and solidify in the
sewer line. These other items may cause your unit to overload, jam, or become clogged. When the unit sounds clear,
turn off the disposal, and let the water run for several seconds. The disposal is not intended for grinding large portions
of food. It is to be used for food remnants scraped from plates.
If the unit is not running, follow these corrective measures:
Turn off the disposal and the cold water. Wait three minutes for the unit to cool, and then press the reset
button which is usually located on the bottom of the disposal.
If this does not correct the problem, the unit is probably clogged or jammed. Unplug the disposal before
attempting any repair yourself.
Check the circuit breakers. An overload of this type may have tripped the circuit. Reset any tripped breakers.
If your disposal has a service wrench, insert one end of the wrench into the bottom of the unit. Work back and
forth until the disposal turns freely.
If your disposal does not have a service wrench, insert a broom handle or mop handle into the throat of the unit
and rotate the impeller back and forth. The obstruction will usually loosen so that it can be removed.
Remove the obstruction, plug the disposal in, press the reset button and proceed, following the
recommendations above for proper use.
LIMITED WARRANTY
Your garbage disposal is covered by the manufacturer’s one-year materials and workmanship warranty. Contact a
licensed plumber or Windmill Homes during the warranty period.

GRADING AND DRAINAGE
HOMEOWNER USE AND MAINTENANCE GUIDELINES
You lot has been graded to drain water away from the foundation of you home. The grading plan for your home is
part of an overall drainage plan for the entire subdivision. It has been engineered to meet local government standards
and home warranty agreement guidelines to insure proper drainage. The final grade of your lot may vary from that of
the model homes and from that of other homes in the subdivision. The contours and features of your lot have been
designed as an appropriate setting for you home and to protect against ponding water, erosion and damage. The
grading of your lot has been created to direct water away from your home and adjacent properties. To avoid water
damage, which can be severe during heavy rains, make sure that the grading is maintained. Do not build fences or other
obstructions across swales.
Backfill around the foundation of you home may settle enough to reverse or flatten the slope. If this occurs, rather than
draining away from the home, rain water and irrigation will pond near the foundation and infiltrate the ground causing
damage to your foundation and possible to other areas of your home. To maintain positive drainage away from your
home periodically re-compact the soil at the surface by tamping it down and adding new fill material as needed. Take
care to keep the surface of the soil away from the bottom of the siding or stucco.
Landscaping can alter the grading of the lot. We suggest you consult with a professional landscape contractor when you
are landscaping. Provide ample room for growth between plants and your home. The ground next to your home
should always slope away from the foundation to prevent standing water, and nothing should be planted within five
feet of the foundation so that the water does not collect near the house. If your project involves adding soil to your
lot, be especially careful not to change the drainage patterns. Flower beds and other additions can significantly alter
drainage patterns. Patios, driveways, walkways, edging, fences, walls, planters, flower beds and play structures can all
impact your drainage system. The pooling of water next to concrete structures can expand the soil causing heaving or
cracking of the concrete. Your professional landscape contractor should assist you in making certain that slope and
drainage patterns are preserved when installing these features.
Before you begin a landscaping project, check with the homeowners association, local building officials and review
Declaration of Covenants, Conditions and Restrictions to make certain that your plans meet all the requirements.
To conserve water you may want to use a drip irrigation system. These systems concentrate a small amount of water
directly to the root of the plant where it provides the most nourishment. Never use drip irrigation near your homes’
foundation or concrete flatwork. For further conservation of water, we urge you to use drought resistant or drought
tolerant plants. Your landscape professional can provide advice on plant selection, watering needs and proper
placement of these plants in your yard.
Besides landscaping and other manmade alteration, natural settling can change the original grading of your lot. It is the
homeowner’s responsibility to maintain, and to re-establish if necessary, drainage on the property prior to
landscaping and in the process of landscaping. Failure to re-establish grading during landscaping of your lot may result
in damage to your home, your lot and neighboring properties. Any alteration of the established grade to your lot may
void the structural portions of your warranty. It is your responsibility to maintain the original drainage patterns of your
lot and to preserve good drainage.
It is not unusual for water run-off from uphill to drain onto the downhill lots, eventually arriving at a discharge point. It
is your responsibility to protect your landscaping improvements from damage caused by drainage from adjacent
properties. Windmill Homes is not responsible for damage to your property or improvements that may be caused by

drainage from uphill or adjacent lots or by rain, snow, wind or other actions that might cause erosion on your property
or otherwise adversely affect the grading or landscaping in your yard.
Your lot has been graded to drain water from your home and in compliance with the drainage plan for the subdivision.
It is your responsibility to protect drainage patterns through your lot.
HARWOOD FLOORING
HOMEOWNER USE AND MAINTENANCE GUIDELINES
Hardwood Flooring will expand and contract from season to season – resulting in cracks between some of the boards. In
caring for your hardwood floors, we recommend that you use a dust mop or soft bristle broom daily to keep the dust
and grit off the floor. When a more thorough cleaning is necessary, use only cleaner that has been recommended by the
manufacturer. Avoid all wax-based products. Do not saturate the floor or allow water or other liquids to stand on the
surface. Never use self- polishing treatments, soaps, detergents, or oils. Wipe all spills immediately to prevent
damaging the wood. Avoid wearing high heeled shoes as they may cause dimples or indentation in the wood. Furniture
legs and pet’s claws can scratch the finished surface. Felt protector pads should be applied to the bottoms of legs of
tables and chairs to allow the furniture to be moved easily over the floor and to help prevent scuffing or scratching.
Clean the protectors regularly to remove any grit that may have accumulated. Rubber-backed rugs can cause
discoloration of the flooring.
The hardwood flooring in your home is generally pre-finished at the factory. Hardwood is a natural product milled from
a tree. It is not fabricated and will have mineral deposits and shade, color and grain variances consistent with the grade
and species of the flooring. Hardwood may have minor splits, chips, cracks and rounded corners. Do not select a wood
floor if you expect it to be “perfect.” There will be slight height differences between boards, side-to-side and end-to-end.
This is inherent to the product and is not due to improper installation. Square edge floors will be affected the most.
Engineered wood floors may be installed by gluing the planks directly to the sub floor; others may be installed using a
floating method, either by gluing the planks to each other or with an interlocking system. With the “floating” floor
system of installation, you will hear an echo or hollow sound when walking on the floor. Squeaking can also be heard in
wood floors as the floors go through temperature and humidity variations.
All wood floors fade or change color over time due to UV exposure and this is considered normal. Light-colored floors
have more of a tendency to be affected. When stained, the floors with a lighter stained color are more likely to show
dirt, while floors with darker stain colors are more likely to show scratches. An exact color match to the sample is
neither implied nor guaranteed. Hardwood will expand and shrink over time due to the presence of moisture and heat.
This will cause gapping between the planks. Keeping a stable temperature around 70 degrees and controlling the level of
humidity with a humidifier in colder months and a dehumidifier in warmer months will help reduce gapping due to
shrinkage and expansion. Hardwood floors are generally not installed in bath and wet areas due to the manufacturers’
warranties being voided upon installation.
The use of approved rugs or mats in heavily used areas is highly recommended to protect your hardwood floors.
Hardwood floors should be treated with the same respect you would give a piece of furniture. Protect your flooring by
equipping furniture legs with floor protectors and do not push or pull furniture or appliances across your floor without
first protecting your floor. Sharp objects, spike heels, pets and grit on shoes will dent, scratch and cause damage. Wood
floors with beveled edges are prone to collect debris, making cleaning more difficult. Wood and water do not mix! Do
not wet mop hardwood floors! Do not use Murphy’s oil soap, or any product not approved for use on your particular
floor. Please refer to the manufacturer’s recommendations for maintenance and cleaning. The manufacturer,
installation contractor or builder will not accept claims related to damage or neglect
LIMITED WARRANTY
Hardwood is a natural product, which varies in color and appearance. Separations between boards is normal, especially
during the heating season, therefore the separations will not be filled unless they exceed 1/16 inch. To restore the
luster and finish of your hardwood floor, have a hardwood flooring contractor “screen and coat” your hardwood every
2-5 years, depending on the amount of wear and tear. Any damages not noted on the Homeowners Orientation Form
prior to occupancy will not be covered under the Limited Warranty.
VINYL FLOORING
HOMEOWNER USE AND MAINTENANCE GUIDELINES
Modern, resilient vinyl flooring is durable and easy to maintain. We offer the following tips for proper care. Clean vinyl
flooring with a solution of warm water and a no-rinse flooring cleaner. Avoid all wax-based products. Wipe up spills
immediately to avoid staining. Use a sponge or soft cloth to dry the floor after removing the spill. Do not use abrasive
cleansers or bleach.
Abrasives will dull the finish and cause permanent damage. Bleach can etch and destroy the surface of the flooring.
LIMITED WARRANTY
Since sheet vinyl is typically manufactured in six-foot wide widths, seams may be visible in large areas, such as the
kitchen. As with carpet, there is no such thing as a completely invisible seam, especially in patterns with no continuous
straight lines. All sheet vinyl is susceptible to being torn, scratched or dented by heavy objects. Extreme care should be
exercised when moving appliances and furniture. Plastic glides are required on all chairs and tables to protect your floor.
Also, please be aware that high heels, dropped objects, toys and other household items can dent or puncture vinyl. No
vinyl material will be installed under built-in appliances. Rubber-backed floor mats can cause discoloration to vinyl
flooring and their use is strongly discouraged. Because of its relatively soft texture, vinyl flooring can be damaged by the
weight of heavy appliances, by dropping or moving heavy object across the surface and by rough use. To prolong the life
and appearance of your vinyl floors, avoid wearing high heeled shoes which can cause permanent dents and gouges.
Use felt protector pads on the bottoms of the legs of tables and chairs to prevent gouging and scratching, as described
above in the Hardwood section. Avoid using rubber-backed rugs on vinyl flooring, as the rubber can cause discoloration
of the floor. Any damage not noted during homeowner orientation prior to occupancy will not be covered under the
Limited Warranty.
LAMINATE FLOORS AND COUNTERTOPS Laminate floors are made with a decorative top wear layer that has the appearance of real wood. Although the wear
layer is highly resistant, it is still susceptible to scratches and gouges. Laminate floors are made of separate panels that
are joined together by tongue and groove joints. Although all of the panels have adhesive to hold them together, the
floor is not glued to the sub-floor. This “floating floor” causes an echoing or tapping when walking on it that is not heard
with a glue-down installation of a hardwood floor.

Each manufacturer details cleaning procedures. As a general rule, routine cleaning of laminate floors consists of
sweeping or vacuuming (without a beater bar). Do not use abrasive cleaners that can scratch the floor or a wet mop.
Surface treatments such as polish, wax or soap are not required or recommended. The core of the laminate will swell if
it is exposed to an excessive amount of moisture.
Laminate countertops are not resistant to burning and hot items can cause delamination if placed directly on the
surface. All laminated materials have the ability to delaminate in highly humid areas and are susceptible to scratches and
gouges.
HEATING AND AIR CONDITIONING
HOMEOWER USE AND MAINTENANCE GUIDELINES
Your new home is equipped with a high quality heating system and may have an optional air conditioning system. These
systems comply with local and state energy codes. With proper care, they will provide many years of efficient,
dependable service. Please read the instruction manual and become familiar with the systems before you use them. If
you have air conditioning, the system is combined with your heating system. It is therefore important to follow
maintenance instructions for both systems to care for each of them properly.
Temperatures in your home may vary from room to from due to such features as floor plan, orientation of you home on
the lot, type and use of window coverings, location of vents, and traffic through the home. On extremely cold days, a 6
degree difference between actual inside temperature and the thermostat setting is acceptable. On excessively hot days,
where outside temperature exceeds 95 degrees Fahrenheit, a difference of more than 17 degrees lower than outside
temperature will be difficult to maintain.
Heating and air conditioning greatly enhance the comfort of your home, but if used improperly or inefficiently, wasted
energy and frustration will result. We offer the follow suggestions to help you in getting the maximum use and
enjoyment from you heating and air conditioning:
Check your system early in the season. Contact the appropriate mechanical contractor for regular service
needs, and to arrange for resolution of any problems before the heavy demand of seasonal service. We
recommend an inspection by a heating and air conditioning professional every year.
Keep vents clean and directed appropriately. During the course of construction, dust and debris may
inadvertently get into the heating and air conditioning vents and ducts. As part of your routing cleaning, take
care to keep the vents and registers free of dust and cobwebs. By adjusting the vents you can maximize air flow
to occupied parts of your home. This is especially important when the seasons change. For example, in the
summer months, you may wish to partially close vents on the north side of the home and fully open vents in the
rooms that receive the most exposure to the sun so that you minimize air flow to those rooms; you should not
completely close off any vents in an effort to get more airflow to other areas.
Keep exterior doors and windows closed when operating you air conditioning and heating system. Warm
outside air disrupts the system and makes efficient cooling impossible. In either season, keep you doors
(including garage doors) and windows closed. In winter, cold outside air impacts the system. In warm weather,
heat from the sun shining through windows with open drapes may be intense enough to overcome the cooling
effect of the air conditioning. For best results in the summer, keep the drapes on these windows closed during
periods of bright sun. On cold days, open window covering to allow the sun to warm your home, and close them
when the sun begins to set.

Keep the thermostat at moderate temperature during the day when you are away. Unlike a light bulb, which
reacts instantly when you turn on the switch, the air conditioning unit only begins a process when you set the
thermostat. For example, if you come home at 6:00 p.m. when the outside temperature has reached 90 degrees
Fahrenheit and set your thermostat to 75 degrees, the air conditioning unit will begin cooling, but will take some
time to reach the desired temperature due to the fact that during the day the sun has been heating not only the
air in the house, but the walls, the carpet, and the furniture are still releasing heat, counteracting the cooling. If
evening cooling is your primary goal, set the thermostat at a moderate temperature in the morning while the
house is cooler, allowing the system to maintain the cooler temperature. The temperature setting may then be
lowered slightly when you arrive home, for better results. Setting the thermostat at 40 degrees will not cool
the home any faster and can result in the unit freezing up and not performing at all. Extended use under these
conditions can damage the unit. If you have a zoned system (more that one furnace and/or separate controls)
plan on operating schedules and temperature settings to maximize comfort and minimize energy consumption.
Ceiling and whole-house fans may increase your comfort. Ceiling fans are inexpensive to operate, and the
moving air usually increases comfort on a warm day. Whole-house fans are effective in cooling down inside
temperatures by drawing cooler outside air into the home through open windows and doors. Do not operate a
whole-house fan at the same time as air conditioning.
Change furnace filters every 30 days or as needed. In areas with heavy dust more frequent changes may be
necessary. Fresh filters can significantly reduce the operating costs and extended the life of your system. It is
important to change the filters during the cooling season as well as heating season. Note that using a denser
filter can restrict airflow and efficiency. In the same manner, smaller micron filters can cause excessive wear on
the fan motor. Always replace your air filter with new ones as recommended by the manufacturer of your air
system.
Check weather stripping on all exterior doors. Adjust the weather stripping as needed to prevent unnecessary
drafts. Ensure that door thresholds provide a tight fit - most are adjustable.
Keep plans and grass trimmed well away from the outdoor air conditioning unit.
If you have questions or requests for warranty service on your heating and air conditioning systems, you may direct
them to a licensed mechanical contractor or Windmill Homes. Before calling for service, check to confirm that:
Thermostat is set to the desired setting
Blower panel cover for the furnace blower (fan) is in place. This panel pushes in a button to allow the fan motor
to come on. If the button is not pushed in, the furnace will not operate.
Air conditioner and furnace breakers on the main electrical panel are on. (Remember, if a breaker trips you
must turn it form the tripped position to the off position before you can turn it back on.)
Switch on the outside wall near the air conditioner is on.
Filter is clean to allow air flow.
Vents in individual rooms are open.
Air conditioner has not frozen from overuse.
Air returns are unobstructed.
LIMITED WARRANTY
The warranty on your heating and air conditioning system is provided by the installer and manufacturer. If you have
questions or requests for warranty service, you may direct them to Windmill Homes during the Limited Warranty period,
or to the mechanical contractor listed on your emergency sticker. The air conditioning system should maintain
temperature of 78 degrees or a differential of 16 degrees from outside temperature on days were outside temperature
exceeds 95 degrees Fahrenheit. It may be possible to obtain a lower inside temperature, but neither the manufacturer

nor Windmill Homes guarantees this. The heating system should maintain no more than a 6 degree difference between
actual inside temperature and thermostat setting. If you home is completed during winter months, the air conditioning
system will need to be charged in the spring. The mechanical contractor will not add coolant to the air conditioning
system until the outside temperature is 70 degrees Fahrenheit or higher. Lack of air conditioning service is not an
emergency. Air conditioning contractors in our region respond to air conditioning service requests during normal
business hours.
INTERIOR WALLS AND DRYWALL
HOMEOWNER USE AND MAINENANCE GUIDELINES
The walls in your new home are constructed of wood and other materials which expand and contract under normal
environmental circumstances. Molding and trip can shrink and warp in some situations. Visible hairline cracks where
drywall meets other materials, and cracks or seams lines due to expansion and contraction of the structure are
normal and will be repaired one time during the first of occupancy.
You are responsible for routine maintenance on molding, trim and wall boards. Use touchup paint and, if necessary, the
appropriate caulking material to complete the repairs.
We provide textured walls to add beauty and style to your home. The texturing material is relatively soft and can be
damaged by scrubbing with abrasive cleansers and rough brushes or cloths. Small finger smudges may be removed from
walls with a solution of warm water and a mild soap. Wash gently with a soft sponge or cloth, and rinse with and dry the
excess water carefully. Do not permit the wall board to become soaked with water. Larger spots, not easily removed
by cleaning, will require paint touch up. It is unlikely that touch ups of paint and re-texturing will match the surrounding
area.
The ceilings in your new home do not require special attention other than cleaning and painting, as needed. Remove
dust and cobwebs as part of your routine cleaning. Repaint as necessary.
LIMITED WARRANTY
One time during the first year after closing Windmill Homes will repair drywall cracks that exceed 1/8 inch in width
and nail pops that have broken the finished surface. We will touch up the repaired area using the same paint color that
was on the surface when the home was delivered. Touch-ups will be visible.
Repainting the entire wall or the entire room is you choice and responsibility. You are also responsible for touch ups to
customer paint colors or wallpaper that have been applied after closing. Due to the effects of time on paint and
wallpaper, as well as possible dye lot variations, touch-ups are unlikely to match the surrounding area.
LAWN CARE
INFORMATION AND GUIDELINES
New sod care. Immediately after the sod has been installed, begin watering by giving the sod a thorough
soaking. Continue watering twice a day for the first 7-14 days using an amount of water that will keep the soil
under your new sod moist to the depth of about 2-3 inches. Once your sod has knitted (established) into the
soil, approximately 2-3 weeks, water thoroughly every third day to help stimulate deep root growth. You can
check the sod to see if it has knitted into the soil by tugging gently at one corner – if you feel resistance, it is
established. Do not mow, fertilize or apply any herbicides until the sod has established. Mowing may be started
as soon as the sod is firmly knitted into the soil. The first few times, your lawn should be mowed in the direction
diagonal to the way the sod was laid. Never cut off more than 1/3 of the grass height. Your mower should be
set at a minimum of 2 inch height. (Optimum height is 2-2 ¼ inches.) Mowing too short exposes the normally
shaded lower stems to sunlight and may cause them to burn and turn brown. If grass is too high, reduce its
height a little at a time. For best results, mow your lawn when you grass is dry.
o Monitor you lawn continuously. If grass becomes wilted, dry or discolored, increase watering time
accordingly. If water is standing or forming puddles, decrease watering times.
Watering. The proper amount and length of watering varies with the type of soil you have, the location of the
sod, the degree of sun exposure and the weather conditions, including humidity, wind, precipitation and
temperature.
There are many types of soils; however, the most common in Colorado are soils that contain a significant amount of
sand or clay. Sandy soils hold the least amount of water and the least amount of air. This means that water moves
more quickly through the sandy soil. Clay soils hold moisture longer than sandy soils. It is important to remember that
each layer of soil must get wet before water will move deeper into the soil. Optimum water penetration into the soil is
approximately 6 inches. Proper water is essential to maintain a healthy, vigorous lawn. Below are general guidelines.
For established lawns, water every third day, applying approximately 1-1/2 inches of water total. Your lawn will require
more water during hot and windy weather and where tree roots are near the surface. Your lawn wil require less water
during cloudy, rainy, cool weather.
Monitoring your lawn continuously. If wilting, dryness or discoloration occurs, increase watering time accordingly. If
water is standing for forming puddles, decrease watering times accordingly.
If you changed the water times, but still notice dryness or discolorations, the zone in question should be turned on and
observed for proper coverage. Sprinkler heads and nozzles may need to be adjusted or replaced to achieve proper
coverage and precipitation rate.
Additional maintenance. To maintain a healthy lawn, apply fertilizer approximately every 5 weeks from
May 1 to September 30. Immediately after you have fertilized your lawn water it thoroughly to avoid
burning the lawn. Do not use high nitrogen fertilizer during hot weather as it may burn the lawn. Fertilizers
containing Nitrogen, Sodium Phosphate and Potash are generally effective with Colorado’s climate and soil
types, when use appropriately. Aerating you lawn in late spring and early fall improves water penetration
and lawn performance. After you have aerated your lawn, apply fertilizer mentioned above.
Winter watering. Your lawn, trees and shrubs need to be watered during the winter when your sprinkler
has been turned off and drained down. Winter watering is very important in the Denver area due to the
very low humidity and dry cold winds. These two factors have the most impact on the survival rate of your
plants. It is ESSENTIAL to manually water new planted trees and bushes at least once a month throughout
the winter. During a dry winter, you should pour about 1 to 2 gallons of warm water around the trunk of
each tree and bush.

MOLD PREVENTION
INFORMATION AND GUIDELINES
Molds are simple, microscopic organisms that are necessary for the natural decomposition of organic material.
Mold exists virtually everywhere, indoors and outdoors, and spreads by means of microscopic spores that travel
through the air. It may be found on plants, food, dry leaves, and other organic matter, carpet wallpaper, and
building materials, such as drywall, wood and insulation. It is common to find mold spores in the air of homes and
growing on damp surfaces. Much of the mold found indoors comes from outdoor sources. Therefore, everyone is
exposed to some mold on a daily basis without evident harm. Residential home construction is new and cannot be,
designed to exclude mold spores; however, mold will not grow without moisture. By eliminating moisture through
good housekeeping and home maintenance practices, homeowners can minimize mold growth.
Exposure to mold is not necessarily harmful, but certain strains of mold may cause adverse health effects in small
percentage of susceptible persons. Windmill Homes is not an expert in the study or remediation of mold. Experts
disagree about the level of mold exposure that may cause health problems and about the level of any health
problems that may be caused by mold.
The following sources of indoor moisture that could create an environment for mold growth:
Humidifiers
Swamp coolers
Water leaks
Flooding
Back-up sewers
Leaky roofs
Damp basements or crawl spaces
House plants
Steam from cooking
Shower/bath steam and leaks
Wet clothes on indoor drying lines
Clothes dryers vented indoors
Combustion appliances not vented to the outdoors
You can reduce the likelihood of mold growth in your home by:
Checking for signs of mold before bringing items into your home. Potted plants (root and soil), furnishings,
used clothing and bedding materials that have been stored, as well as many other household goods, may
already contain mold growth or spores when they are brought into your home. Avoid storing organic material in
basements or damp areas.
Clean you home regularly. Vacuuming and other cleaning will help reduce mold levels. Mild bleach solutions
and most tile cleaners are effective in eliminating or preventing mold growth.
Keep the humidity in the home low. Keep your home well ventilated and the humidity low. Clothes dryers
should always be vented to the outdoors. Ventilate kitchens and bathrooms by opening windows or using
exhaust fans to remove excess moisture in the air and to facilitate evaporation of water from wet surfaces.
Maintain and properly service your heating and air conditioning systems. Do not cover or interfere in any way
with the fresh air supply to your furnace. Air your entire house by opening windows for a time when weather
permits. Make sure crawl space vents are open in summer months and ventilation fans are operating well.

Promptly clean up spills, condensation and other sources of moisture. Thoroughly dry and wet surfaces or
material. Do not let water pool or stand in your home. Promptly replace any material that cannot be
thoroughly dried.
Inspect for leaks on a regular basis. Look for discoloration and wet spots. Repair any leaks promptly. Inspect
condensation pans (refrigerators and air conditioners) for mold growth. Take notice of musty odors and visible
signs of mold.
Prevent water intrusion into the home. Check and repair as necessary all areas of caulking and painting.
Maintain the appropriate grade so that water drains away from your house. Keep irrigation systems from
operating within 5 feet of your foundation and do not over water you landscaping.
Whether the existence of some amount of mold is a problem or not is subject of much debate. Mold is everywhere –
indoors and outdoors. Because there are few if any standards for determining what quantity of mold is acceptable, and
because the susceptibility of individuals varies so greatly, the simplest approach is to take appropriate steps to remove
mold if you can see it.
Cleaning up mold can be hazardous to your health. If you believe you have a mold problem, consult a reliable source
before beginning the clean-up process. A number of governmental internet sites have information on procedures for
remediation of mold problems, including the United States Environmental Protection Agency, www.epa.gove/iag, and
The Center for Disease Control and Prevention.
PLUMBING
HOMEOWNER USE AND MAINTENANCE GUIDELINES
Your plumbing system features modern designs and materials. We recommend that you become familiar with the
primary parts as soon as you move in. You should know the location of the main shut off valve and the individual valves
in each of the bathrooms and the kitchen. In the event of a plumbing emergency, close the main water shutoff at one.
Flowing water can cause severe damage to your home and its contents.
The main water shutoff valve is generally located in the basement, or where the water service enters your home.
Other valves are located under the sinks in the bathrooms and the kitchen. Each toilet has a shutoff valve behind the
toilet bowl. Another water shutoff is located on the top of the water heater. It controls the flow of water to the water
heater and should be closed in the event of a water heater leak. You and others in your home should know where these
valves are and how they work. Our representative will identify the valves during your Homeowner Orientation.
Common Maintenance Issues:
Sewer gas. Each plumbing fixture in your home has a drain pipe specially designed to provide a water barrier
against vapor between you home and the sewer. The drain pipe or trap is the u-shaped area of pipe directly
under the sink. The trap holds water which prevents the odor of sewer gas from entering your home. If any of
your faucets or floor drains is used infrequently, we suggest that it be flushed occasionally with clear water to
replace the water in the trap lost to evaporation. If you detect the odor of sewer gas from a sink after you have
flushed it with clear water, contact a licensed plumbing contractor.
Aerators. Small amounts of minerals may become trapped in the aerators on your faucets. These mineral
deposits may reduce water pressure or cause the faucets to drip because parts wear more rapidly when they
come in contact with foreign matter. To avoid these problems, occasionally remove and flush out the faucet
aerators.

Clogs. Because of it shape, the drain trap is the area most likely to become clogged. Most toilet clogs can be
avoided by not allowing such items as disposable diapers, excessive amounts of toilet paper, sanitary supplies,
Q-tips and dental floss to be flushed down the bowl. Improper garbage disposal use may also cause plumbing
clogs. If a stoppage occurs, close the shut off valve, and give a few vigorous pumps with a plumber’s help
(plunger). We recommend that you not use drain cleaners, which have a risk of personal injury and damage to
fixtures. If you cannot clear the obstruction with a plunger, call a plumbing contractor specializing in drain
cleaning.
Running toilet. To stop running water, check the float in the tank. If it has lifted too high in the tank, the valve
will not shut completely. The float should be free and should not rub in the side of the tank or any other parts.
Also check the chain on the flush handle. It it is too tight, it will prevent the rubber stopper at the bottom of the
tank from sealing, resulting in running water. Be careful when using chlorine or other chemical cleaners inside a
tank that does not have parts that are designed to resist chemical corrosion.
Freezing. Remove hoses and other attachments from outside faucets during cold weather, even if the faucet is
located in your garage. If a hose is left attached, the water that remains in the hose can freeze and expand back
into the pipe, causing a break in the line. Repair of a broken line that feeds an exterior faucet is the
homeowner’s responsibility. Store hoses and attachments in the garage during the winter months and be sure
to have a professional contractor winterize your irrigation system in the fall to prevent freeze damage to the
irrigation system.
Prevent plumbing problems while you are away. If you plan to be away for an extended period of time, shut
off the main water valve to the home. Leave heat set on a reasonable temperature to prevent pipes from
freezing.
Tubs, showers, sinks and toilets. Some cleaning products can damage the finish of these surfaces. Be careful
when choosing cleaners. Never use abrasive cleaners, and always read the labels and follow product
instructions.
LIMITED WARRANTY
Plumbing pipe leaks will be corrected during the two-year Limited Warranty period if they are caused by faulty
workmanship or materials or improper installation. Water supply stops and clogged drains or sewers inside the home
will be corrected during the two-year Limited Warranty period if caused by faulty workmanship or materials. Freeze
damage to plumbing and irrigation systems is not covered under the Limited Warranty.
ROOFS
HOMEOWNER USE AND MAINTENANCE GUIDELINES
Roof and gable vents may be required for proper attic ventilation. During periods of rain or snow with high winds,
moisture can blow into the attic through these vents. It is a homeowner’s responsibility to check the attic after such a
storm for possible accumulation of snow which could melt and cause interior damage.
Maintain gutters and downspouts so that they are free of debris and able to drain quickly. Inspect gutters and
downspouts twice each year, and remove any debris promptly. Downspouts should be directed away from the
foundation of your home so that erosion and water saturation of the soil are prevented. All downspout extensions
should remain down at all times.

LIMITED WARRANTY
Roof leaks that are due to improper installation will be corrected within the warranty period. Windmill Homes will not
be responsible for damage caused to the roof by acts of nature or damage caused by others.
SECURITY SYSTEMS & AUDIO PRE-WIRE
HOMEOWNER USE AND MAINTENANCE GUIDELINES
At least one smoke/carbon monoxide detector has been installed in your new home. The selection, installation
procedure and location of the smoke/carbon monoxide detectors are governed by local and state building code
requirements. Please do not move or disable the smoke/carbon monoxide detectors.
Most smoke/carbon monoxide detectors are powered by 110v current and have 9v battery backup. We recommend
you replace you batteries twice a year. To prevent false alarms, thoroughly clean (dust and vacuum) each device when
you change batteries.
LIMITED WARRANTY Windmill Homes does not represent that the smoke/carbon monoxide detector will provide the protection for which it is
installed or intended. We will test smoke/carbon monoxide detectors during the orientation to confirm that they are
working and to familiarize you with the alarm. You are responsible for maintenance.
SPRINKLER SYSTEM
HOMEOWNER USE AND MAINATENANCE GUIDELINES
Sprinkler systems present a convenient and efficient method of watering your landscaping. Automatic timers permit
you to water at optimum times whether you are at home, away, awake or asleep. The amount of water provided to
each zone can be accurately and consistently controlled and easily adjusted with a timed system. Check the system
after a power outage and keep a battery in place if your system offers that as a backup. You are responsible for routine
cleaning, adjusting sprinkler heads, and winterizing the system to prevent freezing. Failure to winterize the system
before freezing temperatures occur can result in broke lines, which is not covered under the Limited Warranty. A
professional landscape contractor can perform this service.
LIMITED WARRANTY
Windmill Homes will correct malfunctions due to material and workmanship only during the Limited Warranty period.
SUMP PIT
HOMEOWNER USE AND MAINTENANCE GUIDELINES
Sump pits installed in the basement of your home are designed to collect water from the foundation perimeter drain. It
is not uncommon for water to accumulate in the sump pit. This will not necessarily require the installation of a pump,
but will need to be monitored. If during the first year the water level is higher than the inlet pipe, contact the
Windmill Homes Customer Service Department for evaluation.

LIMITED WARRANTY
The sump pump, if installed, is and appliance warranted by the manufacturer. It is the homeowner’s responsibility to
frequently inspect and maintain proper operation of the pump.
WATER HEATER
HOMEOWNER USE AND MAINTENANCE GUIDELINES
Carefully read the manufacturer’s literature and warranty for information regarding your specific water heater. In the
event of a leak in your water heater, close the shutoff valve on the top of the water heater and turn off the pilot light.
Call a licensed plumber or Windmill Homes for service.
Your water heater should be drained and flushed according to the manufacturer’s suggestions. This simple procedure
will remove accumulated silt and debris so that the water heater works efficiently.
LIMITED WARRANTY
Refer to the manufacturer’s limited warranty for information regarding warranty coverage on your water heater.
WINDOWS AND SLIDING DOORS
HOMEOWNER USE AND MAINTENANCE GUIDELINES
Your windows should offer years of trouble-free service if you follow simple maintenance tasks. Clean your windows
inside and out at least twice a year during moderate weather with vinegar and water, a commercial glass cleaner, or the
product recommended by the window manufacturer.
Window and sliding doors are made to last for years, but they do require routine maintenance. The most important
step is to keep the tracks free of dirt and debris. The tracks are pliable and can become damaged if they are not kept
clean. Use a broom or a brush to loosen any debris, and vacuum the tracks thoroughly as part of y our regular cleaning
routine. Avoid using abrasive cleaners as they may scratch the surface. If windows and doors do not slide freely, and
oil-free silicone lubricant can be used on the tracks. Do not use any oil-based lubricant on windows or doors. Oil
lubricants attract dust and dirt and may damage the window or door.
Window and door frames have a small weep holes at the bottom of their exteriors to permit water to drain from the
track and to promote proper ventilation. Keep the weep holes open and free of debris. During high winds, air will
penetrate your windows, especially through the weep holes.
Do not apply film window tinting material to double-glazed window and doors. The use of these materials can cause a
buildup of heat between the panes of glass. The excessive heat will destroy the seals and permit water condensation to
form between the panes. Adding window tinting to your windows voids the warranty on your windows.
LIMITED WARRANTY
Windmill Homes will make adjustments within the warranty period if windows or sliding doors are difficult to open,
close or lock as long as they have been properly maintained.
WOOD TRIM
HOMEOWNER USE AND MAINTENANCE GUIDELINES
Wood has been used throughout your home. Because it is a natural product, it has variations and inconsistencies that
contribute to its beauty. Wood requires protection with paint or sealers because it is a porous material and is subject to
damage by the elements and the interior conditions of your home. Inspect your exposed wood surfaces frequently. If
you find cracking or peeling of the paint, sand the area and repaint it promptly.
All exterior wood on your home will require repainting every two to four years, depending on exposure. Surfaces that
receive direct sun in the morning and mid-afternoon will require more frequent repainting. Inspect these surfaces every
six months.
LIMITED WARRANTY
Windmill Homes will correct gaps that exceed 1/8 inch at trim joints and ¼ inch between trim and adjacent surfaces
within the warranty period. Minor imperfections in wood materials will be visible and will require no action.

WARRANTY WORK REQUEST FORM One Team – Answering all of you service needs for your new Windmills Home.
PLEASE DO NOT CALL YOUR SUPERINTENDENT OR SALES OFFICE or stop the suppliers or vendors that are working in
your neighborhood.
o Email: [email protected]
o Online: www.mywindmillhomes.com/homeowner-support o Address: Customer Service Department, Windmill Homes, 301 Centennial Drive, Milliken, CO 80543
Include your home address, community name, phone numbers and an e-mail address on all pages of the
correspondence. Please note if these are updates for you homeowner records.
All appointments are scheduled during normal business hours and require and adult to be present.
We will confirm receipt of your request within 24 hours from receipt via telephone to the number on your
request.
Your confirmation will include an anticipated schedule for a field representative or the needed contractors to
answer your requests. Your scheduled appointments will be confirmed 24 hours prior to the service date.
In the case of an after-hours emergency, please call the appropriate vendor on your emergency contact list, but be sure
to follow up with Windmill Homes Customer Service Center so that we can document your concerns and follow up to be
sure they are completely addressed. If your request is not an emergency, your work will be scheduled within 30 days
from receipt and in accordance with your service schedule. For all non-emergency warrantable items, your service
requests will be driven toward a 6-month and 10-month inspection. This allows us to better serve all of our customers
and to sufficiently schedule trades and materials for completion of those items in a more organized and timely fashion.
If you have warrantable concerns that are unaddressed, we would ask that you please submit a request through our
normal warranty process.
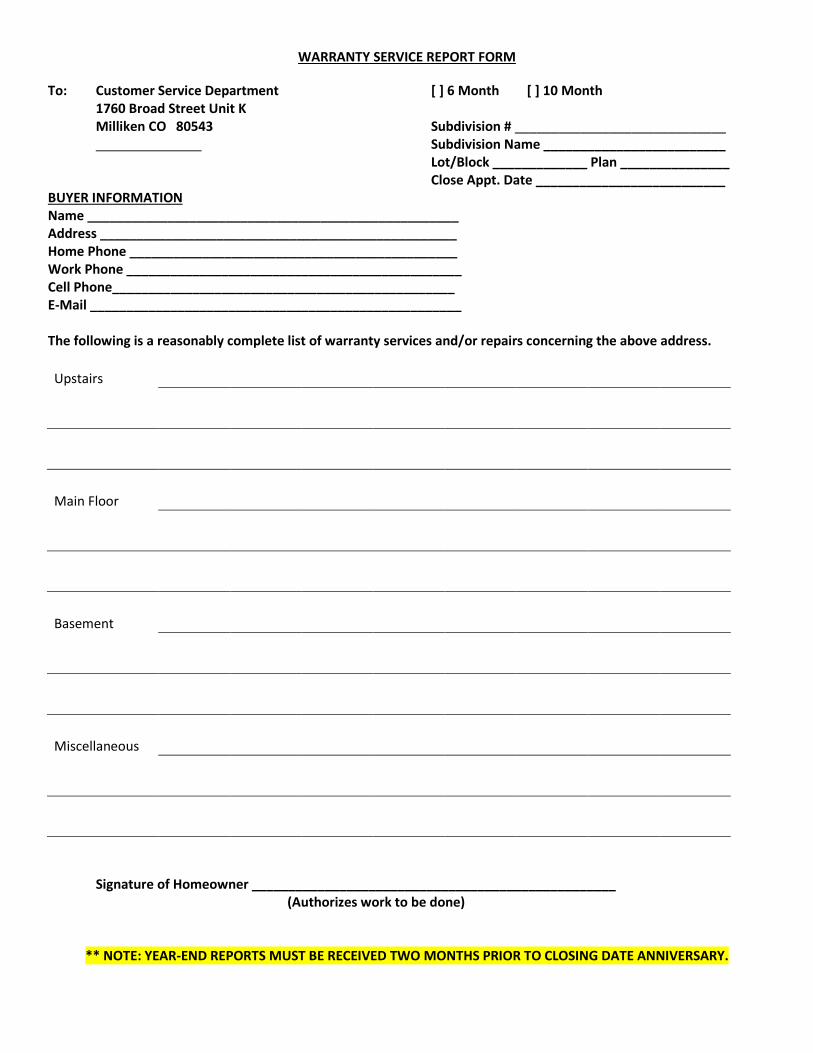
WARRANTY SERVICE REPORT FORM
To: Customer Service Department [ ] 6 Month [ ] 10 Month 1760 Broad Street Unit K Milliken CO 80543 Subdivision # _____________________________ Subdivision Name _________________________ Lot/Block _____________ Plan _______________ Close Appt. Date __________________________ BUYER INFORMATION Name ___________________________________________________ Address _________________________________________________ Home Phone _____________________________________________ Work Phone ______________________________________________ Cell Phone_______________________________________________ E-Mail ___________________________________________________ The following is a reasonably complete list of warranty services and/or repairs concerning the above address.
Upstairs
Main Floor
Basement
Miscellaneous
Signature of Homeowner __________________________________________________ (Authorizes work to be done)
** NOTE: YEAR-END REPORTS MUST BE RECEIVED TWO MONTHS PRIOR TO CLOSING DATE ANNIVERSARY.

TROUBLESHOOTING GUIDE For other problems that may arise, we provide these Troubleshooting suggestions for your convenience. Plumbing
1. If a water main breaks or a major plumbing leak develops, turn off the main water valve located in the basement/crawlspace and immediately arrange for service.
2. If you notice a leak under the sink or toilet, turn off the water by using the shutoff valves located under or behind the unit. If leak continues shut water off at main valve and immediately arrange for service.
3. If a toilet becomes clogged, turn off water to the fixture. When obstruction is removed, turn water back on. 4. If there is a leak in the water heater, turn off the shutoff valve on top of the heater. Turn the electric or gas
supply off and drain the water heater. 5. If you notice water spots (darkened areas) on the walls or ceilings, you may have a water leak. Determine the
source of the water if possible and take steps to prevent further damage. If the leak can be traced to one location (one toilet, sink or tub), turn off the water to that fixture. If the leak cannot be isolated, turn off the main water service. Contact Windmill Homes Customer Care Department for service if within one year warranty period.
Electrical If a complete power outage occurs, look to see if your neighbors have electrical power. If the power is off in your neighborhood, call the electric company to report the outage. If the outage is limited to your home, inspect all circuit breakers, including the main breaker. If a breaker appears damaged leave it off and call your electrical subcontractor. If the breakers are not damages, turn them all off and back on again one at a time.
1. If you notice sparks or smell something burning, find the location of the odor or sparks. Unplug any appliance that is plugged into that outlet. If an appliance is not the problem, shut off the circuit and call the electrical subcontractor. IMPORTANT NOTE: Immediately call the fire department if there is any possibility of fire.
2. If there is no power in the bathroom, kitchen, dining room, garage or outside receptacle, these receptacles may be connected to a Ground Fault Circuit Interrupter (GFCI) device designed to interrupt the flow of electricity preventing electrical injury or damage. Locate the nearest GFCI outlet. If the reset button has tripped, unplug the appliance; press the reset button and restore power. If power is not restored, determine if the circuit is being overloaded. Two hair dryers or other appliances being used on one circuit could cause the breaker to trip. Defective appliances can trip a GFCI when they will not trip a standard breaker. Rarely will a GFCI be too sensitive and require replacement. Contact Windmill Homes Customer Care if you have questions about the GFCI outlets in your home.
3. IMPORATNT NOTE: GFCI outlets should not have refrigerators, freezers or timing devices (such as irrigation system) connected to them. It is also not recommended to plug in A/C adaptors or voltage transformers (phone/battery chargers, razors, etc.) to GFCI outlets.
4. All Bedroom outlets are protected with Arc-Fault Circuit Interrupters. Avoid plugging vacuum cleaner and irons in to these outlets.
5. If there is no power to an electrical outlet, check wall switches and circuit breakers. Heating and Air Conditioning
1. If the heating system is not working properly, verify the thermostat is set to a temperature higher than the room air and the thermostat is turned to the ‘heat’ position. Verify furnace switch is ‘on’, and then check that the circuit breaker is in the ‘on’ position. If you are unable to isolate the problem, contact the Windmill Homes Customer Care Department.
2. If your air conditioning unit shuts down or will not start, verify the thermostat is set to a temperature that is cooler than the room air. Then, turn the air conditioner off at the thermostat and inspect the circuit breaker. If the breaker is tripped, reset it to restore to the unit and turn thermostat to ‘cool’.

TROUBLESHOOTING GUIDE – HARDWOOD FLOORS
PROBLEMS CAUSES SOLUTIONS RESPONSIBILTY
CUPPING Expansion of the boards on the width side/washed board-high edge
High relative humidity
High moisture contents of sub-floor
Excessive moisture
Flooding, source of water
Insufficient expansion space
Use of dehumidifiers during high humidity seasonal (summer period)
Add heat and ventilation
o See Condensation section
Homeowner
GAPPING/SHRINKING (Common in Colorado)
Low relative humidity
Stabilize humidity
See Condensation section
Homeowner
LOCALIZED GAPPING Hot spot under surface such as poorly insulated heating duck or hot water plumbing line
Insulation Homeowner
LEDGING OR OVERWOOD
Sub-floor imperfection
Manufacturing milling
Repair and/or re-cut
Replace board
Do not install board
Installer
Manufacturer
HUMP IN FLOOR Sub-floor imperfection
Shift in foundation
Repair Area Installer
Builder
SQUEAKING Loose/Noisy/Squeaky floor
Sub-floor integrity
Improper nailing
Subjected to excessive moisture and/or drying
Repair (Year 1 Only)
Stabilize humidity
See Condensation section
Installer
Homeowner
PATTERN OR KIT PROBLEM
Improper installation
Repair
Replace board
Installer

TROUBLESHOOTING GUIDE – HARDWOOD FLOORS
PROBLEMS CAUSES SOLUTIONS RESPONSIBILTY
BUMPS ON EDGE Improper Nailing Check nailing machine
Replace board
Installer
DEFECTIVE BOARDS Manufacturing
Warehousing
Handling of material
Cut defect or replace
Relocate in hidden area
Touch-up
Do not install
Manufacturer
Installer
Wholesaler/Retailer
QUALITY/WRONG GRADE/HEAVY COLOR VARIATION
Communication
Consumer expectation
Incorrect or poor sampling
Updated display and samples
Refer to grading charts
Training
Relocate selected boards
Do not install
Wholesaler
Retailer
Homeowner
SPLIT BOARDS ON ENDS Manufacturing
Invisible fracture which opens when nailed and/or after site acclimation
Excessive high relative humidity and/or excessive low relative humidity environment
Installer inspection
Do not install
Replace board
Repair and cut defect
Stabilize humidity
Manufacturer
Installer
Homeowner
SPLIT BOARDS ON EDGES Manufacturing inspection
Nailing technique
Replace board
Re-cut board
Do not install
Manufacturer
Installer
ROUCH-RAISED GRAIN EDGES OF BOARDS (Feathering/splinters/slivers)
Manufacturer
Moisture
Improper maintenance
Installer inspection
Do not install
Touch-up with razor blade and re-finish
Change Maintenance Procedure
Replace board
Manufacturer
Homeowner
Installer
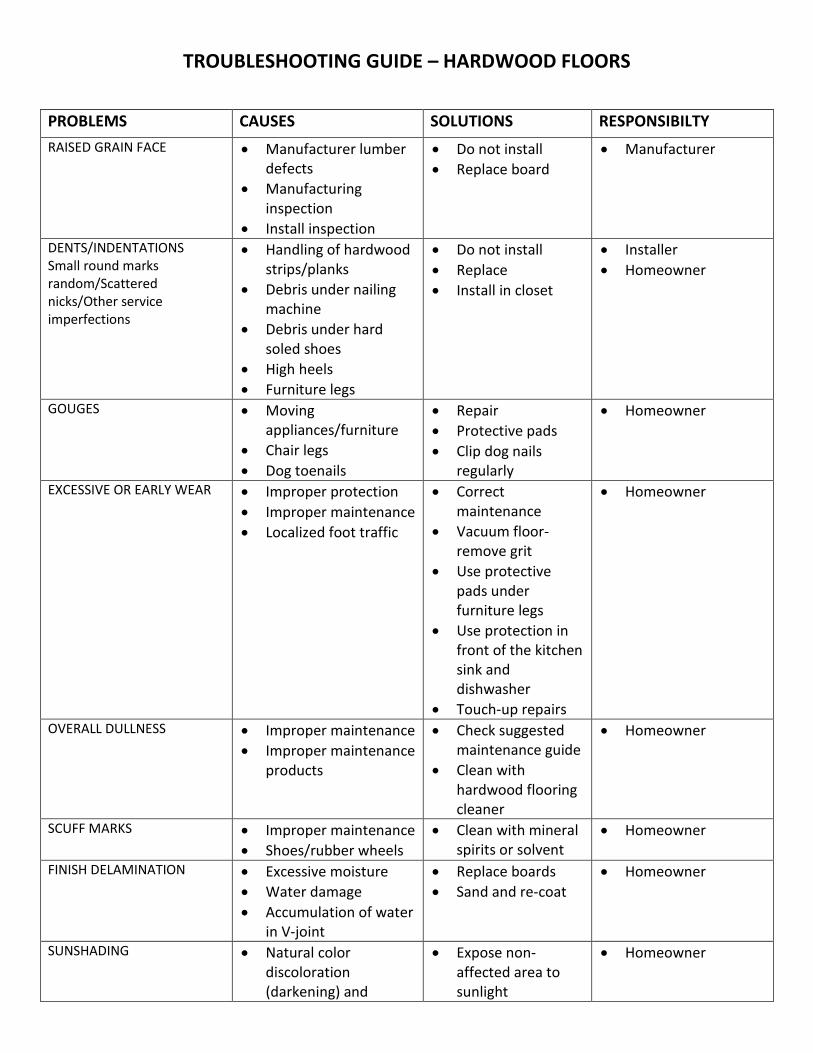
TROUBLESHOOTING GUIDE – HARDWOOD FLOORS
PROBLEMS CAUSES SOLUTIONS RESPONSIBILTY
RAISED GRAIN FACE Manufacturer lumber defects
Manufacturing inspection
Install inspection
Do not install
Replace board
Manufacturer
DENTS/INDENTATIONS Small round marks random/Scattered nicks/Other service imperfections
Handling of hardwood strips/planks
Debris under nailing machine
Debris under hard soled shoes
High heels
Furniture legs
Do not install
Replace
Install in closet
Installer
Homeowner
GOUGES Moving appliances/furniture
Chair legs
Dog toenails
Repair
Protective pads
Clip dog nails regularly
Homeowner
EXCESSIVE OR EARLY WEAR Improper protection
Improper maintenance
Localized foot traffic
Correct maintenance
Vacuum floor-remove grit
Use protective pads under furniture legs
Use protection in front of the kitchen sink and dishwasher
Touch-up repairs
Homeowner
OVERALL DULLNESS Improper maintenance
Improper maintenance products
Check suggested maintenance guide
Clean with hardwood flooring cleaner
Homeowner
SCUFF MARKS Improper maintenance
Shoes/rubber wheels
Clean with mineral spirits or solvent
Homeowner
FINISH DELAMINATION Excessive moisture
Water damage
Accumulation of water in V-joint
Replace boards
Sand and re-coat
Homeowner
SUNSHADING Natural color discoloration (darkening) and
Expose non-affected area to sunlight
Homeowner

variation of sunlight Remove area rug
Relocate Furniture
TROUBLESHOOTING GUIDE – HARDWOOD FLOORS
PROBLEMS CAUSES SOLUTIONS RESPONSIBILTY
Natural change over time (from 1 to 6 months)
Resurface the floor
LOCALIZED DARKENING Excessive moisture (oak)
Water damage
Fix water damage and/or leak
Homeowner