Embed Size (px)
Citation preview
Hitachi Infrastructure DirectorGetting Started Guide
MK-94HID001-01
© 2015 Hitachi, Ltd. All rights reserved.
No part of this publication may be reproduced or transmitted in any form or by anymeans, electronic or mechanical, including photocopying and recording, or stored in adatabase or retrieval system for any purpose without the express written permission ofHitachi, Ltd.
Hitachi, Ltd., reserves the right to make changes to this document at any time withoutnotice and assumes no responsibility for its use. This document contains the mostcurrent information available at the time of publication. When new or revised informationbecomes available, this entire document will be updated and distributed to all registeredusers.
Some of the features described in this document might not be currently available. Referto the most recent product announcement for information about feature and productavailability, or contact Hitachi Data Systems Corporation at https://portal.hds.com.
Notice: Hitachi, Ltd., products and services can be ordered only under the terms andconditions of the applicable Hitachi Data Systems Corporation agreements. The use ofHitachi, Ltd., products is governed by the terms of your agreements with Hitachi DataSystems Corporation.
By using this software, you agree that you are responsible for:
a) Acquiring the relevant consents as may be required under local privacy laws orotherwise from employees and other individuals to access relevant data; andb) Verifying that data continues to be held, retrieved, deleted, or otherwise processed inaccordance with relevant laws.
Hitachi is a registered trademark of Hitachi, Ltd., in the United States and othercountries. Hitachi Data Systems is a registered trademark and service mark of Hitachi,Ltd., in the United States and other countries.
Archivas, Essential NAS Platform, HiCommand, Hi-Track, ShadowImage, Tagmaserve,Tagmasoft, Tagmasolve, Tagmastore, TrueCopy, Universal Star Network, and UniversalStorage Platform are registered trademarks of Hitachi Data Systems.
AIX, AS/400, DB2, Domino, DS6000, DS8000, Enterprise Storage Server, ESCON, FICON,FlashCopy, IBM, Lotus, MVS, OS/390, RS/6000, S/390, System z9, System z10, Tivoli,VM/ESA, z/OS, z9, z10, zSeries, z/VM, and z/VSE are registered trademarks ortrademarks of International Business Machines Corporation.
All other trademarks, service marks, and company names in this document or web siteare properties of their respective owners.
Microsoft product screen shots are reprinted with permission from Microsoft Corporation.
Notice on Export Controls. The technical data and technology inherent in thisDocument may be subject to U.S. export control laws, including the U.S. ExportAdministration Act and its associated regulations, and may be subject to export or importregulations in other countries. Reader agrees to comply strictly with all such regulations
2Hitachi Infrastructure Director Getting Started Guide

and acknowledges that Reader has the responsibility to obtain licenses to export, re-export, or import the Document and any Compliant Products.
3Hitachi Infrastructure Director Getting Started Guide

4Hitachi Infrastructure Director Getting Started Guide
Contents
Preface................................................................................................. 7Intended Audience...................................................................................................8Product version........................................................................................................8Document conventions............................................................................................. 8Conventions for storage capacity values.....................................................................9Accessing product documentation........................................................................... 10Getting help...........................................................................................................10Comments.............................................................................................................10
1 Hitachi Infrastructure Director environment........................................... 11Minimum system requirements................................................................................12Supported storage systems.....................................................................................12Supported file server.............................................................................................. 13Supported fabric switch models...............................................................................13Supported hosts.....................................................................................................13
2 Installing Infrastructure Director........................................................... 15Installing Hitachi Infrastructure Director in a DHCP environment................................16Installing Hitachi Infrastructure Director in a static environment................................ 18Logging in to Infrastructure Director........................................................................21Generating and installing a signed SSL certificate..................................................... 22
3 Onboarding and configuring a storage system........................................25Overview...............................................................................................................26Adding the first storage system...............................................................................26Verifying storage system initial settings....................................................................27Adding a fabric switch............................................................................................ 28Adding servers.......................................................................................................29Creating parity groups............................................................................................ 29
5Hitachi Infrastructure Director Getting Started Guide

6Hitachi Infrastructure Director Getting Started Guide
PrefaceHitachi Infrastructure Director is an infrastructure management solution thatunifies storage management solutions such as storage provisioning, dataprotection, and storage management; simplifies the management of largescale data centers by providing smarter software services; and is extensibleto provide better programmability and better control.
□ Intended Audience
□ Product version
□ Document conventions
□ Conventions for storage capacity values
□ Accessing product documentation
□ Getting help
□ Comments
Preface 7Hitachi Infrastructure Director Getting Started Guide
Intended Audience
This document is intended for system administrators, Hitachi Data Systemsrepresentatives, and authorized service providers who configure and operatethe Hitachi Virtual Storage Platform G200, G400, G600 storage systems withHitachi Infrastructure Director.
Readers of this document should be familiar with the following:• RAID storage systems and their basic functions.• Volume creation and management.• Pool creation and management.• Parity group creation and management.
Product version
This document revision applies to Hitachi Infrastructure Director version 1.0.0or later.
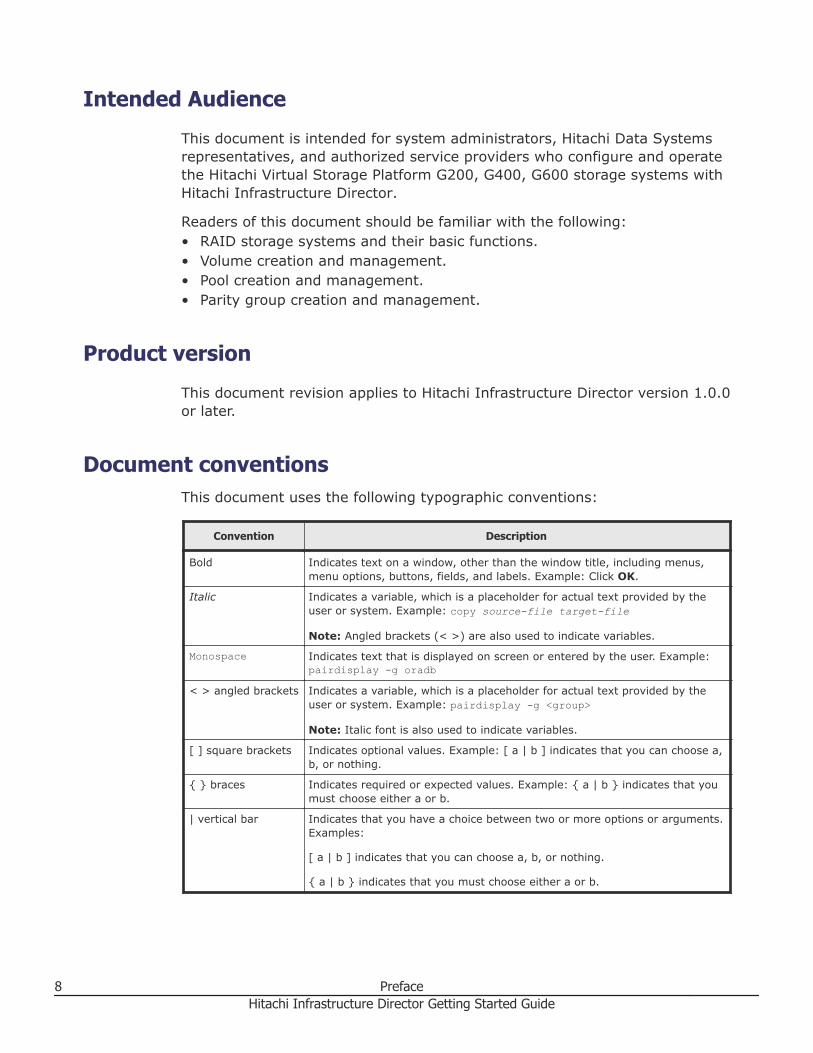
Document conventionsThis document uses the following typographic conventions:
Convention Description
Bold Indicates text on a window, other than the window title, including menus,menu options, buttons, fields, and labels. Example: Click OK.
Italic Indicates a variable, which is a placeholder for actual text provided by theuser or system. Example: copy source-file target-file
Note: Angled brackets (< >) are also used to indicate variables.
Monospace Indicates text that is displayed on screen or entered by the user. Example:pairdisplay -g oradb
< > angled brackets Indicates a variable, which is a placeholder for actual text provided by theuser or system. Example: pairdisplay -g <group>
Note: Italic font is also used to indicate variables.
[ ] square brackets Indicates optional values. Example: [ a | b ] indicates that you can choose a,b, or nothing.
{ } braces Indicates required or expected values. Example: { a | b } indicates that youmust choose either a or b.
| vertical bar Indicates that you have a choice between two or more options or arguments.Examples:
[ a | b ] indicates that you can choose a, b, or nothing.
{ a | b } indicates that you must choose either a or b.
8 PrefaceHitachi Infrastructure Director Getting Started Guide
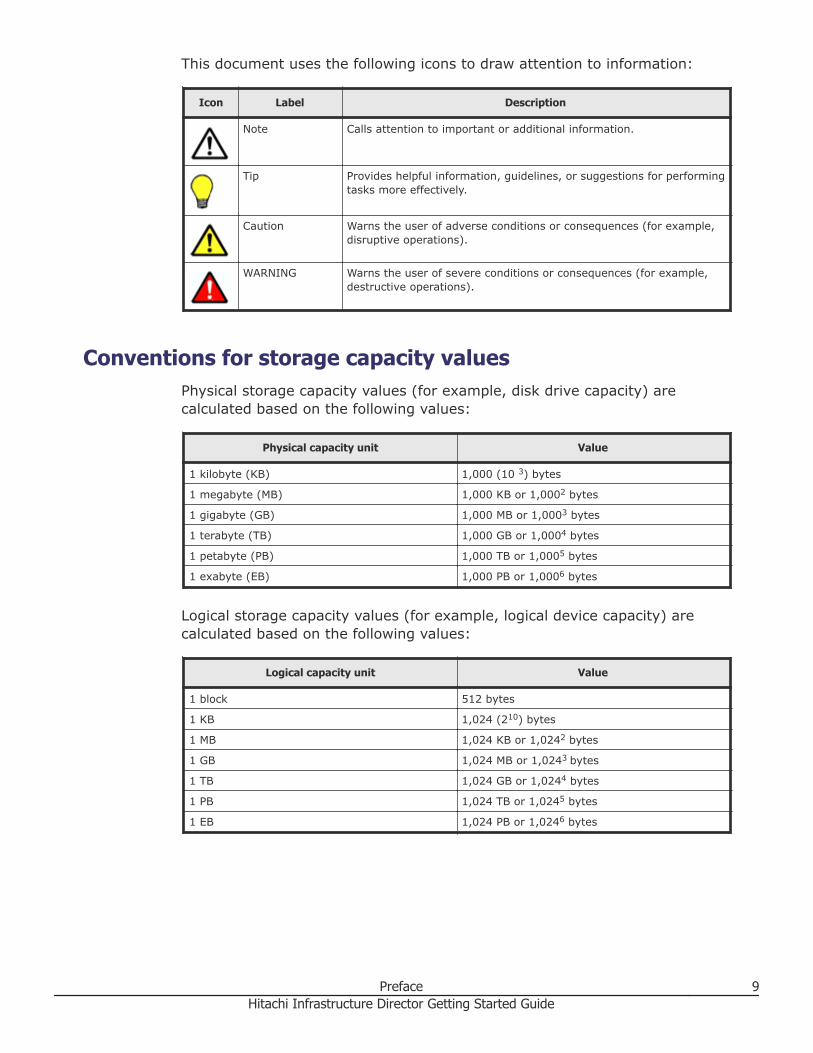
This document uses the following icons to draw attention to information:
Icon Label Description
Note Calls attention to important or additional information.
Tip Provides helpful information, guidelines, or suggestions for performingtasks more effectively.
Caution Warns the user of adverse conditions or consequences (for example,disruptive operations).
WARNING Warns the user of severe conditions or consequences (for example,destructive operations).
Conventions for storage capacity valuesPhysical storage capacity values (for example, disk drive capacity) arecalculated based on the following values:
Physical capacity unit Value
1 kilobyte (KB) 1,000 (10 3) bytes
1 megabyte (MB) 1,000 KB or 1,0002 bytes
1 gigabyte (GB) 1,000 MB or 1,0003 bytes
1 terabyte (TB) 1,000 GB or 1,0004 bytes
1 petabyte (PB) 1,000 TB or 1,0005 bytes
1 exabyte (EB) 1,000 PB or 1,0006 bytes
Logical storage capacity values (for example, logical device capacity) arecalculated based on the following values:
Logical capacity unit Value
1 block 512 bytes
1 KB 1,024 (210) bytes
1 MB 1,024 KB or 1,0242 bytes
1 GB 1,024 MB or 1,0243 bytes
1 TB 1,024 GB or 1,0244 bytes
1 PB 1,024 TB or 1,0245 bytes
1 EB 1,024 PB or 1,0246 bytes
Preface 9Hitachi Infrastructure Director Getting Started Guide
Accessing product documentationProduct user documentation is available on the Hitachi Data Systems Portal: https://portal.hds.com. Check this site for the most current documentation,including important updates that may have been made after the release ofthe product.
Getting helpHitachi Data Systems Support Portal is the destination for technical supportof your current or previously-sold storage systems, midrange and enterpriseservers, and combined solution offerings. The Hitachi Data Systems customersupport staff is available 24 hours a day, seven days a week. If you needtechnical support, log on to the Hitachi Data Systems Support Portal forcontact information: https://portal.hds.com.
Hitachi Data Systems Community is a new global online community for HDScustomers, partners, independent software vendors, employees, andprospects. It is an open discussion among these groups about the HDSportfolio of products and services. It is the destination to get answers,discover insights, and make connections. The HDS Community complementsour existing Support Portal and support services by providing an area whereyou can get answers to non-critical issues and questions. Join theconversation today! Go to community.hds.com, register, and complete yourprofile.
CommentsPlease send us your comments on this document to [email protected] the document title and number, including the revision level (forexample, -07), and refer to specific sections and paragraphs wheneverpossible. All comments become the property of Hitachi Data SystemsCorporation.
Thank you!
10 PrefaceHitachi Infrastructure Director Getting Started Guide

1Hitachi Infrastructure Director
environmentThe Infrastructure Director environment must meet minimum requirementsto support various storage systems, servers, and fabric switches.
□ Minimum system requirements
□ Supported storage systems
□ Supported file server
□ Supported fabric switch models
□ Supported hosts
Hitachi Infrastructure Director environment 11Hitachi Infrastructure Director Getting Started Guide
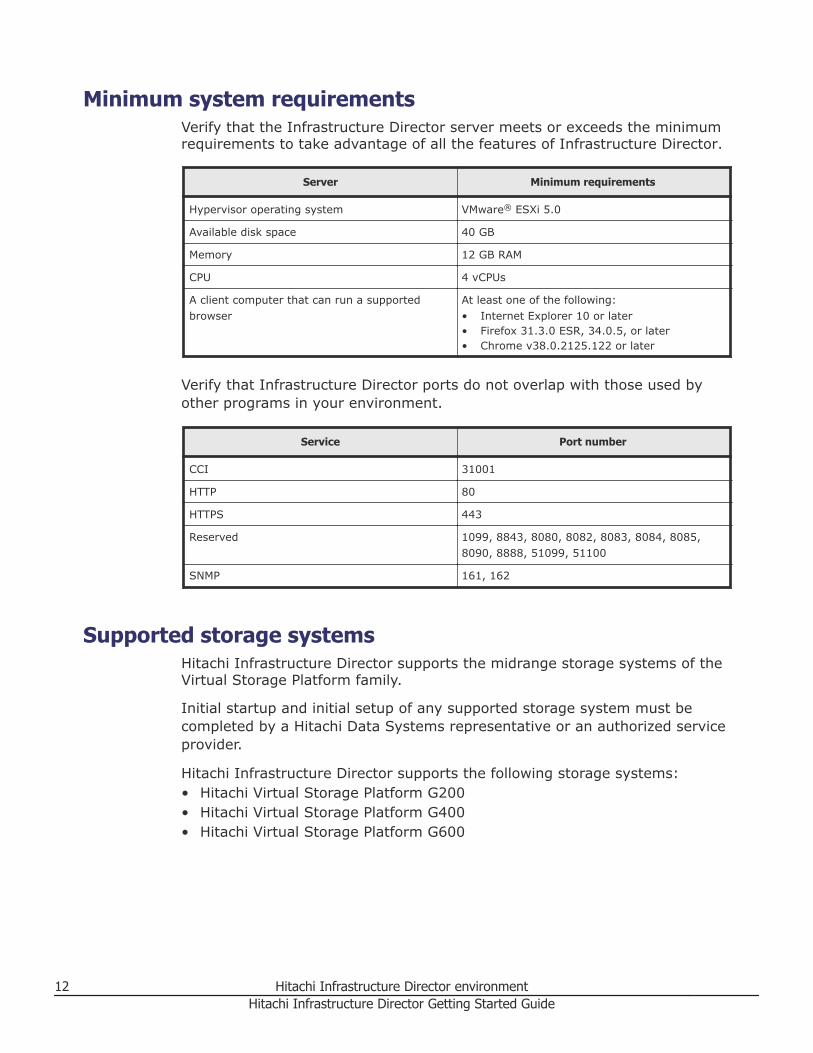
Minimum system requirementsVerify that the Infrastructure Director server meets or exceeds the minimumrequirements to take advantage of all the features of Infrastructure Director.
Server Minimum requirements
Hypervisor operating system VMware® ESXi 5.0
Available disk space 40 GB
Memory 12 GB RAM
CPU 4 vCPUs
A client computer that can run a supportedbrowser
At least one of the following:• Internet Explorer 10 or later• Firefox 31.3.0 ESR, 34.0.5, or later• Chrome v38.0.2125.122 or later
Verify that Infrastructure Director ports do not overlap with those used byother programs in your environment.
Service Port number
CCI 31001
HTTP 80
HTTPS 443
Reserved 1099, 8843, 8080, 8082, 8083, 8084, 8085,8090, 8888, 51099, 51100
SNMP 161, 162
Supported storage systemsHitachi Infrastructure Director supports the midrange storage systems of theVirtual Storage Platform family.
Initial startup and initial setup of any supported storage system must becompleted by a Hitachi Data Systems representative or an authorized serviceprovider.
Hitachi Infrastructure Director supports the following storage systems:• Hitachi Virtual Storage Platform G200• Hitachi Virtual Storage Platform G400• Hitachi Virtual Storage Platform G600
12 Hitachi Infrastructure Director environmentHitachi Infrastructure Director Getting Started Guide
Supported file serverHitachi Infrastructure Director requires minimum file server firmware andsystem management unit software versions.
Hitachi Infrastructure Director supports the following file server configuration:• Hitachi NAS platform (HNAS) firmware: 11.2.3319.14• System management unit (SMU) software: 11.2.3319.02
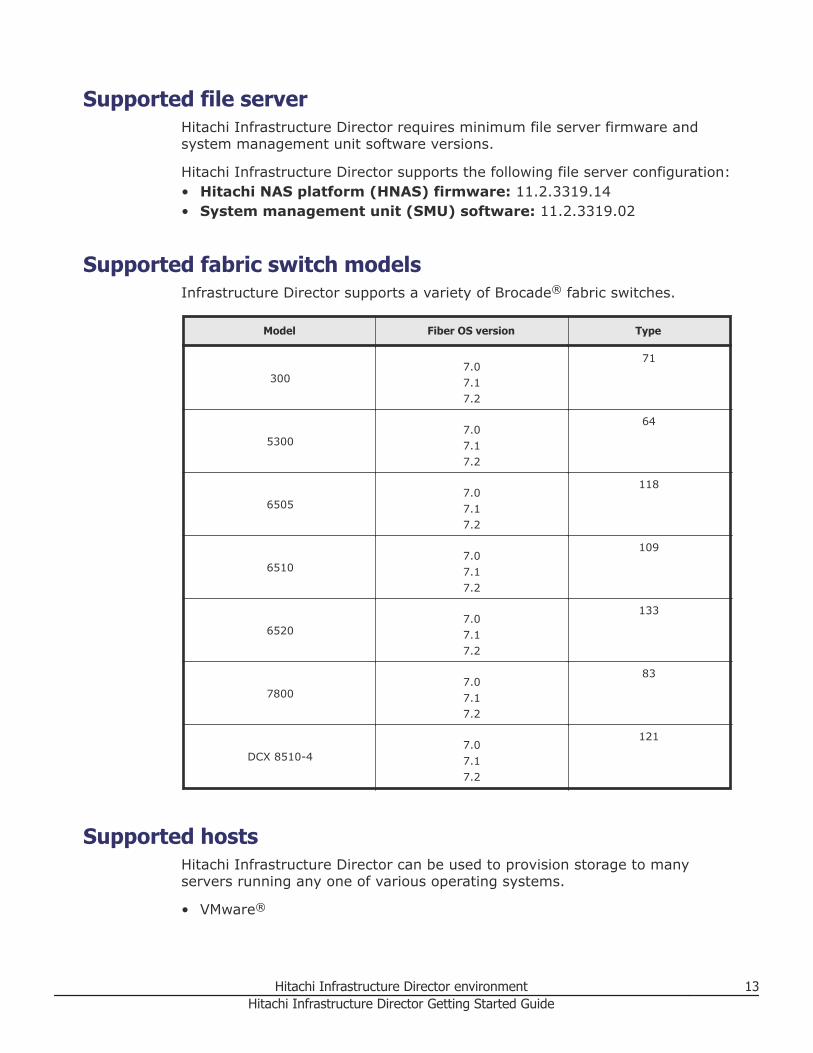
Supported fabric switch modelsInfrastructure Director supports a variety of Brocade® fabric switches.
Model Fiber OS version Type
3007.07.17.2
71
53007.07.17.2
64
65057.07.17.2
118
65107.07.17.2
109
65207.07.17.2
133
78007.07.17.2
83
DCX 8510-47.07.17.2
121
Supported hostsHitachi Infrastructure Director can be used to provision storage to manyservers running any one of various operating systems.
• VMware®
Hitachi Infrastructure Director environment 13Hitachi Infrastructure Director Getting Started Guide

• Windows®
• HP-UX™
• Sun Solaris• NetBSD®
• TRU64 UNIX®
• Novell NetWare®
• IBM® AIX®
• Linux®
• IRIX®
14 Hitachi Infrastructure Director environmentHitachi Infrastructure Director Getting Started Guide
2Installing Infrastructure Director
Infrastructure Director is deployed on a virtual machine and accessed by aclient computer. Review the minimum requirements before installing.
□ Installing Hitachi Infrastructure Director in a DHCP environment
□ Installing Hitachi Infrastructure Director in a static environment
□ Logging in to Infrastructure Director
□ Generating and installing a signed SSL certificate
Installing Infrastructure Director 15Hitachi Infrastructure Director Getting Started Guide
Installing Hitachi Infrastructure Director in a DHCPenvironment
If your environment includes DHCP servers, you can use the Virtual ApplianceManager to set up your Infrastructure Director server.
Prerequisites
The initial setup of a discovered Virtual Storage Platform G200, G400, G600storage system has been completed by a Hitachi Data Systemsrepresentative or authorized service provider.
Procedure
1. From the installation media, deploy Infrastructure Director OVF tohypervisor to the ESXi host.
2. Start the Infrastructure Director virtual machine.3. In the vSphere® client, wait for the System status to change to Online.
The status is just below the banner in the virtual machine output.**********************************************Hitachi Infrastructure Director**********************************************System status: OnlinePlease wait for system to be online before using any services.
4. Open a browser and enter https://ip-address/vam in the address bar.
User name: servicePassword: Chang3Me!
16 Installing Infrastructure DirectorHitachi Infrastructure Director Getting Started Guide

5. From the Virtual Appliance Manager menu, click Network to configurethe network settings.
a. (Optional) If your data center is using the IP address scheme
172.17.*.*, provide another IP range that is not currently used inyour environment.Enter the IP range in the Docker Subnet field in the format ip-address\range. This is the specified range used by InfrastructureDirector.
b. Set the host name for the virtual machine (fully qualified domainname only).
c. Set DHCP to On.d. Enter the IP address of the Infrastructure Director server.e. Set Automatic DNS to On or Off.
If you set this to Off, enter the IP address of at least one DNS server.f. Click Submit.
Installing Infrastructure Director 17Hitachi Infrastructure Director Getting Started Guide
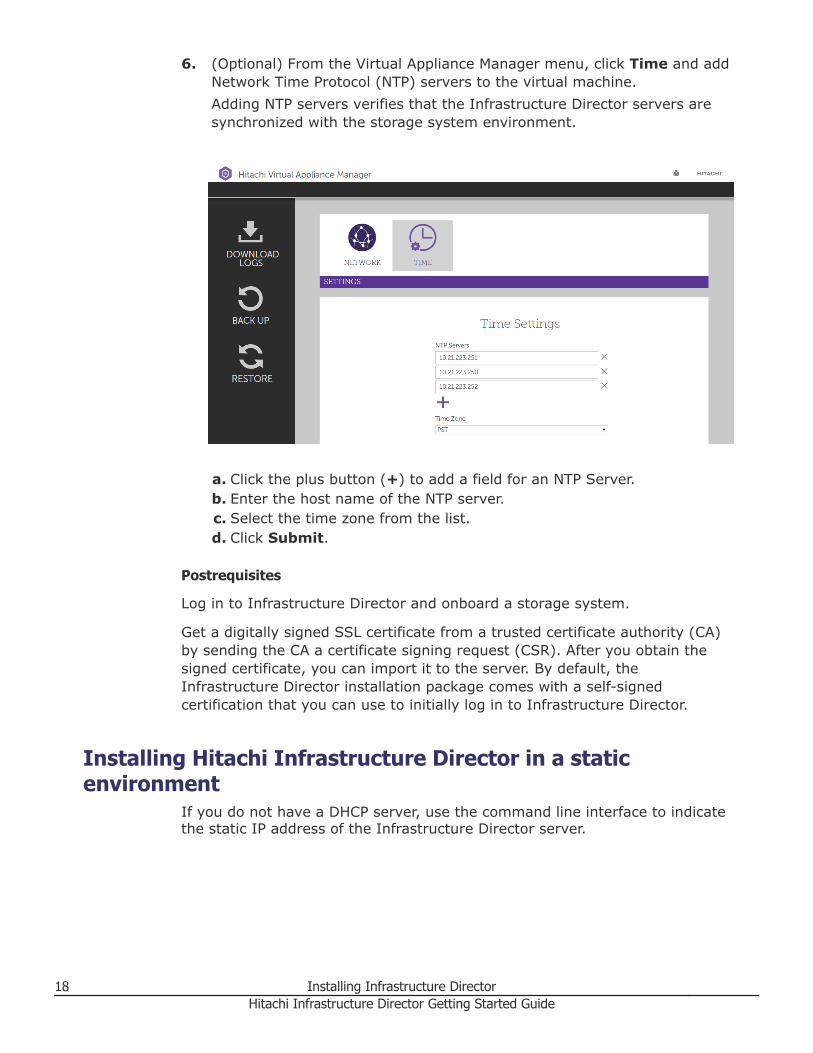
6. (Optional) From the Virtual Appliance Manager menu, click Time and addNetwork Time Protocol (NTP) servers to the virtual machine.Adding NTP servers verifies that the Infrastructure Director servers aresynchronized with the storage system environment.
a. Click the plus button (+) to add a field for an NTP Server.b. Enter the host name of the NTP server.c. Select the time zone from the list.d. Click Submit.
Postrequisites
Log in to Infrastructure Director and onboard a storage system.
Get a digitally signed SSL certificate from a trusted certificate authority (CA)by sending the CA a certificate signing request (CSR). After you obtain thesigned certificate, you can import it to the server. By default, theInfrastructure Director installation package comes with a self-signedcertification that you can use to initially log in to Infrastructure Director.
Installing Hitachi Infrastructure Director in a staticenvironment
If you do not have a DHCP server, use the command line interface to indicatethe static IP address of the Infrastructure Director server.
18 Installing Infrastructure DirectorHitachi Infrastructure Director Getting Started Guide
Prerequisites
The initial setup of a discovered Virtual Storage Platform G200, G400, G600storage system has been completed by a Hitachi Data Systemsrepresentative or authorized service provider.
Procedure
1. From the installation media, deploy Infrastructure Director OVF tohypervisor to the ESXi host.
2. Start the Infrastructure Director virtual machine.3. In the vSphere® client, wait for the System status to change to Online.
The status is just below the banner in the virtual machine output.**********************************************Hitachi Infrastructure Director**********************************************System status: OnlinePlease wait for system to be online before using any services.
4. Press Alt+F2.5. Log in with the service account.
User name: servicePassword: Chang3Me!
6. Enter the command ip-change.7. Open a browser and enter https://ip-address/vam in the address bar.
User name: servicePassword: Chang3Me!
Installing Infrastructure Director 19Hitachi Infrastructure Director Getting Started Guide
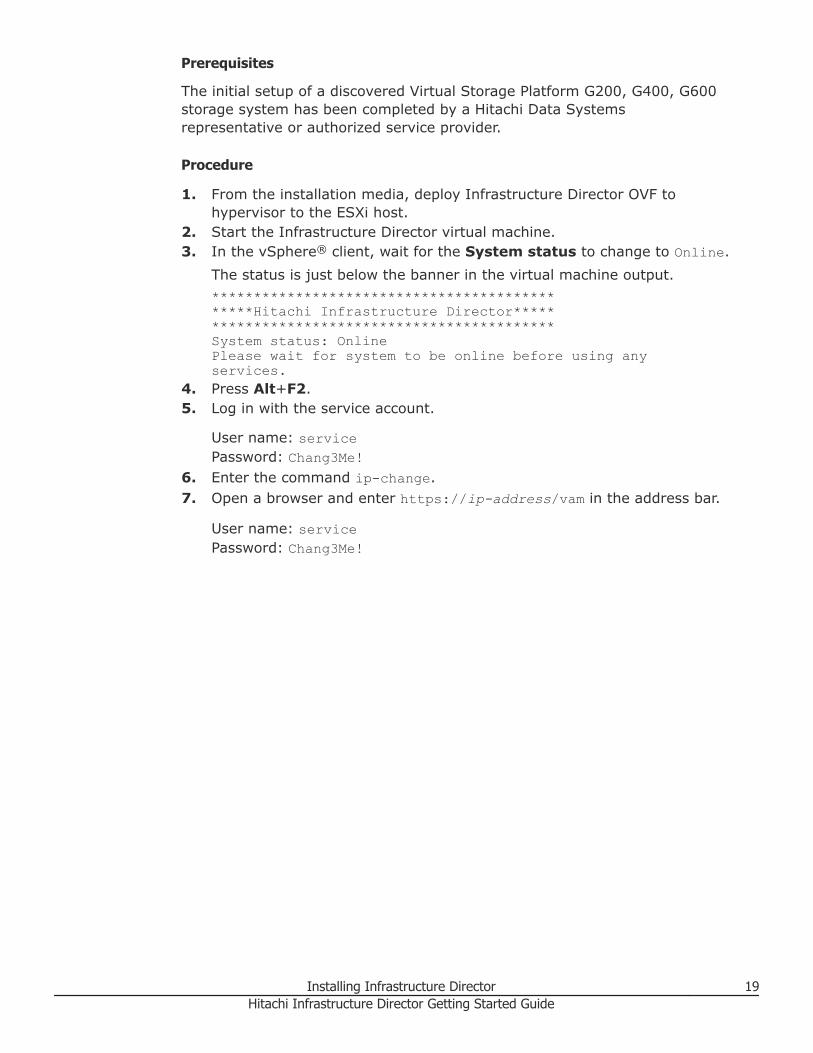
8. From the Virtual Appliance Manager menu, click Network to configurethe network settings.
a. (Optional) If your data center is using the IP address scheme
172.17.*.*, provide another IP range that is not currently used inyour environment.Enter the IP range in the Docker Subnet field in the format ip-address\range. This is the specified range used by InfrastructureDirector.
b. Set the host name for the virtual machine (fully qualified domainname only).
c. Set DHCP to Off.d. Enter the IP address of the Infrastructure Director server.e. Set Automatic DNS to On or Off.
If you set this to Off, enter the IP address of at least one DNS server.f. Click Submit.
20 Installing Infrastructure DirectorHitachi Infrastructure Director Getting Started Guide
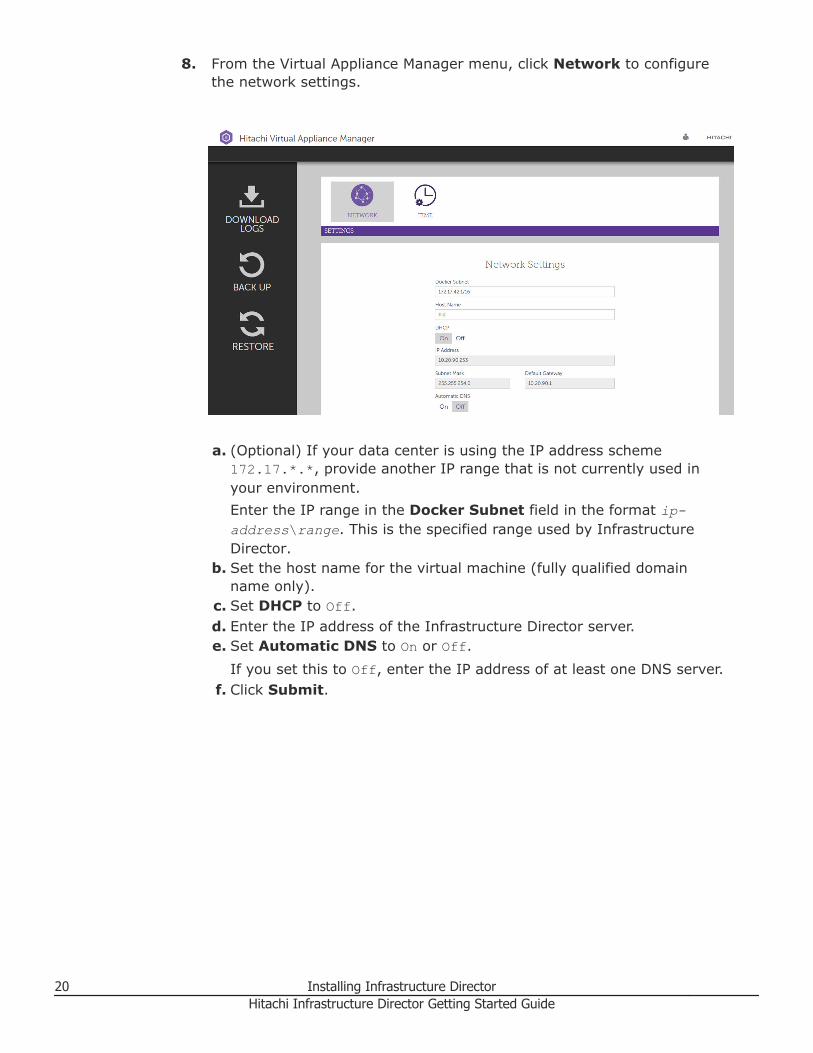
9. (Optional) From the Virtual Appliance Manager menu, click Time and addNetwork Time Protocol (NTP) servers to the virtual machine.Adding NTP servers verifies that the Infrastructure Director servers aresynchronized with the storage system environment.
a. Click the plus button (+) to add a field for an NTP Server.b. Enter the host name of the NTP server.c. Select the time zone from the list.d. Click Submit.
Postrequisites
Log in to Infrastructure Director and onboard a storage system.
Get a digitally signed SSL certificate from a trusted certificate authority (CA)by sending the CA a certificate signing request (CSR). After you obtain thesigned certificate, you can import it to the server. By default, theInfrastructure Director installation package comes with a self-signedcertification that you can use to initially log in to Infrastructure Director.
Logging in to Infrastructure DirectorLog in and verify that the installation is successful by accessing theInfrastructure Director web interface from a browser.
Procedure
1. Open a web browser.2. Enter the URL for Infrastructure Director in the address bar:
Installing Infrastructure Director 21Hitachi Infrastructure Director Getting Started Guide
https://ip-address:port-number where• ip-address is the IP address of the Infrastructure Director server.• port-number is the port number of the Infrastructure Director server.
The default port number is 443.3. In the login window, log in to Infrastructure Director.
User name: sysadminPassword: sysadmin
Generating and installing a signed SSL certificateBy default, a self-signed certificate is used by the server. SSL certificates areused to verify the user's identity and to enhance security on the server. Youcan get a digitally signed SSL certificate from a trusted certificate authority(CA) by sending a certificate signing request (CSR). After you obtain thesigned certificate, you can import it to the server.
The following is a sample procedure for generating and installing a signedSSL certificate. The process of obtaining a certificate may be different withineach organization.
Procedure
1. Open the virtual machine console and log in with the service account.2. Start the openssl program:
openssl req –nodes –x509 -newkey rsa:2048 -sha1 -keyout /etc/nginx/certificates/server.key -out /etc/nginx/certificates/server.crtThe system returns the message Generating a 2048 bit RSA private key.
3. Provide the information as prompted.• Country Name (two-letter code)• State or Province Name (two-letter code)• Locality name (City)• Organization Name (Company)• Organizational Unit Name (Section or department)• Common Name (Your name or the server host name)• Email Address
4. (Optional) Enter the extra attributes to be included with your certificaterequest.• Challenge password• Optional company name
5. When you receive the CRT file, send it to a certificate authority to obtainan SSL certificate.If you need help with this step, consult with your Hitachi Data Systemsrepresentative or authorized service provider.
22 Installing Infrastructure DirectorHitachi Infrastructure Director Getting Started Guide
6. When you receive the SSL certificate file, Copy the certificate to /etc/nginx/certificates/.
7. Restart the virtual machine.
Installing Infrastructure Director 23Hitachi Infrastructure Director Getting Started Guide

24 Installing Infrastructure DirectorHitachi Infrastructure Director Getting Started Guide
3Onboarding and configuring a storage
system
□ Overview
□ Adding the first storage system
□ Verifying storage system initial settings
□ Adding a fabric switch
□ Adding servers
□ Creating parity groups
Onboarding and configuring a storage system 25Hitachi Infrastructure Director Getting Started Guide
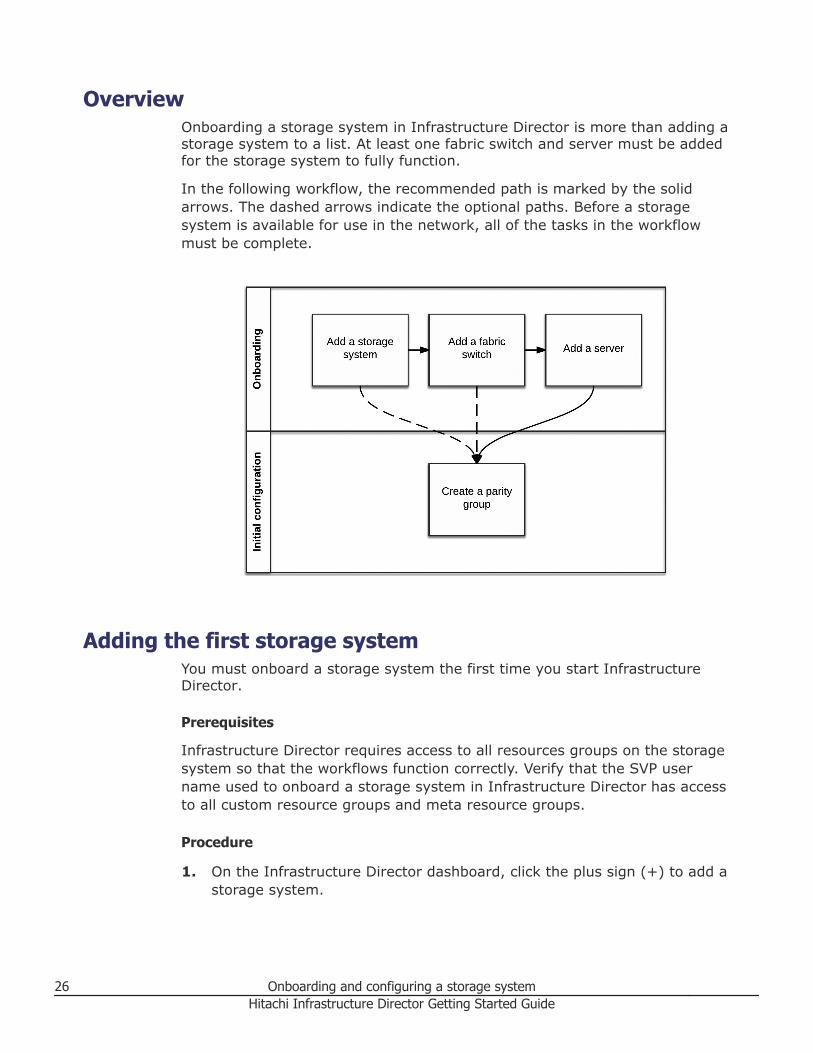
OverviewOnboarding a storage system in Infrastructure Director is more than adding astorage system to a list. At least one fabric switch and server must be addedfor the storage system to fully function.
In the following workflow, the recommended path is marked by the solidarrows. The dashed arrows indicate the optional paths. Before a storagesystem is available for use in the network, all of the tasks in the workflowmust be complete.
Adding the first storage systemYou must onboard a storage system the first time you start InfrastructureDirector.
Prerequisites
Infrastructure Director requires access to all resources groups on the storagesystem so that the workflows function correctly. Verify that the SVP username used to onboard a storage system in Infrastructure Director has accessto all custom resource groups and meta resource groups.
Procedure
1. On the Infrastructure Director dashboard, click the plus sign (+) to add astorage system.
26 Onboarding and configuring a storage systemHitachi Infrastructure Director Getting Started Guide
2. Enter values for the following parameters on the Add Storage Systempage.• SVP IP Address: Enter the IP address or server name of the external
service processor for the storage system you want to discover.• User name and password: Log in as a user that has administrator
privileges on this storage system. For example, you can log in as theuser maintenance.
3. Click Submit.4. (Optional) Onboard other storage systems.
Result
The Jobs tab is updated with the job called Create Storage System.
Wait a while for the storage system to be onboarded. Refresh the Jobs tab toverify that storage system is onboarded.
Postrequisites
Verify the storage system initial settings. Create parity groups.
Verifying storage system initial settings
Look through the initial storage system setup to verify the settings for thestorage system, which includes network configuration, date, time, and licensekeys.
Note: Do not change any of the initial setup information. The setup of adiscovered Virtual Storage Platform G200, G400, G600 storage system hasbeen completed by a Hitachi Data Systems representative or authorizedservice provider.
Prerequisites
Initial setup is complete.
Procedure
1. From the Dashboard, click Storage Systems from the resource sidepanel.
2. Click on a storage system.3. In the top right of the page, click the settings icon ( ) and select Initial
Setup Wizard (Settings).4. On the Common page, verify the information provided.
• The name of the storage system• The contact name for the storage system• The location of the storage system
Onboarding and configuring a storage system 27Hitachi Infrastructure Director Getting Started Guide
Click Next.5. On the Time-Zone page, verify the information provided, then click
Next.• Time zone• Current date and time on the storage system• NTP servers
6. On the Licenses page, verify the list of product licenses and itsinformation, then click Next.• Product name• License status• Information that specifies the type of the license and the used
capacity7. On the Notification page, verify the information in the list shown.
• The email address of the sender of the alerts• The email addresses of the recipients of the SNMP alerts for the
selected storage system• The IP address of the mail server• The mail server user name and password• The SNMP community type and IP address
8. Click Submit to close the initial setup wizard.
Adding a fabric switchAdding a fabric switch is an optional step after onboarding a storage system.You can add, update, and delete fabric switches in the Infrastructure Directorinterface.
After a fabric switch is added, you can choose to auto-create zones duringvolume provisioning.
Prerequisites• The Infrastructure Director server is connected to the same IP network
and has access to SNMP broadcast of Fibre Channel switches.• You have the required information about the fabric switch: Fabric Name,
Fabric Switch IP Address, Principal Switch WWN, Username, and Password.• You have the Admin role for the fabric switch.
Procedure
1. On the Infrastructure Director dashboard, select Fabric Switches toopen the Fabric Switches page.
2. Click the plus sign (+) to open the Add Fabric Switches page.3. Enter the following information from the configuration of the switch you
are adding:• Fabric Name
28 Onboarding and configuring a storage systemHitachi Infrastructure Director Getting Started Guide

Any Unicode character is allowed except "or \ or control-characters:\" \/ \b \f \n \r \t \u.
• Fabric Switch IP AddressTo add or update a core switch, use the Management IP address of theswitch or the Active CP IP address.
• Principal Switch WWN• Username• Password
4. Click the plus sign (+) to add a row for the switch and click Submit.
Result
A job is created to add the fabric switch.
Adding serversAdd servers so you can attach volumes. You can add multiple serverparameters from a file, or add one server at a time.
Procedure
1. On the Infrastructure Director dashboard, click Servers. Then click theplus sign (+) to open the Add Server page.
2. On the Add Server page, do one of the following:• Click the upper plus sign (+) to open a csv (comma-separated values)
file and select the headings for the types of values you want toinclude. A minimum of one server name and one WWN are required.Click Import to add the server values from the file.
• Click the plus sign (+) in the table to add a row and enter a ServerName, OS Type, WWN, and WWN Nickname.
3. Click Submit to add the servers.
Result
A job is started to add the servers.
Postrequisites
Create volumes and attach them to the server. See the InfrastructureDirector User Guide for this procedure.
Creating parity groups
Prerequisites
• The initial setup of any discovered Virtual Storage Platform G400, G600storage system is complete.
Onboarding and configuring a storage system 29Hitachi Infrastructure Director Getting Started Guide
• The storage system for which you will create a parity group is registered.• You know the target storage system name.• You know the total capacity that you expect to use. Plan to use all of the
available disks in the system when you create parity groups.
Procedure
1. On the Infrastructure Director dashboard, select Storage Systems inthe resource side panel to see the inventory of registered storagesystems.
2. Click a storage system to create and configure the parity groups for it.3. Click Parity Groups to see the inventory of all parity groups in the
storage system.4. Click the plus sign (+). In the Create Parity Groups window, review the
list of unused disk types in the storage system. This information isgrouped by disk type, disk speed, and disk capacity, and includes thefollowing details:• Number of available disks.• Available spares detected for each disk type, disk speed, and capacity.• Number of new or additional spares to reserve. This calculation is
based on the total spares needed based on recommended bestpractices, and the number of existing spares in the system.
• The recommended RAID configuration for the disk type.• The number of parity groups that can be created.• The total usable capacity that is available based on the number of
parity groups and the RAID configuration.5. Choose one of the following options:
• Accept the recommended RAID configuration, which uses the fullcapacity of the installed drives.
• Change the RAID configuration or create fewer parity groups. If youmake changes, you might not use the full capacity of the installeddrives.
6. Click Submit.
Result
A job is started to create the parity group for the storage system. This jobincludes the following tasks:• Identifies the appropriate number and position for the spare disk.• Assigns a spare disk.• Creates the required number of parity groups for the requested RAID
layout.• Creates and quick formats the necessary volumes on the parity group so
that it is ready for pool creation.• The job may create sub-jobs when multiple parity groups are being
created. Each sub-job will show the status of the parity groups beingcreated.
30 Onboarding and configuring a storage systemHitachi Infrastructure Director Getting Started Guide
Note: If you are creating parity groups for the entire array, it may takeseveral hours before the storage system is configured.
Postrequisites
Both of these procedures are provided in the Infrastructure Director UserGuide and online help.• Create a pool• Create and attach volumes
Onboarding and configuring a storage system 31Hitachi Infrastructure Director Getting Started Guide

32 Onboarding and configuring a storage systemHitachi Infrastructure Director Getting Started Guide

Hitachi Infrastructure Director Getting Started Guide
Hitachi Data Systems
Corporate Headquarters2845 Lafayette StreetSanta Clara, California 95050-2639U.S.A.www.hds.com
Regional Contact Information
Americas+1 408 970 [email protected]
Europe, Middle East, and Africa+44 (0) 1753 [email protected]
Asia Pacific+852 3189 [email protected]
MK-94HID001-01