Embed Size (px)
Citation preview
Security GuideDocument version: 1.3 – 2016-06-02
Security GuideSAP Integrated Business Planning 4.0, Support Package Stack 2 and Higher
CUSTOMER

Document History
CautionBefore you start the implementation, make sure you have the latest version of this document. You can find the
latest version at the following location:help.sap.com/ibp40
The following table provides an overview of the most important document changes.
Table 1
Version Date Description
1.0 2014-06-30 Initial version
1.1 2014-09-30 Minor corrections
1.2 2015-04-13 Minor corrections
1.3 2016-06-02 SAP HANA Cloud Integration (HCI) has been renamed to SAP HANA Cloud Platform, integration service.
2
CUSTOMER© Copyright 2016 SAP SE or an SAP affiliate company.All rights reserved.
Security GuideDocument History

Content
1 About this Document . . . . . . . . . . . . . . . . . . . . . . . . . . . . . . . . . . . . . . . . . . . . . . . . . . . . . . . . . 5
2 Before You Start . . . . . . . . . . . . . . . . . . . . . . . . . . . . . . . . . . . . . . . . . . . . . . . . . . . . . . . . . . . . . 62.1 Fundamental Security Guides . . . . . . . . . . . . . . . . . . . . . . . . . . . . . . . . . . . . . . . . . . . . . . . . . . . . . 62.2 Important SAP Notes and References . . . . . . . . . . . . . . . . . . . . . . . . . . . . . . . . . . . . . . . . . . . . . . . 62.3 Additional Information . . . . . . . . . . . . . . . . . . . . . . . . . . . . . . . . . . . . . . . . . . . . . . . . . . . . . . . . . . 6
3 Technical System Landscape . . . . . . . . . . . . . . . . . . . . . . . . . . . . . . . . . . . . . . . . . . . . . . . . . . . 8
4 Security Aspects of Data, Data Flow, and Processes . . . . . . . . . . . . . . . . . . . . . . . . . . . . . . . . . 9
5 User Administration and Authentication . . . . . . . . . . . . . . . . . . . . . . . . . . . . . . . . . . . . . . . . . . 115.1 User Management . . . . . . . . . . . . . . . . . . . . . . . . . . . . . . . . . . . . . . . . . . . . . . . . . . . . . . . . . . . . 115.2 User Types . . . . . . . . . . . . . . . . . . . . . . . . . . . . . . . . . . . . . . . . . . . . . . . . . . . . . . . . . . . . . . . . . 115.3 User Creation . . . . . . . . . . . . . . . . . . . . . . . . . . . . . . . . . . . . . . . . . . . . . . . . . . . . . . . . . . . . . . . . 115.4 Password Reset . . . . . . . . . . . . . . . . . . . . . . . . . . . . . . . . . . . . . . . . . . . . . . . . . . . . . . . . . . . . . . 115.5 Unlocking a User Account . . . . . . . . . . . . . . . . . . . . . . . . . . . . . . . . . . . . . . . . . . . . . . . . . . . . . . . 125.6 Authentication . . . . . . . . . . . . . . . . . . . . . . . . . . . . . . . . . . . . . . . . . . . . . . . . . . . . . . . . . . . . . . . 125.7 Single Sign-On . . . . . . . . . . . . . . . . . . . . . . . . . . . . . . . . . . . . . . . . . . . . . . . . . . . . . . . . . . . . . . . 13
6 Authorizations . . . . . . . . . . . . . . . . . . . . . . . . . . . . . . . . . . . . . . . . . . . . . . . . . . . . . . . . . . . . . . 146.1 Authorization Concept . . . . . . . . . . . . . . . . . . . . . . . . . . . . . . . . . . . . . . . . . . . . . . . . . . . . . . . . . 146.2 Role and Authorization Concept . . . . . . . . . . . . . . . . . . . . . . . . . . . . . . . . . . . . . . . . . . . . . . . . . . 14
Defining Roles . . . . . . . . . . . . . . . . . . . . . . . . . . . . . . . . . . . . . . . . . . . . . . . . . . . . . . . . . . . . . 146.3 Standard Roles . . . . . . . . . . . . . . . . . . . . . . . . . . . . . . . . . . . . . . . . . . . . . . . . . . . . . . . . . . . . . . 226.4 Password Policies . . . . . . . . . . . . . . . . . . . . . . . . . . . . . . . . . . . . . . . . . . . . . . . . . . . . . . . . . . . . 23
7 Data Storage Security . . . . . . . . . . . . . . . . . . . . . . . . . . . . . . . . . . . . . . . . . . . . . . . . . . . . . . . . 24
8 Communication Channel Security . . . . . . . . . . . . . . . . . . . . . . . . . . . . . . . . . . . . . . . . . . . . . . . 25
9 Data Privacy . . . . . . . . . . . . . . . . . . . . . . . . . . . . . . . . . . . . . . . . . . . . . . . . . . . . . . . . . . . . . . . 26
10 Security-Relevant Logging and Tracing . . . . . . . . . . . . . . . . . . . . . . . . . . . . . . . . . . . . . . . . . . . 27
11 Frequently Asked Questions . . . . . . . . . . . . . . . . . . . . . . . . . . . . . . . . . . . . . . . . . . . . . . . . . . . 28
Security GuideContent
CUSTOMER© Copyright 2016 SAP SE or an SAP affiliate company.
All rights reserved. 3

4
CUSTOMER© Copyright 2016 SAP SE or an SAP affiliate company.All rights reserved. Security Guide

1 About this Document
When using a distributed system, you need to be sure that your data and processes support your business needs without allowing unauthorized access to critical information. These demands on security apply likewise to the SAP Integrated Business Planning (IBP) application, powered by SAP HANA. This guide provides you with all the information you need to securely run SAP Integrated Business Planning 4.0.
Security GuideAbout this Document
CUSTOMER© Copyright 2016 SAP SE or an SAP affiliate company.
All rights reserved. 5

2 Before You Start
2.1 Fundamental Security Guides
SAP Integrated Business Planning (IBP) is comprised of the following components:
● SAP HANA
● Extended Application Services (HANA XS)
● SAP IBP add-in for Microsoft Office Excel
Other SAP security guides, such as the SAP HANA Security Guide at help.sap.com/hana_platform, can be used as a resource for SAP Integrated Business Planning (IBP). For a complete list of the available SAP Security Guides, see the SAP Service Marketplace at http://service.sap.com/securityguide.
2.2 Important SAP Notes and References
SAP Service Marketplace provides relevant information about the prerequisites for this product, as well as the latest information about reported issues and workarounds.
Before installing the required components make sure that you have all relevant information about the prerequisites, and download the latest version of each SAP Note, found on the SAP Service Marketplace. The following SAP references are relevant for your implementation:
Table 2
Title SAP Note Number or Other Reference
SAP IBP Central Note 2036622
2.3 Additional Information
See the listed Quick Links for more information about specific security-related topics.
Table 3
Content Quick Link on SAP Service Marketplace or SDN
Security http://sdn.sap.com/irj/sdn/security
Security Guides http://service.sap.com/securityguide
Related SAP Notes http://service.sap.com/notes
http://service.sap.com/securitynotes
Released platforms http://service.sap.com/pam
Network security http://service.sap.com/securityguide
6
CUSTOMER© Copyright 2016 SAP SE or an SAP affiliate company.All rights reserved.
Security GuideBefore You Start

Content Quick Link on SAP Service Marketplace or SDN
SAP Solution Manager http://service.sap.com/solutionmanager
Security GuideBefore You Start
CUSTOMER© Copyright 2016 SAP SE or an SAP affiliate company.
All rights reserved. 7
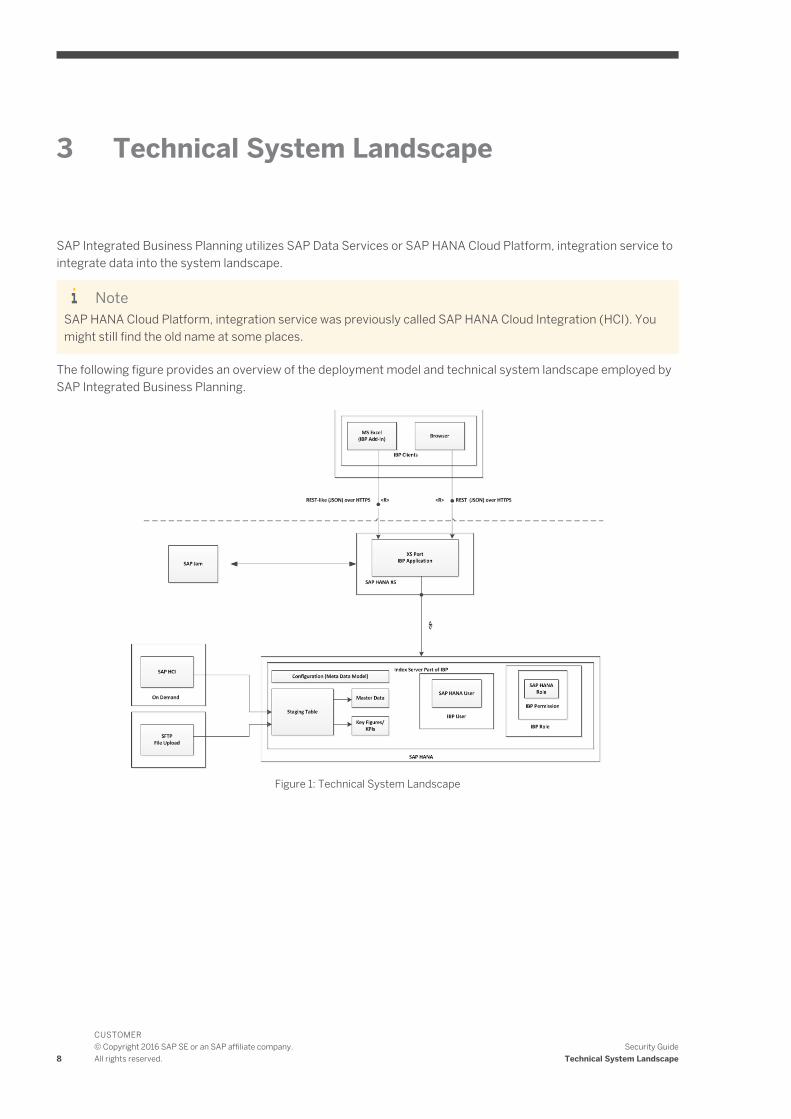
3 Technical System Landscape
SAP Integrated Business Planning utilizes SAP Data Services or SAP HANA Cloud Platform, integration service to integrate data into the system landscape.
NoteSAP HANA Cloud Platform, integration service was previously called SAP HANA Cloud Integration (HCI). You might still find the old name at some places.
The following figure provides an overview of the deployment model and technical system landscape employed by SAP Integrated Business Planning.
Figure 1: Technical System Landscape
8
CUSTOMER© Copyright 2016 SAP SE or an SAP affiliate company.All rights reserved.
Security GuideTechnical System Landscape
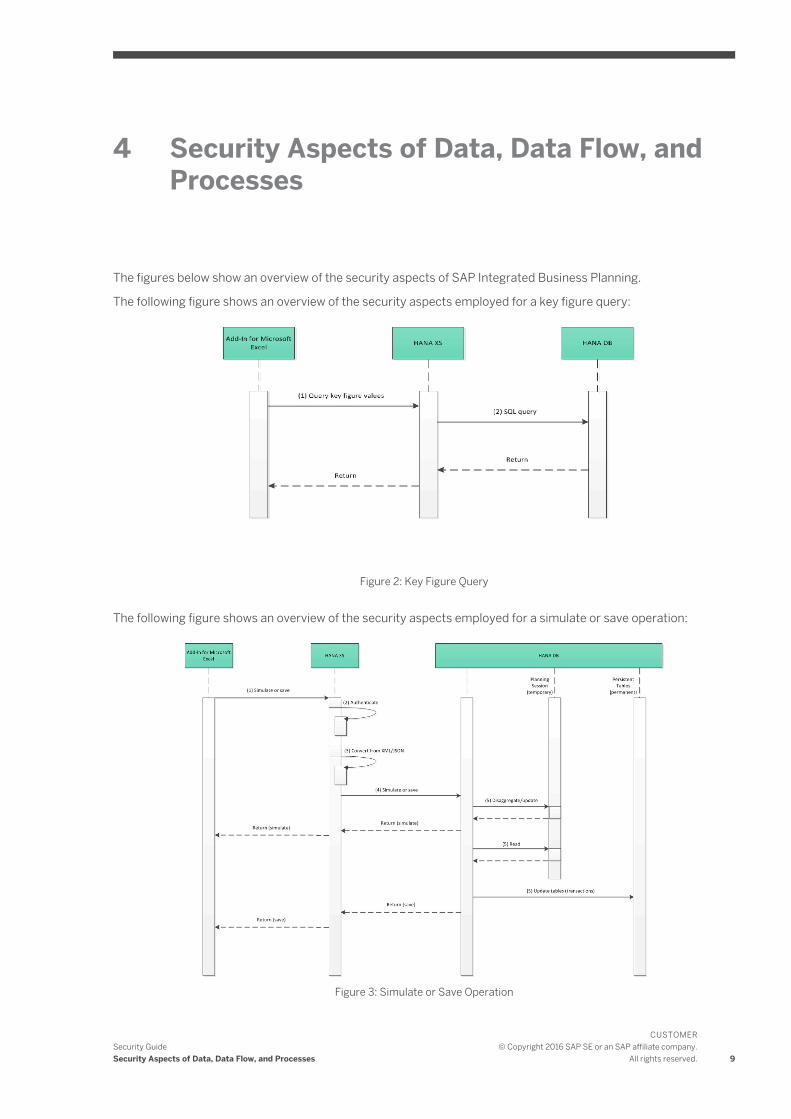
4 Security Aspects of Data, Data Flow, and Processes
The figures below show an overview of the security aspects of SAP Integrated Business Planning.
The following figure shows an overview of the security aspects employed for a key figure query:
Figure 2: Key Figure Query
The following figure shows an overview of the security aspects employed for a simulate or save operation:
Figure 3: Simulate or Save Operation
Security GuideSecurity Aspects of Data, Data Flow, and Processes
CUSTOMER© Copyright 2016 SAP SE or an SAP affiliate company.
All rights reserved. 9
The following table shows the security aspects to be considered for each process and what mechanism applies:
Table 4: Security Measures
Step Description Security Measure
1 User clicks on simulate or save The IBP add-in sends a request through HTTPS.
2 Authentication HANA XS (XS) checks to see if the user is logged on.
3 Convert from XML/JSON Validates input and converts from XML/JSON
4 Runs simulate calculation in SAP HANA Control access per user to key figures and master data for planning (using visibility filters). For more information about roles and visibility filters, see the online help. Visibility filters also apply to:
● Saving as only values that have been read into the planning session can be changed and then saved
● Master data access and to adding new combinations
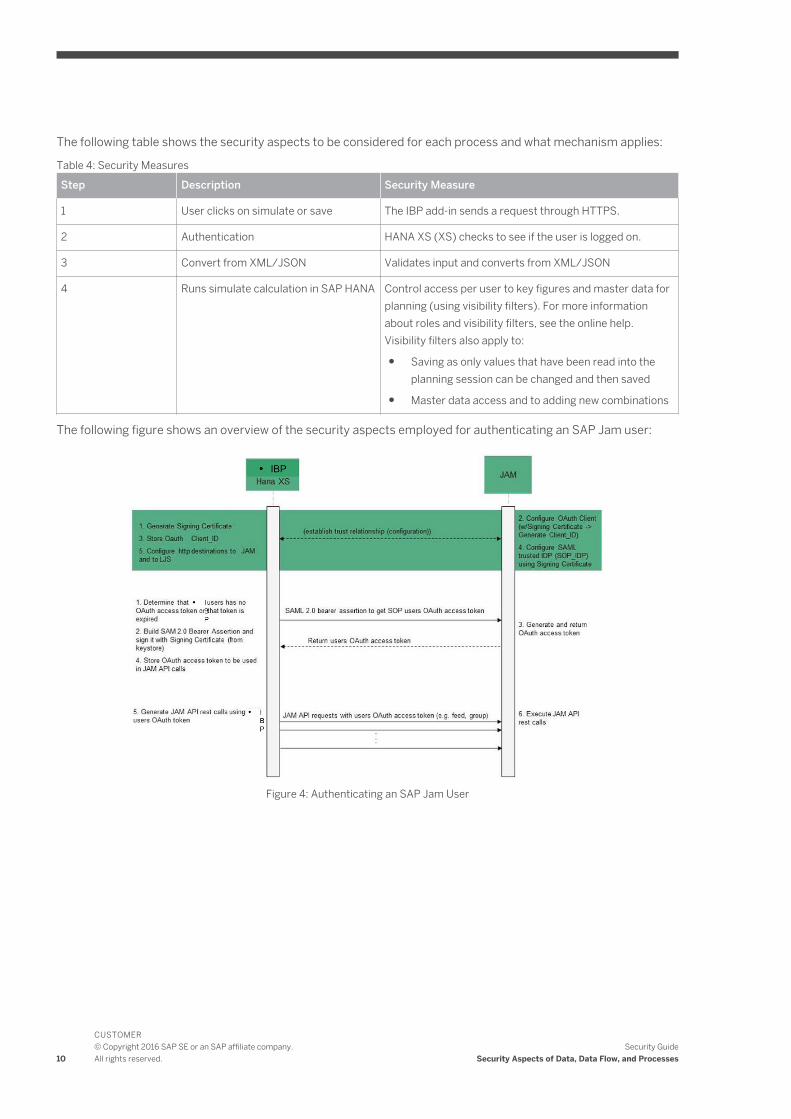
The following figure shows an overview of the security aspects employed for authenticating an SAP Jam user:
Figure 4: Authenticating an SAP Jam User
10
CUSTOMER© Copyright 2016 SAP SE or an SAP affiliate company.All rights reserved.
Security GuideSecurity Aspects of Data, Data Flow, and Processes
5 User Administration and Authentication
5.1 User Management
Each user of SAP Integrated Business Planning has his/her own landscape, and users of each customer are managed in SAP HANA user management.
SAP Integrated Business Planning uses SAP HANA mechanisms (for example, roles and password policies) and provides a web client application that enables administrators to add, remove, or update users. For more information on setting up and managing users in the application, see the User Management section in the application help.
5.2 User Types
SAP Integrated Business Planning provides the following user types:
● The administrative user SOPADMIN has ALL_INCLUSIVE permissions for all administrative tasks in user management, including creating users and roles and granting permissions.
● The default BASIC_USER can view analytics such as charts and dashboards.
5.3 User Creation
Users with Manage Users and Roles permissions can create and edit users. New users must change their initial password when logging on for the first time (a restriction that is enforced by SAP HANA). When a user does not know or cannot recall their logon information, then users with Manage Users and Roles permissions can define a new password, or they can lock or unlock a password for any other user by doing the following:
● Creating a user, defining a password for the user, and manually emailing the user the logon information
● Creating a user and having the system generate a random initial password for the user
5.4 Password Reset
Users have options for resetting their password in SAP Integrated Business Planning. Reasons why a user might need to reset their password include the followng:
● The user is logging in to a new account for the first time, and the administrator has configured password reset on first login as a security measure.
● The user has mistyped their password several times and their account has been locked as a result.
● The user has forgotten their password and just wants to reset it.
Security GuideUser Administration and Authentication
CUSTOMER© Copyright 2016 SAP SE or an SAP affiliate company.
All rights reserved. 11
The following methods are available for resetting a user's password:
● Users can change their passwords in Settings.
● The user‘s administrator can reset the password for any user (who has the same permissions or lower) on the User Management interface.
NoteFor information on password policies, see the SAP HANA Security Guide .
5.5 Unlocking a User Account
Context
If a user exceeds the maximum number of incorrect user or password combinations before a successful (correct) logon, the account is locked. An administrator with Manage Users and Roles permissions can unlock the user's account.
Steps
1. In the User Management list or on the User details interface, choose User Management.
2. In the User Management list, clear the User Locked checkbox. On the user details interface, choose the user name and clear the Locked User check box.
Next Steps
Reset the user's password, then inform the user of the new password. They will be prompted to change the password upon logging in.
More Information
Editing User Details [page 18]
Defining Roles [page 14]
5.6 Authentication
SAP Integrated Business Planning uses the following credentials for authentication:
● A unique ID chosen by the user
● A unique password chosen by the user
12
CUSTOMER© Copyright 2016 SAP SE or an SAP affiliate company.All rights reserved.
Security GuideUser Administration and Authentication
● A set of user permissions that are defined by an administrator user in roles and visibility filters to control access to the data
5.7 Single Sign-On
See the section Single Sign-On in SAP Integrated Business Planning in the application help on the SAP Help Portal at http://help.sap.com/ibp40.
Security GuideUser Administration and Authentication
CUSTOMER© Copyright 2016 SAP SE or an SAP affiliate company.
All rights reserved. 13
6 Authorizations
6.1 Authorization Concept
The SAP HANA authorization concept is based on assigning authorizations to users through their roles and individual visibility filters.
NoteIt is the customer administrator’s responsibility to validate the consistency of the authorization models in the application.
Administrators manage users and their permissions in the web client application using the User Management interface.
6.2 Role and Authorization Concept
The administrator can create new roles with any combination of permissions.
The administrator manages roles and authorizations in the web client application using the User Management interface.
6.2.1 Defining Roles
Context
Roles determine which permissions users have in the application and in the add-in for Microsoft Excel. If you do not assign any roles, by default all users can view analytics (charts and dashboards) with at least one visibility filter applied. The standard role ALL_INCLUSIVE has predefined permissions that cannot be edited.
When you define a role, you can also specify which key figures and master data types can be maintained by users with the role, either globally or for specific versions.
NoteRoles can be transported from a source system to a target system (for example, from a test system to a production system). Dependent objects that are assigned to the roles such as permissions, visibility filters, master data, key figures, subnetworks, and reason codes are also transported. For more information about transporting roles, see the Model Configuration Guide in the Transporting Roles section.
You can also copy a role, rename it, and edit the permissions assigned to it.
14
CUSTOMER© Copyright 2016 SAP SE or an SAP affiliate company.All rights reserved.
Security GuideAuthorizations

Prerequisites
● You have defined key figures and master data types (see Model Configuration [external document]).
● If required, you have defined visibility filters (see Creating Visibility Filters [page 19]).
● To apply version-specific permissions for master data and key figures, you have created a global configuration parameter for the parameter group SCENARIO with the parameter name PERMISSIONS and the parameter value YES. You do this on the configuration user interface (UI) under Manage Global Permissions. If you do not create this parameter, the system ignores all version-specific permissions.
● To apply version-specific permissions for master data, you have also deselected the functional permissions Manage Master Data and View Master Data. These permissions supersede version-specific settings for master data (even if the global parameter has been created).
NoteTo open or create planning views in the Excel add-in, the user must have view or edit permission for at least one key figure in the base version.
Steps
1. Choose Roles, and then click + Add New Role or the icon in the Copy column for a role you want to copy.
2. Enter a name (required) and a description (optional) for the role.
3. Define the functional permissions that are to be assigned to the role by selecting the relevant checkboxes.
For more information, see User Permissions [external document].
4. Define permissions for master data types in the Assigned Master Data screen area.
You can define the master data types that can be maintained globally and for specific versions.
Note that the following permissions relate to master data maintenance and managing versions in the Excel add-in. They do not affect the user of master data attributes in key figures or the use of master data algorithms.
You can select the following levels of permission for each master data type either for all planning areas or for specific versions within a planning area:
Table 5
Level of Permission
Description Comments
Manage All Users can create, edit, delete, and display all master data records.
To copy version-specific master data from one version to another, the user needs Manage All permission for the master data type in the target version (see Permissions for Managing Versions in Excel [external document]).
Update All Users can edit and display all master data records.
This permission alone does not let users create or delete master data records.
Manage Own
Users can display all master data records, create
Users with this permission cannot update or delete master data records created by other users.
Security GuideAuthorizations
CUSTOMER© Copyright 2016 SAP SE or an SAP affiliate company.
All rights reserved. 15

Level of Permission
Description Comments
master data records, and update and delete their own master data records.
If a user has Manage Own permission for a master data type, the system behaves as follows when the user edits a master data record of that type in the Excel add-in:
● Single maintenance: The system retrieves the master data record, but only allows editing if the user created the record.
● Mass maintenance: Only the master data records that the user has created are downloaded to Excel. The user can create new records, but if the record already exists (that is, it was created by a different user), the system does not allow the user to save the master data record to the database.
For more information about managing master data in Excel, see Managing Master Data [external document].
Display Display the master data type and all its records.
To manage a master data type in the Excel add-in using either mass or single maintenance, the user must have at least display permission for the master data type in a version for which version-specific master data has been activated. If this is not the case, the master data type does not appear in the corresponding dropdown list.
In addition, the version to which the master data type is assigned appears only if the user has at least display permission for the master data type in the version.
For more information about version permissions, see Permissions for Managing Versions in Excel [external document].
5. Define permissions for key figures as follows:
● In the Assigned Key Figures screen area, select the key figures that can be viewed and edited by the role in all planning areas or selected planning areas.
● In the Assigned Key Figure Version screen area, define version-specific permissions for key figures. You have the following options:
○ View
○ Simulate (save changes to user-defined scenarios)
○ Edit (save changes to the baseline of the version)
The following table shows how the key figure permissions and the version permissions work together:
Table 6
Version Permission for Key Figures
Key Figure Permission
View Edit
View Key figure can be viewed in version.
Key figure can be viewed in version.
Simulate Key figure can be edited in a user-defined scenario.
Edit Key figure can be edited in the baseline of the version.
For more information, see the example below.
16
CUSTOMER© Copyright 2016 SAP SE or an SAP affiliate company.All rights reserved.
Security GuideAuthorizations

For information about key figure permissions that are required for managing versions, see Permissions for Managing Versions in Excel [external document].
6. Define which subnetworks can be planned using S&OP operators.
Note that this setting is relevant only for planning areas that are enabled for supply planning and that use subnetwork master data.
By specifying subnetworks, you restrict the subentworks that can be planned by the user (that is, selected for a particular planning run), but you do not restrict the visibility of the subnetworks. This is controlled by the visibility filter assigned to the user or user’s role.
If subnetworks exist in a planning area, you must specify at least one of them here to ensure that the S&OP operators are visible in the Excel add-in (both in simulate and batch mode). If you do not specify a subnetwork, the S&OP operators are hidden in the Excel add-in for users with this role even if they have the Supply Planning permission.
7. Apply the required visibility filters in the Assigned Visibility Filters screen area.
You can also assign visibility filters in the user details.
8. Select the required reason codes for the role.
Reason codes indicate why a user has changed a planning view. When they save data, users select a reason code and can enter a comment. Customers define their own reason codes.
9. Save the role.
Example: Version Permission for Key Figures
You assign the following key figures to the role for planning area SAP1:
Table 7
Key Figure Selected Permission
SALESQUANTITY Edit
ACTUALQUANTITY View
You define the following version permissions for key figures in SAP1:
Table 8
Version Version
Base View
Upside Simulate
Downside Edit
Based on how the permissions work together (see the table in step 5 of the process), users can do the following in each version:
Table 9
Key Figure Base Version Permission Upside Permission Downside Permission
SALESQUANTITY View Simulate (that is, edit but only for a simulation) and view if not in simulation mode
Edit (with or without simulation)
Security GuideAuthorizations
CUSTOMER© Copyright 2016 SAP SE or an SAP affiliate company.
All rights reserved. 17
Key Figure Base Version Permission Upside Permission Downside Permission
ACTUALQUANTITY View View View
6.2.1.1 Adding Users
Prerequisites
● You have permission to manage users and roles.
● You have defined the required roles and visibility filters.
Steps
1. Choose User Management and then + Add New User.
2. Under General Information, enter the user information.
Fields marked with an asterisk are required. In general, passwords should be at least 8 characters long and contain at least one uppercase letter, one lowercase letter, and one number.
3. Under Assigned Roles, assign one or more roles to the user.
4. Under Assigned Visibility Filter, assign the required visibility filters to the user.
5. Save the user.
6.2.1.2 Editing User Details
You have the following options for editing user details:
Table 10
Where What
List of users on the User Management interface ● Unlock user
● Deactivate user account
● Download change history of user details
User details ● Edit name and email address
● Unlock user and reset password
● Deactivate user account
● Activate and configure SAML
● Assign roles (see Defining Roles [page 14])
● Assign visibility filters (see Creating Visibility Filters [page 19])
18
CUSTOMER© Copyright 2016 SAP SE or an SAP affiliate company.All rights reserved.
Security GuideAuthorizations
Unlocking User Accounts and Resetting Passwords
If a user exceeds the maximum number of incorrect user or password combinations before a successful logon, the system locks the account. If you have permission to manage users and roles, you can unlock the account by deselecting the User Locked checkbox in the list of users on the User Management interface or in the user details. You must then reset the password by choosing Reset Password in the user details. The next time the user logs on, he or she will be prompted to create a new password.
During a logon session, users can reset their own passwords by choosing Settings in the dropdown menu in the upper-right corner of the Web client and making the required settings under Reset Password.
Deactivating Users
To deactivate an account, deselect the User Activated checkbox in the list of users on the User Management interface or deselect the Active User checkbox in the user details.
Downloading User Change History
If you have the permission Manage User Management Change History, you can download the access control settings and change history for a user from the list of users on the User Management interface.
6.2.1.3 Creating Visibility Filters
Context
Visibility filters control which master data and transaction data a user can view for a particular planning area.
ExampleYou can use a visibility filter to define that a planner can view only consensus demand plan instances related to the planner’s business unit.
The Visibility Filters user interface lets you create, edit, and delete filters. At least one visibility filter must be assigned to users to allow them to view data. Note the following:
● A visibility filter defines a set of attribute combinations that are visible to the user:
○ If there is no condition for an attribute, all values are allowed.
○ Conditions for different attributes within a visibility filter are combined with AND (intersection).
○ Conditions for the same attribute within a visibility filter are combined with OR (union).
● Different visibility filters are combined so that the user has access to the union of the sets of attribute combinations that each of them allows.
NoteIf a user is assigned a role that has permission for supply planning, make sure that he or she can view all data related to supply planning, such as all attribute values related to customers, products, locations, resources, and production sources. This is because the calculation of some key figures (such as capacity usage) may
Security GuideAuthorizations
CUSTOMER© Copyright 2016 SAP SE or an SAP affiliate company.
All rights reserved. 19

depend on other key figure values defined for various products, locations, and customers. If the user has limited data visibility, the resulting key figure values will be incorrect.
In addition, make sure that the planner can view the required subnetworks, that is, subnetworks that he or she plans (see Defining Roles [page 14]) and any other subnetworks that he or she needs to view (for example, subnetworks planned by a different planner).
The standard system contains the predefined visibility filter View All Data for all planning areas. This filter enables the user to see all data in the application from all planning areas (and supersedes any other filters that have been applied).
Visibility filters are dependent on the model configured on the Configuration interface. When you activate a planning area, a View All Data filter is automatically created for the specific planning area.
You cannot edit or delete the View All Data filter. If there is more than one visibility filter assigned to a user, there is an OR relationship between them (union).
Prerequisites
● You have defined master data types and you understand how they are used in your planning area.
● You are familiar with the master data used in your planning area.
Steps
1. Choose Visibility Filters and then + Add New Visibility Filter.
2. Enter a name (required) and a description (optional) for the filter.
The name and description must be 3-20 alphanumeric characters in length.
3. Select a planning area.
4. Under Filter Rules, choose a filter attribute.
If you define a filter that uses the same attribute more than once, there is an OR relationship between them, for example, as follows:
ExampleTable 11: Example One
Attribute Operator Value
Customer ID equal Company ABC
Customer ID equal Company XYZ
Result: You can view data for either Customer ID Company ABC OR Customer ID Company XYZ.
If you define a filter that uses two or more different attributes, there is an AND relationship between them, for example, as follows:
Table 12: Example Two
Attribute Operator Value
Customer ID equal Company ABC
Customer ID equal Company XYZ
20
CUSTOMER© Copyright 2016 SAP SE or an SAP affiliate company.All rights reserved.
Security GuideAuthorizations
Attribute Operator Value
Location Region equal USA
Result: You can view locations in the USA for (AND) either Customer ID Company ABC OR Customer ID Company XYZ.
5. Choose an operator.
ExampleTable 13: Description of Operators
Operator Description Example
equal The result is equal to the value
Rule: Customer ID equal Company ABC
Result: You can view the details of the specific customer Company ABC.
greater than The result is greater than the value
greater than or equal to
The result is greater than or equal to the value
less than The result is less than the value
less than or equal to The result is less than or equal to the value
between The result is between the selected values
contains pattern The result matches the pattern defined. You can use the wildcards * and ? as follows:
● * can be substituted for any other multiple characters in a string
● ? can be substituted for any single character in a string
Rule: Customer ID equal Company*
Result: You can view the details of Company ABC, Company 9000, or any other suffix.
Rule: Customer ID equal Company?
Result: You can view the details of a company with a single character, for example Company A or Company Z.
has no value The attribute value is empty (is null)
has some value The attribute has any value (is not null)
nodes and descendants
This operator is available if an attribute is hierarchical.
Rule: Asset ID nodes and descendants Baker plant
Result: You can view the details of the Baker plant and all of its descendants (for example Buildings 1, 2, and 3).
Security GuideAuthorizations
CUSTOMER© Copyright 2016 SAP SE or an SAP affiliate company.
All rights reserved. 21

Operator Description Example
Therefore, the result includes the selected node and all of its descendants.
6. Enter a value.
7. To add additional rules to the filter, choose the plus icon (Add Filter Rule).
8. Save the visibility filter.
Note that changing the planning area clears the filter rules.
Step Result
The new filter appears in the Visibility Filters list. You can now assign this filter to a user or role.
6.2.1.4 Deactivating User Accounts
Steps
1. To block a user's access to the application, choose User Management.
Step Result
A list of users and their information appears.
2. To deactivate the user account, clear the User Activated check box next to the user's account name. Or, open the user's detail window by clicking the user's name and clear the Active User check box.
6.3 Standard Roles
The following roles are delivered with the application:
Table 14
Role Description
ALL_INCLUSIVE User role that executes all operations in the application.
BASIC_USER This role is hidden. Minimum permissions are required to log in to the application and change the password. Assigned by default to all users and used for viewing only.
Users can have additional roles and permissions. The administrator defines the roles and assigns them to users.
22
CUSTOMER© Copyright 2016 SAP SE or an SAP affiliate company.All rights reserved.
Security GuideAuthorizations

6.4 Password Policies
SAP Integrated Business Planning uses a Strong Password scheme as mandated by SAP product standards. SAP standards, controlled by SAP HANA, require password value compliance and password expiration policies. For more information, see SAP HANA Security Guide at help.sap.com/hana_platform.
Security GuideAuthorizations
CUSTOMER© Copyright 2016 SAP SE or an SAP affiliate company.
All rights reserved. 23

7 Data Storage Security
All applications on the server side are stored in the SAP HANA database. Data is protected by the security infrastructure and operational procedures of the SAP Cloud for SAP on HANA.
24
CUSTOMER© Copyright 2016 SAP SE or an SAP affiliate company.All rights reserved.
Security GuideData Storage Security
8 Communication Channel Security
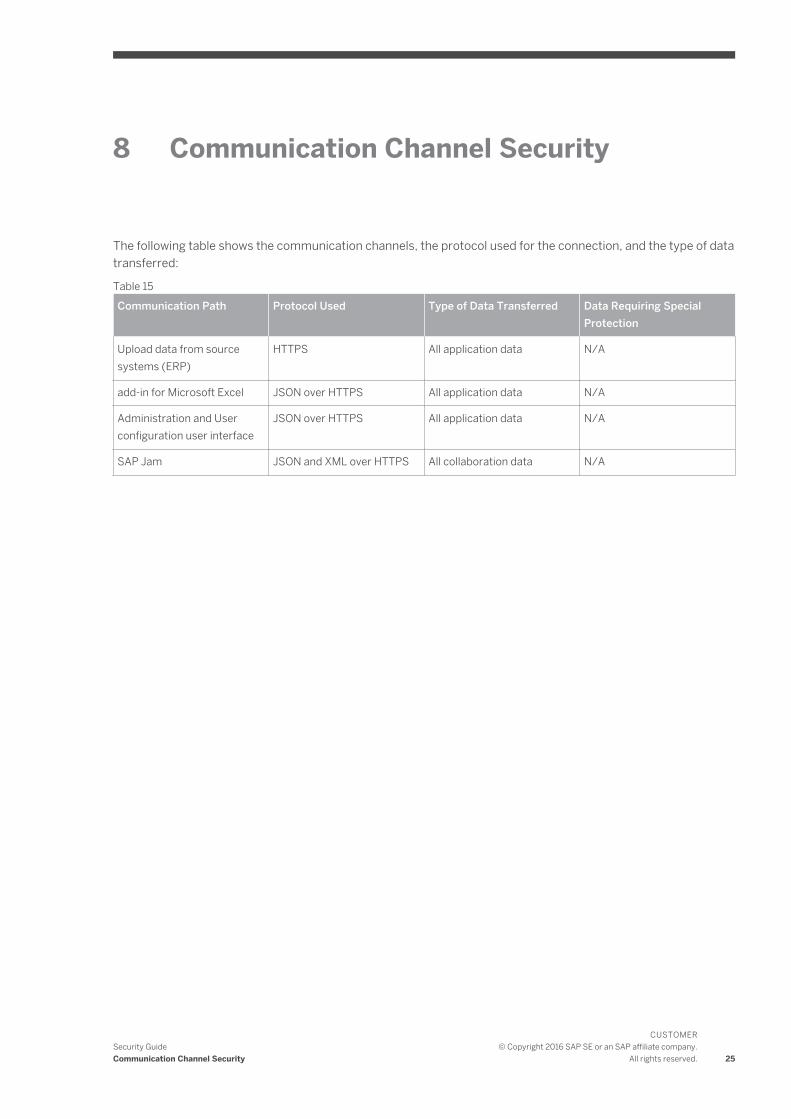
The following table shows the communication channels, the protocol used for the connection, and the type of data transferred:
Table 15
Communication Path Protocol Used Type of Data Transferred Data Requiring Special Protection
Upload data from source systems (ERP)
HTTPS All application data N/A
add-in for Microsoft Excel JSON over HTTPS All application data N/A
Administration and User configuration user interface
JSON over HTTPS All application data N/A
SAP Jam JSON and XML over HTTPS All collaboration data N/A
Security GuideCommunication Channel Security
CUSTOMER© Copyright 2016 SAP SE or an SAP affiliate company.
All rights reserved. 25
9 Data Privacy
The customer should define appropriate data privacy and protection measures and check the respective local legal and privacy requirements before using or implementing certain scenarios in the application.
Parts or all of the master data, as well as application data, can be regarded as sensitive data. Application data can contain customer, product, sales, production plans, and revenue plans, so it must be properly protected against unauthorized access or evaluation.
All personal data stored or accessed by the application should be kept to the necessary minimum. In addition, SAP recommends that you only import the minimum amount of data required to support the use cases in which you are interested.
NoteIf you use Microsoft Excel for planning purposes, note that MS Excel collects financial and collaboration information outside MS Excel. If you download this information to MS Excel and save, you are responsible for that external information. SAP recommends that you save this data as a password protected file.
26
CUSTOMER© Copyright 2016 SAP SE or an SAP affiliate company.All rights reserved.
Security GuideData Privacy

10 Security-Relevant Logging and Tracing
Web client application logon attempts are saved in the HANA logs.
Logon attempts are audited by SAP HANA. For more information, refer to the SAP HANA Security Guide at help.sap.com/hana_platform.
SAP HANA tables containing the information on users, roles, and permission assignments also have auditing fields that log the modifications of these tables.
Security GuideSecurity-Relevant Logging and Tracing
CUSTOMER© Copyright 2016 SAP SE or an SAP affiliate company.
All rights reserved. 27

11 Frequently Asked Questions
FAQs
SAP HANA provides security for all aspects of the application.
Table 16
Question Answer
How is stored data protected? ● KeyStoreSecure vaults (keystores) are used to store sensitive information and keys. All keystores are passphrase protected and are not stored along with the data.
● Data Isolation data is stored in separate SAP HANA instances or schemas so that every access from one domain to another validates user credentials against the local identity store, adding the required isolation.
How are configuration, user, password files, and so on managed?
The SAP solution authenticates the user. It is often necessary to specify different security policies for different types of users. The user types include named users, who represent real persons and are used for daily work with the SAP HANA database. These users are created by the user administrator. Request a change using the support model. Passwords follow
the policy described in the SAP HANA Security Guide .
Can a customer configure the internal access to his/her instance on the Cloud?
Yes. On request, SAP can restrict access to the system to a white list of individual IP addresses.
Is security of data traffic over the public internet provided? Data sent over the internet is encrypted. For more information, see Communication Channel Security [page 25].
28
CUSTOMER© Copyright 2016 SAP SE or an SAP affiliate company.All rights reserved.
Security GuideFrequently Asked Questions

Typographic Conventions
Table 17
Example Description
<Example> Angle brackets indicate that you replace these words or characters with appropriate entries to make entries in the system, for example, “Enter your <User Name>”.
Example Example Arrows separating the parts of a navigation path, for example, menu options
Example Emphasized words or expressions
Example Words or characters that you enter in the system exactly as they appear in the documentation
www.sap.com Textual cross-references to an internet address
/example Quicklinks added to the internet address of a homepage to enable quick access to specific content on the Web
123456 Hyperlink to an SAP Note, for example, SAP Note 123456
Example ● Words or characters quoted from the screen. These include field labels, screen titles, pushbutton labels, menu names, and menu options.
● Cross-references to other documentation or published works
Example ● Output on the screen following a user action, for example, messages
● Source code or syntax quoted directly from a program
● File and directory names and their paths, names of variables and parameters, and names of installation, upgrade, and database tools
EXAMPLE Technical names of system objects. These include report names, program names, transaction codes, database table names, and key concepts of a programming language when they are surrounded by body text, for example, SELECT and INCLUDE
EXAMPLE Keys on the keyboard
Security GuideTypographic Conventions
CUSTOMER© Copyright 2016 SAP SE or an SAP affiliate company.
All rights reserved. 29

30
CUSTOMER© Copyright 2016 SAP SE or an SAP affiliate company.All rights reserved. Security Guide

www.sap.com
© Copyright 2016 SAP SE or an SAP affiliate company. All rights reserved.No part of this publication may be reproduced or transmitted in any form or for any purpose without the express permission of SAP SE or an SAP affiliate company.SAP and other SAP products and services mentioned herein as well as their respective logos are trademarks or registered trademarks of SAP SE (or an SAP affiliate company) in Germany and other countries. All other product and service names mentioned are the trademarks of their respective companies. Please see www.sap.com/corporate-en/legal/copyright/index.epx#trademark for additional trademark information and notices.