Embed Size (px)
Citation preview

IBM Tivoli MonitoringVersion 6.2.3 Fix Pack 1
High Availability Guide for DistributedSystems
SC23-9768-03
���


IBM Tivoli MonitoringVersion 6.2.3 Fix Pack 1
High Availability Guide for DistributedSystems
SC23-9768-03
���

NoteBefore using this information and the product it supports, read the information in “Notices” on page 165.
Edition notice
This edition applies to version 6.2.3 Fix Pack 1 of IBM Tivoli Monitoring (product number 5724–C04) and to allsubsequent releases and modifications until otherwise indicated in new editions.
© Copyright IBM Corporation 2010, 2012.US Government Users Restricted Rights – Use, duplication or disclosure restricted by GSA ADP Schedule Contractwith IBM Corp.

Contents
Figures . . . . . . . . . . . . . . vii
Tables . . . . . . . . . . . . . . . ix
Chapter 1. Overview . . . . . . . . . 1
Chapter 2. Monitoring functions andarchitecture . . . . . . . . . . . . . 3Monitoring functions . . . . . . . . . . . 4
Data visualization . . . . . . . . . . . 4Situations, events, and alerts . . . . . . . . 4Event-management integration . . . . . . . 5Workflow policies . . . . . . . . . . . 5Historical data collection . . . . . . . . . 5
Monitoring architecture . . . . . . . . . . . 5Tivoli Enterprise Portal . . . . . . . . . . 6Tivoli Enterprise Portal Server . . . . . . . 6Tivoli Enterprise Monitoring Server. . . . . . 7Tivoli Enterprise Monitoring Agents . . . . . 7Warehouse Proxy Agent . . . . . . . . . 7Warehouse Summarization and Pruning Agent . . 7Agent resiliency . . . . . . . . . . . . 8
High Availability considerations for the TivoliEnterprise Monitoring Server . . . . . . . . . 8IBM Tivoli Monitoring portal navigation. . . . . 12
Chapter 3. The hot standby option . . . 15Using hot standby . . . . . . . . . . . . 15
Hub Tivoli Enterprise Monitoring Servers . . . 16Remote monitoring servers . . . . . . . . 16Tivoli Enterprise Monitoring agents . . . . . 16Tivoli Enterprise Portal server . . . . . . . 16Failover scenario . . . . . . . . . . . 17
Configuring failover support . . . . . . . . 21Configuring the hot standby feature for hubmonitoring servers . . . . . . . . . . . 21Configuring the hot standby feature for remotemonitoring servers . . . . . . . . . . . 26Configuring the hot standby feature formonitoring agents . . . . . . . . . . . 28Verifying that failover support is working . . . 28Self describing feature in a failover environment 29
Chapter 4. The clustering of IBM TivoliMonitoring components . . . . . . . 31Clustering overview . . . . . . . . . . . 31Supported configurations . . . . . . . . . . 32
Configuration A . . . . . . . . . . . . 32Configuration B . . . . . . . . . . . . 33Configuration C . . . . . . . . . . . . 34
Setting up Tivoli Monitoring components in aclustered environment . . . . . . . . . . . 35
IBM Tivoli Monitoring cluster setup . . . . . 35Monitoring server setup . . . . . . . . . 37
Portal server setup . . . . . . . . . . . 37Data warehouse setup . . . . . . . . . . 38
What to expect from the IBM Tivoli Monitoringinfrastructure in a clustered environment . . . . 39
Clustered hub monitoring server . . . . . . 39Clustered portal server . . . . . . . . . 40Clustered data warehouse . . . . . . . . 40Clustered Summarization and Pruning Agent . . 40Clustered Warehouse Proxy Agent . . . . . . 40Clustered agentless monitoring . . . . . . . 41Situations . . . . . . . . . . . . . . 41Workflow policies . . . . . . . . . . . 42Short-term data collection . . . . . . . . 42Long-term data collection. . . . . . . . . 42Tivoli Enterprise Console event integration . . . 42Maintenance . . . . . . . . . . . . . 43
Chapter 5. Creating clusters with TivoliMonitoring components in an HACMPenvironment . . . . . . . . . . . . 45Preparing for the base cluster . . . . . . . . 45
Gathering cluster nodes information . . . . . 45Checking the cluster nodes environment. . . . 46
Defining the base cluster for Tivoli Monitoring . . 46Building a base HACMP cluster for themonitoring server . . . . . . . . . . . 47Building a base HACMP cluster for the portalserver and data warehouse components . . . . 47Installing DB2 for the base HACMP cluster. . . 48Creating the database for the portal server ordata warehouse on clusternode1 . . . . . . 48Cataloging the portal server and the datawarehouse database on clusternode2 . . . . . 49Adding the database to the base cluster . . . . 49
Installing the monitoring server on its base HACMPcluster . . . . . . . . . . . . . . . . 50
Installing and setting up the monitoring serveron clusternode1 . . . . . . . . . . . . 50Tivoli Enterprise Monitoring Serverreconfiguration procedure for the AIX HACMPenvironment . . . . . . . . . . . . . 52Testing the monitoring server on clusternode1 . . 52Setting up the monitoring server on clusternode2 53Adding the monitoring server to the resourcegroup of the base cluster . . . . . . . . . 53
Installing the portal server on its base HACMPcluster . . . . . . . . . . . . . . . . 58
Installing and setting up the portal server onclusternode1 . . . . . . . . . . . . . 58Testing the portal server on clusternode1 . . . 60Setting up the portal server on clusternode2 . . 60Adding the portal server to the resource group ofthe base cluster . . . . . . . . . . . . 60
© Copyright IBM Corp. 2010, 2012 iii

Installing the Warehouse Proxy Agent orSummarization and Pruning Agent on its baseHACMP cluster . . . . . . . . . . . . . 61
Installing and setting up the Warehouse ProxyAgent and Summarization and Pruning Agent onclusternode1 . . . . . . . . . . . . . 61Testing the Tivoli Data Warehouse components inthe cluster . . . . . . . . . . . . . . 62Setting up the Warehouse Proxy Agent andSummarization and Pruning Agent onclusternode2 . . . . . . . . . . . . . 62Adding the Warehouse Proxy Agent and theSummarization and Pruning Agent to theresource group of the base cluster . . . . . . 62
Known problems and limitations . . . . . . . 64
Chapter 6. Creating clusters withmonitoring components in a SystemAutomation for Multiplatformsenvironment . . . . . . . . . . . . 67Scenarios tested . . . . . . . . . . . . . 67Preparing for the base Tivoli Monitoring clusterwith Tivoli System Automation for Multiplatform . 68
Gathering cluster nodes information . . . . . 68Checking the cluster nodes environment. . . . 69Planning for the cluster tiebreaker networkdevice . . . . . . . . . . . . . . . 70
Installing Tivoli System Automation forMultiplatforms on the cluster nodes . . . . . . 72Creating a cluster with all Tivoli MonitoringComponents . . . . . . . . . . . . . . 73Setting up a cluster for Tivoli Monitoring . . . . 74
Predefined Tivoli System Automation forMultiplatforms Cluster for Tivoli Monitoring . . 75
Installing the monitoring server on its base TivoliSystem Automation for Multiplatforms cluster. . . 79
Installing and setting up the monitoring serveron clusternode1 . . . . . . . . . . . . 79Testing the monitoring server on clusternode1 . . 80Setting up the monitoring server on clusternode2 80Adding the monitoring server to the resourcegroup of the Base Cluster. . . . . . . . . 81Testing the monitoring server failover toclusternode2 . . . . . . . . . . . . . 81
Installing the portal server on the Tivoli SystemAutomation for Multiplatforms cluster . . . . . 82
Installing and setting up the portal server onclusternode1 . . . . . . . . . . . . . 82Testing the portal server on clusternode1 . . . 84Setting up the portal server on clusternode2 . . 84Adding the portal server to the resource group ofthe Base Cluster . . . . . . . . . . . . 84Testing the portal server failover to clusternode2 85
Installing the Warehouse Proxy Agent on a TivoliSystem Automation for Multiplatforms cluster. . . 85
Installing and setting up the Warehouse ProxyAgent on clusternode1. . . . . . . . . . 85Setting up the Warehouse Proxy Agent onclusternode2 . . . . . . . . . . . . . 86
Adding the Warehouse Proxy Agent to theresource group of the Base Cluster. . . . . . 86Testing the Warehouse Proxy Agent failover toclusternode2 . . . . . . . . . . . . . 87
Installing the Summarization and Pruning Agent ona Tivoli System Automation for Multiplatformscluster . . . . . . . . . . . . . . . . 87
Installing and setting up the Summarization andPruning Agent on clusternode1 . . . . . . . 87Setting up the Summarization and Pruning Agenton clusternode2 . . . . . . . . . . . . 88Adding the Summarization and Pruning Agent tothe resource group of the Base Cluster . . . . 89Testing the Summarization and Pruning Agentfailover to clusternode2 . . . . . . . . . 89
Performing IBM Tivoli Monitoring Maintenance ona Tivoli System Automation for Multiplatformscluster . . . . . . . . . . . . . . . . 90
Applying a fix pack to the Hub Tivoli EnterpriseMonitoring Server . . . . . . . . . . . 90Applying a fix pack to the Tivoli EnterprisePortal Server . . . . . . . . . . . . . 90Applying a fix pack to the Warehouse ProxyAgent . . . . . . . . . . . . . . . 91Applying a fix pack to the Summarization andPruning Agent . . . . . . . . . . . . 92
Known problems and limitations . . . . . . . 92
Chapter 7. Creating clusters with TivoliMonitoring components in a MicrosoftCluster Server environment. . . . . . 95Setting up the hub monitoring server in a MicrosoftCluster Server . . . . . . . . . . . . . 95
Setting up basic cluster resources . . . . . . 96Installing and setting up the monitoring serveron clusternode1 . . . . . . . . . . . 103Adding the monitoring server resource to yourresource group . . . . . . . . . . . . 107Testing the monitoring server on clusternode1 114Setting up the monitoring server onclusternode2 . . . . . . . . . . . . . 114Testing the monitoring server on clusternode2 115
Setting up the portal server in a Microsoft ClusterServer . . . . . . . . . . . . . . . . 115
Setting up basic cluster resources . . . . . . 116Installing and setting up DB2 on a MicrosoftCluster Server . . . . . . . . . . . . 116Installing and setting up the portal server in thecluster . . . . . . . . . . . . . . . 122Testing the portal server in the cluster . . . . 132
Setting up Tivoli Data Warehouse components in aMicrosoft Cluster Server . . . . . . . . . . 132
Setting up basic cluster resources . . . . . . 133Installing and setting up DB2 on a MicrosoftCluster Server . . . . . . . . . . . . 133Installing and setting up Tivoli Data Warehousecomponents in the cluster . . . . . . . . 133Testing the Tivoli Data Warehouse componentsin the cluster . . . . . . . . . . . . 140
iv IBM Tivoli Monitoring: High Availability Guide for Distributed Systems

Upgrading IBM Tivoli Monitoring in a MicrosoftCluster environment . . . . . . . . . . . 141Tivoli Monitoring maintenance on the cluster. . . 141Known problems and limitations . . . . . . . 141
Appendix A. Configuring the clustercreation . . . . . . . . . . . . . . 145
Appendix B. Autonomous mode andautonomous agents . . . . . . . . 149Achieving High-Availability with the autonomousagent . . . . . . . . . . . . . . . . 149Autonomous mode agent switch from a secondarymonitoring server back to the primary hubmonitoring server . . . . . . . . . . . . 149
Agent configuration parameters . . . . . . 149Switchback processing . . . . . . . . . 151
Appendix C. Predefined scripts. . . . 153
Appendix D. EIF Information . . . . . 157
Appendix E. Documentation library 159IBM Tivoli Monitoring library . . . . . . . . 159
Documentation for the base agents . . . . . 160Related publications . . . . . . . . . . . 161Other sources of documentation . . . . . . . 161
Appendix F. Support information . . . 163
Notices . . . . . . . . . . . . . . 165Trademarks . . . . . . . . . . . . . . 167
Index . . . . . . . . . . . . . . . 169
Contents v

vi IBM Tivoli Monitoring: High Availability Guide for Distributed Systems

Figures
1. Typical IBM Tivoli Monitoring configuration 62. IBM Tivoli Monitoring configuration with hot
standby . . . . . . . . . . . . . . 153. Configuration after failover . . . . . . . 194. Tivoli Enterprise Monitoring Server
Configuration window: primary hubconfiguration . . . . . . . . . . . . 22
5. Specifying the secondary hub as a backup orstandby server for the primary hub . . . . 23
6. Tivoli Enterprise Monitoring ServerConfiguration window: secondary hubconfiguration . . . . . . . . . . . . 24
7. Specifying the primary hub as a backup orstandby server for the secondary hub . . . . 24
8. Configuring hot standby for a remotemonitoring server . . . . . . . . . . 27
9. Configuring a Windows monitoring agent toconnect to a standby hub monitoring server. . 28
10. Separate component clusters . . . . . . . 3311. Separate component clusters, with the
warehouse proxy agent and Summarizationand Pruning Agents outside the datawarehouse cluster . . . . . . . . . . 34
12. One cluster for the hub, portal server, and datawarehouse . . . . . . . . . . . . . 35
13. Selecting the IP Address in the New Resourcewindow. . . . . . . . . . . . . . 97
14. Specification of Possible Owners . . . . . 9815. Disk R before selection . . . . . . . . . 9916. Dependencies window after adding Disk R 10017. Selecting the virtual IP Address for the hub
TEMS cluster . . . . . . . . . . . 10118. Cluster Administrator before Bring Online
function . . . . . . . . . . . . . 10219. Create the resource for the network name 10320. Starting the IBM Tivoli Monitoring
InstallShield Wizard . . . . . . . . . 10421. Specifying the TEPS Desktop and Browser
Signon ID and Password. . . . . . . . 10522. Specifying the Tivoli Enterprise Monitoring
Server name . . . . . . . . . . . . 10523. Incorrect value for the Hub TEMS
configuration . . . . . . . . . . . 10624. Selecting Generic Service in the New
Resource window . . . . . . . . . . 10725. Possible Owners window with both nodes
listed . . . . . . . . . . . . . . 108
26. Disk R, TEMS IP, and TEMS NetName allpresent. . . . . . . . . . . . . . 109
27. TEMS1 as the service name . . . . . . . 11028. List all registries using the Registry
Replication . . . . . . . . . . . . 11129. Listed registries on the Registry Replication
panel . . . . . . . . . . . . . . 11230. Bring TEMS Service resource online . . . . 11331. Manage Tivoli Enterprise Monitoring Services 11332. Configuring parameters in the DBM
Configuration window . . . . . . . . 11733. Changing the default drive . . . . . . . 11834. Setting the default drive to R . . . . . . 11835. Setting the default drive to R . . . . . . 11936. Selecting DB2-DB2-0 in the Services window 12137. Selecting DB2 Server in the Resource type
field . . . . . . . . . . . . . . 12138. Click OK in the Cluster Administrator
window . . . . . . . . . . . . . 12239. Editing the portal server virtual host name 12440. Entering Name and Resource type into New
Resource window . . . . . . . . . . 12741. Both nodes appear in the Possible Owners
window . . . . . . . . . . . . . 12842. Add Shared disk, virtual IP, virtual host name
and DB2 . . . . . . . . . . . . . 12943. Entering KFWSRV into Generic Service
Parameters . . . . . . . . . . . . 13044. Registry Replication window showing
necessary settings . . . . . . . . . . 13145. Cluster Administrator window after Registry
Replication . . . . . . . . . . . . 13246. Specifying the virtual host name of the portal
server . . . . . . . . . . . . . . 13547. Entering the khdxprto service name into the
Generic Service Parameters . . . . . . . 13648. Registry Replication window showing
required settings . . . . . . . . . . 13749. Bringing the WHPservice resource group
online . . . . . . . . . . . . . . 13850. Bringing SPservice online . . . . . . . 13951. Correct Cluster Administrator window after
configuration . . . . . . . . . . . 14052. Correct Command Prompt window after
configuration . . . . . . . . . . . 14053. Adding a dependency to the Eclipse Service
on the Tivoli Enterprise Portal Server . . . 143
© Copyright IBM Corp. 2010, 2012 vii

viii IBM Tivoli Monitoring: High Availability Guide for Distributed Systems

Tables
1. Options for Tivoli Monitoring componentresiliency. . . . . . . . . . . . . . 9
2. Resiliency characteristics of IBM TivoliMonitoring components and features . . . . 9
3. Basic steps to set up Tivoli Monitoring on acluster . . . . . . . . . . . . . . 36
4. Component product codes . . . . . . . 625. Scenarios Tested . . . . . . . . . . . 68
6. Creating a cluster containing all four IBMTivoli Monitoring components . . . . . . 73
7. Change Resource (chrsrc) commands forsetting the Timeout value . . . . . . . . 94
8. Variables for cluster creation . . . . . . 1459. Predefined scripts . . . . . . . . . . 153
10. Commands . . . . . . . . . . . . 155
© Copyright IBM Corp. 2010, 2012 ix

x IBM Tivoli Monitoring: High Availability Guide for Distributed Systems

Chapter 1. Overview
Users rely on IBM Tivoli Monitoring products to monitor the performance andavailability of their systems and applications. Because many of these systems runmission-critical applications, it is important that the operation and availability ofthese systems and applications are monitored continuously, so that promptremedial action can be taken to fix problems, and potential or impending problemscan be pretreated.
Therefore, it is necessary that the monitoring products are available at all times, sothat system administrators and other stakeholders can effectively monitor andmanage their systems without interruption.
This document presents the options available to Tivoli® Monitoring customerstoday for ensuring high availability of the Tivoli monitoring components in theirenvironments.
Chapter 2, “Monitoring functions and architecture,” on page 3 introduces theconcepts and terminology necessary to understand the overall monitoringarchitecture, and the monitoring features that are relevant to high availability ofthe monitoring functions.
Chapter 3, “The hot standby option,” on page 15 describes the use of the IBMTivoli Monitoring hot standby feature as another option for addressing highavailability requirements.
Chapter 4, “The clustering of IBM Tivoli Monitoring components,” on page 31describes, in detail, the use of clustering as a technique for addressing IBM TivoliMonitoring high-availability requirements. This chapter also describes thesupported IBM® Tivoli Monitoring cluster configurations, provides an overview ofthe setup steps, and describes the expected behavior of the components running ina clustered environment.
Chapter 5, “Creating clusters with Tivoli Monitoring components in an HACMPenvironment,” on page 45 provides information on installing and configuring IBMTivoli Monitoring components in High Availability Cluster Multiprocessing(HACMP™) environments under the IBM AIX® operating system.
Chapter 6, “Creating clusters with monitoring components in a System Automationfor Multiplatforms environment,” on page 67 provides information on theimplementation and design of high-availability IBM Tivoli Monitoringenvironments working with the IBM Tivoli System Automation for Multiplatformsproduct.
Chapter 7, “Creating clusters with Tivoli Monitoring components in a MicrosoftCluster Server environment,” on page 95 contains information on designing andimplementing highly availably IBM Tivoli Monitoring environments by usingMicrosoft Windows Cluster Server (MSCS).
© Copyright IBM Corp. 2010, 2012 1

2 IBM Tivoli Monitoring: High Availability Guide for Distributed Systems

Chapter 2. Monitoring functions and architecture
There are two primary technological approaches to configuring resiliency (alsoknown as high availability) for the Tivoli monitoring platform components. Oneapproach exploits common, commercially available, high-availability clustermanager software. Examples include:v High-Availability Cluster Multiprocessing for pSeries® on AIX systems (HACMP)v IBM Tivoli System Automation for Multiplatformsv Microsoft Cluster Server, from Microsoft (MSCS)
In the second approach, the hub Tivoli Enterprise Monitoring Server is resilient tospecific failure scenarios. This alternative approach is also referred to as hot standbyin Tivoli publications. These two approaches provide different resiliency andfailover characteristics. Failover is the process of taking resource groups offline onone node and bringing them back on another node; the resource dependencies arerespected.
The first approach requires the use of a high-availability cluster manager such asHACMP, IBM's SA-MP, or Microsoft's MSCS. Using this approach, you canconfigure all of the components of the monitoring platform for resiliency in thecase of component failure. See the following chapters for a detailed description ofhow to create clusters with your Tivoli Monitoring components by using each ofthe cluster managers:v Chapter 5, “Creating clusters with Tivoli Monitoring components in an HACMP
environment,” on page 45v Chapter 6, “Creating clusters with monitoring components in a System
Automation for Multiplatforms environment,” on page 67v Chapter 7, “Creating clusters with Tivoli Monitoring components in a Microsoft
Cluster Server environment,” on page 95
If you are primarily concerned with the availability of the hub Tivoli EnterpriseMonitoring Server, the IBM Tivoli Monitoring platform provides the hot standbyoption. The hot standby option replicates selected state information between thehub monitoring server and a secondary hub monitoring server running in alistening standby mode; the secondary hub monitoring server monitors the activehub's heartbeat so that it can remain up-to-date with the hub’s environmentinformation. In an appropriately configured environment, the secondary (that is,the backup) hub monitoring server takes over as the active hub monitoring serverwhenever the primary hub monitoring server fails. Hot standby operates withoutshared or replicated persistent storage between the two monitoring servers anddoes not require cluster manager software. However, hot standby addresses onlythe hub monitoring server component of the monitoring platform, and is thereforesuited to users without stringent resiliency requirements on the other componentsof the monitoring platform. High availability and disaster recovery configurationare also possible when using hot standby. Additional strategies must be used toensure high availability for other IBM Tivoli Monitoring components, including theTivoli Enterprise Portal Server, the Warehouse Proxy Agent, and theSummarization and Pruning Agent.
The following three features are requirements for implementing high availabilityon z/OS® systems:
© Copyright IBM Corp. 2010, 2012 3

v Sysplex environmentv Shared DASDv Dynamic Virtual IP Address (DVIPA)
For more information about implementing high availability on z/OS systems, seeConfiguring the Tivoli Enterprise Monitoring Server on z/OS.
Monitoring functionsIBM Tivoli Monitoring products consist of a set of products and components thatprovide monitoring performance and availability actions and functions, which canbe integrated to establish a service-management process. The IBM TivoliMonitoring components provide you with multiple capabilities under three mainareas: visibility, control, and automation. These key functions are defined in thefollowing sections.
Data visualizationUsers of the monitoring products use the Tivoli Enterprise Portal, a graphical userinterface, to view various reports about the operations of the monitoredenvironment. The reports include the status of the managed systems, variousevents, and performance data that is specific to various managed systems, such asthe CPU utilization of a particular process or the disk usage of a particularcomputer system. This type of performance data is also referred to as performancemetrics.
Situations, events, and alertsUsing the Tivoli Enterprise Portal, users can create monitoring specifications calledsituations to detect when specific conditions or events in their environment occur,thus raising an alert. Each situation is assigned (or distributed) to one or moremanaged systems that is to be monitored for a specific condition of a set ofconditions.
There are two types of events that might be triggered by a situation: pure orsampled. When the determination of the event must be made based onobservations made at specific intervals, the event is known as a sampled event.When the event is based on a spontaneous occurrence, the event is known as apure event. Therefore, situations for sampled events have an interval associatedwith them, while those for pure events do not. Another characteristic of sampledevents is that the condition that caused the event can change, thus causing it to beno longer true. Pure events cannot change. Therefore, alerts raised for sampledevents can transition from true to not true, while a pure event stays true when itoccurs.
An example of a sampled event is number of processes > 100. An event becomestrue when the number of processes exceeds 100 and later becomes false againwhen this count drops to 100 or lower. A situation that monitors for an invalidlogon attempt by user is a pure event: the event occurs when an invalid logonattempt is detected, and does not become a False event.
System managers can also specify actions that must be taken when an eventoccurs. For example, when a disk becomes full, a command can automatically berun to delete temporary files, thereby reclaiming additional storage.
4 IBM Tivoli Monitoring: High Availability Guide for Distributed Systems

Event-management integrationIn many environments, multiple components might trigger events that must besent to the Tivoli Enterprise Console® or IBM Tivoli NetCool®/OMNIbus, whichcan be used for event correlation and management. Tivoli monitoring can beconfigured to forward events to the Tivoli Enterprise Console or TivoliNetCool/OMNIbus for further correlation and management.
Workflow policiesIn addition to defining situations, the Tivoli Enterprise Portal interface can be usedto define workflow policies. A workflow policy can specify complex rules thatmonitor multiple events and take various actions.
Historical data collectionYou can use the Tivoli Enterprise Portal to collect historical data for one or moresets of performance metrics. When configured, metrics for the last 24 hours areavailable for viewing at any time as short-term history. Optionally, the collectedmetrics can be sent to the Tivoli Data Warehouse for storage as long-term history.Metrics sent to the warehouse are also available for viewing from the TivoliEnterprise Portal.
To prevent unbounded growth of the warehouse database, the summarization andpruning features of the warehouse database can be initiated from the TivoliEnterprise Portal to manage the data in the database.
Monitoring architectureTivoli monitoring products are based on the scalable IBM Tivoli MonitoringVersion 6 platform. A typical configuration is shown in Figure 1 on page 6.
Chapter 2. Monitoring functions and architecture 5

Tivoli Enterprise PortalThe Tivoli Enterprise Portal is the user interface into IBM Tivoli Monitoring. It canbe deployed as either a browser-based application or a desktop client (locally oraccessed through the Java Web Start client). Clients are configured to connect to aTivoli Enterprise Portal Server.
Tivoli Enterprise Portal ServerThe Tivoli Enterprise Portal Server provides services for one or more portal clients.You configure the portal server to connect to a hub monitoring server. The portalserver retrieves data from the hub monitoring server in response to user actions atthe portal client, and sends the data back to the portal client for presentation. TheTivoli Enterprise Portal Server also provides presentation information to the portalclient so that the portal client can suitably render the user interface views. Theportal server also maintains a database to store various presentation andauthorization information.
Figure 1. Typical IBM Tivoli Monitoring configuration
6 IBM Tivoli Monitoring: High Availability Guide for Distributed Systems

Tivoli Enterprise Monitoring ServerThe monitoring environment can contain one or more Tivoli Enterprise MonitoringServers. A Tivoli Enterprise Monitoring Server controls one or more monitoringagents and performs the following primary functions:v Monitoring availability of agentsv Retrieving data from agents for reportingv Evaluating situationsv Executing policiesv Distributing situations and policies to agents
Each Tivoli Enterprise Monitoring Server maintains a database called theEnterprise Information Base (EIB). The Enterprise Information Base containsvarious definition objects such as situations and policies, information aboutmanaged systems, and the distribution or assignment of situations and policies tomanaged systems. A monitoring server also has catalog files describingcharacteristics of systems it manages, configuration files, and files used for thedeployment of monitoring agents.
Because of the number of functions that the monitoring server performs,large-scale environments usually include a number of monitoring servers todistribute the load. One of the monitoring servers is designated the hubmonitoring server, and the remaining servers are known as remote monitoringservers. The portal server communicates with the hub monitoring server. The hub,in turn, controls the remote servers and any agents that might be directlyconnected to the hub. The hub monitoring server also holds the master copy of theEnterprise Information Base, while the remote servers maintain a subset of theEnterprise Information Base that is relevant to them, which is synchronized withthe hub. The hub monitoring server is the nerve center of the monitoringarchitecture.
Tivoli Enterprise Monitoring AgentsTivoli Enterprise Monitoring Agents perform data-collection functions specific tothe system being monitored. Each agent reports to a monitoring server, from whichit receives instructions for collecting performance and availability data from thesystem being monitored. Agents also send heartbeats to the monitoring server tolet it know that the agent is available and operating.
Warehouse Proxy AgentThe Warehouse Proxy Agent is a special server process that is configured as anagent reporting to the hub Tivoli Enterprise monitoring server. The WarehouseProxy Agent writes long-term historical data to the Tivoli Data Warehouse.Monitoring agents and servers send their collection of historical data to theWarehouse Proxy Agent periodically for writing to the warehouse database.
For information regarding the configuration of multiple warehouse proxy agents,see IBM Tivoli Monitoring: Installation and Setup Guide.
Warehouse Summarization and Pruning AgentThe Warehouse Summarization and Pruning Agent is a special server process thatis configured as an agent reporting to the hub monitoring server. Based onspecifications provided by the Tivoli Enterprise Portal configurations, the agentkeeps the size of the warehouse database manageable by summarizing andpruning its data.
Chapter 2. Monitoring functions and architecture 7

See the IBM Tivoli Monitoring: Administrator's Guide for further information on howProxy Agent Services contributes to resiliency.
Agent resiliencyThe Agent Management Services feature in IBM Tivoli Monitoring V6.2.1 or higherprovides resiliency at the agent level. Specifically, the IBM Tivoli Monitoring OSMonitoring Agent for Windows, Linux, or Unix agents are monitored foravailability. These agents are automatically restarted according to default policysettings expressed as an XML file. You can create or modify this XML file.
In addition, the OS agents will monitor and automatically restart other agentsrunning adjacent to them according to the terms of the policy files. Policy files forthe Warehouse Proxy Agent, Summarization and Pruning Agent, and TivoliUniversal Agent are installed along with the OS Monitoring Agents. The files canbe activated by using a set of actions associated with the new Agent ManagementServices workspace, which is part of the Windows and Linux OS Monitoring Agentnavigation tree nodes in the Tivoli Enterprise Portal. By monitoring andresponding to abnormal downtime or behavior exhibited by an agent, IBM TivoliMonitoring adds a layer of fault tolerance to endpoint applications and increasestheir availability rating.
For further information on Agent Management Services, see Chapter 11 of the IBMTivoli Monitoring: Administrator's Guide.
High Availability considerations for the Tivoli Enterprise MonitoringServer
In general, the Tivoli monitoring components are highly resilient. The componentsare tolerant of network and communications failures, attempting to reconnect toother components and retry communication until they succeed. The functionsdescribed in “Monitoring functions” on page 4 have the following requirements forthe various components:v Tivoli Enterprise Monitoring Agents must be available at all times. If a
monitoring agent fails to communicate with a monitoring server, it must be ableto connect to another monitoring server and continue operation uninterrupted.
v The hub Tivoli Enterprise Monitoring Server must be available at all times. If thehub fails, another instance of the hub, along with all persistent data files and thefailed hub's internal state, must be available to take over for the failed hub.
v Remote Tivoli Enterprise Monitoring Servers must be able to sense a hub failureand then reconnect to the hub as soon as it (or another instance) becomesavailable, while maintaining its internal state.
v The Warehouse Proxy Agent and Summarization and Pruning Agents must beavailable at all times. If they fail, another instance of these processes must beavailable to take over where the failed agent left off.
See Table 1 on page 9 for the failover options available for each monitoringcomponent.
Note: Other options are available to achieve high availability, such as installingmultiple Tivoli Enterprise Portal Servers and using the migrate-export andmigrate-import commands to synchronize their customization.
8 IBM Tivoli Monitoring: High Availability Guide for Distributed Systems

Table 1. Options for Tivoli Monitoring component resiliency
ComponentPotential single point offailure?
Cluster failoveravailable?
Hot standbyfailover available?
Hub monitoringserver
Yes Yes Yes
Portal server Yes Yes No
Tivoli DataWarehousedatabase
Yes Yes No
Warehouse ProxyAgent
Yes, if a single WarehouseProxy Agent is in theenvironment.
Yes No
Summarizationand Pruning Agent
Yes Yes No
Remotemonitoring server
No. Another monitoring servercan assume the role of a remotemonitoring server for connectedagents. This is known as "agentfailover."
N/A N/A
Agent Not a single point of failure forthe whole monitoring solution,but a specific point of failurefor the specific resource beingmonitored.
Yes No
For resiliency characteristics for each option, see Table 2.
Table 2. Resiliency characteristics of IBM Tivoli Monitoring components and features
ComponentCharacteristics of a hub clusterfailover
Characteristics of a hub hotstandby failover
Hub monitoringserver
The hub monitoring server isrestarted as soon as the clustermanager detects failure.
Communication failure betweenhubs causes the standby hub tostart processing to establish itselfas master, or primary hub server.
Portal server The portal server reconnects to thehub monitoring server as soon as itis restarted.
The portal server needs to bereconfigured to point to the newhub.
Tivoli DataWarehousedatabase
No relationship to hub No relationship to hub
WarehouseProxy Agent
As an agent, the Warehouse ProxyAgent reconnects to its hub andcontinues to export data from agentsto the Tivoli Data Warehouse.
As an agent configured with asecondary connection to the hubserver, the Warehouse Proxy Agentconnects to its secondary hub andcontinues to export data fromagents to the Tivoli DataWarehouse.
Summarizationand PruningAgent
As an agent, the Summarization andPruning Agent reconnects to its huband continues to summarize andprune data from the Tivoli DataWarehouse.
As an agent configured with asecondary connection to the hubserver, the Summarization andPruning Agent connects to itssecondary hub and continues tosummarize and prune data fromthe Tivoli Data Warehouse.
Chapter 2. Monitoring functions and architecture 9

Table 2. Resiliency characteristics of IBM Tivoli Monitoring components andfeatures (continued)
ComponentCharacteristics of a hub clusterfailover
Characteristics of a hub hotstandby failover
Remotemonitoringserver
The remote monitoring serverdetects the hub restart and tries toreconnect, synchronizing with thehub.
When configured with a secondaryconnection to the hub server, theremote monitoring server retriesthe connection with the primaryhub and if unsuccessful tries toconnect to the secondary hub.When the new hub has beenpromoted to master, the remotemonitoring server detects the hubrestart and tries to reconnect,synchronizing with the hub.
Agent All agents directly connected to thehub reconnect to the hub afterrestart and begin synchronization.
When configured with a secondaryconnection to the hub server,agents directly connected to thehub perceive the loss of connectionand retry. With the first hub down,the agent tries to connect to thesecond hub, and beginsynchronization that includesrestarting all situations.
Event data Agents resample all polled situationconditions and reassert all that arestill true.
Situation history is preserved.
Agents resample all polledsituation conditions and reassertall that are still true.
Previous situation history is notreplicated to the failover hubserver and thus lost.
To persist historical event data, usethe Tivoli NetCool/OMNIbus orTivoli Enterprise Console.
Hub failback
(Failback is theprocess ofmovingresources backto their originalnode after thefailed nodecomes backonline.)
Available through cluster manageradministration and configuration.
The secondary hub must bestopped so that the primary hubcan become master again.
10 IBM Tivoli Monitoring: High Availability Guide for Distributed Systems

Table 2. Resiliency characteristics of IBM Tivoli Monitoring components andfeatures (continued)
ComponentCharacteristics of a hub clusterfailover
Characteristics of a hub hotstandby failover
Time forfailover
The detection of a failed hub andsubsequent hub restart is quick andcan be configured through thecluster manager.
The synchronization processcontinues until all situations arerestarted and the wholeenvironment is operational. Theamount of time depends on the sizeof the environment, including thenumber of agents and distributedsituations.
The detection of a failed hub isquick. There is no restart of thehub, but the connection of remotemonitoring server and agents tothe standby hub require at leastone more heartbeat intervalbecause they try the primarybefore trying the secondary.
The synchronization processcontinues until all situations arerestarted and the wholeenvironment is operational. Theamount of time depends on thesize of the environment, includingthe number of agents anddistributed situations.
z/OSenvironments
The clustered solution on a z/OShub has not yet been tested andtherefore is not a supportedconfiguration.
Remote monitoring servers on z/OSsystems are supported.
Hot standby is fully supported onz/OS systems, for both remote andlocal hubs.
Data availableon failover hub
All data is shared through disk orreplication.
All Enterprise Information Basedata, except data for the followingcomponents, is replicated throughthe mirror synchronization process:
v Situation status history
v Publishing of any TivoliUniversal Agent metadata andversioning
v Remote deployment Depot
Manageabilityof failover
Failover can be automatic ordirected through clusteradministration.
You control which hub is currentlythe master hub server and thecurrent state of the cluster.
Failover can be directed bystopping the hub. Note that thestarting order controls which hubis the master hub server.
Note: When using a clustered hub monitoring server, you must completely shutdown for maintenance. However, in a hot standby environment, you can apply apatch one node at a time.For further information on the primary hub monitoring server and itsconfiguration, see Chapter 4, “The clustering of IBM Tivoli Monitoringcomponents,” on page 31.
Chapter 2. Monitoring functions and architecture 11

IBM Tivoli Monitoring portal navigationThe configuration of the Tivoli Enterprise Portal Server includes a newKFW_TOPOLOGY_CLUSTER_LIST environmental variable. Agents with affinitiesthat are included in the KFW_TOPOLOGY_CLUSTER_LIST variable are displayedin the physical view of the navigation tree below the name specified by theCTIRA_HOSTNAME agent variable. By using this enhancement, you can groupagents by a unique name in the physical view of the navigation tree. You mustinclude the agent type (the affinity symbolic name) in the list for every agent youplan to use in the cluster.
Note that the default behavior for the CTIRA_HOSTNAME variable is to take onthe value of the system host name and is displayed under the system host name inthe portal Navigator pane. Setting the CTIRA_HOSTNAME variable for thoseagents that also appear in KFW_TOPOLOGY_CLUSTER_LIST causes the agents toappear in the physical view of the Navigator tree under the value specified inCTIRA_HOSTNAME. In this way, you can group all the agents from one cluster bysetting all the CTIRA_HOSTNAME names to the cluster name. The clusteredagents appear in the Navigator pane under the cluster name (SQLCLUSTER) whilethe Windows OS agents appear under the cluster node names (TIVVM13 andTIVVM14).
The following agent variables are used to modify the agents:
CTIRA_HOSTNAME<Cluster host name>
CTIRA_SYSTEM_NAME<Cluster host name>
CTIRA_HIST_DIRLocation for data collection in the Tivoli Data Warehouse (optional).
CTIRA_SIT_PATHPath to situation files. Can point to shared disk.
CTIRA_LOG_PATHPath to common log files.
If you have a subnode Agent, you will also want to add:
CTIRA_SUBSYSTEM_ID<cluster name>
The KFW_TOPOLOGY_CLUSTER_LIST variable includes a number of agents, suchas:
AFF_MS_CLUSTER,// Cluster agent
AFF_MS_SQL_SERVER,// SQL Server
AFF_NT_EXCHANGE,// Exchange Server
AFF_ALL_ORACLE,// Oracle
AFF_ALL_SYBASE,// Sybase
12 IBM Tivoli Monitoring: High Availability Guide for Distributed Systems

AFF_SIEBEL// Siebel
A complete list of the affinity names can be found in the following file:v For the Windows Tivoli Enterprise Portal Server:
C:\ibm\ITM\CNPS\affinity.properties
v For the Unix/Linux Tivoli Enterprise Portal Server:/opt/IBM/ITM/platform/cq/data/affinity.properties
You can add entries or remove entries. For example,KFW_TOPOLOGY_CLUSTER_LIST=AFF_UDB_AGENT -AFF_MS_SQL_SERVER
adds the affinity UDB agent (AFF_UDB_AGENT) to the list and removes the SQLServer (-AFF_MS_SQL_SERVER) from the list.
You can disable this new behavior (using CTIRA_HOSTNAME at the agent, notgrouping by the IP address, and not using the operating system–assigned hostname) by using the following setting:KFW_TOPOLOGY_CLUSTER_ENABLE=N
To enable this Navigator behavior in the portal on Windows, complete thefollowing steps:1. Stop the Tivoli Enterprise Portal Server (TEPS).2. Right-click on the TEPS icon in the portal, and select Advanced->Edit
Variables from the pop-up menu.The Tivoli Enterprise Portal Server Override Local Variable Settings dialog boxis displayed.
3. Click on the Variable pull-down menu and locate theKFW_TOPOLOGY_CLUSTER_LIST variable.v If the variable exists, ensure that it is set to the agent affinity (for example,
for DB2®, AFF_UNIVERSAL_DATABASE).v If the variable does not exist, type the variable name, and set the value to the
agent affinity (for example, for DB2, AFF_UNIVERSAL_DATABASE).4. To initiate the changes, start the Tivoli Enterprise Portal Server.
Note: This portal behavior affects all agents with that affinity.To enable this Navigator behavior in the portal on Linux or AIX, you need tomanually edit the environment file (cq.ini).
Chapter 2. Monitoring functions and architecture 13

14 IBM Tivoli Monitoring: High Availability Guide for Distributed Systems

Chapter 3. The hot standby option
This chapter provides an overview of the IBM Tivoli Monitoring hot standbyoption. It gives a brief overview of hot standby and explains requirements forpreparing hot standby for the IBM Tivoli Monitoring components.
Instructions on how to enable the hot standby feature, and an overview of howeach component in the IBM Tivoli Monitoring environment is configured to enablethe hot standby feature, are provided in this chapter.
Using hot standbyFigure 2 depicts an environment with the hot standby feature configured.
The following sections provide an overview of how each component in the IBMTivoli Monitoring environment is configured to enable the hot standby feature.
Figure 2. IBM Tivoli Monitoring configuration with hot standby
© Copyright IBM Corp. 2010, 2012 15

Hub Tivoli Enterprise Monitoring ServersIn a hot standby environment, there are two hub Tivoli Enterprise MonitoringServers, which both must be at the same IBM Tivoli Monitoring release levels. Theconfiguration of each hub designates the other hub as the hot standby hub. At anygiven time, one of the two hub monitoring servers is operating as the hub. Thisserver is referred to as the acting hub. The other hub monitoring server is instandby mode and is referred to as the standby hub. (See Figure 2 on page 15.)
When the two hub monitoring servers are running, they continuously synchronizethe data within their Enterprise Information Base. The Enterprise Information Basecontains definition objects such as situations and policies, information aboutmanaged systems, and information about the distribution or assignment ofsituations and policies to managed systems. The hub Tivoli Enterprise MonitoringServers synchronize data within their Enterprise Information Base to enable thestandby hub to take over the role of the acting hub whenever the acting hubbecomes unavailable.
The two hub monitoring servers are symmetrical, but for reasons that areexplained later, one hub monitoring server is designated as the primary hub and theother is designated as the secondary hub. While it is not necessary, you candesignate as the primary hub the server that you expect to be the acting hub mostof the time.
Note that the terms acting and standby refer to operational states, which can changeover a period of time. The terms primary and secondary refer to configuration,which is relatively permanent.
Remote monitoring serversAll remote monitoring servers must be configured to operate in the hot standbyenvironment. When you configure each remote monitoring server, you specify theprimary and secondary hub monitoring servers to which the remote monitoringserver reports.
You must specify the same primary and secondary hub monitoring servers for eachremote monitoring server. In Figure 2 on page 15, the connections from the remotemonitoring servers to the primary hub are depicted with solid arrows. Theconnections to the standby hub are depicted with dashed arrows.
Tivoli Enterprise Monitoring agentsMonitoring agents that report directly to the hub monitoring server, the WarehouseProxy Agent, and the Summarization and Pruning Agent must be configured tooperate in the hot standby environment. When you configure each of these agents,you specify the primary and secondary hub monitoring servers to which theagents report.
In Figure 2 on page 15, the connection between these monitoring agents and theprimary hub is depicted with a solid arrow. The connection to the standby hub isdepicted with a dashed arrow.
Tivoli Enterprise Portal serverThe Tivoli Enterprise Portal Server cannot be configured to fail over to a standbyhub. If the Tivoli Enterprise Portal Server is connected to the standby hub before ittakes over as the acting hub, the portal server will need to be recycled in order to
16 IBM Tivoli Monitoring: High Availability Guide for Distributed Systems

reflect data changes. Portal clients do not need to be reconfigured. Portal clientsautomatically reconnect to the portal server when the portal server is reconfiguredand restarted.
Note: You can configure an alias name for the portal server on your DNS server. Ifyou do so, the portal server connects over an alias to the hub instead of by systemname or IP address. By using an alias name, you can switch the Tivoli EnterprisePortal Server by changing the destination for the alias, rather than reconfiguringthe Tivoli Enterprise Portal Server. After a recycle, the Tivoli Enterprise PortalServer switch is in effect.
The alias must be set on your DNS Server. The following steps show how the aliascan be set on the DNS server:Physical System Name IP-Address ALIAS-Namephysicalsystem1.zurich.com 192.168.1.1 HUB-prod.zurich.comphysicalsystem2.zurich.com 192.168.1.2
These steps will allow the ALIAS Name to be moved on either System 1 or 2.
Failover scenarioThe hot standby operation is best illustrated by describing a scenario. In thisexample, all monitoring components are started in order, a scenario that might takeplace only when the product is initially installed. After installation, componentscan be started and stopped independently.
Starting up the componentsThe following list describes the order of startup and what happens as eachcomponent is started:1. The primary hub is started first.
a. When the primary hub starts, it adds a message to its operations log toindicate that it is configured for hot standby:04/17/07 09:38:54 KQM0001 FTO started at 04/17/07 09:38:54.
b. The primary hub then attempts to connect to the standby hub (thesecondary hub). Because the standby hub is not yet available, the primaryhub assumes the role of the acting hub.
2. The secondary hub is started.a. When the secondary hub starts, it adds a message to its operations log to
indicate that it is enabled for hot standby:04/17/07 09:47:04 KQM0001 FTO started at 04/17/07 09:47:04.
b. The secondary hub attempts to connect to the primary hub. The connectionsucceeds. Sensing that the primary hub started earlier (and is therefore theacting hub), the secondary hub assumes the role of the standby hub,indicated by the following messages:04/17/07 09:47:18 KQM0003 FTO connected to IP.PIPE:#9.52.104.155at 04/17/07 09:47:18.04/17/07 09:47:33 KQM0009 FTO promoted HUB_PRIMARY as the acting HUB.
c. The primary hub also succeeds in connecting with the secondary hub, andissues the following messages:04/17/07 09:45:50 KQM0003 FTO connected to IP.PIPE:#9.52.104.155at 04/17/07 09:45:50.04/17/07 09:45:58 KQM0009 FTO promoted HUB_PRIMARY as the acting HUB.
d. The standby hub queries the acting hub for any updates to the EnterpriseInformation Base data since it last communicated with the acting hub. Thestandby hub replicates all updates.
Chapter 3. The hot standby option 17

e. After the initial startup and connections, the two hubs monitor connectionswith each other periodically to ensure that the other hub is running andthat there is no change in status.
f. The standby hub also monitors the acting hub periodically for furtherupdates to the Enterprise Information Base, and replicates the updates in itsown Enterprise Information Base. By default, this monitoring takes placeevery 5 seconds. As a result, the standby hub is ready to take over the roleof the acting hub when required.
Note: If the secondary hub is recycled after initial startup, the node status atthe secondary hub is not necessarily the same as the node status at the primaryhub. This does not cause an operational problem because the node status at thesecondary hub is corrected when a failover occurs from the primary hub to thesecondary hub.
3. The remote monitoring servers and monitoring agents are started.When the remote monitoring servers and monitoring agents start, they attemptto connect to the primary hub in their configuration. In this scenario, theprimary hub is also the current acting hub. Therefore, the connection attempt issuccessful, and these components start reporting to the primary hub.
4. The Tivoli Enterprise Portal Server connects to the primary hub.The portal server is configured to connect to the primary hub. One or moreportal clients are connected to the portal server for monitoring purposes.
Failing overThe acting hub might become unavailable for a number of reasons. It might needto be shut down for scheduled maintenance, the computer on which it is runningmight need to be shut down or might have stopped, or it can be experiencingnetworking problems.
When the standby hub discovers that the acting hub is unavailable, it takes overthe role of the acting hub and issues the following messages:04/17/07 10:46:40 KQM0004 FTO detected lost parent connectionat 04/17/07 10:46:40.04/17/07 10:46:40 KQM0009 FTO promoted HUB_SECONDARY as the acting HUB.
The primary hub is now the standby hub and the secondary hub is the acting hub,as depicted in Figure 3 on page 19:
18 IBM Tivoli Monitoring: High Availability Guide for Distributed Systems

As the remote monitoring servers and agents connected to the previous acting hubdiscover that this hub is no longer available, they switch and reconnect to the newacting hub. Because these components are in various states of processing andcommunication with the hub monitoring server, the discovery and reconnectionwith the new hub is not synchronized.
All remote monitoring servers and agents now report to the new acting hub. Thereis no mechanism available to switch them back to the standby hub while the actinghub is still running. The only way to switch them to the standby hub is to shutdown the acting hub.
The processing that takes place after reconnection is similar to the processing thattakes place after reconnection in an environment without a hot standby server. Thefollowing processing applies with regard to situations and policies:1. Pure events that occurred before the failover are not visible. Subsequent pure
events are reported when they occur.2. Sampled situations are reevaluated and are reported again if they are still true.
Figure 3. Configuration after failover
Chapter 3. The hot standby option 19

3. A Master Reset Event is sent to the Tivoli Enterprise Console when the failoveroccurs. Events that result from situations being reevaluated are resent to theTivoli Enterprise Console if the monitoring server has been configured to sendevents to the Tivoli Enterprise Console.
4. Policies are restarted.
The Tivoli Enterprise Portal Server must be reconfigured to point to the new actinghub and then restarted. All portal clients reconnect to the portal server after itsrestart.
When reconfiguring the portal server on Windows systems for a differentmonitoring server, a window is displayed asking if a snapshot of the portal serverdata should be taken. No is the correct response when reconfiguring the portalserver for a hot standby monitoring server because the same portal server data isrelevant to both the primary and hot standby monitoring server.
When Yes is selected as the response to the dialog, a snapshot of the portal serverdata is taken through the "migrate-export" process. The data is saved in a filecalled saveeexport.sql and is placed in the %CANDLE_HOME%\CNPS\CMS\HOSTNAME:Port directory, where HOSTNAME:Port is the current monitoring serverhostname and connection port number.
Then, if no existing snapshot exists for the monitoring server that is being switchedto, a new set of portal server data is used and all the customizations are notincluded. In order to get these restored for use on the new monitoring server, a"migrate-import" needs to be run using the saveexport.sql created from thesnapshot.
When reconfiguring the portal server to switch back to previous monitoring server,answering Yes causes the previous snapshot to be automatically loaded thusrestoring the customization. Responding No should be done when switchingbetween the primary hub monitoring server and the hot standby monitoring serversince the same portal server data should be relevant to both.
The new acting hub, which is the secondary hub, retains its role even after theprimary hub Tivoli Enterprise Monitoring Server becomes operational again. Theprimary hub monitoring server now becomes the standby hub. When the newstandby hub starts, it checks the Enterprise Information Base of the new acting hubfor updates and replicates updates to its own Enterprise Information Base ifnecessary. The two hub Tivoli Enterprise Monitoring Servers also start monitoringconnections with each other to ensure that the other hub is running.
If a remote monitoring server or agent experiences a transient communicationproblem with the acting hub and switches over to the standby hub, the standbyhub instructs it to retry the connection with the acting hub because the standbyhub knows that the acting hub is still available.
The environment continues to operate with the configuration shown in Figure 3 onpage 19 until the acting hub is shut down or until the computer on which theacting hub is running becomes unavailable. Each time the acting hub becomesunavailable, the failover scenario described in this section is repeated.
20 IBM Tivoli Monitoring: High Availability Guide for Distributed Systems

Configuring failover support
The optional hot standby feature enables you to maintain high availability bydefining a standby monitoring server to provide failover support for your hubmonitoring server. If the hub monitoring server fails, hub functions automaticallyswitch to the backup monitoring server. IBM Tivoli Monitoring automaticallyconnects all remote monitoring servers and agents to the backup monitoring server.
Configuring the hot standby feature involves the following steps:1. “Configuring the hot standby feature for hub monitoring servers”2. “Configuring the hot standby feature for remote monitoring servers” on page
263. “Tivoli Enterprise Monitoring agents” on page 164. “Verifying that failover support is working” on page 28
Configuring the hot standby feature for hub monitoringservers
The two hub Tivoli Enterprise Monitoring Servers that you configure for hotstandby (the primary hub and the secondary hub) must be exact copies or mirrorsof each other:v The IBM Tivoli Monitoring software on both hub monitoring servers must be at
the same release and maintenance level.v Both hub Tivoli Enterprise Monitoring Servers must be on the same IBM Tivoli
Monitoring level of code and maintenance.v Application support for all required applications must be installed on both
monitoring servers.v The settings for the KMS_SDA parameter on the primary and secondary Tivoli
Enterprise Monitoring Servers must match. A mismatch is reported in themonitoring server operational log (MSG2) and in audit logging with message IDKQMSD100.
Perform the following procedures to configure the primary hub and secondary hubmonitoring servers for the hot standby feature. These procedures and the examplesare ordered as if both hub monitoring servers are installed on the same operatingsystem. However, it is possible to have one hub on a Windows system and theother hub on a UNIX system. Complete the procedure that applies to each system.
On Windows systems: Configuring the hot standby feature forhub Tivoli Enterprise Monitoring ServerComplete the following steps to configure the primary hub and secondary hubmonitoring servers for the hot standby feature on Windows. On the configurationwindows shown as examples in this procedure, the primary hub is namedHUB_PRIMARY and the secondary hub is named HUB_SECONDARY. Actualnames can be different.
Configuring the primary hub:About this task
Install the two hub Tivoli Enterprise Monitoring Servers and then complete thefollowing steps to configure the primary hub to point to the secondary hub as itsbackup or standby server:
Chapter 3. The hot standby option 21

Procedure
1. On the Manage Tivoli Monitoring Services window on the server that willcontain the primary hub, right-click the name of the monitoring server that youare going to use as the primary hub, and click Reconfigure.The monitoring server stops automatically.
2. Complete the following steps on the Tivoli Enterprise Monitoring ServerConfiguration window:a. Enter the name of the primary hub in the TEMS Name field.b. Select the Configure Hot Standby TEMS check box to configure the
secondary hub as a standby server for the primary hub.c. Specify the protocols used by the secondary hub. These protocols must be
the same for both monitoring servers (the primary hub and secondary hub).Figure 4 shows an example of a completed configuration window:
d. Click OK.3. On the Hub Tivoli Enterprise Monitoring Server Configuration window, enter
the host name or IP address of the primary hub and verify the communicationsettings for this server. Click OK.
4. On the Hub TEMS Configuration for Hot Standby window, specify thesecondary hub as the standby server for the primary hub. Enter the host nameor IP address of the secondary hub in the Hostname or IP Address field, asshown in the following example.
Figure 4. Tivoli Enterprise Monitoring Server Configuration window: primary hub configuration
22 IBM Tivoli Monitoring: High Availability Guide for Distributed Systems

5. Click OK.6. Restart the monitoring server.
Configuring the secondary hub:About this task
Complete the following steps to configure the secondary hub to point to theprimary hub as its backup or standby server:
Procedure
1. On the Manage Tivoli Monitoring Services window on the Server that willcontain the primary hub, right-click the name of the monitoring server that youare going to use as the secondary hub, and click Reconfigure.The monitoring server stops automatically.
2. Complete the following steps on the Tivoli Enterprise Monitoring ServerConfiguration window:a. Enter the name of the secondary hub in the TEMS Name field.b. Select the Configure Hot Standby TEMS check box to configure the
primary hub as a standby server for the secondary hub.c. Specify the protocols used by the primary hub. These protocols must be the
same for both monitoring servers (the primary hub and secondary hub).Figure 6 on page 24 shows an example of a completed configurationwindow:
Figure 5. Specifying the secondary hub as a backup or standby server for the primary hub
Chapter 3. The hot standby option 23
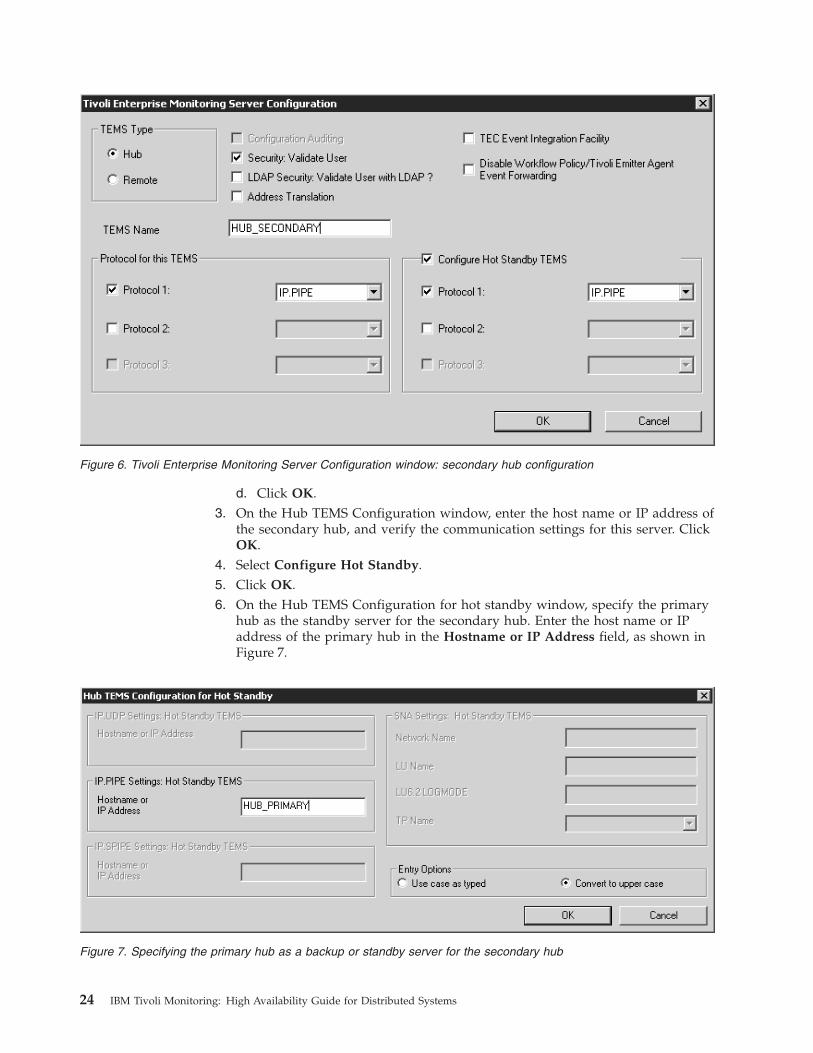
d. Click OK.3. On the Hub TEMS Configuration window, enter the host name or IP address of
the secondary hub, and verify the communication settings for this server. ClickOK.
4. Select Configure Hot Standby.5. Click OK.6. On the Hub TEMS Configuration for hot standby window, specify the primary
hub as the standby server for the secondary hub. Enter the host name or IPaddress of the primary hub in the Hostname or IP Address field, as shown inFigure 7.
Figure 6. Tivoli Enterprise Monitoring Server Configuration window: secondary hub configuration
Figure 7. Specifying the primary hub as a backup or standby server for the secondary hub
24 IBM Tivoli Monitoring: High Availability Guide for Distributed Systems

7. Click OK.8. Restart the monitoring server on the hub Primary server.
On Linux or UNIX systems: Configuring the hot standby featurefor hub monitoring serversComplete the following steps to configure the primary hub and secondary hubmonitoring servers for the hot standby feature on Linux or UNIX computers.
Configuring the primary hub:About this task
Install two hub Tivoli Enterprise Monitoring Servers and then complete thefollowing steps to configure the primary hub to point to the secondary hub as itsbackup or standby server:
Procedure
1. On the Manage Tivoli Monitoring Services window on the server whichcontains the Hub Primary, right-click the name of the monitoring server thatyou are going to use as the primary hub, and click Configure.
2. Click the Advanced Settings tab.3. Select Specify Hot Standby.4. Type the host name of the secondary hub in the Standby TEMS Site field.5. Select the type of protocol to use for hot standby. This should be the same
protocol on both the primary hub and the secondary hub.6. If you specified any backup protocols for the primary hub, specify identical
protocols for the secondary hub.7. Click Save.8. Stop and restart the monitoring server.
Configuring the secondary hub:About this task
Complete the following steps to configure the secondary hub to point to theprimary hub as its backup or standby server:
Procedure
1. On the Manage Tivoli Monitoring Services window on the server to containHub Secondary, right-click the name of the monitoring server that you aregoing to use as the secondary hub, and click Configure.
2. Click the Advanced Settings tab.3. Select Specify Hot Standby.4. Type the host name of the primary hub in the Standby TEMS Site field.5. Select the type of protocol to use for hot standby. This should be the same
protocol on both the primary hub and secondary hub.6. If you specified any backup protocols for the secondary hub, specify identical
protocols for the primary hub.7. Click Save.8. Stop and restart the monitoring server.
Chapter 3. The hot standby option 25

Configuring the hot standby feature for remote monitoringservers
Configure remote monitoring servers to switch to a standby hub monitoring serverwhen the acting hub monitoring server becomes unavailable. Configure all remotemonitoring servers consistently by specifying the primary hub as the hub to whichthey connect and the secondary hub as the standby hub.
On Windows systems: Configuring the hot standby feature forremote monitoring serversAbout this task
Complete the following steps on Windows to configure a remote monitoring serverto switch to a standby hub when the acting hub monitoring server becomesunavailable:
Procedure1. On the Manage Tivoli Monitoring Services window, right-click the name of a
remote monitoring server, and click Reconfigure.The monitoring server stops automatically.
2. Complete the following steps on the Tivoli Enterprise Monitoring ServerConfiguration window:a. In the TEMS Type field, select Remote to indicate that this is a remote
monitoring server.b. Enter the name of the remote monitoring server in the TEMS Name field.c. Select the Configure Hot Standby TEMS check box to configure a Standby
server.d. Specify the protocols used by the Standby server. The protocols are the
same for the primary hub and secondary hub.Figure 8 on page 27 shows an example of a completed configurationwindow:
26 IBM Tivoli Monitoring: High Availability Guide for Distributed Systems

e. Click OK.3. On the Hub TEMS Configuration window, enter the host name or IP address of
the primary hub, and verify the communication settings for this server. ClickOK.
4. On the Hub TEMS Configuration for Hot Standby window, specify thesecondary hub as the standby server. Enter the host name or IP address of thesecondary hub in the Hostname or IP Address field.
5. Click OK.6. Restart the remote monitoring server.
On Linux or UNIX systems: Configuring the hot standby featurefor remote monitoring serversAbout this task
Complete the following steps on Linux or UNIX systems to configure a remotemonitoring server to switch to a standby hub when the active hub monitoringserver becomes unavailable:
Procedure1. On the Manage Tivoli Monitoring Services window, right-click the name of a
remote monitoring server, and click Configure.2. Click the Advanced Settings tab.3. Select Specify Hot Standby.4. Type the host name of the secondary hub in the Standby TEMS Site field.5. Select the type of protocol to use for hot standby. This is the same protocol on
both the primary hub and secondary hub.6. If you specified any backup protocols for the hub monitoring servers, specify
identical protocols for the remote monitoring server.
Figure 8. Configuring hot standby for a remote monitoring server
Chapter 3. The hot standby option 27

7. Click Save.8. Stop and restart the monitoring server.
Configuring the hot standby feature for monitoring agentsAbout this task
Configure any monitoring agents that report directly to the hub monitoring server,the Warehouse Proxy Agent, and the Summarization and Pruning Agent to switchto a standby hub monitoring server when the Active hub monitoring serverbecomes unavailable. Configure all agents consistently by specifying the primaryhub as the hub to which they connect and the secondary hub as the standby hub.Complete the following steps:
Procedure1. On the Manage Tivoli Monitoring Services window, right-click a monitoring
agent, and click either Reconfigure (on Windows systems) or Configure (onUNIX systems).
2. Select Optional: Secondary TEMS Connection, and specify the protocol for thestandby monitoring server.On UNIX agents, click Protocols to display a separate window where you canconfigure the standby server (secondary hub).Figure 9 shows an example of a completed configuration window on Windowssystems:
3. Click OK.4. Enter the host name or IP address of the primary hub and the port number,
and click OK.5. Enter the host name or IP address of the secondary hub, and click OK.6. Restart the monitoring agent.
Verifying that failover support is workingTo verify that the failover support provided by the hot standby feature is working,take your hub monitoring server offline by stopping it in Manage TivoliMonitoring Services. When the hub monitoring server has stopped, reconfigure theTivoli Enterprise Portal Server to point to the backup monitoring server, and restart
Figure 9. Configuring a Windows monitoring agent to connect to a standby hub monitoring server
28 IBM Tivoli Monitoring: High Availability Guide for Distributed Systems

the portal server. Open the Tivoli Enterprise Portal. If everything is configuredcorrectly, you can open the portal and view data.
Self describing feature in a failover environmentIn a failover environment, files required for the self describing feature arereplicated to the mirror monitoring server and audit records clearly indicate if selfdescribing installations at the mirror are initiated by failover.
If the self describing feature is enabled in a failover environment, the followingbehaviors take place:v Tivoli Enterprise Monitoring Server monitoring definitions, such as situations,
distributions, and calendars, are replicated directly, as in the past, to the standbymirror monitoring server.
v Application installation records are replicated and allow the mirror to collect selfdescribing support files from the primary hub monitoring server so thatapplication support is installed on the mirror and Tivoli Enterprise Portal Serverand browser support files are available for a portal server that might connect tothe mirror.
v Self describing agent configuration option settings are replicated.v Pending self describing agent requests are cancelled when a hub switch takes
place to avoid connection error. These requests are redriven when the first agentof that product connects to the new acting primary hub.
Chapter 3. The hot standby option 29

30 IBM Tivoli Monitoring: High Availability Guide for Distributed Systems

Chapter 4. The clustering of IBM Tivoli Monitoringcomponents
This chapter provides an overview of the clustering of IBM Tivoli Monitoringcomponents, some supported clustering configurations, and instructions on thesetup of IBM Tivoli Monitoring components in a clustered environment. Thischapter also includes information on the operations of the Tivoli Monitoringinfrastructure in a clustered environment when encountering a failover or failback.Failback is the process of moving resources back to their original node after thefailed node comes back online.
Clustering overviewThis section uses clustering techniques to provide an overview of IBM TivoliMonitoring high availability. In addition to a brief overview of clustering, thissection includes requirements for preparing to create clusters with TivoliMonitoring components; it also describes the supported IBM Tivoli Monitoringcluster configurations, provides an overview of the setup steps, and describes theexpected behavior of the components running in a clustered environment.
Detailed instructions on how to set up Tivoli Monitoring components on differentcluster managers are provided in the following chapters.
Review the following concepts to enhance your understanding of clusteringtechnology:
ClusterA cluster is a group of individual computer systems working together toprovide increased application availability.
FailbackFailback is the process of moving resources back to their original nodeafter the failed node comes back online.
FailoverFailover is the process of taking resource groups offline on one node andbringing them back on another node. Resource dependencies are respected.
Node A node is a computer system that is a member of a cluster.
ResourceA resource is a physical or logical entity that can be managed by a cluster(that is, brought online, taken offline, or moved between nodes).
Resource groupResource groups are collections of resources that are managed as a singleunit and hosted on one node at any point in time.
Although clusters can be used in configurations other than basic failover (forexample, load sharing and balancing), the current IBM Tivoli Monitoring designdoes not support multiple, concurrent instances of the monitoring components. Forthis reason, this document addresses only IBM Tivoli Monitoring componentfailover.
© Copyright IBM Corp. 2010, 2012 31

Supported configurationsThe following clustering configurations are presented:
Configuration AThe hub monitoring server, portal server, and data warehouse (with theSummarization and Pruning Agent and Warehouse Proxy Agent) each havetheir own cluster.
Configuration BSame as Configuration A, but without the Summarization and PruningAgent and the Warehouse Proxy Agent in the data warehouse cluster.
Configuration CThe hub monitoring server, portal server, and data warehouse (with theSummarization and Pruning Agent and Warehouse Proxy Agent) areclustered on the same cluster.
The IBM Universal Database (DB2) is used as the database in all of theconfiguration tests. Other IBM Tivoli Monitoring-supported databases can also beclustered by following the specific database cluster setup procedures.
Note: All the clustering configurations include at least one agent that directlyreports to the hub. For simplicity, this configuration is not shown in theconfiguration diagrams that follow.
Configuration AThis configuration contains the following components:v Hub clusterv Portal server clusterv Data warehouse cluster (including the Summarization and Pruning Agent and
the Warehouse Proxy Agent)v Multiple remote monitoring servers (RT1, RT2, RT3) and agentsv Tivoli Enterprise Console integration
32 IBM Tivoli Monitoring: High Availability Guide for Distributed Systems

Configuration BIn this configuration, the Warehouse Proxy Agent and Summarization and PruningAgent run outside of the data warehouse cluster.
Figure 10. Separate component clusters
Chapter 4. The clustering of IBM Tivoli Monitoring components 33

Configuration CIn this configuration, all of the main components are clustered in one single cluster.There is also one agent running on the clustered environment that directly reportsto the hub; this agent has not been included in the picture for simplification.
This configuration represents a smaller scale deployment that is similar toConfiguration A. You must ensure that the computers used for such anenvironment have enough power to handle all the components. Although thebehavior of the clustered components do not change, the setup of IBM TivoliMonitoring on such an environment has some differences.
Figure 11. Separate component clusters, with the warehouse proxy agent and Summarization and Pruning Agentsoutside the data warehouse cluster
34 IBM Tivoli Monitoring: High Availability Guide for Distributed Systems

Setting up Tivoli Monitoring components in a clustered environmentThis section describes the overall procedure for setting up IBM Tivoli Monitoringcomponents on clustered environments.
IBM Tivoli Monitoring cluster setupA basic cluster setup includes two computers that participate as nodes in thecluster. Each computer must have two Network Interface Cards (NICs): one for theheartbeat function between the two computers, the other for public access.
The Tivoli Monitoring requirements for the cluster server are:v A shared persistent data storage for the IBM Tivoli Monitoring installation
directory and for any component-specific data.v A virtual IP address to be assigned to the component that runs on the cluster.
Figure 12. One cluster for the hub, portal server, and data warehouse
Chapter 4. The clustering of IBM Tivoli Monitoring components 35

Some important characteristics of a clustered IBM Tivoli Monitoring setup include:v The shared persistent storage and virtual IP Address must be available before
you can install IBM Tivoli Monitoring; also, the node where Tivoli Monitoring isinstalled must own these resources.
v Install an IBM Tivoli Monitoring component (such as the hub monitoring server)only once on the first node of the cluster (on the shared directory); then,configure it on the second node. In the Windows environment, this means thatthe IBM Tivoli Monitoring registry keys must be replicated to the second node.
v The IBM Tivoli Monitoring component must be bound to the virtual IP addresssuch that the infrastructure's other IBM Tivoli Monitoring components can reachit no matter which node it is running on. To do this, set the network interfacewhere the component listens on.
v Only one instance of the component can be active at a time.v When IBM Tivoli Monitoring is running under the cluster, its services cannot be
automatically started. Likewise, its services cannot be directly started or stoppedthrough the command line or through the Manage Tivoli Enterprise MonitoringServices GUI. Instead, the services must be controlled through the clustermanager.
The following table shows the high-level steps required to set up the main TivoliMonitoring components running in a cluster.
Table 3. Basic steps to set up Tivoli Monitoring on a cluster
Step Hub monitoring server Portal server
Data warehouse(Summarization andPruning Agent andWarehouse Proxy Agentoptional)
1 Install the databasesoftware.
Configure the databasesoftware for the cluster.
Install the databasesoftware.
Configure the databasesoftware for the cluster.
2 Create the cluster.
Define the resource groupwith resources:
v Virtual IP
v Shared persistent storage
Create the cluster.
Define the resource groupwith resources:
v Virtual IP
v Shared persistent storage
v Database
Create the cluster.
Define the resource groupwith resources:
v Virtual IP
v Shared persistent storage
v Database
3 Install and set up themonitoring server on thefirst node of the cluster.
Set up the monitoringserver on the second nodeof cluster.
Install and set up theportal server on the firstnode of the cluster.
Set up the monitoringserver on the second nodeof cluster.
Install and set up theSummarization andPruning Agent andWarehouse Proxy Agent onthe first node of thecluster.
Set up the Summarizationand Pruning Agent andWarehouse Proxy Agent onthe second node of thecluster.
36 IBM Tivoli Monitoring: High Availability Guide for Distributed Systems

Table 3. Basic steps to set up Tivoli Monitoring on a cluster (continued)
Step Hub monitoring server Portal server
Data warehouse(Summarization andPruning Agent andWarehouse Proxy Agentoptional)
4 Add the monitoring serveras a resource to theresource group.
Add the portal server as aresource to the resourcegroup.
Add the Summarizationand Pruning Agent andWarehouse Proxy Agent asa resource to the resourcegroup.
Monitoring server setupAbout this task
The monitoring server cluster resources include:v Shared persistent storagev Virtual IP addressv Monitoring server service
The generic setup of the hub monitoring server on a cluster includes the followingsteps:
Procedure1. Set up the basic cluster resource group with a shared persistent storage and
virtual IP address.2. Install the monitoring server on the first node of the cluster (shared persistent
storage).3. Remove automatic startup of the monitoring server service (if applicable to
your platform).4. Bind the monitoring server to the virtual IP address.5. Set up the monitoring server on the second node of the cluster (depending on
the platform, this might involve copying registry keys, environment variables,or both to the second node).
6. Add the monitoring server as a resource to the resource group.
Note: The specific setup of the monitoring server on different platforms andcluster managers has variations.
Portal server setupAbout this task
The portal server cluster includes the following resources:v Shared persistent storagev Virtual IP addressv Database middleware (such as DB2)v Portal server service
The generic setup of the portal server on a cluster includes the following steps:
Chapter 4. The clustering of IBM Tivoli Monitoring components 37

Procedure1. Install the database middleware locally on both nodes.2. Set up the database users and groups to be exactly the same on both nodes.3. Remove automatic startup of the database middleware, so it can run under
cluster control.4. Set up the basic cluster resource group with shared persistent storage, virtual
IP address, and the database middleware.5. Create the portal server database on the first node of the cluster (shared
persistent storage).6. Catalog the portal server database on the second node of the cluster.7. Install the portal server on the first node of the cluster (shared persistent
storage).8. Disable autostart of the portal server service (if applicable to your platform).9. Bind the portal server to the virtual IP address.
10. Set up the monitoring server on the second node of the cluster (depending onthe platform, this might involve copying registry keys, environment variables,or both to the second node).
11. Add the portal server as a resource to the resource group.
Note: The setup of the portal server on different platforms and clustermanagers has variations; in this document, the setup is described for thespecific cluster managers mentioned in this document.
Data warehouse setupThe data warehouse cluster includes the following resources:v Shared persistent storagev Virtual IP addressv Database middleware (such as DB2)v Warehouse Proxy Agent and Summarization and Pruning Agent processes
(optional)
The generic setup of the data warehouse on a cluster involves the following steps:1. Install the database middleware locally on both nodes.2. Set up the database users and groups to be exactly the same on both nodes.3. Remove automatic startup of the database middleware, so it can run under
cluster control.4. Set up the basic cluster resource group with shared persistent storage, virtual IP
address, and the database middleware.5. Create the data warehouse database on the first node of the cluster (shared
persistent storage).6. Catalog the data warehouse database on the second node of the cluster.
The following steps are necessary only if the Summarization and Pruning Agentand the Warehouse Proxy Agent are included in the cluster. Otherwise, these stepsare optional:1. Install the Summarization and Pruning Agent and the Warehouse Proxy Agent
on the first node of the cluster (shared persistent storage).2. Disable automatic startup of the Summarization and Pruning Agent and
Warehouse Proxy Agent services (if applicable to this platform).
38 IBM Tivoli Monitoring: High Availability Guide for Distributed Systems

3. Bind the Summarization and Pruning Agent and the Warehouse Proxy Agent tothe virtual IP address.
4. Set up the Summarization and Pruning Agent and Warehouse Proxy Agent onthe second node of the cluster (depending on your platform, this might involvecopying the registry keys or environment variables or both to the second node).
5. Add the Summarization and Pruning Agent and Warehouse Proxy Agent asresources to the resource group.
What to expect from the IBM Tivoli Monitoring infrastructure in aclustered environment
In general, when a failover or failback of a clustered component occurs, the TivoliMonitoring components operate as if the clustered element has been restarted.
Clustered hub monitoring server
When the hub server is configured as a cluster, and failover or failback occurs, theconnected Tivoli Monitoring components operate as if the hub has been restarted.When failover or failback occurs, the other components automatically reconnect tothe hub and some synchronization takes place.
After reconnection, as part of the remote monitoring server to hub synchronization,all situations that are the responsibility of the remote monitoring server(distributed to the monitoring server itself or to one of its connected agents) arerestarted. This restarting of situations represents the current behavior for allreconnection cases between remote monitoring servers and the hub, despite theclustered environments. See “Situations” on page 41 for more information.
For agents directly connected to the hub, there might be periods in which situationthresholding activity on the connected agents does not occur because, when aconnection failure to the reporting hub is detected, the situations are stopped. Assoon as the connection is reestablished, the synchronization process takes place andsituations are restarted. (Note that historical metric collection is not stopped.)
The portal server, the Summarization and Pruning Agent, and the warehouseproxy agent reconnect to the hub and perform any synchronization steps necessary.
The occurrence of a hub restart depends on the size of the environment (includingthe number of agents and situations). Initially, you are notified that the portalserver has lost contact with the monitoring server, and views might be unavailable.When the portal server reconnects to the hub, the Enterprise default workspace isdisplayed, allowing access to the Navigator Physical view. However, some agentsmight have delays in returning online (due to the reconnection timers) and triggerpolled situations again (when the situations are restarted by the agents).
While the hub failover or failback (including the startup of the new hub) might bequick (approximately 1-3 minutes), the resynchronization of all elements to theirnormal state might be delayed in large-scale environments with thousands ofagents. This behavior is not specific to a cluster environment, but valid anytime thehub is restarted, or when connections from the other Tivoli Monitoringcomponents to the hub are lost and later reestablished.
Chapter 4. The clustering of IBM Tivoli Monitoring components 39

Clustered portal server
When the portal server is clustered and failover or failback occurs, the connectedTivoli Monitoring components operate as if the portal server has been restarted.The components that connect to the portal server include the portal consoles andthe Summarization and Pruning Agent (at the start of its summarization andpruning interval).
When a portal client loses connection to the portal server, the user is notified andsome views become unavailable. When the portal client reestablishes connectionwith the portal server, the home workspace is displayed and the Navigatorrefreshes.
If the Summarization and Pruning Agent is connected to the portal server at thetime of portal server failover, it loses the connection and attempts to reestablishcontact on the next Summarization and Pruning Agent interval.
Clustered data warehouse
When the data warehouse is set up as a cluster, the Tivoli Monitoring componentsconnected to the data warehouse respond to the data warehouse failover orfailback as a database restart. The components that connect to the data warehousedatabase include the summarization and pruning agent, Warehouse Proxy Agent,and portal server (when retrieving long term data collection for the portalworkspace views).
When the Summarization and Pruning Agent loses contact with the datawarehouse database, it attempts to reestablish contact on the next summarizationand pruning agent interval and then restart its work.
When the Warehouse Proxy Agent loses contact with the data warehouse database,it attempts to reestablish the connection and restart its work.
When the portal server loses contact with the data warehouse, it reconnects on thenext query request from a portal client.
Clustered Summarization and Pruning Agent
When the data warehouse cluster resource group includes the clusteredSummarization and Pruning Agent, the agent fails together with the datawarehouse database and must be restarted after the data warehouse. While theSummarization and Pruning Agent uses transactions for its operations to the datawarehouse database, it resumes its summarization and pruning work where it leftoff prior to failure.
Clustered Warehouse Proxy Agent
When the Warehouse Proxy Agent is part of the data warehouse cluster resourcegroup, the proxy agent fails together with the data warehouse database and mustbe restarted after the data warehouse. The Warehouse Proxy Agent then resumesthe work of uploading the short-term data collection to the data warehouse.
40 IBM Tivoli Monitoring: High Availability Guide for Distributed Systems

Clustered agentless monitoring
With the Agentless Monitoring Server now maintaining connections to hundreds ofservers, it becomes a more critical component in the infrastructure than a singleagent instance.
The following two options are available:v Option 1: Run the Agentless Monitoring Server within an Operating System
cluster. The cluster provides the desired HA functionality.v Option 2: Develop a set of custom situations, take action commands, and scripts
in IBM Tivoli Monitoring to natively monitor the Agentless Monitoring Serverstatus.– Two Agentless Monitoring Servers are configured, with environment files
modified to register to IBM Tivoli Monitoring with the same system name.The primary Agentless Monitor is started, while the backup AgentlessMonitor is offline.
– Periodic scripting is done to synchronize the configurations between the twoAgentless Monitors.
– If the Primary Agentless Monitor goes offline, the self-monitoring situationtriggers, forwarding information to the event console for problemdetermination.
– A Take Action command associated with the situation issues a start commandto the backup Agentless Monitor.
When you use Agentless Monitoring, a percentage of preparation time needs to bedevoted to verifying the native data emitter configurations. Complete the followingpreparation tasks:v Ensure that the SNMP daemons are installed, configured, and startedv Verify the MIB branches in SNMP configuration filesv Verify all Windows passwords and user account rights for Windows API
collectionv Verify that the following patch levels for endpoint systems are installed:
– AIX and SLES 9 systems are most likely to require SNMP patches– Solaris CIM-XML systems are most likely to require CIM patches– RedHat, HP-UX, and Windows agents typically operate as delivered. If
possible, use tools such as snmpwalk, WMIExplorer, and perfmon to verifythe metrics are configured before configuring IBM Tivoli Monitoring tomonitor the environments
Note: Single-computer installations have no problems for small environmentswhere you want to monitor less than 50 remote systems.
For information on Agentless monitoring, see the IBM Tivoli Monitoring: InstallationGuide.
Situations
Situations might be affected by failures on the hub, the remote monitoring server,and at the agent. During a hub cluster failover, situations are affected in the sameway as a restart of the hub or a disconnection of the hub from the othercomponents.
Chapter 4. The clustering of IBM Tivoli Monitoring components 41

When a remote monitoring server loses connection with the hub and thenreestablishes contact, the server synchronizes after reconnection. This processinvolves restarting all the situations under that remote monitoring server’sresponsibility. Polled situations are triggered on the next polling interval, but pureevents that were opened before the failure are lost. Use an event managementproduct, such as Tivoli NetCool/OMNIbus or Tivoli Enterprise Console, as thefocal point for storing and manipulating historical events from all event sources.
If you have agents directly connected to the hub, the situations distributed to themare stopped when connection is lost, and the situations are restarted when theagent reconnects to the hub. This behavior also applies for agents that areconnected to a remote monitoring server and lose connection to it.
Workflow policies
Workflow policies can be set to run at the hub. If the hub fails over while aworkflow policy is running, the processing stops and then restarts at the beginningof the workflow policy (upon restart of the hub and triggering).
Short-term data collection
When a hub failover or failback occurs, remote monitoring servers and agentsreconnect to it, causing all situations to be restarted.
Short-term data collection is performed at the agents through special internalsituations called UADVISOR. These situations are also restarted and collect dataonly after the next full interval has passed, resulting in the loss of the datagathered in one collection interval.
Long-term data collection
The Warehouse Proxy and Summarization and Pruning Agents connect to the hub.After a hub failover or failback occurs, the proxy and agent reconnect to it withoutimpacting their work on the data warehouse.
Tivoli Enterprise Console event integration
When Tivoli Monitoring is configured to forward events to the Tivoli EnterpriseConsole event server, it sends a “MASTER_RESET” event to the event server everytime the hub is restarted. This behavior also occurs after failover or failback for aclustered hub. The purpose of this event is to signal to the event server that themonitoring server restarted all its situations and that the event server receives anew set of currently triggered situations. As a result of the default Tivoli EnterpriseConsole rule for Tivoli Monitoring integration, all the events that came from thehub Tivoli Enterprise Monitoring server are closed. Although this closing of eventsensures that both Tivoli Monitoring and Tivoli Enterprise Console have consistenttriggered situations and events, this behavior might not be desirable in someenvironments. For example, this behavior closes pure events that are not reopeneduntil the next pure event occurs. In such cases, you can filter out theMASTER_RESET event either at the hub (event integration facility configurationfile) or at the event server by using the Tivoli Enterprise Console rules. In this case,the rules must process duplicate events caused by the restarted situations.
42 IBM Tivoli Monitoring: High Availability Guide for Distributed Systems
Maintenance
The maintenance requirements of a Tivoli Monitoring environment (patches, fixpacks, or release upgrades) when running in a cluster resemble those of runningan unclustered Tivoli Monitoring environment. The cluster controls the startingand stopping of Tivoli Monitoring services. To return this control to the installationprocedure, you must stop the cluster while the maintenance is being performed.Also, due to current restrictions of the Tivoli Monitoring installation procedures,some settings that are completed during Tivoli Monitoring cluster setup mightneed to be repeated after the maintenance is completed and before the cluster isrestarted.
In a Tivoli System Automation for Multiplatform environment, you will need toswitch off the automatic clustering when upgrading your environment. Byswitching off the clustering, you prevent the components, stopped by the installer,from restarting during the upgrade. However, you must keep the basic resourcesonline (such as VIP and shared disk).
Also, when using the UNIX or LINUX installer, you must remove the inittabentries again after maintenance. The installer adds the inittab entries again despitehaving been removed in the previous installation of the cluster. The failure toremove the inittab entries might cause problems in your environment.
Chapter 4. The clustering of IBM Tivoli Monitoring components 43

44 IBM Tivoli Monitoring: High Availability Guide for Distributed Systems

Chapter 5. Creating clusters with Tivoli Monitoringcomponents in an HACMP environment
This chapter provides information on installing and configuring IBM TivoliMonitoring components in High Availability Cluster Multiprocessing (HACMP)environments under the AIX operating system.
In the environment described, each cluster is set up with a single quorum deviceand two nodes. For HACMP-specific cluster terminology, see the HACMP V5.3Concepts and Facilities Guide (SC23-4864).
Important: The following configurations and operational procedures for highavailability have been tested by IBM Software Support and represent supportedproduct functions. Other configurations or procedures are possible but might beoutside of product design parameters; therefore, other configurations or proceduresmight not operate correctly or be supported.
Preparing for the base clusterBefore defining the base cluster, you must gather cluster nodes information andcheck the cluster nodes environment as described in the following sections.
Gathering cluster nodes informationBefore defining the base cluster, you need the following information:v The host names of both cluster nodes, for example:
clusternode1 clusternode2
Typically, failover clusters have a private pair of network interface cards (NICs)for their heartbeat communications and a public pair for communication withthe outside environment. Therefore, you need the host names of the privateNICs. It is not necessary to have these host names defined on the domain namesystem (DNS); they can be defined only in the local host tables (/etc/hosts) ofeach node.
v The mount point name of the shared file system. The name must be the same onboth nodes. Example of the mount point name:/shareddisk
v The device name of the shared disk that will be mounted to that mount point.The name must be the same on both nodes. Example of the device name:dev/sdc1
v The type of file system on the shared disk, for example:jfs
v The virtual IP address and netmask.v The Ethernet numbers of the public network cards of both nodes, which will
host the virtual IP address, for example:en0 on clusternode1en3 on clusternode2
v The interface name. To determine the interface name, run the ifconfig command.
© Copyright IBM Corp. 2010, 2012 45

Checking the cluster nodes environmentBefore you install the base cluster, check the environment thoroughly:v Ensure that the domain name system for all network interface cards resolves
correctly.v Ensure that all entries for host names (in the local host table /etc/hosts) are set
in the same order on both computers. For example, if clusternode1 /etc/hostscontains:10.0.0.1 host.domain.com host
The /etc/hosts on clusternode2 should also contain10.0.0.1 host.domain.com host
and not:10.0.0.1 host host.domain.com
v Ensure that the host tables have no double entries for the local host. UnderSUSE SLES10, using 2 NICs, you might see the following two entries:localhostlocalhost
If you find a second entry, be sure to remove it. If there are double entries, TivoliMonitoring installation fails.
v Ensure that the domain name system works for the virtual IP address that willbe used for the cluster. (The provided scripts assume that the virtual IP addressis on the same subnet as the nodes’ IP addresses.)
v Verify that the future virtual IP address is a valid address.v Ensure that this IP address is valid for the configured addresses on the public
network interface cards of the cluster nodes (same range and subnet).v Verify, on both nodes, that the shared disk will not be mounted automatically
during startup.
Defining the base cluster for Tivoli MonitoringTo install the Tivoli Monitoring platform components (hub Tivoli EnterpriseMonitoring Server, Tivoli Enterprise Monitoring Server, Tivoli Enterprise PortalServer, or Tivoli Data Warehouse components) on an HACMP cluster, you firstneed to set up a base cluster resource group with some prerequisite resources.
The base HACMP cluster resource group needed for the hub monitoring serverincludes the following resources:v A shared file system for the monitoring server installation and data.v A virtual (service) IP Address for the monitoring server.
The base HACMP cluster resource group needed for the portal server and datawarehouse components includes the following resources:v A shared file system for the portal server and data warehouse components
installation.v A virtual IP address for the portal server and data warehouse components.v A relational database, which is a prerequisite for both the portal server and the
data warehouse.
46 IBM Tivoli Monitoring: High Availability Guide for Distributed Systems

Building a base HACMP cluster for the monitoring server
To build a base HACMP cluster for the monitoring server, you must configure thefollowing components:v HACMP resource group for the monitoring serverv Service IP address for the monitoring serverv File system for the monitoring serverv Monitoring server resource group
Also verify your cluster configuration after completing these configurations.
Configuring an HACMP resource group for the monitoring server
Use the smit hacmp command to configure the resource group for the monitoringserver.
Configuring a service IP address for the monitoring server
Make sure that the domain name system resolves the virtual (service) host namecorrectly. Create a resource by using the virtual IP address for the service IPaddress. (See the HACMP for AIX Administration Guide V5.3.)
Configuring a file system for the monitoring server as a sharedresource
Create a file system on the shared disk, for example, /sharedisk/IBM/ITM. Also,create a cluster shared resource for this shared file system. (See the HACMP forAIX Administration Guide V5.3.)
Creating a monitoring server resource group
Create a resource group for the monitoring server using a unique resource groupname. Assign the defined resources to this resource group. (See the HACMP forAIX Administration Guide V5.3.)
Verifying and synchronizing the cluster configuration
Verify your cluster configuration after the previous steps have been completed. Fixany errors found during verification before proceeding. (See the HACMP for AIXAdministration Guide V5.3.) Review the smit.log (SMIT console messages) andensure that the cluster services were started correctly and that all nodes aresynchronized.
Building a base HACMP cluster for the portal server and datawarehouse components
For the portal server and data warehouse components (Warehouse Proxy Agentand the Summarization and Pruning Agent), you need one additional resource, theunderlying DB2 database.
In this case, you first install the IBM DB2 database locally on each node. Thedatabase is created later, when the cluster is up and running.
Chapter 5. Creating clusters with Tivoli Monitoring components in an HACMP environment 47

Installing DB2 for the base HACMP clusterAbout this task
There are several ways to install a DB2 database in a clustered environment; theconfiguration described in this section is one of many scenarios.
The basic cluster resources required for this DB2 configuration, the shared filesystem, and the virtual IP address, might already be online on the active node.These resources will be required post-installation.
For installing the DB2 server, the DB2 Enterprise Server Edition version 9.1 is used.
Install the DB2 database and its services locally on each cluster node. Accept thedefault directory as the installation directory. Ensure that the DB2 user IDs arecreated using the same group ID (GID) and user ID (UID) on each node.
During the installation, create an instance, usually db2inst1.
Procedure1. Turn off the automatic startup of the DB2 server on each node.2. As the root user:
cd sqllib/instance./db2iauto -off db2inst1
3. Edit the file /etc/inittab on both nodes and comment out this line:fmc:2345:respawn:/opt/IBM/db2/V9.1/bin/db2fmcd #DB2 Fault Monitor Coordinator
4. Stop the DB2 on each node. To do so, switch to the user ID of the instanceowner and run this command:db2stop
Creating the database for the portal server or data warehouseon clusternode1
About this task
The last step is to create the database, either for the portal server or for the datawarehouse:
Procedure1. Bring the basic cluster resources online on clusternode1 if you have not already
done so.2. Create a directory for the database on the shared file system:
/sharedFS/DBdirectory
3. Grant full access to or ownership of this directory to the DB2 instance owner,usually to the user db2inst1.
4. Switch to the user ID of the instance owner.5. Create a database using the DB2 CLI on the active node, using one of these
commands:v for the portal server:
db2 create database <DBName> on /sharedFS/DBdirectory
v for the data warehouse:db2 create database <DBName> on /sharedFS/DBdirectory using codeset UTF-8territory US
48 IBM Tivoli Monitoring: High Availability Guide for Distributed Systems

6. Test the connection to the database using the command:db2 connect to <DBName>
7. After a successful connection, reset the connection with this command:db2 connect reset
8. Create a database user ID on both nodes with the same GID and UID, andgrant full access to the database to this user ID on clusternode1. Because of thesame IDs it should now also work for the same user on clusternode2.
Cataloging the portal server and the data warehouse databaseon clusternode2
About this task
To catalog the portal server and the data warehouse database on clusternode2,complete the following procedure:
Procedure1. Shut down the DB2 on clusternode1 and switch the basic resource group to
clusternode2.2. Catalog the database (both for the portal server and the Tivoli data warehouse
as the case might be) in this instance with this command:db2 catalog database <DBName> on /sharedFS/DBdirectory
3. Test the connection to the database (see above).4. Switch back to the root user.5. Test the connection to the database (see above).6. Now shut down the DB2 database on clusternode2.
What to do next
If you want to install a portal server in the cluster and the data warehouse is onanother computer, also catalog the data warehouse’s database server for this localDB2 as a remote database server on both nodes, so that the portal server can accessthis database later. For further information on this, consult the IBM TivoliMonitoring: Installation and Setup Guide on the Tivoli Monitoring Information center.
Adding the database to the base clusterAbout this task
To add the database to the base cluster, complete the following procedure:
Procedure1. Add the database to cluster resource group.2. Take the basic resource group offline using smit hacmp.3. Create a start/stop script (or two scripts, one for each purpose) in the same
local directory on each cluster node.The following examples show how the start/stop scripts can be created:db2start.shDB2BINDIR=/opt/IBM/db2/V9.1/binsu db2inst1 "-c $DB2BINDIR/db2 db2start"
db2stop.shDB2BINDIR=/opt/IBM/db2/V9.1/binsu db2inst1 "-c $DB2BINDIR/db2 db2stop"
Chapter 5. Creating clusters with Tivoli Monitoring components in an HACMP environment 49

Important: Ensure that the scripts have the executable flag set.4. Create an application server resource for the DB2 using smit hacmp.5. Add the application server resource to the basic cluster resource.6. Synchronize the cluster.7. Bring the cluster resource group online.
Results
DB2 now runs under the control of the HACMP, and you are now ready to installthe portal server, data warehouse, or Summarization and Pruning Agent.
Installing the monitoring server on its base HACMP clusterThis section provides the information for the installation of the monitoring serveron its base HACMP cluster.
Installing and setting up the monitoring server onclusternode1
Before installing the monitoring server, determine the directory on the shared filesystem into which the monitoring server will be installed. Also, decide on aHUBNAME for the monitoring server. You will need this HUBNAME during themonitoring server configuration.
These parameters have to be set during the installation of the monitoring server,and you will later need them to set the desired variables in the start/stop/monitorscript for the monitoring server.
Assume you have the following environment:v DNS 1st box: host1 (active cluster )v DNS name 2nd box: host2v Virtual host name (of the virtual network interface): virtualhost
When you have the base cluster for the monitoring server up and running, use thefollowing procedures to install the monitoring server:v “Upgrading the monitoring server installated”v “Pristine installation” on page 51
Upgrading the monitoring server installatedProcedure1. Determine which cluster node runs the resource group online by using the smit
hacmp command.2. On the active node, stop the monitoring server:
cd /sharedisk/IBM/ITM/bin./itmcmd stop server HUB_VIRTUALHOST
3. Start IBM Tivoli Monitoring V6.2.1 installation and upgrade the TivoliEnterprise Monitoring Server to version V6.2.1.
4. Reconfigure the monitoring server.You can change any settings except for the "TEMS Host Name". The "TEMSHost Name" value has to be preserved, pointing to the virtual host name("virtualhost").cd /sharedisk/IBM/ITM/bin./itmcmd config -S -t HUB_VIRTUALHOST
50 IBM Tivoli Monitoring: High Availability Guide for Distributed Systems

5. Overwrite files "host1_ms_HUB_VIRTUALHOST.config" and"host2_ms_HUB_VIRTUALHOST.config" with file"virtualhost_ms_HUB_VIRTUALHOST.config":cd /sharedisk/IBM/ITM/configcp virtualhost_ms_HUB_VIRTUALHOST.config host1_ms_HUB_VIRTUALHOST.configcp virtualhost_ms_HUB_VIRTUALHOST.config host2_ms_HUB_VIRTUALHOST.config
6. Start the monitoring server and add application support for the desired agenttypes to the monitoring server. For ux, lz, and nt:cd /sharedisk/IBM/ITM/bin./itmcmd server start HUB_VIRTUALHOST./itmcmd support -t HUB_VIRTUALHOST ux lz nt
Note: For an easier installation, install the application support for all plannedagents at the same time. If you also need database agents, use the databaseagent installation image to install the application support for them.
7. Recycle the monitoring system:./itmcmd server stop HUB_VIRTUALHOST./itmcmd server start HUB_VIRTUALHOST
8. Test the monitoring server on clusternode1 and clusternode2 following thesteps provided in “Testing the monitoring server on clusternode1” on page 52and “Setting up the monitoring server on clusternode2” on page 53.
Pristine installationProcedure1. Determine which cluster node runs the resource group online using smit hacmp.2. On the active node, install the monitoring server into your chosen directory on
the shared file system, as described in the IBM Tivoli Monitoring: Installation andSetup Guide.
3. Install the monitoring server on host1 (the active cluster) into /sharedisk/IBM/ITM (the mounted file system of step1).
Important: During installation, you are asked for the monitoring server name(HUB_VIRTUALHOST). Make note of the installation directory and the HUBNAMEfor further use.
4. Specify the virtual host name of the cluster when configuring the Tivolienterprise monitoring server host name.
5. Configure the monitoring server by using the following command:./itmcmd config -S -t HUB_VIRTUALHOST
During the configuration when you are asked for the monitoring server hostname, enter:virtualhost
6. You are prompted to determine if you want to specify the Primary NetworkAdapter. Type Y(es) and set it to virtualhost.The virtualhost sets the KDCB0_HOSTNAME variable in the KBBENV file of thismonitoring server, which is needed for binding onto the virtual adapter. Thissets the primary network adapter to the virtual host name of the cluster, whichensures that the agents and the portal server can later connect to themonitoring server on this IP address.
7. Start up the monitoring server and add the application support for the desiredagent types to the monitoring server. For ux, lz, and nt:./itmcmd server start HUB_VIRTUALHOST./itmcmd support -t HUB_VIRTUALHOST ux lz nt
Chapter 5. Creating clusters with Tivoli Monitoring components in an HACMP environment 51

It is best to install the application support for all planned agents at the sametime.If you also need database agents, use the database agent installation image toinstall the application support for them.
8. Recycle the monitoring server with these commands:./itmcmd server stop HUB_VIRTUALHOST./itmcmd server start HUB_VIRTUALHOST
Tivoli Enterprise Monitoring Server reconfiguration procedurefor the AIX HACMP environment
About this task
When Tivoli Enterprise Monitoring Server reconfiguration is needed, complete thefollowing procedure:
Procedure1. Configure the monitoring server:
cd /sharedisk/IBM/ITM/bin./itmcmd config -S -t HUB_VIRTUALHOST
Adjust settings as needed, however keep "TEMS Host Name" set to"virtualhost".
2. Overwrite files host1_ms_HUB_VIRTUALHOST.config andhost2_ms_HUB_VIRTUALHOST.config with filevirtualhost_ms_HUB_VIRTUALHOST.config:cd /sharedisk/IBM/ITM/configcp virtualhost_ms_HUB_VIRTUALHOST.config host1_ms_HUB_VIRTUALHOST.configcp virtualhost_ms_HUB_VIRTUALHOST.config host2_ms_HUB_VIRTUALHOST.config
3. Recycle the monitoring system:./itmcmd server stop HUB_VIRTUALHOST./itmcmd server start HUB_VIRTUALHOST
4. Test the monitoring server on clusternode1 and clusternode2. Test themonitoring server on clusternode1 and clusternode2, following the same stepsas for pristine installation. See “Testing the monitoring server on clusternode1”and “Testing the monitoring server failover to clusternode2” on page 58.
Testing the monitoring server on clusternode1The following sections provide information on testing the monitoring server onclusternode1.
Setting up the monitoring server cluster configuration
Perform additional verification of your cluster configuration by testing themonitoring server failover scenarios:v Manually migrate resource groups through the System Management (C-SPOC)
panel under the Manage HACMP Services SMIT panel.v Manually stop services (can also be done through the System Management
(C-SPOC) panel) on the higher priority node.v Create a custom test plan to automate the monitoring server failover testing.
(See HACMP for AIX Administration Guide V5.3.)
Connect one OS agent from any supported system (ux, lz, or nt ) to thismonitoring server, pointing onto the host name virtualhost.
52 IBM Tivoli Monitoring: High Availability Guide for Distributed Systems

You can connect a portal server to this monitoring server or use the CLI:v Log on to the monitoring server using ./tacmd login
v List the managed systems using ./tacmd listsystems
You see the hub monitoring server and the agent as two managed systems.
Setting up the monitoring server on clusternode2Procedure1. Shut down the monitoring server on clusternode1.2. Start smit hacmp and switch the cluster to host2.3. Log on at host2. You should see /sharedisk/IBM/ITM with the installed
monitoring server.4. Open a session on clusternode2 and install the IBM Global Services Kit (IBM
GSKit) locally on clusternode2. Make sure that the GSKit is installed in thesame file set on each machine (because the Tivoli Monitoring installer places itoutside the IBM Tivoli Monitoring directory), and then synchronize the clusteragain.
Hint: You can use the runtime environment (RTE) files to install the GSKit withthe SMITTY installer. The RTE files are in the appropriate tar file on the TivoliMonitoring V6.1 CD image, in the GSKit directory below the UNIX directory ofthe image.
5. Change to the following directory:/sharedisk/IBM/ITM/config
6. You find two configuration files for the monitoring server:host1_ms_HUB_VIRTUALHOST.configvirtualhost_ms_HUB_VIRTUALHOST.config
7. Create a copy of this file in the same directory:host1_ms_HUB_VIRTUALHOST.config
Name the copy:host2_ms_HUB_VIRTUALHOST.config
This is required. Otherwise, the startup of the monitoring server fails.
What to do next
Now you can start the monitoring server on host2 with this command:./itmcmd server start HUB_VIRTUALHOST
Check the managed systems with ./tacmd listsystems. After a few minutes, yousee that the agent is online again. If the monitoring server is configured to validateusers IDs, ensure that the users are registered with the local operating system onboth computers with the same user name as the one used to log on to the portalserver and a password.
Adding the monitoring server to the resource group of thebase cluster
After the installation of the monitoring server is complete, you now have tointegrate it into your base cluster so that it can run under the cluster’s control.
Chapter 5. Creating clusters with Tivoli Monitoring components in an HACMP environment 53

Creating start and stop scripts for the monitoring server
Create a start script and stop script in the same local directory on each node. Thescript can resemble this script:export CANDLEHOME=/sharedisk/IBM/ITM/$CANDLEHOME/bin/itmcmd server start HUB_VIRTUALHOST
The start and stop scripts contain the export of the CANDLEHOME variable,which is set to the installation directory of the monitoring server, such as/opt/IBM/ITM. The second line of the script runs the start command of themonitoring server. The stop script is almost identical except the stop commandreplaces the start command. Be sure that the scripts have the executable flag set.
Adding the monitoring server as an application server to thebase clusterNow you can create a new application server using smit hacmp. When it is created,stop the resource group that already contains the shared file system and the virtualIP address of the monitoring server, add the monitoring server resource as a newapplication server to this group, and synchronize the cluster.
Important: Do not try to add the server to the group while it is running.
Bring the resource group online. The monitoring server should be up and running.
Adding HACMP monitoring for the monitoring server processesUse HACMP monitoring to monitor the processes of any defined HACMPapplication server. In the event that the processes are not running, an attempt ismade to restart the component. Failover from the application server to the othernode occurs if the attempt fails; this behavior depends on the script that is definedto do the recovery action.
Because the monitoring server has two processes that must be running, bothprocesses should be stopped to restart the monitoring server. The two TivoliEnterprise Monitoring Server processes are kdsmain and cms.
A modified start script, that first checks if one or both processes are running, mightresemble the following script. Note that the following parameters were used on themonitor setup:v Monitor Mode: both
v Owner: root
v Instance count: 1
v Stabilization interval: 60
v Restart count: default 3 (depends on your environment)v Restart interval: 3 x 60 = 180
v Action on application failure: fallover
v Restart method: startscript
Additional scripts that call this script with the correct parameters must be created.
For additional information on how to set up an application server process monitor,see pages 102-112 of the HACMP for AIX Administration Guide V5.3.
A modified start script:
54 IBM Tivoli Monitoring: High Availability Guide for Distributed Systems

#!/bin/bash#---------------------------------------------------------------------## HACMP: HA start/stop/status script for <TEMSSRV>## Control <TEMSSRV># ==================## This script is to be used as Start/Stop/MonitorCommand# Invocation:## <$0>.ksh <Action> itm_installation_directory hubname## arg $1 <Action> is any one of: {start|stop|status}# arg $2 ITM installation directory# arg $3 ITM hub name#---------------------------------------------------------------------# intended IBM.Application definition# PersistentResourceAttributes::# Name="SA-<TEMSSRV>-rs"# ResourceType=1# NodeNameList="{${clusternode1},${clusternode2}}"# StartCommand=# StartCommandTimeout=# StopCommand=# StopCommandTimeout=# MonitorCommand=# MonitorCommandPeriod=# MonitorCommandTimeout=# UserName=root# RunCommandsSync=1#---------------------------------------------------------------------## Static#---------------------------------------------------------------------INVOCATION="$0 $@"Myname=`/bin/basename $0`USAGE="Usage: ${Myname} [start|stop|status] itm_installation_directory hubname"STATUS_UNKNOWN=0STATUS_ONLINE=1STATUS_OFFLINE=2STATUS_FAILED_OFFLINE=3STATUS_STUCK_ONLINE=4STATUS_PENDING_ONLINE=5STATUS_PENDING_OFFLINE=6
STARTSTOP_OK=0STARTSTOP_ERR=1
RC=0#---------------------------------------------------------------------## ArgumentsNumArgs=3#---------------------------------------------------------------------Action=${1:-status}CANDLEHOME=${2}HUBNAME=${3}#---------------------------------------------------------------------## Var (non-configurable)#---------------------------------------------------------------------## ...#---------------------------------------------------------------------## Var (configurable)#---------------------------------------------------------------------# SYSLOG_LVL - 0 is least detailed, 2 is most detailed.# written to syslogSYSLOG_LVL=1
#--- Verify the OS and set absolute paths to the binariesOS=`uname -s`
Chapter 5. Creating clusters with Tivoli Monitoring components in an HACMP environment 55

OSVERSION="`uname -v`"# do distro stuffif [ -a /etc/SuSE-release ]then
loggerPATH=/binelse
loggerPATH=/usr/binficase $OS in
AIX)INST_INTERP="AIX"BIN="/usr/bin"AWK_CMD="$BIN/awk"CAT_CMD="$BIN/cat"DATE_CMD="$BIN/date"PS_CMD="$BIN/ps"SU_CMD="$BIN/su"GREP_CMD="$BIN/grep"TEE_CMD="$BIN/tee"PIDMON_CMD="$BIN/pidmon"LOGGER_CMD="$BIN/logger"KILL_CMD="$BIN/kill";;
Linux)USRBIN="/usr/bin"BIN="/bin"AWK_CMD="$BIN/gawk"DATE_CMD="$BIN/date"CAT_CMD="$USRBIN/cat"PS_CMD="$BIN/ps"SU_CMD="$BIN/su"KILL_CMD="$BIN/kill"GREP_CMD="$USRBIN/grep"TEE_CMD="$USRBIN/tee"PIDMON_CMD="$USRBIN/pidmon"if [ -a /etc/SuSE-release ]; then
LOGGER_CMD="$BIN/logger"else
LOGGER_CMD="$USRBIN/logger"ficase `uname -m` in
*390*)INST_INTERP="LINUX_S390";;
*86*)INST_INTERP="LINUX_I386";;
*)INST_INTERP="LINUX_OTHER";;esac;;
esac#----------------------------------------------------# function: logit# arg $1 log level# arg $2 message#----------------------------------------------------function logit {
if [ $SYSLOG_LVL -ge $1 ]; thenecho ${Myname} "$2"${LOGGER_CMD} -i -t ${Myname}: "$2"
fi} #logit#----------------------------------------------------------------------## Main Section#----------------------------------------------------------------------
56 IBM Tivoli Monitoring: High Availability Guide for Distributed Systems

if [ $# != ${NumArgs} ]; thenecho ${USAGE}logit 0 "Bad Usage returning: 0"exit 0
fi
export CANDLEHOMEBINARCH=$CANDLEHOME/*/sy/binexport BINARCHexport HUBNAME
case ${Action} instart)
logit 1 "Start command issued"kdsmainproc=$($PS_CMD -ef | $AWK_CMD ’/kdsmain/ &&
!/awk/ {print $2}’)cmsproc=$($PS_CMD -ef | $AWK_CMD ’/cms start/ &&
!/awk/ {print $2}’)restart=0start=1if [[ $kdsmainproc != "" ]]; then
if [[ $cmsproc != "" ]]; thenstart=0
else$KILL_CMD -9 $kdsmainprocstart=1
fielse
if [[ $cmsproc != "" ]]; then$KILL_CMD -9 $cmsprocstart=1
fifi
if [[ $start = 1 ]]; then$SU_CMD - root -c "$CANDLEHOME/bin/itmcmd server
start $HUBNAME"RC=$?
elseRC=0
filogit 0 "Start command returned: $RC";;
stop)logit 1 "Stop command issued"
kdsmainproc=$($PS_CMD -ef | $AWK_CMD ’/kdsmain/ &&!/awk/ {print $2}’)
cmsproc=$($PS_CMD -ef | $AWK_CMD ’/cms start/ &&!/awk/ {print $2}’)
if [[ $kdsmainproc != "" ]]; thenif [[ $cmsproc != "" ]]; then
$SU_CMD - root -c "$CANDLEHOME/bin/itmcmd serverstop $HUBNAME"
else$KILL_CMD -9 $kdsmainproc
fielse
if [[ $cmsproc != "" ]]; then$KILL_CMD -9 $cmsproc
fifiRC=0
logit 0 "Stop command returned: $RC";;
status)logit 2 "Status command issued"
Chapter 5. Creating clusters with Tivoli Monitoring components in an HACMP environment 57

cmsprocstat=$($PS_CMD -ef | $AWK_CMD ’/kdsmain/ && !/awk/{print $2}’)
if [[ $cmsprocstat != "" ]]; then# the kdsmain process is runningecho "cms running"cmsStatus=1
else# the kdsmain process isn’t runningcmsStatus=2
fikdsmainproc=$($PS_CMD -ef | $AWK_CMD ’/kdsmain/ &&
!/awk/ {print $2}’)
start=1;
if [[ $kdsmainproc != "" ]]; then# the kdsmain process is runningkdsStatus=1
else# the kdsmain process isn’t runningkdsStatus=2
fiif [[ $cmsStatus = "1" && $kdsStatus = "1" ]]; then
# HACMP expects 0 if application runningRC=0;
else# and non-zero if not runningRC=2;
filogit 2 "Status command returned: $RC";;
*)RC=${UNKNOWN}echo ${USAGE}logit 0 "Bad Action returning: ${RC}";;
esac
exit $RC
Testing the monitoring server failover to clusternode2
Use smit hacmp to stop services on the primary node, or use the cluster test tool toautomate the monitoring failover testing. Similarly, test the failover of servicesfrom the secondary node back to the primary node.
Note: If you are actively using IBM Tivoli Monitoring (navigating workspaces, andso forth) when the failover occurs, it might take up to 10 minutes for the portalserver and the agents to reconnect to the monitoring server due to portal serverand agent internal timeout intervals.
Installing the portal server on its base HACMP clusterTo install the portal server on its base HACMP cluster, you need to use theinstallation procedures in the following sections.
Installing and setting up the portal server on clusternode1About this task
When the DB2 database is up and running, the installation of the portal serverfollows the instructions in the IBM Tivoli Monitoring: Installation and Setup Guide.
58 IBM Tivoli Monitoring: High Availability Guide for Distributed Systems

To set up the portal server on clusternode1, complete the following steps:
Procedure1. Make sure that the resource group is online and the shared file system, virtual
IP address, and the DB2 are available on clusternode1.2. Run the installation script install.sh from the product image as described in
the IBM Tivoli Monitoring: Installation and Setup Guide.Make sure you install the portal server into the shared file system. For easierhandling of the configuration, also install the IBM Tivoli Monitoring ServiceConsole.After installation, export the DISPLAY variable to point to your workstation. Ifyou have an X server running, you can use the graphical IBM TivoliMonitoring Service Console to configure the portal server. Otherwise, use thecommand line configuration.
3. Configure the portal server interface and URL such that the portal clients canconnect to portal server on its virtual host name. Add the following line to the<CANDLEHOME>/<platform>/cq/original/lnxenv file:KFW_INTERFACE_cnps_HOST=<virtualhostname>
where <virtualhostname> is the virtual host name of the portal server.4. Use one of the following 2 methods to configure the portal server:
To invoke a GUI application, use <CANDLEHOME>/bin/itmcmd manage, whichrequires a connection to an X Server.To invoke a text application, use <CANDLEHOME>/bin/itmcmd config –A cq,which prompts you for the configuration values.
Note: If you are configuring the portal server on Linux on zSeries® in 64-bitmode, you need to run the command from a 31-bit session. To open a 31-bitsession, run the following command:
s390 sh
5. Configure the monitoring server host name so that it is the same as the virtualhost name of the monitoring server (assuming the hub monitoring server isclustered).
6. Configure the portal server to use the virtual host name.a. Make sure Tivoli Enterprise Portal Server and Tivoli Enterprise Portal Server
Extensions are stopped.b. Back up your configuration data located in the $CANDLEHOME/
<architecture>/iw/profiles directory.c. Run the UNIX terminal.d. Change the current directory to $CANDLEHOME/<architecture>/iw/scripts.e. Run sh updateTEPSEHostname.sh <old_hostname> <new_hostname>.
Under <old_hostname> substitute the current host name, do not includedomain name.Under <new_hostname> substitute the valid virtual host name for yourTivoli Enterprise Portal Server cluster.
Note: If you repeat the updateTEPSEHostnamescript execution, make sure touse the correct "old_hostname". For example, the following sequence itcorrect:
Chapter 5. Creating clusters with Tivoli Monitoring components in an HACMP environment 59

updateTEPSEHostname.bat h1 crocodile, the ewas host name waschanged to "crocodile".updateTEPSEHostname.bat crocodile hippi, as old host name, you mustuse "crocodile" or the script will have no effect.
f. If the operation is successful, 'BUILD SUCCESSFUL' is displayed.g. Set the Primary Network Name to the virtual host name of the portal
server. This configuration is necessary for the communication between theportal server and the rest of the Tivoli Monitoring infrastructure, includingthe monitoring server.The Primary Network Name in the Network Name field, which is availableafter selecting Specify Optional Primary Network on the GUI TEMSConnection tab, and the Optional Primary Network Name field in the textapplication.
7. Configure the portal server database on the shared file system in the databasesettings of the portal server.After successful configuration, start the portal server manually and check theconnection via portal client.
8. Stop the portal server, and remove the autostart of the portal server.Under AIX, the installer creates a file under /etc, all named rc.itm1. This filehas to be removed to ensure that the portal server does not start up duringreboot.
Testing the portal server on clusternode1Start the portal server and make sure it connects to the monitoring server. Connecta Tivoli Enterprise Portal client to the portal server and ensure that agentworkspaces are populated.
Setting up the portal server on clusternode2Procedure1. Move the resource group to clusternode2.2. Install the GSKit locally on clusternode2 (for further instructions also see
“Installing and setting up the Warehouse Proxy Agent and Summarization andPruning Agent on clusternode1” on page 61 for the monitoring server).
3. Start the portal server manually on clusternode2 and test it like you did onclusternode1.
4. Stop the portal server on clusternode2.
Adding the portal server to the resource group of the basecluster
Having completed the installation of the portal server, you now have to integrate itinto your base cluster, so that it can then run under the cluster’s control. (SeeHACMP for AIX Administration Guide V5.3).
Creating start and stop scripts for the portal serverProcedure1. Use smit hacmp to take the basic resource group offline.2. Create a start/stop script (or two scripts, one for each purpose) in the same
local directory on each cluster node.3. The scripts look very similar to the control scripts of the monitoring server;
they should, at least, have these entries:
60 IBM Tivoli Monitoring: High Availability Guide for Distributed Systems

export CANDLEHOME=/sharedisk/IBM/ITM/$CANDLEHOME/bin/itmcmd agent start cq
4. For the stop script, use the stop parameter.
What to do next
Make sure that the scripts have the executable flag set.
Adding the portal server as Application Server to base clusterProcedure1. Use smit hacmp to create an application server resource for the portal server.2. Make sure the resource group is offline, and then add the application server
resource to the basic cluster resource with DB2, shared file system, and IPaddress.
3. Synchronize the cluster.4. Bring the cluster resource group online.
Adding monitoring for the portal server process
Use HACMP monitoring to monitor the processes of any defined HACMPapplication server. In the event that the processes are not running, an attempt ismade to restart the component. Failover from the application server to the othernode occurs if the attempt fails; this behavior depends on the script that is definedto do the recovery action. Because the portal server has only one process, you canuse the start script to restart it again if needed.
The name of the portal server process for monitoring is KfwServices.
For more information on setting up an application server process monitor, refer toHACMP for AIX Administration Guide V5.3.
Testing the portal server failover to clusternode2
Use smit hacmp to stop cluster services on the primary node (this should force afailover), or use the cluster test tool to automate the monitoring failover testing.Similarly, test the failover of services from the secondary node back to the primarynode.
Installing the Warehouse Proxy Agent or Summarization and PruningAgent on its base HACMP cluster
To install the Warehouse Proxy Agent and the Summarization and Pruning Agentfollow the same steps described for the portal server.
Installing and setting up the Warehouse Proxy Agent andSummarization and Pruning Agent on clusternode1
Because the Warehouse Proxy Agents and the Summarization and Pruning Agentsare using JDBC on UNIX and Linux, the TCP/IP listener for the DB2 has to beconfigured correctly on both nodes.
To do so, follow the steps in the IBM Tivoli Monitoring: Installation and Setup Guide,“Tivoli Data Warehouse solutions: common procedures."
Chapter 5. Creating clusters with Tivoli Monitoring components in an HACMP environment 61

When this is done, install the Warehouse Proxy Agent and the Summarization andPruning Agent using the same procedure mentioned above for the portal server(See “Installing the portal server on its base HACMP cluster” on page 58).v For the Warehouse Proxy:
Edit the /sharedisk/ITM/IBM/config/hd.config and specify the virtualhost in theCTIRA_HOSTNAME property value.
v For Summarization and Pruning:Edit the /sharedisk/ITM/IBM/config/sy.config and specify the virtualhost inthe CTIRA_HOSTNAME property value.
Testing the Tivoli Data Warehouse components in the clusterVerify that Warehouse Proxy Agent is correctly exporting data to Tivoli DataWarehouse and Summarization and Pruning Agent is correctly summarizing andpruning.
Setting up the Warehouse Proxy Agent and Summarizationand Pruning Agent on clusternode2
Procedure1. Move the resource group to clusternode2.2. Install the GSKit locally on clusternode2 (for further instructions also see
“Setting up the monitoring server on clusternode2” on page 80 for themonitoring server).
3. Start the Warehouse Proxy Agent and Summarization and Pruning Agentmanually on clusternode2 and test it like you did on clusternode1.
4. Stop the Warehouse Proxy Agent and the Summarization and Pruning Agenton clusternode2.
Adding the Warehouse Proxy Agent and the Summarizationand Pruning Agent to the resource group of the base cluster
When the installation of the Warehouse Proxy Agent and the Summarization andPruning Agent is done, integrate it into your base cluster, so that it can then rununder the cluster’s control.
Creating start and stop scripts for the Warehouse Proxy Agentand the Summarization and Pruning AgentAbout this task
The only difference is in the start and stop scripts for the application server underHACMP due to the different product codes:
Table 4. Component product codes
Component Product code
Portal server cq
Warehouse Proxy Agent hd
Summarization and Pruning Agent sy
Procedure1. Take the basic resource group offline using smit hacmp.2. Create a start/stop script (or two scripts, one for each purpose ) in the same
local directory on each cluster node.
62 IBM Tivoli Monitoring: High Availability Guide for Distributed Systems

The scripts look very similar to the control scripts of the portal server. For theWarehouse Proxy Agent, for example, the script should have, at least, theseentries:export CANDLEHOME=/sharedisk/IBM/ITM$CANDLEHOME/bin/itmcmd agent start hd
for the Summarization and Pruning Agent:export CANDLEHOME=/sharedisk/IBM/ITM$CANDLEHOME/bin/itmcmd agent start sy
For the stop script, use the stop parameter.Ensure the scripts have the executable flag set.
Adding the Warehouse Proxy Agent and the Summarization andPruning Agent as Application Server to base clusterProcedure1. Create an application server resource for each of the Warehouse Proxy Agent
and the Summarization and Pruning Agents using smit hacmp.2. Make sure the resource group is offline, and then add the application server
resource to the basic cluster resource with DB2, shared file system and IPaddress.
3. Synchronize the cluster.4. Bring the cluster resource group online.
Adding monitoring for the Warehouse Proxy Agent and theSummarization and Pruning Agent process
Use HACMP monitoring to monitor the processes of any defined HACMPapplication server. In the event that the processes are not running, an attempt ismade to restart the component. Failover from the application server to the othernode occurs if the attempt fails; this behavior depends on the script that is definedto do the recovery action.
The monitoring is defined for each defined application server.
Because the Warehouse Proxy Agent, as well as the Summarization and PruningAgent, have only one process each and also because they are defined as separatedapplication servers, you can use the start scripts to restart them again if needed.
The name of the Warehouse Proxy Agent process for monitoring is:khdxprtj
The name of the Summarization and Pruning Agent process is:ksy610
For further information on how to set up an application server process monitor,refer to HACMP for AIX Administration Guide V5.3.
Testing the Warehouse Proxy Agent and the Summarization andPruning Agent failover to clusternode2
Use smit hacmp to stop cluster services on the primary node (this should force afailover), or use the cluster test tool to automate the agent failover testing.Similarly, test the failover of services from the secondary node back to the primarynode.
Chapter 5. Creating clusters with Tivoli Monitoring components in an HACMP environment 63

Move the resources from clusternode1 to clusternode2, and verify that WarehouseProxy Agent and Summarization and Pruning Agent restart their processing.
Known problems and limitations
It is important to remember specific characteristics and constraints of TivoliMonitoring installation and set up, and their effects on the cluster setup.
During the certification test for Tivoli Monitoring clustering, issues encounteredwhen setting up the clustered environment are formally reported as defects. Thesedefects are typically related to the setup of Tivoli Monitoring in a non-defaultmanner, instead of being specific to the cluster environment. These defects arehandled as part of the Tivoli Monitoring service stream. Here is a list of knownproblems and workarounds:v The Tivoli Monitoring installer configures the components to be autostarted by
default. It does not give the user an option to configure the components to notautostart. Under this limitation, the user has to edit an operating system scriptto remove this behavior.This same behavior occurs whether installing for the first time or applying FixPacks.
v GSKit is a prerequisite of Tivoli Monitoring. As of the current release of TivoliMonitoring, this component can only be installed into a specificlocation: /usr/local/ibm/gsk7. Under this limitation, GSKit cannot be installedinto a user defined location, such as the file system for the shared disk.The workaround is to use the Tivoli Monitoring installation program to installGSKit 15 on both nodes.
v If there are user console activities being performed, such as clicking an object onthe workspace to request data, while the failover process is occurring, then theconsole takes a longer period of time to become active. This delays the time ittakes for the agent to become available to the console user. This is due to theinternal delay timers for the reconnection algorithm.
v There are some IBM Tivoli Monitoring components that are dependent on othercomponents, like the Tivoli Enterprise Portal Server requiring DB2. In this case,you will either want to create a cluster Application Server that includes all ofyour IBM Tivoli Monitoring components with their dependencies, or writescripts that locks the processes that are waiting on their dependencies, otherwisethe cluster will fail on startup.
v If the clustered Tivoli Enterprise Portal Server does not start afterfailover/switch, follow the following instructions:1. Make sure Tivoli Enterprise Portal Server starts successfully on the first
computer in your cluster.2. Switch to the first cluster computer.
a. For Windows:Change the current directory to %CANDLE_HOME%\CNPSJ\profiles\ITMProfile\config\cells\ITMCell\nodes\ITMNode.
b. For UNIX or Linux systems:Change the current directory to $CANDLE_HOME/<architecture>/iw/profiles/ITMProfile/config/cells/ITMCell/nodes/ITMNode.
3. Locate and open serverindex.xml file.4. Check if all "hostName" and "host" properties are equal to virtual host name
for your Tivoli Enterprise Portal Server cluster. Any invalid value must bechanged to the correct value.
64 IBM Tivoli Monitoring: High Availability Guide for Distributed Systems

5. For each unique and invalid host name found in step 5, apply steps 2–5accordingly.
v In order to configure the Ethernet adapters for communication by IBM TivoliMonitoring, you can use the configuration parameter: KDEB_INTERFACELIST.See 2 on page 142 for information on how to remove this entry in the registry.
v In order for Java Web Start to work, you must change all occurrences of $HOST$to your fully qualified host name in the .jnlpt file. You can locate the .jnlpt file inthe CANDLE_HOME\config directory.
Chapter 5. Creating clusters with Tivoli Monitoring components in an HACMP environment 65

66 IBM Tivoli Monitoring: High Availability Guide for Distributed Systems

Chapter 6. Creating clusters with monitoring components in aSystem Automation for Multiplatforms environment
In this chapter, the implementation and design of high-availability IBM TivoliMonitoring environments are described in conjunction with IBM Tivoli SystemAutomation for Multiplatforms. Guidance is provided for high-availabilitystrategies using IBM Tivoli Monitoring components. Practical considerationsregarding design, implementation, testing, and maintenance are also discussed.
“Preparing for the base Tivoli Monitoring cluster with Tivoli System Automationfor Multiplatform” on page 68 lists the Tivoli Monitoring requirements for HighAvailability (HA) when used in conjunction with Tivoli System Automation forMultiplatforms. The requirements of Tivoli System Automation for Multiplatformsto automate Tivoli Monitoring are discussed in “Installing Tivoli SystemAutomation for Multiplatforms on the cluster nodes” on page 72. There is also adiscussion of testing and maintenance issues.
Tivoli System Automation for Multiplatforms provides high availability byautomating the control of resources such as processes, file systems, IP addresses,and other resources in clusters. The product facilitates the automatic switching ofusers, applications, and data from one system to another in the cluster after ahardware or software failure. A complete High Availability (HA) setup includesmany parts, one of which is the HA software. As well as tangible items such ashardware and software, a good HA solution includes planning, design,customizing, and change control. An HA solution reduces the amount of time thatan application is unavailable by removing single points of failure. For moreinformation visit the following website: http://www-306.ibm.com/software/tivoli/products/sys-auto-multi/.
Important: These configurations and operational procedures for high availabilityhave been tested by IBM and represent supported product functions. Otherconfigurations or procedures are possible but might be outside of product designparameters; therefore, other configurations or procedures might not operatecorrectly or be supported.
Scenarios tested
For clustering purposes, Tivoli Monitoring is divided into three primarycomponents: Tivoli Enterprise® Monitoring Server (monitoring server), TivoliEnterprise Portal Server (portal server), and Tivoli Data Warehouse. Themonitoring server component is the hub Tivoli Enterprise Monitoring Server. Theportal server component includes the Tivoli Enterprise Portal Server and PortalServer database. The Tivoli Data Warehouse component consists of the DataWarehouse database, Warehouse Proxy Agent, and Summarization and PruningAgent.
Because of the variety of configurations that are available with Tivoli Monitoringand Tivoli System Automation for Multiplatforms, all combinations are not tested.Tivoli Monitoring V6.1 with Fix Pack 4 and Fix Pack 5 are tested in the followingconfigurations, which are the supported configurations for this document and theaccompanying scripts. Version 2.2.0.0 with Fix Pack 2 of Tivoli System Automationfor Multiplatforms was used.
© Copyright IBM Corp. 2010, 2012 67

Note: The information provided in this document has been tested and updatedwith Tivoli System Automation for Multiplatforms version 3.1.0.0 for IBM TivoliMonitoring V6.2.2.
Table 5. Scenarios Tested
Hardware Operating System Database Tiebreaker type Component Locations
xSeries® SLES10 DB2 9.1 SCSI Monitoring server, portal server,and Tivoli Data Warehousecomponents on separatesystems
xSeries® SLES10 DB2 9.1 Network Monitoring server, portal server,and Tivoli Data Warehousecomponents on separatesystems
xSeries SLES10 DB2 9.1 Network Monitoring server, portal server,and Tivoli Data Warehousecomponents on the samesystem
xSeries RHAS4 DB2 9.1 Network Monitoring server, portal server,and Tivoli Data Warehousecomponents on the samesystem
xSeries RHAS4 DB2 9.1 SCSI Monitoring server, portal server,and Tivoli Data Warehousecomponents on the samesystem
xSeries AIX 5.3 DB2 9.1 Network Monitoring server, portal server,and Tivoli Data Warehousecomponents on the samesystem
xSeries SLES9 DB2 9.1 Network Monitoring server, portal server,and Tivoli Data Warehousecomponents on the samesystem
xSeries SLES9 DB2 9.1 ECKD™ Monitoring server, portal server,and Tivoli Data Warehousecomponents on the samesystem
Preparing for the base Tivoli Monitoring cluster with Tivoli SystemAutomation for Multiplatform
This section provides information on preparing for the base Tivoli Monitoring withTivoli System Automation for Multiplatforms cluster.
Gathering cluster nodes informationAbout this task
Before defining the Base cluster, you must have the following informationavailable:
68 IBM Tivoli Monitoring: High Availability Guide for Distributed Systems

Procedure1. The host names of both cluster nodes, such as:
node1
node2
2. In order to set up Tivoli Monitoring with Tivoli System Automation forMultiplatforms, you will need two cluster nodes with at least 1 NIC (NetworkInterface Card) in each computer.For a more robust cluster, use two NICs for each computer, so that the TivoliSystem Automation for Multiplatforms heartbeat function has a failover path,in case one of the NICs goes down.You will need the host names of the NICs. It is not necessary to have these hostnames defined in the domain name system, they only need to be defined in thelocal host table of each node.
3. The mount point name of the shared file system - must be the same on bothnodes (and mounted only on one node), such as:/shareddisk
4. The device name of the shared disk which is mounted to that mount point – italso must be the same on both nodes, such as:/dev/sdc1
v During testing on Red Hat Enterprise Linux, the Logical Volume Managerwas used to define the shared disk. The following syntax was used for thedevice name (only for shared drives created with the Logical VolumeManager):/dev/mapper/volume_group_name-lv_name
Where volume_group_name is the name of the volume group containing theshared disk logical volume, and lv_name is the name of the logical volume.For example: if the volume group name is shared_vg and the logical volumename is shared_lv, the device name would be:/dev/mapper/shared_vg-shared_lv
v On AIX, the following syntax was used for the device name:/dev/lv_device_name
If the logical volume device name is datalv, the device name would be:/dev/datalv
5. The type of the file system on the shared disk, such as:For Linux: reiserfsFor AIX: jfs2
6. The virtual IP address and netmask7. The Ethernet numbers of the public network interfaces of both nodes, which
will host the virtual IP address, such as:Running Linux: eth0Running AIX: en1
(Run the ifconfig command to determine the Ethernet numbers)
Checking the cluster nodes environment
Before you install the Base cluster, check the environment thoroughly:v Ensure that the name resolution for all network interface cards works properly
Chapter 6. Creating clusters with monitoring components in a System Automation for Multiplatforms environment 69

v Ensure that all entries for host names in the local host table, /etc/hosts, are setin the same order on both computers. For example, if /etc/hosts on node1contains:10.0.0.1 host.domain.com host/etc/hosts on node2 should also contain:10.0.0.1 host.domain.com hostAnd not:10.0.0.1 host host.domain.com
v Ensure that the host tables have no double entries for the localhost. UnderSUSE SLES10, using two network interface cards, you might see the followingtwo entries:localhostlocalhost
Remove the second entry, otherwise, clustering fails.v Ensure that the name resolution works for the virtual IP address that will be
used for the cluster (the provided scripts assume that the virtual IP address is onthe same subnet as the IP addresses of the nodes).
v Verify that the virtual IP address of the cluster is a valid address, to avoidconflicts.
v Verify that this Virtual IP address is not defined (doesn’t show up in ifconfig –a) on any interface on any node in the cluster.
v Ensure that this IP address is valid for the configured addresses on the publicnetwork interface cards of the cluster nodes.
v Verify on both nodes that the shared disk will not be mounted automaticallyduring startup.
v Verify on both nodes that the shared disk file system is not checked on start upof the node (fsck is not run).
Planning for the cluster tiebreaker network device
For a two-node Tivoli System Automation for Multiplatforms cluster, a tiebreaker isrequired. A tiebreaker is a network device (on Linux, Linux on zSeries®, and AIXsystems), a SCSI device (on AIX and Linux systems), or an ECKD device (on Linuxon zSeries systems), which is accessible from both nodes.
The tiebreaker is used when the cluster splits, and the nodes don’t have contactwith each other anymore. In this rare case, the tiebreaker makes sure that only onenode has communication with the shared resources. This communication protectsthe resources from concurrent access through both cluster nodes.
Network tiebreaker
For the Network tiebreaker on Linux, Linux on zSeries, or AIX systems,determine the IP address of the device that is to be used for the tiebreaker.Make sure that this device is accessible from both nodes.
The Network tiebreaker is the easiest to implement because it requires onlyan IP address that is accessible by both nodes. The Network tiebreakermust also be on the same subnet as both nodes.
(To use the Network tiebreaker, use the net parameter forthe itm6/BuildScripts/mkitmcluster.sh script.)
SCSI tiebreaker on Linux systems
70 IBM Tivoli Monitoring: High Availability Guide for Distributed Systems

For the SCSI tiebreaker on Linux, for both nodes, the following parametersfor the SCSI device are required:
SCSI Host number
Channel number
ID number
LUN number
To determine the values, run the following command (on both nodes):
dmesg | grep 'Attached scsi disk'
If this command doesn’t return anything (because the messages might havebeen overwritten in the buffer), then run this command:
cat /proc/scsi/scsi
The output shows the exact parameters of each SCSI device attached to thesystem.
The SCSI device must be accessible to both nodes.
(To use the SCSI tiebreaker, use the scsi parameter for theitm6/BuildScripts/mkitmcluster.sh script.)
SCSI tiebreaker on AIX systems
For the SCSI tiebreaker on AIX, you need the name of the hard disk device(/dev/hdiskX). The hard disk device must support the SCSI protocol.
Note: Drives attached via Fiber Channel, iSCSI, and Serial StorageArchitecture support the SCSI protocol, and can be used as tiebreakerdevices.
IDE drives do not support the SCSI protocol, and can not be used astiebreaker devices.
Use the following command to list all physical volumes:lspv
Use the following command to verify that the specific drive supports SCSI:lsdev -C -l <devicename>
(To use the Disk tiebreaker, use the disk parameter for theitm6/BuildScripts/mkitmcluster.sh script.)
ECKD tiebreaker on Linux on zSeries systems
For the ECKD tiebreaker on Linux on zSeries, you need the ECKD devicenumber. To gather this information, run the following command:cat /proc/dasd/devices
The ECKD device number is in the first column.
(To use the ECKD tiebreaker, use the eckd parameter for theitm6/BuildScripts/mkitmcluster.sh script.)
For further information, see the IBM Tivoli System Automation for Multiplatforms BaseComponent Administrator’s Guide and the Reliable Scalable Cluster Technology (RSCT)Administrator’s Guide.
Chapter 6. Creating clusters with monitoring components in a System Automation for Multiplatforms environment 71

Installing Tivoli System Automation for Multiplatforms on the clusternodes
About this task
To set up Tivoli Monitoring with Tivoli System Automation for Multiplatforms,you will need two cluster nodes with at least one NIC (Network Interface Cards)in each computer. For more information regarding the configuration of the clustercreation, see Appendix A, “Configuring the cluster creation,” on page 145.
For a more robust cluster, use two NICs for each computer, so that the TivoliSystem Automation for Multiplatforms heartbeat function has a failover path, incase one of the NICs goes down.
You should then execute the following steps on each of the cluster nodes(depending on how you received Tivoli System Automation for Multiplatforms,you might have it already installed):
Procedure1. From the Tivoli System Automation for Multiplatforms version 3.1.0.0 image or
CD, run the prereqSAM.sh command to verify that you have the correctprerequisite software. If all prerequisites are present continue to step 2.Otherwise install the required prerequisites. (prereqSAM.sh displays the missingprerequisites, and writes to /tmp/prereqSAM.1.log.)
Note: Installing Tivoli System Automation for Multiplatforms on AIX isdifferent from installing it on Linux mainly because Tivoli System Automationfor Multiplatforms for AIX does not come with the prerequisite packages.
2. From the Tivoli System Automation for Multiplatforms version 3.1.0.0 image orCD, run the installSAM.sh command.
Note: If you are using Tivoli System Automation for Multiplatforms version2.2.0.0, follow the fix pack installation instructions to install the latest TivoliSystem Automation for Multiplatforms Version 2.2.0.0 Fix Pack (Fix Pack 2 wasused for testing.)
Fix Pack 2 can be downloaded from http://www-1.ibm.com/support/docview.wss?uid=swg24018620&rs=0&cs=utf-8&context=SSRM2X&dc=D400&loc=en_US&lang=en&cc=US
3. If the nodes will be running DB2 in the cluster, download the DB2 policiesdb2salinux.tar.gz, fromftp://ftp.software.ibm.com/software/data/db2/linux/Expand the file. A suggested location is /usr/sbin/rsct/sapolicies becausethis is where other products might install their policies.
4. Download additional policies:a. For AIX, download additional policies sam.policies.aix.1.2.2.1, from:
http://www-01.ibm.com/software/brandcatalog/portal/opal/details?catalog.label=1TW10SA01To install the policies, change the execute flag on the file, and run it from acommand line. The policies install to/usr/sbin/rsct/sapolicies.
b. For Linux:For Linux on Intel: sam.policies-1.2.2.1-06212.s390.rpm
72 IBM Tivoli Monitoring: High Availability Guide for Distributed Systems

For Linux: http://www-01.ibm.com/software/brandcatalog/portal/opal/details?catalog.label=1TW10SA02
To install the policies, use the rpm –i filename command. The policiesinstall to /usr/sbin/rsct/sapolicies.
c. For Windows:http://www-01.ibm.com/software/brandcatalog/portal/opal/details?catalog.label=1TW10SA03
d. For Solaris:http://www-01.ibm.com/software/brandcatalog/portal/opal/details?catalog.label=1TW10SA05
Use the latest available version available on the site.
What to do next
Make sure that you run the steps provided above on both cluster nodes.
Note: The Tivoli System Automation for Multiplatforms Version 2.2.0.0 Fix Packprocedure allows you to install the fix pack by either bringing down the entirecluster, or by upgrading the cluster node by node.
With the first method, all of the resources are taken offline, which means that theTivoli Monitoring components in that cluster is stopped.
With the second method, one node is taken offline and upgraded, while the activenode is left online. If a failure occurs on the active node, failover does not occuruntil the inactive node has been brought online.
For further information, refer to the “Installing and uninstalling service” chapter ofthe Tivoli System Automation for Multiplatforms Installation and Configuration Guide,and refer to “Applying a fix pack to the Summarization and Pruning Agent” onpage 92 for an issue with the service installation documentation.
Creating a cluster with all Tivoli Monitoring ComponentsAbout this task
In the case of a demo or proof of concept, you might want to create a cluster thatcontains the four IBM Tivoli Monitoring components on one system. This is notrecommended for a production environment. To accomplish this, complete thesteps in the following table:
Table 6. Creating a cluster containing all four IBM Tivoli Monitoring components
Task Section in this document
1. Build a base cluster including DB2 “Setting up a cluster for Tivoli Monitoring” on page74
2. Install and set up the monitoringserver
“Installing the monitoring server on its base TivoliSystem Automation for Multiplatforms cluster” onpage 79
3. Install and set up the portal server “Installing the portal server on the Tivoli SystemAutomation for Multiplatforms cluster” on page 82
4. Install and set up the WarehouseProxy Agent
“Installing the Warehouse Proxy Agent on a TivoliSystem Automation for Multiplatforms cluster” onpage 85
Chapter 6. Creating clusters with monitoring components in a System Automation for Multiplatforms environment 73

Table 6. Creating a cluster containing all four IBM Tivoli Monitoring components (continued)
Task Section in this document
5. Install and set up theSummarization and Pruning Aent
“Installing the Summarization and Pruning Agenton a Tivoli System Automation for Multiplatformscluster” on page 87
When the previous steps have been completed:
Procedure1. On one of the nodes, take the resource group RG_NAME offline:
chrg –o offline RG_NAME
2. Verify that the resource group is offline, which can take 1 or 2 minutes:lssam -top
3. Switch to the itm6/BuildScripts directory.4. Run the allrscbuild.sh command as root from the same directory.5. Start the resource group again using the command:
chrg –o online RG_NAME
6. Verify that the resource group is online:lssam –top
7. Test the failover by running the rgreq –o move RG_NAME command, and uselssam -top to verify that monitoring server starts on the other node. If acomponent doesn’t start:a. Fix the values entered in the itm6/BuildScripts/clustervariables.sh fileb. Remove the Tivoli System Automation for Multiplatforms domain using the
following commands:stoprpdomain –f domain_name rmrpdomain domain_name
c. Re-execute the steps in “IBM Tivoli Monitoring cluster setup” on page 35.
Note: The terminal session might end after the move completes.
Setting up a cluster for Tivoli Monitoring
To install Tivoli Monitoring components (monitoring server hub, portal server orTivoli Data Warehouse components) on a Tivoli System Automation forMultiplatforms cluster, you need to first set up a Base cluster resource group withsome prerequisite resources.
The Base Tivoli System Automation for Multiplatforms cluster resource groupneeded for the monitoring server hub includes:v A shared File System for the installation and datav A virtual IP Address
The Base Tivoli System Automation for Multiplatforms cluster resource groupneeded for portal server and Tivoli Data Warehouse components includes:v A shared File System for installationv A virtual IP Addressv A Relational Database, which is a prerequisite for both portal server and Tivoli
Data Warehouse.
74 IBM Tivoli Monitoring: High Availability Guide for Distributed Systems

Predefined Tivoli System Automation for MultiplatformsCluster for Tivoli Monitoring
To simplify the setup of a Tivoli System Automation for Multiplatforms cluster forTivoli Monitoring, a set of predefined definitions, also called policies, are providedin a “cluster package” for Tivoli Monitoring.
This package consists of scripts to build and run the cluster with all requiredresources as quickly and easily as possible. The "cluster package" can bedownloaded from: http://www-01.ibm.com/software/brandcatalog/portal/opal/details?catalog.label=1TW10TM4F.
Depending on what you want to run in the Tivoli System Automation forMultiplatforms cluster (monitoring server, portal server or Tivoli Data Warehousecomponents); there are different steps to define and to start up the cluster. Withthis package, the base cluster can be defined and started in less than 10 minutes.
The package comes in a tar file named itm6.sam.policies-2.0.tar, which has tobe installed locally in the same directory on each future cluster node. Thisinstallation ensures that all required resources like control scripts etc. are availableon all nodes with the same file path. The directory on all nodes are:
/<untar-directory>/itm6
A suggested location is /usr/sbin/rsct/sapolicies because this is where otherproducts might install their policies.
The tar file contains the following directories:
itm6/BuildScriptsContains scripts used to create and configure the cluster. See Appendix C,“Predefined scripts,” on page 153 for details about the scripts.
itm6/ControlScriptsContains scripts that are used by Tivoli System Automation forMultiplatforms to control the Tivoli Monitoring components.
itm6/DefFilesThis is initially empty, but is populated with resource definition files, bythe itm6/BuildScripts/generateclusterfiles.sh script.
Note: Do not modify this directory structure. Clustering will not work correctly ifthis is changed.
There are two different types of a Base cluster, depending on which TivoliMonitoring components you want to install:1. Base cluster with a shared file system and IP Address.2. Base cluster with shared file system, IP Address, and DB2. The DB2 resource is
used if the cluster contains the portal server and/or Tivoli Data Warehousecomponents.
Both types of base clusters are built with the same basic steps:1. Prepare the nodes to be Tivoli System Automation for Multiplatforms
cluster-ready.2. Configure the required parameters in the itm6/BuildScripts/
clustervariables.sh file for your selected type of cluster. The file containsexplanations for all needed parameters.
Chapter 6. Creating clusters with monitoring components in a System Automation for Multiplatforms environment 75

3. Run the itm6/BuildScripts/generateclusterfiles.sh script to generate thedefinition files.
4. Run the itm6/BuildScripts/mkitmcluster.sh script to build the cluster.
“Installing and setting up the monitoring server on clusternode1” on page 79describes the detailed steps necessary to build a cluster on a system without theDB2 resource. This option is used if the monitoring server component is beinginstalled on this system, and the components requiring DB2 (portal server andTivoli Data Warehouse) are not on this system.
“Testing the monitoring server on clusternode1” on page 80 describes the detailedsteps necessary to build a cluster on a system with the DB2 resource. This option isused if a component requiring DB2 (portal server and Tivoli Data Warehouse) isbeing installed on this system. Use this section if you are creating a system with allcomponents (monitoring server, portal server, and Tivoli Data Warehouse).
Note: The mkitmcluster.sh script calls other scripts that create the cluster domain,resource group, tiebreaker, shared file system and virtual IP resources, andoptionally create the DB2 resource.
In certain cases, you might already have these resources defined, or you mightwant to define them separately. See Appendix C, “Predefined scripts,” on page 153for more information.
Building a Base Tivoli System Automation for MultiplatformsCluster for the Monitoring Server component onlyAbout this task
This procedure is used to create the base cluster without the DB2 resource. Thisoption is used if the components requiring DB2 (portal server and Tivoli DataWarehouse) are not on this system.
Procedure1. Follow the steps in Appendix A, “Configuring the cluster creation,” on page
145.2. Change to the itm6/BuildScripts directory, and run the build script with the
type of the tiebreaker (scsi, net, disk, or eckd) as its parameter, such as:./mkitmcluster.sh scsi
What to do next
When the cluster is up and running, you can verify that the cluster domain andthe resources are online by running the commands:
lsrpdomainVerify that the domain ITM is now online
lsrg -mVerify that the resources are online
lssam A more detailed view
rgreq –o move RG_NAMEMove the resource group RG_NAME to the other node
You are now ready to install the monitoring server in the Tivoli SystemAutomation for Multiplatforms cluster.
76 IBM Tivoli Monitoring: High Availability Guide for Distributed Systems

Building a Tivoli System Automation for Multiplatforms Clusterfor the portal server and Tivoli Data Warehouse components
For the portal server and Tivoli Data Warehouse components (Warehouse ProxyAgent and Summarization and Pruning Agent) you need one more resource, theunderlying DB2.
The first step is to install the DB2 locally on each node. The database is not createdyet. It is created when the cluster is up and running.
Note: The DB2 Tivoli System Automation for Multiplatforms policies that are usedin this solution is a small subset of the DB2 Tivoli System Automation forMultiplatforms policies that are included with DB2.
Installing/Configuring DB2:About this task
Use the DB2 Enterprise Server Edition.
Note: If you are running Linux on zSeries, you must install the 31-bit version ofDB2 (regardless of whether you are running in 31-bit or 64-bit mode).
Procedure
1. Install DB2 locally on each cluster node into the same directory.This step ensures that the start, stop, and control scripts for the cluster workwithout modifications.
2. Make sure that you create the DB2 user IDs with the same GUUID and UUIDon each node.
3. During the installation, create the same instance on both nodes.4. Switch off the automatic startup of DB2 after the installation on each node:
Switch to the instance owner user: su – <instance_owner>, and run:db2iauto –off <instance>
5. Because Warehouse Proxy Agent and Summarization and Pruning Agent useJDBC on UNIX and Linux, the TCP/IP listener for DB2 has to be configuredcorrectly on both nodes.To do so, run the following commands for the appropriate instance:db2set -i instance_name DB2COMM=tcpip
db2 update dbm cfg using SVCENAME port_number
db2stop
db2start
6. Change back to root.7. Edit the /etc/inittab file on both nodes and comment out the following line:
fmc:2345:respawn:/opt/IBM/db2/V9.1/bin/db2fmcd #DB2 Fault MonitorCoordinator
8. Stop DB2 on each node. To do so, switch to the user ID of the instance ownerand run the command: db2stop
Building the portal server and Tivoli Data Warehouse Cluster:Procedure
1. Follow the steps in Appendix A, “Configuring the cluster creation,” on page145.
Chapter 6. Creating clusters with monitoring components in a System Automation for Multiplatforms environment 77

2. Change to the itm6/BuildScripts/ directory. Run the build script with the typeof the tiebreaker (scsi, net, disk, or eckd), and db2 as the parameters, directingthe script to create the DB2 resource:./mkitmcluster.sh net db2
The script builds the complete Base cluster including the DB2 resource andstarts it up.When the cluster is up and running, you can verify that the cluster domain andthe resources are online by running the commands:
lsrpdomainVerify that the domain ITM is now online
lsrg -mVerify that the resources are online
lssam A more detailed view
rgreq –o move RG_NAMEMove the resource group RG_NAME to the other node
Creating the Database for Portal server/Tivoli Data Warehouse on node1:About this task
The next step is to create the database, either for the portal server or for the TivoliData Warehouse:
Use lsrg -m to find the active cluster node. On the active node, perform thefollowing steps:
Procedure
1. Create a directory for the database on the shared file system, such as:/shareddisk/DBdirectory
2. Grant full access or ownership of this directory to the DB2 instance owner,typically to the user db2inst1, by running:chown db2inst1 /shareddisk/DBdirectory
3. Switch to the user ID of the instance owner.4. Create a database using the DB2 CLI on the active node, using one of these
commands:For the portal server: db2 create database <DBName> on/shareddisk/DBdirectory
For Tivoli Data Warehouse: db2 create database <DBName> on/shareddisk/DBdirectory using codeset UTF-8 territory US
5. Test the connection to the database using the command:db2 connect to <DBName>
6. After successful connection, reset the connection using the command:db2 connect reset
7. Create a database user ID on both nodes with the same GUUID and UUID.8. Grant full database access to this user ID on node1.
Using the same IDs on both nodes allows the database operations to workcorrectly.
Cataloging the Portal server/Tivoli Data Warehouse Database on node 2:
78 IBM Tivoli Monitoring: High Availability Guide for Distributed Systems

Procedure
1. Switch the RG_NAME resource group to the other node:rgreq –o move RG_NAME
Note: The terminal session might end after the move completes.2. Wait until the resource group is online on node2, using:
lssam -top
3. Grant full database access to the database user on node2.4. On the active node, switch to the user ID of the instance owner.5. Catalog the database in this instance using the command:
db2 catalog database <DBName> on /shareddisk/DBdirectory
6. Test the connection to the database using the command:db2 connect to <DBName>
7. After successful connection, reset the connection using the command:db2 connect reset
8. Change back to the root user.9. If you want to install a portal server in the cluster, and the Tivoli Data
Warehouse is on another computer, also catalog the Tivoli Data Warehousedatabase and database server for the local DB2 as a remote database server onboth nodes, so that the portal server can access this database later. For furtherinformation, refer to the IBM Tivoli Monitoring: Installation and Setup Guide.
Results
You are now ready to install the portal server or Tivoli Data Warehousecomponents in this cluster.
Installing the monitoring server on its base Tivoli System Automationfor Multiplatforms cluster
This section provides information on the installation of the monitoring server on itsbase Tivoli System Automation for Multiplatforms cluster.
Installing and setting up the monitoring server onclusternode1
About this task
Use the value that was entered for the CANDLEHOME variable inclustervariables.sh for the installation directory.
Use the value that was entered for the HUBNAME variable inclustervariables.sh for the Hub name.
Procedure1. Check which cluster node is active (online):
lsrg -m
2. Change the cluster's mode to Manual:samctrl –M T
Chapter 6. Creating clusters with monitoring components in a System Automation for Multiplatforms environment 79

3. On the active node, install the monitoring server into your chosen directory onthe shared file system, according to the IBM Tivoli Monitoring: Installation andSetup Guide.
4. Use one of the following two methods to configure the monitoring server:To invoke a GUI application, use <CANDLEHOME>/bin/itmcmd manage, whichrequires a connection to an X Server.To invoke a text application, use <CANDLEHOME>/bin/itmcmd config –S –thub_name, which prompts you for the configuration values.
5. Configure the monitoring server host name so that it is the same as the virtualhost name of the monitoring server.The monitoring server host name is the Host Name field on the GUI BasicSettings tab, and the TEMS Host Name field in the text application.
6. Set the Primary Network Name to the virtual host name of the monitoringserver. That ensures that the agents and portal server can connect to themonitoring server on this IP address.The Primary Network Name is the Network Name field in the OptionalPrimary Network Name box on the GUI Advanced Settings tab, and theOptional Primary Network Name field in the text application.
7. Start up the monitoring server and add the application support for the desiredagent types.
8. Change the cluster's mode to Automatic:samctrl –M F
9. Disable the automatic startup of the monitoring server:a. Edit the /shareddisk/ITM/config/kcirunas.cfg file.b. Add the following section after the <agent> line by including the following
syntax:<productCode>ms</productCode><default><autoStart>no</autoStart>
</default>
c. Save the file.d. Run the /shareddisk/ITM/bin/UpdateAutoRun.sh command as root user.
Note: The path to the kcirunas.cfg file and the UpdateAustoRun.sh command(/shareddisk/ITM) might be different on your system.
Testing the monitoring server on clusternode1Verify that you can start the monitoring server and other components that youinstalled.
Setting up the monitoring server on clusternode2Procedure1. Shut down the monitoring server and change to the config directory, such as:
<CANDLEHOME>/config
2. Copy the monitoring server configuration file into the config directory fornode2.To do so, copy the file:node1_ms_HUB_NAME.config
to
80 IBM Tivoli Monitoring: High Availability Guide for Distributed Systems

node2_ms_HUB_NAME.config
3. Verify that the monitoring server is stopped.4. Open a session on node2, and install the GSKit locally on node2 by doing the
following:a. Start the Tivoli Monitoring installation program.b. Accept the default directory.c. Choose 1) Install products to the local host.d. Choose the language.e. Accept the license agreement.f. Reply to the encryption key prompt, if it is presented.g. If the GSKit is not installed, it is now installed.h. When the Product Packages menu is displayed, press Control-Break to
leave the installation program.
Adding the monitoring server to the resource group of theBase Cluster
About this task
When the installation of the monitoring server is complete, you have to integrate itinto your Base cluster, so that it can then run under the cluster’s control.
Procedure1. On one of the nodes, take the resource group RG_NAME offline:
chrg –o offline RG_NAME
2. Verify that the resource group is offline, it can take 1 or 2 minutes:lssam -top
3. Change to the itm6/BuildScripts directory.4. Run the temsrscbuild.sh command as root from the same directory.5. Start the resource group again using the following command:
chrg –o online RG_NAME
6. Verify that the resource group is online:lssam -top
Results
The monitoring server is now running in the Tivoli System Automation forMultiplatforms cluster.
Testing the monitoring server failover to clusternode2About this task
Run the rgreq –o move RG_NAME command; then, invoke lsrg –m to verify thatmonitoring server starts on the other node. If it doesn't start:
Procedure1. Ensure the values entered in the ITM/BuildScripts/clustervariables.sh file are
correct.2. Remove the Tivoli System Automation for Multiplatforms domain using the
following commands:
Chapter 6. Creating clusters with monitoring components in a System Automation for Multiplatforms environment 81

stoprpdomain &endash;f domain_namermrpdomain domain_name
3. Re-execute the steps in “IBM Tivoli Monitoring cluster setup” on page 35.
Installing the portal server on the Tivoli System Automation forMultiplatforms cluster
This section includes information on the installation and setup of the portal serveron the Tivoli System Automation for Multiplatforms cluster.
Installing and setting up the portal server on clusternode1About this task
To install and set up the portal server on clusternode1, complete the followingprocedure:
Procedure1. Check which cluster node is active (online):
lsrg –m
2. If you installed other Tivoli Monitoring components to the shared file system,use the same installation path for the portal server.
3. Change the cluster's mode to Manual:samctrl –M T
4. On the active node, install the portal server, according to IBM TivoliMonitoring: Installation and Setup Guide.
Note: If you are installing the portal server on Linux on zSeries in 64- bitmode, you need to run the install script from a 31-bit session. To open a 31-bitsession, run the following command:
s390 sh
5. Configure the portal server interface and URL such that the portal clients canconnect to portal server on its virtual host name. Add the following line to the<CANDLEHOME>/<platform>/cq/original/lnxenv file:KFW_INTERFACE_cnps_HOST=<virtualhostname>
where <virtualhostname> is the virtual host name of the portal server.6. Use one of the following 2 methods to configure the portal server:
To invoke a GUI application, use <CANDLEHOME>/bin/itmcmd manage, whichrequires a connection to an X Server.To invoke a text application, use <CANDLEHOME>/bin/itmcmd config –A cq,which prompts you for the configuration values.
Note: If you are configuring the portal server on Linux on zSeries in 64-bitmode, you need to run the command from a 31-bit session. To open a 31-bitsession, run the following command:
s390 sh
7. Configure the monitoring server host name so that it is the same as the virtualhost name of the monitoring server (assuming the hub monitoring server isclustered).
82 IBM Tivoli Monitoring: High Availability Guide for Distributed Systems

The monitoring server host name is the TEMS Hostname field on the GUITEMS Connection tab, and the CMS Host Name field in the text application.
8. Configure the portal server to use the virtual host name.a. Make sure Tivoli Enterprise Portal Server and Tivoli Enterprise Portal
Server Extensions are stopped.b. Back up your configuration data located in the $CANDLEHOME/
<architecture>/iw/profiles directory.c. Run UNIX terminal.d. Change the current directory to $CANDLEHOME/<architecture>/iw/scripts
e. Run sh updateTEPSEHostname.sh <old_hostname> <new_hostname>.Under <old_hostname> substitute the current host name, do notinclude domain name.Under <new_hostname> substitute the valid virtual host name for yourTivoli Enterprise Portal Server cluster.
Note: If you repeat the updateTEPSEHostname script execution, make sureto use correct old_hostname. For example, the following sequence it correct:
updateTEPSEHostname.bat h1 crocodile, the ewas host name waschanged to "crocodile".updateTEPSEHostname.bat crocodile hippi, as old host name, youmust use "crocodile" or the script will have no effect.
f. If the operation is successful, 'BUILD SUCCESSFUL' is displayed.g. Set the Primary Network Name to the virtual host name of the portal
server. This configuration is necessary for the communication between theportal server and the rest of the Tivoli Monitoring infrastructure, includingthe monitoring server.The Primary Network Name in the Network Name field, which isavailable after selecting Specify Optional Primary Network on the GUITEMS Connection tab, and the Optional Primary Network Name field inthe text application.
9. Configure the portal server to have access to the database which you createdbefore (see “Creating the Database for Portal server/Tivoli Data Warehouse onnode1” on page 78).
10. Change the cluster's mode to Automatic:samctrl –M F
11. Disable the automatic startup of the portal server:a. Edit the /shareddisk/ITM/config/kcirunas.cfg file.b. Add the following section after the <agent> line by including the following
syntax:<productCode>cq</productCode><default><autoStart>no</autoStart>
</default>
c. Save the file.d. Run the /shareddisk/ITM/bin/UpdateAutoRun.sh command as root user.
Note: The path to the kcirunas.cfg file and the UpdateAutoRun.sh command(/shareddisk/ITM) might be different on your system.
Chapter 6. Creating clusters with monitoring components in a System Automation for Multiplatforms environment 83

Testing the portal server on clusternode1Verify that you can bring up the Tivoli Enterprise Portal, and that you can performstandard operations.
Note: If you are starting the portal server on Linux on zSeries in 64-bit mode, youneed to run the command from a 31-bit session. To open a 31- bit session, run thefollowing command:
s390 sh
Setting up the portal server on clusternode2About this task
Open a session on node2, and install the GSKit locally on node2.
To do this:
Procedure1. Start the Tivoli Monitoring installation program.2. Accept the default directory.3. Choose 1) Install products to the local host.4. Choose the language.5. Accept the license agreement.6. Reply to the encryption key prompt, if it is presented.7. If the GSKit is not installed, it is now installed.8. When the Product Packages are available menu is displayed, press
Control-Break to leave the installation program.
Adding the portal server to the resource group of the BaseCluster
About this task
When the installation of the portal server is complete, you have to integrate it intoyour cluster, so that it can then run under the cluster’s control.
The portal server is now running in the Tivoli System Automation forMultiplatforms cluster.
Procedure1. On one of the nodes, take the resource group RG_NAME offline:
chrg –o offline RG_NAME
2. Verify that the resource group is offline, it can take 1 or 2 minutes:lssam -top
3. Change to the itm6/BuildScripts directory.4. Run the tepsrscbuild.sh command as root from the same directory.5. Start the resource group again using the following command:
chrg –o online RG_NAME
6. Verify that the resource group is online:lssam -top
84 IBM Tivoli Monitoring: High Availability Guide for Distributed Systems

Testing the portal server failover to clusternode2About this task
Run the rgreq –o move RG_NAME command, and use lssam -top to verify that theportal server starts on the other node. If it doesn’t start:
Procedure1. Fix the values entered in the itm6/BuildScripts/clustervariables.sh file. ( See
“Predefined Tivoli System Automation for Multiplatforms Cluster for TivoliMonitoring” on page 75)
2. Remove the Tivoli System Automation for Multiplatforms domain by using thefollowing commands:
stoprpdomain –f domain_namermrpdomain domain_name
3. Re-execute the steps in “IBM Tivoli Monitoring cluster setup” on page 35.
Note: The terminal session might end after the move completes.
Installing the Warehouse Proxy Agent on a Tivoli System Automationfor Multiplatforms cluster
This section includes information on the installation of the warehouse proxy agenton a Tivoli System Automation for Multiplatform cluster.
Installing and setting up the Warehouse Proxy Agent onclusternode1
Procedure1. Check which cluster node is active (online):
lsrg -m
2. If you installed other Tivoli Monitoring components to the shared file system,use the same installation path for the Warehouse Proxy Agent.
3. Change the cluster's mode to Manual:samctrl –M T
4. On the active node, install the warehouse proxy agent, according to the IBMTivoli Monitoring: Installation and Setup Guide.
5. Use the following method to configure the warehouse proxy agent:To invoke a GUI application, use <CANDLEHOME>/bin/itmcmd manage (whichrequires a connection to an X Server).
6. Configure the monitoring server host name so that it is the same as the virtualhost name of the monitoring server (assuming the hub monitoring server isclustered).The monitoring server host name is the TEMS Hostname field on the GUITEMS Connection tab.
7. Set the Primary Network Name to the virtual host name of the warehouseproxy agent system.This is the Network Name field, which is available after selecting SpecifyOptional Primary Network on the GUI TEMS Connection tab.
8. Configure the Warehouse Proxy Agent to allow access to the database whichyou created previously. On the Agent Parameters tab:
Chapter 6. Creating clusters with monitoring components in a System Automation for Multiplatforms environment 85

a. Add the DB2 JDBC drivers. (To add JDBC drivers, use the scroll bar in theSources section, and scroll to the right, exposing the Add and Deletebuttons.)
b. Update the Warehouse URL so that it refers to the correct database andport.
c. Set the Warehouse User and Warehouse Password.d. Check the parameters by using the Test database connection button.e. Save the configuration.
9. Stop the agent if it is running.10. Change the cluster's mode to Automatic:
samctrl –M F
11. Disable the automatic startup of the Warehouse Proxy Agent:a. Edit the /shareddisk/ITM/config/kcirunas.cfg file.b. Add the following section after the <agent> line by including the following
syntax:<productCode>hd</productCode><default><autoStart>no</autoStart>
</default>
c. Save the file.d. Run the /shareddisk/ITM/bin/UpdateAutoRun.sh command as root user.
Note: The path to the kcirunas.cfg file and the UpdateAutoRun.sh command(/shareddisk/ITM) might be different on your system.
Setting up the Warehouse Proxy Agent on clusternode2About this task
Open a session on node2, and install the GSKit locally on node2.
To do this:
Procedure1. Start the Tivoli Monitoring installation program.2. Accept the default directory.3. Choose 1) Install products to the local host.4. Choose the language.5. Accept the license agreement.6. Reply to the encryption key prompt, if it is presented.7. If the GSKit is not installed, it is now installed.8. When the Product Packages are available menu is displayed, press
Control-Break to leave the installation program.
Adding the Warehouse Proxy Agent to the resource group ofthe Base Cluster
About this task
When the installation of the Warehouse Proxy Agent is complete, integrate it intothe cluster, so that it can run under the cluster’s control.
86 IBM Tivoli Monitoring: High Availability Guide for Distributed Systems

Procedure1. On one of the nodes, take the resource group RG_NAME offline:
chrg –o offline RG_NAME
2. Verify that the resource group is offline, it can take 1 or 2 minutes:lssam -top
3. Change to the itm6/BuildScripts directory.4. Run the tdwproxyrscbuild.sh command as root from the same directory.5. Start the resource group again using the following command:
chrg –o online RG_NAME
6. Verify that the resource group is online:lssam -top
Results
The Warehouse Proxy Agent is now running in the Tivoli System Automation forMultiplatforms cluster on top of the clustered DB2 for the Tivoli Data Warehouse.
Testing the Warehouse Proxy Agent failover to clusternode2About this task
Run the rgreq –o move RG_NAME command, and use lssam -top to verify that thewarehouse proxy agent starts on the other node. If it doesn’t start:
Procedure1. Fix the values entered in the itm6/BuildScripts/clustervariables.sh file.2. Remove the Tivoli System Automation for Multiplatforms domain using the
following commands:stoprpdomain –f domain_namermrpdomain domain_name
3. Re-execute the steps in “IBM Tivoli Monitoring cluster setup” on page 35.
Note: The terminal session might end after the move completes.
Installing the Summarization and Pruning Agent on a Tivoli SystemAutomation for Multiplatforms cluster
This section provides information on the installation of the Summarization andPruning Agent on a Tivoli System Automation for Multiplatforms cluster.
Installing and setting up the Summarization and PruningAgent on clusternode1
Procedure1. Check which cluster node is active (online):
lsrg -m
2. If you installed other Tivoli Monitoring components to the shared file system,use the same installation path for the Summarization and Pruning Agent.
3. Change the cluster's mode to Manual:samctrl –M T
Chapter 6. Creating clusters with monitoring components in a System Automation for Multiplatforms environment 87

4. On the active node, install the warehouse proxy agent, according to the IBMTivoli Monitoring: Installation and Setup Guide.
5. Use the following method to configure the Summarization and Pruning Agent:To invoke a GUI application, use <CANDLEHOME>/bin/itmcmd manage, which itrequires a connection to an X Server.
6. Configure the monitoring server host name so that it is the same as the virtualhost name of the monitoring server (assuming the hub monitoring server isclustered).The monitoring server host name is the TEMS Hostname field on the GUITEMS Connection tab.
7. Set the Primary Network Name to the virtual host name of the Summarizationand Pruning Agent system.The Primary Network Name is the Network Name field, which is availableafter selecting Specify Optional Primary Network on the GUI TEMSConnection tab.
8. Configure the Warehouse Proxy Agent to allow access to the database whichyou created previously. On the Agent Parameters tab:a. Add the DB2 JDBC drivers. (To add JDBC drivers, use the scroll bar in the
Sources section, and scroll to the right, exposing the Add and Deletebuttons.)
b. Update the Warehouse URL so that it refers to the correct database andport.
c. Set the Warehouse User and Warehouse Password.d. Check the parameters by using the Test database connection button.e. Save the configuration.
9. Shut down the agent if it is running.10. Change the cluster's mode to Automatic:
samctrl –M F
11. Disable the automatic startup of the Summarization and Pruning Agent:a. Edit the /shareddisk/ITM/config/kcirunas.cfg file.b. Add the following section after the <agent> line by including the following
syntax:<productCode>sy</productCode><default><autoStart>no</autoStart>
</default>
c. Save the file.d. Run the /shareddisk/ITM/bin/UpdateAutoRun.sh command as root user.
Note: The path to the kcirunas.cfg file and the UpdateAutoRun.sh command(/shareddisk/ITM) might be different on your system.
Setting up the Summarization and Pruning Agent onclusternode2
About this task
Open a session on node2, and install the GSKit locally on node2.
To do this:
88 IBM Tivoli Monitoring: High Availability Guide for Distributed Systems

Procedure1. Start the Tivoli Monitoring installation program.2. Accept the default directory.3. Choose 1) Install products to the local host.4. Choose the language.5. Accept the license agreement.6. Reply to the encryption key prompt, if it is presented.7. If the GSKit is not installed, it is now installed.8. When the Product Packages are available menu is displayed, press
Control-Break to leave the installation program.
Adding the Summarization and Pruning Agent to the resourcegroup of the Base Cluster
About this task
When the installation of the Summarization and Pruning Agent is complete,integrate it into the cluster, so that it can run under the cluster’s control.
Procedure1. On one of the nodes, take the resource group RG_NAME offline:
chrg –o offline RG_NAME
2. Verify that the resource group is offline, it can take 1 or 2 minutes:lssam -top
3. Change to the itm6/BuildScripts directory.4. Run the spagentrscbuild.sh command as root from the same directory.5. Start the resource group again using the following command:
chrg –o online RG_NAME
6. Verify that the resource group is online:lssam -top
Results
The Summarization and Pruning Agent is now running in the Tivoli SystemAutomation for Multiplatforms cluster on top of the clustered DB2 for the TivoliData Warehouse.
Testing the Summarization and Pruning Agent failover toclusternode2
About this task
Run the rgreq –o move RG_NAME command, and use lssam -top to verify thatSummarization and Pruning Agent starts on the other node. If it doesn’t start:
Procedure1. Fix the values entered in the itm6/BuildScripts/clustervariables.sh file.2. Remove the Tivoli System Automation for Multiplatforms domain using the
following commands:stoprpdomain –f domain_namermrpdomain domain_name
Chapter 6. Creating clusters with monitoring components in a System Automation for Multiplatforms environment 89

3. Re-execute the steps in “IBM Tivoli Monitoring cluster setup” on page 35.
Note: The terminal session might end after the move completes.
Performing IBM Tivoli Monitoring Maintenance on a Tivoli SystemAutomation for Multiplatforms cluster
Performing maintenance on Tivoli Monitoring while it is running in a TivoliSystem Automation for Multiplatforms cluster requires you to gracefully stop thecomponent, without unmounting the shared disk. This is done using the TivoliSystem Automation for Multiplatforms rgmbrreq command.
Applying a fix pack to the Hub Tivoli Enterprise MonitoringServer
Procedure1. On one of the nodes, run the following command:
rgmbrreq –o stop IBM.Application:TEMSSRV
2. Check which cluster node is active (online), and verify that theIBM.Application:TEMSSRV member is offline:lsrg –m
3. On the active node, verify that the shared disk is available.4. Follow the fix pack instructions to install the monitoring server component
upgrade to the shared disk.5. Disable the automatic startup of the monitoring server:
a. Edit the /shareddisk/ITM/config/kcirunas.cfg file.b. Add the following section after the <agent> line by including the following
syntax:<productCode>ms</productCode><default><autoStart>no</autoStart>
</default>
c. Save the file.d. Run the /shareddisk/ITM/bin/UpdateAutoRun.sh command as root user.
Note: The path to the kcirunas.cfg file and the UpdateAutoRun.sh command(/shareddisk/ITM) might be different on your system.
6. Run the following command:rgmbrreq –o cancel IBM.Application:TEMSSRV
7. Verify that the resource group is online:lsrg -m
8. Refer to “Testing the monitoring server failover to clusternode2” on page 81 totest failover.
Applying a fix pack to the Tivoli Enterprise Portal ServerProcedure1. On one of the nodes, run the following command:
rgmbrreq –o stop IBM.Application:TEPSSRV
2. Check which cluster node is active (online), and verify that theIBM.Application:TEPSSRV member is offline:
90 IBM Tivoli Monitoring: High Availability Guide for Distributed Systems

lsrg –m
3. On the active node, verify that the shared disk is available.4. Follow the fix pack instructions to install the portal server component upgrade
to the shared disk.5. Disable the automatic startup of the portal server:
a. Edit the /shareddisk/ITM/config/kcirunas.cfg file.b. Add the following section after the <agent> line by including the following
syntax:<productCode>ms</productCode><default><autoStart>no</autoStart>
</default>
c. Save the file.d. Run the /shareddisk/ITM/bin/UpdateAutoRun.sh command as root user.
Note: The path to the kcirunas.cfg file and the UpdateAutoRun.sh command(/shareddisk/ITM) might be different on your system.
6. Run the following command:rgmbrreq –o cancel IBM.Application:TEPSSRV
7. Verify that the resource group is online:lsrg -m
8. Refer to “Testing the portal server failover to clusternode2” on page 85 to testfailover.
Applying a fix pack to the Warehouse Proxy AgentProcedure1. On one of the nodes, run the following command:
rgmbrreq –o stop IBM.Application:TDWProxy
2. Check which cluster node is active (online), and verify that theIBM.Application:TDWProxy member is offline:lsrg –m
3. On the active node, verify that the shared disk is available.4. Follow the fix pack instructions to install the Warehouse Proxy agent
component upgrade to the shared disk.5. Disable the automatic startup of the Warehouse Proxy agent:
a. Edit the /shareddisk/ITM/config/kcirunas.cfg file.b. Add the following section after the <agent> line by including the following
syntax:<productCode>hd</productCode><default><autoStart>no</autoStart>
</default>
c. Save the file.d. Run the /shareddisk/ITM/bin/UpdateAutoRun.sh command as root user.
Note: The path to the kcirunas.cfg file and the UpdateAutoRun.sh command(/shareddisk/ITM) might be different on your system.
6. Run the following command:rgmbrreq –o cancel IBM.Application:TDWProxy
Chapter 6. Creating clusters with monitoring components in a System Automation for Multiplatforms environment 91

7. Verify that the resource group is online:lsrg -m
8. Refer to “Testing the Warehouse Proxy Agent failover to clusternode2” on page87 to test failover.
Applying a fix pack to the Summarization and Pruning AgentProcedure1. On one of the nodes, run the following command:
rgmbrreq –o stop IBM.Application:SPAgent
2. Check which cluster node is active (online), and verify that theIBM.Application:SPAgent member is offline:lsrg –m
3. On the active node, verify that the shared disk is available.4. Follow the fix pack instructions to install the Summarization and Pruning agent
component upgrade to the shared disk.5. Disable the automatic startup of the Summarization and Pruning agent:
a. Edit the /shareddisk/ITM/config/kcirunas.cfg file.b. Add the following section after the <agent> line by including the following
syntax:<productCode>ms</productCode><default><autoStart>no</autoStart>
</default>
c. Save the file.d. Run the /shareddisk/ITM/bin/UpdateAutoRun.sh command as root user.
Note: The path to the kcirunas.cfg file and the UpdateAutoRun.sh command(/shareddisk/ITM) might be different on your system.
6. Run the following command:rgmbrreq –o cancel IBM.Application:SPAgent
7. Verify that the resource group is online:lsrg -m
8. Refer to “Testing the Summarization and Pruning Agent failover toclusternode2” on page 89 to test failover.
Known problems and limitations
It is important to remember specific characteristics and constraints of TivoliMonitoring installation and set up, and their effects on the cluster setup.
During the certification test for Tivoli Monitoring clustering, issues encounteredwhen setting up the clustered environment are formally reported as defects. Thesedefects are typically related to the setup of Tivoli Monitoring in a non-defaultmanner, instead of being specific to the cluster environment. These defects arehandled as part of the Tivoli Monitoring service stream. Here is a list of knownproblems and workarounds.v The Tivoli Monitoring installer configures the components to be auto started by
default. It does not give the user an option to configure the components to notauto start. Under this limitation, the user has to edit an operating system scriptto remove this behavior.
92 IBM Tivoli Monitoring: High Availability Guide for Distributed Systems

Under Linux, another limitation is that the Tivoli Monitoring installer places theauto start commands under every OS run level. Because all of these files areactually links, editing one of them removes this behavior at all run levels.This same behavior occurs whether installing for the first time, or applying FixPacks.See the installation sections and the maintenance section for details on how toconfigure the components not to auto start.
v GSKit is a prerequisite of Tivoli Monitoring. As of the current release of TivoliMonitoring, this component can only be installed into a specific location:/usr/local/ibm/gsk7. Under this limitation, GSKit cannot be installed into a userdefined location, such as the file system for the shared disk. The workaround isto use the Tivoli Monitoring installation program to install GSKit on the secondnode.See the following sections for steps to install GSKit:– “Setting up the monitoring server on clusternode2” on page 80– “Setting up the portal server on clusternode2” on page 84– “Setting up the Warehouse Proxy Agent on clusternode2” on page 86– “Setting up the Summarization and Pruning Agent on clusternode2” on page
88v If there are user console activities being performed, such as clicking an object on
the workspace to request data, while the failover process is occurring, then theconsole takes a longer period of time to become active. This delays the time ittakes for the agent to become available to the console user. This is due to theinternal delay timers for the reconnection algorithm. This problem is being fixedas part of the Tivoli Monitoring 6.1 service stream.
v Chapter 5, “Installing and uninstalling service,” in the Tivoli System Automationfor Multiplatforms Installation and Configuration Guide is missing 2 steps requiredto install service on a node:After running the samctrl -u a Node command in step 2, you need to run thefollowing command to stop the node:stoprpnode Node
Before running the samctrl -u d Node command in step 6, you need to run thefollowing command to start the node:startrpnode Node
v In some cases, removing a cluster domain from one node does not remove itfrom the second node. This is evident when you attempt to create a domainwith the same name that was just removed, and you get an error that thedomain already exists.To remedy this, when removing a domain, run the rmrpdomain command onboth nodes.
v If a resource stays in Stuck online status for a long amount of time, as shown inthe results of lsrg –m or lssam –top, this could mean that the configured stopcommand timeout for the resource is too low.You should time how long it takes to stop the resource, and double that, to get agood timeout value. When you have this value, do the following to change thevalue for the resource:1. Run the following commands to take the resource group offline (this causes
Tivoli Monitoring to stop):export CT_MANAGEMENT_SCOPE=2
chrg –o offline RG_NAME
2. Stop any remaining processes that have not ended for the resource.
Chapter 6. Creating clusters with monitoring components in a System Automation for Multiplatforms environment 93

3. Run the appropriate command for the resource that you would like tochange, where n is the new timeout value, in seconds:
Table 7. Change Resource (chrsrc) commands for setting the Timeout value
Resource Command
Hub monitoringserver
chrsrc –s “Name = 'TEMSSRV'” IBM.ApplicationStopCommandTimeout=n
Portal server chrsrc –s “Name = 'TEPSSRV'” IBM.ApplicationStopCommandTimeout=n
Warehouse ProxyAgent
chrsrc –s “Name = 'TDWProxy'” IBM.ApplicationStopCommandTimeout=n
Summarizationand PruningAgent
chrsrc –s “Name = 'TDWProxy'” IBM.ApplicationStopCommandTimeout=n
4. Run the following command to bring the resource group online:chrg –o online RG_NAME
v IBM Tivoli System Automation for Multiplatforms on AIX 5.3 related problems– During testing, a problem was encountered where shared disks were not
being properly released or mounted after failures. This problem was solvedafter installing the latest storageRM file set, which can be downloaded fromhttp://www-1.ibm.com/support/docview.wss?rs=1207&context=SG11P&dc=DB510&dc=DB550&q1=rsct.opt.storagerm.2.4.7.1&uid=isg1fileset-671500801&loc=en_US&cs=UTF-8&lang=all.
– In the test bed, there was a line in the inittab of the OS that prevented RSCTprocesses from starting automatically after the computer reboot. If there issuch a line in your environment, and it is located above the lines that relatedto RSCT processes, then make sure that you comment out this line:install_assist:2:wait:/usr/sbin/install_assist </dev/console>/dev/console 2>&1
v The Tivoli Enterprise Portal Server automatically starts the Eclipse help server asa requirement. However, if the portal server shuts down, the Eclipse help serverdoes not stop. This causes the portal server resource to go into a "stuck online"state. Therefore, in a clustered environment, the Eclipse help server must bestopped after the portal server.To avoid the "stuck online" state, add the command tacmd agent stop kf to thestop section of the portal server control script. Add this command after theportal server stop command.
94 IBM Tivoli Monitoring: High Availability Guide for Distributed Systems

Chapter 7. Creating clusters with Tivoli Monitoringcomponents in a Microsoft Cluster Server environment
Highly available IBM Tivoli Monitoring environments are designed andimplemented by using a Microsoft Cluster Server. This server has both a GUICluster Administrator and a CLI command (cluster.exe). Use the ClusterAdministrator to install and configure Tivoli Monitoring in Microsoft ClusterServer.
This chapter includes guidance for implementing highly available strategies byusing the Tivoli Monitoring components; practical considerations regarding design,implementation, testing, maintenance work with the system, and upgrade are alsodiscussed.v “Setting up the hub monitoring server in a Microsoft Cluster Server” covers the
hub Tivoli Enterprise Monitoring Server (monitoring server) running on aMicrosoft Cluster Server.
v “Setting up the portal server in a Microsoft Cluster Server” on page 115 includesinformation about running the Tivoli Enterprise Portal Server (portal server) ona Microsoft Cluster Server.
v “Setting up Tivoli Data Warehouse components in a Microsoft Cluster Server” onpage 132 includes information about running the Tivoli Data Warehouse andrelated components (Summarization and Pruning Agent and Warehouse ProxyAgent) on a Microsoft Cluster Server.
Note: If any of these IBM Tivoli Monitoring components will be running on thesame cluster, many of the base steps are common and must be completed onlyonce.
For an overview of Tivoli Monitoring components on clustered environments, seeChapter 4, “The clustering of IBM Tivoli Monitoring components,” on page 31 andto IBM Tivoli Monitoring Resiliency and High Availability.
Important: These configurations and operational procedures for high availabilityhave been tested by IBM Software Support and represent supported productfunctions. Other configurations or procedures are possible but might be outside ofproduct design parameters; therefore, other configurations or procedures might notoperate correctly or be supported. In addition, these configurations and operationalprocedures cover only DB2 as the RDBMS used by the Tivoli Monitoringinfrastructure. IBM Tivoli Monitoring V6.2.3 includes a limited-use version of IBMDB2 Workgroup Server Edition V9.7 for use with the Tivoli Enterprise PortalServer and the Tivoli Data Warehouse.
Setting up the hub monitoring server in a Microsoft Cluster ServerTo set up a highly-available hub monitoring server in a Microsoft Cluster Server,you must complete the following procedures:1. “Setting up basic cluster resources” on page 962. “Installing and setting up the monitoring server on clusternode1” on page 1033. “Adding the monitoring server resource to your resource group” on page 1074. “Setting up the monitoring server on clusternode2” on page 114
© Copyright IBM Corp. 2010, 2012 95

Setting up basic cluster resources
For hub monitoring server installation and setup on a Microsoft Cluster Server, thefollowing four resources are necessary:v Shared disk R: You can assign a different drive letter for the shared disk.v IP address: Must be a valid domain name system registered IP, using static IP.v Host name: Must be a valid domain name system registered host name with the
IP above.v Hub monitoring service: Contains all required information.
Note: These resources might have already been created by your clusteradministrator. If they are not created in your environment, complete the followingsteps to create these resources.
In the test environment, Windows 2003 Enterprise x64 Microsoft® Cluster Serverwas used. Each cluster was set up with a single quorum device and two nodes.
To set up of the basic cluster resources, start with clusternode1:1. Start the Cluster Administrator and connect it to the cluster that you are
working in. Make sure that the cluster is running on clusternode1.By default, the Cluster Administrator contains a Cluster Group (for internalcluster setup) and a Group 0. Use Group 0 as the resource group for IBM TivoliMonitoring. The Cluster Group contains a Cluster Name (in this case,IVTCS001), which is used for follow on configurations.The disk R is by default held in “Group 0”. You can now rename this groupaccording to your needs. In the testing environment, it was renamed toHUBTems. You can also create a new group and then move this shared diskinto that new group.
Note: Do not put any Tivoli Monitoring related resources into the defaultgroup named Cluster Group, which contains Cluster IP, Name, and the quorumdisk.The shared disk resource has been set, and you must set the IP address and thehost name. You define the hub monitoring server service after the installationprocess.
2. To set up the resource for the IP address, complete these steps:a. Right-click the HUBTems group.b. Select New > Resource.c. Select IP Address and then specify the name you want, as shown in
Figure 13 on page 97:
96 IBM Tivoli Monitoring: High Availability Guide for Distributed Systems

d. Specify the node names in the Possible Owners window:
Figure 13. Selecting the IP Address in the New Resource window
Chapter 7. Creating clusters with Tivoli Monitoring components in a Microsoft Cluster Server environment 97

Note: Node names are selected as possible owners by default.e. Specify the dependencies. You want to ensure the shared disk is available
before anything else, so you can specify the shared disk R as thedependency for the IP Address.Highlight the disk, and click Add ->.
Figure 14. Specification of Possible Owners
98 IBM Tivoli Monitoring: High Availability Guide for Distributed Systems

Figure 15. Disk R before selection
Chapter 7. Creating clusters with Tivoli Monitoring components in a Microsoft Cluster Server environment 99

f. Specify the virtual IP Address to be used for the hub TEMS cluster.
Figure 16. Dependencies window after adding Disk R
100 IBM Tivoli Monitoring: High Availability Guide for Distributed Systems

Note: The Cluster IP Address is the virtual IP Address. If a virtual IPAddress already exists, this address is the cluster name.
g. Click Finish.The following message is displayed: Cluster resource "TEMS IP" createdsuccessfully
3. Right-click this resource and then click Bring Online, as shown in Figure 18 onpage 102:
Figure 17. Selecting the virtual IP Address for the hub TEMS cluster
Chapter 7. Creating clusters with Tivoli Monitoring components in a Microsoft Cluster Server environment 101

4. Create the resource for the network name, by following a similar procedure.The only difference is that you select the Network Name resource type. In thetest environment, the Network Name is IVTCS007.
Figure 18. Cluster Administrator before Bring Online function
102 IBM Tivoli Monitoring: High Availability Guide for Distributed Systems

5. Follow the prompts to create a virtual host name for your virtual IP address.The dependencies are the disk R and the IP address. Also bring this host nameonline. Test the virtual host name by pinging it from another computer.
6. Create the Tivoli Monitoring default user ID sysadmin as a local user on thefirst and on the second node of the cluster.
You are now ready to install the monitoring server.
Installing and setting up the monitoring server onclusternode1
About this task
You may install only one installation of IBM Tivoli Monitoring on a Windowscomputer. The installation on the shared disk removes any Tivoli Monitoring V6.xcomponent that was previously installed locally on the node. Previously installedcomponents are removed because the installation directory changed from the localdisk to the shared disk. Therefore, you must make sure that no Tivoli Monitoring6.x component is installed locally before you start the setup.
Before installing or configuring any ITM components in a Microsoft Clusterenvironment, all other ITM components that are already added to resource groupson this cluster should be offline. This precautionary measure prevents conflictsbetween the cluster management tool and the ITM MTEMS tool. Also, you shouldshut down clusternode2 to prevent the Microsoft Cluster Server moving theresource to clusternode2 during ITM installation. Ensure that basic clusterresources are online while installing ITM components.
Figure 19. Create the resource for the network name
Chapter 7. Creating clusters with Tivoli Monitoring components in a Microsoft Cluster Server environment 103

Procedure1. Start the installation by using the setup.exe command. After the Welcome to
Tivoli Monitoring window, the InstallShield Wizard displays the SoftwareLicense agreement.
2. Click Accept to accept the Software License agreement. The window to specifythe destination folder is displayed.
3. Install Tivoli Monitoring on the shared disk (the default is R:\IBM\ITM, but youcan specify a different folder). After you choose the destination location, thewindow to provide the User data Encryption Key is displayed.
4. Provide the key and perform a typical setup with application support for theagents you need. The TEPS Desktop and Browser Signon ID and Passwordwindow is displayed.
Figure 20. Starting the IBM Tivoli Monitoring InstallShield Wizard
104 IBM Tivoli Monitoring: High Availability Guide for Distributed Systems

5. The setup prompts you for the monitoring server name. The monitoring servername is not the host name, so you can choose your preferred hub TivoliEnterprise Monitoring Server name. Avoid using the node name as the TivoliEnterprise Monitoring Server name because Tivoli Enterprise Monitoring Serverwill be running on both nodes of the cluster.
Figure 21. Specifying the TEPS Desktop and Browser Signon ID and Password
Figure 22. Specifying the Tivoli Enterprise Monitoring Server name
Chapter 7. Creating clusters with Tivoli Monitoring components in a Microsoft Cluster Server environment 105

6. When the setup window prompts you for the host name of the monitoringserver, type in the virtual host name that you just created and brought onlineas part of the cluster resources setup. In this case, the virtual host name isIVTCS005.
7. Select OK when the following warning message displays.
To complete the setup, the monitoring server starts up and loads the selectedapplication support.
8. When the setup is complete, open the Manage Tivoli Enterprise Services tool.Then, stop the monitoring server and switch the startup to manual. Changingthe monitoring server startup to manual is required because the cluster musthandle the startup and shutdown processes of the monitoring server.
What to do next
To prepare for the next step (which requires a restart of clusternode1), stop clusterservice for clusternode2 to prevent Microsoft Cluster Server from moving theresource to the clusternode2.1. Right-click the monitoring server again. Select Advanced, and then select Set
Network Interface.2. Set the network interface to the virtual host name. In this example, the virtual
host name is IVTCS005.3. This setting by default requires a restart of the computer and creates an
environment variable for the monitoring server. IThe following registry entry isused by default:HKEY_Local_MACHINE\SYSTEM\CurrentControlSet\Control\Session Manager\Environment
KDEB_INTERFACELIST
Note: The registry replication entries might not be identical to the ones in thisdocument.This setting affects all components installed on the same computer (node).
Figure 23. Incorrect value for the Hub TEMS configuration
106 IBM Tivoli Monitoring: High Availability Guide for Distributed Systems

Although the monitoring server is configured to use the virtual host name, themonitoring server logs are named after each specific node in the cluster.
4. When the computer is back online, make sure that the cluster resources are stillactive on clusternode1. Then, start cluster service on clusternode2.
Adding the monitoring server resource to your resourcegroup
About this task
The final step for the setup, before you configure clusternode2, is to configure theresource for the monitoring server service in the HUBTems group on the cluster:
Procedure1. Open the Cluster Administrator on clusternode1 again.
a. Right-click the group HUBTems group.b. Select New->Resource.c. Select Generic Service as the resource type.
2. Assign a name to the resource. In this testing environment, use TEMSservice.
3. Make sure that both nodes are on the list of Possible Owners:
Figure 24. Selecting Generic Service in the New Resource window
Chapter 7. Creating clusters with Tivoli Monitoring components in a Microsoft Cluster Server environment 107

4. Define the dependencies:Make sure that the service dependencies include all other resources, shareddisk, IP address, and network name to ensure that the monitoring serverservice does not start up before the other resources are online.
Figure 25. Possible Owners window with both nodes listed
108 IBM Tivoli Monitoring: High Availability Guide for Distributed Systems

5. Do not change the Generic Service Parameters. For the service name, specify“TEMS1,” which is the service name used by the monitoring server.
Figure 26. Disk R, TEMS IP, and TEMS NetName all present
Chapter 7. Creating clusters with Tivoli Monitoring components in a Microsoft Cluster Server environment 109

6. After you have added the monitoring server resource to your resource group,replicate the registry keys.
Registry Keys replicationOn the Generic Services Parameter window, click Next to display the RegistryReplication panel.
Figure 27. TEMS1 as the service name
110 IBM Tivoli Monitoring: High Availability Guide for Distributed Systems

Specify the registry entries that must be replicated to the second cluster node.
See the following llist of high level registry entries used by IBM Tivoli MonitoringTivoli Enterprise Monitoring Servers:
HKEY_LOCAL_MACHINE\SOFTWARE\CandleHKEY_LOCAL_MACHINE\SYSTEM\CurrentControlSet\Services\TEMS1HKEY_LOCAL_MACHINE\SYSTEM\CurrentControlSet\Control\SessionManager\EnvironmentHKEY_LOCAL_MACHINE\SOFTWARE\Wow6432Node\Candle
Note: The registry replication entries might not be identical to the ones in thisdocument.
In the registry settings, include only registry names below theHKEY_LOCAL_MACHINE entry.
Figure 28. List all registries using the Registry Replication
Chapter 7. Creating clusters with Tivoli Monitoring components in a Microsoft Cluster Server environment 111

Back on the TEMS resource creation, click Finish and finish the resource creation.After that, you can bring the resource online as shown in the following window:
Figure 29. Listed registries on the Registry Replication panel
112 IBM Tivoli Monitoring: High Availability Guide for Distributed Systems

When this resource is online, open the Manage Tivoli Monitoring Services GUI toverify that the monitoring server is started by the cluster software and running.
Figure 30. Bring TEMS Service resource online
Figure 31. Manage Tivoli Enterprise Monitoring Services
Chapter 7. Creating clusters with Tivoli Monitoring components in a Microsoft Cluster Server environment 113

Testing the monitoring server on clusternode1About this task
Now, you can test the monitoring server.
For example, connect an agent to the monitoring server from another system.Specify the virtual host name for the agent connection to the hub Tivoli EnterpriseMonitoring Server. In the testing environment, the monitoring server virtual hostname is IVTCS005.
On clusternode1:
Procedure1. Open a command line window and switch to R:\IBM\ITM\bin2. Log on to the monitoring server using tacmd login.3. List the managed systems using tacmd listsystems.4. You should see the hub and the agent as two Managed Systems.
Setting up the monitoring server on clusternode2Because the monitoring server is already installed on the shared disk that isaccessible by clusternode2, do not install the monitoring server on clusternode2.
The registry settings for the monitoring server on clusternode1 are replicated toclusternode2 by the cluster software. To ensure that clusternode2 includes the samemonitoring server configuration as clusternode1, you must check the environmentvariables and monitoring server user validation on clusternode2:v “Checking environment variables”v “Monitoring server user validation” on page 115
Checking environment variablesThe monitoring server installation creates environment variables that must beavailable on the computer running the monitoring server. Because you installed themonitoring server on clusternode1, these environment variables are set forclusternode1 under the registry key:
HKEY_LOCAL_MACHINE\SYSTEM\CurrentControlSet\Control\SessionManager\EnvironmentCANDLE_HOMEKDEB_INTERFACELISTKUI_FILEPATHLIBPATHPATH
Note: The registry replication entries might not be identical to the ones in thisdocument.
Make sure that these variables are also available on clusternode2 such that theTivoli Enterprise Monitoring Server can correctly function when running onclusternode2. Verify the availability of these variables by including theEnvironment Registry Key in the registry keys for replication as described in“Adding the monitoring server resource to your resource group” on page 107.However, including the Environment Registry Key will replicate the entireenvironment from clusternode1 to clusternode2. A more selective way of ensuringthe environment variables are available to clusternode2 is by exporting the registry
114 IBM Tivoli Monitoring: High Availability Guide for Distributed Systems

keys of clusternode1, editing the file to leave only the values above, and thenimporting the file into the registry of clusternode2. Finally, restart clusternode2 sothat the changes take affect.
Monitoring server user validationIf, in your environment, you run the monitoring server with user validationconfigured, make sure that the users are configured locally on both computers, andthat they are using the same user ID, assigned user group, and password.
Testing the monitoring server on clusternode2Procedure1. While clusternode2 is online, check that the TEMS1 service, Tivoli Enterprise
Monitoring Svcs – TEMS1, is listed on Windows Services. If it is, then themonitoring server on clusternode2 is ready.If the service is not listed on Windows Services, then check whether the correctregistry entries are replicated. If the registry entries are not replicated, you mustforce replication to occur by completing the following steps:
2. On clusternode1, in Cluster Administrator:a. Right-click on the TEMS resource group.b. Select Move Group.
This Move Group fails and the cluster is back on clusternode1 again.3. You can restart clusternode2 for the registry entries to take effect.
When clusternode2 is available again, it is ready.4. On clusternode1, in Cluster Administrator:
a. Right-click on the TEMS resource group.b. Select Move Group.
The Cluster Resources on the “HUBTems” resource group start the failover: thelower resource in the dependency goes off line first (and then the others inorder). Next, one by one, the resources are available online on clusternode2.
5. You can test the monitoring server on clusternode2 by using the same methodyou used on clusternode1.
6. To see the monitoring server on the Manage Tivoli Monitoring Services GUI,start it on clusternode2 by running the following command:R:\IBM\ITM\InstallITM\kinconfig.exe
Setting up the portal server in a Microsoft Cluster ServerAbout this task
To have the portal server highly available in a Microsoft Cluster, you mustcomplete the following procedures:
Procedure1. “Setting up basic cluster resources” on page 1162. Install DB Software and add the software to the resource group3. Install the portal server clusternode1, and configure the portal server on
clusternode24. “Adding the portal server resource to the resource group” on page 126
Chapter 7. Creating clusters with Tivoli Monitoring components in a Microsoft Cluster Server environment 115

Setting up basic cluster resourcesInstallation and setup of the Tivoli Data Warehouse components on a MicrosoftCluster Server is similar to the portal server and requires the following fiveclustered resources:v Shared diskv IP addressv Host namev Portal Server DBv Portal server service with its associated information
See “Setting up basic cluster resources” on page 96 for the setup of the basiccluster resources for the portal server. Use a different name from the one chosenfor the hub resource group.
In addition to the basic cluster resources as in the Monitoring server case, you alsoneed the portal server database as one of the resources. This procedure is describedin the following sections.
Installing and setting up DB2 on a Microsoft Cluster ServerDB2 is a cluster-enabled database server, which means that the DB2 database isofficially supported in a clustering environment.
The DB2 database must be installed on both cluster nodes.
Installing DB2 on clusternode1Procedure1. Switch the cluster to clusternode1.2. Install DB2 as you typically do on a local drive on clusternode13. As in a default installation, create the default instance.4. Switch all DB2 services to manual so that they can be controlled by the cluster.
The DB2 services are:v DB2 - DB2-0v DB2 Governorv DB2 JDBC Applet Serverv DB2 License Serverv DB2 Remote Command Serverv DB2 Security Serverv DB2DAS - DB2DAS00v DB2 Management Service
5. Complete the following steps to change the DB2 configuration so that thedefault drive (for creating the database to be used by Tivoli Monitoring) is theshared disk:a. Start the DB2 Administration Server by issuing the db2start command in a
DB2 command line.b. Start the DB2 Control Center.c. Right-click the instance name (DB2 by default).d. Select option Confígure parameters.
The following window opens:
116 IBM Tivoli Monitoring: High Availability Guide for Distributed Systems

e. Select DFTDBPATH, click the value field, and then click the “...” to changethe default drive.
Note: If you cannot save your changes, log in to your system as thedb2admin user and update the default drive value as previously described.
Figure 32. Configuring parameters in the DBM Configuration window
Chapter 7. Creating clusters with Tivoli Monitoring components in a Microsoft Cluster Server environment 117

f. Change the drive to the shared drive for the cluster (R in the testingenvironment).
Figure 33. Changing the default drive
Figure 34. Setting the default drive to R
118 IBM Tivoli Monitoring: High Availability Guide for Distributed Systems

6. Stop clusternode1 service so that the changes on DB2 take effect and the clusterswitches to clusternode2.
Installing DB2 on clusternode2On clusternode2, perform the the steps previously described for clusternode1.
Adding the DB2 resource type to the Cluster AdministratorAbout this task
To use DB2 clustering in the Microsoft Cluster Server, you need to add therequired resource types to the Microsoft Cluster Server Administrator.
DB2 provides a command to add the resource type to the cluster. To add theresource type, complete the following steps:
Procedure1. Move the resource group back to clusternode1 and open a command line
window on clusternode1.2. At the prompt, type the db2wolfi i command.
The output is shown as follows:c:>db2wolfi i
ok
Note: Error 183 indicates that the resource type has already been added.3. Restart the cluster nodes so that these changes take effect.
Transforming the DB2 instance into a clustered instanceAbout this task
The DB2 instances (by default, DB2) on both cluster nodes must be transformedinto a clustered instance by using a set of commands that are provided by DB2 inWindows. You must also specify a directory for the DB2 instance on the shareddrive R.
Figure 35. Setting the default drive to R
Chapter 7. Creating clusters with Tivoli Monitoring components in a Microsoft Cluster Server environment 119

To transform the instance, complete the following steps:
Procedure1. Ensure that the cluster is switched to clusternode1 so that the shared disk drive
is accessible on clusternode1.2. Stop all DB2 services if they are not already stopped.3. Create a directory on the shared drive R, such as \db2Teps, to hold the shared
DB2 instance information.4. Open a command-line window, and type the following command:
db2iclus migrate /i:db2 /c:<clustername> /m:<clusternode1> /p:r:\db2Teps
You do not need to specify the cluster name; the cluster you are currently in isthe default cluster.You should see the following CLI output:
DBI1912I The DB2 Cluster command was successful.
Explanation: The user request was successfully processed.
User Response: No action required.
5. Add the second cluster node to the DB2 cluster by running the followingcommand, again on clusternode1:
db2iclus add /i:db2 /m:<clusternode2>
/u:<db2adminName>,<password>You should see the following CLI output:
DBI1912I The DB2 Cluster command was successful.
Explanation: The user request was successfully processed.
User Response:No action required.
Results
You are now ready to configure the DB2 resource in the Cluster Administrator.
Instructions for how to migrate DB2 in a Microsoft Cluster Server are also availablein the Migrating DB2 servers in Microsoft Cluster Server environments topic at theDB2 for Linux, UNIX, and Windows information center (http://publib.boulder.ibm.com/infocenter/db2luw/v9/index.jsp?topic=/com.ibm.db2.udb.uprun.doc/doc/t0022647.htm).
Adding the DB2 resource to the resource groupAbout this task
To configure DB2 in the Cluster Administrator, complete these steps:
Procedure1. Open the Cluster Administrator Tool.2. Add a new resource to the resource group. Make sure that the name of the
resource is the same as the name of the DB2 instance. This name can be “DB2”or, on Windows 2003 Enterprise, “DB2-0."To verify the name, check the name in the windows services, as shown in thefollowing window:
120 IBM Tivoli Monitoring: High Availability Guide for Distributed Systems

3. In the New Resource window, select the resource type DB2 Server, as shown inthe following window:
4. Click Next, and add both cluster nodes to the resource.
Figure 36. Selecting DB2-DB2-0 in the Services window
Figure 37. Selecting DB2 Server in the Resource type field
Chapter 7. Creating clusters with Tivoli Monitoring components in a Microsoft Cluster Server environment 121

5. Set the shared disk R, the IP address, and the host name as dependencies.6. Click Finish. The following window is displayed.
When you finish the resource configuration, you can bring the resource onlineon clusternode1.
7. Move the resource group to clusternode2, and make sure DB is working onclusternode2.If you have problems with this configuration, you might need to restart bothnodes in the cluster so these changes can take place.
Results
You now have the DB2 instance running in the cluster.
Installing and setting up the portal server in the clusterInstalling the portal server in the cluster is very similar to the monitoring serverinstallation. The major difference is that you must install the DB2 database and theODBC data source.
The ODBC data source must be set up and tested before the portal server isinstalled.
Setting up the portal server database and ODBC DSN in theclusterAbout this task
Set up the portal server database by completing the following steps:
Note: Make sure the Portal Server resource group is running on clusternode1.
Complete this procedure on clusternode1:Procedure
1. Create a local user on clusternode1 for the portal server database access, forexample, ITMUser.
2. Create the portal server database (for instance, TEPS) under the clusteredinstance on the shared drive R.
3. Grant access to the portal server database to the user.4. In the ODBC data sources on the computer, create a System DSN (Data Source
Name) named TEPS2, point to the previously created portal server database,and test the connection. See the IBM Tivoli Monitoring: Installation and SetupGuide for more details.
Figure 38. Click OK in the Cluster Administrator window
122 IBM Tivoli Monitoring: High Availability Guide for Distributed Systems

5. If the portal server must connect to a Tivoli Data Warehouse, make sure thatthe required ODBC DSN to the Tivoli Data Warehouse DB is also configuredand tested.
6. Move the portal server resource group to clusternode2.
Complete this procedure on clusternode2:Procedure
1. Create a local user (same as in clusternode1) on clusternode2 for the portalserver DB access.
2. Start the DB2 Control Center and make sure that access has been granted to theuser.
3. In the ODBC data sources, create a System DSN named TEPS2, pointed to theportal server database, and test the connection.
4. If the portal server needs to connect to a Tivoli Data Warehouse, make sure thatthe required ODBC DSN to the Tivoli Data Warehouse DB is also configuredand tested.
5. Move the portal server resource group back to clusternode1.
Installing and setting up the portal server in clusternode1About this task
Before installing or configuring any ITM components in a Microsoft Clusterenvironment, all other ITM components which are already added to resourcegroups on this cluster should be offline. This precautionary measure preventsconflicts between the cluster management tool and the ITM MTEMS tool. Also, youshould shut down clusternode2 to prevent the Microsoft Cluster Server moving theresource to clusternode2 during ITM installation. Ensure that basic clusterresources are online while installing ITM components.
Install the portal server by completing the following steps:1. Start the installation using setup.exe.2. See “Setting up basic cluster resources” on page 96 for specifying the
installation drive and location.3. Start the setup and make sure that the installation directory is on the shared
disk R.4. Select the required Application Support.5. Configure the virtual host name as the host name of the portal server.6. Assuming the hub monitoring server is clustered, specify the virtual host name
of the hub monitoring server as the monitoring server host name.7. For the portal server database access, specify the DSN (TEPS2) and the user
(ITMUser) just created.8. The installation now uses the existing database and user ID to continue.9. Finish the installation as usual.
Configure the portal server to use the virtual host name .1. Make sure Tivoli Enterprise Portal Server and Tivoli Enterprise Portal Server
Extensions are stopped.2. Back up your configuration data %CANDLE_HOME%\CNPSJ\profiles directory.3. Run the cmd shell.4. Change the current directory to %CANDLE_HOME%\CNPSJ\scripts
5. Run updateTEPSEHostname.bat <old_hostname> <new_hostname>.
Chapter 7. Creating clusters with Tivoli Monitoring components in a Microsoft Cluster Server environment 123

Under <old_hostname> substitute the current host name, do not includedomain name.Under <new_hostname> substitute the valid virtual host name for your TivoliEnterprise Portal Server cluster.
6. If the operation is successful, 'BUILD SUCCESSFUL' is displayed.7. Configure the portal server interface and URL such that the portal clients can
connect to the portal server on its the virtual host name . On the ManageTivoli Enterprise Monitoring Services GUI, select portal server and then:
Advanced->Configure TEPS Interfaces
Click Edit on CNPS and type in the portal server virtual host name. in thiscase IVTCS020.
8. The second configuration is for the communication between the portal serverand the rest of the Tivoli Monitoring infrastructure, including the monitoringserver.
Right-click the portal server, select Advanced, and then Set NetworkInterface. Set the network interface also to the virtual host name,(IVTCS020).This setting creates an environment variable for the portal server, so it doesnot take effect until the computer is restarted. Also, this setting affectsevery IBM Tivoli Monitoring component that is installed on the samecomputer (node).
Figure 39. Editing the portal server virtual host name
124 IBM Tivoli Monitoring: High Availability Guide for Distributed Systems

9. Start the portal server.10. Configure a Tivoli Enterprise Portal Console to connect to this portal server
virtual host name.11. Start the Console and make sure the Console to portal server communication
is working.12. As a last step of the portal server configuration on the cluster, set the portal
server and Eclipse Help Server services to manual startup.
Note: In some cases, the portal server environment entries might not be displayedcorrectly in the registry, especially the entries for the authorization key and theDSN.
When the portal server entries are not displayed correctly, the startup of the portalserver fails. If you encounter this problem, complete the following steps, based onMicrosoft Windows-specific behavior.1. Check this key:
HKEY_LOCAL_MACHINE\SOFTWARE\Candle\KFW\CNPS\KFWSRV\Environ ment\KFW_AUTHORIZATION_KEYIt might reflect: @Authorizationkey@But it should be: AABA-AAAA-ACDI-AFgA
Note: The registry replication entries might not be identical to the ones in thisdocument.
2. Also check this key:
HKEY_LOCAL_MACHINE\SOFTWARE\Candle\KFW\CNPS\KFWSRV\Environ ment\KFW_DSNIt might be: @ODBCDSN@But it should be: TEPS2
Note: The registry replication entries might not be identical to the ones in thisdocument.
3. Correct the keys, start the tool Manage Tivoli Enterprise Services, right-click theTEPS, and select:Advanced-> Utilities-> Build TEPS Database
Then select DB2 and follow the few steps to configure the parameters again asyou did during the installation.
4. Start the portal server.5. Open a command prompt and change the directory to R:\IBM\ITM\CNPS on the
shared disk.a. Run the Buildpresentation.bat command.
6. Restart the portal server.
Adding the IBM Eclipse Help Server resource to the resourcegroupProcedure1. Right-click the resource group that you created for the portal server.2. Go to New -> Resource and complete the following fields in the dialog:
a. Resource Type: select Generic Service
b. Name: can be any user-defined name. In this case, use "HELPSVRservice."3. In the Possible Owners list, add both nodes.
Chapter 7. Creating clusters with Tivoli Monitoring components in a Microsoft Cluster Server environment 125

4. As Resource dependencies, add shared disk, virtual IP, and virtual host name.5. For Generic Service Parameters, the Service name must be KKF_HELPSVR.6. For Registry Replication, include the following entries:
HKEY_LOCAL_MACHINE\SOFTWARE\Candle
HKEY_LOCAL_MACHINE\SYSTEM\CurrentControlSet\Control\SessionManager\Environment
HKEY_LOCAL_MACHINE\SYSTEM\CurrentControlSet\Services\KKF_HELPSVR
Note: The registry replication entries might not be identical to those listed inthis document.As noted in the following window, only the part belowHKEY_LOCAL_MACHINE\ must be specified to replicate to all nodes in thecluster: If you need to be more specific on the registry replication for the IBMand Environment keys, see “Adding the portal server resource to the resourcegroup” and “Adding the Warehouse Proxy Agent resource to the resourcegroup” on page 136.
Note: If you add any ITM component to an existing one in the cluster, refreshthe registry entries for the HKEY_LOCAL_MACHINE\SOFTWARE\Candle path (byremoving and adding this entry again). This entry prevents overriding thecurrent registry settings by the cluster registry snapshot.
Results
After the settings are finished, you can bring the Eclipse Help Server resourcegroup online.
Adding the portal server resource to the resource groupAbout this task
See the following final steps for setting up the portal server in the cluster. In theCluster Administrator:
Procedure1. Right-click the resource group that you created for portal server.2. Go to New -> Resource and complete the following fields in the dialog:
a. Resource Type: select Generic Service
b. Name: can be any user defined name. In this case, use "TEPSservice".
126 IBM Tivoli Monitoring: High Availability Guide for Distributed Systems

3. In the Possible Owners list, include both nodes.
Figure 40. Entering Name and Resource type into New Resource window
Chapter 7. Creating clusters with Tivoli Monitoring components in a Microsoft Cluster Server environment 127

4. As Resource dependencies, include shared disk, virtual IP, virtual host name,DB2, and HELPSVRservice.
Figure 41. Both nodes appear in the Possible Owners window
128 IBM Tivoli Monitoring: High Availability Guide for Distributed Systems

5. For Generic Service Parameters, the Service name must be KFWSRV.
Figure 42. Add Shared disk, virtual IP, virtual host name and DB2
Chapter 7. Creating clusters with Tivoli Monitoring components in a Microsoft Cluster Server environment 129

6. For Registry Replication, include the following entries:HKEY_LOCAL_MACHINE\SOFTWARE\Wow6432Node\Candle
HKEY_LOCAL_MACHINE\SYSTEM\CurrentControlSet\Services\KFWSRV
HKEY_LOCAL_MACHINE\SYSTEM\CurrentControlSet\Services\IHSforTivoliEnterprisePortalServer
HKEY_LOCAL_MACHINE\SYSTEM\CurrentControlSet\Control\SessionManager\Environment
Note: The registry replication entries might not be identical to the ones in thisdocument.As noted in the following window, only the part below HKEY_LOCAL_MACHINE\must be specified to replicate to all nodes in the cluster:If you need to be more specific on the registry replication for the IBM andEnvironment keys, see “Adding the portal server resource to the resourcegroup” on page 126 and “Adding the Warehouse Proxy Agent resource to theresource group” on page 136.
Figure 43. Entering KFWSRV into Generic Service Parameters
130 IBM Tivoli Monitoring: High Availability Guide for Distributed Systems

Results
After the settings are finished, you can bring the portal server resource grouponline.
Now the Cluster Administrator window looks like this:
Figure 44. Registry Replication window showing necessary settings
Chapter 7. Creating clusters with Tivoli Monitoring components in a Microsoft Cluster Server environment 131

Testing the portal server in the clusterAfter you bring the resource of the portal server online, log on using the portalbrowser or portal client. Perform typical tasks, such as creating a situation andassociating a situation.
Now, switch the portal server resource group to clusternode2. During the switch,you notice the typical error messages from the portal client about losing theconnection. When the switch is finished, the portal client reconnects to the portalserver, and you should be able to continue your activities on the client.
Note: The registry replication of services from one cluster node to the other mightnot work 100% correctly. Partial registry replication of services might cause theresource not to come up after switching to the second node.
In this case, verify that the service is visible in the services on the secondcomputer.
If not, restart the computer.
Setting up Tivoli Data Warehouse components in a Microsoft ClusterServer
About this task
To have the Tivoli Data Warehouse and associated components (Warehouse ProxyAgent and Summarization and Pruning Agent) highly available in a MicrosoftServer Cluster, verify that the following requirements are satisfied:1. The basic cluster resources are set.2. The DB software is installed and added to the resource group.
Figure 45. Cluster Administrator window after Registry Replication
132 IBM Tivoli Monitoring: High Availability Guide for Distributed Systems

3. The Warehouse Proxy Agent and Summarization and Pruning Agent is installedon clusternode1 and configured on clusternode2.
4. The Warehouse Proxy Agent and Summarization and Pruning Agent servicesare added to the resource group.
The setup of the Warehouse Proxy Agent and Summarization and Pruning Agentas part of the cluster is optional. However, the procedures provided in this sectionare written for a cluster configuration where these agents are installed on thedatabase server.
Setting up basic cluster resourcesThe Tivoli Data Warehouse components installation and setup on a MicrosoftCluster Server is similar to the portal server and requires the following fiveclustered resources:v Shared disk R
v IP addressv Host namev Tivoli Data Warehouse DBv Warehouse component services with associated information (optional)
See “Setting up basic cluster resources” on page 96 for the setup of the basiccluster resources. In this testing environment, specify TDW_Cluster as the name forthe Tivoli Data Warehouse resource group.
In addition, similar to the portal server, the Tivoli Data Warehouse componentsalso require a DB resource in the cluster, as described in the following sections.
Installing and setting up DB2 on a Microsoft Cluster ServerSee “Installing and setting up DB2 on a Microsoft Cluster Server” on page 116.
Installing and setting up Tivoli Data Warehouse componentsin the cluster
Installing the Tivoli Data Warehouse components in the cluster is very similar tothe portal server installation. The installation also requires the database and theODBC data source.
The ODBC data source must be set up and tested before Tivoli Data Warehousecomponents are installed.
Setting up the Tivoli Data Warehouse database and ODBC DSNin the clusterAbout this task
Set up the Tivoli Data Warehouse DB by completing the following steps:
Make sure the Tivoli Data Warehouse resource group is running on clusternode1.
On clusternode1:Procedure
1. Create a local user on clusternode1 (for the Tivoli Data Warehouse DB access,for instance, ITMUser).
Chapter 7. Creating clusters with Tivoli Monitoring components in a Microsoft Cluster Server environment 133

2. Create the Tivoli Data Warehouse database under the clustered instance on theshared drive R, for instance, Warehous.
3. Grant access to the Tivoli Data Warehouse DB to the user.4. In the ODBC data sources on the computer, create a System DSN named ITM
Warehouse, point to the previously created Tivoli Data Warehouse database, andtest the connection.
5. Move the Tivoli Data Warehouse resource group to clusternode2.
On clusternode2:Procedure
1. Create a local user (same as in clusternode1) on clusternode2 for the Tivoli DataWarehouse DB access.
2. Start the DB2 Control Center and make sure that the access has been granted tothe user.
3. In the ODBC data sources, create a System DSN named ITM Warehouse, pointto the Tivoli Data Warehouse database, and test the connection.
4. Move the Tivoli Data Warehouse resource group back to clusternode1.
Installing the Warehouse Proxy Agent and the Summarizationand Pruning Agent in the clusterAbout this task
This step is optional. Complete this step only if Warehouse Proxy Agent orSummarization and Pruning Agent will be part of the Tivoli Data Warehousecluster.
Procedure1. Start the installation with setup.exe command.
See “Setting up basic cluster resources” on page 96 for specifying theinstallation drive and location.a. Start the setup and make sure that the installation directory is the one on
the shared disk R.b. As the host name of the Warehouse Proxy Agent and Summarization and
Pruning Agent, configure the virtual host name of the Tivoli DataWarehouse cluster.
c. For the Tivoli Data Warehouse DB access, specify the DSN and the user thatyou configured when you set up the Tivoli Data Warehouse DB onclusternode1 and clusternode2.
d. Finish the installation.2. Configure the Warehouse Proxy Agent.3. Configure the Summarization and Pruning Agent. However, for the portal
server host, specify the virtual host name of the portal server (assuming theportal server is running in a cluster – in this case IVTCS020), as shown in thefollowing window:
134 IBM Tivoli Monitoring: High Availability Guide for Distributed Systems

4. Open the Manage Tivoli Enterprise Services tool.a. Right-click the Warehouse Proxy Agent, choose Advanced, and then Set
Network Interface.b. Set the network interface also to the Tivoli Data Warehouse virtual host
name. See “Setting up basic cluster resources” on page 96 for more detailsabout this setting.This setting creates an environment variable for the Tivoli Data WarehouseAgents, so it does not take effect unless the computer is restarted. It alsoaffects the Summarization and Pruning Agent running on the samecomputer.
5. Switch both agents to manual startup such that the cluster can control theirstartup and shutdown processes.
Figure 46. Specifying the virtual host name of the portal server
Chapter 7. Creating clusters with Tivoli Monitoring components in a Microsoft Cluster Server environment 135

Adding the Warehouse Proxy Agent resource to the resourcegroupAbout this task
This step is optional. Complete this step only if warehouse proxy agent must bepart of the Tivoli Data Warehouse cluster.
The following steps for adding the warehouse proxy agent resource to the resourcegroup are the same as for the portal server; only the name for the service isdifferent.
Open the Cluster Administrator and complete this procedure:
Procedure1. Create a new resource under your resource group; the type has to be Generic
Service. The name can be any user-defined name (in this case, useWHPservice). The Service name must be khdxprto as shown on the followingwindow:
2. In the Possible owners list, add both cluster nodes.3. As Resource dependencies, add Shared disk, virtual IP, virtual host name, DB2,
and TEMSservice.4. For Registry Replication, use the following entries:
HKEY_LOCAL_MACHINE\SYSTEM\CurrentControlSet\Services\khdxprto
HKEY_LOCAL_MACHINE\SYSTEM\CurrentControlSet\Control\SessionManager\Environment
Figure 47. Entering the khdxprto service name into the Generic Service Parameters
136 IBM Tivoli Monitoring: High Availability Guide for Distributed Systems

HKEY_LOCAL_MACHINE\SOFTWARE\Candle
HKEY_LOCAL_MACHINE\SOFTWARE\Wow6432Node\Candle
Note: The registry replication entries might not be identical to the ones in thisdocument.If you need to be more specific on the registry replication for IBM andEnvironment keys, refer to “Adding the portal server resource to the resourcegroup” on page 126 and “Adding the Warehouse Proxy Agent resource to theresource group” on page 136.
5. Click Finish.6. In the Manage Tivoli Monitoring Services utility, right-click Warehouse Proxy
Agent and select Advanced > Edit Variables. Add an environment override:CTIRA_HOSTNAME=<virtual_host_name> .TYPE=REG_EXPAND_SZso that the Warehouse Proxy Agent shows up in the Managed System Statustable no matter which node it is running on.
7. Bring this resource group online:
Figure 48. Registry Replication window showing required settings
Chapter 7. Creating clusters with Tivoli Monitoring components in a Microsoft Cluster Server environment 137

Adding the Summarization and Pruning Agent resource to theresource groupAbout this task
The following steps are optional and performed only if the Summarization andPruning Agent will be part of the Tivoli Data Warehouse cluster.
Perform the same steps as in “Adding the Warehouse Proxy Agent resource to theresource group” on page 136. Substitute the appropriate names.v On Generic Service Parameters, Service Name must be KSYSRV (internal name
of Summarization and Pruning Agent).v For Registry Replication, the entry for Summarization and Pruning Agent is
HKEY_LOCAL_MACHINE\SYSTEM\CurrentControlSet\Services\KSYSRV.v The other entries are the same as Warehouse Proxy Agent.
In the Manage Tivoli Monitoring Services utility, right-click Summarization andPruning Agent and select Advanced > Edit Variables. Add an environmentoverride:CTIRA_HOSTNAME=<virtual_host_name> .TYPE=REG_EXPAND_SZso that the Warehouse Proxy Agent shows up in the Managed System Status tableno matter which node it is running on.
When finished, bring the resource group online, as shown in the followingwindow:
Figure 49. Bringing the WHPservice resource group online
138 IBM Tivoli Monitoring: High Availability Guide for Distributed Systems

Keep in mind that the first failover to the other node might fail due to the missingregistry entries on this node. If this occurs, restart the computer.
If all of the Tivoli Monitoring components are installed and configured in onecluster, the following window is displayed:
Figure 50. Bringing SPservice online
Chapter 7. Creating clusters with Tivoli Monitoring components in a Microsoft Cluster Server environment 139

The cluster CLI cluster res output looks like this:
Testing the Tivoli Data Warehouse components in the clusterVerify that Warehouse Proxy Agent is correctly exporting data to Tivoli DataWarehouse, and Summarization and Pruning Agent is correctly summarizing and
Figure 51. Correct Cluster Administrator window after configuration
Figure 52. Correct Command Prompt window after configuration
140 IBM Tivoli Monitoring: High Availability Guide for Distributed Systems

pruning. Move the resources from clusternode1 to clusternode2, and verify thatWarehouse Proxy Agent and Summarization and Pruning Agent restart theirprocessing.
Upgrading IBM Tivoli Monitoring in a Microsoft Cluster environmentBefore upgrading IBM Tivoli Monitoring within a Microsoft Cluster, the followingsteps need to be completed to return IBM Tivoli Monitoring to a pre-clusterconfiguration. Failure to do these steps might cause the upgrade of IBM TivoliMonitoring to hang or fail. After the upgrade completes, the resources should bechecked to verify that they connect to the cluster resources and not to theinstallation node resources.
In the following procedure, ITM_Home refers to the location where IBM TivoliMonitoring was installed. This path is usually C:\IBM\ITM. The path can be thesame, but the drive letter is usually a Shared Disk seen by all members of thecluster. For the installation example, drive R: is used. So in the following stepsR:\IBM\ITM replaces ITM_Home.1. Ensure that the upgrade is done from the cluster node where IBM Tivoli
Monitoring was originally installed.2. Delete the ITM_Home\CNPSJ\itmEwasRegistry.properties file.3. Delete the ITM_Home\CNPS\profiles\ITMProfile directory.4. Clear the ITM_Home\logs directory (remove all files).5. Modify the ITM_Home\CNPSJ\properties\profileRegistry.xml file to remove
the data between the <profiles> and </profiles> statement.6. Run the upgrade.7. After the upgrade completes, change the host name for eWas from the
installation cluster host name to the cluster resource host name. You mustcomplete this change before the cluster can be switched from the installationcomputer another member of the cluster. Run the updateTEPSEHostnamecommand in the ITM_Home\CNPSJ\scripts directory to perform the rename.The syntax is as follows:updateTEPSEHostname oldname newname
8. Verify the post installation information to validate that Tivoli EnterpriseMonitoring Server and monitoring agents are configured correctly to connect tothe cluster resource.
9. Test the cluster failover scenarios.
Tivoli Monitoring maintenance on the clusterTo maintain patches, fix packs, and release upgrades for Tivoli Monitoringcomponents running on the Microsoft Cluster Server environment, you must firststop the cluster so that the control of the Tivoli Monitoring services are available tothe installation program. Make sure you start the maintenance from the nodewhere you installed Tivoli Monitoring (typically clusternode1). When themaintenance is complete, make sure the Tivoli Monitoring services controlled bythe cluster are stopped and in manual startup mode. Then, restart the cluster.
Known problems and limitations
This section includes specific characteristics and constraints of the TivoliMonitoring installation and setup on a Windows environment and their effects onthe cluster setup.
Chapter 7. Creating clusters with Tivoli Monitoring components in a Microsoft Cluster Server environment 141

During the certification test for Tivoli Monitoring clustering, issues encounteredwhen setting up the clustered environment are formally reported as defects. Thesedefects are typically related to the setup of Tivoli Monitoring in a non-defaultmanner, instead of being specific to the cluster environment. These defects arehandled as part of the Tivoli Monitoring service stream. See the following list ofknown problems and workarounds.
Installation-related issues:v Tivoli Monitoring components cannot be installed in multiple installation
directories in the same way that you can install them on UNIX or Linuxsystems. Under this limitation, every Tivoli Monitoring component must use thesame cluster shared disk resource. Each component must be defined under thesame cluster resource group. You cannot use more than one shared disk for theTivoli Monitoring components.
v As a consequence of the preceding limitation, if you have a Monitoring Agentfor Windows OS installed on the same computer as the clustered hubmonitoring server, the OS agent must also be clustered and move together withthe resource group.
v Tivoli Monitoring components on Windows operating systems are registered asservices. You may have only one instance of each service on the computer. Youcannot set up a clustered environment where two main hub monitoring serversuse each other‘s computers as their failover hub (such as by having anotherinstance of the hub installed and running as part of a second resource group)because you may have only one instance of the monitoring server serviceinstalled and running on a given computer.
v In a Tivoli Monitoring environment, an ICCRTE_DIR variable is set in theKUIENV file that points to the location where the GSKit (Global Secure Toolkit)is installed. In Tivoli Monitoring 6.1 Fix Pack 4, this variable does not take theuser-specified drive during the installation. Instead it is hard-coded to drive Cas: ICCRTE_DIR=C:\Program Files\IBM\GSK7. Because Tivoli Monitoring in aclustered environment might be installed in a shared disk that is not drive C,this error causes the CLI command to fail. This error can be corrected manuallyby editing the KUIENV file under %candle_home%\BIN to set the correct driveletter:
ICCRTE_DIR=R:\Program Files\IBM\GSK7.This error is resolved when you upgrade from Tivoli Monitoring 6.1 Fix Pack4 to Fix Pack 5.
Configuration-related issues:v Tivoli Monitoring “Set Network Interface” capability issues:
1. If you use the “Set Network Interface” function on the Tivoli Monitoring GUIto set a Network Interface for one agent (for instance, when running such anagent as part of the Tivoli Monitoring clustered resource group and assigningthe virtual host name to it), the setting affects all other agents on the samenode. This is the current default behavior of Tivoli Monitoring.
2. As of IBM Tivoli Monitoring 6.1 Fix Pack 4, uninstalling Tivoli Monitoringdoes not remove the KDEB_INTERFACELIST entry in registry if this has beenconfigured. To completely remove this setting, you need to remove thefollowing registry entry:
HKEY_Local_MACHINE\SYSTEM\CurrentControlSet\Control\SessionManager\Environment\KDEB_INTERFACELIST
v If the clustered Tivoli Enterprise Portal Server does not start after failover orswitching, complete the following steps:
142 IBM Tivoli Monitoring: High Availability Guide for Distributed Systems

1. Make sure Tivoli Enterprise Portal Server starts successfully on the firstcomputer in your cluster.
2. Switch to the first cluster computer.a. For Windows systems:
Change the current directory to %CANDLE_HOME%\CNPSJ\profiles\ITMProfile\config\cells\ITMCell\nodes\ITMNode
b. For UNIX or Linux systems:Change the current directory to $CANDLE_HOME/<architecture>/iw/profiles/ITMProfile/config/cells/ITMCell/nodes/ITMNode
3. Locate and open the serverindex.xml file.4. Check if all "hostName" and "host" properties match the virtual host name
for your Tivoli Enterprise Portal Server cluster. Correct incorrect values.5. For each unique and invalid host name found in step 5, apply steps 2–5
accordingly.v If the Eclipse Help Server will not start on a particular node, you might need to
add a dependency to the Eclipse Service on the Tivoli Enterprise Portal Server.Add the dependency in the Cluster Manager, as shown in Figure 53.
Operation-related issues:
If user console activity occurs (such as clicking an object on the workspace), theconsole takes longer to become available to the user. This delay is due to theinternal delay timers for the reconnection algorithm. This problem is being fixed aspart of the Tivoli Monitoring 6.1 service stream.
Maintenance-related issues:v When using the "Modify" option in a Tivoli Monitoring installation to modify a
running Tivoli Monitoring 6.1 Fix Pack 4 environment, such as adding additional
Figure 53. Adding a dependency to the Eclipse Service on the Tivoli Enterprise Portal Server
Chapter 7. Creating clusters with Tivoli Monitoring components in a Microsoft Cluster Server environment 143

agent support to the monitoring server or portal server, the processing startsTivoli Monitoring services at the end of the change.
v When you are upgrading IBM Tivoli Monitoring 6.1 from Fix Pack 4 to Fix Pack5, the monitoring server and the portal server automatically start at the end ofthe upgrade, even when the startup of these services was set to Manual. Thisissue is the current design of the Fix Pack 5 upgrade. After the upgrade, themonitoring server and portal server have to be manually stopped. Use ClusterAdministrator to bring them online so that these clustered resources function inthe cluster as expected.
144 IBM Tivoli Monitoring: High Availability Guide for Distributed Systems

Appendix A. Configuring the cluster creation
To set up Tivoli Monitoring with Tivoli System Automation for Multiplatforms,you will need two cluster nodes with at least one NIC (Network Interface Cards)in each computer. The first step is to prepare both cluster nodes to be TivoliSystem Automation for Multiplatforms cluster ready.
All commands must run under root authority.1. On both nodes run the following commands:
export CT_MANAGEMENT_SCOPE=2preprpnode node1 node2
where node1 and node2 are the names that resolve to the NICs, as preparedpreviously.
2. On one node, edit the itm6/BuildScripts/clustervariables.sh file, and supplythe values that are described in Table 8 for the variables.
Table 8. Variables for cluster creation
Variable name Type Description Required Notes Example
ITM6_POLICIES_DIRECTORY General The completepath to the itm6directory, asuntarred from theitm6.sam.policies-2.0.tarfile
YES All nodesmust use thesame location
/usr/sbin/rsct/sapolicie s/itm6
CANDLEHOME General The TivoliMonitoringinstallationdirectory on theshared disk
YES All nodesmust use thesame path
/shareddisk/ITM
HUBNAME General The name of theTivoli MonitoringHub
YES HUB_ITMSYSTEM
CLUSTER_NODE1 General The name of thefirst cluster node
YES This shouldbe the samevalue used inthepreprpnodecommand
NODE1
CLUSTER_NODE2 General The name of thesecond clusternode
YES This shouldbe the samevalue used inthepreprpnodecommand
NODE2
CLUSTER_DOMAIN_NAME General The name of theTivoli SystemAutomation forMultiplatformsdomain to becreated
YES ITM
© Copyright IBM Corp. 2010, 2012 145

Table 8. Variables for cluster creation (continued)
Variable name Type Description Required Notes Example
CLUSTER_RESOURCE_GROUP General The name of theTivoli SystemAutomation forMultiplatformsResource Groupto hold the TivoliMonitoringresources
YES ITMRG
DB2_POLICIES_DIRECTORY DB2 cluster The completepath to thedirectory thatcontains the DB2Tivoli SystemAutomation forMultiplatformsscripts(db2_start.ksh,db2_stop.ksh,db2_monitor.ksh,etc), as extractedfrom thedb2salinux.tar.gzfile
NO – onlyneeded ifa DB2cluster isbeingused
/usr/sbin/rsct/sapolicie s/db2
DB2_INSTANCE DB2 cluster The DB2 instancein the cluster
See above DB2INST1
HAFS_MOUNTPOINT Shared filesystem
The mount pointof the shareddisk
YES /shareddisk
HAFS_DEVICENAME Shared filesystem
The device nameof the shareddisk
YES /dev/sdd1
HAFS_VFS Shared filesystem
The type ofshared disk
YES reiserfs
AIXVG_VGNAMEG Shared filesystem onAIX
The name of thevolume groupcontaining theshared filesystem‘s logicalvolume
NO – onlyneeded ifcluster isrunningon AIX
AIXVG_LVNAME Shared filesystem onAIX
The name of thelogical volumecontaining theshares file system
NO – onlyneeded ifcluster isrunningon AIX
HAIP_IPADDRESS Virtual IPaddressinformation
The IP address ofthe virtualsystem
YES 9.12.13.14
HAIP_NETMASK Virtual IPaddressinformation
The subnet maskof the virtualsystem
YES 255.255.252.0
146 IBM Tivoli Monitoring: High Availability Guide for Distributed Systems

Table 8. Variables for cluster creation (continued)
Variable name Type Description Required Notes Example
HAIPNICS_ NODE1ETHERNETNUMBER
Ethernetinformationfor nodes
The Ethernetinterface numberfor node1
YES Run theifconfigcommand todetermine theEthernetnumbers
eth3 (for Linux)
HAIPNICS_ NODE2ETHERNETNUMBER
Ethernetinformationfor nodes
The Ethernetinterface numberfor node2
YES Run theifconfigcommand todetermine theEthernetnumbers
en5 (for AIX)
NETTB_ADDRESS Networktiebreaker
The IP address ofthe networktiebreakers
NO – onlyneeded ifusing anetworktiebreaker
Must bepingable byboth nodes
10.20.20.40
SCSITB_NODE1HOST SCSItiebreakeron Linux
The host numberof the SCSItiebreaker deviceon node1
NO - onlyneeded ifusing aSCSItiebreakeron Linux
Use thedmesg |grep'Attachedscsi disk'command orcat/proc/scsi/scsi commandto determinethese values
1
SCSITB_NODE1CHAN SCSItiebreakeron Linux
The channelnumber of theSCSI tiebreakerdevice on node1
See above See above 0
SCSITB_NODE1ID SCSItiebreakeron Linux
The ID numberof the SCSItiebreaker deviceon node1
See above See above 0
SCSITB_NODE1LUN SCSItiebreakeron Linux
The logical unitnumber of theSCSI tiebreakerdevice on node1
See above See above 0
SCSITB_NODE2HOST SCSItiebreakeron Linux
The host numberof the SCSItiebreaker deviceon node2
See above See above 1
SCSITB_NODE2CHAN SCSItiebreakeron Linux
The channelnumber of theSCSI tiebreakerdevice on node2
See above See above 0
SCSITB_NODE2ID SCSItiebreakeron Linux
The ID numberof the SCSItiebreaker deviceon node2
See above See above 0
Appendix A. Configuring the cluster creation 147

Table 8. Variables for cluster creation (continued)
Variable name Type Description Required Notes Example
SCSITB_NODE2LUN SCSItiebreakeron Linux
The logical unitnumber of theSCSI tiebreakerdevice on node2
See above See above 0
DISKTB_DISKNAME Disktiebreakeron AIX
The disk name ofthe disktiebreaker
NO - onlyneeded ifusing aDisktiebreakeron AIX
/dev/hdisk0
ECKDTB_DEVICENUM ECKDtiebreakeron Linux onzSeries
The devicenumber of theECKD tiebreaker
NO - onlyneeded ifusing aECKDtiebreakeron Linuxon zSeries
Use the cat/proc/dasd/devicescommand toget thisinformation
099f
3. Change to the itm6/BuildScripts directory, and run the following command:./generateclusterfiles.sh
4. You might want to modify the StartCommandTimeout (the amount of time, inseconds, to wait for the resource to start) and StopCommandTimeout (theamount of time, in seconds, to wait for the resource to stop) values in thefollowing files, based on how long these actions take on your system. Forexample, you can double the expected times.
Hub TEMS: itm6/DefFiles/TEMSSrv.defPortal server: itm6/DefFiles/TEPSSrv.defWarehouse Proxy Agent: itm6/DefFiles/TDWProxy.defSummarization and Pruning Agent: itm6/DefFiles/SPAgent.def
5. Copy the contents of the itm6 directory, and all of its subdirectories, from thenode where the generateclusterfiles.sh command was run, to the samelocation on the other node.After copying, verify that the execution flag and owner are correct, for the filesin itm6/BuildScripts and itm6/ControlScripts.
148 IBM Tivoli Monitoring: High Availability Guide for Distributed Systems

Appendix B. Autonomous mode and autonomous agents
This section provides information on both switching from a secondary monitoringserver back to the primary hub monitoring server in autonomous mode andachieving high availability when using the autonomous agent.
Autonomous mode ensures event information is not lost when communications arelost between an agent and its monitoring server. Agent autonomy comprises thefollowing two running modes:
Managed modeAgents come in either of the following two flavors: a fully connected agentto the Tivoli Enterprise Monitoring Server. While in this mode, the agentbehaves as agents traditionally do. But, a partially connected agent runs ina semi-autonomous mode; that is, it is disconnected for some time from themonitoring server.
Unmanaged modeSuch agents are fully autonomous and need not be connected to amonitoring server at all.
Achieving High-Availability with the autonomous agentTo achieve high-availability, you must specify two SNMP based event destinationswhen you are configuring the autonomous agent. If you are using SNMP V1 or V2,the trap might not make it to the destination. However, if you are using SNMP V3,a response will be sent to the agent. When specifying a trap destination withSNMP V3, you can use the retries and timeout parameters to assist with highavailability. If a notification cannot be properly sent, it will retry for the number ofretries specified in the retries parameter. Each retry is attempted after the timeoutvalue is reached. The default number of retries is 3, and the default timeout valueis 2 seconds. You can configure these parameters.
Note: If the autonomous agent loses network connectivity, the traps are lost andwill not be received by the agent. If you are using hysteresis mode, the pure eventtraps won't be sent on the next true interval. In the hysteresis mode, the trap isemitted on the first TRUE encountered, and the clearing trap is emitted when reset.The pure events will only be sent on the next true interval if you are in the defaultrising continuous mode, whereby an alert is sent on each TRUE evaluation of thesituation.
Autonomous mode agent switch from a secondary monitoring serverback to the primary hub monitoring server
When an agent running in autonomous mode detects that the primary TivoliEnterprise Monitoring Server has come back online, it needs to switch from thesecondary back to the primary.
Agent configuration parameters
The following agent configuration parameters can control agent to Tivoli EnterpriseMonitoring Server connectivity and behavior:
© Copyright IBM Corp. 2010, 2012 149

CT_CMSLISTRequired variable that specifies the primary or secondary Tivoli EnterpriseMonitoring Server the agent must connect with. Takes asemicolon-delimited list of monitoring servers of the form networkprotocol:hostname or protocol:address.
CTIRA_RECONNECT_WAITThis parameter specifies, in seconds, the frequency with which the agentwill attempt to connect with the monitoring server. The default is 600 (10minutes).
CTIRA_MAX_RECONNECT_TRIESThis parameter is being deprecated. Use it to specify the number ofconsecutive times without success the agent attempts to connect to amonitoring server before giving up and exiting. The default value of 0means that the agent will remain started regardless of its connection statuswith the monitoring server.
Before the release of Tivoli Monitoring V6.2.2, the default value was 720.Along with the CTIRA_RECONNECT_WAIT default setting of 600, theagent tries to connect to the monitoring server for 432000 seconds (5 days)before giving up and exiting. If you prefer to have the agent shut downwhen the reconnect limit is reached, specify the number of retries. Youmust also disable the agent watchdog function (disarmWatchdog), which isdescribed in the Agent User's guide.
CTIRA_PRIMARY_FALLBACK_INTERVALForces the agent to switch from the primary Tivoli Enterprise MonitoringServer to one of the defined secondary monitoring servers, because theprimary monitoring server is offline or due to network-connectivity issues.It is desirable for the agent to switch back to the primary monitoringserver as soon as possible when it becomes available. This parametercontrols the frequency with which the agent performs lookup of theprimary monitoring server. If the primary monitoring server is found, theagent disconnects from the secondary monitoring server and reconnects tothe primary monitoring server. The minimum value must be 2.5 timesCTIRA_RECONNECT_WAIT value. Default value is 4500 seconds, or 75minutes.
A value of zero disables this feature. Always setCTIRA_PRIMARY_FALLBACK_INTERVAL=0 for agents that are directlyconnected to the hub monitoring server. If FTO is configured, the agentwill switch based on the FTO operation and not based on the primaryfallback feature.
Note: In an hot standby configuration, an agent switches to the primarymonitoring server after receiving a SWITCH command from the hotstandby monitoring server, even ifCTIRA_PRIMARY_FALLBACK_INTERVAL=0, because the mirrormonitoring server reroutes agents to the primary monitoring server. If theagent requires redundant access to a monitoring server, the minimumconfiguration is two hub monitoring servers in a FTO configuration andtwo remote monitoring servers. The agent must be configured to only theremote monitoring servers. That configuration provides the agent twomonitoring servers to connect to at any time. If redundancy is not required,then do not configure FTO.
150 IBM Tivoli Monitoring: High Availability Guide for Distributed Systems

See the IBM Tivoli Monitoring: Installation and Setup Guide for a complete list ofcommon agent environment variables and the IBM Tivoli Monitoring:Administrator's Guide for more information about autonomous agent behavior.
Switchback processing
When an agent loses its connection with its Tivoli Enterprise Monitoring Server, itswitches to a secondary server if one has been defined with the CT_CMSLISTenvironment variable. The agent must switch back to the primary monitoringserver as soon as possible and without restarting.
When an agent running in autonomous mode detects that the primary hub hascome back online, it needs to switch from the secondary hub monitoring serverback to the primary. The following steps show how the switchback proceeds:1. The agent detects that it has connected to a secondary monitoring server.2. The switch back to the primary server occurs when the following conditions
are true:v There are multiple monitoring servers defined by the CT_CMSLIST
parameter.v An agent is actively connected to a secondary monitoring server.v That agent is not in shutdown mode.
3. The agent starts a background periodic lookup task.4. The agent calculates the periodic lookup interval from the
CTIRA_PRIMARY_FALLBACK_INTERVAL customized value and enforces theminimum value limit.
5. When a periodic lookup interval expires, the lookup task performs LocalLocation Broker lookup of the primary server. This periodic lookup continuesuntil the primary Tivoli Enterprise Monitoring Server is found or the agentshuts down.
6. On a successful lookup of the primary monitoring server, the agent initiatesserver-switch processing:a. Notifies the acting monitoring server that the agent is now disconnecting.b. Performs the agent shutdown procedure as if it has lost monitoring server
connectivity.c. Sets the primary monitoring server as the preferred switch-to target.d. Begins the server connection procedure.e. Exits periodic lookup unconditionally: If the reconnection is successful,
there is no need for the periodic lookup task. Otherwise, the standard agentreconnection procedure takes effect.
Appendix B. Autonomous mode and autonomous agents 151

152 IBM Tivoli Monitoring: High Availability Guide for Distributed Systems

Appendix C. Predefined scripts
The following scripts are located in the itm6/BuildScripts directory, in theitm6.sam.policies-2.0.tar file.
The mkitmcluster.sh script calls the scripts listed in Table 9. The mkitmcluster.shscript creates the following resources:
Cluster domainResource groupTiebreakerShared file system and virtual IP resourcesDB2 resource (optional)
mkitmcluster.sh net|scsi|disk|eckd [db2]
Where the first parameter is the tiebreaker type. If the second parameter isspecified, then the DB2 resources are also created.
In certain cases, you might already have these resources defined, or you mightwant to define them separately. Table 9 includes a description of each script. If youneed to define any of the resources differently, you can create your own scriptsbased on the provided ones.
The scripts depend on the variables defined in itm6/BuildScripts/clustervariables.sh , so be sure to edit this file, and run itm6/BuildScripts/generateclusterfiles.sh. If a command-line parameter is specified, it overridesthe variable's value from itm6/BuildScripts/clustervariables.sh.
After running the scripts to create the resources, start the resource group with thefollowing commands:export CT_MANGEMENT_SCOPE=2chrg -o online rg_name
Table 9. Predefined scripts
Script Command line Prereqs Variables used
mkitmdomain.sh
Creates the clusterdomain
mkitmdomain.sh node1node2 domain_name
mkitmddomain.sh node1node2
mkitmdomain.sh node1
mkitmddomain.sh
preprpnodemust be runon bothnodesbeforerunning thiscommand
$CLUSTER_NODE1
$CLUSTER_NODE2
$CLUSTER_DOMAIN_ NAME
mkitmrg.sh
Creates the clusterresource group
mkitmrg.sh rg_namedomain_name
mkitmrg.sh rg_name
mkitmrg.sh
The domainmustalready becreated andstartedbeforerunning thiscommand
$CLUSTER_RESOURCE_ GROUP
$CLUSTER_DOMAIN_ NAME
© Copyright IBM Corp. 2010, 2012 153

Table 9. Predefined scripts (continued)
Script Command line Prereqs Variables used
mkitmtb.sh
Creates the clustertiebreaker, and sets it asthe active tiebreaker
mkitmtb.sh net|scsi|disk|eckd
domain_name
mkitmtb.sh net|scsi|disk|eckd
The domainmustalready becreated andstartedbeforerunning thiscommand
$CLUSTER_DOMAIN_ NAME
mkitmbasicresources.sh
Creates the file systemand virtual IP resources,and adds them to theresource group
mkitmbasicresources.shrg_name
domain_name
mkitmbasicresources.shrg_name
mkitmbasicresources.sh
The domainmustalready becreated andstarted, andthe resourcegroup mustbe created,beforerunning thiscommand
$CLUSTER_RESOURCE_ GROUP
$CLUSTER_DOMAIN_ NAME
mkitmdb2resources.sh
Creates the DB2resource, and adds it tothe resource group
mkitmdb2resources.shrg_name domain_name
mkitmdb2resources.shrg_name
mkitmdb2resources.sh
The domainmustalready becreated andstarted, andthe resourcegroup mustbe created,beforerunning thiscommand
When the resources have been created by the scripts, or by some other means, youmust then install the Tivoli Monitoring components, and add their resources to theresource group. Use the commands that are described in Table 10 on page 155 toadd the Tivoli Monitoring resources.
Again, you might want to modify them to fit your environment.
Before running these scripts, take the resource group offline with the followingcommand:chrg -o offline rg_name
After running the scripts to create the resources, start the resource group with thefollowing command:chrg -o online rg_name
154 IBM Tivoli Monitoring: High Availability Guide for Distributed Systems

Table 10. Commands
Script Command line Prerequisites Variables Used
temsrscbuild.sh
Creates the TivoliMonitoring hub resource,and adds it to theresource group
temsrscbuild.shThe domain must be createdand started, and the resourcegroup must be created andmust be offline.
The ITMIP resource mustexist, which is created in themkitmbasicresources.shscript.
$CLUSTER_RESOURCE_GROUP
tepsrscbuild.sh
Creates the TivoliMonitoring portal serverresource, and adds it tothe resource group
tepsrscbuild.shThe domain must be createdand started, and the resourcegroup must be created andmust be offline.
The ITMDB2 resource mustexist, which is created in themkitmdb2resources.sh script.
$CLUSTER_RESOURCE_GROUP
spagentrscbuild.sh
Creates the TivoliMonitoringSummarization andPruning Agent resource,and adds it to theresource group
spagentrscbuild.shThe domain must be createdand started, and the resourcegroup must be created andmust be offline.
The ITMDB2 resource mustexist, which is created in themkitmdb2resources.sh script.
$CLUSTER_RESOURCE_GROUP
tdwproxyrscbuild.sh
Creates the TivoliMonitoring Tivoli DataWarehouse Proxy Agentresource, and adds it tothe resource group
tdwproxyrscbuild.shThe domain must be createdand started, and the resourcegroup must be created andmust be offline.
The ITMDB2 resource mustexist, which is created in themkitmdb2resources.sh script.
$CLUSTER_RESOURCE_GROUP
allrscbuild.sh
Calls the above fourscripts to create all of theresources, and adds themto the resource group
allrscbuild.sh See above descriptions. See above descriptions.
Appendix C. Predefined scripts 155

156 IBM Tivoli Monitoring: High Availability Guide for Distributed Systems

Appendix D. EIF Information
The following sections describe procedures to assist in creating a high-availabilitysetup by using the EIF (Event Integration Facility).
EIF event synchronization with hot standby
To set up event synchronization from the Tivoli Enterprise Console or OMNIbusfor a hub monitoring server with hot standby, you must configure the eventsynchronization to send updates to the secondary monitoring server equipped withhot standby. This setup can be done during the initial installation of eventsynchronization, or by entering a command at the command-line interface afterinstallation.
For event synchronization with Netcool/OMNIbus, enter the sitconfuser.cmd (forWindows systems) or sitconfuser.sh (for UNIX systems) command in thecommand line interface. The following example displays the command to add theitm17 monitoring server on a UNIX system:sitconfuser.sh add serverid=itm17.ibm.com userid=admin password=acc3ssingpathc=/opt/IBM/SitForwarder/etc type=OMNIBUS
For more information about the sitconfuser.sh command, see Chapter 4 of theIBM Tivoli Monitoring Command Reference.
For event synchronization with the Tivoli Enterprise Console, enter thesitconfsvruser.sh command in the command line interface. The followingexample displays the command to add the itm17 monitoring server:sitconfsvruser.sh add serverid=itm17.ibm.com userid=admin password=acc3ssing
For more information about the sitconfsvruser.sh command, see Chapter 3 of theIBM Tivoli Monitoring Command Reference.
EIF event synchronization with a clustered monitoring server
There should not be a need for configuration changes in the EIF EventSynchronization setup from the Tivoli Enterprise Console and OMNIbus if youhave a clustered monitoring server.
In an FTO environment, the user ID and password for SUF (Situation UpdateForwarder) must be defined to both the hub and the mirror hub.
EIF event forwarding with multiple event destinations
A user can set up multiple event destinations from the command line interface,and can forward events to multiple event destinations by using the tacmdcreateeventdest command to designate additional default event destinations.
The event destination specified during the initial installation and configuration isautomatically designated as the default event destination and given id=0, so adifferent number must be chosen for the id property of any subsequent defaultevent destinations. After a user has specified multiple event destinations, any
© Copyright IBM Corp. 2010, 2012 157

events that do not have designated event destinations specified (using the TDST=parameter in the SITINFO column of the situation definition) will be forwarded toall designated default event destinations.
The following example displays the code used to define an additional defaultevent destination with an ID of "2".tacmd createeventdest -i 2 -p NAME=DEST2 HOST1=dest2.ibm.com:5529 DEFAULT=Y
For more information on the tacmd createeventdest command, see to the IBMTivoli Monitoring Command Reference at http://publib.boulder.ibm.com/infocenter/tivihelp/v15r1/topic/com.ibm.itm.doc_6.2.2/itm_cmdref.pdf.
Scenarios for setting up multiple EIF destinations
If you are managing a cluster environment, see “EIF event forwarding withmultiple event destinations” on page 157 to set up multiple event destinationsusing the tacmd createeventdest command. For an FTO environment, the eventdestination table is not currently automatically replicated, so the tacmdcreateeventdest command must be used to define the same event destinations forboth the HUB and the Mirror HUB.
158 IBM Tivoli Monitoring: High Availability Guide for Distributed Systems

Appendix E. Documentation library
This appendix contains information about the publications related to IBM TivoliMonitoring and to the commonly shared components of Tivoli ManagementServices.
These publications are listed in the following categories:v IBM Tivoli Monitoring libraryv Related publications
See the IBM Tivoli Monitoring Documentation Guide for information about accessingand using the publications. You can find the Documentation Guide in the IBM TivoliMonitoring and OMEGAMON XE Information Center at http://publib.boulder.ibm.com/infocenter/tivihelp/v15r1/index.jsp. To open theDocumentation Guide in the information center, select Using the publication in theContents pane.
To find a list of new and changed publications, click What's new on the Welcomepage of the IBM Tivoli Monitoring and OMEGAMON XE Information Center. Tofind publications from the previous version of a product, click Previous versionsunder the name of the product in the Contents pane.
IBM Tivoli Monitoring libraryThe following publications provide information about IBM Tivoli Monitoring andabout the commonly shared components of Tivoli Management Services:v Quick Start Guide
Introduces the components of IBM Tivoli Monitoring.v Installation and Setup Guide, GC32-9407
Provides instructions for installing and configuring IBM Tivoli Monitoringcomponents on Windows, Linux, and UNIX systems.
v Program Directory for IBM Tivoli Management Services on z/OS, GI11-4105Gives instructions for the SMP/E installation of the Tivoli Management Servicescomponents on z/OS.
v Configuring the Tivoli Enterprise Monitoring Server on z/OS, SC27-2313Provides instructions for preparing, configuring, and customizing yourmonitoring servers on z/OS. This guide complements the IBM TivoliOMEGAMON XE and IBM Tivoli Management Services on z/OS Common Planningand Configuration Guide and the IBM Tivoli Monitoring Installation and Setup Guide.
v High Availability Guide for Distributed Systems, SC23-9768Gives instructions for several methods of ensuring the availability of the IBMTivoli Monitoring components.
v Administrator's Guide, SC32-9408Describes the support tasks and functions required for the Tivoli EnterprisePortal Server and clients, including Tivoli Enterprise Portal user administration.
v Command Reference, SC32-6045Provides detailed syntax and parameter information, as well as examples, for thecommands you can use in IBM Tivoli Monitoring.
© Copyright IBM Corp. 2010, 2012 159

v Messages, SC23-7969Lists and explains messages generated by all IBM Tivoli Monitoring componentsand by z/OS-based Tivoli Management Services components (such as TivoliEnterprise Monitoring Server on z/OS and TMS:Engine).
v Troubleshooting Guide, GC32-9458Provides information to help you troubleshoot problems with the software.
v Tivoli Enterprise Portal online helpProvides context-sensitive reference information about all features andcustomization options of the Tivoli Enterprise Portal. Also gives instructions forusing and administering the Tivoli Enterprise Portal.
v Tivoli Enterprise Portal User's Guide, SC32-9409Complements the Tivoli Enterprise Portal online help. The guide provideshands-on lessons and detailed instructions for all Tivoli Enterprise Portalfeatures.
v Agent Builder User's Guide, SC32-1921Explains how to use the Agent Builder for creating monitoring agents and theirinstallation packages, and for adding functions to existing agents.
v Tivoli Universal Agent User’s Guide, SC32-9459Introduces you to the IBM Tivoli Universal Agent, an agent of IBM TivoliMonitoring. The IBM Tivoli Universal Agent enables you to use the monitoringand automation capabilities of IBM Tivoli Monitoring to monitor any type ofdata you collect.
v Performance Analyzer User’s Guide, SC27-4004Explains how to use the Performance Analyzer to understand resourceconsumption trends, identify problems, resolve problems more quickly, andpredict and avoid future problems.
v IBM Tivoli Universal Agent API and Command Programming Reference Guide,SC32-9461Explains the procedures for implementing the IBM Tivoli Universal Agent APIsand provides descriptions, syntax, and return status codes for the API calls andcommand-line interface commands.
Documentation for the base agentsIf you purchased IBM Tivoli Monitoring as a product, you received a set of basemonitoring agents as part of the product. If you purchased a monitoring agentproduct (for example, an OMEGAMON XE product) that includes the commonlyshared components of Tivoli Management Services, you did not receive the baseagents.
The following publications provide information about using the base agents.v Operating system agents:
– Windows OS Agent User's Guide, SC32-9445– UNIX OS Agent User's Guide, SC32-9446– Linux OS Agent User's Guide, SC32-9447– i5/OS Agent User's Guide, SC32-9448– UNIX Log Agent User's Guide, SC32-9471
v Agentless operating system monitors:– Agentless Monitoring for Windows Operating Systems User's Guide, SC23-9765– Agentless Monitoring for AIX Operating Systems User's Guide, SC23-9761
160 IBM Tivoli Monitoring: High Availability Guide for Distributed Systems

– Agentless Monitoring for HP-UX Operating Systems User's Guide, SC23-9763– Agentless Monitoring for Solaris Operating Systems User's Guide, SC23-9764– Agentless Monitoring for Linux Operating Systems User's Guide, SC23-9762
v Warehouse agents:– Warehouse Summarization and Pruning Agent User's Guide, SC23-9767– Warehouse Proxy Agent User's Guide, SC23-9766
v System P agents:– AIX Premium Agent User's Guide, SA23-2237– CEC Base Agent User's Guide, SC23-5239– HMC Base Agent User's Guide, SA23-2239– VIOS Premium Agent User's Guide, SA23-2238
v Other base agents:– Tivoli Log File Agent User’s Guide, SC14-7484– Systems Director base Agent User’s Guide, SC27-2872– Monitoring Agent for IBM Tivoli Monitoring 5.x Endpoint User's Guide,
SC32-9490
Related publicationsYou can find useful information about related products in the IBM TivoliMonitoring and OMEGAMON XE Information Center at http://publib.boulder.ibm.com/infocenter/tivihelp/v15r1/index.jsp.
Other sources of documentationYou can also obtain technical documentation about IBM Tivoli Monitoring andrelated products from the following sources:v IBM Integrated Service Management Library
http://www.ibm.com/software/brandcatalog/ismlibrary/IBM Integrated Service Management Library is an online catalog that containsintegration documentation and other downloadable product extensions.
v Redbookshttp://www.redbooks.ibm.com/IBM Redbooks and Redpapers include information about products fromplatform and solution perspectives.
v TechnotesTechnotes provide the latest information about known product limitations andworkarounds. You can find Technotes through the IBM Software Support Website at http://www.ibm.com/software/support/.
v Tivoli wikis on the IBM developerWorks Web siteTivoli Wiki Central at http://www.ibm.com/developerworks/wikis/display/tivoli/Home is the home for interactive wikis that offer best practices andscenarios for using Tivoli products. The wikis contain white papers contributedby IBM employees, and content created by customers and business partners.Two of these wikis are of particular relevance to IBM Tivoli Monitoring:– Tivoli Distributed Monitoring and Application Management Wiki at
http://www.ibm.com/developerworks/wikis/display/tivolimonitoring/
Appendix E. Documentation library 161

Home provides information about IBM Tivoli Monitoring and relateddistributed products, including IBM Tivoli Composite ApplicationManagement products.
– Tivoli System z Monitoring and Application Management Wiki athttp://www.ibm.com/developerworks/wikis/display/tivoliomegamon/Home provides information about the OMEGAMON XE products, NetViewfor z/OS, Tivoli Monitoring Agent for z/TPF, and other System z monitoringand application management products.
162 IBM Tivoli Monitoring: High Availability Guide for Distributed Systems

Appendix F. Support information
If you have a problem with your IBM software, you want to resolve it quickly. IBMprovides ways for you to obtain the support you need.
OnlineThe following sites contain troubleshooting information:v Go to the IBM Software Support site at http://www.ibm.com/software/
support/probsub.html and follow the instructions.v Go to the IBM Tivoli Distributed Monitoring and Application
Management Wiki at http://www.ibm.com/developerworks/wikis/display/tivolimonitoring/Home. Feel free to contribute to this wiki.
IBM Support AssistantThe IBM Support Assistant (ISA) is a free local software serviceabilityworkbench that helps you resolve questions and problems with IBMsoftware products. The ISA provides quick access to support-relatedinformation and serviceability tools for problem determination. To installthe ISA software, go to http://www.ibm.com/software/support/isa.
Troubleshooting GuideFor more information about resolving problems, see the product'sTroubleshooting Guide.
Accessing terminology online
The IBM Terminology Web site consolidates the terminology from IBM productlibraries in one convenient location. You can access the Terminology Web site athttp://www.ibm.com/software/globalization/terminology
Ordering publications
You can order many Tivoli publications online at http://www.ibm.com/e-business/linkweb/publications/servlet/pbi.wss.
You can also order by telephone by calling one of these numbers:v In the United States: 800-879-2755v In Canada: 800-426-4968
In other countries, contact your software account representative to order Tivolipublications. To locate the telephone number of your local representative, performthe following steps:1. Go to http://www.elink.ibmlink.ibm.com/publications/servlet/pbi.wss.2. Select your country from the list and click Go.3. Click About this site in the main panel to see an information page that
includes the telephone number of your local representative.
Accessibility
Accessibility features help users with a physical disability, such as restrictedmobility or limited vision, to use software products successfully. With this product,you can use assistive technologies to hear and navigate the interface. You can also
© Copyright IBM Corp. 2010, 2012 163

use the keyboard instead of the mouse to operate all features of the graphical userinterface.
Tivoli technical training
For Tivoli technical training information, refer to the following IBM TivoliEducation Web site at http://www.ibm.com/software/tivoli/education.
Tivoli user groups
Tivoli user groups are independent, user-run membership organizations thatprovide Tivoli users with information to assist them in the implementation ofTivoli Software solutions. Through these groups, members can share informationand learn from the knowledge and experience of other Tivoli users. Tivoli usergroups include the following members and groups:v 23,000+ membersv 144+ groups
Access the link for the Tivoli Users Group at www.tivoli-ug.org.
164 IBM Tivoli Monitoring: High Availability Guide for Distributed Systems

Notices
This information was developed for products and services offered in the U.S.A.IBM may not offer the products, services, or features discussed in this document inother countries. Consult your local IBM representative for information on theproducts and services currently available in your area. Any reference to an IBMproduct, program, or service is not intended to state or imply that only that IBMproduct, program, or service may be used. Any functionally equivalent product,program, or service that does not infringe any IBM intellectual property right maybe used instead. However, it is the user's responsibility to evaluate and verify theoperation of any non-IBM product, program, or service.
IBM may have patents or pending patent applications covering subject matterdescribed in this document. The furnishing of this document does not give youany license to these patents. You can send license inquiries, in writing, to:
IBM Director of LicensingIBM CorporationNorth Castle DriveArmonk, NY 10504-1785 U.S.A.
For license inquiries regarding double-byte (DBCS) information, contact the IBMIntellectual Property Department in your country or send inquiries, in writing, to:
Intellectual Property LicensingLegal and Intellectual Property LawIBM Japan, Ltd.3-2-12, Roppongi, Minato-ku, Tokyo 106-8711 Japan
The following paragraph does not apply to the United Kingdom or any othercountry where such provisions are inconsistent with local law:
INTERNATIONAL BUSINESS MACHINES CORPORATION PROVIDES THISPUBLICATION "AS IS" WITHOUT WARRANTY OF ANY KIND, EITHEREXPRESS OR IMPLIED, INCLUDING, BUT NOT LIMITED TO, THE IMPLIEDWARRANTIES OF NON-INFRINGEMENT, MERCHANTABILITY OR FITNESSFOR A PARTICULAR PURPOSE.
Some states do not allow disclaimer of express or implied warranties in certaintransactions, therefore, this statement might not apply to you.
This information could include technical inaccuracies or typographical errors.Changes are periodically made to the information herein; these changes will beincorporated in new editions of the publication. IBM may make improvementsand/or changes in the product(s) and/or the program(s) described in thispublication at any time without notice.
Any references in this information to non-IBM Web sites are provided forconvenience only and do not in any manner serve as an endorsement of those Websites. The materials at those Web sites are not part of the materials for this IBMproduct and use of those Web sites is at your own risk.
© Copyright IBM Corp. 2010, 2012 165

IBM may use or distribute any of the information you supply in any way itbelieves appropriate without incurring any obligation to you.
Licensees of this program who wish to have information about it for the purposeof enabling: (i) the exchange of information between independently createdprograms and other programs (including this one) and (ii) the mutual use of theinformation which has been exchanged, should contact:
IBM Corporation2Z4A/10111400 Burnet RoadAustin, TX 78758 U.S.A.
Such information may be available, subject to appropriate terms and conditions,including in some cases payment of a fee.
The licensed program described in this document and all licensed materialavailable for it are provided by IBM under terms of the IBM Customer Agreement,IBM International Program License Agreement or any equivalent agreementbetween us.
Any performance data contained herein was determined in a controlledenvironment. Therefore, the results obtained in other operating environments mayvary significantly. Some measurements may have been made on development-levelsystems and there is no guarantee that these measurements will be the same ongenerally available systems. Furthermore, some measurement may have beenestimated through extrapolation. Actual results may vary. Users of this documentshould verify the applicable data for their specific environment.
Information concerning non-IBM products was obtained from the suppliers ofthose products, their published announcements or other publicly available sources.IBM has not tested those products and cannot confirm the accuracy ofperformance, compatibility or any other claims related to non-IBM products.Questions on the capabilities of non-IBM products should be addressed to thesuppliers of those products.
All statements regarding IBM's future direction or intent are subject to change orwithdrawal without notice, and represent goals and objectives only.
All IBM prices shown are IBM's suggested retail prices, are current and are subjectto change without notice. Dealer prices may vary.
This information is for planning purposes only. The information herein is subject tochange before the products described become available.
This information contains examples of data and reports used in daily businessoperations. To illustrate them as completely as possible, the examples include thenames of individuals, companies, brands, and products. All of these names arefictitious and any similarity to the names and addresses used by an actual businessenterprise is entirely coincidental.
COPYRIGHT LICENSE:
This information contains sample application programs in source language, whichillustrate programming techniques on various operating platforms. You may copy,modify, and distribute these sample programs in any form without payment to
166 IBM Tivoli Monitoring: High Availability Guide for Distributed Systems

IBM, for the purposes of developing, using, marketing or distributing applicationprograms conforming to the application programming interface for the operatingplatform for which the sample programs are written. These examples have notbeen thoroughly tested under all conditions. IBM, therefore, cannot guarantee orimply reliability, serviceability, or function of these programs. You may copy,modify, and distribute these sample programs in any form without payment toIBM for the purposes of developing, using, marketing, or distributing applicationprograms conforming to IBM‘s application programming interfaces.
Each copy or any portion of these sample programs or any derivative work, mustinclude a copyright notice as follows:
© IBM 2009. Portions of this code are derived from IBM Corp. Sample Programs. ©Copyright IBM Corp. 2009. All rights reserved.
If you are viewing this information in softcopy form, the photographs and colorillustrations might not be displayed.
TrademarksIBM, the IBM logo, and ibm.com are trademarks or registered trademarks ofInternational Business Machines Corp., registered in many jurisdictions worldwide.Other product and service names might be trademarks of IBM or other companies.A current list of IBM trademarks is available on the Web at “Copyright andtrademark information” at www.ibm.com/legal/copytrade.shtml.
Java and all Java-based trademarks and logos are trademarks or registeredtrademarks of Oracle and/or its affiliates.
Linux is a registered trademark of Linus Torvalds in the United States, othercountries, or both.
Microsoft and Windows are trademarks of Microsoft Corporation in the UnitedStates, other countries, or both.
UNIX is a registered trademark of The Open Group in the United States and othercountries.
Other company, product, or service names may be trademarks or service marks ofothers.
Notices 167

168 IBM Tivoli Monitoring: High Availability Guide for Distributed Systems

Index
Aacting hub 16active hub 3active hub monitoring server 3active hub Tivoli Enterprise Monitoring
Server 3AFF_ALL_ORACLE 12AFF_ALL_SYBASE 12AFF_MS_CLUSTER 12AFF_MS_SQL_SERVER 12AFF_NT_EXCHANGE 12AFF_SIEBEL 13agent
CT_CMSLIST 151monitoring server
agent switchback to primary 151switchback from secondary
monitoring server 151agent autonomous mode
agent configuration parameters 149agent switch
secondary hub monitoring serverto primary hub monitoringserver 149
Agent Management Services 8agent resiliency 8agent switch
secondary hub monitoring server toprimary hub monitoring server 149
agentless monitoringclustered 41
deployment 41AIX, clustering software for 3alerts 4autonomous agent 149
Bbase cluster 45, 46
preparing 45base cluster, defining for Tivoli
Monitoringmonitoring server
base HACMP cluster 47base cluster, defining for Tivoli
Monitoring (HACMP) 46base cluster, HACMP
defining for Tivoli Monitoring 46preparing
cluster node information 45cluster nodes environment,
checking 46base HACMP cluster
monitoring serverclusternode1, installing and setting
up on 50clusternode1,testing 52installing 50monitoring server cluster
configuration, setting up 52
base HACMP cluster (continued)monitoring server (continued)
pristine installation 51reconfiguration 52upgrade 50
monitoring server on clusternode2,setting up 53
monitoring server to resourcegroup 53
application server 54HACMP monitoring for
monitoring server processes 54monitoring server failover to
clusternode2, testing 58start and stop scripts 54
portal serverclusternode1, installing and setting
up on 58clusternode1,testing 60installing 58
portal server on clusternode2, settingup 60
portal server to resource group 60application server 61monitoring for portal server
process 61portal server failover to
clusternode2, testing 61start and stop scripts 60
Summarization and Pruning Agentclusternode1, installing and setting
up on 61installing 61Tivoli data warehouse components,
testing 62Summarization and Pruning Agent on
clusternode2, setting up 62Summarization and Pruning Agent to
resource group 62summarizing and pruning agent,
creating stop and start scripts 62Warehouse Proxy Agent 62
clusternode1, installing and settingup on 61
installing 61Tivoli data warehouse components,
testing 62Warehouse Proxy Agent and
Summarization and Pruning Agentclusternode1, installing and setting
up on 61creating stop and start scripts 62Tivoli data warehouse components,
testing 62Warehouse Proxy Agent and
Summarization and Pruning Agenton clusternode2, setting up 62
Warehouse Proxy Agent andSummarization and Pruning Agentto resource group
application server 63
base HACMP cluster (continued)Warehouse Proxy Agent and
Summarization and Pruning Agentto resource group (continued)
monitoring for Summarization andPruning Agent process 63
monitoring for Warehouse ProxyAgent and Summarization andPruning Agent process 63
monitoring for Warehouse ProxyAgent process 63
Summarization and Pruning Agentfailover to clusternode2,testing 63
Warehouse Proxy Agent andSummarization and PruningAgent failover to clusternode2,testing 63
Warehouse Proxy Agent failover toclusternode2, testing 63
Warehouse Proxy Agent and theSummarization and Pruning Agentto resource group 62
Warehouse Proxy Agent onclusternode2, setting up 62
Warehouse Proxy Agent, creating stopand start scripts 62
base HACMP cluster for monitoringserver 47
base HACMP cluster for monitoringserver, building
cluster configuration, verifying andsynchronizing 47
file system as shared resource,configuring 47
HACMP resource group 47IP address 47monitoring server resource group 47
base HACMP cluster for portal serverand data warehouse components 47
base HACMP cluster, install DB2 48base HACMP cluster, installing on
monitoring server 50, 58Summarization and Pruning
Agent 61Warehouse Proxy Agent 61Warehouse Proxy Agent or
Summarization and PruningAgent 61
Cchecking cluster nodes environment,
HACMP 46checking cluster nodes environment, IBM
Tivoli System Automation forMultiplatforms 69
cluster 31basic steps 36data warehouse 36data warehouse setup 38
© Copyright IBM Corp. 2010, 2012 169

cluster (continued)HACMP
base cluster 45define base cluster 46
HACMP environment 45hub monitoring server 36hub monitoring server setup 37portal server 36portal server setup 37set up
IBM Tivoli System Automation forMultiplatforms 74
SA-MP (IBM Tivoli SystemAutomation forMultiplatforms) 74
cluster agent 12cluster configuration, verifying and
synchronizing 47cluster creation
configuring 145variables 145
cluster split 70clustered
agentless monitoring 41deployment 41
data warehouse 40hub 39portal server 40summarization and pruning agent 40Warehouse Proxy Agent 40
clustered environment, infrastructurewhat to expect 39
clustered environment, setting up IBMTivoli Monitoring components 35
clusteringconfiguration 32
configuration A 32configuration B 33configuration C 34
configuring 145variables 145
Microsoft Cluster Server 95overview 31
clustering IBM Tivoli Monitoringcomponents 31
supported configurations 32configuration A 32configuration B 33configuration C 34
clusternode1, installing and setting upmonitoring server on 50
clusternode1, installing and setting up theportal server on 58
clusternode1, installing and setting up theWarehouse Proxy Agent andSummarization and Pruning Agenton 61
configuration 5configuration A 32configuration B 32, 33configuration C 32, 34creating stop and start scripts for
Warehouse Proxy Agent andSummarization and Pruning Agent 62
CT_CMSLIST 149CTIRA_HOSTNAME 12CTIRA_MAX_RECONNECT_TRIES 149
CTIRA_PRIMARY_FALLBACK_INTERVAL 149, 151
CTIRA_RECONNECT_WAIT 149
Ddata collection
long-term 42short-term 42
data warehouseclustered 40setup
cluster 38data warehouse setup 38
database middleware 38shared persistent storage 38virtual IP address 38Warehouse Proxy and Summarization
and Pruning Agent processes 38database on clusternode1, for portal
server or data warehouse 48database, adding to base cluster 49DB2, install for base HACMP cluster 48defining base cluster for Tivoli
Monitoring 46monitoring server
HACMP resource group 47defining base cluster, HACMP 46
base HACMP clusterdata Summarization and Pruning
Agent 47data warehouse components 47portal server 47Warehouse Proxy Agent 47
base HACMP cluster for monitoringserver 47
cluster configuration, verifying andsynchronizing 47
file system as shared resource,configuring 47
HACMP resource group 47IP address 47monitoring server resource
group 47database on clusternode1, for data
warehouse 48database on clusternode1, for portal
server 48database on clusternode1, for portal
server or data warehouse 48database, adding to base cluster 49DB2, install for base HACMP
cluster 48portal server and data warehouse
database on clusternode2,cataloging 49
defining the base cluster for TivoliMonitoring
data warehousedatabase on clusternode1 48
data warehouse componentsbase HACMP cluster 47
data warehouse databaseclusternode2, cataloging on 49
DB2, install for base HACMPcluster 48
defining the base cluster for TivoliMonitoring (continued)
monitoring servercluster configuration, verifying and
synchronizing 47file system as shared resource,
configuring 47IP address 47monitoring server resource
group 47portal server
base HACMP cluster 47clusternode2, cataloging on 49database on clusternode1 48
Summarization and Pruning Agentbase HACMP cluster 47
Warehouse Proxy Agentbase HACMP cluster 47
disk R, sharedMicrosoft Cluster Server
hub monitoring server 96MSCS (Microsoft Cluster Server)
hub Tivoli Enterprise MonitoringServer 96
EECKD device number 71ECKD tiebreaker
Linux on zSeries 71EIB (enterprise information base) 16EIB (Enterprise Information Base) 7enterprise information base 16Enterprise Information Base 7environment 5even-management integration 5events 4exchange server 12
Ffail over 18failback 31
agentless monitoring, clustered 41deployment 41
clustered hub 39data warehouse, clustered 40portal server, clustered 40Summarization and Pruning Agent,
clustered 40Warehouse Proxy Agent, clustered 40
failover 31agentless monitoring, clustered 41
deployment 41clustered hub 39data warehouse, clustered 40portal server, clustered 40Summarization and Pruning Agent,
clustered 40Warehouse Proxy Agent, clustered 40
failover scenario 17components, starting up 17failing over 18
failover supportconfiguring primary hub
Linux 25
170 IBM Tivoli Monitoring: High Availability Guide for Distributed Systems

failover support (continued)configuring primary hub (continued)
UNIX 25configuring secondary hub
Linux 25UNIX 25
hub monitoring serversUNIX 25Windows 21
hub monitoring servers, configuringhot standby for 21
Linux 25UNIX 25Windows 21
monitoring agents, configuring 28primary hub
Linux 25UNIX 25Windows 21
primary hub, configuringWindows 21
remote monitoring servers,configuring 26
Linux 27UNIX 27Windows 26
secondary hubLinux 25UNIX 25Windows 23
secondary hub, configuringWindows 23
verifying 28failover support, configuring 21file system as shared resource,
configuring for monitoring server 47Fix Pack 2.2.0.0
Tivoli System Automation forMultiplatforms 72
Ggathering cluster node information,
HACMP 45Global Security Tool Kit 37GSKit 37, 38GSKit (Global Security Tool Kit) 37, 38
HHACMP
clustering 45HACMP (High Availability Cluster
Multiprocessing),clustering 45
HACMP (High Availability ClusterMultiprocessing), base cluster 45
creating stop and start scripts forWarehouse Proxy Agent andSummarization and PruningAgent 62
define 46monitoring server
clusternode1, installing and settingup on 50
clusternode1, testing 52
HACMP (High Availability ClusterMultiprocessing), base cluster(continued)
monitoring server (continued)clusternode2, setting up 53installing 50monitoring server cluster
configuration, setting up 52monitoring server to resource
group 53pristine installation 51reconfiguration 52upgrade 50
monitoring server to resourcegroup 53
HACMP monitoring formonitoring server processes 54
monitoring server as applicationserver 54
monitoring server failover toclusternode2, testing 58
start and stop scripts formonitoring server 54
portal serverclusternode1, installing and setting
up on 58clusternode1, testing 60clusternode2, setting up 60installing 58portal server to resource
group 60portal server to resource group 60
monitoring for portal serverprocess 61
portal server as applicationserver 61
portal server failover toclusternode2, testing 61
start and stop scripts for portalserver 60
preparing 45Summarization and Pruning Agent
clusternode1, installing and settingup on 61
clusternode2, setting up 62installing 61resource group 62Tivoli data warehouse components,
testing 62Summarization and Pruning Agent to
resource group 62summarizing and pruning agent,
creating stop and start scripts 62Warehouse Proxy Agent 62
clusternode1, installing and settingup on 61
clusternode2, setting up 62installing 61resource group 62Tivoli data warehouse components,
testing 62Warehouse Proxy Agent and
Summarization and Pruning Agentclusternode1, installing and setting
up on 61clusternode2, setting up 62
HACMP (High Availability ClusterMultiprocessing), base cluster(continued)
Warehouse Proxy Agent andSummarization and Pruning Agent(continued)
Tivoli data warehouse components,testing 62
Warehouse Proxy Agent andSummarization and Pruning Agentto resource group
monitoring for Summarization andPruning Agent process 63
monitoring for Warehouse ProxyAgent and Summarization andPruning Agent process 63
monitoring for Warehouse ProxyAgent process 63
Summarization and Pruning Agentas application server 63
Summarization and Pruning Agentfailover to clusternode2,testing 63
Warehouse Proxy Agent andSummarization and PruningAgent as application server 63
Warehouse Proxy Agent andSummarization and PruningAgent failover to clusternode2,testing 63
Warehouse Proxy Agent asapplication server 63
Warehouse Proxy Agent failover toclusternode2, testing 63
Warehouse Proxy Agent and theSummarization and Pruning Agent
resource group 62Warehouse Proxy Agent and the
Summarization and Pruning Agentto resource group 62
Warehouse Proxy Agent, creating stopand start scripts 62
HACMP (High-Availability ClusterMultiprocessing for pSeries AIX) 3
HACMP monitoring for monitoringserver processes 54
HACMP resource group for themonitoring server, configuring 47
heartbeat function 35High Availability Cluster Multiprocessing
base clustercreating stop and start scripts for
Warehouse Proxy Agent andSummarization and PruningAgent 62
portal server on clusternode2,setting up 60
summarizing and pruning agent,creating stop and startscripts 62
Warehouse Proxy Agent, creatingstop and start scripts 62
clustering 45High Availability Cluster
Multiprocessing, base cluster 45, 46high availability software 3
Index 171

High-Availability ClusterMultiprocessing 3
historical data collection 5performance metrics 5
host nameMicrosoft Cluster Server
hub monitoring server 96MSCS (Microsoft Cluster Server)
hub Tivoli Enterprise MonitoringServer 96
hot standby 3, 15, 21configuring primary hub
Linux 25UNIX 25
configuring secondary hubLinux 25UNIX 25
hub monitoring servers, configuringUNIX 25
hub monitoring servers, configuringhot standby for 21
Linux 25Windows 21
monitoring agents, configuring 28primary hub, configuring
Windows 21remote monitoring servers,
configuring 26Linux 27UNIX 27Windows 26
secondary hub, configuringWindows 23
use 15using hot standby
failover scenario 17hub Tivoli Monitoring Server 16remote monitoring servers 16Tivoli Enterprise Monitoring
Agents 16Tivoli Enterprise Portal Server 16
verifying 28hot standby option
configuring failover supportUNIX 25
failover support, configuring 21hub monitoring servers,
configuring 21Linux 25Windows 21
HTEMS (hub Tivoli EnterpriseMonitoring Server 6
HTEMS (hub Tivoli EnterpriseMonitoring Server) 3, 5, 15, 16
hub 3, 5, 6, 7, 15, 16clustered 39
hub monitoring server 3, 5, 6, 7, 15, 16failover support, configuring 21setup
cluster 37hub monitoring server setup 37
monitoring server service 37shared persistent storage 37virtual IP address 37
hub monitoring servers, configuring hotstandby for
failover support 21
hub monitoring serviceMicrosoft Cluster Server
hub monitoring server 96MSCS (Microsoft Cluster Server)
hub Tivoli Enterprise MonitoringServer 96
hub Tivoli Enterprise MonitoringServer 3, 5, 7, 15, 16
hub Tivoli Enterprise MonitoringSever 6
hub Tivoli Monitoring Serveracting hub 16enterprise information base 16primary hub 16secondary hub 16standby hub 16
IIBM Support Assistant 163IBM Tivoli Distributed Monitoring and
Application Management Wiki 163IBM Tivoli Monitoring
clustered environment, infrastructureagentless monitoring,
clustered 41clustered hub 39data warehouse, clustered 40long-term data collection 42maintenance 43portal server, clustered 40short-term data collection 42situations 41summarization and pruning agent,
clustered 40Tivoli Enterprise Console event
integration 42Warehouse Proxy Agent,
clustered 40what to expect 39workflow policies 42
componentsclustering 31
components, starting up 17enhancement 12historical data collection 5hot standby 15
use 15monitoring architecture 5
Tivoli Enterprise MonitoringAgents 7
Tivoli Enterprise MonitoringServer 7
Tivoli Enterprise Portal 6Tivoli Enterprise Portal Server 6Warehouse Proxy Agent 7Warehouse Summarization and
Pruning Agent 7monitoring functions 4
data visualization 4event-management integration 5situations, events, and alerts 4
monitoring functions andarchitecture 3
high availability considerations forhub Tivoli Enterprise MonitoringServer 8
IBM Tivoli Monitoring (continued)monitoring functions and
architecture (continued)monitoring architecture 5monitoring functions 4
portal navigation 12workflow policies 5
IBM Tivoli Monitoring cluster setup 35IBM Tivoli Monitoring components
clustering 31HACMP environment 45IBM Tivoli System Automation for
Multiplatforms 67IBM Tivoli Monitoring configuration 6IBM Tivoli Monitoring environment 6IBM Tivoli NetCool 5IBM Tivoli NetCool/OMNIbus 5IBM Tivoli System Automation for
Multiplatforms 3cluster nodes environment,
checking 69cluster nodes information 68
AIX 69Linux 69Red Hat enterprise 69
cluster tiebreaker 70clustering 67
preparation 68scenarios 67tested scenarios 68
create clusterall components 73DB2 73monitoring server 73portal server 73summarizing and pruning
agent 73warehouse proxy agent 73
DB2installing/configuring 77
ECKD tiebreakerLinux on zSeries 71
IBM Tivoli Monitoringmaintenance 90
IBM Tivoli Monitoring maintenance,fix pack
hub monitoring server 90hub Tivoli Enterprise Monitoring
Server 90portal server 90Summarization and Pruning
Agent 92Tivoli Enterprise Portal Server 90warehouse proxy agent 91
install 72AIX 72DB2 72Linux 72Solaris 73Windows 73
monitoring serverbase cluster, adding to 81base cluster, installing 79clusternode1, installing and setting
up 79clusternode1, testing 80clusternode2, setting up 80
172 IBM Tivoli Monitoring: High Availability Guide for Distributed Systems

IBM Tivoli System Automation forMultiplatforms (continued)
monitoring server (continued)clusternode2, testing failover
to 81network tiebreaker 70portal server
base cluster, adding to 84cluster, installing 82clusternode1, installing and setting
up 82clusternode1, testing 84clusternode2, setting up 84clusternode2, testing failover
to 85primary network name 83
portal server/Tivoli data warehousecluster 77database on node1 78node2 78
SCSI tiebreakerAIX 71Linux 71
set up cluster 74base cluster, build for monitoring
server 76base cluster, build for portal
server/data warehouse 77IP address 74policies 75predefined definitions 75rational database 74shared file system 74
summarization and pruning agentbase cluster, adding to 88cluster, installing 87clusternode2, testing failover
to 89Summarization and Pruning Agent
add to base cluster 89clusternode1, installing and setting
up 87primary network name 88
warehouse proxy agentbase cluster, adding to 86cluster, installing 85clusternode1, installing and setting
up 85clusternode2, setting up 86clusternode2, testing failover
to 87primary network name 85
installing on base HACMP clustermonitoring server 50
application server 54clusternode1, installing and setting
up on 50clusternode1, testing 52HACMP monitoring for
monitoring server processes 54monitoring server cluster
configuration, setting up 52monitoring server failover to
clusternode2, testing 58pristine installation 51reconfiguration 52start and stop scripts 54
installing on base HACMP cluster(continued)
monitoring server (continued)upgrade 50
portal server 58application server 61clusternode1, installing and setting
up on 58clusternode1, testing 60monitoring for portal server
process 61portal server failover to
clusternode2, testing 61start and stop scripts 60
Summarization and PruningAgent 61
application server 63clusternode1, installing and setting
up on 61Tivoli data warehouse components,
testing 62Warehouse Proxy Agent 61
application server 63clusternode1, installing and setting
up on 61Tivoli data warehouse components,
testing 62Warehouse Proxy Agent and
Summarization and Pruning Agentapplication server 63clusternode1, installing and setting
up on 61monitoring for Summarization and
Pruning Agent process 63monitoring for Warehouse Proxy
Agent and Summarization andPruning Agent process 63
monitoring for Warehouse ProxyAgent process 63
Summarization and Pruning Agentfailover to clusternode2,testing 63
Tivoli data warehouse components,testing 62
Warehouse Proxy Agent andSummarization and PruningAgent failover to clusternode2,testing 63
Warehouse Proxy Agent failover toclusternode2, testing 63
installing on HACMP clustermonitoring server
clusternode2, setting up 53resource group 53
portal serverclusternode2, setting up 60resource group 60
Summarization and Pruning Agentclusternode2, setting up 62resource group 62
Warehouse Proxy Agentclusternode2, setting up 62resource group 62
Warehouse Proxy Agent andSummarization and Pruning Agent
clusternode2, setting up 62creating stop and start scripts 62
installing on HACMP cluster (continued)Warehouse Proxy Agent and the
Summarization and Pruning Agentresource group 62
IP addressMicrosoft Cluster Server
hub monitoring server 96MSCS (Microsoft Cluster Server)
hub Tivoli Enterprise MonitoringServer 96
IP address for monitoring server,configuring 47
ISA 163
JJava runtime environment 37, 38
KKFW_TOPOLOGY_CLUSTER_LIST 12ksycma.ini 138
Llogical volume manager 69long-term data collection 42
MMicrosoft Cluster Server 1, 3, 95
adding to resource group 125DB2
installing and setting up 133eclipse help server
adding to resource group 125hub monitoring server 95
cluster resources 96host name 96hub monitoring service 96IP address 96shared disk R 96
hub Tivoli Enterprise MonitoringServer 95
cluster resources 96host name 96hub monitoring service 96IP address 96shared disk R 96
monitoring serverclusternode1, installing and setting
up 103clusternode1, testing 114clusternode2, setting up 114clusternode2, testing 115environment variables,
checking 114registry keys replication 110resource group, adding to 107user validation 115
ODBC DSNsetting up 122, 133
portal serveradding to resource group 126DB2 116
Index 173

Microsoft Cluster Server (continued)portal server (continued)
DB2, adding to clusteradministrator 119
DB2, adding to resourcegroup 120
DB2, installing onclusternode1 116
DB2, installing onclusternode2 119
DB2, transforming into clusterinstance 119
installing and setting up incluster 122
installing and setting up,clusternode1 123
setting up 115testing 132
portal server databasesetting up 122
portal server database and ODBCDSN
setting up 122registry keys replication 110summarization and pruning agent
adding to resource group 138Summarization and Pruning Agent
installing 134Tivoli data warehouse 132
cluster resources, setting up 116,133
installing and setting up 133testing 140
Tivoli data warehouse databasesetting up 133
Tivoli data warehouse database andODBC DSN
setting up 133Tivoli Enterprise Monitoring Server
clusternode1, installing and settingup 103
clusternode1, testing 114clusternode2, setting up 114clusternode2, testing 115environment variables,
checking 114resource group, adding to 107user validation 115
Tivoli Enterprise Portal Serveradding to resource group 126DB2 116DB2, adding to cluster
administrator 119DB2, adding to resource
group 120DB2, installing on
clusternode1 116DB2, installing on
clusternode2 119DB2, transforming into cluster
instance 119installing and setting up in
cluster 122installing and setting up,
clusternode1 123setting up 115testing 132
Microsoft Cluster Server (continued)Tivoli Monitoring maintenance 141upgrading IBM Tivoli
Monitoring 141Warehouse Proxy agent
installing 134Warehouse Proxy and Summarization
and Pruning Agentinstalling 134
warehouse proxy resourceadding to resource group 136
monitoring agents 16failover support, configuring
hot standby, configuring 28monitoring architecture 5
Tivoli Enterprise MonitoringAgents 7
Tivoli Enterprise MonitoringServer 7
Tivoli Enterprise Portal 6Tivoli Enterprise Portal Server 6warehouse proxy agent 7warehouse summarization and
pruning agent 7monitoring for portal server process 61monitoring for Warehouse Proxy Agent
and Summarization and Pruning Agentprocess 63
monitoring functions 4data visualization 4event-management integration 5
OMNIbus 5Tivoli Enterprise Console 5
historical data collection 5situations, events, and alerts 4
pure events 4sampled events 4
workflow policies 5monitoring functions and architecture 3
high availability considerationshub 8hub monitoring server 8hub Tivoli Enterprise Monitoring
Server 8high availability considerations for
hub Tivoli Enterprise MonitoringServer
Tivoli Monitoring componentresiliency 9
hub Tivoli Enterprise MonitoringServer, high availabilityconsiderations for 8
Tivoli Monitoring componentresiliency 8
resiliencyoptions 9
resiliency characteristicsTivoli Monitoring components and
features 9monitoring server 7
configuring failover support (Linux)primary hub, configuring 25secondary hub, configuring hot
standby 25configuring failover support (UNIX)
hub monitoring server, configuringhot standby for 25
monitoring server (continued)configuring failover support (UNIX)
(continued)primary hub, configuring 25secondary hub, configuring hot
standby 25EIB (Enterprise Information Base) 7failover support
hot standby 21failover support, configuring
configuring hot standby 21failover support, configuring (Linux)
hub monitoring server, configuringhot standby for 25
failover support, configuring(Windows)
hub monitoring server,configuring 21
primary hub, configuring 21secondary hub, configuring 23
setupcluster 37
UNIX 25monitoring server as application server to
base cluster 54monitoring server cluster configuration,
setting up 52monitoring server failover to
clusternode2, testing 58monitoring server on base HACMP
cluster, installing 50monitoring server on clusternode1,
testing 52monitoring server on clusternode2,
setting up 53monitoring server resource group,
creating 47monitoring server setup 37
monitoring server service 37shared persistent storage 37virtual IP address 37
monitoring server to resource group 53MSCS 3MSCS (Microsoft Cluster Server)
hub monitoring server 95cluster resources 96host name 96hub monitoring service 96IP address 96shared disk R 96
hub Tivoli Enterprise MonitoringServer 95
cluster resources 96host name 96hub monitoring service 96IP address 96shared disk R 96
monitoring serverclusternode1, installing and setting
up 103clusternode1, testing 114clusternode2, setting up 114clusternode2, testing 115environment variables,
checking 114registry keys replication 110resource group, adding to 107
174 IBM Tivoli Monitoring: High Availability Guide for Distributed Systems

MSCS (Microsoft Cluster Server)(continued)
monitoring server (continued)user validation 115
portal serversetting up 115
registry keys replication 110Tivoli Enterprise Monitoring Server
clusternode1, installing and settingup 103
clusternode1, testing 114clusternode2, setting up 114clusternode2, testing 115environment variables,
checking 114resource group, adding to 107user validation 115
Tivoli Enterprise Portal Serversetting up 115
Tivoli Monitoring maintenance 141
Nnetwork interface card 45network interface cards 35network tiebreaker 70NIC (network interface card) 45NIC (Network Interface Cards) 35node 31
OODBC DSN
Microsoft Cluster Serversetting up 122
OMNIbus 5oracle 12
Pperformance metrics 4, 5policy files 8
Summarization and Pruning Agent 8Tivoli Universal Agent 8Warehouse Proxy Agent 8
portal server 16clustered 40setup
cluster 37portal server and data warehouse
database on clusternode2,cataloging 49
portal server as application server to basecluster 61
portal server databaseMicrosoft Cluster Server
setting up 122portal server failover to clusternode2,
testing 61portal server on base HACMP cluster,
installing 58portal server on clusternode1, testing 60portal server on clusternode2, setting
up 60portal server setup 37
database middleware 37
portal server setup (continued)portal server service 37shared persistent storage 37virtual IP address 37
portal server to resource group 60predefined definitions
IBM Tivoli System Automation forMultiplatforms 75
SA-MP (IBM Tivoli SystemAutomation for Multiplatforms) 75
predefined scripts 153commands 155
primary hub 3, 16primary hub monitoring server 3primary hub Tivoli Enterprise Monitoring
server 3primary network name
IBM Tivoli System Automation forMultiplatforms 83, 85, 88
pure events 4
Rrational database 74remote monitoring server 5, 6
failover support, configuringhot standby, configuring 26
failover support, configuring (Linux)hot standby, configuring 27
failover support, configuring (UNIX)hot standby, configuring 27
failover support, configuring(Windows)
hot standby, configuring 26remote Tivoli Enterprise Monitoring
Server 5, 6remove monitoring servers 16resiliency
agent 8characteristics 9configuration approach 3options 9
resource 31resource group 31
SSA-MP (IBM Tivoli System Automation
for Multiplatforms)cluster nodes environment,
checking 69cluster nodes information
AIX 69Linux 69Red Hat enterprise 69
cluster tiebreaker 70clustering
preparation 68scenarios 67tested scenarios 68
create clusterall components 73DB2 73monitoring server 73portal server 73
SA-MP (IBM Tivoli System Automationfor Multiplatforms) (continued)
create cluster (continued)summarizing and pruning
agent 73warehouse proxy agent 73
DB2installing/configuring 77
ECKD tiebreakerLinux on zSeries 71
IBM Tivoli Monitoringmaintenance 90
IBM Tivoli Monitoring maintenance,fix pack
hub monitoring server 90hub Tivoli Enterprise Monitoring
Server 90portal server 90Summarization and Pruning
Agent 92Tivoli Enterprise Portal Server 90Warehouse Proxy Agent 91
install 72AIX 72DB2 72Linux 72Solaris 73Windows 73
monitoring serverbase cluster, adding to 81base cluster, installing 79clusternode1, installing and setting
up 79clusternode1, testing 80clusternode2, setting up 80clusternode2, testing failover
to 81network tiebreaker 70portal server
base cluster, adding to 84cluster, installing 82clusternode1, installing and setting
up 82clusternode1, testing 84clusternode2, setting up 84clusternode2, testing failover
to 85primary network name 83
portal server/Tivoli data warehousecluster 77database on node1 78node2 78
SCSI tiebreakerAIX 71Linux 71
set up cluster 74base cluster, build for monitoring
server 76base cluster, build for portal
server/data warehouse 77IP address 74policies 75predefined definitions 75rational database 74shared file system 74, 75
summarization and pruning agentbase cluster, adding to 88
Index 175

SA-MP (IBM Tivoli System Automationfor Multiplatforms) (continued)
summarization and pruning agent(continued)
cluster, installing 87clusternode2, testing failover
to 89Summarization and Pruning Agent
add to base cluster 89clusternode1, installing and setting
up 87primary network name 88
warehouse proxy agentbase cluster, adding to 86cluster, installing 85clusternode1, installing and setting
up 85clusternode2, setting up 86clusternode2, testing failover
to 87primary network name 85
scriptspredefined 153
commands 155SCSI tiebreaker
AIX 71Linux 71
secondary hub 3, 16secondary hub monitoring server 3secondary hub Tivoli Enterprise
Monitoring Server 3self describing agent, behavior of 29service name
KSYSRV 138setup
cluster 35basic steps 36data warehouse 35database 35hub monitoring server 35portal server 35summarizing and pruning
agent 35Tivoli Monitoring components 35warehouse proxy 35
data warehouse 38database middleware 38shared persistent storage 38virtual IP address 38Warehouse Proxy and
Summarization and PruningAgent processes 38
hub monitoring server 37monitoring server service 37shared persistent storage 37virtual IP address 37
IBM Tivoli Monitoring cluster 35basic steps 36data warehouse 35database 35hub monitoring server 35portal server 35summarizing and pruning
agent 35Tivoli Monitoring components 35warehouse proxy 35
monitoring server 37
setup (continued)monitoring server service 37shared persistent storage 37virtual IP address 37
portal server 37database middleware 37portal server service 37shared persistent storage 37virtual IP address 37
shared persistent storage 35short-term data collection 42Siebel 13situations 4, 41situations, events, and alerts 4smit hacmp
monitoring server 58portal server 61Summarization and Pruning
Agent 63Warehouse Proxy Agent 63Warehouse Proxy Agent and
Summarization and PruningAgent 63
Software Support 163SQL server 12standby hub 16Standby monitoring server
configuring 21start and stop scripts for monitoring
server, creating 54start and stop scripts for portal server,
creating 60summarization and pruning agent
clustered 40Summarization and Pruning Agent 16Summarization and Pruning Agent on its
base HACMP cluster, installing 61summarizing and pruning agent, creating
stop and start scripts 62support assistant 163Support Assistant 163Sybase 12System Automation—Multiplatform 1, 3
TTEMA (Tivoli Enterprise Monitoring
Agents) 16TEP (Tivoli Enterprise Portal) 5, 6TEPS (Tivoli Enterprise Portal Server) 5,
6, 16tiebreaker 70
ECKD tiebreakerLinux on zSeries 71
network tiebreaker 70SCSI tiebreaker
AIX 71Linux 71
Tivoli data warehouse 132Tivoli data warehouse components in
cluster, testing 62Tivoli Enterprise Console 5Tivoli Enterprise Console event
integration 42Tivoli Enterprise Console event
server 42
Tivoli Enterprise Monitoring agent 5, 6,7
Tivoli Enterprise Monitoring Agents 16Tivoli Enterprise Monitoring Server 7
EIB (Enterprise Information Base) 7HACMP cluster
pristine installation 51reconfiguration 52upgrade 50
hub Tivoli Enterprise MonitoringServer 16
remote monitoring servers 16Tivoli Enterprise Portal 5, 6Tivoli Enterprise Portal Server 5, 6, 16
Tivoli Enterprise MonitoringAgent 16
Tivoli Monitoringcluster
maintenance 43maintenance 43
Tivoli Monitoring componentresiliency 8
Tivoli Monitoring installationknown problems and limitations
HACMP environment 64IBM Tivoli System Automation for
Multiplatforms environment 92Microsoft Cluster Server
environment 141MSCS (Microsoft Cluster Server
environment) 141limitations
HACMP environment 64IBM Tivoli System Automation for
Multiplatforms environment 92Microsoft Cluster Server
environment 141MSCS (Microsoft Cluster Server
environment) 141problems
HACMP environment 64IBM Tivoli System Automation for
Multiplatforms environment 92Microsoft Cluster Server
environment 141MSCS (Microsoft Cluster Server
environment) 141Tivoli NetCool 5Tivoli NetCool/OMNIbus 5Tivoli System Automation for
Multiplatforms 3Tivoli System Automation for
Multiplatforms events 4Tivoli System Automation for
Multiplatforms Version 2.2.0.0 FixPack 72
Uusing hot standby 15
acting hub 15failover configuration
acting hub 19hub monitoring servers 19monitoring agents 19portal client 19portal server 19
176 IBM Tivoli Monitoring: High Availability Guide for Distributed Systems

using hot standby (continued)failover configuration (continued)
primary hub 19remote monitoring servers 19secondary hub 19standby hub 19
failover scenario 17components, starting up 17failing over 18
hub monitoring server 15hub Tivoli Monitoring Server
acting hub 16enterprise information base 16primary hub 16secondary hub 16standby hub 16
monitoring agents 15portal client 15portal server 15primary hub 15remote monitoring servers 15, 16secondary hub 15standby hub 15Tivoli Enterprise Monitoring
Agents 16Tivoli Enterprise Portal Server 16
Vvirtual IP address 35
Wwarehouse proxy agent 16Warehouse Proxy Agent 5, 6, 7
clustered 40Warehouse Proxy Agent and
Summarization and Pruning Agent asapplication server to base cluster 63
Warehouse Proxy Agent andSummarization and Pruning Agentfailover to clusternode2, testing 63
Warehouse Proxy Agent andSummarization and Pruning Agentserver on clusternode2, setting up 62
Warehouse Proxy Agent and theSummarization and Pruning Agent toresource group 62
Warehouse Proxy Agent on its baseHACMP cluster, installing 61
Warehouse Proxy Agent, creating stopand start scripts 62
warehouse Summarization and PruningAgent 5, 6
Warehouse Summarization and PruningAgent 7
wiki 163workflow policies 5, 42
Index 177

178 IBM Tivoli Monitoring: High Availability Guide for Distributed Systems


����
Printed in USA
SC23-9768-03