Embed Size (px)
Citation preview
3
v050813
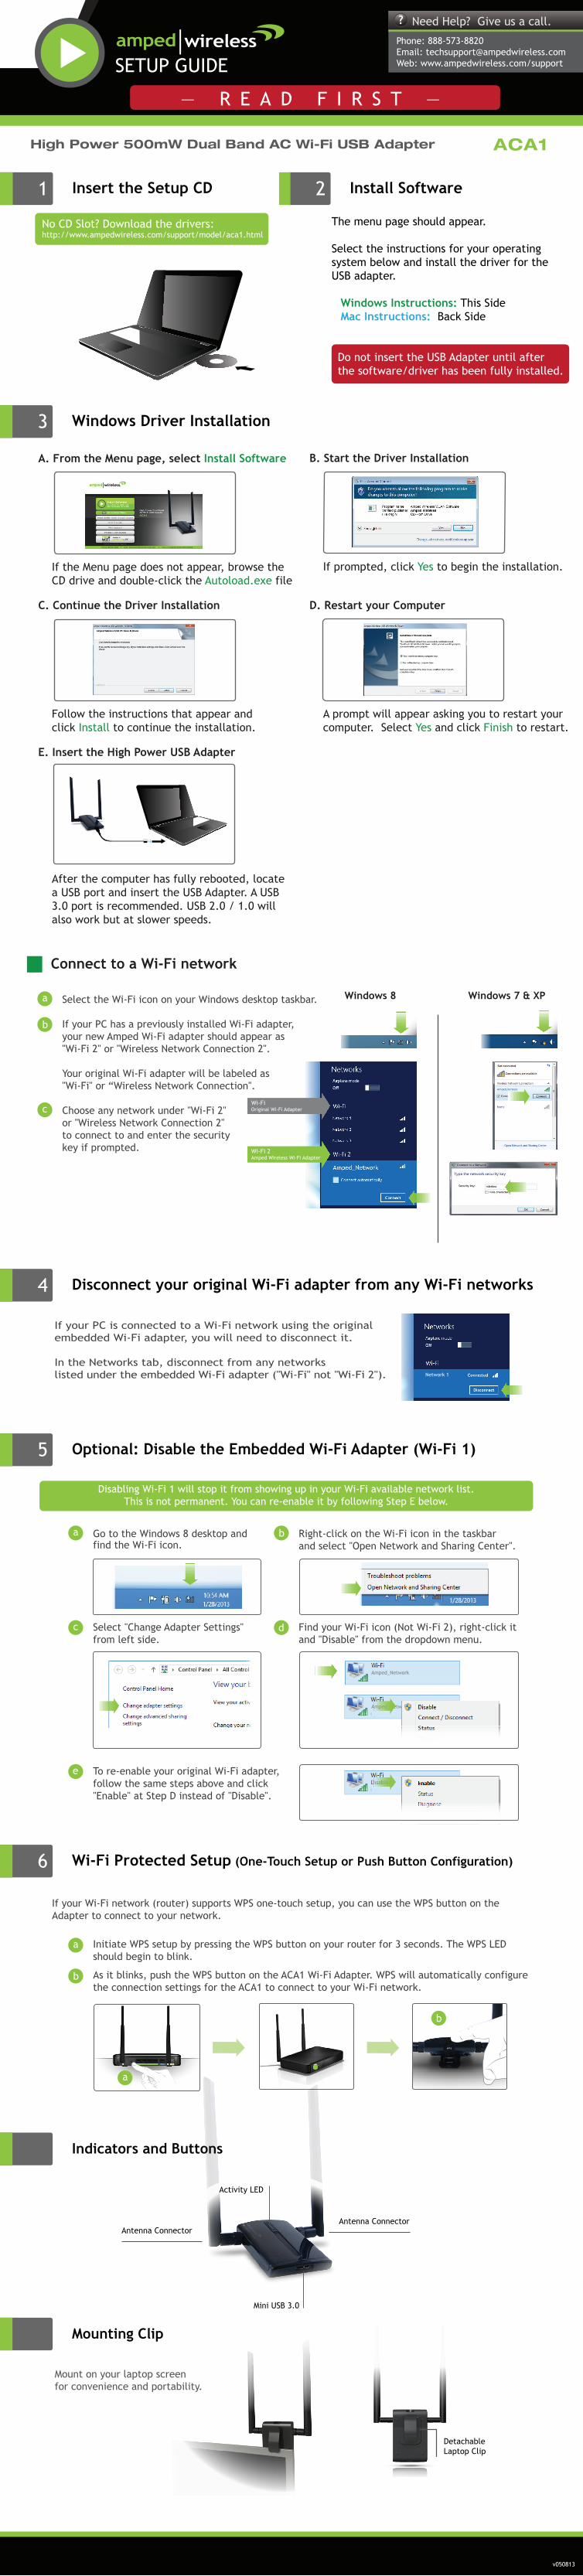
Windows Driver Installation
4 Disconnect your original Wi-Fi adapter from any Wi-Fi networks
Network 1
If your PC is connected to a Wi-Fi network using the originalembedded Wi-Fi adapter, you will need to disconnect it.
In the Networks tab, disconnect from any networks listed under the embedded Wi-Fi adapter ("Wi-Fi" not "Wi-Fi 2").
— R E A D F I R S T —
SETUP GUIDE
High Power 500mW Dual Band AC Wi-Fi USB Adapter
Need Help? Give us a call.
Phone: 888-573-8820Email: [email protected]: www.ampedwireless.com/support
?
ACA1
Insert the Setup CD1
No CD Slot? Download the drivers: http://www.ampedwireless.com/support/model/aca1.html
Install Software2The menu page should appear.
Select the instructions for your operating system below and install the driver for the USB adapter.
Windows Instructions: This SideMac Instructions: Back Side
Do not insert the USB Adapter until after the software/driver has been fully installed.
C. Continue the Driver Installation
Follow the instructions that appear and click Install to continue the installation.
D. Restart your Computer
A prompt will appear asking you to restart your computer. Select Yes and click Finish to restart.
E. Insert the High Power USB Adapter
After the computer has fully rebooted, locate a USB port and insert the USB Adapter. A USB 3.0 port is recommended. USB 2.0 / 1.0 will also work but at slower speeds.
B. Start the Driver Installation
If prompted, click Yes to begin the installation.
A. From the Menu page, select Install Software
If the Menu page does not appear, browse theCD drive and double-click the Autoload.exe file
Connect to a Wi-Fi network
a Select the Wi-Fi icon on your Windows desktop taskbar.
If your PC has a previously installed Wi-Fi adapter, your new Amped Wi-Fi adapter should appear as "Wi-Fi 2" or "Wireless Network Connection 2".
Your original Wi-Fi adapter will be labeled as "Wi-Fi" or “Wireless Network Connection". Choose any network under "Wi-Fi 2" or "Wireless Network Connection 2"to connect to and enter the security key if prompted.
b
c
Amped_Network
Network 1
Network 2
Network 3
Wi-Fi 2Amped Wireless Wi-Fi Adapter
Wi-FiOriginal Wi-Fi Adapter
Windows 8 Windows 7 & XP
Amped_Network
Amped_Network
a Go to the Windows 8 desktop and find the Wi-Fi icon.
Right-click on the Wi-Fi icon in the taskbar and select "Open Network and Sharing Center".
b
Find your Wi-Fi icon (Not Wi-Fi 2), right-click it and "Disable" from the dropdown menu.
d
To re-enable your original Wi-Fi adapter, follow the same steps above and click "Enable" at Step D instead of "Disable".
e
Select "Change Adapter Settings" from left side.
c
Disabling Wi-Fi 1 will stop it from showing up in your Wi-Fi available network list. This is not permanent. You can re-enable it by following Step E below.
5 Optional: Disable the Embedded Wi-Fi Adapter (Wi-Fi 1)
If your Wi-Fi network (router) supports WPS one-touch setup, you can use the WPS button on the Adapter to connect to your network.
Initiate WPS setup by pressing the WPS button on your router for 3 seconds. The WPS LED should begin to blink.
As it blinks, push the WPS button on the ACA1 Wi-Fi Adapter. WPS will automatically configure the connection settings for the ACA1 to connect to your Wi-Fi network.
A.
B.
a
b
b
a
6 Wi-Fi Protected Setup (One-Touch Setup or Push Button Configuration)
Indicators and Buttons
Mounting Clip
Mini USB 3.0
Activity LED
Antenna ConnectorAntenna Connector
Detachable Laptop Clip
Mount on your laptop screenfor convenience and portability.
Troubleshooting Tips
I cannot get the CD menu page to appear.
a. Insert the CD into your CD drive (or DVD) and click on Start, then My Computer. Find your CD or DVD drive and right click it, select Explore or Open. Find the "autoload.exe" file or "Start Here" file and double click it to access the CD menu.b. Check to see that your CD drive is working correctly by inserting another disk first, then retry the Amped Wireless installation disk.
I do not have a CD drive on my computer.
a. Connect to the Internet with your computer and download the drivers from the Amped Wireless Support Center: http://www.ampedwireless.com/support/model/aca1.html b. Unzip the files and find the “setup.exe” file or OS X install file. Double click it to begin the installation of the drivers.
No networks appear in the scan results.
a. Verify that the adapter is firmly inserted into your USB drive and try to scan for networks again.b. Check to see that the wireless network you are connecting to is functioning correctly. If possible, locate your wireless router and see that the wireless LED is blinking correctly. If not, check the connection and configuration of your wireless router.c. (Mac Solution) You may need to activate your wireless adapter. Click the Apple icon, select System Preferences, then click on Network. Highlight the adapter titled Ethernet Adaptor (en#) for OS X 10.5 and below and click Advanced, then click Apply. For OS X 10.6 and 10.7, select the adapter titled Amped Adapter and click Apply. Try to scan for networks again.d. (Windows Solution) The wireless adapter may be disabled. Go to the Start menu, select Control Panel. Then select Device Manager and locate the Amped Wireless adapter under the Network Adapters category. Right click the Amped Wireless adapter and check to see if it is disabled. If disabled, enable the adapter and try to scan for networks again. If there is a problem with the driver, it will also be displayed here. Check solution (f) to solve this issue. e. Uninstall the software by clicking Start, select Control Panel, and then select Programs. Find the Amped Wireless program and uninstall it. Once fully uninstalled, remove the adapter from your USB port, reinstall the Amped Wireless software using the supplied instructions and try again.
The Activity LED is blinking, but I cannot access the Internet.
a. You may have a mismatch in your SSID or your wireless security key. Double check the security key that you are using for your current wireless connection. Double check that the name of the SSID is the correct name of the network you are trying to connect to.b. You may have an incorrect IP address assignment.
• For Windows XP and 2000: Open the Amped Wireless Utility and go to the General tab. Click Renew IP.• For Windows 7 and Vista: Open the Windows wireless utility by clicking the wireless icon on the bottom right corner. Right click the wireless network that you are connected to and click Status. Click Diagnose to allow Windows to reset your connection.• For Mac OS X: Open the Amped Wireless Utility and disconnect from your current network. Wait a few moments and connect again. If this does not work, unplug the USB adapter from your Mac and plug it back in. Connect to your network again and check your Internet connection.
c. The wireless router that you are connecting to may have lost its Internet connection. If possible, check the connection between your router and the ISP.
The wireless signal strength is poor.
a. Your wireless environment, home or office may have objects that cause wireless interference. Obstructions, such as walls, metal appliances, microwaves among other things may cause wireless signal strength to degrade. Try to use the wireless adapter and your wireless router away from these objects.b. The channel of your wireless network may be congested. Change the channel of your wireless network by configuring the settings on your wireless router.
PROBLEM:
SOLUTIONS:
PROBLEM:
SOLUTIONS:
PROBLEM:
SOLUTIONS:
PROBLEM:
SOLUTIONS:
PROBLEM:
SOLUTIONS:
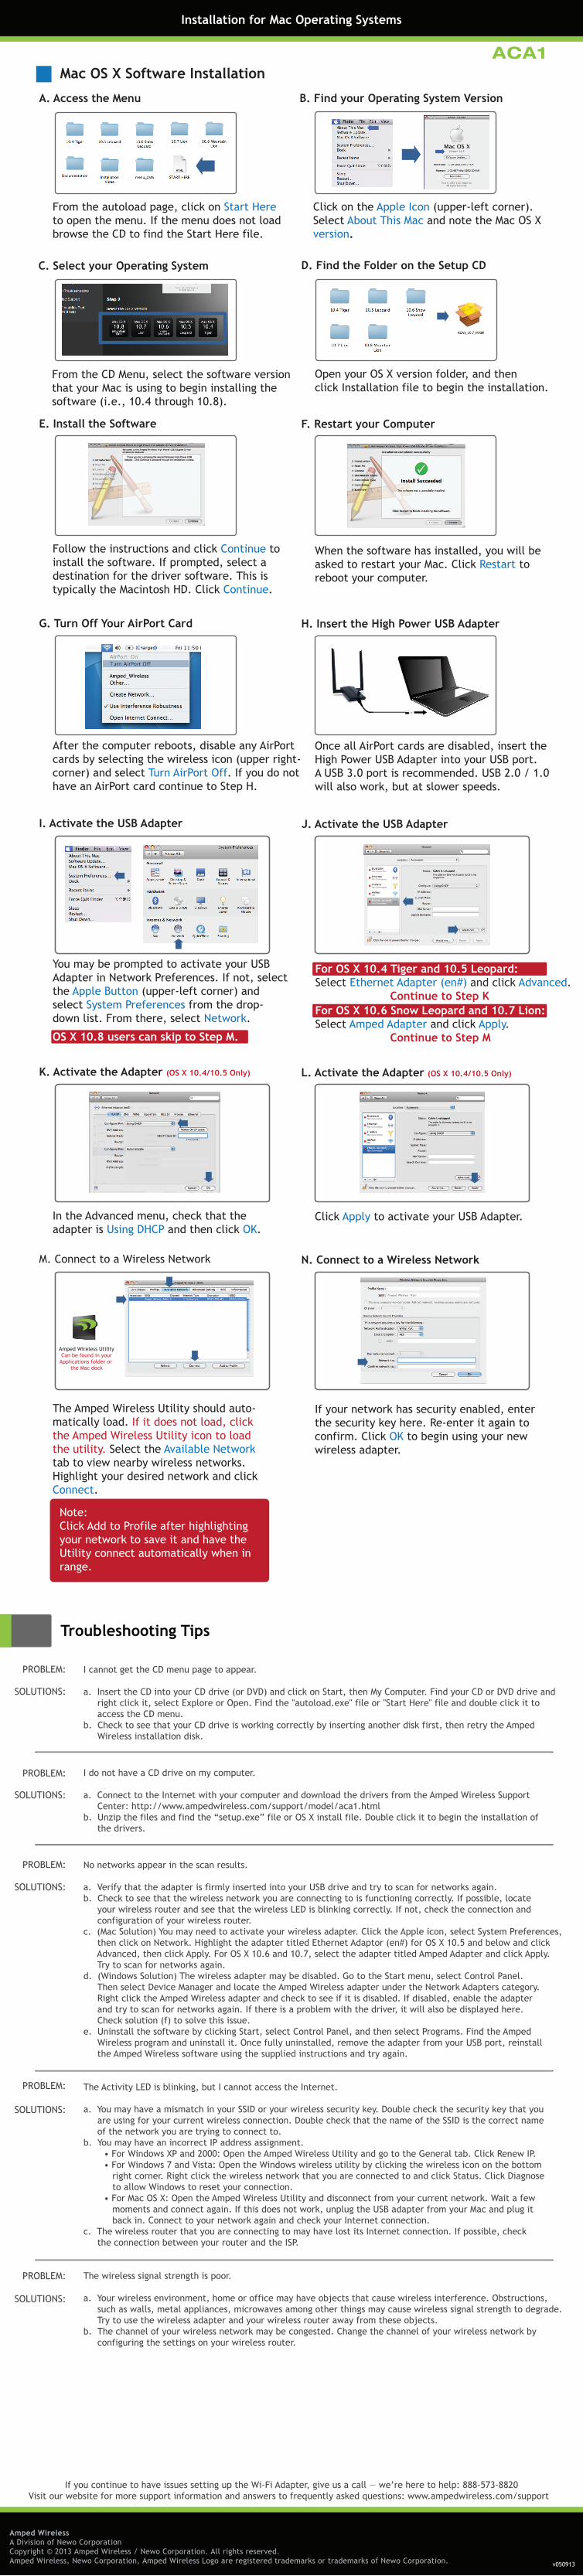
Installation for Mac Operating Systems
ACA1
Amped WirelessA Division of Newo CorporationCopyright © 2013 Amped Wireless / Newo Corporation. All rights reserved. Amped Wireless, Newo Corporation, Amped Wireless Logo are registered trademarks or trademarks of Newo Corporation.
If you continue to have issues setting up the Wi-Fi Adapter, give us a call — we’re here to help: 888-573-8820Visit our website for more support information and answers to frequently asked questions: www.ampedwireless.com/support
v050913
Mac OS X Software Installation
N. Connect to a Wireless Network
If your network has security enabled, enter the security key here. Re-enter it again to confirm. Click OK to begin using your new wireless adapter.
M. Connect to a Wireless Network
The Amped Wireless Utility should auto-matically load. If it does not load, click the Amped Wireless Utility icon to load the utility. Select the Available Network tab to view nearby wireless networks. Highlight your desired network and click Connect.
Note: Click Add to Profile after highlighting your network to save it and have the Utility connect automatically when in range.
Amped Wireless UtilityCan be found in your
Applications folder or the Mac dock
J. Activate the USB Adapter
For OS X 10.4 Tiger and 10.5 Leopard: Select Ethernet Adapter (en#) and click Advanced. Continue to Step KFor OS X 10.6 Snow Leopard and 10.7 Lion: Select Amped Adapter and click Apply. Continue to Step M
C. Select your Operating System
From the CD Menu, select the software versionthat your Mac is using to begin installing the software (i.e., 10.4 through 10.8).
D. Find the Folder on the Setup CD
Open your OS X version folder, and then click Installation file to begin the installation.
E. Install the Software
Follow the instructions and click Continue to install the software. If prompted, select a destination for the driver software. This is typically the Macintosh HD. Click Continue.
F. Restart your Computer
When the software has installed, you will be asked to restart your Mac. Click Restart toreboot your computer.
A. Access the Menu
From the autoload page, click on Start Hereto open the menu. If the menu does not loadbrowse the CD to find the Start Here file.
G. Turn Off Your AirPort Card
After the computer reboots, disable any AirPortcards by selecting the wireless icon (upper right-corner) and select Turn AirPort Off. If you do not have an AirPort card continue to Step H.
H. Insert the High Power USB Adapter
Once all AirPort cards are disabled, insert the High Power USB Adapter into your USB port. A USB 3.0 port is recommended. USB 2.0 / 1.0 will also work, but at slower speeds.
I. Activate the USB Adapter
You may be prompted to activate your USB Adapter in Network Preferences. If not, select the Apple Button (upper-left corner) and select System Preferences from the drop-down list. From there, select Network.
OS X 10.8 users can skip to Step M.
L. Activate the Adapter (OS X 10.4/10.5 Only)
Click Apply to activate your USB Adapter.
K. Activate the Adapter (OS X 10.4/10.5 Only)
In the Advanced menu, check that the adapter is Using DHCP and then click OK.
B. Find your Operating System Version
Click on the Apple Icon (upper-left corner).Select About This Mac and note the Mac OS X version.


![Adobe Photoshop PDF...Access Point LLIJtJ Dual Band Wi-Fi Access Point Wi-Fi Access Point tin] Wi-Fi 97 Wi-Fi AUDIOPHILE VIDEOPHILE nnsW01wa0QnnIWãlluunnunnvvao ñ00f-h01sQIfiðŠ](https://img.pdfslide.us/doc/110x75/5f13acbb3777f75a635fee7f/adobe-photoshop-pdf-access-point-llijtj-dual-band-wi-fi-access-point-wi-fi-access.jpg)