Embed Size (px)
Citation preview
USER MANUALSB102N
The manufacturer of this unit follows a principle of continuous improvement and has no responsibility for any changes that are made to the unit or any liability for these changes. Thank you for choosing our products. Bluetooth is a registered trademark of Bluetooth SIG Inc. All other trademarks and trade names are those of their respective owners.
2.1ch
High-Definition Surround SoundBarwith Bluetooth reception / FM radio / USB port / SD card slot
Before using this product, read this manual carefully and retain it for future reference.

1
English
CONTENTS
Important Safety Instructions 2
Precautions 3
Preparations 4What’s Included Main Unit Remote ControlWall Mounting
Connecting the SoundBar 6Power Supply Connecting with Other DevicesAudio InLine InOptical Input
Operating the SoundBar 7Sleep Timer Setting How to Set TimeTimer SettingUSB & SD/MMC Card PlaybackBluetooth OperatingReconnect to the Bluetooth Audio Source DeviceEQ EffectsTuning the FM RadioStoring Your Favorite Radio StationsMute the UnitVolume Level / Treble / Bass AdjustmentProfessional Audio Modes
Troubleshooting 10
Specifications 11
FCC 12
Warranty 13
2
Eng
lish
IMPORTANT SAFETY INSTRUCTIONS
• Avoid exposing the unit to dripping or splashing liquids. In addition, avoid placing liquid-filledobjects,suchasvases,ontheunit.
• When the main plug or an appliance coupler is used as the disconnect device, the disconnect device shall remain readily operable. To be completely disconnected from the power source, the speaker's main plug or the appliance coupler should be disconnected from the main plug completely.
• Noopenflamesources,suchaslightedcandles,shouldbeplacedonthespeaker.• Allow a minimum space of 2cm around the unit for proper ventilation. In addition, do not
block any openings to the unit with items such as newspapers, curtains and furniture. That could also interfere with the proper ventilation and potentially cause the unit to overheat.
• Do not use in humid and/or moderate climates.• Always dispose of used batteries in accordance with the prevailing community
regulations that apply to the disposal of batteries. If there are no local regulations concerning battery/electronics disposal, please dispose of the device in a waste bin for electronic devices.
•CAUTION: Always dispose of a used batterly properly to avoid the risk of an explosion. And only replace it with the same or an equivalent type of battery.
• Donotexposethespeakerorbatterytoexcessiveheat,includingdirectsunlightorfireand do not store or use inside cars in hot weather.
• See the back of the unit for the marking plate that describes the safety-related markings.
3
English
PRECAUTIONS
Safety Warnings
• BeforeoperatingtheSoundBar,checktoseewhatspecificationsareprovidedforthepowerofthemarkedvoltageforitsuse.Anyothervoltagethanthespecifiedvoltagemaycauseafireoranelectric shock.
•When unplugging the SoundBar, hold the power plug, not the cord. Pulling on the power cord could damagethewiresinsidethecordandcauseafireoranelectricshock.
• If liquid or a foreign object enters the SoundBar, unplug the power cord immediately and contact your dealer.Discontinueusingtheunituntilitcanbetestedandverifiedbyaqualifiedservicetechnician.
Location•Be sure to place the SoundBar on a dry, stable surface so it won't be knocked over and keep it away
from rain, water and moisture. • NeverexposetheSoundBartoexcessiveheat,suchasdirectsunlight,hightemperaturesorfire.• If you are using the SoundBar for TV sound, place it securely under or above the TV screen. Do not
place a TV on top of the device.
4
Eng
lish
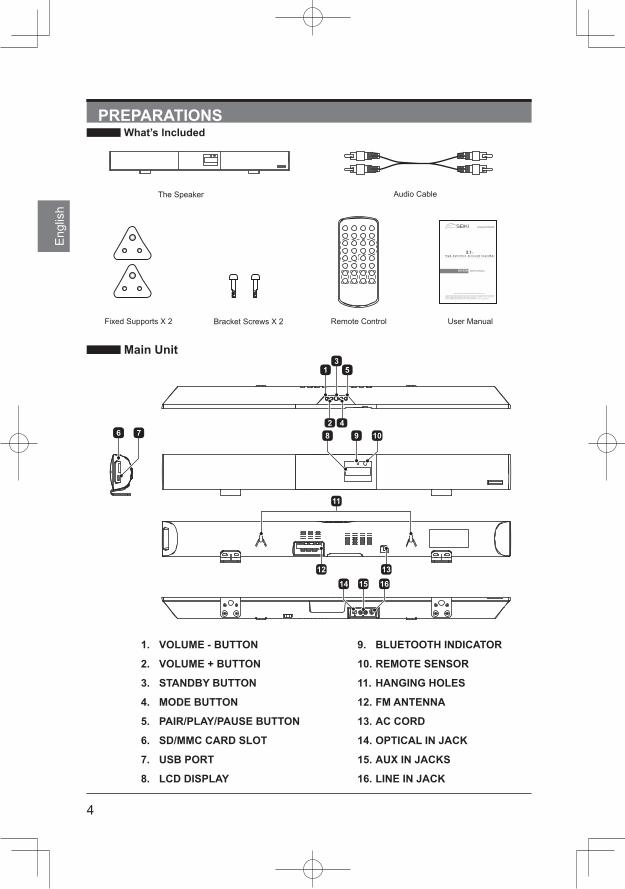
1. VOLUME - BUTTON
2. VOLUME + BUTTON
3. STANDBY BUTTON
4. MODE BUTTON
5. PAIR/PLAY/PAUSE BUTTON
6. SD/MMC CARD SLOT
7. USB PORT
8. LCD DISPLAY
9. BLUETOOTH INDICATOR
10. REMOTE SENSOR
11. HANGING HOLES
12. FM ANTENNA
13. AC CORD
14. OPTICAL IN JACK
15. AUX IN JACKS
16. LINE IN JACK
Main Unit
2
12 13
4
1 53
56 97 10
16
8
14
11
15
Remote Control
Audio Cable
User Manual
USER MANUALSB102N
Manufacturer of this unit follows a principle of continuous improvement and has no responsibility for any changes that are made to the unit or any liability for these changes. Thanks for your choice of our products.Bluetooth is a registered trademark of Bluetooth SIG Inc. All other trademarks and trade names are those of their respective owners.
2.1ch
H i g h - D e f i n i t i o n S u r r o u n d S o u n d B a rw i t h B l u e t o o t h r e c e p t i o n / F M r a d i o / U S B p o r t / S D c a r d s l o t
Before using this product, read this manual carefully and retain it for future reference.
The Speaker
Fixed Supports X 2
PREPARATIONS What’s lncluded
Bracket Screws X 2
5
English
Remote Control
2 11
4 13
9 9
9
7 17
15
9 98 18
5
1 10
3 12
6 16
14
919
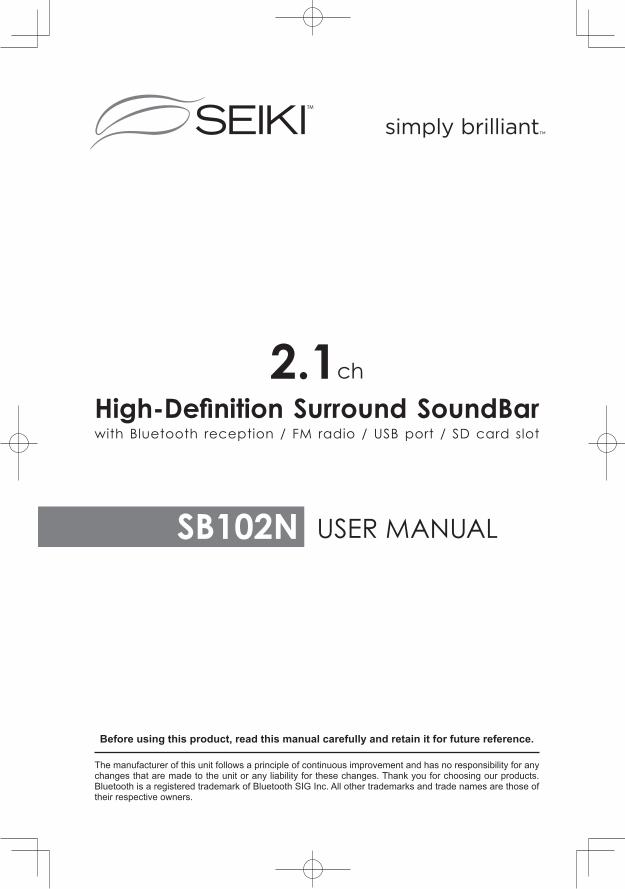
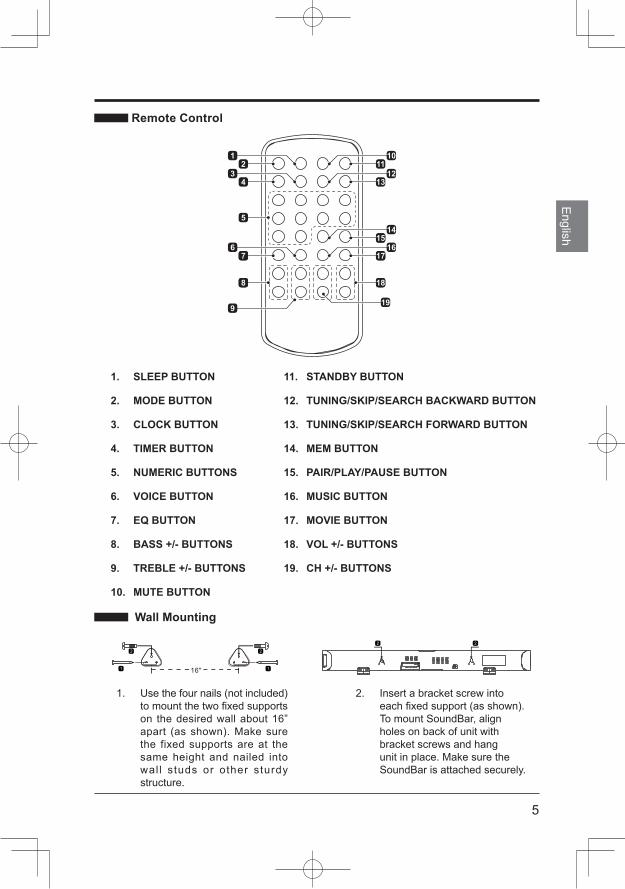
1. SLEEP BUTTON
2. MODE BUTTON
3. CLOCK BUTTON
4. TIMER BUTTON
5. NUMERIC BUTTONS
6. VOICE BUTTON
7. EQ BUTTON
8. BASS +/- BUTTONS
9. TREBLE +/- BUTTONS
10. MUTE BUTTON
11. STANDBY BUTTON
12. TUNING/SKIP/SEARCH BACKWARD BUTTON
13. TUNING/SKIP/SEARCH FORWARD BUTTON
14. MEM BUTTON
15. PAIR/PLAY/PAUSE BUTTON
16. MUSIC BUTTON
17. MOVIE BUTTON
18. VOL +/- BUTTONS
19. CH +/- BUTTONS
Wall Mounting
1. Use the four nails (not included) tomountthetwofixedsupportson the desired wall about 16” apart (as shown). Make sure the fixed supports are at the same height and nailed into wal l studs or other sturdy structure.
2. Insert a bracket screw into eachfixedsupport(asshown).To mount SoundBar, align holes on back of unit with bracket screws and hang unit in place. Make sure the SoundBar is attached securely.
6
Eng
lish
CONNECTING THE SOUNDBAR
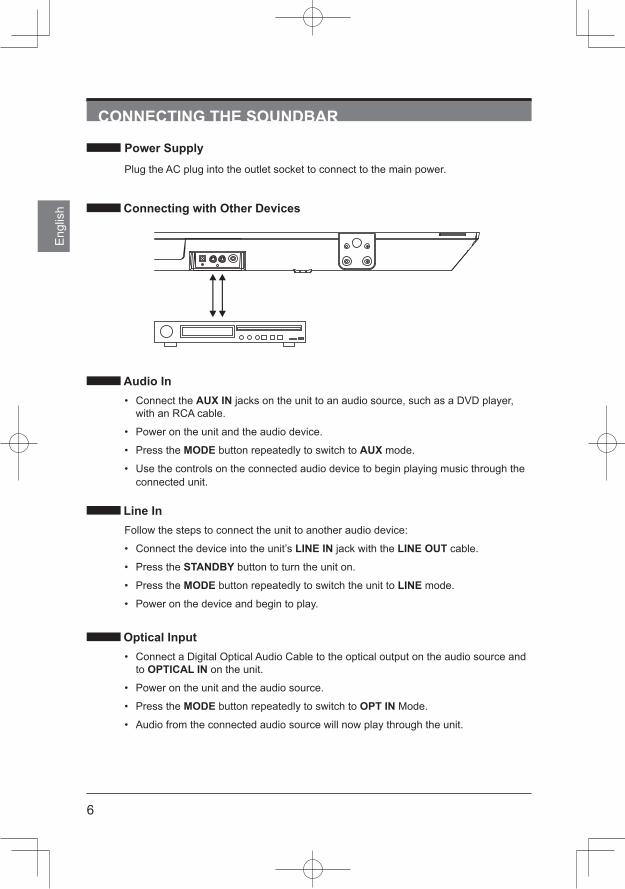
Power Supply
Plug the AC plug into the outlet socket to connect to the main power.
Connecting with Other Devices
Audio In• Connect the AUX IN jacks on the unit to an audio source, such as a DVD player,
with an RCA cable.
• Power on the unit and the audio device.
• Press the MODE button repeatedly to switch to AUX mode.
• Use the controls on the connected audio device to begin playing music through the connected unit.
Line InFollow the steps to connect the unit to another audio device:
• Connect the device into the unit’s LINE IN jack with the LINE OUT cable.
• Press the STANDBY button to turn the unit on.
• Press the MODE button repeatedly to switch the unit to LINE mode.
• Power on the device and begin to play.
Optical Input• Connect a Digital Optical Audio Cable to the optical output on the audio source and
to OPTICAL IN on the unit.
• Power on the unit and the audio source.
• Press the MODE button repeatedly to switch to OPT IN Mode.
• Audio from the connected audio source will now play through the unit.
7
English
OPERATING THE SOUNDBARBefore using the SoundBar to play audio from connected devices, please make the necessary connections described in this user manual and switch the SoundBar to the correct source for other devices.
Sleep Timer Setting Do the following to set the sleep timer at power on modes:
• During playback, press the SLEEP button on the remote control repeatedly to cycle through the sleep time options, Release the SLEEP button when your desired sleep time shows on the screen. Once the sleep time is expired, the unit will be switched off.
• During playback, press the SLEEP button once to check the remaining sleep time.
How to Set the Time• At the standby mode, press and hold the CLOCK button on the remote until the hour flashesonthescreen;usetheTUNING/SKIP/SEARCH buttons on the remote to adjust thehourandconfirmyouradjustmentbypressingtheCLOCK button on the remote.
• When the minute starts blinking on the screen, press the TUNING/SKIP/SEARCH buttons on the remote to set the minute accordingly, and press the CLOCK button on theremoteagaintoconfirmyoursetting.
• During playback, press the CLOCK button on the remote to check the current time. Note: The time only could be set at standby mode.
Timer Setting1. At standby mode, press and hold the TIMER button on the remote. The hour will begin blinkingonthescreenwiththeflashingtimericon"T."
2. Press the TUNING/SKIP/SEARCH buttons on the remote to adjust the hour.3. Press the TIMERbuttontoconfirm.Theminuteonthedisplaywillbeginblinking.4. Press the TUNING/SKIP/SEARCH buttons on the remote to adjust the minute.5. Press the TIMERbuttonontheremotetoconfirmyoursetting.6. After the set time is reached, the unit will power on to the radio automatically.7. The timer function can be deactivated or activated by short pressing the TIMER button
on the remote.
USB & SD/MMC Card Playback1. Power on the unit, insert a USB or an SD/MMC card into the unit.2. Press MODE button repeatedly to switch to USB or CARD mode. The playback will
start automatically.3. Press the TUNING/SKIP/SEARCH FORWARD button on the remote to skip to the next
track.4. Then press and hold to search through the track forward.5. Press the PLAY/PAUSE button on the remote to play or pause the selected radio
station. 6. Press the TUNING/SKIP/SEARCH BACKWARD button on the remote to skip to the
previous track.7. Then press and hold to search through the track backward.8. Use the numeric buttons to enter the track number to select your desired track for
playback.
8
Eng
lish

9
English
10
Eng
lish
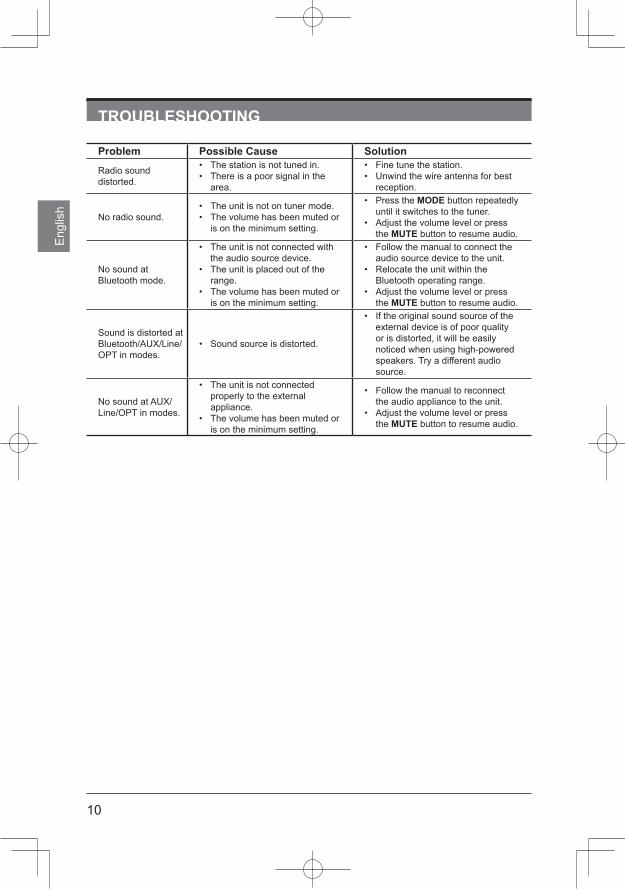
TROUBLESHOOTING
Problem Possible Cause Solution
Radio sound distorted.
• The station is not tuned in.• There is a poor signal in the
area.
• Fine tune the station.• Unwind the wire antenna for best
reception.
No radio sound.• The unit is not on tuner mode.• The volume has been muted or
is on the minimum setting.
• Press the MODE button repeatedly until it switches to the tuner.
• Adjust the volume level or press the MUTE button to resume audio.
No sound at Bluetooth mode.
• The unit is not connected with the audio source device.
• The unit is placed out of the range.
• The volume has been muted or is on the minimum setting.
• Follow the manual to connect the audio source device to the unit.
• Relocate the unit within the Bluetooth operating range.
• Adjust the volume level or press the MUTE button to resume audio.
Sound is distorted at Bluetooth/AUX/Line/OPT in modes.
• Sound source is distorted.
• If the original sound source of the external device is of poor quality or is distorted, it will be easily noticed when using high-powered speakers. Try a different audio source.
No sound at AUX/Line/OPT in modes.
• The unit is not connected properly to the external appliance.
• The volume has been muted or is on the minimum setting.
• Follow the manual to reconnect the audio appliance to the unit.
• Adjust the volume level or press the MUTE button to resume audio.
11
English
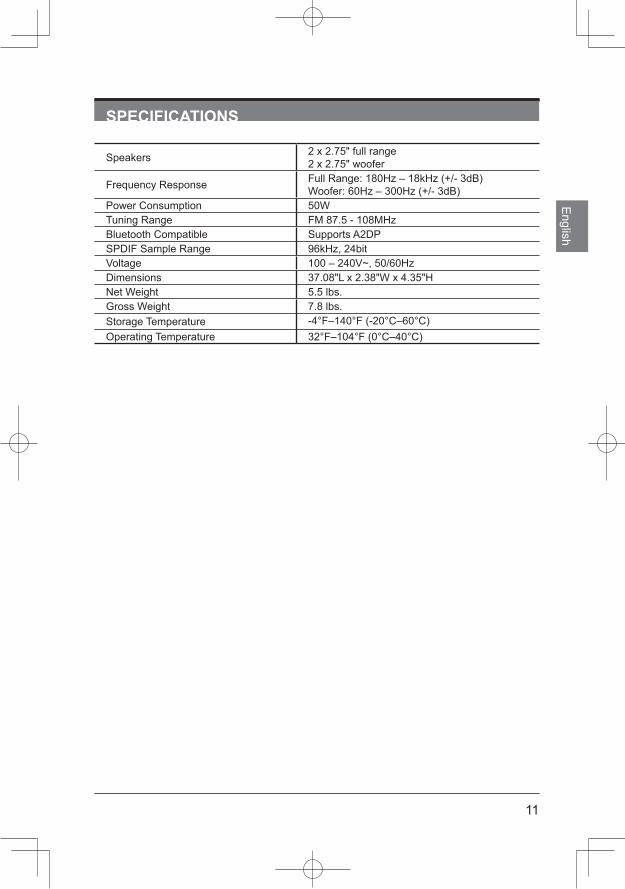
SPECIFICATIONS
Speakers 2x2.75"fullrange2x2.75"woofer
Frequency Response Full Range: 180Hz – 18kHz (+/- 3dB)Woofer: 60Hz – 300Hz (+/- 3dB)
Power Consumption 50WTuning Range FM 87.5 - 108MHzBluetooth Compatible Supports A2DPSPDIF Sample Range 96kHz, 24bitVoltage 100 – 240V~, 50/60HzDimensions 37.08"Lx2.38"Wx4.35"HNet Weight 5.5 lbs.Gross Weight 7.8 lbs.Storage Temperature -4°F–140°F (-20°C–60°C)Operating Temperature 32°F–104°F (0°C–40°C)
12
Eng
lish
THE FCC WANTS YOU TO KNOW
This equipment has been tested and found to comply with the limits for a Class B digital device, pursuant to Part 15 of the FCC Rules. These limits are designed to provide reasonable protection against harmful interference in a residential installation.
This equipment generates, uses and can radiate radio frequency energy and, if not installed or used in accordance with the instructions, it may cause harmful interference to radio communications. However, there is no guarantee that interference will not occur in a particular installation.
If this equipment does cause harmful interference to radio or television reception, which can be determined by turning the equipment off and on, the user is encouraged to try to correct the interference by one or more of the following measures: 1) reorient or relocate the receiving antenna;2)increasetheseparationbetweentheequipmentandthereceiver;3)connecttheequipment toanoutletonacircuitdifferent fromthat towhichthereceiver isconnected;4)consult the dealer or an experienced radio/TV technician for additional suggestions.
Anychangesormodificationsnotexpresslyapprovedbythepartyresponsibleforcompliancecould void the user’s authority to operate the equipment. Where shielded interface cables have beenprovidedwiththeproductorspecifiedadditionalcomponentsoraccessorieselsewheredefinedtobeusedwiththe installationof theproduct, theymustbeusedinordertoensurecompliance with FCC regulation.
13
English
SEIKI DIGITAL INC. AUDIO & VIDEO PRODUCTSThis Product (including any accessories included in the original packaging) as supplied and distributed in new condition, is warranted by SEIKI DIGITAL INC. (SEIKI) to the original consumer purchaser against defects in material and workmanship (“Warranty”) as follows:
1. LABOR: For a period of one (1) year from date of original consumer purchase, if this Product or any part is determined by SEIKI, or a SEIKI authorized service provider, to be defective, SEIKI will repair or replace the Product with new or refurbished product of similar or better quality, at SEIKI’s option, at no charge to the original consumer, or pay the labor charges to any SEIKI authorized service provider. After the one (1) year Warranty period, you must pay for all labor charges.
2. PARTS: For a period of one (1) year from the date of original consumer purchase, SEIKI will supply, at no charge to the original consumer, new, rebuilt or refurbished replacement parts in exchange for defective parts, or will replace the Product with new or refurbished product of similar or better quality, at SEIKI’s option, at no charge to the original consumer. After the one (1) year Warranty period, you must pay for the costs of all parts.
3. SHIPPING COSTS: Notwithstanding the foregoing, the original consumer is responsible for any shipping charges incurred to ship the Product or part(s) to SEIKI or to an SEIKI authorized customer service provider, for diagnosis, repair or replacement.
To obtain Warranty Service and Troubleshooting information, call our toll free customer service line at:
1‐855‐MY‐SEIKI (1‐855‐697‐3454)Please have your model and serial number available along with your date of purchase.
You can also visit us online and REGISTER your SEIKI product at:
seiki.comTo receive Warranty service, the original consumer purchaser must contact SEIKI for problem determination and service procedures. Proof of purchase in the form of a bill of sale or receipted invoice, evidencing that the Product is within the applicable Warranty period(s), MUST be presented to SEIKI, or an authorized customer service provider, in order to obtain the requested service.
EXCLUSIONS AND LIMITATIONSThis Warranty covers manufacturing defects in materials and workmanship encountered in the normal, non-commercial use of the Product, and does not cover (a) damage or failure caused by or attributable to abuse, misuse, failure to follow instructions, improper installation or maintenance, alteration, accident or excess voltage or current; (b) improper or incorrectly performed repairs by non-authorized service facilities; (c) onsite consumer instruction or adjustments; (d) transportation, shipping, delivery, insurance, installation or set-up costs; (e) costs of product removal, transportation or reinstallation costs; (f) ordinary wear and tear, cosmetic damage or damage due to acts of nature, accident; (g) commercial use of the Product; (h) modification of, or to any part of the Product. In addition, this Warranty does not cover images “burnt” into the screen. This Warranty applies to the original consumer only and does not cover products sold AS IS or WITH ALL FAULTS, or consumables (e.g., fuses, batteries, bulbs, etc.), and the Warranty is invalid if the factory-applied serial number has been altered or removed from the Product. This Warranty is valid only in the United States and Canada, and only applies to products purchased and serviced in the United States and Canada. All replaced parts and products, and products on which a refund is made, become the property of the Warrantor. NO WARRANTIES, WHETHER EXPRESS OR IMPLIED, INCLUDING, BUT NOT LIMITED TO, ANY IMPLIED WARRANTIES OF MERCHANTABILITY OR FITNESS FOR A PARTICULAR PURPOSE, OTHER THAN THOSE EXPRESSLY DESCRIBED ABOVE, SHALL APPLY. THE WARRANTOR FURTHER DISCLAIMS ALL WARRANTIES AFTER THE EXPRESS WARRANTY PERIOD STATED ABOVE. NO OTHER EXPRESS WARRANTY OR GUARANTY GIVEN BY ANY PERSON, FIRM OR ENTITY WITH RESPECT TO THE PRODUCT SHALL BE BINDING ON THE WARRANTOR. REPAIR, REPLACEMENT OR REFUND OF THE ORIGINAL PURCHASE PRICE − AT THE WARRANTOR’S SOLE DISCRETION − ARE THE EXCLUSIVE REMEDIES OF THE CONSUMER. THE WARRANTOR SHALL NOT BE LIABLE FOR ANY INCIDENTAL OR CONSEQUENTIAL DAMAGES CAUSED BY THE USE, MISUSE OR INABILITY TO USE THE PRODUCT. NOTWITHSTANDING THE FOREGOING, CONSUMER’S RECOVERY SHALL NOT EXCEED THE PURCHASE PRICE OF THE PRODUCT SOLD BY SEIKI. THIS WARRANTY SHALL NOT EXTEND TO ANYONE OTHER THAN THE ORIGINAL CONSUMER WHO PURCHASED THE PRODUCT AND IS NOT TRANSFERABLE.
Some states do not allow the exclusion or limitation of incidental or consequential damages, or allow limitations on warranties, so the above limitations or exclusions may not apply to you. This Warranty gives you specific rights, and you may have other rights, which vary from state to state. SEIKI DIGITAL INC.c/o SEIKI Digital Customer Service6880 Commerce Blvd., Canton, MI 48187 [email protected]
DO NOT SHIP PRODUCT TO THIS ADDRESS.PLEASE CONTACT CUSTOMER SERVICE TO CONFIRM SHIPPING ADDRESSES FOR SERVICE.
SEIKI.com
© 2013 Seiki Digital Inc. All rights reserved. Printed in China