Embed Size (px)
Citation preview

© 2008 Wolseley 1126 04/08
Installation Instructions
HET Toilet Bowl and Tank with 1.28 Gallons per Flush
Remove Old Toilet1. Shut off water supply line to toilet. Flush toilet
and remove all water from the bowl and tank.Use a sponge to absorb the water.
2. Disconnect the water supply from the tank.3. Remove tank from bowl, use screwdriver and
adjustable wrench or socket wrench. Loosentoilet bowl flange nuts under caps.
4. Remove old bowl by carefully lifting it off thefloor. Clean flange and plug drain with a rag toprevent sewer gas from escaping.
Install New Toilet
1. If new installation, install a toilet flange intowaste line per flange instructions. Make sureyou have the correct rough in toilet.
2. Remove the rag from the drain. Install theflange bolts into the flange.
3. Turn the bowl upside down and place it on theflattened carton box to prevent damage.
4. Install a wax ring evenly around the bowlflange, (horn).
5. Gently lower the bowl onto the flange makingsure the flange bolts protrude through the toiletbolt openings.
6. Apply pressure evenly and rock the bowl fromside-to-side and front-to-back until it is firmlyon the floor.
7. Install the washers, nuts, and caps on theflange bolts snug. Be careful not to over tightenbecause the china may break.
8. Install the tank-to-bowl-gasket, tank bolts withwasher if it is not already installed, and placetank on bowl.
9. Snug and level the tank nuts using a socketwrench and holding the truss head screw
.revirdwercs a htiw knat eht edisni ylmrif10. Connect the water supply to the ballcock. Only
hand tighten the supply line. DO NOT USECHANNEL LOCKS.
11. Turn on water, flush, and check for leaks.Adjust ballcock to proper water line height asnoted on the flush valve tube.
AdjustmentsWater level adjustment:Rotating adjustable rodwill adjust the height offloat cup and changewater level.
A
Flange Bolts
Flange
Wax RingSealant
Nut
Washer
BoltRubberGasket
Filter
Adjustable rod
Mould 2001float cup
Fill valve body
TrianglegasketRubberseal
Plastic seal
Hexagonalseal
DIFFICULTIES REASON SOLUTION
Water level is too high or too low
Fill valveadjustedincorrectly
Adjust waterlevel
Fill valve can’t fill
Shut-off valvenot fully open
Openshut-off valve
Filter clogged Remove andclean filter
Float cup isstuck by tankwall
Free fill valvefrom tank wall
Leaking Hexagonal nut isloose
Tightenhexagonal nut
Tools NeededG I
JA B
C
D
E
FH
K
L
A. Screwdriver B. WrenchC. Tape MeasureD. LevelE. DrillF. Flange
G. Wax SealH. MarkerI. PlugsJ. ScrewsK. Flexible Supply LineL. Gasket Adapter
Distributed Exclusively by Ferguson, Stock Building Supply and Wolseley Canada

© 2008 Wolseley 1126 04/08
Installation Instructions
HET Toilet Bowl and Tank with 1.28 Gallons per Flush
WarrantyWHAT IS COVERED?Ferguson Enterprises, Inc. “Ferguson” or the“Company” warrants its products to be free fromdefects in material and workmanship under normaluse and service FOR A PERIOD OF ONE (1) YEARFROM THE DATE OF INSTALLATION.
WHAT IS NOT COVERED?The warranty set forth in paragraph 1 does not coverinstallation or any other labor charges and does notapply to products which have been damaged as aresult of any accident, abuse, improper installation ormaintenance, or modification of original plumbingproduct. The warranty of such products is limited tothe warranty extended to Ferguson by the productmanufacturer. Finally, FERGUSON SHALL NOT BERESPONSIBLE OR LIABLE FOR ANY FAILURE ORDAMAGE TO THIS PRODUCT OR ANY COMPONENTTHEREOF CAUSED BY THE USE OF ABRASIVECLEANERS.
HOW TO OBTAIN WARRANTY SERVICEThe purchaser should contact their local Fergusonlocation, installing contractor or builder from whomthe product was purchased or upon written requestaddressed to Ferguson Enterprises, Inc., 12500Jefferson Avenue, Newport News, VA 23602,Attention Consumer Affairs. Any shipping charges,associated with warranty service, must be prepared
by the consumer. In all cases, proof of purchase willbe required. Call PROFLO customer service at 800-221-3379 for customer service, defective issuesand technical inquiries.LIMITATIONS OF IMPLIED WARRANTY ANDDISCLAIMER OF CONSEQUENTIAL OR INCIDENTALDAMAGES FERGUSON DISCLAIMS ANY LIABILITYFOR CONSEQUENTIAL OR INCIDENTAL DAMAGESAND DISCLAIMS ALL EXPRESS OR IMPLIEDWARRANTIES, INCLUDING THOSE OFMERCHANTABILITY AND FITNESS FOR APARTICULAR PURPOSE, AS SET FORTH ABOVE.IMPLIED WARRANTIES OF THE PRODUCTS ANDPRODUCT COMPONENTS SET FORTH INPARAGRAPH 1 ABOVE ARE LIMITED TO THEDURATIONS OF THE RESPECTIVE WARRANTY. Somestates do not allow the exclusion or limitation ofincidental or consequential damages or limitations onhow long an implied warranty lasts, so the abovelimitations may not apply to you. This warranty givesyou specific legal rights and you may also have otherrights, which vary from state to state.
Care & Maintenance• DO NOT use abrasive powered or liquid
cleaners which can damage the productsurface.
• Over tightening of lock nut or coupling nutcould result in breakage and flooding.
• DO NOT use cone washer with plastic supply line.
• DO NOT use pipe dope or other silicon basedmaterials to tighten supply coupling nut.
Problem SolvingPROBLEM CAUSE SOLUTION
Fill valve can’t fill 1. Fill switch is closed.2. Drain guard gets stuck.3. Float cup is crushed by tank
wall.
1. Turn on fill switch.2. Clean drain guard.3. Adjust direction of fill valve.
Leakage 1. Fit incorrectly.2. Flush valve does not fit flush
valve body.3. Flush valve body gets stuck.4. Incorrect operation.
1. Fit again according to correctinstallation procedure.
2. Fit again.3. Unpick and wash float body.4. Refill tube should be higher than
water level.
Can’t flush or flush little Steel wire is twisted or pulled too much.
Adjust flush valve body.
Half flush water level is too high or too low
Adust water level incorrectly. Adjust water level.
CAUTIONProduct is fragile. To avoid breakage andpossible injury handle with care!
WARNINGDO NOT USE IN-TANK TOILET BOWL CLEANERS CONTAININGBLEACH OR CHLORINE!
1. Result in damage to tank components andmay cause flooding and property damage.
2. Void PROFLO Fixtures Limited Warranty.
Distributed Exclusively by Ferguson, Stock Building Supply and Wolseley Canada
© 2008 Wolseley 1126 04/08
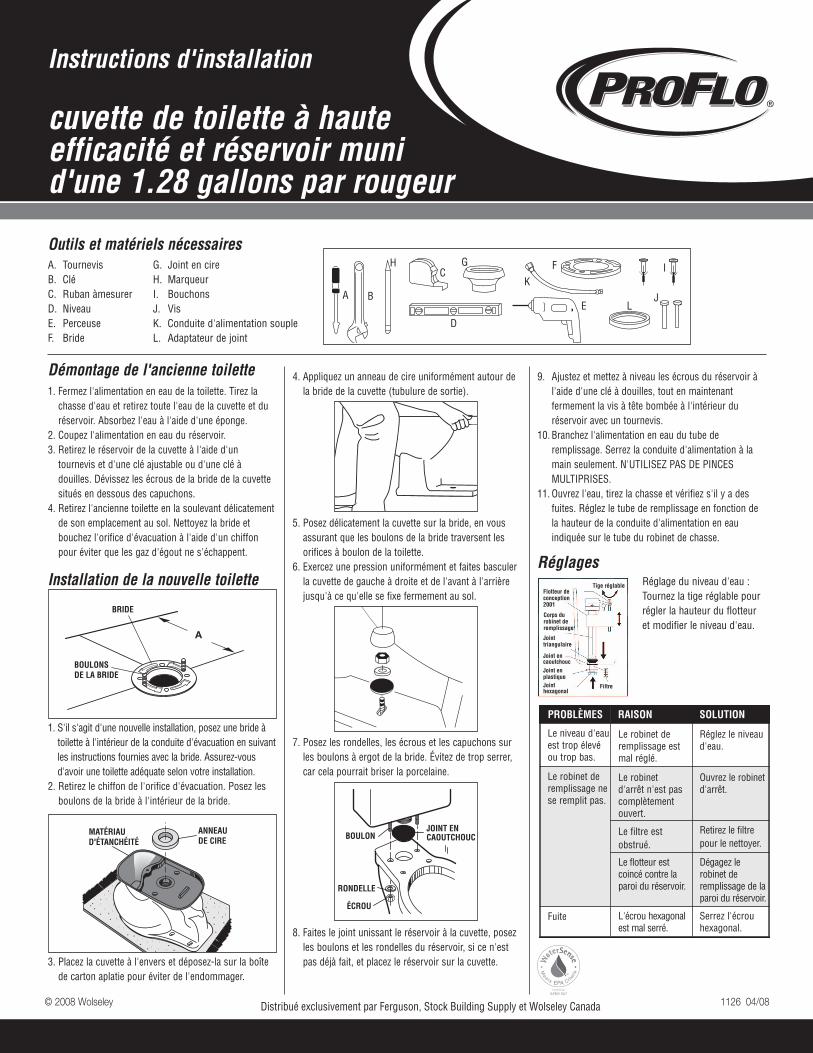
Instructions d'installation
cuvette de toilette à haute efficacité et réservoir muni d'une 1.28 gallons par rougeur
Démontage de l'ancienne toilette1. Fermez l'alimentation en eau de la toilette. Tirez la
chasse d'eau et retirez toute l'eau de la cuvette et duréservoir. Absorbez l'eau à l'aide d'une éponge.
2. Coupez l'alimentation en eau du réservoir.3. Retirez le réservoir de la cuvette à l'aide d'un
tournevis et d'une clé ajustable ou d'une clé àdouilles. Dévissez les écrous de la bride de la cuvettesitués en dessous des capuchons.
4. Retirez l'ancienne toilette en la soulevant délicatementde son emplacement au sol. Nettoyez la bride etbouchez l'orifice d'évacuation à l'aide d'un chiffonpour éviter que les gaz d'égout ne s'échappent.
Installation de la nouvelle toilette
1. S'il s'agit d'une nouvelle installation, posez une bride àtoilette à l'intérieur de la conduite d'évacuation en suivantles instructions fournies avec la bride. Assurez-vousd'avoir une toilette adéquate selon votre installation.
2. Retirez le chiffon de l'orifice d'évacuation. Posez lesboulons de la bride à l'intérieur de la bride.
3. Placez la cuvette à l'envers et déposez-la sur la boîtede carton aplatie pour éviter de l'endommager.
4. Appliquez un anneau de cire uniformément autour dela bride de la cuvette (tubulure de sortie).
5. Posez délicatement la cuvette sur la bride, en vousassurant que les boulons de la bride traversent lesorifices à boulon de la toilette.
6. Exercez une pression uniformément et faites basculerla cuvette de gauche à droite et de l'avant à l'arrièrejusqu'à ce qu'elle se fixe fermement au sol.
7. Posez les rondelles, les écrous et les capuchons surles boulons à ergot de la bride. Évitez de trop serrer,car cela pourrait briser la porcelaine.
8. Faites le joint unissant le réservoir à la cuvette, posezles boulons et les rondelles du réservoir, si ce n'estpas déjà fait, et placez le réservoir sur la cuvette.
9. Ajustez et mettez à niveau les écrous du réservoir àl'aide d'une clé à douilles, tout en maintenantfermement la vis à tête bombée à l'intérieur duréservoir avec un tournevis.
10. Branchez l'alimentation en eau du tube deremplissage. Serrez la conduite d'alimentation à lamain seulement. N'UTILISEZ PAS DE PINCESMULTIPRISES.
11. Ouvrez l'eau, tirez la chasse et vérifiez s'il y a desfuites. Réglez le tube de remplissage en fonction dela hauteur de la conduite d'alimentation en eauindiquée sur le tube du robinet de chasse.
RéglagesRéglage du niveau d'eau :Tournez la tige réglable pourrégler la hauteur du flotteuret modifier le niveau d'eau.
A
BOULONSDE LA BRIDE
BRIDE
ANNEAUDE CIRE
MATÉRIAUD'ÉTANCHÉITÉ
ÉCROU
RONDELLE
BOULONJOINT ENCAOUTCHOUC
Filtre
Tige réglableFlotteur deconception2001
Corps durobinet deremplissage
Jointtriangulaire
Joint encaoutchoucJoint enplastiqueJointhexagonal
PROBLÈMES RAISON SOLUTION
Le niveau d'eauest trop élevéou trop bas.
Le robinet deremplissage estmal réglé.
Réglez le niveaud'eau.
Le robinet deremplissage nese remplit pas.
Le robinetd'arrêt n'est pascomplètementouvert.
Ouvrez le robinetd'arrêt.
Le filtre estobstrué.
Retirez le filtrepour le nettoyer.
Le flotteur estcoincé contre laparoi du réservoir.
Dégagez lerobinet deremplissage de laparoi du réservoir.
Fuite L'écrou hexagonalest mal serré.
Serrez l'écrouhexagonal.
Outils et matériels nécessairesG I
JA B
C
D
E
FH
K
L
A. Tournevis B. CléC. Ruban àmesurerD. NiveauE. PerceuseF. Bride
G. Joint en cireH. MarqueurI. BouchonsJ. VisK. Conduite d'alimentation soupleL. Adaptateur de joint
Distribué exclusivement par Ferguson, Stock Building Supply et Wolseley Canada
© 2008 Wolseley 1126 04/08
Instructions d'installation
cuvette de toilette à haute efficacité et réservoir muni d'une 1.28 gallons par rougeur
Garantie
ÉLÉMENTS COUVERTS PAR LA GARANTIEFerguson Enterprises, Inc. (« Ferguson » ou «l'entreprise ») garantit ses produits contre les défauts dematériaux et les vices de fabrication dans des conditionsd'utilisation et d'entretien normales POUR UNE DURÉED'UN (1) AN À PARTIR DE LA DATE D'INSTALLATION.
ÉLÉMENTS NON COUVERTS PAR LA GARANTIELa garantie exposée au paragraphe 1 ne couvre pas lesfrais d'installation ou de main d'œuvre et ne s'appliquepas aux produits endommagés à la suite d'un accident,d'une utilisation abusive, d'une installation ou d'unentretien inapproprié ou d'une modification du produit deplomberie original. La garantie de ce produit se limite à lagarantie offerte à Ferguson par le fabricant du produit.Enfin, FERGUSON NE PEUT ÊTRE TENU RESPONSABLEDES BRIS OU DES DOMMAGES DE CE PRODUIT OU DETOUTES PIÈCES DE CE PRODUIT CAUSÉS PARL'UTILISATION DE NETTOYANTS ABRASIFS.
POUR OBTENIR LE SERVICE DE GARANTIEL'acheteur doit communiquer avec la succursale Fergusonde sa région, l'entrepreneur qui a effectué l'installation oule constructeur qui a vendu le produit, ou il peut faireparvenir une demande écrite à Ferguson Enterprises, Inc.,12500, Jefferson Avenue, Newport News, VA 23602,États-Unis, à l'attention de : Consumer Affairs. Tous les
frais d'expédition, liés au service de garantie, doivent êtrepris en charge par le consommateur. Dans toutes lessituations, une preuve d'achat est requise. Communiquezavec le service à la clientèle de PROFLO au 1 800 221-3379 pour le service à la clientèle, les défauts defabrication et les questions techniques.RESTRICTIONS DE LA GARANTIE IMPLICITE ETEXONÉRATION DE RESPONSABILITÉ QUANT AUXDOMMAGES INDIRECTS OU ACCESSOIRES FERGUSONDÉCLINE TOUTE RESPONSABILITÉ POUR LESDOMMAGES INDIRECTS OU ACCESSOIRES ET ANNULETOUTE GARANTIE EXPRESSE OU IMPLICITE, Y COMPRISTOUTE GARANTIE DE QUALITÉ MARCHANDE OUD'ADAPTATION À UN USAGE PARTICULIER, TELQU'ÉNONCÉ PRÉCÉDEMMENT. LES GARANTIESIMPLICITES POUR LE PRODUIT ET LES PIÈCES DUPRODUIT ÉNONCÉES PRÉCÉDEMMENT DANS LEPARAGRAPHE 1 SE LIMITENT À LA DURÉE DE VIE DE LAPRÉSENTE GARANTIE. Certains États ne permettent pas lesclauses sur l'exclusion ou la restriction des dommagesindirects ou accessoires ou des restrictions concernant ladurée d'une garantie implicite. Par conséquent, lesrestrictions susmentionnées peuvent ne pas s'appliquer.Cette garantie vous confère certains droitsreconnus par la loi et il est possible que vousayez d'autres droits qui varient d'un État àl'autre.
Entretien• N'utilisez pas de détergent abrasif en poudre ou en
liquide qui risque d'endommager la surface du produit.• Si les contre-écrous ou les écrous de raccordement
sont trop serrés, cela risque d'endommager l'appareilet d'inonder la pièce.
• N'utilisez pas de rondelles avec la conduited'alimentation en plastique.
• N'utilisez pas de pâte lubrifiante ou d'autre matériauà base de silicium pour serrer les écrous deraccordement de l'alimentation.
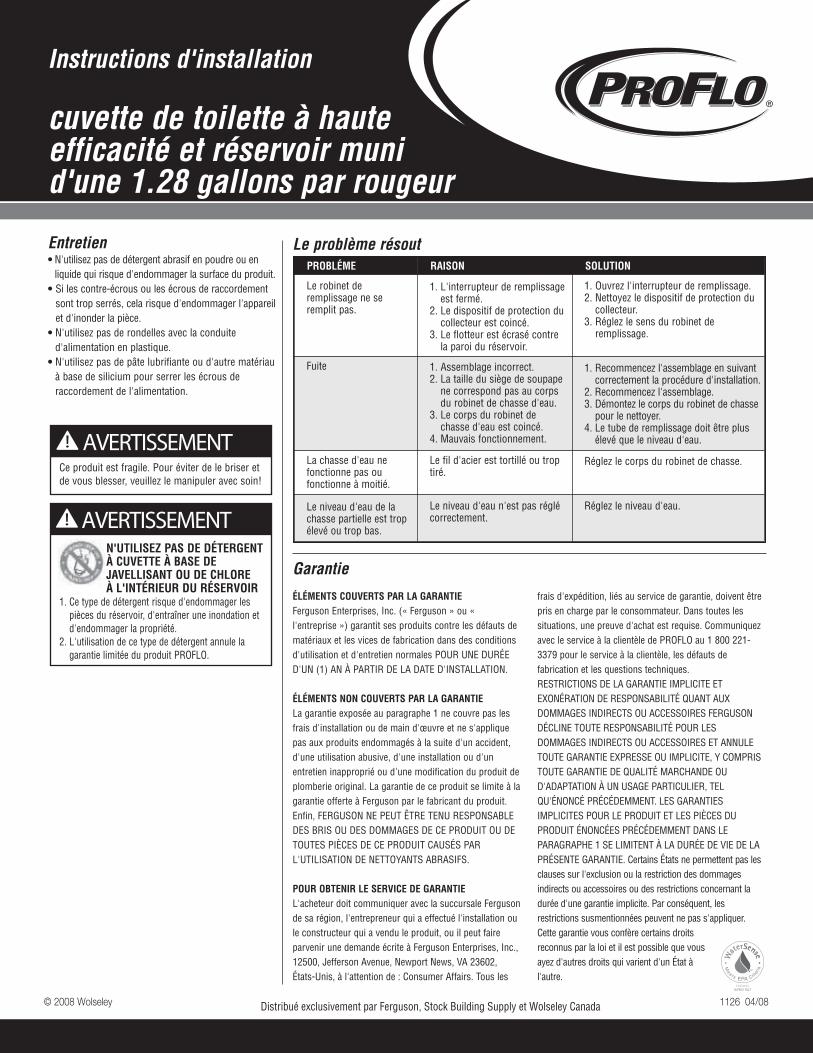
Le problème résoutPROBLÉME RAISON SOLUTION
Le robinet deremplissage ne seremplit pas.
1. L'interrupteur de remplissageest fermé.
2. Le dispositif de protection ducollecteur est coincé.
3. Le flotteur est écrasé contrela paroi du réservoir.
1. Ouvrez l'interrupteur de remplissage.2. Nettoyez le dispositif de protection du
collecteur. 3. Réglez le sens du robinet de
remplissage.
Fuite 1. Assemblage incorrect.2. La taille du siège de soupape
ne correspond pas au corpsdu robinet de chasse d'eau.
3. Le corps du robinet dechasse d'eau est coincé.
4. Mauvais fonctionnement.
1. Recommencez l'assemblage en suivantcorrectement la procédure d'installation.
2. Recommencez l'assemblage. 3. Démontez le corps du robinet de chasse
pour le nettoyer. 4. Le tube de remplissage doit être plus
élevé que le niveau d'eau.
La chasse d'eau nefonctionne pas oufonctionne à moitié.
Le fil d'acier est tortillé ou troptiré.
Réglez le corps du robinet de chasse.
Le niveau d'eau de lachasse partielle est tropélevé ou trop bas.
Le niveau d'eau n'est pas réglécorrectement.
Réglez le niveau d'eau.
AVERTISSEMENTCe produit est fragile. Pour éviter de le briser etde vous blesser, veuillez le manipuler avec soin!
AVERTISSEMENTN'UTILISEZ PAS DE DÉTERGENTÀ CUVETTE À BASE DEJAVELLISANT OU DE CHLOREÀ L'INTÉRIEUR DU RÉSERVOIR
1. Ce type de détergent risque d'endommager lespièces du réservoir, d'entraîner une inondation etd'endommager la propriété.
2. L'utilisation de ce type de détergent annule lagarantie limitée du produit PROFLO.
Distribué exclusivement par Ferguson, Stock Building Supply et Wolseley Canada
© 2008 Wolseley 1126 04/08
Instrucciones de instalación
taza de inodoro de altaeficiencia y cisterna con1.28 galones por rubor
Desinstalación del inodoro viejo1. Cierre la llave de suministro de agua al inodoro. Tire
de la palanca de descarga (vaciado) del inodoro yelimine el resto del agua de la taza y de la cisterna.Use una esponja para absorber el agua.
2. Desconecte el suministro de agua de la cisterna.3. Desinstale la cisterna de la taza, con un destornillador
y una llave ajustable o una llave para tuercas. Aflojelas tuercas de la boca de desagüe del inodoro, lascuales se encuentran bajo las tapas.
4. Desinstale la taza vieja levantándola con cuidado delpiso. Limpie el área de la boca de desagüe y cubradicho agujero con un trapo, para evitar la fuga degases provenientes del agujero.
Instalación del nuevo inodoro
1. Si se trata de una nueva instalación, instale unreborde circular que se ajuste a la tubería de desagüedel inodoro siguiendo las instrucciones de dichoreborde. Asegúrese de que las dimensiones de la bocade desagüe del inodoro son las adecuadas.
2. Quite el trapo con que había cubierto la boca del desagüe.Inserte los pernos correspondientes en el reborde circular.
3. Voltee la taza hacia abajo y colóquela sobre el cartónextendido de la caja de empaque, para evitar daños.
4. Instale un sello de cera de manera uniforme alrededorde la boca (cuerno) de desagüe de la taza.
5. Coloque lentamente la taza en la boca de desagüe,asegurándose de que los pernos de la boca dedesagüe sobresalgan a través de los agujeroscorrespondientes de la taza del inodoro.
6. Presione de manera uniforme y sacuda la taza de unlado a otro y de adelante hacia atrás, hasta que quedefirmemente acoplada al piso.
7. Instale las arandelas, tuercas y tapas en los pernos dela boca de desagüe. Tenga cuidado de no apretardemasiado, a fin de no dañar la superficie de porcelana.
8. Instale la junta hermética (entre cisterna y taza), lospernos de la cisterna con arandelas (en caso de noestar ya instalados) y coloque la cisterna en la taza.
9. Ajuste y nivele las tuercas de la cisterna con una llavede tuercas, manteniendo (con un destornillador) el
.anretsic al ed ortned adnoderrimes azebac ed ollinrot10. Conecte la tubería de suministro de agua a la válvula
del flotador. Apriete dicha tubería solamente con lamano. NO USE PINZAS AJUSTABLES.
11. Abra el suministro de agua, descargue (vacíe) el inodoroy observe si hay fugas de agua. Ajuste la válvula delflotador a la altura correcta de la tubería de agua, segúnse indica en la tubería de la válvula de descarga.
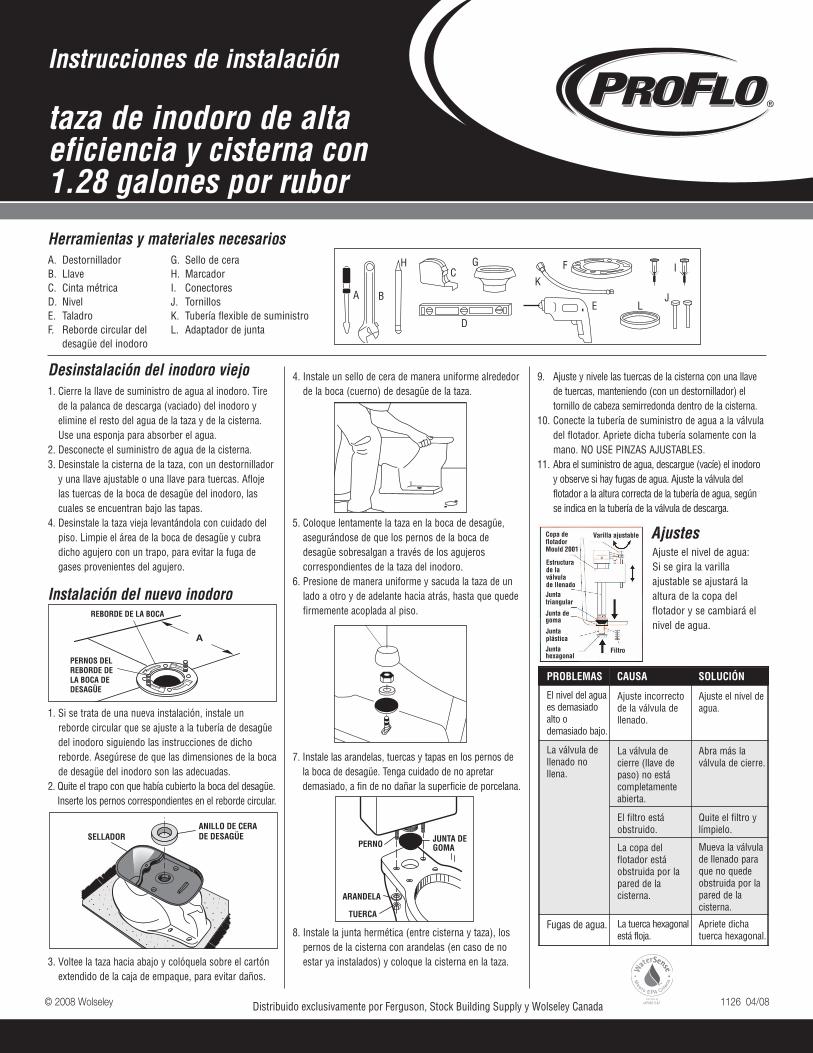
AjustesAjuste el nivel de agua: Si se gira la varillaajustable se ajustará laaltura de la copa delflotador y se cambiará elnivel de agua.
A
PERNOS DELREBORDE DELA BOCA DEDESAGÜE
REBORDE DE LA BOCA
ANILLO DE CERADE DESAGÜESELLADOR
TUERCA
ARANDELA
PERNOJUNTA DEGOMA
Filtro
Varilla ajustableCopa deflotadorMould 2001
Estructurade laválvulade llenadoJuntatriangular
Junta degoma
JuntaplásticaJuntahexagonal
PROBLEMAS CAUSA SOLUCIÓN
El nivel del aguaes demasiadoalto odemasiado bajo.
Ajuste incorrectode la válvula dellenado.
Ajuste el nivel deagua.
La válvula dellenado nollena.
La válvula decierre (llave depaso) no estácompletamenteabierta.
Abra más laválvula de cierre.
El filtro estáobstruido.
Quite el filtro ylímpielo.
La copa delflotador estáobstruida por lapared de lacisterna.
Mueva la válvulade llenado paraque no quedeobstruida por lapared de lacisterna.
Fugas de agua. La tuerca hexagonalestá floja.
Apriete dichatuerca hexagonal.
Herramientas y materiales necesariosG I
JA B
C
D
E
FH
K
L
A. Destornillador B. LlaveC. Cinta métricaD. NivelE. TaladroF. Reborde circular del
desagüe del inodoro
G. Sello de ceraH. MarcadorI. ConectoresJ. TornillosK. Tubería flexible de suministroL. Adaptador de junta
Distribuido exclusivamente por Ferguson, Stock Building Supply y Wolseley Canada

© 2008 Wolseley 1126 04/08
Instrucciones de instalación
taza de inodoro de altaeficiencia y cisterna con1.28 galones por rubor
Garantía¿QUÉ CUBRE LA GARANTÍA?Ferguson Enterprises, Inc. (“Ferguson” o “la compañía”) garantiza
que sus productos están libres de defectos de materiales y mano
de obra, en condiciones normales de uso y mantenimiento,
DURANTE UN PERÍODO DE UN (1) AÑO A PARTIR DE LA FECHA
DE LA INSTALACIÓN DEL PRODUCTO.
¿QUÉ EXCLUYE LA GARANTÍA?La garantía estipulada en el párrafo 1 no cubre la instalación ni
cualquier otro gasto de mano de obra y no es válida para
productos que hayan resultado dañados debido a accidente,
abuso, instalación o mantenimiento inadecuados o la
modificación de los productos originales de plomería. La garantía
de tales productos está limitada a la garantía que haya otorgado
el fabricante del producto a Ferguson. Por último, FERGUSON NO
SE HACE RESPONSABLE DE NINGUNA FALLA O DAÑO AL
PRODUCTO O A CUALQUIERA DE LOS COMPONENTES DEBIDO
AL USO DE LIMPIADORES ABRASIVOS.
CÓMO OBTENER EL SERVICIO TÉCNICO CUBIERTOPOR LA GARANTÍAEl comprador debe ponerse en contacto con su proveedor local
de Ferguson, el contratista de la instalación o el constructor
encargado de la compra del producto, o bien de forma escrita a
Ferguson Enterprises, Inc., 12500 Jefferson Avenue, Newport
News, VA 23602, EE.UU. Attention: Consumer Affairs. Cualquier
gasto de transporte/envío del producto asociado al servicio
técnico cubierto por la garantía deberá ser pagado previamente
por el consumidor. En cualquier caso de solicitud de servicio
técnico se requiere una prueba de compra. El número de atención
telefónica al cliente de PROFLO es 800-221-3379 (tanto para
consultas sobre productos defectuosos, como de tipo técnico).
LÍMITACIONES DE LA GARANTÍA IMPLÍCITA Y EXENCIÓN DE
RESPONSABILIDAD DE DAÑOS CONSECUENCIALES O
INCIDENTALES FERGUSON ESTÁ EXENTA DE CUALQUIER
RESPONSABILIDAD POR DAÑOS CONSECUENCIALES O
INCIDENTALES, ASÍ COMO DE CUALQUIER GARANTÍA
EXPRESA O IMPLÍCITA, INCLUIDAS AQUELLAS RELACIONADAS
CON LA COMERCIALIZACIÓN E IDONEIDAD DEL PRODUCTO
PARA UN FIN DETERMINADO, COMO SE ESTIPULA EN LOS
PÁRRAFOS PREVIOS. LAS GARANTÍAS IMPLÍCITAS DE LOS
PRODUCTOS Y COMPONENTES DEL PRODUCTO ESTIPULADAS
EN EL PÁRRAFO 1 ANTERIOR SE LIMITAN A LA DURACIÓN DE
LA GARANTÍA CORRESPONDIENTE. Algunos estados no
permiten la exclusión o limitación de daños incidentales o
derivados, o bien de limitaciones sobre la duración de una
garantía implícita. Por tanto, puede que las limitaciones
previamente descritas no sean válidas en tal caso. Esta garantía
otorga al comprador del producto derechos
legales específicos y es posible que dicho
comprador tenga otros derechos que varían
de un estado a otro.
Cuidado y Mantenimiento• No use limpiadores abrasivos en polvo o líquidos,
ya que pueden dañar la superficie del producto.• Si se aprieta demasiado la tuerca de bloqueo o de
acoplamiento, es posible que se rompa la superficiedel producto, lo cual podría causar un desbordamientode agua.
• No use una arandela cónica en el caso de tuberíasde plástico.
• No use pegamento para tuberías ni ningún otromaterial a base de silicona para reforzar la tuerca deacoplamiento de suministro.
El problema que resuelvePROBLEMA CAUSA SOLUCIÓN
La válvula de llenadono llena.
1. El regulador de la válvula dellenado está cerrado.
2. El tapón del desagüe sequeda atascado.
3. La copa del flotador estáobstruida por la pared dela cisterna.
1. Abra el regulador de la válvula dellenado.
2. Limpie el tapón del desagüe3. Ajuste la orientación de la válvula de
llenado.
Fugas de agua 1. Los accesorios estánacoplados incorrectamente.
2. El asiento de la válvula dedescarga no se ajusta a laforma de dicha válvula.
3. La válvula de descarga sequeda atascada.
4. Funcionamiento incorrecto.
1. Vuelva a ajustarla de acuerdo alprocedimiento de instalación correcto.
2. Vuelva a ajustarla. 3. Desinstale y lave la estructura de la
válvula de descarga. 4. La tubería de llenado debe quedar por
encima del nivel del agua.
No es posible descargar(vaciar) el inodoro o sedescarga poco.
El alambre de acero está torcidoo se ha estirado demasiado.
Ajuste la estructura de la válvula dedescarga.
El nivel de descarga a lamitad es demasiado altoo demasiado bajo.
El nivel del agua está ajustadoincorrectamente.
Ajuste el nivel de agua.
PRECAUCIÓNEl producto es frágil. Para evitar que se rompa oevitar lesiones personales, manipule el productocon cuidado.
ADVERTENCIANO USE EN LA CISTERNA DELINODORO LIMPIADORES PARALA TAZA QUE CONTENGANBLANQUEADORES O CLORO
1. Esto podría dañar los componentes de la cisternay causar un desbordamiento de agua y daños a lapropiedad.
2. Esto podría anular la Garantía Limitada de losaccesorios de productos PROFLO.
Distribuido exclusivamente por Ferguson, Stock Building Supply y Wolseley Canada