Embed Size (px)
Citation preview
10/11/2016
1
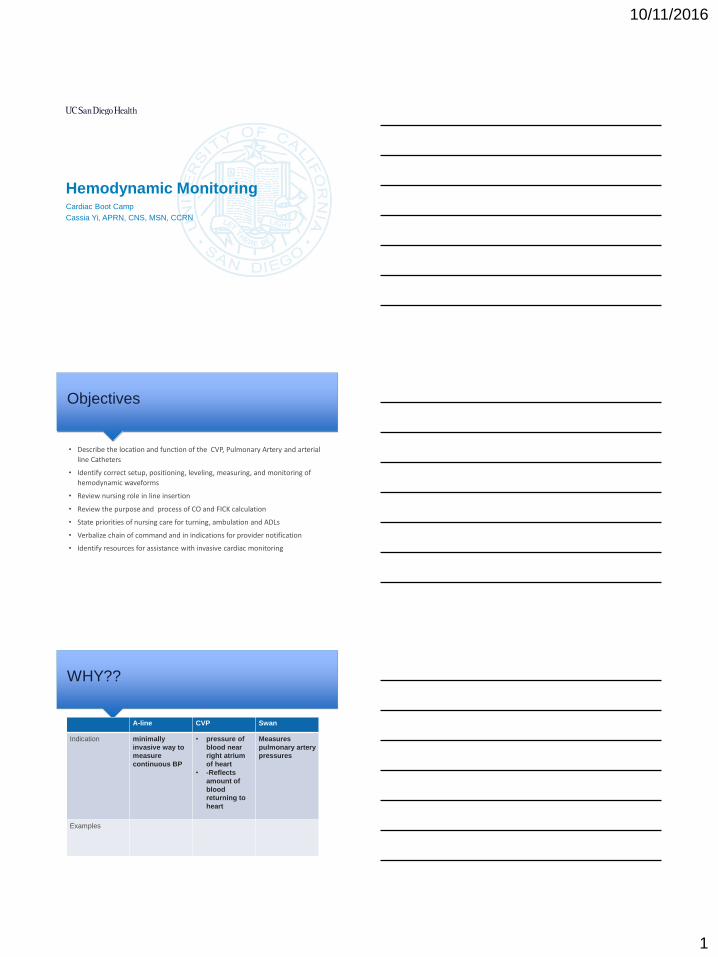
Hemodynamic Monitoring Cardiac Boot Camp
Cassia Yi, APRN, CNS, MSN, CCRN
Objectives
• Describe the location and function of the CVP, Pulmonary Artery and arterial
line Catheters
• Identify correct setup, positioning, leveling, measuring, and monitoring of
hemodynamic waveforms
• Review nursing role in line insertion
• Review the purpose and process of CO and FICK calculation
• State priorities of nursing care for turning, ambulation and ADLs
• Verbalize chain of command and in indications for provider notification
• Identify resources for assistance with invasive cardiac monitoring
WHY??
3
A-line CVP Swan
Indication minimally
invasive way to
measure
continuous BP
• pressure of
blood near
right atrium
of heart
• -Reflects
amount of
blood
returning to
heart
Measures
pulmonary artery
pressures
Examples
10/11/2016
2
Hemodynamics Quick Reference Sheet Last revised: 5/2016, KL, CY
Definition Normal range Elevated Depressed Significance
Central Venous Pressure
(CVP)
Reflects the amount of blood
returning to the RA and the
ability of the heart to pump the
blood into the arterial system.
2-6 mmHg Overhydration, HF, PA stenosis, Renal
failure, Pulm HTN, vasoconstriction,
Increased intrathoracic pressure
(PEEP)
Hypovolemic or septic shock,
third spacing, hyperthermia
Indicates right ventricular function
and systemic fluid status. Does not
measure volume but often used to
estimate preload
Pulmonary Artery Systolic
Pressure (PAS)
Represents rapid blood flow
from RV into PA. Occurs with
opening of pulmonic valve
15-30 mmHg Hypoxemia, Pulm HTN, LV
dysfunction
Hypovolemia Indicates fluid status and
pulmonary disorders
Pulmonary Artery Diastolic
Pressure (PAD)
Represents passive blood flow
from the RV into PA. Occurs
with closure of Pulmonic valve
5-15 mmHg PE, Tachycardia, Pulm HTN Hypovolemia Indicates fluid status and
pulmonary disorders. Mean PA
pressure should be between 7-16
mmHg
Pulmonary Artery Wedge
Pressure (PAWP, PCWP, PWP,
wedge)
Reflects left atrial and left
ventricular pressures.
4-12 mmHg Left sided heart failure, mitral stenosis,
pericardial tamponade
Reduced circulatory blood
volume
Changes in wedge reflect changes
in left ventricular filling pressures
Pulmonary Vascular
Resistance (PVR)
Amount of resistance offered by
the lungs to the RV. The
vascular resistance of
pulmonary circulation
50-250 dynes/sec/cm5 CHF, pulm HTN, pulm edema, ARDS,
hypoxia, PE, vasoconstrictors
vasodilators Indicator of constriction of
pulmonary blood vessels. Can be a
factor in dx of lung disorders
Stroke Volume (SV) The amount of blood ejected
from the ventricle with each
contraction
60-100 ml/beat Bradycardia, positive inotropes,
decreased afterload
Tachycardia, increased
afterload, arrhythmias,
decreased contractility
Measures effectiveness of each
contraction
Cardiac Output (CO) The volume of blood ejected
from the heart with each
contraction per minute
4-8 L/min Hypoxia, positive inotropes, early
septic shock
Hypovolemia, cardiogenic
shock, late septic shock,
hypoperfusion, arrhythmias,
severe metabolic acidosis
Indicates ability of heart to
effectively circulate blood
throughout the body
Cardiac Index (CI) CO based on BSA 2.5-5.0 L/min/m2
*Typically kept above 2.2
in CVC ICU pts
Same as CO Same as CO Same as CO
Systemic Vascular Resistance
(SVR)
SVR=Afterload. The resistance
the LV must overcome to pump
blood through the systemic
circulation
800-1200 dynes/sec/cm5 Hypoperfusion, Hypovolemia,
Hypothermia, vasopressors, LV failure,
cardiogenic shock
Sepsis, anaphylaxis,
hyperthermia, vasodilators
Indicates dilation or constriction of
systemic blood vessels to allow for
proper treatment of BP
Mean Arterial Pressure (MAP) Average arterial blood pressure
during a single cardiac cycle.
Considered to be the perfusion
pressure seen by organs in the
body
70-110 mmHg
*Typical drip parameters
in post-op CVC ICU pts
will be 65-85 but check
your orders to be sure
Exact causes unknown but associated
with factors such as: obesity, smoking,
race, gender, pulm HTN, stress,
anxiety, renal disorders, hypoxemia,
thyroid disorders
Hemorrhage,
Drugs/medication, shock,
stress, hypovolemia, acute
tamponade
A minimum of 60 mmHg is
necessary to perfuse the brain,
kidneys and coronary arteries
Mixed Venous Oxygen
Saturation (SVO2)
End result of both oxygen
delivery and consumption at the
tissue level. Determined by
SaO2, CO, Hgb, and O2
consumption. Drawn from PAD
port
60-80% Hypothermia, anesthesia,
pharmacologic paralysis, sepsis,
alkalosis, cirrhosis of liver
Hyperthermia, anemia,
hemorrhage, late sepsis,
acidosis, hypoxia,
shock,arrhythmias, pain,
shivering, seizures,
restlessness, agitation
Helps determine how much O2 the
body is utilizing. If body is
consuming large quantities of O2 a
higher fiO2 may be required even
with an adequate SaO2
5
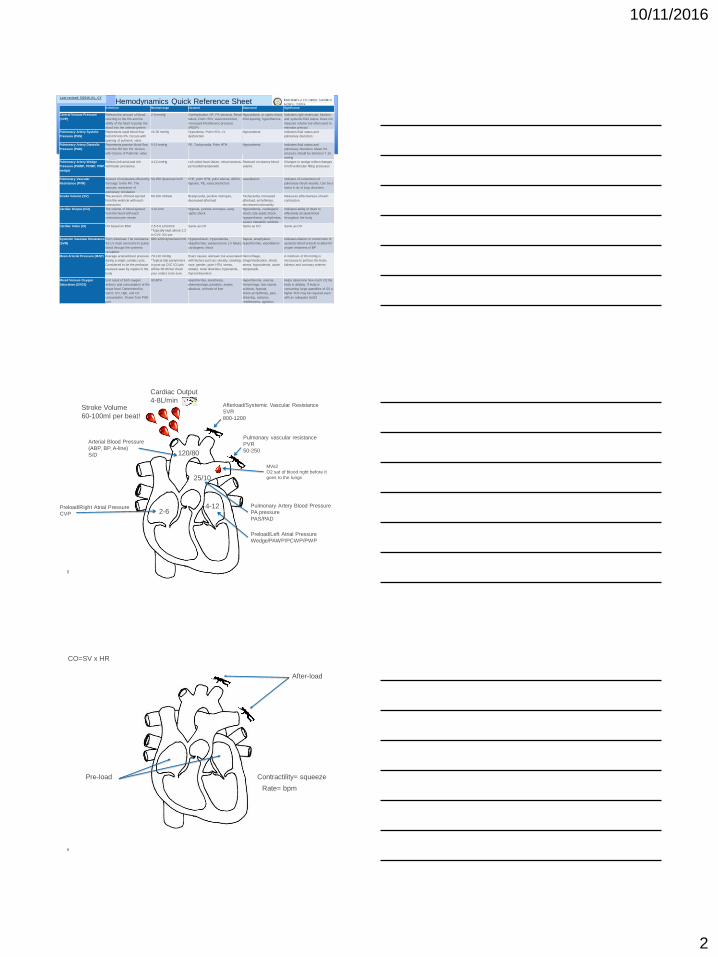
Pulmonary Artery Blood Pressure
PA pressure
PAS/PAD
Preload/Left Atrial Pressure
Wedge/PAWP/PCWP/PWP
Arterial Blood Pressure
(ABP, BP, A-line)
S/D
Preload/Right Atrial Pressure
CVP
Afterload/Systemic Vascular Resistance
SVR
800-1200
2-6 4-12
120/80
25/10
Pulmonary vascular resistance
PVR
50-250
Stroke Volume
60-100ml per beat!
Cardiac Output
4-8L/min
MVo2
O2 sat of blood right before it
goes to the lungs
6
Pre-load
After-load
Rate= bpm
Contractility= squeeze
CO=SV x HR
10/11/2016
3
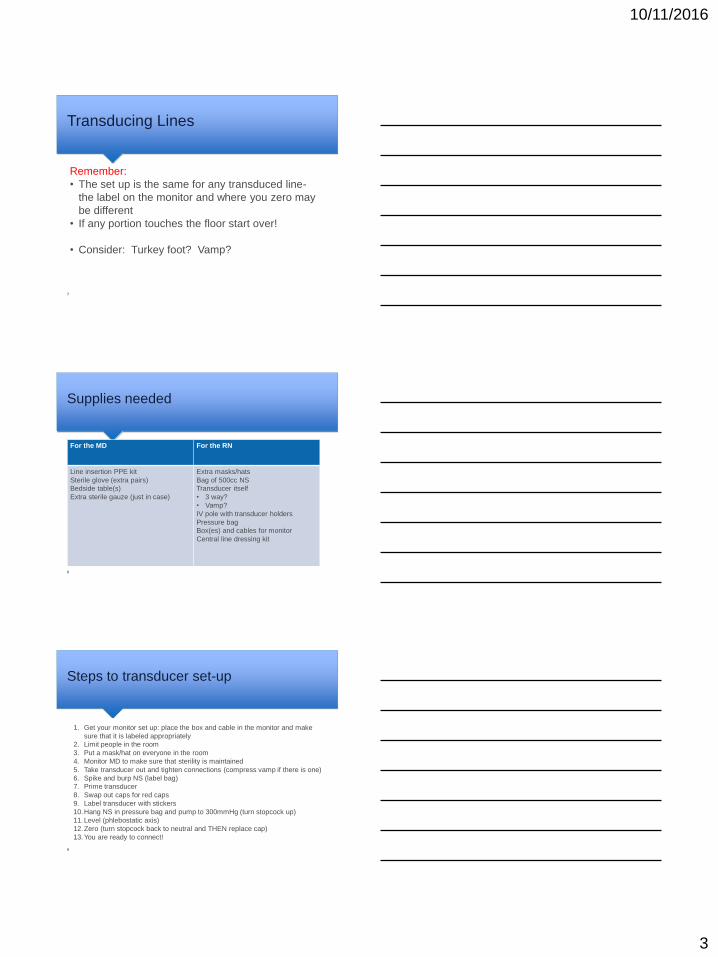
Transducing Lines
7
Remember:
• The set up is the same for any transduced line-
the label on the monitor and where you zero may
be different
• If any portion touches the floor start over!
• Consider: Turkey foot? Vamp?
Supplies needed
8
For the MD For the RN
Line insertion PPE kit
Sterile glove (extra pairs)
Bedside table(s)
Extra sterile gauze (just in case)
Extra masks/hats
Bag of 500cc NS
Transducer itself
• 3 way?
• Vamp?
IV pole with transducer holders
Pressure bag
Box(es) and cables for monitor
Central line dressing kit
Steps to transducer set-up
9
1. Get your monitor set up: place the box and cable in the monitor and make
sure that it is labeled appropriately
2. Limit people in the room
3. Put a mask/hat on everyone in the room
4. Monitor MD to make sure that sterility is maintained
5. Take transducer out and tighten connections (compress vamp if there is one)
6. Spike and burp NS (label bag)
7. Prime transducer
8. Swap out caps for red caps
9. Label transducer with stickers
10.Hang NS in pressure bag and pump to 300mmHg (turn stopcock up)
11.Level (phlebostatic axis)
12.Zero (turn stopcock back to neutral and THEN replace cap)
13.You are ready to connect!
10/11/2016
4
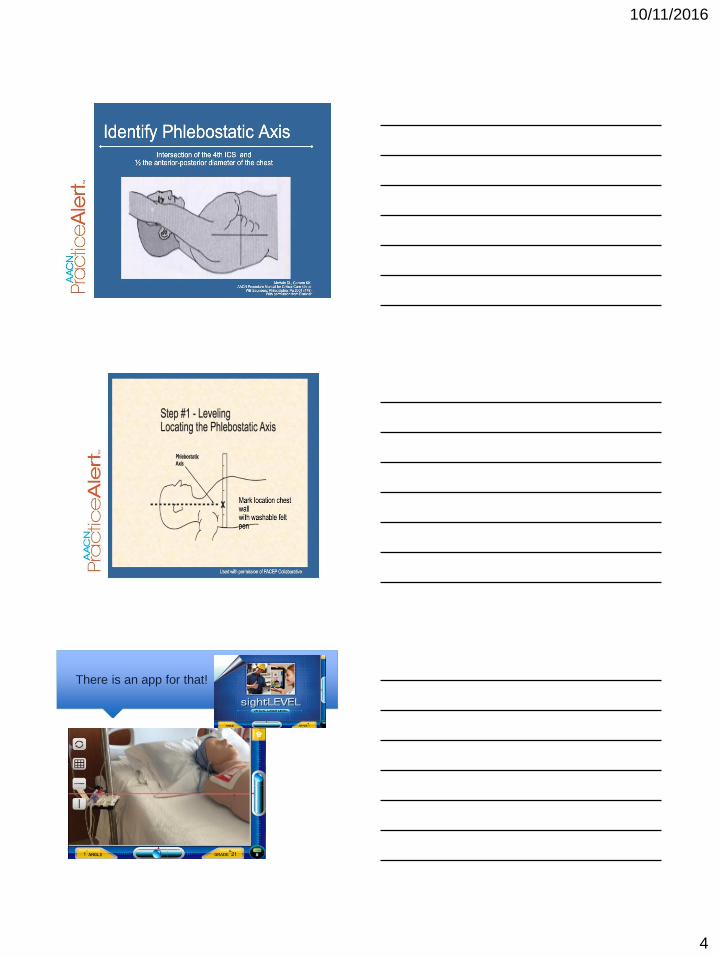
There is an app for that!
12
10/11/2016
5
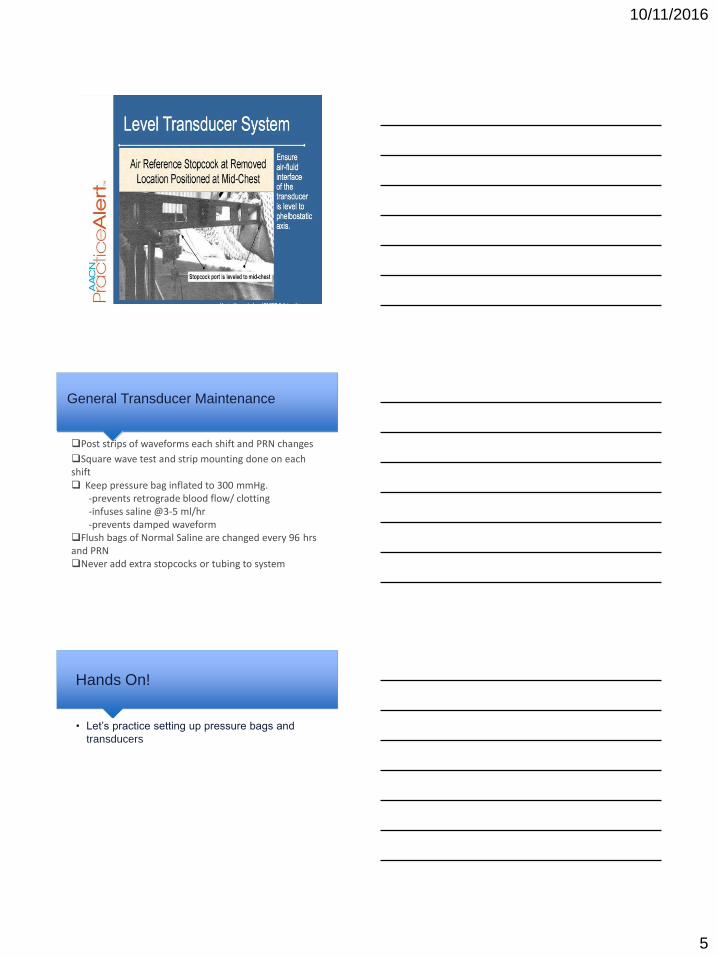
General Transducer Maintenance
Post strips of waveforms each shift and PRN changes
Square wave test and strip mounting done on each shift Keep pressure bag inflated to 300 mmHg. -prevents retrograde blood flow/ clotting -infuses saline @3-5 ml/hr -prevents damped waveform Flush bags of Normal Saline are changed every 96 hrs and PRN Never add extra stopcocks or tubing to system
Hands On!
• Let’s practice setting up pressure bags and
transducers
10/11/2016
6
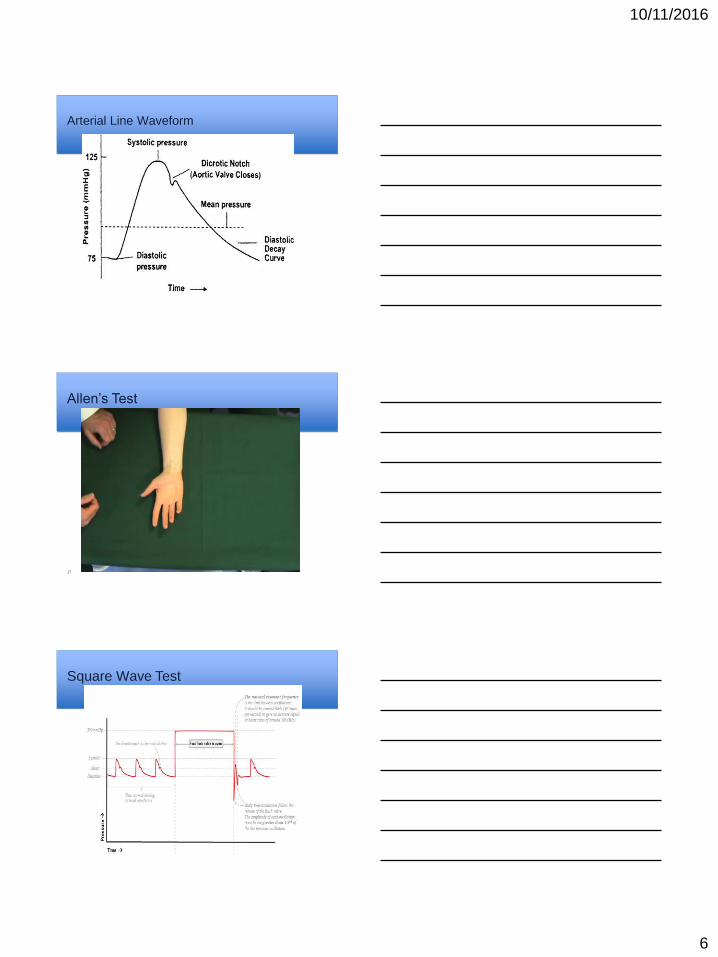
Arterial Line Waveform
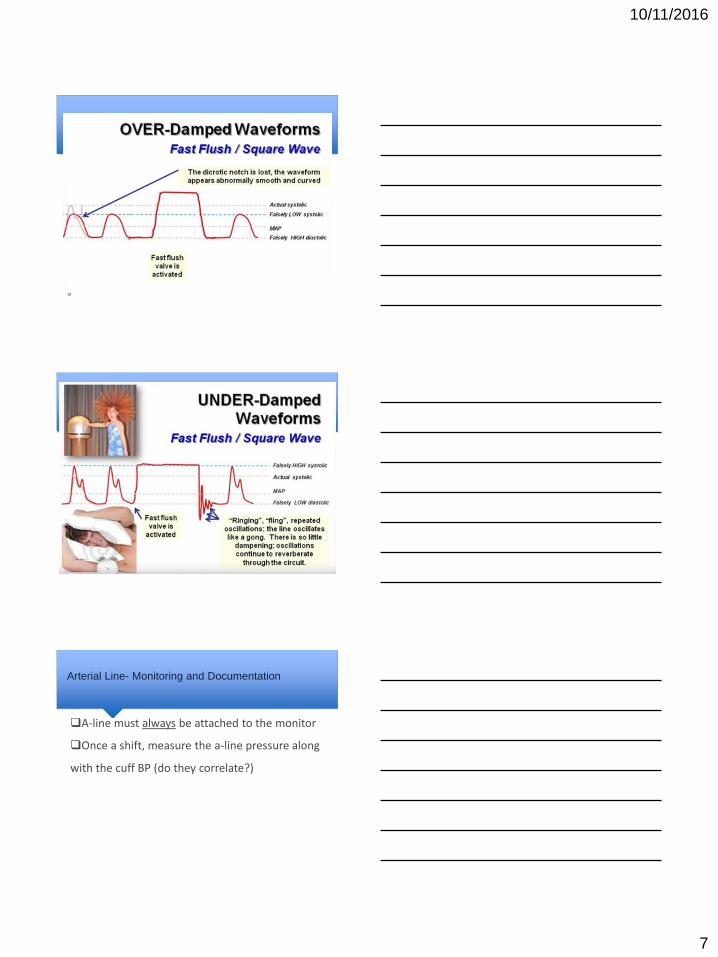
Allen’s Test
17
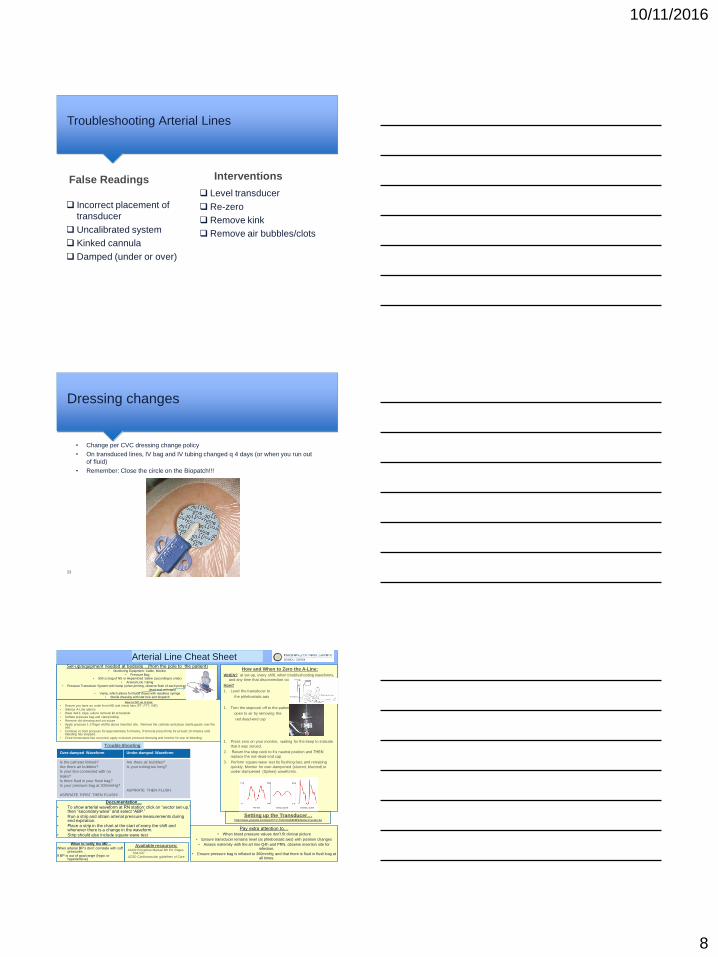
Square Wave Test
10/11/2016
7
19
20
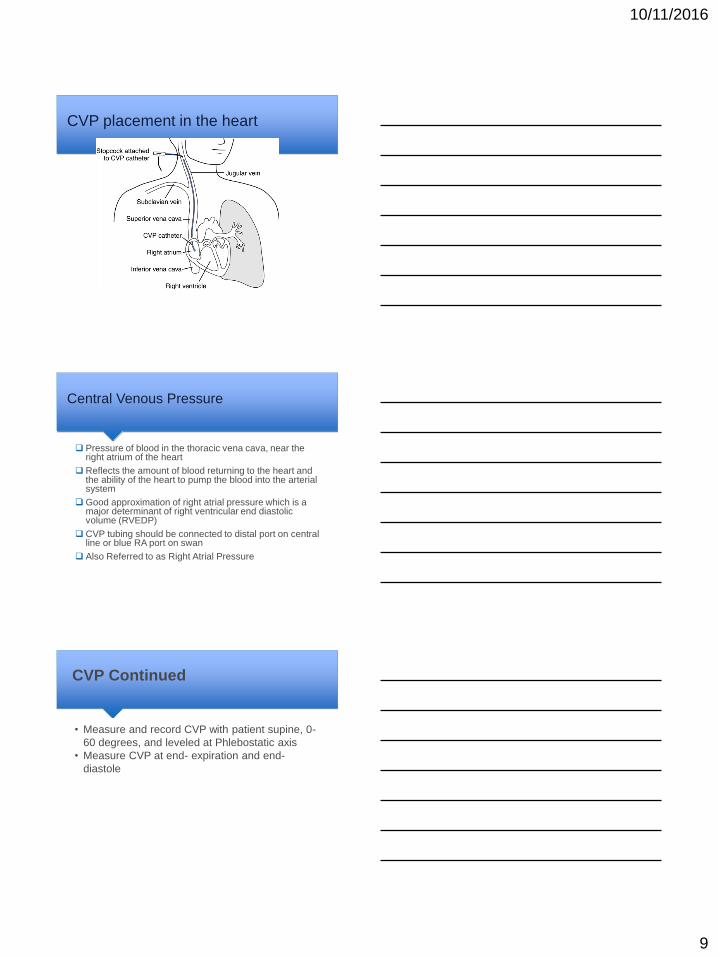
Arterial Line- Monitoring and Documentation
A-line must always be attached to the monitor
Once a shift, measure the a-line pressure along
with the cuff BP (do they correlate?)
10/11/2016
8
Troubleshooting Arterial Lines
Incorrect placement of
transducer
Uncalibrated system
Kinked cannula
Damped (under or over)
Level transducer
Re-zero
Remove kink
Remove air bubbles/clots
False Readings Interventions
Dressing changes
• Change per CVC dressing change policy
• On transduced lines, IV bag and IV tubing changed q 4 days (or when you run out
of fluid)
• Remember: Close the circle on the Biopatch!!!
23
Arterial Line Cheat Sheet Set-up/equipment needed at bedside…(from the pole to the patient)
• Monitoring Equipment: Cable, Monitor
• Pressure Bag • 500 cc bag of NS or Heparinized Saline (according to order)
• Arterial Line Tubing • Pressure Transducer System with Vamp (when priming, observe flush of each port and then replace with
dead-end red caps) • Vamp, which allows for blood draws with needless syringe
• Sterile dressing with stat lock and biopatch
Documentation…
• To show arterial waveform at RN station: click on “sector set-up,” then “secondary wave” and select “ABP.”
• Run a strip and obtain arterial pressure measurements during end expiration.
• Place a strip in the chart at the start of every the shift and whenever there is a change in the waveform.
• Strip should also include square wave test
Pay extra attention to… • When blood pressure values don’t fit clinical picture
• Ensure transducer remains level (at phlebostatic axis) with position changes
• Assess extremity with the art line Q4h and PRN, observe insertion site for infection.
• Ensure pressure bag is inflated to 300mmHg and that there is fluid in flush bag at all times.
When to notify the MD…
When arterial BP’s don’t correlate with cuff pressures .
If BP is out of goal range (hypo or hypertensive)
Available resources: AACN Procedure Manual 6th Ed. Pages
534-547 UCSD Cardiovascular guidelines of Care
How and When to Zero the A-Line:
WHEN? at set-up, every shift, when troubleshooting waveforms,
and any time that disconnection occurs
How?
1. Level the transducer to
the phlebostatic axis
1. Turn the stopcock off to the patient,
open to air by removing the
red dead-end cap
1. Press zero on your monitor, waiting for the beep to indicate
that it was zeroed.
2. Return the stop cock to it’s neutral position and THEN
replace the red dead-end cap
3. Perform square wave test by flushing fast, and releasing
quickly. Monitor for over-dampened (slurred, blunted) or
under-dampened (Spikes) waveforms.
How to D/C an A-Line:
• Ensure you have an order from MD and check labs (PT, PTT, INR)
• Silence A-Line alarms • Have 4x4’s, tape, suture removal kit at bedside
• Deflate pressure bag and clamp tubing • Remove old dressing and cut suture
• Apply pressure 1-2 finger widths above insertion site. Remove the catheter and place sterile gauze over the site.
• Continue to hold pressure for approximately 5 minutes, if femoral press firmly for at least 10 minutes until bleeding has stopped.
• Once hemostasis has occurred, apply occlusive pressure dressing and monitor for any re-bleeding.
Over-damped Waveform Under-damped Waveform
Is the catheter kinked?
Are there air bubbles?
Is your line connected with no
leaks?
Is there fluid in your flush bag?
Is your pressure bag at 300mmHg?
ASPIRATE FIRST THEN FLUSH!
Are there air bubbles?
Is your tubing too long?
ASPIRATE THEN FLUSH
Trouble Shooting
Setting up the Transducer… http://www.youtube.com/watch?v=YeOmkqD3k6E&feature=youtu.be
10/11/2016
9
CVP placement in the heart
Central Venous Pressure
Pressure of blood in the thoracic vena cava, near the right atrium of the heart
Reflects the amount of blood returning to the heart and the ability of the heart to pump the blood into the arterial system
Good approximation of right atrial pressure which is a major determinant of right ventricular end diastolic volume (RVEDP)
CVP tubing should be connected to distal port on central line or blue RA port on swan
Also Referred to as Right Atrial Pressure
CVP Continued
• Measure and record CVP with patient supine, 0-
60 degrees, and leveled at Phlebostatic axis
• Measure CVP at end- expiration and end-
diastole
10/11/2016
10
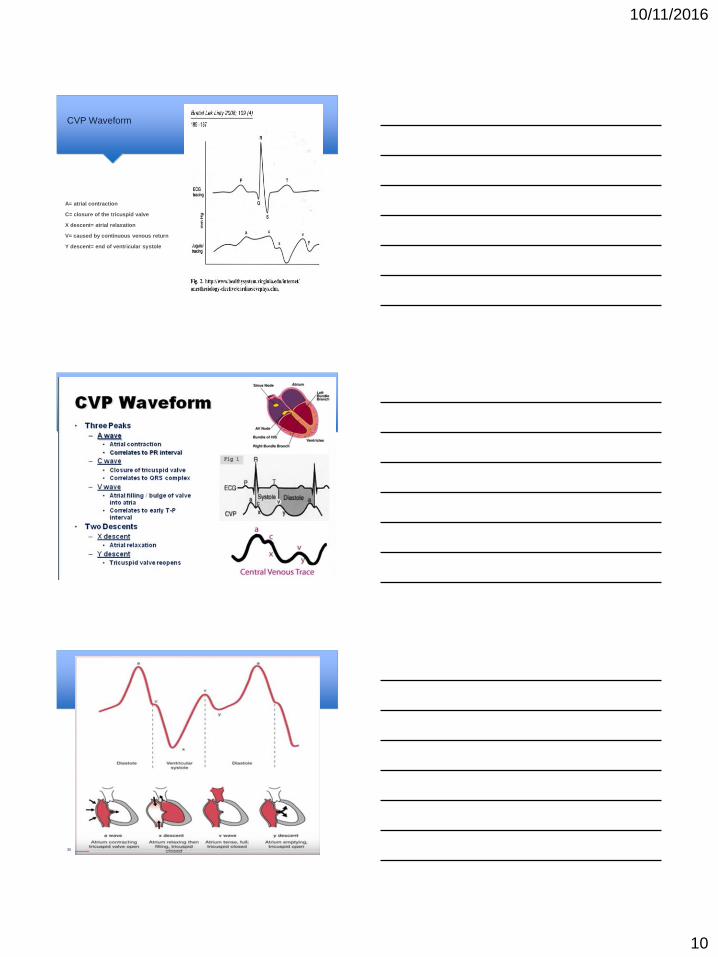
CVP Waveform
A= atrial contraction
C= closure of the tricuspid valve
X descent= atrial relaxation
V= caused by continuous venous return
Y descent= end of ventricular systole
Example CVP Waveforms
29
30
10/11/2016
11
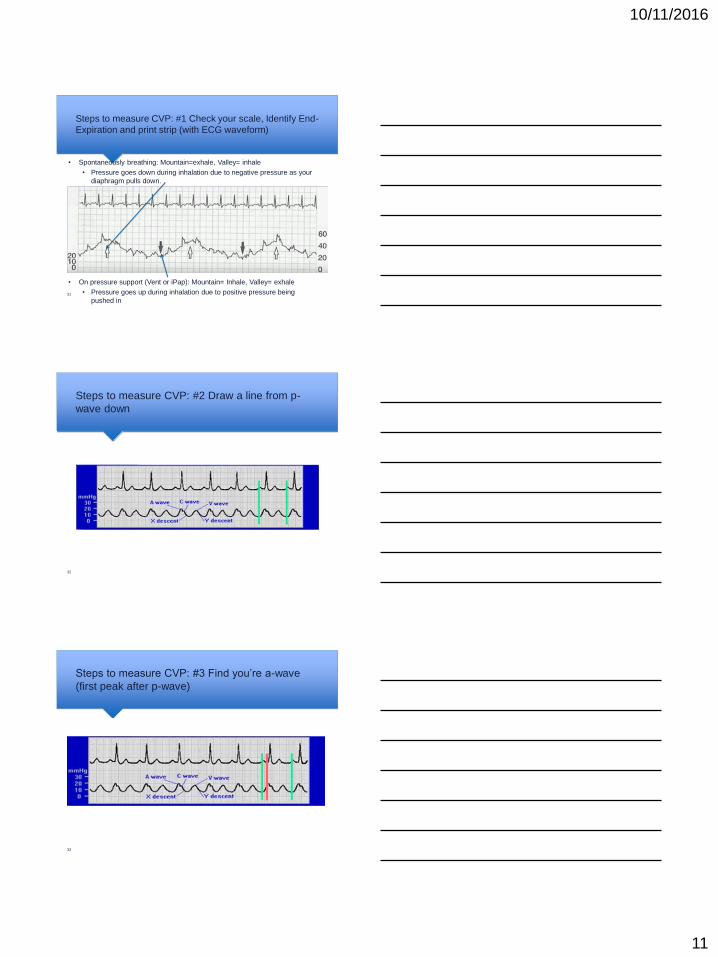
Steps to measure CVP: #1 Check your scale, Identify End-
Expiration and print strip (with ECG waveform)
• Spontaneously breathing: Mountain=exhale, Valley= inhale
• Pressure goes down during inhalation due to negative pressure as your
diaphragm pulls down.
• On pressure support (Vent or iPap): Mountain= Inhale, Valley= exhale
• Pressure goes up during inhalation due to positive pressure being
pushed in 31
Steps to measure CVP: #2 Draw a line from p-
wave down
32
Steps to measure CVP: #3 Find you’re a-wave
(first peak after p-wave)
33
10/11/2016
12
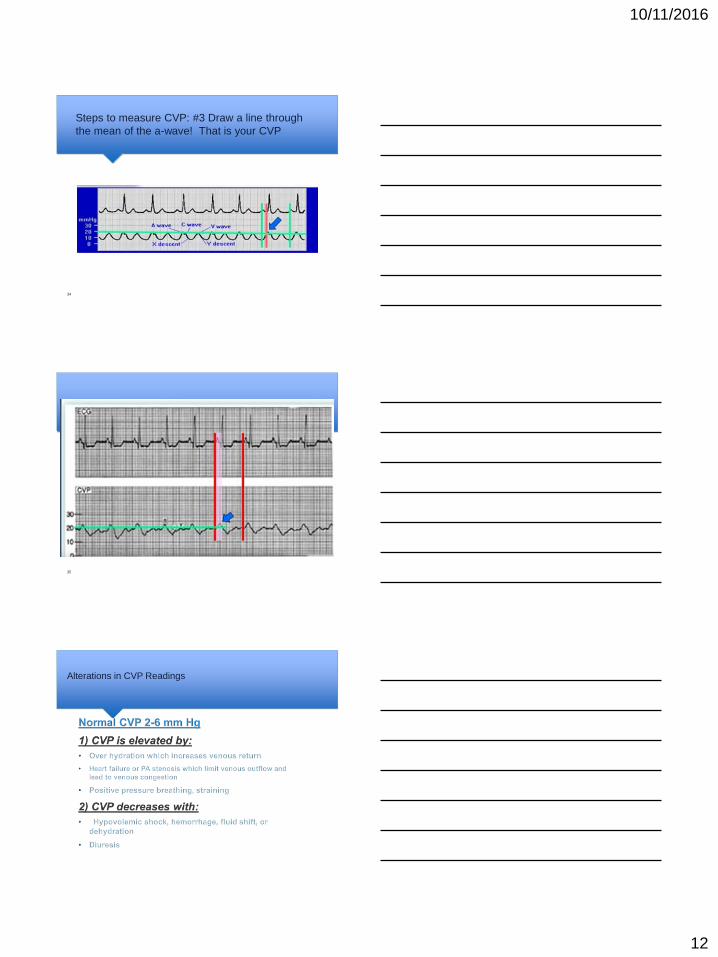
Steps to measure CVP: #3 Draw a line through
the mean of the a-wave! That is your CVP
34
35
Alterations in CVP Readings
10/11/2016
13
Remember!
• When transducing a CVP reading, you must make sure
the Stop Cock is OFF to any infusions or you will have
falsely ELEVATED readings
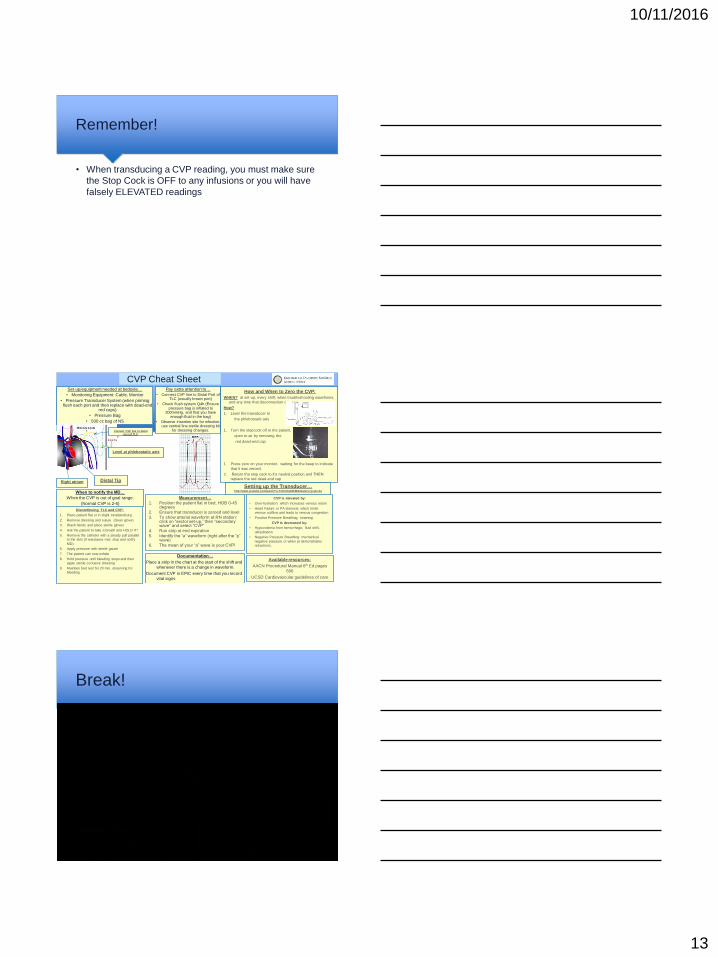
CVP Cheat Sheet Set-up/equipment needed at bedside…
• Monitoring Equipment: Cable, Monitor
• Pressure Transducer System (when priming flush each port and then replace with dead-end
red caps)
• Pressure Bag
• 500 cc bag of NS
Documentation…
Place a strip in the chart at the start of the shift and
whenever there is a change in waveform.
Document CVP in EPIC every time that you record
vital signs
Pay extra attention to…
• Connect CVP line to Distal Port of TLC (usually brown port)
• Check flush system Q4h (Ensure pressure bag is inflated to
300mmHg, and that you have enough fluid in the bag)
• Observe insertion site for infection, use central line sterile dressing kit
for dressing changes.
When to notify the MD…
When the CVP is out of goal range.
(Normal CVP is 2-6)
Available resources:
AACN Procedural Manual 6th Ed pages
606
UCSD Cardiovascular guidelines of care
Right atrium
CVP is elevated by:
• Over-hydration: which increases venous return
• Heart Failure or PA stenosis: which limits
venous outflow and leads to venous congestion
• Positive Pressure Breathing, straining
CVP is decreased by:
• Hypovolemia from hemorrhage, fluid shift,
dehydration
• Negative Pressure Breathing: mechanical
negative pressure or when pt demonstrates
retractions.
Level at phlebostatic axis
Connect CVP line to distal
port of TLC
How and When to Zero the CVP:
WHEN? at set-up, every shift, when troubleshooting waveforms,
and any time that disconnection occurs
How?
1. Level the transducer to
the phlebostatic axis
1. Turn the stopcock off to the patient,
open to air by removing the
red dead-end cap
1. Press zero on your monitor, waiting for the beep to indicate
that it was zeroed.
2. Return the stop cock to it’s neutral position and THEN
replace the red dead-end cap Distal Tip
Discontinuing TLC and CVP:
1. Place patient flat or in slight trendelenburg
2. Remove dressing and suture (clean glove)
3. Wash hands and place sterile gloves
4. Ask the patient to take a breath and HOLD IT!
5. Remove the catheter with a steady pull parallel
to the skin (if resistance met, stop and notify
MD).
6. Apply pressure with sterile gauze
7. The patient can now exhale
8. Hold pressure until bleeding stops and then
apply sterile occlusive dressing
9. Maintain bed rest for 20 min, observing for
bleeding
Measurement…
1. Position the patient flat in bed, HOB 0-45 degrees
2. Ensure that transducer is zeroed and level
3. To show arterial waveform at RN station: click on “sector set-up,” then “secondary wave” and select “CVP”
4. Run strip at end expiration
5. Identify the “a” waveform (right after the “p” wave)
6. The mean of your “a” wave is your CVP!
Setting up the Transducer… http://www.youtube.com/watch?v=YeOmkqD3k6E&feature=youtu.be
Break!
10/11/2016
14
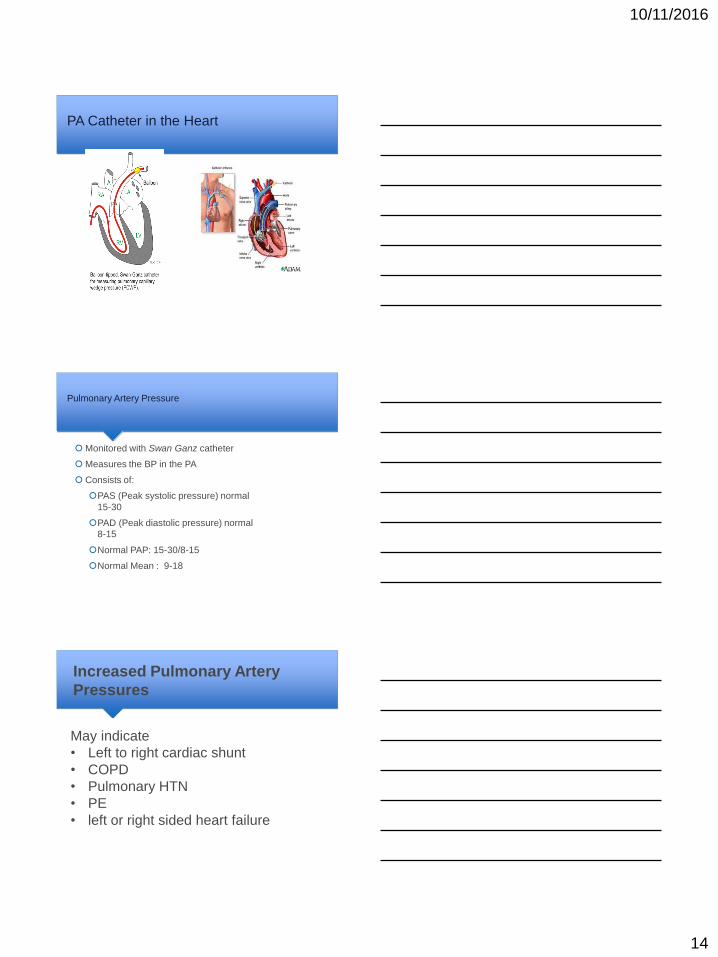
PA Catheter in the Heart
Pulmonary Artery Pressure
Monitored with Swan Ganz catheter
Measures the BP in the PA
Consists of:
PAS (Peak systolic pressure) normal
15-30
PAD (Peak diastolic pressure) normal
8-15
Normal PAP: 15-30/8-15
Normal Mean : 9-18
Increased Pulmonary Artery
Pressures
May indicate
• Left to right cardiac shunt
• COPD
• Pulmonary HTN
• PE
• left or right sided heart failure
10/11/2016
15
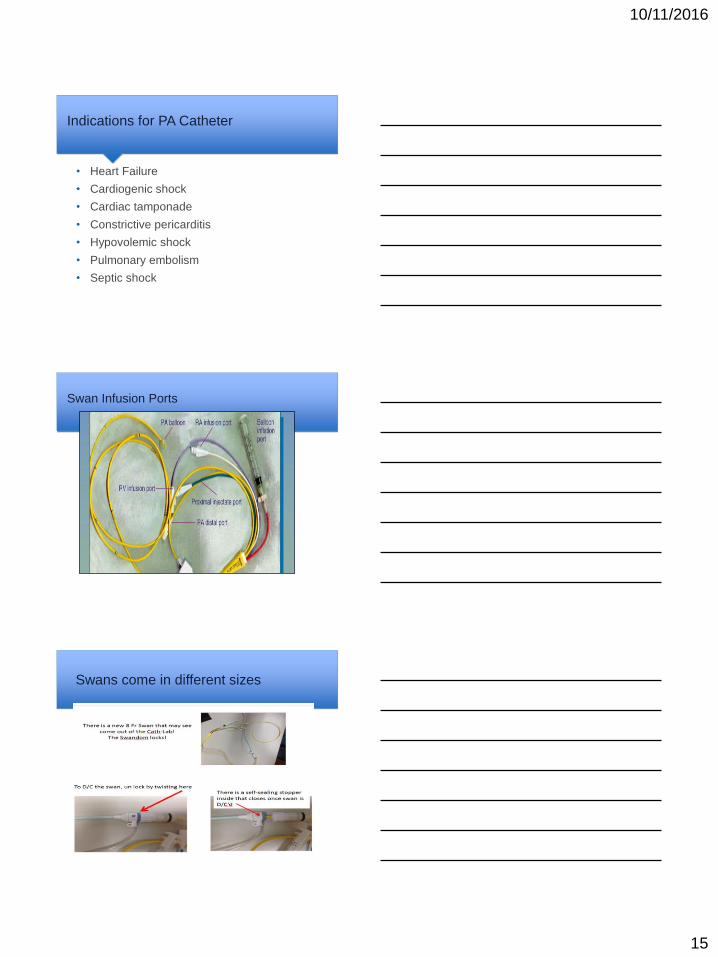
Indications for PA Catheter
• Heart Failure
• Cardiogenic shock
• Cardiac tamponade
• Constrictive pericarditis
• Hypovolemic shock
• Pulmonary embolism
• Septic shock
Swan Infusion Ports
Swans come in different sizes
10/11/2016
16
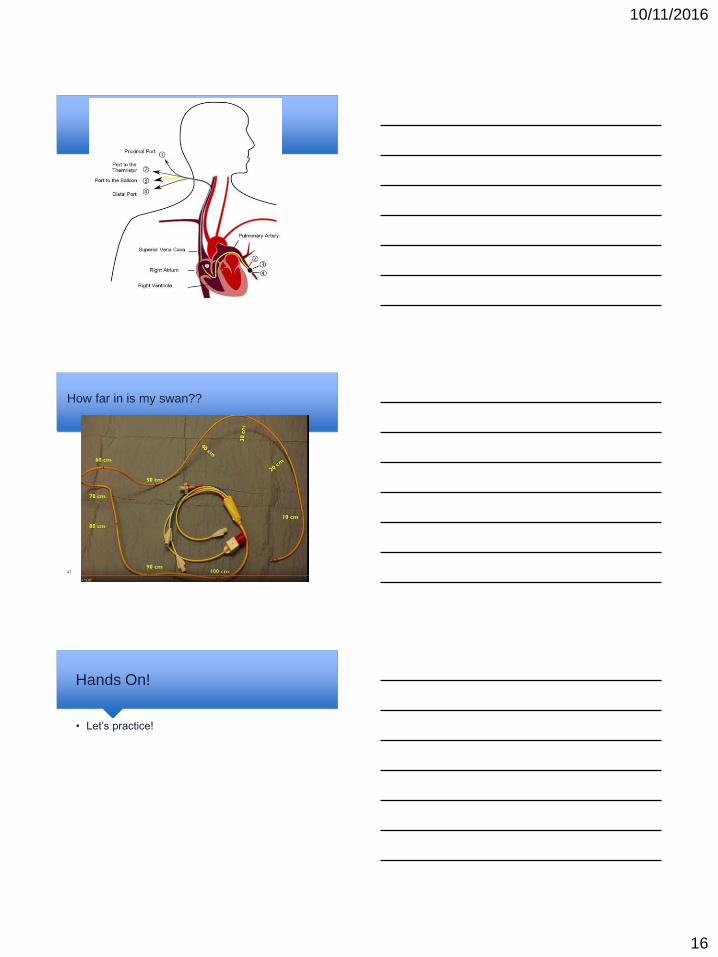
How far in is my swan??
47
Hands On!
• Let’s practice!
10/11/2016
17
Assisting with Swan Insertion
• Generally only occurs in ICU, PTU or Cath lab
• Prime and set-up the transducer
• Assist with sterile set-up (same as central line
insertion)
• Monitor during procedure
49
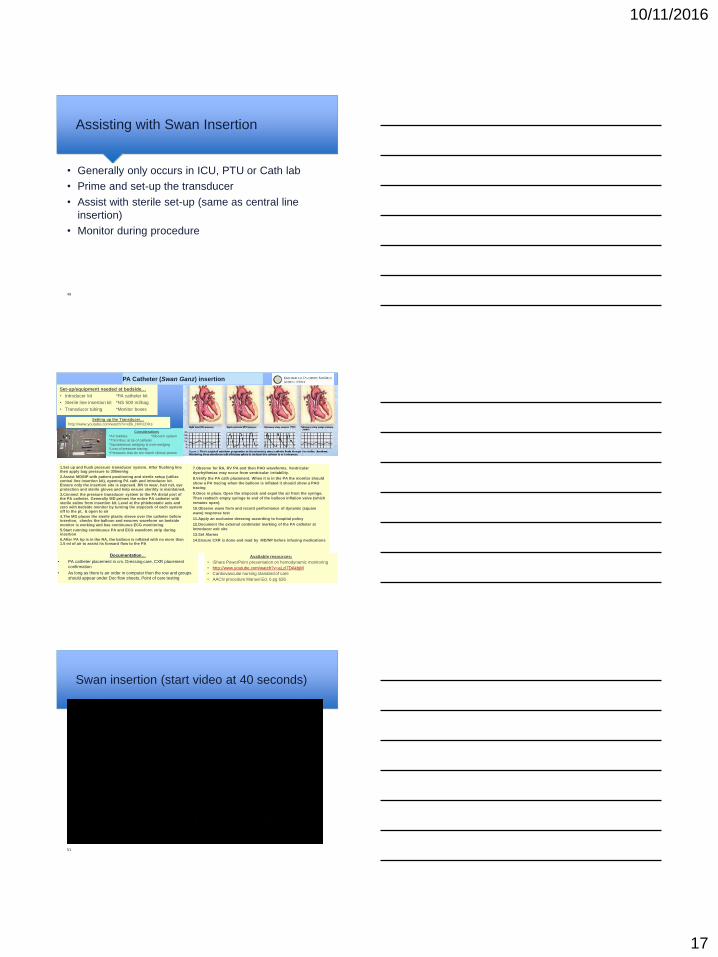
PA Catheter (Swan Ganz) insertion
Documentation…
• PA catheter placement in cm. Dressing care. CXR placement
confirmation
• As long as there is an order in computer then the row and groups
should appear under Doc flow sheets, Point of care testing
Available resources:
• iShare PowerPoint presentation on hemodynamic monitoring
• http://www.youtube.com/watch?v=aLzI7DAkbjM
• Cardiovascular nursing standard of care
• AACN procedure Manuel Ed. 6 pg 626
1.Set up and flush pressure transducer system. After flushing line then apply bag pressure to 300mmhg
2.Assist MD/NP with patient positioning and sterile setup (utilize central line insertion kit), opening PA cath and introducer kit. Ensure only the insertion site is exposed. RN to wear, hair net, eye protection and sterile gloves and help ensure sterility is maintained.
3.Connect the pressure transducer system to the PA distal port of the PA catheter. Generally MD primes the entire PA catheter with sterile saline from insertion kit. Level at the phlebostatic axis and zero with bedside monitor by turning the stopcock of each system off to the pt, & open to air
4.The MD places the sterile plastic sleeve over the catheter before insertion, checks the balloon and ensures waveform on bedside monitor is working and has continuous ECG monitoring
5.Start running continuous PA and ECG waveform strip during insertion
6.After PA tip is in the RA, the balloon is inflated with no more than 1.5 ml of air to assist its forward flow to the PA
7.Observe for RA, RV PA and then PAO waveforms. Ventricular
dysrhythmias may occur from ventricular irritability.
8.Verify the PA cath placement. When it is in the PA the monitor should
show a PA tracing when the balloon is inflated it should show a PAO
tracing
9.Once in place. Open the stopcock and expel the air from the syringe.
Then reattach empty syringe to end of the balloon inflation valve (which
remains open).
10.Observe wave form and record performance of dynamic (square
wave) response test
11.Apply an occlusive dressing according to hospital policy
12.Document the external centimeter marking of the PA catheter at
introducer exit site
13.Set Alarms
14.Ensure CXR is done and read by MD/NP before infusing medications
Set-up/equipment needed at bedside…
• Introducer kit *PA catheter kit
• Sterile line insertion kit *NS 500 ml/bag
• Transducer tubing *Monitor boxes
Considerations
*Air bubbles *Blood in system
*Thrombus at tip of catheter
*Spontaneous wedging & over-wedging
*Loss of pressure tracing
*Pressures that do not match clinical picture
Setting up the Transducer…
http://www.youtube.com/watch?v=xDk_HnhCDKs
Swan insertion (start video at 40 seconds)
51

10/11/2016
18
Waveforms during Insertion
52
Waveform Progression of PA Catheter
10/11/2016
19
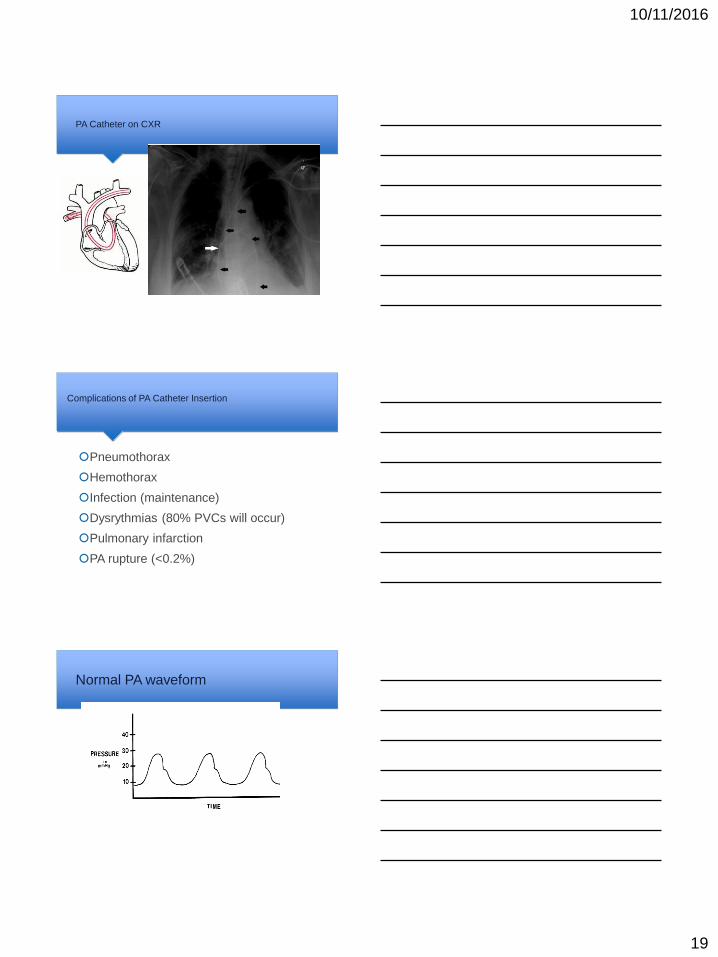
PA Catheter on CXR
Complications of PA Catheter Insertion
Pneumothorax
Hemothorax
Infection (maintenance)
Dysrythmias (80% PVCs will occur)
Pulmonary infarction
PA rupture (<0.2%)
Normal PA waveform
10/11/2016
20
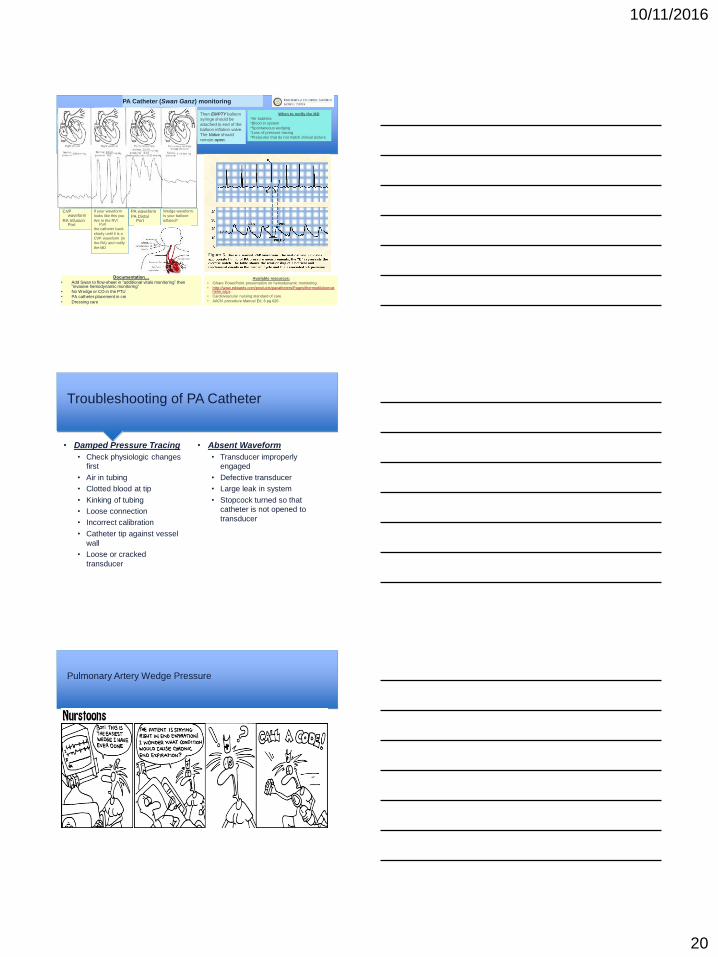
PA Catheter (Swan Ganz) monitoring
Documentation…
• Add Swan to flow-sheet in “additional vitals monitoring” then “invasive hemodynamic monitoring”
• No Wedge or CO in the PTU
• PA catheter placement in cm
• Dressing care
Available resources:
• iShare PowerPoint presentation on hemodynamic monitoring
• http://www.edwards.com/products/pacatheters/Pages/thermodilutioncatheter.aspx
• Cardiovascular nursing standard of care
• AACN procedure Manuel Ed. 6 pg 626
Equipment needed at bedside…
•Monitor box with cable (includes thermister)
Normal Pressures…
• PAS (Peak systolic pressure = 15-25)
• PAD (Peak diastolic pressure = 8-15)
• Increase seen in PHTN, CHF, decreased volume &
mechanical ventilation
When to notify the MD
*Air bubbles
*Blood in system
*Spontaneous wedging
*Loss of pressure tracing
*Pressures that do not match clinical picture
PA waveform
PA Distal Port
CVP waveform
RA Infusion Port
If your waveform
looks like this you
Are in the RV! Pull
the catheter back
slowly until it is a
CVP waveform (in
the RA) and notify
the MD
Wedge waveform.
Is your balloon
inflated?
Then EMPTY balloon
syringe should be
attached to end of the
balloon inflation valve.
The Valve should
remain open.
Troubleshooting of PA Catheter
• Damped Pressure Tracing
• Check physiologic changes
first
• Air in tubing
• Clotted blood at tip
• Kinking of tubing
• Loose connection
• Incorrect calibration
• Catheter tip against vessel
wall
• Loose or cracked
transducer
• Absent Waveform
• Transducer improperly
engaged
• Defective transducer
• Large leak in system
• Stopcock turned so that
catheter is not opened to
transducer
Pulmonary Artery Wedge Pressure
10/11/2016
21
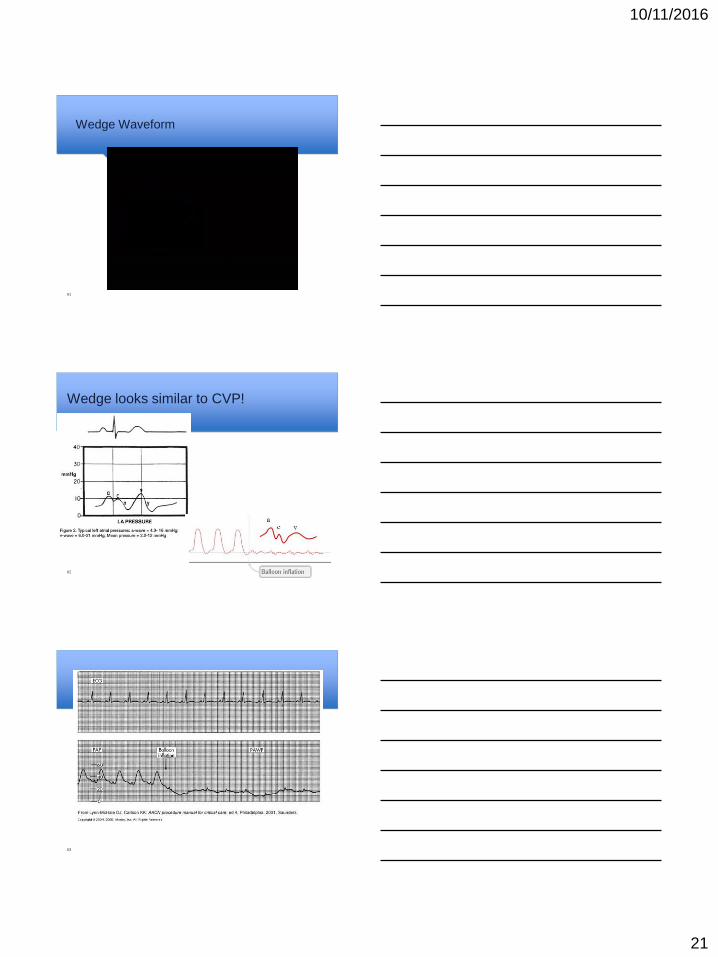
Wedge Waveform
61
Wedge looks similar to CVP!
62
63
10/11/2016
22
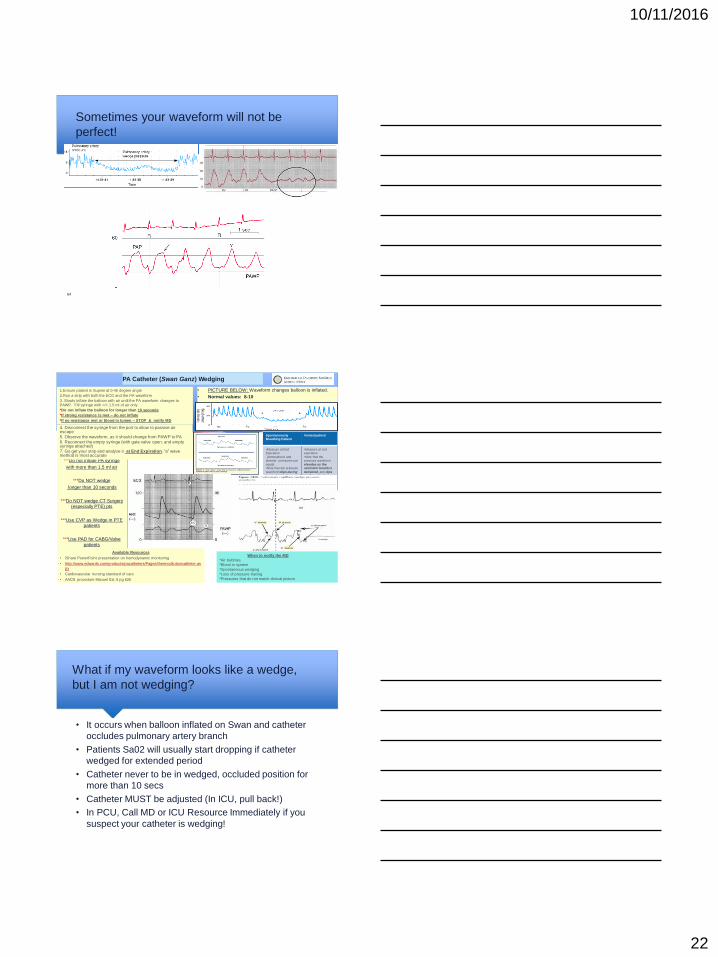
Sometimes your waveform will not be
perfect!
64
PA Catheter (Swan Ganz) Wedging
• PICTURE BELOW: Waveform changes balloon is inflated.
• Normal values: 8-10
***Do not inflate PA syringe
with more than 1.5 ml air
***Do NOT wedge
longer than 10 seconds
***Do NOT wedge CT Surgery
(especially PTE) pts
***Use CVP as Wedge in PTE
patients
***Use PAD for CABG/Valve
patients
1.Ensure patient is Supine at 0-45 degree angle
2.Run a strip with both the ECG and the PA waveform
3. Slowly inflate the balloon with air until the PA waveform changes to PAWP. Fill syringe with =/> 1.5 ml of air only
*Do not inflate the balloon for longer than 10 seconds
*If strong resistance is met – do not inflate
*If no resistance met or blood in lumen – STOP & notify MD
4. Disconnect the syringe from the port to allow to passive air escape
5. Observe the waveform, as it should change from PAWP to PA
6. Reconnect the empty syringe (with gate valve open, and empty syringe attached)
7. Go get your strip and analyze it at End Expiration, “a” wave method is most accurate
Spontaneously Breathing Patient
Vented patient
•Measure at End Expiration
(Atmospheric and alveolar pressures are
equal) •Note that the pressure
waveform dips during inspiration and
elevates during expiration
•Measure at end expiration
•Note that the pressure waveform
elevates as the ventilator breath is
delivered, and dips as the patient
exhales
Available Resources
• iShare PowerPoint presentation on hemodynamic monitoring
• http://www.edwards.com/products/pacatheters/Pages/thermodilutioncatheter.as
px
• Cardiovascular nursing standard of care
• AACN procedure Manuel Ed. 6 pg 626
• Invasive Cardiology: A manual of cath lab personnel
When to notify the MD
*Air bubbles
*Blood in system
*Spontaneous wedging
*Loss of pressure tracing
*Pressures that do not match clinical picture
What if my waveform looks like a wedge,
but I am not wedging?
• It occurs when balloon inflated on Swan and catheter
occludes pulmonary artery branch
• Patients Sa02 will usually start dropping if catheter
wedged for extended period
• Catheter never to be in wedged, occluded position for
more than 10 secs
• Catheter MUST be adjusted (In ICU, pull back!)
• In PCU, Call MD or ICU Resource Immediately if you
suspect your catheter is wedging!
10/11/2016
23
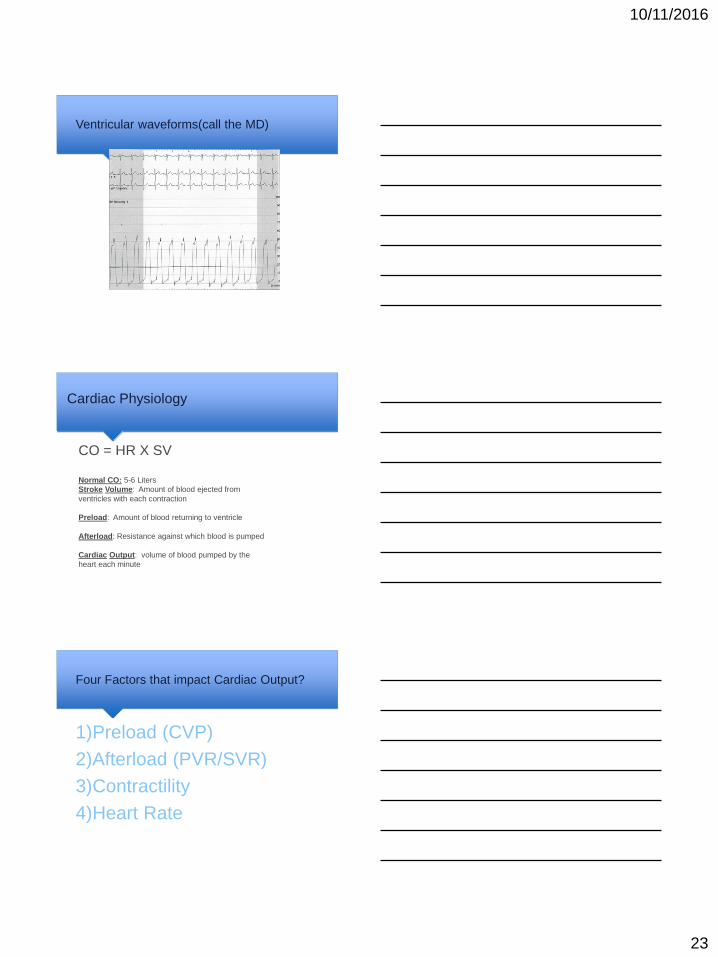
Ventricular waveforms(call the MD)
Cardiac Physiology
CO = HR X SV
Normal CO: 5-6 Liters
Stroke Volume: Amount of blood ejected from
ventricles with each contraction
Preload: Amount of blood returning to ventricle
Afterload: Resistance against which blood is pumped
Cardiac Output: volume of blood pumped by the
heart each minute
Four Factors that impact Cardiac Output?
1)Preload (CVP)
2)Afterload (PVR/SVR)
3)Contractility
4)Heart Rate
10/11/2016
24
How do we measure Cardiac Output?
There are 2 ways: Thermo-dilution and
FICK
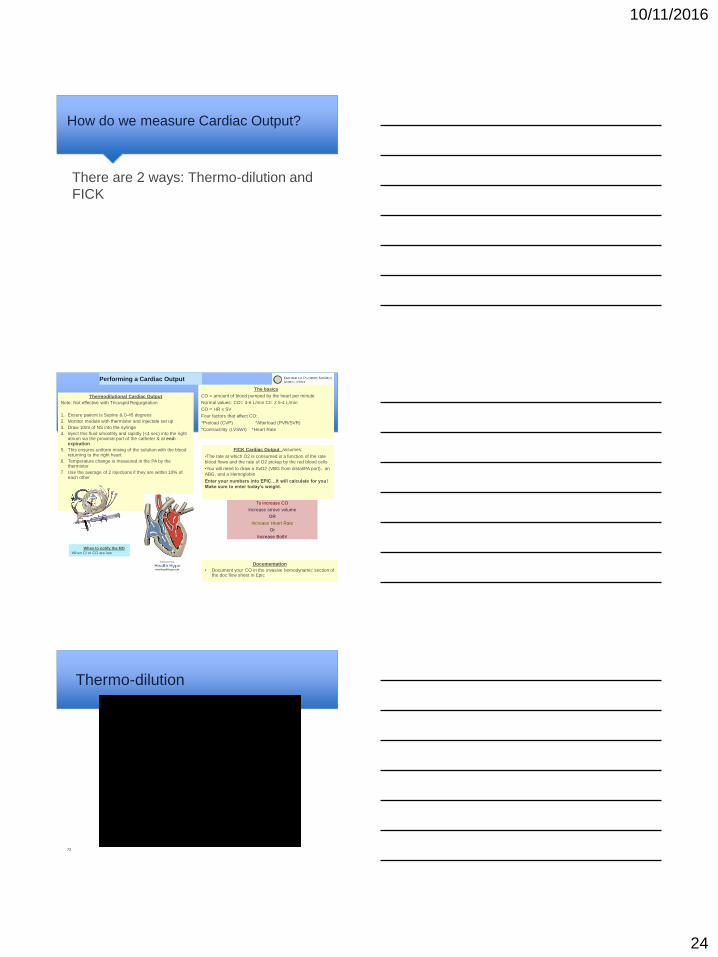
Performing a Cardiac Output
To increase CO
Increase strove volume
OR
Increase Heart Rate
Or
Increase Both!
Documentation
• Document your CO in the invasive hemodynamic section of the doc flow sheet in Epic
Thermodilutional Cardiac Output
Note: Not effective with Tricuspid Regurgitation
1. Ensure patient is Supine & 0-45 degrees
2. Monitor module with thermistor and injectate set up
3. Draw 10ml of NS into the syringe
4. Inject this fluid smoothly and rapidly (<4 sec) into the right atrium via the proximal port of the catheter & at end-expiration
5. This ensures uniform mixing of the solution with the blood returning to the right heart
6. Temperature change is measured in the PA by the thermistor
7. Use the average of 2 injections if they are within 10% of each other
The basics
CO = amount of blood pumped by the heart per minute
Normal values: CO= 4-6 L/min CI= 2.5-4 L/min
CO = HR x SV
Four factors that affect CO:
*Preload (CVP) *Afterload (PVR/SVR)
*Contractility (LVSWI) *Heart Rate
FICK Cardiac Output assumes:
•The rate at which O2 is consumed is a function of the rate
blood flows and the rate of O2 pickup by the red blood cells
•You will need to draw a SvO2 (VBG from distal/PA port), an
ABG, and a Hemoglobin
Enter your numbers into EPIC…it will calculate for you!
Make sure to enter today’s weight.
When to notify the MD
When CI or CO are low
Thermo-dilution
72
10/11/2016
25
FICK
• FICK CARDIAC OUTPUT: Rate at which oxygen is consumed is a
function of the rate blood flows and the rate of oxygen pick-up by
red blood cells
• You will need:
• A VBG drawn from the PA line (MVO2)
• An ABG and/OR the patients Sp02 at the time of draw
• Wedge pressure or PAD
• A calculator
• A current HGB (add-on to VBG)
• Accurate height & weight
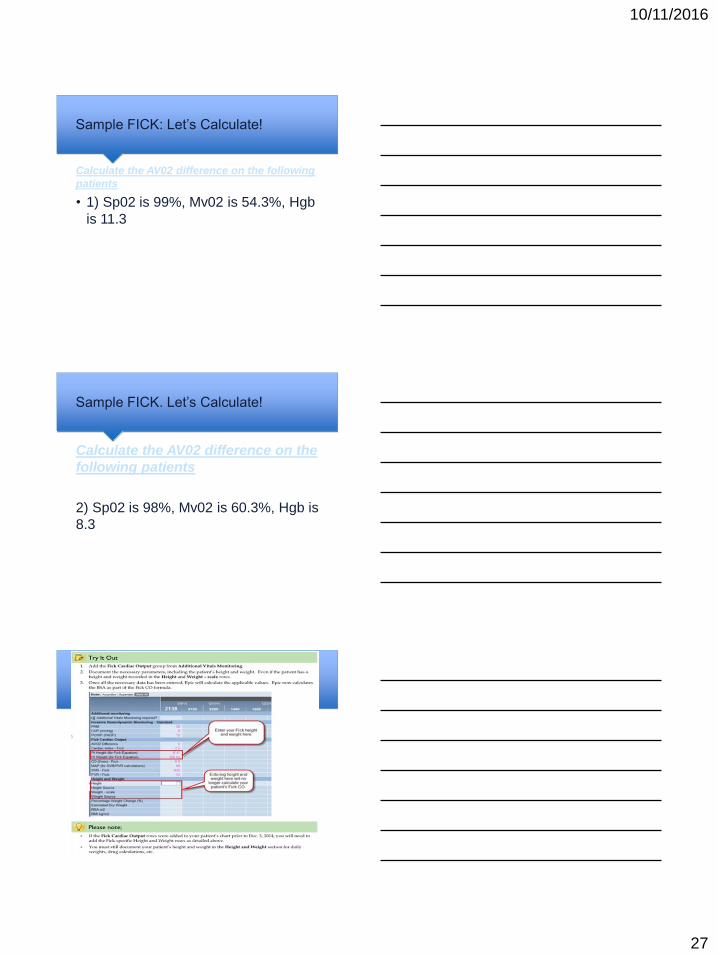
• This formula : 1.36 (SPO2-MVO2) x HGB =AVO2 Diff
73
1.36 (SPO2-MVO2) x HGB =AVO2
Diff
• AV02 difference is the difference in oxygen
content of blood btw arterial blood & venous
blood
• AVO2 Difference is an indication of how much
O2 is removed from the blood as the blood
circulates in the body.
FICK CALC. – The Constant 1.36
What is 1.36?
It is a constant, that assumes “all things are
equal” and states that each gram of hemoglobin
can carry 1.36 ml of 0xygen.
10/11/2016
26
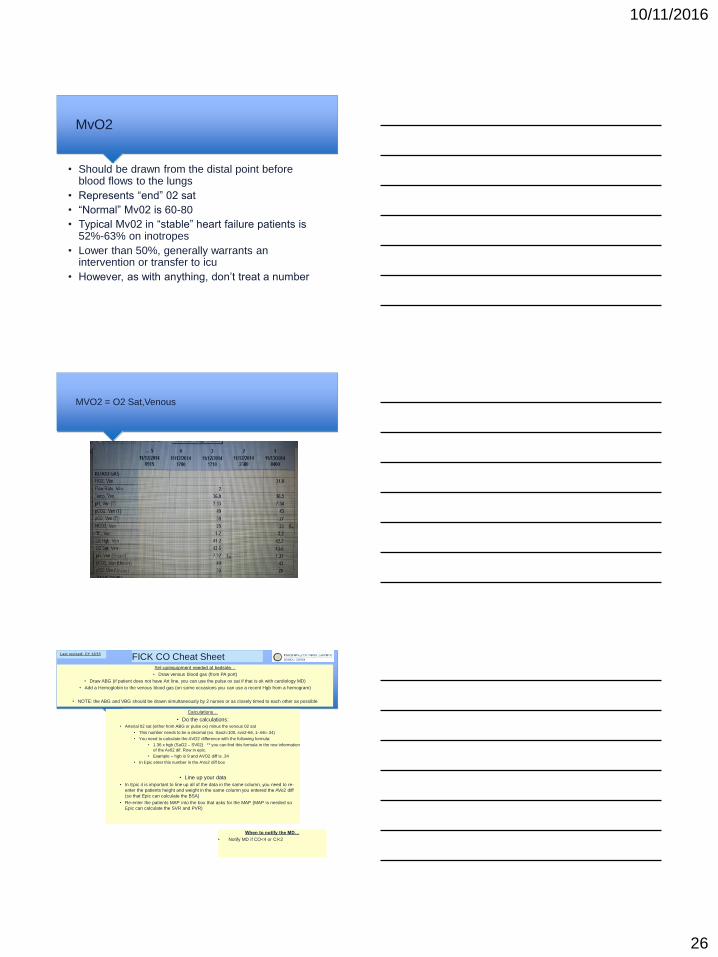
MvO2
• Should be drawn from the distal point before blood flows to the lungs
• Represents “end” 02 sat
• “Normal” Mv02 is 60-80
• Typical Mv02 in “stable” heart failure patients is 52%-63% on inotropes
• Lower than 50%, generally warrants an intervention or transfer to icu
• However, as with anything, don’t treat a number
MVO2 = O2 Sat,Venous
FICK CO Cheat Sheet Set-up/equipment needed at bedside…
• Draw venous blood gas (from PA port)
• Draw ABG (if patient does not have Art line, you can use the pulse ox sat if that is ok with cardiology MD)
• Add a Hemoglobin to the venous blood gas (on some occasions you can use a recent Hgb from a hemogram)
• NOTE: the ABG and VBG should be drawn simultaneously by 2 nurses or as closely timed to each other as possible
Calculations…
• Do the calculations:
• Arterial 02 sat (either from ABG or pulse ox) minus the venous 02 sat
• This number needs to be a decimal (ex. Sao2=100, svo2-66, 1-.66=.34)
• You need to calculate the AVO2 difference with the following formula:
• 1.36 x hgb (SaO2 – SV02) ** you can find this formula in the row information
of the Av02 dif. Row in epic.
• Example – hgb is 9 and AVO2 diff is .34
• In Epic enter this number in the AVo2 diff box
• Line up your data
• In Epic it is important to line up all of the data in the same column, you need to re-
enter the patients height and weight in the same column you entered the AVo2 diff
(so that Epic can calculate the BSA)
• Re-enter the patients MAP into the box that asks for the MAP (MAP is needed so
Epic can calculate the SVR and PVR)
When to notify the MD…
• Notify MD if CO<4 or CI<2
Last revised: CY 12/15
10/11/2016
27
Sample FICK: Let’s Calculate!
Calculate the AV02 difference on the following
patients
• 1) Sp02 is 99%, Mv02 is 54.3%, Hgb
is 11.3
Calculate the AV02 difference on the
following patients
2) Sp02 is 98%, Mv02 is 60.3%, Hgb is
8.3
Sample FICK. Let’s Calculate!

10/11/2016
28
Ambulation
• Yes, we can walk these patients!
• Must have an order to ambulate
• Ensure PA Catheter is locked and secure
• Place patient on portable monitor, so that you can always
assess their waveforms!
• Always walk with patient, No PA catheter patient should ever
walk alone
• Make sure to re zero lines when you plug patient back into
bedside monitor
Removing the PA Catheter
1) Remove all infusions from PA lines and place red caps on ports
2) Make sure patient is in bed in Supine position
3) Gently detach swandom from Hub of introducer by lining up locking
mechanism
4) Ensure balloon is deflated
5) Have patient take deep breath in and hold
6) While patient is holding breath, grasp swan line and gently pull the
catheter out with one steady, smooth motion. ( to prevent RV irritation,
PVC,s)
7) Tell patient to breathe when line out
8) The swan port self seals so don’t worry about any bleeding.
9) Clean and cover cordis with central line dressing
Resources(who to call)
• Your Charge or Resource RN
• The ICU Resource RN
• The Heart Failure residents and fellow
• Remember, we are all on the same team and everyones
number one priority is patient safety
• If something doesn’t feel or look right, call!
10/11/2016
29
Simulation
• POPs online simulation
http://www.edwards.com/eu/Products/Pages/CCEducationMap.aspx
85