Embed Size (px)
Citation preview

5 6
Limited Warranty - Terms & ConditionsSwann Communications warrants this product against defects in workmanship and material for a period of one (1) year from its original purchase date. You must present your receipt as proof of purchase for warranty validation. Any unit which proves defective during the stated period will be repaired without charge for parts or labour or replaced at the sole discretion of Swann. The end user is responsible for all freight charges in-curred to send the product to Swann’s repair cen-tres. The end user is responsible for all shipping costs incurred when shipping from and to any country other than the country of origin. The warranty does not cover any incidental, ac-cidental or consequential damages arising from the use of or the inability to use this product. Any costs associated with the fitting or removal of this product by a tradesman or other person or any
other costs associated with its use are the re-sponsibility of the end user. This warranty applies to the original purchaser of the product only and is not transferable to any third party. Unauthor-ized end user or third party modifications to any component will render all warranties void. By law some countries do not allow limitations on certain exclusions in this warranty. Where applicable by local laws, regulations and legal rights will take precedence.For Australia: Our goods come with guarantees which cannot be excluded under Australian Con-sumer Law. You are entitled to a replacement or refund for a major failure and for compensa-tion for any other reasonably foreseeable loss or damage. You are also entitled to have the goods repaired or replaced if the goods fail to be of ac-ceptable quality.M1080FLDCAM_030516E | © Swann 2016
FCC VerificationThis equipment has been tested and found to comply with the limits for Class B digital device, pursu-ant to part 15 of the FCC Rules. These limits are designed to provide reasonable protection against harmful interference in a residential installation. This equipment generates, uses and can radiate radio frequency energy and, if not installed and used in accordance with the instructions, may cause harmful interference to radio or television reception, which can be determined by turning the equipment off and on, the user is encouraged to try to correct the interference by one or more of the following measures:
• Reorient or relocate the receiving antenna
• Increase the separation between the equipment and the receiver
• Connect the equipment into an outlet on a circuit different from that to which the receiver is con-nected
• Consult the dealer or an experienced radio/TV technician for help
These devices comply with part 15 of the FCC Rules. Operation is subject to the following two conditions:
(1) These devices may not cause harmful interference.
(2) These devices must accept any interference received, including interference that may cause unde-sired operation.
HD DomeSecurity CameraFor use with Swann 1080P HD DVRs
EN INSTRUCTION MANUAL
Helpdesk/Technical Support
Technical Support E-mail: [email protected]
Telephone Helpdesk
USA Toll Free 1-800-627-2799
USA Parts & Warranty 1-800-627-2799
(M-F, 9am-5pm US PT)
AUSTRALIA 1800 788 210
NEW ZEALAND Toll Free 0800 479 266
UK 0808 168 9031

Video & Audio Output
1 2 3 4
Congratulations on your purchase of this HD Dome Security Camera.• Use the On-Screen Display (OSD) control-
ler & built-in software to customize the camera settings including color, bright-ness & wide dynamic range for the best video quality every time
• This camera can be used in combination with other analog surveillance technolo-gy including AHD, TVI, CVI from Swann & other brands. It’s the perfect addition if you already have a recording solution (DVR) & need extra cameras
• The camera joystick is used to set the sig-nal modes for the camera. Hold for 2 sec-onds; Up for Analog, Left for AHD, Right for TVI and Down for CVI.
Important note: All jurisdictions have specific laws and regulations relating to the use of cam-eras. Before using any camera for any purpose, it is the buyer’s responsibility to be aware of all applicable laws and regulations that prohibit or limit the use of cameras and to comply with the applicable laws and regulations.Warning: Modifications not approved by the party responsible for compliance could void user’s au-thority to operate the equipment.Important safety instructions1) Make sure product is fixed correctly and stable if fastened in place.2) Do not operate if wires and terminals are ex-posed.
Introduction Choosing a location for your CameraThis camera has an on-screen configuration menu to configure various image settings as they apply to the camera and the scene that you wish to view.1) You should endeavor to set the camera up close to the area you wish to view before you install the camera so that you have access to the joystick and can adjust the image settings.2) What you want to monitor and where you’ll get the best view of it.3) How you’re going to connect the camera to your monitoring system; you should plan the route from the recorder to each camera4) How to keep the camera out of harm’s way. It’s recommended to mount your cameras in an elevated position to prevent easy access.5) Place your camera as close to the area of interest as practicable. The best position is from about 3-4m (9-13ft) above looking slightly down.
6) Although the sky looks nice when you look at the live view from your camera, it is an unlikely direction for an offender to approach from. Keep the camera pointed down away from the sky or ceiling. This will also minimize glare from lighting affecting the image.7) Think about the most likely way a potential offender may approach your home and position your cameras to give you the best coverage of these areas.8) The camera’s casing is resistant to water, different weather conditions and tampering. However, the cable and connectors are vulnerable and require protection.9) Even though the camera is weather and water-resistant, prolonged exposure to adverse weather conditions such as sunlight or excessive moisture, may eventually damage the internal components of the camera and adversely affect its performance.
Connecting your Camera Mounting your Camera
Connect the video & audio output and DC power connection on the camera to the corresponding connections on the video, audio & power cable.
Connect the video (and audio if available) connection on the other end of the cable to a video (and audio) input on the DVR.
Connect the power adapter to the cable power socket and then to a spare wall socket.
For multi-camera packs, use a power splitter cable (if included).
Twist the video connection to lock it in place.
The camera can be mounted onto a flat, vertical or horizontal surface using the supplied mounting screws. Materials such as hardwood, brick or masonry are ideal. You can mount the camera onto a metal surface, but you’ll need to supply your own mounting hardware.
To mount the camera:
• Loosen the 2 hex screws (T6H) on the base of the camera mount. The mounting bracket will come away from the dome assembly
• If you’re mounting to a wooden surface, screw the bracket directly to the surface
• When mounting to a masonry surface, you’ll need to use the included wall plugs
Aiming the camera:
• Gently loosen the 2 hex screws (T6H) located at the base of the camera
• The gimbal mount can be rotated left or right
• The camera can be aimed in almost any direction from wherever you choose to mount it. After you’ve finished adjusting the viewing angle, tighten each screw to lock the camera’s position in place
Positioning the cables:
• When running the cable, try to avoid bending it at sharp angles
• Avoid positioning the cable near live electrical wiring as electrical current generates a magnetic field which can interfere with the signal from your camera
PTZ
7 5 3 1
8 6 4 2
eSATA
HDMI LAN & USB B A DC 12VINVGAVIDEO IN AUDIO OUT
AUDIO IN
Video, Audio & Power Cable
Joystick
The joystick is used to set the signal from the camera.
1
2
3i

For more information on this product visit www.swann.com
Compact dome camera is discreet & sees wide angles in 1080p HD• Seeing is believing with 1080p (2.1 Megapi xels) HD perfect for close up detail such as license plates,
faces, clothing colors & more• See a wider field of view over a shorter distance with the powerful fixed 3.6mm lens• Latest i nfrared cut filter & LEDs produce amazing night vision clarity in low light to 100ft/30m, with
sturdy aluminum camera construction to suit indoor & outdoor applications with IP66 rating for any weather conditions
• Camera features a built-in microphone so you can see & hear what’s happening^ and longer 100ft/30m cable offers more options when choosing a mounting location for the camera
• Use the On-Screen Display (OSD) controller & built-in software to customize the camera settings including color, brightness & wide dynamic range for the best video quality every time
• This camera can be used in combination with other analog HD surveillance technology including AHD, TVI, CVI from Swann & other brands. It’s the perfect addition if you already have a recording solution (DVR) & need extra cameras
• A compact dome surveillance camera that’s small in size yet has powerful features & it’s perfect for discreet surveillance in wide areas such as offices, entrances, reception areas, living rooms, yards & more
SWPRO-1080FLD
HD Dome Security Camera1080p HD Mini-Dome Camera with 3.6mm Wide Angle Lens
HIGH DEFINITION1080P
NIGHT VISION
EASY INSTALLATION
WEATHER PROOF
WIDE ANGLE
AUDIO MONITORING
3.6mm
1080PPRO-SERIES HD
Security Made Smarter
#1Works with all leading surveillance brands*
UniversallyCompatible

For more information on this product visit www.swann.com
Our PromiseSwann stands by its promise of Lifetime Support to make advanced security easy to use, install and maintain. Everything is in the pack but if you need it Swann’s help desk is available 24 hours a day, 7 days a week for the life of the product.
Installation is easyDo-it-YourselfInstalling this Swann product is simple. For instructions, tips and videos see the operating instructions in this pack or visit www.swann.comProfessional InstallationNeed extra help? We have an installer in your region! For more visit www.swann.com
What’s in the box?All installation accessories included
• PRO-1080FLD™ Camera• BNC Cable 100ft / 30m• Power Adapter• Mounting Screws & Plugs• Operating Instructions• Theft Deterrent Stickers
See the differenceEnjoy video resolution that’s superior to traditional security systems with realistic colors, wide angle and impressive image quality.
SpecificationsPRO-1080FLD™ CAMERA
VideoVideo Quality 1080pViewing Angle 90°
Night VisionNight Vision Distance Up to 66ft / 20mIR cut Filter Yes
General Indoor / Outdoor Indoor / Outdoor, IP66 ratedAudio Range Up to 16ft / 5m Operating Power DC 12VOperating Temperature -4°F ~ 122°F / -20°C ~ 50°CBody Construction AluminumDimensions - Camera LWH 2.72” x 2.72” x 2.17” / 69mm x 69mm x 55mmWeight - Camera 0.42lbs / 195g
CodeSwann Code SWPRO-1080FLD
Take a closer look
Weather resistant aluminum casing
90° Viewing angle
Discreet 2.72” / 69mm diameter
Powerful night vision from 12 infrared LEDs
Mounting holes for easy installation
Color video image sensor
HD Dome Security Camera1080p HD Mini-Dome Camera with 3.6mm Wide Angle Lens
Traditional Surveillance
1080p HD
* As the world’s #1 name in DIY video surveillance Swann is proud to launch new Universally Compatible cameras that are built for the leading Analog HD surveillance technology including AHD, TVI, CVI from Swann & other brands

PRO-SERIES HD
On-Screen DisplayINSTRUCTION MANUAL
2
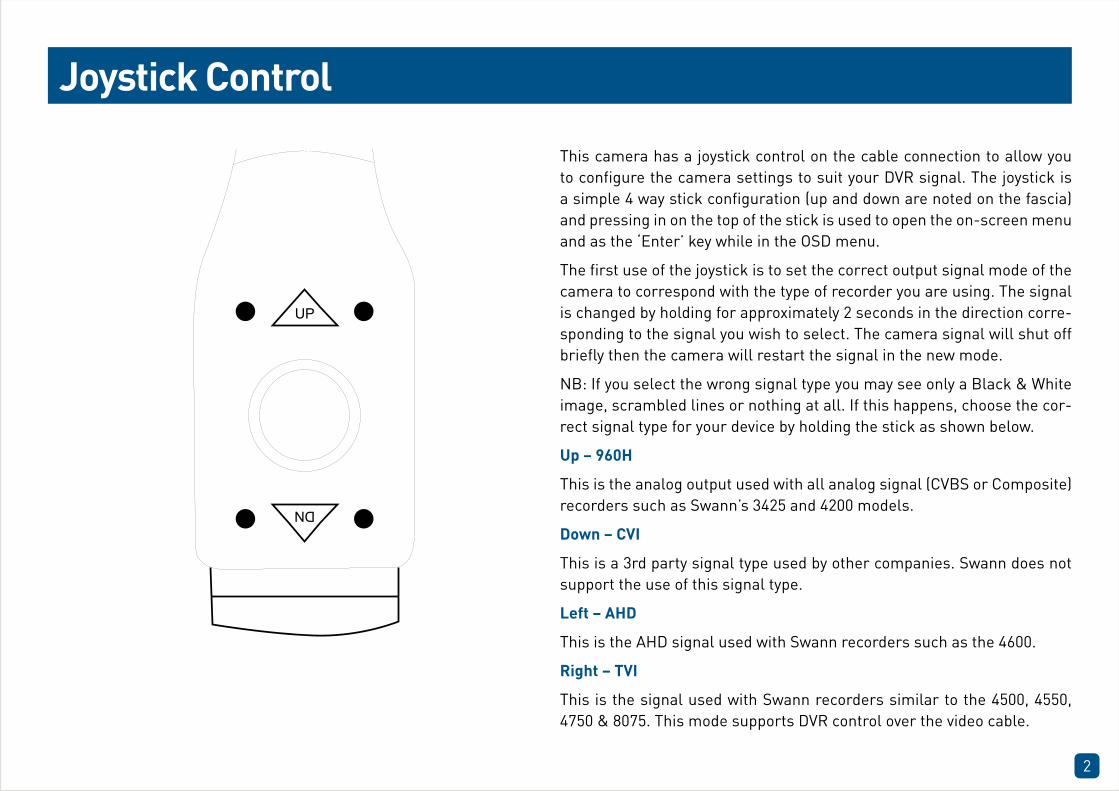
Joystick ControlThis camera has a joystick control on the cable connection to allow you to configure the camera settings to suit your DVR signal. The joystick is a simple 4 way stick configuration (up and down are noted on the fascia) and pressing in on the top of the stick is used to open the on-screen menu and as the ‘Enter’ key while in the OSD menu.
The first use of the joystick is to set the correct output signal mode of the camera to correspond with the type of recorder you are using. The signal is changed by holding for approximately 2 seconds in the direction corre-sponding to the signal you wish to select. The camera signal will shut off briefly then the camera will restart the signal in the new mode.
NB: If you select the wrong signal type you may see only a Black & White image, scrambled lines or nothing at all. If this happens, choose the cor-rect signal type for your device by holding the stick as shown below.
Up – 960H
This is the analog output used with all analog signal (CVBS or Composite) recorders such as Swann’s 3425 and 4200 models.
Down – CVI
This is a 3rd party signal type used by other companies. Swann does not support the use of this signal type.
Left – AHD
This is the AHD signal used with Swann recorders such as the 4600.
Right – TVI
This is the signal used with Swann recorders similar to the 4500, 4550, 4750 & 8075. This mode supports DVR control over the video cable.
UP
DN
3
Setting up the recorder
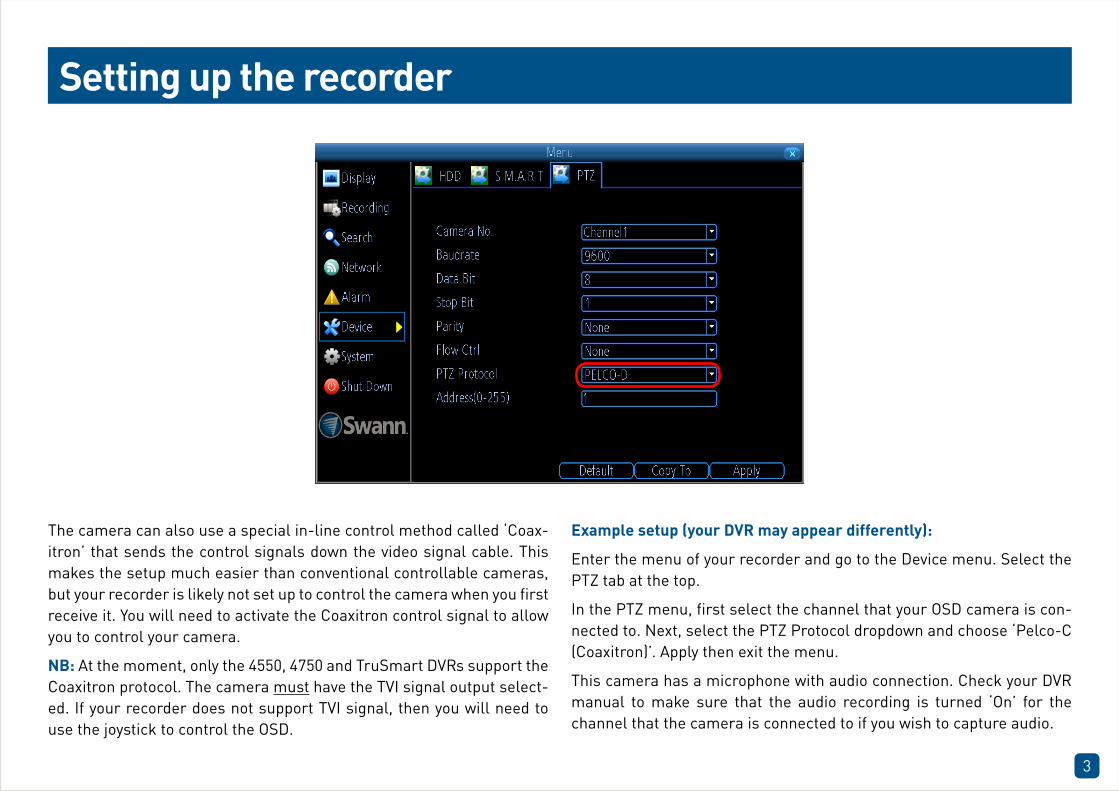
The camera can also use a special in-line control method called ‘Coax-itron’ that sends the control signals down the video signal cable. This makes the setup much easier than conventional controllable cameras, but your recorder is likely not set up to control the camera when you first receive it. You will need to activate the Coaxitron control signal to allow you to control your camera.
NB: At the moment, only the 4550, 4750 and TruSmart DVRs support the Coaxitron protocol. The camera must have the TVI signal output select-ed. If your recorder does not support TVI signal, then you will need to use the joystick to control the OSD.
Example setup (your DVR may appear differently):
Enter the menu of your recorder and go to the Device menu. Select the PTZ tab at the top.
In the PTZ menu, first select the channel that your OSD camera is con-nected to. Next, select the PTZ Protocol dropdown and choose ‘Pelco-C (Coaxitron)’. Apply then exit the menu.
This camera has a microphone with audio connection. Check your DVR manual to make sure that the audio recording is turned ‘On’ for the channel that the camera is connected to if you wish to capture audio.

4
Controlling the OSD menu
MAIN MENUAE
DAY-NIGHTWB
VIDEO SETTINGLANGUAGERESETSAVE-EXITEXIT
ENGLISH
2
4
3
1
The OSD menu is controlled by the PTZ controls on your DVR (as seen above). The Iris+ button (1) on your recorder serves as the menu activate button, as well as your ‘Enter’ button inside the menu. You will see the CR (2) icon whenever you can use the ‘Enter’ (Iris+) button to access a sub-menu.
The left and right PTZ control buttons (3) are used to change the option you currently have selected, when there are arrows (4) on a menu op-tion.
As mentioned previously, the joystick also can be used to control the menu. Don’t forget that pressing in on the joystick functions as your ‘En-
ter’ key and the left and right movement will change options with arrows (4) on a menu option.
The Zoom, Focus and Speed functions have no effect when using the “FLB” or “FLD” camera as they are fixed lens.
The “ZLB” and “ZLD” camera models have an electronic zoom autofocus lens and support zoom and focus using the Coaxitron or RS-485 system depending on the type of DVR you have, use
the DVR controls as shown to zoom the lens in and out and manually control focus if needed.
Don’t forget, to access the PTZ controls, select your camera and the camera toolbar will appear (as seen be-low). Then, choose the PTZ button (highlighted) to open the PTZ controls to get started.
5
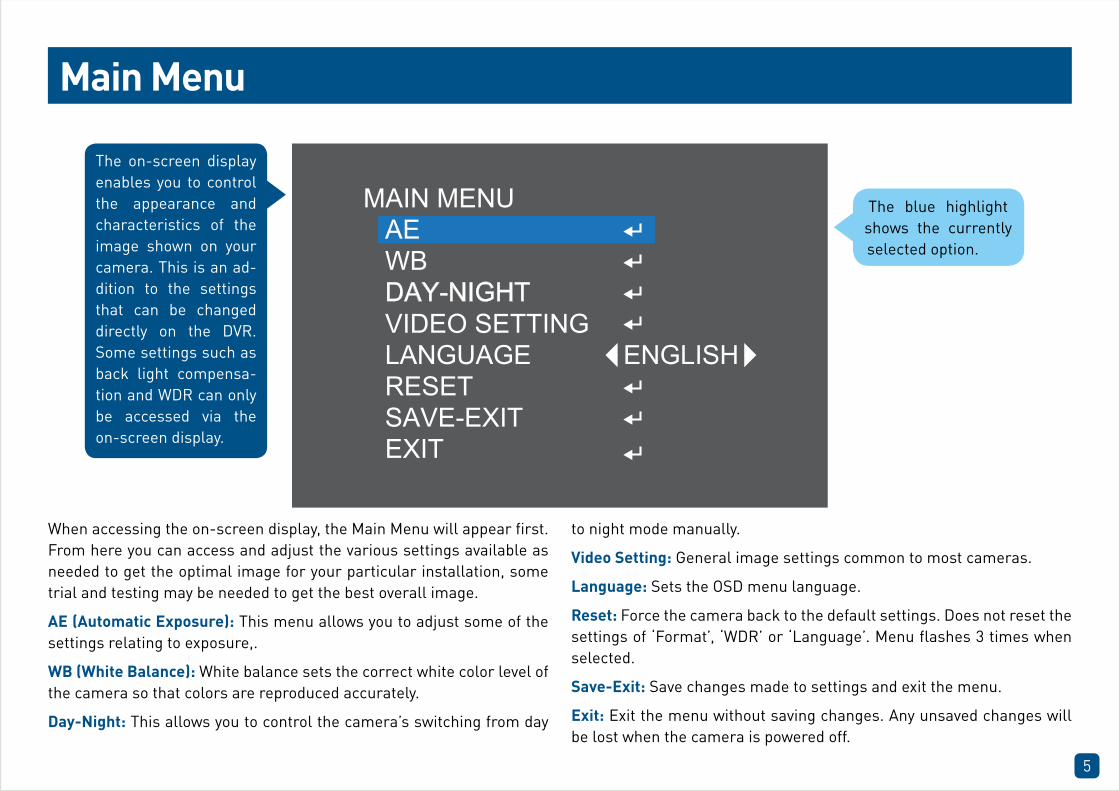
Main Menu
The on-screen display enables you to control the appearance and characteristics of the image shown on your camera. This is an ad-dition to the settings that can be changed directly on the DVR. Some settings such as back light compensa-tion and WDR can only be accessed via the on-screen display.
When accessing the on-screen display, the Main Menu will appear first. From here you can access and adjust the various settings available as needed to get the optimal image for your particular installation, some trial and testing may be needed to get the best overall image.
AE (Automatic Exposure): This menu allows you to adjust some of the settings relating to exposure,.
WB (White Balance): White balance sets the correct white color level of the camera so that colors are reproduced accurately.
Day-Night: This allows you to control the camera’s switching from day
to night mode manually.
Video Setting: General image settings common to most cameras.
Language: Sets the OSD menu language.
Reset: Force the camera back to the default settings. Does not reset the settings of ‘Format’, ‘WDR’ or ‘Language’. Menu flashes 3 times when selected.
Save-Exit: Save changes made to settings and exit the menu.
Exit: Exit the menu without saving changes. Any unsaved changes will be lost when the camera is powered off.
MAIN MENUAE
DAY-NIGHTWB
VIDEO SETTINGLANGUAGERESETSAVE-EXITEXIT
ENGLISH
The blue highlight shows the currently selected option.

6
AE (Auto Exposure)
Brightness (1-20; default 4): This adjusts the direct gain of the image, making the whole scene look whiter or brighter. It is usually best to leave this as the default setting unless you have a specific requirement.
Exposure Mode (Globe, Center, BLC, FLC): This sets the exposure time to account for the amount of light present and how long the sen-sor should collect light before producing an image. The default setting of ‘Globe’ selects automatic exposure settings. Center uses automatic settings as well, but biases the center of the camera image when calcu-lating. The BLC setting allows manual adjustment in a range. Helpful for situations where there is light in front of the camera that is placing the
subject area in shadow. FLC is similar to BLC, but for instances where the light is coming from behind the camera rather than behind the sub-ject.
Gain (1-8; default 3): Gain is the amount of amplification on the gen-erated signal from the sensor. Typically, this needs to be set higher the less light is available for the camera to use. Using higher gain settings will result in higher noise (static) being observed on the image, again some experimentation is needed to get the best setting.
Return: Select this to go back to the Main Menu.
EXPOSUREBRIGHTNESS
GAINEXPOSURE
RETURN
GLOBE3
5
7
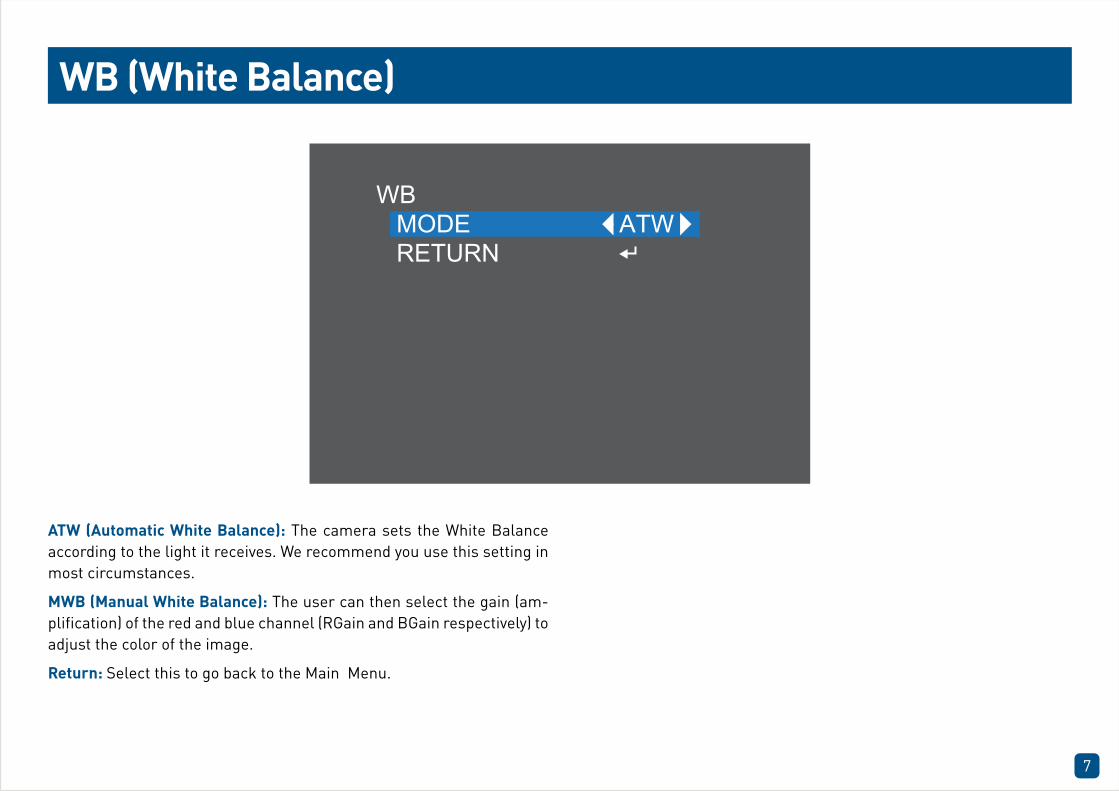
WB (White Balance)
WBMODERETURN
ATW
ATW (Automatic White Balance): The camera sets the White Balance according to the light it receives. We recommend you use this setting in most circumstances.
MWB (Manual White Balance): The user can then select the gain (am-plification) of the red and blue channel (RGain and BGain respectively) to adjust the color of the image.
Return: Select this to go back to the Main Menu.

8
Day-Night
DAY/NIGHTMODERETURN
EXT
Ext & Auto: The camera determines when to switch from day to night mode, Auto is the best option as this will give you colour during the day and Black and White at night.
Colour: The camera will remain in day (colour) mode. The IR filter will stay activated and the camera will not be able to use IR light either from the camera itself or from other sources. Only visible light will be de-tected by the camera. Use this if there is a lot of light (such as security lights or street lights etc) at night and your camera can use them to see colour images when the sun is down.
B/W: The camera will remain in night mode. The camera will switch to black and white display and the IR filter will be deactivated. In day time when the camera is outside, the combination of visible and IR light from the sun may cause the image to be washed out.
Return: Select this to go back to the Main Menu.

9
Video Setting
VIDEO SETTINGCONTRAST
COLOR GAIN
FORMAT
RETURN
PAL
4
10SHARPNESS 6
DNR 3
WDR OFF
Contrast (1-10; default 4): Contrast affects the color difference of the camera. Lower settings will make the image look more grey and blend-ed, while higher settings will make the light and dark areas of the image more pronounced.
Sharpness (1-20; default 5): The clarity of detail and edges in the im-age. Setting the sharpness too high will make the image and especially edges look pixelated. Setting the sharpness too low will result in a soft and slightly blurry image.
Color Gain (1-20; default 9): More commonly known as ‘Saturation’, the amount of color amplification in the image. Higher values will make the
colour more vivid, but can result in colour bleed (where the colour is projected outward slightly from the edges of an object). Set to a value that makes the colours look “right”.
DNR (1-15; default 5): Digital Noise Reduction aims to reduce the amount of noise (static) on the image resulting from the amplification of the signal. Noise is most commonly seen in low-light conditions so you should set a DNR level at night when the camera is in night mode for best results. Setting this value too high can result in reduced clarity of the image when object are moving relatively quickly through the scene.

10
Video Setting (cont.)
VIDEO SETTINGCONTRAST
COLOR GAIN
FORMAT
RETURN
PAL
4
10SHARPNESS 6
DNR 3
WDR OFF
Format (PAL-NTSC): The reason for this option is mainly for indoor mounted cameras. Artificial lighting flickers slightly at the frequency of mains power which the cameras are able to see and shows on your screen as a flickering image. The correct setting here will eliminate any flicker produced by artificial lighting. For USA and Canada select NTSC, for AU, UK and most of Europe select PAL.
NB: If you are using the camera with an analog recorder (960H signal output), then you will need to be sure that you have the correct PAL or NTSC mode selected here for your region or DVR setting. Having the wrong selection can result in a poor quality black and white signal being
seen by the DVR or in some cases no signal at all.
WDR: Wide Dynamic Range causes the camera to take multiple expo-sures and average the result. This will reduce the impact of different light levels on the image, causing dark areas to be brighter and reduc-ing the flaring of exceptionally bright areas. This setting may increase the amount of noise (static) on the image.
Return: Select this to go back to the Main Menu.
Note: For camera connection instructions and an explanation of the PTZ controls, please consult the camera and DVR instruction manuals avail-able at our website.

11
Helpdesk & Technical SupportTechnical Support E-mail: [email protected]
Telephone Helpdesk
USA Toll Free 1-800-627-2799
USA Parts & Warranty 1-800-627-2799
(M-F, 9am-5pm US PT)
AUSTRALIA 1800 788 210
NEW ZEALAND Toll Free 0800 479 266
UK 0808 168 9031
Security Made Smarter 1080FLDOSD030516E | © Swann 2016