Embed Size (px)
Citation preview

Address: 1000 Seville Road, Wadsworth, OH 44281 Phone: 1.800.924.5172 Web: www.ecstuning.com
This tutorial is provided as a courtesy by ECS Tuning.
Proper service and repair procedures are vital to the safe, reliable operation of all engine vehicles as well as the personal safety of those per-forming the repairs. Standard safety procedures and precautions (including use of safety goggles and proper tools and equipment) should be followed at all times to eliminate the possibility of personal injury or improper service which could damage the vehicle or compromise its safety.
Although this material has been prepared with the intent to provide reliable information, no warranty (express or implied) is made as to its accu-racy or completeness. Neither is any liability assumed for loss or damage resulting from reliance on this material. SPECIFICALLY, NO WARRANTY OF MERCHANTABILITY, FITNESS FOR A PARTICULAR PURPOSE OR ANY OTHER WARRANTY IS MADE OR TO BE IMPLIED WITH RESPECT TO THIS MATERIAL. In no event will ECS Tuning, Incorporated or its affiliates be liable for any damages, direct or indirect, consequential or compensatory, arising out of the use of this material.
Heavy Duty Snub Mount
Installation
best viewed in Acrobat® Reader®
Part Number ES2597993for Audi B5 S4
Address: 1000 Seville Road, Wadsworth, OH 44281 Phone: 1.800.924.5172 Web: www.ecstuning.com
Heavy Duty Snub Mount Installation
2
ES2597993
Tools• ratchet• T25 torx• T30 torx• T45 torx• 6mm hex driver• wood blocks• screwdriver• vice grips• pry bar
View of underside, looking towards front of vehicle.
Mount basket
Snub mountMount bracket
B5 S4 snub mount components
Installation overview(1) Raise and support the vehicle safely(2) Place vehicle in ‘service mode’(3) Pry old snub mount bumper off of mount bracket(4) Lubricate new poly snub mount bumper and press into position(5) Reassemble vehicle front end
Address: 1000 Seville Road, Wadsworth, OH 44281 Phone: 1.800.924.5172 Web: www.ecstuning.com
Heavy Duty Snub Mount Installation
3
ES2597993
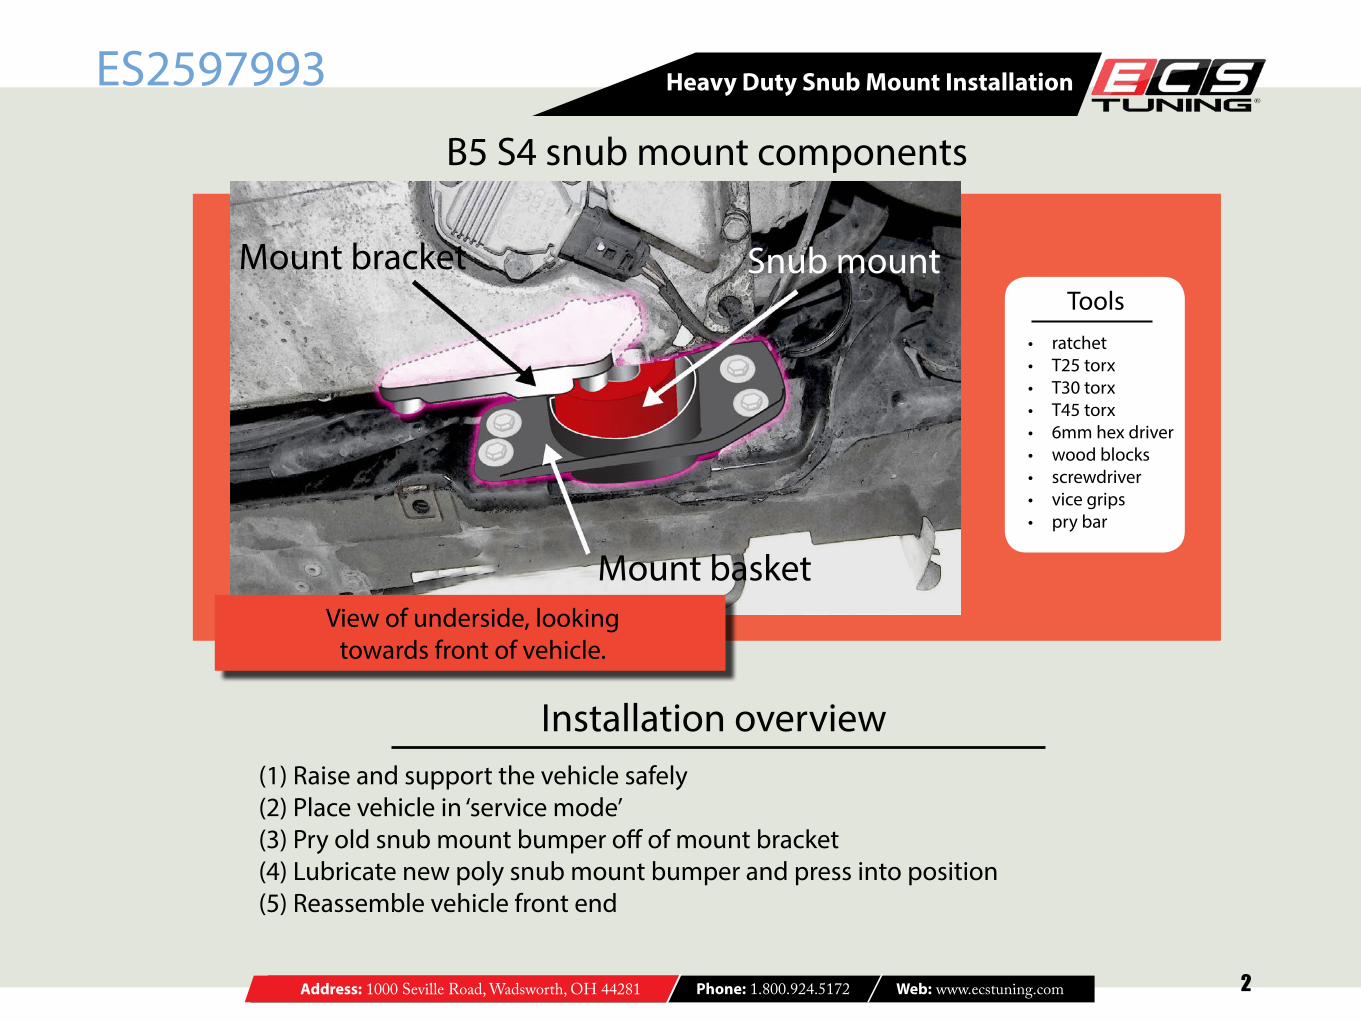
Step 1Raise the car safely, using jack stands and wheel chocks.
Using a flat-tipped screwdriver, remove the retaining screws on the belly pan. Turn counterclockwise 90 degrees to release.
(Note: Many belly pans are loose or damaged. Pan fasteners com-monly go missing from improper installation. The belly pan protects vital engine components and improves vehicle aerodynamics. ECS Tuning stocks both belly pans and fasteners. Purchase fasteners individually or in a complete kit containing screws and clip nuts.)
Step 2Place the vehicle in the service position. First, raise the hood.
Then remove the fender liner retaining screws with a T25 torx. There are six total, three on each side.
belly pan
T25 Torx

Address: 1000 Seville Road, Wadsworth, OH 44281 Phone: 1.800.924.5172 Web: www.ecstuning.com
Heavy Duty Snub Mount Installation
4
ES2597993
Step 2 continued
Now remove the front grilles. They snap into place, so gently but firmly pry them out and away from the center line of the vehicle.
Remove the two bumper mount bolts using a 6mm Allen driver.
Address: 1000 Seville Road, Wadsworth, OH 44281 Phone: 1.800.924.5172 Web: www.ecstuning.com
Heavy Duty Snub Mount Installation
5
ES2597993
Step 2 continued
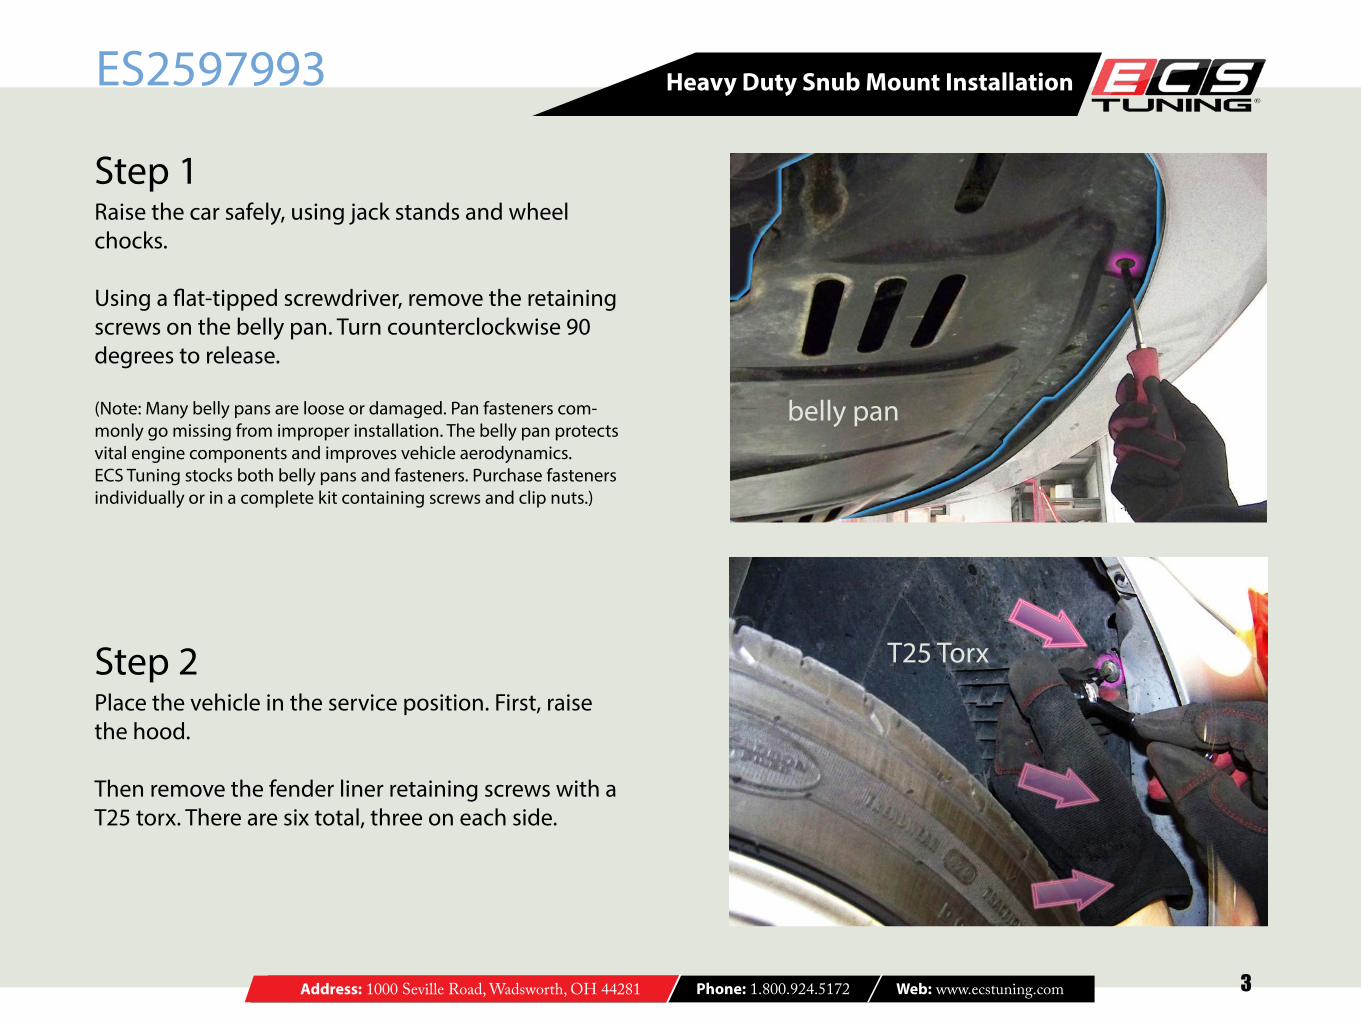
Grab the bottom corner of the bumper, and pull up and towards the front to disengage the bottom clip. Pull carefully, but firmly. Repeat on the other side of the vehicle.
Remove the bumper. This is far easier with a helper!
The bumper retaining clips are on each side of the vehicle fore of the wheel arch. They are C shaped and clamp the bumper both from above and below. To overcome them, pull the bumper as far back (to-wards the rear of the vehicle) as possible. This can be made easier by removing the front wheels.
Then, pull the topmost corner of the bumper away from the body and down to disengage the top clips. It will require a strong tug!
Address: 1000 Seville Road, Wadsworth, OH 44281 Phone: 1.800.924.5172 Web: www.ecstuning.com
Heavy Duty Snub Mount Installation
6
ES2597993
Step 2 continued
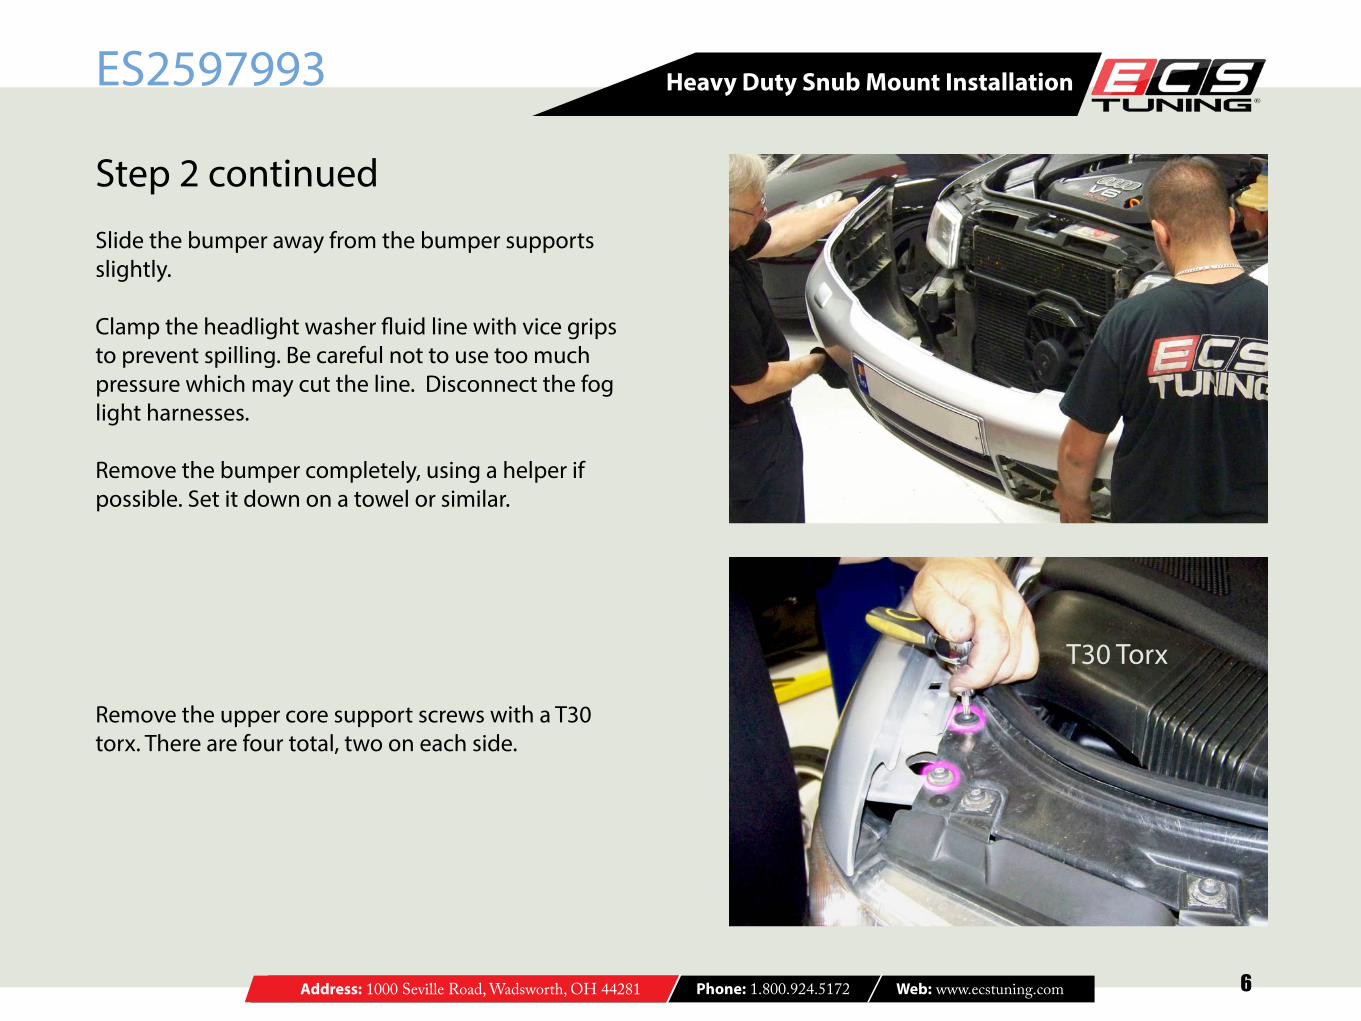
Remove the upper core support screws with a T30 torx. There are four total, two on each side.
Slide the bumper away from the bumper supports slightly.
Clamp the headlight washer fluid line with vice grips to prevent spilling. Be careful not to use too much pressure which may cut the line. Disconnect the fog light harnesses.
Remove the bumper completely, using a helper if possible. Set it down on a towel or similar.
T30 Torx
Address: 1000 Seville Road, Wadsworth, OH 44281 Phone: 1.800.924.5172 Web: www.ecstuning.com
Heavy Duty Snub Mount Installation
7
ES2597993
Step 2 continued
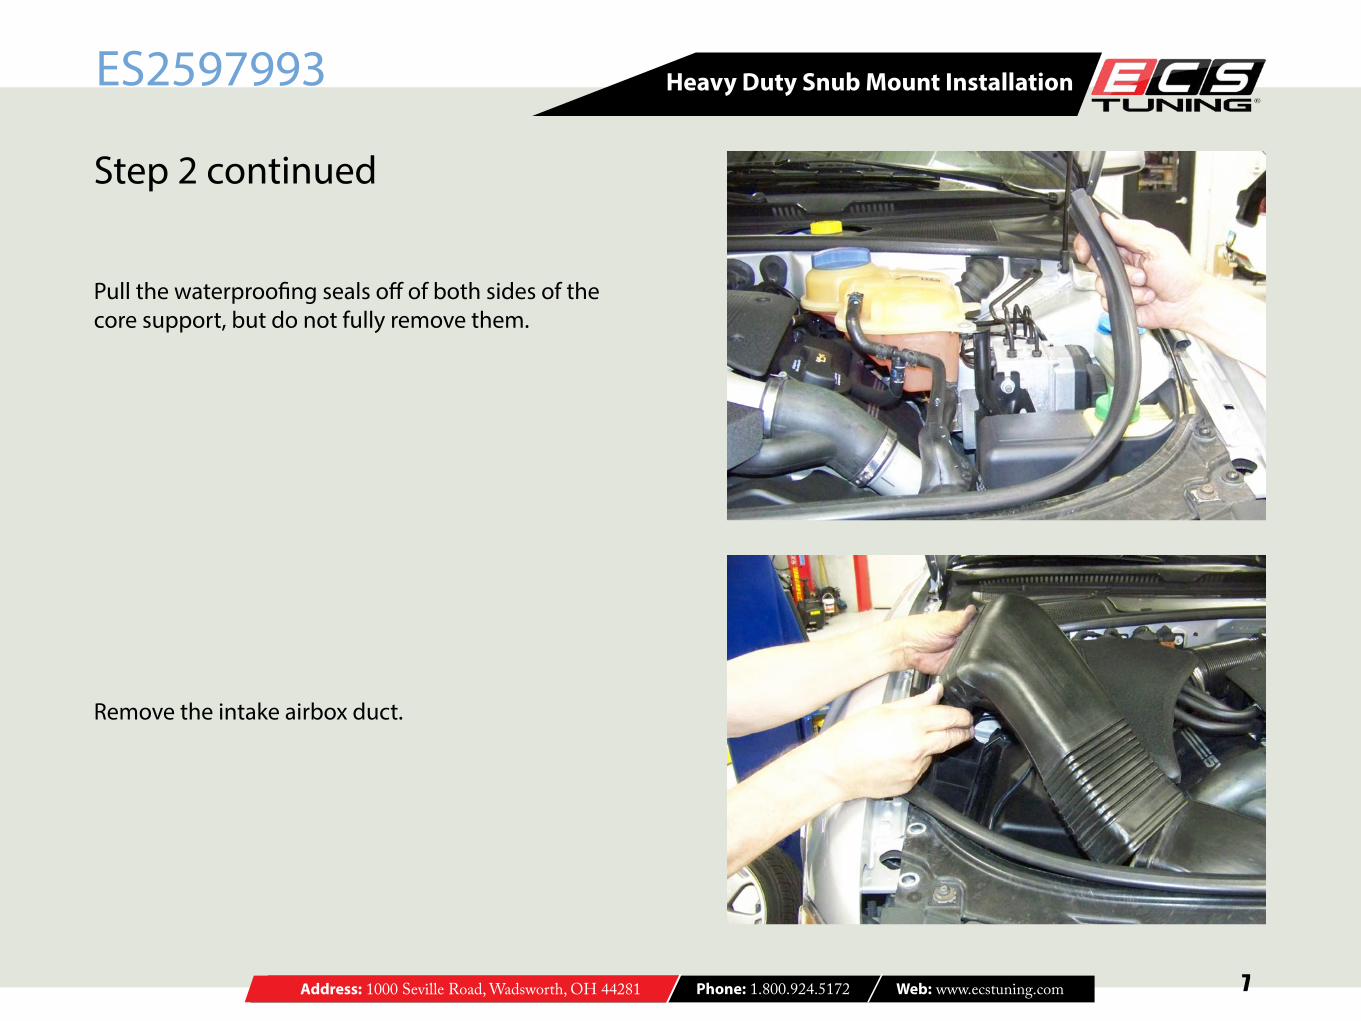
Remove the intake airbox duct.
Pull the waterproofing seals off of both sides of the core support, but do not fully remove them.
Address: 1000 Seville Road, Wadsworth, OH 44281 Phone: 1.800.924.5172 Web: www.ecstuning.com
Heavy Duty Snub Mount Installation
8
ES2597993
Step 2 continued
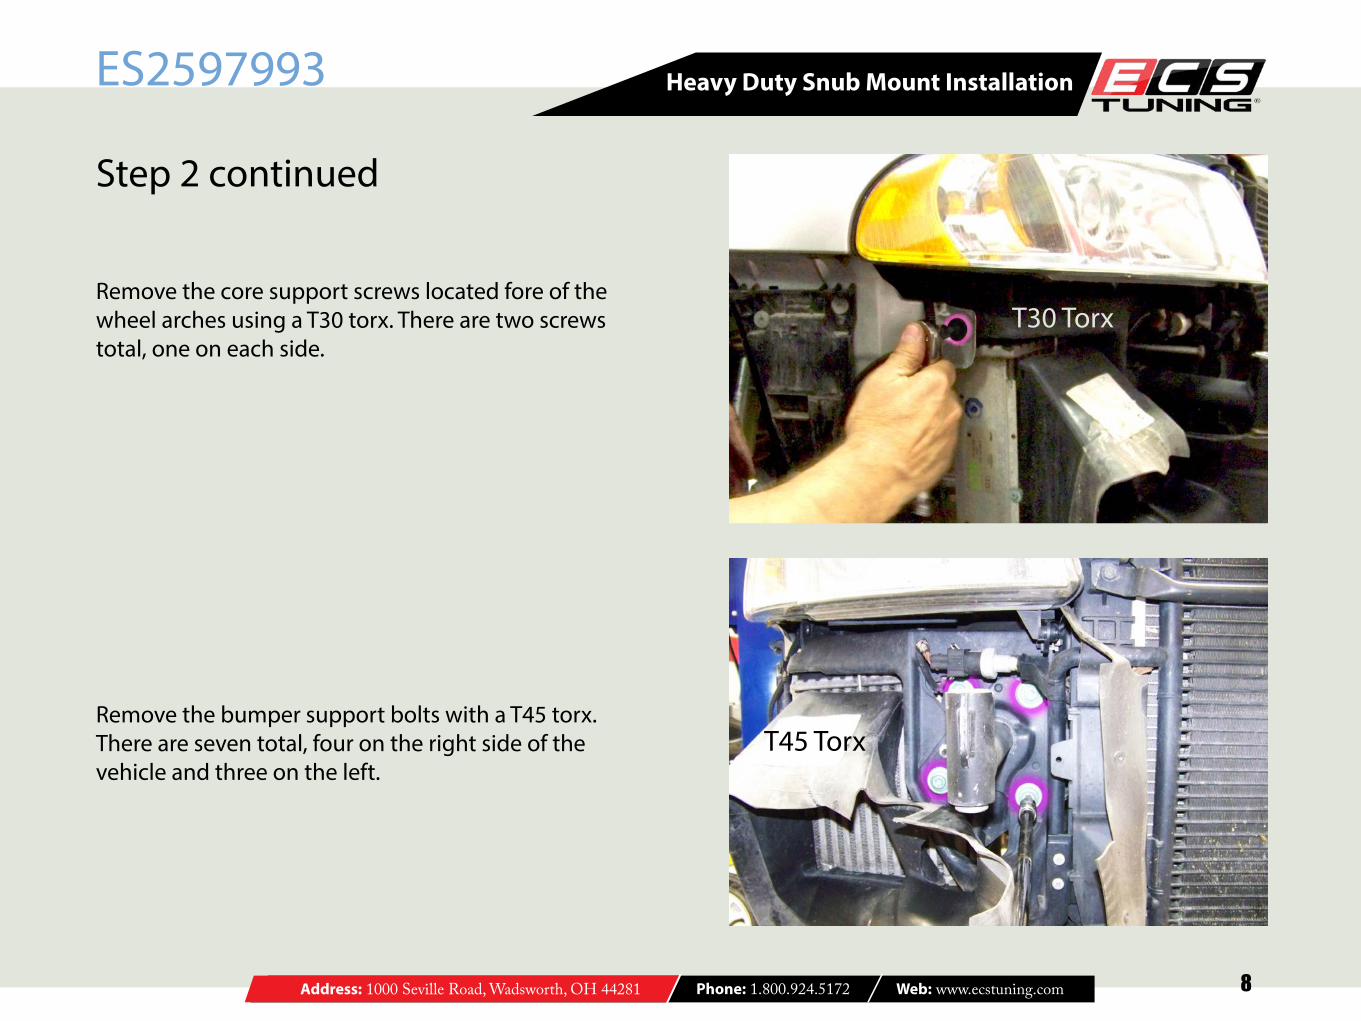
Remove the bumper support bolts with a T45 torx. There are seven total, four on the right side of the vehicle and three on the left.
Remove the core support screws located fore of the wheel arches using a T30 torx. There are two screws total, one on each side.
T30 Torx
T45 Torx
Address: 1000 Seville Road, Wadsworth, OH 44281 Phone: 1.800.924.5172 Web: www.ecstuning.com
Heavy Duty Snub Mount Installation
9
ES2597993
Step 2 continued
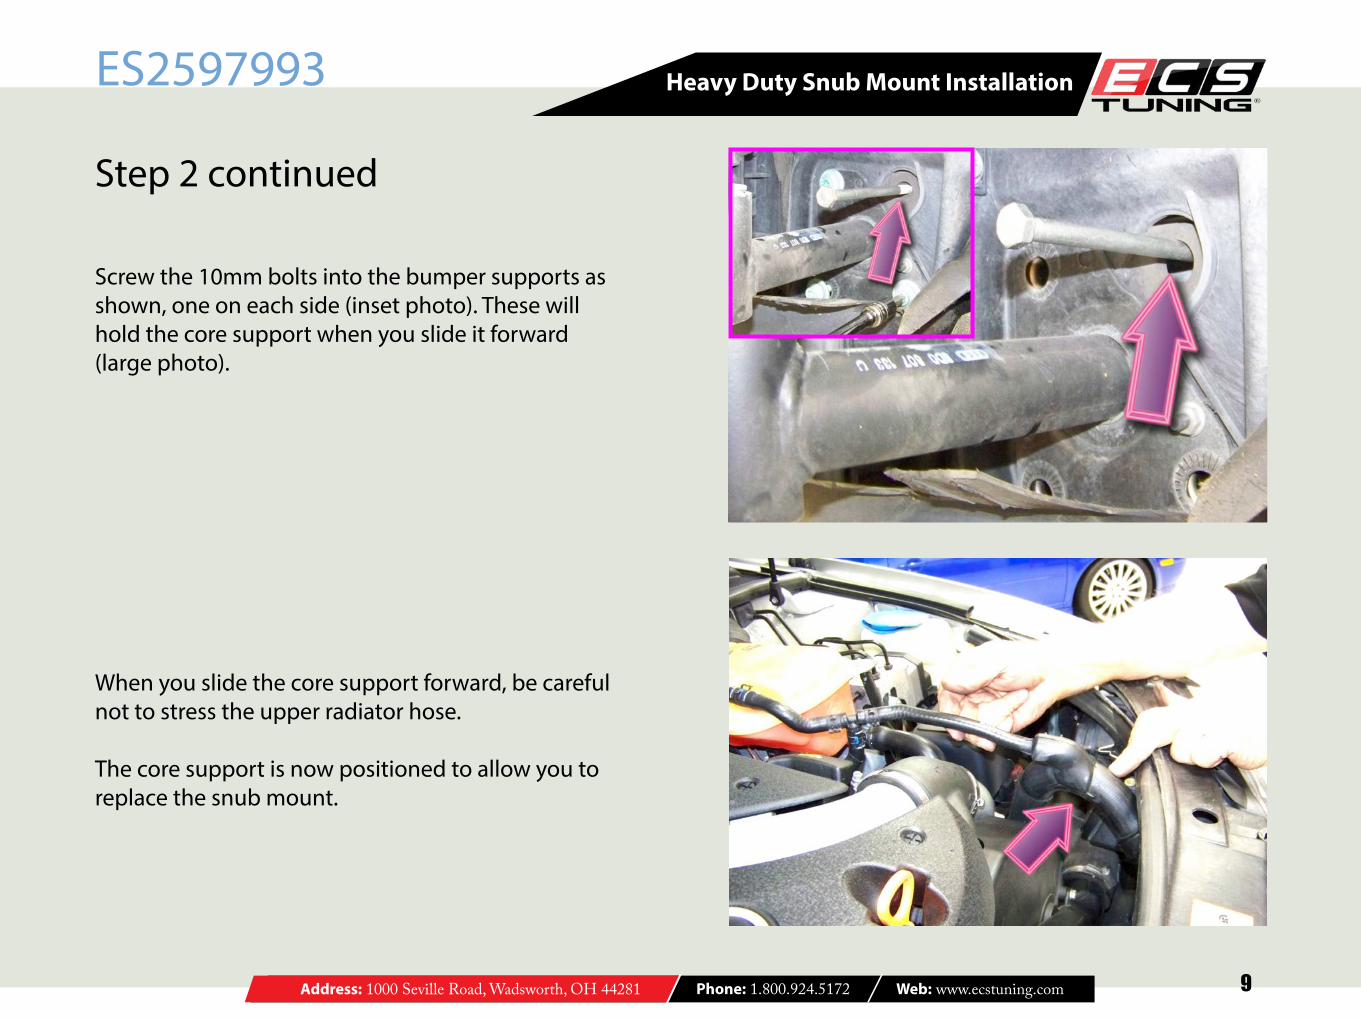
When you slide the core support forward, be careful not to stress the upper radiator hose.
The core support is now positioned to allow you to replace the snub mount.
Screw the 10mm bolts into the bumper supports as shown, one on each side (inset photo). These will hold the core support when you slide it forward (large photo).
Address: 1000 Seville Road, Wadsworth, OH 44281 Phone: 1.800.924.5172 Web: www.ecstuning.com
Heavy Duty Snub Mount Installation
10
ES2597993
Step 3
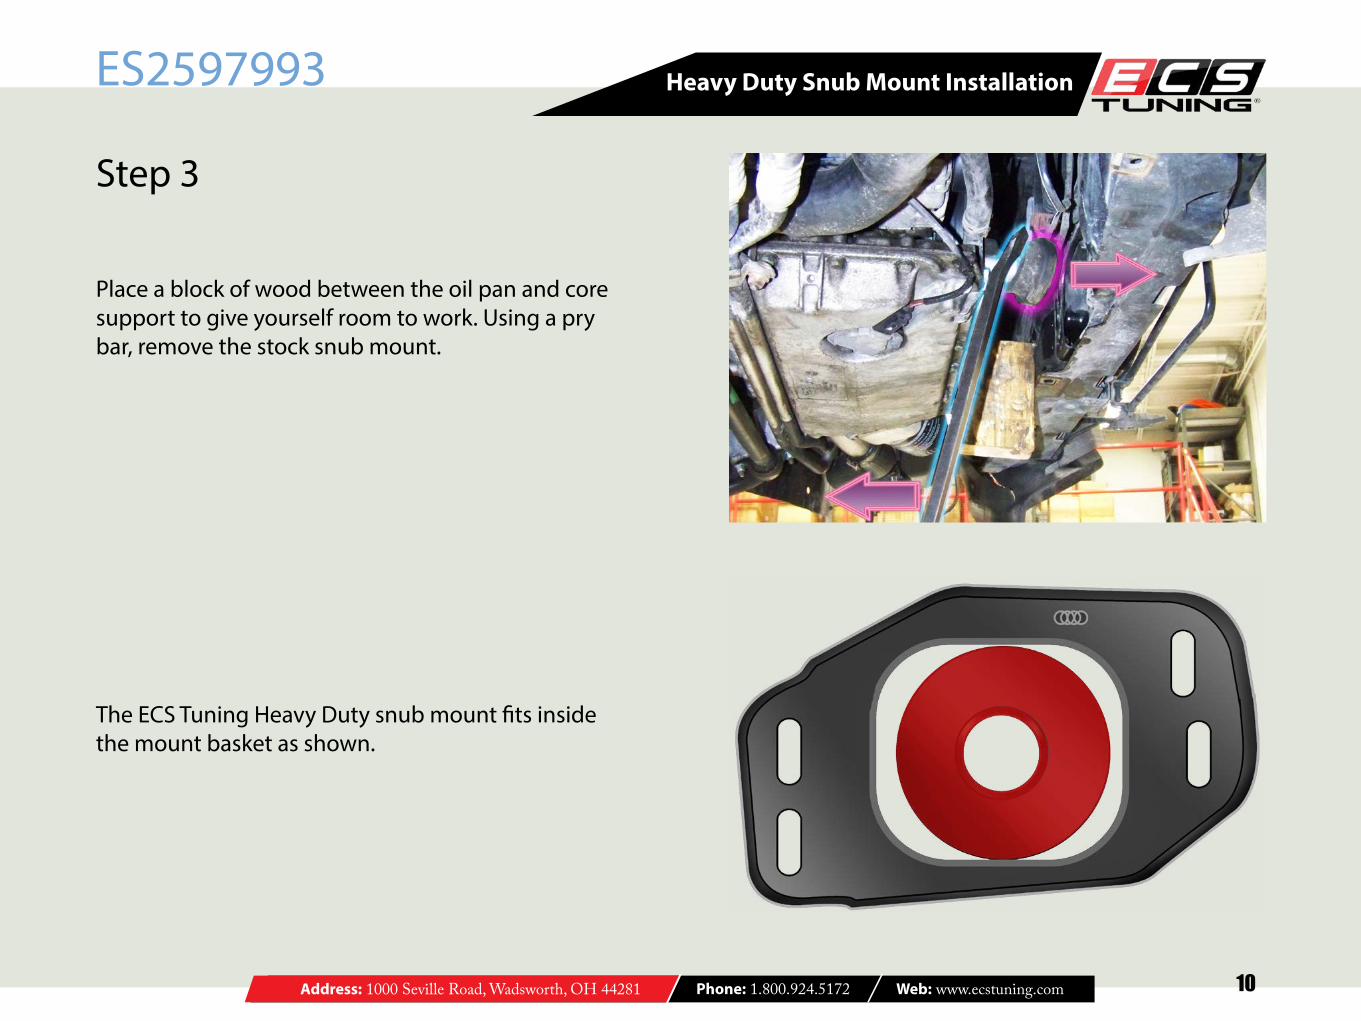
The ECS Tuning Heavy Duty snub mount fits inside the mount basket as shown.
Place a block of wood between the oil pan and core support to give yourself room to work. Using a pry bar, remove the stock snub mount.
Address: 1000 Seville Road, Wadsworth, OH 44281 Phone: 1.800.924.5172 Web: www.ecstuning.com
Heavy Duty Snub Mount Installation
11
ES2597993
Step 3 continued
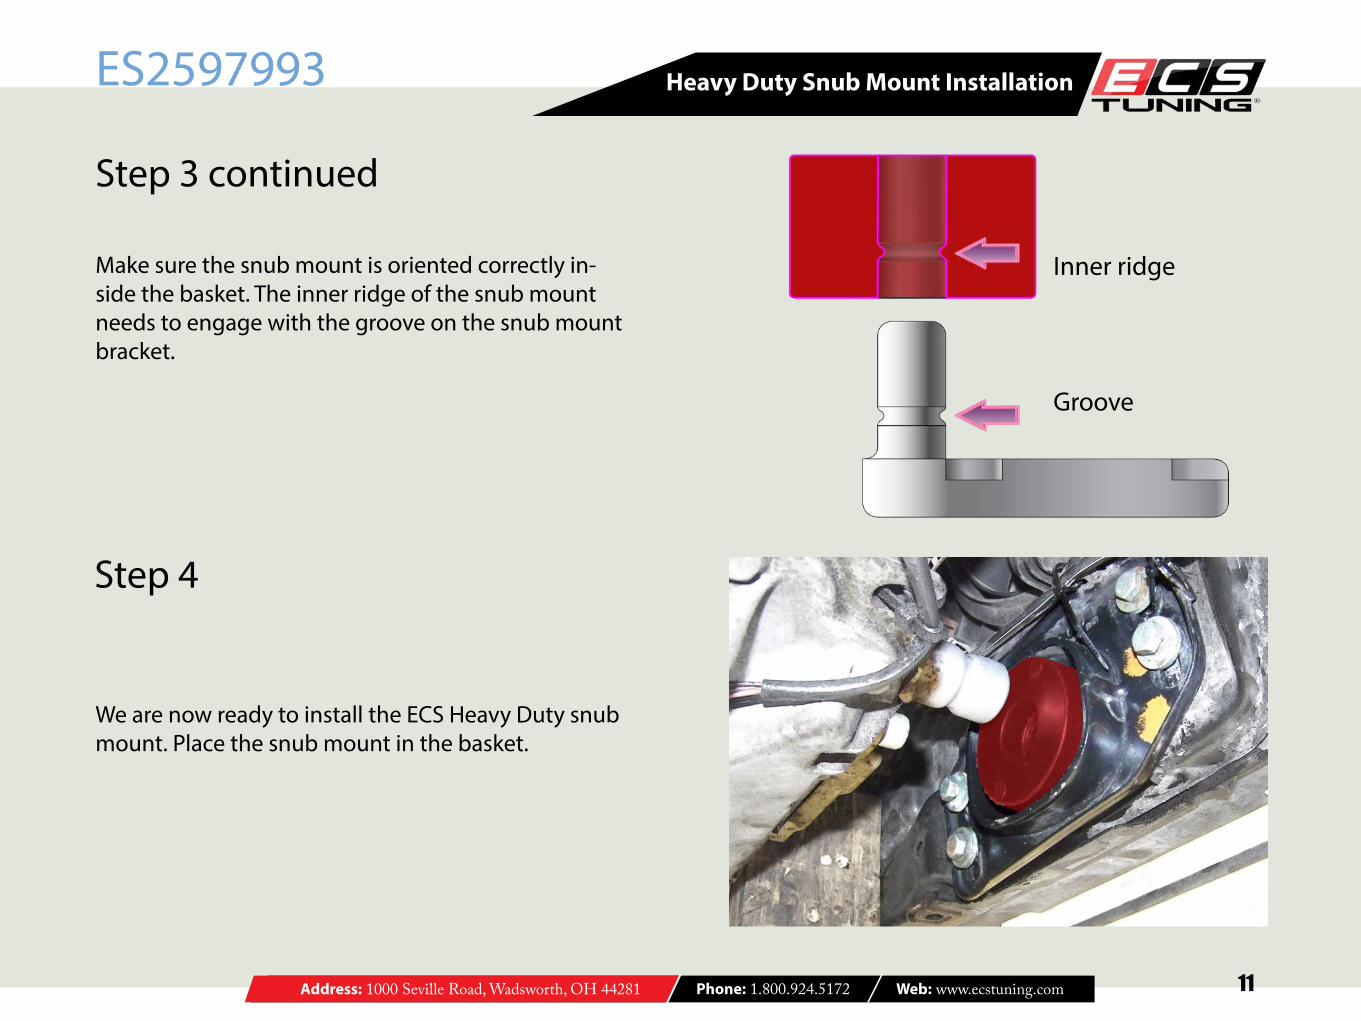
We are now ready to install the ECS Heavy Duty snub mount. Place the snub mount in the basket.
Make sure the snub mount is oriented correctly in-side the basket. The inner ridge of the snub mount needs to engage with the groove on the snub mount bracket.
Step 4
Inner ridge
Groove
Address: 1000 Seville Road, Wadsworth, OH 44281 Phone: 1.800.924.5172 Web: www.ecstuning.com
Heavy Duty Snub Mount Installation
12
ES2597993
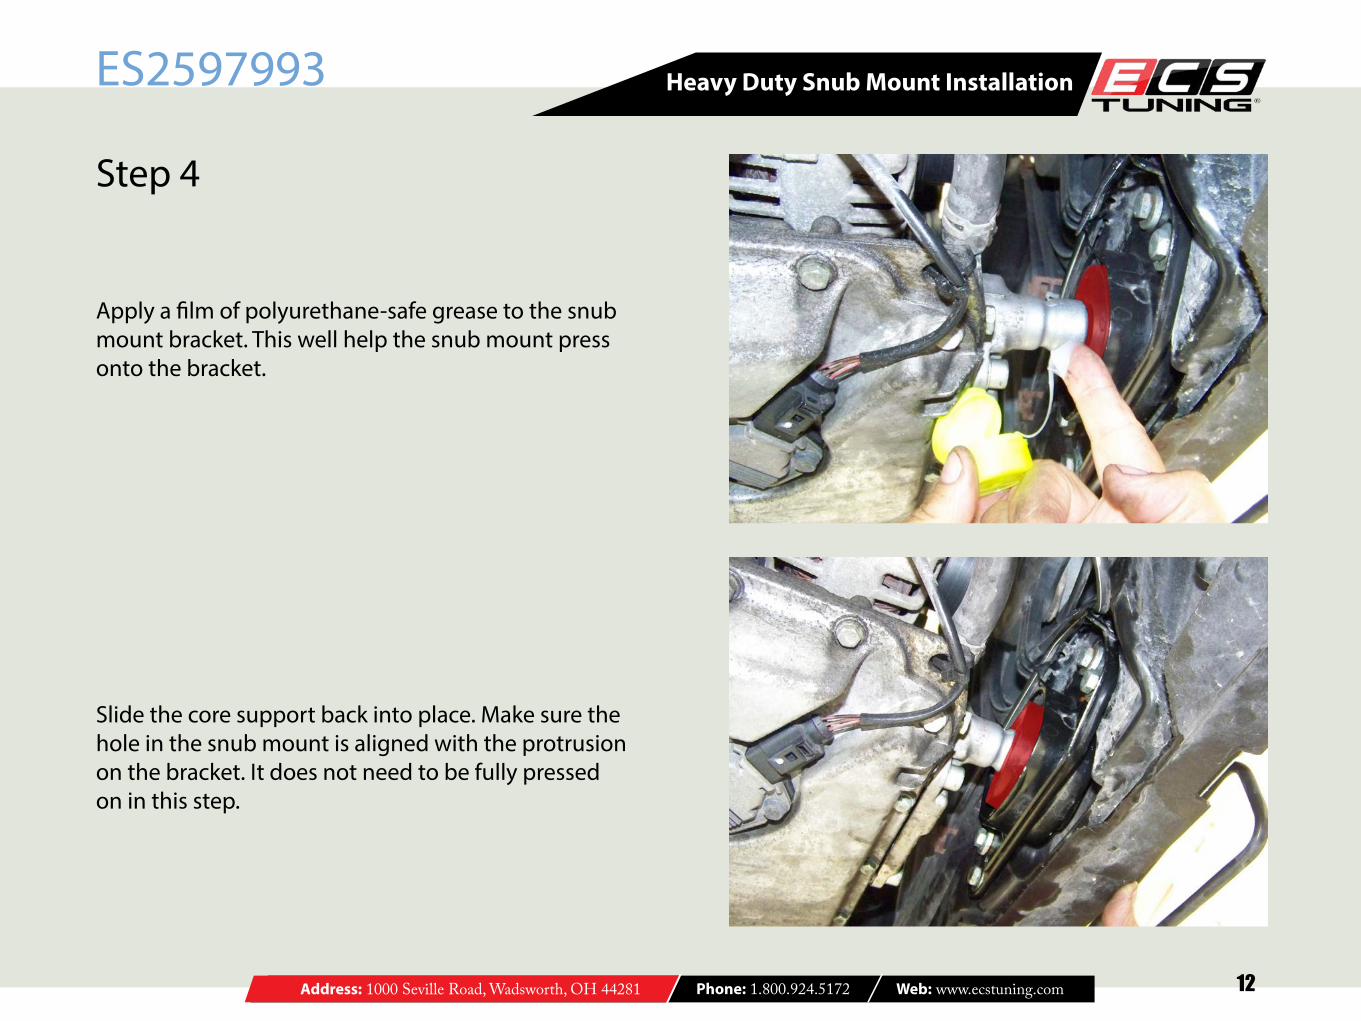
Apply a film of polyurethane-safe grease to the snub mount bracket. This well help the snub mount press onto the bracket.
Step 4
Slide the core support back into place. Make sure the hole in the snub mount is aligned with the protrusion on the bracket. It does not need to be fully pressed on in this step.
Address: 1000 Seville Road, Wadsworth, OH 44281 Phone: 1.800.924.5172 Web: www.ecstuning.com
Heavy Duty Snub Mount Installation
13
ES2597993
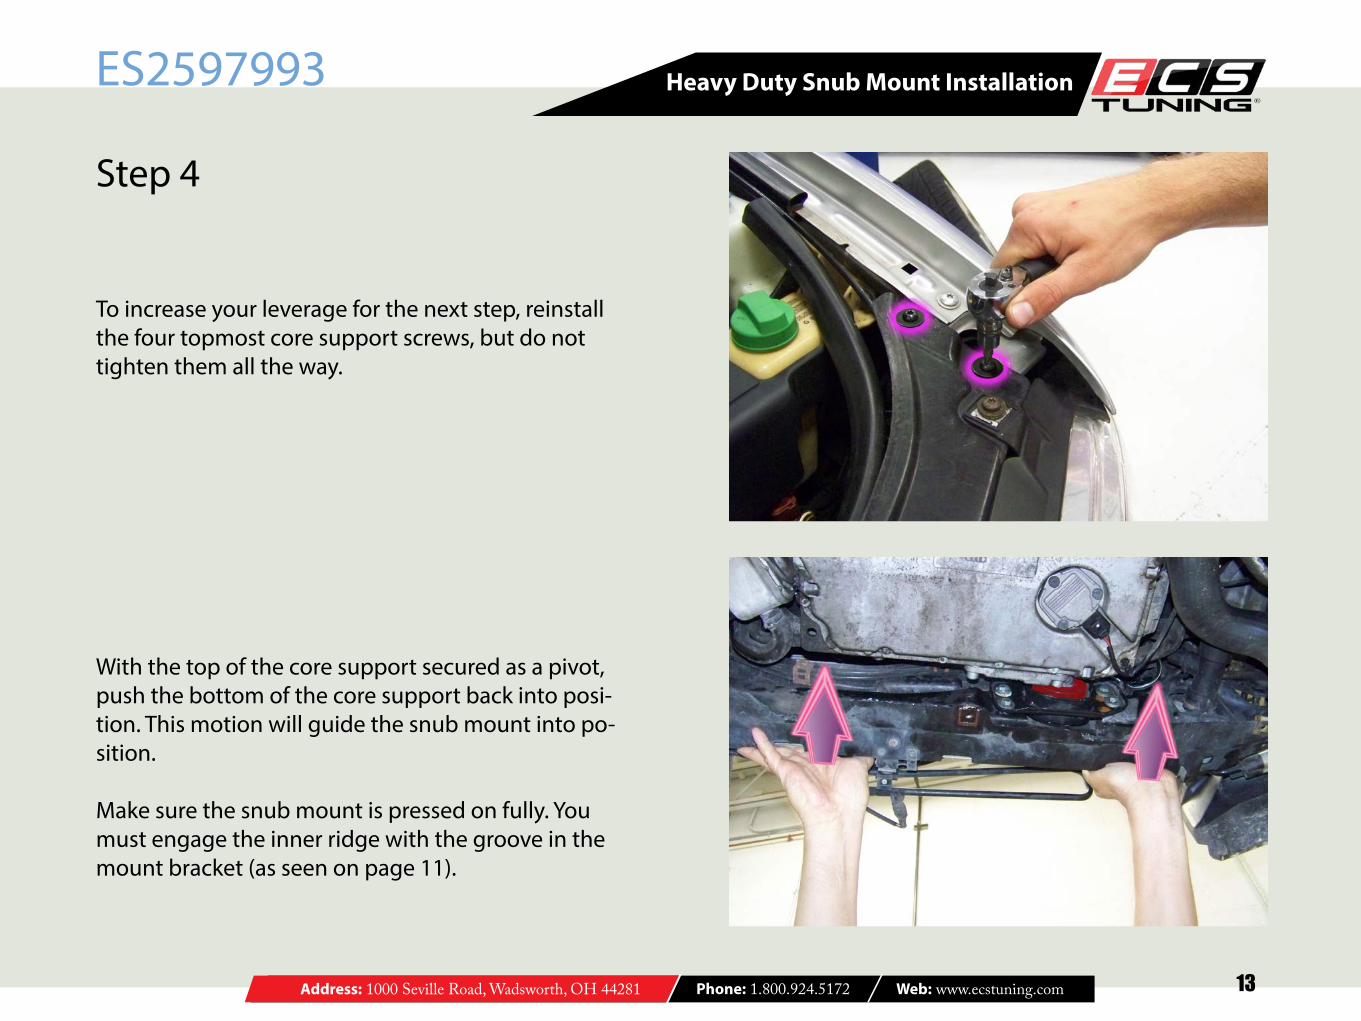
To increase your leverage for the next step, reinstall the four topmost core support screws, but do not tighten them all the way.
Step 4
With the top of the core support secured as a pivot, push the bottom of the core support back into posi-tion. This motion will guide the snub mount into po-sition.
Make sure the snub mount is pressed on fully. You must engage the inner ridge with the groove in the mount bracket (as seen on page 11).
Address: 1000 Seville Road, Wadsworth, OH 44281 Phone: 1.800.924.5172 Web: www.ecstuning.com
Heavy Duty Snub Mount Installation
14
ES2597993
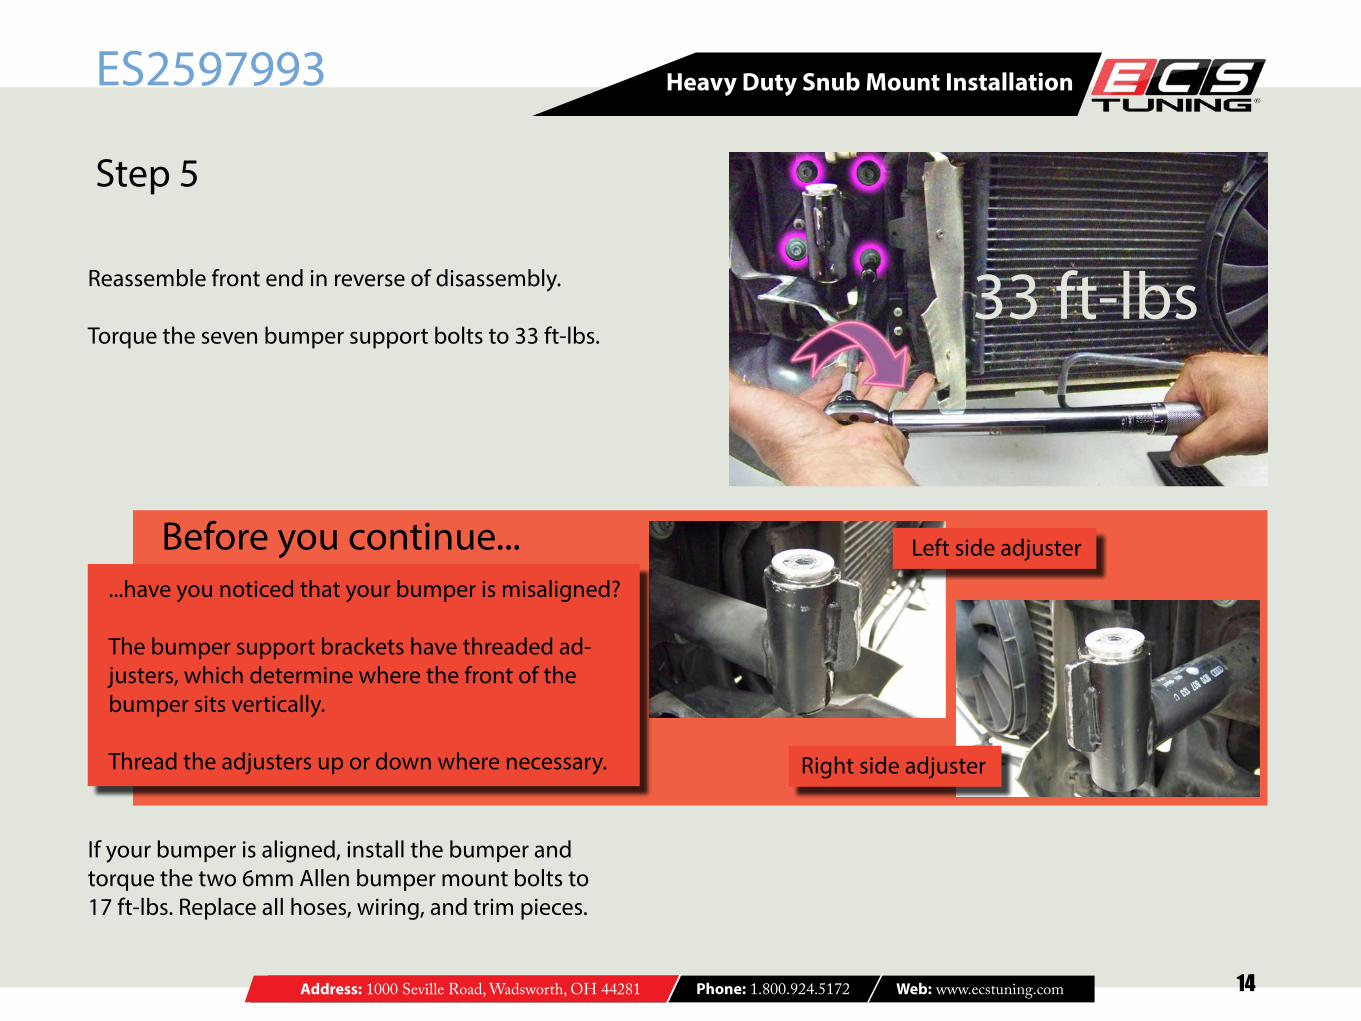
Reassemble front end in reverse of disassembly.
Torque the seven bumper support bolts to 33 ft-lbs.
Step 5
...have you noticed that your bumper is misaligned?
The bumper support brackets have threaded ad-justers, which determine where the front of the bumper sits vertically.
Thread the adjusters up or down where necessary.
Before you continue...
If your bumper is aligned, install the bumper and torque the two 6mm Allen bumper mount bolts to 17 ft-lbs. Replace all hoses, wiring, and trim pieces.
33 ft-lbs
Left side adjuster
Right side adjuster
Address: 1000 Seville Road, Wadsworth, OH 44281 Phone: 1.800.924.5172 Web: www.ecstuning.com
Heavy Duty Snub Mount Installation
15
This completes the installation of the B5 S4 Heavy Duty Snub mount.
We hope this installation guide has been helpful and informative.
Thanks for reading!